Embed Size (px)
Citation preview
GETTING STARTED WITH DOORS
��
®Telelogic DOORS /ERS

doors_getting_started.book Page i Thursday, February 5, 2004 :46 AM11
Getting Started with DOORSDOORS 7.1
ERS71-002
L
doors_getting_started.book Page ii Thursday, February 5, 2004 11:46 AM
ii
Manual creation date: 5 February 2004
This manual describes DOORS 7.1
The information contained in this manual is subject to change without notice.
Companies, names and data used in examples herein are fictitious unless otherwise noted.
This manual, the software, and information contained in any of the databases identified in this document: (1) contain confidential and proprietary information of Telelogic AB; (2) are furnished under license agreement or a nondisclosure agreement; and (3) may be used only in accordance with the terms of such agreements.
All rights reserved. No part of this manual may be reproduced, transmitted, transcribed, stored in a retrieval system or translated into any language, human or computer, in any form, electronically or otherwise, for any purpose, without the express written permission of Telelogic AB, or its duly authorized representative.
Copyright © 2004 Telelogic AB. All rights reserved.
DOORS is a registered trademark of Telelogic AB.
UNIX is a registered trademark of the Open Group in the U.S. and other countries.
Windows and Windows NT are registered trademarks of Microsoft Corporation.
All other trademarks used herein are the properties of their respective companies.
Getting Started with DOORS
doors_getting_started.book Page iii hursday, February 5, 2004 11:46 AMT
iii
Table of Contents
About this manual. . . . . . . . . . . . . . . . . . . . . . . . . . . . . . . . . . . . . . . 1Typographical Conventions . . . . . . . . . . . . . . . . . . . . . . . . . . . . . . . . . . . . . . . . . . . . . . . . . . . . . . . . . . .1Related Documentation . . . . . . . . . . . . . . . . . . . . . . . . . . . . . . . . . . . . . . . . . . . . . . . . . . . . . . . . . . . . . .1
1 Understanding access rights . . . . . . . . . . . . . . . . . . . . . . . . . . . . . 3What are access rights? . . . . . . . . . . . . . . . . . . . . . . . . . . . . . . . . . . . . . . . . . . . . . . . . . . . . . . . . . . . . . . .3
Full access and no access. . . . . . . . . . . . . . . . . . . . . . . . . . . . . . . . . . . . . . . . . . . . . . . . . . . . . . . . . .4What are groups? . . . . . . . . . . . . . . . . . . . . . . . . . . . . . . . . . . . . . . . . . . . . . . . . . . . . . . . . . . . . . . . . . . .4How do group and user rights interact? . . . . . . . . . . . . . . . . . . . . . . . . . . . . . . . . . . . . . . . . . . . . . . . . .6
When you're in several groups . . . . . . . . . . . . . . . . . . . . . . . . . . . . . . . . . . . . . . . . . . . . . . . . . . . . .8How does inheritance work? . . . . . . . . . . . . . . . . . . . . . . . . . . . . . . . . . . . . . . . . . . . . . . . . . . . . . . . . . .8Scenario . . . . . . . . . . . . . . . . . . . . . . . . . . . . . . . . . . . . . . . . . . . . . . . . . . . . . . . . . . . . . . . . . . . . . . . . . .10Why propagate extra access rights with create? . . . . . . . . . . . . . . . . . . . . . . . . . . . . . . . . . . . . . . . . . .11
2 Introducing DOORS . . . . . . . . . . . . . . . . . . . . . . . . . . . . . . . . . . . . . 13What is DOORS? . . . . . . . . . . . . . . . . . . . . . . . . . . . . . . . . . . . . . . . . . . . . . . . . . . . . . . . . . . . . . . . . . .13What are requirements? . . . . . . . . . . . . . . . . . . . . . . . . . . . . . . . . . . . . . . . . . . . . . . . . . . . . . . . . . . . . .13What are modules? . . . . . . . . . . . . . . . . . . . . . . . . . . . . . . . . . . . . . . . . . . . . . . . . . . . . . . . . . . . . . . . . .14What are objects and attributes? . . . . . . . . . . . . . . . . . . . . . . . . . . . . . . . . . . . . . . . . . . . . . . . . . . . . . .15
Object Heading and Object Text attributes . . . . . . . . . . . . . . . . . . . . . . . . . . . . . . . . . . . . . . . . . .15What is traceability? . . . . . . . . . . . . . . . . . . . . . . . . . . . . . . . . . . . . . . . . . . . . . . . . . . . . . . . . . . . . . . . .16What are views? . . . . . . . . . . . . . . . . . . . . . . . . . . . . . . . . . . . . . . . . . . . . . . . . . . . . . . . . . . . . . . . . . . .16What are folders and projects?. . . . . . . . . . . . . . . . . . . . . . . . . . . . . . . . . . . . . . . . . . . . . . . . . . . . . . . .17What changes does DOORS track?. . . . . . . . . . . . . . . . . . . . . . . . . . . . . . . . . . . . . . . . . . . . . . . . . . . .18What are baselines?. . . . . . . . . . . . . . . . . . . . . . . . . . . . . . . . . . . . . . . . . . . . . . . . . . . . . . . . . . . . . . . . .20What are edit modes? . . . . . . . . . . . . . . . . . . . . . . . . . . . . . . . . . . . . . . . . . . . . . . . . . . . . . . . . . . . . . . .21What is the Change Proposal System?. . . . . . . . . . . . . . . . . . . . . . . . . . . . . . . . . . . . . . . . . . . . . . . . . .21What are partitions? . . . . . . . . . . . . . . . . . . . . . . . . . . . . . . . . . . . . . . . . . . . . . . . . . . . . . . . . . . . . . . . .22What are user types? . . . . . . . . . . . . . . . . . . . . . . . . . . . . . . . . . . . . . . . . . . . . . . . . . . . . . . . . . . . . . . . .22What next? . . . . . . . . . . . . . . . . . . . . . . . . . . . . . . . . . . . . . . . . . . . . . . . . . . . . . . . . . . . . . . . . . . . . . . .23
3 Quick tour . . . . . . . . . . . . . . . . . . . . . . . . . . . . . . . . . . . . . . . . . . . . 27About this tour . . . . . . . . . . . . . . . . . . . . . . . . . . . . . . . . . . . . . . . . . . . . . . . . . . . . . . . . . . . . . . . . . . . .27Get ready to start the tour . . . . . . . . . . . . . . . . . . . . . . . . . . . . . . . . . . . . . . . . . . . . . . . . . . . . . . . . . . .27Edit a module . . . . . . . . . . . . . . . . . . . . . . . . . . . . . . . . . . . . . . . . . . . . . . . . . . . . . . . . . . . . . . . . . . . . .31Change your view . . . . . . . . . . . . . . . . . . . . . . . . . . . . . . . . . . . . . . . . . . . . . . . . . . . . . . . . . . . . . . . . . .38Make a link . . . . . . . . . . . . . . . . . . . . . . . . . . . . . . . . . . . . . . . . . . . . . . . . . . . . . . . . . . . . . . . . . . . . . . .43Create an attribute . . . . . . . . . . . . . . . . . . . . . . . . . . . . . . . . . . . . . . . . . . . . . . . . . . . . . . . . . . . . . . . . .48Sort and filter the data . . . . . . . . . . . . . . . . . . . . . . . . . . . . . . . . . . . . . . . . . . . . . . . . . . . . . . . . . . . . . .52Finish. . . . . . . . . . . . . . . . . . . . . . . . . . . . . . . . . . . . . . . . . . . . . . . . . . . . . . . . . . . . . . . . . . . . . . . . . . . .54
4 Contacting customer support . . . . . . . . . . . . . . . . . . . . . . . . . . . . 57Before you contact customer support . . . . . . . . . . . . . . . . . . . . . . . . . . . . . . . . . . . . . . . . . . . . . . . . . .57
Getting Started with DOORS
doors_getting_started.book Page iv Thursday, February 5, 2004 1:46 AM1
iv
How to contact customer support . . . . . . . . . . . . . . . . . . . . . . . . . . . . . . . . . . . . . . . . . . . . . . . . . . . . 57Contact Information . . . . . . . . . . . . . . . . . . . . . . . . . . . . . . . . . . . . . . . . . . . . . . . . . . . . . . . . . . . . 58
Index . . . . . . . . . . . . . . . . . . . . . . . . . . . . . . . . . . . . . . . . . . . . . . . . 61
Getting Started with DOORS
doors_getting_started.book Page 1 Thursday, February 5, 2004 :46 AM11
1
About this manual
Welcome to DOORS 7.1, the world's leading requirements management application.
This manual introduces you to DOORS concepts to help you get started with DOORS.
Typographical The following typographical conventions are used in this manual: Conventions
Typeface or Meaning Symbol
Bold Book titles, important items, and items that you can select, including buttons and menus. For example: Click Yes to continue.
Courier Commands, files, and directories; computer output. For example: Edit your .properties file.
> A menu choice. For example: Select File > Open. This means select the File menu, then select the Open command from it.
Related The following table describes where to find information in the DOORS Enterprise Requirements Documentation Suite documentation set:
For information on See
What's new in version 7.1 of DOORS
How to install DOORS and set up licenses touse it
How to use DOORS
How to write requirements
How to set up and manage DOORS
The DXL programming language
How to integrate DOORS with other
The DOORS readme file
Installing and Setting up
Getting Started with DOORS Using DOORS
Get it Right the First Time
Managing DOORS
DXL Reference Manual
DOORS API manual applications
Getting Started with DOORS
doors_getting_started.book Page 2 Thursday, February 5, 2004 :46 AM11
2
You'll find PDF versions of these manuals on:
• The DOORS Enterprise Requirements Suite documentation CD
• Our web site at http://support.telelogic.com
Getting Started with DOORS
doors_getting_started.book Page 3 Thursday, February 5, 2004 :46 AM11
3
1 Understanding access rights
This chapter contains the following topics:
• What are access rights?
• What are groups?
• How do group and user rights interact?
• How does inheritance work?
• Scenario
• Why propagate extra access rights with create?
Note: You can skip this chapter if you're only going to use DOORS to look at data, and you don't want to create or edit data. You can also ignore this chapter if your site isn't using access controls; that is, if your database is set up to allow everyone full access to all data.
What are access Access rights control who can do what to each item of data in your DOORS database. DOORS rights? provides five access rights.
You need this access right To
Read (R) Read (look at) data.
Create (C) Create new data.
Modify (M) Edit existing data.
Delete (D) Delete data.
Admin (A) Change the access rights for data.
For example, to be able to see a folder, you need read access to it.
You have read access to everything you can see in the DOORS Explorer. If you can see a project, folder or module in the DOORS Explorer, then you have read access to it.
Create access lets you create new things one level down in the database tree:
• If you have create access to a project or folder, you can create new projects, folders and modules in the project or folder.
• If you have create access to a module, you can create new top-level objects in the module.
• And if you have create access to an object, you can create new objects one level below the object.
Getting started with DOORS
doors_getting_started.book Page 4 Thursday, February 5, 2004 :46 AM11
4
Modify access lets you edit existing data. For example, if you have modify access to an object, you can edit the object and change the values of its attributes. To be able to delete something, you need delete access to it. And to be able to change the access rights for something, you need admin access to it.
Full access and no access If you have full access to something, it means you have all five access rights to it. Full access is just a shorthand for the five access rights.
If you have no access to a project, folder or module, you can't see the project, folder or module, so you don't even know it exists.
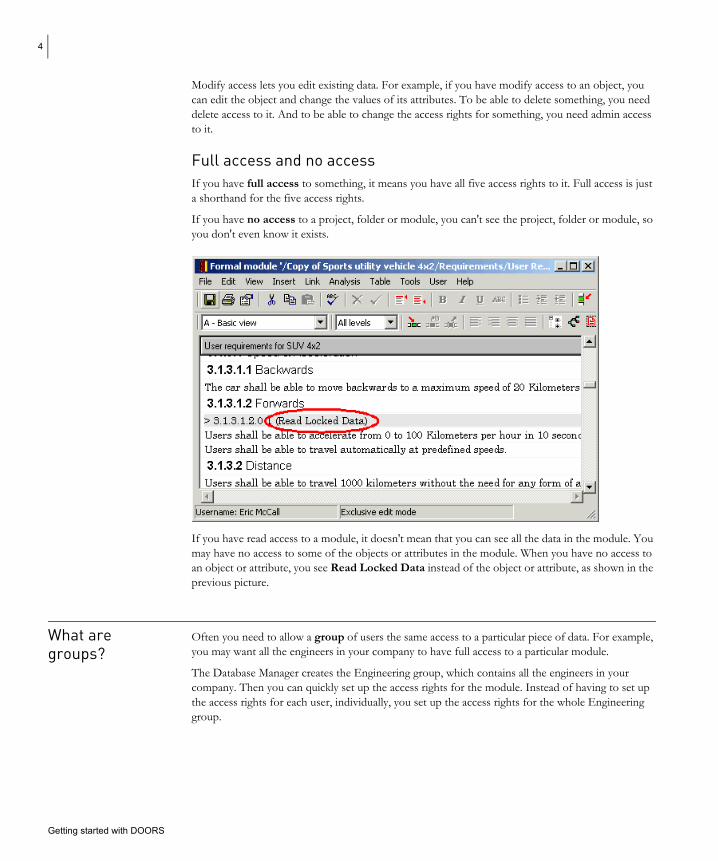
If you have read access to a module, it doesn't mean that you can see all the data in the module. You may have no access to some of the objects or attributes in the module. When you have no access to an object or attribute, you see Read Locked Data instead of the object or attribute, as shown in the previous picture.
What are Often you need to allow a group of users the same access to a particular piece of data. For example, groups? you may want all the engineers in your company to have full access to a particular module.
The Database Manager creates the Engineering group, which contains all the engineers in your company. Then you can quickly set up the access rights for the module. Instead of having to set up the access rights for each user, individually, you set up the access rights for the whole Engineering group.
Getting started with DOORS
doors_getting_started.book Page 5 Thursday, February 5, 2004 :46 AM11
5
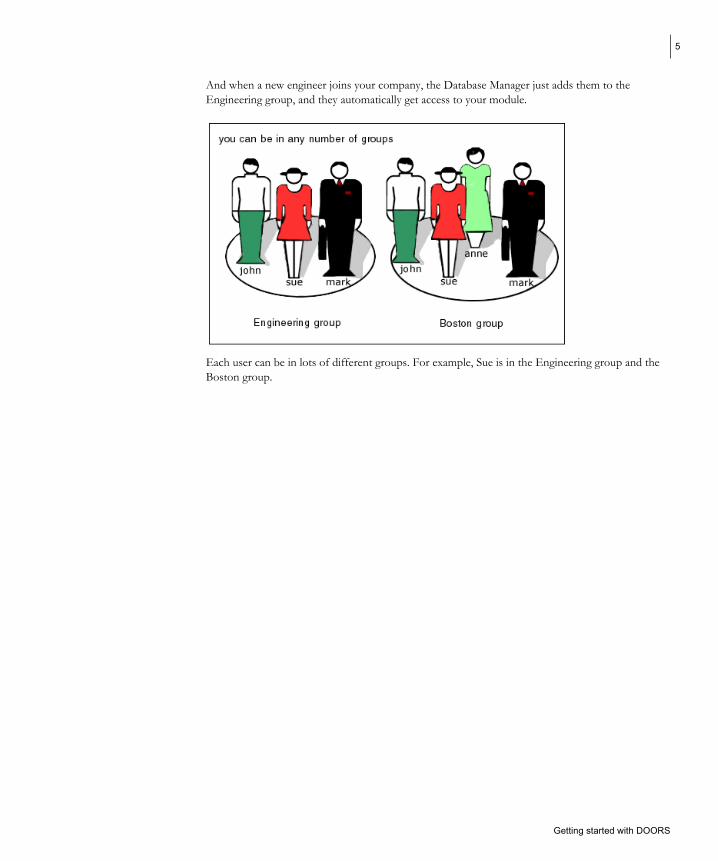
And when a new engineer joins your company, the Database Manager just adds them to the Engineering group, and they automatically get access to your module.
Each user can be in lots of different groups. For example, Sue is in the Engineering group and the Boston group.
Getting started with DOORS
doors_getting_started.book Page 6 Thursday, February 5, 2004 :46 AM11
6
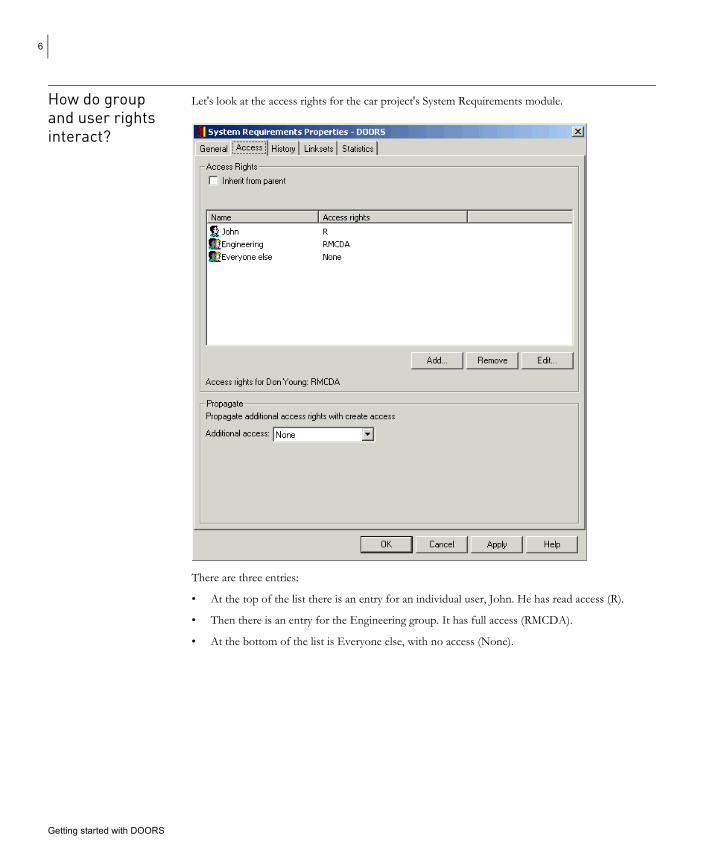
How do group Let's look at the access rights for the car project's System Requirements module.and user rights interact?
There are three entries:
• At the top of the list there is an entry for an individual user, John. He has read access (R).
• Then there is an entry for the Engineering group. It has full access (RMCDA).
• At the bottom of the list is Everyone else, with no access (None).
Getting started with DOORS

doors_getting_started.book Page 7 Thursday, February 5, 2004 :46 AM11
7
The following picture shows how the different types of entry for individual users, groups, and everyone else interact. It shows how to figure out what access rights you have to a piece of data. It assumes that you have read access to the data, otherwise you can't see it and so you can't click its Access tab.
In the previous example, there is an entry for John, so John gets the access rights defined in that entry (read access).
John is also in the Engineering group, which has full access (RMCDA). But because John has his own entry, he doesn't get the access rights defined for the group.
Getting started with DOORS
doors_getting_started.book Page 8 Thursday, February 5, 2004 :46 AM11
8
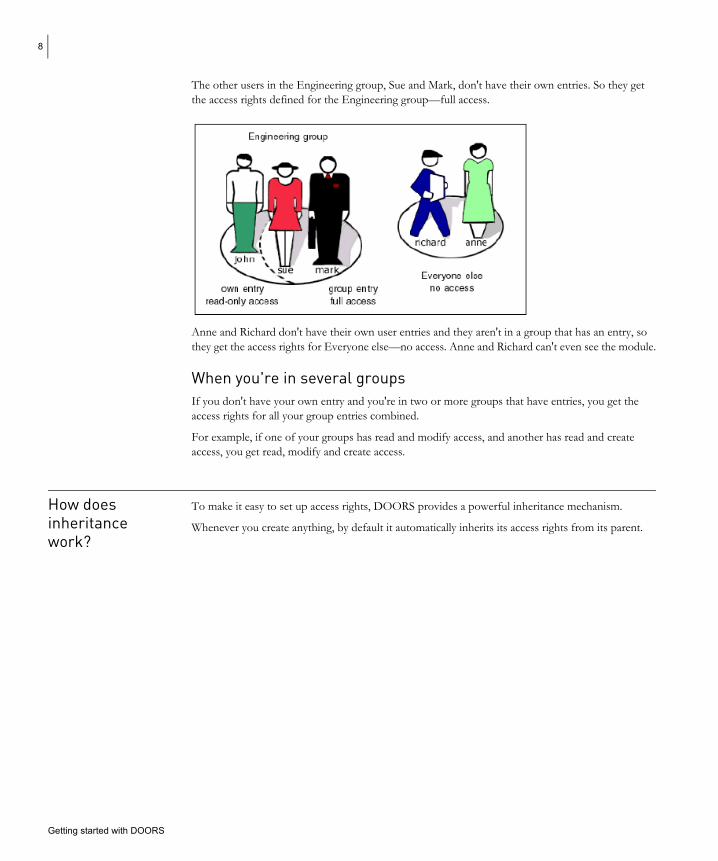
The other users in the Engineering group, Sue and Mark, don't have their own entries. So they get the access rights defined for the Engineering group—full access.
Anne and Richard don't have their own user entries and they aren't in a group that has an entry, so they get the access rights for Everyone else—no access. Anne and Richard can't even see the module.
When you're in several groups If you don't have your own entry and you're in two or more groups that have entries, you get the access rights for all your group entries combined.
For example, if one of your groups has read and modify access, and another has read and create access, you get read, modify and create access.
How does To make it easy to set up access rights, DOORS provides a powerful inheritance mechanism. inheritance Whenever you create anything, by default it automatically inherits its access rights from its parent. work?
Getting started with DOORS
doors_getting_started.book Page 9 Thursday, February 5, 2004 :46 AM11
9
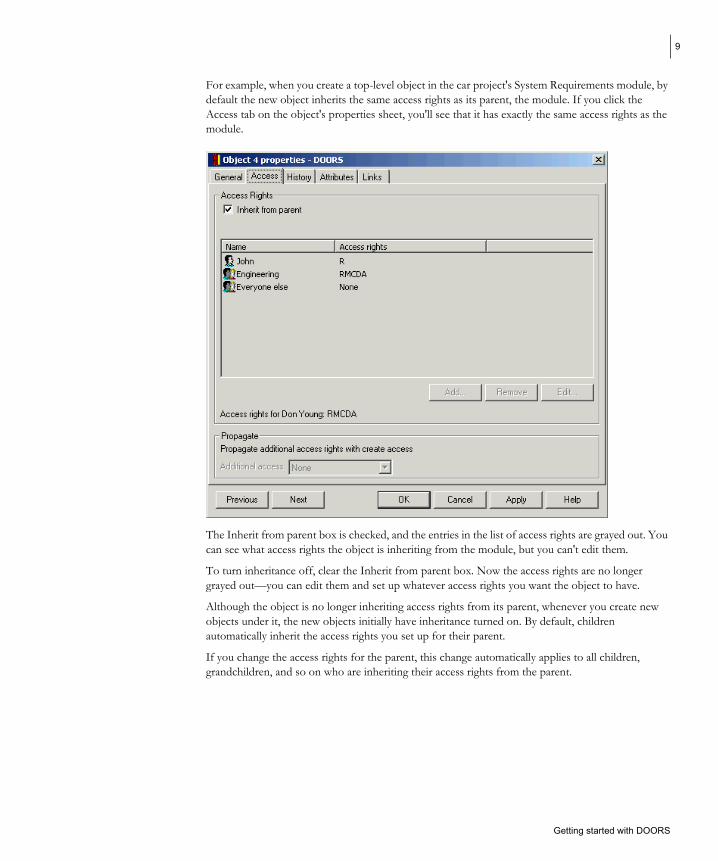
For example, when you create a top-level object in the car project's System Requirements module, by default the new object inherits the same access rights as its parent, the module. If you click the Access tab on the object's properties sheet, you'll see that it has exactly the same access rights as the module.
The Inherit from parent box is checked, and the entries in the list of access rights are grayed out. You can see what access rights the object is inheriting from the module, but you can't edit them.
To turn inheritance off, clear the Inherit from parent box. Now the access rights are no longer grayed out—you can edit them and set up whatever access rights you want the object to have.
Although the object is no longer inheriting access rights from its parent, whenever you create new objects under it, the new objects initially have inheritance turned on. By default, children automatically inherit the access rights you set up for their parent.
If you change the access rights for the parent, this change automatically applies to all children, grandchildren, and so on who are inheriting their access rights from the parent.
Getting started with DOORS
doors_getting_started.book Page 10 Thursday, February 5, 2004 1:46 AM1
10
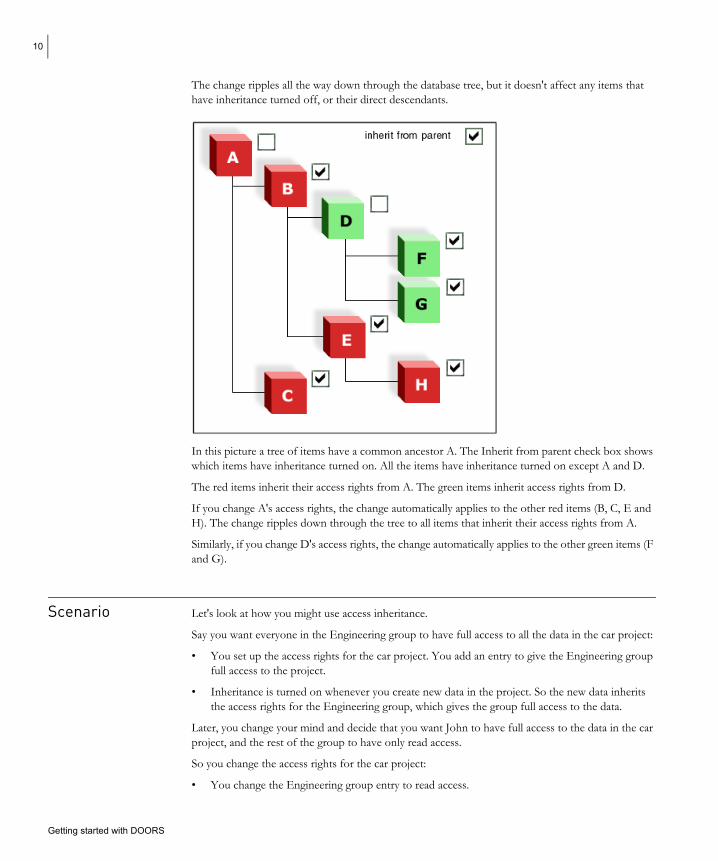
The change ripples all the way down through the database tree, but it doesn't affect any items that have inheritance turned off, or their direct descendants.
In this picture a tree of items have a common ancestor A. The Inherit from parent check box shows which items have inheritance turned on. All the items have inheritance turned on except A and D.
The red items inherit their access rights from A. The green items inherit access rights from D.
If you change A's access rights, the change automatically applies to the other red items (B, C, E and H). The change ripples down through the tree to all items that inherit their access rights from A.
Similarly, if you change D's access rights, the change automatically applies to the other green items (F and G).
Scenario Let's look at how you might use access inheritance.
Say you want everyone in the Engineering group to have full access to all the data in the car project:
• You set up the access rights for the car project. You add an entry to give the Engineering group full access to the project.
• Inheritance is turned on whenever you create new data in the project. So the new data inherits the access rights for the Engineering group, which gives the group full access to the data.
Later, you change your mind and decide that you want John to have full access to the data in the car project, and the rest of the group to have only read access.
So you change the access rights for the car project:
• You change the Engineering group entry to read access.
Getting started with DOORS
doors_getting_started.book Page 11 Thursday, February 5, 2004 1:46 AM1
11
• You add an entry for John, giving him full access.
These changes automatically apply to all the data in car project because all the data has inheritance turned on.
But Sue and Mark are writing the Design module, so you want to give them full access to that one module. Easy. You just turn inheritance off for the Design module, and add an access entry for Sue that gives her full access to the module, and an access entry for Mark that gives him full access to the module.
Why propagate extra access rights with create?
Let's look at another scenario:
• You want to let Mark create modules in a folder. So Mark needs create access to the folder.
• You also want Mark to be able to delete the modules he creates in the folder, but you don't want him to be able to delete the folder itself.
You can't do this using standard inheritance.
One way around this would be to turn inheritance off for every module that Mark creates in the folder, and then set up the access rights for these modules to give Mark delete access to them. That would be very time consuming.
So DOORS lets you treat create access in a special way. You can choose to propagate extra access rights with create access.
This option is only available if the item has inheritance turned off. In our example, the folder must have inheritance turned off.
You can choose which extra access rights to propagate with create access:
• Modify (M)
• Modify and delete (MD)
• Modify, delete, and admin (MDA)
The extra access rights are not specific to a particular user or group. They are propagated with every access rights entry that includes the create access right.
For example, item X has four access rights entries, two of which (for Anne and Engineering) include the create access right.
Name Access rights
Anne RC
John R
Engineering RCMD
Everyone else RM
Getting started with DOORS
doors_getting_started.book Page 12 Thursday, February 5, 2004 1:46 AM1
12
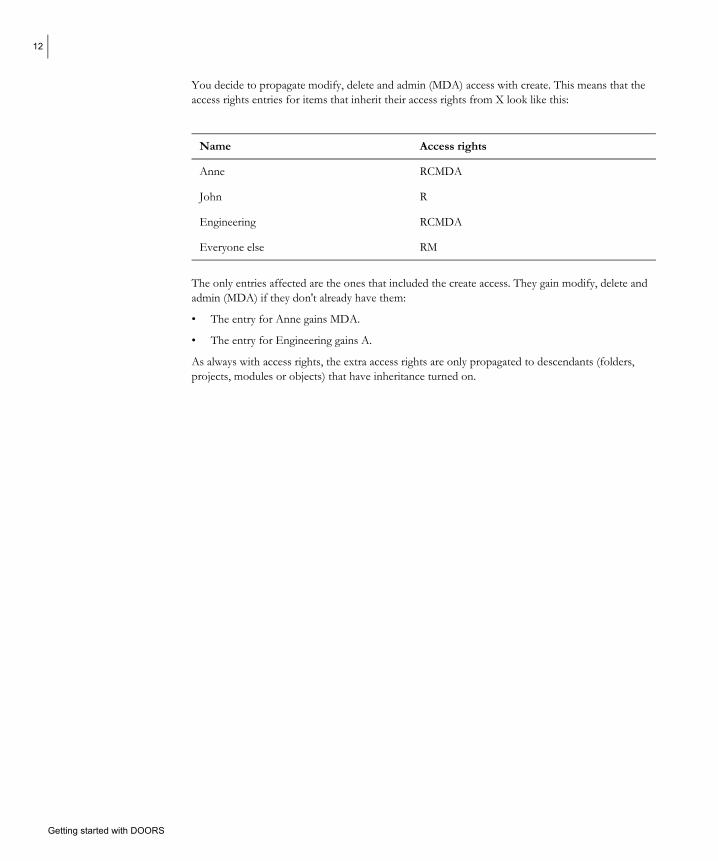
You decide to propagate modify, delete and admin (MDA) access with create. This means that the access rights entries for items that inherit their access rights from X look like this:
Name Access rights
Anne RCMDA
John R
Engineering RCMDA
Everyone else RM
The only entries affected are the ones that included the create access. They gain modify, delete and admin (MDA) if they don't already have them:
• The entry for Anne gains MDA.
• The entry for Engineering gains A.
As always with access rights, the extra access rights are only propagated to descendants (folders, projects, modules or objects) that have inheritance turned on.
Getting started with DOORS
doors_getting_started.book Page 13 Thursday, February 5, 2004 1:46 AM1
13
2 Introducing DOORS
This chapter describes the concepts you need to understand before you use DOORS:
• What is DOORS?
• What are requirements?
• What are modules?
• What are objects and attributes?
• What is traceability?
• What are views?
• What are folders and projects?
• What changes does DOORS track?
• What are baselines?
• What are edit modes?
• What is the Change Proposal System?
• What are partitions?
• What are user types?
• What next?
What is DOORS? DOORS is the world's leading requirements management application.
It provides all the features you need to capture, track and manage user requirements. You can enter your requirements directly into DOORS, using its familiar word processor style interface.
You can also import your requirements into DOORS from a wide variety of file formats, including:
• Microsoft Word, Excel, PowerPoint, and Outlook
• Plain (ASCII) text
• Rich Text Format (RTF)
• FrameMaker
• Interleaf
Once you've captured your requirements in DOORS, you can track and manage them throughout the project life cycle using a variety of features, such as views, links and traceability analyses.
What are Requirements describe what users want from a product or service. requirements?
Getting started with DOORS
doors_getting_started.book Page 14 Thursday, February 5, 2004 1:46 AM1
14
For example, if you are planning to buy a new car, you might sit down with your family and make a list of the things you need from the car. A typical list might be:
• Must be able to carry at least five people
• Must have fuel consumption of over 35 miles per gallon
• Must cost no more than X
Less important features that you would like, such as a particular color, would be further down your list. At the end of the exercise, you have a list of user requirements, which specify the kind of car you want to buy.
The exercise of listing requirements for buying a car is fairly straightforward. However, the designers of that car need more.
The designers need system requirements, which describe the features the car must provide. From these they can prepare detailed design documents. Each part of the design must be tested, so tests are specified in a separate document.
Well defined requirements ensure that your customers get what they want and show you what product you have to build or what service you have to provide. For information on writing requirements, see Get it Right the First Time, which is on the DOORS Enterprise Requirements Suite documentation CD.
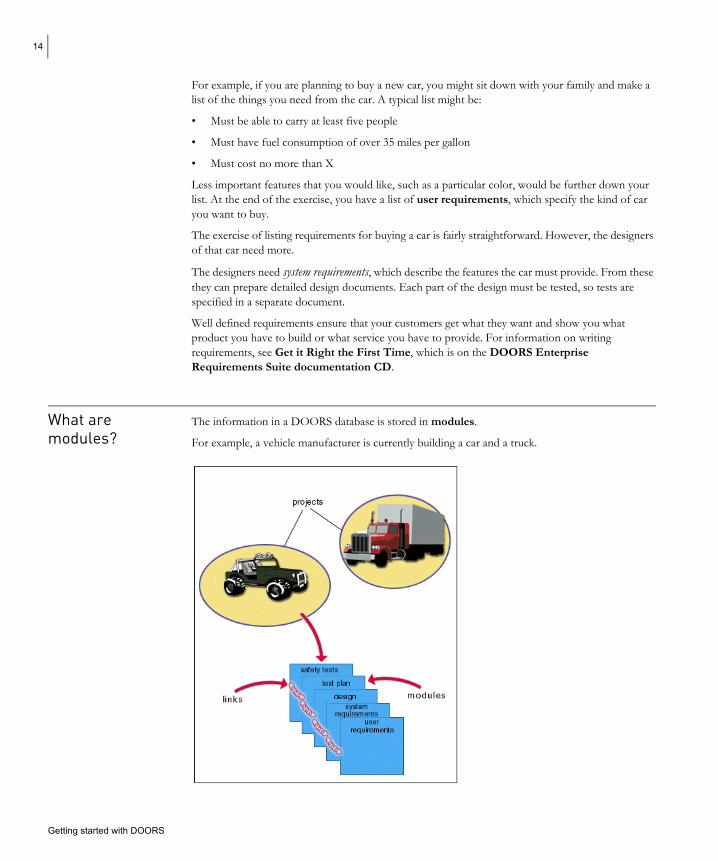
What are The information in a DOORS database is stored in modules. modules? For example, a vehicle manufacturer is currently building a car and a truck.
Getting started with DOORS
doors_getting_started.book Page 15 Thursday, February 5, 2004 1:46 AM1
15
The information for the car project is stored in several modules including:
• A user requirements module which contains information about the features users want in the car.
• A design module which describes the engineering design of the car.
• A safety tests module which describes the safety tests that must be carried out on the car.
What are objects and attributes?
The information within each module is divided into objects and attributes.
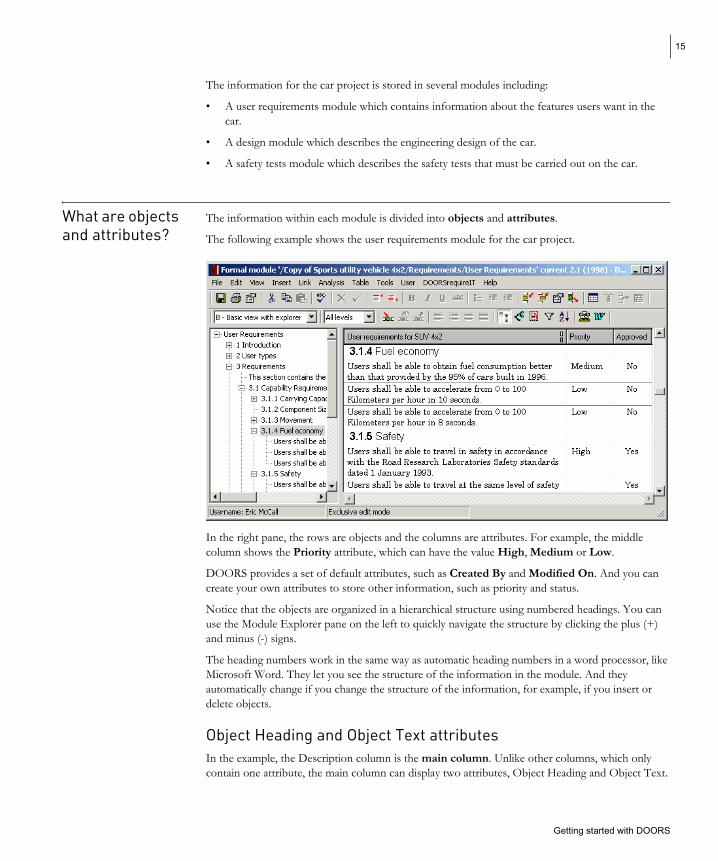
The following example shows the user requirements module for the car project.
In the right pane, the rows are objects and the columns are attributes. For example, the middle column shows the Priority attribute, which can have the value High, Medium or Low.
DOORS provides a set of default attributes, such as Created By and Modified On. And you can create your own attributes to store other information, such as priority and status.
Notice that the objects are organized in a hierarchical structure using numbered headings. You can use the Module Explorer pane on the left to quickly navigate the structure by clicking the plus (+) and minus (-) signs.
The heading numbers work in the same way as automatic heading numbers in a word processor, like Microsoft Word. They let you see the structure of the information in the module. And they automatically change if you change the structure of the information, for example, if you insert or delete objects.
Object Heading and Object Text attributes In the example, the Description column is the main column. Unlike other columns, which only contain one attribute, the main column can display two attributes, Object Heading and Object Text.
Getting started with DOORS
doors_getting_started.book Page 16 Thursday, February 5, 2004 1:46 AM1
16
The following table describes the main column attributes.
Attributes in the main Description column
Object Heading This attribute is shown in bold, and has a heading number that is automatically generated by DOORS. For example, look at the object at the top of the previous picture. Its Object Heading attribute is Fuel economy, and its heading number is 3.1.4.
Object Text This attribute is shown in normal font. For example, look at the object at the bottom of the previous picture. Its Object Text attribute starts with Users shall be able to travel at the same level.
What is traceability?
DOORS lets you link together related information. You can follow the links by clicking on them.
For example, you can link a user requirement to the design features that fulfill that requirement. And you can link the design features to the tests that are carried out to verify the design features.
Links give you traceability. You can check that what you're building satisfies your user requirements.
You can follow links in both directions. For example, if a test fails, you can find out which requirements are affected by tracing the links from the test back to the design features, and from the design features back to the requirements.
Links allow you to manage change. You can quickly trace the impact of a change to a single piece of data on the rest of your system.
For example, the engineering department tells you that they can't deliver the solar-powered battery you were expecting. You can trace the links from the battery object back to the requirements that depend on it, and forward to the other features of the car that depend on having a solar-powered battery. You can quickly see the full impact of not having a solar-powered battery. You can make an informed decision about whether to use a conventional battery or whether to invest more money, time and resources to help deliver a solar-powered battery.
What are views? Different people need to see different information. For example:
• Managers are interested in scheduling and cost information.
• Engineers are interested in technical design information.
Getting started with DOORS
doors_getting_started.book Page 17 Thursday, February 5, 2004 1:46 AM1
17
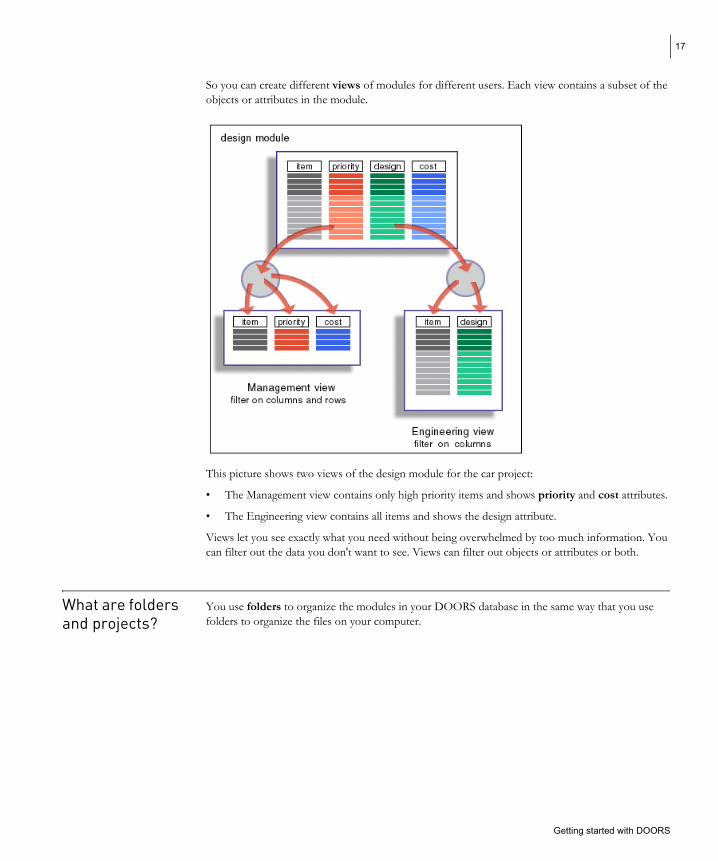
So you can create different views of modules for different users. Each view contains a subset of the objects or attributes in the module.
This picture shows two views of the design module for the car project:
• The Management view contains only high priority items and shows priority and cost attributes.
• The Engineering view contains all items and shows the design attribute.
Views let you see exactly what you need without being overwhelmed by too much information. You can filter out the data you don't want to see. Views can filter out objects or attributes or both.
What are folders You use folders to organize the modules in your DOORS database in the same way that you use and projects? folders to organize the files on your computer.
Getting started with DOORS
doors_getting_started.book Page 18 Thursday, February 5, 2004 1:46 AM1
18
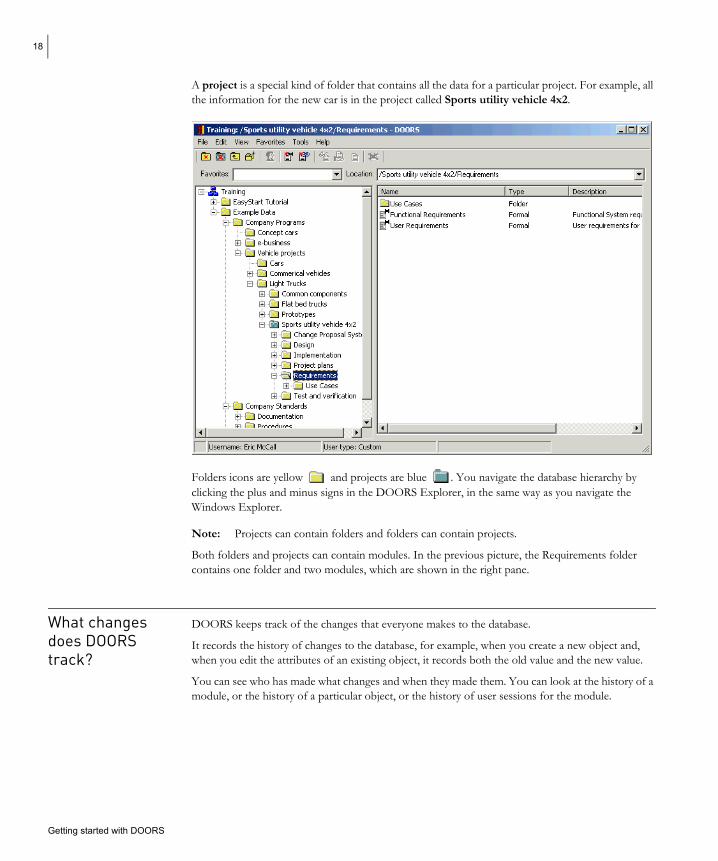
A project is a special kind of folder that contains all the data for a particular project. For example, all the information for the new car is in the project called Sports utility vehicle 4x2.
Folders icons are yellow and projects are blue . You navigate the database hierarchy by clicking the plus and minus signs in the DOORS Explorer, in the same way as you navigate the Windows Explorer.
Note: Projects can contain folders and folders can contain projects.
Both folders and projects can contain modules. In the previous picture, the Requirements folder contains one folder and two modules, which are shown in the right pane.
What changes DOORS keeps track of the changes that everyone makes to the database. does DOORS It records the history of changes to the database, for example, when you create a new object and, track? when you edit the attributes of an existing object, it records both the old value and the new value.
You can see who has made what changes and when they made them. You can look at the history of a module, or the history of a particular object, or the history of user sessions for the module.
Getting started with DOORS

doors_getting_started.book Page 19 Thursday, February 5, 2004 1:46 AM1
19
This is what the history looks like for an object:
DOORS also provides change bars so you can see at a glance what's changed.
The color of an object's change bar tells you when the object was last changed.
Color Description
Green The object hasn't been changed since the module was last baselined.
Yellow The object has been changed since the module was last baselined, and the changes have been saved.
Red You've edited the object during the current session and have not yet saved the changes.
Getting started with DOORS

doors_getting_started.book Page 20 Thursday, February 5, 2004 1:46 AM1
20
In the following picture, the User types heading has a red change bar at the left, showing that it has been edited during the current session, but the changes have not yet been saved:
A baseline is a read-only version of a module. It captures and preserves a moment in time. The baseline cannot be deleted until you delete the module.
When you create a baseline of a module, you create a copy of the module, which no-one can edit.
The baseline includes the history of the module:
• Information about all the attribute definitions and types that have been created, deleted or edited since the module's most recent baseline.
• Information about all the objects that have been created, deleted or edited since the module's most recent baseline.
• Information about every module session (every time the module has been opened) since it was first created.
Note: You can control what edits are tracked with change bars and recorded in the database history. If you don't want to know when users edit a particular attribute, you can turn change bars off for that attribute.
What are baselines?
Getting started with DOORS
doors_getting_started.book Page 21 Thursday, February 5, 2004 1:46 AM1
21
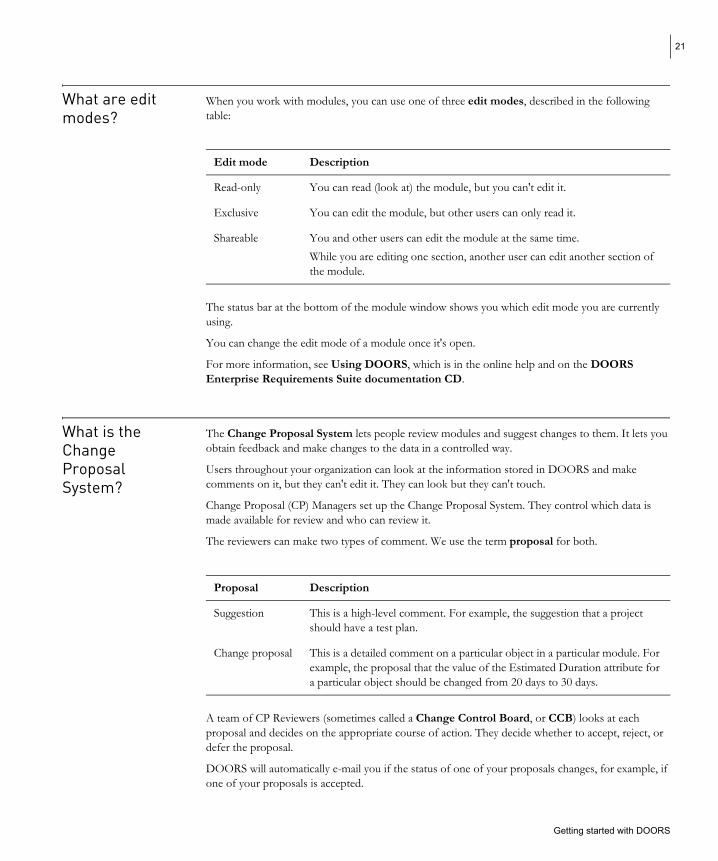
What are edit When you work with modules, you can use one of three edit modes, described in the following modes? table:
Edit mode Description
Read-only You can read (look at) the module, but you can't edit it.
Exclusive You can edit the module, but other users can only read it.
Shareable You and other users can edit the module at the same time. While you are editing one section, another user can edit another section of the module.
The status bar at the bottom of the module window shows you which edit mode you are currently using.
You can change the edit mode of a module once it's open.
For more information, see Using DOORS, which is in the online help and on the DOORS Enterprise Requirements Suite documentation CD.
What is the The Change Proposal System lets people review modules and suggest changes to them. It lets you Change obtain feedback and make changes to the data in a controlled way.
Proposal Users throughout your organization can look at the information stored in DOORS and make
System? comments on it, but they can't edit it. They can look but they can't touch.
Change Proposal (CP) Managers set up the Change Proposal System. They control which data is made available for review and who can review it.
The reviewers can make two types of comment. We use the term proposal for both.
Proposal Description
Suggestion This is a high-level comment. For example, the suggestion that a project should have a test plan.
Change proposal This is a detailed comment on a particular object in a particular module. For example, the proposal that the value of the Estimated Duration attribute for a particular object should be changed from 20 days to 30 days.
A team of CP Reviewers (sometimes called a Change Control Board, or CCB) looks at each proposal and decides on the appropriate course of action. They decide whether to accept, reject, or defer the proposal.
DOORS will automatically e-mail you if the status of one of your proposals changes, for example, if one of your proposals is accepted.
Getting started with DOORS
doors_getting_started.book Page 22 Thursday, February 5, 2004 1:46 AM1
22
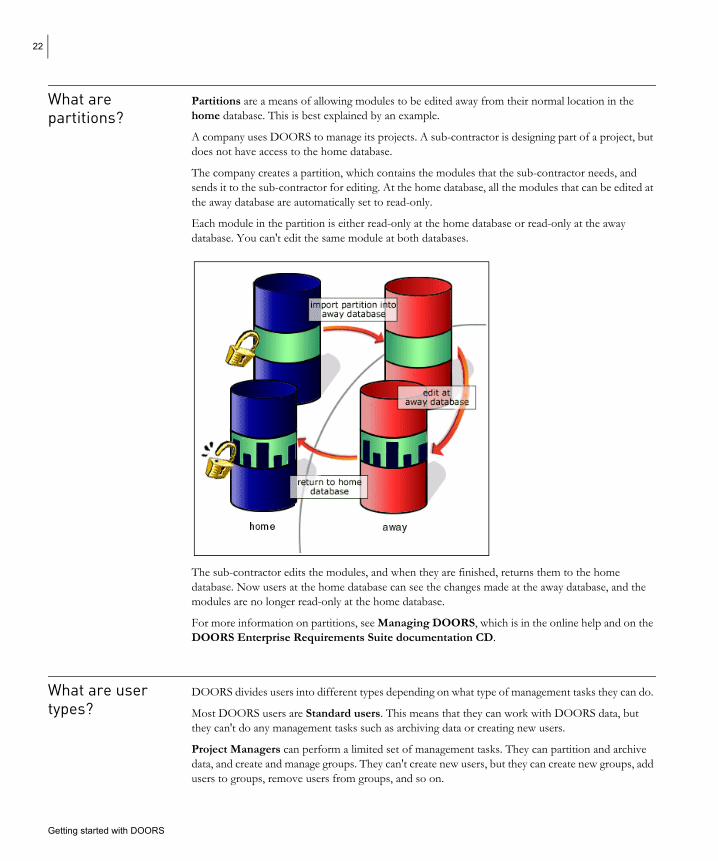
What are partitions?
Partitions are a means of allowing modules to be edited away from their normal location in the home database. This is best explained by an example.
A company uses DOORS to manage its projects. A sub-contractor is designing part of a project, but does not have access to the home database.
The company creates a partition, which contains the modules that the sub-contractor needs, and sends it to the sub-contractor for editing. At the home database, all the modules that can be edited at the away database are automatically set to read-only.
Each module in the partition is either read-only at the home database or read-only at the away database. You can't edit the same module at both databases.
The sub-contractor edits the modules, and when they are finished, returns them to the home database. Now users at the home database can see the changes made at the away database, and the modules are no longer read-only at the home database.
For more information on partitions, see Managing DOORS, which is in the online help and on the DOORS Enterprise Requirements Suite documentation CD.
What are user DOORS divides users into different types depending on what type of management tasks they can do. types? Most DOORS users are Standard users. This means that they can work with DOORS data, but
they can't do any management tasks such as archiving data or creating new users.
Project Managers can perform a limited set of management tasks. They can partition and archive data, and create and manage groups. They can't create new users, but they can create new groups, add users to groups, remove users from groups, and so on.
Getting started with DOORS
doors_getting_started.book Page 23 Thursday, February 5, 2004 1:46 AM1
23
Database Managers can do every management task. They can do everything that Project Managers can do and they can create projects and users, and manage the database.
Finally, there are Custom users, who can have any combination of powers. For example, a Custom user might just have the power to partition data. This user would have more power than a Standard user but less power than a Project Manager.
Database Managers and Custom users who have the power to create users can change the type of any user. If you're a Standard user today, it doesn't mean that you'll always be a Standard user. For example, if you start to manage a new project, you can ask a Database Manager to change your user type from Standard user to Project Manager.
What next? This chapter explained the concepts behind DOORS. For more information, run the EasyStart interactive tutorial, which should take about 40 or 50 minutes.
To run the EasyStart tutorial:
1. Install the Training Database.
On your Windows Desktop:
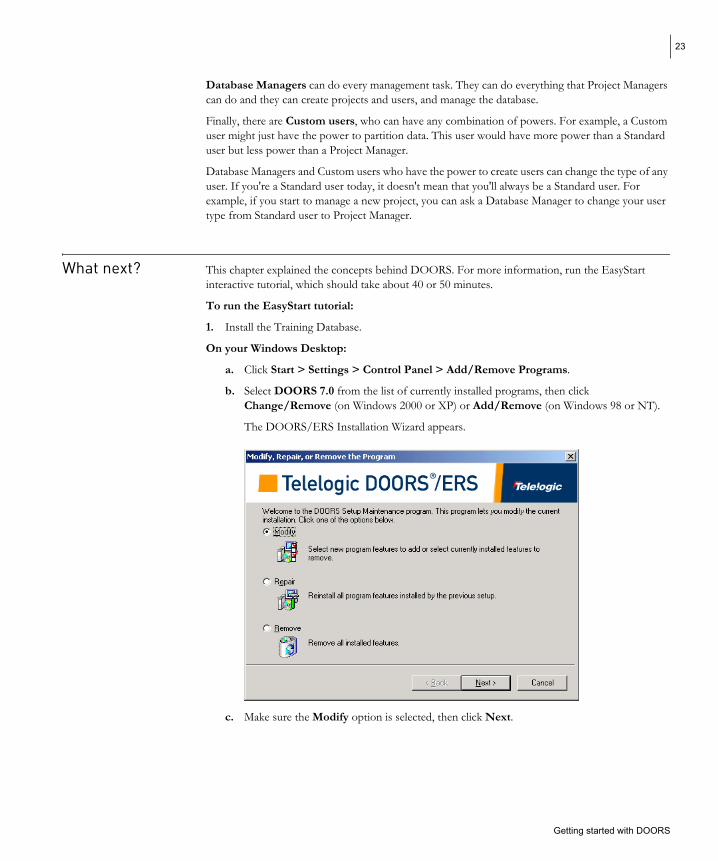
a. Click Start > Settings > Control Panel > Add/Remove Programs.
b. Select DOORS 7.0 from the list of currently installed programs, then click Change/Remove (on Windows 2000 or XP) or Add/Remove (on Windows 98 or NT).
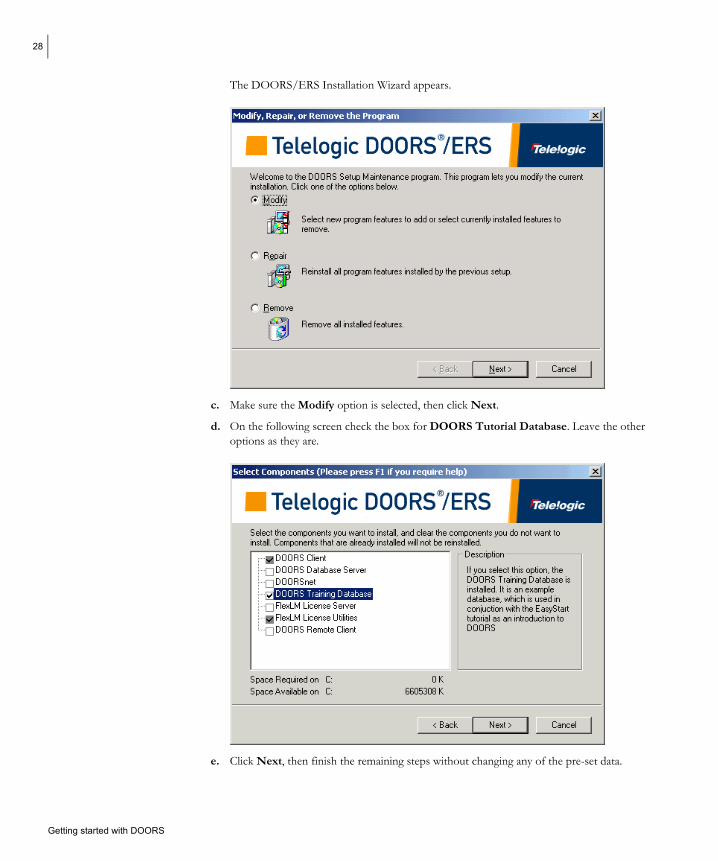
The DOORS/ERS Installation Wizard appears.
c. Make sure the Modify option is selected, then click Next.
Getting started with DOORS
doors_getting_started.book Page 24 Thursday, February 5, 2004 1:46 AM1
24
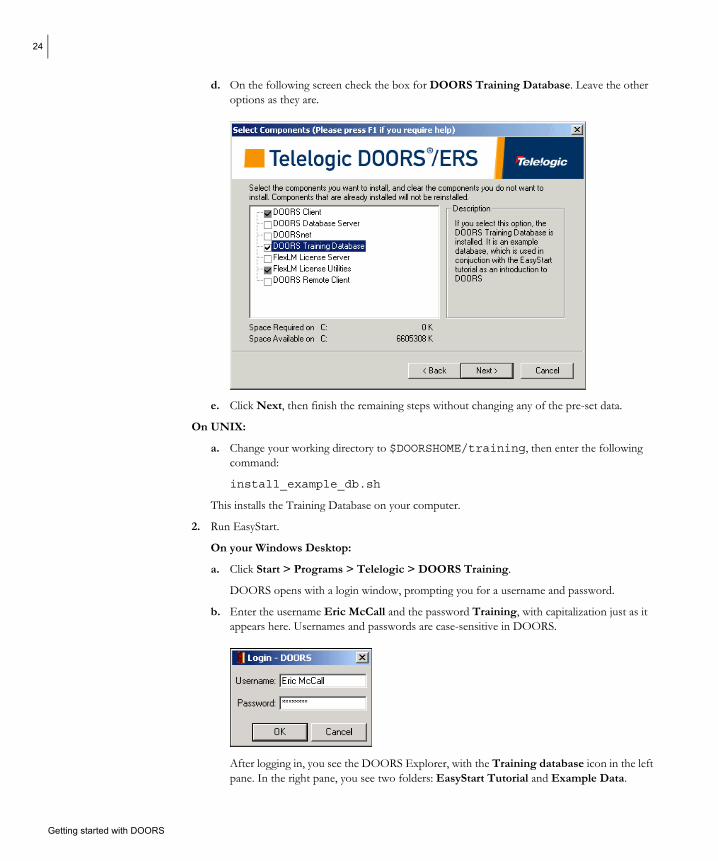
d. On the following screen check the box for DOORS Training Database. Leave the other options as they are.
e. Click Next, then finish the remaining steps without changing any of the pre-set data.
On UNIX:
a. Change your working directory to $DOORSHOME/training, then enter the following command:
install_example_db.sh
This installs the Training Database on your computer.
2. Run EasyStart.
On your Windows Desktop:
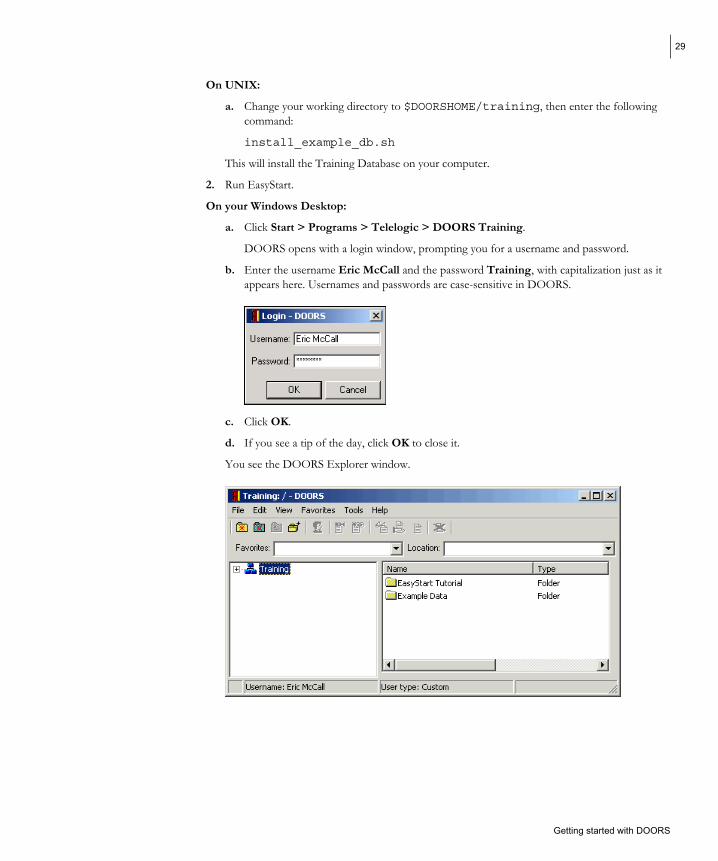
a. Click Start > Programs > Telelogic > DOORS Training.
DOORS opens with a login window, prompting you for a username and password.
b. Enter the username Eric McCall and the password Training, with capitalization just as it appears here. Usernames and passwords are case-sensitive in DOORS.
After logging in, you see the DOORS Explorer, with the Training database icon in the left pane. In the right pane, you see two folders: EasyStart Tutorial and Example Data.
Getting started with DOORS
doors_getting_started.book Page 25 Thursday, February 5, 2004 1:46 AM1
25
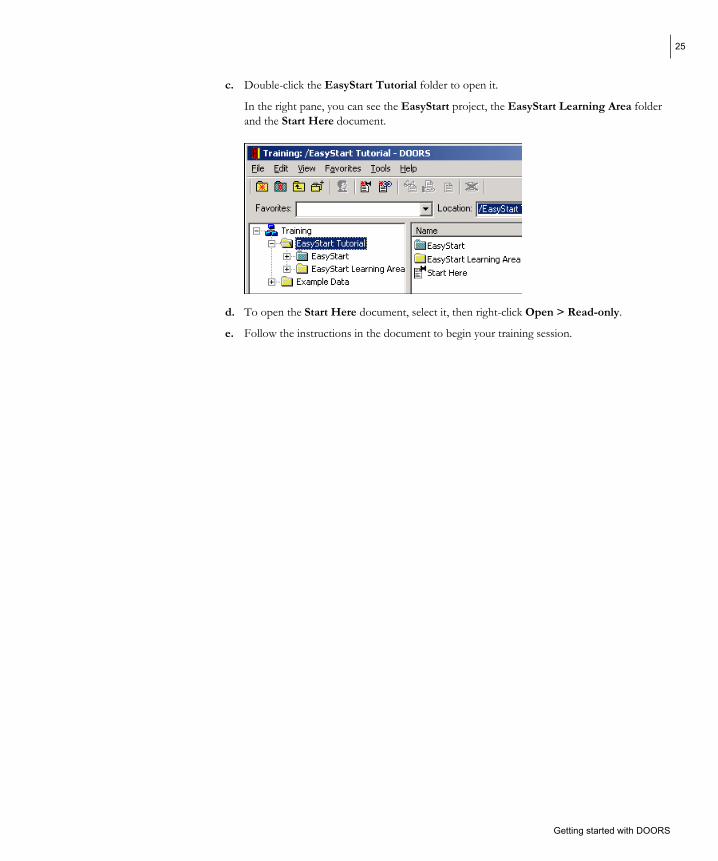
c. Double-click the EasyStart Tutorial folder to open it.
In the right pane, you can see the EasyStart project, the EasyStart Learning Area folder and the Start Here document.
d. To open the Start Here document, select it, then right-click Open > Read-only.
e. Follow the instructions in the document to begin your training session.
Getting started with DOORS

doors_getting_started.book Page 26 Thursday, February 5, 2004 1:46 AM1
26
Getting started with DOORS
doors_getting_started.book Page 27 Thursday, February 5, 2004 1:46 AM1
27
3 Quick tour
This chapter contains the following topics:
•
•
•
•
•
•
•
•
About this tour
Get ready to start the tour
Edit a module
Change your view
Make a link
Create an attribute
Sort and filter the data
Finish
About this tour This tour gives an overview of DOORS. It should take about 15 minutes. If you want, you can follow the steps on your computer. Or you may prefer just to read through the tour without following the steps yourself.
Note: You can also learn how to use DOORS by running the EasyStart interactive tutorial. For more information, see “What next?,” on page 23.
Get ready to start the tour
In this part of the tour, you install the training database, run DOORS and then make a copy of an example project.
Throughout the rest of the tour you use the copy of the example project, so it doesn't matter if you make any mistakes during the tour. You still have the original copy.
To run the EasyStart tutorial:
1. Install the Training Database.
On your Windows Desktop:
a. Click Start > Settings > Control Panel > Add/Remove Programs.
b. Select DOORS 7.0 from the list of currently installed programs, then click Change/Remove (on Windows 2000 or XP) or Add/Remove (on Windows 98 or NT).
Getting started with DOORS
doors_getting_started.book Page 28 Thursday, February 5, 2004 1:46 AM1
28
The DOORS/ERS Installation Wizard appears.
c. Make sure the Modify option is selected, then click Next.
d. On the following screen check the box for DOORS Tutorial Database. Leave the other options as they are.
e. Click Next, then finish the remaining steps without changing any of the pre-set data.
Getting started with DOORS
doors_getting_started.book Page 29 Thursday, February 5, 2004 1:46 AM1
29
On UNIX:
a. Change your working directory to $DOORSHOME/training, then enter the following command:
install_example_db.sh
This will install the Training Database on your computer.
2. Run EasyStart.
On your Windows Desktop:
a. Click Start > Programs > Telelogic > DOORS Training.
DOORS opens with a login window, prompting you for a username and password.
b. Enter the username Eric McCall and the password Training, with capitalization just as it appears here. Usernames and passwords are case-sensitive in DOORS.
c. Click OK.
d. If you see a tip of the day, click OK to close it.
You see the DOORS Explorer window.
Getting started with DOORS
doors_getting_started.book Page 30 Thursday, February 5, 2004 1:46 AM1
30
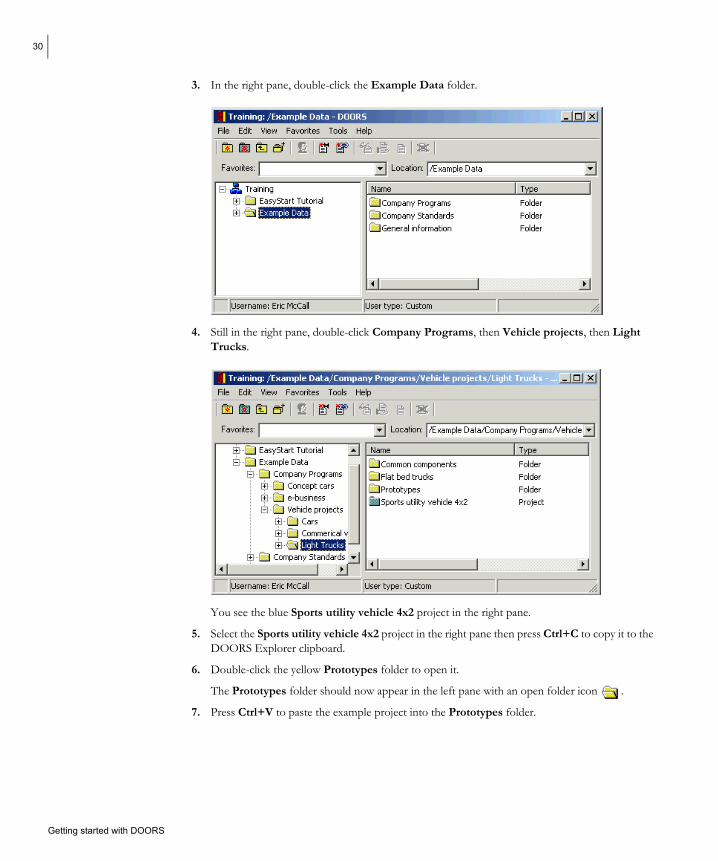
3. In the right pane, double-click the Example Data folder.
4. Still in the right pane, double-click Company Programs, then Vehicle projects, then Light Trucks.
You see the blue Sports utility vehicle 4x2 project in the right pane.
5. Select the Sports utility vehicle 4x2 project in the right pane then press Ctrl+C to copy it to the DOORS Explorer clipboard.
6. Double-click the yellow Prototypes folder to open it.
The Prototypes folder should now appear in the left pane with an open folder icon .
7. Press Ctrl+V to paste the example project into the Prototypes folder.
Getting started with DOORS
doors_getting_started.book Page 31 Thursday, February 5, 2004 1:46 AM1
31
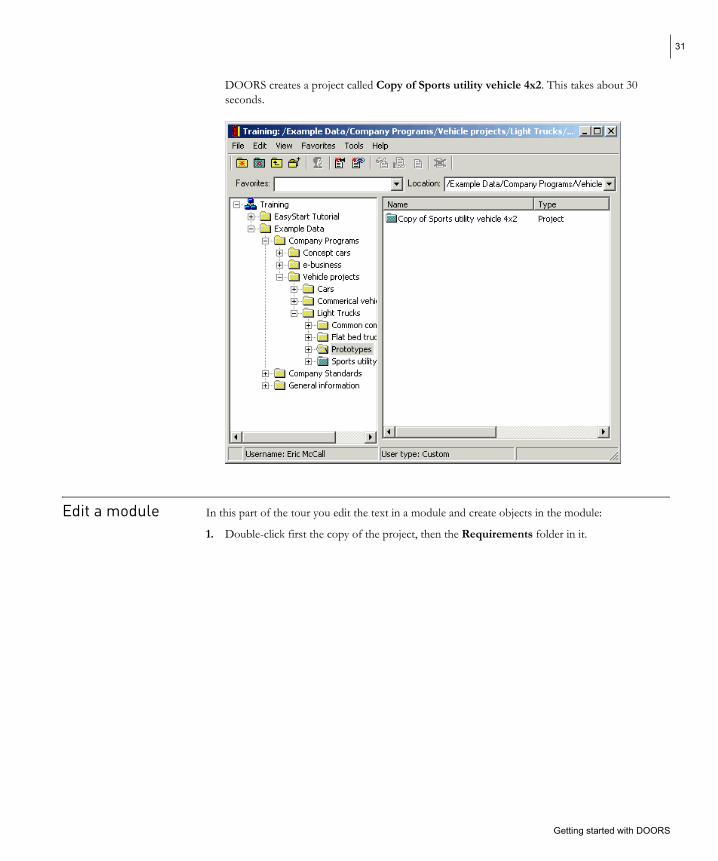
DOORS creates a project called Copy of Sports utility vehicle 4x2. This takes about 30 seconds.
Edit a module In this part of the tour you edit the text in a module and create objects in the module:
1. Double-click first the copy of the project, then the Requirements folder in it.
Getting started with DOORS
doors_getting_started.book Page 32 Thursday, February 5, 2004 1:46 AM1
32
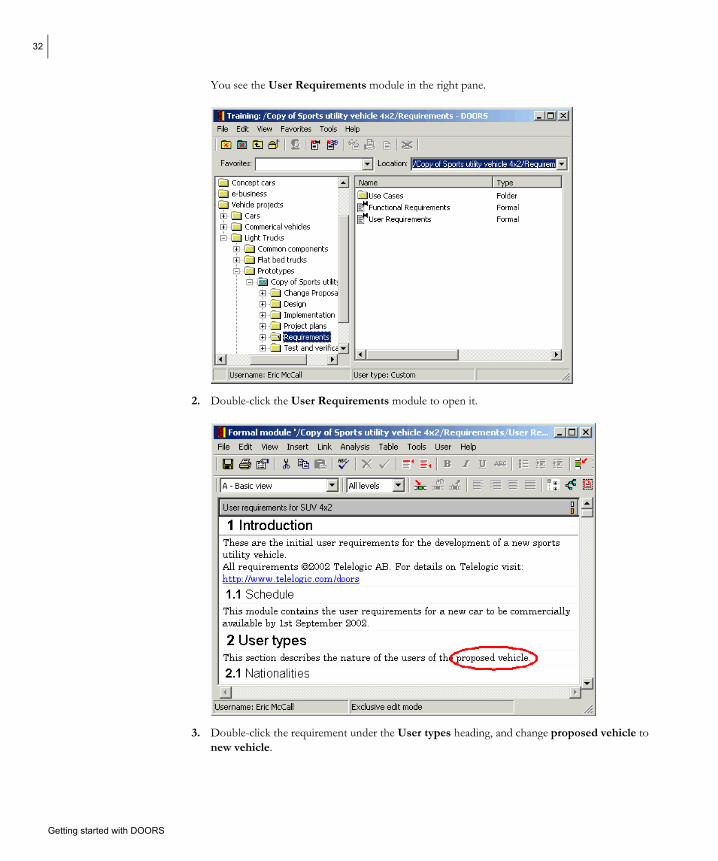
You see the User Requirements module in the right pane.
2. Double-click the User Requirements module to open it.
3. Double-click the requirement under the User types heading, and change proposed vehicle to new vehicle.
Getting started with DOORS
doors_getting_started.book Page 33 Thursday, February 5, 2004 1:46 AM1
33
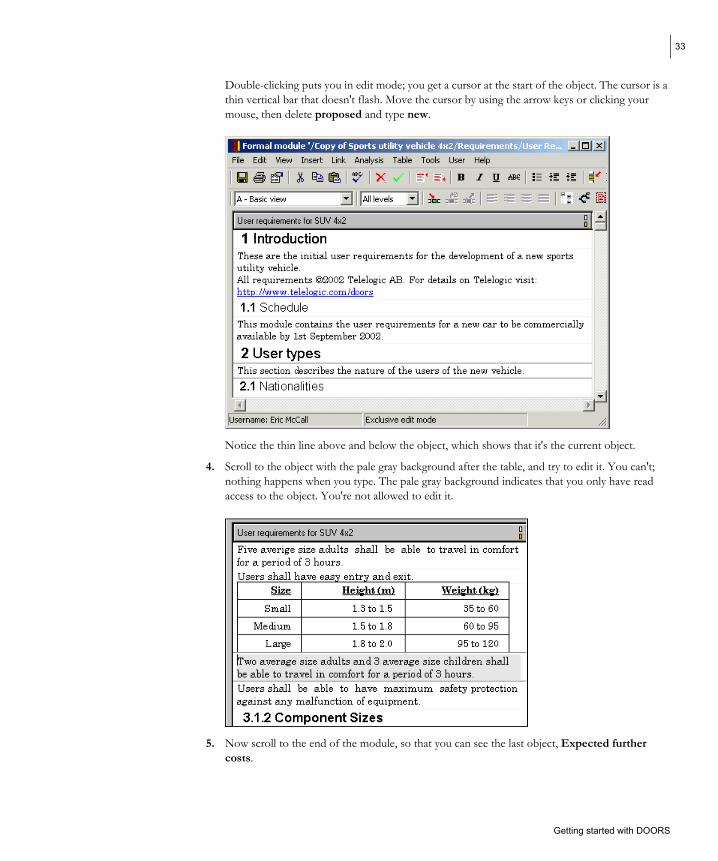
Double-clicking puts you in edit mode; you get a cursor at the start of the object. The cursor is a thin vertical bar that doesn't flash. Move the cursor by using the arrow keys or clicking your mouse, then delete proposed and type new.
Notice the thin line above and below the object, which shows that it's the current object.
4. Scroll to the object with the pale gray background after the table, and try to edit it. You can't; nothing happens when you type. The pale gray background indicates that you only have read access to the object. You're not allowed to edit it.
5. Now scroll to the end of the module, so that you can see the last object, Expected further costs.
Getting started with DOORS
doors_getting_started.book Page 34 Thursday, February 5, 2004 1:46 AM1
34
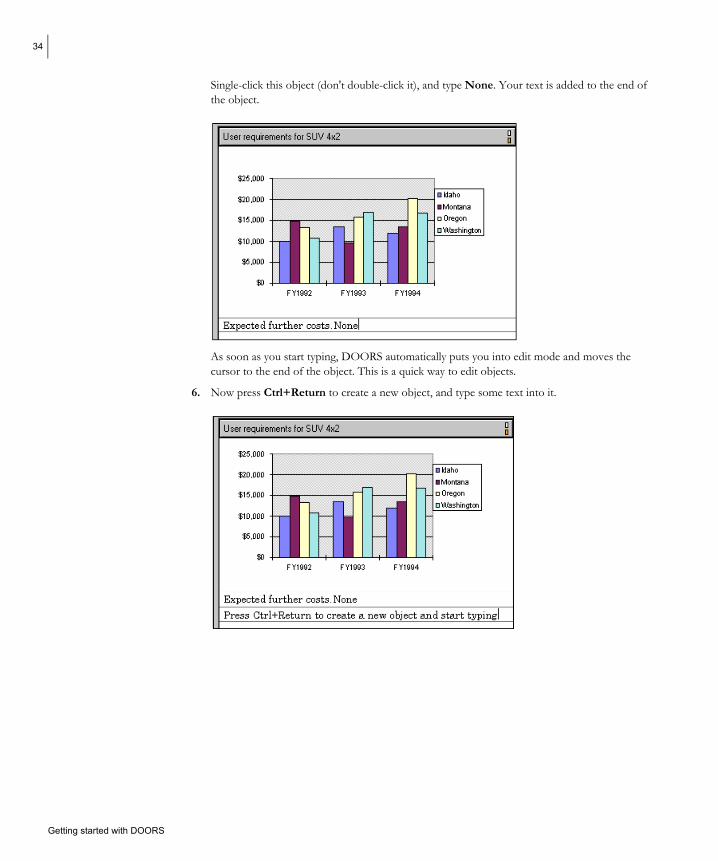
Single-click this object (don't double-click it), and type None. Your text is added to the end of the object.
As soon as you start typing, DOORS automatically puts you into edit mode and moves the cursor to the end of the object. This is a quick way to edit objects.
6. Now press Ctrl+Return to create a new object, and type some text into it.
Getting started with DOORS

doors_getting_started.book Page 35 Thursday, February 5, 2004 1:46 AM1
35
7. Press Ctrl+Return twice without typing anything, and notice that DOORS gives the first new object a heading number (5.1) because you didn't type any text and so DOORS assumed it was a heading.
Pressing Ctrl+Return creates an object at the same level in the hierarchy as the current object.
8. Now create a new object one level below the current object by clicking the New object below button on the toolbar.
Note: If you start typing after you click the icon, the heading number disappears and the object is no longer a heading. If you want to type a heading, click the Edit Object Heading button on the toolbar before you start typing.
9. Delete the objects you created. Either click the right mouse button and select Delete from the pop-up menu, or press the Delete key.
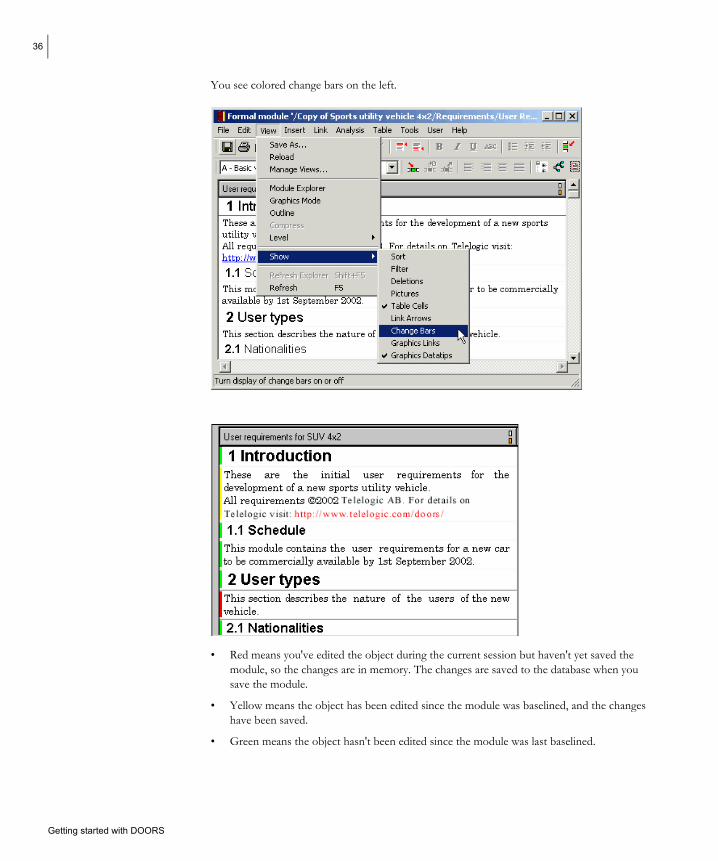
10. Scroll back to the top of the module and then turn change bars on. Click View > Show > Change Bars.
Getting started with DOORS
doors_getting_started.book Page 36 Thursday, February 5, 2004 1:46 AM1
36
You see colored change bars on the left.
• Red means you've edited the object during the current session but haven't yet saved the module, so the changes are in memory. The changes are saved to the database when you save the module.
• Yellow means the object has been edited since the module was baselined, and the changes have been saved.
• Green means the object hasn't been edited since the module was last baselined.
Getting started with DOORS
doors_getting_started.book Page 37 Thursday, February 5, 2004 1:46 AM1
37
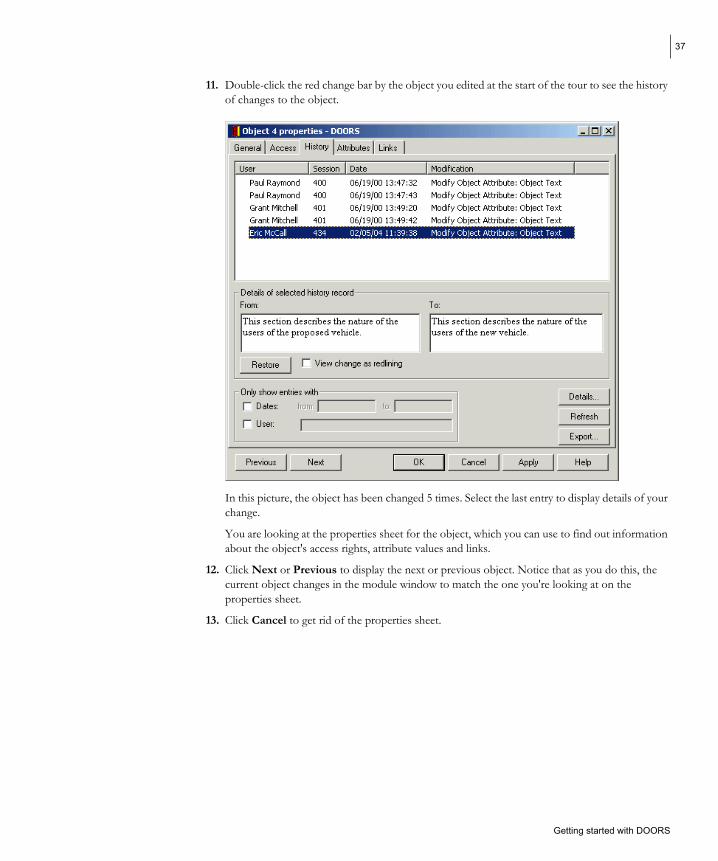
11. Double-click the red change bar by the object you edited at the start of the tour to see the history of changes to the object.
In this picture, the object has been changed 5 times. Select the last entry to display details of your change.
You are looking at the properties sheet for the object, which you can use to find out information about the object's access rights, attribute values and links.
12. Click Next or Previous to display the next or previous object. Notice that as you do this, the current object changes in the module window to match the one you're looking at on the properties sheet.
13. Click Cancel to get rid of the properties sheet.
Getting started with DOORS
doors_getting_started.book Page 38 Thursday, February 5, 2004 1:46 AM1
38
Change your view
In this part of the tour you look at different views of the module:
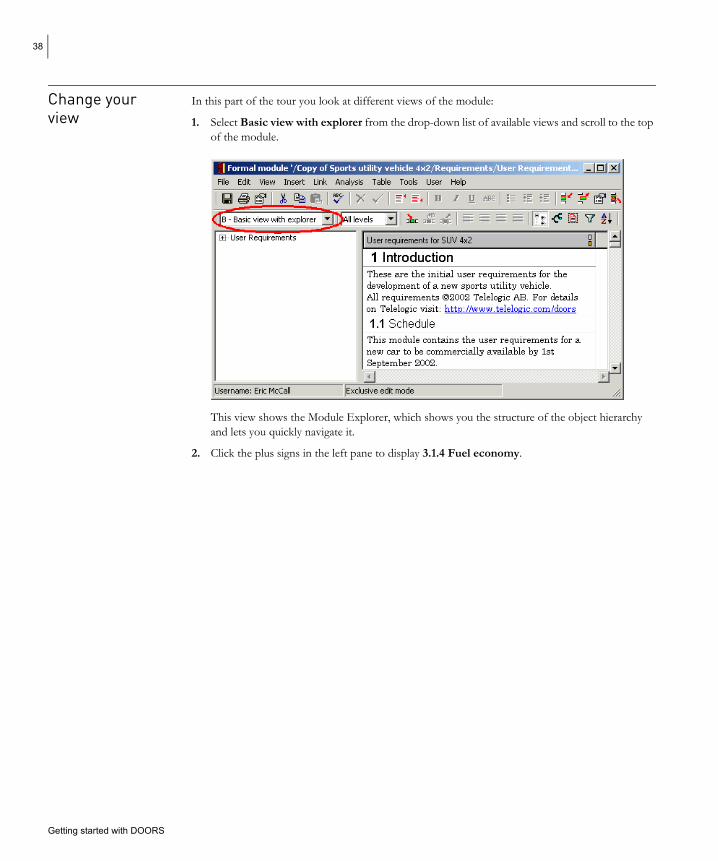
1. Select Basic view with explorer from the drop-down list of available views and scroll to the top of the module.
This view shows the Module Explorer, which shows you the structure of the object hierarchy and lets you quickly navigate it.
2. Click the plus signs in the left pane to display 3.1.4 Fuel economy.
Getting started with DOORS

doors_getting_started.book Page 39 Thursday, February 5, 2004 1:46 AM1
39
3. Click this object in the left pane to make it the current object in the right pane.
4. In the right pane scroll to the end of the module and select the last object in the module. Notice that the left pane doesn't change; the object selected in the left pane is still 3.1.4 Fuel economy.
Getting started with DOORS
doors_getting_started.book Page 40 Thursday, February 5, 2004 1:46 AM1
40
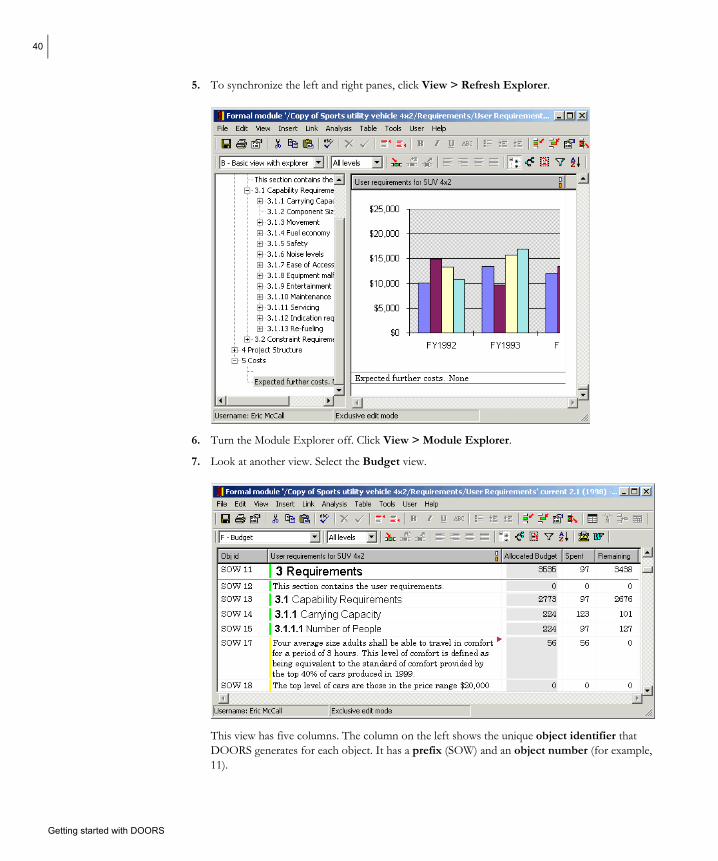
5. To synchronize the left and right panes, click View > Refresh Explorer.
6. Turn the Module Explorer off. Click View > Module Explorer.
7. Look at another view. Select the Budget view.
This view has five columns. The column on the left shows the unique object identifier that DOORS generates for each object. It has a prefix (SOW) and an object number (for example, 11).
Getting started with DOORS
doors_getting_started.book Page 41 Thursday, February 5, 2004 1:46 AM1
41
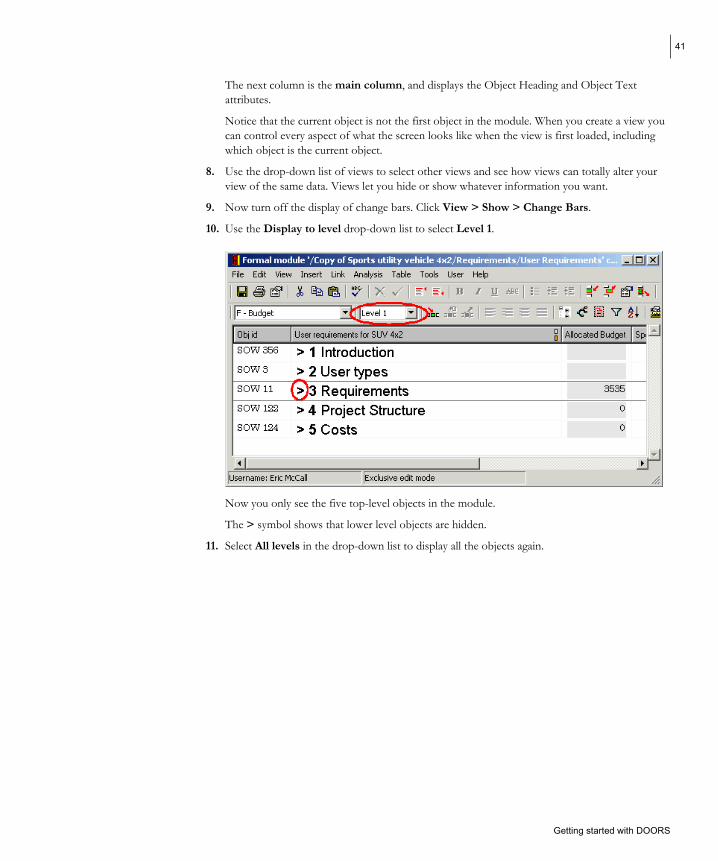
The next column is the main column, and displays the Object Heading and Object Text attributes.
Notice that the current object is not the first object in the module. When you create a view you can control every aspect of what the screen looks like when the view is first loaded, including which object is the current object.
8. Use the drop-down list of views to select other views and see how views can totally alter your view of the same data. Views let you hide or show whatever information you want.
9. Now turn off the display of change bars. Click View > Show > Change Bars.
10. Use the Display to level drop-down list to select Level 1.
Now you only see the five top-level objects in the module.
The > symbol shows that lower level objects are hidden.
11. Select All levels in the drop-down list to display all the objects again.
Getting started with DOORS
doors_getting_started.book Page 42 Thursday, February 5, 2004 1:46 AM1
42
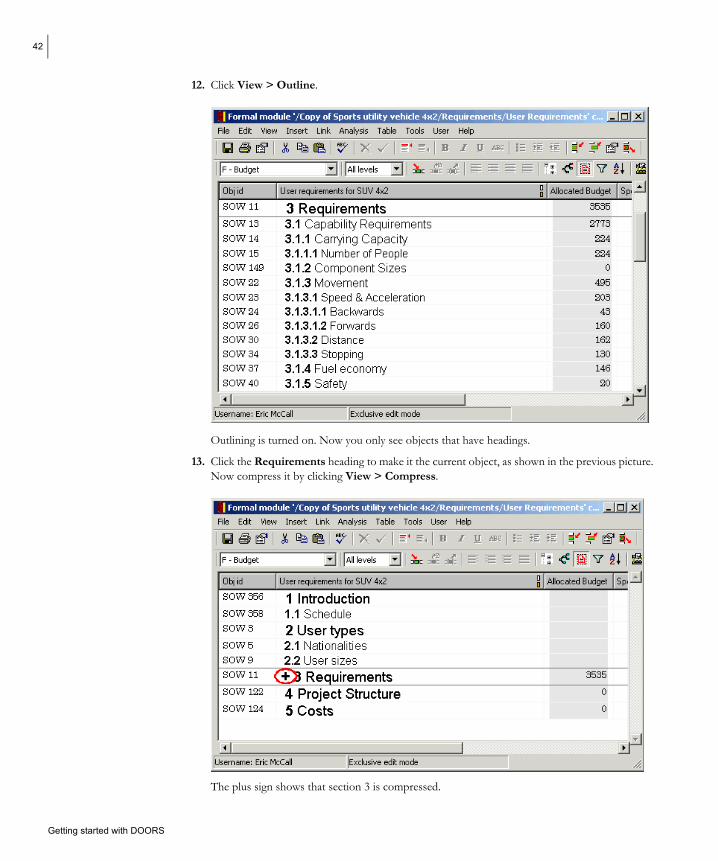
12. Click View > Outline.
Outlining is turned on. Now you only see objects that have headings.
13. Click the Requirements heading to make it the current object, as shown in the previous picture. Now compress it by clicking View > Compress.
The plus sign shows that section 3 is compressed.
Getting started with DOORS
doors_getting_started.book Page 43 Thursday, February 5, 2004 1:46 AM1
43
14. Uncompress section 3. Make sure it's the current object, then click View > Compress again.
15. Turn outlining off. Click View > Outline.
Make a link In this part of the tour you follow and create links:
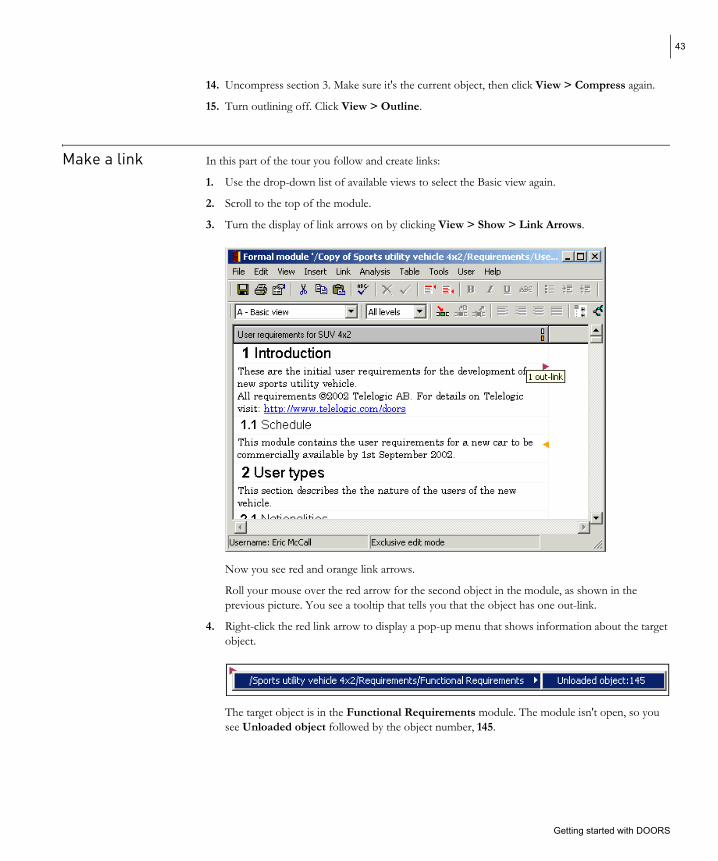
1. Use the drop-down list of available views to select the Basic view again.
2. Scroll to the top of the module.
3. Turn the display of link arrows on by clicking View > Show > Link Arrows.
Now you see red and orange link arrows.
Roll your mouse over the red arrow for the second object in the module, as shown in the previous picture. You see a tooltip that tells you that the object has one out-link.
4. Right-click the red link arrow to display a pop-up menu that shows information about the target object.
The target object is in the Functional Requirements module. The module isn't open, so you see Unloaded object followed by the object number, 145.
Getting started with DOORS

doors_getting_started.book Page 44 Thursday, February 5, 2004 1:46 AM1
44
5. Select Unloaded object 145 from the pop-up menu to open the module, with that object as the current object.
The target object has an orange in-link arrow. Right-click it and use the pop-up menu to go back to the User Requirements module.
6. Now make a link. In the User Requirements module:
a. Scroll to the top of the module and single-click the second object to make it the current object.
b. Right-click Link > Start Link.
Note: Make sure you single click the object to select it. If you double-click, you go into edit mode and see the edit mode pop-up menu.
Getting started with DOORS
doors_getting_started.book Page 45 Thursday, February 5, 2004 1:46 AM1
45
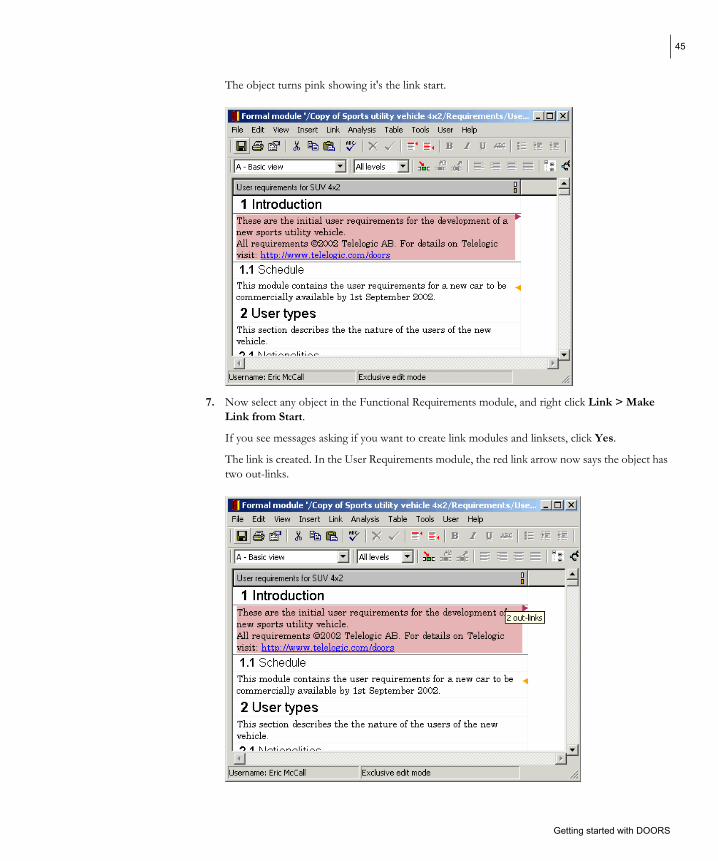
The object turns pink showing it's the link start.
7. Now select any object in the Functional Requirements module, and right click Link > Make Link from Start.
If you see messages asking if you want to create link modules and linksets, click Yes.
The link is created. In the User Requirements module, the red link arrow now says the object has two out-links.
Getting started with DOORS
doors_getting_started.book Page 46 Thursday, February 5, 2004 1:46 AM1
46
8. The object is still pink so you can repeat Step 7 to create more links that have that object as the source.
When you've finished, clear the link start by clicking Link > Clear Start. The object is no longer pink.
Notice that the right-click link options you used earlier are also on the Link menu.
9. Finally, look at the Traceability Explorer, which provides another way of showing and navigating links.
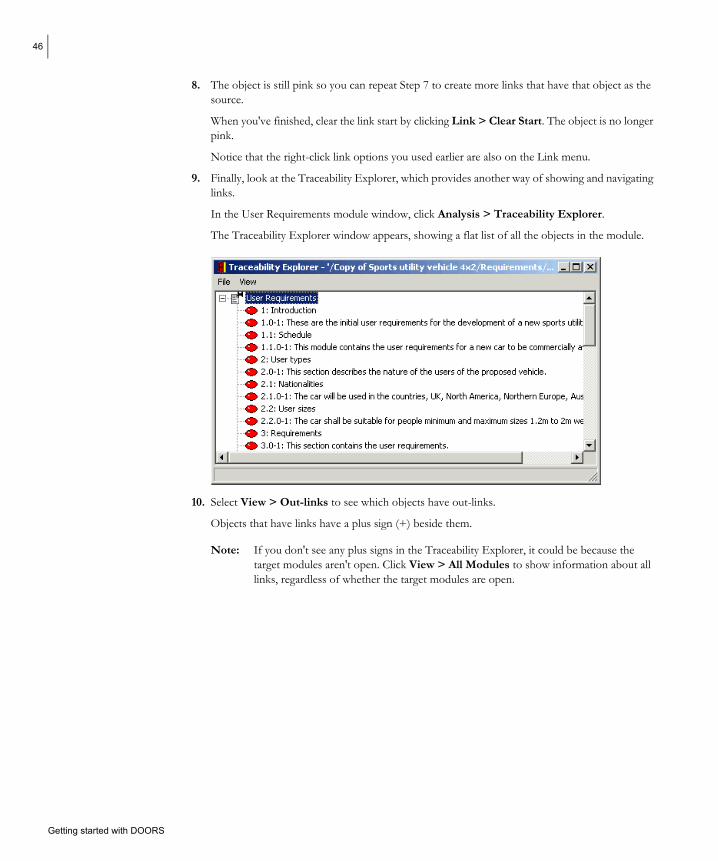
In the User Requirements module window, click Analysis > Traceability Explorer.
The Traceability Explorer window appears, showing a flat list of all the objects in the module.
10. Select View > Out-links to see which objects have out-links.
Objects that have links have a plus sign (+) beside them.
Note: If you don't see any plus signs in the Traceability Explorer, it could be because the target modules aren't open. Click View > All Modules to show information about all links, regardless of whether the target modules are open.
Getting started with DOORS
doors_getting_started.book Page 47 Thursday, February 5, 2004 1:46 AM1
47
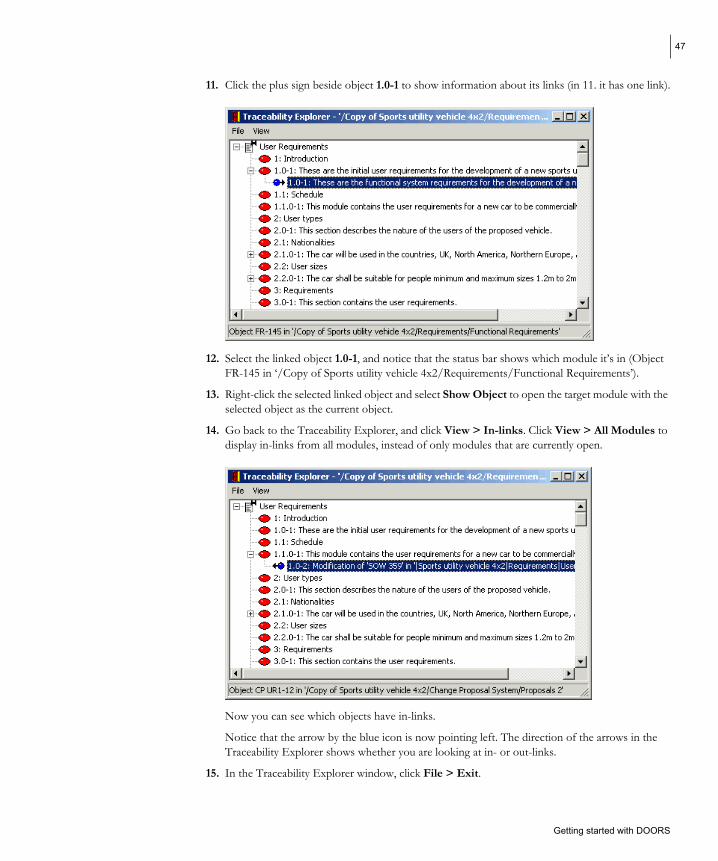
11. Click the plus sign beside object 1.0-1 to show information about its links (in 11. it has one link).
12. Select the linked object 1.0-1, and notice that the status bar shows which module it’s in (Object FR-145 in ‘/Copy of Sports utility vehicle 4x2/Requirements/Functional Requirements’).
13. Right-click the selected linked object and select Show Object to open the target module with the selected object as the current object.
14. Go back to the Traceability Explorer, and click View > In-links. Click View > All Modules to display in-links from all modules, instead of only modules that are currently open.
Now you can see which objects have in-links.
Notice that the arrow by the blue icon is now pointing left. The direction of the arrows in the Traceability Explorer shows whether you are looking at in- or out-links.
15. In the Traceability Explorer window, click File > Exit.
Getting started with DOORS
doors_getting_started.book Page 48 Thursday, February 5, 2004 1:46 AM1
48
Create an In this part of the tour you create an attribute, add a column to display it, then change the position of attribute the column:
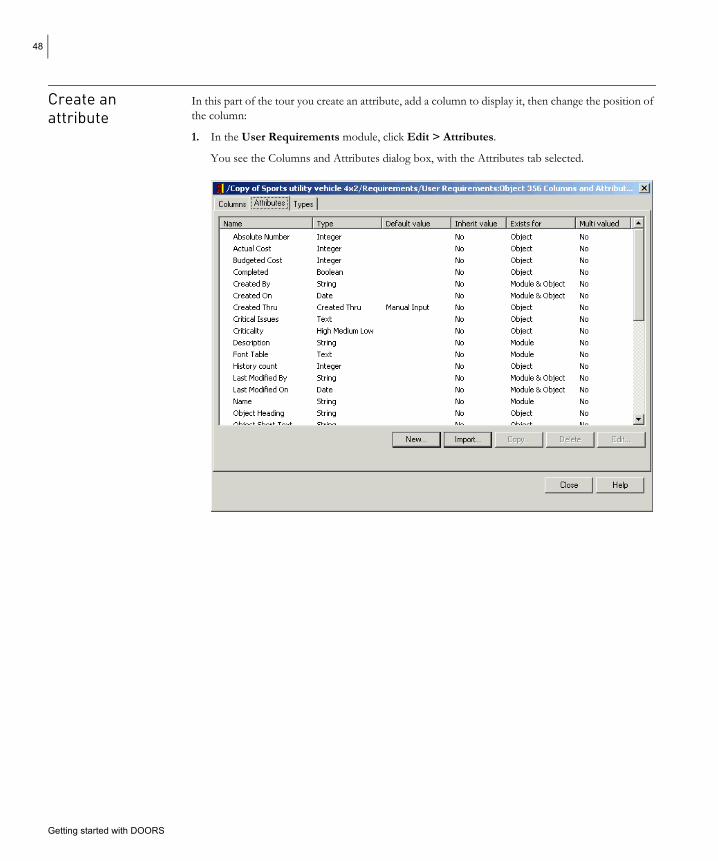
1. In the User Requirements module, click Edit > Attributes.
You see the Columns and Attributes dialog box, with the Attributes tab selected.
Getting started with DOORS
doors_getting_started.book Page 49 Thursday, February 5, 2004 1:46 AM1
49
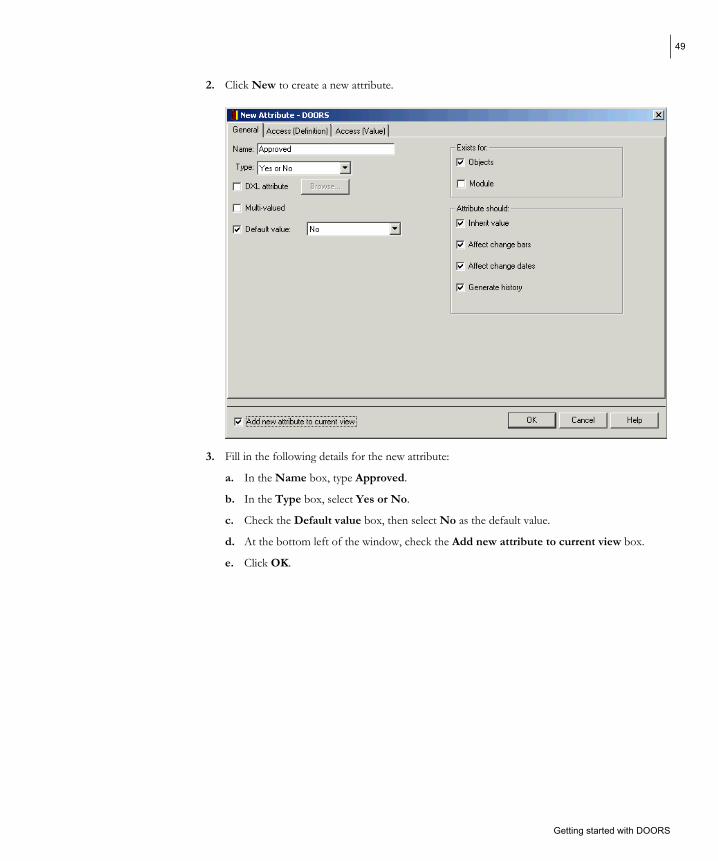
2. Click New to create a new attribute.
3. Fill in the following details for the new attribute:
a. In the Name box, type Approved.
b. In the Type box, select Yes or No.
c. Check the Default value box, then select No as the default value.
d. At the bottom left of the window, check the Add new attribute to current view box.
e. Click OK.
Getting started with DOORS
doors_getting_started.book Page 50 Thursday, February 5, 2004 1:46 AM1
50
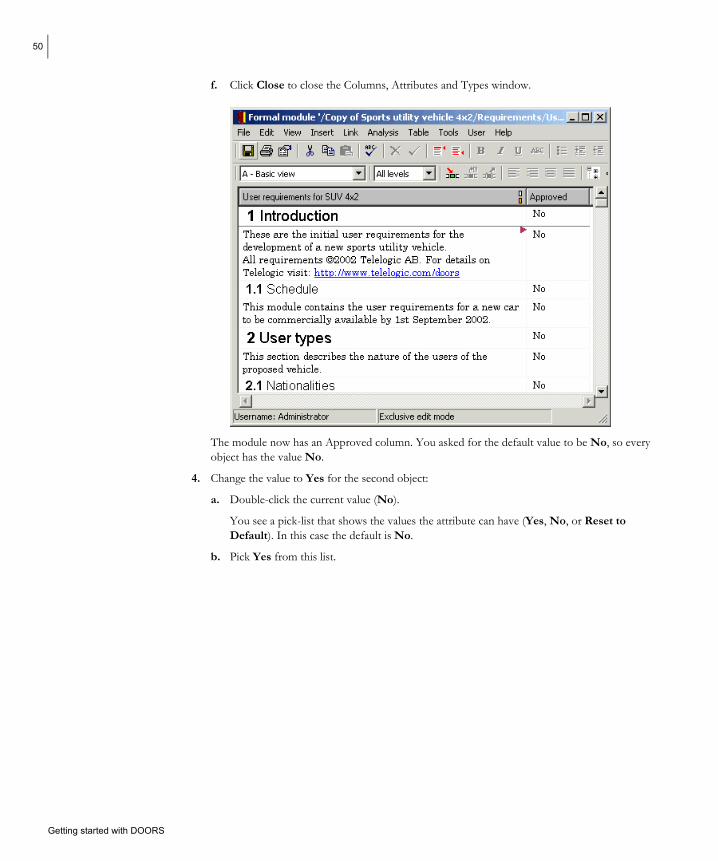
f. Click Close to close the Columns, Attributes and Types window.
The module now has an Approved column. You asked for the default value to be No, so every object has the value No.
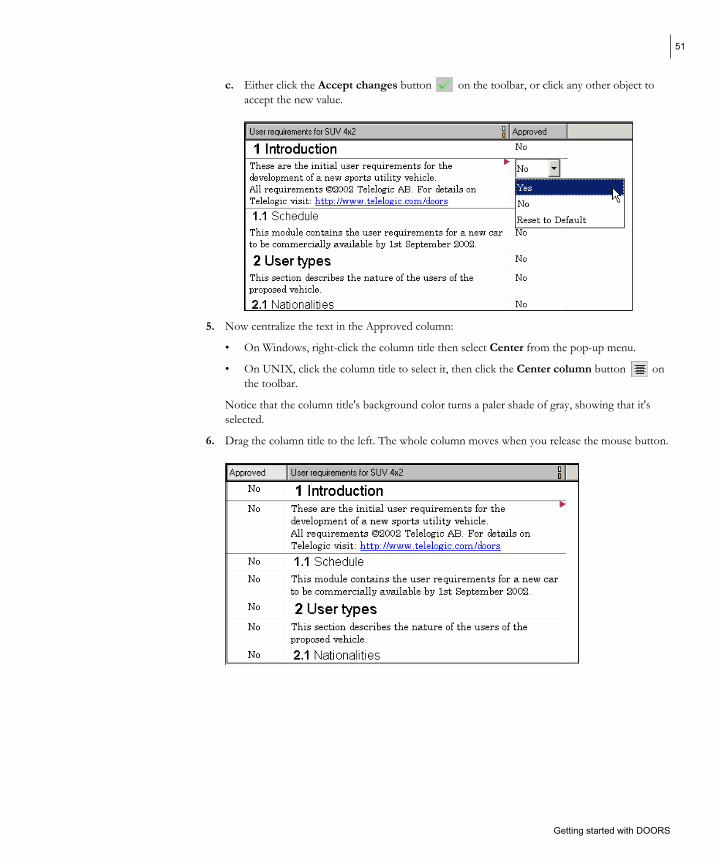
4. Change the value to Yes for the second object:
a. Double-click the current value (No).
You see a pick-list that shows the values the attribute can have (Yes, No, or Reset to Default). In this case the default is No.
b. Pick Yes from this list.
Getting started with DOORS
doors_getting_started.book Page 51 Thursday, February 5, 2004 1:46 AM1
51
c. Either click the Accept changes button on the toolbar, or click any other object to accept the new value.
5. Now centralize the text in the Approved column:
• On Windows, right-click the column title then select Center from the pop-up menu.
• On UNIX, click the column title to select it, then click the Center column button on the toolbar.
Notice that the column title's background color turns a paler shade of gray, showing that it's selected.
6. Drag the column title to the left. The whole column moves when you release the mouse button.
Getting started with DOORS
doors_getting_started.book Page 52 Thursday, February 5, 2004 1:46 AM1
52
Sort and filter the data
In this part of the tour you sort the data and then apply a filter to it:
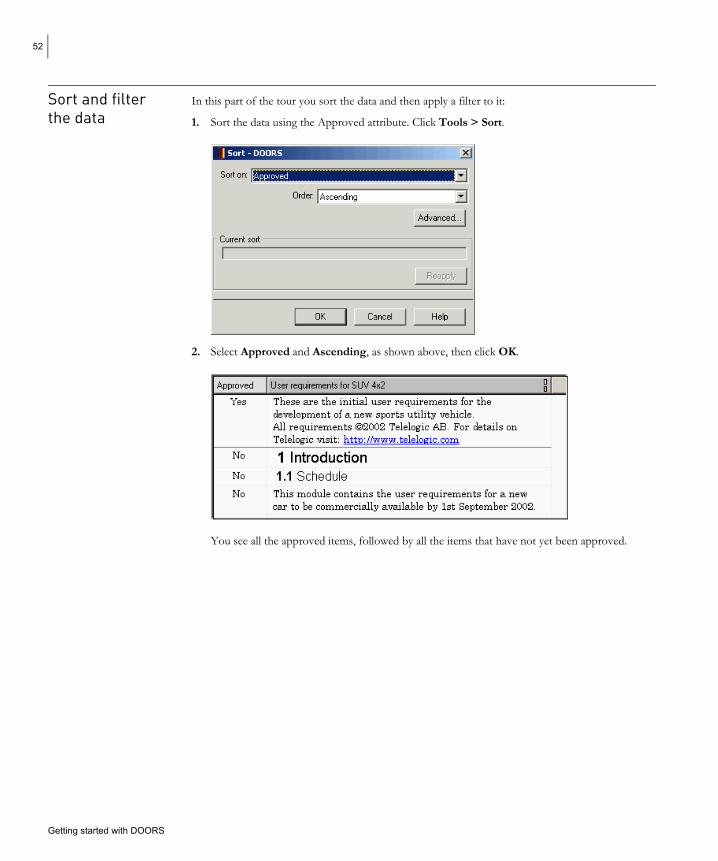
1. Sort the data using the Approved attribute. Click Tools > Sort.
2. Select Approved and Ascending, as shown above, then click OK.
You see all the approved items, followed by all the items that have not yet been approved.
Getting started with DOORS
doors_getting_started.book Page 53 Thursday, February 5, 2004 1:46 AM1
53
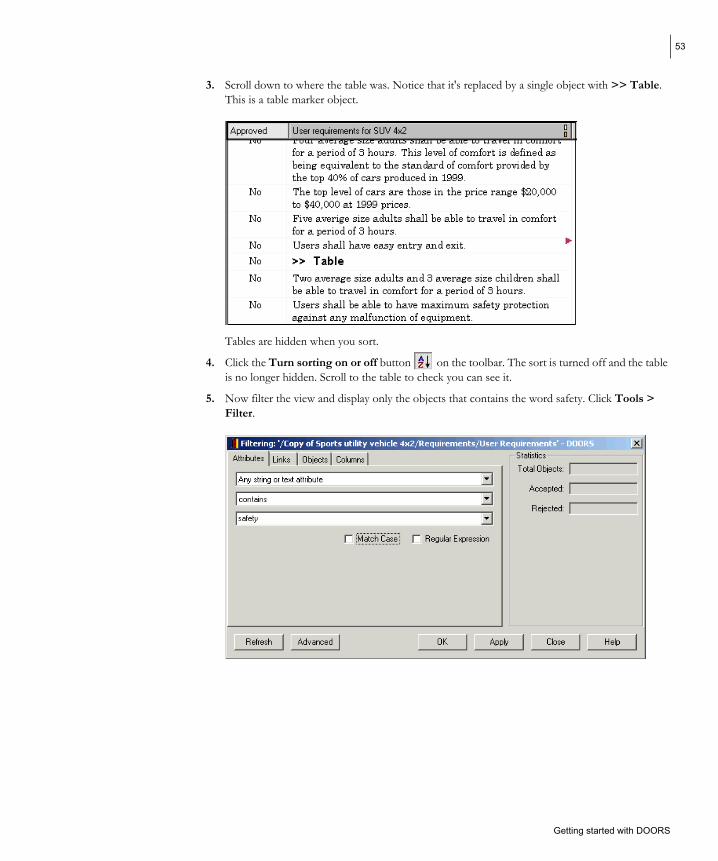
3. Scroll down to where the table was. Notice that it's replaced by a single object with >> Table. This is a table marker object.
Tables are hidden when you sort.
4. Click the Turn sorting on or off button on the toolbar. The sort is turned off and the table is no longer hidden. Scroll to the table to check you can see it.
5. Now filter the view and display only the objects that contains the word safety. Click Tools > Filter.
Getting started with DOORS
doors_getting_started.book Page 54 Thursday, February 5, 2004 1:46 AM1
54
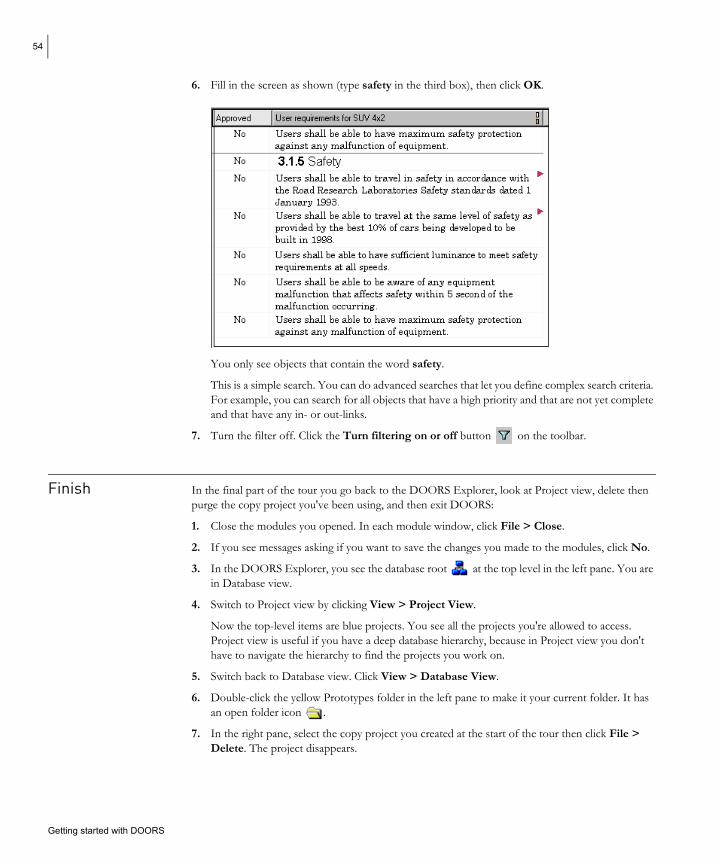
6. Fill in the screen as shown (type safety in the third box), then click OK.
You only see objects that contain the word safety.
This is a simple search. You can do advanced searches that let you define complex search criteria. For example, you can search for all objects that have a high priority and that are not yet complete and that have any in- or out-links.
7. Turn the filter off. Click the Turn filtering on or off button on the toolbar.
Finish In the final part of the tour you go back to the DOORS Explorer, look at Project view, delete then purge the copy project you've been using, and then exit DOORS:
1. Close the modules you opened. In each module window, click File > Close.
2. If you see messages asking if you want to save the changes you made to the modules, click No.
3. In the DOORS Explorer, you see the database root at the top level in the left pane. You are in Database view.
4. Switch to Project view by clicking View > Project View.
Now the top-level items are blue projects. You see all the projects you're allowed to access. Project view is useful if you have a deep database hierarchy, because in Project view you don't have to navigate the hierarchy to find the projects you work on.
5. Switch back to Database view. Click View > Database View.
6. Double-click the yellow Prototypes folder in the left pane to make it your current folder. It has an open folder icon .
7. In the right pane, select the copy project you created at the start of the tour then click File > Delete. The project disappears.
Getting started with DOORS
doors_getting_started.book Page 55 Thursday, February 5, 2004 1:46 AM1
55
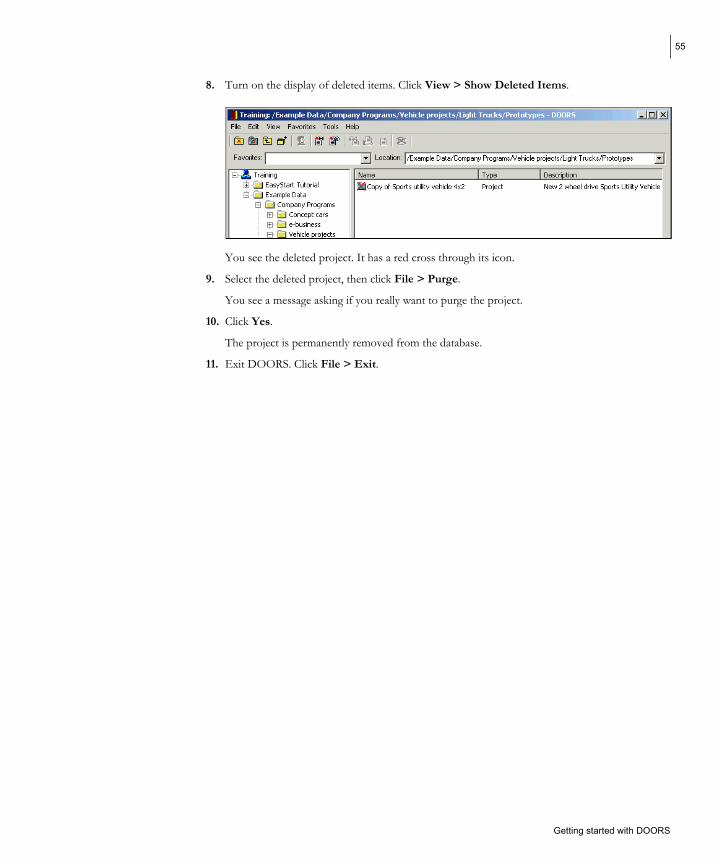
8. Turn on the display of deleted items. Click View > Show Deleted Items.
You see the deleted project. It has a red cross through its icon.
9. Select the deleted project, then click File > Purge.
You see a message asking if you really want to purge the project.
10. Click Yes.
The project is permanently removed from the database.
11. Exit DOORS. Click File > Exit.
Getting started with DOORS

doors_getting_started.book Page 56 Thursday, February 5, 2004 1:46 AM1
56
Getting started with DOORS
doors_getting_started.book Page 57 Thursday, February 5, 2004 1:46 AM1
57
4 Contacting customer support
This chapter contains the following topics:
• Before you contact customer support
• How to contact customer support
• Contact Information
Before you contact customer support
If your site has a designated on-site support person, please contact that person before you contact our customer support team.
To help our customer support team solve your problem, please have the following information available:
• Your name, title, company name, e-mail address, fax number and telephone number.
• Your Telelogic DOORS site ID.
• The version and build number of DOORS that you're running.
To get this information, run DOORS, and click Help > About DOORS.
• The operating system you're running DOORS on, for example, Windows NT 4.0 Service Pack 6.
• What operating system your DOORS database is running on, if different.
• If you are reporting a new problem, please have a clear statement of the problem, including the exact text of any error messages produced by DOORS, your operating system, or any other tools that were running when the problem occurred.
• If you are calling about a problem you reported earlier, you need the original tracking number the customer support team assigned to your problem.
How to contact Visit the support center on our web site at http://support.telelogic.com customer Alternatively, you can e-mail or telephone us. support Contact information for users in the Americas, Europe, Scandinavia, Asia and Pacific is shown
below.
Getting started with DOORS
doors_getting_started.book Page 58 Thursday, February 5, 2004 1:46 AM1
58
Getting started with DOORS
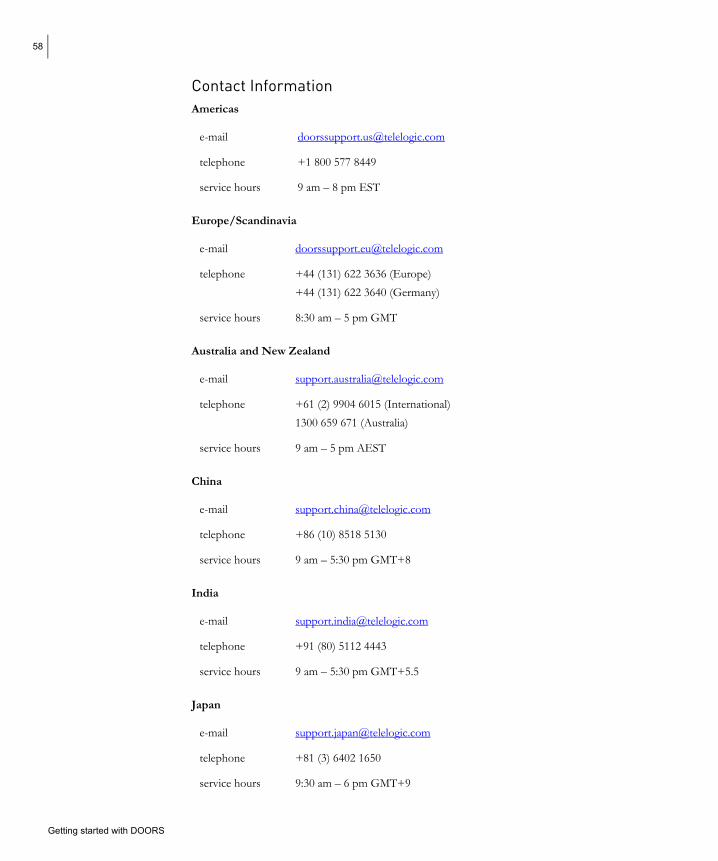
Contact Information Americas
e-mail [email protected]
telephone +1 800 577 8449
service hours 9 am – 8 pm EST
Europe/Scandinavia
e-mail [email protected]
telephone +44 (131) 622 3636 (Europe) +44 (131) 622 3640 (Germany)
service hours 8:30 am – 5 pm GMT
Australia and New Zealand
e-mail [email protected]
telephone +61 (2) 9904 6015 (International) 1300 659 671 (Australia)
service hours 9 am – 5 pm AEST
China
e-mail [email protected]
telephone +86 (10) 8518 5130
service hours 9 am – 5:30 pm GMT+8
India
e-mail [email protected]
telephone +91 (80) 5112 4443
service hours 9 am – 5:30 pm GMT+5.5
Japan
e-mail [email protected]
telephone +81 (3) 6402 1650
service hours 9:30 am – 6 pm GMT+9
doors_getting_started.book Page 59 Thursday, February 5, 2004 1:46 AM1
59
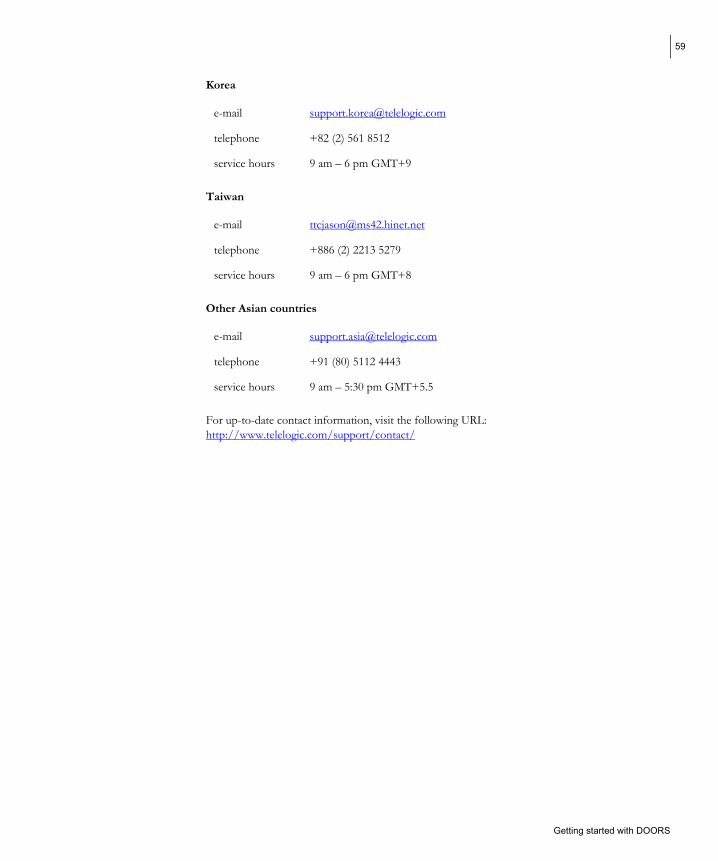
Korea
e-mail [email protected]
telephone +82 (2) 561 8512
service hours 9 am – 6 pm GMT+9
Taiwan
e-mail [email protected]
telephone +886 (2) 2213 5279
service hours 9 am – 6 pm GMT+8
Other Asian countries
e-mail [email protected]
telephone +91 (80) 5112 4443
service hours 9 am – 5:30 pm GMT+5.5
For up-to-date contact information, visit the following URL: http://www.telelogic.com/support/contact/
Getting started with DOORS

doors_getting_started.book Page 60 Thursday, February 5, 2004 1:46 AM1
60
Getting started with DOORS
doors_getting_started.book Page 61 Thursday, February 5, 2004 1:46 AM1
61
Index
A Access rights 8
inheritance 8 using 10
propagating extra with create 11 understanding 3
Attributes Object Heading 16 Object Text 16 understanding 15
B Baselines
understanding 20
Change Control Board 21 Change Proposal Managers 21 Change Proposal System
understanding 21 Custom users 23
D Database managers 23 DOORS
understanding 13
E EasyStart tutorial
running 23, 27 Edit modes
understanding 21
F Folders
understanding 17 Formal modules
understanding 14
G Groups
understanding 4
I Inheritance
access rights 8 using 10
L Links
understanding 16
M Modules
understanding 14
O Object Heading attribute 16 Object Text attribute 16 Objects
object identifiers 40 object numbers 40 understanding 15
P Partitions
understanding 22 Project managers 22 Projects
understanding 17 Propagating extra access rights 11 Proposals
types Change proposal 21 Suggestion 21
R Requirements
system requirements 14 understanding 13 user requirements 14
Running the EasyStart tutorial 23, 27
Getting Started with DOORS
C
doors_getting_started.book Page 62 Thursday, February 5, 2004 1:46 AM1
62
S Standard users 22System requirements 14
T Traceability
understanding 16
U User requirements 14User types 22
VViews
understanding 16
Getting Started with DOORS


Visit www.telelogic.com/support for more information on our support centers across the world.
World Headquarters P.O. Box 4128, SE-203 12 Malmö, Sweden Phone: +46 40 650 00 00 · Fax: +46 40 650 65 55
American Headquarters 9401 Jeronimo Road, Irvine, CA 92618, USA Phone: +1 949 830 8022 · Fax: +1 949 830 8023
Offices in Europe, America, Asia and Australia
[email protected] · www.telelogic.com
��