Embed Size (px)
Citation preview
w w w . d p r . c o m 1
DPR Model Slicer
v5 Help
Contact:
DPR Model Slicer v5
Help Document
What is DPR Model Slicer v5?What is DPR Model Slicer v5?What is DPR Model Slicer v5?What is DPR Model Slicer v5? ........................................................................................................................................................................................................................................................................................................................................................................................................ 3333
Basic questions about DPR Model Slicer v5:Basic questions about DPR Model Slicer v5:Basic questions about DPR Model Slicer v5:Basic questions about DPR Model Slicer v5:................................................................................................................................................................................................................................................................................................................ 4444
What’s new on Version 5? ......................................................................................................... 4
What operating systems does it support? ................................................................................ 4
What versions of Revit does it support? ................................................................................... 4
Do I need to manually uninstall any previous versions of Model Slicer? ............................... 4
Do projects created on the previous release transfer to the new release?........................... 4
How to use the ‘Create 3D Sections’ tool?How to use the ‘Create 3D Sections’ tool?How to use the ‘Create 3D Sections’ tool?How to use the ‘Create 3D Sections’ tool? ............................................................................................................................................................................................................................................................................................................................ 5555
How does it work? ...................................................................................................................... 5
How to create a new project?.................................................................................................... 6
How to create a new 3D section box? ...................................................................................... 8
How to define elevation boundaries? ....................................................................................... 8
How to define plan view boundaries? .................................................................................... 10
How to override plan view boundaries? ................................................................................. 11
Option 1: Use the ‘Rectangle’ Tool ..................................................................................... 11
Option 2: Use the ‘Pick X’ and ‘Pick Y’ Grid Selection Tools ............................................. 11
Option 3: Manual Project Extents Definition ...................................................................... 13
How to create additional 3D section boxes? ......................................................................... 14
How to create new visibility settings? ..................................................................................... 16
How to create 3D Views? ......................................................................................................... 22
How to duplicate a project? ..................................................................................................... 25
How to use the ‘Create Room Sections’ tool?How to use the ‘Create Room Sections’ tool?How to use the ‘Create Room Sections’ tool?How to use the ‘Create Room Sections’ tool? ................................................................................................................................................................................................................................................................................................ 26262626
How does it work? .................................................................................................................... 26
How to create a new project?.................................................................................................. 27

w w w . d p r . c o m 2
DPR Model Slicer
v5 Help
Contact:
How to access an existing project? ........................................................................................ 28
How to choose which room sections to export? .................................................................... 29
How to define the names for each of the views created? ..................................................... 30
How to create the views? ........................................................................................................ 30
How to offset the box boundaries? ......................................................................................... 31
How to use the ‘Copy Revit Linked How to use the ‘Copy Revit Linked How to use the ‘Copy Revit Linked How to use the ‘Copy Revit Linked File’ tool?File’ tool?File’ tool?File’ tool? .................................................................................................................................................................................................................................................................................................... 33333333
How does it work? .................................................................................................................... 33
How to use copy linked files tool? .......................................................................................... 33
How to export the 3D Views?How to export the 3D Views?How to export the 3D Views?How to export the 3D Views? ........................................................................................................................................................................................................................................................................................................................................................................................................ 35353535
How to ‘Clean Up’ your views?How to ‘Clean Up’ your views?How to ‘Clean Up’ your views?How to ‘Clean Up’ your views? ................................................................................................................................................................................................................................................................................................................................................................................................ 38383838
How to use the ‘Batch Navisworks Export’ tool?How to use the ‘Batch Navisworks Export’ tool?How to use the ‘Batch Navisworks Export’ tool?How to use the ‘Batch Navisworks Export’ tool? ................................................................................................................................................................................................................................................................................ 39393939
How does it work? .................................................................................................................... 39
How to use Batch Navisworks Export Tool? ........................................................................... 39
How to reuse a project’s settings for other projects?How to reuse a project’s settings for other projects?How to reuse a project’s settings for other projects?How to reuse a project’s settings for other projects? .................................................................................................................................................................................................................................................... 40404040
How to share project settings with other users?How to share project settings with other users?How to share project settings with other users?How to share project settings with other users? ................................................................................................................................................................................................................................................................................ 43434343
How to register?How to register?How to register?How to register? ........................................................................................................................................................................................................................................................................................................................................................................................................................................................................................ 46464646
LicensingLicensingLicensingLicensing .................................................................................................................................................................................................................................................................................................................................................................................................................................................................................................................................... 47474747
UninstallingUninstallingUninstallingUninstalling .................................................................................................................................................................................................................................................................................................................................................................................................................................................................................................................... 47474747
w w w . d p r . c o m 3
DPR Model Slicer
v5 Help
Contact:
What is DPR Model SlicerWhat is DPR Model SlicerWhat is DPR Model SlicerWhat is DPR Model Slicer v5v5v5v5????
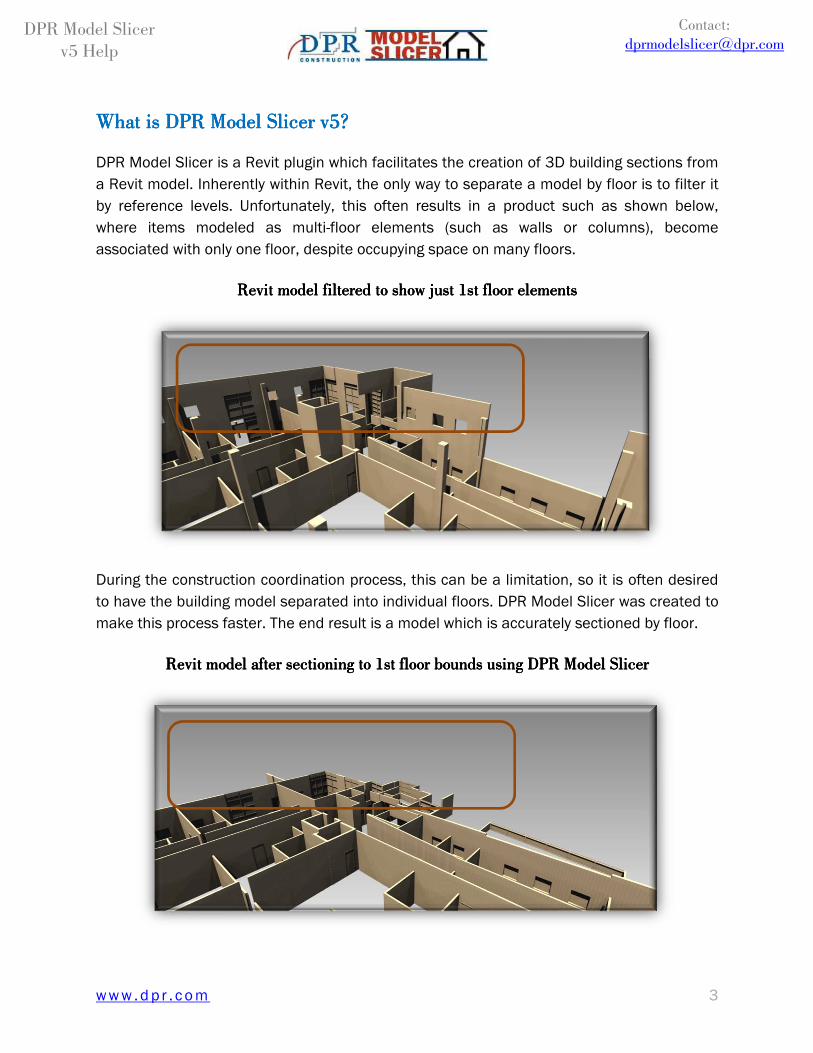
DPR Model Slicer is a Revit plugin which facilitates the creation of 3D building sections from
a Revit model. Inherently within Revit, the only way to separate a model by floor is to filter it
by reference levels. Unfortunately, this often results in a product such as shown below,
where items modeled as multi-floor elements (such as walls or columns), become
associated with only one floor, despite occupying space on many floors.
Revit model filtered to show just 1st floor elementsRevit model filtered to show just 1st floor elementsRevit model filtered to show just 1st floor elementsRevit model filtered to show just 1st floor elements
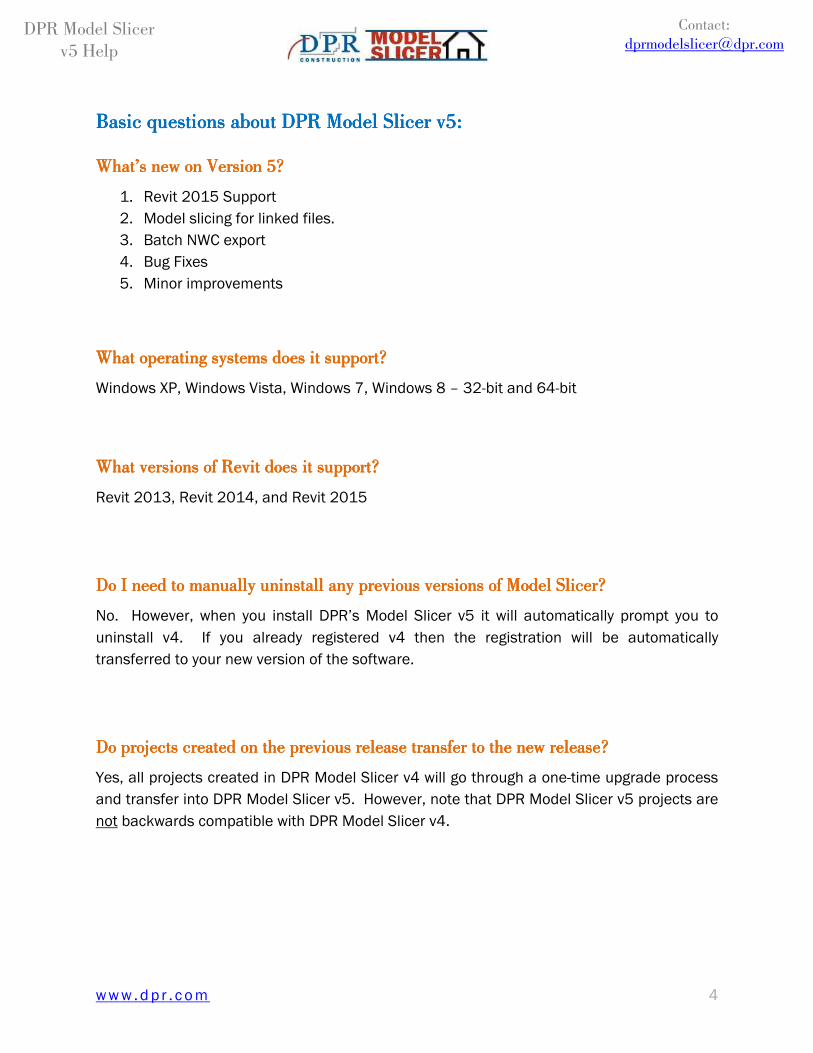
During the construction coordination process, this can be a limitation, so it is often desired
to have the building model separated into individual floors. DPR Model Slicer was created to
make this process faster. The end result is a model which is accurately sectioned by floor.
Revit model after sectioning to 1st floor bounds using DPR Model SlicerRevit model after sectioning to 1st floor bounds using DPR Model SlicerRevit model after sectioning to 1st floor bounds using DPR Model SlicerRevit model after sectioning to 1st floor bounds using DPR Model Slicer
w w w . d p r . c o m 4
DPR Model Slicer
v5 Help
Contact:
Basic questions about DPR Model SlBasic questions about DPR Model SlBasic questions about DPR Model SlBasic questions about DPR Model Slicer icer icer icer v5v5v5v5::::
What’s new on Version 5What’s new on Version 5What’s new on Version 5What’s new on Version 5????
1. Revit 2015 Support
2. Model slicing for linked files.
3. Batch NWC export
4. Bug Fixes
5. Minor improvements
What operating systems does it support?What operating systems does it support?What operating systems does it support?What operating systems does it support?
Windows XP, Windows Vista, Windows 7, Windows 8 – 32-bit and 64-bit
What versions What versions What versions What versions of Revit does it support?of Revit does it support?of Revit does it support?of Revit does it support?
Revit 2013, Revit 2014, and Revit 2015
Do I need toDo I need toDo I need toDo I need to manuallymanuallymanuallymanually uninstall any uninstall any uninstall any uninstall any previous versions of Model Sprevious versions of Model Sprevious versions of Model Sprevious versions of Model Slicer?licer?licer?licer?
No. However, when you install DPR’s Model Slicer v5 it will automatically prompt you to
uninstall v4. If you already registered v4 then the registration will be automatically
transferred to your new version of the software.
Do projects created on the previous release transfer to the new release?Do projects created on the previous release transfer to the new release?Do projects created on the previous release transfer to the new release?Do projects created on the previous release transfer to the new release?
Yes, all projects created in DPR Model Slicer v4 will go through a one-time upgrade process
and transfer into DPR Model Slicer v5. However, note that DPR Model Slicer v5 projects are
not backwards compatible with DPR Model Slicer v4.
w w w . d p r . c o m 5
DPR Model Slicer
v5 Help
Contact:
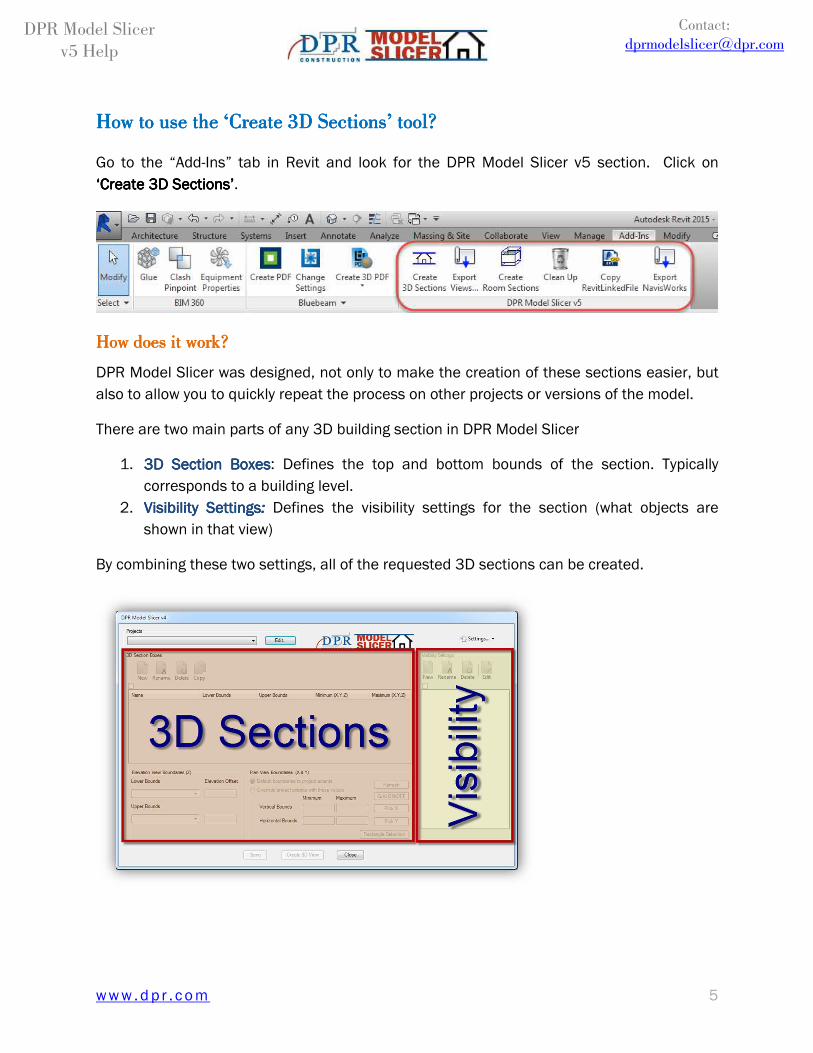
How to use the ‘Create 3D Sections’ tool?How to use the ‘Create 3D Sections’ tool?How to use the ‘Create 3D Sections’ tool?How to use the ‘Create 3D Sections’ tool?
Go to the “Add-Ins” tab in Revit and look for the DPR Model Slicer v5 section. Click on
‘Create 3D Sections’‘Create 3D Sections’‘Create 3D Sections’‘Create 3D Sections’.
How does it work?How does it work?How does it work?How does it work?
DPR Model Slicer was designed, not only to make the creation of these sections easier, but
also to allow you to quickly repeat the process on other projects or versions of the model.
There are two main parts of any 3D building section in DPR Model Slicer
1. 3D Section Box3D Section Box3D Section Box3D Section Boxeseseses: Defines the top and bottom bounds of the section. Typically
corresponds to a building level.
2. Visibility SettingsVisibility SettingsVisibility SettingsVisibility Settings:::: Defines the visibility settings for the section (what objects are
shown in that view)
By combining these two settings, all of the requested 3D sections can be created.
w w w . d p r . c o m 6
DPR Model Slicer
v5 Help
Contact:
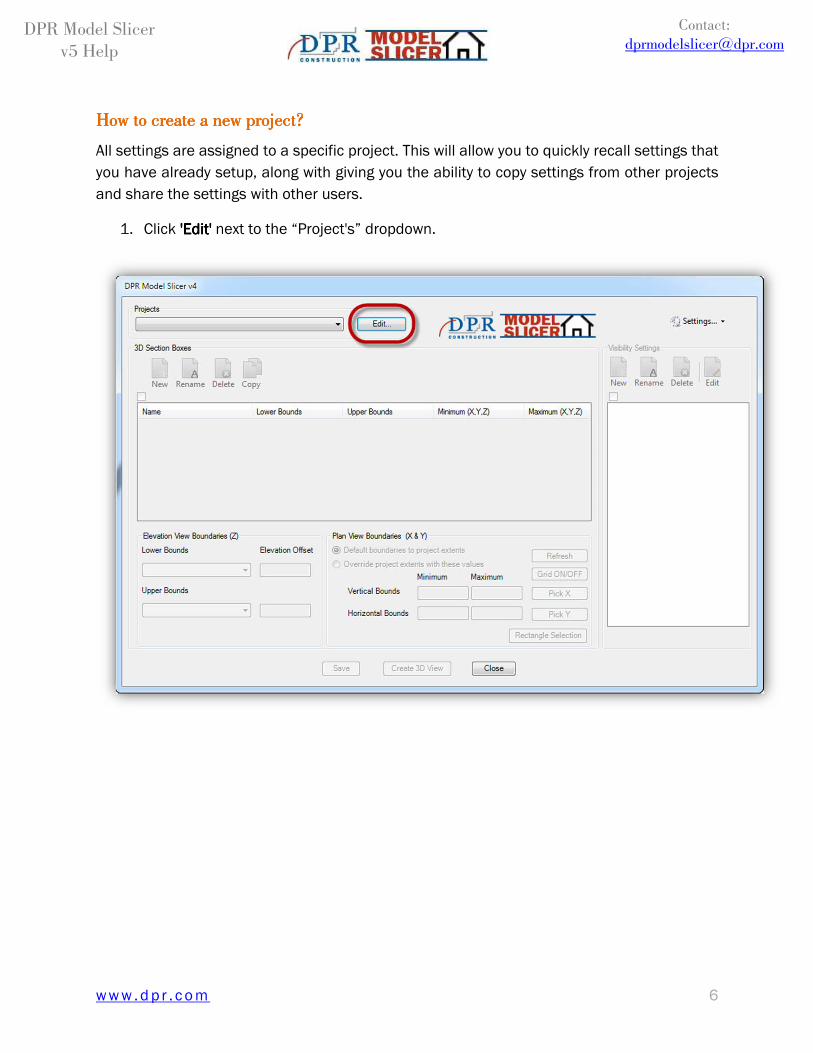
How to create a new pHow to create a new pHow to create a new pHow to create a new projectrojectrojectroject????
All settings are assigned to a specific project. This will allow you to quickly recall settings that
you have already setup, along with giving you the ability to copy settings from other projects
and share the settings with other users.
1. Click 'Edit''Edit''Edit''Edit' next to the “Project's” dropdown.
w w w . d p r . c o m 7
DPR Model Slicer
v5 Help
Contact:
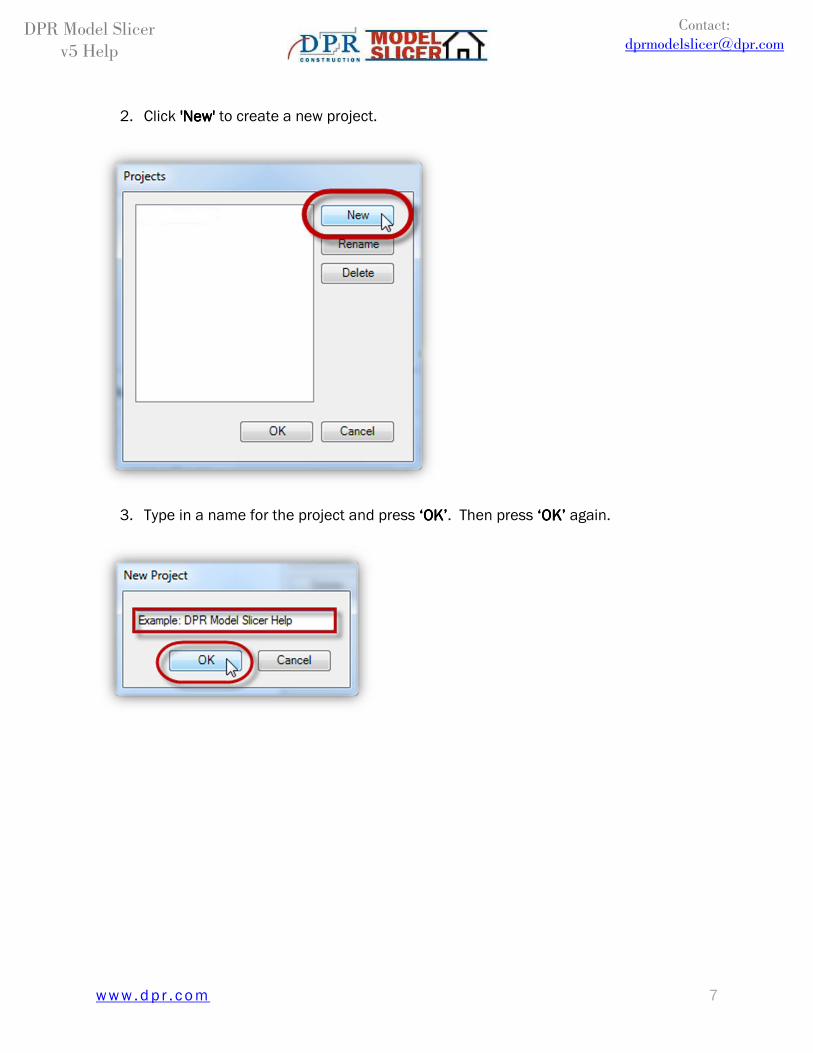
2. Click 'New''New''New''New' to create a new project.
3. Type in a name for the project and press ‘‘‘‘OKOKOKOK’’’’. Then press ‘‘‘‘OKOKOKOK’’’’ again.
w w w . d p r . c o m 8
DPR Model Slicer
v5 Help
Contact:
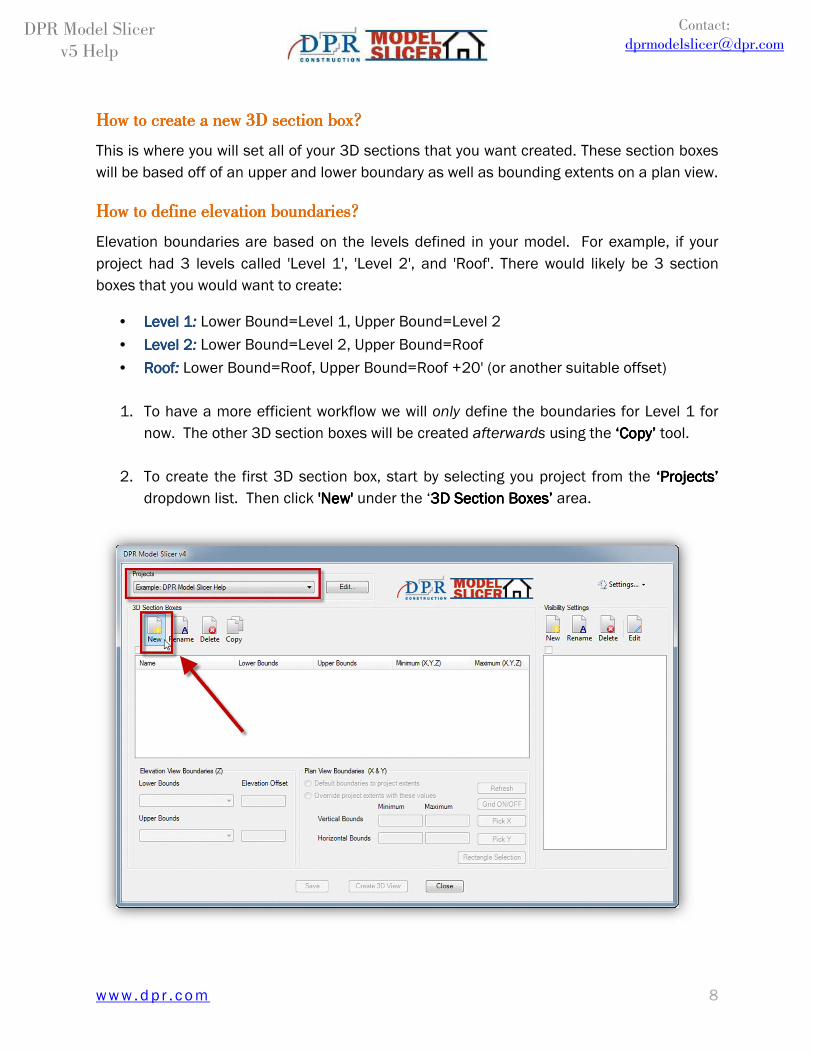
How to create a new 3D section bHow to create a new 3D section bHow to create a new 3D section bHow to create a new 3D section boxoxoxox????
This is where you will set all of your 3D sections that you want created. These section boxes
will be based off of an upper and lower boundary as well as bounding extents on a plan view.
How to define eHow to define eHow to define eHow to define elevation levation levation levation bbbboundariesoundariesoundariesoundaries????
Elevation boundaries are based on the levels defined in your model. For example, if your
project had 3 levels called 'Level 1', 'Level 2', and 'Roof'. There would likely be 3 section
boxes that you would want to create:
• Level 1Level 1Level 1Level 1:::: Lower Bound=Level 1, Upper Bound=Level 2
• Level 2Level 2Level 2Level 2:::: Lower Bound=Level 2, Upper Bound=Roof
• RoofRoofRoofRoof:::: Lower Bound=Roof, Upper Bound=Roof +20' (or another suitable offset)
1. To have a more efficient workflow we will only define the boundaries for Level 1 for
now. The other 3D section boxes will be created afterwards using the ‘Copy’‘Copy’‘Copy’‘Copy’ tool.
2. To create the first 3D section box, start by selecting you project from the ‘Projects’‘Projects’‘Projects’‘Projects’
dropdown list. Then click 'New''New''New''New' under the ‘3D Section Boxes3D Section Boxes3D Section Boxes3D Section Boxes’’’’ area.
w w w . d p r . c o m 9
DPR Model Slicer
v5 Help
Contact:
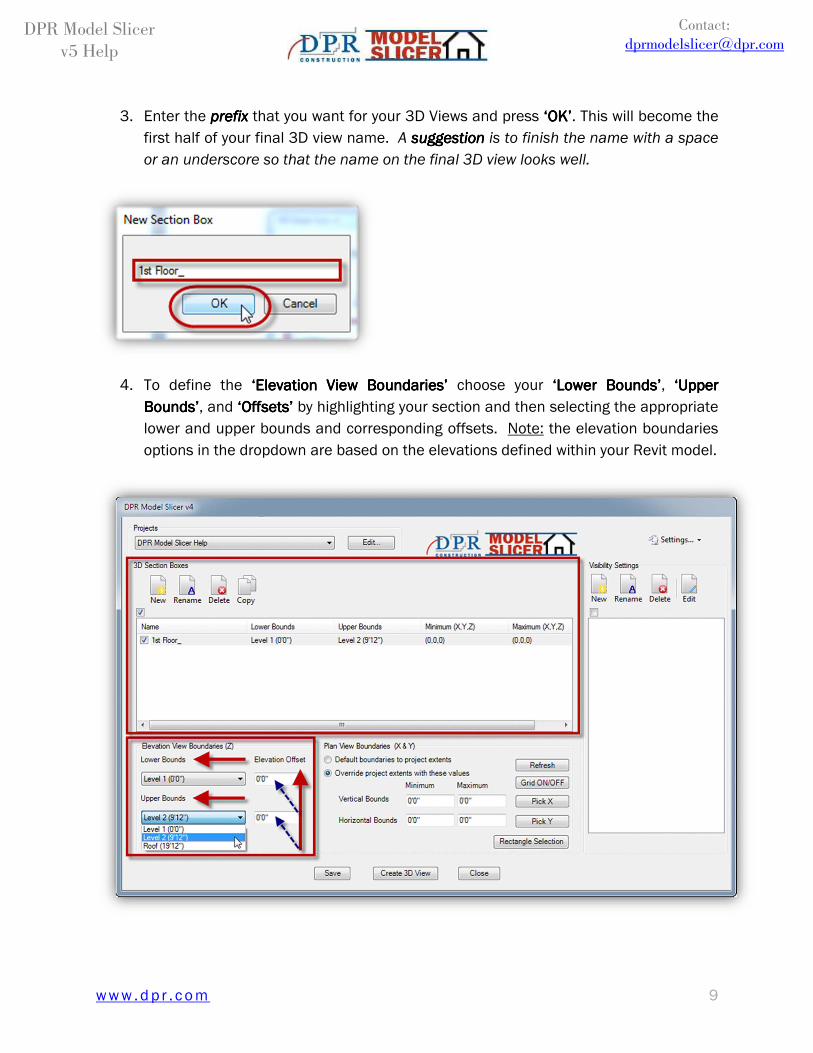
3. Enter the prefixprefixprefixprefix that you want for your 3D Views and press ‘‘‘‘OKOKOKOK’’’’. This will become the
first half of your final 3D view name. A suggestionsuggestionsuggestionsuggestion is to finish the name with a space
or an underscore so that the name on the final 3D view looks well.
4. To define the ‘Elevation View Boundaries’‘Elevation View Boundaries’‘Elevation View Boundaries’‘Elevation View Boundaries’ choose your ‘Lower Bounds’‘Lower Bounds’‘Lower Bounds’‘Lower Bounds’, ‘Upper ‘Upper ‘Upper ‘Upper
Bounds’Bounds’Bounds’Bounds’, and ‘Offsets’‘Offsets’‘Offsets’‘Offsets’ by highlighting your section and then selecting the appropriate
lower and upper bounds and corresponding offsets. Note: the elevation boundaries
options in the dropdown are based on the elevations defined within your Revit model.
w w w . d p r . c o m 10
DPR Model Slicer
v5 Help
Contact:
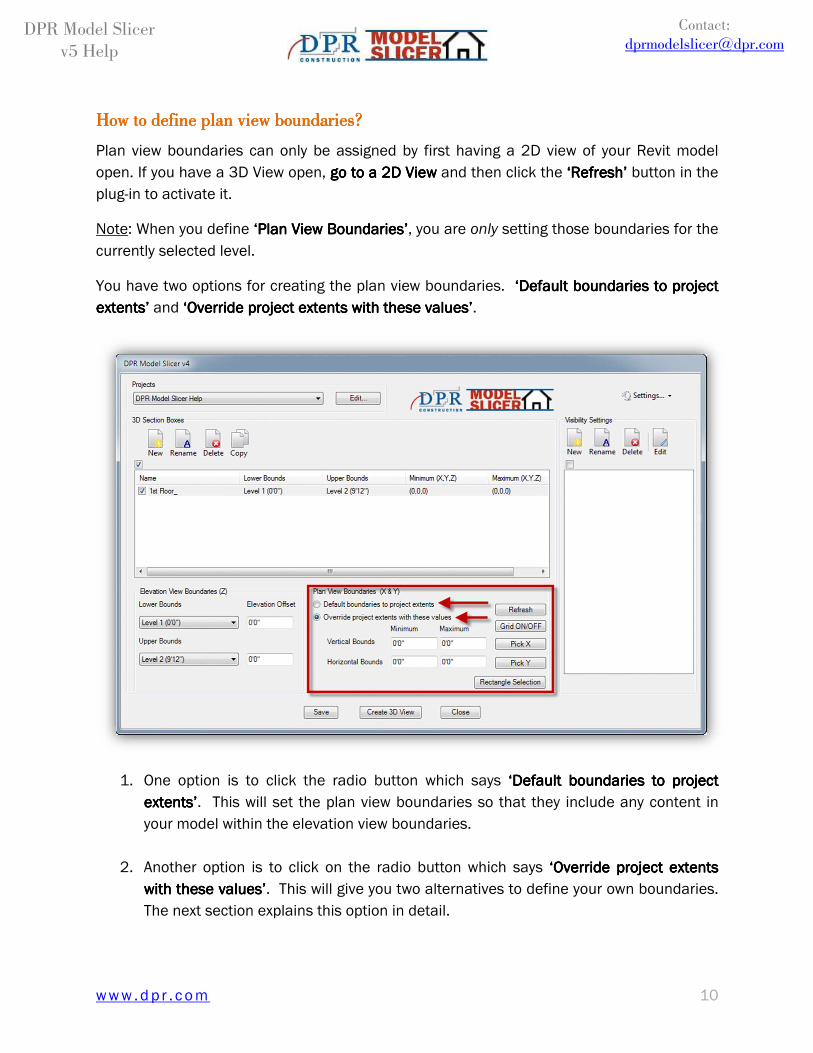
How to define plan vHow to define plan vHow to define plan vHow to define plan view iew iew iew bbbboundariesoundariesoundariesoundaries????
Plan view boundaries can only be assigned by first having a 2D view of your Revit model
open. If you have a 3D View open, gogogogo to a 2D Viewto a 2D Viewto a 2D Viewto a 2D View and then click the ‘‘‘‘RefreshRefreshRefreshRefresh’’’’ button in the
plug-in to activate it.
Note: When you define ‘Plan View ‘Plan View ‘Plan View ‘Plan View Boundaries’Boundaries’Boundaries’Boundaries’, you are only setting those boundaries for the
currently selected level.
You have two options for creating the plan view boundaries. ‘Default boundaries to project ‘Default boundaries to project ‘Default boundaries to project ‘Default boundaries to project
extents’extents’extents’extents’ and ‘Override project extents with these values’‘Override project extents with these values’‘Override project extents with these values’‘Override project extents with these values’.
1. One option is to click the radio button which says ‘Default boundaries to project ‘Default boundaries to project ‘Default boundaries to project ‘Default boundaries to project
extents’extents’extents’extents’. This will set the plan view boundaries so that they include any content in
your model within the elevation view boundaries.
2. Another option is to click on the radio button which says ‘‘‘‘Override prOverride prOverride prOverride project extents oject extents oject extents oject extents
with these values’with these values’with these values’with these values’. This will give you two alternatives to define your own boundaries.
The next section explains this option in detail.
w w w . d p r . c o m 11
DPR Model Slicer
v5 Help
Contact:
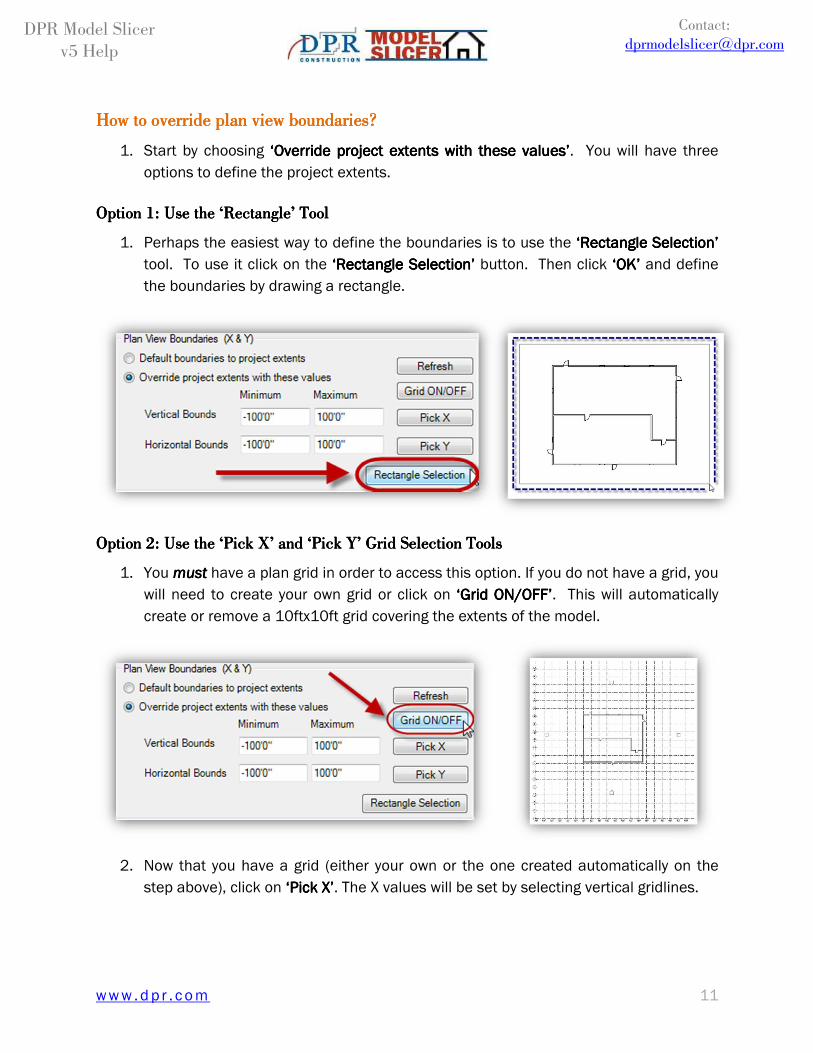
How to override plan view How to override plan view How to override plan view How to override plan view boundariesboundariesboundariesboundaries????
1. Start by choosing ‘Override project extents ‘Override project extents ‘Override project extents ‘Override project extents with these values’with these values’with these values’with these values’. You will have three
options to define the project extents.
Option 1: Use the ‘Rectangle’ ToolOption 1: Use the ‘Rectangle’ ToolOption 1: Use the ‘Rectangle’ ToolOption 1: Use the ‘Rectangle’ Tool
1. Perhaps the easiest way to define the boundaries is to use the ‘Rectangle Selection’‘Rectangle Selection’‘Rectangle Selection’‘Rectangle Selection’
tool. To use it click on the ‘Rectangle Selection’‘Rectangle Selection’‘Rectangle Selection’‘Rectangle Selection’ button. Then click ‘OK’‘OK’‘OK’‘OK’ and define
the boundaries by drawing a rectangle.
Option 2: Use the ‘Pick X’ and ‘Pick Y’ Grid Selection ToolsOption 2: Use the ‘Pick X’ and ‘Pick Y’ Grid Selection ToolsOption 2: Use the ‘Pick X’ and ‘Pick Y’ Grid Selection ToolsOption 2: Use the ‘Pick X’ and ‘Pick Y’ Grid Selection Tools
1. You mustmustmustmust have a plan grid in order to access this option. If you do not have a grid, you
will need to create your own grid or click on ‘Grid ON/OFF’‘Grid ON/OFF’‘Grid ON/OFF’‘Grid ON/OFF’. This will automatically
create or remove a 10ftx10ft grid covering the extents of the model.
2. Now that you have a grid (either your own or the one created automatically on the
step above), click on ‘‘‘‘Pick XPick XPick XPick X’’’’. The X values will be set by selecting vertical gridlines.
w w w . d p r . c o m 12
DPR Model Slicer
v5 Help
Contact:
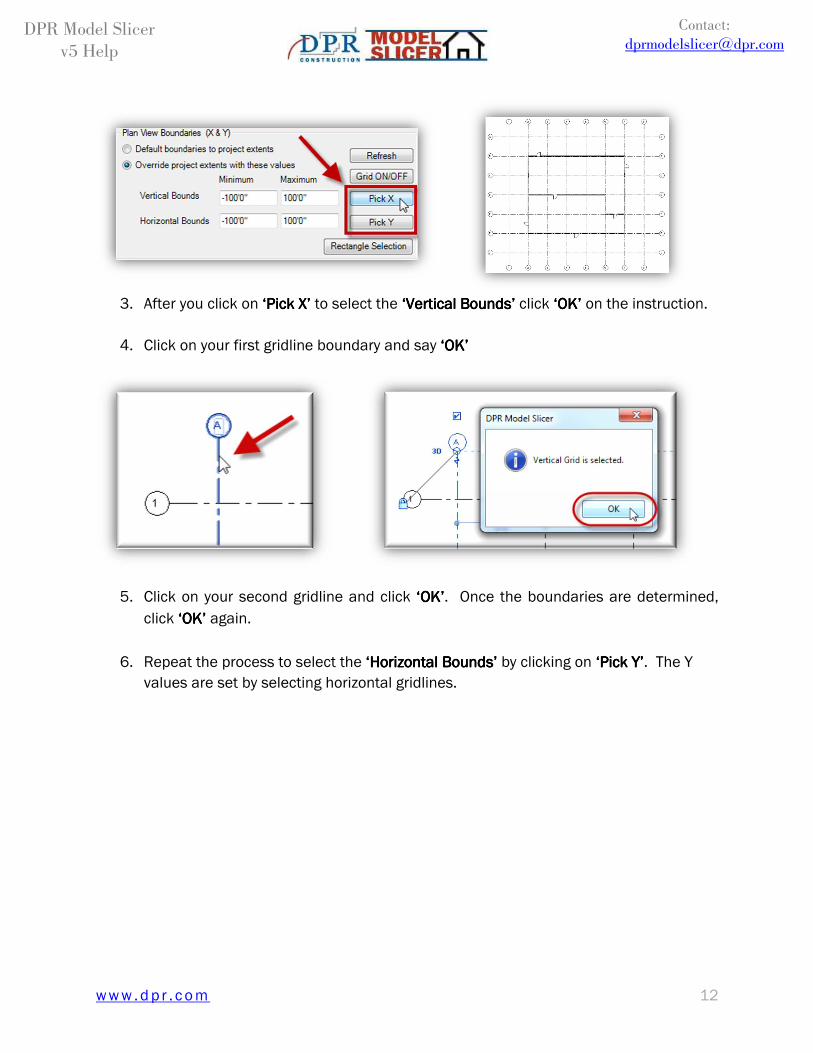
3. After you click on ‘Pick X’‘Pick X’‘Pick X’‘Pick X’ to select the ‘Vertical Bounds’‘Vertical Bounds’‘Vertical Bounds’‘Vertical Bounds’ click ‘OK’‘OK’‘OK’‘OK’ on the instruction.
4. Click on your first gridline boundary and say ‘OK’‘OK’‘OK’‘OK’
5. Click on your second gridline and click ‘OK’‘OK’‘OK’‘OK’. Once the boundaries are determined,
click ‘OK’‘OK’‘OK’‘OK’ again.
6. Repeat the process to select the ‘Horizontal Bounds’‘Horizontal Bounds’‘Horizontal Bounds’‘Horizontal Bounds’ by clicking on ‘Pick Y’‘Pick Y’‘Pick Y’‘Pick Y’. The Y
values are set by selecting horizontal gridlines.
w w w . d p r . c o m 13
DPR Model Slicer
v5 Help
Contact:
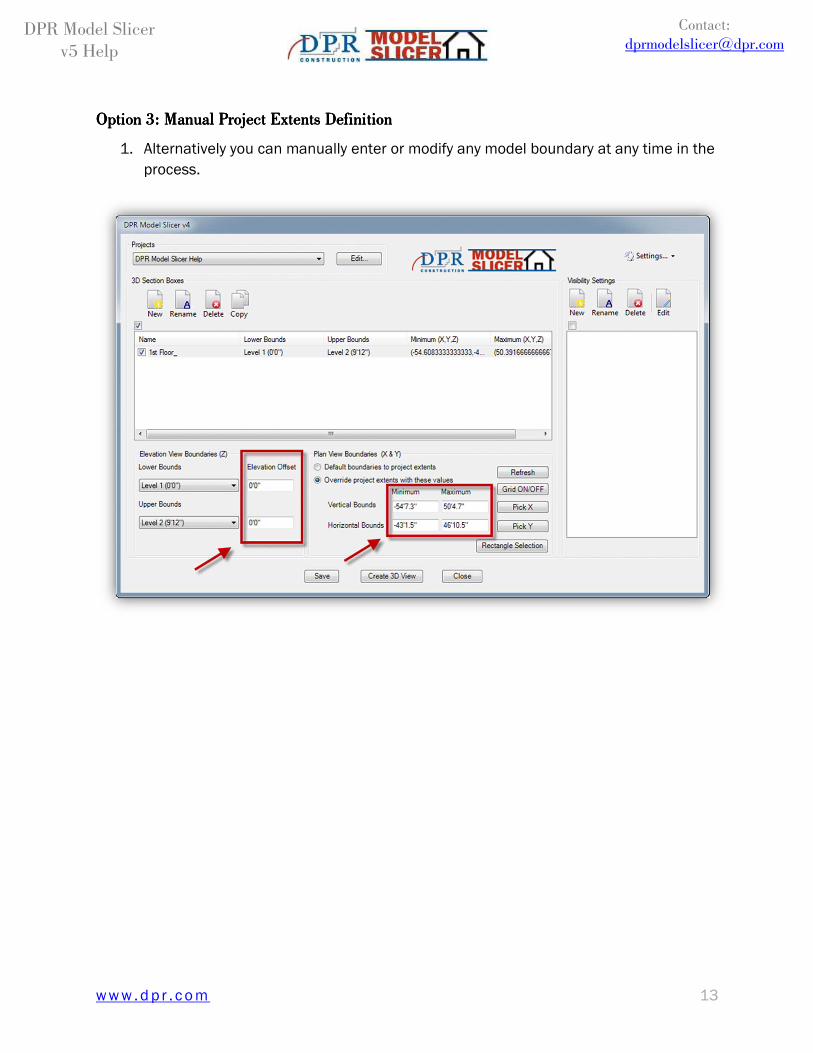
Option 3: ManualOption 3: ManualOption 3: ManualOption 3: Manual Project Extents DefinitionProject Extents DefinitionProject Extents DefinitionProject Extents Definition
1. Alternatively you can manually enter or modify any model boundary at any time in the
process.
w w w . d p r . c o m 14
DPR Model Slicer
v5 Help
Contact:
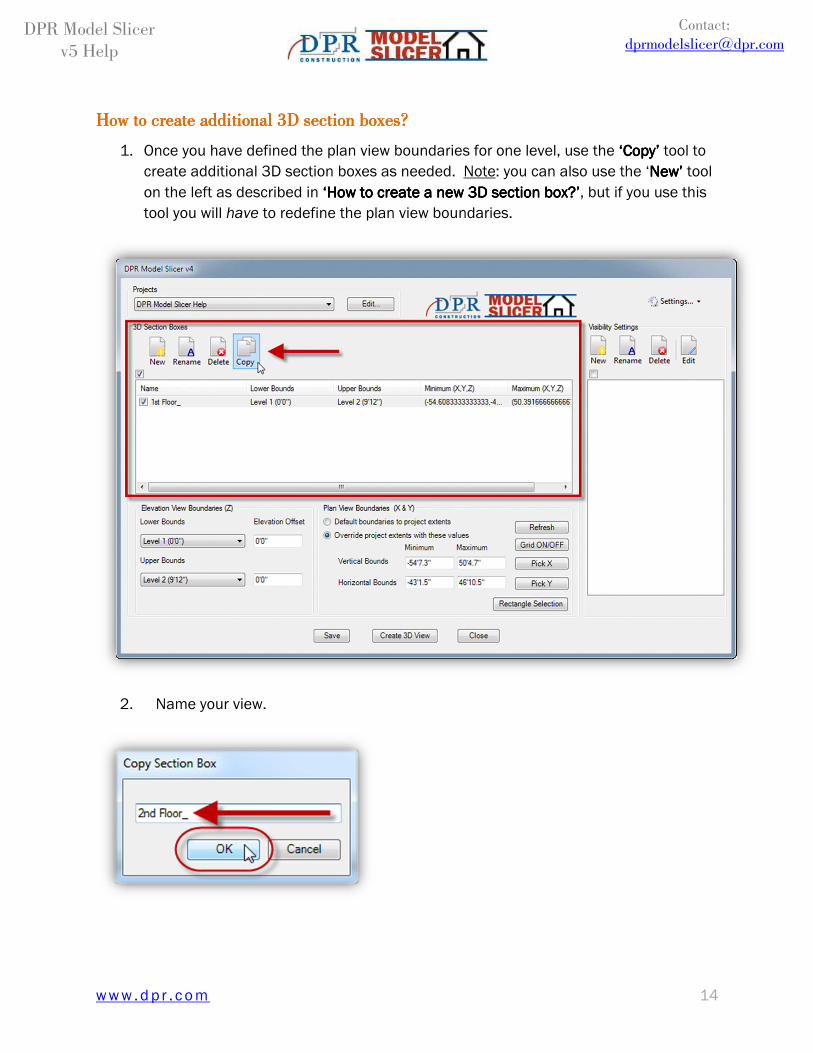
How to create additional 3D section bHow to create additional 3D section bHow to create additional 3D section bHow to create additional 3D section boxoxoxoxes?es?es?es?
1. Once you have defined the plan view boundaries for one level, use the ‘Copy’‘Copy’‘Copy’‘Copy’ tool to
create additional 3D section boxes as needed. Note: you can also use the ‘New’New’New’New’ tool
on the left as described in ‘How to create a new 3D section box?’‘How to create a new 3D section box?’‘How to create a new 3D section box?’‘How to create a new 3D section box?’, but if you use this
tool you will have to redefine the plan view boundaries.
2. Name your view.
w w w . d p r . c o m 15
DPR Model Slicer
v5 Help
Contact:
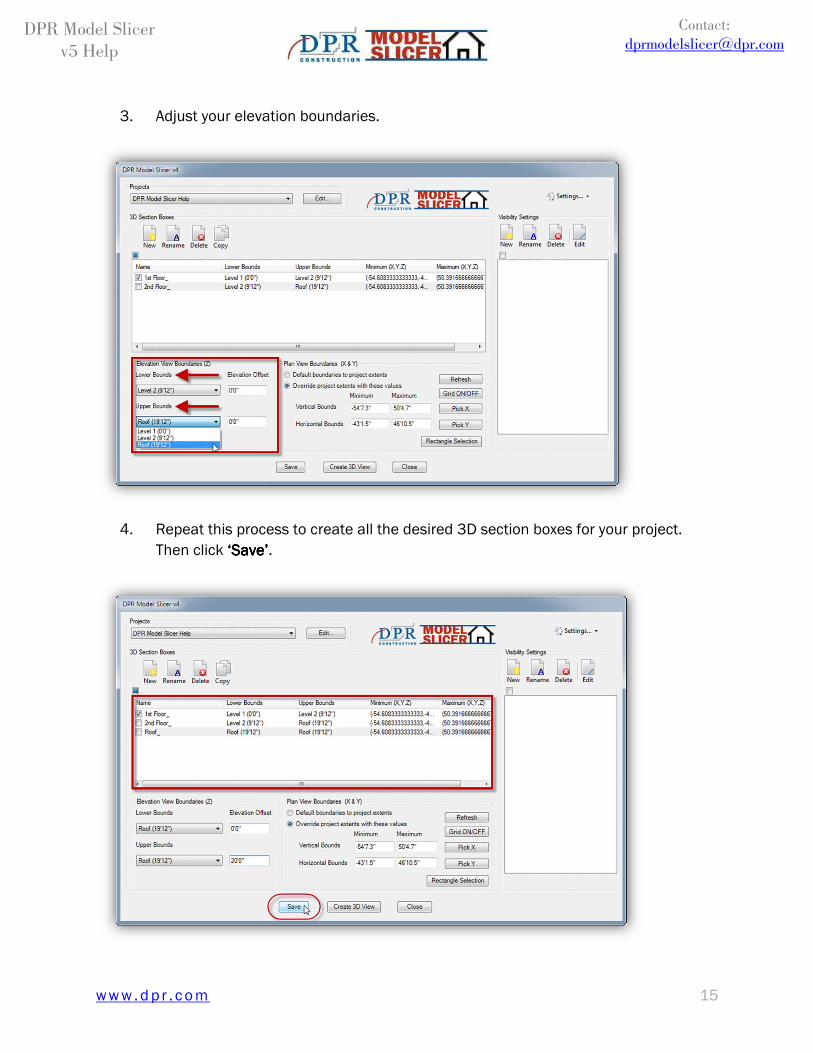
3. Adjust your elevation boundaries.
4. Repeat this process to create all the desired 3D section boxes for your project.
Then click ‘Save’‘Save’‘Save’‘Save’.
w w w . d p r . c o m 16
DPR Model Slicer
v5 Help
Contact:
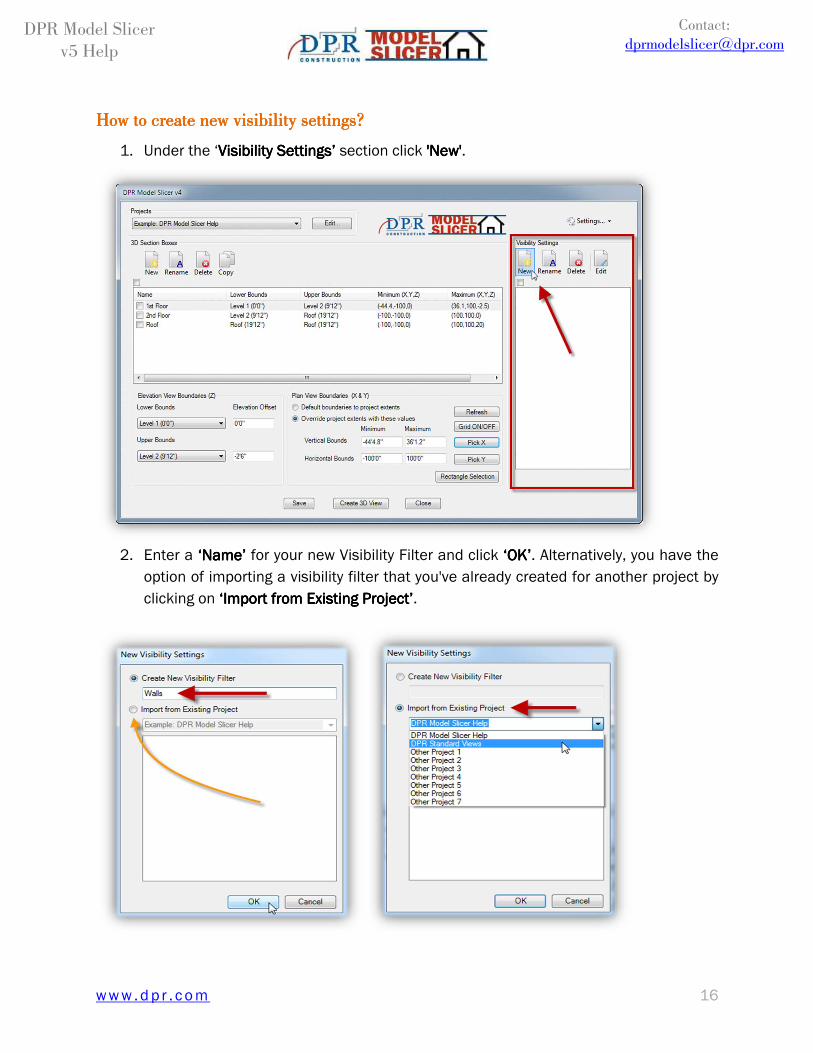
How to cHow to cHow to cHow to create new reate new reate new reate new vvvvisibility isibility isibility isibility ssssettingettingettingettings?s?s?s?
1. Under the ‘Visibility SettingsVisibility SettingsVisibility SettingsVisibility Settings’’’’ section click 'New''New''New''New'.
2. Enter a ‘N‘N‘N‘Nameameameame’’’’ for your new Visibility Filter and click ‘OK’‘OK’‘OK’‘OK’. Alternatively, you have the
option of importing a visibility filter that you've already created for another project by
clicking on ‘Import from Existing Project’‘Import from Existing Project’‘Import from Existing Project’‘Import from Existing Project’.
w w w . d p r . c o m 17
DPR Model Slicer
v5 Help
Contact:
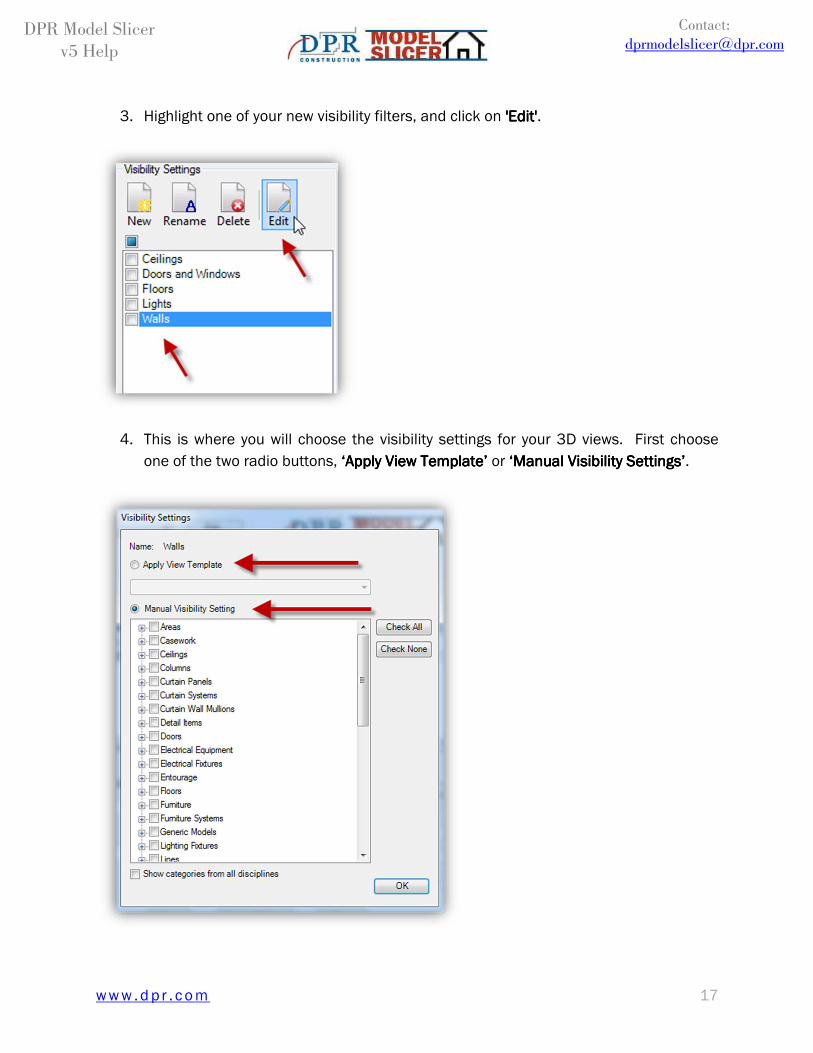
3. Highlight one of your new visibility filters, and click on 'Edit''Edit''Edit''Edit'.
4. This is where you will choose the visibility settings for your 3D views. First choose
one of the two radio buttons, ‘Apply View Template’‘Apply View Template’‘Apply View Template’‘Apply View Template’ or ‘Manual Visibility Settings’‘Manual Visibility Settings’‘Manual Visibility Settings’‘Manual Visibility Settings’.
w w w . d p r . c o m 18
DPR Model Slicer
v5 Help
Contact:
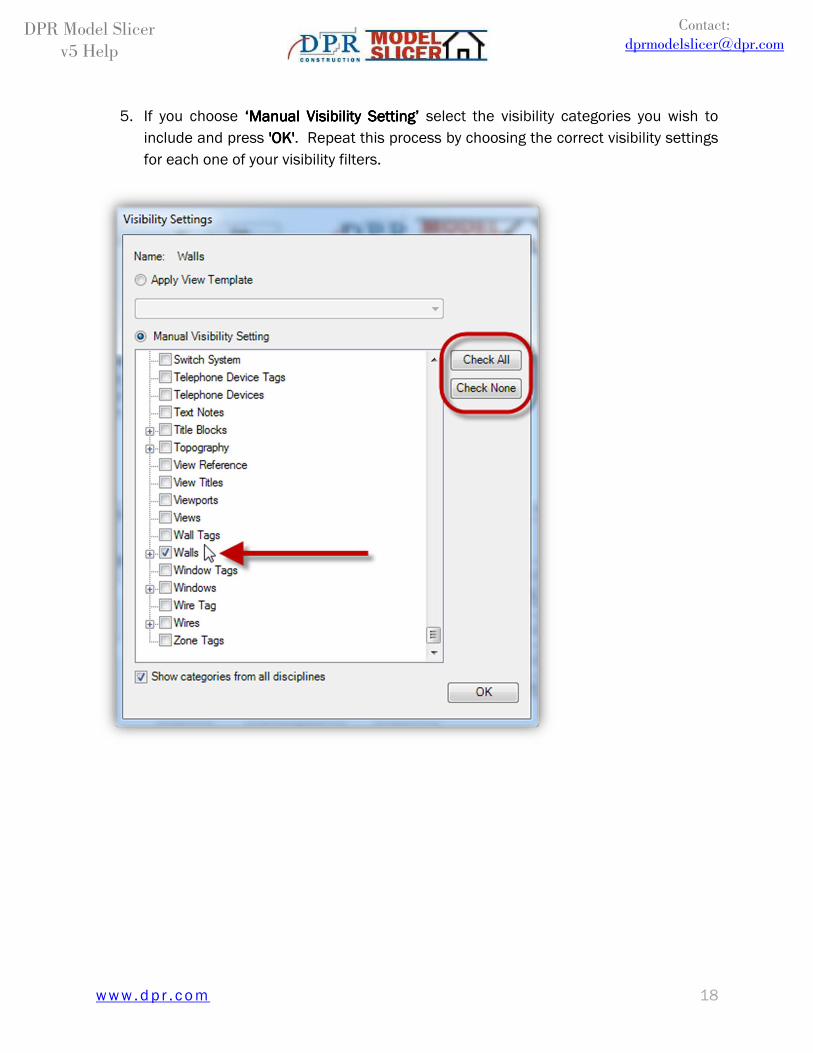
5. If you choose ‘Manual Visibility Setting’‘Manual Visibility Setting’‘Manual Visibility Setting’‘Manual Visibility Setting’ select the visibility categories you wish to
include and press 'OK''OK''OK''OK'. Repeat this process by choosing the correct visibility settings
for each one of your visibility filters.
w w w . d p r . c o m 19
DPR Model Slicer
v5 Help
Contact:
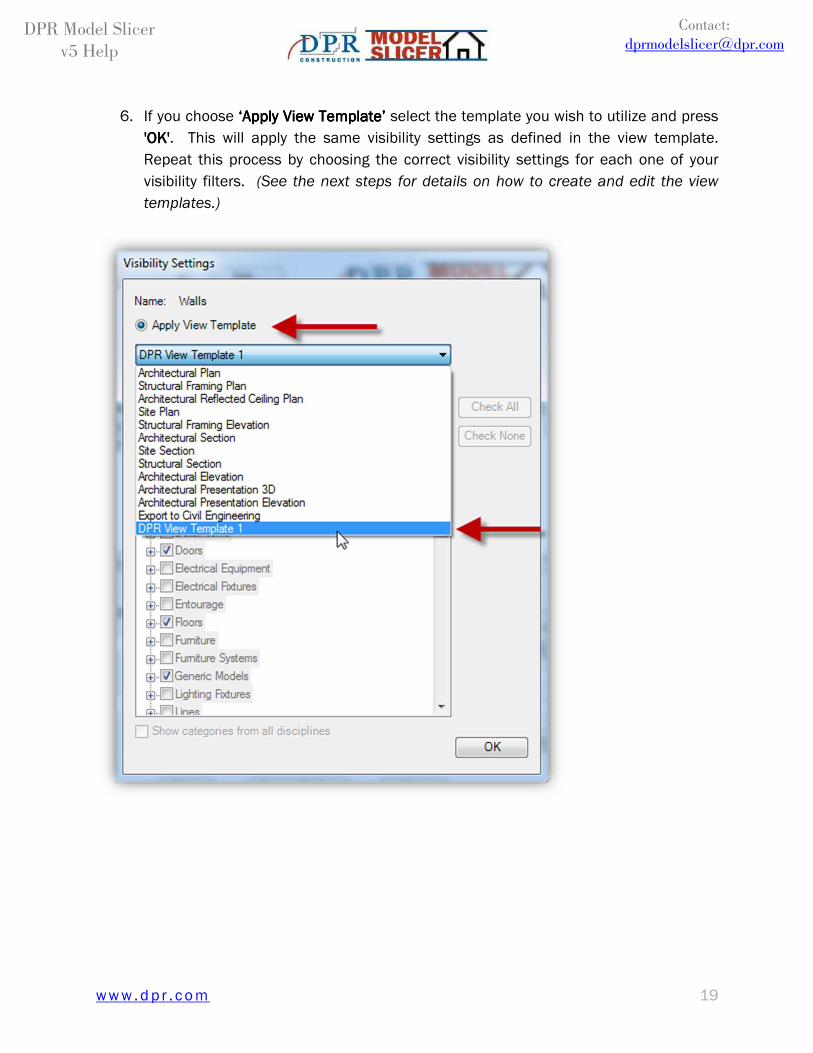
6. If you choose ‘‘‘‘Apply View TemplateApply View TemplateApply View TemplateApply View Template’’’’ select the template you wish to utilize and press
'OK''OK''OK''OK'. This will apply the same visibility settings as defined in the view template.
Repeat this process by choosing the correct visibility settings for each one of your
visibility filters. (See the next steps for details on how to create and edit the view
templates.)
w w w . d p r . c o m 20
DPR Model Slicer
v5 Help
Contact:
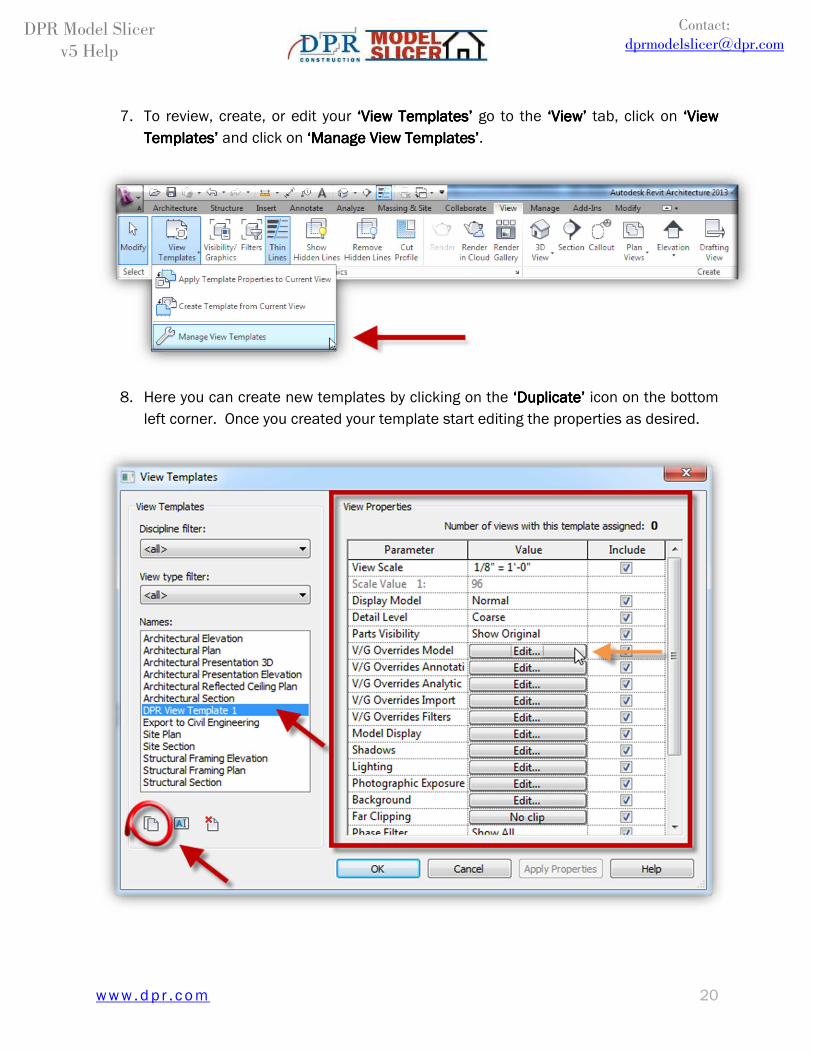
7. To review, create, or edit your ‘View Templates’‘View Templates’‘View Templates’‘View Templates’ go to the ‘View’‘View’‘View’‘View’ tab, click on ‘View ‘View ‘View ‘View
TemplatesTemplatesTemplatesTemplates’’’’ and click on ‘Manage View Templates’‘Manage View Templates’‘Manage View Templates’‘Manage View Templates’.
8. Here you can create new templates by clicking on the ‘Duplicate’‘Duplicate’‘Duplicate’‘Duplicate’ icon on the bottom
left corner. Once you created your template start editing the properties as desired.
w w w . d p r . c o m 21
DPR Model Slicer
v5 Help
Contact:
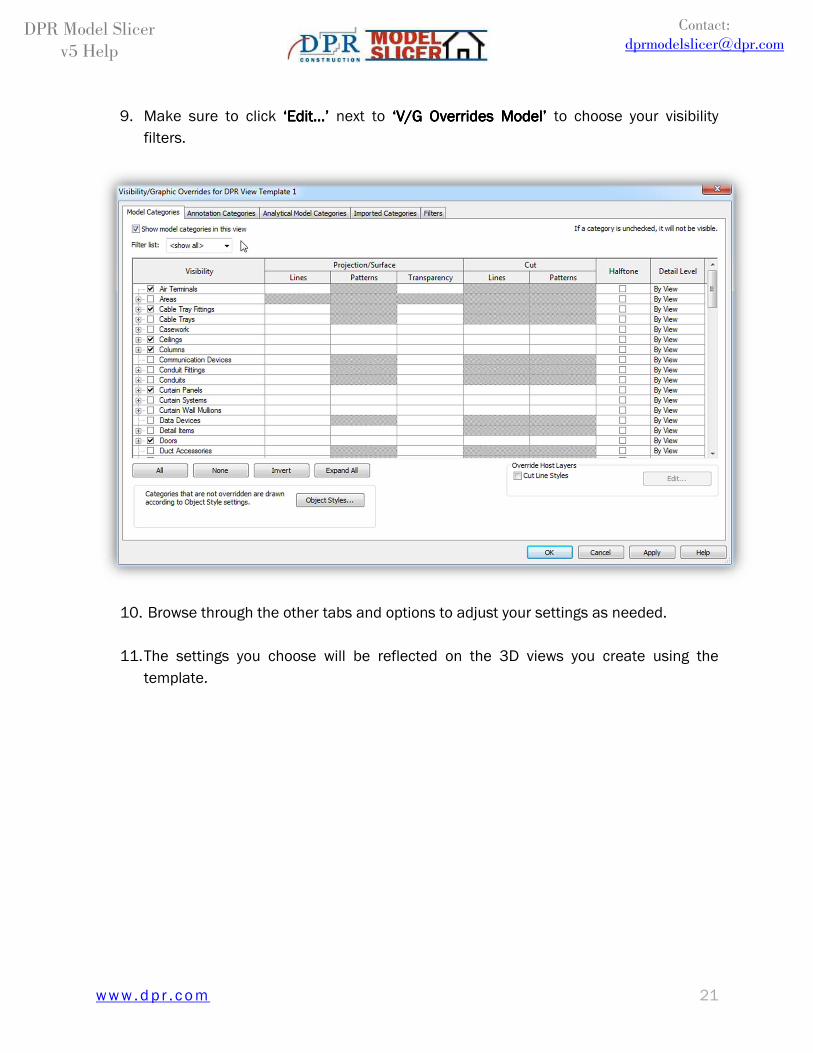
9. Make sure to click ‘Edit…’‘Edit…’‘Edit…’‘Edit…’ next to ‘V/G Overrides Model’‘V/G Overrides Model’‘V/G Overrides Model’‘V/G Overrides Model’ to choose your visibility
filters.
10. Browse through the other tabs and options to adjust your settings as needed.
11. The settings you choose will be reflected on the 3D views you create using the
template.
w w w . d p r . c o m 22
DPR Model Slicer
v5 Help
Contact:
How to create How to create How to create How to create 3D Views3D Views3D Views3D Views????
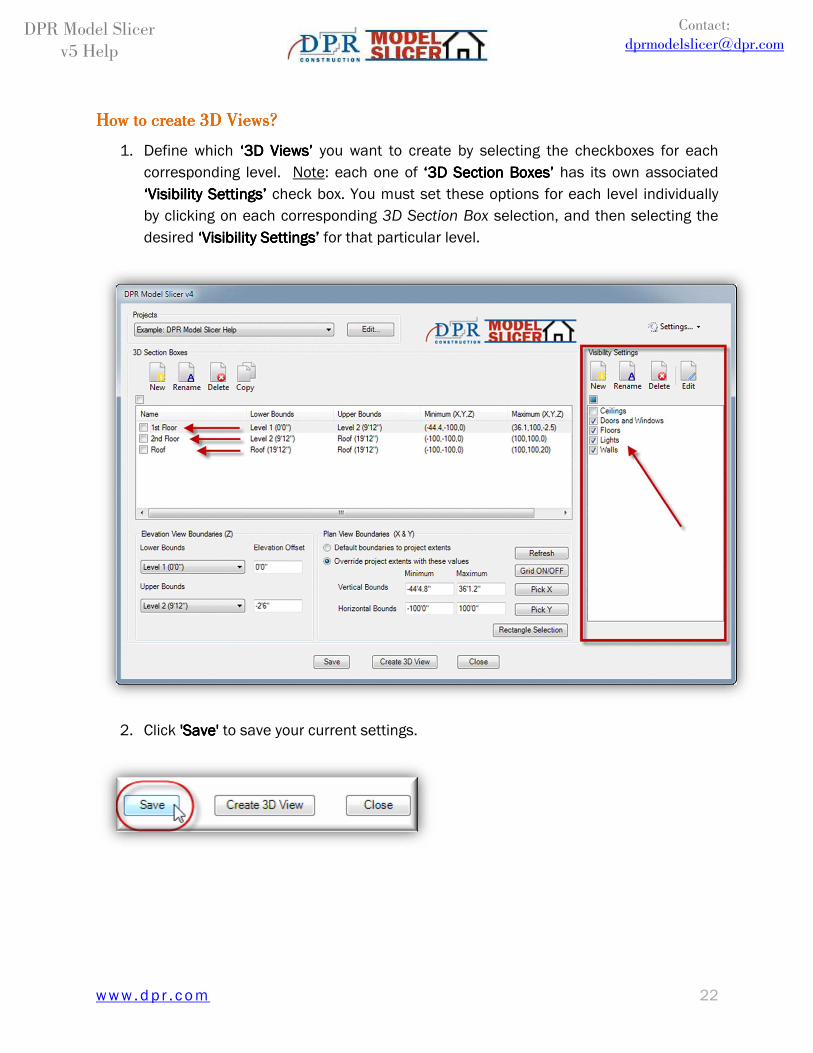
1. Define which ‘‘‘‘3D Views3D Views3D Views3D Views’’’’ you want to create by selecting the checkboxes for each
corresponding level. Note: each one of ‘3D Section Box‘3D Section Box‘3D Section Box‘3D Section Boxeseseses’’’’ has its own associated
‘Visibility‘Visibility‘Visibility‘Visibility Settings’Settings’Settings’Settings’ check box. You must set these options for each level individually
by clicking on each corresponding 3D Section Box selection, and then selecting the
desired ‘Visibility Settings’‘Visibility Settings’‘Visibility Settings’‘Visibility Settings’ for that particular level.
2. Click 'Save''Save''Save''Save' to save your current settings.
w w w . d p r . c o m 23
DPR Model Slicer
v5 Help
Contact:
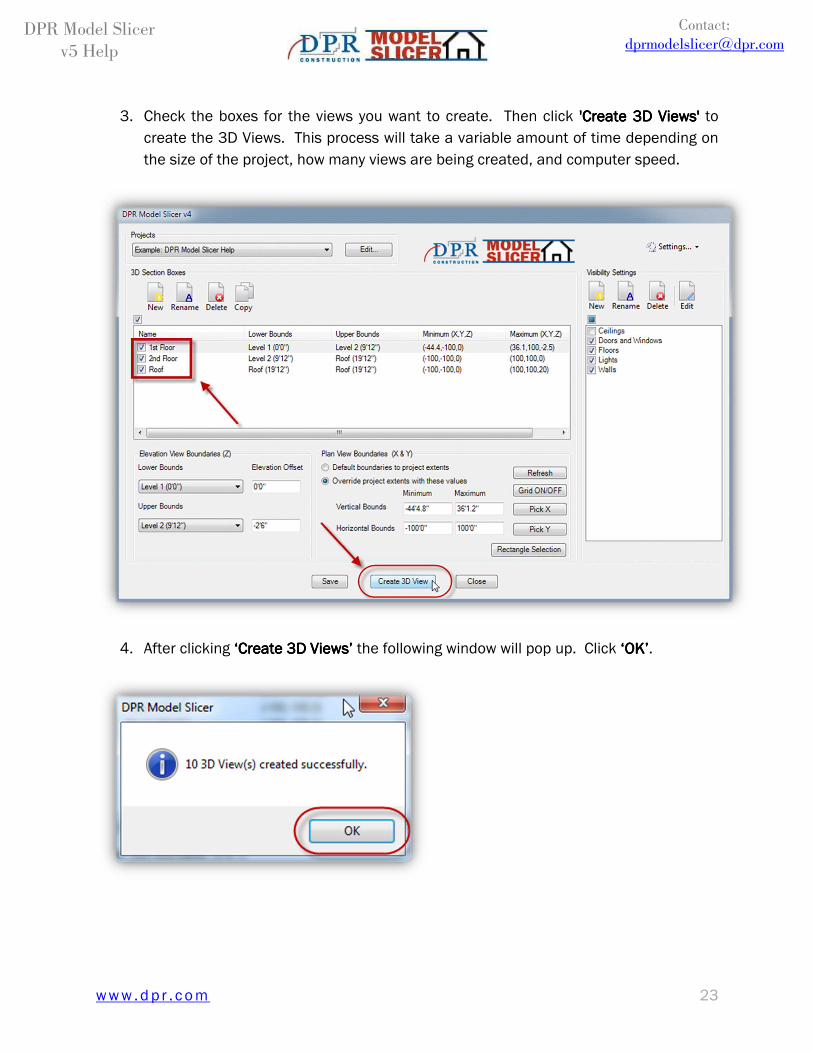
3. Check the boxes for the views you want to create. Then click 'Create'Create'Create'Create 3D3D3D3D Views'Views'Views'Views' to
create the 3D Views. This process will take a variable amount of time depending on
the size of the project, how many views are being created, and computer speed.
4. After clicking ‘Create‘Create‘Create‘Create 3D3D3D3D Views’Views’Views’Views’ the following window will pop up. Click ‘OK’‘OK’‘OK’‘OK’.
w w w . d p r . c o m 24
DPR Model Slicer
v5 Help
Contact:
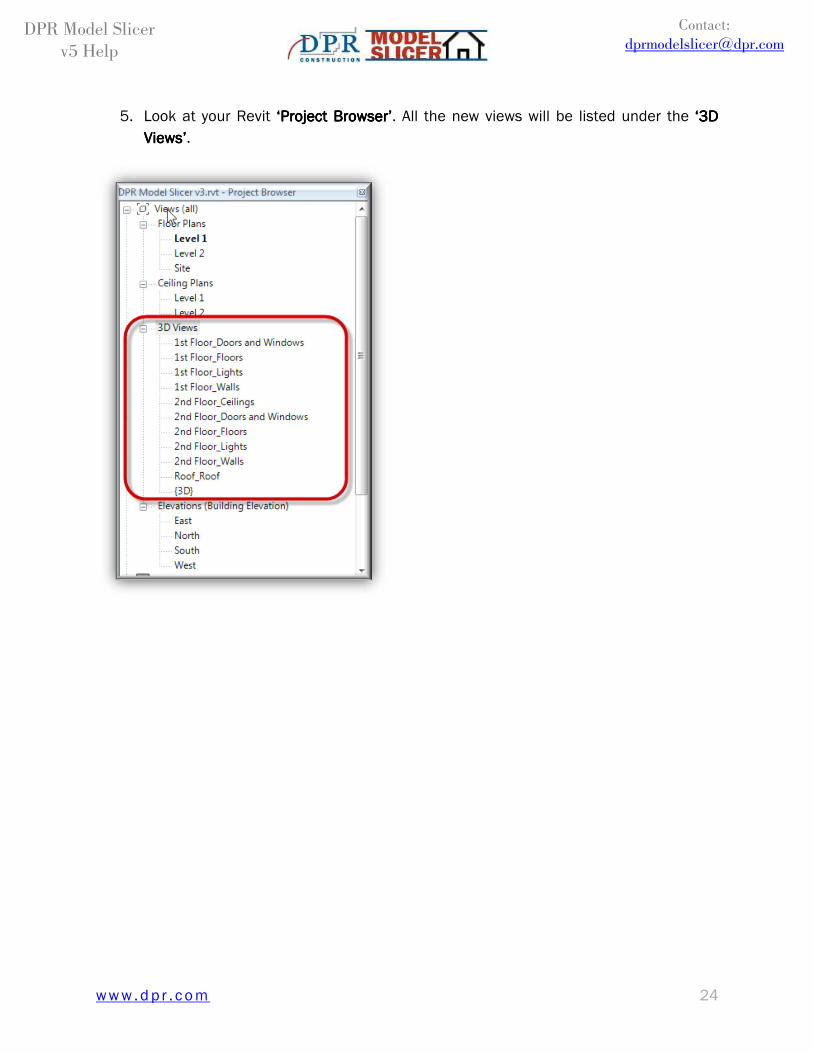
5. Look at your Revit ‘‘‘‘Project BrowserProject BrowserProject BrowserProject Browser’’’’. All the new views will be listed under the ‘3D ‘3D ‘3D ‘3D
Views’Views’Views’Views’.
w w w . d p r . c o m 25
DPR Model Slicer
v5 Help
Contact:
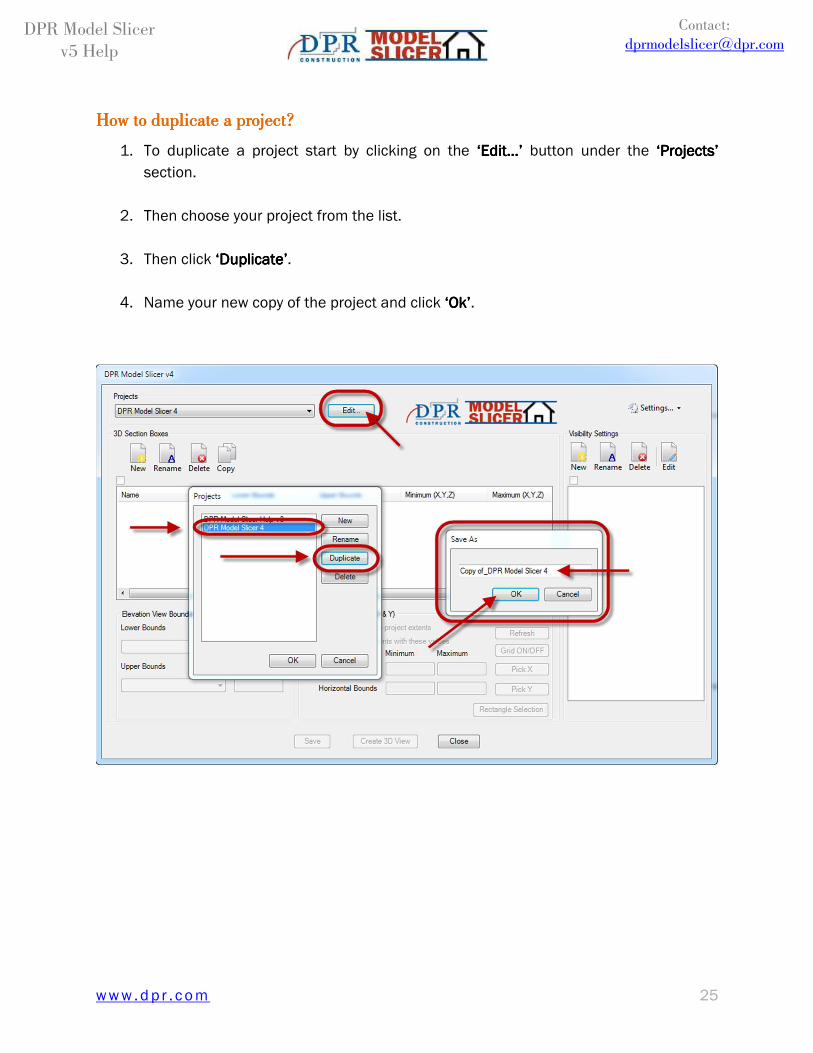
How to duplicate a project?How to duplicate a project?How to duplicate a project?How to duplicate a project?
1. To duplicate a project start by clicking on the ‘Edit…’‘Edit…’‘Edit…’‘Edit…’ button under the ‘Projects’‘Projects’‘Projects’‘Projects’
section.
2. Then choose your project from the list.
3. Then click ‘Duplicate’‘Duplicate’‘Duplicate’‘Duplicate’.
4. Name your new copy of the project and click ‘Ok’‘Ok’‘Ok’‘Ok’.
w w w . d p r . c o m 26
DPR Model Slicer
v5 Help
Contact:
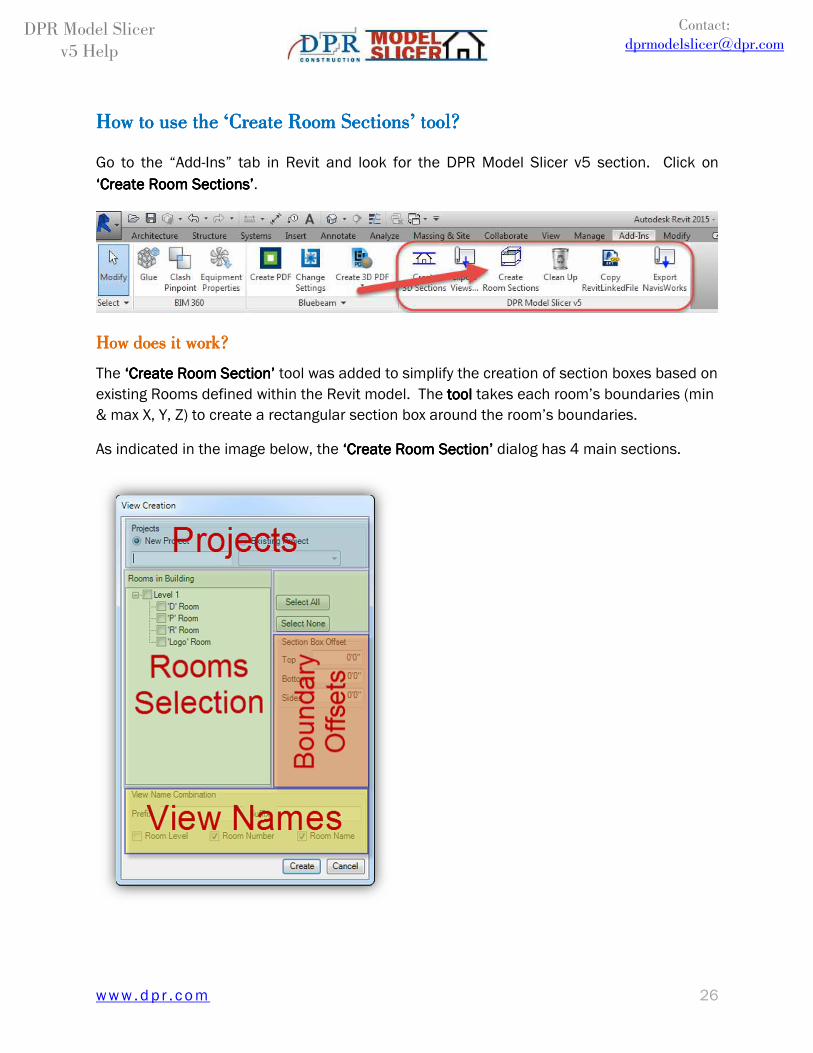
How to use the ‘Create Room Sections’ How to use the ‘Create Room Sections’ How to use the ‘Create Room Sections’ How to use the ‘Create Room Sections’ tool?tool?tool?tool?
Go to the “Add-Ins” tab in Revit and look for the DPR Model Slicer v5 section. Click on
‘‘‘‘Create Room SectionsCreate Room SectionsCreate Room SectionsCreate Room Sections’’’’.
How does it work?How does it work?How does it work?How does it work?
The ‘Create Room Section’‘Create Room Section’‘Create Room Section’‘Create Room Section’ tool was added to simplify the creation of section boxes based on
existing Rooms defined within the Revit model. The tooltooltooltool takes each room’s boundaries (min
& max X, Y, Z) to create a rectangular section box around the room’s boundaries.
As indicated in the image below, the ‘Create Room Section’‘Create Room Section’‘Create Room Section’‘Create Room Section’ dialog has 4 main sections.
w w w . d p r . c o m 27
DPR Model Slicer
v5 Help
Contact:
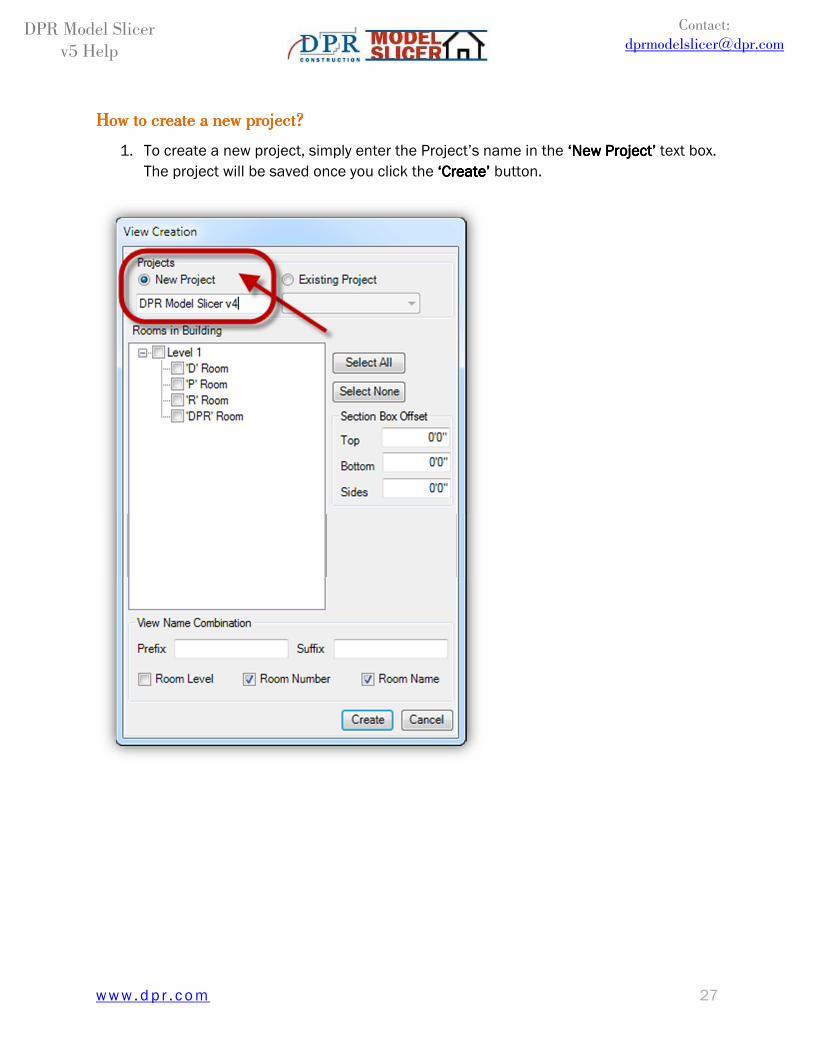
How to How to How to How to create a new project?create a new project?create a new project?create a new project?
1. To create a new project, simply enter the Project’s name in the ‘New Project’‘New Project’‘New Project’‘New Project’ text box.
The project will be saved once you click the ‘Create’‘Create’‘Create’‘Create’ button.
w w w . d p r . c o m 28
DPR Model Slicer
v5 Help
Contact:
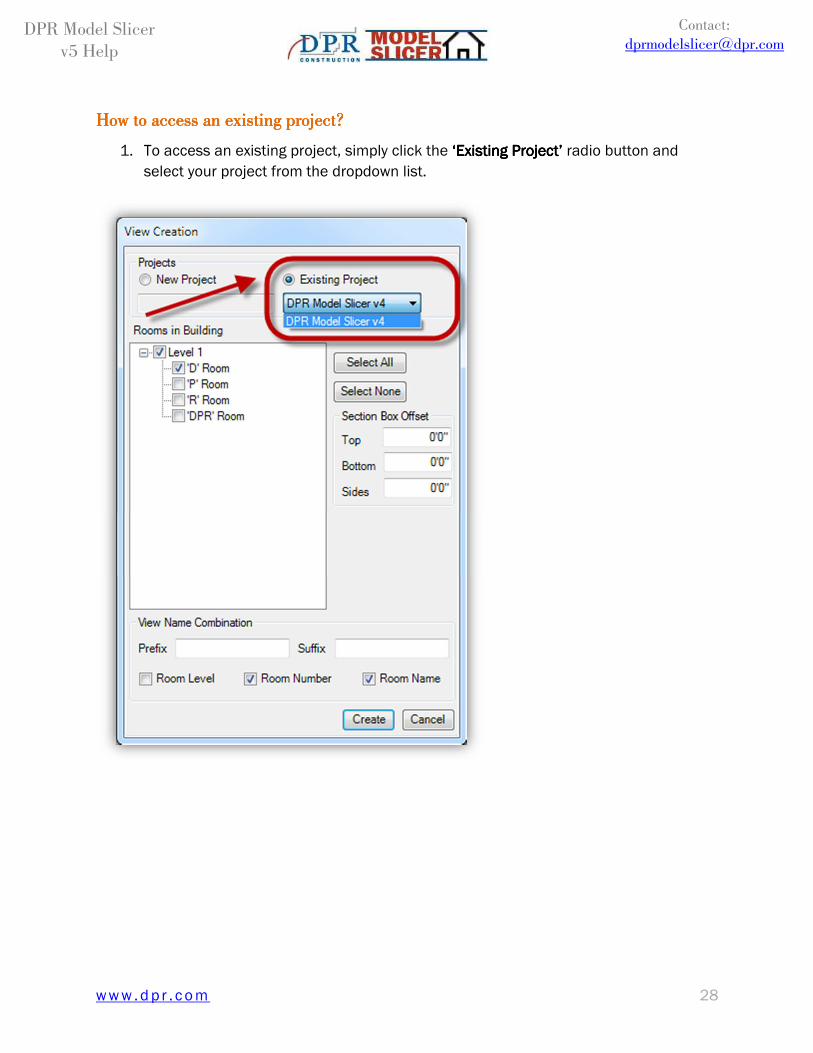
How to access an existing project?How to access an existing project?How to access an existing project?How to access an existing project?
1. To access an existing project, simply click the ‘‘‘‘ExistingExistingExistingExisting Project’Project’Project’Project’ radio button and
select your project from the dropdown list.
w w w . d p r . c o m 29
DPR Model Slicer
v5 Help
Contact:
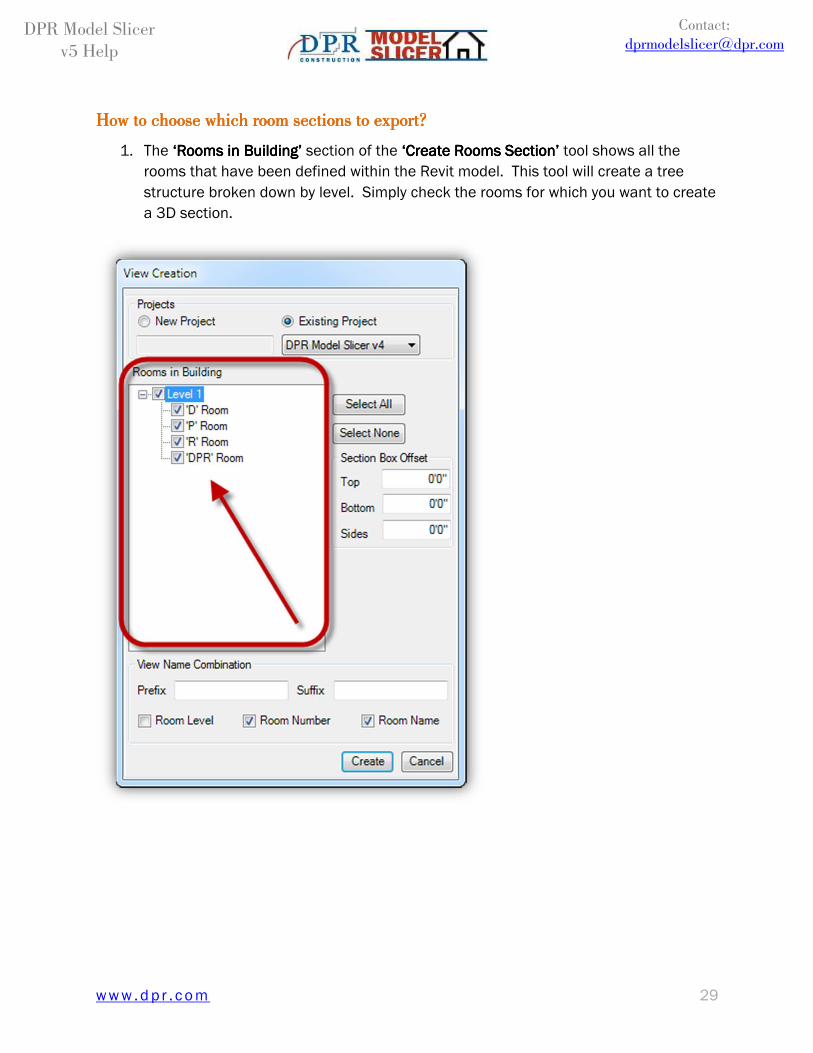
How How How How to to to to choose which room sections to export?choose which room sections to export?choose which room sections to export?choose which room sections to export?
1. The ‘Rooms in Building’‘Rooms in Building’‘Rooms in Building’‘Rooms in Building’ section of the ‘‘‘‘Create Rooms SectionCreate Rooms SectionCreate Rooms SectionCreate Rooms Section’’’’ tool shows all the
rooms that have been defined within the Revit model. This tool will create a tree
structure broken down by level. Simply check the rooms for which you want to create
a 3D section.

w w w . d p r . c o m 30
DPR Model Slicer
v5 Help
Contact:
How to define the names for each of the views creHow to define the names for each of the views creHow to define the names for each of the views creHow to define the names for each of the views created?ated?ated?ated?
1. The ‘‘‘‘View Name CombinationView Name CombinationView Name CombinationView Name Combination’’’’ section of the ‘‘‘‘Create Rooms SectionCreate Rooms SectionCreate Rooms SectionCreate Rooms Section’’’’ tool has text
boxes to allow you to add a ‘Prefix’ ‘Prefix’ ‘Prefix’ ‘Prefix’ and/or a ‘Sufix’‘Sufix’‘Sufix’‘Sufix’ to each room section view
created. In addition, there are three checkboxes that allow you to add within the view
name the ‘Room Level’‘Room Level’‘Room Level’‘Room Level’, ‘Room Number’‘Room Number’‘Room Number’‘Room Number’, and/or ‘Room Name’‘Room Name’‘Room Name’‘Room Name’.
How to create the views?How to create the views?How to create the views?How to create the views?
1. Simply click ‘Create’‘Create’‘Create’‘Create’.
w w w . d p r . c o m 31
DPR Model Slicer
v5 Help
Contact:
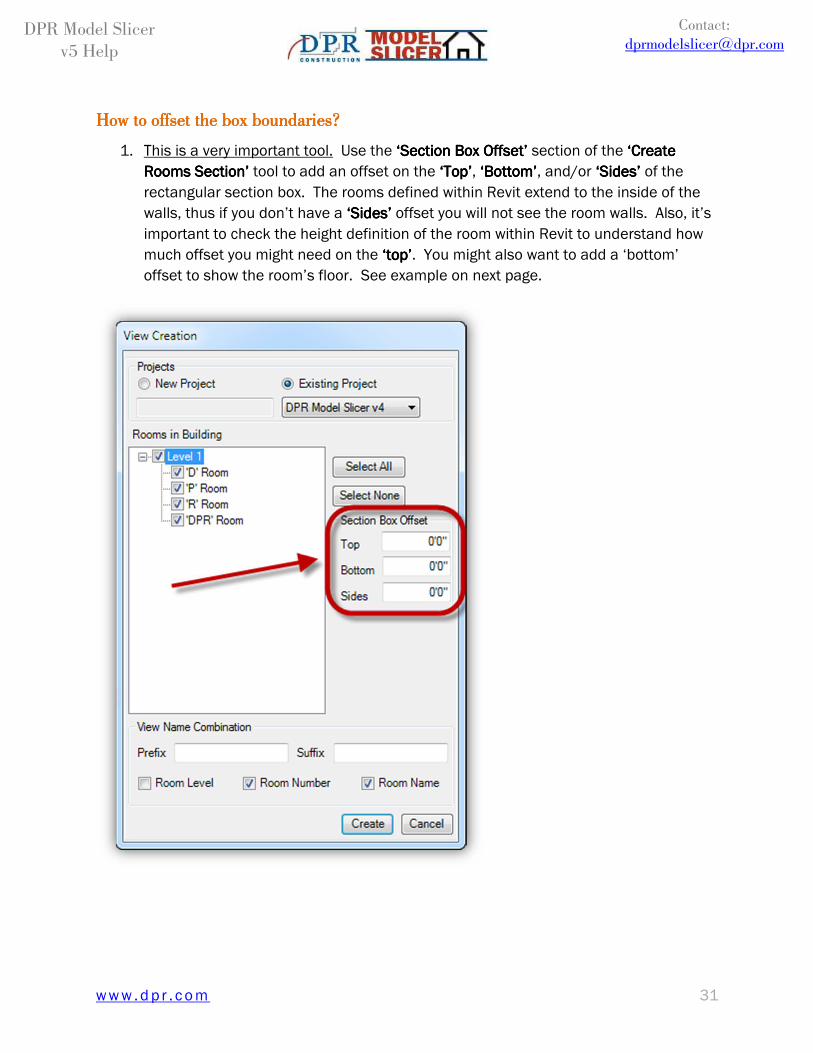
How to How to How to How to offset the box boundariesoffset the box boundariesoffset the box boundariesoffset the box boundaries????
1. This is a very important tool. Use the ‘Section Box Offset’‘Section Box Offset’‘Section Box Offset’‘Section Box Offset’ section of the ‘‘‘‘Create Create Create Create
Rooms SectionRooms SectionRooms SectionRooms Section’’’’ tool to add an offset on the ‘Top’‘Top’‘Top’‘Top’, ‘Bottom’‘Bottom’‘Bottom’‘Bottom’, and/or ‘Sides’‘Sides’‘Sides’‘Sides’ of the
rectangular section box. The rooms defined within Revit extend to the inside of the
walls, thus if you don’t have a ‘Sides’‘Sides’‘Sides’‘Sides’ offset you will not see the room walls. Also, it’s
important to check the height definition of the room within Revit to understand how
much offset you might need on the ‘top’‘top’‘top’‘top’. You might also want to add a ‘bottom’
offset to show the room’s floor. See example on next page.

w w w . d p r . c o m 32
DPR Model Slicer
v5 Help
Contact:
Figure Figure Figure Figure 1111: DPR 3D Logo Revit Model: DPR 3D Logo Revit Model: DPR 3D Logo Revit Model: DPR 3D Logo Revit Model
Figure Figure Figure Figure 2222: 'D Room' exported without boundaries: 'D Room' exported without boundaries: 'D Room' exported without boundaries: 'D Room' exported without boundaries
Figure Figure Figure Figure 3333: 'D Room' exported with 1ft offset on the sides and bottom.: 'D Room' exported with 1ft offset on the sides and bottom.: 'D Room' exported with 1ft offset on the sides and bottom.: 'D Room' exported with 1ft offset on the sides and bottom.
w w w . d p r . c o m 33
DPR Model Slicer
v5 Help
Contact:
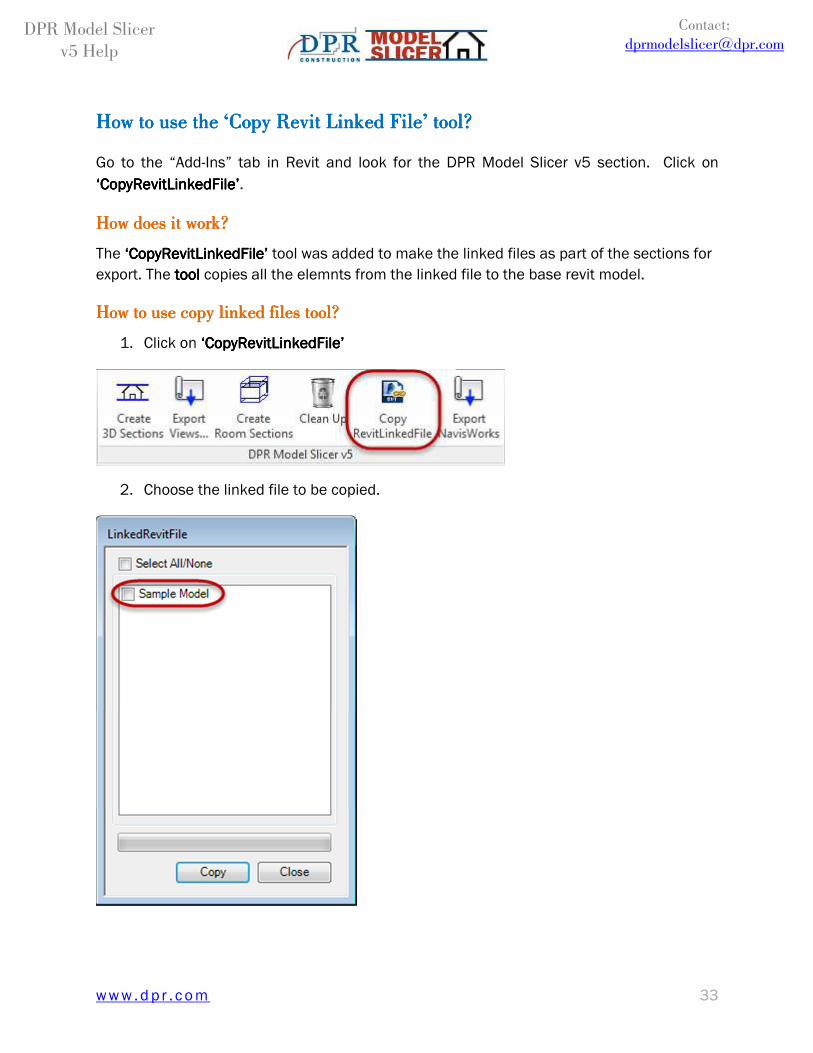
How to use the ‘Copy Revit Linked File’ tool?How to use the ‘Copy Revit Linked File’ tool?How to use the ‘Copy Revit Linked File’ tool?How to use the ‘Copy Revit Linked File’ tool?
Go to the “Add-Ins” tab in Revit and look for the DPR Model Slicer v5 section. Click on
‘‘‘‘CopyRevitLinkedFileCopyRevitLinkedFileCopyRevitLinkedFileCopyRevitLinkedFile’’’’.
How does it work?How does it work?How does it work?How does it work?
The ‘‘‘‘CopyRevitLinkedFileCopyRevitLinkedFileCopyRevitLinkedFileCopyRevitLinkedFile’’’’ tool was added to make the linked files as part of the sections for
export. The tooltooltooltool copies all the elemnts from the linked file to the base revit model.
How How How How to use copy linked files toolto use copy linked files toolto use copy linked files toolto use copy linked files tool????
1. Click on ‘‘‘‘CopyRevitLinkedFileCopyRevitLinkedFileCopyRevitLinkedFileCopyRevitLinkedFile’’’’
2. Choose the linked file to be copied.
w w w . d p r . c o m 34
DPR Model Slicer
v5 Help
Contact:
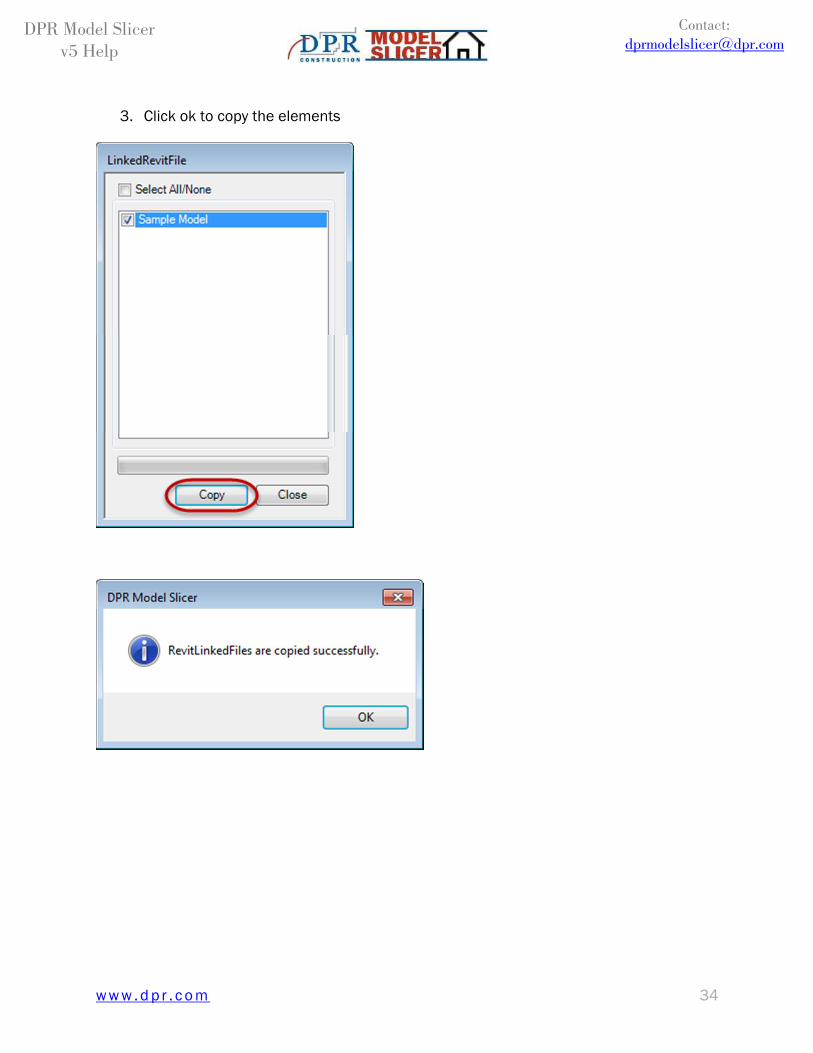
3. Click ok to copy the elements
w w w . d p r . c o m 35
DPR Model Slicer
v5 Help
Contact:
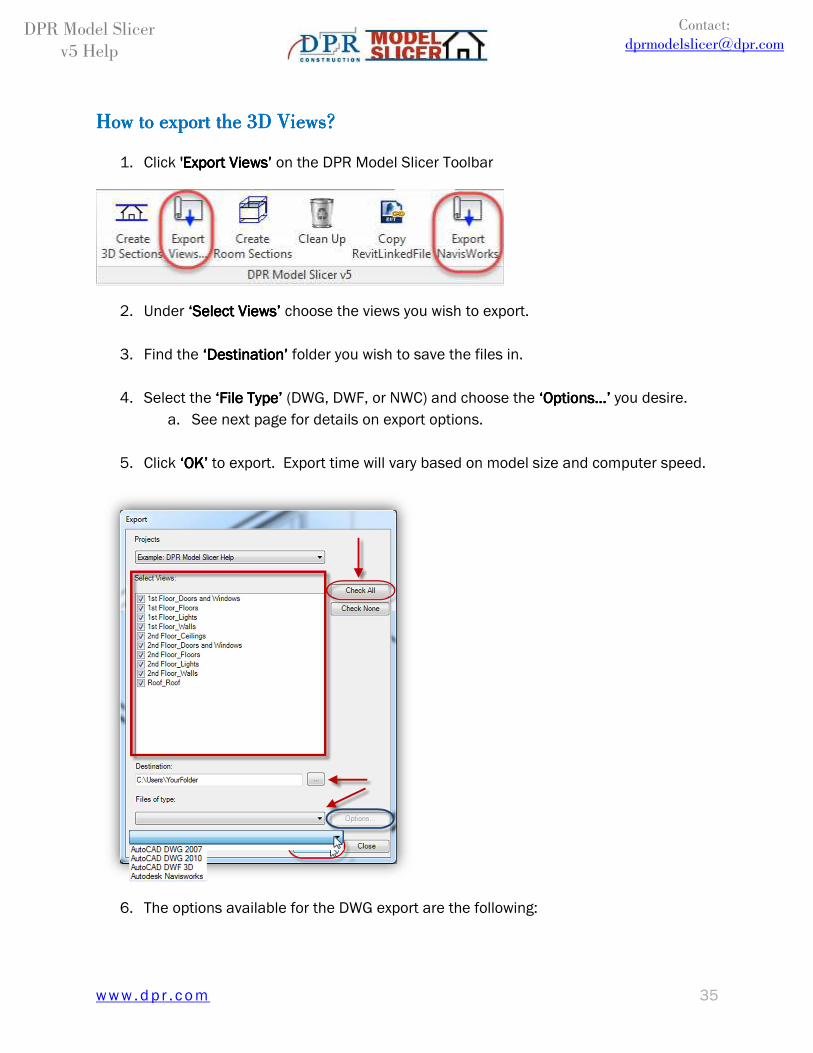
How to export theHow to export theHow to export theHow to export the 3D Views3D Views3D Views3D Views????
1. Click 'Export Views’'Export Views’'Export Views’'Export Views’ on the DPR Model Slicer Toolbar
2. Under ‘Select Views’‘Select Views’‘Select Views’‘Select Views’ choose the views you wish to export.
3. Find the ‘D‘D‘D‘Destinationestinationestinationestination’’’’ folder you wish to save the files in.
4. Select the ‘File T‘File T‘File T‘File Typeypeypeype’ ’ ’ ’ (DWG, DWF, or NWC) and choose the ‘Options…’‘Options…’‘Options…’‘Options…’ you desire.
a. See next page for details on export options.
5. Click ‘‘‘‘OKOKOKOK’’’’ to export. Export time will vary based on model size and computer speed.
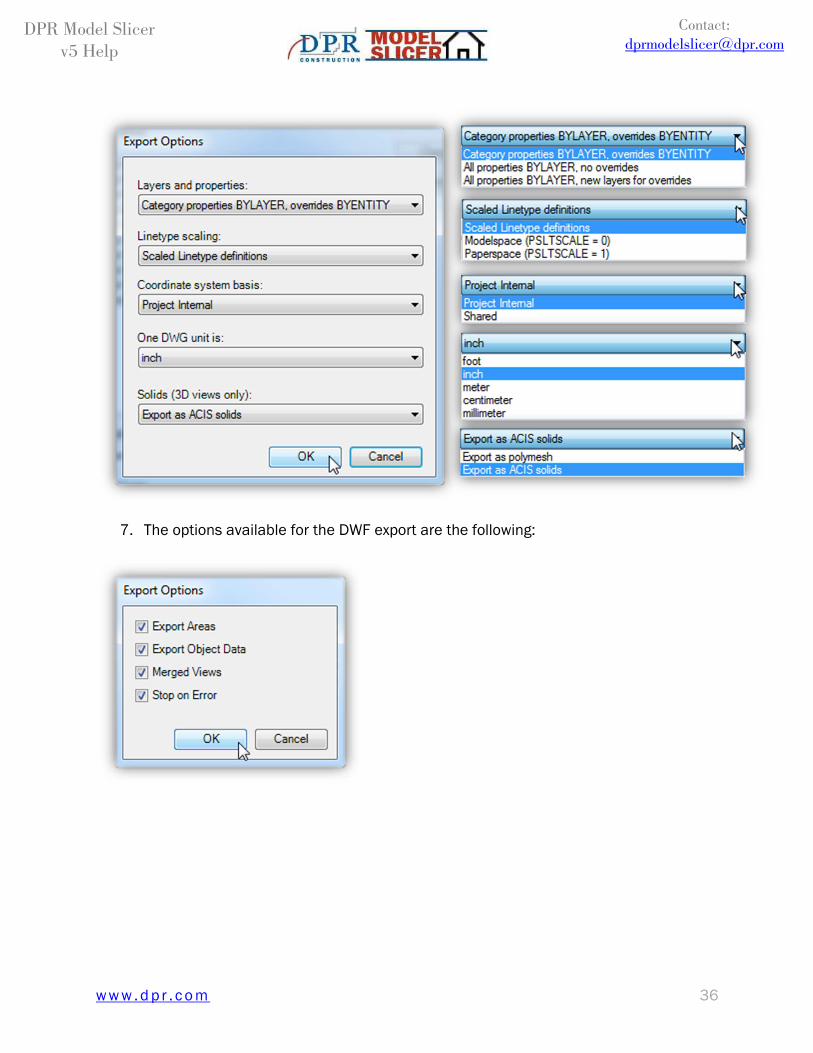
6. The options available for the DWG export are the following:
w w w . d p r . c o m 36
DPR Model Slicer
v5 Help
Contact:
7. The options available for the DWF export are the following:
w w w . d p r . c o m 37
DPR Model Slicer
v5 Help
Contact:
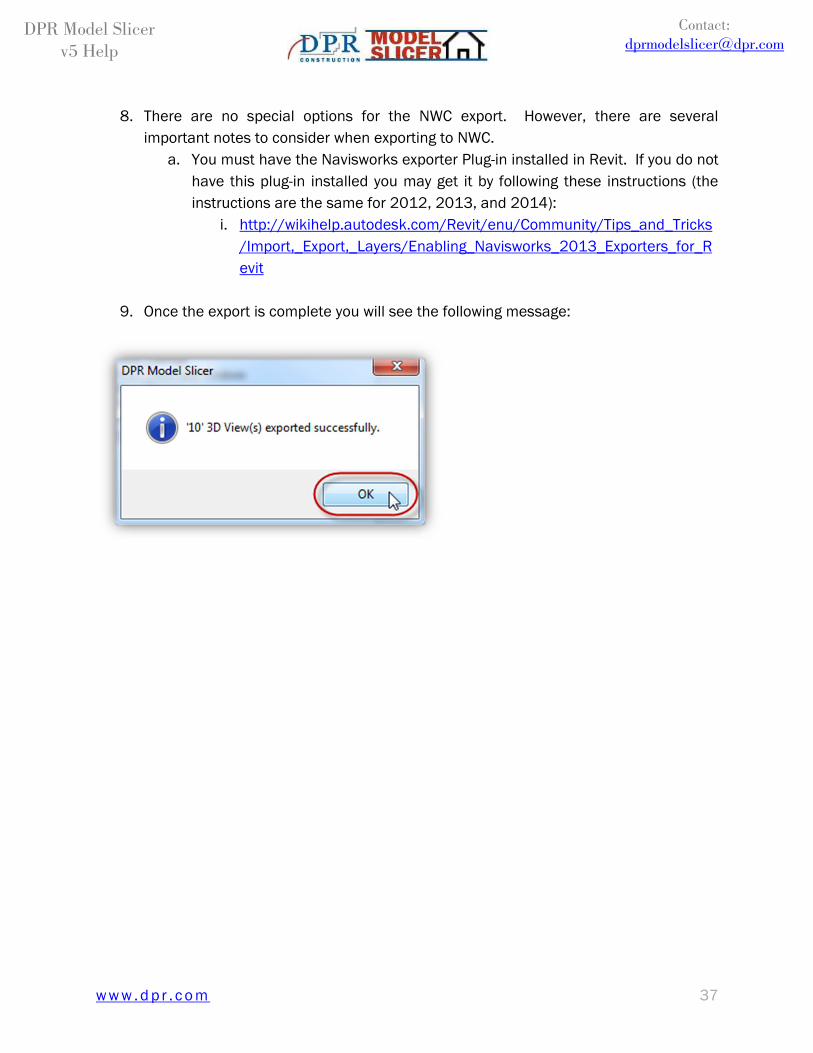
8. There are no special options for the NWC export. However, there are several
important notes to consider when exporting to NWC.
a. You must have the Navisworks exporter Plug-in installed in Revit. If you do not
have this plug-in installed you may get it by following these instructions (the
instructions are the same for 2012, 2013, and 2014):
i. http://wikihelp.autodesk.com/Revit/enu/Community/Tips_and_Tricks
/Import,_Export,_Layers/Enabling_Navisworks_2013_Exporters_for_R
evit
9. Once the export is complete you will see the following message:
w w w . d p r . c o m 38
DPR Model Slicer
v5 Help
Contact:
How to ‘Clean Up’ your views?How to ‘Clean Up’ your views?How to ‘Clean Up’ your views?How to ‘Clean Up’ your views?
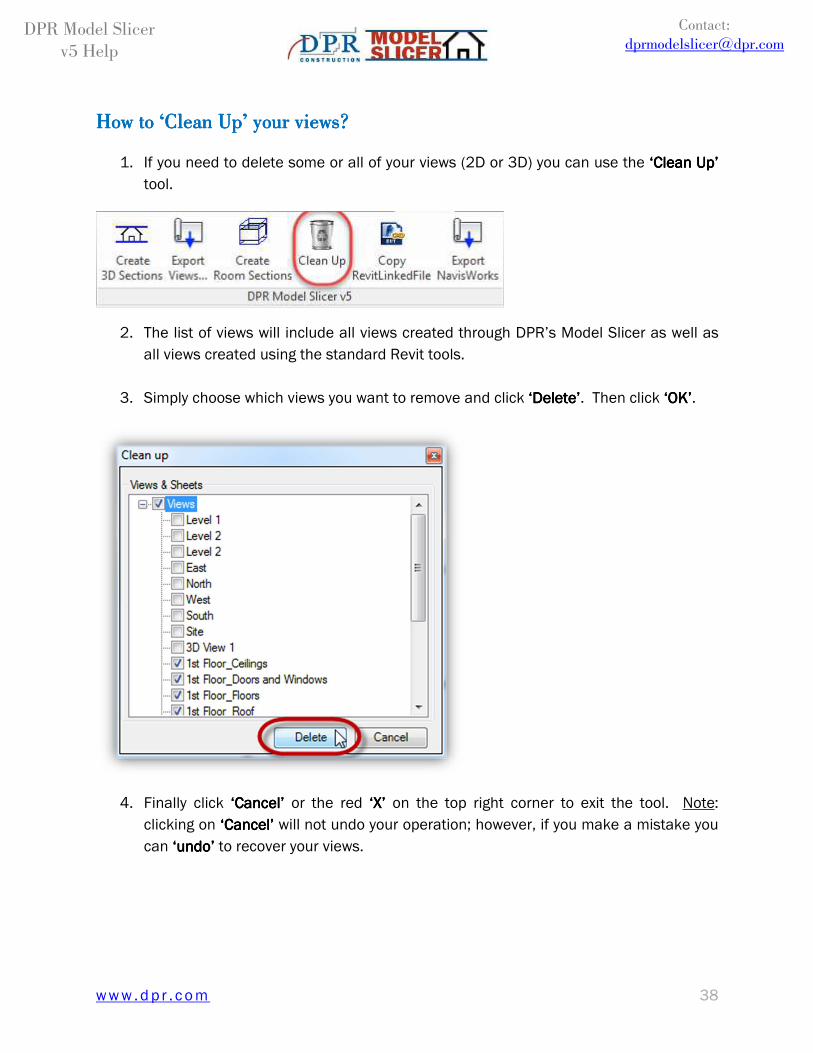
1. If you need to delete some or all of your views (2D or 3D) you can use the ‘Clean Up’ ‘Clean Up’ ‘Clean Up’ ‘Clean Up’
tool.
2. The list of views will include all views created through DPR’s Model Slicer as well as
all views created using the standard Revit tools.
3. Simply choose which views you want to remove and click ‘Delete’‘Delete’‘Delete’‘Delete’. Then click ‘OK’‘OK’‘OK’‘OK’.
4. Finally click ‘Cancel’‘Cancel’‘Cancel’‘Cancel’ or the red ‘X’‘X’‘X’‘X’ on the top right corner to exit the tool. Note:
clicking on ‘Cancel’‘Cancel’‘Cancel’‘Cancel’ will not undo your operation; however, if you make a mistake you
can ‘undo’‘undo’‘undo’‘undo’ to recover your views.
w w w . d p r . c o m 39
DPR Model Slicer
v5 Help
Contact:
How to use the ‘Batch Navisworks ExporHow to use the ‘Batch Navisworks ExporHow to use the ‘Batch Navisworks ExporHow to use the ‘Batch Navisworks Export’ tool?t’ tool?t’ tool?t’ tool?
Go to the “Add-Ins” tab in Revit and look for the DPR Model Slicer v5 section. Click on
‘‘‘‘ExportNavisworksExportNavisworksExportNavisworksExportNavisworks’’’’.
How does it work?How does it work?How does it work?How does it work?
The ‘‘‘‘Export NavisworksExport NavisworksExport NavisworksExport Navisworks’’’’ tool was added to simplify the export operation. Now you can batch
export all the 3D views in your project as NWCs.
How How How How to use to use to use to use Batch Navisworks Export ToolBatch Navisworks Export ToolBatch Navisworks Export ToolBatch Navisworks Export Tool????
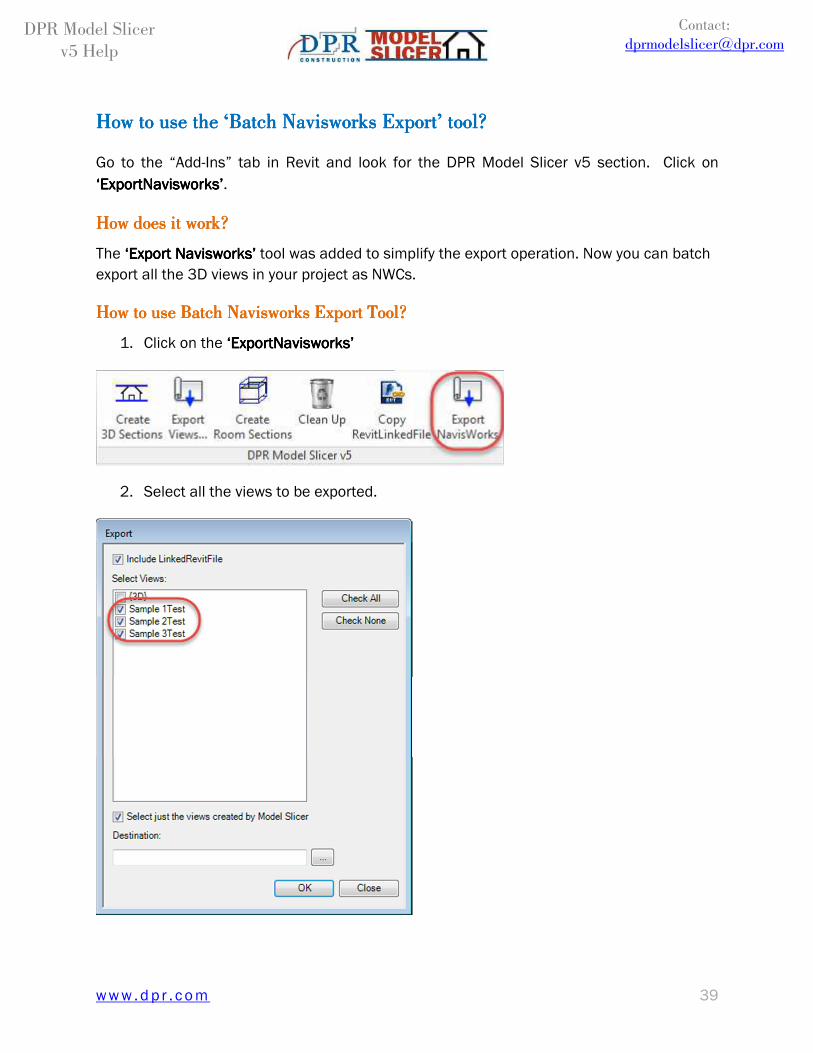
1. Click on the ‘‘‘‘ExportNavisworksExportNavisworksExportNavisworksExportNavisworks’’’’
2. Select all the views to be exported.
w w w . d p r . c o m 40
DPR Model Slicer
v5 Help
Contact:
3. Choose the “Destination Folder”
4. Click “Ok”
How to reuse a project’s settings for other projects?How to reuse a project’s settings for other projects?How to reuse a project’s settings for other projects?How to reuse a project’s settings for other projects?
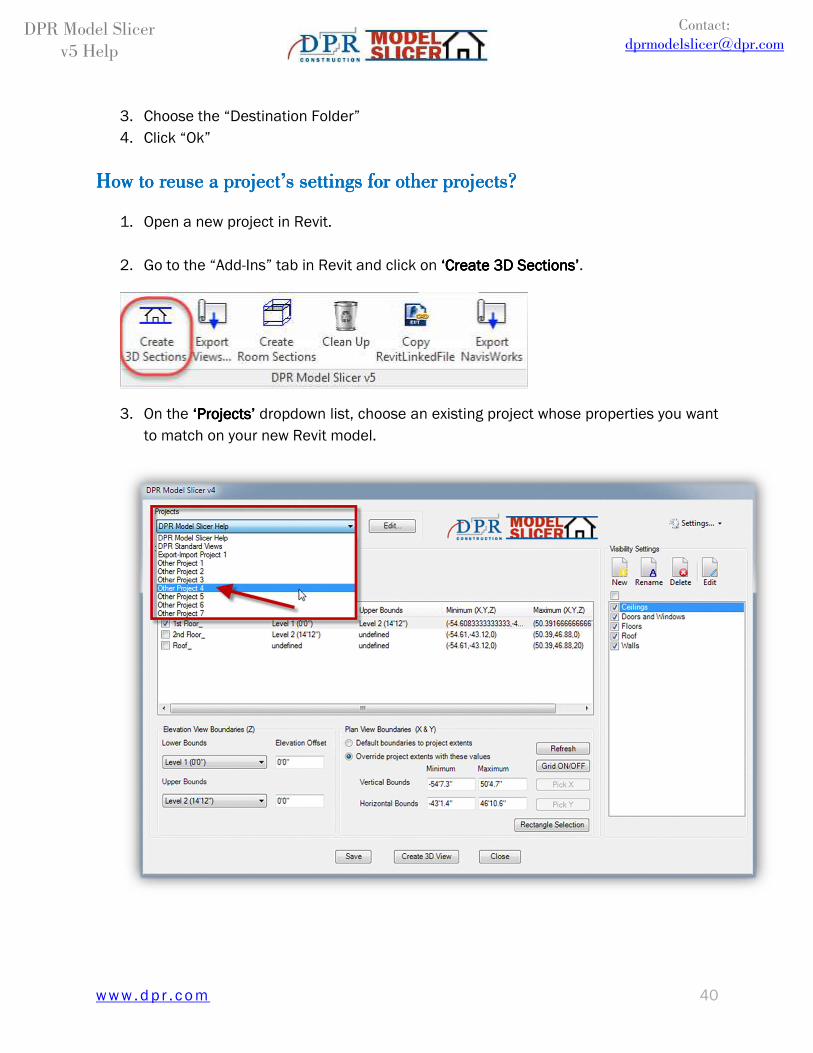
1. Open a new project in Revit.
2. Go to the “Add-Ins” tab in Revit and click on ‘Create 3D Sections’‘Create 3D Sections’‘Create 3D Sections’‘Create 3D Sections’.
3. On the ‘Projects’‘Projects’‘Projects’‘Projects’ dropdown list, choose an existing project whose properties you want
to match on your new Revit model.
w w w . d p r . c o m 41
DPR Model Slicer
v5 Help
Contact:
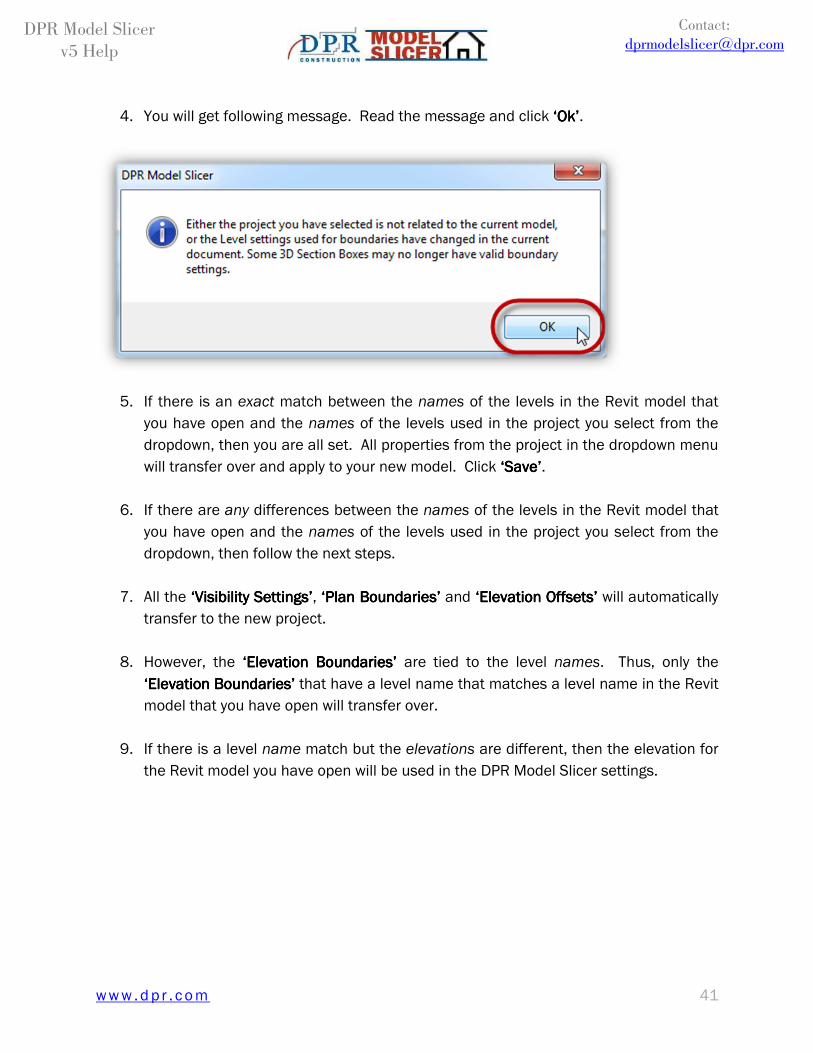
4. You will get following message. Read the message and click ‘Ok’‘Ok’‘Ok’‘Ok’.
5. If there is an exact match between the names of the levels in the Revit model that
you have open and the names of the levels used in the project you select from the
dropdown, then you are all set. All properties from the project in the dropdown menu
will transfer over and apply to your new model. Click ‘Save’‘Save’‘Save’‘Save’.
6. If there are any differences between the names of the levels in the Revit model that
you have open and the names of the levels used in the project you select from the
dropdown, then follow the next steps.
7. All the ‘Visibility Settings’‘Visibility Settings’‘Visibility Settings’‘Visibility Settings’, ‘P‘P‘P‘Plan lan lan lan Boundaries’Boundaries’Boundaries’Boundaries’ and ‘Elevation Offsets’‘Elevation Offsets’‘Elevation Offsets’‘Elevation Offsets’ will automatically
transfer to the new project.
8. However, the ‘Elevation Boundaries’‘Elevation Boundaries’‘Elevation Boundaries’‘Elevation Boundaries’ are tied to the level names. Thus, only the
‘Elevation Boundaries’‘Elevation Boundaries’‘Elevation Boundaries’‘Elevation Boundaries’ that have a level name that matches a level name in the Revit
model that you have open will transfer over.
9. If there is a level name match but the elevations are different, then the elevation for
the Revit model you have open will be used in the DPR Model Slicer settings.
w w w . d p r . c o m 42
DPR Model Slicer
v5 Help
Contact:
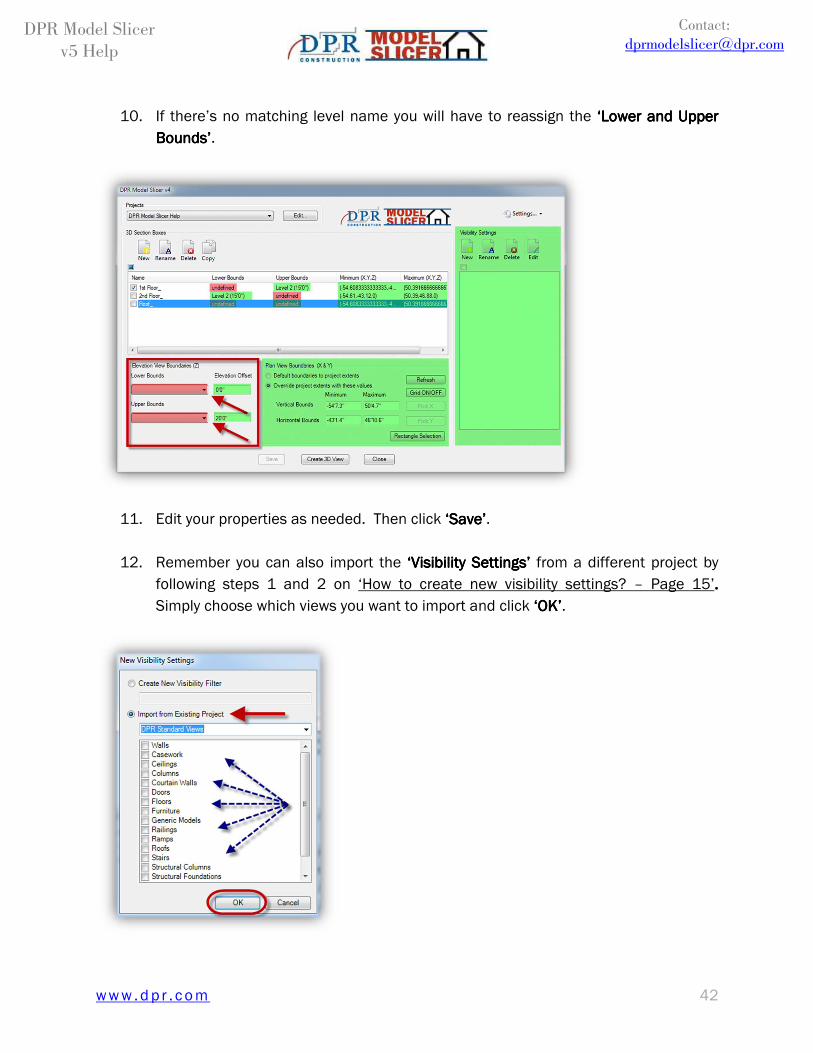
10. If there’s no matching level name you will have to reassign the ‘Lower and Upper ‘Lower and Upper ‘Lower and Upper ‘Lower and Upper
Bounds’Bounds’Bounds’Bounds’.
11. Edit your properties as needed. Then click ‘Save’‘Save’‘Save’‘Save’.
12. Remember you can also import the ‘Visibility Settings’‘Visibility Settings’‘Visibility Settings’‘Visibility Settings’ from a different project by
following steps 1 and 2 on ‘How to create new visibility settings? – Page 15’. . . .
Simply choose which views you want to import and click ‘OK’‘OK’‘OK’‘OK’.
w w w . d p r . c o m 43
DPR Model Slicer
v5 Help
Contact:
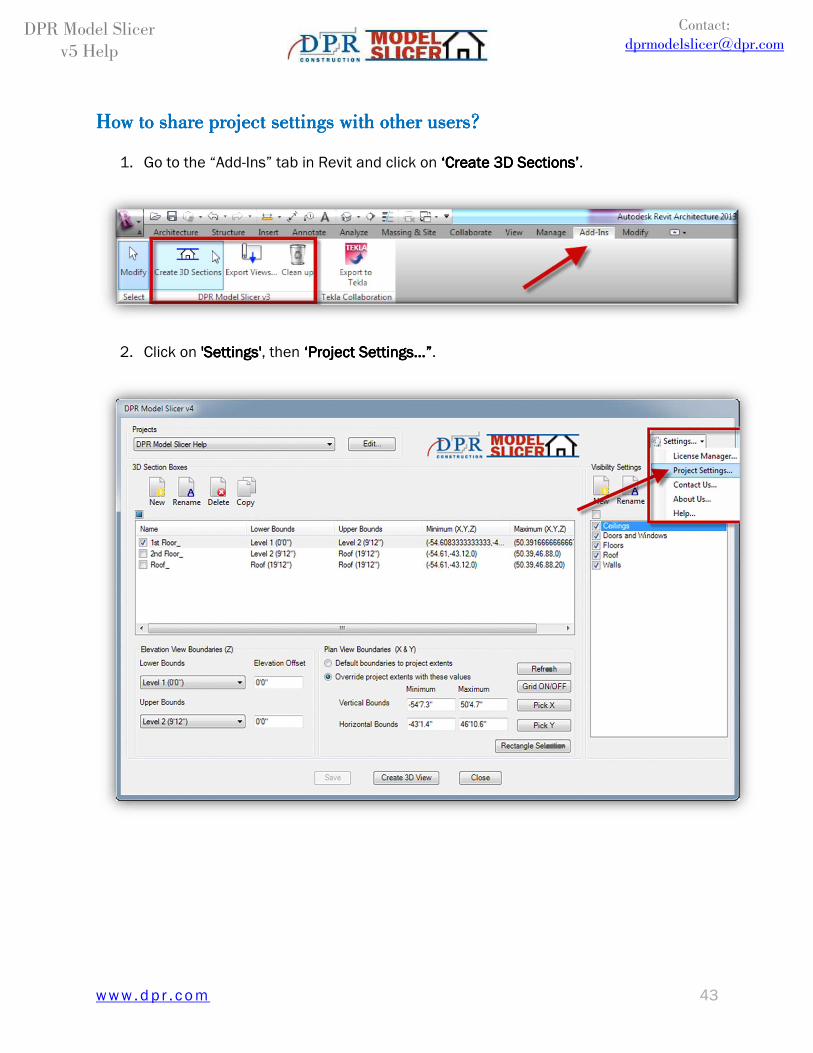
How to share project settingsHow to share project settingsHow to share project settingsHow to share project settings with other users?with other users?with other users?with other users?
1. Go to the “Add-Ins” tab in Revit and click on ‘Create 3D Sections‘Create 3D Sections‘Create 3D Sections‘Create 3D Sections’’’’.
2. Click on 'Settings''Settings''Settings''Settings', then ‘Project Settings…”‘Project Settings…”‘Project Settings…”‘Project Settings…”.
w w w . d p r . c o m 44
DPR Model Slicer
v5 Help
Contact:
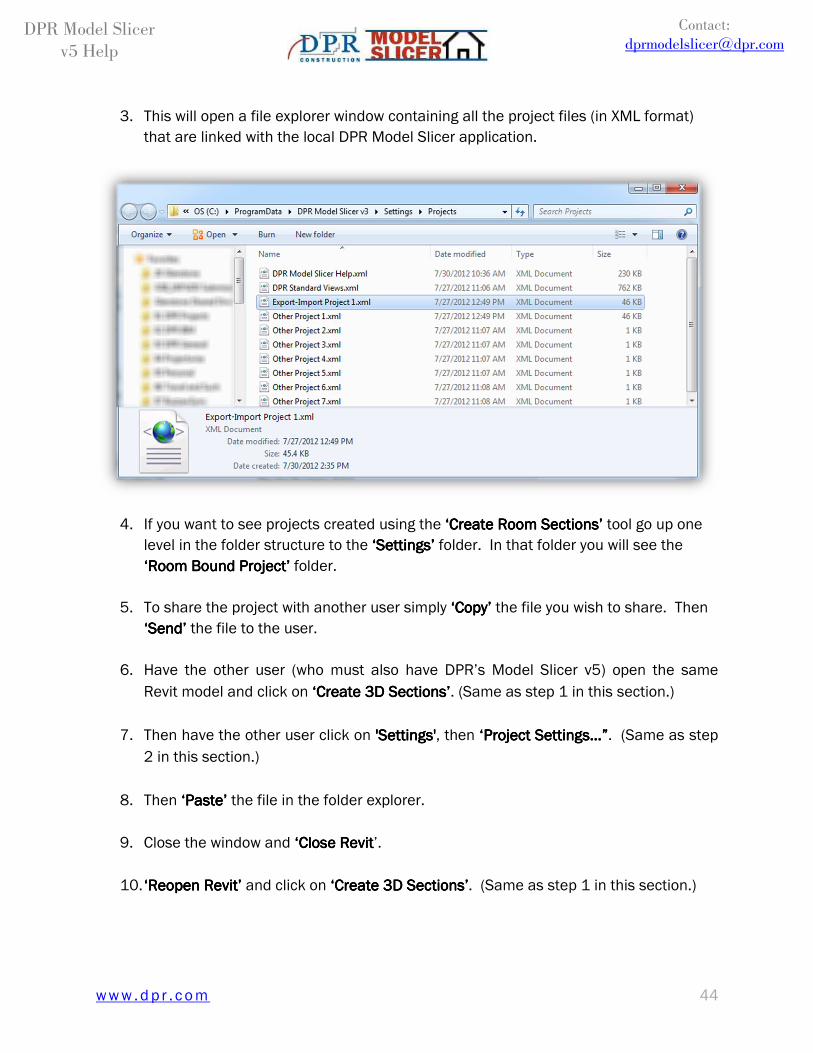
3. This will open a file explorer window containing all the project files (in XML format)
that are linked with the local DPR Model Slicer application.
4. If you want to see projects created using the ‘Create Room Sections’‘Create Room Sections’‘Create Room Sections’‘Create Room Sections’ tool go up one
level in the folder structure to the ‘Settings’ ‘Settings’ ‘Settings’ ‘Settings’ folder. In that folder you will see the
‘Room Bound Project’‘Room Bound Project’‘Room Bound Project’‘Room Bound Project’ folder.
5. To share the project with another user simply ‘Copy’‘Copy’‘Copy’‘Copy’ the file you wish to share. Then
‘Send’‘Send’‘Send’‘Send’ the file to the user.
6. Have the other user (who must also have DPR’s Model Slicer v5) open the same
Revit model and click on ‘Create 3D Sections’‘Create 3D Sections’‘Create 3D Sections’‘Create 3D Sections’. (Same as step 1 in this section.)
7. Then have the other user click on 'Settings''Settings''Settings''Settings', then ‘Project Settings…”‘Project Settings…”‘Project Settings…”‘Project Settings…”. (Same as step
2 in this section.)
8. Then ‘Paste’‘Paste’‘Paste’‘Paste’ the file in the folder explorer.
9. Close the window and ‘‘‘‘Close Close Close Close RevitRevitRevitRevit’.
10. ‘‘‘‘ReoReoReoReopenpenpenpen RevitRevitRevitRevit’’’’ and click on ‘Create 3D‘Create 3D‘Create 3D‘Create 3D Sections’Sections’Sections’Sections’. (Same as step 1 in this section.)
w w w . d p r . c o m 45
DPR Model Slicer
v5 Help
Contact:
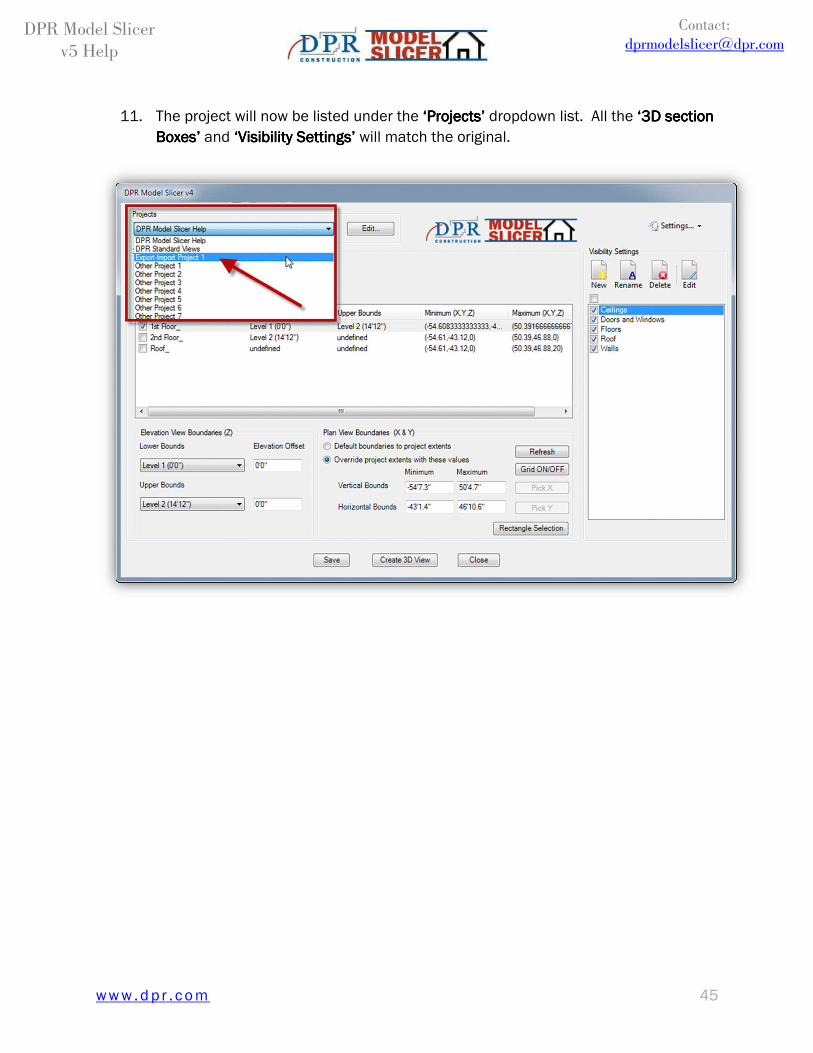
11. The project will now be listed under the ‘Projects’‘Projects’‘Projects’‘Projects’ dropdown list. All the ‘3D section ‘3D section ‘3D section ‘3D section
Boxes’Boxes’Boxes’Boxes’ and ‘Visibility Settings’‘Visibility Settings’‘Visibility Settings’‘Visibility Settings’ will match the original.
w w w . d p r . c o m 46
DPR Model Slicer
v5 Help
Contact:
How to How to How to How to registerregisterregisterregister????
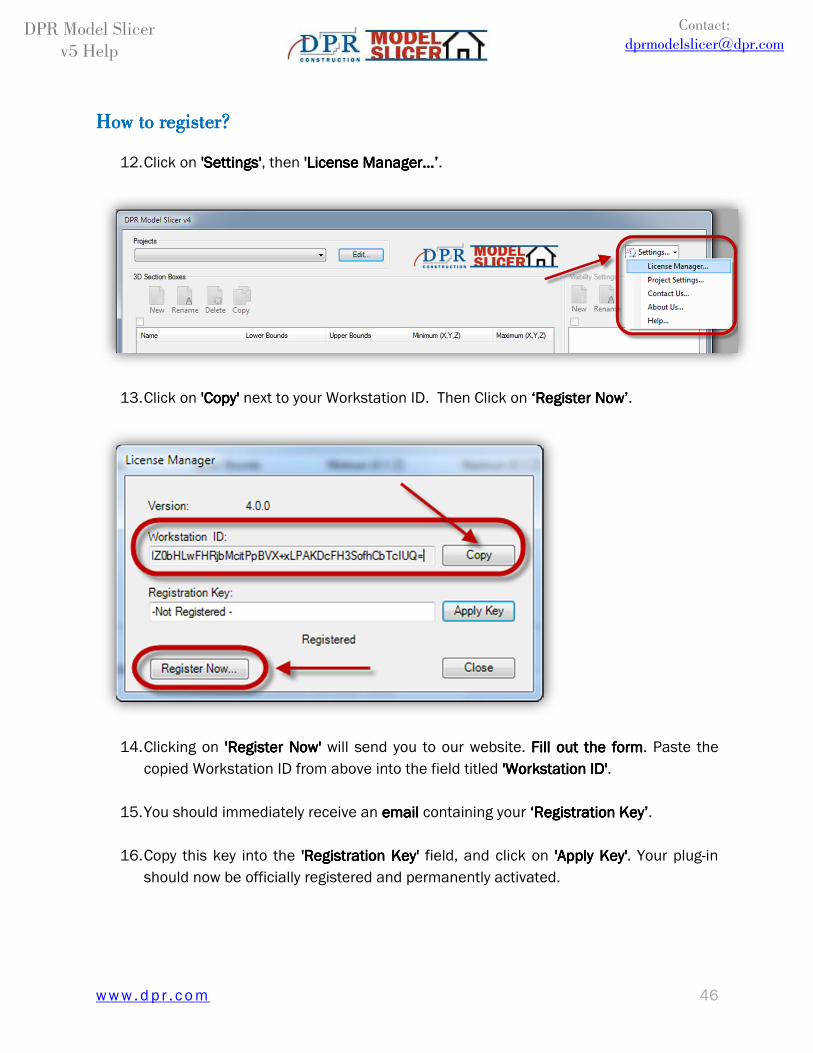
12. Click on 'Settings''Settings''Settings''Settings', then 'License 'License 'License 'License ManagerManagerManagerManager…’…’…’…’.
13. Click on 'Copy''Copy''Copy''Copy' next to your Workstation ID. Then Click on ‘Register Now’‘Register Now’‘Register Now’‘Register Now’.
14. Clicking on 'Register Now''Register Now''Register Now''Register Now' will send you to our website. Fill out the formFill out the formFill out the formFill out the form. Paste the
copied Workstation ID from above into the field titled 'Workstation ID''Workstation ID''Workstation ID''Workstation ID'.
15. You should immediately receive an emailemailemailemail containing your ‘R‘R‘R‘Registration egistration egistration egistration KKKKeyeyeyey’’’’.
16. Copy this key into the 'Registration Key''Registration Key''Registration Key''Registration Key' field, and click on 'Apply Key''Apply Key''Apply Key''Apply Key'. Your plug-in
should now be officially registered and permanently activated.
w w w . d p r . c o m 47
DPR Model Slicer
v5 Help
Contact:
LicensingLicensingLicensingLicensing
DPR Model Slicer is available free of chargefree of chargefree of chargefree of charge for anyone to use.
The current release, ‘DPR Model Slicer ‘DPR Model Slicer ‘DPR Model Slicer ‘DPR Model Slicer v5v5v5v5’’’’, will upgrade DPR Model Slicer v4. If you already
registered v4 then the registration will be automatically transferred to your newer version of
the software.
After installing, DPR Model Slicer will work fully for 30 days regardless of registration status.
However, to continue usage after the 30 day period, we do request that you register your
installation with us (for free). The information gathered through this registration will only be
used to track plug-in usage, which will help guide future plug-in development.
The registered version of DPR Model Slicer will not expire.
UninstallingUninstallingUninstallingUninstalling
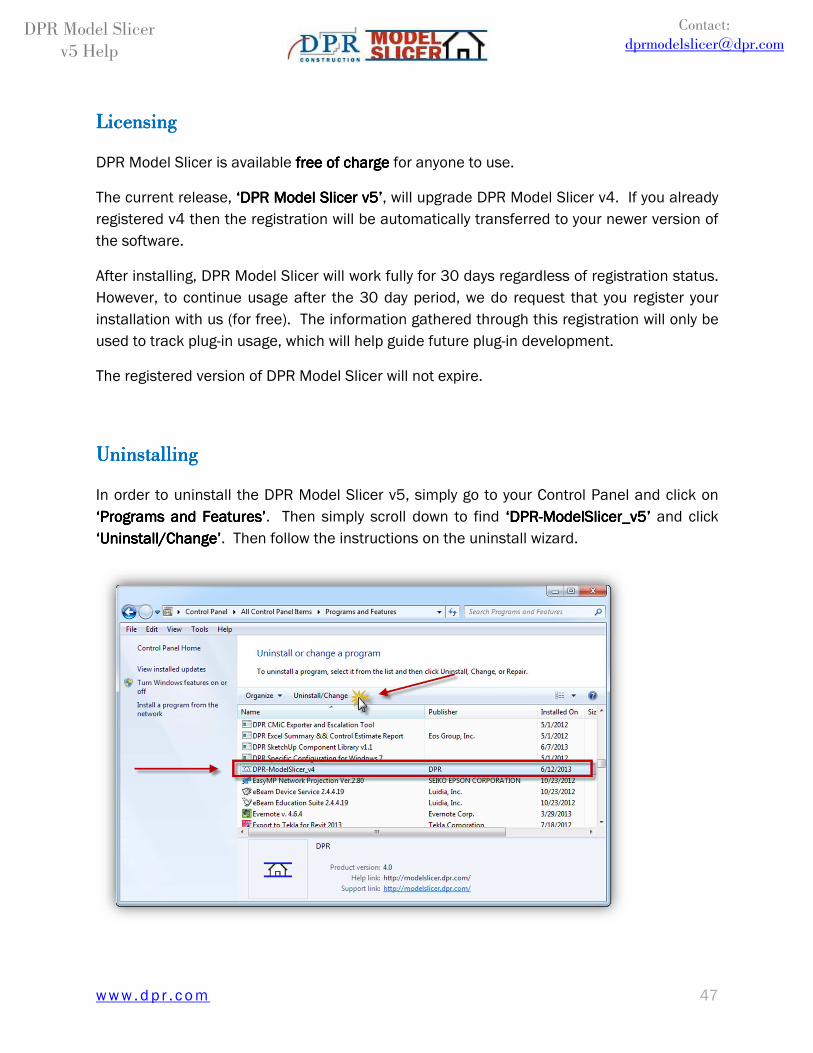
In order to uninstall the DPR Model Slicer v5, simply go to your Control Panel and click on
‘Programs and Features’‘Programs and Features’‘Programs and Features’‘Programs and Features’. Then simply scroll down to find ‘‘‘‘DPRDPRDPRDPR----ModelModelModelModelSSSSlicerlicerlicerlicer____v5v5v5v5’’’’ and click
‘Uninstall‘Uninstall‘Uninstall‘Uninstall/Change/Change/Change/Change’’’’. Then follow the instructions on the uninstall wizard.