Embed Size (px)
Citation preview
DR5Compact DR1-2 Installer & Coordinator Guide


Table of Contents Meridian Norstar Orientation l-1
Using this Guide 1-4
Adminlstration Programming 2-1 Learning Administration Programming 2-8 Programming 2- 15
1. System Speed Dial Numbers 2- 19 2. Assigning Names to Phones 2-21 3. Setting Time and Date 2-23
Configuration Programming 3-l Learning Configuration Programming 3-7
Programming 3- 14 1. Lines (Installer Only) 3- 18
2. Sets 3-20 3. Call Handling 3- 24
4. Restrictions 3-28
5. Overrides 3-30
Feature Operatlon 4-l Introduction 4-2 Feature Operation 4-5
Index 4-40
Glossary of Terms 4 - 47
P;orslar 5rienlalion
1-2
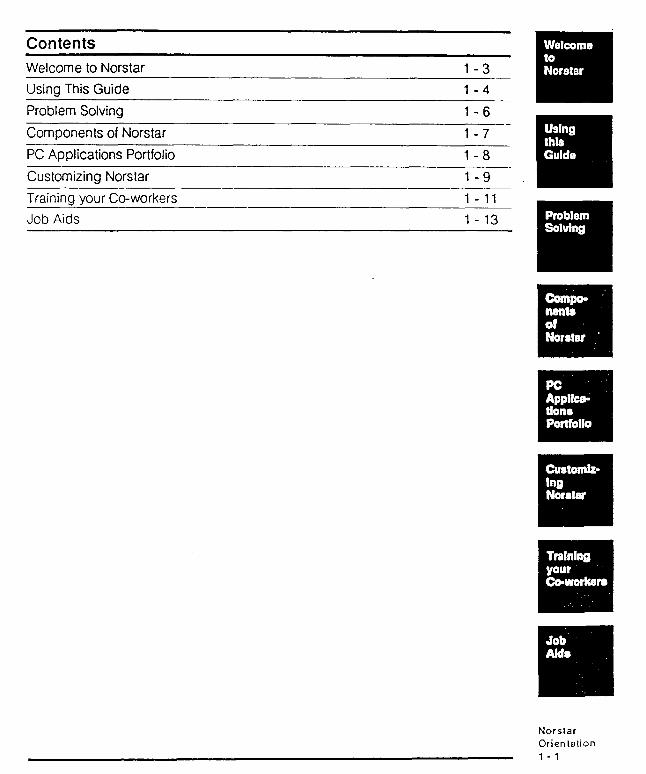
Contents Welcome to Norstar Usina This Guide
l-3 1-4
Problem Solving l-6 Components of Norstar PC Applications Portfolio
Customizing Norstar
1-7--
l-8 1-9
Training your Co-workers --___ Job Aids
1- 11
1 - 13
Norslar Orientelion l-l
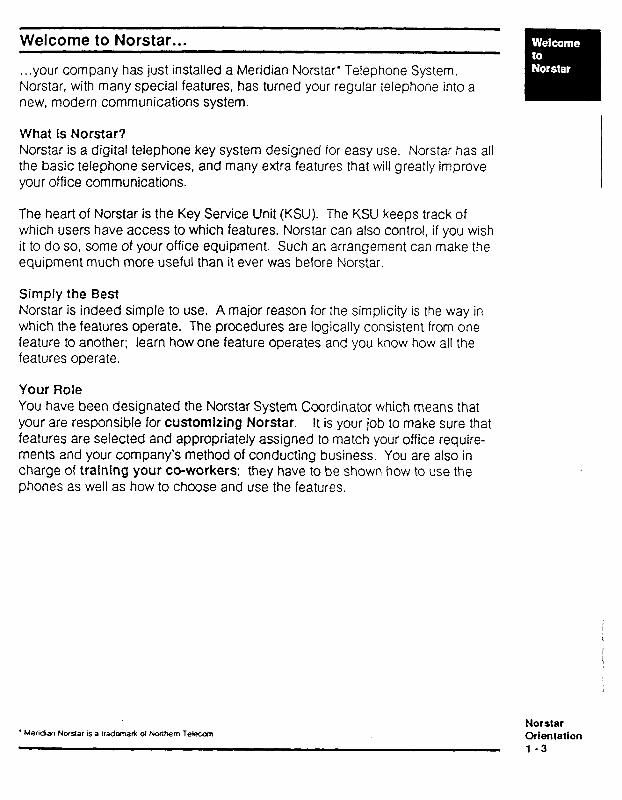
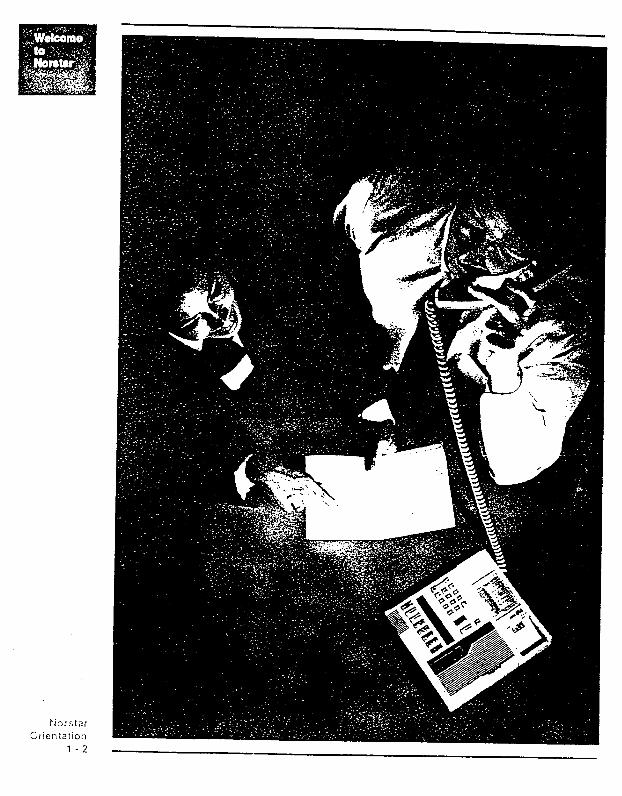
Welcome to Norstar...
. .your company has just installed a Meridian Norstar’ Telephone System. Norstar, with many special features, has turned your regular telephone into a new, modern communications system.
What Is Norstar? Norstar is a digital telephone key system designed for easy use. Norstar has all the basic telephone services, and many extra features that will greatly improve your office communications.
The heart of Norstar is the Key Service Unit (KSU). The KSU keeps track of which users have access to which features. Norstar can also control, if you wish it to do so, some of your office equipment. Such an arrangement can make the equipment much more useful than it ever was before Norstar.
Simply the Best Norstar is indeed simple to use. A major reason for the simplicity is the way in which the features operate. The procedures are logically consistent from one feature to another; learn how one feature operates and you know how all the features operate.
Your Role You have been designated the Norstar System Coordinator which means that your are responsible for customizing Norstar. It is your job to make sure that features are selected and appropriately assigned to match your office require- ments and your company’s method of conducting business. You are also in charge of training your co-workers; they have to be shown how to use the phones as well as how to choose and use the features,
Norstar * Meridtan Nwsiar is a lradmah ol tblhem Teiecun Orientation
l-3
4
Using this Guide
This System Coordinator Guide is written for your use as you customize Norstar, train your co-workers and problem solve. The external green tabs divide the Guide into four major sections:
Orien ta lion Administration Configuration Feature Operation
The internal colored tabs down the side of each page keep track of where you are in the Guide. The tabs, along with the Tables of Contents and Index, quickly locate information for you.
Both Administration and Configuration contain two sub-sections, Learning and Programming. The instructions in the Learning sub-sections are self-paced. You can move comfortably through them at a speed which suits you. The Programming sub-sections describe, clearly and concisely, the customization process. As you program the system, you will make regular use of the pr6 gramming chart and hints.
The Feature Operation section describes the best ways to explain to your co-workers how to select and to use the many Norstar features available to them. You may wish to copy pages from this sub-section to distribute to your co-workers. This section defines the features and explains how to use them. For a dictionary of additional words used in this guide, refer to the glossary starting on page 4-47.
Three simple symbols are used throughout the Guide to quickly identify specific kinds of button functions.
The II symbol identifies line and feature buttons. The 0 symbol identifies the Release button and the dialpad. The 71 symbol identifies prompts, error messages, and time and date when displayed.
Norstar , Orientation
l-4

A map of the different sections and their sub-sections helps you understand th-3 relationship among them. The map is shown below.
Norstar Orientation
Administration
I
’ I-----
Configuration Feature
Operations
Each area should he!? you iri getting the most from Norstar.
Norstar Orientation
Problem Solvinq Checklist
Checklist of Problems
It someone has difficulty using a feature: l Refer to the Feature Operation section; check the feature’s operation and
demonstrate how it is used. l Check to see if the feature interacts with other features.
If someone has difficulty programming a feature: l Refer to the Feature Operation section and demonstrate how to program
the feature. l If your co-worker is trying to program onto a line or intercom button or
Handsfree/Mute. explain that these buttons are not programmable and show which buttons are.
l Determine if the feature is programmed onto a button or if it is activated by pressing jFeatu:e] and its code.
l Determine if your co-worker was trying to program a feature while you were programming the system. Explain that users are locked out while the system is being programmed and to try again when you have finished.
If feature access buttons or autodial buttons don’t work: l Use the Button Inquiry f Feature !n q to check the function of each button
and determine if your co-worker is using the buttons properly.
If the power has been off for three days or more: l Verify the system operation. If there is a problem ihat you cannot correct, tail
your Service Representaiive. l Replace any settings that are not default settings including System Speed
Dial Numbers, Names, and Time and Date. Refer to Job Aids, Administration and Configuraiion Programming.
If the KSU or a phone or phones are not working: ; Make sure they are plugged in. l Call your Service Representative.
Norstar Orientation
l-6
Components of Norstar
Key Service Unft. The Key Service Unit (KSU) contains the intelligence behind the system. It is a small computer installed in an inconspicuous place in your office. As well as keeping track of everyone’s features, the KSU has a connection for an optional emergency phone. Thus, if the power fails, you can still make and receive regular calls.
Any maintenance required by the Norstar system is performed by the installer’s service department. Ask the installer for the service department’s phone number and write it down. Should you encounter any problems, call for service: Do not try to fix the KSU yourself!
New telephones - M7310 and M7208. These telephones were designed by human factors engineers who study how people use telephones. The display and butions are designed so that users don’t have to remember long, complicated procedures; these friendly Norstar telephones tell you what to do next.
Take a moment and Icok at each phone and read through the user cards. These cards contain all the information you’ll need for operation of the feaiures most frequently used. Refer to it for answers to your co-workers’ questions.
The Feature Operation section of this Guide contains more detailed information. Refer to it for answers to your co-workers’ questions.
In case you are asked what the phone model numbers mean. M M = Meridian 7 7 = indicates a Norstar product 2 3 = handsfree and the number of lines in the display 08 10 = the number of buttons with indicators.
Ensure that each user has the correct user card
New auxiliary equipment l Busy Lamp Field is a display of lights added to a secretary’s set to help
monitor telephone use. l Analog Terminal Adapter lets you plug various kinds of office equipment,
such as a FAX machine, into Norstar to give the equipment access to the telephone system.
l Norstar phones also come with a headset and a shoulder rest for users with busy hands.
Norstar Orientation l-7
PC Applications Portfolio
Your company can improve the effectiveness of your Personal Computers by tying them into the Norstar with a PC Applications Board. Programs running on the PC can provide services, such as those described below, to Norstar telephones users.
1. Dial-by-Name. A directory of over 3ooo names and telephone numbers can be established using your word processor. Dial-by-Name is, in effect, an 1 electronic telephone book to which Norstar users have access. Users simply enter names through their telephone dialpad and the Dial-by-Name application retrieves and dials the number.
2. Call Detail Recordfng. A program running on the PC that keeps track of all telephone call events made on the Norstar system. By analyzing this data, your company can identify areas in which money can be saved.
If your company has purchased these software packages, you may be the person responsible for coordinating this aspect of Norstar as well. Each package comes with a Coordinator’s Guide that describes all the administrative procedures.
Norttar OrientalIon
l-0
Customizing Norstar
There are two customization processes, Administration and Configuration and this section describes how to program each one.
Administration involves those features of the system that you are to keep up to date. 1. System Speed Dial numbers. Enter and maintain a little directory of up to
30 outside numbers which people in your office commonly use. Your coworkers access this directory using the System Speed dial feature. A courier service or a taxi company your company uses frequently are possible candidates for a System Speed Dial directory.
2. User Names. Enter the first names of your co-workers into the system. When Paula calls David, David’s display says ‘Paula calling”. As time passes and people come and go, you will have to change the names associated with the phones.
3. Time and Date. Your Norstar phones display the time and date when they are idle. You will have to maintain this service in much the way you would a digital clock at home. Program this feature after prolonged power failures, and in the spring and fall when the clocks are set ahead and back.
Configuration programs the way in which the telephone system is set up. Your system is installed with a basic “default” configuration which you may change as necessary. It is certainly not necessary to change the default configuration immediately; you may elect to wait a few weeks until you are more familiar with Norstar. You will then have a better idea of how you would like to change the system configuration. Configuration is not performed very often; after the system has been set up, it will be some time before you will have to use it again,
1. Llnes. This is a task done by the Installer. During installation, all the outside lines ordered by your company are connected into your office. If, at some time, you need to change the number of outside lines, call your service representative and have the installer return .
2. Sets. This feature allo.% you to change your co-workers’ telephone line assignment and select ringing lines. You can also give someone Handsfree capability, join a Call Pick-up group, access a Line Pool, receive phone paging, or enable an Auxiliary Ringer.
Note: The term set is interchangeable with the term phone.
Norster Orlmtatlon l-9
After Norstar has been in operation for a few weeks, check with your co-workers to see if their phone configurations match their preferences and expectations. Take advantage of the functions mentioned above to make the telephone system a more congenial addition to your office.
3. Call Handling. This feature allows you to change the reminders and tones in the system. You can also enable a Held Line Reminder and Music on Hold; establish set 21 as the prime phone on the system and arrange to pass calls automatically to it after 3 rings. This latter feature is one you will probably want to program only after Norstar has been in operation for several weeks.
4. Restrictions. There may be certain lines or phones - such as the one in your lobby - from which you do not want long distance calls made. This feature allows you to apply such restrictions. Discuss the various restrictions with the off ice managers to determine their preferences.
5. Overrides. As with some rules which may be broken, you may have some telephone numbers which are to be exempt from the programmed restric- tions. This feature enables you to set the exceptions to the restrictions rules.
This Guide has been designed to help you with your customization tasks.
1. Administration and Configuration are each divided into two sub-sections: a) a self-paced Learning module to give you hands-on experience from the
moment you start reading, b) a reference Programming section with programming charts and hints to let
you quickly accomplish whaf you want to do .
2. The Administration and Configuration Programs have a simple prompt and response interface on the phone and the programming procedures follow that format. The programming charts explain how the system works.
3. A task-oriented index is provided at the end of this Guide. Identify the changes you wish to make in Administration or Configuration and look up the appropriate section.
Note: Keep accurate records of the system speed dial numbers as well as the name and number assigned to each phone so your co-workers have an up-to- date listing. If more than one person is responsible for Administration and Configuration, share all the records and keep them in one place.
Norstar Orientation
1 - 10
Note: Only one person can do Administration or Configuration programming at any one time. Some features cannot be used while the system is being programmed.
Trainina Your Co-workers
Your first task is to familiarize yourself with the operation of Norstar features
1. With both types of phones in front of you, work through the Feature Operation section of this Guide. Go through each procedure carefully and make sure you know how each feature works.
There are some features which cannot be used while you are programming either of the Administration or Configuration functions.
Later, if users have difficulty using one feature or another, let them read (or photocopy) the appropriate section of the manual. The Feature Opera- tions section has been written for end users. It occasionally refers them io you, the System Coordinator, in instances where you may have made prc- gramming changes to the feature.
2. Work through the two user cards. Make sure you understand what the following are:
M7310 only - memory buttons - the shift button (triangle) - intercom buttons - display buttons
- dual memory buttons
The following features and characteristics are described in the System Coordinator’s Guide but not the user cards:
- how to remove a feature from a button i.e. make it blank - how to split a conference call - the meaning of different indicator flash rates - the meaning of different tones - what :he display messages mean - for example ‘Paula> David”
or “Feature Inactive”. - how the message system works. - what ‘Later” means - how to send and receive a message - how to turn a message off.
3. Make sure you are comfortable programming feature access and autodial on the memory buttons. Your coworkers will get much greater use from their Norstar system if they can program their own memory buttons. Get them started by helping them to program their home number as an outside autodial first,
Norstar Orientation l-11

After you have had Norstar for a while. encourage your co-workers to reread the feature list in their user cards and to consider handy features to program into memory buttons.
4. Read the user cards for the Norstar Busy Lamp Field (BLF). the Single-Line
Telephone using the Norstar Analog Terminal Adapter, and the Headset Make sure you are comfortable with the operation of these pieces of equipment. If the users of this special equipment have questions. be prepared to assist them.
During the system installation, accompany the installer around the offie to make sure that each co-worker knows that you are the System Coordinator. Show them this Guide and tell them where it is to be kept. Encourage them to read the Feature Operation section and answer any questions they may have.
Norstar Orlentatlon
Job Aids
The following special sheets are designed to make your job easier.
Programming Sheet and Overlays The programming sheet, which you will get from the installer, is a convenient way of keeping track of the manner in which your new Norstar system has been organized. Overlays are templates applied temporarily to the telephone while you are programming the system. A few simple instructions on using both the sheet and the overlays are included in the sections on Learning Administration and Learning Configuration. You can find the programming sheet and overlays (received from the installer) in the back pocket cover of this Guide.
Button Caps and Labels A supply of button caps and labels are provided in the telephone boxes The caps and labels are to be applied to buttons onto which features have been programmed by your co-workers.
Intercom Numbers When your Norstar system is installed, each phone is labeled with a two-digit intercom number used to make calls inside the office. Prepare a list of your co- workers names and their respective intercom numbers and distribute it to everyone in the office. The list is also used when you program Administration.
To check the intercom number of each phone, press w[[7/m Intercom The number is displayed on the phone following the letters IIJ.
Speed Dial System Speed Dial allows outside calls to be made by dialing only two digits instead of the usual seven or more. Up to 30 Speed Dial codes are available for frequently dialed numbers and are used by everyone in the office. Speed Dial numbers, which can be up to 16 digits long, are assigned in the Administrative program. Prepare a list of Speed Dial numbers and distribute it to everyone in the office.
Norslai Odentatlon 1-13
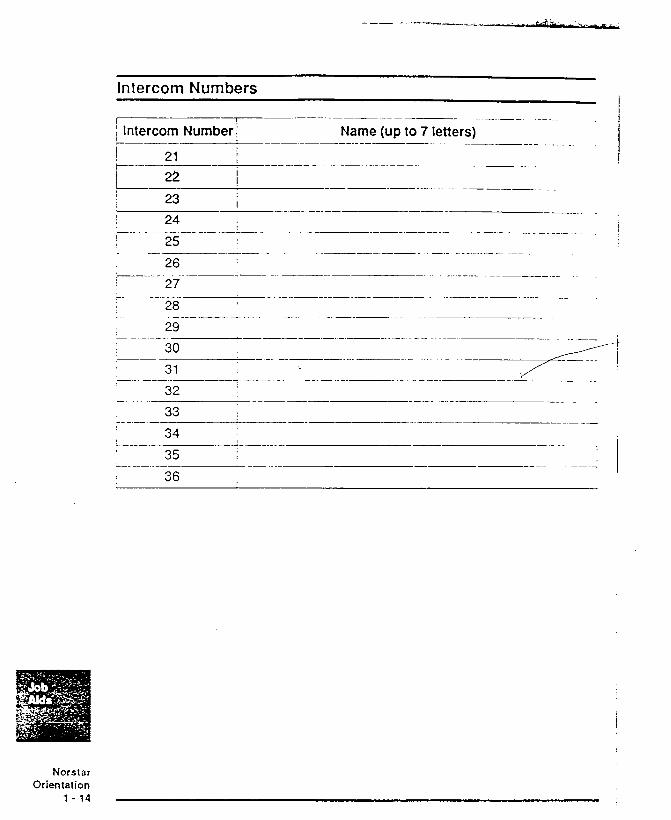
Intercom Numbers
I I ----~_ ..- ..__ .___. 1 Intercom Number: Name (up to 7 letters) ----
~-.-AL_j ----.-- - .-. .-.. - __ _
12 / --- .-- _.... .- ---_-_ I / 23 I -___
24 A.... - -___- I 25 _- .___ 26
/ _..._ --- .---__ -_ 27
r- _-.. 28
29 - _-._ --.-.- -~ . . . -- - - -.. -__ 30
~- - -. -- -_.... __-.._ 31 --_-. --.- 32 - 33
35 - --..--- - 36 :
Norstar Orientation
1 - 14
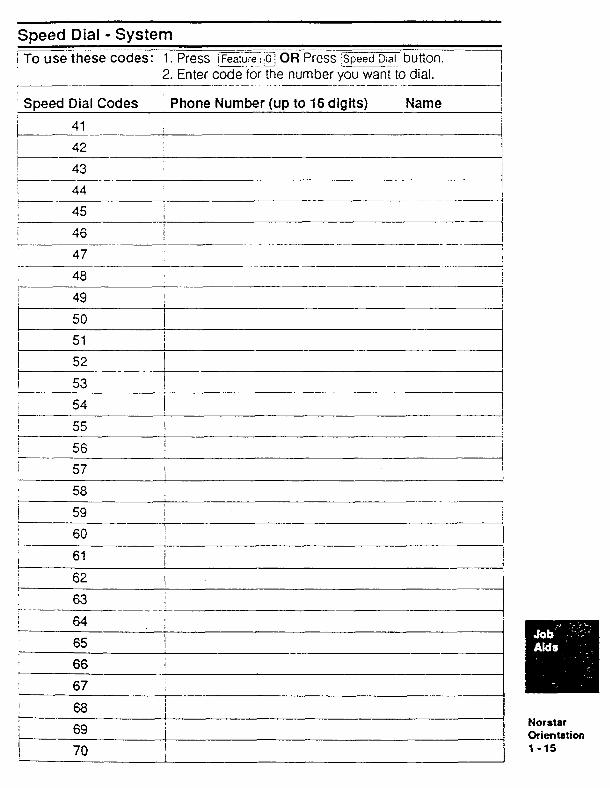
Speed Dial - System ~ - .--~ -- -- ___ i To use these codes: 1. Press /Feature ;!OI OR Press iSpeed Dial button. ~-...
2. Enter code for the number you want to dial. /
I .-_---_ -- . ..--.-- ~. ._.--___I
SDeed Dial Codes Phone Number (UP to 16 digits) Name /
41 1 42-- i 43 I
44
b--- 45 -~ - --_-I
I
52 I I
53 j
54 I I I 55 I I?---- /
56 I
I 57 I I
! 58
! .-._ .-A
1 59 I I
61 I 62 I , 63
64 .;
65 I 1 --. 66 / I
67 --- 68 I
I 69 Norstar
I Orientation
70 I l-15 I
Contents Administratlon 2-2
Introduction to Leamina Administration - 2-3
Inspecting Your Norstar Office System 2-4
Examining Your Phone 2-5
The Overlav The Programming Sheet
Learning Adminlstration Se&on
Entering the Administration Code Moving Among the Three Main Administration Headings
Moving to the Next Heading Moving Back to the Previous Heading
Moving from a Heading to a Sub-Heading
Z-7
2-8 2-8 2-8
Z-10 Z-10 2-11
Moving from a Sub-Heading to the Last Heading 2-11
Erasing the Current Setting 2-12
Selecting Letters Through the Dialpad 2-12
Entering Letters 2-13
Moving Back One Space to Overwrite 2-13
Erasina the Previous Letter 2-14
Endina the Administration Session Introduction to Administration Programming
2-14
2-15
Phone Defautts
Making Choices Programming Sheet 2-17
Phone Overlays 2-17
Enter Administration Access Code 2-17
How to Program
Allocating System Speed Dial Numbers 2-19
Assigning Co-workers’ Names to Phones 2-21
Settino Time and Date 2-23
Admin.
Administration
This function allows you to enter Speed Dial numbers, the names of your coworkers associated with the various intercom numbers, and the time and date.
When an Administration session is underway, your phone cannot be used to make or receive calls nor can your coworkers program the office phones.
Learning Administration This section is essentially a practice session that gets you started in Administration programming. Work through the button sequences once to become familiar with the process and the settings.
When you perform the IChange1 button sequence on pages 2-l 0 and 2-l 1, the current setting of your system is changed. If you exit from the learning session at this point you will have made changes to the original setting. To return the system to the original setting continue on to page 2-12.
Administration Programming When you feel comfortable with the process, you can enter the program and, in conjuction with the programming sheet and overlays, customize Norstar to meet your office requirements. This section guides you using programming charts.
Admin. 2-2
Introduction to Learning Administration
This section takes you through a sample Administration session.
There is no need to memorize the headings, sub-headings and choices, and the programming buttons, but you should become familiar with them. The better you understand the information, the easier your job will be.
After completing the Sample Session, the program settings should be the same as they were when you started. Work at your own speed. It takes about thirty minutes to complete the learning section. If you don’t have time to complete the session now, press the @ button to return the system to manual operation and complete the session at a later time.
Admin.
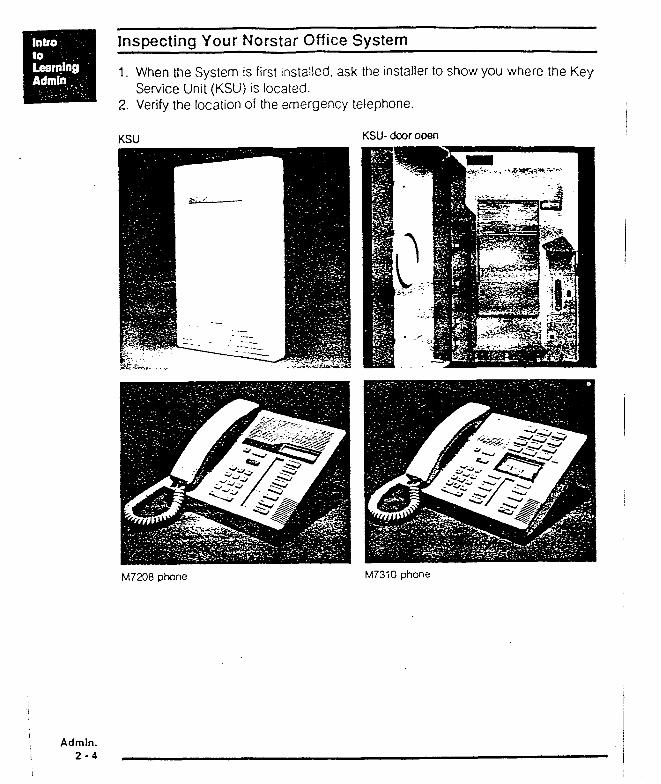
Inspecting Your Norstar Office System
1. When the System is first installed, ask the installer to show you where the Key Service Unit (KSU) is located.
2. Verify the location of the emergency telephone.
KSU KSU- door open
M7208 phone M73iQ phone
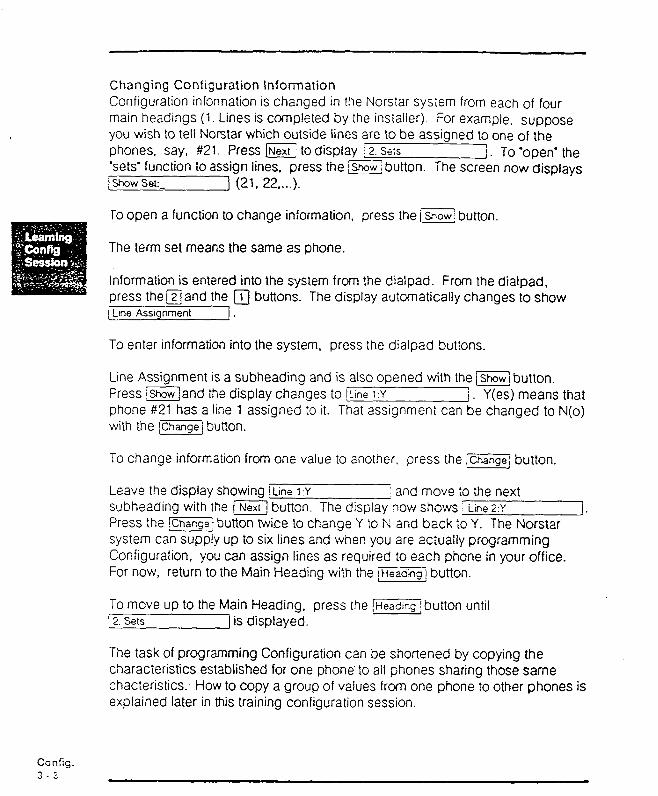
! Admin. 2-4
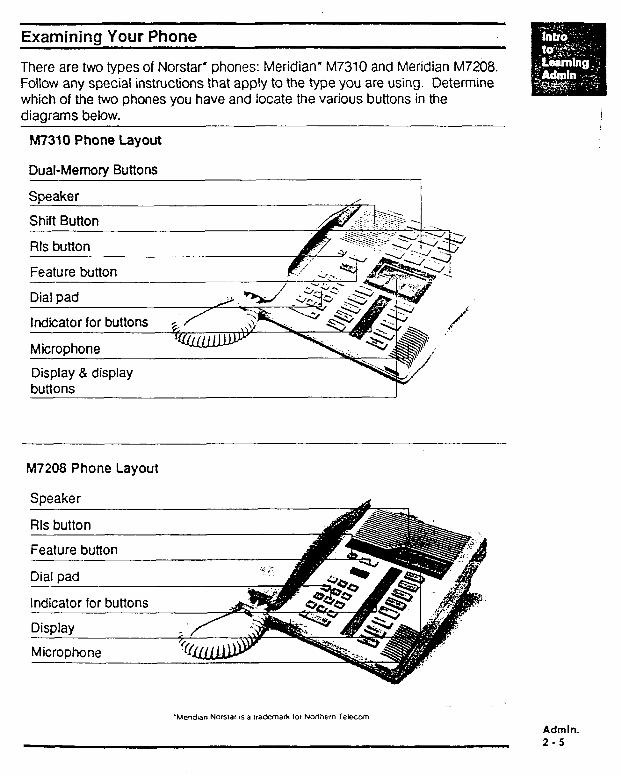
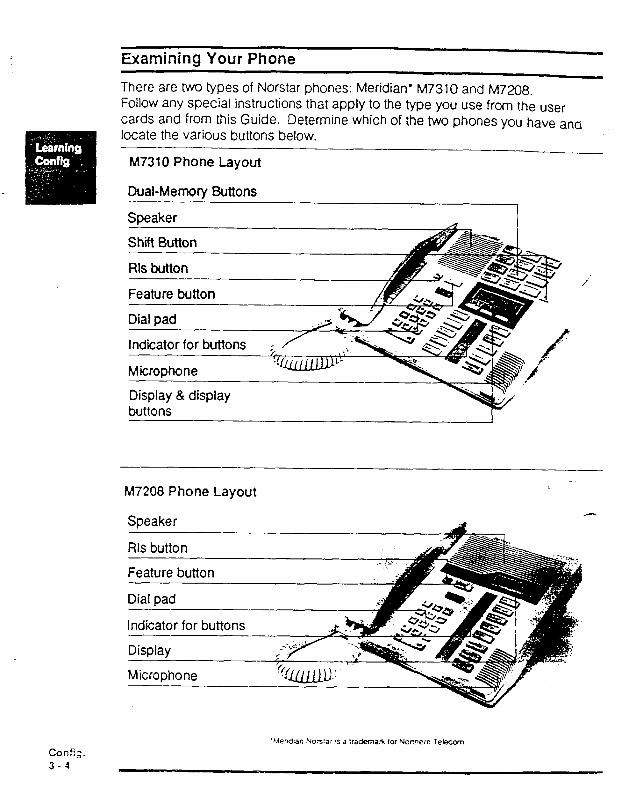
Examining Your Phone
There are two types of Norstar’ phones: Meridian” M7310 and Meridian M7X)8. Follow any special instructions that apply to the type you are using. Determine which of the two phones you have and locate the various buttons in the diagrams below.
M7310 Phone Layout
Dual-Memory Buttons
Speaker
Shift Button
Rls button
Feature button
Dial pad
Indicator for buttons
Display & display buttons
M7208 Phone Layout
Speaker
Rls button
Feature button
Dial pad
Indicator for buttons
Microphone
Admin. 2-5
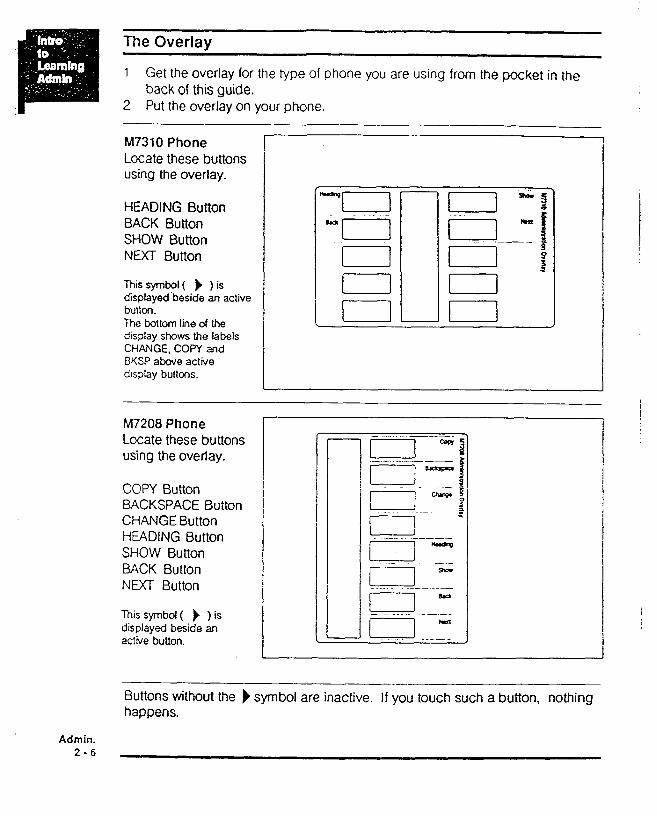
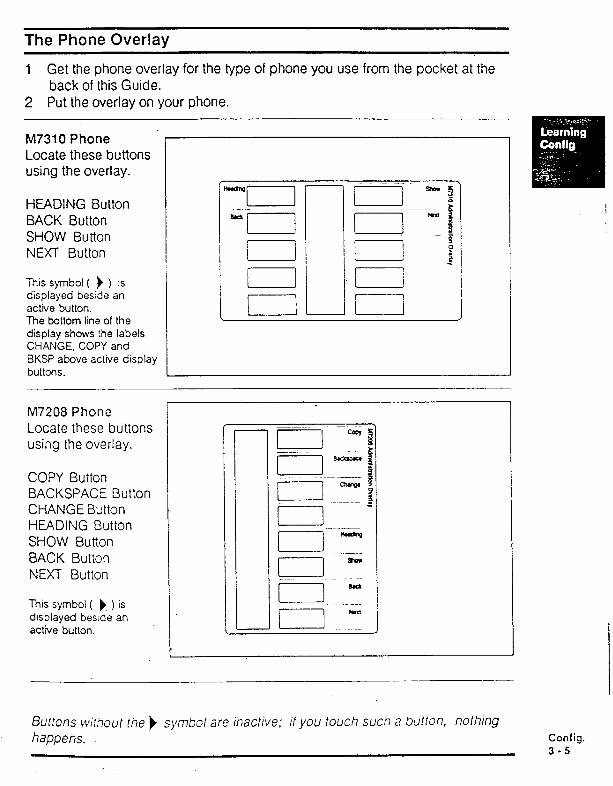
The Overlay
1 Get the overlay for the type of phone you are using from the pocket in the back of this guide.
2 Put the overlay on your phone.
h47310 Phone Locate these buttons using the overlay.
HEADING Button BACK Button SHOW Button NEXT Button
Thissymbol( ) )is ckplayed‘beside an active button. The bottom line of the display shows the labels CHANGE, COPY and BKSP above active display buttons.
“CZJ “0
‘0 I I I 1 -I
M7208 Phone Locate these buttons using the overlay.
COPY Button BACKSPACE Button CHANGE Button HEADING Button SHOW Button BACK Button NEXT Button
This symbol( ) ) is displayed beside an ahwe button.
Buttons without the ) symbol are inactive. If you touch such a button, nothing happens.
Admin. 2-6
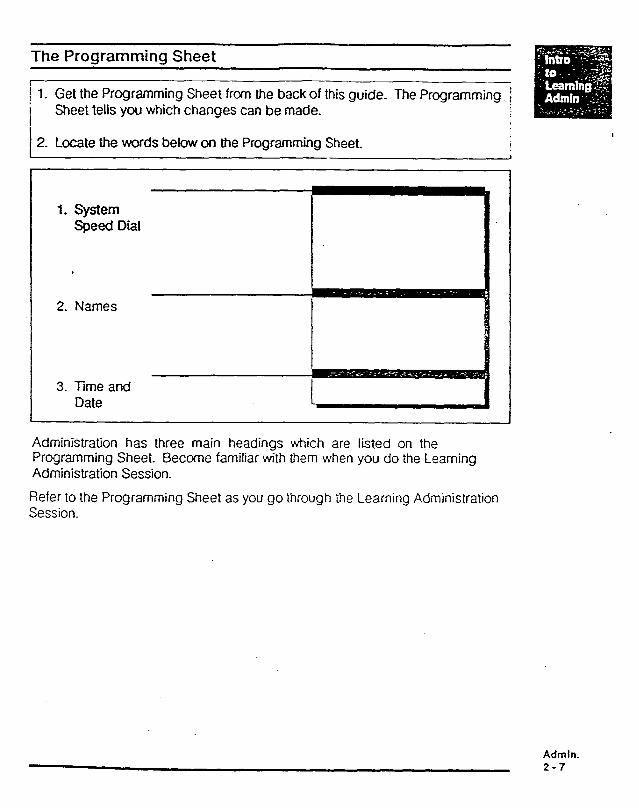
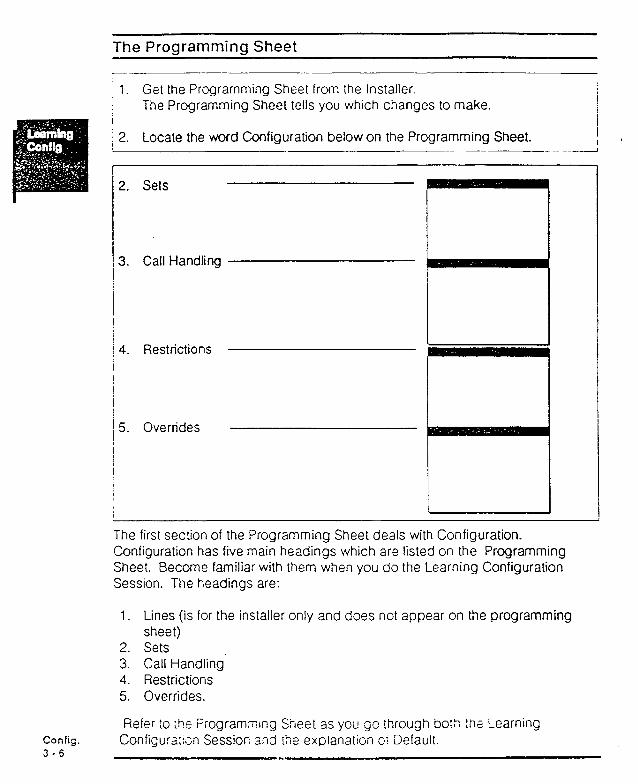
The Programming Sheet I ! 1. Get the Programming Sheet from the back of this guide. The Programming i i I
Sheet tells you which changes can be made.
2. Locate the words below on the Programming Sheet. ,
1. System Speed Dial
2. Names
3. Time and Date
Administration has three main headings which are listed on the Programming Sheet. Become familiar with them when you do the Learning Administration Session.
Refer to the Programming Sheet as you go through the Learning Administration Session.
Admin. 2-7
Learning Administration Session
Admin. 2-8
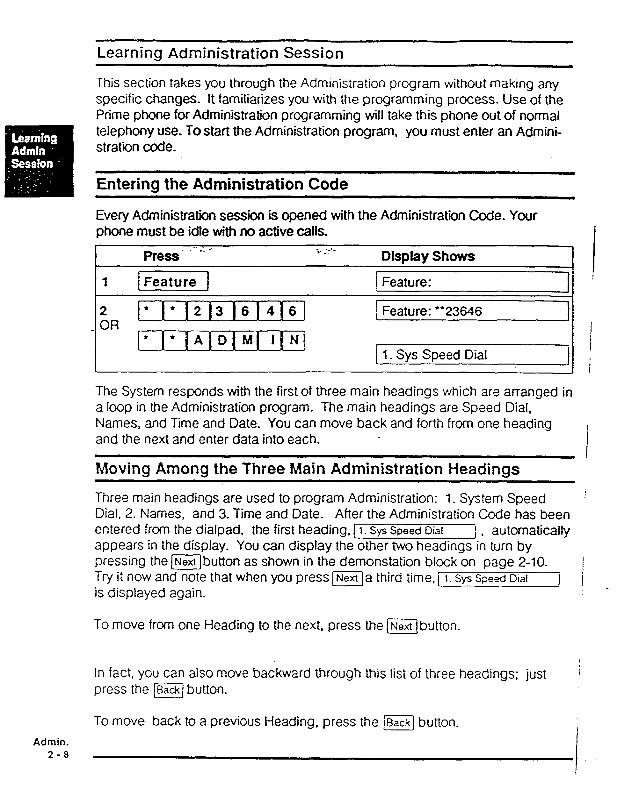
This section takes you through the Administration program without making any specific changes. It familiarizes you with the programming process. Use of the Prime phone for Administratiin programming will take this phone out of normal telephony use. To stat-t the Administration program, you must enter an Admini- stratiin code.
Entering the Administration Code
Every Administration session is opened with the Administration Code. Your phone must be idle with no active calls.
Press’ .- ‘-- Display Shows
‘1 I
jFeatore1 I ! Feature: I,
.iR ’ * * 12 I3 IS 14161 f Feature: “23646 1 l t [A[D[M~ I[t4[
1. Sys Speed Dial I
The System responds witI? the first of three main headings which are arranged in a loop in the Administration program. The main headings are Speed Dial, Names, and Time and Date. You can move back and forth from one heading , and the next and enter data into each.
I Moving Among the Three Main Administration Headings
Three main headings are used to program Administration: 1. System Speed j Dial. 2. Names, and 3. Time and Date. After the Administration Code has been entered from the dialpad. the first heading, / I. Sys Speed Dial ) , automatically appears in the display. You can display the other two headings in turn by pressing the (Nextbutton as shown in the demonstation block on page 2-10. Try it now and note that when you press ma third time, i I. sys Speed Dial 1
1 1
is displayed again.
To move from one Heading to the next. press the @button.
In fact, you can also move backward through this list of three headings; just press the (Bade button.
To move back to a previous Heading, press the ~ button.
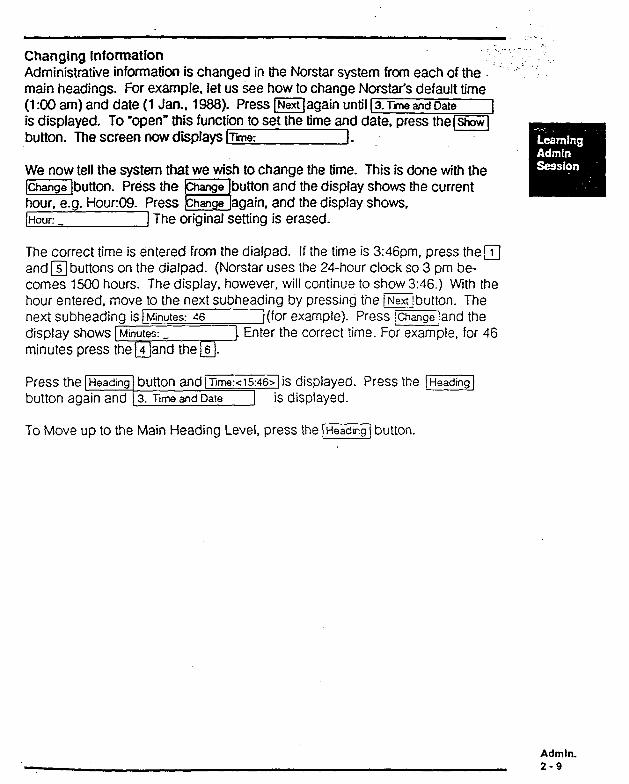
Changing Information -...
Administrative information is changed in the Norstar system from each of the main headings. For example, let us See how to change Norstar’s default time (1 :oO am) and date (1 Jan., 1988). Press (Next again until (3. Tii and Date I is displayed. To ‘open” this function to set the time and date, press the(show] button. The screen now displays ITiie: 1.
We now tell the system that we wish to change the time. This is done with the [changslbutton. Press the button and the display shows the current hour, e.g. Hour% Press again, and the display shows, flour: _ ] The original setting is erased.
.,/-,
c ’
The correct time is entered from the dialpad. If the time is 3:46pm, press them and q buttons on the dialpad. (Norstar uses the 24-hour clock so 3 pm be- comes 1500 hours. The display, however, will continue to show 3:46.) With the hour entered, move to the next subheading by pressing the li\lexiibutton. The next subheading is 1 Minutes: 46 I(for example). Press /Chwgeland the
Enter the correct time. For example, for 46
Press the [Heading button and ITime:<l5:46>]iS displayed. Press the -1 button again and 3. Tme and Date ] is displayed.
To Move up to the Main Heading Level, press the JHeadingl button.
Admin. 2-9

Moving to the Next Heading
To move from one heading to the next. or from one sub-heading to the next, press the m button.
1
12. Names
Movina Back to the Previous Headina
To move back to a previous heading, or back to a previous sub-heading, press the m button.
.,_,~D#t)hy Shq+&%? --‘I .‘ : ..Ljig&.. Y!:&g
2. Names I
1 1. Sys speed dial
3. Time and Date I is
i 2. Names LL 1 i l_ Sys speed dial I
Admin. z-10
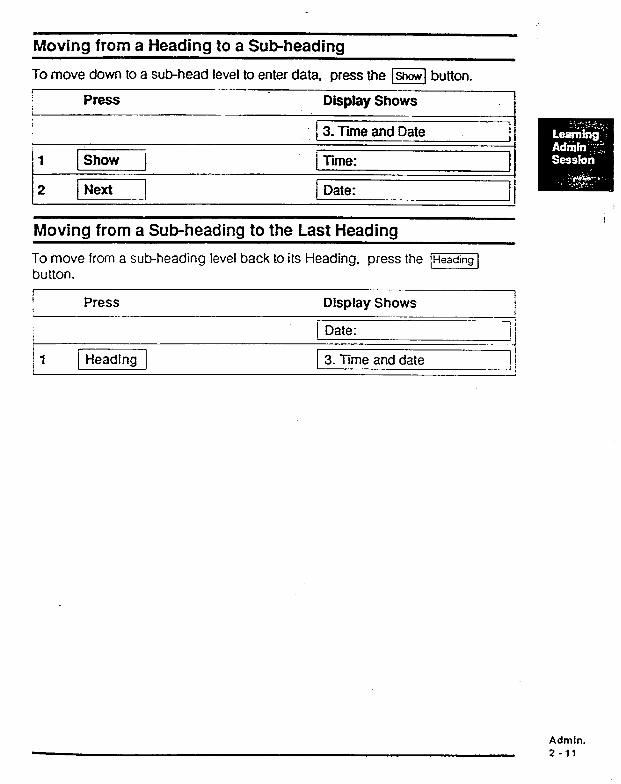
Moving from a Heading to a Subheading
To move down to a sub-head level to enter data, press the m button. i .-
PESS Display Shows I
------A f 3. Time and Date ii
4 @r-J 1 Time: I
2 [rj Date: I ii
Moving from a Sub-heading to the Last Heading
To move from a sub-heading level back to its Heading, press the (Heading] button. I
Press Display Shows 1 I
I , I
jl [Heading
1 Date:
3. Time and date 1 i
Admin. 2-11
Admin. 2-12
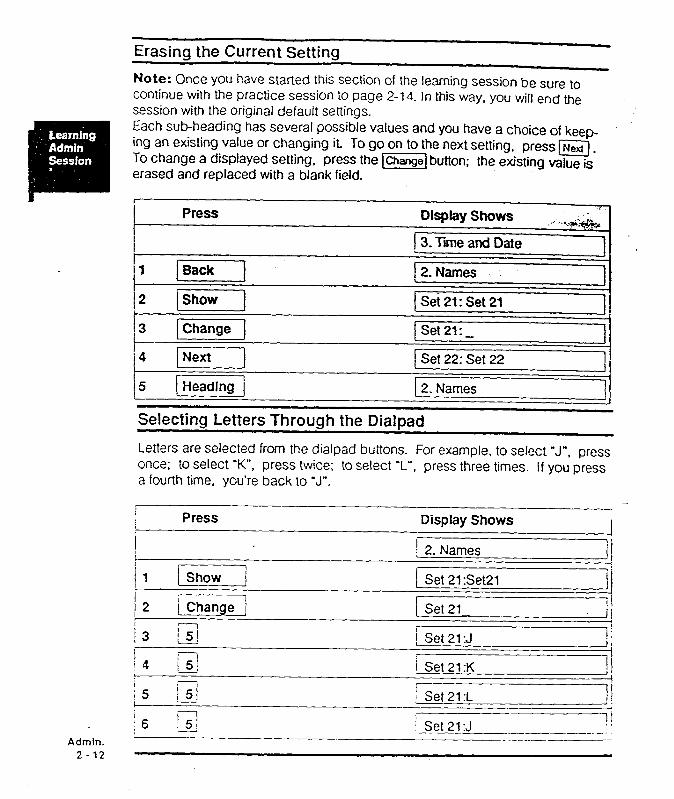
Erasing the Current Setting
Note: Once you have started this section of the learning session be sure to continue with the practice session to page 2-14. In this way, you will end the session with the original default settings. Each sub-heading has several possible values and you have a choice of keep- ing an existing value or changing it To go on to the next setting, press m. To change a displayed setting, press the 1-j button; erased and replaced with a blank field.
the existing value is
Press
I
/1 lpi--I
j2
Display Shows <.
.I -,.&&
} 3. liie and Date I ! 2.Names I
L3
(Show] 1 Set 21: Set 21
[ChangeJ I Set 21:-
‘4 pi----~ Set 22: Set 22
5 [Heading 2. Names
Selecting Letters Through the Dialpad
I!
I
II
1J
Letters are selected from the dialpad buttons. For example, to select ‘J”, press once; to select ‘K”, press twice; to select ‘L”, press three times. If you press a fourth time, you’re back to ‘J”.
Press Display Shows
1 [ 2. Names / 1 i!
i Show 1 Set 21 :SetZl jl
j2 1
i Change j [ Set 21 !I Ii
13 ‘G I Set 21:J .! !: 1,
7 j 4 Id iset 21 :K I
I I 15 .-J Get 21 :L II
/6 151 IF-7 b.et21:J -.----z i
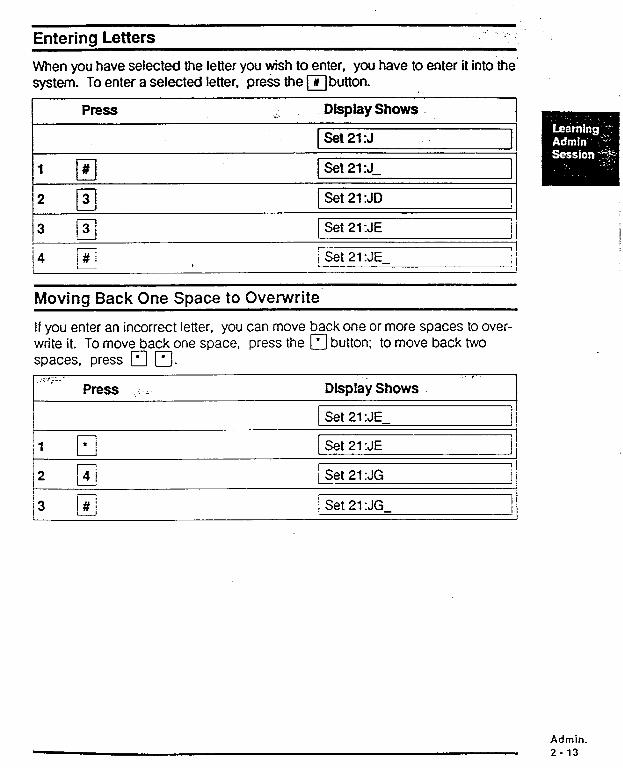
Entering Letters :. ”
When you have selected the letter you wish to enter, you have to enter it into the system. To enter a selected letter, pre& the m button.
I ~~ PRSS :. Display Shows I
ISet21:J II 1 cl # 1 Set 21:J-
I - ,1
2
3
Ll 3
m -
1 Set 21 :JD !’
1 Set 21:JE . I
14 k i Set 21 :JE- , ! I i
Moving Back One Space to Overwrite’
If you enter an incorrect letter, you can move back one or more spaces to over- write it. To move back one space, press the q button; to move back two spaces, press Fl q . . . ..Y.p. ’
Press .;. Dlspl& Shows ” ’ 1
1 Set 21:JE- i I I I 11 l I c 1 Set 21 :JE I
B bet 21 :JG 1
2 ii
/3 E i Set 21:JG- !/ ’ I
Admin. 2-13
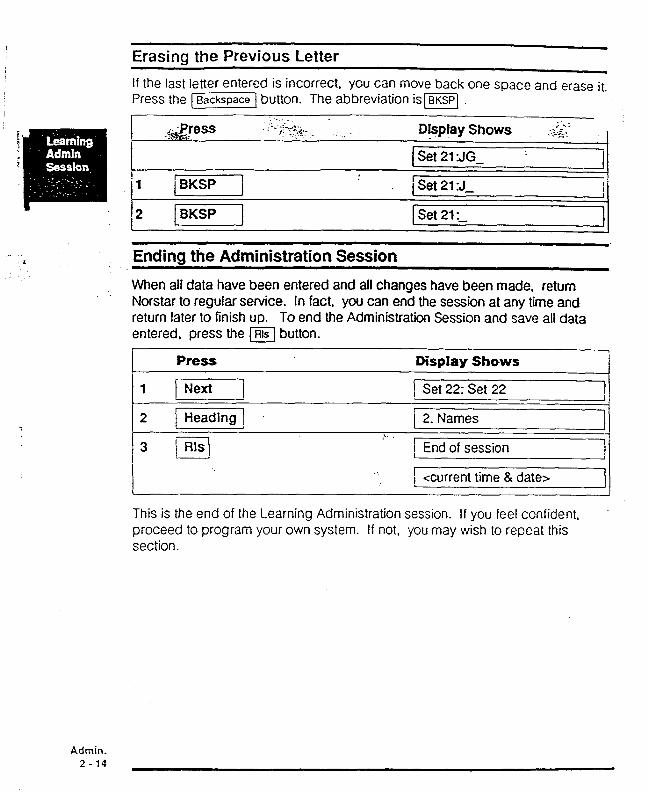
, Erasinq the Previous Letter If the last letter entered is incorrect. you can move back one space and erase it. Press the I Backspace 1 button. The abbreviation isl%%%l .
1 I
il /f3KSP 1 1 Set 21 :J- iI L
‘2 piF-]
I
1 Set 21:-
: Ending the Administration Session When all data have been entered and afl changes have been made, return Norstar to regular service. in fact, you can end the session at any time and return later to finish up. To end the Administration Session and save all data entered, press the @ button.
1 PEsZi Display Shows
II INext I Set 22: Set 22 1 I
2 [Heading . 1 2. Names 1 - : I I
3 El
.;.. RIS 1 End of session 1
.;_ f <current time & date> 1
This is the end of the Learning Administration session. If you feel confident, proceed to program your own system. If not, you may wish to repeat this section.
Admin. 2-14
Introduction to Administration Programming
YOU are now ready to customize your Norstar ofice system. Administration Programming explains the defaults or pre-programmed values that are originally assigned to your Norstar system. With the use of the programming sheet (provided by the Installer). Job Aids from Orientation and overlays from the back of this Guide, you can customize your office system. When ready to make changes to your office system, follow the programming charts and procedures provided in this section.
Let your co--workers know when you are in Administration. They cannot program or use certain features while you are in Administration. The display appears with (ACCESS Denied 1. This same message appears if they cannot program a feature that is not available on the system.
Admin. 2-15
Phone Defaults
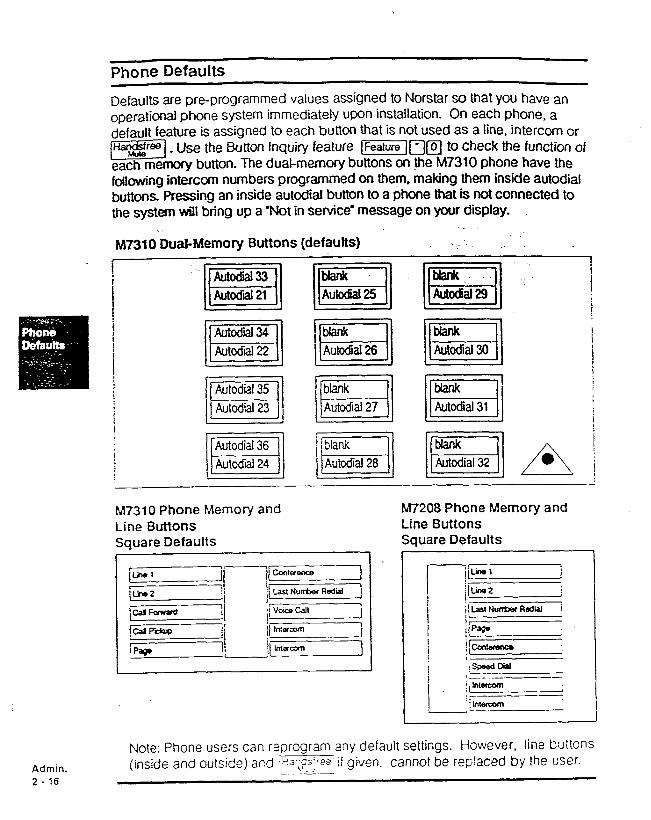
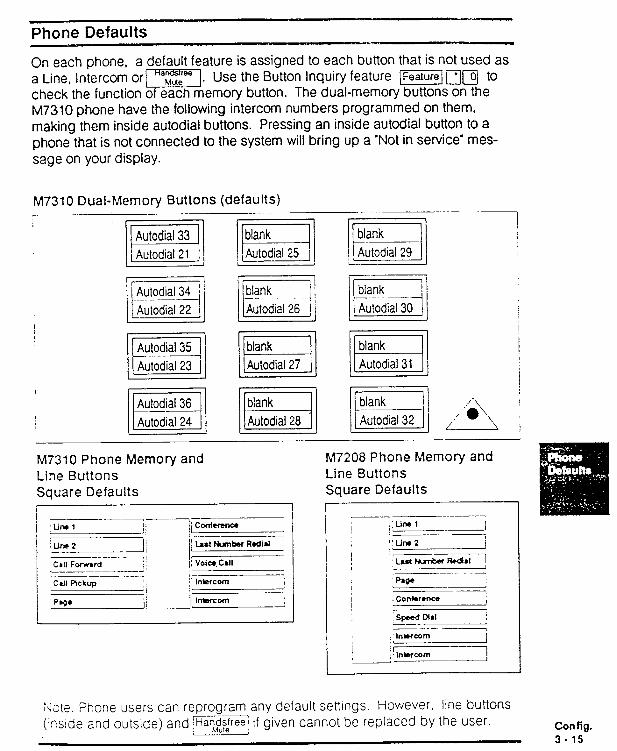
Defaults are pre-programmed values assigned to Norstar so that you have an operational phone system immediately upon installation. On each phone, a default feature is assigned to each button that is not used as a line, intercom or
I- Hancfsfr@ Use the E3utton Inquiry feature [j/r{/-?F] to check the function of each memcny button. The dual-memory buttons on .@e M7310 phone have the following intercan numbers programmed on them, making them inside autodial buttons Pressing an inside autodial button to a phone that is not connected to the system will bring up a ‘Not in service* message on your display.
~7310 DuakMemory Buttons (defaults)
Autodii 34 iF=ii Autodii 22
M7310 Phone Memory and M7208 Phone Memory and Line Buttons Line Buttons Sauare Defaults Square Defaults
Note: Fhone users can reprogram any default settings. However. line buitonS
Admin. 2 - 16
(inside and outside) and +J\c~;= =‘if given, cannot be replaced by the user. -.. .-.-
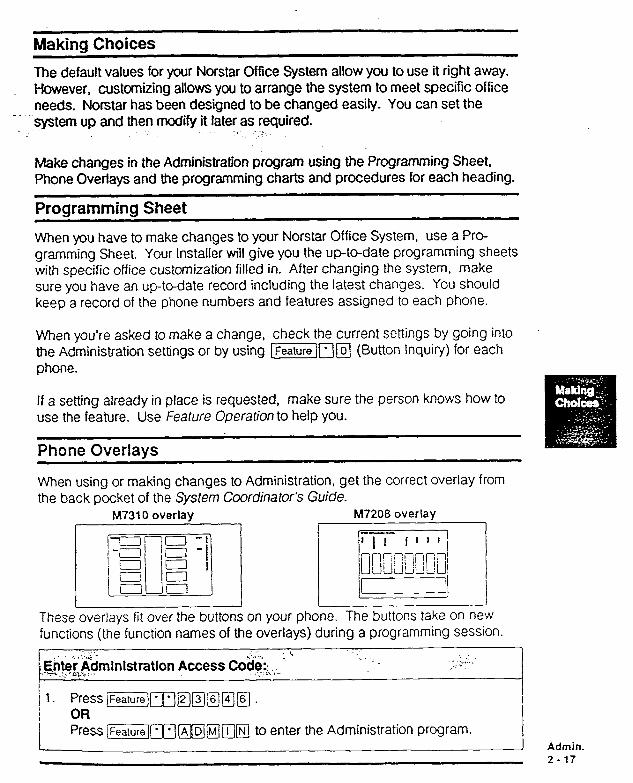
Making Choices
The default values for your Norstar Office System allow you to use it right away. However. customizing allows you to arrange the system to meet specific office needs. Norstar has been designed to be changed easily. You can set the
.-- system up and then modify it later as required. ‘> ‘I,..
Make changes in the Administration program using the Programming Sheet, Phone Overlays and the programming charts and procedures for each heading.
Programming Sheet
When you have to make changes to your Norstar Office System, use a Pro- gramming Sheet. Your Installer will give you the up-to-date programming sheets with specific office custcxnization filled in. After changing the system, make sure you have an up-todate record including the latest changes. You should keep a record of the phone numbers and features assigned to each phone.
When you’re asked to make a change, check the current settings by going into the Administration settings or by using FIr\@j (Button inquiry) for each phone.
If a setting already in place is requested, make sure the person knows how to use the feature. Use Feature Operation to help you.
Phone Overlavs
When using or making changes to Administration, get the correct overlay from the back pocket of the System Coordinator’s Guide.
M7310 overlay M7208 overlay
These overlays fit over the buttons on your phone. The buttons take on new functions (the function names of the overlays) during a programming session.
En&Admlnlstratlon Access Cod$;, s-l ’ .-* ..-. ‘%2;-.. /
. . : -2
I Press jFeaturejr;-h;Jmp[ rjw to enter the Administration program. j L 1 Admin.
2 - 17
- - . ._ ._ _
How to Program
The following pages will help you make changes in Administration.
Remember, you can get a result only by pressing the buttons with ) beside them when using the overlays. If you want to explore the system on.your own, use the [Next, ISl, PI. (Headingland dialpad buttons. Settings are not changed unless you press the Ichange) button, Remember to use your phone overlay and refer to the display.
System Coordinator Notes: (use this space to make any notes you may have lbout programming Administration).
The features affected in each heading are listed in italics located at the bottom of the text on the hints page.
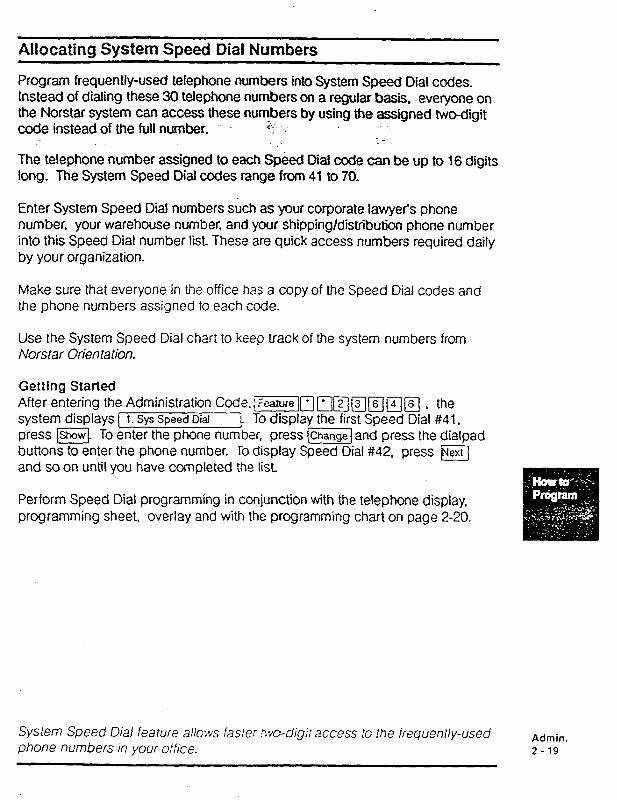
Allocating System Speed Dial Numbers
Program frequently-used telephone numbers into System Speed Dial codes. Instead of dialing these 30 telephone numbers on a regular basis, everyone on the Norstar system can acceS these numbers by using the assigned two-digit code instead of the full number. % .
: The telephone number assigned to each Speed Diaf code can be up to 16 digits long. The System Speed Dial codes range from 41 to 70.
Enter System Speed Dial numbers such as your corporate lawyer’s phone number, your warehouse number, and your shipping/distribut phone number into this Speed Dial number list These are quick access numbers required daily by your organization.
Make sure that everyone in the office has a copy of the Speed Dial codes and the phone numbers assigned to each code.
Use the System Speed Dial chart to keep track of the system numbers from Norstar Orientation.
Gettlng Started After entering the Administration Code.:~~~r;7~~l~~~~~~~~ , the system displays 1 1. Sys Speed 0-d 1 To display the first Speed Dial #41, press m. To enter the phone number, press E] and press the dialpad buttons to enter the phone number. To display Speed Dial #42, press m and so on until you have completed the list
Perform Speed Dial programming in conjunction with the telephone display, programming sheet, overlay and with the programming chart on page 2-20.
System Speed Dial feature a/lo% faster ?.‘/Gd@;i access :o the frequently-used phone numbers in your office.
Admin. 2-19
1. System Speed Dial Programming
The following chart lists the step by step process to storing telephone numbers into 2 digit fast access, System Speed Dial memory bins (41 - 70).
Note: Each telephone number entered can be a maximum of 16 digits in length.
f Press Display S~OJMS 4:; :
--j..
1 <Current Time 8 Date> T”
1 r i 1. Sys speed dial
I#41: *current # or blank>
‘3 iChange .2 f#41:/
[ Enter dumber, I \#41: uwmbeh 1
F] 1#42: <current # or blank>
6 (Change ; #42: _ I
7 [ Enter <number> I i #42: <number> I
/ 8 lNextj I I
I I I
I I I
I I I
I I I
I I ( i #70: cnumbeo
I :$&r-T
I I : 2. Names I 1 I j Rls 1 1 End of session I
i <Current Time 8 Date> j I
Admin. 2 - 20
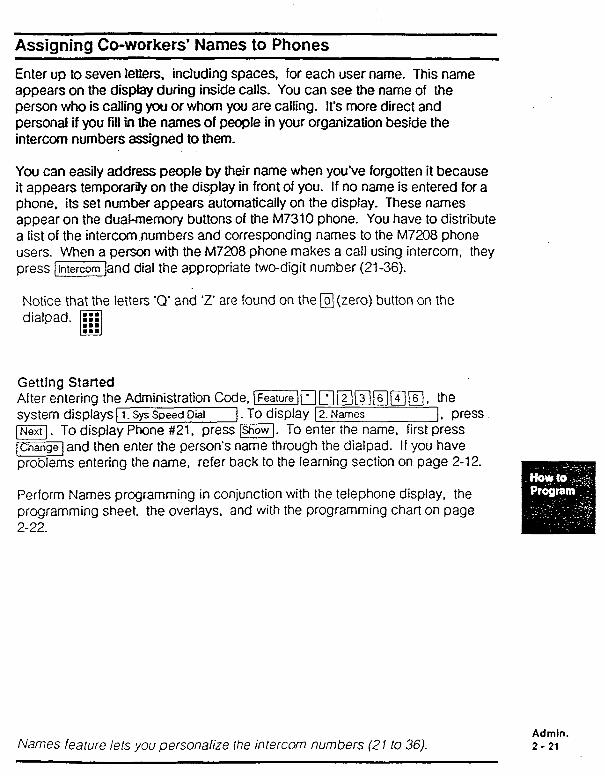
Assigning Co-workers* Names to Phones
Enter up to seven letters, including spaces. for each user name. This name appears on the display during inside calls. You can see the name of the person who is calling you or whom you are calling. It’s more direct and personal if you fill in the names of people in your organization beside the intercom numbers assigned to them.
You can easily address people by their name when you’ve forgotten it because it appears temporarily on the display in front of you. If no name is entered for a phone, its set number appears automatically on the display. These names appear on the dual-memory buttons of the M7310 phone. You have to distribute a list of the intercom numbers and corresponding names to the M7208 phone users. When a person with the M7208 phone makes a call using intercom, they press [Eland dial the appropriate two-digit number (21-36).
Notice that the letters ‘Q’ and ‘Z’ are found on the q (zero) button on the
Gettlng Started After entering the Administration Code, [Featurej~]~‘)[2\~)~j~]16j, the system displays 11. Sys Speed Dial ] _ To display [ 2. Names 1. press m. To display Phone #21, press r-1. To enter the name, first press -land then nt e er the person’s name through the dialpad. If you have problems entering the name, refer back to the learning section on page 2-12.
Perform Names programming in conjunction with the telephone display, the programming sheet. the overlays, and with the programming chart on page 2-22.
Names feature lets you personalize the intercom numbers (21 to 36). Admin. 2 - 21

-~ 2 Names Programming
The following chart lists the step by step process to assigning user names to each phone in the Meridian Norstar system.
Note: Letters are entered from the dialpad buttons. For example, to enter “P”, press the number ‘7” once; to enter “R”, press the number “7” twice; to enter “S”, press the number 7” three times- After each letter entered, press the “#” button to move the cursor, on the display, over one space.
I P&s DlspIay Shows sy.8. _.. E
I I f &went Time 8 Date> I I
2 (Next j
:3 [Show
i4 !
is [ Enter <name>
16 INext]
17 [Chanqef
1s I
iNext 1
12. Names I
i Set 21: <current name>
!Set21:- 1 I I Set 21: <name> 1
r Set 22: <current name> ’
+Set22:- 1 1
I I
I 1 1 Set <n>: ccurrent name> 1 I
1 , [Heading i ! 2. Names
rj I End of session
1 <Current Time & Date> I 1
Admin. 2 - 22
Administration
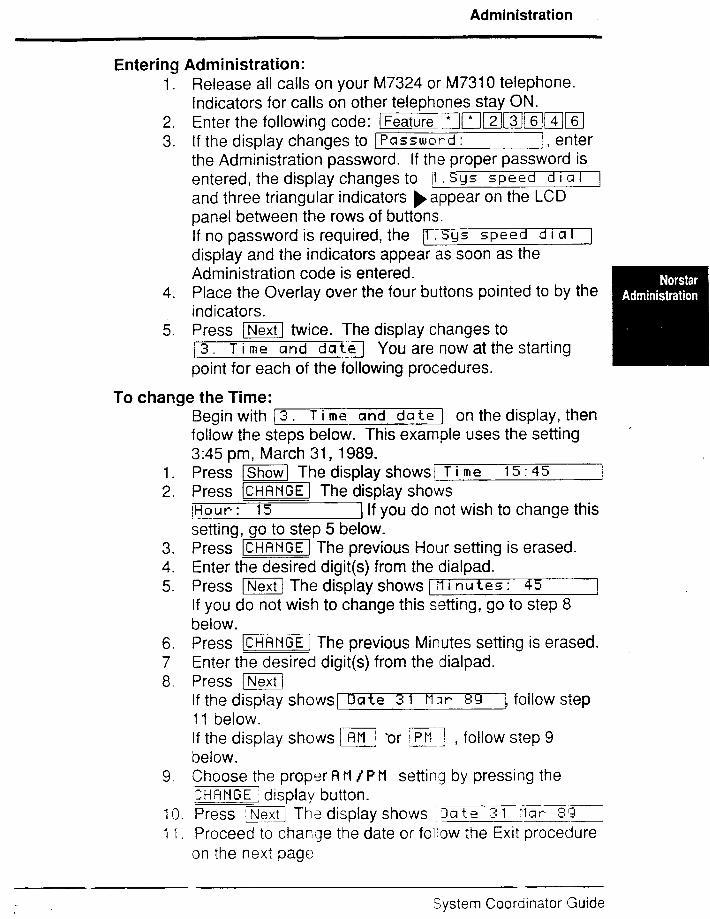
Entering Administration: 1. Release all calls on your M7324 or M7310 telephone.
Indicators for calls on other telephones stay ON. 2. Enter the following code: ~Feature~~r?l~k?Il~]~/ 3. If the display changes to 1 Fasswor-d : 1, enter
the Administration password. If the proper password is entered, the display changes to 11 . sgs speed d 1 a I 1 and three triangular indicators )appear on the LCD panel between the rows of buttons. If no password is required, the Il. SLJS speed d i a I 1 display and the indicators appear as soon as the Administration code is entered.
4. Place the Overlay over the four buttons pointed to by the indicators.
5. Press [] twice. The display changes to [ 3. T i me and date ] You are now at the starting point for each of the following procedures.
To change the Time: Begin with 13. T i me and date 1 on the display, then follow the steps below. This example uses the setting . 3:45 pm, March 31, 1989.
1. Press /%KGl The display shows/ T i me 15:45 1 2. Press -1 The display shows
IHour: 15 1 If you do not wish to change this setting, go to step 5 below.
3. Press -1 The previous Hour setting is erased. 4. Enter the desired digit(s) from the dialpad. 5. Press [I The display shows 1 ti i nu tes : 4:,
If you do not wish to change this setting, go to step 8 below.
6. Press -1 The previous Minutes setting is erased. 7. Enter the desired digit(s) from the dialpad. 8. Press WI
If the display shows1 Uate 3 1 Mlr 8Y ] follow step 11 below. If the display shows 1x1 ‘or ;PM] , follow step 9 below.
9. Choose the proper A M )PM setting by pressing the CHHNGE j display button.
10. Press jNext 1 The display shows -3a te 3 1 Uar- 8’2 ; ~~___ 1 1. Proceed to change the date or fol’ow the Exit procedure
on the next page
System Coordinator Guide
- _, Administration
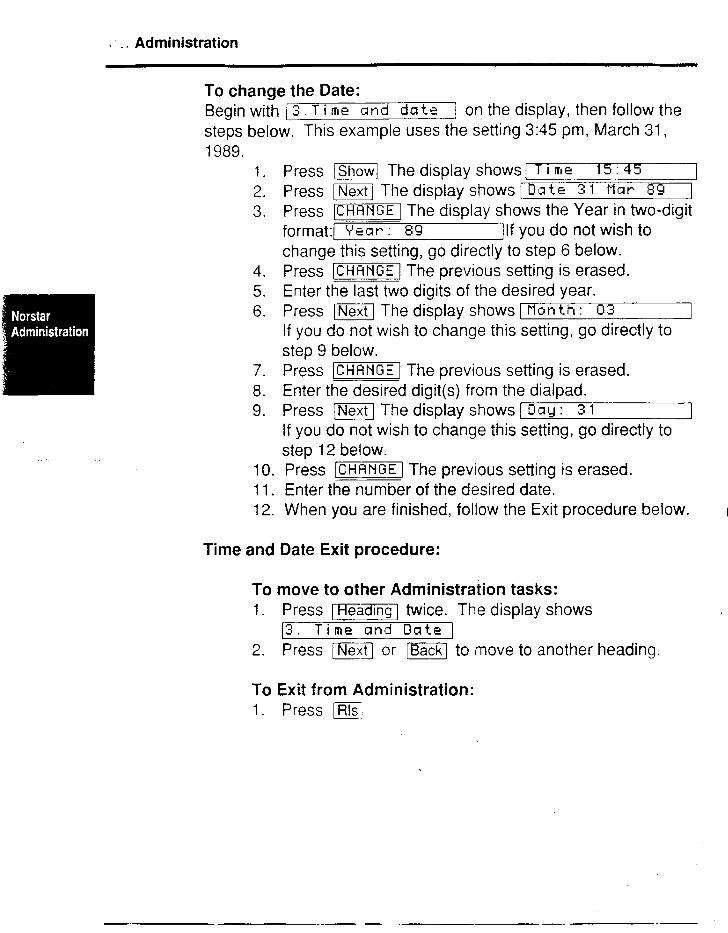
To change the Date: Begin with ( 3 _ T i me and date 1 on the display, then follow the steps below. This example uses the setting 3:45 pm, March 31, 1989.
1. Press -1 The display shows [ T i me 15 : 45 2. Press w] The display shows [Date 3 1 Mar 89 3. Press -1 The display shows the Year in two-digit
format:[ year: 89 )If you do not wish to change this setting, go directly to step 6 below.
4. Press [I=HHNGEJ The previous setting is erased. 5. Enter the last two digits of the desired year. 6. Press m The display shows 1 Month : 03
If you do not wish to change this setting, go directly to step 9 below.
7. Press -1 The previous setting is erased. 8. Enter the desired digit(s) from the dialpad. 9. Press I] The display shows 1 Day : 3 1
If you do not wish to change this setting, go directly to step 12 below.
10. Press 1-1 The previous setting is erased. 11. Enter the number of the desired date. 12. When you are finished, follow the Exit procedure below.
Time and Date Exit procedure:
To move to other Administration tasks: 1. Press /Heading] twice. The display shows
13. Time and Date 1 2. Press i] or [ml to move to another heading.
To Exi.t from Administration: 1. Press E
System Coordinator Guide
Contents Confiauration 3-2
Introduction to Configuration Learning 3-3 .---- - -- __- .._.. - Examinino Your Phone 3-4 The Phone Overtav 3-5
The Programming Sheet 3-6
Learning Conflguration Session Entering the Configuration Code
3-7 --~ 3-7 __-
Moving Among the Five Main Configuration Headings 3-7 _-.-__ __ ~~. _-_ Moving to the Next Heading 3-9 ___--_______--- -____ Moving to the Previous Heading 3-9 -___- ._.. ---.-- .--. Moving from Heading to Subheading 3- 10 _____ Moving from a Subheading to a Heading 3- 10
Change the Current Setting 3- 11
Copying information from One Phone to Another Phone 3- 12
Copying Information from One Phone to Other Phones 3- 12 Ending the Learning Configuration Session 3- 13 Introduction to Configuration Programming 3- 14 _--__--- System Defuafts 3- 14 -. Phone Defaults 3--15 Making Choices 3-16
Programming Sheet 3- 16 - Phone Overlays / Access Code How to Program Configuration 3: 17
Lines (Installer only) Sets (Phones) 3 - 20 ___-----___ _____. .-.. Call Handling 3 - 24 -- _--- -- Restrictions 3 - 28 ____-- - -__-- Overrides 3-30 I
Config. 3-1
Configuration
This function allows you to enter data on Lines, Sets, Call Handling, Restrictions, and Overrides. The installer sets the Line function for you.
Remember, however, that when a Configuration session is underway. your phone cannot be used to make or receive call nor can your co-workers program their office phones.
Learning Configuration This section is essentially a practice session that gets you started in Configuration programming. If you run through the button sequences one time to become familiar with the process and the settings, you should end up with the original default settings. If you perform these button sequences after initial programming has been completed, the copy button sequence on page 3-12 can result in changes.
Configuration Programming When you feel comfortable with the process, you can enter Configuration and, in conjunction with the programming sheet and overlays, customize Norstar to meet your specific office requirements.
Config. 3-2 r-s..
~-__ - . - “ - .-,=m -- .--a.---
Introduction to Learning Configuration
This section explains the phones and tools you need to perform configuration.
You only need to run through this once before going to make actual changes to Configuration programming.
There is no need to memorize the headings, sub-headings and choices, and the programming buttons, but you should become familiar with them. The better you understand the information, the easier your job will be.
If you follow the Sample Configuration Session, the program settings should be the same as they were when you started. Work at your own speed. It takes about thirty minutes to complete the learning section, If you don’t have time to complete the session, press the / button. You can begin it again later.
Examining Your Phone -
There are two types of Norstar phones: Meridian’ M7310 and M7208. Follow any special instructions that apply to the type you use from the user cards and from this Guide. Determine which of the two phones you have ana locate the various buttons below.
M7310 Phone Layout
Dual-Memory Buttons
Srxaker
Shift Button
Display & display buttons
M7208 Phone Layout
Speaker
Rls button
Feature button
Dial pad
Microphone
The Phone Overlay
1 Get the phone overlay for the type of phone you use from the pocket at the back of this Guide.
2 Put the overlay on your phone.
M7310 Phone Locate these buttons using the overlay.
HEADING Button BACK Button SHOW Button NEXT Button
This symbol ( ) ) is displayed beside an active button. The bottom line of the display shows !he labels CHANGE, COPY and BKSP above active display buttons.
I
M7208 Phone Locate these buttons using the overlay.
COPY Button BACKSPACE Button CHANGE Button HEADING Button SHOW Button BACK Button NEXT Button
This symbol ( ) ) is displayed beside an active button.
r
- -
Buttons without the ) symbol are inactive; if you touch such a button, nothing happens. Config.
3-5
Config. 3-6
The Programming Sheet
1. Get the Programming Sheet from the Installer. The Programming Sheet tells you which changes to make.
!
I 2. Locate the word Configuration below on the Programming Sheet. I - .- -----A
2. Sets
3. Call Handling
4. Restrictions
5. Overrides
The first section of the Programming Sheet deals with Configuration. Configuration has five main headings which are listed on the Programming Sheet. Become familiar with them when you do the Learning Configuration Session. The headings are:
1. Lines (is for the installer only and does not appear on the programming sheet)
2. Sets 3. Call Handling 4. Restrictions 5. Overrides.
Refer ;o ;he Programmrng Sheet as you go through bo:h :hs Learning Configurs::;;. ‘I Session and the explanation oi Default.
Learning Configuration Session
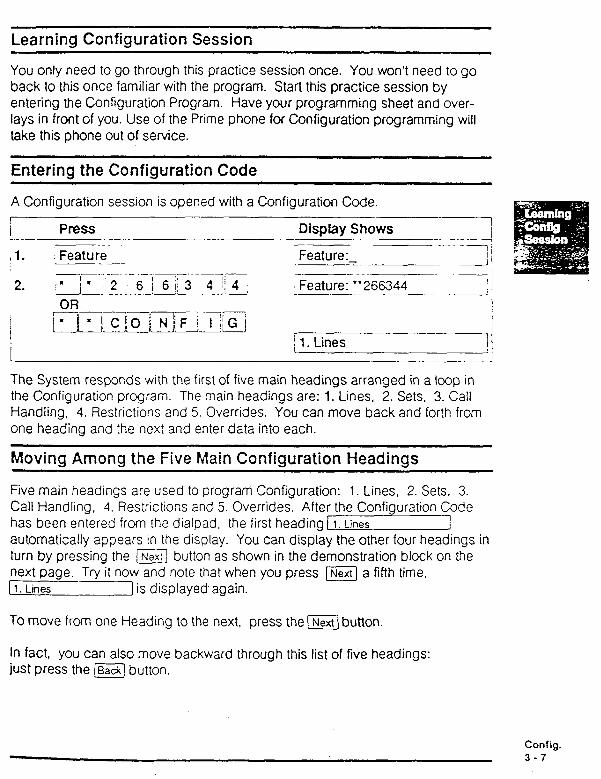
You only need to go through this practice session once. You won’t need to go back to this once familiar with the program. Start this practice session by entering the Configuration Program. Have your programming sheet and over- lays in front of you. Use of the Prime phone for Configuration programming will take this phone out of service.
Entering the Configuration Code
A Configuration session is opened with a Configuration Code. I
PR?sS --.-. ._- ~._. ,l. Featur_e-,
Display Shows -- -____ Feature:-
2. -.___- - -- Feature: “266344 1 i . _.~ _--_
The System responds with the first of five main headings arranged in a loop in the Configuration program. The main headings are: 1. Lines, 2. Sets, 3. Call Handling, 4. Restrictions and 5. Overrides. You can move back and forth from one heading and the next and enter data into each.
Moving Among the Five Main Configuration Headings
Five main headings are used to program Configuration: 1. Lines, 2. Sets, 3. Call Handling, 4. Restrictions and 5. Overrides. After the Configuration Code has been entered from the dialpad, the first heading 1 I. Lines
I I
automatically appears in the display. You can display the other four headings in turn by pressing the m button as shown in the demonstration block on the next page. Try it now and note that when you press m a fifth time,
1 1. Lines ] is displayed.again.
To move from one Heading to the next, press the @ button.
In fact, you can also move backward through this list of five headings: just press the m button.
Config. 3-7
Changing Configuration Information Configuration information is changed in the Norstar system from each of four main headings (t Lines is ccxnpleted by the installer). For example, suppose you wish to tell Norstar which outside lines are to be assigned to one of the phones, say, #21. Press E to display ; 2. Sex 1. To ‘open’ the I ‘sets’ function to assign lines. press the tshow j button. The screen now displays i show set:- ] (21, 22....).
To open a function to change information, press the’= button,
The term set means the same as phone.
Information is entered into the system from the dialpad. From the dialpad, press theBand the m buttons. The display automatically changes to show
[Line Assignment 1
To enter information into the system, press the dialpad buttons.
Line Assignment is a subheading and is also opened with the I! button. Press jshowjand the display changes to !bne I :Y i. Y(es) means that phone #21 has a line 1 assigned to it. That assignment can be changed to N(o) with the IChange) button.
To change information from one value to another, press the iChange; button.
Leave the display showing [tine I:Y I and move iO the next subheading with the f button. The display now shows Line 2:~ 1.
Press the LChang;: button twice to change Y to N and back to Y. The Norstar system can supply up to six lines and when you are actually programming Configuration. you can assign lines as required to each phone in your office. For now, return to the Main Heading with the IHezding ) button.
To move up to the Main Heading, press the lHeading button until 12. sets 1 is displayed.
The task of programming Configuration can be shortened by copying the characteristics established for one phone. to all phones sharing those same chacteristics: How to copy a group of values from one phone to other phones is explained later in this training configuration session.
Changing the Current Setting
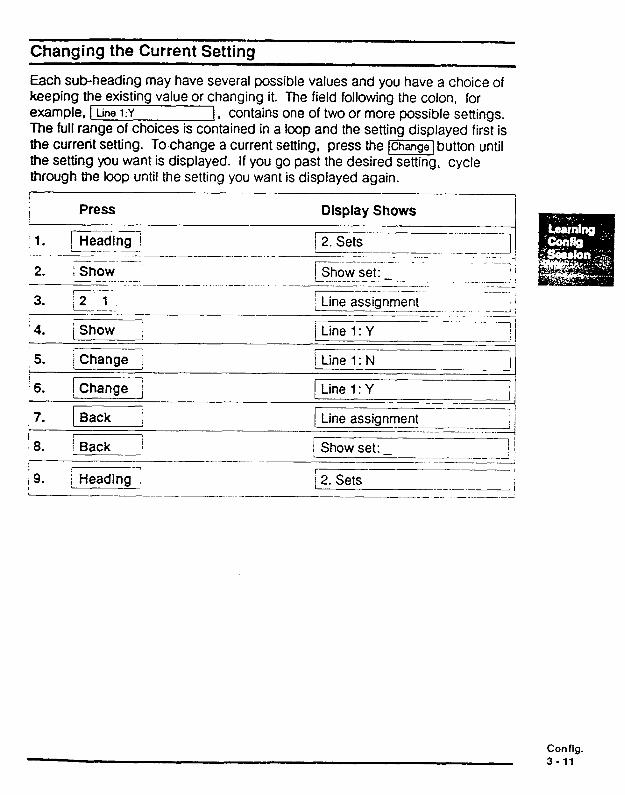
Each sub-heading may have several possible values and you have a choice of keeping the existing value or changing it. The field following the colon, for example, 1 Line i:Y 1 contains one of two or more possible settings. The full range of choices is contained in a loop and the setting displaved first is the current setting. To-change a current setting, press the 1-1 button until the setting you want is displayed. If you go past the desired setting, cycle through the loop until the setting you want is displayed again.
i Press Display Shows I I
il. fiGi iii 12. - --------I I i-- _ -.
_-.-._-
2. I Show ~-... ~_
3. z -7.. _--
iq* /Show i
,s. i Change i
: - - - - - -_ __ -.-j I ___-- -_...- __ -..---_- -. - ----
kh ow set- I / L--...--..- _Lz __..._ .-___-__.-- ..___. I _--.-._ I Line assignment .-~-- .~ -1;
---- j Line 1: Y -?i jLine-N
.----I k
r j Change j L Line I: Y
17. m -. ----.-I
Line assignment --. .- 18.
I Ij f Back i 1 Show set: _ -----I!
---__ -___-.__-.. 2
/ 9. i Heading j 2. Sets .--.. A I
Conflg. 3-11
Config.
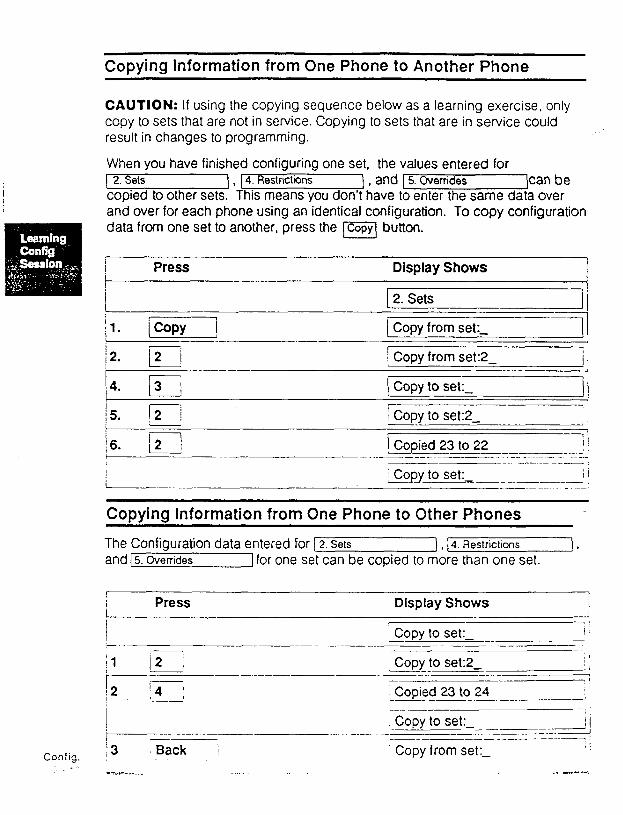
Copying Information from One Phone to Another Phone
CAUTION: If using the copying sequence below as a learning exercise, only copy to sets that are not in service. Copying to sets that are in service could result in changes to programming.
When you have finished configuring one set, the values entered for 1 2. sets 1 , 14. Restrictions 1 , and 1 5. Overrides lean be copied to other sets. This means you don’t have to enter the same data over and over for each phone using an-identical configuration. To copy configuration data from one set to another, press the button.
1 Press -- Display Shows --I
2. Sets
1. icopy 1 Copy from set:- -7 -j
2. p-J -- _..-- I
I Copy from set:2- jI I ---.___
4. 3 / cz Copy to set:-
/q --
5. I Copy to set:2- -1
6. ‘2 fcigGr- ----y-l
II L- -__-- ___-_ 2 -- ..- ~- Qpy to set: il _-~--.~---~ _ __-- -.-. _..--.
Copying Information from One Phone to Other Phones
The Configuration data entered for j 2. Sets \ , ) 4. Restrictions and 15. Overrides 1 for one set can be copied to more than one set.
Press ip__-.-
Display Shows
Copy to set:- I’ - -- -___-.. . ,- ~~ il 121 l Copy to set:2- / ’ : / --___--__ -II.. -.. -___ -
’ Copied 23 to 24 -
I Copy to set: i ---~1 - =:A ____ _________- --- -- ~-- ’ Back j Copy from set:- ,’
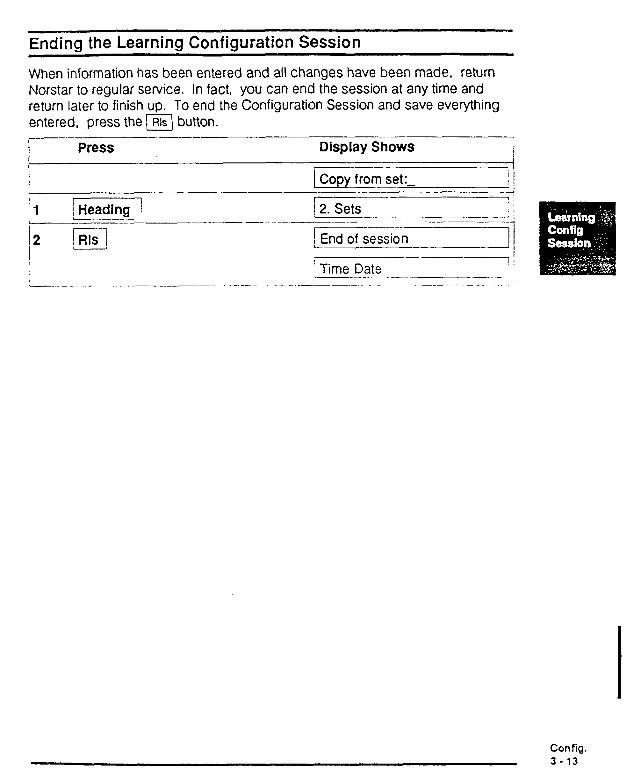
Ending the Learning Configuration Session
When information has been entered and all changes have been made, return Norstar to regular service. In fact, you can end the session at any time and return later to finish up. To end the Configuration Session and save everything entered, press the m button.
- -__- Press Display Shows
i I Copy from set:- ! i -- - --__- I
11 / Heading ! l2xG-y : j
I--- --.1 ( ___-. ____ - --.. .--. ~ .-.-
2 jj r-i::____1 LEnd of session
! Time Date --7.
~---. .__~~.__.._
Config. 3 - 13
Introduction to Configuration Programming
This section contains programming charts to help you program your own office system. Use it as a Configuration programming reference.
System Defaults
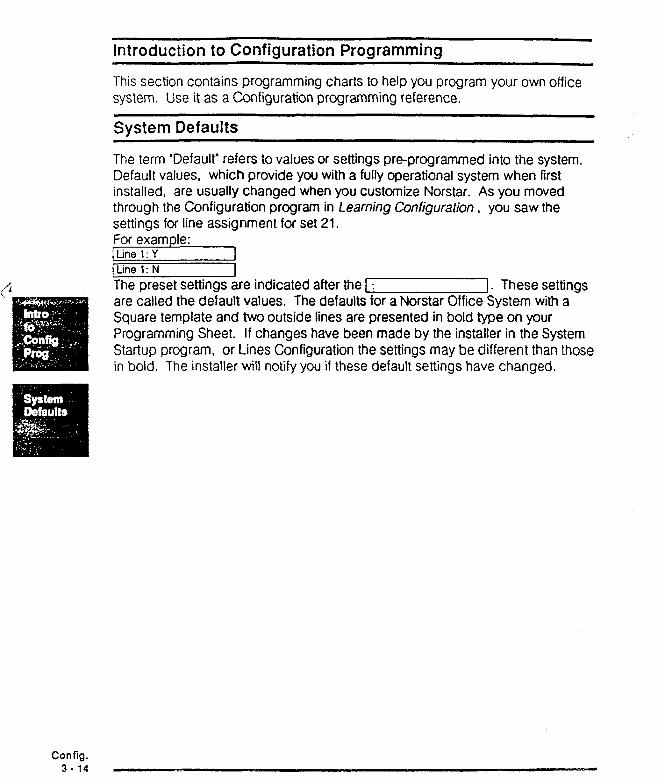
The term ‘Default’ refers to values or settings pm-programmed into the system. Default values, which provide you with a fully operational system when first installed, are usually changed when you customize Norstar. As you moved through the Configuration program in Learning Configuration, you saw the settings for line assignment for set 21. For example: ILine l:Y I Itine 1: N
The preset settings are indicated after the 1: 1. These settings are called the default values. The defaults for a Norstar Office System with a Square template and two outside lines are presented in bold type on your Programming Sheet. If changes have been made by the installer in the System Startup program, or Lines Configuration the settings may be different than those in bold. The installer will notify you if these default settings have changed.
Config. 3-14
Phone Defaults
On each phone, a default feature is assigned to each button that is not used as a Line, Intercom or
P aM,lllee . Use the Button Inquiry feature [Feature y/j?j to
check the function o each memory button. The dual-memory buttons on the M7310 phone have the following intercom numbers programmed on them, making them inside autodial buttons. Pressing an inside autodial button to a phone that is not connected to the system will bring up a ‘Not in service’ mes- sage on your display.
M7310 Dual-Memory Buttons (defaults)
IIAutodiai31 Ij
-
M7310 Phone Memory and M7208 Phone Memory and Line Buttons Line Buttons Square Defaults Square Defaults
-____ . - -p-T--
,Li#Wl 1: !!
Ii COllfarroCr
-Ii I--
:Lim2 di --- ___-- ;, Call Forward
--_-2’ ~-_ ..-- I-- Call Flckw j: incwcoln
j
! ; : Lin 1 -.l I
- ..-- ~ : Intercom
I :, Inkcorn 1
t\:c[e: Phone users can reprogram any default settings. Hcwever, he buttons (inside and outside) and $$p, if given cannot be replaced by the user. Config.
3-15
Making Choices
The default values for the Norstar Office System allow it to be used right away. However, customizing allows you to arrange the system to meet specific office needs. Norstar has been designed to be changed easily. You can set the system up and then modify it later as required.
Make changes in the Configuration program using the Programming Sheet, Phone overlays and the programming charts.
Programming Sheet
When you have to make changes to a Norstar Office System, use the Programming Sheet. You may be given a completed Programming Sheet from the installer or your service representative. After changing the system, make sure you have an up-tedate record including the latest changes. You should keep a record of the phone numbers and features assigned to each phone.
When you are asked to make a change from the Programming Sheet, check the current settings of the features by going into the Configuration program or by using (Featurelr;ll?J to see each phone setting.
If a setting already in place is requested, make sure the person knows how to use the feature.
Phone Overlays / Access Code
You may or may not be in Configuration at this point. If not, with the Phone overlays and Programming Sheet in front of you, enter the configuration code:
F r--
[Feature] 17 iF] mloj m Fi p]m
; 1. Lines I appears on the display which is the first heading in Configuration. Ignore this and continue on to the next heading with the
I
;Nextl button. i
12. Sets ] appears. I L I
Config. 3-16
How to Program Configuration
The following pages will help program Configuration.
Remember, you can get a result only by pressing the buttons with ) beside them. If you want to explore the system on your own, use the [m,p), F], [Heading1 and dial pad buttons. Changes to the settings are not made unless you press the (Change1 button. Remember to use your phone overlay.
There are helpful suggestions and programming charts for each of the five main headings in Configuration.
System Coordinator Notes: (Use this space to make any notes you may have about programming Configuration).
Config. 3.17
1. Lines
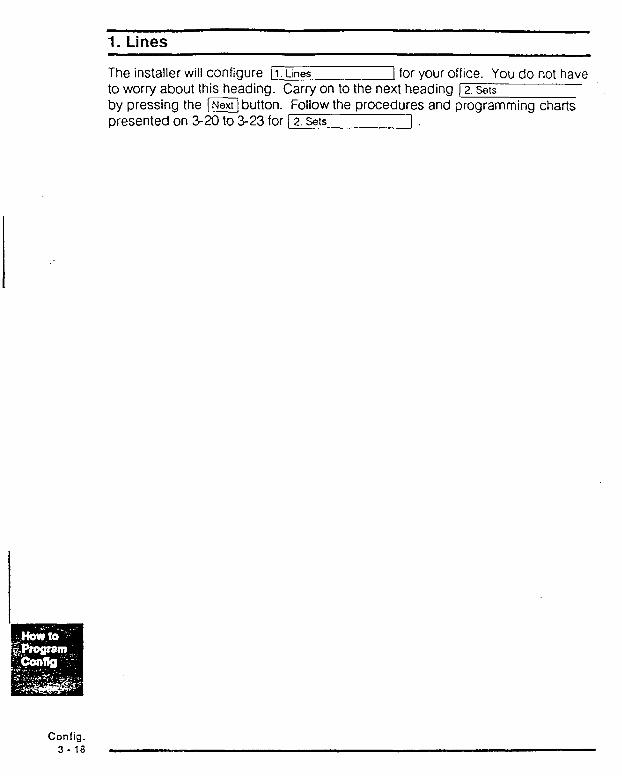
The installer will configure [I. Lines 1 for your office. You do not have to worry about this heading. Carry on to the next heading 12. ws
by pressing the [button. Follow the procedures and programming charts presented on 3-20 to 3-23 for [ 2. sets 1.
Config. 3-18
1. Lines Programming
The following chart lists the step by step process for assigning programming options to the outside lines connected to the Meridian Norstar system.
--- -____.. -. Press Display Shows I
i <Current Time & Date> / I 7 ,
I 1 1 Feature l l 2 66344 j 1. Lines
: 2 I i Show j , Show line: -
3 ! Enter tllne #, I
I Type: <current value> i I -.
;4 ! Change ’ : - .-.- Type: <next value> -.--___
is .._ ~----
‘Next I Mode: <current value> - ~~-._______.___- / -~- 6 j Change Xi&ii: <next value> - .--- .-
‘7 pix-j Aux. Ringer:<current value>) I I j Change j
, I 8 j Aux. Ringer: <next value> -! -=
9 jNext] i Auto-hold: <current value> 1
10 jChange] 1 Auto-hold: <next value> 1 -~-- __-~ - jll
I /Next / j Show line: _ I
1 Enter <line #b !
1 Type: <current value> j I
;12 .---. ~-- I13 1 Change i --- - ! Type: <next value> .--__--
I 14 !Next j !
I I
I I
I I
I I I I
I I I I -____
Show line: _ P-Y I --
@adIng ; ; 1. Lines 1
2 _______.-~-.._- / Rls 1 %nd of session
__-, 7 I_--> .----_I -. -.
I <Current Time 8 Date> / -_ I
Note: This chart is for the installer only. Conflg. 3.19
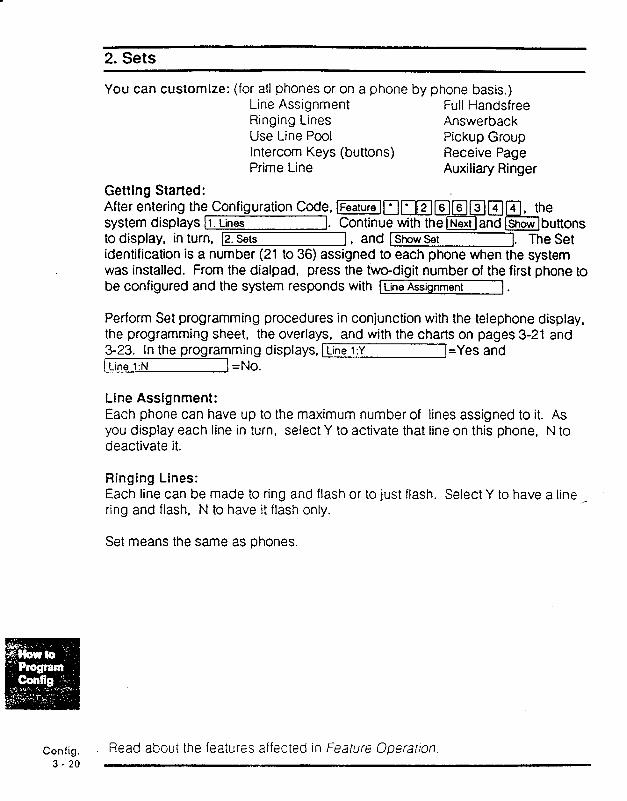
2. Sets
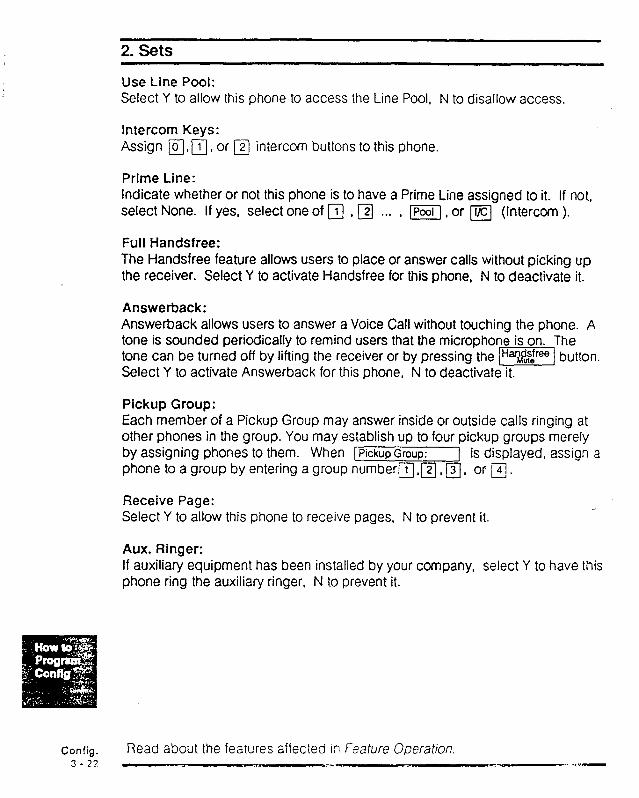
You can customize: (for all phones or on a phone by phone basis.) Line Assignment Full Handsfree Ringing Lines Answerback Use Line Pool Pickup Group intercom Keys (buttons) Receive Page Prime Line Auxiliary Ringer
Gettlna Started: After eitering the Configuration Code, j~~/~~]161~)~1 4 , the system displays Ii. LW El I. Continue with the Band show buttons to display, in turn, (2. sets 1, and (show set 1. The Set identification is a number (21 to 36) assigned to each phone when the system was installed. From the dialpad, press the two-digit number of the first ihone to be configured and the system responds with [ LineAssignment ] .
Perform Set programming procedures in conjunction with the telephone display, the programming sheet, the overlays, and with the charts on pages 3-21 and 3-23. In the programming displays, [ Line 1:~ ]=Yes and [Line 1:N ] =No.
Line Assignment: Each phone can have up to the maximum number of lines assigned to it. As you display each line in turn, select Y to activate that line on this phone, N to deactivate it.
Ringing Lines: Each line can be made to ring and flash or to just flash. Select Y to have a line _ ring and flash, N to have it flash only.
Set means the same as phones.
Config. Read about the features affected in Fmure Opmt;on. 3 - 20
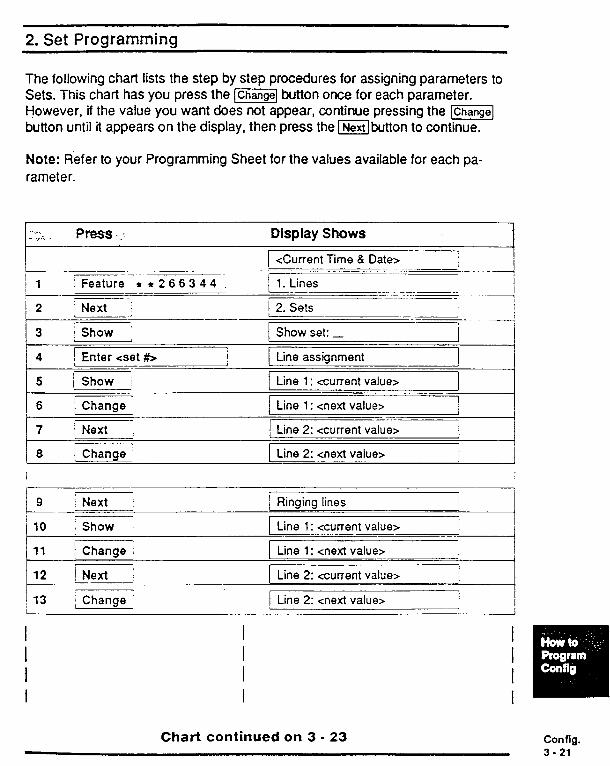
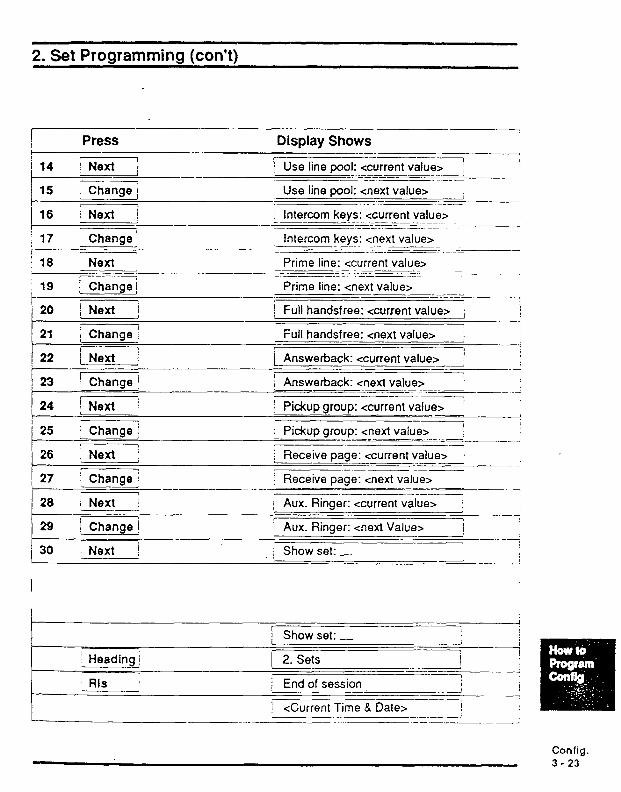
2. Set Programming
The following chart lists the step by step procedures for assigning parameters to Sets. This chart has you press the (Change1 button once for each parameter. However, if the value you want does not appear, continue pressing the IChange] button until it appears on the display, then press the mbutton to continue.
Note: Refer to your Programming Sheet for the values available for each pa- rameter.
.. > - .,..~ . Press . . .( Display Shows
<Current Time 8 Date> -----
i 1 i Feature t * 2 6 6 3 4 4 1 i..
, 1. Lines - - . . ..~
[2 Next -, ~_~ ---.~ _-- .--y ! 2. Sets I
-- 3 I Show Show set: _ I
4 [ Enter <set #> I Line assignment
5 [ Show I Line 1: <current value>
6 / Change / Line 1: <next value> ! -- --
7 j Next : , Line 2: ccurrent value> I
L-- 8 j Change I Line 2: <next value> i
/9- : Next : / Ringing lines I
10 : Show Line 1: <current value> I
11 ! Change ----.-A Line 1: <next value> - --
1 I ---: I 12 ! Next : Line 2: <current value>
/ 13 i Change Line 2: <next value> I I J
Chart continued on 3 - 23 Config. 3 - 21
2. sets
Use Line Pool: Select Y to allow this phone to access the Line Pool, N to disallow access.
Intercom Keys: Assign @,m, or B intercom buttons to this phone.
Prime Line: Indicate whether or not this phone is to have a Prime Line assigned to it. If not, select None. If yes, select one of q , q . . . , spool, or Ii/cl (Intercom ).
Full Handsfree: The Handsfree feature allows users to place or answer calls without picking up the receiver. Select Y to activate Handsfree for this phone, N to deactivate it.
Answerback: Answerback allows users to answer a Voice Call without touching the phone. A tone is sounded periodically to remind users that the microphone is on. The tone can be turned off by lifting the receiver or by pressing the -1 button. Select Y to activate Answerback for this phone, N to deactivate it.
Pickup Group: Each member of a Pickup Group may answer inside or outside calls ringing at other phones in the group. You may establish up to four pickup groups merely by assigning phones to them. When [Pickup Group: 1 is displayed, assign a phone to a group by entering a group numbera ,111, @, or m.
Receive Page: Select Y to allow this phone to receive pages, N to prevent it.
Aux. Ringer: If auxiliary equipment has been installed by your company, select Y to have this phone ring the auxiliary ringer, N to prevent it.
Config. 3 - 22
Read about the features affected in Fearure Operation.
2. Set Programming (con?)
! Press Display Shows !- ---__ _.~~__ 1 14 / Next 1
------ j Use line pool: <current value7
1 -2 -- 77 ---- ---___-.~- __-- --_ :
15 ; Change I Use line pool: <next value> :
16 i Next / ! Intercom keys: <current value> ~-~.-______----~..- ..- ; 17 Change I Intercom keys: <next value> _ ..- _._~~_ jGTNe; j
~.-. _ ~----.~I--=- --.--= - Prime line: <current value> .-__ --.. -- .--- - ----..z -_-_- ---
j 19 L Change j Prime line: <next values - ~- 20 I Next i
-----7 i Full handsfree: <current value> i /
21 j Change 1 Full handsfree: <next value> i 2 1 22 ) [ Next i Answerback: <current value> j -~-- -2 ’ 23 j Change i _____ ! Answerback: <next value> __-.-__--. .-.--__ ___--- ___
j Pickup group: <current value> ’ --__
Pickup group: <next value> ) -~.--._-__r--._-_~____- - ’ 26 Next i Receive page: <current values .-____- -.-___ --~
,
i 27 Change I Receive page: <next value> -- .--- ‘--._- -.-. - __.~. -- -- ---__-. 28 i Next i / Aux. Ringer: <current value> :
29 1 Change ! / Aux. Ringer: <next Value> ! 7
i -____
30 Next j Show set: _ -
1 Show set: _
--- 1 End of session /
j <Current Time 8 Date> I I -.-.-__
Config. 3- 23
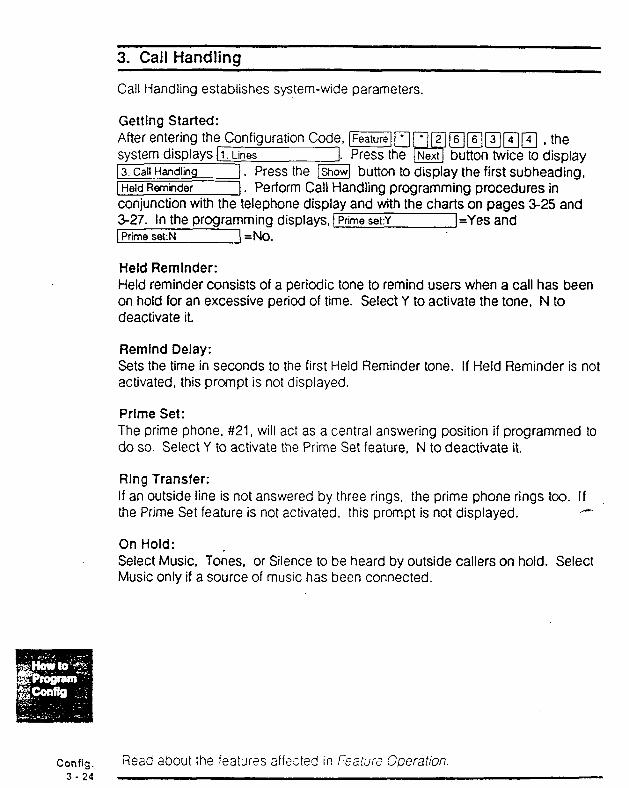
3. Call Handlina
Call Handling establishes system-wide parameters.
Getting Started: After entering the Configuration system displays [I. Lines
13. Call Handling I. Press the m button to display the first subheading, [Held Remhder 1. Perform Call Handling programming procedures in conjunction with the telephone display and with the charts on pages 325 and 3-27. In the programming displays, 1 Prime set:Y j=Yes and 1 Prime s&N 1 =No.
Held Remlnder: Held reminder consists of a periodic tone to remind users when a call has been on hold for an excessive period of time. Select Y to activate the tone, N to deactivate it.
Remlnd Delay: Sets the time in seconds to the first Held Reminder tone. If Held Reminder is not activated, this prompt is not displayed.
Prime Set: The prime phone, #21, will act as a central answering position if programmed to do so. Select Y to activate the Prime Set feature, N to deactivate it.
Ring Transfer: If an outside line is not answered by three rings, the prime phone rings too. If the Prime Set feature is not activated, this prompt is not displayed. ,-
On Hold: Select Music, Tones, or Silence to be heard by outside callers on hold. Select Music only if a source of music has been connected.
Config. Read about the featurss affxted in FE;I!J,E Operation. 3 - 24
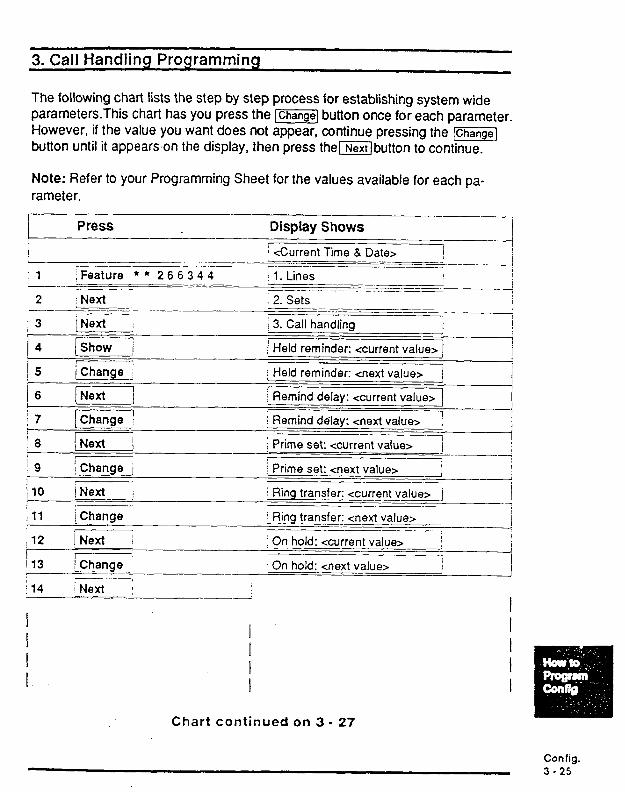
3. Call Handling Programming
The following chart lists the step by step process for establishing system wide parameters.This chart has you press the 1-1 button once for each parameter. However, if the value you want does not appear, continue pressing the lGhangej button until it appears.on the display, then press thembutton to continue.
Note: Refer to your Programming Sheet for the values available for each pa- rameter.
Press Display Shows I -- ! I <Current Time & Date> 1 \
___ 1 --:_=---d=.p I - ; 1 i Feature l l 2 6 6 3 4 4 : 1. Lines -..- --7-p -__.
2 :Nexf 2. Sets -~-- --i
I --p_d.- ..-.- -----____ __ __- ---------- --
;3 iNext : i 3. Call handling
4 (Show / Held reminder: <current value> 1 , I 15 j Change I / Held reminder: <next value> 1
j6 pi&i--J
[7
j Remind delay: <current value>
(Change i Remind ddlay: <next value> I I
;s(Next] ; Prime set: <current value> I i
1 ..~.._
j9 1 Chang_e_i : Prime set: <next value> , , 1
;10 ___
iNext I i Ring transfer: <current value> - --- j -j .-
111 &ge ____
’ Ring transfer: <next value> I -- ~_____~_ -- :12 piGi- : On hold: <current value> j r I13 jChange__ On hold: <next value> I
;14 i- ---7 iNext I A
I I
I I I I
I I
I I I I I
Chart continued on 3 - 27
Config. 3.25
3. Call Handling
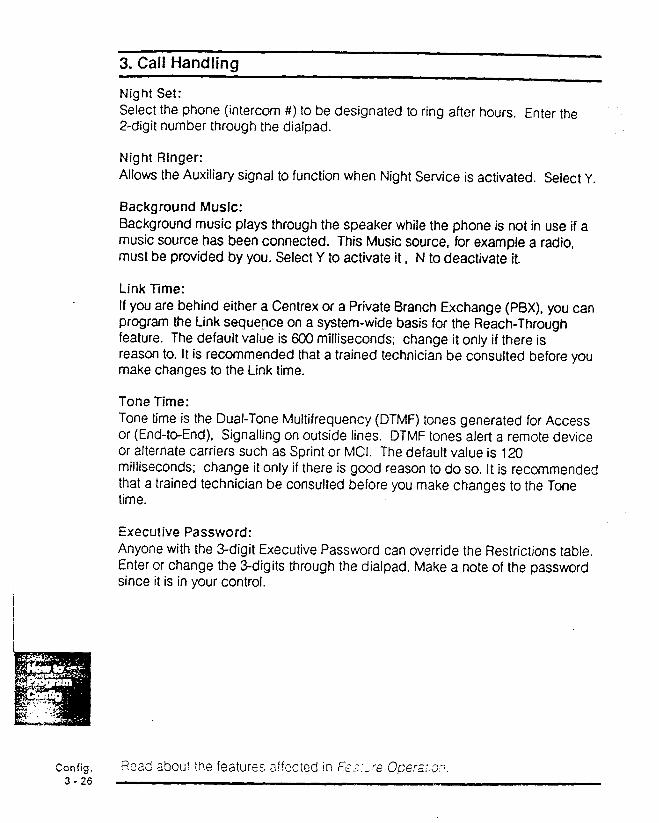
Night Set: Select the phone (intercom #) to be designated to ring after hours, Enter the Z-digit number through the diaipad.
Night Ringer: Allows the Auxiliary signal to function when Night Service is activated. Select Y.
Background Music: Background music plays through the speaker while the phone is not in use if a music source has been connected. This Music source, for example a radio, must be provided by you. Select Y to activate it, N to deactivate it.
Link Time: If you are behind either a Centrex or a Private Branch Exchange (PBX). you can program the Link sequence on a system-wide basis for the Reach-Through feature. The default value is 600 milliseconds; change it only if there is reason to. It is recommended that a trained technician be consulted before you make changes to the Link time.
Tone Time: Tone time is the Dual-Tone Multifrequency (DTMF) tones generated for Access or (End-to-End), Signalling on outside lines. DTMF tones alert a remote device or alternate carriers such as Sprint or MCI. The default value is 120 milliseconds; change it only if there is good reason to do so. It is recommended that a trained technician be consulted before you make changes to the Tone time.
Executive Password: Anyone with the 3digit Executive Password can override the Restrictions table. Enter or change the Z-digits through the dialpad. Make a note of the password since it is in your control.
Config. 3 - 26
Read &cl;! t?e features af!?cted in %:f:_re Qcera: CF
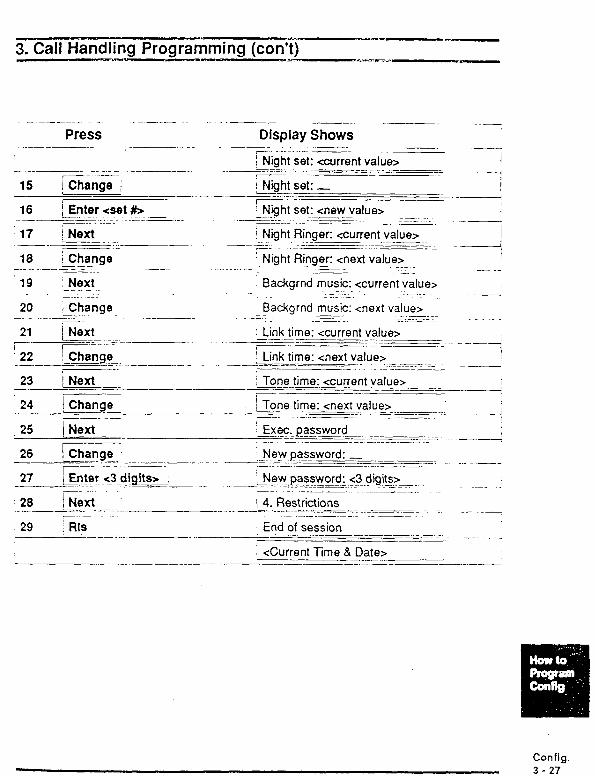
3. Call Handling Programming (con’3
Press ..--___..
-__-___- -. ..-- ..-__--. r - - - - - -~
15 ! Change / ,
16 s+er <set #, -..c..:; -.-. 17 iNext-yI
-. ____ .- 18 j Change -.- -. -;.. 19 Next
20 ! Change .--~~ 21 - .+=-~ 22 I Change ~ .-. .----_L--.~ ..-____-- .-- --
.~ _ .____- -c__- . - - - ,
Display Shows -_ .__.. .___. -.- 1 Night set: ccurrent val& !
e-z.-.-- --~ ~-- ;PL.z 2--_ I Night set-: - -
._ ----I L__~_ . . -____-.. .-._ - 7. -- .___: ! Night set: <new value> --.. .___- .__-.- ..___... iNight Ringer: <current valuer I ..-____ .~ ---- .-. . -___-- -_ ._. .____ - -----A : Night Ringer: <next value> ._ __ ._I .___- .-
Backgrnd music: <current value>
Backgrnd music: <next value> ___~ - : Link time- <current value> --.--.L-.---. ..- -__-. ~Linktime~ <next value> -- !
----.z~-=~ ___. *--.- .L_~.~-. ~__ - i Tone time: <current value> I --=I z- -. l>ne time. <next value> .:.L,~ --I --___ .y---.--:. - -A,
23
24
26 / Change ----_ -_ New password: _ -- ~_.. .- -.~-.~_--~~ --.- ..- __ ~_ ..- --__- 27 1 Enter ~3 digIts> : - . -_-.-_. &IW password: c3 digits> -___-_ ~.. . __ ._- ..--. .-_. -- .- 26 INext ’ .-.-e=.----.---r _.... _ . -
, 29 i Rls .-.--. - ..- --- ..-_
L _--.- - .-
/ 4. Restrictions .-~-.
End of session -.- --.. ..._~ ------. - ~ __-_. ;. _-. ~. .~_ -- -~ ’ <Current Time 8 Date>
-..---
Config. 3 - 27
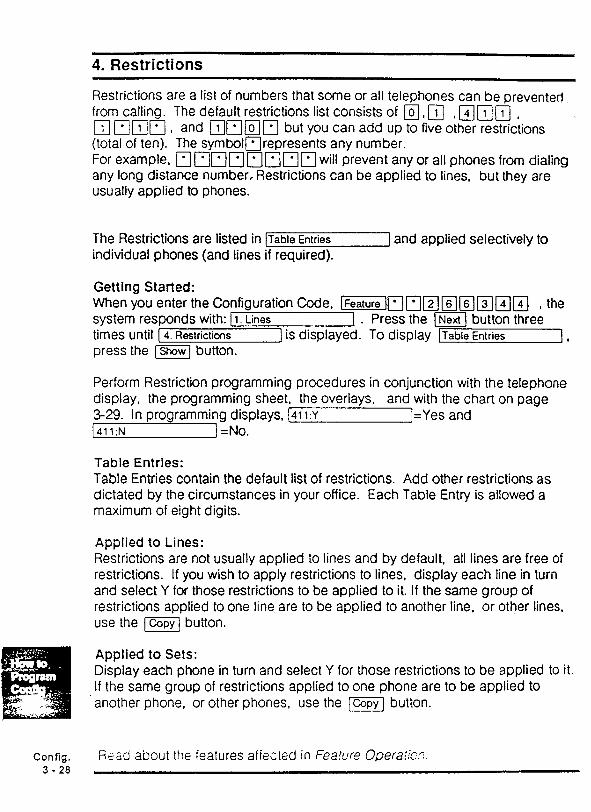
4. Restrictions
Restrictions are a list of numbers that some or all telephones can be prevented from calling. The default restrictions list consists of q , q , [7~/7J/?-] , r] p]mrj , and j-i-/mE]Fj but you can add up to five other restrictions (total of ten). The symbollr]represents any number. For example, [~[~~~~~j~]~]~] will prevent any or all phones from dialing any long distance number, Restrictions can be applied to lines, but they are usually applied to phones.
The Restrictions are listed in [Table Entries
individual phones (and lines if required). 1 and applied selectively to
Getting Started: When you enter the Configuration Code, lz)r] system responds with: [I. Lines I . tit-tX?S Until [ 4. Restrictions ] is displayed. press the j3iGVj button.
~~l~~l%/f$i-l~j , the Press the (Nextl button three TO display ITable Entries
Perform Restriction programming procedures in conjunction with the telephone display, the programming sheet, the overlays, and with the chart on page S-29. In programming displays, 1411:~ ]=Yes and
1411:N 1 =No.
Table Entries: Table Entries contain the default list of restrictions. Add other restrictions as dictated by the circumstances in your office. Each Table Entry is allowed a maximum of eight digits.
Applied to Lines: Restrictions are not usually applied to lines and by default, all lines are free of restrictions. If you wish to apply restrictions to lines, display each line in turn and select Y for those restrictions to be applied to it. If the same group of restrictions applied to one line are to be applied to another line, or other lines, use the iCoDvl button.
Applied to Sets: Display each phone in turn and select Y for those restrictions to be applied to it. If the same group of restrictions applied to one phone are to be applied to
‘another phone, or other phones, use the [Copy] button.
Config. Fiad about tk features afiectad in Fea!ure Operatic.?. 3 - 20
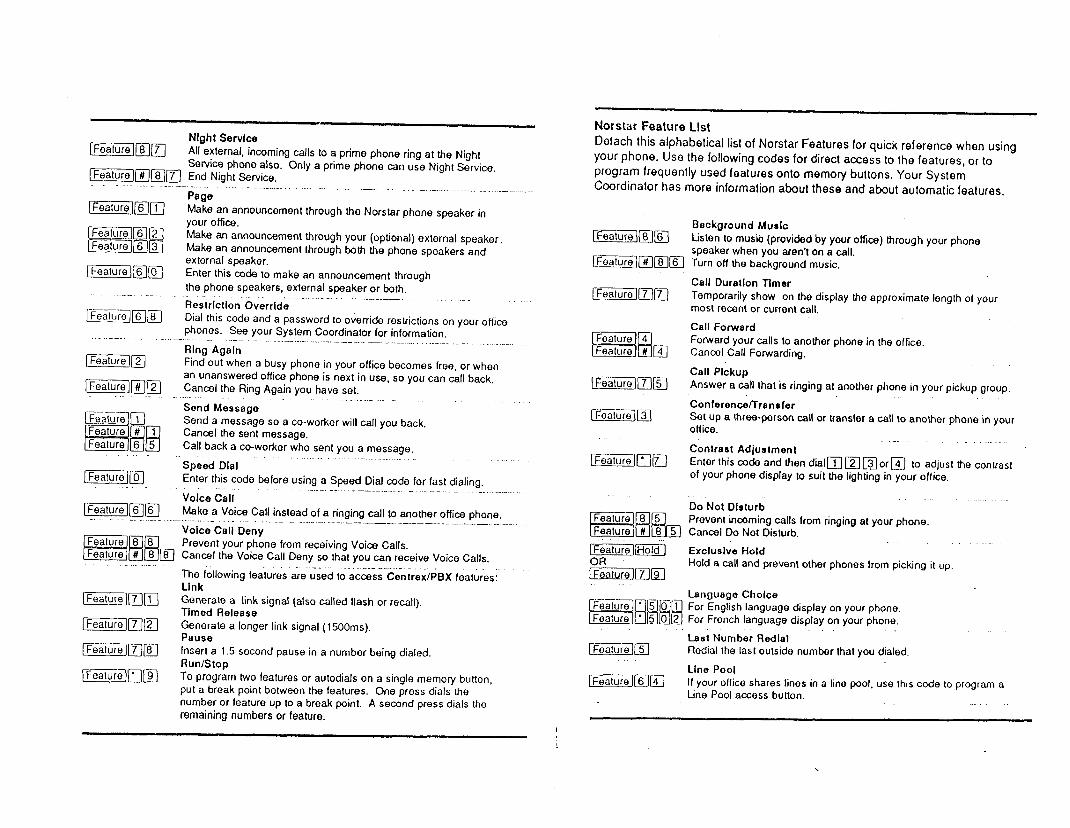
[FealureJm]/7] Nlght Service All external, incoming calls to a prime phone ring at the Night Service phone also. Only a prime phone can use Night Service.
[~j~]]~]~] End Night Service. . -.- ,- - .- ..--....... .._... .._-.._ _ ._~ - .._. - ._.. _ - .___.. .._ .~. ._._...
Page Make an announcement through the Norstar phone speaker in your office. Make an announcement through your (optional) external speaker. Make an announcement through both the phone speakers and external speaker. Enter this code to make an announcement through the phone speakers, external speaker or both.
~kestrlctl&&errlde~ Dial this code and a password to override restrictions on your office phones. See your System Coordinator for information.
Ring Again Find out when a busy phone in your office becomes free, or when an unanswered office phone is next in use, so you can call back. Cancel the Ring Again you have set.
Send Message Send a message so a co-worker will call you back. Cancel the sent message. Call back a co-worker who sent you a message.
Speed Dlel .’ Enter this code before using a Speed Dial code for fast dialing.
voice Call. Make a Voice Call instead of a ringing call to another office phone.
._ _ .._ _._____ --_ .-._. - -..._ - ._..-._- -.. Voice Call Deny
._ -...
Prevent your phone from receiving Voice Calls. the Voice Call Deny so that you can receive Voice Calls.
The following features-are used to access Centrex/PBX features; Llnk Generate a link signal [also called flash or recall). Tlmed Release Generate a longer link signal (1500ms). Pause Insert a 1.5 second pause in a number being dialed.
FeaturGJF]IY] Run/Stop To program two features or autodials on a single memory button, put a break point between the features. One press dials the number or feature up to a break point. A second press dials the remaining numbers or feature.
Norslar Feature Llst Detach this alphabetical list of Norstar Features for quick reference when using your phone. Use the following codes for direct access to the features, or to program frequently used features onto memory buttons. Your System Coordinator has more information about these and about automatic features.
[FealureJ157r77
Background Mualc Listen to musio (provided by your office) through your phone speaker when you aren’t on a call. Turn off the background music.
Call Duratlon Tlmer Temporarily show on the display the approximate length 01 your most recent or current call.
Call Forward Forward your calls to another phone in the office. Cancel Call Forwarding.
Call Plckup Answer a call that is ringing at another phone in your pickup group,
Conference/Transfer Set up a three-person call or transfer a call to another phone in your office.
.._ Contrast Adjustment Enter this code and then dial~~L~or@ to adjust the contrast of your phone display to suit the lighting in your office.
Do Not Disturb Prevent incoming calls from ringing at your phone. Cancel Do Not Disturb.
Exclusive Hold Hold a call and prevent other phones from picking it up.
Language Choice For English language display on your phone. For French language display on your phone.
. Last Number Redlal Rodial the last outside number that you dialed.
- rFeatuGll31
Llne Pool If your office shares tines in a line pool, use this code to program a tine Pool access button.
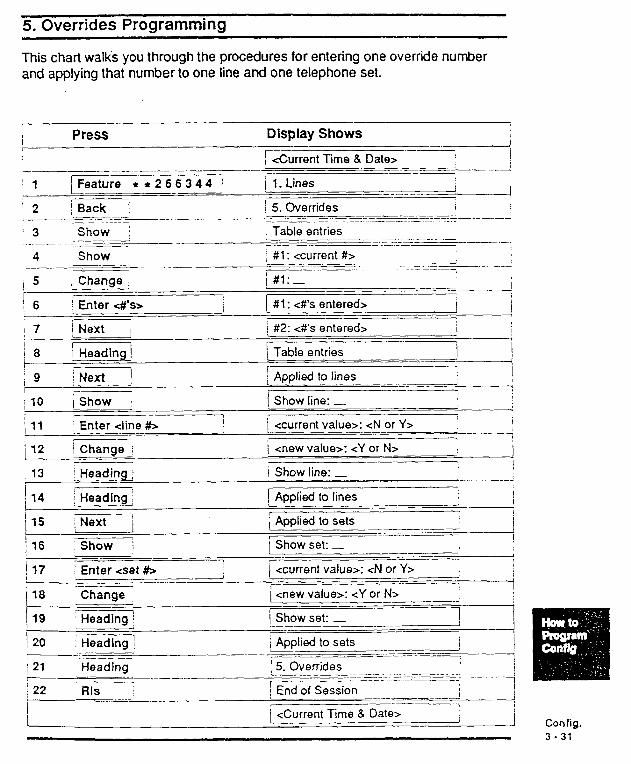
5. Overrides Programming
This chart walks you through the procedures for entering one override number and applying that number to one line and one telephone set.
, I I P& Display Shows
f <Current Time 8 Date> .--__y
.- ~-.._~-_---.- -.- ---. -7- --- a 1 jre l *266344 / i 1. Lines
~___ _-- . . . -._--- I
; 2 .-
1 Back j / 6. Overrides I eL--..------ --.-- --__- ----_.-__- - .__._ _--__---_--.--.--.--
3 ‘show : Table entries ___- - __-._- .-... -- -.._-
4 Show ’ #l : <current #> L- - ___-. -2 ___-- .-__- _----___ ___.___.. -----. --__.. ---
! 5 ; Change j #l:- --i
(6 / Enter 4% / #l : MS entered> i 1 ! ’ 1 Next
rGziLj
i #2: <#‘s entered> I I I [ Table entries
I ! 8 1
1 9 --F,
____- ._- I i 10 /Show : 1 Show line: _ _ - j i 1 / 11 j Enter <line #, i <current value>: <N or Y> I
- - _-- --;
j12 / Change j i <new value>: <Y or N> -. I - __. 13 1 Headingj I Show line: _
I ;14 ! 1 Applied to lines - I I
Heading i 1
115 ; Next i j Applied to sets
116 i Show set: - 4 -.------
: Show : -- -A ) 17 : Enter tS8t #z-
7 I / Grit value>: <N or Y>
----- __.--
,18 -___ <new value>: <Y or N> I
Change
PQ Heading j
! 20 Heading 1 -_-- ; 21 Heading ____--- __--___ j 22 -___ Rls j ____.-
I
.-_ -- \ Applied to sets /
--~~--.---; .____- i ’ 5. Overrides I _ ...__.__~.. I 1 End of Session --__- _II _- ---I_ p-1 -. ---I, i <Current Time 8 Date> I
2 I Config. 3 - 31

-~~ Contents Introduction to Feature Operation 4-2 Programming Features 4-2 Feature Codes Quick Reference Guide 4-3 Feature -Operation A : C 4-5 Feature Operation D - K 4- 17 Feature Operation L - Q 4 - 25 Feature Operation R - 2 4 - 33 index 4 - 40 Glossary of Terms 4 - 47 -
Feature Operalion
A-i
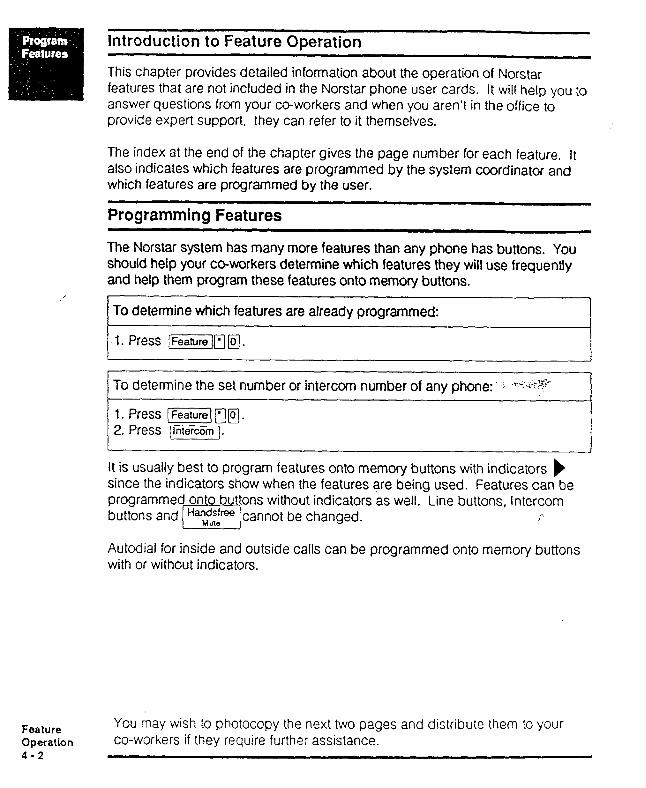
introduction to Feature Operation
This chapter provides detailed information about the operation of Norstar features that are not included in the Norstar phone user cards. It will help you to answer questions frm your co-workers and when you aren’t in the office to
provide expert support, they can refer to it themselves.
The index at the end of the chapter gives the page number for each feature. It also indicates which features are programmed by the system coordinator and which features are programmed by the user.
Programming Features
The Norstar system has many more features than any phone has buttons. You should help your co-workers determine which features they will use frequently and help them program these features onto memory buttons.
To determine which features are already programmed:
1. Press jFeature/Fj@.
To determine the set number or intercom number of any phone: ’ ,i +-+‘~”
1. Press jFeatureJ OF,. 2. Press (IntercomI.
It is usually best to program features onto memory buttons with indicators ) since the indicators show when the features are being used. Features can be programmed onto buttons without indicators as well. Line buttons, Intercom buttons and Handsfree cannot be changed. r-i-y i”
Autodial for inside and outside calls can be programmed onto memory buttons with or without indicators.
Feature Operation 4-2
You may wish to photocopy the next two pages and distribute them to your co-workers if they require further assistance.
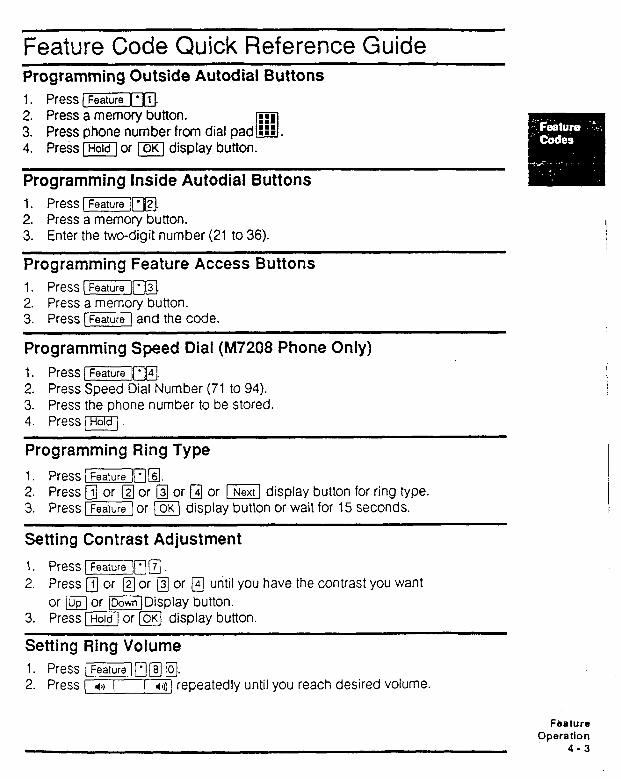
Feature Code Quick Reference Guide Programming Outside Autodial Buttons 1. Press FBTl 2. Press a memory button. 031 3. Press phone number from dial pad CD . cl 4. PreSs [Hold] or m display button.
Programming Inside Autodial Buttons 1. Press 1 Feature )‘]2)
2. Press a memory button. 3. Enter the two-digit number (21 to 36).
Programming Feature Access Buttons 1. Press (I~$?~ 2. Press a memory button. 3. Press (Feature! and the code.
Programming Speed Dial (M7208 Phone Only) 1. Press 1 Feature /j l j4j.
2. Press Speed Dial Number (71 to 94). 3. Press the phone number to be stored. 4. Pressm.
Programming Ring Type 1. Press ~\iTkj. 2. Press a or q or q or q or II display button for ring type. 3. Press r-1 or m display button or wait for 15 seconds.
Setting Contrast Adjustment
1. Press vjlr;l[J 2. Press @ or q or a or q until you have the contrast you want
or 1up or [SjDisplay button. 3. Press m or @ display button.
Setting Ring Volume 1. Press mlr;laa. 2. Press 1 40 ( ( +))f repeatedly until you reach desired volume.
Feature Operation
4-3
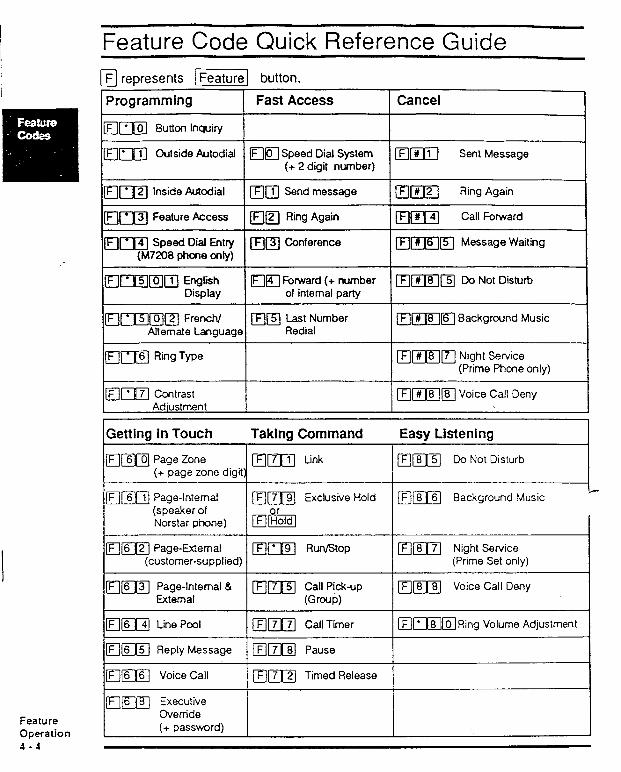
Feature Code Quick Reference Guide
Feature Operation 4-4
q represents Ifeature] button.
1 Programming Fast Access 1 Cancel
Imm] inside Autodial Ring Again 1 [11a Send message 1 q m
[Fjm] Feature Access flm Ring Again klw\ Call Forward
I [E3m Forward (+ number [Fllp[ Do Not Disturb of internal party
lFl~[~jlz] French/ q m Last Number [E3m[sl Background Music Alternate Language Redial
/Flm] Ring Type [?jwlr;l Night Service (Prime Phone only)
F[mj Contrast Adiustment
/Tlr#j81(87 Voice Call Deny
(+ password)
Accidental DiSCOnneCt
This automatic feature ensures that you can retrieve a dropped call that you were answering within one second. Just pick up the receiver or press-1 again to retrieve your dropped call within one second.
Autodial - Outside Autodial
For one button access to frequently-dialed numbers outside your office, use the Outside Autodial feature. You can store an outside number on any memory button using Outside Autodial. Autodiaf numbers are subject to Rex&/e Call Restrictions and Overrides. To dial inside numbers, inside auto&l buttons are used.
I How to program How to use
, .- A47370 Phone With Prime Line Select Feature 1 Press IFeature; * j 1 !. 2. Press a memory button
If programming the top part of a duaf button remember to press the triangle (shift) button first.
3. Dial the number to be stored. 4. Pressj button. 5. Label the memory button
M72U8 Phone 1. Press [Feature ( * 1 1 j.
2. Press a memory button. 3. Enter the phone number
to be stored. 4. Press1 HOIC! :button. 5. Label theemory button
1. Press an outside autodial button. Your Prime Line will auto- matically be selected and the number dialed.
Without Prime Line Select Feature 1. Select an outside line. 2. Press the autodial button.
The stored number is dialed on that line.
Dialed digits are shown on the Display.
Prime Line Selection
If your phone has prime line selection, autodial selects that line, pauses for two seconds and then dials the stored sequence.
If your phone has no prime line selection, you will be prompted tOi=].
If the power Is off for more than three days, autodlal numbers may be lost.
Autodial - Inside Autodial
For one-button access to frequently-dialed intercom numbers within the Norstar System, use the Inside Autodial feature. Your co-workers should knov the two-digit intercom phone code to program the inside autodial feature. (See Job Aid - Orientation Section)
r ‘. ck.’ >.:-
How to program ! Howtouse ’
M7310 Phone 1. PfeSS(Feahm~ l j12j 1. Press an inside autodial button to 2. Press a memory button. make a call to a selected inside
Remember to press the number. The system selects a triangle/shift button to program free inside line and places the into the top of a dual call. button. OR
3. Enter the two-digit intercom code. Press an inside autodial button 4. Label the memory button. while connected to another call.
M7208 Phone The first call is held automatically
1. Press i$ZZ[‘j~j. and the new call is started.
2. Press a memory button. 3. Enter the twodigit intercom code
to be stored. 4. Label the memory button.
Inside autodial will be automatically programmed on memory buttons for M7310 users. This feature should be used to move or change inside autodial buttons.
Feature Operation 4-6
Automatic Line %kCtiOn
Incoming Calls When more than one Call begins to ring at your phone at the same time, your phone automatically selects one call when you lift the receiver or press
. Calls are answered in this order: a call on your Prime Line (if you have calls on outside lines, calls on inside lines.
Override this automatic line selection by pressing the line button of the call you want to answer before picking up the receiver or pressingr-].
Outgoing Calls If your phone has a Prime Line, lift the receiver or press w] to select the Prime Line for your call. If the Prime Line is in use or your phone is ringing, you must select a line manually.
Automatic Phone Relocation
You do not lose any information programmed onto your phone when the phone is unplugged. All programming (outside autodial, inside autodial, feature access buttons) remains with your phone when it moves to another location within the Norstar system. To change locations. unplug your phone and plug it in again at your new desk.
Auxiliary Ringing
Incoming calls on outside lines and incoming calls to specific phones may ring at an Auxiliary Ringer. The Auxiliary Ringer can also ring when the system is placed into Night Service.
Install an Auxiliary Ringer in a lab or outside an office so you can hear your phone ring when you are away from your desk.
A phone administered to ring at the Auxiliary Ringer can receive Voice Calls, but the auxiliary ringer won’t be activated.
Calls to a phone using the Do Not Disturb or Call Fotward features will not ring at the Auxiliary Ringer.
If you are unable to program this feature, see your System Coordinator. You may not be able to use the feature because of Office System programming.
Feature Operation
4-7
Background Music
You can listen to music through the phone speaker if an external music source has been attached to the KSU . The music will automatically stop when you make or answer a call. Adjust the level of the music with the volume button.
1 Howto get Background Music ! ! 1 1. Press the IMUSiC] button. I OR i
1
Press /-i5ZG$~j~l. Music is heard through the phone speaker whenever you are not making
I or answering a call.
I ; How to cancel !
j 1. Press the ,T button again. OR
Press the ‘@Z%J(ni%-@J. The background music is cancelled.
Feature Operation 4-8
If you are unable to program this feature, see you: System Coordinator. You may not be able to use the feature because of Office System programming.
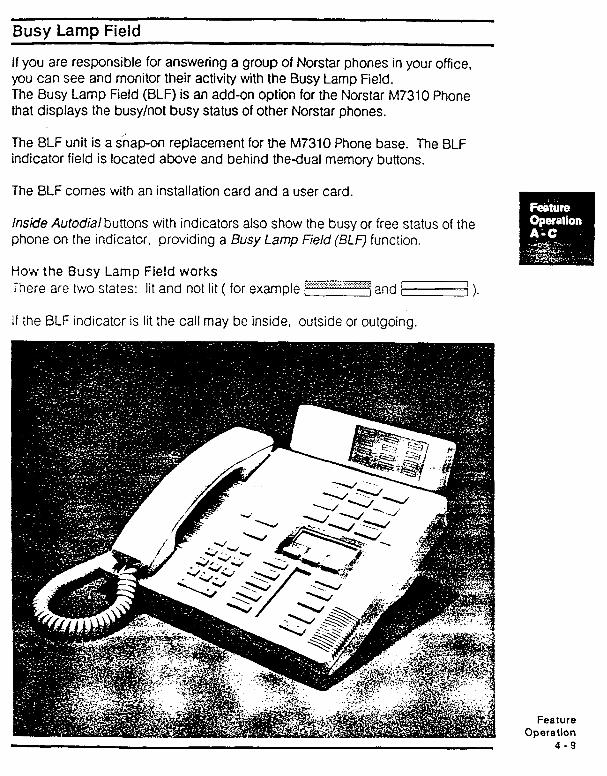
Busy Lamp Field
If you are responsible for answering a group of Norstar phones in your office, you can see and monitor their activity with the Busy Lamp Field. The Busy Lamp Field (BLF) is an add-on option for the Norstar M7310 Phone that displays the busy/not busy status of other Norstar phones.
The BLF unit is a snap-on replacement for the M7310 Phone base. The BLF indicator field is located above and behind the-dual memory buttons.
The BLF comes with an installation card and a user card.
inside Autodial buttons with indicators also show the busy or free status of the phone on the indicator, providing a Busy Lamp Field (ELF) function.
How the Busv Lame Field works There are two’states: v.- . . . . . . . . . . . . . . . ..i . . . . . . . . . . . ??q lit and not lit ( for example r-----j and -3 ).
If the BLF indicator is lit the call may be inside, outside or outgoing.
Feature Operation
4-9
Button Inquiry
You can check the function of each line, intercom and memory button on your Norstar phone. Before you program a button, use Button Inquiry to see the function before you change it.
This is a very important feature. When installing memory button labels, activate Button lnquiryso the action of pressing the labels into place does not activate the feature programmed into the button.
i How to check Button Function
j 1. i 2. ! j 3.
Press [Feature!(~. Press the button you want to check. Read the display.
: 4.
To check other buttons, repeat Step 2 as often as necessary. To return to normal operation, Press :RIS ‘.
Button Display
intercom button
Outside line button Handsfree/Mute Inside autodial button
Call Duration Timer
IC<intercom code for your phone> <name given to your phone> P<port number> (for installer) Linecline number> Handsfree/Mute Autocfial<name or intercom number>
You can measure the duration of phone calls for your records. The approximate elapsed connect time on the most recent call is displayed when requested. Because Voice Call can be turned into a twoway call, timing is also maintained for Voice Calls.
i Howlto Measure Length of Calls
/ 1. Press the iTimer (button. ! 1
OR I
Press /EZGZ]~j7-. I !
You can see the approximate length of the current call. The length is 1
I I !
shown in hours, minutes and seconds. The time is displayed for a few ! I seconds. I
i
Feature Operation 4-10
Call Forward (All Calls)
If you wish to have another person answer your calls, have your calls forwarded to that person’s phone. Forward calls when you are away from your desk and you don’t want to miss a call.
You can forward inside and outside calls to another Norstar phone. When this feature is used, the line indicators flash for incoming calls. You can continue to make outgoing calls while Call Forward is active.
How to Call Forward
1. Press the (mFonvard] button. OR Press [FeatureIF. 1 Forward to: ] appears on the display.
2. Dial the phone to which the calls are to be sent. OR
Press the Inside Autodial button for the phone to which the calls are sent. j When forwarding is in use, the display shows [Forward, c sat # or name> j
1
-I 1. Press the [-button again.
OR
Press (FeatureI(3J[4/. OR
Press the !!display button. The display shows [Cancel Forward J briefly.
Call Forward Override
If calls have been forwarded to your phone, you can call the ‘forwarded from’ party, to ask that forwarding. be cancelled or to transfer a call back to that phone. Only the ‘forwarded to’ person can get through to the ‘forwarded from’ person.
This feature is sometimes called ‘secretarial filtering’. A secretary can take the Calls for the boss and call him or her periodically to give messages.
Feature Operation
4-11
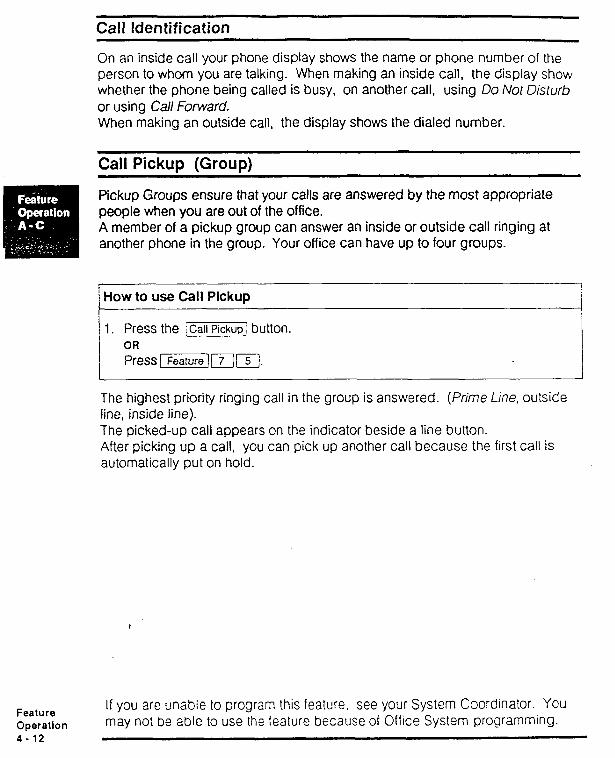
Call Identification
On an inside call your phone display shows the name or phone number of the person to whom you are talking. When making an inside call, the display show whether the phone being called is busy, on another call, using Do No! Disturb or using Call Forward. When making an outside call, the display shows the dialed number.
Call Pickup (Group)
Pickup Groups ensure that your calls are answered by the most appropriate people when you are out of the office. A member of a pickup group can answer an inside or outside call ringing at another phone in the group. Your office can have up to four groups.
/ use Call Pickup I
1 OR
1. Press the iCall Pickup1 button.
I Press IFeatureJI7Imj.
The highest priority ringing call in the group is answered. (Prime Line, outside line, inside line). The picked-up call appears on the indicator beside a line button. After picking up a call, you can pick up another call because the first call is automatically put on hold.
Feature Operation 4-12
If you are unable to program this feature, see your System Coordinator. You may not be able to use the feature because of Office System programming.
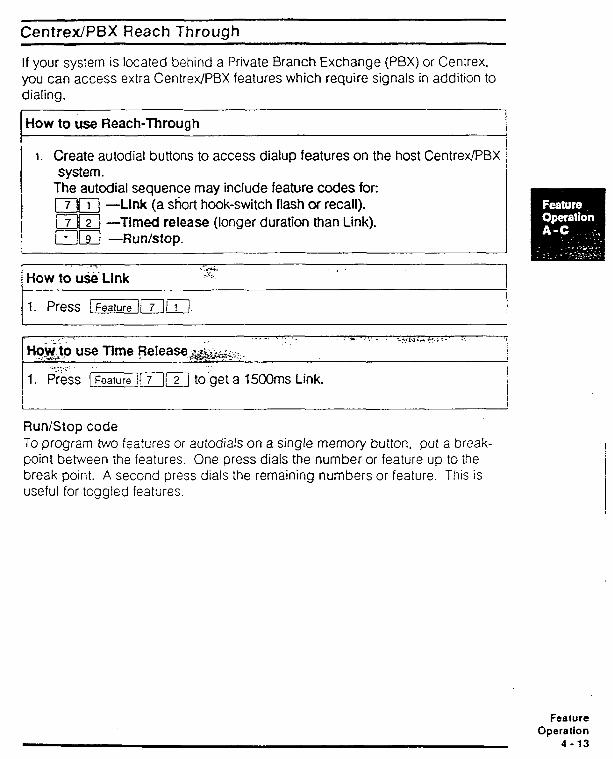
CentretiPBX Reach Through
If your system is located behind a Private Branch Exchange (PBX) or Centrex, you can access extra CentrexIPBX features which require signals in addition to dialing.
I How to use Reach-Through ! I
I. Create autodial buttons to access dialup features on the host Centrex/PBX system.
The autodial sequence may include feature codes for: (7#1] 4lnk (a short hook-switch flash or recall). i7!2j -Timed release (longer duration than Link). iKlII -Run/stop.
-
I 1. Press iFeature ii?)ll. !
. . . , i,-. . . . ._
* -’ I . ._
- _.
*w.!g use Time pelease;&‘..,. .. :?i*i.+-‘.;-.-. :1
.,_., . ‘1 -“:.:.
1. P&s [Fearure!j7jjl to.‘get a 15OOms Link. ! I
Run/Stop code To program two features or autodials on a single memory button, put a break- point between the features. One press dials the number or feature up to ihe break point. A second press dials the remaining numbers or feature. This is useful for toggled features.
Feature Operation
4-13
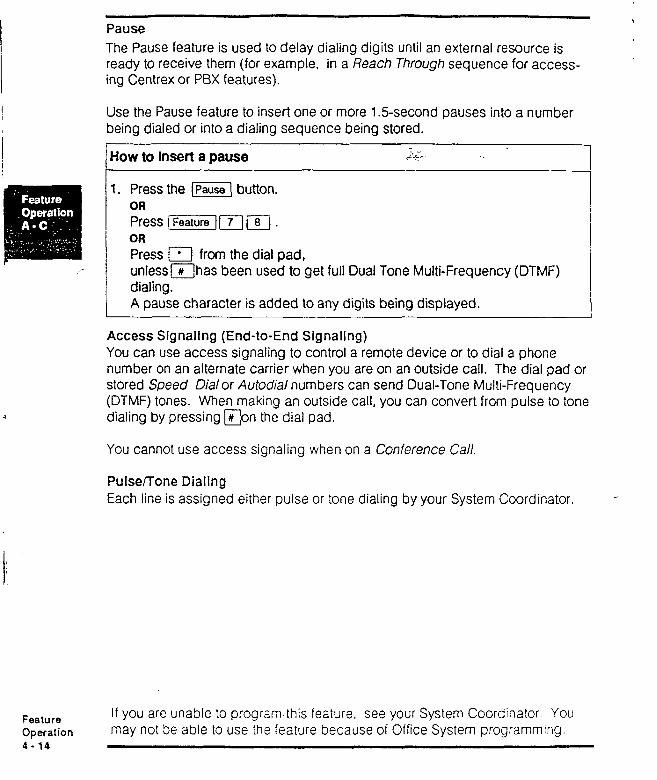
Pause The Pause feature is used to delay dialing digits until an external resource is ready to receive them (for example. in a Reach Through sequence for access- ing Centrex or PBX features).
Use the Pause feature to insert one or more 15second pauses into a number being dialed or into a dialing sequence being stored.
How to insert a pause
1. Press the (pause1 button. OR
Press m from the dial pad, unless(rvhas been used to get full Dual Tone Multi-Frequency (DTMF) dialing. A pause character is added to any digits being displayed.
Access Signaling (End-to-End Signaling) You can use access signaling to control a remote device or to dial a phone number on an alternate carrier when you are on an outside call. The dial pad or stored Speed Dial or Autodial numbers can send Dual-Tone Multi-Frequency (DTMF) tones. When making an outside call, you can convert from pulse to tone dialing by pressing Inn the dial pad.
You cannot use access signaling when on a Conference Call.
Pulsenone Dialing Each line is assigned either pulse or tone dialing by your System Coordinator. -
Feature Operation 4-14
If you are unable to program this feature, see your System Coordinator You may not be able to use the feature because of Office System programming.
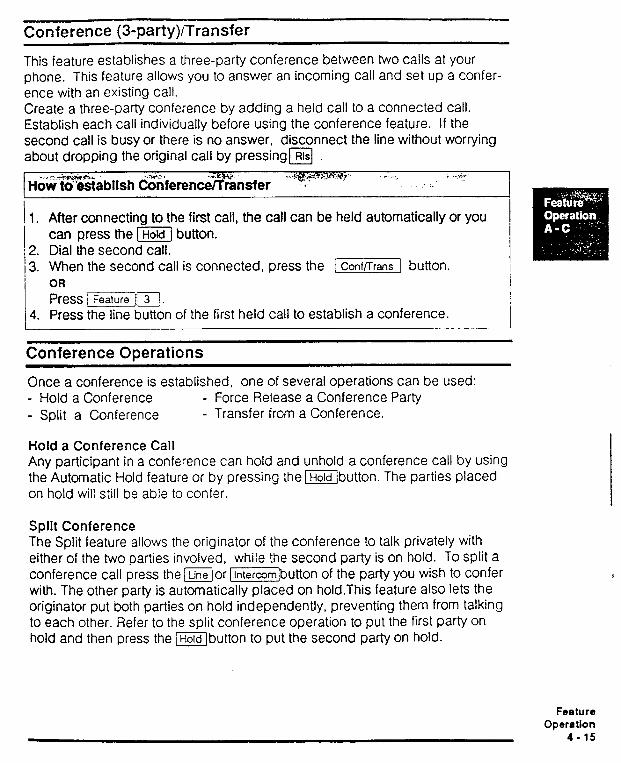
Conference (3-party)/Transfer
This feature establishes a three-party conference between two calls at your phone. This feature allows you to answer an incoming call and set up a confer- ence with an existing call. Create a three-party conference by adding a held call to a connected call. Establish each call individually before using the conference feature. If the second call is busy or there is no answer, disconnect the line without worrying about dropping the original call by pressingB .
“sfer ~.:.!;~Y+%b , ..-i” - . . . :_
1. After connecting to the first call, the call can be held automatically or you can press the -1 button.
e 2. Dial the second call. ,3. When the second call is connected, press the IConf/TransJ button.
OR
Press ‘m]i3. 4. Press the line b%n of the first held call to establish a conference.
Conference Operations
Once a conference is established, one of several operations can be used: - Hold a Conference - Force Release a Conference Party - Split a Conference - Transfer from a Conference.
Hold a Conference Call Any participant in a conference can hold and unhold a conference call by using the Automatic Hold feature or by pressing the Ibutton. The parties placed on hold will still be able to confer.
Split Conference The Split feature allows the originator of the conference to talk privately with either of the two parties involved, while the second party is on hold. To split a conference call press the ior 1 htercomjbutton of the party you wish to confer with. The other party is automatically placed on hold.This feature also lets the originator put both parties on hold independently, preventing them from talking to each other. Refer to the split conference operation to put the first Party on hold and then press the @button to put the second party on hold.
Feature Operation
4-15
Feature Operation 4.16
Force Release a Conference Party -
Force Release allows you to disconnect one of the parties from the conference by pressing the w’r ejbutton that you wish to disconnect and then pressing the Ibutton. The other party is automatically placed on hold. Tc
return to the first party press the held jUnelbutt0r-r.
Transfer from a Conference The Transfer feature allows you to transfer the original call to the other party and disconnect from the conference. One of the two parties remaining must be inside the Norstar system. If both are outside your office then you must put the Conference on hold, and disconnect only after both parties have hung up. To transfer a call press mar the (Transfervisplay button.
Consultation Consultation allows you to put a three-party Conference call on hold while you make or answer another call.
1 How to use
1. To make or answer another call while connected on a Conference call, press another line button at any time . The Conference call is put on hold automatically.
2. To reconnect to the conference, press one of its line buttons.
Contrast Adjustment
The contrast on your phone display can be adjusted so you can read it eat;’ under different lighting conditions.
I .i% :
/ M7310 Phone , . .a . . - .
-; ?s;v. :yL I i 1.
__-. Press / FeatureT/‘,p--,.
2. Press the !up or ~ $ display button. ,3. Repeat step 2 until you havt ? the level of contrast that you want. 14. Press the ;oKi display button OR ,RlsoR wait 15 seconds.
i M7208 Phone II ,I
,i 1. Press lFeature(‘lj7. /2. Press ?pj1) or 41 from the dialpad. I 3. Repeat step 2 until you have the level of contrast that you want. -.- ! 4. PreSS : Feature / OR :Rls OR Wait 15 seconds. ----_2 __
Delayed Ring Transfer (DRT)
Delayed Ring Transfer forwards your unanswered outside calls to the Prime Phone or Night Phone. This feature ensures that your outside calls will be an- swered.
If your office has a Prime Phone with DRT enabled, after three full ring cycles an unanswered outside call rings at the prime phone. The prime phone displays the message 1 DRT line <number of outside line> 1. The Prime Phone must have access to the line that the call is on.
If you are unable to program this feature, see your System Coordinator. You may not be able to use the feature because of Office System programming.
Do Not Disturb (DND) or (Selective Call Forward)
If you press DND while an outside call is ringing at your phone, the call will ring at the Prime Phone. This is a selective form of Call Forward.
If you activate DND with no active call. you are in DND mode. DND suppresses ringing, paging announcements and Ring Again offers. It stops all tones and ringing, except Held Line Reminder.
When the phone is in DND mode, incoming calls continue to appear on the line indicators, but Cal/ ldentificafion for incoming inside calls is not displayed.
I
?I Press the ~DQ Not Disturb j button. ( I OR
Press v)F\))J. I All tones and ringing except for /-/e/d Line Reminder tones are stopped. ! Ringing is transferred to the Prime Phone. [
car&et Do Not,$?kturt, $$. $ .F+ 3
:, :-“-;” .I,; _ _ .-.
ss the (Do Not Disturb 1 button again. OR
+.L Press (Featurel[d/181(5J
Feature Operation
4- 17
Emergency Transfer/Power Fail Cut-Through
This feature provides basic telephone service if the power fails or if a system error occurs.
A dial or push-button single line phone must be connected to the Key Se&ice Unit (KSU) through a designated Tetedapt’ jack. This single line phone acts independently of the Norstar system and can be used as an Emergency Telephone.
Power failures can be reported with this phone.
Find out from the System Coordinaior or installer if you have an Emergency Telephone.
Feature Access
To program for FezHure Access !
------A M73 10 phone 1. Press 1 Feature j>[T] .
2. Press any memory button except line or intercom or ; H%%lree ! . ! (Remember to press the triangle button to program the top half of the dual-memory buttons.
/
3. Press IFeaturem and the feature code you want. i 4.
--- Label the Feature Access button with Feature name.
/ ’ M7208 phone
I’: Press [Featurejml.
,2 Press any memory button except line or intercom or iH%zfree ! . 3. Press [Feature\ and the feature code you want. 4. Label the Feature Access button with Feature name.
I
Feature Operation 4-18
h&e a Feature
M7310 1. Press /Feahrreffl’ji. 2. tress the button y% wish to erase. 3. Press @ display button.
M7208 1. Press !FeaturejF:ll. ‘--- 2. Press the button you wish to erase. 3. Press @ZTJ.
Flexible Call Restrictions and Overrides
Control telephone costs by limiting the types of calls that can be made on phones and lines in your Norstar system. Access to specific numbers, such as long distance, can be restricted. Specific individuals can then override their restrictions. If restrictions and overrides are used, they apply to all outgoing calls. Restrictions and overrides may apply to your phone or to specific outside lines that you use.
If you are unable to program this feature, see your System Coordinator. You may not be able to use the feature because of Office System programming. Restriction Override ..
You can place any call on any line of any phone, with or without call restrictions, by using a 3-digit password. See your System Coordinator for the password.
How to use Restriction Override (Executive Password)
1. Press the i Ovenide : button. OR
Press mF[l(Tj. 2. ‘. Enter the password you received from your System Coordinator. 3. Dial your call.
If you are unable to program this feature, see your System Coordinator. You may not be able to use the feature because of Office System programming.
Feature Operetlon
4-19
Handsfree/Mute
Feature Operation 4 - 20
Use your phone without picking up the receiver. Adjust the volume of the Handsfree speaker using the Volume but[on. &“* “~~~~~~~utJ~~,~~..~~~~.~ , ~‘.:-!qgyTc’ :‘ ‘-;I: .* $&-$e&
1. Pressi. 2. Dial a call.
If a line.is selected, the handsfree microphone and speaker are turned on. The line indicator is lit up.
To mute the-microphone’ . .-; :
1. Press 1-i again to consult someone outside the phone conversation. The display shows [Microphone Muted ! .
The button indicator flashes. 2. Press ( HarX?Lree jagain to return the microphone to its normal level to
continue your Handsfree call.
How to end Handsfree -7
1. Lift the receiver to conduct a private conversation. OR
Press ! to end the call.
If you are unable to program this feature, see your System Coordinator. You may not be able to use the feature because of Office System programming.
Headset
You can use a Norstar Headset to talk without using the receiver or []. The headset provides convenient handsfree service for the receptionist or secretary who handles large numbers of calls. To use our Headset, follow the instructions given for Handsffee on this page. The e] is used to control the Headset in the same way that it controls Handsfree calls. The Headset volume is adjusted using the Volume button. The Headset comes with an instruction card.
Hearing Aid Compatibility
The receiver on your Norstar M7310 or M7208 Phone is compatible with hearing aids.

Hold
Use m on your Norstar Phone to suspend all calls temporarily. Use this button while you answer or make another call. If you have to do something else or consult with someone else during a call, usem until you are ready to return to the original conversation. If you’ve been put on hold, you too can put the call on hold and use L&VI on Hold while you continue with other tasks.
When you put an outside call on hold, it can be picked up on other phones that have access to that line. Use Exclusive Hold if you want to keep the call private. To end a call that you have put on hold, first reconnect the call and then press the @ button or replace ihe receiver.
Automatic Hold You don’t always need 13 use iHold to put a call on hold. If you are on a call and you be$&other call on a different line, the first call is put on hold au:xnatica:iy. You do not have to press (
When Autofnaii:: Hold is used, the held call can be picked up by other people that have access to the sa;ne line. This feature can be used to transfer calls to other phones in the offce system.
low to Use Automatic Hold
While on a call: 1. Press another line SuZm.
OR
Press a memory button programmed as an autodial button. You can return to the first call by pressing its line button You can s:‘/itch fro-n one call to another using the line buttons.
‘ransfer Using Automatic Hold i I I While on a call:
1. Press another line button and call the phone to which the call will be I
transferred. OR Press a memory button programmed to call the destination (for example, an inside autodial button).
‘2. Tell the person which line the call is being held on. The destination phone I must have a button for the line that the call is on. When that person I Presses the appropriate line button, the call is transferred. I
I Feature
Operation 4 - 21
.:
The Conference feature can be used to transfer calls if the destination phone does not have a button for the line that the Call is on.
If you are unable to program this feature, see your System Coordinator. You may not be able to use the feature because of Office System programming. Exclusive Hold This feature guarantees that your call remains private when you place it on hold. Exclusive Hold prevents others with access to the line from picking up the call. When Automatic Ho/d is used, other people with access to the line on hold, can pick up the held call.
1 How to use Exclusive Hold . _
1
1. Press the I-1 button and then the rHoldbutton. OR
I I Press the 1 Exclusive Hold 1 button. I OR
I f%?SS ! Feature 117.
The ca~d&%only be picked up on the phone from which it was put !
I on hold.
Listen on Hold If you are put on hold, you can put the receiver down or, while on Handsfree, continue to work while listening for the other person to take you off hold.
i How to use Listen on Hold \
! 1. i 2. j 3. 1 / 4.
1. j 2. I ; 3.
Put the call on hold. Hang up the receiver. Press the line button for the call. Listen through the speaker. When you are removed from hold lift the receiver. OR
If you have HandsfreeRvIute:
Press m. Hang up the receiver. Listen through the speaker. Talk using the Handsfree microphone or pick up the receiver.
,
Feature Operation 4 - 22
Held Line Reminder When you place an outside call on hold, you hear periodic reminder tones until the call is removed from hold.
If you are unable to program this feature, see your System Coordinator. You may not be able to use the feature because of Office System programming.
MusWTonelSlleke on Hold for OutsIde Callers #en you put outside calls on hold, the held party hears either music, a periodic tone or silence depending on the setting for your Meridian Norstar Office System.
If you are unable to program this feature, see your System Coordinator. You may not be able to use the feature because of Office System programming.
Feature Operallon
4-23 ;
Intercom (Inside Phone) Numbers
Communication inside your office is easy with Norstar two-digit phone numbers. Make inside calls by selecting an inside line and then dialing a two-digit intercom number (21, 22 . ..). Call the Prime Phone by dialing @ on an intercm (inside) line.
‘1. Press a free inside line button. ._..
I The indicator is turned ON.
j 2. en inside dial tone is heard. Dial the two-digit intercom number (21. 22 . ..).
I When dialing is complete, Call identification is displayed at both the
I originating and destination phones.
1 ’ To the Coordinator
_* . ..-. - ;_ :.,- i .;;-< -;‘; .I -s -.‘~,‘&g,-
I j 1. Make sure you distribute an intercom list of names and numbers to I / 2.
everyone in your office system (Norstar Orientation). Make sure users understand what is meant by ‘intercom’.
i .T
i
Feature Operation 4 - 24
Language Choice
The buttonslabels and display information on your M7310 or M7208 phone are available in either North American English, Canadian French or alternate lan- guage.
To select the language used for message display on your phone: . . c,:.
1 Press t~I(~)ll~~. .- -The display, ShOwS / In English... 1 .
‘.t. . OR Press [Fealurej[j~/~j~. The display shows 1 En frarqais... ) or alternate language.
Last Number Redial
Last Number Redial saves time when you are trying to reach a previously-busy or unanswered number. This feature automatically redials the last outside number dialed. The stored number may be up to 16 digits long.
OR Press ‘-No.] after. getting a dial tone on
‘.*an outside line. If a line is not,selected before Last Number Redial is used, Autwnatic
k --Outgoing Linti’Selection trfes to select a free line. ‘>\T’ ;; -; : .y >-r
Feature Operation
4 - 25
Lines
Inside Llne Access You can use intercom (inside) line to make and answer calls inside the Norstar system. Each phone has an associated two-digit intercom number (21, 22...). See your System Coordinator for a list of intercom numbers.
How to use inside Lines
If an inside line is free, the indicator beside the button is OFF. 1. Press an inside line button.
The indicator changes to ON. You’ll hear an inside dial tone.
2. :::
Dial an inside call using the dial pad :;: . •I OR
Press an inside autodial button.
If you are unable to program this feature, see your System Coordinator. You may not be able to use the feature because of Office System programming. Llne Pool The Line Pool feature lets you make efficient use of outside lines. A group of outside lines in a line pool can be shared by a group of phones within your office.
How to use a Llne Pool i
1. Press- 2. Dial the line pool access code l%J .
OR
Press /GGGGpool]. OR Press [?ZGJj%$J. A line pool button may not be used to answer outside calls ringing on a lint pool line.
If you are unable to program this feature, see your System Coordinator. You may not be able to use the feature because of Office System programming.
Feature Operation 4 - 26
Manual Line Selectlon Press a line button to select any free or ringing line and to override Automatic Incoming or Outgoing Line Selection. Manual Line Selection allows you to make or answer a call in cases where Automatic Line Seledon does not apply. This feature allows you to answer a call that is alerting the phone visually but without ringing (such as when you use Do Not Disturb). You must select an outside line when there is no Prime Line defined for the phone.
Multiple Line Buttons If more than one line button is available, you have access to each call on a separate line button. Multiple Line buttons allow you to handle calls easily. These buttons also have a Call Waiting function when you are on another call. The indicator beside the line button flashes when a line is ringing or on hold.
Outside Llne Access Use outside line buttons to make and answer calls to or from parties outside the Norstar system.
How to use Outside Llnes
If the line is free, the indicator is OFF. 1. Press an outside line button.
The indicator changes to ON. You’ll hear an outside dial tone.
2. Dial an outside call using: - the dial pad. - a Speed Dial number using (Feature//O] (plus two-digit number). - - an autodial key.
I -[Last1 or [Feature))TJ. I I J
The number of lines in your Norstar System are preset by the installer or your service representative.
If you are unable to program this feature, see your System Coordinator. You may not be able to use the feature because of Office System programming.
Feature Operalion
4- 27
Message Waiting/Send
Feature Operation 4 - 28
You can send a message to request another person in your Norstar system to call back. The message list stores up to four different messages before you can get 1 Message list full Ion the display. The prime phone stores up to ten messages.
How to Send a message
M7208 M7310
1. Press[FeatureJr]. OR
1. PresslFeature OR
PreSS 1 Send Message 1. Press1 Send Message I.
2. Dial the 2 digit Intercom number. 2. Press the fdisplay button. OR
Press an inside Autodial button. 3. Dial the 2 digit Intercom numb OR
Press an inside Autodial button.
How to Show a message (hI7310 only)
1. Press @SGJ rj. OR
3. Pressidisplay button if morf
Press [Send k~age J. than one message.
2. Press the [Showldisplay button. 4. Pressmisplay button.
OR
Pressj.
How to Cancel a sent message
M7208 M7310
1. PressJFeahJre]TX71]. 1. Pres.s[l[Tj . OR OR
Press 1 caf~~ei Send Msg 1 Press\ Send Message ] .
2. Dial the 2 digit Intercom number. 2. Press the (Shawl display button. OR
Press an inside Autodial button. 3. Press the [Eraseldisplay button.
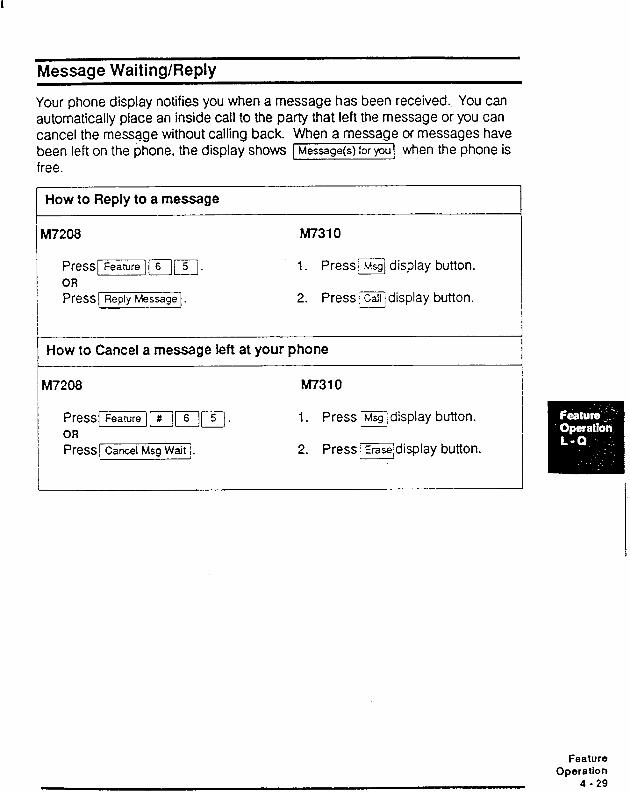
Message Waiting/Reply
Your phone display notifies you when a message has been received. You can automatically place an inside call to the party that left the message or you can cancel the message without calling back. When a message or messages have been left on the phone, the display shows 1 Message(s) for you] when the phone is free.
I
How to Reply to a message
id7208 M7310
Pressl] p))51. 1. Press- display button. OR Press.1 Reply Message]. 2. Press i display button.
How to Cancel a message left at your phone
hft72oa
Press[ I#lpjlT]. OR
PressrCancel Msg Wait ;.
M7310
1. Press +j display button.
2. Press iErasejdisplay button.
J
Feature Operation
4 - 29
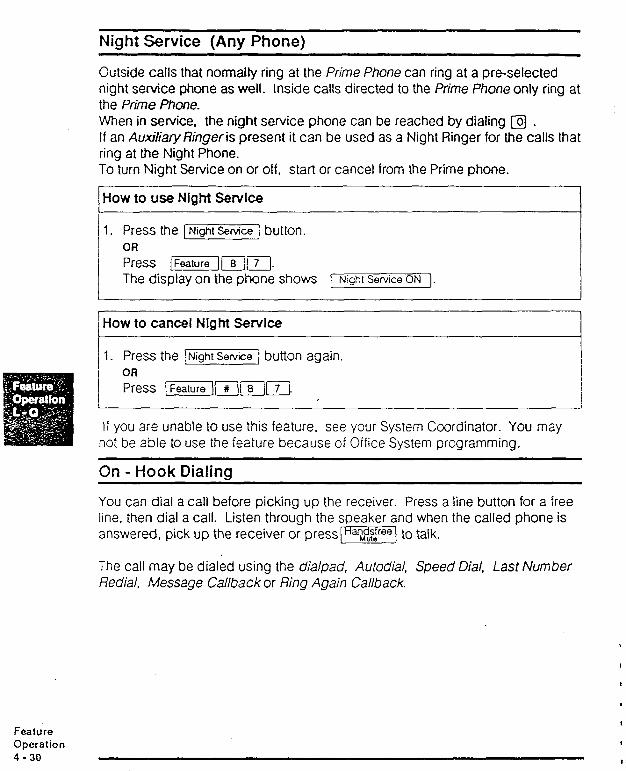
Night Service (Any Phone) -
Outside calls that normally ring at the Prime Phone can ring at a preselected night service phone as well. Inside calls directed to the Prime Phone only ring at the Prime Phone. When in service, the night service phone can be reached by dialing q . If an Auxiliary Ringeris present it can be used as a Night Ringer for the calls that ring at the Night Phone. To turn Night Service on or oif, start or cancel from the Prime phone.
How to use Night Service
1. Press the (Night] button. OR
Press [FaatureI 18;17]. The display on the phone shows I Nighl Service ON 1.
How to cancel Night Service I
1. Press the L-1 button again. OR
Press lFeaturelIili8)1
Ii you are unable to use this feature, see your System Coordinator. You may not be able to use the feature because of Office System programming.
On - Hook Dialina
You can dial a call before picking up the receiver. Press a line button for a free line. then dial a call. Listen through the speaker and when the called phone is answered, pick up the receiver or pressp-1 to talk.
The call may be dialed using the dialpad, Autodial, Speed Dial, Last Number Redial, Message Callback or Ring Again Callback.
Feature Operation 4 - 30
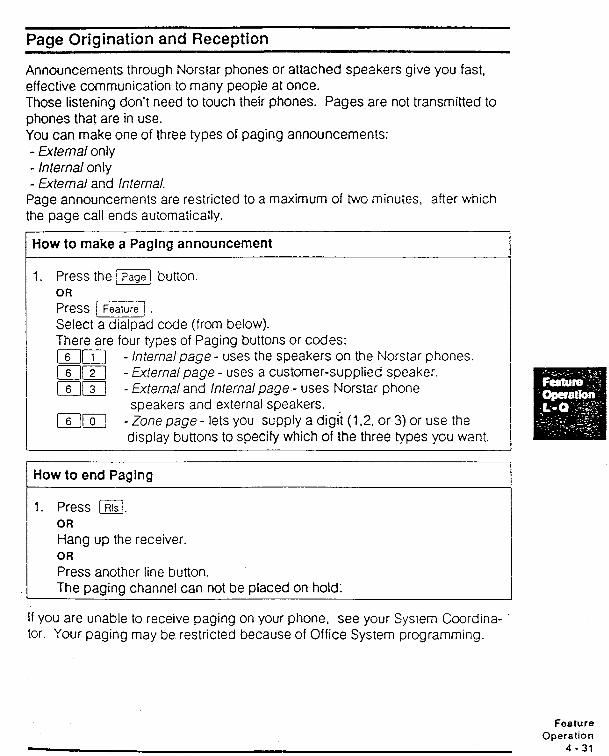
Page Origination and Reception
Announcements through Norstar phones or attached speakers give you fast, effective communication to many people at once. Those listening don’t need to touch their phones. Pages are not transmitted to phones that are in use. You can make one of three types of paging announcements: - External only - internal only - External and Internal.
Page announcements are restricted to a maximum of two minutes, after which the page call ends automatically.
How to make a Paging announcement
1. Press the iPagel button. OR Press [, . Select a dialpad code (from below). There are four types of Paging buttons of codes: [7)-i-j - lnternalpage - uses the speakers on the Norstar phones. ls]F] - Edema/ page - uses a customer-supplied speaker. r]]?? - External and internal page - uses Norstar phone
speakers and external speakers. m[ol - Zone page - lets you supply a digit (12. or 3) or use the
display buttons to specify which of the three types you want. -I
How to end Paging
1. Press I. OR
Hang up the receiver. OR
Press another line button. The paging channel can not be placed on hold:
If you are unable to receive paging on your phone, see your System Coordina- tor. Your paging may be restricted because of Office System programming.
Feature Operation
4 - 31
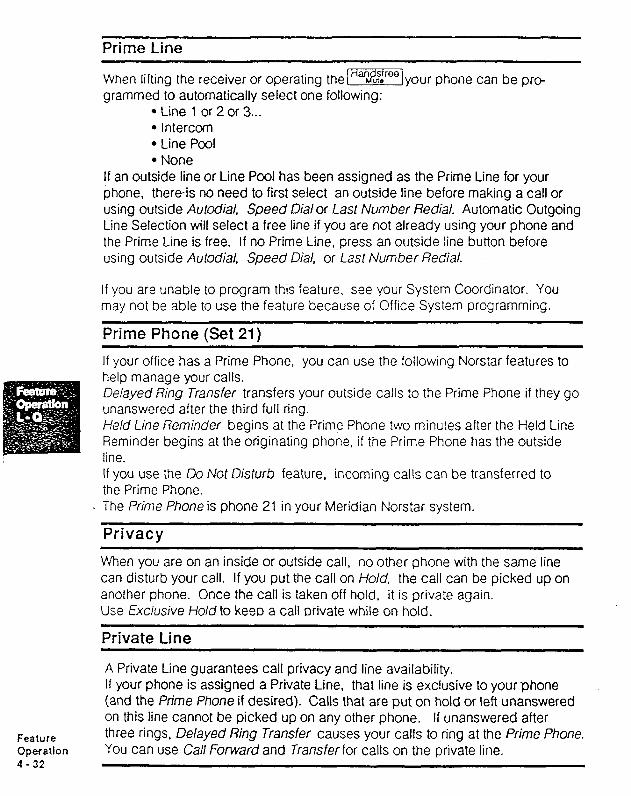
Feature Operation 4 - 32
Prime Line
When lifting the receiver or operating the-your phone can be pro- grammed to automatically select one following:
l Line 1 or 2 or 3... l Intercom l Line Pool l None
If an outside line or Line Pool has been assigned as the Prime Line for your phone, there-is no need to first select an outside line before making a call or using outside Autodial, Speed Dialor Last Number Redial. Automatic Outgoing Line Selection will select a free line if you are not already using your phone and the Prime Line is free. If no Prime Line, press an outside line button before using outside Autodial, Speed Dial, or Last Number Redial.
If you are unable to program this feature. see your System Coordinator. You may not be able to use the feature because of Office System programming.
Prime Phone (Set 21)
If your office has a Prime Phone, you can use the following Norstar features to help manage your calls. Delayed Ring Transfer transfers your outside calls to the Prime Phone if they go unanswered after the third full ring. Held Line Reminder begins at the Prime Phone two minutes after the Held Line Reminder begins at the originating phone, if the Prime Phone has the outside line. If you use the Do Not Disturb feature, incoming calls can be transferred to the Prime Phone.
. The Prime Phone is phone 21 in your Meridian Norstar system.
Privacy
When you are on an inside or outside call, no other phone with the same line can disturb your call. If you put the call on Hold, the call can be picked up on another phone. Once the call is taken off hold, it is private again. Use Exclusive Hold to keeD a call Drivate while on hold.
Private Line
A Private Line guarantees call privacy and line availability. If your phone is assigned a Private Line, that line is exclusive to your phone (and the Prime Phone if desired). Calls that are put on hold or left unanswered on this line cannot be picked up on any other phone. If unanswered after three rings, Delayed Ring Transfer causes your calls to ring at the Prime Phone. You can use Call Forward and Transfer for calls on the private line.
Ring Again on Busy
Rirlg Again eliminates the need to make repeated attempts to contact people *within your office. Ring Again on Busy alerts you when a busy inside phone jecomes available. Ring Again on Busy Line Pool alerts you when a line in the
‘!rle pool becomes available. Ring Again cannot be used after making a Voice :;all.
How to use Ring Agaln on Busy
Press -Again. OR Press [FeatureIj. The call is disconnected. The display shows 1 Ring Againw. When the Ring Again offer occurs you hear an alerting tone. ) Call <name>? IOf Use line pool? I appears on the display.
! How to cancel Ring Again
Press (Ring Again j again. OR PESS IFeature jim. !
Eing Again on No Answer .--
ii:l-;g Again eliminates the need to make repeated attempts to contact people within your office. Ring Again on No Answer alerts you when the next activity occurs at an inside phone that previously failed to answer a call . Ring Again cannot be used after making a Voice Call to that number.
---. ‘%w to use Ring Agaln on No.Answer .
/ 1 Press IRing Again I. I
I OR
! I
Press l$GGG;. -: 1
The call is disconnected. The display shows iRing Again ON ;
I When the Ring Again offer occurs you’ll hear an alerting tone. Fall <name>? appears on the display.
I 1
Feature Operation
4 * 33
1 How to cancel Ring Again
I- 1. , Press 1 Ring Again 1 again. ( OR
1 Press iF]I )2). L
Ring Type .
Select one of four different tone ccmbinations to give your phone a distinctive ring.
[How to select a Ring Type 1 I M73 10 Phone MEQ8 Phone
1. PressiFeature((‘!/ . You hear one of the ring types for two seconds.
1. Press /$GGF/‘]il. You hear one of the ring types for
2. Press the display button jNextl until the display is
i Ring type -cl. 2. 3 or 4~ .
You hear the selected ring type for two seconds.
3 Repeat step 2 until you reach the ring type you prefer.
4. Press the ioKJ display button. OR
Press the ig button.
two seconds. 2. Press m./Tj2j., or (41 from
the dialpad. You hear the selected ring type for two seconds.
3. Repeat step 2 until you hear the ring type you prefer.
4. Press them button. I
I
-i
Ringing Line Preference
Incoming calls on some or all the outside lines for which your phone has buttons, can ring at your phone. Your System Coordinator has a record of the number of outside lines selected to ring at your phone .
Feature Operation 4 - 34
Rls (Release)
Press I to end a call without putting the receiver down, and to end a Han&free call or to end feature programming or feature use.
Selective Call Forward (Do Not Disturb)
Send an incoming call on an outside line to the Prime Phone without answering it.
1
How to use Selective Call Forward
While the call is ringing: 1. Press the [ Do Not Disturb 1 button.
OR
Press r$GGllljI1]. The call rings at the Prime Phone.
To cancel Selective Call Forward
1. Press 1 Do Not Disturb jagain. /
OR
Feature Operation
4 - 35
Speed Dial - Personal (M7208 Phone only)
Speed dial gives you fast access to frequently-called numbers. This feature lets you automatically dial one of 24 pre-stored numbers. You can program these numbers independently on your M7208 phone. Each Speed Dial number may contain up to 16 digits. M7310 Phones can use outside Autodial buttons for fast dialing.
How to use Speed Dial
i il. PESS the ! Speed Dial j button. FEATLR& + (t - cC’A/TER c&E p I
i Es piiiGq[.
&fl7-EL pHvn/~ * -c /+&Lo &J7TAJ
1 Speed dial >
12. j appears on the display.
Press a Speed Dial code (2-digit number from 71 to 94).
Speed Dial - System
System Speed Dial provides fast access to numbers that are frequently used by everyone in your Norstar office system. This feature allows up to 30 phone numbers to be shared among all users. Unlike Personal Speed Dial numbers, System Speed Dial numbers are acces- sible from the M7310 phone as well as the M7208 phone. System Speed Dial entry numbers range from 41 to 70 inclusive,
~HOW to use System Speed Dial 1 t
4 4
11. Press the i Speed Dial ! button. I OR
I Press )KZFj/)
12. Press a System Speed Dial code (2-digit number from 41-70). I I I
If you are unable to program this feature, see your System Coordinator. You may not be able to use the feature because of Office System programming.
Feature Operation 4 - 36
Time and Date
The time and date appear on the display of your phone when you are not on a call. To adjust time and date see your System Coordinator.
Transfer -
Transfer calls quickly and easily with this Norstar’feature.
Transfer a call to someone In your office.
While on a call: 1. Call the person to whom the first call will be transferred.
(The first call will be automatically placed on hold). After the call is answered:
2. Press [iZG?XZF]. OR
Press ]EZG-X]]. 3. Press the line button of the held call. 4. To disconnect yourself from the call, press m .
Transfer a call to someone outside your off Ice.
While on a call: 1. Call the person to whom the first call will be transferred .
After the call is answered: 2. Press 1-J.
OR
f Press wj3j. 3. Press the line button of the held call. 4. To remove yourself from the call, press [Hold. 5. If both parties are outside your office then press m
only after both parties have hung up.
Feature Operation
4 - 37
Voice Call
You can make a voice announcement to another phone instead of the normal ringing call. If the Voice Call succeeds, the called phone generates a Voice Call Alert Tone once, answers the call automatically, turns on their speaker and may activate handsfree or headset automatically. See Handsfree Answerback below.
: How to make a Voice Call
1. Press the -1 button before dialing the call. OR
2. Press (-i%GZj(6)(~] and [ Dial Voice Call jappears. Dial the intercom number of the person you wish to speak to.
3. Speak after you see the display 71, J
Handsfree Answerback The Handsfree microphone is activated when the Voice Call occurs. A ‘micro- phone ON’ tone is given immediately following the first ring, and is repeated periodically to receiver or press
microphone is activated until you pick up the acknowledge the call.
If you are unable to program this feature, see your System Coordinator. You may not be able to use the feature because of Office System programming.
Voice Call Denv
This feature prevents a phone from receiving Voice Calls so that incoming inside calls can be received as a ringing call.
How to use Voice Call Deny
1. Press the [ Voice cart deny] button. I OR
I Press (-FGGFJFl)1}. I
I
1 How to cancel Voice Call Deny I
t 1
1. Press the [ Voice call Deny j button again, OR
Feature Operetlon 4 -38
Volume Button
Press the volume button to adjust the volume of the receiver, Handsfree speaker, Headset or ringing. As you use each, press the volume button until the correct level of sound is reached. ..-
To set Ring Volume 1
1. Press (FeatureI(]w]I(OI to make your phone ring for 4 seconds. 2. Press [-141)) until you have the level of ringing you want.
1 1
Wall - Mounted Phones
Your Norstar M7310 or M7208 Phone can be wall-mounted. Your System Coordinator can call the installer or service representative to have your phone wall-mounted.
Feature Operation
4 - 39
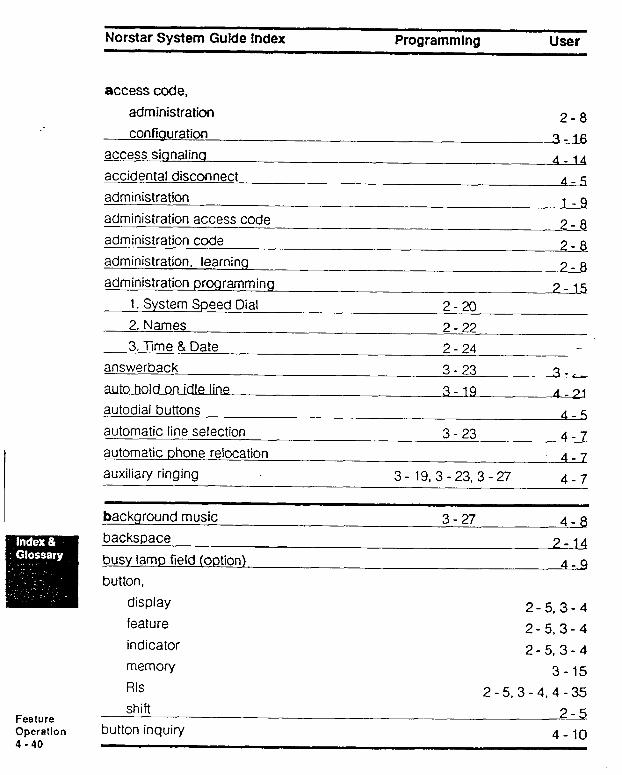
Norstar System Gulde Index Programmlng USer
access code,
administration confiouration
access siqnalino
accidental disconnect administration administration access code administration code
administration, learning administration programminq
1. System Speed Dial 2. Names 3. Tme & Date
answerback donAl&ne . .
autodial buttons
automatic line selection automatic phone relocation
auxiliary ringing
2-8 1-16
4-14
4-5
l-9 2-4 2-8 3-8
?- 15 2-20 2 22 - 2-24 _-
3 - 23 ?-,. 3- 19 -
4-5
3 23 - 4-7 4-7
3- 19,3-23,3-27 4-7
background music backspace busy lamp field (option)
button, display feature
indicator memory RlS
shift button inquiry
3-27 4-8 7-14
4-g
2-5,3-4 2-5,3-4 2-5,3-4
3-15
2-5,3-4,4-35 2-5
4-10 Feature Operation 4 - 40
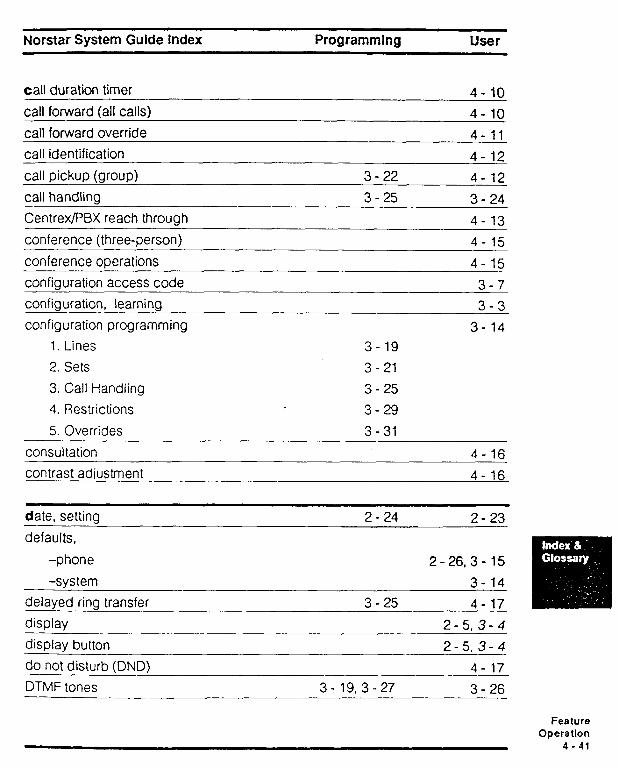
Norstar System Guide index Programming User
call duration timer
call forward (ail calls) cafl forward override
4- 10 4-10
A- 11
call identification 4- 12
call pickup (group) 3 - 22 4- 12
call handling 3 - 25 3-24 CentrexPBX reach through 4-13
conference (three-person) 4-15
conference operations 4-15
configuration access code configuration, learning
3-7 3-3
configuration programming 3- 14 1. Lines 3- 19
2. Sets 3-21
3. Call Handling 3 - 25
4. Restrictions 3 - 29
5. Overrides 3-31 consultation 4-16
contrast adiustment 4-16
date, setting defaults,
2 - 24 2-23
-phone Z-26,3- 15
-sys tern 3- 14
delayed ring transfer 3 - 25 4-17
display 2-5.3-4 display button
do not disturb (DND) 2-5.3-4
4-17 ~- DTMF tones 3- 19,3-27 3-26
Feature Operation
4 - 41
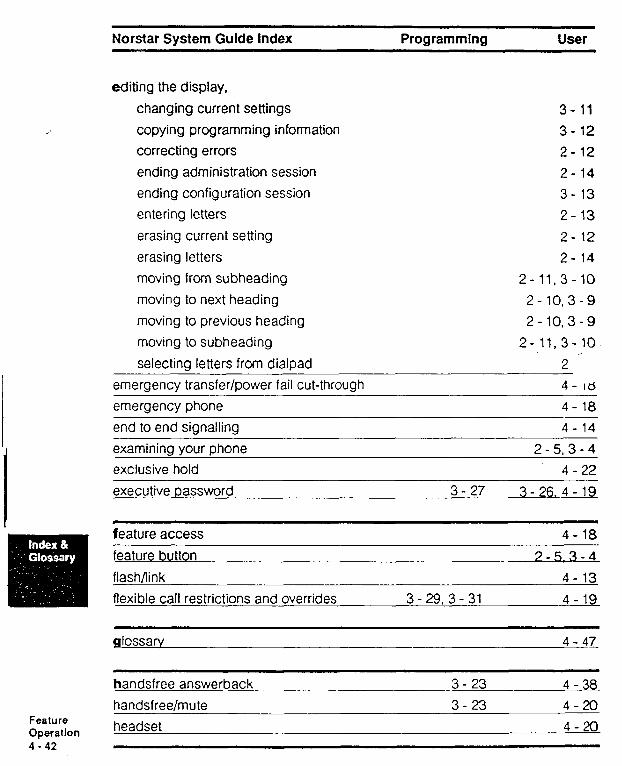
Norstar System Guide index Programmlng User
editing the display,
changing current settings copying programming information
correcting errors ending administration session ending configuration session
entering letters erasing current setting erasing letters moving from subheading
moving to next heading moving to previous heading moving to subheading
selecting letters from dialpad emergency transfer/power fail cut-through
emergency phone end to end signalling examining your phone exclusive hold
executive password
3- 11 3-12 2-12 2- 14 3- 13
2- 13 2- 12 2- 14
z-11,3-10
2-10,3-g 2-10,3-g
2-11,3-10
2 ‘. 4- I6
4- 18 4- 14
2-53-4 4 - 22
3-27 3-26.4-19
feature access 4- 18 feature button ?-!i,3-4
flash/fink 4- 13 flexible call restrictions and overrides 3-29.3-31 4- 19
glossary 4-42
handsfree answerback 3- 23 4-38
handsfree/mute 3-23 4-20 Feature Operation headset 4-20
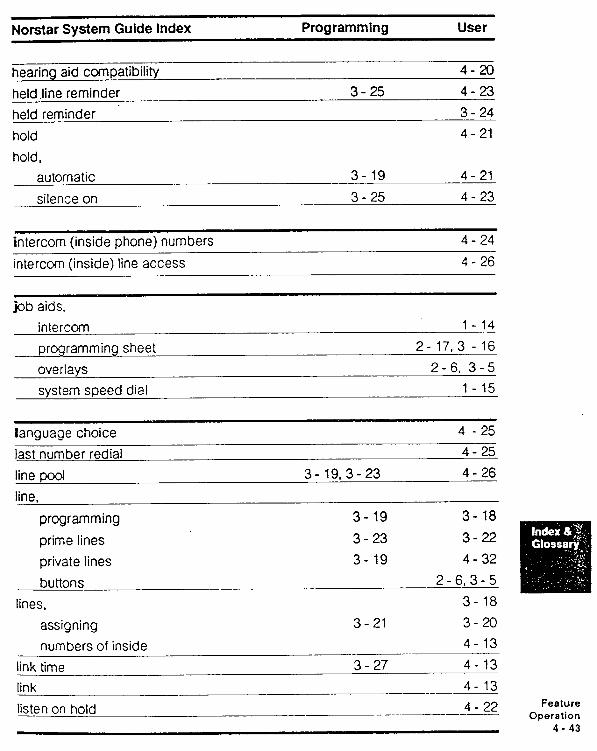
Norstar System Guide Index Programming User
hearing aid compatibility held fine reminder
-. held reminder hold
hold, automatic
4-20 3-25 4-23
3-24 4- 21
3- 19 4- 21
silence on 3-25 4 - 23
intercom (inside phone) numbers 4-24
intercom (inside) line access 4 - 26
job aids, intercom
programming sheet
overlays system speed dial
1 - 14 2- 17,3 - 16
2-6, 3-5 1 - 15
language choice 4 -25 last number redial 4- 25 line pool 3- 19,3-23 4-26
programming
prime lines private lines buttons
lines, assigning numbers of inside
link time link listen on hold
3-19 3- 18 3-23 3-22
3-19 4-32
2-6,3-5 3- 18
3- 21 3-20 4- 13
3-27 4- 13
4- 13 - ~--- 4 - 22 Feature
- ___-.~---~ Operation 4 - 43
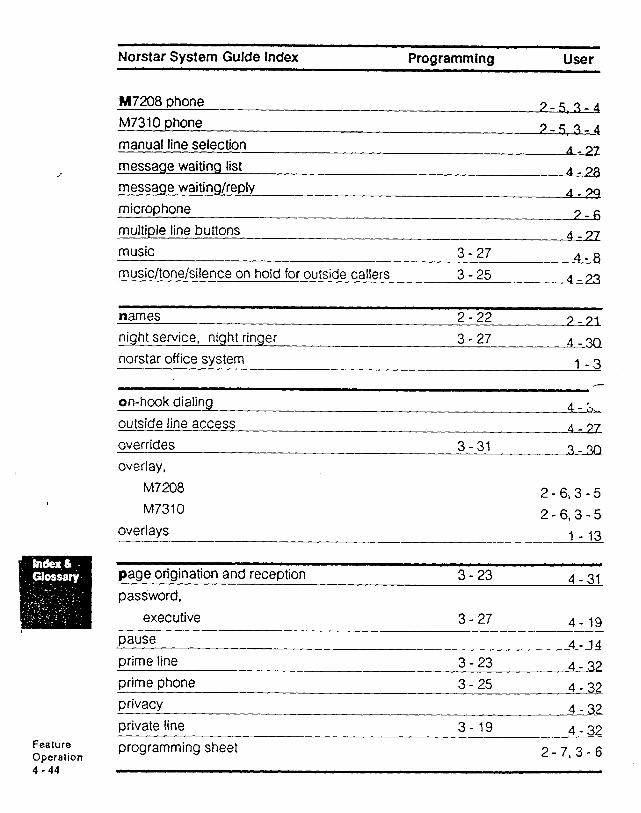
Norstar System Guide Index Programming User
M7208 phone M7310 phone
manual line selection
- - - -
- message waiting list message waiting/reply
microphone multiple line buttons music
music/tone/silence on hold for outside callers 3-27
3 - 25
A - 38
A - 39 7-fj
4-77
4-8
4 - 73
names night service, night ringer norstar office system
2 - 22 7 - 71
3 - 27 4-3Q
1-3
on-hook dialing
outside line access
overrides overlay,
M7208 M7310
overlays
I 3, A - 37
3-31 !-A-?Q
2-6,3-5 2-6,3-5
I- 13
Feature Operation
page origination and reception password,
executive pause
prime line
prime phone privacy
private line programming sheet
3 - 23 4- 31
3-27 4- 19
4- 14
3-23 4-37 3 - 25 4 32 -
4-32 3-19 4-32
2-7,3-6 4 : 44
Norstar System Guide Index Programmlng User
pulse/tone dialing 3- 19 4- 14
reach through 4- 13
remind delay 3-25 3 - 24
reply message 4-29
restrictions 3-29 3 - 28
ring again on busy 4 - 33
ring again on no answer 4 - 33
ring type 4 - 34
ringing line preference 4 - 34
Rls (release) 4-35
run/stop 4- 13
selective call forwarding 4-35
send message 4 - 28
sets programming 3- 21 3-20
speaker 2-5
sneaker ohone 4-x)
speed dial - M7208 phone only 4 - 36
speed dial - system 2-20 4 - 36
speed dial lists, svstem 2- 19
time and date 2-24 4 - 37
timed release 4- 13 - tone time 3- 27 3 - 26 - tones, DTMF 3- 26 ---- transfer using conference 4-16 -___ __- transfer using hold 4 - 21
transfer 4 - 37 Feature
Operation 4 - 45
Norstar System Guide index Programming User
voice call deny voice call
volume button
4-38 4-38
4 - 39
wall-mounted phones 4 - 39
Feature Operation
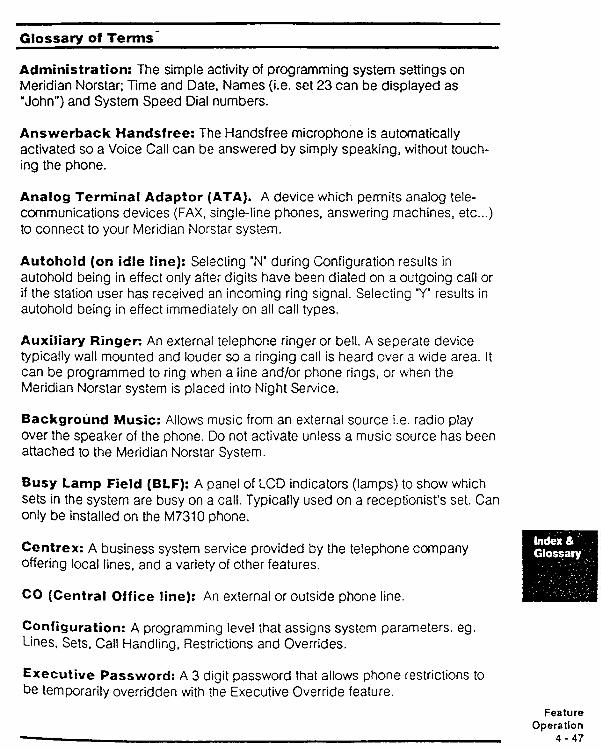
Glossary of Terms-
Administration: The simple activity of programming system settings on Meridian Norstar; Time and Date, Names (i.e. set 23 can be displayed as “John”) and System Speed Dial numbers.
Answerback Handsfree: The Handsfree microphone is automatically activated so a Voice Call can be answered by simply speaking, without touch- ing the phone.
Analog Terminal Adaptor (ATA). A device which permits analog tele- communications devices (FAX, single-line phones, answering machines, etc...) to connect to your Meridian Norstar system.
Autohold (on idle line): Selecting ‘N’ during Configuration results in autohold being in effect only after digits have been dialed on a outgoing call or if the station user has received an incoming ring signal. Selecting Y’ results in autohold being in effect immediately on all call types.
Auxiliary Ringer: An external telephone ringer or bell. A seperate device typically wall mounted and louder so a ringing call is heard over a wide area. It can be programmed to ring when a line and/or phone rings, or when the Meridian Norstar system is placed into Night Service.
Backgrotind Music: Allows music from an external source i.e. radio play over the speaker of the phone. Do not activate unless a music source has been attached to the Meridian Norstar System.
Busy Lamp Field (BLF): A panel of LCD indicators (lamps) to show which sets in the system are busy on a call. Typically used on a receptionist’s set. Can Only be installed on the M7310 phone.
Centrex: A business system service provided by the telephone company offering local lines, and a variety of other features.
CO (Central Office line): An external or outside phone line.
Configuration: A programming level that assigns system parameters. eg. Lines, Sets. Call Handling, Restrictions and Overrides.
Executive Password: A 3 digit password that allows phone reStriCtiOnS to
be temporarily overridden with the Executive Override feature. Feature
Operation 4 - 47

Glossary con?...
Feature Code: A number that is used to activate a particular feature. Features are activated by first pressing the feature button and then keying the feature’s code number from the dialpad.
:’ Full Handsfree: Allows the user to talk and listen without lifting the receiver of the M7208 or M7310 phone.
Held Line Reminder: A reminder tone and a “Held Call” message on the display of the M7208 or M7310 phones occur when a call has been placed on hold for a excessive period of time.
Hybrid (template): One of the four Meridian Norstar system Templates or default patterns. All specified outside lines are in the Line Pool, and Line 1 ap- pears on every phone.
Intercom Keys: The buttons on the phone that select intercom or inside line.
I/C: An abbreviation for ‘intercom”. _r
Line Assignment: The configuration task of determining which outside lines appear on each phone.
Link lime: (Installer only). A specific time delay when signalling PBX or Cen- trex features through Meridian Norstar. Call the PBX or Centrex customer service department for information on the required link time.
M7208: The Meridian model 7208 telephone having 8 programmable buttons and a single line display.
M7310: The Meridian model 7310 telephone having 10 programmable buttons with indicators, 12 dual programmable keys without indicators and a 2-line display with display buttons.
Music Source: An external music signal such as from a radio, which can be connected into the KSU for Music on Hold and/or Background Music.
Night Set: Selected incoming calls normally directed to the Prime Set will ring at a preselected phone called a night set. The Night Service Feature is activated by the Prime Set.
Feature Operation 4 - 48
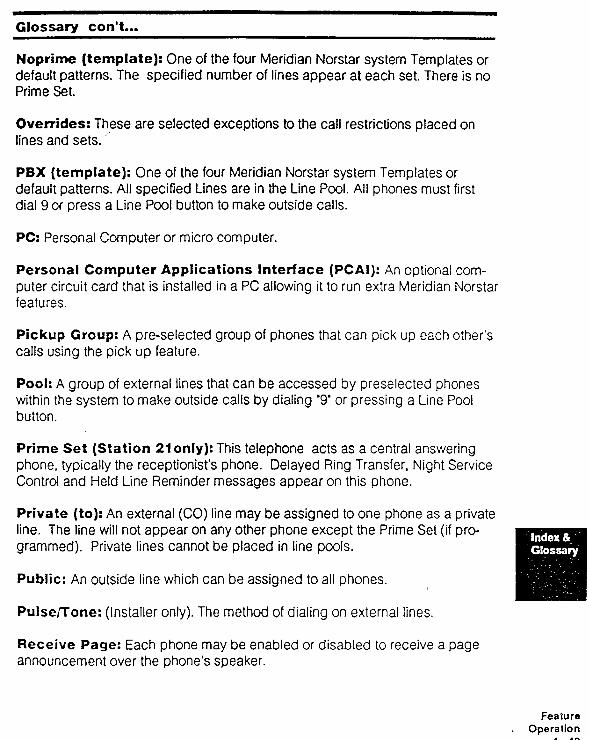
-~ Glossary con?...
Noprime (template): One of the four Meridian Norstar system Templates or default patterns. The specified number of lines appear at each set. There is no Prime Set.
Overrides: These are selected exceptions to the call restrictions placed on lines and sets. ..
PBX (template): One of the four Meridian Norstar system Templates or default patterns. All specified Lines are in the Line Pool. All phones must first dial 9 or press a Line Pool button to make outside calls.
PC: Personal Computer or micro computer.
Personal Computer Applications Interface (PCAI): An optional com- puter circuit card that is installed in a PC allowing it to run extra Meridian Norstar features.
Pickup Group: A pre-selected group of phones that can pick up each other’s calls using the pick up feature.
Pool: A group of external lines that can be accessed by preselected phones within the system to make outside calls by dialing ‘9’ or pressing a Line Pool button.
Prime Set (Station 21 only): This telephone acts as a central answering phone, typically the receptionist’s phone. Delayed Ring Transfer, Night Service Control and Held Line Reminder messages appear on this phone.
Private (to): An external (CO) line may be assigned to one phone as a private line. The line will not appear on any other phone except the Prime Set (if pro- grammed). Private lines cannot be placed in line pools.
Public: An outside line which can be assigned to all phones. ,
Pulse/Tone: (Installer only). The method of dialing on external lines.
Receive Page: Each phone may be enabled or disabled to receive a page announcement over the phone’s speaker.
Feature . Operation
4 - 49
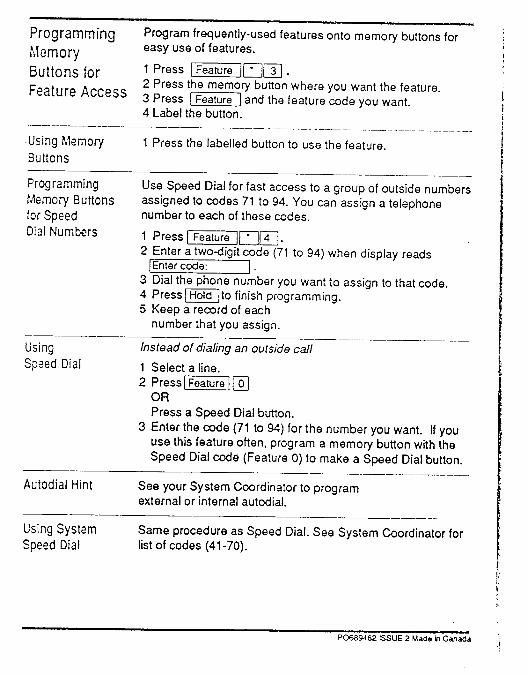
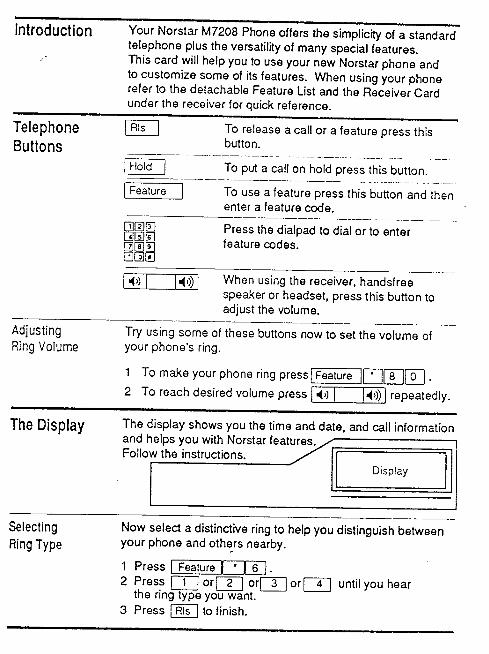
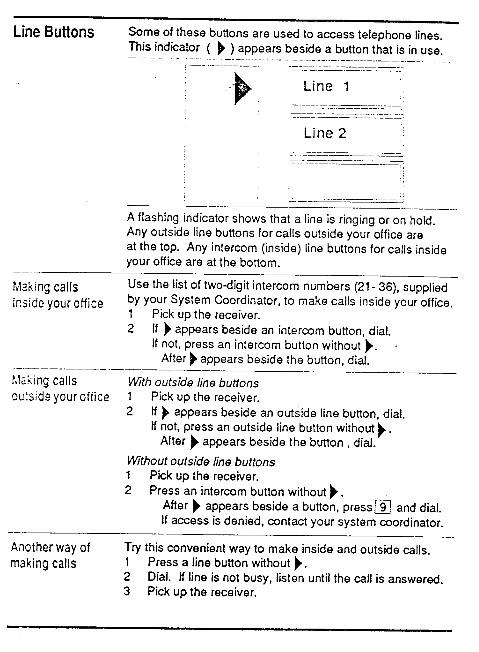
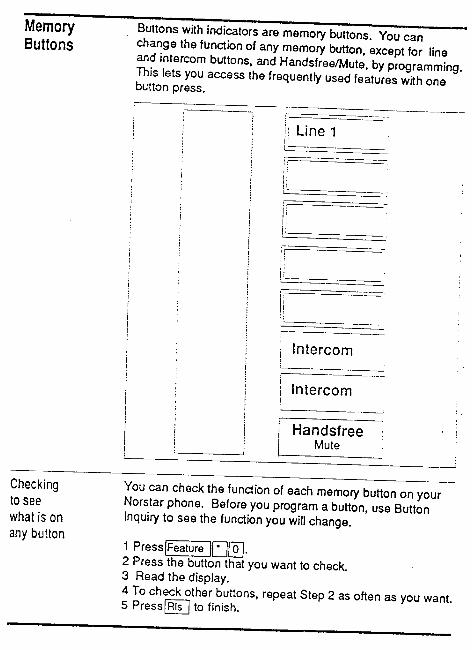
Norstar KSU Installation Guide
Reaulatorv Information
Radio Frequency interference
Warning: This equipment generates, uses, and can radiate radio fre- quency energy and if not installed and used in accordance with the instructions manual, may cause interference to radio communications. It has been tested and found to comply with the limits for a Class A comput- ing device pursuant to Subpart J of Part 15 of FCC Rules, which are designed to provide reasonable protection against such interference when operated in a commercial environment. Operation of this equipment in a residential area is likely to cause interference in which case the user at his own expense will be required to take whatever measures may be required to correct the interference.
Registration
The Meridian Norstar Key Telephone System is registered with the FCC based upon compliance with Part 68 of its rules. Connection of the Meridian Norstar Key Telephone System to the nationwide telecommuni- cations network is made through a standard. network interface jack which you can order from your telephone company. Jacks for this type of customer provided equipment will not be provided on party lines or coin lines.
Telephone Company Notification
There is no need to contact your telephone company before connecting the Meridian Norstar Key Service Unit (KSU) to the telephone network, but they may request that you provided them with the following informa- tion:
l The telephone number(s) that the KSU will be connected to
l The FCC Registration Number (on label behind door on KSU)
l The Ringer Equivalence Number (on label behind door on KSU)
l The USOC Jack RJ-11 C
l Service Order Code (SOC) 9.0 F
l Facility Interface Code (FIC) 02LS2
Continued on inside back cover
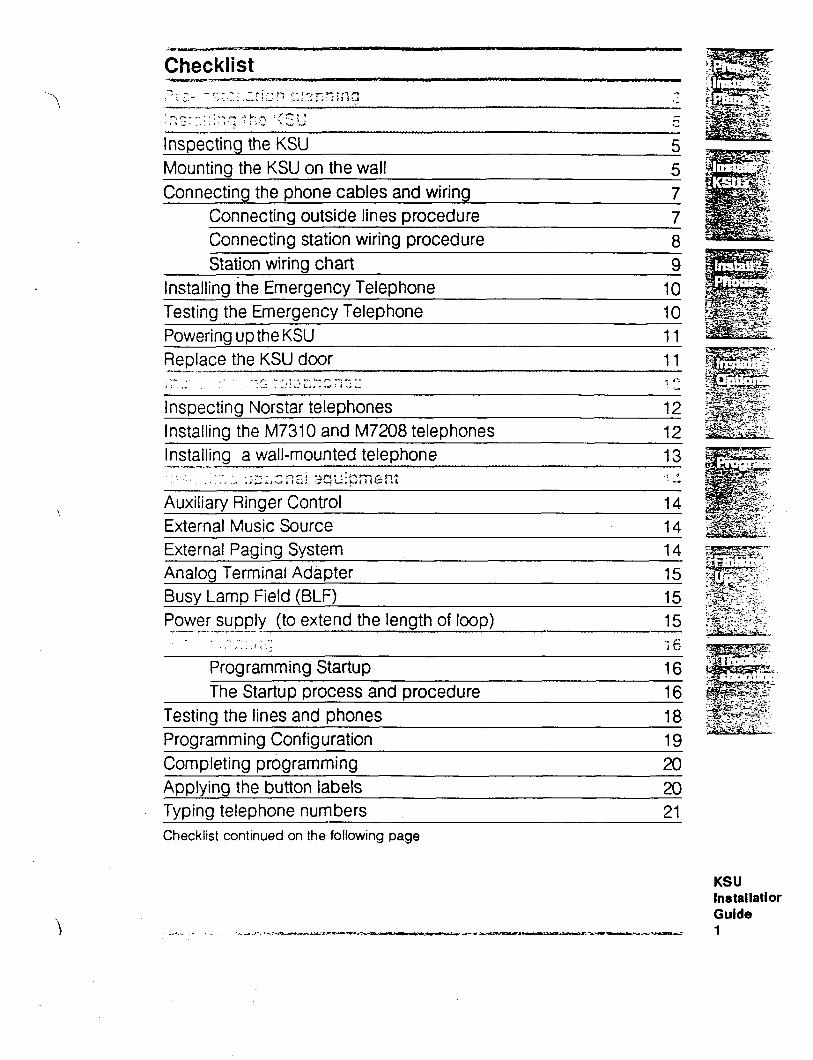
‘f~‘.~.‘..” Ai-,?, ‘.[F\‘-‘? T 3 ..::;...; :.:_ . . u ‘s r;
Gpecting the KSU 5 Mounting the KSU on the wall Connecting the phone cables and wiring
Connecting outside lines procedure 7 Connecting station wiring procedure 8 Station wiring chart 9
Installing the Emergency Telephone 10 Testing the Emergency Telephone 10 Powering up the KSU 11 Replace the KSU door 11
Inspecting Norstar telephones 12 Installing the M7310 and M7208 telephones 12 Installing a wall-mounted telephone -,F--- _- , . -. -- -y- I -,fFt ;j?*.rn . . . . .;,,.v*rci: zlL.y‘lr Gz:
13 ? &“,
External Music Source External Paging System _ Analog Terminal Adapter Busy Lamp Field (BLF) Power supply (to extend the length of loop) -- -. .-,.- -- _ - / - . . _ I. ., ,..C!Z .
Programming Startup
Auxiliary Ringer Control 14 14 14 15 15 15 j fj
16 The Startup process and procedure 16
Testing the lines and phones 18 Programming Configuration Completing programming Applying the button labels Typing telephone numbers Checklist continued on the following page
19 20 20 21
Checklist
Testing phone and system operation 21 End-user training 21 -. --a--.-_ __._ _ _.._.._ s--w ~ ._---. - . - _.. -_ _ ..e - . -; . . %. 1. x External Paging trouble 22 . Auxiliary Ringer trouble 22 No Dial Tone trouble (on CO lines) 23 No Music on Hold/Background Music trouble 23 Set dead trouble 23 KSU Down trouble 24
KSU Installation
Gu!de 2
Analog Terminal Adapter trouble -_ -- -. ._-_. .-- . 24
.
The Norstar digital key system is easy to install and program. With the use of a few access codes, initializing and programming the system is accomplished quickly and efficiently. The highlighted tab on the side of the page identifies, by task, your position in the guide.
The IJand 0 symbols identify which buttons to press for procedures. The (1 symbol identifies which response appears on the LCD display of the telephones.
This Guide, through the use of checklists, photographs and illustrations, helps you to remember certain important areas. Use the Guide as a reference when unpacking the KSU and for specific wiring information. When finished with the installation, leave the Guide in the pocket of the KSU. The Troubleshooting section at the back of this Guide should help the next service representative or installer identify and solve problem areas if they arise.
. - . - . - . - . . , , . .~ , . r . I - I elf- . - < rs . ; . . )(&‘i;“. i?.Z^: I - ‘><” - 1 . , I - i :
The button labels and display informaion on the M7310 and M7208 phones is available in either North American English, Canadian French, or alternate language. The feature codes are: French or alternate Ian uage
,pzapp-jmR. English
pizGqqq(01(11.
.
Checking the environm& / r - , . .>w v-. . .w_- M _-, .>s- - _ - . : , ..__
_- . _ _,<> 1> -~ _. , _. 7 .x es, ._ The installation area should be:
q Clean, dry, and well ventilated [7 Maintained at a temperature of between 0°C and 50°C
(32°F and 122°F) fl Maintained at a relative humidity of between 0%
and 95% non-condensing 0 Located at least 4m (13.lft) from equipment
such as copiers and electrical motors and other equipment that can produce electromagnetic interference
0 An acsurge suppressor is recommended.
Checking KSU requirements
The ac power outlet for the KSU must:
0 Be dedicated 115Vac, 50/60Hz, 3-wire, 15 amps 0 Have a grounded third wire [71 Not be switched 0 Be no more than 1.5m (4.9ft.) from the KSU
(An extension cord is not recommended). Mount the KSU vertically upright on a convenient flat surface. If this is not available, a backboard is recommended. The backboard should be cut large enough to accommodate the distribution block. The KSU specifications and clearance are:
Dimension Metric Imperial Length 556 mm 21.9 in Width 356 mm 14 in Height 87 mm 3.4 in Weight 5250 g 11.6 Ibs Clearance (front) 1000 mm 39.4 in
._. ..--.:JI.~.PL w>.-... ..w.u.md - __ Checking telephone .wi;ing facilities
_.
All new or existing wiring must meet the following specifications:
0 One twisted or spiraled pair per phone, dc loop resistance less than 59 ohms.
0 Cable length (24 AWG j not to exceed 305 m (lOOOft). 0 No bridge taps.
. . . ” ,,_
KSU Installation Guide 3
..-... . . . . , * _._-. _/-.-..- -.-*-i.-. __ -.,. . _ ._ ^
Checking equipment and supplies _-.. . .Lzn~.---r.. *wH>m>J*--.ez.- rs--- . . . ---l_n.-l_ _ -. -, , -:.--Ed>-- ~. There are several ways to wire a key system; the following list of material represents a typical installation.
.’ . . .
.- .I_. .-. . s; . . _ .*’ . ,
One Key Service Unit (KSU) Appropriate number of M7310 and/or M7208 phones in any combihation.
. .
Analog Terminal Adapter (for single line phone or other tip and ring devices) PC Application Interface (for Dial-by-Name and Call Detail Recording) Busy Lamp Field (for the M7310 phone only) Power supply to extend length of loop Shoulder Rest Headset Auxiliary Ring Generator External Paging Equipment Music Source Noisy Location Handset.
. . AS _,.. r !-A..... +,,.$:‘-:!r.Gd;t: :;;-:c.i2‘ ;- F i ._ : _ _ ‘_ i .;::I Lr ; . ._ ..‘>,-, .z __ , .
Mounting materials Two 25pair @@pin) distribution terminal blocks; QCBIX-IA or equivalent One 25-pair cable, 24 AWG, complete with an RJ-21 (50-pin female connector) on one end. Connects the KSU to the distribution block. Make sure the distribution block is not beyond the reach of the cable. A supply of 24 AWG twisted or spiraled station wire QCBIX designation strips or equivalent RJ-11 modular jack for each phone.
1. Mark and update the location of all equipment specified on the floor plan.
2. Verfiy and revise the programming sheet from the service order if required.
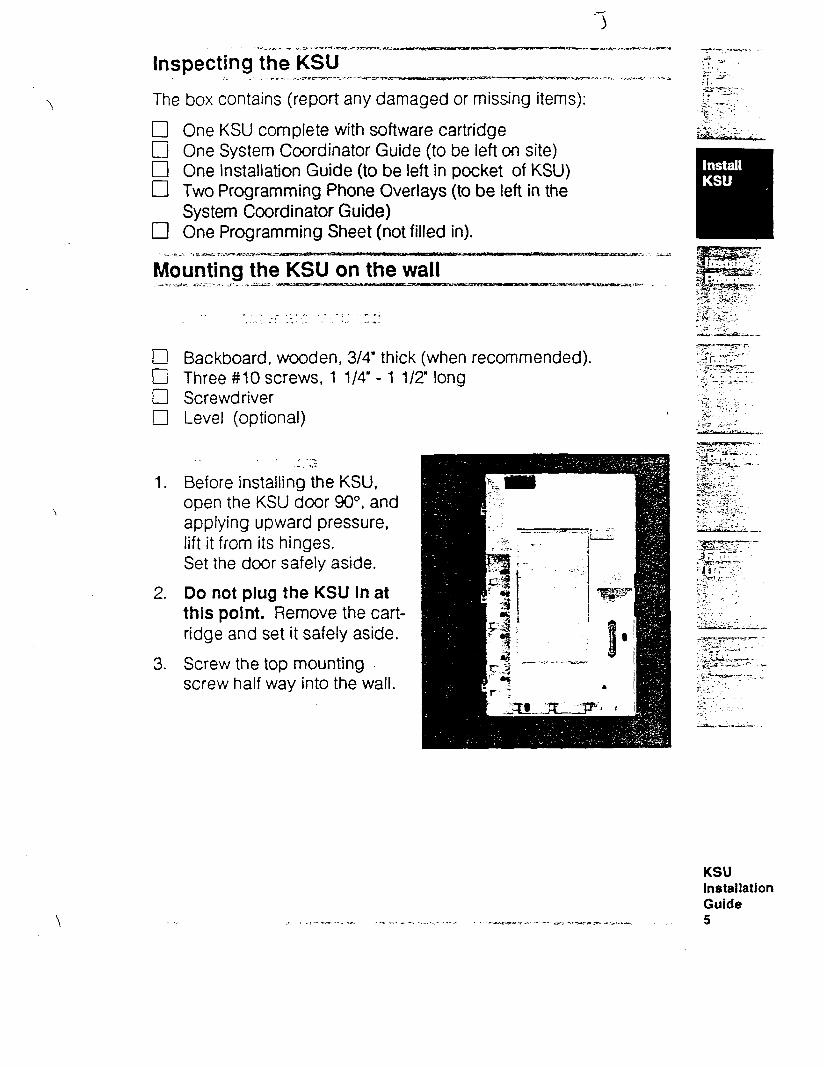
Inspecting the KSU IreT.% ._?<<: AS5 The box contains (report any damaged or missing items):
cl cl cl 0
cl
One KSU complete with software cartridge One System Coordinator Guide (to be left on site) One Installation Guide (to be left in pocket of KSU) Two Programming Phone Overlays (to be left in the System Coordinator Guide) One Programming Sheet (not filled in).
- _ . . . . ^ . . . .
: : . : _ _ . . . _ _ ~ .
0 Backboard, wooden, 3/4” thick (when recommended). fl Three #IlO screws, 1 l/4” - 1 l/Z” long 0 Screwdriver 0 Level (optional)
1.
2.
3.
< ._ - s.‘
Before installing the KSU, open the KSU door 90°, and applying upward pressure, lift it from its hinges. Set the door safely aside.
Do not plug the KSU in at this point. Remove the cart- ridge and set it safely aside.
Screw the top mounting screw half way into the wall.
KSU Installation Guide
: .l,-%l .-_ -. . . . - __ .._._ _ .-. ._-- ?_ - -- _ -.-112 * ..I.. - 5
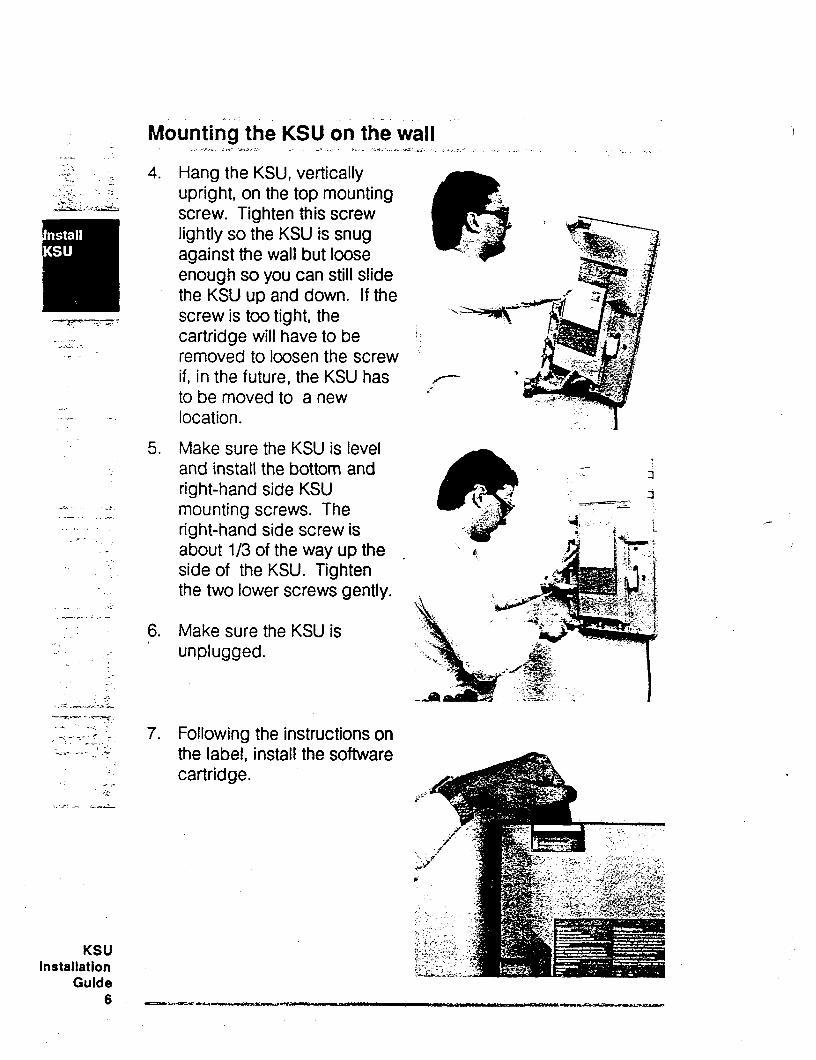
-.. .- .-
_i --L. -~_- _ _. . . . - _“. -.
. .--._ .--
KSU Installation
Guide 6
MO
4.
5.
6.
7.
Hang the KSU, vertically upright, on the top mounting screw. Tighten this screw lightly so the KSU is snug -.. against the wall but loose
i ^ 3 I enough so you can still slide ;ri the KSU up and down. If the screw is too tight, the cartridge will have to be ‘; removed to loosen the screw ’ if, in the future, the KSU has to be moved to a new &-
location.
Make sure the KSU is level and install the bottom and right-hand side KSU mounting screws. The right-hand side screw is about 113 of the way up the _ side of the KSU. Tighten the two lower screws gently.
Make sure the KSU is unplugged.
Following the instructions on the label, install the software cartridge.
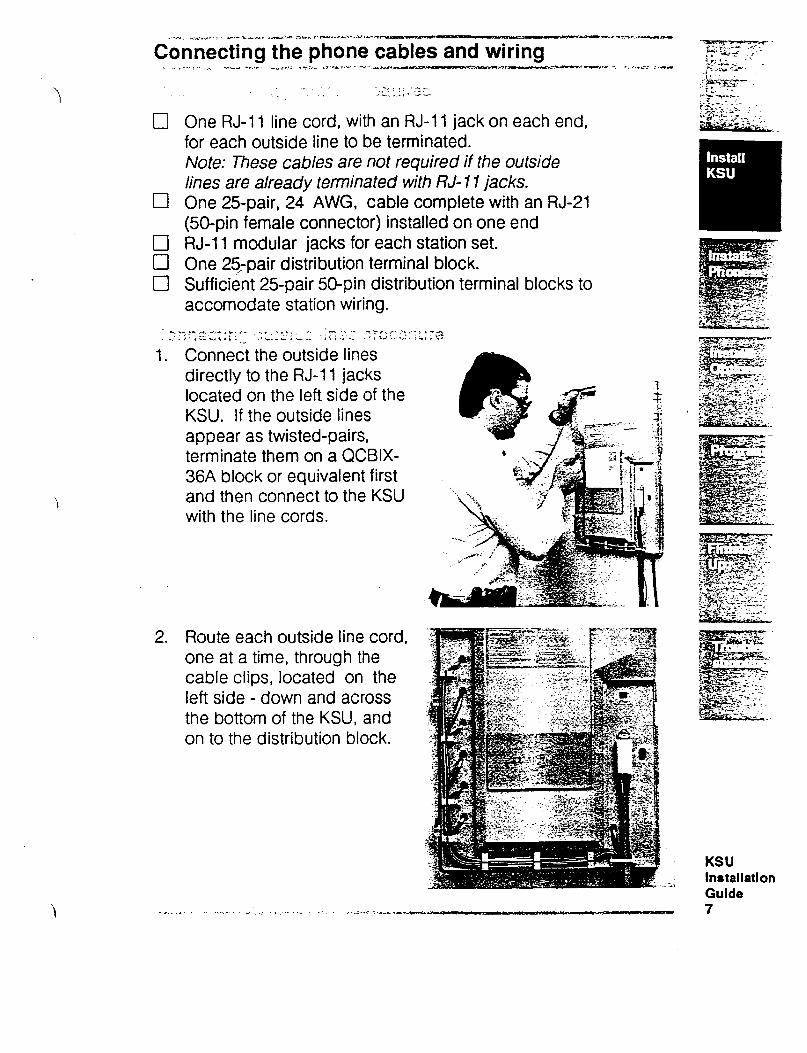
_ .--_ -,.x.“-i 11%-L_. - . - w . . i--~D~G~..~..._l
Connecting the phone cables and wiring
cl
cl
Ei cl
,_ .- -z,~:;;;3’~~;
One RJ-11 line cord, with an RJ-11 jack on each end, for each outside line to be terminated. Note: These cables are not required if the outside lines are already terminated with RJ- 11 jacks. One 25pair, 24 AWG, cable complete with an RJ-21 @O-pin female connector) installed on one end RJ-11 modular jacks for each station set. One 25:pair distribution terminal block. Sufficient 25pair 5@pin distribution terminal blocks to accomodate station wiring.
1. Connect the outside lines directly to the RJ-11 jacks located on the left side of the KSU. If the outside lines appear as twisted-pairs, terminate them on a QCBIX- 36A block or equivalent first and then connect to the KSU with the line cords.
2. Route each outside line cord, one at a time, through the cable clips, located on the left side - down and across the bottom of the KSU, and on to the distribution block.
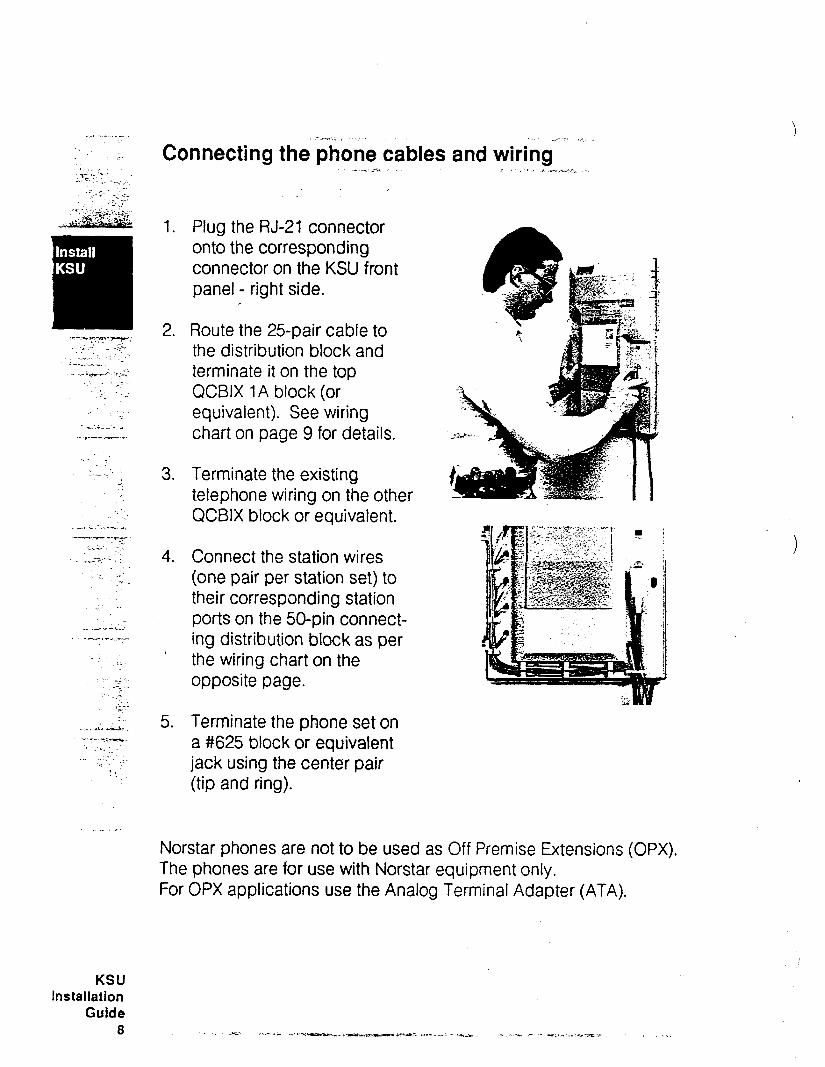
: - . .1 . . - -_.-. , .
Connecting the phone cables and wiring - _ ;-+
1.
2.
3.
4.
5.
Plug the RJ-21 connector onto the corresponding connector on the KSU front panel - right side.
Route the 25-pair cable to the distribution block and terminate it on the top QCBIX 1A block (or equivalent). See wiring chart on page 9 for details.
Terminate the existing telephone wiring on the other QCBIX block or equivalent.
Connect the station wires (one pair per station set) to their corresponding station ports on the 50-pin connect- ing distribution block as per the wiring chart on the opposite page.
Terminate the phone set on a #625 block or equivalent jack using the center pair (tip and ring).
Norstar phones are not to be used as Off Premise Extensions (OPX). The phones are for use with Norstar equipment only. For OPX applications use the Analog Terminal Adapter (ATA).
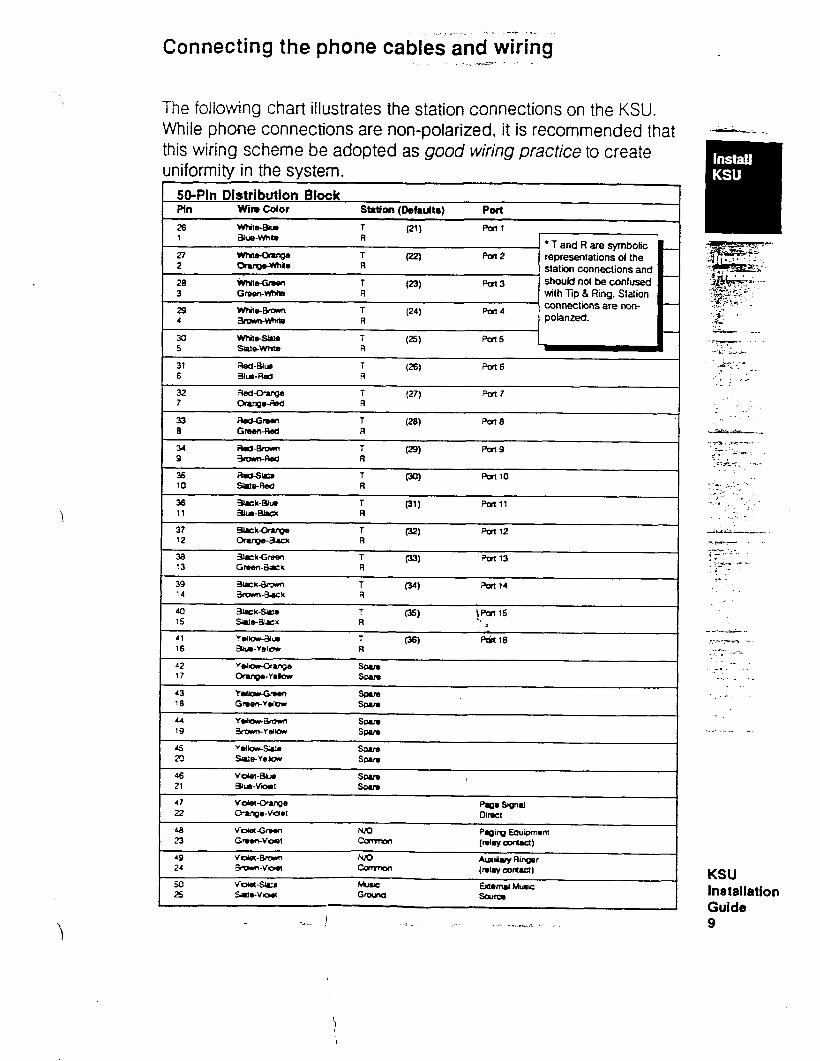
,_. ,_. . . -.- .,_.-
Connecting the phone cables and wiring
The following chart illustrates the station connections on the KSU. While phone connections are non-polarized, it is recommended that this wiring scheme be adopted as good wiring practice to create uniformity in the svstem.
SO-Pin Distribution Block Pin wm color stion (D8hm) Pwt
20 wtiia 1 (20 port1 1 3lue-wlb R
7iix&Gzi 27 T 0 Pm2 2 -*a R
representations of the station connections and
20 ifihil- T G-1 Pals should not be confused 3 Gf9eo-ylhis R with Tip & Ring. Station
- 29 WFilPm T (24) Pm4 connectiins are non-
4 -mi-a A polarized.
30 wl%l*w T m Fbls 5 s&m-wms R 7 l
_ i. r 2. : I .._..._. i . _
KSU Installation Guide 9
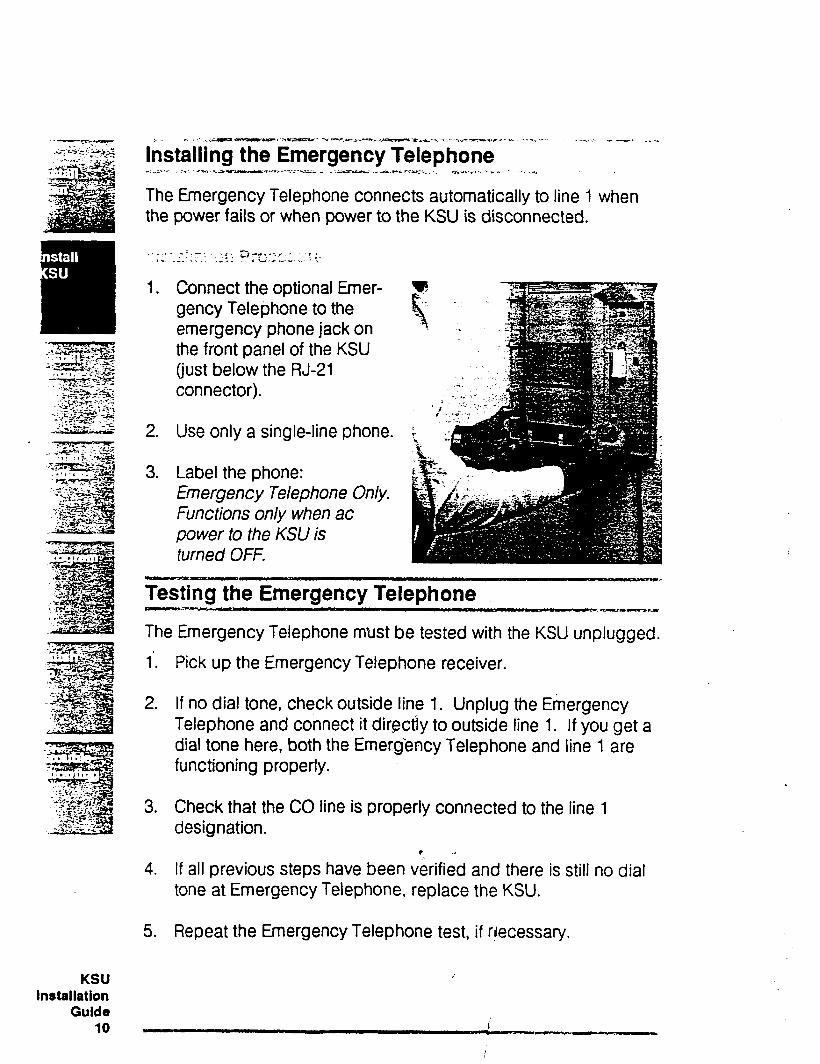
KSU lnrtallat~on
Guide 10
Installing the Emergency Telephone -._;r.i mic----.:I--- _ ‘m: ._ *,N,+Ac-c. ~,.,-r.r--L-\- ._ ._._.* The Emergency Telephone connects automatically to line 1 when the power fails or when power to the KSU is disconnected.
2.
3.
Connect the optional Emer- gency Telephone to the emergency phone jack on the front panel of the KSU (just below the RJ-21 connector).
Use only a single-line phone.
Label the phone: Emergency Telephone Only. Functions only when ac power to the KSU is turned OFF.
Testing the Emergency Telephone -. The Emergency Telephone must be tested with the KSU unplugged.
1’.
2.
3.
4.
5.
Pick up the Emergency Telephone receiver.
If no dial tone, check outside line 1. Unplug the Emergency Telephone and connect it directly to outside line 1. If you get a dial tone here, both the Emergency Telephone and line 1 are functioning properly.
Check that the CO line is properly connected to the line 1 designation.
_,. If all previous steps have been verified and there is still no dial tone at Emergency Telephone, replace the KSU.
Repeat the Emergency Telephone test, if necessary.
Ringer Equivalence Number (REN)
The FCC Registration Label, found on the label behind the KSU door, includes the Ringer Equivalence Number (REN). This number is a 4% representation of the electrical load that will be applied to your telephone line once it is connected to the KSU. The telephone lines serving your premise will not operate properly if the total load exceeds the capability of the telephone company central office equipment. That is, if too many ringersare connected to the line, there may be insufficient energy to ring your terminal(s). If the ringer load is excessive, you may also have difficulty dialing telephone numbers.
If you desire to know the total REN allowed for your telephone line(s), you may call the telephone company and they will inform you.
Hearing Aid Compatibility
The Meridian Norstar Telephones are Hearing Aid Compatible, as defined in Section 68.316 of Part 68 FCC Rules.
Rights Of The Telephone Company
If the system is determined to be causing harm to the telephone network, the telephone company may discontinue your service temporarily. If possible, they will notify you in advance. But if advance notice is not practical, you will be notified as soon as possible. You will be given the opportunity to correct the situation and you will be informed of your right to file a complaint to the FCC.
Your telephone company may make changes in its facilities, equipment, operations or procedures that could affect the proper functioning of your system. If they do, you will be notified in advance to give you an opportu- nity to maintain uninterrupted telephone service.
In the event of an equipment malfunction, all repairs will be performed by Northern Telecom Inc. or by one of its authorized dealers.
Address of Repair Facility USA:
Northern Telecom Inc. Product Service Center 720 Massman Drive Nashville, TN 37210 Attn. RA#
Canada: Northern Telecom Canada Ltd. Telecom Services Division 30 Norelco Drive Weston, Ontario M9L 2X6
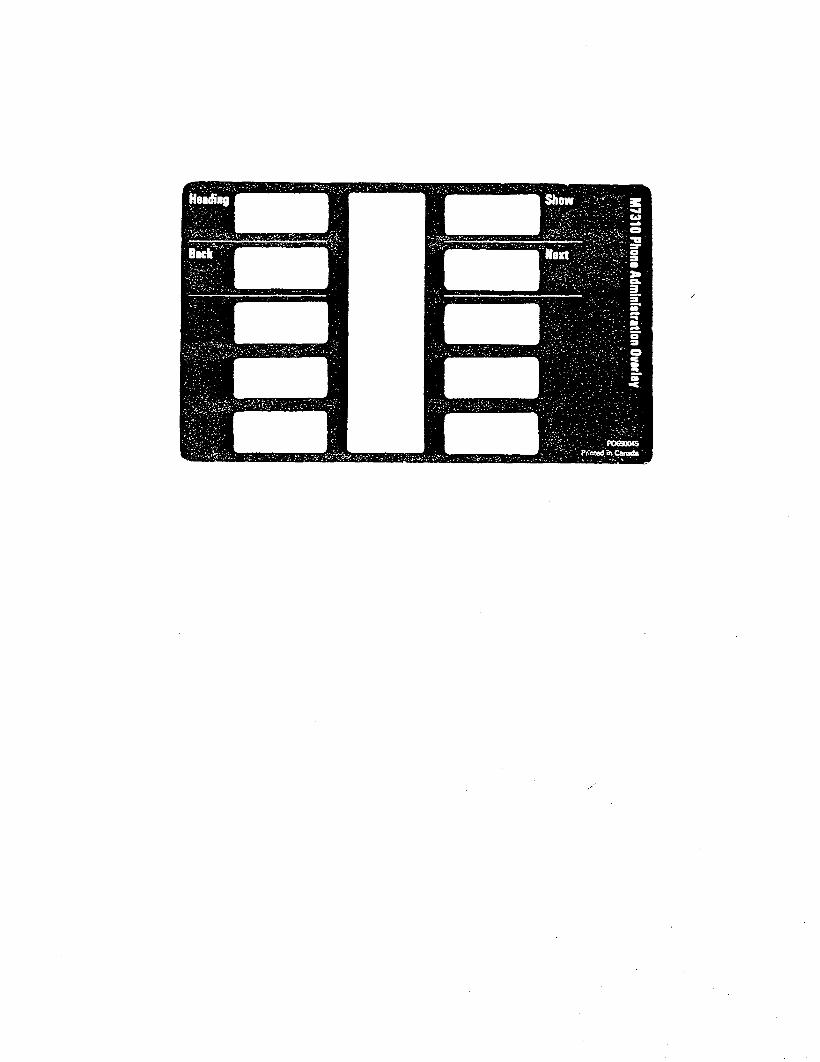
No Dial Tone trouble (on CO lines)
Verify that the phone has Line appearance programmed. Use Button Inquiry ([qlr;lpj).
Unplug the RJ-11 jack (CO line) from the KSU and test for dial tone with a telephone. If no dial tone, report trouble to your telephone company. If dial tone, replace the KSU.
No Music on Hold/Background Music trouble
Ensure that the volume control is turned up and you are using proper feature code
Check 13. Call Handling 1 in Configuration. - Background Music and Music on Hold sections.
Check wiring between Violet/Slate (Pin 50) Slate/Violet (Pin 25) or RJ-21 and music source.
Check that the music source is turned ON, operational, and has the volume control set properly.
Note: Any high impedance (=3,30(X2) /low output (I Vrms max) can ..,
..,;+& ,I<,iIG,.,;;. be connected as a music source.
KSU Installation Guide 23
Set Dead trouble
Check to ensure LCD contrast is dark enough for proper light .ing by using the Contrast Adjustment feature from the User Cardor System Coordinator Guide.
Verify that the phone line cord is connected and in good condition. Check station wiring at both the RJ-11 and the distribution cross- connect.
Note: A TCM port should have between 15 and 20 Vdc across the Tip and Ring with the phone disconnected.
Replace the phone with an operational phone.(Beware of Auto-Set Relocation implications in the System Coordinator Guide - Feature Operations and replace software cartridge with a known working cartridge. . ..; -_- KSU Down trouble
Ensure that the KSU ac power cord is plugged into a working outlet. Verify that the RJ-21 connector is connected properly to both the KSU and the 50-pin distribution block. Check by terminating a telephone directly on the QCBIX-IA strip or equivalent which connects to the KSU.
E-p> - * ‘ -.r- -*a .~. ;.; ,-. -,~~~*~~~~~~~: p-,; $; If ac power is present and the I-ED indicator on the KSU is OFF, replace the KSU.
Check wiring of RJ-21 connector.
PI& a Norstar phone into the suspect port. If it works, the wiring from the ATA to the analog device for example, single line phone or Modem should be checked. If the wiring is good, replace the ATA. If,the Norstar phone does not work, check the wiring to the KSU. If that wiring is good, replace the KSU.
..-.u,_
Typini telephon&&6&&~x --Y-?e&$.--- - _.._ - -
Sl _---__..c i .q ,-- ,.-. i ._,. _-3.-----R- . --_ . -cul4-:----- .- I ~. . Use the green caps labeled Line 1, 2, . . . . or type the individual tele- phone numbers on labels and attach them to the appropriate telephones. Type in the telephone number and inside extension number on the Receiver Card which is to be installed with a plastic lens underneath the receiver.
Verify the system functions and program features by working through the fvl7310 or M7208 user cards.
Refer to your lnstallef Checklist Card and remember to leave the following Items to be left with the Customer or in the KSU:
KSU
Cl installation Guide to go into the pocket of the KSU
0 Programming Sheet (tear off the installer section and store in the pocket of the KSU).
q Floor plan to be stored in the pocket of the KSU
0 Optional equipment installer cards (BLF, ATA, etc.)
Customer
Sys tern Coofdina tof Guide with phone overlays stored in the pocket of the guide.
M7310 and M7208 Telephone User Cards
Optional equipment user cards (BLF, ATA, etc.)
Spare button labels and button caps
Programming Sheet (Give the System Coordinator sections to the System Coordinator).
Telephone overlays to be stored in the pocket of the System Coordinator Guide.
KSU Installation Guide
_.- - --
. : ~_
- ..: . ,
: . . .v . :
. . L
. - _.
---;~ - - . - . <...<..
*i *
- - -._I _ -’
. . . .
:
. .._ .’
._-, c...._
External Paging trouble. i.. ., I. J_i. ei-
Ensure you are using the proper feature code mj%-jEj. Use Button Inquiry ( -mm] ) to verify feature or line buttons.
Check wiring between Violet/Orange (Pin 47) Orange/Violet (Pin 22) or RJ 21 connector and the paging amplifier.
Test that Paging equipment is operational. The output signal for an External Pager should be a nominal 775mV across 6CQ a.
Auxikary Ri@-&rouble r _~ :-. .:.-.-.
If used for Night Service, ensure that Night Service is activated from the Prime phone.
Auxiliary ring contacts can be programmed to operate in conjunc- tion with any or all of the following features:
Auxiliary Ringer 1. Lines
Loud Ringing Station Set 2. Sets
Night Ringer 3. Call Handling
Check wiring between Violet/Brown (Pin 49) Brown/Violet (Pin 24) or the RJ-21. Check wiring between Auxiliary ring generator and ringing device.
Ensure that Auxiliary Ring contacts are operating (connect an ohmmeter across pair Violet/Brown (Pin 49) Brown/Violet (Pin 24) or the RJ-11 connector).
Note: The current capacity of the Norstar relay contacts is 50 mA dc. They are designed to operate with the NTOB 17AB Auxiliary Ring Generator or equivalent.
Programming Configuration
1. Press [Featurelr;ll’j/21-q-q~~~ OR
The display responds with 1 I. Lines ] Look at ILines on your Programming Sheet under Configuration’ for the Inslaller. The Norstar defaults are in black and bold on this programming sheet. The following examples are based on the Startup Configuration Square template.
Program the outside line characteristics as shown on the program- ming sheet for each outside line. There are three choices - line pool, public and private. Selecting line poolassigns a line to belong
‘\ to a group of outside lines, selecting public assigns a line to all phones and selecting private assigns a line to a particular phone.
1. Press -1. The display responds with 1 show Line: _ 1.
2. Enter <line number I,2 . . . >from the dial pad. The display responds with IType: Public I.
3. To cycle throught the options, press -1 . until you come to the option specified in the programming sheet.
4. To save your selection and advance to the next mode, press /AZ%-].
To stay with the Pulse default and continue to the next area,
1. Press jXX]. OR To get DTMF tone (touch tone), press -1.
.--_: .
: cP . . - - - ___. . . . - _.- _ - , . .
.._
- ..--_, . . 1. ..__ -
, . ; .
KSU Installation Guide 19
KSU Installation
Guide 20
- . _.-w r--.-__.l-C ._..
Programming Configuration ---, 1_ _ __ ,> ..-z.. i-%-*aT..:-d I - --.. -_. . .I.. is .__.-. ,
To stay with the Yes default (so people can hear incoming calls on outside lines through remote ring device) and continue to the next area:
1. Press (Next]. OR i. To get No, press (Changei. ..“. ! .-I. -. 1, ;-. .-.. .
To stay with the No default (so autohold is in effect only after digits have been dialed on an outgoing call or if the station user has received an incoming ring signal) and continue to the last area:
1. Press [Next]. OR To get Yes, press [I . If Yes, idle line autohold is in effect immediatley on all call types.
Repeat the above process for all of the remaining lines.
Tear off your portion of the programming sheet and put it in the KSU pocket. If you do not continue with programming, make sure you give the System Coordinator the other section of the Programming Sheet.
To continue programming, refer to Configuration Programming in the System Coordinator’s Guide.
Do not apply button labels unless you have performed the remain- der of the configuration procedures. If you expect the customer to reprogram some or all of the buttons, it would be prudent not to apply the button labels until all the reprogramming is done. There are two types of labelled buttons, pre-printed and blank ones you label yourself. Leave the label and extra button kit with the System Coordinator. es-.+?- -- -“.sxx--~.~~ ----A...>~- ?,........ ,^. .Y. _ _a-- /.. ..- .- __..
If you wish to continue with the Startup process, all current administrative data will be replaced with the Square default values. After entering the Startup code, the display responds with [Next to erase 1 . All memory buttons are now temporarily assigned a new set of programming functions. The temporary functions of the buttons are designated when you install the overlay.
To exit fromStartup at any time during the following procedures: 1. Press [-El.
To confirm that the default system memory is to be erased and reset at the end of the Startup session:
1.
‘\
2.
3.
4.
Press the button which corresponds to the ~lcommand on the overlay.
The display responds with 1 Template: Square 1. The Change command is now active. Cycle through the list to the desired template (No Prime, Hybrid, PBX, Square). Check your programming sheet for information about the templates. When the desired Template is displayed:
Press /Next).
The display responds with 1 No. of Lines: 2 To cycle through the number of lines assigned automatically to each telephone:
1.
Press (Change.
When the desired number of lines appears:
Press [Next] or /EFJ to exit.
At this point, you have initialized the system configuration. Before continuing on with programming, it is advised that you test the lines and telephones to ensure’that they are installed correctly.
KSU lnstallatlon Guide 17
KSU Installation
Guide 18
u.za”A~--~~~~.pl T”
Check all outside lines by selecting each line in turn at one of the phones and verifying dial tone. If you do not get a dial tone, plug a single-line phone directly into the outside line at the distribution block. If you still do not get a dial tone, check all your wiring or contact your telephone company.
Check all station loop(s) by calling the Norstar phones.
Check the quality and clarity of all connections. Check for crackling, static, hums or any other unusual noises.
If there are any problems, check the Troubleshooting section of this Guide.
Verify visual associated indicators:
To check a button: 1. Select a line button and the indicator should appear.
To check the display: 1. Press I~~]~]. The display responds [Press any key 1.
To exit from the display: 1. Press /X&j.

Installing optional equipment ..-..-ws. _)_ .I.<., __ m.zz--vPT : -. . -r..:.
The Analog Terminal Adapter (ATA) is an interface between Norstar KSU and any standard analog device such as a single line tele- phone, a modem, answering machines and some fax machines.
1. Follow the ATA’s installation instructions.
: ;-.‘. -.-._ _ .’ . . _._- Li;ii __ ! +iL
The Norstar Busy Lamp Field is a group of indicators that light up individually when specific telephones are in use. The unit attaches to the M7310 telephone and indicates whose phones are in use.
1. Follow the BLF’s installation instructions.
KSU Installation Guide
-*n-.-=w- _--.:z - .._- .i- .-- - --r.wm* i. -,-.. 15
Prbgra~tirbing Startup _ >-ii%.--r- . _ ̂ W.T..\. - -.
The Startup process selects one of four default configuration settings to make subsequent programming faster and easier.
The System Startup Code performs an initialization procedure which erases any existing system memory and resets it to the default values. Startup is to be used for initial installation only. Do not use Startup to add lines after Norstar is in operation because the procedure erases all phone administrative data.
To be accepted, the correct Startup Code must be entered no later than 15 minutes after the KSU has been powered up. A Startup Code entered at any time after the E-minute timeout results in the message Startup denied 1 . If 15 minutes has elapsed since you powered the KSU up, unplug and repower the system again to set the timer.
All administrative data will be retained for at least three days if the power fails or if the KSU is unplugged. After three days without power, it may be necessary to perform the initialization procedures again. \
Have your programming sheet and phone overlay (from the System Coordinator Guide back pocket) ready.
P .-.r *-iT*r.& -5 .-=
i _. -. _ ~ , _ -. . .
Place the overlay on the phone. 2. From the dialpad, press
piGE--jII’~‘1171~~~(81~. OR
(p-pJII’~‘~/-TJ-uj~. _. - i.F” ‘r.. ‘1’s_-,: ,r . _ i. :-. - ;c .._. j -.
I I -.A-. ‘i< - r .-. I
.~ 2;;. .::r c.; .
If you wish to escape insread of proceeding with Startup, you can, at this juncture, do so without affecting system memory. To escape and retain current administrative data:
1. Press (Rlsl .
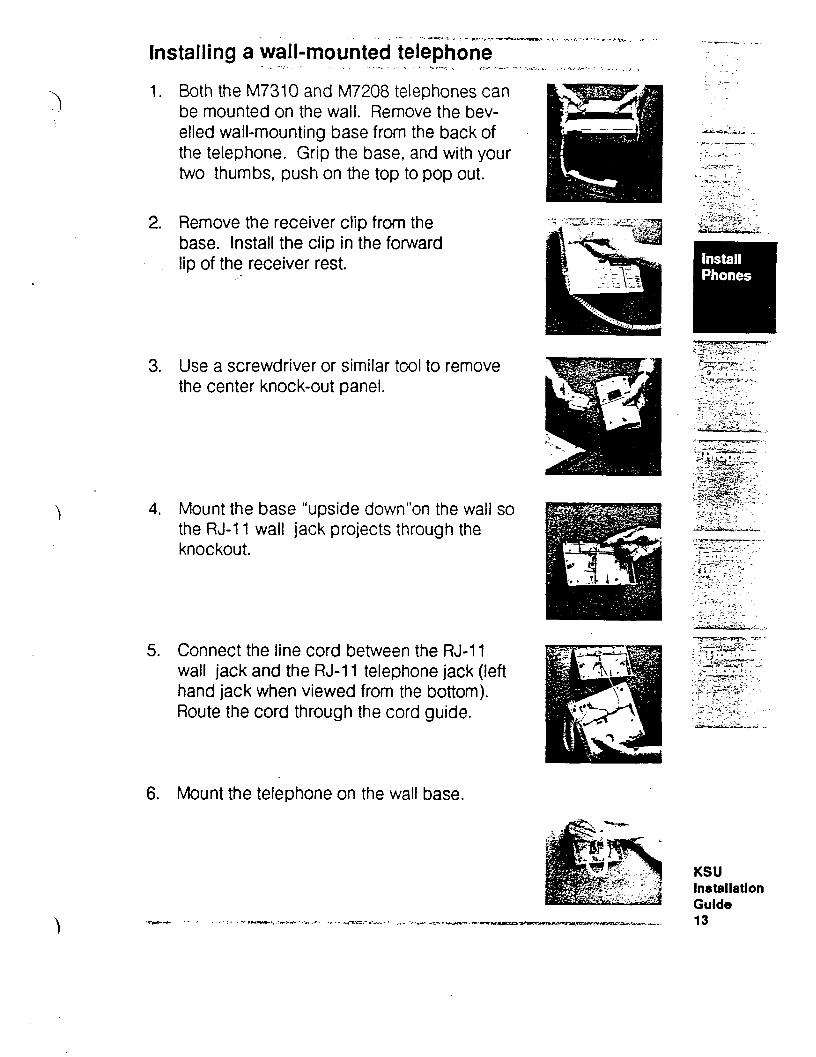
Installing a wall-mounted -telephone
1. Both the M7310 and M7208 telephones can be mounted on the wall. Remove the bev- elled wall-mounting base from the back of the telephone. Grip the base, and with your two thumbs, push on the top to pop out.
2. Remove the receiver clip from the base. Install the clip in the forward lip of the receiver rest. _-
3. Use a screwdriver or similar tool to remove the center knock-out panel.
4. Mount the base “upside down”on the wall so the RJ-11 wall jack projects through the knockout.
5. Connect the line cord between the RJ-11 wall jack and the RJ-11 telephone jack (left hand jack when viewed from the bottom). Route the cord through the cord guide.
6. Mount the telephone on the wall base.
KSU lnetallatlon
Guide 14
The ringer must not draw more than 50 mA from a 30 V dc source.
1. Follow the manufacturer’s installation instructions. Connect the Auxiliary Ring Generator to pins 24 (brown/violet) and 49 (violet/ brown) on the KSU distribution block (see the station wiring chart). These pins provide a control contact. They do not provide ring current or dc voltage.
t=,.,ie+.~r : A I,, a.ir r. c .CIY -+-%:-zi !.d: ,h.d;Si.- ,,l.J; -‘;I
This feature plays music for callers on hold and Background Music. These features must be enabled with Configuration. Refer to the System Coordinator Guide and Programming Sheet for more information.
The music source can be any low-power output device such as a radio with a high-impedence earphone jack. The recommended KSU input level is 1 Vrms across an input impedance of 3300 ohms.
1. Connect the music source to pins 25 (slate/violet) and 50 I
(violet/slate) on the KSU distribution block (see the station wiring chart). Connect ground of music source to pin 25.
2. Make a call into the system on an outside line to a Norstar phone and put the call on hold. Adjust the volume of the music source to a suitable level. The volume can also be adjusted at the phone as well. Note: Music On Hold must be enabled first.
The Paging System operates in conjunction with loudspeakers and amplifiers installed by the customer. The system allows pages and announcements to be made in offices, warehouses and buildings. The paging system should produce 775 mV across the KSU input impedance of 600 ohms.
1. Follow the manufacturer’s installation instructions. Connect the paging system to pins 22 (orange/violet) and 47 (violet/orange) to make a direct connection and then to pins 23 (green/violet) and 48 (violet/green) to make connection through a relay contact (max. rating: 30 V dc @ 50 mA). See station wiring chart.
Note: Norstar external paging does not support talk-back paging equipment If a CO line port is not used.
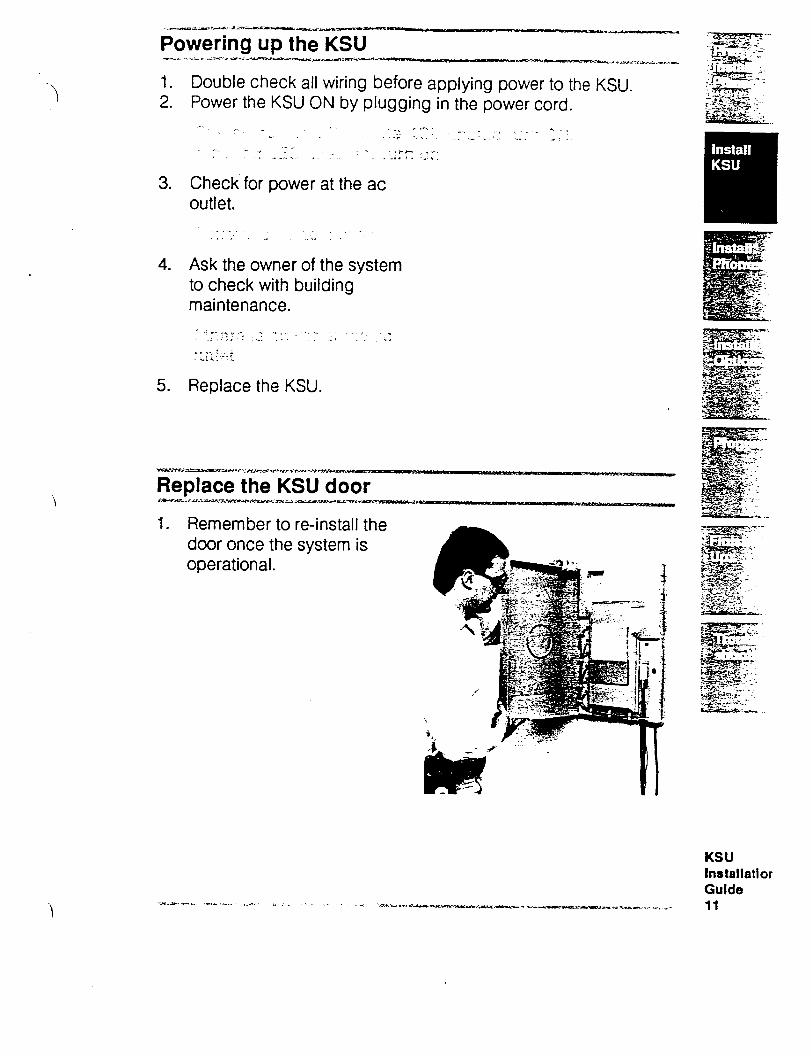
--wY*~ai -..az.dm--
Powering up the KSU
1. 2.
3.
4.
5.
Double check all wiring before applying power to the KSU. Power the KSU ON by plugging in the power cord. _. . F. _. _.. .I _._ - .: -. .r ..-:: ,. I . -... .: . . - . ,-. -- ., _ .I __._,- _ ‘- . .-*- : 3-- -*;.a; _L,
Check for power at the ac outlet.
. .i. .>._’ _1 _
Ask the owner of the system to check with building maintenance.
Replace the KSU.
Remember to re-install the door once the system is operational.
KSU In8tallatior Guide 11
Inspecting Norstar telephones .,i -.._ r*- . >: = -. Each box contains (report any damaged or missing items):
0 One telephone q Receiver 0 Receiver cord 0 Telephone User Card (to be left with the user) 0 Designation kit containing:
- button labels - button caps (pre-printed) - receiver card - plastic cover to fit over the receiver card
0 2.1 m (7 ft) line cord.
1. Connect the receiver cord to the receiver jack (right hand jack when viewed from rear). Route the cord through the cord guide embedded in the bottom of the telephone.
2. Connect the line cord.
3. Connect the telephones to the #625 terminating blocks or equivalent jacks in locations designated by the customer. Route the cord through the cord guide.
4. Check telephone displays; the indicators should flash for up to 15 seconds while the set is initializing. Default time and date are then displayed. This does not verify the wiring. Check the wiring at the distribution block.