Embed Size (px)
Citation preview
Section 18.4 - Drawing Cleanup Tool for ARG Drawings 18.4-1
CA
D S
ta
nd
ar
ds
-
3
rd
E
ditio
n –
N
ov
em
be
r 2
01
6
Section 18.4
Drawing Cleanup Tool for
ARG Drawings
Overview - Section 18.4
Internal Use: Full compliance
Contractor Use: Reference only
It is important that ARG data is cleaned up, to make the translation to GIS easy and accurate.
18.4-2 Section 18.4 - Drawing Cleanup Tool for ARG Drawings
CA
D S
ta
nd
ar
ds
-
3
rd
E
ditio
n –
N
ov
em
be
r 2
01
6
THIS PAGE INTENTIONALLY LEFT BLANK
Section 18.4 - Drawing Cleanup Tool for ARG Drawings 18.4-3
CA
D S
ta
nd
ar
ds
-
3
rd
E
ditio
n –
N
ov
em
be
r 2
01
6
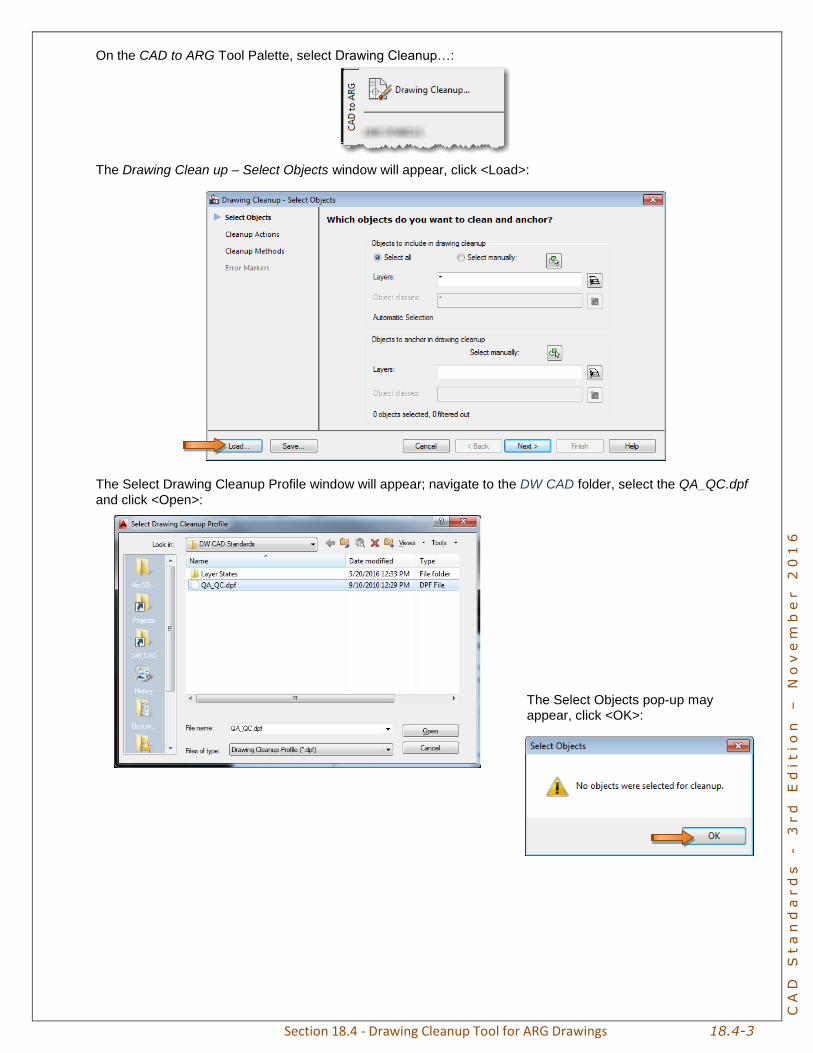
On the CAD to ARG Tool Palette, select Drawing Cleanup…:
The Drawing Clean up – Select Objects window will appear, click <Load>:
The Select Drawing Cleanup Profile window will appear; navigate to the DW CAD folder, select the QA_QC.dpf
and click <Open>:
The Select Objects pop-up may appear, click <OK>:
18.4-4 Section 18.4 - Drawing Cleanup Tool for ARG Drawings
CA
D S
ta
nd
ar
ds
-
3
rd
E
ditio
n –
N
ov
em
be
r 2
01
6
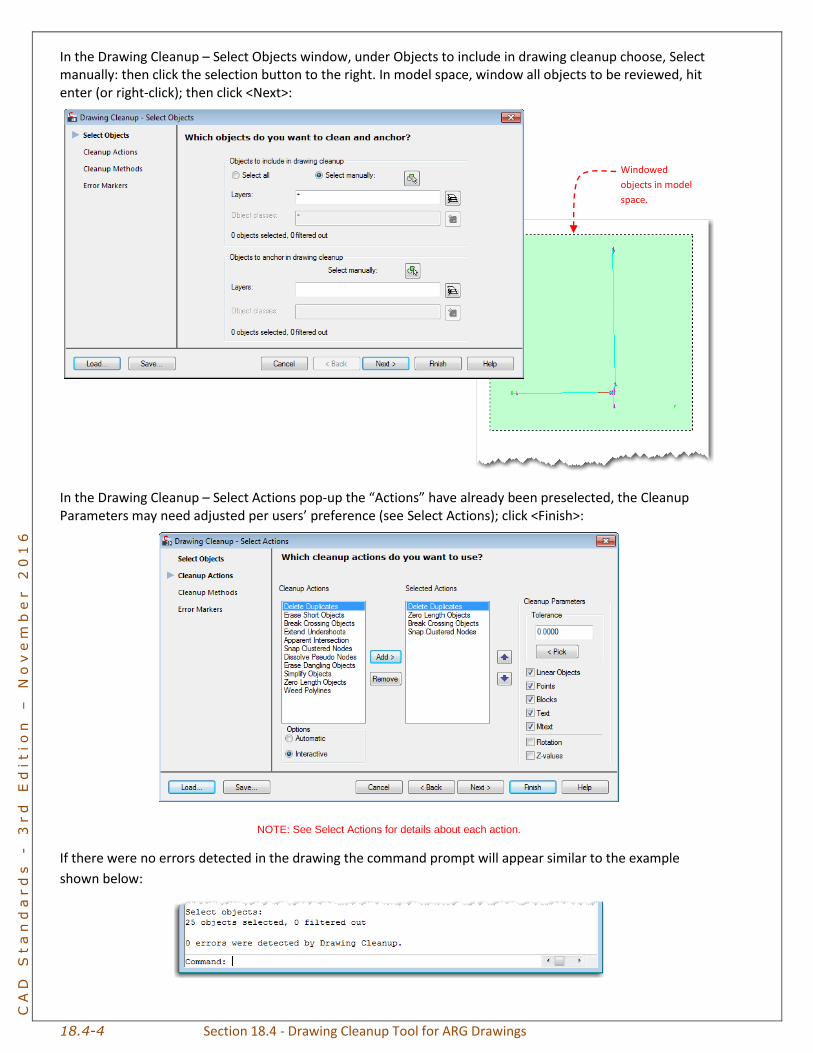
In the Drawing Cleanup – Select Objects window, under Objects to include in drawing cleanup choose, Select manually: then click the selection button to the right. In model space, window all objects to be reviewed, hit enter (or right-click); then click <Next>:
In the Drawing Cleanup – Select Actions pop-up the “Actions” have already been preselected, the Cleanup Parameters may need adjusted per users’ preference (see Select Actions); click <Finish>:
NOTE: See Select Actions for details about each action.
If there were no errors detected in the drawing the command prompt will appear similar to the example
shown below:
Windowed
objects in model
space.
Section 18.4 - Drawing Cleanup Tool for ARG Drawings 18.4-5
CA
D S
ta
nd
ar
ds
-
3
rd
E
ditio
n –
N
ov
em
be
r 2
01
6
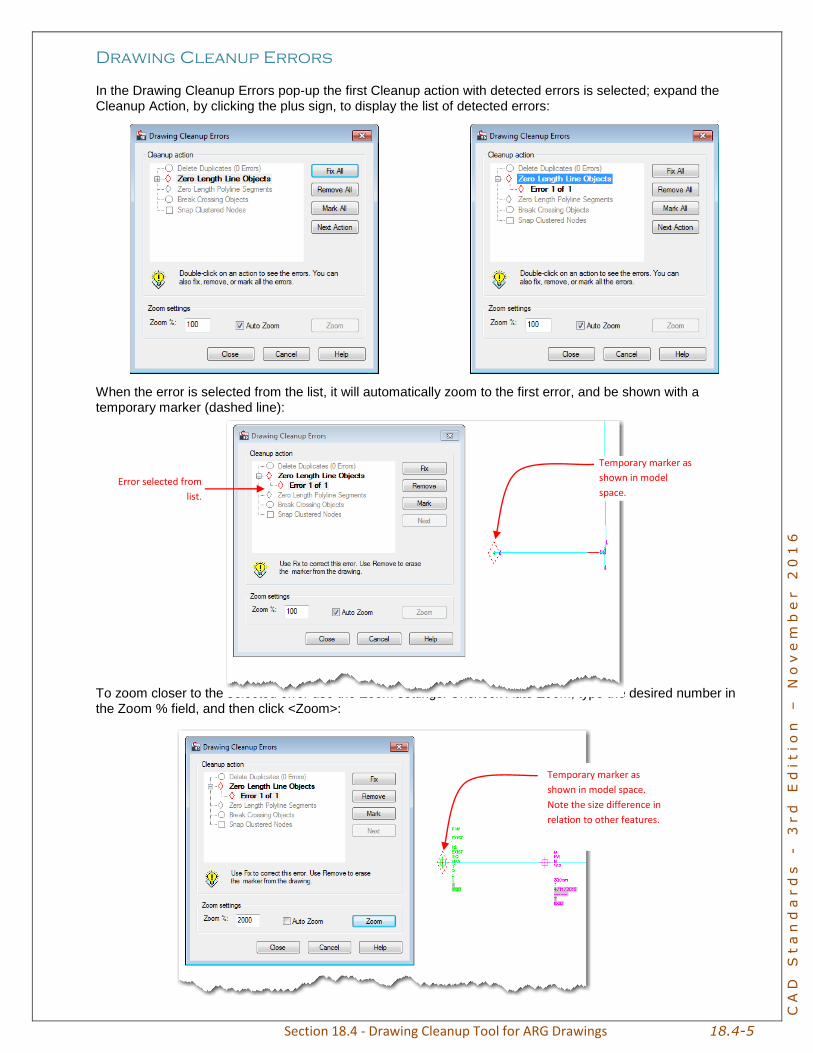
Drawing Cleanup Errors
In the Drawing Cleanup Errors pop-up the first Cleanup action with detected errors is selected; expand the Cleanup Action, by clicking the plus sign, to display the list of detected errors:
When the error is selected from the list, it will automatically zoom to the first error, and be shown with a temporary marker (dashed line):
To zoom closer to the selected error use the Zoom settings. Uncheck Auto Zoom, type the desired number in the Zoom % field, and then click <Zoom>:
Error selected from
list.
Temporary marker as
shown in model
space.
Temporary marker as
shown in model space.
Note the size difference in
relation to other features.
18.4-6 Section 18.4 - Drawing Cleanup Tool for ARG Drawings
CA
D S
ta
nd
ar
ds
-
3
rd
E
ditio
n –
N
ov
em
be
r 2
01
6
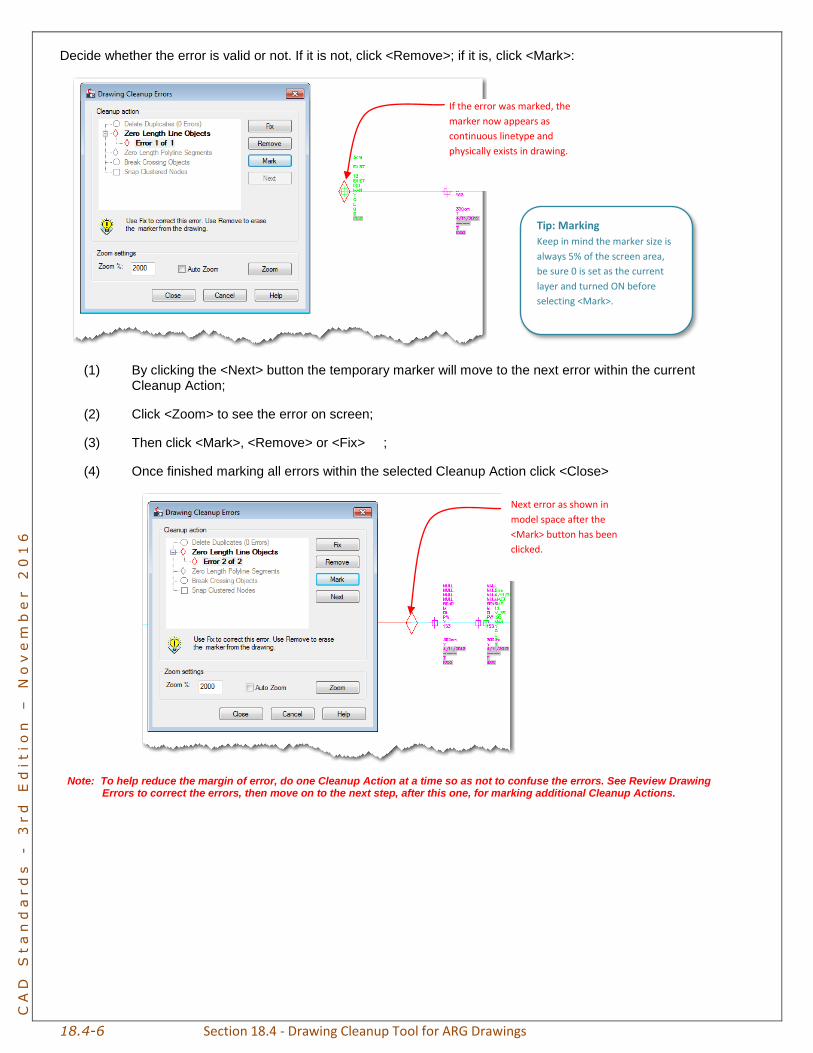
Decide whether the error is valid or not. If it is not, click <Remove>; if it is, click <Mark>:
(1) By clicking the <Next> button the temporary marker will move to the next error within the current Cleanup Action;
(2) Click <Zoom> to see the error on screen;
(3) Then click <Mark>, <Remove> or <Fix> ;
(4) Once finished marking all errors within the selected Cleanup Action click <Close>
Note: To help reduce the margin of error, do one Cleanup Action at a time so as not to confuse the errors. See Review Drawing Errors to correct the errors, then move on to the next step, after this one, for marking additional Cleanup Actions.
If the error was marked, the
marker now appears as
continuous linetype and
physically exists in drawing.
Tip: Marking
Keep in mind the marker size is
always 5% of the screen area,
be sure 0 is set as the current
layer and turned ON before
selecting <Mark>.
Next error as shown in
model space after the
<Mark> button has been
clicked.

Section 18.4 - Drawing Cleanup Tool for ARG Drawings 18.4-7
CA
D S
ta
nd
ar
ds
-
3
rd
E
ditio
n –
N
ov
em
be
r 2
01
6
If there is more than one cleanup action, select the current Cleanup action, then click <Next Action>; this will display the next set of Cleanup Actions with errors, repeat previous steps for marking each error:
Review Drawing Errors
The following is just one example showing how to review errors. Each user may have a different preference, this is just a guideline.
Each marker placed, using the Drawing Cleanup, is now an AutoCAD block. To search for these blocks the user can utilize the Quick Select tool by either clicking the Quick Select button on the Properties palette or by right-clicking in model space and choosing Quick Select…:
An error window may pop-up, click <OK> and move on to the next step:
18.4-8 Section 18.4 - Drawing Cleanup Tool for ARG Drawings
CA
D S
ta
nd
ar
ds
-
3
rd
E
ditio
n –
N
ov
em
be
r 2
01
6
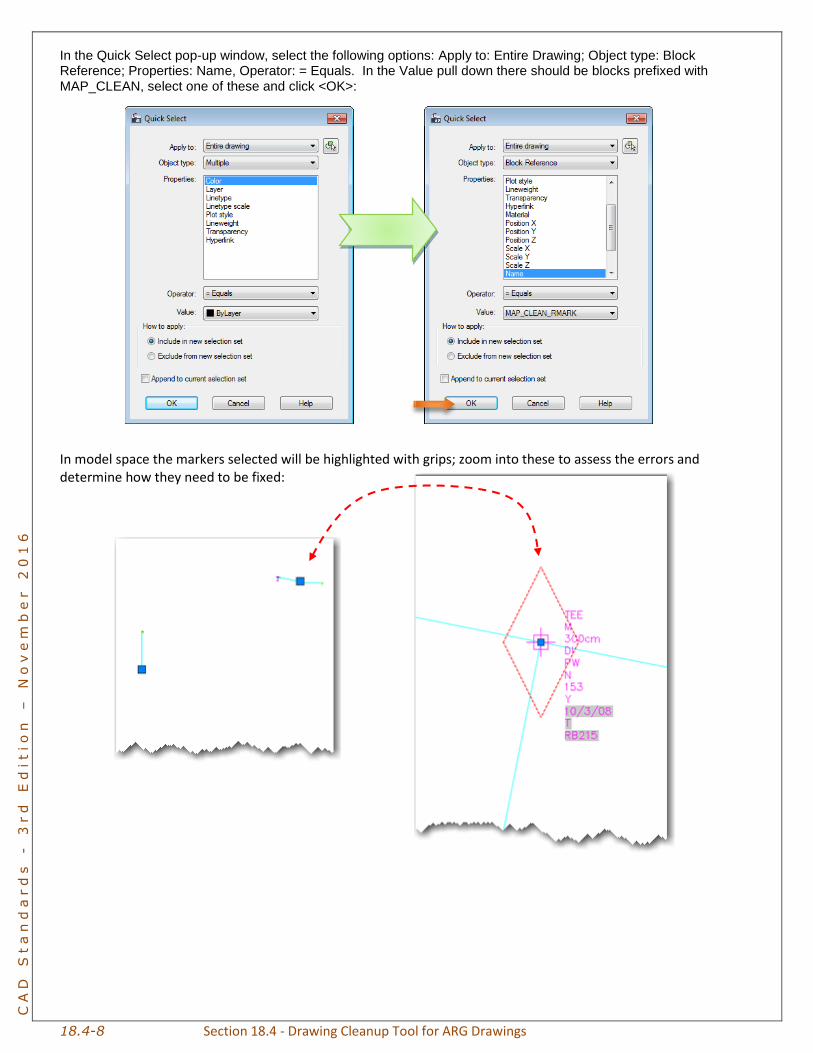
In the Quick Select pop-up window, select the following options: Apply to: Entire Drawing; Object type: Block Reference; Properties: Name, Operator: = Equals. In the Value pull down there should be blocks prefixed with MAP_CLEAN, select one of these and click <OK>:
In model space the markers selected will be highlighted with grips; zoom into these to assess the errors and determine how they need to be fixed:
Section 18.4 - Drawing Cleanup Tool for ARG Drawings 18.4-9
CA
D S
ta
nd
ar
ds
-
3
rd
E
ditio
n –
N
ov
em
be
r 2
01
6
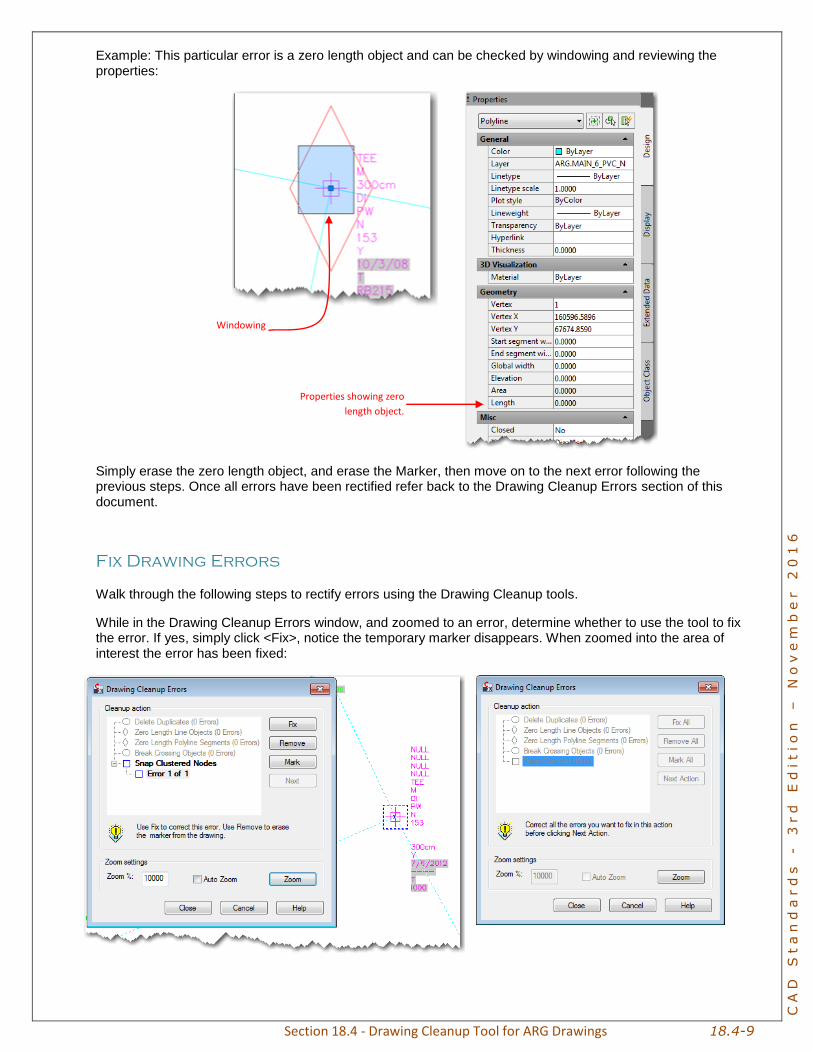
Example: This particular error is a zero length object and can be checked by windowing and reviewing the properties:
Simply erase the zero length object, and erase the Marker, then move on to the next error following the previous steps. Once all errors have been rectified refer back to the Drawing Cleanup Errors section of this document.
Fix Drawing Errors
Walk through the following steps to rectify errors using the Drawing Cleanup tools.
While in the Drawing Cleanup Errors window, and zoomed to an error, determine whether to use the tool to fix the error. If yes, simply click <Fix>, notice the temporary marker disappears. When zoomed into the area of interest the error has been fixed:
Windowing
Properties showing zero
length object.
18.4-10 Section 18.4 - Drawing Cleanup Tool for ARG Drawings
CA
D S
ta
nd
ar
ds
-
3
rd
E
ditio
n –
N
ov
em
be
r 2
01
6
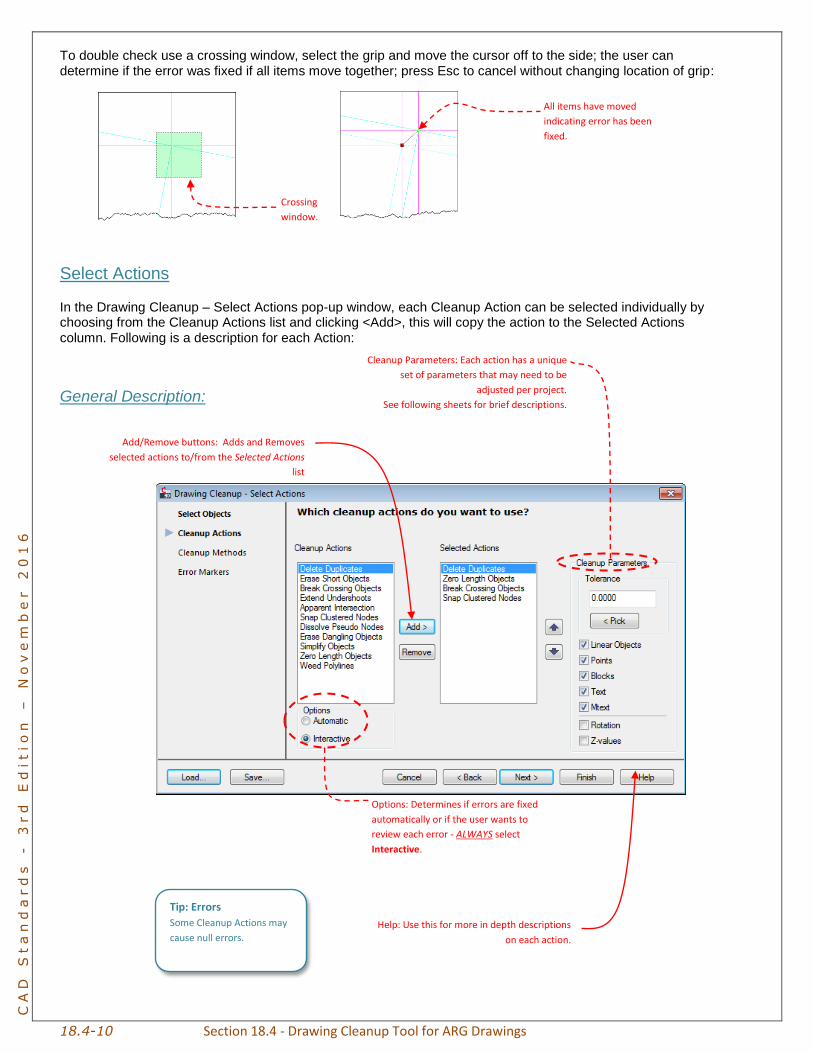
To double check use a crossing window, select the grip and move the cursor off to the side; the user can determine if the error was fixed if all items move together; press Esc to cancel without changing location of grip:
Select Actions
In the Drawing Cleanup – Select Actions pop-up window, each Cleanup Action can be selected individually by choosing from the Cleanup Actions list and clicking <Add>, this will copy the action to the Selected Actions column. Following is a description for each Action:
General Description:
Crossing
window.
All items have moved
indicating error has been
fixed.
Options: Determines if errors are fixed
automatically or if the user wants to
review each error - ALWAYS select
Interactive.
Cleanup Parameters: Each action has a unique
set of parameters that may need to be
adjusted per project.
See following sheets for brief descriptions.
Add/Remove buttons: Adds and Removes
selected actions to/from the Selected Actions
list
Help: Use this for more in depth descriptions
on each action.
Tip: Errors
Some Cleanup Actions may
cause null errors.

Section 18.4 - Drawing Cleanup Tool for ARG Drawings 18.4-11
CA
D S
ta
nd
ar
ds
-
3
rd
E
ditio
n –
N
ov
em
be
r 2
01
6
Delete Duplicates
Locates objects sitting on top of each other:
Zero Length Objects
Locates lines with zero-length - for example, snapping to the same endpoint twice:
Cleanup Parameters:
Tolerance is set to 0 by
default. This will alert
the user to any
duplicate objects that
share the same
location.
The items checked
indicate what objects
the cleanup tool will
look at in the drawing.
Cleanup Parameters:
No parameter to set on
this Action.
18.4-12 Section 18.4 - Drawing Cleanup Tool for ARG Drawings
CA
D S
ta
nd
ar
ds
-
3
rd
E
ditio
n –
N
ov
em
be
r 2
01
6
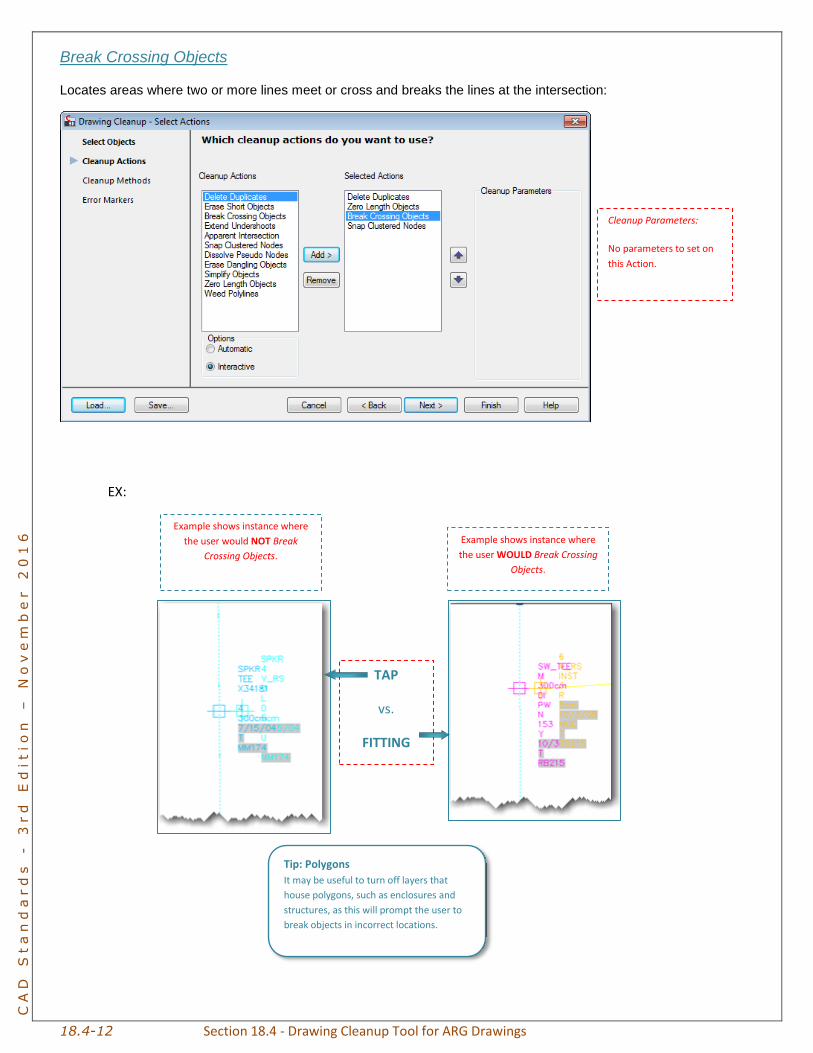
Break Crossing Objects
Locates areas where two or more lines meet or cross and breaks the lines at the intersection:
EX:
Cleanup Parameters:
No parameters to set on
this Action.
Example shows instance where
the user would NOT Break
Crossing Objects.
Example shows instance where
the user WOULD Break Crossing
Objects.
TAP
vs.
FITTING
Tip: Polygons
It may be useful to turn off layers that
house polygons, such as enclosures and
structures, as this will prompt the user to
break objects in incorrect locations.
Section 18.4 - Drawing Cleanup Tool for ARG Drawings 18.4-13
CA
D S
ta
nd
ar
ds
-
3
rd
E
ditio
n –
N
ov
em
be
r 2
01
6
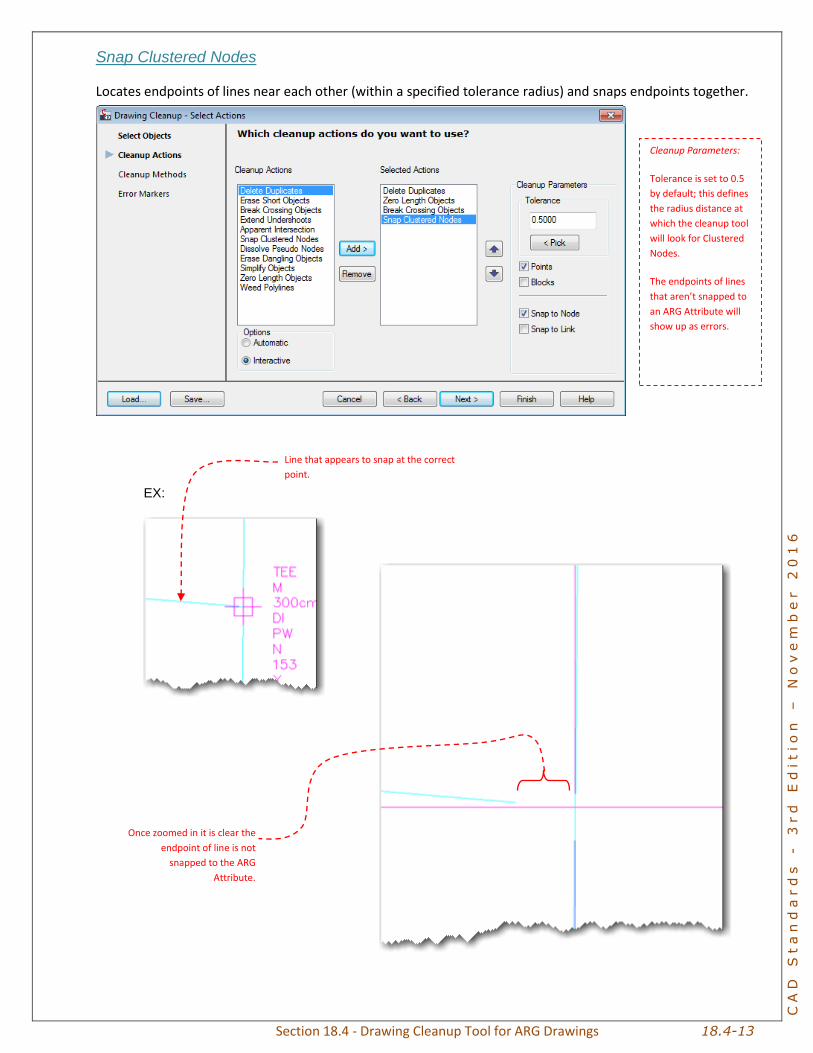
Snap Clustered Nodes
Locates endpoints of lines near each other (within a specified tolerance radius) and snaps endpoints together.
EX:
Cleanup Parameters:
Tolerance is set to 0.5
by default; this defines
the radius distance at
which the cleanup tool
will look for Clustered
Nodes.
The endpoints of lines
that aren’t snapped to
an ARG Attribute will
show up as errors.
Line that appears to snap at the correct
point.
Once zoomed in it is clear the
endpoint of line is not
snapped to the ARG
Attribute.

18.4-14 Section 18.4 - Drawing Cleanup Tool for ARG Drawings
CA
D S
ta
nd
ar
ds
-
3
rd
E
ditio
n –
N
ov
em
be
r 2
01
6
THIS PAGE INTENTIONALLY LEFT BLANK