Embed Size (px)
Citation preview

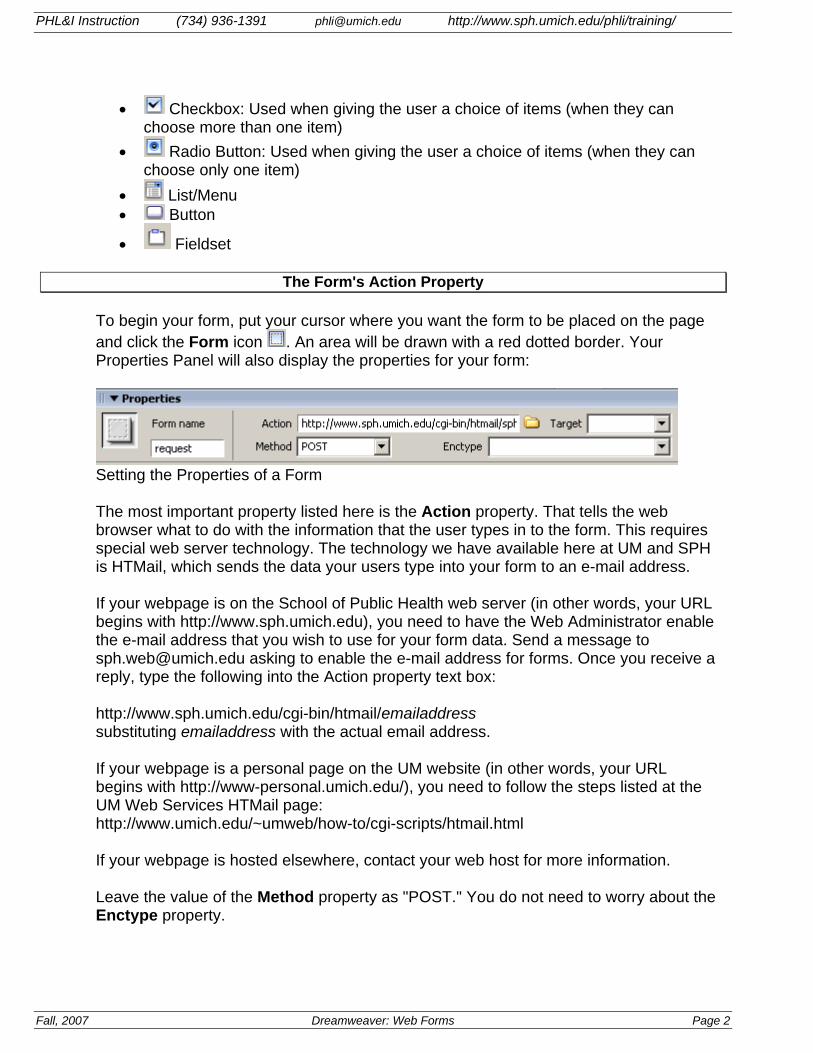
PHL&I Instruction (734) 936-1391 [email protected] http://www.sph.umich.edu/phli/training/
Dreamweaver: Web Forms
Introduction Web forms allow your users to type information into form fields on a web page and send it to you. Dreamweaver makes it easy to create them. This workshop is a follow-up to "Dreamweaver Basics." We will cover the following topics:
• The Forms Toolbar • The Form's Action Property • Inserting a Text Field • Inserting a Hidden Field • Inserting a Success URL Field • Inserting a Textarea Field • Inserting a Check Box • Inserting a Radio Button • Inserting a List/Menu Field • Inserting a Submit Button • Using Fieldset to Group Form Elements • Assigning CSS Styles to your Form Elements • Previewing and Testing your Form • Form Validation using Dreamweaver Behaviors • Form Validation using Spry
The Forms Toolbar The first step in Dreamweaver is to change your Objects Toolbar from Common to Forms by clicking the Forms tab
The Forms Toolbar Roll your mouse over any icon in the Forms Toolbar and the object that each icon is associated with will be displayed. The ones we will cover today are as follows:
• Form: All form elements must be placed inside the form tag • Text Field: A single-line field for typing in text • Hidden Field: A field that sends a value without your user seeing it • Textarea: A multi-line text field for larger amounts of space
Fall, 2007 Dreamweaver: Web Forms Page 1
PHL&I Instruction (734) 936-1391 [email protected] http://www.sph.umich.edu/phli/training/
• Checkbox: Used when giving the user a choice of items (when they can choose more than one item)
• Radio Button: Used when giving the user a choice of items (when they can choose only one item)
• List/Menu • Button
• Fieldset
The Form's Action Property To begin your form, put your cursor where you want the form to be placed on the page and click the Form icon . An area will be drawn with a red dotted border. Your Properties Panel will also display the properties for your form:
Setting the Properties of a Form The most important property listed here is the Action property. That tells the web browser what to do with the information that the user types in to the form. This requires special web server technology. The technology we have available here at UM and SPH is HTMail, which sends the data your users type into your form to an e-mail address. If your webpage is on the School of Public Health web server (in other words, your URL begins with http://www.sph.umich.edu), you need to have the Web Administrator enable the e-mail address that you wish to use for your form data. Send a message to [email protected] asking to enable the e-mail address for forms. Once you receive a reply, type the following into the Action property text box: http://www.sph.umich.edu/cgi-bin/htmail/emailaddress substituting emailaddress with the actual email address. If your webpage is a personal page on the UM website (in other words, your URL begins with http://www-personal.umich.edu/), you need to follow the steps listed at the UM Web Services HTMail page: http://www.umich.edu/~umweb/how-to/cgi-scripts/htmail.html If your webpage is hosted elsewhere, contact your web host for more information. Leave the value of the Method property as "POST." You do not need to worry about the Enctype property.
Fall, 2007 Dreamweaver: Web Forms Page 2
PHL&I Instruction (734) 936-1391 [email protected] http://www.sph.umich.edu/phli/training/
The Target property tells the web browser whether to open a new window after the form is sent in, or stay in the same window. Leave that field blank. You should give your form a name in the Form Name property box.
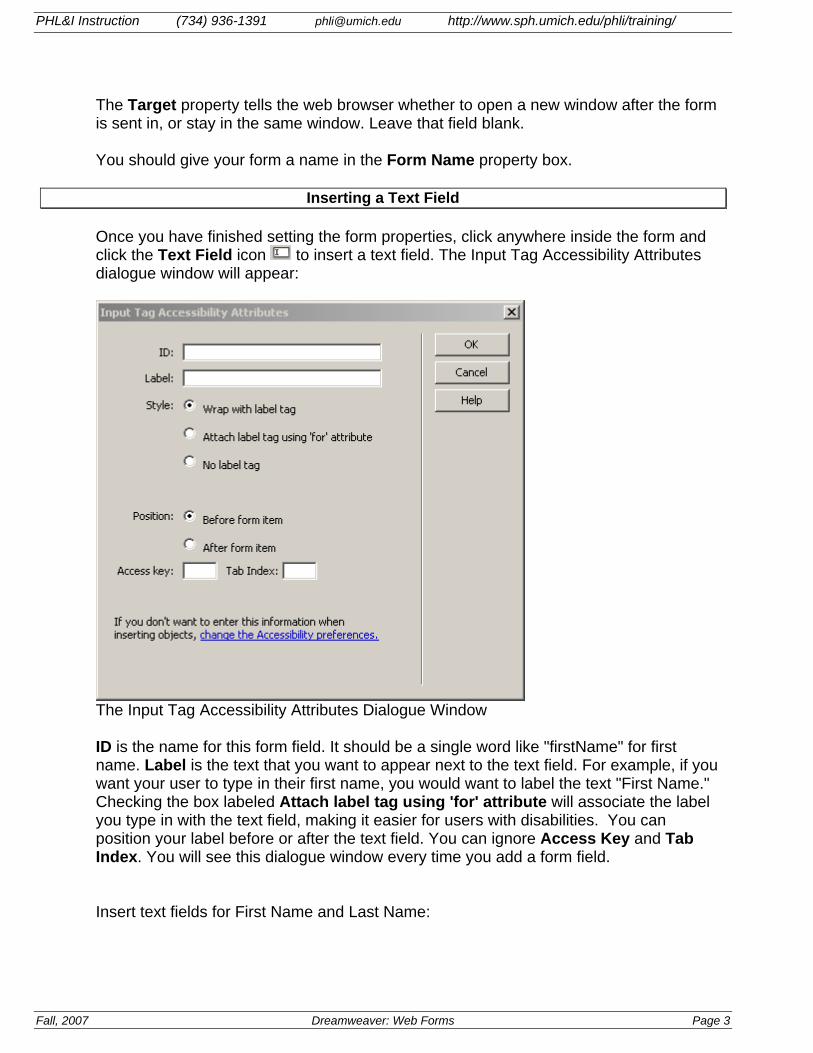
Inserting a Text Field Once you have finished setting the form properties, click anywhere inside the form and click the Text Field icon to insert a text field. The Input Tag Accessibility Attributes dialogue window will appear:
The Input Tag Accessibility Attributes Dialogue Window ID is the name for this form field. It should be a single word like "firstName" for first name. Label is the text that you want to appear next to the text field. For example, if you want your user to type in their first name, you would want to label the text "First Name." Checking the box labeled Attach label tag using 'for' attribute will associate the label you type in with the text field, making it easier for users with disabilities. You can position your label before or after the text field. You can ignore Access Key and Tab Index. You will see this dialogue window every time you add a form field. Insert text fields for First Name and Last Name:
Fall, 2007 Dreamweaver: Web Forms Page 3

PHL&I Instruction (734) 936-1391 [email protected] http://www.sph.umich.edu/phli/training/
Text Fields Select the first text field by clicking on it, then check the Properties Panel again:
Setting the Properties of a Text Field The name you gave your field when inserting it shows in the far left-most box in the Properties Panel. It is also important that you set the Char Width property, which tells the browser how wide to make the box, and the Max Chars property, which tells the browser the maximum number of characters that can be typed into the box. Be sure not to set this too small. Finally, you can specify whether the text field is a single line field, a multi-line field, or a password field. Whatever the user types in to a password field will be displayed as asterisks. If you want something to be typed into the text field when the user first opens the form, type that text into the Initial Value field.
Fall, 2007 Dreamweaver: Web Forms Page 4
PHL&I Instruction (734) 936-1391 [email protected] http://www.sph.umich.edu/phli/training/
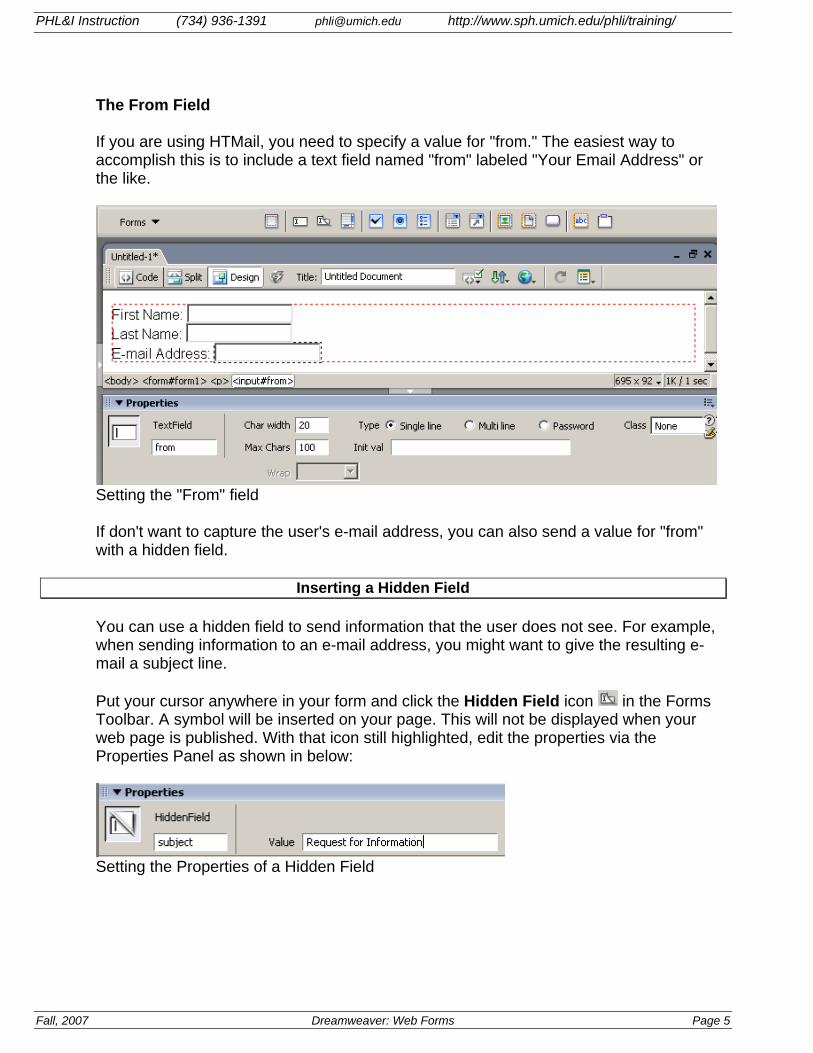
The From Field If you are using HTMail, you need to specify a value for "from." The easiest way to accomplish this is to include a text field named "from" labeled "Your Email Address" or the like.
Setting the "From" field If don't want to capture the user's e-mail address, you can also send a value for "from" with a hidden field.
Inserting a Hidden Field You can use a hidden field to send information that the user does not see. For example, when sending information to an e-mail address, you might want to give the resulting e-mail a subject line. Put your cursor anywhere in your form and click the Hidden Field icon in the Forms Toolbar. A symbol will be inserted on your page. This will not be displayed when your web page is published. With that icon still highlighted, edit the properties via the Properties Panel as shown in below:
Setting the Properties of a Hidden Field
Fall, 2007 Dreamweaver: Web Forms Page 5
PHL&I Instruction (734) 936-1391 [email protected] http://www.sph.umich.edu/phli/training/
Inserting a Success URL Field The Success URL field is a hidden field that controls what page the user will be taken to after clicking the submit button. If not specified, the user will go to a standard page displaying text that says "Your message has been sent successfully. You can click on the "Back" button twice to return to the page that linked you to this form." If you want the user to be taken to a different page after clicking the submit button, insert a hidden field with the name=successURL. The value of the field will be the complete URL of the page you wish your users to be sent to after clicking submit.
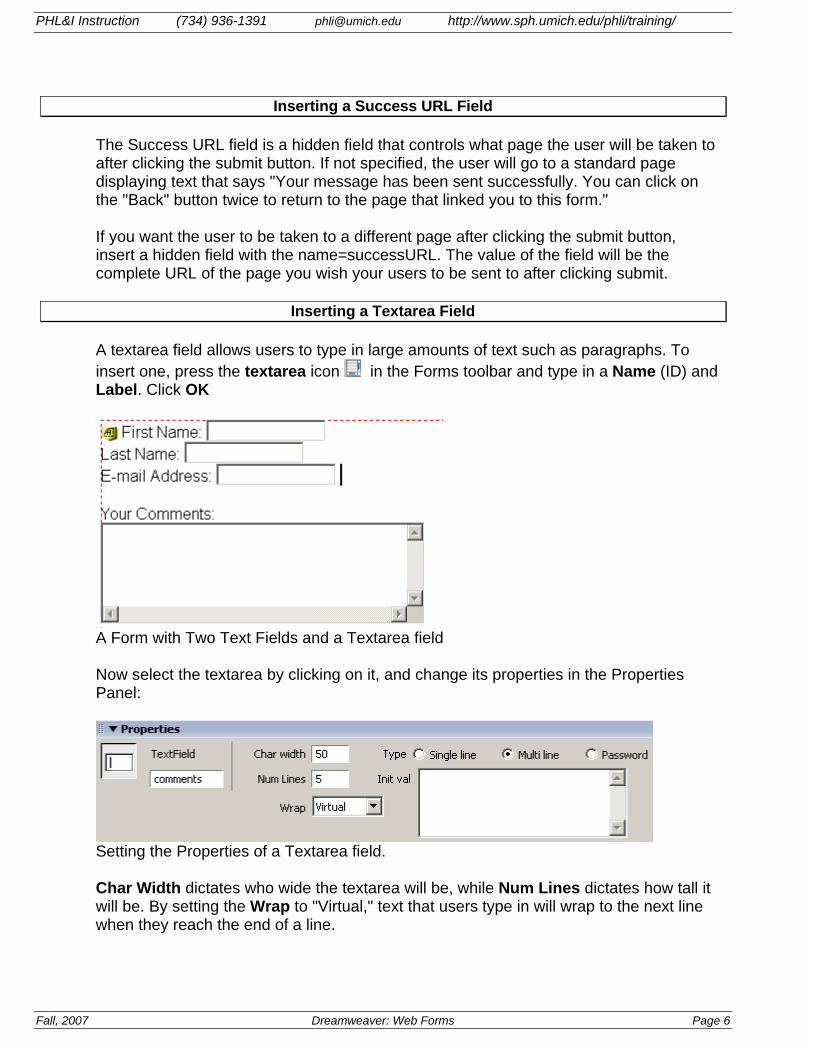
Inserting a Textarea Field A textarea field allows users to type in large amounts of text such as paragraphs. To insert one, press the textarea icon in the Forms toolbar and type in a Name (ID) and Label. Click OK
A Form with Two Text Fields and a Textarea field Now select the textarea by clicking on it, and change its properties in the Properties Panel:
Setting the Properties of a Textarea field. Char Width dictates who wide the textarea will be, while Num Lines dictates how tall it will be. By setting the Wrap to "Virtual," text that users type in will wrap to the next line when they reach the end of a line.
Fall, 2007 Dreamweaver: Web Forms Page 6
PHL&I Instruction (734) 936-1391 [email protected] http://www.sph.umich.edu/phli/training/
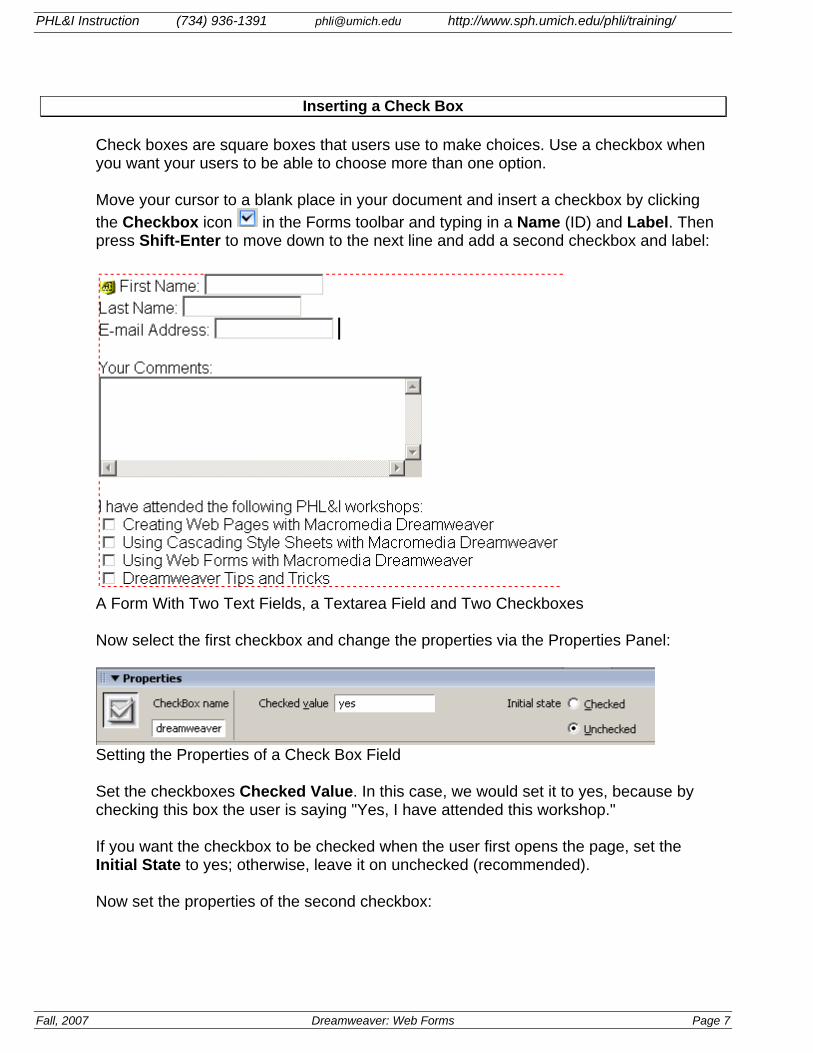
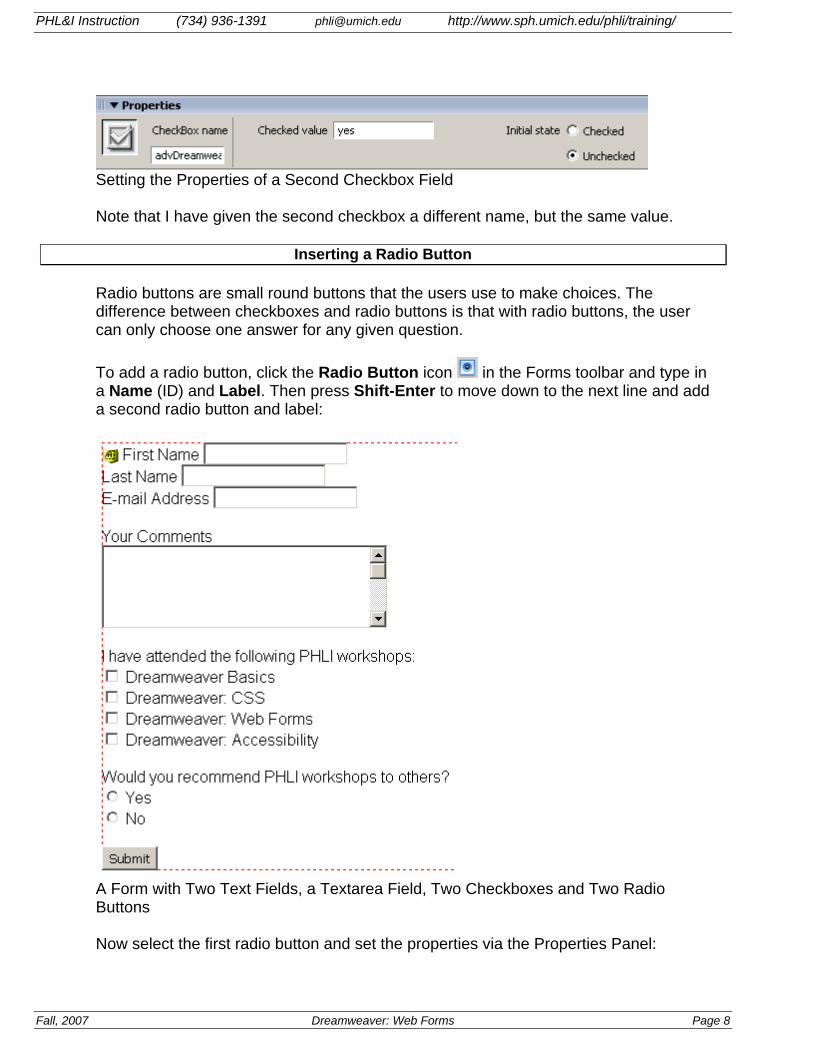
Inserting a Check Box Check boxes are square boxes that users use to make choices. Use a checkbox when you want your users to be able to choose more than one option. Move your cursor to a blank place in your document and insert a checkbox by clicking the Checkbox icon in the Forms toolbar and typing in a Name (ID) and Label. Then press Shift-Enter to move down to the next line and add a second checkbox and label:
A Form With Two Text Fields, a Textarea Field and Two Checkboxes Now select the first checkbox and change the properties via the Properties Panel:
Setting the Properties of a Check Box Field Set the checkboxes Checked Value. In this case, we would set it to yes, because by checking this box the user is saying "Yes, I have attended this workshop." If you want the checkbox to be checked when the user first opens the page, set the Initial State to yes; otherwise, leave it on unchecked (recommended). Now set the properties of the second checkbox:
Fall, 2007 Dreamweaver: Web Forms Page 7
PHL&I Instruction (734) 936-1391 [email protected] http://www.sph.umich.edu/phli/training/
Setting the Properties of a Second Checkbox Field Note that I have given the second checkbox a different name, but the same value.
Inserting a Radio Button Radio buttons are small round buttons that the users use to make choices. The difference between checkboxes and radio buttons is that with radio buttons, the user can only choose one answer for any given question. To add a radio button, click the Radio Button icon in the Forms toolbar and type in a Name (ID) and Label. Then press Shift-Enter to move down to the next line and add a second radio button and label:
A Form with Two Text Fields, a Textarea Field, Two Checkboxes and Two Radio Buttons Now select the first radio button and set the properties via the Properties Panel:
Fall, 2007 Dreamweaver: Web Forms Page 8
PHL&I Instruction (734) 936-1391 [email protected] http://www.sph.umich.edu/phli/training/
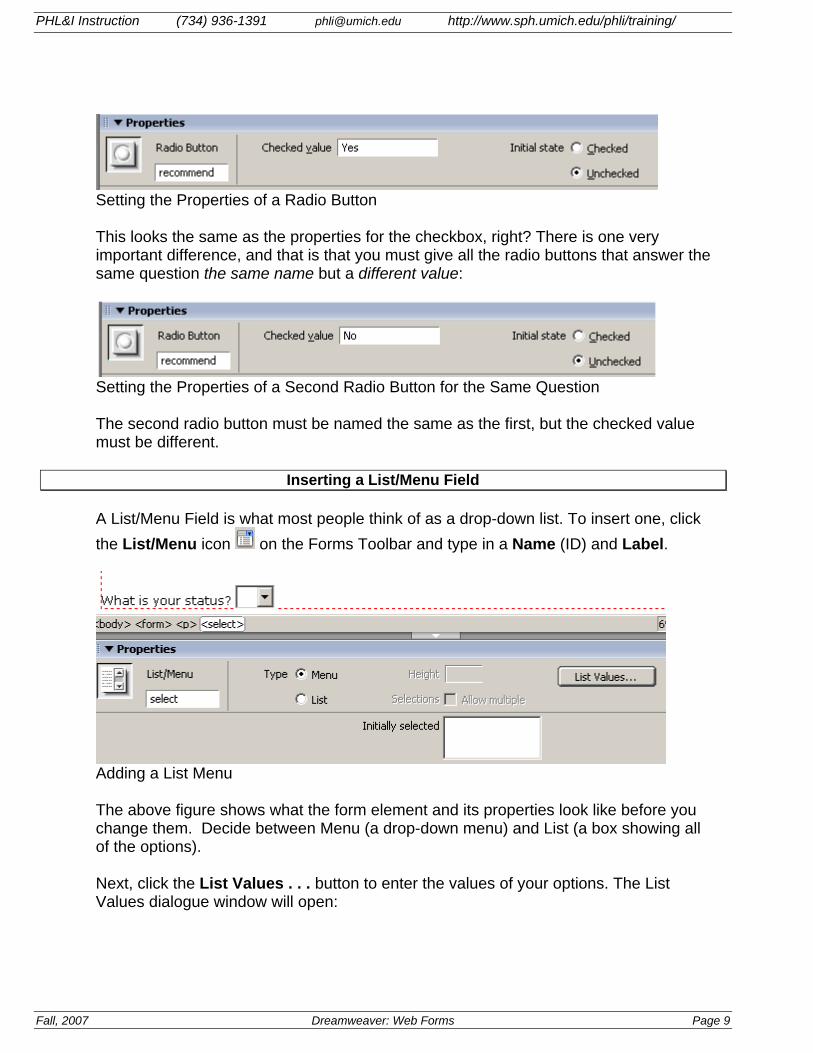
Setting the Properties of a Radio Button This looks the same as the properties for the checkbox, right? There is one very important difference, and that is that you must give all the radio buttons that answer the same question the same name but a different value:
Setting the Properties of a Second Radio Button for the Same Question The second radio button must be named the same as the first, but the checked value must be different.
Inserting a List/Menu Field A List/Menu Field is what most people think of as a drop-down list. To insert one, click the List/Menu icon on the Forms Toolbar and type in a Name (ID) and Label.
Adding a List Menu The above figure shows what the form element and its properties look like before you change them. Decide between Menu (a drop-down menu) and List (a box showing all of the options). Next, click the List Values . . . button to enter the values of your options. The List Values dialogue window will open:
Fall, 2007 Dreamweaver: Web Forms Page 9
PHL&I Instruction (734) 936-1391 [email protected] http://www.sph.umich.edu/phli/training/
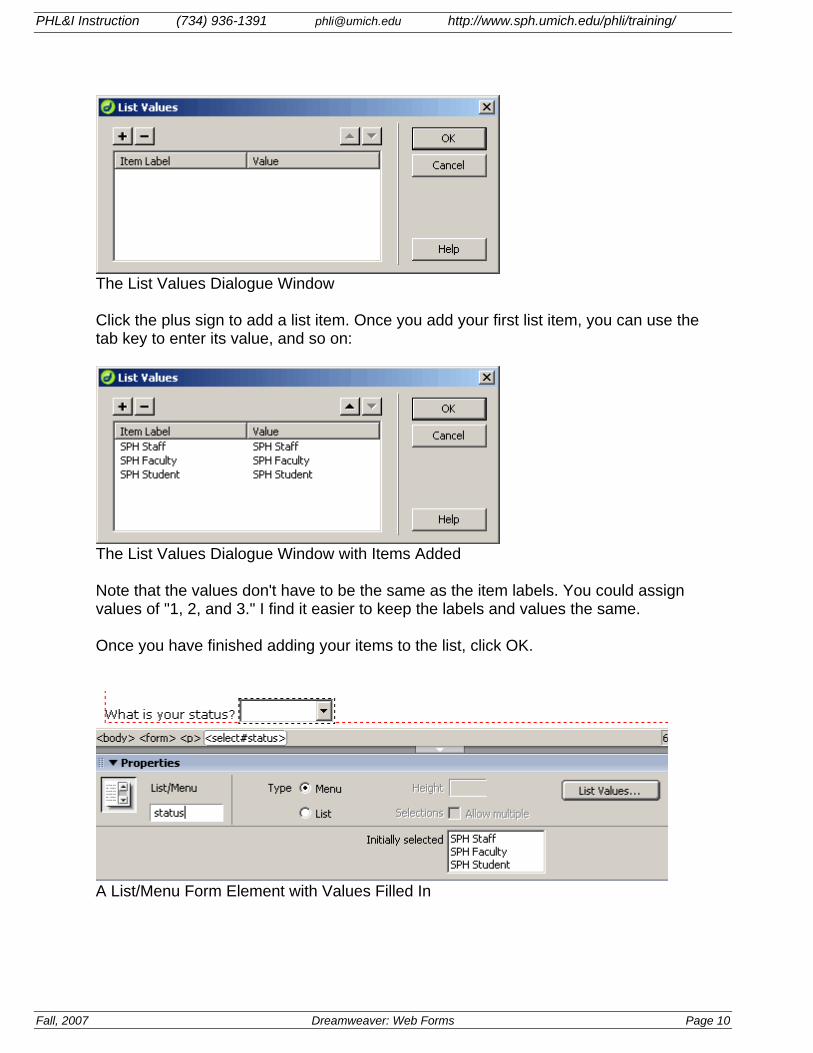
The List Values Dialogue Window Click the plus sign to add a list item. Once you add your first list item, you can use the tab key to enter its value, and so on:
The List Values Dialogue Window with Items Added Note that the values don't have to be the same as the item labels. You could assign values of "1, 2, and 3." I find it easier to keep the labels and values the same. Once you have finished adding your items to the list, click OK.
A List/Menu Form Element with Values Filled In
Fall, 2007 Dreamweaver: Web Forms Page 10
PHL&I Instruction (734) 936-1391 [email protected] http://www.sph.umich.edu/phli/training/
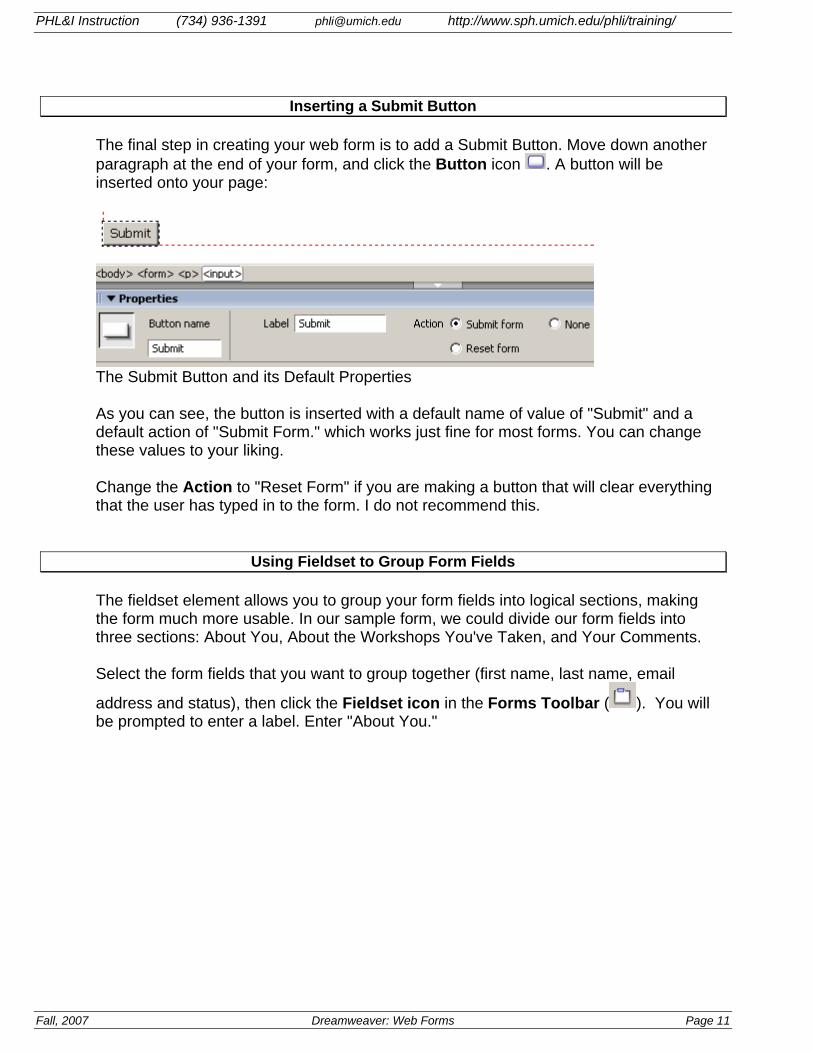
Inserting a Submit Button The final step in creating your web form is to add a Submit Button. Move down another paragraph at the end of your form, and click the Button icon . A button will be inserted onto your page:
The Submit Button and its Default Properties As you can see, the button is inserted with a default name of value of "Submit" and a default action of "Submit Form." which works just fine for most forms. You can change these values to your liking. Change the Action to "Reset Form" if you are making a button that will clear everything that the user has typed in to the form. I do not recommend this.
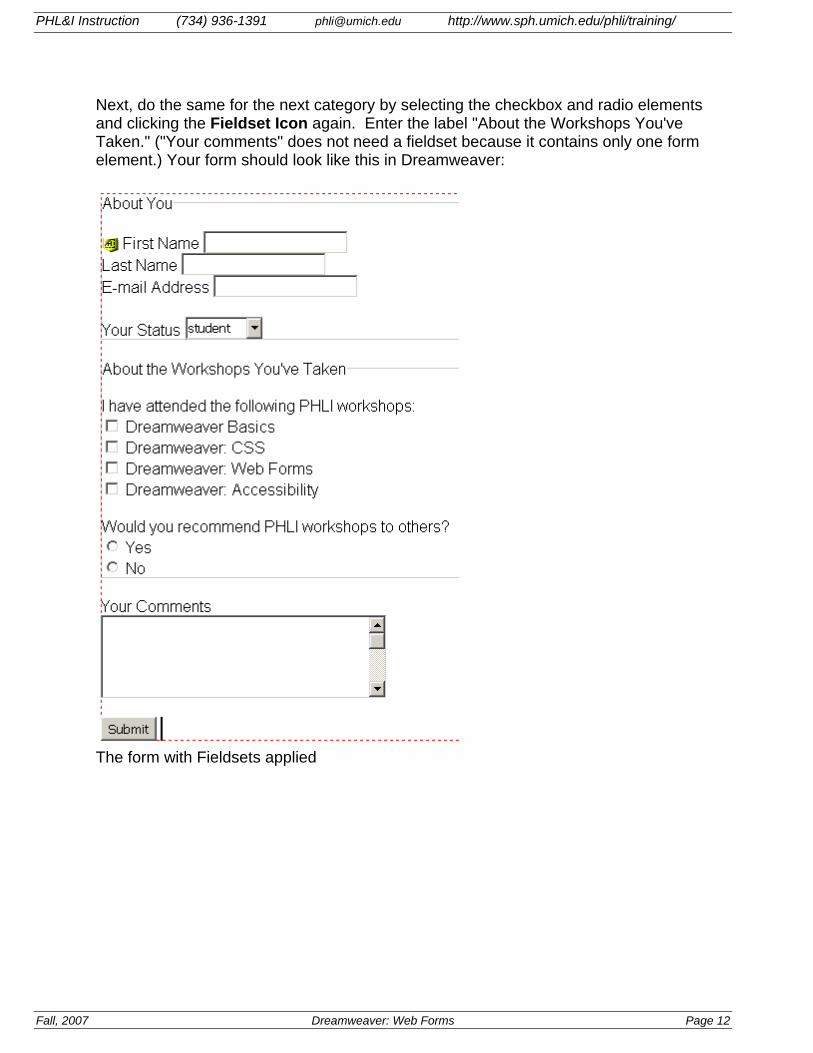
Using Fieldset to Group Form Fields The fieldset element allows you to group your form fields into logical sections, making the form much more usable. In our sample form, we could divide our form fields into three sections: About You, About the Workshops You've Taken, and Your Comments. Select the form fields that you want to group together (first name, last name, email
address and status), then click the Fieldset icon in the Forms Toolbar ( ). You will be prompted to enter a label. Enter "About You."
Fall, 2007 Dreamweaver: Web Forms Page 11
PHL&I Instruction (734) 936-1391 [email protected] http://www.sph.umich.edu/phli/training/
Next, do the same for the next category by selecting the checkbox and radio elements and clicking the Fieldset Icon again. Enter the label "About the Workshops You've Taken." ("Your comments" does not need a fieldset because it contains only one form element.) Your form should look like this in Dreamweaver:
The form with Fieldsets applied
Fall, 2007 Dreamweaver: Web Forms Page 12
PHL&I Instruction (734) 936-1391 [email protected] http://www.sph.umich.edu/phli/training/
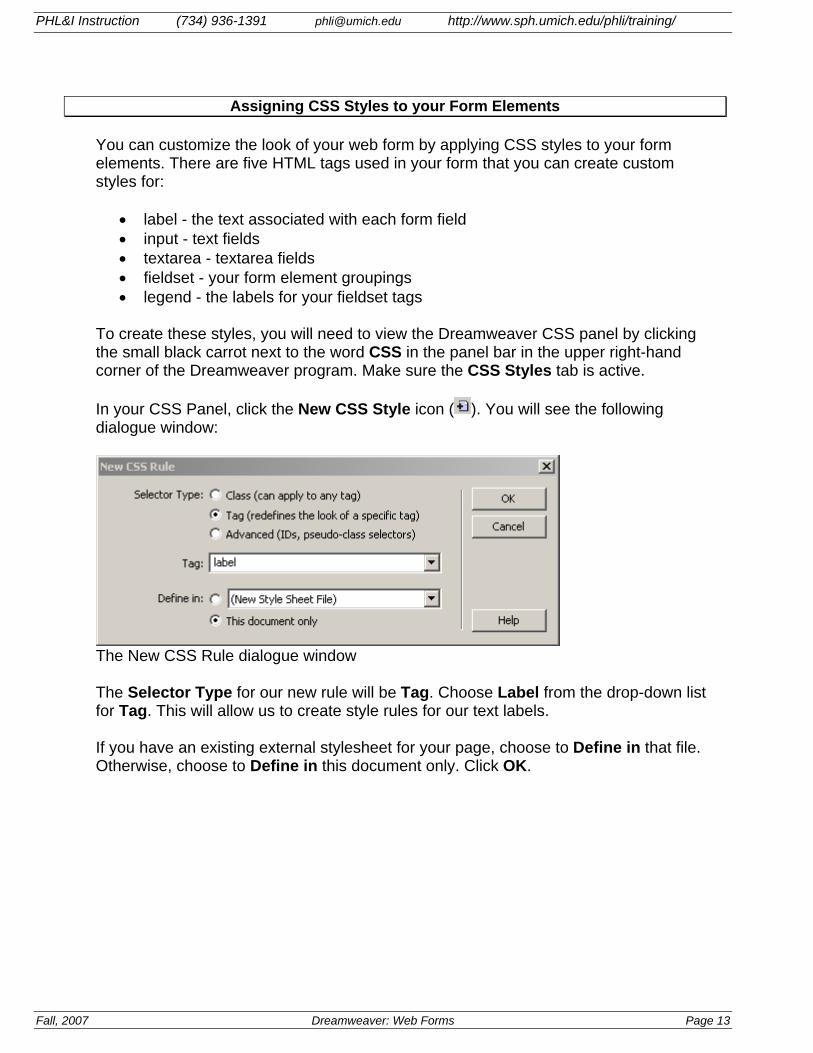
Assigning CSS Styles to your Form Elements You can customize the look of your web form by applying CSS styles to your form elements. There are five HTML tags used in your form that you can create custom styles for:
• label - the text associated with each form field • input - text fields • textarea - textarea fields • fieldset - your form element groupings • legend - the labels for your fieldset tags
To create these styles, you will need to view the Dreamweaver CSS panel by clicking the small black carrot next to the word CSS in the panel bar in the upper right-hand corner of the Dreamweaver program. Make sure the CSS Styles tab is active. In your CSS Panel, click the New CSS Style icon ( ). You will see the following dialogue window:
The New CSS Rule dialogue window The Selector Type for our new rule will be Tag. Choose Label from the drop-down list for Tag. This will allow us to create style rules for our text labels. If you have an existing external stylesheet for your page, choose to Define in that file. Otherwise, choose to Define in this document only. Click OK.
Fall, 2007 Dreamweaver: Web Forms Page 13
PHL&I Instruction (734) 936-1391 [email protected] http://www.sph.umich.edu/phli/training/
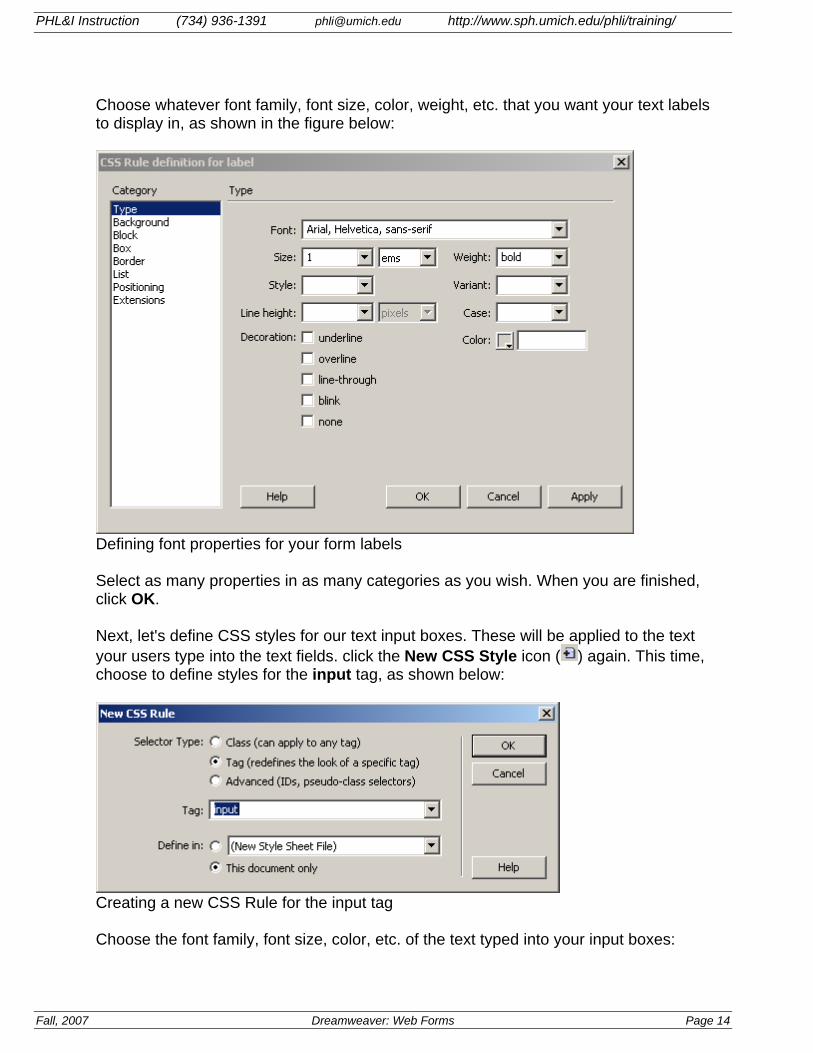
Choose whatever font family, font size, color, weight, etc. that you want your text labels to display in, as shown in the figure below:
Defining font properties for your form labels Select as many properties in as many categories as you wish. When you are finished, click OK. Next, let's define CSS styles for our text input boxes. These will be applied to the text your users type into the text fields. click the New CSS Style icon ( ) again. This time, choose to define styles for the input tag, as shown below:
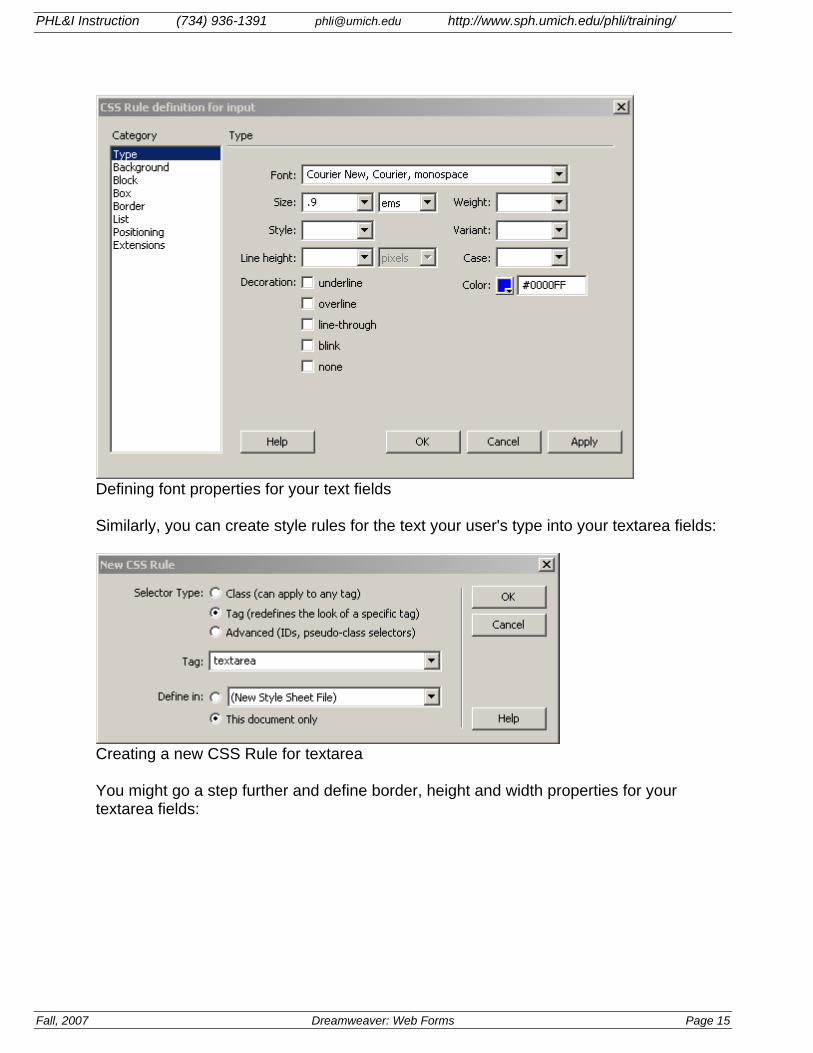
Creating a new CSS Rule for the input tag Choose the font family, font size, color, etc. of the text typed into your input boxes:
Fall, 2007 Dreamweaver: Web Forms Page 14
PHL&I Instruction (734) 936-1391 [email protected] http://www.sph.umich.edu/phli/training/
Defining font properties for your text fields Similarly, you can create style rules for the text your user's type into your textarea fields:
Creating a new CSS Rule for textarea You might go a step further and define border, height and width properties for your textarea fields:
Fall, 2007 Dreamweaver: Web Forms Page 15
PHL&I Instruction (734) 936-1391 [email protected] http://www.sph.umich.edu/phli/training/
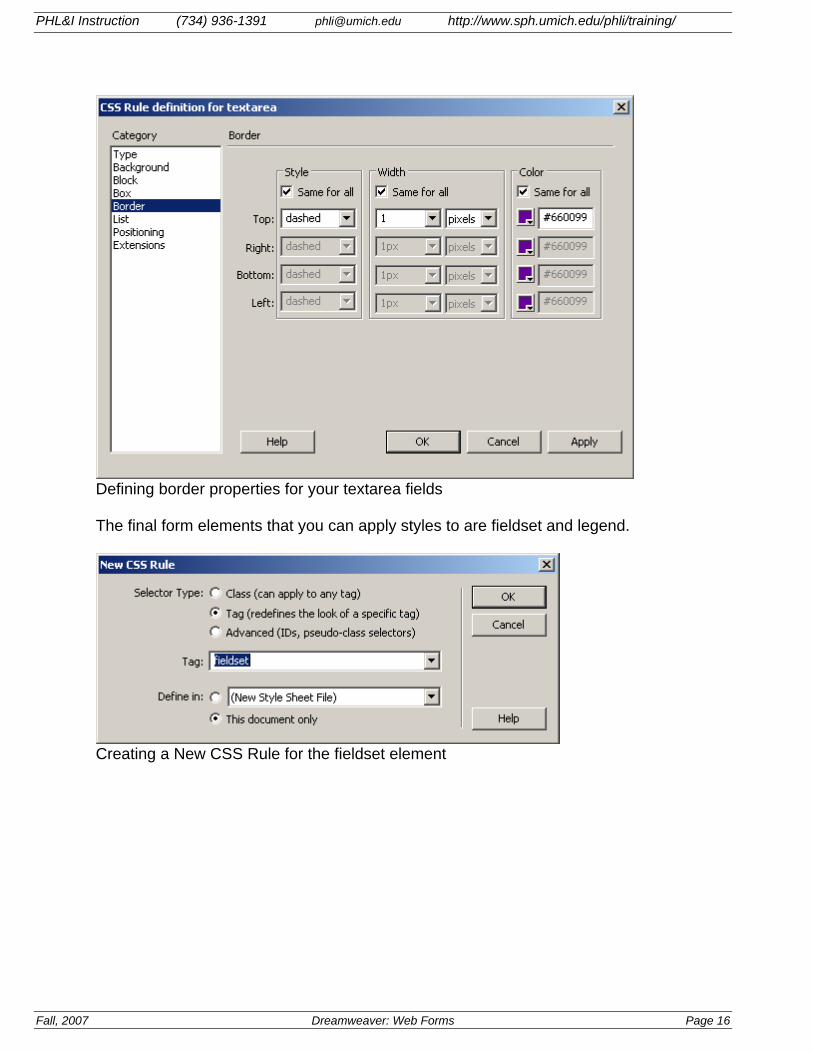
Defining border properties for your textarea fields The final form elements that you can apply styles to are fieldset and legend.
Creating a New CSS Rule for the fieldset element
Fall, 2007 Dreamweaver: Web Forms Page 16
PHL&I Instruction (734) 936-1391 [email protected] http://www.sph.umich.edu/phli/training/
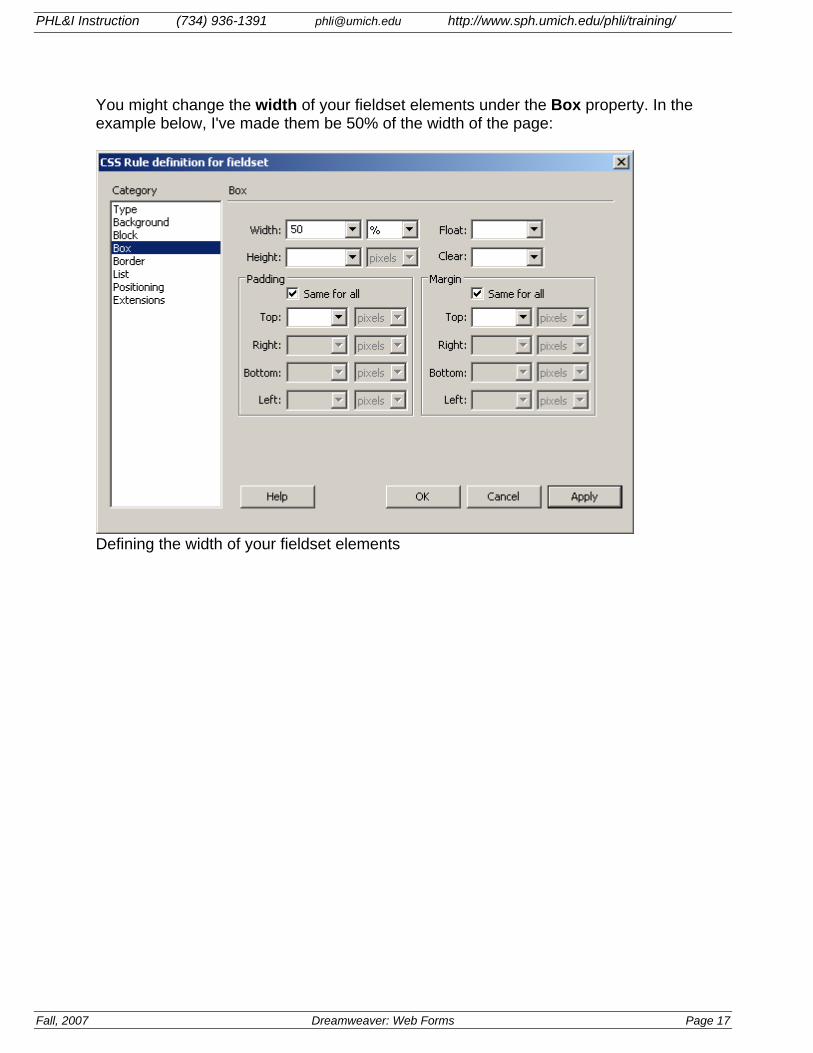
You might change the width of your fieldset elements under the Box property. In the example below, I've made them be 50% of the width of the page:
Defining the width of your fieldset elements
Fall, 2007 Dreamweaver: Web Forms Page 17
PHL&I Instruction (734) 936-1391 [email protected] http://www.sph.umich.edu/phli/training/
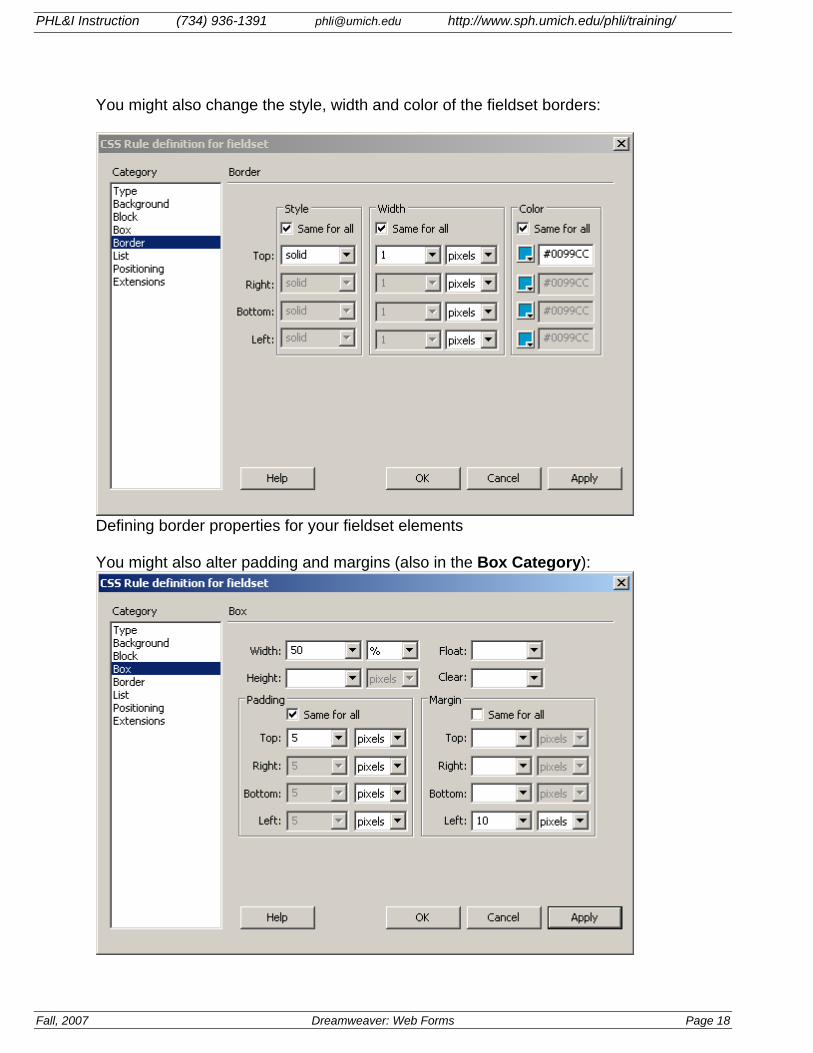
You might also change the style, width and color of the fieldset borders:
Defining border properties for your fieldset elements You might also alter padding and margins (also in the Box Category):
Fall, 2007 Dreamweaver: Web Forms Page 18

PHL&I Instruction (734) 936-1391 [email protected] http://www.sph.umich.edu/phli/training/
You could even give your fieldset elements a background color:
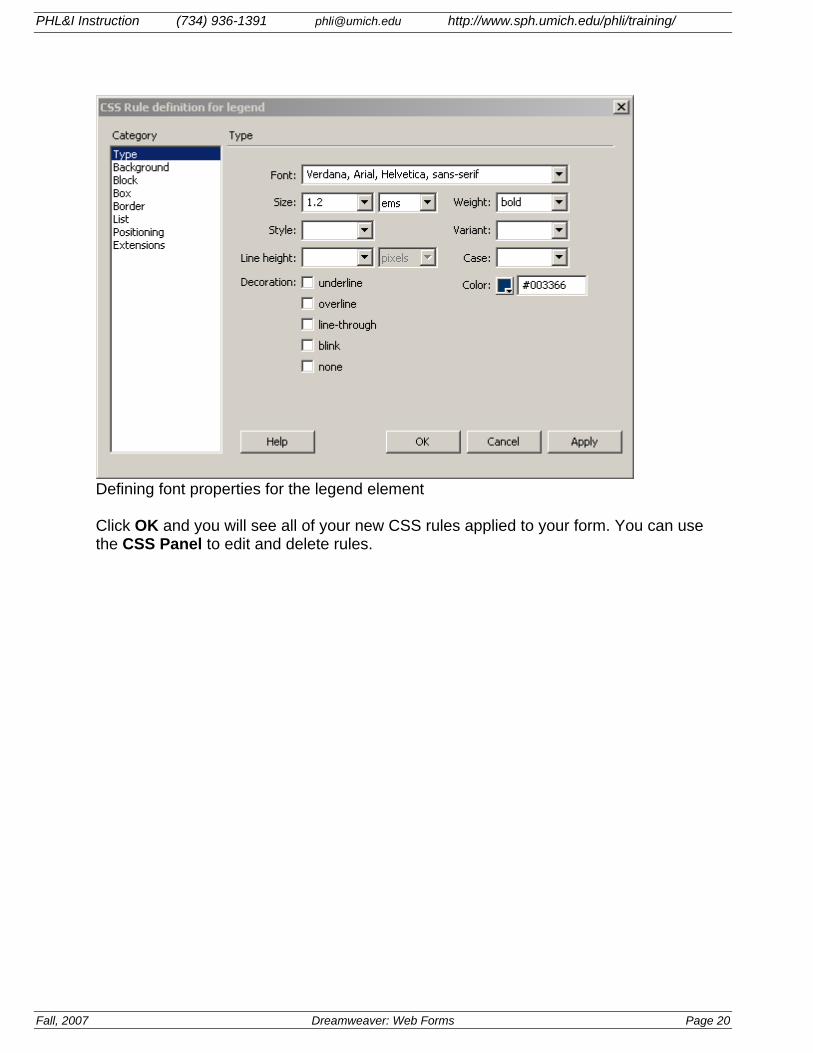
Click OK to see the results. Now, to change the look of the words associated with your fieldset elements - called legends - we need to create a new CSS rule for the legend tag:
Creating a New CSS Rule for the legend element
Fall, 2007 Dreamweaver: Web Forms Page 19
PHL&I Instruction (734) 936-1391 [email protected] http://www.sph.umich.edu/phli/training/
Defining font properties for the legend element Click OK and you will see all of your new CSS rules applied to your form. You can use the CSS Panel to edit and delete rules.
Fall, 2007 Dreamweaver: Web Forms Page 20
PHL&I Instruction (734) 936-1391 [email protected] http://www.sph.umich.edu/phli/training/
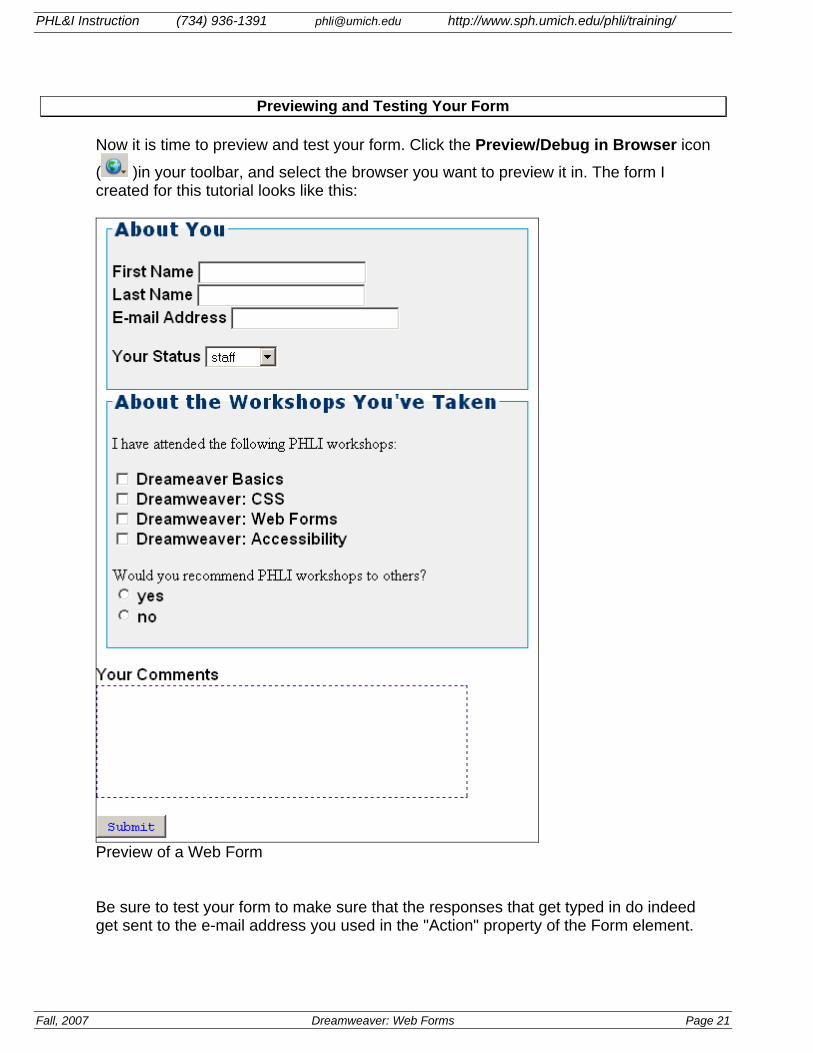
Previewing and Testing Your Form Now it is time to preview and test your form. Click the Preview/Debug in Browser icon
( )in your toolbar, and select the browser you want to preview it in. The form I created for this tutorial looks like this:
Preview of a Web Form Be sure to test your form to make sure that the responses that get typed in do indeed get sent to the e-mail address you used in the "Action" property of the Form element.
Fall, 2007 Dreamweaver: Web Forms Page 21

PHL&I Instruction (734) 936-1391 [email protected] http://www.sph.umich.edu/phli/training/
Form Validation using Dreamweaver Behaviors If you've ever filled out a web form, clicked the Submit button, and a little pop-up window opened telling you that you forgot to fill something in or that you filled something in incorrectly, then you have seen form validation. This can be very useful for web developers because it can help prevent inaccurate or incomplete data from being sent via their forms. Form validation is typically done using a web scripting language called JavaScript. Dreamweaver can insert the needed JavaScript using the Behaviors Panel. You can set validation parameters on form fields one at a time or on all your form fields at the same time. Let's say that we want to make sure a real e-mail address (with an @ sign) gets typed into the "from" field on our form. This is what we call a "behavior." Click the Window drop-down menu and choose Behaviors to bring up the Behaviors Tab of the Tag Panel:
Bringing Up the Behaviors Tab of the Tag Panel
Fall, 2007 Dreamweaver: Web Forms Page 22
PHL&I Instruction (734) 936-1391 [email protected] http://www.sph.umich.edu/phli/training/
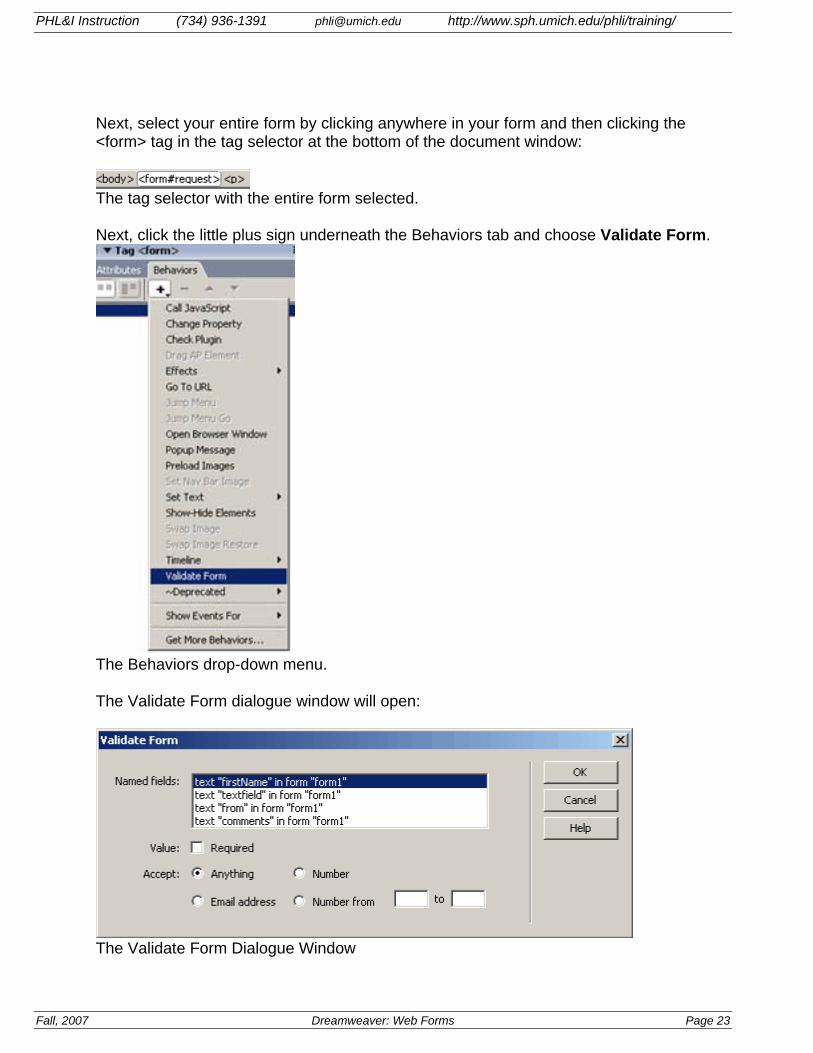
Next, select your entire form by clicking anywhere in your form and then clicking the <form> tag in the tag selector at the bottom of the document window:
The tag selector with the entire form selected. Next, click the little plus sign underneath the Behaviors tab and choose Validate Form.
The Behaviors drop-down menu. The Validate Form dialogue window will open:
The Validate Form Dialogue Window
Fall, 2007 Dreamweaver: Web Forms Page 23

PHL&I Instruction (734) 936-1391 [email protected] http://www.sph.umich.edu/phli/training/
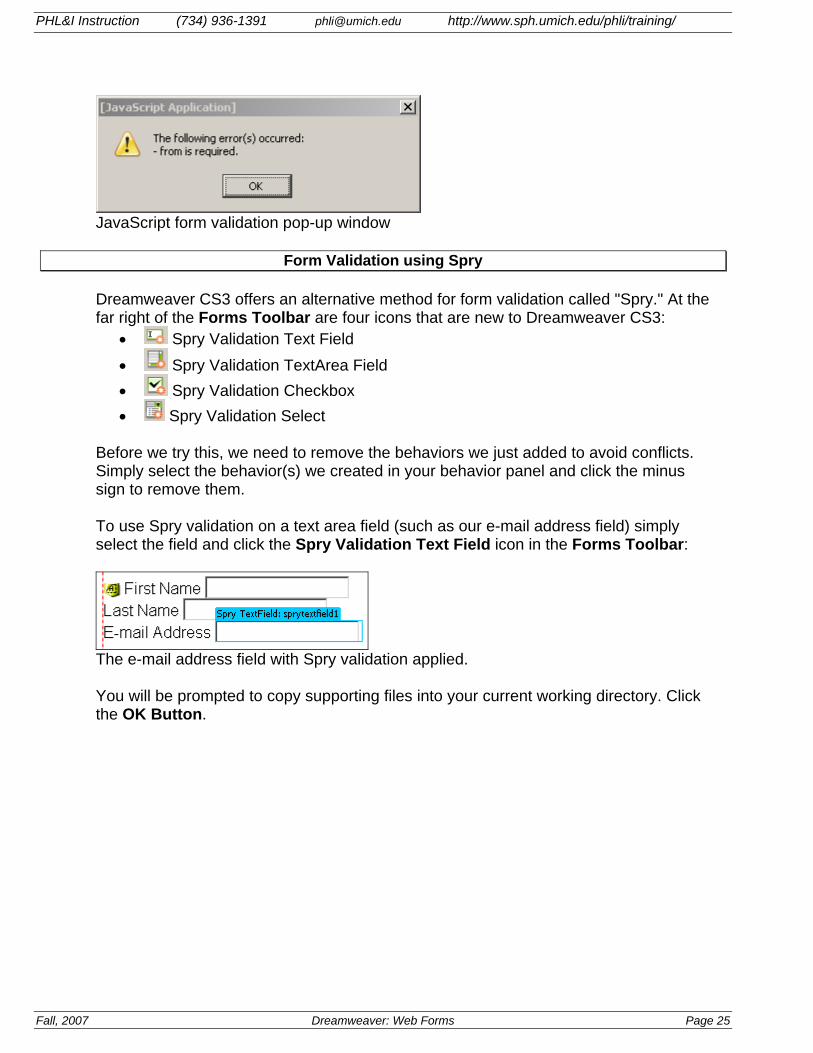
Note that all of your text fields and your textarea field are displayed. Dreamweaver cannot insert the JavaScript code necessary to validate checkbox fields, radio button fields or List/Menu fields. You have several options for how to validate each field. You can make the field required by checking the box next to the word Required. This is useful when you do not want the user to click submit before filling in a particular piece of information. But if you do this, you should make sure to state that the field is required on the form, so the user knows it before they click Submit. You can also specify that only a number can be typed in to a field with the Accept options. Lastly, you can specify that the value of a field be an e-mail address, or be within a number range. For e-mail addresses, the web browser will look for an @ sign to verify the value of the field. I will set the "from" field to be required, and accept only an e-mail address, as shown below:
The Validate Form Dialogue Window with a Field required Click OK when you are setting the validation parameters for all of your fields. Once you do, the necessary JavaScript will be inserted into your page. You never even have to see it. Now test your form again. Try leaving the required field blank and clicking Submit. You should see a pop-up window preventing you from going further:
Fall, 2007 Dreamweaver: Web Forms Page 24
PHL&I Instruction (734) 936-1391 [email protected] http://www.sph.umich.edu/phli/training/
JavaScript form validation pop-up window
Form Validation using Spry Dreamweaver CS3 offers an alternative method for form validation called "Spry." At the far right of the Forms Toolbar are four icons that are new to Dreamweaver CS3:
• Spry Validation Text Field • Spry Validation TextArea Field • Spry Validation Checkbox • Spry Validation Select
Before we try this, we need to remove the behaviors we just added to avoid conflicts. Simply select the behavior(s) we created in your behavior panel and click the minus sign to remove them. To use Spry validation on a text area field (such as our e-mail address field) simply select the field and click the Spry Validation Text Field icon in the Forms Toolbar:
The e-mail address field with Spry validation applied. You will be prompted to copy supporting files into your current working directory. Click the OK Button.
Fall, 2007 Dreamweaver: Web Forms Page 25
PHL&I Instruction (734) 936-1391 [email protected] http://www.sph.umich.edu/phli/training/
Fall, 2007 Dreamweaver: Web Forms Page 26
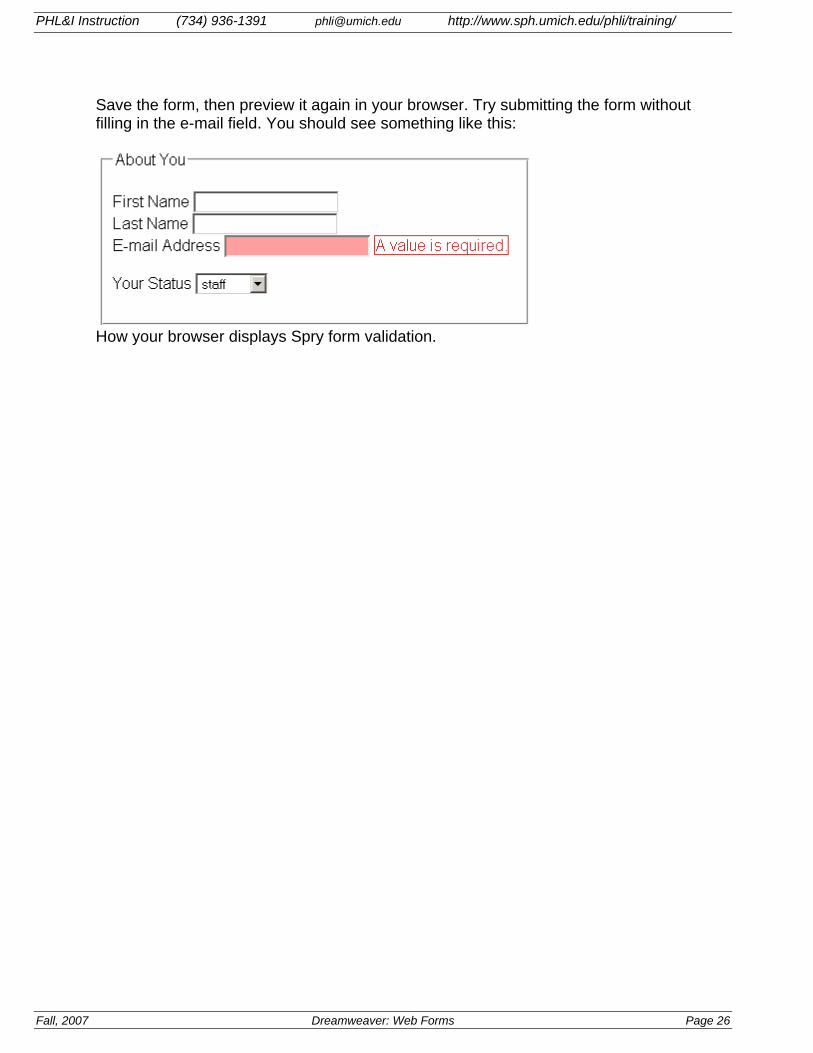
Save the form, then preview it again in your browser. Try submitting the form without filling in the e-mail field. You should see something like this:
How your browser displays Spry form validation.