Embed Size (px)
Citation preview
WARNING: CHOKING HAZARD - This item contains small parts. Not suitable for children under 3 years.
WARNING: Please Do Not sit, climb or lean on the product.
WARNING:Adult supervision is required at all times when children are in the area. Being struck by a thrown object can cause serious injury.
WARNING:This item is not a toy, adult supervision is required at all times for children. Please be sure to carefully readthe instructions, proper use of this item will reduce the risk of injury.
1 2 3 4 5
6 7 8 9 10
11 12 13 14 15
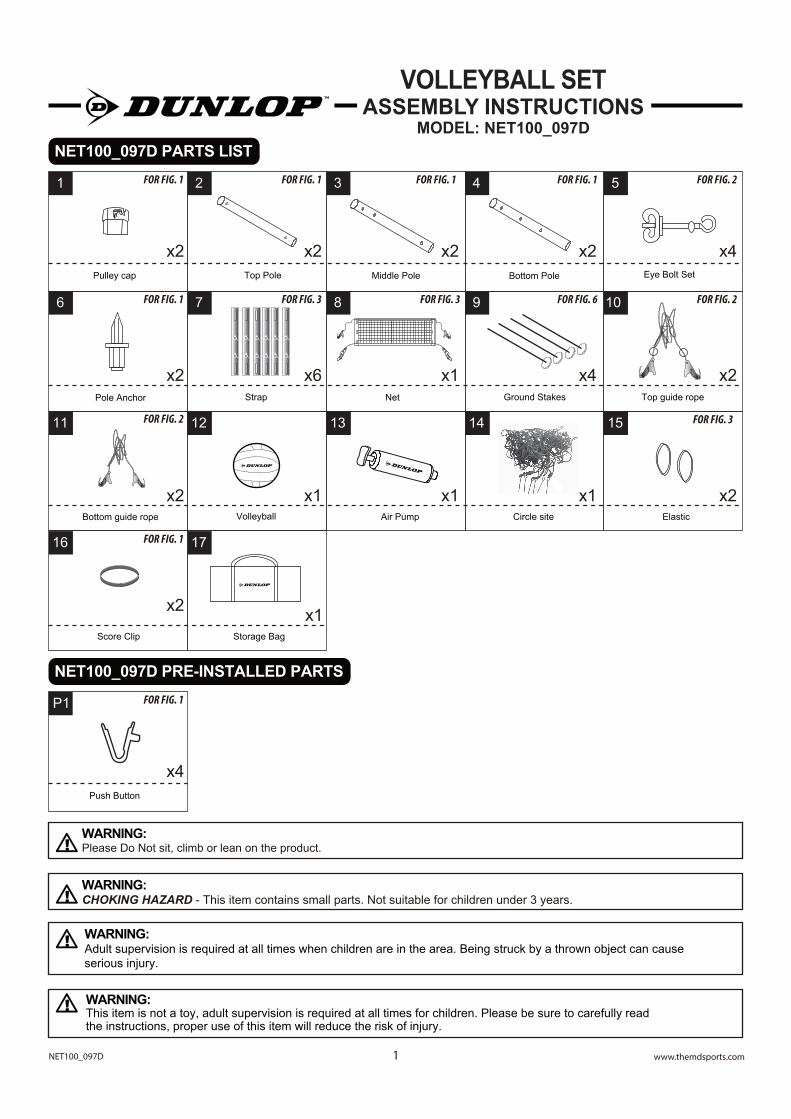
Score Clip
Pulley cap Top Pole Middle Pole Bottom Pole Eye Bolt Set
Pole Anchor Strap Net Ground Stakes Top guide rope
Bottom guide rope
16
Volleyball Air Pump Circle site Elastic
VOLLEYBALL SETASSEMBLY INSTRUCTIONS
MODEL: NET100_097D
www.themdsports.comNET100_097D 1
NET100_097D PARTS LIST
x2 x2 x2 x2 x4
x2 x6 x1 x4 x2
x2
x2
x1 x1 x1 x2
FOR FIG. 1 FOR FIG. 1 FOR FIG. 1 FOR FIG. 1 FOR FIG. 2
FOR FIG. 1
FOR FIG. 2
FOR FIG. 3 FOR FIG. 3 FOR FIG. 6 FOR FIG. 2
FOR FIG. 1
FOR FIG. 3
P1
Push Button
NET100_097D PRE-INSTALLED PARTS
x4
FOR FIG. 1
17
Storage Bag
x1

3 X 2
4 X 2
6
P1
X 2
X 4
1 X 2
2 X 2
16 X 2
Pulley Cap
Top Pole
Middle Pole
Bottom Pole
Eye Bolt Hole
Eye Bolt Hole
Push Button
Pole Anchor
Score Clip
FIG. 1A
1
2
P1
Push ButtonP1
3
16
4
6
FIG. 1
VOLLEYBALL SETASSEMBLY INSTRUCTIONS
MODEL: NET100_097D
www.themdsports.comNET100_097D 2
1. POLE ASSEMBLY
2. TOP & BOTTOM GUIDE ROPE ATTACHMENT
5 X 4 FIG. 2
10 X 2
11 X 2
0123456789
10111213141516171819202122232425
5 5
5 5
Eyebolt Wing Nut
3
2knot
10
5FIG. 2A
10
11
Tension Clip

8 X 1
15 X 2
VOLLEYBALL SETASSEMBLY INSTRUCTIONS
MODEL: NET100_097D
FIG. 3
FIG. 4
3. NET ATTACHMENT
4. TOP CABLE ATTACHMENT
7 X 6
0123456789
10111213141516171819202122232425
8
5 8
15
8
FIG. 3A
FIG. 3B
FIG. 3D
15
5
FIG. 3C
Connecting Cord Loop
7Strap
0123456789
10111213141516171819202122232425
8
8
8 1
FIG. 4A
FIG. 4B
8
5
Note: Run the clip of the top cable through the wheel of the pulley cap (#1).
www.themdsports.comNET100_097D 3

6. BOTTOM GUIDE ROPE SET UP Make the loops on the Bottom Guide Rope tension clips large enough to slip over the stakes already in the ground. Make sure that the Guide Rope loops are placed under the stake hooks as shown in FIG. 6
VOLLEYBALL SETASSEMBLY INSTRUCTIONS
MODEL: NET100_097D
www.themdsports.comNET100_097D 4
FIG. 5
5. NET SET UP Stretch the assembled Net and poles across the playing area until the Net is taut. Press the Pole Anchors into the ground with the poles touching the ground. Slip the poles onto the anchors. Holding the poles in the vertical position, press the Guide Rope stakes into the ground at a 45º angle, 3 feet to 5 feet from the pole and 3 feet to 5 feet apart. Make sure that the hooks on the stakes are facing away from the poles.
0123456789
10111213141516171819202122232425
Top Guide Rope
Bottom Guide Rope
3 feet - 5 feet
3 feet - 5 feet
012345678910111213141516171819202122232425
TIP: After the net is assembled, you can adjust thepole tension by sliding the tension clips up or downalong the guide ropes.
TensionClip
FIG. 6 9 X 4
0123456789
10111213141516171819202122232425
TensionClip
TIP: After the net is completely assembled and the pole tension is correct, the net can be tightened by adjusting the tension clips up or down along the top cable.
BottomGuide Rope
9
Top GuideRope
FIG. 6A

VOLLEYBALL SETASSEMBLY INSTRUCTIONS
MODEL: NET100_097D
www.themdsports.comNET100_097D 5
FIG. 7
FIG. 8
PushButton
PushButton
PushButton
5 ft. 1 in. pole7 ft. pole 6 ft. pole
2
3
4
2
3
4
2
3
4
6. NET HEIGHT ADJUSTMENT The height of the net can be adjusted by depressing the push buttons on the poles (#2 & #3) and raising or lowering the poles until the push buttons are aligned with the holes in the poles (#3 & #4) .
7. COURT MARKING KIT Lay out green rope (#14) as per diagram. Slip the metal stakes into the holes at the bottom and secure the rope to the metal stakes with the flags in an upright position at each corner.
Green Rope
60FT
30FT
1414

VOLLEYBALL SETPLAYING RULE INSTRUCTIONS
MODEL: NET100_097D
www.themdsports.comNET100_097D 6
VOLLEYBALL RULES:COURT SIZE:The standard size of a volleyball court is 30 feet wide and 60 feet long. The playfield can be increased or decreased based on the space available.
NET:Stretch the net across the center of the court dividing it in half. The net height should be set at 7 feet when playing volleyball, but it can be set to 6 feet or 5 feet 1 inch if all of the players agree to the change.
NUMBER OF PLAYERS:Each team should have the same number of players and the there shouldn’t be more than 6 total per team.
A singles match is played with one player on each side of the net.
SERVICE:Each player shall serve in turn and will continue to serve until their team loses the point (called "siding out"). When serving, the ball must go over the net; if the ball hits the net when served and goes over the net, the ball must be re-served. If the ball does not go over the net when served or is out of bounds or touches any team-mate before touching an opponent or opponent’s court, they"side out" and the opponent takes possession and becomes the serving team.
SERVING AREA:The serving area should be a minimum of 5 feet behind the back boundary of the court. In the event that the playing area does not provide enough space for such an area, then the serving area shall extend into the court. The serving area should be located in the right end section of each court; the width should not exceed 8 feet. (see diagram).
VOLLEY:Each team is allowed three consecutive ball touches before it is returned to the opponent’s area.ROTATION:After a team has lost its serve, the team receiving the ball for the serve should rotate clockwise, with every player moving round one position.GAME:The game shall be played to 21 or 15 points. In order to win the match, a team must win two out of three games.SCORING:Only the serving team can score. When the serving team fails to score, it is “side out” and the receiving team becomes the serving team.VOLLEY:Each team is allowed three consecutive ball touches before it is returned to the opponent’s area.ROTATION:After a team has lost its serve, the team receiving the ball for the serve should rotate clockwise, with every player moving round one position.
GAME:The game shall be played to 21 or 15 points. In order to winthe match, a team must win two out of three games.
SCORING:Only the serving team can score. When the serving teamfails to score, it is “side out” and the receiving team becomesthe serving team.
ERRORS AND FAULTS:
1) When a player does not clearly hit the ball or allows the ball to rest on any part of his/her body.
2) A player hits the ball out of bounds.
3) A player allows the ball to hit the floor or any other object outside the established play area (except the net), before being legally returned to the opponent's side of the court.
4) When a player touches or hits the ball two times in a row.
5) When a player fails to make a good serve within the play area.
6) The ball is caught and/or thrown; it does not rebound from the hit.
7) If the ball touches any part of the body, except the hands or forearms.
8) Touching the net with any part of the body or reaching over the net.
9) If a player plays out of position when ball is being served.
PENALTY:Touching the net with any part of the body or reaching overthe net.
.
Caution: Stand clear of the court area to avoid being injured while a player is taking his or her turn.
STANDARD COURT LAYOUT
LEFT
FO
RW
AR
D
LEFT FOR
WA
RD
LEFT
BA
CK
LEFT BA
CK
CEN
TER
BA
CKC
ENTER
BA
CK
RIG
HT
BA
CK
RIG
HT B
AC
K
RIG
HT FO
RW
AR
D
RIG
HT
FOR
WA
RD
NET CENTER LINE
SERVING AREA
SERVING AREA
30 feet 30 feet
8 feet
8 feet
CEN
TER FO
RW
AR
D C
ENTE
R F
OR
WA
RD
30 feet

1 2 3 4 5
6 7 8 9 10
11 12 13 14 15
Grampa de puntaje
Tapa de Polea Poste superior Palo del medio Palo de fondo Cáncamo del ojo
Ancla de poste Correa Red Postes de piso Cuerda guía superior
Cuerda guía inferior
16
Balón de voleibol Bomba de aire Sitio de círculo Elástico
NET100_097D LISTA DE PARTES
x2 x2 x2 x2 x4
x2 x6 x1 x4 x2
x2
x2
x1 x1 x1 x2
FOR FIG. 1 FOR FIG. 1 FOR FIG. 1 FOR FIG. 1 FOR FIG. 2
FOR FIG. 1
FOR FIG. 2
FOR FIG. 3 FOR FIG. 3 FOR FIG. 6 FOR FIG. 2
FOR FIG. 1
FOR FIG. 3
P1
Botón de presión
NET100_097D PIEZAS PREINSTALADAS
x4
FOR FIG. 1
17
Bolsa
x1
www.themdsports.comNET100_097D 7
JUEGO DE VÓLEIBOLINSTRUCCIONES DE ARMADO
MODELO: NET100_097D
ADVERTENCIA:PELIGRO DE ASFIXIO - Este artículo contiene piezas pequeñas. No es conviente para los menores de 3 años de edad.
ADVERTENCIA:Por favor No sientes, subas o inclíne el producto.
ADVERTENCIA:Se requiere la supervisión de adulto en todo el momento cuando están los niños en el área. Si fuera golpeado por un objeto lanzado se pudiera causar herida grave.
ADVERTENCIA:Este artículo no es un juguete; se requiere la supervisión de los niños por adulto en todo el momento. Asegúrese de leer cuidadosamente las instrucciones; el uso apropiado de este artículo reducirá el riesgo de lesiones.

3 X 2
4 X 2
6
P1
X 2
X 4
1 X 2
2 X 2
16 X 2
Tapa de Polea
Poste superior
Palo del medio
Palo de fondo
Hoyo de Cáncamo
Hoyo de Cáncamo
Perilla de Empuje
Ancla de poste
Grampa de puntaje
FIG. 1A
1
2
P1
Perilla de EmpujeP1
3
16
4
6
FIG. 1
1. ENSAMBLADURA DE POSTE
2. ADJUNTADO LA CUERDA GUIA SUPERIOR E INFERIOR
5 X 4 FIG. 2
10 X 2
11 X 2
0123456789
10111213141516171819202122232425
5 5
5 5
Cáncamos Tuerca de Mariposa
3
2
10
11
Nudo
Clip de Tensión10
5FIG. 2A
www.themdsports.comNET100_097D 8
JUEGO DE VÓLEIBOLINSTRUCCIONES DE ARMADO
MODELO: NET100_097D
8 X 1
15 X 2
FIG. 3
FIG. 4
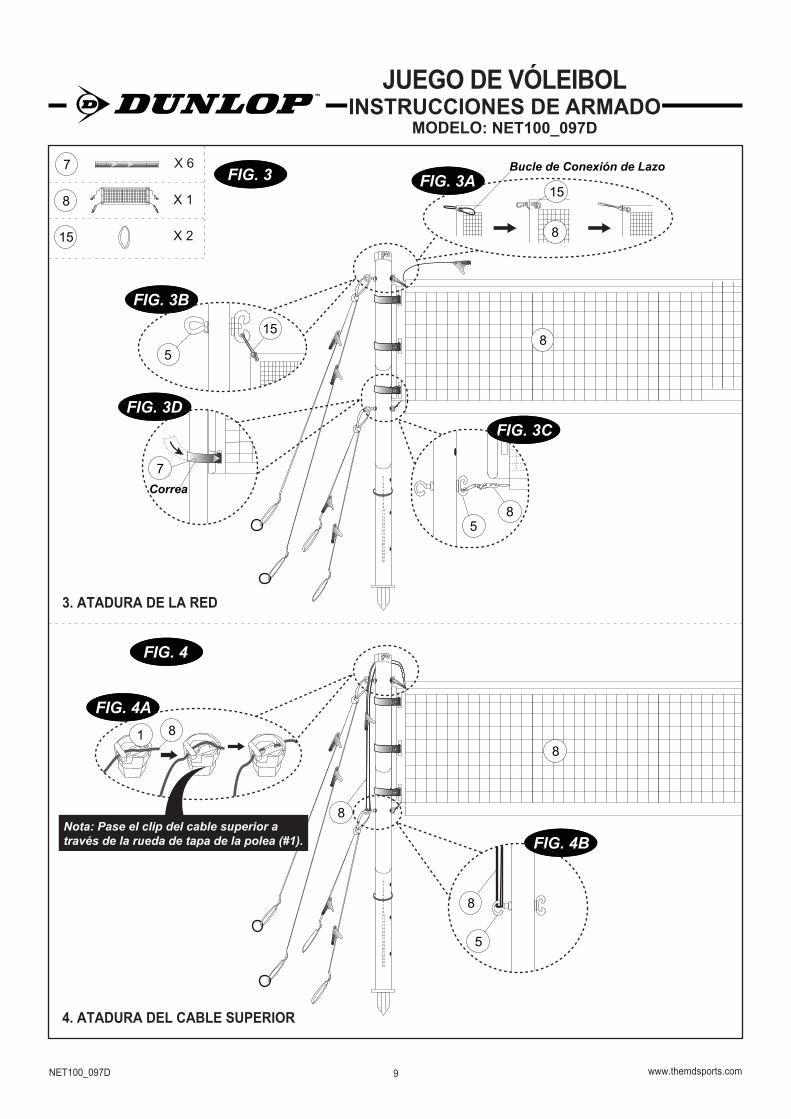
3. ATADURA DE LA RED
4. ATADURA DEL CABLE SUPERIOR
7 X 6
0123456789
10111213141516171819202122232425
8
5 8
15
8
FIG. 3A
FIG. 3B
FIG. 3D
15
5
FIG. 3C
Bucle de Conexión de Lazo
7Correa
0123456789
10111213141516171819202122232425
8
8
8 1
FIG. 4A
FIG. 4B
8
5
Nota: Pase el clip del cable superior a través de la rueda de tapa de la polea (#1).
www.themdsports.comNET100_097D 9
JUEGO DE VÓLEIBOLINSTRUCCIONES DE ARMADO
MODELO: NET100_097D

6. MONTAR EL LAZO DE GUIA SEGUNDO Haga suficiente largo las clips de tension del bucle del Lazo de Guía Segundo para deslizar sobre las estacas en el suelo. Asegúrese de que los bucles del Lazo de Guía están colocados debajo de los ganchos de estaca como mostrado en la FIG. 6.
FIG. 5
5. MONTAR LA RED Estirar la red ensamblada y los palos a través de los niños del juego hasta que la red quede tensa. Presione las Anclas de Poste al suelo con los postes tocando el suelo. Deslice los postes sobre las anclas. Mantenga los postes en la posición vertical, presione las estacas del Lazo de Guía al suelo en un ángulo de 45º, 3 pies a 5 pies del poste y 3 pies a 5 pies de distancia. Asegúrese de que los ganchos de las estacas están de espaldas de los postes.
0123456789
10111213141516171819202122232425
Cuerda guíasuperior
Cuerda guíainferior
3 pies - 5 pies
3 pies - 5 pies
012345678910111213141516171819202122232425
Clip de Tensión
TIP: Luego de ensamblar la red, Ud. puede ajustar l atensión del palo deslizando las grampas de tensiónarriba ó abajo a lo largo de las cuerdas guía.
FIG. 6 9 X 4
www.themdsports.comNET100_097D 10
JUEGO DE VÓLEIBOLINSTRUCCIONES DE ARMADO
MODELO: NET100_097D
Cuerda guíainferior
9
Cuerda guíasuperior
FIG. 6A0123456789
10111213141516171819202122232425
Clip de Tensión
TIP: Luego de que la red está completamente montada y la tensión del polo está correcta, La red se puede apretar ajustando los clips de tensión hacia arriba o abajo a lo largo del cable superior.

FIG. 7
FIG. 8
Perillade Empuje
Perillade Empuje
Perillade Empuje
5 piés 1 pulgadas. Poste7 piés. Poste 6 piés. Poste
2
3
4
2
3
4
2
3
4
6. AJUSTE DE LA ALTURA DE RED La altura de red se puedeajustarpresionando los botones de los postes (#2 & #3) y elevando o bajando los postes hasta que los botonesestánalineados con agujeros en los postes (#3 & #4) .
7. JUEGO MARCADOR DE GANCHA Trace la cuerda verde (#14) según el diagrama. Deslice los postes de metal en los hoyos en el fondo sujetando la cuerda en los postes de metal con las banderitas en posición vertical en cada rincón.
Cuerda Verde
60 piés
30 piés
1414
www.themdsports.comNET100_097D 11
JUEGO DE VÓLEIBOLINSTRUCCIONES DE ARMADO
MODELO: NET100_097D

REGLAS DEL VOLEIBOL:TAMAÑO DE LA CANCHA:El tamaño estándar de una cancha de voleibol es de 30 pies de ancho y 60 pies de largo. El campo de juego se puede aumentar o disminuir en base al espacio disponible.
RED:Estire la red a través del centro de la cancha dividiéndola por la mitad. La altura de la red debe fijarse a 7 pies cuando se juega voleibol, pero se puede poner a 6 pies o a 5 pies 1 pulgada si todos los jugadores están de acuerdo con el cambio.
NÚMERO DE JUGADORES:Cada equipo debe tener el mismo número de jugadores que no deben ser más de 6 en total por equipo.
SERVICIO:Cada jugador debe servir en turno y continuará sirviendo hasta que su equipo pierda de punto (conocido como "echado de lado"). Para servir, la pelota debe pasar por sobre la red; de tocar la red la pelota en el servicio y pasa por la red, la pelota se debe servir de nuevo. Si la pelota no pasa por sobre la red en el servicio ó sale para afuera de los límites ó toca cualquier jugador compañero antes de tocar un jugador opuesto ó la cancha opuesta, queda "echado de lado " y el equipo opuesto tiene la posesión de la pelota para servir.
ÁREA DE SERVICIO:El área de servicio debe estar a un mínimo de 5 pies detrás de la línea de delimitación trasera de la cancha. En el caso de que el área de juego no ofrezca suficiente espacio para tal área, entonces el área de servicio se extenderá en la cancha. El área de servicio debe estar ubicada en la sección del extremo derecho de cada cancha; el ancho no debe exceder los 8 pies (ver el diagrama).
VOLEO:Cada equipo tiene derecho a tres toques consecutivos de balón antes de devolverlo al área rival.
ROTACIÓN:Después de que un equipo pierda su servicio, el equipo que reciba la pelota para servir debe girar en el sentido contrariodel reloj, moviéndose los jugadores en la posición de la primera vuelta.
JUEGO:El juego se jugará a 21 o 15 puntos. Para ganar el partido, el equipo deberá ganar dos de tres juegos.
PUNTUACIÓN:Sólo el equipo que está realizando el servicio puede anotar. Cuando el equipo que está realizando el servicio deja de anotar un punto, "pierde la bola" y el equipo receptor se convierte en el equipo que realiza el saque.
VOLEO:Cada equipo tiene derecho a tres toques consecutivos de balón antes de devolverlo al área rival.
ROTACIÓN:Después de que un equipo pierda su servicio, el equipo quereciba la pelota para servir debe girar en el sentido contrario delreloj, moviéndose los jugadores en la posición de la primeravuelta.
JUEGO:El juego se jugará a 21 o 15 puntos. Para ganar el partido, elequipo deberá ganar dos de tres juegos.
PUNTUACIÓN:
Sólo el equipo que está realizando el servicio puede anotar.Cuando el equipo que está realizando el servicio deja de anotarun punto, "pierde la bola" y el equipo receptor se convierteen el equipo que realiza el saque.
ERRORES Y FALTAS:
1) Cuando un jugador no golpea claramente la pelota o permiteque la bola toque cualquier parte de su cuerpo.2) Un jugador golpea la bola fuera de los límites.3) Un jugador permite que la bola toque el suelo o cualquier otroobjeto fuera de la zona establecida de juego (excepto la red),antes de ser devuelta legalmente al lado contrario de lacancha.4) Cuando un jugador toca o golpea el balón dos vecesseguidas.5) Cuando un jugador no hace un buen saque dentro del áreade juego.6) La pelota se agarra y/o se lanza; no rebota por el golpe.7) Si la pelota toca cualquier parte del cuerpo, exceptuando lasmanos o los antebrazos.8) Si se toca la red con cualquier parte del cuerpo o se pasa porencima de la red.9) Si un jugador juega fuera de su posición cuando se estásirviendo el balón.
SANCIÓN:Tocar la red con cualquier parte del cuerpo o estirarse porencima de la red.
Precaución: Manténgase alejado de la zona de la cancha para evitar recibir lesiones mientras un jugador está tomando su turno.
DISPOSICIÓN DE LA CANCHA ESTÁNDAR
LEFT
FO
RW
AR
D
IZQU
IERD
OD
ELAN
TERO
IZQ
UIE
RD
O T
RA
SER
O
IZQU
IERD
O TR
ASER
O
CEN
TRO
TR
ASE
ROC
ENTR
O TR
ASER
O
DER
ECH
OTR
ASE
RO
DER
ECH
OTR
ASER
O
DER
ECH
OD
ELAN
TERO
RIG
HT
FOR
WA
RD
LÍNEA CENTRAL DE LA RED
ÁREA DE SERVICIO
ÁREA DE SERVICIO
30 pies 30 pies
8 pies
30 pies
CEN
TRO
DELA
NTER
O
CEN
TRO
DEL
AN
TER
O
30 pies
www.themdsports.comNET100_097D 12
JUEGO DE VÓLEIBOLINSTRUCCIONES DEL JUEGO
MODELO: NET100_097D