Embed Size (px)
Citation preview
Drupal 7 Manual
January 2015
IT Training & Empowerment
Geraldine Gerhardi
Table of Contents i
Table of Contents
1. Important notes .................................................................................................... 1
2. Logging in ............................................................................................................. 2
3. Starting a page ...................................................................................................... 3
4. Editing an existing page ..................................................................................... 10
4.1. Method 1 (Selecting a Business Unit) ............................................................... 10
4.2. Method 2 (navigating via home page) ............................................................... 11
4.3. Method 3 (using page URL) ............................................................................... 12
5. Editing page ........................................................................................................ 13
5.1. Toolbar ................................................................................................................ 13
5.2. Headings ............................................................................................................. 14
5.2.1. Your business unit home page .......................................................................... 14
5.2.2. Secondary pages ................................................................................................ 14
5.2.3. Banners ............................................................................................................... 15
5.3. Adding content ................................................................................................... 16
5.3.1. Uploading files .................................................................................................... 16
5.3.2. Hyperlinks ........................................................................................................... 17
5.3.2.1. Linking to a website ........................................................................................... 17
5.3.2.2. Linking to another Drupal page on the NWU domain....................................... 17
5.3.2.3. Linking to a document ....................................................................................... 18
5.3.2.4. Linking to an e-mail address ............................................................................. 19
5.3.2.5. Linking to an anchor .......................................................................................... 20
5.3.3. Images ................................................................................................................. 21
5.3.3.1. Resizing images before uploading them to Drupal .......................................... 21
5.3.3.2. Uploading images to Drupal .............................................................................. 24
5.3.3.3. Inserting an image in your website ................................................................... 25
6. Multilingual pages and page translation ........................................................... 26
7. Webometrics ....................................................................................................... 27
8. References .......................................................................................................... 27
1
Drupal 7 Manual
1. Important notes
We recommend that you use Mozilla Firefox or Google Chrome as browser when creating or editing in Drupal. If this browser is not available on your workstation, please log an IT-Help request
The URL to open Drupal is: http://www.nwu.ac.za/user/login
Log in with your NWU staff number and network password.
Each web file or page has a node number as well as a user friendly name (See section 3.3.1).
There are 2 methods to create new web pages: Content > Create content > Information About or Clone content (copy) an existing web page (See sections 3.1 and 3.2)
Some handy shortcut keys are: o Copy (Ctrl + C) o Cut (Ctrl + X) o Paste (Ctrl + V)
We recommend uploading documents in PDF format. Use the New Window (_blank) target option. This will open the document in a separate window in the browser.
We recommend saving images in PNG format.
Keep your file names and page titles as short as possible.
Do not upload documents or images with spaces in the filename. You will get an error when trying to publish the page. Hyphenate in longer filenames to avoid spaces: e.g: “document-name.pdf”.
For web support (including menu linking), contact your Campus Web Coordinator: o Mafikeng Campus: Koos Degenaar (x89 2800) o Potchefstroom Campus: Pertunia Thulo (x99 2168) o Vaal Triangle Campus: Jeremy Mooi (x10 3182)
Contact details for the Institutional Web Office is: o Moira Müller (editorial content): x99 4913 o Ronel Roscher (data analytics and Drupal support): x85 2011 o Géna Thompson (IT Department Drupal support): x99 4623
Visit http://www.w3schools.com/ This is a nice resource to learn more about web development.
2
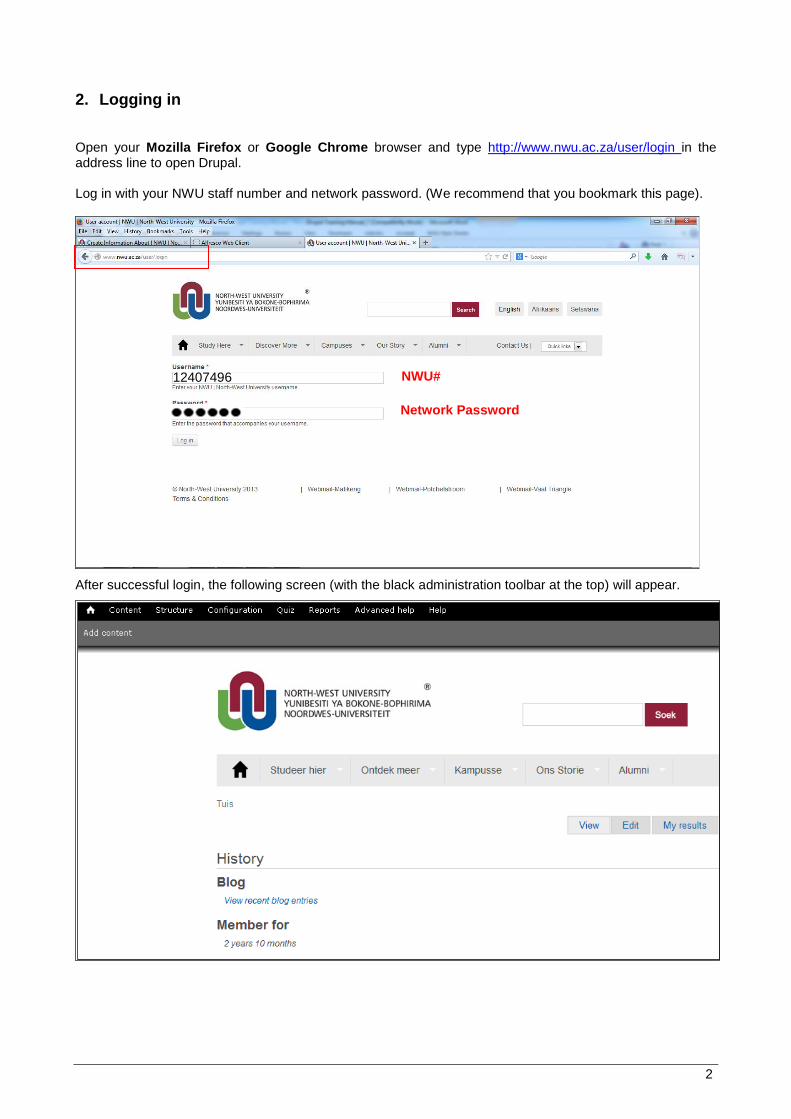
2. Logging in
Open your Mozilla Firefox or Google Chrome browser and type http://www.nwu.ac.za/user/login in the address line to open Drupal. Log in with your NWU staff number and network password. (We recommend that you bookmark this page).
After successful login, the following screen (with the black administration toolbar at the top) will appear.
12407496 NWU#
Network Password
3
3. Starting a page
3.1. Create a new page
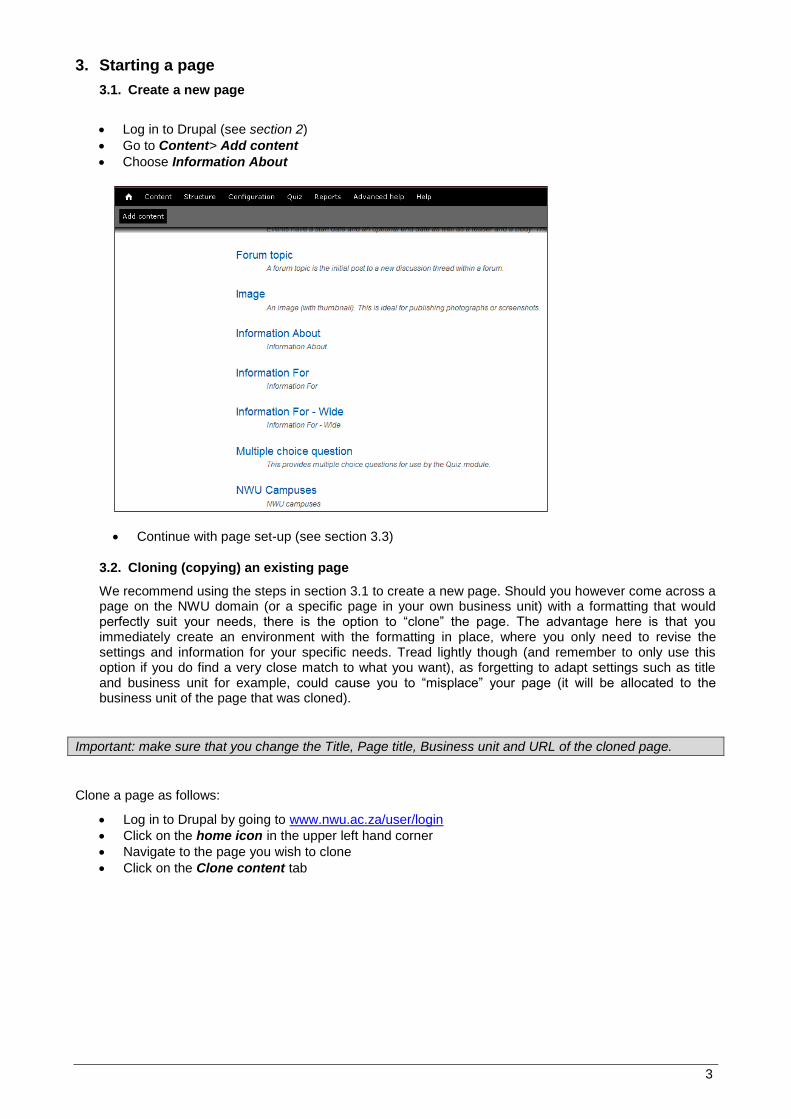
Log in to Drupal (see section 2)
Go to Content> Add content
Choose Information About
Continue with page set-up (see section 3.3)
3.2. Cloning (copying) an existing page
We recommend using the steps in section 3.1 to create a new page. Should you however come across a page on the NWU domain (or a specific page in your own business unit) with a formatting that would perfectly suit your needs, there is the option to “clone” the page. The advantage here is that you immediately create an environment with the formatting in place, where you only need to revise the settings and information for your specific needs. Tread lightly though (and remember to only use this option if you do find a very close match to what you want), as forgetting to adapt settings such as title and business unit for example, could cause you to “misplace” your page (it will be allocated to the business unit of the page that was cloned).
Important: make sure that you change the Title, Page title, Business unit and URL of the cloned page.
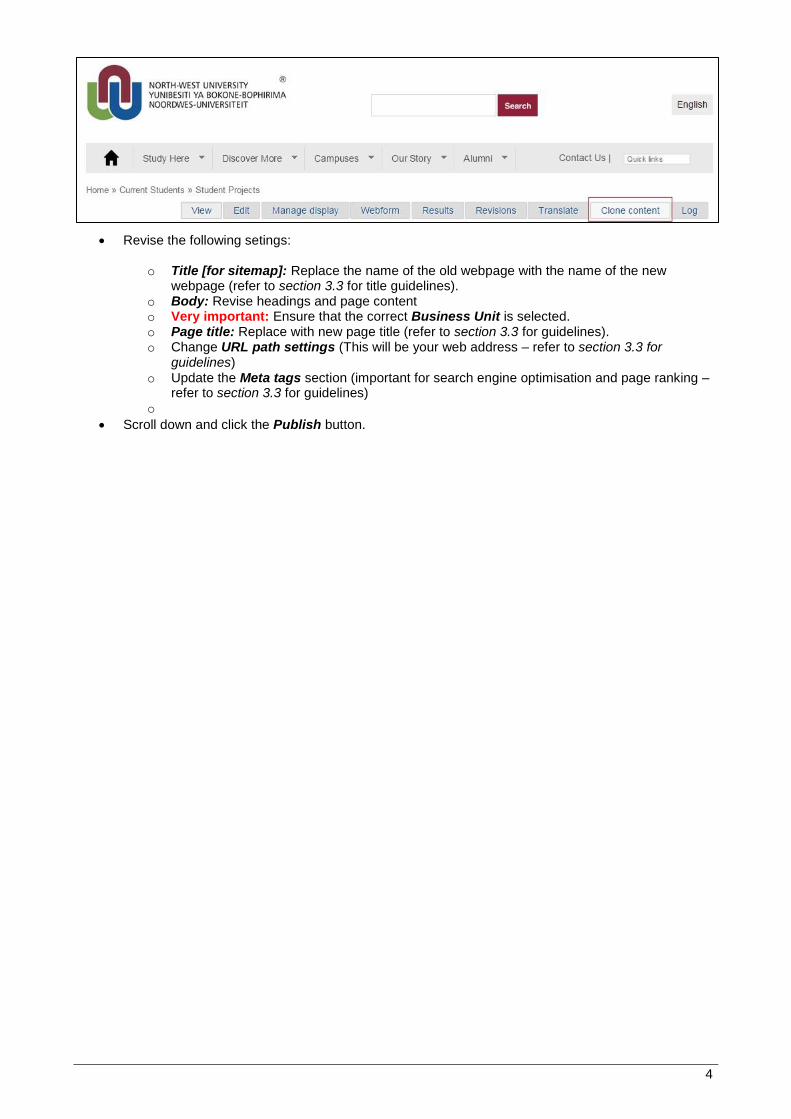
Clone a page as follows:
Log in to Drupal by going to www.nwu.ac.za/user/login
Click on the home icon in the upper left hand corner
Navigate to the page you wish to clone
Click on the Clone content tab
4
Revise the following setings:
o Title [for sitemap]: Replace the name of the old webpage with the name of the new webpage (refer to section 3.3 for title guidelines).
o Body: Revise headings and page content o Very important: Ensure that the correct Business Unit is selected. o Page title: Replace with new page title (refer to section 3.3 for guidelines). o Change URL path settings (This will be your web address – refer to section 3.3 for
guidelines) o Update the Meta tags section (important for search engine optimisation and page ranking –
refer to section 3.3 for guidelines) o
Scroll down and click the Publish button.
5
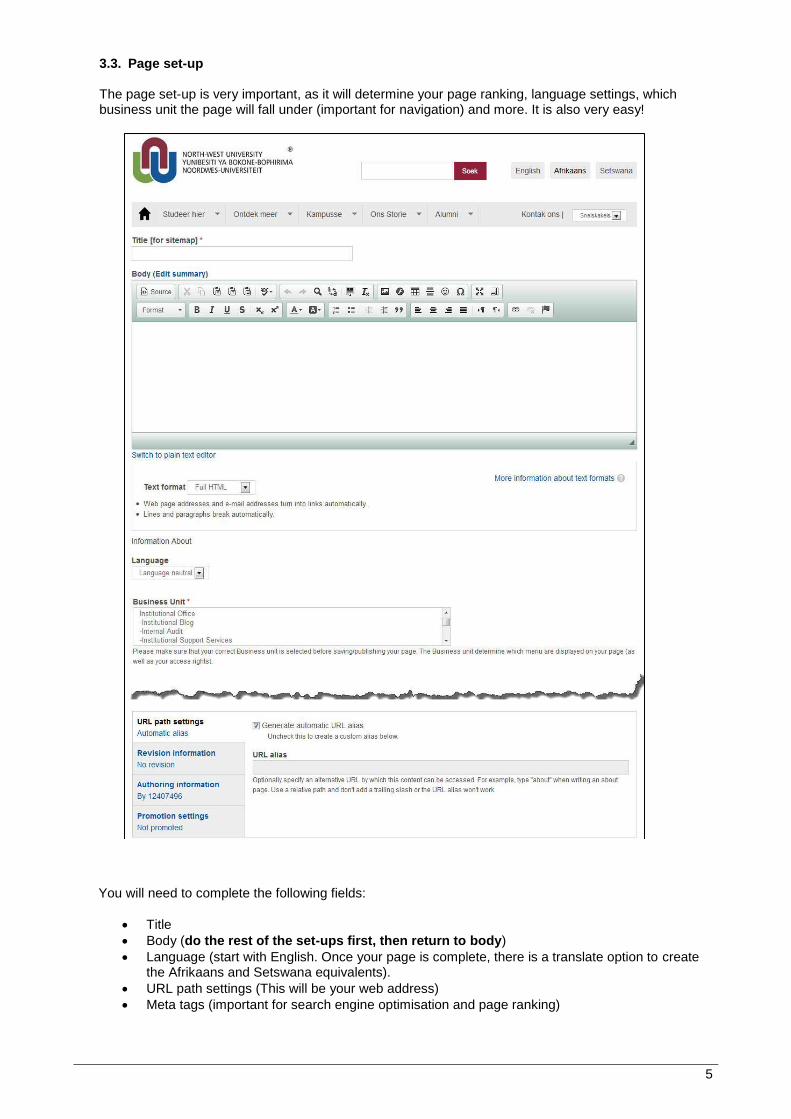
3.3. Page set-up The page set-up is very important, as it will determine your page ranking, language settings, which business unit the page will fall under (important for navigation) and more. It is also very easy!
You will need to complete the following fields:
Title
Body (do the rest of the set-ups first, then return to body)
Language (start with English. Once your page is complete, there is a translate option to create the Afrikaans and Setswana equivalents).
URL path settings (This will be your web address)
Meta tags (important for search engine optimisation and page ranking)
6
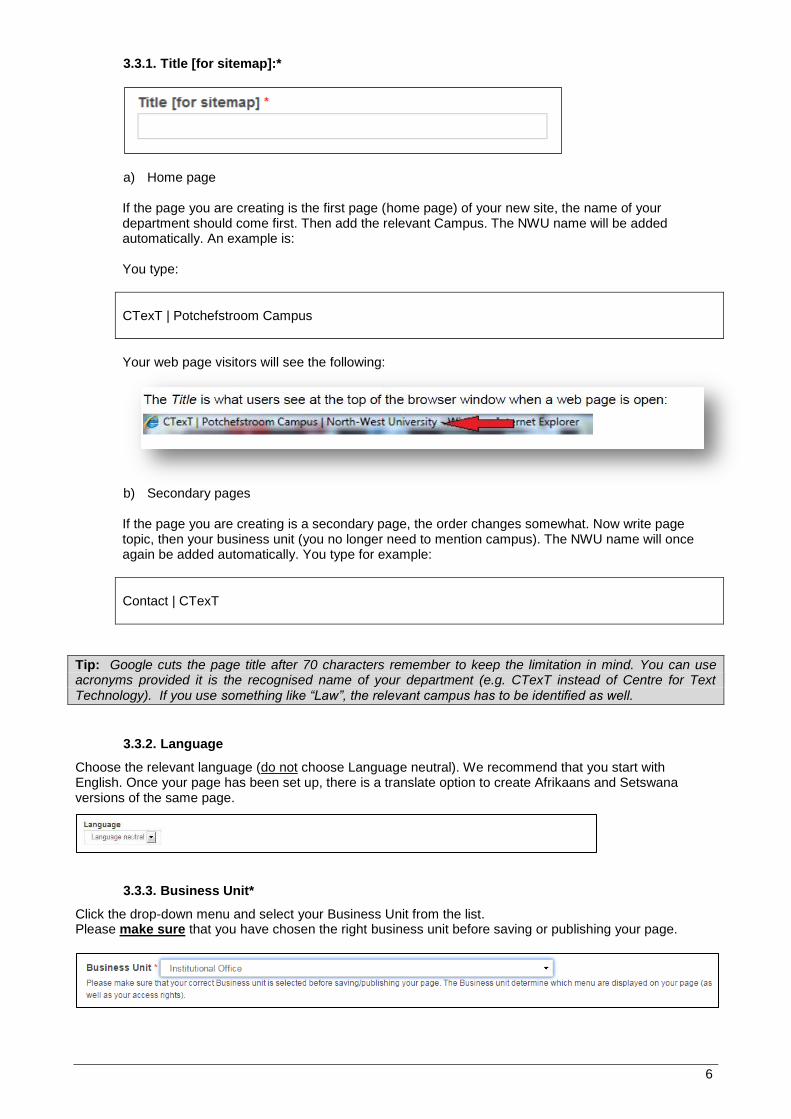
3.3.1. Title [for sitemap]:*
a) Home page
If the page you are creating is the first page (home page) of your new site, the name of your department should come first. Then add the relevant Campus. The NWU name will be added automatically. An example is: You type:
CTexT | Potchefstroom Campus
Your web page visitors will see the following:
b) Secondary pages If the page you are creating is a secondary page, the order changes somewhat. Now write page topic, then your business unit (you no longer need to mention campus). The NWU name will once again be added automatically. You type for example:
Contact | CTexT
Tip: Google cuts the page title after 70 characters remember to keep the limitation in mind. You can use acronyms provided it is the recognised name of your department (e.g. CTexT instead of Centre for Text Technology). If you use something like “Law”, the relevant campus has to be identified as well.
3.3.2. Language
Choose the relevant language (do not choose Language neutral). We recommend that you start with English. Once your page has been set up, there is a translate option to create Afrikaans and Setswana versions of the same page.
3.3.3. Business Unit*
Click the drop-down menu and select your Business Unit from the list. Please make sure that you have chosen the right business unit before saving or publishing your page.
7
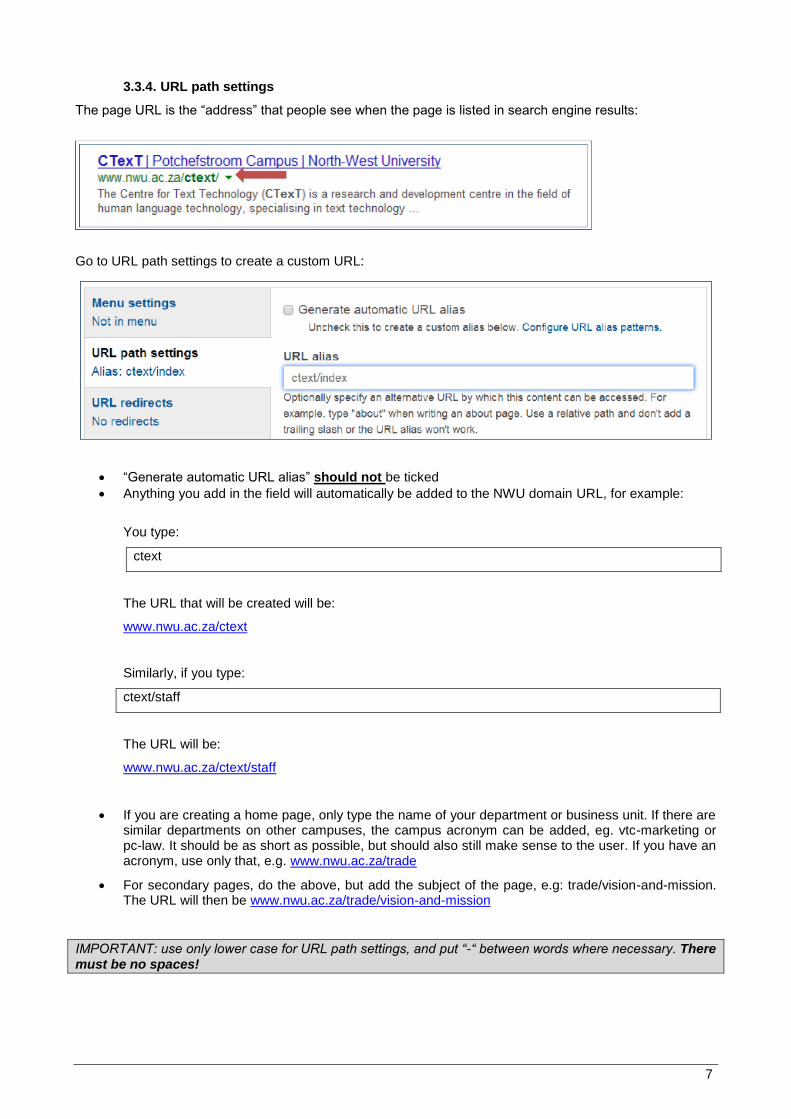
3.3.4. URL path settings
The page URL is the “address” that people see when the page is listed in search engine results:
Go to URL path settings to create a custom URL:
“Generate automatic URL alias” should not be ticked
Anything you add in the field will automatically be added to the NWU domain URL, for example:
You type:
ctext
The URL that will be created will be:
www.nwu.ac.za/ctext
Similarly, if you type:
ctext/staff
The URL will be:
www.nwu.ac.za/ctext/staff
If you are creating a home page, only type the name of your department or business unit. If there are similar departments on other campuses, the campus acronym can be added, eg. vtc-marketing or pc-law. It should be as short as possible, but should also still make sense to the user. If you have an acronym, use only that, e.g. www.nwu.ac.za/trade
For secondary pages, do the above, but add the subject of the page, e.g: trade/vision-and-mission. The URL will then be www.nwu.ac.za/trade/vision-and-mission
IMPORTANT: use only lower case for URL path settings, and put “-“ between words where necessary. There must be no spaces!
8
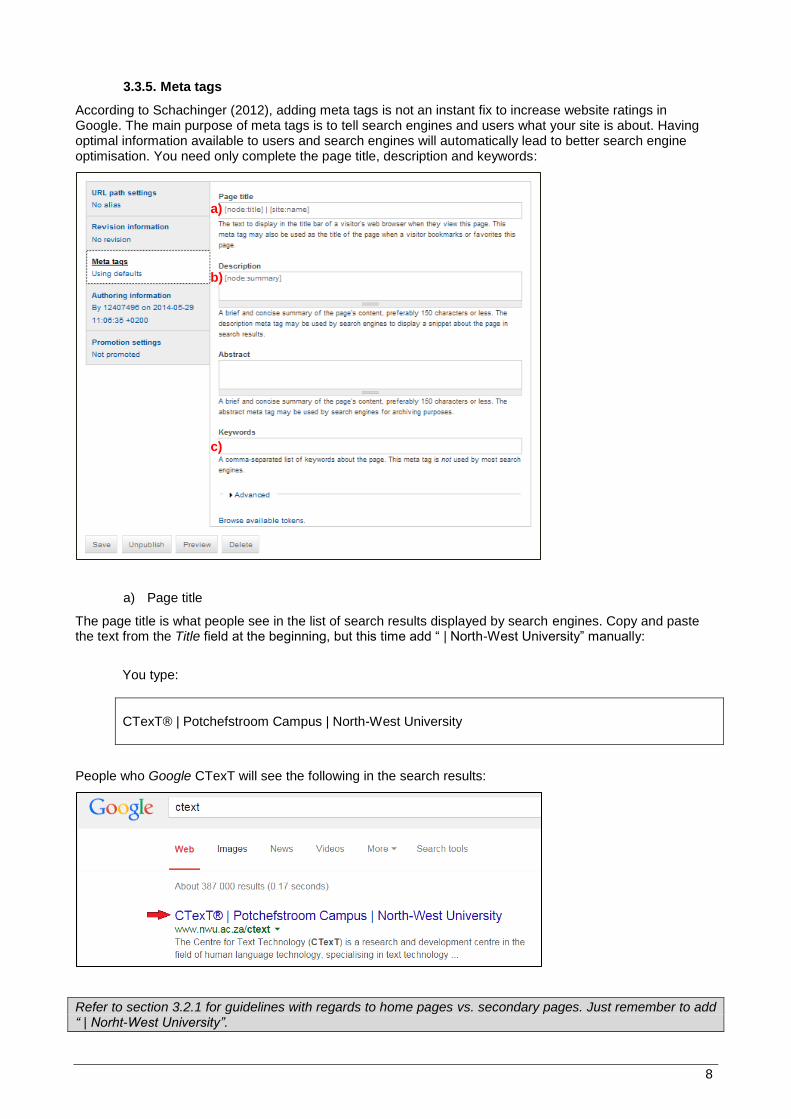
3.3.5. Meta tags
According to Schachinger (2012), adding meta tags is not an instant fix to increase website ratings in Google. The main purpose of meta tags is to tell search engines and users what your site is about. Having optimal information available to users and search engines will automatically lead to better search engine optimisation. You need only complete the page title, description and keywords:
a) Page title
The page title is what people see in the list of search results displayed by search engines. Copy and paste the text from the Title field at the beginning, but this time add “ | North-West University” manually:
You type:
CTexT® | Potchefstroom Campus | North-West University
People who Google CTexT will see the following in the search results:
Refer to section 3.2.1 for guidelines with regards to home pages vs. secondary pages. Just remember to add “ | Norht-West University”.
a)
b)
c)
9
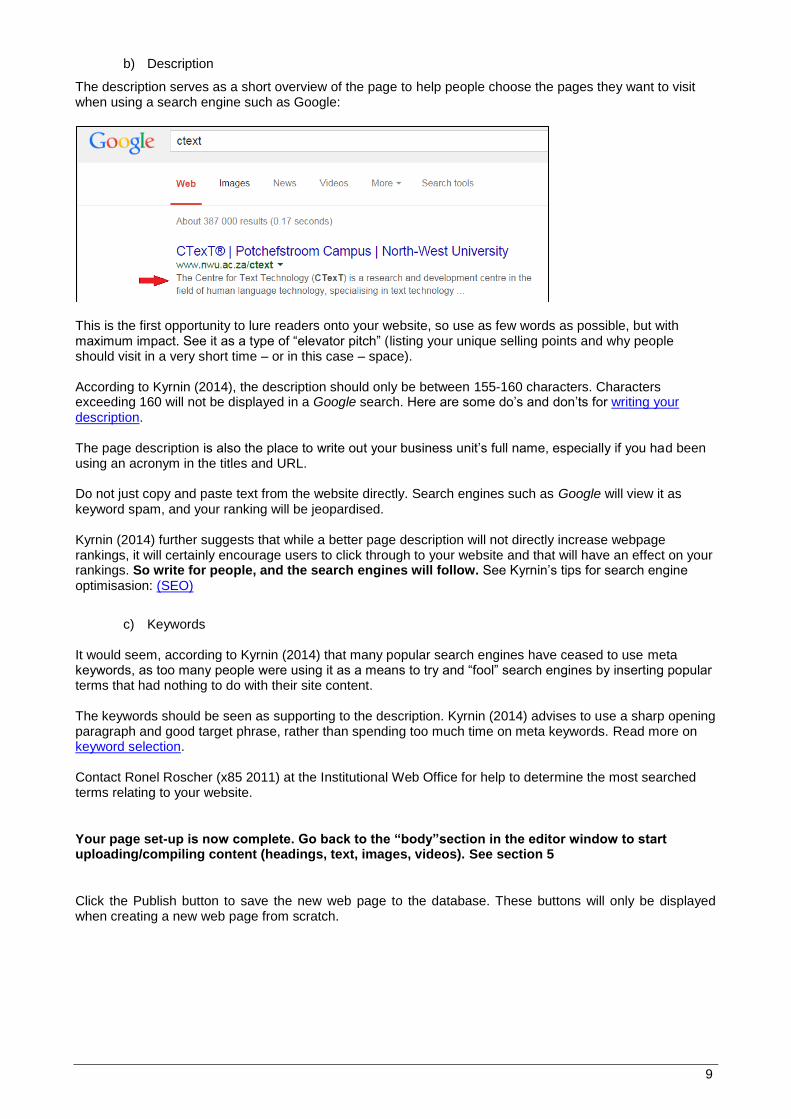
b) Description
The description serves as a short overview of the page to help people choose the pages they want to visit when using a search engine such as Google:
This is the first opportunity to lure readers onto your website, so use as few words as possible, but with maximum impact. See it as a type of “elevator pitch” (listing your unique selling points and why people should visit in a very short time – or in this case – space). According to Kyrnin (2014), the description should only be between 155-160 characters. Characters exceeding 160 will not be displayed in a Google search. Here are some do’s and don’ts for writing your description. The page description is also the place to write out your business unit’s full name, especially if you had been using an acronym in the titles and URL. Do not just copy and paste text from the website directly. Search engines such as Google will view it as keyword spam, and your ranking will be jeopardised. Kyrnin (2014) further suggests that while a better page description will not directly increase webpage rankings, it will certainly encourage users to click through to your website and that will have an effect on your rankings. So write for people, and the search engines will follow. See Kyrnin’s tips for search engine optimisasion: (SEO)
c) Keywords
It would seem, according to Kyrnin (2014) that many popular search engines have ceased to use meta keywords, as too many people were using it as a means to try and “fool” search engines by inserting popular terms that had nothing to do with their site content. The keywords should be seen as supporting to the description. Kyrnin (2014) advises to use a sharp opening paragraph and good target phrase, rather than spending too much time on meta keywords. Read more on keyword selection. Contact Ronel Roscher (x85 2011) at the Institutional Web Office for help to determine the most searched terms relating to your website.
Your page set-up is now complete. Go back to the “body”section in the editor window to start uploading/compiling content (headings, text, images, videos). See section 5
Click the Publish button to save the new web page to the database. These buttons will only be displayed when creating a new web page from scratch.
10
4. Editing an existing page
4.1. Method 1 (Selecting a Business Unit)
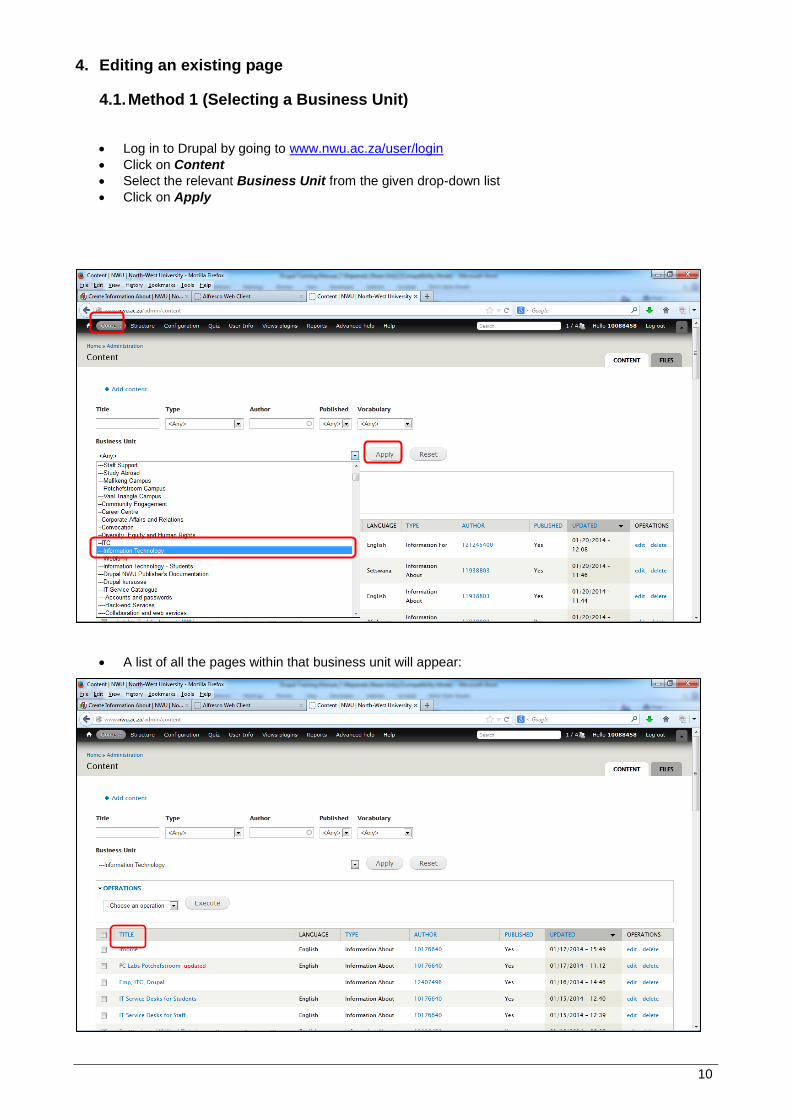
Log in to Drupal by going to www.nwu.ac.za/user/login
Click on Content
Select the relevant Business Unit from the given drop-down list
Click on Apply
A list of all the pages within that business unit will appear:
11
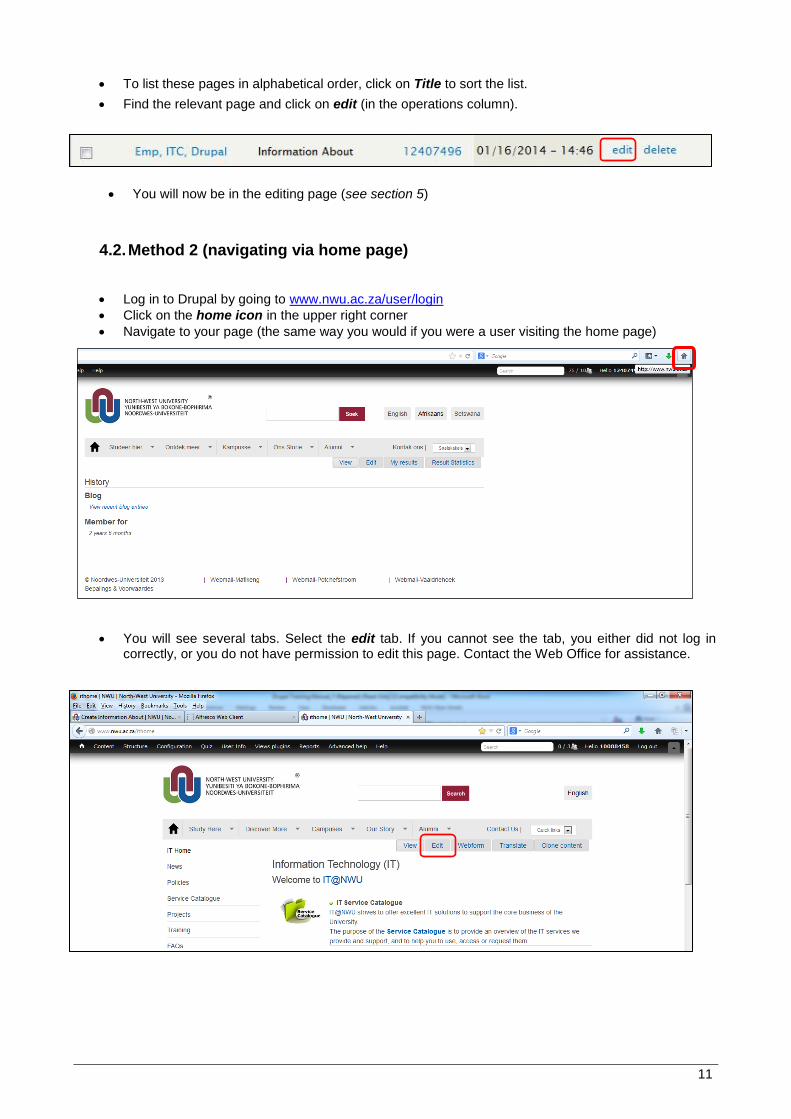
To list these pages in alphabetical order, click on Title to sort the list.
Find the relevant page and click on edit (in the operations column).
You will now be in the editing page (see section 5)
4.2. Method 2 (navigating via home page)
Log in to Drupal by going to www.nwu.ac.za/user/login
Click on the home icon in the upper right corner
Navigate to your page (the same way you would if you were a user visiting the home page)
You will see several tabs. Select the edit tab. If you cannot see the tab, you either did not log in correctly, or you do not have permission to edit this page. Contact the Web Office for assistance.
3.
12
4.3. Method 3 (using page URL)
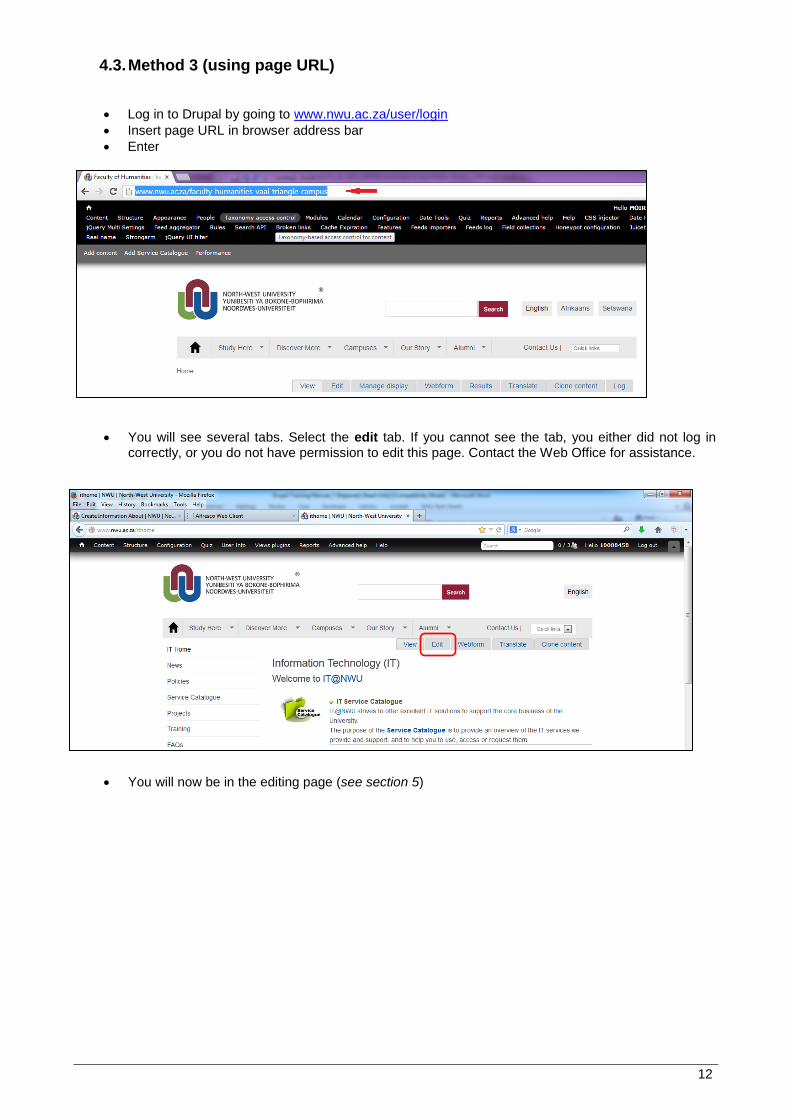
Log in to Drupal by going to www.nwu.ac.za/user/login
Insert page URL in browser address bar
Enter
You will see several tabs. Select the edit tab. If you cannot see the tab, you either did not log in correctly, or you do not have permission to edit this page. Contact the Web Office for assistance.
You will now be in the editing page (see section 5)
3.
13
5. Editing page
You should now be on the editing page
Ensure that all pre-sets are completed (see section 3.3)
Go to the Body area
Familiarise yourself with the toolbar
Insert your headings
Start adding content
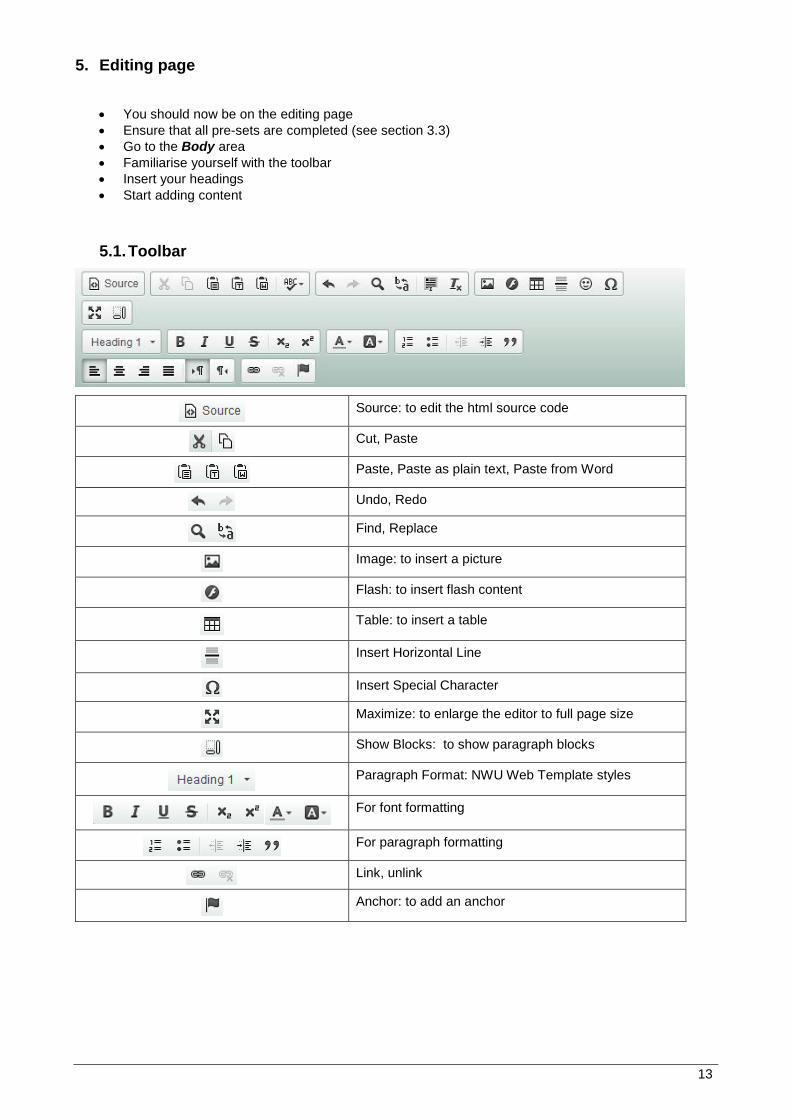
5.1. Toolbar
Source: to edit the html source code
Cut, Paste
Paste, Paste as plain text, Paste from Word
Undo, Redo
Find, Replace
Image: to insert a picture
Flash: to insert flash content
Table: to insert a table
Insert Horizontal Line
Insert Special Character
Maximize: to enlarge the editor to full page size
Show Blocks: to show paragraph blocks
Paragraph Format: NWU Web Template styles
For font formatting
For paragraph formatting
Link, unlink
Anchor: to add an anchor
14
5.2. Headings
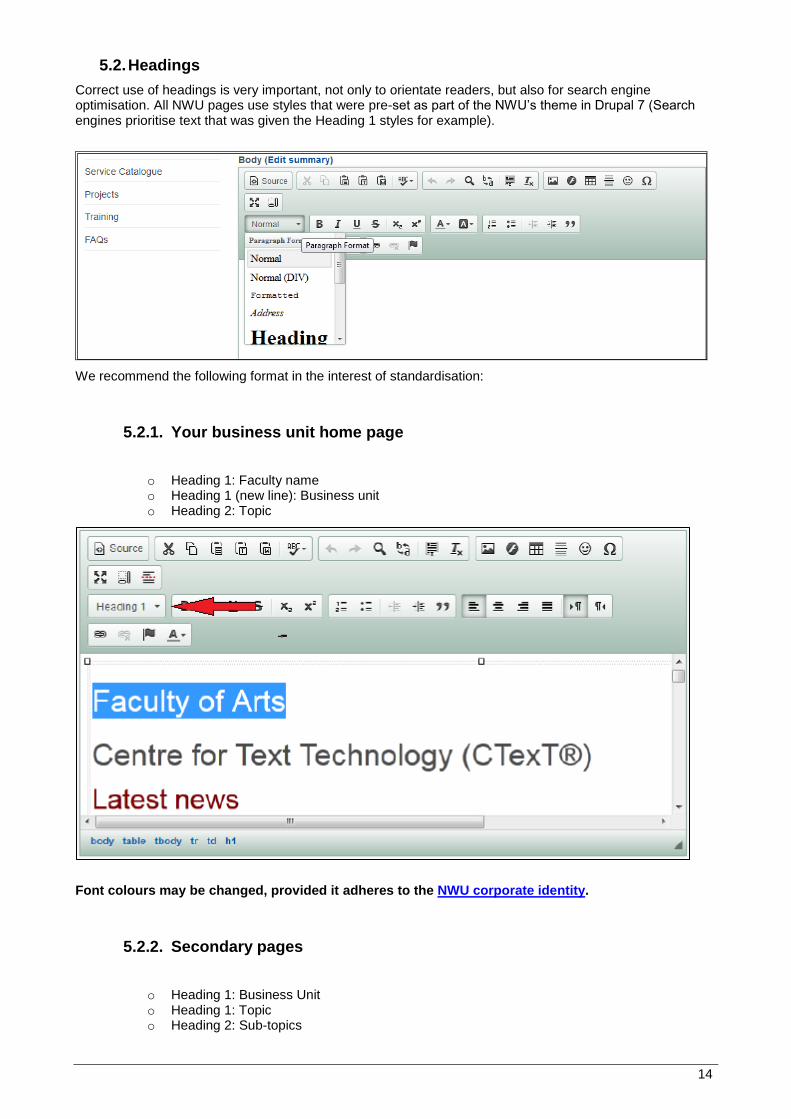
Correct use of headings is very important, not only to orientate readers, but also for search engine optimisation. All NWU pages use styles that were pre-set as part of the NWU’s theme in Drupal 7 (Search engines prioritise text that was given the Heading 1 styles for example).
We recommend the following format in the interest of standardisation:
5.2.1. Your business unit home page
o Heading 1: Faculty name o Heading 1 (new line): Business unit o Heading 2: Topic
Font colours may be changed, provided it adheres to the NWU corporate identity.
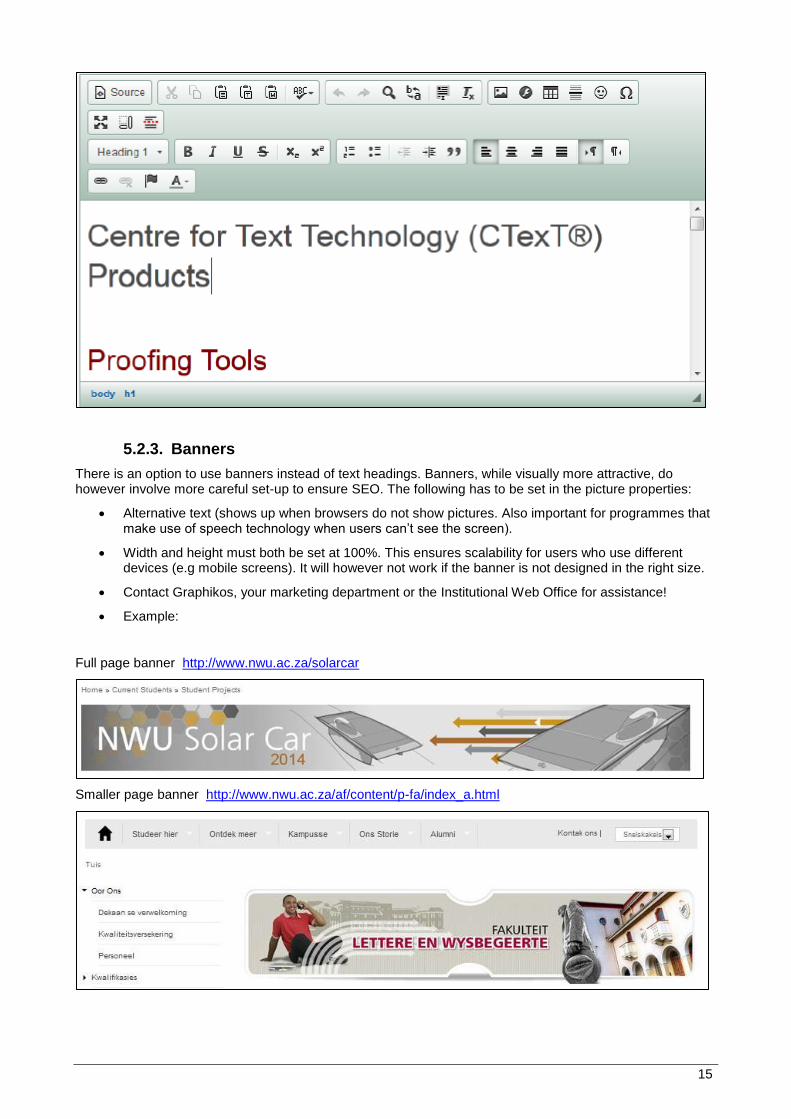
5.2.2. Secondary pages
o Heading 1: Business Unit o Heading 1: Topic o Heading 2: Sub-topics
15
5.2.3. Banners
There is an option to use banners instead of text headings. Banners, while visually more attractive, do however involve more careful set-up to ensure SEO. The following has to be set in the picture properties:
Alternative text (shows up when browsers do not show pictures. Also important for programmes that make use of speech technology when users can’t see the screen).
Width and height must both be set at 100%. This ensures scalability for users who use different devices (e.g mobile screens). It will however not work if the banner is not designed in the right size.
Contact Graphikos, your marketing department or the Institutional Web Office for assistance!
Example:
Full page banner http://www.nwu.ac.za/solarcar
Smaller page banner http://www.nwu.ac.za/af/content/p-fa/index_a.html
16
5.3. Adding content
5.3.1. Uploading files
IMPORTANT: In order to be able to link to a document for example, the document (file) must first be uploaded onto the Drupal server. Make sure that your filename contains no spaces as this will result in error messages in on your editing page. Replace spaces with hyphens (e.g. test-document.pdf). The filename should also make sense and act as a type of description of the document (e.g.NWUAnnualReport.pdf). This will benefit SEO
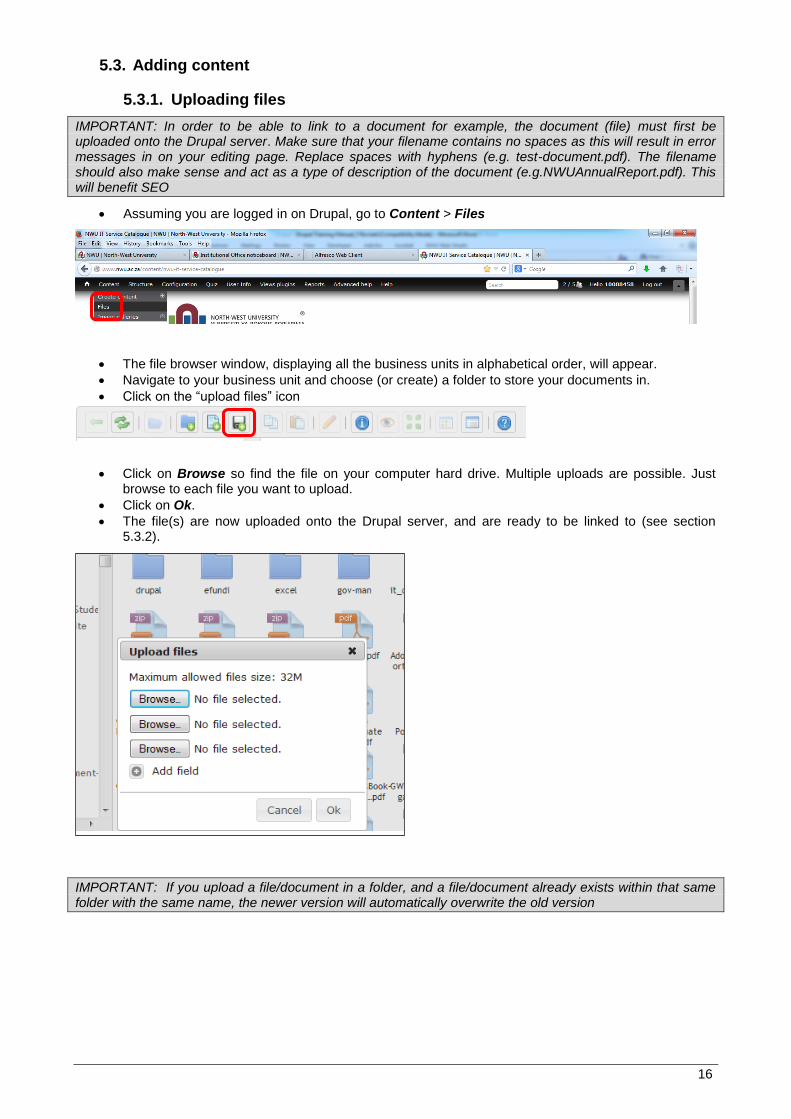
Assuming you are logged in on Drupal, go to Content > Files
The file browser window, displaying all the business units in alphabetical order, will appear.
Navigate to your business unit and choose (or create) a folder to store your documents in.
Click on the “upload files” icon
Click on Browse so find the file on your computer hard drive. Multiple uploads are possible. Just browse to each file you want to upload.
Click on Ok.
The file(s) are now uploaded onto the Drupal server, and are ready to be linked to (see section 5.3.2).
IMPORTANT: If you upload a file/document in a folder, and a file/document already exists within that same folder with the same name, the newer version will automatically overwrite the old version
17
5.3.2. Hyperlinks
5.3.2.1. Linking to a website
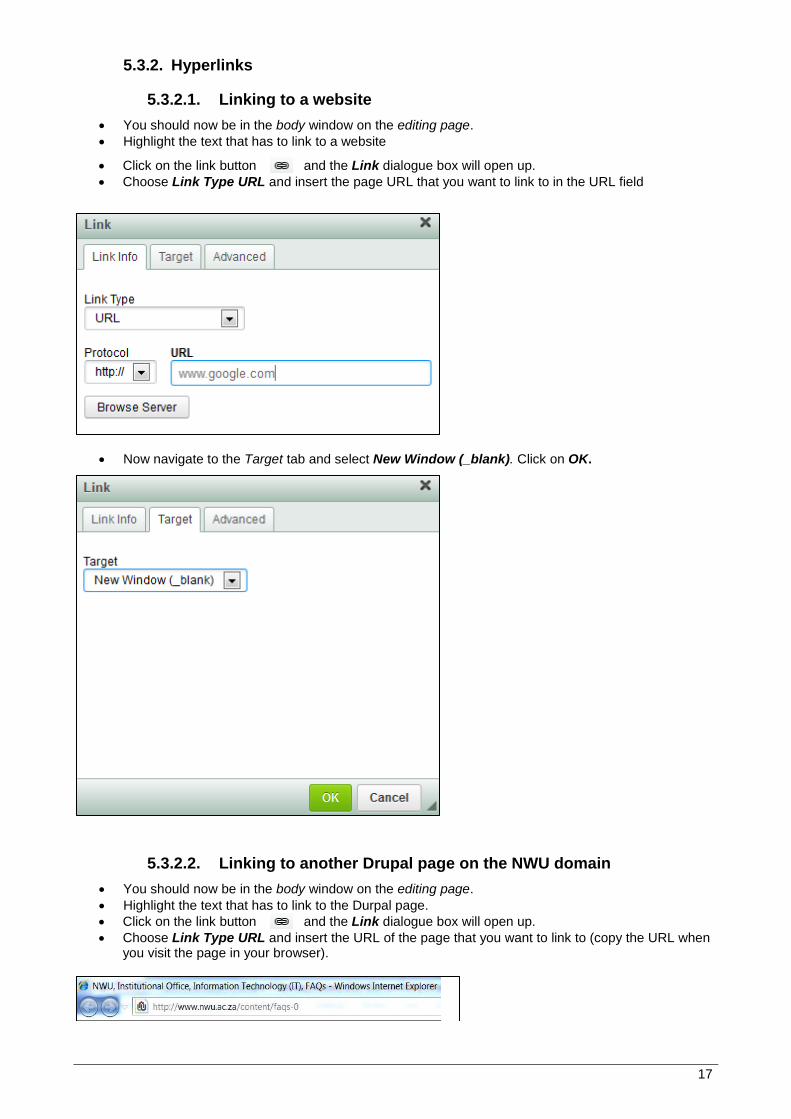
You should now be in the body window on the editing page.
Highlight the text that has to link to a website
Click on the link button and the Link dialogue box will open up.
Choose Link Type URL and insert the page URL that you want to link to in the URL field
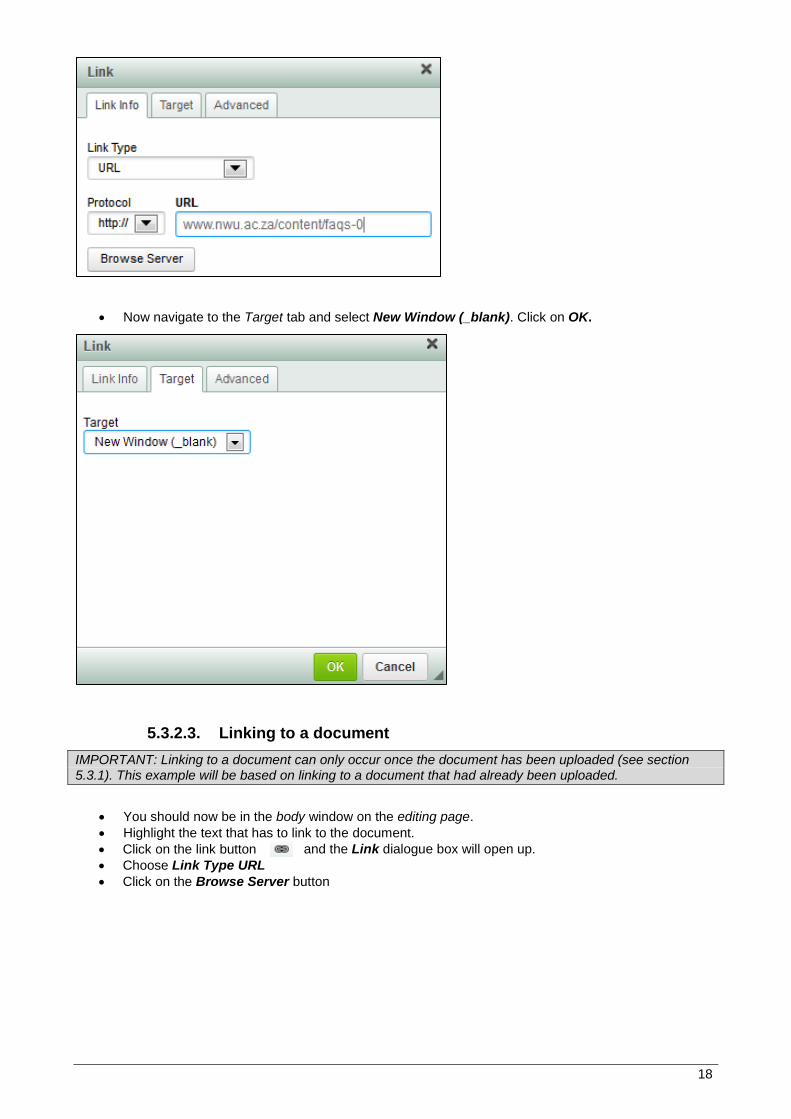
Now navigate to the Target tab and select New Window (_blank). Click on OK.
5.3.2.2. Linking to another Drupal page on the NWU domain
You should now be in the body window on the editing page.
Highlight the text that has to link to the Durpal page.
Click on the link button and the Link dialogue box will open up.
Choose Link Type URL and insert the URL of the page that you want to link to (copy the URL when you visit the page in your browser).
18
Now navigate to the Target tab and select New Window (_blank). Click on OK.
5.3.2.3. Linking to a document
IMPORTANT: Linking to a document can only occur once the document has been uploaded (see section
5.3.1). This example will be based on linking to a document that had already been uploaded.
You should now be in the body window on the editing page.
Highlight the text that has to link to the document.
Click on the link button and the Link dialogue box will open up.
Choose Link Type URL
Click on the Browse Server button
19
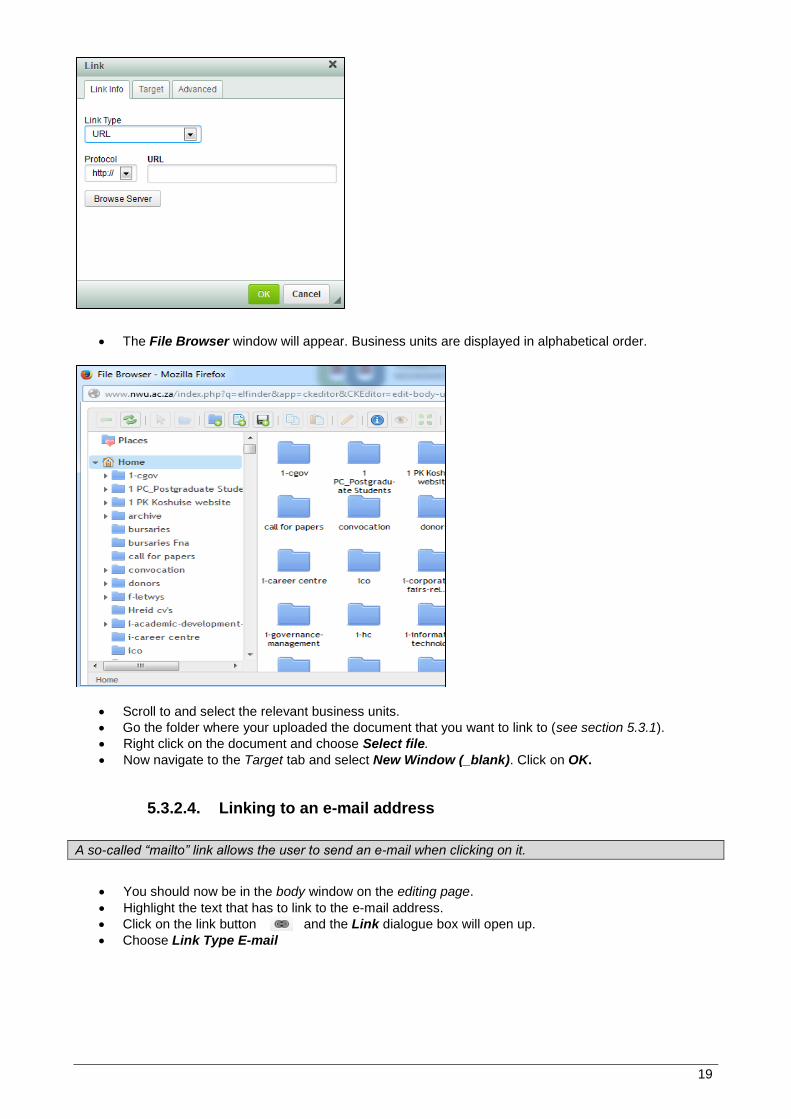
The File Browser window will appear. Business units are displayed in alphabetical order.
Scroll to and select the relevant business units.
Go the folder where your uploaded the document that you want to link to (see section 5.3.1).
Right click on the document and choose Select file.
Now navigate to the Target tab and select New Window (_blank). Click on OK.
5.3.2.4. Linking to an e-mail address
A so-called “mailto” link allows the user to send an e-mail when clicking on it.
You should now be in the body window on the editing page.
Highlight the text that has to link to the e-mail address.
Click on the link button and the Link dialogue box will open up.
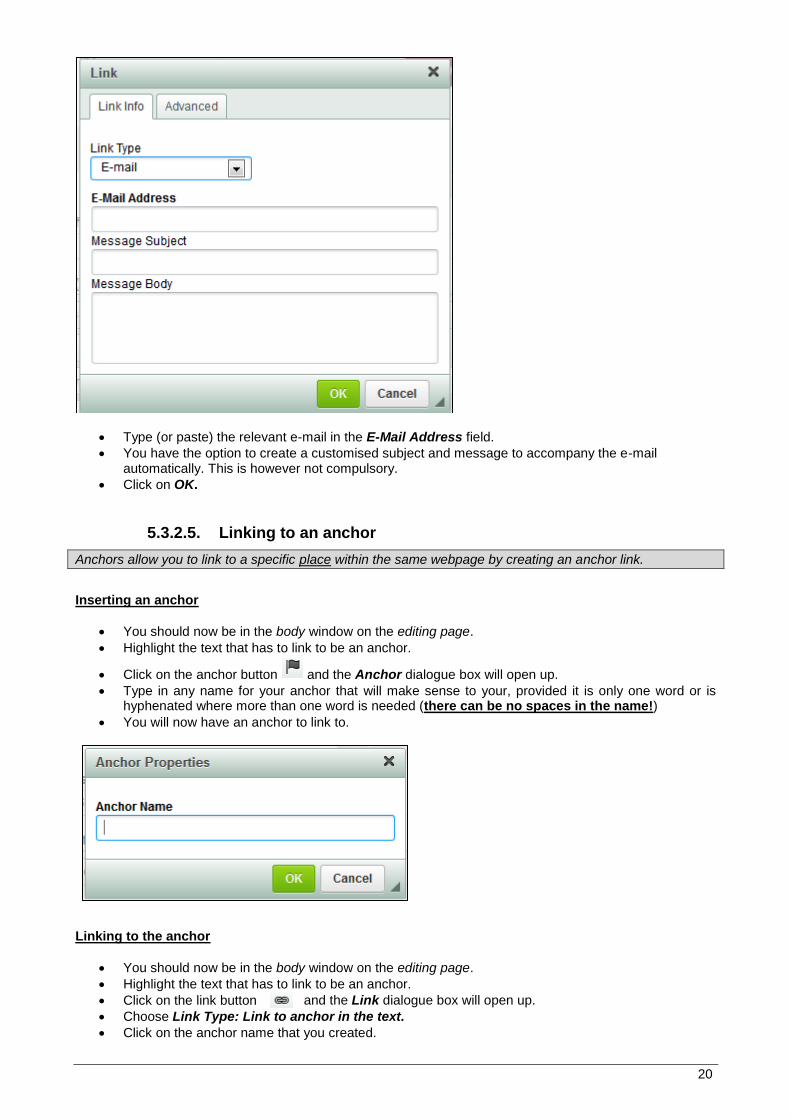
Choose Link Type E-mail
20
Type (or paste) the relevant e-mail in the E-Mail Address field.
You have the option to create a customised subject and message to accompany the e-mail automatically. This is however not compulsory.
Click on OK.
5.3.2.5. Linking to an anchor
Anchors allow you to link to a specific place within the same webpage by creating an anchor link.
Inserting an anchor
You should now be in the body window on the editing page.
Highlight the text that has to link to be an anchor.
Click on the anchor button and the Anchor dialogue box will open up.
Type in any name for your anchor that will make sense to your, provided it is only one word or is hyphenated where more than one word is needed (there can be no spaces in the name!)
You will now have an anchor to link to.
Linking to the anchor
You should now be in the body window on the editing page.
Highlight the text that has to link to be an anchor.
Click on the link button and the Link dialogue box will open up.
Choose Link Type: Link to anchor in the text.
Click on the anchor name that you created.
21
5.3.3. Images
IMPORTANT: When uploading your image onto the Drupal server (using the same steps you would when uploading a document – see section 5.3.1), ensure that it is as close to the right size as possible. Resizing the image in Drupal may cause distortion. It also just resizes the image without reducing the filesize (space the image will take up in the server).
Preferrably use PNG formats.
5.3.3.1. Resizing images before uploading them to Drupal
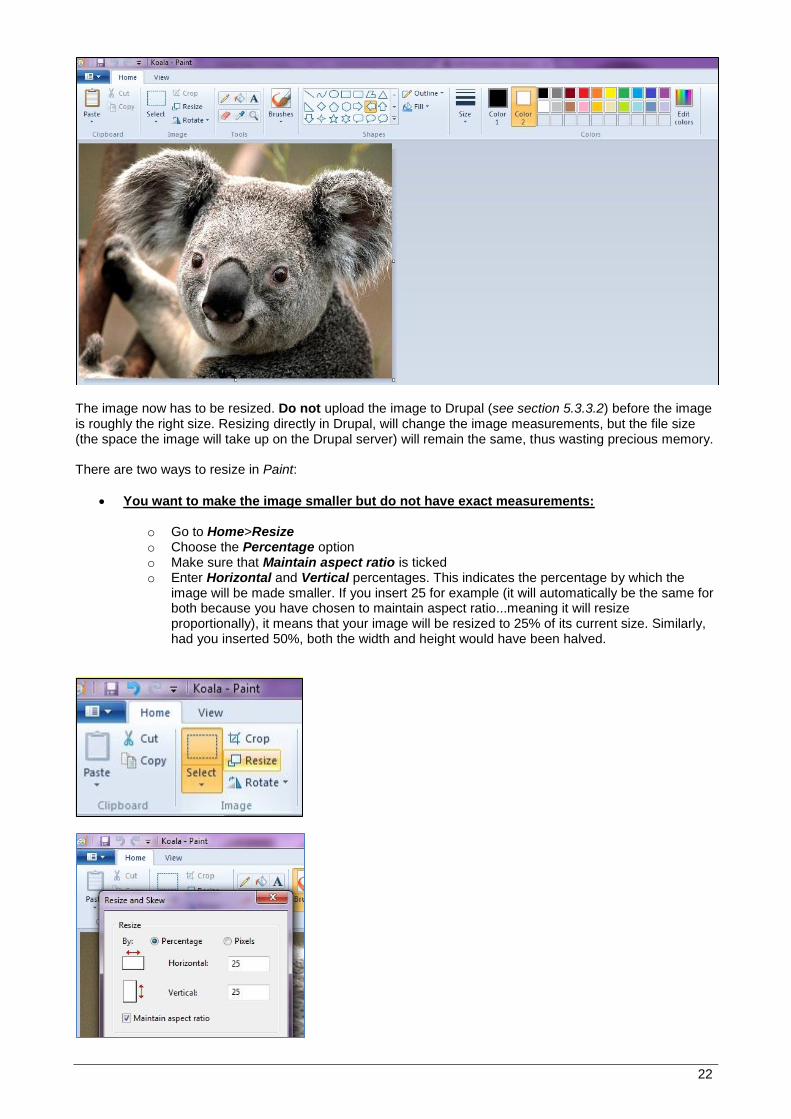
You may use any photo-editing software (such as Adobe Photoshop) to edit your photos. The below example makes use of Windows Paint (a default programme included in most versions of Windows).
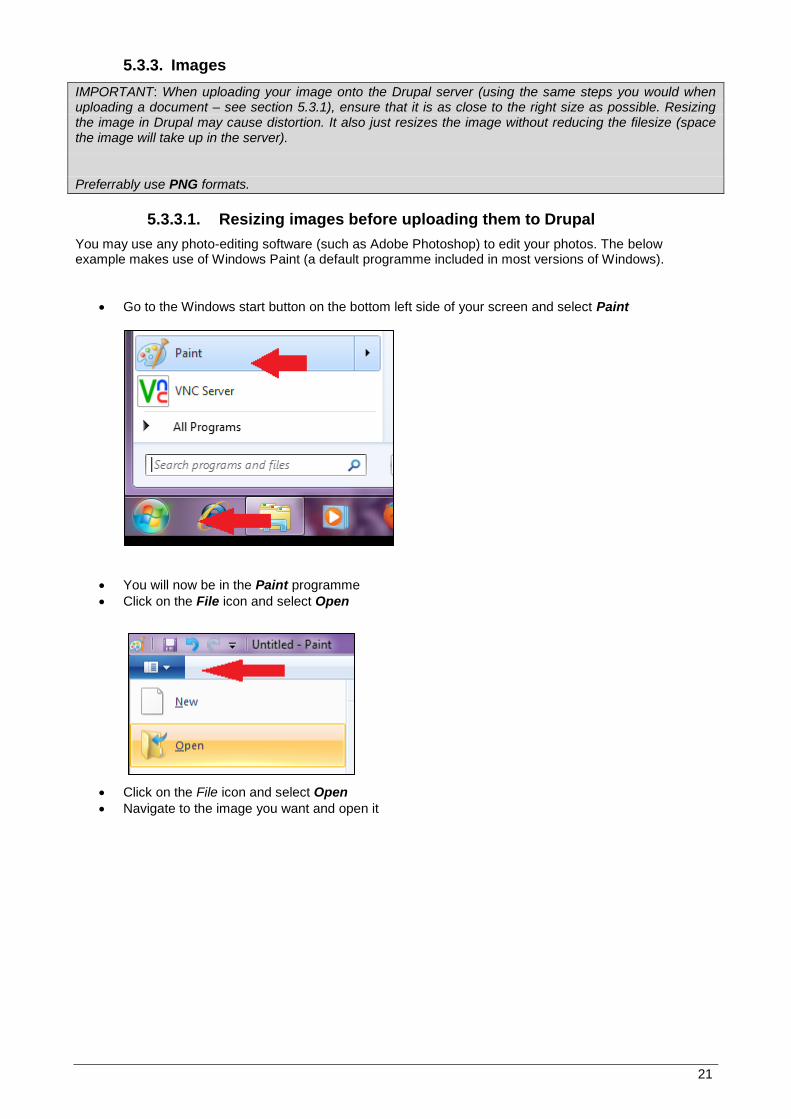
Go to the Windows start button on the bottom left side of your screen and select Paint
You will now be in the Paint programme
Click on the File icon and select Open
Click on the File icon and select Open
Navigate to the image you want and open it
22
The image now has to be resized. Do not upload the image to Drupal (see section 5.3.3.2) before the image is roughly the right size. Resizing directly in Drupal, will change the image measurements, but the file size (the space the image will take up on the Drupal server) will remain the same, thus wasting precious memory. There are two ways to resize in Paint:
You want to make the image smaller but do not have exact measurements:
o Go to Home>Resize o Choose the Percentage option o Make sure that Maintain aspect ratio is ticked o Enter Horizontal and Vertical percentages. This indicates the percentage by which the
image will be made smaller. If you insert 25 for example (it will automatically be the same for both because you have chosen to maintain aspect ratio...meaning it will resize proportionally), it means that your image will be resized to 25% of its current size. Similarly, had you inserted 50%, both the width and height would have been halved.
23
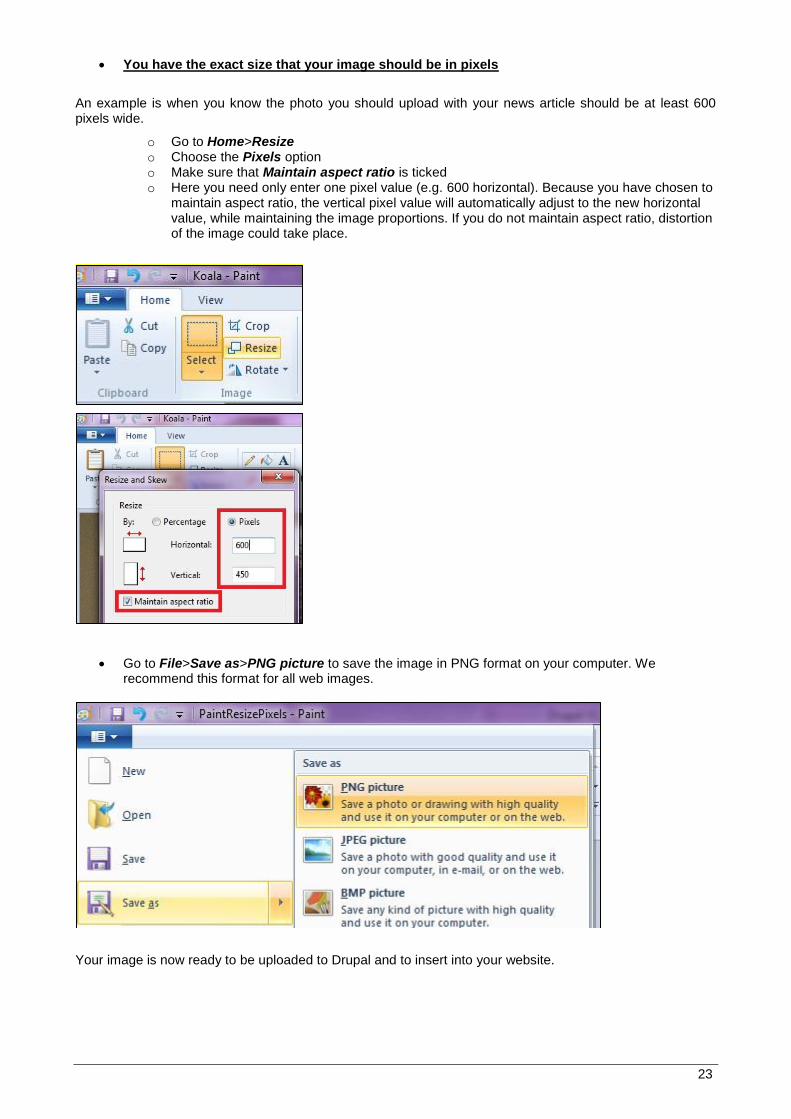
You have the exact size that your image should be in pixels
An example is when you know the photo you should upload with your news article should be at least 600 pixels wide.
o Go to Home>Resize o Choose the Pixels option o Make sure that Maintain aspect ratio is ticked o Here you need only enter one pixel value (e.g. 600 horizontal). Because you have chosen to
maintain aspect ratio, the vertical pixel value will automatically adjust to the new horizontal value, while maintaining the image proportions. If you do not maintain aspect ratio, distortion of the image could take place.
Go to File>Save as>PNG picture to save the image in PNG format on your computer. We recommend this format for all web images.
Your image is now ready to be uploaded to Drupal and to insert into your website.
24
5.3.3.2. Uploading images to Drupal
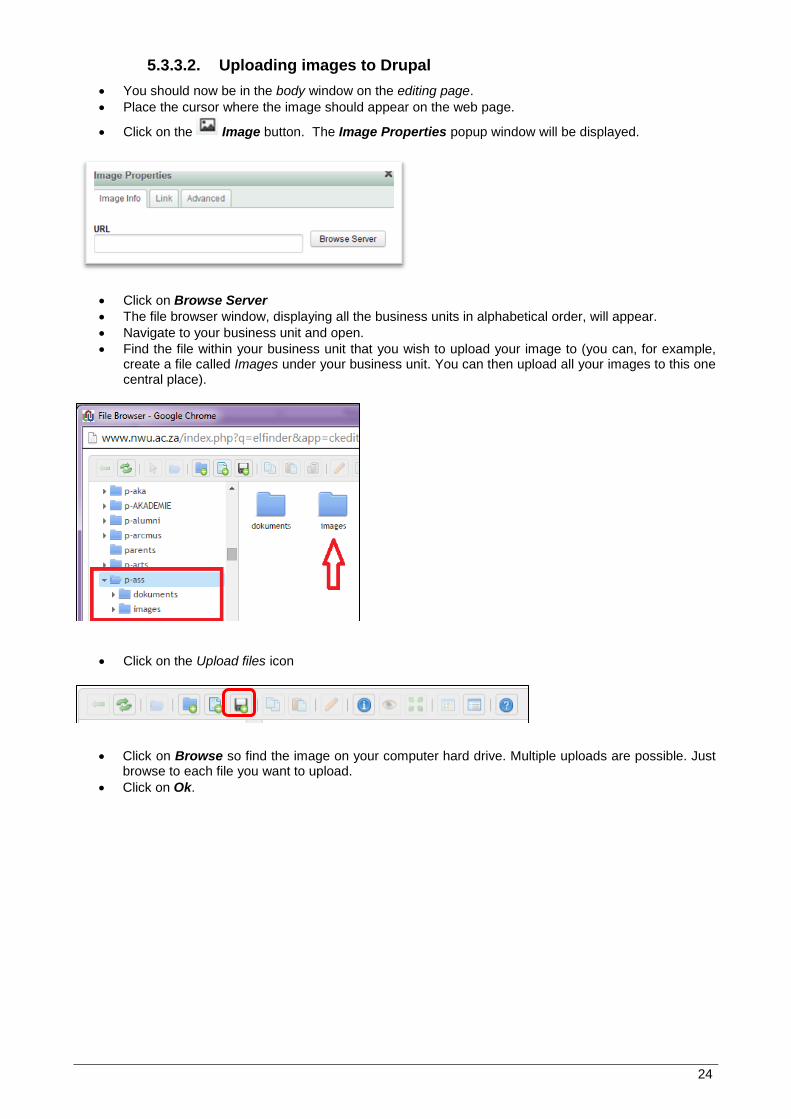
You should now be in the body window on the editing page.
Place the cursor where the image should appear on the web page.
Click on the Image button. The Image Properties popup window will be displayed.
Click on Browse Server
The file browser window, displaying all the business units in alphabetical order, will appear.
Navigate to your business unit and open.
Find the file within your business unit that you wish to upload your image to (you can, for example, create a file called Images under your business unit. You can then upload all your images to this one central place).
Click on the Upload files icon
Click on Browse so find the image on your computer hard drive. Multiple uploads are possible. Just browse to each file you want to upload.
Click on Ok.
25
The images are now uploaded onto the Drupal server, and are ready to be inserted into your webpage (see section 5.3.3.3).
IMPORTANT: If you upload an image in a folder, and an image already exists within that same folder with the same name, the newer version will automatically overwrite the old version
5.3.3.3. Inserting an image in your website
If you had followed the steps in section 5.3.3.2 correctly, you should now see the images that you have uploaded.
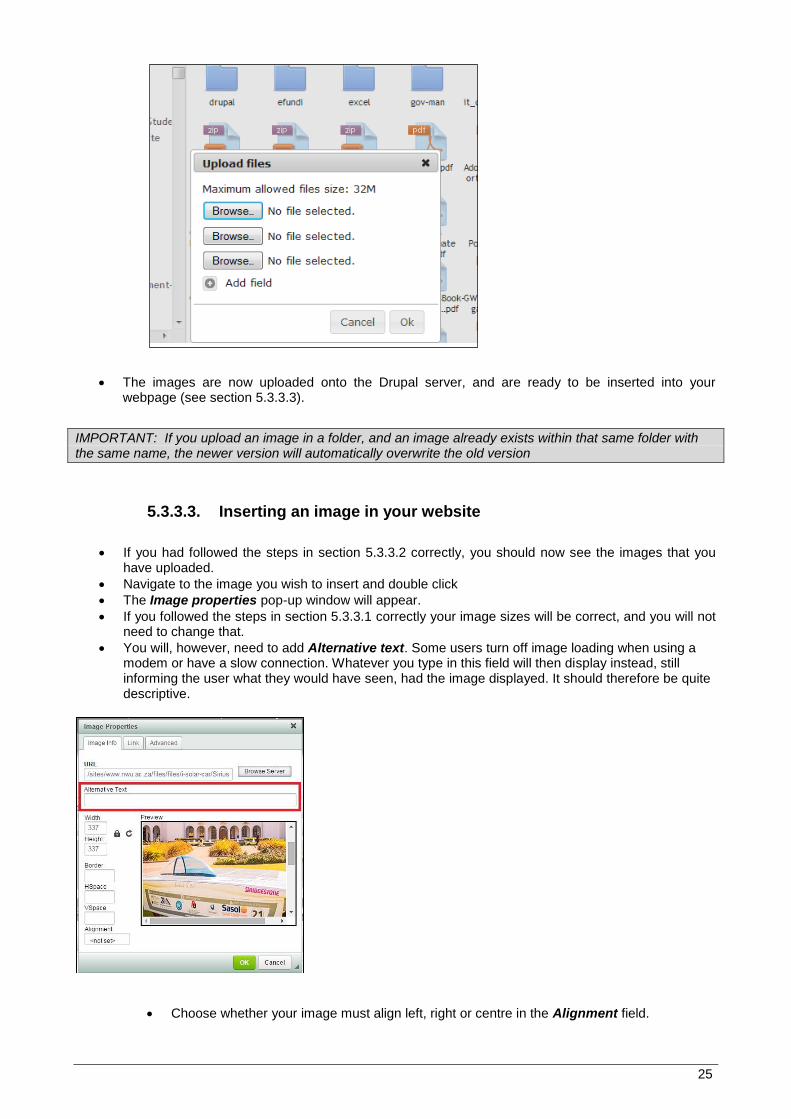
Navigate to the image you wish to insert and double click
The Image properties pop-up window will appear.
If you followed the steps in section 5.3.3.1 correctly your image sizes will be correct, and you will not need to change that.
You will, however, need to add Alternative text. Some users turn off image loading when using a modem or have a slow connection. Whatever you type in this field will then display instead, still informing the user what they would have seen, had the image displayed. It should therefore be quite descriptive.
Choose whether your image must align left, right or centre in the Alignment field.
26
The HSpace (horisontal space) and VSpace (vertical space) fields refer to the space that will surround the image. Only insert values if you want “padding” around your image.
The value that you insert in the Border will determine the thickness (if any) of the border around your image (where 1 is very thin and 5 is much thicker for example). If you want no border, simply leave the field blank or insert 0.
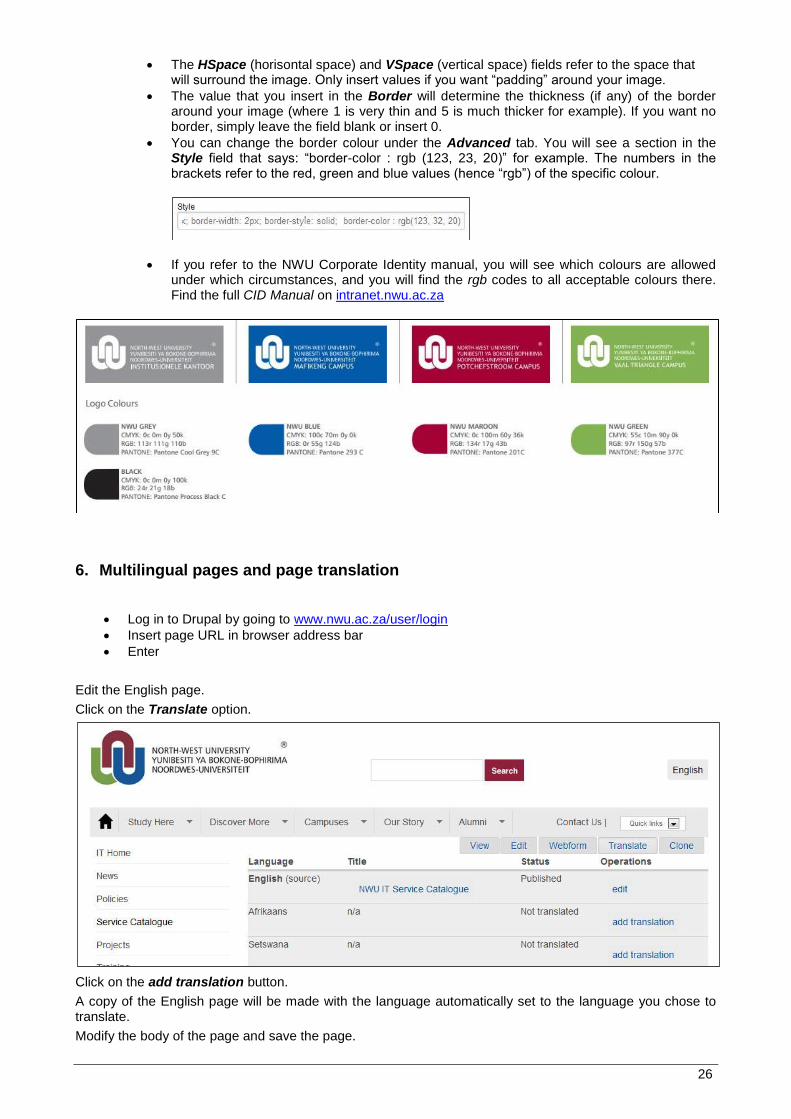
You can change the border colour under the Advanced tab. You will see a section in the Style field that says: “border-color : rgb (123, 23, 20)” for example. The numbers in the brackets refer to the red, green and blue values (hence “rgb”) of the specific colour.
If you refer to the NWU Corporate Identity manual, you will see which colours are allowed under which circumstances, and you will find the rgb codes to all acceptable colours there. Find the full CID Manual on intranet.nwu.ac.za
6. Multilingual pages and page translation
Log in to Drupal by going to www.nwu.ac.za/user/login
Insert page URL in browser address bar
Enter
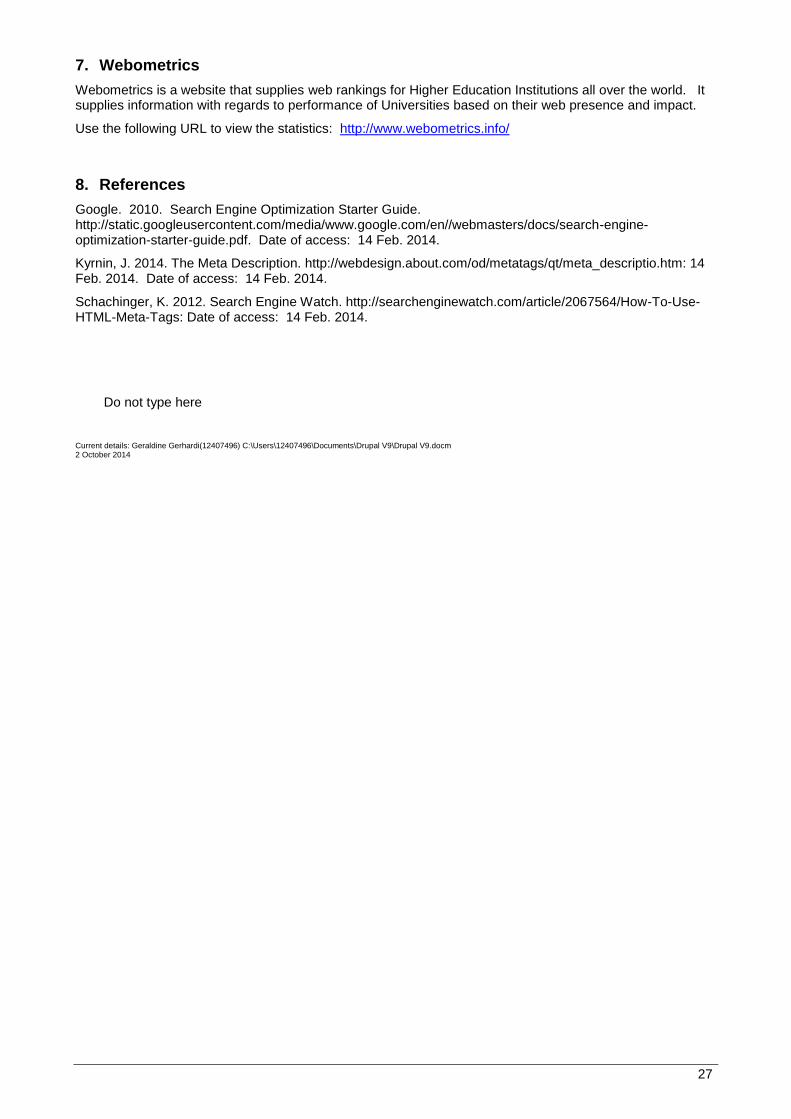
Edit the English page.
Click on the Translate option.
Click on the add translation button.
A copy of the English page will be made with the language automatically set to the language you chose to translate.
Modify the body of the page and save the page.
27
7. Webometrics
Webometrics is a website that supplies web rankings for Higher Education Institutions all over the world. It supplies information with regards to performance of Universities based on their web presence and impact.
Use the following URL to view the statistics: http://www.webometrics.info/
8. References
Google. 2010. Search Engine Optimization Starter Guide. http://static.googleusercontent.com/media/www.google.com/en//webmasters/docs/search-engine-optimization-starter-guide.pdf. Date of access: 14 Feb. 2014.
Kyrnin, J. 2014. The Meta Description. http://webdesign.about.com/od/metatags/qt/meta_descriptio.htm: 14 Feb. 2014. Date of access: 14 Feb. 2014.
Schachinger, K. 2012. Search Engine Watch. http://searchenginewatch.com/article/2067564/How-To-Use-HTML-Meta-Tags: Date of access: 14 Feb. 2014.
Do not type here
Current details: Geraldine Gerhardi(12407496) C:\Users\12407496\Documents\Drupal V9\Drupal V9.docm 2 October 2014