Embed Size (px)
Citation preview

DSA 103 User Guide Minimum System Requirements This section lists the minimum system requirements recommended to run Adobe AEM for end
users.
End User Client (Web) Item Minimum Requirements
Processor 32-bit or 64-bit single core CPU
Memory 1GB RAM
Operating System Any that support the web browsers listed below
Web Browser - Internet Explorer
- Edge
- Chrome
- Firefox
- Safari
Mobile User
Item Minimum Requirements
Windows - Windows 10
- Intel / AMD 32-bit or 64-bit CPU
- Microsoft.NET Framework 4.6 or later
Android - Version 5.0 and above
- Tablets and Phone
IOS - Version 10 and above
- Tablets and Phones
P a g e 1 of 11
Overview: Navigating and Using AEM
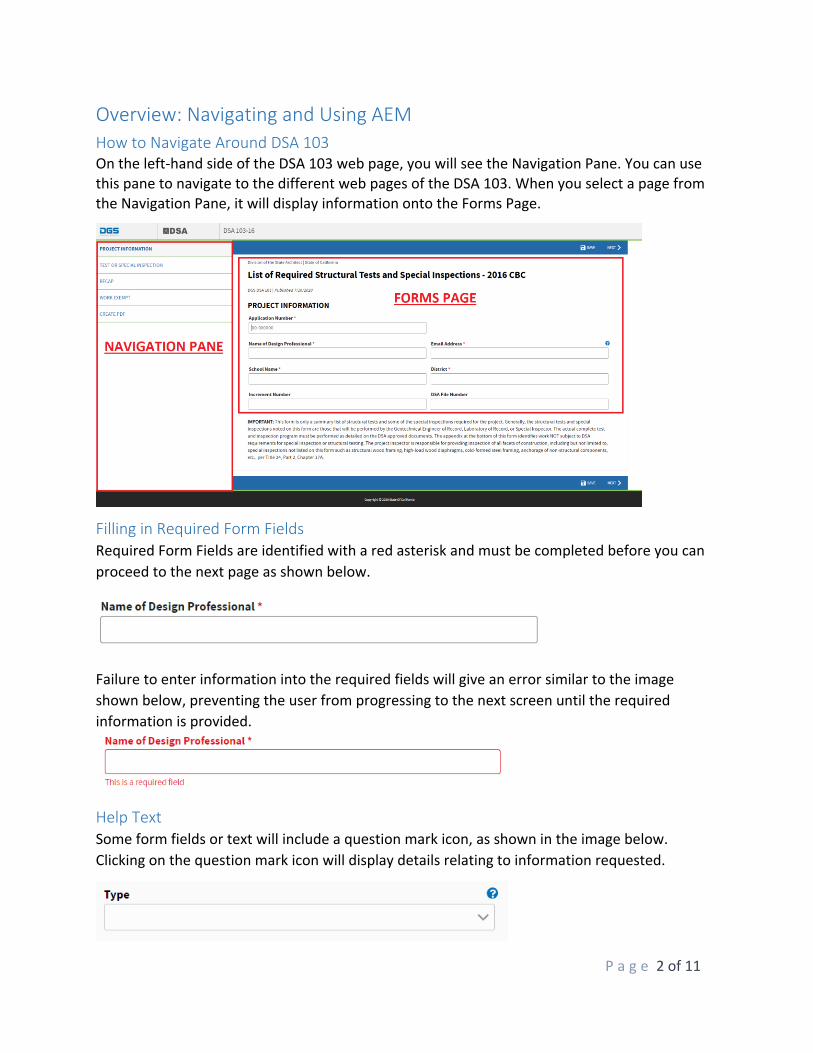
How to Navigate Around DSA 103On the left-hand side of the DSA 103 web page, you will see the Navigation Pane. You can use this pane to navigate to the different web pages of the DSA 103. When you select a page from the Navigation Pane, it will display information onto the Forms Page.
Filling in Required Form Fields Required Form Fields are identified with a red asterisk and must be completed before you can
proceed to the next page as shown below.
Failure to enter information into the required fields will give an error similar to the image
shown below, preventing the user from progressing to the next screen until the required
information is provided.
Help Text Some form fields or text will include a question mark icon, as shown in the image below.
Clicking on the question mark icon will display details relating to information requested.
P a g e 2 of 11
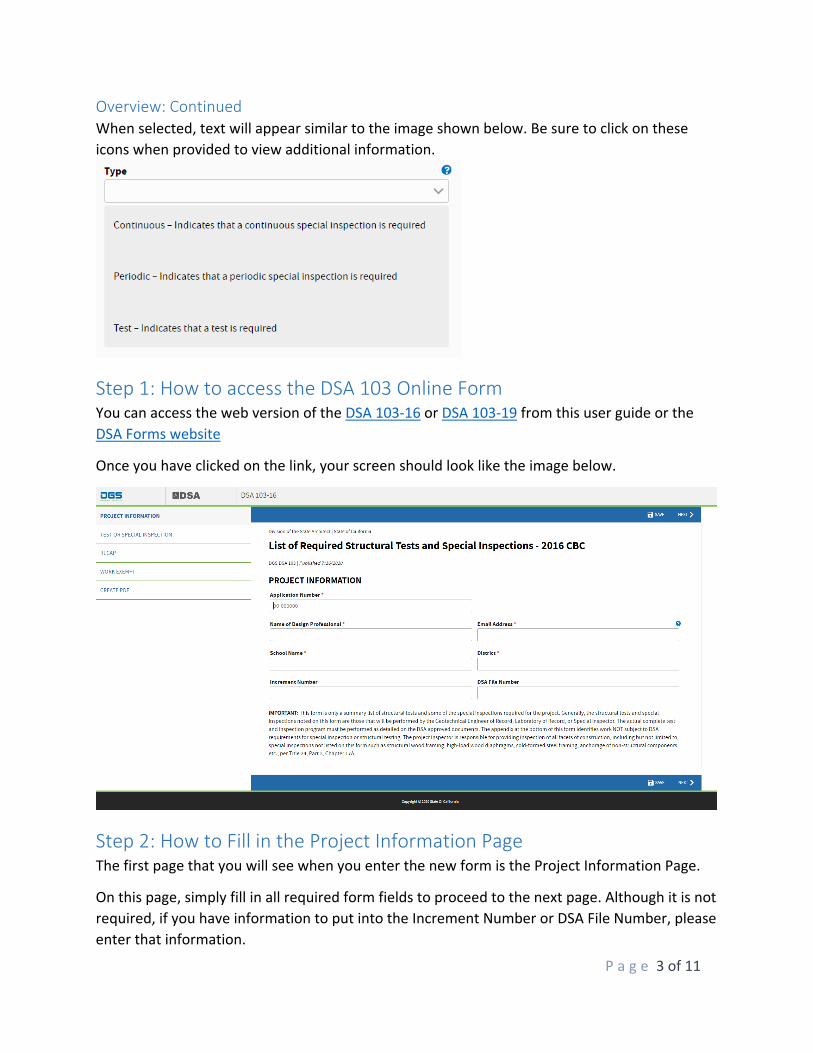
Overview: Continued When selected, text will appear similar to the image shown below. Be sure to click on these
icons when provided to view additional information.
Step 1: How to access the DSA 103 Online Form You can access the web version of the DSA 103-16 or DSA 103-19 from this user guide or the
DSA Forms website
Once you have clicked on the link, your screen should look like the image below.
Step 2: How to Fill in the Project Information Page The first page that you will see when you enter the new form is the Project Information Page.
On this page, simply fill in all required form fields to proceed to the next page. Although it is not
required, if you have information to put into the Increment Number or DSA File Number, please
enter that information.
P a g e 3 of 11
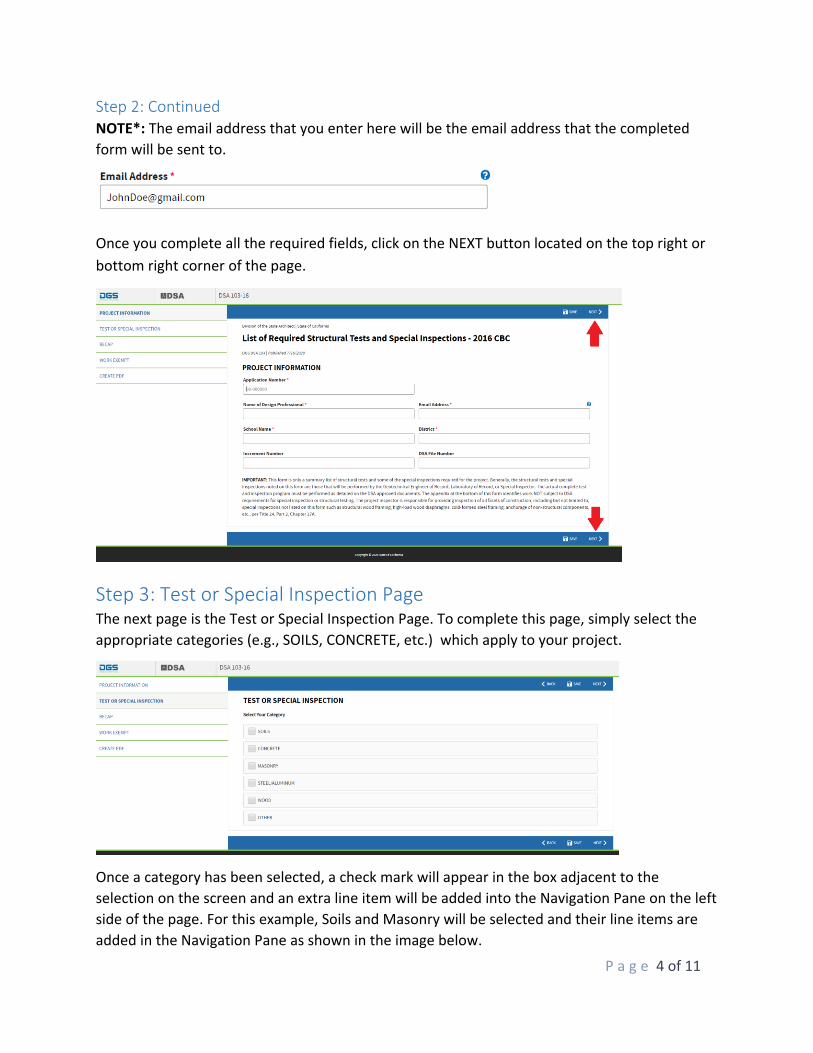
Step 2: Continued NOTE*: The email address that you enter here will be the email address that the completed
form will be sent to.
Once you complete all the required fields, click on the NEXT button located on the top right or
bottom right corner of the page.
Step 3: Test or Special Inspection Page The next page is the Test or Special Inspection Page. To complete this page, simply select the
appropriate categories (e.g., SOILS, CONCRETE, etc.) which apply to your project.
Once a category has been selected, a check mark will appear in the box adjacent to the
selection on the screen and an extra line item will be added into the Navigation Pane on the left
side of the page. For this example, Soils and Masonry will be selected and their line items are
added in the Navigation Pane as shown in the image below.
P a g e 4 of 11

Step 3: Continued
After all the applicable categories are selected, simply click either of the NEXT buttons located
on the right side of the screen to proceed to the Category Pages. For example, because Soils is
the first category selected from the Category Details list, the NEXT button will send you to the
Soils page.
NOTE: You may also go to any specific page displayed in the Navigation Pane at any time by
hovering your cursor over the name of that page and selecting (clicking on) it.
Step 4: How to Fill in a Category Page This step will cover the Soils Page as an example. However, other Category Pages will follow
similar steps. the Soils Page will be displayed as shown in the image below.
Simply select the options that apply to your project. When a checkbox or radio button is
selected, more text or options may appear as shown in the image below.
P a g e 5 of 11
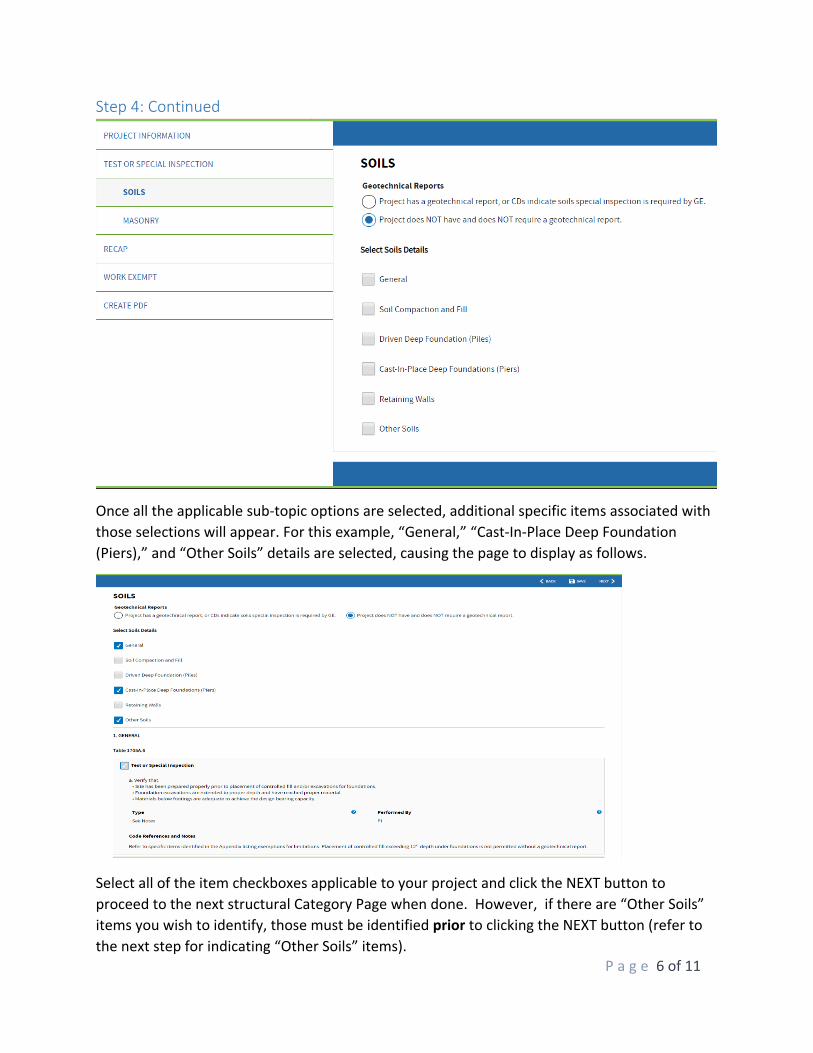
Step 4: Continued
Once all the applicable sub-topic options are selected, additional specific items associated with
those selections will appear. For this example, “General,” “Cast-In-Place Deep Foundation
(Piers),” and “Other Soils” details are selected, causing the page to display as follows.
Select all of the item checkboxes applicable to your project and click the NEXT button to
proceed to the next structural Category Page when done. However, if there are “Other Soils”
items you wish to identify, those must be identified prior to clicking the NEXT button (refer to
the next step for indicating “Other Soils” items). P a g e 6 of 11
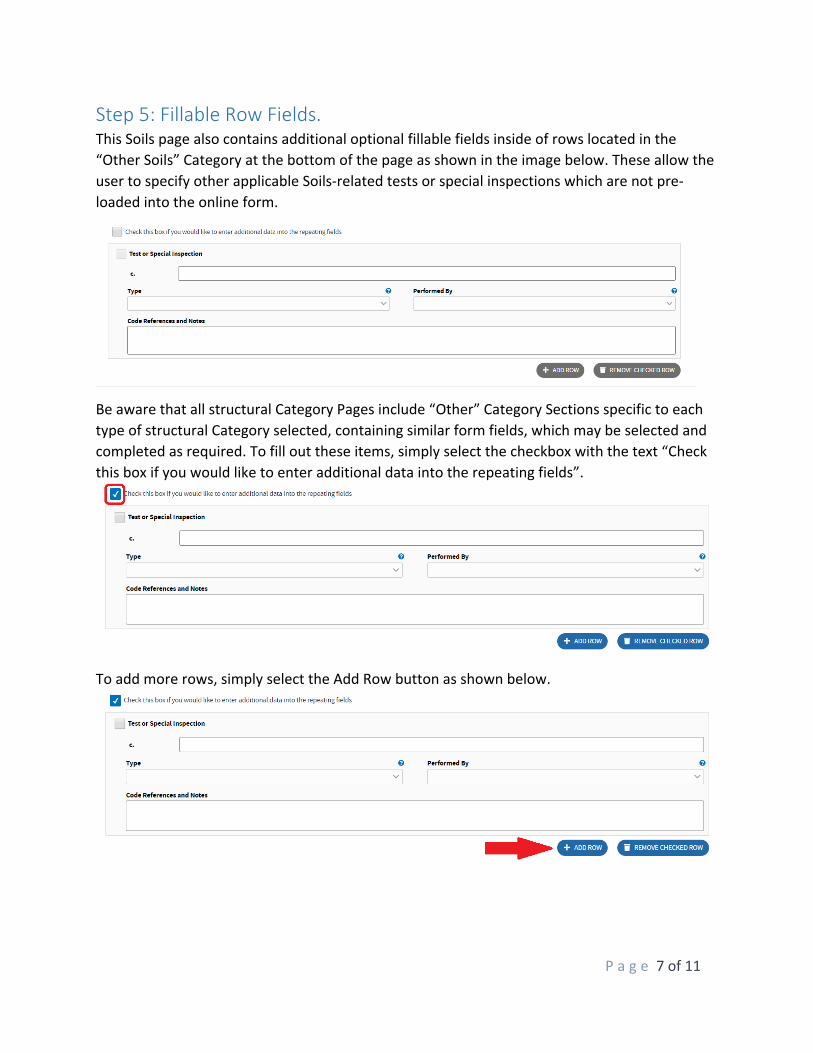
Step 5: Fillable Row Fields. This Soils page also contains additional optional fillable fields inside of rows located in the
“Other Soils” Category at the bottom of the page as shown in the image below. These allow the
user to specify other applicable Soils-related tests or special inspections which are not pre-
loaded into the online form.
Be aware that all structural Category Pages include “Other” Category Sections specific to each
type of structural Category selected, containing similar form fields, which may be selected and
completed as required. To fill out these items, simply select the checkbox with the text “Check
this box if you would like to enter additional data into the repeating fields”.
To add more rows, simply select the Add Row button as shown below.
P a g e 7 of 11
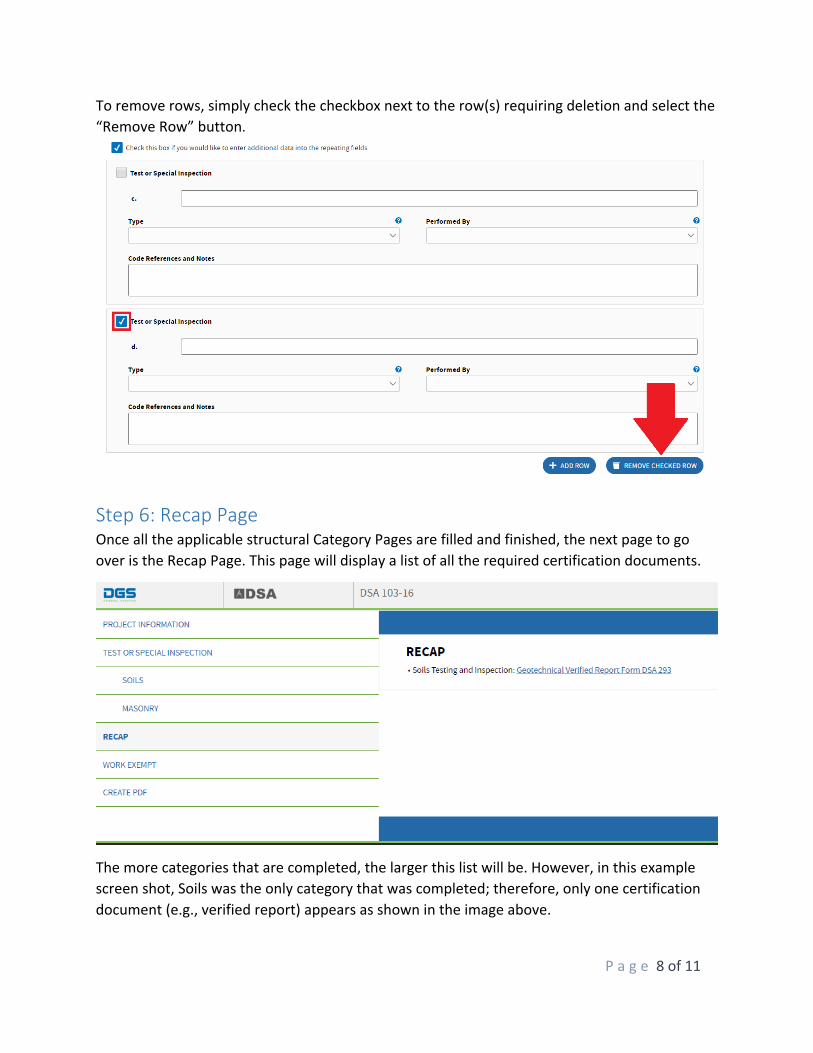
To remove rows, simply check the checkbox next to the row(s) requiring deletion and select the
“Remove Row” button.
Step 6: Recap Page Once all the applicable structural Category Pages are filled and finished, the next page to go
over is the Recap Page. This page will display a list of all the required certification documents.
The more categories that are completed, the larger this list will be. However, in this example
screen shot, Soils was the only category that was completed; therefore, only one certification
document (e.g., verified report) appears as shown in the image above.
P a g e 8 of 11
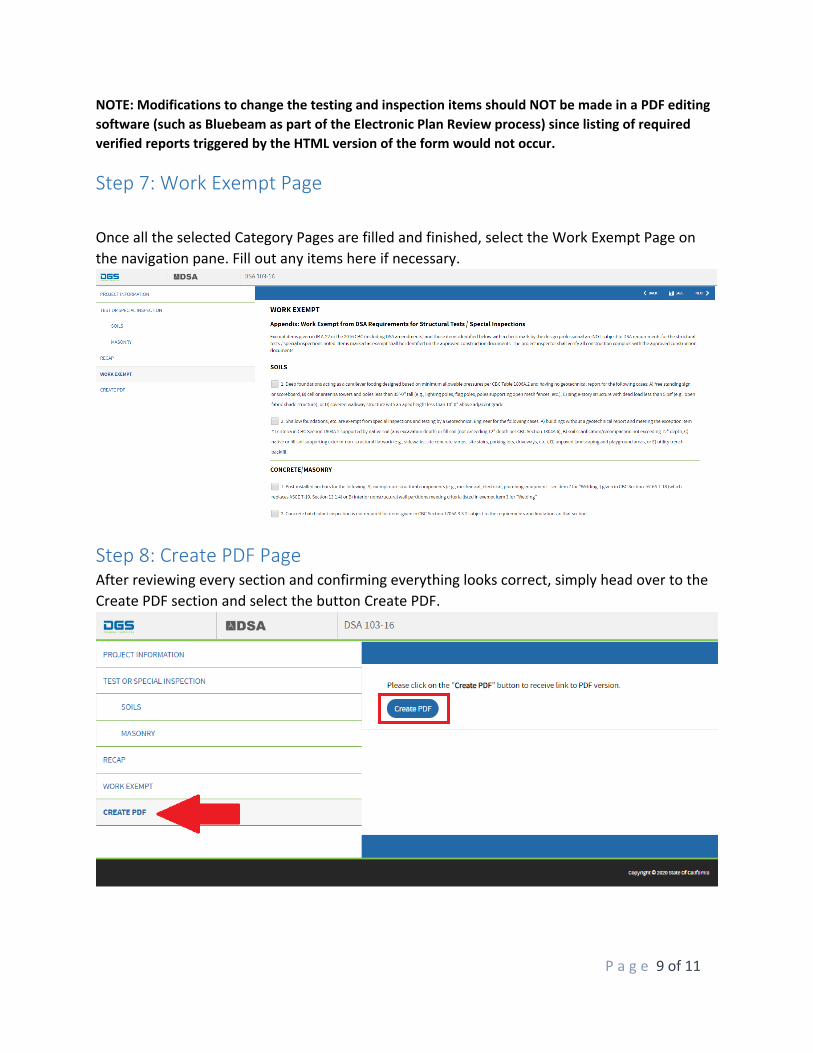
NOTE: Modifications to change the testing and inspection items should NOT be made in a PDF editing
software (such as Bluebeam as part of the Electronic Plan Review process) since listing of required
verified reports triggered by the HTML version of the form would not occur.
Step 7: Work Exempt Page
Once all the selected Category Pages are filled and finished, select the Work Exempt Page on
the navigation pane. Fill out any items here if necessary.
Step 8: Create PDF Page After reviewing every section and confirming everything looks correct, simply head over to the
Create PDF section and select the button Create PDF.
P a g e 9 of 11
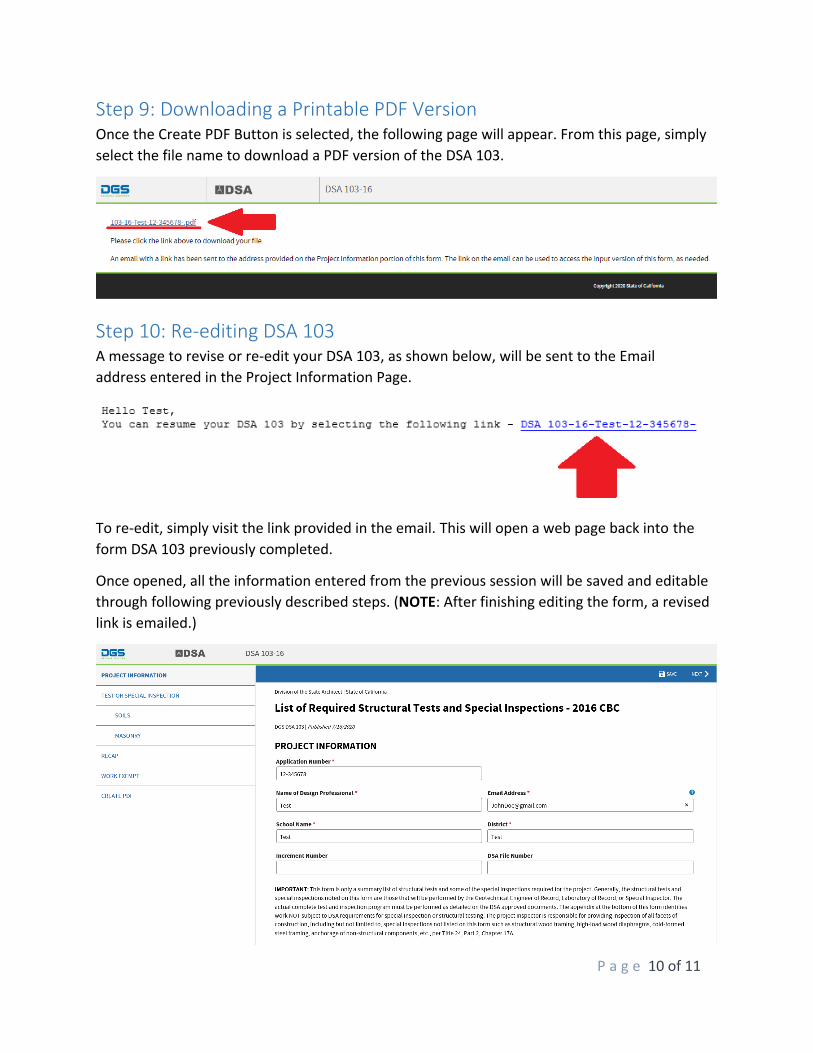
Step 9: Downloading a Printable PDF Version Once the Create PDF Button is selected, the following page will appear. From this page, simply
select the file name to download a PDF version of the DSA 103.
Step 10: Re-editing DSA 103A message to revise or re-edit your DSA 103, as shown below, will be sent to the Email
address entered in the Project Information Page.
To re-edit, simply visit the link provided in the email. This will open a web page back into the
form DSA 103 previously completed.
Once opened, all the information entered from the previous session will be saved and editable
through following previously described steps. (NOTE: After finishing editing the form, a revised
link is emailed.)
P a g e 10 of 11

NOTE: DSA may periodically revise the DSA 103 and note the date of revision. In the event a revised
DSA 103 is required for use after a prior version was completed, the user must access the revised
version from DSA’s webpage. If the user were to instead use the previously emailed link to re-edit the
previously completed form, it would be for a prior version lacking DSA revisions. The revision date
indicated on the DSA 103 serves as a method to determine what version of the form is being used.
P a g e 11 of 11


![CALIFORNIA BUILDING CODE - poweranddata.infopoweranddata.info/wp-content/uploads/Codes- California/2013 CBC... · [DSA-SS/CC] The scope of appli-cation of Chapter 16 is as follows:](https://img.pdfslide.net/doc/110x75/5be98a1e09d3f29e6f8caf12/california-building-code-california2013-cbc-dsa-sscc-the-scope-of-appli-cation.jpg)