Embed Size (px)
Citation preview
DSA Email Migration v20161114 Department User Steps – A Quick Start Guide
Though most of the migration is automated, there are some simple steps you must follow to switch to your
campus user mailbox and calendar, as well as some optional items to consider.
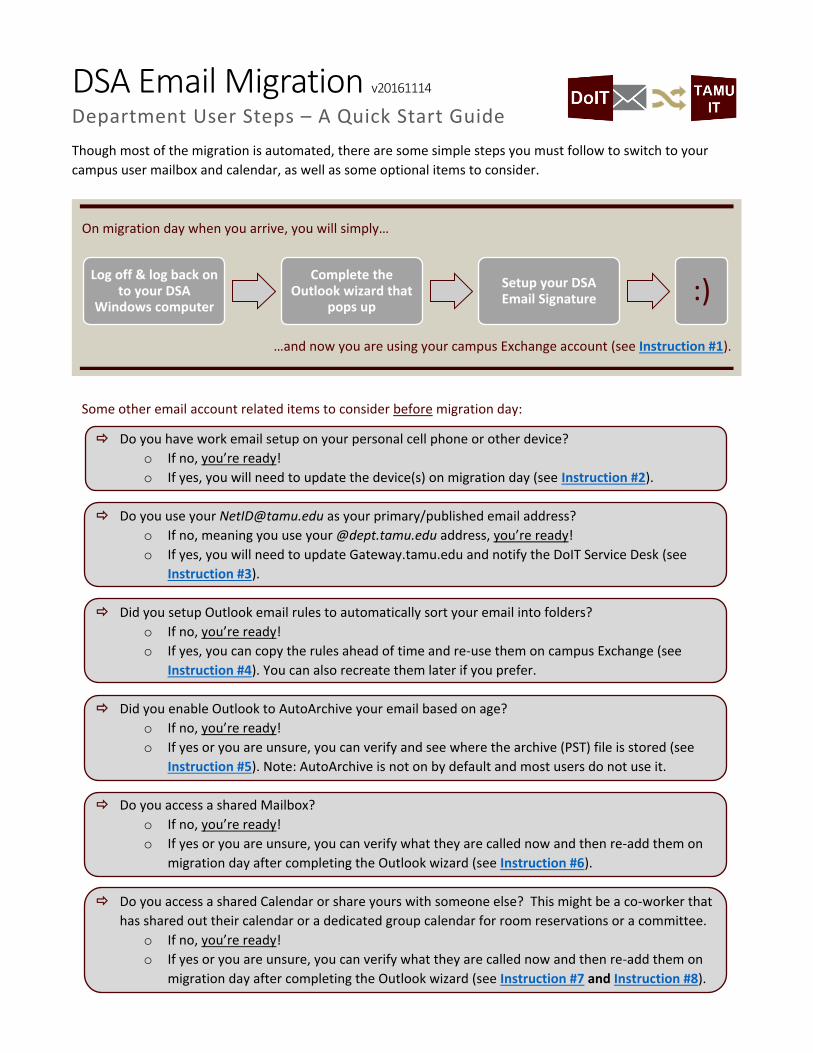
Some other email account related items to consider before migration day:
Do you have work email setup on your personal cell phone or other device?
o If no, you’re ready!
o If yes, you will need to update the device(s) on migration day (see Instruction #2).
Do you use your [email protected] as your primary/published email address?
o If no, meaning you use your @dept.tamu.edu address, you’re ready!
o If yes, you will need to update Gateway.tamu.edu and notify the DoIT Service Desk (see
Instruction #3).
Did you setup Outlook email rules to automatically sort your email into folders?
o If no, you’re ready!
o If yes, you can copy the rules ahead of time and re-use them on campus Exchange (see
Instruction #4). You can also recreate them later if you prefer.
Did you enable Outlook to AutoArchive your email based on age?
o If no, you’re ready!
o If yes or you are unsure, you can verify and see where the archive (PST) file is stored (see
Instruction #5). Note: AutoArchive is not on by default and most users do not use it.
Do you access a shared Mailbox?
o If no, you’re ready!
o If yes or you are unsure, you can verify what they are called now and then re-add them on
migration day after completing the Outlook wizard (see Instruction #6).
Do you access a shared Calendar or share yours with someone else? This might be a co-worker that
has shared out their calendar or a dedicated group calendar for room reservations or a committee.
o If no, you’re ready!
o If yes or you are unsure, you can verify what they are called now and then re-add them on
migration day after completing the Outlook wizard (see Instruction #7 and Instruction #8).
On migration day when you arrive, you will simply…
…and now you are using your campus Exchange account (see Instruction #1).
Log off & log back on to your DSA
Windows computer
Complete the Outlook wizard that
pops up
Setup your DSA Email Signature :)
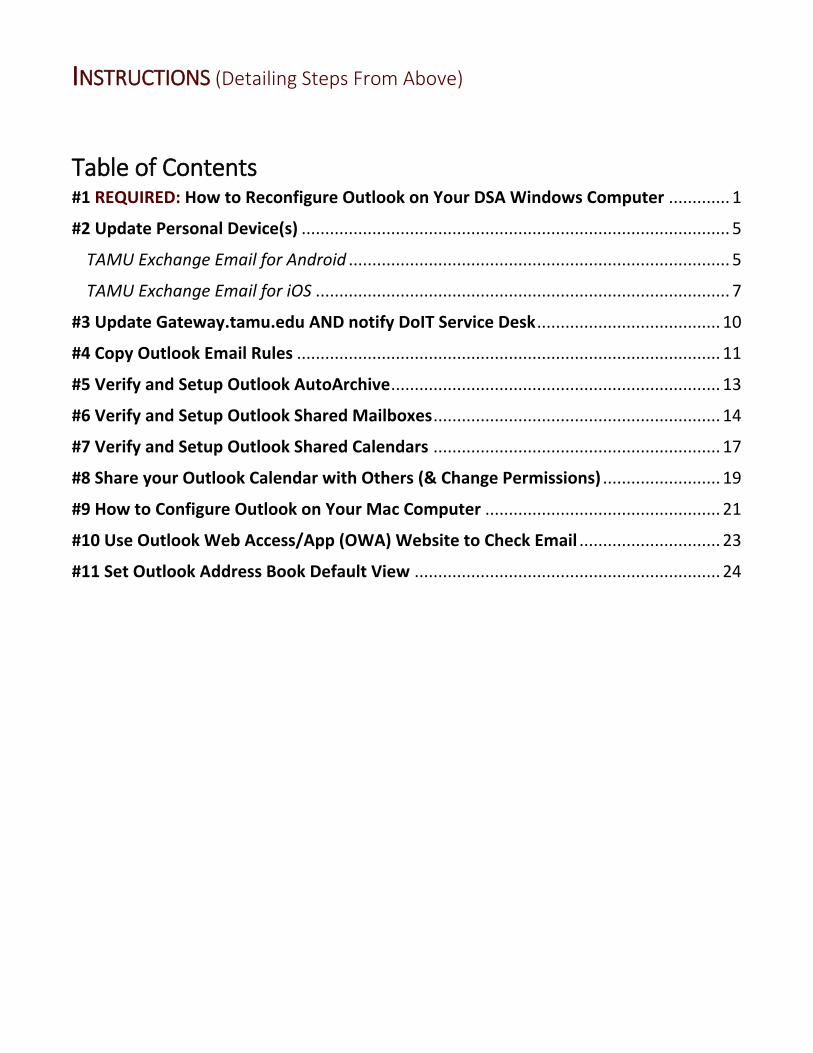
INSTRUCTIONS (Detailing Steps From Above)
Table of Contents #1 REQUIRED: How to Reconfigure Outlook on Your DSA Windows Computer ............. 1
#2 Update Personal Device(s) ........................................................................................... 5
TAMU Exchange Email for Android ................................................................................. 5
TAMU Exchange Email for iOS ........................................................................................ 7
#3 Update Gateway.tamu.edu AND notify DoIT Service Desk ....................................... 10
#4 Copy Outlook Email Rules .......................................................................................... 11
#5 Verify and Setup Outlook AutoArchive ...................................................................... 13
#6 Verify and Setup Outlook Shared Mailboxes ............................................................. 14
#7 Verify and Setup Outlook Shared Calendars ............................................................. 17
#8 Share your Outlook Calendar with Others (& Change Permissions) ......................... 19
#9 How to Configure Outlook on Your Mac Computer .................................................. 21
#10 Use Outlook Web Access/App (OWA) Website to Check Email .............................. 23
#11 Set Outlook Address Book Default View ................................................................. 24

1
#1 REQUIRED: How to Reconfigure Outlook on Your DSA Windows Computer (Done ON your department’s migration day)
1. Log off of your DSA Windows computer and then log back on.
2. The “Welcome to Outlook 2013” wizard will start automatically; press Next.
3. Leave “Yes” selected; press Next.
4. Leave “E-mail Account” selected, you should see your name and email address; press Next.
2
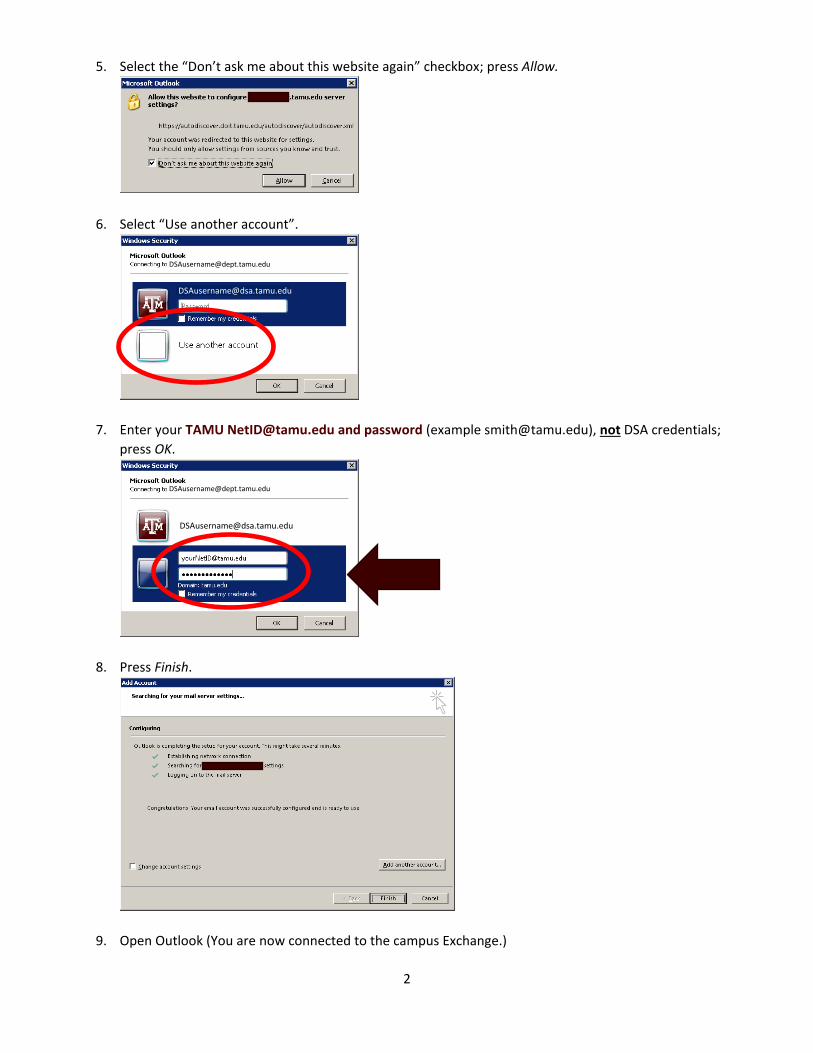
5. Select the “Don’t ask me about this website again” checkbox; press Allow.
6. Select “Use another account”.
7. Enter your TAMU [email protected] and password (example [email protected]), not DSA credentials;
press OK.
8. Press Finish.
9. Open Outlook (You are now connected to the campus Exchange.)
3
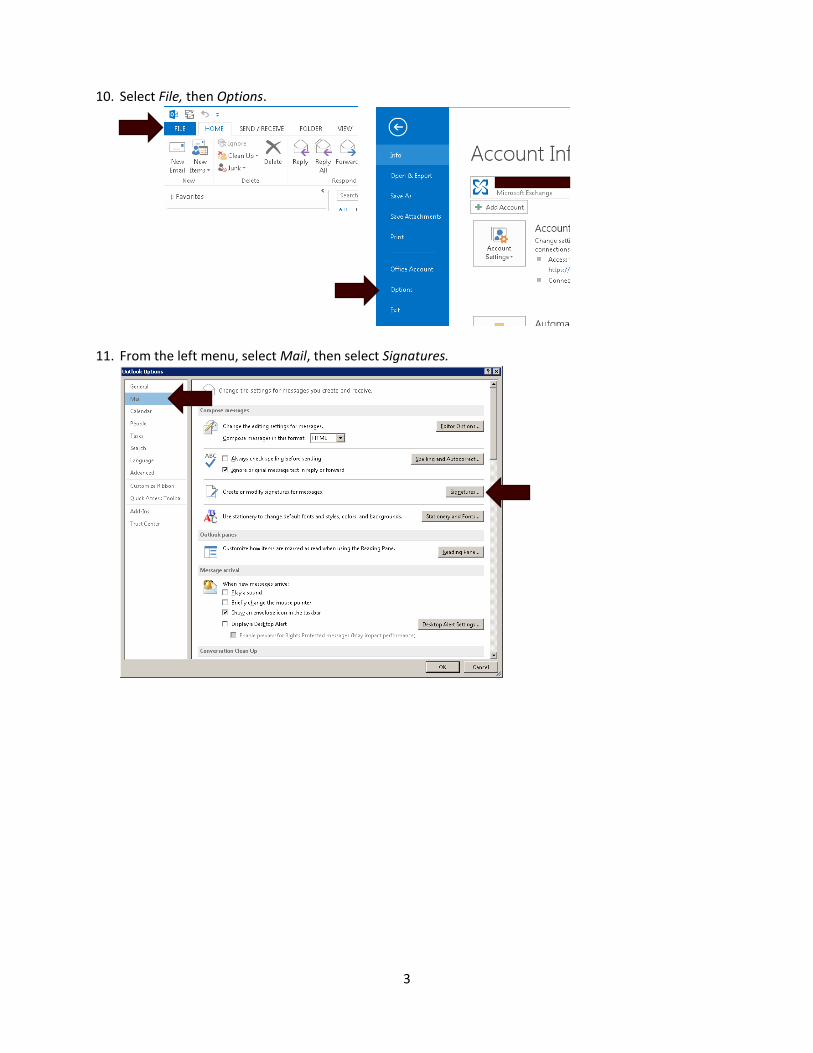
10. Select File, then Options.
11. From the left menu, select Mail, then select Signatures.
4
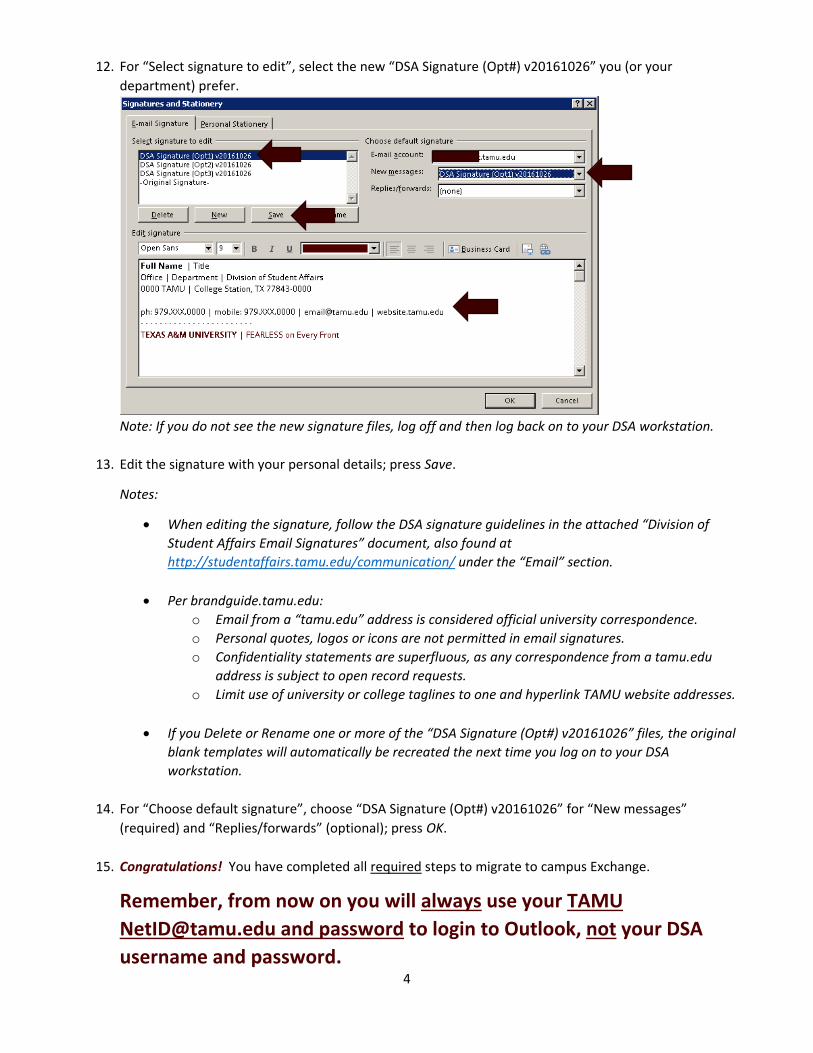
12. For “Select signature to edit”, select the new “DSA Signature (Opt#) v20161026” you (or your
department) prefer.
Note: If you do not see the new signature files, log off and then log back on to your DSA workstation.
13. Edit the signature with your personal details; press Save.
Notes:
When editing the signature, follow the DSA signature guidelines in the attached “Division of
Student Affairs Email Signatures” document, also found at
http://studentaffairs.tamu.edu/communication/ under the “Email” section.
Per brandguide.tamu.edu:
o Email from a “tamu.edu” address is considered official university correspondence.
o Personal quotes, logos or icons are not permitted in email signatures.
o Confidentiality statements are superfluous, as any correspondence from a tamu.edu
address is subject to open record requests.
o Limit use of university or college taglines to one and hyperlink TAMU website addresses.
If you Delete or Rename one or more of the “DSA Signature (Opt#) v20161026” files, the original
blank templates will automatically be recreated the next time you log on to your DSA
workstation.
14. For “Choose default signature”, choose “DSA Signature (Opt#) v20161026” for “New messages”
(required) and “Replies/forwards” (optional); press OK.
15. Congratulations! You have completed all required steps to migrate to campus Exchange.
Remember, from now on you will always use your TAMU
[email protected] and password to login to Outlook, not your DSA
username and password.
5
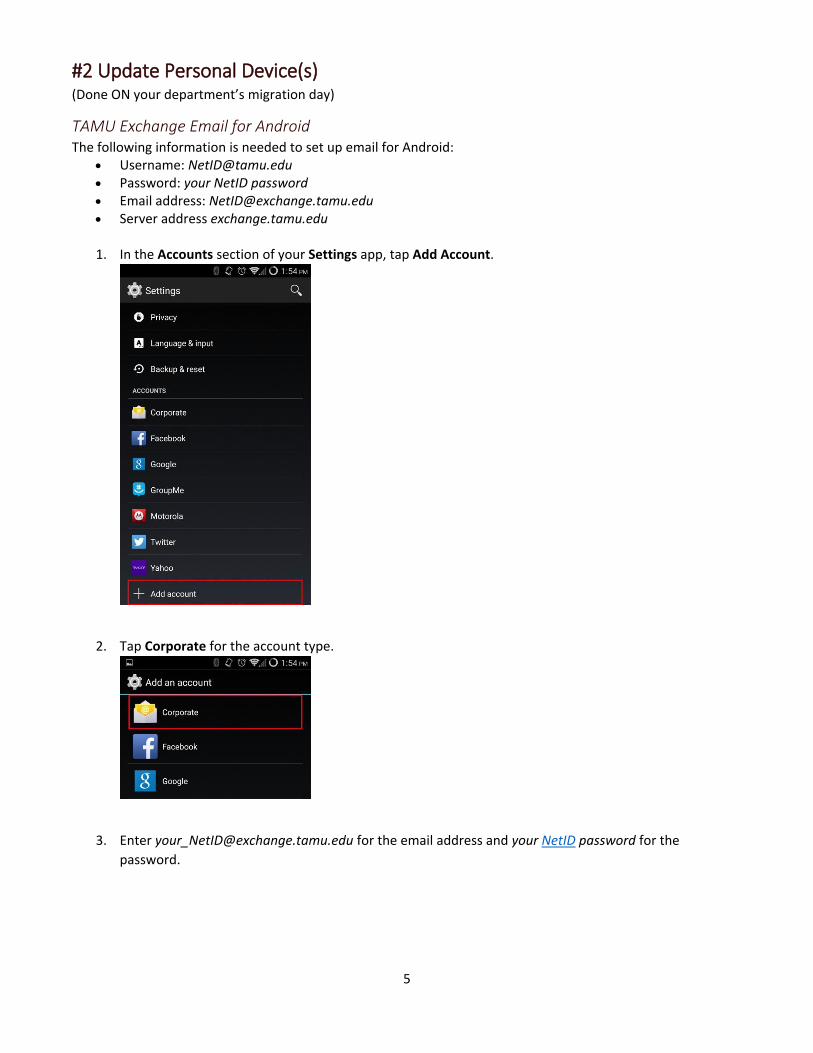
#2 Update Personal Device(s) (Done ON your department’s migration day)
TAMU Exchange Email for Android The following information is needed to set up email for Android:
Username: [email protected] Password: your NetID password Email address: [email protected] Server address exchange.tamu.edu
1. In the Accounts section of your Settings app, tap Add Account.
2. Tap Corporate for the account type.
3. Enter [email protected] for the email address and your NetID password for the
password.
6
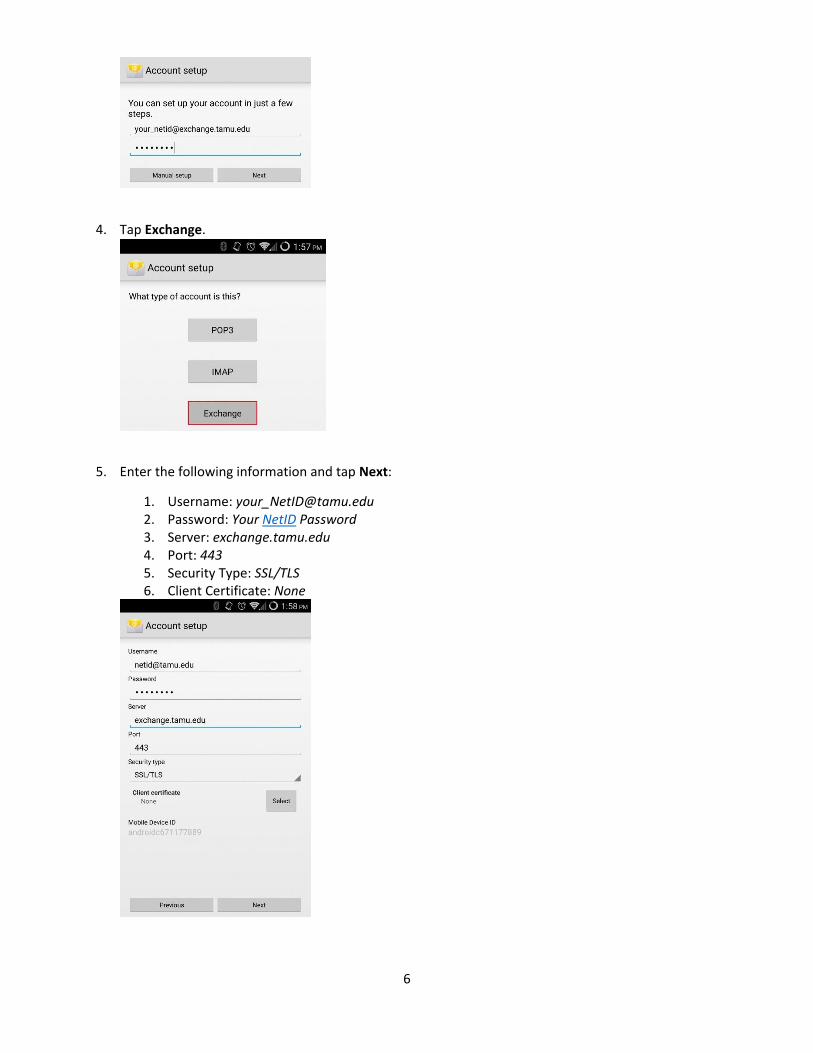
4. Tap Exchange.
5. Enter the following information and tap Next:
1. Username: [email protected] 2. Password: Your NetID Password 3. Server: exchange.tamu.edu 4. Port: 443 5. Security Type: SSL/TLS 6. Client Certificate: None
7
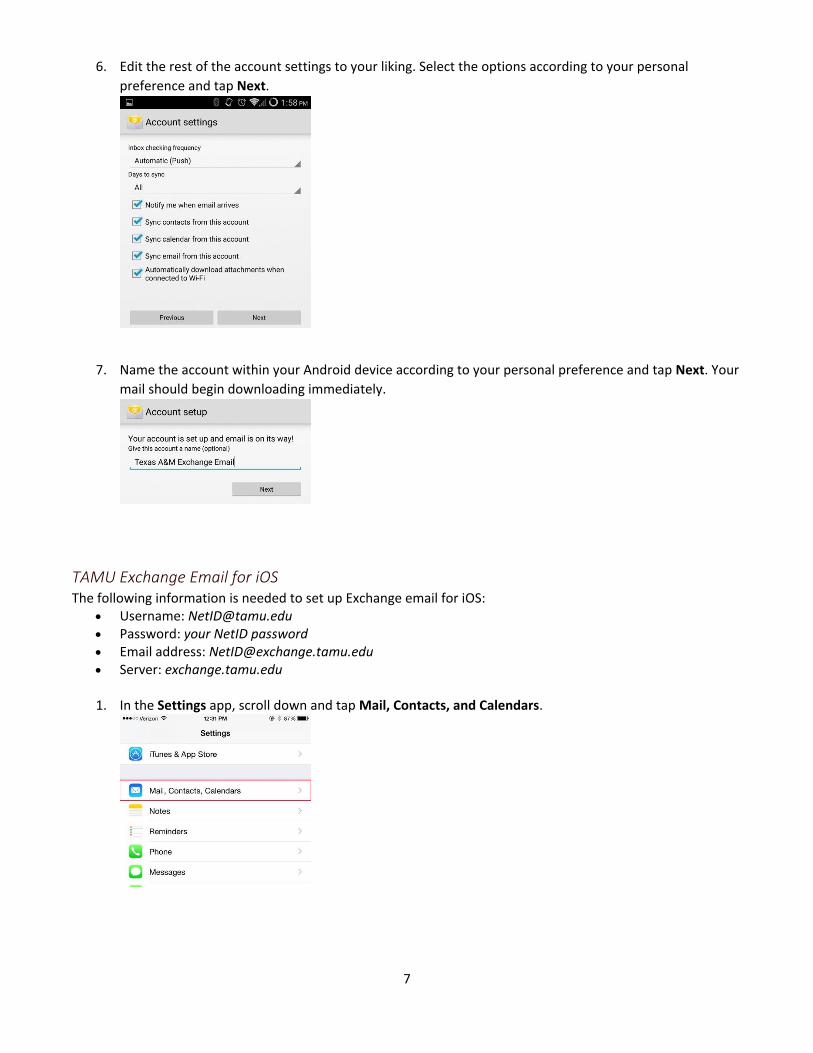
6. Edit the rest of the account settings to your liking. Select the options according to your personal
preference and tap Next.
7. Name the account within your Android device according to your personal preference and tap Next. Your
mail should begin downloading immediately.
TAMU Exchange Email for iOS The following information is needed to set up Exchange email for iOS:
Username: [email protected] Password: your NetID password Email address: [email protected] Server: exchange.tamu.edu
1. In the Settings app, scroll down and tap Mail, Contacts, and Calendars.
8
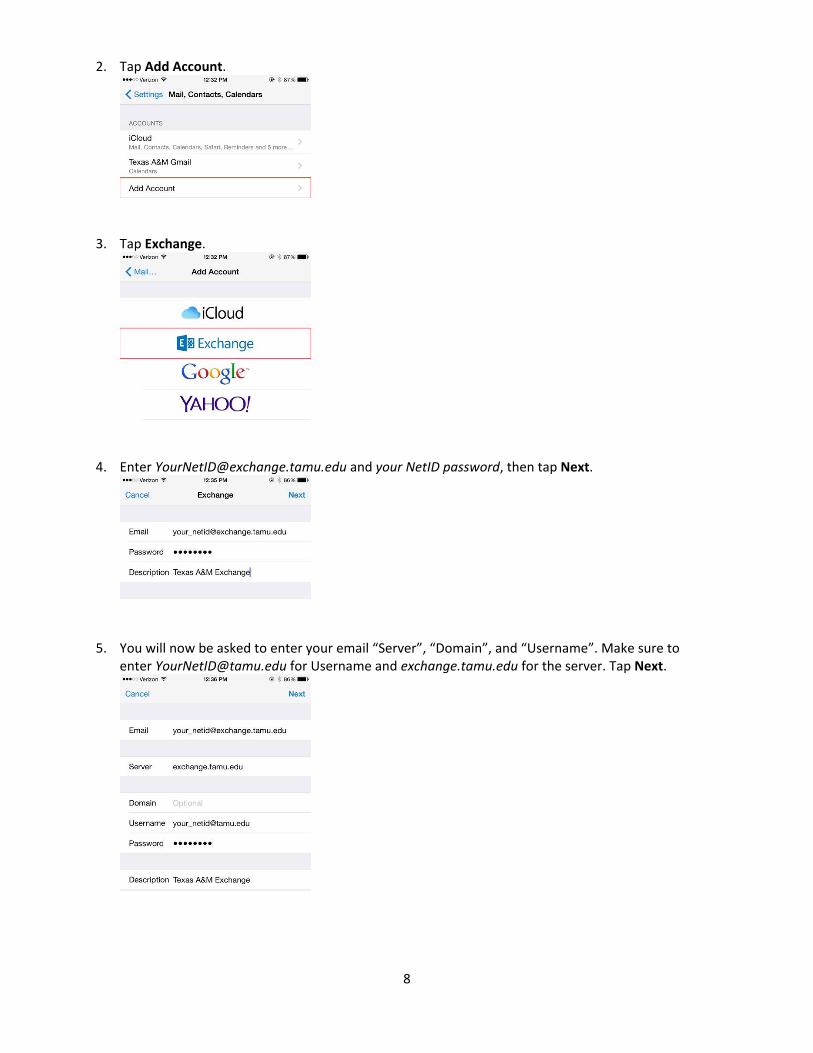
2. Tap Add Account.
3. Tap Exchange.
4. Enter [email protected] and your NetID password, then tap Next.
5. You will now be asked to enter your email “Server”, “Domain”, and “Username”. Make sure to enter [email protected] for Username and exchange.tamu.edu for the server. Tap Next.
9
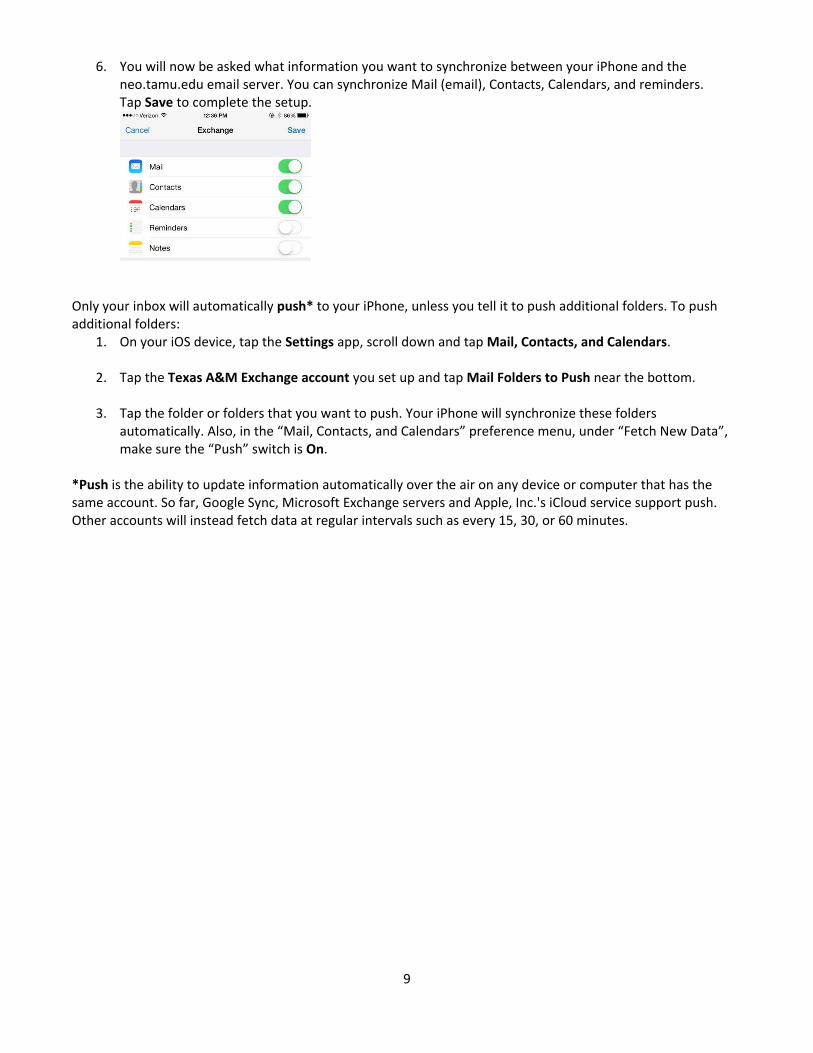
6. You will now be asked what information you want to synchronize between your iPhone and the neo.tamu.edu email server. You can synchronize Mail (email), Contacts, Calendars, and reminders. Tap Save to complete the setup.
Only your inbox will automatically push* to your iPhone, unless you tell it to push additional folders. To push additional folders:
1. On your iOS device, tap the Settings app, scroll down and tap Mail, Contacts, and Calendars.
2. Tap the Texas A&M Exchange account you set up and tap Mail Folders to Push near the bottom.
3. Tap the folder or folders that you want to push. Your iPhone will synchronize these folders automatically. Also, in the “Mail, Contacts, and Calendars” preference menu, under “Fetch New Data”, make sure the “Push” switch is On.
*Push is the ability to update information automatically over the air on any device or computer that has the same account. So far, Google Sync, Microsoft Exchange servers and Apple, Inc.'s iCloud service support push. Other accounts will instead fetch data at regular intervals such as every 15, 30, or 60 minutes.

10
#3 Update Gateway.tamu.edu AND notify DoIT Service Desk (Done ON your department’s migration day)
You may continue using your [email protected] as your primary email address but AFTER the migration you must
update your campus email settings and then notify DoIT.
1. Login to http://gateway.tamu.edu with your TAMU NetID and password.
2. Select the Email Settings tab.
3. Under the section “Forwarding Settings for Your Published Email Address ([email protected])”, select the
bullet for “Sent to and stored in my Texas A&M Exchange mailbox”.
4. Press the Save button.
5. Notify the DoIT Service Desk by emailing [email protected] or by calling 979-862-7990. Specify that
you have been migrated to the campus Exchange, want to continue using your [email protected] as your
primary address, and have updated Gateway.tamu.edu.
11
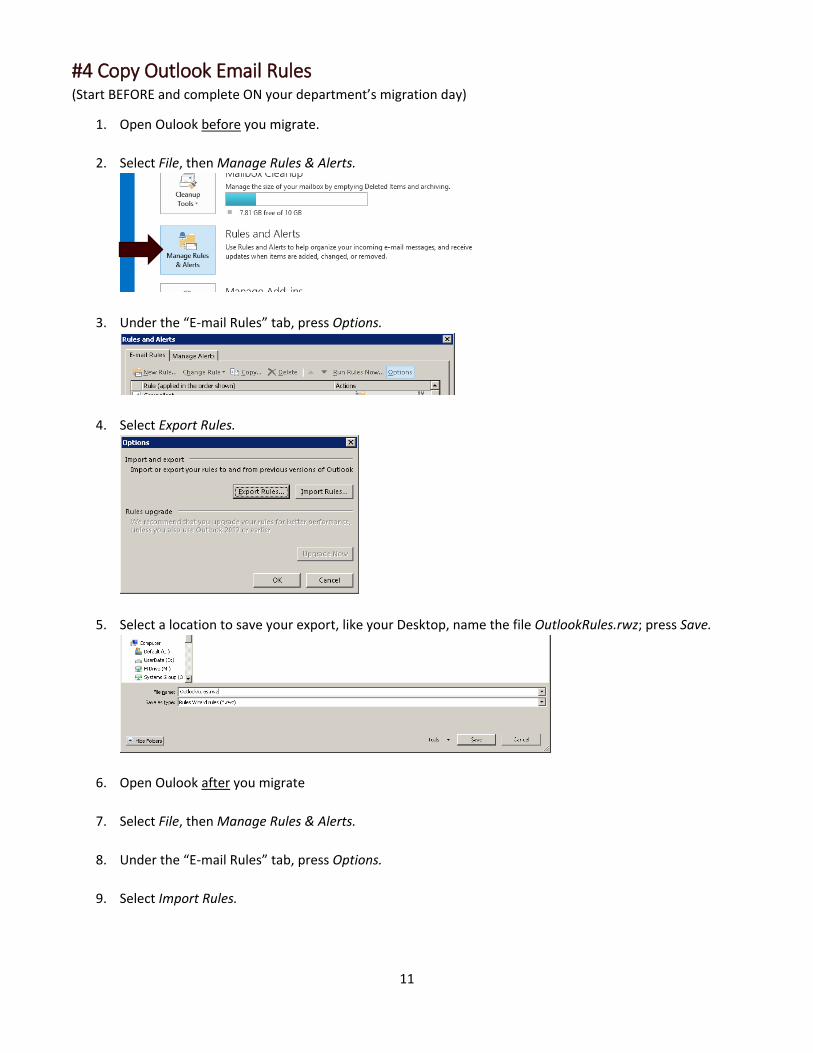
#4 Copy Outlook Email Rules (Start BEFORE and complete ON your department’s migration day)
1. Open Oulook before you migrate.
2. Select File, then Manage Rules & Alerts.
3. Under the “E-mail Rules” tab, press Options.
4. Select Export Rules.
5. Select a location to save your export, like your Desktop, name the file OutlookRules.rwz; press Save.
6. Open Oulook after you migrate
7. Select File, then Manage Rules & Alerts.
8. Under the “E-mail Rules” tab, press Options.
9. Select Import Rules.

12
10. Select Desktop (or the location you saved the export), select the OutlookRules.rwz file, press Open.
11. Press OK, then OK.
13
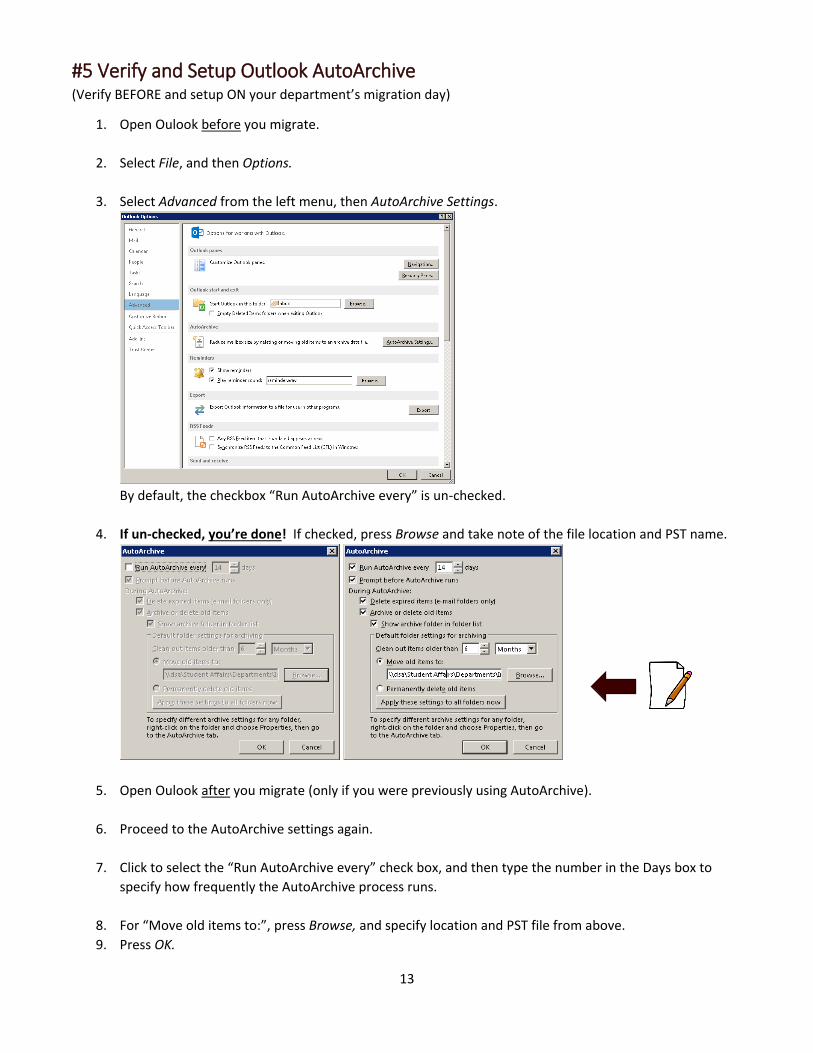
#5 Verify and Setup Outlook AutoArchive (Verify BEFORE and setup ON your department’s migration day)
1. Open Oulook before you migrate.
2. Select File, and then Options.
3. Select Advanced from the left menu, then AutoArchive Settings.
By default, the checkbox “Run AutoArchive every” is un-checked.
4. If un-checked, you’re done! If checked, press Browse and take note of the file location and PST name.
5. Open Oulook after you migrate (only if you were previously using AutoArchive).
6. Proceed to the AutoArchive settings again.
7. Click to select the “Run AutoArchive every” check box, and then type the number in the Days box to
specify how frequently the AutoArchive process runs.
8. For “Move old items to:”, press Browse, and specify location and PST file from above.
9. Press OK.
14
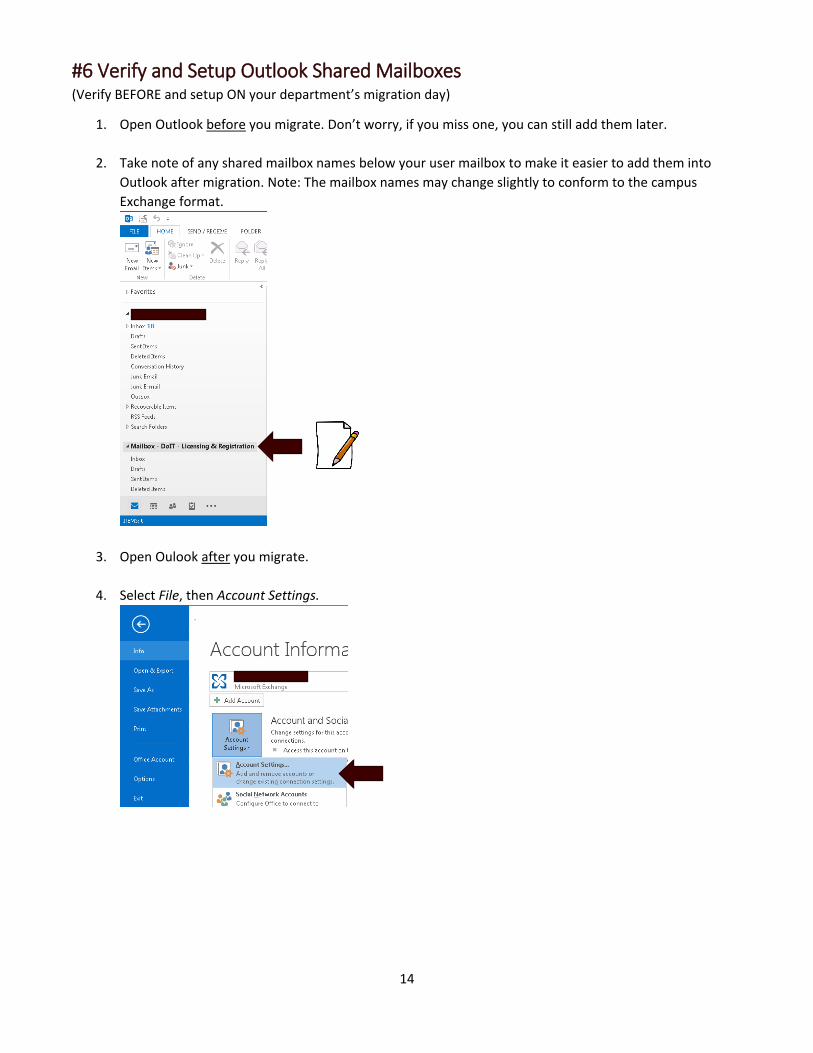
#6 Verify and Setup Outlook Shared Mailboxes (Verify BEFORE and setup ON your department’s migration day)
1. Open Outlook before you migrate. Don’t worry, if you miss one, you can still add them later.
2. Take note of any shared mailbox names below your user mailbox to make it easier to add them into
Outlook after migration. Note: The mailbox names may change slightly to conform to the campus
Exchange format.
3. Open Oulook after you migrate.
4. Select File, then Account Settings.
15
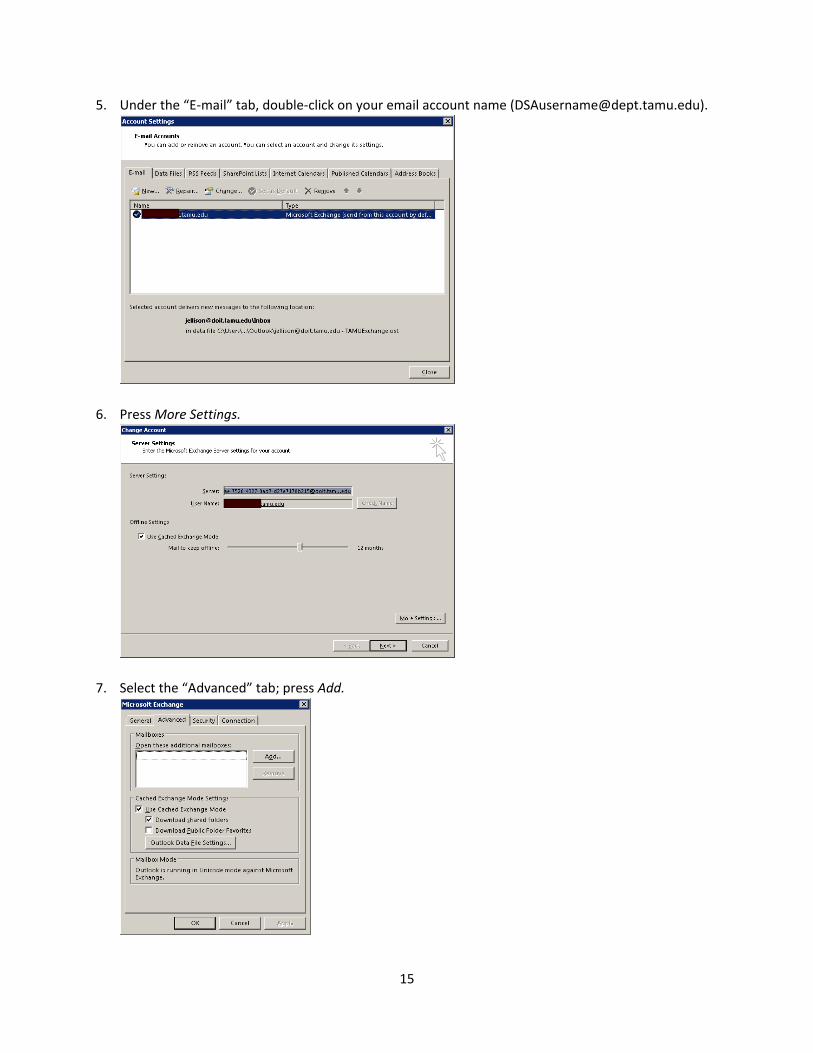
5. Under the “E-mail” tab, double-click on your email account name ([email protected]).
6. Press More Settings.
7. Select the “Advanced” tab; press Add.
16
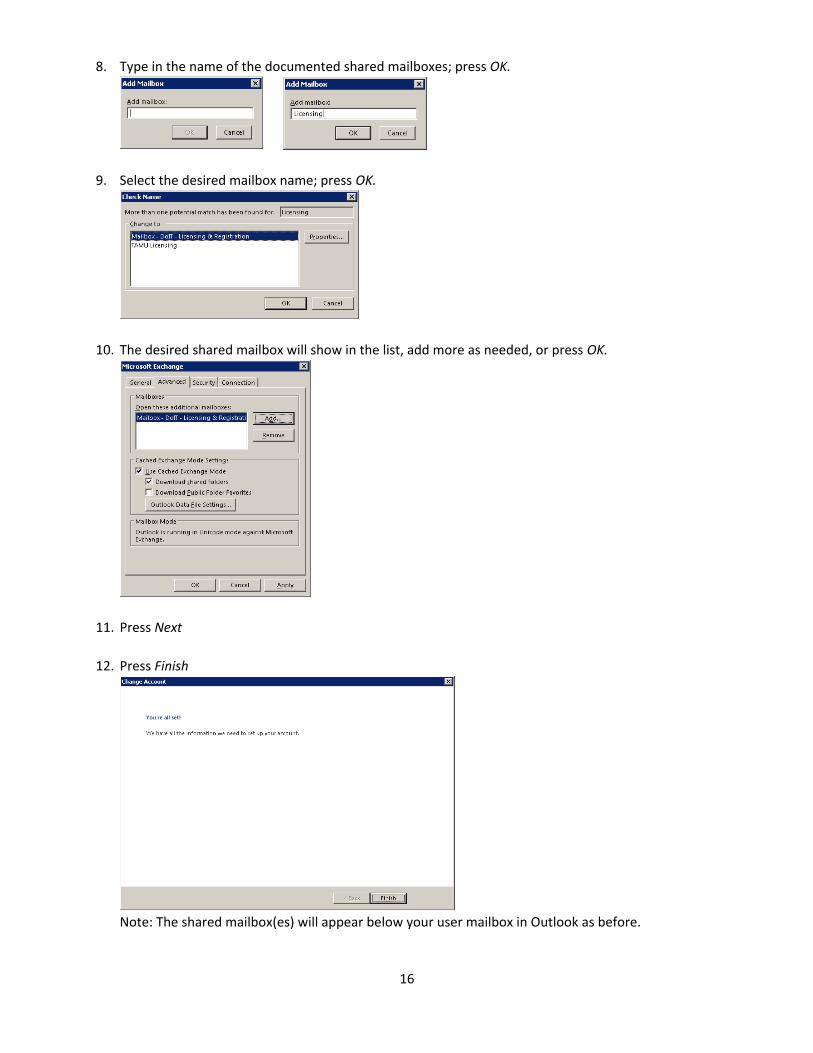
8. Type in the name of the documented shared mailboxes; press OK.
9. Select the desired mailbox name; press OK.
10. The desired shared mailbox will show in the list, add more as needed, or press OK.
11. Press Next
12. Press Finish
Note: The shared mailbox(es) will appear below your user mailbox in Outlook as before.
17
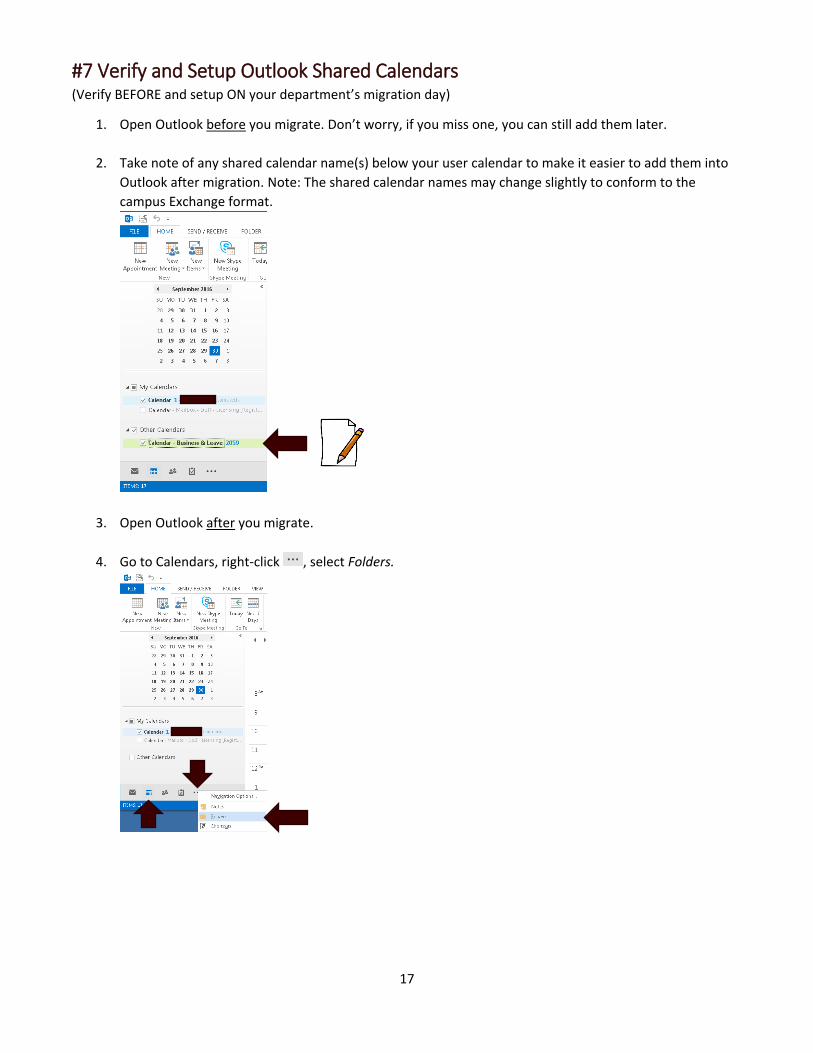
#7 Verify and Setup Outlook Shared Calendars (Verify BEFORE and setup ON your department’s migration day)
1. Open Outlook before you migrate. Don’t worry, if you miss one, you can still add them later.
2. Take note of any shared calendar name(s) below your user calendar to make it easier to add them into
Outlook after migration. Note: The shared calendar names may change slightly to conform to the
campus Exchange format.
3. Open Outlook after you migrate.
4. Go to Calendars, right-click , select Folders.
18
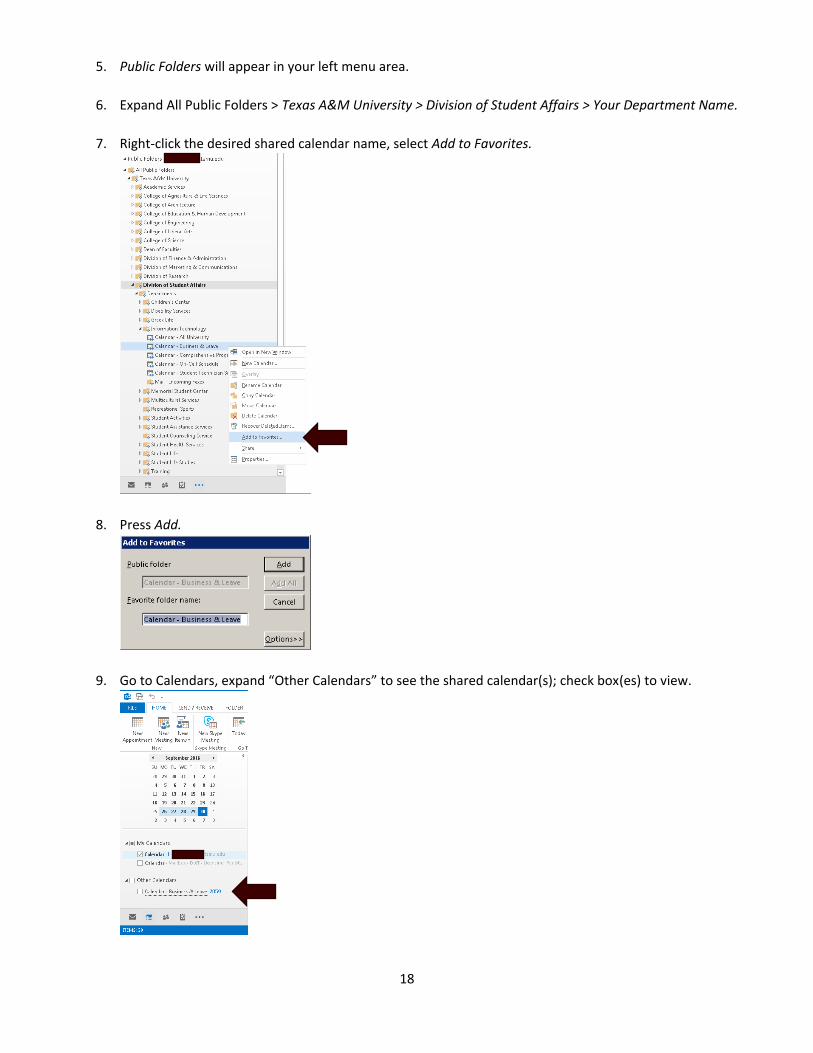
5. Public Folders will appear in your left menu area.
6. Expand All Public Folders > Texas A&M University > Division of Student Affairs > Your Department Name.
7. Right-click the desired shared calendar name, select Add to Favorites.
8. Press Add.
9. Go to Calendars, expand “Other Calendars” to see the shared calendar(s); check box(es) to view.
19
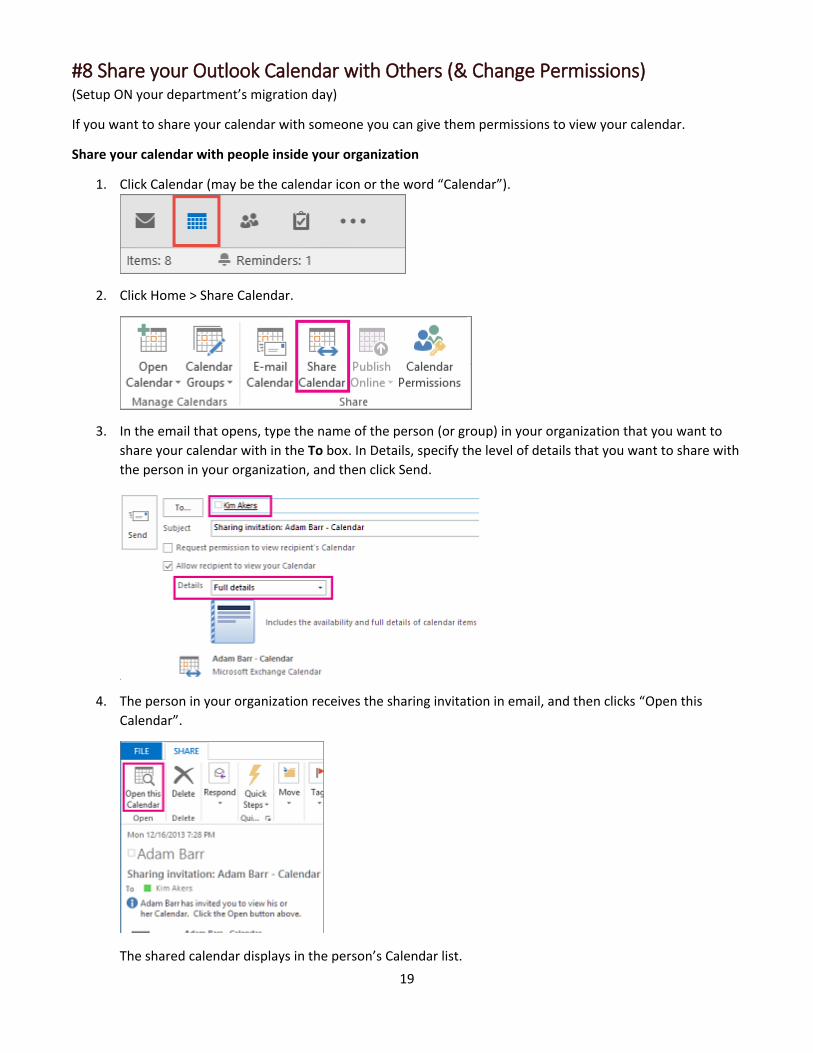
#8 Share your Outlook Calendar with Others (& Change Permissions) (Setup ON your department’s migration day)
If you want to share your calendar with someone you can give them permissions to view your calendar.
Share your calendar with people inside your organization
1. Click Calendar (may be the calendar icon or the word “Calendar”).
2. Click Home > Share Calendar.
3. In the email that opens, type the name of the person (or group) in your organization that you want to
share your calendar with in the To box. In Details, specify the level of details that you want to share with
the person in your organization, and then click Send.
4. The person in your organization receives the sharing invitation in email, and then clicks “Open this
Calendar”.
The shared calendar displays in the person’s Calendar list.
20
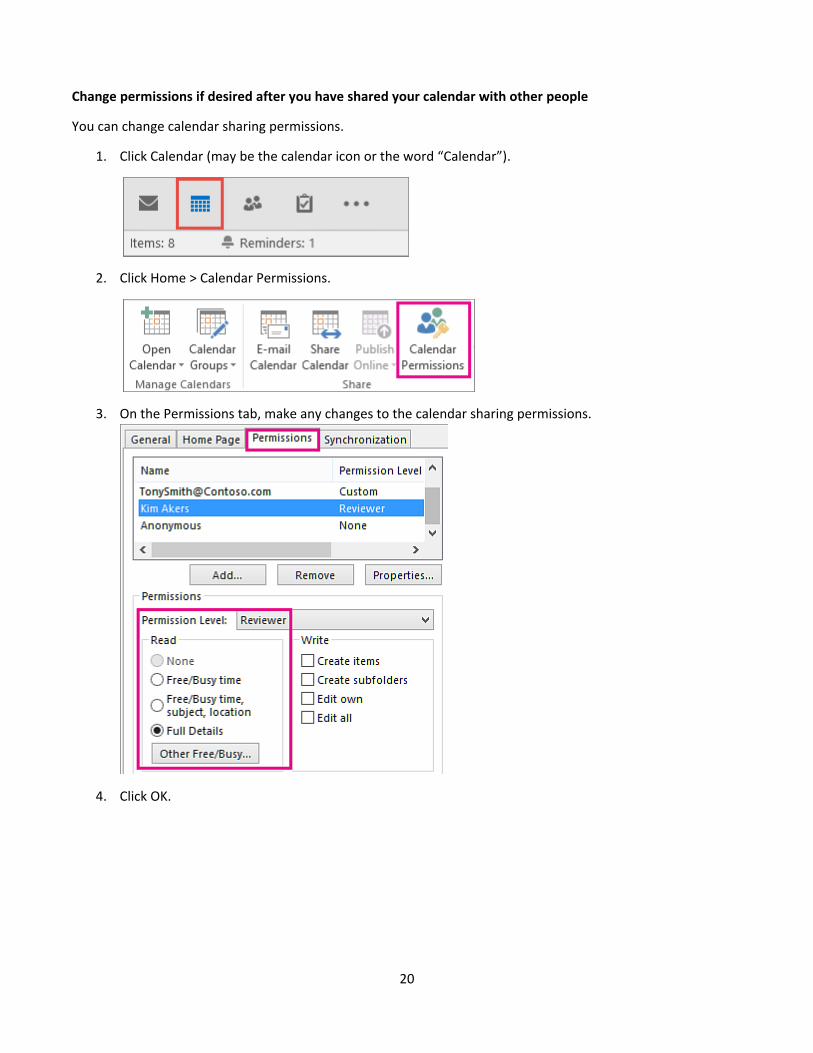
Change permissions if desired after you have shared your calendar with other people
You can change calendar sharing permissions.
1. Click Calendar (may be the calendar icon or the word “Calendar”).
2. Click Home > Calendar Permissions.
3. On the Permissions tab, make any changes to the calendar sharing permissions.
4. Click OK.
21
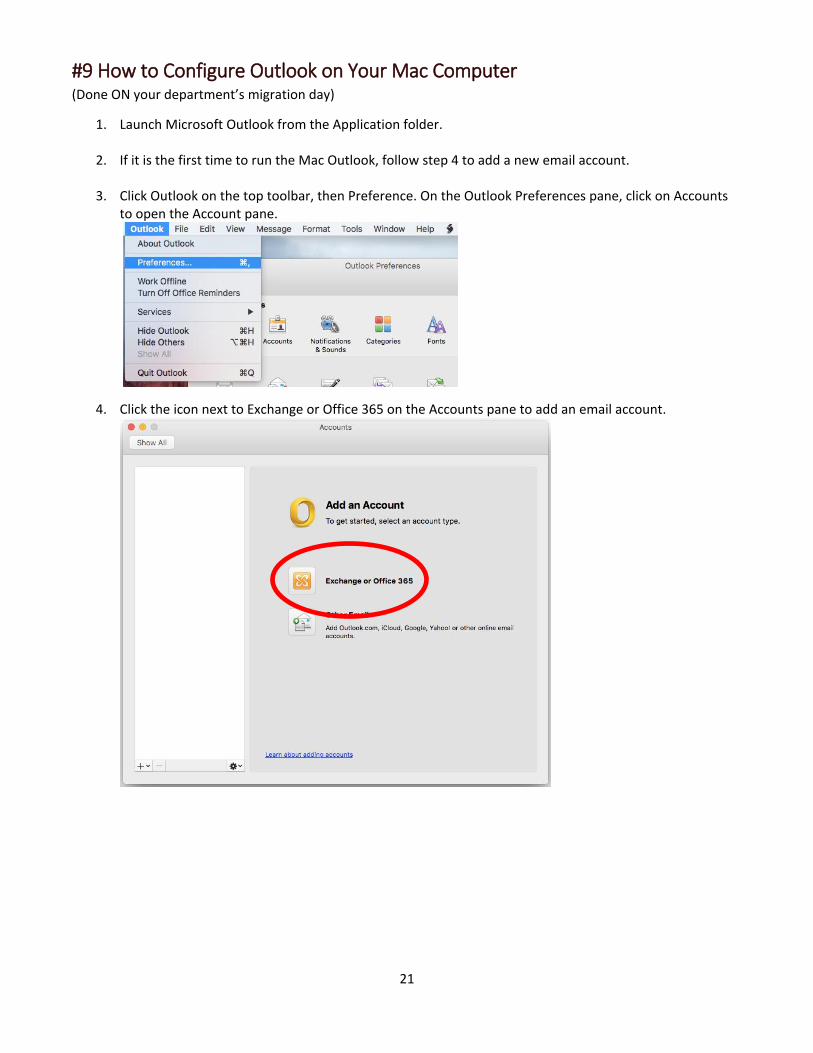
#9 How to Configure Outlook on Your Mac Computer (Done ON your department’s migration day)
1. Launch Microsoft Outlook from the Application folder.
2. If it is the first time to run the Mac Outlook, follow step 4 to add a new email account.
3. Click Outlook on the top toolbar, then Preference. On the Outlook Preferences pane, click on Accounts to open the Account pane.
4. Click the icon next to Exchange or Office 365 on the Accounts pane to add an email account.
22
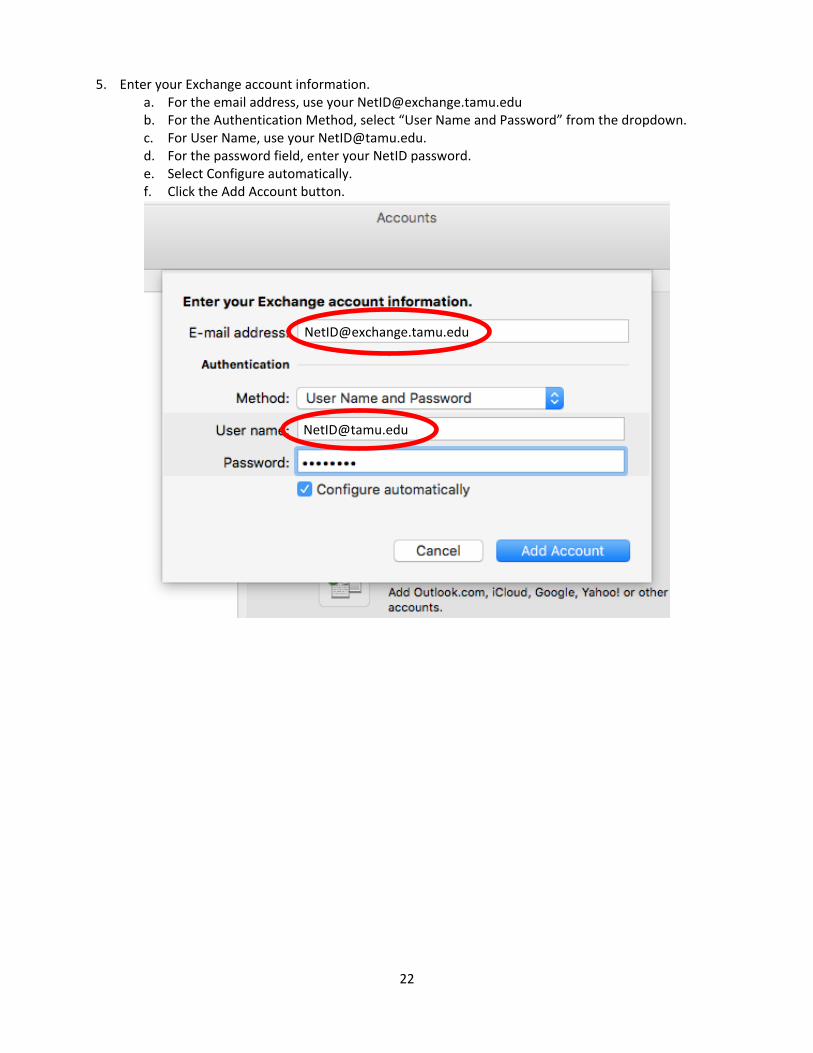
5. Enter your Exchange account information.
a. For the email address, use your [email protected] b. For the Authentication Method, select “User Name and Password” from the dropdown. c. For User Name, use your [email protected]. d. For the password field, enter your NetID password. e. Select Configure automatically. f. Click the Add Account button.
23
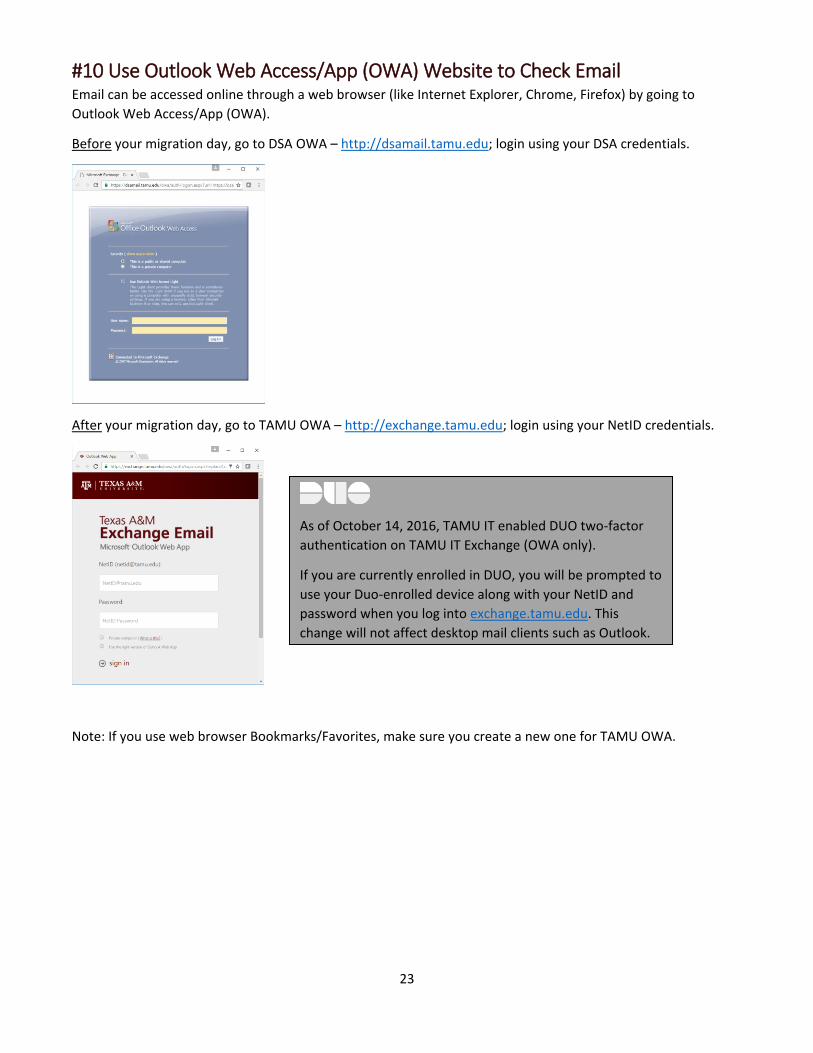
#10 Use Outlook Web Access/App (OWA) Website to Check Email Email can be accessed online through a web browser (like Internet Explorer, Chrome, Firefox) by going to
Outlook Web Access/App (OWA).
Before your migration day, go to DSA OWA – http://dsamail.tamu.edu; login using your DSA credentials.
After your migration day, go to TAMU OWA – http://exchange.tamu.edu; login using your NetID credentials.
Note: If you use web browser Bookmarks/Favorites, make sure you create a new one for TAMU OWA.
As of October 14, 2016, TAMU IT enabled DUO two-factor
authentication on TAMU IT Exchange (OWA only).
If you are currently enrolled in DUO, you will be prompted to
use your Duo-enrolled device along with your NetID and
password when you log into exchange.tamu.edu. This
change will not affect desktop mail clients such as Outlook.
24
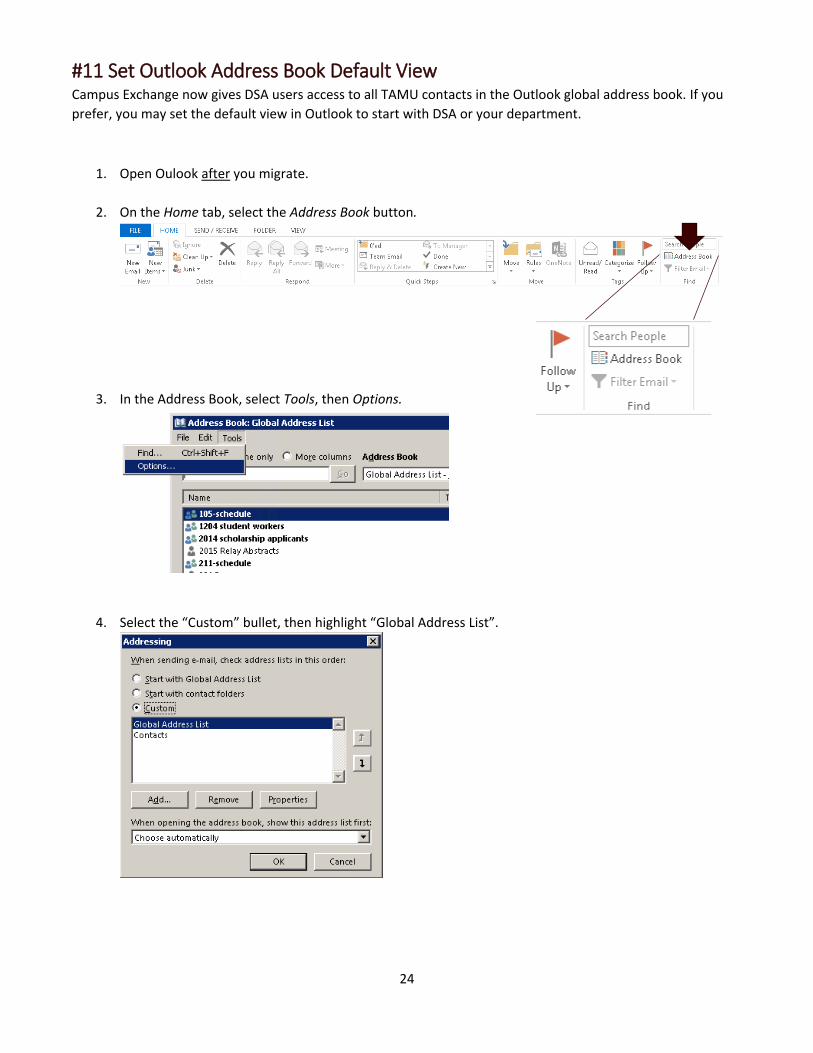
#11 Set Outlook Address Book Default View Campus Exchange now gives DSA users access to all TAMU contacts in the Outlook global address book. If you
prefer, you may set the default view in Outlook to start with DSA or your department.
1. Open Oulook after you migrate.
2. On the Home tab, select the Address Book button.
3. In the Address Book, select Tools, then Options.
4. Select the “Custom” bullet, then highlight “Global Address List”.
25
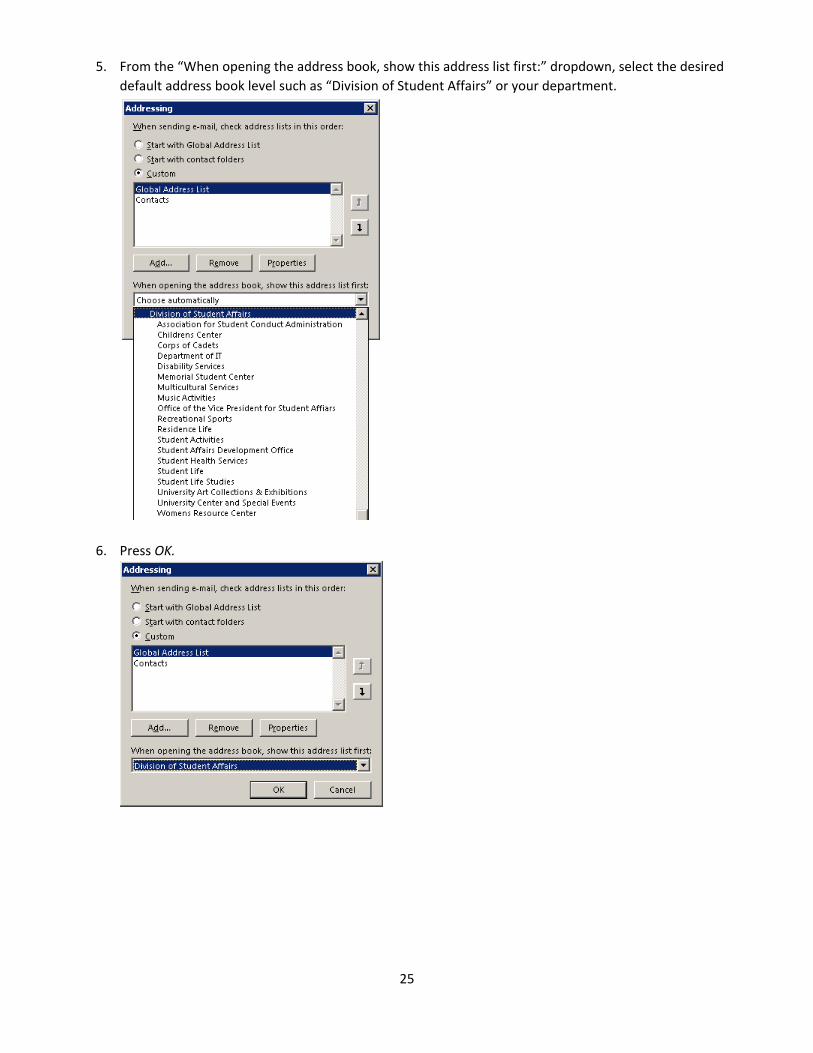
5. From the “When opening the address book, show this address list first:” dropdown, select the desired
default address book level such as “Division of Student Affairs” or your department.
6. Press OK.