Embed Size (px)
Citation preview
DGX STATION
DU-08255-001 _v2.4 | July 2018
User Guide
www.nvidia.comDGX Station DU-08255-001 _v2.4 | ii
TABLE OF CONTENTS
About this Guide..................................................................................................vChapter 1. Introduction to the NVIDIA® DGX Station™................................................... 1
1.1. What's in the Box.........................................................................................21.2. DGX OS Desktop Software Summary...................................................................21.3. DGX Station Hardware Summary....................................................................... 2
Chapter 2. Setting Up the NVIDIA DGX Station............................................................ 42.1. Siting the DGX Station................................................................................... 42.2. Removing or Replacing the Packing Inside the DGX Station....................................... 52.3. Connecting and Powering on the DGX Station....................................................... 72.4. Completing the Initial Ubuntu OS Configuration................................................... 122.5. Adding Support for Additional Languages to the DGX Station....................................122.6. Registering Your DGX Station..........................................................................132.7. Configuring the DGX Station To Use Multiple Displays............................................ 132.8. Enabling Multiple Users to Access the DGX Station Remotely....................................152.9. Preparing the DGX Station for Use with Docker................................................... 15
2.9.1. Enabling Users To Run Docker Containers......................................................152.9.2. Preventing IP Address Conflicts Between Docker and the DGX Station....................16
Chapter 3. Updating DGX Station Software............................................................... 183.1. Updating DGX Station Software from the Details Window........................................183.2. Updating DGX Station Software from the Command Line........................................ 213.3. Available DGX Station Software Updates............................................................21
3.3.1. Updates to Docker and Software Exclusive to the DGX Station............................ 223.3.2. Updates to the Ubuntu Software on the DGX Station........................................23
3.4. Checking for Updates to DGX Station Software.................................................... 233.5. Getting Release Information for DGX Station.......................................................243.6. Updating Software on an Air-Gapped DGX Station System....................................... 25
3.6.1. Providing DGX Station Software Updates from a Private Repository....................... 253.6.2. Loading a Container Image onto an Air-Gapped DGX Station System......................25
Chapter 4. Maintaining and Servicing the NVIDIA DGX Station........................................274.1. Problem Resolution and Customer Care............................................................. 274.2. Cleaning the Mesh Filter Under the DGX Station.................................................. 274.3. Collecting Information for Troubleshooting the DGX Station.....................................284.4. Checking the Health of the DGX Station............................................................ 294.5. Replacing the System and Components..............................................................29
4.5.1. Replacing the System............................................................................. 304.5.2. Repacking the DGX Station for Shipment...................................................... 304.5.3. Replacing a DIMM.................................................................................. 33
4.6. Maintaining the DGX Station Persistent Storage................................................... 384.6.1. Changing the RAID Level of the RAID Array................................................... 384.6.2. Checking the Status of the DGX Station RAID Array..........................................39

www.nvidia.comDGX Station DU-08255-001 _v2.4 | iii
4.6.3. Checking the Status of the DGX Station SSDs................................................. 404.6.4. Replacing an SSD...................................................................................414.6.5. Rebuilding the DGX Station RAID Array........................................................ 44
4.7. Restoring the DGX Station Software Image......................................................... 454.7.1. Obtaining the DGX Station Software ISO Image and Checksum File....................... 464.7.2. Creating a Bootable Installation Medium...................................................... 46
4.7.2.1. Creating a Bootable USB Flash Drive by Using Startup Disk Creator.................. 474.7.2.2. Creating a Bootable USB Flash Drive by Using Akeo Rufus............................. 47
4.7.3. Verifying the Bootable Installation Medium................................................... 494.7.3.1. Verifying a Bootable USB Flash Drive..................................................... 494.7.3.2. Verifying a Bootable DVD-ROM............................................................. 50
4.7.4. Installing the DGX Station Software Image from a USB Flash Drive or DVD-ROM......... 514.8. Updating the DGX Station System BIOS..............................................................524.9. Maintaining the GPU Liquid Cooling System........................................................ 53
4.9.1. Monitoring GPU Temperatures................................................................... 534.9.2. Checking the Level of the Liquid in the GPU Cooling System.............................. 544.9.3. Replenishing the Liquid in the GPU Cooling System..........................................57
Appendix A. Safety............................................................................................. 61A.1. Intended Application Uses............................................................................. 62A.2. General Precautions.................................................................................... 62A.3. Electrical Precautions.................................................................................. 62A.4. Communications Cable Precautions.................................................................. 63A.5. Other Hazards........................................................................................... 64
Appendix B. Connections, Controls, and Indicators..................................................... 65B.1. Front-Panel Connections and Controls...............................................................65B.2. Rear-Panel Connections and Controls................................................................65B.3. LAN Port Indicators..................................................................................... 67B.4. Audio I/O Connections................................................................................. 68
Appendix C. Compliance...................................................................................... 70C.1. DGX Station Model Number........................................................................... 70C.2. Argentina................................................................................................. 70C.3. Australia/New Zealand................................................................................. 70C.4. Brazil...................................................................................................... 71C.5. Canada.................................................................................................... 71C.6. China...................................................................................................... 72C.7. European Union..........................................................................................73C.8. India....................................................................................................... 74C.9. Israel...................................................................................................... 74C.10. Japan.................................................................................................... 75C.11. Russia.................................................................................................... 75C.12. South Africa............................................................................................ 75C.13. South Korea.............................................................................................76C.14. Taiwan................................................................................................... 76
www.nvidia.comDGX Station DU-08255-001 _v2.4 | iv
C.15. United States........................................................................................... 77C.16. United States/Canada.................................................................................78C.17. Vietnam..................................................................................................78
Appendix D. DGX Station Hardware Specifications...................................................... 79D.1. Environmental Conditions..............................................................................79D.2. Component Specifications............................................................................. 79D.3. Mechanical Specifications..............................................................................80D.4. Power Specifications....................................................................................80
www.nvidia.comDGX Station DU-08255-001 _v2.4 | v
ABOUT THIS GUIDE
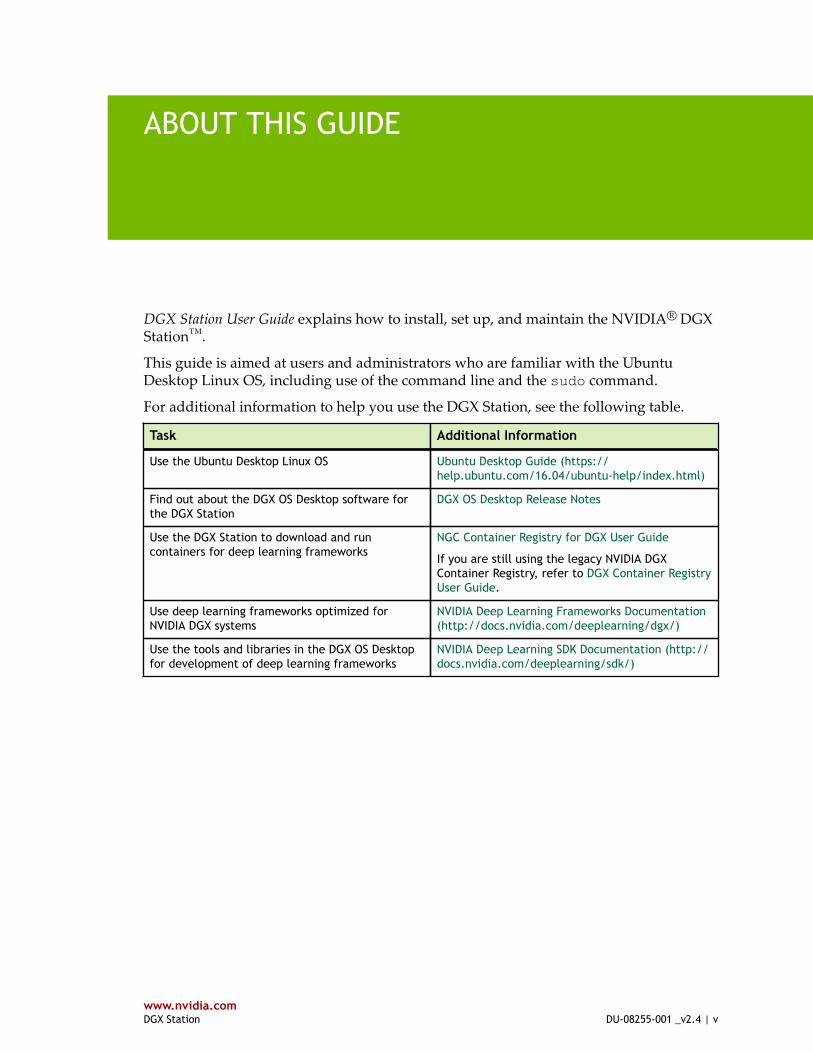
DGX Station User Guide explains how to install, set up, and maintain the NVIDIA® DGXStation™.
This guide is aimed at users and administrators who are familiar with the UbuntuDesktop Linux OS, including use of the command line and the sudo command.
For additional information to help you use the DGX Station, see the following table.
Task Additional Information
Use the Ubuntu Desktop Linux OS Ubuntu Desktop Guide (https://help.ubuntu.com/16.04/ubuntu-help/index.html)
Find out about the DGX OS Desktop software forthe DGX Station
DGX OS Desktop Release Notes
Use the DGX Station to download and runcontainers for deep learning frameworks
NGC Container Registry for DGX User Guide
If you are still using the legacy NVIDIA DGXContainer Registry, refer to DGX Container RegistryUser Guide.
Use deep learning frameworks optimized forNVIDIA DGX systems
NVIDIA Deep Learning Frameworks Documentation(http://docs.nvidia.com/deeplearning/dgx/)
Use the tools and libraries in the DGX OS Desktopfor development of deep learning frameworks
NVIDIA Deep Learning SDK Documentation (http://docs.nvidia.com/deeplearning/sdk/)

About this Guide
www.nvidia.comDGX Station DU-08255-001 _v2.4 | vi
www.nvidia.comDGX Station DU-08255-001 _v2.4 | 1
Chapter 1.INTRODUCTION TO THE NVIDIA® DGXSTATION™
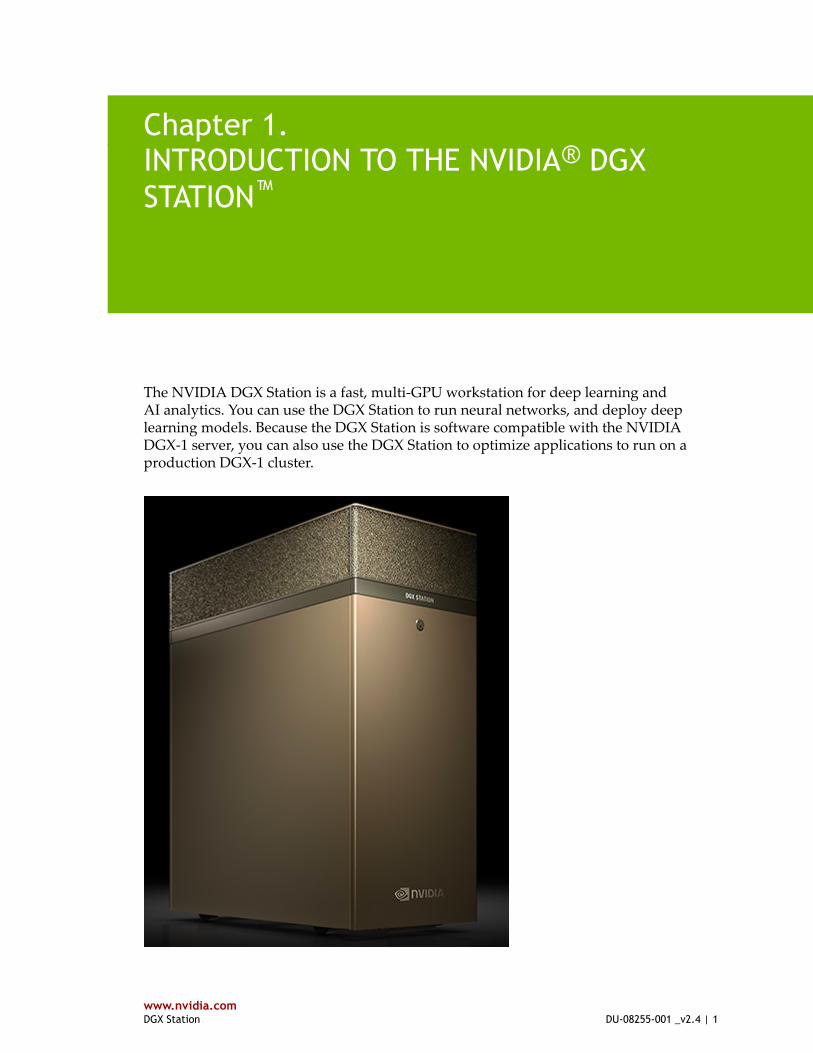
The NVIDIA DGX Station is a fast, multi-GPU workstation for deep learning andAI analytics. You can use the DGX Station to run neural networks, and deploy deeplearning models. Because the DGX Station is software compatible with the NVIDIADGX-1 server, you can also use the DGX Station to optimize applications to run on aproduction DGX-1 cluster.

Introduction to the NVIDIA® DGX Station™
www.nvidia.comDGX Station DU-08255-001 _v2.4 | 2
1.1. What's in the Box‣ DGX Station‣ Accessory boxes containing:
‣ Quick Start Guide‣ AC power cable‣ 3 DisplayPort™ 1.2 to HDMI 2.0 adapters‣ USB recovery flash drive containing a backup copy of the operating system
image and CUDA toolkit‣ DVD-ROM containing source code of open-source software installed on the
DGX Station‣ Toxic Substance Notice and Safety Instructions‣ Declaration of Conformity‣ Repacking Instructions/Intra-Transit
Inspect each piece of equipment in the packing box. If anything is missing or damaged,contact your supplier.
1.2. DGX OS Desktop Software SummaryThe DGX OS Desktop software that is supplied with the DGX Station includes thesoftware that you need for downloading and running containers for deep learningframeworks. The software is already installed on the DGX Station, except wherelicensing requirements mandate that the software be supplied separately. Any softwarethat must be supplied separately is installed automatically when the DGX Station is firstpowered on.
For details about the DGX OS Desktop software, refer to DGX OS Desktop ReleaseNotes.
1.3. DGX Station Hardware Summary
Processors
Component Qty Description
CPU 1 Intel Xeon E5-2698 v4 2.2 GHz (20-Core)
GPU - current units 4 NVIDIA Tesla® V100-DGXS-32GB with 32 GB per GPU (128 GB total) of
GPU memory
GPU - earlier units 4 NVIDIA Tesla V100-DGXS-16GB with 16 GB per GPU (64 GB total) of
GPU memory

Introduction to the NVIDIA® DGX Station™
www.nvidia.comDGX Station DU-08255-001 _v2.4 | 3
System Memory and Storage
Component QtyUnitCapacity
TotalCapacity Description
System memory 8 32 GB 256 GB ECC Registered LRDIMM DDR4 SDRAM
Data storage 3 1.92 TB 5.76 TB 2.5" 6 Gb/s SATA III SSD in RAID 0 configuration
OS storage 1 1.92 TB 1.92 TB 2.5" 6 Gb/s SATA III SSD
www.nvidia.comDGX Station DU-08255-001 _v2.4 | 4
Chapter 2.SETTING UP THE NVIDIA DGX STATION
Before using the DGX Station, ensure that its initial set-up is complete.
2.1. Siting the DGX Station
Caution
The DGX Station weighs 88 lbs (40 kg). Do not attempt to lift the DGX Station.Instead, remove the DGX Station from its packaging and move it into position byrolling it on its fitted casters.
To prevent damage to components inside the DGX Station, do not subject the DGXStation to excessive vibration or mechanical shock. After moving or transporting theDGX Station, visually inspect the NVLINK bridge, which connects the GPUs, and thedrive trays in the drive cage to see if they have shifted out of position. If any of thesecomponents has shifted, reseat the component before operating the DGX Station.
Site the DGX Station in a location that is clean, dust-free, well ventilated, and near anappropriately rated, grounded AC power outlet.
Leave approximately 5" (12.5 cm) of clearance behind and at the sides of the DGX Stationto allow sufficient airflow for cooling the unit.
When operating the DGX Station, keep the ambient temperature and relative humiditywithin the following ranges:
‣ Ambient temperature: 10°C to 30°C (50°F to 86°F)‣ Relative humidity: 10% to 80% (non-condensing)
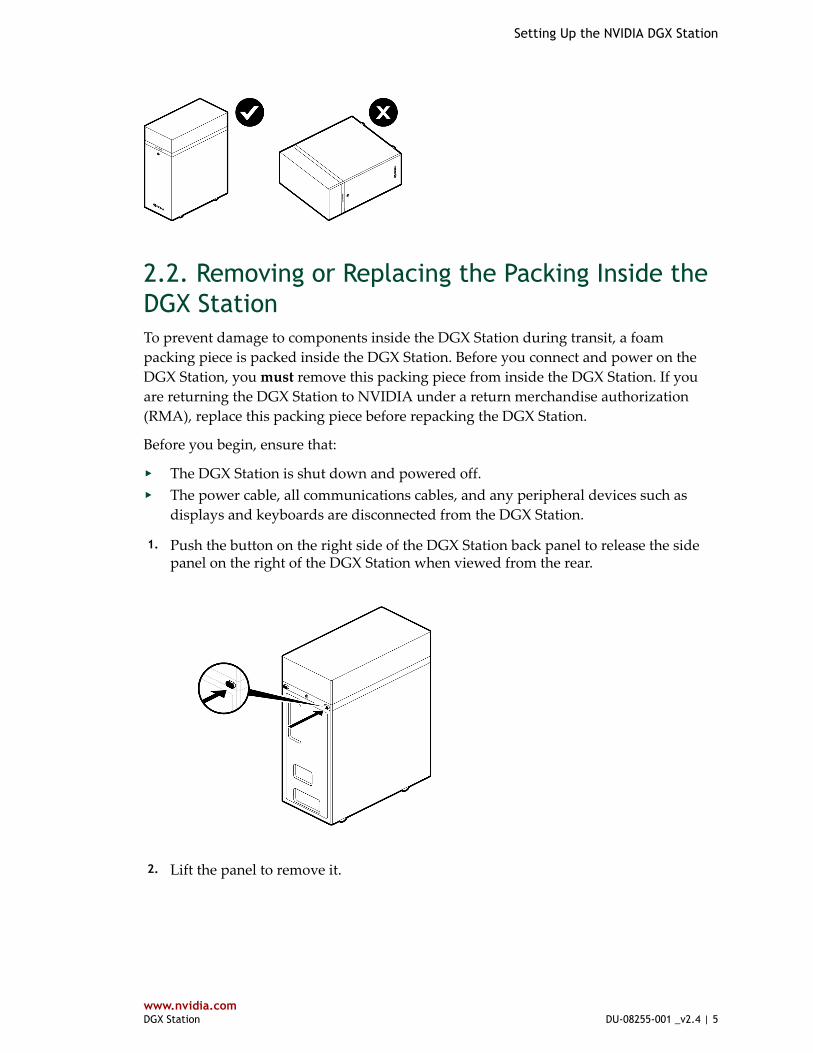
Always keep the DGX Station upright. Do not lay the unit on its side.
Setting Up the NVIDIA DGX Station
www.nvidia.comDGX Station DU-08255-001 _v2.4 | 5
2.2. Removing or Replacing the Packing Inside theDGX StationTo prevent damage to components inside the DGX Station during transit, a foampacking piece is packed inside the DGX Station. Before you connect and power on theDGX Station, you must remove this packing piece from inside the DGX Station. If youare returning the DGX Station to NVIDIA under a return merchandise authorization(RMA), replace this packing piece before repacking the DGX Station.
Before you begin, ensure that:
‣ The DGX Station is shut down and powered off.‣ The power cable, all communications cables, and any peripheral devices such as
displays and keyboards are disconnected from the DGX Station.
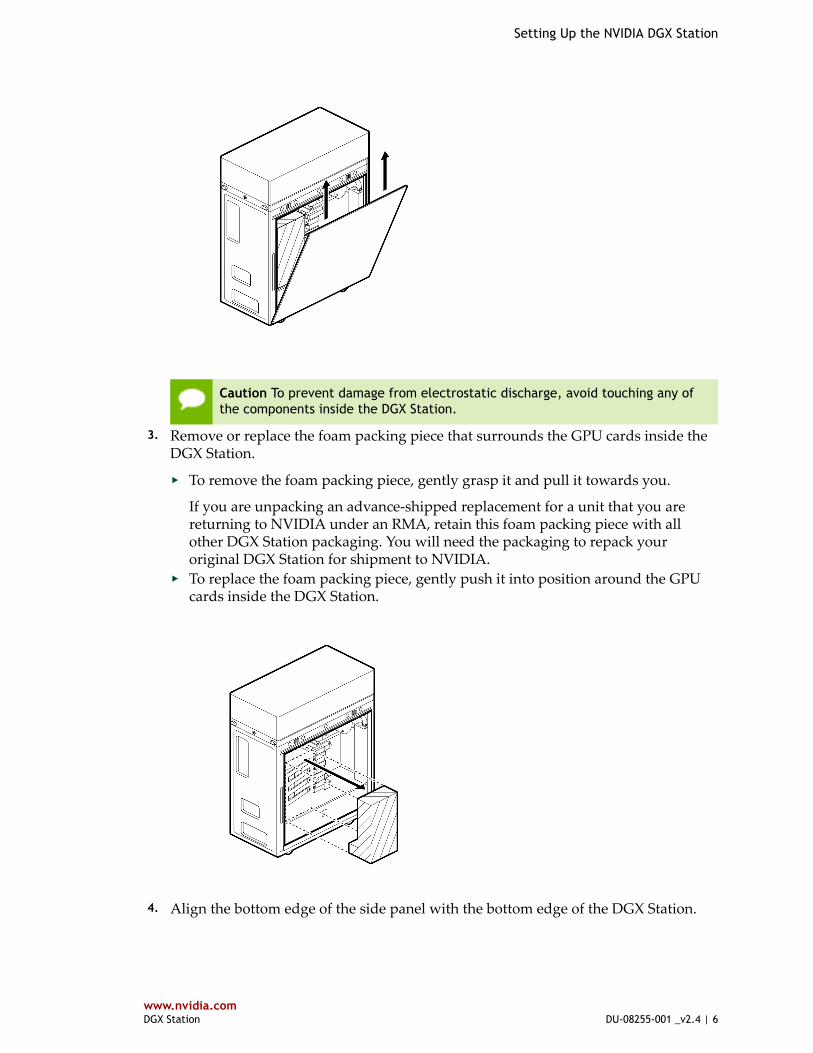
1. Push the button on the right side of the DGX Station back panel to release the sidepanel on the right of the DGX Station when viewed from the rear.
2. Lift the panel to remove it.
Setting Up the NVIDIA DGX Station
www.nvidia.comDGX Station DU-08255-001 _v2.4 | 6
Caution To prevent damage from electrostatic discharge, avoid touching any ofthe components inside the DGX Station.
3. Remove or replace the foam packing piece that surrounds the GPU cards inside theDGX Station.
‣ To remove the foam packing piece, gently grasp it and pull it towards you.
If you are unpacking an advance-shipped replacement for a unit that you arereturning to NVIDIA under an RMA, retain this foam packing piece with allother DGX Station packaging. You will need the packaging to repack youroriginal DGX Station for shipment to NVIDIA.
‣ To replace the foam packing piece, gently push it into position around the GPUcards inside the DGX Station.
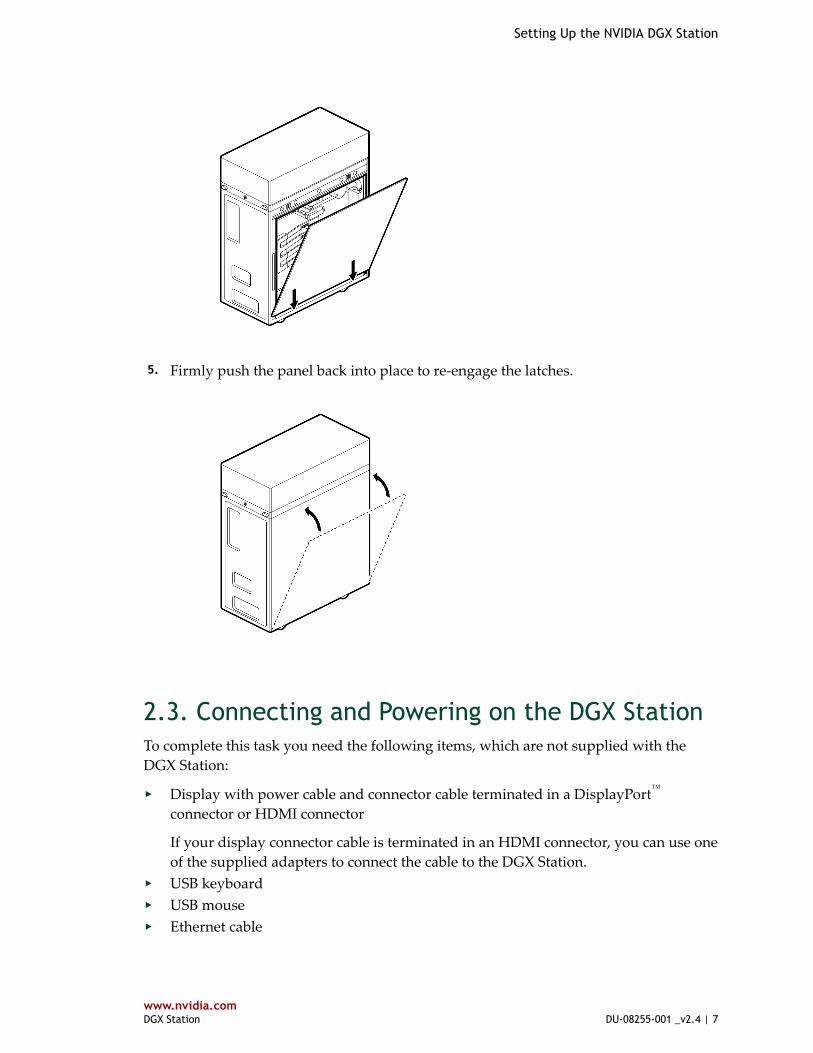
4. Align the bottom edge of the side panel with the bottom edge of the DGX Station.
Setting Up the NVIDIA DGX Station
www.nvidia.comDGX Station DU-08255-001 _v2.4 | 7
5. Firmly push the panel back into place to re-engage the latches.
2.3. Connecting and Powering on the DGX StationTo complete this task you need the following items, which are not supplied with theDGX Station:
‣ Display with power cable and connector cable terminated in a DisplayPort™
connector or HDMI connector
If your display connector cable is terminated in an HDMI connector, you can use oneof the supplied adapters to connect the cable to the DGX Station.
‣ USB keyboard‣ USB mouse‣ Ethernet cable

Setting Up the NVIDIA DGX Station
www.nvidia.comDGX Station DU-08255-001 _v2.4 | 8
1. Connect a display to any DisplayPort connector and a keyboard and mouse to anytwo USB ports.
For initial setup, connect only one display to the DGX Station. After youcomplete the initial Ubuntu OS configuration, you can configure the DGX Stationto use multiple displays. For details, see Configuring the DGX Station To UseMultiple Displays.
2. Use any of the two Ethernet ports to connect the DGX Station to your LAN withInternet connectivity.
Connect only one Ethernet port on the DGX Station to the Internet unless youplan to configure the ports manually and disable DHCP on at least one of theports.
By default, both Ethernet ports on the DGX Station are configured for DHCP.If both the ports are connected simultaneously, each port will get its ownIP address. The IP address that the Linux operating system (OS) uses will

Setting Up the NVIDIA DGX Station
www.nvidia.comDGX Station DU-08255-001 _v2.4 | 9
then alternate between these addresses, causing the OS and applications tomalfunction.
3. Make sure that the power supply rocker switch is in the OFF position.
Current units:
Earlier units:
4. Connect the supplied power cable from the power socket at the back of the unit toan appropriately rated, grounded AC outlet.For details of the power consumption, input voltage, and current rating of the DGXStation, see Power Specifications.

Setting Up the NVIDIA DGX Station
www.nvidia.comDGX Station DU-08255-001 _v2.4 | 10
Current units:
Earlier units:
Caution
Use only the supplied power cable and do not use this power cable with any otherproducts or for any other purpose. Not all power cables have the same currentratings.
Do not use household extension cables with your product. Household extensioncables do not have overload protection and are not intended for use withcomputer systems.
5. Connect the display to a suitable AC outlet and power on the display. 6. Move the DGX Station power supply rocker switch to the ON position.

Setting Up the NVIDIA DGX Station
www.nvidia.comDGX Station DU-08255-001 _v2.4 | 11
Current units:
Earlier units:
7. Push the Power button on the front of the unit to power on the DGX Station.
Setting Up the NVIDIA DGX Station
www.nvidia.comDGX Station DU-08255-001 _v2.4 | 12
2.4. Completing the Initial Ubuntu OSConfigurationWhen you power on the DGX Station for the first time, you are prompted to accept enduser license agreements for NVIDIA software. You are then guided through the processfor completing the initial Ubuntu OS configuration. As part of this process, you areprompted to create your user name and password for logging in to the DGX Station.
To protect the DGX Station from unauthorized access, choose a strong password. Thestrength of the password you choose is indicated as you type it.
After the Ubuntu OS configuration is complete, you can log in to the DGX Station toaccess your Ubuntu desktop.
Updates to the DGX Station software might have been made available after yourDGX Station was manufactured. To ensure that you have the latest DGX Stationsoftware, including security updates, check for updates and install any availableupdates before using your DGX Station. For more information, see Updating DGXStation Software.
2.5. Adding Support for Additional Languages tothe DGX StationDuring the initial Ubuntu OS configuration, you are prompted to select the defaultlanguage on the DGX Station. If the language that you select is included in the DGXOS Desktop software image, it is installed in addition to English and you will see thatlanguage after you log in to access your desktop. If the language that you select is notincluded, you will still see English after logging in and you will need to install thelanguage separately.
The following languages are included in the DGX OS Desktop software image:
‣ English‣ Chinese (Simplified)‣ French‣ German‣ Italian‣ Portuguese‣ Russian‣ Spanish
Setting Up the NVIDIA DGX Station
www.nvidia.comDGX Station DU-08255-001 _v2.4 | 13
For information about how to install languages, see Install languages (https://help.ubuntu.com/16.04/ubuntu-help/prefs-language-install.html) in the Ubuntu OfficialDocumentation.
2.6. Registering Your DGX StationBe sure to register your DGX Station with NVIDIA as soon as you receive your purchaseconfirmation e-mail. By registering your DGX Station, you will be entitled to receivetechnical support, warranty services, and software updates. You will also be able to setup an NVIDIA DGX Container Registry account.
To register your DGX Station, you will need information provided in your purchaseconfirmation e-mail. If you do not have the information, send an e-mail to NVIDIAEnterprise Support at [email protected].
1. From a browser, go to the NVIDIA DGX Product Registration (http://www.nvidia.com/object/dgx-product-registration) page.
2. Enter all required information and then click SUBMIT to complete the registrationprocess and receive all warranty entitlements and, if applicable, DGX Stationsupport services entitlements.
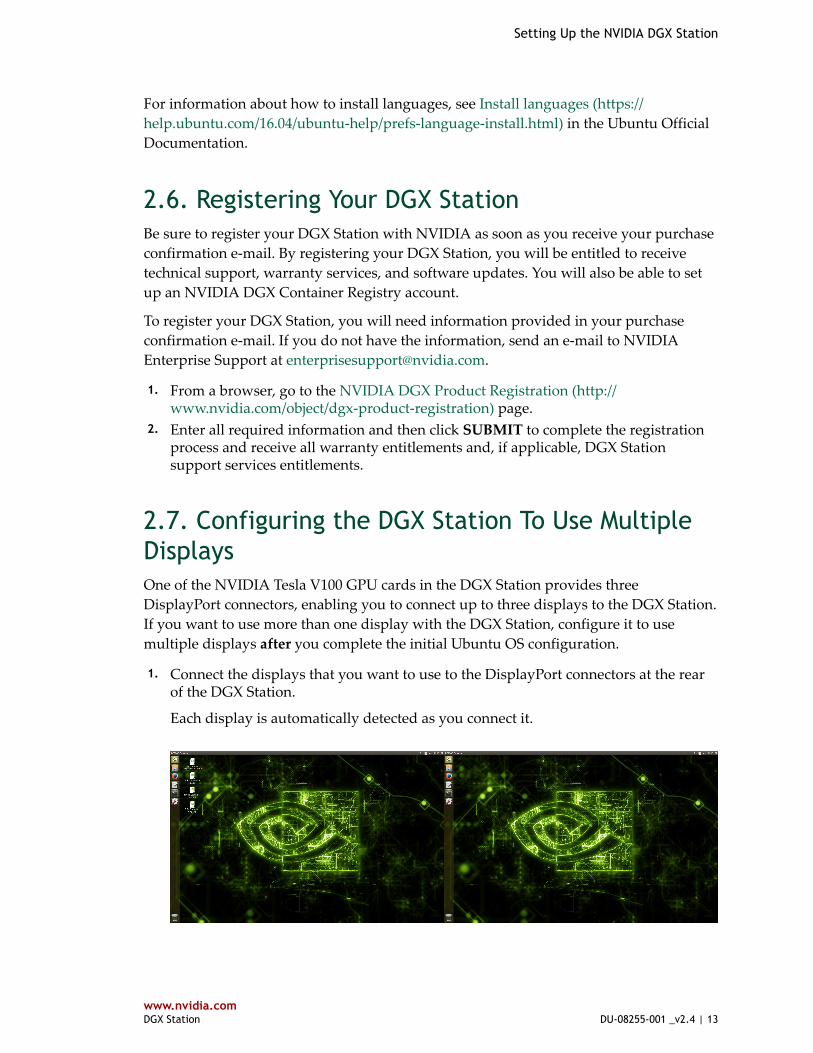
2.7. Configuring the DGX Station To Use MultipleDisplaysOne of the NVIDIA Tesla V100 GPU cards in the DGX Station provides threeDisplayPort connectors, enabling you to connect up to three displays to the DGX Station.If you want to use more than one display with the DGX Station, configure it to usemultiple displays after you complete the initial Ubuntu OS configuration.
1. Connect the displays that you want to use to the DisplayPort connectors at the rearof the DGX Station.
Each display is automatically detected as you connect it.
Setting Up the NVIDIA DGX Station
www.nvidia.comDGX Station DU-08255-001 _v2.4 | 14
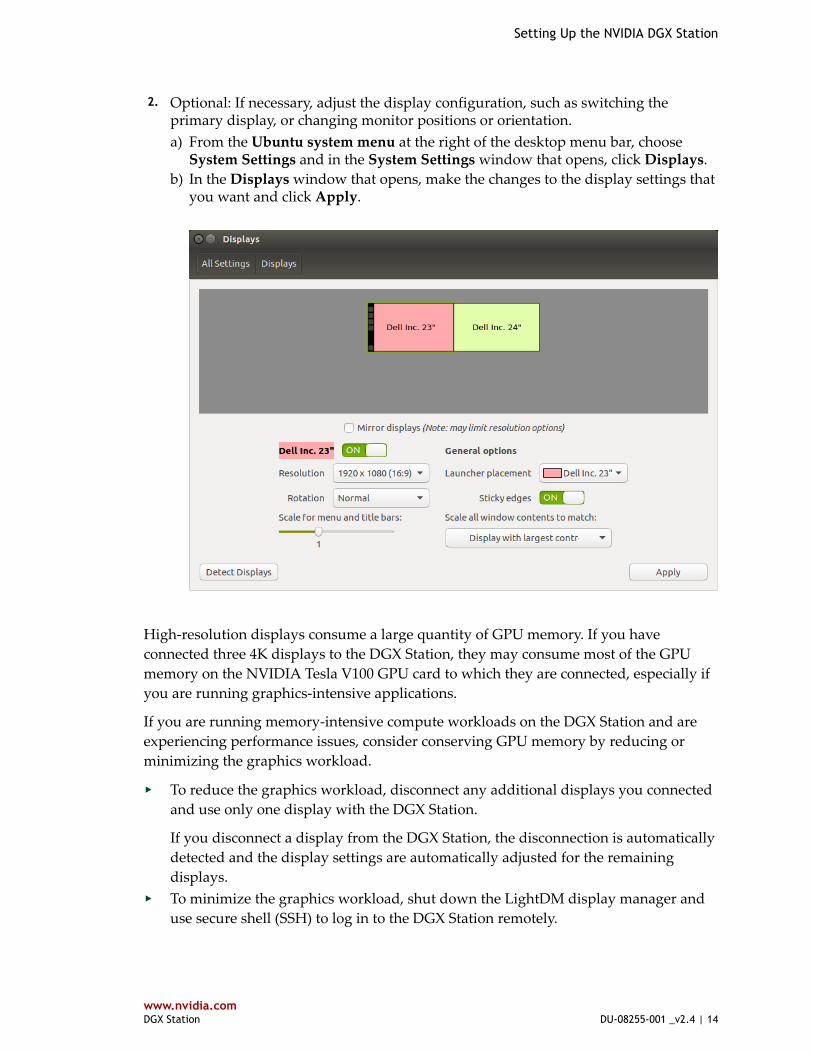
2. Optional: If necessary, adjust the display configuration, such as switching theprimary display, or changing monitor positions or orientation.a) From the Ubuntu system menu at the right of the desktop menu bar, choose
System Settings and in the System Settings window that opens, click Displays.b) In the Displays window that opens, make the changes to the display settings that
you want and click Apply.
High-resolution displays consume a large quantity of GPU memory. If you haveconnected three 4K displays to the DGX Station, they may consume most of the GPUmemory on the NVIDIA Tesla V100 GPU card to which they are connected, especially ifyou are running graphics-intensive applications.
If you are running memory-intensive compute workloads on the DGX Station and areexperiencing performance issues, consider conserving GPU memory by reducing orminimizing the graphics workload.
‣ To reduce the graphics workload, disconnect any additional displays you connectedand use only one display with the DGX Station.
If you disconnect a display from the DGX Station, the disconnection is automaticallydetected and the display settings are automatically adjusted for the remainingdisplays.
‣ To minimize the graphics workload, shut down the LightDM display manager anduse secure shell (SSH) to log in to the DGX Station remotely.
Setting Up the NVIDIA DGX Station
www.nvidia.comDGX Station DU-08255-001 _v2.4 | 15
To shut down the LightDM display manager, type the following command:
$ sudo service lightdm stop
To start the LightDM display manager, log in to the DGX Station remotely and typethe following command:
$ sudo service lightdm start
2.8. Enabling Multiple Users to Access the DGXStation RemotelyTo enable multiple users to access the DGX Station remotely, secure shell (SSH) server isinstalled and enabled on the DGX Station.
Add other Ubuntu OS users to the DGX Station to allow them to log in remotely to theDGX Station through SSH.
For information about how to add a user, see Add a new user account (https://help.ubuntu.com/16.04/ubuntu-help/user-add.html) in the Ubuntu OfficialDocumentation. For information about how to log in remotely through SSH, seeConnecting to an OpenSSH Server (https://help.ubuntu.com/community/SSH/OpenSSH/ConnectingTo) on the Ubuntu Community Help Wiki.
The DGX Station does not provide any additional isolation guarantees between usersbeyond the guarantees that the Ubuntu OS offers. For guidelines about how to secureaccess to the DGX Station over SSH, see Configuring an OpenSSH Server (https://help.ubuntu.com/community/SSH/OpenSSH/Configuring) on the Ubuntu CommunityHelp Wiki.
2.9. Preparing the DGX Station for Use withDockerSome initial setup of the DGX Station is required to ensure that users have the requiredprivileges to run Docker containers and to prevent IP address conflicts between Dockerand the DGX Station.
2.9.1. Enabling Users To Run Docker ContainersTo prevent the docker daemon from running without protection against escalation ofprivileges, the Docker software requires sudo privileges to run containers. Meeting thisrequirement involves enabling users who will run Docker containers to run commandswith sudo privileges. Therefore, you should ensure that only users whom you trust
Setting Up the NVIDIA DGX Station
www.nvidia.comDGX Station DU-08255-001 _v2.4 | 16
and who are aware of the potential risks to the DGX Station of running commands withsudo privileges are able to run Docker containers.
Before allowing multiple users to run commands with sudo privileges, consult your ITdepartment to determine whether you would be violating your organization's securitypolicies. For the security implications of enabling users to run Docker containers, seeDocker daemon attack surface.
You can enable users to run the Docker containers in one of the following ways:
‣ Add each user as an administrator user with sudo privileges.‣ Add each user as a standard user without sudo privileges and then add the user
to the docker group. This approach is inherently insecure because any user whocan send commands to the docker engine can escalate privilege and run root-useroperations.
To add an existing user to the docker group, run this command:
$ sudo usermod -aG docker user-login-id
user-login-idThe user login ID of the existing user that you are adding to the docker group.
2.9.2. Preventing IP Address Conflicts Between Dockerand the DGX StationTo ensure that the DGX Station can access the network interfaces for Docker containers,configure the containers to use a subnet distinct from other network resources usedby the DGX Station. By default, Docker uses the 172.17.0.0/16 subnet. If addresseswithin this range are already used on the DGX Station network, change the Dockernetwork to specify the bridge IP address range and container IP address range to beused by Docker containers.
This task requires sudo privileges.
1. Open the /etc/systemd/system/docker.service.d/docker-override.conf file in a plain-text editor, such as vi.
$ sudo vi /etc/systemd/system/docker.service.d/docker-override.conf
2. Append the following options to the line that begins ExecStart=/usr/bin/dockerd, which specifies the command to start the dockerd daemon:
‣ --bip=bridge-ip-address-range‣ --fixed-cidr=container-ip-address-range
bridge-ip-address-rangeThe bridge IP address range to be used by Docker containers, for example,192.168.127.1/24.
Setting Up the NVIDIA DGX Station
www.nvidia.comDGX Station DU-08255-001 _v2.4 | 17
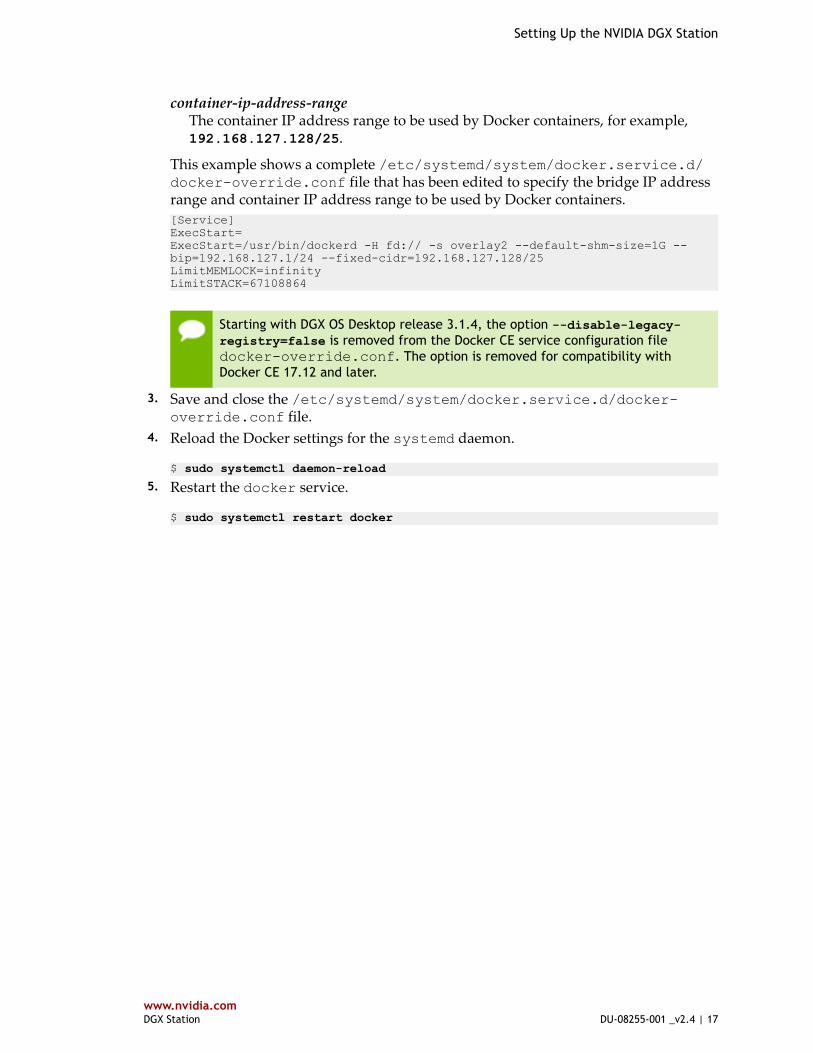
container-ip-address-rangeThe container IP address range to be used by Docker containers, for example,192.168.127.128/25.
This example shows a complete /etc/systemd/system/docker.service.d/docker-override.conf file that has been edited to specify the bridge IP addressrange and container IP address range to be used by Docker containers.[Service]ExecStart=ExecStart=/usr/bin/dockerd -H fd:// -s overlay2 --default-shm-size=1G --bip=192.168.127.1/24 --fixed-cidr=192.168.127.128/25LimitMEMLOCK=infinityLimitSTACK=67108864
Starting with DGX OS Desktop release 3.1.4, the option --disable-legacy-registry=false is removed from the Docker CE service configuration filedocker-override.conf. The option is removed for compatibility withDocker CE 17.12 and later.
3. Save and close the /etc/systemd/system/docker.service.d/docker-override.conf file.
4. Reload the Docker settings for the systemd daemon.
$ sudo systemctl daemon-reload
5. Restart the docker service.
$ sudo systemctl restart docker

www.nvidia.comDGX Station DU-08255-001 _v2.4 | 18
Chapter 3.UPDATING DGX STATION SOFTWARE
Updates to DGX Station software are available from several sources. These updatesmay contain important security vulnerability fixes. You are responsible for updating thesoftware on the DGX Station from these sources. For details about the available updates,see Available DGX Station Software Updates.
You can use any of the standard means provided by the Ubuntu Desktop OS to updatethis software. For examples, see:
‣ Updating DGX Station Software from the Details Window‣ Updating DGX Station Software from the Command Line
Caution When you use these means to update software on the DGX Station,you update all software for which updates are available from your configuredsoftware sources, including applications that you installed yourself. If youwant to prevent an application from being updated, you can instruct theUbuntu package manager to keep the current version. For more information,see Introduction to Holding Packages (https://help.ubuntu.com/community/PinningHowto#Introduction_to_Holding_Packages) on the Ubuntu Community HelpWiki.
3.1. Updating DGX Station Software from theDetails WindowWhen you open the Details window to get information about your DGX Station, thesystem checks for updates and, if any updates are available, gives you the option toinstall them.
Ensure that you are logged in to your Ubuntu desktop on the DGX Station as anadministrator user.
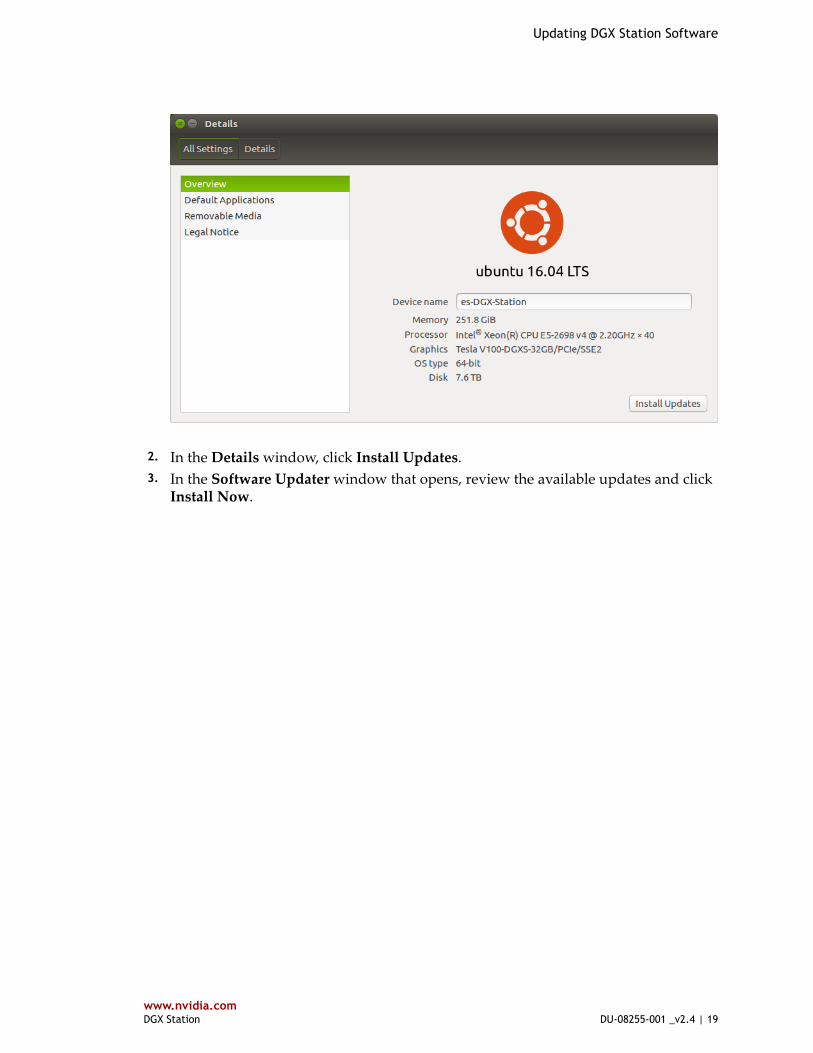
1. From the Ubuntu system menu at the top right of the desktop, choose About ThisComputer.
The Details window opens and the system checks for updates.
Updating DGX Station Software
www.nvidia.comDGX Station DU-08255-001 _v2.4 | 19
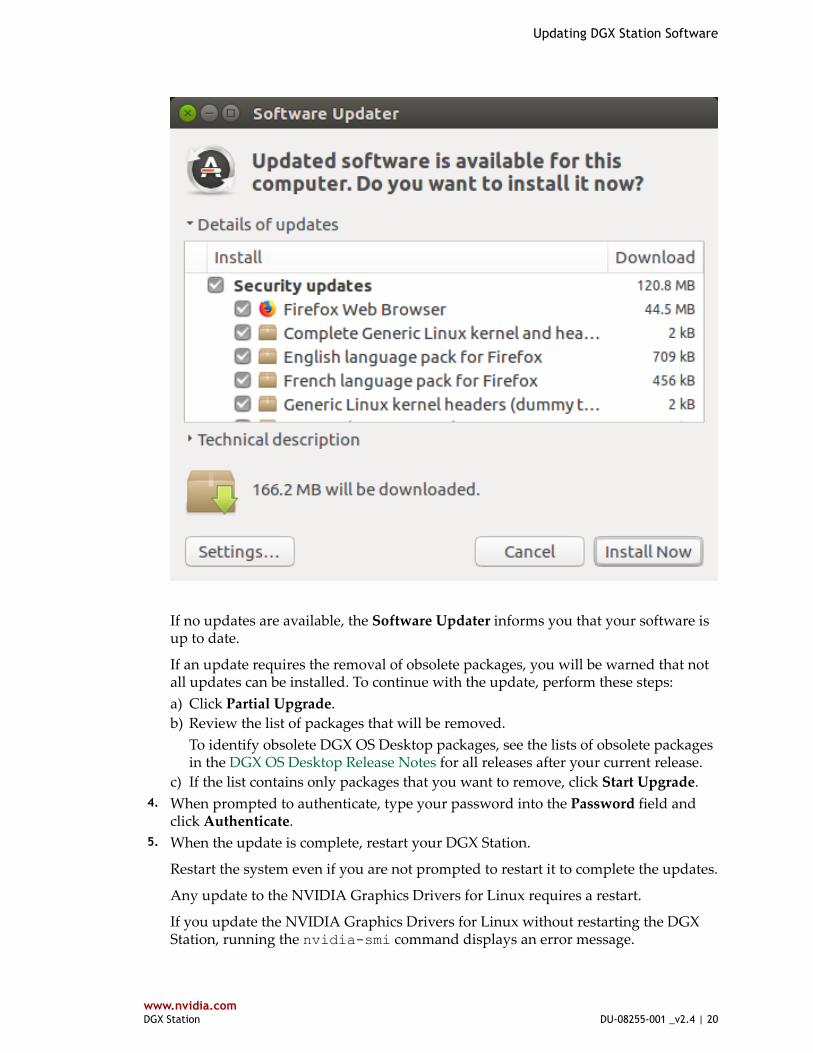
2. In the Details window, click Install Updates. 3. In the Software Updater window that opens, review the available updates and click
Install Now.
Updating DGX Station Software
www.nvidia.comDGX Station DU-08255-001 _v2.4 | 20
If no updates are available, the Software Updater informs you that your software isup to date.
If an update requires the removal of obsolete packages, you will be warned that notall updates can be installed. To continue with the update, perform these steps:a) Click Partial Upgrade.b) Review the list of packages that will be removed.
To identify obsolete DGX OS Desktop packages, see the lists of obsolete packagesin the DGX OS Desktop Release Notes for all releases after your current release.
c) If the list contains only packages that you want to remove, click Start Upgrade. 4. When prompted to authenticate, type your password into the Password field and
click Authenticate. 5. When the update is complete, restart your DGX Station.
Restart the system even if you are not prompted to restart it to complete the updates.
Any update to the NVIDIA Graphics Drivers for Linux requires a restart.
If you update the NVIDIA Graphics Drivers for Linux without restarting the DGXStation, running the nvidia-smi command displays an error message.
Updating DGX Station Software
www.nvidia.comDGX Station DU-08255-001 _v2.4 | 21
$ nvidia-smiFailed to initialize NVML: Driver/library version mismatch
3.2. Updating DGX Station Software from theCommand LineUse the apt (http://manpages.ubuntu.com/manpages/xenial/en/man8/apt.8.html)command to update DGX Station software from the command line.
Ensure that you are logged in to your Ubuntu desktop on the DGX Station as anadministrator user.
1. Download information from all configured sources about the latest versions of thepackages.
$ sudo apt update
2. Review the available updates by simulating an upgrade of the packages.
$ sudo apt full-upgrade -s
3. Upgrade the packages to the latest version.
$ sudo apt full-upgrade
4. When the update is complete, restart your DGX Station.
Any update to the NVIDIA Graphics Drivers for Linux requires a restart.
If you update the NVIDIA Graphics Drivers for Linux without restarting the DGXStation, running the nvidia-smi command displays an error message.
$ nvidia-smiFailed to initialize NVML: Driver/library version mismatch
3.3. Available DGX Station Software UpdatesUpdates to DGX Station are made available through standard Ubuntu repositories.
DGX Station is preset to obtain from these repositories updates to the followingsoftware:
‣ Docker‣ Software that is exclusive to the DGX Station, including the CUDA Toolkit and
CUDA Drivers packages‣ Ubuntu software
For more information about repositories, see Repositories/Ubuntu (https://help.ubuntu.com/community/Repositories/Ubuntu) on the Ubuntu Community HelpWiki.
Updating DGX Station Software
www.nvidia.comDGX Station DU-08255-001 _v2.4 | 22
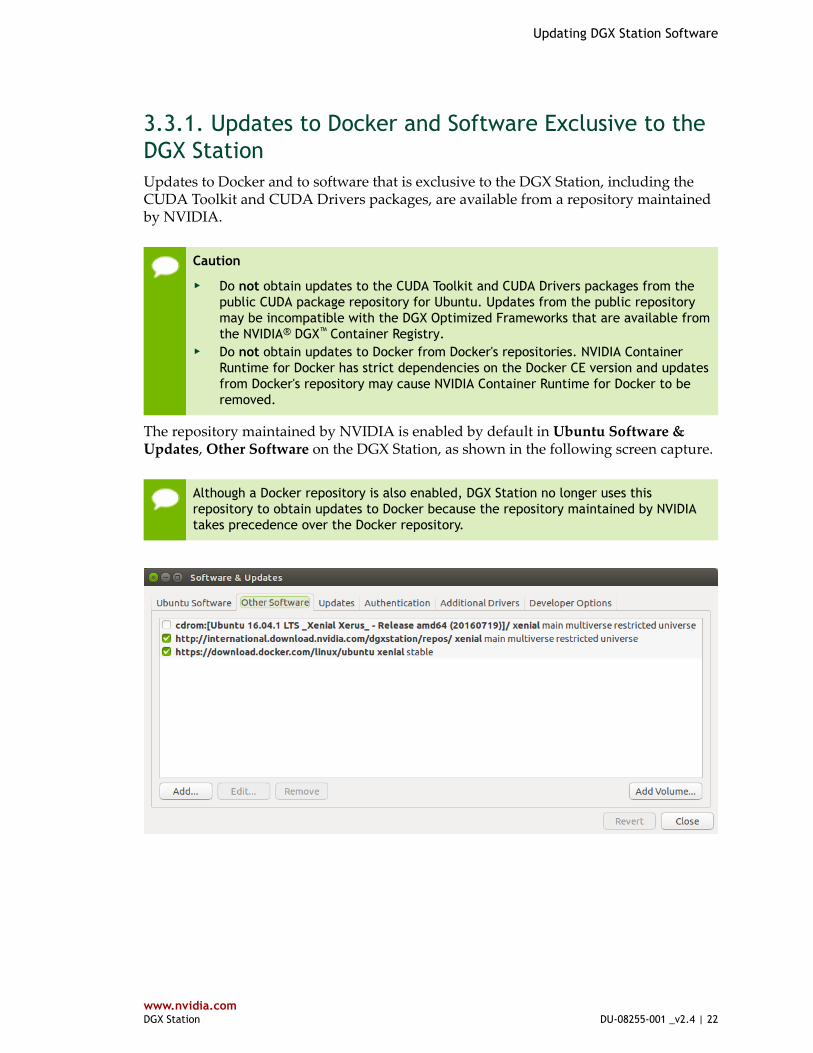
3.3.1. Updates to Docker and Software Exclusive to theDGX StationUpdates to Docker and to software that is exclusive to the DGX Station, including theCUDA Toolkit and CUDA Drivers packages, are available from a repository maintainedby NVIDIA.
Caution
‣ Do not obtain updates to the CUDA Toolkit and CUDA Drivers packages from thepublic CUDA package repository for Ubuntu. Updates from the public repositorymay be incompatible with the DGX Optimized Frameworks that are available fromthe NVIDIA® DGX™ Container Registry.
‣ Do not obtain updates to Docker from Docker's repositories. NVIDIA ContainerRuntime for Docker has strict dependencies on the Docker CE version and updatesfrom Docker's repository may cause NVIDIA Container Runtime for Docker to beremoved.
The repository maintained by NVIDIA is enabled by default in Ubuntu Software &Updates, Other Software on the DGX Station, as shown in the following screen capture.
Although a Docker repository is also enabled, DGX Station no longer uses thisrepository to obtain updates to Docker because the repository maintained by NVIDIAtakes precedence over the Docker repository.
Updating DGX Station Software
www.nvidia.comDGX Station DU-08255-001 _v2.4 | 23
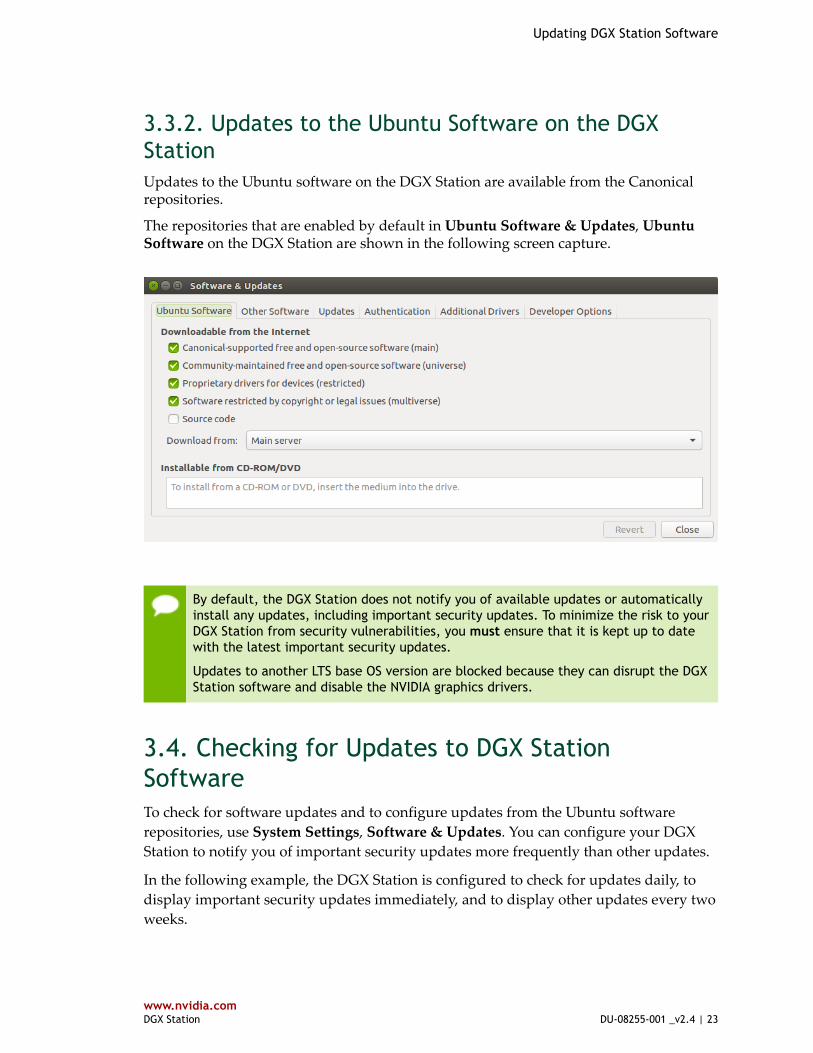
3.3.2. Updates to the Ubuntu Software on the DGXStationUpdates to the Ubuntu software on the DGX Station are available from the Canonicalrepositories.
The repositories that are enabled by default in Ubuntu Software & Updates, UbuntuSoftware on the DGX Station are shown in the following screen capture.
By default, the DGX Station does not notify you of available updates or automaticallyinstall any updates, including important security updates. To minimize the risk to yourDGX Station from security vulnerabilities, you must ensure that it is kept up to datewith the latest important security updates.
Updates to another LTS base OS version are blocked because they can disrupt the DGXStation software and disable the NVIDIA graphics drivers.
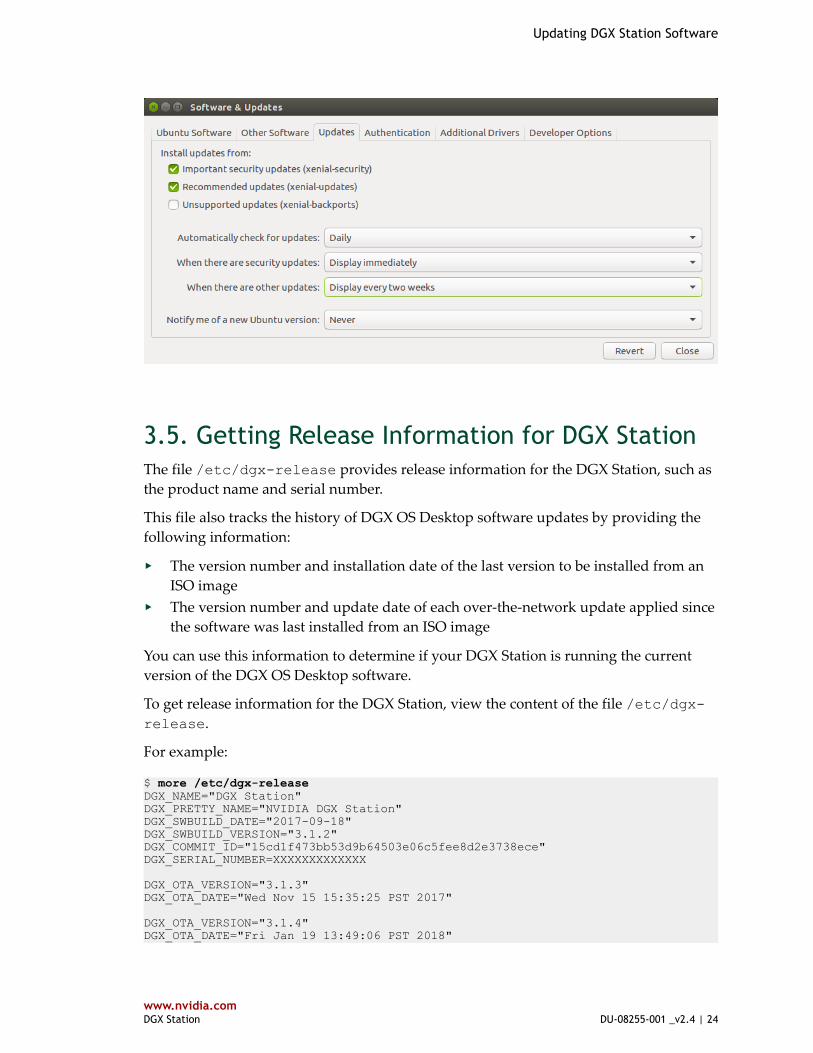
3.4. Checking for Updates to DGX StationSoftwareTo check for software updates and to configure updates from the Ubuntu softwarerepositories, use System Settings, Software & Updates. You can configure your DGXStation to notify you of important security updates more frequently than other updates.
In the following example, the DGX Station is configured to check for updates daily, todisplay important security updates immediately, and to display other updates every twoweeks.
Updating DGX Station Software
www.nvidia.comDGX Station DU-08255-001 _v2.4 | 24
3.5. Getting Release Information for DGX StationThe file /etc/dgx-release provides release information for the DGX Station, such asthe product name and serial number.
This file also tracks the history of DGX OS Desktop software updates by providing thefollowing information:
‣ The version number and installation date of the last version to be installed from anISO image
‣ The version number and update date of each over-the-network update applied sincethe software was last installed from an ISO image
You can use this information to determine if your DGX Station is running the currentversion of the DGX OS Desktop software.
To get release information for the DGX Station, view the content of the file /etc/dgx-release.
For example:
$ more /etc/dgx-releaseDGX_NAME="DGX Station"DGX_PRETTY_NAME="NVIDIA DGX Station"DGX_SWBUILD_DATE="2017-09-18"DGX_SWBUILD_VERSION="3.1.2"DGX_COMMIT_ID="15cd1f473bb53d9b64503e06c5fee8d2e3738ece"DGX_SERIAL_NUMBER=XXXXXXXXXXXXX
DGX_OTA_VERSION="3.1.3"DGX_OTA_DATE="Wed Nov 15 15:35:25 PST 2017"
DGX_OTA_VERSION="3.1.4"DGX_OTA_DATE="Fri Jan 19 13:49:06 PST 2018"
Updating DGX Station Software
www.nvidia.comDGX Station DU-08255-001 _v2.4 | 25
3.6. Updating Software on an Air-Gapped DGXStation SystemFor security purposes, some installations require that the DGX Station be an air-gappedsystem. An air-gapped system is not connected to any unsecured networks, such asthe public Internet or an unsecured LAN, or to any other computers connected to anunsecured network. The default mechanisms for updating software on the DGX Stationand loading container images from the NVIDIA DGX Container Registry require anInternet connection. On an air-gapped system, which is isolated from the Internet, youmust provide alternative mechanisms for updating software and loading containerimages.
3.6.1. Providing DGX Station Software Updates from aPrivate RepositoryThe public NVIDIA and Canonical repositories that provide software updates to theDGX Station are Ubuntu repositories. Access to these repositories requires an Internetconnection. On an air-gapped system, which is isolated from the Internet, you mustprovide these updates from a private repository that mirrors the public repositories.
1. Identify the sources corresponding to the public NVIDIA and Canonical repositoriesthat provide updates to the DGX Station software.You can identify these sources from the /etc/apt/sources.list file and thecontents of /etc/apt.sources.list.d/ directory, or by using System Settings,Software & Updates.
2. Create and maintain a private repository that mirrors the sources that you identifiedin the previous step.For detailed instructions, refer to Debian Repository Setup (https://wiki.debian.org/DebianRepository/Setup) on the Debian wiki.
3. Update the sources that provide updates to the DGX Station to use your privaterepository instead of the public repositories.You can update these sources by modifying the /etc/apt/sources.list fileand the contents of /etc/apt.sources.list.d/ directory, or by using SystemSettings, Software & Updates.
Future updates to the DGX Station software will be obtained from your privaterepository.
3.6.2. Loading a Container Image onto an Air-GappedDGX Station SystemLoading a container image from the NVIDIA DGX Container Registry requires anInternet connection. On an air-gapped system, which is isolated from the Internet, you
Updating DGX Station Software
www.nvidia.comDGX Station DU-08255-001 _v2.4 | 26
must use a removable medium to copy the container image from a system with anInternet connection to the air-gapped system.
1. On a system with an Internet connection, log in to the NVIDIA DGX ContainerRegistry and load the container image that you want.For instructions, refer to DGX Container Registry User Guide.
2. Save the container image as a tar archive.
$ docker save nvcr.io/registry-space/repository:tag > archive-file.tar
registry-spaceThe name of the space within the registry that contains the container image. Forcontainer images provided by NVIDIA, the registry space is nvidia.
repositoryThe repository that contains the container image. A repository is a collection ofall versions of a container image with the same name. The repository name is themain container image name.
tagA tag that identifies the version of the container image.
archive-fileYour choice of name for the archive file to which you are saving the containerimage.
3. Transfer the image to the air-gapped system by using a removable medium such as aUSB flash drive or DVD-ROM.
4. On the air-gapped system, load the container image from the local copy of thearchive file that contains the image.
$ docker load –i framework.tar
5. Confirm that the image is loaded on the air-gapped system.
$ docker images

www.nvidia.comDGX Station DU-08255-001 _v2.4 | 27
Chapter 4.MAINTAINING AND SERVICING THE NVIDIADGX STATION
Be sure to familiarize yourself with the NVIDIA Terms & Conditions documents beforeattempting to perform any modification or repair to the DGX Station. These Terms& Conditions for the DGX Station can be found through the NVIDIA DGX SystemsSupport (http://www.nvidia.com/object/dgxsystems-support.html) page.
Caution The DGX Station is designed as an integrated system and does not support theinstallation of additional PCIe devices such as GPU cards. Any attempt to modify theDGX Station by installing additional PCIe devices is an unauthorized modification andwill void the DGX Station hardware warranty. Any such modification will also impairthe performance of the system, may overload the system’s electrical circuits, andmay cause it to overheat.
4.1. Problem Resolution and Customer CareLog on to the NVIDIA Enterprise Support (https://nvid.nvidia.com/dashboard/) sitefor assistance with troubleshooting, diagnostics, or to report problems with your DGXStation.
4.2. Cleaning the Mesh Filter Under the DGXStationTo prevent dust from entering the DGX Station through the ventilation holes under theunit, a mesh filter is fitted to the underside of the DGX Station. Clean this mesh filterperiodically to prevent the accumulation of dust on the filter from impeding the flow ofair through the DGX Station.
1. Reach under the front of the DGX Station and grasp the mesh filter by its handle. 2. Pull the mesh filter towards you to slide it out from the font of the unit.
Maintaining and Servicing the NVIDIA DGX Station
www.nvidia.comDGX Station DU-08255-001 _v2.4 | 28
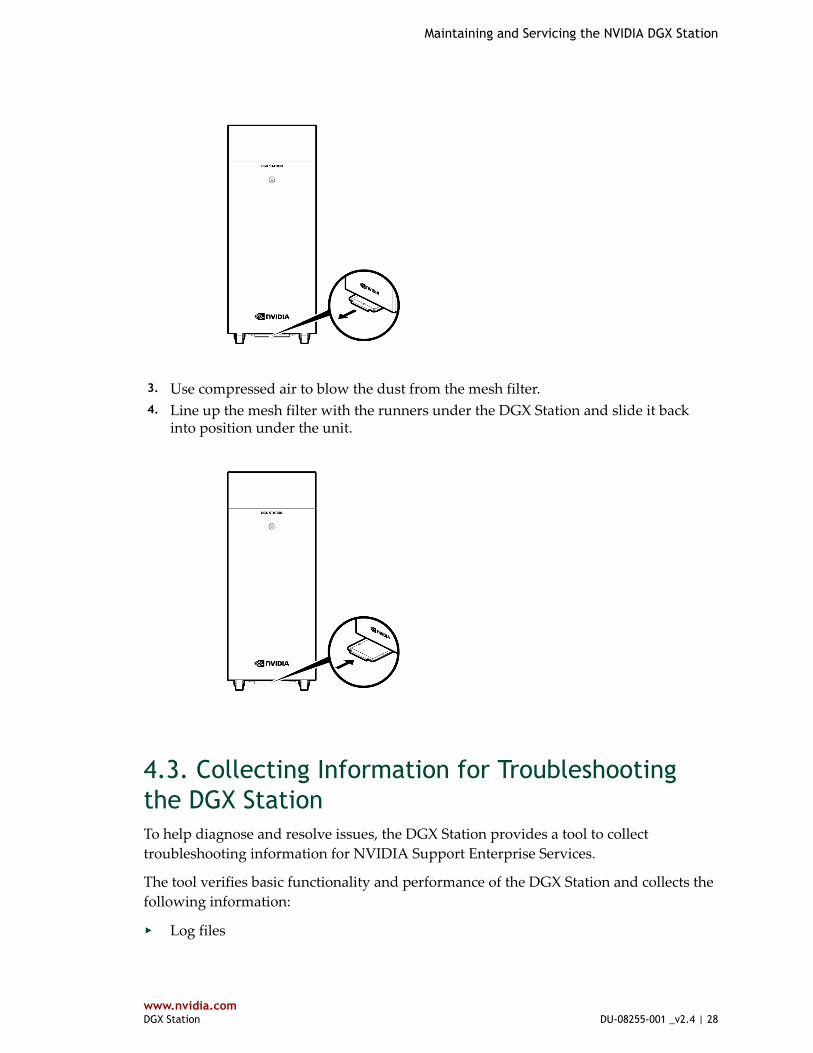
3. Use compressed air to blow the dust from the mesh filter. 4. Line up the mesh filter with the runners under the DGX Station and slide it back
into position under the unit.
4.3. Collecting Information for Troubleshootingthe DGX StationTo help diagnose and resolve issues, the DGX Station provides a tool to collecttroubleshooting information for NVIDIA Support Enterprise Services.
The tool verifies basic functionality and performance of the DGX Station and collects thefollowing information:
‣ Log files
Maintaining and Servicing the NVIDIA DGX Station
www.nvidia.comDGX Station DU-08255-001 _v2.4 | 29
‣ Hardware inventory‣ SW inventory
To collect information for troubleshooting the DGX Station, run the following command:
sudo nvsysinfo [-o output-file]
For DGX OS Desktop releases 3.1.1 through 3.1.3, the command to run is as follows:
sudo nvidia-sysinfo [-o output-file]
output-file is the name and the path of the file in which the information iswritten. If you omit the output file, the information is written to the file /tmp/nvsysinfo-timestamp.random-number.out.
For DGX OS Desktop releases 3.1.1 through 3.1.3, the file name is /tmp/nvidia-sys-info-timestamp.random-number.out.
Use any method that is convenient for you to send the file to NVIDIA SupportEnterprise Services. For example, send the file as an e-mail attachment.
4.4. Checking the Health of the DGX StationThe DGX Station provides the NVIDIA System Health Checker (nvhealth) tool toexercise the system and verify its health. The output of nvhealth is an itemized list ofchecks and their status, typically Healthy or Unhealthy. On a healthy system, all checksshould return Healthy. You should investigate any checks that return Unhealthy todetermine their root cause and resolve them.
To check the health of the DGX Station, run the following command:
$ sudo nvhealth [-k output-file]
output-file is the name and the path of the file in which the raw state of the systemis written. If you omit the output file, the information is written to the file /tmp/nvhealth-log.random-string.jsonl, for example, /tmp/nvhealth-log.6wf3WriAC3.jsonl. The nvhealth command displays this file name at the endof the output from the command.
4.5. Replacing the System and ComponentsBe sure to familiarize yourself with the NVIDIA Terms & Conditions documents beforeattempting to perform any modification or repair to the DGX Station. These Terms& Conditions for the DGX Station can be found through the NVIDIA DGX SystemsSupport (http://www.nvidia.com/object/dgxsystems-support.html) page.
Maintaining and Servicing the NVIDIA DGX Station
www.nvidia.comDGX Station DU-08255-001 _v2.4 | 30
Contact NVIDIA Enterprise Support to obtain an RMA number for any system orcomponent that needs to be returned for repair or replacement. When replacing acomponent, use only the replacement supplied to you by NVIDIA.
The following components are customer-replaceable:
‣ Solid State Drives (SSDs)‣ DIMMs
Return the failed components to NVIDIA.
4.5.1. Replacing the SystemWhen returning a DGX Station under RMA, consider the following points.
Packaging
To prevent damage during shipping, repack the DGX Station in the packaging in whichthe replacement unit was advanced shipped by following the instructions in Repackingthe DGX Station for Shipment.
SSDs
If necessary, you can remove and keep the SSDs prior to shipping the system back forreplacement. If you already received a replacement system and you want to keep theoriginal SSDs, install the new SSDs into the defective system when shipping it back.
AC Power Cable
Do not return the AC power cable when returning the DGX Station.
Accessories
Include all supplied accessories except the AC power cable when returning the DGXStation.
4.5.2. Repacking the DGX Station for ShipmentIf you are returning the DGX Station to NVIDIA under an RMA, repack it in thepackaging in which the replacement unit was advanced shipped to prevent damageduring shipment.
Caution The DGX Station weighs 88 lbs (40 kg). Do not attempt to lift the DGX Station.Instead, move it into position by rolling it on its fitted casters.
Before you begin, ensure that the foam packing piece that surrounds the GPU cardsinside the DGX Station has been replaced. For detailed instructions, see Removing orReplacing the Packing Inside the DGX Station.
Maintaining and Servicing the NVIDIA DGX Station
www.nvidia.comDGX Station DU-08255-001 _v2.4 | 31
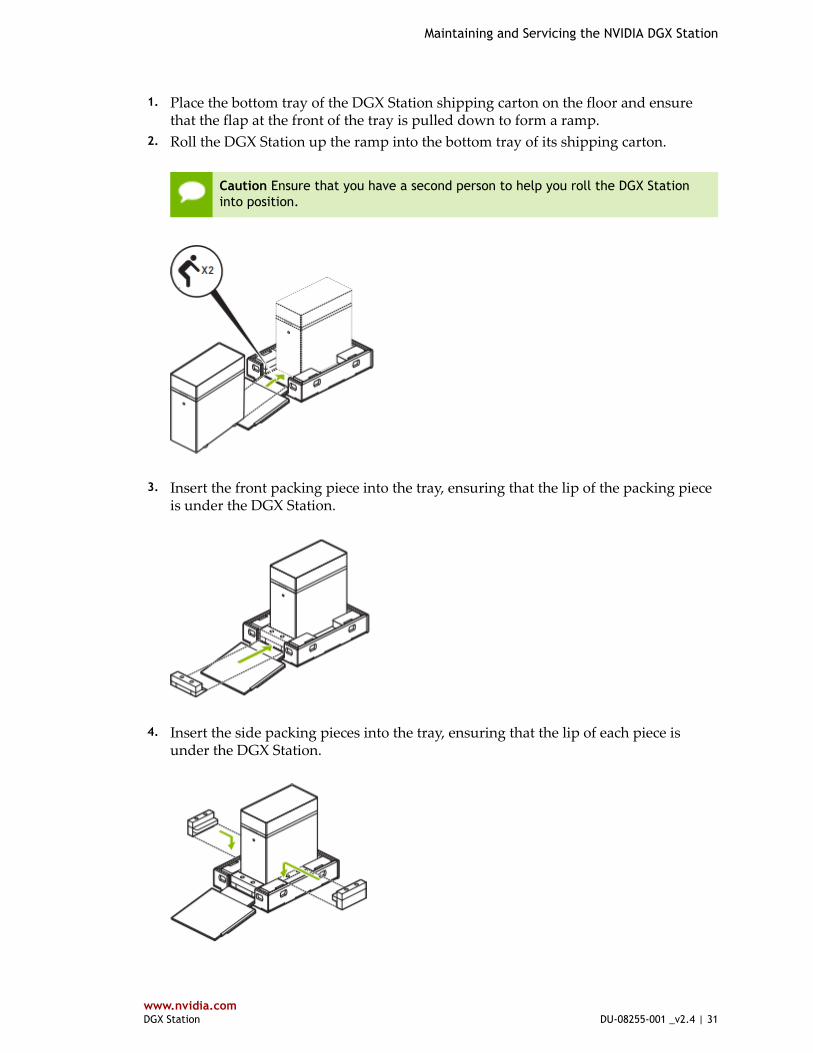
1. Place the bottom tray of the DGX Station shipping carton on the floor and ensurethat the flap at the front of the tray is pulled down to form a ramp.
2. Roll the DGX Station up the ramp into the bottom tray of its shipping carton.
Caution Ensure that you have a second person to help you roll the DGX Stationinto position.
3. Insert the front packing piece into the tray, ensuring that the lip of the packing piece
is under the DGX Station.
4. Insert the side packing pieces into the tray, ensuring that the lip of each piece is
under the DGX Station.
Maintaining and Servicing the NVIDIA DGX Station
www.nvidia.comDGX Station DU-08255-001 _v2.4 | 32
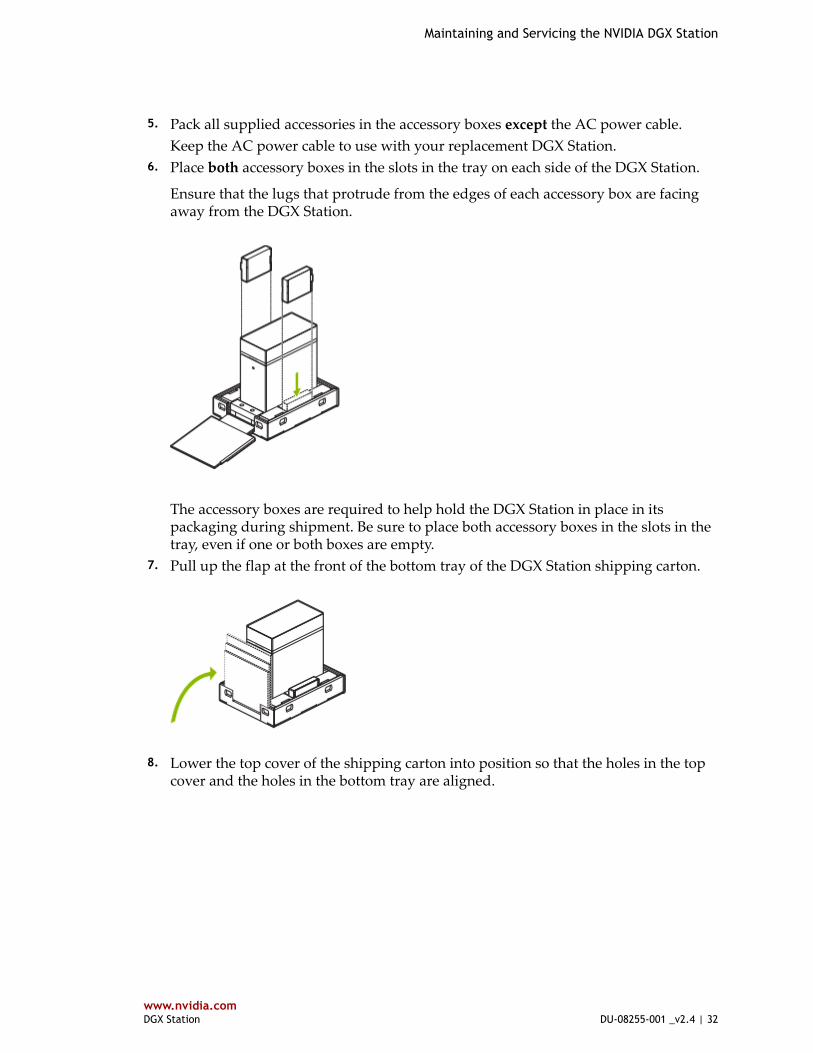
5. Pack all supplied accessories in the accessory boxes except the AC power cable.
Keep the AC power cable to use with your replacement DGX Station. 6. Place both accessory boxes in the slots in the tray on each side of the DGX Station.
Ensure that the lugs that protrude from the edges of each accessory box are facingaway from the DGX Station.
The accessory boxes are required to help hold the DGX Station in place in itspackaging during shipment. Be sure to place both accessory boxes in the slots in thetray, even if one or both boxes are empty.
7. Pull up the flap at the front of the bottom tray of the DGX Station shipping carton.
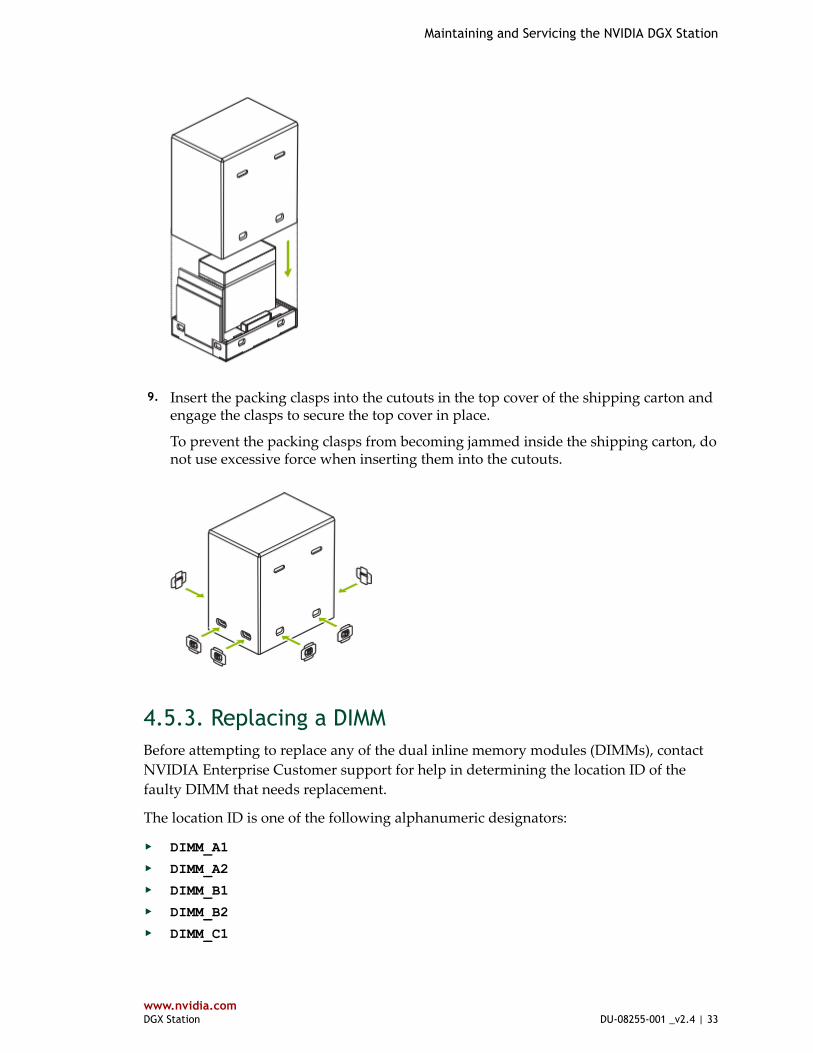
8. Lower the top cover of the shipping carton into position so that the holes in the top
cover and the holes in the bottom tray are aligned.
Maintaining and Servicing the NVIDIA DGX Station
www.nvidia.comDGX Station DU-08255-001 _v2.4 | 33
9. Insert the packing clasps into the cutouts in the top cover of the shipping carton and
engage the clasps to secure the top cover in place.
To prevent the packing clasps from becoming jammed inside the shipping carton, donot use excessive force when inserting them into the cutouts.
4.5.3. Replacing a DIMMBefore attempting to replace any of the dual inline memory modules (DIMMs), contactNVIDIA Enterprise Customer support for help in determining the location ID of thefaulty DIMM that needs replacement.
The location ID is one of the following alphanumeric designators:
‣ DIMM_A1
‣ DIMM_A2
‣ DIMM_B1
‣ DIMM_B2
‣ DIMM_C1

Maintaining and Servicing the NVIDIA DGX Station
www.nvidia.comDGX Station DU-08255-001 _v2.4 | 34
‣ DIMM_C2
‣ DIMM_D1
‣ DIMM_D2
Caution The components inside the DGX Station are static-sensitive devices. Protectthese devices against electrostatic discharge (ESD) by wearing a wrist strap connectedto the DGX Station chassis ground and placing components on static-free worksurfaces.
The DIMMs are located on the motherboard inside the DGX Station.
1. Turn off the DGX Station and disconnect the network and power cables. 2. Remove the side panel on the right of the DGX Station when viewed from the rear.
a) Push the button on the right side of the DGX Station back panel to release thepanel.
b) Lift the panel to remove it.
Maintaining and Servicing the NVIDIA DGX Station
www.nvidia.comDGX Station DU-08255-001 _v2.4 | 35
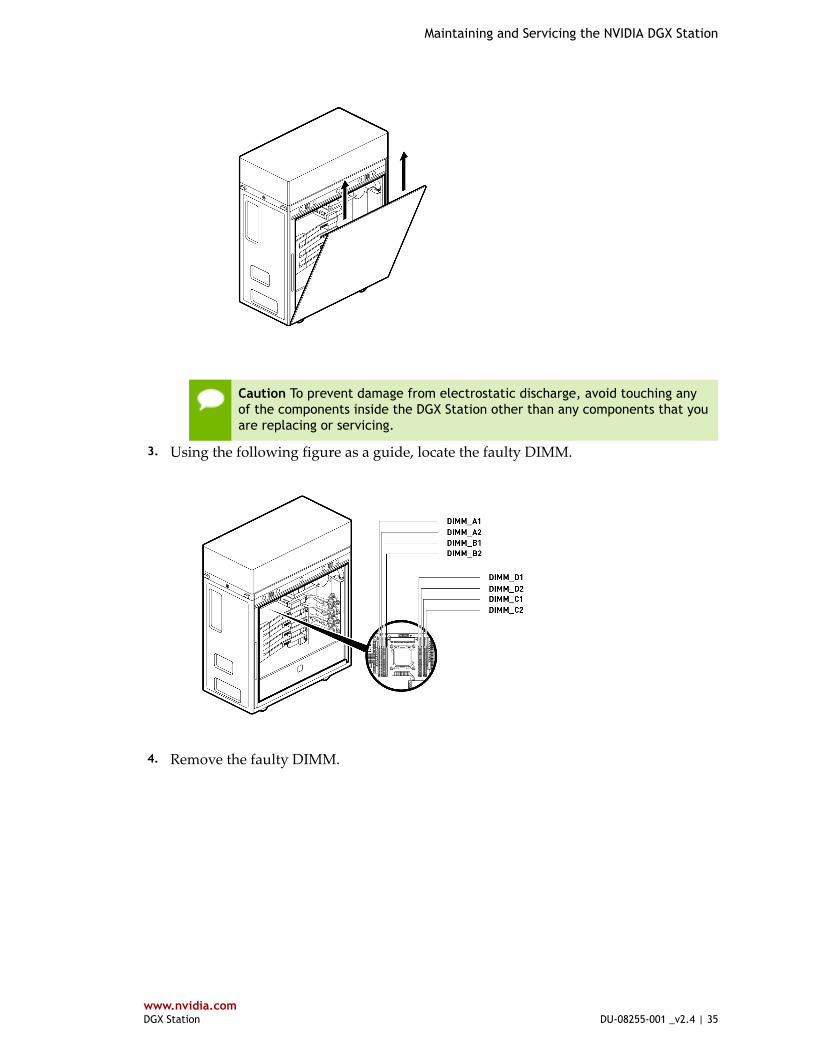
Caution To prevent damage from electrostatic discharge, avoid touching anyof the components inside the DGX Station other than any components that youare replacing or servicing.
3. Using the following figure as a guide, locate the faulty DIMM.
4. Remove the faulty DIMM.
Maintaining and Servicing the NVIDIA DGX Station
www.nvidia.comDGX Station DU-08255-001 _v2.4 | 36
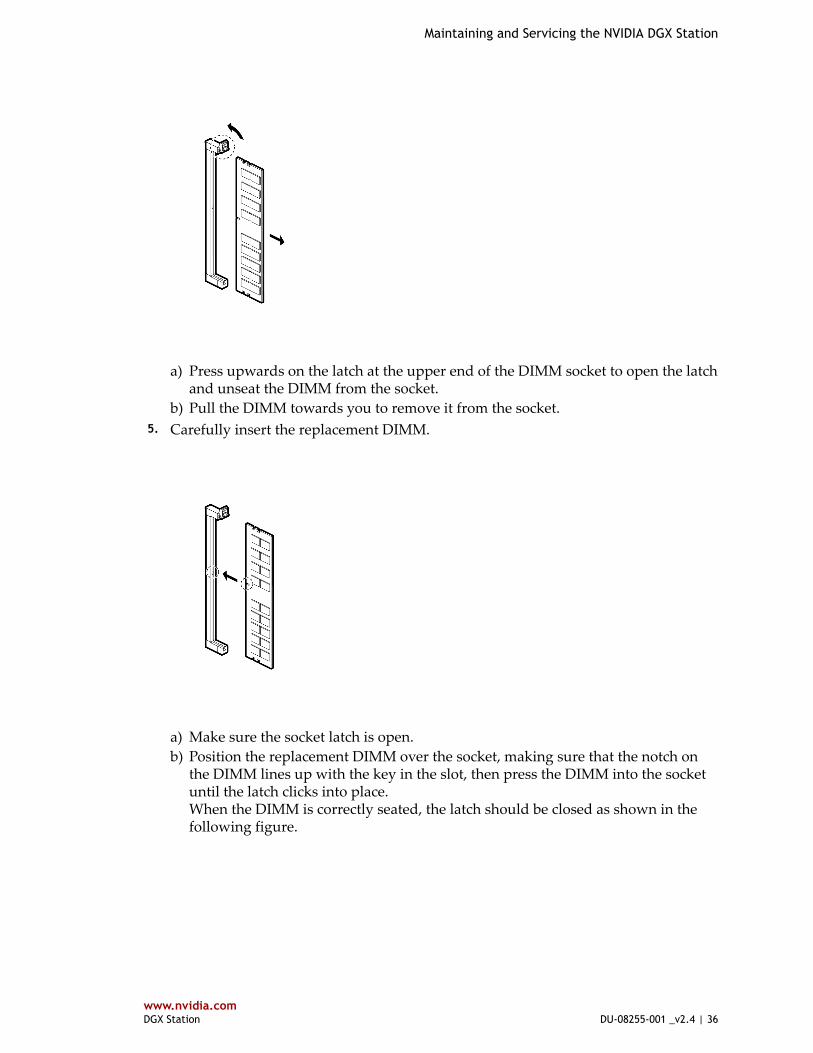
a) Press upwards on the latch at the upper end of the DIMM socket to open the latch
and unseat the DIMM from the socket.b) Pull the DIMM towards you to remove it from the socket.
5. Carefully insert the replacement DIMM.
a) Make sure the socket latch is open.b) Position the replacement DIMM over the socket, making sure that the notch on
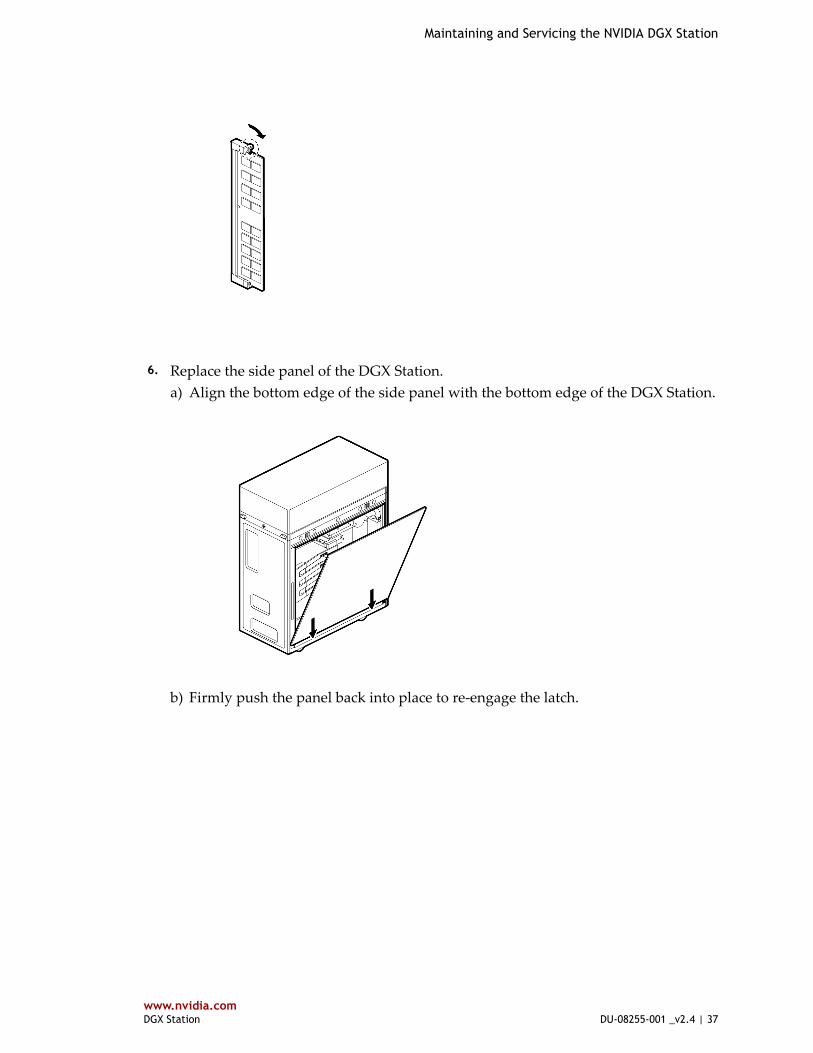
the DIMM lines up with the key in the slot, then press the DIMM into the socketuntil the latch clicks into place.When the DIMM is correctly seated, the latch should be closed as shown in thefollowing figure.
Maintaining and Servicing the NVIDIA DGX Station
www.nvidia.comDGX Station DU-08255-001 _v2.4 | 37
6. Replace the side panel of the DGX Station.
a) Align the bottom edge of the side panel with the bottom edge of the DGX Station.
b) Firmly push the panel back into place to re-engage the latch.
Maintaining and Servicing the NVIDIA DGX Station
www.nvidia.comDGX Station DU-08255-001 _v2.4 | 38
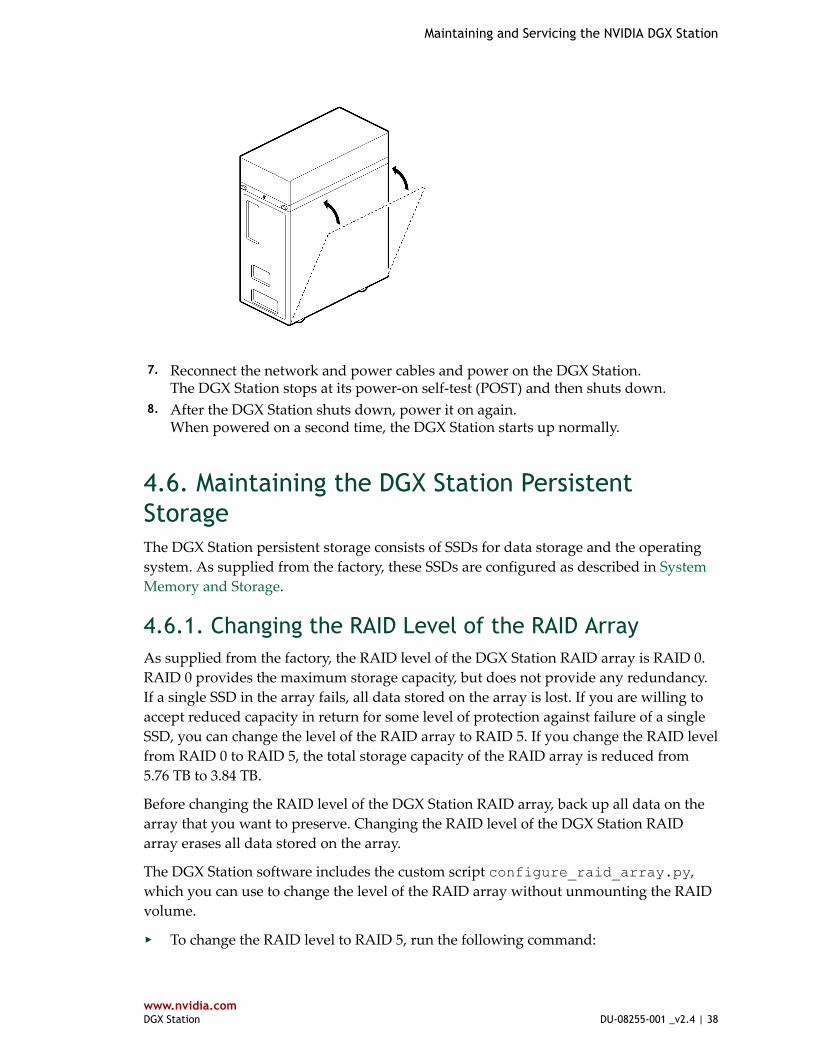
7. Reconnect the network and power cables and power on the DGX Station.
The DGX Station stops at its power-on self-test (POST) and then shuts down. 8. After the DGX Station shuts down, power it on again.
When powered on a second time, the DGX Station starts up normally.
4.6. Maintaining the DGX Station PersistentStorageThe DGX Station persistent storage consists of SSDs for data storage and the operatingsystem. As supplied from the factory, these SSDs are configured as described in SystemMemory and Storage.
4.6.1. Changing the RAID Level of the RAID ArrayAs supplied from the factory, the RAID level of the DGX Station RAID array is RAID 0.RAID 0 provides the maximum storage capacity, but does not provide any redundancy.If a single SSD in the array fails, all data stored on the array is lost. If you are willing toaccept reduced capacity in return for some level of protection against failure of a singleSSD, you can change the level of the RAID array to RAID 5. If you change the RAID levelfrom RAID 0 to RAID 5, the total storage capacity of the RAID array is reduced from5.76 TB to 3.84 TB.
Before changing the RAID level of the DGX Station RAID array, back up all data on thearray that you want to preserve. Changing the RAID level of the DGX Station RAIDarray erases all data stored on the array.
The DGX Station software includes the custom script configure_raid_array.py,which you can use to change the level of the RAID array without unmounting the RAIDvolume.
‣ To change the RAID level to RAID 5, run the following command:

Maintaining and Servicing the NVIDIA DGX Station
www.nvidia.comDGX Station DU-08255-001 _v2.4 | 39
$ sudo configure_raid_array.py -m raid5
‣ To change the RAID level to RAID 0, run the following command:
$ sudo configure_raid_array.py -m raid0
To confirm that the RAID level was changed as required, run the lsblk command. Theentry in the TYPE column for each SSD in the RAID array indicates the RAID level of thearray.
The following example shows that the RAID level of the array is RAID 0. The name ofthe RAID volume is md0 and the mount point of the volume is /raid.
~$ lsblkNAME MAJ:MIN RM SIZE RO TYPE MOUNTPOINTsda 8:0 0 1.8T 0 disk|_sda1 8:1 0 487M 0 part /boot/efi|_sda2 8:2 0 1.8T 0 part /sdb 8:16 0 1.8T 0 disk|_md0 9:0 0 5.2T 0 raid0 /raidsdc 8:32 0 1.8T 0 disk|_md0 9:0 0 5.2T 0 raid0 /raidsdd 8:48 0 1.8T 0 disk|_md0 9:0 0 5.2T 0 raid0 /raid
4.6.2. Checking the Status of the DGX Station RAIDArrayUse the mdadm command to print details of the md0 device.
$ sudo mdadm -D /dev/md0
This example shows the status of a RAID array that is functioning properly.
$ sudo mdadm -D /dev/md0 Version : 1.2 Creation Time : Mon Jun 5 17:40:48 2017 Raid Level : raid0 Array Size : 374964224 (357.59 GiB 383.96 GB) Raid Devices : 3 Total Devices : 3 Persistence : Superblock is persistent
Update Time : Mon Jun 5 17:40:48 2017 State : clean Active Devices : 3Working Devices : 3 Failed Devices : 0 Spare Devices : 0
Chunk Size : 512K Name : lab-VirtualBox:0 (local to host lab-VirtualBox) UUID : c8ba911a:8634bd99:2ebeea3d:c9a7db4c Events : 0
Number Major Minor RaidDevice State 0 8 16 0 active sync /dev/sdb 1 8 32 1 active sync /dev/sdc 2 8 48 2 active sync /dev/sdd

Maintaining and Servicing the NVIDIA DGX Station
www.nvidia.comDGX Station DU-08255-001 _v2.4 | 40
This example shows the status of a RAID array in which one SSD has failed or ismissing. The failed or missing SSD is identified by the empty RaidDevice Statecolumn.
$ sudo mdadm -D /dev/md0 ...
Number Major Minor RaidDevice State 0 8 16 0 active sync /dev/sdb 1 8 32 1 active sync 2 8 48 2 active sync /dev/sdd
4.6.3. Checking the Status of the DGX Station SSDsLEDs on the DGX Station SSDs indicate the status of the SSDs. The SSDs are mountedinside the DGX Station and are visible only when the side panel that covers the SSDs isremoved.
1. Remove the side panel on the left of the DGX Station when viewed from the rear.a) Push the button on the left side of the DGX Station back panel to release the
panel.b) Lift the panel to remove it.
Caution To prevent damage from electrostatic discharge, avoid touching anyof the components inside the DGX Station other than any components that youare replacing or servicing.
2. Examine each SSD to determine its status from the state of the LED on the SSD.
On (steady)
The SSD is operational but is idle.On (blinking)
The SSD is being read from or written to.Off
The SSD has failed and must be replaced.
Maintaining and Servicing the NVIDIA DGX Station
www.nvidia.comDGX Station DU-08255-001 _v2.4 | 41
3. Replace the side panel of the DGX Station.a) Align the bottom edge of the side panel with the bottom edge of the DGX Station.b) Firmly push the panel back into place to re-engage the latches.
If an SSD has failed, you must replace it as explained in Replacing an SSD.
4.6.4. Replacing an SSDIf an SSD in the DGX Station fails, replace the SSD to return the system to operation.
Caution The default RAID level of the array in the DGX Station is RAID 0, which doesnot provide any redundancy. If a single SSD in the array fails, all data stored on thearray is lost. To prevent the failure of an SSD from causing a loss of data, ensure thatany data on the array that you want to preserve is backed up.
1. Remove the side panel on the left of the DGX Station when viewed from the rear.a) Push the button on the left side of the DGX Station back panel to release the
panel.b) Lift the panel to remove it.
Caution To prevent damage from electrostatic discharge, avoid touching anyof the components inside the DGX Station other than any components that youare replacing or servicing.
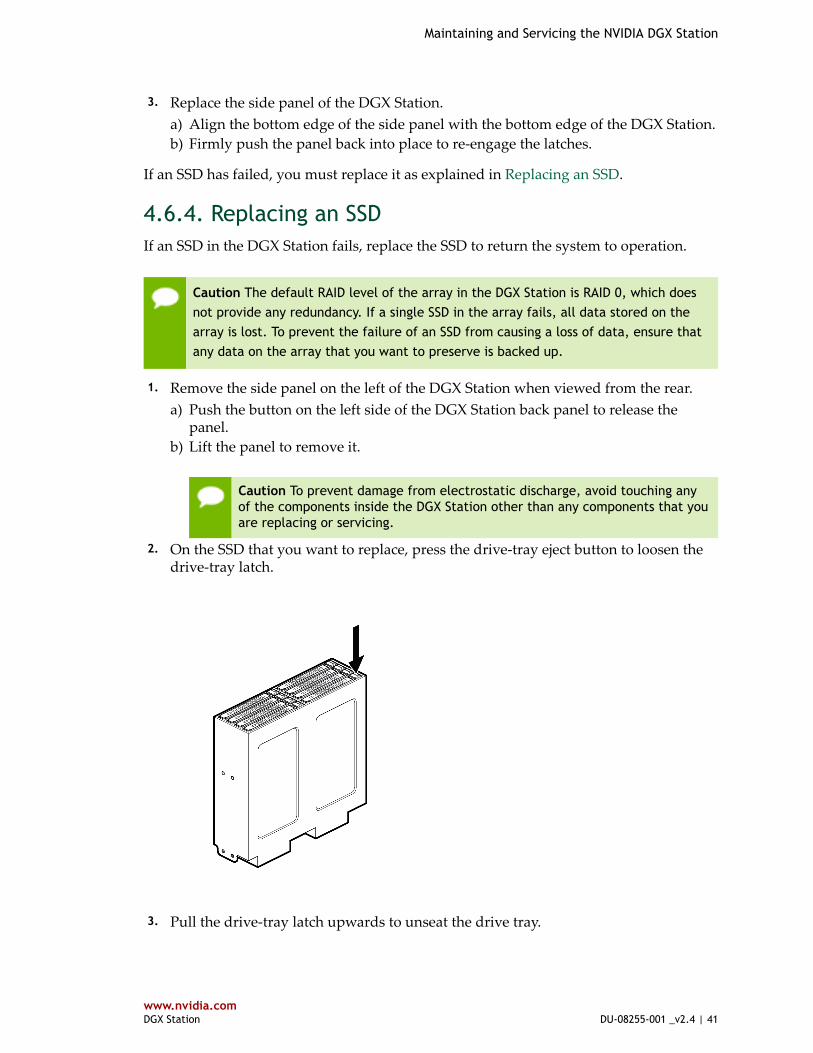
2. On the SSD that you want to replace, press the drive-tray eject button to loosen thedrive-tray latch.
3. Pull the drive-tray latch upwards to unseat the drive tray.

Maintaining and Servicing the NVIDIA DGX Station
www.nvidia.comDGX Station DU-08255-001 _v2.4 | 42
4. Slide the drive tray upwards to completely remove it from the unit.
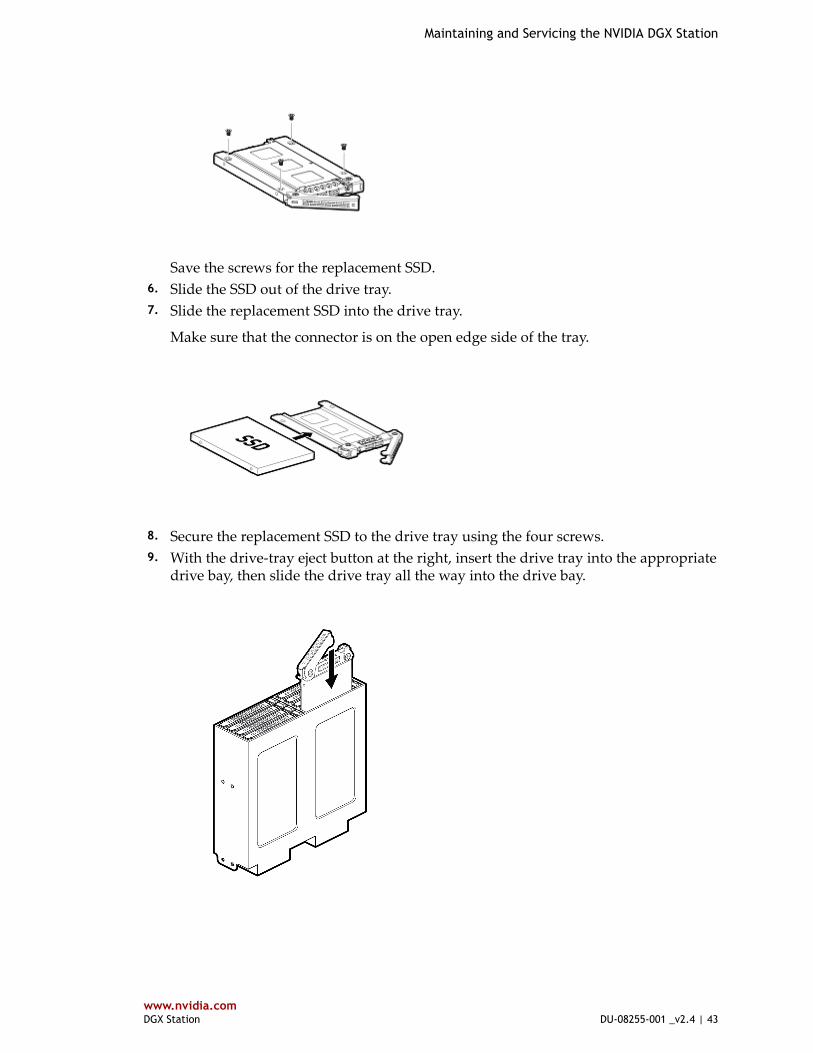
5. Using a Phillips screwdriver, remove the four screws attaching the SSD to the drive
tray.
Maintaining and Servicing the NVIDIA DGX Station
www.nvidia.comDGX Station DU-08255-001 _v2.4 | 43
Save the screws for the replacement SSD. 6. Slide the SSD out of the drive tray. 7. Slide the replacement SSD into the drive tray.
Make sure that the connector is on the open edge side of the tray.
8. Secure the replacement SSD to the drive tray using the four screws. 9. With the drive-tray eject button at the right, insert the drive tray into the appropriate
drive bay, then slide the drive tray all the way into the drive bay.

Maintaining and Servicing the NVIDIA DGX Station
www.nvidia.comDGX Station DU-08255-001 _v2.4 | 44
10. Press the drive-try latch downwards until you hear a click to completely seat thedrive tray.
11. Replace the side panel of the DGX Station.
a) Align the bottom edge of the side panel with the bottom edge of the DGX Station.b) Firmly push the panel back into place to re-engage the latches.
What you need to do to return the DGX Station to service depends on whether youreplaced an SSD in the RAID array the OS SSD.
‣ If you replaced an SSD in the RAID array, rebuild the RAID array as explained inRebuilding the DGX Station RAID Array.
‣ If you replaced the OS SSD, restore the software image as explained in Restoring theDGX Station Software Image.
4.6.5. Rebuilding the DGX Station RAID ArrayIf the DGX Station RAID array is degraded because an SSD failed, replace the SSD asexplained in Replacing an SSD.
After replacing a failed SSD in the RAID array, you must rebuild the array toadd the new SSD to a RAID 0 array or to regenerate the lost data on the newSSD in a RAID 5 array. The DGX Station software includes the custom scriptconfigure_raid_array.py for this purpose.
To rebuild the array, run the following command:

Maintaining and Servicing the NVIDIA DGX Station
www.nvidia.comDGX Station DU-08255-001 _v2.4 | 45
$ sudo configure_raid_array.py -r
The time required to rebuild a RAID 5 array depends on factors such as system load,SSD capacity, and the number of SSDs in the array. Rebuilding the array of three, 1.92-terabyte SSDs in the DGX Station may require several hours.
You can monitor the progress of a long-running rebuild by examining the contents of the/proc/mdstat file:
$ cat /proc/mdstatPersonalities : [raid0] [linear] [multipath] [raid1] [raid6] [raid5] [raid4] [raid10]md0 : active raid5 sdb[0] sdd[3] sdc[1] 3750486016 blocks super 1.2 level 5, 512k chunk, algorithm 2 [3/2] [UU_] [>....................] recovery = 4.0% (75580956/1875243008) finish=438.3min speed=68419K/sec bitmap: 2/14 pages [8KB], 65536KB chunk
unused devices: <none>
In this example, the rebuild is 4.0% complete and the rebuild is estimated to finish in438.3 minutes.
The RAID array is rebuilt with its existing RAID level.
‣ If the array is a RAID 0 array, all data that was on the array is erased after array isrebuilt.
‣ If the array is a RAID 5 array, the data on the array is preserved after array is rebuilt.
If you have rebuilt a RAID 0 array and have a backup of data on the array that you wantto preserve, restore the data from the backup.
4.7. Restoring the DGX Station Software ImageIf the DGX Station software image becomes corrupted or the OS SSD was replaced aftera failure, restore the DGX Station software image to its original factory condition from apristine copy of the image.
A USB flash drive is supplied from which you can restore the DGX Station softwareimage. Before using this USB drive to restore the DGX Station software image, contactNVIDIA Enterprise Support to see if a later version of the software image is available.If a later version of the image is available, prepare a bootable installation medium thatcontains the current software image as explained in the following topics:
‣ Obtaining the DGX Station Software ISO Image and Checksum File‣ Creating a Bootable Installation Medium
Maintaining and Servicing the NVIDIA DGX Station
www.nvidia.comDGX Station DU-08255-001 _v2.4 | 46
When you have a bootable installation medium that contains the current software image,install the image as explained in Installing the DGX Station Software Image from a USBFlash Drive or DVD-ROM.
Updates to the DGX Station software might have been made available after thelatest available ISO image file was created. To ensure that you have the latest DGXStation software, including security updates, check for updates and install anyavailable updates after you restore the software image. For more information, seeUpdating DGX Station Software.
4.7.1. Obtaining the DGX Station Software ISO Imageand Checksum FileTo ensure that you restore the latest available version of the DGX Station softwareimage, obtain the current ISO image file from NVIDIA Enterprise Support. A checksumfile is provided for the image to enable you to verify the bootable installation mediumthat you create from the image file.
1. Log on to the NVIDIA Enterprise Support (https://nvid.nvidia.com/dashboard/) site. 2. Click the Announcements tab to locate the download links for the DGX Station
software image. 3. Download the ISO image and its checksum file and save them to your local disk.
The ISO image is also available in an archive file. If you download the archive file, besure to extract the ISO image before proceeding.
4.7.2. Creating a Bootable Installation MediumAfter obtaining an ISO file that contains the software image from NVIDIA EnterpriseSupport, create a bootable installation medium, such as a USB flash drive or DVD-ROM,that contains the image.
‣ If you are creating a bootable USB flash drive, follow the instructions for theplatform that you are using:
‣ On Ubuntu Desktop, see Creating a Bootable USB Flash Drive by Using StartupDisk Creator.
‣ On Windows, see Creating a Bootable USB Flash Drive by Using Akeo Rufus.‣ If you are creating a bootable DVD-ROM, you can use any of the methods
described in Burning the ISO on to a DVD (https://help.ubuntu.com/community/BurningIsoHowto#Burning_the_ISO_on_to_a_DVD) on the Ubuntu CommunityHelp Wiki.
Maintaining and Servicing the NVIDIA DGX Station
www.nvidia.comDGX Station DU-08255-001 _v2.4 | 47
4.7.2.1. Creating a Bootable USB Flash Drive by Using Startup DiskCreatorOn an Ubuntu Desktop system, you can use Startup Disk Creator to create a bootableUSB flash drive that contains the DGX Station software image.
Ensure that the following prerequisites are met:
‣ The correct DGX Station software image is saved to your local disk. For moreinformation, see Obtaining the DGX Station Software ISO Image and Checksum File.
‣ The USB flash drive has a capacity of at least 4 GB.
1. Plug the USB flash drive into one of the USB ports of your Ubuntu Desktop system. 2. Open the Dash, search for Startup Disk Creator , and click the Startup Disk
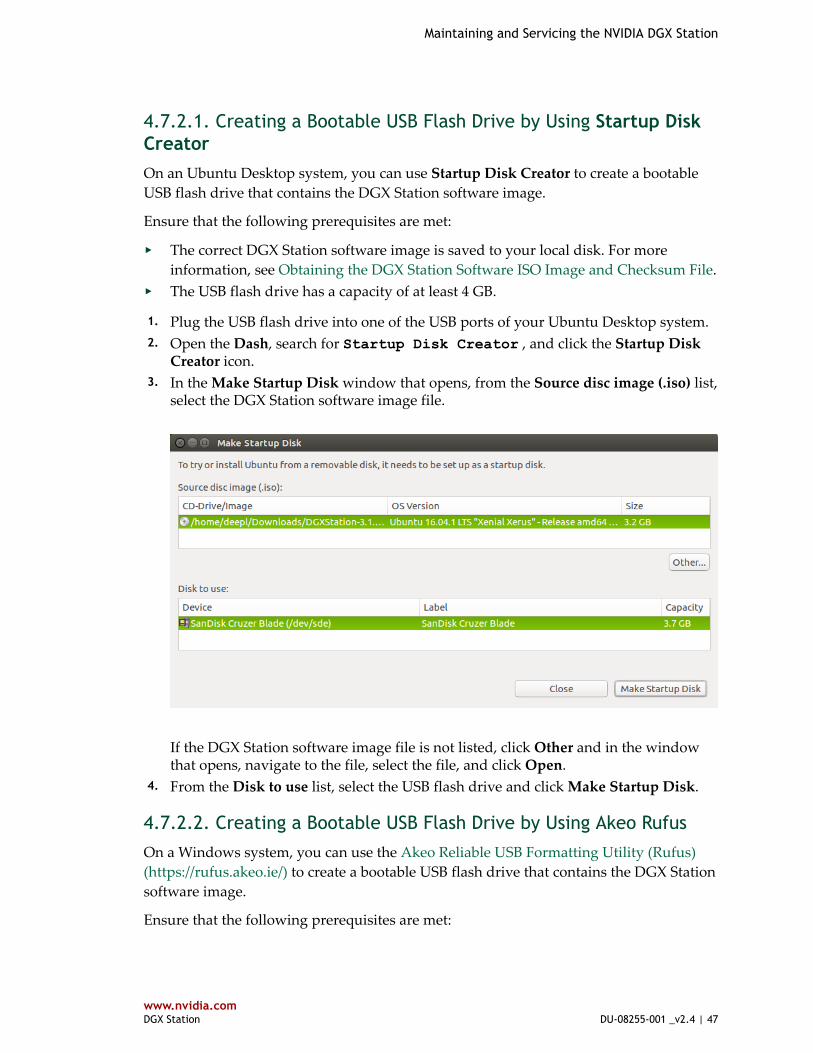
Creator icon. 3. In the Make Startup Disk window that opens, from the Source disc image (.iso) list,
select the DGX Station software image file.
If the DGX Station software image file is not listed, click Other and in the windowthat opens, navigate to the file, select the file, and click Open.
4. From the Disk to use list, select the USB flash drive and click Make Startup Disk.
4.7.2.2. Creating a Bootable USB Flash Drive by Using Akeo Rufus
On a Windows system, you can use the Akeo Reliable USB Formatting Utility (Rufus)(https://rufus.akeo.ie/) to create a bootable USB flash drive that contains the DGX Stationsoftware image.
Ensure that the following prerequisites are met:
Maintaining and Servicing the NVIDIA DGX Station
www.nvidia.comDGX Station DU-08255-001 _v2.4 | 48
‣ The correct DGX Station software image is saved to your local disk. For moreinformation, see Obtaining the DGX Station Software ISO Image and Checksum File.
‣ The USB flash drive has a capacity of at least 4 GB.
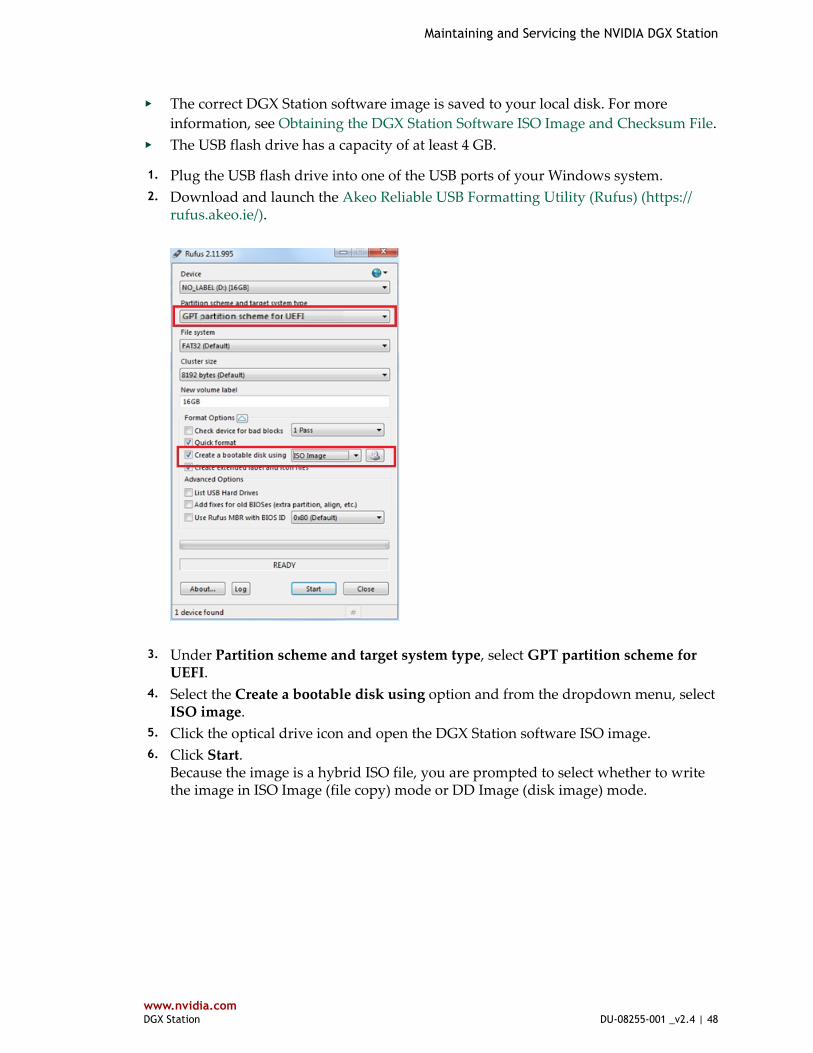
1. Plug the USB flash drive into one of the USB ports of your Windows system. 2. Download and launch the Akeo Reliable USB Formatting Utility (Rufus) (https://
rufus.akeo.ie/).
3. Under Partition scheme and target system type, select GPT partition scheme for
UEFI. 4. Select the Create a bootable disk using option and from the dropdown menu, select
ISO image. 5. Click the optical drive icon and open the DGX Station software ISO image. 6. Click Start.
Because the image is a hybrid ISO file, you are prompted to select whether to writethe image in ISO Image (file copy) mode or DD Image (disk image) mode.

Maintaining and Servicing the NVIDIA DGX Station
www.nvidia.comDGX Station DU-08255-001 _v2.4 | 49
7. Select Write in ISO Image mode and click OK.
4.7.3. Verifying the Bootable Installation MediumOn a Linux system, you can use the checksum file provided for the DGX Stationsoftware image to verify the installation medium that you created from the image.
Ensure that the following prerequisites are met:
‣ The checksum file for the DGX Station software image is saved to your local disk.For more information, see Obtaining the DGX Station Software ISO Image andChecksum File.
‣ You have created a bootable installation medium from the image. For moreinformation, see Creating a Bootable Installation Medium.
How to verify a bootable installation medium depends on whether it is a USB flash driveor a DVD-ROM.
4.7.3.1. Verifying a Bootable USB Flash Drive
1. Plug the USB flash drive into one of the USB ports of your Linux system. 2. Obtain the device ID of the USB flash drive by running the lsblk (http://
manpages.ubuntu.com/manpages/xenial/man8/lsblk.8.html) command.
$ lsblk
You can identify the USB flash drive from its size, which is much smaller than thesize of the SSDs in the DGX Station, and from the mount points of any partitions onthe drive, which are under /media.
In the following example, the device ID of the USB flash drive is sde1.
$ lsblkNAME MAJ:MIN RM SIZE RO TYPE MOUNTPOINTsda 8:0 0 1.8T 0 disk|_sda1 8:1 0 487M 0 part /boot/efi|_sda2 8:2 0 1.8T 0 part /sdb 8:16 0 1.8T 0 disk|_md0 9:0 0 5.2T 0 raid0 /raid
Maintaining and Servicing the NVIDIA DGX Station
www.nvidia.comDGX Station DU-08255-001 _v2.4 | 50
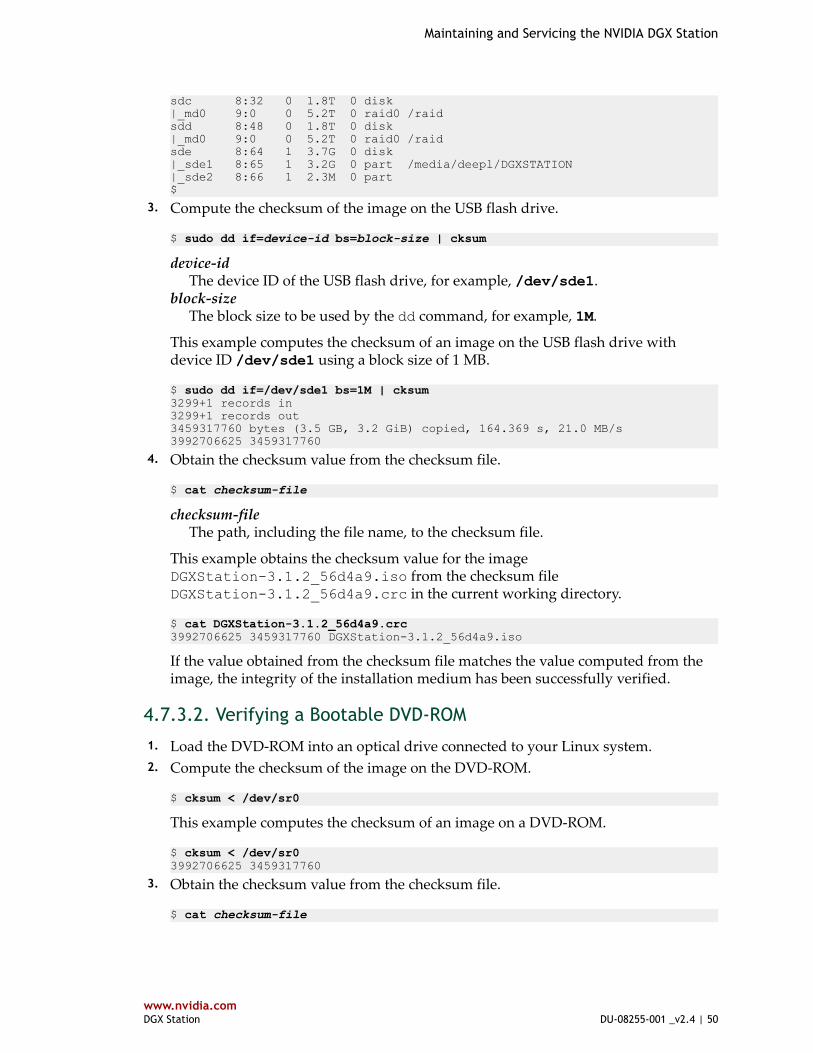
sdc 8:32 0 1.8T 0 disk|_md0 9:0 0 5.2T 0 raid0 /raidsdd 8:48 0 1.8T 0 disk|_md0 9:0 0 5.2T 0 raid0 /raidsde 8:64 1 3.7G 0 disk|_sde1 8:65 1 3.2G 0 part /media/deepl/DGXSTATION|_sde2 8:66 1 2.3M 0 part$
3. Compute the checksum of the image on the USB flash drive.
$ sudo dd if=device-id bs=block-size | cksum
device-idThe device ID of the USB flash drive, for example, /dev/sde1.
block-sizeThe block size to be used by the dd command, for example, 1M.
This example computes the checksum of an image on the USB flash drive withdevice ID /dev/sde1 using a block size of 1 MB.
$ sudo dd if=/dev/sde1 bs=1M | cksum3299+1 records in3299+1 records out3459317760 bytes (3.5 GB, 3.2 GiB) copied, 164.369 s, 21.0 MB/s3992706625 3459317760
4. Obtain the checksum value from the checksum file.
$ cat checksum-file
checksum-fileThe path, including the file name, to the checksum file.
This example obtains the checksum value for the imageDGXStation-3.1.2_56d4a9.iso from the checksum fileDGXStation-3.1.2_56d4a9.crc in the current working directory.
$ cat DGXStation-3.1.2_56d4a9.crc3992706625 3459317760 DGXStation-3.1.2_56d4a9.iso
If the value obtained from the checksum file matches the value computed from theimage, the integrity of the installation medium has been successfully verified.
4.7.3.2. Verifying a Bootable DVD-ROM
1. Load the DVD-ROM into an optical drive connected to your Linux system. 2. Compute the checksum of the image on the DVD-ROM.
$ cksum < /dev/sr0
This example computes the checksum of an image on a DVD-ROM.
$ cksum < /dev/sr03992706625 3459317760
3. Obtain the checksum value from the checksum file.
$ cat checksum-file
Maintaining and Servicing the NVIDIA DGX Station
www.nvidia.comDGX Station DU-08255-001 _v2.4 | 51
checksum-fileThe path, including the file name, to the checksum file.
This example obtains the checksum value for the imageDGXStation-3.1.2_56d4a9.iso from the checksum fileDGXStation-3.1.2_56d4a9.crc in the current working directory.
$ cat DGXStation-3.1.2_56d4a9.crc3992706625 3459317760 DGXStation-3.1.2_56d4a9.iso
If the value obtained from the checksum file matches the value computed from theimage, the integrity of the installation medium has been successfully verified.
4.7.4. Installing the DGX Station Software Image from aUSB Flash Drive or DVD-ROMBefore installing the DGX Station software image, ensure that you have a bootable USBflash drive or DVD-ROM that contains the current DGX Station software image.
Caution Installing the DGX Station software image erases all data stored on the OSSSD. The /home partition, where all users' documents, software settings, bookmarks,and other personal files are stored, resides on the OS SSD and will be erased.However, if you chose to install the DGX Station software and preserve the RAID arraycontents, persistent data stored in the RAID array is unaffected.
1. Shut down the DGX Station. 2. Load the USB flash drive or DVD-ROM into the DGX Station.
‣ If you are using a USB flash drive, plug it into one of the USB ports of the DGXStation.
‣ If you are using a DVD-ROM, connect an external optical drive to the DGXStation and load the DVD-ROM into the drive.
3. Power on the DGX Station. 4. At the first NVIDIA screen to appear, press F8 to select the boot device. 5. In the menu for selecting the boot device, use the arrow keys to select UEFI: usb-
key-or-dvd-rom-name, Partition n (size) and press Enter. 6. When the GNU GRUB menu appears, select the option you want for installing the
DGX Station software and press Enter.
‣ To install the software while preserving persistent data stored in the RAID array,select Install DGX OS Desktop release and preserve RAID contents.
‣ To install the software and re-initialize the RAID array, select Install DGX OSDesktop release and re-initialize RAID0 volume.
Caution If you chose this option, all data stored in the RAID array will beerased.
Maintaining and Servicing the NVIDIA DGX Station
www.nvidia.comDGX Station DU-08255-001 _v2.4 | 52
The installation requires several minutes to complete.
Licensing requirements prevent some DGX Station software, such as the NVIDIAGraphics Drivers, from being supplied in the software image. The DGX Stationautomatically installs this software when installation from the software image iscomplete.
7. When the installation is complete, respond to the prompts to accept end userlicense agreements for NVIDIA software and to configure the Ubuntu OS, includingcreating your user name and password for logging in to the DGX Station.
8. After the Ubuntu OS configuration is complete, log in to the DGX Station to accessyour Ubuntu desktop.
9. Eject the USB flash drive or DVD-ROM. 10. Unplug the USB flash drive or optical drive from the DGX Station.
4.8. Updating the DGX Station System BIOSIf you need to update the DGX Station system BIOS, you can obtain the current versionof it from NVIDIA Support Enterprise Services.
Caution
Update the system BIOS only if required to resolve an issue with the DGX Station.If your DGX Station is operating normally, do not update the system BIOS. An errorduring an attempt to update the system BIOS may leave your DGX Station unable toboot.
If you must update the system BIOS, be sure to obtain the BIOS file from NVIDIAEnterprise Services. Do not obtain a BIOS file from the motherboard manufacturer orany other source.
To complete this task, you need a USB flash drive formatted to a single FAT 16 or FAT 32partition.
1. Obtain the system BIOS file.a) Log on to NVIDIA Enterprise Support (https://nvid.nvidia.com/dashboard/).b) Click the Announcements tab to locate the download links for the archive file
containing the DGX Station system BIOS file.c) Download the archive file and extract the system BIOS file.
2. Copy the system BIOS file to the USB flash drive. 3. Shut down the DGX Station. 4. Plug the USB flash drive into one of the USB ports of the DGX Station. 5. Power on the DGX Station. 6. At the first NVIDIA screen to appear, press Delete or F2 to enter the UEFI BIOS
setup.
Maintaining and Servicing the NVIDIA DGX Station
www.nvidia.comDGX Station DU-08255-001 _v2.4 | 53
7. In the UEFI BIOS Utility - EZ Mode screen, click Advanced Mode. 8. From the Tool menu, choose EZ 3 Flash Utility and press Enter. 9. In the EZ 3 Flash Update screen, select via Storage Device(s) as the BIOS update
method and press Enter. 10. In the Drive list, use the up arrow and down arrow keys to select the USB flash
drive that contains the BIOS file and press Enter. 11. In the Folder list, use the up arrow and down arrow keys to select the BIOS file. 12. Press Enter to start the BIOS update process.
Caution To avoid the risk of leaving your DGX Station unable to boot, do not shutdown or reset the DGX Station during the BIOS update process.
13. When the BIOS update process is complete, reboot the DGX Station.
4.9. Maintaining the GPU Liquid Cooling SystemA liquid cooling system keeps the GPUs in the DGX Station within their requiredoperating temperature range. To ensure reliable operation of the cooling system, youmust maintain it periodically.
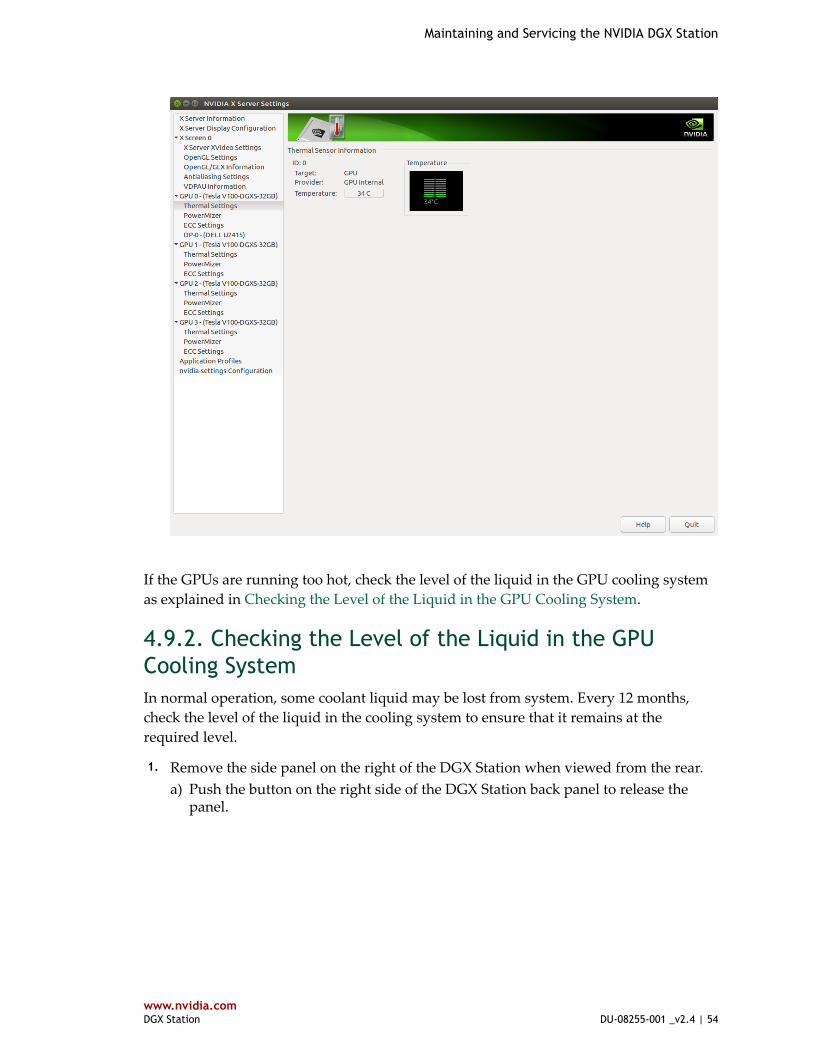
4.9.1. Monitoring GPU Temperatures 1. Open the Dash, search for NVIDIA X Server Settings, and click the NVIDIA
X Server Settings icon. 2. Under each GPU in the list of GPUs in the NVIDIA X Server Settings window, click
Thermal Settings.
Thermal sensor information for the GPU is displayed, including its currenttemperature and an indication of whether the temperature is within the GPU'soperating range.
Maintaining and Servicing the NVIDIA DGX Station
www.nvidia.comDGX Station DU-08255-001 _v2.4 | 54
If the GPUs are running too hot, check the level of the liquid in the GPU cooling systemas explained in Checking the Level of the Liquid in the GPU Cooling System.
4.9.2. Checking the Level of the Liquid in the GPUCooling SystemIn normal operation, some coolant liquid may be lost from system. Every 12 months,check the level of the liquid in the cooling system to ensure that it remains at therequired level.
1. Remove the side panel on the right of the DGX Station when viewed from the rear.a) Push the button on the right side of the DGX Station back panel to release the
panel.

Maintaining and Servicing the NVIDIA DGX Station
www.nvidia.comDGX Station DU-08255-001 _v2.4 | 55
b) Lift the panel to remove it.
Caution To prevent damage from electrostatic discharge, avoid touching anyof the components inside the DGX Station other than any components that youare replacing or servicing.
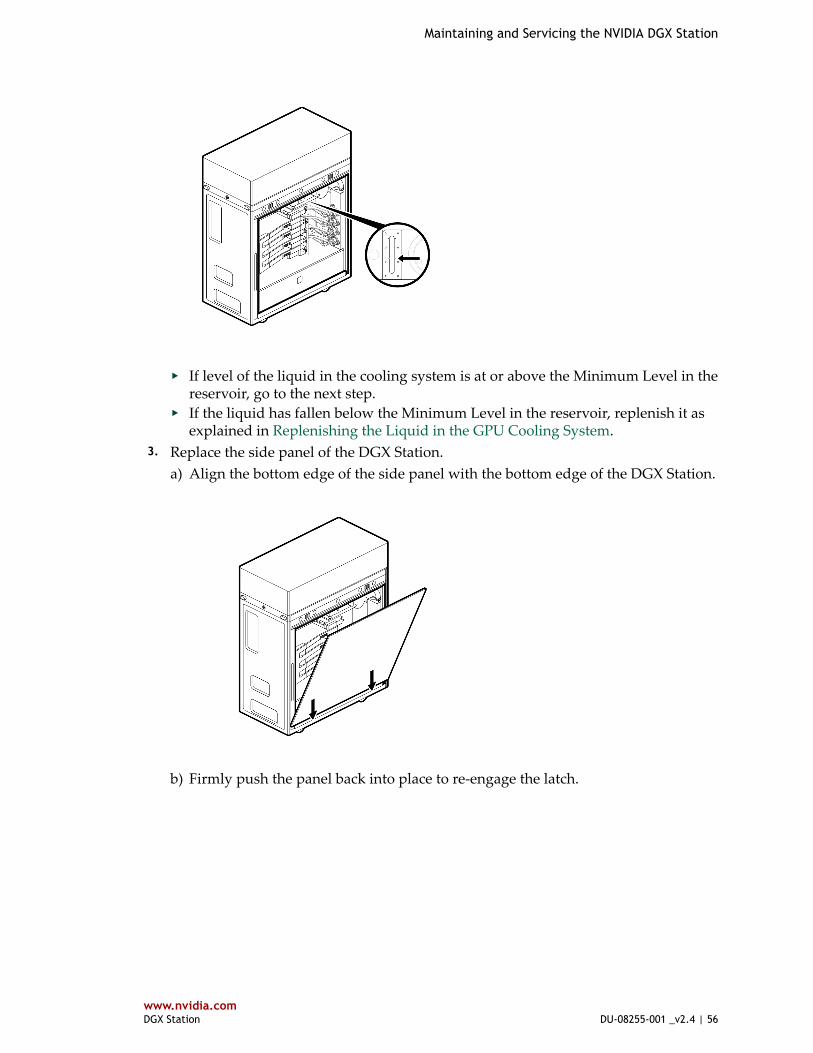
2. Look at the gauge on the side of the cooling system pump to determine the level ofthe liquid in the cooling system.
Maintaining and Servicing the NVIDIA DGX Station
www.nvidia.comDGX Station DU-08255-001 _v2.4 | 56
‣ If level of the liquid in the cooling system is at or above the Minimum Level in thereservoir, go to the next step.
‣ If the liquid has fallen below the Minimum Level in the reservoir, replenish it asexplained in Replenishing the Liquid in the GPU Cooling System.
3. Replace the side panel of the DGX Station.a) Align the bottom edge of the side panel with the bottom edge of the DGX Station.
b) Firmly push the panel back into place to re-engage the latch.
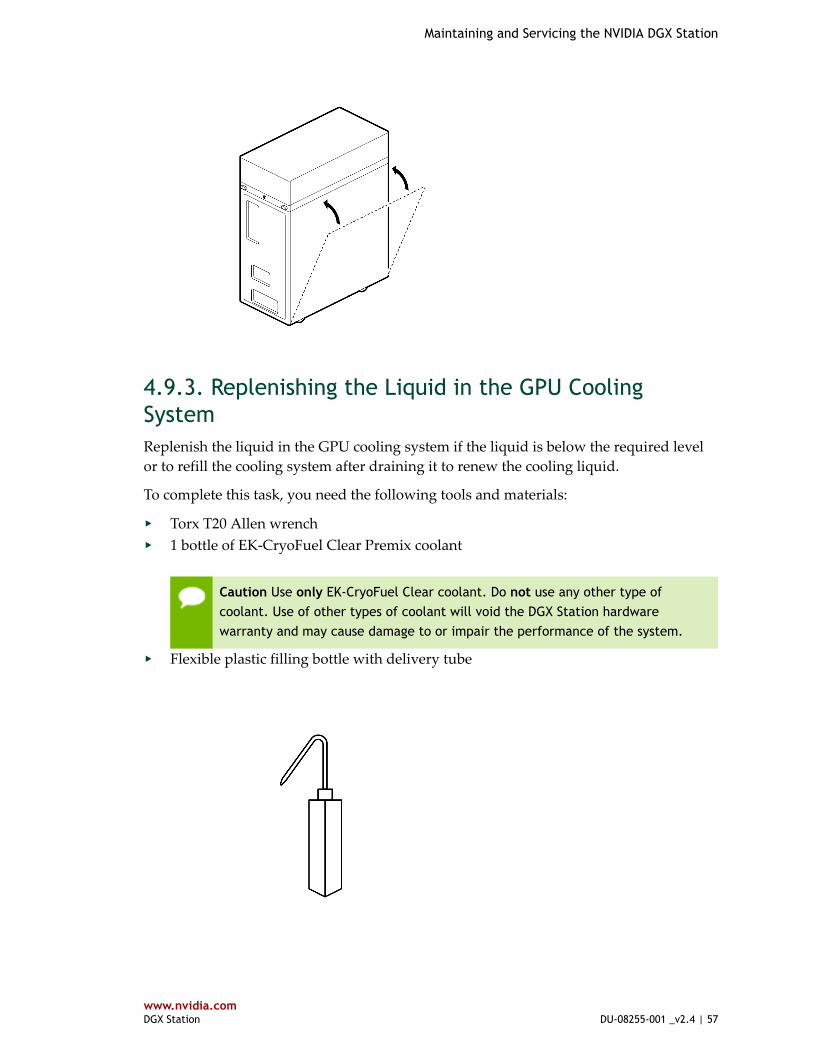
Maintaining and Servicing the NVIDIA DGX Station
www.nvidia.comDGX Station DU-08255-001 _v2.4 | 57
4.9.3. Replenishing the Liquid in the GPU CoolingSystemReplenish the liquid in the GPU cooling system if the liquid is below the required levelor to refill the cooling system after draining it to renew the cooling liquid.
To complete this task, you need the following tools and materials:
‣ Torx T20 Allen wrench‣ 1 bottle of EK-CryoFuel Clear Premix coolant
Caution Use only EK-CryoFuel Clear coolant. Do not use any other type ofcoolant. Use of other types of coolant will void the DGX Station hardwarewarranty and may cause damage to or impair the performance of the system.
‣ Flexible plastic filling bottle with delivery tube

Maintaining and Servicing the NVIDIA DGX Station
www.nvidia.comDGX Station DU-08255-001 _v2.4 | 58
Before you begin, ensure that the DGX Station is powered off.
1. Fill the plastic filling bottle with the mixture. 2. Use the Torx T20 Allen wrench to loosen the filler cap at top of the cooling system
pump and when the cap is loose, remove it.
3. Insert the delivery tube of the filling bottle into the open filler cap at the top of the
pump. 4. Gently squeeze the filler bottle to dispense the coolant liquid into the pump until the
liquid reaches the Maximum Level in the reservoir.
5. Replace the filler cap at top of the pump and use the Torx T20 Allen wrench to
tighten the cap until it is finger tight.Do not over tighten the filler cap.
6. Power on the DGX Station and let it run for one minute.
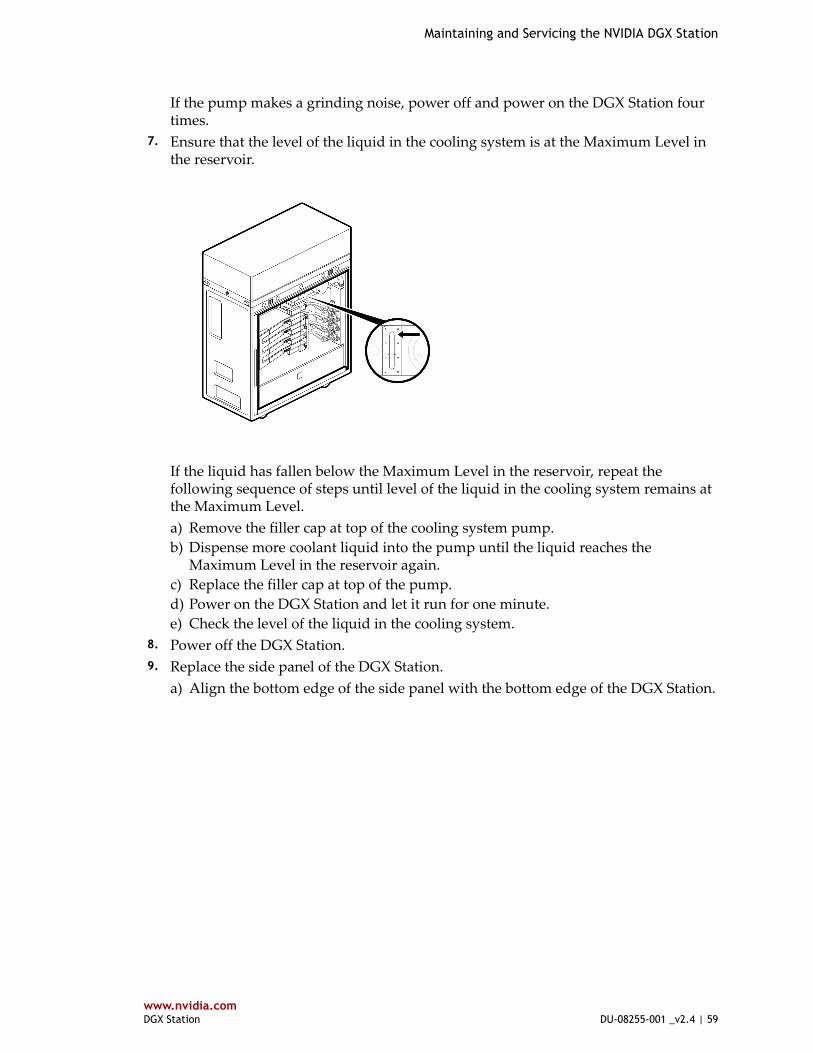
Maintaining and Servicing the NVIDIA DGX Station
www.nvidia.comDGX Station DU-08255-001 _v2.4 | 59
If the pump makes a grinding noise, power off and power on the DGX Station fourtimes.
7. Ensure that the level of the liquid in the cooling system is at the Maximum Level inthe reservoir.
If the liquid has fallen below the Maximum Level in the reservoir, repeat thefollowing sequence of steps until level of the liquid in the cooling system remains atthe Maximum Level.a) Remove the filler cap at top of the cooling system pump.b) Dispense more coolant liquid into the pump until the liquid reaches the
Maximum Level in the reservoir again.c) Replace the filler cap at top of the pump.d) Power on the DGX Station and let it run for one minute.e) Check the level of the liquid in the cooling system.
8. Power off the DGX Station. 9. Replace the side panel of the DGX Station.
a) Align the bottom edge of the side panel with the bottom edge of the DGX Station.

Maintaining and Servicing the NVIDIA DGX Station
www.nvidia.comDGX Station DU-08255-001 _v2.4 | 60
b) Firmly push the panel back into place to re-engage the latch.
www.nvidia.comDGX Station DU-08255-001 _v2.4 | 61
Appendix A.SAFETY
To reduce the risk of bodily injury, electrical shock, fire, and equipment damage, readthis document and observe all warnings and precautions in this guide before installingor maintaining your product. NVIDIA products are designed to operate safely wheninstalled and used according to the product instructions and general safety practices.The guidelines included in this document explain the potential risks associated withcomputer operation and provide important safety practices designed to minimize theserisks.
The product is designed and tested to meet IEC 60950-1, the Standard for the Safety ofInformation Technology Equipment. This also covers the national implementation ofIEC 60950-1 based safety standards around the world, for example, UL 60950-1. Thesestandards reduce the risk of injury from the following hazards:
‣ Electric shock: Hazardous voltage levels contained in parts of the product‣ Fire: Overload, temperature, material flammability‣ Mechanical: Sharp edges, moving parts, instability‣ Energy: Circuits with high energy levels (240 volt amperes) or potential as burn
hazards‣ Heat: Accessible parts of the product at high temperatures‣ Chemical: Chemical fumes and vapors‣ Radiation: Noise, ionizing, laser, ultrasonic waves
Retain and follow all product safety and operating instructions. Always refer to thedocumentation supplied with your equipment. Observe all warnings on the product andin the operating instructions.
WARNING: FAILURE TO FOLLOW THESE SAFETY INSTRUCTIONS COULD RESULT IN FIRE,ELECTRIC SHOCK OR OTHER INJURY OR DAMAGE. ELECTRICAL EQUIPMENT CAN BEHAZARDOUS IF MISUSED. OPERATION OF THIS PRODUCT, OR SIMILAR PRODUCTS, MUSTALWAYS BE SUPERVISED BY AN ADULT. DO NOT ALLOW CHILDREN ACCESS TO THE INTERIOROF ANY ELECTRICAL PRODUCT AND DO NOT PERMIT THEM TO HANDLE ANY CABLES.
Safety
www.nvidia.comDGX Station DU-08255-001 _v2.4 | 62
A.1. Intended Application UsesThis product was evaluated as Information Technology Equipment (ITE), which maybe installed in offices, schools, computer rooms, and similar commercial type locations.The suitability of this product for other product categories and environments (such asmedical, industrial, residential, alarm systems, and test equipment), other than an ITEapplication, may require further evaluation.
A.2. General PrecautionsTo reduce the risk of personal injury or damage to the equipment:
‣ Shut down the product and disconnect all AC power cables before installation.‣ Do not connect or disconnect any cables when performing installation, maintenance,
or reconfiguration of this product during an electrical storm.‣ Never turn on any equipment when there is evidence of fire, water, or structural
damage.‣ Place the product away from radiators, heat registers, stoves, amplifiers, or other
products that produce heat.‣ Never use the product in a wet location.‣ Avoid inserting foreign objects through openings in the product.‣ Do not use conductive tools that could bridge live parts.‣ Do not make mechanical or electrical modifications to the equipment.‣ Use the product only with approved equipment.‣ Follow all cautions and instructions marked on the equipment. Do not attempt to
defeat safety interlocks (where provided).‣ Operate the DGX Station in a place where the temperature is always in the range
10°C to 30°C (50°F to 86°F).
A.3. Electrical Precautions
Power Cable
To reduce the risk of electric shock, fire, or damage to the equipment:
‣ Use only the supplied power cable and do not use this power cable with any otherproducts or for any other purpose. Not all power cables have the same currentratings.
‣ Do not use household extension cables with your product. Household extensioncables do not have overload protection and are not intended for use with computersystems.
‣ If you lose or damage the supplied power cable, or have to change the power cablefor any reason, use a cable rated for your product and for the voltage and current
Safety
www.nvidia.comDGX Station DU-08255-001 _v2.4 | 63
marked on the electrical ratings label of the product. The voltage and current ratingof the cable must be greater than the voltage and current rating marked on theproduct.
‣ Plug the power cable into a grounded (earthed) electrical outlet that is easilyaccessible at all times. The product is equipped with a three-wire electricalgrounding-type plug which has a third pin for ground. This plug fits only into agrounded electrical power outlet.
‣ Do not disable the power cable grounding plug. The grounding plug is an importantsafety feature.
‣ Do not place objects on power cables. Arrange them so that no one may accidentallystep on or trip over them.
‣ Do not pull on a cable. When unplugging the product from the electrical outlet,grasp the plug.
‣ When possible, use one hand only to connect or disconnect cables.‣ Do not modify power cables or plugs. Consult a licensed electrician or your power
company for site modifications.
Power Supply
‣ Ensure that the voltage and frequency of your power source match the voltage andfrequency inscribed on the equipment’s electrical rating label. If you have a questionabout the type of power source to use, contact your authorized service provider.
‣ Connect the equipment to a properly wired and grounded electrical outlet andalways follow your local or national wiring rules.
‣ Ensure that the socket outlet is near the equipment and is readily accessible fordisconnection.
‣ To help protect your system from sudden, transient increases and decreases inelectrical power, consider using a surge suppressor or line conditioner.
‣ Never force a connector into a port. Check for obstructions on the port. If theconnector and port don’t join with reasonable ease, they probably don’t match. Makesure that the connector matches the port and that you have positioned the connectorcorrectly in relation to the port.
‣ Do not open the power supply. Hazardous voltage, current and energy levels arepresent inside the power supply. The power supply in this product contains no user-serviceable parts. Return to manufacturer for servicing.
A.4. Communications Cable PrecautionsTo reduce the risk of exposure to electrical shock hazards from communications cables:
‣ Do not connect communications cables during an electrical storm. There may be arisk of electric shock from lightning.
‣ Do not connect or use communications cables in a wet location.
Safety
www.nvidia.comDGX Station DU-08255-001 _v2.4 | 64
‣ Disconnect the communications cables before opening a product enclosure, ortouching or installing internal components.
A.5. Other Hazards
Proposition 65 Warning
This product contains chemicals known to the State of California to cause cancer andbirth defects or other reproductive harm.
California Department of Toxic Substances Control
Perchlorate Material – special handling may apply. See www.dtsc.ca.gov/hazardouswaste/perchlorate.
Perchlorate Material: Lithium battery (CR2032) contains perchlorate. Please followinstructions for disposal.
Nickel
The decorative metal foam on the DGX Station casework contains some nickel. Themetal foam is not intended for direct and prolonged skin contact. While nickel exposureis unlikely to be a problem, you should be aware of the possibility in case you’resusceptible to nickel-related reactions.
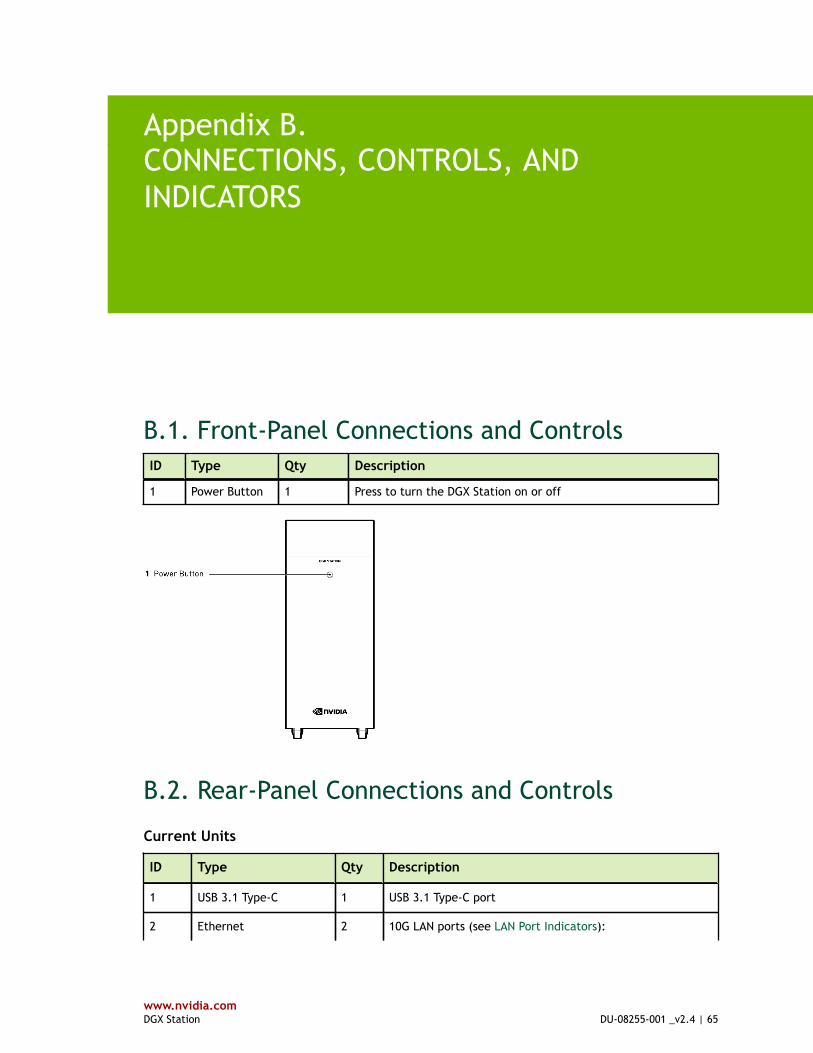
www.nvidia.comDGX Station DU-08255-001 _v2.4 | 65
Appendix B.CONNECTIONS, CONTROLS, ANDINDICATORS
B.1. Front-Panel Connections and ControlsID Type Qty Description
1 Power Button 1 Press to turn the DGX Station on or off
B.2. Rear-Panel Connections and Controls
Current Units
ID Type Qty Description
1 USB 3.1 Type-C 1 USB 3.1 Type-C port
2 Ethernet 2 10G LAN ports (see LAN Port Indicators):
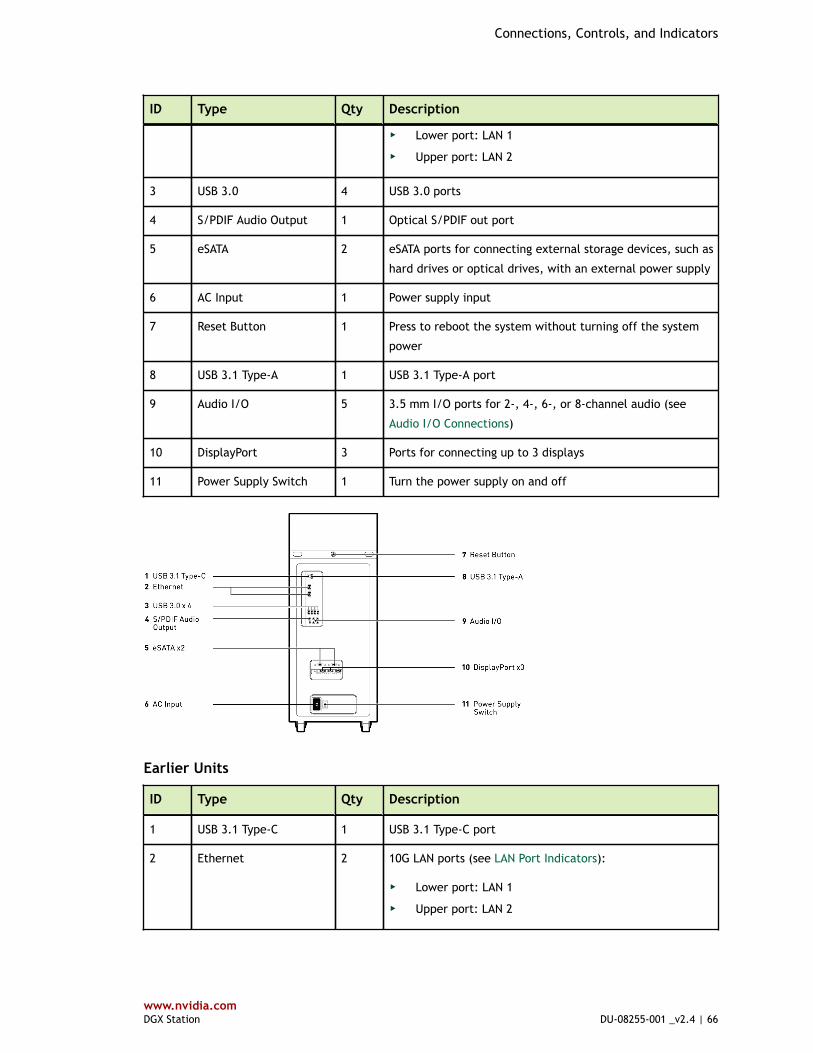
Connections, Controls, and Indicators
www.nvidia.comDGX Station DU-08255-001 _v2.4 | 66
ID Type Qty Description
‣ Lower port: LAN 1
‣ Upper port: LAN 2
3 USB 3.0 4 USB 3.0 ports
4 S/PDIF Audio Output 1 Optical S/PDIF out port
5 eSATA 2 eSATA ports for connecting external storage devices, such as
hard drives or optical drives, with an external power supply
6 AC Input 1 Power supply input
7 Reset Button 1 Press to reboot the system without turning off the system
power
8 USB 3.1 Type-A 1 USB 3.1 Type-A port
9 Audio I/O 5 3.5 mm I/O ports for 2-, 4-, 6-, or 8-channel audio (see
Audio I/O Connections)
10 DisplayPort 3 Ports for connecting up to 3 displays
11 Power Supply Switch 1 Turn the power supply on and off
Earlier Units
ID Type Qty Description
1 USB 3.1 Type-C 1 USB 3.1 Type-C port
2 Ethernet 2 10G LAN ports (see LAN Port Indicators):
‣ Lower port: LAN 1
‣ Upper port: LAN 2
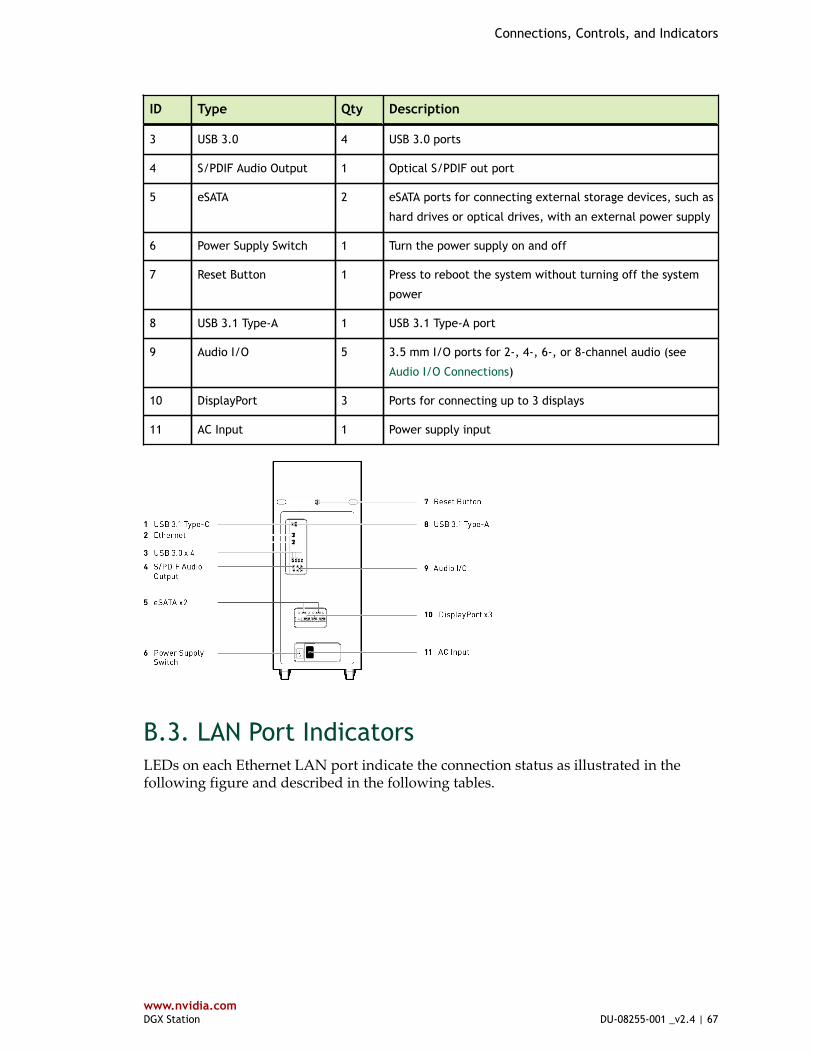
Connections, Controls, and Indicators
www.nvidia.comDGX Station DU-08255-001 _v2.4 | 67
ID Type Qty Description
3 USB 3.0 4 USB 3.0 ports
4 S/PDIF Audio Output 1 Optical S/PDIF out port
5 eSATA 2 eSATA ports for connecting external storage devices, such as
hard drives or optical drives, with an external power supply
6 Power Supply Switch 1 Turn the power supply on and off
7 Reset Button 1 Press to reboot the system without turning off the system
power
8 USB 3.1 Type-A 1 USB 3.1 Type-A port
9 Audio I/O 5 3.5 mm I/O ports for 2-, 4-, 6-, or 8-channel audio (see
Audio I/O Connections)
10 DisplayPort 3 Ports for connecting up to 3 displays
11 AC Input 1 Power supply input
B.3. LAN Port IndicatorsLEDs on each Ethernet LAN port indicate the connection status as illustrated in thefollowing figure and described in the following tables.
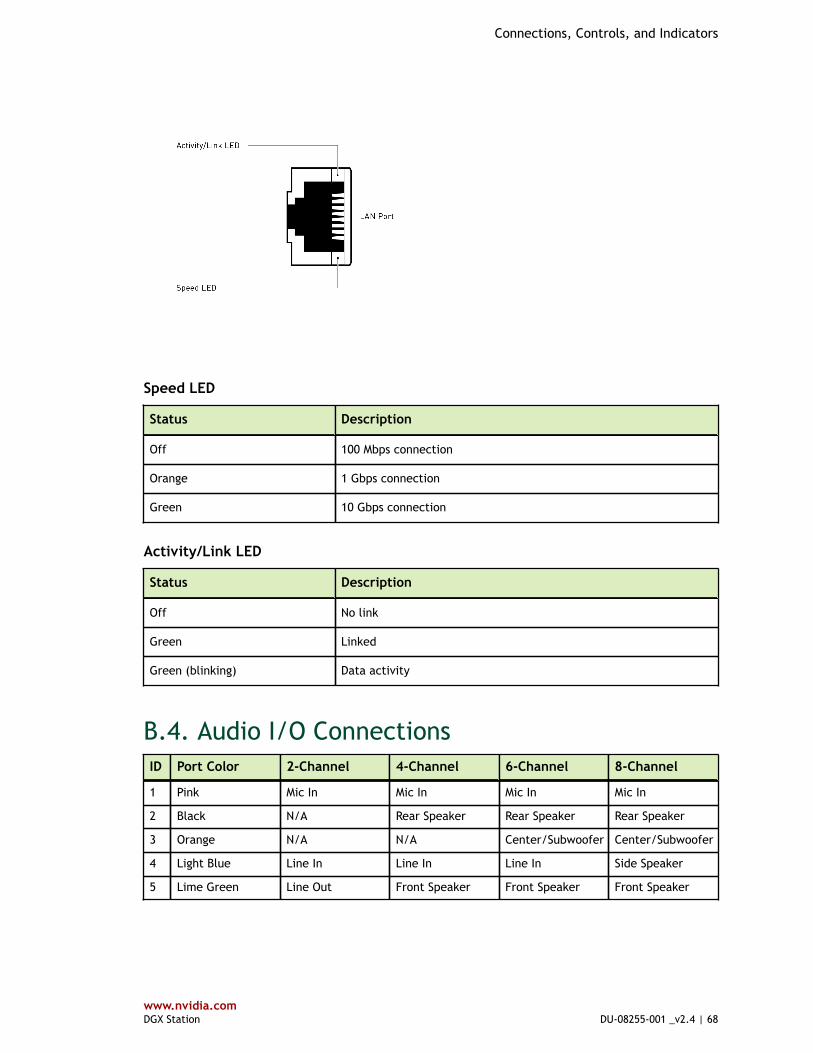
Connections, Controls, and Indicators
www.nvidia.comDGX Station DU-08255-001 _v2.4 | 68
Speed LED
Status Description
Off 100 Mbps connection
Orange 1 Gbps connection
Green 10 Gbps connection
Activity/Link LED
Status Description
Off No link
Green Linked
Green (blinking) Data activity
B.4. Audio I/O ConnectionsID Port Color 2-Channel 4-Channel 6-Channel 8-Channel
1 Pink Mic In Mic In Mic In Mic In
2 Black N/A Rear Speaker Rear Speaker Rear Speaker
3 Orange N/A N/A Center/Subwoofer Center/Subwoofer
4 Light Blue Line In Line In Line In Side Speaker
5 Lime Green Line Out Front Speaker Front Speaker Front Speaker
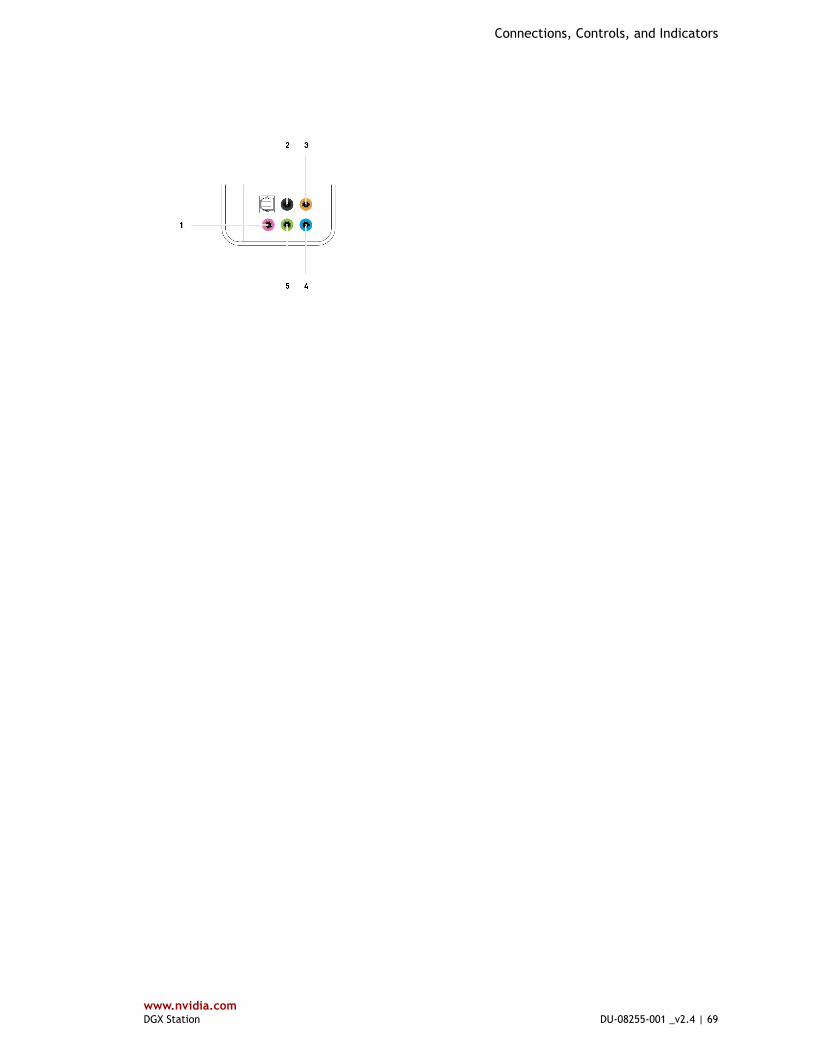
Connections, Controls, and Indicators
www.nvidia.comDGX Station DU-08255-001 _v2.4 | 69
www.nvidia.comDGX Station DU-08255-001 _v2.4 | 70
Appendix C.COMPLIANCE
The NVIDIA DGX Station is compliant with the regulations listed in this section.
C.1. DGX Station Model NumberModel: P2587
C.2. Argentina
S-Mark
C.3. Australia/New Zealand
RCM
Compliance
www.nvidia.comDGX Station DU-08255-001 _v2.4 | 71
C.4. Brazil
INMETRO
C.5. CanadaInnovation, Science and Economic Development Canada (ISED)
CAN ICES-3(A)/NMB-3(A)
The Class A digital apparatus meets all requirements of the Canadian Interference-Causing Equipment Regulation.
Cet appareil numérique de la classe A respecte toutes les exigences du Règlement sur lematériel brouilleur du Canada.
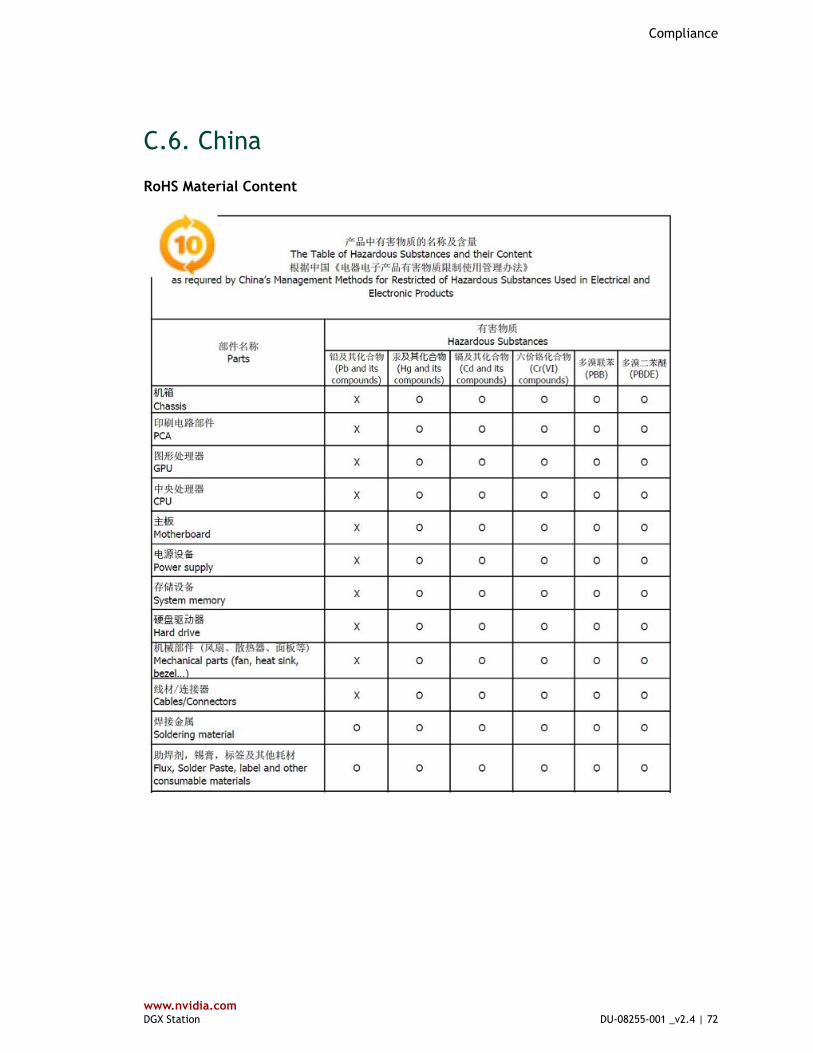
Compliance
www.nvidia.comDGX Station DU-08255-001 _v2.4 | 72
C.6. China
RoHS Material Content
Compliance
www.nvidia.comDGX Station DU-08255-001 _v2.4 | 73
C.7. European Union
European Conformity; Conformité Européenne (CE)
This is a Class A product. In a domestic environment this product may cause radiofrequency interference in which case the user may be required to take adequatemeasures.
The product has been marked with the CE Mark to illustrate its compliance.
This device complies with the following Directives:
‣ EMC Directive (2014/30/EU) for Class A, I.T.E equipment.‣ Low Voltage Directive (2014/35/EU) for electrical safety.‣ RoHS Directive (2011/65/EU) for hazardous substances.‣ ErP Directive (2009/125/EC) for European Ecodesign.
A copy of the Declaration of Conformity to the essential requirements may be obtaineddirectly from NVIDIA GmbH (Floessergasse 2, 81369 Munich, Germany).
Compliance
www.nvidia.comDGX Station DU-08255-001 _v2.4 | 74
C.8. India
BIS
Self Declaration - Conforming to IS13252:2010, R-41078743
C.9. Israel

Compliance
www.nvidia.comDGX Station DU-08255-001 _v2.4 | 75
C.10. Japan
VCCI
C.11. Russia
CU-TR
C.12. South Africa
LOA
Compliant with SANS IEC 60950
SABS
Compliant with SANS 222 CISPR 22
Compliance
www.nvidia.comDGX Station DU-08255-001 _v2.4 | 76
C.13. South Korea
KC
C.14. Taiwan
BSMI

Compliance
www.nvidia.comDGX Station DU-08255-001 _v2.4 | 77
C.15. United StatesFederal Communications Commission (FCC)
FCC Marking (Class A)
This device complies with part 15 of the FCC Rules. Operation is subject to the followingtwo conditions: (1) this device may not cause harmful interference, and (2) this devicemust accept any interference received, including any interference that may causeundesired operation of the device.
NOTE: This equipment has been tested and found to comply with the limits for a ClassA digital device, pursuant to part 15 of the FCC Rules. These limits are designed toprovide reasonable protection against harmful interference when the equipment isoperated in a commercial environment. This equipment generates, uses, and can radiate
Compliance
www.nvidia.comDGX Station DU-08255-001 _v2.4 | 78
radio frequency energy and, if not installed and used in accordance with the instructionmanual, may cause harmful interference to radio communications. Operation of thisequipment in a residential area is likely to cause harmful interference in which case theuser will be required to correct the interference at his own expense.
C.16. United States/Canada
cULus Listing Mark
C.17. Vietnam
ICT

www.nvidia.comDGX Station DU-08255-001 _v2.4 | 79
Appendix D.DGX STATION HARDWARE SPECIFICATIONS
D.1. Environmental ConditionsCondition Operating Range Nonoperating Range
Ambient temperature 10°C to 30°C (50°F to 86°F) 5°C to 40°C (41°F to 104°F)
Relative humidity 10% to 80% (non-condensing) 8% to 90% (non-condensing)
D.2. Component SpecificationsComponent Qty Description
CPU 1 Intel Xeon E5-2698 v4 2.2 GHz (20-Core)
GPU- currentunits
4 NVIDIA Tesla V100-DGXS-32GB, featuring:
‣ 4×125 TeraFLOPS (500 TeraFLOPS total), FP16‣ 4×32 GB (128 GB total) GPU memory‣ 4×640 (2,560 total) NVIDIA Tensor Cores‣ 4×5,120 (20,480 total) NVIDIA CUDA® cores
GPU - earlierunits
4 NVIDIA Tesla V100-DGXS-16GB, featuring:
‣ 4×125 TeraFLOPS (500 TeraFLOPS total), FP16‣ 4×16 GB (64 GB total) GPU memory‣ 4×640 (2,560 total) NVIDIA Tensor Cores‣ 4×5,120 (20,480 total) NVIDIA CUDA® cores
System memory 8 8×32 GB (256 GB total) ECC Registered LRDIMM DDR4 SDRAM
Data storage 3 3×1.92 TB (5.76 TB total) 2.5" 6 Gb/s SATA III SSD in RAID 0 configuration
OS storage 1 1.92 TB 2.5" 6 Gb/s SATA III SSD
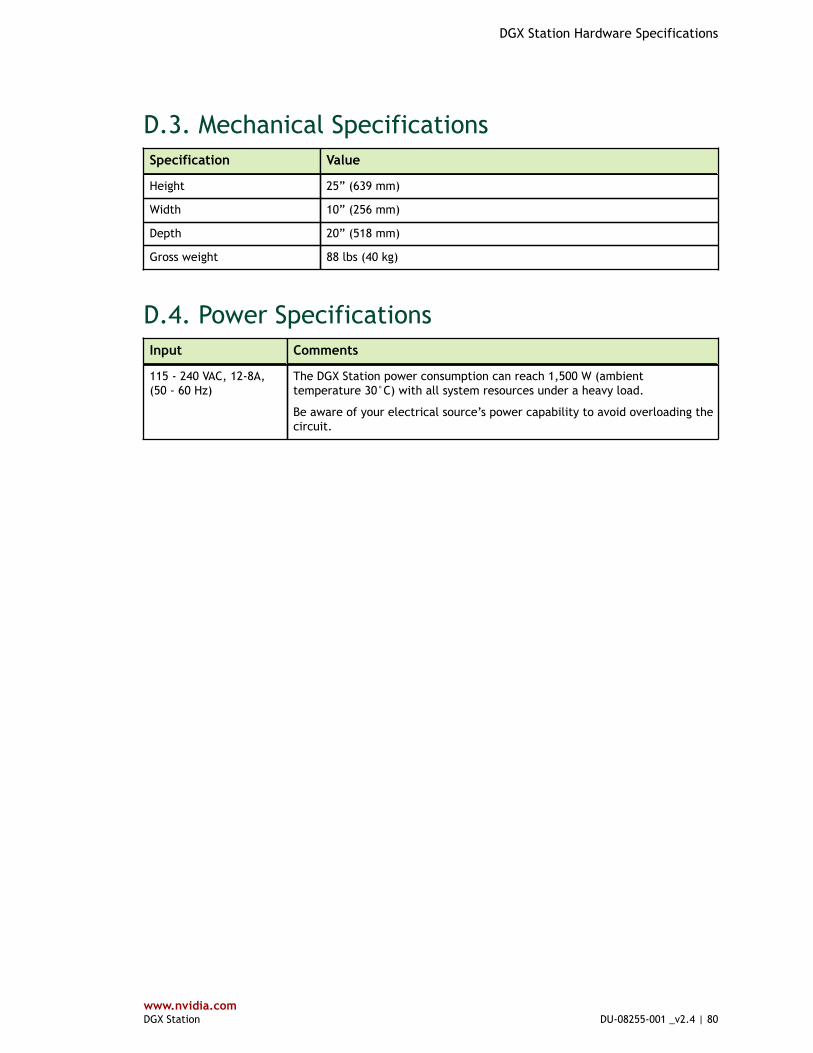
DGX Station Hardware Specifications
www.nvidia.comDGX Station DU-08255-001 _v2.4 | 80
D.3. Mechanical SpecificationsSpecification Value
Height 25” (639 mm)
Width 10” (256 mm)
Depth 20” (518 mm)
Gross weight 88 lbs (40 kg)
D.4. Power SpecificationsInput Comments
115 - 240 VAC, 12-8A,(50 - 60 Hz)
The DGX Station power consumption can reach 1,500 W (ambienttemperature 30°C) with all system resources under a heavy load.
Be aware of your electrical source’s power capability to avoid overloading thecircuit.
Notice
THE INFORMATION IN THIS GUIDE AND ALL OTHER INFORMATION CONTAINED IN NVIDIA DOCUMENTATION
REFERENCED IN THIS GUIDE IS PROVIDED “AS IS.” NVIDIA MAKES NO WARRANTIES, EXPRESSED, IMPLIED,
STATUTORY, OR OTHERWISE WITH RESPECT TO THE INFORMATION FOR THE PRODUCT, AND EXPRESSLY
DISCLAIMS ALL IMPLIED WARRANTIES OF NONINFRINGEMENT, MERCHANTABILITY, AND FITNESS FOR A
PARTICULAR PURPOSE. Notwithstanding any damages that customer might incur for any reason whatsoever,
NVIDIA’s aggregate and cumulative liability towards customer for the product described in this guide shall
be limited in accordance with the NVIDIA terms and conditions of sale for the product.
THE NVIDIA PRODUCT DESCRIBED IN THIS GUIDE IS NOT FAULT TOLERANT AND IS NOT DESIGNED,
MANUFACTURED OR INTENDED FOR USE IN CONNECTION WITH THE DESIGN, CONSTRUCTION, MAINTENANCE,
AND/OR OPERATION OF ANY SYSTEM WHERE THE USE OR A FAILURE OF SUCH SYSTEM COULD RESULT IN A
SITUATION THAT THREATENS THE SAFETY OF HUMAN LIFE OR SEVERE PHYSICAL HARM OR PROPERTY DAMAGE
(INCLUDING, FOR EXAMPLE, USE IN CONNECTION WITH ANY NUCLEAR, AVIONICS, LIFE SUPPORT OR OTHER
LIFE CRITICAL APPLICATION). NVIDIA EXPRESSLY DISCLAIMS ANY EXPRESS OR IMPLIED WARRANTY OF FITNESS
FOR SUCH HIGH RISK USES. NVIDIA SHALL NOT BE LIABLE TO CUSTOMER OR ANY THIRD PARTY, IN WHOLE OR
IN PART, FOR ANY CLAIMS OR DAMAGES ARISING FROM SUCH HIGH RISK USES.
NVIDIA makes no representation or warranty that the product described in this guide will be suitable for
any specified use without further testing or modification. Testing of all parameters of each product is not
necessarily performed by NVIDIA. It is customer’s sole responsibility to ensure the product is suitable and
fit for the application planned by customer and to do the necessary testing for the application in order
to avoid a default of the application or the product. Weaknesses in customer’s product designs may affect
the quality and reliability of the NVIDIA product and may result in additional or different conditions and/
or requirements beyond those contained in this guide. NVIDIA does not accept any liability related to any
default, damage, costs or problem which may be based on or attributable to: (i) the use of the NVIDIA
product in any manner that is contrary to this guide, or (ii) customer product designs.
Other than the right for customer to use the information in this guide with the product, no other license,
either expressed or implied, is hereby granted by NVIDIA under this guide. Reproduction of information
in this guide is permissible only if reproduction is approved by NVIDIA in writing, is reproduced without
alteration, and is accompanied by all associated conditions, limitations, and notices.
Trademarks
NVIDIA, the NVIDIA logo, DGX, DGX-1, and DGX Station are trademarks and/or registered trademarks of
NVIDIA Corporation in the Unites States and other countries. Other company and product names may be
trademarks of the respective companies with which they are associated.
Copyright
© 2018 NVIDIA Corporation. All rights reserved.
www.nvidia.com