Embed Size (px)
Citation preview

Dual Digital Media Player
DN-D4500MK2Owner’s Manual

I
CAUTIONRISK OF ELECTRIC SHOCK
DO NOT OPEN
CAUTION: TO REDUCE THE RISK OF ELECTRIC SHOCK, DO NOT REMOVE COVER (OR BACK). NO USER-SERVICEABLE PARTS INSIDE. REFER SERVICING TO QUALIFIED SERVICE PERSONNEL.
The lightning flash with arrowhead symbol, within an equilateral triangle, is intended to alert the user to the presence of uninsulated “dangerous voltage” within the product’s enclosure that may be of sufficient magnitude to constitute a risk of electric shock to persons.
The exclamation point within an equilateral triangle is intended to alert the user to the presence of important operating and maintenance (servicing) instructions in the literature accompanying the appliance.
IMPORTANT TO SAFETYWARNING:To reduce the risk of fire and electric shock, this apparatus should not be exposed to rain or moisture.
CAUTION:USE OF CONTROLS OR ADJUSTMENTS OR PERFORMANCE OF PROCEDURES OTHER THAN THOSE SPECIFIED HEREIN MAY RESULT IN HAZARDOUS RADIATION EXPOSURE.THIS PRODUCT SHOULD NOT BE ADJUSTED OR REPAIRED BY ANYONE EXCEPT PROPERLY QUALIFIED SERVICE PERSONNEL.
FCC INFORMATION (For US customers)
1. PRODUCTThis product complies with Part 15 of the FCC Rules. Operation is subject to the following two conditions: (1) this product may not cause harmful interference, and (2) this product must accept any interference received, including interference that may cause undesired operation.
2. IMPORTANT NOTICE: DO NOT MODIFY THIS PRODUCT This product, when installed as indicated in the instructions contained in this manual, meets FCC requirements. Modification not expressly approved by DENON may void your authority, granted by the FCC, to use the product.
3. NOTEThis product has been tested and found to comply with the limits for a Class B digital device, pursuant to Part 15 of the FCC Rules. These limits are designed to provide reasonable protection against harmful interference in a residential installation.This product generates, uses and can radiate radio frequency energy and, if not installed and used in accordance with the instructions, may cause harmful interference to radio communications. However, there is no guarantee that interference will not occur in a particular installation. If this product does cause harmful interference to radio or television reception, which can be determined by turning the product OFF and ON, the user is encouraged to try to correct the interference by one or more of the following measures:
• Reorientorrelocatethereceivingantenna.• Increasetheseparationbetweentheequipmentandreceiver.• Connect the product into an outlet on a circuit different from that to which the receiver is
connected.• Consult the local retailer authorized to distribute this typeof product or an experienced radio/TV
technician for help.
For Canadian customers:This Class B apparatus complies with Canadian ICES-003.Cet appareil numérique de la classe B est conforme à la norme NMB-003 du Canada.

II
IMPORTANT SAFETY INSTRUCTIONS1. Read these instructions.
2. Keep these instructions.
3. Heed all warnings.
4. Follow all instructions.
5. Do not use this apparatus near water.
6. Clean only with dry cloth.
7. Do not block any ventilation openings. Install in accordance with the manufacturer’s instructions.
8. Do not install near any heat sources such as radiators, heat registers, stoves, or other apparatus (including amplifiers) that produce heat.
9. Donotdefeatthesafetypurposeofthepolarizedorgrounding-typeplug.Apolarizedplughastwobladeswithonewiderthantheother.Agroundingtypeplughastwobladesandathirdgroundingprong. The wide blade or the third prong are provided for your safety. If the provided plug does not fit into your outlet, consult an electrician for replacement of the obsolete outlet.
10. Protect the power cord from being walked on or pinched particularly at plugs, convenience receptacles, and the point where they exit from the apparatus.
11. Onlyuseattachments/accessoriesspecifiedbythemanufacturer.
12. Use only with the cart, stand, tripod, bracket, or table specified by the manufacturer, or sold with the apparatus.Whenacart isused,usecautionwhenmovingthecart/apparatuscombinationtoavoidinjury from tip-over.
13. Unplug this apparatus during lightning storms or when unused for long periods of time.
14. Refer all servicing to qualified service personnel. Servicing is required when the apparatus has been damaged in any way, such as power-supply cord or plug is damaged, liquid has been spilled or objects have fallen into the apparatus, the apparatus has been exposed to rain or moisture, does not operate normally, or has been dropped.
15. This product is equipped with a three-wire grounding type plug, a plug having a third (grounding) pin. This plug will only fit into a grounding-type power outlet. If you are unable to insert the plug into the outlet, contact your electrician to replace your obsolete
outlet. Do not defeat the safety purpose of the grounding-type plug.
CAUTION1. Handle the power supply cord carefully
Do not damage or deform the power supply cord. If it is damaged or deformed, it may cause electric shock or malfunction when used. When removing from wall outlet, be sure to remove by holding the plug attachment and not by pulling the cord.
2. Do not open the rear coverIn order to prevent electric shock, do not open the top cover.Ifproblemsoccur,contactyourDENONDEALER.
3. Do not place anything insideDo not place metal objects or spill liquid inside the system.Electric shock or malfunction may result.
Please, record and retain the Model name and serial number of your set shown on the rating label.Model No. DN-D4500MK2
Serial No.
,CLASS 1
LASER PRODUCT,
,,
n Laser Class(IEC60825-1:2007)CLASS 1 LASER PRODUCTLUOKAN 1 LASERLAITEKLASS 1 LASERAPPARATADVARSEL: USYNLIG LASERSTRÅLING VED ÅBNING, NÅR SIKKERHEDSAFBRYDERE ER UDE AF FUNKTION. UNDGÅ UDSAETTELSE FOR STRÅLING.VAROITUS! LAITTEEN KÄYTTÄMINEN MUULLA KUIN TÄSSÄ KÄYTTÖOHJEESSA MAINITULLA TAVALLA SAATTAA ALTISTAA KÄYTTÄJÄN TURVALLISUUSLUOKAN 1 YLITTÄVÄLLE NÄKYMÄMTTÖMÄLLE LASERSÄTEILYLLE.VARNING: OM APPARATEN ANVÄNDS PÅ ANNAT SÄTT ÄN I DENNA BRUKSANVISNING SPECIFICERATS, KAN ANVÄNDAREN UTSÄTTAS FÖR OSYNLIG LASERSTRÅLNING SOM ÖVERSKRIDER GRÄNSEN FÖR LASERKLASS 1.
ATTENZIONE:QUESTOAPPARECCHIOE’DOTATODIDISPOSITIVOOTTICOCONRAGGIOLASER.L’USOIMPROPRIODELL’APPARECCHIOPUO’CAUSAREPERICOLOSEESPOSIZIONIARADIAZIONI!

III
n NOTE ON USE/HINWEISE ZUM GEBRAUCH/OBSERVATIONS RELATIVES A L’UTILISATION/ NOTE SULL’USO/NOTAS SOBRE EL USO/ALVORENS TE GEBRUIKEN/OBSERVERA
WARNINGS WARNHINWEISE AVERTISSEMENTS AVVERTENZE ADVERTENCIAS WAARSCHUWINGEN VARNINGAR•Handle the power cord carefully.
Hold the plug when unplugging the cord.
•Keep the unit free from moisture, water, and dust.
•Unplug the power cord when not using the unit for long periods of time.
•Do not obstruct the ventilation holes.
•Do not let foreign objects into the unit.
•Do not let insecticides, benzene,andthinnercomeincontact with the unit.
•Never disassemble or modify the unit in any way.
•Ventilationshouldnotbeimpeded by covering the ventilation openings with items, such as newspapers, tablecloths or curtains.
•Naked flame sources such as lighted candles should not be placed on the unit.
•Do not expose the unit to dripping or splashing fluids.
•Do not place objects filled with liquids, such as vases, on the unit.
•Do not handle the mains cord with wet hands.
•When the switch is in the OFF position, the equipment is not completely switched off from MAINS.
•The equipment shall be installed near the power supply so that the power supply is easily accessible.
•GehenSievorsichtigmitdemNetzkabelum.Halten Sie das Kabel am Stecker, wenn Sie den Stecker herausziehen.
•HaltenSiedasGerätvonFeuchtigkeit, Wasser und Staub fern.
•DeckenSiedenLüftungsbereichnicht ab.
•WenndasGerätlängereZeitnicht verwendet werden soll, trennenSiedasNetzkabelvomNetzstecker.
•LassenSiekeinefremdenGegenständeindasGerätkommen.
•LassenSiedasGerätnichtmitInsektiziden,BenzinoderVerdünnungsmittelninBerührungkommen.
•VersuchenSieniemalsdasGerätauseinanderzunehmenoderzuverändern.
•DieBelüftungsollteaufkeinenFalldurchdasAbdeckenderBelüftungsöffnungendurchGegenständewiebeispielsweiseZeitungen,Tischtücher,Vorhängeo. Ä. behindert werden.
•AufdemGerätsolltenkeinerleidirekte Feuerquellen wie beispielsweiseangezündeteKerzenaufgestelltwerden.
•DasGerätsolltekeinertropfendenoderspritzendenFlüssigkeitausgesetztwerden.
•AufdemGerätsolltenkeinemitFlüssigkeitgefülltenBehälterwiebeispielsweiseVasenaufgestelltwerden.
•DasNetzkabelnichtmitfeuchtenodernassenHändenanfassen.
•Wenn der Schalter ausgeschaltet ist(OFF-Position),istdasGerätnichtvollständigvomStromnetz(MAINS)abgetrennt.
•DasGerätsollteinderNäheeinerNetzsteckdoseaufgestelltwerden,damitesleichtandasStromnetzangeschlossen werden kann.
•Manipuler le cordon d’alimentation avec précaution.Tenir la prise lors du débranchement du cordon.
•Protéger l’appareil contre l’humidité, l’eau et la poussière.
•Débrancher le cordon d’alimentation lorsque l’appareil n’est pas utilisé pendant de longues périodes.
•Ne pas obstruer les trous d’aération.
•Ne pas laisser des objets étrangers dans l’appareil.
•Ne pas mettre en contact des insecticides,dubenzèneetundiluant avec l’appareil.
•Ne jamais démonter ou modifier l’appareil d’une manière ou d’une autre.
•Ne pas recouvrir les orifices de ventilation avec des objets tels que des journaux, nappes ou rideaux. Cela entraverait la ventilation.
•Ne jamais placer de flamme nue sur l'appareil, notamment des bougies allumées.
•L’appareilnedoitpasêtreexposé à l’eau ou à l’humidité.
•Ne pas poser d’objet contenant du liquide, par exemple un vase, sur l’appareil.
•Ne pas manipuler le cordon d’alimentation avec les mains mouillées.
•Lorsquel’interrupteurestsurla position OFF, l’appareil n’est pas complètement déconnecté duSECTEUR(MAINS).
•L’appareilserainstalléprèsdela source d’alimentation, de sorte que cette dernière soit facilement accessible.
•Manneggiate il cavo di alimentazioneconattenzione.Tenete ferma la spina quando scollegate il cavo dalla presa.
•Tenete l’unità lontana dall’umidità, dall’acqua e dalla polvere.
•Scollegate il cavo di alimentazionequandoprevedetedinonutilizzarel’unità per un lungo periodo di tempo.
•Non coprite i fori di ventilazione.
•Non inserite corpi estranei all’interno dell’unità.
•Assicuratevichel’unitànonentri in contatto con insetticidi, benzoloosolventi.
•Non smontate né modificate l’unità in alcun modo.
•Leaperturediventilazionenon devono essere ostruite coprendole con oggetti, quali giornali, tovaglie, tende e così via.
•Nonposizionatesull’unitàfiamme libere, come ad esempio candele accese.
•L’apparecchiaturanondeveessere esposta a gocciolii o spruzzi.
•Nonposizionatesull’unitàalcunoggetto contenente liquidi, come ad esempio i vasi.
•Non toccare il cavo di alimentazioneconlemanibagnate.
•Quandol’interruttoreènellaposizioneOFF,l’apparecchiatura non è completamente scollegata da MAINS.
•L’apparecchiovainstallatoin prossimità della fonte di alimentazione,inmodochequest’ultima sia facilmente accessibile.
•Maneje el cordón de energía con cuidado.Sostenga el enchufe cuando desconecte el cordón de energía.
•Mantenga el equipo libre de humedad, agua y polvo.
•Desconecte el cordón de energía cuando no utilice el equipo por mucho tiempo.
•No obstruya los orificios de ventilación.
•No deje objetos extraños dentro del equipo.
•No permita el contacto de insecticidas, gasolina y diluyentes con el equipo.
•Nunca desarme o modifique el equipo de ninguna manera.
•Laventilaciónnodebequedarobstruida por haberse cubierto las aperturas con objetos como periódicos, manteles o cortinas.
•No deberán colocarse sobre el aparato fuentes inflamables sin protección, como velas encendidas.
•No exponer el aparato al goteo o salpicaduras cuando se utilice.
•No colocar sobre el aparato objetos llenos de líquido, como jarros.
•No maneje el cable de alimentación con las manos mojadas.
•Cuando el interruptor está en la posición OFF, el equipo no está completamente desconectado delaalimentaciónMAINS.
•El equipo se instalará cerca de la fuente de alimentación de manera que resulte fácil acceder a ella.
•Hanteer het netsnoer voorzichtig.Houd het snoer bij de stekker vastwanneerdezemoetworden aan- of losgekoppeld.
•Laatgeenvochtigheid,water of stof in het apparaat binnendringen.
•Neem altijd het netsnoer uit het stopkontakt wanneer het apparaat gedurende een lange periode niet wordt gebruikt.
•De ventilatieopeningen mogen niet worden beblokkeerd.
•Laatgeenvreemdevoorwerpen in dit apparaat vallen.
•Voorkomdatinsecticiden,benzeenofverfverdunnermetdit toestel in contact komen.
•Dit toestel mag niet gedemonteerd of aangepast worden.
•De ventilatie mag niet worden belemmerd door de ventilatieopeningen af te dekken met bijvoorbeeld kranten, een tafelkleed of gordijnen.
•Plaats geen open vlammen, bijvoorbeeld een brandende kaars, op het apparaat.
•Stel het apparaat niet bloot aan druppels of spatten.
•Plaats geen voorwerpen gevuld met water, bijvoorbeeld een vaas, op het apparaat.
•Raak het netsnoer niet met natte handen aan.
•AlsdeschakelaaropOFFstaat, is het apparaat niet volledig losgekoppeld van de netspanning(MAINS).
•De apparatuur wordt in de buurt van het stopcontact geïnstalleerd,zodatditaltijdgemakkelijk toegankelijk is.
•Hanteranätkabelnvarsamt.Hållikabelnnärdenkopplasfrån el-uttaget.
•Utsättinteapparatenförfukt,vatten och damm.
•Kopplalossnätkabelnomapparaten inte kommer att användasilångtid.
•Täppintetillventilationsöppningarna.
•Setillattfrämmandeföremålinteträngeriniapparaten.
•Se till att inte insektsmedel på spraybruk, bensen och thinner kommer i kontakt med apparatenshölje.
•Tainteisärapparatenochförsökintebyggaomden.
•Ventilationenbörinteförhindrasgenomatttäckaförventilationsöppningarnamedföremålsåsomtidningar,bordsdukar eller gardiner.
•Placerainteöppeneld,t.ex.tändaljus,påapparaten.
•Apparatenfårinteutsättasförvätska.
•Placerainteföremålfylldamedvätska,t.ex.vaser,påapparaten.
•Hanteraintenätsladdenmedvåtahänder.
•ÄvenomströmbrytarenståridetavstängdalägetOFF,såärutrustningeninteheltbortkopplad från det elektriska nätet(MAINS).
•Utrustningen ska vara installeradnäraströmuttagetsåattströmförsörjningenärlättatt tillgå.

IV
•DECLARATION OF CONFORMITY (English) We declare under our sole responsibility that this product, to which this declaration relates, is in conformity with
the following standards: EN60065, EN55013, EN55020, EN61000-3-2 and EN61000-3-3. FollowingtheprovisionsofLowVoltageDirective2006/95/ECandEMCDirective2004/108/EC,theECregulation1275/2008anditsframeworkDirective2009/125/ECforEnergy-relatedProducts(ErP).
•ÜBEREINSTIMMUNGSERKLÄRUNG (Deutsch) WirerklärenunterunsererVerantwortung,daßdiesesProdukt,aufdassichdieseErklärungbezieht,den
folgenden Standards entspricht: EN60065, EN55013, EN55020, EN61000-3-2 und EN61000-3-3. GemäßdenBestimmungenderNiederspannungsrichtlinie2006/95/EGundEMVRichtlinie2004/108/EG,derVerordnung(EG)Nr.1275/2008derKommissionundderenRahmenrichtlinie2009/125/EGzuenergieverbrauchsrelevanten Produkten (ErP).
•DECLARATION DE CONFORMITE (Français) Nous déclarons sous notre seule responsabilité que l’appareil, auquel se réfère cette déclaration, est conforme aux
standards suivants: EN60065, EN55013, EN55020, EN61000-3-2 et EN61000-3-3. Selonladirective2006/95/ECconcernantlabassetensionetladirectiveCEM2004/108/EC,laréglementationeuropéenne1275/2008etladirective2009/125/ECétablissantuncadredetravailapplicableauxproduitsliésàl’énergie (ErP).
•DICHIARAZIONE DI CONFORMITÀ (Italiano) Dichiariamoconpienaresponsabilitàchequestoprodotto,alqualelanostradichiarazionesiriferisce,èconforme
alle seguenti normative: EN60065, EN55013, EN55020, EN61000-3-2 e EN61000-3-3. Facendoseguitoalledisposizionidelladirettivasulbassovoltaggio2006/95/ECalladirettivaEMC2004/108/EC,allanormaEC1275/2008eallarelativaleggequadro2009/125/ECinmateriadiprodottialimentatiadenergia(ErP).
QUESTOPRODOTTOE’CONFORME ALD.M.28/08/95N.548
•DECLARACIÓN DE CONFORMIDAD (Español) Declaramos bajo nuestra exclusiva responsabilidad que este producto al que hace referencia esta declaración, está
conforme con los siguientes estándares: EN60065, EN55013, EN55020, EN61000-3-2 y EN61000-3-3. Deacuerdoconladirectivasobrebajatensión2006/95/CEyladirectivasobreCEM2004/108/CE,lanormativaCE1275/2008ysudirectivamarco2009/125/ECparaproductosrelacionadosconlaenergía(ErP).
•EENVORMIGHEIDSVERKLARING (Nederlands) Wijverklarenuitsluitendoponzeverantwoordelijkheiddatditprodukt,waaropdezeverklaringbetrekkingheeft,in
overeenstemming is met de volgende normen: EN60065, EN55013, EN55020, EN61000-3-2 en EN61000-3-3. Volgensdevoorzieningenvanlagespanningsrichtlijn2006/95/ECenEMC-richtlijn2004/108/EC,deEU-richtlijn1275/2008endekaderrichtlijn2009/125/ECvoorenergieverbruikendeproducten(ErP).
•ÖVERENSSTÄMMELSESINTYG (Svenska) Härmedintygasheltpåegetansvarattdennaprodukt,vilkendettaintygavser,uppfyllerföljandestandarder: EN60065, EN55013, EN55020, EN61000-3-2 och EN61000-3-3. Uppfyllerreglernailågspänningsdirektivet2006/95/ECochEMC-direktivet2004/108/EC,EU-förordningen1275/2008ochramverksdirektivet2009/125/ECförenergirelateradeprodukter(ErP).
D&M Professional EuropeA division of D&M Europe B.V.Beemdstraat 115653 MA EindhovenThe Netherlands
CAUTION: (English)To completely disconnect this product from the mains, disconnect the plug from the wall socket outlet.The mains plug is used to completely interrupt the power supply to the unit and must be within easy access by the user.
VORSICHT: (Deutsch)Um dieses Gerät vollständig von der Stromversorgung abzutrennen, trennen Sie bitte denNetzsteckervonderWandsteckdoseab.DieHauptsteckerwerdenverwendet,umdieStromversorgungzumGerätvölligzuunterbrechen;ermussfürdenBenutzergutundeinfachzuerreichensein.
PRECAUTION: (Français)Pour déconnecter complètement ce produit du courant secteur, débranchez la prise de la prisemurale.La prise secteur est utilisée pour couper complètement l’alimentation de l’appareil et l’utilisateurdoit pouvoir y accéder facilement.
ATTENZIONE: (Italiano)Perscollegaredefinitivamentequestoprodottodallaretedialimentazioneelettrica,toglierelaspinadalla relativa presa.Laspinadiretevieneutilizzataperinterromperecompletamentel’alimentazioneall’unitàedeveessere facilmente accessibile all’utente.
PRECAUCIÓN: (Español)Para desconectar completamente este producto de la alimentación eléctrica, desconecte el enchufe del enchufe de la pared.Elenchufedelaalimentaciónseutilizaparainterrumpirporcompletoelsuministrodealimentaciónala unidad y debe de encontrarse en un lugar al que el usuario tenga fácil acceso.
VOORZICHTIGHEID: (Nederlands)Om de voeding van dit product volledig te onderbreken moet de stekker uit het stopcontact worden getrokken.De netstekker wordt gebruikt om de stroomtoevoer naar het toestel volledig te onderbreken en moetvoordegebruikergemakkelijkbereikbaarzijn.
FÖRSIKTIHETSMÅTT: (Svenska)Kopplalossstickproppenfråneluttagetförattheltskiljaproduktenfrånnätet.Stickproppenanvändsförattheltbrytaströmförsörjningentillapparaten,ochdenmåstevaralättillgängligföranvändaren.

V
A NOTE ABOUT RECYCLING:This product’s packaging materials are recyclable and can be reused. Please dispose of any materials in accordance with the local recycling regulations.When discarding the unit, comply with local rules or regulations.Batteries should never be thrown away or incinerated but disposed of in accordance with the local regulations concerning battery disposal.This product and the supplied accessories, excluding the batteries, constitute the applicable product according to the WEEE directive.
HINWEIS ZUM RECYCLING:Das Verpackungsmaterial dieses Produktes ist zum Recyceln geeignet und kann wiederverwendetwerden.BitteentsorgenSiealleMaterialienentsprechendderörtlichenRecycling-Vorschriften.BeachtenSiebeiderEntsorgungdesGerätesdieörtlichenVorschriftenundBestimmungen.DieBatteriendürfennichtindenHausmüllgeworfenoderverbranntwerden;bitteentsorgenSiedieBatteriengemäßderörtlichenVorschriften.Dieses Produkt und das im Lieferumfang enthaltene Zubehör (mit Ausnahme der Batterien!)entsprechen der WEEE-Direktive.
UNE REMARQUE CONCERNANT LE RECYCLAGE:Lesmatériauxd’emballagedeceproduitsontrecyclablesetpeuventêtreréutilisés.Veuillezdisposerdes matériaux conformément aux lois sur le recyclage en vigueur.Lorsquevousmettezcetappareilaurebut,respectezlesloisouréglementationsenvigueur.Lespilesnedoiventjamaisêtrejetéesouincinérées,maismisesaurebutconformémentauxloisenvigueursurlamise au rebut des piles.Ce produit et les accessoires inclus, à l’exception des piles, sont des produits conformes à la directive DEEE.
NOTA RELATIVA AL RICICLAGGIO:Imateriali di imballaggio di questoprodotto sono riutilizzabili e riciclabili. Smaltire imateriali conformemente allenormative locali sul riciclaggio.Per lo smaltimento dell’unità, osservare le normative o le leggi locali in vigore.Non gettare le batterie, né incenerirle, ma smaltirle conformemente alla normativa locale sui rifiuti chimici.Questoprodottoegliaccessoriinclusinell’imballaggiosonoapplicabilialladirettivaRAEE,adeccezionedellebatterie.
ACERCA DEL RECICLAJE:Losmateriales de embalaje de este producto son reciclables y se pueden volver a utilizar. Disponga de estosmateriales siguiendo los reglamentos de reciclaje de su localidad. Cuando se deshaga de la unidad, cumpla con las reglas o reglamentos locales. Laspilasnuncadeberántirarseniincinerarse.Deberádisponerdeellassiguiendolosreglamentosdesulocalidadrelacionados con los desperdicios químicos.EsteproductojuntoconlosaccesoriosempaquetadoseselproductoaplicablealadirectivaRAEEexceptopilas.
EEN AANTEKENING MET BETREKKING TOT DE RECYCLING:Hetinpakmateriaalvanditproductisrecycleerbaarenkanopnieuwgebruiktworden.Erwordtverzochtomzichvanelk afvalmateriaal te ontdoen volgens de plaatselijke voorschriften. Volgvoorhetwegdoenvandespelerdevoorschriftenvoordeverwijderingvanwit-enbruingoedop.Batterijen mogen nooit worden weggegooid of verbrand, maar moeten volgens de plaatselijke voorschriften betreffende chemisch afval worden verwijderd.Op dit product en de meegeleverde accessoires, m.u.v. de batterijen is de richtlijn voor afgedankte elektrische en elektronische apparaten (WEEE) van toepassing.
OBSERVERA ANGÅENDE ÅTERVINNING:Produktensemballageäråtervinningsbartochkanåteranvändas.Kasseradetenligtlokalaåtervinningsbestämmelser.Närdukasserarenhetenskadugöradetiöverensstämmelsemedlokalareglerochbestämmelser.Batterierfårabsolutintekastasisopornaellerbrännas.Kasserademenligtlokalabestämmelserförkemisktavfall.DennaapparatochdetillbehörsomlevererasmeddenuppfyllergällandeWEEE-direktiv,medundantagavbatterierna.

1
ConnectionPlayback
TroubleshootingSpecifications
IndexO
thersPreset
Getting started
Accessories ····················································································2About this manual ········································································2Main features ·················································································3Cautions on handling ····································································3Discs ·······························································································4
Discs playable on this unit ····························································4Holding discs ················································································4Loadingdiscs ················································································4Cautions on loading discs ·····························································4Cautions on storing discs······························································4Cleaning discs ···············································································4
Supported media and files ···························································5Supported media ··········································································5Playable files ·················································································5
Part names and functions·····························································6Front panel ····················································································6Display ··························································································9Rear panel ···················································································10
Contents
Connection··············································································11
Cables used for connection ························································11Basic connections ·······································································11Connecting the power cord························································12
Playback ···················································································13
Turning the power on ·································································13Turning the power off ·································································13Playback ·······················································································13
CD playback ················································································13CD-ROM/CD-R/CD-RWplayback ················································14USB memory device or HDD playback ·······································15
Operations during playback ·······················································17Setting playback mode ·······························································17Playback ······················································································17Pause ··························································································17Fastforward/Rewind ··································································18Setting the cue point ··································································18Adjustingtheplaybackspeed ·····················································19Adjustingtheplaybackspeedwithoutchangingthepitch ·········19Changing the playback speed temporarily (pitch bend function) 19Manual loop playback ·································································19Adjustingthetrackendtime ·······················································20Adjustingbraketime ···································································21Relay play····················································································22Power on play ·············································································22
Others························································································23
Memo function ············································································23Memo settings ···········································································23
Getting started ·······································································1
Getting started
Preset function······································································25
Preset menu map ········································································25How to adjust the various Preset settings ··································25
Troubleshooting···································································26
Specifications ········································································27
Index ··························································································28
2
ConnectionPlayback
TroubleshootingSpecifications
IndexO
thersPreset
Getting started
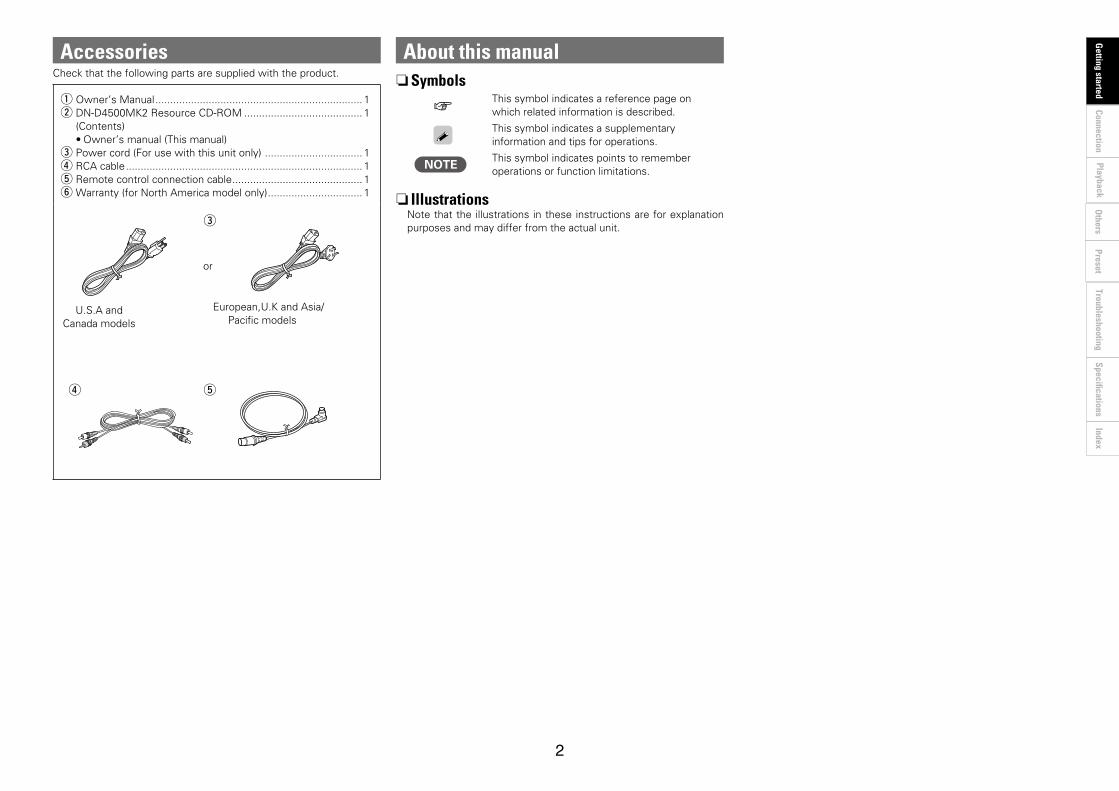
AccessoriesCheck that the following parts are supplied with the product.
q Owner’s Manual ...................................................................... 1w DN-D4500MK2 Resource CD-ROM ........................................ 1
(Contents)•Owner’s manual (This manual)
e Power cord (For use with this unit only) ................................. 1rRCAcable ................................................................................ 1t Remote control connection cable ............................................ 1yWarranty(forNorthAmericamodelonly) ................................ 1
e
r t
or
U.S.AandCanada models
European,U.KandAsia/Pacific models
About this manual nSymbols
vThis symbol indicates a reference page on which related information is described.
This symbol indicates a supplementary information and tips for operations.
NOTEThis symbol indicates points to remember operations or function limitations.
n IllustrationsNote that the illustrations in these instructions are for explanation purposes and may differ from the actual unit.
3
ConnectionPlayback
TroubleshootingSpecifications
IndexO
thersPreset
Getting started
6. Hot Start / StutterPlaybackcanbestartedinstantaneouslyfrompointsA-1andA-2.In the stutter mode, these same buttons play momentary audio while pressed and held down.
7. Brake8. Relay Play
When this mode is set, CD1 and CD2 start their playback alternately.This unit can relay the playback of CD1 and CD2 every track or every disc.
9. Power on PlayThe player can be set so that playback in the relay mode starts when the power is turned on.
10. Fader StartTheDN-D4500MK2FADERSTARTcontrols are compatiblewithvarious Denon DJ mixers and other mixers on the market.
11. Auto Disc Tray Close System12. Preset functions - Different presets can be changed according
to your needs.13. Custom Setting Memory14. USB memory device Audio playback function15. CD TEXT / MP3 ID3 Tag name display16. CD-R / RW Playback
ThisplayercanplayCD-R/RWdiscs,butonlyiftheyarefinalized.
NOTEHowever that depending on the recording quality, the player may not beabletoplaysomefinalizedCD-R/RWdiscs.
Main featuresThe DN-D4500MK2 is a Dual Digital Media Player equipped with a variety of functions and high performance characteristics, specifically designed for Mobile and Club DJ’s around the world.Control section1. The DN-D4500MK2 can be easily mounted on a standard
19-inch rack.2. Improved visibility under low lighting conditions thanks to a
large fluorescent display, back-lit illuminated action buttons and illuminated disc trays.
3. Improved interface operation thanks to a large jog/Shuttle wheel and track select knob.
Functions1. Shockproof function protecting against external vibrations2. Auto Level Search / Instant Start3. Pitch / Pitch Bend & Key Adjust4. MP3/USB Playback
It is possible to play MP3 files created in the specified format found on page 14. Files can be searched for easily, by either manually scanning, or by using a number of file search functions (File search, File/Folder search, Artist name search, Title name search, Filename search).
5. Seamless LoopPlayback can be looped between any two points in a track without anybreakintheaudio.Twoloopstartpoints(A-1andA-2)canbeset anywhere within the track or disc.
Cautions on handling•Before turning the power switch on
Check once again that all connections are correct and that there are no problems with the connection cables.
•Power is supplied to some of the circuitry even when the unit is set to the standby mode. When going on vacation or leaving home for long periods of time, be sure to unplug the power cord from the power outlet.
•Proper ventilationIf the unit is left in a smoke-filled environment for long periods of time. the surface of the optical pickup may get dirty, preventing it from receiving signals properly.
•About condensationIf there is a major difference in temperature between the inside of the unit and the surroundings, condensation (dew) may form on the operating parts inside the unit, causing the unit not to operate properly.If this happens, let the unit sit for an hour or two with the power turned off and wait until there is little difference in temperature before using the unit.
•Cautions on using mobile phonesUsing a mobile phone near this unit may result in noise. If that occurs, move the mobile phone away from this unit when it is in use.
•Moving the unit•Please remove any discs from both trays of the drive unit before
transport.•Turn off the power and unplug the power cord from the power
outlet. Next, disconnect the connection cables to other system units before moving the unit.
•About care•Wipe the cabinet and control panel clean with a soft cloth.•Follow the instructions when using a chemical cleaner.•Benzene, paint thinner or other organic solvents as well as
insecticide may cause material changes and discoloration if brought into contact with the unit, and should therefore not be used.

4
ConnectionPlayback
TroubleshootingSpecifications
IndexO
thersPreset
Getting started
DiscsDiscs playable on this unitq Music CDs
Discs marked with the logo at right can be played in this unit.
w CD-R/CD-RW
NOTE•Discs in special shapes
(heartshaped discs, octagonal discs, etc.) cannot be played. Do not attempt to play them, as doing so can damage the unit.
•Some discs and some recording formats cannot be played.•Non-finalizeddiscscannotbeplayed.
z What is finalization?FinalizationistheprocessthatmakesrecordedCD-R/CD-RWdiscsplayable on compatible players.
Holding discs
Do not touch the signal surface.
Loading discs•Onlyloadonediscatatime.Loadingtwoormorediscscandamage
the unit or scratch the discs.•When the disc is drawn into the unit, be careful not to trap your
fingers.•Do not insert anything other than discs into the disc loading slot.•Do not use cracked or warped discs or discs that have been repaired
with adhesive, etc.•Do not use discs on which the sticky part of cellophane tape or labels
is exposed or on which there are traces of where labels have been removed. Such discs can get caught inside the player and damage it.
•If the label side of the disc is dirty, wipe it clean before use. If the discloading/ejectionrollerbecomesdirty,discsmaynotloadorejectcorrectly.
Cautions on loading discs•Do not get fingerprints, oil or dirt on discs.•Take special care not to scratch discs when removing them from
their cases.•Do not bend or heat discs.•Do not enlarge the hole in the center.•Do not write on the labeled (printed) surface with ball-point pens,
pencils, etc., or stick new labels on discs.•Water droplets may form on discs if they are moved suddenly from
a cold place (outdoors for example) to a warm place, but do not try to dry them off using a hair-dryer, etc.
Cautions on storing discs•Be sure to remove discs after using them.•Be sure to store discs in their cases to protect them from dust,
scratches, warping, etc.•Do not store discs in the following places:•Places exposed to direct sunlight for long periods of time•Dusty or humid places•Places exposed to heat from heaters, etc.
Cleaning discs•If there are fingerprints or dirt on a disc, wipe them off before using
the disc. Fingerprints and dirt can impair sound quality and cause interruptions in playback.
•Use a commercially available disc cleaning set or a soft cloth to clean discs.
Gentlywipethediscfromtheinside towards the outside.
Do not wipe in a circular motion.
NOTEDonotuserecordspray,antistaticagents,benzene,thinnerorothersolvents.
5
ConnectionPlayback
TroubleshootingSpecifications
IndexO
thersPreset
Getting started
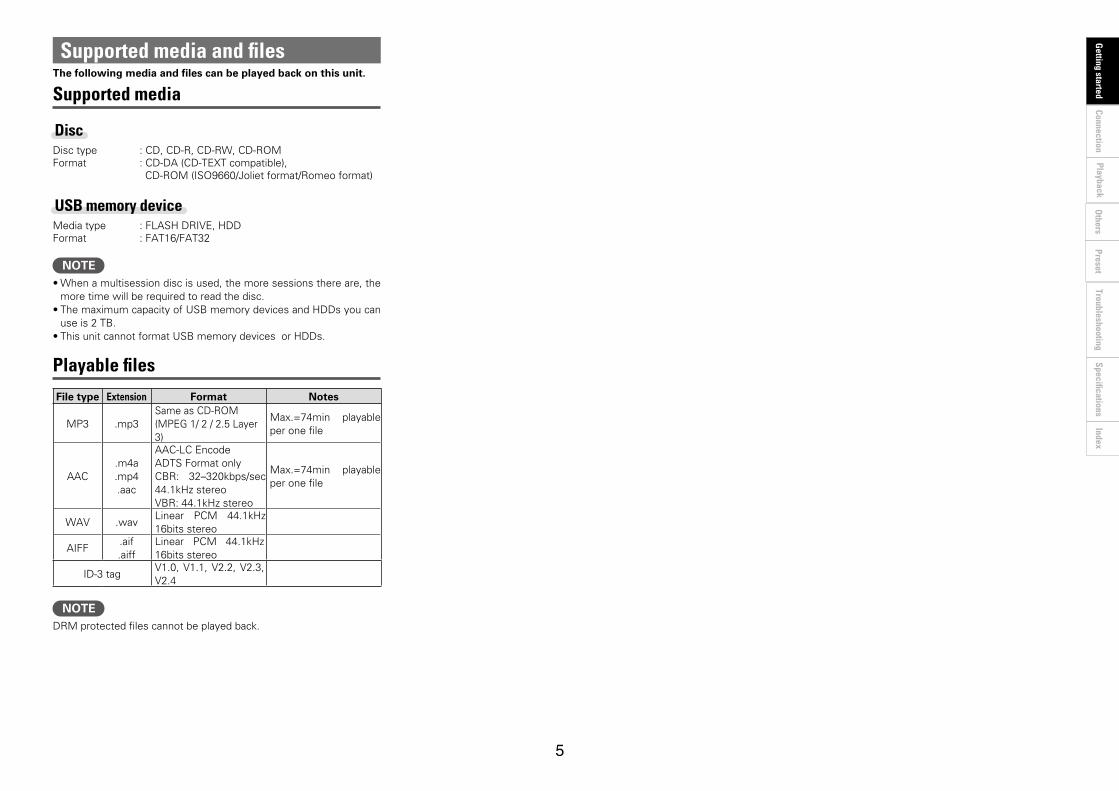
Supported media and filesThe following media and files can be played back on this unit.
Supported media
DiscDisc type : CD, CD-R, CD-RW, CD-ROMFormat :CD-DA(CD-TEXTcompatible),
CD-ROM(ISO9660/Jolietformat/Romeoformat)
USB memory deviceMedia type :FLASHDRIVE,HDDFormat :FAT16/FAT32
NOTE•When a multisession disc is used, the more sessions there are, the
more time will be required to read the disc.•The maximum capacity of USB memory devices and HDDs you can
use is 2 TB.•This unit cannot format USB memory devices or HDDs.
Playable files
File type Extension Format Notes
MP3 .mp3Same as CD-ROM (MPEG1/2/2.5Layer3)
Max.=74min playable per one file
AAC.m4a.mp4.aac
AAC-LCEncodeADTSFormatonlyCBR: 32–320kbps/sec44.1kHzstereoVBR:44.1kHzstereo
Max.=74min playable per one file
WAV .wavLinear PCM 44.1kHz16bits stereo
AIFF.aif.aiff
Linear PCM 44.1kHz16bits stereo
ID-3 tagV1.0,V1.1,V2.2,V2.3,V2.4
NOTEDRM protected files cannot be played back.
6
ConnectionPlayback
TroubleshootingSpecifications
IndexO
thersPreset
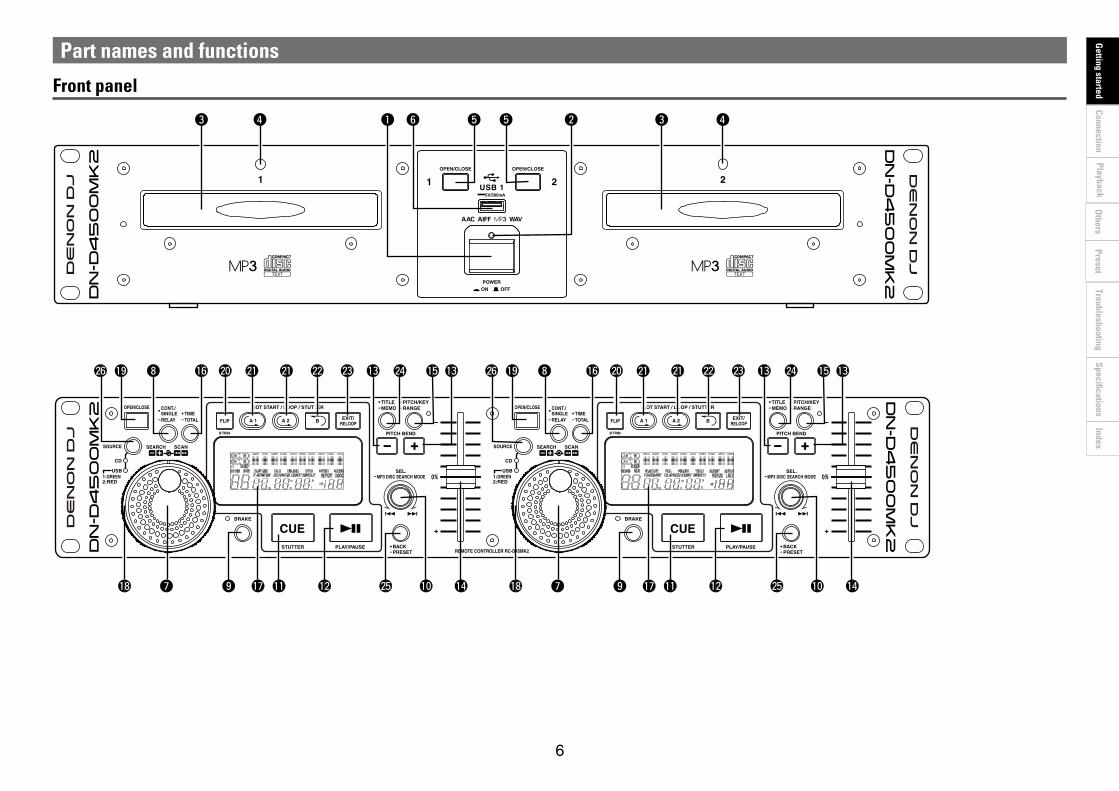
Getting startedFront panel
W0 W2W6
W5
W3 W4W1 W1
Q1 Q0ou
y t t rw ee r q
Q2Q7
Q3 Q3
Q4
Q5Q6
Q8
Q9 i W0 W2W6
W5
W3 W4W1 W1
Q1 Q0ou Q2Q7
Q3 Q3
Q4
Q5Q6
Q8
Q9 i
Part names and functions

7
ConnectionPlayback
TroubleshootingSpecifications
IndexO
thersPreset
Getting started
Part names and functions
nDN-D4500MK2 Front panelq POWER button (hON jOFF)
•Press this button to turn the power on.
NOTE•Be sure to close the disc holders before turning
off the power.
w POWER indicator•This lights when the power is on.
e Disc holder•Place discs in this holder.•PressthedischolderOPEN/CLOSEbuttonto
open and close the disc holder.
CAUTION•Do not place foreign objects in the disc holders.
Doing so could damage the player.•Do not press the disc tray in manually when the
power is off, as this may result in malfunction and damage to the player.
r Disc holder LED•This flashes while the disc holder is opening
and closing.•TheLED lightswhen thedischolder isopen
and serves as the disc holder illumination.
t Disc holder OPEN/CLOSE button•Press this button to open and close the disc
holder.•The disc holder will not open during playback.
Stop playback before pressing this button.
y USB1 port•Insert a USB memory device or connect a
HDD.
nRC-D45MK2 Front panelCAUTION
•Note that there are many buttons working two different functions selected by short time pressing or long pressing (1 second or more). The
mark indicates short time press function andmark indicates long time press function.
u Jog wheel (inner wheel)•While the player is in pause, cue, or frame
repeat mode, turn this wheel to find the cue point in frame measurement.
•In the Playback mode, turn this wheel to temporarily pitch bend the playing speed.
i Continue/Single button( CONT./SINGLE, RELAY)•CONT./SINGLE:
Short Pressing alternates the play ending mode between CONT. (Continuous: play more tracks)andSINGLE (stopsplayingat theendof a track and re-cues back to your set point).
•SINGLE PLAY LOCK:SINGLE PLAY LOCK can be selected byPRESET(10). At this time , if this button ispressed, it will be selected. When SINGLEPLAYLOCKisselected,trackselectionduringplayback is disabled. This prevents playback from stopping when the Track Select Knob is turned accidentally during playback. Play ending mode is the same as single.
•RELAY:When this button is pressed for more than 1sec, youcan turnonandoffRELAYPLAYmode.
o BRAKE buttonWhen this button is pressed you can turn the Brake mode on and off. WhentheBrakemodeison,theLEDlights.NoLEDindicatesOFFmode.
Q0 TRACK SELECT/MP3 DISC SEARCH MODE knob(SEL./ MP3 DISC SEARCH MODE)•TRACK:
Turn this knob to select the first or next track to be played.Turn the knob clockwise by one click to move one track forward, counterclockwise by one click to move one track backward.When the knob is turned while pressing it down, one click corresponds to advancing 10 tracks at a time.In the Preset and Memo mode, use this knob to set and enter Preset and Memo settings.
•MP3 DISC SEARCH MODE:MP3 DISC only.When pressing this knob down for more than 1 second, the MP3 file search selection mode is selected.
Q1 CUE button•Pressing the CUE button during play provides
a return to the position at which play was started.AlternatelypressingthePLAY/PAUSEbutton and the CUE button allows the CD to be played from the same position any number of times.
•The CUE button lit, when the standby mode is set.
•In CUE mode, by pressing the CUE button makes a Stutter sound from the CUE point. This is called Stutter play for added performance. (Stutter)
Q2 PLAY/PAUSE button (13)•Use this button to start playback.•Press once to start playback, once again to set
the pause mode, and once more to resume playback.
•WhentheBrakemodeisON,pressthePlay/Pause to activate the Brake sound.
Q3 PITCH BEND +/– button•Theplayingspeed increases/decreaseswhile
these buttons are held down.•When either button is released, the playing
speed returns to the previous speed.
Q4 Pitch slider•Use this to adjust the playing speed.•The playing speed decreases when moved
upwards and increases when moved downwards.
Q5 PITCH/KEY, RANGE button•WiththisbuttonyoucanselectPITCHandKEYADJUSTmode.ModechangesPitchon,KeyAdjust on and both off cyclically.Green LEDindicates in Pitch mode and Orange indicator in Key Adjust mode. No LED indicates OFFmode.
•RANGE:Press this button for more than 1 sec to select the pitch range. The pitch range can be selectedwith theTRACKSELECTknobfrom±4, 10, *16, 24, 50 or 100%. (*Max pitch for MP3)
Q6 TIME, TOTAL button•Press this to switch the time display between
the elapsed time or remaining time per track or per disc.
•When this button is pressed for more 1 second, you can display the total time. (4 way, audio, CD only)
Q7 Display•See page 9.

8
ConnectionPlayback
TroubleshootingSpecifications
IndexO
thersPreset
Getting started
Q8 Shuttle ring (outer ring)•This control is used to select the scanning
direction and speed. The CD is scanned in the forward direction when the shuttle ring is turned clockwise from the center position. To scan backwards, the shuttle ring is turned counterclockwise.
•The scanning speed increases as the wheel is turned further.
Q9 Disc holder OPEN/CLOSE button•Press this button to open and close the disc
holder.•The disc holder will not open during playback.
Stop playback before pressing this button.
W0 FLIP/B TRIM button•Press this button to switch between the loop mode/hotstartmodeandstuttermode.
•AftersettingtheBpoint, theBTRIMMODEcan be selected.
W1 A1, A2 buttons•Press these buttons to set the start point for loopplayback(pointA-1orA-2).
•Press these buttons to use the stutter and hot start functions.
W2 B button•Press this button to set the end point for loop
playback (point B).
W3 EXIT/RELOOP button•When this button is pressed during a seamless
loop, the track resumes back to normal play fromtheBpoint.(EXIT)When pressed again, the playback jumps back intoyourA-Bseamlessloop.(RELOOP)
Part names and functions
W4 TITLE/ MEMO button•CD TEXT:
When there is CD text data, the CD text data is displayed automatically or when the button is pressed.IfnoTEXTisavailable,thedisplaywillindicate“NoTEXT”.
•MP3:When an MP3 file has ID-3 tag data, the title, artist name and album name can be selected and displayed each time the button is pressed.
•MEMO:The memo mode starts when this button is pressed once in the CUE mode.
W5 BACK, PRESET button•BACK
Pressing this button during the folder search displays the folder one level up.
•PRESET:When this button is pressed for more than 1 sec, the PRESET mode starts.
NOTEMemo’s can not be set for MP3 files.
W6 SOURCE select buttons (CD/USB1/USB2)•When“CD”isselected,theCDLEDlights.•When “USB1” is selected, the USB1 GreenLEDlights.
•When“USB2”isselected,theUSB2RedLEDlights.

9
ConnectionPlayback
TroubleshootingSpecifications
IndexO
thersPreset
Getting started
r MP3 file search mode indicatorFILE:
FILE indicator appears in display, when intheFILEnamesearchmode.
FOLDER:FOLDERindicatorappearsindisplay,whenintheFILE&FOLDERnamesearchmode.
TITLE:TITLE indicatorappears indisplay,when intheTITLEnamesearchmode.
ARTIST:ARTISTindicatorappearsindisplay,whenintheARTISTnamesearchmode.
t Character display•This displays various operational information,
text message, etc.
y Play mode indicators•WhenSINGLEindicatorlightsup,playbackwill
finish at end of current track.•When CONT. indicator lights up, playback
continues to the end of the disc.
u MEMO indicator•MEMO sign appears in display when there
is a memory setting for the currently playing track or the track at which the standby mode is currently set.
i Play Position indicators•Play position indicator:
The 30 white dots indicate where is playing visually in a track in the normal play.
•End of Message:When the time remaining to the end of the track is less than the specified time, the EOM (End Of Message) play position indicator flashes along with the remaining time, a notification to the user that the track will end soon.
z The EOM time can be set within the preset mode.
o Pitch display•This numeric indicator display the playback
speed (pitch).
Q0 MP3 indicators•LightswhenanMP3discisdetected.
Part names and functions
Display
9
ENGLISH
q
i
e y o
w
u
t r!0
(5) Display
q Track, minute, second and framedisplays• These displays indicate current position
information.
w Loop mode indicators• DN-D4500 has Loop mode indicators consist of
two sets of A (A1, A2), B and two arrows. Aand B marks indicate A and B points are set.
• Two arrows indicate loop setting mode asfollows.
Example: A1 BBoth arrows on:
Seamless Loop mode, Both arrows flashing:
Seamless Loop Playing
, Left arrow on, right flashing: Exit play from Seamless Loop
e Time mode indicators• When the TIME/TOTAL button is pushed, the
Time mode indicator switches as follows:ELAPSED:
Track’s elapsed time is displayed.REMAIN:
Track’s remaining time is displayed.T. + ELAPSED:
The total elapsed time of disc orprogrammed track is displayed.
T. + REMAIN:The total remaining time of disc orprogrammed track is displayed.
BA1BA1
BA1BA1
BA1
r MP3 file search mode indicatorFILE:
FILE indicator appears in display, when inthe FILE name search mode.
FOLDER:FOLDER indicator appears in display, whenin the FILE & FOLDER name search mode.
TITLE:TITLE indicator appears in display, when inthe TITLE name search mode.
ARTIST:ARTIST indicator appears in display, when inthe ARTIST name search mode.
t Character display• This displays various operational information,
text message, etc.
y Play mode indicators• When SINGLE indicator lights up, playback will
finish at end of current track.• When CONT. indicator lights up, playback
continues to the end of the disc.
u MEMO indicator• MEMO sign appears in display when there is a
memory setting for the currently playing trackor the track at which the standby mode iscurrently set.
@9 Control connector• Connect the opposite side of supplied 8pin din
cable to the DN-D4500 (main unit).
(4) RC-D45 Rear panel
(3) DN-D4500 Rear panel
@5 Analog output jacks 1, 2(ANALOG OUT 1, 2)• These are unbalanced output jacks. The audio
signals from the both players are output fromthese jacks.
@6 Digital output jacks 1, 2(DIGITAL OUT 1, 2)• Digital data is available from this jack.• Use 75 Ω/ohms pin cord for connection.• We recommend you use braided wire type
shielded cable.NOTE: The playback level after analog
conversion is set to –6dB bellow theusual level to avoid digital distortion.
@7 Fader input jacks 1, 2 (FADER 1, 2)• Use this when your mixer has Fader Start
function with 3.5 mm stereo mini cord.
@8 Remote control connector(REMOTE)• Connect the supplied 8pin din cable to the
RC-D45 control unit.
!9 FLIP/B TRIM button• Push this button to switch between the loop
mode/hot start mode and stutter mode.• After setting the B point, the B TRIM MODE
can be selected.
@0 A1, A2 buttons• Push these buttons to set the start point for
loop playback (point A-1 or A-2).• Push these buttons to use the stutter and hot
start functions.
@1 B button• Push this button to set the end point for loop
playback (point B).
@2 EXIT/RELOOP button• When this button is pushed during a seamless
loop, the track resumes back to normal playfrom the B point. (EXIT)When pushed again, the playback jumps backinto your A-B seamless loop. (RELOOP)
@3 TITLE button• CD TEXT:
When there is CD text data, the CD text data isdisplayed automatically or when the button ispressed.If no TEXT is available, the display will indicate“No TEXT”.
• MP3:When an MP3 file has ID-3 tag data, the title,artist name and album name can be selectedand displayed each time the button is pressed.
@4 MEMO, PRESET button• MEMO:
The memo mode starts when this button ispushed once in the CUE mode.
• PRESET:When this button is pushed for more than 1sec, the PRESET mode starts.
NOTE:• Memo’s can not be set for MP3 files.
CAUTION:To completely disconnect this product fromthe mains, disconnect the plug from the wallsocket outlet.The mains plug is used to completely interruptthe power supply to the unit and must bewithin easy access by the user.
q Track, minute, second and frame displays•These displays indicate current position
information.
w Loop mode indicators•DN-D4500MK2 has Loop mode indicatorsconsistoftwosetsofA(A1,A2),Bandtwoarrows.AandBmarksindicateAandBpointsare set.
•Two arrows indicate loop setting mode as follows.Example: A1 B
Both arrows on:SeamlessLoopmode
, , Both arrows flashing:SeamlessLoopPlaying
, , Left arrow on, rightflashing:ExitplayfromSeamlessLoop
e Time mode indicators•When the TIME/TOTAL button is pressed,
the Time mode indicator switches as follows: ELAPSED:
Track’s elapsed time is displayed.REMAIN:
Track’s remaining time is displayed.T.+ELAPSED:
The total elapsed time of disc orprogrammed track is displayed.
T.+REMAIN:The total remaining time of disc orprogrammed track is displayed.

10
ConnectionPlayback
TroubleshootingSpecifications
IndexO
thersPreset
Getting started
nDN-D4500MK2 Rear panelq Analog output jacks 1, 2
(ANALOG OUT 1, 2)•These are unbalanced output jacks. The audio
signals from the both players are output from these jacks.
w Digital output jacks 1, 2 (DIGITAL OUT 1, 2)•Digital data is available from this jack.•Use75Ω/ohmspincordforconnection.•We recommend you use braided wire type
shielded cable.
NOTEThe playback level after analog conversion is set to –6dB bellow the usual level to avoid digital distortion.
e Fader input jacks 1, 2 (FADER 1, 2)•Use this when your mixer has Fader Start
function with 3.5 mm stereo mini cord.
r Remote control connector (REMOTE)•Connect the supplied 8pin din cable to the
RC-D45MK2 control unit.
CAUTIONTo completely disconnect this product from the mains, disconnect the plug from the wall socket outlet.The mains plug is used to completely interrupt the power supply to the unit and must be within easy access by the user.
t USB2 port•Insert a USB memory device or connect a
HDD.
y AC inlet (AC IN)
nRC-D45MK2 Rear panelu Control connector
•Connect the opposite side of supplied 8 pin din cable to the DN-D4500MK2 (main unit).
Part names and functions
Rear panel
u
tre e
w
q q
yw
11
Getting started
PlaybackTroubleshooting
SpecificationsIndex
Others
PresetConnection
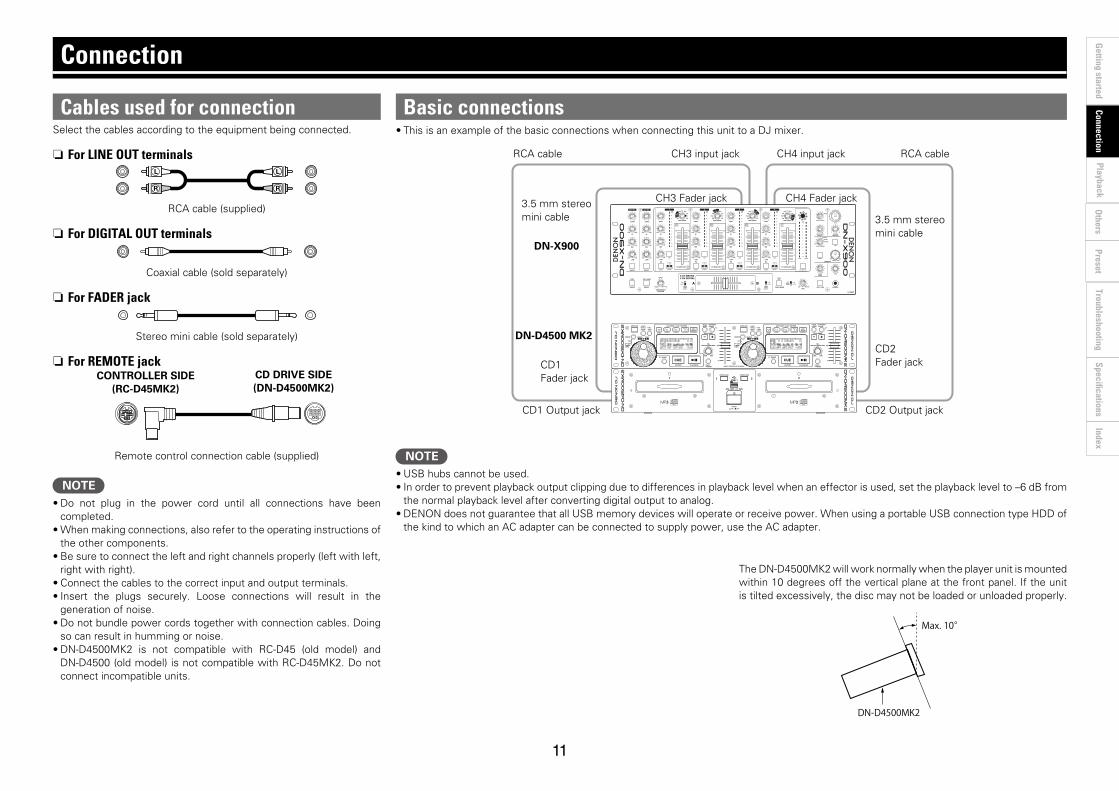
Cables used for connectionSelect the cables according to the equipment being connected.
n For LINE OUT terminals
R
L
R
L
RCAcable(supplied)
n For DIGITAL OUT terminals
Coaxial cable (sold separately)
n For FADER jack
Stereo mini cable (sold separately)
n For REMOTE jackCONTROLLER SIDE
(RC-D45MK2)CD DRIVE SIDE (DN-D4500MK2)
Remote control connection cable (supplied)
NOTE•Do not plug in the power cord until all connections have been
completed.•When making connections, also refer to the operating instructions of
the other components.•Be sure to connect the left and right channels properly (left with left,
right with right).•Connect the cables to the correct input and output terminals.•Insert the plugs securely. Loose connections will result in the
generation of noise.•Do not bundle power cords together with connection cables. Doing
so can result in humming or noise.•DN-D4500MK2 is not compatible with RC-D45 (old model) and
DN-D4500 (old model) is not compatible with RC-D45MK2. Do not connect incompatible units.
Basic connections•This is an example of the basic connections when connecting this unit to a DJ mixer.
7
ENGLISH
– TABLE OF CONTENTS –
z Main features .....................................................7
x Connections/Installation .....................................7
c Part names and functions ..........................8 ~ 10
v Compact discs ..................................................10
b Basic operation...........................................10, 11
n Pitch/Brake .......................................................11
2 ACCESSORIESCheck that the following parts are included in addition to the main unit:
q Operating instructions ........................................1w Connection cords for signal output (RCA) ..........2e Remote control unit (RC-D45) ............................1
m Seamless loop/Hot start and Stutter ................12
, MP3 Playback.............................................13, 14
. Other functions.................................................14
⁄0 Memo.........................................................14, 15
⁄1 Preset ...............................................................15
⁄2 Specifications ...................................................16
r Remote control connection cable.......................1t Service Station List .............................................1
1 MAIN FEATURESThe DN-D4500 is a double CD/MP3 player equippedwith a variety of functions and high performancecharacteristics, specifically designed for Mobile andClub DJ’s around the world.
Control section1. The DN-D4500 can be easily mounted on a
standard 19-inch rack.2. Improved visibility under low lighting
conditions thanks to a large fluorescent display,back-lit illuminated action buttons andilluminated disc trays.
3. Improved interface operation thanks to a largejog/Shuttle wheel and track select knob.
Functions1. Shockproof function protecting against external
vibrations2. Auto Level Search / Instant Start3. Pitch / Pitch Bend & Key Adjust4. MP3 Playback
It is possible to play MP3 files created in thespecified format found on page 13.Files can be searched for easily either manually, orby scanning or using a number of file searchfunctions (File search, File/Folder search, Artistname search, Title name search, File name search).
5. Seamless LoopPlayback can be looped between any two points ina track without any break in the audio. Two loopstart points (A-1 and A-2) can be set anywherewithin the track or disc.
16. Hot Start / StutterPlayback can be started instantaneously frompoints A-1 and A-2.In the stutter mode, these same buttons playmomentary audio while pressed and held down.
17. Brake18. Relay Play
When this mode is set, CD1 and CD2 startsplayback alternately.This unit can relay the playback of CD1 and CD2every track or every disc.
19. Power on PlayThe player can be set so that playback in the relaymode starts when the power is turned on.
10. Fader StartThe DN-D4500 FADER START controls arecompatible with our DN-X400, DN-X500, DN-X800, DN-X900 or DN-X1500 mixers.
11. Auto Disc Tray Close System12. Preset functions - Different presets can be
changed according to your needs.13. Custom Setting Memory14. CD TEXT / MP3 ID3 Tag name display15. CD-R / RW Playback
This player can play CD-R/RW discs, but only ifthey are finalized.
Note: However that depending on therecording quality, the player may not beable to play some finalized CD-R/RWdiscs.
DN-D4500
Max. 10°
2 CONNECTIONS/INSTALLATION1. Turn off the POWER switch.2. Connect the RCA pin cords to the inputs on your
mixer.3. Connect the control cord to the REMOTE connector
on the RC-D45.
CAUTION:• Be sure to use the supplied control cord. Using
another type of cable may result in damage.• Be sure the power is off when connecting the
control cord. Otherwise the units may not workproperly.
• Never connect any remote controllers other thanthe RC-D45.Doing so can damage the equipment.
The DN-D4500 will work normally when the player unitis mounted within 10 degrees off the vertical plane atthe front panel. If the unit is tilted excessively, the discmay not be loaded or unloaded properly.
CH4 Fader jackCH3 Fader jack3.5 mm stereomini cord
DN-X900
DN-D4500
CD1Fader jack
3.5 mm stereomini cord
CD2Fader jack
CH4 input jackCH3 input jackRCA Cord RCA Cord
CD1 Output jack CD2 Output jack
NOTE:• Use a commercially available 3.5mm stereo mini cord for the Fader jack connections.
DN-X900
RCAcable RCAcableCH3 input jack CH4 input jack
CH3 Fader jack CH4 Fader jack3.5 mm stereo mini cable 3.5 mm stereo
mini cable
DN-D4500 MK2
CD1Fader jack
CD2Fader jack
CD1 Output jack CD2 Output jack
NOTE•USB hubs cannot be used.•In order to prevent playback output clipping due to differences in playback level when an effector is used, set the playback level to –6 dB from
the normal playback level after converting digital output to analog.•DENON does not guarantee that all USB memory devices will operate or receive power. When using a portable USB connection type HDD of thekindtowhichanACadaptercanbeconnectedtosupplypower,usetheACadapter.
Connection
The DN-D4500MK2 will work normally when the player unit is mounted within 10 degrees off the vertical plane at the front panel. If the unit is tilted excessively, the disc may not be loaded or unloaded properly.
DN-D4500MK2
Max. 10°

12
Getting started
PlaybackTroubleshooting
SpecificationsIndex
Others
PresetConnection
Connecting the power cordConnect the supplied power cord to this unit, and insert the plug into the wall socket.
NOTE•Do not plug in the power cord until all connections have been
completed.•Insert the plug fully and securely into the socket. Incomplete
connection to the power supply may cause damage to the unit, or noise.
ToACoutlet (AC230V,50/60Hz)
U.S.AandCanadamodels
European,U.KandAsia/Pacific models
Power cord(supplied)
ToACoutlet(AC120V,60Hz)
To prevent the power plug from falling out, we recommend fixing the powercordtotheACcordholder.UseaPhillipsscrewdrivertofixthepowercordtotheACcordholder.

13
Getting started
TroubleshootingSpecifications
IndexO
thersPreset
PlaybackConnection
Playback
Turning the power onPress POWER ON/OFF.“DENON DN-D4500 MK2” appears on the display, and the power switches on.
Turning the power offPress POWER ON/OFF.The power switches off.
NOTEBe sure to close the disc holders before turning off the power.
PlaybackCD playback
1 Press SOURCE to switch the source to CD.
2 Press OPEN/CLOSE on the unit to open the disc holder and insert the disc.
3 Turn SEL. to select the track you want to play. •Press and turn SEL. to select 10 tracks at a time.
4 Press 13.13 lights green, and playback starts.
If you select a track during playing, playback starts from the beginning of the selected track.
OPEN/CLOSE
POWER ON/OFF
OPEN/CLOSE
SOURCE
SEL. OPEN/CLOSE
SOURCE
SEL.
BACKBACKCUEPLAY/PAUSE
CUEPLAY/PAUSE
Disc holder Disc holder

14
Getting started
TroubleshootingSpecifications
IndexO
thersPreset
PlaybackConnection
Preparation for playback
CD-ROM/CD-R/CD-RW playbackFor details on the files that can be played on this unit, see vpage 5.
NOTEThis section explains the operating procedures for CD-ROM/CD-R/CD-RWdiscsthathavebeenfinalizedasdataCDs.ForCDsthathavebeenfinalizedasmusicCDs,see“CDplayback”(vpage 13).
1 Press SOURCE to switch the source to CD.
2 Press OPEN/CLOSE on the unit to open the disc holder and insert the disc.
3 Hold down SEL. (-MP3 DISC SEARCH MODE).
4 Turn SEL. to select “FileFolder”.
5 Turn SEL. to select the folder that contains the track you want to play.
6 Press SEL.The folder names or track names within the folder are shown in the display.
7 Turn SEL. to select the track you want to play. •Press BACK to return to the previous folder.
8 Press SEL.The cue standby mode is set at the start of the selected tracks.
9 Press 13.13 lights green, and playback starts.
nEjecting CDsPress OPEN/CLOSE on the unit to open the disc holder.The CD is ejected from the disc loading slot.
NOTEBe sure the CD is paused before ejecting. If OPEN/CLOSE is pressed during CD playback, the CD will not be ejected.
n If the CD cannot be ejectedIf the CD is not ejected due to a malfunction in the unit even when OPEN/CLOSE is pressed, it can be ejected using other buttons.
Hold down OPEN/CLOSE for the disc holder 1 or 2, and press POWER ON/OFF.The CD is ejected from the disc loading slot.
nSelecting the fileThere are three methods for selecting files.
File search modeTo search a file directly from among all of those recorded in a disc.
Folder search modeTo specify the layer to select a folder or file from among all of those recorded in a disc.
File name search modeTo sort the files in alphabetical order to select from among all of those recorded in a disc.
nSelecting files in file search mode
1 Hold down SEL. (-MP3 DISC SEARCH MODE).
2 Turn SEL. to select “FileSearch”.
3 Press SEL. •To select files in group of ten, hold down SEL. and turn.
4 Turn SEL. to select a file.The cue standby mode is set at the start of the selected file.
See the illustration on the previous page for details of the buttons used for the operations on this page.
nSelecting files in folder search mode
1 Hold down SEL. (-MP3 DISC SEARCH MODE).
2 Turn SEL. to select “FileFolder”.
3 Press SEL.•To return to the layer of the upper folder, press BACK.
4 Turn SEL. to select a file.
5 Press SEL.The cue standby mode is set at the start of the selected file.
nSelecting files in file name search mode
1 Hold down SEL. (-MP3 DISC SEARCH MODE).
2 Turn SEL. to select “File Name”.
3 Press SEL.
4 Turn SEL. to select a file.To change to the next initial letter, hold down SEL. and turn.
5 Press SEL.The cue standby mode is set at the start of the selected file.

15
Getting started
TroubleshootingSpecifications
IndexO
thersPreset
PlaybackConnection
Preparation for playback
USB memory device or HDD playback•Connect USB memory device or HDD to the USB port on the top panel, and prepare to playback a track.•For details on the file formats that can be played on this unit, see vpage 5.
1 Connect a USB memory device or HDD to the USB1 port or USB2 port.
2 Press SOURCE to switch the source to USB1/USB2.
3 Turn SEL. to select the folder.TheLEDindicatorlightsingreenwhenUSB1portisselected.TheLEDindicatorlightsinredwhenUSB2portisselected.
4 Press SEL.The folder names or track names within the selected folder are shown in the display. •Press BACK to go back 1 folder level.
5 Turn SEL. to select the track you want to play.
6 Press SEL.The cue standby mode is set at the start of the selected tracks.
•FAT16/FAT32issupportedfortheUSBmemorydeviceandHDD.•WhenusingaUSBHDDofthekindtowhichanACadaptercanbeconnectedtosupplypower,usetheACadapter.
•IftheUSBmemorydeviceisnotrecognized,disconnecttheUSBmemorydeviceandthenreconnectit.
NOTE•Depending on the type of mass-storage USB memory device or portable music player, it may take some timeforthisunittorecognizethedevice.
•Do not connect devices or cables that do not conform to USB standards. •USB memory devices will not work via a USB hub.•NTFS format USB memory devices and HDDs are not supported. If used, this unit may malfunction. •WhenusingaHDDthathasanautomaticpowerON/OFFfunctionthatswitchestheHDDpoweronand
off in sync with the computer, disable this function in the settings. •The maximum capacity of USB memory devices and HDDs you can use is 2 TB.•This unit cannot format USB memory devices or HDDs.
SOURCE
SEL.
SOURCE
SEL.
BACKBACK(CD/USB1/USB2) (CD/USB1/USB2)
16
Getting started
TroubleshootingSpecifications
IndexO
thersPreset
PlaybackConnection
Preparation for playback
See the illustration on the previous page for details of the buttons used for the operations on this page.
nRemoving the USB memory device or HDD
Before removing the USB memory device or HDD, be sure to make sure the access lamp for the connected device is turned off.
NOTE•Be sure the USB memory device or HDD is paused before removing.•When removingUSBmemory device orHDD, use the above procedure to turn off theUSBDRIVE
indicator before removing. Incorrectly removing the USB memory device or HDD may damage the data stored on the device.
•DENON cannot accept any responsibility whatsoever for the damage or loss of data from USB memory devices or HDDs that are used in conjunction with this device.
•There is no guarantee that this unit is compatible with all types of USB memory devices or HDDs.

17
Getting started
TroubleshootingSpecifications
IndexO
thersPreset
PlaybackConnection
Setting playback modeThis sets how tracks are played back.
Press SINGLE/CONT.•The playback mode is switched in the following order each time the button is pressed.
SINGLE (PLAY LOCK) SINGLE
CONT.
SINGLE (PLAY LOCK)
TheSINGLEindicatorlightsinthedisplay,and“PlayLock”isshown.Inthismode,whenplayback of the track is completed, the track returns to the cue point and is paused.
SINGLE TheSINGLEindicatorlightsinthedisplay,and“LockOff”isshown.Inthismode,whenplayback of the track is completed, the track returns to the cue point and is paused.
CONT. The CONT. indicator in the display lights. In this mode, when playback of the track has finished, the next track is played back.
PlaybackPress 13.13 lights green, and playback starts.
PausePress 13 during playback.13 flashes, and the track is paused. •Press 13 again to resume playback from the point at which the track was paused.
Operations during playback
SEL.
CUE
SEL.
PLAY/PAUSE
CONT./SIGNAL-RELAY
CUE
SEL.
PLAY/PAUSE
CONT./SIGNAL-RELAY
Jog wheel Jog wheel
Shuttle ring Shuttle ring

18
Getting started
TroubleshootingSpecifications
IndexO
thersPreset
PlaybackConnection
Setting the cue pointBy setting a cue point, the track can be played back from the set position.
nSetting the cue point
Pause the track in the position where you want to set the cue point, and press CUE.The cue point is set at the paused position.
•Irrespective of the mode, the cue point is set at the start of the track when the track is loaded.
nReturning to the cue point•Playback stops, returns to the position where you want to playback again (cue point), and is paused
(back cue function). •When this function is used, playback can always be started from the same position.
During playback, press CUE.Playback stops, cues to the playback start position (cue point), and pauses.
nMoving the cue pointThere are two methods for moving the cue point, using the shuttle ring, or using the jog wheel.
Setting with shuttle ring and jog wheel
1 During pause, turn the shuttle ring in the forward or reverse direction to move the cue point while listening to the playback sound.
2 If the jog wheel is turned in the forward or reverse direction, you can move the cue point while listening to the playback sound frame by frame.
11
ENGLISH
DN-D4500 has six pitch ranges,4%, 10%, *16%, 24%, 50% and100%. (*Max MP3) When the
RANGE button !4 is pushedfor more than 1 sec, the pitchrange can be selected by turningthe TRACK SELECT knob o.
• When the TRACK SELECTknob o is pushed down thepitch range is entered andthe pitch range selectionmode is completed.
6 PITCH/BRAKE
(1) Pitch
• There are two ways to change the playing speed.• Adjust the Pitch using the pitch slider !3.• The PITCH BEND button !2 or jog wheel y can be used to temporarily change the pitch.
• The playing speed can be changed greatly to achieve effect similar to those achievable with analog vinyl.• If you wish to preserve the original key of sound, set the Key Adjust function to ON.
1-1
[Pitch slider]Set the variable speed mode.Push the PITCH button !4 to lightthe PITCH LED.• PITCH → KEY (key adjust) → OFF
(Green) (Orange) (Off) (LED color)
The Pitch decreaseswhen the pitch slider !3
is moved upwards,increases when the pitchslider !3 is moveddownwards.
1-2
2-1
[PITCH BEND button]Push the PITCH BEND + (orPITCH BEND –) button !2.• The Pitch increases or
decreases temporarily while thePITCH BEND + or PITCH BEND– button !2 is pushed.
• The extent to which the PITCH BEND button!2 changes the Pitch is proportionate to theamount of time the button is pushed. Thelonger the button is held down, the greaterthe percentage of change.
2-2
Set the jog wheel to the pitch bend mode.During playback, pitch bend is setting for theJog wheel.• The playing speed increases
gradually when the jog wheely is turned clockwise anddecreases gradually when the jogwheel y is turnedcounterclockwise. When you stop turningthe jog wheel y, the playing speed returnsto the previous speed.
• When playback is stopped, the jog/shuttlewheel is set to the search mode.
0%
Pitchdecreases
Pitchincreases
§SEARCH SCAN6 7I II
1-3
• When the track is selected with the TRACK SELECT knob o and the PLAY/PAUSE button !1 is pushed,playback starts from the beginning of that track. If you wish to start from a different position, use theprocedure described below to search for the desired position.
(2) Starting playback from the Middle of a track (Manual Search)
1
Find the play start position.Turn the shuttle ring !7 to change theplayback position quickly. (Search for theapproximate playback position.)
The fast forward/reverse modeis set when the shuttle ring(outer side) !7 is turned.The speed changes according tothe angle at which the ring isturned.
• When operated during playback, playbackresumes after the operation.
• When playback is started, the jog wheel isset to the bend mode.
• When turned fully in either direction, theplayback position jumps about 10 seconds.The jump time can be selected in the presetmode from 10, 20, 30 or 60 sec.
2
Turn the jog wheel y. (Search for the preciseplayback position.)
When the jog wheel (inner side)y is turned, the frame movemode is set.The playback position can bemoved in units of one frame.
Listen to the sound and find the desired playstart position.
§SEARCH SCAN6 7I II
RVS FWD
§SEARCH SCAN6 7I II
Shockproof memory• A maximum of approximately 20 seconds
uncompressed audio data is stored into memory(per drive). This guards audible interruptions dueto external mechanical shocks such as bumpsor other hard vibrations.
• If advanced data reading is not possible due toscratches or dirt on the disc, playback stopsonce the data stored up to that point is read.
RVS FWD
NOTE:• For MP3 discs, frames are not displayed,
however frame resolution is audible by turningthe jog wheel (inner side) y.
(2) BRAKE
• Use this function to achieve effect similar to analog players.
1
Push the BRAKE button i to lightthe BRAKE LED.
• The effect sound is similar toa DJ turntable coming to aquick stop. This effect canbe achieved by pushing thePLAY/PAUSE button !1
during playback.
RVS FWD
3 Press CUE.The cue point is set at the moved position.
Press 13.The cue point is set at the moved position, and playback starts.
Operations during playback
See the illustration on the previous page for details of the buttons used for the operations on this page.
Fast forward/RewindTherearefourmethodsforfastforward/rewinding.
n Fast forward/Rewind using shuttle ring and jog wheelDuring playback, turn the shuffle ring.If turned in the FWD direction, the playback point is moved to the forward direction, and playback is resumed from the new point.If turned in theRVSdirection, theplaybackpoint ismoved to the reversedirection, andplayback isresumed from the new point.
During playback, turn the jog wheel (inner side).If turned in the FWD direction, the playback speed increases.IfturnedintheRVSdirection,theplaybackspeeddecreases.
11
ENGLISH
DN-D4500 has six pitch ranges,4%, 10%, *16%, 24%, 50% and100%. (*Max MP3) When the
RANGE button !4 is pushedfor more than 1 sec, the pitchrange can be selected by turningthe TRACK SELECT knob o.
• When the TRACK SELECTknob o is pushed down thepitch range is entered andthe pitch range selectionmode is completed.
6 PITCH/BRAKE
(1) Pitch
• There are two ways to change the playing speed.• Adjust the Pitch using the pitch slider !3.• The PITCH BEND button !2 or jog wheel y can be used to temporarily change the pitch.
• The playing speed can be changed greatly to achieve effect similar to those achievable with analog vinyl.• If you wish to preserve the original key of sound, set the Key Adjust function to ON.
1-1
[Pitch slider]Set the variable speed mode.Push the PITCH button !4 to lightthe PITCH LED.• PITCH → KEY (key adjust) → OFF
(Green) (Orange) (Off) (LED color)
The Pitch decreaseswhen the pitch slider !3
is moved upwards,increases when the pitchslider !3 is moveddownwards.
1-2
2-1
[PITCH BEND button]Push the PITCH BEND + (orPITCH BEND –) button !2.• The Pitch increases or
decreases temporarily while thePITCH BEND + or PITCH BEND– button !2 is pushed.
• The extent to which the PITCH BEND button!2 changes the Pitch is proportionate to theamount of time the button is pushed. Thelonger the button is held down, the greaterthe percentage of change.
2-2
Set the jog wheel to the pitch bend mode.During playback, pitch bend is setting for theJog wheel.• The playing speed increases
gradually when the jog wheely is turned clockwise anddecreases gradually when the jogwheel y is turnedcounterclockwise. When you stop turningthe jog wheel y, the playing speed returnsto the previous speed.
• When playback is stopped, the jog/shuttlewheel is set to the search mode.
0%
Pitchdecreases
Pitchincreases
§SEARCH SCAN6 7I II
1-3
• When the track is selected with the TRACK SELECT knob o and the PLAY/PAUSE button !1 is pushed,playback starts from the beginning of that track. If you wish to start from a different position, use theprocedure described below to search for the desired position.
(2) Starting playback from the Middle of a track (Manual Search)
1
Find the play start position.Turn the shuttle ring !7 to change theplayback position quickly. (Search for theapproximate playback position.)
The fast forward/reverse modeis set when the shuttle ring(outer side) !7 is turned.The speed changes according tothe angle at which the ring isturned.
• When operated during playback, playbackresumes after the operation.
• When playback is started, the jog wheel isset to the bend mode.
• When turned fully in either direction, theplayback position jumps about 10 seconds.The jump time can be selected in the presetmode from 10, 20, 30 or 60 sec.
2
Turn the jog wheel y. (Search for the preciseplayback position.)
When the jog wheel (inner side)y is turned, the frame movemode is set.The playback position can bemoved in units of one frame.
Listen to the sound and find the desired playstart position.
§SEARCH SCAN6 7I II
RVS FWD
§SEARCH SCAN6 7I II
Shockproof memory• A maximum of approximately 20 seconds
uncompressed audio data is stored into memory(per drive). This guards audible interruptions dueto external mechanical shocks such as bumpsor other hard vibrations.
• If advanced data reading is not possible due toscratches or dirt on the disc, playback stopsonce the data stored up to that point is read.
RVS FWD
NOTE:• For MP3 discs, frames are not displayed,
however frame resolution is audible by turningthe jog wheel (inner side) y.
(2) BRAKE
• Use this function to achieve effect similar to analog players.
1
Push the BRAKE button i to lightthe BRAKE LED.
• The effect sound is similar toa DJ turntable coming to aquick stop. This effect canbe achieved by pushing thePLAY/PAUSE button !1
during playback.
RVS FWD
During pause, turn the shuffle ring.If turned in the FWD direction, the pause point is moved to the forward direction, and pause mode is set at the new point.IfturnedintheRVSdirection,thepausepointismovedtothereversedirection,andpausemodeissetat the new point.
During pause, turn the jog wheel (inner side).If turned in the FWD direction, the pause point is moved to the forward direction frame by frame, and pause mode is set at the new point.IfturnedintheRVSdirection,thepausepoint ismovedtothereversedirectionframebyframe,andpause mode is set at the new point.

19
Getting started
TroubleshootingSpecifications
IndexO
thersPreset
PlaybackConnection
Adjusting the playback speedUse the pitch slider to adjust the playback speed (pitch).
1 Press and hold PITCH/KEY - RANGE.Range **% is displayed.Each time SEL. is turned, the range in which the playback speed can be adjusted switches as shown below. Turn SEL. to select the pitch range, and press SEL. to select the playback speed.
4 % 10 % 16 %
24%100 % 50 %
4 % 10 % 16 %GFor MP3 DISCH
2 Press PITCH/KEY - RANGE.TheLEDlightsgreen.
3 Move the pitch slider, and adjust to the desired playback speed.
Adjusting the playback speed without changing the pitchWhen the playback speed is adjusted, the pitch is not changed.
Press PITCH/KEY - RANGE.TheLEDlightsorange.
Operations during playback
CUE PLAY/PAUSECUE PLAY/PAUSEBRAKEBRAKE
PITCH/KEYRANGE
PITCH BEND -/+PITCH BEND -/+
EXIT/RELOOPFILP/BTRIMEXIT/RELOOP
A1,A2,BA1,A2,B
FILP/BTRIM
PITCH/KEYRANGE
Shuttle ring
Jog wheel Jog wheel
Shuttle ring
Pitch slider Pitch slider
Changing the playback speed temporarily (pitch bend function)This function temporarily changes the playback speed. There are 2 methods for changing the playback speed.
nUsing the PITCH BEND buttons
Press PITCH BEND +/–.PITCH BEND +
PITCH BEND –
Playback speed is increased while the button is being pressed.
Playback speed is decreased while the button is being pressed.
nDuring playback, turn the jog wheel
If turned in the FWD direction, playback speed is increased.If turned in the RVS direction, playback speed is decreased.
11
ENGLISH
DN-D4500 has six pitch ranges,4%, 10%, *16%, 24%, 50% and100%. (*Max MP3) When the
RANGE button !4 is pushedfor more than 1 sec, the pitchrange can be selected by turningthe TRACK SELECT knob o.
• When the TRACK SELECTknob o is pushed down thepitch range is entered andthe pitch range selectionmode is completed.
6 PITCH/BRAKE
(1) Pitch
• There are two ways to change the playing speed.• Adjust the Pitch using the pitch slider !3.• The PITCH BEND button !2 or jog wheel y can be used to temporarily change the pitch.
• The playing speed can be changed greatly to achieve effect similar to those achievable with analog vinyl.• If you wish to preserve the original key of sound, set the Key Adjust function to ON.
1-1
[Pitch slider]Set the variable speed mode.Push the PITCH button !4 to lightthe PITCH LED.• PITCH → KEY (key adjust) → OFF
(Green) (Orange) (Off) (LED color)
The Pitch decreaseswhen the pitch slider !3
is moved upwards,increases when the pitchslider !3 is moveddownwards.
1-2
2-1
[PITCH BEND button]Push the PITCH BEND + (orPITCH BEND –) button !2.• The Pitch increases or
decreases temporarily while thePITCH BEND + or PITCH BEND– button !2 is pushed.
• The extent to which the PITCH BEND button!2 changes the Pitch is proportionate to theamount of time the button is pushed. Thelonger the button is held down, the greaterthe percentage of change.
2-2
Set the jog wheel to the pitch bend mode.During playback, pitch bend is setting for theJog wheel.• The playing speed increases
gradually when the jog wheely is turned clockwise anddecreases gradually when the jogwheel y is turnedcounterclockwise. When you stop turningthe jog wheel y, the playing speed returnsto the previous speed.
• When playback is stopped, the jog/shuttlewheel is set to the search mode.
0%
Pitchdecreases
Pitchincreases
§SEARCH SCAN6 7I II
1-3
• When the track is selected with the TRACK SELECT knob o and the PLAY/PAUSE button !1 is pushed,playback starts from the beginning of that track. If you wish to start from a different position, use theprocedure described below to search for the desired position.
(2) Starting playback from the Middle of a track (Manual Search)
1
Find the play start position.Turn the shuttle ring !7 to change theplayback position quickly. (Search for theapproximate playback position.)
The fast forward/reverse modeis set when the shuttle ring(outer side) !7 is turned.The speed changes according tothe angle at which the ring isturned.
• When operated during playback, playbackresumes after the operation.
• When playback is started, the jog wheel isset to the bend mode.
• When turned fully in either direction, theplayback position jumps about 10 seconds.The jump time can be selected in the presetmode from 10, 20, 30 or 60 sec.
2
Turn the jog wheel y. (Search for the preciseplayback position.)
When the jog wheel (inner side)y is turned, the frame movemode is set.The playback position can bemoved in units of one frame.
Listen to the sound and find the desired playstart position.
§SEARCH SCAN6 7I II
RVS FWD
§SEARCH SCAN6 7I II
Shockproof memory• A maximum of approximately 20 seconds
uncompressed audio data is stored into memory(per drive). This guards audible interruptions dueto external mechanical shocks such as bumpsor other hard vibrations.
• If advanced data reading is not possible due toscratches or dirt on the disc, playback stopsonce the data stored up to that point is read.
RVS FWD
NOTE:• For MP3 discs, frames are not displayed,
however frame resolution is audible by turningthe jog wheel (inner side) y.
(2) BRAKE
• Use this function to achieve effect similar to analog players.
1
Push the BRAKE button i to lightthe BRAKE LED.
• The effect sound is similar toa DJ turntable coming to aquick stop. This effect canbe achieved by pushing thePLAY/PAUSE button !1
during playback.
RVS FWD
Manual loop playbackSetthestartingpoint(Apoint)andendpoint(Bpoint),andplaybackisrepeatedseamlesslybetweenthetwo points. Twoloopranges(A1andB1points,A2andB2points)canbeset.
1 During playback or pause, press A1 at the position where you want to start playback.TheAindicatorlightsinthedisplay,andplaybackstartsfromthesetApoint.
2 Press B at the position where you want to end playback.TheBindicatorlightsinthedisplay,andmanualloopplaybackrepeatsbetweenAandB.
A2andB2pointscanbesetinthesameway.

20
Getting started
TroubleshootingSpecifications
IndexO
thersPreset
PlaybackConnection
In normal playback or pause, press EXIT/RELOOP.
n If the current playback position is before the A-B positions, •“Exit Off” is shown in the display. •WhentheplaybackpositionpassestheApoint(startpoint)manualloopplaybackstartsautomatically.
n If the current playback position is after the A-B positions, •MovestheplaybackpointtotheApoint(startpoint)andmanualloopplaybackstarts.
If the EXIT/RELOOPispressedbeforetheplaybackpointpassestheApoint(startpoint),“ExitLoop”isshown in the display, and normal playback resumes.
nExiting auto loop playback
During auto loop playback, press EXIT/RELOOP.Autoloopplaybackexits,andnormalplaybackresumes.
nStutterStuttereffectcanbeusedatA1andA2pointssetasaloopstartpoint.
1 Press FLIP repeatedly until “STR A1” is shown in the display. changes to , and the player enters the stutter mode.
2 Hold down A1 to stutter A1 point.
3 To return to the loop play mode, press FLIP repeatedly until “H/S A1” is shown in the display.A2pointcanbestutteredinthesameway.
nChanging the end point of manual loop playback
During manual loop playback or pause, press B at the position where you want to end playback.•The B point (end point) is moved to the position where B was pressed.
nExiting manual loop playback
During manual loop playback, press EXIT/RELOOP.“ExitLoop”isshowninthedisplay,andnormalplaybackresumes.
nReturning to manual loop playback
In normal playback, press EXIT/RELOOP.TheplaybackpositionmovestotheApoint(startpoint)andmanualloopplaybackstarts.
nAdjusting loop points
1 During manual loop playback, press A1.
2 Turn the jog wheel while listening to the playback sound, and move to the position where you want to end playback.
11
ENGLISH
DN-D4500 has six pitch ranges,4%, 10%, *16%, 24%, 50% and100%. (*Max MP3) When the
RANGE button !4 is pushedfor more than 1 sec, the pitchrange can be selected by turningthe TRACK SELECT knob o.
• When the TRACK SELECTknob o is pushed down thepitch range is entered andthe pitch range selectionmode is completed.
6 PITCH/BRAKE
(1) Pitch
• There are two ways to change the playing speed.• Adjust the Pitch using the pitch slider !3.• The PITCH BEND button !2 or jog wheel y can be used to temporarily change the pitch.
• The playing speed can be changed greatly to achieve effect similar to those achievable with analog vinyl.• If you wish to preserve the original key of sound, set the Key Adjust function to ON.
1-1
[Pitch slider]Set the variable speed mode.Push the PITCH button !4 to lightthe PITCH LED.• PITCH → KEY (key adjust) → OFF
(Green) (Orange) (Off) (LED color)
The Pitch decreaseswhen the pitch slider !3
is moved upwards,increases when the pitchslider !3 is moveddownwards.
1-2
2-1
[PITCH BEND button]Push the PITCH BEND + (orPITCH BEND –) button !2.• The Pitch increases or
decreases temporarily while thePITCH BEND + or PITCH BEND– button !2 is pushed.
• The extent to which the PITCH BEND button!2 changes the Pitch is proportionate to theamount of time the button is pushed. Thelonger the button is held down, the greaterthe percentage of change.
2-2
Set the jog wheel to the pitch bend mode.During playback, pitch bend is setting for theJog wheel.• The playing speed increases
gradually when the jog wheely is turned clockwise anddecreases gradually when the jogwheel y is turnedcounterclockwise. When you stop turningthe jog wheel y, the playing speed returnsto the previous speed.
• When playback is stopped, the jog/shuttlewheel is set to the search mode.
0%
Pitchdecreases
Pitchincreases
§SEARCH SCAN6 7I II
1-3
• When the track is selected with the TRACK SELECT knob o and the PLAY/PAUSE button !1 is pushed,playback starts from the beginning of that track. If you wish to start from a different position, use theprocedure described below to search for the desired position.
(2) Starting playback from the Middle of a track (Manual Search)
1
Find the play start position.Turn the shuttle ring !7 to change theplayback position quickly. (Search for theapproximate playback position.)
The fast forward/reverse modeis set when the shuttle ring(outer side) !7 is turned.The speed changes according tothe angle at which the ring isturned.
• When operated during playback, playbackresumes after the operation.
• When playback is started, the jog wheel isset to the bend mode.
• When turned fully in either direction, theplayback position jumps about 10 seconds.The jump time can be selected in the presetmode from 10, 20, 30 or 60 sec.
2
Turn the jog wheel y. (Search for the preciseplayback position.)
When the jog wheel (inner side)y is turned, the frame movemode is set.The playback position can bemoved in units of one frame.
Listen to the sound and find the desired playstart position.
§SEARCH SCAN6 7I II
RVS FWD
§SEARCH SCAN6 7I II
Shockproof memory• A maximum of approximately 20 seconds
uncompressed audio data is stored into memory(per drive). This guards audible interruptions dueto external mechanical shocks such as bumpsor other hard vibrations.
• If advanced data reading is not possible due toscratches or dirt on the disc, playback stopsonce the data stored up to that point is read.
RVS FWD
NOTE:• For MP3 discs, frames are not displayed,
however frame resolution is audible by turningthe jog wheel (inner side) y.
(2) BRAKE
• Use this function to achieve effect similar to analog players.
1
Push the BRAKE button i to lightthe BRAKE LED.
• The effect sound is similar toa DJ turntable coming to aquick stop. This effect canbe achieved by pushing thePLAY/PAUSE button !1
during playback.
RVS FWD
•It can be adjusted in 1 frame units.
GAdjustable rangeHItcanbeadjustedfrom1frameaftertheApoint(startpoint)totheendofthetrack.
A+3 f
B
z
End of the track
z AdjustmentrangeforBpoint
3 Press B at the position where you want to end playback.B point (end point) adjustment is complete.
B2pointforA2pointcanbeadjustedinthesameway.
nClear the A1/A2 pointWhile pressing the FLIP press the A1 or A2toclearthecorrespondingAandBpoints.
Press FLIP/B TRIM for more than 1 sec to clear both A1 and A2 points at once.
Adjusting the track end time
nBrake
1 Press BRAKE.TheBRAKELEDlights.
2 Press PLAY/PAUSE during playback.The ending time of the track is delayed, and the characteristic like an analog player is obtained.
Operations during playback
See the illustration on the previous page for details of the buttons used for the operations on this page.

21
Getting started
TroubleshootingSpecifications
IndexO
thersPreset
PlaybackConnection
Adjusting brake timeThe brake time can be adjust using Preset function.
1 Hold down •BACK –PRESET.
2 Press SEL. repeatedly to select the brake time.Step 1 Step 2
Step 4 Step 3
3 Press •BACK –PRESET to enter.
The larger the step number is, the longer the brake time is.
Operations during playback
SEL.
CUE
SEL.
CUE
SEL.
PLAY/PAUSE
BACKPRESET
PLAY/PAUSE
BACKPRESET
CONT./SINGLERELAY
CONT./SINGLERELAY

22
Getting started
TroubleshootingSpecifications
IndexO
thersPreset
PlaybackConnection
Power on playThis mode enables playback to start automatically from the first track of the loaded CD when powering on.
1 Load a CD into the deck.
2 Hold down –PRESET.
3 Turn SEL. to select “Power Play”.
4 Press SEL. to display “P.PlayON”.
5 Press –PRESET.
“Now Saving” is shown.Playback automatically starts from the first track when powering on.Power on play can be set on CD drives 1 and 2, respectively.
Operations during playback
See the illustration on the previous page for details of the buttons used for the operations on this page.
Relay playWhat is relay play?Playback relays between deck 1 and deck 2.
nCD playbackA disc loaded in the next deck will be played after playback of the current track when the playback modes of deck 1 and deck 2 are set to SINGLE, or after playback of all tracks in the current disc when those modes are set to CONT.
nUSB playbackFiles in the folder of the next deck will be played after playback of the current file when the playback modes of deck 1 and deck 2 are set to SINGLE, or after playback of all files in the current folder when those modes are set to CONT.
•If both a CD (track) and USB memory device (file) are loaded in each deck, relay playback between the CD and the USB memory device is possible.
Performing relay playback
1 Press CONT./SINGLE on the first deck to select the playback mode, SINGLE or CONT., then hold down CONT./SINGLE to select the relay mode.TheSINGLEorCONT.indicatorflashesinthedisplay.TurnSEL. to select a track or file.
2 Press CONT./SINGLE on the second deck to select the playback mode, SINGLE or CONT.TheSINGLEorCONT.indicatorflashesinthedisplay.TurnSEL. to select a track or file.
3 Press PLAY/PAUSE of the first deck.Relay playback starts.
4 To stop the relay playback, press CUE on the deck currently played.*If not stopped, relay playback is repeated.

23
Getting started
ConnectionTroubleshooting
SpecificationsIndex
PresetO
thersPlayback
Others
Memo functionDetails set in advance can be stored as memo data on a USB memory device or HDD or Flash Memory.When you need to configure settings in a short space of time, settings can be configured automatically
SEL. SEL.TITLEMEMO
TITLEMEMO
BACKPRESET
BACKPRESET
Details that can be saved as memo data•Cue point•Manuallooppoint(A1/B1,A2,B2point)•Hot start or Stutter•Playback speed•Pitch ON or OFF•Key adjust ON or OFF•Pitch range
Memo settings
nMemo SetSave the setting details to memo data.
1 Set this unit with memo data.
2 Press TITLE - MEMO.“Memo Set?” is shown in the display.
3 Press SEL.“Complete!”isshowninthedisplay.
•When “MEMO” is shown in the display, memo data has already been saved. Clear the saved memo data, and redo the setting.
•If memo data cannot be saved, check the remaining capacity of the USB memory device or HDD. It may not be possible to save memo data if there is not enough spare memory.
•If the USB memory device or HDD is equipped with a security function, check that the security is disabled. •1000 is the maximum possible number of tracks that can be stored to memory.
However, to simplify the MEMO operations, the memory system manages each 200 MEMO data groups as a minimum unit (the total 1000 memory capacity divided into 5 memory data groups). When you want toclearjustoneMEMOdatainthe1MEMOCLEARmode(vpage 24), the unit will erase the memo information but not the internalmemo allocation number.Accordingly, depending on conditions, thenumber of tracks that can be stored in the memory may be fewer than 1000.Onceyoureached1000storedpoints,youwillseeamessagethatsays“MEMOFULL!”.Atthistimeyou will need to “delete” old data to make room for new memo points. Therefore the oldest 200 memo points in that group will be deleted and become available.
•The MEMO indicator on the display lights up when a track for which data is stored in the memory is selected.
24
Getting started
ConnectionTroubleshooting
SpecificationsIndex
PresetO
thersPlayback
Memo function
nMemo CallThis function calls saved memo data.
1 Select the track that is stored with the memo data that you want to call.
•When a track that has memo data stored is selected, the MEMO indicator lights in the display.
2 Press TITLE - MEMO.“Memo Call?” is shown in the display.
3 Press SEL.
When the playback speed is called from the memo data, the PITCH indicator flashes, and the pitch may be locked. This is because the actual playback speed and playback speed selected by the pitch slider differ. In order to cancel the pitch lock, adjust the pitch slider to the same pitch as the called memo data.
nMemo ClearThis function clears saved memo data.
1 Select the track that is stored with the memo data that you want to clear.
•When a track that has memo data stored is selected, the MEMO indicator lights in the display.
2 Press TITLE - MEMO.“Memo Call?” is shown in the display.
3 Turn SEL. to select “Memo Clr?”.
4 Press SEL.“Clear OK” is shown in the display.
5 Press SEL.The MEMO indicator in the display goes out, and the memo data is cleared.
nDisc tray auto closeDisc tray will automatically close after 30 seconds have elapsed for the disc tray auto close mode. (Preset item 3)
nEnd of messageDuring playback, the Play Position indicators start flashing when the remaining playing time to the end of the track (set in the preset mode) is reached, indicating that the end of the track is near. (Preset item 6)

25
Getting started
ConnectionPlayback
TroubleshootingSpecifications
IndexO
thersPreset
Preset function
Preset menu mapSetting items Description
Auto Cue Sets the detection level of the sound start point when ignoring the soundless part at the head of a track at playback. (A.CUEON*/A.CUEOFF)
Brake Time Setting the track end time (STEP1/STEP2*/STEP3/STEP4)
Auto Close Time for automatically closing disc holder. (CloseOFF/Close10s/Close30s*/Close1min)
Jump Time SelectthejumptimeofQuickJump. (Jump10sec*/Jump20sec/Jump30sec/Jump1min)
P. Range Select the playing pitch range when the power is turned on. (4%Range/10%Range*/16%Range/24%Range)
EOM Time Sets the notification for the time remaining until the end of the track being played back. (EOMOFF/EOM10sec*/EOM15sec/EOM20sec/EOM30sec/EOM60sec/EOM 90 sec)
Fader Mode Switches the operation for fader start for the mixer connected to this unit. Select 1-line (TS) type cable (Play and Pause). Select 2-line (TRS) type cable (CUE and Play) (Play/CUE*/PlayPause)
Power Play Switches power on playback on or off. Playback starts when the power is turned on if a disc is loaded. (P.PlayON/P.PlayOFF*)
Pitch Select the pitch mode when the power is turned on. (PitchON*/Key.AdjON(KEYADJUSTON)/PitchOFF)
Play Mode Select the play mode when the power is turned on. (Single/Cont./PlayLock*)
Time Mode Select the time mode when the power is turned on. (Elapsed*/Remain)
Bpm Disp Select the BPM display (DispON*/DispOFF)
Relay Mode Switches relay playback on or off. (RelayON/RelayOFF*)
Relay Time Select the crossover time the currently playing track when the opposite drive start to play with the Relay Play function. (RelayOsec*/Relay1sec/Relay2sec/Relay3sec)
Setting items Description
MemoClear MemoClear(MEMOALLCLEAR) NOTE: This PRESET item can be only performed in CD1 (left side) of the remote controller. Clear all MEMO data in the non-volatile memory.q To clear all MEMO data, press the SEL. down.
“Clear OK?” flashes on the character display.w Press the TRACK SEL. down again and select “OK” to execute clearing all MEMO
data. “Memo Clear” is displayed on the character display while clearing.
e Onceclearingiscompleted,“Complete!”isdisplayed.Version No The DN-D4500MK2’s software version is displayed.
(SYSTEM/DSP/SER/RC)Preset Int Set all the preset data back to the factory defaults.
q To clear the PRESET data, press the TRACK SEL. down. “Initial OK?” flashes on the character display.
w Press the SEL. down. again and select “OK” to start clear the preset data. “Preset Int” is displayed on the character display while data clearing.
e Once clearing is completed, “Complete!”isdisplayed.
The “*” mark next to the data indicates the default value.
How to adjust the various Preset settings
1 Hold down •BACK –PRESET.“PresetMode” is displayed.
2 Turn SEL. to select the setting item.Press SEL. to enter the selected item.
3 Press •BACK –PRESET.“Now Saving” is displayed.Configuration is complete.
26
Getting started
ConnectionPlayback
SpecificationsIndex
PresetTroubleshooting
Others
If a problem should arise, first check the following:1. Are the connections correct?2. Is the set being operated as described in this owner’s manual?3. Is the external device (DJ mixer, player or effects processor) operating correctly?
If this unit does not operate properly, check the items listed in the table below.If the symptom is not covered on the check list, contact your dealer or service centers.Service centers are listed at http://www.d-mpro.com or http://www.denondj.com.
Symptom Cause/Solution
Cannot eject disc holder. •Check that the power is on. •Discs cannot be ejected during playback. Stop playback before ejecting
the disc.
“Disc Error” is displayed. •The disc may be dirty or scratched. Either clean the dirt from the disc, or replace with another disc.
Power does not turn on. •Check that the plug is inserted correctly into the wall socket, and that the power cord is inserted into this unit.
This unit does not operate properly, or there is no sound.
•Check the connections for all devices.•Check the file sampling frequency. Only files with a sampling frequency of44.1kHzcanbeplayedonthisunit.
There is no sound. Or the sound is distorted.
•Check the mixer connections.•Themixeradjustmentsorswitchingmaybeunsuitable.Adjusttheknobs
on the mixer.
There is no sound. Or the sound is too quiet.
•Check the connections for all devices.•Switch the input source switching button to the device that is currently
playing.
“Fail” is displayed. •If the USB memory device or HDD is equipped with a security function, check that the security is disabled.
•Memo data cannot be saved on a USB memory device or HDD formatted inHFS+format.UseFAT16orFAT32format.
ACD-RorCD-RWdisccannot be played.
•Thedischasnotbeenfinalized.Finalizethediscthenplayit.
•Therecordingconditionsand/orthequalityofthediscitselfarepoor.Use a properly recorded disc.
TroubleshootingSymptom Cause/Solution
Data stored in a USB memory device cannot be displayed (read).
•HastheunitinitializedtheUSBmemorydevicewithapplicableformats?(FAT16/FAT32)
•AreyouusingaUSBhub?Ifso,directlyconnecttheUSBmemorydeviceto a USB port on the front panel of the unit.
•AreyouusingaUSBextensioncable?Ifso,directlyconnecttheUSBmemory device to the USB port on the front panel of the unit.
•AretheUSBmemorydevicecontentsapplicabletothisunit?Usethe“Files” menu to confirm whether the contents are applicable to the unit.
•WhenaUSBmemorydeviceof192MBorlessisformattedwithFAT32, this unit may not be able to read it. If that is the case, format it with FAT16.
•This unit does not support a USB memory device containing encrypted data.
The USB memory device is notrecognized.
•Some USB memory devices cannot be operated by the power supplied fromthisunit.Theunitsupplies5V/1AtoaUSBmemorydevice.Usea USB memory device that is compatible with the specifications of this unit.
•Check if the USB memory device is firmly connected to the USB port.

27
Getting started
ConnectionPlayback
TroubleshootingIndex
Others
SpecificationsSettings
n GeneralType: Compact disc playerDisc type: Standardcompactdisc(12cmdisc),CD-TEXT
CD-R, CD-RW discs
NOTEFinalizedCD-RorCD-RWdiscscanbeplayedbackinthisunit.However,accordingtorecordingquality,someCD-R/RWdiscscannotbe played.
Installation: 19-inch rack mountablePlayer unit: 2URemote control unit: 2U
Power supply: U.S.A.,CanadaandTaiwanR.O.C.models: 120VAC±10%,60HzEuropeanmodels: 230VAC±10%,50/60Hz
Power consumption: 25 WEnvironmental conditions: Operational temperature: 5 to 35°C (41 to 95°F)
Operational humidity: 25 to 85% (no condensation)Storage temperature: –20 to 60°C (-4 to 140°F)
n Audio sectionMain out, Monitor out Quantization:
24-bit (internal DSP Process)
Sampling frequency: 44.1kHzatnormalpitchOversampling rate: 8 timesTotal harmonic distortion: 0.01% or lessSignal to noise ratio: 90 dB or moreChannel separation: 85 dB or moreFrequency response: 20to20,000HzAnalog output Output level: 2.0Vr.m.s.
Load impedance: 10 kΩ or moreDigital output Signal format: IEC958-Type2
Output level: 0.5Vp-p75Ω
Specifications n FunctionsInstant start: Within 20 msec.Variable pitch: ±4% (0.1% pitch), ±10% (0.1% pitch), ±16% (0.1% pitch)
±24% (1.0% pitch), ±50% (1.0% pitch), ±100% (1.0% pitch)Pitch bend: Pitch range ±4% – ±24% : ±32%
Pitch range ±50%, ±100% : ±99%Search precision: 1/75sec.(1subcodeframe)Max. scan speed: Over 20 times normal speedMax. MEMO memory steps: 1000 steps
z Specifications and design are subject to change without notice for purpose of improvement.
Service centers are listed at http://www.d-mpro.com or http://www.denondj.com.

28
Getting started
ConnectionPlayback
SpecificationsO
thersPreset
IndexTroubleshooting
Index v A
Accessories ·························································· 2AutoClose ·························································· 25AutoCue ···························································· 25Autoloopplayback ············································· 20
v BBpm Disp ··························································· 25Brake ·································································· 20Brake Time ························································· 25
v CCable
Coaxial cable ···················································· 11RCAcable ························································ 11Remote control connection cable ···················· 11Stereo mini cable ············································· 11
ConnectionHDD ································································· 15Power cord ······················································ 12USB memory device ·································· 15, 16
Cue point ···························································· 18
v DDisplay ·································································· 9
v EEOM Time ·························································· 25
v FFader Mode ························································ 25Fastforward/Rewind ·········································· 18Finalization ···························································· 4Front panel ··························································· 6
v HHot Start ······························································· 3
v JJump Time ························································· 25
v LLooppoint ·························································· 20
v MManual loop playback ········································· 19Memo Call ·························································· 24MemoClear ·················································· 24, 25Memo function ··················································· 23Memo Set ·························································· 23
v PPause ································································· 17Pitch ··································································· 25Pitch bend function ············································ 19Playback ····························································· 17
CD ···································································· 13CD-R ································································ 14CD-ROM ·························································· 14CD-RW ····························································· 14USB memory device ········································ 15
Playback mode ··················································· 17Playback speed ·················································· 19Play Mode ·························································· 25Poweron/off ······················································ 13Power on play ···················································· 22Power Play ························································· 25P. Range ····························································· 25Preset Int ···························································· 25Preset settings ··················································· 25
v RRear panel ·························································· 10Relay Mode ························································ 25Relay play ··························································· 22Relay Time ························································· 25
v SStutter ································································ 20
v TTime Mode ························································· 25
v VVersionNo ·························································· 25

29
Getting started
ConnectionPlayback
TroubleshootingSpecifications
IndexO
thersPreset
nDimensions
Unit: in. (mm)
Weight: (Player unit:11 lbs (5.0 kg), Remote control unit: 4 lbs 2 oz (1.9 kg))
25/32
(20.
0)2-9/32
(58.
0)9/16
(14.
2)3
(76.
2)
3-15
/32
(88.
0)
9-51
/64(248
.8)
10-5/16
(261
.0)
11/64
(4.2
)5/64
(2.0)
5/64
(2.1)
3 (7
6.2)
3-15
/32
(88.
0)15
/64
(6.0
)18-31/32(482.0)18-5/16(465.0)
18-31/32(482.0)
18-5/16(465.0)
5/64
(2.0
)

V00 35201016600AP