Embed Size (px)
Citation preview

Medidas: 18 cm Dificultad: Alta Tiempo estimado: 10 h Aguja crochet: 2-3 mm
Duende Navideño Patrón amigurumi
Diseñado por Sueños Blanditos
MATERIALES
- Lana de diferentes colores: blanco, negro, color carne, rojo, verde, marrón, azul. - Grosor de la lana: 2-3 mm. - Aguja crochet adecuada al grosor de la lana. - Aguja coser lana. - Relleno sintético.
ABREVIATURAS
Pb: punto bajo Aum: aumentar/ aumento Dism: disminuir/ disminución B: blanco. R: rojo. V: verde Rellenar a medida que tejemos.
Si tienes alguna duda escríbeme a: [email protected]

CABEZA / CUERPO En color carne
1. Anillo de 6 pb.
2. Aum en todos los puntos (12).
3. “1 pb, aum”, repetir (18).
4. “2 pb, aum”, repetir (24).
5. “3 pb, aum”, repetir (30).
6. “4 pb, aum”, repetir (36).
7. “5 pb, aum”, repetir (42).
8. "6 pb, aum", repetir (48).
9. "7 pb, aum", repetir (54).
10. "8 pb, aum", repetir (60).
11. al 20. 1 pb en cada punto (60).
21. "9 pb, aum", repetir (66).
22. "10 pb, aum", repetir (72).
23. al 26. 1 pb en cada punto (72).
27. Cambiamos al rojo y tejemos 1 pb en
cada punto (72).
28. Tejemos en la parte superior de las
cadenas 1 pb en cada punto (72).
Volveremos a esta vuelta para completar el
cuello.
29. y 30. 1 pb en cada punto (72).
31. "10 pb, dism", repetir (66).
32. "9 pb, dism", repetir (60).
33. al 40. 1 pb en cada punto (60).
41. "8 pb, dism", repetir (54).
42. "7 pb, dism", repetir (48).
43. "6 pb, dism", repetir (42).
2Suenhosblanditos.com

44. “5 pb, dism”, repetir (36).
45. "4 pb, dism", repetir (30).
46. "3 pb, dism", repetir (24).
47. "2 pb, dism", repetir (18).
48. "1 pb, dism", repetir (12).
49. Dism en todos los puntos (6).
Rematamos. Cerramos el hueco con la
aguja lanera.
3Suenhosblanditos.com
PELO En marrón
1. Anillo de 6 pb.
2. Aum en todos los puntos (12).
3. “1 pb, aum”, repetir (18).
4. “2 pb, aum”, repetir (24).
5. “3 pb, aum”, repetir (30).
6. “4 pb, aum”, repetir (36).
7. “5 pb, aum”, repetir (42).
8. "6 pb, aum", repetir (48).
9. "7 pb, aum", repetir (54).
10. "8 pb, aum", repetir (60).
11. al 14. 1 pb en cada punto (60).
15. 36 pb (dejamos 24 pb sin tejer).

16. al 18. Sin cadena de separación antes
de girar y haciendo una dism final con
los 2 últimos pb, perderemos 2 pb en
cada fila. (34), (32), (30).
Rematamos.
Flequillo:
En marrón
Vamos a hacer 3 rizos. Los tejemos sobre
los 24 pb del pelo que dejamos sin tejer.
1º Rizo:
Colocamos la pieza del pelo con el Anillo
de inicio colocado hacia nosotros (vemos
el pelo desde atrás). Enganchamos en el
primer pb de la derecha y tejemos 10
cadenas, regresando con 3 varetas en
cada cadena y 1 punto deslizado hacia el
pb de origen de las cadenas.
Rematamos.
2º y 3º Rizo:
Enganchamos de jando 4 pb de
separación con respecto al rizo anterior y
hacemos 7 cadenas, regresando con 3
varetas en cada cadena y 1 punto
deslizado hacia el pb de origen. (18).
Rematamos.
Doblamos el tejido dando forma de
espiral a los rizos.
4Suenhosblanditos.com

5Suenhosblanditos.com
OJOS (x2) En negro
1. Anillo de 6 pb.
2. Cambiamos al blanco y tejemos 1
aum, cambiamos al negro y tejemos 5
aum (12).
3. Cambiamos al azul y tejemos "1 pb,
aum", repetir (18).
4. Cambiamos al blanco y tejemos 1 pb
en cada punto (18).
Rematamos.
En blanco
Tejemos un Anillo de 4 pb.
Rematamos.
Cosemos las 2 partes como se ve en la
imagen.
NARIZ En color carne
1. Anillo de 6 pb.
2. "1 aum, 2 pb" 2 veces (8).
3. "2 aum, 2 pb" 2 veces (12).
4. 1 pb, 3 aum, 3 pb, 3 aum, 2 pb (18).
5. y 6. 1 pb en cada punto (18).
7. Dism en todos los puntos (9).
Rematamos.

BRAZOS (x2) En color carne
1. Anillo de 6 pb.
2. Aum en todos los puntos (12).
3. “1 pb, aum”, repetir (18).
4. “2 pb, aum”, repetir (24).
5. al 8. 1 pb en cada punto (24).
9. Cambiamos al rojo y tejemos 1 pb en
cada punto (24).
10. 1 pb en cada punto (24).
11. Dism en todos los puntos (12).
Rematamos.
6Suenhosblanditos.com
OREJAS (x2) No las rellenamos
En color carne
1. Anillo de 4 pb.
2. 1 pb en cada punto (4).
3. "1 pb, aum", repetir (6).
4. 1 pb en cada punto (6).
5. "1 pb, aum", repetir (9).
6. "2 pb, aum", repetir (12).
7. y 8. 1 pb en cada punto (12).
9. "3 pb, aum", repetir (15).
10. "4 pb, aum", repetir (18).
11. y 12. 1 pb en cada punto (18).
13. 6 dism, 1 pb en cada punto en el
resto de la vuelta (12).

14. 3 dism, 1 pb en cada punto en el
resto de la vuelta (9).
15. 3 dism, 1 pb en cada punto en el
resto de la vuelta (6).
Rematamos. Cerramos el hueco con la
aguja lanera.
Las doblamos dejando una parte recta
con respecto a la última vuelta de la
pieza.
7Suenhosblanditos.com
PIES (x2) En verde
1. Anillo de 4 pb.
2. 1 pb en cada punto (4).
3. "1 pb, aum", repetir (6).
4. 1 pb en cada punto (6).
5. "1 pb, aum", repetir (9).
6. 3 dism, 3 aum (9).
7. 2 dism, 1 pb, 1 aum, 1 pb, 1 aum, 1
pb (9).
8. "1 aum, 2 pb" 3 veces (12).
9. y 10. 1 pb en cada punto (12).
11. "1 pb, aum", repetir (18).
12. y 13. 1 pb en cada punto (18).
14. "1 pb, dism", repetir (12).
15. y 16. 1 pb en cada punto (12).
17. Dism en todos los puntos (6).
Rematamos. Cerramos el hueco con la
aguja lanera.

COMPLETAMOS EL CUELLO
En rojo
1. Partimos de la vuelta 28 del cuerpo y
con la cabeza del muñeco colocada hacia
abajo, tejemos en la parte de las cadenas
que dejamos libre 1 pb en cada punto
(72).
2. Cambiamos al blanco y tejemos 1 pb
en cada punto (72).
3. Comenzamos a tejer las ondas del
cuello. Para ello tejemos: B 1 vareta, R 1
vareta, B 1 vareta (las 3 varetas sobre el
primer pb), R 1 vareta, B 1 vareta, R 1
vareta (las 3 varetas sobre el segundo pb),
B 1 vareta, R 1 vareta, B 1 vareta (las 3
varetas sobre el tercer pb). Debemos
hacer todos los cambios de color al
terminar cada vareta, enganchando el
nuevo hilo cuando nos queda sólo una
hebra en la aguja.
Continuamos tejiendo en color rojo 1
punto deslizado en cada uno de los
siguientes 3 pb que nos servirán de
separación entre una onda y otra.
Repetimos la secuencia de varetas
formando las ondas hasta el final de la
vuelta.
8Suenhosblanditos.com

GORRO En verde
1. Anillo de 6 pb.
2. 1 pb en cada punto (6).
3. "1 pb, aum", repetir (9).
4. al 7. 1 pb en cada punto (9).
8. "2 pb, aum", repetir (12).
9. al 13. 1 pb en cada punto (12).
14. 6 aum, 3 dism (15).
15. y 16. 1 pb en cada punto (15).
17. 1 dism, "2 pb, aum" 3 veces, 2 dism
(15).
18. y 19. 1 pb en cada punto (15).
20. "4 pb, aum", repetir (18).
21. y 22. 1 pb en cada punto (18).
23. 3 dism, "1 pb, aum" 6 veces (21).
24. y 25. 1 pb en cada punto (21).
26. 3 dism, 2 pb, 6 aum, 1 pb, 3 dism (21).
27. y 28. 1 pb en cada punto (21).
29. "6 pb, aum", repetir (24).
30. "3 pb, aum", repetir (30).
31. "4 pb, aum", repetir (36).
32. "5 pb, aum", repetir (42).
33. "6 pb, aum", repetir (48).
34. "7 pb, aum", repetir (54).
35. "8 pb, aum", repetir (60).
36. al 40. 1 pb en cada punto (60).
9Suenhosblanditos.com

41. Cambiamos al blanco y tejemos en la
parte superior de las cadenas 1 pb en
cada punto (60).
42. Tejemos 1 pb en cada punto
siguiendo la siguiente secuencia: "2 pb
en verde, 1 pb en blanco" (60).
43. Tejemos 1 pb en cada punto
siguiendo la siguiente secuencia: "2 pb
en blanco, 1 pb en verde" (60).
44. Tejemos 1 pb en cada punto
siguiendo la siguiente secuencia: "2 pb
en verde, 1 pb en blanco" (60).
45. Tejemos 1 pb en cada punto
siguiendo la siguiente secuencia: "2 pb
en blanco, 1 pb en verde" (60).
Rematamos. Doblamos el borde y
cosemos el gorro por la parte doblada
inicio del borde.
POMPÓN
En blanco
1. Anillo de 6 pb.
2. "V 2 aum, B 1 aum" 2 veces (12).
3. "B 1pb, 1 aum, 1 pb, 1 aum, V 1 pb, 1
aum" 2 veces (18).
4. "V 2 pb, 1 aum, 2 pb, 1 aum, B 2 pb, 1
aum" 2 veces (24).
5. al 7. 1 pb en cada punto tejiendo en
color blanco sobre los puntos verdes de la
vuelta anterior y en verde sobre los
puntos blancos (24).
10Suenhosblanditos.com

8. "2 pb, dism", repetir cambiando de
color tejiendo blanco sobre verde y verde
sobre blanco (18).
9. "1 pb, dism", repetir cambiando de
color tejiendo blanco sobre verde y verde
sobre blanco (12).
10. Dism en todos los puntos cambiando
de color tejiendo blanco sobre verde y
verde sobre blanco (12).
Rematamos. Cerramos. Cosemos el
pompón a la punta del gorro y para que
ésta esté más curvada, cosemos el primer
pliegue al gorro.
11Suenhosblanditos.com
BOTÓN
En verde
1. Anillo de 6 pb.
2. "Cambiamos al blanco y tejemos 1
aum, en verde 1 aum", repetir hasta el
final (12).
Rematamos
Suenhosblanditos.com 12
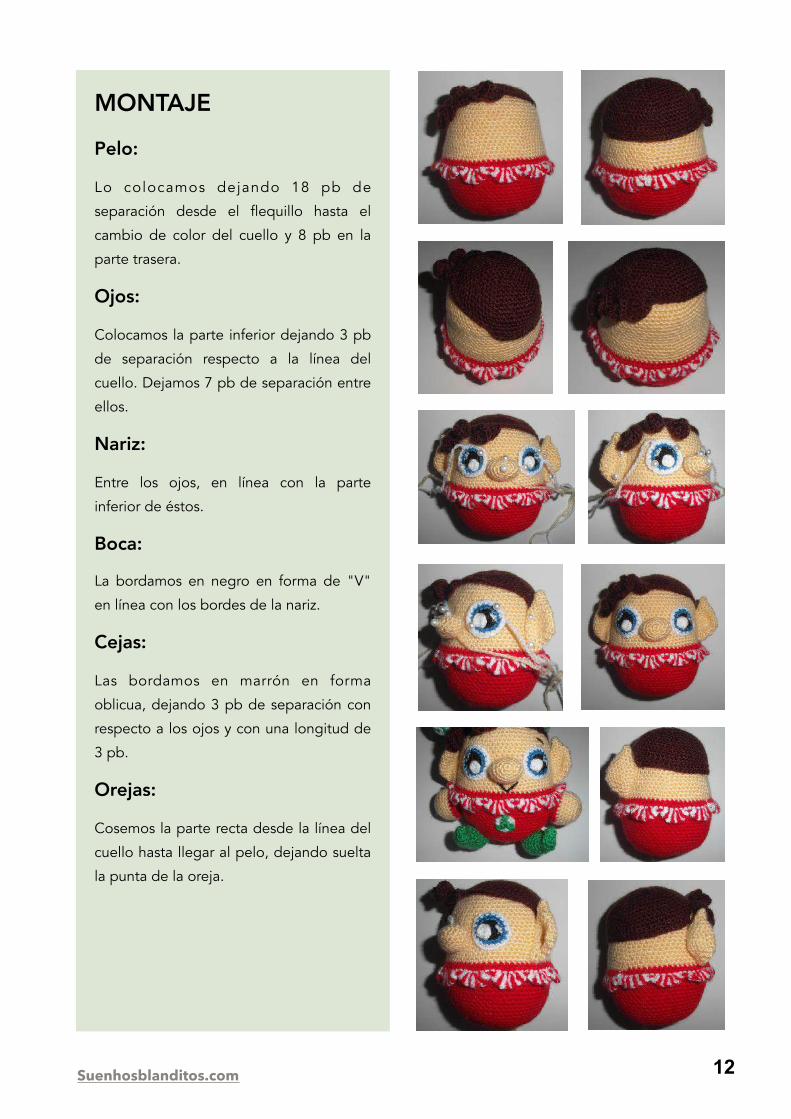
MONTAJE
Pelo:
Lo colocamos dejando 18 pb de
separación desde el flequillo hasta el
cambio de color del cuello y 8 pb en la
parte trasera.
Ojos:
Colocamos la parte inferior dejando 3 pb
de separación respecto a la línea del
cuello. Dejamos 7 pb de separación entre
ellos.
Nariz:
Entre los ojos, en línea con la parte
inferior de éstos.
Boca:
La bordamos en negro en forma de "V"
en línea con los bordes de la nariz.
Cejas:
Las bordamos en marrón en forma
oblicua, dejando 3 pb de separación con
respecto a los ojos y con una longitud de
3 pb.
Orejas:
Cosemos la parte recta desde la línea del
cuello hasta llegar al pelo, dejando suelta
la punta de la oreja.

Suenhosblanditos.com 13
Brazos:
En línea con respecto a las orejas,
dejando 2 pb de separación con respecto
a la vuelta de inicio de las ondas del
cuello que quedarán sobre ellos.
Pies:
En línea con respecto a los ojos, dejando
8 pb de separación con respecto a la
última vuelta del cuerpo. Cosemos los
pies dejando 10 vueltas desde la punta
sin coser.
Botón:
Centrado con respecto a la nariz y la boca
bajo las ondas del cuello.
¡Y LISTO!… ¡QUE TE DIVIERTAS!

Measures: 18 cm Difficulty: High Estimated time: 10 h Gauge: 2-3 mm
MATERIALS
- Yarn of different colors: white, black, skin color, red, green, brown, blue. - 2-3 mm yarn - Gauge according to the size of the yarn. - Yarn needle.
- Fiberfill.
ABREVIATIONS
sc: single crochet st: stitch inc: increase dec: decrease W: white. R: red. G: green Fill the doll with fiberfill while you crochet.
If you have any doubt, send an email to:
Christmas Elf Amigurumi pattern
Designed by Sueños Blanditos

HEAD / BODY With skin color yarn
1. Work 6 sc in a magic ring.
2. Inc in all st (12).
3. “1 sc, inc”, repeat (18).
4. “2 sc, inc”, repeat (24).
5. “3 sc, inc”, repeat (30).
6. “4 sc, inc”, repeat (36).
7. “5 sc, inc”, repeat (42).
8. "6 sc, inc", repeat (48).
9. "7 sc, inc", repeat (54).
10. "8 sc, inc", repeat (60).
11. to 20. 1 sc in each st (60).
21. "9 sc, inc", repeat (66).
22. "10 sc, inc", repeat (72).
23. to 26. 1 sc in each st (72).
27. Change to red yarn and crochet 1 sc in
each st (72).
28. Crochet in back loops only 1 sc in each
st (72). We will return to this row to
complete the collar.
29. and 30. 1 sc in each st (72).
31. "10 sc, dec", repeat (66).
32. "9 sc, dec", repeat (60).
33. to 40. 1 sc in each st (60).
41. "8 sc, dec", repeat (54).
42. "7 sc, dec", repeat (48).
43. "6 sc, dec", repeat (42).
2Suenhosblanditos.com

44. “5 sc, dec”, repeat (36).
45. "4 sc, dec", repeat (30).
46. "3 sc, dec", repeat (24).
47. "2 sc, dec", repeat (18).
48. "1 sc, dec", repeat (12).
49. Dec in all st (6).
Fasten off. Close the hole with the yarn
needle.
3Suenhosblanditos.com
HAIR With brown yarn
1. Work 6 sc in a magic ring.
2. Inc in all st (12).
3. “1 sc, inc”, repeat (18).
4. “2 sc, inc”, repeat (24).
5. “3 sc, inc”, repeat (30).
6. “4 sc, inc”, repeat (36).
7. “5 sc, inc”, repeat (42).
8. "6 sc, inc", repeat (48).
9. "7 sc, inc", repeat (54).
10. "8 sc, inc", repeat (60).
11. to 14. 1 sc in each st (60).
15. 36 sc (leave 24 sc without crochet).

16. to 18. Without separation chain
before turn and by making a final dec
with the last 2 sc, you will lose 2 sc in
each row. (34), (32), (30).
Fasten off.
Fringe:
With brown yarn
We are going to make 3 curls. Crochet
them over the 24 sc of the hair that you
left without crochet.
1st Curl:
Place the hair piece with the initial magic
ring looking to you (see the hair from
behind). Engage on the first sc of the
right side and crochet 10 chains,
returning with 3 double crochets in each
chain and 1 slip st towards the initial sc
of the chains.
Fasten off.
2nd and 3rd Curls:
Engage leaving 4 sc of separation in
relation to the previous curl and make 7
chains, returning with 3 double crochets
in each chain and 1 slip st towards the
initial sc. (18).
Fasten off.
Fold the pieces spiraling the curls.
4Suenhosblanditos.com

5Suenhosblanditos.com
EYES (x2) With black yarn
1. Work 6 sc in a magic ring.
2. Change to white yarn and crochet 1
inc, change to black yarn and crochet 5
inc (12).
3. Change to blue yarn and crochet "1
sc, inc", repeat (18).
4. Change to white yarn and crochet 1 sc
in each st (18).
Fasten off.
With white yarn
Work 4 sc in a magic ring.
Fasten off.
Sew the 2 parts as you can see in the
picture.
NOSE With skin color yarn
1. Work 6 sc in a magic ring.
2. "1 inc, 2 sc" 2 times (8).
3. "2 inc, 2 sc" 2 times (12).
4. 1 sc, 3 inc, 3 sc, 3 inc, 2 sc (18).
5. and 6. 1 sc in each st (18).
7. Dec in all st (9).
Fasten off.

ARMS (x2) With skin color yarn
1. Work 6 sc in a magic ring.
2. Inc in all st (12).
3. “1 sc, inc”, repeat (18).
4. “2 sc, inc”, repeat (24).
5. to 8. 1 sc in each st (24).
9. Change to red yarn and crochet 1 sc
in each st (24).
10. 1 sc in each st (24).
11. Dec in all st (12).
Fasten off.
6Suenhosblanditos.com
EARS (x2) Don´t fill them
With skin color yarn
1. Work 4 sc in a magic ring.
2. 1 sc in each st (4).
3. "1 sc, inc", repeat (6).
4. 1 sc in each st (6).
5. "1 sc, inc", repeat (9).
6. "2 sc, inc", repeat (12).
7. and 8. 1 sc in each st (12).
9. "3 sc, inc", repeat (15).
10. "4 sc, inc", repeat (18).
11. and 12. 1 sc in each st (18).
13. 6 dec, 1 sc in each st to the rest of
the row (12).

14. 3 dec, 1 sc in each st to the rest of
the row (9).
15. 3 dec, 1 sc in each st to the rest of
the row (6).
Fasten off. Close the hole with the yarn
needle.
Fold them leaving a straight part in
relation to the last row of the piece.
7Suenhosblanditos.com
FEET (x2) With green yarn
1. Work 4 sc in a magic ring.
2. 1 sc in each st (4).
3. "1 sc, inc", repeat (6).
4. 1 sc in each st (6).
5. "1 sc, inc", repeat (9).
6. 3 dec, 3 inc (9).
7. 2 dec, 1 sc, 1 inc, 1 sc, 1 inc, 1 sc (9).
8. "1 inc, 2 sc" 3 times (12).
9. and 10. 1 sc in each st (12).
11. "1 sc, inc", repeat (18).
12. and 13. 1 sc in each st (18).
14. "1 sc, dec", repeat (12).
15. and 16. 1 sc in each st (12).
17. Dec in all st (6).
Fasten off. Close the hole with the yarn
needle.

COMPLETE THE COLLAR
With red yarn
1. Return to row 28 of the body and with
the head of the doll to the bottom,
crochet in the free loops 1 sc in each st
(72).
2. Change to white yarn and crochet 1 sc
in each st (72).
3. Begin crocheting the collar waves. In
order to do that crochet: W 1 double
crochet, R 1 double crochet, W 1 double
crochet (all the 3 double crochets on the
first sc), R 1 double crochet, W 1 double
crochet, R 1 double crochet (all the 3
double crochets on the second sc), W 1
double crochet, R 1 double crochet, W 1
double crochet (all the 3 double crochets
on the third sc). You must make all the
color changes when you finish each
double crochet, engaging the new color
when you only have one thread left in the
needle.
Continue crocheting with red yarn 1 slip st
in each one of the 3 next sc as separation
between waves.
Repeat the double crochets sequence
making the waves to the end of the row.
8Suenhosblanditos.com

HAT With green yarn
1. Work 6 sc in a magic ring.
2. 1 sc in each st (6).
3. "1 sc, inc", repeat (9).
4. to 7. 1 sc in each st (9).
8. "2 sc, inc", repeat (12).
9. to 13. 1 sc in each st (12).
14. 6 inc, 3 dec (15).
15. and 16. 1 sc in each st (15).
17. 1 dec, "2 sc, inc" 3 times, 2 dec (15).
18. and 19. 1 sc in each st (15).
20. "4 sc, inc", repeat (18).
21. and 22. 1 sc in each st (18).
23. 3 dec, "1 sc, inc" 6 times (21).
24. and 25. 1 sc in each st (21).
26. 3 dec, 2 sc, 6 inc, 1 sc, 3 dec (21).
27. and 28. 1 sc in each st (21).
29. "6 sc, inc", repeat (24).
30. "3 sc, inc", repeat (30).
31. "4 sc, inc", repeat (36).
32. "5 sc, inc", repeat (42).
33. "6 sc, inc", repeat (48).
34. "7 sc, inc", repeat (54).
35. "8 sc, inc", repeat (60).
36. to 40. 1 sc in each st (60).
9Suenhosblanditos.com

41. Change to white yarn and crochet in
back loops only 1 sc in each st (60).
42. Crochet 1 sc in each st following the
next sequence: "2 sc with green yarn, 1 sc
with white yarn" (60).
43. Crochet 1 sc in each st following the
next sequence: "2 sc with white yarn, 1 sc
with green yarn" (60).
44. Crochet 1 sc in each st following the
next sequence: "2 sc with green yarn, 1 sc
with white yarn" (60).
45. Crochet 1 sc in each st following the
next sequence: "2 sc with white yarn, 1 sc
with green yarn" (60).
Fasten off. Fold the edge and sew the hat
by the folded part at the beginning of the
edge.
POMPOM
With white yarn
1. Work 6 sc in a magic ring.
2. "G 2 inc, W 1 inc" 2 times (12).
3. "W 1pb, 1 inc, 1 sc, 1 inc, G 1 sc, 1 inc"
2 times (18).
4. "G 2 sc, 1 inc, 2 sc, 1 inc, W 2 sc, 1 inc"
2 times (24).
5. to 7. 1 sc in each st crocheting with
white yarn over the green stitches of the
previous row and with green yarn over the
white stitches (24).
10Suenhosblanditos.com

8. "2 sc, dec", repeat changing color
crocheting with white yarn over green and
green over white (18).
9. "1 sc, dec", repeat changing color
crocheting with white yarn over green and
green over white (12).
10. Dec in all st changing color crocheting
with white yarn over green and green over
white (12).
Fasten off. Close. Sew the pompom to the
tip of the hat and to make it more curved,
sew the first fold to the hat.
11Suenhosblanditos.com
BUTTON
With green yarn
1. Work 6 sc in a magic ring.
2. "Change to white yarn and crochet 1
inc, with green yarn 1 inc", repeat to the
end (12).
Fasten off
Suenhosblanditos.com 12
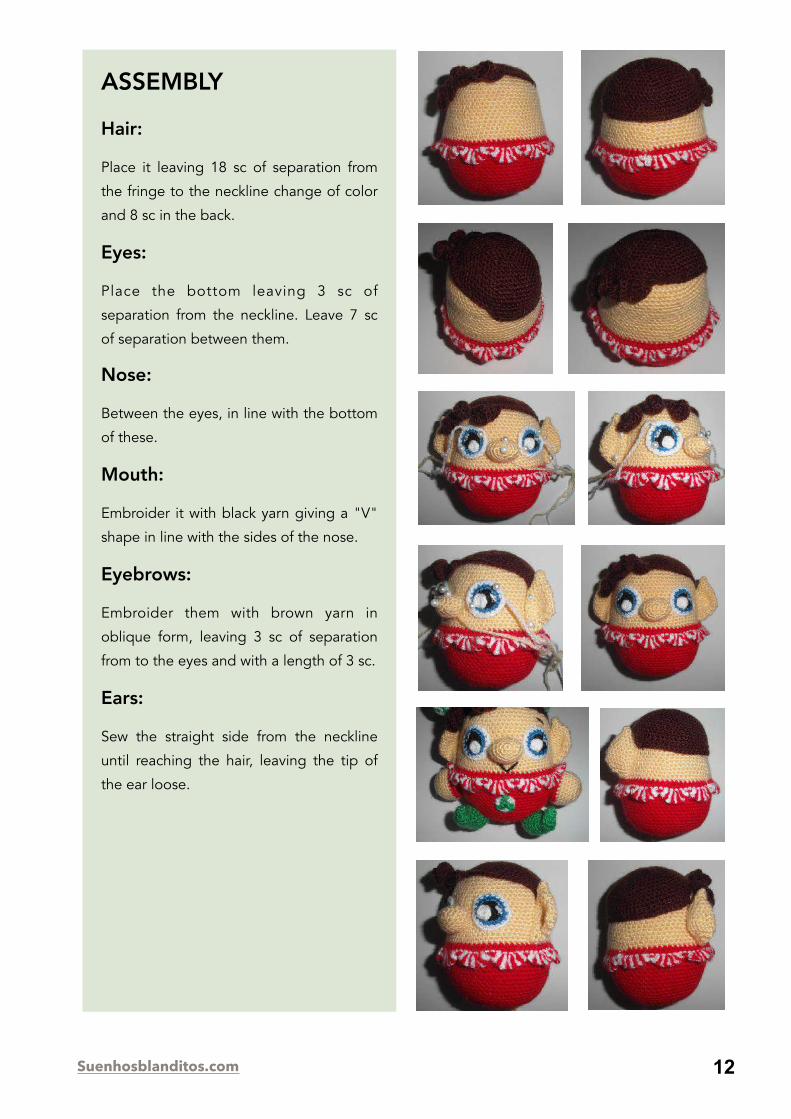
ASSEMBLY
Hair:
Place it leaving 18 sc of separation from
the fringe to the neckline change of color
and 8 sc in the back.
Eyes:
Place the bottom leaving 3 sc of
separation from the neckline. Leave 7 sc
of separation between them.
Nose:
Between the eyes, in line with the bottom
of these.
Mouth:
Embroider it with black yarn giving a "V"
shape in line with the sides of the nose.
Eyebrows:
Embroider them with brown yarn in
oblique form, leaving 3 sc of separation
from to the eyes and with a length of 3 sc.
Ears:
Sew the straight side from the neckline
until reaching the hair, leaving the tip of
the ear loose.

Arms:
In line with the ears, leaving 2 sc of
separation from the initial row of the collar
waves that will remain on them.
Feet:
In line with the eyes, leaving 8 sc of
separation from the last row of the body.
Sew the feet leaving 10 rows from the tip
without sewing.
Button:
Centered in relation to the nose and the
mouth under the collar waves.
Suenhosblanditos.com 13
AND READY!… HAVE FUN!