Embed Size (px)
Citation preview

Chevy/GM Duramax Diesel® LB7 & LLY Power Edge Juice and Attitude
Installation Instructions and Manual

GM Juice/Attitude Manual Edge Products, LLC
2
© 2004, Edge Products, LLC
All rights reserved.
Edge Products, LLC 1080 South Depot Dr.
Ogden, UT 84404 (801) 476-3343
www.edgeproducts.com Manual Version 110105

GM Juice/Attitude Manual Edge Products, LLC
3
Table of Contents
Disclaimer of Liability………………………………………………………… 4 Aftermarket Products and Your Manufacturer’s Warranty………………. 5 About the Chevy/GM Juice…………………………………………………… 6 Chevy/GM Juice getting connected……………………………………………7 Using the Juice…………………………………………………………………. 9 Power Gains…………………………………………………………………… 10 Making sense of it all………………………………………………………….. 11 Transmission Relearning………………………………………………………13 About the Attitude……………………………………………………………...15 Power gains……………………………………………………………………. 16 Attitude getting connected……………………………………………………. 17 Changing the display view……………………………………………………. 21 Changing the onscreen variables…………………………………………….. 23 Adjusting the backlight……………………………………………………….. 24 Alerts…………………………………………………………………………… 25 Records………………………………………………………………………… 28 Performance tests……………………………………………………………… 29 Juice configuration…………………………………………………………….. 31 Adjusting Juice power level…………………………………………………… 37 Index……………………………………………………………………………. 38

GM Juice/Attitude Manual Edge Products, LLC
4
The Juice Module is a high performance product It is strongly recommended that EGT and boost gauges
be installed when using this product. USE THIS PRODUCT AT YOUR OWN RISK.
Do not use this product until you have carefully read the following agreement.
This sets forth the terms and conditions for the use of this product. The installation of this product indicates that the BUYER has read and understands this agreement and
accepts its terms and conditions
DISCLAIMER OF LIABILITY Edge Products, LLC and its successors, distributors, jobbers, and dealers (hereafter SELLER) shall in no way be responsible for the product's proper use and service. THE BUYER HEREBY WAIVES ALL LIABILITY CLAIMS. The BUYER acknowledges that he/she is not relying on the SELLER’s skill or judgment to select or furnish goods suitable for any particular purpose and that there are no liabilities which extend beyond the description on the face hereof and the BUYER hereby waives all remedies or liabilities, expressed or implied, arising by law or otherwise, (including without any obligations of the SELLER with respect to fitness, merchantability and consequential damages) or whether or not occasioned by the SELLER's negligence. The SELLER disclaims any warranty and expressly disclaims any liability for personal injury or damages. The BUYER acknowledges and agrees that the disclaimer of any liability for personal injury is a material term for this agreement and the BUYER agrees to indemnify the SELLER and to hold the SELLER harmless from any claim related to the item of the equipment purchased. Under no circumstances will the SELLER be liable for any damages or expenses by reason of use or sale of any such equipment. The SELLER assumes no liability regarding the improper installation or misapplication of its products. It is the installer's responsibility to check for proper installation and if in doubt, contact the manufacturer.
LIMITATION OF WARRANTYEdge Products, LLC (hereafter "SELLER") gives Limited Warranty as to description, quality, merchantability, fitness for any product’s purpose, productiveness, or any other matter of SELLER's product sold herewith. The SELLER shall be in no way responsible for the product’s open use and service and the BUYER hereby waives all rights other than those expressly written herein. This Warranty shall not be extended or varied except by a written instrument signed by SELLER and BUYER. The Warranty is Limited to one (1) year from the date of sale and limited solely to the parts contained within the product's kit. All products that are in question of Warranty must be returned shipping prepaid to the SELLER and must be accompanied by a dated proof of purchase receipt. All Warranty claims are subject to approval by Edge Products, LLC Under no circumstances shall the SELLER be liable for any labor charged or travel time incurred in diagnosis for defects, removal, or reinstallation of this product, or any other contingent expenses. If the BUYER sends back a failed unit that is out of warranty and chooses to buy a refurbished unit, the refurbished unit will only carry a 60 day warranty. If the BUYER purchases a new unit at a predetermined discounted rate, it will have the standard 1 year warranty. Under no circumstances will the SELLER be liable for any damage or expenses insured by reason of the use or sale of any such equipment.
IN THE EVENT THAT THE BUYER DOES NOT AGREE WITH THIS AGREEMENT: THE BUYER MAY PROMPTLY RETURN THIS PRODUCT, IN A NEW AND UNUSED CONDITION, WITH A DATED PROOF OF PURCHASE, TO THE PLACE OF PURCHASE WITHIN SIXTY (60) DAYS FROM DATE OF PURCHASE FOR A FULL REFUND. THE INSTALLATION OF THIS PRODUCT INDICATES THAT THE BUYER HAS READ AND UNDERSTANDS THIS AGREEMENT AND ACCEPTS ITS TERMS AND CONDITIONS.

GM Juice/Attitude Manual Edge Products, LLC
5
AFTERMARKET PRODUCTS AND YOUR VEHICLE’S WARRANTY Many of our customers ask, “Will your product void my vehicle manufacturer’s warranty?” While the answer is straightforward from a legal standpoint, we also want to educate our customers (and after-market consumers) on some industry realities and offer some common sense precautions to minimize your risk. Consumers of aftermarket products are protected by The Federal Magnusson-Moss Warranty Act. The Act states that if something breaks on your car and you take it in for warranty repair, the dealer must honor your warranty unless they can prove that whatever modifications you have added to your car actually caused the problem. Please keep in mind that towing in anything higher than level two and hard driving in levels four and five are not recommended. While as a consumer, you have strong legal protection with regards to your vehicle’s warranty, there is also a practical reality that different automotive manufacturers and dealers have greatly varying views on aftermarket products, in particular those that produce horsepower, such as performance enhancement chips, modified intake manifolds, or aftermarket exhaust systems. There are dealers and manufacturers out there that will use the presence of a horsepower upgrade to void your vehicle’s warranty. They will do this regardless of whose product you are using. Any aftermarket company that does not acknowledge this is misleading you. The bottom line is that while the law protects the consumer and provides for enforcement of the warranty, it is very difficult for most people to hire an attorney and fight a voided warranty. Edge recommends that you always disconnect and remove your module and monitor when you take your vehicle to a dealer for warranty work in order not to interfere with Diagnostic equipment.

GM Juice/Attitude Manual Edge Products, LLC
About the Chevy/GM Thank you for purchasing the Power Edge Juice Module for the Chevy/GM Duramax Diesel®. The Juice module has been developed and produced from the highest quality materials available to ensure the best performance for years to come. If you have any questions, please contact Edge Products. We will be very happy to answer your questions about our complete product line. The Juice Module is an add-on Engine Control Module (ECM) for the Duramax® Engine that offers additional features not available with the factory setup. Since it is an add on ECM, it uses all the factory data, and then enhances the factory settings to optimize your truck’s performance. These features include: • Engine temperature monitoring and power increase from the Juice module as engine reaches operating temperature • Four selectable power level settings for Normal and Tow/Haul transmission modes (5 on-the-fly selectable power settings with the Attitude) • Transmission slip monitoring - If any transmission slip is detected power is decreased to eliminate transmission slippage • Smart power control during torque converter lockup to allow a smooth, easy torque converter clutch lock-up The Juice module offers a large power increase over stock throughout the rpm range, but the power is most noticeable in the midrange rpm’s. This greatly improves drivability and towing performance. Transmission downshifting is greatly reduced, especially while passing or towing. The Juice also regulates power delivery and timing based on engine temperature. This means that while the engine temperature is below 160° F no additional fueling or timing is delivered. At 160° F the module begins delivering fuel at 50% of the calculated additional fuel, and the percentage increases as the engine temperature increases, until at full engine temperature (174° F) the Juice delivers 100% of the calculated additional fuel. At full engine temperature the Juice also starts modifying timing.
6

GM Juice/Attitude Manual Edge Products, LLC
Chevy/GM JuiceSupplied Items: 1. Power Edge Juice Module 2. Three Wire Ties 3. Two Velcro Strips Required Tools: None Please read these instructions completely so that you understand each step prior to installation. The Power Edge Juice Module This picture shows the Power Edge Juice Module with the harness cable and Edge Attitude Display wiring (Attitude instructions on pg. 13)
7
Chevy/GM Juice
Get ting Connected
This cable is where the optional Edge Attitude Display module gets connected.
These two connectors are EGT thermocouple connections.
GM Juice/Attitude Manual Edge Products, LLC
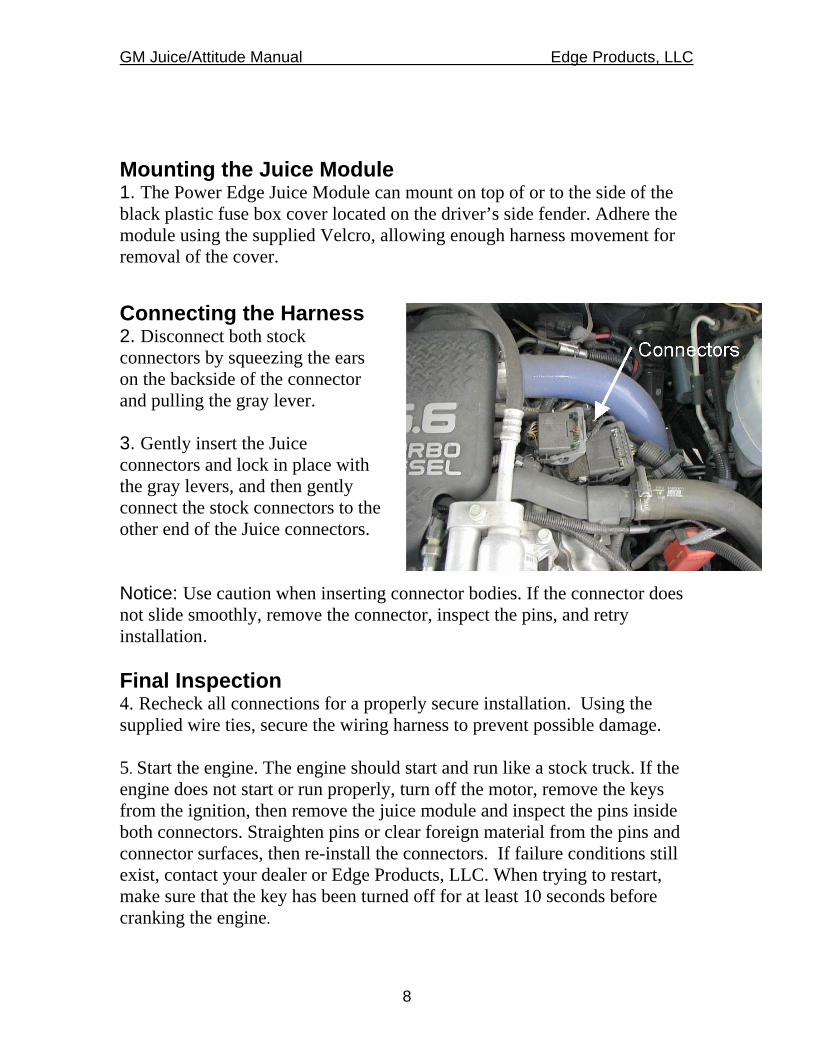
Mounting the Juice Module 1. The Power Edge Juice Module can mount on top of or to the side of the black plastic fuse box cover located on the driver’s side fender. Adhere the module using the supplied Velcro, allowing enough harness movement for removal of the cover. Connecting the Harness 2. Disconnect both stock connectors by squeezing the ears on the backside of the connector and pulling the gray lever. 3. Gently insert the Juice connectors and lock in place with the gray levers, and then gently connect the stock connectors to the other end of the Juice connectors. Notice: Use caution when inserting connector bodies. If the connector does not slide smoothly, remove the connector, inspect the pins, and retry installation. Final Inspection 4. Recheck all connections for a properly secure installation. Using the supplied wire ties, secure the wiring harness to prevent possible damage. 5. Start the engine. The engine should start and run like a stock truck. If the engine does not start or run properly, turn off the motor, remove the keys from the ignition, then remove the juice module and inspect the pins inside both connectors. Straighten pins or clear foreign material from the pins and connector surfaces, then re-install the connectors. If failure conditions still exist, contact your dealer or Edge Products, LLC. When trying to restart, make sure that the key has been turned off for at least 10 seconds before cranking the engine.
8

GM Juice/Attitude Manual Edge Products, LLC
Using the Juice Adjusting Power Levels
The Juice has four power levels. The Attitude module allows five levels. The Juice module was designed to allow the user to select a power level for Normal operating mode, and either the same or a different power level for Tow/Haul mode. NOTE: If you have the Attitude installed, the following procedure does NOT apply. Power levels are changed using the Attitude. 1. Set the Parking Brake 2. Turn key on without starting the engine (engine must not be running). 3. Select the desired transmission mode to set the power level for (Normal or Tow/Haul). 4. Place gear selector in the gear corresponding to desired power level (D=4, 3=3, 2=2, 1=1, R=stock). 5. Press accelerator to the floor two times, completely releasing the pedal each time. 6. Return gear selector to Park and start the engine. 7. Press the Tow/Haul button twice. This causes the Juice module to “remember” the level setting for the mode. Power Level Confirmation To confirm the power level that is selected: 1. Place gear selector in Park with your foot off of the accelerator while engine is idling 2. Set the Parking Brake 3. Select Normal or Tow/Haul mode, depending upon the transmission mode power setting you wish to confirm 4. Place gear selector to reverse, neutral, reverse, then back to park. P-R-N-R-P 5. The engine will rev to coincide with the power level selected, revving 4 times for level 4, 3 times for level 3, and so on It is recommended that you use the Tow/Haul transmission mode while towing. This provides torque converter lockup in gears 2-5 reducing transmission heat, and also raising the shift rpm threshold to keep the rpm’s 9

GM Juice/Attitude Manual Edge Products, LLC
higher. It is recommended that you maintain engine rpm above 1800 while towing. While towing, the Juice module allows the engine to pull many grades in the mid rpm’s rather than having to downshift and pull them in the high rpm’s. This provides for lower EGT (Exhaust Gas Temperature) with the same power output. EGT rises significantly with rpm--especially above 2500. It is highly recommended that you install an EGT gauge while using the Power Edge Juice. You can also opt to limit the EGT with the Attitude monitor to maintain lower EGT levels. It is recommended while towing you use power levels 1
or 2 due to EGT and transmission stress
Power Gains The following power gains are representative of an actual test vehicle.
These gains were measured on a SuperFlow Dyno at an altitude of 4400 ft above sea level, and represent power delivered to the rear wheels of the test truck. The only modification made to the test truck was the addition of the Power Edge Juice module. Power gains may vary somewhat on a different vehicle or in different geographic settings. Horsepower Torque Level 1: 40 100 Level 2: 60 120 Level 3: 75 170 Level 4: 90 200 Warning: It is strongly advised that you do not combine, or “stack” chips to gain more horsepower.
Power Gains 10

GM Juice/Attitude Manual Edge Products, LLC
Making Sense Of It This section is designed to help you understand how the additional power will change your driving experience as well as help you figure out what power level will best suit your driving style. The first thing you will probably notice, especially if this is your first time driving a diesel truck with a performance module, is that this is a whole different animal. You will experience more power, quicker take-offs, better passing and acceleration, and even better fuel economy. Power level one is specifically designed to maximize fuel economy improvements. (if you can put off the little guy on your shoulder telling you to ‘step on it hard’). If you are towing, the beauty of the extra power the Edge module delivers is that not only will be able to maintain speed going up a hill, but the added power will also keep you in a higher gear, so your transmission will not keep “hunting” for lower gears. We recommend level one or level two for towing applications. Only use level two if you are towing a light load. The remaining power levels are designed to match fueling with any additional upgrades you may have done to your vehicle. Level 3 is as far as you should go on a stock truck and should never be used while towing. Level 3 is designed to take advantage of the built-in safety margins the manufacture needs to add in order to make sure your vehicle can tow at its maximum capacity. When driven responsibly, and used with an EGT gauge or the Attitude monitor, level 3 will not stress the stock engine or transmission as long as you are not towing. Levels four and five are race levels and are designed to be used with upgraded drive trains. If you have modified your injectors, upgraded the transmission, changed turbos or performed other similar enhancements, levels four and five will match fueling to the additional performance created by these upgrades. On a stock truck, it is possible to overstress the engine and transmission while driving in levels four and five. EGTs: What they mean and why 11

GM Juice/Attitude Manual Edge Products, LLC
12
EGT stands for exhaust gas temperature, and is the single most important indicator of how a diesel engine is performing. Unlike a gasoline motor, a diesel motor will continue to make power as more fuel is added. As more fuel is added, heat will be generated until the motor just gets too hot and things start to melt. This is a situation you want to avoid. Exhaust gas temperature is the ideal measurement of how hot the motor is, since temperature fluctuations in exhaust gas are almost instantaneous. Just so you know, it is possible to generate excessive EGT on a stock truck, particularly if you are towing. This is why we always recommend installing an EGT gauge and we built the Attitude monitor, which monitors EGT and will automatically defuel your truck when EGTs get too high. In our experience 1350 degrees is about as high as you want to let your EGTs go. Keep in mind, the stress on your engine created by the heat is a function of both temperature and time. A brief spike to 1400 that lasts a second is not that big a deal. Pulling up a hill for several minutes at 1400 is far worse. As you drive your truck in the various power settings, keep your eye on the EGTs. Depending on how you drive and where you drive, you may find a particular power level is more suitable to your power needs. The Juice Module and your Transmission The automatic transmission has a fluid-filled clutch-like device called a torque converter. This device uses the spinning motion of the motor to drive the transmission which drives your wheels. As the truck speed stabilizes, the torque converter engages a mechanical connection which locks the two halves of the torque converter, so the output shaft is going the same speed as the input shaft. This mechanical linking of the two halves is called Transmission Lock-up. If the motor produces too much power, this mechanical lock-up can start to slip. When this slippage occurs, the Juice module reduces the power output to allow the transmission to function properly. This is a great future that provides an extra level of protection for your vehicle. Please keep in mind however, that if you run in level 4 or 5, the additional power is so great that it is possible to overstress a stock Allison transmission if you drive too hard. Edge on your Side Edge takes a great deal of pride in the quality of our customer service. If you

GM Juice/Attitude Manual Edge Products, LLC
have any questions or concerns about your Juice module, please feel free to call us at 888-360-3343. Our tech support desk is open from 8:00 am to 5:00 pm Mountain time Monday through Friday.
Transmission The Allison transmission is a “Smart” transmission. That means that it pays attention to how smoothly the transmission is changing gears, and modifies the shifting to improve drivability. When the motor delivers more power (by adding the Juice module), the transmission has to ‘re-learn’ how to shift. After first installing the Juice module, you may notice rough shifting. The best way to re-teach the transmission is to set the truck in the power level you will be using most of the time. Then set out to drive, some city, some highway, varying the driving and the speed. Make sure that you shift through each gear 20 to 30 times. A good rule of thumb would be 100 to 200 miles. Remember that the truck must go through each gear 20 to 30 times. You will notice the shifting becoming better, and your truck responding better to the additional power as you go through the learning cycle.
Transmission Relearning
13

GM Juice/Attitude Manual Edge Products, LLC
Attitude Instructions
14

GM Juice/Attitude Manual Edge Products, LLC
About the Attitude Congratulations on purchasing the Attitude for the Chevy/GM Duramax diesel. The following manual contains information and instructions on the proper use of the Attitude. Please read carefully before proceeding to install the Attitude to your vehicle. IMPORTANT: For the LB7 model (EJC1000) the Attitude is only compatible with the Edge GM Juice module version 4.73 or later. The Attitude allows you to monitor the performance of your vehicle’s vital engine components and output values. The following parameters can be displayed on the main Attitude screen (maximum of 4 at one time):
• Boost
• Speed
• EGT (exhaust gas temp)
• Throttle position
• RPM
• Torque converter clutch status
• % Engine load
• Transmission clutch slippage
• Current gear
• % backdown due to high EGT
* Important Note: Engine Temperature does not display accurately on all 2001 GM vehicles. Standard transmission vehicles do not display information related to speed (i.e., performance tests, etc.) and transmission related features.
15

GM Juice/Attitude Manual Edge Products, LLC
One of the most powerful features of the Attitude is the option to monitor the EGT of your vehicle and automatically lower the fuel input to maintain an EGT below a maximum desired level (we recommend 1350°F). The following items should be included in your Attitude package: 1. The Attitude Module 2. The EGT Hardware Bag 3. Hook and Loop Mounting strips and wire ties 4. Attitude Post Mounting Bracket 5. Exhaust Gas Thermocouple
Power Gains The following power gains are representative of an actual test vehicle. These gains were measured on a SuperFlow Dyno at an altitude of 4400 ft above sea level, and represent power delivered to the rear wheels of the test truck. The only modification made to the test truck was the addition of the Power Edge Juice module. Power gains may vary somewhat on a different vehicle or in different geographic settings. Horsepower Torque Level 1: 40 HP 100
16

GM Juice/Attitude Manual Edge Products, LLC
Level 2: 60 HP 120 Level 3: 75 HP 170 Level 4: 90 HP 200 Level 5: 125 HP 240 Warning: It is strongly advised that you do not combine, or “stack” chips to gain more horsepower.
Power Gains
Chevy/GM Attitude The Attitude monitor connects under the hood to the Edge Juice module. Follow these steps to install the Attitude: 1. Place your Attitude monitor on the dash of your vehicle approximately where you want it installed and, with the driver’s door open, feed the cable through the open door, and into the engine compartment via the slot near the hood hinge. 2. Determine where you want to attach the Attitude mounting bracket and insert it into your dashboard. The bracket fits well in the seam of the dash board by separating the seam slightly and sliding in the bottom portion of the bracket until it snaps into place (see figure 1). The following pictures demonstrate how to best mount the Attitude with the new bracket.
The bracket fits well in the seam of the dash board by separating the seam slightly and sliding in the bottom portion of the bracket until it snaps into place.
Figure 1
17

GM Juice/Attitude Manual Edge Products, LLC
After the bracket is mounted, use the supplied two sided tape to secure the Attitude to the bracket
Figure 2 3. Connect the Attitude to your Edge Juice module by snapping together the cables with the green connections (see figure 3). Secure any excess cable to prevent entanglement with moving engine parts.
The Attitude cable attaches to the Edge Juice module under the hood.
This is the EGT cable that gets tapped into the exhaust manifold.
This connection only exists on older Juice modules that were modified to accept the Attitude.
Figure 3 4. It is necessary to tap a small hole into your exhaust manifold to insert the EGT sensor. The EGT probe must be mounted before the turbo to operate properly. Drill the hole using a 5/ 16 or a 21/64” drill bit, then tap it with an 1/8” NPT tap (see tip on figure 5). Once the hole is drilled and tapped, run the motor at idle for 10 to 15 seconds to clear the few remaining shavings from the manifold. Once the engine has been run, screw in the brass fitting and insert the EGT sensor by sliding it into the hole (see figure 4) and tightening the back end brass fittings.
18

GM Juice/Attitude Manual Edge Products, LLC
Figure 4
The EGT thermocouple installed into the drilled and tapped exhaust manifold
Figure 5
19

GM Juice/Attitude Manual Edge Products, LLC
Tip: Pulling back the wheel splash guard provides easy access to the exhaust manifold for tapping the EGT cable.
Figure 6 Once your Attitude monitor is installed successfully and you have turned on your vehicle, you will be prompted to indicate acceptance of the user agreement contained in this user manual. To indicate you accept the agreement, press the [Enter] button. This screen will appear the first five times the Attitude monitor is used.
Once you have accepted the user agreement, you will see a screen similar to the following:
20

GM Juice/Attitude Manual Edge Products, LLC
Changing the Display The Attitude allows you to view multiple engine parameters on the same screen. To select a desired view, perform the following steps: 1. Press the [Menu] button until the Setup screen appears:
21

GM Juice/Attitude Manual Edge Products, LLC
2. Select the Display option and press the [Enter] button. The following screen appears:
3. Select the desired viewing option by using the up and down arrows and pressing the [Enter] key. Below are examples of the display options:
Two Function Digital Display Sample
22

GM Juice/Attitude Manual Edge Products, LLC
Three Function Digital Display Sample
Four Function Digital Display Sample
Changing the On- To change the variables on the screen, perform the following steps: 23

GM Juice/Attitude Manual Edge Products, LLC
1. When viewing the main screen of variables, press the [Menu] button. The following screen appears:
2. Select the Display option and press [Enter]. The following screen appears:
3. Select the style you would like the variables displayed on your screen and press [Enter]. Depending on which option you choose, a screen similar to the following appears:
4. This screen lists the current variables you have selected to view and their respective positions on the screen (i.e., TOP LEFT, etc.). Select the variable you would like to change and press [Enter]. A screen listing the possible
24

GM Juice/Attitude Manual Edge Products, LLC
replacement variables similar to the following appears:
5. Select the variable you would like to view and press [Enter]. The Setup Digital Displays screen appears again listing the variable options you have chosen to view. If you have no more changes, select the Set As Display option and press [Enter]. The main screen appears with your desired variable in view. One new variable has been added in the current version of the Attitude, which is Mod Temp. Mod temp displays the current temperature of the Juice module.
Adjusting the When viewing engine parameters (like the sample below) press the [Enter] button to adjust the backlight. Each time the [Enter] button is pressed, the backlight will change to either bright, dim, or off.
g the Backlight 25
Alerts

GM Juice/Attitude Manual Edge Products, LLC
The Attitude can actually alert you when certain engine parameter levels are met such as EGT, Boost, Speed, and Engine Temperature. When these parameter thresholds are met, the Attitude screen will display the value and you will hear a repeating audible alarm. The volume of this audible alarm cannot be changed. The alerts default to off, and the default values of the parameters are noted in each section below. To set alerts, follow these steps: 1. Press the [Menu] button until the Setup screen appears:
2. Select the Alerts option and press [Enter]. The following screen appears:
3. Turn alerts On by scrolling to the Alerts are On/Off option and press [Enter] to turn alerts On or Off.
264. To change the EGT Alert value [default is 1350] scroll to the EGT Alert

GM Juice/Attitude Manual Edge Products, LLC
option and press [Enter]. The following screen appears:
5. Press the up and down arrow keys until you see the desired EGT level at which you want to be alerted and press [Enter] to set that value. 6. To change the Boost Alert value [default is 25] scroll to the Boost Alert option and press [Enter]. The following screen appears:
7. Press the up and down arrow keys until you see the desired Boost level at which you want to be alerted and press [Enter] to set that value. 8. To change the Speed Alert value [default is 70] scroll to the Speed Alert option and press [Enter]. The following screen appears: 27

GM Juice/Attitude Manual Edge Products, LLC
9. Press the up and down arrow keys until you see the desired Speed level at which you want to be alerted and press [Enter] to set that value. 10. To change the Engine Temperature Alert value [default is 210] scroll to the EngTmp Alert option and press [Enter]. The following screen appears:
11. Press the up and down arrow keys until you see the desired Engine Temperature level at which you want to be alerted and press [Enter] to set that value. • Important Note: Engine Temperature does not display accurately on all 2001 GM vehicles. Note: If you desire to temporarily stop the Attitude from alerting you to a specific threshold, while the actual alert is signaling you, press any key (MENU, arrow or ENTER) and the alert will temporarily stop. When all of the alarm parameters drop below the set thresholds, then exceed them again, the alert will start up again.
Records
28

GM Juice/Attitude Manual Edge Products, LLC
The Attitude can actually keep a record of the maximum (or minimum) engine parameter and performance test values that your vehicle produces. These records are stored in the Records section of the Attitude. To view or clear these values, follow these steps: 1. Press the [Menu] button until the Setup screen appears:
2. Select the Records option and press [Enter]. The following screen appears:
3. All of the records are stored on this screen including your 0-60 and ¼ mile times. To clear an individual record, select that record and press [Enter]. To clear all the values, select Clear All and press [Enter].
Records
Performance Tests 29

GM Juice/Attitude Manual Edge Products, LLC
The Attitude allows you to test the performance of your vehicle by timing the 0-60 and the ¼ mile times. To run these tests, perform the following steps: 1. Press the [Menu] button until the Setup screen appears:
2. Select the Performance Tests option and press [Enter]. The following screen appears:
Performance Tests 3. Select the desired performance test and press [Enter]. The following screen appears:
30

GM Juice/Attitude Manual Edge Products, LLC
4. When your vehicle is at a complete stop, the following screen automatically appears:
5. When you press the accelerator pedal, the screen returns to the display mode and automatically begins the performance test. During testing, a “T” appears in the upper right corner of the screen indicating that testing is in process. When the test is complete (the desired distance or speed is reached) the test will automatically stop and your time will be displayed on the screen like the following (quarter mile result example):
Juice Configuration 31

GM Juice/Attitude Manual Edge Products, LLC
The Attitude allows you to configure your Juice module in a variety of ways. To change the Juice configurations, perform the following steps: 1. Press the [Menu] button until the Setup screen appears:
2. Select the Juice Configuration option and press [Enter]. The following screen appears:
3. Select the desired option and press [Enter]. The following are descriptions of each of the Juice Configuration options available:
J guration Transmission Setup After selecting the Transmission Setup option from the Juice Configuration
32

GM Juice/Attitude Manual Edge Products, LLC
screen (previous steps), the following screen appears:
Select the desired option and press the [Enter] key. Transmission Setup Option Descriptions Defueling at locked (when the torque converter is locked) shift points reduces the torque output by the engine and allows the torque converter clutch to lock after the shift. Defuel all locked shifts With this option, when the torque converter is locked the amount of fuel at the shift point is reduced—thus decreasing torque during the shift point and allowing the torque converter clutch to lock. This will cause less wear on the transmission—and result in overall improved drivability. Defuel 4-5 locked shift This option provides a decrease in torque output at the shift point between gears 4 and 5, thus decreasing torque during the shift point and allowing the torque converter clutch to lock. This will cause less wear on the transmission—and result in overall improved drivability. This is still a little harder on the transmission, but is not as hard on the transmission as no defuel during shifts. No defuel on shifts This option provides no decrease in fuel during shift points. Power will be delivered throughout all of the shift points resulting in quicker more responsive shifting, but is harder on your transmission, possibly resulting in your transmission wearing out sooner. Max EGT Set Point As the exhaust gas temperature approaches the EGT set point, a percentage 33

GM Juice/Attitude Manual Edge Products, LLC
of defueling occurs. This percentage is represented by the backdown value you can display on your screen. The percentage represents the amount of defueling that is occurring due to the max EGT value being reached. In other words, fueling is decreased at higher percentages. When this value reaches 100% the fueling delivered by the Juice module has been totally disabled. However, stock fueling will allow the truck to reach its stock EGT levels which may exceed the preset Max EGT Set Point which you established in the Attitude. Important Note: Any other high performance modifications in addition to the Juice can allow the fueling to exceed stock EGT levels even after 100% defueling by the Attitude is reached, which may result in dangerous EGT levels.
The backdown percent represents the amount of defueling that is occurring when the max EGT level is reached
After selecting the Max EGT Set Point option from the Juice Configuration screen (previous steps), the following screen appears:
1. Change the Max EGT set point by pressing the up and down arrow keys to select the maximum temperature that you want your exhaust gas temperature to reach, then pressing [Enter]. When the exhaust gas temperature reaches this value, the power delivery will be retarded so as not to allow the temperature to exceed this set value. 34

GM Juice/Attitude Manual Edge Products, LLC
Disabling Backdown at Set EGT There are times you may want to disable the EGT backdown feature for a limited period such as when climbing a hill or in a competition setting. For whatever the reason, you may disable the EGT backdown for a period of 1-30 minutes. Warning: Disabling this feature could lead to dangerous EGT levels. To remove the option that backs down the power at a set EGT point, perform the following steps: 1. Make sure the Attitude is set to view the EGT level as one of the engine parameters. 2. When you are viewing EGT as one of the engine parameters, press [Enter] twice quickly and the following screen will appear:
This number is the number of minutes for which you want to disable the EGT backdown feature.
3. The number on this screen represents the number of minutes the EGT Backdown feature will be disabled. Press the up or down arrow keys to select the desired number of minutes you would like this feature disabled. (The number of minutes you do NOT want your power decreased because of high EGT levels.) 4. After you have selected the number of minutes you would like the EGT backdown option disabled, press [Enter]. The screen will return to your previous view mode, and the Juice power level indicator will flash until the designated time for disabling has been reached. When the Juice power level indicator quits flashing, your set max EGT backdown level goes into effect.
35

GM Juice/Attitude Manual Edge Products, LLC
When EGT backdown is disabled, the Juice power level display flashes.
Low Boost Fueling Adjustment After selecting the Low Boost Fueling Adj option from the Juice Configuration screen (previous steps), the following screen appears:
Adjusting the fuel at low boost allows you to adjust the way in which your truck delivers fuel at low boost levels. Select option 1 for the lowest level of fuel at low boost, and select option 5 for the highest level. You will see a significant change in vehicle response and smoke level depending on which option you select. 36

GM Juice/Attitude Manual Edge Products, LLC
Tire Size If your vehicle has stock tires, there is no need to change the value on this screen. After selecting the Tire Size option from the Juice Configuration screen (previous steps), the following screen appears:
The numbers on this screen represent the circumference of your tire. Adjust the tire size by pressing the up/down arrow keys. The table below will help you determine your wheel circumference by matching your tire size with the sizes listed. For example, if your tire size is 285/ 65/ 18R, the value (circumference) you enter into the Attitude is 2599.0. Another alternative is to measure your tire’s circumference by marking your tire and rolling it one complete revolution and measuring the distance then multiply the inches by 25.4 (i.e., 91.3 inches x 25.4 = 2319.0 mm).
Width Ratio Rim Circumference
215 75 16 2288.8 mm (select 2300) 245 75 16 2430.0 mm 265 75 16 2524.2 mm 285 75 16 2618.4 mm 295 75 16 2665.5 mm 305 75 16 2712.6 mm 315 75 16 2759.7 mm 325 75 16 2806.8 mm 265 70 17 2520.8 mm 285 75 17 2698.2 mm 315 75 17 2839.5 mm 285 65 18 2599.0 mm 285 60 18 2509.5 mm 325 60 18 2660.2 mm 265 70 16 2441.0 mm 275 70 16 2485.0 mm 305 70 16 2616.9 mm Tire Size 33 2631.9 mm 35 2791.5 mm 37 2951.0 mm 38 3030.7 mm
37

GM Juice/Attitude Manual Edge Products, LLC
Adjusting the Juice The Juice power level is displayed in the upper right-hand corner of the screen when vehicle parameters are being viewed. To adjust the power levels, press the arrow keys to the desired level. Levels can be changed at any time while viewing vehicle parameters. (The truck’s engine must be running to change power levels.)
The current Juice power level is displayed here. To adjust the
Juice power levels press the arrow keys.
NOTE: The Juice module power level adjuster is disabled when the Attitude controller is installed. Power levels must be adjusted using the Attitude controller. Level 0: For extremely heavy towing, it is recommended that you tow in
the stock level (0), particularly on grades over 6%. Level 1*: Good for towing most trailer weights. Level 2*: Good for towing trailer weights less than 6,000 lbs. Level 3*: Not recommended for towing. A good level to increase
drivability and vehicle performance. Level 4: Not recommended for towing. Level 5: Not recommended for towing. Race application only. *For best fuel economy use levels 1-3, but it is recommended that you use a calculator to determine actual fuel mileage. It is highly recommended that you monitor your EGT levels and keep them under 1350 F.
38

GM Juice/Attitude Manual Edge Products, LLC
Index 0-60............................................28 Juice features...............................6 ¼ mile........................................28 Juice final inspection...................8 2001 GM Temperature Note......27 Juice getting connected................7 About the Juice............................6 Juice picture.................................7 adhesive tape..............................17 juice power level........................37 adjusting power levels...............37 Juice Power Level Confirmation.9 Alerts..........................................25 Low Boost Fueling Adustment..35 backdown definition..................34 Making Sense of it all.................11 backlight.....................................24 Max EGT....................................33 Boost alert..................................26 Max EGT set point.....................33 cable connections.......................17 Maximums..................................25 changing variables.....................23 mounting the attitude..................17 circumference.............................36 Mounting the Juice.......................8 Clearing records.........................28 performance tests........................29 Connecting the harness................8 quarter mile time.........................29 Defueling at EGT Set Point.......33 Records.......................................28 Defueling on shifts.....................32 Setup...........................................19 Digital Display...........................22 Speed alert..................................27 dim.............................................24 Storing records...........................28 disabling EGT backdown..........34 Tire Size.....................................36 Disclaimer....................................4 torque converter.........................32 EGT alert....................................26 Torque gains..........................10,16 EGT backdown disable..............34 Towing Recommendations..........9 EGT sensor installation..............18 Transmission…………………..12 Engine Temperature alert...........27 Transmission Setup....................32 getting connected.......................17 Using the Juice.............................9 Horsepower gains..................10,16 viewing different variables........23 Juice Adjusting Power Levels.....9 zero to sixty................................29 Juice Configurations..................31
39