Embed Size (px)
Citation preview
DV CLIENTTRACK USER MANUAL AN INSTRUCTION GUIDE ON HOW TO USE CLIENTTRACK, A WEB-BASED CASE MANAGEMENT SYSTEM
WWW.INDIANABOS.ORG
2017
IHCDA
2017 DV ClientTrack User Manual 1
CONTENTS
Objectives .................................................................................................................................................................. 3
Contacts .................................................................................................................................................................... 4
Staff ....................................................................................................................................................................... 4
DV ClientTrack Help Desk ...................................................................................................................................... 4
ClientTrack Access ................................................................................................................................................. 4
Security Policies & Procedures .................................................................................................................................. 4
Privacy and Client Information Restrictions.......................................................................................................... 5
ClientTrack Computers.......................................................................................................................................... 5
Logging Into the System ........................................................................................................................................ 5
Overview of ClientTrack Features ............................................................................................................................. 6
User Dashboard .................................................................................................................................................... 6
Client Dashboard .................................................................................................................................................. 8
Case Management Tools ....................................................................................................................................... 9
Household Members .......................................................................................................................................... 10
Notifications ........................................................................................................................................................ 10
Managing Client Information and Program Enrollments ........................................................................................ 11
Finding a Client in the System ............................................................................................................................. 11
Adding a New Client with a Program Enrollment ............................................................................................... 12
Adding Household Members .............................................................................................................................. 14
Program Enrollment ............................................................................................................................................ 15
HMIS Universal Data Assessment for Intake Workflow ...................................................................................... 15
HMIS Barriers Assessment for Intake Workflow ................................................................................................. 16
Domestic Violence (DV) Assessment for Intake Workflow ................................................................................. 17
Crimes Assessment ............................................................................................................................................. 18
Financial Assessment for Intake Workflow ......................................................................................................... 19
Adult Education for Intake Workflow ................................................................................................................. 21
Legal Assessment for Intake Workflow ............................................................................................................... 22
Transportation Assessment for Intake Workflow ............................................................................................... 22
DV Universal Data Assessment for Child at Intake ............................................................................................. 23
HMIS Barriers Assessment for Child at Intake .................................................................................................... 23
Child Education Assessment ............................................................................................................................... 24
Completing the Intake Workflow ........................................................................................................................ 24
Pausing a Workflow ............................................................................................................................................ 24
Adding Services ................................................................................................................................................... 25
IHCDA
2017 DV ClientTrack User Manual 2
Quick Services ..................................................................................................................................................... 26
Case Notes .......................................................................................................................................................... 26
Update/Annual Assessment ............................................................................................................................... 28
HMIS Universal Data Assessment for Update/Annual Workflow ....................................................................... 29
HMIS Barriers Assessment for Update/Annual Workflow .................................................................................. 29
DV Assessment for Update/Annual Workflow .................................................................................................... 30
Financial Assssment for Update/Annual Workflow ............................................................................................ 31
Adult Education Assessment for Update/Annual Workflow............................................................................... 31
HMIS Universal Data Assessment for Child at Update/Annual ........................................................................... 31
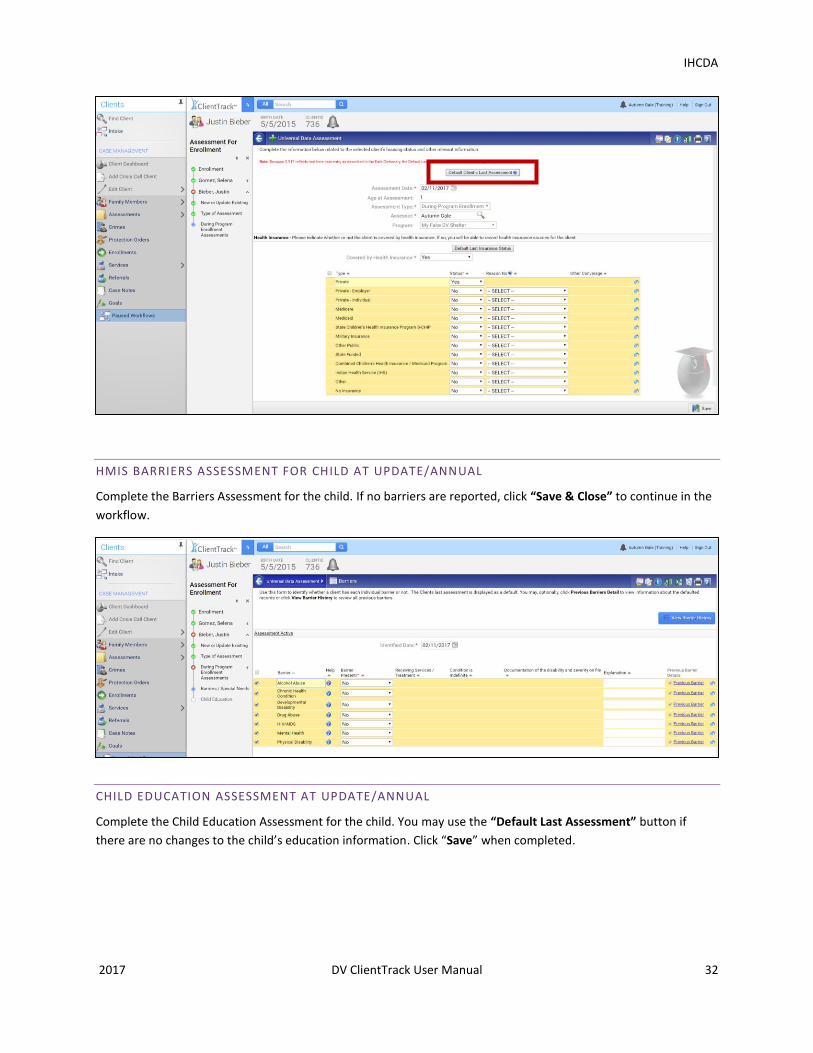
HMIS Barriers Assessment for Child at Update/Annual ...................................................................................... 32
Child Education Assessment at Update/Annual ................................................................................................. 32
Program Discharge .................................................................................................................................................. 33
HMIS Universal Data Assessment for Exit Workflow .......................................................................................... 34
HMIS Barriers Assessment for Exit Workflow ..................................................................................................... 34
Financial Assessment for Exit Workflow ............................................................................................................. 35
Adult Education Assessment for Exit Workflow ................................................................................................. 36
Exit Workflow for Children .................................................................................................................................. 37
HMIS Universal Data Assessment for Child at Exit .............................................................................................. 37
HMIS Barriers Assessment for Child at Exit......................................................................................................... 38
Child Education Assessment at Exit .................................................................................................................... 38
Completing the Exit Workflow ............................................................................................................................ 39
Managing Providers ................................................................................................................................................ 40
Basic Reports ........................................................................................................................................................... 42
Service Summary Report ..................................................................................................................................... 42
Annual Performance Report (APR) ..................................................................................................................... 43
IHCDA
2017 DV ClientTrack User Manual 3
OBJECTIVES
Thank you for using ClientTrack for your case management needs. ClientTrack is an electronic data collection system for persons who access a variety of services for homeless prevention and/or rapid re-housing services. Aggregate data can be used to understand the size, characteristics, and needs of the population at the local, state, and national levels. ClientTrack enables you to track information about client needs, goals, and service outcomes.
The content in this user manual will provide information on all of the basic features of ClientTrack and detailed guidance on your day to day data entry, as well as helpful case management tools to optimize your services and time. We believe you will find this web-based case management system easy to use and essential in sharing your impact.
In this manual you will find the following information:
CONTACTS
IHCDA staff list and contact information
DV ClientTrack help desk information SECURITY POLICIES & PROCEDURES
DV Acknowledgment
Computer storage
Username and password OVERVIEW OF CLIENTTRACK FEATURES
User dashboard
Client dashboard
Case management tools
Household members MANAGEMENT OF CLIENT INFORMATION AND PROGRAM ENROLLMENTS
Intake workflow
Services
Case notes
Update/Annual Assessment
Exit workflow
Managing providers BASIC REPORTS
Service Summary
Annual Performance Report (APR)
Universal Data Quality Report

IHCDA
2017 DV ClientTrack User Manual 4
CONTACTS
STAFF
Jill Robertson
Director of Community Services
Indiana Housing & Community Development Authority
317.234.7572
Nastacia’ Moore
HMIS/DV Trainer & Data Analyst
Indiana Housing & Community Development Authority
317.232.2761
Valerie Walton
HMIS Data Analyst
Indiana Housing & Community Development Authority
317.232.2873
DV CLIENTTRACK HELP DESK
If you encounter any issues with ClientTrack at any time, please contact the help desk with the email address
below. Please do not send any identifying information for clients when emailing the help desk. There is a unique
client ID number assigned to each client record in the system. This number is
found at the top of the client record to the right of the client’s name and date
of birth as seen outlined by the red box. Please use the client ID number when
emailing the help desk if applicable.
DV ClientTrack Help Desk: [email protected]
CLIENTTRACK ACCESS
You can access HMIS with the following link:
www.ihcdaonline.com/IDV
ClientTrack for Domestic Violence Providers
SECURITY POLICIES & PROCEDURES
Personal Protected Information (PPI) is considered any information that could lead to individual identification.
Agencies participating in ClientTrack should have procedures in place for the secure storage and disposal of
hardcopy and electronic data generated from ClientTrack or created for entry into ClientTrack. PPI should be stored
IHCDA
2017 DV ClientTrack User Manual 5
in locked drawers/file cabinets and hardcopy data should be shredded before disposal. Electronic PPI including data
contained on disks, CD’s, jump drives, computer hard drives, and/or other media should be reformatted before
disposal.
PRIVACY AND CLIENT INFORMATION RESTRICTIONS
The Domestic Violence (DV) ClientTrack environment is a closed system. Client level data is only seen by your
organization and the support team.
A client should be provided the DV Acknowledgement Form
(http://www.in.gov/myihcda/files/Final_DV_acknowledgement_form_2016.pdf) and sign it accordingly. A client
can refuse data collection or data entry into DV ClientTrack, but the client should be asked. The agency cannot
determine participation on behalf of the client. No person is to be refused services regardless of their participation
in ClientTrack.
You can find Indiana’s Balance of State (BOS) security plan on the partner website, as well as other helpful forms
and resources: http://www.in.gov/myihcda/hmis.htm.
CLIENTTRACK COMPUTERS
All computers used to access ClientTrack should be situated in secure locations. ClientTrack computers in publicly
accessible areas should be staffed at all times and not viewable by other individuals. All computers should be
password protected, and the password you use to log onto your computer should NOT be the same password as
your ClientTrack password, but rather a password to prevent access to the computer itself.
ClientTrack user names and passwords are NOT be shared with other users. Users should not keep
username/password information in a public location (i.e., sticky notes on monitors or filed under ClientTrack or
Password in a Rolodex). ClientTrack security policies require the use of strict passwords. Passwords must have:
At least one number
Between 8 and 12 characters
At least one non-letter, non-numeric character (!#@$)
At least one capital letter
New passwords will be required upon first login. Accounts are automatically deactivated after 30 days of inactivity
for security purposes. You will be required to change your password every 90 days for security purposes. If you
need assistance with your username and password contact the Help Desk by emailing [email protected]
and someone will assist you.
LOGGING INTO THE SYSTEM
ClientTrack is a web-based application and you will need to use an internet browser to access it. ClientTrack works
with Microsoft Internet Explorer, Google Chrome, Mobile Safari, and Mozilla’s Firefox. Some older versions of these
web browsers can cause unique issues in ClientTrack. We recommend that you work with your IT personnel to
ensure you have the newest version of your web browser.
IHCDA
2017 DV ClientTrack User Manual 6
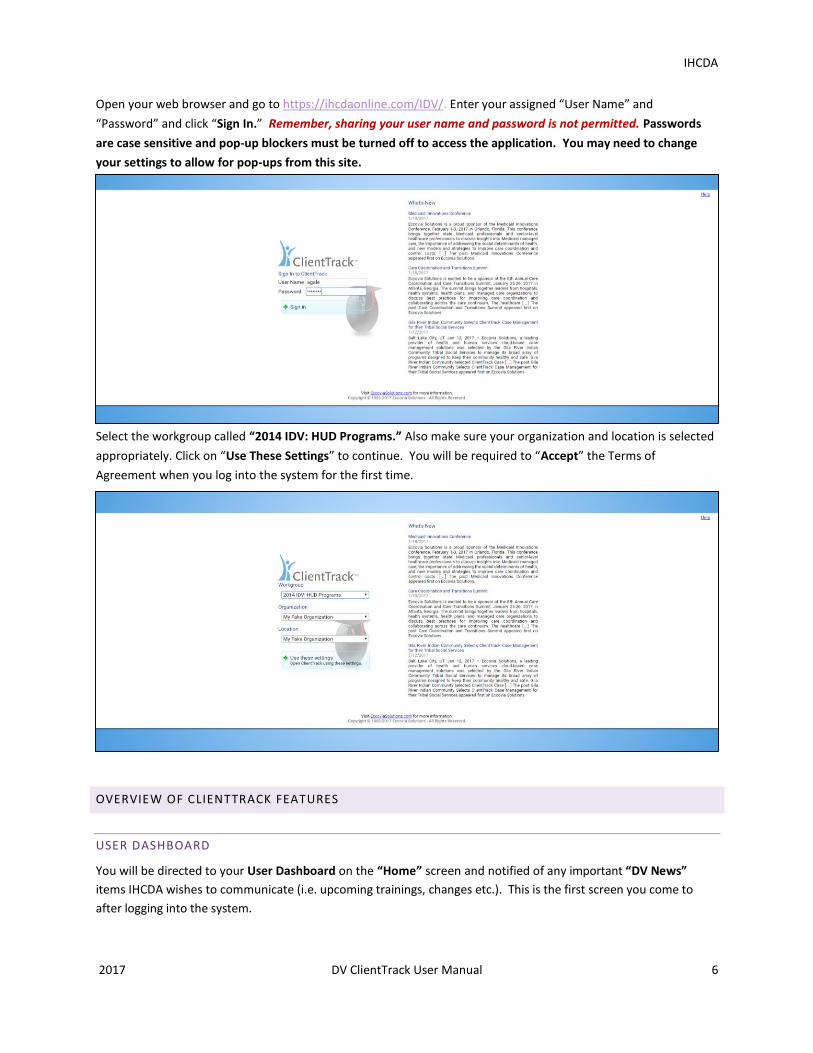
Open your web browser and go to https://ihcdaonline.com/IDV/. Enter your assigned “User Name” and
“Password” and click “Sign In.” Remember, sharing your user name and password is not permitted. Passwords
are case sensitive and pop-up blockers must be turned off to access the application. You may need to change
your settings to allow for pop-ups from this site.
Select the workgroup called “2014 IDV: HUD Programs.” Also make sure your organization and location is selected
appropriately. Click on “Use These Settings” to continue. You will be required to “Accept” the Terms of
Agreement when you log into the system for the first time.
OVERVIEW OF CLIENTTRACK FEATURES
USER DASHBOARD
You will be directed to your User Dashboard on the “Home” screen and notified of any important “DV News”
items IHCDA wishes to communicate (i.e. upcoming trainings, changes etc.). This is the first screen you come to
after logging into the system.
IHCDA
2017 DV ClientTrack User Manual 7
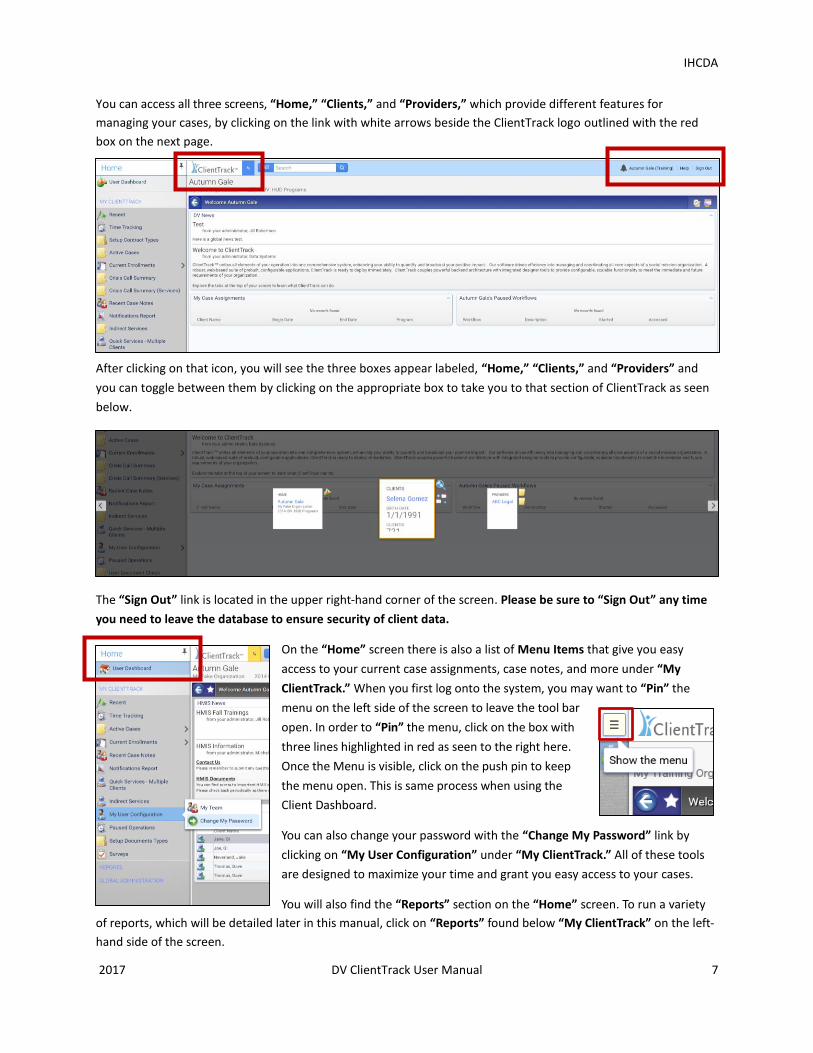
You can access all three screens, “Home,” “Clients,” and “Providers,” which provide different features for
managing your cases, by clicking on the link with white arrows beside the ClientTrack logo outlined with the red
box on the next page.
After clicking on that icon, you will see the three boxes appear labeled, “Home,” “Clients,” and “Providers” and
you can toggle between them by clicking on the appropriate box to take you to that section of ClientTrack as seen
below.
The “Sign Out” link is located in the upper right-hand corner of the screen. Please be sure to “Sign Out” any time
you need to leave the database to ensure security of client data.
On the “Home” screen there is also a list of Menu Items that give you easy
access to your current case assignments, case notes, and more under “My
ClientTrack.” When you first log onto the system, you may want to “Pin” the
menu on the left side of the screen to leave the tool bar
open. In order to “Pin” the menu, click on the box with
three lines highlighted in red as seen to the right here.
Once the Menu is visible, click on the push pin to keep
the menu open. This is same process when using the
Client Dashboard.
You can also change your password with the “Change My Password” link by
clicking on “My User Configuration” under “My ClientTrack.” All of these tools
are designed to maximize your time and grant you easy access to your cases.
You will also find the “Reports” section on the “Home” screen. To run a variety
of reports, which will be detailed later in this manual, click on “Reports” found below “My ClientTrack” on the left-
hand side of the screen.
IHCDA
2017 DV ClientTrack User Manual 8
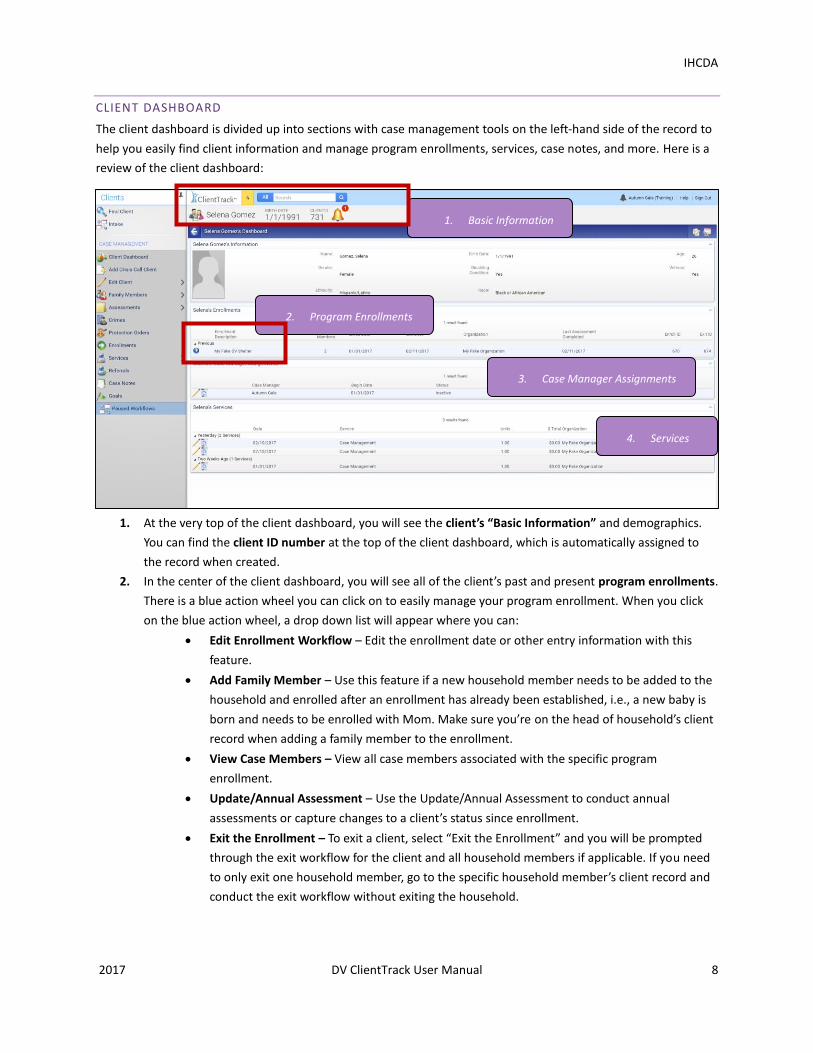
CLIENT DASHBOARD
The client dashboard is divided up into sections with case management tools on the left-hand side of the record to
help you easily find client information and manage program enrollments, services, case notes, and more. Here is a
review of the client dashboard:
1. At the very top of the client dashboard, you will see the client’s “Basic Information” and demographics.
You can find the client ID number at the top of the client dashboard, which is automatically assigned to
the record when created.
2. In the center of the client dashboard, you will see all of the client’s past and present program enrollments.
There is a blue action wheel you can click on to easily manage your program enrollment. When you click
on the blue action wheel, a drop down list will appear where you can:
Edit Enrollment Workflow – Edit the enrollment date or other entry information with this
feature.
Add Family Member – Use this feature if a new household member needs to be added to the
household and enrolled after an enrollment has already been established, i.e., a new baby is
born and needs to be enrolled with Mom. Make sure you’re on the head of household’s client
record when adding a family member to the enrollment.
View Case Members – View all case members associated with the specific program
enrollment.
Update/Annual Assessment – Use the Update/Annual Assessment to conduct annual
assessments or capture changes to a client’s status since enrollment.
Exit the Enrollment – To exit a client, select “Exit the Enrollment” and you will be prompted
through the exit workflow for the client and all household members if applicable. If you need
to only exit one household member, go to the specific household member’s client record and
conduct the exit workflow without exiting the household.
1. Basic Information
2. Program Enrollments
3. Case Manager Assignments
4. Services
IHCDA
2017 DV ClientTrack User Manual 9
Review Entry/Exit Assessments – You can review the assessments completed at entry and exit
with this feature without going through the workflow. This is helpful in completing missing
data that was not captured at those points in time.
3. Case Manager Assignments are located below the enrollments section of the client dashboard. You can
manage case assignments here by clicking on “[Client Name] Case Manager Assignments” or clicking on
the little pencil beside the case manager’s name. Clicking on the recycle bin beside a case manager’s
name will delete the case manager from the client record. By clicking on the case manager assignments
link, you will be taken to a screen where you can edit the status of a case manager for a specific program
enrollment or add new case managers to the client record.
4. Services associated with a specific program enrollment will be listed at the bottom of the client
dashboard. You can manage your client services by clicking on “Services” in the list of case management
tools on the left-hand side of the client record or by clicking “[Client Name] Services” above the list of
services on the client record. Documenting services is discussed in detail starting on page 25 of this
manual.
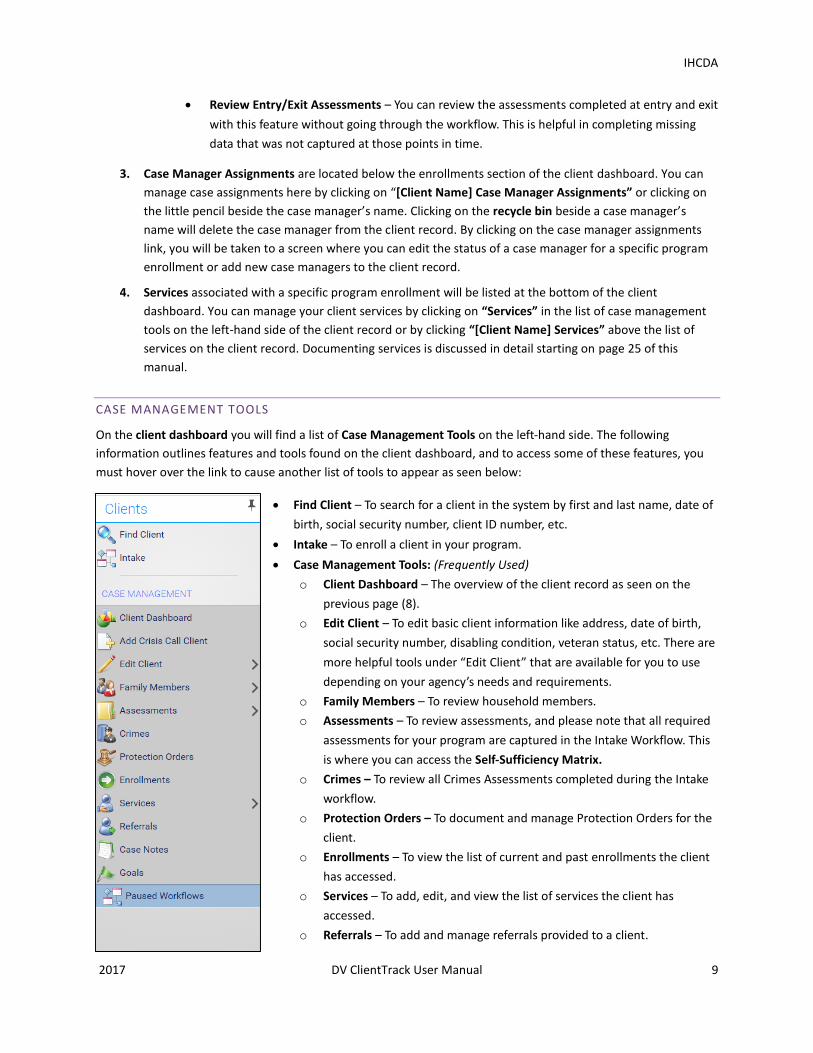
CASE MANAGEMENT TOOLS
On the client dashboard you will find a list of Case Management Tools on the left-hand side. The following
information outlines features and tools found on the client dashboard, and to access some of these features, you
must hover over the link to cause another list of tools to appear as seen below:
Find Client – To search for a client in the system by first and last name, date of
birth, social security number, client ID number, etc.
Intake – To enroll a client in your program.
Case Management Tools: (Frequently Used)
o Client Dashboard – The overview of the client record as seen on the
previous page (8).
o Edit Client – To edit basic client information like address, date of birth,
social security number, disabling condition, veteran status, etc. There are
more helpful tools under “Edit Client” that are available for you to use
depending on your agency’s needs and requirements.
o Family Members – To review household members.
o Assessments – To review assessments, and please note that all required
assessments for your program are captured in the Intake Workflow. This
is where you can access the Self-Sufficiency Matrix.
o Crimes – To review all Crimes Assessments completed during the Intake
workflow.
o Protection Orders – To document and manage Protection Orders for the
client.
o Enrollments – To view the list of current and past enrollments the client
has accessed.
o Services – To add, edit, and view the list of services the client has
accessed.
o Referrals – To add and manage referrals provided to a client.
IHCDA
2017 DV ClientTrack User Manual 10
o Case Notes – To create, edit, and view case notes.
o Paused Workflows – To resume a workflow you previously paused.
Basic Client Information and Client ID Number - Located at the very top of the
client record including the client’s name, gender, date of birth, etc. (Client ID
Number is required when communicating electronically about a client record,
i.e., when requesting assistance from the help desk).
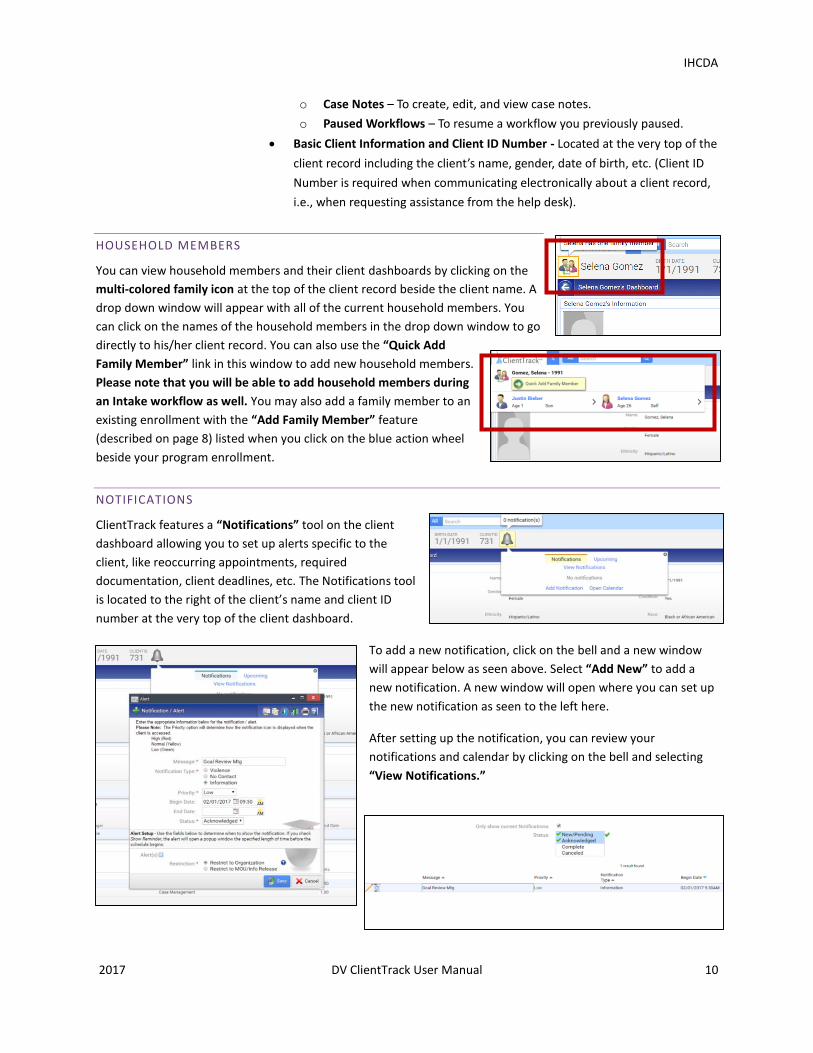
HOUSEHOLD MEMBERS
You can view household members and their client dashboards by clicking on the
multi-colored family icon at the top of the client record beside the client name. A
drop down window will appear with all of the current household members. You
can click on the names of the household members in the drop down window to go
directly to his/her client record. You can also use the “Quick Add
Family Member” link in this window to add new household members.
Please note that you will be able to add household members during
an Intake workflow as well. You may also add a family member to an
existing enrollment with the “Add Family Member” feature
(described on page 8) listed when you click on the blue action wheel
beside your program enrollment.
NOTIFICATIONS
ClientTrack features a “Notifications” tool on the client
dashboard allowing you to set up alerts specific to the
client, like reoccurring appointments, required
documentation, client deadlines, etc. The Notifications tool
is located to the right of the client’s name and client ID
number at the very top of the client dashboard.
To add a new notification, click on the bell and a new window
will appear below as seen above. Select “Add New” to add a
new notification. A new window will open where you can set up
the new notification as seen to the left here.
After setting up the notification, you can review your
notifications and calendar by clicking on the bell and selecting
“View Notifications.”
IHCDA
2017 DV ClientTrack User Manual 11
MANAGING CLIENT INFORMATION AND PROGRAM ENROLLMENTS
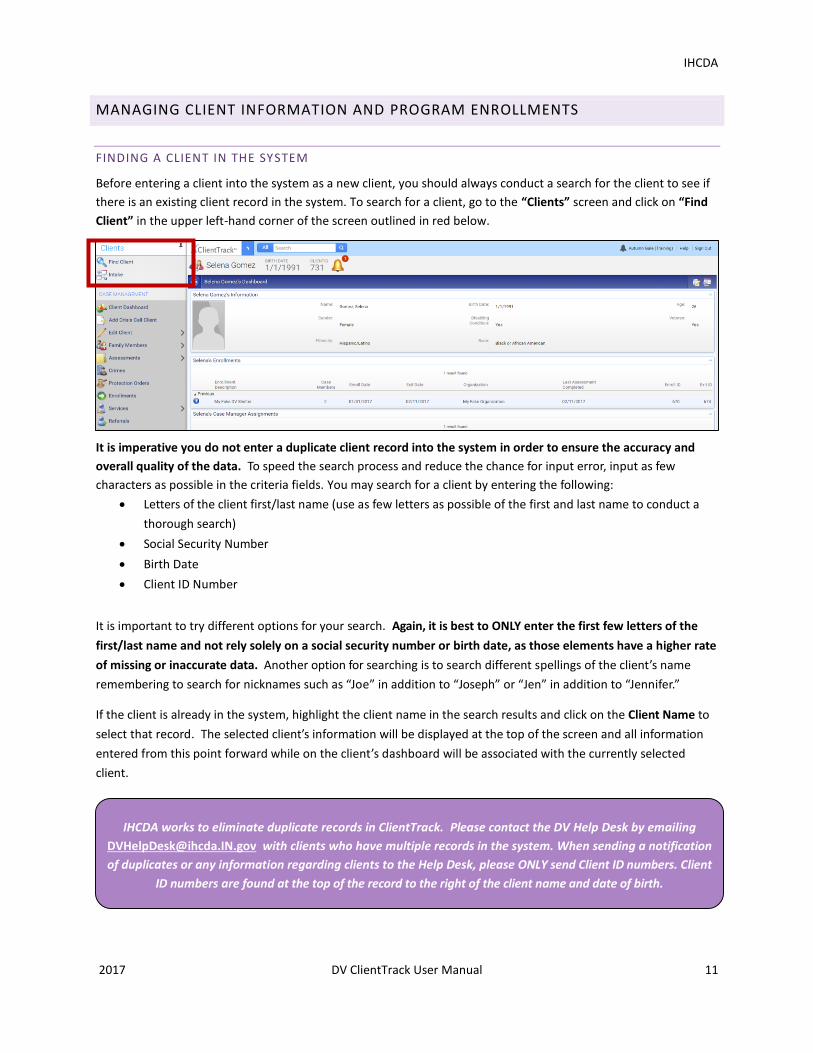
FINDING A CLIENT IN THE SYSTEM
Before entering a client into the system as a new client, you should always conduct a search for the client to see if
there is an existing client record in the system. To search for a client, go to the “Clients” screen and click on “Find
Client” in the upper left-hand corner of the screen outlined in red below.
It is imperative you do not enter a duplicate client record into the system in order to ensure the accuracy and
overall quality of the data. To speed the search process and reduce the chance for input error, input as few
characters as possible in the criteria fields. You may search for a client by entering the following:
Letters of the client first/last name (use as few letters as possible of the first and last name to conduct a
thorough search)
Social Security Number
Birth Date
Client ID Number
It is important to try different options for your search. Again, it is best to ONLY enter the first few letters of the
first/last name and not rely solely on a social security number or birth date, as those elements have a higher rate
of missing or inaccurate data. Another option for searching is to search different spellings of the client’s name
remembering to search for nicknames such as “Joe” in addition to “Joseph” or “Jen” in addition to “Jennifer.”
If the client is already in the system, highlight the client name in the search results and click on the Client Name to
select that record. The selected client’s information will be displayed at the top of the screen and all information
entered from this point forward while on the client’s dashboard will be associated with the currently selected
client.
IHCDA works to eliminate duplicate records in ClientTrack. Please contact the DV Help Desk by emailing
[email protected] with clients who have multiple records in the system. When sending a notification
of duplicates or any information regarding clients to the Help Desk, please ONLY send Client ID numbers. Client
ID numbers are found at the top of the record to the right of the client name and date of birth.
IHCDA
2017 DV ClientTrack User Manual 12
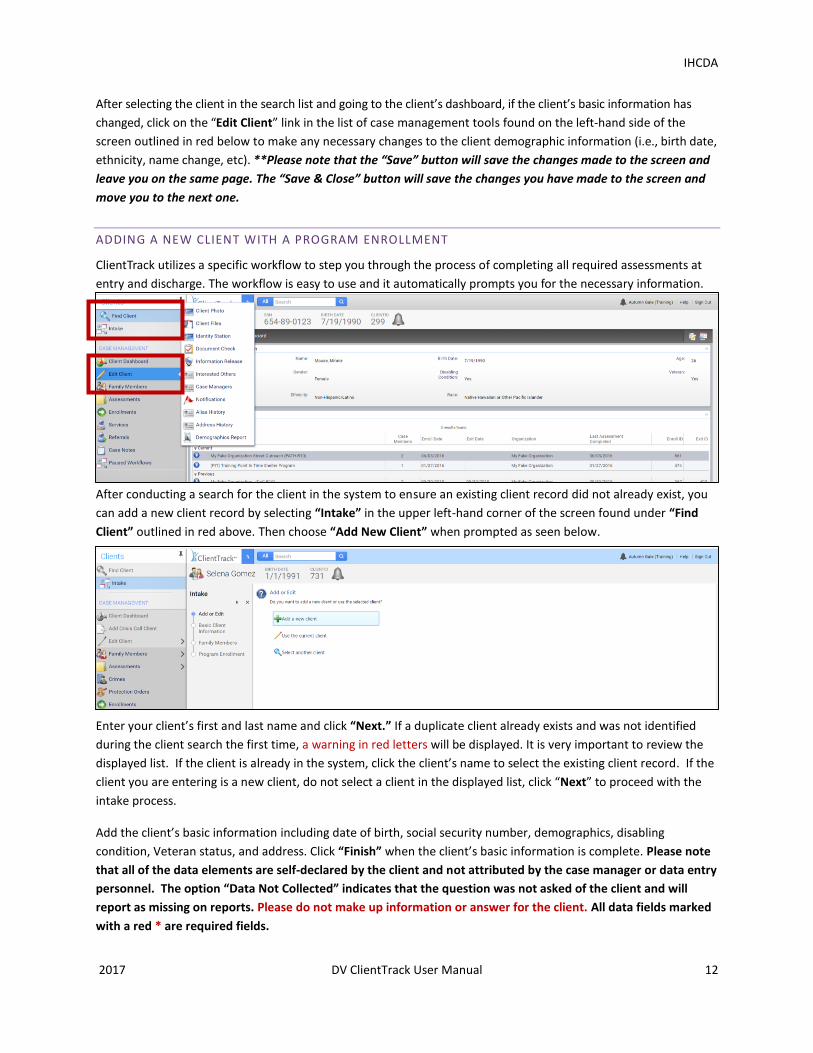
After selecting the client in the search list and going to the client’s dashboard, if the client’s basic information has
changed, click on the “Edit Client” link in the list of case management tools found on the left-hand side of the
screen outlined in red below to make any necessary changes to the client demographic information (i.e., birth date,
ethnicity, name change, etc). **Please note that the “Save” button will save the changes made to the screen and
leave you on the same page. The “Save & Close” button will save the changes you have made to the screen and
move you to the next one.
ADDING A NEW CLIENT WITH A PROGRAM ENROLLMENT
ClientTrack utilizes a specific workflow to step you through the process of completing all required assessments at
entry and discharge. The workflow is easy to use and it automatically prompts you for the necessary information.
After conducting a search for the client in the system to ensure an existing client record did not already exist, you
can add a new client record by selecting “Intake” in the upper left-hand corner of the screen found under “Find
Client” outlined in red above. Then choose “Add New Client” when prompted as seen below.
Enter your client’s first and last name and click “Next.” If a duplicate client already exists and was not identified
during the client search the first time, a warning in red letters will be displayed. It is very important to review the
displayed list. If the client is already in the system, click the client’s name to select the existing client record. If the
client you are entering is a new client, do not select a client in the displayed list, click “Next” to proceed with the
intake process.
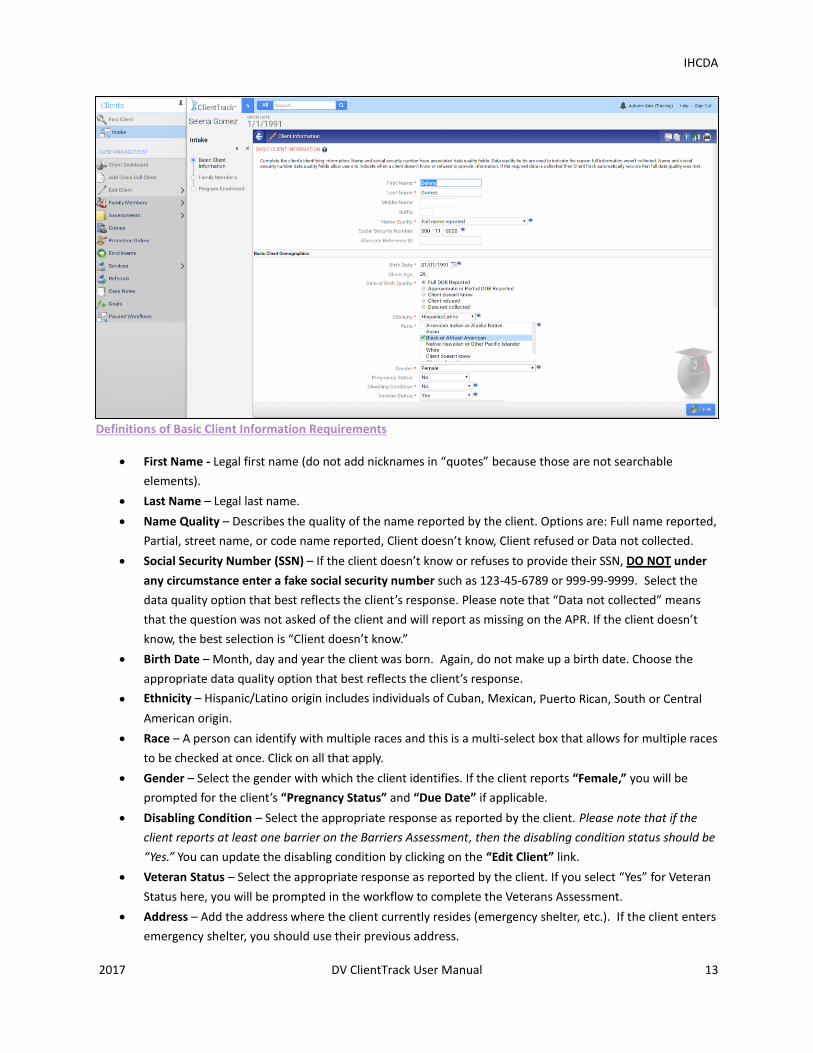
Add the client’s basic information including date of birth, social security number, demographics, disabling
condition, Veteran status, and address. Click “Finish” when the client’s basic information is complete. Please note
that all of the data elements are self-declared by the client and not attributed by the case manager or data entry
personnel. The option “Data Not Collected” indicates that the question was not asked of the client and will
report as missing on reports. Please do not make up information or answer for the client. All data fields marked
with a red * are required fields.
IHCDA
2017 DV ClientTrack User Manual 13
Definitions of Basic Client Information Requirements
First Name - Legal first name (do not add nicknames in “quotes” because those are not searchable
elements).
Last Name – Legal last name.
Name Quality – Describes the quality of the name reported by the client. Options are: Full name reported,
Partial, street name, or code name reported, Client doesn’t know, Client refused or Data not collected.
Social Security Number (SSN) – If the client doesn’t know or refuses to provide their SSN, DO NOT under
any circumstance enter a fake social security number such as 123-45-6789 or 999-99-9999. Select the
data quality option that best reflects the client’s response. Please note that “Data not collected” means
that the question was not asked of the client and will report as missing on the APR. If the client doesn’t
know, the best selection is “Client doesn’t know.”
Birth Date – Month, day and year the client was born. Again, do not make up a birth date. Choose the
appropriate data quality option that best reflects the client’s response.
Ethnicity – Hispanic/Latino origin includes individuals of Cuban, Mexican, Puerto Rican, South or Central
American origin.
Race – A person can identify with multiple races and this is a multi-select box that allows for multiple races
to be checked at once. Click on all that apply.
Gender – Select the gender with which the client identifies. If the client reports “Female,” you will be
prompted for the client’s “Pregnancy Status” and “Due Date” if applicable.
Disabling Condition – Select the appropriate response as reported by the client. Please note that if the
client reports at least one barrier on the Barriers Assessment, then the disabling condition status should be
“Yes.” You can update the disabling condition by clicking on the “Edit Client” link.
Veteran Status – Select the appropriate response as reported by the client. If you select “Yes” for Veteran
Status here, you will be prompted in the workflow to complete the Veterans Assessment.
Address – Add the address where the client currently resides (emergency shelter, etc.). If the client enters
emergency shelter, you should use their previous address.
IHCDA
2017 DV ClientTrack User Manual 14
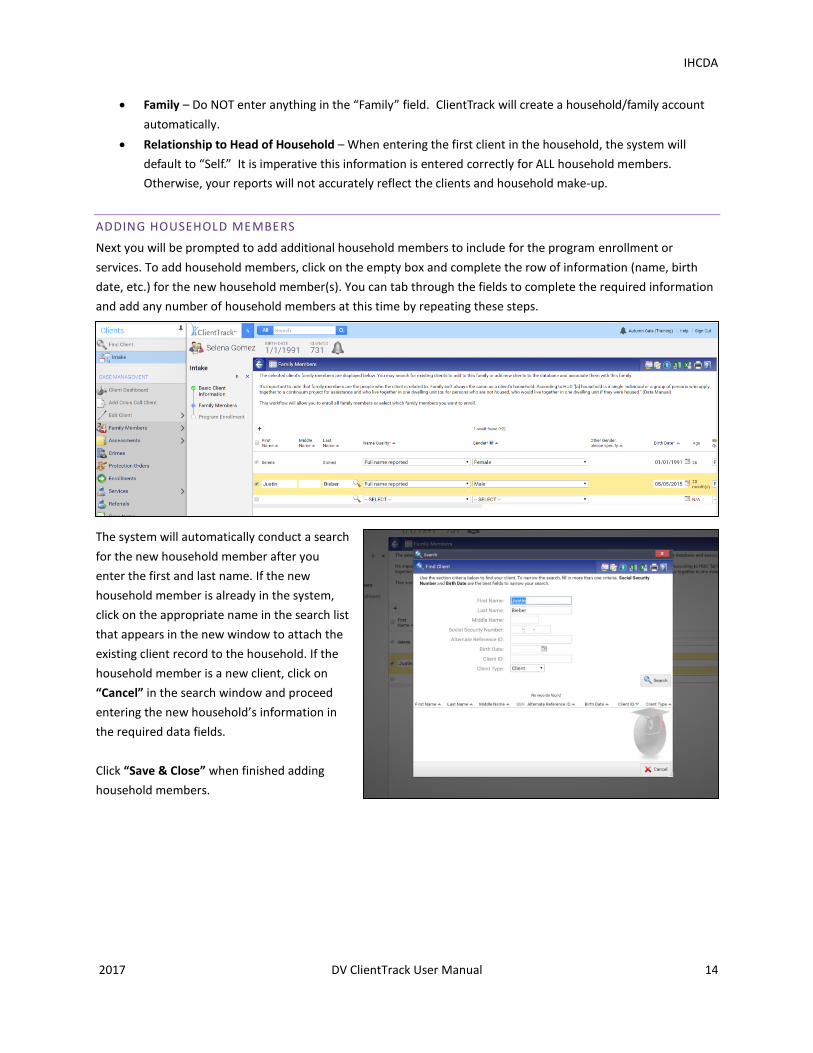
Family – Do NOT enter anything in the “Family” field. ClientTrack will create a household/family account
automatically.
Relationship to Head of Household – When entering the first client in the household, the system will
default to “Self.” It is imperative this information is entered correctly for ALL household members.
Otherwise, your reports will not accurately reflect the clients and household make-up.
ADDING HOUSEHOLD MEMBERS
Next you will be prompted to add additional household members to include for the program enrollment or
services. To add household members, click on the empty box and complete the row of information (name, birth
date, etc.) for the new household member(s). You can tab through the fields to complete the required information
and add any number of household members at this time by repeating these steps.
The system will automatically conduct a search
for the new household member after you
enter the first and last name. If the new
household member is already in the system,
click on the appropriate name in the search list
that appears in the new window to attach the
existing client record to the household. If the
household member is a new client, click on
“Cancel” in the search window and proceed
entering the new household’s information in
the required data fields.
Click “Save & Close” when finished adding
household members.
IHCDA
2017 DV ClientTrack User Manual 15
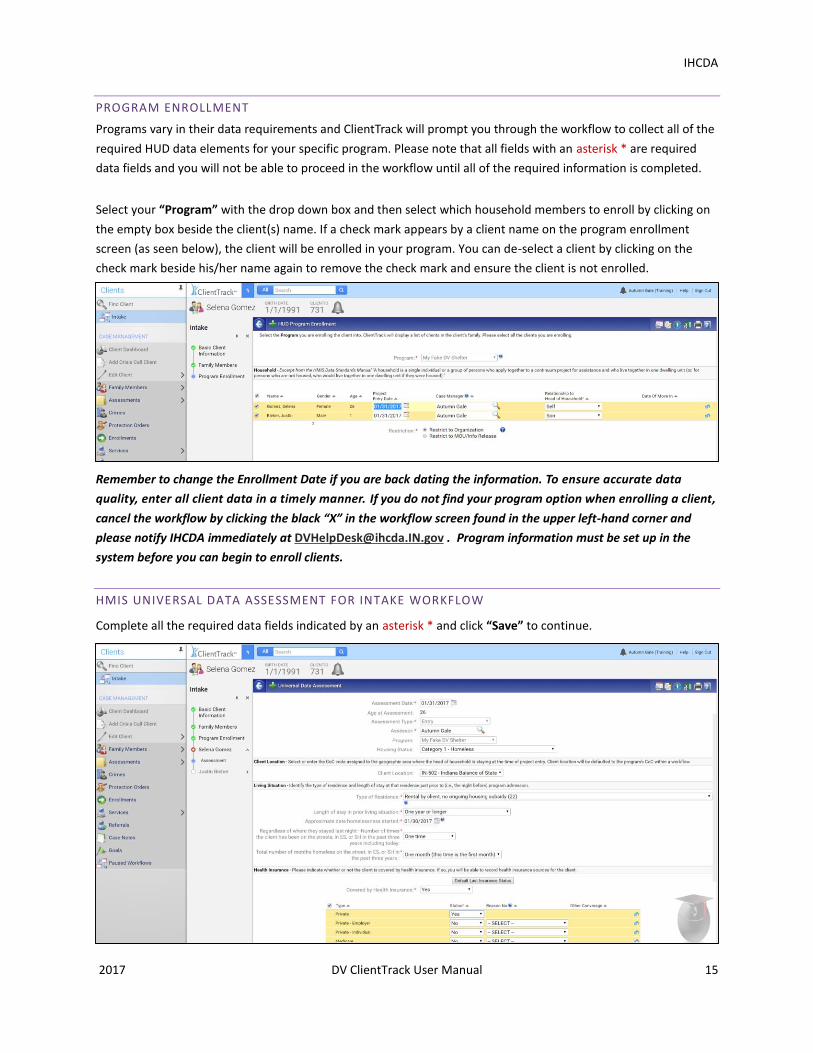
PROGRAM ENROLLMENT
Programs vary in their data requirements and ClientTrack will prompt you through the workflow to collect all of the
required HUD data elements for your specific program. Please note that all fields with an asterisk * are required
data fields and you will not be able to proceed in the workflow until all of the required information is completed.
Select your “Program” with the drop down box and then select which household members to enroll by clicking on
the empty box beside the client(s) name. If a check mark appears by a client name on the program enrollment
screen (as seen below), the client will be enrolled in your program. You can de-select a client by clicking on the
check mark beside his/her name again to remove the check mark and ensure the client is not enrolled.
Remember to change the Enrollment Date if you are back dating the information. To ensure accurate data
quality, enter all client data in a timely manner. If you do not find your program option when enrolling a client,
cancel the workflow by clicking the black “X” in the workflow screen found in the upper left-hand corner and
please notify IHCDA immediately at [email protected] . Program information must be set up in the
system before you can begin to enroll clients.
HMIS UNIVERSAL DATA ASSESSMENT FOR INTAKE WORKFLOW
Complete all the required data fields indicated by an asterisk * and click “Save” to continue.
IHCDA
2017 DV ClientTrack User Manual 16
Definitions of Universal Data Assessment Requirements
Assessment Date – Date the assessment was completed with the client (field will auto-fill with today’s
date).
Assessment Type – Defaulted and cannot be changed during the workflow. If you notice that you’re
completing the incorrect assessment, contact the DV Help Desk where you will be assisted.
Assessor – Case manager completing the assessment and who will automatically be assigned to all case
members.
Housing Status – Choose the appropriate category for the housing status of the household. This is based
on the household’s housing condition just prior to project entry. More extensive definitions can be found
by clicking on the blue information circle located in the upper right-hand of the screen beside the printer
icon.
Client Location – Defaulted information that is set up with your program in the system. If this information
is missing when completing an assessment, please contact the DV Help Desk.
Type of Residence – Identify where the client was staying on the night before the client is enrolled in your
program. The built in logic will prompt you for more data depending on the selection made for this
question. Those additional data elements are the following:
o Did you stay less than 7 nights
o Did you stay less than 90 days
o Length of stay in the prior living situation – Identify the length of stay for the residence prior to
program entry.
o On the night before, did you stay on the streets, ES (Emergency Shelter), or SH (Safe Haven)
o Approximate date homelessness started
o Regardless of where they stayed last night – Number of times the client has been on the
streets, in ES, or SH in the past three years including today
o Total number of months homeless on the street, in ES, or SH in the past three years - Data in
this section are used along with disabling condition to determine whether or not a client is
chronically homeless. HUD strongly encourages DV users to just ask the client for the information
and record the client’s answer. Attempting to tie each individual response with definitions or
documentation requirement is not the attempt of this question.
Health Insurance Assessment – Complete the required information pertaining to the client’s insurance
status. If a client’s health insurance status has changed, change the status of the type of insurance to “No”
and then add an end date. Then you can change the Health Insurance status to “No” and click “Save” to
continue.
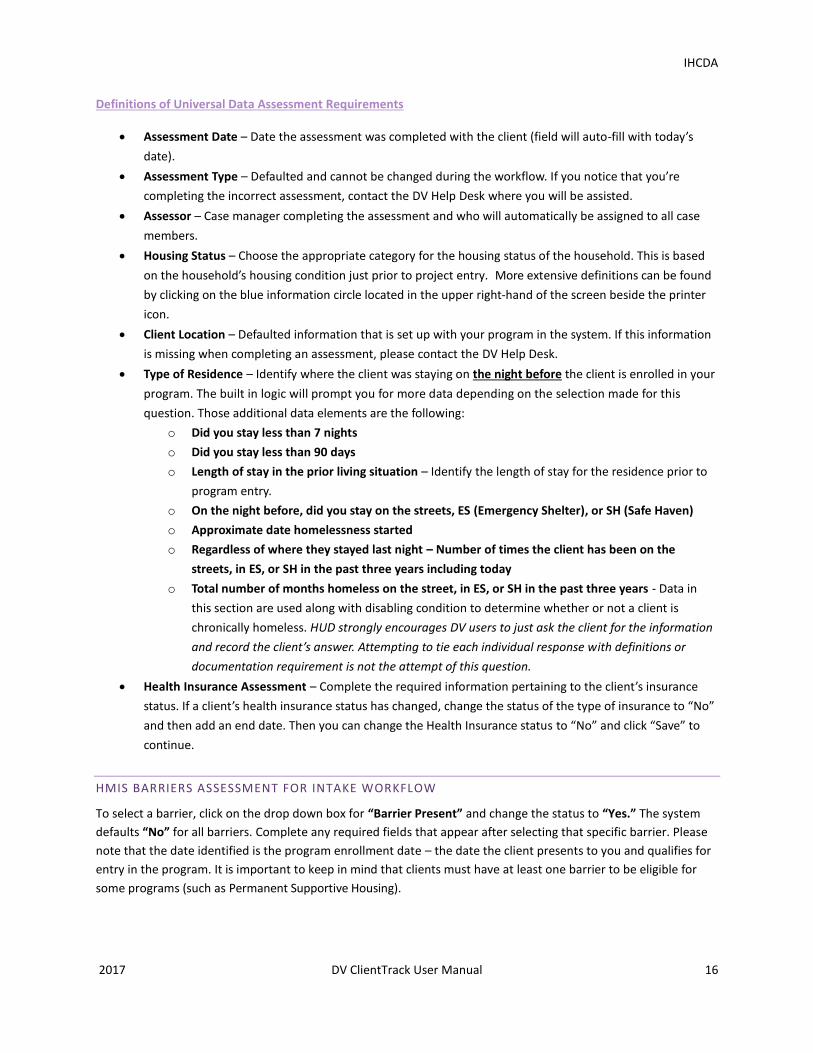
HMIS BARRIERS ASSESSMENT FOR INTAKE WORKFLOW
To select a barrier, click on the drop down box for “Barrier Present” and change the status to “Yes.” The system
defaults “No” for all barriers. Complete any required fields that appear after selecting that specific barrier. Please
note that the date identified is the program enrollment date – the date the client presents to you and qualifies for
entry in the program. It is important to keep in mind that clients must have at least one barrier to be eligible for
some programs (such as Permanent Supportive Housing).
IHCDA
2017 DV ClientTrack User Manual 17
If no barriers are present at enrollment, select all barriers and leave the “Barrier Present” status as “No” and click
“Save & Close.”
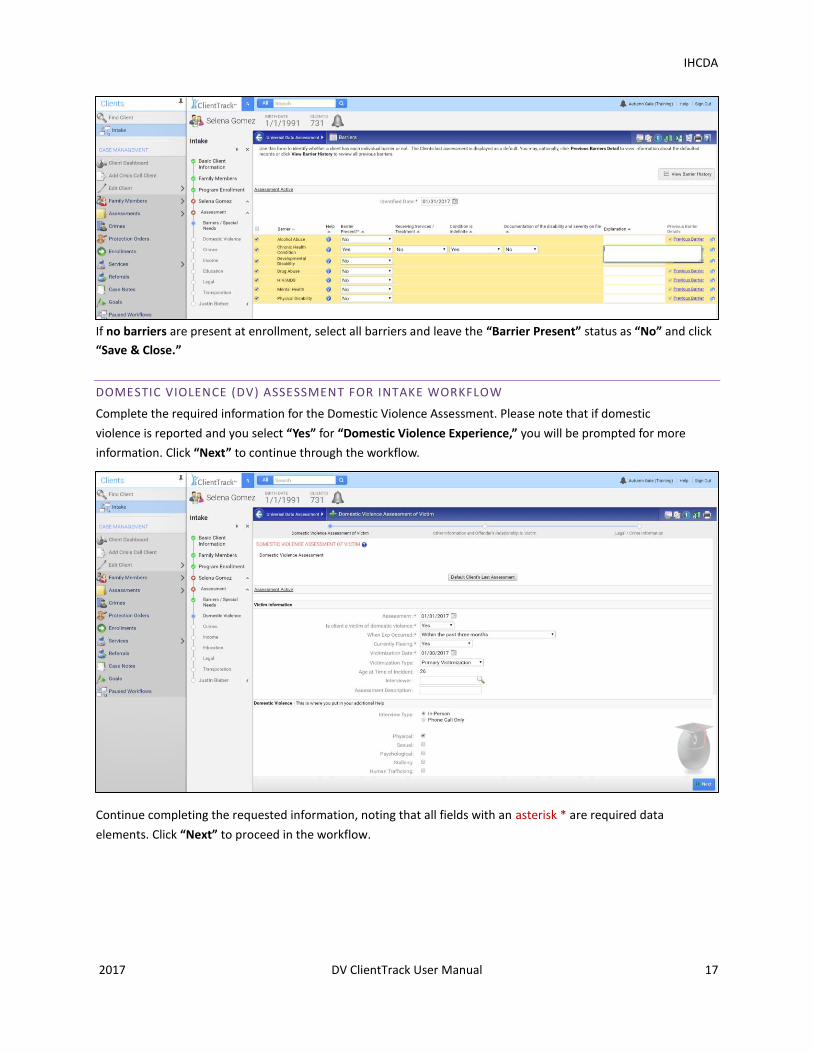
DOMESTIC VIOLENCE (DV) ASSESSMENT FOR INTAKE WORKFLOW
Complete the required information for the Domestic Violence Assessment. Please note that if domestic
violence is reported and you select “Yes” for “Domestic Violence Experience,” you will be prompted for more
information. Click “Next” to continue through the workflow.
Continue completing the requested information, noting that all fields with an asterisk * are required data
elements. Click “Next” to proceed in the workflow.
IHCDA
2017 DV ClientTrack User Manual 18
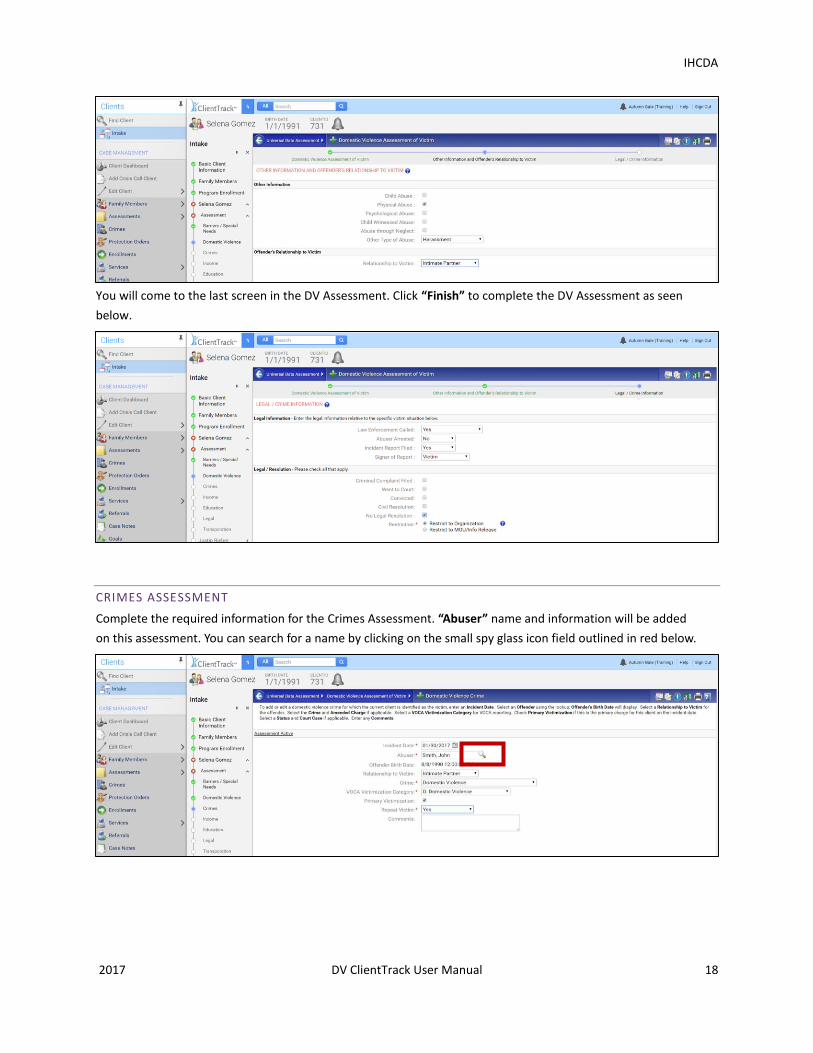
You will come to the last screen in the DV Assessment. Click “Finish” to complete the DV Assessment as seen
below.
CRIMES ASSESSMENT
Complete the required information for the Crimes Assessment. “Abuser” name and information will be added
on this assessment. You can search for a name by clicking on the small spy glass icon field outlined in red below.
IHCDA
2017 DV ClientTrack User Manual 19
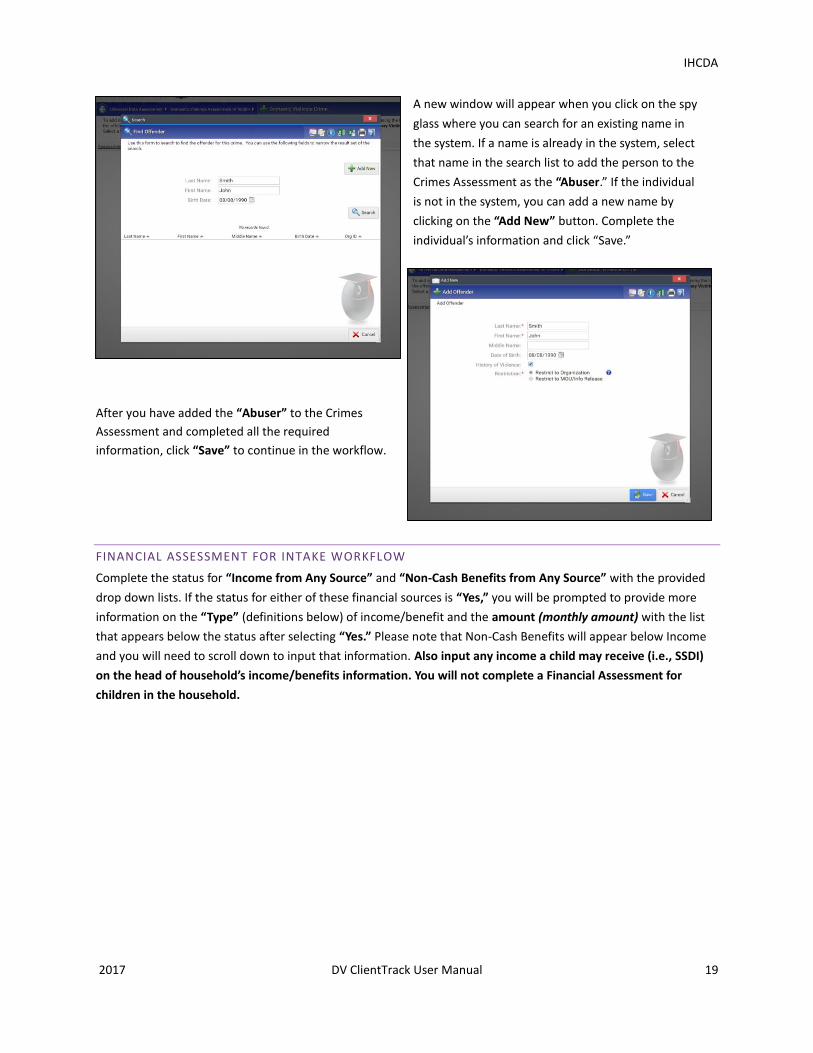
A new window will appear when you click on the spy
glass where you can search for an existing name in
the system. If a name is already in the system, select
that name in the search list to add the person to the
Crimes Assessment as the “Abuser.” If the individual
is not in the system, you can add a new name by
clicking on the “Add New” button. Complete the
individual’s information and click “Save.”
After you have added the “Abuser” to the Crimes
Assessment and completed all the required
information, click “Save” to continue in the workflow.
FINANCIAL ASSESSMENT FOR INTAKE WORKFLOW
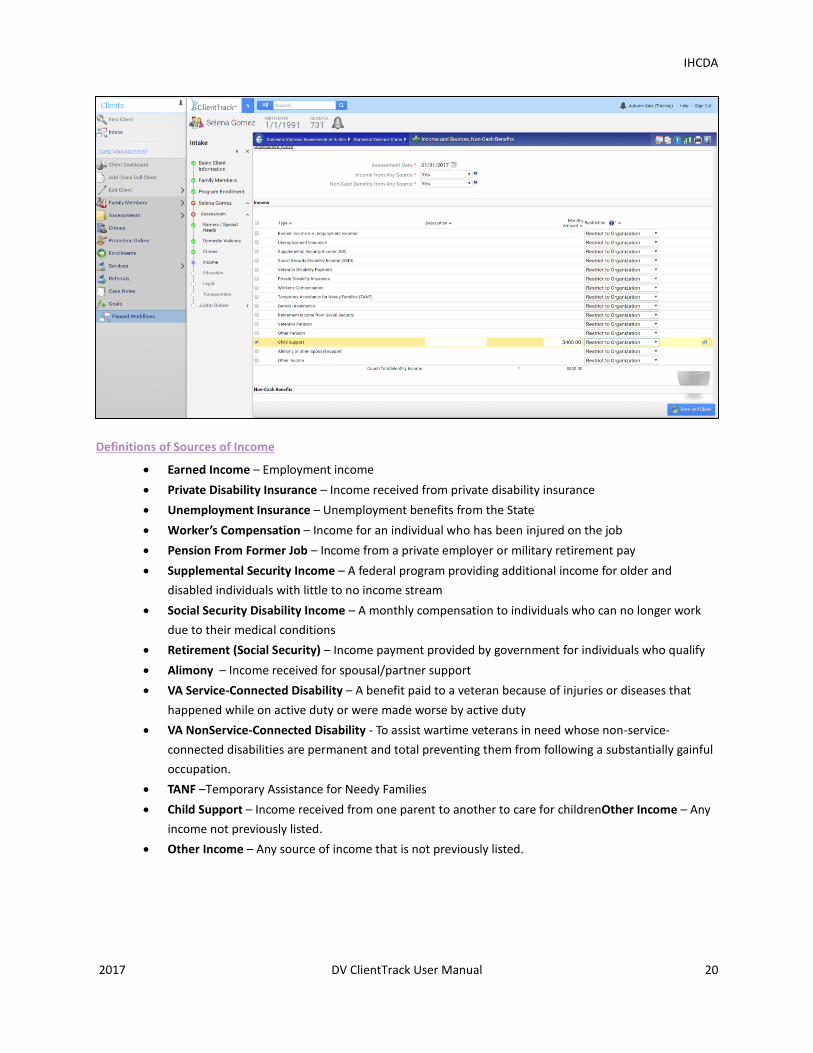
Complete the status for “Income from Any Source” and “Non-Cash Benefits from Any Source” with the provided
drop down lists. If the status for either of these financial sources is “Yes,” you will be prompted to provide more
information on the “Type” (definitions below) of income/benefit and the amount (monthly amount) with the list
that appears below the status after selecting “Yes.” Please note that Non-Cash Benefits will appear below Income
and you will need to scroll down to input that information. Also input any income a child may receive (i.e., SSDI)
on the head of household’s income/benefits information. You will not complete a Financial Assessment for
children in the household.
IHCDA
2017 DV ClientTrack User Manual 20
Definitions of Sources of Income
Earned Income – Employment income
Private Disability Insurance – Income received from private disability insurance
Unemployment Insurance – Unemployment benefits from the State
Worker’s Compensation – Income for an individual who has been injured on the job
Pension From Former Job – Income from a private employer or military retirement pay
Supplemental Security Income – A federal program providing additional income for older and
disabled individuals with little to no income stream
Social Security Disability Income – A monthly compensation to individuals who can no longer work
due to their medical conditions
Retirement (Social Security) – Income payment provided by government for individuals who qualify
Alimony – Income received for spousal/partner support
VA Service-Connected Disability – A benefit paid to a veteran because of injuries or diseases that
happened while on active duty or were made worse by active duty
VA NonService-Connected Disability - To assist wartime veterans in need whose non-service-
connected disabilities are permanent and total preventing them from following a substantially gainful
occupation.
TANF –Temporary Assistance for Needy Families
Child Support – Income received from one parent to another to care for childrenOther Income – Any
income not previously listed.
Other Income – Any source of income that is not previously listed.
IHCDA
2017 DV ClientTrack User Manual 21
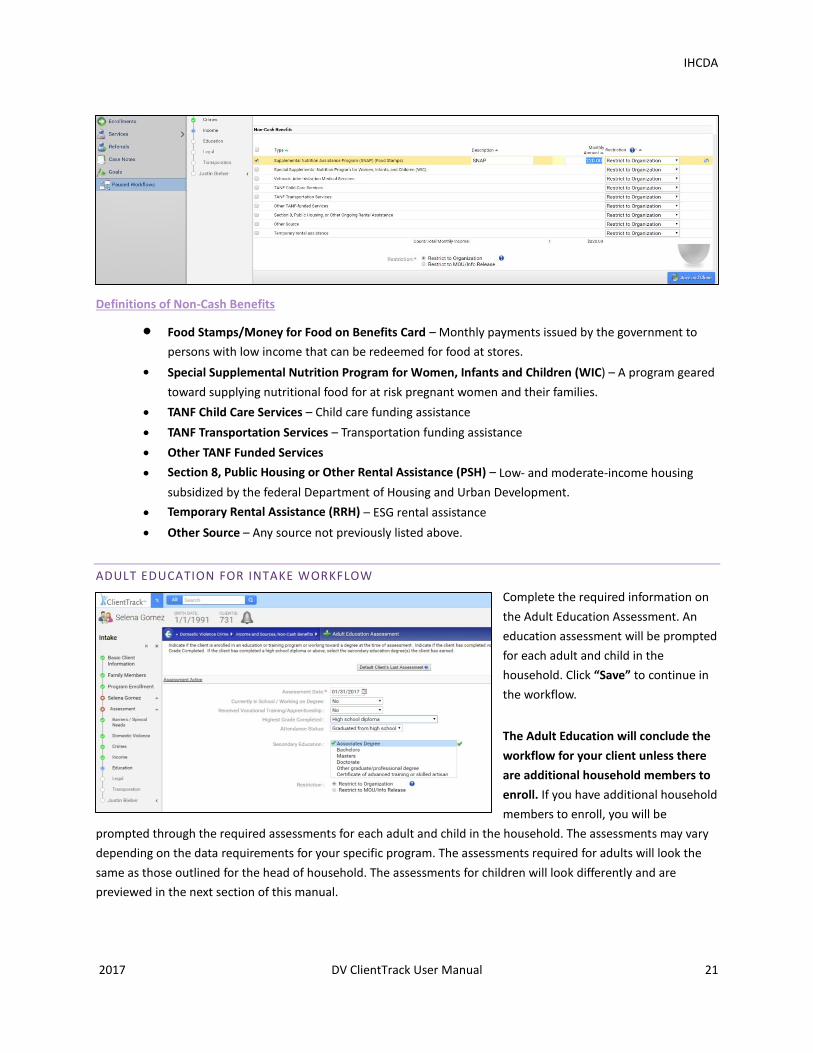
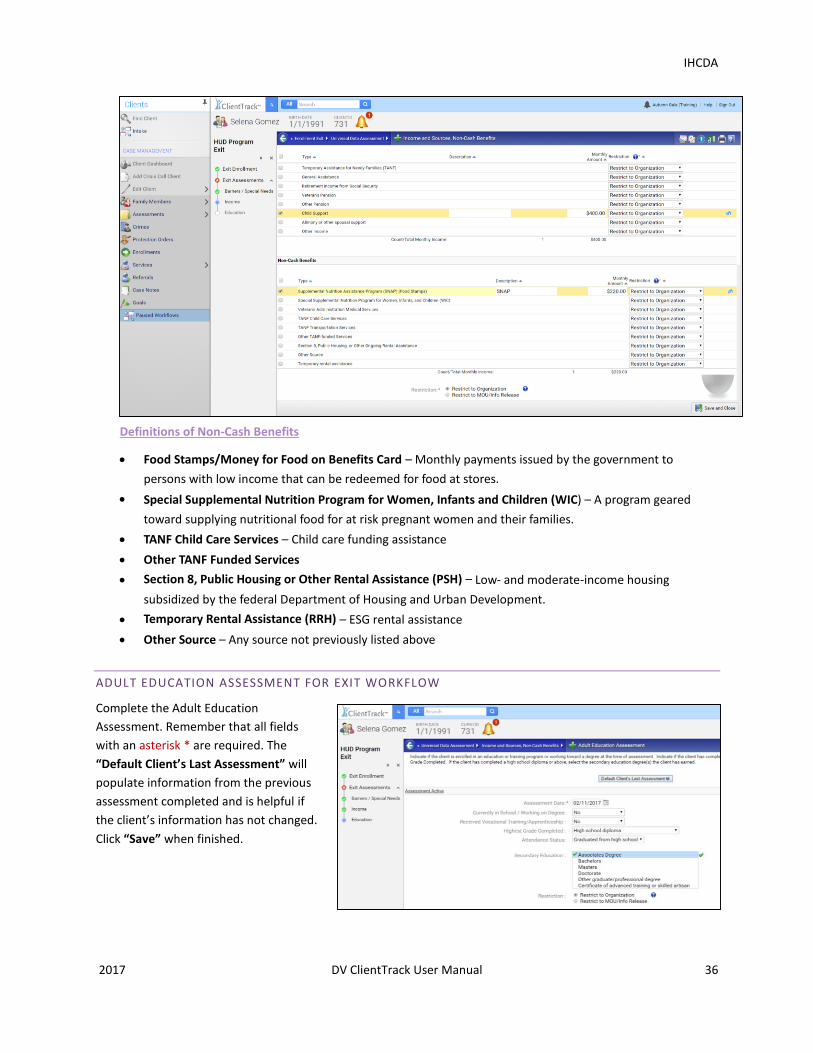
Definitions of Non-Cash Benefits
Food Stamps/Money for Food on Benefits Card – Monthly payments issued by the government to
persons with low income that can be redeemed for food at stores. Special Supplemental Nutrition Program for Women, Infants and Children (WIC) – A program geared
toward supplying nutritional food for at risk pregnant women and their families.
TANF Child Care Services – Child care funding assistance
TANF Transportation Services – Transportation funding assistance
Other TANF Funded Services
Section 8, Public Housing or Other Rental Assistance (PSH) – Low- and moderate-income housing
subsidized by the federal Department of Housing and Urban Development.
Temporary Rental Assistance (RRH) – ESG rental assistance
Other Source – Any source not previously listed above.
ADULT EDUCATION FOR INTAKE WORKFLOW
Complete the required information on
the Adult Education Assessment. An
education assessment will be prompted
for each adult and child in the
household. Click “Save” to continue in
the workflow.
The Adult Education will conclude the
workflow for your client unless there
are additional household members to
enroll. If you have additional household
members to enroll, you will be
prompted through the required assessments for each adult and child in the household. The assessments may vary
depending on the data requirements for your specific program. The assessments required for adults will look the
same as those outlined for the head of household. The assessments for children will look differently and are
previewed in the next section of this manual.
IHCDA
2017 DV ClientTrack User Manual 22
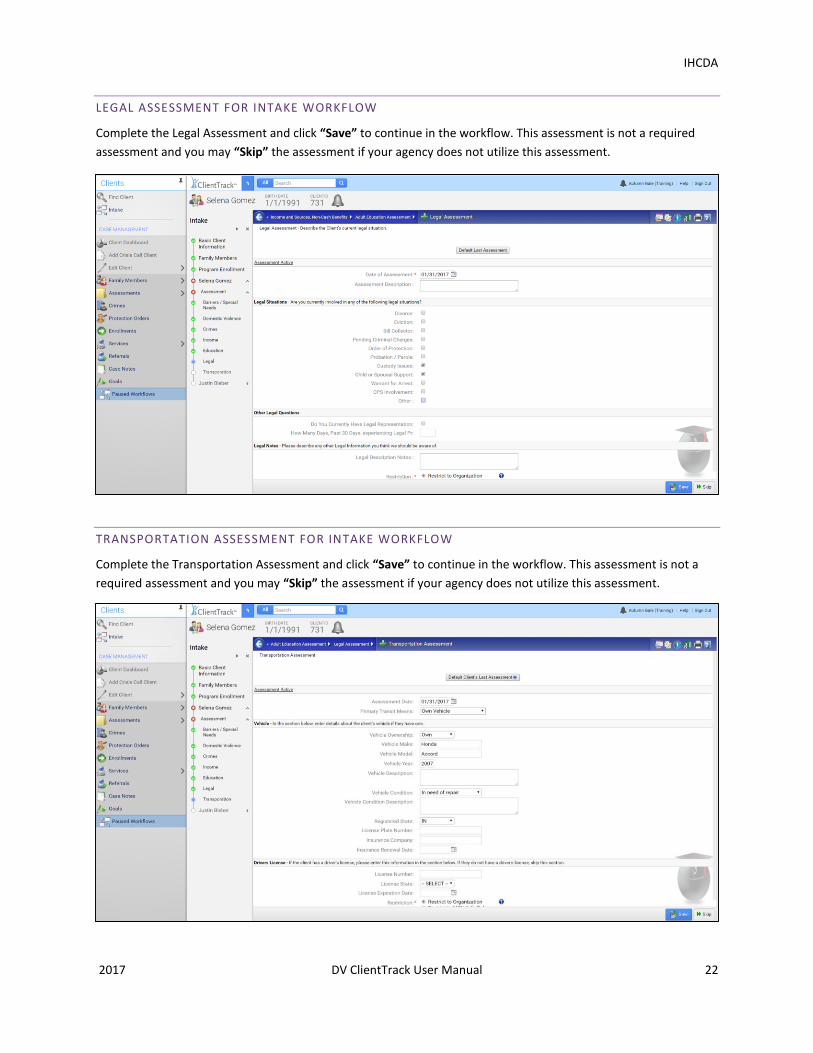
LEGAL ASSESSMENT FOR INTAKE WORKFLOW
Complete the Legal Assessment and click “Save” to continue in the workflow. This assessment is not a required
assessment and you may “Skip” the assessment if your agency does not utilize this assessment.
TRANSPORTATION ASSESSMENT FOR INTAKE WORKFLOW
Complete the Transportation Assessment and click “Save” to continue in the workflow. This assessment is not a
required assessment and you may “Skip” the assessment if your agency does not utilize this assessment.
IHCDA
2017 DV ClientTrack User Manual 23
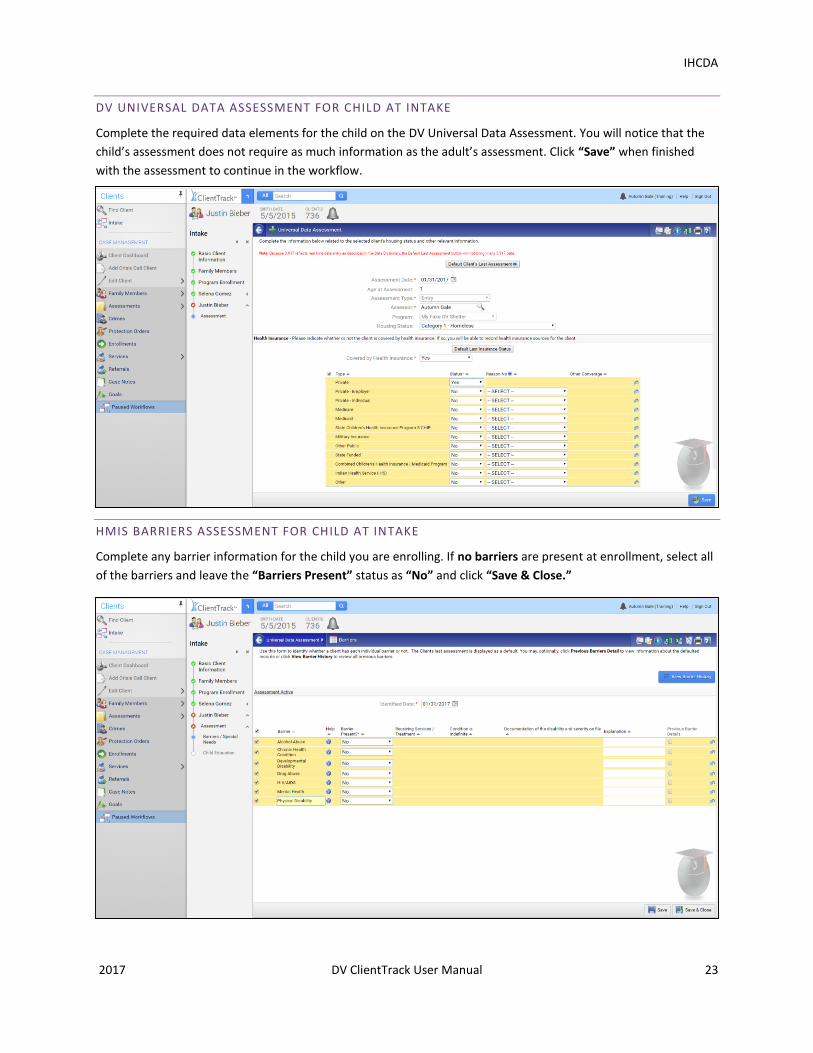
DV UNIVERSAL DATA ASSESSMENT FOR CHILD AT INTAKE
Complete the required data elements for the child on the DV Universal Data Assessment. You will notice that the
child’s assessment does not require as much information as the adult’s assessment. Click “Save” when finished
with the assessment to continue in the workflow.
HMIS BARRIERS ASSESSMENT FOR CHILD AT INTAKE
Complete any barrier information for the child you are enrolling. If no barriers are present at enrollment, select all
of the barriers and leave the “Barriers Present” status as “No” and click “Save & Close.”
IHCDA
2017 DV ClientTrack User Manual 24
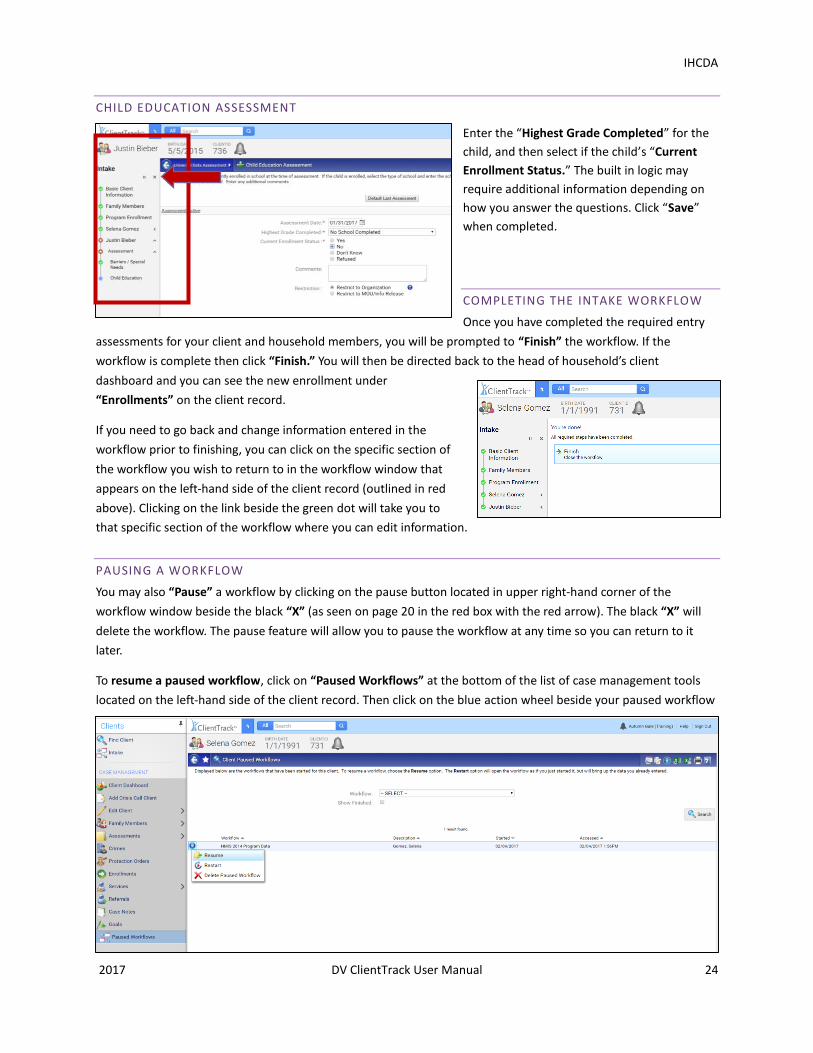
CHILD EDUCATION ASSESSMENT
Enter the “Highest Grade Completed” for the
child, and then select if the child’s “Current
Enrollment Status.” The built in logic may
require additional information depending on
how you answer the questions. Click “Save”
when completed.
COMPLETING THE INTAKE WORKFLOW
Once you have completed the required entry
assessments for your client and household members, you will be prompted to “Finish” the workflow. If the
workflow is complete then click “Finish.” You will then be directed back to the head of household’s client
dashboard and you can see the new enrollment under
“Enrollments” on the client record.
If you need to go back and change information entered in the
workflow prior to finishing, you can click on the specific section of
the workflow you wish to return to in the workflow window that
appears on the left-hand side of the client record (outlined in red
above). Clicking on the link beside the green dot will take you to
that specific section of the workflow where you can edit information.
PAUSING A WORKFLOW
You may also “Pause” a workflow by clicking on the pause button located in upper right-hand corner of the
workflow window beside the black “X” (as seen on page 20 in the red box with the red arrow). The black “X” will
delete the workflow. The pause feature will allow you to pause the workflow at any time so you can return to it
later.
To resume a paused workflow, click on “Paused Workflows” at the bottom of the list of case management tools
located on the left-hand side of the client record. Then click on the blue action wheel beside your paused workflow
IHCDA
2017 DV ClientTrack User Manual 25
to select “Resume” in the drop down. This will take you back to where you paused the workflow and you can finish
your program enrollment.
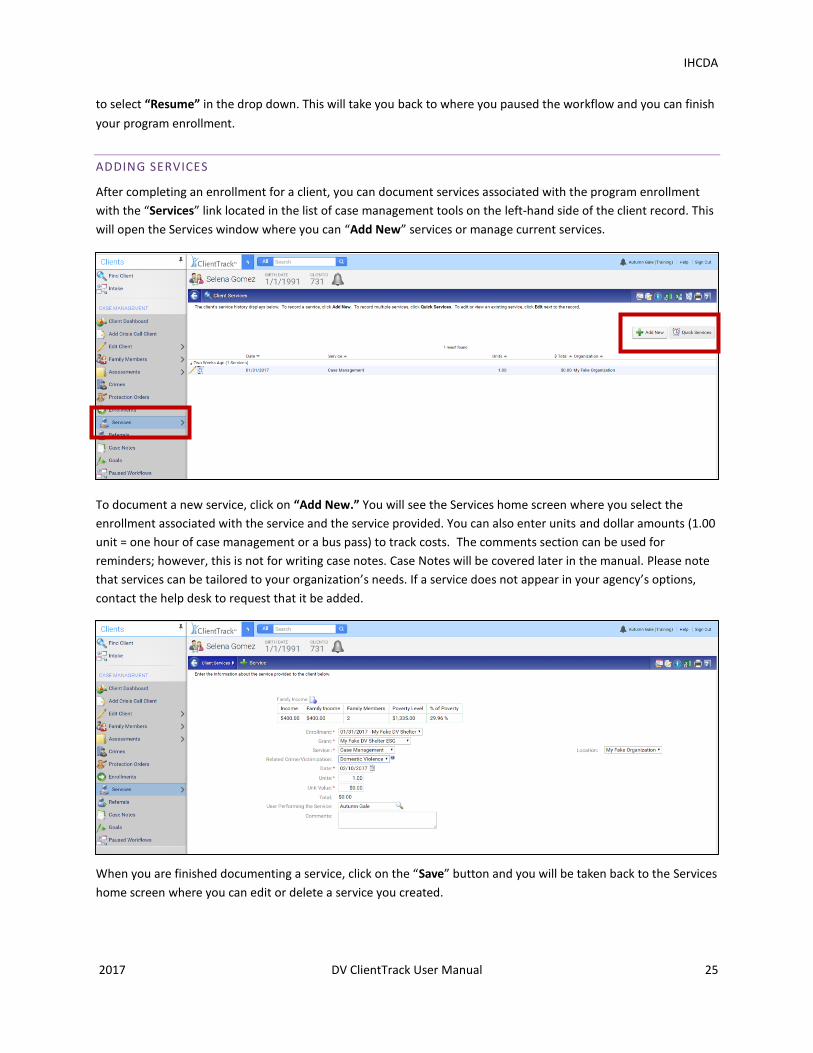
ADDING SERVICES
After completing an enrollment for a client, you can document services associated with the program enrollment
with the “Services” link located in the list of case management tools on the left-hand side of the client record. This
will open the Services window where you can “Add New” services or manage current services.
To document a new service, click on “Add New.” You will see the Services home screen where you select the
enrollment associated with the service and the service provided. You can also enter units and dollar amounts (1.00
unit = one hour of case management or a bus pass) to track costs. The comments section can be used for
reminders; however, this is not for writing case notes. Case Notes will be covered later in the manual. Please note
that services can be tailored to your organization’s needs. If a service does not appear in your agency’s options,
contact the help desk to request that it be added.
When you are finished documenting a service, click on the “Save” button and you will be taken back to the Services
home screen where you can edit or delete a service you created.
IHCDA
2017 DV ClientTrack User Manual 26
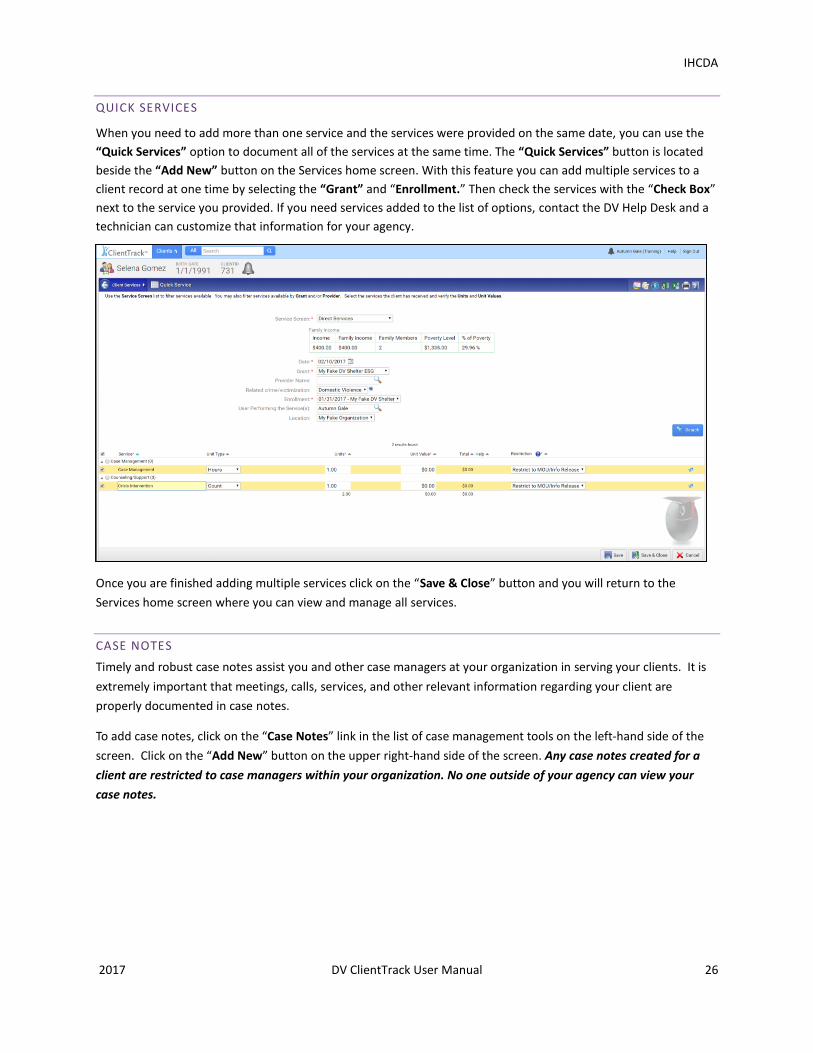
QUICK SERVICES
When you need to add more than one service and the services were provided on the same date, you can use the
“Quick Services” option to document all of the services at the same time. The “Quick Services” button is located
beside the “Add New” button on the Services home screen. With this feature you can add multiple services to a
client record at one time by selecting the “Grant” and “Enrollment.” Then check the services with the “Check Box”
next to the service you provided. If you need services added to the list of options, contact the DV Help Desk and a
technician can customize that information for your agency.
Once you are finished adding multiple services click on the “Save & Close” button and you will return to the
Services home screen where you can view and manage all services.
CASE NOTES
Timely and robust case notes assist you and other case managers at your organization in serving your clients. It is
extremely important that meetings, calls, services, and other relevant information regarding your client are
properly documented in case notes.
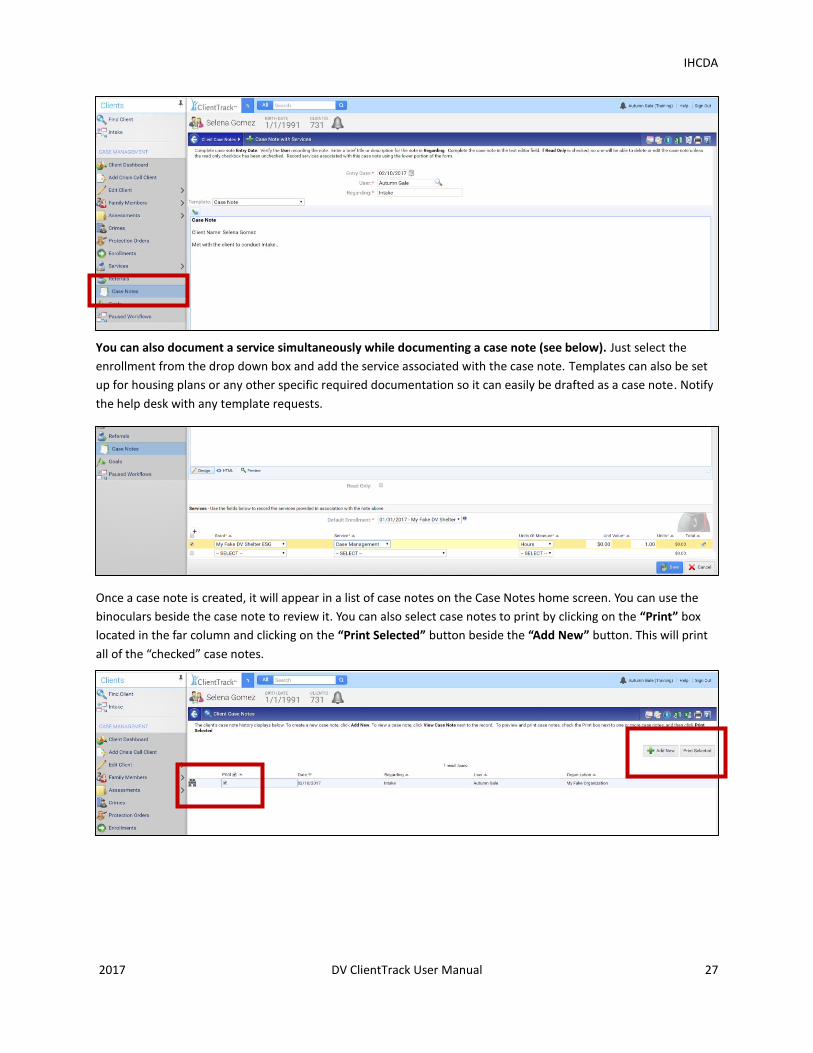
To add case notes, click on the “Case Notes” link in the list of case management tools on the left-hand side of the
screen. Click on the “Add New” button on the upper right-hand side of the screen. Any case notes created for a
client are restricted to case managers within your organization. No one outside of your agency can view your
case notes.
IHCDA
2017 DV ClientTrack User Manual 27
You can also document a service simultaneously while documenting a case note (see below). Just select the
enrollment from the drop down box and add the service associated with the case note. Templates can also be set
up for housing plans or any other specific required documentation so it can easily be drafted as a case note. Notify
the help desk with any template requests.
Once a case note is created, it will appear in a list of case notes on the Case Notes home screen. You can use the
binoculars beside the case note to review it. You can also select case notes to print by clicking on the “Print” box
located in the far column and clicking on the “Print Selected” button beside the “Add New” button. This will print
all of the “checked” case notes.
IHCDA
2017 DV ClientTrack User Manual 28
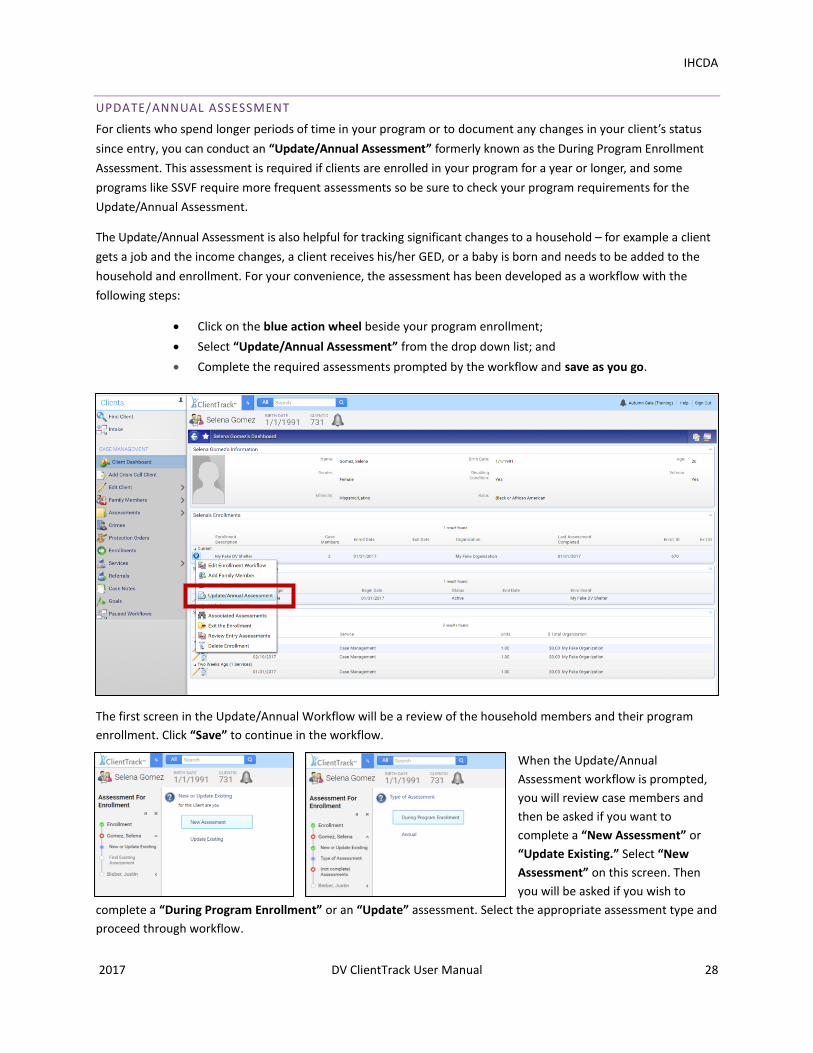
UPDATE/ANNUAL ASSESSMENT
For clients who spend longer periods of time in your program or to document any changes in your client’s status
since entry, you can conduct an “Update/Annual Assessment” formerly known as the During Program Enrollment
Assessment. This assessment is required if clients are enrolled in your program for a year or longer, and some
programs like SSVF require more frequent assessments so be sure to check your program requirements for the
Update/Annual Assessment.
The Update/Annual Assessment is also helpful for tracking significant changes to a household – for example a client
gets a job and the income changes, a client receives his/her GED, or a baby is born and needs to be added to the
household and enrollment. For your convenience, the assessment has been developed as a workflow with the
following steps:
Click on the blue action wheel beside your program enrollment;
Select “Update/Annual Assessment” from the drop down list; and
Complete the required assessments prompted by the workflow and save as you go.
The first screen in the Update/Annual Workflow will be a review of the household members and their program
enrollment. Click “Save” to continue in the workflow.
When the Update/Annual
Assessment workflow is prompted,
you will review case members and
then be asked if you want to
complete a “New Assessment” or
“Update Existing.” Select “New
Assessment” on this screen. Then
you will be asked if you wish to
complete a “During Program Enrollment” or an “Update” assessment. Select the appropriate assessment type and
proceed through workflow.
IHCDA
2017 DV ClientTrack User Manual 29
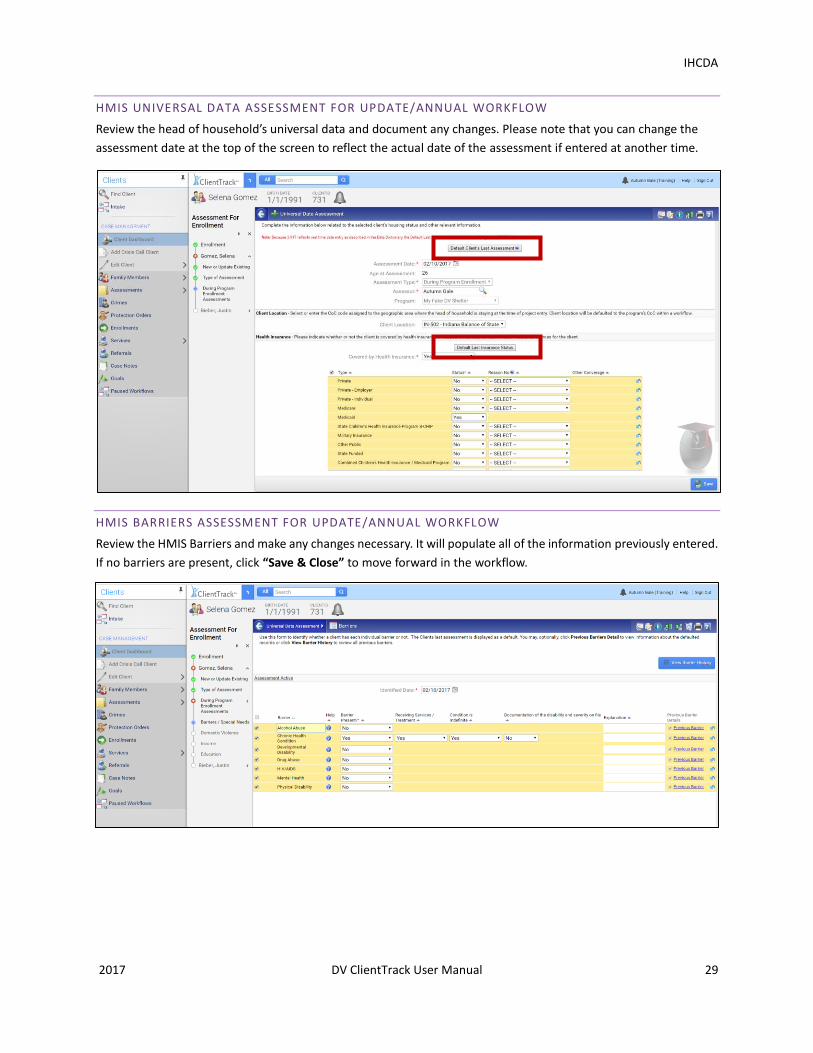
HMIS UNIVERSAL DATA ASSESSMENT FOR UPDATE/ANNUAL WORKFLOW
Review the head of household’s universal data and document any changes. Please note that you can change the
assessment date at the top of the screen to reflect the actual date of the assessment if entered at another time.
HMIS BARRIERS ASSESSMENT FOR UPDATE/ANNUAL WORKFLOW
Review the HMIS Barriers and make any changes necessary. It will populate all of the information previously entered.
If no barriers are present, click “Save & Close” to move forward in the workflow.
IHCDA
2017 DV ClientTrack User Manual 30
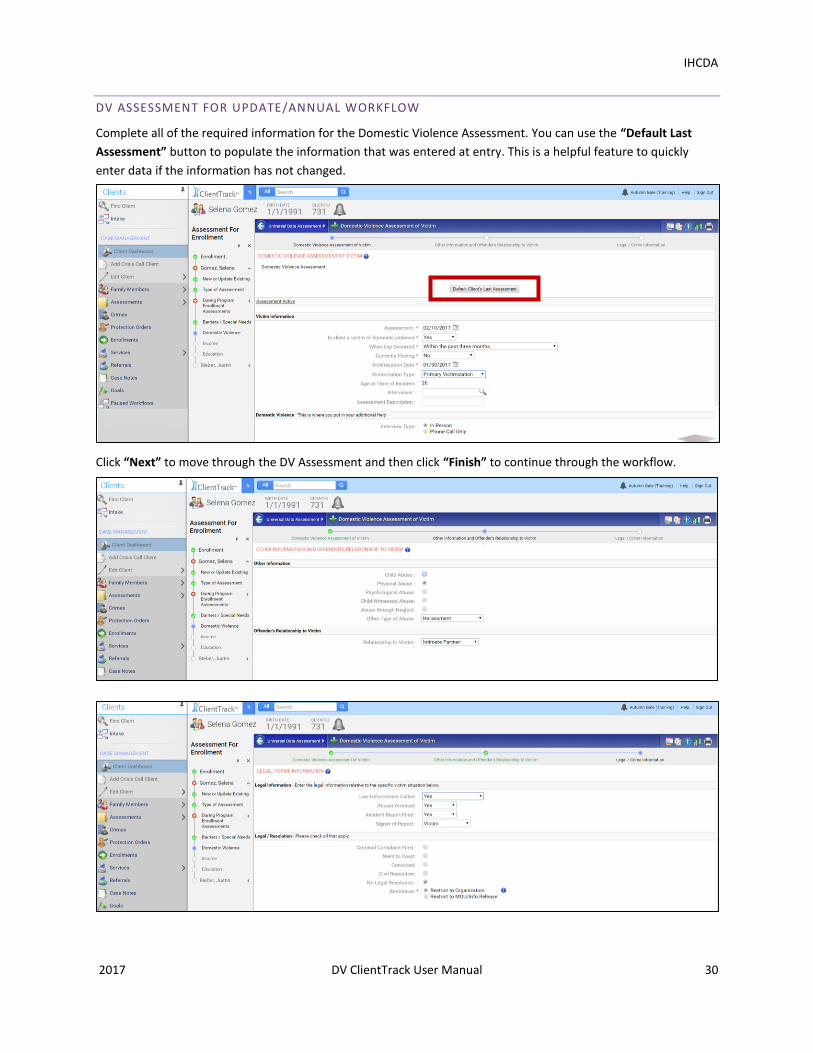
DV ASSESSMENT FOR UPDATE/ANNUAL WORKFLOW
Complete all of the required information for the Domestic Violence Assessment. You can use the “Default Last
Assessment” button to populate the information that was entered at entry. This is a helpful feature to quickly
enter data if the information has not changed.
Click “Next” to move through the DV Assessment and then click “Finish” to continue through the workflow.
IHCDA
2017 DV ClientTrack User Manual 31
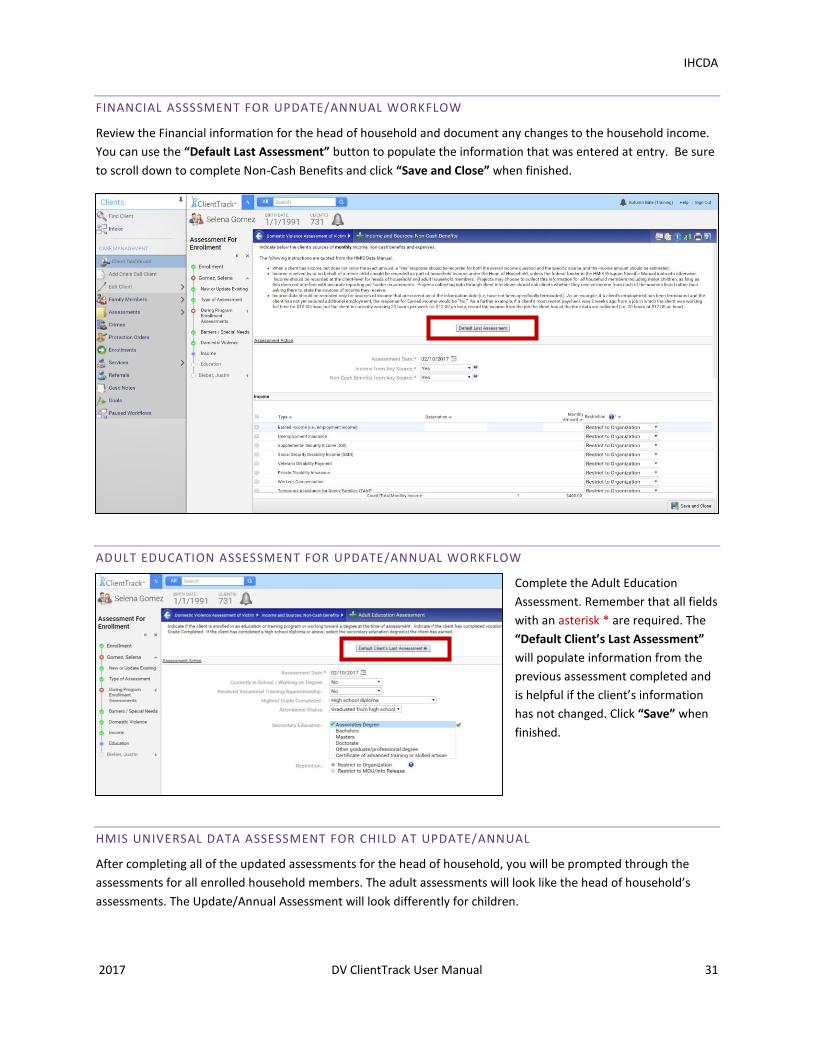
FINANCIAL ASSSSMENT FOR UPDATE/ANNUAL WORKFLOW
Review the Financial information for the head of household and document any changes to the household income.
You can use the “Default Last Assessment” button to populate the information that was entered at entry. Be sure
to scroll down to complete Non-Cash Benefits and click “Save and Close” when finished.
ADULT EDUCATION ASSESSMENT FOR UPDATE/ANNUAL WORKFLOW
Complete the Adult Education
Assessment. Remember that all fields
with an asterisk * are required. The
“Default Client’s Last Assessment”
will populate information from the
previous assessment completed and
is helpful if the client’s information
has not changed. Click “Save” when
finished.
HMIS UNIVERSAL DATA ASSESSMENT FOR CHILD AT UPDATE/ANNUAL
After completing all of the updated assessments for the head of household, you will be prompted through the
assessments for all enrolled household members. The adult assessments will look like the head of household’s
assessments. The Update/Annual Assessment will look differently for children.
IHCDA
2017 DV ClientTrack User Manual 32
HMIS BARRIERS ASSESSMENT FOR CHILD AT UPDATE/ANNUAL
Complete the Barriers Assessment for the child. If no barriers are reported, click “Save & Close” to continue in the
workflow.
CHILD EDUCATION ASSESSMENT AT UPDATE/ANNUAL
Complete the Child Education Assessment for the child. You may use the “Default Last Assessment” button if
there are no changes to the child’s education information. Click “Save” when completed.
IHCDA
2017 DV ClientTrack User Manual 33
Once you have completed the required entry assessments for your client and household members, you will be
prompted to “Finish” the workflow. If the workflow is complete then click “Finish.” You will then be directed back
to the head of household’s client record.
PROGRAM DISCHARGE
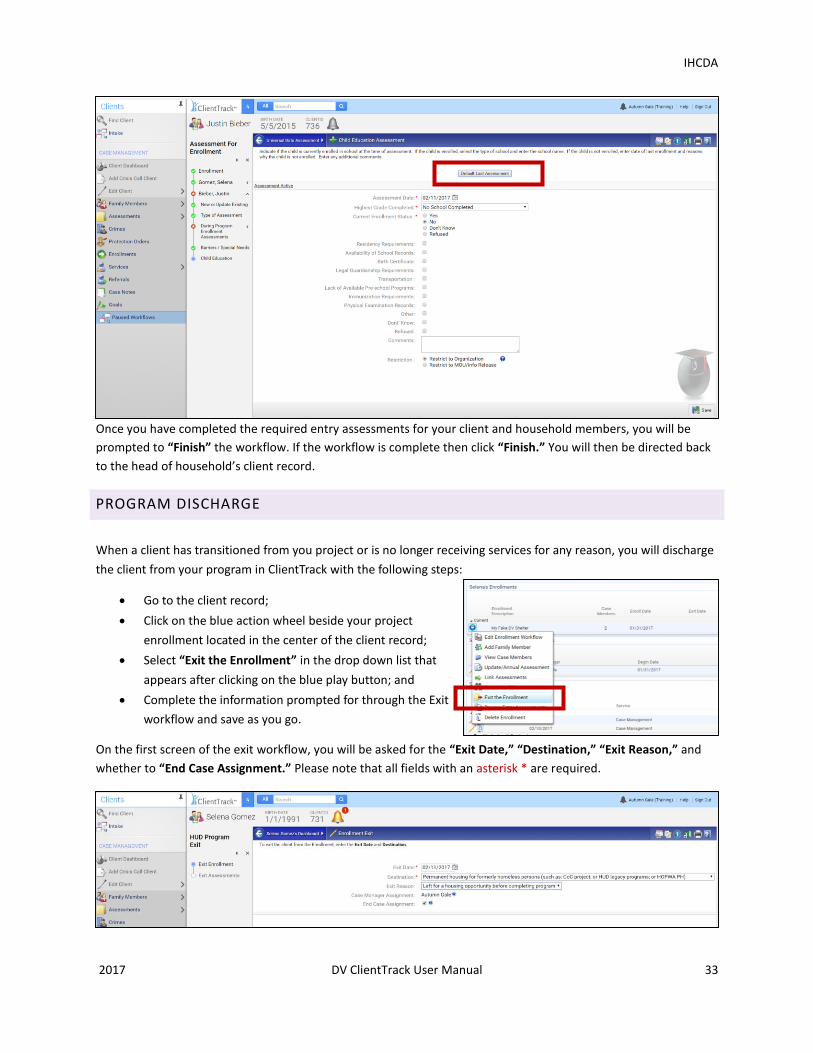
When a client has transitioned from you project or is no longer receiving services for any reason, you will discharge
the client from your program in ClientTrack with the following steps:
Go to the client record;
Click on the blue action wheel beside your project
enrollment located in the center of the client record;
Select “Exit the Enrollment” in the drop down list that
appears after clicking on the blue play button; and
Complete the information prompted for through the Exit
workflow and save as you go.
On the first screen of the exit workflow, you will be asked for the “Exit Date,” “Destination,” “Exit Reason,” and
whether to “End Case Assignment.” Please note that all fields with an asterisk * are required.
IHCDA
2017 DV ClientTrack User Manual 34
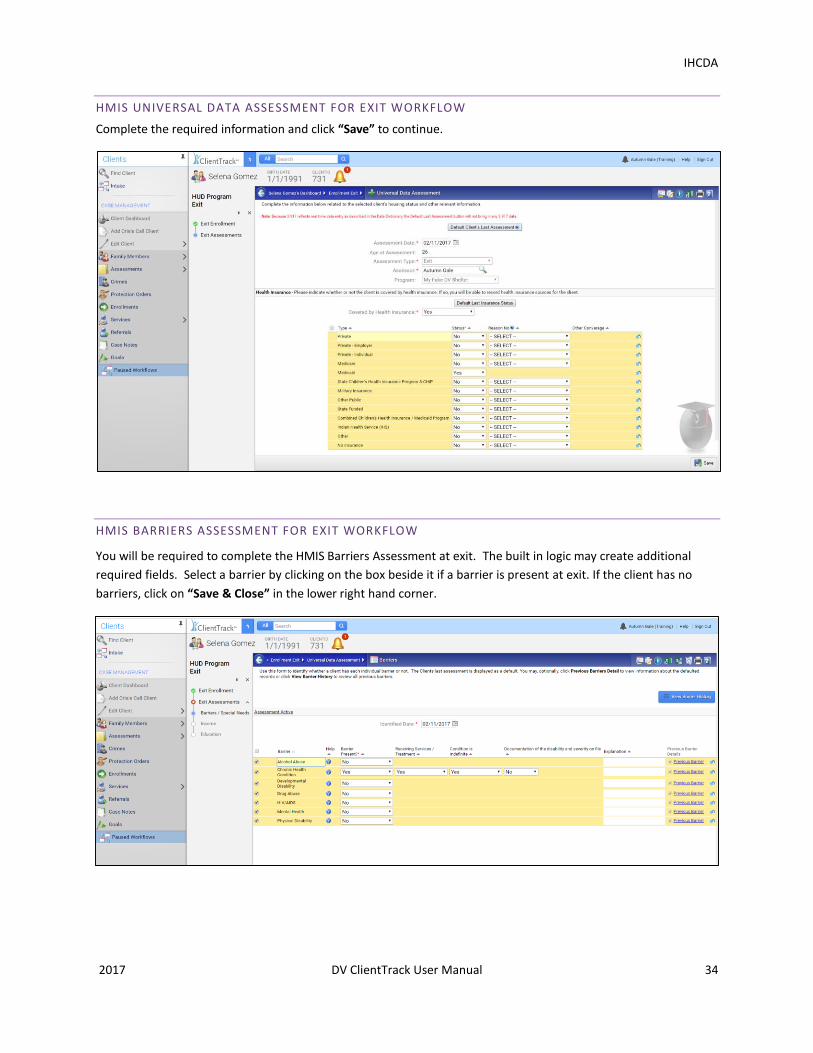
HMIS UNIVERSAL DATA ASSESSMENT FOR EXIT WORKFLOW
Complete the required information and click “Save” to continue.
HMIS BARRIERS ASSESSMENT FOR EXIT WORKFLOW
You will be required to complete the HMIS Barriers Assessment at exit. The built in logic may create additional
required fields. Select a barrier by clicking on the box beside it if a barrier is present at exit. If the client has no
barriers, click on “Save & Close” in the lower right hand corner.
IHCDA
2017 DV ClientTrack User Manual 35
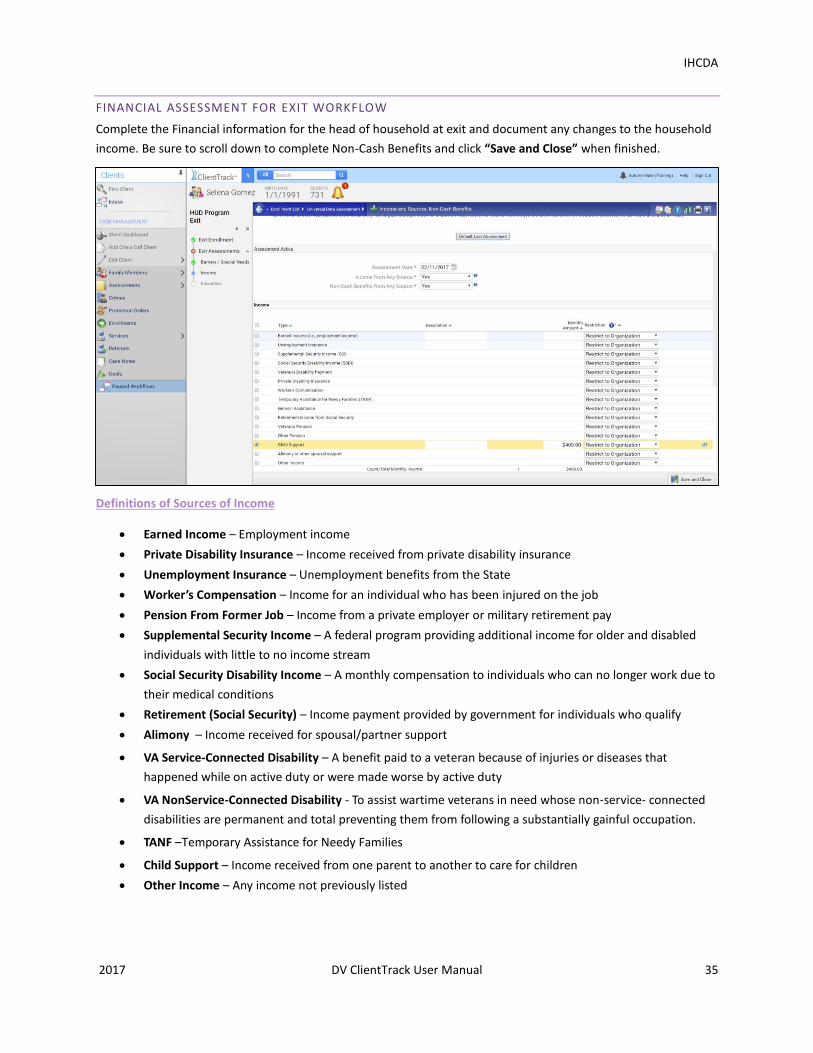
FINANCIAL ASSESSMENT FOR EXIT WORKFLOW
Complete the Financial information for the head of household at exit and document any changes to the household
income. Be sure to scroll down to complete Non-Cash Benefits and click “Save and Close” when finished.
Definitions of Sources of Income
Earned Income – Employment income
Private Disability Insurance – Income received from private disability insurance
Unemployment Insurance – Unemployment benefits from the State
Worker’s Compensation – Income for an individual who has been injured on the job
Pension From Former Job – Income from a private employer or military retirement pay
Supplemental Security Income – A federal program providing additional income for older and disabled
individuals with little to no income stream
Social Security Disability Income – A monthly compensation to individuals who can no longer work due to
their medical conditions
Retirement (Social Security) – Income payment provided by government for individuals who qualify
Alimony – Income received for spousal/partner support
VA Service-Connected Disability – A benefit paid to a veteran because of injuries or diseases that
happened while on active duty or were made worse by active duty
VA NonService-Connected Disability - To assist wartime veterans in need whose non-service- connected
disabilities are permanent and total preventing them from following a substantially gainful occupation.
TANF –Temporary Assistance for Needy Families
Child Support – Income received from one parent to another to care for children
Other Income – Any income not previously listed
IHCDA
2017 DV ClientTrack User Manual 36
Definitions of Non-Cash Benefits
Food Stamps/Money for Food on Benefits Card – Monthly payments issued by the government to
persons with low income that can be redeemed for food at stores.
Special Supplemental Nutrition Program for Women, Infants and Children (WIC) – A program geared
toward supplying nutritional food for at risk pregnant women and their families.
TANF Child Care Services – Child care funding assistance
Other TANF Funded Services
Section 8, Public Housing or Other Rental Assistance (PSH) – Low- and moderate-income housing
subsidized by the federal Department of Housing and Urban Development.
Temporary Rental Assistance (RRH) – ESG rental assistance
Other Source – Any source not previously listed above
ADULT EDUCATION ASSESSMENT FOR EXIT WORKFLOW
Complete the Adult Education
Assessment. Remember that all fields
with an asterisk * are required. The
“Default Client’s Last Assessment” will
populate information from the previous
assessment completed and is helpful if
the client’s information has not changed.
Click “Save” when finished.
IHCDA
2017 DV ClientTrack User Manual 37
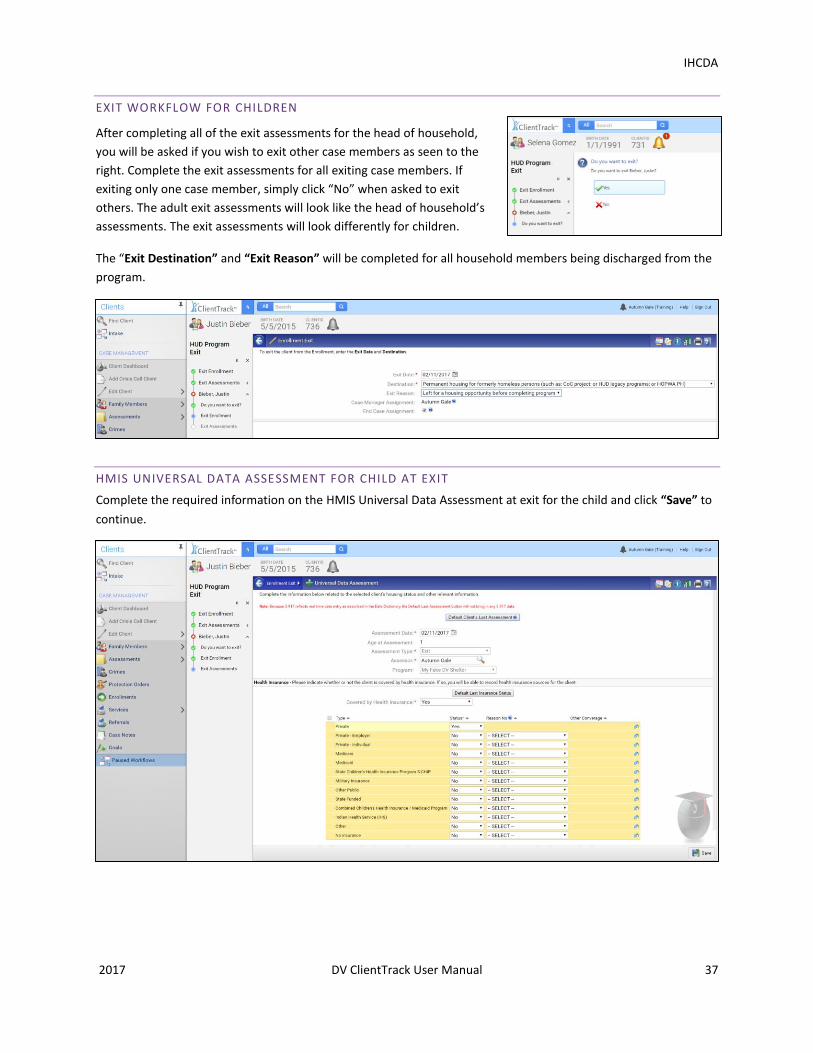
EXIT WORKFLOW FOR CHILDREN
After completing all of the exit assessments for the head of household,
you will be asked if you wish to exit other case members as seen to the
right. Complete the exit assessments for all exiting case members. If
exiting only one case member, simply click “No” when asked to exit
others. The adult exit assessments will look like the head of household’s
assessments. The exit assessments will look differently for children.
The “Exit Destination” and “Exit Reason” will be completed for all household members being discharged from the
program.
HMIS UNIVERSAL DATA ASSESSMENT FOR CHILD AT EXIT
Complete the required information on the HMIS Universal Data Assessment at exit for the child and click “Save” to
continue.
IHCDA
2017 DV ClientTrack User Manual 38
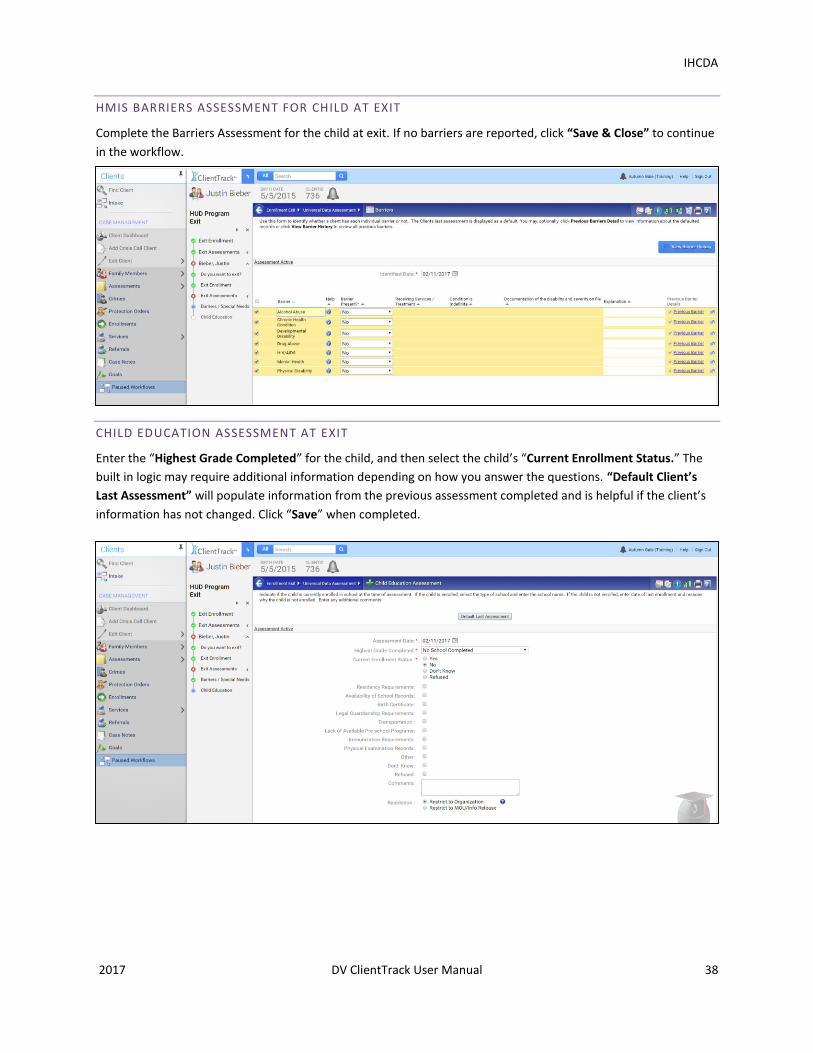
HMIS BARRIERS ASSESSMENT FOR CHILD AT EXIT
Complete the Barriers Assessment for the child at exit. If no barriers are reported, click “Save & Close” to continue
in the workflow.
CHILD EDUCATION ASSESSMENT AT EXIT
Enter the “Highest Grade Completed” for the child, and then select the child’s “Current Enrollment Status.” The
built in logic may require additional information depending on how you answer the questions. “Default Client’s
Last Assessment” will populate information from the previous assessment completed and is helpful if the client’s
information has not changed. Click “Save” when completed.
IHCDA
2017 DV ClientTrack User Manual 39
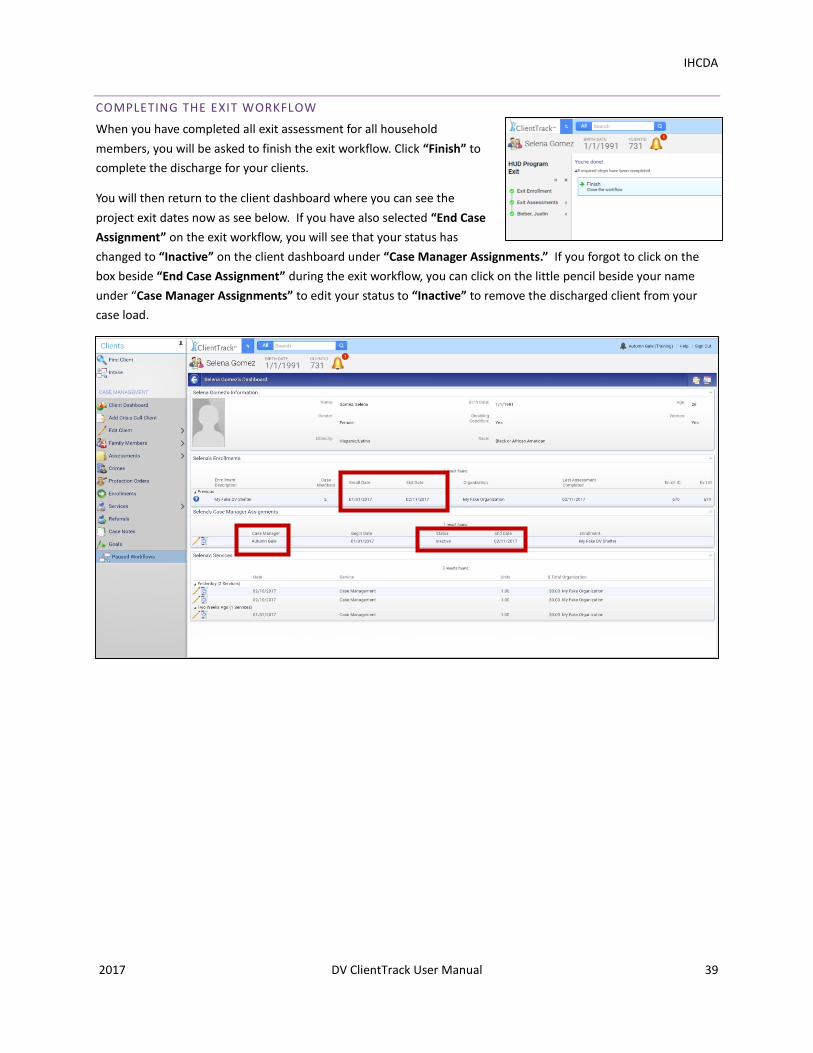
COMPLETING THE EXIT WORKFLOW
When you have completed all exit assessment for all household
members, you will be asked to finish the exit workflow. Click “Finish” to
complete the discharge for your clients.
You will then return to the client dashboard where you can see the
project exit dates now as see below. If you have also selected “End Case
Assignment” on the exit workflow, you will see that your status has
changed to “Inactive” on the client dashboard under “Case Manager Assignments.” If you forgot to click on the
box beside “End Case Assignment” during the exit workflow, you can click on the little pencil beside your name
under “Case Manager Assignments” to edit your status to “Inactive” to remove the discharged client from your
case load.
IHCDA
2017 DV ClientTrack User Manual 40
MANAGING PROVIDERS
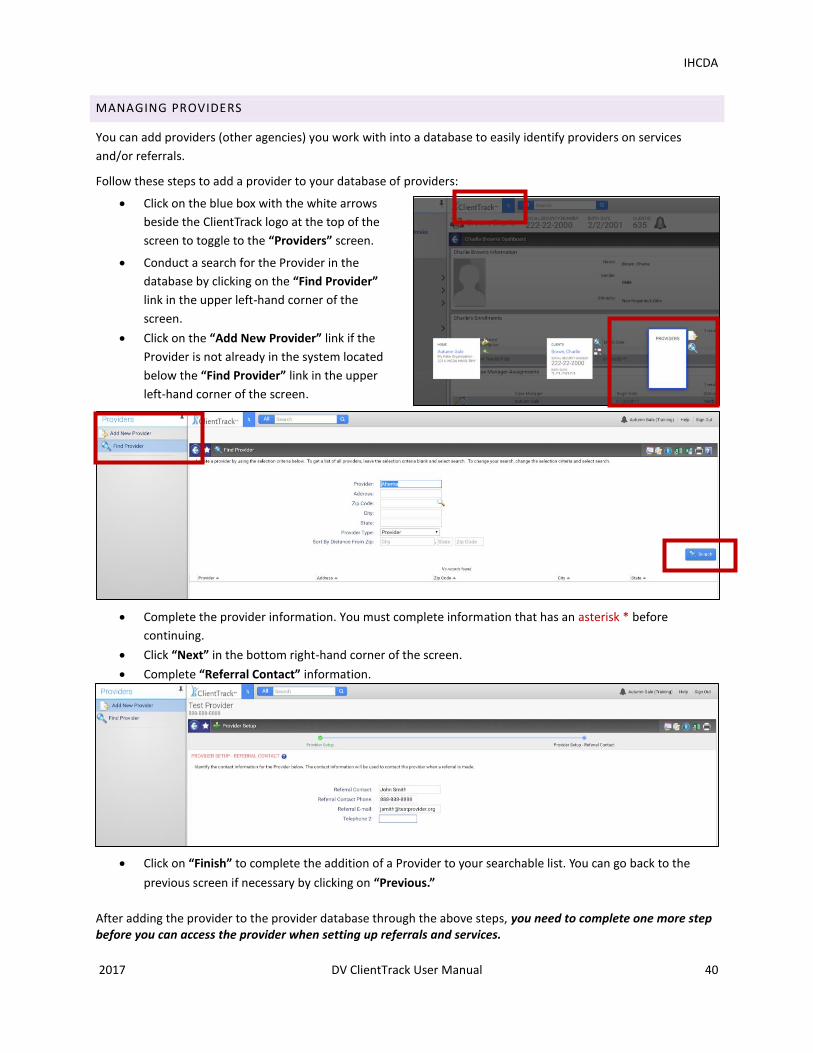
You can add providers (other agencies) you work with into a database to easily identify providers on services
and/or referrals.
Follow these steps to add a provider to your database of providers:
Click on the blue box with the white arrows
beside the ClientTrack logo at the top of the
screen to toggle to the “Providers” screen.
Conduct a search for the Provider in the
database by clicking on the “Find Provider”
link in the upper left-hand corner of the
screen.
Click on the “Add New Provider” link if the
Provider is not already in the system located
below the “Find Provider” link in the upper
left-hand corner of the screen.
Complete the provider information. You must complete information that has an asterisk * before
continuing.
Click “Next” in the bottom right-hand corner of the screen.
Complete “Referral Contact” information.
Click on “Finish” to complete the addition of a Provider to your searchable list. You can go back to the
previous screen if necessary by clicking on “Previous.”
After adding the provider to the provider database through the above steps, you need to complete one more step before you can access the provider when setting up referrals and services.
IHCDA
2017 DV ClientTrack User Manual 41
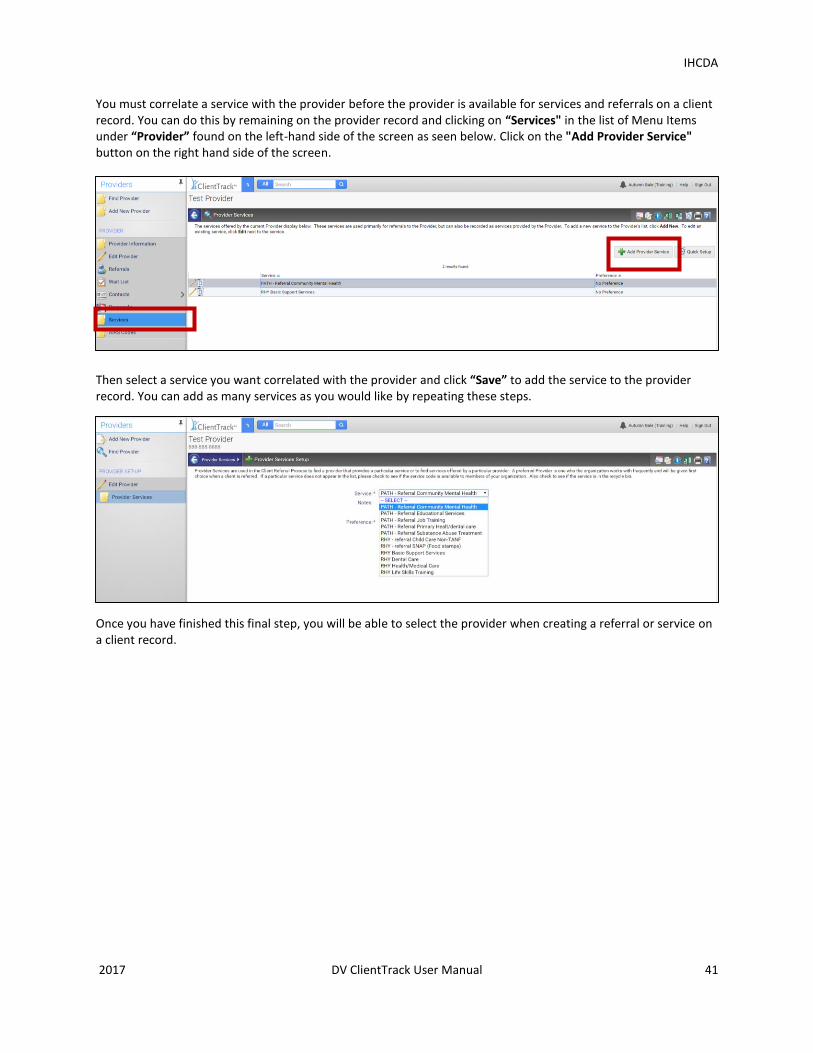
You must correlate a service with the provider before the provider is available for services and referrals on a client record. You can do this by remaining on the provider record and clicking on “Services" in the list of Menu Items under “Provider” found on the left-hand side of the screen as seen below. Click on the "Add Provider Service" button on the right hand side of the screen.
Then select a service you want correlated with the provider and click “Save” to add the service to the provider record. You can add as many services as you would like by repeating these steps.
Once you have finished this final step, you will be able to select the provider when creating a referral or service on a client record.
IHCDA
2017 DV ClientTrack User Manual 42
BASIC REPORTS
SERVICE SUMMARY REPORT
The Service Summary Report is a report of the services your agency has provided for clients enrolled in a specific program. You can run a Service Summary Report a variety of ways to extract specific service information from client records, for example services rendered in the month of December or Case Management Services provided for the year, etc. Most often the Service Summary Report is used to submit for reimbursement.
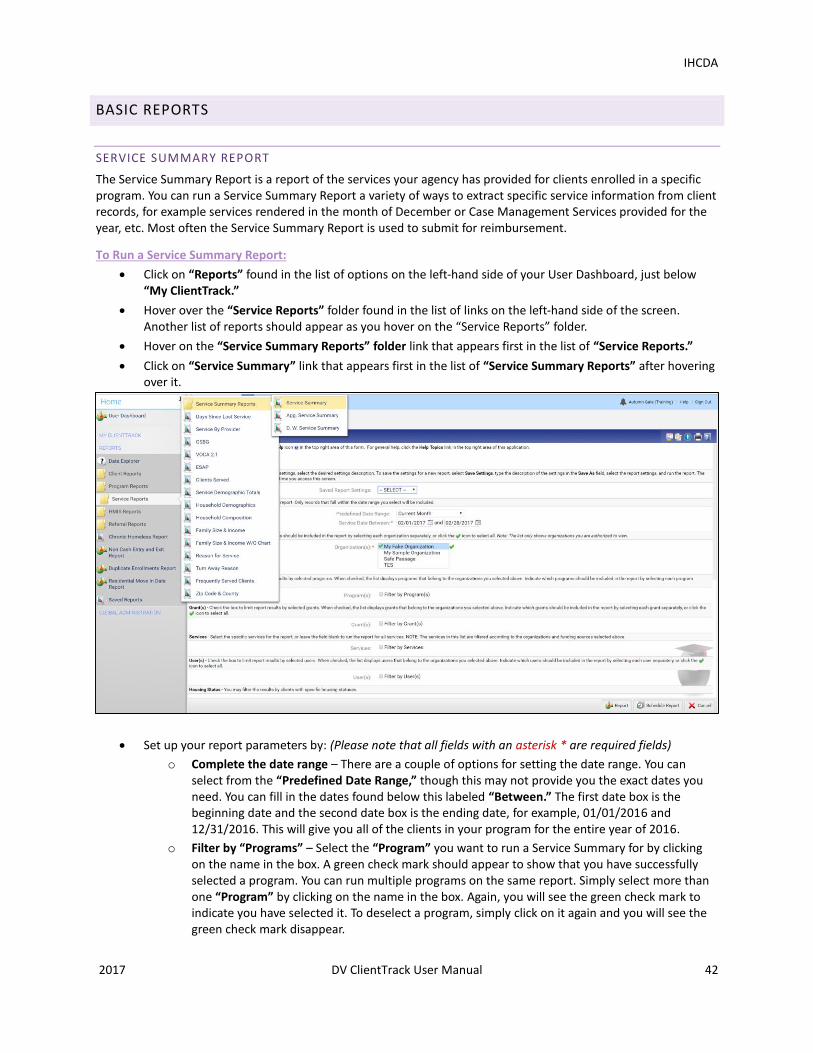
To Run a Service Summary Report:
Click on “Reports” found in the list of options on the left-hand side of your User Dashboard, just below “My ClientTrack.”
Hover over the “Service Reports” folder found in the list of links on the left-hand side of the screen. Another list of reports should appear as you hover on the “Service Reports” folder.
Hover on the “Service Summary Reports” folder link that appears first in the list of “Service Reports.”
Click on “Service Summary” link that appears first in the list of “Service Summary Reports” after hovering over it.
Set up your report parameters by: (Please note that all fields with an asterisk * are required fields)
o Complete the date range – There are a couple of options for setting the date range. You can select from the “Predefined Date Range,” though this may not provide you the exact dates you need. You can fill in the dates found below this labeled “Between.” The first date box is the beginning date and the second date box is the ending date, for example, 01/01/2016 and 12/31/2016. This will give you all of the clients in your program for the entire year of 2016.
o Filter by “Programs” – Select the “Program” you want to run a Service Summary for by clicking on the name in the box. A green check mark should appear to show that you have successfully selected a program. You can run multiple programs on the same report. Simply select more than one “Program” by clicking on the name in the box. Again, you will see the green check mark to indicate you have selected it. To deselect a program, simply click on it again and you will see the green check mark disappear.
IHCDA
2017 DV ClientTrack User Manual 43
o Filter by “Grants” – Select the “Grant” you want to run the report for by clicking on the name in the box. A green check mark should appear to show that you have successfully selected a grant. You can run multiple grants on the same report. However, your grant options will be dictated by the “Program(s)” you selected in the “Filter by Program(s)” box. If more than one grant appears, simply select more than one “Grant” by clicking on the name in the box. To deselect one, simply click on it again and you will see the green check mark disappear.
o Filter by Services, User(s), Housing Status, Results by Age, State(s), Counties, Zip Code(s) and more – Select a variety of parameters to extract more specific service data from clients your organization has served. Most of these selections will allow you to select more than one option in the box. Again, simply click on the option in the box and a green check mark will appear. To deselect an option, click on it again and you will see the green check mark disappear.
Click on the “Report” button found in the bottom right-hand corner of the screen. You should see your Service Summary Report pop up in a new window within seconds. You can export your report to a pdf file for email transmission or record-keeping by clicking on the pfd icon in the upper right-hand corner of the report window.
ANNUAL PERFORMANCE REPORT (APR)
The APR is a comprehensive report of your program – who you served and how you served them. It is recommended that you run an APR often throughout the year to track missing data so that your report is complete when it is time for the annual submission. Here are quick steps to running the report and cleaning up missing data.
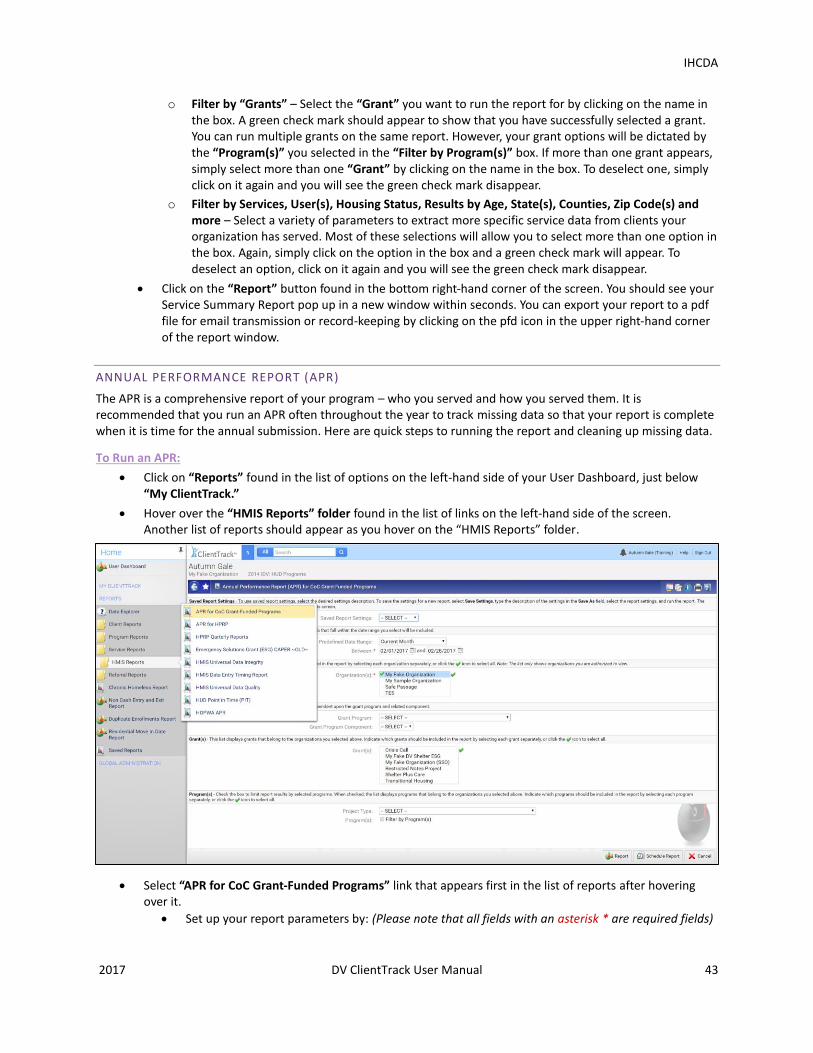
To Run an APR:
Click on “Reports” found in the list of options on the left-hand side of your User Dashboard, just below “My ClientTrack.”
Hover over the “HMIS Reports” folder found in the list of links on the left-hand side of the screen. Another list of reports should appear as you hover on the “HMIS Reports” folder.
Select “APR for CoC Grant-Funded Programs” link that appears first in the list of reports after hovering over it.
Set up your report parameters by: (Please note that all fields with an asterisk * are required fields)
IHCDA
2017 DV ClientTrack User Manual 44
o Complete the date range – There are a couple of options for setting the date range. You can select from the “Predefined Date Range,” though this may not provide you the exact dates you need. You can fill in the dates found below this labeled “Between.” The first date box is the beginning date and the second date box is the ending date, for example, 01/01/2016 and 12/31/2016. This will give you all of the clients in your program for the entire year of 2016.
o Select the “Grant Program” and “Grant Program Component” - Select the grant associated with your program with the drop down for “Grant Program.” This will prompt the next selection in “Grant Program Component.” If you do not know this information, feel free to try several selections to find the correct options for your program. You won’t break it by choosing different options. If you do not see the correct set up information here, contact the DV Help Desk by emailing [email protected]
o Select the “Grant(s)” – You may see several options to choose from after selecting “Grant Program” and “Grant Program Component.” Again, the aforementioned Grant Program and Grant Program Component will determine the options you see in this box. Select the “Grant” you want to run the APR for by clicking on the name in the box. A green check mark should appear to show that you have successfully selected a grant. You can run multiple grants on the same report. Simply select more than one “Grant” by clicking on the name in the box. Again, you will see the green check mark to indicate you have selected it. To deselect one, simply click on it again and you will see the green check mark disappear.
o Select the “Project Type”- Select a project type with the drop down list that appears. You may only select one “Project Type” at a time. Please note that Project Type and Program must be selected to populate the final measurement on Q.36 of the report. You can run your report without selecting “Project Type” and “Program,” but the measurement on the last page will not populate data.
o Filter by “Program(s)” - Click on the name in the box and a green check mark will appear to show that you have successfully selected it. Multiple programs can be selected here as well like the “Grant” parameter. You can deselect a program by clicking on it again and the green check mark will disappear.
Click on the “Report” button found in the bottom right-hand corner of the screen. You should see your report pop up in a new window within seconds.
To Drill Down and Find Missing Data
After your APR populates in a new window, you can review it by clicking on the blue arrows at the top of the report window. It is important to review your APR and see what sections (if any) of the report show “Missing” data. If a section of the report indicates there is missing data, follow these steps to identify which clients are reporting that missing information:
Click on the blue link for that section heading where you are missing data, for example “Q.7 Data Quality.” *Please note that not all sections have a link to select. You may be able to find this missing data in another section of the report or you can contact the DV Help Desk for assistance.
Another window will pop up with more detailed information for this section. You may be able to find your missing data in this screen, but it may be more helpful to export it to an Excel Spreadsheet to find the missing data in a more detailed, organized format.
To export the client data to an Excel Spreadsheet, click on the Excel icon with the gold spindle in the upper right-hand corner of the report window. You will be asked to “Open” or “Save” the spreadsheet, select “Open” to review the data. Be sure to clear your downloads in your Internet browser after exporting client data.
You will see the word “MISSING” on the spreadsheet where clients are missing data. The columns are labeled at the top of the spreadsheet and client names are on the far left-hand side of the spreadsheet. You can then go to client records and complete the missing data.
IHCDA
2017 DV ClientTrack User Manual 45
To Complete or Edit Missing Data
In unusual cases, there may be a missing enrollment ID for an entry or exit of a client. You can complete the entry and/or exit assessments after a technician has set up the master assessment for you. If you need assistance with setting up the master assessment, contact the DV Help Desk at [email protected] . Follow these steps to complete missing data on the assessments with enroll and exit IDs:
Go to the client’s record who is reported as missing the data on the APR.
Click on the blue action wheel beside your program enrollment found on the client dashboard under “[Client Name] Enrollments” located centrally on the client’s record.
Select “Review Entry Assessments” or “Review Exit Assessments” (depending on which one you need to complete) in the drop down list that appears after clicking on the blue action wheel.
Complete the missing data by clicking on the little notepad beside the appropriate assessment listed.
Save as you edit or complete assessments by scrolling down on the assessment screen and clicking on “Save.”
Blue check marks will appear to indicate an assessment is completed.
When you have completed the missing data on client records, run your APR again to review it and ensure all missing data is resolved. Please don’t hesitate to contact the DV Help Desk if you need any assistance with your report or completing missing data.