Embed Size (px)
Citation preview
Page 1
DV21678-L
Revit to Google Cardboard Mark Cronin (& Ben Thomas as contributing author) Peddle Thorp Architects
Description Are you interested in Virtual Reality but think the cost of entry is too high? Think again! With a $20 Google Cardboard headset you can use Virtual Reality to immerse your clients in your design. From photospheres to web hosted experiences, find out all you need to know to get started in Virtual Reality. Your AU Expert(s) Mark Cronin is a Senior Executive – Design Systems & Technology at Peddle Thorp Architects, based in Brisbane, Australia. He leads the integration of digital design tools with a primary objective of maximizing the efficiency of Building Information Modeling (BIM) within the company and extending this knowledge into the wider industry. Cronin develops, implements, and manages design workflows, and is actively involved with several industry bodies contributing to the future of BIM in Australia. He is responsible for providing in-house training and best-practice solutions at Peddle Thorp, and is a regular speaker at industry conferences. Cronin is an industry blog author, a member of the Collaborate ANZ leadership committee, and a founding committee member of BrisBIM.
Learning Objectives • Learn how to transfer Revit models into a virtual environment • Identify the different VR options available in Google Cardboard • Experience the your Revit models in VR • Learn different ways to prepare files for Google Cardboard
Page 2
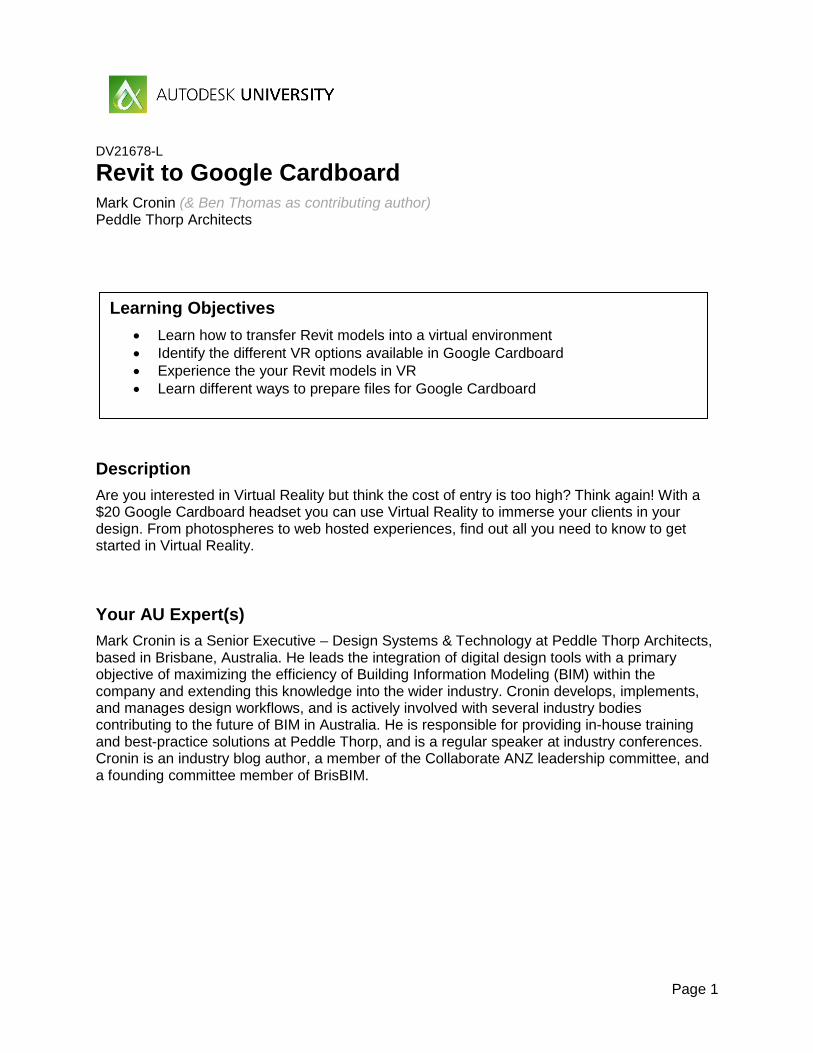
Before we get started… Take out your phone and:
Connect to conference WiFi (?) WiFi Access point name: Password:
Download a QR code scanner Or just click on the QR code for a hyperlink.
Download the Iris Scope Mobile App:
Visit https://www.irisvr.com/ and create a new account for Iris Scope. Keep your Iris Sign In details to hand.
Have your Autodesk Sign In details to hand

Page 3
Contents Introduction .................................................................................................................... 4
Review of current technology ......................................................................................... 4
Benefits of use (Why) ..................................................................................................... 6
Options to consider (How) .............................................................................................. 7
Lab Activities .................................................................................................................10
Lab Activity 1 .................................................................................................................11
Lab Activity 2 .................................................................................................................16
Lab Activity 3 .................................................................................................................20
Lab Activity 4 .................................................................................................................25
Lab Activity 5 - Demo ....................................................................................................29
Lab Activity 6 .................................................................................................................30
Lab Activity 7 .................................................................................................................36
Lab Demo 8 - Prepare and host VR files on your website ..............................................47
More Advanced Concepts .............................................................................................49
Future Direction (Summary) ..........................................................................................50
Page 4
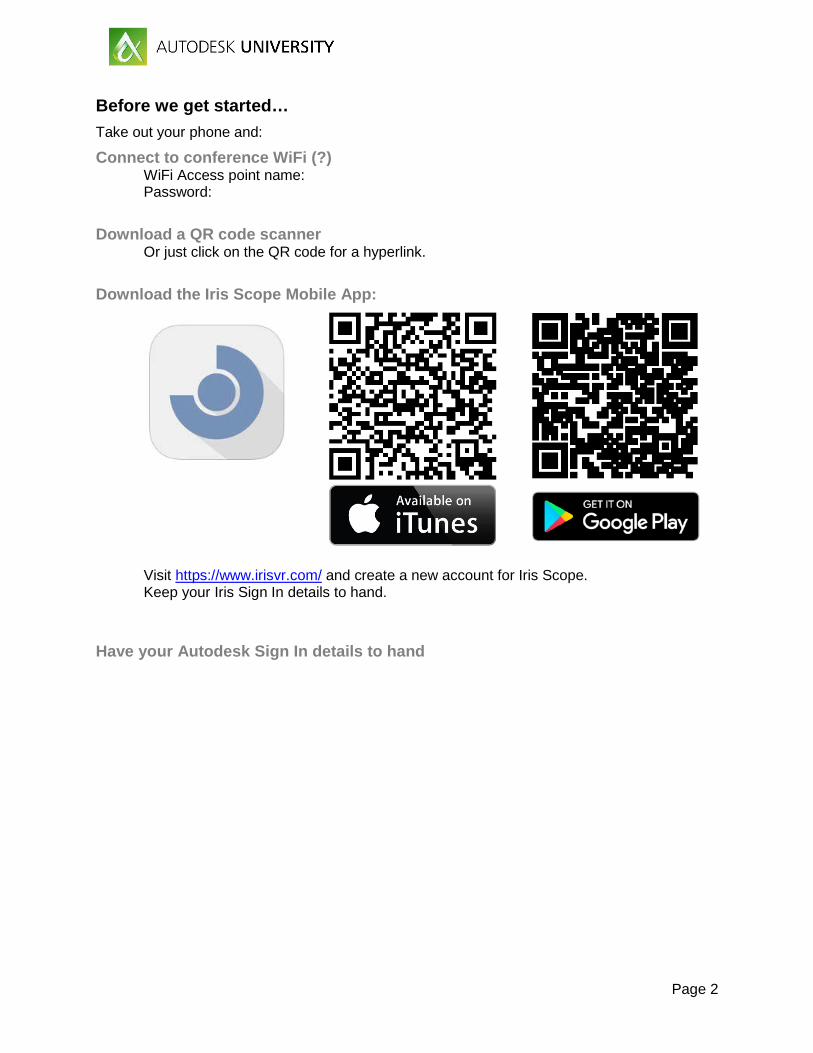
Introduction While there have been plenty of examples and classes talking about what Virtual Reality (VR) is and how great the technology is, most of them show what can be done but not how to achieve it. This lab is intended for newcomers to VR, from the simplest of workflows through to intermediate examples of how to produce content for Google Cardboard.
Google Cardboard is limited in capability – you can only view static scenes (and jump between them), not walk around freely as you can using more advanced technology such as HTC Vive or Oculus Rift. However it offers a cheap and easy introduction to VR, using easily accessed tools with a relatively fast turnaround, and most importantly, can be completed by beginners! This lab is fundamentally about getting you started on your VR journey! Review of current technology What is Google Cardboard? Google Cardboard is an affordable, easy way to experiment with Virtual Reality (VR), in our case for AEC design. It consists of a simple flat packed cardboard headset that a smartphone is inserted into.
An app (or code on a website) is used on the phone to project a separate image to each eye, which the brain combines into an immersive 3D environment.
Page 5
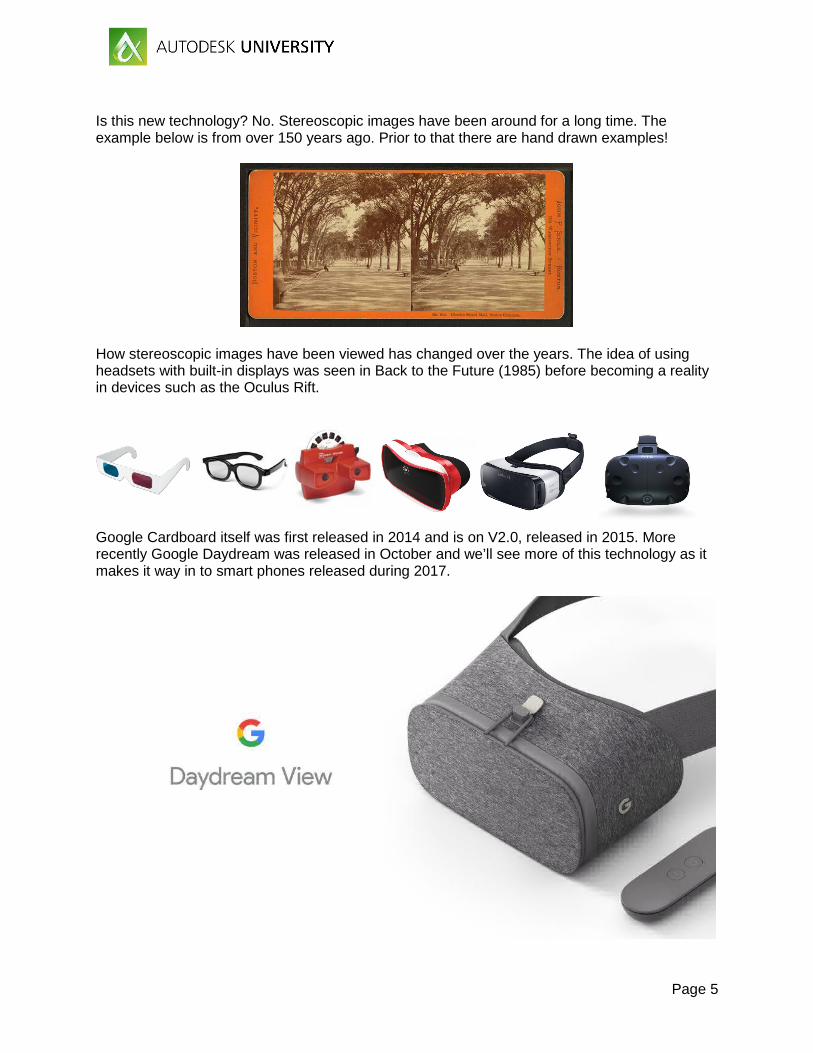
Is this new technology? No. Stereoscopic images have been around for a long time. The example below is from over 150 years ago. Prior to that there are hand drawn examples!
How stereoscopic images have been viewed has changed over the years. The idea of using headsets with built-in displays was seen in Back to the Future (1985) before becoming a reality in devices such as the Oculus Rift.
Google Cardboard itself was first released in 2014 and is on V2.0, released in 2015. More recently Google Daydream was released in October and we’ll see more of this technology as it makes it way in to smart phones released during 2017.
Page 6
Benefits of use (Why) Why should you use it? The question should be why not. Your competitors are! Not to mention benefits for the client.
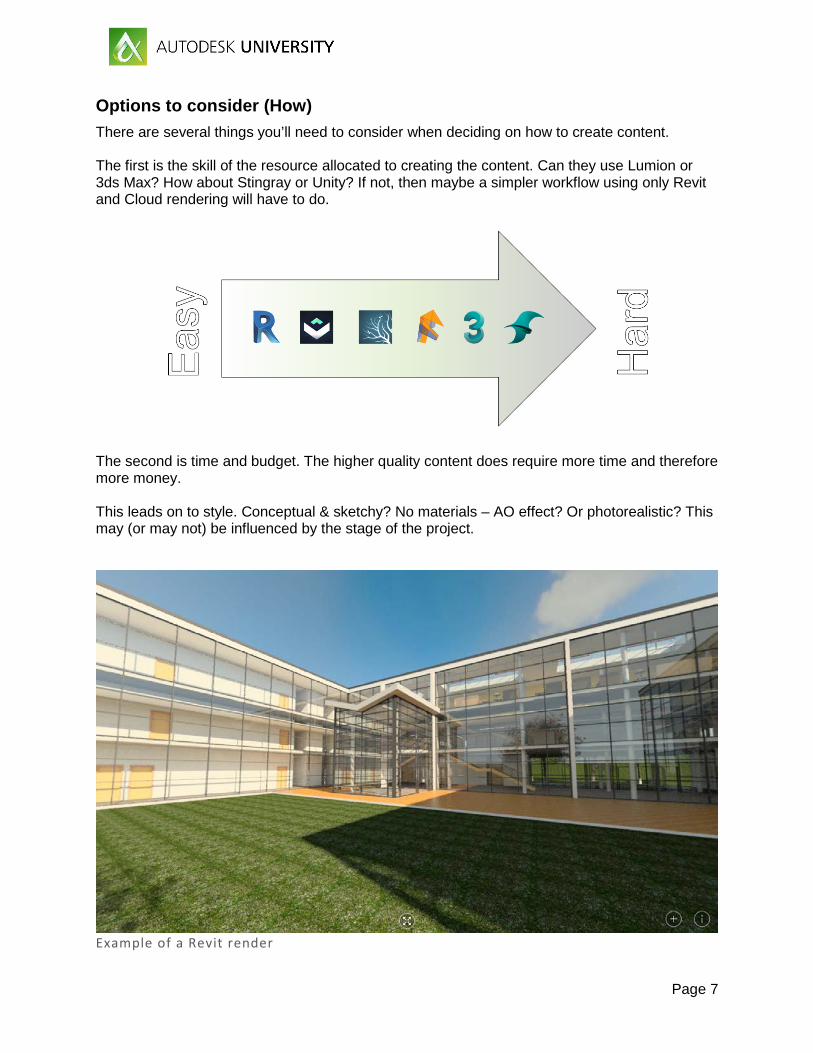
Client engagement The days of expecting clients to be satisfied with paper plans is long gone. Not only is visualization expected but so are more advanced methods of conveying design. However, aside from 3D printing, not much else is as engaging as VR – actually immersing your client in your design!
Google Cardboard certainly can’t compete with a true VR Cave but its great value for money. Also consider: • Ease of access • Technology implementation • Low cost • Novelty factor
Page 7
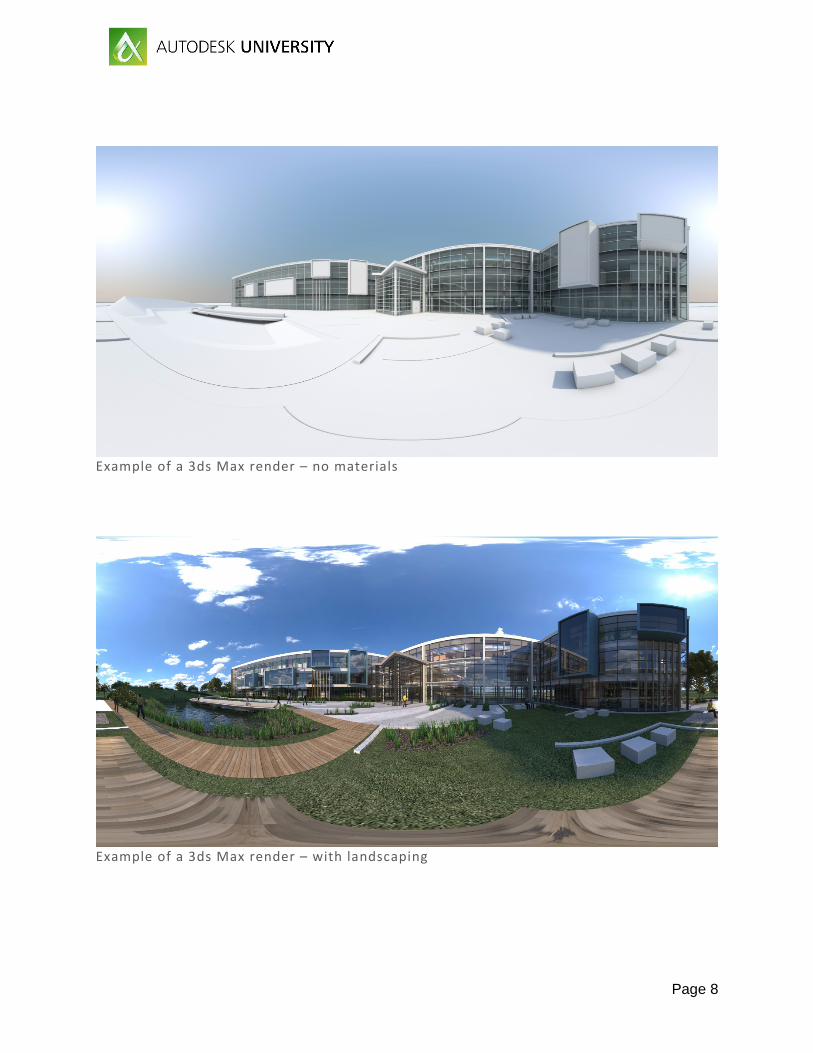
Options to consider (How) There are several things you’ll need to consider when deciding on how to create content. The first is the skill of the resource allocated to creating the content. Can they use Lumion or 3ds Max? How about Stingray or Unity? If not, then maybe a simpler workflow using only Revit and Cloud rendering will have to do.
The second is time and budget. The higher quality content does require more time and therefore more money. This leads on to style. Conceptual & sketchy? No materials – AO effect? Or photorealistic? This may (or may not) be influenced by the stage of the project.
Example of a Revit render
Page 8
Example of a 3ds Max render – no materials
Example of a 3ds Max render – with landscaping
Page 9
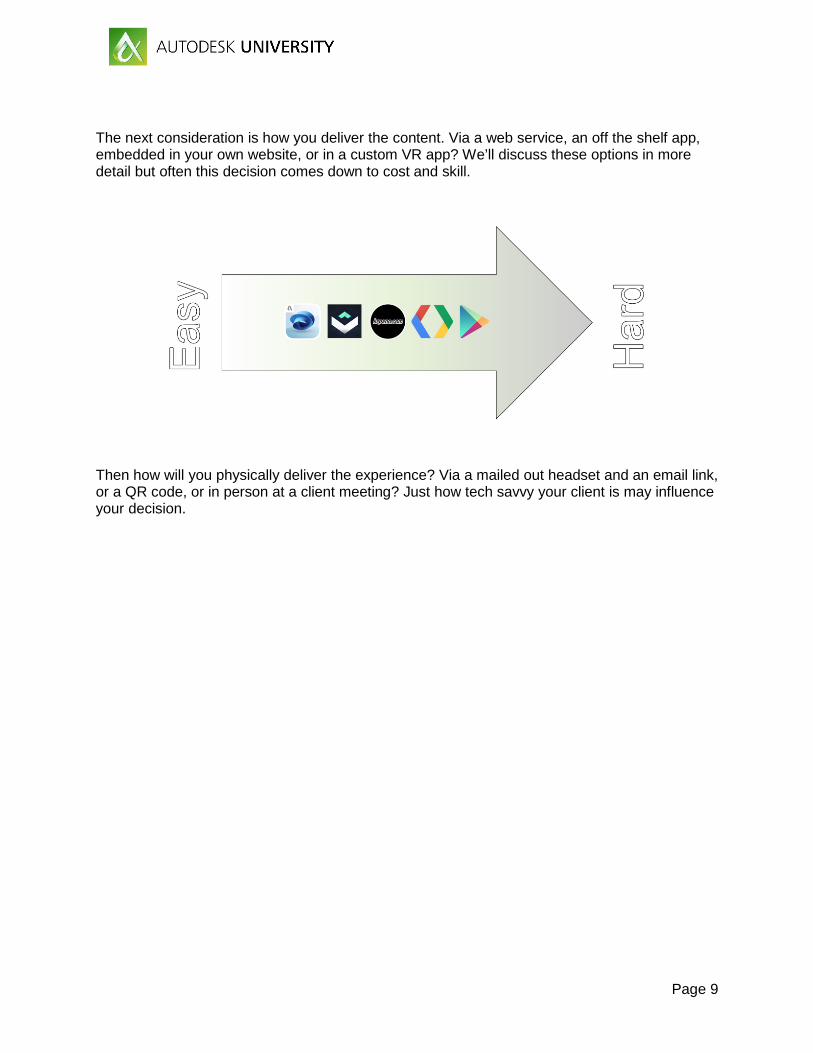
The next consideration is how you deliver the content. Via a web service, an off the shelf app, embedded in your own website, or in a custom VR app? We’ll discuss these options in more detail but often this decision comes down to cost and skill.
Then how will you physically deliver the experience? Via a mailed out headset and an email link, or a QR code, or in person at a client meeting? Just how tech savvy your client is may influence your decision.
Page 10
Lab Activities Lab Activity 1 - Revit to Render in the Cloud Lab Activity 2 - Revit Material Overrides and Render in the Cloud Lab Activity 3 - Build you Google Cardboard headset and view A360 Renders Lab Activity 4 - Iris Scope to Google Cardboard Lab Demo 5 - Export from Revit using Modelo / Kubity Lab Activity 6 - Revit to 3ds Max Lab Activity 7 - 3ds Max white render Lab Demo 8 - Hosting VR on your website
Page 11
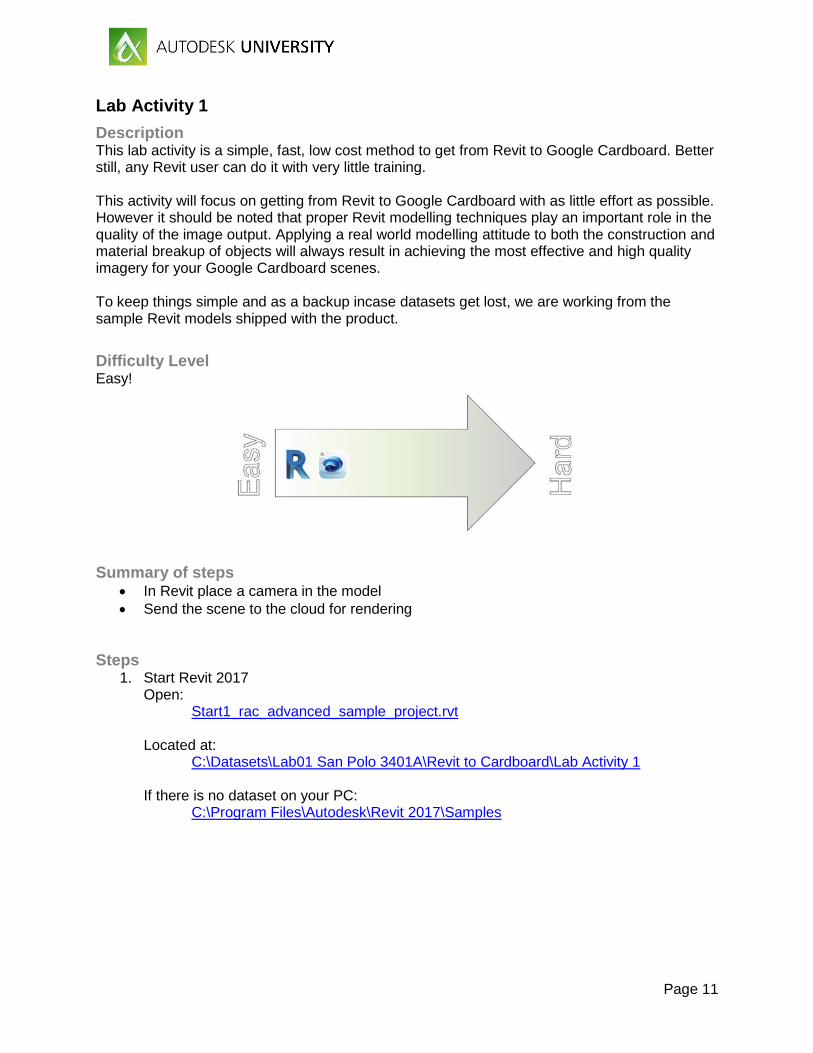
Lab Activity 1 Description This lab activity is a simple, fast, low cost method to get from Revit to Google Cardboard. Better still, any Revit user can do it with very little training. This activity will focus on getting from Revit to Google Cardboard with as little effort as possible. However it should be noted that proper Revit modelling techniques play an important role in the quality of the image output. Applying a real world modelling attitude to both the construction and material breakup of objects will always result in achieving the most effective and high quality imagery for your Google Cardboard scenes. To keep things simple and as a backup incase datasets get lost, we are working from the sample Revit models shipped with the product.
Difficulty Level Easy!
Summary of steps • In Revit place a camera in the model • Send the scene to the cloud for rendering
Steps
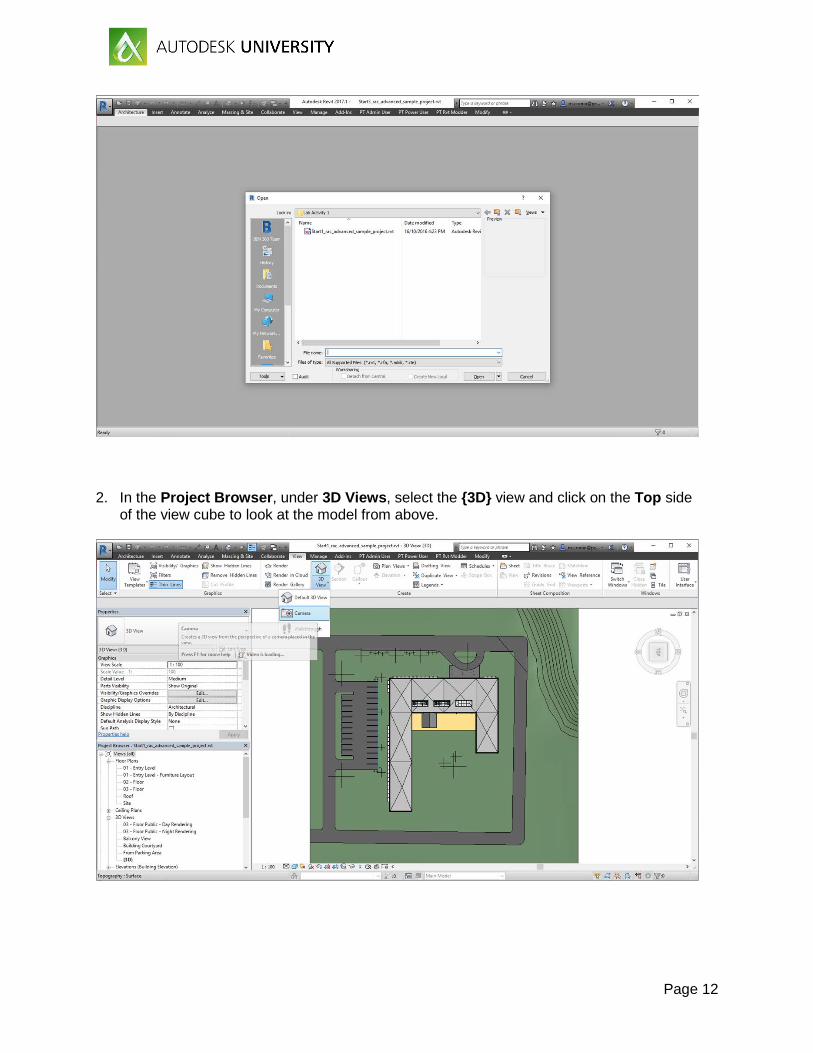
1. Start Revit 2017 Open:
Start1_rac_advanced_sample_project.rvt Located at:
C:\Datasets\Lab01 San Polo 3401A\Revit to Cardboard\Lab Activity 1 If there is no dataset on your PC:
C:\Program Files\Autodesk\Revit 2017\Samples
Page 12
2. In the Project Browser, under 3D Views, select the {3D} view and click on the Top side
of the view cube to look at the model from above.
Page 13
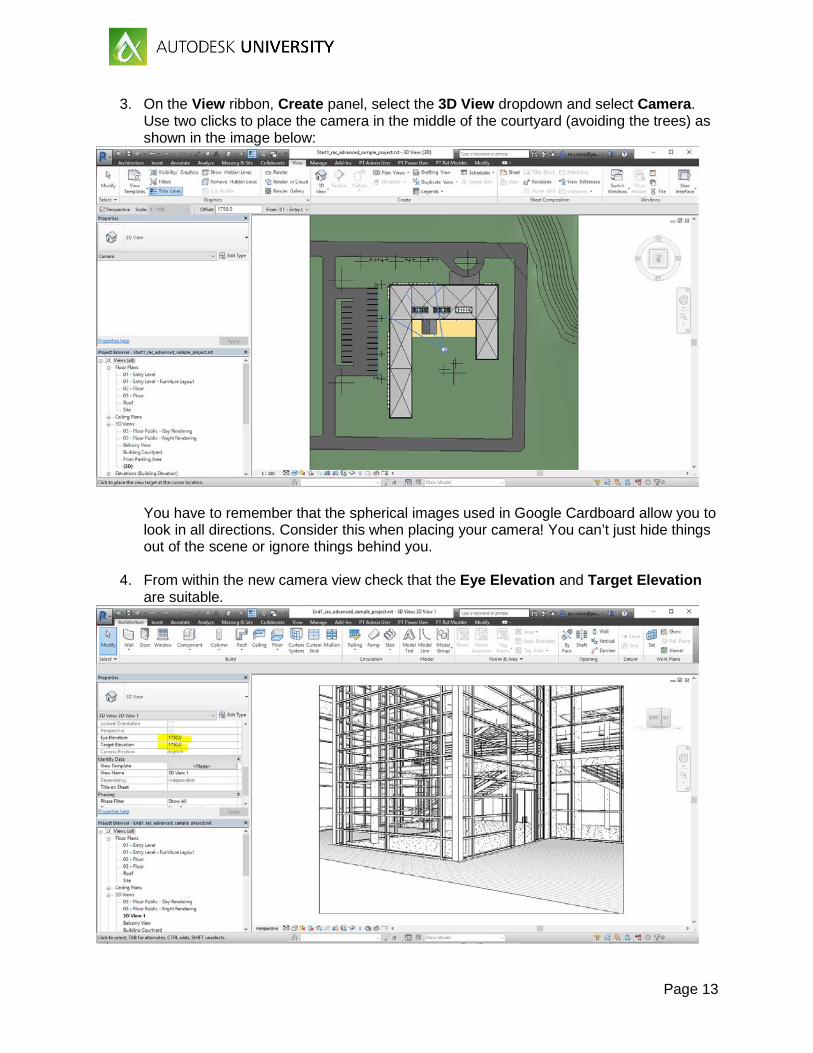
3. On the View ribbon, Create panel, select the 3D View dropdown and select Camera. Use two clicks to place the camera in the middle of the courtyard (avoiding the trees) as shown in the image below:
You have to remember that the spherical images used in Google Cardboard allow you to look in all directions. Consider this when placing your camera! You can’t just hide things out of the scene or ignore things behind you.
4. From within the new camera view check that the Eye Elevation and Target Elevation
are suitable.

Page 14
5. On the View ribbon, in the Graphics panel, select Render in Cloud:
6. Sign in with your Autodesk credentials and select Continue in the Render in Cloud
window:

Page 15
7. Match the settings in the image below before submitting the render to the cloud service.
These settings are fine for a draft quality image but you’d want to set them higher for final production quality images. The downside is you’ll burn through cloud credits really fast on max settings!
8. While we wait for the render to complete let’s get started on Lab Activity 2…
Page 16
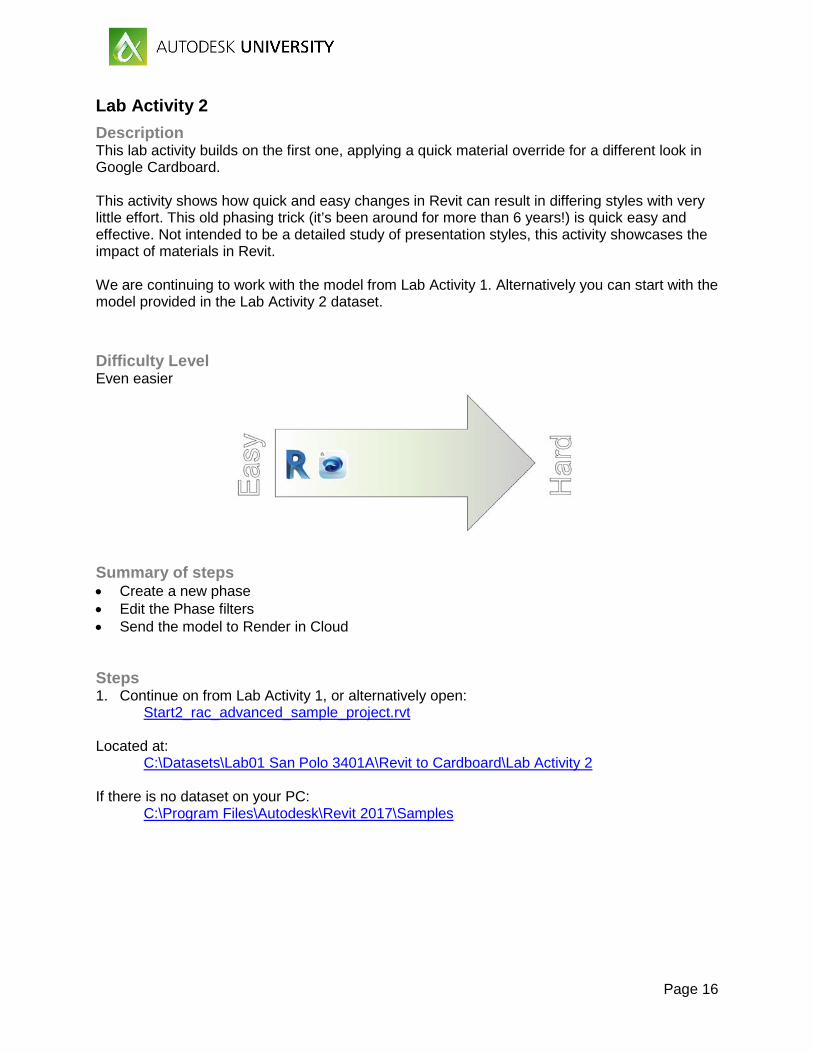
Lab Activity 2 Description This lab activity builds on the first one, applying a quick material override for a different look in Google Cardboard. This activity shows how quick and easy changes in Revit can result in differing styles with very little effort. This old phasing trick (it’s been around for more than 6 years!) is quick easy and effective. Not intended to be a detailed study of presentation styles, this activity showcases the impact of materials in Revit. We are continuing to work with the model from Lab Activity 1. Alternatively you can start with the model provided in the Lab Activity 2 dataset.
Difficulty Level Even easier
Summary of steps • Create a new phase • Edit the Phase filters • Send the model to Render in Cloud Steps 1. Continue on from Lab Activity 1, or alternatively open:
Start2_rac_advanced_sample_project.rvt Located at:
C:\Datasets\Lab01 San Polo 3401A\Revit to Cardboard\Lab Activity 2 If there is no dataset on your PC:
C:\Program Files\Autodesk\Revit 2017\Samples

Page 17
2. One the Manage ribbon, in the Phasing panel, select Phases. First click on line 2 and then add a new phase by clicking After, making sure it is in the future (at the bottom) and call it Render:
3. Select the Graphic Overrides tab and click in the Material box for the Existing line of the Phase Status:
Page 18
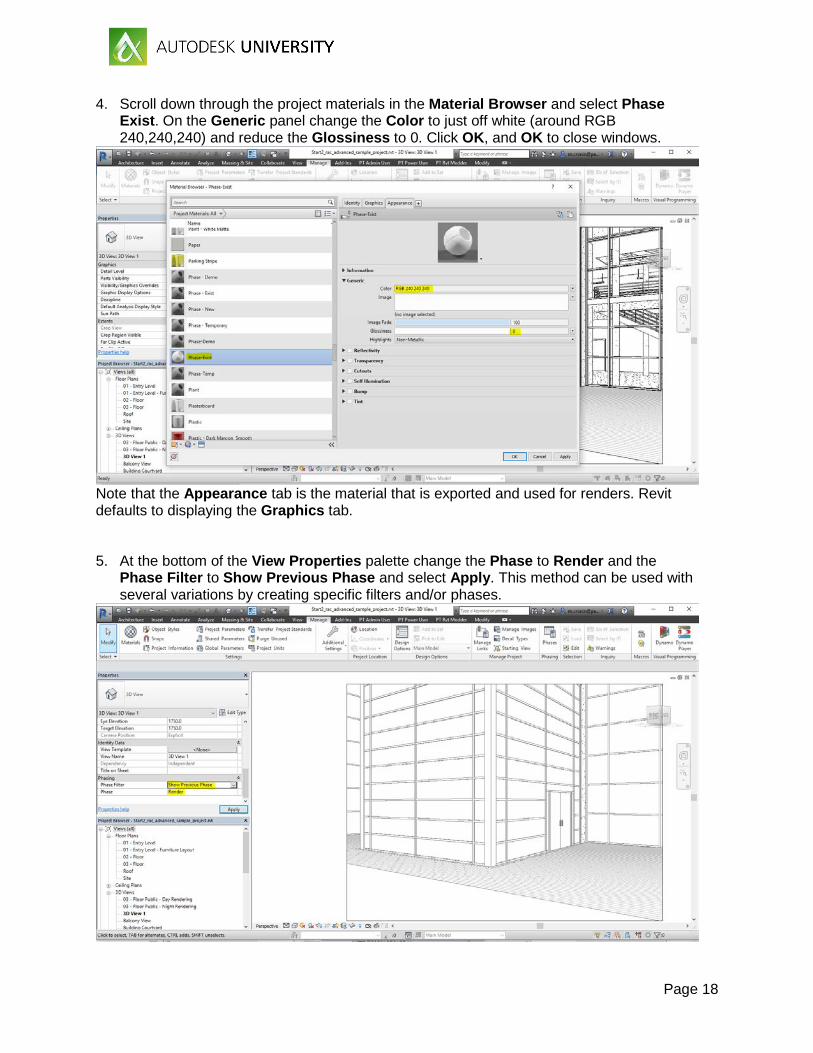
4. Scroll down through the project materials in the Material Browser and select Phase Exist. On the Generic panel change the Color to just off white (around RGB 240,240,240) and reduce the Glossiness to 0. Click OK, and OK to close windows.
Note that the Appearance tab is the material that is exported and used for renders. Revit defaults to displaying the Graphics tab. 5. At the bottom of the View Properties palette change the Phase to Render and the
Phase Filter to Show Previous Phase and select Apply. This method can be used with several variations by creating specific filters and/or phases.

Page 19
6. We don’t want the glass to show so we can quickly hide it by using the Visibility/Graphics Overrides Edit button in the View Properties palette. Then simply uncheck Curtain Panels and Doors in the Visibility column of the Model Category tab. Click OK and Apply to return to the model.
7. Back on the View ribbon, Graphics panel, select Render in Cloud and submit another Stereo Panorama:

Page 20
Lab Activity 3 Description This lab activity builds on the first two activities, and looks at the options available in the Cloud Render Gallery. This activity shows how to view or share images from this cloud service. We are continuing to work with the model/renders from Lab Activity 1 & 2. Alternatively you can start with the render links provided in the Lab Activity 3 dataset.
Difficulty Level Easiest yet!
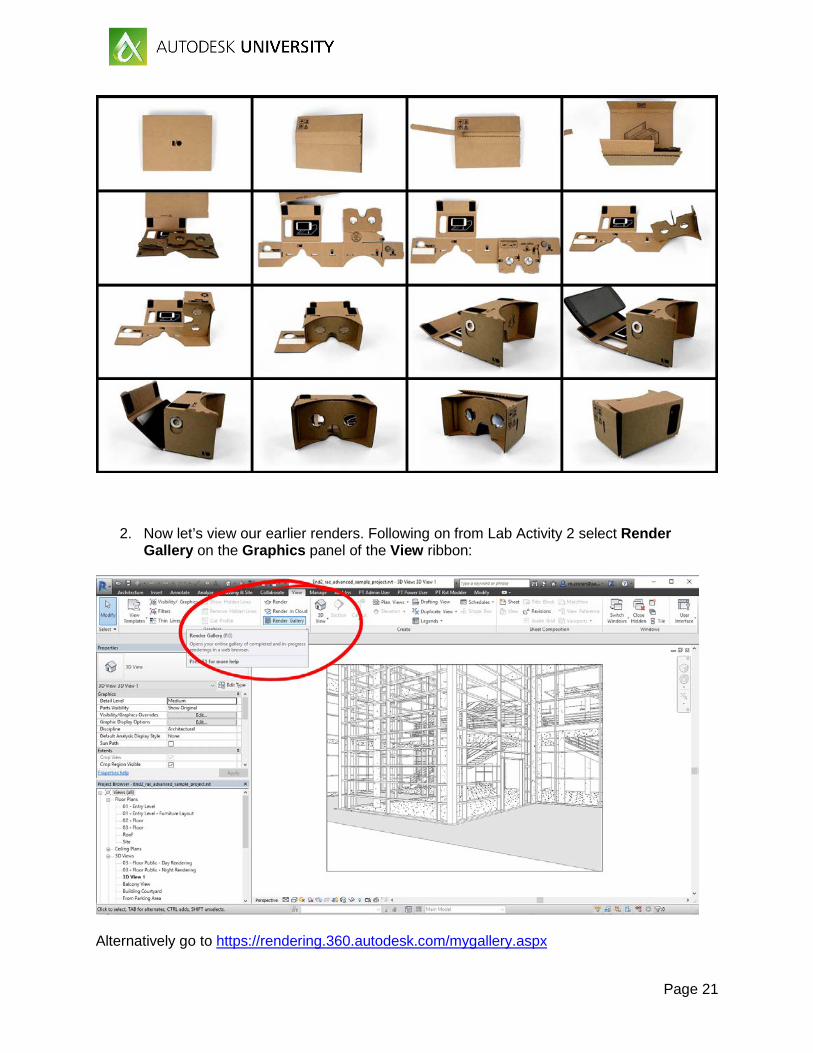
Summary of steps • Open and assemble your free Autodesk Google Cardboard headset • Access Cloud Gallery • View renders in browser • Share renders • View renders in Google Cardboard Steps 1. Open and assemble your free Google Cardboard headsets, courtesy of Autodesk.
Thanks! Refer to the next image.
Page 21
2. Now let’s view our earlier renders. Following on from Lab Activity 2 select Render Gallery on the Graphics panel of the View ribbon:
Alternatively go to https://rendering.360.autodesk.com/mygallery.aspx
Page 22
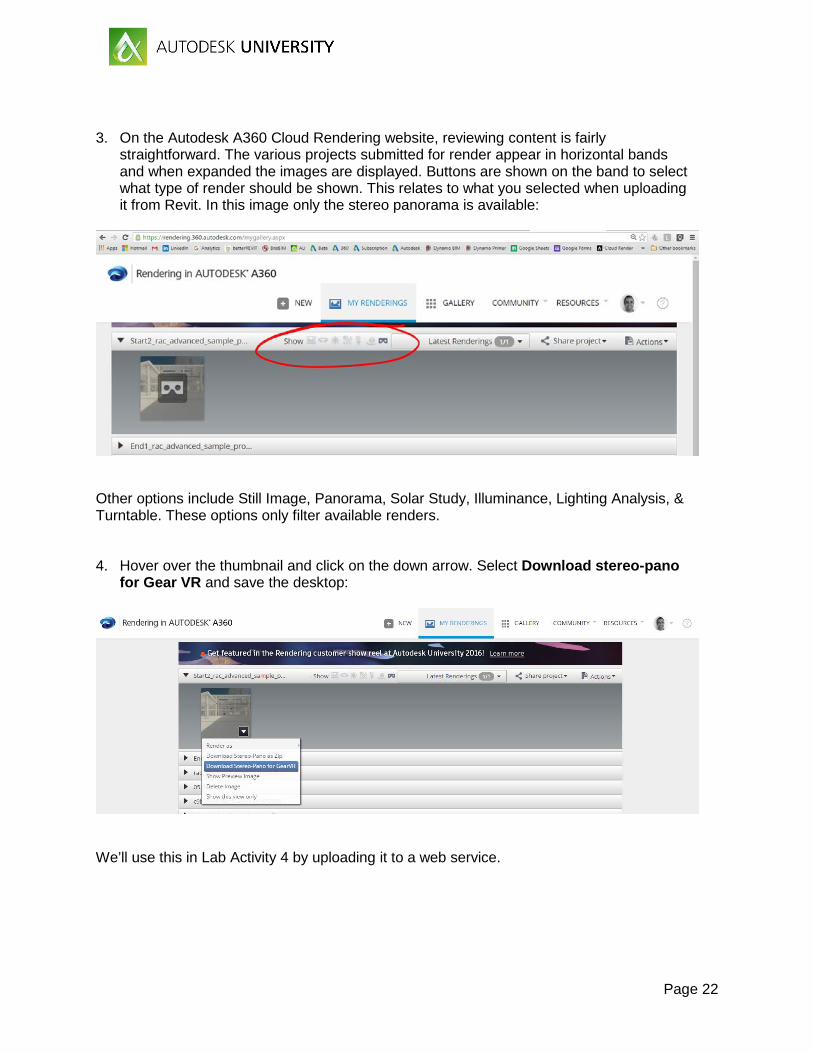
3. On the Autodesk A360 Cloud Rendering website, reviewing content is fairly
straightforward. The various projects submitted for render appear in horizontal bands and when expanded the images are displayed. Buttons are shown on the band to select what type of render should be shown. This relates to what you selected when uploading it from Revit. In this image only the stereo panorama is available:
Other options include Still Image, Panorama, Solar Study, Illuminance, Lighting Analysis, & Turntable. These options only filter available renders. 4. Hover over the thumbnail and click on the down arrow. Select Download stereo-pano
for Gear VR and save the desktop:
We’ll use this in Lab Activity 4 by uploading it to a web service.
Page 23
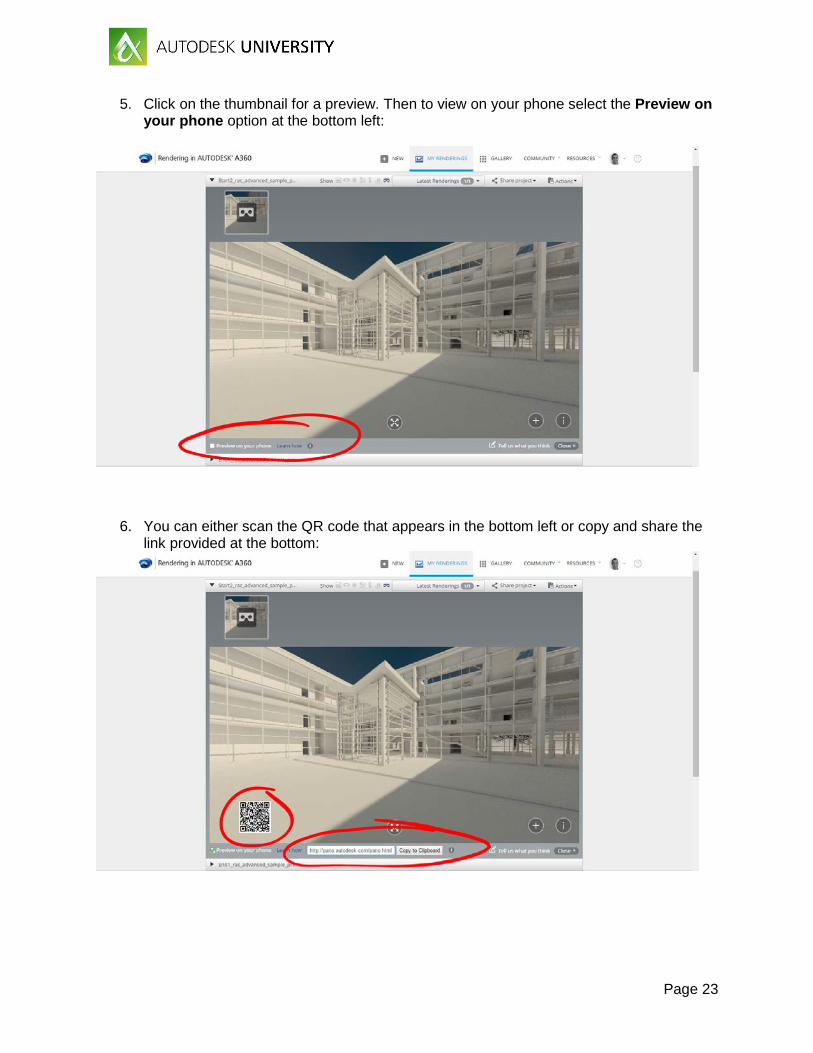
5. Click on the thumbnail for a preview. Then to view on your phone select the Preview on your phone option at the bottom left:
6. You can either scan the QR code that appears in the bottom left or copy and share the link provided at the bottom:

Page 24
7. Now simply drop your phone into the Google Cardboard headset and enjoy! How easy
was that?
Page 25
Lab Activity 4 Description This lab activity is quite similar to the last one but introduces a third party web service, Iris Scope (https://www.irisvr.com/). Basically you upload pre-rendered images for viewing from their website. It is also worth noting that they have more advanced options for use with more advanced VR headsets.
There are several similar options that rely on you producing rendered VR images (in various formats) which are uploaded to the supplier’s cloud service, from where you can interact with them via a custom app on your mobile device. Obviously there are also plenty of choices for generating these renders, of which we are only looking at two (A360 & 3ds Max). Several other easy options include rendering through applications such as V-Ray for Revit, or Lumion, etc.
Difficulty Level Really easy!
Summary of steps • Download Iris Scope App • Upload previously rendered content to Iris • View Iris content in a browser • View Iris content in Google Cardboard
Steps
1. On your phone download the Iris Scope App as per page 2 of this handout.
2. Go to the location (Desktop?) where you saved the downloaded stereo-pano for Gear VR from A360. Extract the files from the compressed folder using the usual Windows tools. Alternatively you can use the files provided with the dataset in step 6.
3. In your PC browser (use Chrome if available – IE doesn’t always support the latest 3d
web viewing toolset), browse to https://www.irisvr.com/ and login with the details you created earlier.
Page 26
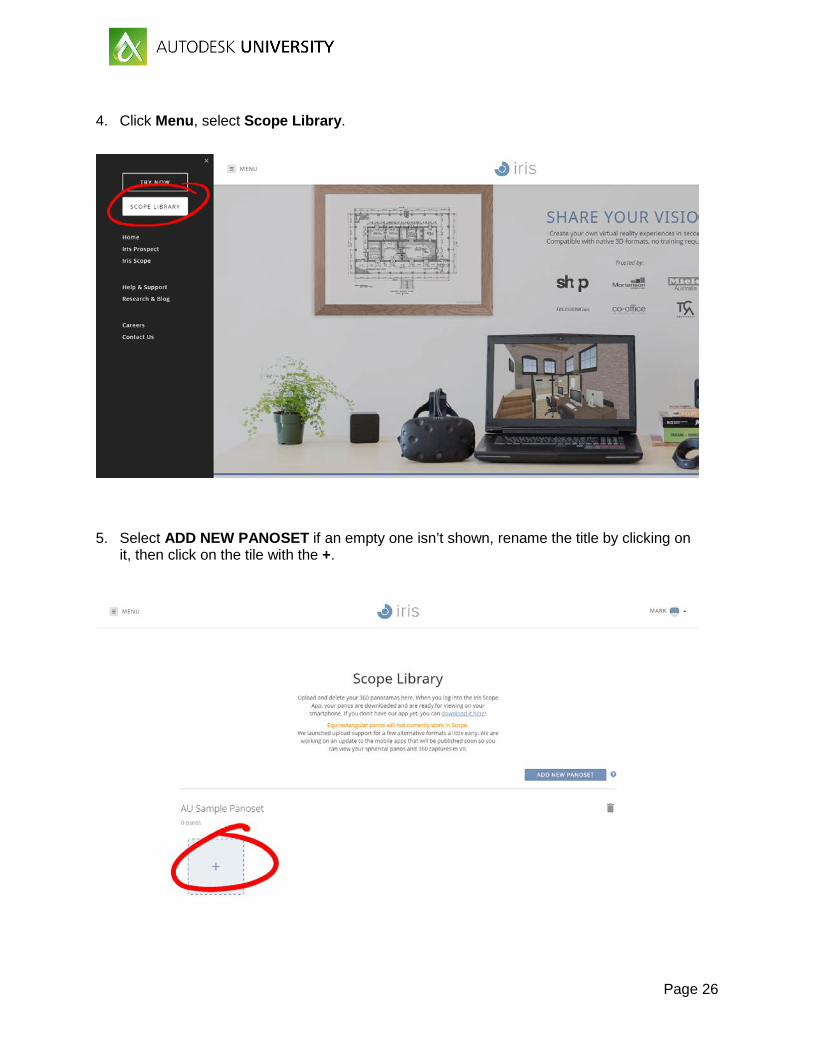
4. Click Menu, select Scope Library.
5. Select ADD NEW PANOSET if an empty one isn’t shown, rename the title by clicking on
it, then click on the tile with the +.

Page 27
6. Browse to the previously unzipped A360 download (stereo-pano for Gear VR) or select the files from the Dataset – Lab Activity 4 (C:\Datasets\Lab01 San Polo 3401A\Revit to Cardboard\Lab Activity 4). Make sure to click UPLOAD in the bottom right corner of the window.
7. While you are waiting for it to upload, open the Iris Scope app on your phone (refer to page 2 for download links). Log in to the app. Select your named scene and then download (as soon as it has finished processing).

Page 28
8. Then it is as simple as clicking on the thumbnail or the Google Cardboard icon to launch the viewer, and just drop your phone into your headset!
Note the lack of the address bar and on screen menus – this is an improvement over the A360 viewer. You can also easily upload content produced from other render engines, leading to the opportunity of a much better quality VR environment. You can also interact with the 360 pano on your PC in a web browser, which is useful for multiple people to view at the same time. These experiences aren’t particularly easy to share though – you’d also have to share login details which isn’t ideal.
Page 29
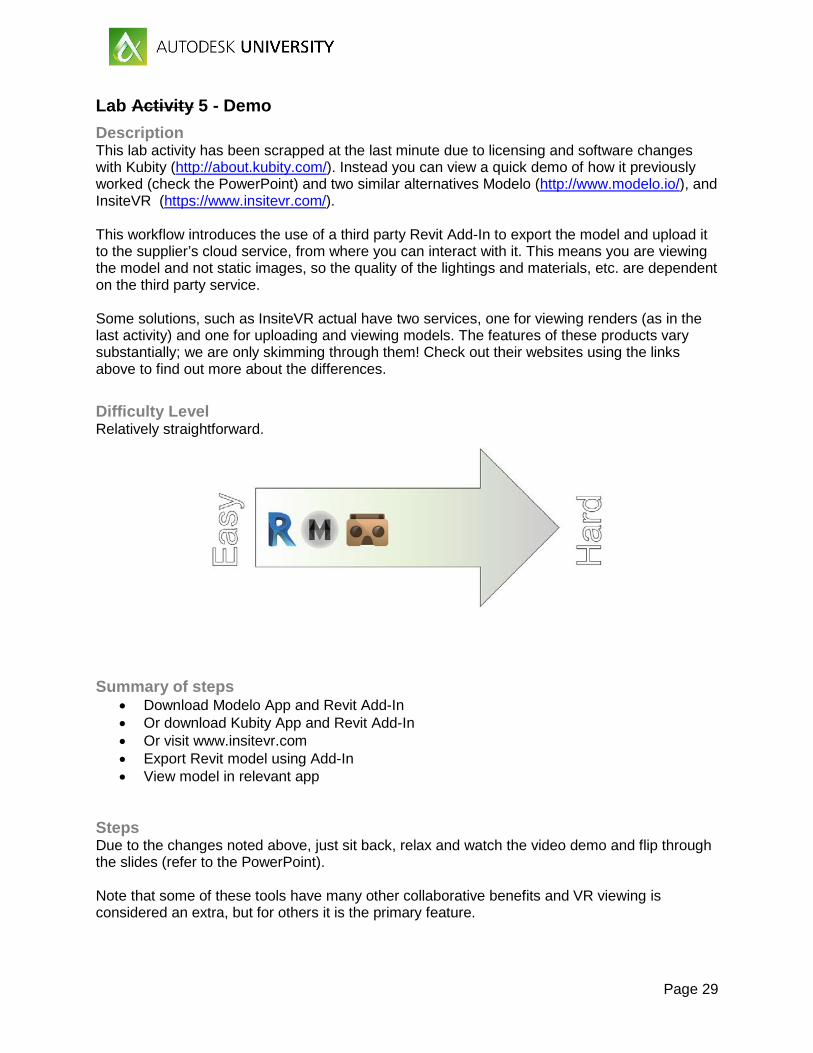
Lab Activity 5 - Demo Description This lab activity has been scrapped at the last minute due to licensing and software changes with Kubity (http://about.kubity.com/). Instead you can view a quick demo of how it previously worked (check the PowerPoint) and two similar alternatives Modelo (http://www.modelo.io/), and InsiteVR (https://www.insitevr.com/). This workflow introduces the use of a third party Revit Add-In to export the model and upload it to the supplier’s cloud service, from where you can interact with it. This means you are viewing the model and not static images, so the quality of the lightings and materials, etc. are dependent on the third party service. Some solutions, such as InsiteVR actual have two services, one for viewing renders (as in the last activity) and one for uploading and viewing models. The features of these products vary substantially; we are only skimming through them! Check out their websites using the links above to find out more about the differences.
Difficulty Level Relatively straightforward.
Summary of steps • Download Modelo App and Revit Add-In • Or download Kubity App and Revit Add-In • Or visit www.insitevr.com • Export Revit model using Add-In • View model in relevant app
Steps Due to the changes noted above, just sit back, relax and watch the video demo and flip through the slides (refer to the PowerPoint). Note that some of these tools have many other collaborative benefits and VR viewing is considered an extra, but for others it is the primary feature.
Page 30
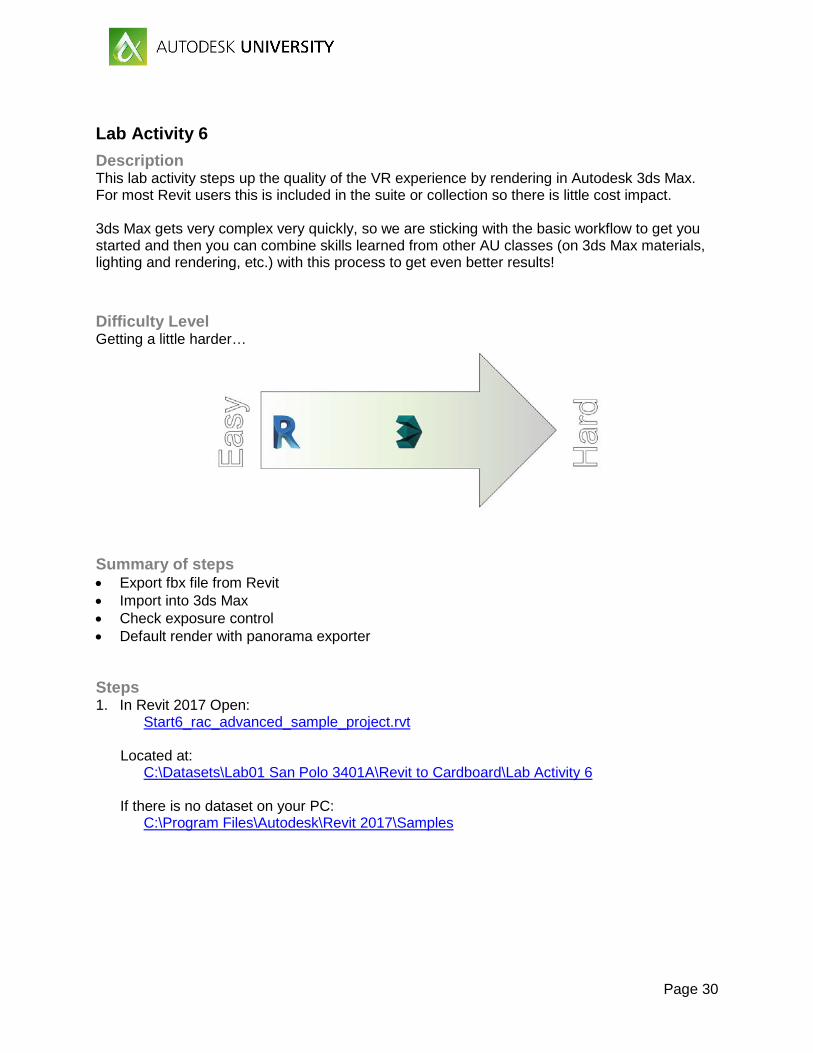
Lab Activity 6 Description This lab activity steps up the quality of the VR experience by rendering in Autodesk 3ds Max. For most Revit users this is included in the suite or collection so there is little cost impact. 3ds Max gets very complex very quickly, so we are sticking with the basic workflow to get you started and then you can combine skills learned from other AU classes (on 3ds Max materials, lighting and rendering, etc.) with this process to get even better results!
Difficulty Level Getting a little harder…
Summary of steps • Export fbx file from Revit • Import into 3ds Max • Check exposure control • Default render with panorama exporter Steps 1. In Revit 2017 Open:
Start6_rac_advanced_sample_project.rvt Located at:
C:\Datasets\Lab01 San Polo 3401A\Revit to Cardboard\Lab Activity 6 If there is no dataset on your PC:
C:\Program Files\Autodesk\Revit 2017\Samples

Page 31
2. In the {3D} view, go to the application button (big R in the top right) and select Export, then FBX. Select a location to save the file (Desktop?).
There are multiple methods of transitioning to 3ds Max. We prefer this one.
3. Open 3ds Max 2017 and from the application button select, Import, then Link FBX.
Page 32
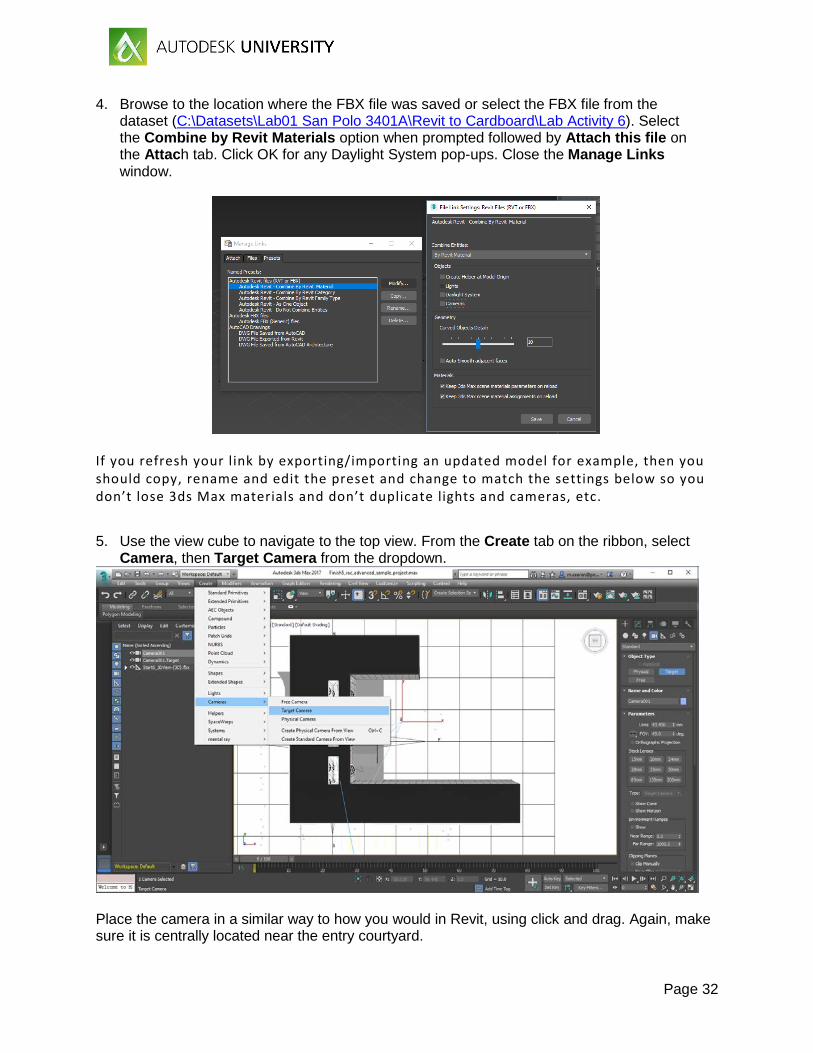
4. Browse to the location where the FBX file was saved or select the FBX file from the dataset (C:\Datasets\Lab01 San Polo 3401A\Revit to Cardboard\Lab Activity 6). Select the Combine by Revit Materials option when prompted followed by Attach this file on the Attach tab. Click OK for any Daylight System pop-ups. Close the Manage Links window.
If you refresh your link by exporting/importing an updated model for example, then you should copy, rename and edit the preset and change to match the settings below so you don’t lose 3ds Max materials and don’t duplicate lights and cameras, etc.
5. Use the view cube to navigate to the top view. From the Create tab on the ribbon, select
Camera, then Target Camera from the dropdown.
Place the camera in a similar way to how you would in Revit, using click and drag. Again, make sure it is centrally located near the entry courtyard.
Page 33
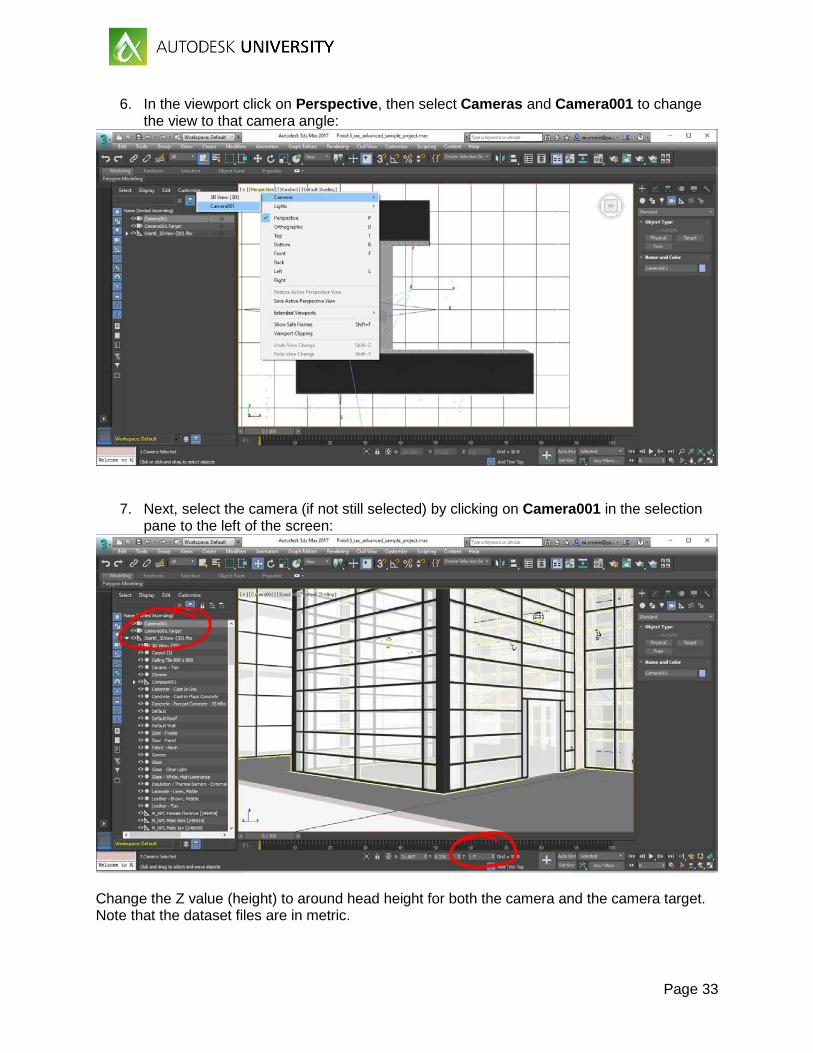
6. In the viewport click on Perspective, then select Cameras and Camera001 to change the view to that camera angle:
7. Next, select the camera (if not still selected) by clicking on Camera001 in the selection pane to the left of the screen:
Change the Z value (height) to around head height for both the camera and the camera target. Note that the dataset files are in metric.
Page 34
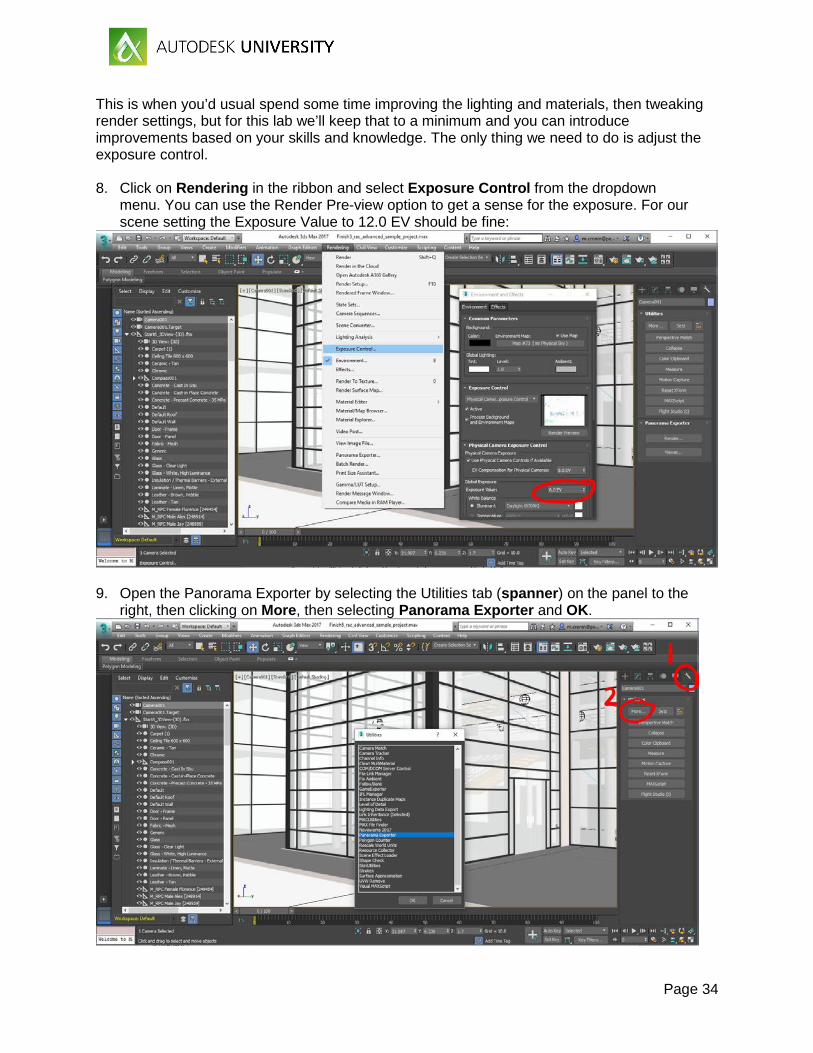
This is when you’d usual spend some time improving the lighting and materials, then tweaking render settings, but for this lab we’ll keep that to a minimum and you can introduce improvements based on your skills and knowledge. The only thing we need to do is adjust the exposure control. 8. Click on Rendering in the ribbon and select Exposure Control from the dropdown
menu. You can use the Render Pre-view option to get a sense for the exposure. For our scene setting the Exposure Value to 12.0 EV should be fine:
9. Open the Panorama Exporter by selecting the Utilities tab (spanner) on the panel to the
right, then clicking on More, then selecting Panorama Exporter and OK.
Page 35
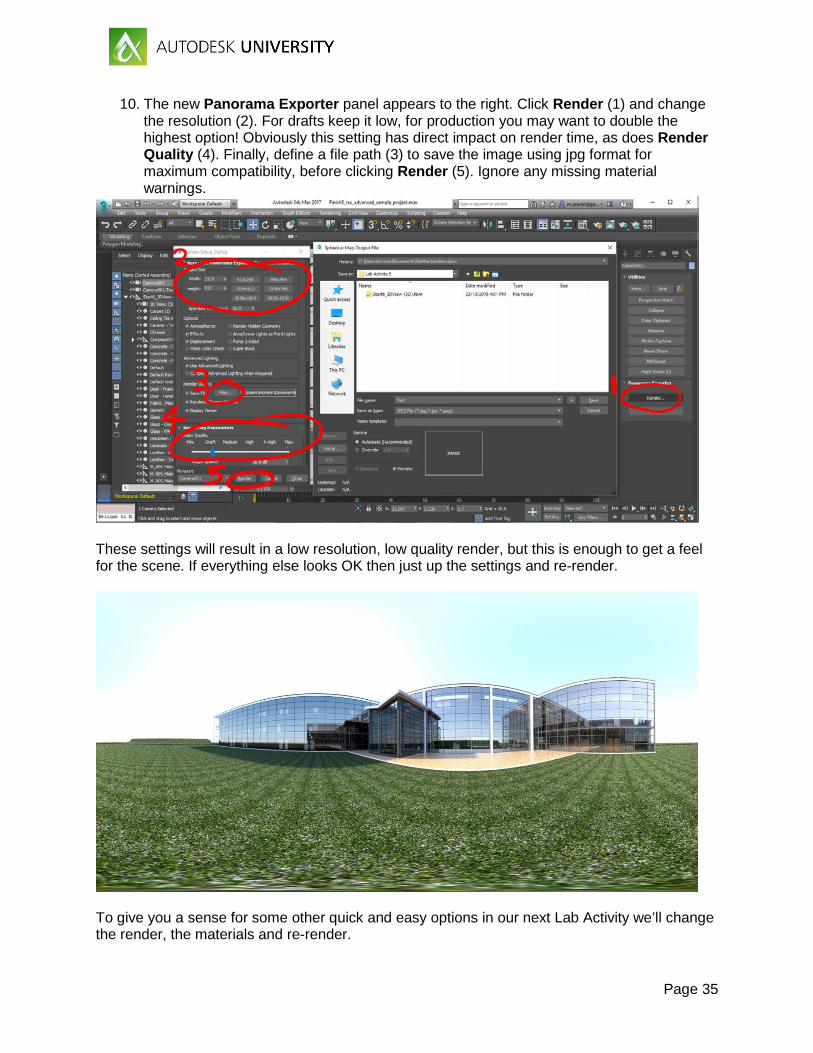
10. The new Panorama Exporter panel appears to the right. Click Render (1) and change the resolution (2). For drafts keep it low, for production you may want to double the highest option! Obviously this setting has direct impact on render time, as does Render Quality (4). Finally, define a file path (3) to save the image using jpg format for maximum compatibility, before clicking Render (5). Ignore any missing material warnings.
These settings will result in a low resolution, low quality render, but this is enough to get a feel for the scene. If everything else looks OK then just up the settings and re-render.
To give you a sense for some other quick and easy options in our next Lab Activity we’ll change the render, the materials and re-render.
Page 36
Lab Activity 7 Description This lab activity continues on from the last, but looks at how to change a few more settings in 3ds Max. We create some basic materials and apply them to the geometry. We also change the lighting and the render engine. This will introduce the user to some more basic settings in 3ds Max as well as how to produce different style renders. In this activity we are going to recreate the effect from earlier, similar to a cardboard model or clay render. You’ll change the base material and create a glass material to get some reflections in the render. As stated earlier, it is recommended that you do further study of 3ds Max and combine those skills with this process to get even better results!
Difficulty Level A little harder still…
Summary of steps • Create and apply materials • Adjust lighting • Select different render engine • Render with panorama exporter Steps 1. In 3ds Max 2017 Open:
Start7_rac_advanced_sample_project.max Located at:
C:\Datasets\Lab01 San Polo 3401A\Revit to Cardboard\Lab Activity 7

Page 37
2. Firstly, let’s create two new materials. On the ribbon select the Material Editor button:
3. If your material editor doesn’t look like the one below, then on the material editor select Mode, and check Compact Material Editor:
The compact material editor is easier to work in if you’re not familiar with 3ds Max. The slate material editor is both more advanced and more capable for experienced users.
Page 38
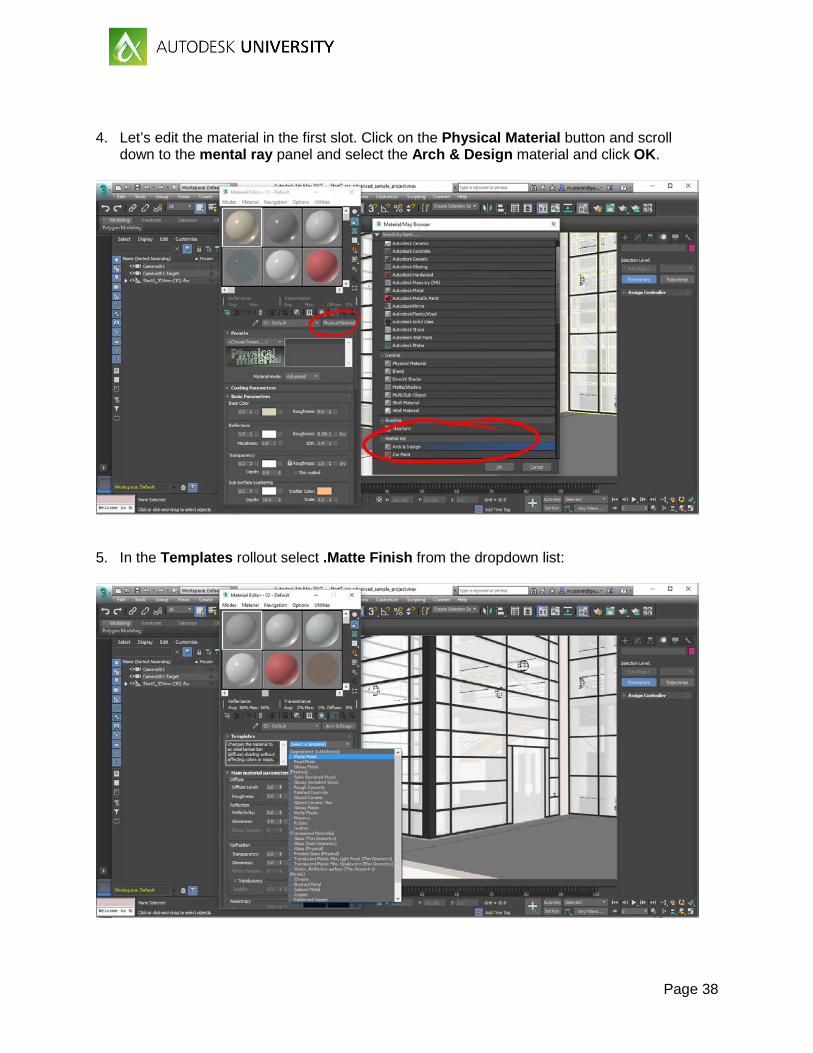
4. Let’s edit the material in the first slot. Click on the Physical Material button and scroll
down to the mental ray panel and select the Arch & Design material and click OK.
5. In the Templates rollout select .Matte Finish from the dropdown list:
Page 39
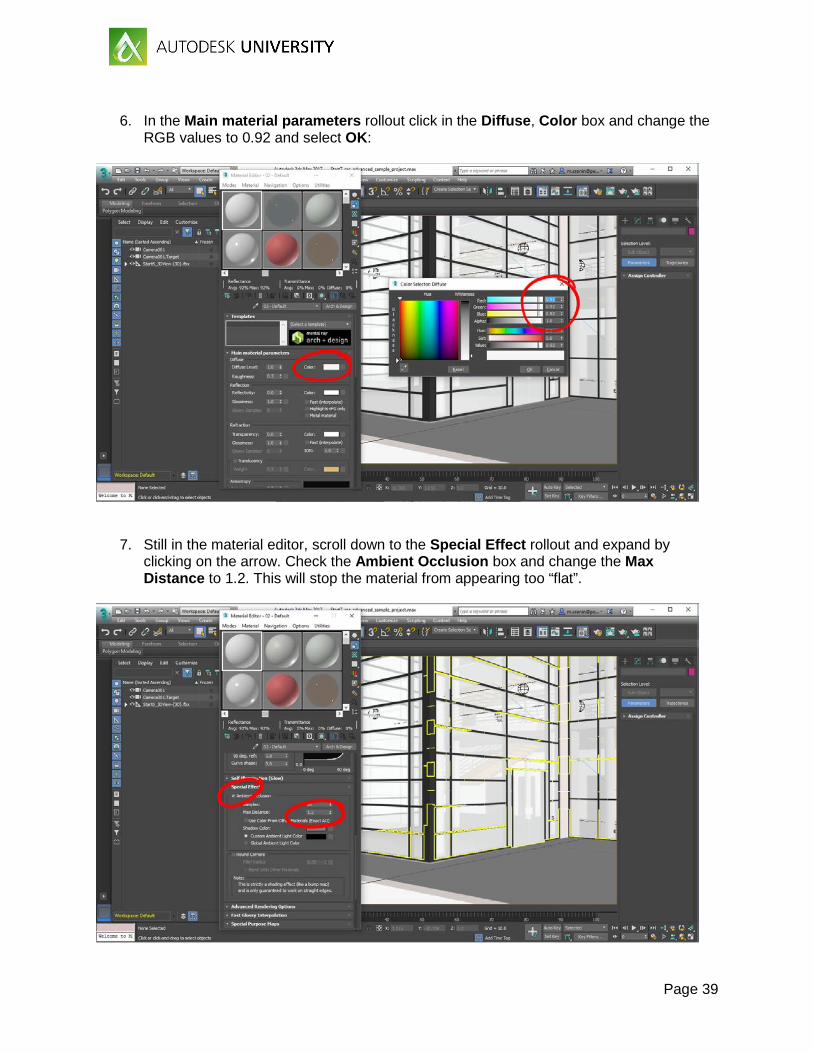
6. In the Main material parameters rollout click in the Diffuse, Color box and change the
RGB values to 0.92 and select OK:
7. Still in the material editor, scroll down to the Special Effect rollout and expand by clicking on the arrow. Check the Ambient Occlusion box and change the Max Distance to 1.2. This will stop the material from appearing too “flat”.
Page 40
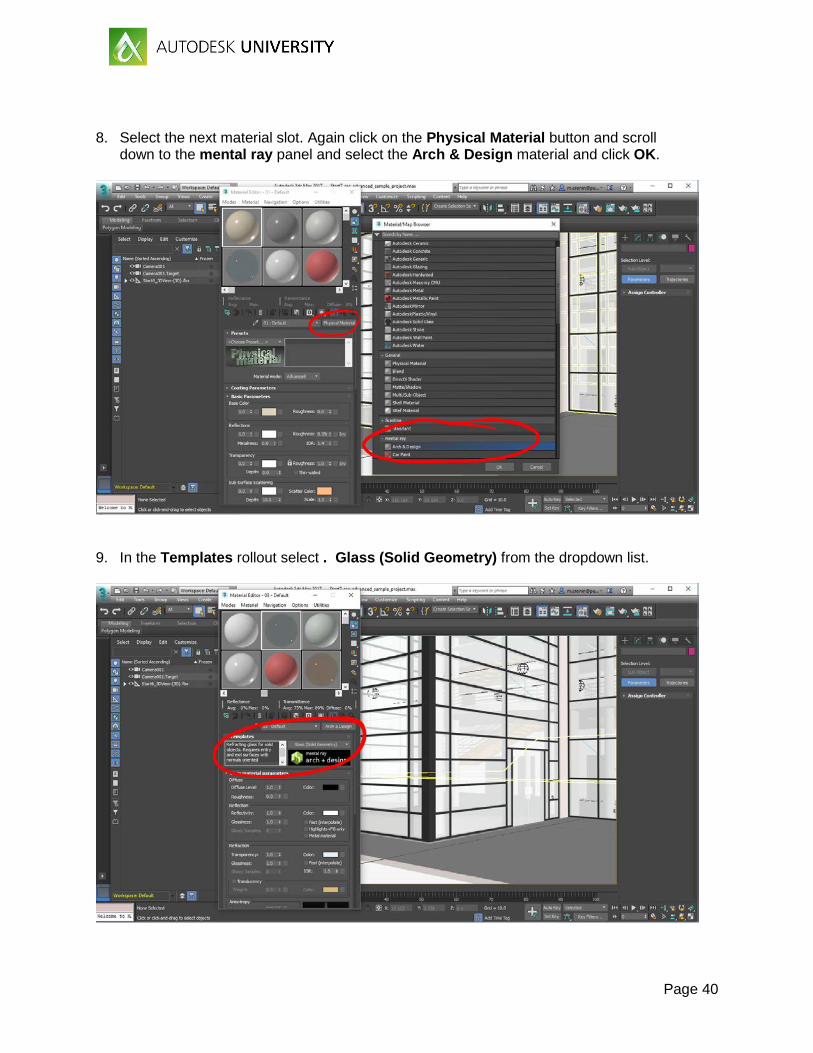
8. Select the next material slot. Again click on the Physical Material button and scroll
down to the mental ray panel and select the Arch & Design material and click OK.
9. In the Templates rollout select . Glass (Solid Geometry) from the dropdown list.
Page 41
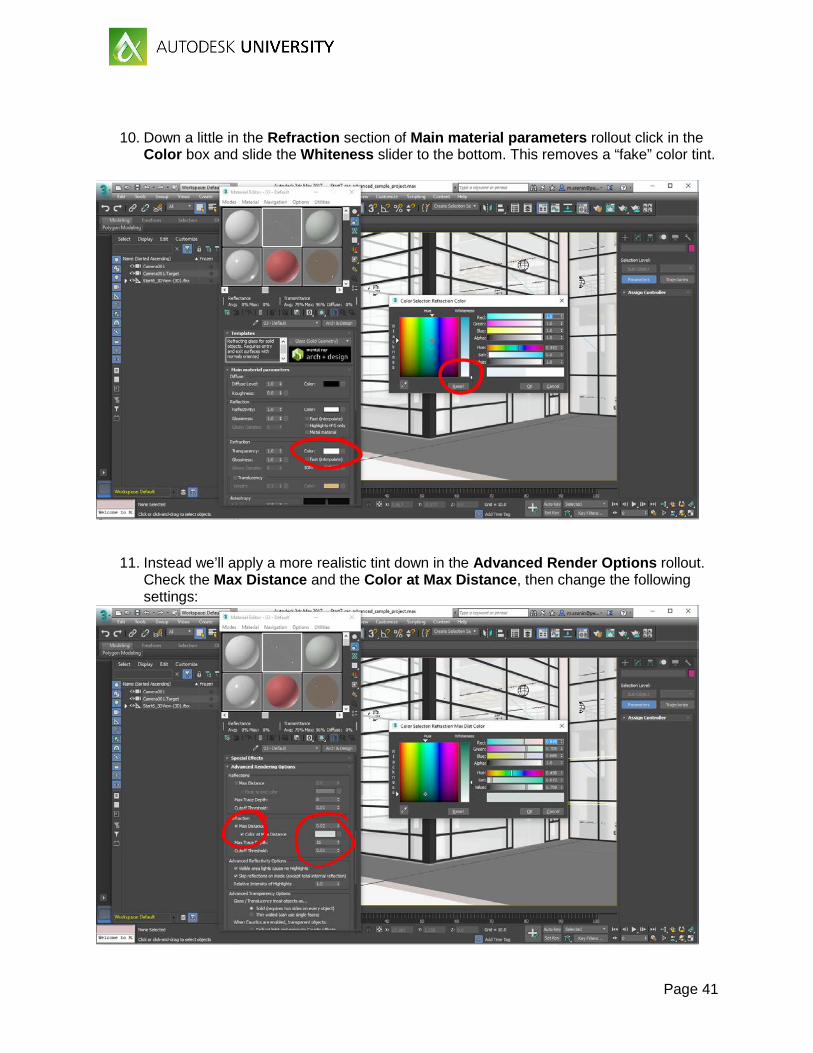
10. Down a little in the Refraction section of Main material parameters rollout click in the Color box and slide the Whiteness slider to the bottom. This removes a “fake” color tint.
11. Instead we’ll apply a more realistic tint down in the Advanced Render Options rollout. Check the Max Distance and the Color at Max Distance, then change the following settings:

Page 42
12. Finally in the material editor, scroll down to the Special Purpose Maps rollout and click in the empty Bump map slot where it displays None. Select Noise from the list. This will add a subtle deflection to the reflections to prevent them from looking perfect.
13. In the Noise Parameter rollout adjust the size to 3.6 and adjust the Color #1 and Color
#2 boxes to dark grey and light grey so the bump isn’t too intense (you can also reduce the bump amount next to the map slot if required). Then click the up arrow Go to Parent to return to the main material settings.
Page 43
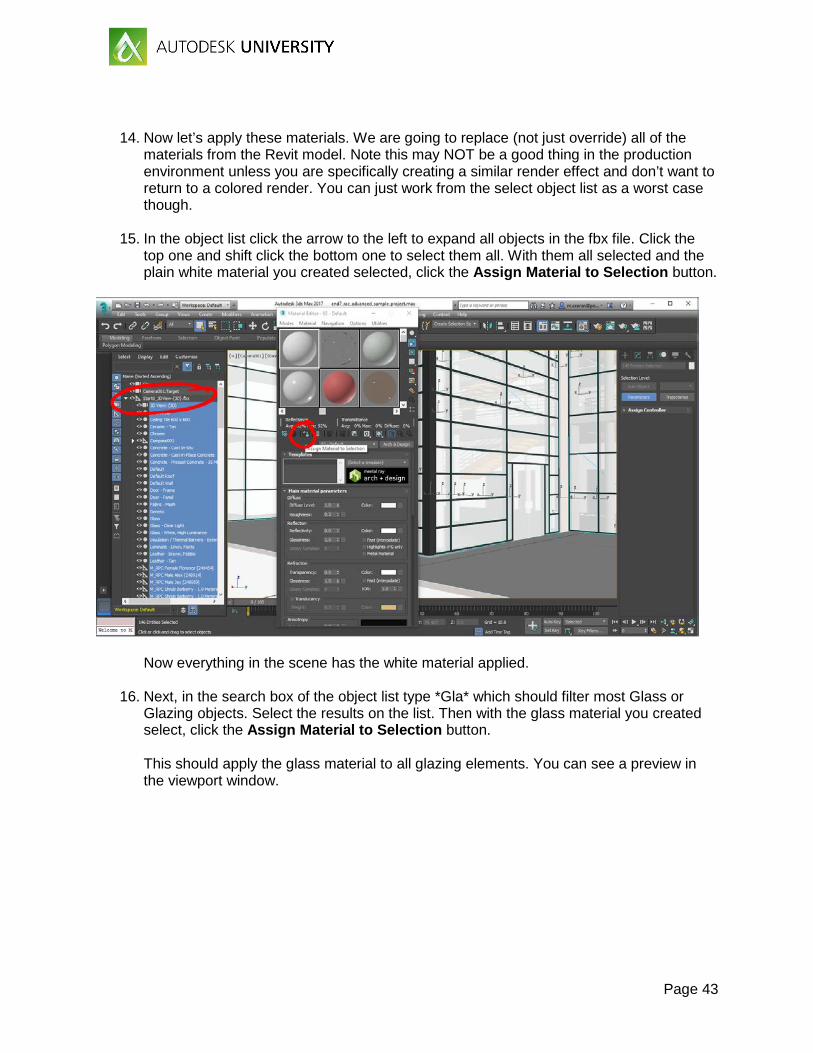
14. Now let’s apply these materials. We are going to replace (not just override) all of the materials from the Revit model. Note this may NOT be a good thing in the production environment unless you are specifically creating a similar render effect and don’t want to return to a colored render. You can just work from the select object list as a worst case though.
15. In the object list click the arrow to the left to expand all objects in the fbx file. Click the
top one and shift click the bottom one to select them all. With them all selected and the plain white material you created selected, click the Assign Material to Selection button.
Now everything in the scene has the white material applied.
16. Next, in the search box of the object list type *Gla* which should filter most Glass or Glazing objects. Select the results on the list. Then with the glass material you created select, click the Assign Material to Selection button. This should apply the glass material to all glazing elements. You can see a preview in the viewport window.
Page 44
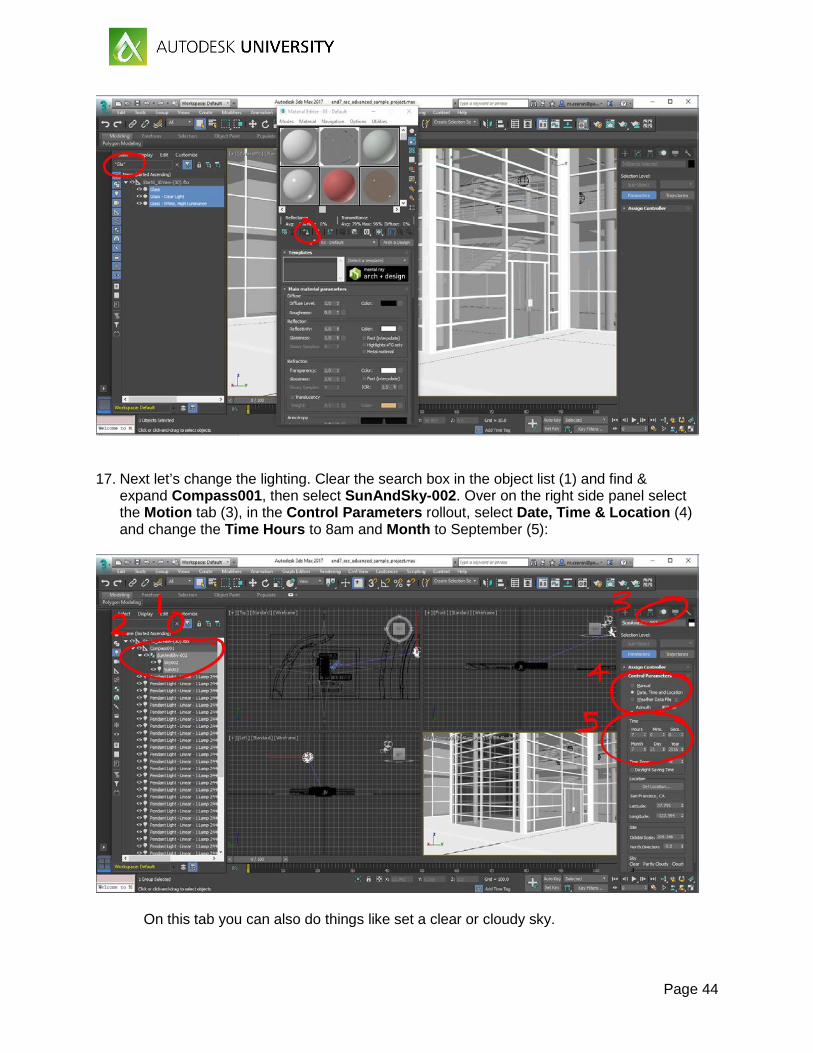
17. Next let’s change the lighting. Clear the search box in the object list (1) and find &
expand Compass001, then select SunAndSky-002. Over on the right side panel select the Motion tab (3), in the Control Parameters rollout, select Date, Time & Location (4) and change the Time Hours to 8am and Month to September (5):
On this tab you can also do things like set a clear or cloudy sky.
Page 45
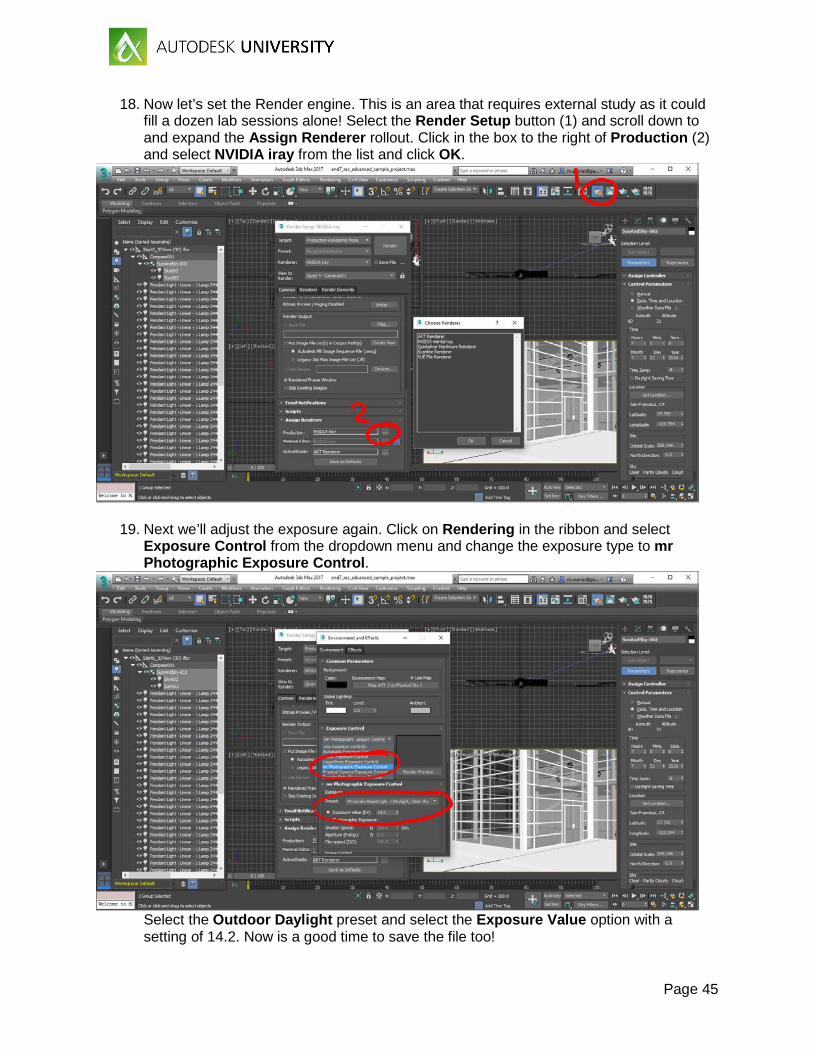
18. Now let’s set the Render engine. This is an area that requires external study as it could fill a dozen lab sessions alone! Select the Render Setup button (1) and scroll down to and expand the Assign Renderer rollout. Click in the box to the right of Production (2) and select NVIDIA iray from the list and click OK.
19. Next we’ll adjust the exposure again. Click on Rendering in the ribbon and select Exposure Control from the dropdown menu and change the exposure type to mr Photographic Exposure Control.
Select the Outdoor Daylight preset and select the Exposure Value option with a setting of 14.2. Now is a good time to save the file too!
Page 46
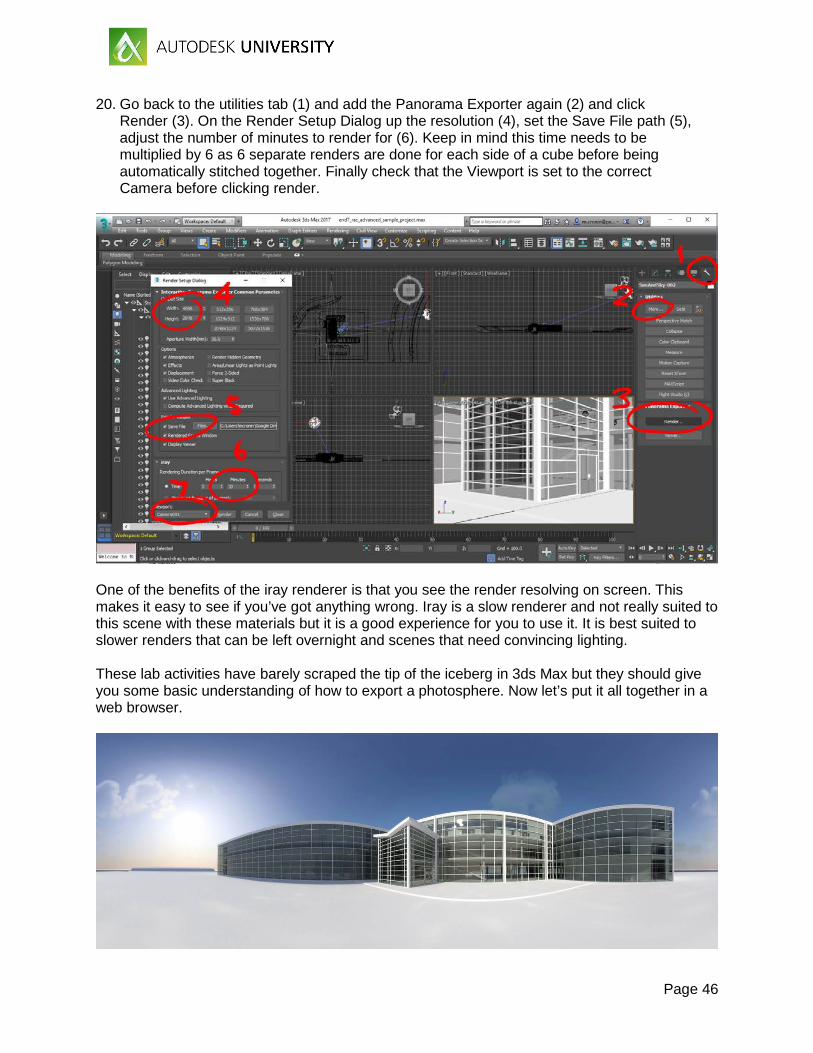
20. Go back to the utilities tab (1) and add the Panorama Exporter again (2) and click Render (3). On the Render Setup Dialog up the resolution (4), set the Save File path (5), adjust the number of minutes to render for (6). Keep in mind this time needs to be multiplied by 6 as 6 separate renders are done for each side of a cube before being automatically stitched together. Finally check that the Viewport is set to the correct Camera before clicking render.
One of the benefits of the iray renderer is that you see the render resolving on screen. This makes it easy to see if you’ve got anything wrong. Iray is a slow renderer and not really suited to this scene with these materials but it is a good experience for you to use it. It is best suited to slower renders that can be left overnight and scenes that need convincing lighting. These lab activities have barely scraped the tip of the iceberg in 3ds Max but they should give you some basic understanding of how to export a photosphere. Now let’s put it all together in a web browser.
Page 47
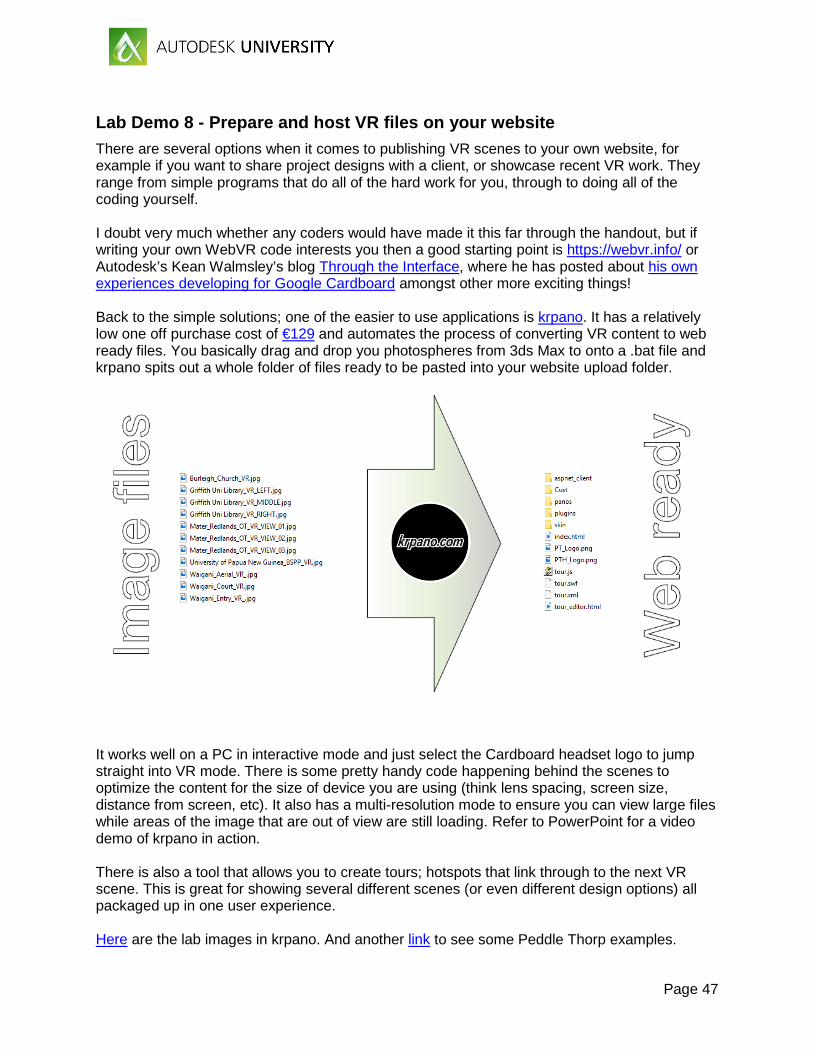
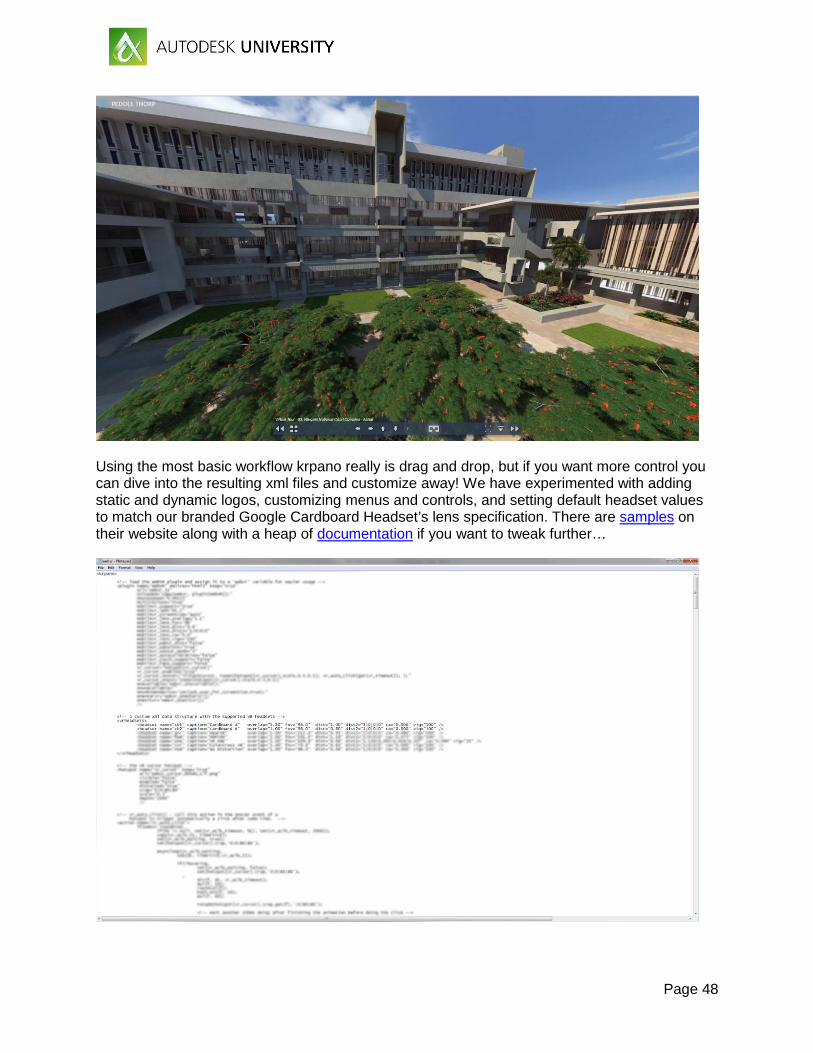
Lab Demo 8 - Prepare and host VR files on your website There are several options when it comes to publishing VR scenes to your own website, for example if you want to share project designs with a client, or showcase recent VR work. They range from simple programs that do all of the hard work for you, through to doing all of the coding yourself. I doubt very much whether any coders would have made it this far through the handout, but if writing your own WebVR code interests you then a good starting point is https://webvr.info/ or Autodesk’s Kean Walmsley’s blog Through the Interface, where he has posted about his own experiences developing for Google Cardboard amongst other more exciting things! Back to the simple solutions; one of the easier to use applications is krpano. It has a relatively low one off purchase cost of €129 and automates the process of converting VR content to web ready files. You basically drag and drop you photospheres from 3ds Max to onto a .bat file and krpano spits out a whole folder of files ready to be pasted into your website upload folder. It works well on a PC in interactive mode and just select the Cardboard headset logo to jump straight into VR mode. There is some pretty handy code happening behind the scenes to optimize the content for the size of device you are using (think lens spacing, screen size, distance from screen, etc). It also has a multi-resolution mode to ensure you can view large files while areas of the image that are out of view are still loading. Refer to PowerPoint for a video demo of krpano in action. There is also a tool that allows you to create tours; hotspots that link through to the next VR scene. This is great for showing several different scenes (or even different design options) all packaged up in one user experience. Here are the lab images in krpano. And another link to see some Peddle Thorp examples.
Page 48
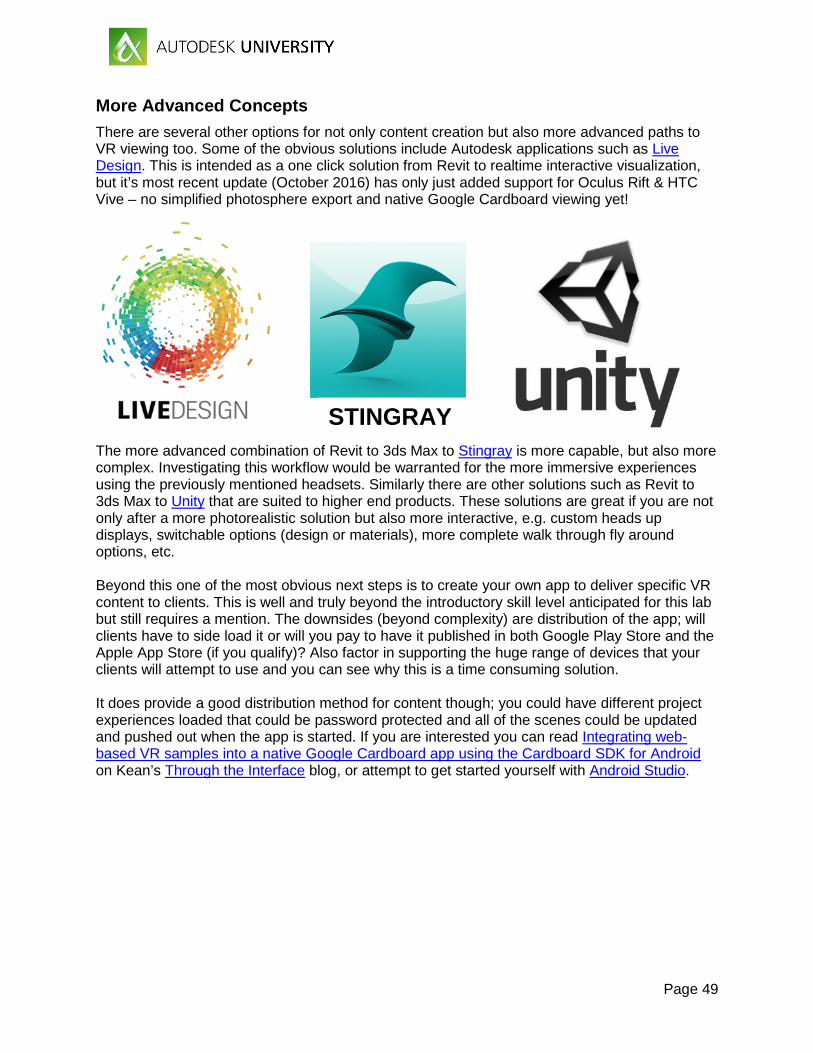
Using the most basic workflow krpano really is drag and drop, but if you want more control you can dive into the resulting xml files and customize away! We have experimented with adding static and dynamic logos, customizing menus and controls, and setting default headset values to match our branded Google Cardboard Headset’s lens specification. There are samples on their website along with a heap of documentation if you want to tweak further…
Page 49
STINGRAY
More Advanced Concepts There are several other options for not only content creation but also more advanced paths to VR viewing too. Some of the obvious solutions include Autodesk applications such as Live Design. This is intended as a one click solution from Revit to realtime interactive visualization, but it’s most recent update (October 2016) has only just added support for Oculus Rift & HTC Vive – no simplified photosphere export and native Google Cardboard viewing yet!
The more advanced combination of Revit to 3ds Max to Stingray is more capable, but also more complex. Investigating this workflow would be warranted for the more immersive experiences using the previously mentioned headsets. Similarly there are other solutions such as Revit to 3ds Max to Unity that are suited to higher end products. These solutions are great if you are not only after a more photorealistic solution but also more interactive, e.g. custom heads up displays, switchable options (design or materials), more complete walk through fly around options, etc. Beyond this one of the most obvious next steps is to create your own app to deliver specific VR content to clients. This is well and truly beyond the introductory skill level anticipated for this lab but still requires a mention. The downsides (beyond complexity) are distribution of the app; will clients have to side load it or will you pay to have it published in both Google Play Store and the Apple App Store (if you qualify)? Also factor in supporting the huge range of devices that your clients will attempt to use and you can see why this is a time consuming solution. It does provide a good distribution method for content though; you could have different project experiences loaded that could be password protected and all of the scenes could be updated and pushed out when the app is started. If you are interested you can read Integrating web-based VR samples into a native Google Cardboard app using the Cardboard SDK for Android on Kean’s Through the Interface blog, or attempt to get started yourself with Android Studio.
Page 50
Future Direction (Summary) VR is easy: • You can get from Revit to Google Cardboard in as little as 6 clicks! • The quality can range from conceptual to photorealistic. • There are many different options to choose from for the workflow (choose one that suits
your requirements, budget and skill level). What’s next? Well there are a few new headsets on the way announced in October 2016, from both Oculus (Santa Cruz prototype), and Microsoft (Cheap VR with Windows 10). While VR has been gaining ground, Augmented Reality (also referred to as Mixed Reality) is going to be the next big thing. Currently Microsoft HoloLens is leading the way, and there are already ideas for how this technology may be useful not only for, but also beyond, design.
But it’s only a matter of time before actual reality will become more valuable: https://googleblog.blogspot.com.au/2016/03/cardboard-plastic.html Please let us know is this lab has been helpful in getting you started on your road to VR by completing your AU class survey. Thank you! Finally check out Autodesk University’s Online Learning page for great content to help you progress further!


![Works with Google Cardboardstatic.googleusercontent.com/media/...with Google Cardboard,” or “[device] works on Google Cardboard”. Use the title case for “Works with Google](https://img.pdfslide.net/doc/110x75/5e93f8efb275df6a6202d3f8/works-with-google-with-google-cardboarda-or-aoedevice-works-on-google-cardboarda.jpg)