Embed Size (px)
Citation preview

Version 4.1Software Installation Guide
(Full)

Important! – Read First
• You must have administrative rights to install the
E-A-Rfit™ software and the drivers for the hardware (speaker).
• Ensure your PC meets the Minimum Hardware Requirements listed in Annex A
• Do NOT plug in the USB cable until after you have successfully installed the software. The software contains the USB drivers required in order for the speaker to function properly.
• Internet connectivity is required for one phase of the installation process. See Annex A for connectivity requirements
• Shut down any other programs you may be running on your computer before you begin.

Table of Contents• Download the E-A-Rfit™ software executable file
• Installation of E-A-Rfit software – Installation of .Net 2.0
– Installation of MATLAB
• Installation of USB Drivers
• E-A-Rfit Start Up
• Creating an Account
• Annex A: IT Minimum Requirements &
Software Connectivity Requirements

Download the Software
Download the E-A-Rfit 4.1 software executable file and save it to a folder for future reference. We suggest you create a folder called “My Downloads” within your “My Documents” folder. The icon will look like this once you have downloaded the file from the E-A-Rfit User Support website.

1.Chose the language from the dropdown. Click “OK”
3.Read the Terms of the License Agreement and click “I Agree” if you accept the terms
2.Click Next
4.Software defaults to chose the applications needed. Click on “Next”
Follow the prompts
E-A-Rfit™ 4.1 Software Installation

5.Keep default location for the software program. Click “Next”
6. Click “Next” to begin installing speaker drivers

.Net 2.0 Installation
7. Click “Next” 8. Read and/or print the Terms of the License Agreement, tick the box if you agree to the Terms and click “Install”
10. .Net Framework 2.0 Installation successful, click “Finish”
9. Wait for the components to install

MATLAB Installation
11. Select language, click “OK”
13. MATLAB prepares to install
14. Begin installation wizard by clicking “Next”
15. Enter User Name & Organization (optional). Click “Next”
12. Click “Install”

16. Allow the program to save to the default destination folder, click “Next”
17. Begin installation, click “Install”
19. Once installation has completed, click “Finish”
18. Installation begins and may take several minutes

Finalizing E-A-Rfit Installation
20. Default selection, click “Next”
21. DOS window appears then disappears if successful. No action needs to be taken during this step
22. When you receive a message indicating that the E-A-Rfit setup has been successful, click “Finish”
23. Reboot the computer? Click “Yes”.
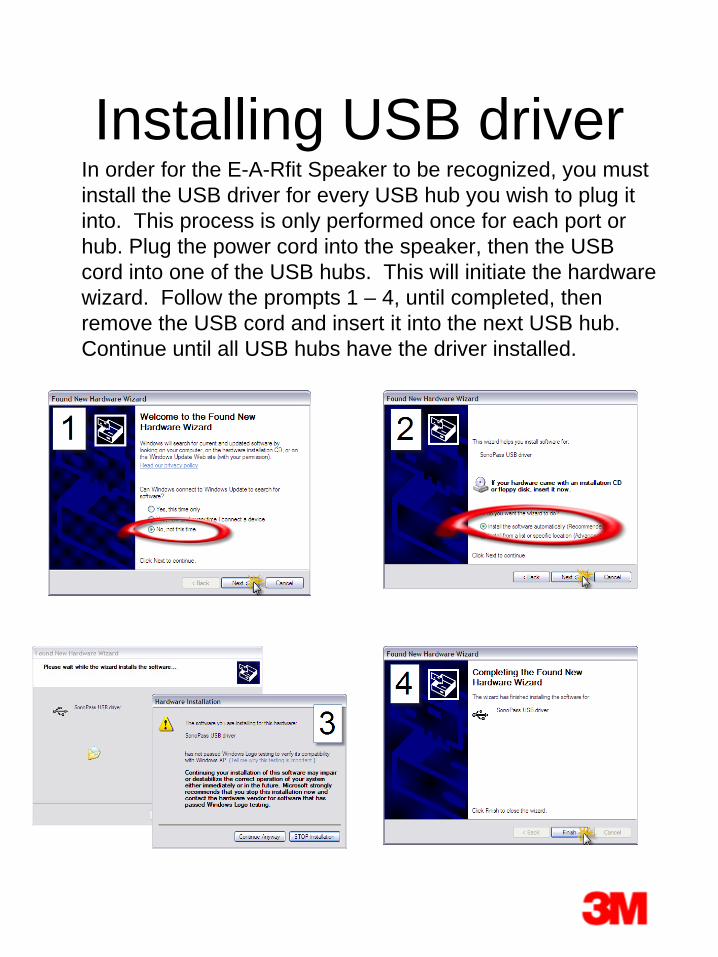
Installing USB driverIn order for the E-A-Rfit Speaker to be recognized, you must install the USB driver for every USB hub you wish to plug it into. This process is only performed once for each port or hub. Plug the power cord into the speaker, then the USB cord into one of the USB hubs. This will initiate the hardware wizard. Follow the prompts 1 – 4, until completed, then remove the USB cord and insert it into the next USB hub. Continue until all USB hubs have the driver installed.

E-A-Rfit Start Up

Creating an AccountIn order to gain the full functionality of the software, you are required to “Create An Account”. This requires internet connectivity. See Annex A for details. This process is required only once on the PC installed with the software.
The E-A-Rfit™ software is capable of being demonstrated using an embedded technician code called DEMOØØ32. To test in DEMO mode, type in the technician code DEMOØØ32 into the technician code field. Type the same code into the password field being sure that the letters are capitalized. The technician code can also be copied and pasted into the password field as a more efficient way to login.
The limitation of using the embedded DEMO code is that all measurement data under this code will not be saved when the software is exited. Also, an “Unvalidated Test” watermark will remain printed on the reports at the end of the test cycle.

Account Creation• Required to validate and save test results• Preparation
– Install software and speaker drivers on computer– Connect speaker to computer via USB– Connect to the internet (not through company VPN, see
Annex A for details)– Have Technician Code ready (3M Technical Support will
provide and it is case-senstive)– Have Password ready (3M Technical Support will provide
and it is case-sensitive)
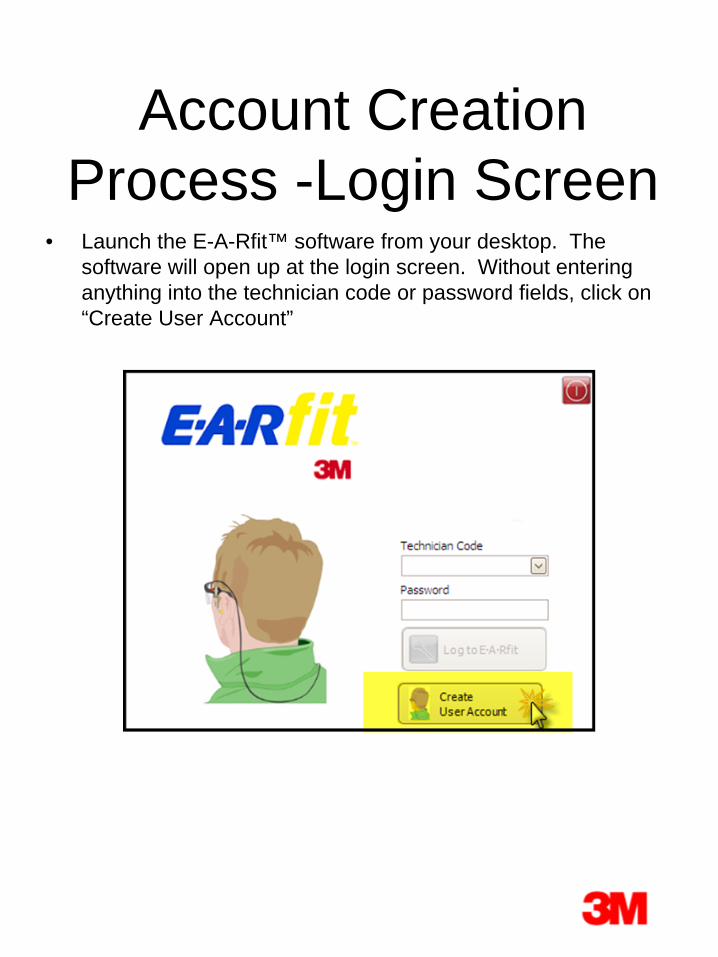
Account Creation Process -Login Screen
• Launch the E-A-Rfit™ software from your desktop. The software will open up at the login screen. Without entering anything into the technician code or password fields, click on “Create User Account”

Technician Code and Password
This will open up a window for entering in your Technician Code and Password. These fields are case sensitive, so make sure you type them in the way they were presented to you. The software recognizes the serial number of the speaker that is attached to the computer via the USB. Once you have entered the information into the required fields, click “Create Account”.

Verify Demographic Information
A second window will appear which displays all the demographic information you have provided previously. Verify that the information is correct and edit any fields as necessary. You will be required to set a new password and type it in the same way twice. The password will be case sensitive and is required to be at least 6 characters long. Be sure to write down this password for future reference. If you happen to forget your password, we can retrieve it for you if you contact technical support.

Successful CreationIf the information submitted through the internet is verified , a third window will appear that informs you that your Technician Code has been successfully registered. This means that your account has been created successfully. Click “Ok” and the software will begin loading.

Subsequent LoginsCreating an account is only required once per computer. Subsequent logins will display your Technician Code on the Technician Code drop-down menu. Select the correct Technician Code, then, type your newly created Password into the Password field. If the password is typed correctly, the “Log to EARfit” button will be illuminated and you are ready to log in and begin using the E-A-Rfit software.

Annex A IT Minimum Requirements
Processor: Intel Pentium IV or AMD
Processor Speed: 1 GHz (2.4 GHz recommended)
RAM: 512 MB (1 GB recommended)
Screen Resolution: 1024 X 768
Operating System:Windows 2000, XP or Vista (requires run as administrator)
Free Disk Space: 120 MB
USB Port: 1 USB V1.1
Internet Access:Dialup 56 Kbps but Cable or DSL preferred
(Required for Account Creation and optional Data Synchronization)
Installation Drive: CD-ROM or DVD drive

Software Communication Requirement
Purpose:The E-A-Rfit software has two operations that require the computer to communicate to the 3M server through the internet. The two operations are Account Creation & Data Synchronization (optional).
Communication Objectives for Software OperationsA local account must be created on each PC installed with the E-A-Rfit™ software in order to have access to all of the features. Account Creation is required only once for each Technician on each PC.Uploading your E-A-Rfit™ data* to the 3M server allows 3M to provide you more support (backup and archiving of your data) & more features (custom reports for a specific job, detailed statistical analysis, etc .). Data Synchronization is optional
Requirements for successful connectionThe software uses a Destination IP and Destination Port to connect to the DB and the computer local port is a random one provided by Windows. If security is based on blocking traffic from Local Ports, Destination Ports, Destination IP, the software will not be able to connect.Please make sure that the following information is fulfilled for successful connection:Local Port Open: Randomly created by Windows. (No action required)
The communication is not blocked to the following address and port:Destination Address: datacenter.earfit3m.com Destination Port: 80 or 3306
Extra Steps for successful connectionDisconnect any VPN connectionTemporarily disable your Windows firewall and/or Virus Protection for the duration of the communicationAllow or Create a rule on the Local Firewall – if exists - to allow the software to successfully communicate with the 3M database (DB).Through the IT Administrator, Allow or Create a rule on the External Firewall “Company’s Firewall” to allow the software to successfully communicate with the 3M DB.
Alternative methods that can be used:Connect via a dialup internet connection or internet air card rather than the existing broadband connection.Connect PC outside of the Company intranetDatabase can be assembled & Account Created “offline”
Please have your company IT personnel contact the 3M OH&ESD Technical Support Hotline at 1-800-243-4630 and then select option 1, option 3, then option 4 if you require assistance.
© 3M 2010. All Rights Reserved. 3M, the color yellow for earplugs and all other trademarks used herein are trademarks of 3M Company, and used under license in Canada.


![Installation Guide Flatpack PRSB 9kW48VDC 1[1].3m OCabFan Rev 3](https://img.pdfslide.net/doc/110x75/55cf8dcf550346703b8b7c29/installation-guide-flatpack-prsb-9kw48vdc-113m-ocabfan-rev-3.jpg)