Embed Size (px)
Citation preview
© 2008 e-MDs, Inc. All rights reserved. Product and company names are trademarks or trade names of their respective corporations.
No part of this manual shall be reproduced or transmitted by any means, electronic, mechanical, photocopying, recording, or otherwise without written permission from e-MDs. No patent liability is assumed with respect to the use of the information contained herein. Although every precaution has been taken in the preparation of this manual,
e-MDs assumes no responsibility for errors or omissions. Neither is any liability assumed for damages resulting from the use of the information contained herein. Patient Portal 6.2.0 User Guide R00
e-MDs Patient Portal Version 6.2.0
User Guide
e-MDs 9900 Spectrum Drive.
Austin, TX 78717 Phone 512.257.5200
Fax 512.335.4375 e-MDs.com
TM
e-MDs Patient Portal 6.2.0 i
Table of Contents What is the Patient Portal?........................................................................................... 1 How is the Portal used by the patient? ......................................................................................................... 1 How is the Portal used by the clinic staff? .................................................................................................... 1
Portal Instructions for the Patient................................................................................ 3 Accessing the Patient Portal ......................................................................................................................... 3 Introduction to the Portal Interface................................................................................................................ 5 Communicating through the Portal ............................................................................................................... 6
Send Messages to Clinic Staff ........................................................................................................... 6 Receive Your Lab or Test Results from the Clinic ............................................................................. 6 Request a Physician Referral............................................................................................................. 9 Ask a Billing Question ........................................................................................................................ 9 Submit a Portal Suggestion................................................................................................................ 9 Request a Medication Refill ............................................................................................................. 10 Request an Appointment.................................................................................................................. 11 Confirm, Cancel, or Reschedule an Appointment............................................................................ 13 Fill Out Medical History (Message Alert).......................................................................................... 14
Viewing or Updating Information through the Portal ................................................................................... 16 View or Update Your Current Medications List ................................................................................ 17 View or Update Your Health Summary Information ......................................................................... 17 View, Print, or Copy your Continuity of Care Record (CCR)............................................................ 18 View or Update Your Demographic Information .............................................................................. 19 View or Update Your Insurance Information .................................................................................... 20 Update Your Portal Account Password or Email Address ............................................................... 20
If you forget your password… ..................................................................................................................... 21 If you do not have a login account for the Portal…..................................................................................... 22
Portal Instructions for the Clinic Staff....................................................................... 23 Authorizing a Patient to Use Portal ............................................................................................................. 23 Managing Portal Appointments in e-MDs Schedule ................................................................................... 24
Open Access Appointments............................................................................................................. 24 Portal Appointments in the Wait List ................................................................................................ 24 Appointment Confirmation................................................................................................................ 25 Instant Medical History™ ................................................................................................................. 25
Sending a Message to a Patient ................................................................................................................. 26 Processing Portal Messages in TaskMan................................................................................................... 27
Health Information Updates ............................................................................................................. 28 Referral Requests ............................................................................................................................ 28 Medication Refill Requests............................................................................................................... 28 Other Portal Messages .................................................................................................................... 29
e-MDs Patient Portal 6.2.0 ii
The Clinic Administrator Account ............................................................................. 30 Accessing Administrator Functions............................................................................................................. 30 Setting Up and Maintaining the Portal ........................................................................................................ 30
View Clinic Information..................................................................................................................... 31 Access Clinic Maintenance Functions.............................................................................................. 31 Perform General Clinic Maintenance ............................................................................................... 32 Perform Notification Maintenance .................................................................................................... 32 Configure Message Options............................................................................................................. 33 Update Portal Appearance............................................................................................................... 35 Perform Home Page Maintenance................................................................................................... 35
Managing Portal Accounts .......................................................................................................................... 36 Edit Member Accounts ..................................................................................................................... 37 Edit Clinic Staff ................................................................................................................................. 37
Auditing Portal Use ..................................................................................................................................... 38 View Portal Audit Trails .................................................................................................................... 38
What is the Patient Portal?
e-MDs Patient Portal 6.2.0 1
C H A P T E R 1
What is the Patient Portal? The Patient Portal is a web-based system that allows for secure communication and transfer of information between the clinic and the patient. When a patient logs in to the Portal, current data is pulled directly from the clinic’s e-MDs Solution Series database and displayed on the web page viewed by the patient. No patient information is stored on the Patient Portal server.
How is the Portal used by the patient? NOTE: Instructions for patient use of the Portal are included in Chapter 2 of this user guide, so that clinic staff can reference the instructions if patients require assistance in using the Portal. These instructions are also provided in a separate document for distribution to the patient. The document for distribution to the patient is called The Patient’s Guide to Using the Portal, and is available on the Portal Installation DVD as well as on the e-MDs Support Site. After logging in to Portal, the patient can:
• Use the messaging function to communicate with clinic staff.
• View results of lab and other diagnostic tests.
• Schedule, confirm, cancel, or reschedule an appointment.
• Add an appointment request to your wait list.
• Request a referral or a medication refill.
• View their health summary information and send you update requests if they see missing information.
• Print or save an electronic copy of their Health Summary using the standard Continuity of Care Record (CCR) format.
Keep in mind that much of this functionality is optional so you can enable specific features based on how you want to implement and use the system.
How is the Portal used by the clinic staff? To support efficient workflow, the Patient Portal is integrated with e-MDs Solution Series. When a patient sends a message to the clinic via the Portal, the message is displayed in TaskMan. When a patient submits a medication refill request, referral request, or billing question, these requests are also displayed as notifications in TaskMan.
Clinic staff can use Patient Portal functionality to:
• Communicate with patients via an online messaging system.
• Send results of lab and other diagnostic tests to the patient via the Portal and include messages related to the results.
• Receive notifications of refill requests, referral requests, and billing questions submitted via the Portal.
• Receive appointments requests sent from Portal directly to the Wait List in e-MDs Schedule and/or allow patients to schedule appointments directly into e-MDs Schedule.
What is the Patient Portal?
e-MDs Patient Portal 6.2.0 2
• Receive medication refill requests directly into the Refill Requests or TaskMan modules in e-MDs Solution Series.
• Automatically request specific health information associated with certain appointment types.
• Send and view appointment reminder messages with custom text to match appointment types and clinic requirements.
The clinic can enable or disable many aspects of Portal functionality. See Chapter 3 of this user guide for more details about how clinic staff will use the Patient Portal.
Portal Instructions for the Patient
e-MDs Patient Portal 6.2.0 3
C H A P T E R 2
Portal Instructions for the Patient Instructions included in this chapter refer to the Patient Portal interface used by the patient. These instructions are included here as a reference for clinic staff who may need to assist patients in understanding how to use Portal.
NOTE: These instructions are also provided in a separate document, How to Use the Patient Portal, which can be printed and given to the patient or can be posted on the clinic website. How to Use the Patient Portal is included on the DVD provided when Portal is installed and is also available on the e-MDs support website which can be accessed from www.e-MDs.com.
Accessing the Patient Portal When your clinic creates a Patient Portal account for you, a message will be sent to the email address you provided to the clinic. The message will contain the URL (Internet address) for your clinic's Patient Portal. It will also contain a user name and password, which you must use to log in to the Portal.
To access the clinic's Patient Portal:
1. Open a web browser.
2. Type the clinic's Patient Portal URL in the address field of the browser.
3. Press the Enter key.
The Portal home should be displayed in your browser.
NOTE: Some clinics provide a link to the Portal on their website. If so, you can simply click the link to access the Patient Portal.
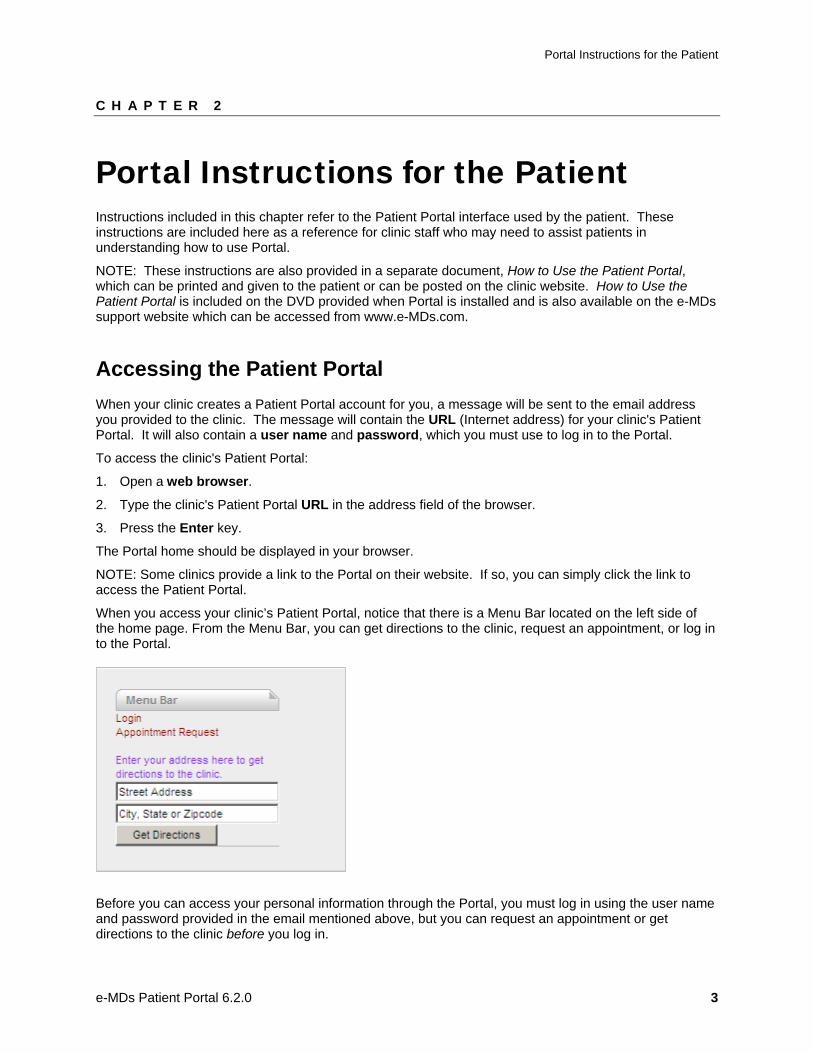
When you access your clinic’s Patient Portal, notice that there is a Menu Bar located on the left side of the home page. From the Menu Bar, you can get directions to the clinic, request an appointment, or log in to the Portal.
Before you can access your personal information through the Portal, you must log in using the user name and password provided in the email mentioned above, but you can request an appointment or get directions to the clinic before you log in.
Portal Instructions for the Patient
e-MDs Patient Portal 6.2.0 4
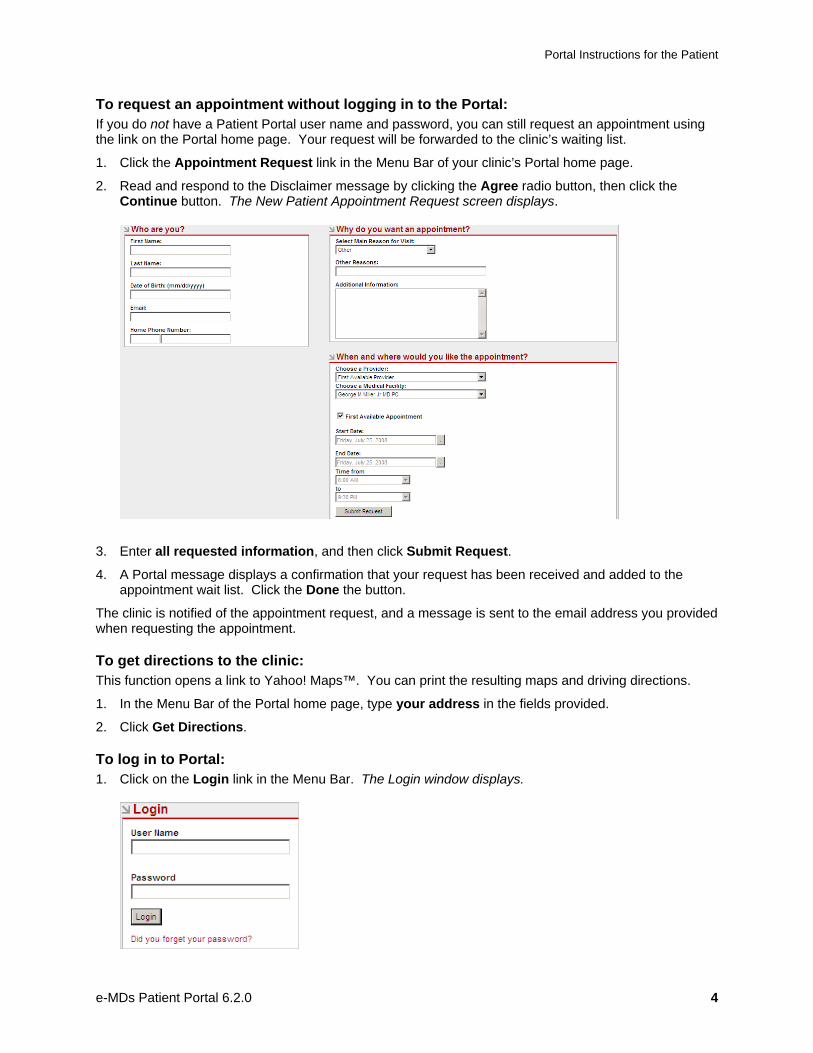
To request an appointment without logging in to the Portal: If you do not have a Patient Portal user name and password, you can still request an appointment using the link on the Portal home page. Your request will be forwarded to the clinic’s waiting list.
1. Click the Appointment Request link in the Menu Bar of your clinic’s Portal home page.
2. Read and respond to the Disclaimer message by clicking the Agree radio button, then click the Continue button. The New Patient Appointment Request screen displays.
3. Enter all requested information, and then click Submit Request.
4. A Portal message displays a confirmation that your request has been received and added to the appointment wait list. Click the Done the button.
The clinic is notified of the appointment request, and a message is sent to the email address you provided when requesting the appointment.
To get directions to the clinic: This function opens a link to Yahoo! Maps™. You can print the resulting maps and driving directions.
1. In the Menu Bar of the Portal home page, type your address in the fields provided.
2. Click Get Directions.
To log in to Portal: 1. Click on the Login link in the Menu Bar. The Login window displays.

Portal Instructions for the Patient
e-MDs Patient Portal 6.2.0 5
2. Enter your Portal user name and password in the fields provided.
3. Click the Login button.
After you log in, it is good practice to change your password and add a security question for your Portal account. (Instructions for updating your Portal account password are included in this user guide.) Note that when you change your Portal password, the system sends a message to the email account that you provided to the clinic. The message is simply a notification of a change to your account and does not include any password information.
Introduction to the Portal Interface Although your clinic’s Portal may have a different appearance and may not include all the items shown here, the general layout and functionality will be similar.
Click on a navigation tab to access the information indicated by the label on the tab. Note that a number is displayed next to the label on the Messages and Lab/Test Results tabs. This number tells you how many new (unread) messages or test results you have.
The font size controls allow you to increase or decrease the size of the text in the Portal window.
When you log in to the Patient Portal, the Overview tab is selected by default. On the Overview tab, notice the Actions pane and the My Information links. The Actions pane provides quick access to most Portal functions, and you can click on the links in My Information to access the tab containing the information indicated.
Functions and information available on each tab are explained in subsequent parts of this documentation.
Portal Instructions for the Patient
e-MDs Patient Portal 6.2.0 6
Communicating through the Portal The Portal provides a convenient communication link between you and your clinic. For example, you might use Portal to send a message to a particular staff member, request a referral, request a medication refill, or schedule an appointment.
Communications your clinic might send through the Portal include lab and test results, responses to requests you submitted through the Portal, messages requesting information, or general announcements sent to all Portal patients.
You can view all communications from the clinic through your Portal Inbox on the Messages tab. Attachments may be included with communications sent by the clinic.
Send Messages to Clinic Staff If your clinic has enabled the messaging feature of Portal, you can use the Portal to send a new message to or respond to a message sent by your clinic.
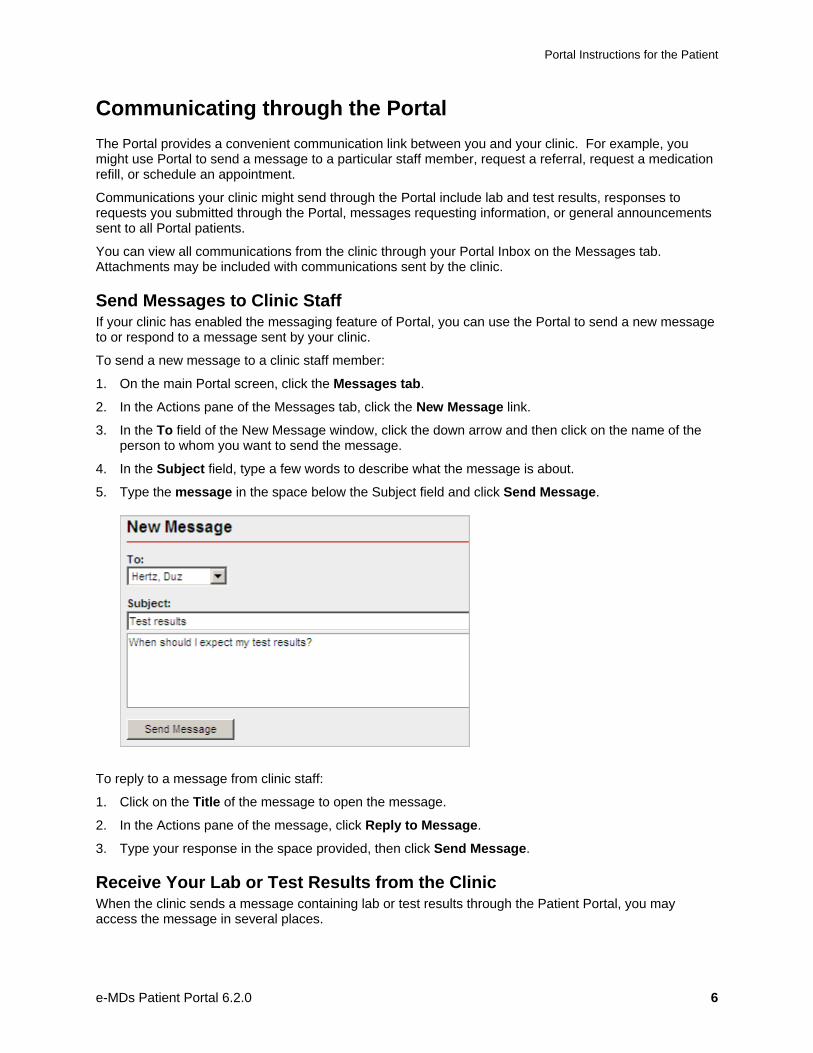
To send a new message to a clinic staff member:
1. On the main Portal screen, click the Messages tab.
2. In the Actions pane of the Messages tab, click the New Message link.
3. In the To field of the New Message window, click the down arrow and then click on the name of the person to whom you want to send the message.
4. In the Subject field, type a few words to describe what the message is about.
5. Type the message in the space below the Subject field and click Send Message.
To reply to a message from clinic staff:
1. Click on the Title of the message to open the message.
2. In the Actions pane of the message, click Reply to Message.
3. Type your response in the space provided, then click Send Message.
Receive Your Lab or Test Results from the Clinic When the clinic sends a message containing lab or test results through the Patient Portal, you may access the message in several places.
Portal Instructions for the Patient
e-MDs Patient Portal 6.2.0 7
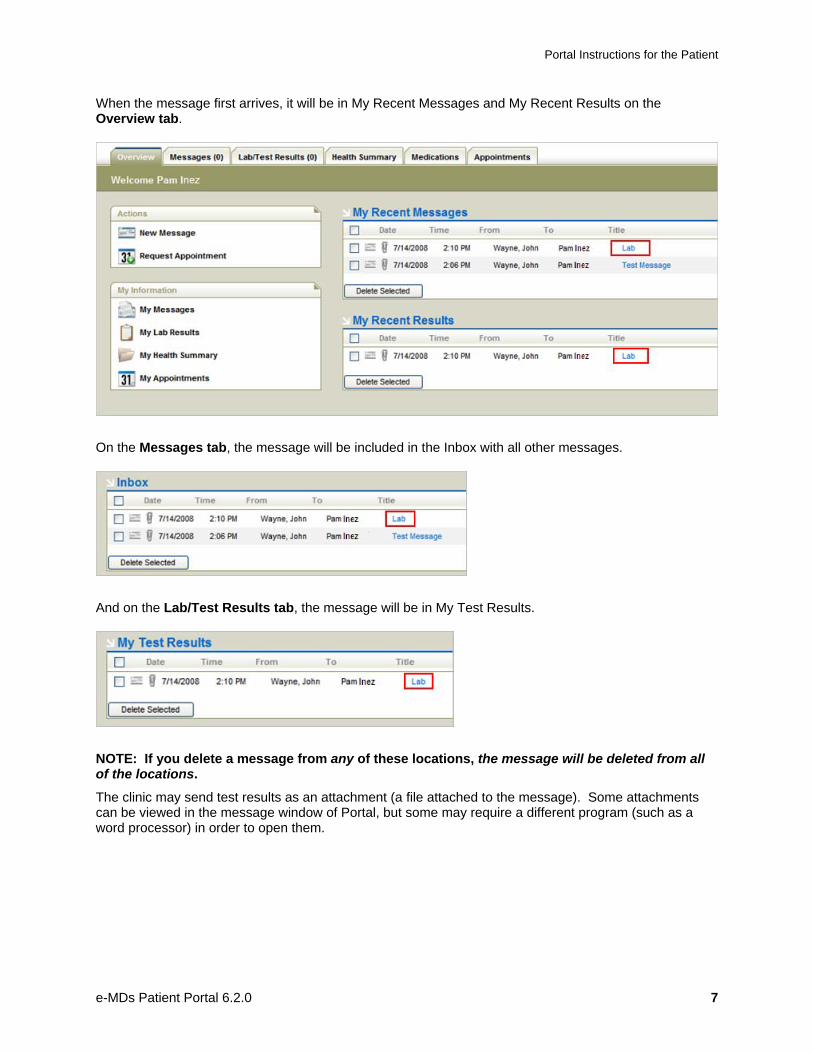
When the message first arrives, it will be in My Recent Messages and My Recent Results on the Overview tab.
On the Messages tab, the message will be included in the Inbox with all other messages.
And on the Lab/Test Results tab, the message will be in My Test Results.
NOTE: If you delete a message from any of these locations, the message will be deleted from all of the locations.
The clinic may send test results as an attachment (a file attached to the message). Some attachments can be viewed in the message window of Portal, but some may require a different program (such as a word processor) in order to open them.
Portal Instructions for the Patient
e-MDs Patient Portal 6.2.0 8
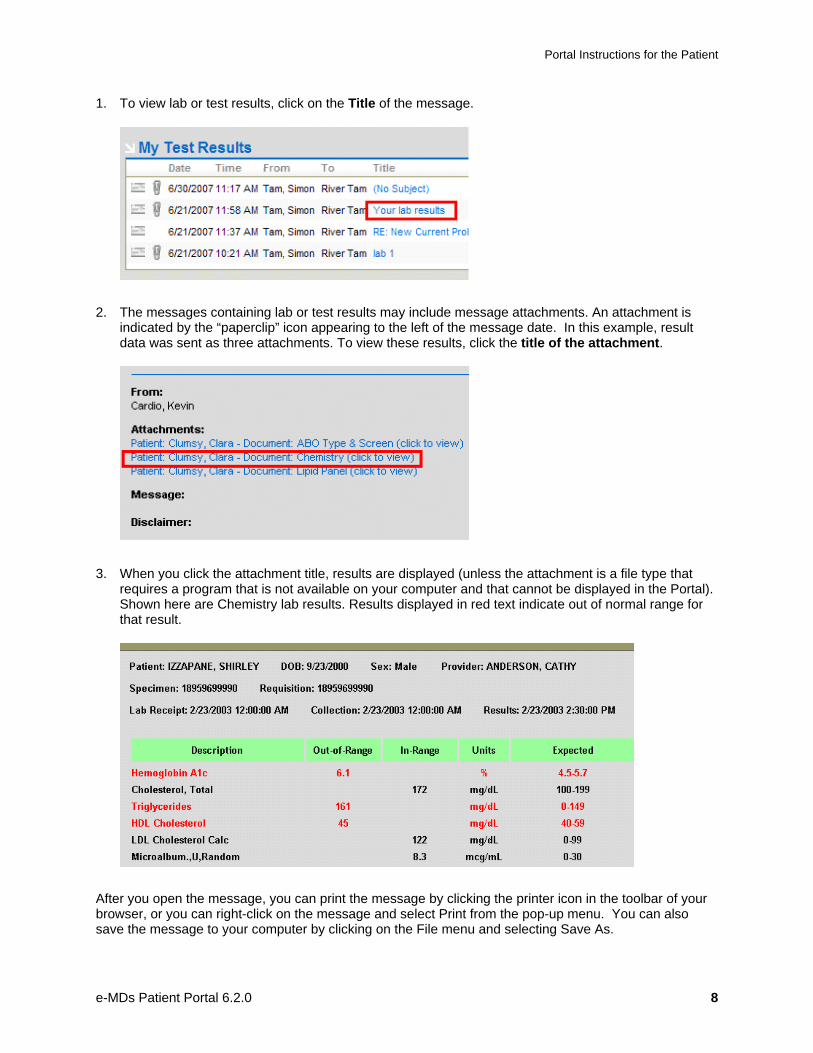
1. To view lab or test results, click on the Title of the message.
2. The messages containing lab or test results may include message attachments. An attachment is indicated by the “paperclip” icon appearing to the left of the message date. In this example, result data was sent as three attachments. To view these results, click the title of the attachment.
3. When you click the attachment title, results are displayed (unless the attachment is a file type that requires a program that is not available on your computer and that cannot be displayed in the Portal). Shown here are Chemistry lab results. Results displayed in red text indicate out of normal range for that result.
After you open the message, you can print the message by clicking the printer icon in the toolbar of your browser, or you can right-click on the message and select Print from the pop-up menu. You can also save the message to your computer by clicking on the File menu and selecting Save As.
Portal Instructions for the Patient
e-MDs Patient Portal 6.2.0 9
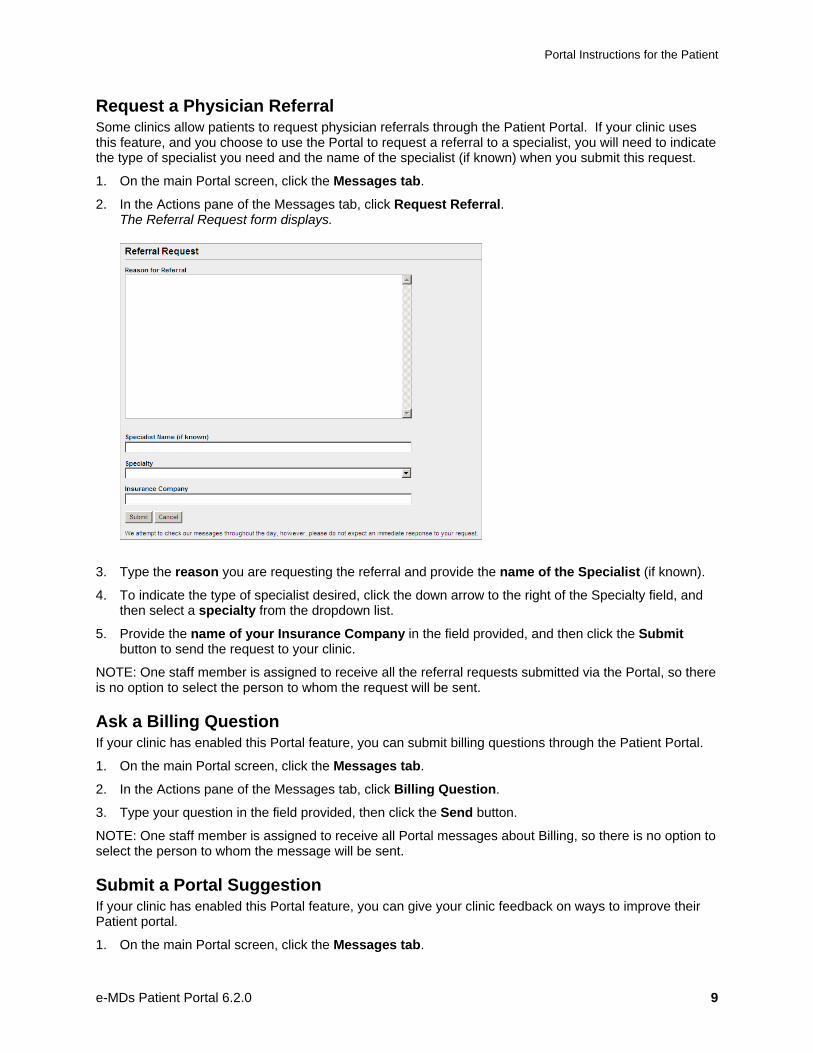
Request a Physician Referral Some clinics allow patients to request physician referrals through the Patient Portal. If your clinic uses this feature, and you choose to use the Portal to request a referral to a specialist, you will need to indicate the type of specialist you need and the name of the specialist (if known) when you submit this request.
1. On the main Portal screen, click the Messages tab.
2. In the Actions pane of the Messages tab, click Request Referral. The Referral Request form displays.
3. Type the reason you are requesting the referral and provide the name of the Specialist (if known).
4. To indicate the type of specialist desired, click the down arrow to the right of the Specialty field, and then select a specialty from the dropdown list.
5. Provide the name of your Insurance Company in the field provided, and then click the Submit button to send the request to your clinic.
NOTE: One staff member is assigned to receive all the referral requests submitted via the Portal, so there is no option to select the person to whom the request will be sent.
Ask a Billing Question If your clinic has enabled this Portal feature, you can submit billing questions through the Patient Portal.
1. On the main Portal screen, click the Messages tab.
2. In the Actions pane of the Messages tab, click Billing Question.
3. Type your question in the field provided, then click the Send button.
NOTE: One staff member is assigned to receive all Portal messages about Billing, so there is no option to select the person to whom the message will be sent.
Submit a Portal Suggestion If your clinic has enabled this Portal feature, you can give your clinic feedback on ways to improve their Patient portal.
1. On the main Portal screen, click the Messages tab.
Portal Instructions for the Patient
e-MDs Patient Portal 6.2.0 10
2. In the Actions pane, click Portal Suggestion.
3. Type your suggestion in the field provided.
4. To submit to the clinic, click the Send button.
NOTE: One staff member is assigned to receive all Portal suggestions, so there is no option to select the person to whom the suggestion will be sent.
Request a Medication Refill Some clinics allow patients to use the Patient Portal to request a refill for an existing prescription. Refill requests sent to the clinic via the Portal must be reviewed and approved by a clinic provider before they will be refilled.
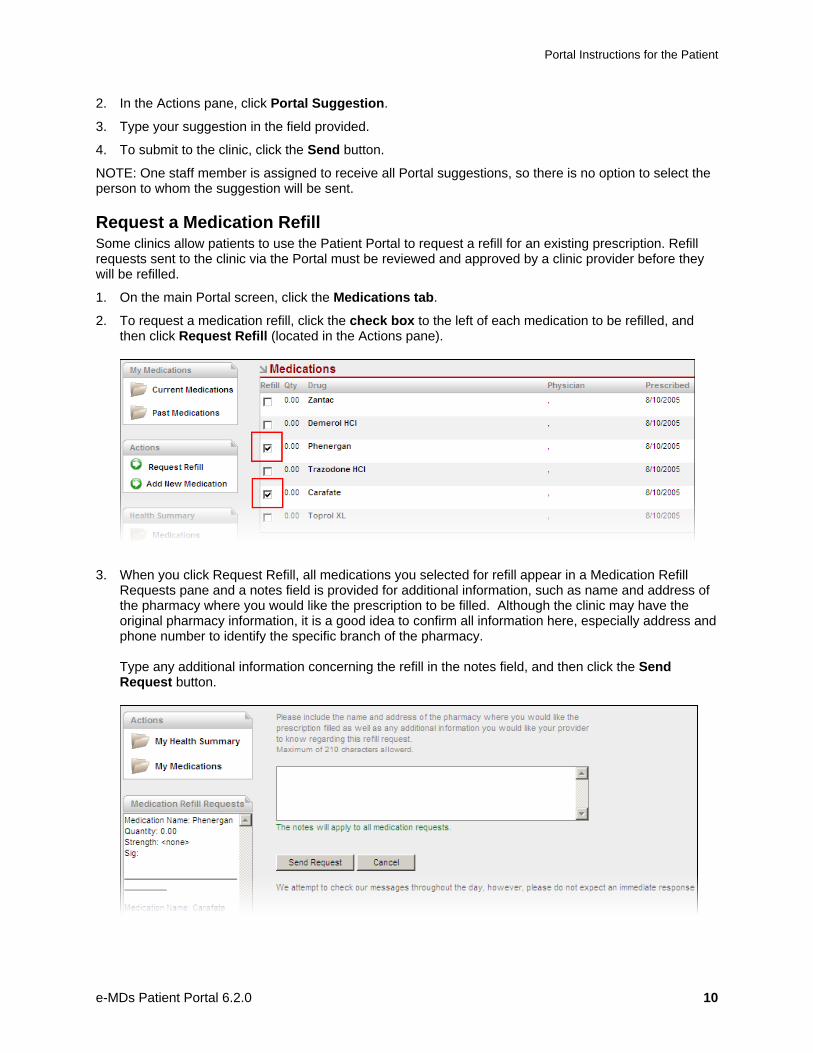
1. On the main Portal screen, click the Medications tab.
2. To request a medication refill, click the check box to the left of each medication to be refilled, and then click Request Refill (located in the Actions pane).
3. When you click Request Refill, all medications you selected for refill appear in a Medication Refill Requests pane and a notes field is provided for additional information, such as name and address of the pharmacy where you would like the prescription to be filled. Although the clinic may have the original pharmacy information, it is a good idea to confirm all information here, especially address and phone number to identify the specific branch of the pharmacy. Type any additional information concerning the refill in the notes field, and then click the Send Request button.
Portal Instructions for the Patient
e-MDs Patient Portal 6.2.0 11
NOTE: One staff member is assigned to receive all the refill requests sent via the Portal, so there is no option to select the person to whom the request will be sent.
Request an Appointment Your clinic may allow you to schedule an appointment through the Portal directly into their scheduling system. This is called Open Access scheduling. If your clinic does not allow Open Access scheduling, you can use the Portal to request an appointment for a particular date and time, and your request will be routed to the clinic’s waiting list. The following instructions for requesting an appointment apply to clinics who allow Open Access scheduling as well as clinics who do not allow Open Access scheduling.
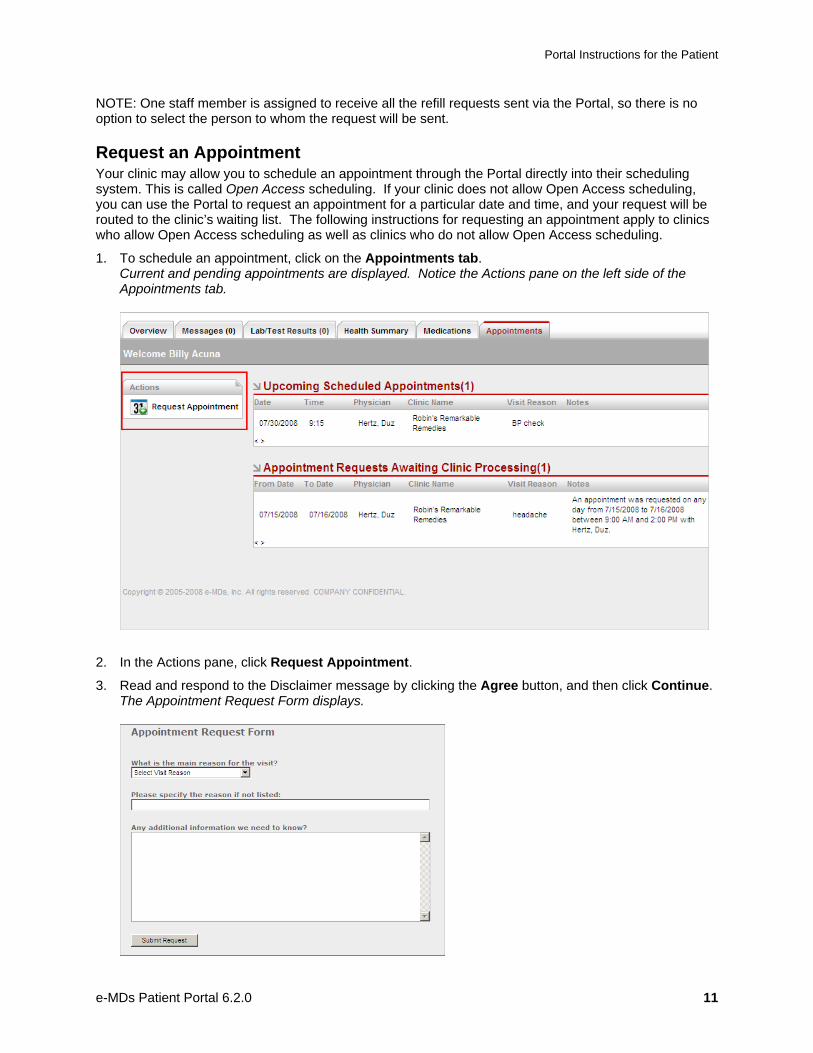
1. To schedule an appointment, click on the Appointments tab. Current and pending appointments are displayed. Notice the Actions pane on the left side of the Appointments tab.
2. In the Actions pane, click Request Appointment.
3. Read and respond to the Disclaimer message by clicking the Agree button, and then click Continue. The Appointment Request Form displays.
Portal Instructions for the Patient
e-MDs Patient Portal 6.2.0 12
4. Indicate a main reason for the visit by clicking the down arrow, and then select (click) a reason from the dropdown list. NOTE: If your visit reason is not listed, you can select Other. If you do select Other as your main reason, you must complete the field labeled “Please specify the reason if not listed”.
5. Add any additional information about your appointment request that will be helpful for the practice to know. For example, you might describe the symptoms you are experiencing.
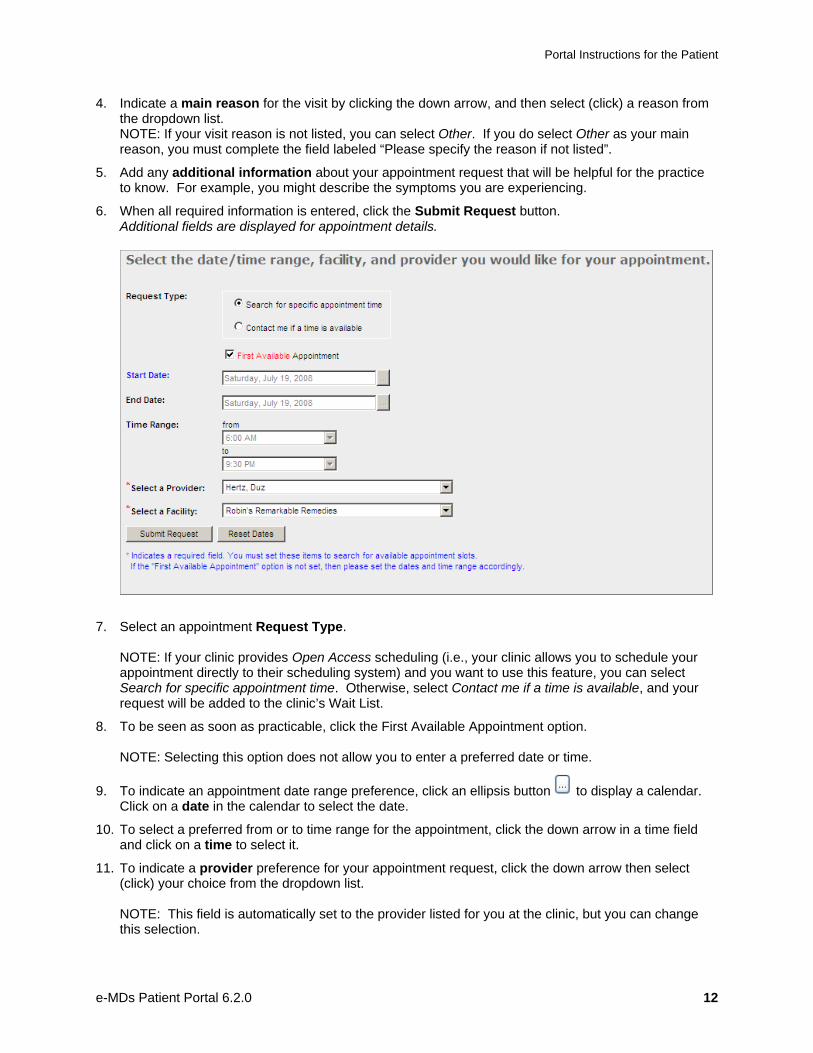
6. When all required information is entered, click the Submit Request button. Additional fields are displayed for appointment details.
7. Select an appointment Request Type. NOTE: If your clinic provides Open Access scheduling (i.e., your clinic allows you to schedule your appointment directly to their scheduling system) and you want to use this feature, you can select Search for specific appointment time. Otherwise, select Contact me if a time is available, and your request will be added to the clinic’s Wait List.
8. To be seen as soon as practicable, click the First Available Appointment option. NOTE: Selecting this option does not allow you to enter a preferred date or time.
9. To indicate an appointment date range preference, click an ellipsis button to display a calendar. Click on a date in the calendar to select the date.
10. To select a preferred from or to time range for the appointment, click the down arrow in a time field and click on a time to select it.
11. To indicate a provider preference for your appointment request, click the down arrow then select (click) your choice from the dropdown list. NOTE: This field is automatically set to the provider listed for you at the clinic, but you can change this selection.
Portal Instructions for the Patient
e-MDs Patient Portal 6.2.0 13
12. To indicate a facility preference for your appointment request (if applicable), click the down arrow, then select (click) your choice from the dropdown list.
13. When you have completed all required fields for the appointment request, click Submit Request.
14. If you selected Other as the Main reason for the visit, a confirmation message is displayed, your request is sent to the clinic’s scheduling Wait List, and the appointment appears in your list of appointment requests waiting for clinic processing. You will also receive an e-mail message confirming receipt of your request. When the clinic processes the request it will move to the confirmed appointments list with an appointment date and time.
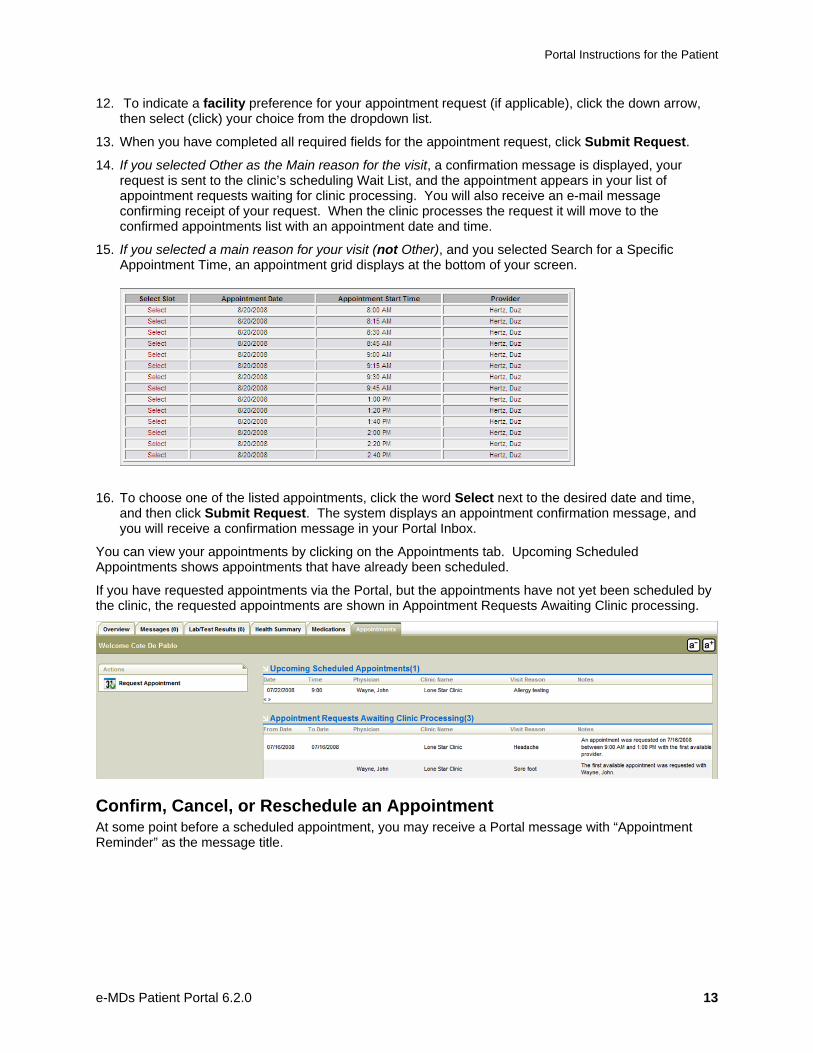
15. If you selected a main reason for your visit (not Other), and you selected Search for a Specific Appointment Time, an appointment grid displays at the bottom of your screen.
16. To choose one of the listed appointments, click the word Select next to the desired date and time, and then click Submit Request. The system displays an appointment confirmation message, and you will receive a confirmation message in your Portal Inbox.
You can view your appointments by clicking on the Appointments tab. Upcoming Scheduled Appointments shows appointments that have already been scheduled.
If you have requested appointments via the Portal, but the appointments have not yet been scheduled by the clinic, the requested appointments are shown in Appointment Requests Awaiting Clinic processing.
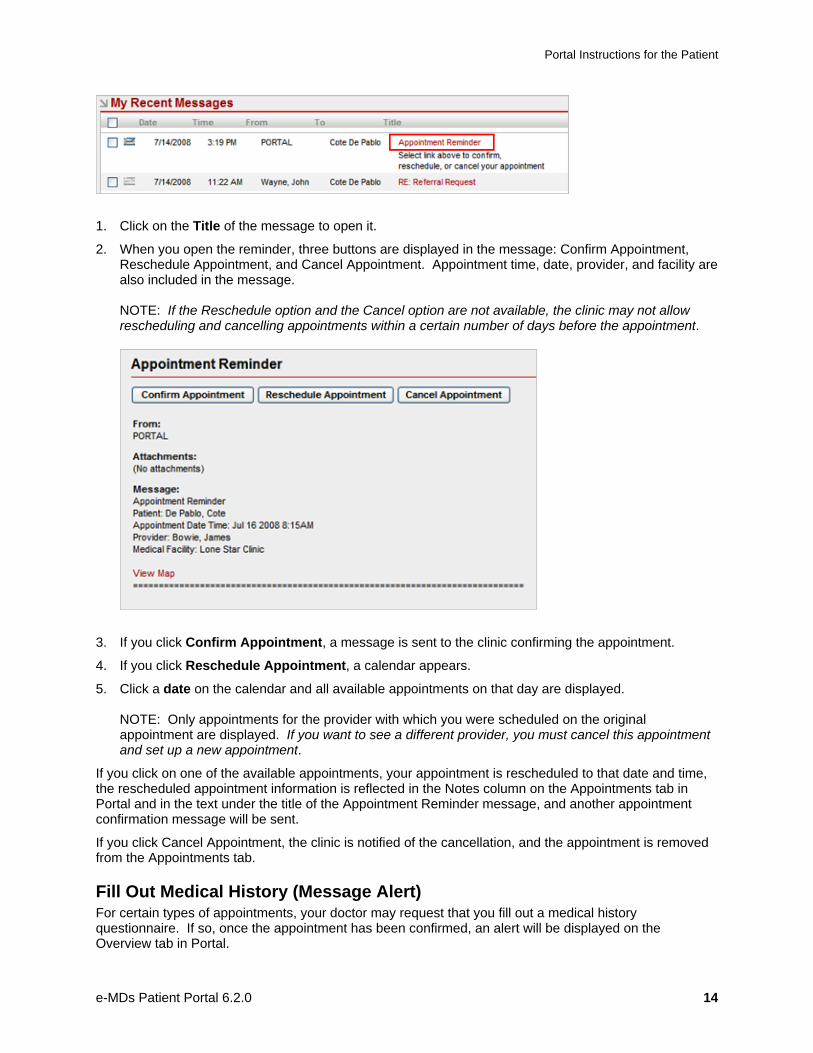
Confirm, Cancel, or Reschedule an Appointment At some point before a scheduled appointment, you may receive a Portal message with “Appointment Reminder” as the message title.
Portal Instructions for the Patient
e-MDs Patient Portal 6.2.0 14
1. Click on the Title of the message to open it.
2. When you open the reminder, three buttons are displayed in the message: Confirm Appointment, Reschedule Appointment, and Cancel Appointment. Appointment time, date, provider, and facility are also included in the message. NOTE: If the Reschedule option and the Cancel option are not available, the clinic may not allow rescheduling and cancelling appointments within a certain number of days before the appointment.
3. If you click Confirm Appointment, a message is sent to the clinic confirming the appointment.
4. If you click Reschedule Appointment, a calendar appears.
5. Click a date on the calendar and all available appointments on that day are displayed. NOTE: Only appointments for the provider with which you were scheduled on the original appointment are displayed. If you want to see a different provider, you must cancel this appointment and set up a new appointment.
If you click on one of the available appointments, your appointment is rescheduled to that date and time, the rescheduled appointment information is reflected in the Notes column on the Appointments tab in Portal and in the text under the title of the Appointment Reminder message, and another appointment confirmation message will be sent.
If you click Cancel Appointment, the clinic is notified of the cancellation, and the appointment is removed from the Appointments tab.
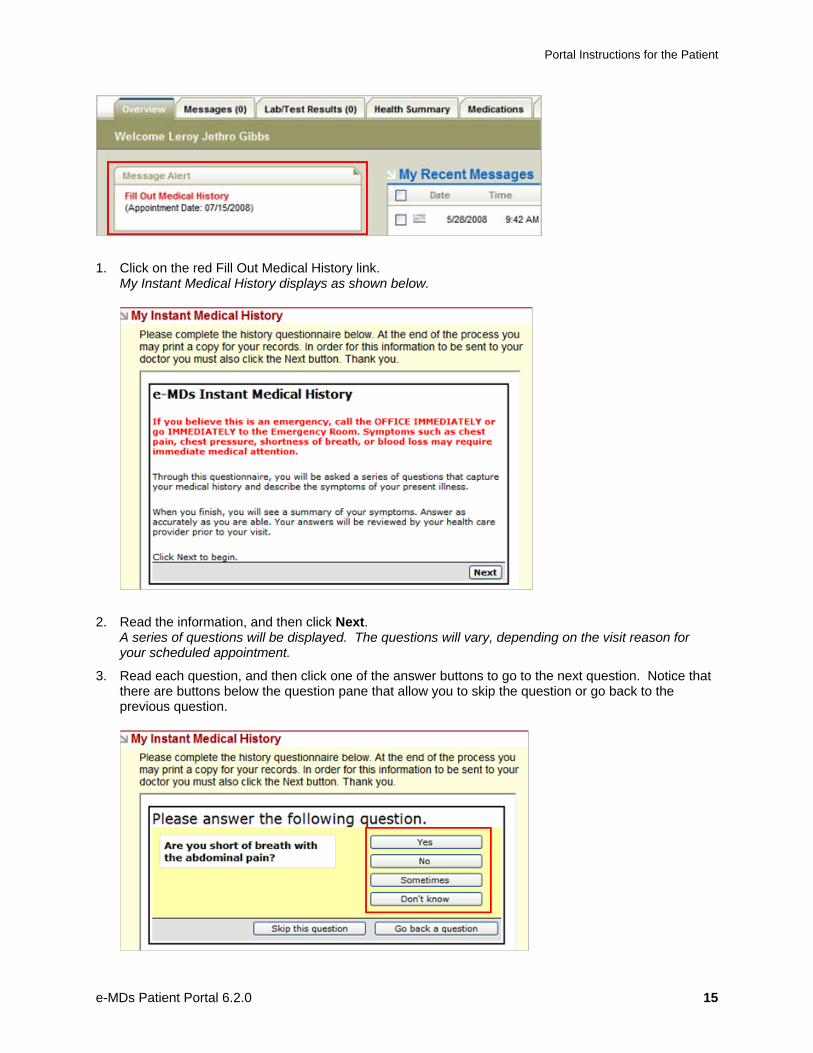
Fill Out Medical History (Message Alert) For certain types of appointments, your doctor may request that you fill out a medical history questionnaire. If so, once the appointment has been confirmed, an alert will be displayed on the Overview tab in Portal.
Portal Instructions for the Patient
e-MDs Patient Portal 6.2.0 15
1. Click on the red Fill Out Medical History link. My Instant Medical History displays as shown below.
2. Read the information, and then click Next. A series of questions will be displayed. The questions will vary, depending on the visit reason for your scheduled appointment.
3. Read each question, and then click one of the answer buttons to go to the next question. Notice that there are buttons below the question pane that allow you to skip the question or go back to the previous question.
Portal Instructions for the Patient
e-MDs Patient Portal 6.2.0 16
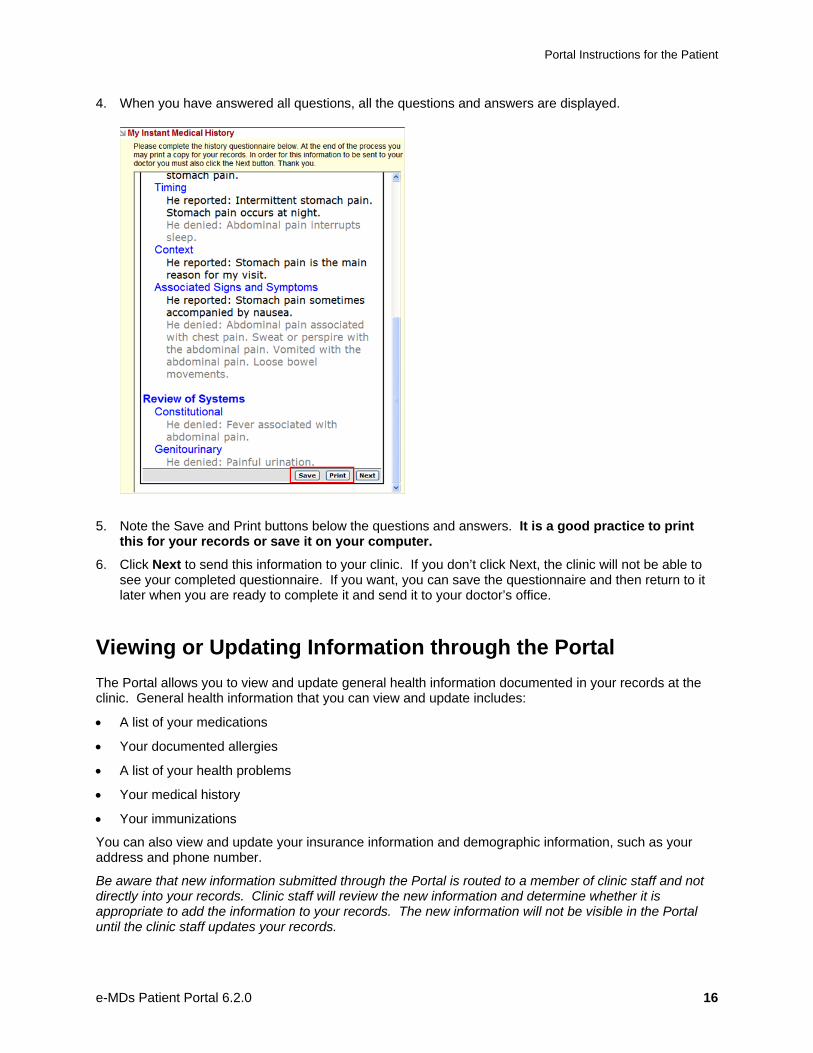
4. When you have answered all questions, all the questions and answers are displayed.
5. Note the Save and Print buttons below the questions and answers. It is a good practice to print this for your records or save it on your computer.
6. Click Next to send this information to your clinic. If you don’t click Next, the clinic will not be able to see your completed questionnaire. If you want, you can save the questionnaire and then return to it later when you are ready to complete it and send it to your doctor’s office.
Viewing or Updating Information through the Portal The Portal allows you to view and update general health information documented in your records at the clinic. General health information that you can view and update includes:
• A list of your medications
• Your documented allergies
• A list of your health problems
• Your medical history
• Your immunizations
You can also view and update your insurance information and demographic information, such as your address and phone number.
Be aware that new information submitted through the Portal is routed to a member of clinic staff and not directly into your records. Clinic staff will review the new information and determine whether it is appropriate to add the information to your records. The new information will not be visible in the Portal until the clinic staff updates your records.
Portal Instructions for the Patient
e-MDs Patient Portal 6.2.0 17
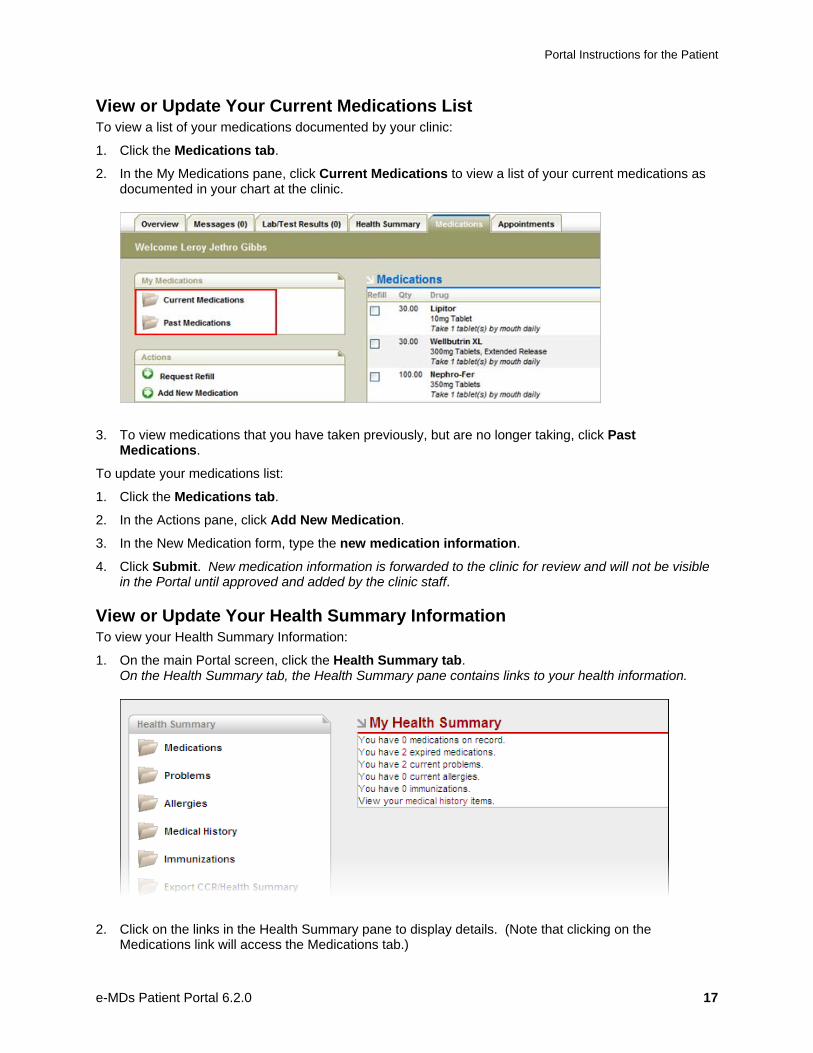
View or Update Your Current Medications List To view a list of your medications documented by your clinic:
1. Click the Medications tab.
2. In the My Medications pane, click Current Medications to view a list of your current medications as documented in your chart at the clinic.
3. To view medications that you have taken previously, but are no longer taking, click Past Medications.
To update your medications list:
1. Click the Medications tab.
2. In the Actions pane, click Add New Medication.
3. In the New Medication form, type the new medication information.
4. Click Submit. New medication information is forwarded to the clinic for review and will not be visible in the Portal until approved and added by the clinic staff.
View or Update Your Health Summary Information To view your Health Summary Information:
1. On the main Portal screen, click the Health Summary tab. On the Health Summary tab, the Health Summary pane contains links to your health information.
2. Click on the links in the Health Summary pane to display details. (Note that clicking on the Medications link will access the Medications tab.)
Portal Instructions for the Patient
e-MDs Patient Portal 6.2.0 18
3. Click the Problems link to display a list of current medical problems recorded in your chart.
4. Click the Allergies link to display all current allergies recorded in your chart.
5. Click Medical History to display a summary of the history contained in your chart.
6. Click Immunizations to display immunizations documented by your clinic.
Notice that links to View CCR/Health Summary or View Confidential CCR/Health Summary are also included in the Health Summary pane. See the next section, View, Print, or Copy Your Continuity of Care Record (CCR), for information about these links.
To update your Health Summary information:
1. To update health summary information documented in your chart, click the Health Summary tab located on the main Portal screen.
2. In the Health Summary pane, click the Problems link to review current medical problems recorded in your chart. To add a new problem, click Add New Problem, type the new information in the Description field, and then click Submit to create and send a message with the new information.
3. Click Allergies in the Health Summary Pane to review the current allergies recorded in your chart. Click Add New Allergy to create and submit a message regarding new allergies.
4. Click Medical History to review the history documented in your chart. To submit more information, click Add New History.
5. Click Immunizations to review the immunizations recorded in your chart. To submit information about other immunizations, click Add New Immunization.
Any new updates to your Health Summary information will be reviewed by the clinic, and then added to your records if appropriate. The new information will not be visible in the Portal until the clinic staff updates your records.
View, Print, or Copy your Continuity of Care Record (CCR) Your Portal allows you to view a Continuity of Care Record (CCR) which contains a “snapshot” of the health summary information currently documented in your electronic medical record at your doctor’s office. You can print a copy of your CCR, or you can save a copy to your computer.
You may want to take a copy of your CCR with you if you go to see another doctor, so that the new doctor will have detailed information about your health history and will be able to review all medications that you are currently taking before prescribing new medications. This promotes continuity of care between providers and is especially useful in avoiding potentially dangerous medication interactions.
Note that you can access a CCR with all information, including information that has been marked confidential, or you can access a CCR that does not show information marked confidential.
To view or print your Continuity of Care Record:
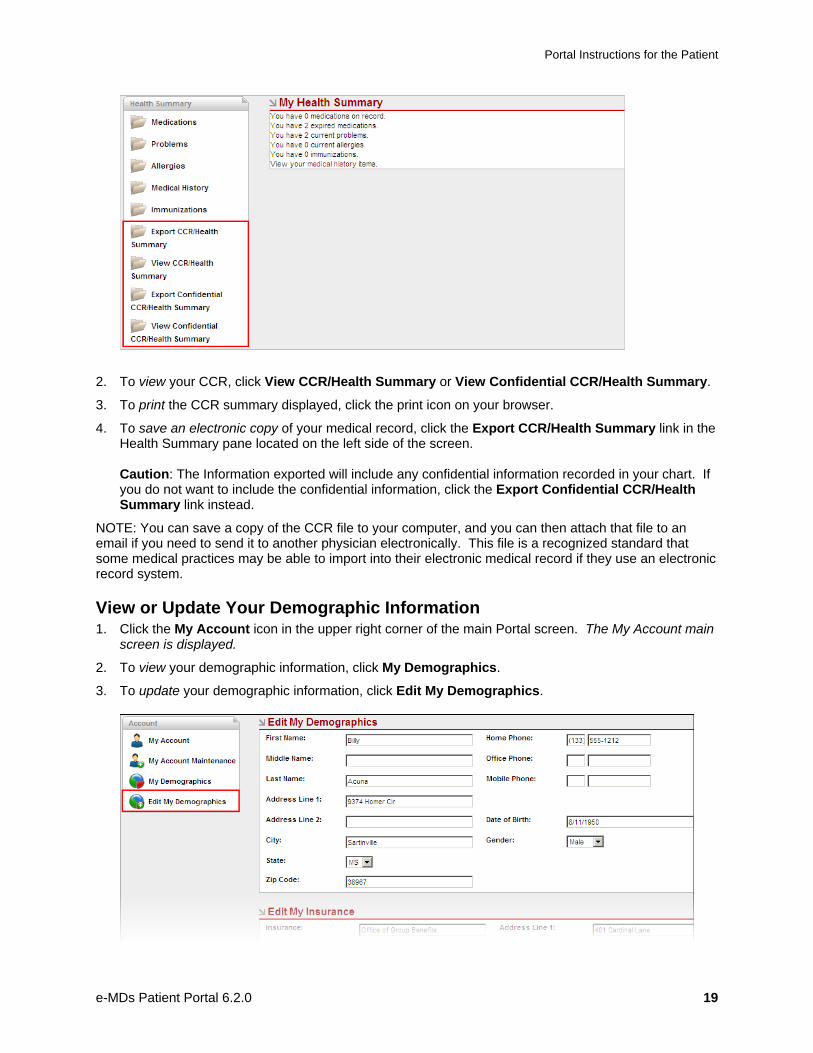
1. On the main Portal screen, click the Health Summary tab. Notice the Health Summary pane located on the left side of the tab. Links to view your CCR or export your CCR are included in the Health Summary pane. The View CCR/Health Summary and Export CCR/Health Summary links include confidential information in the CCR. The confidential information can be identified by the word “Confidential” in the Comments column. The View Confidential CCR/Health Summary and Export Confidential CCR/Health Summary links do not include the confidential information in the CCR.
Portal Instructions for the Patient
e-MDs Patient Portal 6.2.0 19
2. To view your CCR, click View CCR/Health Summary or View Confidential CCR/Health Summary.
3. To print the CCR summary displayed, click the print icon on your browser.
4. To save an electronic copy of your medical record, click the Export CCR/Health Summary link in the Health Summary pane located on the left side of the screen. Caution: The Information exported will include any confidential information recorded in your chart. If you do not want to include the confidential information, click the Export Confidential CCR/Health Summary link instead.
NOTE: You can save a copy of the CCR file to your computer, and you can then attach that file to an email if you need to send it to another physician electronically. This file is a recognized standard that some medical practices may be able to import into their electronic medical record if they use an electronic record system.
View or Update Your Demographic Information 1. Click the My Account icon in the upper right corner of the main Portal screen. The My Account main
screen is displayed.
2. To view your demographic information, click My Demographics.
3. To update your demographic information, click Edit My Demographics.
Portal Instructions for the Patient
e-MDs Patient Portal 6.2.0 20
4. Type the new information in the appropriate fields.
5. Click Submit Changes. The new information will be routed to your clinic for review, and then added to your records if appropriate. The new information will not be visible in the Portal until the clinic staff updates your records.
View or Update Your Insurance Information 1. Click the My Account icon in the upper right corner of the main Portal screen. The My Account main
screen is displayed.
2. Click the My Demographics link, and scroll down to Edit My Insurance.
3. To update information about your insurance provider, type the information in the fields provided in the Edit My Insurance pane.
4. If you have changed health insurance providers, scroll down the Edit My Demographics window to the Add New Insurance pane. Enter the requested information, then click the Add Insurance button.
5. To submit demographic changes to the clinic, click Submit Changes.
NOTE: Edited information will not be reflected in your records until approved by the clinic.
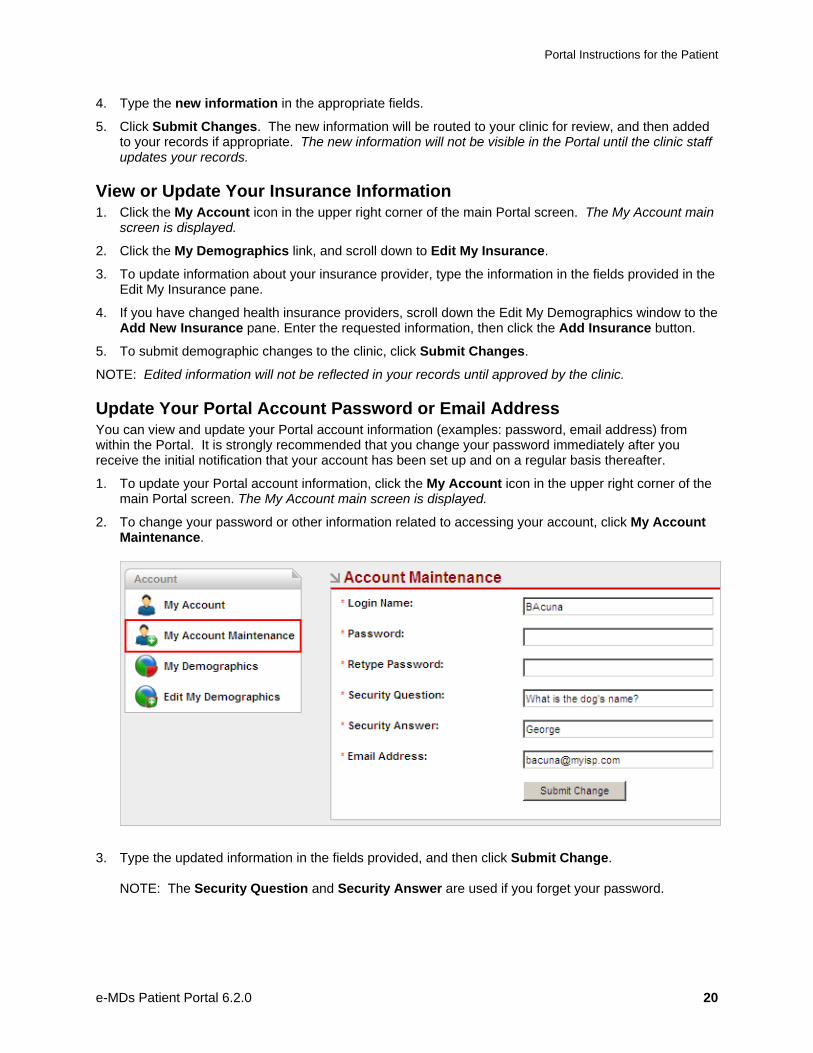
Update Your Portal Account Password or Email Address You can view and update your Portal account information (examples: password, email address) from within the Portal. It is strongly recommended that you change your password immediately after you receive the initial notification that your account has been set up and on a regular basis thereafter.
1. To update your Portal account information, click the My Account icon in the upper right corner of the main Portal screen. The My Account main screen is displayed.
2. To change your password or other information related to accessing your account, click My Account Maintenance.
3. Type the updated information in the fields provided, and then click Submit Change. NOTE: The Security Question and Security Answer are used if you forget your password.
Portal Instructions for the Patient
e-MDs Patient Portal 6.2.0 21
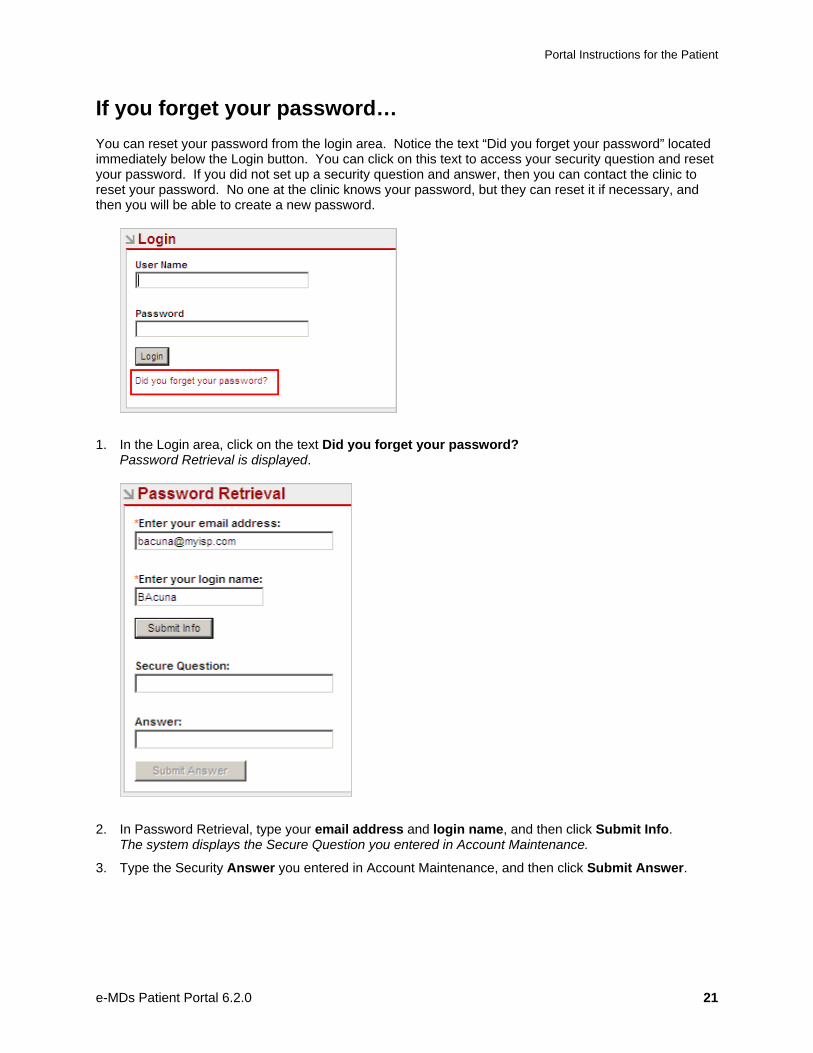
If you forget your password… You can reset your password from the login area. Notice the text “Did you forget your password” located immediately below the Login button. You can click on this text to access your security question and reset your password. If you did not set up a security question and answer, then you can contact the clinic to reset your password. No one at the clinic knows your password, but they can reset it if necessary, and then you will be able to create a new password.
1. In the Login area, click on the text Did you forget your password? Password Retrieval is displayed.
2. In Password Retrieval, type your email address and login name, and then click Submit Info. The system displays the Secure Question you entered in Account Maintenance.
3. Type the Security Answer you entered in Account Maintenance, and then click Submit Answer.
Portal Instructions for the Patient
e-MDs Patient Portal 6.2.0 22
If you do not have a login account for the Portal… This clinic uses an Internet-based Patient Portal allowing its patients to receive clinic communications as well as request appointments. Access to most Portal functions requires a user name and password issued by the clinic.
If you are a new patient (i.e. you have never been seen by this clinic), or the clinic has not assigned you a user name and password, you can still use the Portal to request an appointment.
When completed, your appointment request is automatically added to the clinic’s Scheduling Wait List. Once your request is received and processed, someone from the clinic staff will contact you, ask for additional information (if needed), and confirm an actual appointment time.
You can also access driving directions to this clinic if needed.
You must sign a Portal Authorization form before the clinic can assign a user name and password.
Portal Instructions for the Clinic Staff
e-MDs Patient Portal 6.2.0 23
C H A P T E R 3
Portal Instructions for the Clinic Staff This chapter of the user guide addresses the integration of e-MDs Patient Portal with e-MDs Solution Series and describes how clinic staff members interact with the Portal to manage appointment requests, send and receive Portal messages, and process notifications and requests received from the Portal.
The Patient Portal can offer significant time savings when used to communicate lab results, automate appointment reminders, and request information updates form the patient. All of these features are integrated into your existing e-MDs Solution Series software, so you won’t have to learn a new system.
Most of the functionality on the Patient Portal is optional and can be implemented in stages, if desired. The Clinic Administrator for the Portal can enable selected features, while leaving others disabled.
Authorizing a Patient to Use Portal Other than a new patient appointment request, patients cannot use the Portal until you set them up in Solution Series as Portal Patients.
1. Have the patient sign a Portal Authorization form (created by the clinic), then scan and import into DocMan. NOTE: You can link the Portal Authorization form to a Schedule check in task, and the form can be scanned directly from the Check In screen during the patient intake process.
2. When you import or refile the authorization to the patient’s chart, in the Required Form field, select Portal Authorization. A demographic icon appears next to the Required Form field.
3. Click on the demographic icon.
4. Patient Maintenance opens. Verify that the patient has an email address.
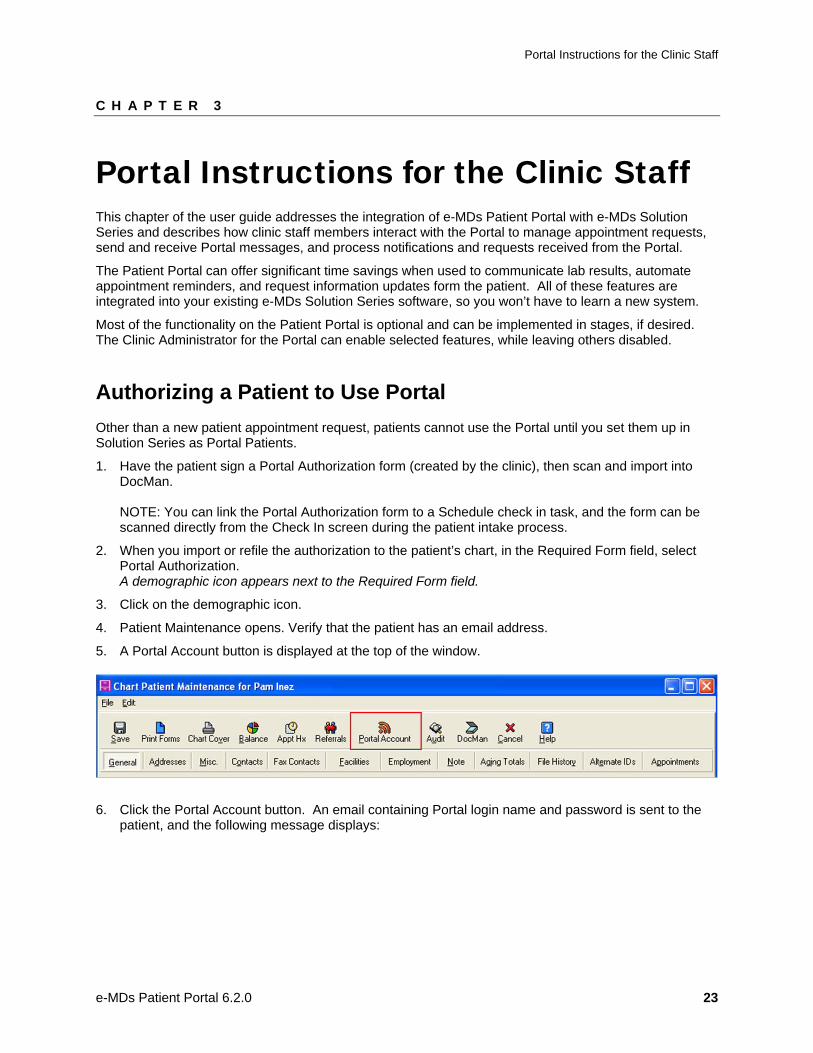
5. A Portal Account button is displayed at the top of the window.
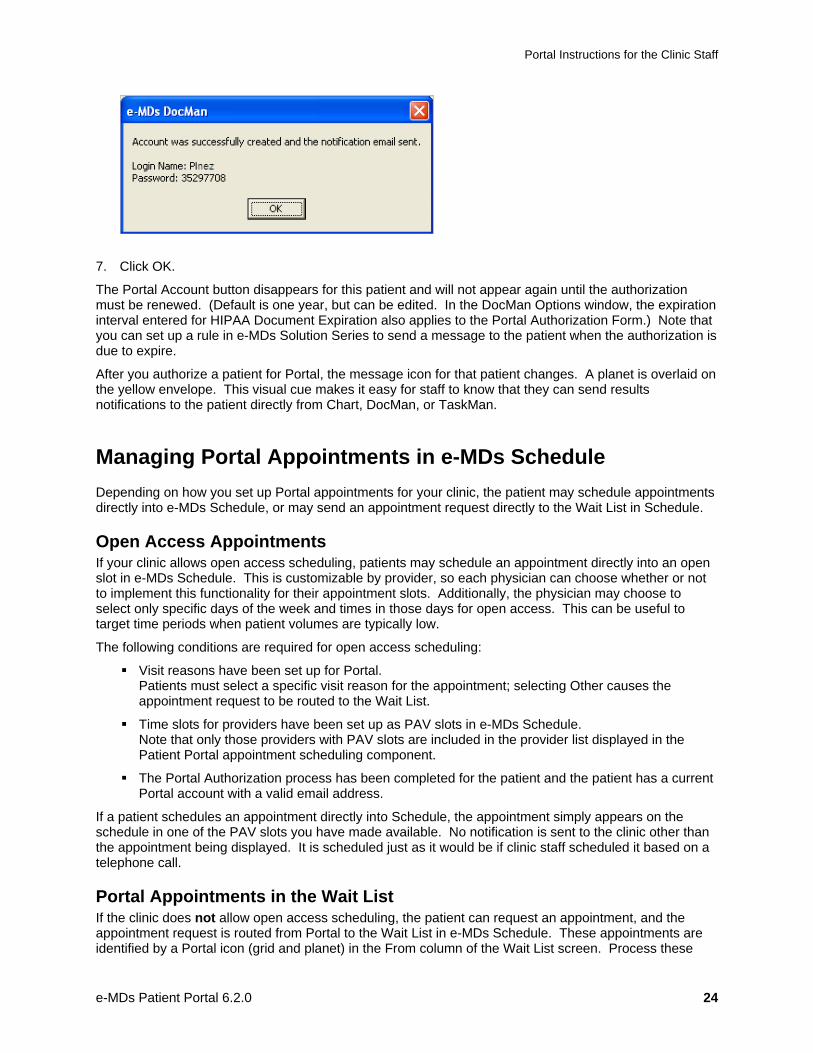
6. Click the Portal Account button. An email containing Portal login name and password is sent to the patient, and the following message displays:
Portal Instructions for the Clinic Staff
e-MDs Patient Portal 6.2.0 24
7. Click OK.
The Portal Account button disappears for this patient and will not appear again until the authorization must be renewed. (Default is one year, but can be edited. In the DocMan Options window, the expiration interval entered for HIPAA Document Expiration also applies to the Portal Authorization Form.) Note that you can set up a rule in e-MDs Solution Series to send a message to the patient when the authorization is due to expire.
After you authorize a patient for Portal, the message icon for that patient changes. A planet is overlaid on the yellow envelope. This visual cue makes it easy for staff to know that they can send results notifications to the patient directly from Chart, DocMan, or TaskMan.
Managing Portal Appointments in e-MDs Schedule Depending on how you set up Portal appointments for your clinic, the patient may schedule appointments directly into e-MDs Schedule, or may send an appointment request directly to the Wait List in Schedule.
Open Access Appointments If your clinic allows open access scheduling, patients may schedule an appointment directly into an open slot in e-MDs Schedule. This is customizable by provider, so each physician can choose whether or not to implement this functionality for their appointment slots. Additionally, the physician may choose to select only specific days of the week and times in those days for open access. This can be useful to target time periods when patient volumes are typically low.
The following conditions are required for open access scheduling:
Visit reasons have been set up for Portal. Patients must select a specific visit reason for the appointment; selecting Other causes the appointment request to be routed to the Wait List.
Time slots for providers have been set up as PAV slots in e-MDs Schedule. Note that only those providers with PAV slots are included in the provider list displayed in the Patient Portal appointment scheduling component.
The Portal Authorization process has been completed for the patient and the patient has a current Portal account with a valid email address.
If a patient schedules an appointment directly into Schedule, the appointment simply appears on the schedule in one of the PAV slots you have made available. No notification is sent to the clinic other than the appointment being displayed. It is scheduled just as it would be if clinic staff scheduled it based on a telephone call.
Portal Appointments in the Wait List If the clinic does not allow open access scheduling, the patient can request an appointment, and the appointment request is routed from Portal to the Wait List in e-MDs Schedule. These appointments are identified by a Portal icon (grid and planet) in the From column of the Wait List screen. Process these
Portal Instructions for the Clinic Staff
e-MDs Patient Portal 6.2.0 25
appointments as you would any other appointment request in the Wait List. The Wait List notes field contains any preferred times specified by the patient. When you schedule an appointment from the Wait List, the patient can see the date and time in their upcoming appointments list on Portal.
Appointment Confirmation You can use the Rule Manager in e-MDs Solution Series to create a Portal rule and set it to run a specific number of days before appointments so that a message is sent to remind the patient and request appointment confirmation. The reminder is sent to the email address recorded for the patient in Solution Series, and it tells the patient that they have a message in the Patient Portal. This rule is recommended as a means of decreasing staff telephone time, increasing the appointment confirmation rate, and reducing the number of missed appointments.
The automated confirmation function also gives you the ability to set up messages based on different appointment types and allows for creation of a custom message for each appointment type. (Mail merge fields can be used for these messages.) Such messages might include instructions or reminders for pre-procedure preparation, reminders of co-pay amounts, etc.
When the patient opens the message in Portal, several options may be presented, depending on which settings have been enabled by your Clinic Administrator for Portal. Possible options include Confirm, Reschedule, and Cancel. If the patient selects the Confirm Appointment option, the confirmation status in your e-MDs Schedule is updated with a purple telephone and green globe with the number 1. If the patient selects the Reschedule option, the appointment is removed from the original date and scheduled on the new date and a note is available which tells you the appointment was rescheduled from the original date. If the patient selects the Cancel option, the appointment is removed from the slot. Note that the Reschedule and Cancel options are only available if you enable them on the Portal administration pages. They are based on the number of days before an appointment that a patient is not allowed to cancel or reschedule.
Clinic staff can easily follow up on cancellation requests by using the Reports >> Appointment Confirmations work list tool. See the e-MDs Schedule and Rounds User Guide or e-MDs Bill User Guide for further information and instructions for using Rule Manager and Reports.
Instant Medical History™ The Instant Medical History (IMH) feature is licensed from a 3rd party vendor, Primetime Medical, at no cost to you. It sends a questionnaire link to the patient when appointments are made for visit reasons that have been set to require a Portal History. Once the appointment is confirmed, a bold red alert is displayed when the patient logs in to the Portal. An online medical history form is provided for them to complete and submit via the Portal. You can then opt to include the information in pertinent sections of the chart, such as HPI, ROS, or Past Medical History.
NOTE: The time prior to the appointment that the medical history alert appears is a preference that can be set by your Clinic Administrator for Portal, but the Instant Medical History alert will not activate until after the appointment is confirmed either in e-MDs Schedule or in the Patient Portal.
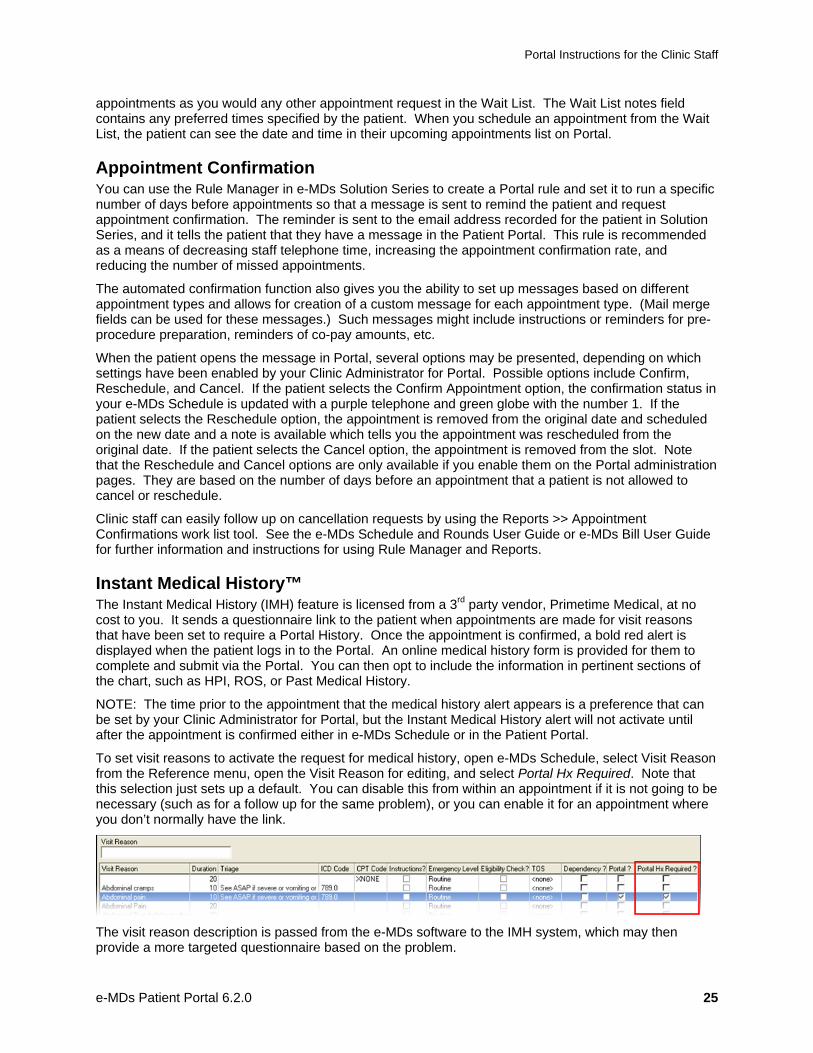
To set visit reasons to activate the request for medical history, open e-MDs Schedule, select Visit Reason from the Reference menu, open the Visit Reason for editing, and select Portal Hx Required. Note that this selection just sets up a default. You can disable this from within an appointment if it is not going to be necessary (such as for a follow up for the same problem), or you can enable it for an appointment where you don’t normally have the link.
The visit reason description is passed from the e-MDs software to the IMH system, which may then provide a more targeted questionnaire based on the problem.
Portal Instructions for the Clinic Staff
e-MDs Patient Portal 6.2.0 26
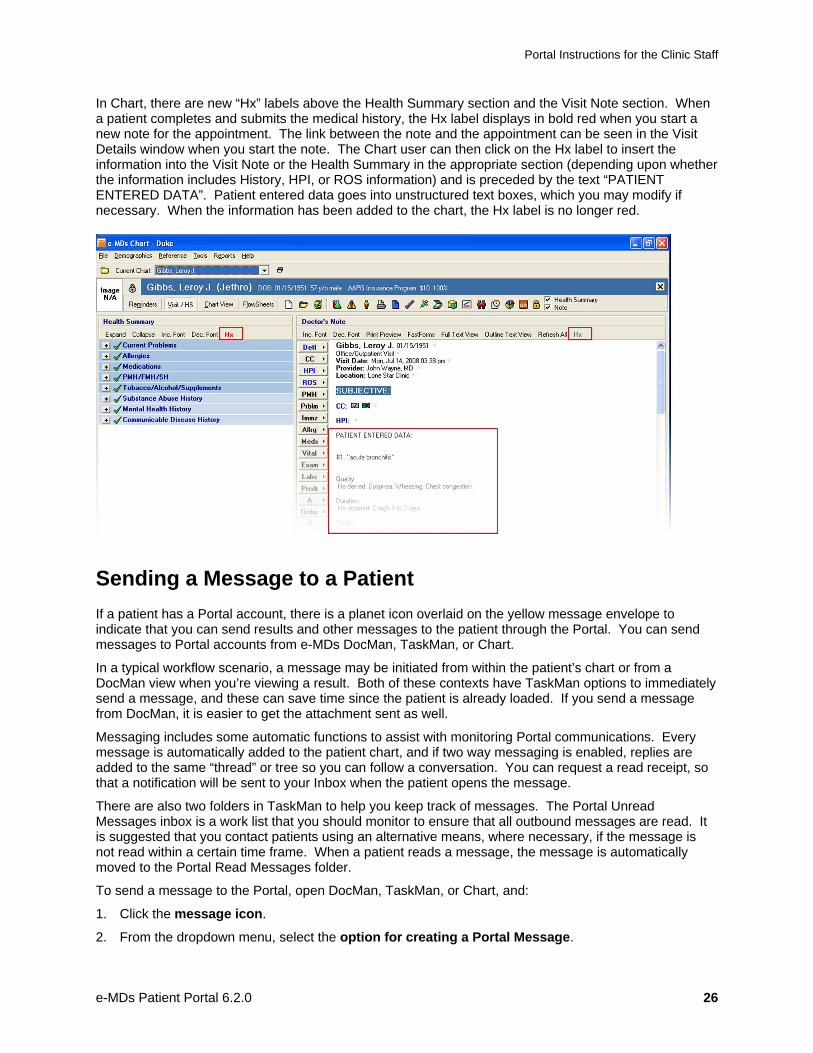
In Chart, there are new “Hx” labels above the Health Summary section and the Visit Note section. When a patient completes and submits the medical history, the Hx label displays in bold red when you start a new note for the appointment. The link between the note and the appointment can be seen in the Visit Details window when you start the note. The Chart user can then click on the Hx label to insert the information into the Visit Note or the Health Summary in the appropriate section (depending upon whether the information includes History, HPI, or ROS information) and is preceded by the text “PATIENT ENTERED DATA”. Patient entered data goes into unstructured text boxes, which you may modify if necessary. When the information has been added to the chart, the Hx label is no longer red.
Sending a Message to a Patient If a patient has a Portal account, there is a planet icon overlaid on the yellow message envelope to indicate that you can send results and other messages to the patient through the Portal. You can send messages to Portal accounts from e-MDs DocMan, TaskMan, or Chart.
In a typical workflow scenario, a message may be initiated from within the patient’s chart or from a DocMan view when you’re viewing a result. Both of these contexts have TaskMan options to immediately send a message, and these can save time since the patient is already loaded. If you send a message from DocMan, it is easier to get the attachment sent as well.
Messaging includes some automatic functions to assist with monitoring Portal communications. Every message is automatically added to the patient chart, and if two way messaging is enabled, replies are added to the same “thread” or tree so you can follow a conversation. You can request a read receipt, so that a notification will be sent to your Inbox when the patient opens the message.
There are also two folders in TaskMan to help you keep track of messages. The Portal Unread Messages inbox is a work list that you should monitor to ensure that all outbound messages are read. It is suggested that you contact patients using an alternative means, where necessary, if the message is not read within a certain time frame. When a patient reads a message, the message is automatically moved to the Portal Read Messages folder.
To send a message to the Portal, open DocMan, TaskMan, or Chart, and:
1. Click the message icon.
2. From the dropdown menu, select the option for creating a Portal Message.
Portal Instructions for the Clinic Staff
e-MDs Patient Portal 6.2.0 27
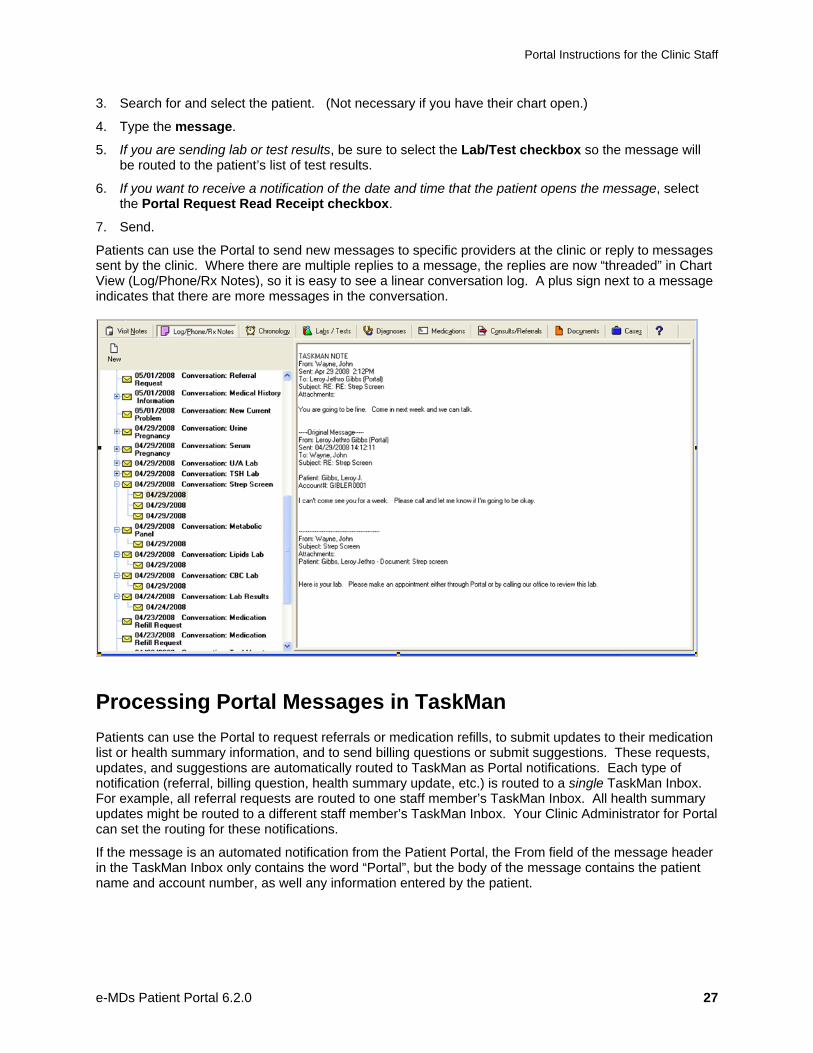
3. Search for and select the patient. (Not necessary if you have their chart open.)
4. Type the message.
5. If you are sending lab or test results, be sure to select the Lab/Test checkbox so the message will be routed to the patient’s list of test results.
6. If you want to receive a notification of the date and time that the patient opens the message, select the Portal Request Read Receipt checkbox.
7. Send.
Patients can use the Portal to send new messages to specific providers at the clinic or reply to messages sent by the clinic. Where there are multiple replies to a message, the replies are now “threaded” in Chart View (Log/Phone/Rx Notes), so it is easy to see a linear conversation log. A plus sign next to a message indicates that there are more messages in the conversation.
Processing Portal Messages in TaskMan Patients can use the Portal to request referrals or medication refills, to submit updates to their medication list or health summary information, and to send billing questions or submit suggestions. These requests, updates, and suggestions are automatically routed to TaskMan as Portal notifications. Each type of notification (referral, billing question, health summary update, etc.) is routed to a single TaskMan Inbox. For example, all referral requests are routed to one staff member’s TaskMan Inbox. All health summary updates might be routed to a different staff member’s TaskMan Inbox. Your Clinic Administrator for Portal can set the routing for these notifications.
If the message is an automated notification from the Patient Portal, the From field of the message header in the TaskMan Inbox only contains the word “Portal”, but the body of the message contains the patient name and account number, as well any information entered by the patient.
Portal Instructions for the Clinic Staff
e-MDs Patient Portal 6.2.0 28
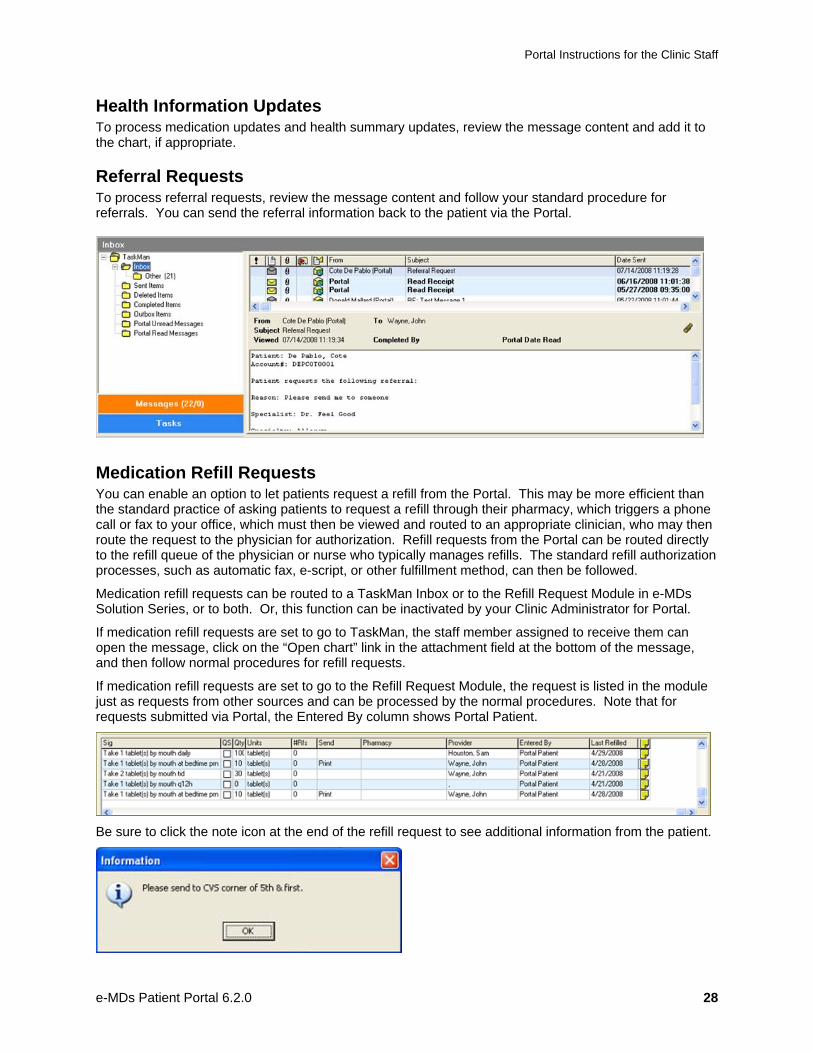
Health Information Updates To process medication updates and health summary updates, review the message content and add it to the chart, if appropriate.
Referral Requests To process referral requests, review the message content and follow your standard procedure for referrals. You can send the referral information back to the patient via the Portal.
Medication Refill Requests You can enable an option to let patients request a refill from the Portal. This may be more efficient than the standard practice of asking patients to request a refill through their pharmacy, which triggers a phone call or fax to your office, which must then be viewed and routed to an appropriate clinician, who may then route the request to the physician for authorization. Refill requests from the Portal can be routed directly to the refill queue of the physician or nurse who typically manages refills. The standard refill authorization processes, such as automatic fax, e-script, or other fulfillment method, can then be followed.
Medication refill requests can be routed to a TaskMan Inbox or to the Refill Request Module in e-MDs Solution Series, or to both. Or, this function can be inactivated by your Clinic Administrator for Portal.
If medication refill requests are set to go to TaskMan, the staff member assigned to receive them can open the message, click on the “Open chart” link in the attachment field at the bottom of the message, and then follow normal procedures for refill requests.
If medication refill requests are set to go to the Refill Request Module, the request is listed in the module just as requests from other sources and can be processed by the normal procedures. Note that for requests submitted via Portal, the Entered By column shows Portal Patient.
Be sure to click the note icon at the end of the refill request to see additional information from the patient.

Portal Instructions for the Clinic Staff
e-MDs Patient Portal 6.2.0 29
Other Portal Messages Portal suggestions, billing questions, and general portal messages can be managed just as if you received them via email. Responses can be sent to the patient via the Portal.
The Clinic Administrator Account
e-MDs Patient Portal 6.2.0 30
C H A P T E R 4
The Clinic Administrator Account The Clinic Administrator (cadmin) account is used to set up and maintain a clinic’s Patient Portal. This chapter of the User Guide is designed to help the clinic:
• Manage access to their Portal
• Configure Portal functions used by the clinic
• Customize the Portal appearance
• Monitor Portal use
Accessing Administrator Functions When the Patient Portal is installed, the Portal home page contains only the login link. Log in with the Clinic Administrator user name and password provided by the e-MDs Implementation Project Manager or Trainer. This account provides exclusive access to functions used to perform the initial set up of the clinic’s Portal, as well as to maintain and update the portal.
Setting Up and Maintaining the Portal Administrator maintenance functions include maintaining the Portal’s clinical and technical information, assigning staff to process Portal inquiries, selecting which Portal functions are available to patients, and customizing the Portal appearance. An overview of each maintenance function follows:
• Clinic Info: Displays clinic, web, and server information related to the Portal. This function is normally used only during Portal installation. e-MDs Technical Support may use it as a quick reference when working with a clinic. Information can be viewed, but not updated from this screen.
• Clinic Maintenance: Consists of these sub-functions:
General Maintenance: Update clinic information and test web-related functions of the Portal.
Notification Maintenance: Assign clinic staff to receive a specific type of patient communication from the Portal (e.g., Billing question, scheduling inquiry, etc.).
Message Maintenance & Options: Select which Portal functions (i.e., Refill requests, referrals, etc.) are made available to patients. Use these functions to set the frequency of access parameters and standard text replies for various functions.
Portal Appearance: Upload and display a clinic’s logo on Portal screens and select a Portal style (screen colors). NOTE: Most of the functionality on the Patient Portal is optional and can be implemented in stages, if desired. For example, you can enable the messaging feature initially, leaving the remaining features disabled. The online appointment features, automated refill request, etc. can be added when clinic staff members are ready to work with the remaining features.
• Home Page Maintenance: Allows clinics to upload a specific graphic displayed on the clinic’s main Portal web page.
The Clinic Administrator Account
e-MDs Patient Portal 6.2.0 31
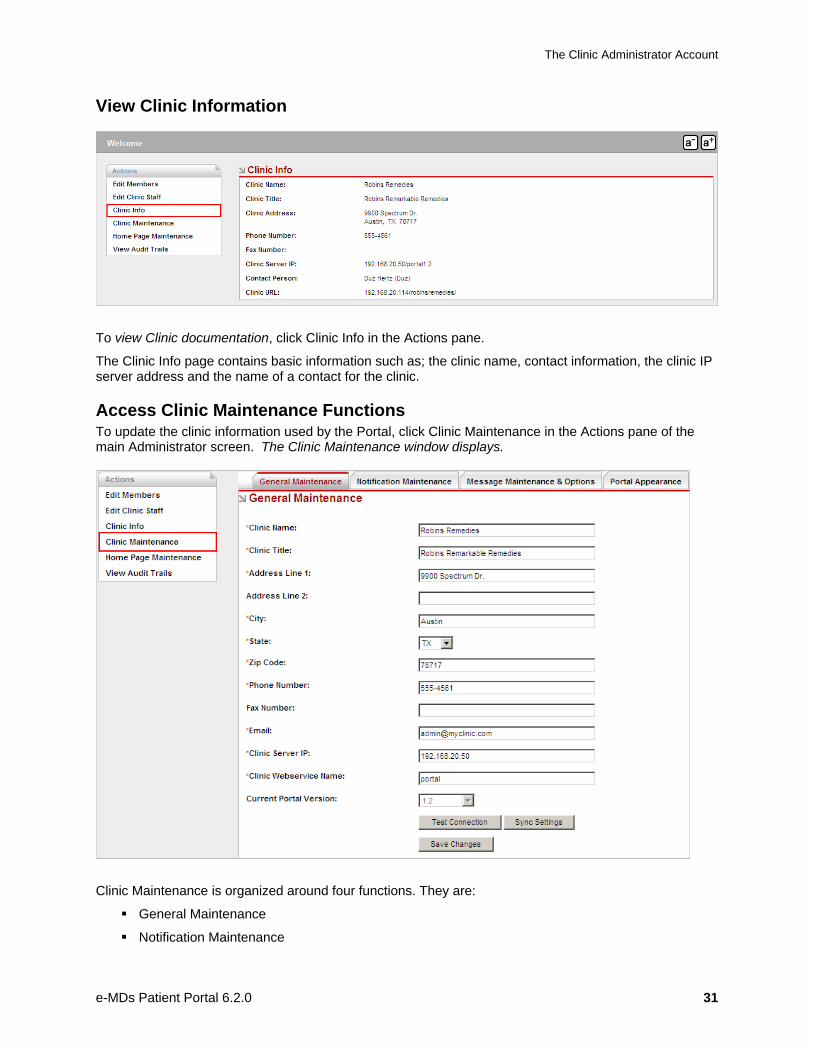
View Clinic Information
To view Clinic documentation, click Clinic Info in the Actions pane.
The Clinic Info page contains basic information such as; the clinic name, contact information, the clinic IP server address and the name of a contact for the clinic.
Access Clinic Maintenance Functions To update the clinic information used by the Portal, click Clinic Maintenance in the Actions pane of the main Administrator screen. The Clinic Maintenance window displays.
Clinic Maintenance is organized around four functions. They are:
General Maintenance
Notification Maintenance
The Clinic Administrator Account
e-MDs Patient Portal 6.2.0 32
Message Maintenance & Options
Portal Appearance
Perform General Clinic Maintenance All fields on the General Maintenance tab can be edited except the Clinic Name. Required fields are denoted with a red asterisk.
The Email field contains the address of the clinic’s portal contact person.
The Clinic Server IP is the IP address for the machine used as the clinic’s portal server. The Clinic Webservice Name tells the portal what to call on within the client’s server. To locate the webservice name, open IIS on the machine. This displays the webservice name followed by the version number. Example: webserviceforportal1.1.
To access previous settings, click the down arrow in the Current Portal Version: field, then select (click) a version to display.
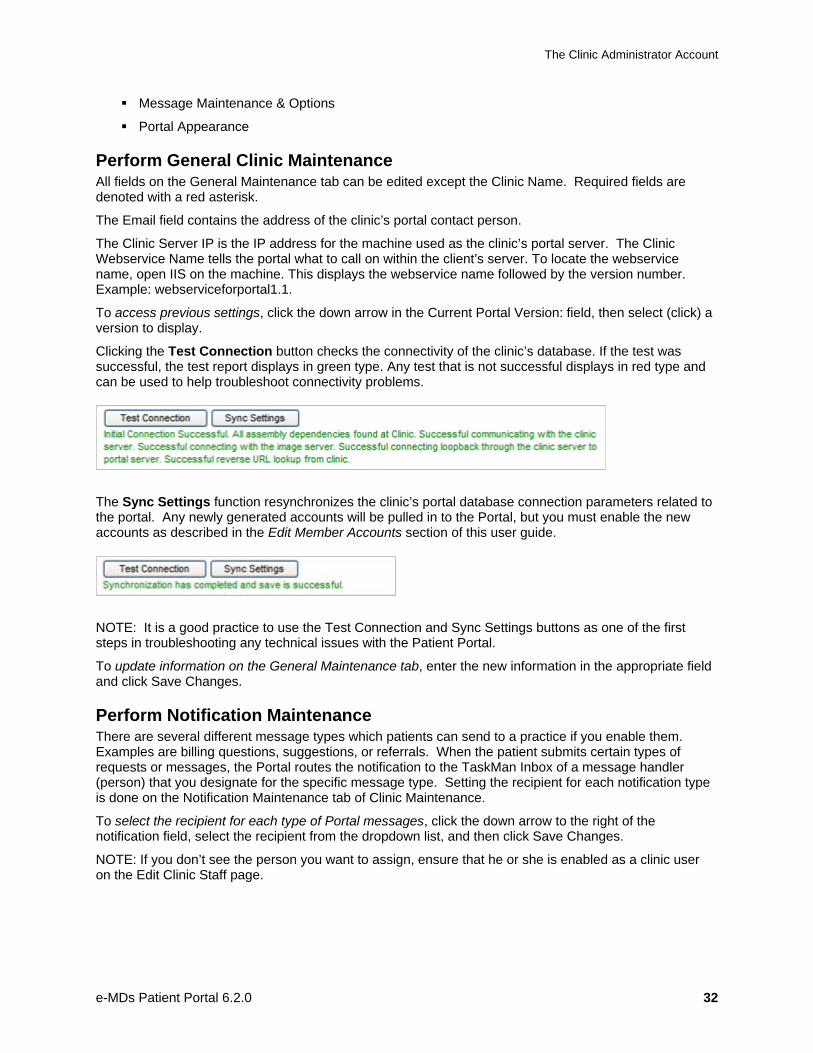
Clicking the Test Connection button checks the connectivity of the clinic’s database. If the test was successful, the test report displays in green type. Any test that is not successful displays in red type and can be used to help troubleshoot connectivity problems.
The Sync Settings function resynchronizes the clinic’s portal database connection parameters related to the portal. Any newly generated accounts will be pulled in to the Portal, but you must enable the new accounts as described in the Edit Member Accounts section of this user guide.
NOTE: It is a good practice to use the Test Connection and Sync Settings buttons as one of the first steps in troubleshooting any technical issues with the Patient Portal.
To update information on the General Maintenance tab, enter the new information in the appropriate field and click Save Changes.
Perform Notification Maintenance There are several different message types which patients can send to a practice if you enable them. Examples are billing questions, suggestions, or referrals. When the patient submits certain types of requests or messages, the Portal routes the notification to the TaskMan Inbox of a message handler (person) that you designate for the specific message type. Setting the recipient for each notification type is done on the Notification Maintenance tab of Clinic Maintenance.
To select the recipient for each type of Portal messages, click the down arrow to the right of the notification field, select the recipient from the dropdown list, and then click Save Changes.
NOTE: If you don’t see the person you want to assign, ensure that he or she is enabled as a clinic user on the Edit Clinic Staff page.
The Clinic Administrator Account
e-MDs Patient Portal 6.2.0 33
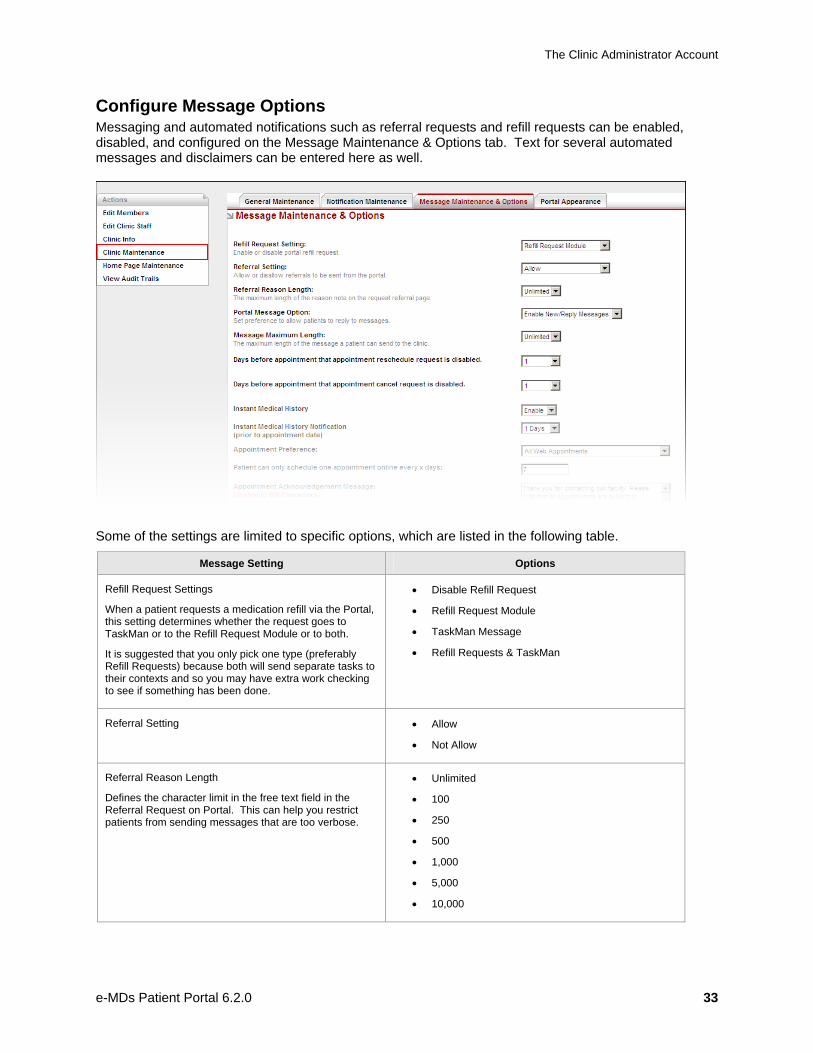
Configure Message Options Messaging and automated notifications such as referral requests and refill requests can be enabled, disabled, and configured on the Message Maintenance & Options tab. Text for several automated messages and disclaimers can be entered here as well.
Some of the settings are limited to specific options, which are listed in the following table.
Message Setting Options
Refill Request Settings
When a patient requests a medication refill via the Portal, this setting determines whether the request goes to TaskMan or to the Refill Request Module or to both.
It is suggested that you only pick one type (preferably Refill Requests) because both will send separate tasks to their contexts and so you may have extra work checking to see if something has been done.
• Disable Refill Request
• Refill Request Module
• TaskMan Message
• Refill Requests & TaskMan
Referral Setting • Allow
• Not Allow
Referral Reason Length
Defines the character limit in the free text field in the Referral Request on Portal. This can help you restrict patients from sending messages that are too verbose.
• Unlimited
• 100
• 250
• 500
• 1,000
• 5,000
• 10,000

The Clinic Administrator Account
e-MDs Patient Portal 6.2.0 34
Message Setting Options
Portal Message Option
Applies to replies or new messages sent from the Portal. It does not affect your ability to send patients a one way message. When set to Disable, patients will not be able to see links/functions that are used to send messages.
• Enable New/Reply Messages
• Disable New/Reply Messages
Message Maximum Length • Same as Referral Reason Length
Days before appointment that appointment reschedule request is disabled
This controls whether patients can reschedule themselves using a function in a reminder/confirmation message. When selecting this option, consider the number of days before an appointment that you actually send the reminder message.
• Disabled
• 1
• 2
• […up to 99]
Days before appointment that appointment cancel request is disabled
Similar to the above setting, but applies to the Cancel function in the reminder/confirmation message.
• Disabled
• 1
• 2
• […up to 99]
Instant Medical History
Enables a link to fill out a history if the appointment is confirmed.
• Enable
• Disable
Instant Medical History Notification (prior to appointment date)
Specifies number of days before appointment that IMH notification is sent. NOTE: Notification is not sent until appointment is confirmed, regardless of setting.
• 1 Days
• 2 Days
• […up to 30 Days]
Appointment Preference • All Web Appointments [Patient can select specific visit reason and schedule directly or select Other and appointment goes to Wait List.]
• No Web Appointments
• Add Free Text Requests to Wait List [Patient can select Other only – no open access scheduling.]
• Specified Visit Reason Appointments [Patient must select specific visit reason – no Other option.]
Patient can only schedule one appointment online every x days
Applies to online appointment scheduling and prevents the patient from scheduling x number of days before and after any appointment scheduled via Portal. Useful to avoid abuse of online appointment system; patient can still request first available appointment.
(Numeric field)
The remaining message and disclaimer settings allow free text entries. Most are self-explanatory. These messages and disclaimers are very important since they set patient expectations for responses, etc.
The Clinic Administrator Account
e-MDs Patient Portal 6.2.0 35
Note that the Appointment Acknowledgement Message is appended to the default text containing the specific date/time information that is automatically added to the message.
The Email Notification Subject and Email Notification Message settings apply to the auto-generated message that is sent to the patient’s email account when a new message is sent to the patient’s Portal.
The Disclaimer Message appears at the bottom of all auto-generated or TaskMan-generated messages.
To change settings, select the option or type the text, and then click Save Changes.
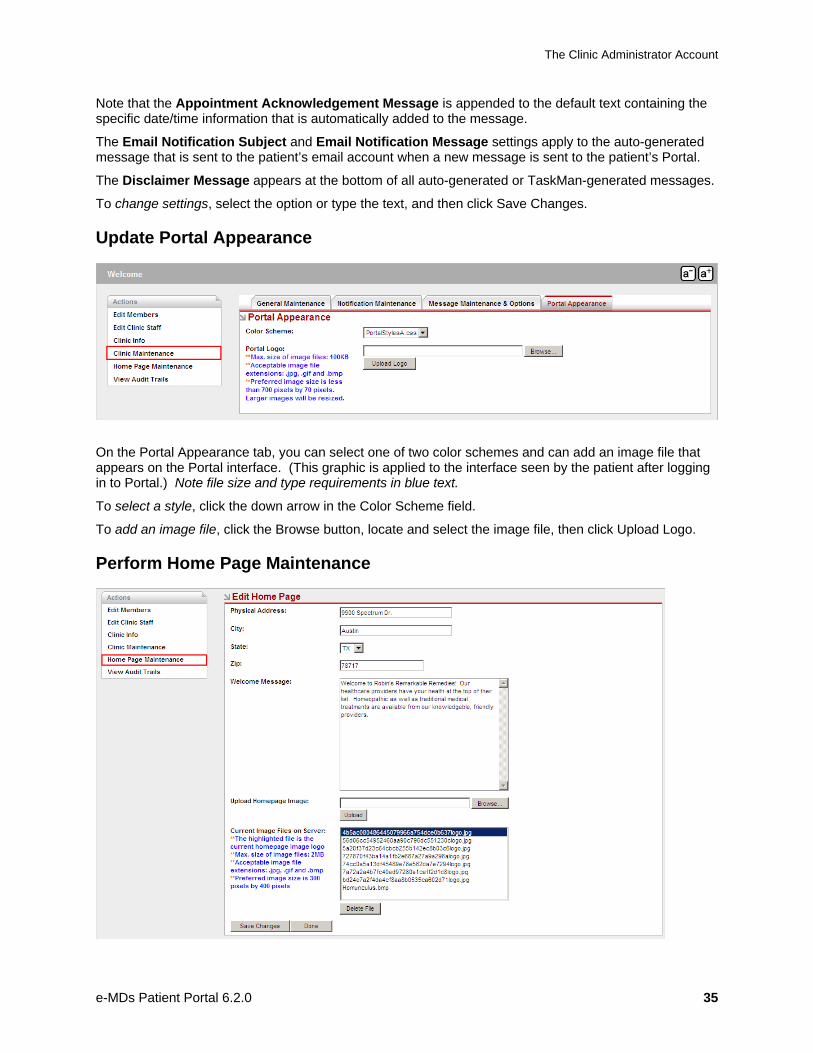
Update Portal Appearance
On the Portal Appearance tab, you can select one of two color schemes and can add an image file that appears on the Portal interface. (This graphic is applied to the interface seen by the patient after logging in to Portal.) Note file size and type requirements in blue text.
To select a style, click the down arrow in the Color Scheme field.
To add an image file, click the Browse button, locate and select the image file, then click Upload Logo.
Perform Home Page Maintenance
The Clinic Administrator Account
e-MDs Patient Portal 6.2.0 36
The address shown on the Edit Home Page screen is the address that is used as the reference point in the Get Directions function on your clinic’s Patient Portal home page. The Homepage Image is displayed in the center of the home page, and the Welcome Message is displayed directly beneath it. The message style cannot be edited.
To upload a new image file to the Portal server (i.e.: not previously used on the portal home page):
1. Click the Browse button.
2. Locate and select the image file. (The file name appears in the Upload Homepage Image field.)
3. Click the Upload button to save the image on the Portal server.
Note that previously uploaded images are listed in the Current Image Files on Server field, and that specific image file size and type requirements are displayed in blue next to this field.
• Maximum image file size: 2 MB
• Acceptable image file extensions: .jpg, .gif, and .bmp
• Preferred image size: 300 x 400 pixels
To apply one of the existing image files to your Portal home page:
1. Click the file name to highlight it.
2. Click Save Changes.
To delete a current image file from the server:
1. Click the file name to highlight it.
2. Click Delete File.
When all home page changes are complete, click Save Changes and then click Done to exit this function.
Managing Portal Accounts Clinic Administrators for the Portal can edit, enable, disable, and remove Portal accounts for patients and staff.
The Edit Members function is used to allow or prevent a patient from accessing the portal. It is also used to update an existing account (such as when a patient forgets a login) or delete an account.
NOTE: The Remove User function should be used only when you are certain the patient will no longer need a Portal account with the clinic (for example, if the patient is deceased). If you remove the user account and then add the same user account again, an extension is added to the login.
Using the Edit Clinic Staff function allows an administrator to designate which clinic staff can communicate with patients through the Portal. It does not give staff a portal login. (The staff member may have a login, however, if he or she is a patient at the clinic as well.)
The Clinic Administrator Account
e-MDs Patient Portal 6.2.0 37
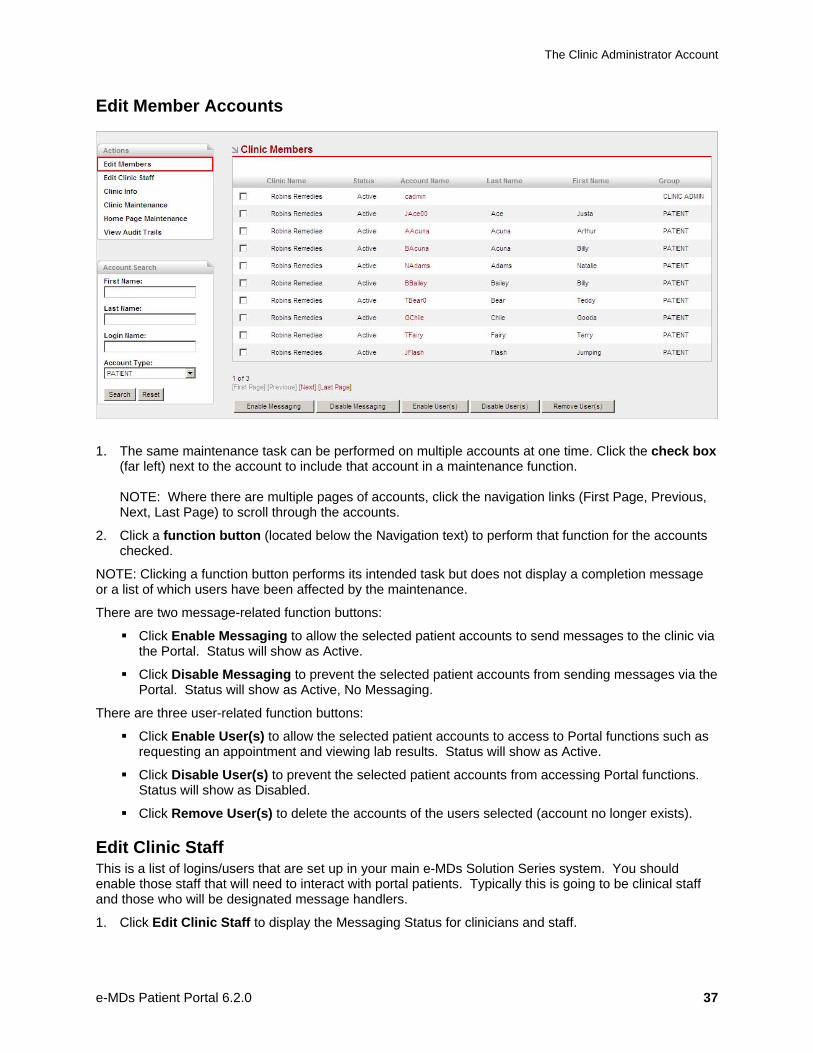
Edit Member Accounts
1. The same maintenance task can be performed on multiple accounts at one time. Click the check box (far left) next to the account to include that account in a maintenance function. NOTE: Where there are multiple pages of accounts, click the navigation links (First Page, Previous, Next, Last Page) to scroll through the accounts.
2. Click a function button (located below the Navigation text) to perform that function for the accounts checked.
NOTE: Clicking a function button performs its intended task but does not display a completion message or a list of which users have been affected by the maintenance.
There are two message-related function buttons:
Click Enable Messaging to allow the selected patient accounts to send messages to the clinic via the Portal. Status will show as Active.
Click Disable Messaging to prevent the selected patient accounts from sending messages via the Portal. Status will show as Active, No Messaging.
There are three user-related function buttons:
Click Enable User(s) to allow the selected patient accounts to access to Portal functions such as requesting an appointment and viewing lab results. Status will show as Active.
Click Disable User(s) to prevent the selected patient accounts from accessing Portal functions. Status will show as Disabled.
Click Remove User(s) to delete the accounts of the users selected (account no longer exists).
Edit Clinic Staff This is a list of logins/users that are set up in your main e-MDs Solution Series system. You should enable those staff that will need to interact with portal patients. Typically this is going to be clinical staff and those who will be designated message handlers.
1. Click Edit Clinic Staff to display the Messaging Status for clinicians and staff.
The Clinic Administrator Account
e-MDs Patient Portal 6.2.0 38
2. To enable messaging for a staff member, click the check box to the left of his or her name, then click the Enable Messaging button.
3. To disable messaging for a staff member, click the check box, then click the Disable Messaging button.
Auditing Portal Use The Audit Trail function allows the administrator to review all patient interactions with the portal.
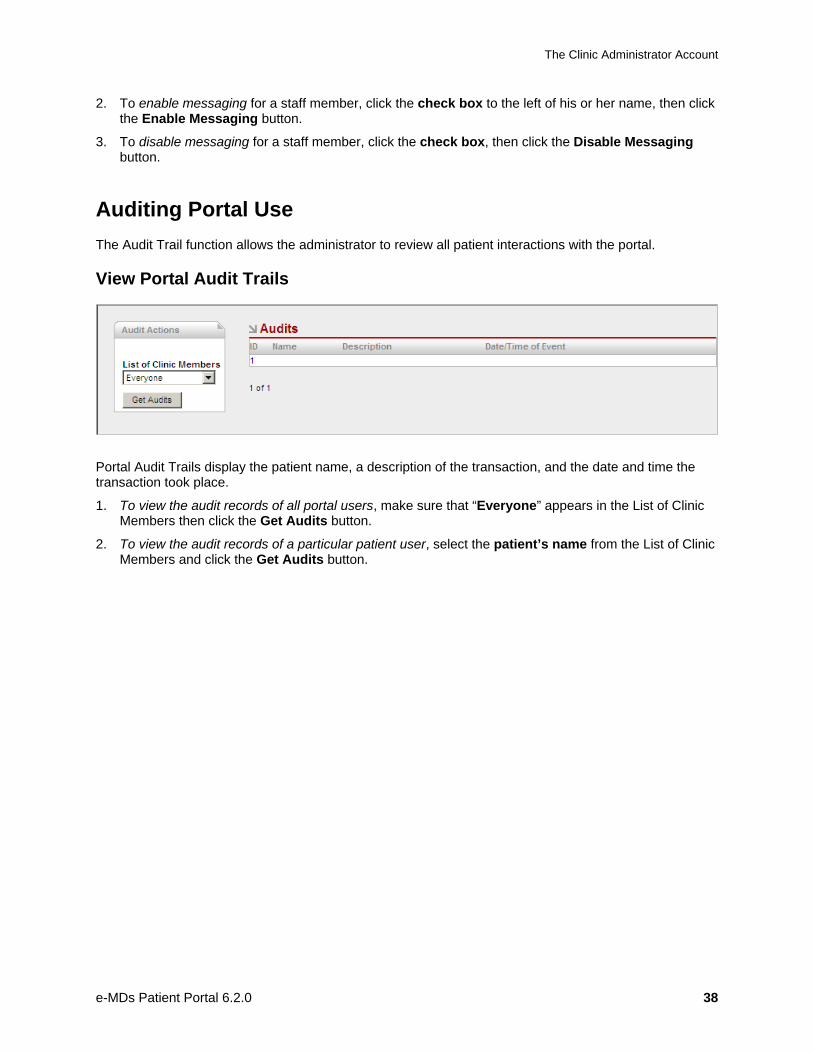
View Portal Audit Trails
Portal Audit Trails display the patient name, a description of the transaction, and the date and time the transaction took place.
1. To view the audit records of all portal users, make sure that “Everyone” appears in the List of Clinic Members then click the Get Audits button.
2. To view the audit records of a particular patient user, select the patient’s name from the List of Clinic Members and click the Get Audits button.