Embed Size (px)
Citation preview
EARTH SCIENCE 2 Student Workbook & Parent/Teacher Guidebook
A comprehensive course that teaches the big ideas behind rocks, minerals, and the science
of geology. Students burn coal, fluoresce minerals, chemically react rocks, streak powders,
scratch glass, and play with atomic bonds as they learn how to be a real field geologist.
Created by Aurora Lipper, Supercharged Science
www.SuperchargedScience.com
This curriculum is aligned with the National Standards and STEM for Science.
© 2014 Supercharged Science P.O. Box 4418, San Luis Obispo, CA 93403 (805) 617-1789
© 2014 Supercharged Science 2 www.SuperchargedScience.com
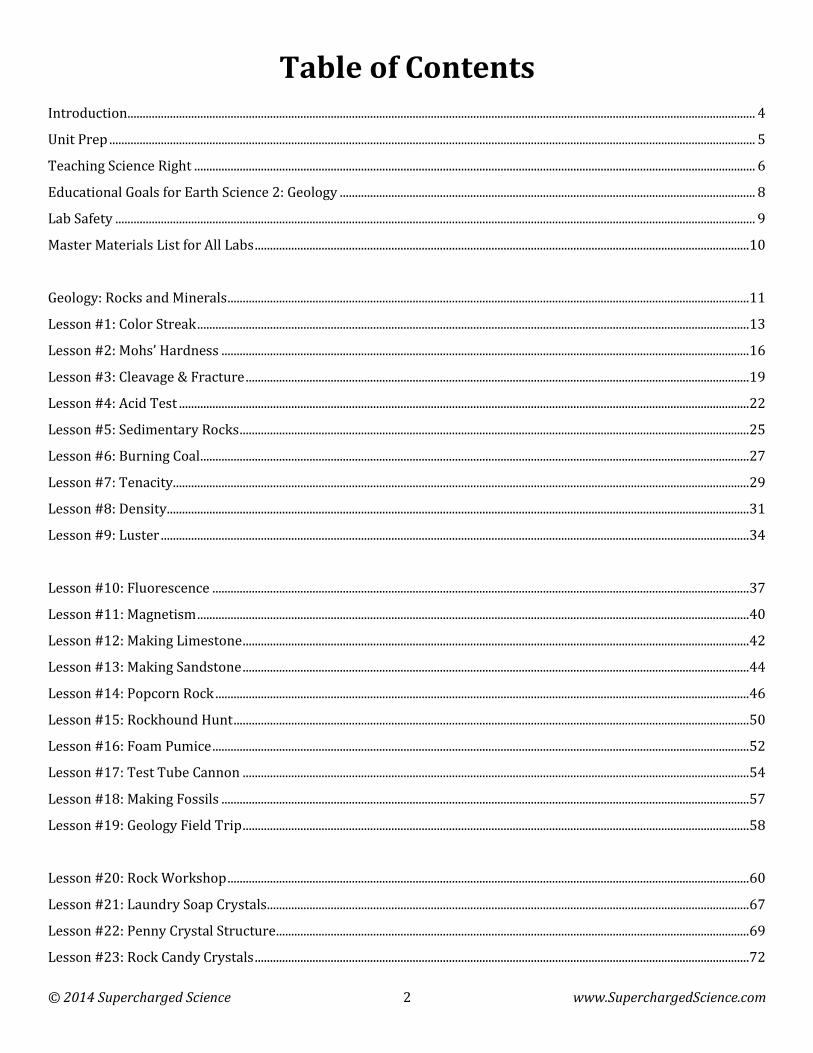
Table of Contents
Introduction ............................................................................................................................................................................................................... 4
Unit Prep ..................................................................................................................................................................................................................... 5
Teaching Science Right ......................................................................................................................................................................................... 6
Educational Goals for Earth Science 2: Geology ......................................................................................................................................... 8
Lab Safety ................................................................................................................................................................................................................... 9
Master Materials List for All Labs ................................................................................................................................................................... 10
Geology: Rocks and Minerals ............................................................................................................................................................................ 11
Lesson #1: Color Streak ...................................................................................................................................................................................... 13
Lesson #2: Mohs’ Hardness .............................................................................................................................................................................. 16
Lesson #3: Cleavage & Fracture ...................................................................................................................................................................... 19
Lesson #4: Acid Test ............................................................................................................................................................................................ 22
Lesson #5: Sedimentary Rocks ........................................................................................................................................................................ 25
Lesson #6: Burning Coal ..................................................................................................................................................................................... 27
Lesson #7: Tenacity.............................................................................................................................................................................................. 29
Lesson #8: Density ................................................................................................................................................................................................ 31
Lesson #9: Luster .................................................................................................................................................................................................. 34
Lesson #10: Fluorescence ................................................................................................................................................................................. 37
Lesson #11: Magnetism ...................................................................................................................................................................................... 40
Lesson #12: Making Limestone ....................................................................................................................................................................... 42
Lesson #13: Making Sandstone ....................................................................................................................................................................... 44
Lesson #14: Popcorn Rock ................................................................................................................................................................................ 46
Lesson #15: Rockhound Hunt .......................................................................................................................................................................... 50
Lesson #16: Foam Pumice ................................................................................................................................................................................. 52
Lesson #17: Test Tube Cannon ....................................................................................................................................................................... 54
Lesson #18: Making Fossils .............................................................................................................................................................................. 57
Lesson #19: Geology Field Trip ....................................................................................................................................................................... 58
Lesson #20: Rock Workshop ............................................................................................................................................................................ 60
Lesson #21: Laundry Soap Crystals ............................................................................................................................................................... 67
Lesson #22: Penny Crystal Structure ............................................................................................................................................................ 69
Lesson #23: Rock Candy Crystals ................................................................................................................................................................... 72
© 2014 Supercharged Science 3 www.SuperchargedScience.com
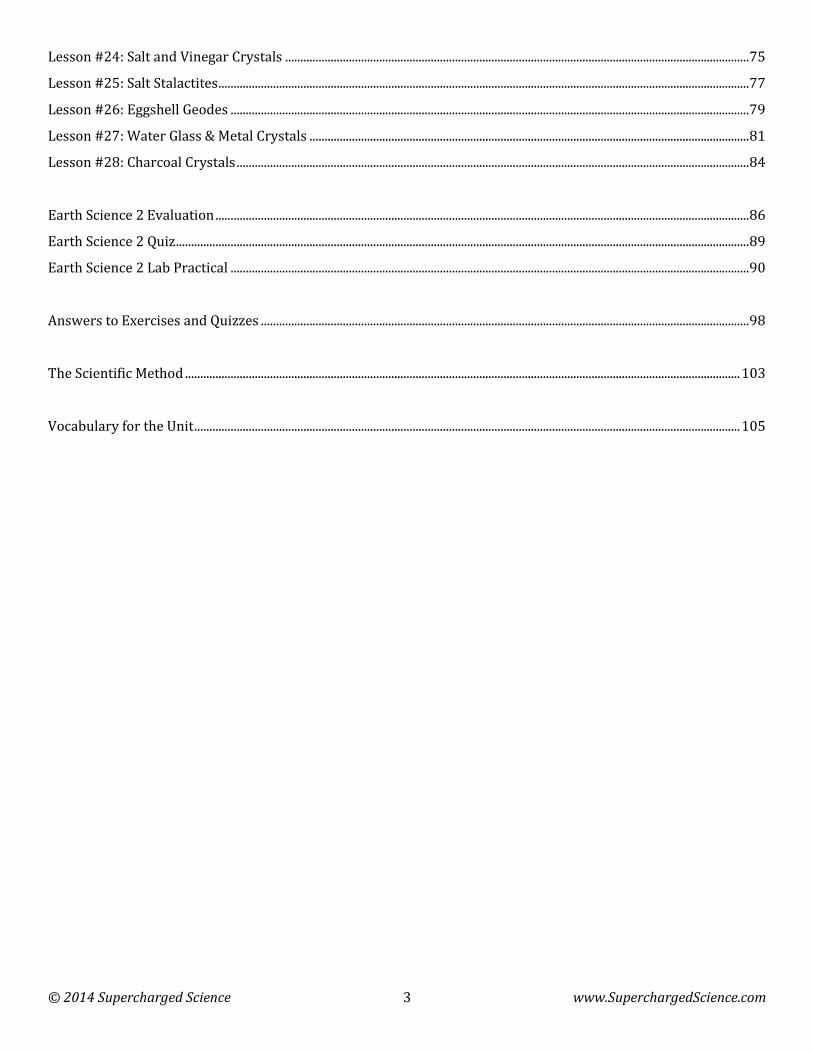
Lesson #24: Salt and Vinegar Crystals ......................................................................................................................................................... 75
Lesson #25: Salt Stalactites ............................................................................................................................................................................... 77
Lesson #26: Eggshell Geodes ........................................................................................................................................................................... 79
Lesson #27: Water Glass & Metal Crystals ................................................................................................................................................. 81
Lesson #28: Charcoal Crystals ......................................................................................................................................................................... 84
Earth Science 2 Evaluation ................................................................................................................................................................................ 86
Earth Science 2 Quiz ............................................................................................................................................................................................. 89
Earth Science 2 Lab Practical ........................................................................................................................................................................... 90
Answers to Exercises and Quizzes ................................................................................................................................................................. 98
The Scientific Method ....................................................................................................................................................................................... 103
Vocabulary for the Unit .................................................................................................................................................................................... 105
© 2014 Supercharged Science 4 www.SuperchargedScience.com
Introduction
Greetings and welcome to the study of Earth Science. This unit was created by a mechanical engineer, university
instructor, airplane pilot, astronomer, robot-builder and real rocket scientist … me! I have the happy opportunity
to teach you everything I know about electricity over the next set of lessons. I promise to give you my best stuff so
you can take it and run with it … or fly!
This curriculum course has been prepared to be completed over several weeks, completing 1-2 lessons per week.
You will find that there are 28 lessons outlined to take you from an introduction of geology on through several
advanced projects which are complex enough to win a prize at the science fair. If you complete this course and
send your kids off, you’ll find their high school teachers entirely blown away by their mastery of the subject.
To get the most out of these labs, there are really only a couple of things to keep in mind. Since we are all here to
have fun and learn something new, this shouldn’t be too hard. With each lesson, you’ll find:
Overview
What to Learn
Materials
Experiments & Worksheets
Exercises
In addition to the lessons, we have also prepared the following items you’ll find useful:
Scientific Method Guide
Master Materials and Equipment List
Lab Safety Sheet
Written Quiz (with Answer Key)
Lab Practical Test
One of the best things you can do as the student is to cultivate your curiosity about things. This unit on Earth
Science is chock full of demonstrations and experiments for two big reasons. First, they’re fun. But more
importantly, the reason we do experiments in science is to hone your observational skills. Science experiments
really speak for themselves much better than I can ever put into words or show you on a video. And I’m going to hit
you with a lot of these science demonstrations and experiments to help you develop your observing techniques.
Scientists not only learn to observe what’s going on in the experiment, but they also learn how to observe what
their experiment is telling them, which is found by looking at your data. It’s not enough to invent some new kind of
experiment if you don’t know how it will perform when the conditions change a bit, like on Mars. We’re going to
learn how to predict what we think will happen, design experiments that will test this idea, and look over the
results we got to figure out where to go from there. Science is a process, it’s a way of thinking, and we’re going to
get plenty of practice at it.
Good luck with this Earth Science unit!
© 2014 Supercharged Science Page 5 www.SuperchargedScience.com
Unit Prep
This is a short list of things that you may want to consider as you prepare for this unit.
Student Lab Books: If you’re the kind of teacher who likes to prepare lab books for your kids, now is a good time
to do this. You can copy the Introduction for Kids and the Student Worksheets for each of the experiments, 3-hole
punch them, and stick them in a binder. You’ll want one binder per student.
Science Journals: One of the best things you can do with your students is to teach them how to take notes in a
journal as you go along. This is the same way scientists document their own findings, and it’s a lot of fun to look
back at the splattered pages later on and see how far you’ve come. I always jot down my questions that didn’t get
answered with the experiment across the top of the page so I can research these topics more.
Master Set of Materials: If you plan on doing all the labs in this unit, you’ll want to start gathering your materials
together. There’s a master materials list so you’ll have everything you need when you need it.
Test Copies: Students will take two tests at the end of each section. There are quizzes and lab practical tests you
can copy and stash away for when you need them.
Classroom Design: As you progress through the units, you’ll be making demos of the experiments and kids will be
making posters. You can hang these up on your bulletin boards, string them from the ceiling, or display them in a
unique way. I always like to snap photos of the kids doing their experiments and hang those up along with their
best labs so they can see their progress as we go along.
© 2014 Supercharged Science Page 6 www.SuperchargedScience.com
Teaching Science Right These activities and experiments will give you a taste of how science can be totally cool AND educational. But
teaching science isn’t always easy. There’s a lot more to it than most traditional science books and programs
accomplish. If your students don’t remember the science they learned last year, you have a problem.
What do kids really need to know when it comes to science? Kids who have a solid science and technology
background are better equipped to go to college, and will have many more choices once they get out into the real
world.
Learning science isn’t just a matter of memorizing facts and theories. On the contrary, it’s developing a deep
curiosity about the world around us, AND having a set of tools that lets kids explore that curiosity to answer their
questions. Teaching science in this kind of way isn't just a matter of putting together a textbook with a few science
experiments and kits.
Science education is a three-step process (and I mean teaching science in a way that your students will really
understand and remember).
Here are the steps:
1. Get kids genuinely interested and excited about a topic.
2. Give them hands-on activities and experiments to make the topic meaningful.
3. Teach the supporting academics and theory.
Most science books and curriculum just focus on the third step and may throw in an experiment or two as an
afterthought. This just isn’t how students learn. When you provide your students with these three keys (in order),
you can give your students the kind of science education that not only excites them, but that they remember for
many years to come.
So what do you do? First, don’t worry. It’s not something that takes years and years to do. It just takes
commitment.
What if you don’t have time? What I’m about to describe can take a bit of time as a teacher, but it doesn’t have to.
There is a way to shortcut the process and get the same results! But I’ll tell you more about that in a minute. First,
let me tell you how to do it the right way:
Putting It into Action
Step one: Get students genuinely interested and excited about a topic. Start by deciding what topic you want your
students to learn. Then, you’re going to get them really interested in it. For example, suppose I want my fifth-
grade students to learn about aerodynamics. I’ll arrange for them to watch a video of what it’s like to go up in a
small plane, or even find someone who is a pilot and can come talk with the kids. This is the kind of experience
that will really excite them.
Step two: Give your students hands-on activities and experiments to make the topic meaningful. This is where I
take that excitement and let them explore it. I have flying lesson videos, airplane books, and real pilots interact
with my students. I’ll also show videos on how pilots plan for a flight. My students will learn about navigation,
figuring out how much fuel is needed for the flight, how the weight the plane carries affects the aerodynamics of it,
and so much more. (And did I just see a spot for a future math lesson also?) I’ll use pilot training videos to help us
© 2014 Supercharged Science Page 7 www.SuperchargedScience.com
figure this out (short of a live demo, a video is incredibly powerful for learning when used correctly).
My students are incredibly excited at this point about anything that has to do with airplanes and flying. They are
all positive they want to be pilots someday and are already wanting flying lessons (remember - they are only fifth-
graders!).
Step three: Teach the supporting academics and theory. Now, it’s time to introduce academics. Honestly, I have
my pick of so many topics, because flying includes so many different fields. I mean my students use angles and
math in flight planning, mechanics and energy in how the engine works, electricity in all the equipment on board
the plane, and of course, aerodynamics in keeping the plane in the air (to name just a few).
I’m going to use this as the foundation to teach the academic side of all the topics that are appropriate. We start
with aerodynamics. They learn about lift and drag, make paper and balsa-wood gliders and experiment by
changing different parts. They calculate how big the wings need to be to carry more weight (jelly beans) and then
try their models with bigger wings. Then we move on to the geometry used in navigation. Instead of drawing
angles on a blank sheet of paper, our workspace is made of airplane maps (free from the airport). We’re actually
planning part of the next flight my students will “take” during their geography lesson. Suddenly, angles are a lot
more interesting. In fact, it turns out that we need a bit of trigonometry to figure out some things.
Of course, a 10-year old can’t do trigonometry, right? Wrong! They have no idea that it’s usually for high school
and learn about cosines and tangents. Throughout this, I’m giving them chances to talk with the pilot in class,
share what they’ve learned with each other, and even plan a real flight. How cool is that to a kid?
The key is to focus on building interest and excitement first, and then the academics are easy to get students to
learn. Try starting with the academics and...well, we’ve all had the experience of trying to get kids do something
they don’t really want to do.
The Shortcut: Okay, so this might sound like it’s time-intensive. If you’re thinking “I just don’t have the time to do
this!” Or maybe “I just don’t understand science well enough myself to teach it to my students at that level.” If this
is you, you’re not alone.
The good news is, you don’t have to. The shortcut is to find someone who already specializes in the area you want
your students to learn about and expose them to the excitement that the person gets from the field. Then, instead
of you being the one to invent an entirely new curriculum of hands-on activities and academics, use a solid science
program or curriculum (live videos, not cartoons). This will provide them with both the hands-on experiments and
the academic background they need.
If you use a program that is self-guided (that is, it guides you and your students through it step-by-step), you don’t
need to be hassled with the preparation. That’s what this unit is intended to do for you and your students. This
program uses these components and matches your educational goals set by state standards.
This unit implements the three key steps we just talked about and does this all for you. My hope is that you now
have some new tools in your teaching toolbox to give your students the best start you can. I know it’s like a wild
roller coaster ride some days, but I also know it’s worth it. Have no doubt that that the caring and attention you
give to your students’ education today will pay off manifold in the future.
© 2014 Supercharged Science Page 8 www.SuperchargedScience.com
For the Parent/Teacher:
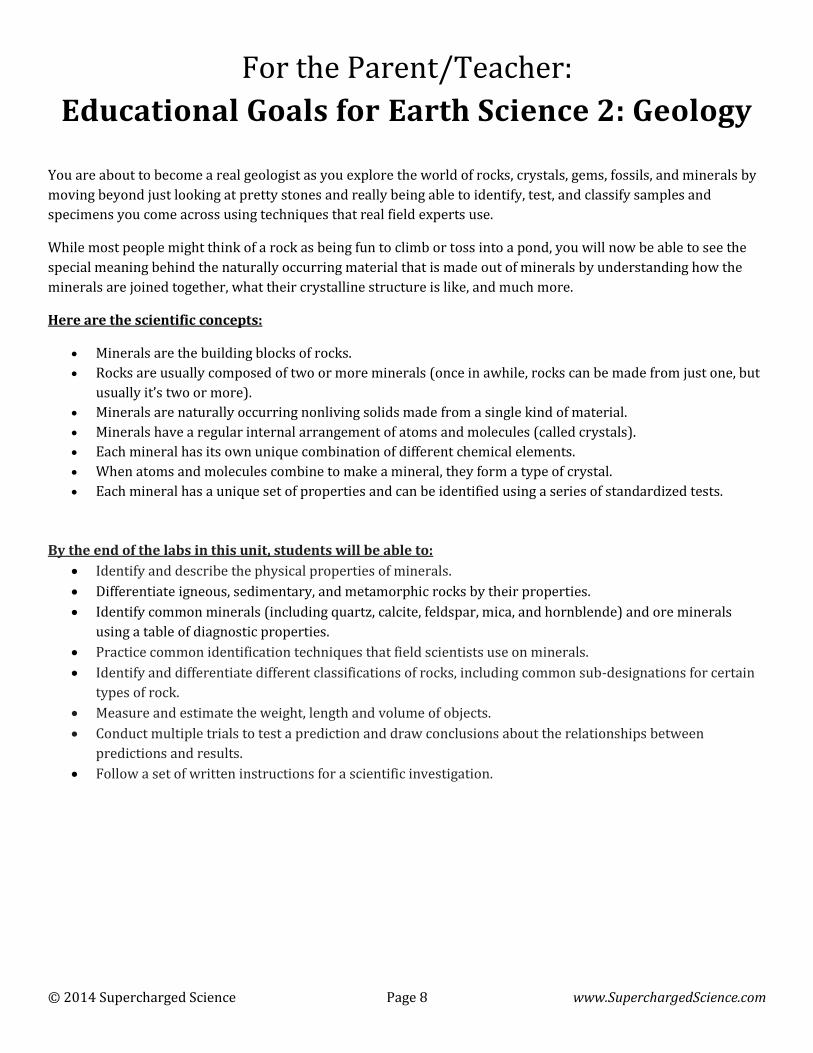
Educational Goals for Earth Science 2: Geology
You are about to become a real geologist as you explore the world of rocks, crystals, gems, fossils, and minerals by
moving beyond just looking at pretty stones and really being able to identify, test, and classify samples and
specimens you come across using techniques that real field experts use.
While most people might think of a rock as being fun to climb or toss into a pond, you will now be able to see the
special meaning behind the naturally occurring material that is made out of minerals by understanding how the
minerals are joined together, what their crystalline structure is like, and much more.
Here are the scientific concepts:
Minerals are the building blocks of rocks.
Rocks are usually composed of two or more minerals (once in awhile, rocks can be made from just one, but
usually it’s two or more).
Minerals are naturally occurring nonliving solids made from a single kind of material.
Minerals have a regular internal arrangement of atoms and molecules (called crystals).
Each mineral has its own unique combination of different chemical elements.
When atoms and molecules combine to make a mineral, they form a type of crystal.
Each mineral has a unique set of properties and can be identified using a series of standardized tests.
By the end of the labs in this unit, students will be able to:
Identify and describe the physical properties of minerals.
Differentiate igneous, sedimentary, and metamorphic rocks by their properties.
Identify common minerals (including quartz, calcite, feldspar, mica, and hornblende) and ore minerals
using a table of diagnostic properties.
Practice common identification techniques that field scientists use on minerals.
Identify and differentiate different classifications of rocks, including common sub-designations for certain
types of rock.
Measure and estimate the weight, length and volume of objects.
Conduct multiple trials to test a prediction and draw conclusions about the relationships between
predictions and results.
Follow a set of written instructions for a scientific investigation.
© 2014 Supercharged Science Page 9 www.SuperchargedScience.com
Lab Safety
Goggles: These should be worn when working with chemicals, heat, fire, or projectiles. These protect your eyes
from chemical splatter, explosions, and tiny fast-moving objects aimed at the eyes. If you wear glasses, you can find
goggles that fit over them. Don’t substitute eyeglasses for goggles, because of the lack of side protection. Eyeglasses
don’t provide this important side eye protection.
Clean up Messes: Your lab area should be neat, organized, and spotless before you start, during your experiment,
and when you leave. Scientists waste more time hunting for lost papers, pieces of an experiment, and trying to
reposition sensitive equipment… all of which could have easily been avoided had they been taught organizational
skills from the start.
Dispose of Poisons: If a poisonous substance was used, created, or produced during your experiment, you must
follow the proper handling procedures for disposal. You’ll find details for this in the experiments as needed.
Special Notes on Batteries: Do not use alkaline batteries with your experiments. Find the super-cheap kind of
batteries (usually labeled “Heavy Duty” or “Super Heavy Duty”) because these types of batteries have a carbon-zinc
core, which does not contain the acid that alkaline batteries have. This means when you wire up circuits incorrectly
(which you should expect to do because you are learning), the circuits will not overheat or leak. If you use alkaline
batteries (like Energizer and Duracell) and your students short a circuit, their wires and components will get
super-hot and leak acid, which is very dangerous.
No Eating or Drinking in the Lab: All foods and drinks are banned from your classroom during science
experimentation. When you eat or drink, you run the very real risk of ingesting part of your experiment. For
electricity and magnetism labs, always wash your hands after the lab is over to rinse off the lead from the electrical
components.
No Horse Play: When you goof around, accidents happen, which means chemicals spill, circuits short, and all kinds
of hazards can occur that you weren’t expecting. Never throw anything to another person and be careful where you
put your hands – it could be in the middle of a sensitive experiment, especially with magnetism and electricity. You
don’t want to run the risk of getting shocked or electrified when it’s not part of your experiment.
Fire: If you think there’s a fire in the room (even if you’re not sure), let your teacher know right away. If they are
not around (they always should be), smother the fire with a fire blanket or use a fire extinguisher and send
someone to find an adult. Stop, drop, and roll!
Questions: If you’re not sure about something stop and ask, no matter what it’s about. If you don’t know how to
properly handle a chemical, do part of an experiment, ask! If you’re not comfortable doing part of the experiment,
then don’t do it.
© 2014 Supercharged Science Page 10 www.SuperchargedScience.com
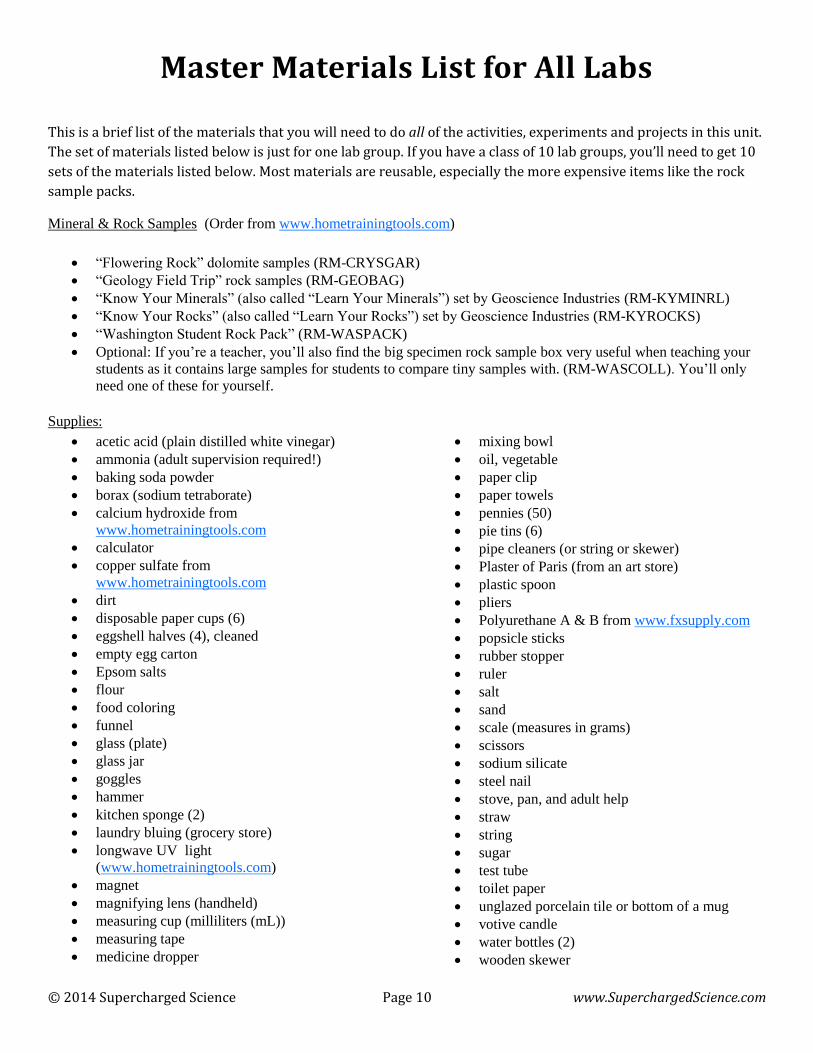
Master Materials List for All Labs
This is a brief list of the materials that you will need to do all of the activities, experiments and projects in this unit.
The set of materials listed below is just for one lab group. If you have a class of 10 lab groups, you’ll need to get 10
sets of the materials listed below. Most materials are reusable, especially the more expensive items like the rock
sample packs.
Mineral & Rock Samples (Order from www.hometrainingtools.com)
“Flowering Rock” dolomite samples (RM-CRYSGAR)
“Geology Field Trip” rock samples (RM-GEOBAG)
“Know Your Minerals” (also called “Learn Your Minerals”) set by Geoscience Industries (RM-KYMINRL)
“Know Your Rocks” (also called “Learn Your Rocks”) set by Geoscience Industries (RM-KYROCKS)
“Washington Student Rock Pack” (RM-WASPACK)
Optional: If you’re a teacher, you’ll also find the big specimen rock sample box very useful when teaching your
students as it contains large samples for students to compare tiny samples with. (RM-WASCOLL). You’ll only
need one of these for yourself.
Supplies:
acetic acid (plain distilled white vinegar)
ammonia (adult supervision required!)
baking soda powder
borax (sodium tetraborate)
calcium hydroxide from
www.hometrainingtools.com
calculator
copper sulfate from
www.hometrainingtools.com
dirt
disposable paper cups (6)
eggshell halves (4), cleaned
empty egg carton
Epsom salts
flour
food coloring
funnel
glass (plate)
glass jar
goggles
hammer
kitchen sponge (2)
laundry bluing (grocery store)
longwave UV light
(www.hometrainingtools.com)
magnet
magnifying lens (handheld)
measuring cup (milliliters (mL))
measuring tape
medicine dropper
mixing bowl
oil, vegetable
paper clip
paper towels
pennies (50)
pie tins (6)
pipe cleaners (or string or skewer)
Plaster of Paris (from an art store)
plastic spoon
pliers
Polyurethane A & B from www.fxsupply.com
popsicle sticks
rubber stopper
ruler
salt
sand
scale (measures in grams)
scissors
sodium silicate
steel nail
stove, pan, and adult help
straw
string
sugar
test tube
toilet paper
unglazed porcelain tile or bottom of a mug
votive candle
water bottles (2)
wooden skewer
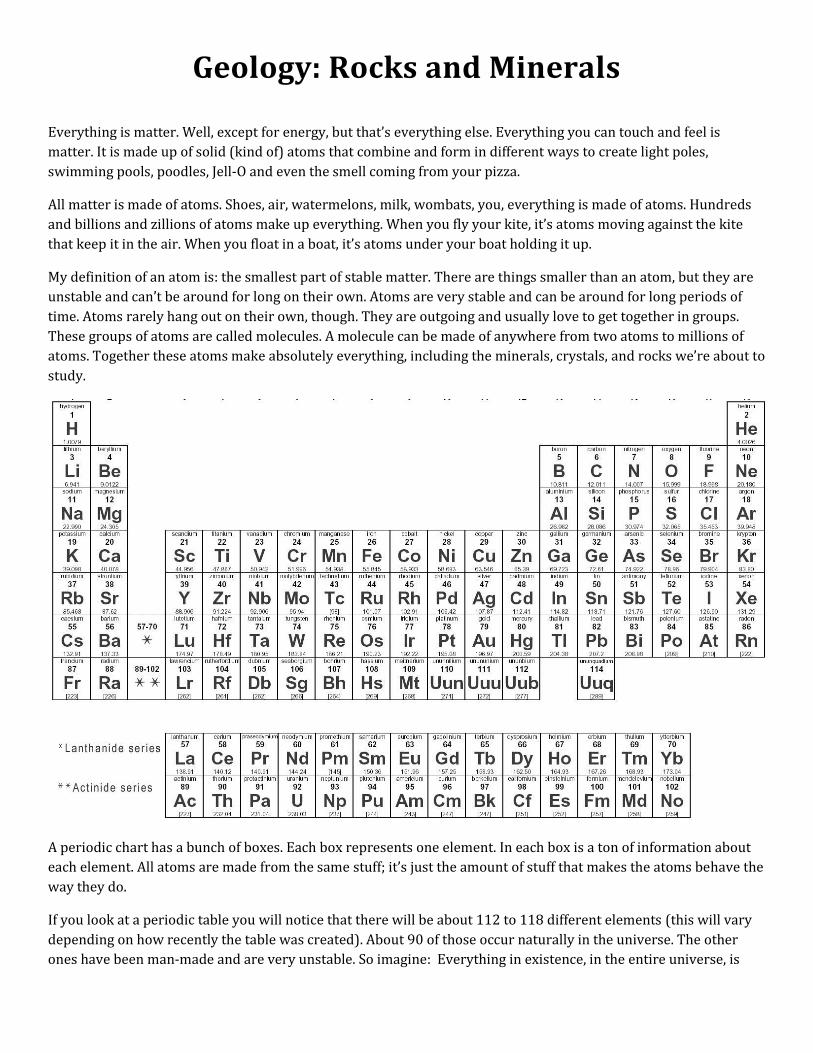
Geology: Rocks and Minerals
Everything is matter. Well, except for energy, but that’s everything else. Everything you can touch and feel is
matter. It is made up of solid (kind of) atoms that combine and form in different ways to create light poles,
swimming pools, poodles, Jell-O and even the smell coming from your pizza.
All matter is made of atoms. Shoes, air, watermelons, milk, wombats, you, everything is made of atoms. Hundreds
and billions and zillions of atoms make up everything. When you fly your kite, it’s atoms moving against the kite
that keep it in the air. When you float in a boat, it’s atoms under your boat holding it up.
My definition of an atom is: the smallest part of stable matter. There are things smaller than an atom, but they are
unstable and can’t be around for long on their own. Atoms are very stable and can be around for long periods of
time. Atoms rarely hang out on their own, though. They are outgoing and usually love to get together in groups.
These groups of atoms are called molecules. A molecule can be made of anywhere from two atoms to millions of
atoms. Together these atoms make absolutely everything, including the minerals, crystals, and rocks we’re about to
study.
A periodic chart has a bunch of boxes. Each box represents one element. In each box is a ton of information about
each element. All atoms are made from the same stuff; it’s just the amount of stuff that makes the atoms behave the
way they do.
If you look at a periodic table you will notice that there will be about 112 to 118 different elements (this will vary
depending on how recently the table was created). About 90 of those occur naturally in the universe. The other
ones have been man-made and are very unstable. So imagine: Everything in existence, in the entire universe, is
© 2014 Supercharged Science Page 12 www.SuperchargedScience.com
made of one or several of only about 90 different types of atoms. Everything, from pianos to pistachios are made
from the same set of 90 different Legos!
Now, if you find that amazing, listen to this: Almost everything in the universe is mostly made of only twelve
different kinds of atoms! But wait, there’s more.
All living things are mostly made of only five different kinds of atoms! Five! You and a hamster are made of the
same stuff! All living and once-living things are made mostly of carbon, hydrogen, oxygen, nitrogen, and calcium. Ta
daa! Those are the ingredients for life. Put ‘em in a bowl, stir and voila, you can make your own penguin.
Okay, obviously it’s not that easy. It takes a lot more than that to make life, but at least now you know the
ingredients. An easy way to remember the main ingredients for living things is to remember the word CHONC.
Each letter in CHONC is the first letter in the 5 elements carbon, hydrogen, oxygen, nitrogen and calcium.
One last interesting thing to think about here: Of all the atoms in the entire universe, 90% of them are hydrogen.
Only 10% of the entire universe is made up of anything other than hydrogen.
So what does this have to do with rocks and minerals?
A mineral is inorganic, meaning that it doesn’t come from carbon (C on the periodic table) compounds. Minerals
are crystalline, which means their atoms form a pattern, like quartz and diamond. A crystal of pyrite is made of iron
sulfide molecules that are all stacked on top of one another in a regular pattern (cubes, actually). Halite is made of
cubes of sodium chloride. The thing to remember here is that most crystals are big enough to see with your eye.
Minerals are pure chemical substances, made up entirely of one molecule through and through. Examples of
minerals are everywhere. Rock salt is a mineral called halite. Fool’s gold is a mineral called pyrite. They are made
of a single substance and nothing else. Rocks are composed of two or more minerals. We’re going to study rocks,
minerals, crystals, and more in our unit on geology! Let’s get started…
© 2014 Supercharged Science Page 13 www.SuperchargedScience.com
Lesson #1: Color Streak
Overview: This lesson will introduce you to the shiny world of minerals and crystals by learning how to identify
rocks by both the color that you see, and the color that gets left behind.
What to Learn: You will be able to identify minerals by their colors and streaks, and be able to tell a sample of real
gold from the fake look-alike called pyrite.
Materials
1 handheld magnifying lens
Unglazed porcelain tile
Rock samples (the ones in the video are: graphite, pyrite, talc, iron, and jasper)
Experiment
1. Number your rock samples by placing them on your data table.
2. Using your data table, record the color of each sample.
3. Now use your streak plate. Take a rock and draw a short line across your streak plate (unglazed porcelain
tile).
4. Record the color of the streak in your data table. Are there any surprises?
© 2014 Supercharged Science Page 14 www.SuperchargedScience.com
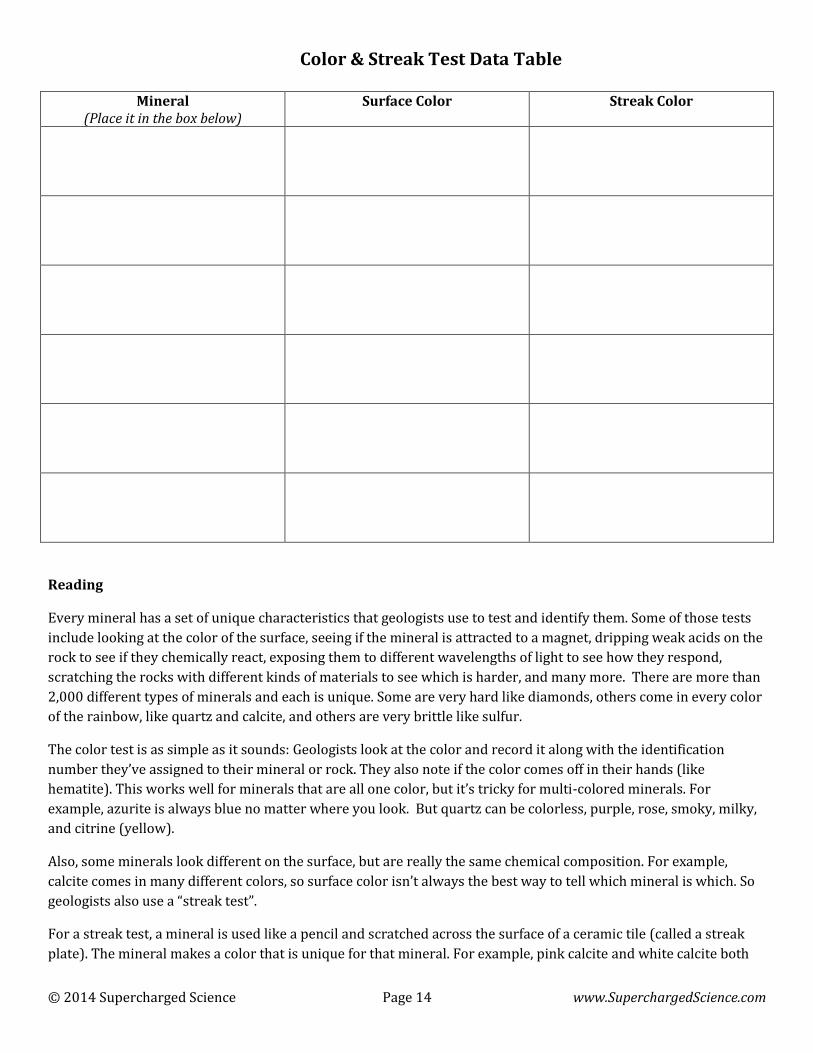
Color & Streak Test Data Table
Mineral (Place it in the box below)
Surface Color Streak Color
Reading
Every mineral has a set of unique characteristics that geologists use to test and identify them. Some of those tests
include looking at the color of the surface, seeing if the mineral is attracted to a magnet, dripping weak acids on the
rock to see if they chemically react, exposing them to different wavelengths of light to see how they respond,
scratching the rocks with different kinds of materials to see which is harder, and many more. There are more than
2,000 different types of minerals and each is unique. Some are very hard like diamonds, others come in every color
of the rainbow, like quartz and calcite, and others are very brittle like sulfur.
The color test is as simple as it sounds: Geologists look at the color and record it along with the identification
number they’ve assigned to their mineral or rock. They also note if the color comes off in their hands (like
hematite). This works well for minerals that are all one color, but it’s tricky for multi-colored minerals. For
example, azurite is always blue no matter where you look. But quartz can be colorless, purple, rose, smoky, milky,
and citrine (yellow).
Also, some minerals look different on the surface, but are really the same chemical composition. For example,
calcite comes in many different colors, so surface color isn’t always the best way to tell which mineral is which. So
geologists also use a “streak test”.
For a streak test, a mineral is used like a pencil and scratched across the surface of a ceramic tile (called a streak
plate). The mineral makes a color that is unique for that mineral. For example, pink calcite and white calcite both
© 2014 Supercharged Science Page 15 www.SuperchargedScience.com
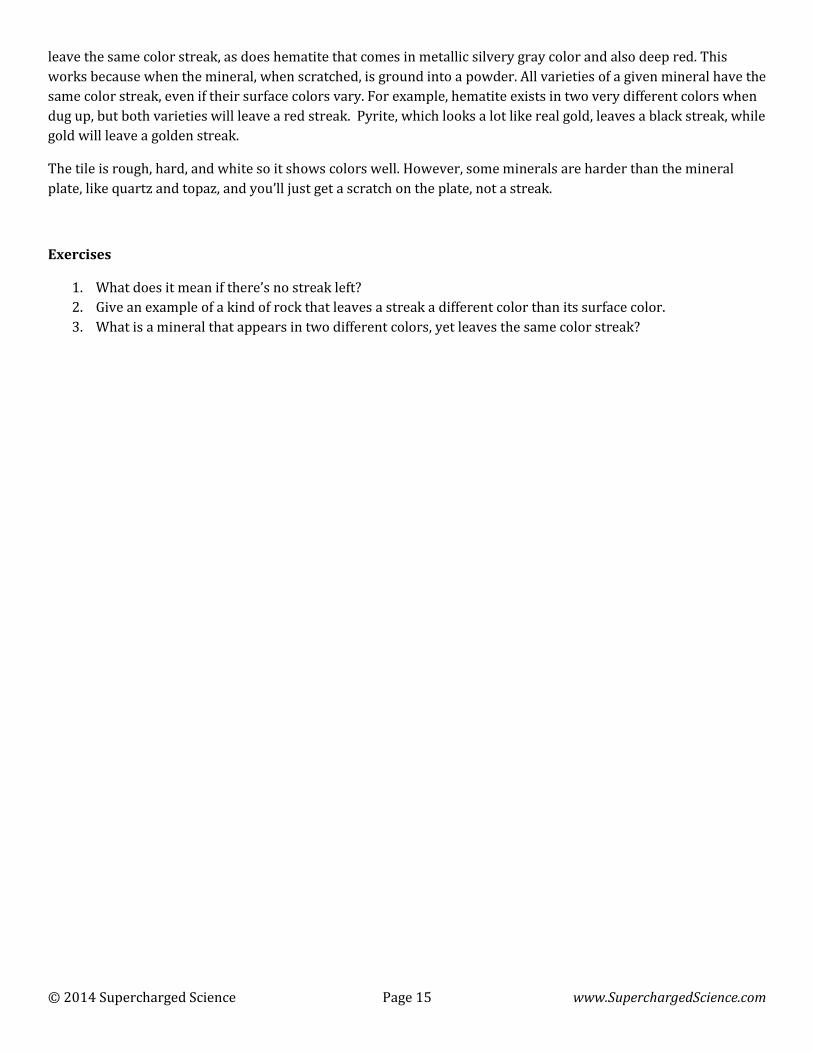
leave the same color streak, as does hematite that comes in metallic silvery gray color and also deep red. This
works because when the mineral, when scratched, is ground into a powder. All varieties of a given mineral have the
same color streak, even if their surface colors vary. For example, hematite exists in two very different colors when
dug up, but both varieties will leave a red streak. Pyrite, which looks a lot like real gold, leaves a black streak, while
gold will leave a golden streak.
The tile is rough, hard, and white so it shows colors well. However, some minerals are harder than the mineral
plate, like quartz and topaz, and you’ll just get a scratch on the plate, not a streak.
Exercises
1. What does it mean if there’s no streak left?
2. Give an example of a kind of rock that leaves a streak a different color than its surface color.
3. What is a mineral that appears in two different colors, yet leaves the same color streak?
© 2014 Supercharged Science Page 16 www.SuperchargedScience.com
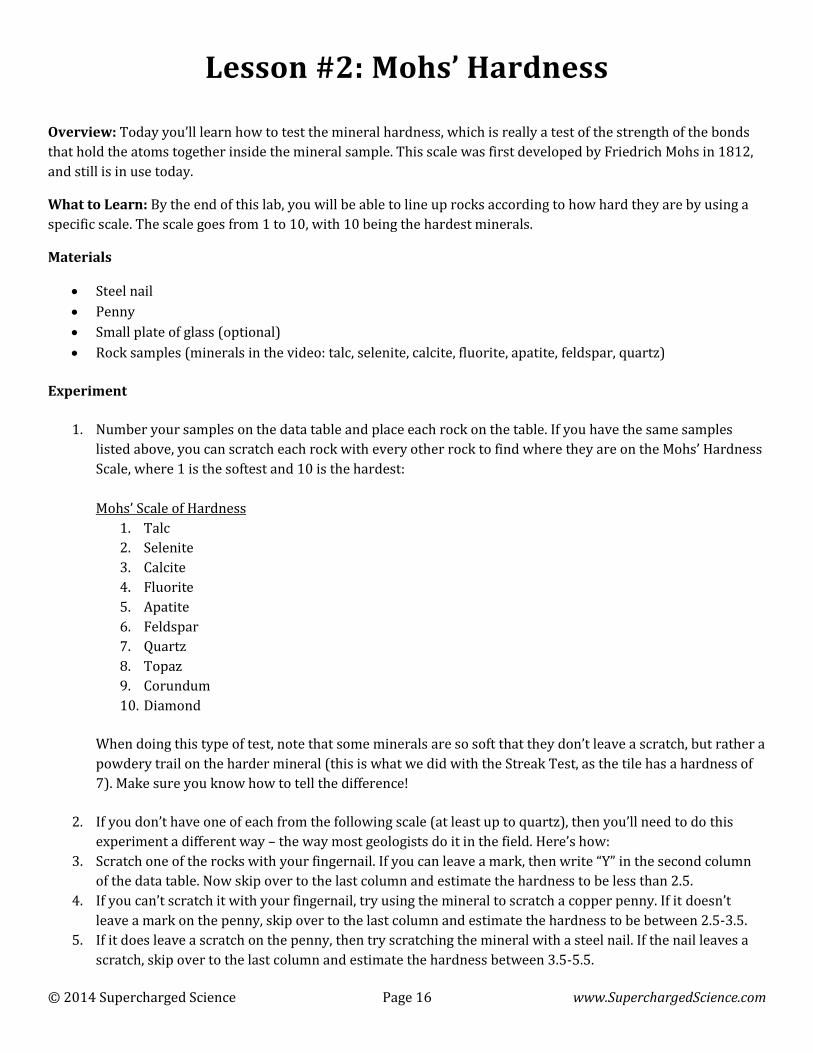
Lesson #2: Mohs’ Hardness
Overview: Today you’ll learn how to test the mineral hardness, which is really a test of the strength of the bonds
that hold the atoms together inside the mineral sample. This scale was first developed by Friedrich Mohs in 1812,
and still is in use today.
What to Learn: By the end of this lab, you will be able to line up rocks according to how hard they are by using a
specific scale. The scale goes from 1 to 10, with 10 being the hardest minerals.
Materials
Steel nail
Penny
Small plate of glass (optional)
Rock samples (minerals in the video: talc, selenite, calcite, fluorite, apatite, feldspar, quartz)
Experiment
1. Number your samples on the data table and place each rock on the table. If you have the same samples
listed above, you can scratch each rock with every other rock to find where they are on the Mohs’ Hardness
Scale, where 1 is the softest and 10 is the hardest:
Mohs’ Scale of Hardness
1. Talc
2. Selenite
3. Calcite
4. Fluorite
5. Apatite
6. Feldspar
7. Quartz
8. Topaz
9. Corundum
10. Diamond
When doing this type of test, note that some minerals are so soft that they don’t leave a scratch, but rather a
powdery trail on the harder mineral (this is what we did with the Streak Test, as the tile has a hardness of
7). Make sure you know how to tell the difference!
2. If you don’t have one of each from the following scale (at least up to quartz), then you’ll need to do this
experiment a different way – the way most geologists do it in the field. Here’s how:
3. Scratch one of the rocks with your fingernail. If you can leave a mark, then write “Y” in the second column
of the data table. Now skip over to the last column and estimate the hardness to be less than 2.5.
4. If you can’t scratch it with your fingernail, try using the mineral to scratch a copper penny. If it doesn’t
leave a mark on the penny, skip over to the last column and estimate the hardness to be between 2.5-3.5.
5. If it does leave a scratch on the penny, then try scratching the mineral with a steel nail. If the nail leaves a
scratch, skip over to the last column and estimate the hardness between 3.5-5.5.
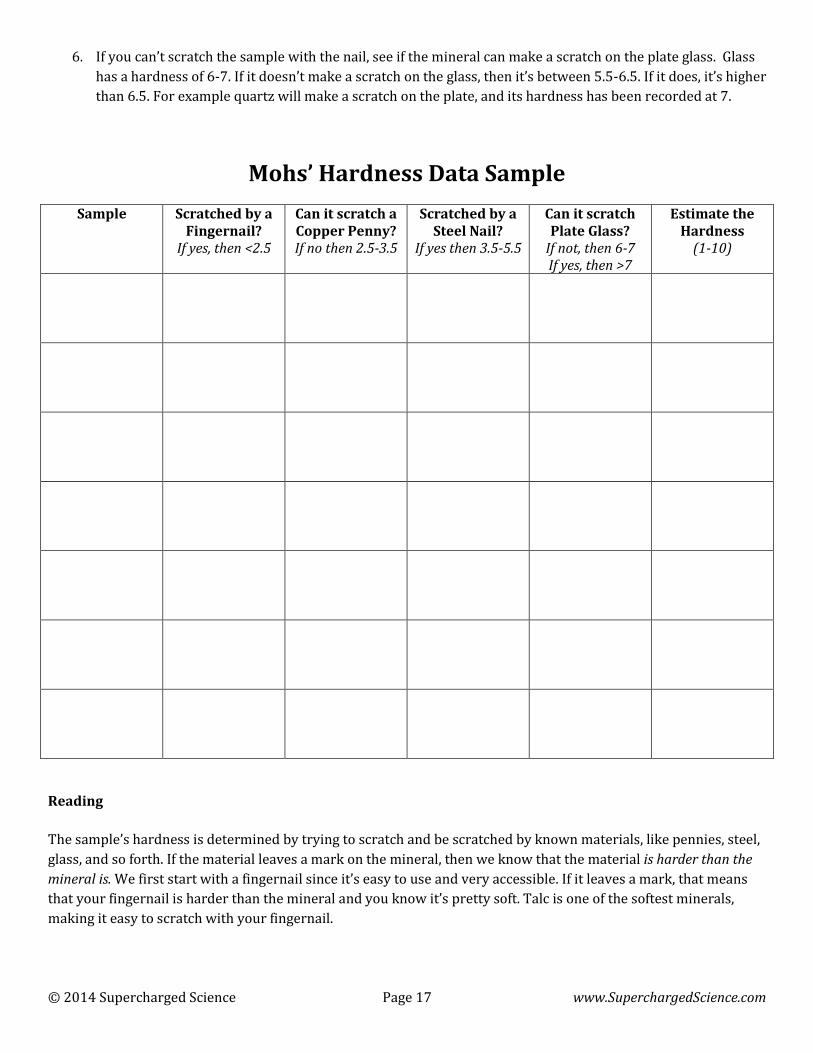
© 2014 Supercharged Science Page 17 www.SuperchargedScience.com
6. If you can’t scratch the sample with the nail, see if the mineral can make a scratch on the plate glass. Glass
has a hardness of 6-7. If it doesn’t make a scratch on the glass, then it’s between 5.5-6.5. If it does, it’s higher
than 6.5. For example quartz will make a scratch on the plate, and its hardness has been recorded at 7.
Mohs’ Hardness Data Sample
Sample Scratched by a Fingernail?
If yes, then <2.5
Can it scratch a Copper Penny? If no then 2.5-3.5
Scratched by a Steel Nail?
If yes then 3.5-5.5
Can it scratch Plate Glass?
If not, then 6-7 If yes, then >7
Estimate the Hardness
(1-10)
Reading
The sample’s hardness is determined by trying to scratch and be scratched by known materials, like pennies, steel,
glass, and so forth. If the material leaves a mark on the mineral, then we know that the material is harder than the
mineral is. We first start with a fingernail since it’s easy to use and very accessible. If it leaves a mark, that means
that your fingernail is harder than the mineral and you know it’s pretty soft. Talc is one of the softest minerals,
making it easy to scratch with your fingernail.

© 2014 Supercharged Science Page 18 www.SuperchargedScience.com
However, most minerals can’t be scratched with a fingernail, so we can try other objects, like copper pennies
(which have a hardness of 2.5-3.5), steel nail (3.5-5.5), steel knife (5.5), and even quartz (7). The most difficult part
of this experiment is keeping track of everything, so it’s a great opportunity to practice going slowly and recording
your observations for each sample as you go along.
Exercises
1. If a mineral scratches a penny but doesn’t get scratched by a nail, can you approximate its hardness?
2. Give examples of the hardest and softest minerals on the Mohs’ Scale.
3. Is feldspar harder or softer than quartz?
© 2014 Supercharged Science Page 19 www.SuperchargedScience.com
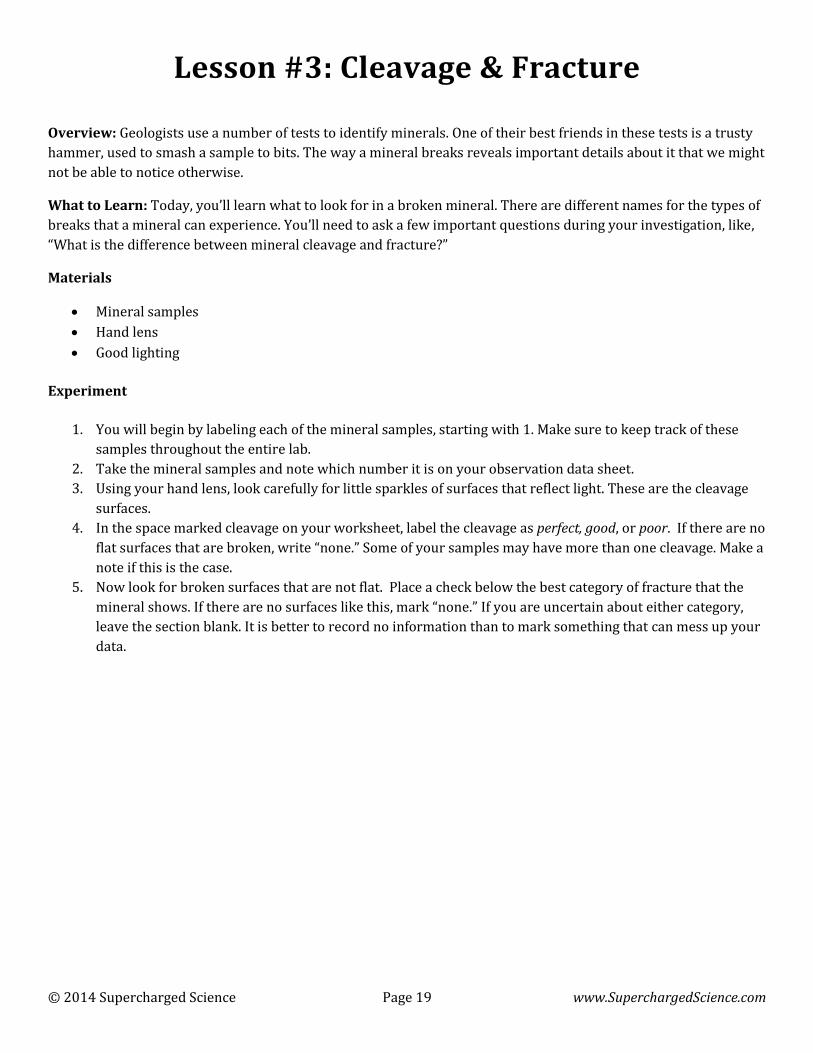
Lesson #3: Cleavage & Fracture
Overview: Geologists use a number of tests to identify minerals. One of their best friends in these tests is a trusty
hammer, used to smash a sample to bits. The way a mineral breaks reveals important details about it that we might
not be able to notice otherwise.
What to Learn: Today, you’ll learn what to look for in a broken mineral. There are different names for the types of
breaks that a mineral can experience. You’ll need to ask a few important questions during your investigation, like,
“What is the difference between mineral cleavage and fracture?”
Materials
Mineral samples
Hand lens
Good lighting
Experiment
1. You will begin by labeling each of the mineral samples, starting with 1. Make sure to keep track of these
samples throughout the entire lab.
2. Take the mineral samples and note which number it is on your observation data sheet.
3. Using your hand lens, look carefully for little sparkles of surfaces that reflect light. These are the cleavage
surfaces.
4. In the space marked cleavage on your worksheet, label the cleavage as perfect, good, or poor. If there are no
flat surfaces that are broken, write “none.” Some of your samples may have more than one cleavage. Make a
note if this is the case.
5. Now look for broken surfaces that are not flat. Place a check below the best category of fracture that the
mineral shows. If there are no surfaces like this, mark “none.” If you are uncertain about either category,
leave the section blank. It is better to record no information than to mark something that can mess up your
data.
© 2014 Supercharged Science Page 20 www.SuperchargedScience.com
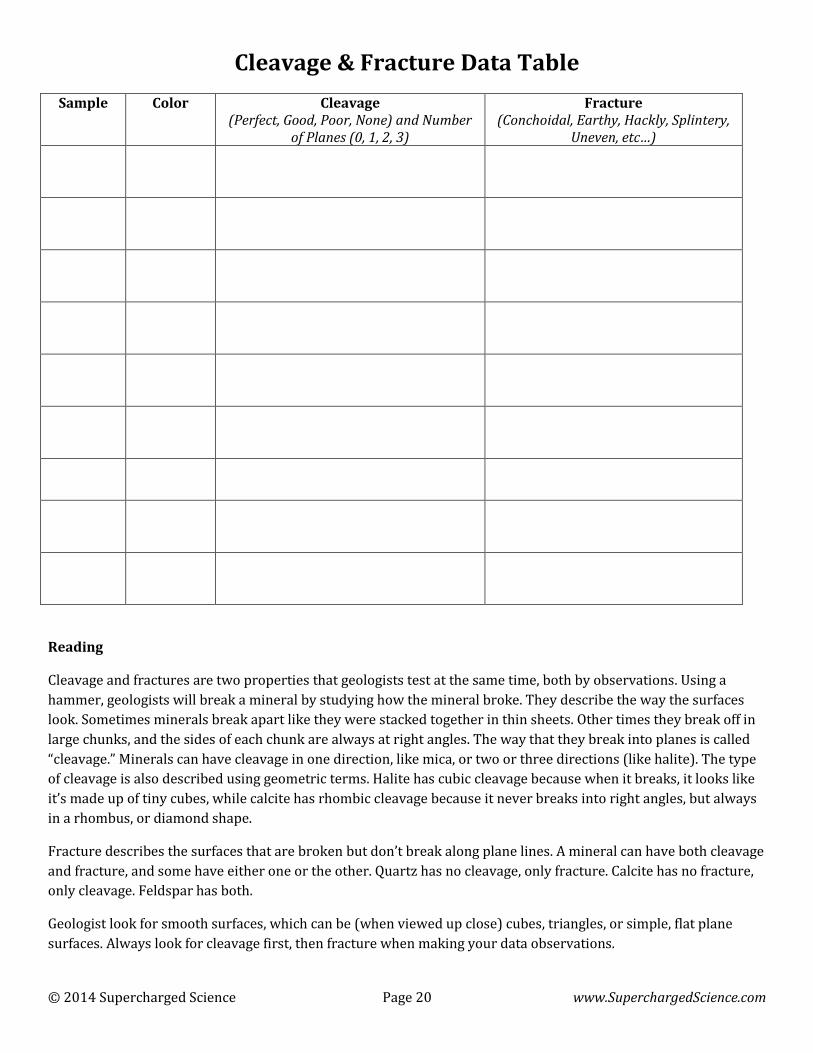
Cleavage & Fracture Data Table
Sample Color Cleavage (Perfect, Good, Poor, None) and Number
of Planes (0, 1, 2, 3)
Fracture (Conchoidal, Earthy, Hackly, Splintery,
Uneven, etc…)
Reading
Cleavage and fractures are two properties that geologists test at the same time, both by observations. Using a
hammer, geologists will break a mineral by studying how the mineral broke. They describe the way the surfaces
look. Sometimes minerals break apart like they were stacked together in thin sheets. Other times they break off in
large chunks, and the sides of each chunk are always at right angles. The way that they break into planes is called
“cleavage.” Minerals can have cleavage in one direction, like mica, or two or three directions (like halite). The type
of cleavage is also described using geometric terms. Halite has cubic cleavage because when it breaks, it looks like
it’s made up of tiny cubes, while calcite has rhombic cleavage because it never breaks into right angles, but always
in a rhombus, or diamond shape.
Fracture describes the surfaces that are broken but don’t break along plane lines. A mineral can have both cleavage
and fracture, and some have either one or the other. Quartz has no cleavage, only fracture. Calcite has no fracture,
only cleavage. Feldspar has both.
Geologist look for smooth surfaces, which can be (when viewed up close) cubes, triangles, or simple, flat plane
surfaces. Always look for cleavage first, then fracture when making your data observations.
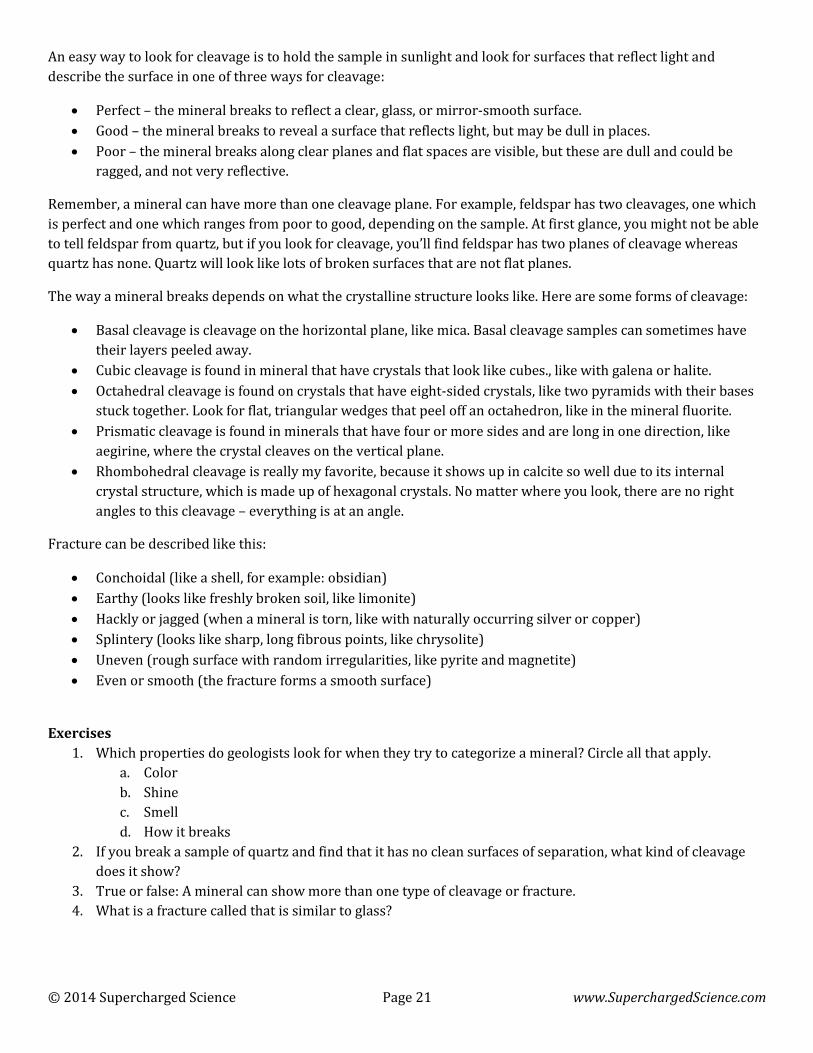
© 2014 Supercharged Science Page 21 www.SuperchargedScience.com
An easy way to look for cleavage is to hold the sample in sunlight and look for surfaces that reflect light and
describe the surface in one of three ways for cleavage:
Perfect – the mineral breaks to reflect a clear, glass, or mirror-smooth surface.
Good – the mineral breaks to reveal a surface that reflects light, but may be dull in places.
Poor – the mineral breaks along clear planes and flat spaces are visible, but these are dull and could be
ragged, and not very reflective.
Remember, a mineral can have more than one cleavage plane. For example, feldspar has two cleavages, one which
is perfect and one which ranges from poor to good, depending on the sample. At first glance, you might not be able
to tell feldspar from quartz, but if you look for cleavage, you’ll find feldspar has two planes of cleavage whereas
quartz has none. Quartz will look like lots of broken surfaces that are not flat planes.
The way a mineral breaks depends on what the crystalline structure looks like. Here are some forms of cleavage:
Basal cleavage is cleavage on the horizontal plane, like mica. Basal cleavage samples can sometimes have
their layers peeled away.
Cubic cleavage is found in mineral that have crystals that look like cubes., like with galena or halite.
Octahedral cleavage is found on crystals that have eight-sided crystals, like two pyramids with their bases
stuck together. Look for flat, triangular wedges that peel off an octahedron, like in the mineral fluorite.
Prismatic cleavage is found in minerals that have four or more sides and are long in one direction, like
aegirine, where the crystal cleaves on the vertical plane.
Rhombohedral cleavage is really my favorite, because it shows up in calcite so well due to its internal
crystal structure, which is made up of hexagonal crystals. No matter where you look, there are no right
angles to this cleavage – everything is at an angle.
Fracture can be described like this:
Conchoidal (like a shell, for example: obsidian)
Earthy (looks like freshly broken soil, like limonite)
Hackly or jagged (when a mineral is torn, like with naturally occurring silver or copper)
Splintery (looks like sharp, long fibrous points, like chrysolite)
Uneven (rough surface with random irregularities, like pyrite and magnetite)
Even or smooth (the fracture forms a smooth surface)
Exercises
1. Which properties do geologists look for when they try to categorize a mineral? Circle all that apply.
a. Color
b. Shine
c. Smell
d. How it breaks
2. If you break a sample of quartz and find that it has no clean surfaces of separation, what kind of cleavage
does it show?
3. True or false: A mineral can show more than one type of cleavage or fracture.
4. What is a fracture called that is similar to glass?
© 2014 Supercharged Science Page 22 www.SuperchargedScience.com
Lesson #4: Acid Test
Overview: Geologists use a number of tests to identify minerals, one of which is the acid test. Regular old vinegar,
also known as dilute acetic acid, is used to test for the presence of calcium carbonate, which will help you tell the
difference between specimens that look similar, but really aren’t, like marble and quartz.
What to Learn: Your goal is to identify samples according to their reactivity with acid. Minerals that react are
called chemical rocks, and minerals that don’t are called clastic rocks. Some chemical rocks contain carbonate
minerals, like limestone, dolomite, and marble which react with the acid.
Materials
Acetic acid (plain distilled white vinegar) in a dropper bottle or in a small cup with a medicine dropper
Pie tin
Paper towels
Steel nail
Optional: handheld magnifier
Rock samples (in the video: bituminous coal, limestone, conglomerate, coquina, shale, siltstone, sandstone,
and dolomite)
Experiment
1. Number and label your samples using the data table.
2. Use a dropper to take vinegar out of its bottle.
3. Drop a few drops onto your sample and watch for a reaction. You’re looking for bubbles, both in size and
quantity. A few tiny bubbles don’t count. You’re looking for a reaction similar to the baking soda and
vinegar reaction you are probably familiar with.
4. Optional: check with your hand lens while the reaction is taking place.
5. Record your observations in your data table.
6. Wipe your samples dry with a clean, damp cloth.
7. Test the hardness of your sample with the nail and record it in your data table. If the sample is softer than
the nail, you’ll see a scratch and a powder left behind. Scratch it a couple of times to dig up more powder,
then add a drop of the vinegar to the powder. Record your results. Did you see bubbles on the powder?
© 2014 Supercharged Science Page 23 www.SuperchargedScience.com
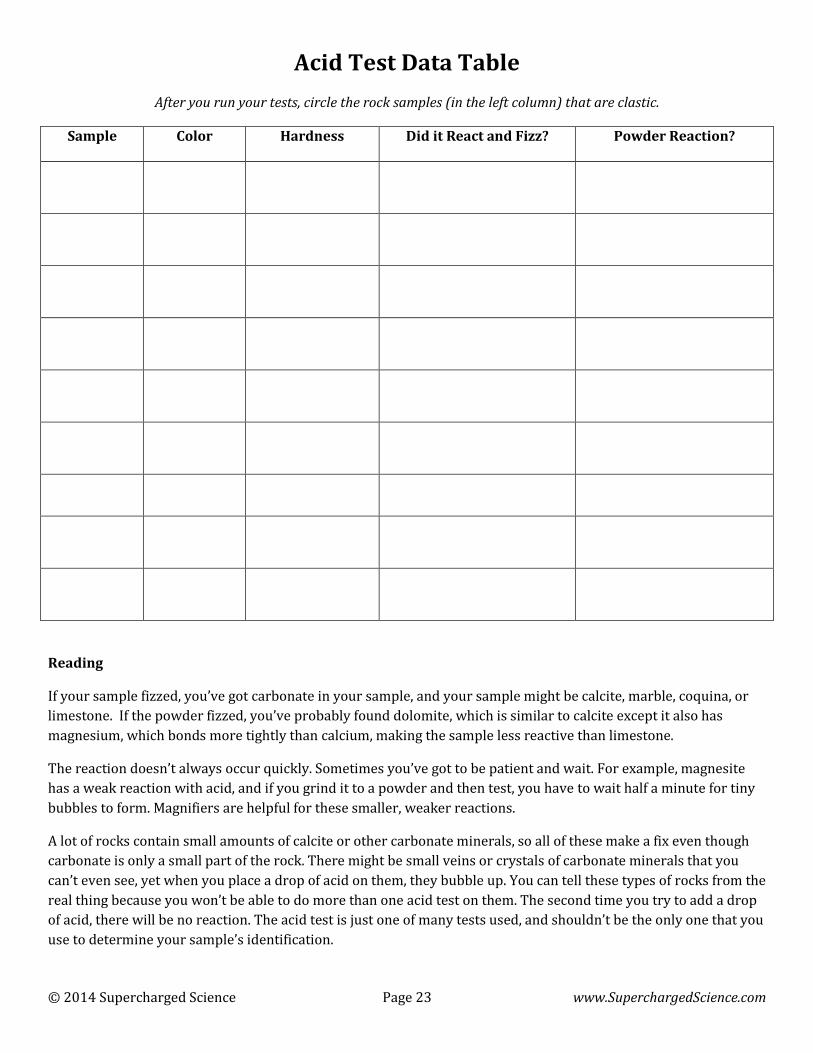
Acid Test Data Table
After you run your tests, circle the rock samples (in the left column) that are clastic.
Sample Color Hardness Did it React and Fizz? Powder Reaction?
Reading
If your sample fizzed, you’ve got carbonate in your sample, and your sample might be calcite, marble, coquina, or
limestone. If the powder fizzed, you’ve probably found dolomite, which is similar to calcite except it also has
magnesium, which bonds more tightly than calcium, making the sample less reactive than limestone.
The reaction doesn’t always occur quickly. Sometimes you’ve got to be patient and wait. For example, magnesite
has a weak reaction with acid, and if you grind it to a powder and then test, you have to wait half a minute for tiny
bubbles to form. Magnifiers are helpful for these smaller, weaker reactions.
A lot of rocks contain small amounts of calcite or other carbonate minerals, so all of these make a fix even though
carbonate is only a small part of the rock. There might be small veins or crystals of carbonate minerals that you
can’t even see, yet when you place a drop of acid on them, they bubble up. You can tell these types of rocks from the
real thing because you won’t be able to do more than one acid test on them. The second time you try to add a drop
of acid, there will be no reaction. The acid test is just one of many tests used, and shouldn’t be the only one that you
use to determine your sample’s identification.
© 2014 Supercharged Science Page 24 www.SuperchargedScience.com
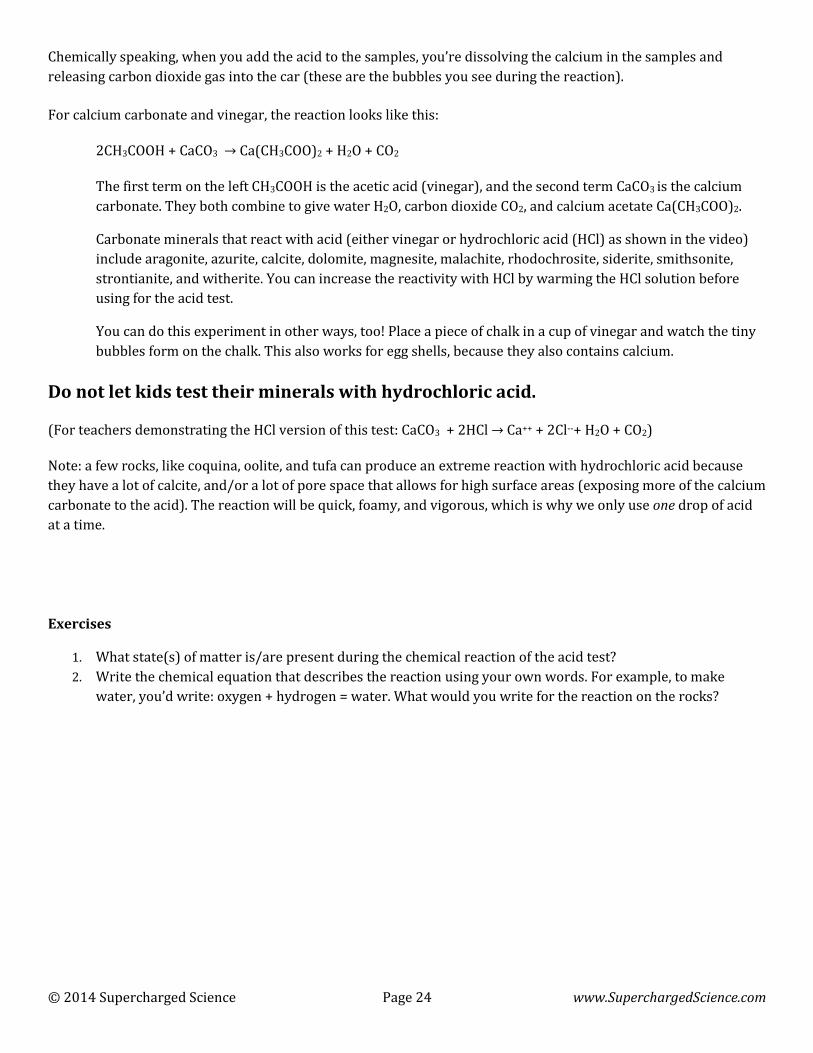
Chemically speaking, when you add the acid to the samples, you’re dissolving the calcium in the samples and
releasing carbon dioxide gas into the car (these are the bubbles you see during the reaction).
For calcium carbonate and vinegar, the reaction looks like this:
2CH3COOH + CaCO3 → Ca(CH3COO)2 + H2O + CO2
The first term on the left CH3COOH is the acetic acid (vinegar), and the second term CaCO3 is the calcium
carbonate. They both combine to give water H2O, carbon dioxide CO2, and calcium acetate Ca(CH3COO)2.
Carbonate minerals that react with acid (either vinegar or hydrochloric acid (HCl) as shown in the video)
include aragonite, azurite, calcite, dolomite, magnesite, malachite, rhodochrosite, siderite, smithsonite,
strontianite, and witherite. You can increase the reactivity with HCl by warming the HCl solution before
using for the acid test.
You can do this experiment in other ways, too! Place a piece of chalk in a cup of vinegar and watch the tiny
bubbles form on the chalk. This also works for egg shells, because they also contains calcium.
Do not let kids test their minerals with hydrochloric acid.
(For teachers demonstrating the HCl version of this test: CaCO3 + 2HCl → Ca++ + 2Cl--+ H2O + CO2)
Note: a few rocks, like coquina, oolite, and tufa can produce an extreme reaction with hydrochloric acid because
they have a lot of calcite, and/or a lot of pore space that allows for high surface areas (exposing more of the calcium
carbonate to the acid). The reaction will be quick, foamy, and vigorous, which is why we only use one drop of acid
at a time.
Exercises
1. What state(s) of matter is/are present during the chemical reaction of the acid test?
2. Write the chemical equation that describes the reaction using your own words. For example, to make
water, you’d write: oxygen + hydrogen = water. What would you write for the reaction on the rocks?
© 2014 Supercharged Science Page 25 www.SuperchargedScience.com
Lesson #5: Sedimentary Rocks
Overview: Sedimentary rocks are broken into three different types: organic, chemical, and clastic. The Acid Test
determines which rocks are clastic because they don’t react with the acid. Here’s another test to further determine
the different kinds of clastic rocks by using the hardness scale.
What to Learn: Clastic rocks come in very different shapes and sizes, but they all have a few characteristics in
common. A clast is a grain of sand, gravel, pebble, etc that makes up a rock. Clastic rocks look like they are made up
of fragments of other rocks.
Materials
Small piece of plate glass
Magnifying lens
Vinegar
Paper towel
Shallow dish
Rock samples (in the video: bituminous coal, sandstone, siltstone, shale)
Experiment
1. Number and label your samples with your data table.
2. Take your hand magnifier and look closely at each sample and record the color information on the data
table.
3. Use a dropper to take vinegar out of its bottle.
4. Drop a few drops onto your sample and watch for a reaction. If you see a reaction, note this in the data table
and classify the rock as a chemical rock, not a clastic rock.
5. Wipe your samples dry with a clean, damp cloth.
6. Test the hardness of your sample with the nail and record it in your data table using Mohs’ Hardness Scale.
© 2014 Supercharged Science Page 26 www.SuperchargedScience.com
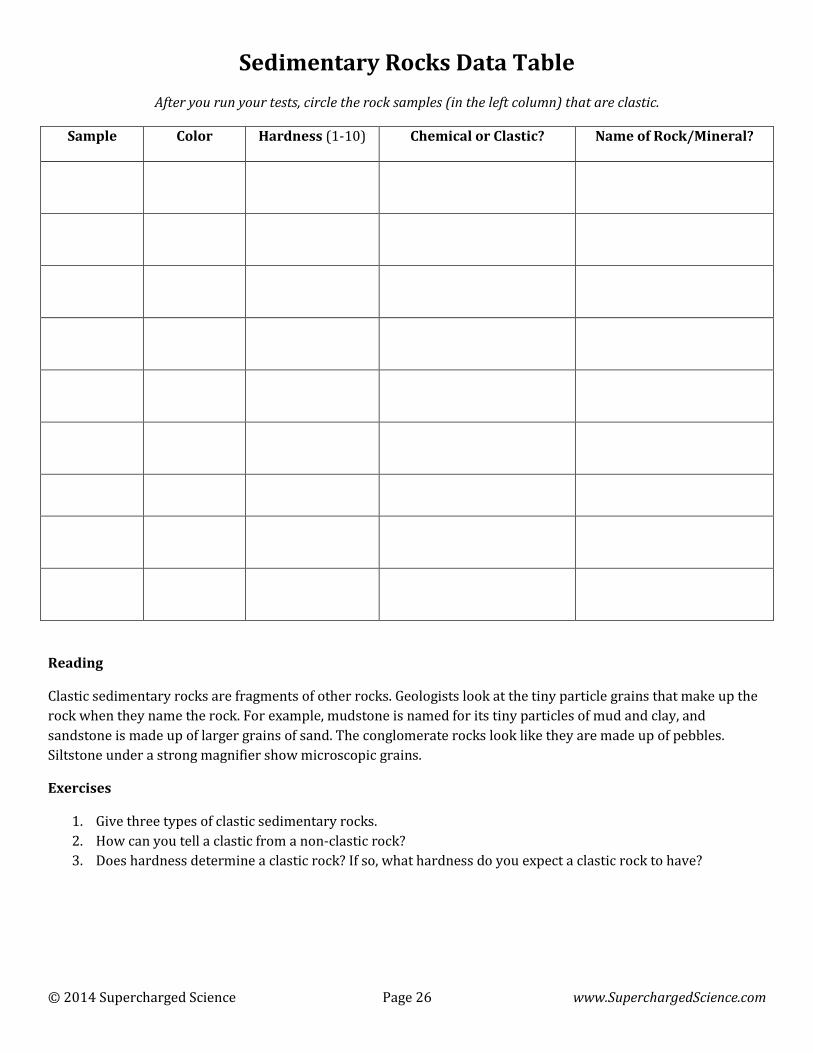
Sedimentary Rocks Data Table
After you run your tests, circle the rock samples (in the left column) that are clastic.
Sample Color Hardness (1-10) Chemical or Clastic? Name of Rock/Mineral?
Reading
Clastic sedimentary rocks are fragments of other rocks. Geologists look at the tiny particle grains that make up the
rock when they name the rock. For example, mudstone is named for its tiny particles of mud and clay, and
sandstone is made up of larger grains of sand. The conglomerate rocks look like they are made up of pebbles.
Siltstone under a strong magnifier show microscopic grains.
Exercises
1. Give three types of clastic sedimentary rocks.
2. How can you tell a clastic from a non-clastic rock?
3. Does hardness determine a clastic rock? If so, what hardness do you expect a clastic rock to have?
© 2014 Supercharged Science Page 27 www.SuperchargedScience.com
Lesson #6: Burning Coal
Overview: The soft coal called “bituminous coal” contains 15-20% volatile matter, making it a cheap, easy source
of energy. Coal goes through three stages when burned: coal gas, coal tar, and coking.
What to Learn: Bituminous coal (also called black coal) is a soft, black organic sedimentary rock that contains
85% carbon. It’s a lower grade than anthracite coal, which contains 93% carbon. Bituminous coal can either be dull
or shiny, whereas anthracite is hard and shiny. Lignite, a lower grade than bituminous, is a crumbly, black type of
coal that only contains 72% carbon.
Materials
Votive candle
Paperclip
Hammer (if your piece of coal is large)
Pliers (to bend paperclip)
Lighter with adult help
Cup of water
Rock samples (in the video: bituminous coal, anthracite coal)
Experiment
1. Move your experiment outside. Do not do this indoors! Fumes generated must be properly ventilated.
2. Open up and bend the paperclip into a shape that will allow you to hold the coal without it falling off the
end. Use pliers to bend the paperclip.
3. Set a small piece (about the size of a pea) of bituminous coal at the end of the paperclip.
4. Put on your goggles. NO EXCEPTIONS!
5. Have an adult light your candle.
6. Place the coal piece at the top of the flame for the most intense heat.
7. Look for brown to black smoke to come from the coal. Record your observations in your data table.
8. When you’re done, place the entire piece of coal in your cup of water.
Optional: If you’ve got a test tube and stand, you can do the following experiment:
9. Put on your goggles, and pick up the test tube with the test tube holder.
10. Place a small piece of bituminous coal in the test tube (about the size of a pea).
11. Place the tube at an angle in a proper holder.
12. Turn on the heat source, and wave it near the bottom of the test tube for a few minutes, until you notice any
slight changes.
13. As your coal sample heats up, look for bubbles or gas, which is coal gas, one of the first of three things
produced by coal. The coal gas was captured and used as fuel in household lamps and streetlights before
electricity was available.
14. As you continue to heat the sample, look for brown stuff along the sides of the tube called coal tar, which is
used in dyes, aspirin, textiles, pesticides, and more.
15. As your sample continues to burn, notice if there are any gray-black solids in the bottom. This will look a lot
like ash, but it’s called coke and it’s used to purify metals in a chemical process.
© 2014 Supercharged Science Page 28 www.SuperchargedScience.com
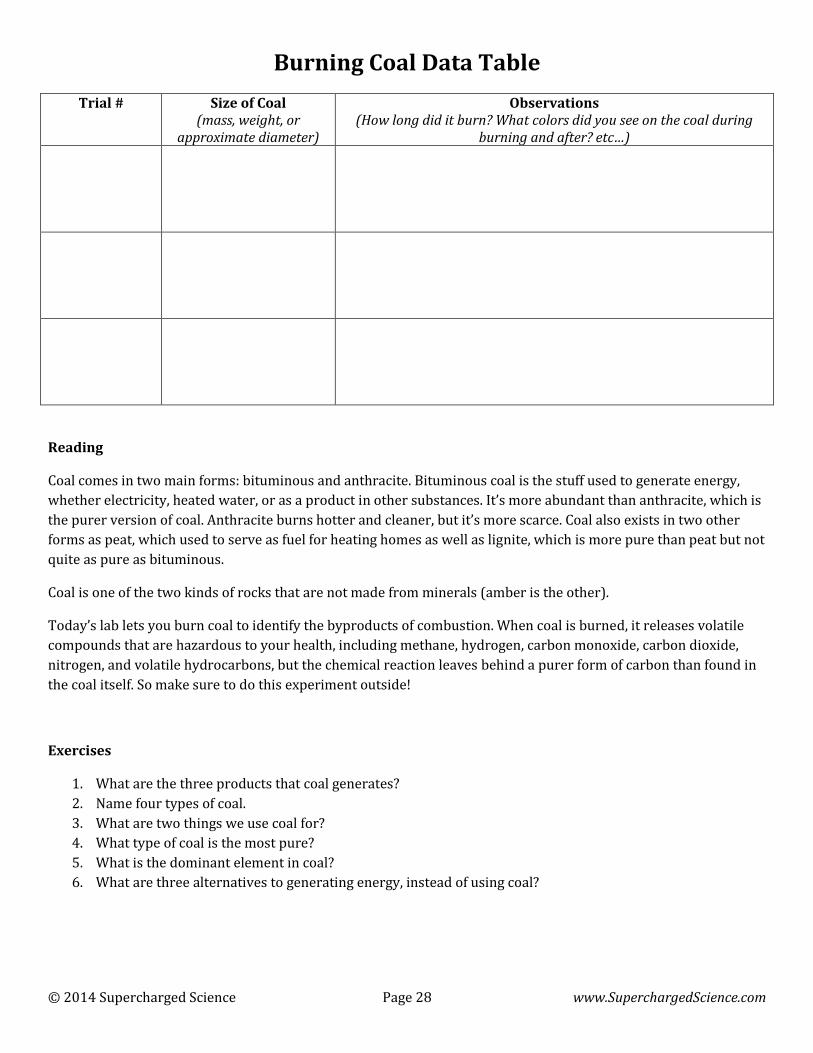
Burning Coal Data Table
Trial # Size of Coal (mass, weight, or
approximate diameter)
Observations (How long did it burn? What colors did you see on the coal during
burning and after? etc…)
Reading
Coal comes in two main forms: bituminous and anthracite. Bituminous coal is the stuff used to generate energy,
whether electricity, heated water, or as a product in other substances. It’s more abundant than anthracite, which is
the purer version of coal. Anthracite burns hotter and cleaner, but it’s more scarce. Coal also exists in two other
forms as peat, which used to serve as fuel for heating homes as well as lignite, which is more pure than peat but not
quite as pure as bituminous.
Coal is one of the two kinds of rocks that are not made from minerals (amber is the other).
Today’s lab lets you burn coal to identify the byproducts of combustion. When coal is burned, it releases volatile
compounds that are hazardous to your health, including methane, hydrogen, carbon monoxide, carbon dioxide,
nitrogen, and volatile hydrocarbons, but the chemical reaction leaves behind a purer form of carbon than found in
the coal itself. So make sure to do this experiment outside!
Exercises
1. What are the three products that coal generates?
2. Name four types of coal.
3. What are two things we use coal for?
4. What type of coal is the most pure?
5. What is the dominant element in coal?
6. What are three alternatives to generating energy, instead of using coal?
© 2014 Supercharged Science Page 29 www.SuperchargedScience.com
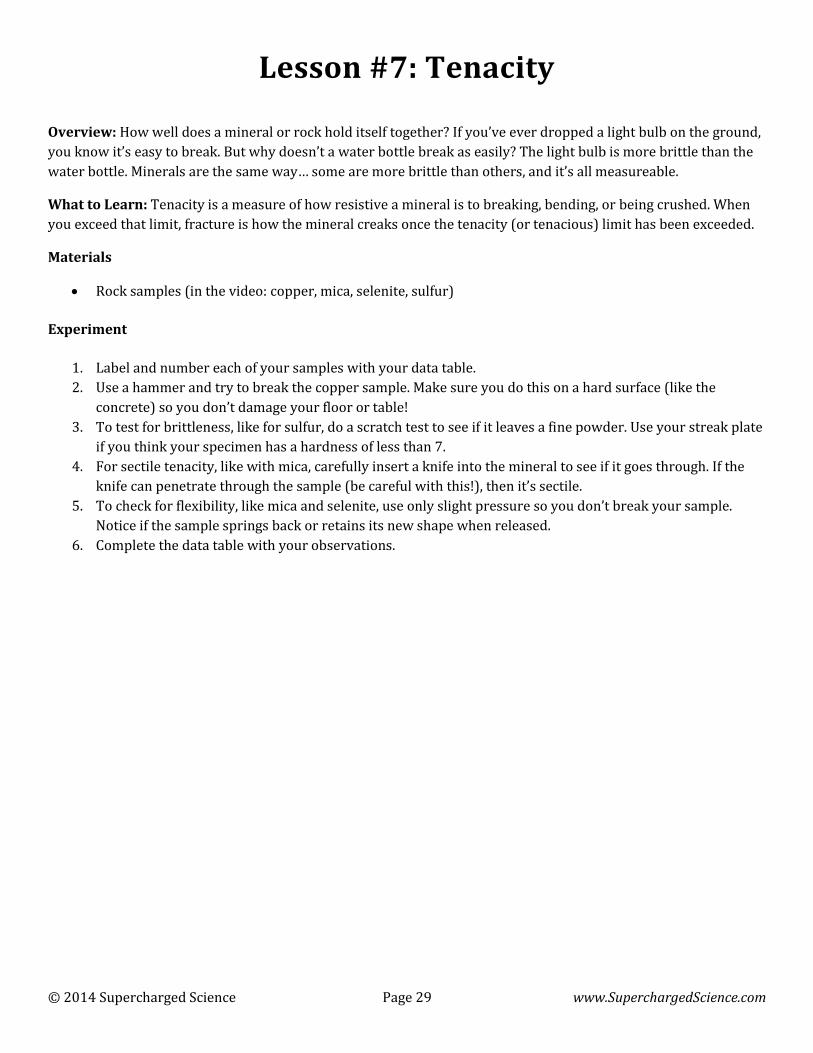
Lesson #7: Tenacity
Overview: How well does a mineral or rock hold itself together? If you’ve ever dropped a light bulb on the ground,
you know it’s easy to break. But why doesn’t a water bottle break as easily? The light bulb is more brittle than the
water bottle. Minerals are the same way… some are more brittle than others, and it’s all measureable.
What to Learn: Tenacity is a measure of how resistive a mineral is to breaking, bending, or being crushed. When
you exceed that limit, fracture is how the mineral creaks once the tenacity (or tenacious) limit has been exceeded.
Materials
Rock samples (in the video: copper, mica, selenite, sulfur)
Experiment
1. Label and number each of your samples with your data table.
2. Use a hammer and try to break the copper sample. Make sure you do this on a hard surface (like the
concrete) so you don’t damage your floor or table!
3. To test for brittleness, like for sulfur, do a scratch test to see if it leaves a fine powder. Use your streak plate
if you think your specimen has a hardness of less than 7.
4. For sectile tenacity, like with mica, carefully insert a knife into the mineral to see if it goes through. If the
knife can penetrate through the sample (be careful with this!), then it’s sectile.
5. To check for flexibility, like mica and selenite, use only slight pressure so you don’t break your sample.
Notice if the sample springs back or retains its new shape when released.
6. Complete the data table with your observations.
© 2014 Supercharged Science Page 30 www.SuperchargedScience.com
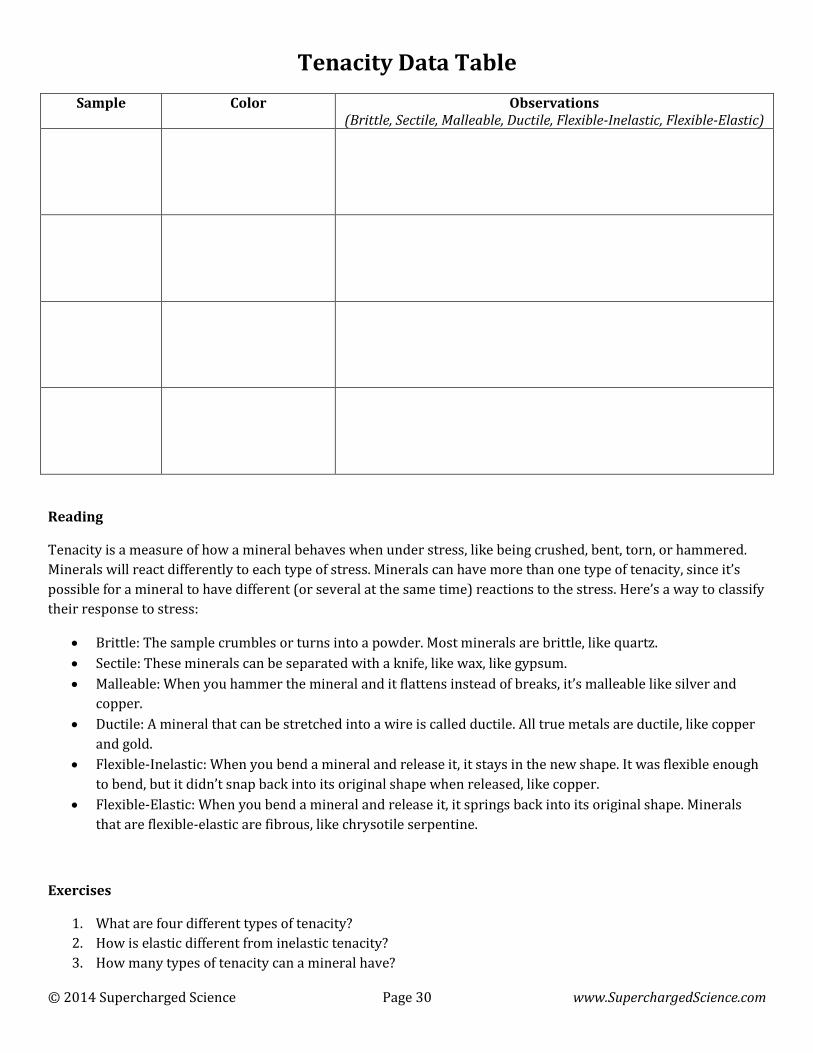
Tenacity Data Table
Sample Color Observations (Brittle, Sectile, Malleable, Ductile, Flexible-Inelastic, Flexible-Elastic)
Reading
Tenacity is a measure of how a mineral behaves when under stress, like being crushed, bent, torn, or hammered.
Minerals will react differently to each type of stress. Minerals can have more than one type of tenacity, since it’s
possible for a mineral to have different (or several at the same time) reactions to the stress. Here’s a way to classify
their response to stress:
Brittle: The sample crumbles or turns into a powder. Most minerals are brittle, like quartz.
Sectile: These minerals can be separated with a knife, like wax, like gypsum.
Malleable: When you hammer the mineral and it flattens instead of breaks, it’s malleable like silver and
copper.
Ductile: A mineral that can be stretched into a wire is called ductile. All true metals are ductile, like copper
and gold.
Flexible-Inelastic: When you bend a mineral and release it, it stays in the new shape. It was flexible enough
to bend, but it didn’t snap back into its original shape when released, like copper.
Flexible-Elastic: When you bend a mineral and release it, it springs back into its original shape. Minerals
that are flexible-elastic are fibrous, like chrysotile serpentine.
Exercises
1. What are four different types of tenacity?
2. How is elastic different from inelastic tenacity?
3. How many types of tenacity can a mineral have?
© 2014 Supercharged Science Page 31 www.SuperchargedScience.com
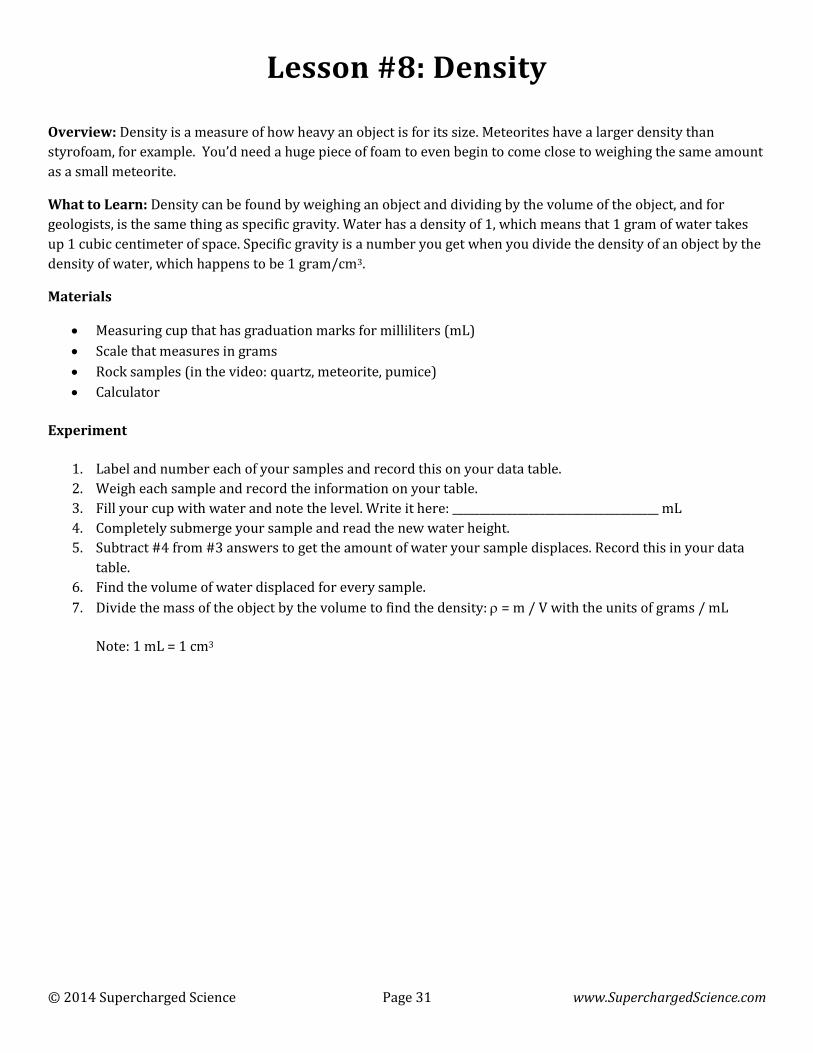
Lesson #8: Density
Overview: Density is a measure of how heavy an object is for its size. Meteorites have a larger density than
styrofoam, for example. You’d need a huge piece of foam to even begin to come close to weighing the same amount
as a small meteorite.
What to Learn: Density can be found by weighing an object and dividing by the volume of the object, and for
geologists, is the same thing as specific gravity. Water has a density of 1, which means that 1 gram of water takes
up 1 cubic centimeter of space. Specific gravity is a number you get when you divide the density of an object by the
density of water, which happens to be 1 gram/cm3.
Materials
Measuring cup that has graduation marks for milliliters (mL)
Scale that measures in grams
Rock samples (in the video: quartz, meteorite, pumice)
Calculator
Experiment
1. Label and number each of your samples and record this on your data table.
2. Weigh each sample and record the information on your table.
3. Fill your cup with water and note the level. Write it here: ______________________________________ mL
4. Completely submerge your sample and read the new water height.
5. Subtract #4 from #3 answers to get the amount of water your sample displaces. Record this in your data
table.
6. Find the volume of water displaced for every sample.
7. Divide the mass of the object by the volume to find the density: = m / V with the units of grams / mL
Note: 1 mL = 1 cm3
© 2014 Supercharged Science Page 32 www.SuperchargedScience.com
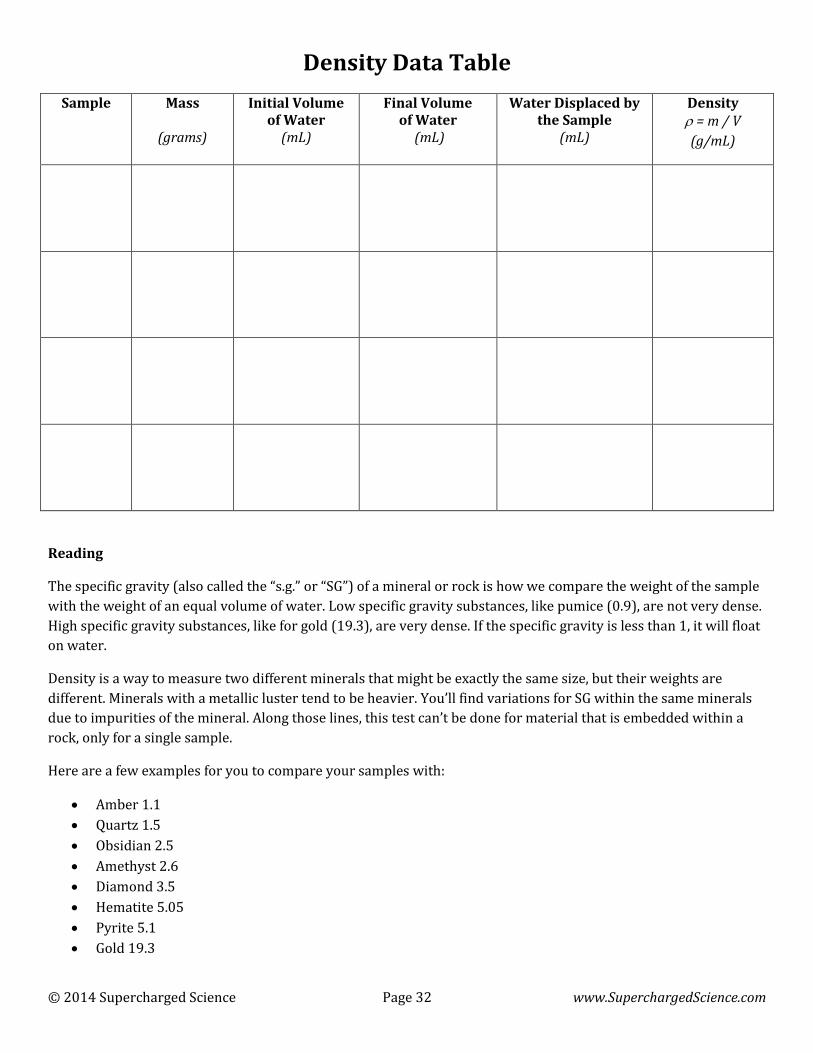
Density Data Table
Sample Mass
(grams)
Initial Volume of Water
(mL)
Final Volume of Water
(mL)
Water Displaced by the Sample
(mL)
Density = m / V
(g/mL)
Reading
The specific gravity (also called the “s.g.” or “SG”) of a mineral or rock is how we compare the weight of the sample
with the weight of an equal volume of water. Low specific gravity substances, like pumice (0.9), are not very dense.
High specific gravity substances, like for gold (19.3), are very dense. If the specific gravity is less than 1, it will float
on water.
Density is a way to measure two different minerals that might be exactly the same size, but their weights are
different. Minerals with a metallic luster tend to be heavier. You’ll find variations for SG within the same minerals
due to impurities of the mineral. Along those lines, this test can’t be done for material that is embedded within a
rock, only for a single sample.
Here are a few examples for you to compare your samples with:
Amber 1.1
Quartz 1.5
Obsidian 2.5
Amethyst 2.6
Diamond 3.5
Hematite 5.05
Pyrite 5.1
Gold 19.3
© 2014 Supercharged Science Page 33 www.SuperchargedScience.com
Exercises
1. In your data table, which number was the same for every trial run?
2. What is the equation for finding density?
3. How did you find the volume of the rock?
© 2014 Supercharged Science Page 34 www.SuperchargedScience.com
Lesson #9: Luster
Overview: The sparkle, shine, sheen, or lack thereof is what geologists call luster. Luster describes how a mineral
appears to reflect light, and this tells how brilliant or dull the surface of the mineral is.
What to Learn: Luster is the way a mineral reflects light, and it depends on the surface reflectivity.
Materials
Sunlight
Rock samples (in the video: pyrite, fluorite, and serpentine)
Experiment
1. Label and number each of your samples and record this on your data table.
2. Hold your mineral in the sunlight.
3. Use the list to find the word that best describes what you see. Look particularly on your sample for a
surface that is clean and not tarnished, discolored, or coated. Look at cleaved surfaces and on uneven parts.
Metallic
Submetallic (duller than metallic)
Vitreous or glassy
Adamantine (like a cut diamond)
Resinous (like honey)
Silky (like a silk cloth)
Pearly
Greasy or oily
Pitchy (like tar)
Waxy (like a candle)
Dull or earthy
4. Record your observations in the data table.
© 2014 Supercharged Science Page 35 www.SuperchargedScience.com
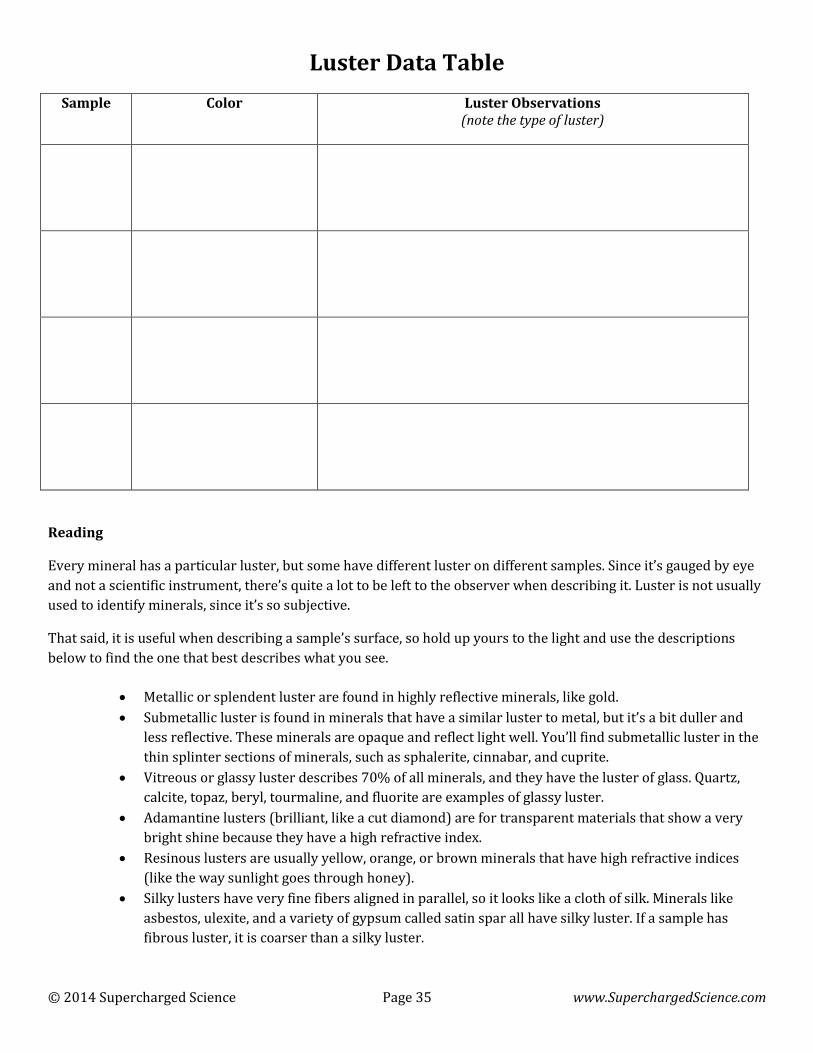
Luster Data Table
Sample Color Luster Observations (note the type of luster)
Reading
Every mineral has a particular luster, but some have different luster on different samples. Since it’s gauged by eye
and not a scientific instrument, there’s quite a lot to be left to the observer when describing it. Luster is not usually
used to identify minerals, since it’s so subjective.
That said, it is useful when describing a sample’s surface, so hold up yours to the light and use the descriptions
below to find the one that best describes what you see.
Metallic or splendent luster are found in highly reflective minerals, like gold.
Submetallic luster is found in minerals that have a similar luster to metal, but it’s a bit duller and
less reflective. These minerals are opaque and reflect light well. You’ll find submetallic luster in the
thin splinter sections of minerals, such as sphalerite, cinnabar, and cuprite.
Vitreous or glassy luster describes 70% of all minerals, and they have the luster of glass. Quartz,
calcite, topaz, beryl, tourmaline, and fluorite are examples of glassy luster.
Adamantine lusters (brilliant, like a cut diamond) are for transparent materials that show a very
bright shine because they have a high refractive index.
Resinous lusters are usually yellow, orange, or brown minerals that have high refractive indices
(like the way sunlight goes through honey).
Silky lusters have very fine fibers aligned in parallel, so it looks like a cloth of silk. Minerals like
asbestos, ulexite, and a variety of gypsum called satin spar all have silky luster. If a sample has
fibrous luster, it is coarser than a silky luster.
© 2014 Supercharged Science Page 36 www.SuperchargedScience.com
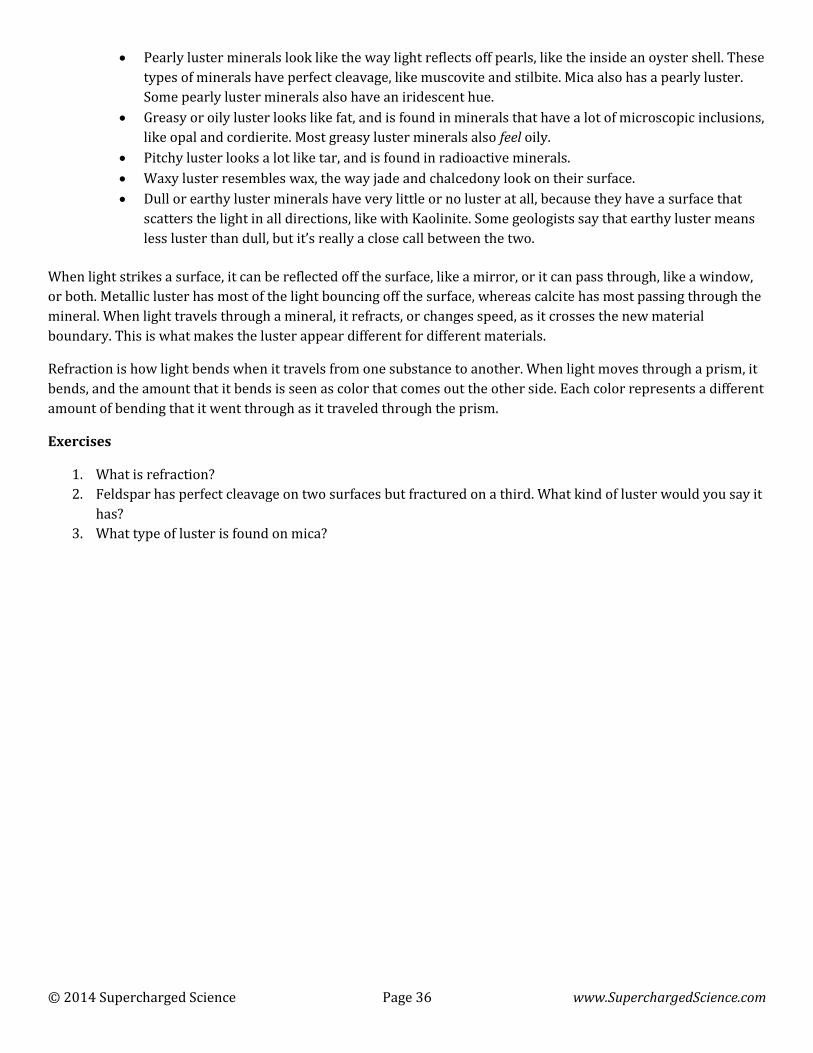
Pearly luster minerals look like the way light reflects off pearls, like the inside an oyster shell. These
types of minerals have perfect cleavage, like muscovite and stilbite. Mica also has a pearly luster.
Some pearly luster minerals also have an iridescent hue.
Greasy or oily luster looks like fat, and is found in minerals that have a lot of microscopic inclusions,
like opal and cordierite. Most greasy luster minerals also feel oily.
Pitchy luster looks a lot like tar, and is found in radioactive minerals.
Waxy luster resembles wax, the way jade and chalcedony look on their surface.
Dull or earthy luster minerals have very little or no luster at all, because they have a surface that
scatters the light in all directions, like with Kaolinite. Some geologists say that earthy luster means
less luster than dull, but it’s really a close call between the two.
When light strikes a surface, it can be reflected off the surface, like a mirror, or it can pass through, like a window,
or both. Metallic luster has most of the light bouncing off the surface, whereas calcite has most passing through the
mineral. When light travels through a mineral, it refracts, or changes speed, as it crosses the new material
boundary. This is what makes the luster appear different for different materials.
Refraction is how light bends when it travels from one substance to another. When light moves through a prism, it
bends, and the amount that it bends is seen as color that comes out the other side. Each color represents a different
amount of bending that it went through as it traveled through the prism.
Exercises
1. What is refraction?
2. Feldspar has perfect cleavage on two surfaces but fractured on a third. What kind of luster would you say it
has?
3. What type of luster is found on mica?
© 2014 Supercharged Science Page 37 www.SuperchargedScience.com
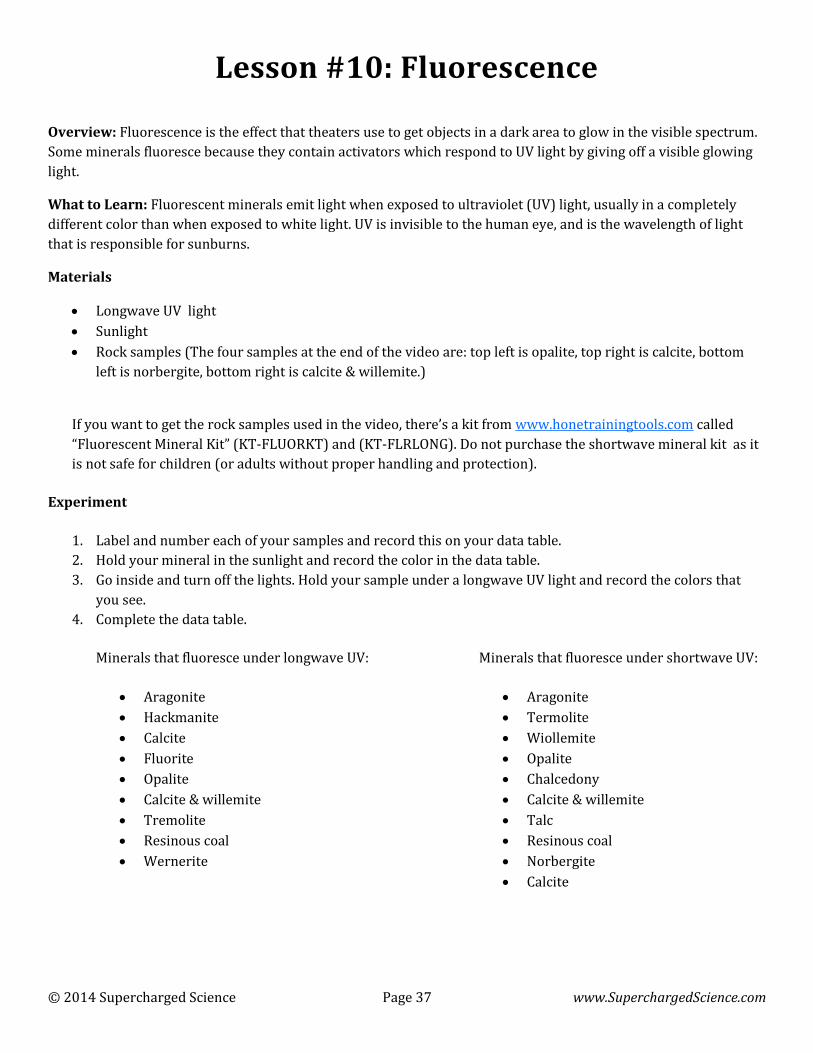
Lesson #10: Fluorescence
Overview: Fluorescence is the effect that theaters use to get objects in a dark area to glow in the visible spectrum.
Some minerals fluoresce because they contain activators which respond to UV light by giving off a visible glowing
light.
What to Learn: Fluorescent minerals emit light when exposed to ultraviolet (UV) light, usually in a completely
different color than when exposed to white light. UV is invisible to the human eye, and is the wavelength of light
that is responsible for sunburns.
Materials
Longwave UV light
Sunlight
Rock samples (The four samples at the end of the video are: top left is opalite, top right is calcite, bottom
left is norbergite, bottom right is calcite & willemite.)
If you want to get the rock samples used in the video, there’s a kit from www.honetrainingtools.com called
“Fluorescent Mineral Kit” (KT-FLUORKT) and (KT-FLRLONG). Do not purchase the shortwave mineral kit as it
is not safe for children (or adults without proper handling and protection).
Experiment
1. Label and number each of your samples and record this on your data table.
2. Hold your mineral in the sunlight and record the color in the data table.
3. Go inside and turn off the lights. Hold your sample under a longwave UV light and record the colors that
you see.
4. Complete the data table.
Minerals that fluoresce under longwave UV:
Aragonite
Hackmanite
Calcite
Fluorite
Opalite
Calcite & willemite
Tremolite
Resinous coal
Wernerite
Minerals that fluoresce under shortwave UV:
Aragonite
Termolite
Wiollemite
Opalite
Chalcedony
Calcite & willemite
Talc
Resinous coal
Norbergite
Calcite
© 2014 Supercharged Science Page 38 www.SuperchargedScience.com
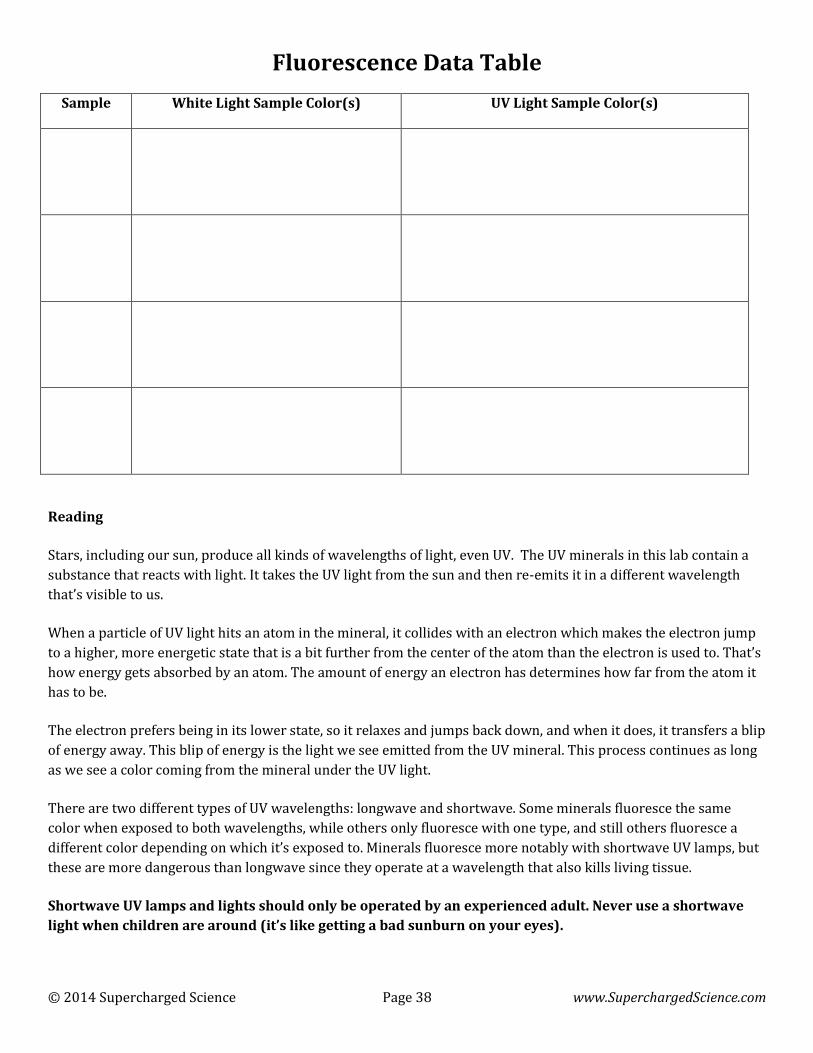
Fluorescence Data Table
Sample White Light Sample Color(s) UV Light Sample Color(s)
Reading
Stars, including our sun, produce all kinds of wavelengths of light, even UV. The UV minerals in this lab contain a
substance that reacts with light. It takes the UV light from the sun and then re-emits it in a different wavelength
that’s visible to us.
When a particle of UV light hits an atom in the mineral, it collides with an electron which makes the electron jump
to a higher, more energetic state that is a bit further from the center of the atom than the electron is used to. That’s
how energy gets absorbed by an atom. The amount of energy an electron has determines how far from the atom it
has to be.
The electron prefers being in its lower state, so it relaxes and jumps back down, and when it does, it transfers a blip
of energy away. This blip of energy is the light we see emitted from the UV mineral. This process continues as long
as we see a color coming from the mineral under the UV light.
There are two different types of UV wavelengths: longwave and shortwave. Some minerals fluoresce the same
color when exposed to both wavelengths, while others only fluoresce with one type, and still others fluoresce a
different color depending on which it’s exposed to. Minerals fluoresce more notably with shortwave UV lamps, but
these are more dangerous than longwave since they operate at a wavelength that also kills living tissue.
Shortwave UV lamps and lights should only be operated by an experienced adult. Never use a shortwave
light when children are around (it’s like getting a bad sunburn on your eyes).
© 2014 Supercharged Science Page 39 www.SuperchargedScience.com
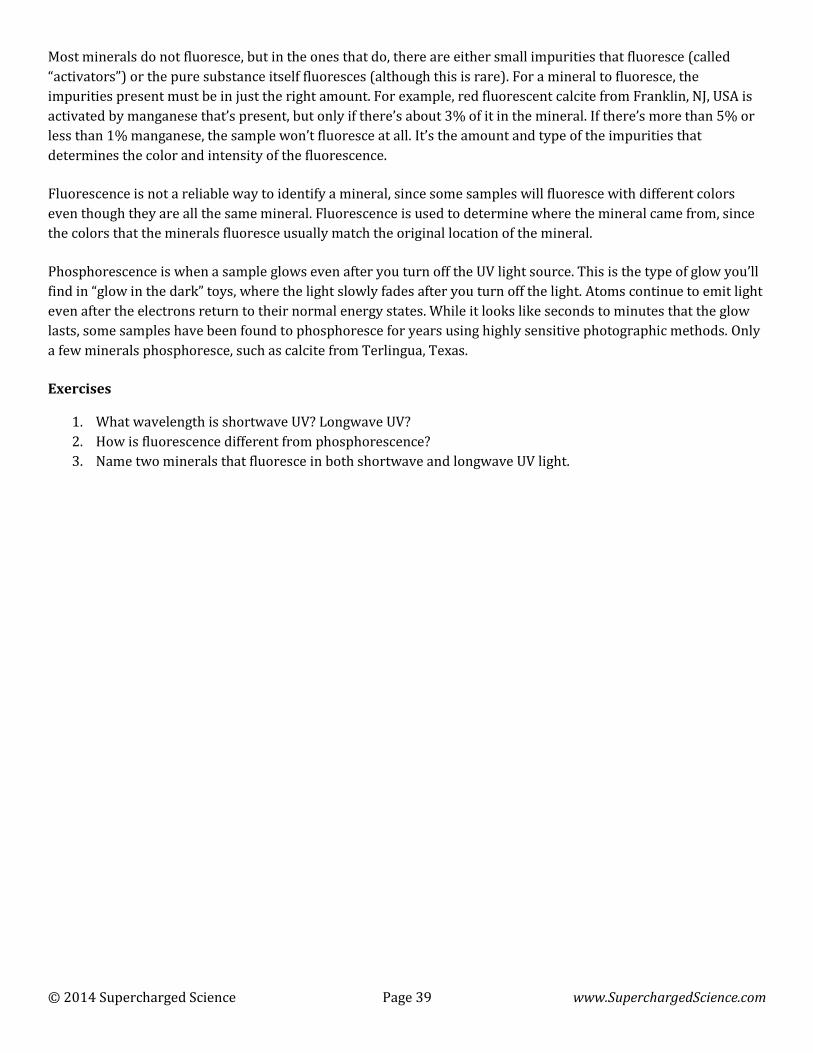
Most minerals do not fluoresce, but in the ones that do, there are either small impurities that fluoresce (called
“activators”) or the pure substance itself fluoresces (although this is rare). For a mineral to fluoresce, the
impurities present must be in just the right amount. For example, red fluorescent calcite from Franklin, NJ, USA is
activated by manganese that’s present, but only if there’s about 3% of it in the mineral. If there’s more than 5% or
less than 1% manganese, the sample won’t fluoresce at all. It’s the amount and type of the impurities that
determines the color and intensity of the fluorescence.
Fluorescence is not a reliable way to identify a mineral, since some samples will fluoresce with different colors
even though they are all the same mineral. Fluorescence is used to determine where the mineral came from, since
the colors that the minerals fluoresce usually match the original location of the mineral.
Phosphorescence is when a sample glows even after you turn off the UV light source. This is the type of glow you’ll
find in “glow in the dark” toys, where the light slowly fades after you turn off the light. Atoms continue to emit light
even after the electrons return to their normal energy states. While it looks like seconds to minutes that the glow
lasts, some samples have been found to phosphoresce for years using highly sensitive photographic methods. Only
a few minerals phosphoresce, such as calcite from Terlingua, Texas.
Exercises
1. What wavelength is shortwave UV? Longwave UV?
2. How is fluorescence different from phosphorescence?
3. Name two minerals that fluoresce in both shortwave and longwave UV light.

© 2014 Supercharged Science Page 40 www.SuperchargedScience.com
Lesson #11: Magnetism
Overview: Minerals that react when you place them in a magnetic field have magnetic properties. How attracted
they are to the magnet depends on the temperature and the properties of the mineral itself.
What to Learn: A magnetic field is the area around a magnet or an electrical current that attracts or repels objects
that are placed in the field. The closer the object is to the magnet, the more powerfully it’s going to experience the
magnetic effect. Nearly all minerals that are magnetic have iron as a component.
Materials
Magnet
Rock samples (samples in the video that stuck to the magnet are lodestone [which is the magnetic form of
magnetite] and meteorites)
Experiment
1. Label and number each of your samples and record this on your data table.
2. Hold your mineral close to the magnet and observe how strongly it is attracted to the magnet. How far
away do you have to be to start influencing the sample?
3. Complete the data table.
4. There are several magnetic properties that geologists use to specify the type of magnetism within a
mineral:
Ferromagnetism is the kind of magnetism you’ll see in magnetite and pyrrhotite, as these have strong
attraction to magnetic fields.
Paramagnetism is a weak attraction to magnetic fields, such as with the minerals hematite and
franklinite.
Diamagnetism occurs in only one mineral, bismuth, which means it’s repelled from magnetic fields.
Magnetism is found in only one mineral called lodestone, which is the magnetic version of magnetite.
It’s really rare, since it’s only found in a couple locations in the entire world. Lodestone is weakly
magnetic, but if you drop small paperclips, staples, and iron filings onto a piece, they’ll stick.
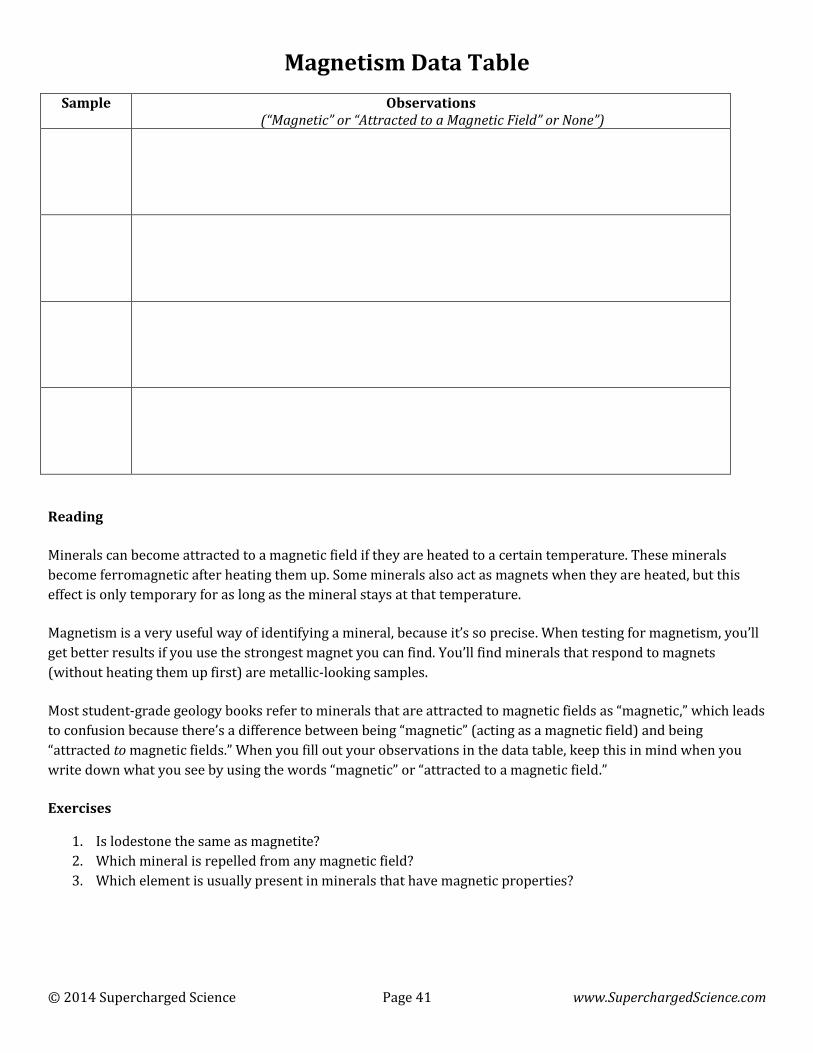
© 2014 Supercharged Science Page 41 www.SuperchargedScience.com
Magnetism Data Table
Sample Observations (“Magnetic” or “Attracted to a Magnetic Field” or None”)
Reading
Minerals can become attracted to a magnetic field if they are heated to a certain temperature. These minerals
become ferromagnetic after heating them up. Some minerals also act as magnets when they are heated, but this
effect is only temporary for as long as the mineral stays at that temperature.
Magnetism is a very useful way of identifying a mineral, because it’s so precise. When testing for magnetism, you’ll
get better results if you use the strongest magnet you can find. You’ll find minerals that respond to magnets
(without heating them up first) are metallic-looking samples.
Most student-grade geology books refer to minerals that are attracted to magnetic fields as “magnetic,” which leads
to confusion because there’s a difference between being “magnetic” (acting as a magnetic field) and being
“attracted to magnetic fields.” When you fill out your observations in the data table, keep this in mind when you
write down what you see by using the words “magnetic” or “attracted to a magnetic field.”
Exercises
1. Is lodestone the same as magnetite?
2. Which mineral is repelled from any magnetic field?
3. Which element is usually present in minerals that have magnetic properties?
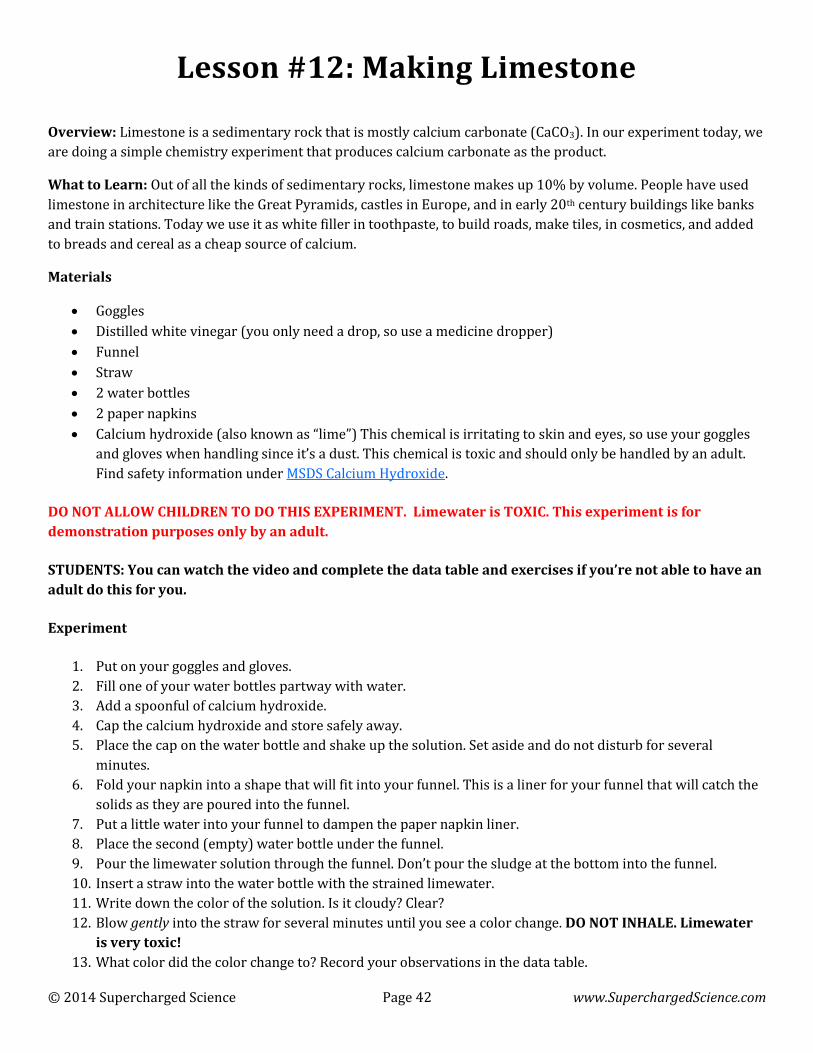
© 2014 Supercharged Science Page 42 www.SuperchargedScience.com
Lesson #12: Making Limestone
Overview: Limestone is a sedimentary rock that is mostly calcium carbonate (CaCO3). In our experiment today, we
are doing a simple chemistry experiment that produces calcium carbonate as the product.
What to Learn: Out of all the kinds of sedimentary rocks, limestone makes up 10% by volume. People have used
limestone in architecture like the Great Pyramids, castles in Europe, and in early 20th century buildings like banks
and train stations. Today we use it as white filler in toothpaste, to build roads, make tiles, in cosmetics, and added
to breads and cereal as a cheap source of calcium.
Materials
Goggles
Distilled white vinegar (you only need a drop, so use a medicine dropper)
Funnel
Straw
2 water bottles
2 paper napkins
Calcium hydroxide (also known as “lime”) This chemical is irritating to skin and eyes, so use your goggles
and gloves when handling since it’s a dust. This chemical is toxic and should only be handled by an adult.
Find safety information under MSDS Calcium Hydroxide.
DO NOT ALLOW CHILDREN TO DO THIS EXPERIMENT. Limewater is TOXIC. This experiment is for
demonstration purposes only by an adult.
STUDENTS: You can watch the video and complete the data table and exercises if you’re not able to have an
adult do this for you.
Experiment
1. Put on your goggles and gloves.
2. Fill one of your water bottles partway with water.
3. Add a spoonful of calcium hydroxide.
4. Cap the calcium hydroxide and store safely away.
5. Place the cap on the water bottle and shake up the solution. Set aside and do not disturb for several
minutes.
6. Fold your napkin into a shape that will fit into your funnel. This is a liner for your funnel that will catch the
solids as they are poured into the funnel.
7. Put a little water into your funnel to dampen the paper napkin liner.
8. Place the second (empty) water bottle under the funnel.
9. Pour the limewater solution through the funnel. Don’t pour the sludge at the bottom into the funnel.
10. Insert a straw into the water bottle with the strained limewater.
11. Write down the color of the solution. Is it cloudy? Clear?
12. Blow gently into the straw for several minutes until you see a color change. DO NOT INHALE. Limewater
is very toxic!
13. What color did the color change to? Record your observations in the data table.
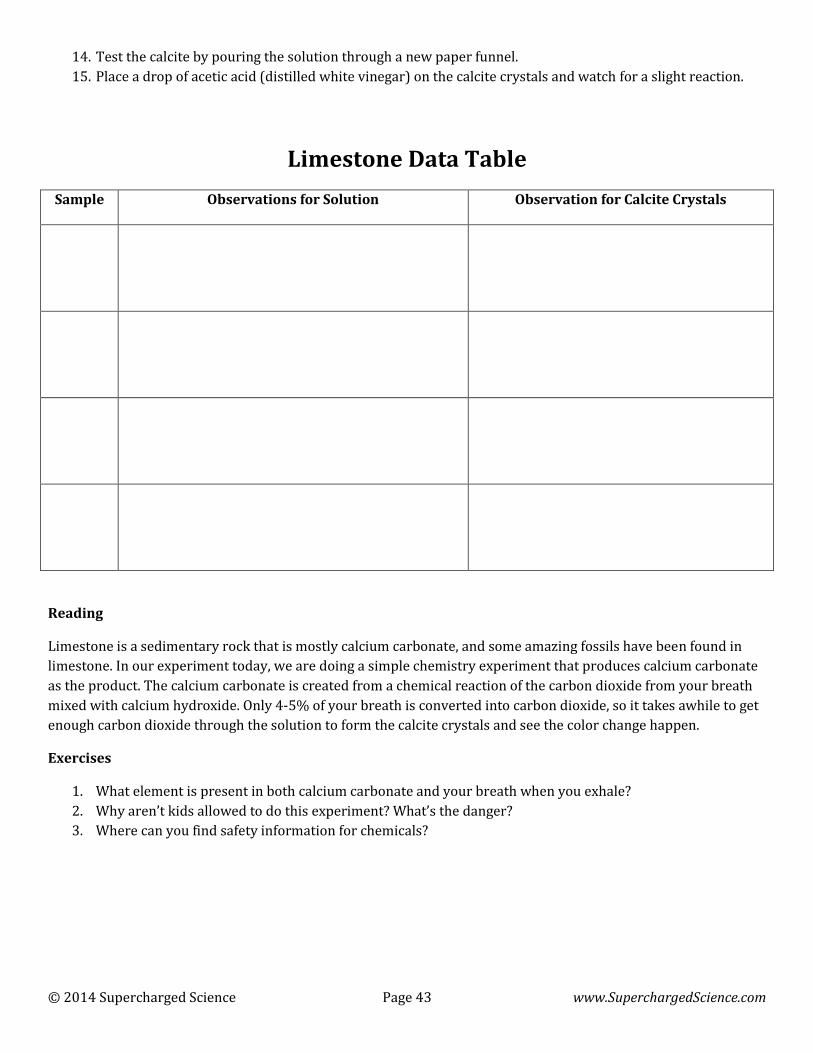
© 2014 Supercharged Science Page 43 www.SuperchargedScience.com
14. Test the calcite by pouring the solution through a new paper funnel.
15. Place a drop of acetic acid (distilled white vinegar) on the calcite crystals and watch for a slight reaction.
Limestone Data Table
Sample Observations for Solution
Observation for Calcite Crystals
Reading
Limestone is a sedimentary rock that is mostly calcium carbonate, and some amazing fossils have been found in
limestone. In our experiment today, we are doing a simple chemistry experiment that produces calcium carbonate
as the product. The calcium carbonate is created from a chemical reaction of the carbon dioxide from your breath
mixed with calcium hydroxide. Only 4-5% of your breath is converted into carbon dioxide, so it takes awhile to get
enough carbon dioxide through the solution to form the calcite crystals and see the color change happen.
Exercises
1. What element is present in both calcium carbonate and your breath when you exhale?
2. Why aren’t kids allowed to do this experiment? What’s the danger?
3. Where can you find safety information for chemicals?
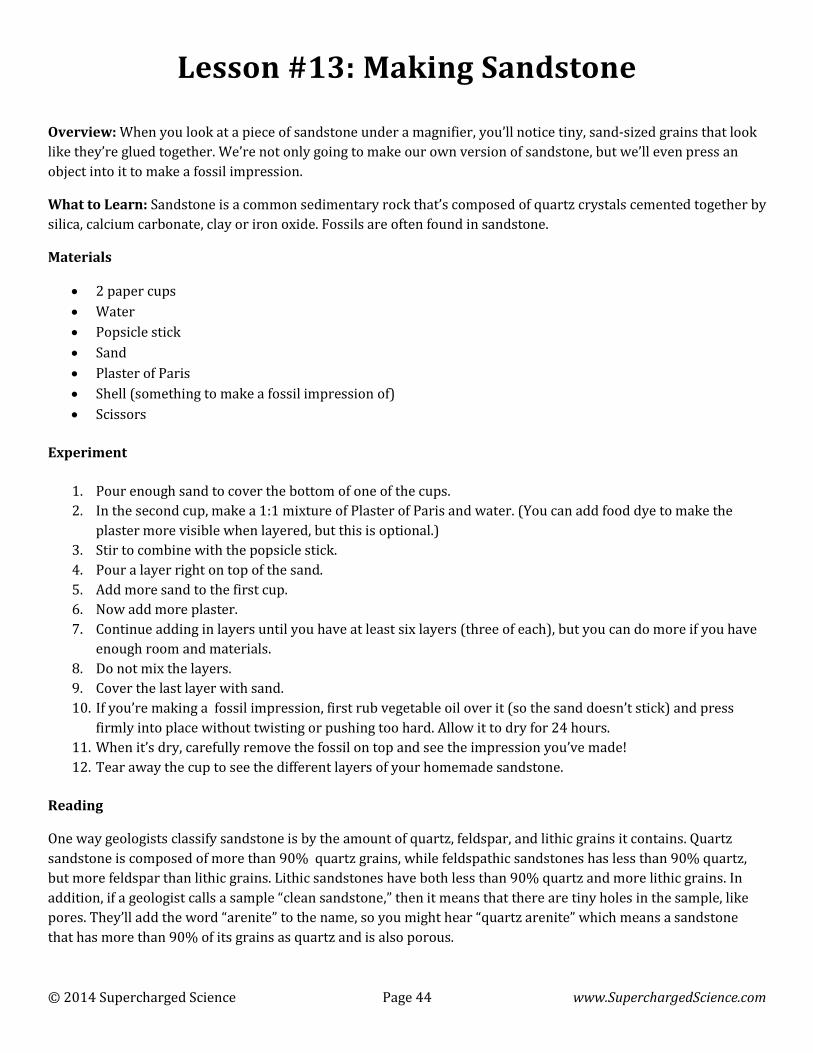
© 2014 Supercharged Science Page 44 www.SuperchargedScience.com
Lesson #13: Making Sandstone
Overview: When you look at a piece of sandstone under a magnifier, you’ll notice tiny, sand-sized grains that look
like they’re glued together. We’re not only going to make our own version of sandstone, but we’ll even press an
object into it to make a fossil impression.
What to Learn: Sandstone is a common sedimentary rock that’s composed of quartz crystals cemented together by
silica, calcium carbonate, clay or iron oxide. Fossils are often found in sandstone.
Materials
2 paper cups
Water
Popsicle stick
Sand
Plaster of Paris
Shell (something to make a fossil impression of)
Scissors
Experiment
1. Pour enough sand to cover the bottom of one of the cups.
2. In the second cup, make a 1:1 mixture of Plaster of Paris and water. (You can add food dye to make the
plaster more visible when layered, but this is optional.)
3. Stir to combine with the popsicle stick.
4. Pour a layer right on top of the sand.
5. Add more sand to the first cup.
6. Now add more plaster.
7. Continue adding in layers until you have at least six layers (three of each), but you can do more if you have
enough room and materials.
8. Do not mix the layers.
9. Cover the last layer with sand.
10. If you’re making a fossil impression, first rub vegetable oil over it (so the sand doesn’t stick) and press
firmly into place without twisting or pushing too hard. Allow it to dry for 24 hours.
11. When it’s dry, carefully remove the fossil on top and see the impression you’ve made!
12. Tear away the cup to see the different layers of your homemade sandstone.
Reading
One way geologists classify sandstone is by the amount of quartz, feldspar, and lithic grains it contains. Quartz
sandstone is composed of more than 90% quartz grains, while feldspathic sandstones has less than 90% quartz,
but more feldspar than lithic grains. Lithic sandstones have both less than 90% quartz and more lithic grains. In
addition, if a geologist calls a sample “clean sandstone,” then it means that there are tiny holes in the sample, like
pores. They’ll add the word “arenite” to the name, so you might hear “quartz arenite” which means a sandstone
that has more than 90% of its grains as quartz and is also porous.
© 2014 Supercharged Science Page 45 www.SuperchargedScience.com
Exercises
1. What elements is calcium carbonate made out of? (Carbon and oxygen.)
2. How does this experiment look like sandstone? (The tiny grains of sand are glued together by the Plaster of
Paris.)
3. What do you know about a feldspathic arenite sample? (The sample has less than 90% quartz, but more
feldspar than lithic grains, and it’s porous.)
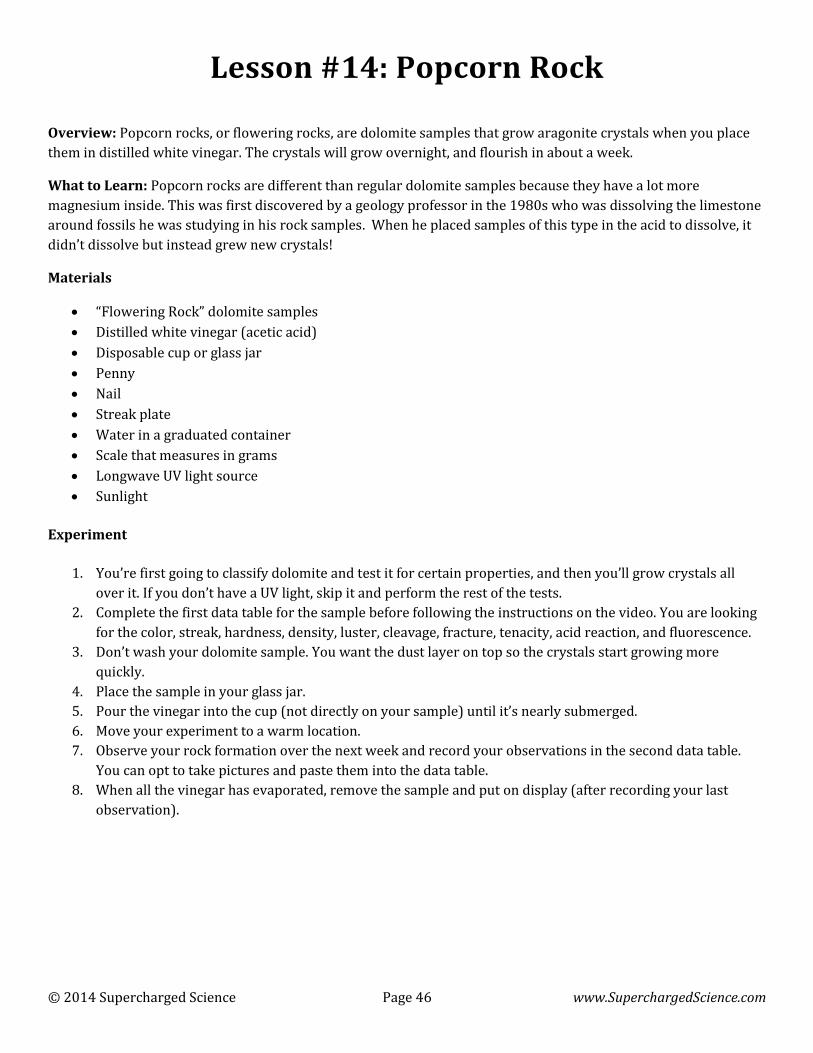
© 2014 Supercharged Science Page 46 www.SuperchargedScience.com
Lesson #14: Popcorn Rock
Overview: Popcorn rocks, or flowering rocks, are dolomite samples that grow aragonite crystals when you place
them in distilled white vinegar. The crystals will grow overnight, and flourish in about a week.
What to Learn: Popcorn rocks are different than regular dolomite samples because they have a lot more
magnesium inside. This was first discovered by a geology professor in the 1980s who was dissolving the limestone
around fossils he was studying in his rock samples. When he placed samples of this type in the acid to dissolve, it
didn’t dissolve but instead grew new crystals!
Materials
“Flowering Rock” dolomite samples
Distilled white vinegar (acetic acid)
Disposable cup or glass jar
Penny
Nail
Streak plate
Water in a graduated container
Scale that measures in grams
Longwave UV light source
Sunlight
Experiment
1. You’re first going to classify dolomite and test it for certain properties, and then you’ll grow crystals all
over it. If you don’t have a UV light, skip it and perform the rest of the tests.
2. Complete the first data table for the sample before following the instructions on the video. You are looking
for the color, streak, hardness, density, luster, cleavage, fracture, tenacity, acid reaction, and fluorescence.
3. Don’t wash your dolomite sample. You want the dust layer on top so the crystals start growing more
quickly.
4. Place the sample in your glass jar.
5. Pour the vinegar into the cup (not directly on your sample) until it’s nearly submerged.
6. Move your experiment to a warm location.
7. Observe your rock formation over the next week and record your observations in the second data table.
You can opt to take pictures and paste them into the data table.
8. When all the vinegar has evaporated, remove the sample and put on display (after recording your last
observation).
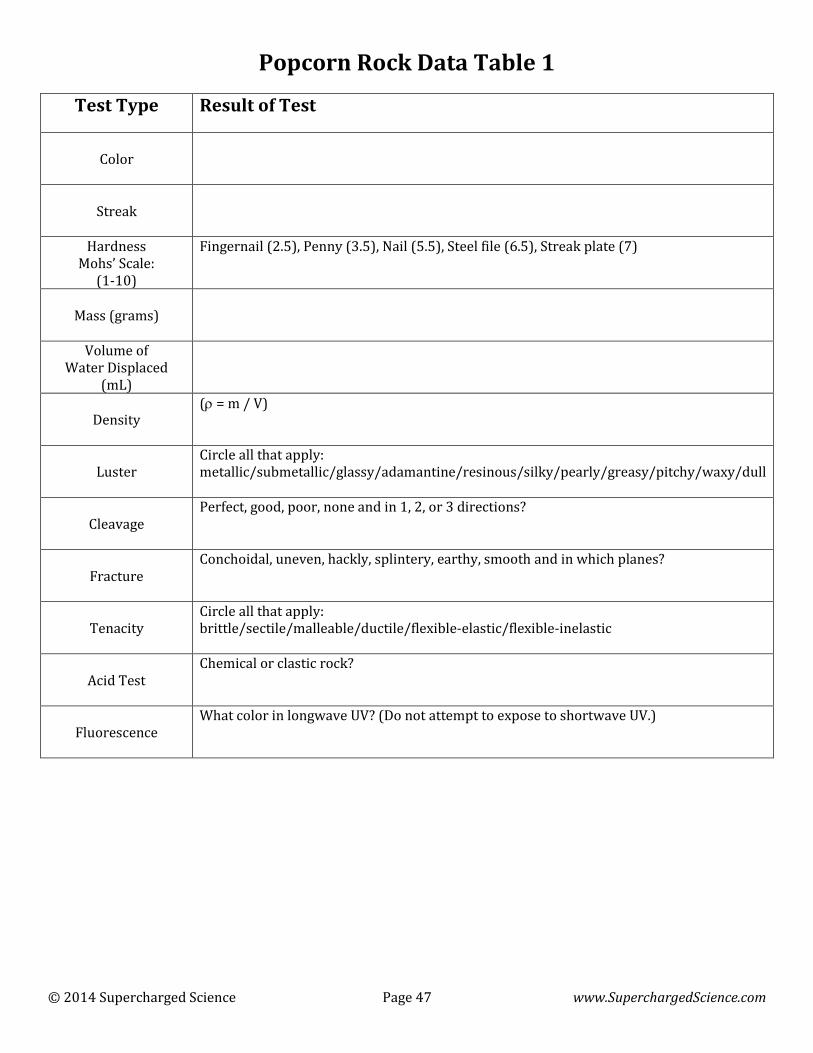
© 2014 Supercharged Science Page 47 www.SuperchargedScience.com
Popcorn Rock Data Table 1
Test Type Result of Test
Color
Streak
Hardness Mohs’ Scale:
(1-10)
Fingernail (2.5), Penny (3.5), Nail (5.5), Steel file (6.5), Streak plate (7)
Mass (grams)
Volume of Water Displaced
(mL)
Density
( = m / V)
Luster
Circle all that apply: metallic/submetallic/glassy/adamantine/resinous/silky/pearly/greasy/pitchy/waxy/dull
Cleavage
Perfect, good, poor, none and in 1, 2, or 3 directions?
Fracture
Conchoidal, uneven, hackly, splintery, earthy, smooth and in which planes?
Tenacity
Circle all that apply: brittle/sectile/malleable/ductile/flexible-elastic/flexible-inelastic
Acid Test
Chemical or clastic rock?
Fluorescence
What color in longwave UV? (Do not attempt to expose to shortwave UV.)
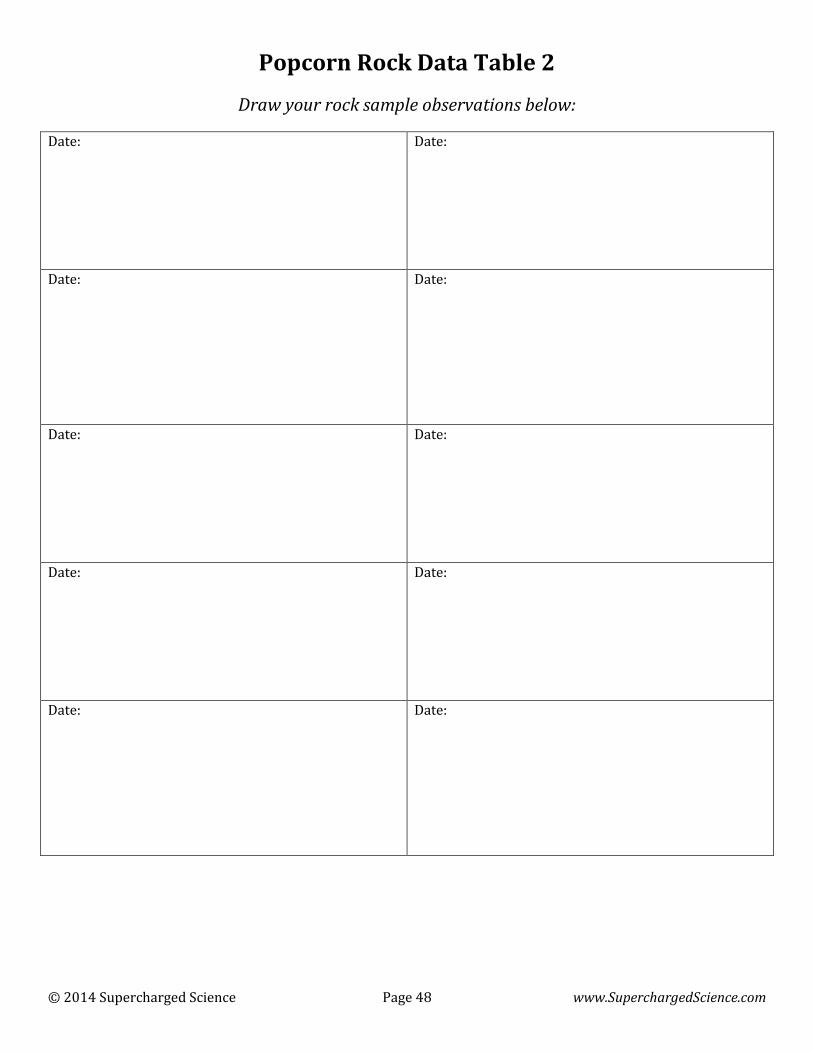
© 2014 Supercharged Science Page 48 www.SuperchargedScience.com
Popcorn Rock Data Table 2
Draw your rock sample observations below:
Date:
Date:
Date:
Date:
Date:
Date:
Date:
Date:
Date:
Date:
© 2014 Supercharged Science Page 49 www.SuperchargedScience.com
Reading
Dolomite is made of calcium magnesium carbonate (CaMg(CO3)2 and is both a mineral and a rock. Dolomite comes
in all kinds of colors, including white, gray, pink, peach, yellow and orange … even colorless. Dolomite gives a white
streak, which is hard to see on a white streak plate, and the hardness ranges from 3.4 to 4 on the Moh’s hardness
scale. Specific gravity for dolomite is 2.8 to 3, with a vitreous (glassy), pearly luster and rhombohedra cleavage on
two planes and conchoidal fracture on the third. It’s brittle (think tenacity), and is usually found around limestone.
Dolomite is a chemical rock, since it reacts to acid. Dolomite fluoresces bluish-white when placed under a longwave
UV light, and pink when exposed to a shortwave UV light.
Exercises
1. What would happen if you warmed the vinegar first, and placed it on a heating pad during your
experiment?
2. What is it in the dolomite samples that make the aragonite crystals grow?
3. What else can you try instead of vinegar?
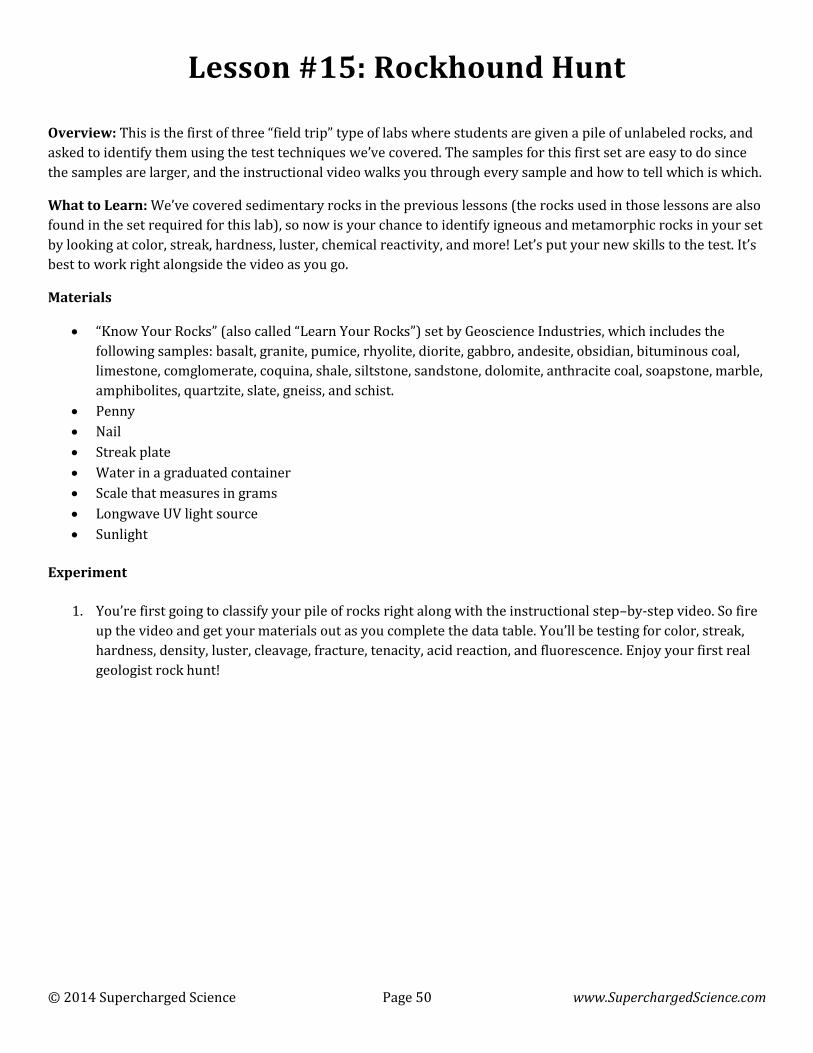
© 2014 Supercharged Science Page 50 www.SuperchargedScience.com
Lesson #15: Rockhound Hunt
Overview: This is the first of three “field trip” type of labs where students are given a pile of unlabeled rocks, and
asked to identify them using the test techniques we’ve covered. The samples for this first set are easy to do since
the samples are larger, and the instructional video walks you through every sample and how to tell which is which.
What to Learn: We’ve covered sedimentary rocks in the previous lessons (the rocks used in those lessons are also
found in the set required for this lab), so now is your chance to identify igneous and metamorphic rocks in your set
by looking at color, streak, hardness, luster, chemical reactivity, and more! Let’s put your new skills to the test. It’s
best to work right alongside the video as you go.
Materials
“Know Your Rocks” (also called “Learn Your Rocks”) set by Geoscience Industries, which includes the
following samples: basalt, granite, pumice, rhyolite, diorite, gabbro, andesite, obsidian, bituminous coal,
limestone, comglomerate, coquina, shale, siltstone, sandstone, dolomite, anthracite coal, soapstone, marble,
amphibolites, quartzite, slate, gneiss, and schist.
Penny
Nail
Streak plate
Water in a graduated container
Scale that measures in grams
Longwave UV light source
Sunlight
Experiment
1. You’re first going to classify your pile of rocks right along with the instructional step–by-step video. So fire
up the video and get your materials out as you complete the data table. You’ll be testing for color, streak,
hardness, density, luster, cleavage, fracture, tenacity, acid reaction, and fluorescence. Enjoy your first real
geologist rock hunt!
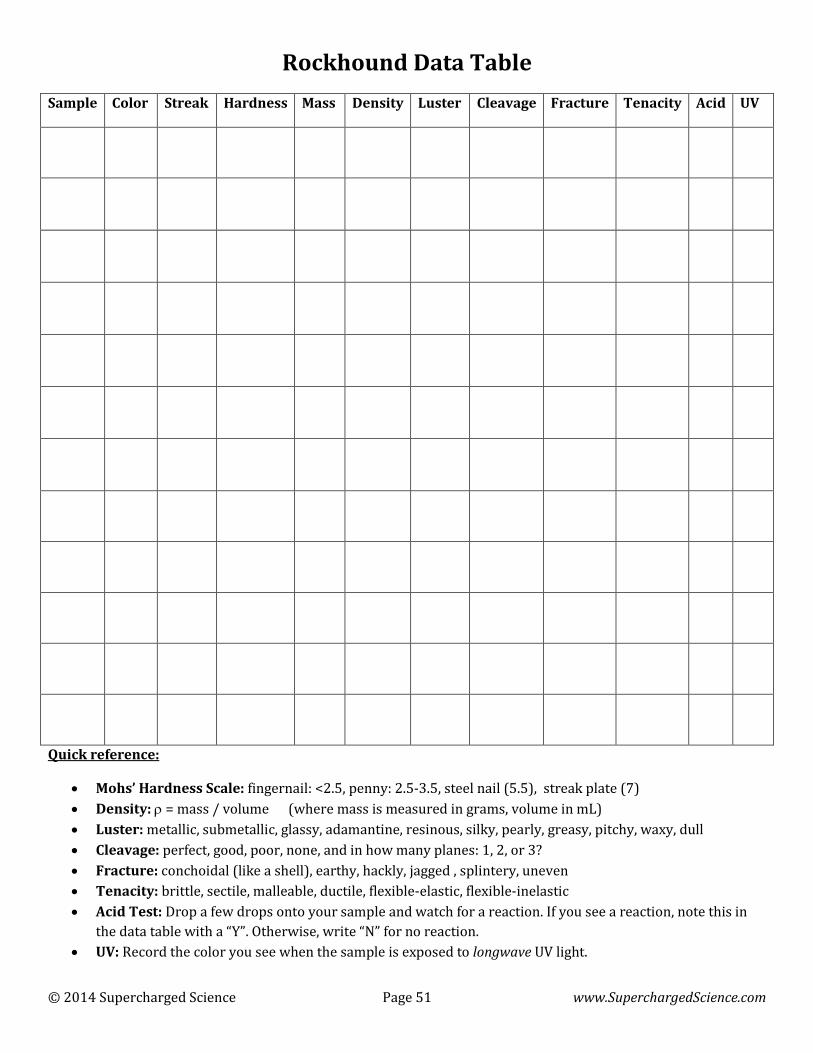
© 2014 Supercharged Science Page 51 www.SuperchargedScience.com
Rockhound Data Table
Sample Color Streak Hardness Mass Density Luster Cleavage Fracture Tenacity Acid UV
Quick reference:
Mohs’ Hardness Scale: fingernail: <2.5, penny: 2.5-3.5, steel nail (5.5), streak plate (7)
Density: = mass / volume (where mass is measured in grams, volume in mL)
Luster: metallic, submetallic, glassy, adamantine, resinous, silky, pearly, greasy, pitchy, waxy, dull
Cleavage: perfect, good, poor, none, and in how many planes: 1, 2, or 3?
Fracture: conchoidal (like a shell), earthy, hackly, jagged , splintery, uneven
Tenacity: brittle, sectile, malleable, ductile, flexible-elastic, flexible-inelastic
Acid Test: Drop a few drops onto your sample and watch for a reaction. If you see a reaction, note this in
the data table with a “Y”. Otherwise, write “N” for no reaction.
UV: Record the color you see when the sample is exposed to longwave UV light.
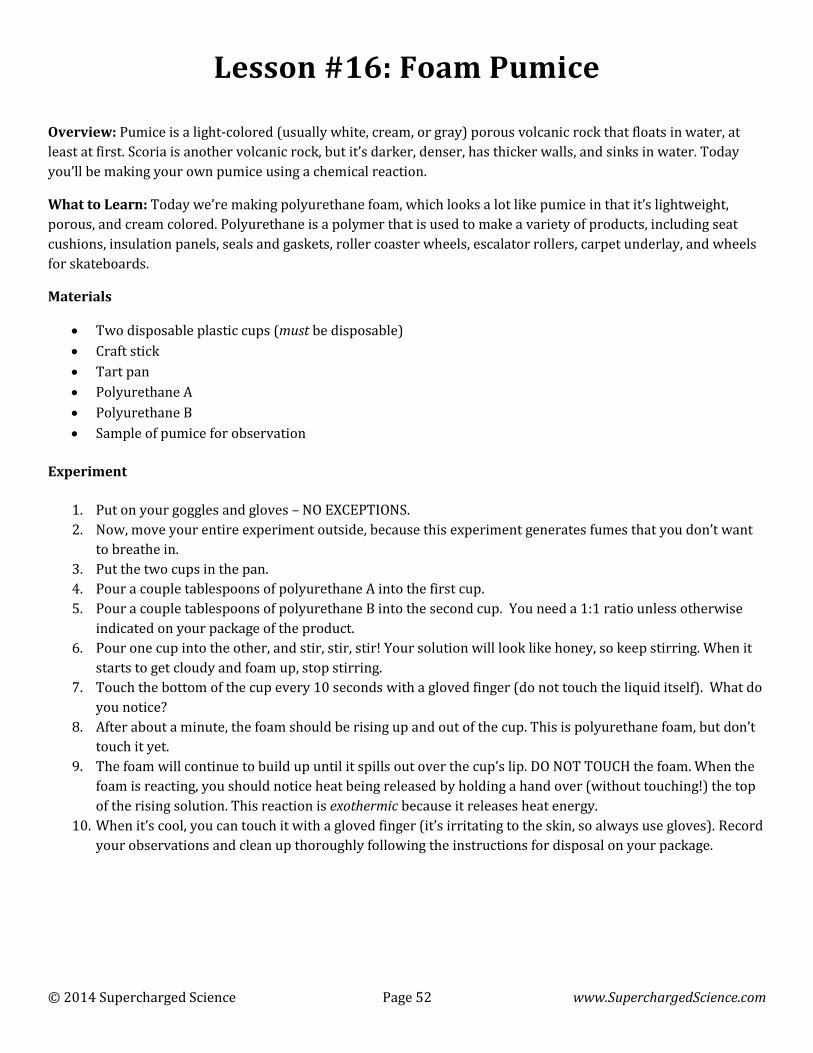
© 2014 Supercharged Science Page 52 www.SuperchargedScience.com
Lesson #16: Foam Pumice
Overview: Pumice is a light-colored (usually white, cream, or gray) porous volcanic rock that floats in water, at
least at first. Scoria is another volcanic rock, but it’s darker, denser, has thicker walls, and sinks in water. Today
you’ll be making your own pumice using a chemical reaction.
What to Learn: Today we’re making polyurethane foam, which looks a lot like pumice in that it’s lightweight,
porous, and cream colored. Polyurethane is a polymer that is used to make a variety of products, including seat
cushions, insulation panels, seals and gaskets, roller coaster wheels, escalator rollers, carpet underlay, and wheels
for skateboards.
Materials
Two disposable plastic cups (must be disposable)
Craft stick
Tart pan
Polyurethane A
Polyurethane B
Sample of pumice for observation
Experiment
1. Put on your goggles and gloves – NO EXCEPTIONS.
2. Now, move your entire experiment outside, because this experiment generates fumes that you don’t want
to breathe in.
3. Put the two cups in the pan.
4. Pour a couple tablespoons of polyurethane A into the first cup.
5. Pour a couple tablespoons of polyurethane B into the second cup. You need a 1:1 ratio unless otherwise
indicated on your package of the product.
6. Pour one cup into the other, and stir, stir, stir! Your solution will look like honey, so keep stirring. When it
starts to get cloudy and foam up, stop stirring.
7. Touch the bottom of the cup every 10 seconds with a gloved finger (do not touch the liquid itself). What do
you notice?
8. After about a minute, the foam should be rising up and out of the cup. This is polyurethane foam, but don’t
touch it yet.
9. The foam will continue to build up until it spills out over the cup’s lip. DO NOT TOUCH the foam. When the
foam is reacting, you should notice heat being released by holding a hand over (without touching!) the top
of the rising solution. This reaction is exothermic because it releases heat energy.
10. When it’s cool, you can touch it with a gloved finger (it’s irritating to the skin, so always use gloves). Record
your observations and clean up thoroughly following the instructions for disposal on your package.

© 2014 Supercharged Science Page 53 www.SuperchargedScience.com
Foam Pumice Observations:
Write what polyurethane A and B looked like right after you mixed them:
Draw a “cartoon” (or sketch) of the reaction below, starting with when you combined A & B and ending with your
reaction to the reaction:
Reading
Pumice is used to make concrete, cinder blocks, and cement. The Roman Pantheon and aqueducts used pumice as
one of their construction materials. Today, you’ll find pumice in polishes because it’s an abrasive. It’s also on the tip
of your pencil as an eraser and on your toothbrush inside your toothpaste. If you’ve ever owned a pair of stone-
washed jeans, you now know what stone was used to get that look on the pants. Beauty salons use pumice stones
for pedicures and chinchillas use powdered pumice to bathe in, since they don’t like to get wet.
Exercises
1. Name three characteristics of pumice.
2. How is pumice different from scoria?
3. What can you use pumice for?

© 2014 Supercharged Science Page 54 www.SuperchargedScience.com
Lesson #17: Test Tube Cannon
Overview: Today you get to combine a solid and a liquid substance to generate a gas that will pop the stopper off
your test tube. The better you make your solution, the further the stopper will go.
What to Learn: You’ll learn about the key ingredient in an explosive eruption like the one we’re simulating in lab
today.
Materials
test tube
rubber stopper
toilet paper
goggles
distilled white vinegar
baking soda powder
measuring tape
scale that weighs in grams
ruler
Experiment
1. Put on your safety goggles. NO EXCEPTIONS!
2. Tear off a single sheet of toilet paper.
3. Pour a small pile of baking soda right in the middle of the toilet paper.
4. Fold the toilet paper in half, and then wrap the sides around until you make a mini-burrito or mini-plug.
You want it to fit snugly into your test tube (but don’t put it in there yet!)
5. Carefully pour vinegar into your test tube. You want about an inch (2-3 cm) of vinegar.
6. Gently push the toilet paper burrito plug into the test tube, but don’t let it touch the vinegar yet.
7. Push in your rubber stopper, making sure it’s nice and snug.
8. Point the stopper away from you or anyone else … like straight up.
9. Place a thumb on the stopper and shake the tube several times. Remove your thumb before the stopper
pops!
10. After you’ve tried this a few times, it’s time to start taking real measurements. Here’s what you do:
11. Place the sheet of toilet paper on the scale and zero it (hit “tare”).
12. Add baking soda and record the mass of the baking soda (in grams) on your data table.
13. Fill your test tube with vinegar. Rest the bottom of the test tube on the table, and using a ruler, measure
many centimeters of vinegar you added and record this number on your data table.
14. Roll up the toilet paper into the burrito plug and insert it into the test tube.
15. Add the stopper and shake!
16. Measure the distance that your stopper traveled in your data sheet and repeat the experiment until you’ve
found the perfect ratio of baking soda and vinegar to make the stopper fly the farthest.

© 2014 Supercharged Science Page 55 www.SuperchargedScience.com
Test Tube Cannon Data Table
Trial # Amount of Baking Soda Amount of Vinegar Distance Stopper Traveled
Reading
Active volcanoes create domes inside the eruption chamber which act like giant plugs, stopping up the magma and
building up pressure until … BOOM! The dome explodes and out comes all the material from inside, just like the
plug in the test tube.
Baking soda (sodium bicarbonate) and vinegar (acetic acid) chemically react and combine to form carbon dioxide
bubbles and a solid form of sodium acetate, which looks like little white flakes at the bottom of the solution.
For baking soda and vinegar, the chemical equation for the reaction looks like this:
NaHCO3 + HC2H3O2 → NaC2H3O2 + H2O + CO2
The chemical reaction actually occurs in two steps. The first reaction looks like this as the vinegar reacts with the baking soda to form sodium acetate and carbonic acid:
NaHCO3 + HC2H3O2 → NaC2H3O2 + H2CO3
But the carbonic acid isn’t a stable molecule, so it breaks down to make the carbon dioxide gas like this:
H2CO3 → H2O + CO2
Since the bubbles are heavier than air, the carbon dioxide builds up and overflows, and stays in the test tube until you dump it out.

© 2014 Supercharged Science Page 56 www.SuperchargedScience.com
Exercises
1. Does the stopper go further when you add more or less vinegar?
2. Look at your answer for #1 above. Why is that?
3. Which gases are produced by this reaction?

© 2014 Supercharged Science Page 57 www.SuperchargedScience.com
Lesson #18: Making Fossils
Overview: Most fossils can be found in the most common type of rock on earth: sedimentary rock. Fossils are
usually found in shale, sandstone, and limestone and are actually more common than most people think. Although
some sedimentary rocks will have absolutely no fossils whatsoever, sometimes you’ll find nothing but fossils in a
certain area of limestone. Once in a while, you’ll find fossils embedded in amber.
What to Learn: Today you get to make your own glop of earth that holds an embedded fossil. If you close the
dough over the top of the fossil, you can hammer it apart after it’s had two days to dry.
Materials
½ cup dirt
½ cup flour
½ water
½ cup salt
shallow pan
oil
shell or other object to make a fossil impression of
Experiment
1. Mix the dry ingredients together (dirt, flour, and salt) with your hands (or with a spoon).
2. Add the water and mix together well. Discard any pebbles or gravel from the dirt. You want a gloppy, clay-
like mixture that holds together. Add more dry ingredients if needed.
3. Press the dough ball into the pan, making it ½- to 1-inch thick with ragged edges (fossils aren’t perfect).
4. Let dry overnight, or at least for a few hours if you’re in a hurry.
5. Coat the shell or object with oil and press it gently into the dough.
6. Let it dry thoroughly until it’s hardened. Remove your object and admire!
Reading
There are lots of collecting sites listed in geology field guides and books. Even if sites are popular, new fossils are
exposed each spring after the winter’s weather. Another great resource is local fossil clubs, geologic societies, and
local museums, especially those that participate in field trips. It’s a lot of fun to go collecting with a group, and
many colleges and universities provide unique hands-on opportunities to students interested in earth science
classes. Always make sure you’re allowed to collect before you go out with your tools … many local areas require
permits.
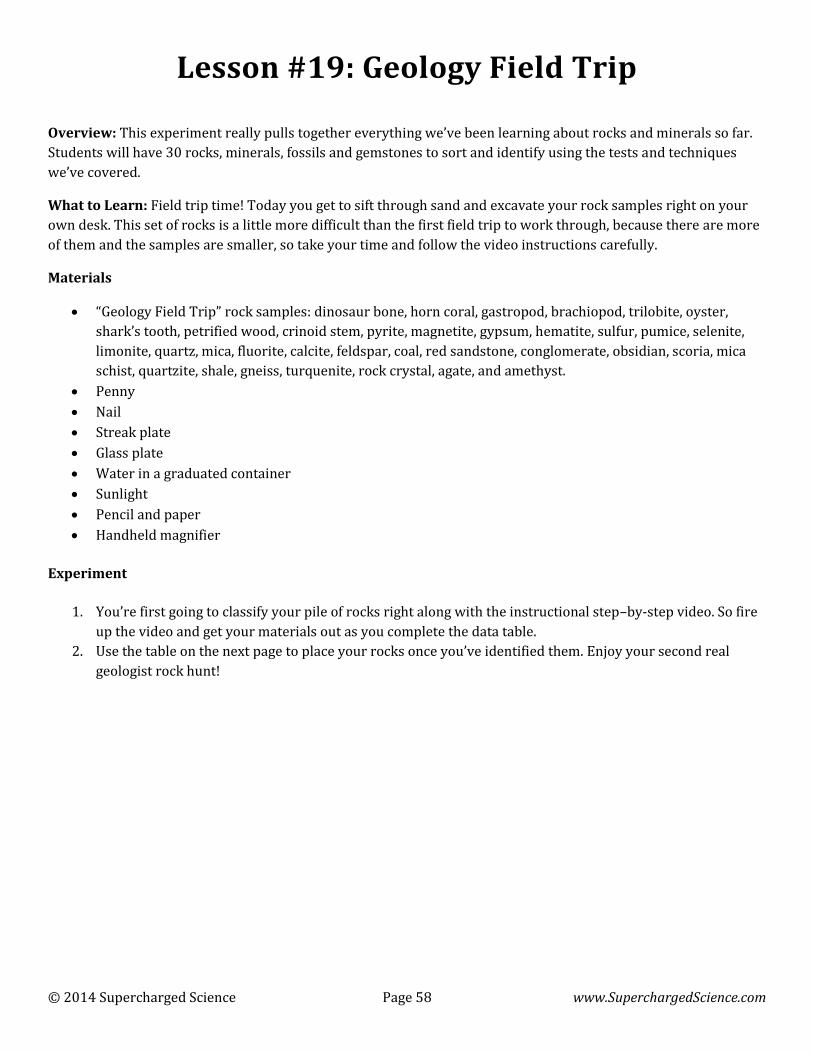
© 2014 Supercharged Science Page 58 www.SuperchargedScience.com
Lesson #19: Geology Field Trip
Overview: This experiment really pulls together everything we’ve been learning about rocks and minerals so far.
Students will have 30 rocks, minerals, fossils and gemstones to sort and identify using the tests and techniques
we’ve covered.
What to Learn: Field trip time! Today you get to sift through sand and excavate your rock samples right on your
own desk. This set of rocks is a little more difficult than the first field trip to work through, because there are more
of them and the samples are smaller, so take your time and follow the video instructions carefully.
Materials
“Geology Field Trip” rock samples: dinosaur bone, horn coral, gastropod, brachiopod, trilobite, oyster,
shark’s tooth, petrified wood, crinoid stem, pyrite, magnetite, gypsum, hematite, sulfur, pumice, selenite,
limonite, quartz, mica, fluorite, calcite, feldspar, coal, red sandstone, conglomerate, obsidian, scoria, mica
schist, quartzite, shale, gneiss, turquenite, rock crystal, agate, and amethyst.
Penny
Nail
Streak plate
Glass plate
Water in a graduated container
Sunlight
Pencil and paper
Handheld magnifier
Experiment
1. You’re first going to classify your pile of rocks right along with the instructional step–by-step video. So fire
up the video and get your materials out as you complete the data table.
2. Use the table on the next page to place your rocks once you’ve identified them. Enjoy your second real
geologist rock hunt!
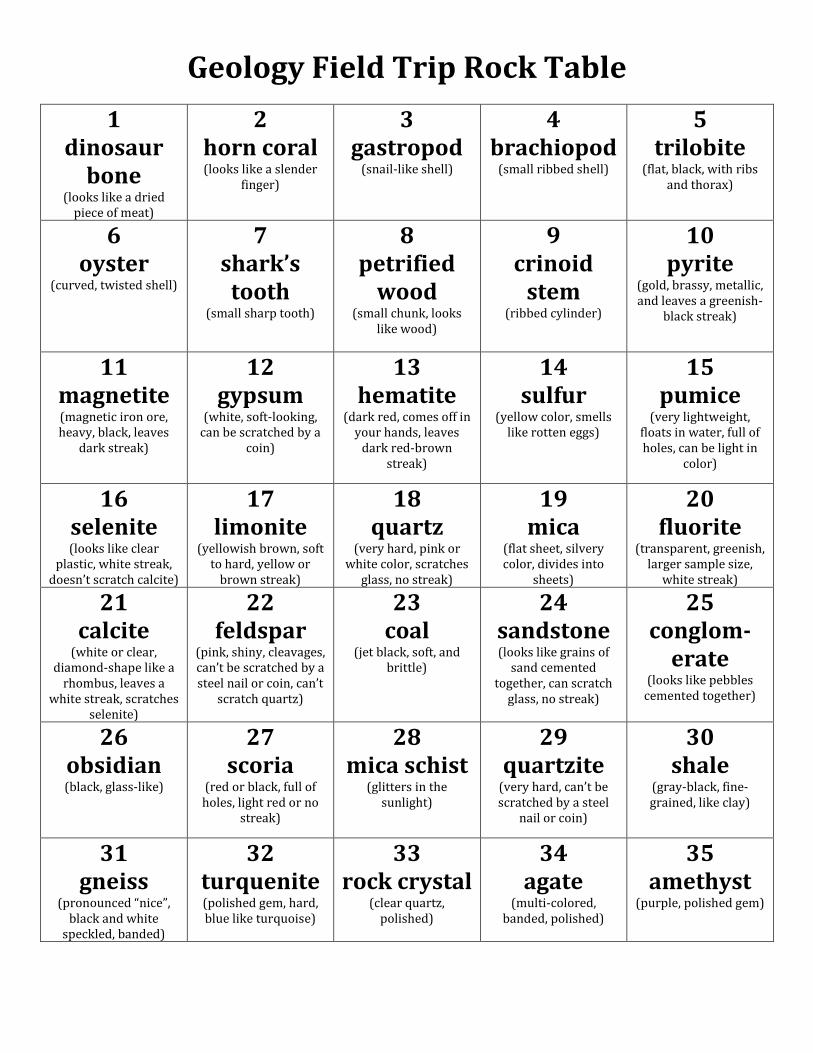
Geology Field Trip Rock Table
1 dinosaur
bone
(looks like a dried piece of meat)
2 horn coral (looks like a slender
finger)
3 gastropod
(snail-like shell)
4 brachiopod
(small ribbed shell)
5 trilobite
(flat, black, with ribs and thorax)
6 oyster
(curved, twisted shell)
7 shark’s tooth
(small sharp tooth)
8 petrified
wood (small chunk, looks
like wood)
9 crinoid
stem (ribbed cylinder)
10 pyrite
(gold, brassy, metallic, and leaves a greenish-
black streak)
11 magnetite (magnetic iron ore, heavy, black, leaves
dark streak)
12 gypsum
(white, soft-looking, can be scratched by a
coin)
13 hematite
(dark red, comes off in your hands, leaves
dark red-brown streak)
14 sulfur
(yellow color, smells like rotten eggs)
15 pumice
(very lightweight, floats in water, full of holes, can be light in
color)
16 selenite (looks like clear
plastic, white streak, doesn’t scratch calcite)
17 limonite
(yellowish brown, soft to hard, yellow or
brown streak)
18 quartz
(very hard, pink or white color, scratches
glass, no streak)
19 mica
(flat sheet, silvery color, divides into
sheets)
20 fluorite
(transparent, greenish, larger sample size,
white streak) 21
calcite (white or clear,
diamond-shape like a rhombus, leaves a
white streak, scratches selenite)
22 feldspar
(pink, shiny, cleavages, can’t be scratched by a steel nail or coin, can’t
scratch quartz)
23 coal
(jet black, soft, and brittle)
24 sandstone (looks like grains of
sand cemented together, can scratch
glass, no streak)
25 conglom-
erate (looks like pebbles
cemented together)
26 obsidian (black, glass-like)
27 scoria
(red or black, full of holes, light red or no
streak)
28 mica schist
(glitters in the sunlight)
29 quartzite
(very hard, can’t be scratched by a steel
nail or coin)
30 shale
(gray-black, fine-grained, like clay)
31
gneiss (pronounced “nice”,
black and white speckled, banded)
32 turquenite (polished gem, hard, blue like turquoise)
33 rock crystal
(clear quartz, polished)
34 agate
(multi-colored, banded, polished)
35 amethyst
(purple, polished gem)
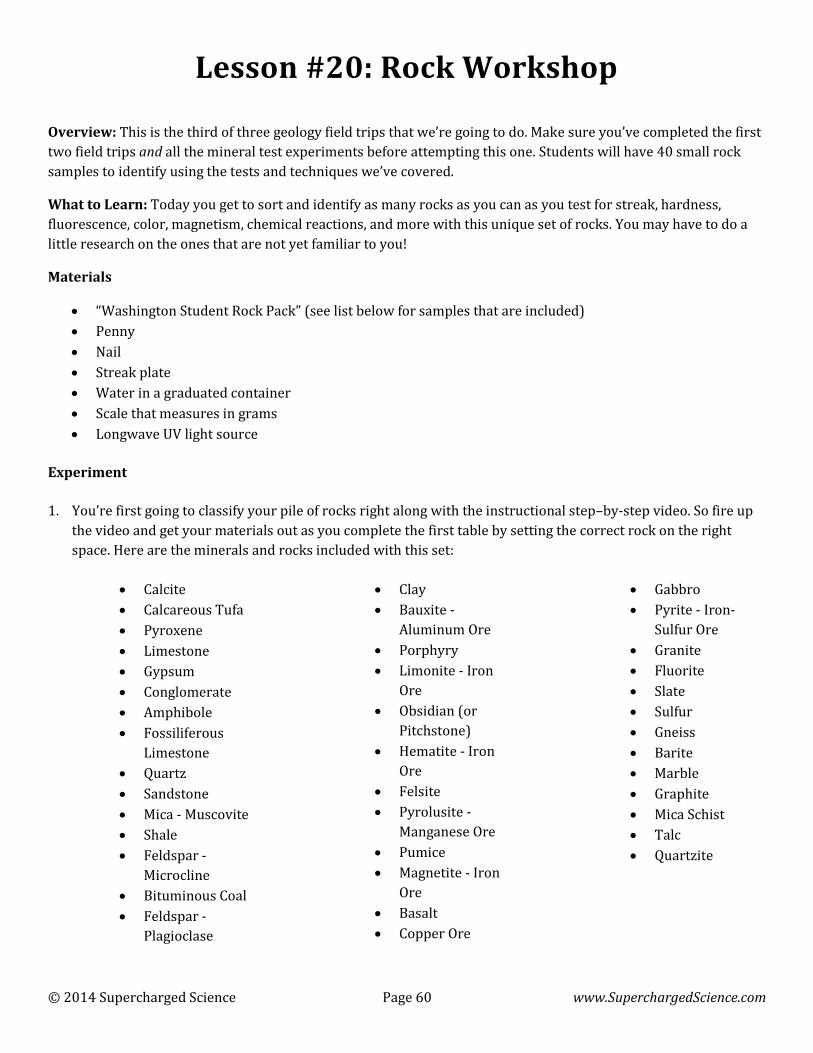
© 2014 Supercharged Science Page 60 www.SuperchargedScience.com
Lesson #20: Rock Workshop
Overview: This is the third of three geology field trips that we’re going to do. Make sure you’ve completed the first
two field trips and all the mineral test experiments before attempting this one. Students will have 40 small rock
samples to identify using the tests and techniques we’ve covered.
What to Learn: Today you get to sort and identify as many rocks as you can as you test for streak, hardness,
fluorescence, color, magnetism, chemical reactions, and more with this unique set of rocks. You may have to do a
little research on the ones that are not yet familiar to you!
Materials
“Washington Student Rock Pack” (see list below for samples that are included)
Penny
Nail
Streak plate
Water in a graduated container
Scale that measures in grams
Longwave UV light source
Experiment
1. You’re first going to classify your pile of rocks right along with the instructional step–by-step video. So fire up
the video and get your materials out as you complete the first table by setting the correct rock on the right
space. Here are the minerals and rocks included with this set:
Calcite
Calcareous Tufa
Pyroxene
Limestone
Gypsum
Conglomerate
Amphibole
Fossiliferous
Limestone
Quartz
Sandstone
Mica - Muscovite
Shale
Feldspar -
Microcline
Bituminous Coal
Feldspar -
Plagioclase
Clay
Bauxite -
Aluminum Ore
Porphyry
Limonite - Iron
Ore
Obsidian (or
Pitchstone)
Hematite - Iron
Ore
Felsite
Pyrolusite -
Manganese Ore
Pumice
Magnetite - Iron
Ore
Basalt
Copper Ore
Gabbro
Pyrite - Iron-
Sulfur Ore
Granite
Fluorite
Slate
Sulfur
Gneiss
Barite
Marble
Graphite
Mica Schist
Talc
Quartzite
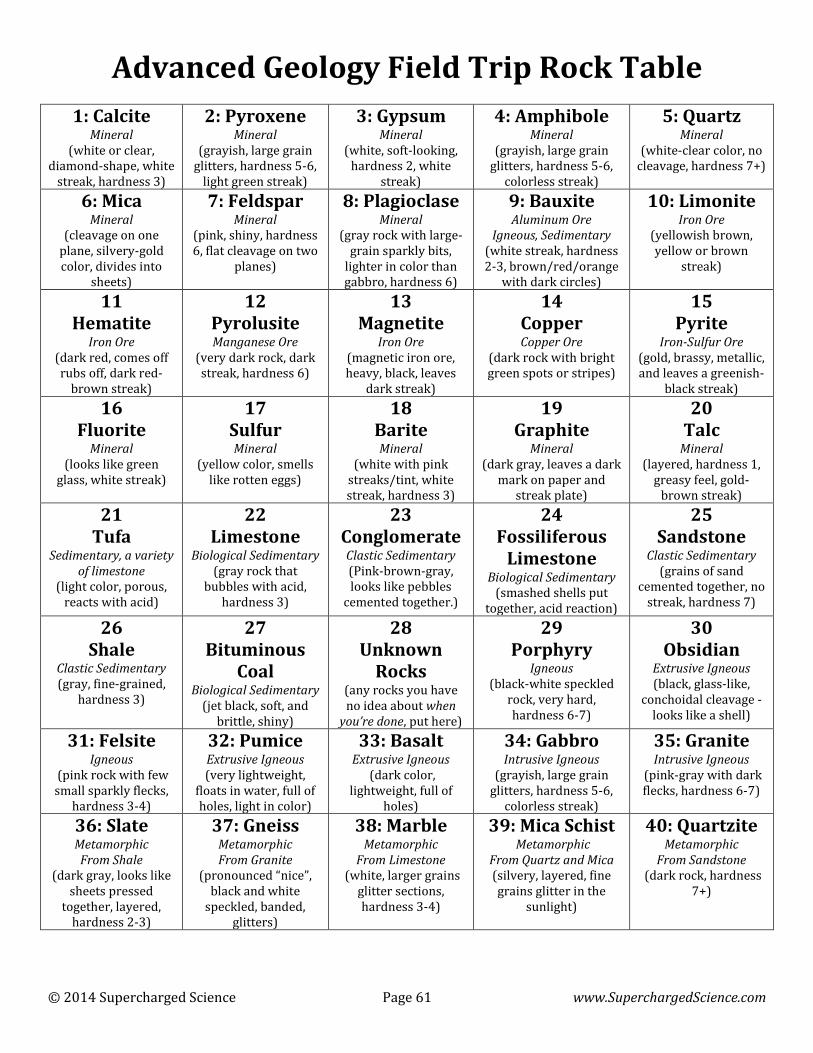
© 2014 Supercharged Science Page 61 www.SuperchargedScience.com
Advanced Geology Field Trip Rock Table
1: Calcite Mineral
(white or clear, diamond-shape, white
streak, hardness 3)
2: Pyroxene Mineral
(grayish, large grain glitters, hardness 5-6,
light green streak)
3: Gypsum Mineral
(white, soft-looking, hardness 2, white
streak)
4: Amphibole Mineral
(grayish, large grain glitters, hardness 5-6,
colorless streak)
5: Quartz Mineral
(white-clear color, no cleavage, hardness 7+)
6: Mica Mineral
(cleavage on one plane, silvery-gold color, divides into
sheets)
7: Feldspar Mineral
(pink, shiny, hardness 6, flat cleavage on two
planes)
8: Plagioclase Mineral
(gray rock with large-grain sparkly bits,
lighter in color than gabbro, hardness 6)
9: Bauxite Aluminum Ore
Igneous, Sedimentary (white streak, hardness 2-3, brown/red/orange
with dark circles)
10: Limonite Iron Ore
(yellowish brown, yellow or brown
streak)
11 Hematite
Iron Ore (dark red, comes off rubs off, dark red-
brown streak)
12 Pyrolusite Manganese Ore
(very dark rock, dark streak, hardness 6)
13 Magnetite
Iron Ore (magnetic iron ore, heavy, black, leaves
dark streak)
14 Copper Copper Ore
(dark rock with bright green spots or stripes)
15 Pyrite
Iron-Sulfur Ore (gold, brassy, metallic, and leaves a greenish-
black streak) 16
Fluorite Mineral
(looks like green glass, white streak)
17 Sulfur Mineral
(yellow color, smells like rotten eggs)
18 Barite Mineral
(white with pink streaks/tint, white streak, hardness 3)
19 Graphite
Mineral (dark gray, leaves a dark
mark on paper and streak plate)
20 Talc
Mineral (layered, hardness 1,
greasy feel, gold-brown streak)
21 Tufa
Sedimentary, a variety of limestone
(light color, porous, reacts with acid)
22 Limestone
Biological Sedimentary (gray rock that
bubbles with acid, hardness 3)
23 Conglomerate Clastic Sedimentary (Pink-brown-gray, looks like pebbles
cemented together.)
24 Fossiliferous
Limestone Biological Sedimentary
(smashed shells put together, acid reaction)
25 Sandstone
Clastic Sedimentary (grains of sand
cemented together, no streak, hardness 7)
26 Shale
Clastic Sedimentary (gray, fine-grained,
hardness 3)
27 Bituminous
Coal Biological Sedimentary
(jet black, soft, and brittle, shiny)
28 Unknown
Rocks (any rocks you have no idea about when
you’re done, put here)
29 Porphyry
Igneous (black-white speckled
rock, very hard, hardness 6-7)
30 Obsidian
Extrusive Igneous (black, glass-like,
conchoidal cleavage - looks like a shell)
31: Felsite Igneous
(pink rock with few small sparkly flecks,
hardness 3-4)
32: Pumice Extrusive Igneous (very lightweight,
floats in water, full of holes, light in color)
33: Basalt Extrusive Igneous
(dark color, lightweight, full of
holes)
34: Gabbro Intrusive Igneous
(grayish, large grain glitters, hardness 5-6,
colorless streak)
35: Granite Intrusive Igneous
(pink-gray with dark flecks, hardness 6-7)
36: Slate Metamorphic From Shale
(dark gray, looks like sheets pressed
together, layered, hardness 2-3)
37: Gneiss Metamorphic From Granite
(pronounced “nice”, black and white
speckled, banded, glitters)
38: Marble Metamorphic
From Limestone (white, larger grains
glitter sections, hardness 3-4)
39: Mica Schist Metamorphic
From Quartz and Mica (silvery, layered, fine grains glitter in the
sunlight)
40: Quartzite Metamorphic
From Sandstone (dark rock, hardness
7+)
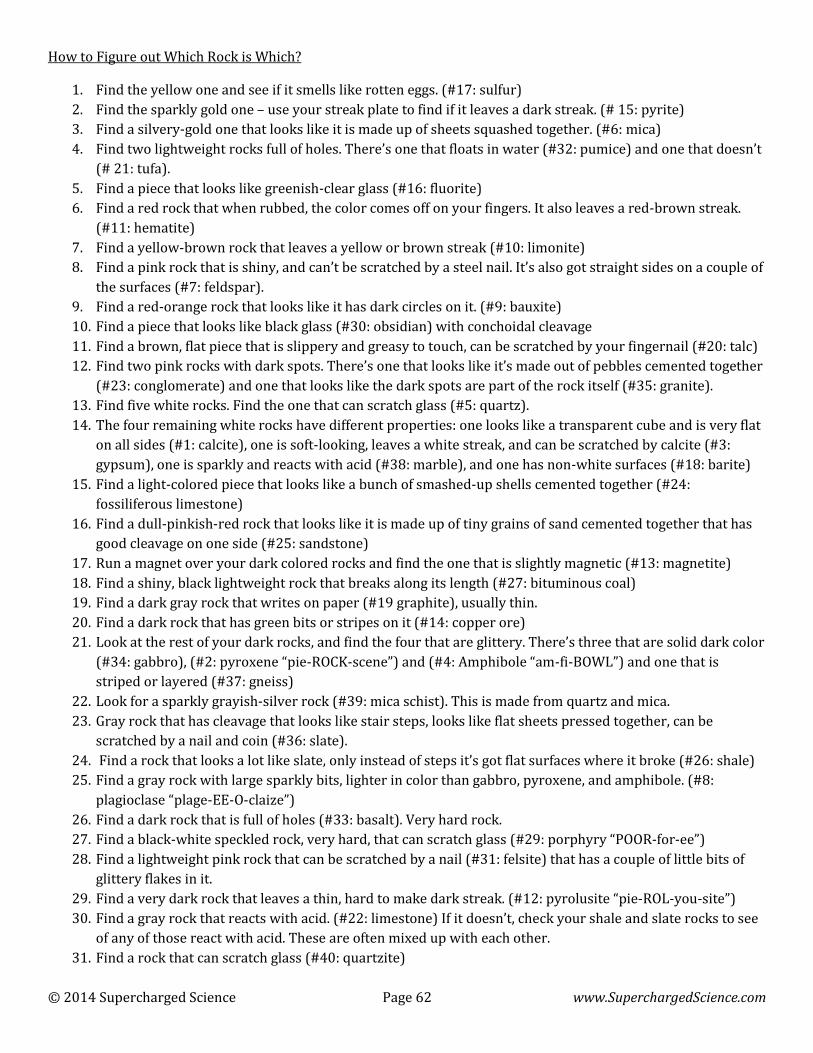
© 2014 Supercharged Science Page 62 www.SuperchargedScience.com
How to Figure out Which Rock is Which?
1. Find the yellow one and see if it smells like rotten eggs. (#17: sulfur)
2. Find the sparkly gold one – use your streak plate to find if it leaves a dark streak. (# 15: pyrite)
3. Find a silvery-gold one that looks like it is made up of sheets squashed together. (#6: mica)
4. Find two lightweight rocks full of holes. There’s one that floats in water (#32: pumice) and one that doesn’t
(# 21: tufa).
5. Find a piece that looks like greenish-clear glass (#16: fluorite)
6. Find a red rock that when rubbed, the color comes off on your fingers. It also leaves a red-brown streak.
(#11: hematite)
7. Find a yellow-brown rock that leaves a yellow or brown streak (#10: limonite)
8. Find a pink rock that is shiny, and can’t be scratched by a steel nail. It’s also got straight sides on a couple of
the surfaces (#7: feldspar).
9. Find a red-orange rock that looks like it has dark circles on it. (#9: bauxite)
10. Find a piece that looks like black glass (#30: obsidian) with conchoidal cleavage
11. Find a brown, flat piece that is slippery and greasy to touch, can be scratched by your fingernail (#20: talc)
12. Find two pink rocks with dark spots. There’s one that looks like it’s made out of pebbles cemented together
(#23: conglomerate) and one that looks like the dark spots are part of the rock itself (#35: granite).
13. Find five white rocks. Find the one that can scratch glass (#5: quartz).
14. The four remaining white rocks have different properties: one looks like a transparent cube and is very flat
on all sides (#1: calcite), one is soft-looking, leaves a white streak, and can be scratched by calcite (#3:
gypsum), one is sparkly and reacts with acid (#38: marble), and one has non-white surfaces (#18: barite)
15. Find a light-colored piece that looks like a bunch of smashed-up shells cemented together (#24:
fossiliferous limestone)
16. Find a dull-pinkish-red rock that looks like it is made up of tiny grains of sand cemented together that has
good cleavage on one side (#25: sandstone)
17. Run a magnet over your dark colored rocks and find the one that is slightly magnetic (#13: magnetite)
18. Find a shiny, black lightweight rock that breaks along its length (#27: bituminous coal)
19. Find a dark gray rock that writes on paper (#19 graphite), usually thin.
20. Find a dark rock that has green bits or stripes on it (#14: copper ore)
21. Look at the rest of your dark rocks, and find the four that are glittery. There’s three that are solid dark color
(#34: gabbro), (#2: pyroxene “pie-ROCK-scene”) and (#4: Amphibole “am-fi-BOWL”) and one that is
striped or layered (#37: gneiss)
22. Look for a sparkly grayish-silver rock (#39: mica schist). This is made from quartz and mica.
23. Gray rock that has cleavage that looks like stair steps, looks like flat sheets pressed together, can be
scratched by a nail and coin (#36: slate).
24. Find a rock that looks a lot like slate, only instead of steps it’s got flat surfaces where it broke (#26: shale)
25. Find a gray rock with large sparkly bits, lighter in color than gabbro, pyroxene, and amphibole. (#8:
plagioclase “plage-EE-O-claize”)
26. Find a dark rock that is full of holes (#33: basalt). Very hard rock.
27. Find a black-white speckled rock, very hard, that can scratch glass (#29: porphyry “POOR-for-ee”)
28. Find a lightweight pink rock that can be scratched by a nail (#31: felsite) that has a couple of little bits of
glittery flakes in it.
29. Find a very dark rock that leaves a thin, hard to make dark streak. (#12: pyrolusite “pie-ROL-you-site”)
30. Find a gray rock that reacts with acid. (#22: limestone) If it doesn’t, check your shale and slate rocks to see
of any of those react with acid. These are often mixed up with each other.
31. Find a rock that can scratch glass (#40: quartzite)
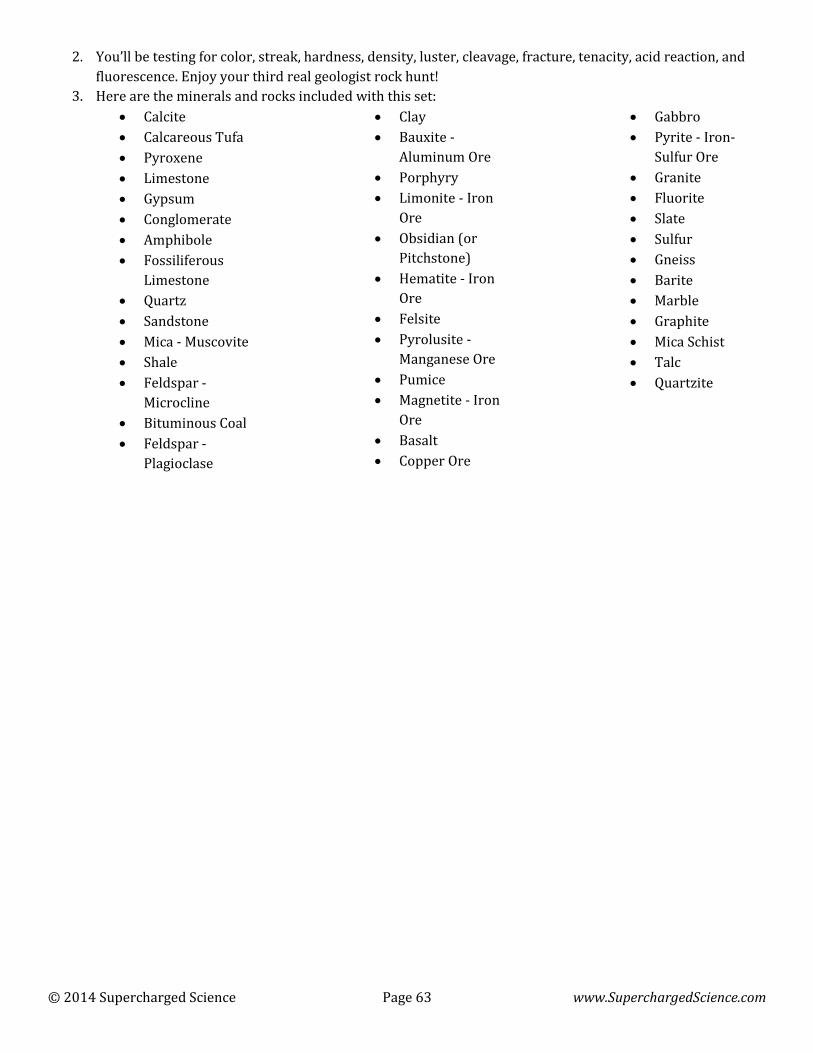
© 2014 Supercharged Science Page 63 www.SuperchargedScience.com
2. You’ll be testing for color, streak, hardness, density, luster, cleavage, fracture, tenacity, acid reaction, and
fluorescence. Enjoy your third real geologist rock hunt!
3. Here are the minerals and rocks included with this set:
Calcite
Calcareous Tufa
Pyroxene
Limestone
Gypsum
Conglomerate
Amphibole
Fossiliferous
Limestone
Quartz
Sandstone
Mica - Muscovite
Shale
Feldspar -
Microcline
Bituminous Coal
Feldspar -
Plagioclase
Clay
Bauxite -
Aluminum Ore
Porphyry
Limonite - Iron
Ore
Obsidian (or
Pitchstone)
Hematite - Iron
Ore
Felsite
Pyrolusite -
Manganese Ore
Pumice
Magnetite - Iron
Ore
Basalt
Copper Ore
Gabbro
Pyrite - Iron-
Sulfur Ore
Granite
Fluorite
Slate
Sulfur
Gneiss
Barite
Marble
Graphite
Mica Schist
Talc
Quartzite
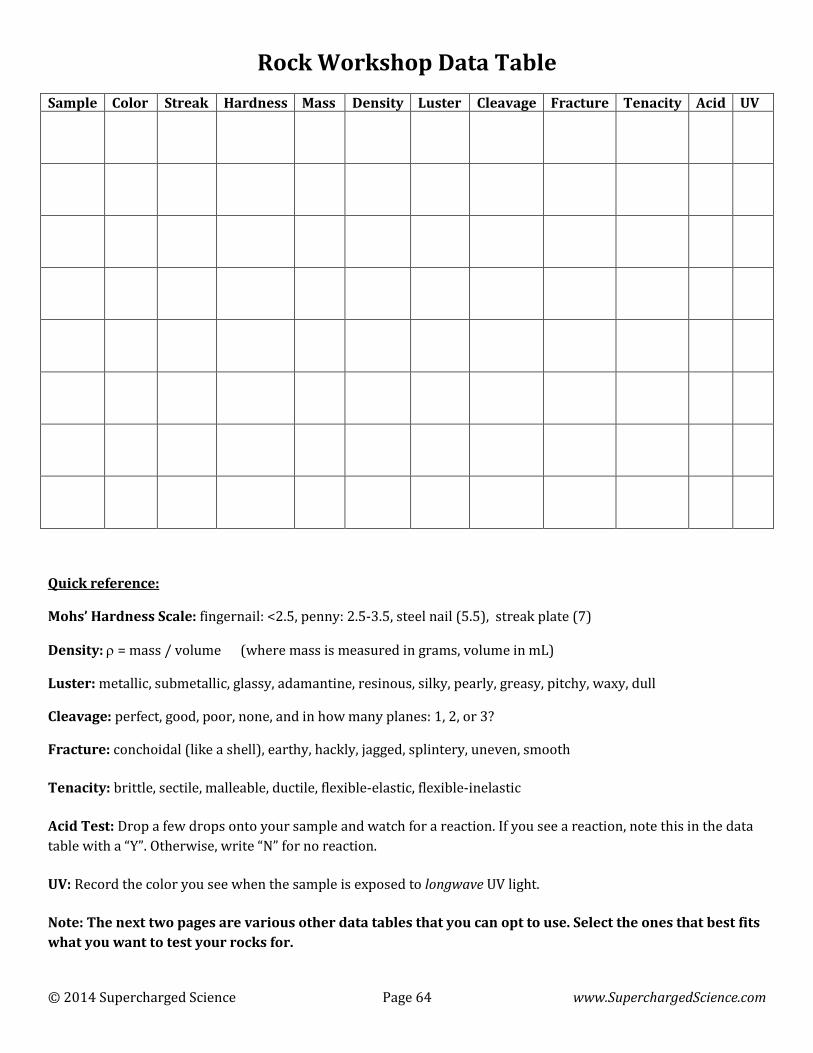
© 2014 Supercharged Science Page 64 www.SuperchargedScience.com
Rock Workshop Data Table
Sample Color Streak Hardness Mass Density Luster Cleavage Fracture Tenacity Acid UV
Quick reference:
Mohs’ Hardness Scale: fingernail: <2.5, penny: 2.5-3.5, steel nail (5.5), streak plate (7)
Density: = mass / volume (where mass is measured in grams, volume in mL)
Luster: metallic, submetallic, glassy, adamantine, resinous, silky, pearly, greasy, pitchy, waxy, dull
Cleavage: perfect, good, poor, none, and in how many planes: 1, 2, or 3?
Fracture: conchoidal (like a shell), earthy, hackly, jagged, splintery, uneven, smooth
Tenacity: brittle, sectile, malleable, ductile, flexible-elastic, flexible-inelastic
Acid Test: Drop a few drops onto your sample and watch for a reaction. If you see a reaction, note this in the data
table with a “Y”. Otherwise, write “N” for no reaction.
UV: Record the color you see when the sample is exposed to longwave UV light.
Note: The next two pages are various other data tables that you can opt to use. Select the ones that best fits
what you want to test your rocks for.

Rock Workshop Data Table Name_________________________________
Surface Color
Streak Color
Hardness Fingernail = 2
Coin = 3 Nail = 5.5 Glass=7
Any Clasts? (Use a magnifier!)
Magnetic? (Y / N)
Glittery in
sunlight? (Y / N)
Texture (Check all that apply)
Luster (Check one)
React with Acid? (Y / N)
Sample Name
□ All same size □ Different sizes □ Angular □ Round □ No Clasts
□ Porous (full of holes) □ Course grains □ Fine grains □ Glassy □ Smooth □ Rough
□ Metallic □ Glassy □ Dull □ Other:
□ All same size □ Different sizes □ Angular □ Round □ No Clasts
□ Porous (full of holes) □ Course grains □ Fine grains □ Glassy □ Smooth □ Rough
□ Metallic □ Glassy □ Dull □ Other:
□ All same size □ Different sizes □ Angular □ Round □ No Clasts
□ Porous (full of holes) □ Course grains □ Fine grains □ Glassy □ Smooth □ Rough
□ Metallic □ Glassy □ Dull □ Other:
□ All same size □ Different sizes □ Angular □ Round □ No Clasts
□ Porous (full of holes) □ Course grains □ Fine grains □ Glassy □ Smooth □ Rough
□ Metallic □ Glassy □ Dull □ Other:
□ All same size □ Different sizes □ Angular □ Round □ No Clasts
□ Porous (full of holes) □ Course grains □ Fine grains □ Glassy □ Smooth □ Rough
□ Metallic □ Glassy □ Dull □ Other:
□ All same size □ Different sizes □ Angular □ Round □ No Clasts
□ Porous (full of holes) □ Course grains □ Fine grains □ Glassy □ Smooth □ Rough
□ Metallic □ Glassy □ Dull □ Other:
□ All same size □ Different sizes □ Angular □ Round □ No Clasts
□ Porous (full of holes) □ Course grains □ Fine grains □ Glassy □ Smooth □ Rough
□ Metallic □ Glassy □ Dull □ Other:
After completing the table above, put a star (*) next to the names of the rocks you think are minerals. Then put a “M”
next to the ones that are metamorphic, an “I” next to the igneous rocks, and a “S” next to sedimentary rocks.
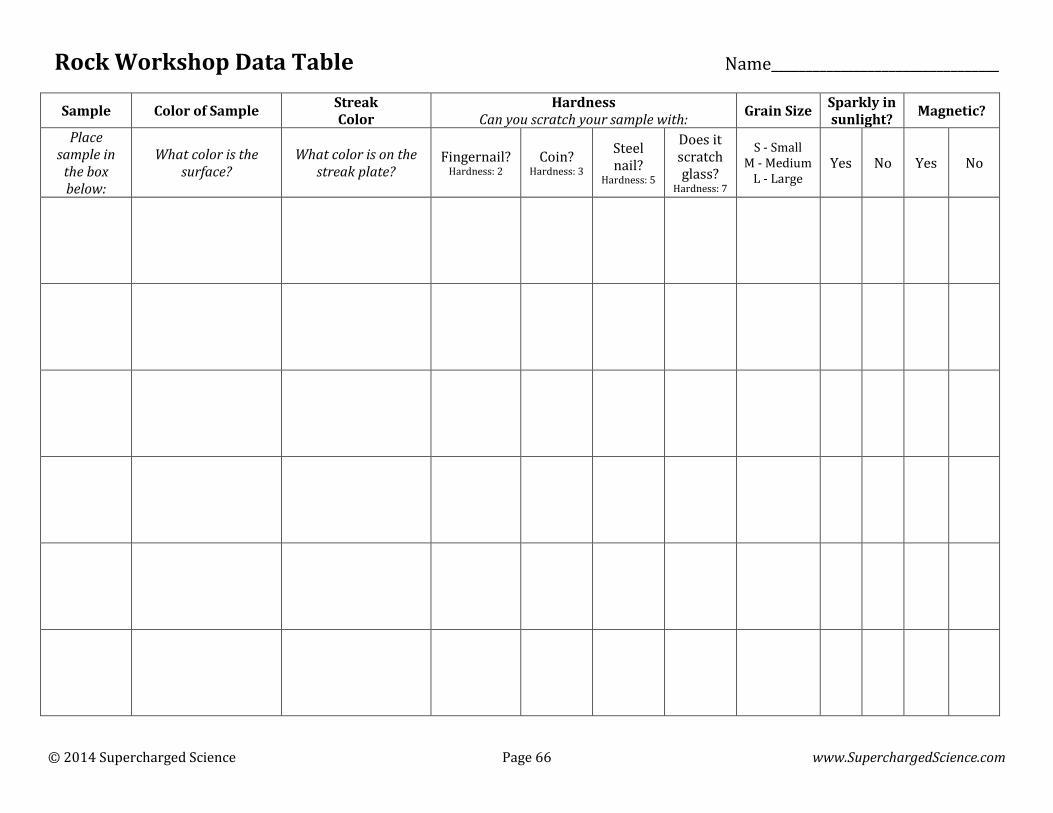
© 2014 Supercharged Science Page 66 www.SuperchargedScience.com
Rock Workshop Data Table Name_________________________________
Sample Color of Sample Streak Color
Hardness Can you scratch your sample with:
Grain Size Sparkly in sunlight?
Magnetic?
Place sample in
the box below:
What color is the surface?
What color is on the streak plate?
Fingernail? Hardness: 2
Coin? Hardness: 3
Steel nail?
Hardness: 5
Does it scratch glass?
Hardness: 7
S - Small M - Medium
L - Large Yes No Yes No
Lesson #21: Laundry Soap Crystals
Overview: Crystals are formed when atoms line up in patterns and solidify. There are crystals everywhere — in
the form of salt, sugar, sand, diamonds, quartz, and many more!
What to Learn: To make crystals, you need to make a very special kind of solution called a supersaturated solid
solution. Here’s what that means: If you add salt by the spoonful to a cup of water, you’ll reach a point where the
salt doesn’t disappear (dissolve) anymore and forms a lump at the bottom of the glass. The point at which it begins
to form a lump is just past the point of saturation. If you heat up the saltwater, the lump disappears. You can now
add more and more salt, until it can’t take any more (you’ll see another lump starting to form at the bottom). This
is now a supersaturated solid solution. Mix in a bit of water to make the lump disappear. Your solution is ready for
making crystals.
Materials
pipe cleaners (or string or skewer)
cleaned-out pickle, jam, or mayo jar
water
borax (AKA sodium tetraborate)
adult help, stove, pan, and stirring spoon
Lab Time
1. Cut a length of string and tie it to your pipe cleaner shape; tie the other end around a pencil or wooden
skewer. You want the shape suspended in the jar, not touching the bottom or sides.
2. Bring enough water to fill the jar (at least 2 cups) to a boil on the stove (food coloring is fun, but entirely
optional).
3. Add 1 cup of borax (aka sodium tetraborate or sodium borate) to the solution, stirring to dissolve. If there
are no bits settling to the bottom, add another spoonful and stir until you cannot dissolve any more borax
into the solution. When you see bits of undissolved borax at the bottom, the solution is ready. You have
made a supersaturated solution. Make sure your solution is saturated, or your crystals will not grow.
Note: You’ll be adding in a lot of borax, which is why you got a full box.
4. Wait until your solution has cooled to about 130oF (hot to the touch, but not so hot that you yank your hand
away).
5. Pour this solution (just the liquid, not the solid bits) into the jar with the shape. Put the jar in a place where
the crystals can grow undisturbed overnight, or even for a few days. Warmer locations (such as upstairs or
on top shelves) is best.
6. This is probably obvious, but don’t eat these! Keep them away from small children and pets, because they
look a lot like sugar crystals or rock candy.
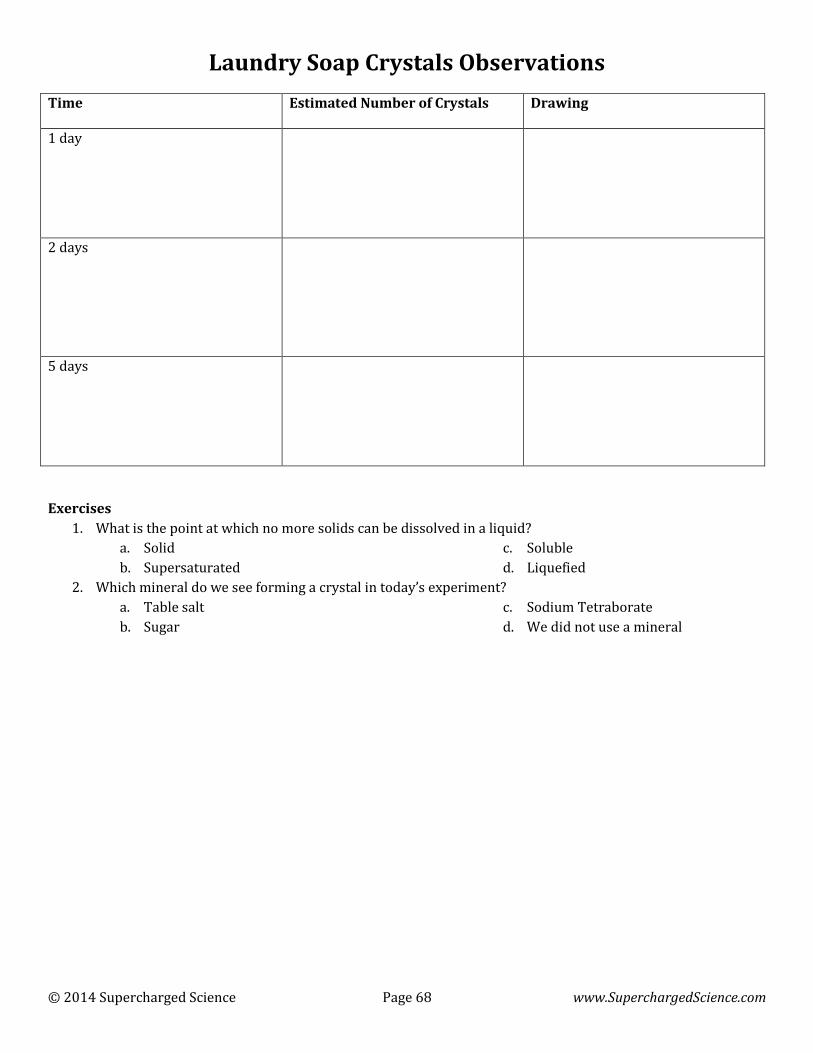
© 2014 Supercharged Science Page 68 www.SuperchargedScience.com
Laundry Soap Crystals Observations
Time Estimated Number of Crystals Drawing
1 day
2 days
5 days
Exercises
1. What is the point at which no more solids can be dissolved in a liquid?
a. Solid
b. Supersaturated
c. Soluble
d. Liquefied
2. Which mineral do we see forming a crystal in today’s experiment?
a. Table salt
b. Sugar
c. Sodium Tetraborate
d. We did not use a mineral
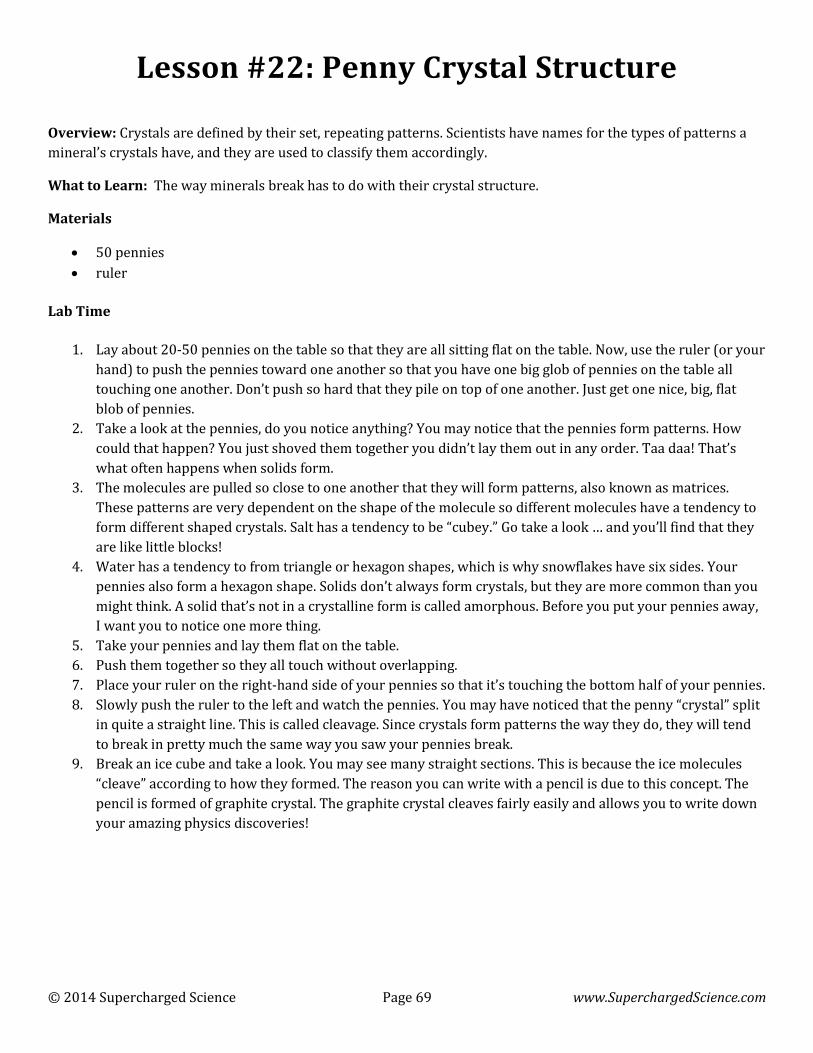
© 2014 Supercharged Science Page 69 www.SuperchargedScience.com
Lesson #22: Penny Crystal Structure
Overview: Crystals are defined by their set, repeating patterns. Scientists have names for the types of patterns a
mineral’s crystals have, and they are used to classify them accordingly.
What to Learn: The way minerals break has to do with their crystal structure.
Materials
50 pennies
ruler
Lab Time
1. Lay about 20-50 pennies on the table so that they are all sitting flat on the table. Now, use the ruler (or your
hand) to push the pennies toward one another so that you have one big glob of pennies on the table all
touching one another. Don’t push so hard that they pile on top of one another. Just get one nice, big, flat
blob of pennies.
2. Take a look at the pennies, do you notice anything? You may notice that the pennies form patterns. How
could that happen? You just shoved them together you didn’t lay them out in any order. Taa daa! That’s
what often happens when solids form.
3. The molecules are pulled so close to one another that they will form patterns, also known as matrices.
These patterns are very dependent on the shape of the molecule so different molecules have a tendency to
form different shaped crystals. Salt has a tendency to be “cubey.” Go take a look … and you’ll find that they
are like little blocks!
4. Water has a tendency to from triangle or hexagon shapes, which is why snowflakes have six sides. Your
pennies also form a hexagon shape. Solids don’t always form crystals, but they are more common than you
might think. A solid that’s not in a crystalline form is called amorphous. Before you put your pennies away,
I want you to notice one more thing.
5. Take your pennies and lay them flat on the table.
6. Push them together so they all touch without overlapping.
7. Place your ruler on the right-hand side of your pennies so that it’s touching the bottom half of your pennies.
8. Slowly push the ruler to the left and watch the pennies. You may have noticed that the penny “crystal” split
in quite a straight line. This is called cleavage. Since crystals form patterns the way they do, they will tend
to break in pretty much the same way you saw your pennies break.
9. Break an ice cube and take a look. You may see many straight sections. This is because the ice molecules
“cleave” according to how they formed. The reason you can write with a pencil is due to this concept. The
pencil is formed of graphite crystal. The graphite crystal cleaves fairly easily and allows you to write down
your amazing physics discoveries!
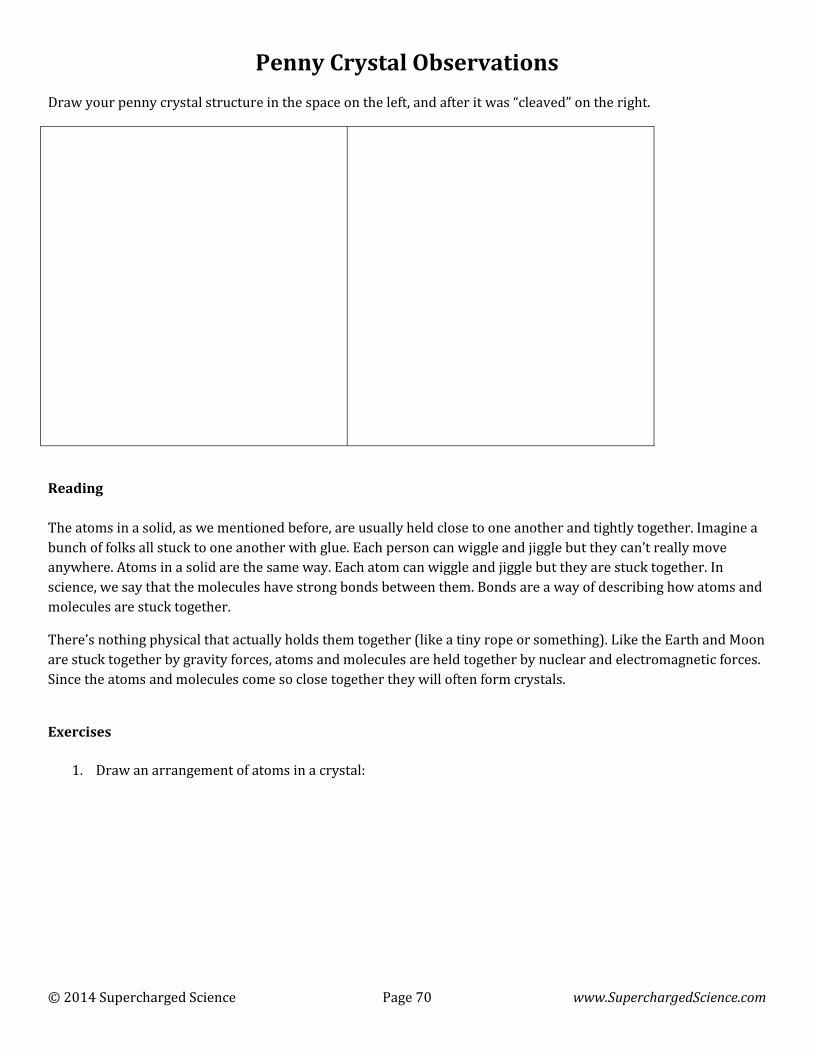
© 2014 Supercharged Science Page 70 www.SuperchargedScience.com
Penny Crystal Observations
Draw your penny crystal structure in the space on the left, and after it was “cleaved” on the right.
Reading
The atoms in a solid, as we mentioned before, are usually held close to one another and tightly together. Imagine a
bunch of folks all stuck to one another with glue. Each person can wiggle and jiggle but they can’t really move
anywhere. Atoms in a solid are the same way. Each atom can wiggle and jiggle but they are stuck together. In
science, we say that the molecules have strong bonds between them. Bonds are a way of describing how atoms and
molecules are stuck together.
There’s nothing physical that actually holds them together (like a tiny rope or something). Like the Earth and Moon
are stuck together by gravity forces, atoms and molecules are held together by nuclear and electromagnetic forces.
Since the atoms and molecules come so close together they will often form crystals.
Exercises
1. Draw an arrangement of atoms in a crystal:
© 2014 Supercharged Science Page 71 www.SuperchargedScience.com
2. How are atoms stuck together?
a. They have bonds between them.
b. Gravity
c. None of these
3. What is a crystal pattern called?
a. Revelation
b. Matrix
c. Lattice
d. Mineral
4. Circle a few other crystalline substances that you could find nearby:
a. Chalk
b. Paper
c. Soap
d. Graphite in pencil
e. Ice cube
f. Paper towel
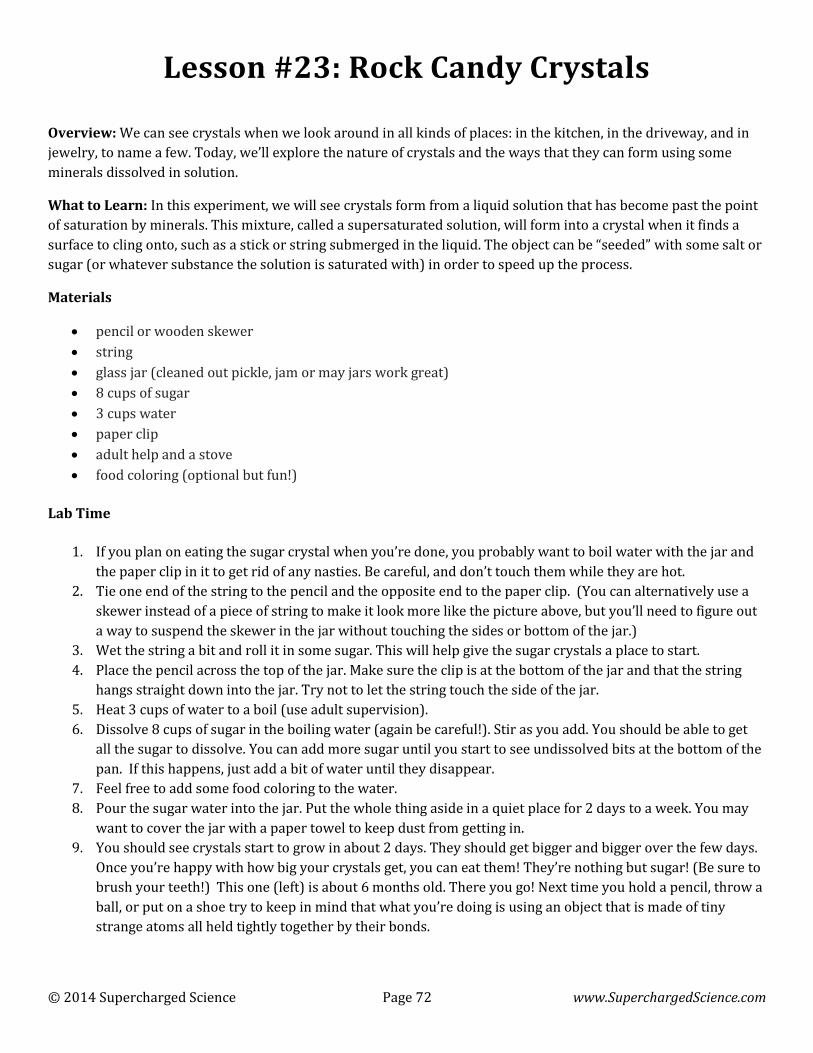
© 2014 Supercharged Science Page 72 www.SuperchargedScience.com
Lesson #23: Rock Candy Crystals
Overview: We can see crystals when we look around in all kinds of places: in the kitchen, in the driveway, and in
jewelry, to name a few. Today, we’ll explore the nature of crystals and the ways that they can form using some
minerals dissolved in solution.
What to Learn: In this experiment, we will see crystals form from a liquid solution that has become past the point
of saturation by minerals. This mixture, called a supersaturated solution, will form into a crystal when it finds a
surface to cling onto, such as a stick or string submerged in the liquid. The object can be “seeded” with some salt or
sugar (or whatever substance the solution is saturated with) in order to speed up the process.
Materials
pencil or wooden skewer
string
glass jar (cleaned out pickle, jam or may jars work great)
8 cups of sugar
3 cups water
paper clip
adult help and a stove
food coloring (optional but fun!)
Lab Time
1. If you plan on eating the sugar crystal when you’re done, you probably want to boil water with the jar and
the paper clip in it to get rid of any nasties. Be careful, and don’t touch them while they are hot.
2. Tie one end of the string to the pencil and the opposite end to the paper clip. (You can alternatively use a
skewer instead of a piece of string to make it look more like the picture above, but you’ll need to figure out
a way to suspend the skewer in the jar without touching the sides or bottom of the jar.)
3. Wet the string a bit and roll it in some sugar. This will help give the sugar crystals a place to start.
4. Place the pencil across the top of the jar. Make sure the clip is at the bottom of the jar and that the string
hangs straight down into the jar. Try not to let the string touch the side of the jar.
5. Heat 3 cups of water to a boil (use adult supervision).
6. Dissolve 8 cups of sugar in the boiling water (again be careful!). Stir as you add. You should be able to get
all the sugar to dissolve. You can add more sugar until you start to see undissolved bits at the bottom of the
pan. If this happens, just add a bit of water until they disappear.
7. Feel free to add some food coloring to the water.
8. Pour the sugar water into the jar. Put the whole thing aside in a quiet place for 2 days to a week. You may
want to cover the jar with a paper towel to keep dust from getting in.
9. You should see crystals start to grow in about 2 days. They should get bigger and bigger over the few days.
Once you’re happy with how big your crystals get, you can eat them! They’re nothing but sugar! (Be sure to
brush your teeth!) This one (left) is about 6 months old. There you go! Next time you hold a pencil, throw a
ball, or put on a shoe try to keep in mind that what you’re doing is using an object that is made of tiny
strange atoms all held tightly together by their bonds.
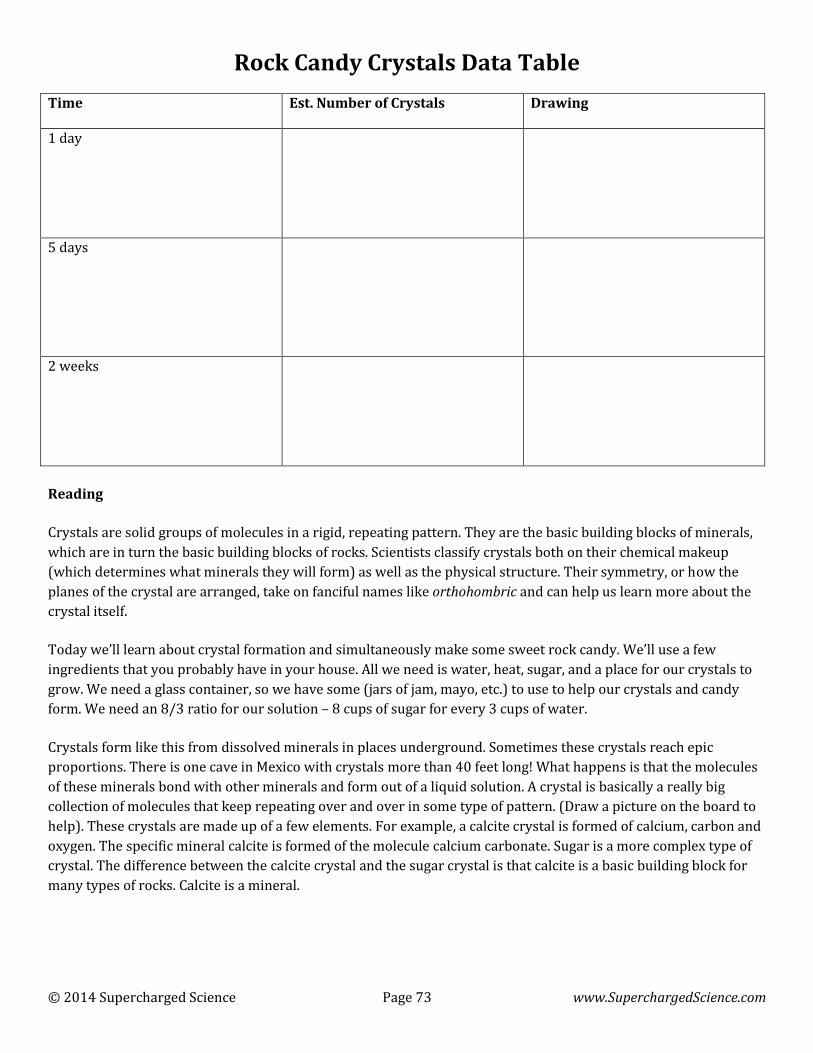
© 2014 Supercharged Science Page 73 www.SuperchargedScience.com
Rock Candy Crystals Data Table
Time Est. Number of Crystals Drawing
1 day
5 days
2 weeks
Reading
Crystals are solid groups of molecules in a rigid, repeating pattern. They are the basic building blocks of minerals,
which are in turn the basic building blocks of rocks. Scientists classify crystals both on their chemical makeup
(which determines what minerals they will form) as well as the physical structure. Their symmetry, or how the
planes of the crystal are arranged, take on fanciful names like orthohombric and can help us learn more about the
crystal itself.
Today we’ll learn about crystal formation and simultaneously make some sweet rock candy. We’ll use a few
ingredients that you probably have in your house. All we need is water, heat, sugar, and a place for our crystals to
grow. We need a glass container, so we have some (jars of jam, mayo, etc.) to use to help our crystals and candy
form. We need an 8/3 ratio for our solution – 8 cups of sugar for every 3 cups of water.
Crystals form like this from dissolved minerals in places underground. Sometimes these crystals reach epic
proportions. There is one cave in Mexico with crystals more than 40 feet long! What happens is that the molecules
of these minerals bond with other minerals and form out of a liquid solution. A crystal is basically a really big
collection of molecules that keep repeating over and over in some type of pattern. (Draw a picture on the board to
help). These crystals are made up of a few elements. For example, a calcite crystal is formed of calcium, carbon and
oxygen. The specific mineral calcite is formed of the molecule calcium carbonate. Sugar is a more complex type of
crystal. The difference between the calcite crystal and the sugar crystal is that calcite is a basic building block for
many types of rocks. Calcite is a mineral.
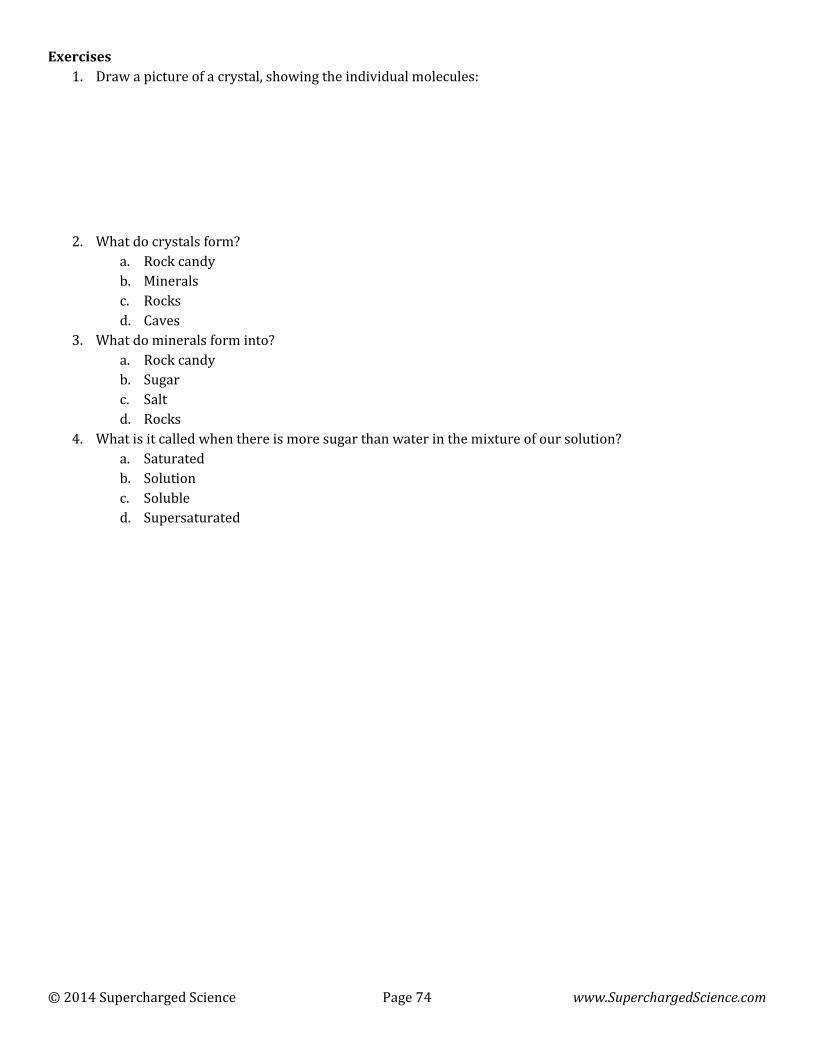
© 2014 Supercharged Science Page 74 www.SuperchargedScience.com
Exercises
1. Draw a picture of a crystal, showing the individual molecules:
2. What do crystals form?
a. Rock candy
b. Minerals
c. Rocks
d. Caves
3. What do minerals form into?
a. Rock candy
b. Sugar
c. Salt
d. Rocks
4. What is it called when there is more sugar than water in the mixture of our solution?
a. Saturated
b. Solution
c. Soluble
d. Supersaturated
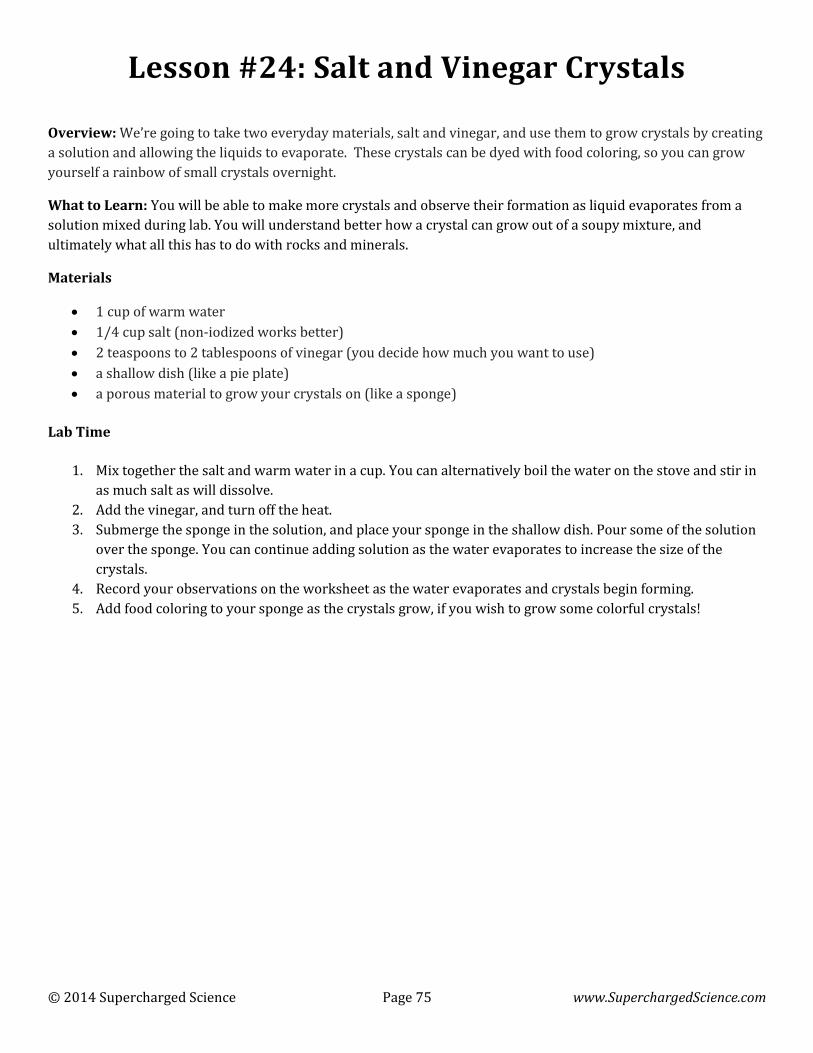
© 2014 Supercharged Science Page 75 www.SuperchargedScience.com
Lesson #24: Salt and Vinegar Crystals
Overview: We’re going to take two everyday materials, salt and vinegar, and use them to grow crystals by creating
a solution and allowing the liquids to evaporate. These crystals can be dyed with food coloring, so you can grow
yourself a rainbow of small crystals overnight.
What to Learn: You will be able to make more crystals and observe their formation as liquid evaporates from a
solution mixed during lab. You will understand better how a crystal can grow out of a soupy mixture, and
ultimately what all this has to do with rocks and minerals.
Materials
1 cup of warm water
1/4 cup salt (non-iodized works better)
2 teaspoons to 2 tablespoons of vinegar (you decide how much you want to use)
a shallow dish (like a pie plate)
a porous material to grow your crystals on (like a sponge)
Lab Time
1. Mix together the salt and warm water in a cup. You can alternatively boil the water on the stove and stir in
as much salt as will dissolve.
2. Add the vinegar, and turn off the heat.
3. Submerge the sponge in the solution, and place your sponge in the shallow dish. Pour some of the solution
over the sponge. You can continue adding solution as the water evaporates to increase the size of the
crystals.
4. Record your observations on the worksheet as the water evaporates and crystals begin forming.
5. Add food coloring to your sponge as the crystals grow, if you wish to grow some colorful crystals!
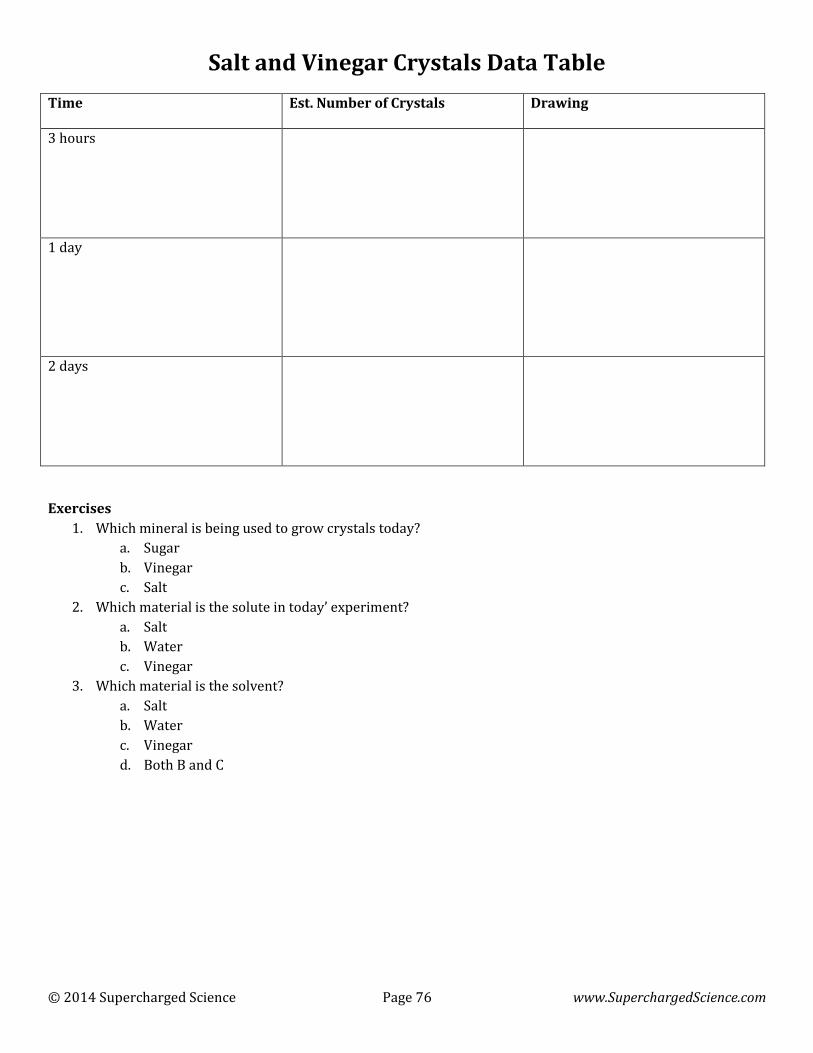
© 2014 Supercharged Science Page 76 www.SuperchargedScience.com
Salt and Vinegar Crystals Data Table
Time Est. Number of Crystals Drawing
3 hours
1 day
2 days
Exercises
1. Which mineral is being used to grow crystals today?
a. Sugar
b. Vinegar
c. Salt
2. Which material is the solute in today’ experiment?
a. Salt
b. Water
c. Vinegar
3. Which material is the solvent?
a. Salt
b. Water
c. Vinegar
d. Both B and C

© 2014 Supercharged Science Page 77 www.SuperchargedScience.com
Lesson #25: Salt Stalactites
Overview: Crystals can grow within a jar on a piece of string, as we say with the laundry soap crystals and rock
candy, but what about outside? Today’s experiment will allow you to make some of those spectacular
arrangements of minerals that you may find in caverns, called stalactites.
What to Learn: The secret to getting this experiment to work has to do with the capillary action of the water as it
gets drawn up the string, against the force of gravity. A stalactite is a formation of minerals found in a cave that is
formed when water drips down and leaves a bit of mineral behind. Most frequently these minerals are limestone,
such as in the spectacular formations of Carlsbad Caverns.
Materials
two clean glass jars
yarn or string
Epsom salts
water
tin foil or cook sheet
adult help, sauce pot, and a stove
Lab Time
1. Make a supersaturated solution with warm water and Epsom salts (magnesium sulfate). Add enough salt to
the point that it no longer dissolves.
2. Fill two empty glass jars with the solution.
3. Place the jars on a cookie sheet about a foot apart.
4. Suspend a piece of yarn or string between the jars.
5. Wait for three days, and record all observations in the data table.
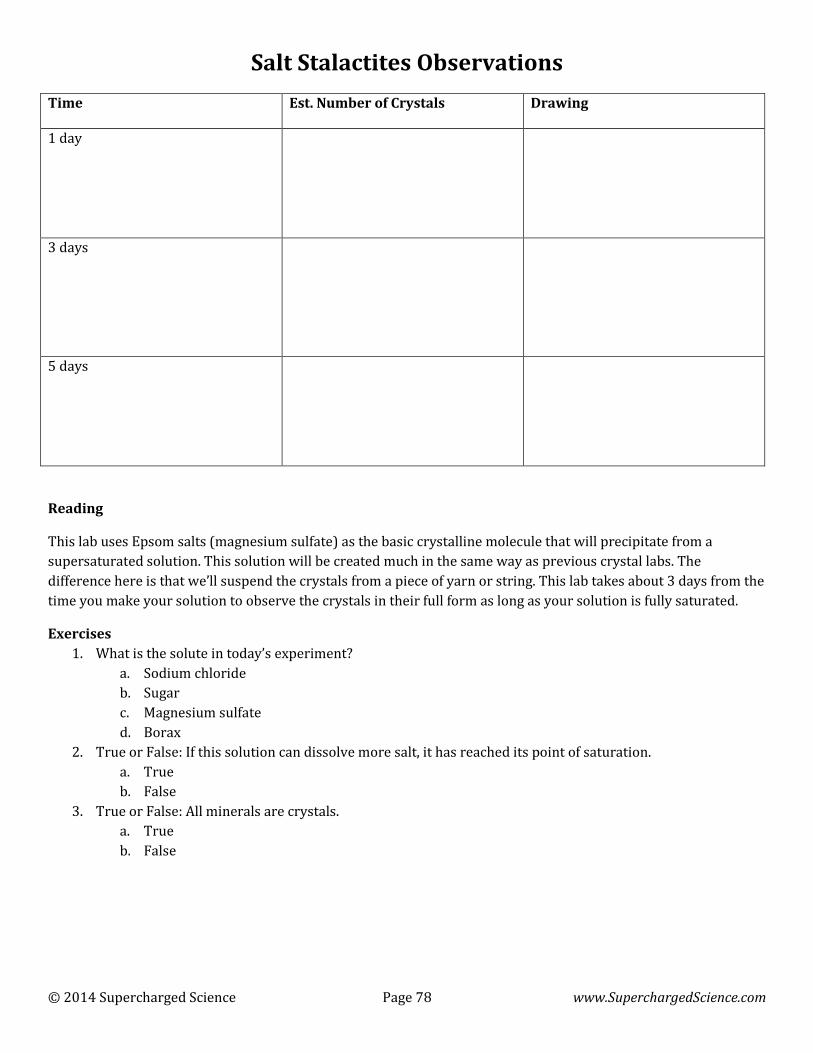
© 2014 Supercharged Science Page 78 www.SuperchargedScience.com
Salt Stalactites Observations
Time Est. Number of Crystals Drawing
1 day
3 days
5 days
Reading
This lab uses Epsom salts (magnesium sulfate) as the basic crystalline molecule that will precipitate from a
supersaturated solution. This solution will be created much in the same way as previous crystal labs. The
difference here is that we’ll suspend the crystals from a piece of yarn or string. This lab takes about 3 days from the
time you make your solution to observe the crystals in their full form as long as your solution is fully saturated.
Exercises
1. What is the solute in today’s experiment?
a. Sodium chloride
b. Sugar
c. Magnesium sulfate
d. Borax
2. True or False: If this solution can dissolve more salt, it has reached its point of saturation.
a. True
b. False
3. True or False: All minerals are crystals.
a. True
b. False
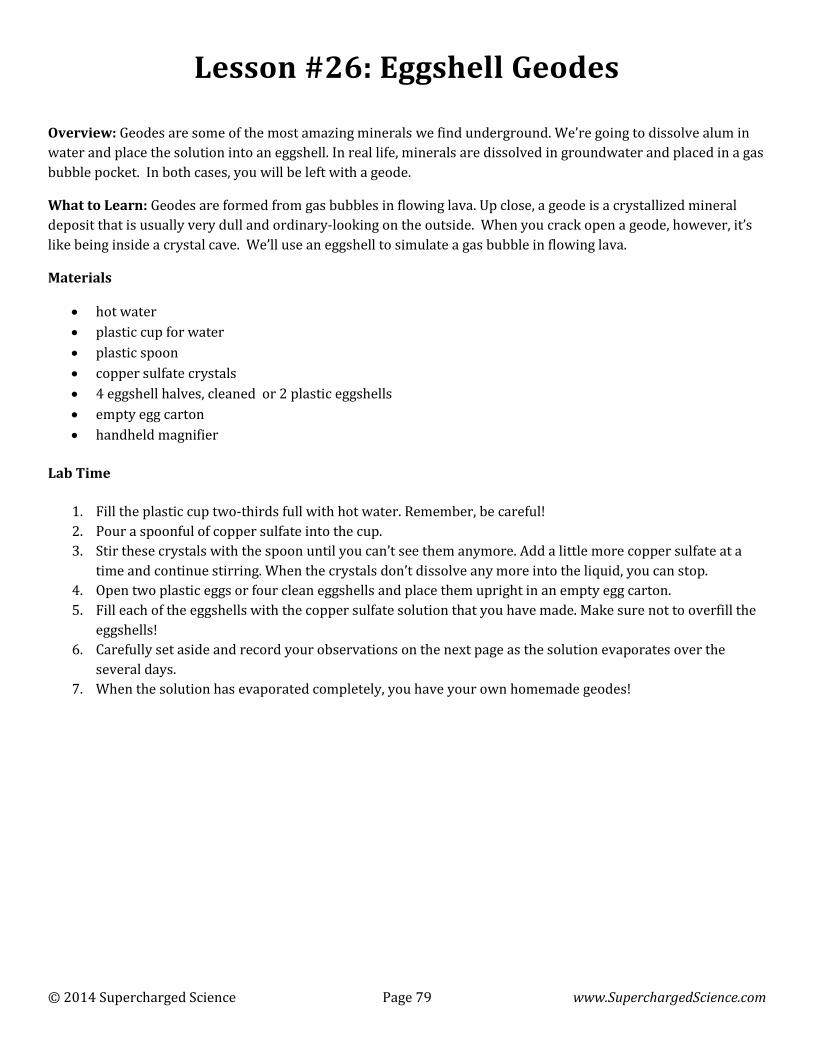
© 2014 Supercharged Science Page 79 www.SuperchargedScience.com
Lesson #26: Eggshell Geodes
Overview: Geodes are some of the most amazing minerals we find underground. We’re going to dissolve alum in
water and place the solution into an eggshell. In real life, minerals are dissolved in groundwater and placed in a gas
bubble pocket. In both cases, you will be left with a geode.
What to Learn: Geodes are formed from gas bubbles in flowing lava. Up close, a geode is a crystallized mineral
deposit that is usually very dull and ordinary-looking on the outside. When you crack open a geode, however, it’s
like being inside a crystal cave. We’ll use an eggshell to simulate a gas bubble in flowing lava.
Materials
hot water
plastic cup for water
plastic spoon
copper sulfate crystals
4 eggshell halves, cleaned or 2 plastic eggshells
empty egg carton
handheld magnifier
Lab Time
1. Fill the plastic cup two-thirds full with hot water. Remember, be careful!
2. Pour a spoonful of copper sulfate into the cup.
3. Stir these crystals with the spoon until you can’t see them anymore. Add a little more copper sulfate at a
time and continue stirring. When the crystals don’t dissolve any more into the liquid, you can stop.
4. Open two plastic eggs or four clean eggshells and place them upright in an empty egg carton.
5. Fill each of the eggshells with the copper sulfate solution that you have made. Make sure not to overfill the
eggshells!
6. Carefully set aside and record your observations on the next page as the solution evaporates over the
several days.
7. When the solution has evaporated completely, you have your own homemade geodes!
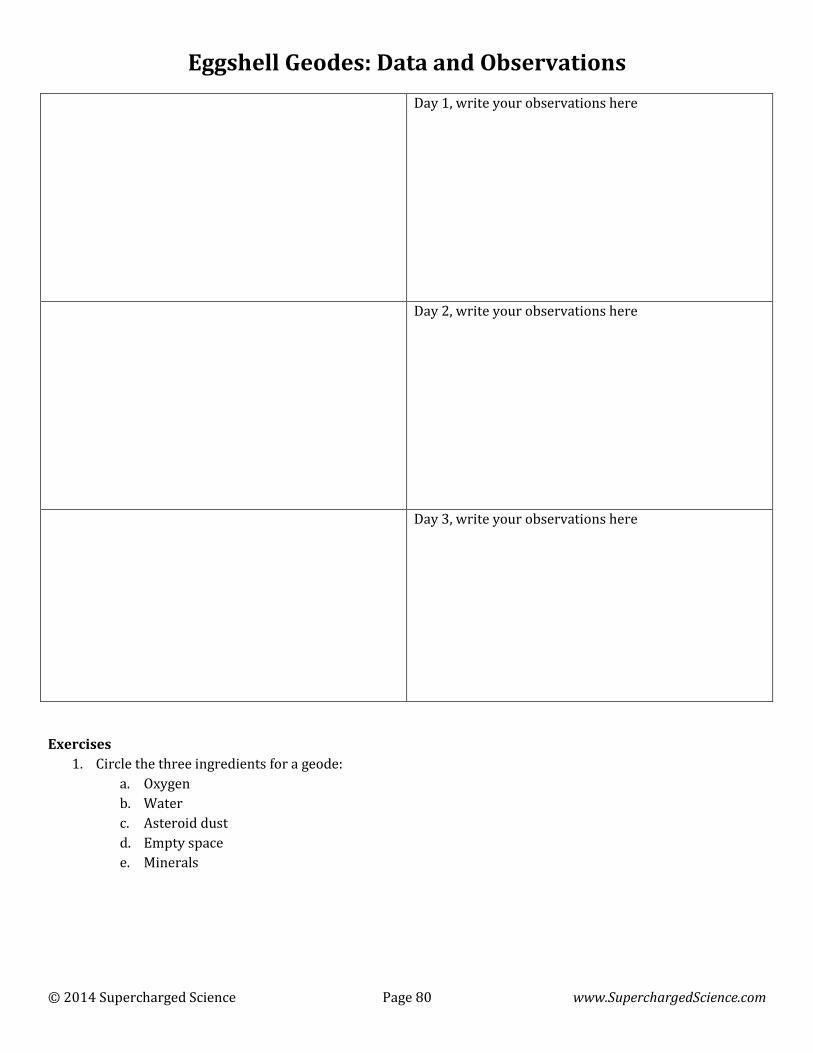
© 2014 Supercharged Science Page 80 www.SuperchargedScience.com
Eggshell Geodes: Data and Observations
Day 1, write your observations here
Day 2, write your observations here
Day 3, write your observations here
Exercises
1. Circle the three ingredients for a geode:
a. Oxygen
b. Water
c. Asteroid dust
d. Empty space
e. Minerals
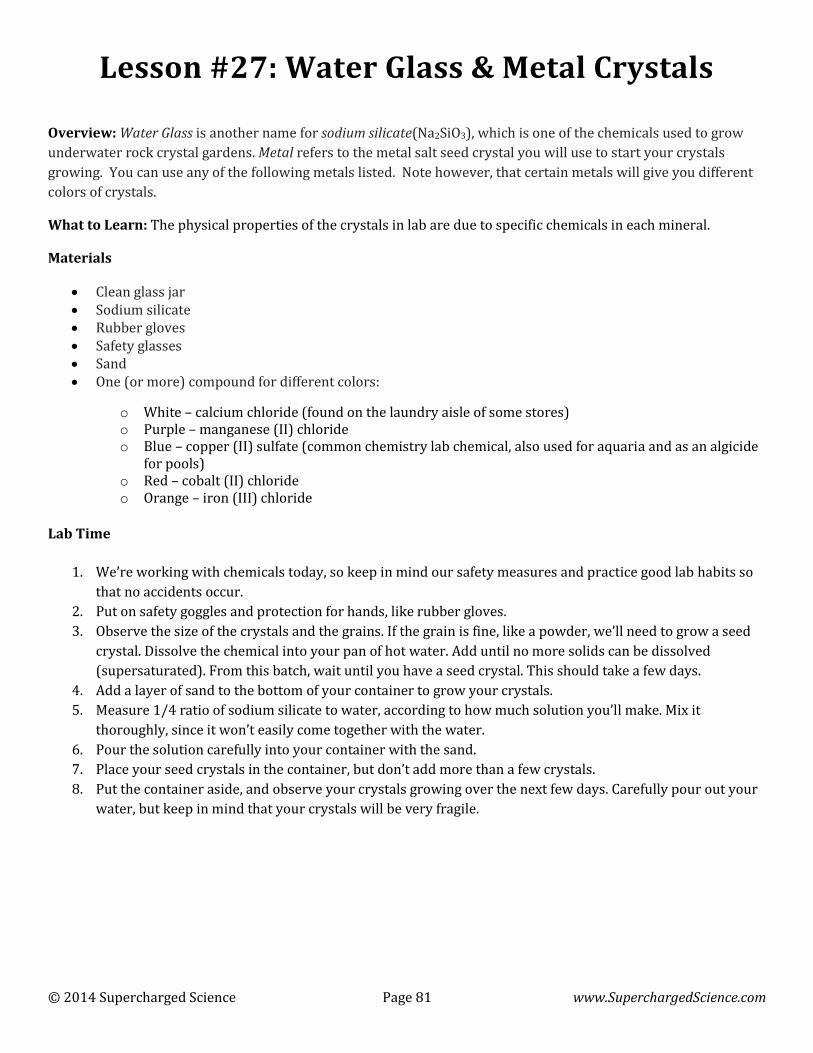
© 2014 Supercharged Science Page 81 www.SuperchargedScience.com
Lesson #27: Water Glass & Metal Crystals
Overview: Water Glass is another name for sodium silicate(Na2SiO3), which is one of the chemicals used to grow
underwater rock crystal gardens. Metal refers to the metal salt seed crystal you will use to start your crystals
growing. You can use any of the following metals listed. Note however, that certain metals will give you different
colors of crystals.
What to Learn: The physical properties of the crystals in lab are due to specific chemicals in each mineral.
Materials
Clean glass jar Sodium silicate Rubber gloves Safety glasses Sand One (or more) compound for different colors:
o White – calcium chloride (found on the laundry aisle of some stores) o Purple – manganese (II) chloride o Blue – copper (II) sulfate (common chemistry lab chemical, also used for aquaria and as an algicide
for pools) o Red – cobalt (II) chloride o Orange – iron (III) chloride
Lab Time
1. We’re working with chemicals today, so keep in mind our safety measures and practice good lab habits so
that no accidents occur.
2. Put on safety goggles and protection for hands, like rubber gloves.
3. Observe the size of the crystals and the grains. If the grain is fine, like a powder, we’ll need to grow a seed
crystal. Dissolve the chemical into your pan of hot water. Add until no more solids can be dissolved
(supersaturated). From this batch, wait until you have a seed crystal. This should take a few days.
4. Add a layer of sand to the bottom of your container to grow your crystals.
5. Measure 1/4 ratio of sodium silicate to water, according to how much solution you’ll make. Mix it
thoroughly, since it won’t easily come together with the water.
6. Pour the solution carefully into your container with the sand.
7. Place your seed crystals in the container, but don’t add more than a few crystals.
8. Put the container aside, and observe your crystals growing over the next few days. Carefully pour out your
water, but keep in mind that your crystals will be very fragile.
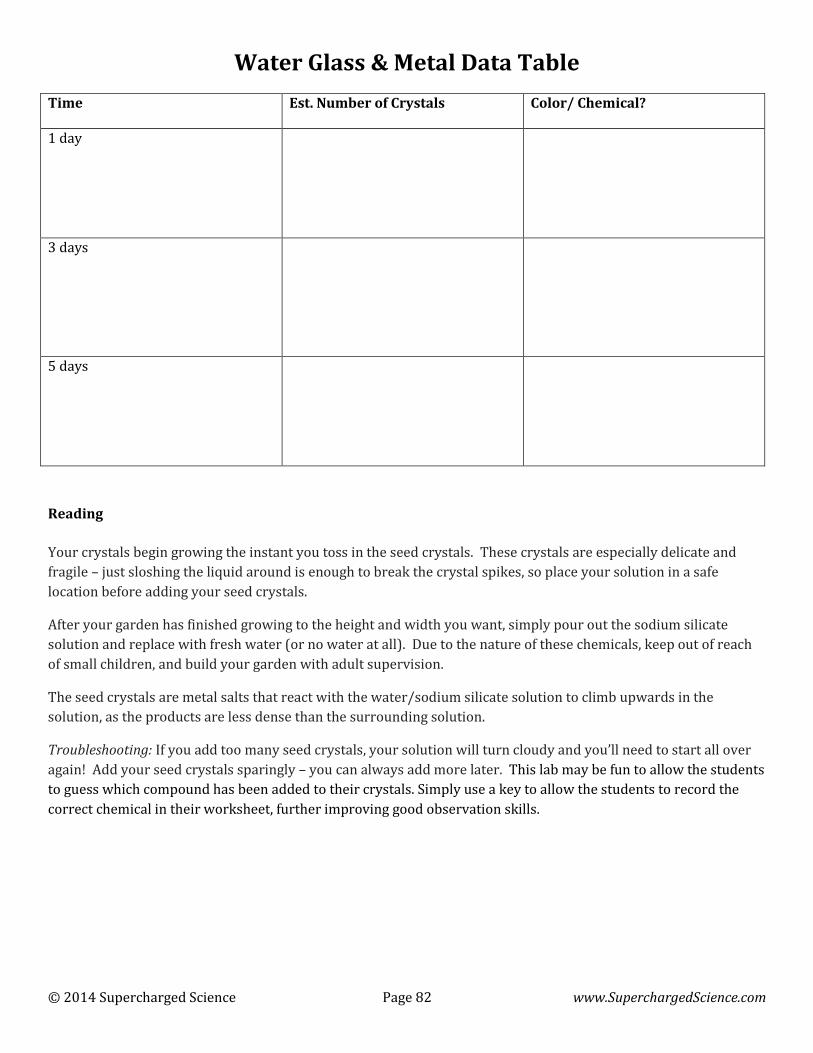
© 2014 Supercharged Science Page 82 www.SuperchargedScience.com
Water Glass & Metal Data Table
Time Est. Number of Crystals Color/ Chemical?
1 day
3 days
5 days
Reading
Your crystals begin growing the instant you toss in the seed crystals. These crystals are especially delicate and
fragile – just sloshing the liquid around is enough to break the crystal spikes, so place your solution in a safe
location before adding your seed crystals.
After your garden has finished growing to the height and width you want, simply pour out the sodium silicate
solution and replace with fresh water (or no water at all). Due to the nature of these chemicals, keep out of reach
of small children, and build your garden with adult supervision.
The seed crystals are metal salts that react with the water/sodium silicate solution to climb upwards in the
solution, as the products are less dense than the surrounding solution.
Troubleshooting: If you add too many seed crystals, your solution will turn cloudy and you’ll need to start all over
again! Add your seed crystals sparingly – you can always add more later. This lab may be fun to allow the students
to guess which compound has been added to their crystals. Simply use a key to allow the students to record the
correct chemical in their worksheet, further improving good observation skills.
© 2014 Supercharged Science Page 83 www.SuperchargedScience.com
Exercises
1. What is the solution called when no more solids can be dissolved?
2. What is the main solute in this experiment?
a. Sodium silicate
b. Sodium chloride
c. Magnesium sulfate
d. Cobalt (II) chlorate
3. What are the main types of elements that give crystals and minerals their color?
a. Noble gases
b. Metals
c. Hydrocarbons
d. Volatile compounds
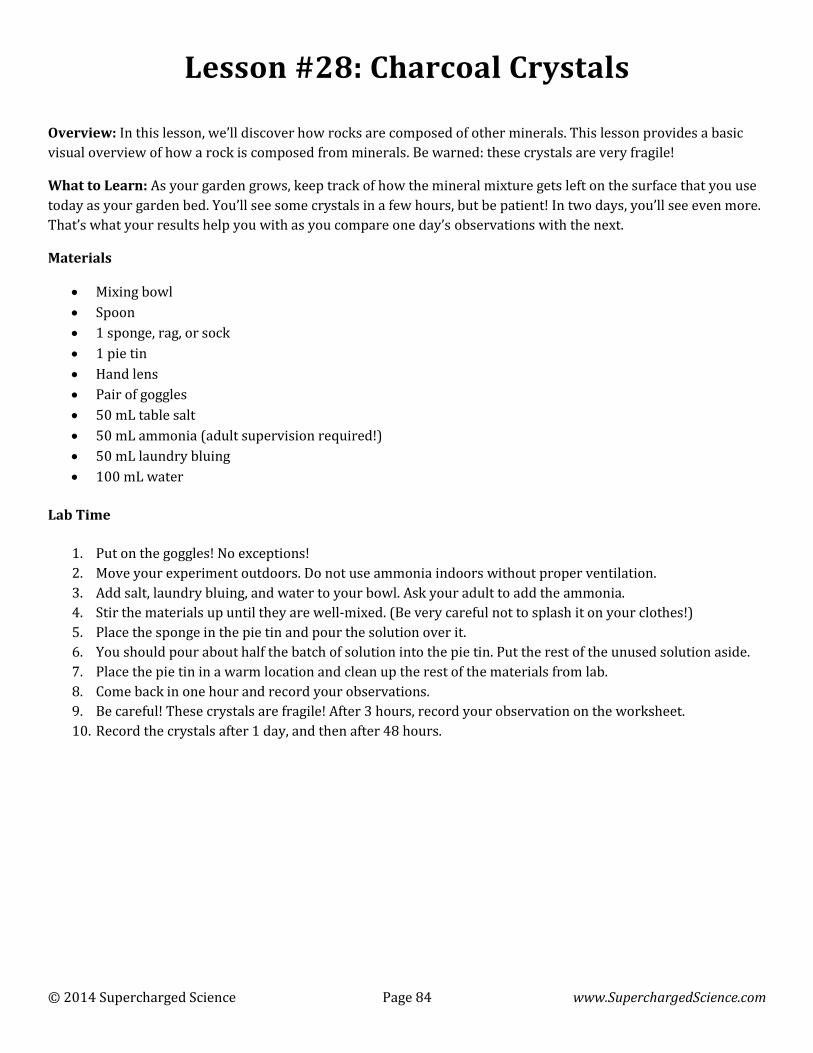
© 2014 Supercharged Science Page 84 www.SuperchargedScience.com
Lesson #28: Charcoal Crystals
Overview: In this lesson, we’ll discover how rocks are composed of other minerals. This lesson provides a basic
visual overview of how a rock is composed from minerals. Be warned: these crystals are very fragile!
What to Learn: As your garden grows, keep track of how the mineral mixture gets left on the surface that you use
today as your garden bed. You’ll see some crystals in a few hours, but be patient! In two days, you’ll see even more.
That’s what your results help you with as you compare one day’s observations with the next.
Materials
Mixing bowl
Spoon
1 sponge, rag, or sock
1 pie tin
Hand lens
Pair of goggles
50 mL table salt
50 mL ammonia (adult supervision required!)
50 mL laundry bluing
100 mL water
Lab Time
1. Put on the goggles! No exceptions!
2. Move your experiment outdoors. Do not use ammonia indoors without proper ventilation.
3. Add salt, laundry bluing, and water to your bowl. Ask your adult to add the ammonia.
4. Stir the materials up until they are well-mixed. (Be very careful not to splash it on your clothes!)
5. Place the sponge in the pie tin and pour the solution over it.
6. You should pour about half the batch of solution into the pie tin. Put the rest of the unused solution aside.
7. Place the pie tin in a warm location and clean up the rest of the materials from lab.
8. Come back in one hour and record your observations.
9. Be careful! These crystals are fragile! After 3 hours, record your observation on the worksheet.
10. Record the crystals after 1 day, and then after 48 hours.
© 2014 Supercharged Science Page 85 www.SuperchargedScience.com
Crystal Garden Data & Observations
After 1 hour…
3 hours…
24 hours…
48 hours…
Exercises
1. Write down the four ingredients that you’re using to build your homemade rock today:
2. Are any of them minerals? Which ones?
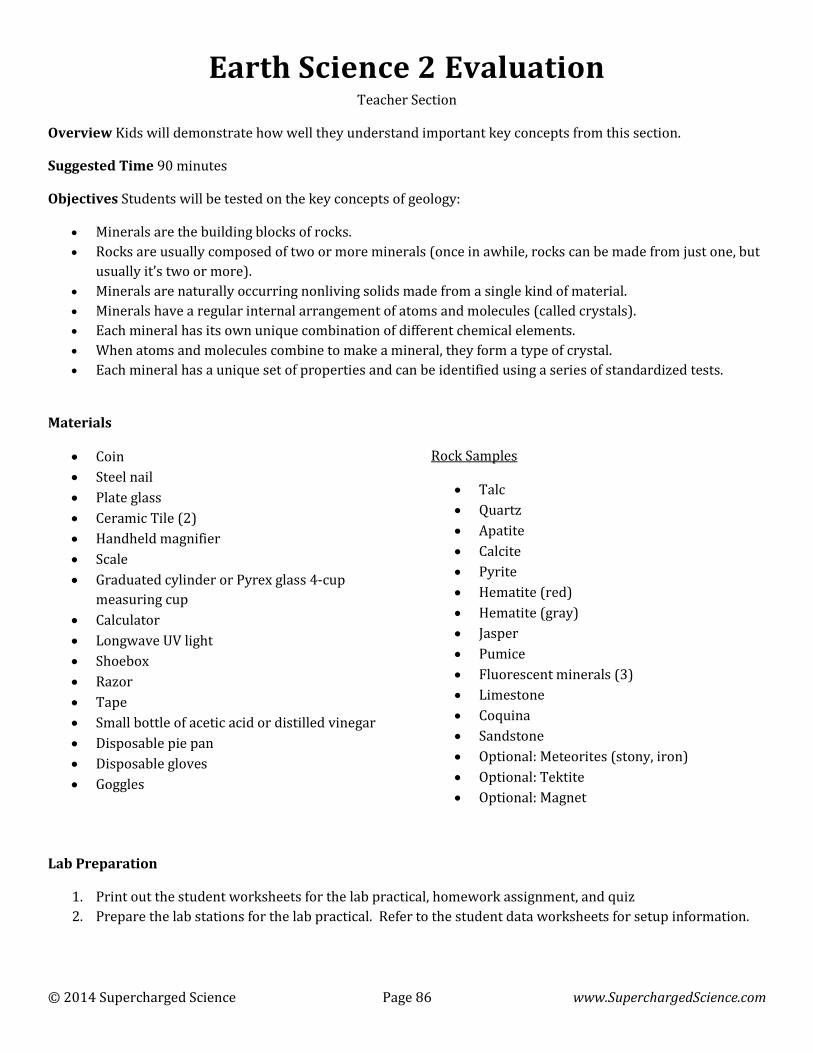
© 2014 Supercharged Science Page 86 www.SuperchargedScience.com
Earth Science 2 Evaluation Teacher Section
Overview Kids will demonstrate how well they understand important key concepts from this section.
Suggested Time 90 minutes
Objectives Students will be tested on the key concepts of geology:
Minerals are the building blocks of rocks.
Rocks are usually composed of two or more minerals (once in awhile, rocks can be made from just one, but
usually it’s two or more).
Minerals are naturally occurring nonliving solids made from a single kind of material.
Minerals have a regular internal arrangement of atoms and molecules (called crystals).
Each mineral has its own unique combination of different chemical elements.
When atoms and molecules combine to make a mineral, they form a type of crystal.
Each mineral has a unique set of properties and can be identified using a series of standardized tests.
Materials
Coin
Steel nail
Plate glass
Ceramic Tile (2)
Handheld magnifier
Scale
Graduated cylinder or Pyrex glass 4-cup
measuring cup
Calculator
Longwave UV light
Shoebox
Razor
Tape
Small bottle of acetic acid or distilled vinegar
Disposable pie pan
Disposable gloves
Goggles
Rock Samples
Talc
Quartz
Apatite
Calcite
Pyrite
Hematite (red)
Hematite (gray)
Jasper
Pumice
Fluorescent minerals (3)
Limestone
Coquina
Sandstone
Optional: Meteorites (stony, iron)
Optional: Tektite
Optional: Magnet
Lab Preparation
1. Print out the student worksheets for the lab practical, homework assignment, and quiz
2. Prepare the lab stations for the lab practical. Refer to the student data worksheets for setup information.

© 2014 Supercharged Science Page 87 www.SuperchargedScience.com
Lesson: The students are taking two tests today: the quiz and the lab practical. The quiz takes about 20 minutes,
and you’ll find the answer key to make it easy to grade.
Lab Practical: Students will demonstrate that they know how to follow a set of written instructions for scientific
investigation, identify and describe the physical properties of minerals, practice common identification techniques
that field scientists use on minerals, Follow a set of written instructions for a scientific investigation, and measure
or calculate the weight and volume of objects.
© 2014 Supercharged Science Page 88 www.SuperchargedScience.com
Earth Science 2 Evaluation
Student Worksheet
Overview: Today, you’re going to take two different tests: the quiz and the lab practical. You’re going to take the
written quiz first, and the lab practical at the end of this lab. The lab practical isn’t a paper test – it’s where you get
to show your teacher that you know how to do something.
Lab Test & Homework
1. Your teacher will ask you to share how much you understand about Earth Science. Since science is so much
more than just reading a book or circling the right answer, this is an important part of the test to find out
what you really understand.
2. While you are waiting to show how much of this stuff you already know, you get to choose which
homework assignment you want to complete. The assignment is due tomorrow, and half the credit is for
creativity and the other half is for content, so really let your imagination fly as you work through it. Choose
one:
a. Write a short story or skit about minerals from the perspective of the rock itself (like marble or
granite). You’ll read this aloud to your class.
b. Make a poster that teaches one of the main concepts of geology you enjoyed most. When you’re
finished, you’ll use it to teach to a class to younger students and demonstrate the principles that
you’ve learned.
c. Write and perform a poem or song about your favorite type of rock (fluorite, gypsum,
conglomerate…). This will be performed for your class.
© 2014 Supercharged Science Page 89 www.SuperchargedScience.com
Name____________________________________________
Earth Science 2 Quiz Student Exam
1. What is the definition of a rock?
2. What does it mean if there’s no streak left on the streak plate?
3. Give an example of a kind of rock that leaves a streak a different color than its surface color.
4. If a mineral scratches a penny but doesn’t get scratched by a nail, can you approximate its hardness?
5. Give examples of the hardest and softest minerals on the Mohs’ Scale of Hardness.
6. Name three properties geologists look for when they try to categorize a mineral.
7. If you break a sample of quartz and find that it has no clean surfaces of separation, what kind of cleavage does it show?
8. What are two things we use coal for?
9. What is the equation for finding density?
10. How is fluorescence different from phosphorescence?
11. Is lodestone the same as magnetite?
12. Name three characteristics of pumice.
13. What is a crystal, and how is it different from a mineral and a rock?

© 2014 Supercharged Science Page 90 www.SuperchargedScience.com
Name____________________________________________
Earth Science 2 Lab Practical Student Worksheet
This is your chance to show how much you have picked up on important key concepts, and if there are any
holes. You also will be working on a homework assignment as you do this test individually with a teacher.
Lab Practical:
You will be visiting several different stations that have been set up already for you. Your job is to figure out
which rock is which and complete the data sheet in this packet for each station you visit.
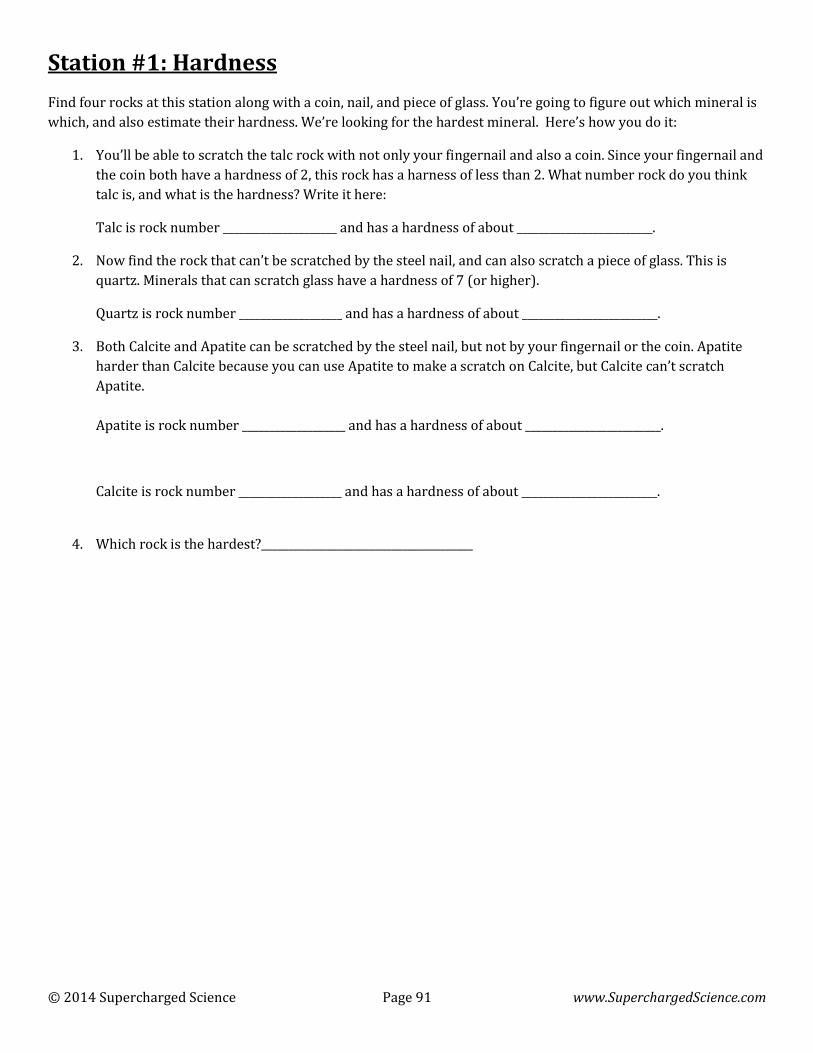
© 2014 Supercharged Science Page 91 www.SuperchargedScience.com
Station #1: Hardness
Find four rocks at this station along with a coin, nail, and piece of glass. You’re going to figure out which mineral is
which, and also estimate their hardness. We’re looking for the hardest mineral. Here’s how you do it:
1. You’ll be able to scratch the talc rock with not only your fingernail and also a coin. Since your fingernail and
the coin both have a hardness of 2, this rock has a harness of less than 2. What number rock do you think
talc is, and what is the hardness? Write it here:
Talc is rock number _____________________ and has a hardness of about _________________________.
2. Now find the rock that can’t be scratched by the steel nail, and can also scratch a piece of glass. This is
quartz. Minerals that can scratch glass have a hardness of 7 (or higher).
Quartz is rock number ___________________ and has a hardness of about _________________________.
3. Both Calcite and Apatite can be scratched by the steel nail, but not by your fingernail or the coin. Apatite
harder than Calcite because you can use Apatite to make a scratch on Calcite, but Calcite can’t scratch
Apatite.
Apatite is rock number ___________________ and has a hardness of about _________________________.
Calcite is rock number ___________________ and has a hardness of about _________________________.
4. Which rock is the hardest?_______________________________________
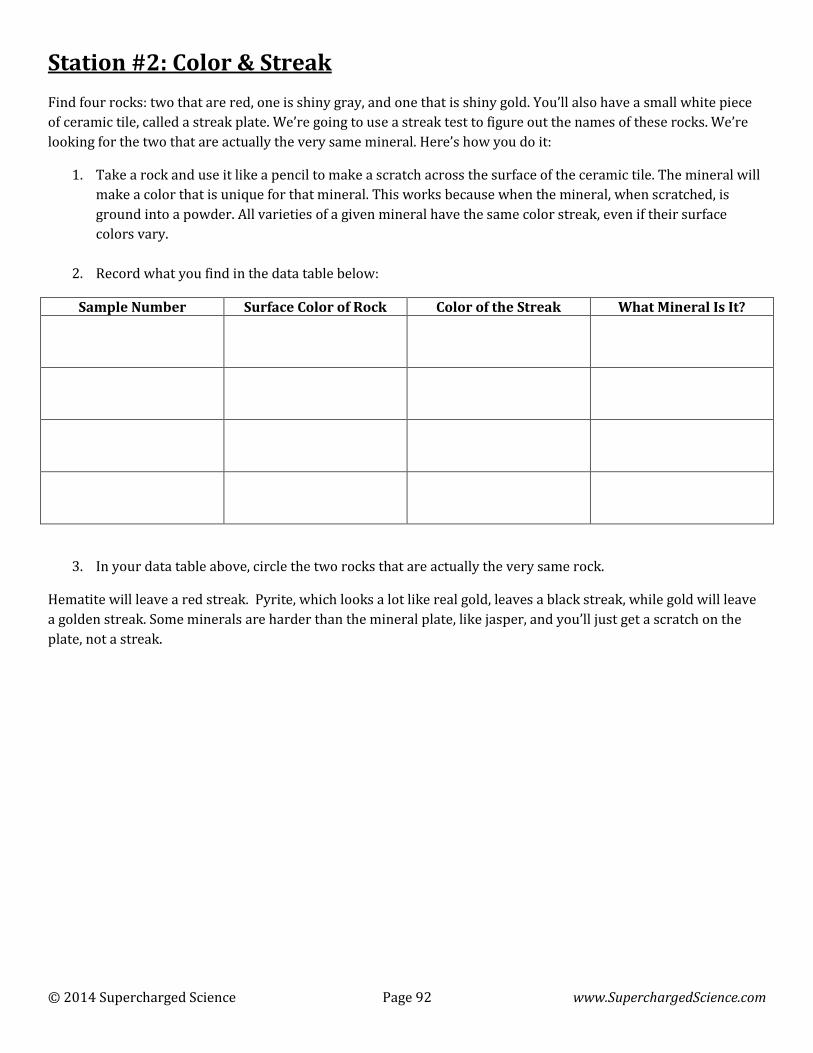
© 2014 Supercharged Science Page 92 www.SuperchargedScience.com
Station #2: Color & Streak
Find four rocks: two that are red, one is shiny gray, and one that is shiny gold. You’ll also have a small white piece
of ceramic tile, called a streak plate. We’re going to use a streak test to figure out the names of these rocks. We’re
looking for the two that are actually the very same mineral. Here’s how you do it:
1. Take a rock and use it like a pencil to make a scratch across the surface of the ceramic tile. The mineral will
make a color that is unique for that mineral. This works because when the mineral, when scratched, is
ground into a powder. All varieties of a given mineral have the same color streak, even if their surface
colors vary.
2. Record what you find in the data table below:
Sample Number Surface Color of Rock Color of the Streak What Mineral Is It?
3. In your data table above, circle the two rocks that are actually the very same rock.
Hematite will leave a red streak. Pyrite, which looks a lot like real gold, leaves a black streak, while gold will leave
a golden streak. Some minerals are harder than the mineral plate, like jasper, and you’ll just get a scratch on the
plate, not a streak.
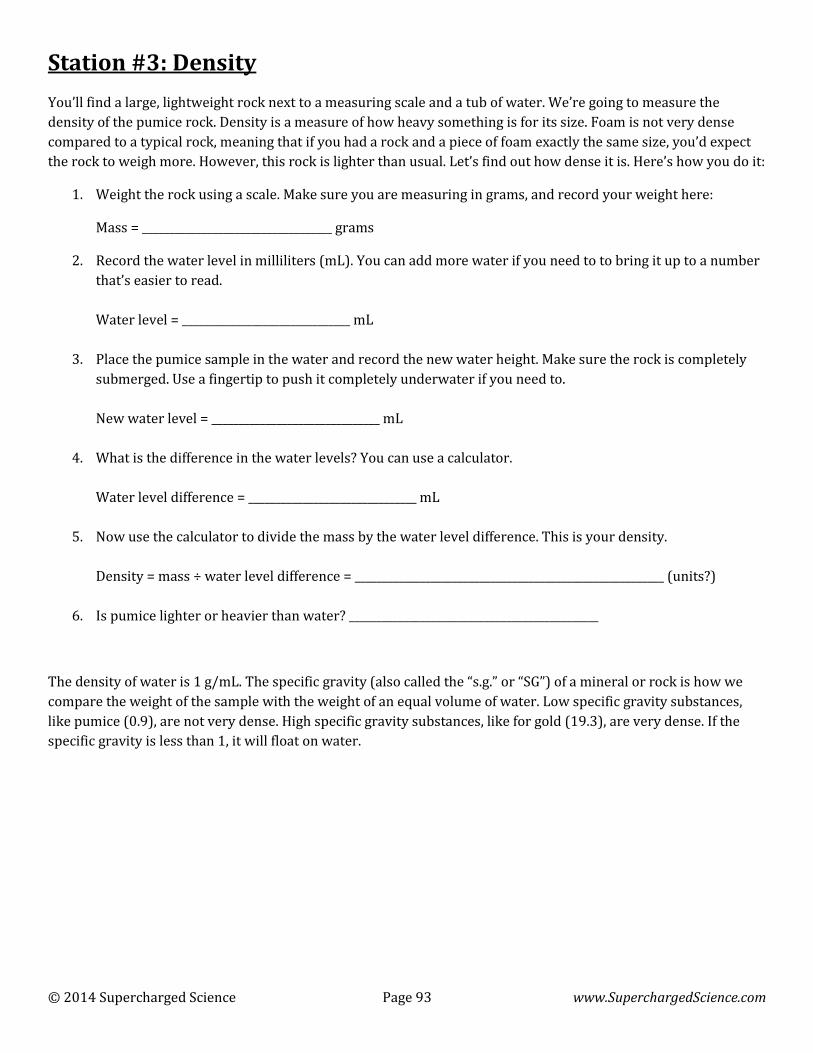
© 2014 Supercharged Science Page 93 www.SuperchargedScience.com
Station #3: Density
You’ll find a large, lightweight rock next to a measuring scale and a tub of water. We’re going to measure the
density of the pumice rock. Density is a measure of how heavy something is for its size. Foam is not very dense
compared to a typical rock, meaning that if you had a rock and a piece of foam exactly the same size, you’d expect
the rock to weigh more. However, this rock is lighter than usual. Let’s find out how dense it is. Here’s how you do it:
1. Weight the rock using a scale. Make sure you are measuring in grams, and record your weight here:
Mass = ___________________________________ grams
2. Record the water level in milliliters (mL). You can add more water if you need to to bring it up to a number
that’s easier to read.
Water level = _______________________________ mL
3. Place the pumice sample in the water and record the new water height. Make sure the rock is completely
submerged. Use a fingertip to push it completely underwater if you need to.
New water level = _______________________________ mL
4. What is the difference in the water levels? You can use a calculator.
Water level difference = _______________________________ mL
5. Now use the calculator to divide the mass by the water level difference. This is your density.
Density = mass ÷ water level difference = _________________________________________________________ (units?)
6. Is pumice lighter or heavier than water? ______________________________________________
The density of water is 1 g/mL. The specific gravity (also called the “s.g.” or “SG”) of a mineral or rock is how we
compare the weight of the sample with the weight of an equal volume of water. Low specific gravity substances,
like pumice (0.9), are not very dense. High specific gravity substances, like for gold (19.3), are very dense. If the
specific gravity is less than 1, it will float on water.
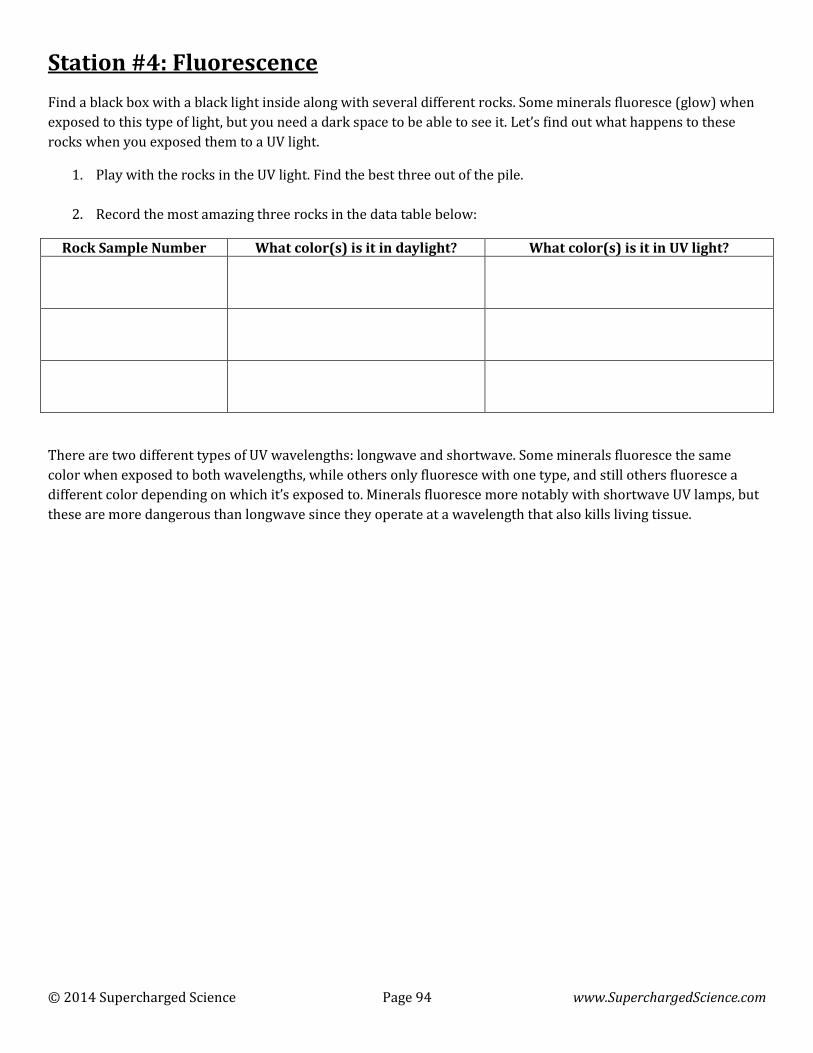
© 2014 Supercharged Science Page 94 www.SuperchargedScience.com
Station #4: Fluorescence
Find a black box with a black light inside along with several different rocks. Some minerals fluoresce (glow) when
exposed to this type of light, but you need a dark space to be able to see it. Let’s find out what happens to these
rocks when you exposed them to a UV light.
1. Play with the rocks in the UV light. Find the best three out of the pile.
2. Record the most amazing three rocks in the data table below:
Rock Sample Number What color(s) is it in daylight? What color(s) is it in UV light?
There are two different types of UV wavelengths: longwave and shortwave. Some minerals fluoresce the same
color when exposed to both wavelengths, while others only fluoresce with one type, and still others fluoresce a
different color depending on which it’s exposed to. Minerals fluoresce more notably with shortwave UV lamps, but
these are more dangerous than longwave since they operate at a wavelength that also kills living tissue.
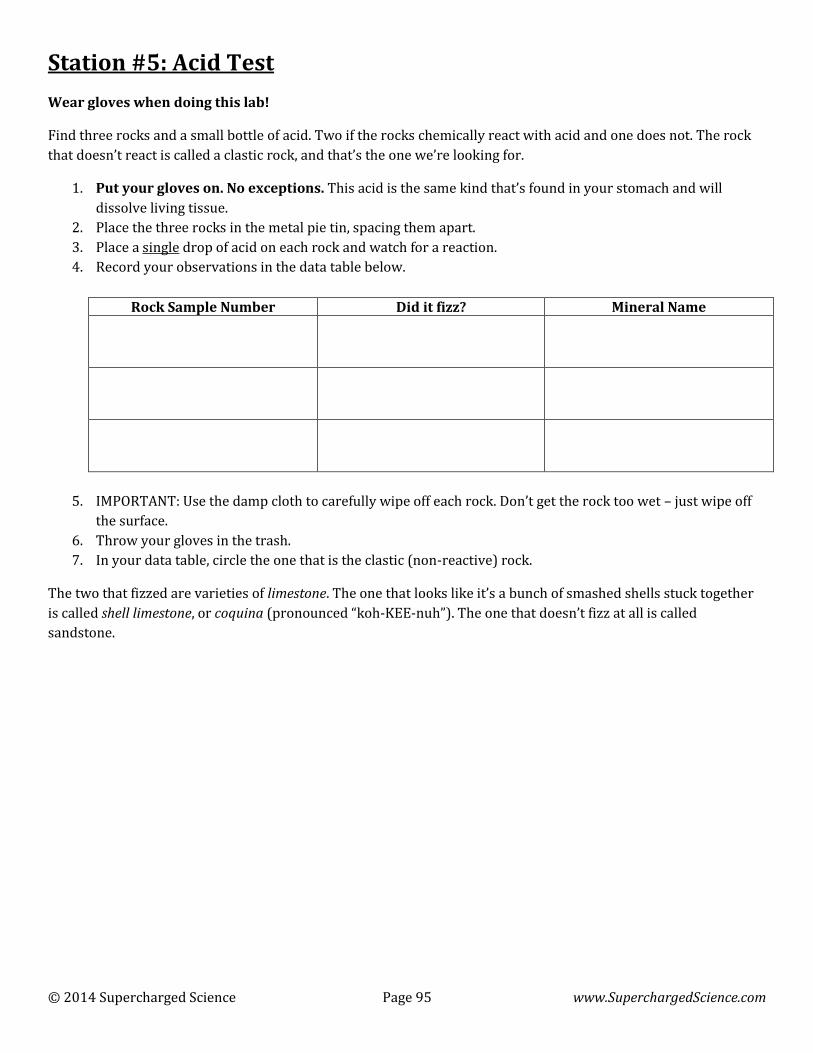
© 2014 Supercharged Science Page 95 www.SuperchargedScience.com
Station #5: Acid Test
Wear gloves when doing this lab!
Find three rocks and a small bottle of acid. Two if the rocks chemically react with acid and one does not. The rock
that doesn’t react is called a clastic rock, and that’s the one we’re looking for.
1. Put your gloves on. No exceptions. This acid is the same kind that’s found in your stomach and will
dissolve living tissue.
2. Place the three rocks in the metal pie tin, spacing them apart.
3. Place a single drop of acid on each rock and watch for a reaction.
4. Record your observations in the data table below.
Rock Sample Number Did it fizz? Mineral Name
5. IMPORTANT: Use the damp cloth to carefully wipe off each rock. Don’t get the rock too wet – just wipe off
the surface.
6. Throw your gloves in the trash.
7. In your data table, circle the one that is the clastic (non-reactive) rock.
The two that fizzed are varieties of limestone. The one that looks like it’s a bunch of smashed shells stuck together
is called shell limestone, or coquina (pronounced “koh-KEE-nuh”). The one that doesn’t fizz at all is called
sandstone.
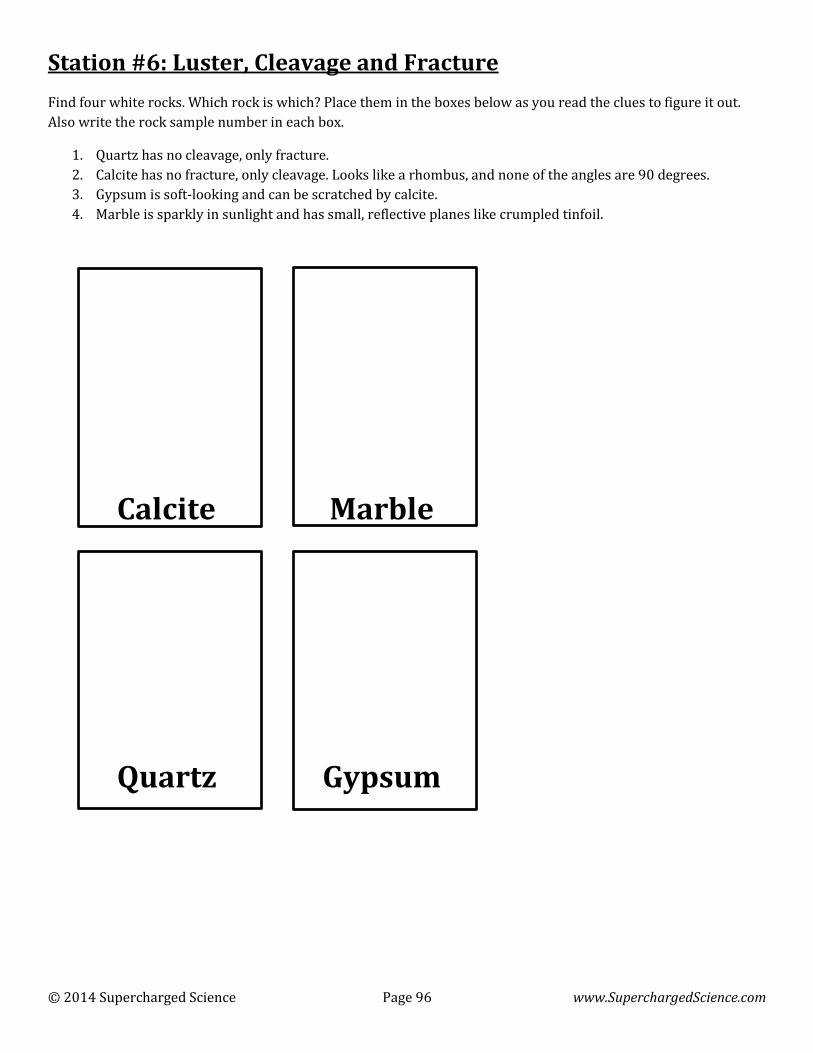
© 2014 Supercharged Science Page 96 www.SuperchargedScience.com
Station #6: Luster, Cleavage and Fracture
Find four white rocks. Which rock is which? Place them in the boxes below as you read the clues to figure it out.
Also write the rock sample number in each box.
1. Quartz has no cleavage, only fracture.
2. Calcite has no fracture, only cleavage. Looks like a rhombus, and none of the angles are 90 degrees.
3. Gypsum is soft-looking and can be scratched by calcite.
4. Marble is sparkly in sunlight and has small, reflective planes like crumpled tinfoil.
Calcite Marble
Quartz Gypsum
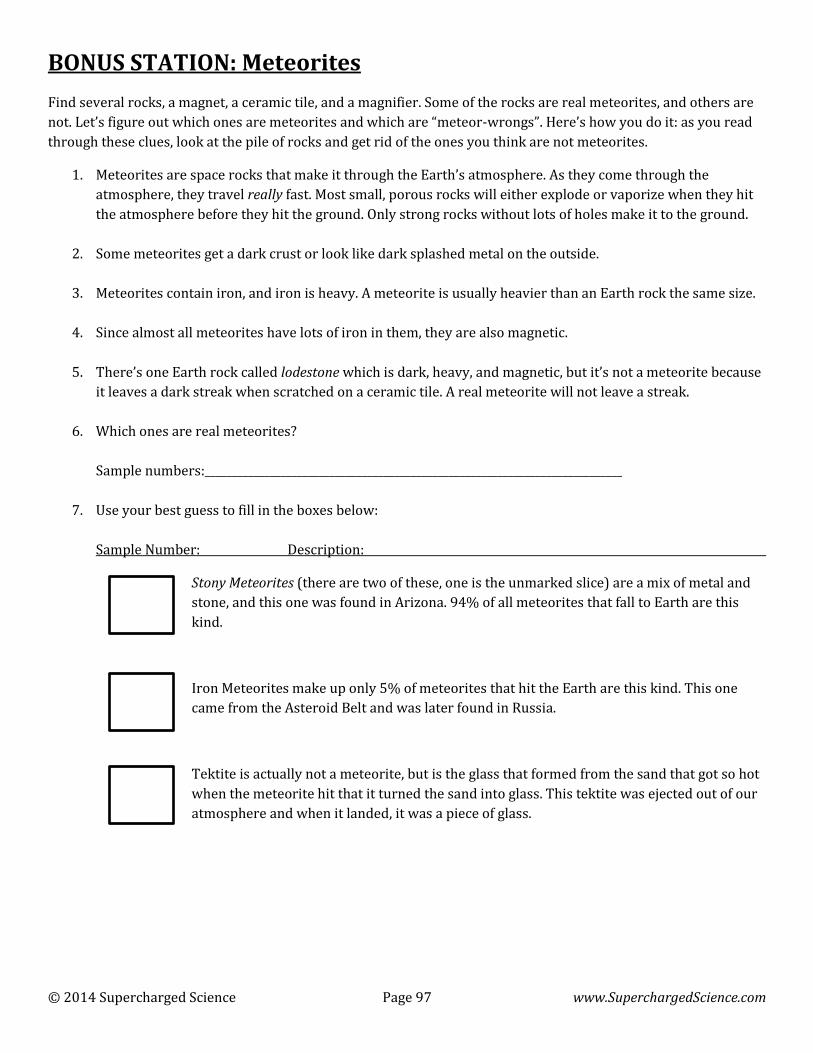
© 2014 Supercharged Science Page 97 www.SuperchargedScience.com
BONUS STATION: Meteorites
Find several rocks, a magnet, a ceramic tile, and a magnifier. Some of the rocks are real meteorites, and others are
not. Let’s figure out which ones are meteorites and which are “meteor-wrongs”. Here’s how you do it: as you read
through these clues, look at the pile of rocks and get rid of the ones you think are not meteorites.
1. Meteorites are space rocks that make it through the Earth’s atmosphere. As they come through the
atmosphere, they travel really fast. Most small, porous rocks will either explode or vaporize when they hit
the atmosphere before they hit the ground. Only strong rocks without lots of holes make it to the ground.
2. Some meteorites get a dark crust or look like dark splashed metal on the outside.
3. Meteorites contain iron, and iron is heavy. A meteorite is usually heavier than an Earth rock the same size.
4. Since almost all meteorites have lots of iron in them, they are also magnetic.
5. There’s one Earth rock called lodestone which is dark, heavy, and magnetic, but it’s not a meteorite because
it leaves a dark streak when scratched on a ceramic tile. A real meteorite will not leave a streak.
6. Which ones are real meteorites?
Sample numbers:_____________________________________________________________________________
7. Use your best guess to fill in the boxes below:
Sample Number: Description:
Stony Meteorites (there are two of these, one is the unmarked slice) are a mix of metal and
stone, and this one was found in Arizona. 94% of all meteorites that fall to Earth are this
kind.
Iron Meteorites make up only 5% of meteorites that hit the Earth are this kind. This one
came from the Asteroid Belt and was later found in Russia.
Tektite is actually not a meteorite, but is the glass that formed from the sand that got so hot
when the meteorite hit that it turned the sand into glass. This tektite was ejected out of our
atmosphere and when it landed, it was a piece of glass.
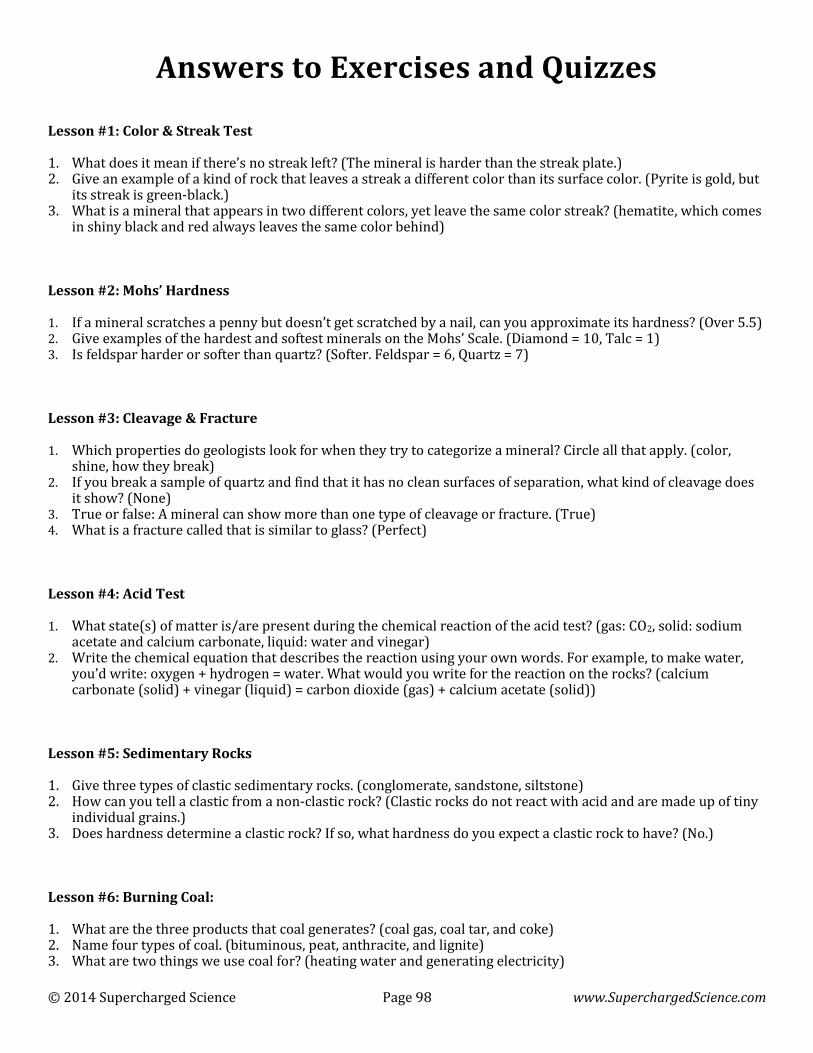
© 2014 Supercharged Science Page 98 www.SuperchargedScience.com
Answers to Exercises and Quizzes
Lesson #1: Color & Streak Test
1. What does it mean if there’s no streak left? (The mineral is harder than the streak plate.) 2. Give an example of a kind of rock that leaves a streak a different color than its surface color. (Pyrite is gold, but
its streak is green-black.) 3. What is a mineral that appears in two different colors, yet leave the same color streak? (hematite, which comes
in shiny black and red always leaves the same color behind)
Lesson #2: Mohs’ Hardness
1. If a mineral scratches a penny but doesn’t get scratched by a nail, can you approximate its hardness? (Over 5.5) 2. Give examples of the hardest and softest minerals on the Mohs’ Scale. (Diamond = 10, Talc = 1) 3. Is feldspar harder or softer than quartz? (Softer. Feldspar = 6, Quartz = 7)
Lesson #3: Cleavage & Fracture
1. Which properties do geologists look for when they try to categorize a mineral? Circle all that apply. (color, shine, how they break)
2. If you break a sample of quartz and find that it has no clean surfaces of separation, what kind of cleavage does it show? (None)
3. True or false: A mineral can show more than one type of cleavage or fracture. (True) 4. What is a fracture called that is similar to glass? (Perfect)
Lesson #4: Acid Test
1. What state(s) of matter is/are present during the chemical reaction of the acid test? (gas: CO2, solid: sodium acetate and calcium carbonate, liquid: water and vinegar)
2. Write the chemical equation that describes the reaction using your own words. For example, to make water, you’d write: oxygen + hydrogen = water. What would you write for the reaction on the rocks? (calcium carbonate (solid) + vinegar (liquid) = carbon dioxide (gas) + calcium acetate (solid))
Lesson #5: Sedimentary Rocks
1. Give three types of clastic sedimentary rocks. (conglomerate, sandstone, siltstone) 2. How can you tell a clastic from a non-clastic rock? (Clastic rocks do not react with acid and are made up of tiny
individual grains.) 3. Does hardness determine a clastic rock? If so, what hardness do you expect a clastic rock to have? (No.)
Lesson #6: Burning Coal:
1. What are the three products that coal generates? (coal gas, coal tar, and coke) 2. Name four types of coal. (bituminous, peat, anthracite, and lignite) 3. What are two things we use coal for? (heating water and generating electricity)
© 2014 Supercharged Science Page 99 www.SuperchargedScience.com
4. What type of coal is the most pure? (anthracite) 5. What is the dominant element in coal? (carbon) 6. What are three alternatives to generating energy, instead of using coal? (solar power, natural gas, and wind
power)
Lesson #7: Tenacity
1. What are four different types of tenacity? (ductile, malleable, flexible-elastic, and brittle) 2. How is elastic different from inelastic tenacity? (elastic minerals spring back into shape when released) 3. How many types of tenacity can a mineral have? (as many as they need to!)
Lesson #8: Density
1. In your data table, which number was the same for every trial run? (Initial Volume of Water) 2. What is the equation for finding density? (= m/V) 3. How did you find the volume of the rock? (When the rock is submerged in water, the water level rises by the
amount of volume of that rock. With careful measurements of the water level before and after, we can easily find the volume of the rock.)
Lesson #9: Luster
1. What is refraction? (Refraction is how light bends as it travels through a substance.) 2. Feldspar has perfect cleavage on two surfaces but fractured on a third. What kind of luster would you say it
has? (Feldspar is glassy on good cleavage planes but waxy or dull on the fractured side.) 3. What type of luster is found on mica? (Mica is glassy on the cleaved plane, but dull on the edges.)
Lesson #10: Fluorescence
1. What wavelength is shortwave UV? Longwave UV? (Longwave UV wavelengths are between 3000-4000 Å, or 300-400 nm (nanometers). Shortwave wavelength is less than 3000Å, or 300 nm.)
2. How is fluorescence different from phosphorescence? (Minerals that are fluorescent glow when exposed to a UV light. Minerals that continue to emit light even after the UV light has been switched off are phosphorescent.)
3. Name two minerals that fluoresce in both shortwave and longwave UV light. (aragonite and calcite)
Lesson #11: Magnetism
1. Is lodestone the same as magnetite? (Lodestone is the magnetic version of magnetite) 2. Which mineral is repelled from any magnetic field? (bismuth) 3. Which element is usually present in minerals that have magnetic properties? (iron)
Lesson #12: Making Limestone
1. What element is present in both calcium carbonate and your breath when you exhale? (carbon) 2. Why aren’t kids allowed to do this experiment? What’s the danger? (The danger is if they inhale the solution,
which is very caustic and toxic.)
© 2014 Supercharged Science Page 100 www.SuperchargedScience.com
3. Where can you find safety information for chemicals? (Look for MSDS sheets under the chemical name.)
Lesson #13: Sandstone
1. What elements is calcium carbonate made out of? (carbon and oxygen.) 2. How does this experiment look like sandstone? (The tiny grains of sand are glued together by the plaster of
Paris.) 3. What do you know about a feldspathic arenite sample? (The sample has less than 90% quartz, but more
feldspar than lithic grains, and it’s porous.)
Lesson #14: Popcorn Rock
1. What would happen if you warmed the vinegar first, and placed it on a heating pad during your experiment? (The vinegar would evaporate faster, making the crystals grow faster.)
2. What is it in the dolomite samples that make the aragonite crystals grow? (magnesium) 3. What else can you try instead of vinegar? (answers vary)
Lesson #16: Foam Pumice
1. Name three characteristics of pumice. (light-colored, floats on water, and is porous) 2. How is pumice different from scoria? (Scoria is darker, larger holes, thicker walls, denser, and sinks.) 3. What can you use pumice for? (Getting dead skin off your heels.)
Lesson #17: Test Tube Cannon
1. Does the stopper go further when you add more or less vinegar? (less) 2. Look at your answer for #1 above. Why is that? (More space for the gas to build up, leading to a higher pressure
and a bigger “explosion.”) 3. Which gases are produced by this reaction? (carbon dioxide)
Lesson 21: Laundry Soap Crystals
1. What is the point at which no more solids can be dissolved in a liquid? (supersaturated) 2. Which mineral do we see forming a crystal in today’s experiment? (sodium tetraborate)
Lesson 22: Penny Crystal Structure
1. Draw an arrangement of atoms in a crystal: (should show the atoms close together)
2. How are atoms stuck together? (bonds between them) 3. What is a crystal pattern called? (matrix) 4. Circle the examples of other crystal-like substances: (Graphite in a pencil, ice cube, chalk, etc.)
© 2014 Supercharged Science Page 101 www.SuperchargedScience.com
Lesson 23: Rock Candy Crystals
1. Draw a picture of a crystal, showing the individual molecules (should show some geometric pattern) 2. What do crystals form? (minerals) 3. What do minerals form into? (rocks) 4. What is it called when there is more sugar than water in the mixture of our solution? (supersaturated)
Lesson 24: Salt and Vinegar Crystals
1. Which mineral is being used to grow crystals today? (salt, sodium chloride) 2. Which material is the solute in today’ experiment? (salt) 3. Which material is the solvent (water and vinegar)
Lesson 25: Salt Stalactites
1. What is the solute in today’s experiment? (magnesium sulfate) 2. True or False: If this solution can dissolve more salt, it has reached its point of saturation. (False) 3. True or False: All minerals are crystals. (True)
Lesson 26: Eggshell Geodes
1. Circle the three ingredients for a geode? (water, minerals, and a space for it to fill)
Lesson 27: Metal Crystals
1. What is the solution called when no more solids can be dissolved? (supersaturated) 2. What is the main solute in this experiment? (sodium silicate) 3. What are the main types of elements that give crystals and minerals their color? (metals)
Lesson #28: Charcoal Crystals
1. Write down the four ingredients that you’re using to build the crystals today: (salt, water, laundry bluing, ammonia)
2. Are any of them minerals? Which ones? (salt, laundry bluing)

© 2014 Supercharged Science Page 102 www.SuperchargedScience.com
Rocks and Minerals Quiz
Answer Key
1. What is the definition of a rock? (Something that is made of two or more minerals.)
2. What does it mean if there’s no streak left on the streak plate? (The mineral is harder than the streak plate, which means it has a hardness of above 7.)
3. Give an example of a kind of rock that leaves a streak a different color than its surface color. (Pyrite is gold, but its streak is green-black.)
4. If a mineral scratches a penny but doesn’t get scratched by a nail, can you approximate its hardness? (Over 5.5) 5. Give examples of the hardest and softest minerals on the Mohs’ Scale. (Diamond = 10, Talc = 1) 6. Name three properties geologists look for when they try to categorize a mineral. (Color, hardness, fluorescence,
magnetism, luster, how they break, if they react to acid, etc.) 7. If you break a sample of quartz and find that it has no clean surfaces of separation, what kind of cleavage does
it show? (none) 8. What are two things we use coal for? (heating water and generating electricity) 9. What is the equation for finding density? (= m/V) 10. How is fluorescence different from phosphorescence? (Minerals that are fluorescent glow when exposed to a
UV light. Minerals that continue to emit light even after the UV light has been switched off are phosphorescent.) 11. Is lodestone the same as magnetite? (Lodestone is the magnetic version of magnetite.) 12. Name three characteristics of pumice. (light-colored, floats on water, and is porous.) 13. What is a crystal, and how is it different from a mineral and a rock? (Crystals are a structure of a regular
pattern of atoms within a solid. A mineral is an inorganic substance. All minerals are crystalline. Rocks are composed of two or more minerals. Not all crystals are minerals.)
© 2014 Supercharged Science Page 103 www.SuperchargedScience.com
The Scientific Method
One of the problems kids have is how to experiment with their great ideas without getting lost in the jumble of
result data. So often students will not have any clear ideas about what change caused which effect in their results!
Students often have trouble communicating their ideas in ways that not only make sense but are also acceptable by
science fairs or other technical competitions designed to get kids thinking like a real scientist. Another problem
they face is struggling to apply the scientific method to their science project in school, for scout badges, or any
other type of report where it’s important that other folks know and understand their work.
The scientific method is widely used by formal science academia as well as scientific researchers. For most people,
it’s a real jump to figure out not only how to do a decent project, but also how to go about formulating a scientific
question and investigate answers methodically like a real scientist. Presenting the results in a meaningful way via
“exhibit board”… well, that’s just more of a stretch that most kids just aren’t ready for. There isn’t a whole lot of
useful information available on how to do it by the people who really know how. That’s why I’m going to show you
how useful and easy it is.
The scientific method is a series of 5 steps that scientists use to do their work. But, honestly, you use it every day,
too! The five steps are Observation, Hypothesis, Test, Collect Data, and Report Results. That sounds pretty
complicated, but don’t worry, they are just big words. Let me tell you what these words mean and how to play with
them.
Step 1: Observation means what do you see, or hear, or smell, or feel? What is it that you’re looking at? Is
that what it usually does? Is that what it did last time? What would happen if you tried something different with it?
Observation is the beginning of scientific research. You have to see or touch or hear something before you can start
to do stuff with it, right?
Step 2: Once you observe something, you can then form a hypothesis. All hypothesis really means is
“guess.” A hypothesis is an educated guess. Tonight at dinner, when someone asks you, “Do you want peas or
carrots?” Say, “I hypothesize that I would like the carrots.” Everyone will think you’re a genius! Basically you’re
saying “I guess that I would like the carrots.” Hypotheses aren’t right or wrong, they are just your best guess.
Step 3: To see if your guess is correct, you need to do the next step in the scientific method: test. The
test is just what it sounds like: running experiments to see whether or not your hypothesis is correct.
Step 4: As you do your tests, you need to collect data. That means collecting the numbers, the
measurements, the times, and the data of the experiment. Once you collect your data, you can take a look at it, or in
other words, analyze it.
Step 5: Once you analyze your data you can report your results. That basically means tell someone
about it. You can put your data in a chart or a graph or just shout it from the rooftops!
Here’s a great way to remember the 5 steps. Remember the sentence “Orange Hippos Take Classes Regularly.” The
first letter in each word of that goofy sentence is the same as the first letter in each step of the scientific method.
That’s called a mnemonic device. Make up your own mnemonic devices to remember all sorts of stuff.
“OK, so that’s what the words mean. How do I use that every day?”
© 2014 Supercharged Science Page 104 www.SuperchargedScience.com
Well, I’m glad you asked that question. If you had cereal for breakfast this morning, you did the scientific method.
On the table you had a bowl of cereal with no milk in it. As you looked at your dry cereal, you made an observation,
“I need milk!” At that point, you made a hypothesis, “There’s milk in the fridge.” You can’t be sure there’s milk in
the fridge. Someone might have used it up. It might have gone bad. Aliens may have used it to gas up their milk-
powered spaceship. You just don’t know! So you have to do a test.
What would be a good test to see if there is milk in the fridge? Open the fridge! Now once you move the week-old
spaghetti and the green Jell-O (at least you hope it’s Jell-O) out of the way, you can see if there is milk or not. So you
collect your data. There is milk or there isn’t milk. Now you can finally report your results. If there is milk, you can
happily pour it on your cereal. If there isn’t any milk, you report your results by shouting, “Hey, Mom...We need
milk!” Scientific method, not so hard is it?
You’ll get familiar with the scientific method by doing the activities and experiments in your lessons. Most
scientists don’t use the full version of the scientific method, which actually includes several additional steps to the
ones I’ve outlined above.
© 2014 Supercharged Science Page 105 www.SuperchargedScience.com
Vocabulary for the Unit
Mineral - an inorganic, crystalline, chemical substance that occurs naturally.
Crystal - minerals made of a single chemical with atoms that repeat in a predictable or regular pattern.
Foliation –the process and final appearance of banded minerals within a larger rock feature, describing the
flattening and lining up of mineral grains through heat and pressure in rock metamorphosis.
Fossils –mineralized remains of plants and animals that lived on earth long ago but have since been buried under
layers of rock and sediment.
Geode - a deposit of mineral material that has formed crystals within a pocket.
Rock – a compound made of two or more minerals, formed from different physical and chemical processes in the
Earth’s crust, and often from other rocks themselves.