Embed Size (px)
Citation preview
earthstraw installation & operation instructions | multiple patents pending | © copyright 2014 flojak industries | v1.3 112514
1
2
3
4
With the exception of the pump handle assembly, which attaches very quickly, your EarthStraw is ready to install. Cut the plastic wrap-ties and uncoil the system on the ground with the black foot-valve strainer pointing toward your well. You may have to untwist the coils to flatten them against the ground. Allow the EarthStraw to relax and straighten out as much as possible. This works better in warmer temperatures. For better control and easier insertion, VERY CAREFULLY hand-straighten the first 20 feet or so (on the foot-valve end) by over-bending the pipe in the opposite direction. Do not kink the pipe during the straightening process as this will damage the pump.
CAUTION: Do not attempt to install the handle before uncoiling the system. Do not “dry-pump” or “dry-lift” the handle prior to installing it in the well.
What Comes with this KitCoiled pump with footvalve on one end
Earthstraw sucker rod (pump rod) assembly
24” reinforced clear filler hose
Parts bag with instructions, threaded “T” handle, and machined aluminum stop
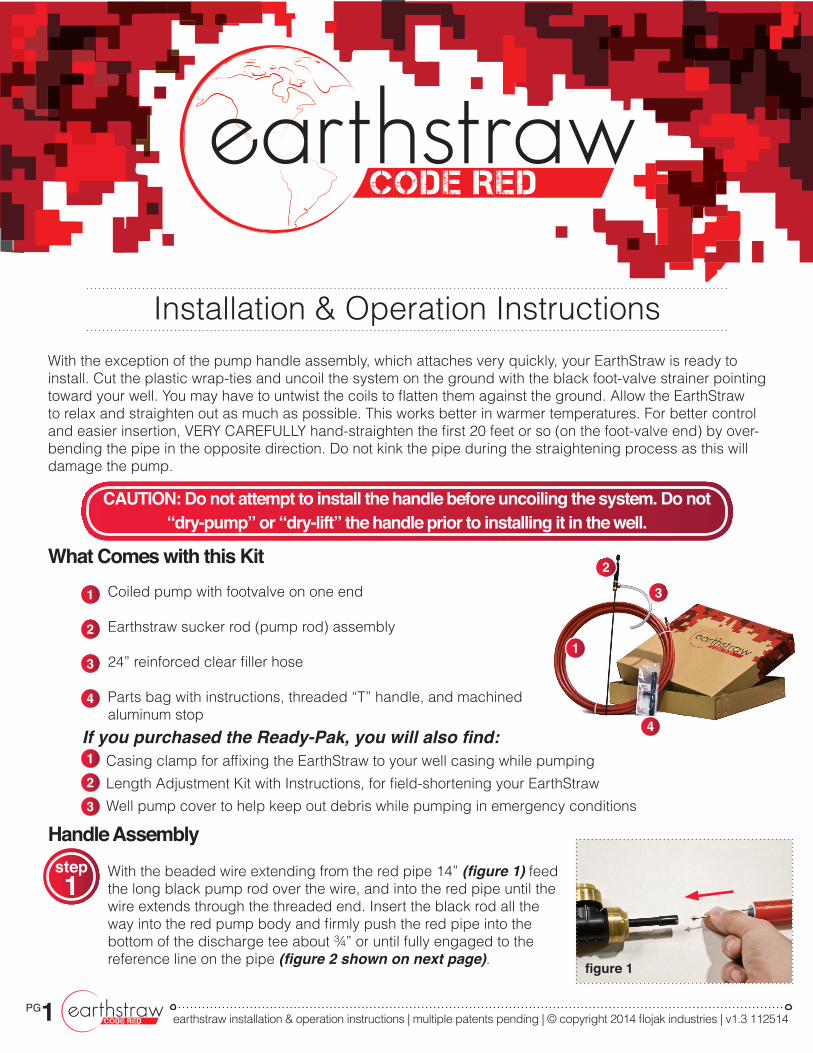
Handle AssemblyWith the beaded wire extending from the red pipe 14” (figure 1) feed the long black pump rod over the wire, and into the red pipe until the wire extends through the threaded end. Insert the black rod all the way into the red pump body and firmly push the red pipe into the bottom of the discharge tee about ¾” or until fully engaged to the reference line on the pipe (figure 2 shown on next page).
Installation & Operation Instructions
step1
1
1
2
3
4
figure 1
PG1
If you purchased the Ready-Pak, you will also find:Casing clamp for affixing the EarthStraw to your well casing while pumpingLength Adjustment Kit with Instructions, for field-shortening your EarthStraw Well pump cover to help keep out debris while pumping in emergency conditions
2
3
earthstraw installation & operation instructions | multiple patents pending | © copyright 2014 fl ojak industries | v1.3 112514
Just below the beaded-end, lay the wire into the machined side slot in the side of the aluminum stop (fi gure 3). Using vice grips, crimp the small end of the aluminum stop over the stainless steel wire until the slot closes a little over half way and the wire is captured (fi gure 4). Now slide the stop toward the end of the wire until the bead is recessed and seated in the end of the aluminum stop.
Clean the machined aluminum stop with isopropyl alcohol and a Q-tip. When dry, drop a small amount of super glue into the machined slot and over the bead, and allow the glue to harden. This will help to secure the wire in position. Now, insert the aluminum stop into the pump rod until seated (fi gure 5). Hand-screw the double grip pump handle in place to secure the aluminum stop (fi gure 6). Do not over-tighten.
NOTE | You will see a small weep-hole to help drain the system in freezing conditions. An additional hole may be added futher down the system by
melting through the pipe with a small heated paper clip
There are several installation options, based on one of three common well confi gurations listed below (1)Open Well, (2) Well Cap and (3) Well Seal.
NOTE | Always ensure that the foot-valve is several feet from the bottom of the well to avoid sand and silt Shorten the system if necessary using the Length Adjustment Kit. Also, never force the EarthStraw into your well! If you hit resistance, lift, rotate and gently probe to fi nd a better route. Tight fi ts or tight bends can cause the pump housing to distort and impede a smooth friction-free operation, or can damage your pump.
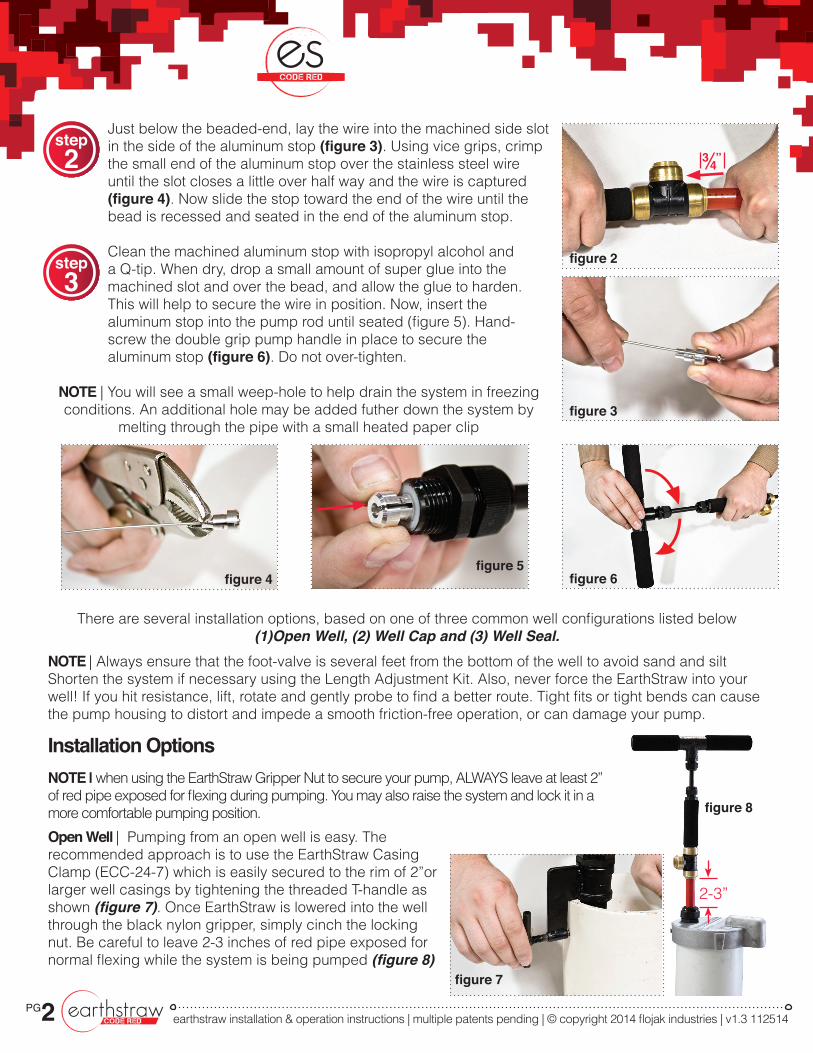
Installation OptionsNOTE | when using the EarthStraw Gripper Nut to secure your pump, ALWAYS leave at least 2” of red pipe exposed for fl exing during pumping. You may also raise the system and lock it in a more comfortable pumping position.Open Well | Pumping from an open well is easy. The recommended approach is to use the EarthStraw Casing Clamp (ECC-24-7) which is easily secured to the rim of 2”or larger well casings by tightening the threaded T-handle as shown (fi gure 7). Once EarthStraw is lowered into the well through the black nylon gripper, simply cinch the locking nut. Be careful to leave 2-3 inches of red pipe exposed for normal fl exing while the system is being pumped (fi gure 8)
fi gure 4fi gure 5
fi gure 6
PG2
fi gure 3
fi gure 2
3 4”step2
step3
fi gure 7
fi gure 8
2-3”
earthstraw installation & operation instructions | multiple patents pending | © copyright 2014 flojak industries | v1.3 112514
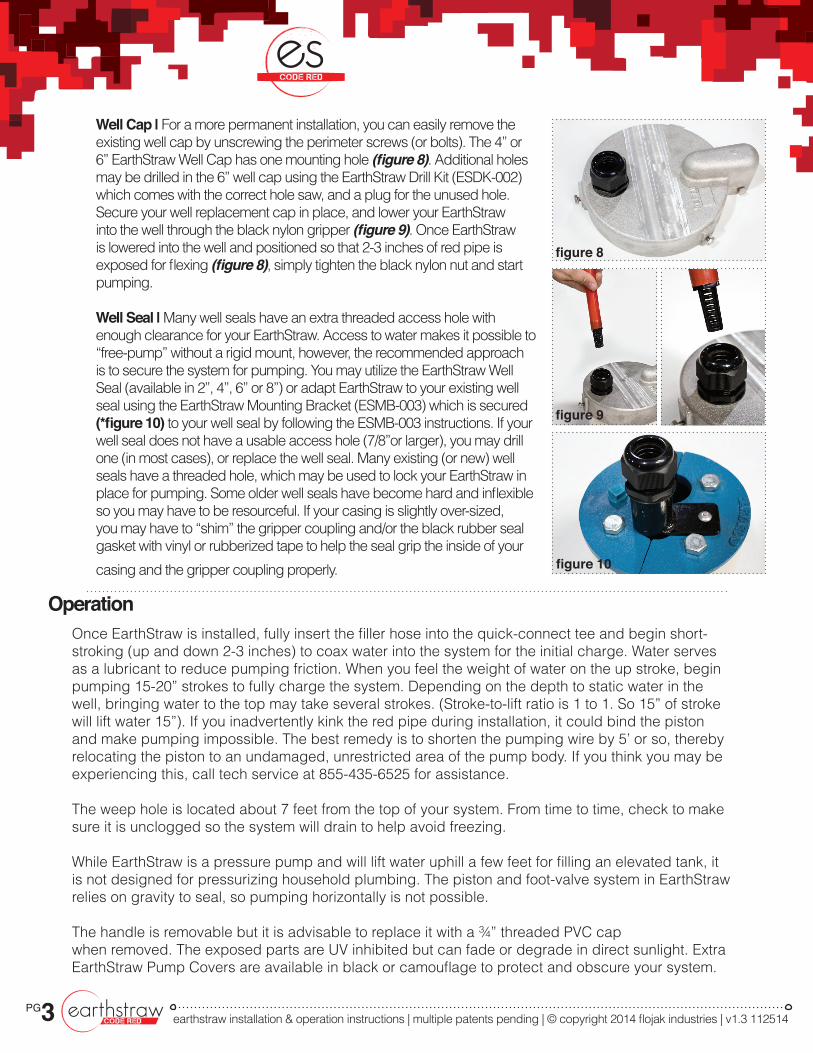
Well Cap | For a more permanent installation, you can easily remove the existing well cap by unscrewing the perimeter screws (or bolts). The 4” or 6” EarthStraw Well Cap has one mounting hole (figure 8). Additional holes may be drilled in the 6” well cap using the EarthStraw Drill Kit (ESDK-002) which comes with the correct hole saw, and a plug for the unused hole. Secure your well replacement cap in place, and lower your EarthStraw into the well through the black nylon gripper (figure 9). Once EarthStraw is lowered into the well and positioned so that 2-3 inches of red pipe is exposed for flexing (figure 8), simply tighten the black nylon nut and start pumping.
Well Seal | Many well seals have an extra threaded access hole with enough clearance for your EarthStraw. Access to water makes it possible to “free-pump” without a rigid mount, however, the recommended approach is to secure the system for pumping. You may utilize the EarthStraw Well Seal (available in 2”, 4”, 6” or 8”) or adapt EarthStraw to your existing well seal using the EarthStraw Mounting Bracket (ESMB-003) which is secured (*figure 10) to your well seal by following the ESMB-003 instructions. If your well seal does not have a usable access hole (7/8”or larger), you may drill one (in most cases), or replace the well seal. Many existing (or new) well seals have a threaded hole, which may be used to lock your EarthStraw in place for pumping. Some older well seals have become hard and inflexible so you may have to be resourceful. If your casing is slightly over-sized, you may have to “shim” the gripper coupling and/or the black rubber seal gasket with vinyl or rubberized tape to help the seal grip the inside of your casing and the gripper coupling properly.
OperationOnce EarthStraw is installed, fully insert the filler hose into the quick-connect tee and begin short-stroking (up and down 2-3 inches) to coax water into the system for the initial charge. Water serves as a lubricant to reduce pumping friction. When you feel the weight of water on the up stroke, begin pumping 15-20” strokes to fully charge the system. Depending on the depth to static water in the well, bringing water to the top may take several strokes. (Stroke-to-lift ratio is 1 to 1. So 15” of stroke will lift water 15”). If you inadvertently kink the red pipe during installation, it could bind the piston and make pumping impossible. The best remedy is to shorten the pumping wire by 5’ or so, thereby relocating the piston to an undamaged, unrestricted area of the pump body. If you think you may be experiencing this, call tech service at 855-435-6525 for assistance.
The weep hole is located about 7 feet from the top of your system. From time to time, check to make sure it is unclogged so the system will drain to help avoid freezing.
While EarthStraw is a pressure pump and will lift water uphill a few feet for filling an elevated tank, it is not designed for pressurizing household plumbing. The piston and foot-valve system in EarthStraw relies on gravity to seal, so pumping horizontally is not possible.
The handle is removable but it is advisable to replace it with a ¾” threaded PVC capwhen removed. The exposed parts are UV inhibited but can fade or degrade in direct sunlight. Extra EarthStraw Pump Covers are available in black or camouflage to protect and obscure your system.
PG3
figure 10
figure 8
figure 9