Embed Size (px)
Citation preview
EBIZ IMAGE UPLOAD OVERVIEW &
TROUBLESHOOTING GUIDE
TABLE OF CONTENTS
How to Upload Images .................................................................................................................................. 1
How It Works .............................................................................................................................................. 11
Basic Auth URLs ....................................................................................................................................... 11
Hosting your Images ................................................................................................................................... 12
Common Errors & Troubleshooting ............................................................................................................ 12
Clipping Path ........................................................................................................................................... 12
Copy Information Only ............................................................................................................................ 12
Image Viewers ......................................................................................................................................... 12
Ways to get to the image location from an image viewer .................................................................. 14
Testing with Basic Auth URL format ................................................................................................... 15
Dropbox workaround .......................................................................................................................... 15
Box.com workaround .......................................................................................................................... 16
HOW TO UPLOAD IMAGES
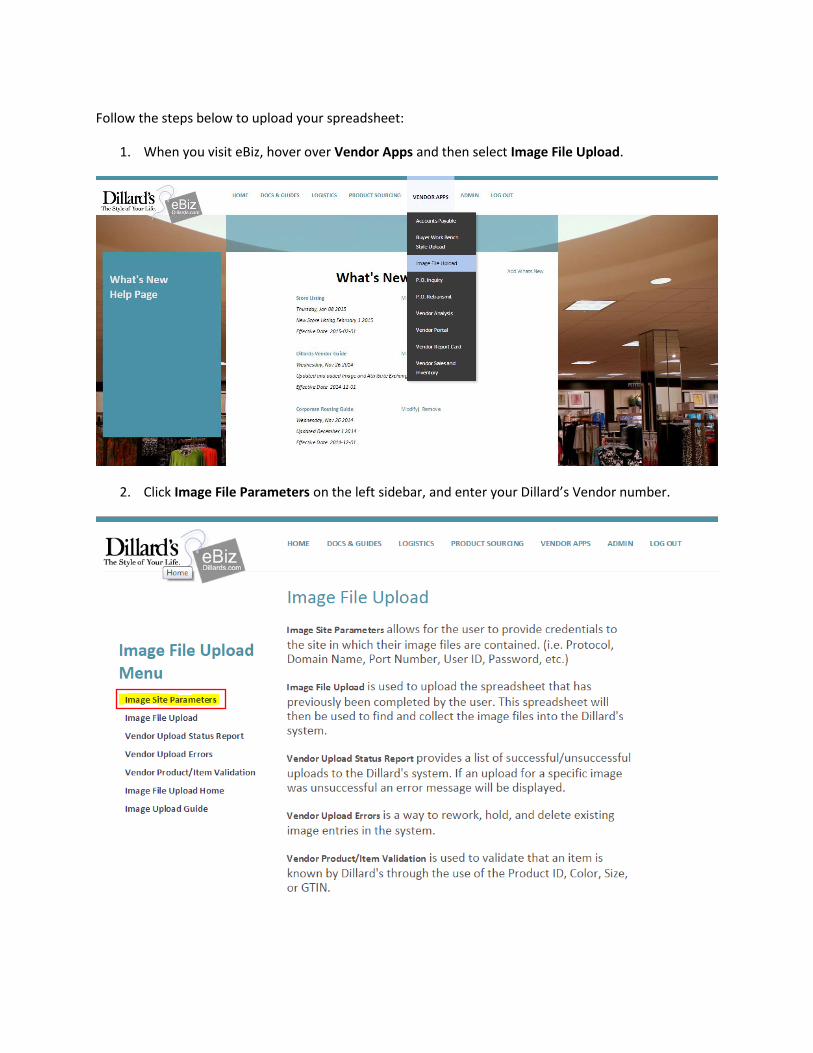
Follow the steps below to upload your spreadsheet:
1. When you visit eBiz, hover over Vendor Apps and then select Image File Upload.
2. Click Image File Parameters on the left sidebar, and enter your Dillard’s Vendor number.
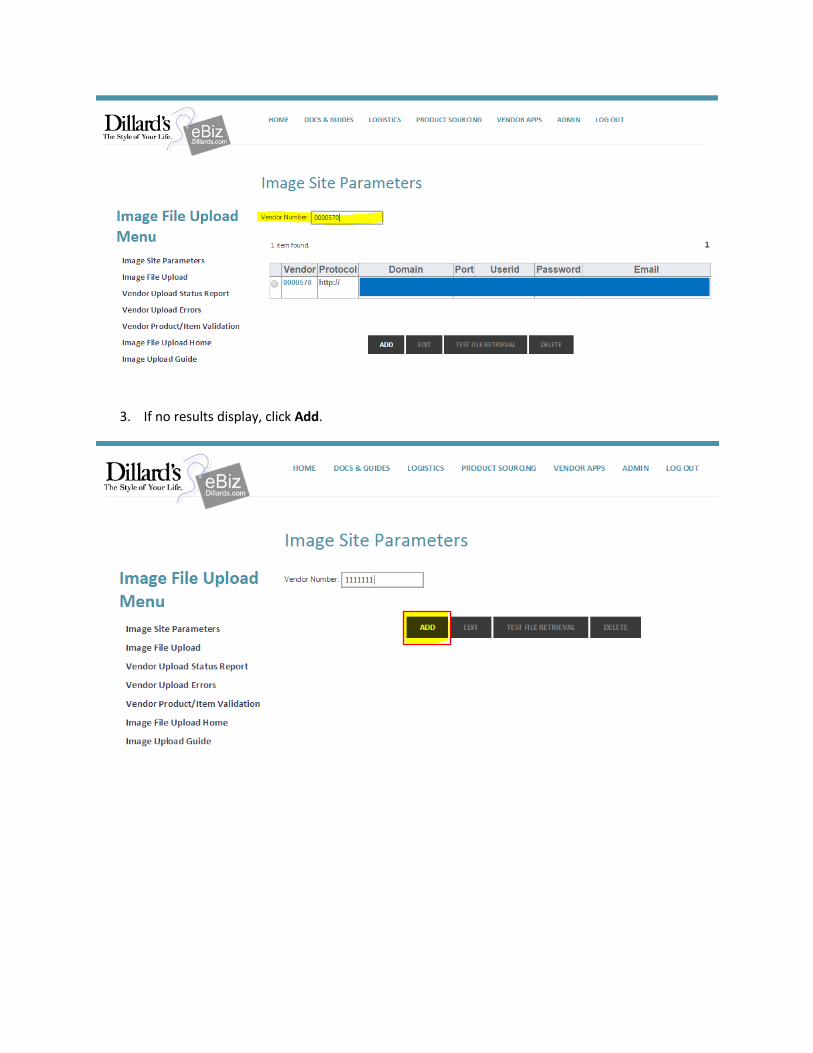
3. If no results display, click Add.

4. Fill out the form with the key information. You’re giving us the directions on how to get to your
image. Let’s pretend your image is having a house party (Wahoo!).
a. Protocol – Choose FTP or HTTP. An easy way to tell is by looking at the URLs for your
images in the spreadsheet. Giving us the protocol is like telling us what vehicle to take to
get to the party (i.e. Should we take the train or the bus?).
b. Domain – This is the website that hosts your images. Examples include: ftp.dillards.com
or dl.dropbox.com. This is like telling us which building your image lives in.
c. Port – Most commonly, FTP uses port 21, HTTP uses port 80, and HTTPS uses port 443.
Ask your IT guys for this information. This is like telling us which unit to go to (4A or
8D?).
d. Email and Password – If the site where you host the image is secured, we need to know
how to get past authentication. This is like our invitation to the party.
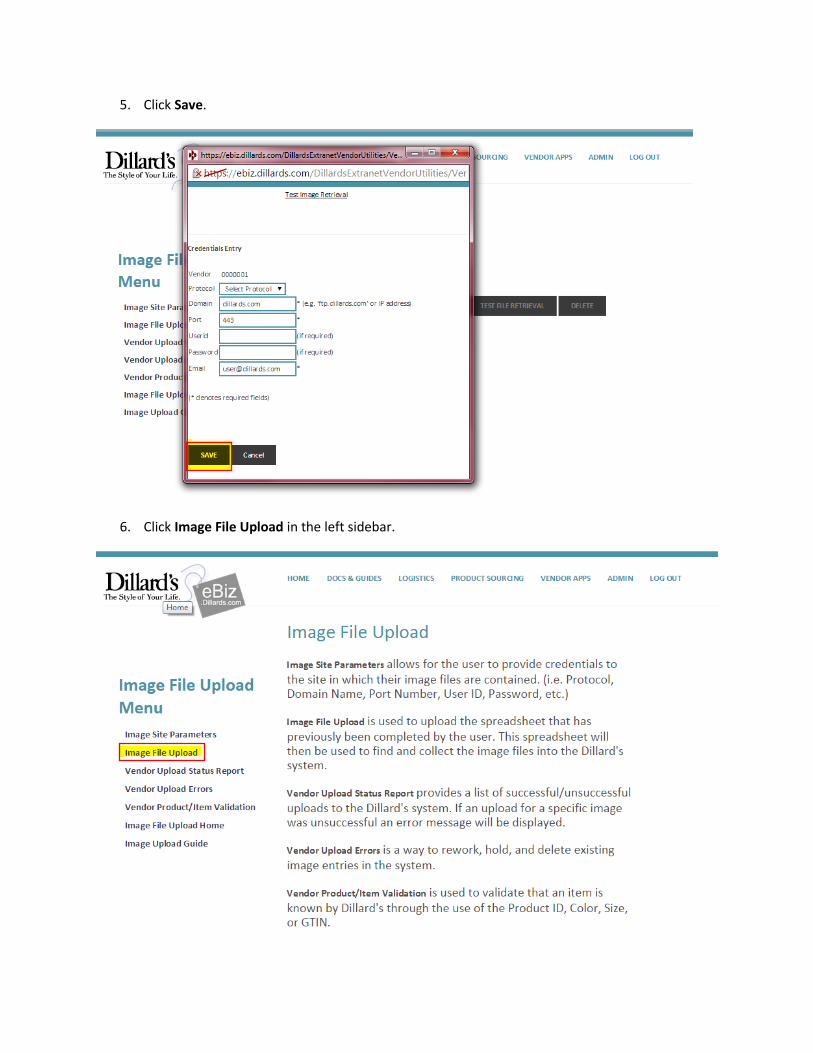
5. Click Save.
6. Click Image File Upload in the left sidebar.

If you’ve already completed your spreadsheet, click Choose File and select which file you’d like to
upload.
7. If you haven’t filled out a spreadsheet at this point, you can click Vendor Image Upload
Template to download a clean one.

8. Once you’ve selected the file, click Validate.
9. If a green bar appears at the top of your screen, your spreadsheet isn’t missing any required
fields. Note: your spreadsheet could still contain errors!

10. If you see a red bar, then go edit your spreadsheet to make sure all required fields are present.
Required fields are denoted by blue text in the template.
11. If your spreadsheet validated, browse and select your spreadsheet once more, but this time click
Submit. You should see another green bar at the top of the screen. If not, you’ve experienced an
error.

12. Click Vendor Upload Status Report in the left sidebar.
13. Your spreadsheet should be located at the top. If it isn’t, enter your Dillard’s vendor number to
filter the results. Check the message. If your spreadsheet was successful, it should tell you it’s
complete. Note: there might still be errors!
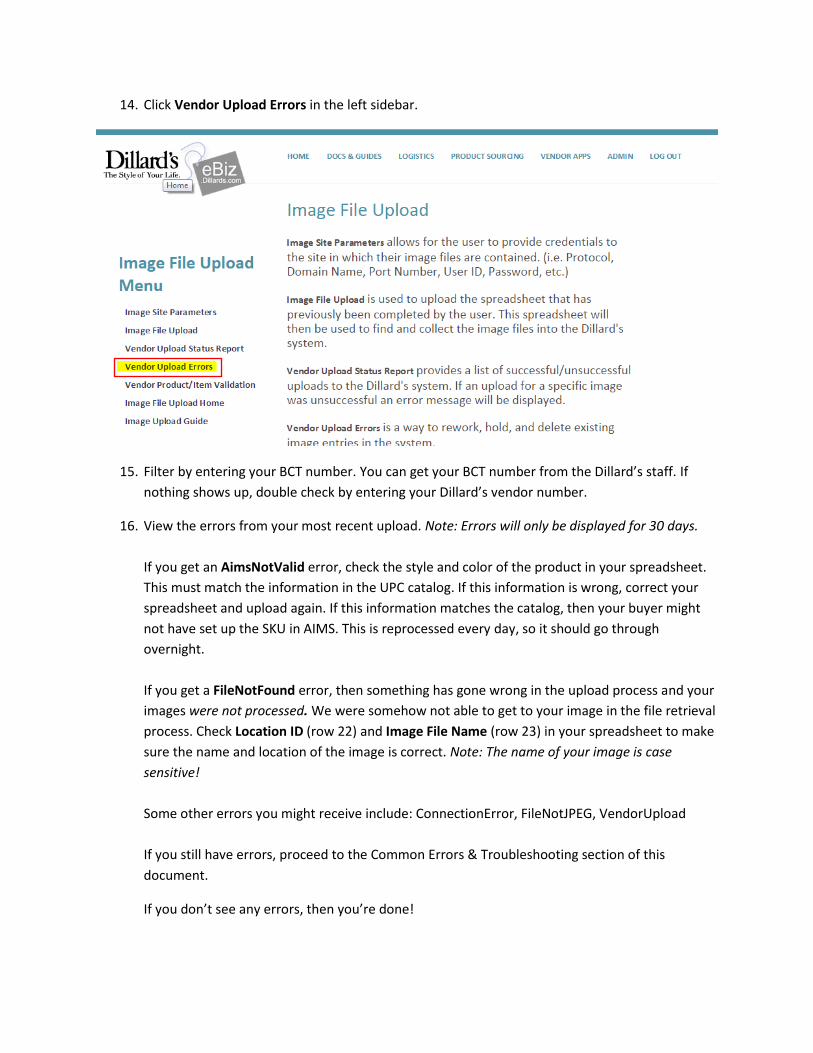
14. Click Vendor Upload Errors in the left sidebar.
15. Filter by entering your BCT number. You can get your BCT number from the Dillard’s staff. If
nothing shows up, double check by entering your Dillard’s vendor number.
16. View the errors from your most recent upload. Note: Errors will only be displayed for 30 days.
If you get an AimsNotValid error, check the style and color of the product in your spreadsheet.
This must match the information in the UPC catalog. If this information is wrong, correct your
spreadsheet and upload again. If this information matches the catalog, then your buyer might
not have set up the SKU in AIMS. This is reprocessed every day, so it should go through
overnight.
If you get a FileNotFound error, then something has gone wrong in the upload process and your
images were not processed. We were somehow not able to get to your image in the file retrieval
process. Check Location ID (row 22) and Image File Name (row 23) in your spreadsheet to make
sure the name and location of the image is correct. Note: The name of your image is case
sensitive!
Some other errors you might receive include: ConnectionError, FileNotJPEG, VendorUpload
If you still have errors, proceed to the Common Errors & Troubleshooting section of this
document.
If you don’t see any errors, then you’re done!
HOW IT WORKS
Let’s go through what actually happens when you click Submit.
1. Validation – First thing, the program checks to make sure all the required fields are present in
the spreadsheet and that the spreadsheet is in the correct format.
2. AIMS – AIMS is our inventory management system. The system uses the product information
you have given in the spreadsheet to make sure the product is setup in inventory. It then
updates the copy information you provided in the spreadsheet. The style and color of your
product must match the UPC catalog.
3. Image Retrieval – The program uses both the site parameters and the image information you’ve
provided in the spreadsheet to retrieve the image and store in our asset management system. It
automatically links the images to the product information we store in AIMS. This allows us to get
your product on the web store quickly.
BASIC AUTH URLS
When we retrieve your image, the program uses a URL format called HTTP Basic Authentication, or basic
auth. The following format is used:
<protocol>://<userid>:<password>:@<domain name>:<port number>/<file path>/<file name>
You should remember giving us some of this information in your site parameters. For example, Jane Doe
Fashion might have provided Dillard’s with the following information on eBiz:
Protocol: HTTP
Domain: janedoefashion.com
Port: 443
Email: [email protected]
Password: Dillards1
Then in the spreadsheet, Jane Doe Fashion has said that the image for a handbag is located at the
following address:
File path (row 22): janedoefashion.com/dillards/
File name (row 23): handbag.jpg
Our web service constructs the following:
https://[email protected]:Dillards1:@janedoefashion.com:443/dillards/handbag.jpg
If our web service doesn’t see an image at that address, then you’ll receive a FileNotFound error.

HOSTING YOUR IMAGES
If you are not currently hosting your images, you have several options.
For HTTP hosting, we recommend SmartFile (www.smartfile.com). Another popular option is Dropbox
(www.dropbox.com).
You may also wish to explore your options with FTP (File Transfer Protocol). FTP can make filling out
your spreadsheet much easier as it gives you more control over the file paths and locations of your
images.
Be sure to discuss HTTP and FTP hosting solutions with your IT department.
COMMON ERRORS & TROUBLESHOOTING
Below are some typical errors and fixes that we see when validating the spreadsheet and trying to
retrieve images.
CLIPPING PATH
If your spreadsheet is having trouble validating, check to see what the last column in the sheet is. If the
last column isn’t Clipping Path, then the spreadsheet won’t validate. Delete any content from all rows
after the last Clipping Path row. Note: Do not alter any content in column A.
COPY INFORMATION ONLY
If you’re trying to load copy information only, make sure that your spreadsheet still ends on Clipping
Path, but delete all image information in the rows. Make sure there isn’t any text in the column after
Row 15.
IMAGE VIEWERS
You must give us URL to the actual location of your file. Image viewers in some content management
systems can make that tricky.
An image URL typically looks like this:
https://dillards.com/images/logo.jpg
If the URL does not end with the image name followed by a “.jpg”, the URL is probably not correct. This
might be because your URL is pointing to an image viewer.
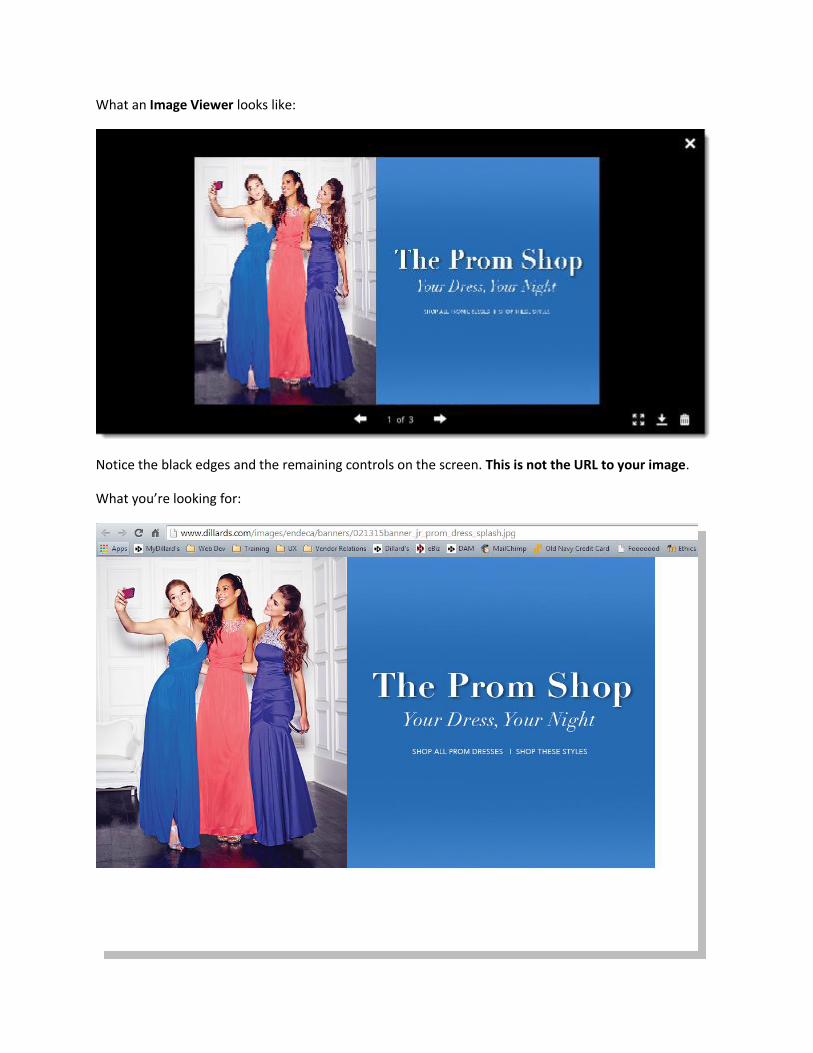
What an Image Viewer looks like:
Notice the black edges and the remaining controls on the screen. This is not the URL to your image.
What you’re looking for:

Notice how this page contains only the image on the screen. The image will be located in the top-left
corner and have white space surrounding it. This is how you know you’ve located your image in the
browser. Use the URL at the top of the page to fill in rows 22 and 23 on the spreadsheet.
WAYS TO GET TO THE IMAGE LOCATION FROM AN IMAGE VIEWER
There are a few ways that might work to allow you to get to the image from the image viewer.
Right click on the image. Select Open Image in New Tab.
Right click on the image. Select Get Image URL.
In some content management systems, you might have the option to click View Original.

TESTING WITH BASIC AUTH URL FORMAT
Use the following steps to make sure that your new URL will work on the web service:
1. Open a new browser. If you’re in Google Chrome, click the three bars on the top right of the
screen, and select New Incognito Window. If you want to stay in your current browser, log out
of all systems and websites.
2. Look up your Image Site Parameters in eBiz. Enter your information in the following format:
<protocol>://<userid>:<password>:@<domain name>:<port number>/<file path>/<file name>
3. Use the file path and file name in your spreadsheet rows 22 and 23 to fill in the last two places.
4. Double check that all punctuation is correct. There should be a colon and two forward slashes
(://) after the protocol, a colon (:) in between the username and password, a colon and at sign
(:@) in between password and domain name, a colon (:) between domain name and port
number, and forward slashes (/) between the port number, file path, and file name.
5. Hit enter on your keyboard. Do you see your image? If not, then there will still be errors when
you upload.
DROPBOX WORKAROUND
If you host your images using Dropbox, there are few steps you need to take to get the actual location
URL of the images.
1. Click on the image you want to share. This should bring up the image viewer.
2. Click the Share button. It looks like chain links.
3. You should see a URL that you can copy. Paste that URL into a spreadsheet or word processor.
4. Replace “www.dropbox.com” with “dl.dropboxusercontent.com”.
5. Remove any characters in the URL after “.jpg”. Normally, you’ll have to remove “?dl=0”.
6. This is your final URL. Paste the URL in your browser to test if it works.
7. If the image will popped up on the screen, use that URL in your image spreadsheet.
Note: The image name might not be what you named it. This is okay. In your spreadsheet, the
image name will be whatever comes before the “.jpg” in the URL.
BOX.COM WORKAROUND
You must have a paid account on Box.com for this process to work. If you have a paid account, to get the
location of your image, do the following:
1. Click the image you’d like to use.
2. Click the share icon. It looks like a chain link in the top right corner of the viewer.
3. At the very bottom of the menu, you click Direct Link.
4. Use the URL given to fill out rows 22 and 23 of your spreadsheet.
Further instruction can be found online in the Box.com documentation:
https://support.box.com/hc/en-us/articles/200519908-Direct-Linking-to-a-File
If you do not have a paid account for Box.com, you must upgrade your account. If you must have a free
solution, check into Dropbox (www.dropbox.com) as an alternate host.