Embed Size (px)
Citation preview

Introduction
I have a passion for pools. I’m addicted to the energy that surrounds them. When a family gets a pool
the children sleep in their bathing suits, adults become giddy, and for some reason old friends start
calling again. After being in the pool industry for fifteen years this “energy” makes what I do so fulfilling.
My name is Jason Hughes, and I am co-owner and co-founder of River Pools and Spas located in Virginia.
Over eight years ago my partners and I pioneered the effort to educate the people of Central Virginia of
the benefits of inground fiberglass swimming pools. Since that time we have continued our focus on
education and are now the leading dealer of fiberglass pools in the state, and have since expanded into
Maryland and the D.C. area. I have been personally involved with the planning, design, and construction
of almost five hundred inground pool projects and have seen everything from floating pools down the
river to delivering them via helicopter. I sit down with every customer and discuss the unique
characteristics of their project from design to completion and find tremendous satisfaction in seeing my
client’s dreams come to fruition. My hope is that this book will play a role in making your dream a
reality as well.
I feel that there is a genuine need for this book. As great as the pool industry is, it fails to serve many
inground pool customers in two critical areas: education and design. Most pool contractors are reliable
people and are great at their specialty, building pools. But unfortunately most have not taken time to
study backyard design and hesitate to spend the necessary amount of time with clients in the planning
and design process. I am somewhat of an anomaly in the industry because I do understand the
intricacies of pool construction, but have also taken the time to educate myself on the basic guiding
principles that make my clients dream pools a reality….five hundred and counting. This book is my best
attempt to give potential pool customers the information I know they are starving for. It is designed to
fill the information void that exists with answers to the same questions I have been answering for years.
Now I want to share this experience with you and help maximize the potential that exists in your
backyard.
The format of this book is simple. I walk you through the six step process of achieving pool and patio
perfection. Chapter by chapter we’ll tackle issues like finding the perfect spot in the yard, choosing pool
shape, pool and patio layout, managing sloping yards, fencing, and landscaping. Each chapter we’ll take
time to observe two case studies and see how the information from each section is applicable to them.
These two “clients”, Stacey and Kip, are fictional but their circumstances and concerns are the same
ones I encounter every day with real pool customers. We will watch their backyards transform from

plain to paradise through the use of 3D design software. I utilize this technology throughout the book to
demonstrate various aspects of design. It allows us to look at the same project in a number of different
ways and apply the same principles and logic to your backyard.
Introducing our Case Studies
Meet the Alvarez family
For the past several years Stacey Alvarez and her husband have kicked around the idea of building a pool
in their backyard. They always knew a backyard oasis would create a setting where their family could
spend quality time together, but after vacationing at a rental home with a pool, their two children had
so much fun they decided it was time to go ahead and take the plunge. After researching online and
talking with several friends who have pools, the Alvarez’s decide that a fiberglass pool was probably the
way to go. Let’s take a look at Stacey’s back yard to see what she has to work with.
View of Stacey’s backyard from back porch.

View from rear of Alvarez property
As you can see, the Alvarez family has a nice lot to work with. Now let’s meet the McDaniel family
The McDaniels
Kip McDaniel’s wife said it was her turn. After her husband bought his fifth boat she decided that a
lifetime of waiting was long enough. It was time to get her pool. After some playful banter they
determined that Kip would be the person to do the research. He didn’t mind, the pool would be a
grandchild magnet, and he looked forward to taking a refreshing dip after yard work. They most look
forward to watching the sun rise from their pool deck while enjoying the relaxing sound of a water
feature. Let’s take a closer look at Kip’s backyard.

View of Kip’s existing backyard from the rear of the property

Kip’s view of the backyard from the back door
As you can see, their backyard has lots of open space; a veritable clean slate to work with. As we
progress through this book, we will watch the step by step transformation of both of these backyards
from common backyards to beautiful poolscapes.
The 6 Steps Outlined
Each of the six chapters of this book discusses one step to pool and patio perfection.
They are as follows:
Step One: Choosing the Perfect Site
This chapter discusses the major factors to consider when deciding where to locate your pool. Yard
slope, direct sunlight, privacy, and many other factors that impact pool placement are discussed with
accompanying design images to illustrate.
Step Two: Selecting the right Pool
This chapter will add clarity to the dream and help assess your real needs and desires to insure you get
the right pool for you.

Step Three: Designing the Perfect Layout
Chapter three will help you develop the best pool and patio layout for your site by working with existing
elements and themes of the yard and house. The pool puzzle process is introduced which helps you
incorporate all of the various elements of your design into the perfect layout for you.
Step Four: Managing a Sloping Lot
This chapter will discuss the most effective ways to manage a sloping yard. Retaining walls construction
and materials are discussed, as well as using site work as a viable option of dealing with slopes. Various
types of slopes are discussed as well as the best methods of dealing with each.
Step Five: A Safe and Attractive Pool Fence
Some people view pool fence as a necessary evil. This chapter explores different fence styles and
materials, how to tie in with existing structures, and how to successfully incorporate a fence into any
design.
Step Six: Beautify your Poolscape with Landscaping
Landscaping can turn the most basic pool and patio into an absolute oasis. Chapter Six will cover some
landscaping basics like incorporating planting areas, using potted plants, landscaping for privacy,
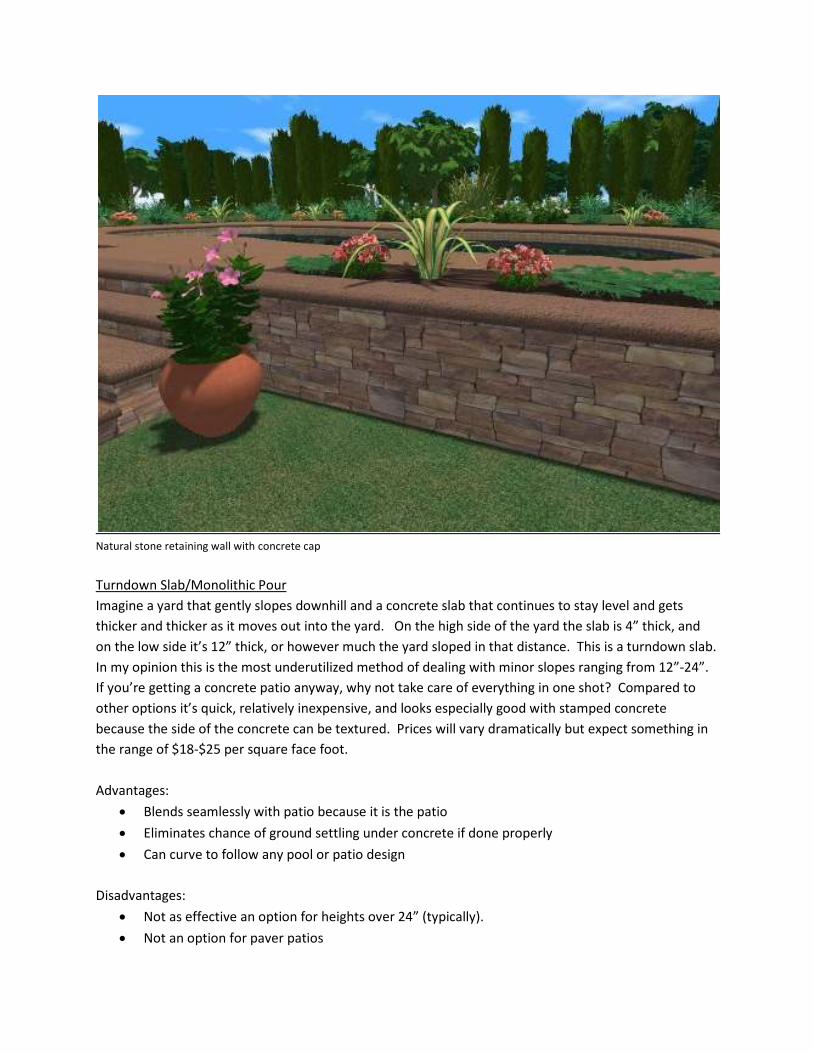
outdoor lighting, and low maintenance landscaping.
Enough introductions; let’s get started!
Step One: Choosing the Perfect Site
The journey to achieving the perfect poolscape begins with selecting the best area in your yard for your
pool and patio. This section will help you narrow several potential pool locations down to one best site.
This first step is critical because it lays the foundation for many of the design decisions you will make in
later chapters. Below are seven major factors to consider when choosing a pool site. These are
presented in random order and many are expounded on in later chapters. Remember, the only
objective here is to consider enough information to allow us to pick a site. We’ll worry about details like
pool position and patio layout later.
Seven factors to consider when choosing a pool site:
1. Privacy
Privacy is one of the first things people consider when choosing a pool location in their yard. The last
thing you want is to feel exposed while enjoying your pool with family and friends.
Ask yourself two questions:
1. What privacy barriers already exist in the potential pool locations that I can take advantage of?

2. What privacy barriers can I add to the potential pool locations to give me the privacy I desire?
We’ll discuss fencing and barriers in more detail in a later chapter, but for now it’s important to
understand that privacy concerns can usually be resolved with privacy fence, creative landscaping, or
walls. The following images demonstrate how simple landscaping can be used as a natural screen to
achieve the desired amount of privacy.

See how some simple trees purchased for approx $75 each allows this pool owner to forget her
neighbors. So don’t give up on a site without considering all options for getting the privacy you desire.
2. Imposed Restrictions
An imposed restriction is any outside force that impacts where you can locate your pool, or how big of a
pool you can build on your property. Below is a list of potential restrictions that need to be considered
when choosing a site for your pool.
Local building, zoning, and health department setbacks
City and county setbacks dictate how close you can locate a pool or patio to your property line, house,
septic or sewer lines, well, etc. Check with local building, zoning, and health department officials to
determine the setbacks for your property. Sometimes the information can be found online.
Tip: Don’t make any assumptions on this one; there are wide variations in setbacks even between
adjoining neighborhoods.
Resource Protection Areas (RPA’s)

The Federal Government as well as states, counties, and cities establish RPA’s to protect the
environment and reduce the impact of construction on specific areas. A RPA is a protective buffer that
varies in size depending on the resource to be preserved. The most common Resource Protection Areas
are designed to protect tidal rivers, creeks, streams, and sometimes forests. These protective buffers
average in size from twenty-five to one hundred feet of required undisturbed space. If you have an RPA
that restricts you from building in a preferred area, you can apply to the local powers that be for a
variance.
Utility Lines
Take a minute to find the general location of your utilities, especially the power line. As a general rule
there’s no need to be concerned with the phone, cable, or satellite lines because relocating them is not
a major expense or hassle. But it is important to insure the power line is not running too close or even
through the center of the potential pool site. It can be moved if in the way; just contact the service
provider and 3-4 weeks and a thousand dollars later you have a great spot to put your pool. If you want
to work around the power line, ten feet is a standard minimum distance (sometimes less) from an
underground power line to the water’s edge of a pool. Just to be crystal clear here, I’m talking about
the service line from the power company, not basic underground lines feeding sheds, lights, etc.
If you have overhead power lines they generally have a vertical and horizontal setback from the pool, so
check with the service provider for these distances if applicable. If Propane or Natural Gas lines are a
problem, they can be moved with some expense, but that wouldn’t deter me from the otherwise
perfect pool site. Most utility marking companies will not mark LP(liquid propane) lines, so contact the
fuel provider to have this done. By the way, your contractor is required by law to have the utilities
marked before beginning excavation. But go ahead and have them marked yourself if the unknown
location of a utility line prevents you from picking a site. It only takes about five minutes to set up and
it’s free, hard to do better than free….right?
Tip: Don’t rely on the word of anyone else when it comes to the location of underground utilities, septic
systems, or any other underground component in your yard.
Easements
Many areas, especially subdivisions, have drainage or utility easements that run along a property line or
sometimes through the lot. These are usually a total of sixteen to twenty four feet wide with half of the
easement on your lot and half on a neighboring lot. Pools and pool decks are not allowed to encroach
easements but fences and landscaping are usually permitted. To find out if your property has any
applicable easements look at the plot plan of the property first (if handy), and if none are shown,
contact your local building or zoning official.
Tip: If a drainage or utility easement prohibits you from placing your pool or patio where you would like,
contact your local zoning official and it’s possible that they will make an exception.
Impervious Cover
Many areas now enforce impervious cover restrictions that limit the amount of impermeable surfaces
such as structures, driveways, and patios on your property to a certain percentage of the property. The
percentage varies drastically by area and is usually determined by rainfall and average lot size. Check
with your local health department if applicable to find out if you have any impervious cover restrictions.
They can help you assess your lot.
Tip: If you live within city limits or near tidal waters, there’s a fair chance of having impervious cover
restrictions.
Home Owners Associations
The good ole’ hoa: The protector of the neighborhood. Give them the information they ask for, but DO
NOT let them intimidate you. You’d be amazed at how many people are scared to death of a hoa board
meeting; like it’s the final judgment or something. Most hoa’s are actually great to work with, but
occasionally you get stuck with “the warden”. You know, the person who walks around the
neighborhood checking everyone’s grass with a ruler! Seriously though, hoa’s do play an important role
in society. I can’t remember the last time I’ve seen a pink flamingo or yard gnome at a customer’s house
in a subdivision.
3. Direct Sunlight
One of the most important factors in determining pool placement is the amount of direct sun an area
gets during the day. Pay attention to the patterns of sun and shade in your yard. Take note of the time
of year and remember that the further we are from the summer solstice the lower the arc of the sun in
the sky. Also note that the areas of the yard that will get the most direct sun, assuming you are in the
Northern Hemisphere, will be those most open to the southern and western skies, respectively. But if
you don’t happen to have a compass in your back pocket, just walk outside and see what the sun’s doing
during the times of day you expect to use the pool. While you’re out there, take note of wind patterns.
Nothing can ruin an eighty degree day around the pool like a cool breeze. We will go more in depth on
how direct sun impacts the specific pool location in a later chapter; but for now, let’s see how shifting
the pool in the yard can have a huge impact on the amount of direct sun a pool receives.

This image demonstrates the sun at approx 4:00 pm. As you can see, the majority of the congregating area of the patio and the
entire shallow end of the pool are shaded.

This is the same pool at 4:00, but changing the location of the pool in the yard allows much more direct sun.
As you can see, turning the pool perpendicular to the house and shifting it away from the trees allows
for more direct sunlight on the pool and patio. There would be a significant difference in water
temperature between the two pool sites.
4. Yard Slope
Boy if I had a dollar for every time I’ve heard “I thought our yard was flat”. As a general rule, a lot that
looks perfectly flat is usually a minimum of four to six inches out of level, and lots that appear to have a
“little” slope usually fall two to three feet. Nothing can ball up a nice pool plan and chuck it in the waste
basket like designing the pool and patio layout without first considering of the slope of the yard. Grade
changes of one foot or less usually do not present problems, and sometimes grade changes of two or
three feet can be managed without issue, but it all depends on the site and what elements are adjacent
to the pool area. For you super analyticals out there, I’ve included some homespun ways to estimate
grades in your yard without expensive equipment.
Three ways to estimate your yard slope in order of increasing difficulty.

1. Walk around and guess, but guess liberally. Hey….it’s a start.
2. Walk around the lot and see if there are any level horizontal lines on the house that you can use as a
reference like a piece of siding or a mortar joint. Let’s say we’re using a piece of siding on the side of the
house as our height reference. We want to stand in the backyard in line with our chosen piece of siding
so it is pointing directly at us from front to back. Now look down the length of the piece of siding and
get your eye on the same level plane as the top or bottom. Then measure down from the ground to
your eye. Walk up to the house and measure down from the piece of siding to the ground. The
difference between the two numbers is amount of slope from the house to where you were standing.
3. Go to the hardware store and buy 40’ of 3/8” clear tubing. Grab a five gallon bucket and fill it with
water, put one end of the hose in the water and make sure it rests on the bottom of the bucket. Next
get all of the air out of the hose. Do this by starting a siphon from the opposite end and placing it on the
ground, lower than the water level in the bucket. When all of the air bubbles are out, pick the end of
the hose up. Congrats, you’ve just created a water level. Now walk out to your site and place the
bucket at the highest point of your potential site. Stand right beside the bucket, hold the hose a little
higher than the top, let the water equalize in the hose, and measure from the equalized point down to
the ground. This is your reference grade mark. Now walk around the yard (don’t move the bucket)
always holding the hose higher than the bucket, and check different locations by measuring down from
the equalized point to the ground. Subtract each measurement from the reference grade mark to
determine the slope from the bucket to where you measured.
5. Proximity to house
A common misconception is that a pool will not be used as much if it is a significant distance from the
house. This is true for hot tubs but not necessarily for pools. If you’re torn between two potential sites
and the proximity to the house is a factor hopefully this section will add some clarity. My pool was over
one hundred feet from our house when I was a kid and it was great, but there were some drawbacks.
Let’s consider some advantages and disadvantages of having the pool near and far from the house.
Near the house:
Advantages:
• Existing facilities like bathroom, kitchen, etc. are easily accessible
• Can often incorporate existing decks and patios into the pool area
• Pool can serve as an architectural extension of house
• Electrical hook-up to pool equipment is usually less expensive at the house
Disadvantages:
• Sometimes have to “get creative” with the fence (see future chapter)
• Can be cumbersome and unattractive in the off-season
• Can create the need for additional drain systems at the house
Far from house:
Advantages:

• Out of the way in the off-season
• Can create an area distinct from rest of yard; another outdoor room
• Can fence directly around the pool (simpler option)
• Drainage usually less complicated
Disadvantages:
• Electrical hookup usually more expensive
• No existing facilities to utilize
• No existing patios or decks to tie into
6. Existing Structures, Trees and Decking
Any patios, decks, swing sets, dog kennels, sheds, gazebos, trees, arbors, pergolas, fire pits, fences,
gardens, chicken coups(seen it!), etc. in your yard can impact the location of a pool. Ask yourself the
following questions:
Question: What existing components of my yard can I incorporate into the pool plan?
Question: What items are in the way?
Question: Can they be moved?
To tear out, or not to tear out?
How do you draw the line when deciding whether or not to keep an existing patio, deck, etc? As a rule
people are almost always willing to spend 5%-10% of their total project cost without hesitation to
remove something that is either in the way or will simply look better gone. Some people obviously
spend much more.
Some thoughts on tree removal:
People often make several significant mistakes when it comes to tree removal for new pool
construction. First, they only remove enough trees (initially) to get the pool built and forget the
maintenance aspect; and second, they do not know to tell the tree guy to pull up all stumps that fall
within the parameters of the pool, patio, and landscaping area. The tree guy will probably tell you that
grinding the stumps will be sufficient. Don’t buy it! Tell him to yank those suckers out of there…..unless
you want a void under your concrete the size of a washing machine after 5-10 years when the stump
decomposes.
7. Total Project Size
I’ll sum this one up in a sentence: Don’t assume that your pool and patio will fit in your yard without
measuring with a tape measure. Guestimate a pool size for now, add a minimum of twelve feet for
decking and landscaping to the pool length, and walk around your yard with a tape measure to give
yourself some perspective of the relative size of the project. Doing this will make any drastic size
limitations obvious and give you a feel for which pool size you might eventually settle on. You’d be
amazed at how many homes I visit where the customer has already invested hours in developing a game

plan on paper….only for me to obliterate it within 5 minutes because they never took time to measure
anything in the yard.
Conclusion:
Designating an area in the yard for your dream pool can be the most exciting and challenging aspect of
the planning and design process. Taking time to visualize the different possibilities is fun and rewarding.
Hopefully this section has served to inform you of the different factors that impact where to put your
pool in your yard. Now I have a question for you: How did it go? Did the stars align? Did the heavens
open and sun beams illuminate the perfect pool spot? That seldom happens….this process usually
involves compromise on many levels. There have been many times when we realized the potential of a
spot in a yard only because there was no alternative. Such projects are usually the most rewarding to
the builder and the client, and often turn out far more beautiful than they would have otherwise been.
We now use this experience and look for potential areas of the yard that are less conspicuous, and you
should do the same. The great news is that after many years of working with pool clients and
participating in hundreds of projects, I can say for certain that a pool in your yard will be fun and
relaxing, regardless of its location.

Step Two: Selecting the Right Pool
The objective of this chapter is to clarify exactly what it is that you want to get out of your pool design.
We’ll start by assessing your real needs and desires to insure you select the best pool shape and size for
you. I would like to make one observation based on my experience: People tend to overcomplicate the
process of selecting pool size and shape. This process can be simplified by asking yourself two basic
questions: “What do I want to do?” and “What do I want it to look like?”
Question #1: What activities do I want my pool to accommodate?
Make a list of all of the activities (or in-activities) that you want to do in your pool and rank them in
order of importance. Note that these are water activities. We’ll worry about the extra curriculars on
the pool deck later. This will help us identify the size and features of the pool that best meet your
needs.
Examples are volleyball, floating, relaxing in seats, diving, using slide, basketball, swimming laps, water
aerobics, sticking your head under a waterfall, goofing off with the kids, etc.
Let’s take a look at how our two case studies prioritized their in-pool activities:
Stacy Alvarez’s pool priorities:
1. Kid’s games (dive toys, noodle fights, marco polo, and general playing)
2. Relaxing in bench seats with her friends while the kids play.
3. Swimming laps for exercise
4. The occasional volleyball game when hubby’s friends are over.
If we look at each of Stacey’s activities separately we can make conclusions about the pool size and
features that best meet her family’s needs.
1. Kid’s games
Since games are the highest priority we definitely want to make sure we have plenty of space in the
pool. In this case pool width is much more important than length and Stacey should go with a minimum
14’wide, but 16’ would be better if space and budget will allow.
2. Relaxing in Seats
Luckily for Stacey most fiberglass pool designs have bench seats as a standard feature. They vary as
much in size and style as the individual models, but since relaxing in them is high on the priority list, she
should pay special attention to make sure the seats in her pool meet her needs.
3. Swimming
Swimming laps for exercise or therapy requires two things: 30’ minimum length and an open swim lane.
Of course Stacey can swim laps in any pool, but if she wants to do this as regular exercise these are two
good guidelines to follow. Note that 30’ is a minimum length, but a smaller pool with a swimming

machine is always an option. If lap swimming was number one on Stacey’s list she would probably want
to go with a pool 35’ or longer, but in this case she feels that the minimum 30’ is adequate.
4. Volleyball
A good volleyball game or any game where there are two teams on opposing sides is very difficult to
play in a pool less than 14x28. Of course the larger the better, but for the Alvarez’s competitive games
are pretty low on the totem pole. So any pool in the 14x30 to 16x35 range with pretty good open space
will work for them. Water depth should be considered also. It’s virtually impossible to plays games in a
pool with an eight foot deep end with any success. I’d rather play in a small shallow pool than a huge
pool with a deep end any day.
Now that Stacey has taken time to assess her needs, she knows that her pool must have:
• A minimum width of 14’
• A minimum length of 30’ with an open swim lane
• Bench seats
• 6’ maximum depth
Let’s take a look at how Kip and his wife prioritized their pool activities:
The McDaniel’s Pool Priorities:
1. The Mrs. wants to float with a drink while serenaded by the sound of falling water.
2. Kip wants to take a refreshing dip after yard work.
3. Occasional pool games with grandchild and future grandchildren.
It doesn’t take much to figure out what they need:
1. Enough water to float.
2. Enough water to cool off.
3. Enough water to make the grandkids happy (which could be a mud puddle)
It seems that size doesn’t matter to the McDaniel’s. They just want to create a beautiful and relaxing
setting in their backyard, and the shape of the pool will play the dominant role in bringing this to pass.
This brings us to our second question.
Question #2: What look am I trying to achieve?
When considering a pool shape it’s best to ask yourself if you prefer one of two broad options: a pool
with linear features or a pool with curve appeal.
Pools with linear features are typically more symmetrical and lend themselves to more formal scenery.
They are commonly placed parallel or perpendicular to the house unless the site or other structures
dictate otherwise. Two traditional linear pools are the rectangle and roman end pools, but there are
many non-traditional linear pools manufactured today that incorporate angles and soft arches into their

design to create pools with clean lines. Pools with curve appeal, on the other hand, are typically
asymmetrical and freeform lending themselves to more casual settings. Their random shapes invoke
thoughts of a mountain lake or tropical beach. It’s common to place these pools on random angles in
the yard or for them to run parallel or perpendicular to the house or other structure.
Time to Pick a Pool!
It’s time for our two families to narrow down their options and select a pool. Let’s see what they come
up with:
The Alvarez’s knew from jump they wanted a pool with curve appeal, but there were so many free form
models they had difficulty narrowing it down to one pool. Now that they have a complete set of criteria
to work with, it shouldn’t be too hard. They know the pool for them will be a free form pool at least
14’X30’ long with a max depth of 6’ and good seating. After considering all of the pool models available
to them they settle on the Riviera 34 from Leisure Pools. This is a free form pool 15’X34’ and 5’ 11’
deep.
The Alvarez’s Riviera 34
Stacey loves this design for several reasons. Notwithstanding its curves, the design still has a
tremendous amount of open space, which is needed for games. It also has a wonderful bench seat in
the shallow end and to top it all off, an open swim lane. It was love at first site….once they knew what
they wanted. Now on to the McDaniels.
Kip and company are thinking linear. He and his wife both agree that clean lines are the way to go, but a
plain rectangle doesn’t seem too appealing. They both fell in love with the classy look of a roman end
pool. In their mind smaller is better, so they search for a 12’ wide roman and find it in the Roman 23’
also from Leisure Pools. This pool is perfect for them, with steps on one end, a nice bench seat on the
other, and enough open space for Kip’s wife to float till her heart’s content.

The McDaniel’s Roman 23
Now it’s your turn. Just take time to prioritize your pool activities, consider the look you’re after, and
choose the perfect pool for you. Notice that there was no mention of step location. That’s no accident.
People frequently get hung up on that one. When’s the last time you bought a house because of where
the steps were located? It doesn’t make sense does it? There are situations where the pool step
location is critical. For example, if you have an elegant set of steps leading from the house down to the
pool area, and you want to base your pool selection on this factor alone, that’s great. But that’s not the
concern in most cases. Most times people are worried about the steps simply being on the other side of
the pool from the patio, house, fence gate, etc. Forget about it, it doesn’t matter. It’s folly to eliminate
an otherwise perfect pool design because of step location unless you have a situation similar to that
above. I hope this chapter has served to make your priorities clear and made the process of selecting a
pool design a simple and painless process. Now we’re ready to embark on the next leg of our journey:
Designing the layout of our pool and patio.

Step Three: Designing the Perfect Layout
This chapter is designed to help you develop the pool and patio layout of your dreams; one that is both
breathtaking and fully functional. We’ll accomplish this by using a three step process that makes the
whole process fun and simple. Who said this stuff has to be hard? The one thing we’re trying to
prevent here is paralysis by analysis; so just relax and see what you come up with.
Our Three Step Process: The Pool Puzzle
Think of your backyard as a giant jigsaw puzzle where all of the pieces are the various elements of the
design. Our objective is to fit the pieces together in the most beautiful and functional configuration
according to your needs. So what part of a jigsaw puzzle most people focus on first: the outside border
right? Why is this? Most folks begin with the border of a puzzle for two reasons: they want to identify
their boundaries, and because those pieces are the easiest to identify. Your backyard is the same way.
The first thing we need to do is understand the parameters and restrictions of our site, and coincidently,
they happen to be very easy to distinguish. Step one, assessing the site, is a function of identifying the
characteristics of your site that create the boundaries of our pool design. What part of a puzzle do most
people focus on next? They go to work on the interior right; but where? They start with the most
prominent features of the puzzle, in our case the pool, patio, and any other new element of the design.
Step two is identifying the prominent features of our plan that create the puzzles interior. Step three is
the fun part, simply rearranging the various pieces of the puzzle until you find a perfect fit. Sound
exciting? Great, let’s get started.
Step One: Assessing the Site
The objective of Step One is to identify anything on the site that impacts where we place our pool and
patio. These are fixed features of the yard like trees or the property line that place limitations on the
space that we have to work with. These are also existing elements of the site like a gazebo or planting
area that you want to incorporate into the design and will thus impact the pool and patio location.
Remember, we’re creating the border of our puzzle. Let’s consider the following questions to help
assess the features of your site that will impact the pool and patio layout.
• Are there any property lines, setbacks, or easements that limit the space or location of our pool
or patio?
• Does the slope of my site affect the layout?(see chapter four for details)
• What existing elements of my yard like a shed, deck, or gazebo do I want to incorporate into my
design?
• Are there any trees that that need to be preserved or otherwise limit my design?

• How does the sun/shade pattern of my yard affect pool and patio placement?
• What views do I want to capture or avoid?
• Will the access to the house or other traffic patterns affect the layout?
• Are there any areas that I want to keep open for off-season use?
What did you come up with? Jot down your answers, you’ll need them later. Now let’s figure out what
other pieces of the puzzle we have to work with.
Step Two: Identifying the Big Pieces
If step one was the process of creating the boundaries of our puzzle, then the objective of step two is to
identify the big pieces of the interior of the puzzle that we will fit together within those boundaries.
There are three major components of the interior. They are the pool, the patio, and any accessory
structures that you plan to add. In this step we will also determine the size of these components so we
know how much space to allocate. We’ve already tackled the pool, so let’s focus on patio size first.
Then consider any accessory structures that you might want to incorporate into the design.
1. Sizing the Pool Patio
Our objective here is to determine the minimum square footage of our pool patio, the shape will come
later. Size is all that matters….for now. Let’s consider the following points about sizing the pool patio.
The average pool patio is between 600 and 900 square feet. Here are some patio sizing guidelines to
help you determine the space needed for your patio activities:
• A conversation area for 3 to 6 people requires a 10’x10’ space.
• A dining area for four people should be at least 10’x10’
• A dining area for six to eight people should be at least 12’x12’
• A chase lounge requires an area 4’x7’, but figure 7’x7’ for two.
• You want a minimum of 30” between any patio furniture and the pools edge.
• Pathways and other traffic areas should be a minimum of 3’ wide at all points.
• Two chairs and a small table require a 6’x6’ area.
• A grill and small side table need a minimum of 6’x6’.
• 6’ feet of space are needed between the base of a set of steps and the water’s edge of the pool.
• An average hot tub requires a 10’x10’ space.
• A fire pit needs 30”-36” of open space between the pit and furniture or seating area.
• A slide requires a minimum area of 7’x15’ beside the pool.
• Diving boards require a minimum area of 8’ long by 6’ wide on the end of the pool.
• Allow at least 24”-30” of space between any water feature and the edge of the patio.
• An outdoor shower needs an area at least 5’x5’.

Here are a few more pointers to consider when determining patio size:
Consolidate, Consolidate, Consolidate
A very effective way to distribute the square footage of your patio is to consolidate patio area into one
or two larger sections and make the remainder of the patio just wide enough to walk around.
This patio makes good use of its space.
The patio in the above image is 800 square feet. Notice how all of the area is consolidated to one side
and one end. This allows for the maximum use of this space. Now let’s take a look at the same pool
with another patio configuration.

This patio makes poor use of its space.
The above patio has the exact same amount of area, 800 square feet. But as you can see, it’s distributed
throughout around the entire pool and as a consequence there’s no true gathering area. Consolidating
square footage is essential, especially when operating on a limited budget.
Utilize existing patios and decks
Another factor that may impact the size of your patio is an existing patio or deck that is adjacent to the
pool area. These can be incorporated into the design to take advantage of their usable space. Be sure
to incorporate a sidewalk or other needed access to these structures.
How will you use your patio?
Before you can determine how much patio space you need, you must determine how you plan to use it.
Two simple questions will help you plan the use of your patio:
How many people does it need to accommodate?
What will they be doing?
Answer these questions and apply them to the guidelines listed above to determine the amount of area
you will need for you patio. Each block of patio is an individual piece of the interior of our puzzle. Now
let’s focus on accessory structures and see if we have any other pieces to add to our puzzle.
2. Other Accessory Elements
What other features are you planning to incorporate into your design?

• Gazebo
• Pergola
• Hot Tub
• Planters
• Outdoor Kitchen
• Fire Pit
• Pool house or shed
Take a moment to determine the size of your accessory structures. These are the remaining pieces of
the interior of our puzzle. Now take a moment to list them all: pool, patio blocks, and accessory
elements.
Step Three: Putting the Puzzle together
Now it’s time for the fun part. Let’s fit the various pieces of your poolscape together to create the pool
of your dreams. This may seem a little elementary, but it’s helpful to draw the major pieces of your
design on paper, cut them out, and slide them around until you find the right fit. Using a ruler, draw
each component at a scale of 1/8”= 1’ and this will allow you to work with a normal 8 ½” x 11” sheet of
paper. This process allows you to easily visualize multiple configurations of your layout. We do the
same thing with our pool design software, but the principle remains the same. Before we jump right
into configuring our layout, relax for a moment and enjoy a brief overview of some fundamental design
principles that you may find interesting and will hopefully help you find the perfect fit for your yard.
Overview of Basic Design Principles
Form follows Function
The phrase “form follows function” was made famous by American architect Louis Sullivan. The
principle basically states that the practical application of a design should take priority over its aesthetic
properties. This concept shaped Sullivan’s entire life philosophy as he believed it was not only the
foundation of architecture, but the dominant law of nature. Sullivan felt that life itself is only
recognizable in its expression (or function). That all created things are designed with a purpose in mind,
and beauty comes from the fulfillment of that purpose. Pretty deep huh? I tend to agree with him. The
cool thing is that he went on to develop the shape of the steel skyscraper and also mentored an
assistant by the name of Frank Lloyd Wright. Ever heard of him? Form follows function is the dominant
design philosophy of the modern era and was the only philosophy on the market for most of the 20th
century.
Now let’s clarify something. Form follows function is often mistakenly interwoven with another popular
idiom: ornament is crime; which states that beauty for the sake of itself is bad. They are not the same.
Form only follows function; it’s not eradicated by it. The goal of course is to have both functionality and

beauty, and you will. In our application we simply want the pool and patio design to be practical. A
woman wouldn’t wear a pair of beautiful high heel shoes mountain hiking would she? Of course not,
but people do the equivalent with pools all the time. They get something stuck in their head, and
regardless of how impractical, they do it. For example, a guy wants his sidewalk from the house to the
pool to be curvy. Everything at his old house was straight. He’s sick of straight, and he wants curvy. So
he lays out this meandering sidewalk that takes you on a 50’ tour of half the yard instead of designing a
simple 20’ sidewalk with some personality. The sidewalk is pretty, but the problem is no one uses it.
They cut straight across the yard and kill the grass. Form follows function, that’s all I’m saying.
Symmetry
When most people think of symmetry the concept of a mirror image comes to mind. This mirror image,
or reflection, is actually only one of three types of symmetry. Let’s take a quick look at all three:
Reflection symmetry refers to the mirroring of an element around a central axis or mirror line. This
occurs often in nature. Several examples are the wings of a butterfly, the human body, or the leaves of
most trees.
Rotation symmetry refers to the rotation of similar elements around an axis. Several examples that
occur naturally are the petals of a sunflower or daisy.
Translation symmetry refers to the repetition of similar elements that maintain the same orientation or
direction. Several naturally occurring examples are a school of fish or the kernels of an ear of corn.
It has been said that symmetry is the most basic and enduring aspect of beauty. Things that are
symmetrical convey balance and harmony. Any type of symmetry can be incorporated into your design,
but does not have to be. Many people make the mistake of assuming that their patio design needs to
have reflection symmetry; in other words, equal amounts patio on opposite sides. While this should be
the case in some instances, there should be a logical reason for this layout besides the individual just
being a “symmetrical person”. There are also many ways to incorporate symmetry into a design in
addition to the patio layout. Patio furniture, planters, potted plants, fence layout, and many other
variables can be used to achieve symmetry in your design.
Figure-Ground Relationship
This principle refers to the relationship between objects that are perceived as a figure or as ground.
Figures are elements of a design that have a definite shape, whereas the ground is shapeless and
indefinable. The relationship between these two elements is either stable or unstable. A stable
relationship is one where the figure is clearly distinct from the ground, and an unstable relationship is
where the two merge together in ambiguity. An example of an unstable figure-ground relationship is
The Rubin vase.

Rubin vase- great example of an unstable figure
This relationship is unstable because it can be perceived as a black vase on a white background or two
white faces on a black background. This happens with pools in the same way. Where there
definition of boundaries, no elevated elements to break up flat patio monotony, or no variation of color
or texture the same result occurs; a loss of identity. Make sure that you always have a stable figure
ground relationship with all of our components. In other words, when you look out at your poolscape
you want it to pop; we do not want it to look like a wash of merging flat elements. A solid figure ground
relationship will clearly define all of the elements of our design that you want to
can utilize various methods and materials to accomplish this. For example, to accentuate the shape of a
pool, incorporate a border around the pool that differentiates it from the patio. Do the same with the
outside of the patio by simply landscaping around the edge with a decorative stone or mulch that will
create the same effect. Utilize bench walls, potted plants, or an elevated water feature to add elevation
to the pool deck. This will break up the shapeless ground effect and
pool patio. To break up the monotony of pool fence, incorporate taller landscaping that will soften the
area and keep you from staring at rows of repeating pickets.
Golden Ratio
The golden ratio is found throughout nature and represents the ratio within the elements of a form,
such as length to width, at a ratio of 0.618. Adding 1 to the golden ratio equals 1.618, or Phi,
popularized by the movie “The Da Vinci Code”.
great example of an unstable figure-ground relationship
This relationship is unstable because it can be perceived as a black vase on a white background or two
white faces on a black background. This happens with pools in the same way. Where there
definition of boundaries, no elevated elements to break up flat patio monotony, or no variation of color
or texture the same result occurs; a loss of identity. Make sure that you always have a stable figure
components. In other words, when you look out at your poolscape
you want it to pop; we do not want it to look like a wash of merging flat elements. A solid figure ground
relationship will clearly define all of the elements of our design that you want to draw attention to. You
can utilize various methods and materials to accomplish this. For example, to accentuate the shape of a
pool, incorporate a border around the pool that differentiates it from the patio. Do the same with the
simply landscaping around the edge with a decorative stone or mulch that will
create the same effect. Utilize bench walls, potted plants, or an elevated water feature to add elevation
to the pool deck. This will break up the shapeless ground effect and clearly define the boundaries of the
pool patio. To break up the monotony of pool fence, incorporate taller landscaping that will soften the
area and keep you from staring at rows of repeating pickets.
hout nature and represents the ratio within the elements of a form,
such as length to width, at a ratio of 0.618. Adding 1 to the golden ratio equals 1.618, or Phi,
popularized by the movie “The Da Vinci Code”.
This relationship is unstable because it can be perceived as a black vase on a white background or two
white faces on a black background. This happens with pools in the same way. Where there is no clear
definition of boundaries, no elevated elements to break up flat patio monotony, or no variation of color
or texture the same result occurs; a loss of identity. Make sure that you always have a stable figure-
components. In other words, when you look out at your poolscape
you want it to pop; we do not want it to look like a wash of merging flat elements. A solid figure ground
draw attention to. You
can utilize various methods and materials to accomplish this. For example, to accentuate the shape of a
pool, incorporate a border around the pool that differentiates it from the patio. Do the same with the
simply landscaping around the edge with a decorative stone or mulch that will
create the same effect. Utilize bench walls, potted plants, or an elevated water feature to add elevation
clearly define the boundaries of the
pool patio. To break up the monotony of pool fence, incorporate taller landscaping that will soften the
hout nature and represents the ratio within the elements of a form,
such as length to width, at a ratio of 0.618. Adding 1 to the golden ratio equals 1.618, or Phi,

We find this ratio everywhere and there seems to be a subconscious preference in people towards it.
Some examples are the ratio of length and width found in a normal piece of paper, an iPod, and
hundreds of other products. The ratio between the thigh and calf and upper and lower arms of the
human body as well as the architectural examples of the Parthenon and Notre Dame Cathedral are also
examples of the golden ratio in action. This principle applies to our design in one fundamental way. I do
not believe a design needs to pass a golden ratio litmus test to be effective, but if you come to a point
where you are putting things together and they just don’t look right, turn to it for help. For example,
let’s say you have everything laid out and the project seems too long and narrow. Find the ratio
between the total width and length and see what number you come up with. If the ratio of total width
to length is significantly greater than 0.618, then reconfigure to become closer to the golden ratio and
chances are that will do the trick. The application of this principle is limitless, but using it in this limited
capacity can still serve us well.
Rule of Thirds
Last but definitely not least, the rule of thirds. Pay attention to this one because it could revolutionize
the way you see the world from an artistic perspective, or at least the way you take pictures. This is a
technique of dividing a medium into thirds as a means of creating an aesthetic position for the primary
elements of a design. You basically create a grid of three vertical and three horizontal lines across
whatever you are looking at, and position the primary elements at the intersecting points of the grid.
This is a way of creating beautiful asymmetry.
Great example of a photo utilizing the Rule of Thirds
Applying this to your site is simple. Create this grid across the area that comprises the pool area and
place prominent features at intersecting points. You can use this to help create the right angle for your
pool, determine the location of patio area, or to configure any other dominant features of your
poolscape. The rule of thirds is usually not used in conjunction with symmetry, but is often turned to as
an alternative to it.

Now that we have some basic design principles under our belt, let’s check in with our case studies to see
how they’ll apply our three step process:
Case Studies
Alvarez family
First, let’s take a look at Stacy’s yard one more time:
View from the rear of the Alvarez property.

View of the Alvarez backyard from the deck.

Overhead view of the Alvarez property
Let’s walk through each step with the Alvarez family to see how they apply the 3 step process to their
backyard.
3 Step Process: Alvarez family
Step One: Assessing the Site
Several aspects of Stacy’s site affect her pool and patio layout:
1. She wants to utilize the existing shed as a pool house.
This has several implications on the pool layout. First, she needs to insure that the patio will
accommodate traffic flow from the pool deck to the shed. Second, the shed is only approximately 40’
from the house, so this places limitations on the way the pool and patio can be configured.
2. She wants to incorporate the existing wood deck into the design.
Stacy will need to insure that there is at least 6’ of space between the steps of the deck and the pool
edge. The patio will also need to tie in with the deck in a way that seems natural.
3. She has a significant slope falling away from the house.

The property falls about 18” from the deck to the shed. This is not normally considered a significant
slope, but the proximity of the shed makes it more difficult to manage. The method that the Alvarez’s
used to manage the slope of their yard is discussed in detail in Chapter 4.
Step Two: Identifying the Big Pieces
1. Sizing the Pool Patio
Here’s how they plan to use their patio:
• They want a table and chair set for four to six people
• four chase lounges
• enough space, aside from table and chairs, for up to six people to gather and converse
• enough space to generally accommodate up to 12 people
From this they determine they need:
• one 12’x12’ area for the table and chair set
• one 14’x7’ area for the chase lounges
• another 12’x12’ area for people to gather
• some general open space wherever convenient, if possible
2. Other Accessory Elements
• Stacy is planning to add a 7’x7’ hot tub which requires a 10’x10’ area.
Alright, now we can take a moment to look at all of the pieces of the Alvarez’ puzzle:
We have determined that they:
• are using the existing shed
• are using the existing deck
• are limited by yard slope toward the rear of the property
• have chosen the Riviera pool: 15’x34’
• need two 12’x12’ blocks of patio
• need one 14’x7’ block of patio
• need one 10’x10’ block of patio
Now they’re ready for step three.
Step Three: Putting the Puzzle together
Stacy is now ready to put the design together. Let’s take a look at all of the pieces of the Alvarez’s pool
puzzle. The house and shed create the boundaries, and the pool, patio blocks, and hot tub are the
interior pieces that she can shift around.

Stacey considered three different layouts for her pool and patio. Let look at the pros and cons of each.
Option 1: Pool Parallel with House

This option has the pool parallel with the house. Here are some pros and cons of this configuration:
Pros:
• It affords plenty of room between the house, pool, and shed.
• It consolidates space very well as most of the patio blocks are on one side.
• Stacey’s initial thought was to have the pool centered with the shed, which this allows.
Cons:
• After some study, she thinks it looks a little plain.
• She also wants the pool to shift to the right to achieve better flow with the deck.

• The hot tub is a bit visually obtrusive in that location and it also obstructs traffic flow.
Let’s look at Stacy’s second option:
Option 2: Pool Perpendicular to House
Having the pool perpendicular to the house changes the entire layout. Let’s look at what Stacy thought
of this one:
Pros:
• The hot tub is out of the way.

• The pool is shifted more to the right so the layout is more compatible with the deck.
Cons:
• Having the pool perpendicular to the house makes for tight quarters between the house, pool,
and shed.
• Having the pool on this angle also increased the total length of the project. Moving further into
the yard increase the amount of slope to be managed.
• The layout is better, but still too plain for Stacey.
Option 3: Pool on an angle

Because of the freeform shape of the pool, Stacey thought considering the pool on an angle would be
worth considering. Let’s look at some of the pros and cons of this configuration from her perspective:
Pros:
• The layout has some personality.
• It does a great job of consolidating the patio.
• It also has great flow from the deck and to the shed.
• It does not extend too far into the yard, but does not feel too close to the house either.
Cons:
• She likes the angle of the pool, but doesn’t like the unbalanced look of the patio following the
pool on the side opposite the house.
Which option did they choose?
The Alvarez’s settled on option 3 with the pool on an angle. Let’s take another look at the design after
they finished the contouring of the patio.

Notice that a bonus area was added to the far side of the pool. This adds balance to the design plus
adds a cozy area secluded from the rest of the patio. The angle of the pool is important here. If you
were to draw the grid, you would see that the angle follows the rule of thirds. This is a great starting
point when placing pool on a random angle when there are no other cues to turn to on the site such as
an existing fence or wood line. Also make sure to create enough of an angle to make it seem as though
it were placed that way on purpose and not just set out of square. Notice in Stacy’s layout how the pool
seems to point to the shed, which is other dominant feature of the site. This adds harmony to the
design as all of the elements work together. Let’s take a look at some pictures of the Alvarez’s pool after
completion.
Finished Product: The Alvarez Pool

Overhead view of the Alvarez pool.

Here’s a view from the hot tub area.

Another overhead view from the rear of the property.

Here’s one last view from the pool shed.
Now let’s see how the McDaniel’s make out.
The McDaniel’s
Let’s take a look at Kip’s yard before the pool one more time:

View from the rear of the McDaniel’s property

Overhead view of the lot
Now let’s see how the McDaniel’s apply our process to their yard.
3 Step Process: McDaniel family
Step One: Assessing the Site
Several factors of the McDaniel’s site will affect the pool and patio layout:
1. Kip wants to remove the existing wood deck and replace it with an elevated stone patio. Centered on
the patio will be a set of elegant steps leading down to the pool area. Kip knows he wants the pool
perpendicular to the house and centered on this set of steps.
2. The gazebo will move. He doesn’t know where yet, but if left in its current location it will appear
randomly placed in the design. Kip’s is after more of a symmetrical design where each element seems
to have found its place purposely.
3. He doesn’t want any of the pool or patio to extend beyond the side of the house for privacy reasons.

Step Two: Identifying the Big Pieces
1. Sizing the Pool Patio
Here’s what the McDaniels know they want for their patio:
• A table and chair set for four people
• Four chase lounges
• Four laminar deck jets. These are water features that are recessed into the pool deck and shoot
a tube of water from the deck into the pool. They require about 18”x18” of space each. They
will be located in opposite corners of the pool.
From this they determine they need:
• one 10’x10’ area for the table and chair set
• one 14’x7’ area for the chase lounges
• enough area to comfortably walk around the laminar deck jets.
2. Other Accessory Elements
• The gazebo that will move is about 11’x11’.
Alright, now we can take a moment to look at all of the pieces of the McDaniel’s puzzle:
We have determined that they:
• Are remodeling their deck and want the pool centered on the new elevated patio.
• Are shifting the 11’x11’ gazebo to another location in the yard that is still undetermined.
• Have chosen the Roman 12’x23’ pool.
• Need one 10’x10’ block of patio
• Need one 14’x7’ block of patio
Now they’re ready for step three.
Step Three: Putting the Puzzle together
Kip is now ready to put the design together. Let’s take a look at all of the pieces of the McDaniel’s pool
puzzle.

Kip considered three different layouts for his pool and patio. Let look at the pros and cons of each one.
Option 1: Large Patio block between house and pool

This option has the 10’x10 area between the pool and the house, the gazebo on the right side centered
with the pool, and the lounge chair to the left centered with the pool. Kip felt that there were some
pros and cons to this configuration.
Pros:
• The main patio space is very accessible to the house and will work well for off season activities
that include the elevated patio.
• The close proximity of the gazebo would allow an escape from the sun without losing the visual
and audible effects of the pool and water features.
Cons:

• The patio furniture in the 10’x10’ area will block traffic flow to the pool.
• It will also serve to obstruct the view of the pool from the elevated patio.
• This layout also requires the pool to be further back in the yard than Kip would like.
Let’s look at Kip’s second option:
Option 2: Large Patio to the right of the pool and Gazebo to the left.
With this configuration the main patio space is to the right, the gazebo is to the left, and the lounge
chair area to the rear. Let’s look at the pros and cons of this layout.
Pros:
• Full view of the pool from the elevated patio.
• Open traffic lane to the pool from the elevated patio.

• Can still enjoy pool and water features from gazebo.
Cons:
• Having the gazebo on one side may create an unbalance visual affect.
Let’s look at the third and final option.
Option 3: Gazebo centered on the Pool

With this configuration the patio furniture is on opposite sides of the pool and the gazebo centered to
the rear of the pool. Let’s see what Kip thinks of this layout:
Pros:
• Great flow to pool
• Having the gazebo centered on the pool is a very balanced and symmetrical.
• Beautiful view of pool and house from gazebo.
Cons:
• The gazebo is somewhat disconnected from pool.
Which option did the McDaniel’s choose?
Kip and his wife settled on option 3 with the gazebo centered on the pool. Let’s take another look at the
design showing the entire shape of the patio.

The McDaniel’s settled on this design because of its balanced appeal. To Kip, the view from his new
elevated stone patio was paramount. The location of the gazebo may be somewhat disconnected from
the pool, but it serves as a gorgeous backdrop to the entire setting. The remote location also creates a
feeling of another outdoor room which adds intrigue and character to the yard. Let’s take a look at the
McDaniel’s pool after the project was completed.

Finished Product: The McDaniel’s Pool
Overhead view of the McDaniel’s pool.

View from elevated deck.

A good perspective of the elevated patio.

……and the gazebo.

Here’s a good shot of one of the laminar deck jets.

The entire poolscape from another angle.

......and another.
Now that we’ve seen the Alvarez’s and McDaniel’s projects come together. Let’s review the process of
finding the perfect pool and patio layout one last time before you put it into action:
3 Step Process Revisited
Step One: Assessing the Site is a function of defining the boundaries of our site. Several things to look
at are the property lines, setbacks, yard slope, trees, and existing structures like sheds or gazebos that
will not move in the design. You should also consider the sun/shade patterns of your yard as well as any
views that you want to capture or avoid. In step one we are essentially creating the border of our
puzzle.
Step Two: Identifying the Big Pieces is the process of identifying the interior pieces of the puzzle.
These pieces consist of the pool, patio, and any other new or shifting structures that will be
incorporated into the design. Another focus of step two is determining patio size. This is accomplished
by anticipating two things: how many people will use the patio, and in what ways they will use it. This
information will enable you to determine what major blocks of patio are needed for your design. Next,
take into consideration the size of any accessory structures like hot tubs, gazebos, fire pits, or outdoor

kitchens that you plan to incorporate into the layout. Finally, take a moment to draw and cut out the
major pieces of the puzzle.
Step Three: Putting the Puzzle together is the fun part. Rearrange the various pieces until you find the
perfect fit for you. If you get hung up, take a moment to fill in the contour of the patio as well as any
other features that might help you visualize the finished project. Remember that consolidation is key,
and don’t forget to utilize any existing deck or patio space that could be incorporated into the design.
I hope this chapter was informative and assisted you in finding the perfect pool and patio layout.
Planning a pool project is an exciting endeavor and I am grateful for the opportunity to help make your
dream a reality. Good Luck! In our next chapter we’ll tackle the most challenging aspect of pool
planning: techniques for managing a sloping lot.
Step Four: Managing a Sloping Lot
Sloping lots present more challenges to customers and contractors alike than any other part of a pool
project. Customers have a hard time visualizing the completed project and contractors must determine
the most effective method of managing the slope while working within the confines of their customer’s
budget. Visualization is such a challenge for most people because they recognize their yard isn’t level
but they can’t picture the finished product. To make matters worse many pool contractors mistakenly
assume that they know their client’s expectations without making the finished yard a point of
discussion. As a result, many people enter into a pool project with wishful thinking and trust that their
contractor will produce something that looks “good”, whatever that means. Don’t settle for wishful
thinking. If you are uncertain about the final result, ask questions or do whatever it takes to get clarity.
The good news is it doesn’t have to be that difficult. Managing a sloping lot is nothing more than the
process of planning and building a transition from a higher area of a yard to a lower one. This chapter
will provide you with a basic knowledge of the methods used to manage yard slope, what materials are
most commonly used in these processes, and an overview of the various types of slopes. This
foundation will enable you to speak intelligently with your contractor about the issue or possibly even
determine the best method of managing your site for yourself. First, let’s take a look at the methods
used to deal with a sloping yard.
There are two fundamental ways of managing any sloping yard: retaining walls or site work. Retaining
walls are structural entities built of solid materials for the purpose of holding back material from an area
of higher to lower elevation. They are constructed of various materials like interlocking block, stone,
brick, or lumber. Site work, on the other hand, consists of cutting down or building up earth to achieve
an acceptable degree of slope away from the house or pool. This new slope or grade can be managed
by planting grass or using ground cover like mulch or decorative gravel. Let’s take a look at each of
these alternatives to see which might work best for you.

1. Retaining Walls
Retaining walls are common features in many landscapes. They are frequently used around homes and
businesses and are built of a wide variety of materials. In this section we will discuss some important
facts about retaining walls as well as the most common materials used in their construction.
Important general information about retaining walls:
• Most walls over 48” tall require an engineered set of plans to build, so try to stay under this
height whenever possible.
• Most areas require a railing for walls over 30” above ground level. If the wall height is over 30”
various methods can be utilized to offset the need for a rail. This will be discussed later.
• Most areas also require a handrail if you have more than two consecutive steps leading from a
wall, terrace, or deck.
• Retaining walls are measured in units of square face feet (length x height)
• For structural purposes most wall designs call for the bottom course of block to be completely
buried in the ground. So don’t forget to factor that into your estimates if you’re calculating wall
size.
A Brief Overview of Retaining Wall Materials:
Interlocking/Segmented Concrete Block
Over the past 5-10 years segmented walls have become the dominant retaining wall material used
around swimming pools in most areas. Installation is relatively simple and most people find them
attractive. The height of these walls range from six inches to sixty feet tall, and they come in a wide
variety of sizes, shapes, and colors. Construction consists of dry stacking the individual blocks together
to create one interlocked segment of wall. Prices usually range from $25-$45 per square face foot
depending on material selection and location.
Advantages:
• Good for construction in tight quarters and in limited access sites because of ease of handling
and transporting the individual blocks.
• Can easily be built to follow any free form pool or patio
Disadvantages:
• Requires “geo-grid”. A product that keeps the wall from falling forward by tying back into the
hill side. This usually extends into the backfilled area a distance equal to the height of the wall.
So if you have a 6’ wall, the “geo-grid” would extend back from the wall 6’. This is a problem if
the pool on this side of the wall is only 4’ away.
• From a design perspective, it necessitates the need for yet another type of material to pick out.
You need another choice to make, right?

Interlocking concrete block retaining wall
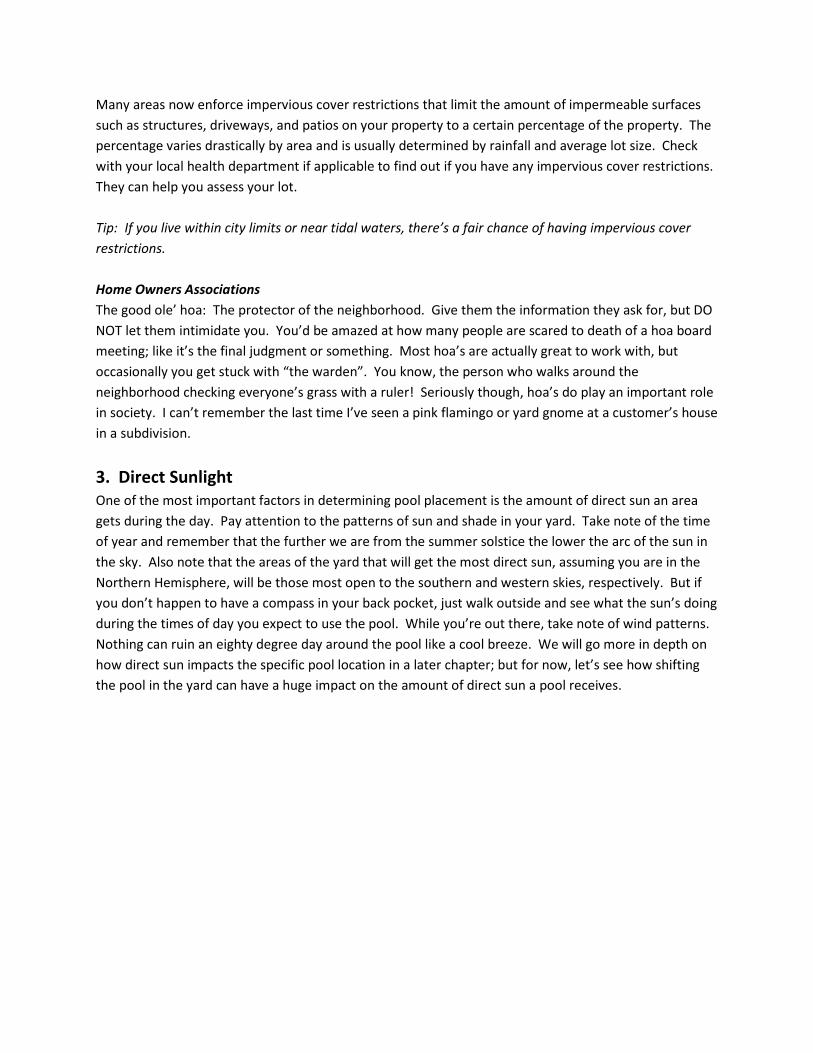
Natural Stone or Brick on Cinder Block
This is your standard block and mortar wall on a concrete footing. This type of wall is reinforced with
rebar and by filling the block with grout or concrete. The beauty of this type of structure is that you get
to choose the venire. Natural stone, brick, or simple parging (coating with mortar) are common finishes
of these walls. The cap, or top of these walls are usually made of the same stone or brick or can be
constructed of poured concrete like demonstrated in the illustration below. Construction typically takes
longer with this type of wall because of the detail oriented nature of the work, so the price is usually a
little higher than a segmented block wall. $35-$60 per square face foot is common.
Advantages:
• They afford wide design opportunities as you can customize the venire to meet your needs.
• No “geo-grid” or tie-back required as all stability comes from within the wall (in most cases).
Disadvantages:
• Price per sq ft tends to increase with free form designs.
• Pouring the concrete footing is a challenge and expensive on sites with limited access.
Natural stone retaining wall with concrete cap
Turndown Slab/Monolithic Pour
Imagine a yard that gently slopes downhill and a concrete slab that continues to stay level and gets
thicker and thicker as it moves out into the yard. On the high side of the yard the slab is 4” thick, and
on the low side it’s 12” thick, or however much the yard sloped in that distance. This is a turndown slab.
In my opinion this is the most underutilized method of dealing with minor slopes ranging from 12”-24”.
If you’re getting a concrete patio anyway, why not take care of everything in one shot? Compared to
other options it’s quick, relatively inexpensive, and looks especially good with stamped concrete
because the side of the concrete can be textured. Prices will vary dramatically but expect something in
the range of $18-$25 per square face foot.
Advantages:
• Blends seamlessly with patio because it is the patio
• Eliminates chance of ground settling under concrete if done properly
• Can curve to follow any pool or patio design
Disadvantages:
• Not as effective an option for heights over 24” (typically).
• Not an option for paver patios

• When done with broom finish concrete this method can look a little drab, but can easily be
dressed up with landscaping.
This illustration of a turndown slab shows how the thickness of the pool deck increases in height as the yard slopes downhill
from the house. This turndown slab is approximately 14” tall.
Poured Concrete Walls
Poured concrete walls are built by setting wall forms in place then filling them with concrete. This is
completed in lifts to insure the concrete is properly consolidated. The forms are then stripped and
viola…a wall. Some forms are designed to make the concrete look like brick or stone; some are flat
surfaces that you can leave “as is” or face with real stone or brick. This option is usually best left to
contractors and typically not the best alternative for smaller walls (36” or less) because of the high set
up cost of the wall forms. For larger walls the price is usually equal to, or slightly higher than, the cost of
a plain cinder block wall. The difference between a poured concrete wall and a turndown slab is that
the poured wall, unlike the turndown, is free standing and not connected with the patio.
Advantages:
• Great for taller straight walls in tight quarters because they do not require any “tie-back”.
• Great when incorporating steps into the wall because they can be constructed of poured
concrete as well.

Disadvantages:
• Usually more expensive to build free form designs, if possible at all (depending on contractor).
• Very expensive to build in restricted access lots because of difficulty in getting concrete to the
site.
Poured concrete wall with recessed concrete steps
Wood
The most budget friendly of all retaining wall options. Wood walls can be constructed of 6x6’s, railroad
ties, landscaped timbers, or literally any type of treated lumber. If these walls are over a height of 18”-
24” they usually require some form of “tie-back” into the hill side.
Advantages:
• Can beautify any area when combined with planting beds or elevated to make bench seats.
• Can satisfy the needs of a tight budget when all of the other extra expenses are adding up.
Disadvantages:
• Limited to straight runs with angles.

Wood retaining wall built of 6x6 pressure treated lumber
Some other types of walls are:
• Dry Stacked Stone- commonly used for smaller free standing walls around landscaping, etc. An
easy diy project.
• Mortared Stacked Stone- used for smaller walls and can be built of literally any type of stone.
Now that we’ve looked at the most popular retaining wall materials, let’s take a look at another critical
feature of any retaining wall design: steps. The following illustrations show the three most common
step configurations.
Types of Retaining Wall Steps:
Straight External:

Straight external steps are most common and least expensive type of steps to build with retaining wall block.
Wedding Cake Steps:
Wedding Cake style steps add class and beauty to almost any setting. The amount of labor required to construct this
configuration makes them more expensive than straight external steps.
Recessed Steps:

Recessed steps have several advantages. They do not extend beyond the outside of the wall and therefore allow for
unobstructed traffic around the lower level. The “built in” look of the steps is also very appealing to the eye, and gives a feeling
of integration and permanence. Two disadvantages are that they are the most expensive to build, and they can increase the
distance required from the pool to the wall because of the space needed for the steps.
Another important design function with retaining walls is the transition from the wall to the pool patio.
Notice in the above pictures that there is a space between the retaining wall and the pool deck with the
exception of the area connected to the steps. This serves several fundamental purposes. First, it
provides a buffer to keep people a safe distance from the edge of the wall. Remember, in most areas
you can be 30” above grade without a railing, so building in cues to alert people of a change in elevation
is a good idea. Second, the open space allows water from the pool deck to filter down to the wall’s
drainage system that was installed behind the wall during construction. This keeps water from running
down the face of the wall which can result in stains, discoloration, or mildew. Third, the space allows
area for a landscaping which will break up the cold transition from pool deck to wall block and give a
softer and more attractive look. This gap between the wall and patio can be as wide as you like, but
keep in mind that as the width of the project increases so does the size and cost of your wall.
Different Wall Configurations
Any site requiring a retaining wall begs the question: Where do I put the wall? Let’s look at a few
options.
Option 1: Building up and putting the wall in the back:
Advantages:
• You can walk straight out onto pool deck from the house
• The top of wall can provide great place to install fence if your plan is to fence directly around the
pool.

Disadvantages:
• If wall is over 30” tall it will require a railing which is a view obstructer.
• Cost of gravel, or other material, to backfill between wall and pool can be very expensive.
Option 2: Cutting down and putting the wall in the front:
Advantages:
• Great view of pool from house.
• You have an opportunity to incorporate a majestic set of steps from the house leading down to
the pool deck.
Disadvantages:
• Those steps come with a price tag.
• Drainage required at the base of the wall on pool side
• Creating potential need for a railing and handrail.
Option 3: Splitting the difference:

Advantages:
• No railing or handrail required
• No feeling of containment by a taller wall.
• Less site work required.
Disadvantages:
• Multiple walls are more expensive for two reasons. First, each requires a course of block buried
in the ground which increases your square footage. And second, because each requires its own
footing your labor cost is more than with a single wall.
Two last points on retaining walls. When you have a wall higher than 30” and you want to avoid the
need for a railing, consider terracing the wall. This can be pricey, but it’s well worth the effort if it allows
you to maintain a spectacular view. Terracing is essentially building a double wall; first, the primary wall
that’s higher than 30”, then a shorter second wall built two or three feet away from it that reduces the
height discrepancy to less than the required amount. Fill the gap between the two walls with
landscaping, make sure your secondary wall is not higher than 30”, and you’ve eliminated the need for a
railing. If that doesn’t work for you, consider backfilling against the backside of the wall so that less than
30” of it is exposed. That’ll make Mr. Inspector happy also.
If you have more than two steps and want to eliminate the need for a handrail, consider building a
series of landings instead of steps. Normal step treads are 10”-14” wide. Try making each step its own
separate landing, say 48” wide or better. If you have the room this will make for a grand entry point and
also rid you of the unwanted handrail. Don’t forget our 30” rule. This won’t fly if these landings are too
far off the ground.

As you know, sometimes the use of retaining walls is inevitable. However, there are many instances
when just simply cutting down or building up an area with earth will do the trick. Let’s look at site work
as an option for dealing with sloping terrain.
2. Site Work- Time to Get Dirty
Site work simply consists of using earth to achieve an acceptable transition from a higher to a lower area
of a site. This is commonly referred to as cutting and filling. This method is typically very cost effective
and can be used to eliminate the need for a retaining wall. Let’s take a look at a couple of ways to utilize
site work as a means of dealing with a sloping yard.
In this case the yard has a slope that falls about four feet from the back of the house to where the
opposite side of the pool will be. Let’s look at two ways of managing this slope using site work.
Option 1: Building up on the low side:

As you can see in this diagram, the pool is set level with the grade at the house. The far side of the pool
was built up approximately four feet. In cases such as this, two factors have a great impact on the
amount of dirt required to achieve an acceptable degree of slope:
1. the distance the patio extends into the yard.
2. The amount of flat ground around the outside of the patio before it begins to slope off.
Two great ways to spend what I call “invisible money” are to add patio to the downhill side of the yard,
or to attempt to make a sloped yard flat. You’ll spend much of your hard earned money on dirt and get
nothing in return. Try to work with your yard not against it. In my estimation, this site would require
multiple loads of dirt to achieve the slope that’s illustrated, however this approach does a fair job of
working with the yard. But in my opinion there’s a better option.
Option 2: Splitting the difference:

In this case, the pool and pool deck were set lower than the house in order to reduce the amount of
build up on the far side. This approach works well for several reasons:
1. It minimizes the degree of slope on the far side which makes it easier to maintain and requires less
dirt.
2. It lowers the pool and allows for a better perspective from the house.
3. The sloped earth at the house serves as an elevated planting area which can break up the monotony
of a plain pool deck.
However, this method does require some additional work. A 12”x12” gravel infiltration trench needs to
be installed at the perimeter of the patio on the house side. Encased in the gravel is a 4” piece of
perforated plastic pipe running the entire length of the trench. This will carry any water away from the
house or the pool deck and prevent drainage problems. This can actually serve to add beauty and
diversity to the pool area. Use decorative stone and continue it all the way around the pool deck to
create a decorative border.
Here are some other things to consider regarding site work:
• Using dirt from the pool excavation to build up for the concrete patio is the most common
method used to manage sloping yards. However, any time a patio or other structural element is
constructed on fill material it is critical to insure that:
1. Only suitable fill material is used, and
2. It is properly compacted.
This is probably the biggest area of failure with most pool contractors, so be careful if you
have a significant amount of building up to do in your yard.

• The objective of any site work is to achieve an acceptable degree of slope that:
1. Can be easily maintained
2. Does not conflict with other elements in the yard like sheds, swing set, etc.
3. Drains well
Just remember, you’re the one who has to look at it, live with it, and care for it.
Here are some pointers on landscaping sloping terrain:
• Anything greater than a 3:1 slope (1’ of fall in a 3’ span) will not take grass (typically). The seed
simply washes out in these areas. But even if you can get it to grow, good luck cutting it.
• Some treatments to hillsides include mulch, pine tags, stone, gravel, ivy, etc. Use your
imagination.
• Take advantage of terrain changes. I frequently see people with flat yards keep dirt from the
pool excavation and use it to build elevated water features, mounds, or anything to give their
property some topographical personality.
• Get your erosion control in place quickly. This is especially true around pools. It only takes one
torrential thunder storm to wash a truck full of mud either toward or away from your pool.
Neither of which is desirable.
• Think drainage. Look at how the yard will drain and plan your landscaping accordingly. Try to
use stable material like decorative stone in high water flow areas to prevent wash out.
3. What challenges do you face?
Now that we have a firm understanding of the two methods of managing yard slope, let’s take a brief
look at the various types of slopes that may exist in your backyard. They are ascending, descending, and
lateral slopes. These terms refer to the direction a slope falls from a point of interest, in our case the
house. We’ll also consider some of the inherent challenges and opportunities particular to each one.
Ascending slopes fall toward the house. In other words, the yard increases in height, or ascends, as you
distance yourself from the house. The backyard is uphill from the house, so if you were to walk out into
the yard and place a ball on the ground, it would roll toward the house. Here are some opportunities
and challenges of building a pool on a site with an ascending slope:
Opportunities:
• It affords the opportunity to have an elevated pool and patio with a wall or landscape bed facing
the house, which has great potential.
• The steps leading up to an elevated poolscape can be very attractive and inviting.
Challenges:
• Drainage can be a concern because everything in yard slopes toward the house.
• Because the pool and patio are often higher than, or level with the floor of the house, it gives
you a lower perspective of the pool from the house. Consider this when planning pool height,

fence location, or any other factors that could obstruct or otherwise affect your view of the
pool.
Descending slopes are the opposite of ascending slopes; the ground falls away from the house.
Descending slopes are the most common type of slope found in backyards because the house is usually
at a higher elevation than the rest of the yard.
Opportunities:
• Because the pool is lower, there is usually a more pleasant view of the pool from the house.
As a general rule, the higher the perspective, the more appealing the view. You could
capitalize on this by planning your pool location around a view from a specific place in the
house.
Challenges:
• If a wall separates the pool from the house, and the pool is at a lower level, the wall can
obstruct the view of the pool from the house. If this is important to you, be sure to create
enough space between the wall and the pool to allow a clear line of sight of the pool from the
house.
• A wall that is too tall or too close to the pool can give a cramped feeling. So be sure to allow
enough space between the pool and wall for this purpose as well. As general rule, place a wall
no closer than its height plus two feet to the pool. (3’ wall would be 5’ away from the pool).
Lateral slopes fall from one side of a lot to another.
Opportunities:
• The panoramic view across the yard shows the terracing of the poolscape. This perspective adds
character to any site.
Challenges:
• In many cases water runoff from neighboring side lots can create an issue.
• Preventative measures must be taken to insure new water is not diverted toward neighboring
lots.
Many lots are a combination of these various types of slopes. Because a wide variety of factors
differentiate one yard from another, a cookie cutter approach to managing sites is impossible. But,
there are two sites we can study to see how to apply what we’ve learned.
Case Studies
The McDaniel’s had it pretty easy. Kip’s lot was relatively flat with a slight descending slope. The
contractor simply built up 4”-6” on the low side to make up the difference. The additional dirt was
hauled off site, and that’s all there was to it. Wish we all had it that easy! Let’s take a look at how he
made out.

View of the back of McDaniels pool.

Another view from the opposite side.
The Alvarez’s on the other hand had a little more to deal with. Their lot had a more severe descending
slope that fell approximately 14” from the house to where the pool deck ends. And to complicate
matters further, their shed, which they want to convert to a pool house, is only 6’ from the back edge of
the pool deck. This eliminates the option of building up the site with dirt because it would create an
unfavorable transition from the pool deck to the pool shed. Let’s see how they decided to manage the
problem.

As you can see, the Alvarez’s decided to utilize a turn down slab. Wise move!

Another view of the turn down slab from directly behind the pool deck.
Why a turndown slab?
Let’s take a look at why they chose to go with a turn down slab:
1. Budget: quote was about $1,500 less than a segmented retaining wall
2. Location: because the wall faced the back of the property they felt it didn’t have to be the most
expensive material.
3. They were getting stamped concrete anyway and they like the seamless transition from pool deck to
wall.
That was enough for them. But what about the transition from the pool deck to the pool house? How
did they pull that off? Let’s see how they handled that one.

Forming and pouring steps and a sidewalk did the trick.

A view of the sidewalk and steps from the pool house.
As you can see, the steps and sidewalk are beautiful and provide a great transition from the patio to the
pool house.
Well, I hope this chapter has helped you understand some of the intricacies of managing a sloping lot.
You are now prepared with a full arsenal of info that will empower you to speak intelligently with your
contractor or better yet, to take on the yard yourself. I want to reiterate one last word of advice: don’t
assume the contractor understands what you want your yard to look like in the end. There’s no room
for wishful thinking here. Be very clear and do whatever it takes to convey your expectations of what
your finished project will look like. Good luck!

Step Five: A Safe and Attractive Pool Fence
Even though some people view fence as a necessary evil, a safe barrier is a critical component to any
pool design. The regulation of the pool fence code has prevented thousands of catastrophes
nationwide. In most areas the barrier receives more attention from building inspectors than any other
component of the pool. However, this chapter is not designed to educate you on the intricacies of the
pool fence requirements or as a fence installation manual. You can easily obtain that information from
your local municipality or the fence manufacturer.
The objective of this chapter is threefold:
• To discuss the most common pool fence mistakes and how to avoid them.
• To briefly introduce the most common types of pool fence.
• To discuss the incorporation on pool fence as a part of a complete design.
Let’s get started:
Section One: Common Pool Fence Mistakes
First let’s cover some basics
Here are some of the most basic requirements of the fence code that you have to know:
• A barrier is required on all sides of the pool, but the distance from the pool is irrelevant
• Minimum height is 48”
• Gates must swing out away from pool area
• Gates must self close and self latch
• Door alarms are required on any door from house leading into fenced pool area
Here are some other things that an inspector will check:
• Distance from bottom of fence to the ground
• Distance between pickets
• Distance between horizontal rails
• Height of gate latch from ground
This barely scratches the surface, but it will get you started. Remember that the model barrier code is a
nationwide regulation; however it is only a minimum requirement. Some localities or home owners
associations may have more restrictions, but none can require less.
Most Common Fence Mistakes and Pareto’s Law
Pareto’s Law, or the 80/20 Rule, states that 80% of the effects come from 20% of the causes. Well, this
certainly holds true when it comes to pool fence mistakes. Eighty percent of the problems come from
twenty percent of the code requirements. Here’s a brief overview of these common oversights and how
to prevent them.

Common Problems with New fences:
Bottom of the Fence too High off of the Ground
Because most fence panels are straight and most ground has some slope, it is difficult to insure that the
entire bottom of the fence is close enough to the ground to pass code. This is the most common reason
new pool fences fail inspection. The solution is to either drive the fence closer to the ground or to build
the ground up. Sometimes the difference can be too great for either approach. In this case you can
place pavers or some large stone directly under the fence to reduce the difference to the required
distance.
Door Alarms, or Lack Thereof
If the house serves as part of the barrier, or in other words if you fence three sides of the pool and tie
the fence into the house, any door leading from the house directly into the fenced area must be
alarmed. Surprisingly, many pool contractors and even fence companies do not inform people of this
requirement. This does require you to be home for the final inspection, so it will need to be coordinated
with the person scheduling the final inspection.
Tying the Fence in With an Existing Deck
This is simply a can of worms, so if you are considering this option pay attention. If you run your fence
to an existing deck, that deck becomes part of the barrier. If the fence terminates at the railing of a set
of steps, then that railing must meet the code requirement (which it probably doesn’t). A common
mistake people make is simply running the fence to the end of the step railing without considering the
consequences. The solution in this case is to rebuild the railing. Another common mistake is butting the
fence to an elevated deck without considering the open space between the deck and the ground. This
area must be closed off with approved lattice or something else that meets the code
requirement. People also make an assumption that if a deck has two sets of steps, one inside the fence
and one outside, then they can simply add a gate to the outside set of steps to close them off. This
would work if the said step railing and the new gate were up to code, but neither the height or picket
spacing of a standard railing meet the requirement. Again, you could adjust the railing, or just skip the
hassle and fence to the corner of the house. If you actually plan on doing any of this, it’s best to meet
with an inspector on site before hand and have him tell you what he wants.
Metal Fence too Close to Pool
Anything metal within 5’ of the water’s edge of the pool needs to be bonded. Bonding is the process of
removing any stray voltage from your pool components that might otherwise deliver a small shock when
you touch them. This is done by attaching a bare copper wire to the metal component. Handrails,
ladders, slides, diving boards, steel in the pool deck, and anything else within 5’ of the pool need to be
bonded. Many people, unaware that such a thing even exists, install their aluminum fence within 5’ of
the pool and it fails inspection. The remedy is to run a bare copper (bonding) wire to each post and

panel of the fence that falls within the 5’. The best thing to do is keep the fence more than 5’ from the
pool.
Common problems with Modifying Existing Fences
Gates will not self close
This is a big one with existing PVC and especially wood fences. The biggest problem is often that the
bottom of the gate rubs the ground just enough to prevent it from closing. Simply take a shovel or a
weed eater, whichever is applicable and clear out plenty of space under the gate to ensure a smooth
close. This is also a result of the gate hinges not opening and closing smoothly due to age. If this is the
case, some cleaning and lubricating is in order. If that doesn’t do the trick, new hinges are inexpensive
and easy to install.
Gates will not self latch
Even if you can get the gate to close, getting it to latch is another matter. The gate must have enough
speed upon closing that in enable the latch to fasten. There are many types of latches, but the magnet
activated latches with the pull top require the least amount of speed and force from the closing gate.
Another common cause of this problem is incorrect alignment of the latch between the post and gate
sides. This is a simple adjustment and should only take a minute. The key with an existing fence gate is
to get it right and then check it again before the inspector shows up. I think inspectors have the same
effect on fence gates that mechanics have on a cars. Somehow fence gates stop closing and latching on
the day of the inspection the same way your car’s funny noise disappears just as you arrive at the repair
shop.
Gates open the wrong direction
Seeing a trend here; as you can see most problems with existing fence revolve around gates. The gate
needs to swing away from the pool. They won’t let this one fly, so you have two options: board the
gate off, or turn it around.
Fence too short
This is a big one. Especially with a concave fence; the style that dips in the middle of each section. The
minimum height applies to the entire fence, so if any portion of the fence doesn’t measure up, the
entire fence fails. The reason this is a common problem is because the standard concave fence is 48” at
the post, then dips below that height in the middle. This is common in many areas of new construction
where this type of fence is included as part of the house package.
Now that we’ve covered some of the most common oversights that people make. Let’s look at the most
common styles of pool fence.
Section Two: Pool Fence Styles

In this section we will discuss the three most common styles of pool fence. We will also look at the
advantages and disadvantages of each type as well as discuss settings where one type of fence may be
preferred to another.
Ornamental Aluminum
Ornamental aluminum has become the most popular type of pool fence in America due to its durability
and elegant appearance. The aluminum is coated with a type of dry powder which is applied as a free
flowing agent. This process is called powder coating and differs from conventional liquid paint because
it does not require the use of a solvent to keep the product in suspension form. The coating is applied
electrostatically and then cured under heat to allow it to form the skin that coats the aluminum.
Powder coated aluminum fence is sometimes confused with wrought iron fence which is extremely
heavy and has a painted surface. Iron fence is not frequently used around pools because it is much
more expensive and time consuming to maintain. The panels for residential aluminum fence come in six
foot sections and are composed of individual top and bottom rails and pickets that are fastened
together with rivets or screws. There are two standard heights of pool code fence. One is a single top
rail fence that is 48” tall. The second and most popular style of aluminum pool fence is 54” tall and has
two rails on top and one at the bottom. Let’s take a look at two of the most popular styles of
54”aluminum pool fence.

This 54” fence is a double top rail with every picket extending to the top of the fence.
With this style of 54” fence every other picket has a crushed tip for additional ornament.
Let’s take a look at some of the advantages and disadvantages of ornamental aluminum fence.
Advantages:
• Extremely durable
• Low maintenance
• Relatively inconspicuous (especially darker colors)
Disadvantages:
• Not a good privacy fence
Applications
Ornamental aluminum fence is perfect for any setting where low maintenance is important and a
privacy fence is not required. Aluminum fence is also great for waterfront properties or any other

setting where you want to limit the obstruction of a wonderful view as much as possible. This is
primarily because of the narrow rails and pickets used to construct the fence. This is the only type of
fence that requires absolutely no maintenance, and that’s a huge plus for most people. Regarding
pricing, all fences are priced by the linear foot. The cost of aluminum fence varies by region, but an
average range is $25-$40 per foot installed. There is usually an additional charge for each gate, normally
a couple hundred dollars each. Aluminum fence is also available in a variety of colors. The most
popular color is black, but many manufacturers also offer white, bronze, or green.
PVC
PVC fence is also frequently used around pools. There are two primary styles: standard fence, which is
48”-54” tall with either solid slats or spaced pickets; and privacy fence, which is 6’-7’ tall with the slats
butted together to make a solid panel. Many privacy fences have lattice or spindles for the top foot of
the fence to add ornament to the design. Let’s take a look:
Standard PVC privacy fence.

Lattice top PVC privacy fence.

Spindle top PVC privacy fence.
Now let’s take a look at some of the pros and cons of PVC pool fence.
Advantages
• Great privacy fence
• Low maintenance
• Many solid and picketed styles available
• Many manufacturers can adapt their styles to custom heights for little or no additional charge.
Disadvantages
• Gates tend to sag over time
• Pickets and rails are much thicker and considered bulky by some consumers
• White color tends to be very conspicuous
• Mildew can form on fence in wet shady areas
Applications
PVC is the undisputed champion of privacy fences. It’s durable, low maintenance, and provides great
privacy. What else could you ask for? It’s frankly not my favorite choice for a standard pool fence
because the bulkiness of the thick pickets and rails. But that’s just my opinion. We’ve used PVC in many

settings, often when tying in with an existing PVC fence, and the projects have all turned out wonderful.
In terms of pricing, standard PVC fence (48”-54”) normally ranges from $25 to $35 per foot and privacy
fence is normally $35 to $45 per foot. Gates are normally $250-$350 each. Almost all PVC fences are
white, but many manufactures also offer tan as another option.
Wood
Wood is a tried and true building material and continues to be a popular fence material used around
pools. Over the past decade it has been overshadowed by PVC and aluminum because of their low
maintenance benefits, but thousands of wood fences are still installed around pools every year.
A standard concave wood fence.
Let’s consider some of the pros and cons of wood fence:
Advantages:
• Size and style are totally customizable
• Less expensive than PVC or aluminum
• Can paint or stain a wide variety of colors

Disadvantages:
• Requires more maintenance
• Can warp and twist over time
Applications
Wood has some very strong qualities to take advantage of, if you’re willing to put the time in to
maintain it. It is natural not manmade, and there’s power in incorporating various natural elements into
a design. In some settings a manmade barrier constructed of plastic or aluminum may not work as well
as wood. Notwithstanding the maintenance aspect, there’s no disputing the fact that it looks great in
any setting and also makes a wonderful privacy fence.
Section Three: Incorporating the Fence into the Total Design
One of the biggest mistakes people make in planning their pool project is waiting until the pool and
patio are in before deciding what they will do with the fence. Many times the fence layout is a no-
brainer, but sometimes it can be quite tricky, and these are the times the planning is usually
deferred…..big mistake. This section is designed to share some simple tips and methods for
incorporating the pool fence into the complete design. It is divided into sections on fencing around
patio, walls, accessory structures, and sloping lots.
Low Maintenance Fence Layouts
Low maintenance is a goal for all pool owners. You want to spend your time around the pool lounging in
a float with a cold drink, not weed eating around a fence. One simple and attractive method to prevent
weeds between the patio and fence is to border the patio with an area of decorative gravel that extends
at least a foot beyond the outside of the fence. Install a permeable weed barrier underneath the gravel
and you have a beautiful low maintenance border that ties the fence into the design. I’ve found that the
best gravel is round stone 1 ¼” or bigger. Small pea gravel should be avoided because it scatters across
the pool deck whenever a stray foot finds its way off the patio. Mulch is another alternative, but has to
be redone at least once per year.
Fencing on the Pool Patio
Occasionally a customer wants to install the fence on the pool deck. This does make for a clean look,
and it is certainly low maintenance, but it is more expensive.
There are several ways to accomplish this:
Core drill a hole through the patio for each fence post after the deck is poured. The post is then set in
the hole, and anchoring cement poured around the post. This is probably the most fool-proof method,
but also the most expensive. A standard price is $40-$70 per hole.
Placing a piece of pipe in the deck for each fence post is another option. This is very cost effective, but
if one piece of pipe is laid off incorrectly or shifted during the pour you are out of luck.

Bolting the post to the deck with brackets is a third option. This is also more cost effective than core
drilling and not as risky as the pipe method. The disadvantage of this method is that the posts are not as
stable as having the post installed in the ground or concrete.
With any of these methods you need to have the posts a minimum of four inches away from the edge of
the patio to prevent the concrete from cracking or breaking off between the post and the edge; so be
sure to size your patio accordingly.
Fencing Across the Pool Patio
Sometimes it’s necessary to divide a patio area into two sections with the pool fence. This tends to
break up the continuity between the pool area and the space outside of the fence. One way to
overcome this is to install a double gate in the major connecting area. When the pool is in use, simply
open both gates and this will give you eight feet of open area connecting the two spaces. This gives a
feeling of continuity that cannot be achieved with only one gate.
Fencing on a Retaining Wall
When a retaining wall requires a railing, it’s sometimes best to install the pool fence on the wall. In this
case, the posts can be set using either the core drilling or bracket methods mentioned above. One word
of caution when using the core drilling method: be sure the anchoring cement does not run down
outside of the wall when setting the posts. It’s a bear to remove from the wall once it sets up. Placing
the fence just inside the wall instead of on top of the wall is another option if there’s plenty of space
between the patio and wall.
Fencing to Accessory Structures
Fencing to the side of an accessory structure works very well in most cases. Here are a few pointers for
incorporating an accessory structure into a fence plan:
• Make sure the entire structure meets the barrier code requirement
• Only the main dwelling requires door alarms; sheds, pool houses, etc. do not.
• If mounting the filter system behind a structure and outside of the fence, be sure to install a
gate close to the structure to easily access the equipment.
Fencing on Sloping lots
This is a tricky one. Sloping lots have their advantages and disadvantages when it comes to pool fence.
There are two primary disadvantages. First, it can be difficult to maintain the minimum distance
between the fence and the ground. Even though the fence panels are straight, they can be racked to
run somewhat with the ground. But the gates, which are the second obstacle, cannot be altered to
follow the ground because they are welded straight and must be installed perfectly level. Two solutions
for the gate are to either have a gate custom built, or to simply install it on level ground. One great
advantage of a sloped lot, especially when you would like the fence to be inconspicuous, is to run the
fence down the hill on both sides so you look over top of the fence. This is great for waterfront
properties or anywhere else where you want to avoid disrupting a nice view.

Let’s take a close look at how our case studies incorporated the fence into their designs.
Case Studies
The Alvarez’s and McDaniel’s took similar approaches with regards to their pool fence. Both used black
ornamental aluminum and both fenced to the corners of the house and included a large portion of the
backyard into the pool area. Let’s take a look at the Alvarez’s first.
Alvarez family
Let’s look at some pictures of Stacey’s fence.
An overhead view of the Alvarez’s fence layout.

Fence tying into the side of the pool shed.

Fence tying in with the side of the house.

Another view of the entire Alvarez fence.
McDaniel
Now let’s take a look at Kip’s fence.

Here’s a good picture of the McDaniel’s fence layout.

Fence tying into the side of the house.

…..and tying in with the opposite corner of the house.

A final look at the McDaniel fence. Here’s a good view of the low maintenance gravel border.
Hopefully this chapter has helped you with the process of incorporating the pool fence into your total
design. If you plan to install the fence yourself, make sure to read the entire fence code for your area. If
you’re having a contractor do it, it’s a good idea to discuss some of the points of this chapter with him to
insure you are both on the same page.
Step Six: Beautify your Poolscape with Landscaping

Landscaping can turn the most basic pool and patio into an absolute oasis. In many cases, it’s not until
the landscaping is completed that a project develops the “wow” factor that people are after. This
chapter will cover some basic principles of pool landscaping that will help you bring the project together.
Consider the following principles of pool landscaping:
Make use of Potted Plants
The use of potted plants can transform the most lackluster area of an outdoor space into an oasis. The
power of these contained beauties is that they are totally portable. Here are some tips on maintaining
and positioning potted plants:
Potted plant tips:
• Be sure to water your potted plants more frequently. They dry out much faster because of
exposure of the pot to warm air.
• Cluster potted plants together to obtain the feel of a landscape bed.
• Utilize stands to combine various types of pots and plants.
• Use potted plants as a means of transition. For example, place them at the end of a bench wall,
on both sides of a door or gate, or beside patio furniture to help bring the layout together.

Something simple like adding a few potted plants beside this bench swing adds a little vitality to the area.
Utilize Landscaping for Privacy
Privacy is a major concern for most pool owners. No one wants to feel like they are literally swimming in
a fish bowl. The visual and audible screening properties of natural plants and trees make landscaping
one of the most powerful ways to achieve privacy in a pool area. Take a look at the difference this single
row of Leland cypress trees makes in this setting.


Incorporate Planters into your design
As opposed to potted plants, planters are a permanent feature of your pool area. They are typically
incorporated into a design as a flat open area in the pool patio, or as an elevated feature adjacent to
benches or walls. Either way, planting beds are a great way to bring diversity and vitality to any
poolscape. Take a look at how this planter is incorporated into the pool deck. Notice how it breaks the
monotony of the open area. From a budget perspective, it also reduced the amount of square footage
of the patio which lowered the cost.


Incorporating this simple planter into the patio transformed this little used section of patio into an area that adds character to
the layout.
Utilize Landscape Lighting
Nothing adds class and sophistication to an outdoor area like properly designed outdoor lighting.
Because most outdoor lighting systems are low voltage, many people choose to tackle the installation
themselves, but there are many reputable companies available to do turn-key installations. If you think
outdoor lighting may be an option for you in the future but the budget doesn’t allow it now, have your
electrician run some extra conduit to the pool area for your future installation. Spending a few extra
dollars now will save you big time in the future. Let’s take a look at the outdoor lighting at the McDaniel
job.

Here’s the McDaniel job with no outdoor lighting.
Look how several low voltage lights accentuate the steps and landscaping.
Plants to Use and Avoid
Wide varieties of plants and trees are used around pools according to region. Even though
comprehensive lists of acceptable plants are available, most folks just want some general guidelines of
what plants to use and what to stay away from. Consider the following:
Plants to use around pools
Evergreen trees and groundcover
Shrubs
Long blooming flowers
Ornamental grasses like fountain grass
Avoid these types of plants
Fruit bearing trees
Plants that attracts bees and other insects like mint or bee balm
Plants with thorns, barbs, or other prickly parts like roses or hollies
Deciduous trees whenever possible
Crape myrtles

Be careful with Boulders
…..and not just because they’re heavy. There is a thing called architectural continuity. In other words, if
you use boulders, make sure they fit into the theme of the total design. One of the biggest head-
scratchers is when people plop a single boulder around a pool that has no business there. As a general
rule, a pool is either naturalistic or not. If yours falls into the “not” category, please stay away from the
boulder. Now, with that said the proper use of boulders can transform a pool area into an oasis. Based
on my experience, boulders are best utilized when they are used in groups and with an abundance of
landscaping.
Use Grass with discretion inside the Fence
Be careful not to create awkward strips of grass inside the fence area. Typically a pool fence either
borders the pool patio or encompasses a large area of the yard. Getting caught in the middle can cause
you more maintenance. You do not want to weed-eat or push mow inside the fence if it can be avoided.
If you end up with a small space between the patio and fence, fill it with low maintenance landscaping
like washed stone and simple plants. Be sure not to use small pea gravel around your pool because it
has a tendency to scatter across the pool deck when stepped on. Round stone 1 ½” or bigger is perfect
because it looks great and stays put.
Case studies
Let’s have one final look at both of our case study families.
Alvarez Family
Stacey had a great opportunity to incorporate landscaping into her design because of the significant
space between the pool deck and the house, and because of the open areas around the hot tub and
pool shed. Let’s take a look at how she utilized landscaping in her design.

The Alvarez’s landscaping plan incorporates planting beds between the house and pool deck, around the hot tub, and in front
of the pool shed.

This is a good view of the landscaping at the house, around the hot tub, and of the potted plants beside the bench.

Simple planting areas in front of the pool shed.
The McDaniel’s
Let’s take a look at some of the unique landscaping features of Kip’s design.

The two large flowering shrubs off the rear of the pool deck add to the symmetry and balance of the project.

The landscaping that borders the steps and wall draw the eye in, and the area in the center of the steps was finished off with a
statue.

This perspective shows how the detached gazebo serves as a separate outdoor room, but still adds to the total design.
In conclusion, I cannot put enough emphasis on the importance of incorporating landscaping into the
total design of a pool. Pool shape, patio layout, walls, and even the fence are critical, but it’s not until
the landscaping is complete that a project really comes to life. The good news is that it’s really hard to
mess up. As long as there’s something green and alive there, that pretty much gets the job done. For a
more in depth list of recommended plants by region, consult with your local landscape designer.
The Six Steps Revisited
Here’s a quick review of the six steps to pool and patio success:
Step One: Choosing the Pool Site
Factors like direct sunlight, privacy, imposed restrictions, and yard slope can have an impact on the
location of the pool in your yard. Consider all of these factors to choose the ideal location for your site.
Step Two: Selecting the Right Pool

Ask yourself two simple questions: What activities do I want my pool to accommodate? What do I want
my pool to look like? Consider how you want to use your pool and find the pool that has the right
features and look for you.
Step Three: Designing the Perfect Layout
Designing the perfect layout is as simple as putting together a jigsaw puzzle. First, identify the
boundaries of your site that will impact your pool and patio location. Next, identify the interior pieces of
the design. This is your pool, major blocks of patio, and any other accessory structure that is
incorporated into your design. Finally, rearrange the various pieces of the puzzle until you find the
perfect configuration for you.
Step Four: Managing a Sloping Lot
Sloping lots can be effectively managed in two ways. Retaining walls are a popular option on sites that
slope more than three or four feet or have space limitations. Some of the most popular retaining wall
materials are interlocking concrete block, brick or block and mortar with stone, and wood. Site work is
the other method of managing a sloping lot. It consists of cutting or filling earth to achieve a desired
degree of slope on the site.
Step Five: A Safe and Attractive Pool Fence
Even though many people view pool fence as a necessary evil, it is a critical component of any pool
design. Familiarize yourself with the pool fence code to avoid some of the common mistakes that cause
a fence to fail inspection. The three most prominent types of pool fence are ornamental aluminum,
PVC, and wood.
Step Six: Beautify your Poolscape with Landscaping
No project is complete without landscaping. Potted plants, planters, landscaping for privacy, and
outdoor lighting are all critical components of a landscape design. Certain types of plants should be
avoided, but generally any living plant will serve to add vitality and character to your poolscape.
Well that’s it: The Six Steps to Pool and Patio Success. I hope the information in this book has helped
you in planning a pool and patio that you will enjoy for years to come. Please feel free to contact me
directly via phone or email with any questions or comments.