Embed Size (px)
Citation preview

Eclipse Forms Release 8.7.2

Legal Notices
© 2011 Epicor Software Corporation. All rights reserved. Unauthorized reproduction is a violation of applicable laws. Epicor and the Epicor logo are registered trademarks and/or registered service marks of Epicor Software Corporation in the United States and other countries. Epicor Eclipse is a trademark and/or service mark of Epicor Software Corporation. All other trademarks or service marks are the property of their respective owners and should be treated as such.
Epicor ® Eclipse™ 8.7.2 Online Help System
This online help system, as well as the software described in it, is provided under license and may be used only in accordance with the terms of the license. The content provided is for informational use only and is subject to change without notice. Epicor Software Corporation assumes no responsibility or liability for any errors or inaccuracies that may be included in this documentation.
Publication Date: July 15, 2011

iii
Table of Contents Eclipse Forms Overview ............................................................................................................................... 1
Setup Requirements for Eclipse Forms ......................................................................................................... 2
Control Maintenance Records .................................................................................................................. 2
Additional Setup ....................................................................................................................................... 2
Defining Eclipse Forms Parameters .............................................................................................................. 4
Mapping Print Styles to Form Types for Eclipse Forms............................................................................... 7
Entering Tray and Paper Size for Eclipse Forms .......................................................................................... 8
Using Print-to-PDF with Eclipse Forms ....................................................................................................... 9
Printing to Local Printers with Eclipse Forms ............................................................................................ 10
Creating Order Summary Snapshots ........................................................................................................... 11
Creating Custom Fax Cover Sheets ............................................................................................................ 13
Modifying Standard Forms Overview ........................................................................................................ 14
Creating New Forms in Eclipse Forms ....................................................................................................... 15
Modifying Columns on Standard Forms ..................................................................................................... 17
Changing Default Form Types in Eclipse Forms ........................................................................................ 19
Overriding Form Types at the Order Level ................................................................................................ 21
Enabling Eclipse Forms PDF Archiving ..................................................................................................... 22
Setting PDF Archiving Parameters Per Form Type .................................................................................... 24
Accessing the Eclipse Forms Administrator Home Page ........................................................................... 25
Working with Logs in Eclipse Forms ......................................................................................................... 26
Troubleshooting Eclipse Forms .................................................................................................................. 27
Consolidated Invoices Setup ....................................................................................................................... 28
Specifying Page Ranges When Printing Forms .......................................................................................... 29


© 2011 Epicor Software Corporation. All rights reserved. 1
Eclipse Forms Overview
Your business requires unique forms for printing, such as for invoices and sales orders. The Eclipse Forms application provides you a way to design and save your own forms so they fit your business needs.
Eclipse Forms solves the following:
• Makes printer set up easier by moving it from AIX/Universe to Windows.
• Removes the need for re-integration charges for custom forms when you upgrade, giving you the ability to modify columns on standard forms.
• Increases form flexibility.
• Provides the ability to store PDF copies of printed, faxed, and e-mailed forms.
• Provides a more professional look and feel to your forms.
• Prints, faxes, and e-mails the same form, unlike in today’s environment.
• Provides the ability to attach forms to a sales order in the system for easy look up.
• Prints, faxes, and e-mails reports directly from your hold file.
Eclipse Forms consists of a design application you use to build forms you need for your business, and an administrative application you use to monitor system activity and to troubleshoot any printing issues. For information about building forms using Eclipse Forms and the design application, see the online help attached to the designer.
The Administrator application manages access to the Deployment Server. Using the Administrator application, you can view details about the following:
• Deployment server users
• Runtime server statuses
• Process logs
• Configuration settings and processes

Eclipse Forms Rel. 8.7.2
2 © 2011 Epicor Software Corporation. All rights reserved.
Setup Requirements for Eclipse Forms
Following are the control maintenance records and additional setup requirements to use Eclipse Forms.
Control Maintenance Records • Branch That Controls Eclipse Forms Logo
• Eclipse Forms - Canadian GST Tax #
• Eclipse Forms - Canadian HST Tax #
• Eclipse Forms - Canadian PST Tax #
• Eclipse Forms - Canadian Tax Types
• Eclipse Forms - Eclipse Forms Branch Logos
• Eclipse Forms - Footer Message for Acknowledgements
• Eclipse Forms - Footer Message for Bids
• Eclipse Forms - Footer Message for Credit Memos
• Eclipse Forms - Footer Message for Direct POs
• Eclipse Forms - Footer Message for Invoices
• Eclipse Forms - Footer Message for Pick Tickets
• Eclipse Forms - Footer Message for Purchase Order Bids
• Eclipse Forms - Footer Message for Purchase Orders
• Eclipse Forms - Footer Message for Return Goods
• Eclipse Forms - Footer Message for Ship Tickets
• Eclipse Forms - Footer Message for Statements
• Eclipse Forms - Hide Freight Allowed Box
• Eclipse Forms - Print All Description Lines Of Backordered Products
• Eclipse Forms - Print Eclipse Part Number After Product Desc
• Print Barcodes On Eclipse Forms
Additional Setup Complete the following additional setup for Eclipse Forms:
• Enable or disable Eclipse Forms for specific users in your system using the Enable Forms Status control maintenance record. Typically, you would disable all users during implementation except for the users that are testing that forms and printers are set up correctly.
• Define default parameters, such as enabling PDF archiving and default printers.
• Assign a slave printer
• Set up tray and paper sizes

Rel. 8.7.2 Eclipse Forms
© 2011 Epicor Software Corporation. All rights reserved. 3
• Set any forms to bypass the Eclipse Forms process, such as labels.
• If you report Canadian tax, indicate your tax numbers in the Canadian tax control maintenance records listed above. Set the Enable HST/GST/PST Hot Key In Tax Jurisdiction Code Maintenance control maintenance record to Yes, and mark the appropriate tax option in Tax Jurisdiction Code Maintenance.
Eclipse Forms Rel. 8.7.2
4 © 2011 Epicor Software Corporation. All rights reserved.
Defining Eclipse Forms Parameters
Before using the Eclipse Forms application, define the application default settings, such as printer names and logo paths. These default settings tell the application where it can find the information it needs to print your forms.
To define Eclipse Forms parameters:
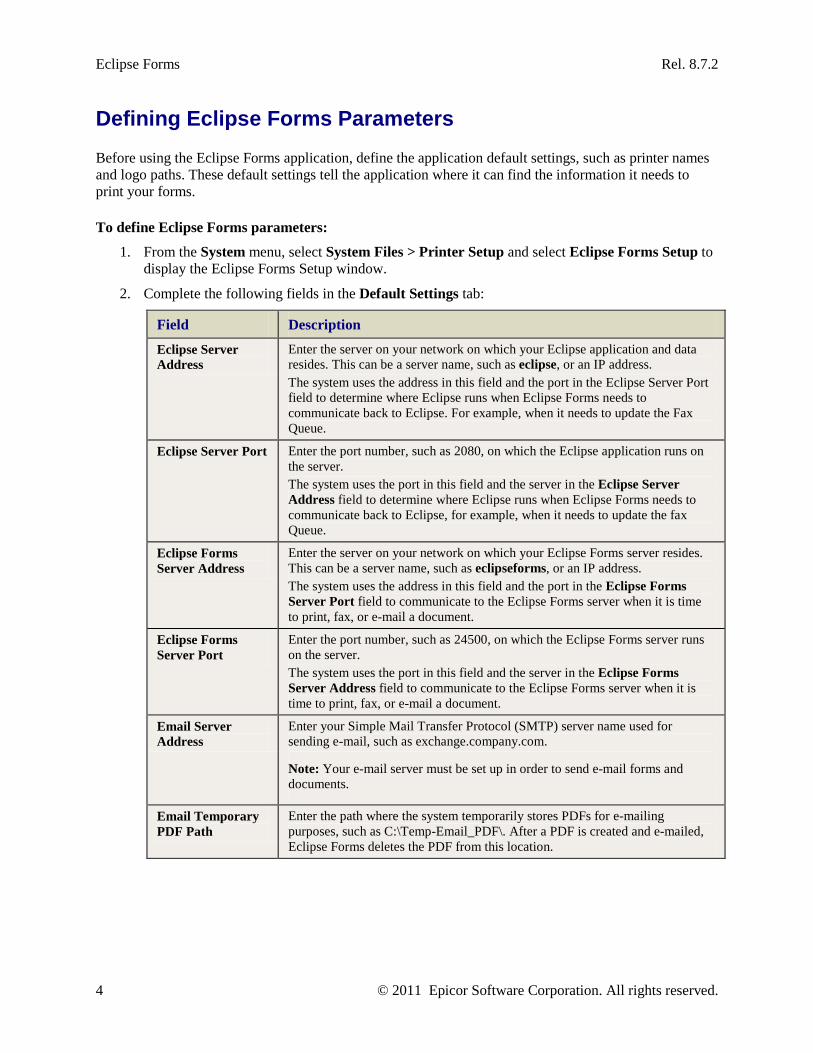
1. From the System menu, select System Files > Printer Setup and select Eclipse Forms Setup to display the Eclipse Forms Setup window.
2. Complete the following fields in the Default Settings tab:
Field Description Eclipse Server Address
Enter the server on your network on which your Eclipse application and data resides. This can be a server name, such as eclipse, or an IP address. The system uses the address in this field and the port in the Eclipse Server Port field to determine where Eclipse runs when Eclipse Forms needs to communicate back to Eclipse. For example, when it needs to update the Fax Queue.
Eclipse Server Port Enter the port number, such as 2080, on which the Eclipse application runs on the server. The system uses the port in this field and the server in the Eclipse Server Address field to determine where Eclipse runs when Eclipse Forms needs to communicate back to Eclipse, for example, when it needs to update the fax Queue.
Eclipse Forms Server Address
Enter the server on your network on which your Eclipse Forms server resides. This can be a server name, such as eclipseforms, or an IP address. The system uses the address in this field and the port in the Eclipse Forms Server Port field to communicate to the Eclipse Forms server when it is time to print, fax, or e-mail a document.
Eclipse Forms Server Port
Enter the port number, such as 24500, on which the Eclipse Forms server runs on the server. The system uses the port in this field and the server in the Eclipse Forms Server Address field to communicate to the Eclipse Forms server when it is time to print, fax, or e-mail a document.
Email Server Address
Enter your Simple Mail Transfer Protocol (SMTP) server name used for sending e-mail, such as exchange.company.com.
Note: Your e-mail server must be set up in order to send e-mail forms and documents.
Email Temporary PDF Path
Enter the path where the system temporarily stores PDFs for e-mailing purposes, such as C:\Temp-Email_PDF\. After a PDF is created and e-mailed, Eclipse Forms deletes the PDF from this location.

Rel. 8.7.2 Eclipse Forms
© 2011 Epicor Software Corporation. All rights reserved. 5
Field Description Default Logo File Location
Enter the directory path, such as C:\EclipseFormsLogos\logo.gif, where the logo that prints on your forms is stored. Graphics can be in .gif, .jpg, .bmp, or .png format. We recommend storing logos in the C:\EclipseFormsLogos folder on the Eclipse Forms server. To override the logo at a specific branch, set a different logo path for that branch in the Eclipse Forms Branch Logos control maintenance record. Logos can be any size and color. E-mails and PDF archive documents use the color version of the logo, however, faxes and printed documents print the logo in black and white. It is not necessary to include the branch address and phone number in the logo, as Eclipse Forms prints the branch address information on the form. Create your logos with limited white space around the actual graphic. Any white space is considered as part of the logo, and causes the actual logo picture to print smaller on your forms.
Check Signature File Location
If you print signatures on Accounts Payable checks, you need to save the check signature graphic file needs on the Eclipse Forms Server. Enter the directory path, such as C:\EclipseFormsLogos\check.gif, where the logo that prints on your forms is stored. Graphics can be in .gif, .jpg, .bmp, or .png format. We recommend storing logos in the C:\EclipseFormsLogos folder on the Eclipse Forms server.
Fax Prefix Enter the number combination you use to access an outside line when dialing your fax machine. For example, enter 8 if your system requires you to dial 8 for an outside line prior to dialing the fax destination number. Use commas to indicate pauses in the dialing sequence. If you leave this field blank, Eclipse Forms uses the default VisiFax configurations to send faxes.
Fax Server Name Enter the server on which your fax server resides.
Default Printer Enter the path from the forms server to your default printer. The system uses this printer if a printer is not assigned to a specific form.
Documents Per Batch
Enter the number of documents you want to process at a time. This field is only valid for printed invoices and statements. For example, if you accept the default setting of 50, the system processes the first 50 invoices or statements and sends them to the printer. While the first 50 are printing, the system begins processing the second set of 50 in the batch. Processing documents in smaller groups reduces the network bandwidth required to process the print job. For e-mailing invoices, the system respects this setting. This setting helps manage the attachments if your system administrators have set limits on file sizes for e-mails. The system defaults to ten (10) for e-mailing invoices, if this field is left blank.
Show Unit Price by Order Unit of Measure
Select this check box if you want to display unit prices per the quantity listed on the product's price sheet in the Unit Price column on your standard forms. For example, if you are ordering 3 of Product A, and Product A's price sheet lists 1.499 per each item, the unit price on a standard form displays as 1.499/ea if you select this check box. If the check box is deselected, the unit price for the same product displays as 1499.00/m.
3. If you have enabled PDF archiving, see Enabling Eclipse Forms PDF Archiving for information about the remaining fields.

Eclipse Forms Rel. 8.7.2
6 © 2011 Epicor Software Corporation. All rights reserved.
4. If you want to use custom fax sheets when you send documentations, select the Use Custom Fax Sheet check box
Note: This field can only be checked in combination with a forms request for a custom fax sheet otherwise your fax sheet remains blank.
5. Save your changes and exit the window.

Rel. 8.7.2 Eclipse Forms
© 2011 Epicor Software Corporation. All rights reserved. 7
Mapping Print Styles to Form Types for Eclipse Forms
Prior to using Eclipse Forms, you defined Print Styles to control how pricing and other information printed on your documents. Using Eclipse Forms, you use standard forms or modify the layout of a standard form to meet your needs. You then assign each document type, such as Sales Cut Ticket or a Purchasing Bid, a form type to use for printing, e-mailing, and faxing purposes.
When you enable Eclipse Forms, map your old print style to form types. Mapping and then running a conversion updates all customers who have that print style set in the Print Style and Invoice Print Style fields in the Customer Pricing/Printing window to use the new form types. Use the Print Style to Form Type Mapping utility to convert a print style to use the new form types.
Note: After you convert the print style, you can make changes for customers in the Customer Pricing/Printing window in the Form Types tab.
To map a print style to form types for Eclipse Forms:
1. From the System menu, select System Files > Printer Setup > Eclipse Forms Print Style Conversion to display the Print Style to Form Type Mapping window.
2. In the Print Style field, select the print style you want to map to form types.
3. In the right section of the window, in the Printing, Emailing, and Faxing fields, select the form you want to use by default for each purpose.
You can use the same form or different forms depending on how you send the form to the customer or vendor.
4. To convert print styles to use the form type assignments, do one of the following:
• To convert a single print style, select the print style and select Convert Current Row from the File menu.
• To convert all the print styles, select Convert All Rows from the File menu.
After you convert the print style, you can make changes for customers in the Customer Pricing/Printing window in the Form Types tab.
5. Save your changes and exit the window.

Eclipse Forms Rel. 8.7.2
8 © 2011 Epicor Software Corporation. All rights reserved.
Entering Tray and Paper Size for Eclipse Forms
If you use the Eclipse Forms product to design and save your own forms, you need to set the tray and paper size information for the specific printers that you use at your site.
To enter tray and paper size for Eclipse Forms:
1. From the System > System Files > Printer Setup menu, select Printer Characteristics to display the Printer Characteristics screen.
Note: If prompted, log on to the character-based system.
2. In the Printer Type field, press F10 and select the printer for which you want to set tray and paper information.
3. Use the Printer Commands hot key to display the Printer Commands screen and then use the Eclipse Forms Addl hot key to display the Printer Path Setup screen.
4. In the Tray field, enter the tray name for the printer.
For example, your printer trays might be labeled 1, 2, and 3.
5. In the Paper Size, enter the size of paper that is loaded in the tray you entered in the Tray field.
For example, enter 8.5 x 11.
6. Press Esc to save your settings and return to the Printer Commands screen.
7. Press Esc again to return to the Printer Characteristics field, and again to save your printer settings.

Rel. 8.7.2 Eclipse Forms
© 2011 Epicor Software Corporation. All rights reserved. 9
Using Print-to-PDF with Eclipse Forms
If you use Eclipse Forms, you no longer assign a slave printer for printing purposes. Instead, when you print a document, the system creates a PDF copy of the document and opens the document on your screen. From there, you can review, save or e-mail the PDF document, or you can print the document to any printer available to your computer. Printing to PDF allows you to print to a local printer without sharing that printer on the network.
Important: To print to a PDF, you must have Adobe Acrobat Reader installed on your desktop. This is available for download at no cost from www.adobe.com.
To enable Print-to-PDF:
1. From the System > System Files menu, select Terminal Setup to display the Terminal Setup window.
2. Find your terminal ID in the list and select the check box in the Slave Printer column.
Note: To find the ID of the terminal, go to File > Preferences to display the Preferences window. The terminal ID displays on the General tab.
3. Save your settings and exit the window.
4. Log out and back into Eclipse.
Your selected printer now shows as SLAVE. Manual printing within Eclipse now creates PDF documents and are not sent to the printer. This does not affect batch printing or printing defined by location settings such as Pick Tickets.

Eclipse Forms Rel. 8.7.2
10 © 2011 Epicor Software Corporation. All rights reserved.
Printing to Local Printers with Eclipse Forms
If you want your local printer to be available for printing directly from Eclipse, you need to share the printer on the network so the Eclipse Forms server can access it. When you share a printer, it is available to anyone on the network. Printing to a local printer also requires setup on the Eclipse Forms server and within Eclipse. Your network administrator may need to perform this setup for you.
To share a local printer on the network: Note: These procedures are written for Windows XP, and may vary slightly if you are
running a different version of the Windows operating system.
1. From the computer to which the printer is connected, ensure the printer is added and that you can successfully print to it.
2. Click the Windows Start button and select Printers and Faxes to display the list of local and network printers available to the computer on which you are working.
3. Right-click the name of the printer you want to share and select Sharing.
4. In the My Printer Properties dialog box, select Share this printer and enter a name to identify the printer.
For example, you might name the printer by its physical location at your facility.
5. Click OK to share the printer.
To allow Eclipse Forms to print to your local printer: Note: These steps are performed on the Eclipse Forms Server.
1. On the Eclipse Forms Server, click the Windows Start button and select Printers and faxes to display the list of printers available to the PC on which you are working.
2. From the File menu, select Add Printer to display the Add Printer Wizard, and click Next.
3. Select A network printer, or printer attached to another computer, and click Next.
4. On the Specify a Printer page, click Browse for a printer, and click Next.
5. On the Browse for Printer page, select the printer to add and click Next.
6. Click Yes in the Connect to Printer prompt and click Finish in the wizard.
To setup the printer for Eclipse Forms in Eclipse:
1. From the System > System Files > Printer Setup menu, select Eclipse Forms Printer Setup to display the Eclipse Forms Printer Setup window.
2. For information about using the window to setup your printer, see Eclipse Forms Printer Setup Overview in the Printers documentation.

Rel. 8.7.2 Eclipse Forms
© 2011 Epicor Software Corporation. All rights reserved. 11
Creating Order Summary Snapshots
Use the sales order entry snapshot functionality to see a summary of an order that includes both line items and actions on the order. The system shows what action or events have occurred for an order all on one document. When you use the capture function, the system saves a PDF document of that snapshot. You can create a snapshot for an order as many times as needed and create a history of an order based on snapshots you take.
For example, if your customer places a large order or bid and you want to keep a copy of how the order looks before submitting because you have entered items in a specific order, you can capture a snapshot and it stays attached to the order. If the customer later wants to see all the items as ordered like an order confirmation, rather than in availability or ship date order as the system processes it, you have a copy you can send to the customer.
If a line item has changed, was added, or removed from the order since the last time a snapshot was taken, the system places an asterisk (*) in front of the line item on the order summary PDF. The system uses headings on the order summary to indicate line item status, such as Open/Partially Shipped Line Items and Completely Shipped Items. The system attaches snapshot PDFs directly to the order.
You can print your order summaries or view your PDF snapshots using Document Imaging software. To access the document image, click the image in the menu bar or from the User Tools > Imaging menu, select View Images. The system saves the order with the date and time stamped so that you can determine which PDF you want to view or send. Using Activity Triggers, you set the system to automatically generate an order summary snap shot for a customer when you create a new sales order, pick ticket, ship ticket, or when you convert a bid to an order.
The order summary PDF contains the following information:
• All open, partially, or completely shipped items, and any comments associated with products.
• Each product's information, such as order number and generation, ship date if the product on that generation is in an Invoice status, estimated ship date if the product has not been received, and in process data if the product on that generation is in a Q, P, H, T, or B status.
• Any cancelled generations.
• All payments or deposits regardless if they were made directly or through cash receipts.
• Any credits or rebills applied.
• Removed products. Any removed products have an indicator that reads: Products removed since first order summary. After the first printing of an order from any document, any deleted products are listed in the deleted items. However, items deleted before the first printing are not included.
To create a snapshot of an order:
1. Open or create the order for which you want to create a snapshot.
2. From the File menu, select Order Summary Snapshot.
The system saves a PDF for the order. For information about how to set up where you want the system to save your PDF, see Setting PDF Archiving Parameters for Each Form Type.
3. Continue with your order.

Eclipse Forms Rel. 8.7.2
12 © 2011 Epicor Software Corporation. All rights reserved.
To print an order summary:
1. Open or create the order for which you want to create a snapshot.
2. Click the Status tab.
3. From the Print menu, select Options.
4. In the Order Status field, select M - Order Summary.
5. From the File menu, select Print Order.

Rel. 8.7.2 Eclipse Forms
© 2011 Epicor Software Corporation. All rights reserved. 13
Creating Custom Fax Cover Sheets
You can make custom or semi-custom fax sheets for sales orders, purchase orders, transfer documents and statements when the standard fax sheet does not meet your needs.
The system allows import of an image fitting an area of 7.8" x 3.2" on the top of the fax cover sheet. You can design your own image to include logos, branch addresses, or other information for your customers. The image you want to use for a fax cover sheet must be saved on your Eclipse Forms server.
To create a custom or semi-custom fax sheet:
1. From the System menu, select System Files > Printer Setup and select Eclipse Forms Setup to display the Eclipse Forms Setup window.
2. In the Default Settings tab, select the Use Custom Fax Sheet check box.
3. Design your image and save as an image file, such as .jpeg or .tiff.
Note: If the image is smaller than the 7.8" x 3.2" area, the system sizes to fit the page.
4. Use the Branch Fax Cover Sheet control maintenance record to choose which image to use for your cover sheet. You can select a different image for each branch, if needed.
Note: If you require further customizing, please call Eclipse Support and have a quote generated.

Eclipse Forms Rel. 8.7.2
14 © 2011 Epicor Software Corporation. All rights reserved.
Modifying Standard Forms Overview
Eclipse contains a standard set of forms that are assigned to the different types of documents or form types that you print while running your business. For example, there is a specific form that the system uses when it prints sales acknowledgements and a different form it uses when it prints Pick tickets. Each form contains a standard set of information, such as your company logo, address, product information, such as quantity and product description.
As you create forms of your own based on the standard forms, or modify the columns on existing forms, you can change the set of default forms the system uses to use your site-specific forms instead of the standard forms that came with your system.
If you want to change the columns on standard forms and use the new form, do the following:
1. Create the new form in Eclipse Forms View Maintenance.
2. Update the form type to use your new or updated form.
3. As needed, set specific customers to use a form that is different from the default.
You can also override the selected form when you are printing or reprinting orders.
Rel. 8.7.2 Eclipse Forms
© 2011 Epicor Software Corporation. All rights reserved. 15
Creating New Forms in Eclipse Forms
If you are running the Eclipse Forms product, you can create new forms and assign them or printing, faxing, and e-mailing purposes in system.
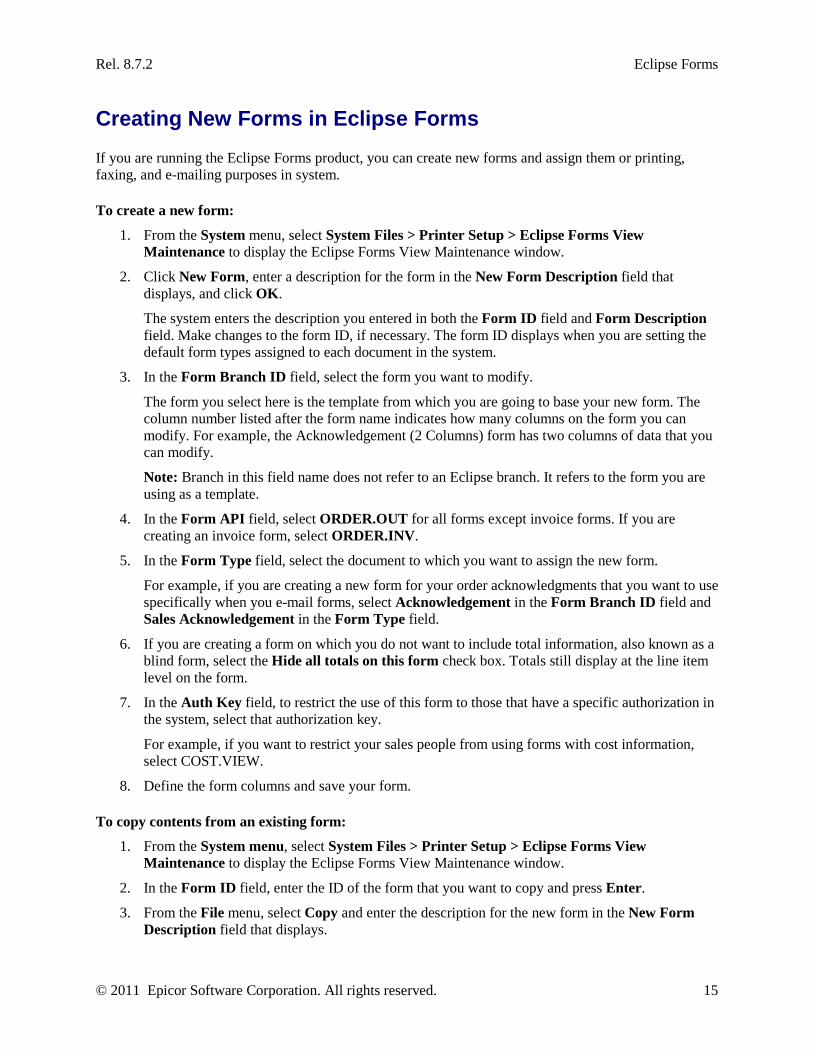
To create a new form:
1. From the System menu, select System Files > Printer Setup > Eclipse Forms View Maintenance to display the Eclipse Forms View Maintenance window.
2. Click New Form, enter a description for the form in the New Form Description field that displays, and click OK.
The system enters the description you entered in both the Form ID field and Form Description field. Make changes to the form ID, if necessary. The form ID displays when you are setting the default form types assigned to each document in the system.
3. In the Form Branch ID field, select the form you want to modify.
The form you select here is the template from which you are going to base your new form. The column number listed after the form name indicates how many columns on the form you can modify. For example, the Acknowledgement (2 Columns) form has two columns of data that you can modify.
Note: Branch in this field name does not refer to an Eclipse branch. It refers to the form you are using as a template.
4. In the Form API field, select ORDER.OUT for all forms except invoice forms. If you are creating an invoice form, select ORDER.INV.
5. In the Form Type field, select the document to which you want to assign the new form.
For example, if you are creating a new form for your order acknowledgments that you want to use specifically when you e-mail forms, select Acknowledgement in the Form Branch ID field and Sales Acknowledgement in the Form Type field.
6. If you are creating a form on which you do not want to include total information, also known as a blind form, select the Hide all totals on this form check box. Totals still display at the line item level on the form.
7. In the Auth Key field, to restrict the use of this form to those that have a specific authorization in the system, select that authorization key.
For example, if you want to restrict your sales people from using forms with cost information, select COST.VIEW.
8. Define the form columns and save your form.
To copy contents from an existing form:
1. From the System menu, select System Files > Printer Setup > Eclipse Forms View Maintenance to display the Eclipse Forms View Maintenance window.
2. In the Form ID field, enter the ID of the form that you want to copy and press Enter.
3. From the File menu, select Copy and enter the description for the new form in the New Form Description field that displays.

Eclipse Forms Rel. 8.7.2
16 © 2011 Epicor Software Corporation. All rights reserved.
4. Click OK.
The system populates the fields in the Eclipse Forms View Maintenance with the information from the form you copied.
5. Update the form information as described in the above procedure and define the form columns.
6. Save your changes and close the window.

Rel. 8.7.2 Eclipse Forms
© 2011 Epicor Software Corporation. All rights reserved. 17
Modifying Columns on Standard Forms
As you are creating and modifying forms for your business use, you can modify the data that displays in some of the columns on the standard forms by copying the original form and modifying the content. Each form has a standard set of data that is required, such as product quantities, product descriptions, and customer information such as ship-to or bill-to addresses.
Not all forms have columns that you can modify.
You can do the following with column data:
• Modify a column with a single data element.
• Combine elements in a single column.
• Display subtotals on blind forms.
To modify columns with a single data element:
1. Create a new form or select an existing form in the Form ID field to change the content of an existing form.
2. In the Dynamic Forms Columns area, in the Column Header field, enter the text you want to display to identify the contents of the column.
For example, enter Comm % for commission percent.
3. In the Column Elements field, select the element you want to display in the field.
You can add any element to the form that you can add to an order entry view. To narrow the list of results, enter part of the name of the element you want to add. For example, to list all elements that have the word "price" enter price in the field and click the Down arrow. The list contains only those elements that contain the word "price." Click More at the bottom of the displayed list to see the next set of column elements.
You must define the number of columns indicated next to the Form Branch ID field prior to saving the form.
4. Save your changes and exit the window.
To combine multiple elements in a single column:
1. Create a new form or select an existing form in the Form ID field to change the content of an existing form.
2. In the Dynamic Forms Columns area, in the Column Header field, enter the text you want to display to identify the contents of the column.
3. In the Column Elements field, select the first element you want to display in the column.
4. On the line directly below the line you added in step 2, in the Column Elements field, select the element you want to display next in the column and click Group. The system displays -Group- in the Column Header field and both items are listed as being in the same row.
5. To separate the column data, select a character to use to separate the data in the Separator field.

Eclipse Forms Rel. 8.7.2
18 © 2011 Epicor Software Corporation. All rights reserved.
To display the data without a separator, leave the Separator field blank.
6. Repeat steps 4 and 5 to add additional column in the same data.
7. Save your changes and exit the window.
To display subtotals on a blind form:
1. Create a new form or select an existing form in the Form ID field to change the content of an existing form.
2. In the Dynamic Forms Columns area, in the Column Header field, enter the text you want to display to identify the contents of the column.
3. In the Column Elements field, select the element you want to display in the field.
4. Select Subtotal Only on the line to include a subtotals for all the lines.
Selecting this option only displays subtotals, it does not displays prices for individual lines.
5. Save your changes and exit the window.

Rel. 8.7.2 Eclipse Forms
© 2011 Epicor Software Corporation. All rights reserved. 19
Changing Default Form Types in Eclipse Forms
As you create forms of your own based on the standard forms, or modify the columns on existing forms, you can change the set of default forms the system uses to use your site-specific forms instead of the standard forms that came with your system.
The system uses the form types defined in the Eclipse Forms Setup window for each form. You can override the default setting at the customer level and the vendor level and also when printing an order.
To change the default form assigned to a form type:
1. From the System menu, select System Files > Printer Setup and select Eclipse Forms Setup to display the Eclipse Forms Setup window.
2. Click the Default Form Types tab to display the list of forms assigned to each document, such as Sales Acknowledgement, for printing, e-mailing, and faxing purposes.
3. Locate the document in the list for which you want to change the default form that prints.
4. In the Printing, Emailing, and Faxing fields, select the form you want to use by default for each purpose.
You can use the same form or different forms depending on how you send the form to the customer or vendor.
5. Save your changes and exit the window.
To override the default form at the customer level:
1. From the Maintenance menu, select Customer to display the Customer Maintenance window and display the record for the customer whose forms settings you want to change.
2. From the Pricing menu, select Price Information to display the Customer Pricing Information window, and select the Form Types tab.
3. Locate the document in the list for which you want to change the default form that prints.
4. In the Printing, Emailing, and Faxing fields, select the form you want to use for this customer for each purpose.
You can use the same form or different forms depending on how you send the form to the customer.
5. Save your changes and exit the window and save the customer record.
To override the default form at the vendor level:
1. From the Maintenance menu, select Vendor to display the Vendor Maintenance window and display the record for the vendor whose forms settings you want to change.
2. From the Additional menu, select Additional Vendor Information to display the Additional Vendor Information window and select the Form Types tab.
3. Locate the purchasing document in the list for which you want to change the default form that prints.
4. In the Printing, Emailing, and Faxing fields, select the form you want to use for this vendor for each purpose.

Eclipse Forms Rel. 8.7.2
20 © 2011 Epicor Software Corporation. All rights reserved.
You can use the same form or different forms depending on how you send the form to the vendor.
5. Save your changes and exit the window and save the customer record.

Rel. 8.7.2 Eclipse Forms
© 2011 Epicor Software Corporation. All rights reserved. 21
Overriding Form Types at the Order Level
As you are printing, e-mailing, and faxing forms, you might find it necessary to override the system default, or the customer-specific forms settings at the order level.
To override a form type at the sales, purchase, or transfer order level:
1. Create or open a sales order, purchase order or transfer order, and view the order's Header tab.
2. From the Edit menu, select Form Type Override to display the Eclipse Form Types Setup window.
If you are using Eterm, use the Add'l hot key and then the Form Type Override hot key to display the Eclipse Form Types Setup screen.
3. For each document type you want to override for this order, select the form type to use when printing, e-mailing, or faxing the document.
If you set up customer-specific form types, those forms are listed in this window.
Note: You can only access the forms that apply to the order type you are viewing. For example, if you are in a sales order, you cannot set overrides for transfer documents such as the Transfer Shipper.
4. Click OK to save your changes.
The system uses the form types you selected when printing, e-mailing, and faxing documents for this order.

Eclipse Forms Rel. 8.7.2
22 © 2011 Epicor Software Corporation. All rights reserved.
Enabling Eclipse Forms PDF Archiving
Enable PDF archiving in Eclipse Forms to save documents that you send through the system in a format that you can always have on hand for viewing or reprinting. The PDFs the system creates are an exact copy of the forms sent to your customers or vendors.
After you enable and set up PDF archiving for your forms, the system automatically attaches the archive PDF to the transaction from which the form was created. Use Adobe Reader to view attached PDFs. For example, you create a sales order for an account customer and change the Print field on the Status window to Yes. When you exit the Status window, the system prints the order acknowledgement using the Acknowledgement form type. If you have enabled PDF archiving for Acknowledgement documents, the system also attaches a PDF of the acknowledgement document to the order in Eclipse.
Important: Due to processing time, it is possible to view an order before the system has successfully attached the PDF.
To enable PDF archiving, your system must have the following components:
• Document Imaging companion product to handle attaching PDFs to transactions or records in Eclipse as well as image maintenance, such as specifying where to store images and when to purge images.
• A directory on the Eclipse Forms server that is shared to the network. Add network security as you do for other Document Imaging locations. In the Eclipse Forms Setup window, add both the local path, such as C:\PDF-Temp\ and the network path, such as \\eclipseforms\PDF-Temp\. This allows the most efficiency when the Eclipse Forms server saves and clears temporary PDF files.
You must also setup UNIX security from the Eclipse server to the Eclipse Forms server in the Document Imaging Document Storage Location Maintenance window. These settings allow the Eclipse server to connect to the Eclipse Forms server and retrieve the documents for attaching.
• PDF Writer to create the PDF documents.
To enable Eclipse Forms PDF archiving:
1. From the System menu, select System Files > Printer Setup and select Eclipse Forms Setup to display the Eclipse Forms Setup window.
2. Set the following options in the Default Settings tab for PDF archiving:
Field Description PDF Temporary Local Path
Enter the network path to which Eclipse Forms saves each PDF it creates. For system efficiency when saving files, we use the local address of the temporary directory. Used for both PDF Archiving and Print-to-PDF (slave printing). Use the local path to the temporary directory, such as C:\PDF-Temp\. After the system attaches the PDF to Eclipse, the file is removed from the temporary directory.

Rel. 8.7.2 Eclipse Forms
© 2011 Epicor Software Corporation. All rights reserved. 23
Field Description PDF Temporary Network Path
Enter the network path to which Eclipse Forms saves each PDF it creates. This is a network path both Eclipse and Eclipse Forms can access and is where the Document Imaging application looks for files to attach as images to transactions or records in Eclipse. Used for both PDF Archiving and Print-to-PDF (slave printing). Use the network path to the temporary directory, such as //eclipseforms/PDF-Temp/ After the system attaches the PDF to Eclipse, the file is removed from the temporary directory.
Enable PDF Archiving
Select one of the following options: • Yes - Saves all forms displayed in the PDF Archiving tab to a PDF file
using the same settings. For example, manifests are not saved as PDFs if you set this field to Yes.
• No - Does not save any forms that are processed through the Eclipse Forms application to PDF.
• By Form - Saves each form that is processed through the Eclipse Forms application to a PDF file with the parameters that you set for each form type. Select this option if you want to archive PDFs for some of your forms, but not for all your forms, or if you want to set different preferences for each form. If you select this option and do not set archiving preferences for a form type, the system does not archive a PDF for the form type.
Default PDF Profile Select the indexing profile the system uses as a default when attaching images to transactions or records. For example, use document profiles to control image storage locations and security access. You can choose to select an existing profile, or you might want to create a profile specific for your PDF images. For more information about creating image profiles, see Creating Custom Indexing Profiles in the Document Imaging documentation. To override the PDF profile on a form-by-form basis, use the PDF Profile Override field on the PDF Archiving tab.
Note: If the PDF Writer or the Document Imaging products are missing on your system, you cannot access the fields listed above.
3. Save your changes and exit the window.
If you selected to enable PDF archiving by form, see Setting PDF Archiving Parameters for Each Form Type

Eclipse Forms Rel. 8.7.2
24 © 2011 Epicor Software Corporation. All rights reserved.
Setting PDF Archiving Parameters Per Form Type
If you select to enable archiving for all your forms or on a form-by-form basis, set the archiving parameters for each form that runs through your Eclipse Forms application. If a form does not have individual archiving parameters set, the system uses the default forms parameters set in the Default Settings tab of the Eclipse Forms Setup window.
To set PDF archive parameters per form type:
1. From the System menu, select System Files > Printer Setup and select Eclipse Forms Setup to display the Eclipse Forms Setup window.
2. Ensure the that PDF Archiving is enabled and that the Enable PDF Archiving field is set to By Form.
3. Click the PDF Archiving tab and complete the following fields for each form type:
Field Description Form Area Select the area of the system to which the form applies. For example,
Sales Orders or Accounting. Your selection in this field filters the form types available in the Form Type field.
Form Type Select the type of form, such as a sales order acknowledgement or a statement for which you want to define PDF archive settings.
Form Description Enter the description of the PDF file as you want it to display after it is attached to a transaction or record in Eclipse. Make this description detailed enough so you can identify a document when you press Shift-F8 from a transaction or record to view attachments. If you change the form description after the system has created forms and you have attached them to transactions or records in Eclipse, the system does not go back and update the previously attached images. The changes are effective from the change point forward.
Enable PDF Archiving Select Yes to enable PDF archiving for the form selected in the Form Type field. This field is only available for selection if you set the Enable PDF Archiving field on the Default Settings tab to By Form. If the default setting is set to Yes or No, then this field displays "Yes - See Default Settings" or "No - See Default Settings," respectively.
PDF Profile Override Select a different indexing profile to use for the form, if it is different than the default profile you set in the Default Settings tab.
4. Do one of the following:
• If you have additional forms to define PDF archiving settings for, select File > Next Item to save the settings for this form and return to a blank window to start entering settings for the next form type.
• To save this form's settings and exit the window, select File > Save, enter the reason for updating the change in the Reason for Change field, and click OK.

Rel. 8.7.2 Eclipse Forms
© 2011 Epicor Software Corporation. All rights reserved. 25
Accessing the Eclipse Forms Administrator Home Page
The Eclipse Forms application displays through a web browser on your computer. Eclipse personnel provide your system administrator a user name and password to access the application.
To access the Administrator Home page:
1. From the Windows Start menu, select All Programs > Eclipse Forms > Administrator to display the Administrator login page.
2. In the Deployment Server field, enter the name or the IP address of the server on which Eclipse Forms is installed.
3. In the Username and Password fields, enter the access information provided by Eclipse personnel to access the Administrator Home page and click Sign in.
The Status page displays.

Eclipse Forms Rel. 8.7.2
26 © 2011 Epicor Software Corporation. All rights reserved.
Working with Logs in Eclipse Forms
Use the logs available in Eclipse Forms to help troubleshoot errors with print processes. In addition to monitoring the activity for a process, you can also copy and paste log information to send it to Eclipse support personnel to help you troubleshoot errors. You can also export the contents of the log file to view it in a different application, or to send the entire log file to Eclipse.
Viewing logs in Eclipse Forms:
1. From anywhere in the Administrator application, click the Status tab and select the process for which you want to view the log, and click View Log.
2. Review the log file, expanding log entries as necessary to view additional information, such as the branch, printer, and the number of pages in the print job.
Exporting logs from Eclipse Forms:
1. Display the log file for a process.
2. Select the format in which you would like to save the contents of the file and click Export.
3. Click Save and enter the location to which you want to save the file.

Rel. 8.7.2 Eclipse Forms
© 2011 Epicor Software Corporation. All rights reserved. 27
Troubleshooting Eclipse Forms
Use the Administrator application to help troubleshoot form printing issues, such as when a form or document fails to print. Use the server status information available in the Administrator application to view error logs, which you can copy and paste and send to Eclipse personnel for troubleshooting purposes. In most cases, Eclipse personnel will walk you through the troubleshooting process.
For information about additional administrative features available in the Administrator application, see the online help provided with the Administrator application. The online help is viewable only if you use Internet Explorer.
Note: If your e-mail server generates a "502 Command Not Implemented" error, the Eclipse user does not see the error. The e-mail is still successfully sent.
To troubleshoot Eclipse Forms:
1. From anywhere in the Administrator application, click the Runtime Servers tab to display a list of runtime servers.
2. Select the process related to the form type that did not print. For example, if an invoice failed to print, select the queue specific to invoices.
3. Do one of the following:
To... Do this.. stop the Eclipse Forms server
click Stop. Important: All forms at your site stop printing if you stop the Eclipse Forms server. To restart the server, click Start.
view the log for a process
click Show to display the server's summary information. Use the submenu across the top to view different aspects of the server and its activity.
monitor process activity
click Show and then the Processes submenu
clear the selected error for a process from the list after it has been fixed
click Clear Error. Clearing errors from the lists allows you to better see further errors or warnings that occur. Clearing an error from this list does not clear it from the log file.
stop the selected process
click Stop Selected. To restart the process, select the process in the list and click Start Selected.
filter the processes shown
select the time frame you want to view in the Show Status For field and click Refresh.
4. If you are receiving errors that you want to send to Eclipse personnel, copy the information f send it in an email to your Eclipse support representative.
Note: To copy only a few lines in the Live Log Monitor window, click Pause first to freeze the contents of the window.
Eclipse Forms Rel. 8.7.2
28 © 2011 Epicor Software Corporation. All rights reserved.
Consolidated Invoices Setup
A consolidated invoice is one that combines various sales for a customer. Some companies use this invoicing method for credit-worthy accounts who prefer one comprehensive invoice. Depending on the forms you use for printing, a consolidated invoice can list all the products, can list all the transaction numbers and amounts, and can provide the total amount due. Order invoices can only be consolidated after their print status is set to B.
For consolidating invoices, complete the following setup:
• Create a miscellaneous charge product with a product description of ***Consolidated Invoices***. Set this record as the consolidated product in the Consolidated Invoicing Product control maintenance record. The system uses this product when it prints a consolidated invoice.
You can also set a user-defined print style to use for a customer's invoices. From Customer Maintenance, select Pricing > Price Information and enter the print style in the Invoice Print Style field.
• Indicate how to consolidate invoices:
• If you want all invoices for a customer to be consolidated regardless if they are on the same order, set the flag at the customer level. Use this procedure if you have a service level agreement with your customer whereby the customer would prefer to have invoices cut at regular intervals, such as daily or weekly, based on the amount of orders they generally process through your system.
From Customer Maintenance, select Additional > Master Job Bid Maintenance and set the Consolidated Invoicing field to Yes.
• If you want to consolidate invoices on a single order, such as for a job, set the flag from a sales order. Use this procedure if your customer has a large job and knows ahead of time that several orders may be processed in a specified period of time. Flag each order that comes in and when you cut an invoice, all the flagged orders are consolidated onto one invoice. This applies to the order even if it is not a master job bid order.
From the sales order Header tab, select Edit > Job Maintenance and set the Consolidated Invoicing field to Yes.
For information on how to specify which invoices to print, see Printing Consolidated Invoices in the Sales Management documentation.
Rel. 8.7.2 Eclipse Forms
© 2011 Epicor Software Corporation. All rights reserved. 29
Specifying Page Ranges When Printing Forms
When you have Eclipse Forms turned on in your system, you can opt to print, fax, or e-mail parts of forms instead of sending the entire document.
Note: You can print forms that contain special characters, but the system may print them as question marks.
To specify a page range when printing a form:
1. From the System > Printers menu, select Your Hold File to display the Spooler Control screen.
2. Place the cursor on the file you want to print.
3. Use the Print hot key to display the Print Options screen.
4. Use the Start Page and End Page fields to indicate the range of pages you want to print, fax, or e-mail.
Note: If there is no e-mail address in the To: field, the system uses the address in the From: field.
5. Do one of the following:
• Press Esc to print the document.
• Use the Fax hot key to send the document to a fax machine.
• Use the E-mail hot key to send the document via e-mail.