Embed Size (px)
Citation preview

Eco-Safe DigesterEngineering ManualOperation, Maintenance, Installation, and RepairFor E1 and E2 Series Digesters
Version 5.0.0 | Published: 06-16-2016

Eco-Safe Digester Engineering Manual
Table of ContentsPreface .................................................................................................................................................... vii
1. Document Revision History ........................................................................................................... viii2. Intended Audience ......................................................................................................................... ix3. Errors and Omissions ...................................................................................................................... x
1. Introduction ........................................................................................................................................... 11. Important Safety Notices .................................................................................................................. 22. The Eco-Safe Digester ..................................................................................................................... 3
2.1. Key Machine Components ..................................................................................................... 33. BioHiTech Cloud ............................................................................................................................ 5
2. Installation & Start-Up ............................................................................................................................ 61. Site Preparation .............................................................................................................................. 7
1.1. Space ................................................................................................................................. 71.2. Power ................................................................................................................................. 71.3. Water and Drainage .............................................................................................................. 71.4. Internet Connectivity ............................................................................................................ 8
2. Transportation ................................................................................................................................ 93. Installation ................................................................................................................................... 10
3.1. Machine Installation ............................................................................................................ 103.2. Network Installation ............................................................................................................ 10
4. Start-Up ....................................................................................................................................... 113. Usage .................................................................................................................................................. 17
1. Feeding the Eco-Safe Digester ........................................................................................................ 181.1. Overview .......................................................................................................................... 181.2. How The Eco-Safe Digester Works ....................................................................................... 181.3. Feeding the Digester ........................................................................................................... 191.4. Acceptable Food Waste ....................................................................................................... 201.5. Feed Schedule .................................................................................................................... 201.6. The Tower Lamp ................................................................................................................ 211.7. Best Practices .................................................................................................................... 21
2. Routine Maintenance ..................................................................................................................... 232.1. Daily Cleaning and Inspection .............................................................................................. 232.2. Microorganism Replenishment .............................................................................................. 242.3. BioMedia Replenishment ..................................................................................................... 252.4. Deodorizer Replenishment ................................................................................................... 252.5. Lock-Out / Tag-Out (Shutdown) Procedure ............................................................................. 26
3. Basic Touchscreen Operation .......................................................................................................... 293.1. Dashboard ......................................................................................................................... 293.2. Touchscreen Password ......................................................................................................... 293.3. Operating Modes ................................................................................................................ 303.4. Alerts ............................................................................................................................... 313.5. Configuration ..................................................................................................................... 32
4. Touchscreen Reference .................................................................................................................. 334.1. About Screen ..................................................................................................................... 334.2. Alerts Screen ..................................................................................................................... 334.3. BioBrain Screen ................................................................................................................. 344.4. Category Selection Screen .................................................................................................... 344.5. Configuration Menu Screen .................................................................................................. 354.6. Cycles Configuration Screens ............................................................................................... 364.7. Dashboard Screen ............................................................................................................... 384.8. Date / Time Configuration Screen ......................................................................................... 404.9. Language Configuration Screen ............................................................................................ 414.10. Main Menu Screen ............................................................................................................ 424.11. Network Configuration Screens ........................................................................................... 42
iii
Eco-Safe Digester Engineering Manual
4.12. Operation Screens ............................................................................................................. 464.13. Password Configuration Screen ........................................................................................... 484.14. System Status Screen ......................................................................................................... 494.15. Temperature Configuration Screen ....................................................................................... 504.16. USB Data Screens ............................................................................................................ 514.17. Usage Report Screen ......................................................................................................... 524.18. Weight Configuration Screens ............................................................................................. 53
5. Troubleshooting ............................................................................................................................ 57A. Machine Specifications .......................................................................................................................... 58B. Contacting BioHiTech Support ............................................................................................................... 66C. Servicing Schedule ............................................................................................................................... 68D. Touchscreen Alerts ............................................................................................................................... 69E. Network Connectivity ............................................................................................................................ 70F. Repair ................................................................................................................................................. 72
1. Parts Cut Sheet ............................................................................................................................. 732. Actuator Valve Replacement ........................................................................................................... 743. Agitator Repair ............................................................................................................................. 754. Bearing Replacement ..................................................................................................................... 765. Chain Removal and Replacement ..................................................................................................... 776. Chain Tensioner Service ................................................................................................................ 787. Door Piston Replacement ............................................................................................................... 798. FloJet Replacement ....................................................................................................................... 809. Food Hatch Door Bearing Assembly ................................................................................................ 8110. Food Hatch Gasket Replacement .................................................................................................... 8211. Food Hatch Sensor Replacement .................................................................................................... 8312. Light Bulb Replacement ............................................................................................................... 8413. Liquid Level Sensor Replacement .................................................................................................. 8514. Motor Replacement ..................................................................................................................... 8615. Nozel (Deodorizer and Shower) Replacement ................................................................................... 8716. Paddle Arm Replacement .............................................................................................................. 88
Index ...................................................................................................................................................... 89
iv
List of Figures3.1. Acceptable Organic Materials ............................................................................................................... 20
v
List of Tables1. Revision History .................................................................................................................................. viii1.1. Eco-Safe Digester 24-Hour Capacity ....................................................................................................... 32.1. Machine Dimensions (E1 Series) ............................................................................................................ 72.2. Machine Dimensions (E2 Series) ............................................................................................................ 73.1. Feeding Schedule and Load Size ........................................................................................................... 203.2. Tower lamp Status .............................................................................................................................. 213.3. Feeding Schedule and Load Size ........................................................................................................... 57A.1. Machine 24-Hour Operational Capacities (E1 and E2 Series) ..................................................................... 58A.2. Machine Dimensions (E1 Series) .......................................................................................................... 58A.3. Machine Dimensions (E2 Series) .......................................................................................................... 58A.4. Machine Weight (E1 Series) ................................................................................................................ 58A.5. Machine Weight (E2 Series) ................................................................................................................ 58A.6. Daily Water Consumption (E1 and E2 Series) ........................................................................................ 59A.7. Typical Effluent Discharge (E1 and E2 Series) ....................................................................................... 59A.8. Monthly Power Consumption ............................................................................................................... 59C.1. Recommended Service Schedule ........................................................................................................... 68D.1. Digester Touchscreen Alerts ................................................................................................................ 69
vi
Preface
vii
Preface
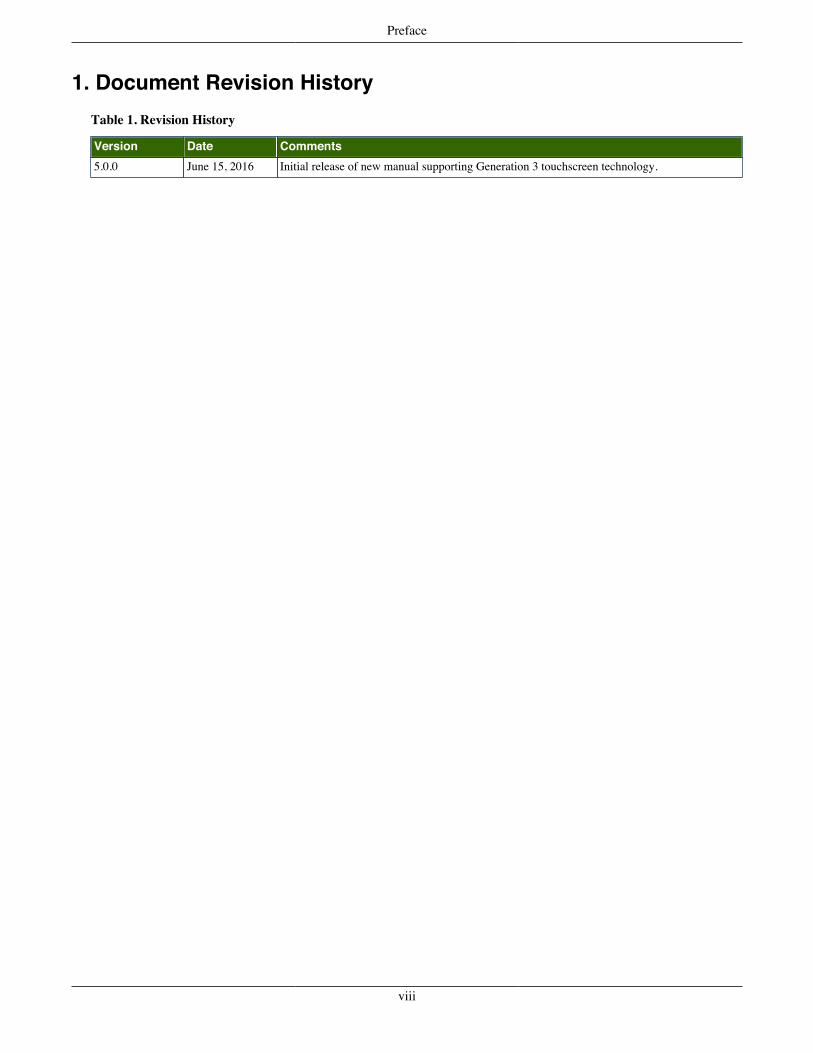
1. Document Revision HistoryTable 1. Revision History
Version Date Comments5.0.0 June 15, 2016 Initial release of new manual supporting Generation 3 touchscreen technology.
viii
Preface
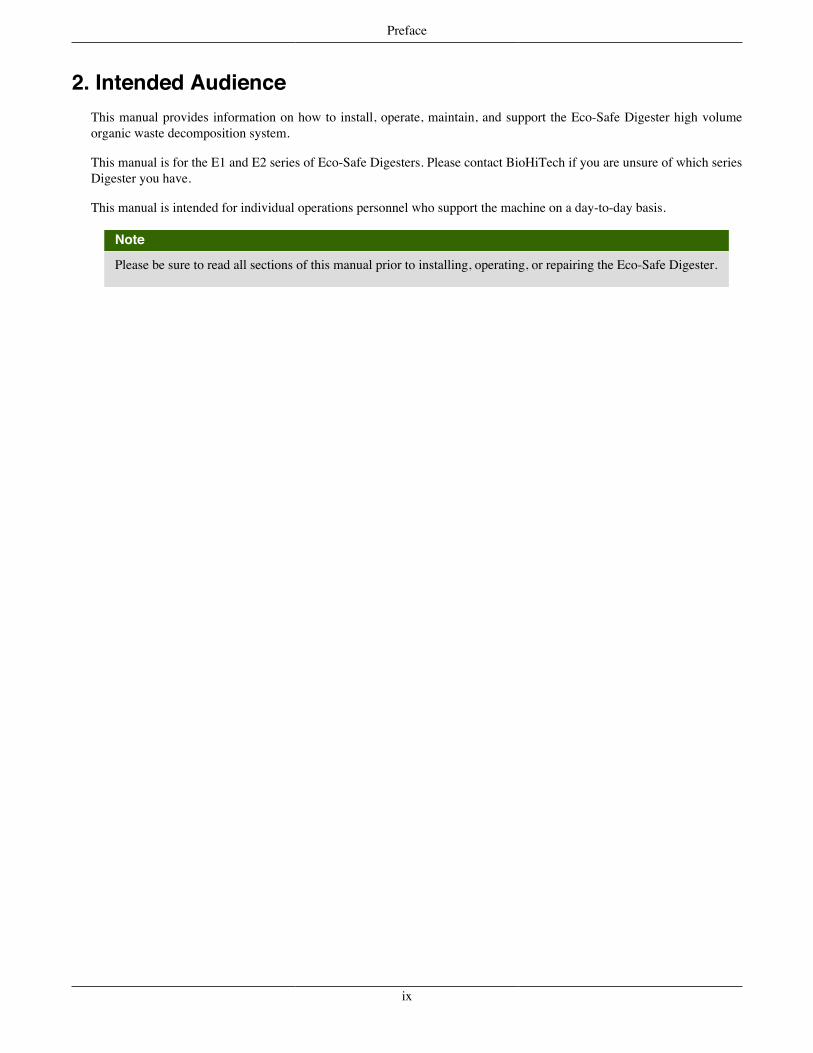
2. Intended AudienceThis manual provides information on how to install, operate, maintain, and support the Eco-Safe Digester high volumeorganic waste decomposition system.
This manual is for the E1 and E2 series of Eco-Safe Digesters. Please contact BioHiTech if you are unsure of which seriesDigester you have.
This manual is intended for individual operations personnel who support the machine on a day-to-day basis.
Note
Please be sure to read all sections of this manual prior to installing, operating, or repairing the Eco-Safe Digester.
ix
Preface
3. Errors and OmissionsPlease report any errors, omissions, or corrections to BioHiTech America.
BioHiTech America 80 Red Schoolhouse Road Suite 101 Chestnut Ridge, NY10977 Phone: 888.876.9300 Email: [email protected]
For more information about contacting BioHiTech America, see Appendix B, Contacting BioHiTech Support.
x
Chapter 1. Introduction
1
Introduction
1. Important Safety Notices
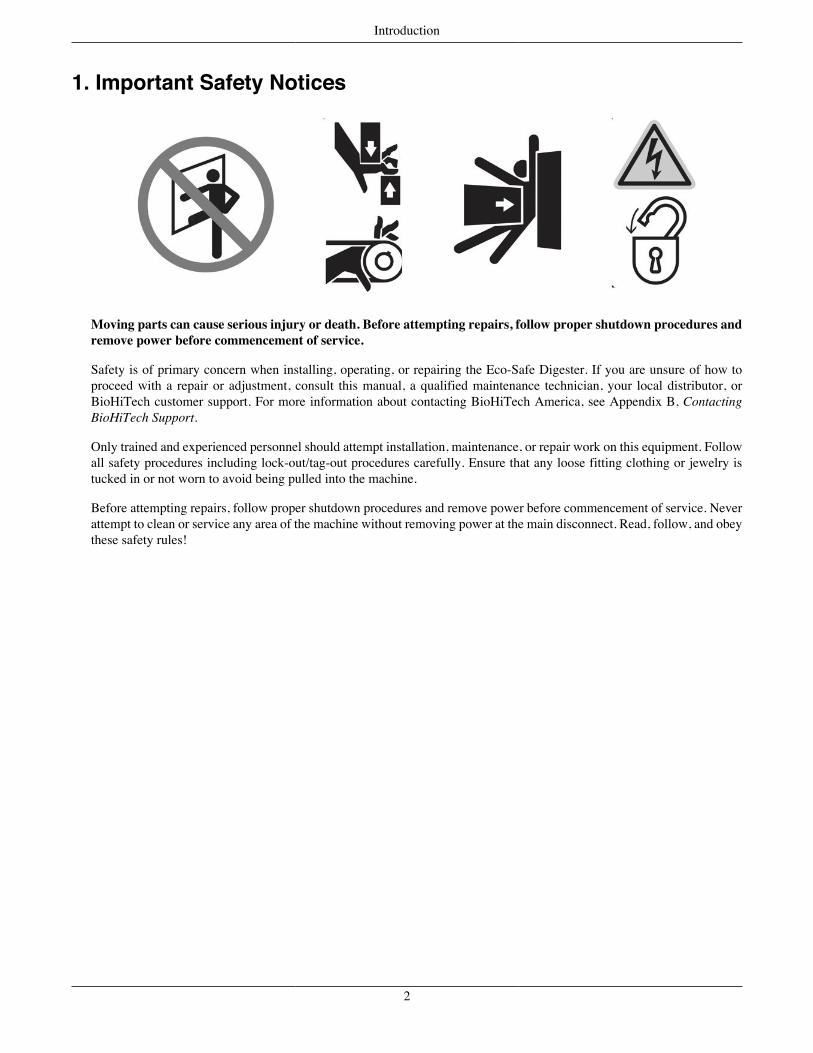
Moving parts can cause serious injury or death. Before attempting repairs, follow proper shutdown procedures andremove power before commencement of service.
Safety is of primary concern when installing, operating, or repairing the Eco-Safe Digester. If you are unsure of how toproceed with a repair or adjustment, consult this manual, a qualified maintenance technician, your local distributor, orBioHiTech customer support. For more information about contacting BioHiTech America, see Appendix B, ContactingBioHiTech Support.
Only trained and experienced personnel should attempt installation, maintenance, or repair work on this equipment. Followall safety procedures including lock-out/tag-out procedures carefully. Ensure that any loose fitting clothing or jewelry istucked in or not worn to avoid being pulled into the machine.
Before attempting repairs, follow proper shutdown procedures and remove power before commencement of service. Neverattempt to clean or service any area of the machine without removing power at the main disconnect. Read, follow, and obeythese safety rules!
2
Introduction
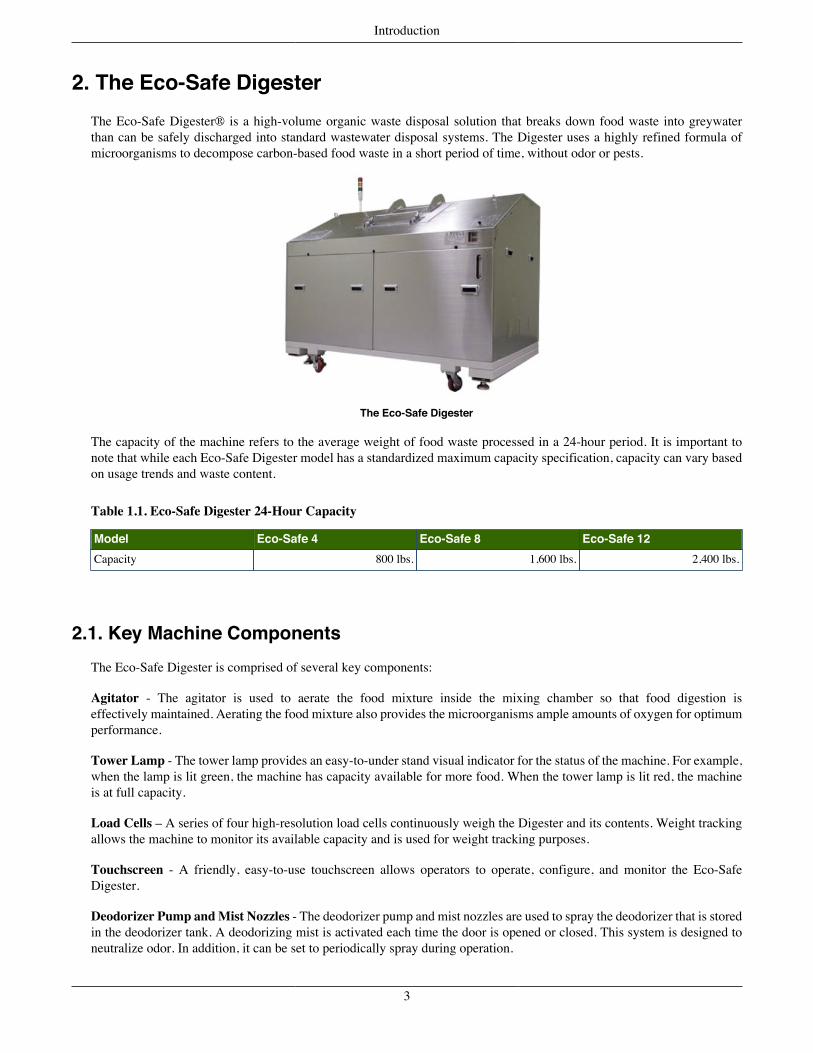
2. The Eco-Safe DigesterThe Eco-Safe Digester® is a high-volume organic waste disposal solution that breaks down food waste into greywaterthan can be safely discharged into standard wastewater disposal systems. The Digester uses a highly refined formula ofmicroorganisms to decompose carbon-based food waste in a short period of time, without odor or pests.
The Eco-Safe Digester
The capacity of the machine refers to the average weight of food waste processed in a 24-hour period. It is important tonote that while each Eco-Safe Digester model has a standardized maximum capacity specification, capacity can vary basedon usage trends and waste content.
Table 1.1. Eco-Safe Digester 24-Hour Capacity
Model Eco-Safe 4 Eco-Safe 8 Eco-Safe 12Capacity 800 lbs. 1,600 lbs. 2,400 lbs.
2.1. Key Machine ComponentsThe Eco-Safe Digester is comprised of several key components:
Agitator - The agitator is used to aerate the food mixture inside the mixing chamber so that food digestion iseffectively maintained. Aerating the food mixture also provides the microorganisms ample amounts of oxygen for optimumperformance.
Tower Lamp - The tower lamp provides an easy-to-under stand visual indicator for the status of the machine. For example,when the lamp is lit green, the machine has capacity available for more food. When the tower lamp is lit red, the machineis at full capacity.
Load Cells – A series of four high-resolution load cells continuously weigh the Digester and its contents. Weight trackingallows the machine to monitor its available capacity and is used for weight tracking purposes.
Touchscreen - A friendly, easy-to-use touchscreen allows operators to operate, configure, and monitor the Eco-SafeDigester.
Deodorizer Pump and Mist Nozzles - The deodorizer pump and mist nozzles are used to spray the deodorizer that is storedin the deodorizer tank. A deodorizing mist is activated each time the door is opened or closed. This system is designed toneutralize odor. In addition, it can be set to periodically spray during operation.
3
Introduction
High Pressure Washing Pump - There are a series of high pressure washing pump nozzles within the drain discharge areathat remove washing oil and fat residues to help prevent blockages in the perforated bottom of the mixing chamber.
Electric Solenoid Valves - These valves regulate the flow of water to various functions of the machine.
Trace Heater - The trace heater controls the temperature of the main chamber. In addition, it heats up the bottom of themachine to prevent oil coagulation.
Integrated Computer System - Each Digester is controlled by a state of the art computer that controls the configurationand operation of the Digester to create the ideal environment for microorganism performance.
Internet Ready - Finally, each Digester is internet-capable, allowing the machine to send and receive data from BioHiTechCloud to deliver real-time reporting and reomote operational capabilities for end-users.
4
Introduction
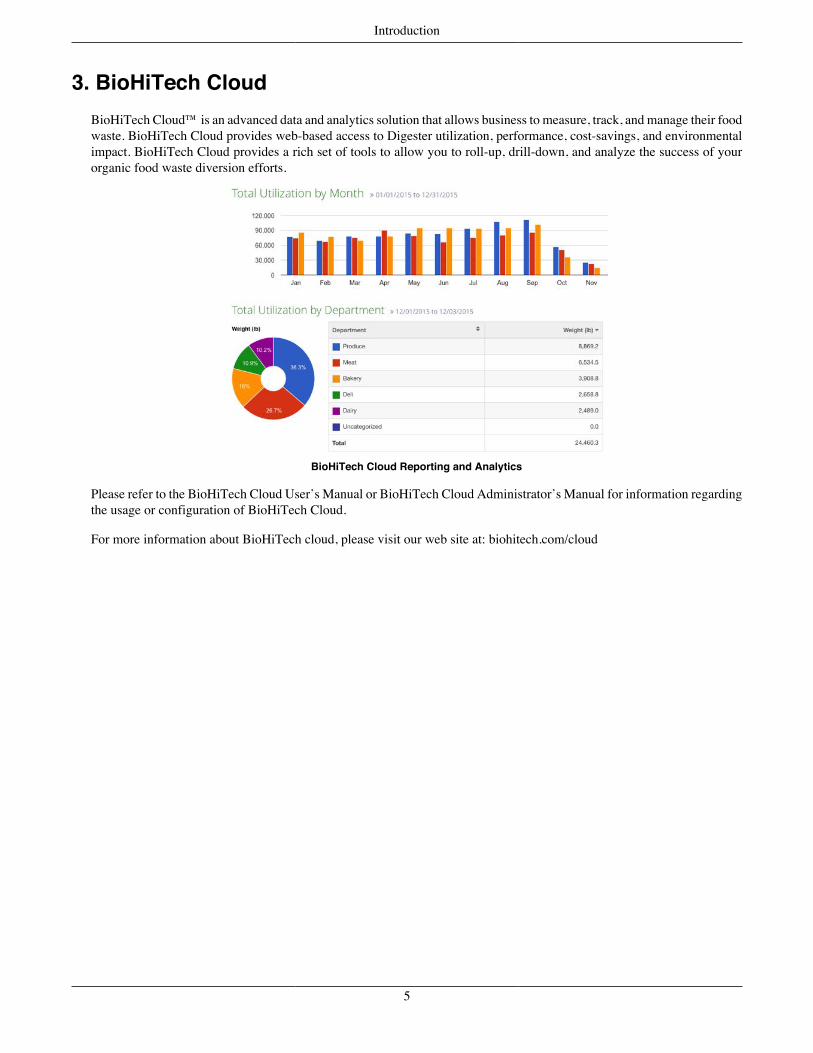
3. BioHiTech CloudBioHiTech Cloud™ is an advanced data and analytics solution that allows business to measure, track, and manage their foodwaste. BioHiTech Cloud provides web-based access to Digester utilization, performance, cost-savings, and environmentalimpact. BioHiTech Cloud provides a rich set of tools to allow you to roll-up, drill-down, and analyze the success of yourorganic food waste diversion efforts.
BioHiTech Cloud Reporting and Analytics
Please refer to the BioHiTech Cloud User’s Manual or BioHiTech Cloud Administrator’s Manual for information regardingthe usage or configuration of BioHiTech Cloud.
For more information about BioHiTech cloud, please visit our web site at: biohitech.com/cloud
5
Chapter 2. Installation & Start-Up
6
Installation & Start-Up
1. Site PreparationSite preparation is simple. However, it is important to ensure that all physical requirements are met before installing theEco-Safe Digester. This section will review these requirements.
1.1. Space
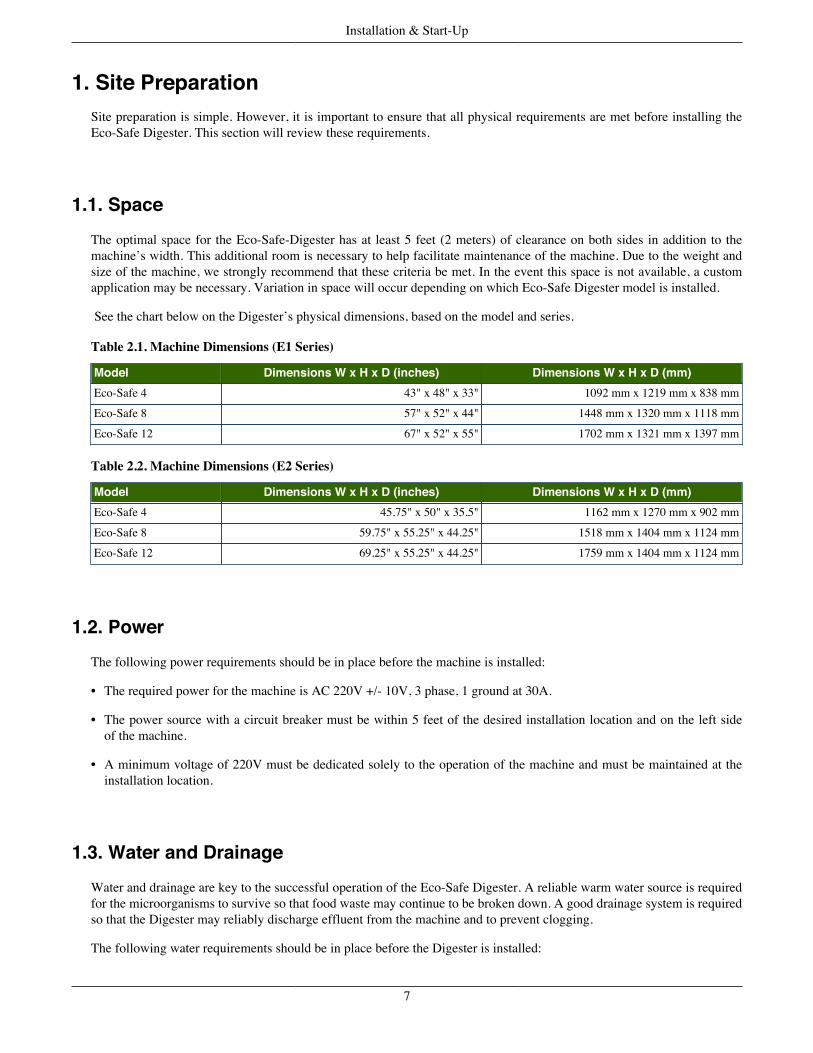
The optimal space for the Eco-Safe-Digester has at least 5 feet (2 meters) of clearance on both sides in addition to themachine’s width. This additional room is necessary to help facilitate maintenance of the machine. Due to the weight andsize of the machine, we strongly recommend that these criteria be met. In the event this space is not available, a customapplication may be necessary. Variation in space will occur depending on which Eco-Safe Digester model is installed.
See the chart below on the Digester’s physical dimensions, based on the model and series.
Table 2.1. Machine Dimensions (E1 Series)
Model Dimensions W x H x D (inches) Dimensions W x H x D (mm)Eco-Safe 4 43" x 48" x 33" 1092 mm x 1219 mm x 838 mm
Eco-Safe 8 57" x 52" x 44" 1448 mm x 1320 mm x 1118 mm
Eco-Safe 12 67" x 52" x 55" 1702 mm x 1321 mm x 1397 mm
Table 2.2. Machine Dimensions (E2 Series)
Model Dimensions W x H x D (inches) Dimensions W x H x D (mm)Eco-Safe 4 45.75" x 50" x 35.5" 1162 mm x 1270 mm x 902 mm
Eco-Safe 8 59.75" x 55.25" x 44.25" 1518 mm x 1404 mm x 1124 mm
Eco-Safe 12 69.25" x 55.25" x 44.25" 1759 mm x 1404 mm x 1124 mm
1.2. PowerThe following power requirements should be in place before the machine is installed:
• The required power for the machine is AC 220V +/- 10V, 3 phase, 1 ground at 30A.
• The power source with a circuit breaker must be within 5 feet of the desired installation location and on the left sideof the machine.
• A minimum voltage of 220V must be dedicated solely to the operation of the machine and must be maintained at theinstallation location.
1.3. Water and Drainage
Water and drainage are key to the successful operation of the Eco-Safe Digester. A reliable warm water source is requiredfor the microorganisms to survive so that food waste may continue to be broken down. A good drainage system is requiredso that the Digester may reliably discharge effluent from the machine and to prevent clogging.
The following water requirements should be in place before the Digester is installed:
7
Installation & Start-Up
• A dedicated warm water source with a ¾ male pipe fitting is also required within 5 feet (2 meters) of the left side ofthe machine.
• The water source should provide water at 104° F (40° C).
• The water source should be dedicated to machine operation only. Sharing the water source with other usage is notrecommended.
The following drainage requirements should be in place before the Digester is installed:
• The drain must be an open floor drain and should be connected to the Digester with a 3-inch drain pipe (PVC or Copper).Please minimize any changes in flow direction from the machine to the drain hole.
• An elbow fitting should not be used more than 2 times.
• A pitch must be maintained at least 1/4-inch declination for every 2 feet length.
1.4. Internet Connectivity
If the BioHiTech Cloud analytics solution is purchased, then Eco-Safe Digester will require Internet connectivity. BioHiTechCloud provides end-user reporting on machine and waste utilization as well as providing service technicians with remotediagnostics information to help resolve issues in the field.
Please coordinate with your Information Technology department to ensure that proper network connectivity is available toyour Eco-Safe Digester.
There are two methods to provide network connectivity to the Digester:
• Hardline - You can provide an Ethernet RJ45 jack that will allow outbound internet access for the Digester. Note: Thisjack should be located relatively close to the Digester.
• Cellular Wireless - You can rent a cellular data modem from BioHiTech which will provide wireless cellular data access.Note: The location of the Digester must have proper cellular data reception.
For more detailed information about networking requirements for your IT department, see Appendix E, NetworkConnectivity.
8
Installation & Start-Up
2. Transportation
Please review the following guidelines when transporting and leveling your Eco-Safe Digester:
• Forklift - In the event your machine must be moved with a forklift, be sure to lift it at the base frame between the leftand right casters at the bottom of the machine. Extreme caution is necessary to avoid damaging the external cover.
• Crane / Winch - In the event your machine must be lifted with a crane or winch, be sure to use the left and right eyebolts attached on the top of the machine and lift it carefully.
• Vehicle Transportation - In the event your machine is going to be transported in or on a vehicle, be sure to turn thescrew handles of all four casters located under the machine to allow the fixing pads to contact the floor. Do not skip thisstep or your machine may be damaged in transport.
• Securing with a Bar or Belt - In the event a bar or belt is used to secure the machine during transport, be sure to avoidcontact with the top cover of the machine. Use a base frame or caster parts on the lower part of the machine without anyexcessive force to secure the machine.
• Short Distance Moves - In short distance moves, a forklift is strongly advised to move the machine after the machine isunloaded. Movement of the machine using the casters may cause excessive vibration that can damage certain electricalcomponents. Movement of the machine using the casters should be avoided at all times except for adjustments to themachine at the final installation location.
• Leveling - The final location of the machine should be a level surface. The positioning legs will be installed at eachcorner of the machine and may be used as a level adjuster.
Caution
Excessive vibration or rough handling may cause loosening of machine elements and/or electrical devices, whichmay impair installation and performance. A qualified service technician should be used for all service andinstallation requirements.
9

Installation & Start-Up
3. Installation
3.1. Machine Installation
Online Videos
A detailed installation is available online at: http://biohitech.com/customer/training
The following procedure should be used to install your Eco-Safe Digester:
1. When the machine is placed in its final location, turn the screw handles of all fixing pads so contact with the floor ismade. Be sure to level the fixing pads so that the machine is grounded. If the machine rocks or shakes, this may be anindication that the fixing pads have not made contact with the floor, and that the machine may not be level.
2. Connect the water supply hose to the water supply valve exposed at the front-left part of the machine so that it is secure.
3. Open the cover on the right side of the machine and connect the drainpipe or hose to allow for proper drainage of theeffluent to the designated floor drain.
4. Before connecting the power lines, be sure to check if it is suitable for 220V, 3 phases.
5. Open the front cover and the door of the electrical panel and connect the power lines to the main breaker.
6. Before turning the main switch to the ON position, be sure to tighten any loose connections on each terminal withinthe electrical panel.
7. Check to see if there are any loose fitting bolts or nuts on the pipes of the machine.
8. Turn all switches, including the main power switch, to the ON position. The machine is now ready to use in the factorysetting mode.
3.2. Network InstallationIf the Eco-Digester will be using the BioHiTech Cloud service, then the Digester must be connected to the Internet.
1. Open the front cover of the Eco-Safe Digester, and locate the black “BioBrain” computer.
2. The back of the computer will have a standard Ethernet RJ45 network cable connected to it. Plug the other end of thiscable into an Ethernet RJ45 network jack or into the RJ45 network jack of cellular modem.
Note: If using the cellular modem, please place the antennas in a location that receives optimal cellular wirelessconnectivity. BioHiTech America is not responsible for poor cellular wireless reception.
3. Use the touchscreen panel on the Digester to configure and test your network settings.
For more information about using the touchscreen to configure the network settings used by the Eco-Safe Digester, pleasesee Section 4.11, “Network Configuration Screens”.
10
Installation & Start-Up
4. Start-UpThe following procedure can be used to turn on and set-up the Eco-Safe Digester for the first time.
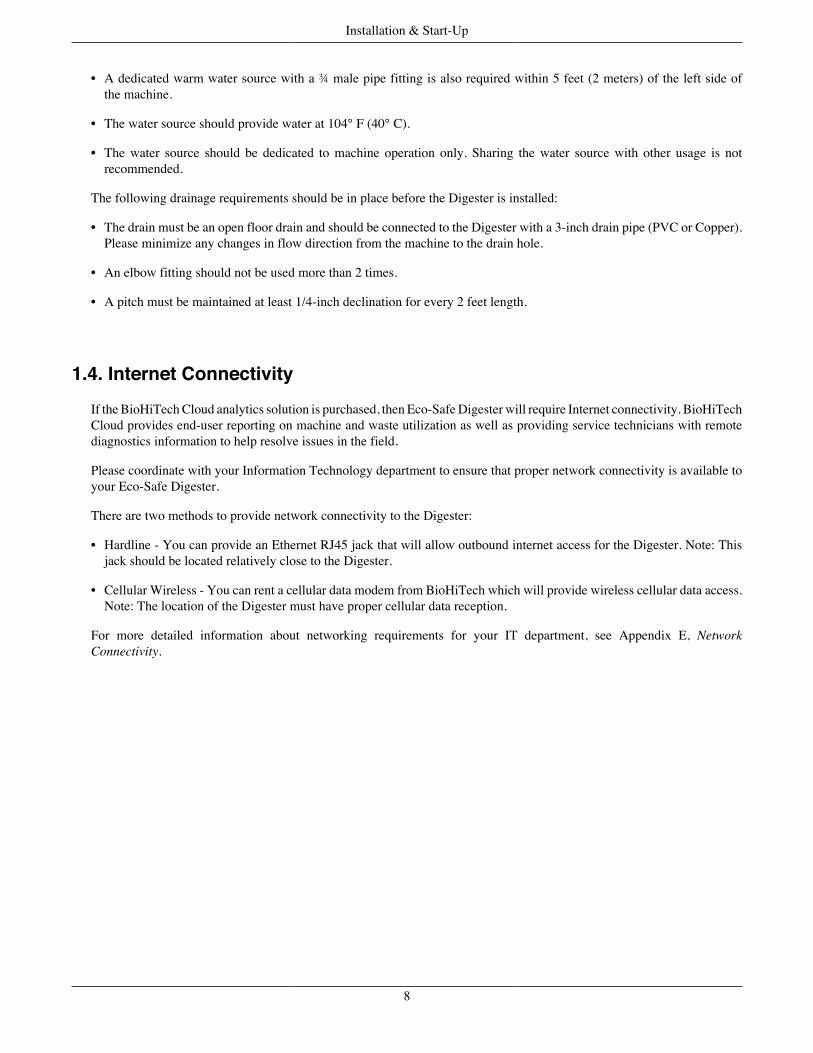
1. Make sure all breakers inside the Digester are in the on position. They are located inside the electrical box, on theleft-hand side.
Power Breaker
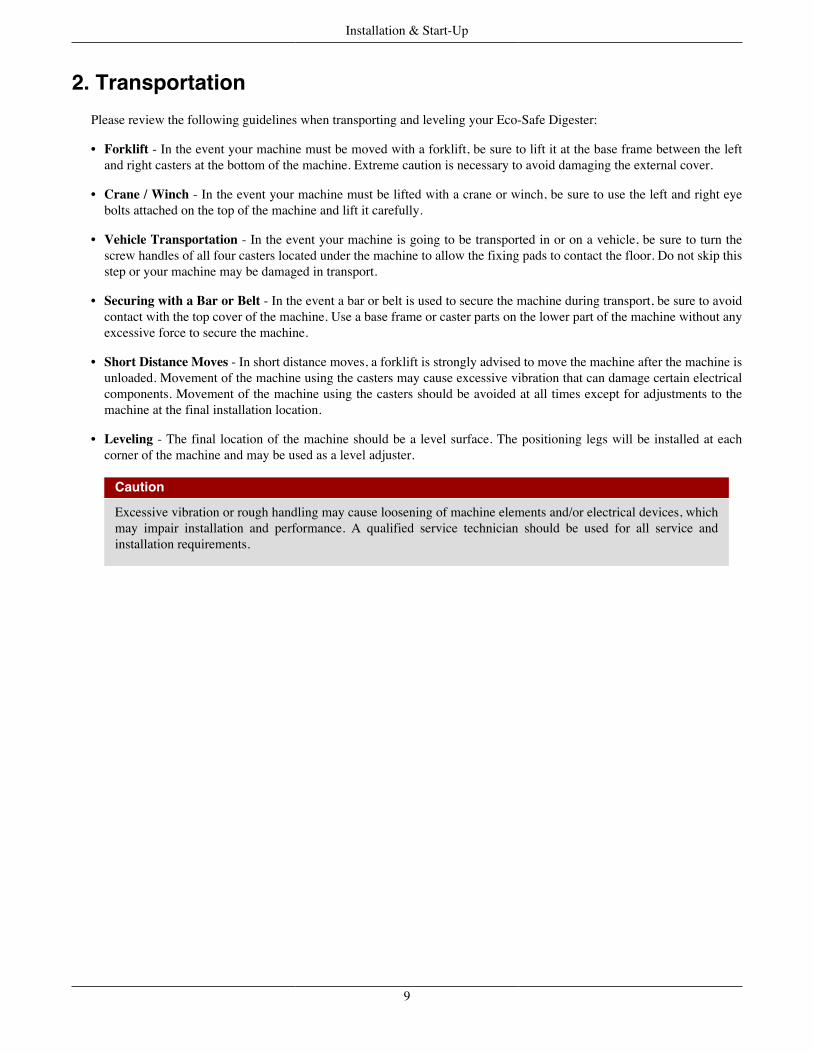
2. Use the Power key next to the touchscreen and turn the key to the on position.
Power Lock
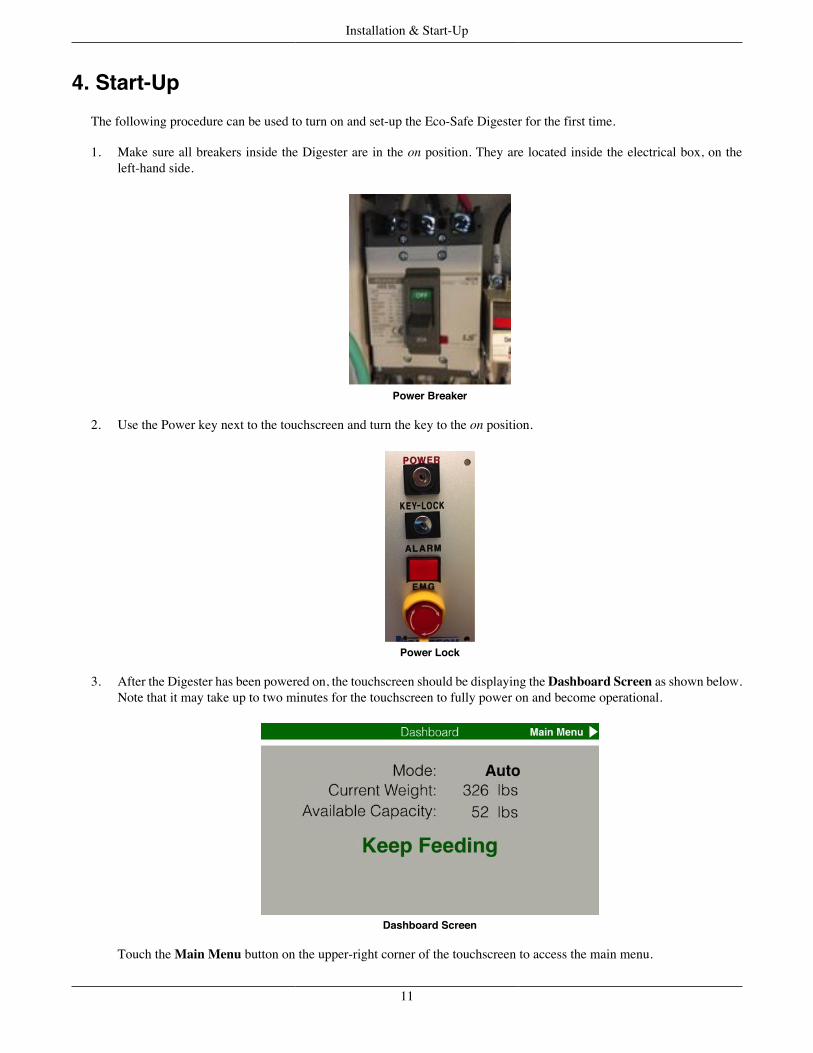
3. After the Digester has been powered on, the touchscreen should be displaying the Dashboard Screen as shown below.Note that it may take up to two minutes for the touchscreen to fully power on and become operational.
Dashboard Screen
Touch the Main Menu button on the upper-right corner of the touchscreen to access the main menu.
11
Installation & Start-Up
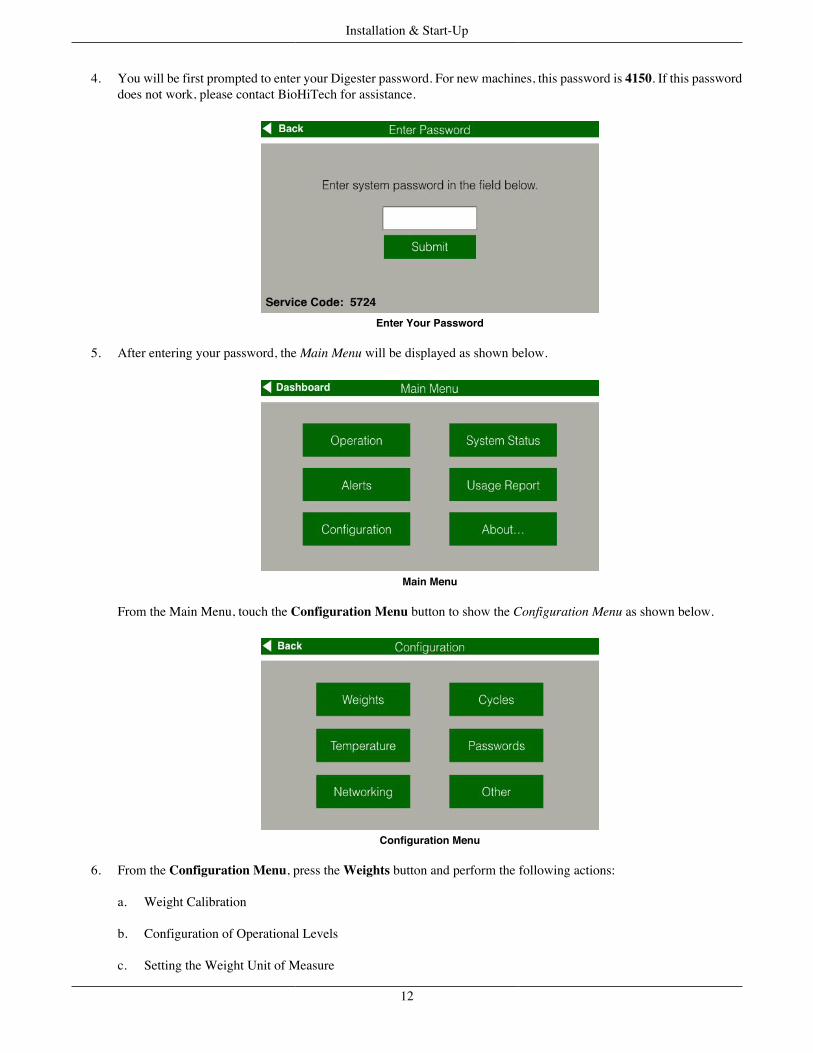
4. You will be first prompted to enter your Digester password. For new machines, this password is 4150. If this passworddoes not work, please contact BioHiTech for assistance.
Enter Your Password
5. After entering your password, the Main Menu will be displayed as shown below.
Main Menu
From the Main Menu, touch the Configuration Menu button to show the Configuration Menu as shown below.
Configuration Menu
6. From the Configuration Menu, press the Weights button and perform the following actions:
a. Weight Calibration
b. Configuration of Operational Levels
c. Setting the Weight Unit of Measure
12
Installation & Start-Up
For more information on weight calibration and configuration, see Section 4.18, “Weight Configuration Screens”.
Weight Configuration Menu
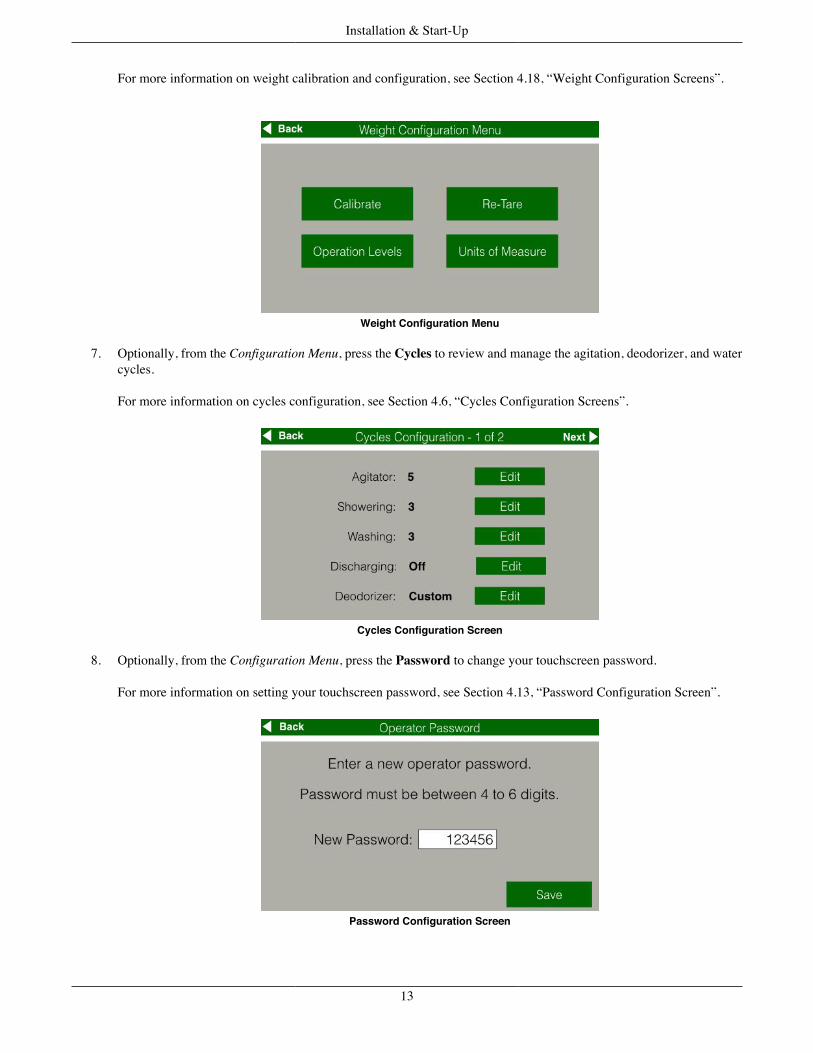
7. Optionally, from the Configuration Menu, press the Cycles to review and manage the agitation, deodorizer, and watercycles.
For more information on cycles configuration, see Section 4.6, “Cycles Configuration Screens”.
Cycles Configuration Screen
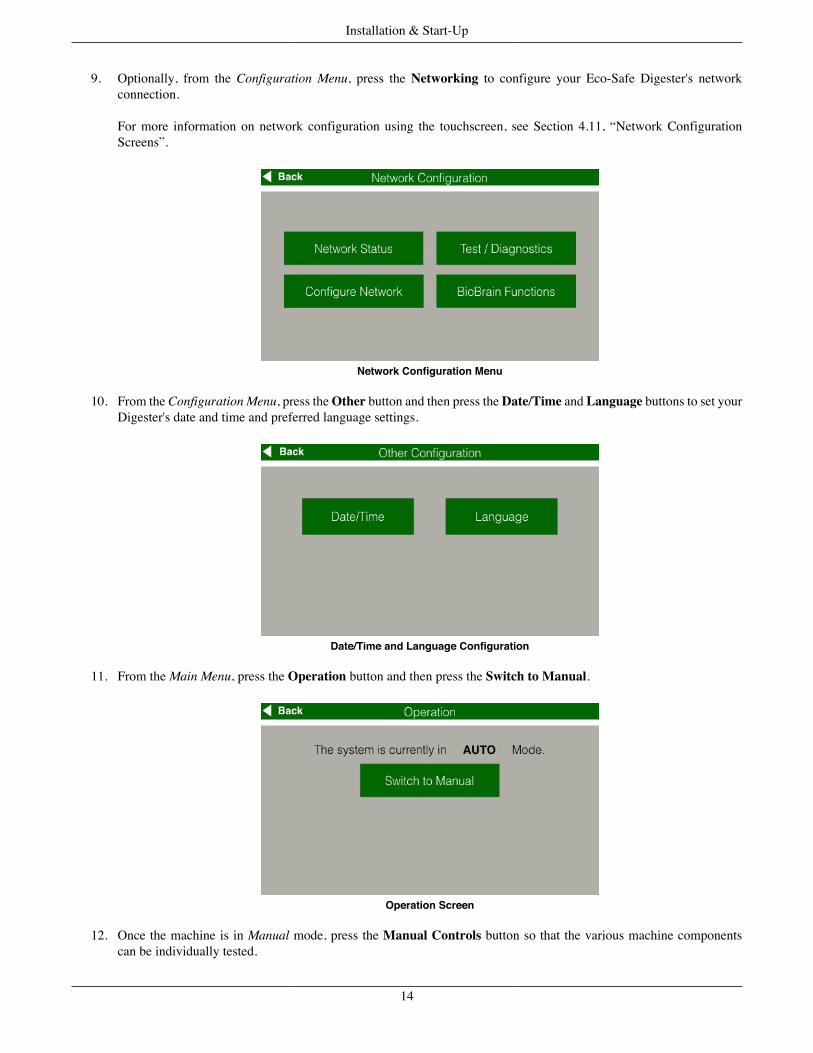
8. Optionally, from the Configuration Menu, press the Password to change your touchscreen password.
For more information on setting your touchscreen password, see Section 4.13, “Password Configuration Screen”.
Password Configuration Screen
13
Installation & Start-Up
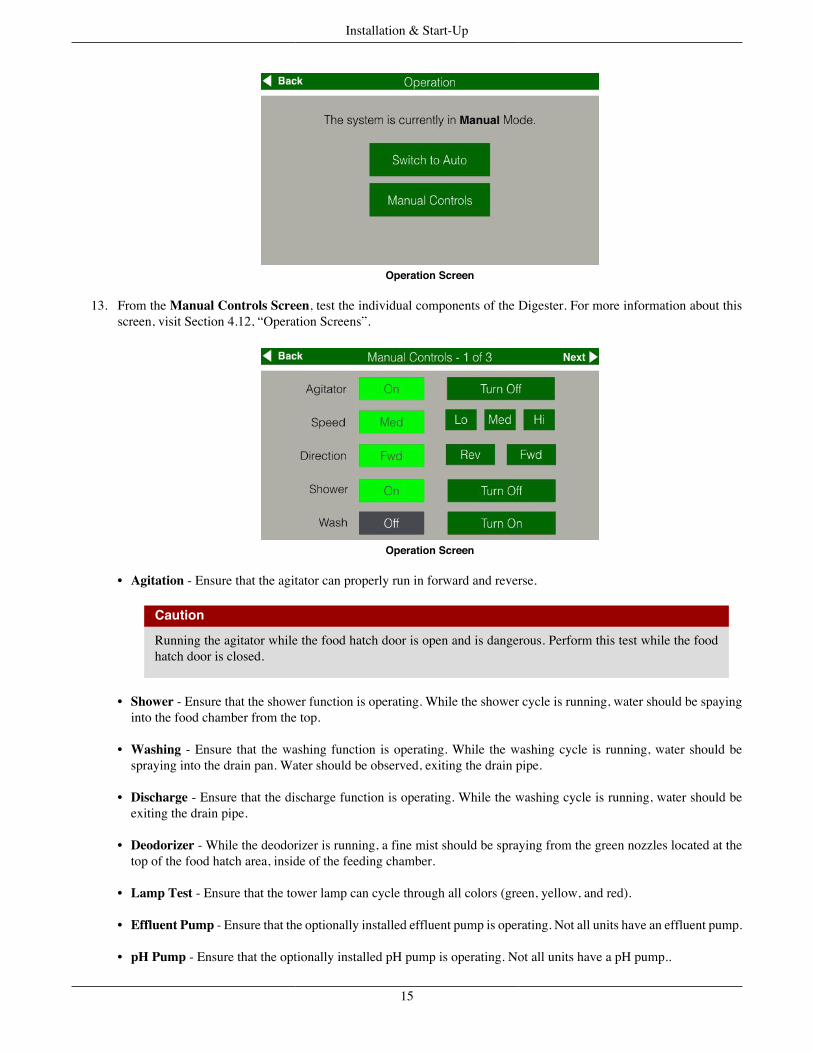
9. Optionally, from the Configuration Menu, press the Networking to configure your Eco-Safe Digester's networkconnection.
For more information on network configuration using the touchscreen, see Section 4.11, “Network ConfigurationScreens”.
Network Configuration Menu
10. From the Configuration Menu, press the Other button and then press the Date/Time and Language buttons to set yourDigester's date and time and preferred language settings.
Date/Time and Language Configuration
11. From the Main Menu, press the Operation button and then press the Switch to Manual.
Operation Screen
12. Once the machine is in Manual mode, press the Manual Controls button so that the various machine componentscan be individually tested.
14
Installation & Start-Up
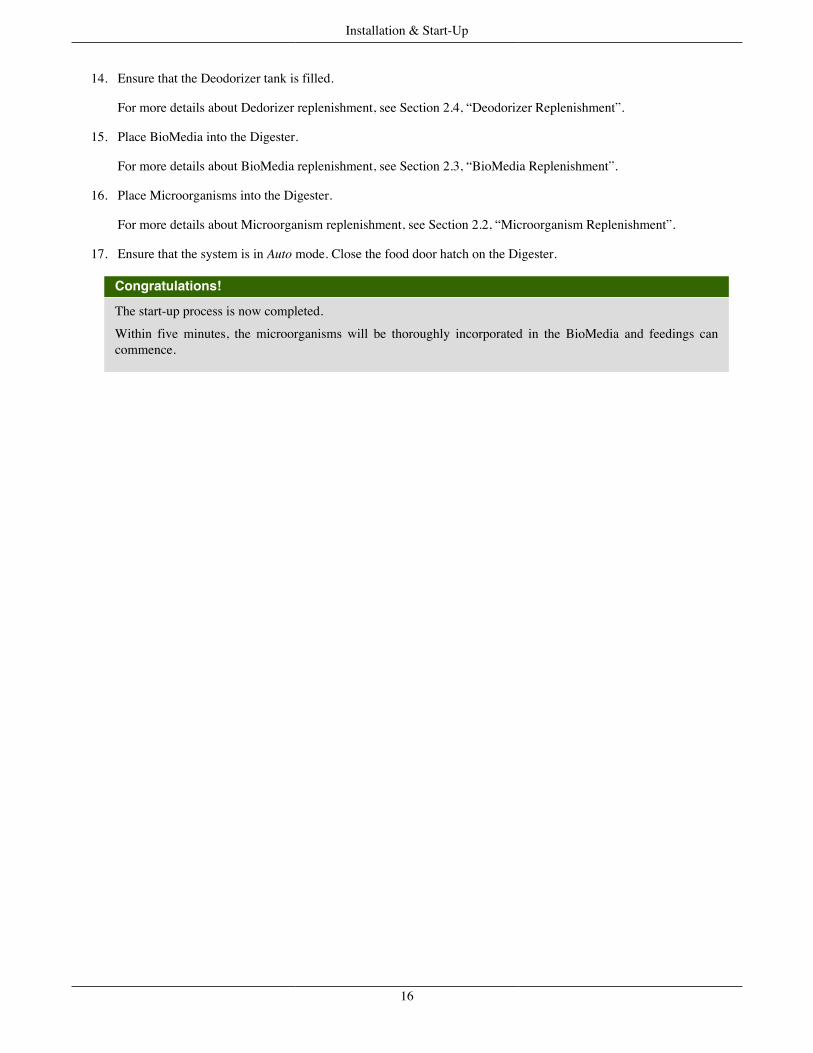
Operation Screen
13. From the Manual Controls Screen, test the individual components of the Digester. For more information about thisscreen, visit Section 4.12, “Operation Screens”.
Operation Screen
• Agitation - Ensure that the agitator can properly run in forward and reverse.
Caution
Running the agitator while the food hatch door is open and is dangerous. Perform this test while the foodhatch door is closed.
• Shower - Ensure that the shower function is operating. While the shower cycle is running, water should be spayinginto the food chamber from the top.
• Washing - Ensure that the washing function is operating. While the washing cycle is running, water should bespraying into the drain pan. Water should be observed, exiting the drain pipe.
• Discharge - Ensure that the discharge function is operating. While the washing cycle is running, water should beexiting the drain pipe.
• Deodorizer - While the deodorizer is running, a fine mist should be spraying from the green nozzles located at thetop of the food hatch area, inside of the feeding chamber.
• Lamp Test - Ensure that the tower lamp can cycle through all colors (green, yellow, and red).
• Effluent Pump - Ensure that the optionally installed effluent pump is operating. Not all units have an effluent pump.
• pH Pump - Ensure that the optionally installed pH pump is operating. Not all units have a pH pump..
15
Installation & Start-Up
14. Ensure that the Deodorizer tank is filled.
For more details about Dedorizer replenishment, see Section 2.4, “Deodorizer Replenishment”.
15. Place BioMedia into the Digester.
For more details about BioMedia replenishment, see Section 2.3, “BioMedia Replenishment”.
16. Place Microorganisms into the Digester.
For more details about Microorganism replenishment, see Section 2.2, “Microorganism Replenishment”.
17. Ensure that the system is in Auto mode. Close the food door hatch on the Digester.
Congratulations!
The start-up process is now completed.
Within five minutes, the microorganisms will be thoroughly incorporated in the BioMedia and feedings cancommence.
16
Chapter 3. Usage
17
Usage
1. Feeding the Eco-Safe Digester
1.1. OverviewThe digestion process inside of the Digester is similar to the human digestion process. Feeding the Digester is easy, butit's important to follow the procedures and guidelines outlined in this seciton to achieve good machine performance andavoid machine malfunction or damage.
1.2. How The Eco-Safe Digester WorksThe Eco-Safe Digester is an organic waste disposal solution that converts organic waste to a greywater that can be dischargedto the sanitary sewer system. The process by which organic waste gets converted is called Aerobic Digestion, which workslike the human stomach using naturally occurring microorganisms, water, and oxygen. With the right conditions, the Digestercan process 100 pounds of food waste in one hour.
A key component of the Digester is microorganisms. Microorganisms are microscopic, living, single-celled organismscalled bacteria. Most microorganisms in the world are very beneficial, as they are the housekeepers of the planet. Theyremove toxins from water and soil and degrade organic matter from dead plants and animals. Without microorganisms, lifewould be impossible. Microorganisms perform their work by producing enzymes. Microorganisms are really quite smart –they can detect the organics present in waste and produce only the enzymes that are needed to break down the organics.
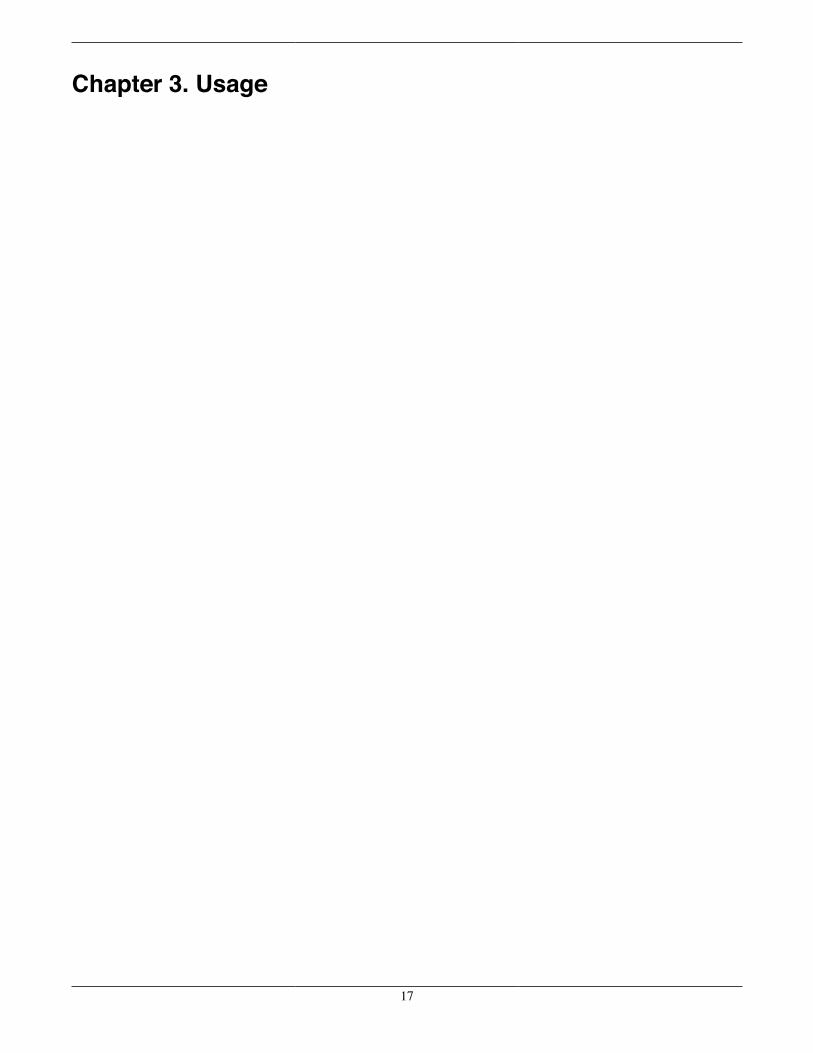
While microorganisms perform the work of breaking down organic waste, the BioMedia acts as a habitat for thesemicroorganisms. The BioMedia is a plastic material that does not degrade during the digestion process and prevents themicroorganisms from getting washed away, especially during the initial phases of digestion of food waste.
BioMedia
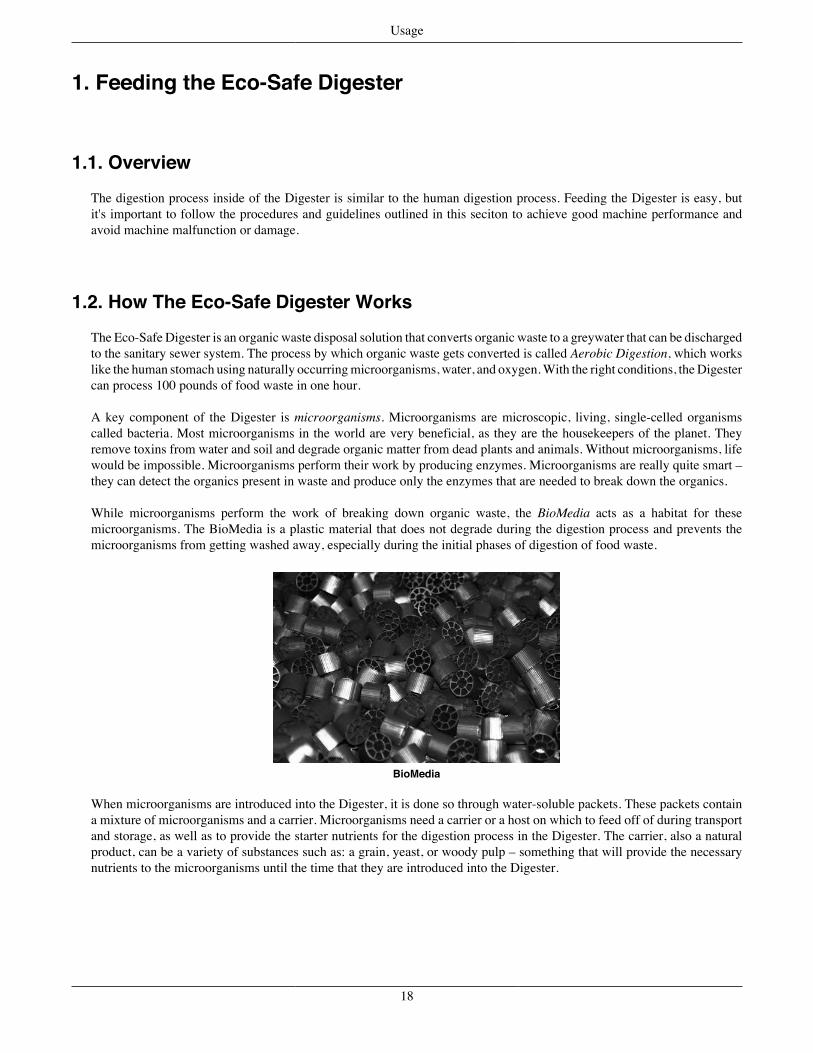
When microorganisms are introduced into the Digester, it is done so through water-soluble packets. These packets containa mixture of microorganisms and a carrier. Microorganisms need a carrier or a host on which to feed off of during transportand storage, as well as to provide the starter nutrients for the digestion process in the Digester. The carrier, also a naturalproduct, can be a variety of substances such as: a grain, yeast, or woody pulp – something that will provide the necessarynutrients to the microorganisms until the time that they are introduced into the Digester.
18
Usage
Microorganism Packets
There are thousands of strains of microorganisms, each with unique characteristics that are important to the organic wastedigestion process. BioHiTech America partners with companies and industry experts to determine the optimal mix ofmicroorganisms that will breakdown any specific waste profile that your facility may have. Some microorganisms thriveon fats, oils and greases while others prefer fruits and vegetables. Regardless of waste profile, BioHiTech can provide theperfect mix of microorganisms for your application.
As with the human stomach, microorganisms need water, warmth, and oxygen to assist in the breakdown of food. TheEco-Safe Digester intelligently introduces warm water throughout the digestion process, maintaining the correct moisturecontent and climate for the microorganisms to thrive. The Eco-Safe Digester agitates the contents of the drum to providea continuous introduction of oxygen for the microorganisms.
Finally, enzymes created by microorganisms to breakdown the food particles during the digestion process producegreywater. As the digestion process continues, these digested food particles become smaller and smaller. When the foodparticles become small enough, they will pass through the digester screen, exiting the digester and into the sanitary sewersystem. This greywater has a greatly reduced organic component, making it safe for discharge. BioHiTech America worksto manage and reduce key regulated discharge components, including: Biological Oxygen Demand, Chemical OxygenDemand, total suspended solids, oils, grease, and pH. BioHiTech America works with you to make sure that all localregulatory requirements are met.
1.3. Feeding the Digester
The following procedure should be use to load organic waste into the Eco-Safe Digester:
1. Check the tower lamp to ensure that it is okay to place waste into the Digester.
If the tower lamp is green green or yellow, you may feed the machine.
If the tower lamp is red, the machine is full and should NOT be fed.
2. Open the food hatch door.
3. Perform a quick visual inspection to ensure that the machine is not too full, or contains foreign objects.
Caution
If foreign objects are found inside of the Digester, carefully and safely remove them before adding more waste.
If you are unsure about the safety of removing the objects, please contact your supervisor or contact BioHiTechAmerica for assistance.
19
Usage
4. Place your organic waste into the Digester. If placing a large volume of waste into the machine, please note the statusof the tower lamp. If the light turns red, stop loading waste into the Digester.
5. Close the food hatch door.
Once the food hatch door is closed, the Digester will resume its agitation and water cycles to provide the optimal environmentfor the microorganisms.
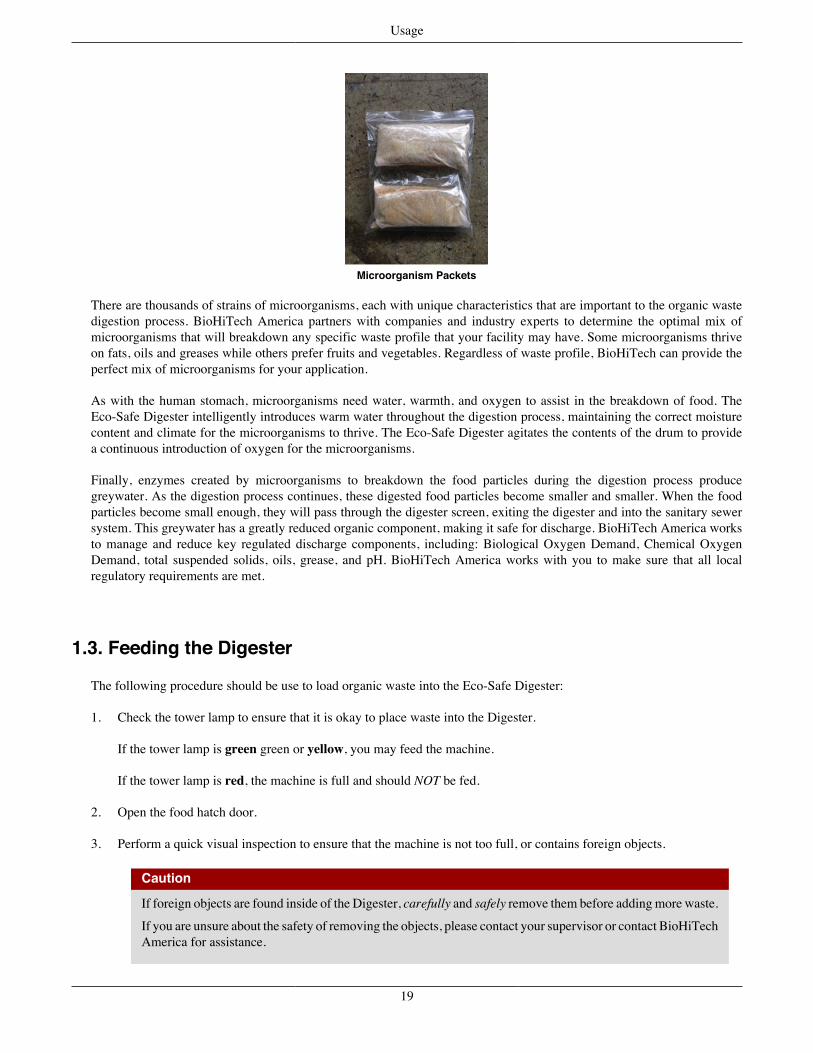
1.4. Acceptable Food WasteFoot Types - The general rule of thumb is that the Eco-Safe Digester can consume any organic waste that can be consumedby a human. However, please read and understand the types of materials that may or may not be placed into the Eco-SafeDigester.
Figure 3.1. Acceptable Organic Materials
Temperature – Items deposited into the Digester should be at room temperature. Avoid throwing in frozen food or very hotfoods (like hot soup). Extreme food waste temperatures can have a negative impact on the microorganism habitat, decreasingperformance and possibly killing the microorganisms.
Non-Organic Materials - It is important to note that all chemicals, metals, and foreign objects are not suitable for themachine and may cause permanent damage and/or void your warranty.
1.5. Feed Schedule
Ideally, the Digester should be fed on an hourly to every-4-hour schedule. More often (hourly) feeding is preferred. Referto Figure 5-2 below for optimal feeding sizes.
Table 3.1. Feeding Schedule and Load Size
Model Eco-Safe 4 Eco-Safe 8 Eco-Safe 12Daily Capacity 800 lbs. 1600 lbs. 2400 lbs.
20
Usage
Model Eco-Safe 4 Eco-Safe 8 Eco-Safe 12Feed Size (every 4 hours) 135 lbs. 265 lbs. 400 lbs.
Feed Size (hourly) 35 lbs. 65 lbs. 100 lbs.
The tower lamp on the Eco-Safe Digester will indicate whether or not the machine can be fed. See the section below formore information about the tower lamp.
Caution
Overloading – The maximum feeding capacity should not exceed the agitator shaft. Do not overload the machine.
Note
Overloading – Oxygen is essential to microorganism performance; overloading the machine will cause themicroorganisms to perform inefficiently. Feed scheduling is highly recommended.
1.6. The Tower Lamp
The Eco-Safe Digester continuously monitors its weight. If the weight becomes too high, then the Digester is full and shouldno longer be fed organic waste. The tower lamp on the back of the machine informs the machine operator of the weightstatus of the machine.
Please check the status of the tower lamp before placing organic waste into the Digester.
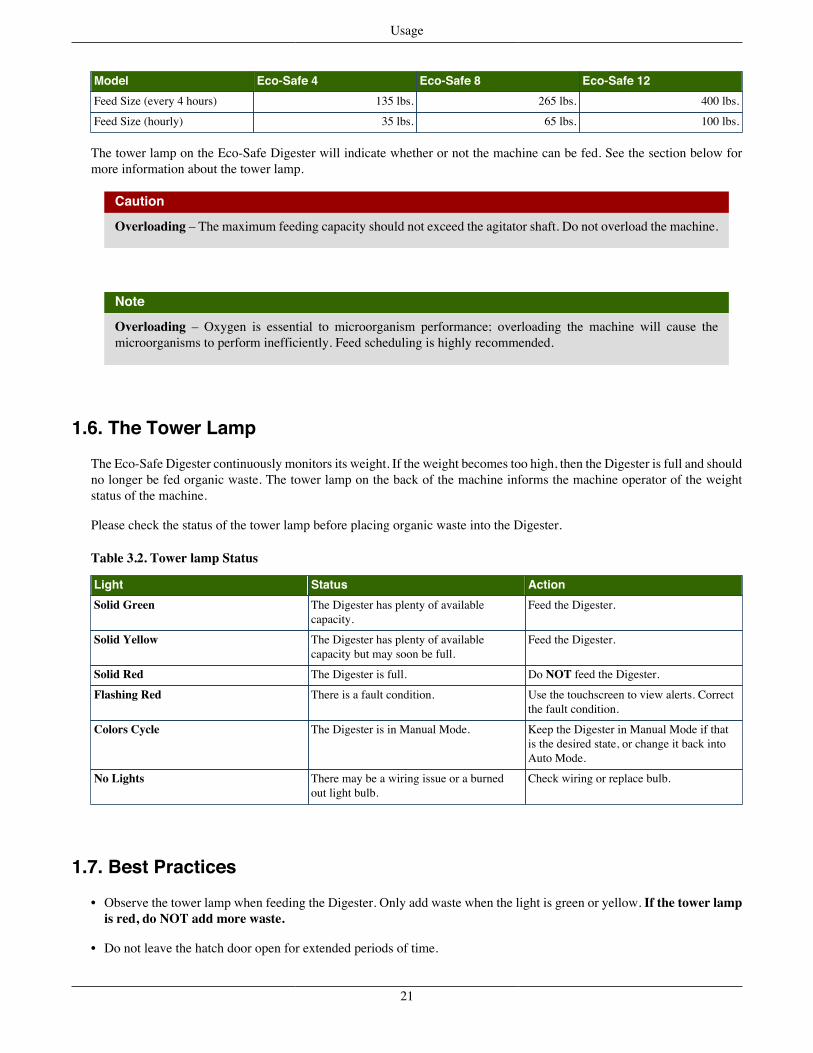
Table 3.2. Tower lamp Status
Light Status ActionSolid Green The Digester has plenty of available
capacity.Feed the Digester.
Solid Yellow The Digester has plenty of availablecapacity but may soon be full.
Feed the Digester.
Solid Red The Digester is full. Do NOT feed the Digester.
Flashing Red There is a fault condition. Use the touchscreen to view alerts. Correctthe fault condition.
Colors Cycle The Digester is in Manual Mode. Keep the Digester in Manual Mode if thatis the desired state, or change it back intoAuto Mode.
No Lights There may be a wiring issue or a burnedout light bulb.
Check wiring or replace bulb.
1.7. Best Practices
• Observe the tower lamp when feeding the Digester. Only add waste when the light is green or yellow. If the tower lampis red, do NOT add more waste.
• Do not leave the hatch door open for extended periods of time.
21
Usage
• Feed the Digester frequently throughout the day.
• A mixed diet containing produce, dairy, bakery items, fish, meat, and poultry should be introduced throughout the day.
• The smaller the food item size, the better, as digestion will occur at a faster rate. Chopping of larger items such aswatermelons and squash is recommended.
• Avoid adding large quantities of baked goods at one time.
• Avoid adding frozen items; allow them time to thaw. Food will digest best at room temperature.
• Keep the machine clean and free from all debris, particularly around the hatch seal area.
• Make sure that the inside of the machine is hosed off daily. Remove non-organic debris from the inside of the Digester.
• Refer to the Acceptable Materials decal on the machine for what should and should not be added to this Digester.
• DO NOT add any cleaning agents, chemicals, or boiling water as they will kill the microorganisms.
• DO NOT add any cardboard, china, glass, paper, plastic, rubber bands, or silverware as these non-organic items will causedamage to the machine.
• DO NOT add large meat bones (T-bones, ham ,and shank bones) as they will cause damage to the machine
• DO NOT add grease, fat, or fryer oil. The Digester is not intended for this purpose.
• DO NOT hose down the outside of the machine. The touchscreen display must not get wet.
22
Usage
2. Routine MaintenanceRoutine maintenance is key to keep a Digester performing optimally.
2.1. Daily Cleaning and InspectionThe following activities should be performed on a daily basis:
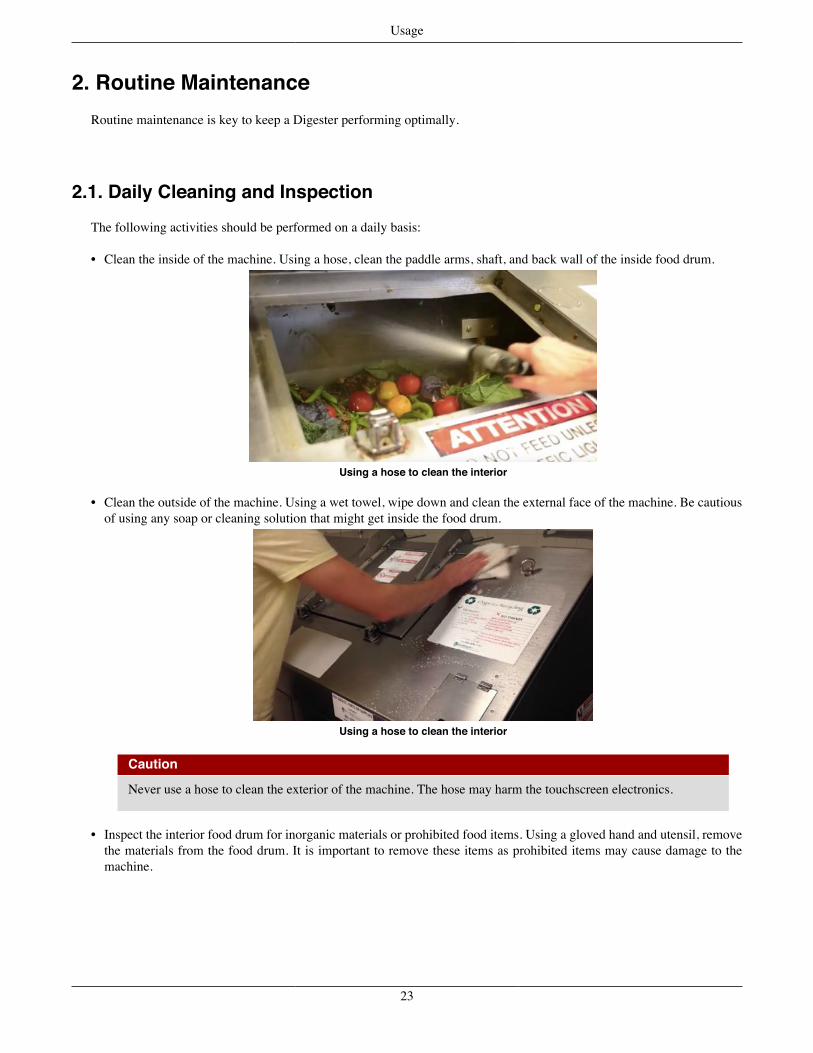
• Clean the inside of the machine. Using a hose, clean the paddle arms, shaft, and back wall of the inside food drum.
Using a hose to clean the interior
• Clean the outside of the machine. Using a wet towel, wipe down and clean the external face of the machine. Be cautiousof using any soap or cleaning solution that might get inside the food drum.
Using a hose to clean the interior
Caution
Never use a hose to clean the exterior of the machine. The hose may harm the touchscreen electronics.
• Inspect the interior food drum for inorganic materials or prohibited food items. Using a gloved hand and utensil, removethe materials from the food drum. It is important to remove these items as prohibited items may cause damage to themachine.
23
Usage
Using a hose to clean the interior
Caution
Use caution when handling inorganic materials retrieved from the food drum.
• Ensure that the effluent drain pipe is positioned direclty over the floor drain.
• Ensure that the paddle arms are fasten to the shaft. If the paddle arms are flapping or rattling, contact BioHiTech Support.
• Ensure that the incoming water temperature ramins between 105° and 120° F (40° and 50° C).
• Check the deodorizer gauge to ensure that there is sufficient deodorizer in the machine.
• Ensure that the effluent drain pipe is positioned directly over the floor drain.
2.2. Microorganism ReplenishmentMicroorganisms should be replaced every 60 days. Simply place the bag of microorganisms into the Digester and close thefood hatch door. The bag will biodegrade inside of the Digester.
Microorganisms can be ordered directly from BioHiTech. Visit us at biohitech.com and click the CUSTOMER button atthe top of the web page.
Replenishing the Microorganisms is simple:
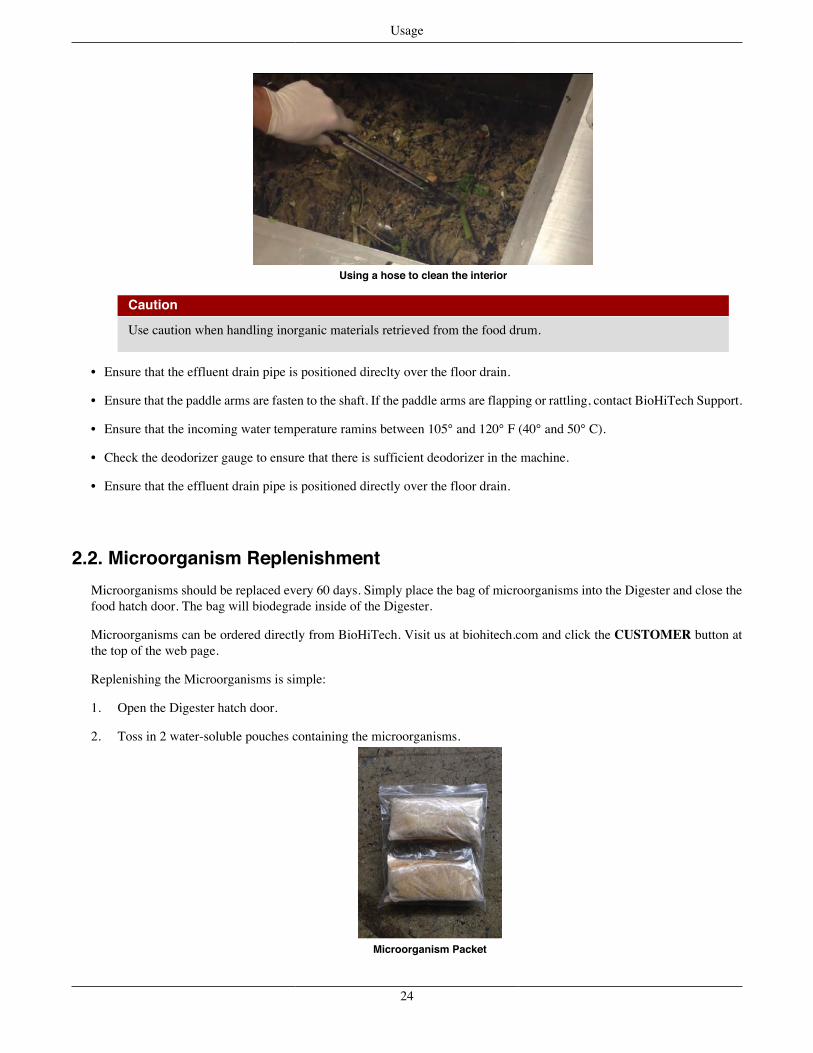
1. Open the Digester hatch door.
2. Toss in 2 water-soluble pouches containing the microorganisms.
Microorganism Packet
24
Usage
3. Close the hatch door.
4. The microorganisms will be thoroughly incorporated into the media after five minutes. Feedings can resume.
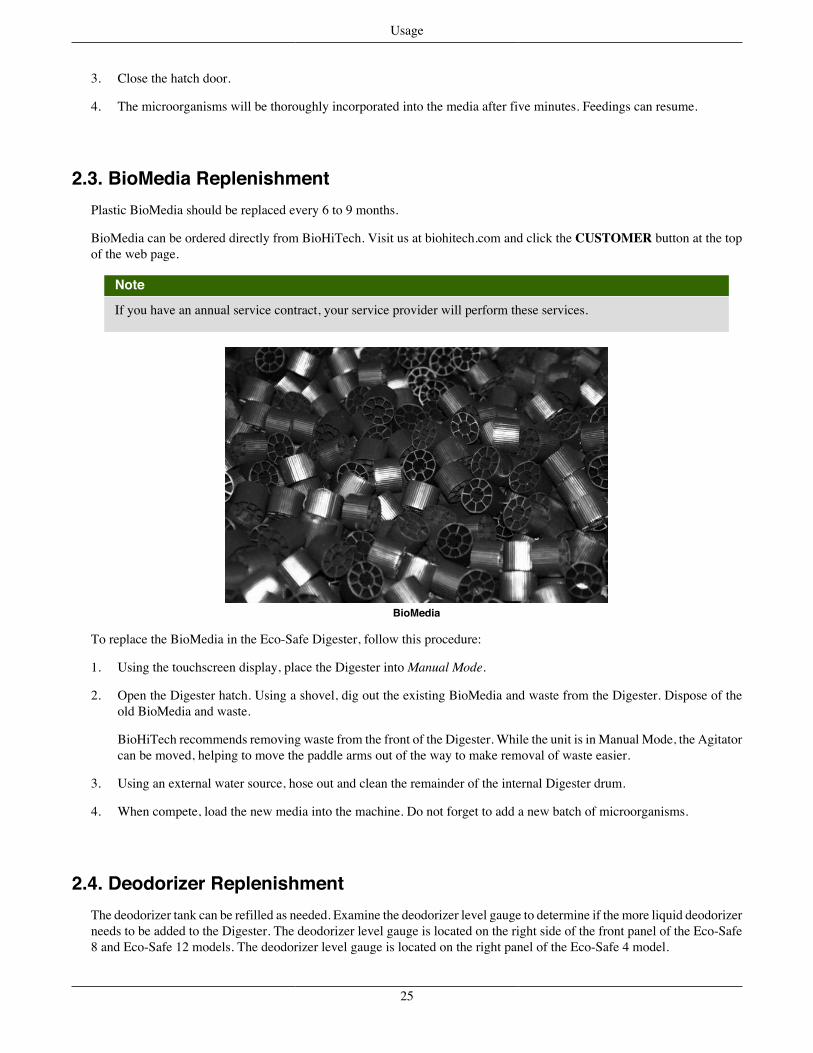
2.3. BioMedia ReplenishmentPlastic BioMedia should be replaced every 6 to 9 months.
BioMedia can be ordered directly from BioHiTech. Visit us at biohitech.com and click the CUSTOMER button at the topof the web page.
Note
If you have an annual service contract, your service provider will perform these services.
BioMedia
To replace the BioMedia in the Eco-Safe Digester, follow this procedure:
1. Using the touchscreen display, place the Digester into Manual Mode.
2. Open the Digester hatch. Using a shovel, dig out the existing BioMedia and waste from the Digester. Dispose of theold BioMedia and waste.
BioHiTech recommends removing waste from the front of the Digester. While the unit is in Manual Mode, the Agitatorcan be moved, helping to move the paddle arms out of the way to make removal of waste easier.
3. Using an external water source, hose out and clean the remainder of the internal Digester drum.
4. When compete, load the new media into the machine. Do not forget to add a new batch of microorganisms.
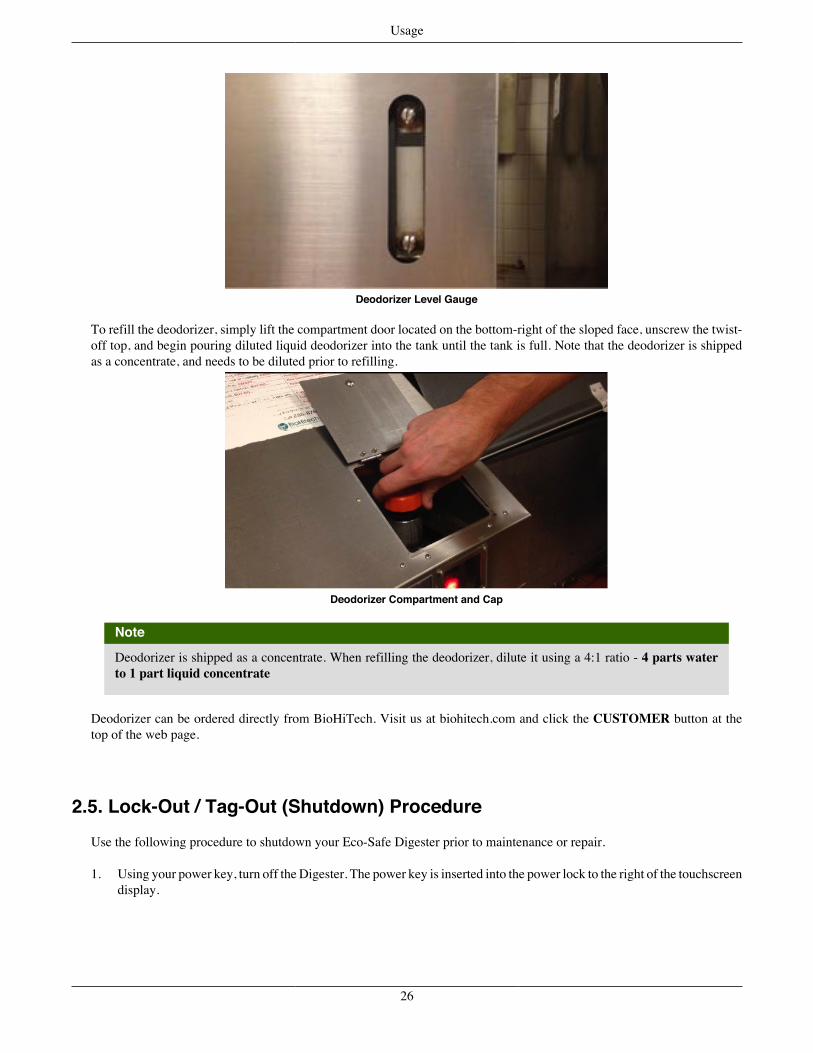
2.4. Deodorizer ReplenishmentThe deodorizer tank can be refilled as needed. Examine the deodorizer level gauge to determine if the more liquid deodorizerneeds to be added to the Digester. The deodorizer level gauge is located on the right side of the front panel of the Eco-Safe8 and Eco-Safe 12 models. The deodorizer level gauge is located on the right panel of the Eco-Safe 4 model.
25
Usage
Deodorizer Level Gauge
To refill the deodorizer, simply lift the compartment door located on the bottom-right of the sloped face, unscrew the twist-off top, and begin pouring diluted liquid deodorizer into the tank until the tank is full. Note that the deodorizer is shippedas a concentrate, and needs to be diluted prior to refilling.
Deodorizer Compartment and Cap
Note
Deodorizer is shipped as a concentrate. When refilling the deodorizer, dilute it using a 4:1 ratio - 4 parts waterto 1 part liquid concentrate
Deodorizer can be ordered directly from BioHiTech. Visit us at biohitech.com and click the CUSTOMER button at thetop of the web page.
2.5. Lock-Out / Tag-Out (Shutdown) ProcedureUse the following procedure to shutdown your Eco-Safe Digester prior to maintenance or repair.
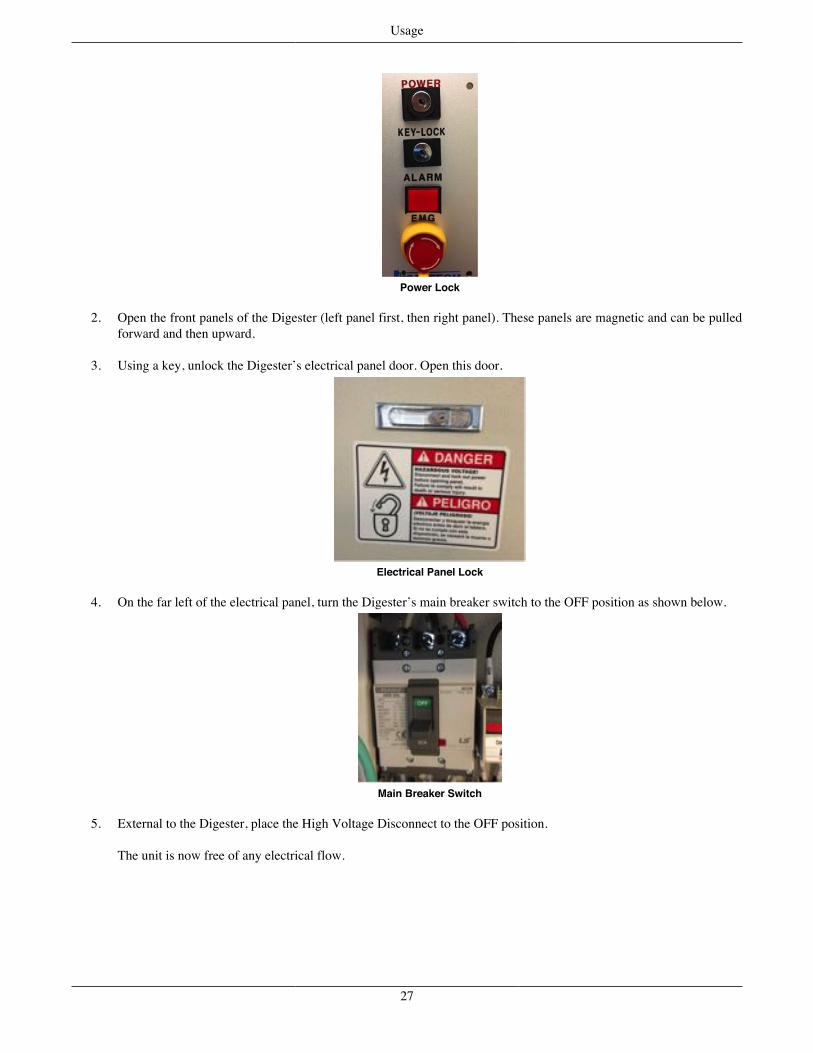
1. Using your power key, turn off the Digester. The power key is inserted into the power lock to the right of the touchscreendisplay.
26
Usage
Power Lock
2. Open the front panels of the Digester (left panel first, then right panel). These panels are magnetic and can be pulledforward and then upward.
3. Using a key, unlock the Digester’s electrical panel door. Open this door.
Electrical Panel Lock
4. On the far left of the electrical panel, turn the Digester’s main breaker switch to the OFF position as shown below.
Main Breaker Switch
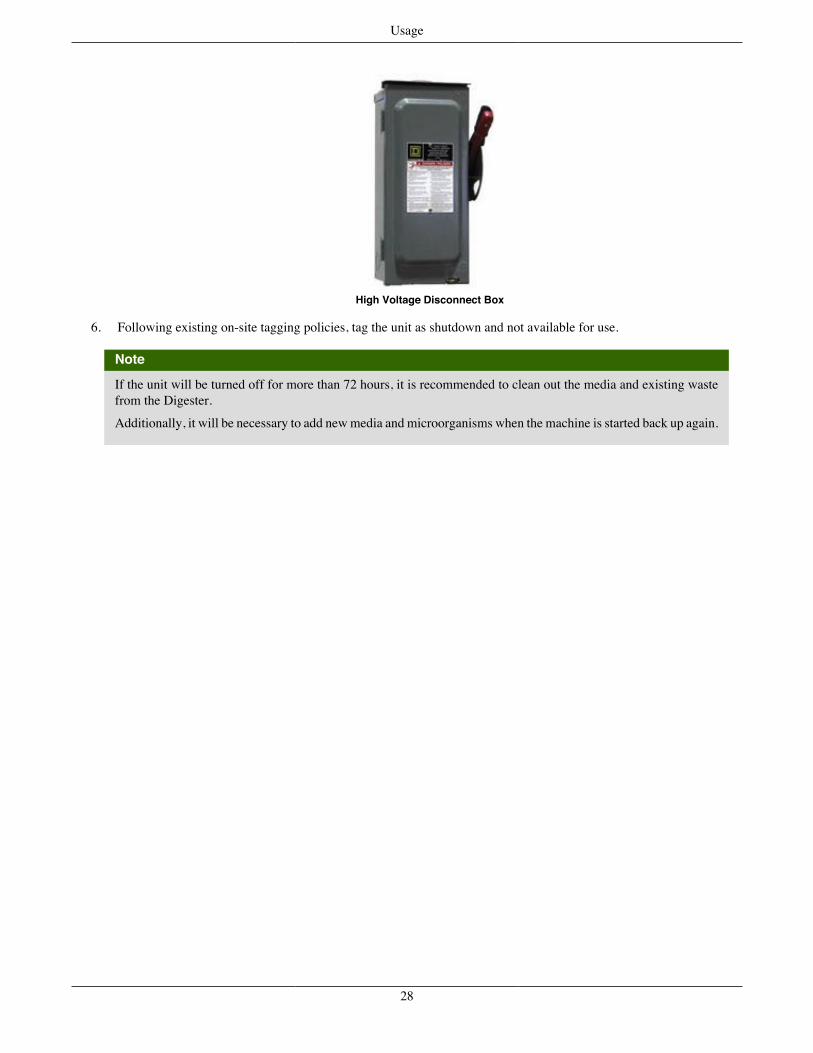
5. External to the Digester, place the High Voltage Disconnect to the OFF position.
The unit is now free of any electrical flow.
27
Usage
High Voltage Disconnect Box
6. Following existing on-site tagging policies, tag the unit as shutdown and not available for use.
Note
If the unit will be turned off for more than 72 hours, it is recommended to clean out the media and existing wastefrom the Digester.
Additionally, it will be necessary to add new media and microorganisms when the machine is started back up again.
28
Usage
3. Basic Touchscreen Operation
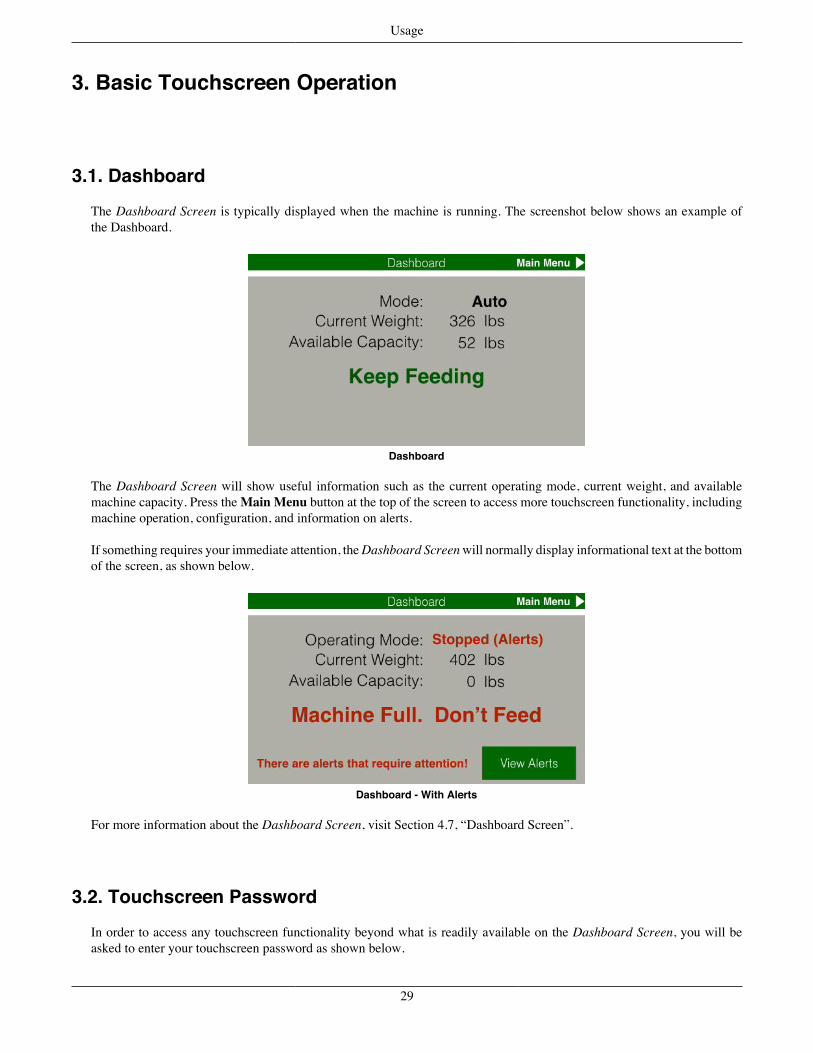
3.1. DashboardThe Dashboard Screen is typically displayed when the machine is running. The screenshot below shows an example ofthe Dashboard.
Dashboard
The Dashboard Screen will show useful information such as the current operating mode, current weight, and availablemachine capacity. Press the Main Menu button at the top of the screen to access more touchscreen functionality, includingmachine operation, configuration, and information on alerts.
If something requires your immediate attention, the Dashboard Screen will normally display informational text at the bottomof the screen, as shown below.
Dashboard - With Alerts
For more information about the Dashboard Screen, visit Section 4.7, “Dashboard Screen”.
3.2. Touchscreen PasswordIn order to access any touchscreen functionality beyond what is readily available on the Dashboard Screen, you will beasked to enter your touchscreen password as shown below.
29
Usage
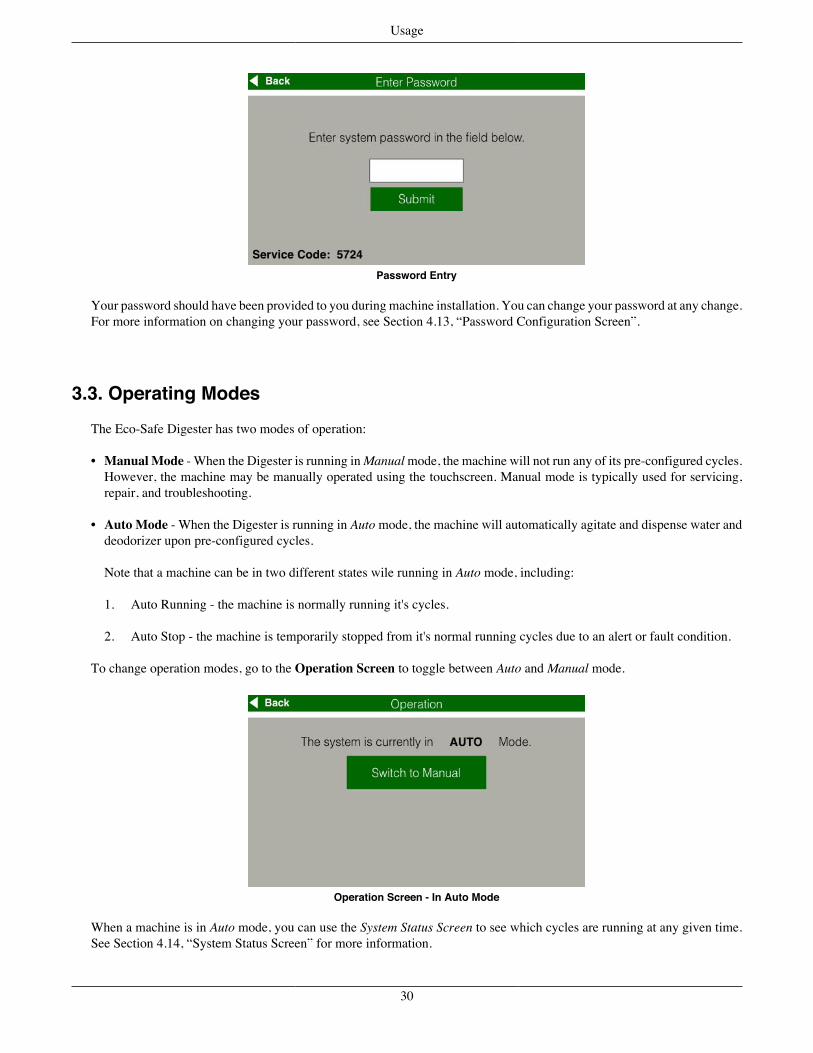
Password Entry
Your password should have been provided to you during machine installation. You can change your password at any change.For more information on changing your password, see Section 4.13, “Password Configuration Screen”.
3.3. Operating ModesThe Eco-Safe Digester has two modes of operation:
• Manual Mode - When the Digester is running in Manual mode, the machine will not run any of its pre-configured cycles.However, the machine may be manually operated using the touchscreen. Manual mode is typically used for servicing,repair, and troubleshooting.
• Auto Mode - When the Digester is running in Auto mode, the machine will automatically agitate and dispense water anddeodorizer upon pre-configured cycles.
Note that a machine can be in two different states wile running in Auto mode, including:
1. Auto Running - the machine is normally running it's cycles.
2. Auto Stop - the machine is temporarily stopped from it's normal running cycles due to an alert or fault condition.
To change operation modes, go to the Operation Screen to toggle between Auto and Manual mode.
Operation Screen - In Auto Mode
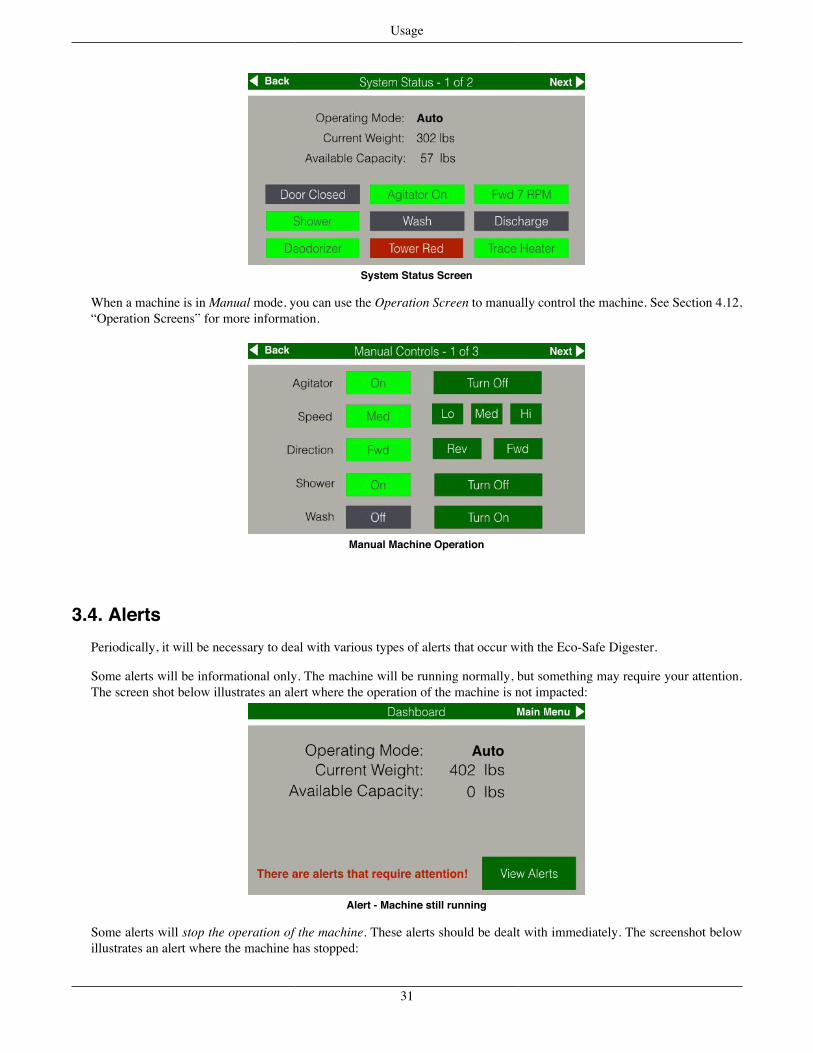
When a machine is in Auto mode, you can use the System Status Screen to see which cycles are running at any given time.See Section 4.14, “System Status Screen” for more information.
30
Usage
System Status Screen
When a machine is in Manual mode, you can use the Operation Screen to manually control the machine. See Section 4.12,“Operation Screens” for more information.
Manual Machine Operation
3.4. AlertsPeriodically, it will be necessary to deal with various types of alerts that occur with the Eco-Safe Digester.
Some alerts will be informational only. The machine will be running normally, but something may require your attention.The screen shot below illustrates an alert where the operation of the machine is not impacted:
Alert - Machine still running
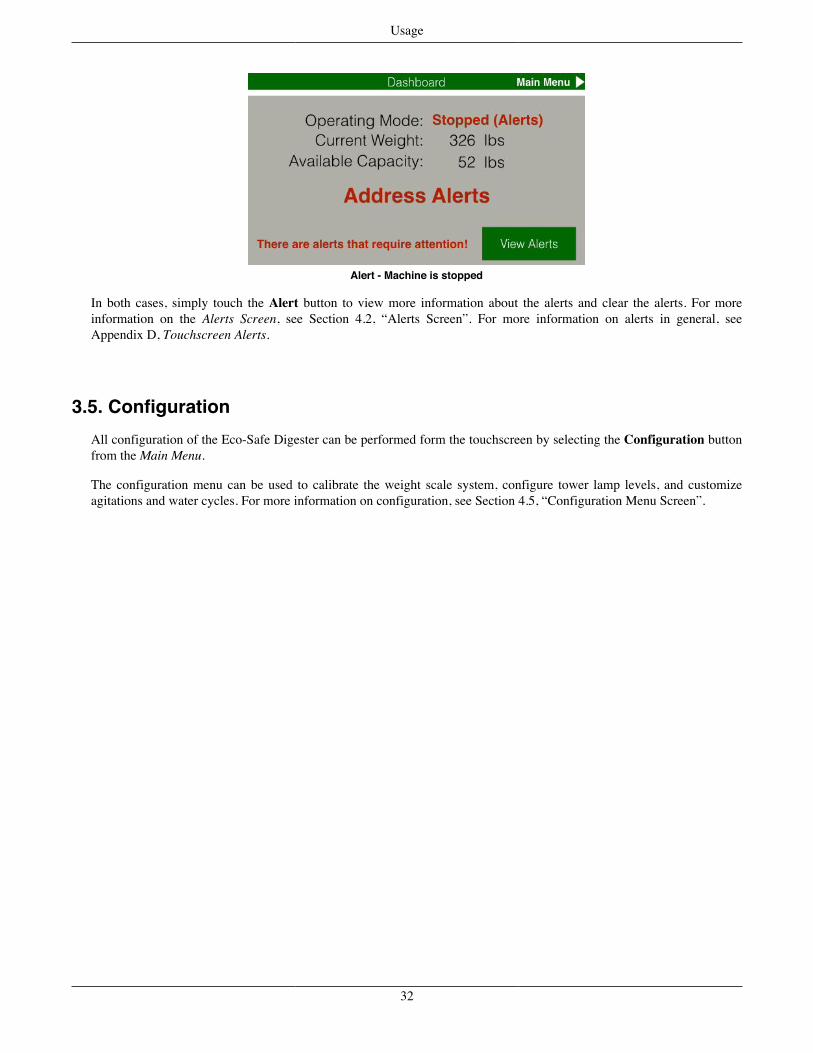
Some alerts will stop the operation of the machine. These alerts should be dealt with immediately. The screenshot belowillustrates an alert where the machine has stopped:
31
Usage
Alert - Machine is stopped
In both cases, simply touch the Alert button to view more information about the alerts and clear the alerts. For moreinformation on the Alerts Screen, see Section 4.2, “Alerts Screen”. For more information on alerts in general, seeAppendix D, Touchscreen Alerts.
3.5. ConfigurationAll configuration of the Eco-Safe Digester can be performed form the touchscreen by selecting the Configuration buttonfrom the Main Menu.
The configuration menu can be used to calibrate the weight scale system, configure tower lamp levels, and customizeagitations and water cycles. For more information on configuration, see Section 4.5, “Configuration Menu Screen”.
32
Usage
4. Touchscreen ReferenceThis section outlines all touchscreen functionality available on the Eco-Safe Digester. This section is intended to be areference. Screens are listed in alphabetical order.
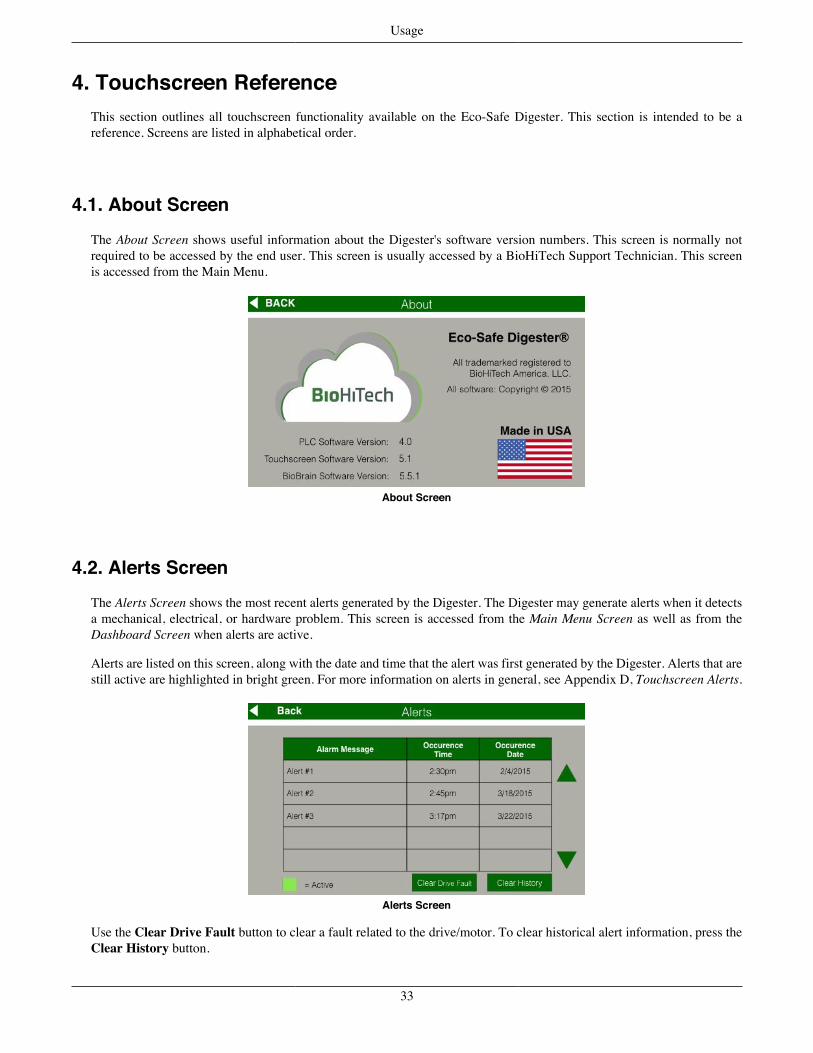
4.1. About ScreenThe About Screen shows useful information about the Digester's software version numbers. This screen is normally notrequired to be accessed by the end user. This screen is usually accessed by a BioHiTech Support Technician. This screenis accessed from the Main Menu.
About Screen
4.2. Alerts Screen
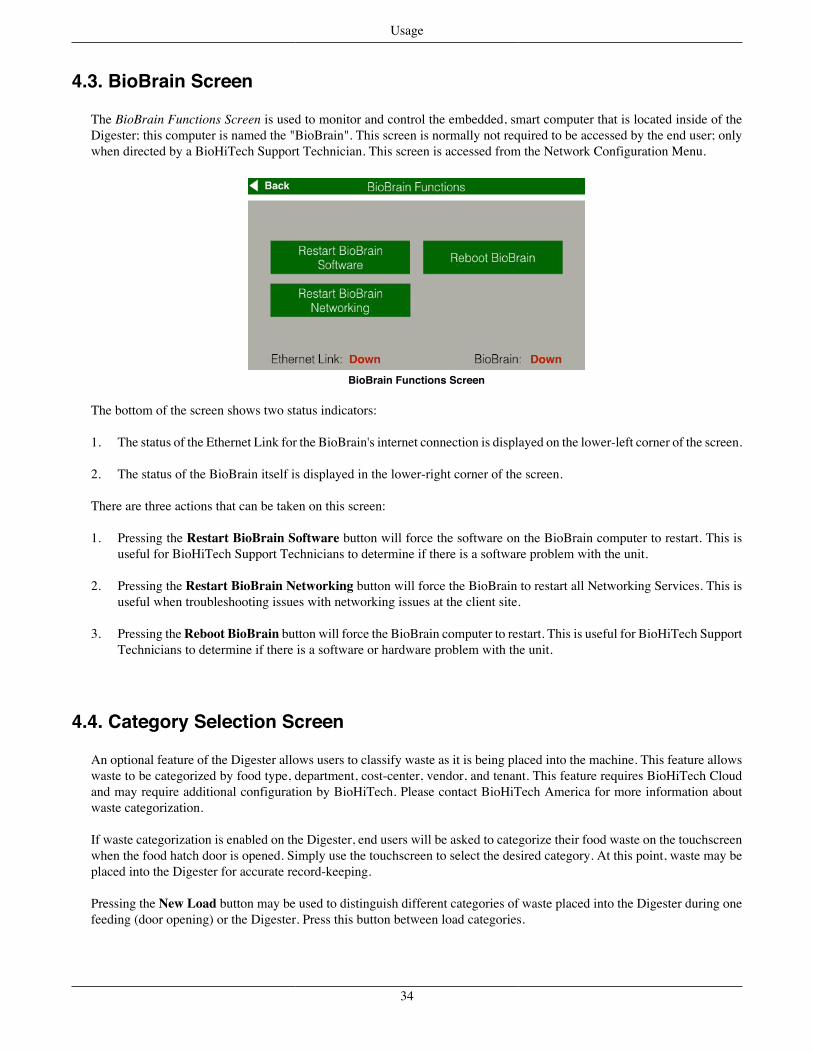
The Alerts Screen shows the most recent alerts generated by the Digester. The Digester may generate alerts when it detectsa mechanical, electrical, or hardware problem. This screen is accessed from the Main Menu Screen as well as from theDashboard Screen when alerts are active.
Alerts are listed on this screen, along with the date and time that the alert was first generated by the Digester. Alerts that arestill active are highlighted in bright green. For more information on alerts in general, see Appendix D, Touchscreen Alerts.
Alerts Screen
Use the Clear Drive Fault button to clear a fault related to the drive/motor. To clear historical alert information, press theClear History button.
33
Usage
4.3. BioBrain Screen
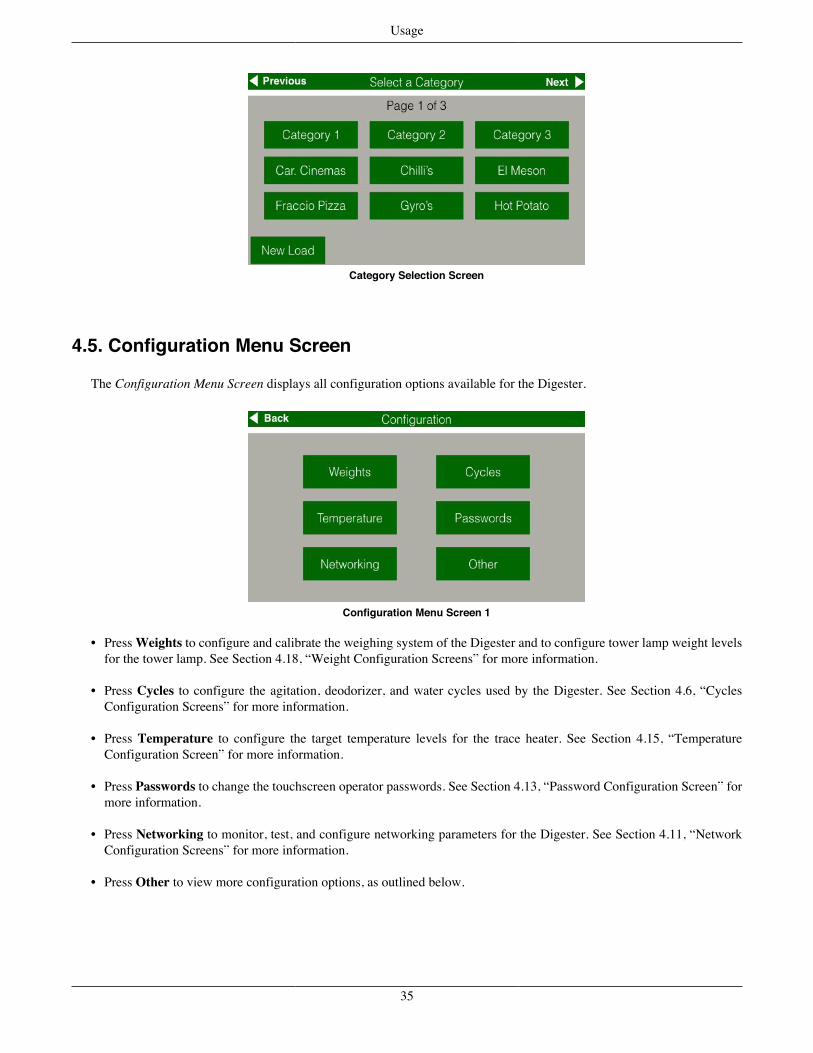
The BioBrain Functions Screen is used to monitor and control the embedded, smart computer that is located inside of theDigester; this computer is named the "BioBrain". This screen is normally not required to be accessed by the end user; onlywhen directed by a BioHiTech Support Technician. This screen is accessed from the Network Configuration Menu.
BioBrain Functions Screen
The bottom of the screen shows two status indicators:
1. The status of the Ethernet Link for the BioBrain's internet connection is displayed on the lower-left corner of the screen.
2. The status of the BioBrain itself is displayed in the lower-right corner of the screen.
There are three actions that can be taken on this screen:
1. Pressing the Restart BioBrain Software button will force the software on the BioBrain computer to restart. This isuseful for BioHiTech Support Technicians to determine if there is a software problem with the unit.
2. Pressing the Restart BioBrain Networking button will force the BioBrain to restart all Networking Services. This isuseful when troubleshooting issues with networking issues at the client site.
3. Pressing the Reboot BioBrain button will force the BioBrain computer to restart. This is useful for BioHiTech SupportTechnicians to determine if there is a software or hardware problem with the unit.
4.4. Category Selection Screen
An optional feature of the Digester allows users to classify waste as it is being placed into the machine. This feature allowswaste to be categorized by food type, department, cost-center, vendor, and tenant. This feature requires BioHiTech Cloudand may require additional configuration by BioHiTech. Please contact BioHiTech America for more information aboutwaste categorization.
If waste categorization is enabled on the Digester, end users will be asked to categorize their food waste on the touchscreenwhen the food hatch door is opened. Simply use the touchscreen to select the desired category. At this point, waste may beplaced into the Digester for accurate record-keeping.
Pressing the New Load button may be used to distinguish different categories of waste placed into the Digester during onefeeding (door opening) or the Digester. Press this button between load categories.
34
Usage
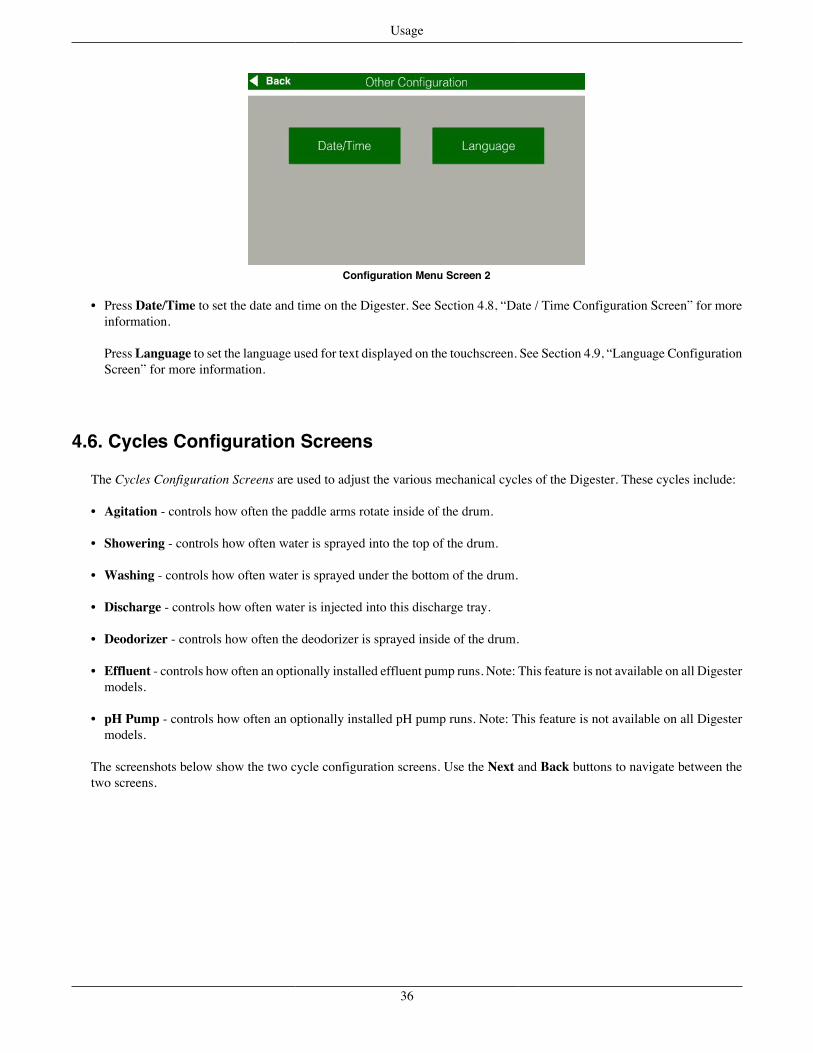
Category Selection Screen
4.5. Configuration Menu Screen
The Configuration Menu Screen displays all configuration options available for the Digester.
Configuration Menu Screen 1
• Press Weights to configure and calibrate the weighing system of the Digester and to configure tower lamp weight levelsfor the tower lamp. See Section 4.18, “Weight Configuration Screens” for more information.
• Press Cycles to configure the agitation, deodorizer, and water cycles used by the Digester. See Section 4.6, “CyclesConfiguration Screens” for more information.
• Press Temperature to configure the target temperature levels for the trace heater. See Section 4.15, “TemperatureConfiguration Screen” for more information.
• Press Passwords to change the touchscreen operator passwords. See Section 4.13, “Password Configuration Screen” formore information.
• Press Networking to monitor, test, and configure networking parameters for the Digester. See Section 4.11, “NetworkConfiguration Screens” for more information.
• Press Other to view more configuration options, as outlined below.
35
Usage
Configuration Menu Screen 2
• Press Date/Time to set the date and time on the Digester. See Section 4.8, “Date / Time Configuration Screen” for moreinformation.
Press Language to set the language used for text displayed on the touchscreen. See Section 4.9, “Language ConfigurationScreen” for more information.
4.6. Cycles Configuration Screens
The Cycles Configuration Screens are used to adjust the various mechanical cycles of the Digester. These cycles include:
• Agitation - controls how often the paddle arms rotate inside of the drum.
• Showering - controls how often water is sprayed into the top of the drum.
• Washing - controls how often water is sprayed under the bottom of the drum.
• Discharge - controls how often water is injected into this discharge tray.
• Deodorizer - controls how often the deodorizer is sprayed inside of the drum.
• Effluent - controls how often an optionally installed effluent pump runs. Note: This feature is not available on all Digestermodels.
• pH Pump - controls how often an optionally installed pH pump runs. Note: This feature is not available on all Digestermodels.
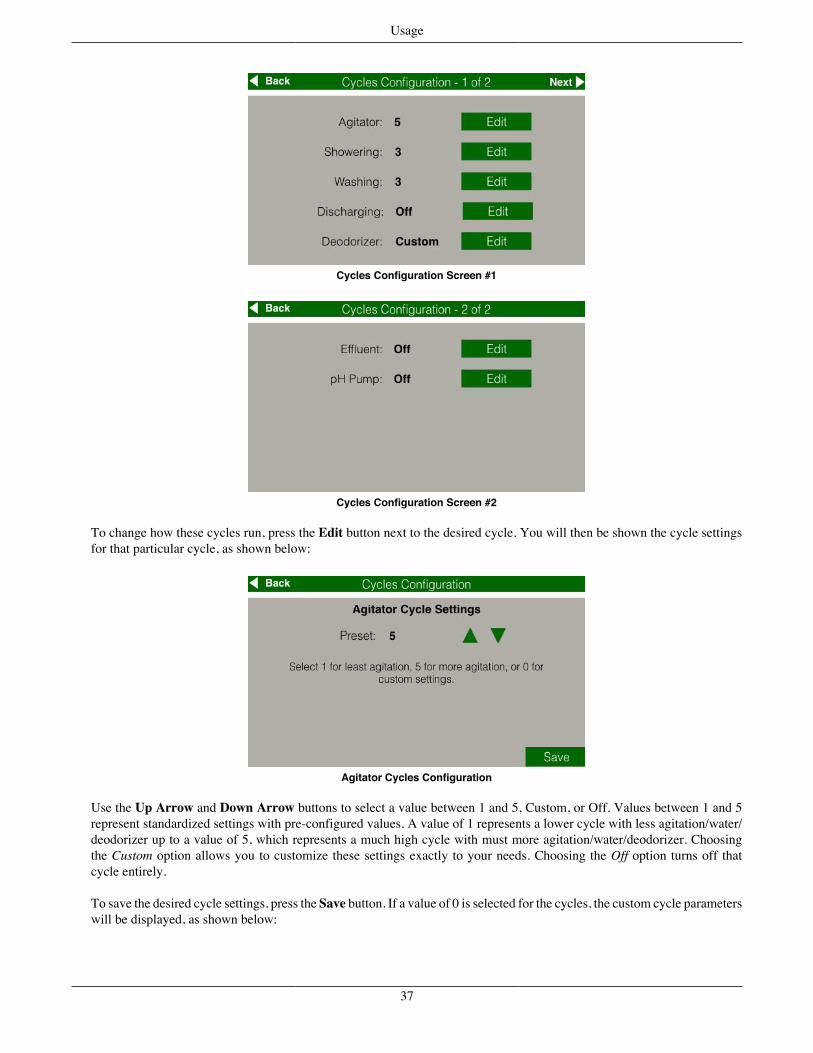
The screenshots below show the two cycle configuration screens. Use the Next and Back buttons to navigate between thetwo screens.
36
Usage
Cycles Configuration Screen #1
Cycles Configuration Screen #2
To change how these cycles run, press the Edit button next to the desired cycle. You will then be shown the cycle settingsfor that particular cycle, as shown below:
Agitator Cycles Configuration
Use the Up Arrow and Down Arrow buttons to select a value between 1 and 5, Custom, or Off. Values between 1 and 5represent standardized settings with pre-configured values. A value of 1 represents a lower cycle with less agitation/water/deodorizer up to a value of 5, which represents a much high cycle with must more agitation/water/deodorizer. Choosingthe Custom option allows you to customize these settings exactly to your needs. Choosing the Off option turns off thatcycle entirely.
To save the desired cycle settings, press the Save button. If a value of 0 is selected for the cycles, the custom cycle parameterswill be displayed, as shown below:
37
Usage
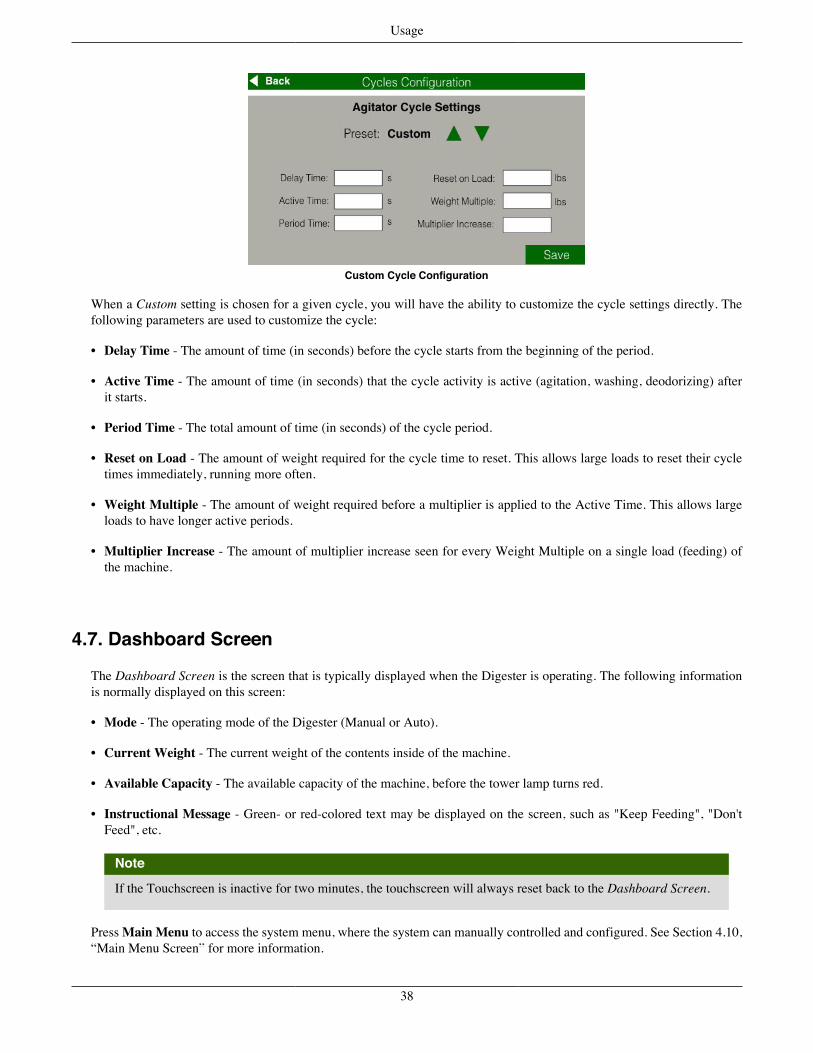
Custom Cycle Configuration
When a Custom setting is chosen for a given cycle, you will have the ability to customize the cycle settings directly. Thefollowing parameters are used to customize the cycle:
• Delay Time - The amount of time (in seconds) before the cycle starts from the beginning of the period.
• Active Time - The amount of time (in seconds) that the cycle activity is active (agitation, washing, deodorizing) afterit starts.
• Period Time - The total amount of time (in seconds) of the cycle period.
• Reset on Load - The amount of weight required for the cycle time to reset. This allows large loads to reset their cycletimes immediately, running more often.
• Weight Multiple - The amount of weight required before a multiplier is applied to the Active Time. This allows largeloads to have longer active periods.
• Multiplier Increase - The amount of multiplier increase seen for every Weight Multiple on a single load (feeding) ofthe machine.
4.7. Dashboard Screen
The Dashboard Screen is the screen that is typically displayed when the Digester is operating. The following informationis normally displayed on this screen:
• Mode - The operating mode of the Digester (Manual or Auto).
• Current Weight - The current weight of the contents inside of the machine.
• Available Capacity - The available capacity of the machine, before the tower lamp turns red.
• Instructional Message - Green- or red-colored text may be displayed on the screen, such as "Keep Feeding", "Don'tFeed", etc.
Note
If the Touchscreen is inactive for two minutes, the touchscreen will always reset back to the Dashboard Screen.
Press Main Menu to access the system menu, where the system can manually controlled and configured. See Section 4.10,“Main Menu Screen” for more information.
38
Usage
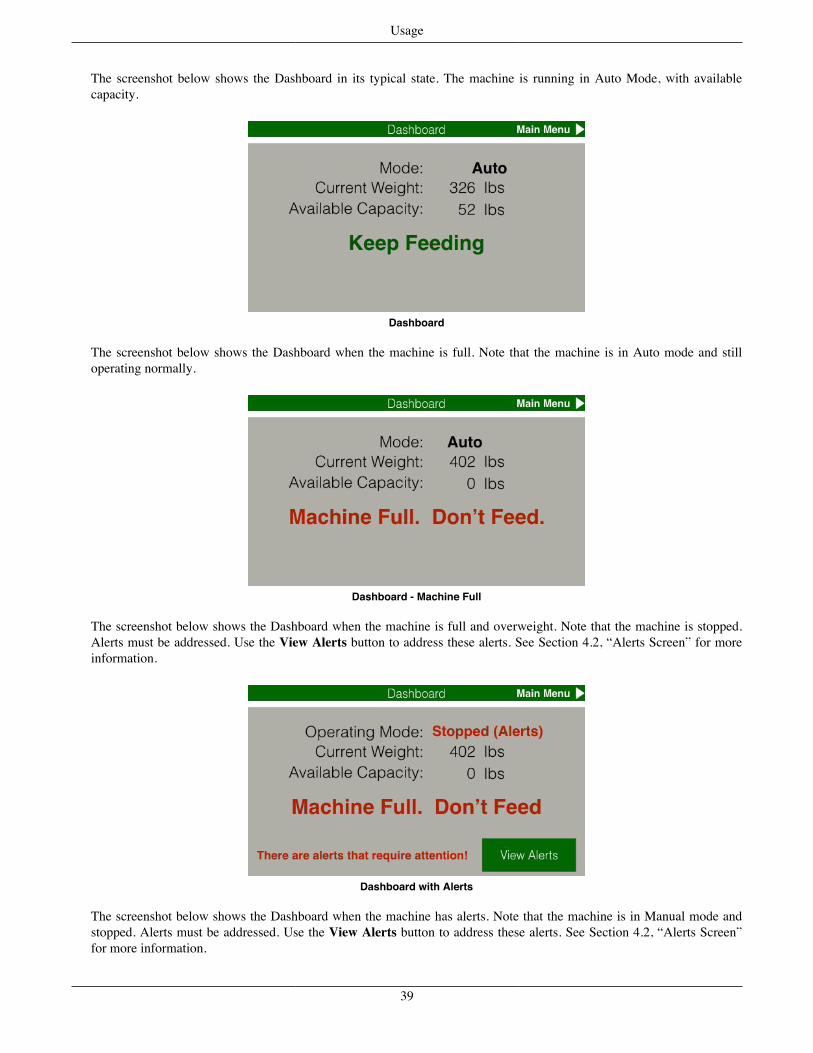
The screenshot below shows the Dashboard in its typical state. The machine is running in Auto Mode, with availablecapacity.
Dashboard
The screenshot below shows the Dashboard when the machine is full. Note that the machine is in Auto mode and stilloperating normally.
Dashboard - Machine Full
The screenshot below shows the Dashboard when the machine is full and overweight. Note that the machine is stopped.Alerts must be addressed. Use the View Alerts button to address these alerts. See Section 4.2, “Alerts Screen” for moreinformation.
Dashboard with Alerts
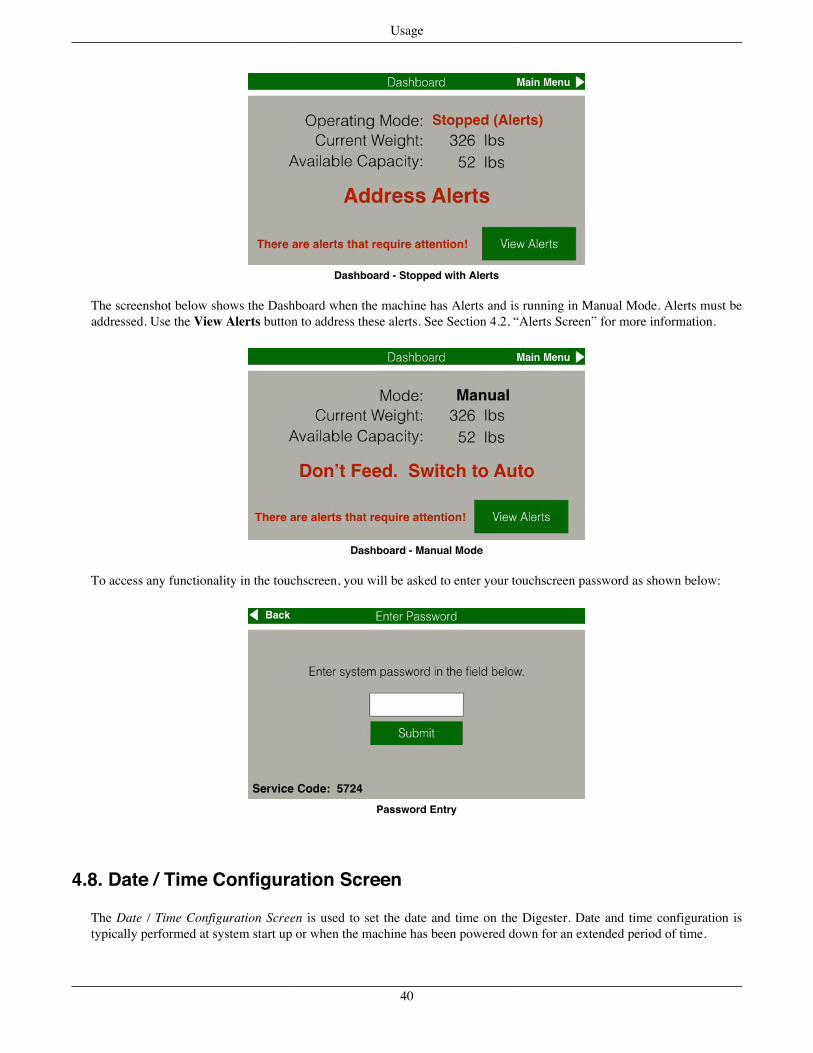
The screenshot below shows the Dashboard when the machine has alerts. Note that the machine is in Manual mode andstopped. Alerts must be addressed. Use the View Alerts button to address these alerts. See Section 4.2, “Alerts Screen”for more information.
39
Usage
Dashboard - Stopped with Alerts
The screenshot below shows the Dashboard when the machine has Alerts and is running in Manual Mode. Alerts must beaddressed. Use the View Alerts button to address these alerts. See Section 4.2, “Alerts Screen” for more information.
Dashboard - Manual Mode
To access any functionality in the touchscreen, you will be asked to enter your touchscreen password as shown below:
Password Entry
4.8. Date / Time Configuration Screen
The Date / Time Configuration Screen is used to set the date and time on the Digester. Date and time configuration istypically performed at system start up or when the machine has been powered down for an extended period of time.
40
Usage
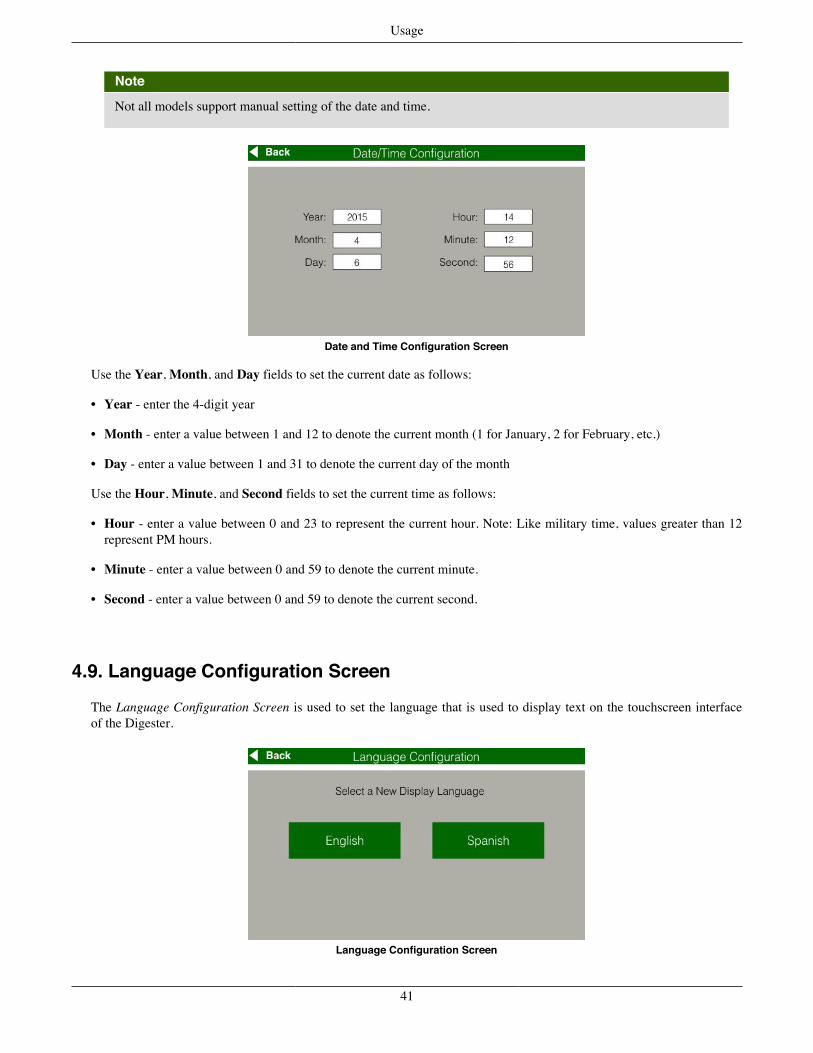
Note
Not all models support manual setting of the date and time.
Date and Time Configuration Screen
Use the Year, Month, and Day fields to set the current date as follows:
• Year - enter the 4-digit year
• Month - enter a value between 1 and 12 to denote the current month (1 for January, 2 for February, etc.)
• Day - enter a value between 1 and 31 to denote the current day of the month
Use the Hour, Minute, and Second fields to set the current time as follows:
• Hour - enter a value between 0 and 23 to represent the current hour. Note: Like military time, values greater than 12represent PM hours.
• Minute - enter a value between 0 and 59 to denote the current minute.
• Second - enter a value between 0 and 59 to denote the current second.
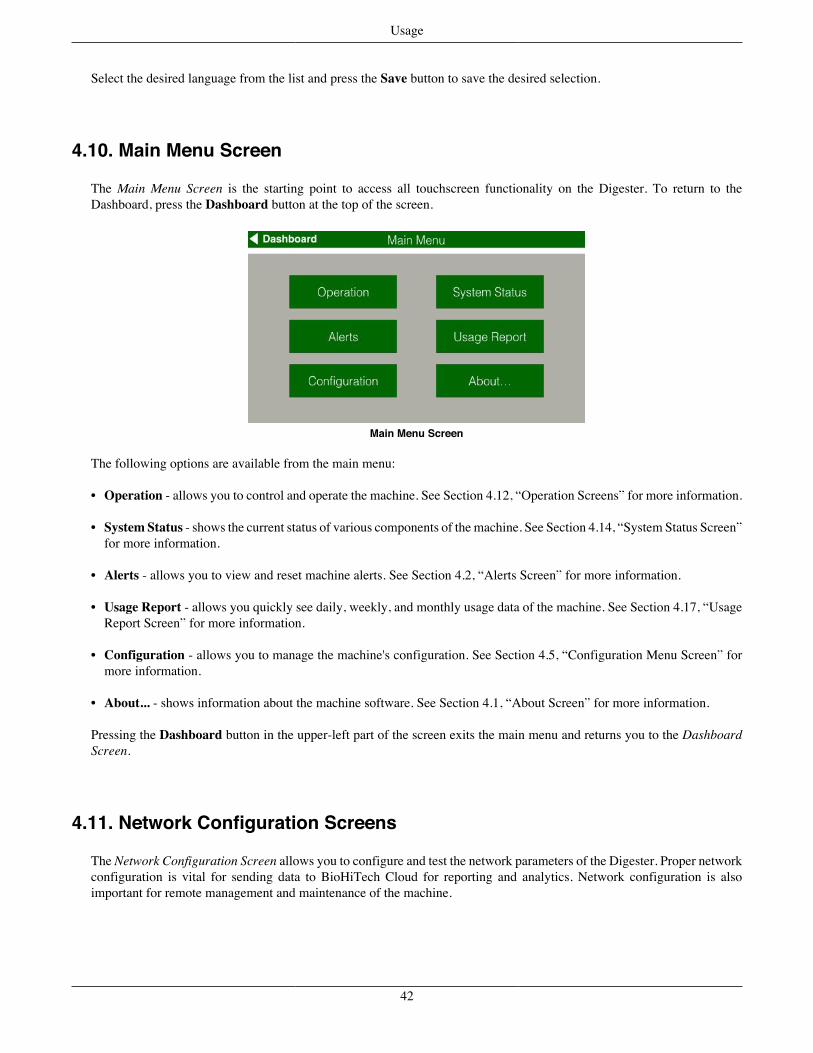
4.9. Language Configuration Screen
The Language Configuration Screen is used to set the language that is used to display text on the touchscreen interfaceof the Digester.
Language Configuration Screen
41
Usage
Select the desired language from the list and press the Save button to save the desired selection.
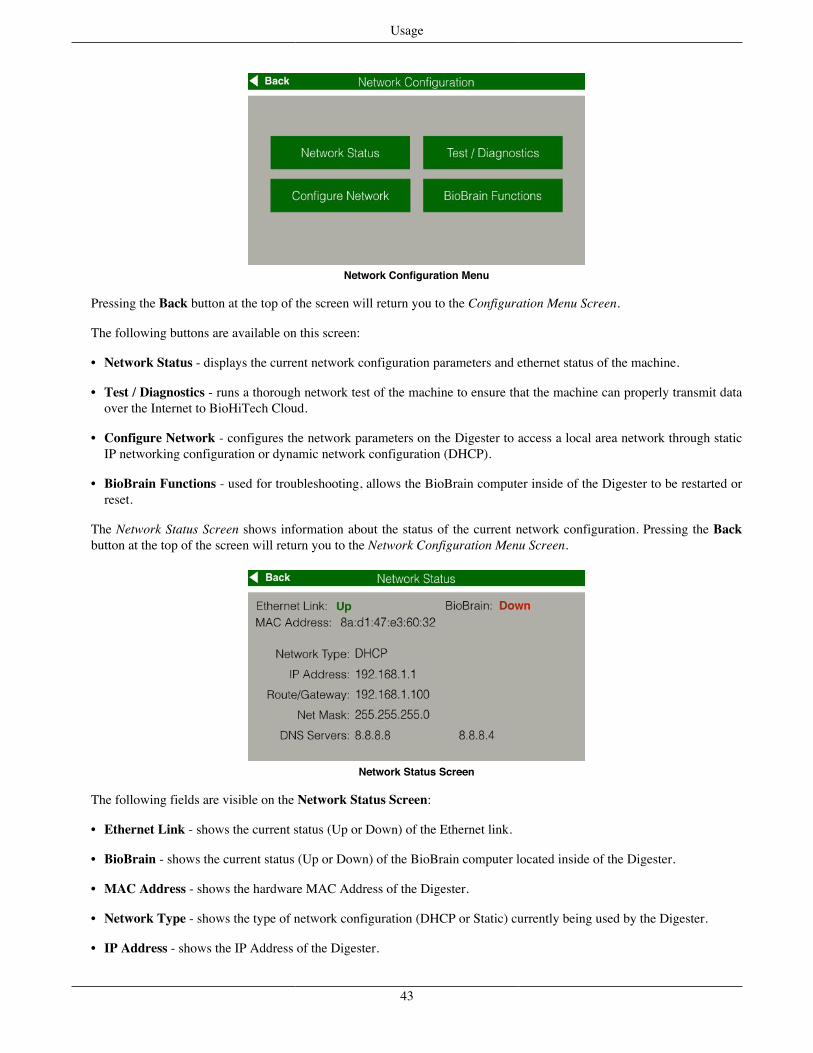
4.10. Main Menu Screen
The Main Menu Screen is the starting point to access all touchscreen functionality on the Digester. To return to theDashboard, press the Dashboard button at the top of the screen.
Main Menu Screen
The following options are available from the main menu:
• Operation - allows you to control and operate the machine. See Section 4.12, “Operation Screens” for more information.
• System Status - shows the current status of various components of the machine. See Section 4.14, “System Status Screen”for more information.
• Alerts - allows you to view and reset machine alerts. See Section 4.2, “Alerts Screen” for more information.
• Usage Report - allows you quickly see daily, weekly, and monthly usage data of the machine. See Section 4.17, “UsageReport Screen” for more information.
• Configuration - allows you to manage the machine's configuration. See Section 4.5, “Configuration Menu Screen” formore information.
• About... - shows information about the machine software. See Section 4.1, “About Screen” for more information.
Pressing the Dashboard button in the upper-left part of the screen exits the main menu and returns you to the DashboardScreen.
4.11. Network Configuration Screens
The Network Configuration Screen allows you to configure and test the network parameters of the Digester. Proper networkconfiguration is vital for sending data to BioHiTech Cloud for reporting and analytics. Network configuration is alsoimportant for remote management and maintenance of the machine.
42
Usage
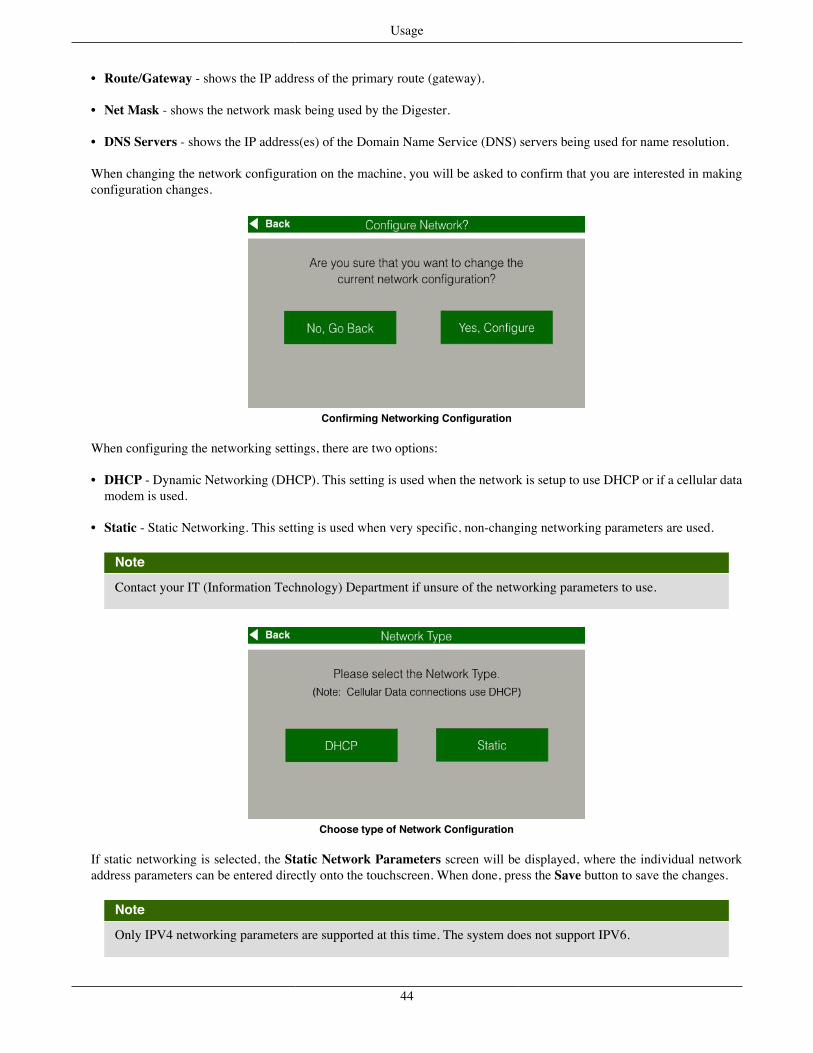
Network Configuration Menu
Pressing the Back button at the top of the screen will return you to the Configuration Menu Screen.
The following buttons are available on this screen:
• Network Status - displays the current network configuration parameters and ethernet status of the machine.
• Test / Diagnostics - runs a thorough network test of the machine to ensure that the machine can properly transmit dataover the Internet to BioHiTech Cloud.
• Configure Network - configures the network parameters on the Digester to access a local area network through staticIP networking configuration or dynamic network configuration (DHCP).
• BioBrain Functions - used for troubleshooting, allows the BioBrain computer inside of the Digester to be restarted orreset.
The Network Status Screen shows information about the status of the current network configuration. Pressing the Backbutton at the top of the screen will return you to the Network Configuration Menu Screen.
Network Status Screen
The following fields are visible on the Network Status Screen:
• Ethernet Link - shows the current status (Up or Down) of the Ethernet link.
• BioBrain - shows the current status (Up or Down) of the BioBrain computer located inside of the Digester.
• MAC Address - shows the hardware MAC Address of the Digester.
• Network Type - shows the type of network configuration (DHCP or Static) currently being used by the Digester.
• IP Address - shows the IP Address of the Digester.
43
Usage
• Route/Gateway - shows the IP address of the primary route (gateway).
• Net Mask - shows the network mask being used by the Digester.
• DNS Servers - shows the IP address(es) of the Domain Name Service (DNS) servers being used for name resolution.
When changing the network configuration on the machine, you will be asked to confirm that you are interested in makingconfiguration changes.
Confirming Networking Configuration
When configuring the networking settings, there are two options:
• DHCP - Dynamic Networking (DHCP). This setting is used when the network is setup to use DHCP or if a cellular datamodem is used.
• Static - Static Networking. This setting is used when very specific, non-changing networking parameters are used.
Note
Contact your IT (Information Technology) Department if unsure of the networking parameters to use.
Choose type of Network Configuration
If static networking is selected, the Static Network Parameters screen will be displayed, where the individual networkaddress parameters can be entered directly onto the touchscreen. When done, press the Save button to save the changes.
Note
Only IPV4 networking parameters are supported at this time. The system does not support IPV6.
44

Usage
Static Network Configuration
• IP Address - the static IP address that should be assigned to the Digester.
• Route/Gateway - the IP address of the default route or gateway.
• Net Mask - the IP network mask that should be applied to the current local area network.
• DNS Server 1 - the IP address of the primary DNS (Domain Name Service) server.
• DNS Server 2 - the IP address of the secondary DNS (Domain Name Service) server. This field is optional.
After the networking configuration settings are saved, press the Test Network button to perform a network test.
Saved Network Settings
The Network Test Screen allows you to run a comprehensive suite of networking tests to ensure that the BioBrain and Eco-Safe Digester can successfully communicate over the internet to BioHiTech Cloud.
Network Configuration Test
45
Usage
Press the Start Tests button at the bottom to run the networking tests. Next to each of the eight tests, a green Pass status ora red Fail will be displayed. The networking tests is considered successful only if all networking tests pass.
Note
Normally all networking tests can be completed in under twenty seconds. If there are problems with the networkingconfiguration, it may take as long as ten minutes to complete all of the tests.
4.12. Operation Screens
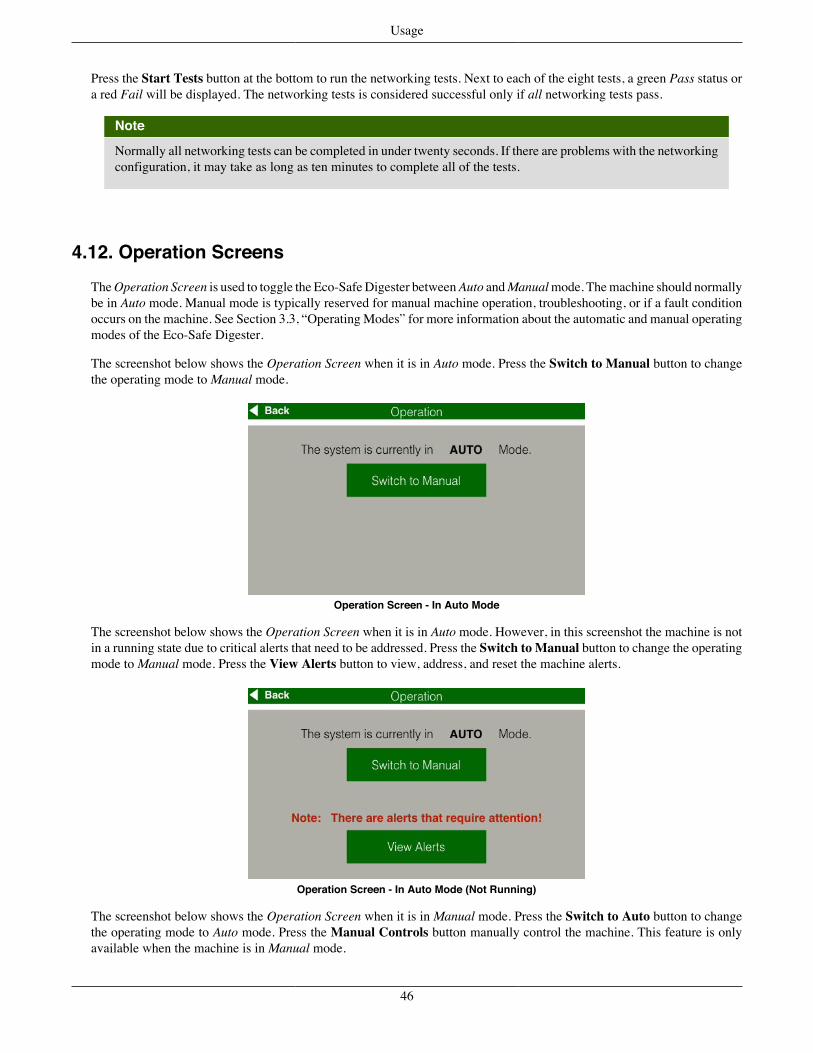
The Operation Screen is used to toggle the Eco-Safe Digester between Auto and Manual mode. The machine should normallybe in Auto mode. Manual mode is typically reserved for manual machine operation, troubleshooting, or if a fault conditionoccurs on the machine. See Section 3.3, “Operating Modes” for more information about the automatic and manual operatingmodes of the Eco-Safe Digester.
The screenshot below shows the Operation Screen when it is in Auto mode. Press the Switch to Manual button to changethe operating mode to Manual mode.
Operation Screen - In Auto Mode
The screenshot below shows the Operation Screen when it is in Auto mode. However, in this screenshot the machine is notin a running state due to critical alerts that need to be addressed. Press the Switch to Manual button to change the operatingmode to Manual mode. Press the View Alerts button to view, address, and reset the machine alerts.
Operation Screen - In Auto Mode (Not Running)
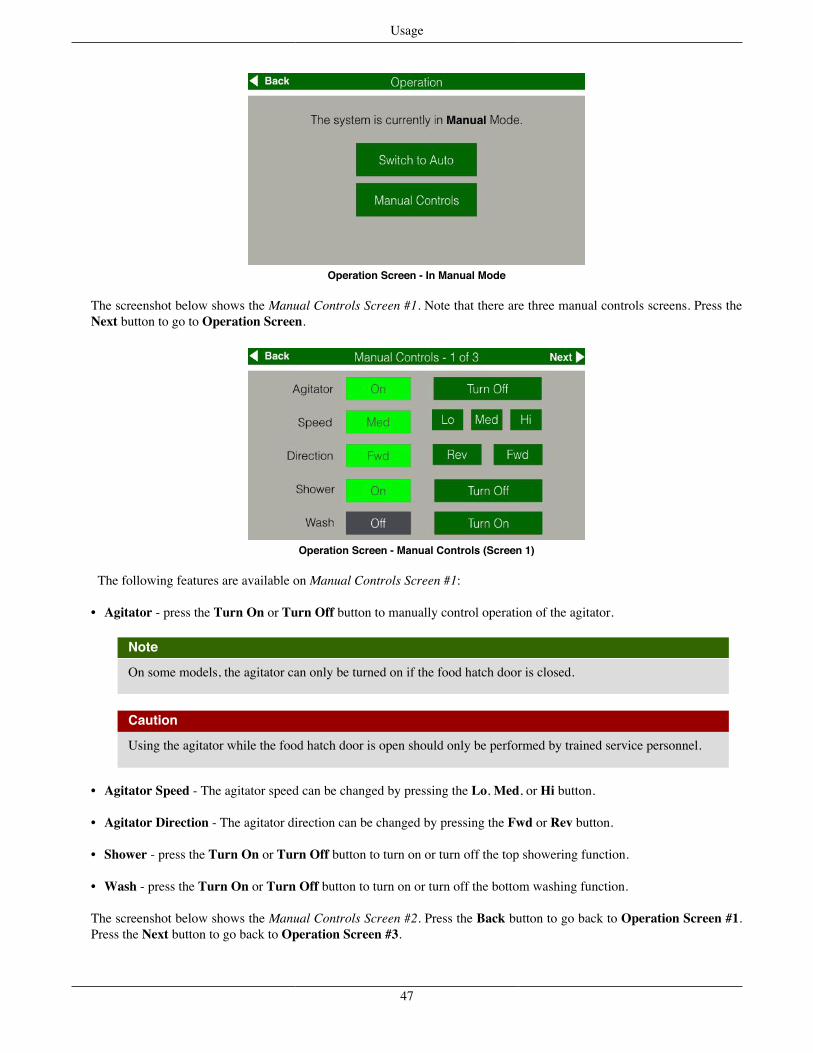
The screenshot below shows the Operation Screen when it is in Manual mode. Press the Switch to Auto button to changethe operating mode to Auto mode. Press the Manual Controls button manually control the machine. This feature is onlyavailable when the machine is in Manual mode.
46
Usage
Operation Screen - In Manual Mode
The screenshot below shows the Manual Controls Screen #1. Note that there are three manual controls screens. Press theNext button to go to Operation Screen.
Operation Screen - Manual Controls (Screen 1)
The following features are available on Manual Controls Screen #1:
• Agitator - press the Turn On or Turn Off button to manually control operation of the agitator.
Note
On some models, the agitator can only be turned on if the food hatch door is closed.
Caution
Using the agitator while the food hatch door is open should only be performed by trained service personnel.
• Agitator Speed - The agitator speed can be changed by pressing the Lo, Med, or Hi button.
• Agitator Direction - The agitator direction can be changed by pressing the Fwd or Rev button.
• Shower - press the Turn On or Turn Off button to turn on or turn off the top showering function.
• Wash - press the Turn On or Turn Off button to turn on or turn off the bottom washing function.
The screenshot below shows the Manual Controls Screen #2. Press the Back button to go back to Operation Screen #1.Press the Next button to go back to Operation Screen #3.
47
Usage
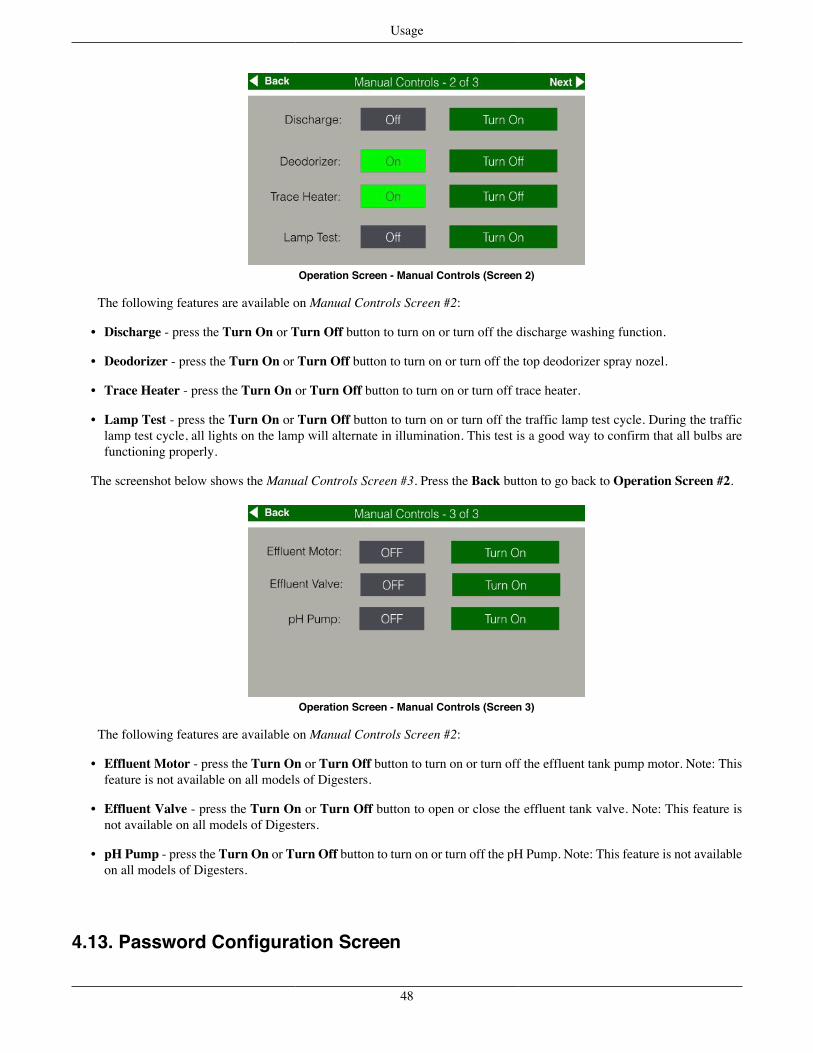
Operation Screen - Manual Controls (Screen 2)
The following features are available on Manual Controls Screen #2:
• Discharge - press the Turn On or Turn Off button to turn on or turn off the discharge washing function.
• Deodorizer - press the Turn On or Turn Off button to turn on or turn off the top deodorizer spray nozel.
• Trace Heater - press the Turn On or Turn Off button to turn on or turn off trace heater.
• Lamp Test - press the Turn On or Turn Off button to turn on or turn off the traffic lamp test cycle. During the trafficlamp test cycle, all lights on the lamp will alternate in illumination. This test is a good way to confirm that all bulbs arefunctioning properly.
The screenshot below shows the Manual Controls Screen #3. Press the Back button to go back to Operation Screen #2.
Operation Screen - Manual Controls (Screen 3)
The following features are available on Manual Controls Screen #2:
• Effluent Motor - press the Turn On or Turn Off button to turn on or turn off the effluent tank pump motor. Note: Thisfeature is not available on all models of Digesters.
• Effluent Valve - press the Turn On or Turn Off button to open or close the effluent tank valve. Note: This feature isnot available on all models of Digesters.
• pH Pump - press the Turn On or Turn Off button to turn on or turn off the pH Pump. Note: This feature is not availableon all models of Digesters.
4.13. Password Configuration Screen
48
Usage
The Passwords Configuration Screen is used set the passwords on the Eco-Safe Digester. There are two passwordsavailable on the Eco-Safe Digester:
1. Operator Password - If this password is entered, the user has limited access to the touchscreen functions. Specifically,the user will be unable to access the Configuration Menu.
2. Administrator Password - If this password is entered, the user will have full access to all features in the main menu.
This password is required to access the Main Menu from the Dashboard.
The screenshot below shows the Password Configuration Screen.
Password Configuration Screen
Touch inside the New Password input box and use the onscreen keypad to enter a new password. Passwords should bebetween 4 and 6 digits (numbers). Touch the Save button when finished.
Remember Your Password
Please take note of your password. Forgetting your password will prevent you from managing the Digester andmay incur a service visit to have the password reset.
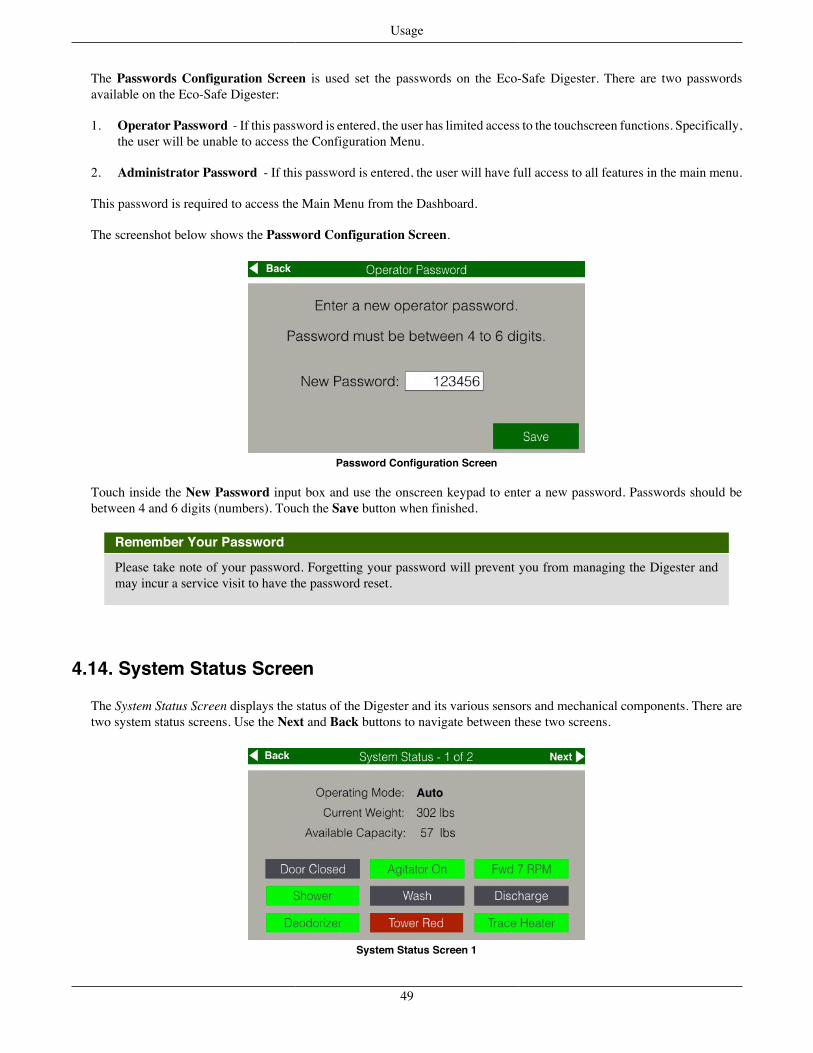
4.14. System Status Screen
The System Status Screen displays the status of the Digester and its various sensors and mechanical components. There aretwo system status screens. Use the Next and Back buttons to navigate between these two screens.
System Status Screen 1
49
Usage
At the top of the screen #1, the operating mode (Auto or Manual), the current weight (inside the drum), and availablecapacity is displayed.
The bottom half of the screen displays the state of the following components, including:
• Door State - denotes whether the food hatch door is currently open or closed.
• Agitator State - denotes whether the agitator is currently on or off.
• Agitator Direction and Speed - denotes direction (forward or reverse) and the speed of the agitator.
• Shower - denotes whether the top shower function is currently on or off.
• Wash - denotes whether the bottom washing function is currently on or off.
• Discharge - denotes whether the discharge washing function is currently on or off.
• Deodorizer - denotes whether the deodorizer spray function is currently on or off.
• Tower Lamp - denotes whether the green, yellow, or red lamp is illuminate on the tower.
• Trace Heater - denotes whether the trace heater is currently turned on or off.
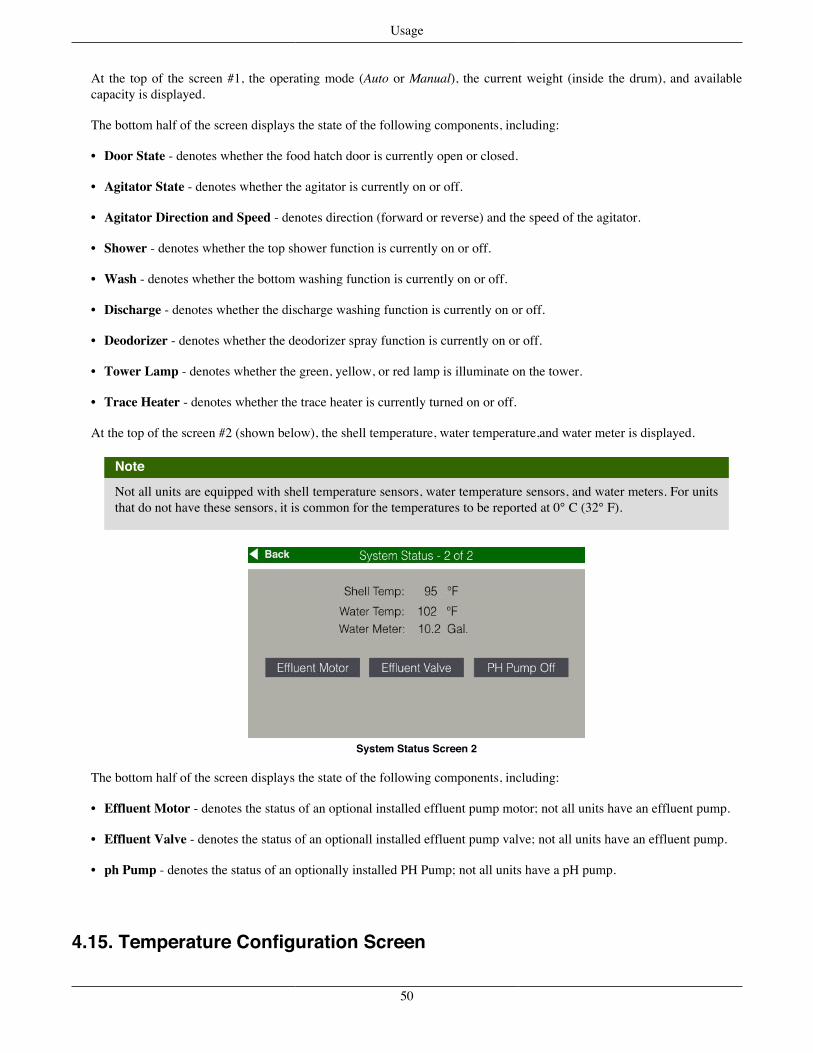
At the top of the screen #2 (shown below), the shell temperature, water temperature,and water meter is displayed.
Note
Not all units are equipped with shell temperature sensors, water temperature sensors, and water meters. For unitsthat do not have these sensors, it is common for the temperatures to be reported at 0° C (32° F).
System Status Screen 2
The bottom half of the screen displays the state of the following components, including:
• Effluent Motor - denotes the status of an optional installed effluent pump motor; not all units have an effluent pump.
• Effluent Valve - denotes the status of an optionall installed effluent pump valve; not all units have an effluent pump.
• ph Pump - denotes the status of an optionally installed PH Pump; not all units have a pH pump.
4.15. Temperature Configuration Screen
50
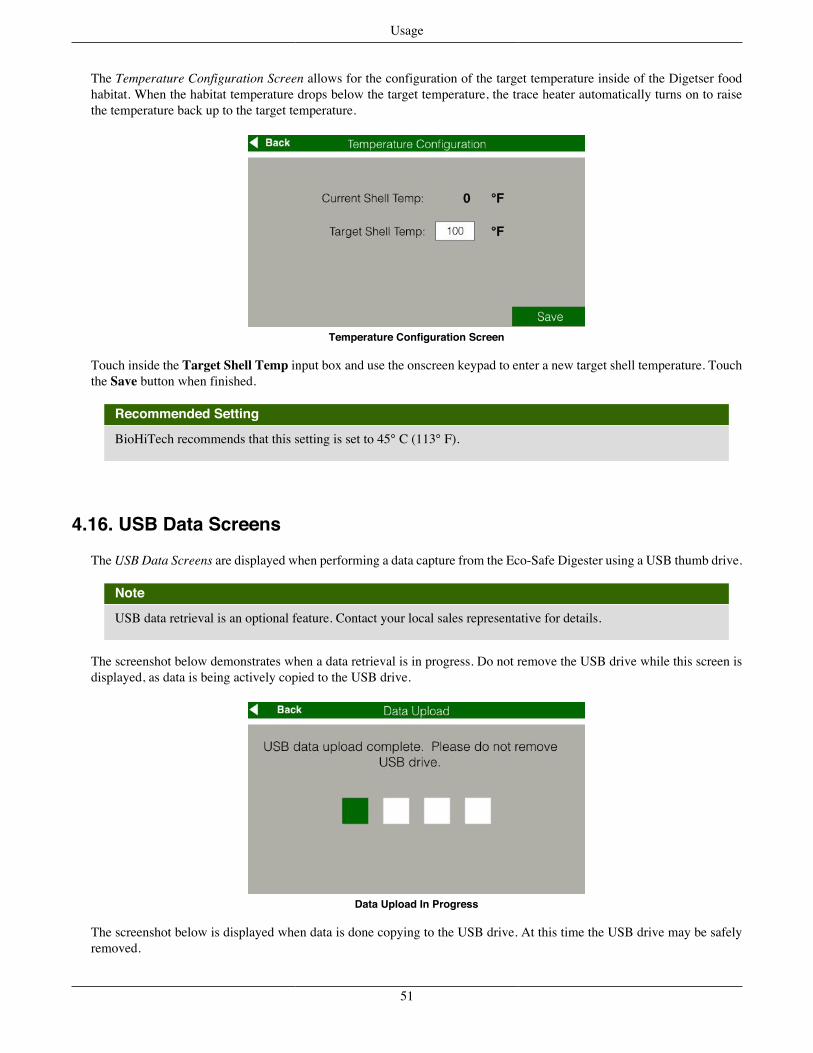
Usage
The Temperature Configuration Screen allows for the configuration of the target temperature inside of the Digetser foodhabitat. When the habitat temperature drops below the target temperature, the trace heater automatically turns on to raisethe temperature back up to the target temperature.
Temperature Configuration Screen
Touch inside the Target Shell Temp input box and use the onscreen keypad to enter a new target shell temperature. Touchthe Save button when finished.
Recommended Setting
BioHiTech recommends that this setting is set to 45° C (113° F).
4.16. USB Data Screens
The USB Data Screens are displayed when performing a data capture from the Eco-Safe Digester using a USB thumb drive.
Note
USB data retrieval is an optional feature. Contact your local sales representative for details.
The screenshot below demonstrates when a data retrieval is in progress. Do not remove the USB drive while this screen isdisplayed, as data is being actively copied to the USB drive.
Data Upload In Progress
The screenshot below is displayed when data is done copying to the USB drive. At this time the USB drive may be safelyremoved.
51

Usage
Data Upload Completed
The screenshot below is displayed if there is an error copying data to the USB drive. Take note of the error code and contactBioHiTech customer support.
Data Upload error
4.17. Usage Report Screen
The Usage Report Screen displays utilization data for various time periods. Utilization is a measure of how much organicwaste was placed into the Digester over a given time frame.
The screenshot below shows an example usage report.
Usage Report Screen
The Usage Report will show utilization metrics for the following time periods:
52
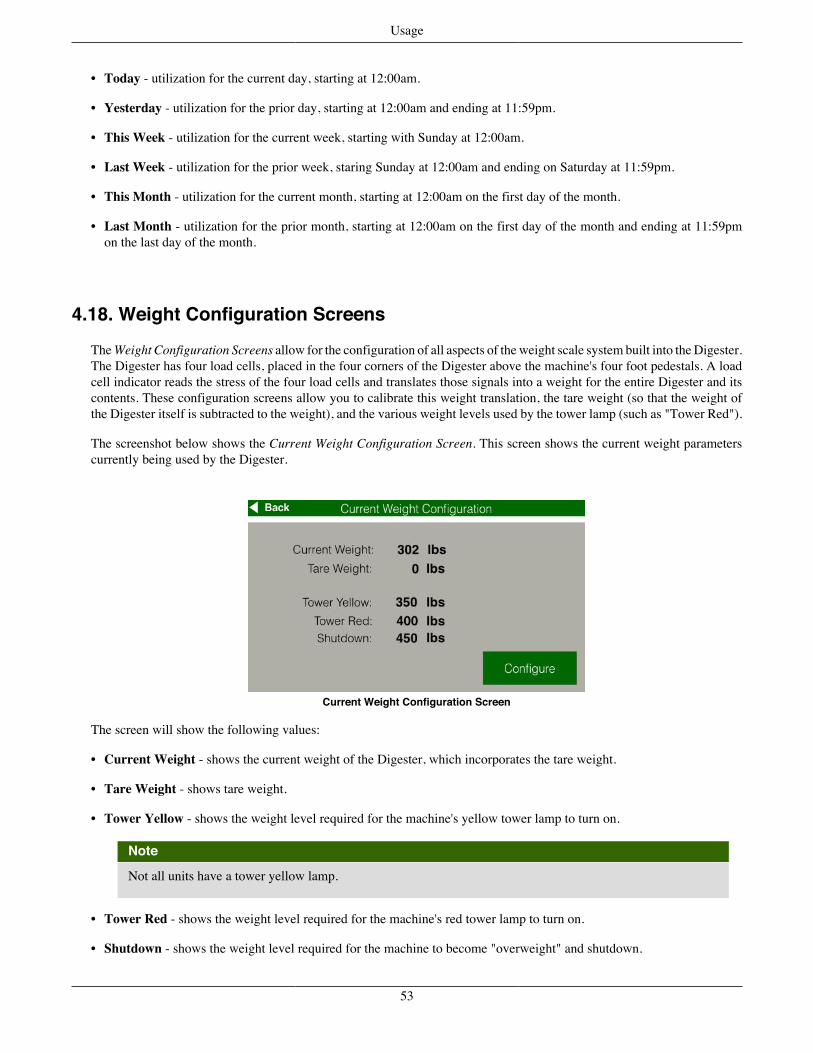
Usage
• Today - utilization for the current day, starting at 12:00am.
• Yesterday - utilization for the prior day, starting at 12:00am and ending at 11:59pm.
• This Week - utilization for the current week, starting with Sunday at 12:00am.
• Last Week - utilization for the prior week, staring Sunday at 12:00am and ending on Saturday at 11:59pm.
• This Month - utilization for the current month, starting at 12:00am on the first day of the month.
• Last Month - utilization for the prior month, starting at 12:00am on the first day of the month and ending at 11:59pmon the last day of the month.
4.18. Weight Configuration Screens
The Weight Configuration Screens allow for the configuration of all aspects of the weight scale system built into the Digester.The Digester has four load cells, placed in the four corners of the Digester above the machine's four foot pedestals. A loadcell indicator reads the stress of the four load cells and translates those signals into a weight for the entire Digester and itscontents. These configuration screens allow you to calibrate this weight translation, the tare weight (so that the weight ofthe Digester itself is subtracted to the weight), and the various weight levels used by the tower lamp (such as "Tower Red").
The screenshot below shows the Current Weight Configuration Screen. This screen shows the current weight parameterscurrently being used by the Digester.
Current Weight Configuration Screen
The screen will show the following values:
• Current Weight - shows the current weight of the Digester, which incorporates the tare weight.
• Tare Weight - shows tare weight.
• Tower Yellow - shows the weight level required for the machine's yellow tower lamp to turn on.
Note
Not all units have a tower yellow lamp.
• Tower Red - shows the weight level required for the machine's red tower lamp to turn on.
• Shutdown - shows the weight level required for the machine to become "overweight" and shutdown.
53
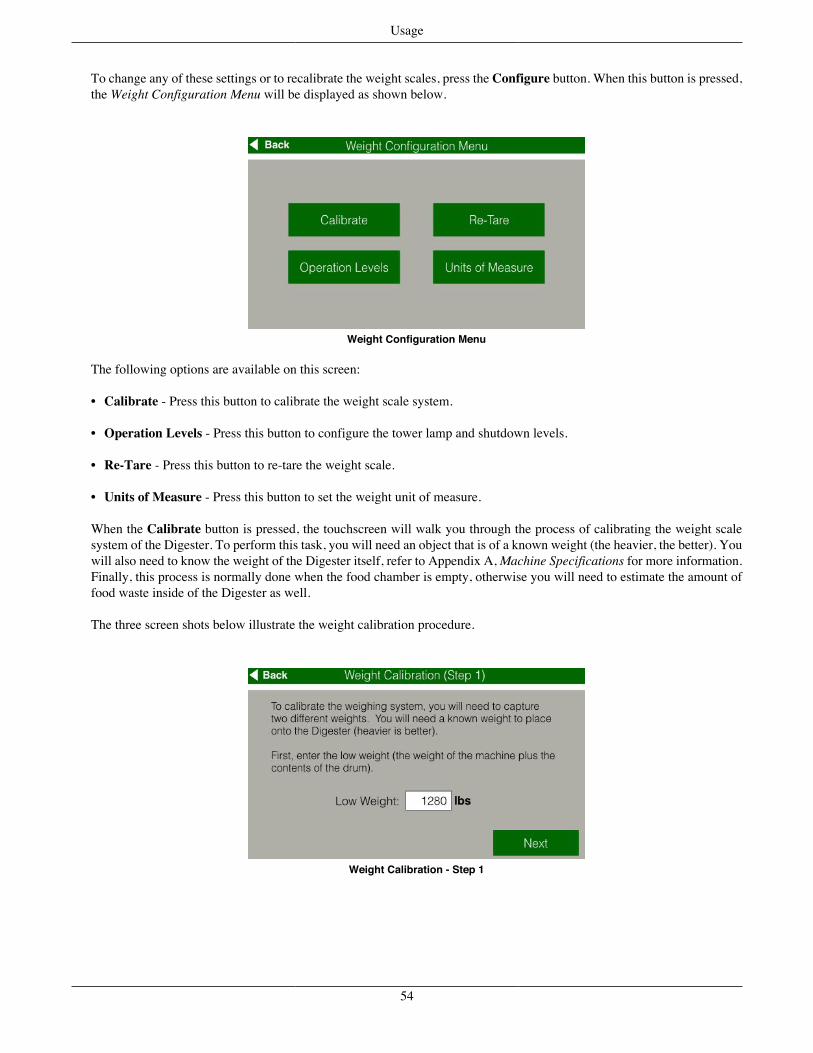
Usage
To change any of these settings or to recalibrate the weight scales, press the Configure button. When this button is pressed,the Weight Configuration Menu will be displayed as shown below.
Weight Configuration Menu
The following options are available on this screen:
• Calibrate - Press this button to calibrate the weight scale system.
• Operation Levels - Press this button to configure the tower lamp and shutdown levels.
• Re-Tare - Press this button to re-tare the weight scale.
• Units of Measure - Press this button to set the weight unit of measure.
When the Calibrate button is pressed, the touchscreen will walk you through the process of calibrating the weight scalesystem of the Digester. To perform this task, you will need an object that is of a known weight (the heavier, the better). Youwill also need to know the weight of the Digester itself, refer to Appendix A, Machine Specifications for more information.Finally, this process is normally done when the food chamber is empty, otherwise you will need to estimate the amount offood waste inside of the Digester as well.
The three screen shots below illustrate the weight calibration procedure.
Weight Calibration - Step 1
54
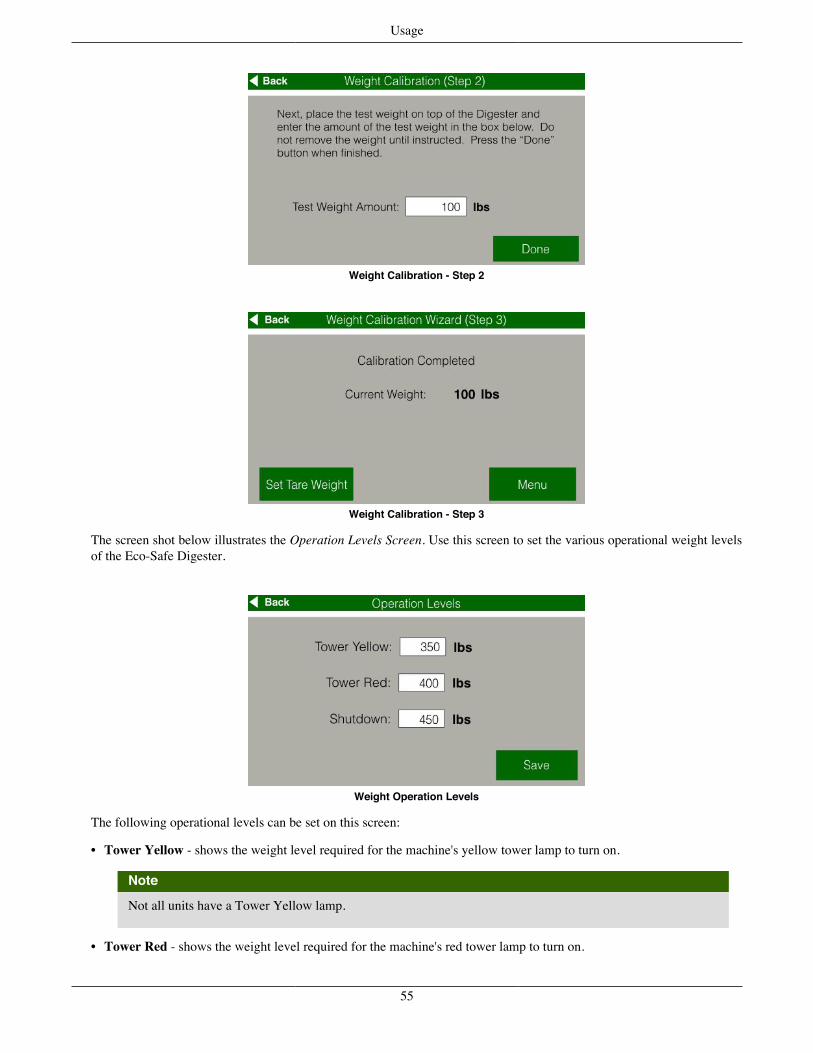
Usage
Weight Calibration - Step 2
Weight Calibration - Step 3
The screen shot below illustrates the Operation Levels Screen. Use this screen to set the various operational weight levelsof the Eco-Safe Digester.
Weight Operation Levels
The following operational levels can be set on this screen:
• Tower Yellow - shows the weight level required for the machine's yellow tower lamp to turn on.
Note
Not all units have a Tower Yellow lamp.
• Tower Red - shows the weight level required for the machine's red tower lamp to turn on.
55
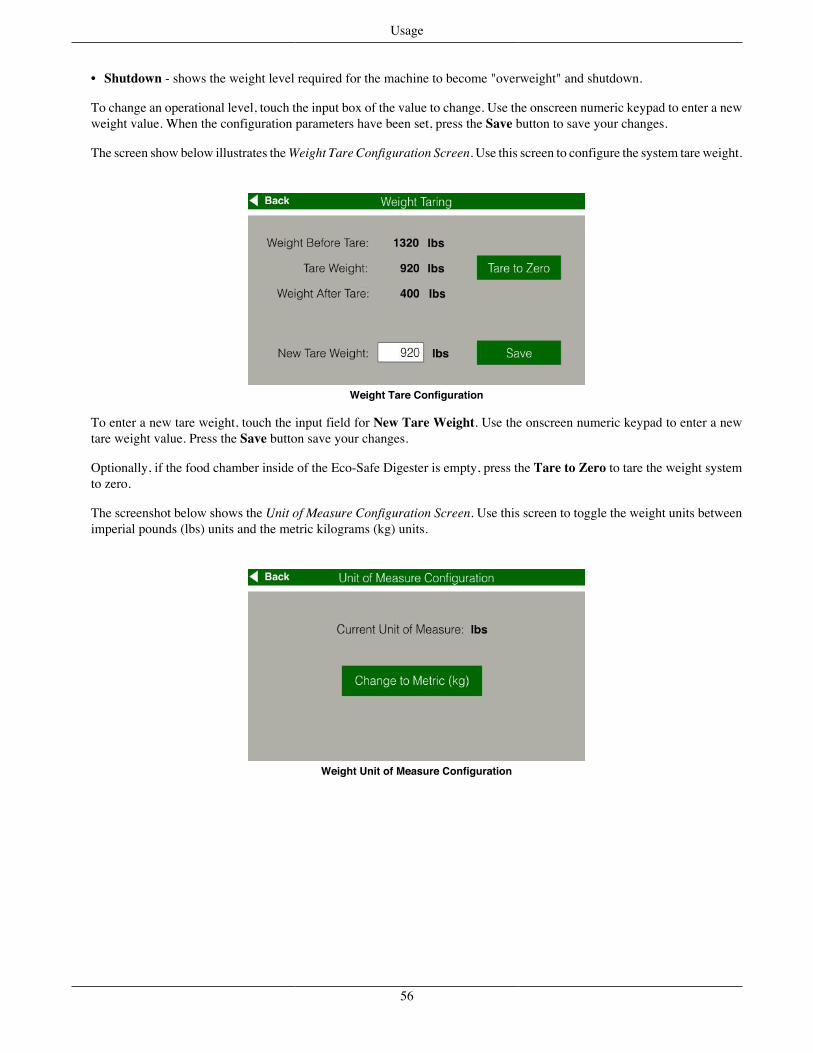
Usage
• Shutdown - shows the weight level required for the machine to become "overweight" and shutdown.
To change an operational level, touch the input box of the value to change. Use the onscreen numeric keypad to enter a newweight value. When the configuration parameters have been set, press the Save button to save your changes.
The screen show below illustrates the Weight Tare Configuration Screen. Use this screen to configure the system tare weight.
Weight Tare Configuration
To enter a new tare weight, touch the input field for New Tare Weight. Use the onscreen numeric keypad to enter a newtare weight value. Press the Save button save your changes.
Optionally, if the food chamber inside of the Eco-Safe Digester is empty, press the Tare to Zero to tare the weight systemto zero.
The screenshot below shows the Unit of Measure Configuration Screen. Use this screen to toggle the weight units betweenimperial pounds (lbs) units and the metric kilograms (kg) units.
Weight Unit of Measure Configuration
56
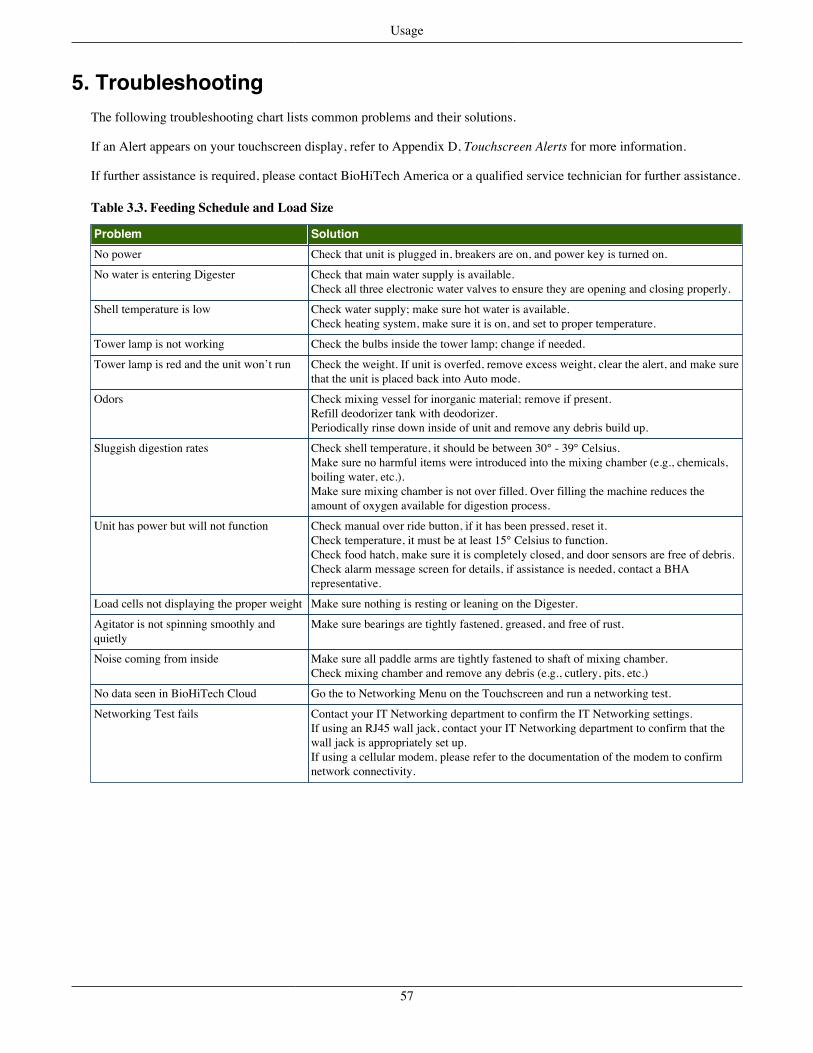
Usage
5. TroubleshootingThe following troubleshooting chart lists common problems and their solutions.
If an Alert appears on your touchscreen display, refer to Appendix D, Touchscreen Alerts for more information.
If further assistance is required, please contact BioHiTech America or a qualified service technician for further assistance.
Table 3.3. Feeding Schedule and Load Size
Problem SolutionNo power Check that unit is plugged in, breakers are on, and power key is turned on.
No water is entering Digester Check that main water supply is available.Check all three electronic water valves to ensure they are opening and closing properly.
Shell temperature is low Check water supply; make sure hot water is available.Check heating system, make sure it is on, and set to proper temperature.
Tower lamp is not working Check the bulbs inside the tower lamp; change if needed.
Tower lamp is red and the unit won’t run Check the weight. If unit is overfed, remove excess weight, clear the alert, and make surethat the unit is placed back into Auto mode.
Odors Check mixing vessel for inorganic material; remove if present.Refill deodorizer tank with deodorizer.Periodically rinse down inside of unit and remove any debris build up.
Sluggish digestion rates Check shell temperature, it should be between 30° - 39° Celsius.Make sure no harmful items were introduced into the mixing chamber (e.g., chemicals,boiling water, etc.).Make sure mixing chamber is not over filled. Over filling the machine reduces theamount of oxygen available for digestion process.
Unit has power but will not function Check manual over ride button, if it has been pressed, reset it.Check temperature, it must be at least 15° Celsius to function.Check food hatch, make sure it is completely closed, and door sensors are free of debris.Check alarm message screen for details, if assistance is needed, contact a BHArepresentative.
Load cells not displaying the proper weight Make sure nothing is resting or leaning on the Digester.
Agitator is not spinning smoothly andquietly
Make sure bearings are tightly fastened, greased, and free of rust.
Noise coming from inside Make sure all paddle arms are tightly fastened to shaft of mixing chamber.Check mixing chamber and remove any debris (e.g., cutlery, pits, etc.)
No data seen in BioHiTech Cloud Go the to Networking Menu on the Touchscreen and run a networking test.
Networking Test fails Contact your IT Networking department to confirm the IT Networking settings.If using an RJ45 wall jack, contact your IT Networking department to confirm that thewall jack is appropriately set up.If using a cellular modem, please refer to the documentation of the modem to confirmnetwork connectivity.
57
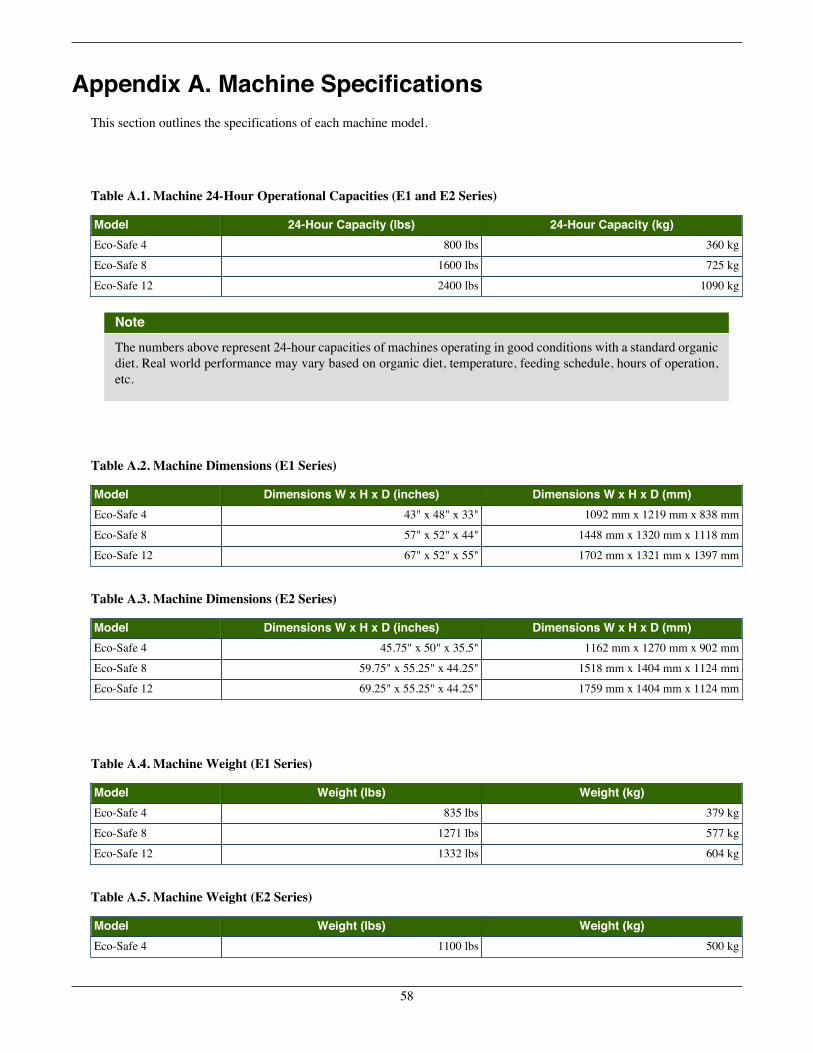
Appendix A. Machine SpecificationsThis section outlines the specifications of each machine model.
Table A.1. Machine 24-Hour Operational Capacities (E1 and E2 Series)
Model 24-Hour Capacity (lbs) 24-Hour Capacity (kg)Eco-Safe 4 800 lbs 360 kg
Eco-Safe 8 1600 lbs 725 kg
Eco-Safe 12 2400 lbs 1090 kg
Note
The numbers above represent 24-hour capacities of machines operating in good conditions with a standard organicdiet. Real world performance may vary based on organic diet, temperature, feeding schedule, hours of operation,etc.
Table A.2. Machine Dimensions (E1 Series)
Model Dimensions W x H x D (inches) Dimensions W x H x D (mm)Eco-Safe 4 43" x 48" x 33" 1092 mm x 1219 mm x 838 mm
Eco-Safe 8 57" x 52" x 44" 1448 mm x 1320 mm x 1118 mm
Eco-Safe 12 67" x 52" x 55" 1702 mm x 1321 mm x 1397 mm
Table A.3. Machine Dimensions (E2 Series)
Model Dimensions W x H x D (inches) Dimensions W x H x D (mm)Eco-Safe 4 45.75" x 50" x 35.5" 1162 mm x 1270 mm x 902 mm
Eco-Safe 8 59.75" x 55.25" x 44.25" 1518 mm x 1404 mm x 1124 mm
Eco-Safe 12 69.25" x 55.25" x 44.25" 1759 mm x 1404 mm x 1124 mm
Table A.4. Machine Weight (E1 Series)
Model Weight (lbs) Weight (kg)Eco-Safe 4 835 lbs 379 kg
Eco-Safe 8 1271 lbs 577 kg
Eco-Safe 12 1332 lbs 604 kg
Table A.5. Machine Weight (E2 Series)
Model Weight (lbs) Weight (kg)Eco-Safe 4 1100 lbs 500 kg
58
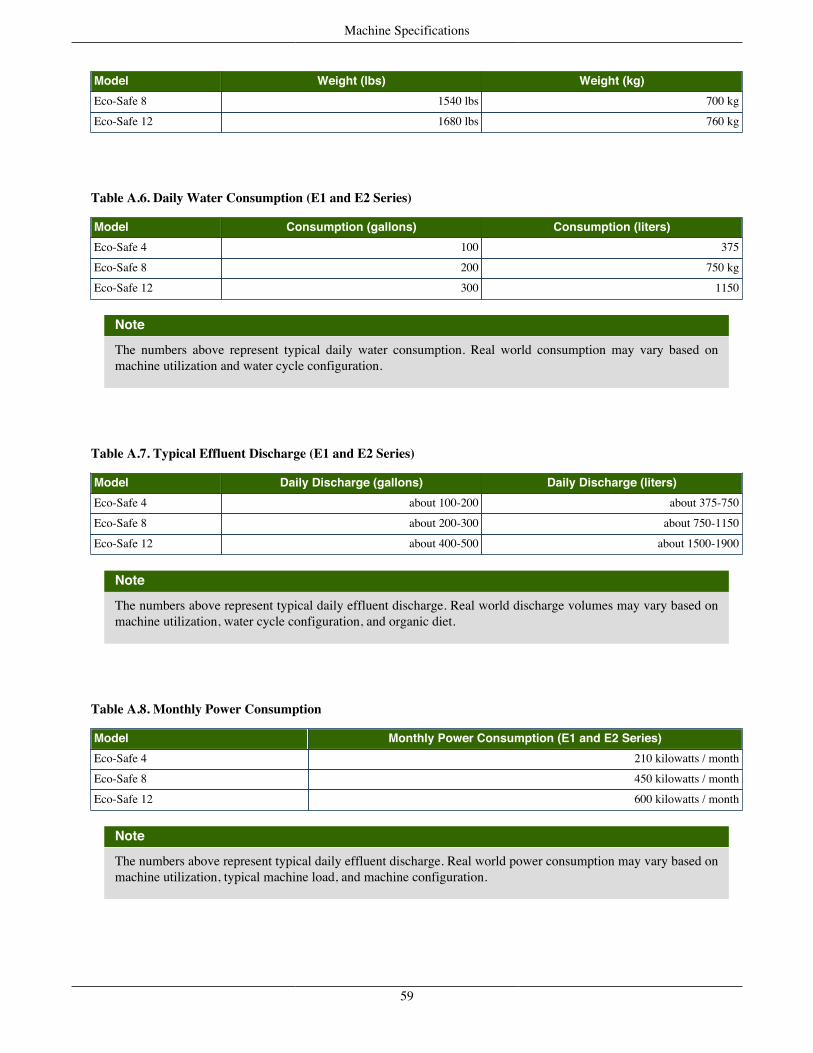
Machine Specifications
Model Weight (lbs) Weight (kg)Eco-Safe 8 1540 lbs 700 kg
Eco-Safe 12 1680 lbs 760 kg
Table A.6. Daily Water Consumption (E1 and E2 Series)
Model Consumption (gallons) Consumption (liters)Eco-Safe 4 100 375
Eco-Safe 8 200 750 kg
Eco-Safe 12 300 1150
Note
The numbers above represent typical daily water consumption. Real world consumption may vary based onmachine utilization and water cycle configuration.
Table A.7. Typical Effluent Discharge (E1 and E2 Series)
Model Daily Discharge (gallons) Daily Discharge (liters)Eco-Safe 4 about 100-200 about 375-750
Eco-Safe 8 about 200-300 about 750-1150
Eco-Safe 12 about 400-500 about 1500-1900
Note
The numbers above represent typical daily effluent discharge. Real world discharge volumes may vary based onmachine utilization, water cycle configuration, and organic diet.
Table A.8. Monthly Power Consumption
Model Monthly Power Consumption (E1 and E2 Series)Eco-Safe 4 210 kilowatts / month
Eco-Safe 8 450 kilowatts / month
Eco-Safe 12 600 kilowatts / month
Note
The numbers above represent typical daily effluent discharge. Real world power consumption may vary based onmachine utilization, typical machine load, and machine configuration.
59
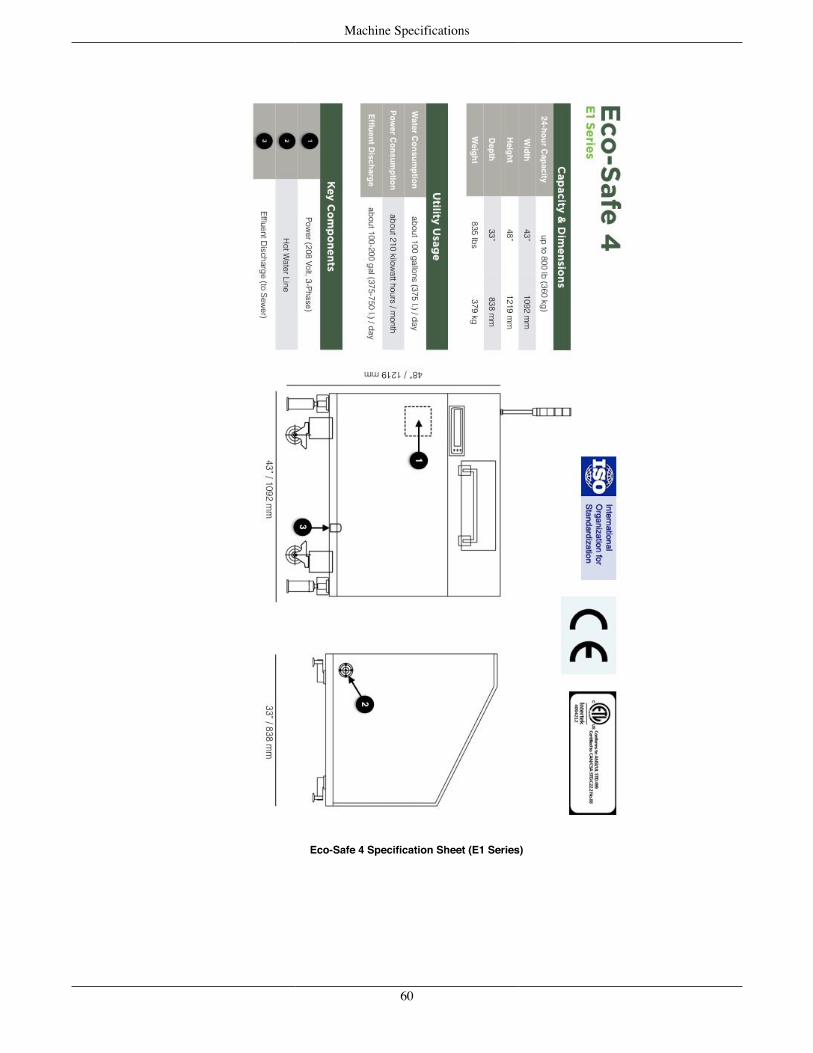
Machine Specifications
Eco-Safe 4 Specification Sheet (E1 Series)
60
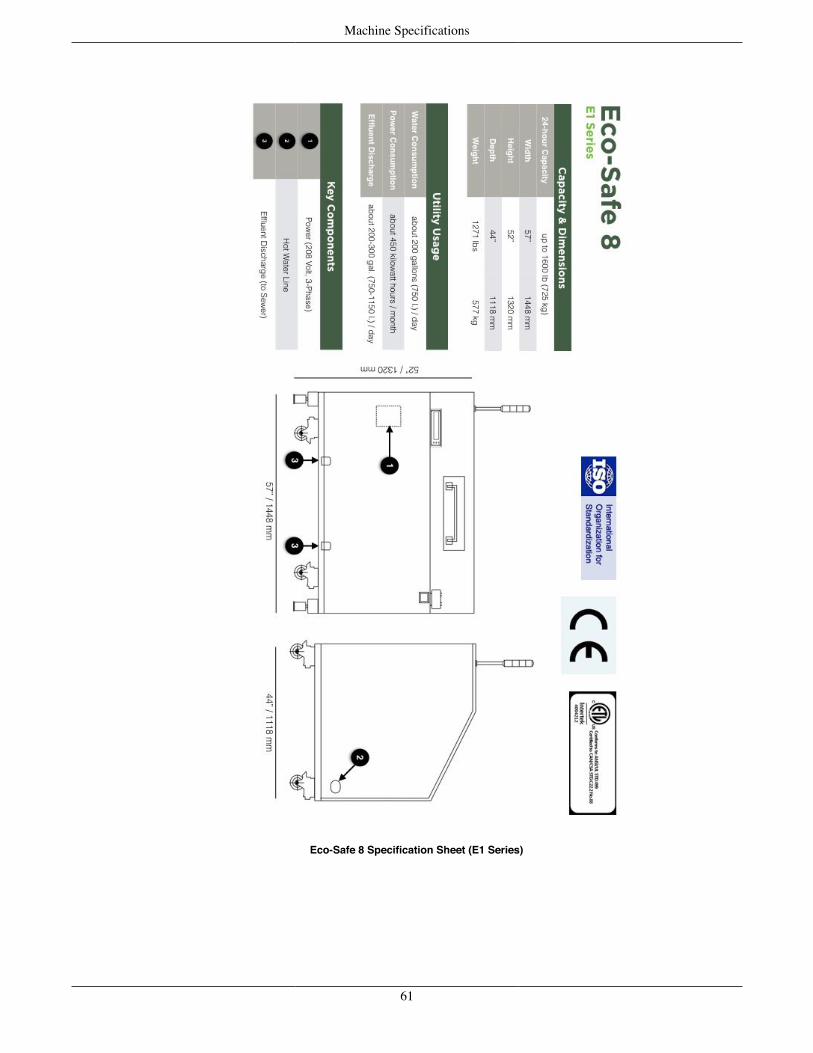
Machine Specifications
Eco-Safe 8 Specification Sheet (E1 Series)
61
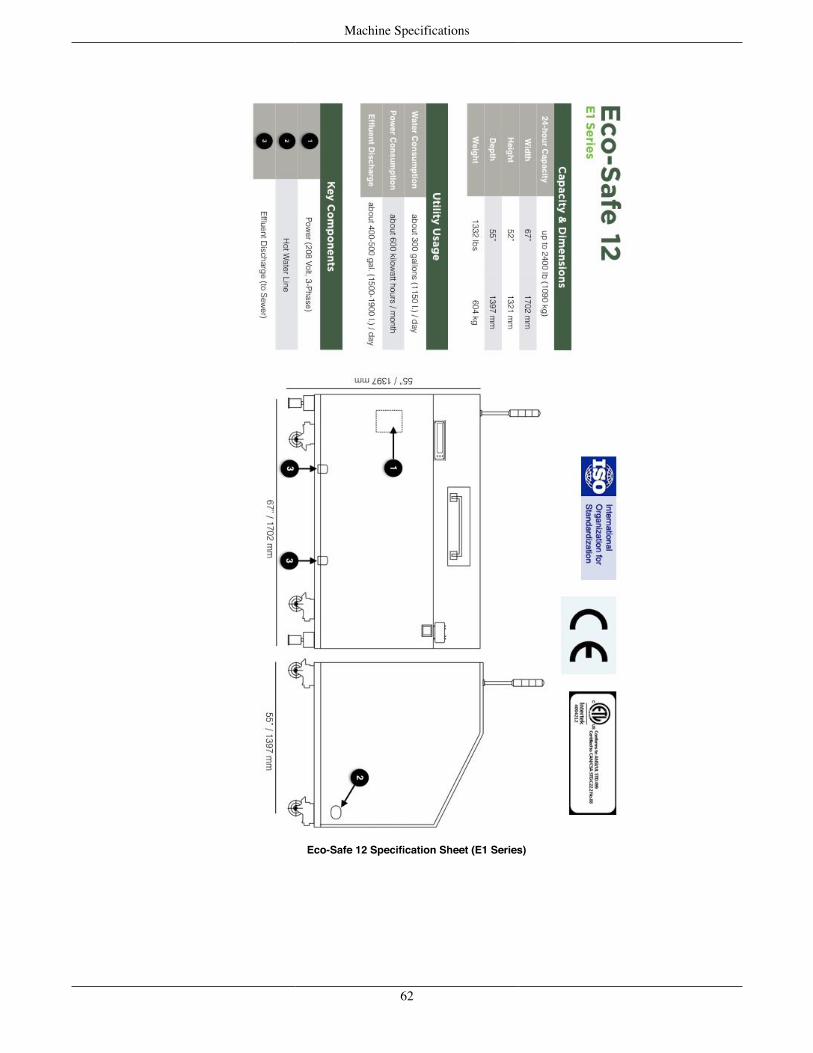
Machine Specifications
Eco-Safe 12 Specification Sheet (E1 Series)
62

Machine Specifications
Eco-Safe 4 Specification Sheet (E2 Series)
63

Machine Specifications
Eco-Safe 8 Specification Sheet (E2 Series)
64
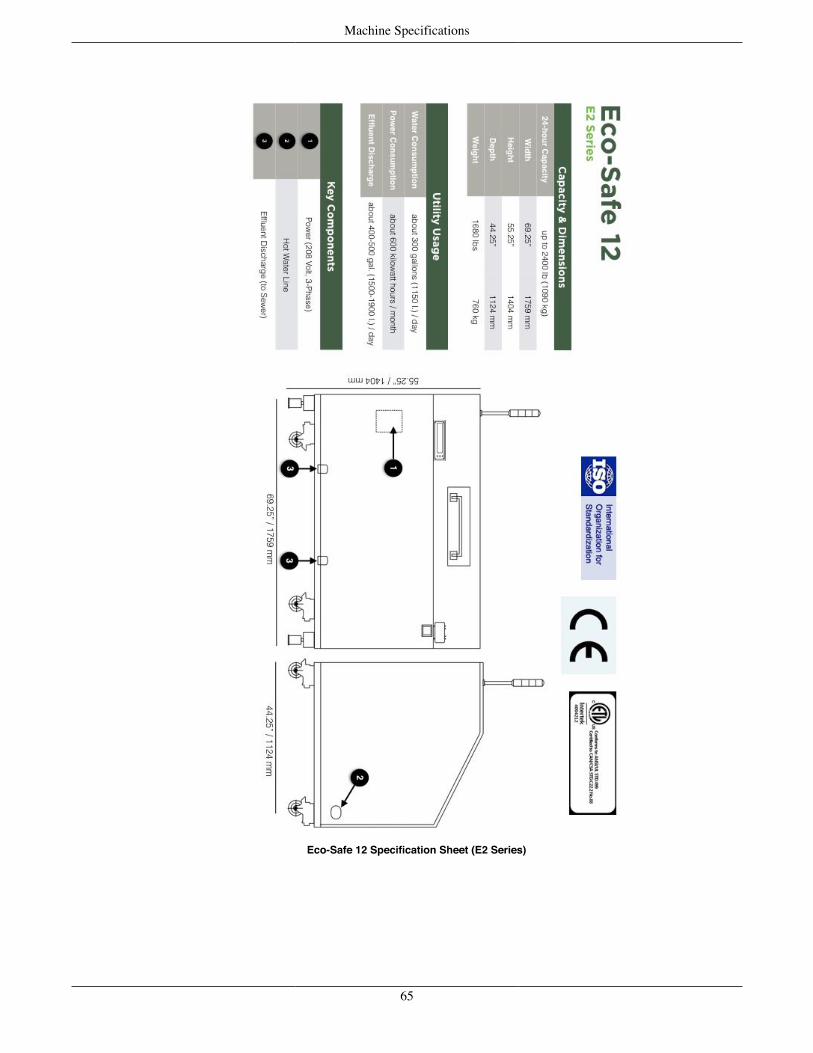
Machine Specifications
Eco-Safe 12 Specification Sheet (E2 Series)
65
Appendix B. Contacting BioHiTech SupportIf you need assistance with your Eco-Safe Digester, please contact BioHiTech. BioHiTech can be reached 24 hours perday, 7 days per week.
Customer Support can be used for:
• Replacement parts
• Ordering supplies
• Scheduling unplanned maintenance or service
• Scheduling clean outs
• Assistance with troubleshooting problem with your Digester
Note
Depending on warranty and support plans purchased, additional charges may apply.
Online SupportFor optimal customer support, please submit a support request online at: biohitech.com. Customers should click theCUSTOMER button at the top of the web page.
Other benefits of using the Customer Portal include:
• Online bill payment
• Access to documentation
• Access to online training videos
Phone SupportAlternatively, BioHiTech America phone support can be reached at 888.876.9300, Press Option 2 at the prompt.
By MailWritten correspondence may be directed to:
BioHiTech America 80 Red Schoolhouse Road Suite 101 Chestnut Ridge NY 10977 888.876.9300
66
Contacting BioHiTech Support
BioHiTech Europe 5th Floor Greener House 66-68 Haymarket London SW1Y 4RF +44 (0)203.553.8005
67
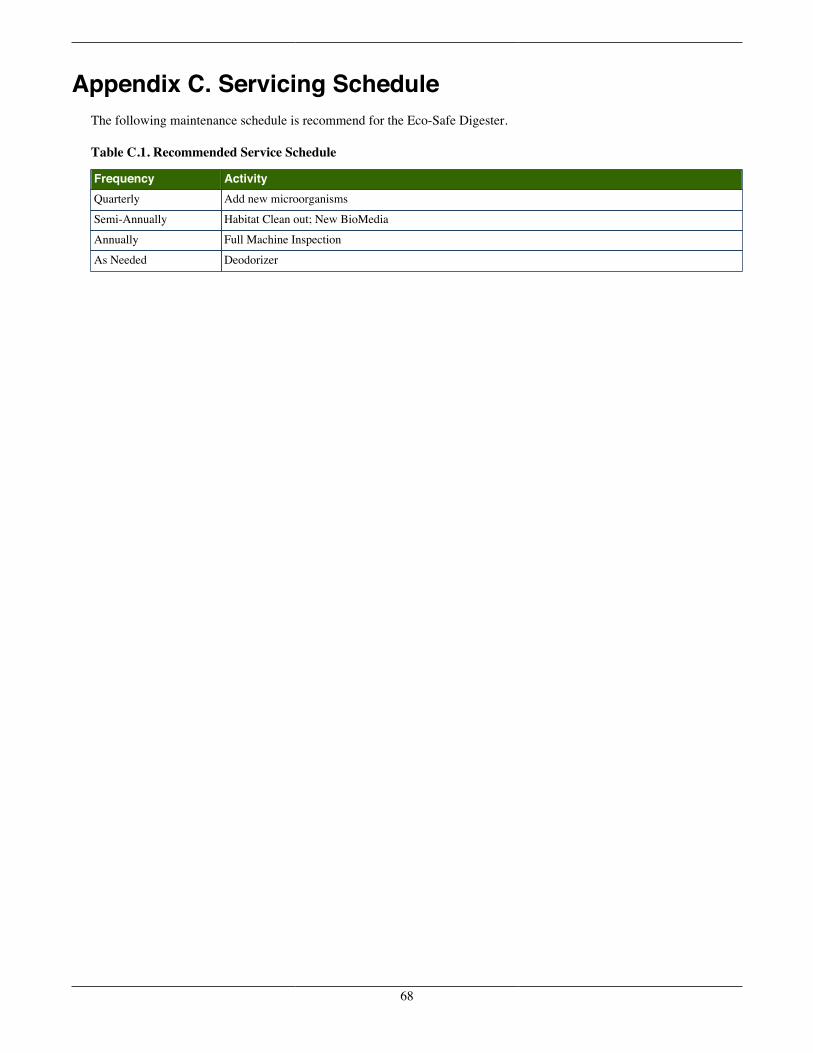
Appendix C. Servicing ScheduleThe following maintenance schedule is recommend for the Eco-Safe Digester.
Table C.1. Recommended Service Schedule
Frequency ActivityQuarterly Add new microorganisms
Semi-Annually Habitat Clean out; New BioMedia
Annually Full Machine Inspection
As Needed Deodorizer
68
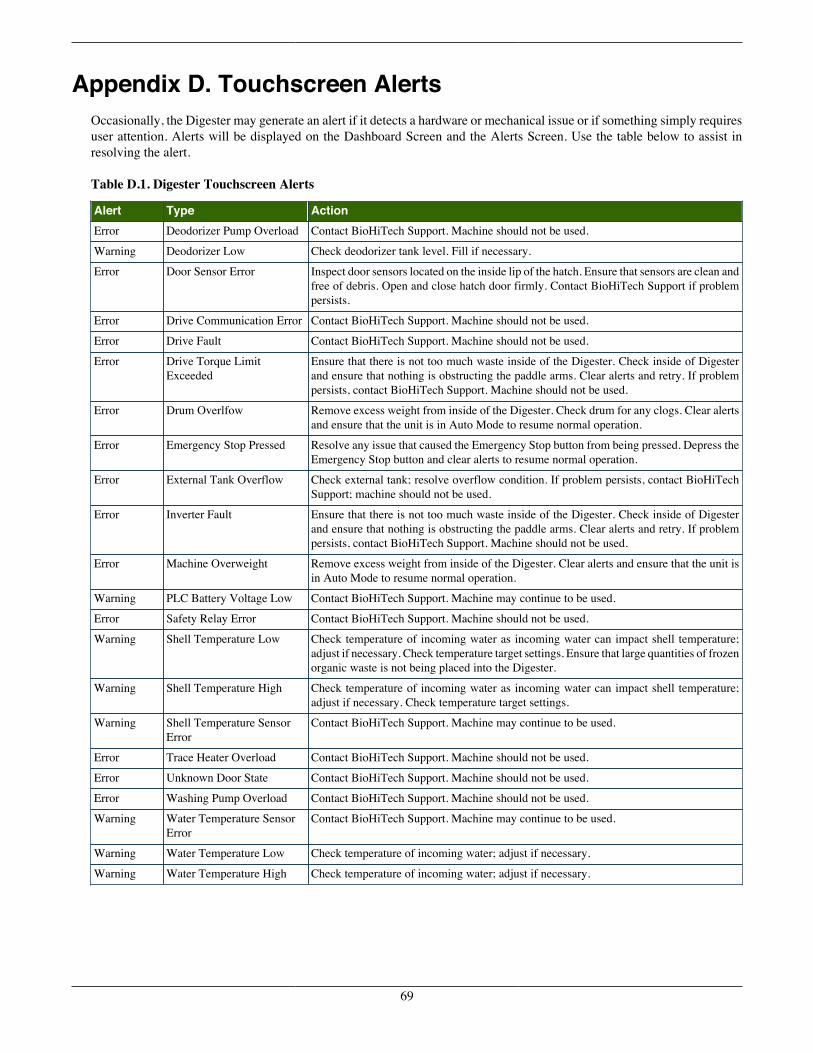
Appendix D. Touchscreen AlertsOccasionally, the Digester may generate an alert if it detects a hardware or mechanical issue or if something simply requiresuser attention. Alerts will be displayed on the Dashboard Screen and the Alerts Screen. Use the table below to assist inresolving the alert.
Table D.1. Digester Touchscreen Alerts
Alert Type ActionError Deodorizer Pump Overload Contact BioHiTech Support. Machine should not be used.
Warning Deodorizer Low Check deodorizer tank level. Fill if necessary.
Error Door Sensor Error Inspect door sensors located on the inside lip of the hatch. Ensure that sensors are clean andfree of debris. Open and close hatch door firmly. Contact BioHiTech Support if problempersists.
Error Drive Communication Error Contact BioHiTech Support. Machine should not be used.
Error Drive Fault Contact BioHiTech Support. Machine should not be used.
Error Drive Torque LimitExceeded
Ensure that there is not too much waste inside of the Digester. Check inside of Digesterand ensure that nothing is obstructing the paddle arms. Clear alerts and retry. If problempersists, contact BioHiTech Support. Machine should not be used.
Error Drum Overlfow Remove excess weight from inside of the Digester. Check drum for any clogs. Clear alertsand ensure that the unit is in Auto Mode to resume normal operation.
Error Emergency Stop Pressed Resolve any issue that caused the Emergency Stop button from being pressed. Depress theEmergency Stop button and clear alerts to resume normal operation.
Error External Tank Overflow Check external tank; resolve overflow condition. If problem persists, contact BioHiTechSupport; machine should not be used.
Error Inverter Fault Ensure that there is not too much waste inside of the Digester. Check inside of Digesterand ensure that nothing is obstructing the paddle arms. Clear alerts and retry. If problempersists, contact BioHiTech Support. Machine should not be used.
Error Machine Overweight Remove excess weight from inside of the Digester. Clear alerts and ensure that the unit isin Auto Mode to resume normal operation.
Warning PLC Battery Voltage Low Contact BioHiTech Support. Machine may continue to be used.
Error Safety Relay Error Contact BioHiTech Support. Machine should not be used.
Warning Shell Temperature Low Check temperature of incoming water as incoming water can impact shell temperature;adjust if necessary. Check temperature target settings. Ensure that large quantities of frozenorganic waste is not being placed into the Digester.
Warning Shell Temperature High Check temperature of incoming water as incoming water can impact shell temperature;adjust if necessary. Check temperature target settings.
Warning Shell Temperature SensorError
Contact BioHiTech Support. Machine may continue to be used.
Error Trace Heater Overload Contact BioHiTech Support. Machine should not be used.
Error Unknown Door State Contact BioHiTech Support. Machine should not be used.
Error Washing Pump Overload Contact BioHiTech Support. Machine should not be used.
Warning Water Temperature SensorError
Contact BioHiTech Support. Machine may continue to be used.
Warning Water Temperature Low Check temperature of incoming water; adjust if necessary.
Warning Water Temperature High Check temperature of incoming water; adjust if necessary.
69
Appendix E. Network Connectivity
Network Connectivity OptionsThere are two network connectivity options for the Eco-Safe Digester:
• An RJ45 Ethernet connection in close proximity to the Eco-Safe Digester
A cellular modem purchased from BioHitech America
A dedicated hardline RJ45 Ethernet connection is the preferred network connection type due to the reliability of the hardlineconnection. However, in areas where providing access to an RJ45 Ethernet connection is not possible, a cellular modemmay be purchased from BioHiTech.
Note
When using the cellular modem, be sure that adequate cellular coverage is available at the location of the Eco-Safe Digester.
Network ConfigurationsIf you are using the cellular modem purchased from BioHiTech, then no more network configuration is required. TheDigester will connect to the cellular modem via DHCP (dynamic network) to the wireless cellular network.
For RJ45 Ethernet connections, additional network configuration may be necessary.
The Eco-Safe Digester can used with both Dynamic/DHCP and Static IP configuration.
If static IP configuration is used, the Digester will require the following configuration parameters:
• IP Address - the IP address that you wish to assign to the Digester
• Net Mask> - The net mask of the network
• Gateway IP Address - the IP address of the gateway or router on your network
• DNS Server(s) - the IP address(es) of your DNS server(s). The Digester can accept used to two IP addresses for DNSservers.
Firewall ConsiderationsThe Eco-Safe Digester requires only outbound Internet Access on TCP port 443 (HTTPS, secure HTTP).
The Eco-Safe Digester communicates to the following public IP addresses:
• 54.221.243.115
54.209.122.209
70
Network Connectivity
54.209.181.132
54.208.204.191
54.85.105.167
54.85.142.150
Firewalls shold be configured appropriately.
Bandwidth UtilizationAverage bandwidth utilization is about 3MB per day per Digester.
SSL ProxiesThe Eco-Safe Digester does not support SSL/TLS proxy servers at this time.
71

Appendix F. Repair
72
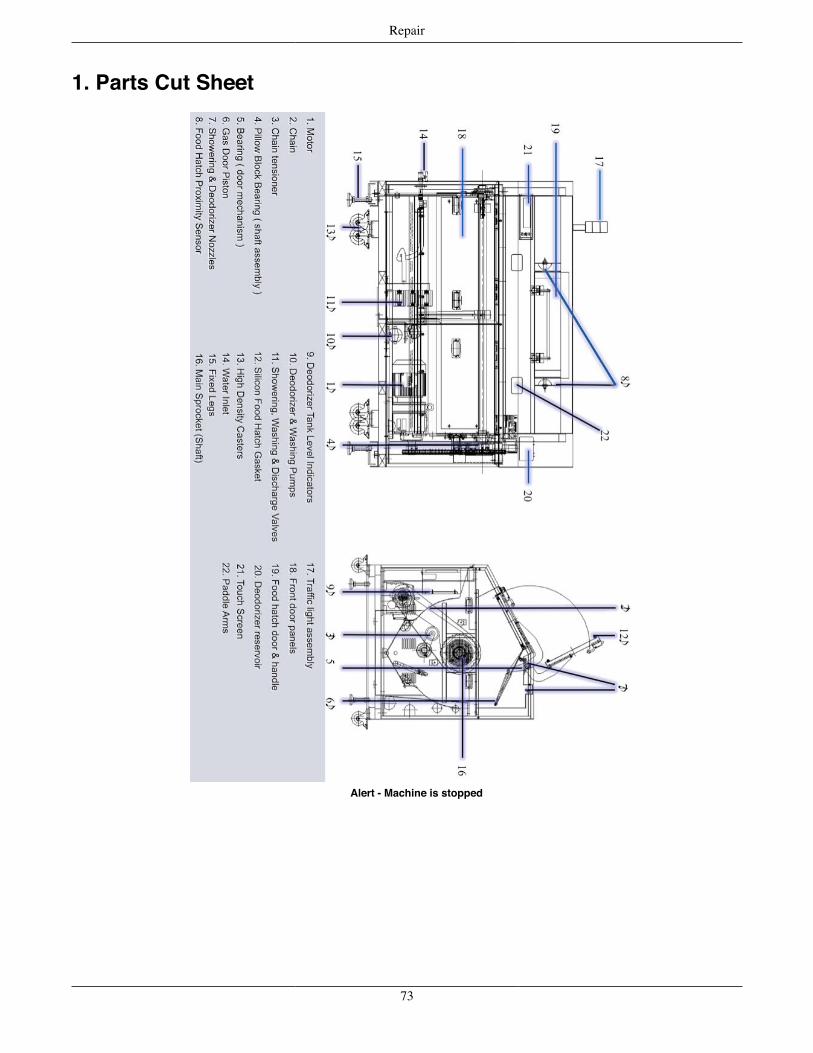
Repair
1. Parts Cut Sheet
Alert - Machine is stopped
73
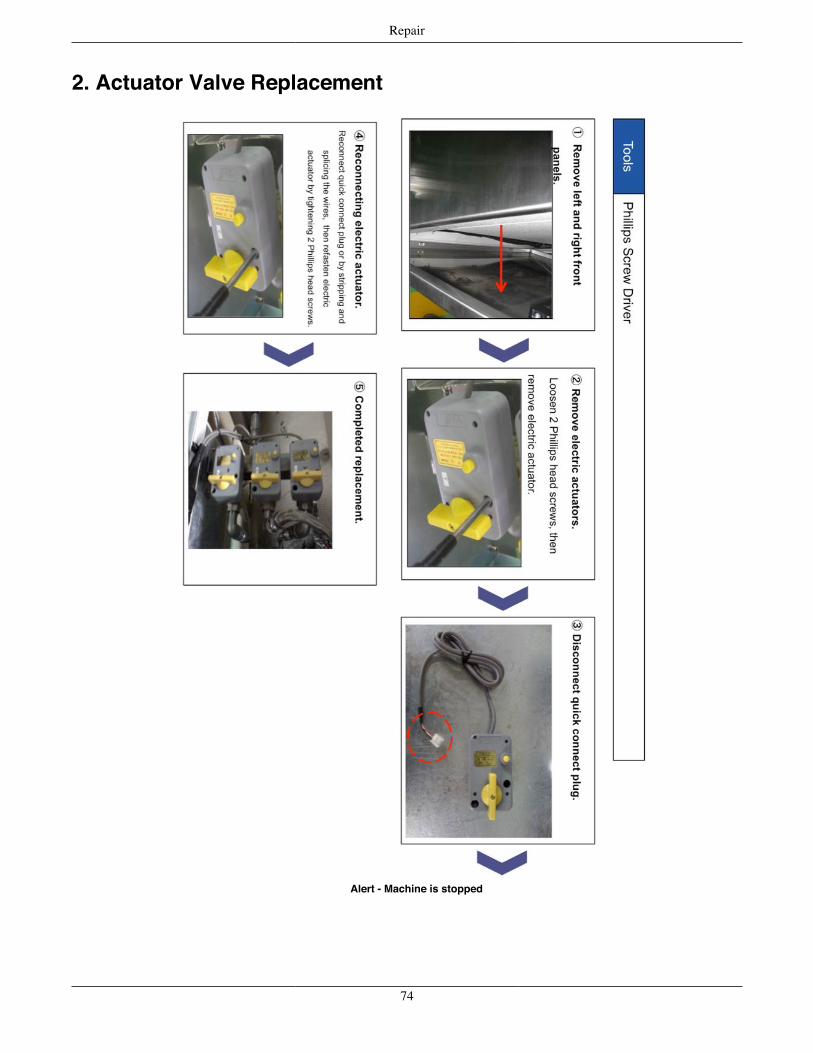
Repair
2. Actuator Valve Replacement
Alert - Machine is stopped
74
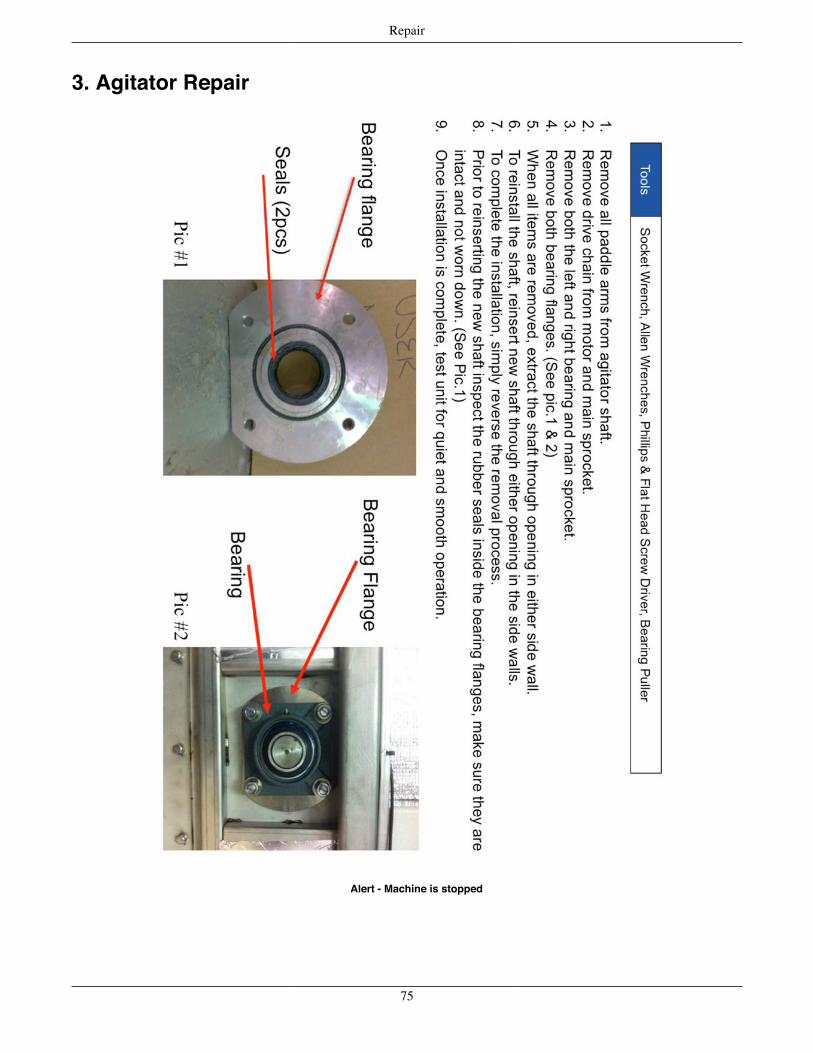
Repair
3. Agitator Repair
Alert - Machine is stopped
75
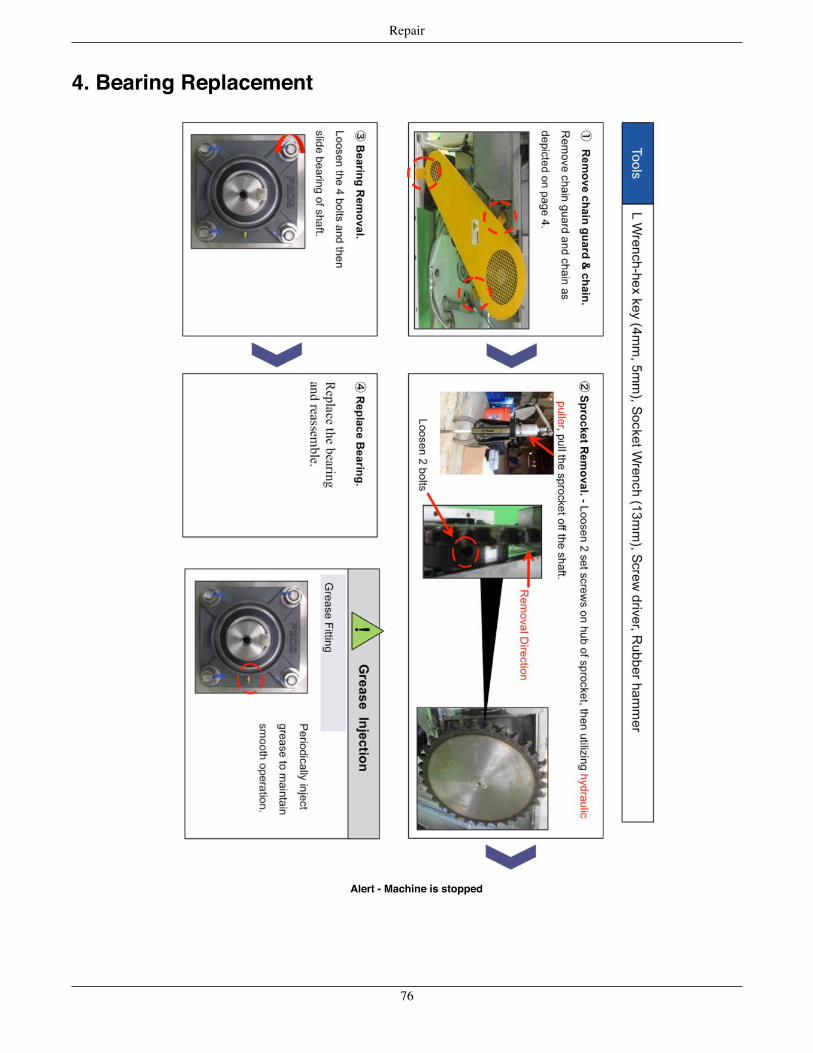
Repair
4. Bearing Replacement
Alert - Machine is stopped
76
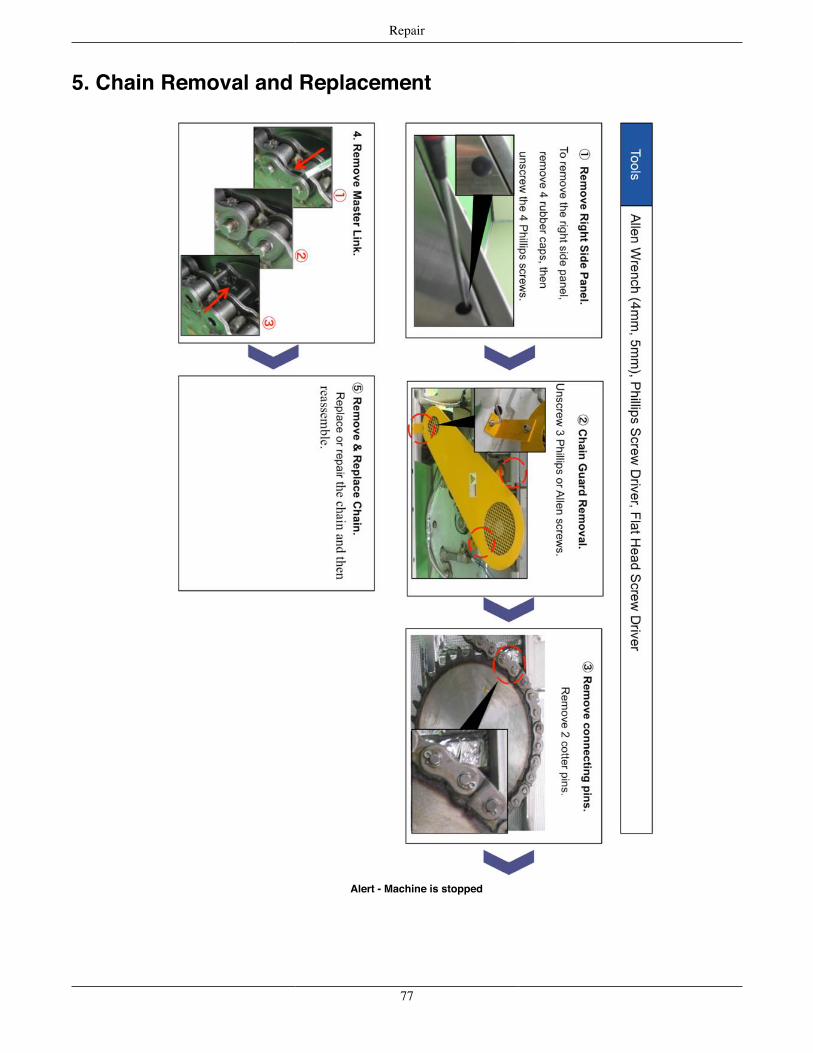
Repair
5. Chain Removal and Replacement
Alert - Machine is stopped
77
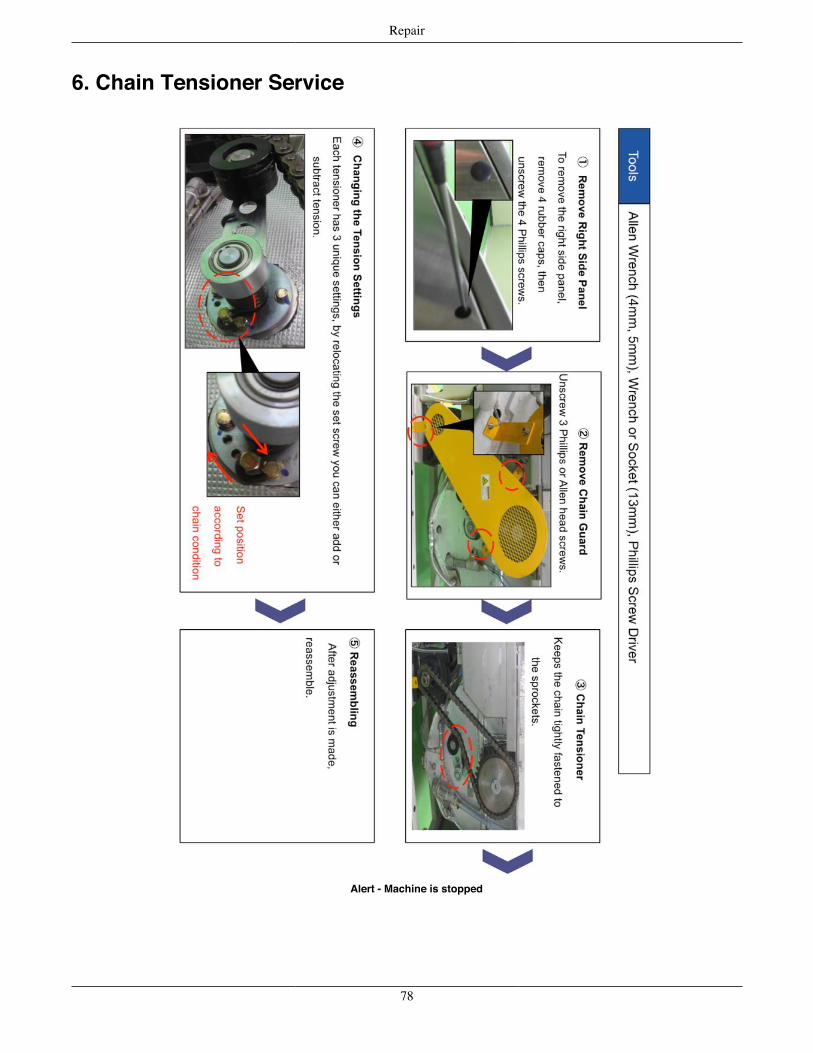
Repair
6. Chain Tensioner Service
Alert - Machine is stopped
78
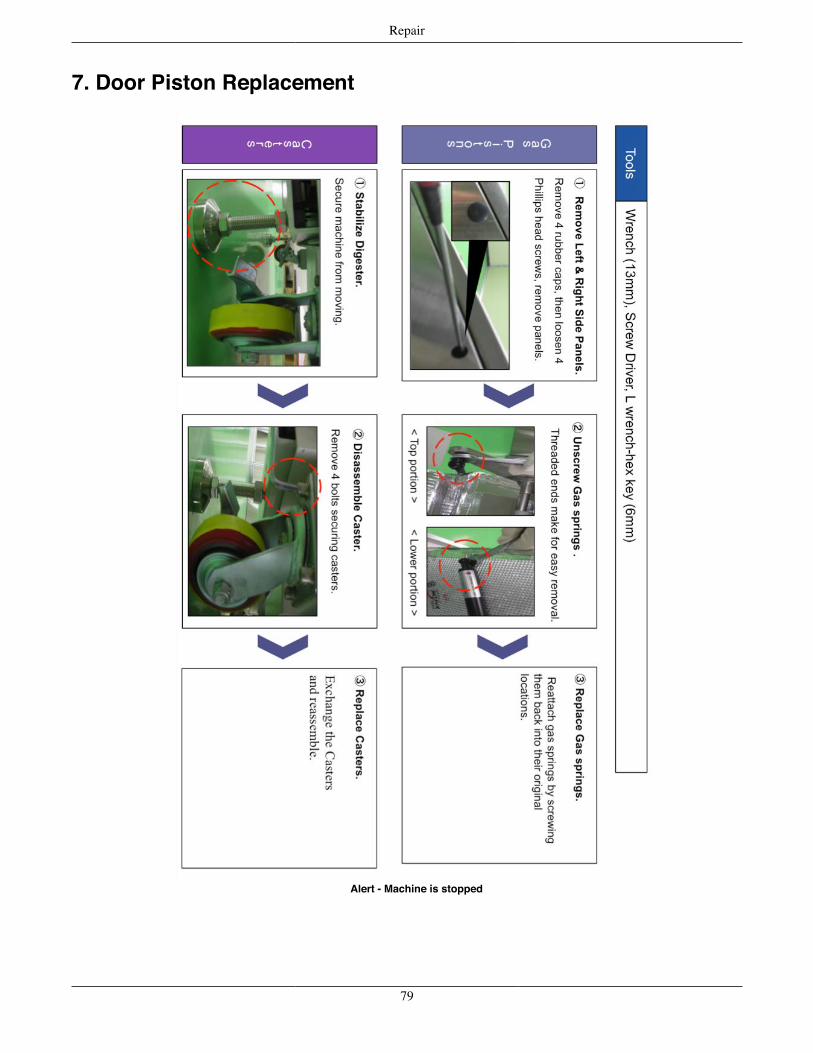
Repair
7. Door Piston Replacement
Alert - Machine is stopped
79
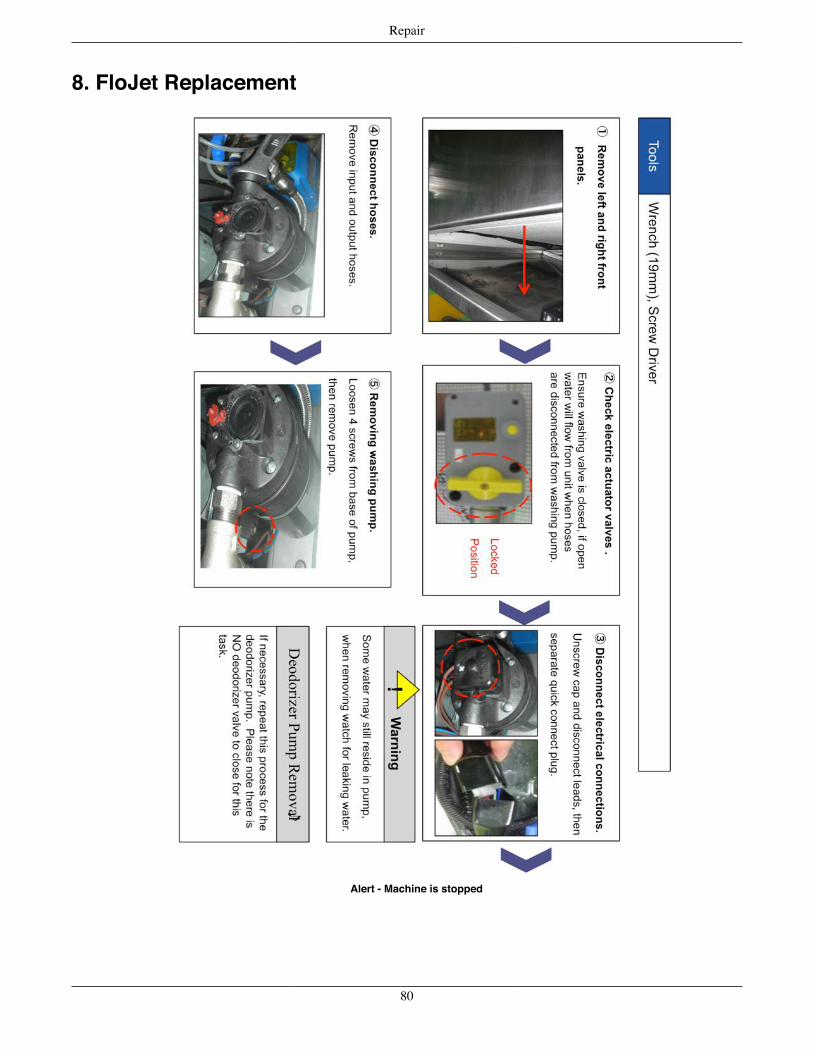
Repair
8. FloJet Replacement
Alert - Machine is stopped
80
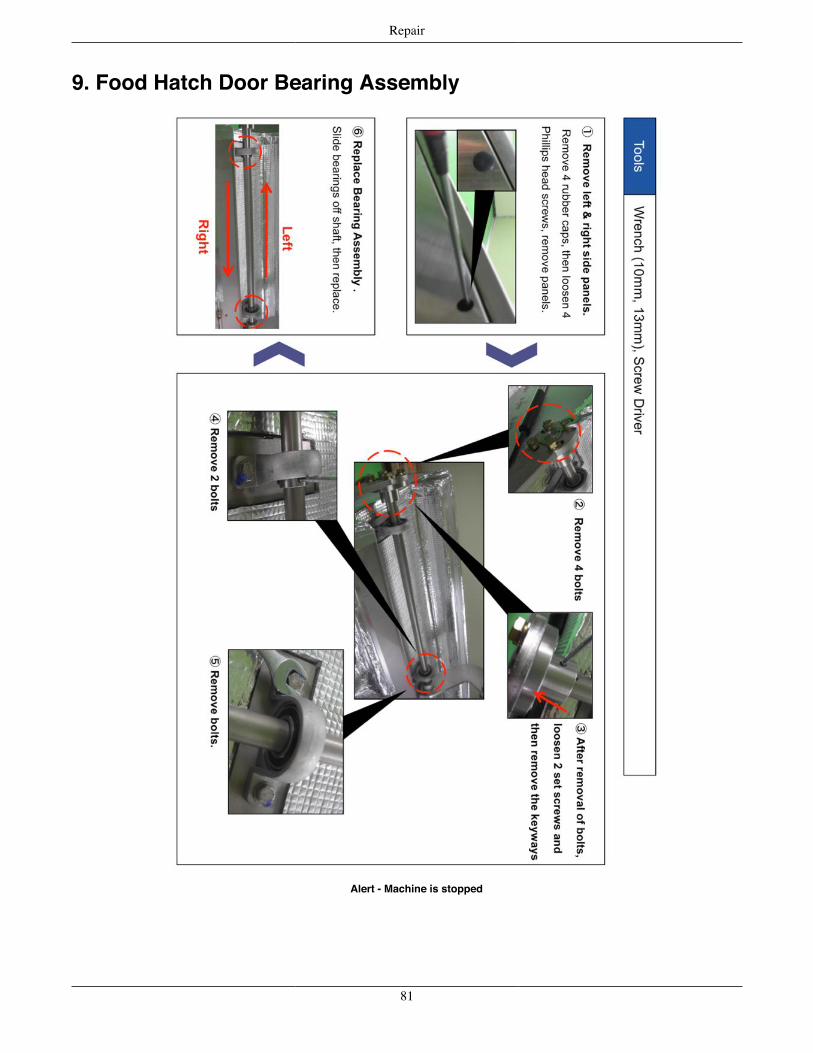
Repair
9. Food Hatch Door Bearing Assembly
Alert - Machine is stopped
81
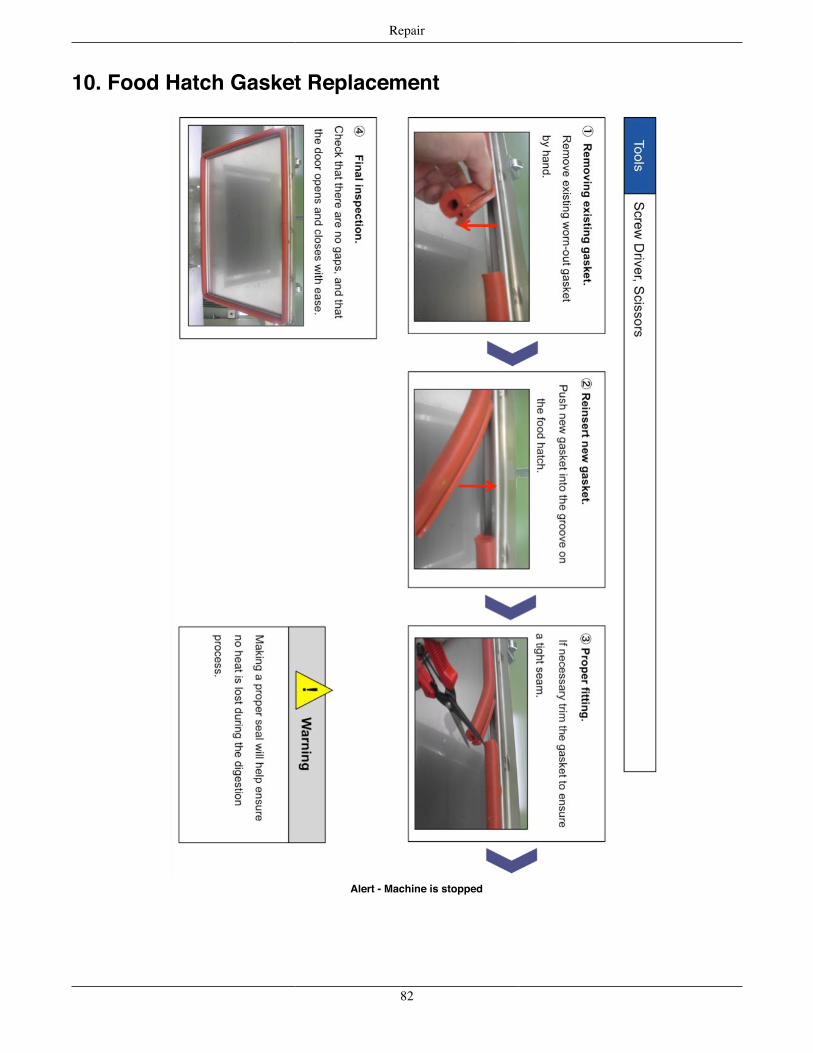
Repair
10. Food Hatch Gasket Replacement
Alert - Machine is stopped
82
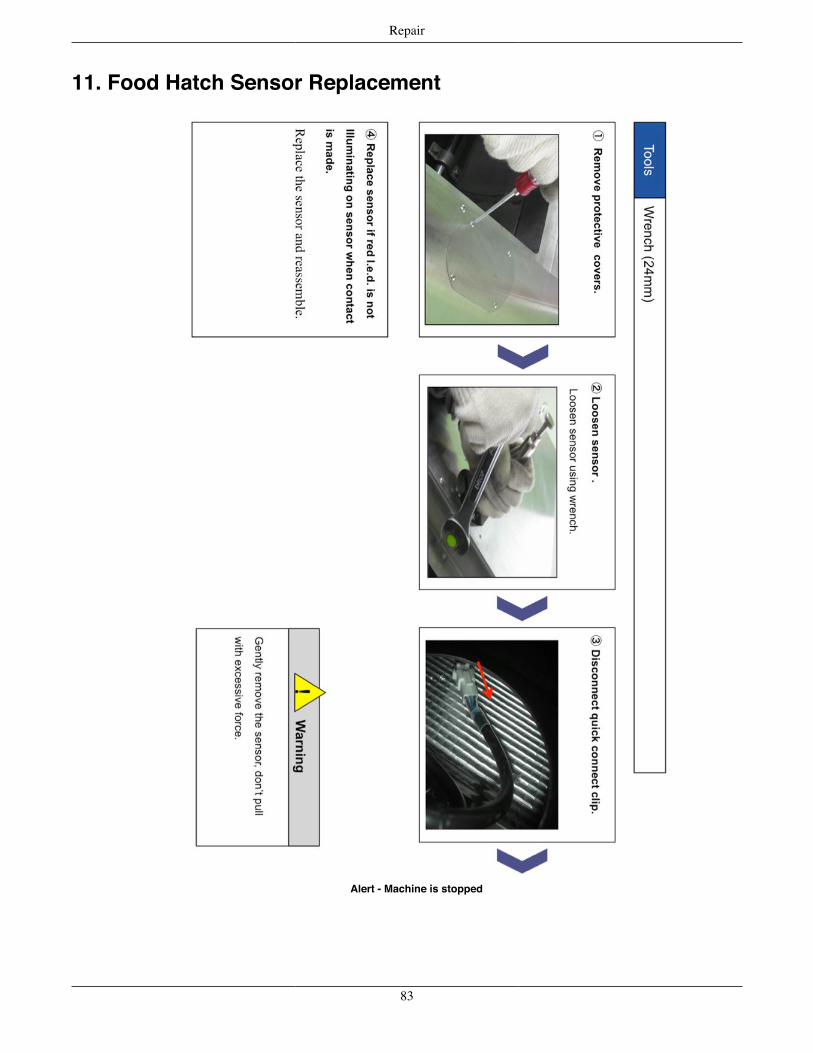
Repair
11. Food Hatch Sensor Replacement
Alert - Machine is stopped
83
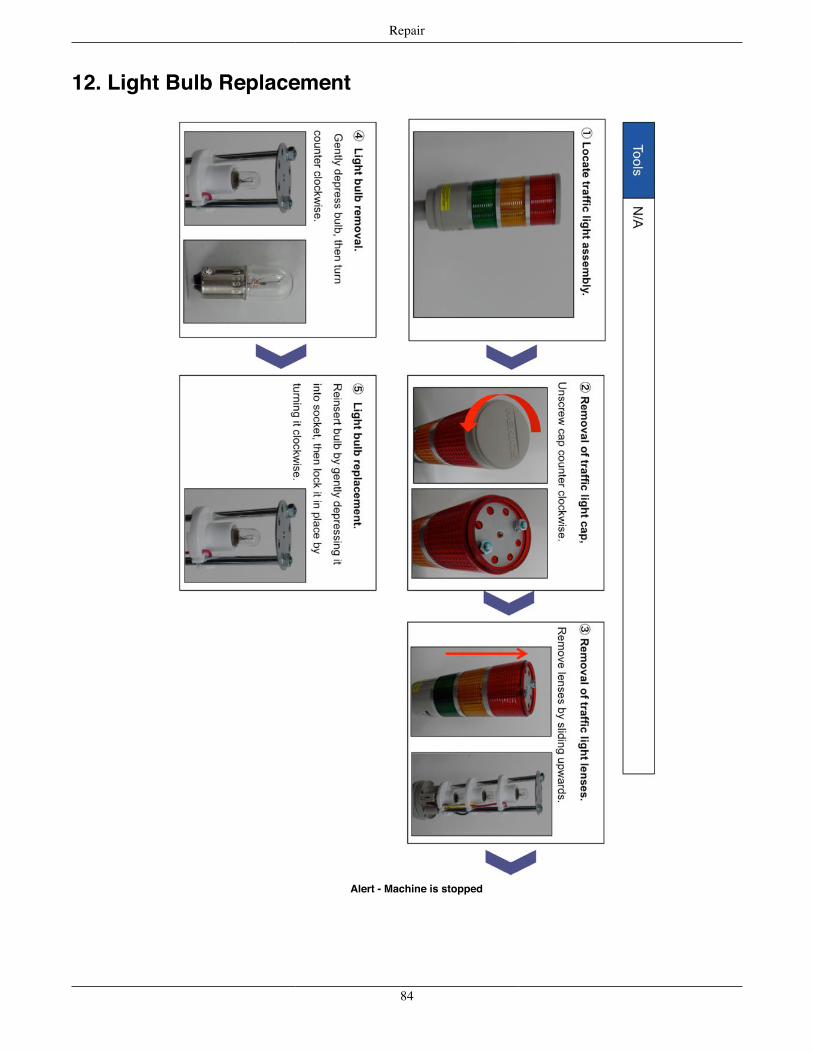
Repair
12. Light Bulb Replacement
Alert - Machine is stopped
84
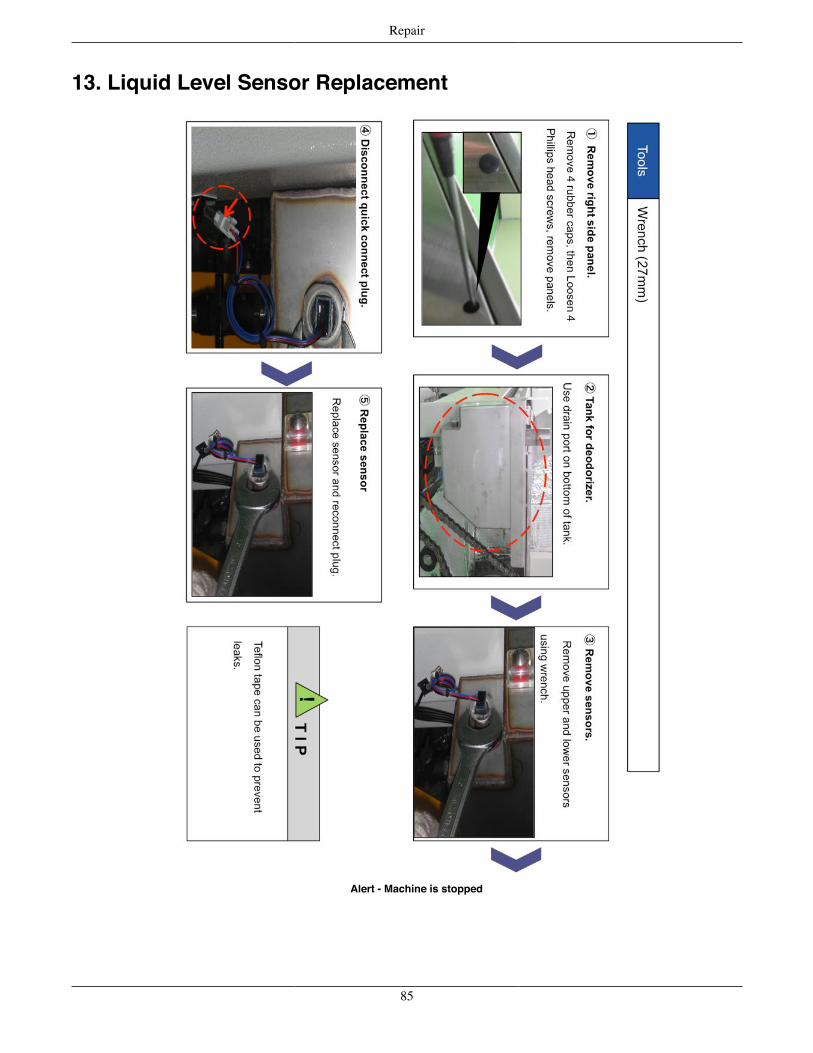
Repair
13. Liquid Level Sensor Replacement
Alert - Machine is stopped
85
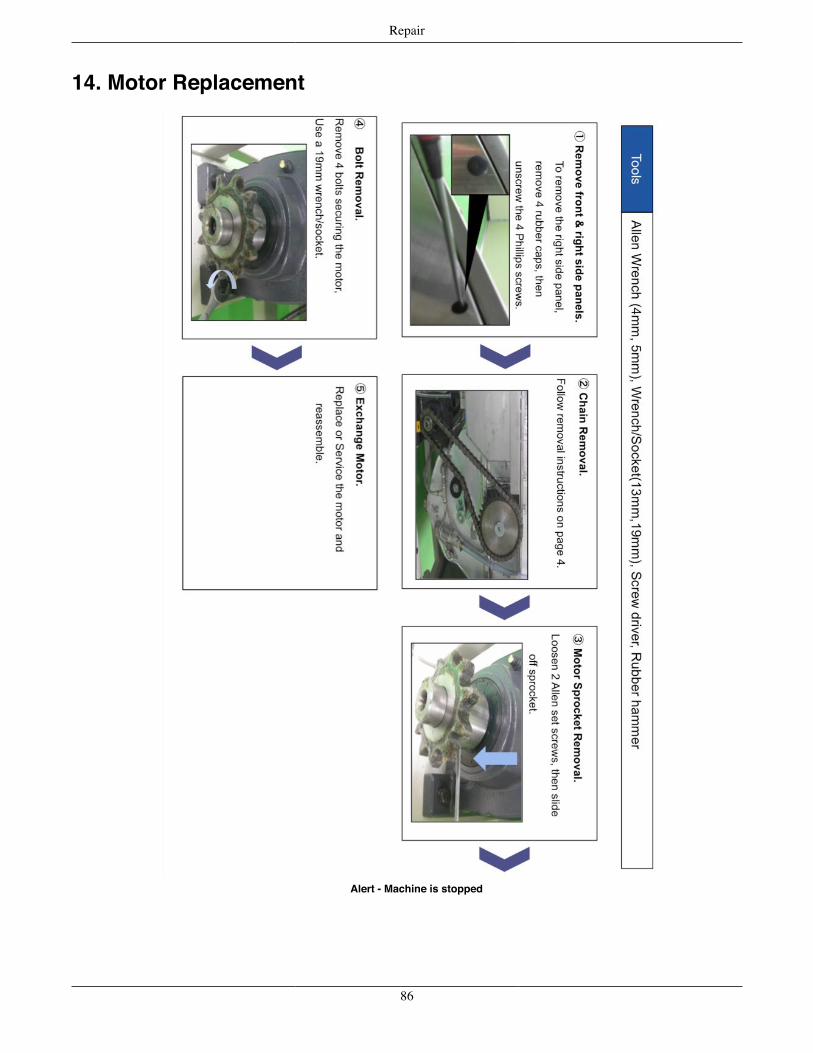
Repair
14. Motor Replacement
Alert - Machine is stopped
86
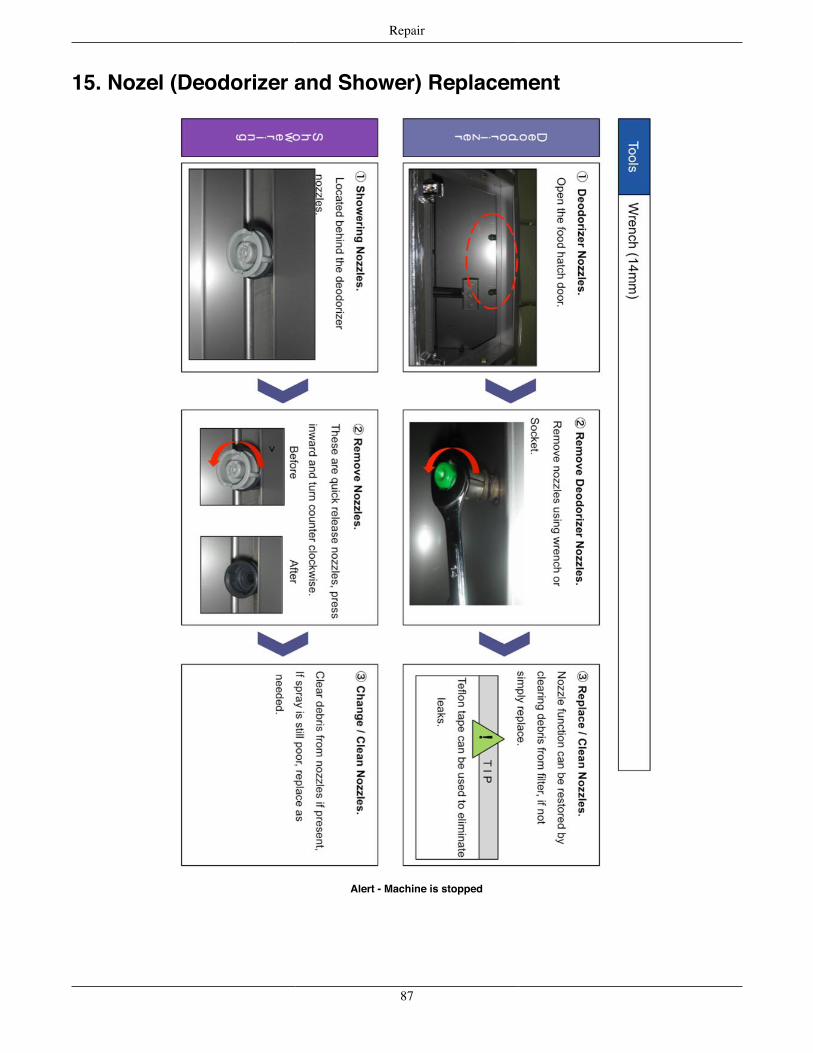
Repair
15. Nozel (Deodorizer and Shower) Replacement
Alert - Machine is stopped
87
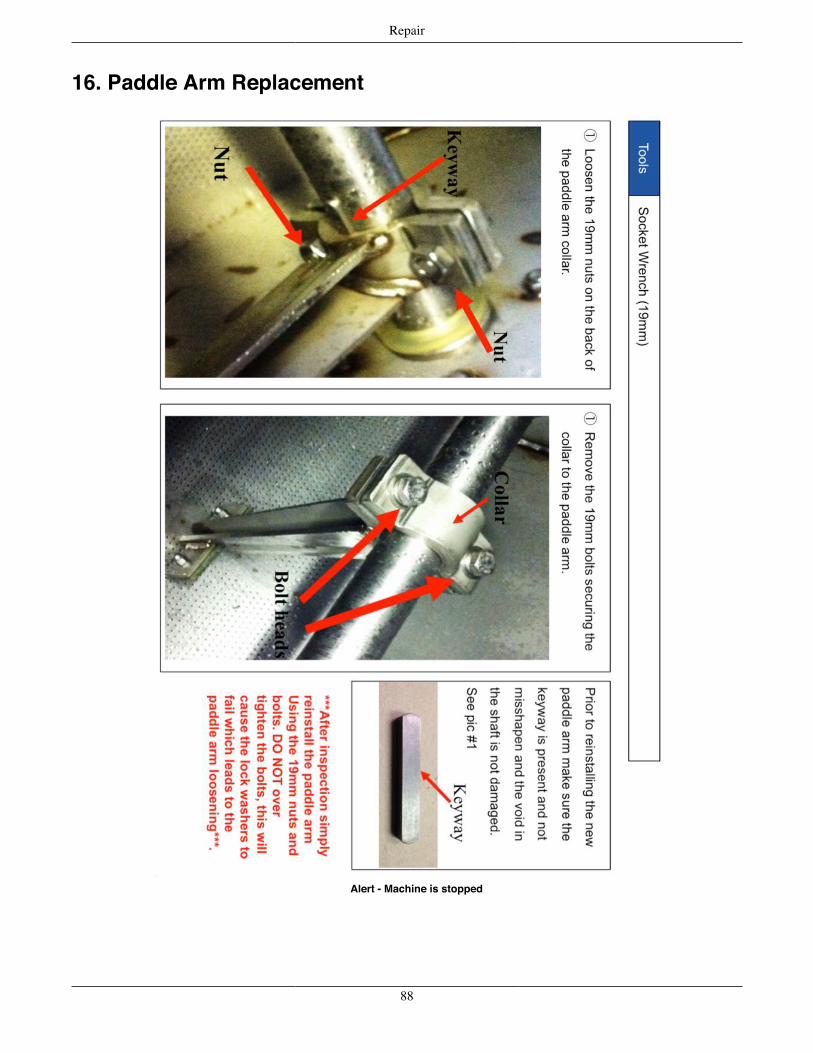
Repair
16. Paddle Arm Replacement
Alert - Machine is stopped
88
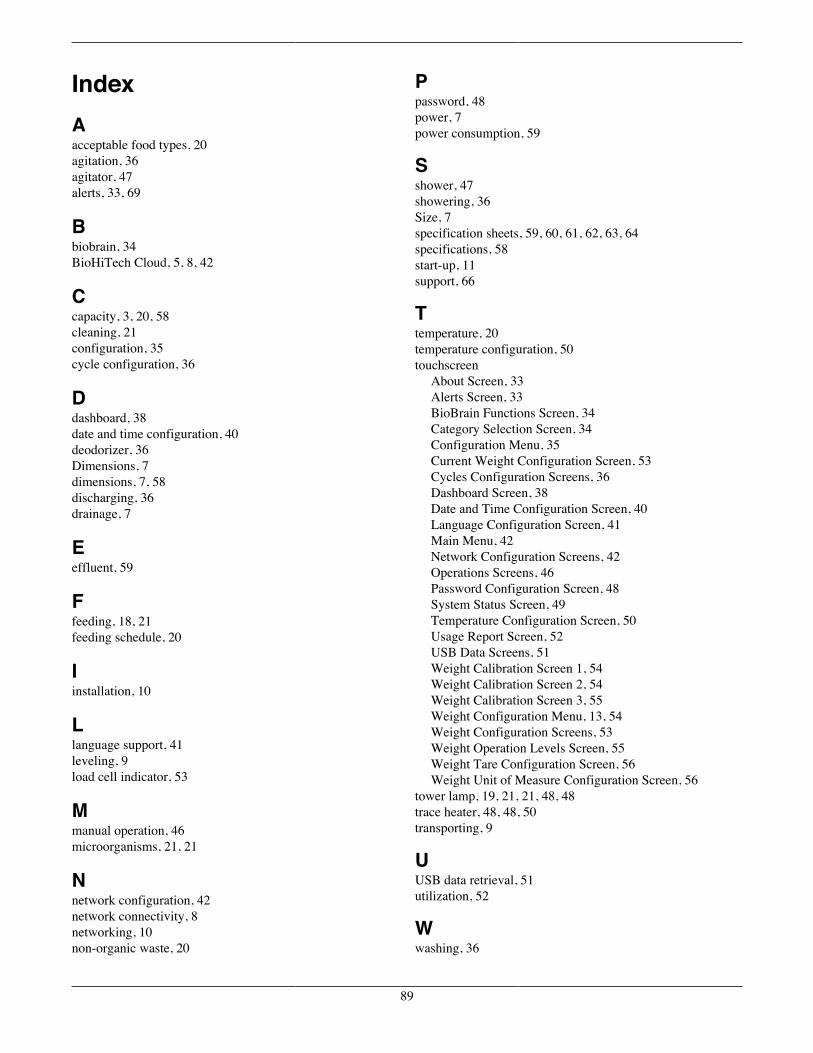
IndexAacceptable food types, 20agitation, 36agitator, 47alerts, 33, 69
Bbiobrain, 34BioHiTech Cloud, 5, 8, 42
Ccapacity, 3, 20, 58cleaning, 21configuration, 35cycle configuration, 36
Ddashboard, 38date and time configuration, 40deodorizer, 36Dimensions, 7dimensions, 7, 58discharging, 36drainage, 7
Eeffluent, 59
Ffeeding, 18, 21feeding schedule, 20
Iinstallation, 10
Llanguage support, 41leveling, 9load cell indicator, 53
Mmanual operation, 46microorganisms, 21, 21
Nnetwork configuration, 42network connectivity, 8networking, 10non-organic waste, 20
Ppassword, 48power, 7power consumption, 59
Sshower, 47showering, 36Size, 7specification sheets, 59, 60, 61, 62, 63, 64specifications, 58start-up, 11support, 66
Ttemperature, 20temperature configuration, 50touchscreen
About Screen, 33Alerts Screen, 33BioBrain Functions Screen, 34Category Selection Screen, 34Configuration Menu, 35Current Weight Configuration Screen, 53Cycles Configuration Screens, 36Dashboard Screen, 38Date and Time Configuration Screen, 40Language Configuration Screen, 41Main Menu, 42Network Configuration Screens, 42Operations Screens, 46Password Configuration Screen, 48System Status Screen, 49Temperature Configuration Screen, 50Usage Report Screen, 52USB Data Screens, 51Weight Calibration Screen 1, 54Weight Calibration Screen 2, 54Weight Calibration Screen 3, 55Weight Configuration Menu, 13, 54Weight Configuration Screens, 53Weight Operation Levels Screen, 55Weight Tare Configuration Screen, 56Weight Unit of Measure Configuration Screen, 56
tower lamp, 19, 21, 21, 48, 48trace heater, 48, 48, 50transporting, 9
UUSB data retrieval, 51utilization, 52
Wwashing, 36
89
Index
waste categorization, 34water, 7water consumption, 59weight calibration, 53weight, machine, 58
90