Embed Size (px)
Citation preview
1. General Description1.1 Collet Kit for Bosch Colt palm router PR20EVSK
2. List of Components2.1 1/8 in. Precision Grade (PG) Colt collet (BOPG-COLT-1250)2.2 Collet nut (BOPG-1618-NUT)2.3 Spanner wrench (BOPG-1618-TLN)2.4 Calibration blank (CB0000-1250-150MIT)2.5 118 ml of ColletCare (MI00-0096-118)
2.5.1 Solvent, light lubricant and corrosion inhibitor mixture that cleans, conditions and protects
*All components can be purchased separately through the purchase source
3. Collet Calibration Procedure
1. take a BOPG-COLT-1/8 (or BOSG-COLT-1/8) collet, a 1/8" calibration blank, a few Q-tips and a fine-tip permanent marker to the store with you
2. remove the OEM nut/collet from a store model (probably good idea to ask the store clerk for permission first)
3. clean out the router's tapered bore with a Q-tip4. use the permanent marker to draw 2 broad, heavy lines, 180° apart, from the inside
of the tapered bore to the mouth (widest part)5. let the ink dry (we do NOT want to smear it during this test, we want sharp, easily
seen scratches)6. insert the calbration blank all the way into the collet with about 1/8" hanging out
the back7. using your thumb and index finger, press the collet FIRMLY into the bore8. grip the end of the calibration blank with your other hand and see if you can wigggle
the collet back and forth9. leaving the blank in place and holding the router shaft to keep it from turning, rotate
the collet in the bore 2 full turns with moderate pressure
If the collet seats snugly (no perceptible movement), it is probably a good match. If there is any apparent movement between the collet and the router shaft, remove the collet and look at the 2 black lines that you drew inside the bore
DRAWING #:P14113: PCB ISOLATION ROUTER V00005
Purchased Part DrawingORIGINAL REV DATE: 11/25/13
TITLE: RESPONSIBLE ENGINEER:
Collet Kit Sarah DumanREVISION: REVISION DATE: STATUS:
A 11/25/13 Approved for purchase
If the ink is only rubbed away deep in the bore, about where the end of the collet would hit, the collet is bottoming out against the narrow part of the taper. This indicates that the bore taper-angle is larger than the collet taper and, unfortunately, incompatible with our collets.
If the ink is rubbed away near the mouth of the taper, or evenly along the length of the line, the collet taper and the bore taper have a relatively good match. The collet will probably work quite well with this router, in spite of the slight movement you might have felt above.
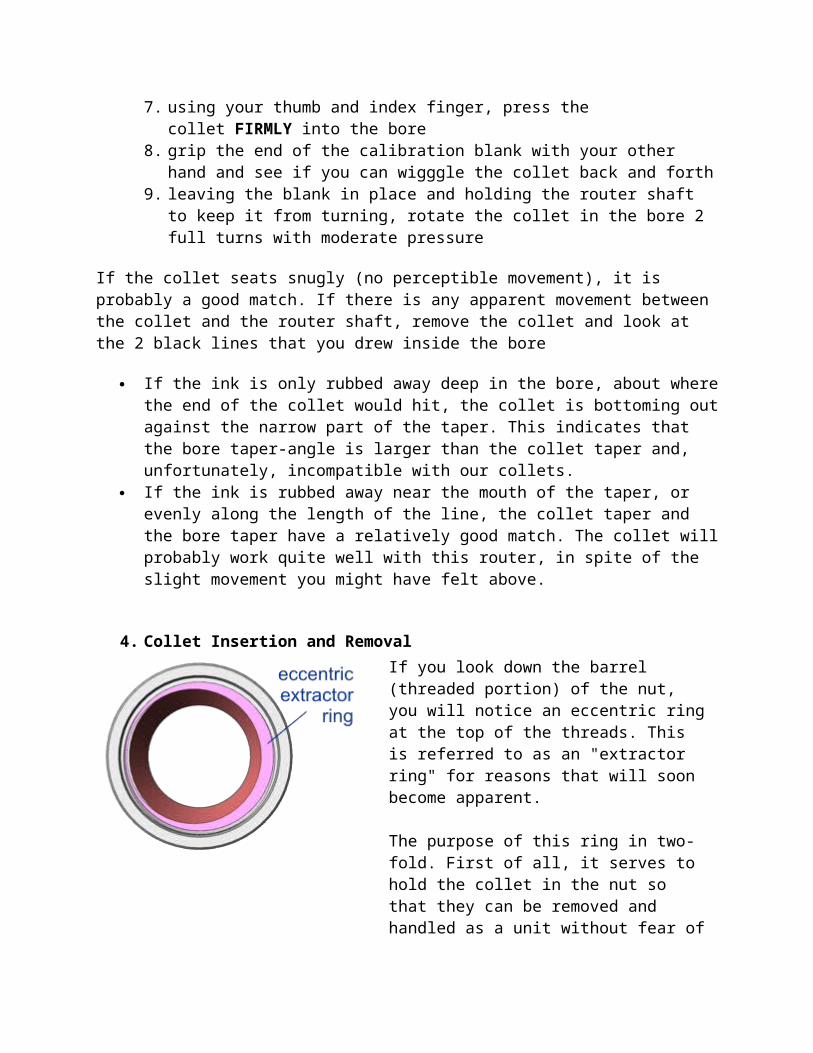
4. Collet Insertion and RemovalIf you look down the barrel (threaded portion) of the nut, you will notice an eccentric ring at the top of the threads. This is referred to as an "extractor ring" for reasons that will soon become apparent.
The purpose of this ring in two-fold. First of all, it serves to hold the collet in the nut so that they can be removed and handled as a unit without fear of them falling apart. Second, as the nut is loosened, the ring runs around the groove in the collet and lifts it out of the spindle bore (kind of like running a finger around the lid of a plastic container to remove it). With this kind of system, there is no way for the collet to remain jammed in the spindle as the nut is removed. Automatic collet extraction at its finest.
As far as putting the collet and nut together, the trick is to insert the collet so that the annular groove straddles the extractor ring and the tapered top rim of the collet seats properly into the conical cavity of the nut.
This is easily done by angling the collet up into the nut and pushing it past the extractor ring until the entire top portion of the collet is above the ring.

Now, push on the bottom of the collet until the collet completely enters, and lines up with, the nut. As the collet moves into proper alignment, you will hear and feel a distinct click, indicating that the top of the collet is safely secured above the extractor ring.
The nut / collet assembly can now be screwed onto the spindle, loaded with one of those great PreciseBits, and made ready to use.
NOTE
NEVER ACTIVATE (TURN ON) A SPINDLE WITHOUT A TOOL SECURELY FASTENED INSIDE
THE COLLET, AND THE NUT PROPERLY TIGHTENED.
FAILURE TO FOLLOW THIS SIMPLE PRECAUTION COULD LEAD TO DAMAGE TO THE SPINDLE,
COLLET, NUT AND ANY UNFORUTNATE BYSTANDER.
Removing the collet from the nut is also quite easy.
1. Remove the nut / collet from the spindle and remove any bits from the collet bore ("DUH" you say, but you would be surprised!).
2. Gripping the nut with one hand, tilt the collet over as far as it will go with the other.3. While maintaining pressure on the collet, twist the nut until you hear / feel a click.4. The "click" indicates that the top rim of the collet groove has completely snapped out
of the extractor ring and the collet can be removed from the nut. Note: with a new nut or collet it might be necessary to also press on the top of the collet with your thumb as you twist the nut to achieve separation.

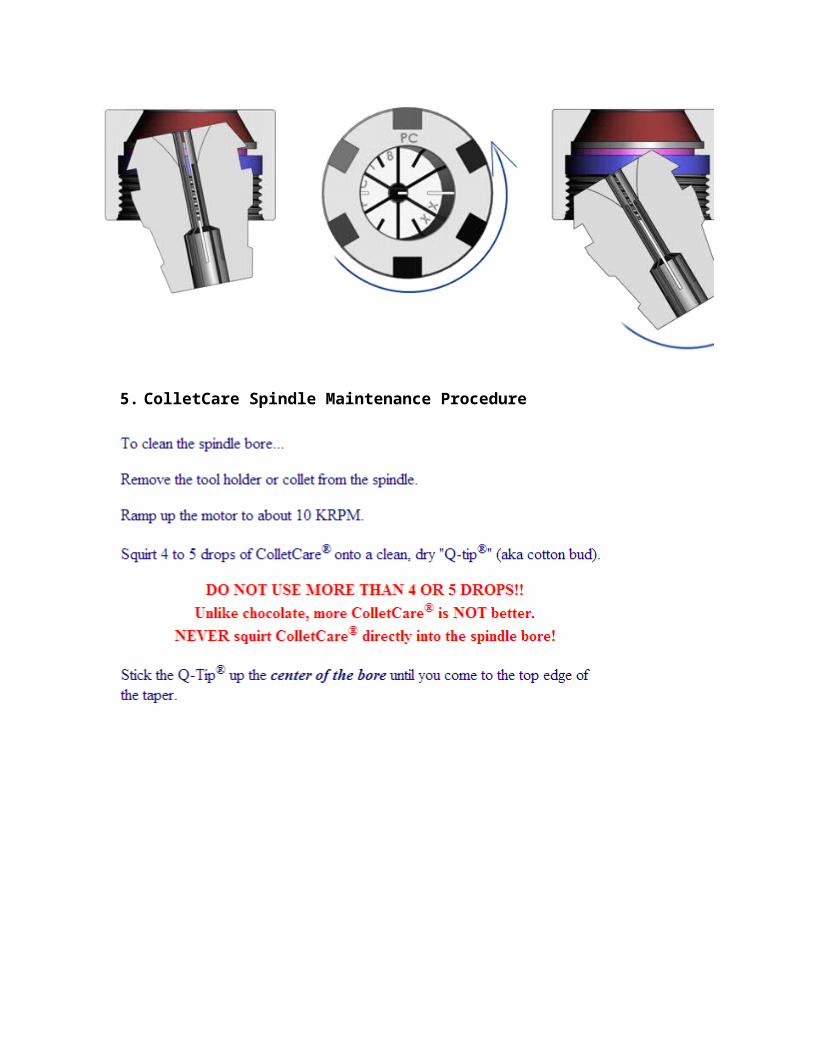
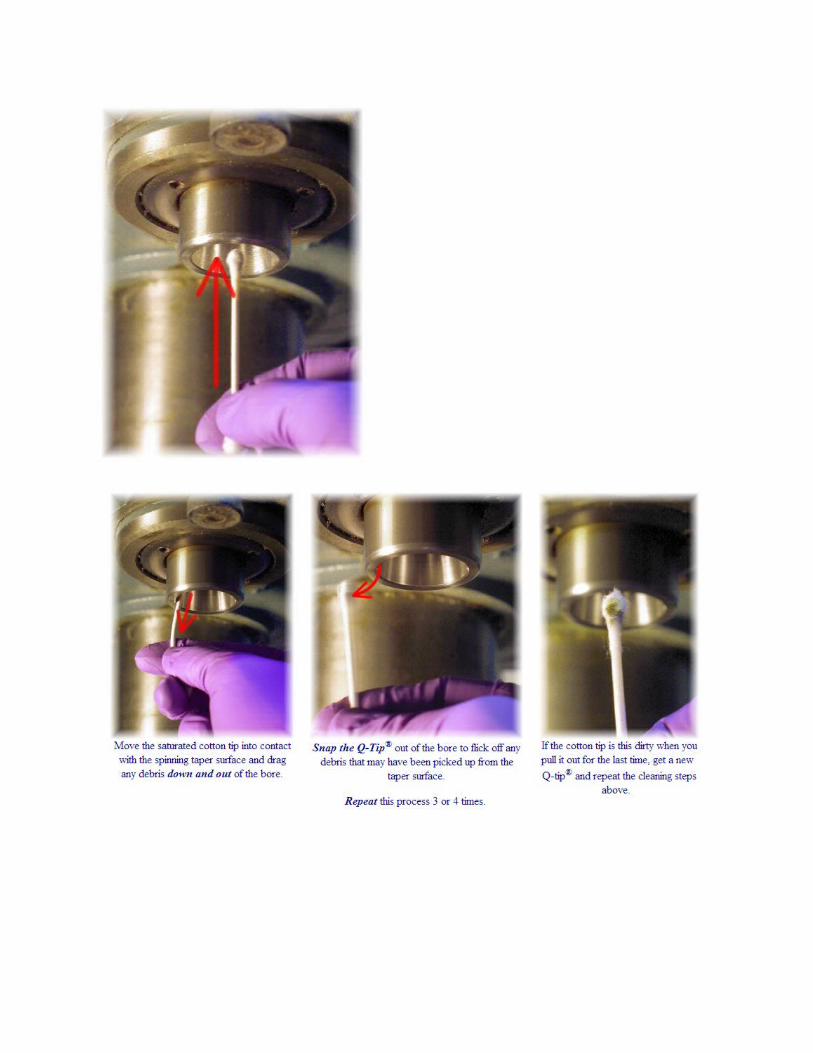
5. ColletCare Spindle Maintenance Procedure
6. Purchase Source6.1 Think & Tinker Ltd.
Precisebits.comSales 719 488-9640FAX: 866-453-8473


![Untitled-1 [uralbeznarkotikov.ru]uralbeznarkotikov.ru/cat/paper/1-2016.pdf · 800 3333 118 8800 3333 118 "talbeznarkotihov.ru 8800 3333 8800 3333 118 8800 3333 118 B 800 3333 118](https://img.pdfslide.net/doc/110x75/5fa8ba52bd5e685c68532c8a/untitled-1-800-3333-118-8800-3333-118-talbeznarkotihovru-8800-3333-8800.jpg)

![edge.rit.eduTranslate this pageedge.rit.edu/edge/P14453/public/DDR_Documents/Research/Advanced...%PDF-1.6 %âãÏÓ 7070 0 obj endobj 7085 0 obj /Filter/FlateDecode/ID[]/Index[7070](https://img.pdfslide.net/doc/110x75/5aba06e57f8b9ac60e8ec100/edgeritedutranslate-this-pdf-16-7070-0-obj-endobj-7085-0-obj-filterflatedecodeid232221cbe671d84796b806c4994d5b72index7070.jpg)