Embed Size (px)
Citation preview

EDI SERVICESGCEDi
Vendors without EDI capabilitiesNot to worry!
Suppliers without EDI capability or in-house technical expertisewill have access the GCEDi web portal. GCEDi is simple easy-to-use way to view a KeHE purchase order, acknowledge thatorder, send advanced shipping notifications and invoicedetails. Our Supplier Support team will provide all the trainingyour company needs to hit the ground running!
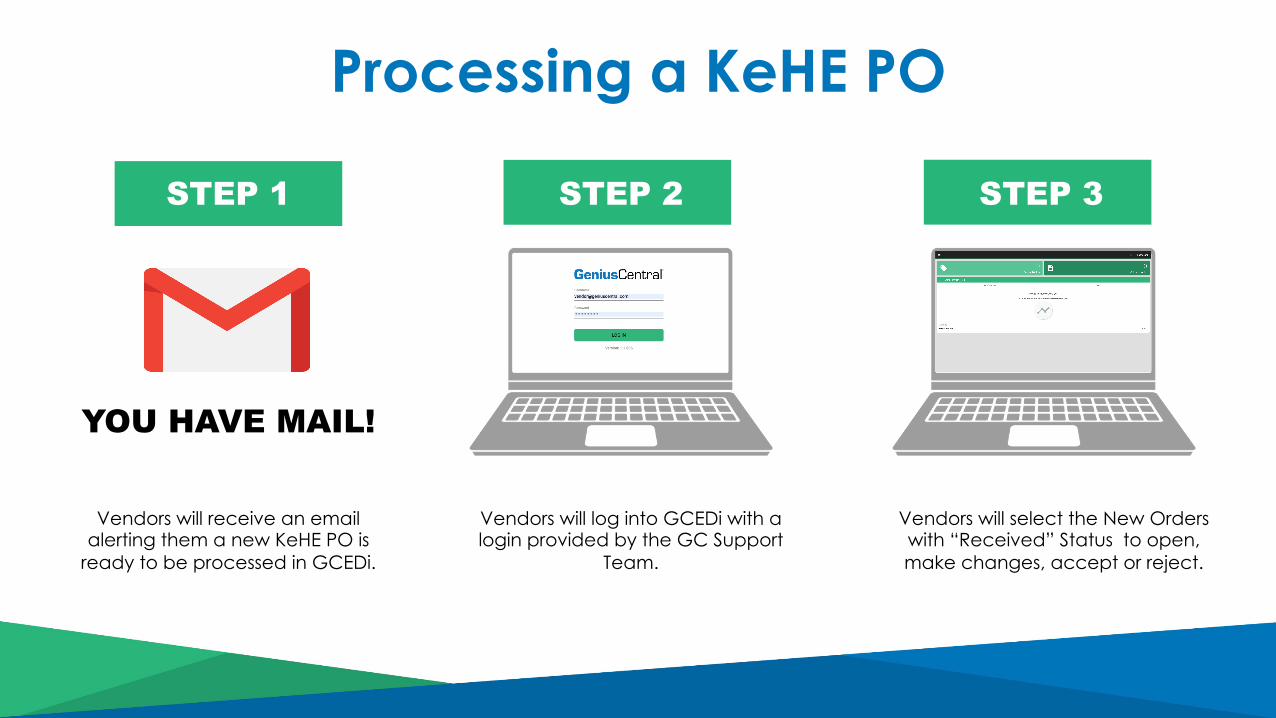
Processing a KeHE PO
Vendors will receive an email alerting them a new KeHE PO is
ready to be processed in GCEDi.
YOU HAVE MAIL!
STEP 1 STEP 2
Vendors will log into GCEDi with a login provided by the GC Support
Team.
STEP 3
Vendors will select the New Orders with “Received” Status to open, make changes, accept or reject.
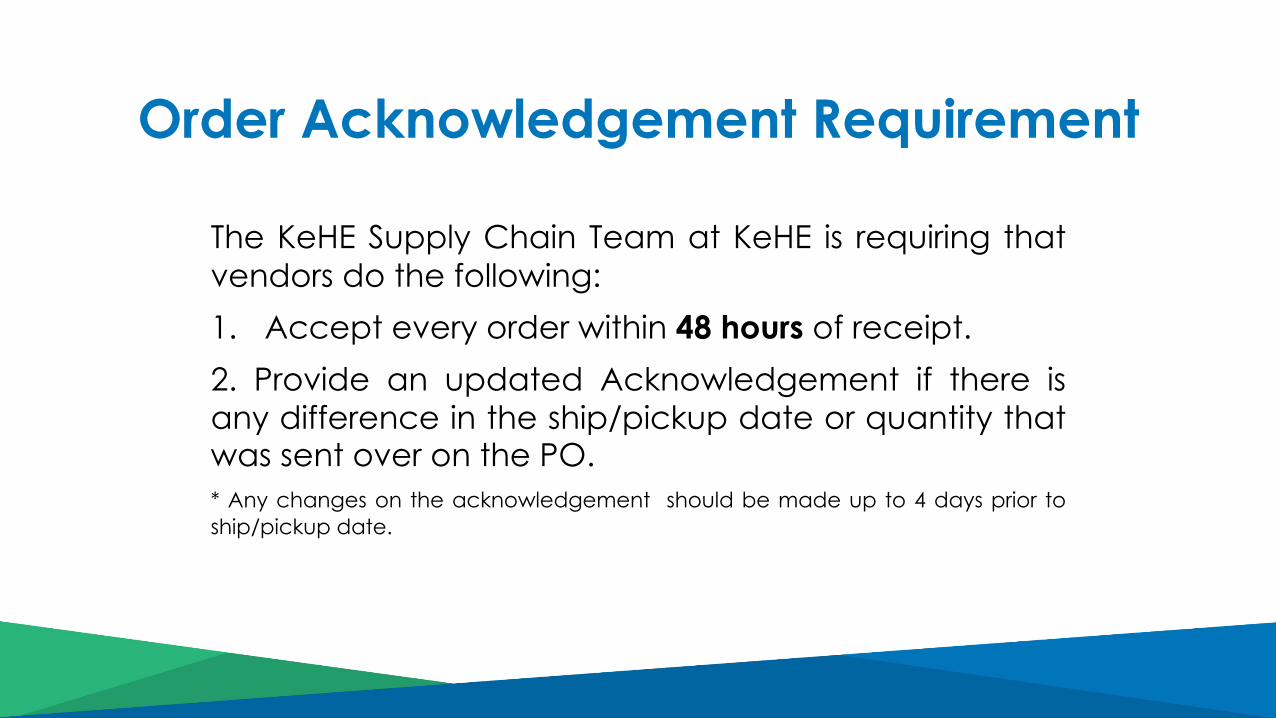
Order Acknowledgement Requirement
The KeHE Supply Chain Team at KeHE is requiring thatvendors do the following:1. Accept every order within 48 hours of receipt.2. Provide an updated Acknowledgement if there isany difference in the ship/pickup date or quantity thatwas sent over on the PO.* Any changes on the acknowledgement should be made up to 4 days prior toship/pickup date.
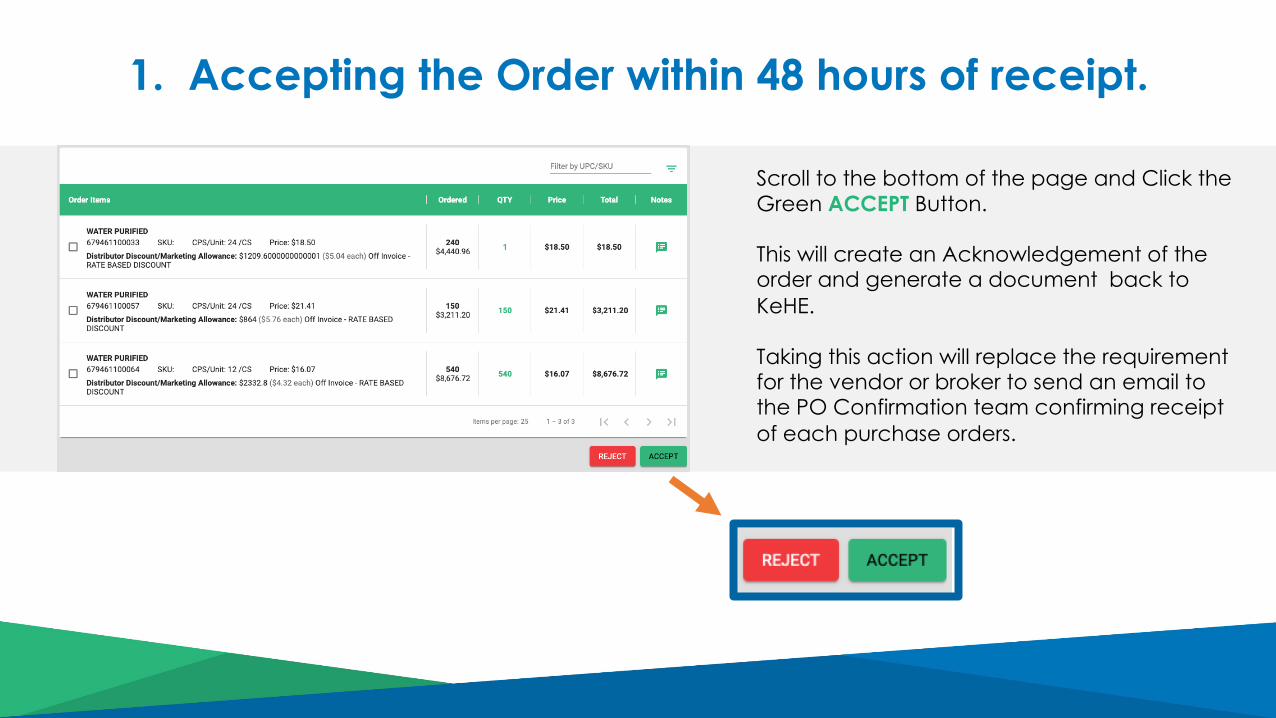
1. Accepting the Order within 48 hours of receipt.
Scroll to the bottom of the page and Click the Green ACCEPT Button.
This will create an Acknowledgement of the order and generate a document back to KeHE.
Taking this action will replace the requirement for the vendor or broker to send an email to the PO Confirmation team confirming receipt of each purchase orders.
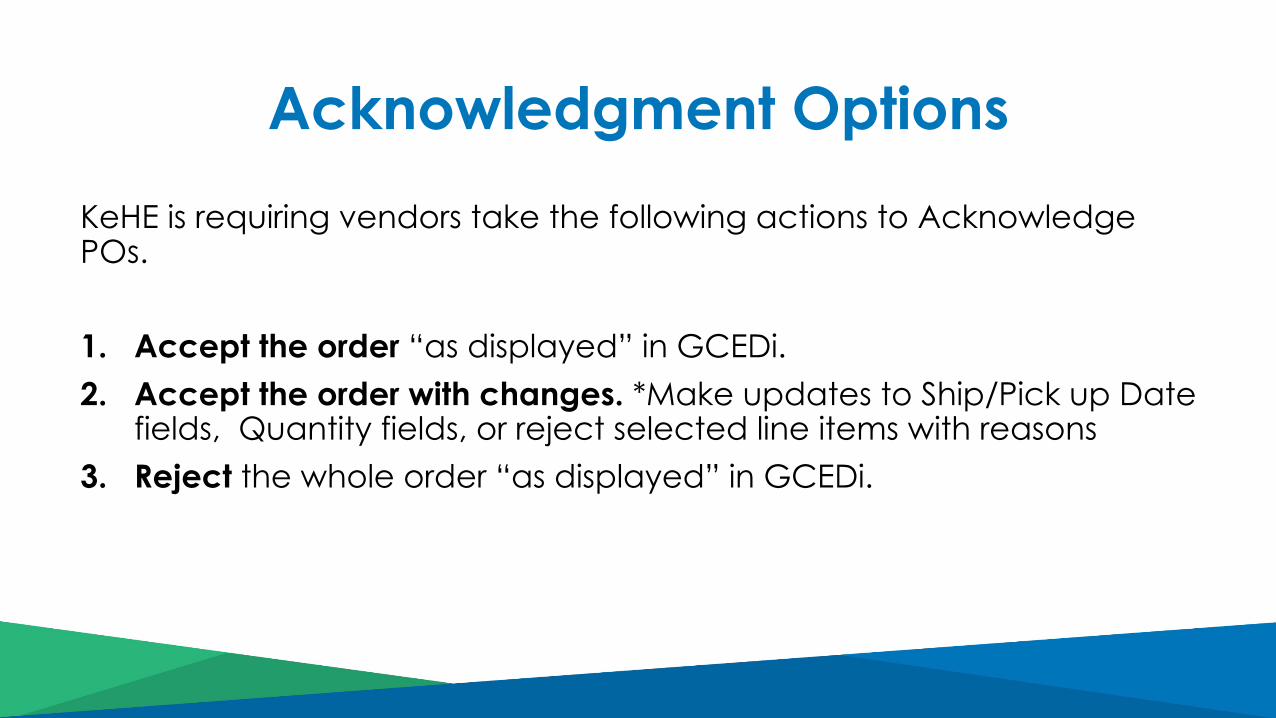
KeHE is requiring vendors take the following actions to Acknowledge POs.
1. Accept the order “as displayed” in GCEDi. 2. Accept the order with changes. *Make updates to Ship/Pick up Date
fields, Quantity fields, or reject selected line items with reasons3. Reject the whole order “as displayed” in GCEDi.
Acknowledgment Options
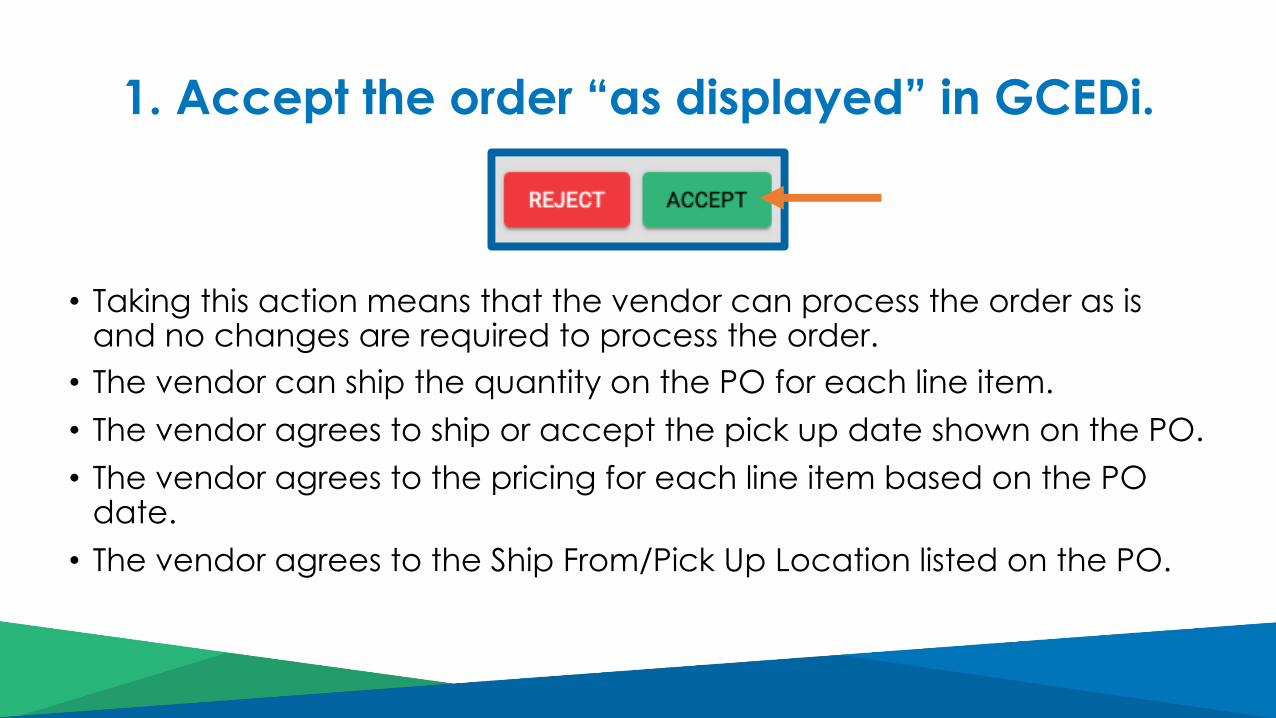
• Taking this action means that the vendor can process the order as is and no changes are required to process the order.• The vendor can ship the quantity on the PO for each line item.• The vendor agrees to ship or accept the pick up date shown on the PO.• The vendor agrees to the pricing for each line item based on the PO
date. • The vendor agrees to the Ship From/Pick Up Location listed on the PO.
1. Accept the order “as displayed” in GCEDi.
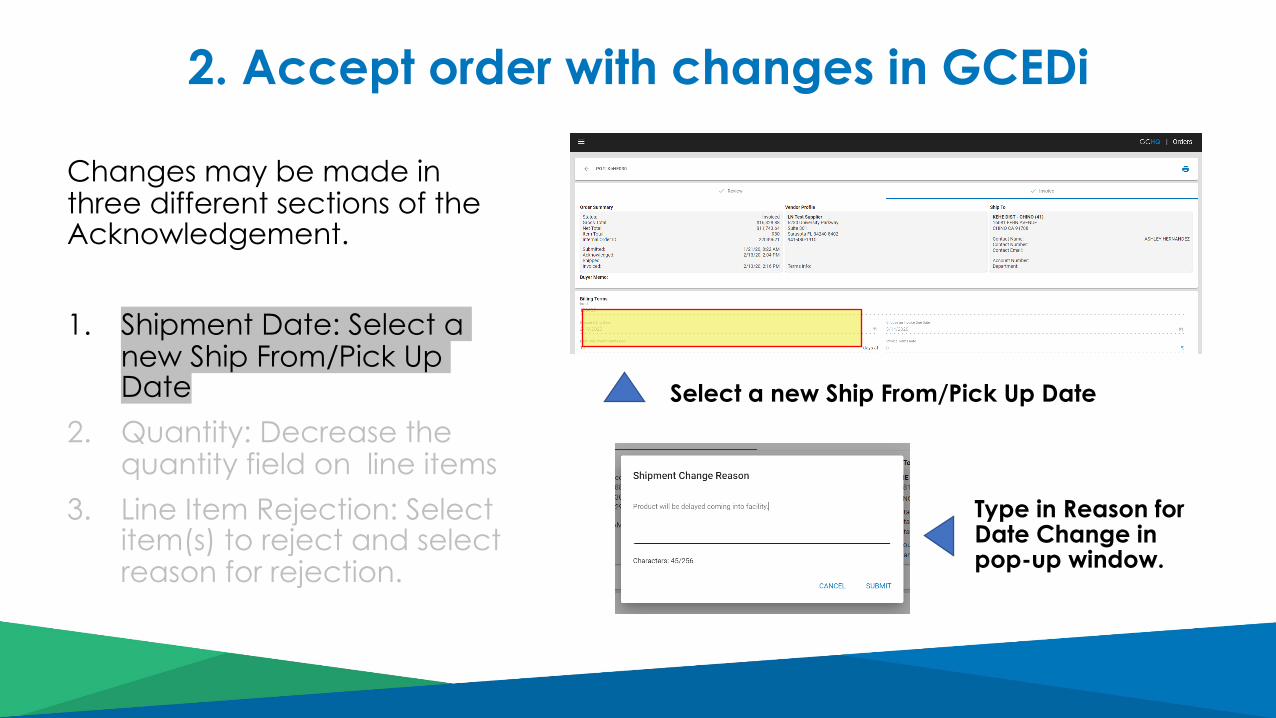
2. Accept order with changes in GCEDi
Select a new Ship From/Pick Up Date
Type in Reason for Date Change in pop-up window.
Changes may be made in three different sections of the Acknowledgement.
1. Shipment Date: Select a new Ship From/Pick Up Date
2. Quantity: Decrease the quantity field on line items
3. Line Item Rejection: Select item(s) to reject and select reason for rejection.
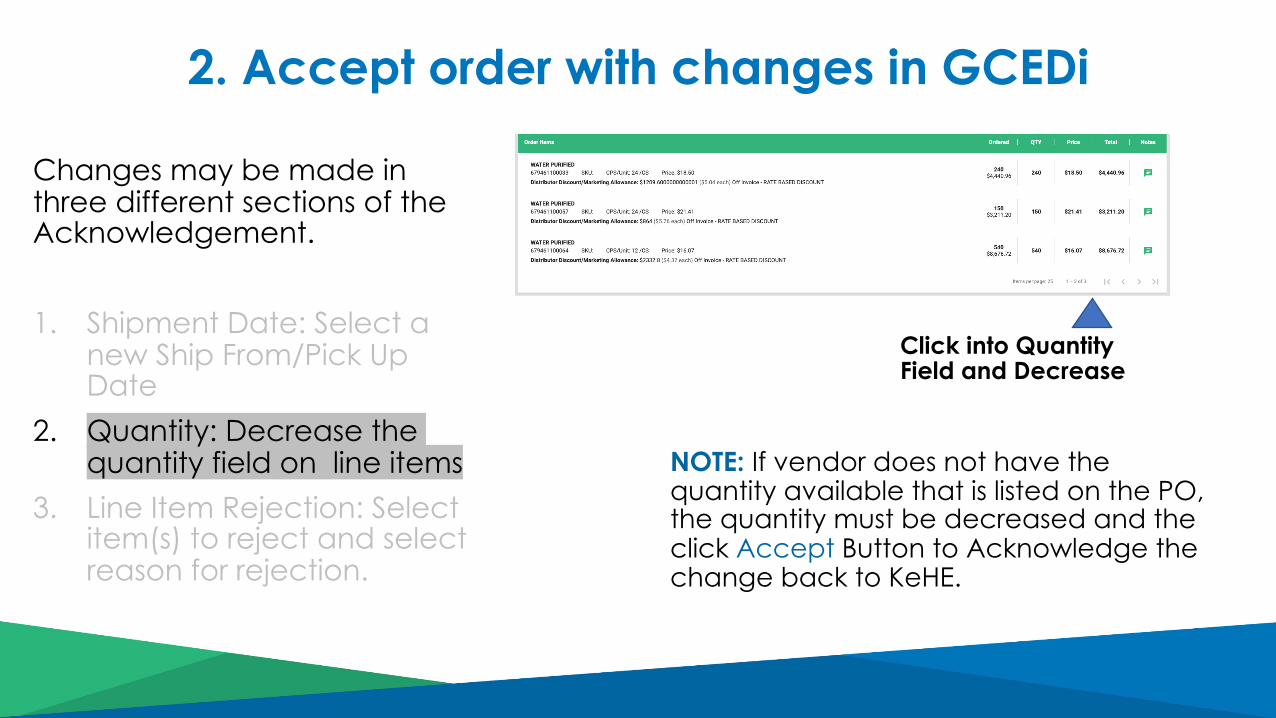
Click into Quantity Field and Decrease
NOTE: If vendor does not have the quantity available that is listed on the PO, the quantity must be decreased and the click Accept Button to Acknowledge the change back to KeHE.
2. Accept order with changes in GCEDi
Changes may be made in three different sections of the Acknowledgement.
1. Shipment Date: Select a new Ship From/Pick Up Date
2. Quantity: Decrease the quantity field on line items
3. Line Item Rejection: Select item(s) to reject and select reason for rejection.
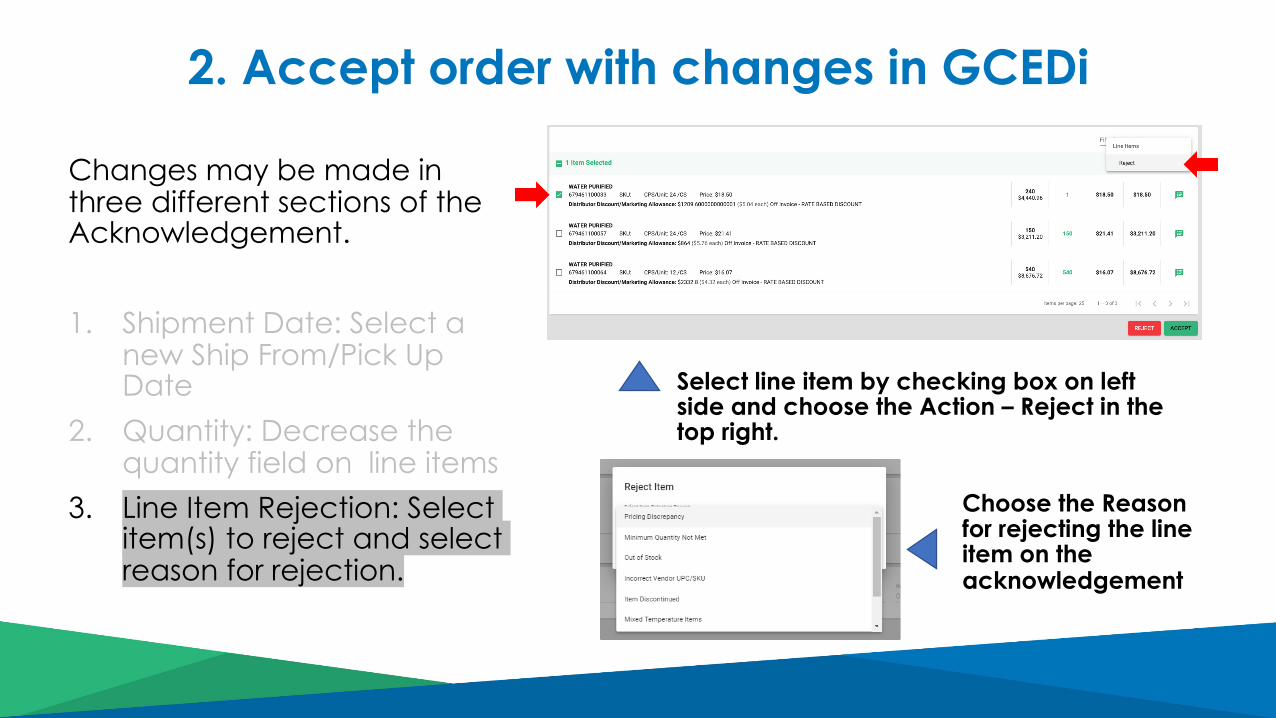
Select line item by checking box on left side and choose the Action – Reject in the top right.
Choose the Reason for rejecting the line item on the acknowledgement
2. Accept order with changes in GCEDi
Changes may be made in three different sections of the Acknowledgement.
1. Shipment Date: Select a new Ship From/Pick Up Date
2. Quantity: Decrease the quantity field on line items
3. Line Item Rejection: Select item(s) to reject and select reason for rejection.
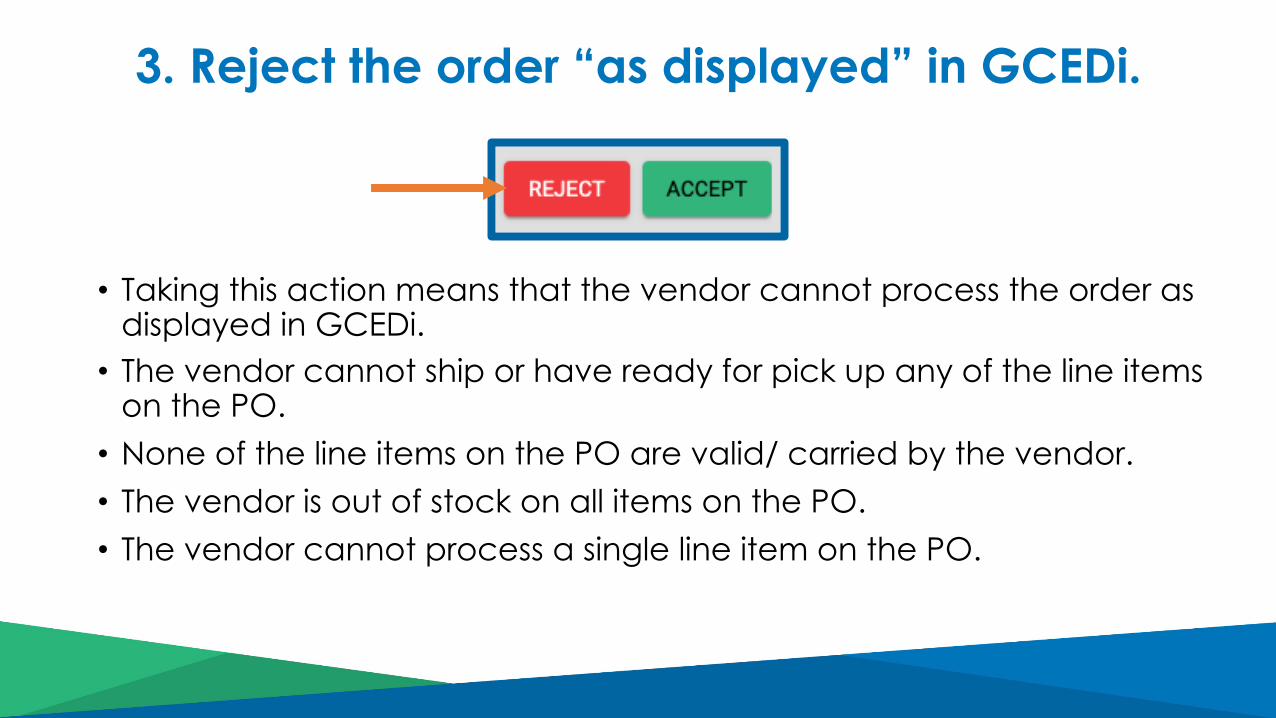
3. Reject the order “as displayed” in GCEDi.
• Taking this action means that the vendor cannot process the order as displayed in GCEDi.• The vendor cannot ship or have ready for pick up any of the line items
on the PO.• None of the line items on the PO are valid/ carried by the vendor.• The vendor is out of stock on all items on the PO.• The vendor cannot process a single line item on the PO.
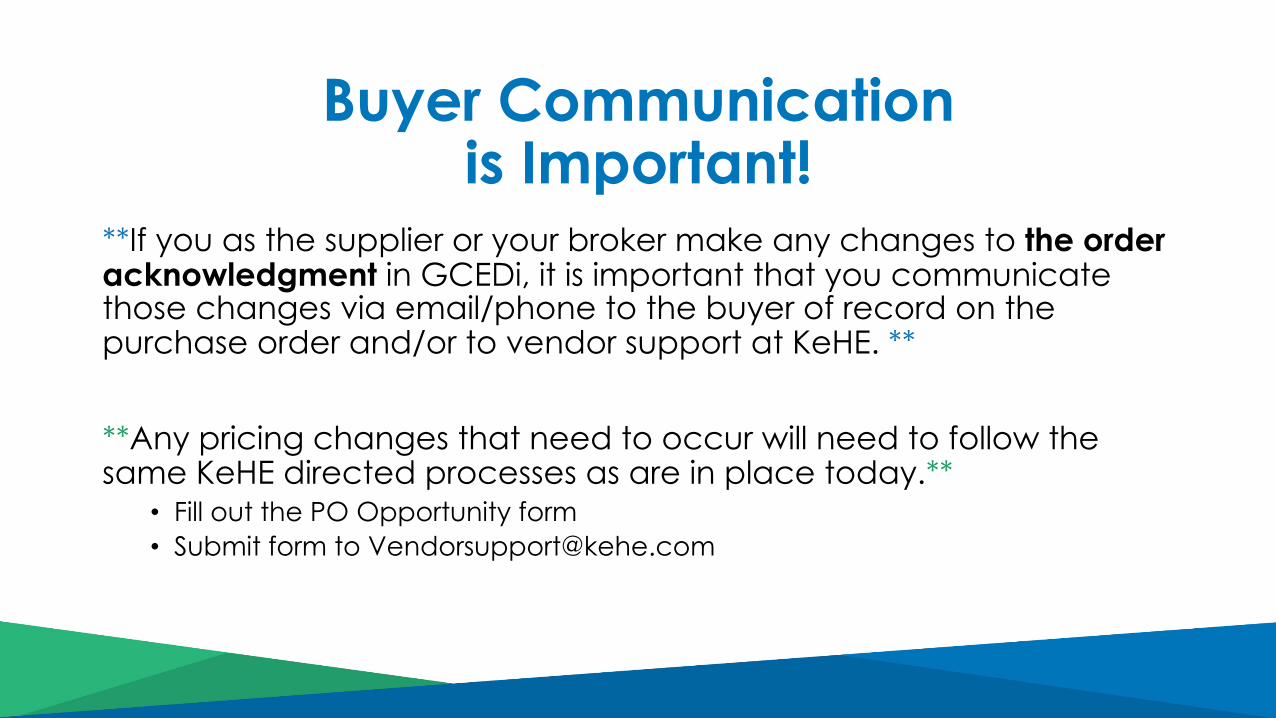
Buyer Communication is Important!
**If you as the supplier or your broker make any changes to the order acknowledgment in GCEDi, it is important that you communicate those changes via email/phone to the buyer of record on the purchase order and/or to vendor support at KeHE. **
**Any pricing changes that need to occur will need to follow the same KeHE directed processes as are in place today.**
• Fill out the PO Opportunity form• Submit form to [email protected]
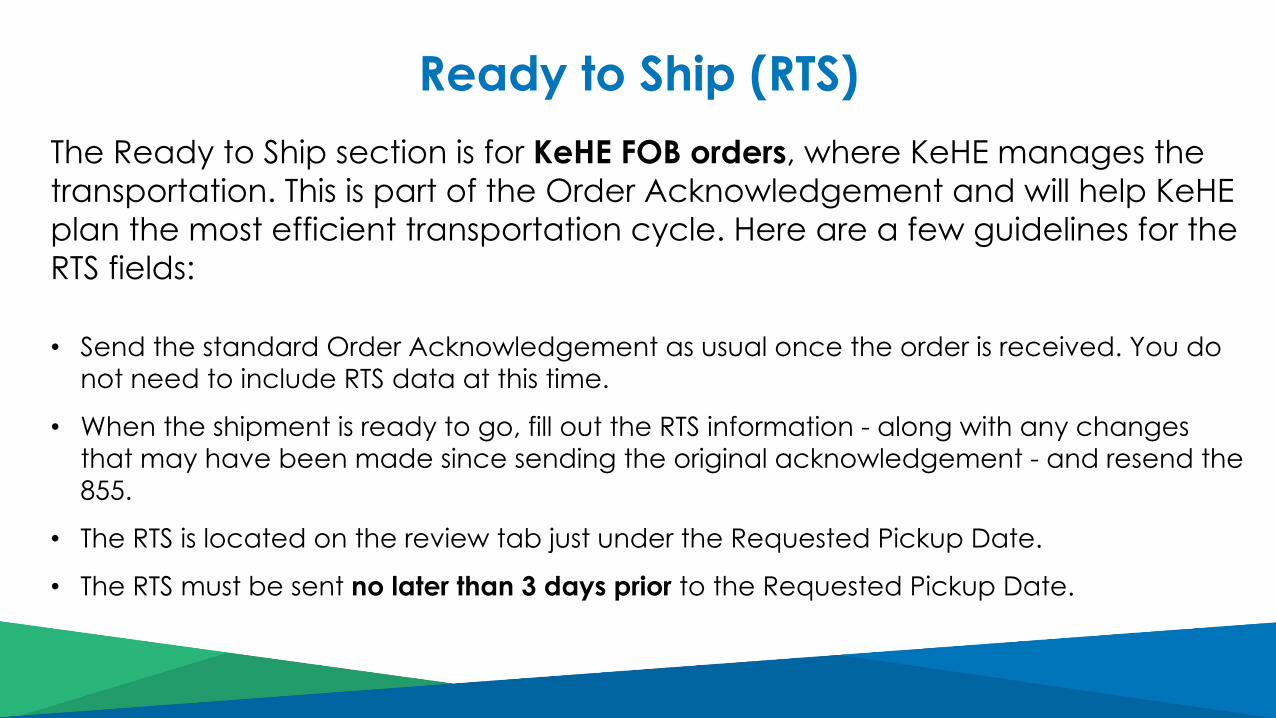
The Ready to Ship section is for KeHE FOB orders, where KeHE manages the transportation. This is part of the Order Acknowledgement and will help KeHEplan the most efficient transportation cycle. Here are a few guidelines for the RTS fields:
• Send the standard Order Acknowledgement as usual once the order is received. You do not need to include RTS data at this time.
• When the shipment is ready to go, fill out the RTS information - along with any changes that may have been made since sending the original acknowledgement - and resend the 855.
• The RTS is located on the review tab just under the Requested Pickup Date.
• The RTS must be sent no later than 3 days prior to the Requested Pickup Date.
Ready to Ship (RTS)
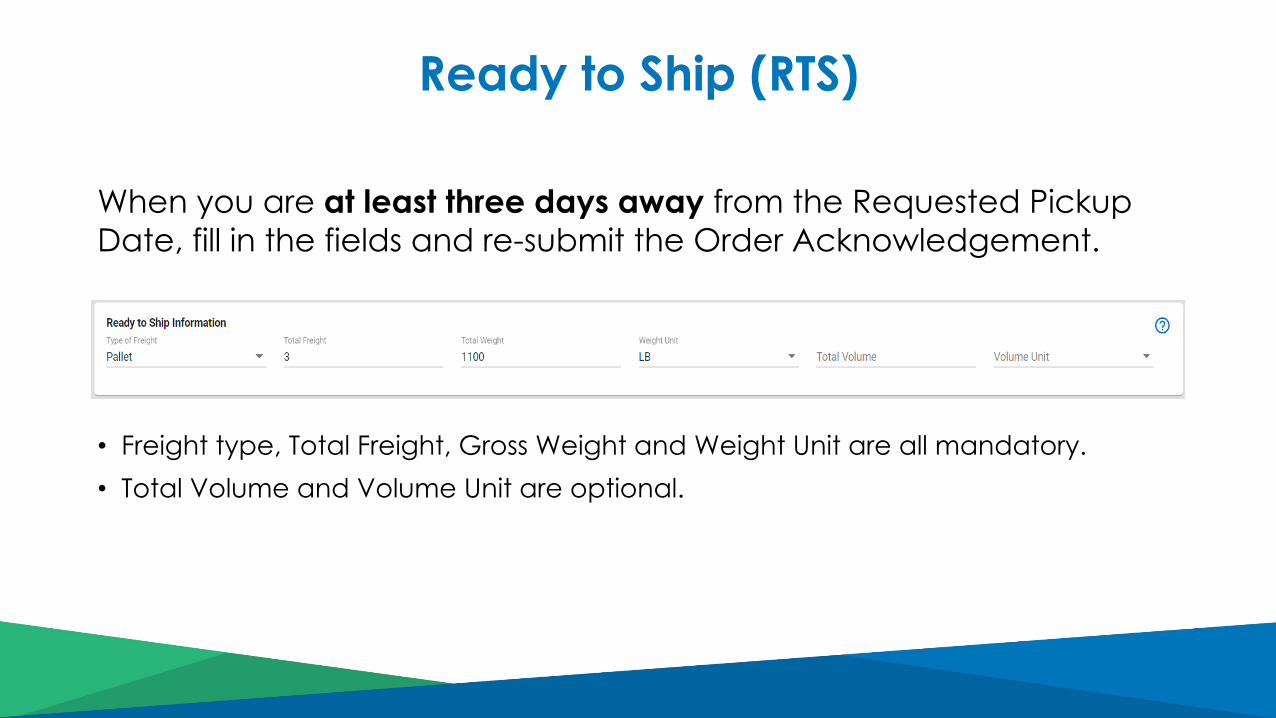
When you are at least three days away from the Requested Pickup Date, fill in the fields and re-submit the Order Acknowledgement.
• Freight type, Total Freight, Gross Weight and Weight Unit are all mandatory. • Total Volume and Volume Unit are optional.
Ready to Ship (RTS)
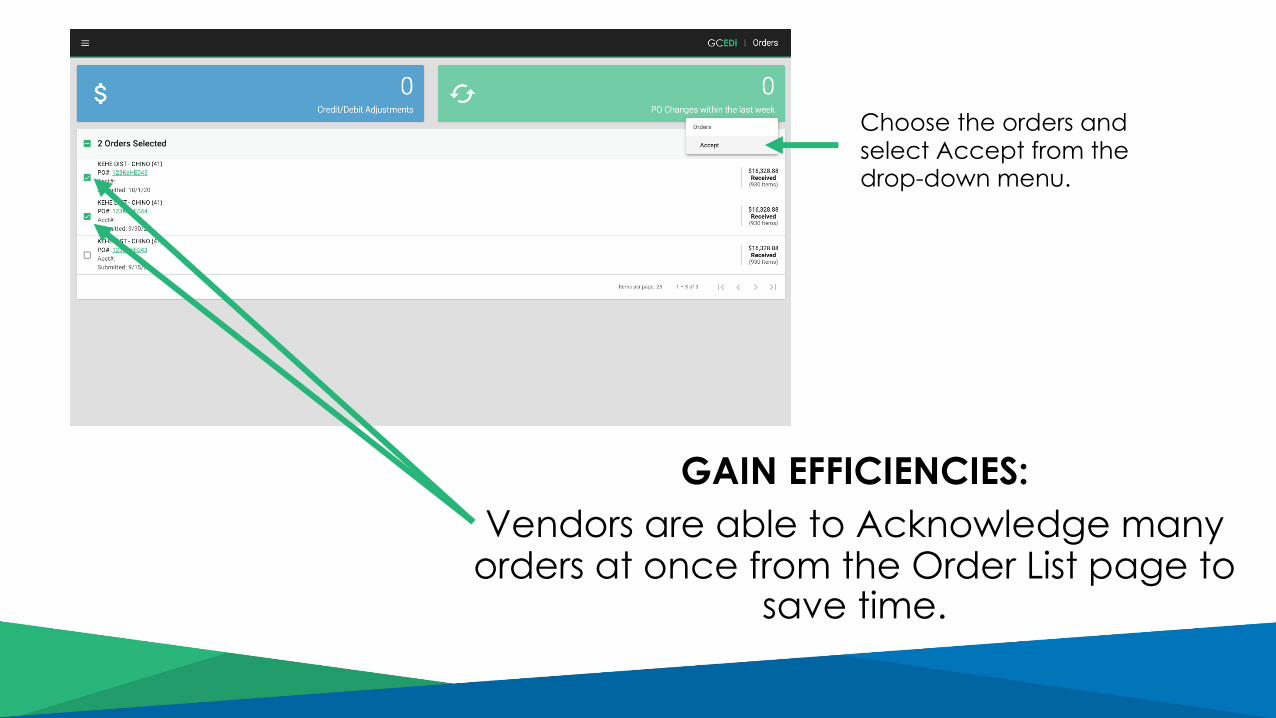
GAIN EFFICIENCIES:Vendors are able to Acknowledge many
orders at once from the Order List page to save time.
Choose the orders and select Accept from the drop-down menu.
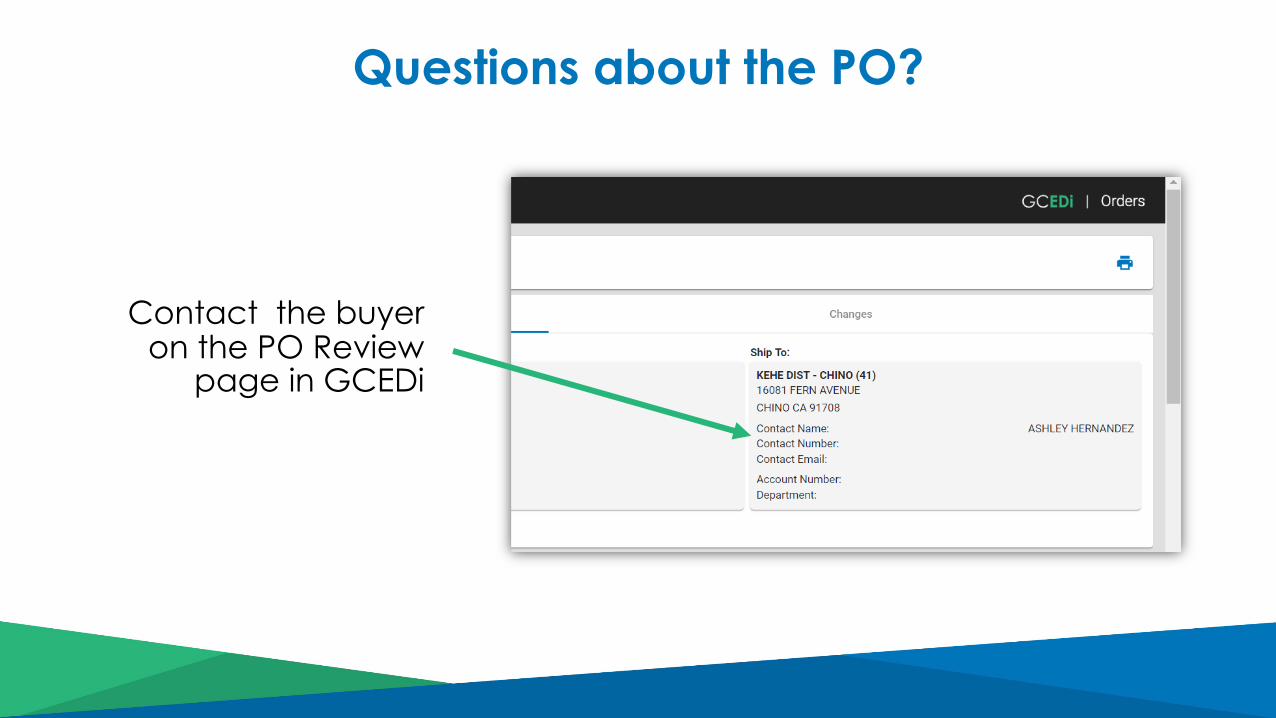
Questions about the PO?
Contact the buyer on the PO Review
page in GCEDi
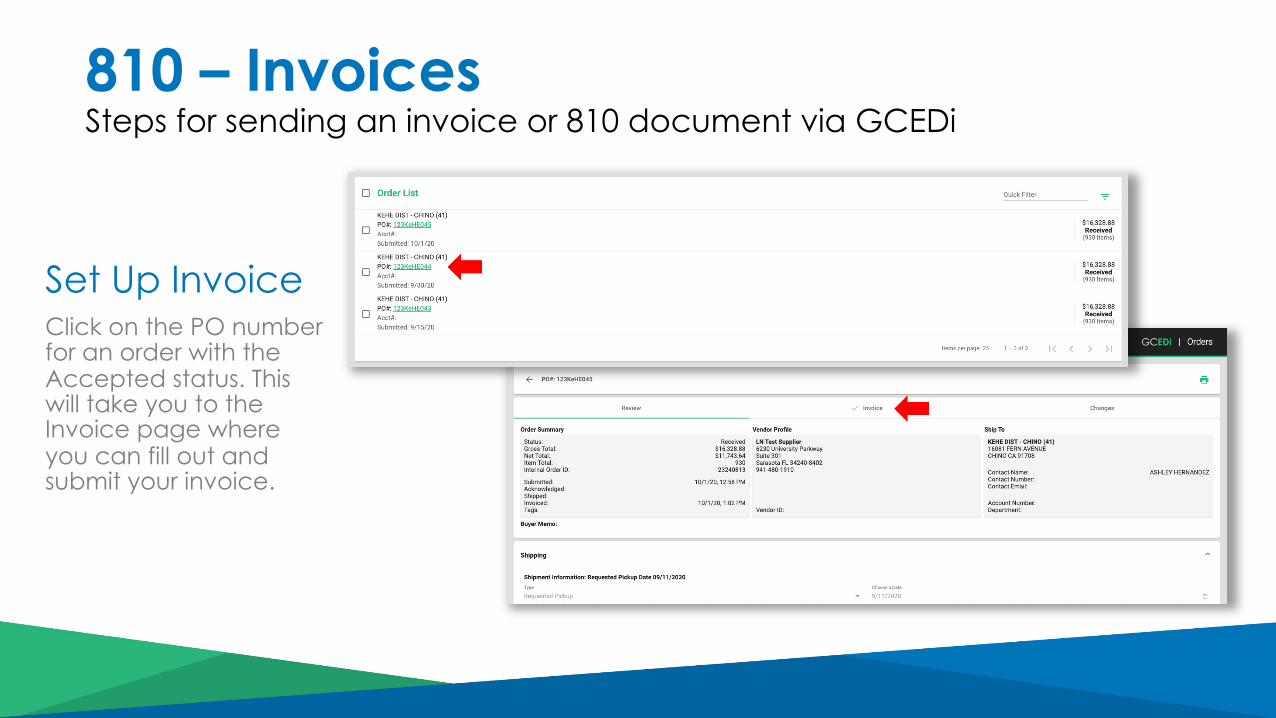
810 – Invoices Steps for sending an invoice or 810 document via GCEDi
Set Up InvoiceClick on the PO number for an order with the Accepted status. This will take you to the Invoice page where you can fill out and submit your invoice.

Fill in the Billing Terms with an Invoice number, ship date, invoice due date, days until invoice terms due, and terms of sale. All of these are required fields for an invoice.
Enter any Allowances or Charges. KeHE has provided a list of Type options for each of these selections.
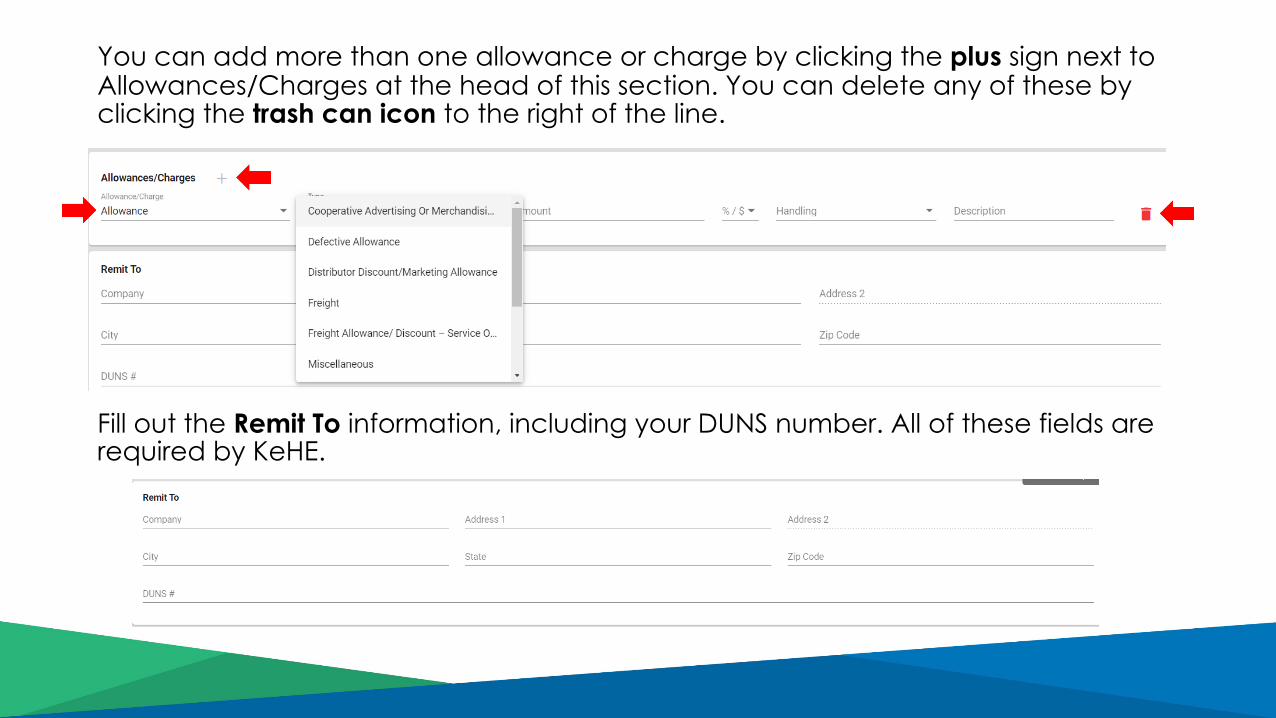
You can add more than one allowance or charge by clicking the plus sign next to Allowances/Charges at the head of this section. You can delete any of these by clicking the trash can icon to the right of the line.
Fill out the Remit To information, including your DUNS number. All of these fields are required by KeHE.
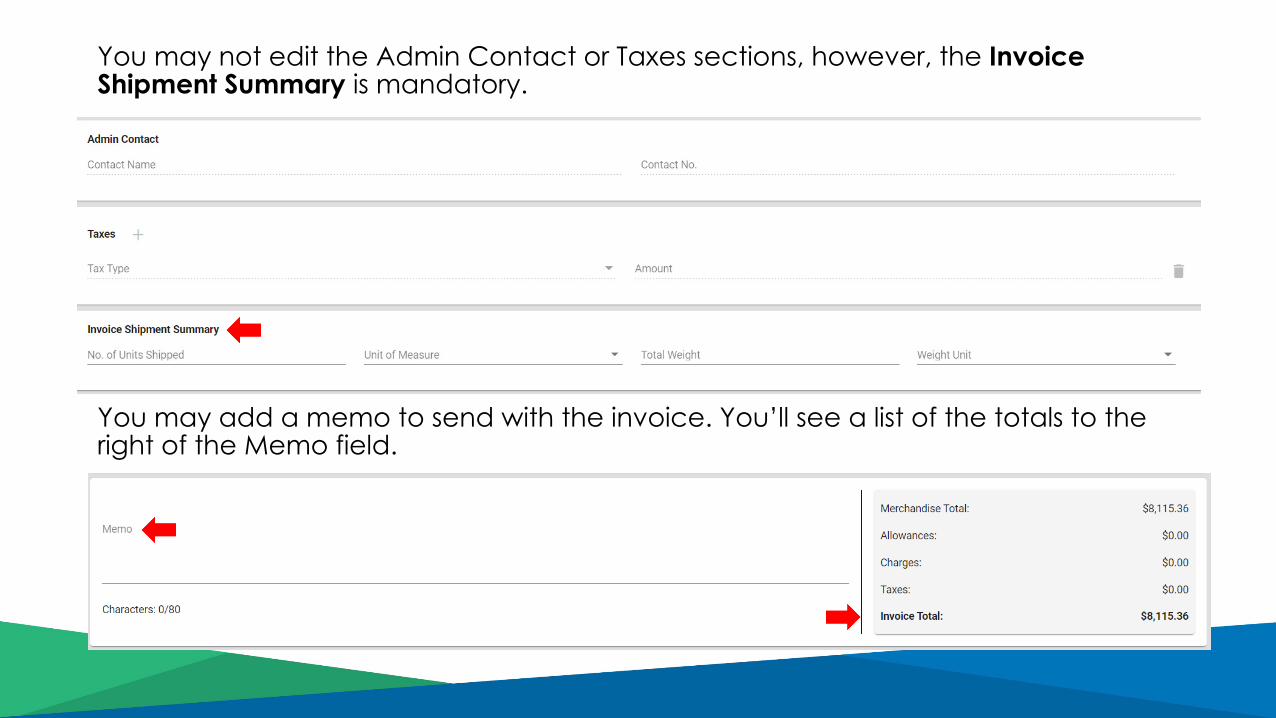
You may not edit the Admin Contact or Taxes sections, however, the Invoice Shipment Summary is mandatory.
You may add a memo to send with the invoice. You’ll see a list of the totals to the right of the Memo field.
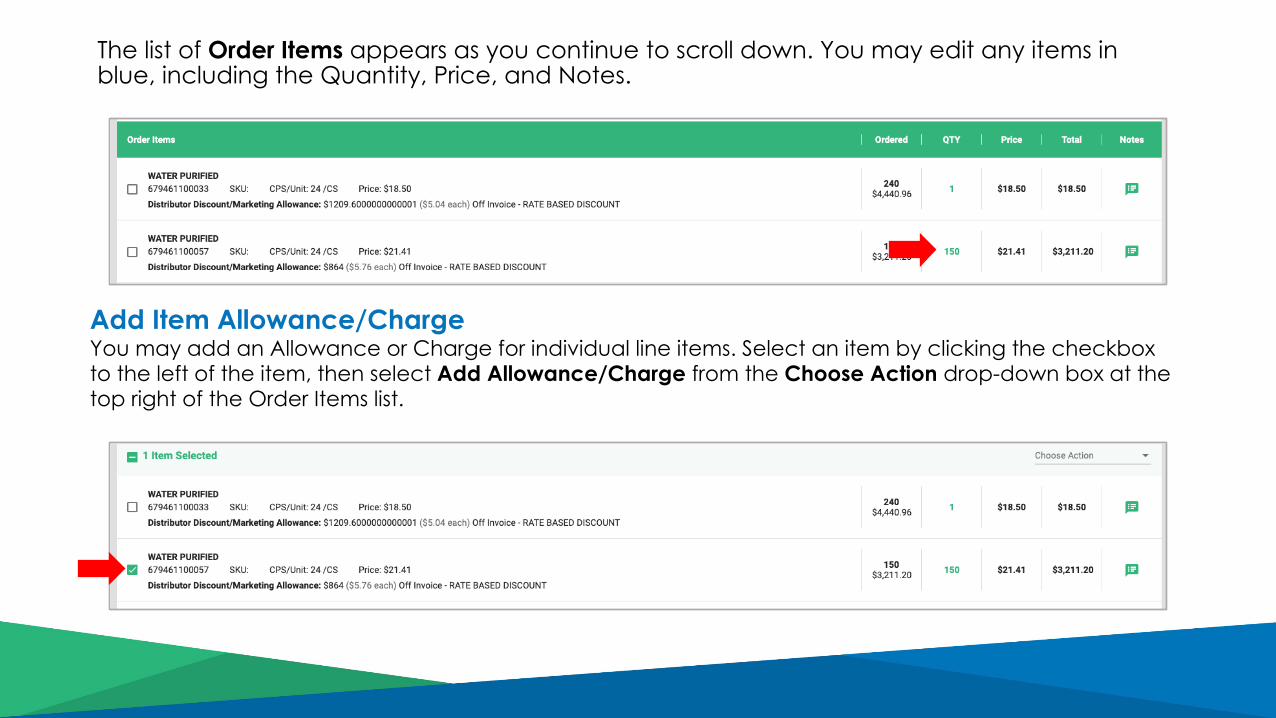
The list of Order Items appears as you continue to scroll down. You may edit any items in blue, including the Quantity, Price, and Notes.
Add Item Allowance/Charge You may add an Allowance or Charge for individual line items. Select an item by clicking the checkbox to the left of the item, then select Add Allowance/Charge from the Choose Action drop-down box at the top right of the Order Items list.
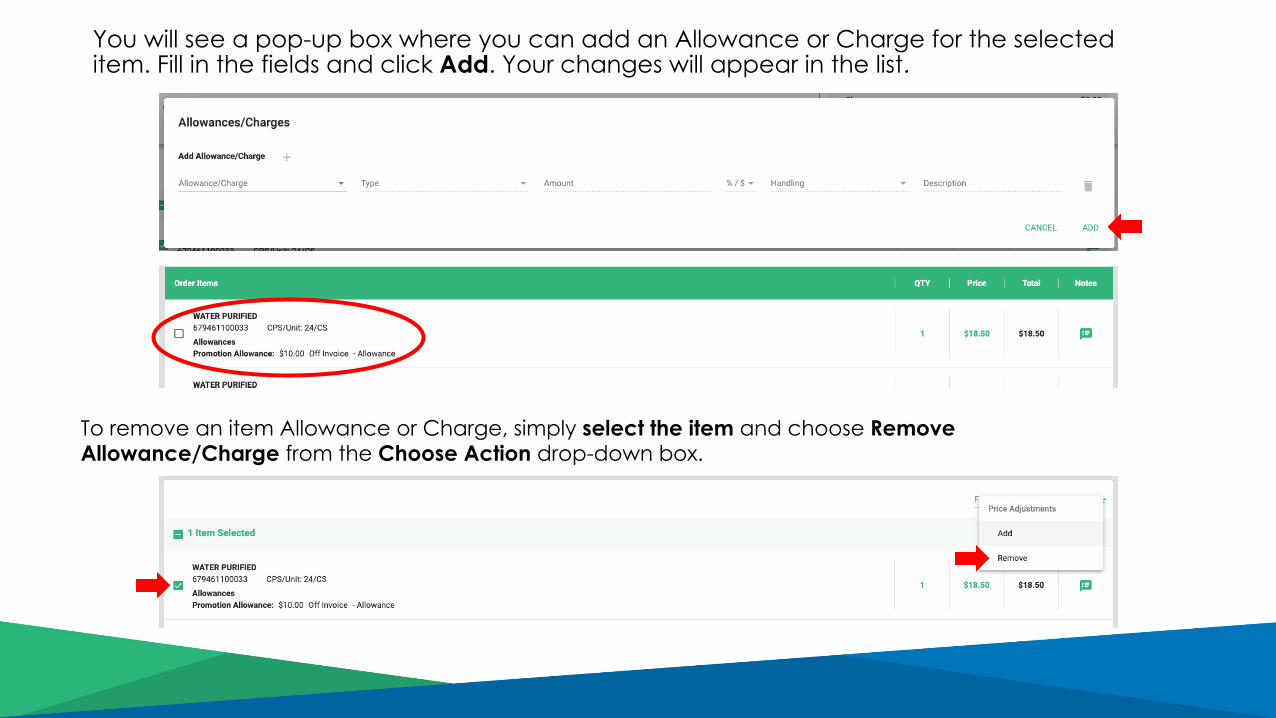
You will see a pop-up box where you can add an Allowance or Charge for the selected item. Fill in the fields and click Add. Your changes will appear in the list.
To remove an item Allowance or Charge, simply select the item and choose Remove Allowance/Charge from the Choose Action drop-down box.
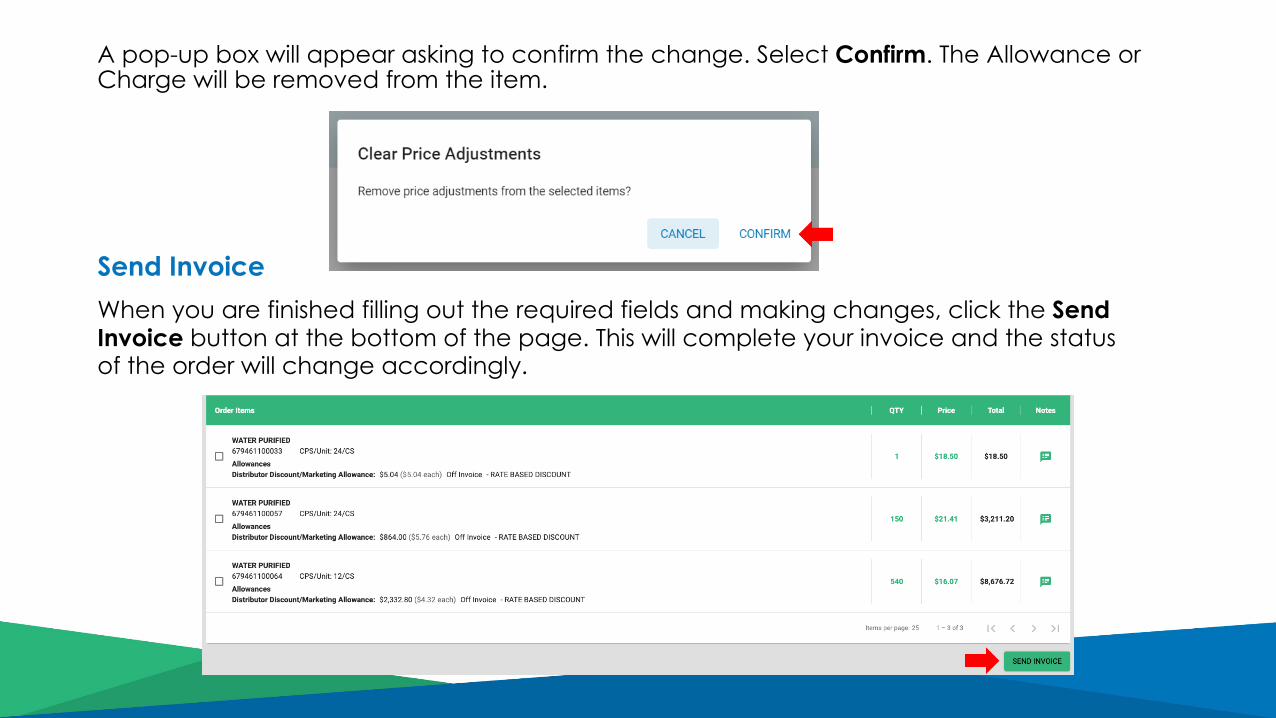
A pop-up box will appear asking to confirm the change. Select Confirm. The Allowance or Charge will be removed from the item.
Send Invoice When you are finished filling out the required fields and making changes, click the Send Invoice button at the bottom of the page. This will complete your invoice and the status of the order will change accordingly.
Set Invoice Defaults
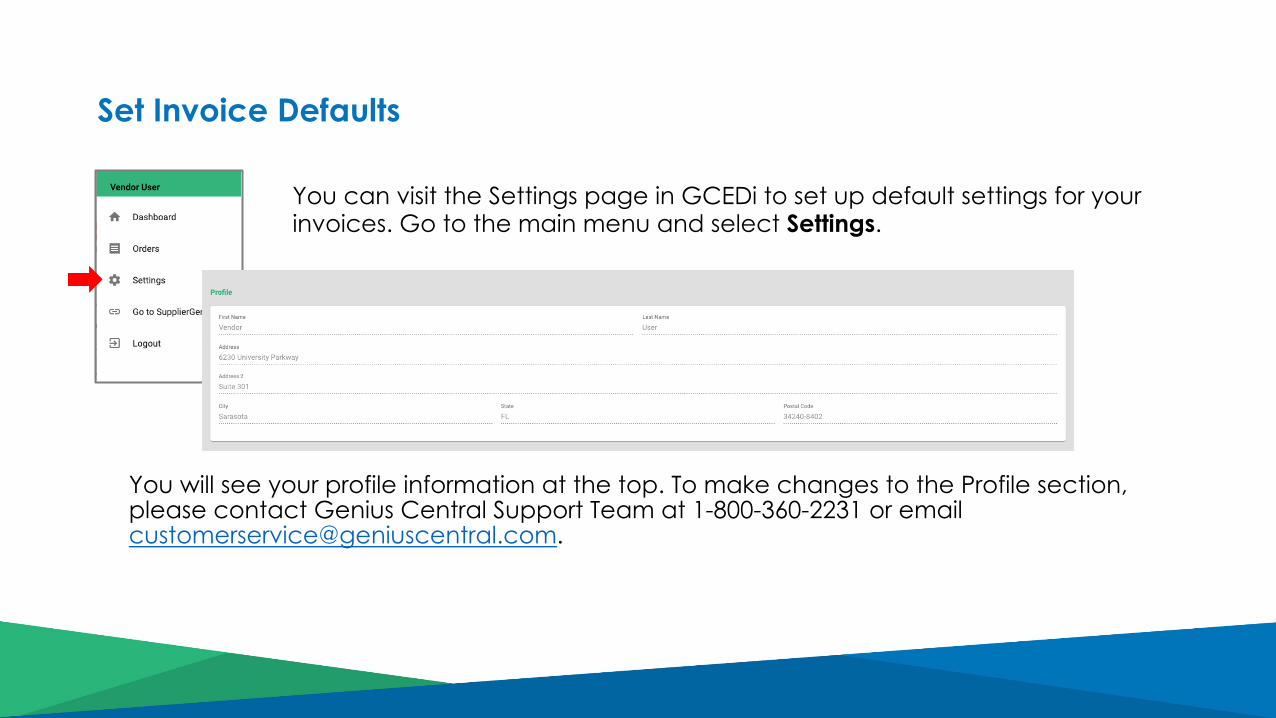
You will see your profile information at the top. To make changes to the Profile section, please contact Genius Central Support Team at 1-800-360-2231 or email [email protected].
You can visit the Settings page in GCEDi to set up default settings for your invoices. Go to the main menu and select Settings.
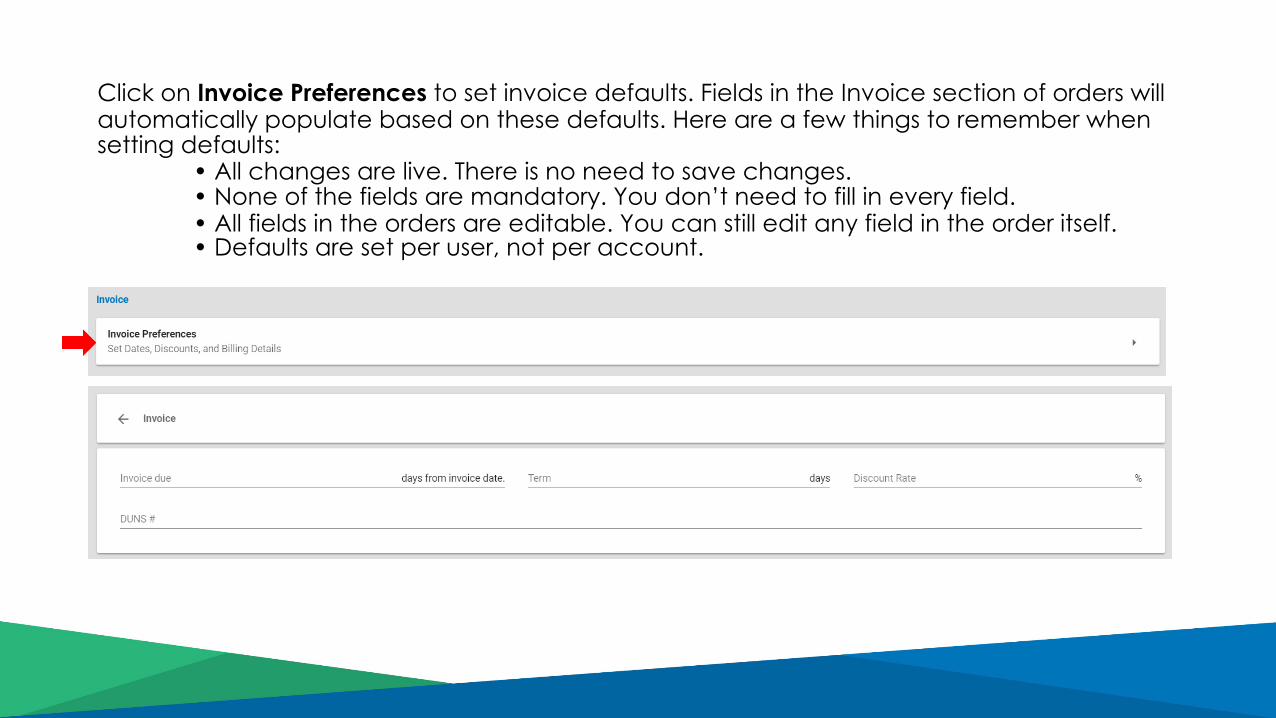
Click on Invoice Preferences to set invoice defaults. Fields in the Invoice section of orders will automatically populate based on these defaults. Here are a few things to remember when setting defaults:
• All changes are live. There is no need to save changes. • None of the fields are mandatory. You don’t need to fill in every field. • All fields in the orders are editable. You can still edit any field in the order itself. • Defaults are set per user, not per account.
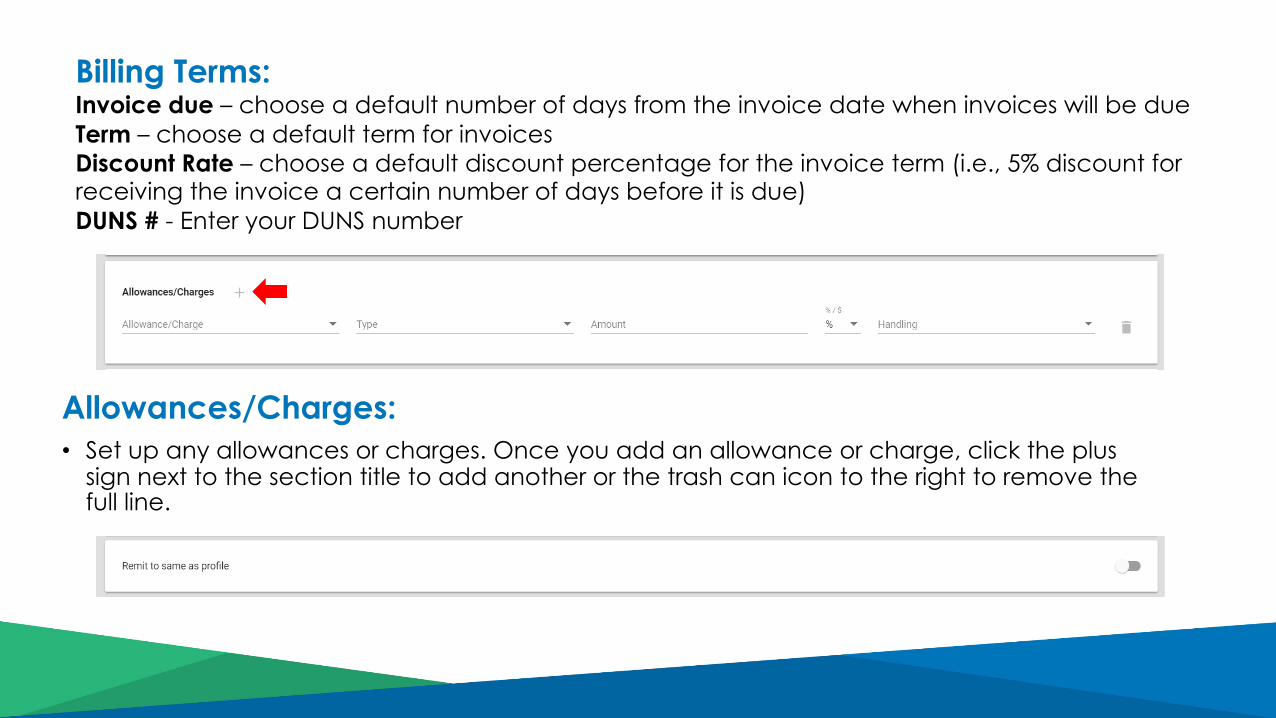
Billing Terms: Invoice due – choose a default number of days from the invoice date when invoices will be due Term – choose a default term for invoices Discount Rate – choose a default discount percentage for the invoice term (i.e., 5% discount for receiving the invoice a certain number of days before it is due) DUNS # - Enter your DUNS number
Allowances/Charges: • Set up any allowances or charges. Once you add an allowance or charge, click the plus
sign next to the section title to add another or the trash can icon to the right to remove the full line.
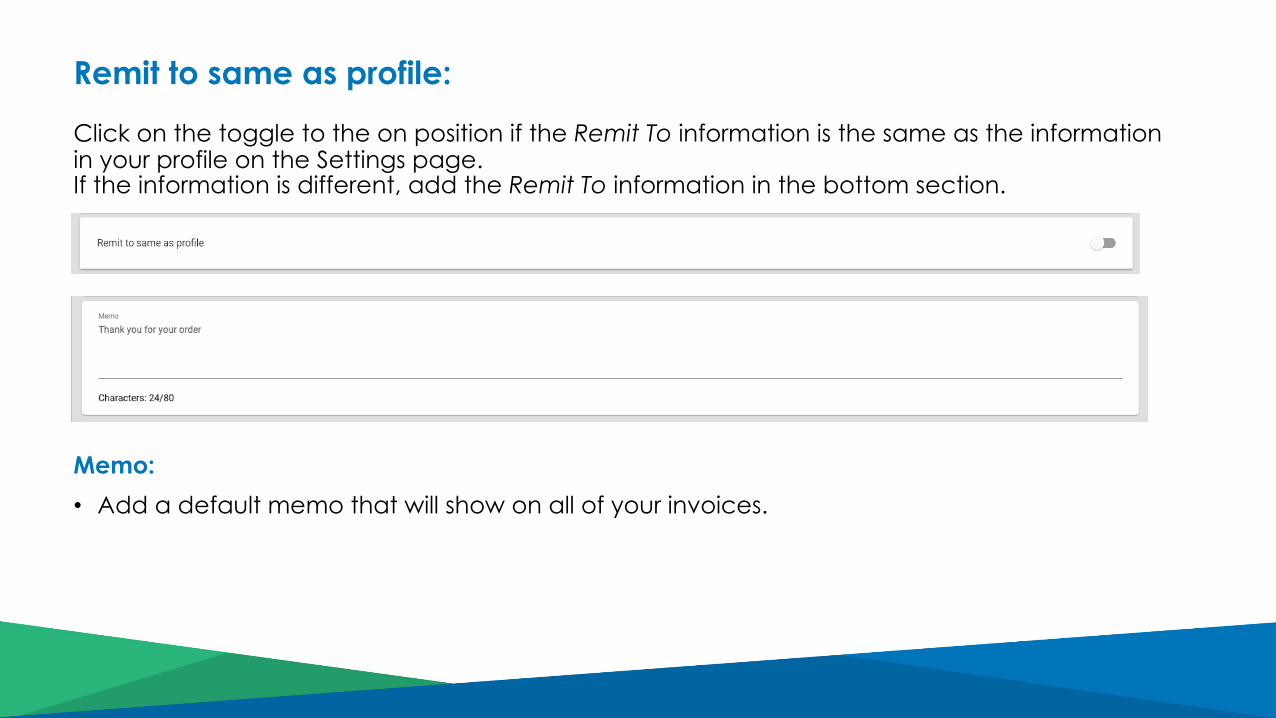
Click on the toggle to the on position if the Remit To information is the same as the information in your profile on the Settings page. If the information is different, add the Remit To information in the bottom section.
Memo: • Add a default memo that will show on all of your invoices.
Remit to same as profile:
Need Further Assistance?Please contact Genius Central support at 1.800.360.2231 or
by email at [email protected] if you have any questions or require additional training.


![Unlock-TO1 Genius Edu - Soal [genius-stan.blogspot.com].pdf](https://img.pdfslide.net/doc/110x75/55cf92ea550346f57b9a6871/unlock-to1-genius-edu-soal-genius-stanblogspotcompdf.jpg)


![[Www.pustaka78.Com] Buku Pintar Genius Senior Oleh Edi Songo KBO](https://img.pdfslide.net/doc/110x75/55cf991e550346d0339bb164/wwwpustaka78com-buku-pintar-genius-senior-oleh-edi-songo-kbo.jpg)
