Embed Size (px)
Citation preview
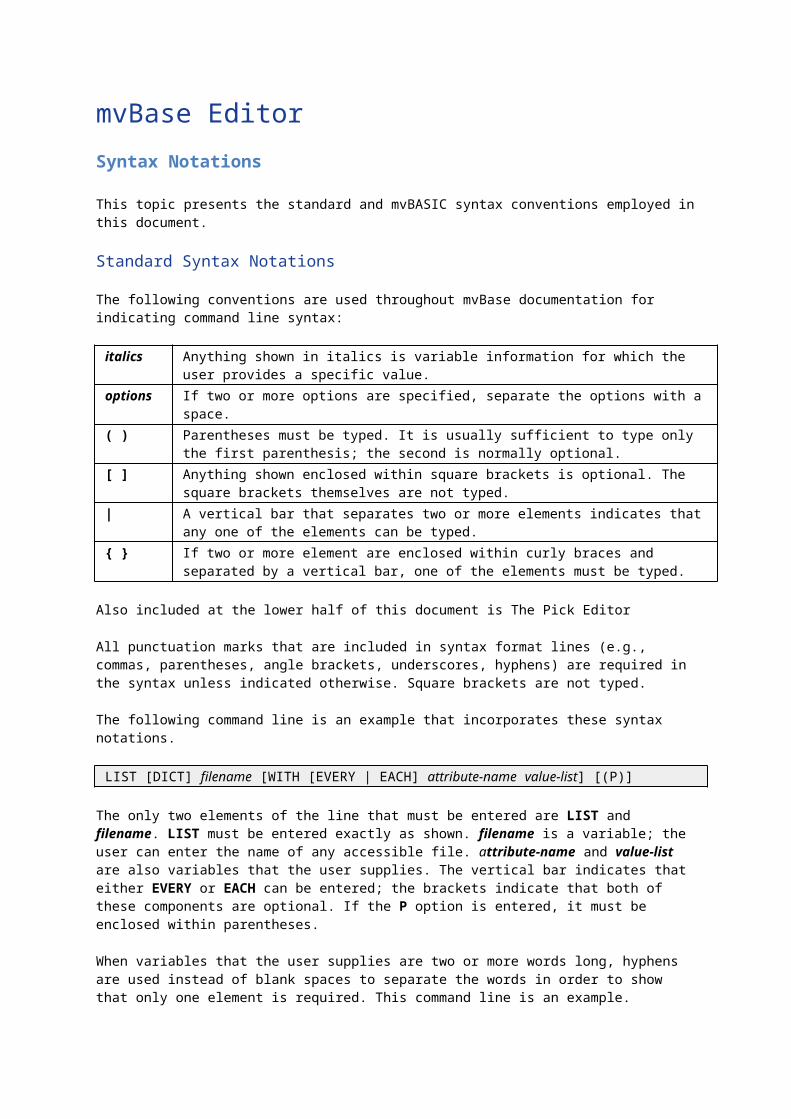
mvBase EditorSyntax Notations
This topic presents the standard and mvBASIC syntax conventions employed in this document.
Standard Syntax Notations
The following conventions are used throughout mvBase documentation for indicating command line syntax:
italics Anything shown in italics is variable information for which the user provides a specific value.
options If two or more options are specified, separate the options with a space.( ) Parentheses must be typed. It is usually sufficient to type only the first
parenthesis; the second is normally optional.[ ] Anything shown enclosed within square brackets is optional. The square
brackets themselves are not typed.| A vertical bar that separates two or more elements indicates that any one of
the elements can be typed.{ } If two or more element are enclosed within curly braces and separated by a
vertical bar, one of the elements must be typed.
Also included at the lower half of this document is The Pick Editor
All punctuation marks that are included in syntax format lines (e.g., commas, parentheses, angle brackets, underscores, hyphens) are required in the syntax unless indicated otherwise. Square brackets are not typed.
The following command line is an example that incorporates these syntax notations.
LIST [DICT] filename [WITH [EVERY | EACH] attribute-name value-list] [(P)]
The only two elements of the line that must be entered are LIST and filename. LIST must be entered exactly as shown. filename is a variable; the user can enter the name of any accessible file. attribute-name and value-list are also variables that the user supplies. The vertical bar indicates that either EVERY or EACH can be entered; the brackets indicate that both of these components are optional. If the P option is entered, it must be enclosed within parentheses.
When variables that the user supplies are two or more words long, hyphens are used instead of blank spaces to separate the words in order to show that only one element is required. This command line is an example.
LIST filename item-list
The word filename indicates a single element, and the words item and list joined by a hyphen likewise indicate a single element.
mvBASIC Syntax Notations

Syntax notations for mvBASIC are very similar to the standard syntax notations, but they do differ in minor ways. This topic summarizes syntax notations specific to mvBASIC.
italics Anything shown in italics is variable information for which the user provides a specific value.
[ ] Anything shown enclosed within square brackets is optional unless indicated otherwise. The square brackets themselves are not typed unless they are shown in bold.
| A vertical bar that separates two or more elements indicates that any one of the elements can be typed.
< > Bold angle brackets are part of the syntax, and must be typed unless indicated otherwise.
{ } Bold parentheses are a part of the syntax. both parentheses must be typed unless indicated otherwise.
All punctuation marks that are included in syntax format lines (e.g., commas, parentheses, angle brackets, underscores, hyphens) are required in the syntax unless indicated otherwise.
The following command line is an example that incorporates these syntax notations.
OPEN [‘DICT’] filename TO filevar THEN | ELSE statements
The keywords OPEN and TO must be specified. Either the THEN or ELSE clause must be specified, but both are not necessary. The user must supply appropriate values for filename, filevar, and statements. The keyword DICT is optional, but if it is included, it must be enclosed within parentheses.
When variables that are supplied by the user are two or more words long, hyphens are used instead of blank spaces to separate the words in order to show that only one element is required. For example, in the following statement, the word count-var indicates a single element.
GET var [,length] SETTING count-var...
Introduction to the EditorThe Editor is a processor that can create or modify any item on the mvBase system, including dictionary and data items, text items, mvBASIC programs, Procs, and assembly source code. An applications program usually manages updating data items. The Editor is most frequently used to create or update dictionary items, mvBASIC programs, and Procs.
The Editor is the standard MultiValue line-oriented editor. This section introduces the Editor and discusses:
Invoking the Editor Processor
This topic describes how to activate or invoke the Editor for use. This includes actions such as addressing the current line and using the Insert Mode.
Using Editor Buffers
This topic describes how the Editor uses buffers to maintain a copy of an item during an update.
Using the Editor
The mvBase Editor can both create new items and edit existing items. It is a line-oriented editor, which means that the Editor commands are addressed to the current line or to a range of lines starting at the current line. As an item is entered, changes are recorded in an update buffer; they are not visible until the buffers are flipped. The Editor is exited and control is returned to TCL upon exiting the last item to be edited.
This section is a tutorial that describes the basics of editing an item. It covers these topics:
How to use the EDIT command to read an existing item or create a new item, and how to use the EDIT-LIST command to invoke the Editor on a saved select-list.
How to move the current line and address one line or a range of lines. How to use the Editor’s search commands. How to invoke Insert Mode to type successive new lines, and how to insert empty
lines in a dictionary item. How and why the Editor buffers are flipped. How to save the edited version of an item to disk drive. How to exit an item and return control to the TCL processor.
Invoking the Editor
The EDIT command invokes the Editor on any item in an existing file. If the item already exists, it is read for editing; if an item with the item-ID you specify does not exist, a new item is created with that item-ID.
Format
ED [IT] [DICT] filename item-list [(options)]
You can type the EDIT command either in full, or simply as ED. The file name of an existing file must be included; if you do not include an item-ID, you are prompted for it. If you include a list of item-IDs, or if you invoke the Editor when a select-list is active, each item in the list is read once the preceding item is exited.
Take a look at this example which invokes the Editor on three items in the PROCLIB file:
>ED PROCLIB CUST-ADD CUST-EDIT CUST-SORTCUST-ADDTOP.
Once CUST-ADD is exited CUST-EDIT is read, and so on. When the last item is exited, control is returned to TCL.
If the Editor is invoked when a select-list is active, each item in the select-list is read.
For example, the same items as in the above example could be selected with the SELECT command and then edited:

>SELECT PROCLIB = "CUST-]"3 ITEMS SELECTED.>ED PROCLIBCUST-ADDTOP.
Again, once the first item in the list is exited, the next is read, and so on.
If you use an asterisk (*) in place of an item list, all of the items in the file specified are read. For example, the following command reads all of the items in the CUSTOMERS file. HJENK7129 is the first item to be edited:
>ED CUSTOMERS *HJENK7129TOP.
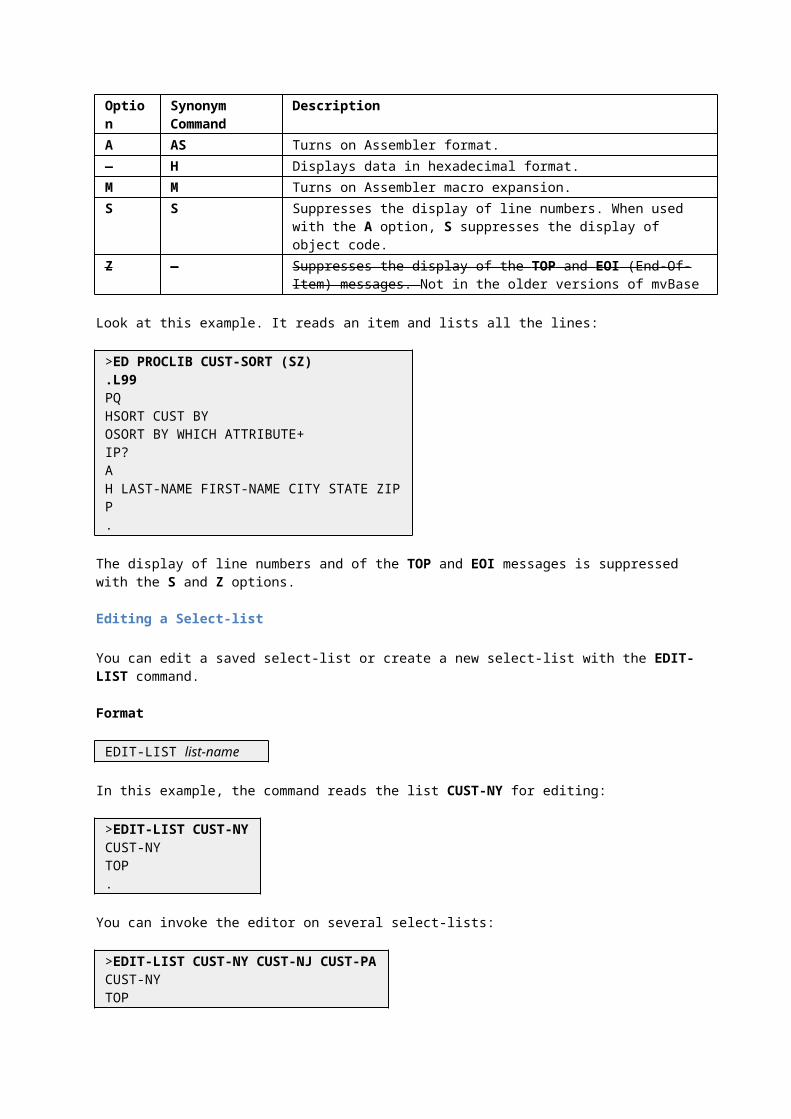
Options to the EDIT command are listed below. Options should be entered in parentheses or they will be interpreted as another item-ID. Most of the options are also available as Editor commands once the Editor is invoked.
Option
Synonym Command
Description
A AS Turns on Assembler format.— H Displays data in hexadecimal format.M M Turns on Assembler macro expansion.S S Suppresses the display of line numbers. When used with the
A option, S suppresses the display of object code.Z — Suppresses the display of the TOP and EOI (End-Of-Item)
messages. Not in the older versions of mvBase
Look at this example. It reads an item and lists all the lines:
>ED PROCLIB CUST-SORT (SZ).L99PQHSORT CUST BYOSORT BY WHICH ATTRIBUTE+IP?AH LAST-NAME FIRST-NAME CITY STATE ZIPP.
The display of line numbers and of the TOP and EOI messages is suppressed with the S and Z options.
Editing a Select-list
You can edit a saved select-list or create a new select-list with the EDIT-LIST command.
Format
EDIT-LIST list-name
In this example, the command reads the list CUST-NY for editing:
>EDIT-LIST CUST-NYCUST-NYTOP.
You can invoke the editor on several select-lists:
>EDIT-LIST CUST-NY CUST-NJ CUST-PACUST-NYTOP.
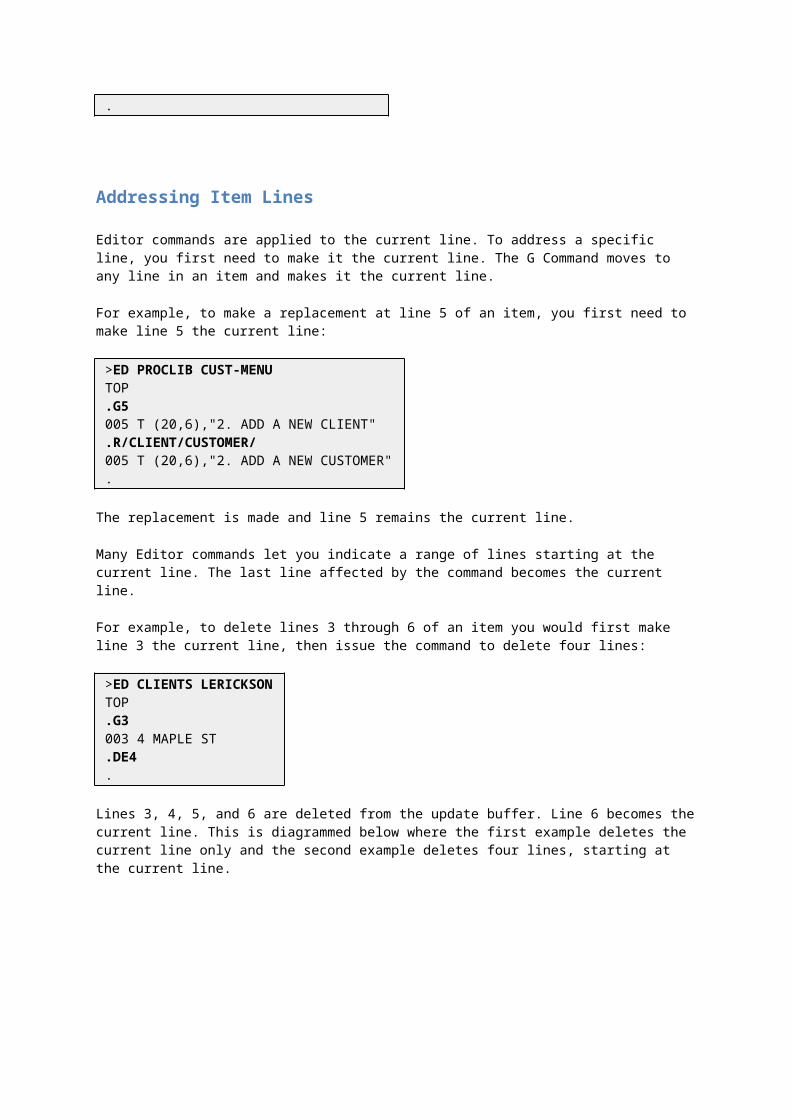
Addressing Item Lines
Editor commands are applied to the current line. To address a specific line, you first need to make it the current line. The G Command moves to any line in an item and makes it the current line.
For example, to make a replacement at line 5 of an item, you first need to make line 5 the current line:
>ED PROCLIB CUST-MENUTOP.G5005 T (20,6),"2. ADD A NEW CLIENT".R/CLIENT/CUSTOMER/005 T (20,6),"2. ADD A NEW CUSTOMER".
The replacement is made and line 5 remains the current line.
Many Editor commands let you indicate a range of lines starting at the current line. The last line affected by the command becomes the current line.
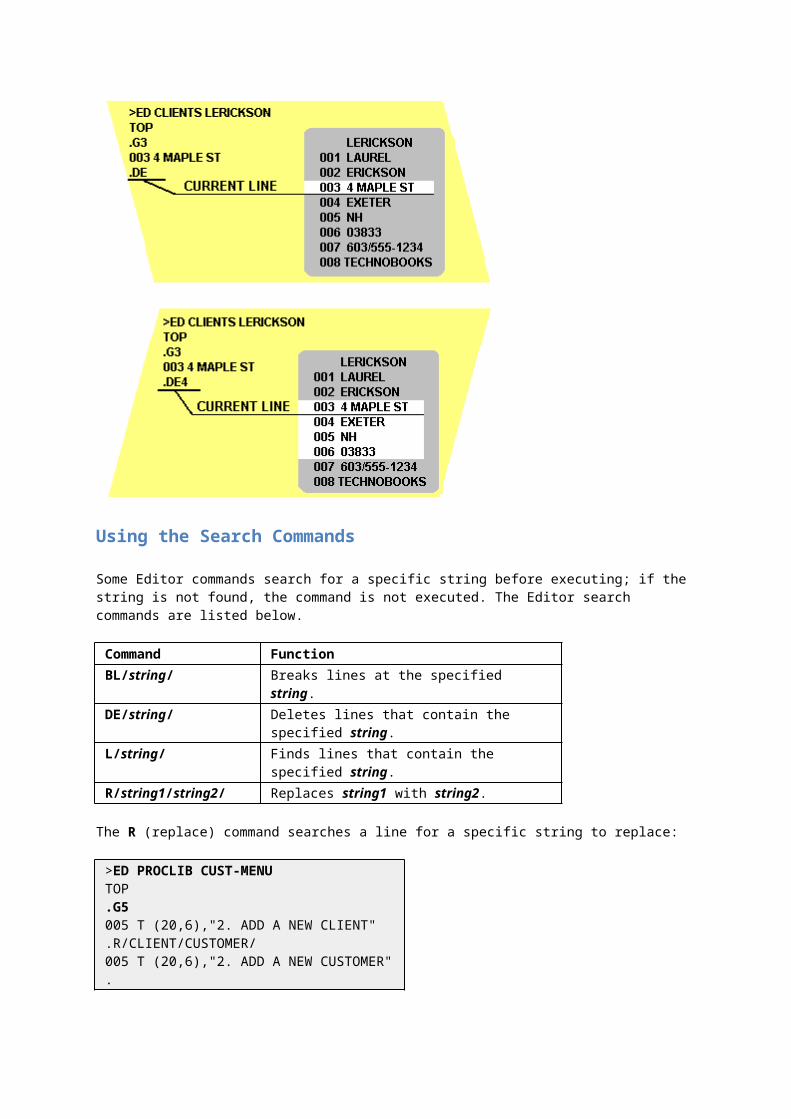
For example, to delete lines 3 through 6 of an item you would first make line 3 the current line, then issue the command to delete four lines:
>ED CLIENTS LERICKSONTOP.G3003 4 MAPLE ST.DE4.
Lines 3, 4, 5, and 6 are deleted from the update buffer. Line 6 becomes the current line. This is diagrammed below where the first example deletes the current line only and the second example deletes four lines, starting at the current line.
Using the Search Commands
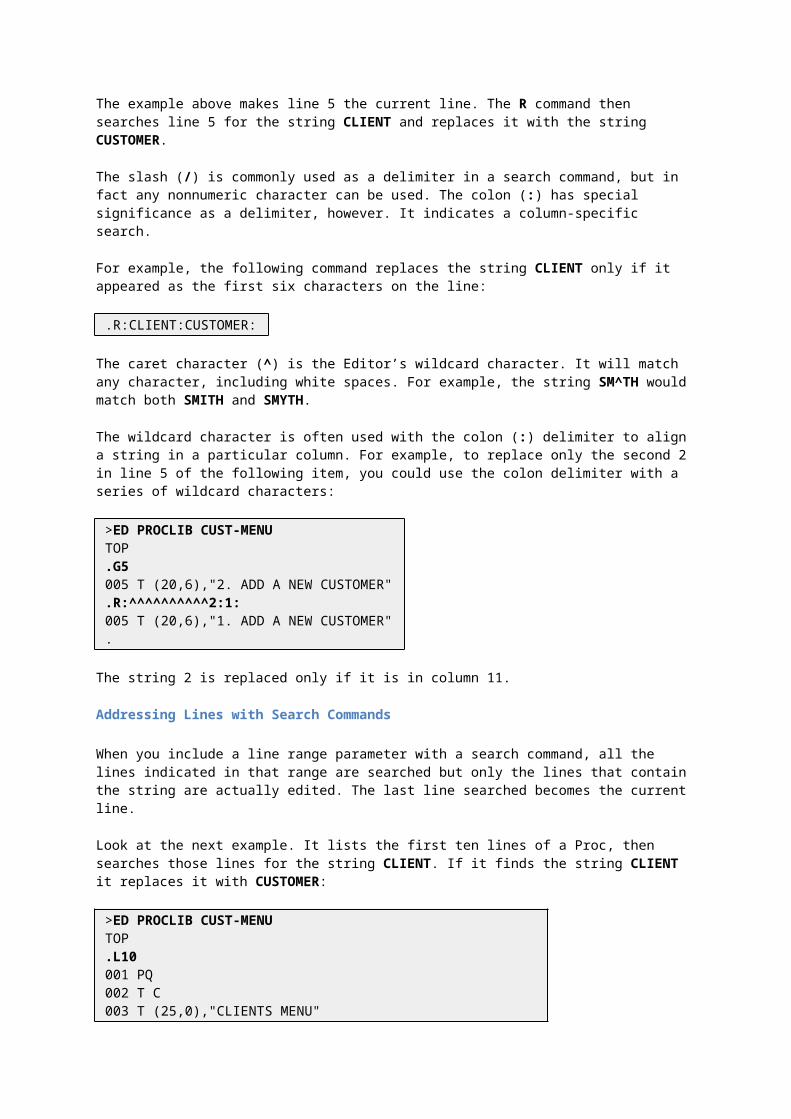
Some Editor commands search for a specific string before executing; if the string is not found, the command is not executed. The Editor search commands are listed below.
Command FunctionBL/string/ Breaks lines at the specified string.DE/string/ Deletes lines that contain the specified
string.L/string/ Finds lines that contain the specified
string.R/string1/string2/ Replaces string1 with string2.
The R (replace) command searches a line for a specific string to replace:
>ED PROCLIB CUST-MENUTOP.G5005 T (20,6),"2. ADD A NEW CLIENT".R/CLIENT/CUSTOMER/005 T (20,6),"2. ADD A NEW CUSTOMER".
The example above makes line 5 the current line. The R command then searches line 5 for the string CLIENT and replaces it with the string CUSTOMER.
The slash (/) is commonly used as a delimiter in a search command, but in fact any nonnumeric character can be used. The colon (:) has special significance as a delimiter, however. It indicates a column-specific search.
For example, the following command replaces the string CLIENT only if it appeared as the first six characters on the line:
.R:CLIENT:CUSTOMER:
The caret character (^) is the Editor’s wildcard character. It will match any character, including white spaces. For example, the string SM^TH would match both SMITH and SMYTH.
The wildcard character is often used with the colon (:) delimiter to align a string in a particular column. For example, to replace only the second 2 in line 5 of the following item, you could use the colon delimiter with a series of wildcard characters:
>ED PROCLIB CUST-MENUTOP.G5005 T (20,6),"2. ADD A NEW CUSTOMER".R:^^^^^^^^^^2:1:005 T (20,6),"1. ADD A NEW CUSTOMER".
The string 2 is replaced only if it is in column 11.
Addressing Lines with Search Commands
When you include a line range parameter with a search command, all the lines indicated in that range are searched but only the lines that contain the string are actually edited. The last line searched becomes the current line.
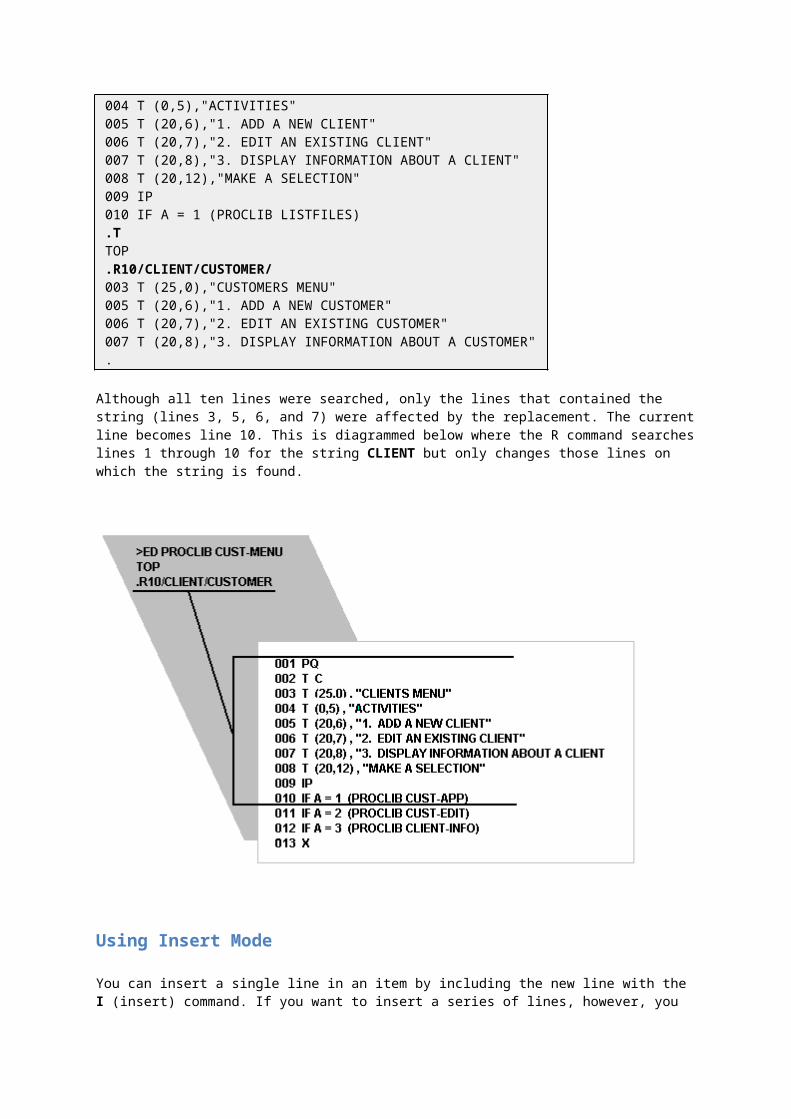
Look at the next example. It lists the first ten lines of a Proc, then searches those lines for the string CLIENT. If it finds the string CLIENT it replaces it with CUSTOMER:
>ED PROCLIB CUST-MENUTOP.L10001 PQ002 T C003 T (25,0),"CLIENTS MENU"004 T (0,5),"ACTIVITIES"005 T (20,6),"1. ADD A NEW CLIENT"006 T (20,7),"2. EDIT AN EXISTING CLIENT"007 T (20,8),"3. DISPLAY INFORMATION ABOUT A CLIENT"008 T (20,12),"MAKE A SELECTION"009 IP010 IF A = 1 (PROCLIB LISTFILES).TTOP.R10/CLIENT/CUSTOMER/003 T (25,0),"CUSTOMERS MENU"005 T (20,6),"1. ADD A NEW CUSTOMER"006 T (20,7),"2. EDIT AN EXISTING CUSTOMER"007 T (20,8),"3. DISPLAY INFORMATION ABOUT A CUSTOMER".
Although all ten lines were searched, only the lines that contained the string (lines 3, 5, 6, and 7) were affected by the replacement. The current line becomes line 10. This is diagrammed below where the R command searches lines 1 through 10 for the string CLIENT but only changes those lines on which the string is found.
Using Insert Mode
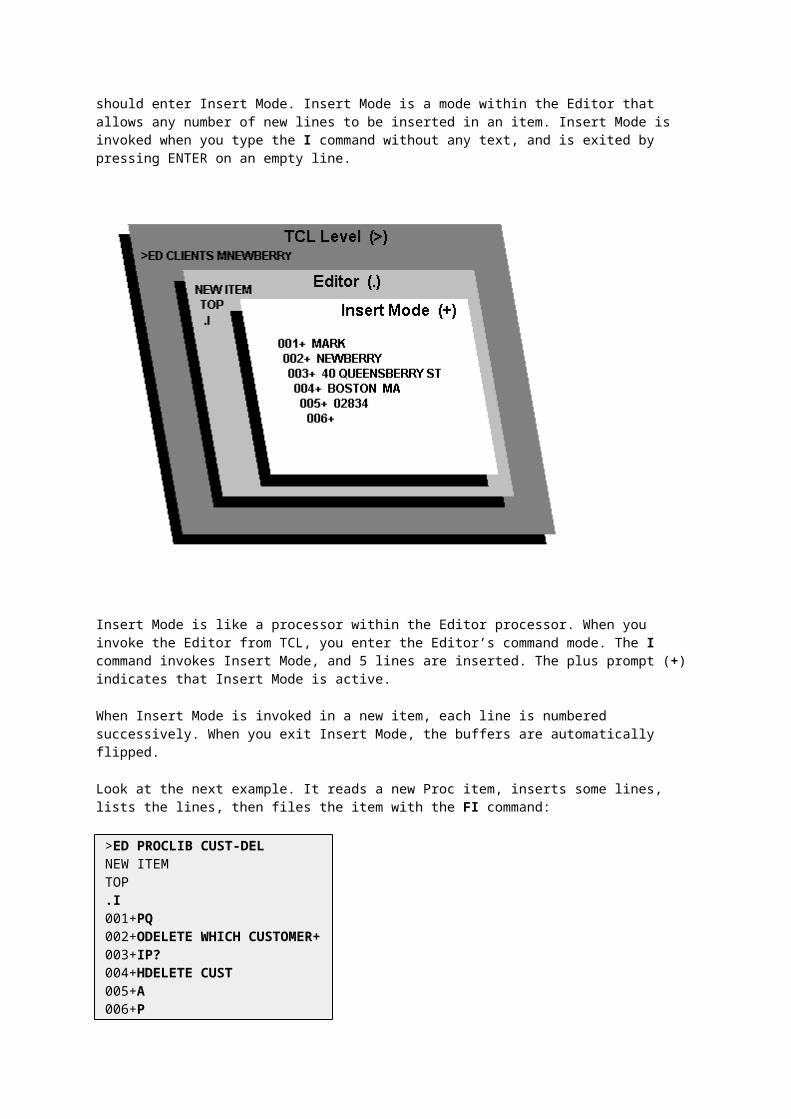
You can insert a single line in an item by including the new line with the I (insert) command. If you want to insert a series of lines, however, you should enter Insert Mode. Insert Mode is a mode within the Editor that allows any number of new lines to be inserted in an item. Insert Mode is invoked when you type the I command without any text, and is exited by pressing ENTER on an empty line.
Insert Mode is like a processor within the Editor processor. When you invoke the Editor from TCL, you enter the Editor’s command mode. The I command invokes Insert Mode, and 5 lines are inserted. The plus prompt (+) indicates that Insert Mode is active.
When Insert Mode is invoked in a new item, each line is numbered successively. When you exit Insert Mode, the buffers are automatically flipped.
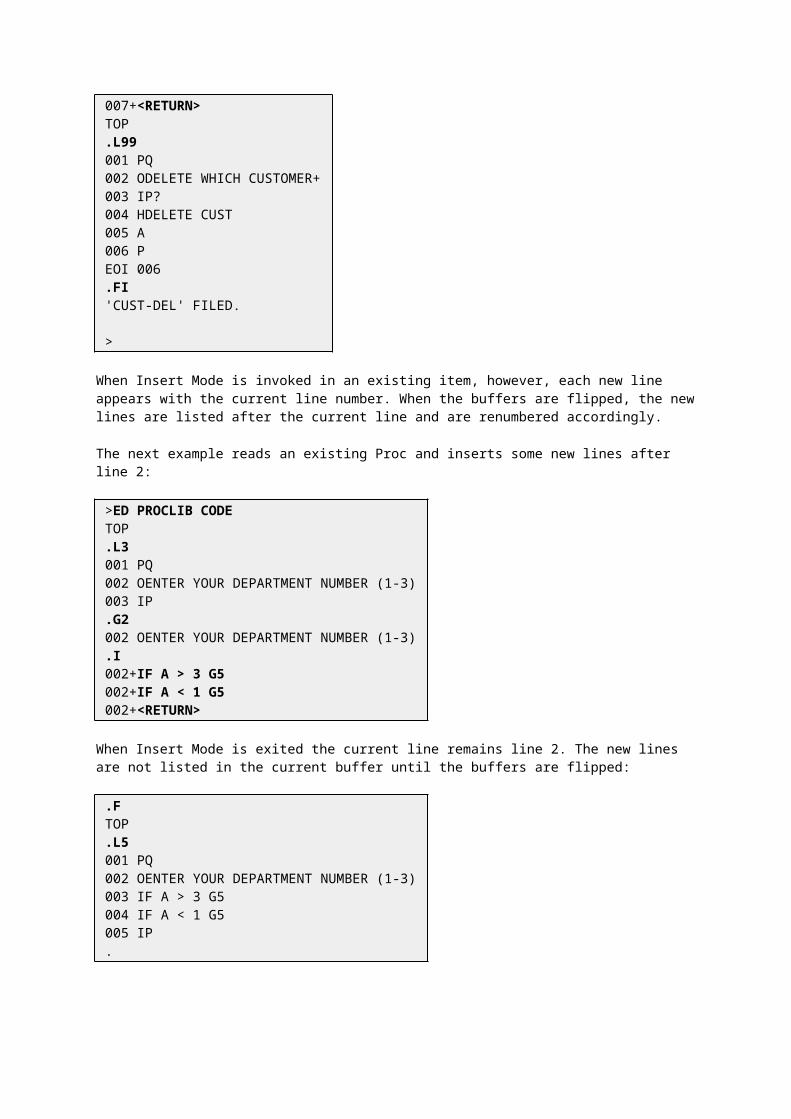
Look at the next example. It reads a new Proc item, inserts some lines, lists the lines, then files the item with the FI command:
>ED PROCLIB CUST-DELNEW ITEMTOP.I001+PQ002+ODELETE WHICH CUSTOMER+003+IP?004+HDELETE CUST005+A006+P007+<RETURN>TOP.L99001 PQ002 ODELETE WHICH CUSTOMER+003 IP?004 HDELETE CUST005 A006 PEOI 006.FI
'CUST-DEL' FILED.
>
When Insert Mode is invoked in an existing item, however, each new line appears with the current line number. When the buffers are flipped, the new lines are listed after the current line and are renumbered accordingly.
The next example reads an existing Proc and inserts some new lines after line 2:
>ED PROCLIB CODETOP.L3001 PQ002 OENTER YOUR DEPARTMENT NUMBER (1-3)003 IP.G2002 OENTER YOUR DEPARTMENT NUMBER (1-3).I002+IF A > 3 G5002+IF A < 1 G5002+<RETURN>
When Insert Mode is exited the current line remains line 2. The new lines are not listed in the current buffer until the buffers are flipped:
.FTOP.L5001 PQ002 OENTER YOUR DEPARTMENT NUMBER (1-3)003 IF A > 3 G5004 IF A < 1 G5005 IP.
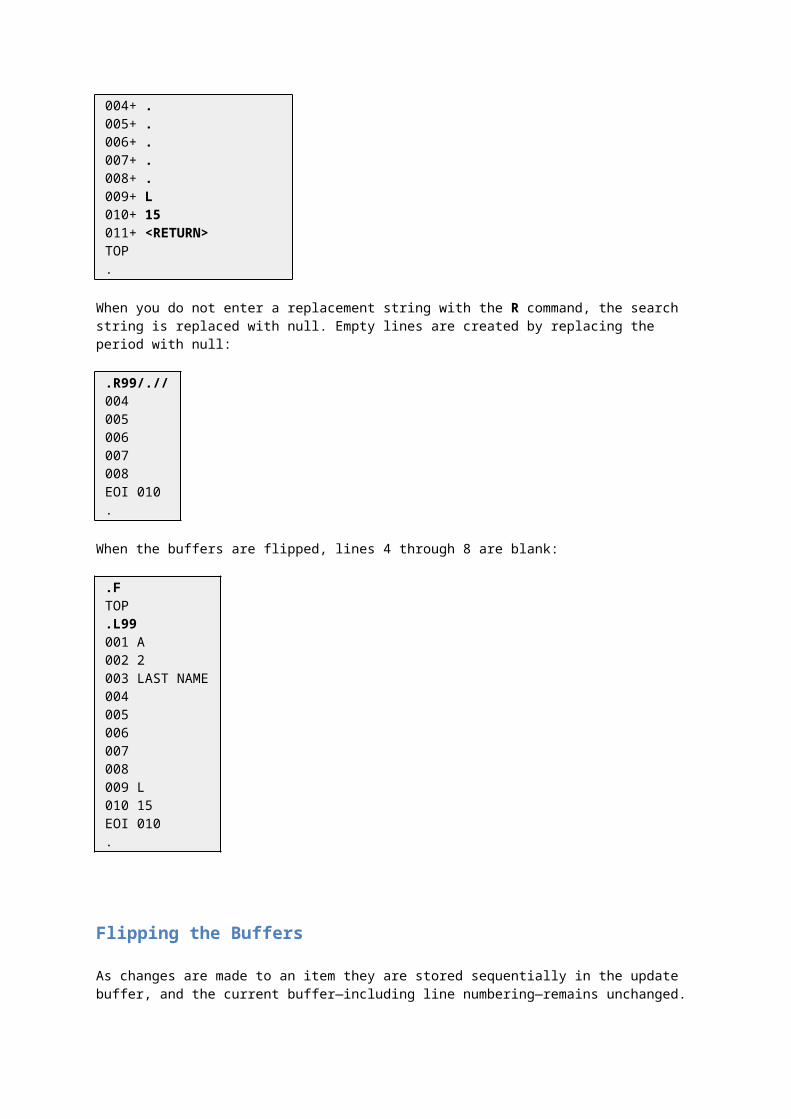
Creating Empty Lines
Dictionary items often require empty lines, but in Insert Mode a carriage return entered on an empty line exits the insert prompt.
The method to create an empty line from Insert Mode is to insert a character on the line; then replace that character with null. For example, this method produces the result shown at the center:
Attribute marks are control characters that delimit each line of an item. An attribute mark is automatically inserted by each carriage return entered in Insert Mode.
Empty lines are created by entering a specific character (usually a period) on each line that is to be blank and then using the R (replace) command to replace that character with null. One advantage to this method is that you can keep better track of the line number you are on. This next example creates a dictionary item and inserts a period (.) on each line that is to be blank:
>ED DICT CLIENTS LNAMENEW ITEMTOP.I001+ A002+ 2003+ LAST NAME004+ .005+ .006+ .007+ .008+ .009+ L010+ 15011+ <RETURN>TOP.
When you do not enter a replacement string with the R command, the search string is replaced with null. Empty lines are created by replacing the period with null:
.R99/.//004

005006007008EOI 010.
When the buffers are flipped, lines 4 through 8 are blank:
.FTOP.L99001 A002 2003 LAST NAME004005006007008009 L010 15EOI 010.
Flipping the Buffers
As changes are made to an item they are stored sequentially in the update buffer, and the current buffer—including line numbering—remains unchanged. To make a change to an earlier line or to display a change, you must flip the buffers.
The F (flip) command flips the buffers and makes the update buffer the current buffer. The F command does not save the changes to the disk drive. To save changes permanently, use the FS (filesave) or FI (file item) command.
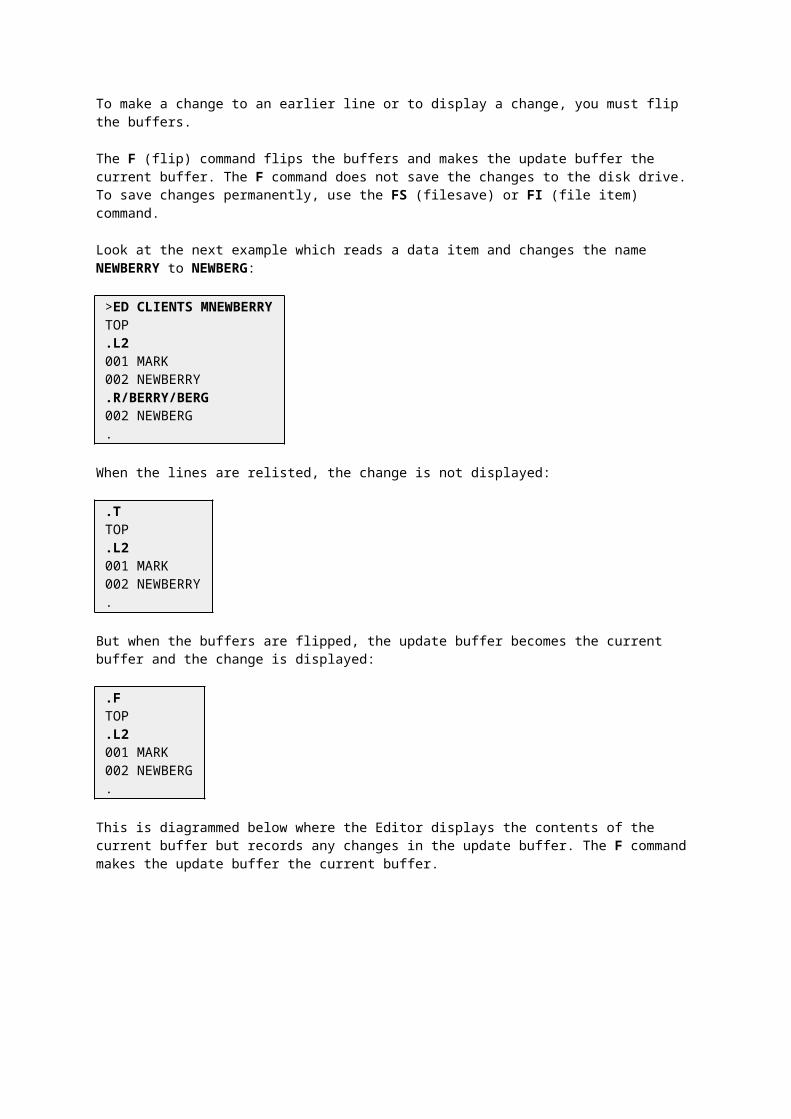
Look at the next example which reads a data item and changes the name NEWBERRY to NEWBERG:
>ED CLIENTS MNEWBERRYTOP.L2001 MARK002 NEWBERRY.R/BERRY/BERG002 NEWBERG.
When the lines are relisted, the change is not displayed:
.TTOP.L2001 MARK002 NEWBERRY
.
But when the buffers are flipped, the update buffer becomes the current buffer and the change is displayed:
.FTOP.L2001 MARK002 NEWBERG.
This is diagrammed below where the Editor displays the contents of the current buffer but records any changes in the update buffer. The F command makes the update buffer the current buffer.
Saving an Item
You can save your changes to disk with either the FS (filesave) or FI (file item) command.
The FS command saves the updated version of an item to disk without exiting the item.
The FI command saves the updated version as it exits the item.
The syntax is similar for both commands:
Format
FS [O] [([DICT] filename] [item-ID]]
FI [K] [O] [([DICT] filename] [item-ID]]
When the FS and FI commands are entered without any options, they save the updated version of the item to disk under the original file name and item-ID.
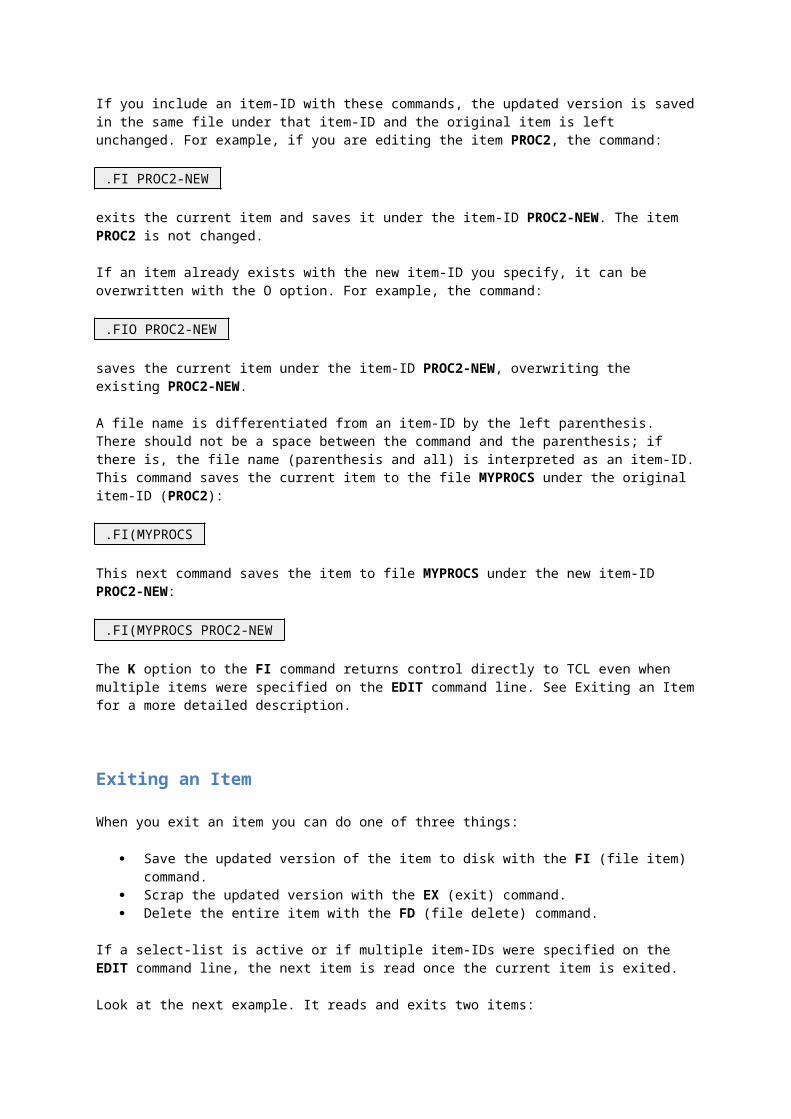
If you include an item-ID with these commands, the updated version is saved in the same file under that item-ID and the original item is left unchanged. For example, if you are editing the item PROC2, the command:
.FI PROC2-NEW
exits the current item and saves it under the item-ID PROC2-NEW. The item PROC2 is not changed.
If an item already exists with the new item-ID you specify, it can be overwritten with the O option. For example, the command:
.FIO PROC2-NEW
saves the current item under the item-ID PROC2-NEW, overwriting the existing PROC2-NEW.
A file name is differentiated from an item-ID by the left parenthesis. There should not be a space between the command and the parenthesis; if there is, the file name (parenthesis and all) is interpreted as an item-ID. This command saves the current item to the file MYPROCS under the original item-ID (PROC2):
.FI(MYPROCS
This next command saves the item to file MYPROCS under the new item-ID PROC2-NEW:
.FI(MYPROCS PROC2-NEW
The K option to the FI command returns control directly to TCL even when multiple items were specified on the EDIT command line. See Exiting an Item for a more detailed description.
Exiting an Item
When you exit an item you can do one of three things:
Save the updated version of the item to disk with the FI (file item) command. Scrap the updated version with the EX (exit) command. Delete the entire item with the FD (file delete) command.

If a select-list is active or if multiple item-IDs were specified on the EDIT command line, the next item is read once the current item is exited.
Look at the next example. It reads and exits two items:
>ED PROCLIB PROC1 PROC2PROC1TOP.EX'PROC1' EXITEDPROC2TOP.EX'PROC2' EXITED>
When the last item is exited, control is returned to TCL.
To kill the reading of all remaining items and return directly to TCL, use the K option with the FI, EX and FD commands.
This example exits the current item and returns directly to the TCL prompt:
>ED PROCLIB PROC1 PROC2 PROC3 PROC4PROC1TOP.EXK'PROC1' EXITED
>
Items PROC2, PROC3, and PROC4 are not read.
Recovering a Deleted Item
The TCL command RECOVER-FD recovers an item accidentally deleted with the FD command. RECOVER-FD can recover only the most recently deleted item and must be used immediately after an FD command or the item will not be recovered.
RECOVER-FD prompts for the item-ID of the deleted item with the prompt:
ENTER ITEM-ID *
If anything other than the item-ID of the deleted item is entered, the item-ID prompt is displayed again.
An item is not recoverable if another item has been deleted after it. If you enter a carriage return at the ENTER ITEM-ID * prompt, the item is not recovered and you return to TCL.
CAUTION
On an active system it may not be possible to recover the deleted item if the frames that contained the deleted item, which are returned to the available space table, are immediately used by another process.

The PICK Editor
The Editor is the process through which programs are entered into the computer. It allows the creation, update, and deletion of items in a file. A brief tutorial on the most essential Editor commands is provided in this chapter.
In general, editors fall into two categories. There are line editors, like the one about to be discussed, and there are full-screen editors. A line editor is much more primitive in design. In line editors, you must position the "line pointer" to the line (attribute) that you want to affect using a positioning command such as "G" (goto line), "U" (move up), and "N" (move down). With a full-screen editor, you use the numeric keypad or the arrow keys to position to the line that you want to alter.
Activating The Pick Command Line Editor
The following commands are essential for the use of the Editor throughout the course of this book:
ED or EDITEither of these verbs may be used at the TCL prompt character ( > ) to activate the Editor. It always has the general form:
>ED filename item-id <cr>
to edit an individual item in a file, or
>ED filename item-id item-id item-id. <cr>
to edit multiple items in a file, or
>ED filename * <cr>
to edit all the items in a file, or
>SELECT filename {with selection criteria... } < cr >
n ITEMS SELECTED.
>ED filename <cr>The ED command does not require the itemlist specification when following a SELECT or SSELECT command.
Before entering the Editor, the requested filename is searched for the specified item-id. If the item-id is found, the line pointer is left at the "top" of the item. If it is not found, then a "NEW ITEM" message appears and the line pointer is positioned to the top of an otherwise empty item. Once the Editor has been invoked, there are a number of commands available; the next several sections describe those that are used the most often.
Inserting New LinesThe Insert Editor command inserts one or more lines:
I
For an example, examine the terminal dialogue in Fig. 2-1. Note that while you are in "insert mode," each new line (attribute) is given a line number. To get out of insert mode, press the carriage return key while the cursor is positioned immediately to the right of a "plus" (+) sign. This returns control to the Editor command mode.
>ED filename item-id
NEW ITEM
TOP
· I<cr>
001+* this is line 1 <cr>
002+* this is line 2 <cr>
003+<cr>
Replacing Existing LinesTo replace a portion or all of an attribute, or a range of attributes, use the Replace command:
R
For example:
.R/PRINT/CRT
replaces, on the current line, the first occurrence of the word "PRINT" with "CRT." The command
.RU999/PRINT/CRT replaces, in the next 999 lines, the first occurrence on each line of "PRINT" with "CRT."
RU999/PRINT/CRT/*
Replaces, in the next 999 lines, all occurrences of “PRINT” with “CRT”
Listing Items to the ScreenTo list a specified number of lines on the screen, use the List command:
L
See Fig. 2-2 for an example of using the List command. The "EOI 011" message means that the "End Of Item" has occurred at line 11. There are no more attributes or lines after this message.
The Shortcut Way to List Items. Most versions of Pick allow "prestored" commands in the Editor:
Prestored CommandsP
Normally, the only one that is defined automatically is P0 (zero), and it issues an "L22" command. To test this, enter the P command at the Editor command
>ED filename item-id <cr>
TOP
.L22<cr>
001 * this is line 1
002 * this is line 2
003 * and so on...
*
*
011 * this is the last line...
EOI 011
We use also P1, P2, … p20 to pre-store other commands, using the [ESC] key to separate commands
e.g. P2 l5
by typing in P2, 5 lines will be listed
e.g. P2 l5 ] l5/who, where “]” is the Escape key
this lines will list 5 lines, then list another 5 lines looking only for the characters WHO.
Fig. 2-2. Using the List command.
>ED filename item-id <cr>
TOP
.P<cr>
001 * this is line 1
002 * this is line 2
003 * and so on...
*
*
011 * this is the last line...
EOI 011
Deleting Lines
To delete one or more lines, use the Delete command:
DEorDEn
For example:
014 * this line needs to go away... .
.DE<cr>
This does away with the current line, which in this case is line 14. Or, you can use the DE command on multiple lines:
014 * this line is going away...
.DE3<cr>
This deletes line 14 and the next two lines, for a total of three lines.
Moving the Line Pointer
To move the pointer to a particular line n, use the Goto command:
Gnorn
For example:
014 * this is line 14
.G7<cr>
007 * this is line 7
The "G" is optional. You may also simply enter the line number:
014 * this is line 14
.7<cr>
007 * this is line 7
Reviewing Changes: The F Command
To review changes in an item, use the Flip command:
F
This command "flips" Editor buffers. Get used to this. You must use this command before you may review any changes that have been made to an item:
014 * this is line 14
.F<cr>
TOP
.
Saving and Exiting
The File command is used to save (or resave) the item being entered or modified. Entering
FI
files the item, saving all changes made. For example:

014 * this is line 14
.FI<cr>
'item-id' filed.
FS
files the item, saving all changes made. For example:
014 * this is line 14
.FS<cr>
But does NOT Exit the item
Exiting without Saving Changes
To abort the edit of an item, use the Exit command. Entering
EX
exits the item without saving any changes. For example: