Embed Size (px)
Citation preview
Page 1 of 18 This work is created by Greg Walters for the University of Glasgow Library EdShare and is licensed
under a Creative Commons Attribution-Non Commercial-ShareAlike 4.0 International License
EdShare
User Guide
Uploading resources to EdShare
Level: Beginner
Page 2 of 18 This work is created by Greg Walters for the University of Glasgow Library EdShare and is licensed
under a Creative Commons Attribution-Non Commercial-ShareAlike 4.0 International License
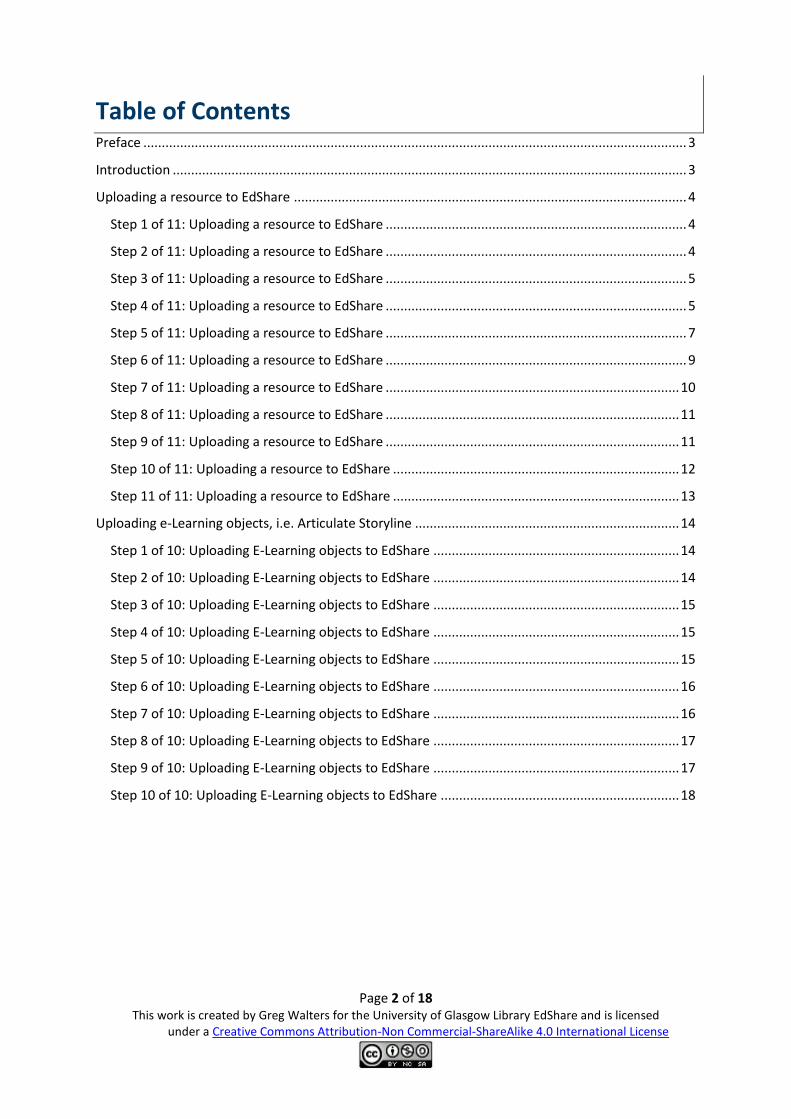
Table of Contents Preface .................................................................................................................................................... 3
Introduction ............................................................................................................................................ 3
Uploading a resource to EdShare ........................................................................................................... 4
Step 1 of 11: Uploading a resource to EdShare .................................................................................. 4
Step 2 of 11: Uploading a resource to EdShare .................................................................................. 4
Step 3 of 11: Uploading a resource to EdShare .................................................................................. 5
Step 4 of 11: Uploading a resource to EdShare .................................................................................. 5
Step 5 of 11: Uploading a resource to EdShare .................................................................................. 7
Step 6 of 11: Uploading a resource to EdShare .................................................................................. 9
Step 7 of 11: Uploading a resource to EdShare ................................................................................ 10
Step 8 of 11: Uploading a resource to EdShare ................................................................................ 11
Step 9 of 11: Uploading a resource to EdShare ................................................................................ 11
Step 10 of 11: Uploading a resource to EdShare .............................................................................. 12
Step 11 of 11: Uploading a resource to EdShare .............................................................................. 13
Uploading e-Learning objects, i.e. Articulate Storyline ........................................................................ 14
Step 1 of 10: Uploading E-Learning objects to EdShare ................................................................... 14
Step 2 of 10: Uploading E-Learning objects to EdShare ................................................................... 14
Step 3 of 10: Uploading E-Learning objects to EdShare ................................................................... 15
Step 4 of 10: Uploading E-Learning objects to EdShare ................................................................... 15
Step 5 of 10: Uploading E-Learning objects to EdShare ................................................................... 15
Step 6 of 10: Uploading E-Learning objects to EdShare ................................................................... 16
Step 7 of 10: Uploading E-Learning objects to EdShare ................................................................... 16
Step 8 of 10: Uploading E-Learning objects to EdShare ................................................................... 17
Step 9 of 10: Uploading E-Learning objects to EdShare ................................................................... 17
Step 10 of 10: Uploading E-Learning objects to EdShare ................................................................. 18
Page 3 of 18 This work is created by Greg Walters for the University of Glasgow Library EdShare and is licensed
under a Creative Commons Attribution-Non Commercial-ShareAlike 4.0 International License
Preface Before continuing with this guide, it is assumed you have read the Copyright and legal guidance
found in the document titled ‘EdShare Copyright Guidance’. It is advised you read this document
before proceeding as it will give you an understanding of how UK Copyright Law and policy can be
applied to resources that are uploaded to the institutions EdShare repository.
Introduction The purpose of this guide is to provide you (the reader) with an overview of how to upload a
resource(s) to the EdShare platform and if required embed it in within Moodle and or other online
source.
Edshare is a versatile platform which enables you to upload a wide variety of resources, e.g.
documents, PowerPoint presentations, images, video, audio files and zipped folders.
Page 4 of 18 This work is created by Greg Walters for the University of Glasgow Library EdShare and is licensed
under a Creative Commons Attribution-Non Commercial-ShareAlike 4.0 International License
Uploading a resource to EdShare
Step 1 of 11: Uploading a resource to EdShare
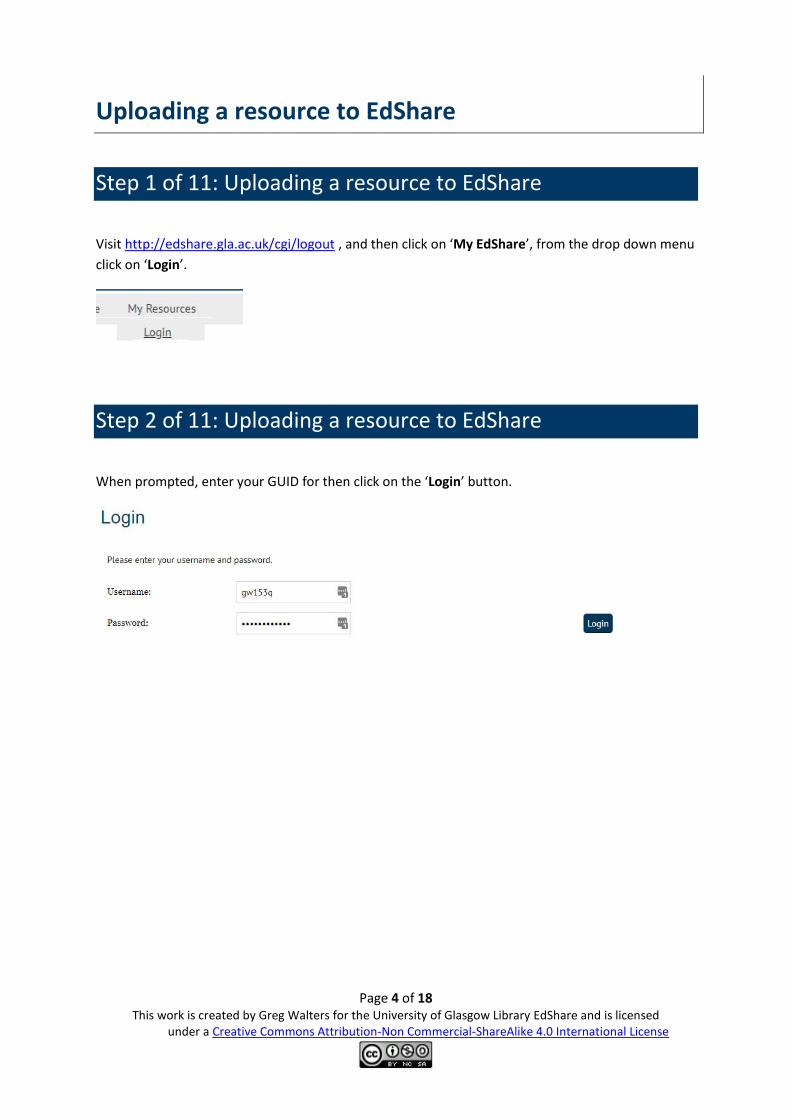
Visit http://edshare.gla.ac.uk/cgi/logout , and then click on ‘My EdShare’, from the drop down menu
click on ‘Login’.
Step 2 of 11: Uploading a resource to EdShare
When prompted, enter your GUID for then click on the ‘Login’ button.

Page 5 of 18 This work is created by Greg Walters for the University of Glasgow Library EdShare and is licensed
under a Creative Commons Attribution-Non Commercial-ShareAlike 4.0 International License
Step 3 of 11: Uploading a resource to EdShare
To upload a file, click on the ‘Choose file’ button.
Please note, Google chrome displays ‘Choose button’ other internet browsers will display this button
as ‘Browse Button’.
This guide refers to ‘choose button’ throughout, if you are not using Google Chrome, please
remember and replace this with the ‘Browse button’.
Step 4 of 11: Uploading a resource to EdShare
From the pop up that appears on screen, navigate to your video file and click on it. After you have
selected your chosen video file, click on the ‘open’ button.
Page 6 of 18 This work is created by Greg Walters for the University of Glasgow Library EdShare and is licensed
under a Creative Commons Attribution-Non Commercial-ShareAlike 4.0 International License
Additional notes relating to specific file types uploaded to
EdShare
Note: If you are uploading a text based document to link to from a Moodle course, then it advised to
make sure it is a PDF format. This format opens directly when linked to from Moodle, where as a
Word document produces no preview and requires students to click on the ‘download’ button within
EdShare in order to view the file.
Note: Multimedia file types, e.g. video and audio create a number of derivative files when uploaded
to EdShare. These files are normally generated within several minutes of upload. Multimedia files
uploaded to EdShare, can be embedded in other online platforms, e.g. Moodle and webpages via the
generated ‘embed’ file. To see a series of short tutorials in how to embed Multimedia files, please
refer to the ‘Embedding Multimedia files within Moodle’ document.
Page 7 of 18 This work is created by Greg Walters for the University of Glasgow Library EdShare and is licensed
under a Creative Commons Attribution-Non Commercial-ShareAlike 4.0 International License
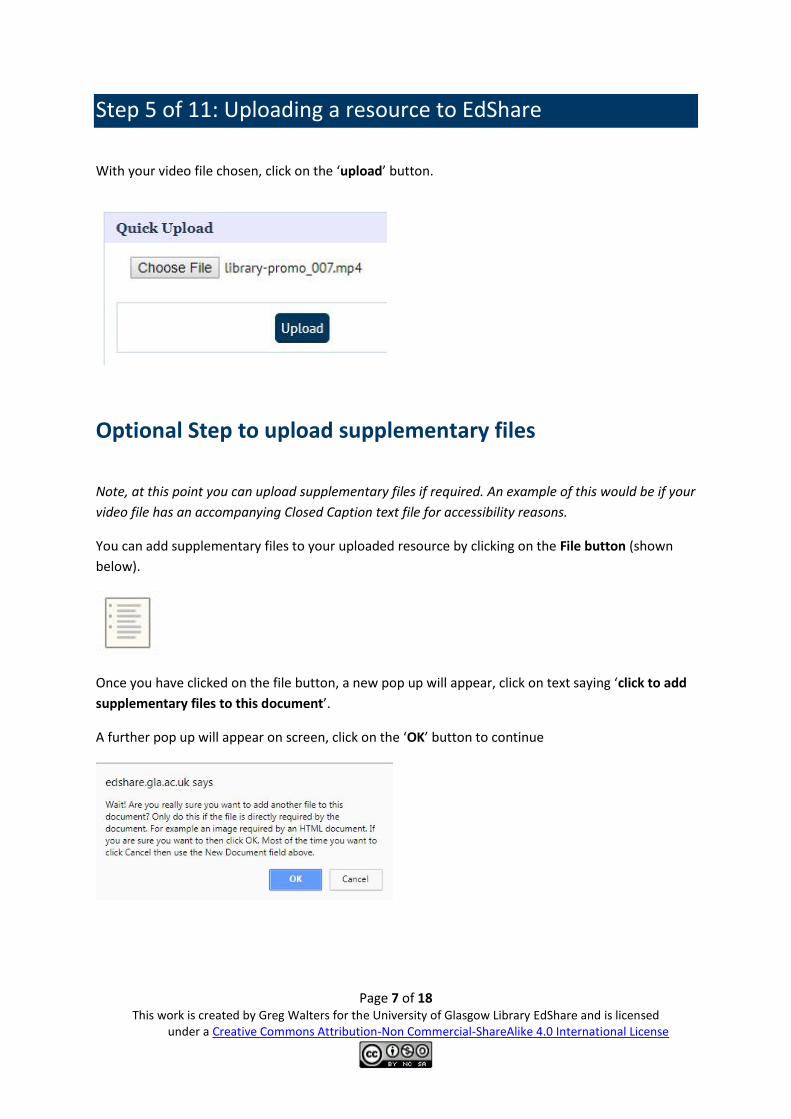
Step 5 of 11: Uploading a resource to EdShare
With your video file chosen, click on the ‘upload’ button.
Optional Step to upload supplementary files
Note, at this point you can upload supplementary files if required. An example of this would be if your
video file has an accompanying Closed Caption text file for accessibility reasons.
You can add supplementary files to your uploaded resource by clicking on the File button (shown
below).
Once you have clicked on the file button, a new pop up will appear, click on text saying ‘click to add
supplementary files to this document’.
A further pop up will appear on screen, click on the ‘OK’ button to continue
Page 8 of 18 This work is created by Greg Walters for the University of Glasgow Library EdShare and is licensed
under a Creative Commons Attribution-Non Commercial-ShareAlike 4.0 International License
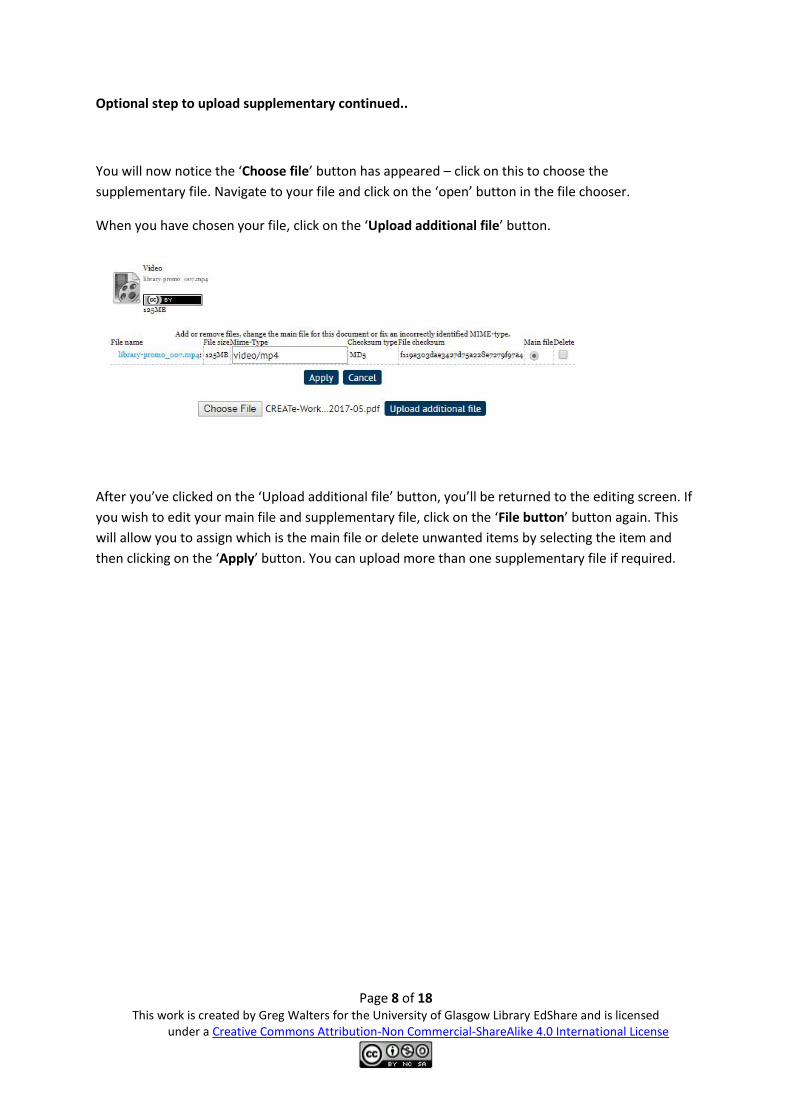
Optional step to upload supplementary continued..
You will now notice the ‘Choose file’ button has appeared – click on this to choose the
supplementary file. Navigate to your file and click on the ‘open’ button in the file chooser.
When you have chosen your file, click on the ‘Upload additional file’ button.
After you’ve clicked on the ‘Upload additional file’ button, you’ll be returned to the editing screen. If
you wish to edit your main file and supplementary file, click on the ‘File button’ button again. This
will allow you to assign which is the main file or delete unwanted items by selecting the item and
then clicking on the ‘Apply’ button. You can upload more than one supplementary file if required.
Page 9 of 18 This work is created by Greg Walters for the University of Glasgow Library EdShare and is licensed
under a Creative Commons Attribution-Non Commercial-ShareAlike 4.0 International License
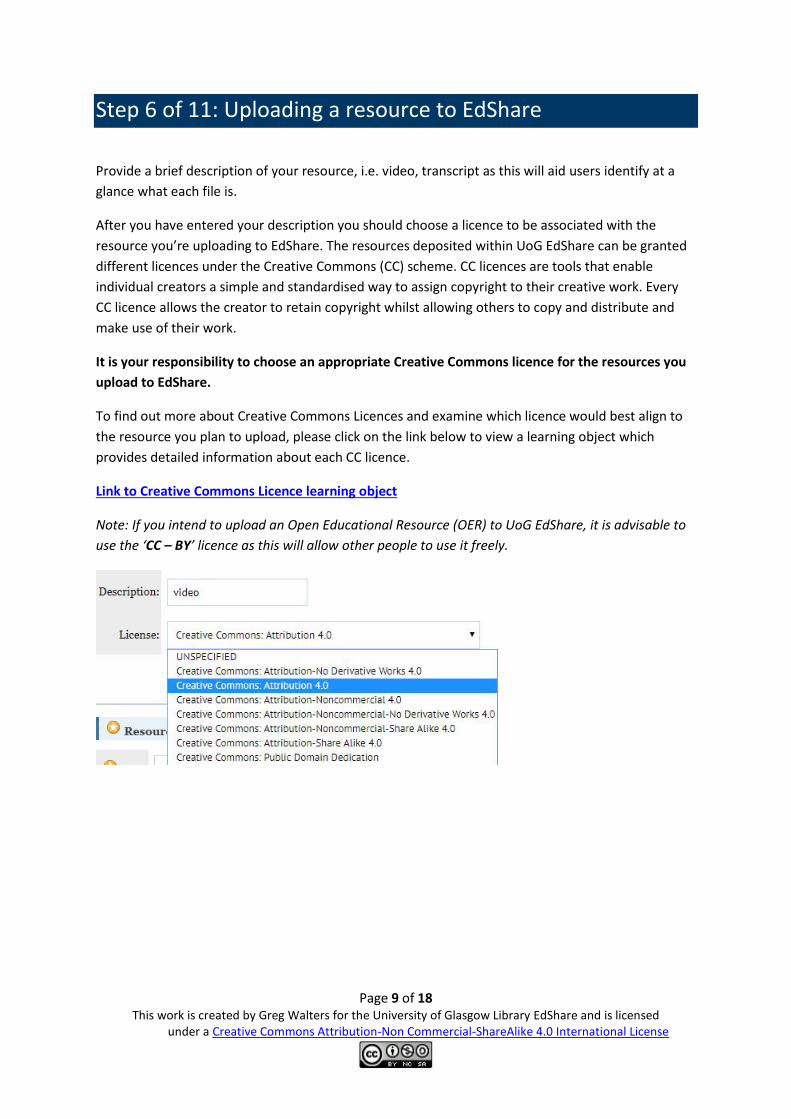
Step 6 of 11: Uploading a resource to EdShare
Provide a brief description of your resource, i.e. video, transcript as this will aid users identify at a
glance what each file is.
After you have entered your description you should choose a licence to be associated with the
resource you’re uploading to EdShare. The resources deposited within UoG EdShare can be granted
different licences under the Creative Commons (CC) scheme. CC licences are tools that enable
individual creators a simple and standardised way to assign copyright to their creative work. Every
CC licence allows the creator to retain copyright whilst allowing others to copy and distribute and
make use of their work.
It is your responsibility to choose an appropriate Creative Commons licence for the resources you
upload to EdShare.
To find out more about Creative Commons Licences and examine which licence would best align to
the resource you plan to upload, please click on the link below to view a learning object which
provides detailed information about each CC licence.
Link to Creative Commons Licence learning object
Note: If you intend to upload an Open Educational Resource (OER) to UoG EdShare, it is advisable to
use the ‘CC – BY’ licence as this will allow other people to use it freely.
Page 10 of 18 This work is created by Greg Walters for the University of Glasgow Library EdShare and is licensed
under a Creative Commons Attribution-Non Commercial-ShareAlike 4.0 International License
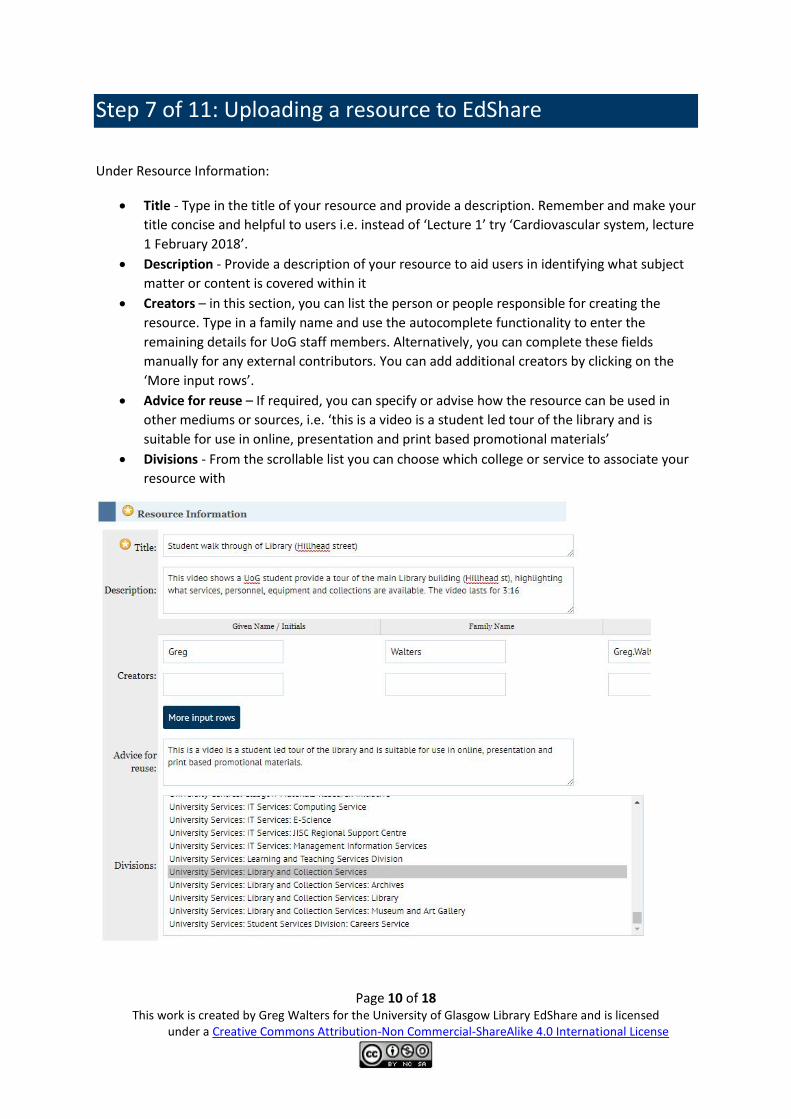
Step 7 of 11: Uploading a resource to EdShare
Under Resource Information:
Title - Type in the title of your resource and provide a description. Remember and make your
title concise and helpful to users i.e. instead of ‘Lecture 1’ try ‘Cardiovascular system, lecture
1 February 2018’.
Description - Provide a description of your resource to aid users in identifying what subject
matter or content is covered within it
Creators – in this section, you can list the person or people responsible for creating the
resource. Type in a family name and use the autocomplete functionality to enter the
remaining details for UoG staff members. Alternatively, you can complete these fields
manually for any external contributors. You can add additional creators by clicking on the
‘More input rows’.
Advice for reuse – If required, you can specify or advise how the resource can be used in
other mediums or sources, i.e. ‘this is a video is a student led tour of the library and is
suitable for use in online, presentation and print based promotional materials’
Divisions - From the scrollable list you can choose which college or service to associate your
resource with
Page 11 of 18 This work is created by Greg Walters for the University of Glasgow Library EdShare and is licensed
under a Creative Commons Attribution-Non Commercial-ShareAlike 4.0 International License
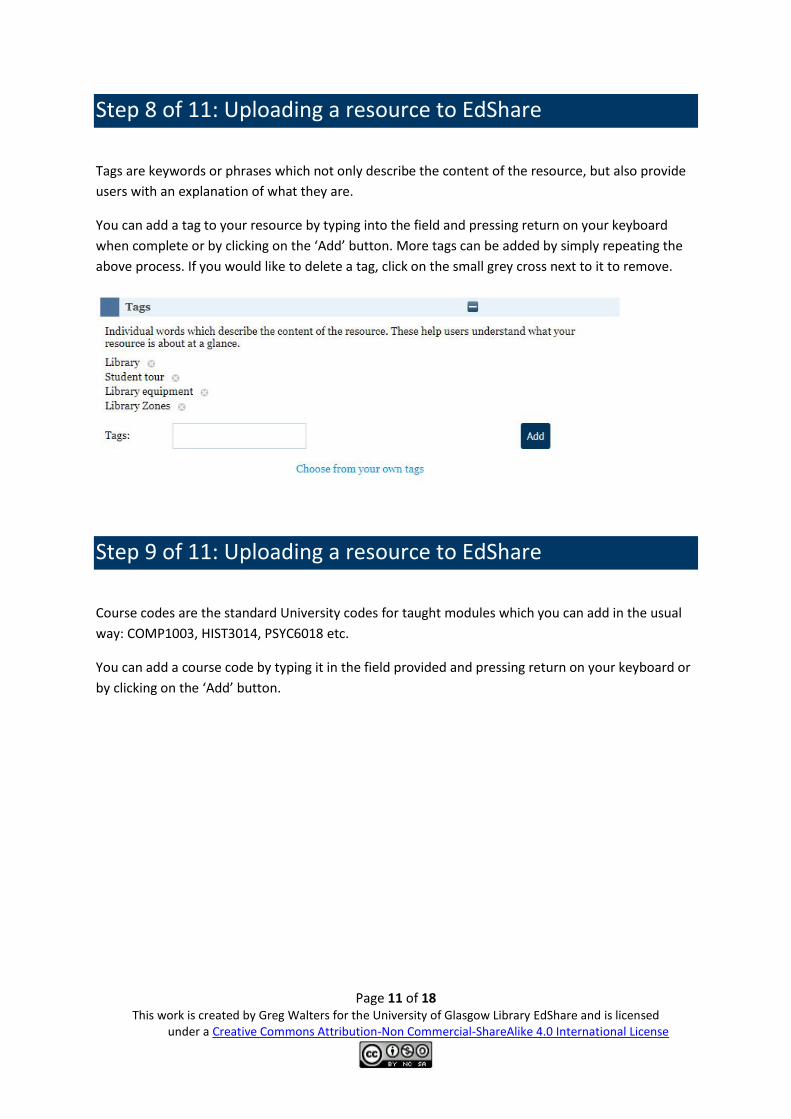
Step 8 of 11: Uploading a resource to EdShare
Tags are keywords or phrases which not only describe the content of the resource, but also provide
users with an explanation of what they are.
You can add a tag to your resource by typing into the field and pressing return on your keyboard
when complete or by clicking on the ‘Add’ button. More tags can be added by simply repeating the
above process. If you would like to delete a tag, click on the small grey cross next to it to remove.
Step 9 of 11: Uploading a resource to EdShare
Course codes are the standard University codes for taught modules which you can add in the usual
way: COMP1003, HIST3014, PSYC6018 etc.
You can add a course code by typing it in the field provided and pressing return on your keyboard or
by clicking on the ‘Add’ button.
Page 12 of 18 This work is created by Greg Walters for the University of Glasgow Library EdShare and is licensed
under a Creative Commons Attribution-Non Commercial-ShareAlike 4.0 International License
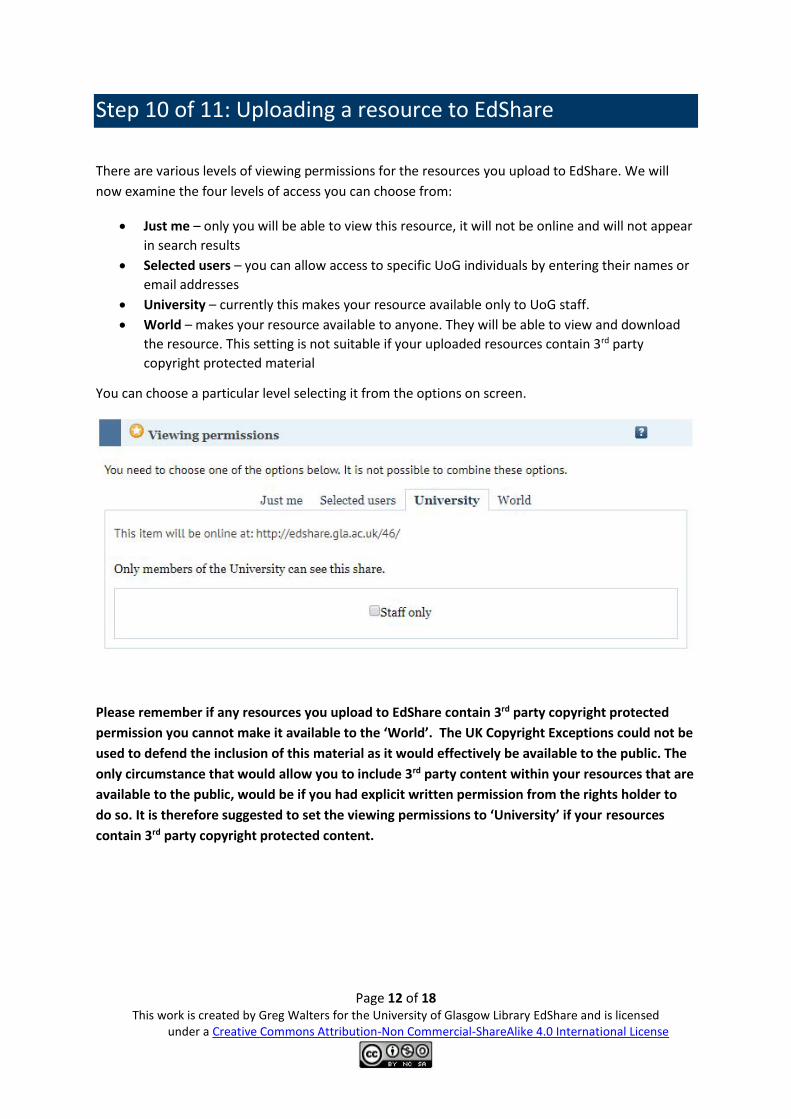
Step 10 of 11: Uploading a resource to EdShare
There are various levels of viewing permissions for the resources you upload to EdShare. We will
now examine the four levels of access you can choose from:
Just me – only you will be able to view this resource, it will not be online and will not appear
in search results
Selected users – you can allow access to specific UoG individuals by entering their names or
email addresses
University – currently this makes your resource available only to UoG staff.
World – makes your resource available to anyone. They will be able to view and download
the resource. This setting is not suitable if your uploaded resources contain 3rd party
copyright protected material
You can choose a particular level selecting it from the options on screen.
Please remember if any resources you upload to EdShare contain 3rd party copyright protected
permission you cannot make it available to the ‘World’. The UK Copyright Exceptions could not be
used to defend the inclusion of this material as it would effectively be available to the public. The
only circumstance that would allow you to include 3rd party content within your resources that are
available to the public, would be if you had explicit written permission from the rights holder to
do so. It is therefore suggested to set the viewing permissions to ‘University’ if your resources
contain 3rd party copyright protected content.
Page 13 of 18 This work is created by Greg Walters for the University of Glasgow Library EdShare and is licensed
under a Creative Commons Attribution-Non Commercial-ShareAlike 4.0 International License
Step 11 of 11: Uploading a resource to EdShare
Editing permissions allow you to add either selected users or all University staff as editors to your
object. This means anyone else who has access would be able to adjust settings e.g. change the tags
associated with your resource.
The levels of editing permission are:
Only Me – as the title suggests, only you have permission to edit your resource
Selected Users – you can select specific UoG individuals to have editing privileges for your
selected resource by entering their name or email address
University – Any member of UoG will have the rights to edit your resource. This can be set
to be for UoG staff only.
After you have entered all of the information required for your resource, review it, take this
opportunity go over items like the title, tags, licence etc.. After you have reviewed your chosen
settings, click on the ‘Save and Return’ button.
Your resource is now published to EdShare.
Page 14 of 18 This work is created by Greg Walters for the University of Glasgow Library EdShare and is licensed
under a Creative Commons Attribution-Non Commercial-ShareAlike 4.0 International License
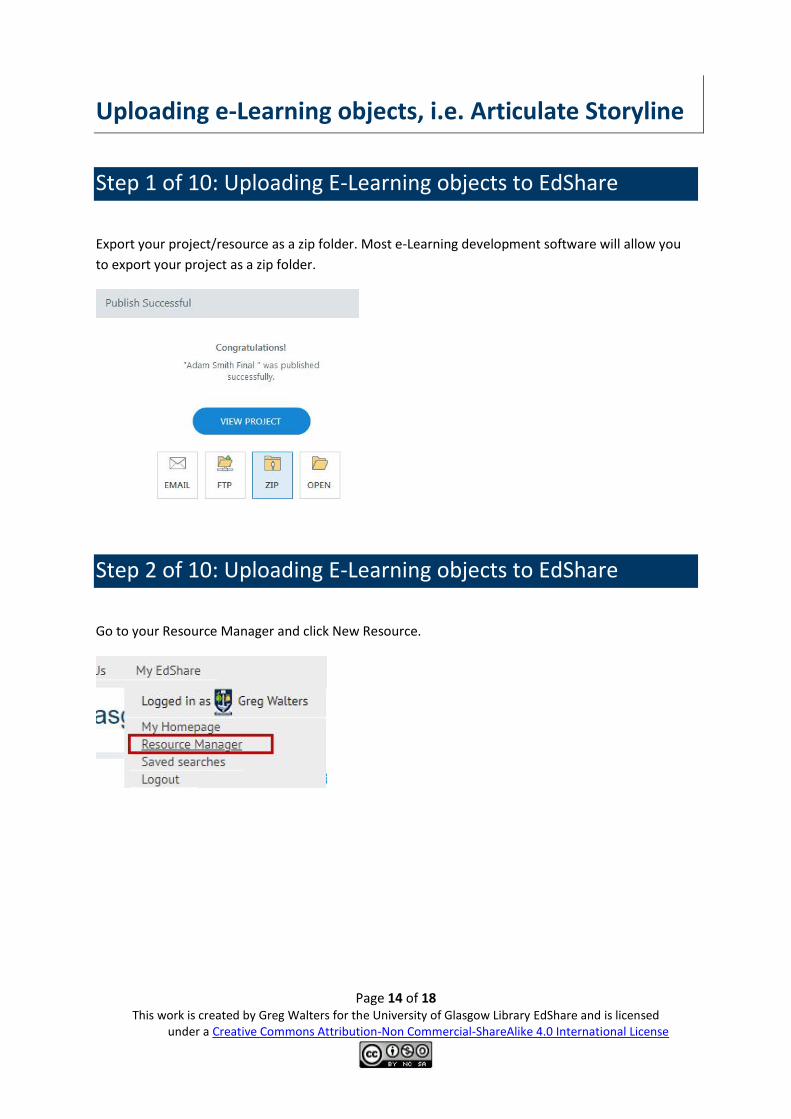
Uploading e-Learning objects, i.e. Articulate Storyline
Step 1 of 10: Uploading E-Learning objects to EdShare
Export your project/resource as a zip folder. Most e-Learning development software will allow you
to export your project as a zip folder.
Step 2 of 10: Uploading E-Learning objects to EdShare
Go to your Resource Manager and click New Resource.

Page 15 of 18 This work is created by Greg Walters for the University of Glasgow Library EdShare and is licensed
under a Creative Commons Attribution-Non Commercial-ShareAlike 4.0 International License
Step 3 of 10: Uploading E-Learning objects to EdShare
In the Files section, click on ‘Choose file’ to select your file and upload it.
Step 4 of 10: Uploading E-Learning objects to EdShare
Once uploaded click on the Box Icon (to unpack the contents of your project)
Step 5 of 10: Uploading E-Learning objects to EdShare
From the pop up that appears on screen select ‘Single’. Always make sure you select single as
multiple will unpack your entire project into individual files. A second file will now display under the
files section.
Page 16 of 18 This work is created by Greg Walters for the University of Glasgow Library EdShare and is licensed
under a Creative Commons Attribution-Non Commercial-ShareAlike 4.0 International License
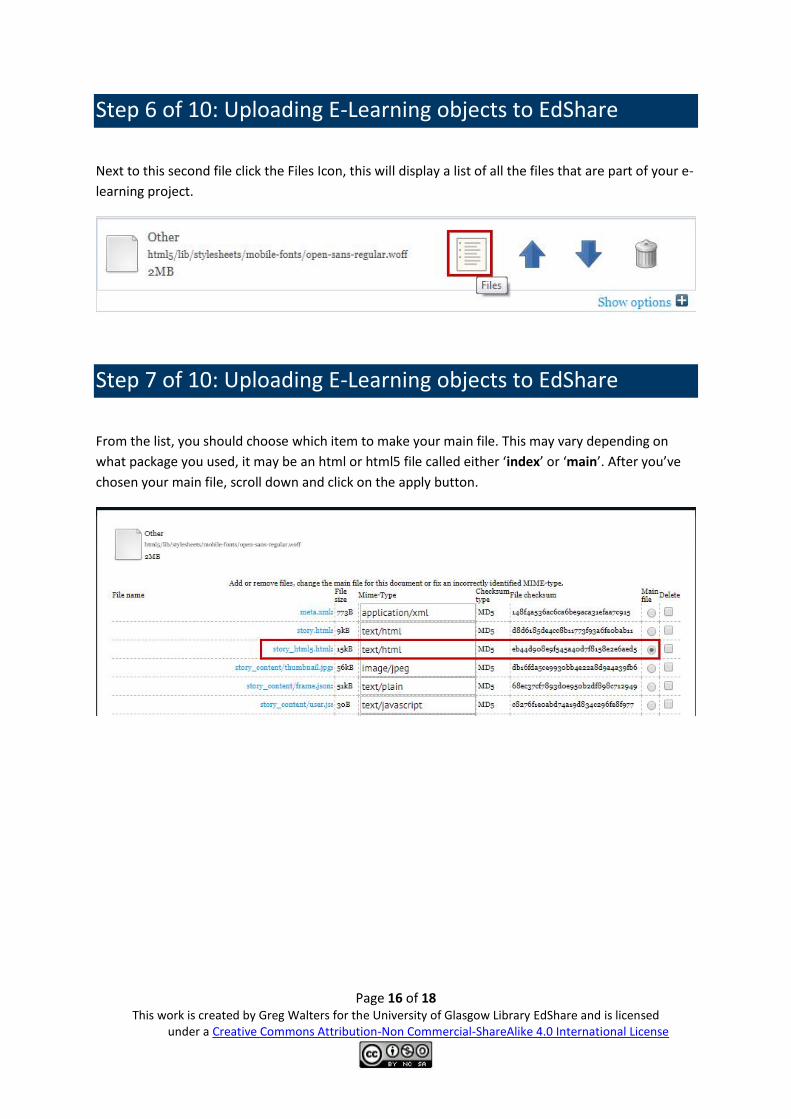
Step 6 of 10: Uploading E-Learning objects to EdShare
Next to this second file click the Files Icon, this will display a list of all the files that are part of your e-
learning project.
Step 7 of 10: Uploading E-Learning objects to EdShare
From the list, you should choose which item to make your main file. This may vary depending on
what package you used, it may be an html or html5 file called either ‘index’ or ‘main’. After you’ve
chosen your main file, scroll down and click on the apply button.
Page 17 of 18 This work is created by Greg Walters for the University of Glasgow Library EdShare and is licensed
under a Creative Commons Attribution-Non Commercial-ShareAlike 4.0 International License
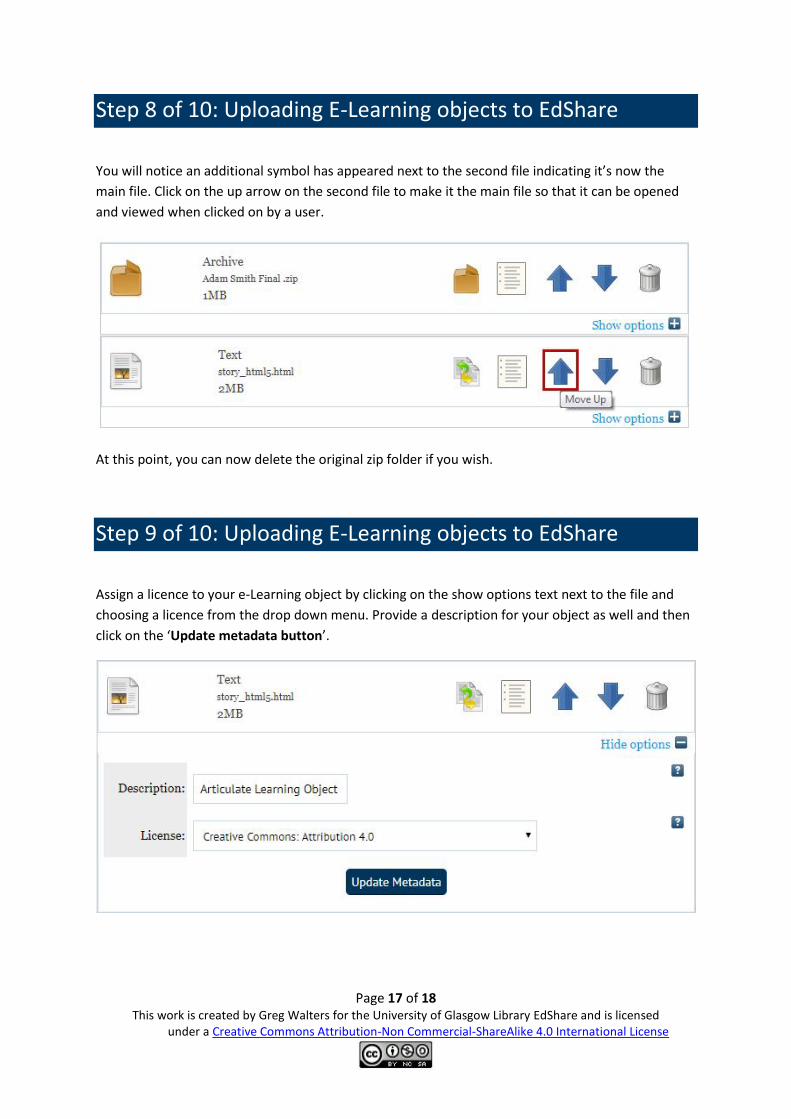
Step 8 of 10: Uploading E-Learning objects to EdShare
You will notice an additional symbol has appeared next to the second file indicating it’s now the
main file. Click on the up arrow on the second file to make it the main file so that it can be opened
and viewed when clicked on by a user.
At this point, you can now delete the original zip folder if you wish.
Step 9 of 10: Uploading E-Learning objects to EdShare
Assign a licence to your e-Learning object by clicking on the show options text next to the file and
choosing a licence from the drop down menu. Provide a description for your object as well and then
click on the ‘Update metadata button’.
Page 18 of 18 This work is created by Greg Walters for the University of Glasgow Library EdShare and is licensed
under a Creative Commons Attribution-Non Commercial-ShareAlike 4.0 International License
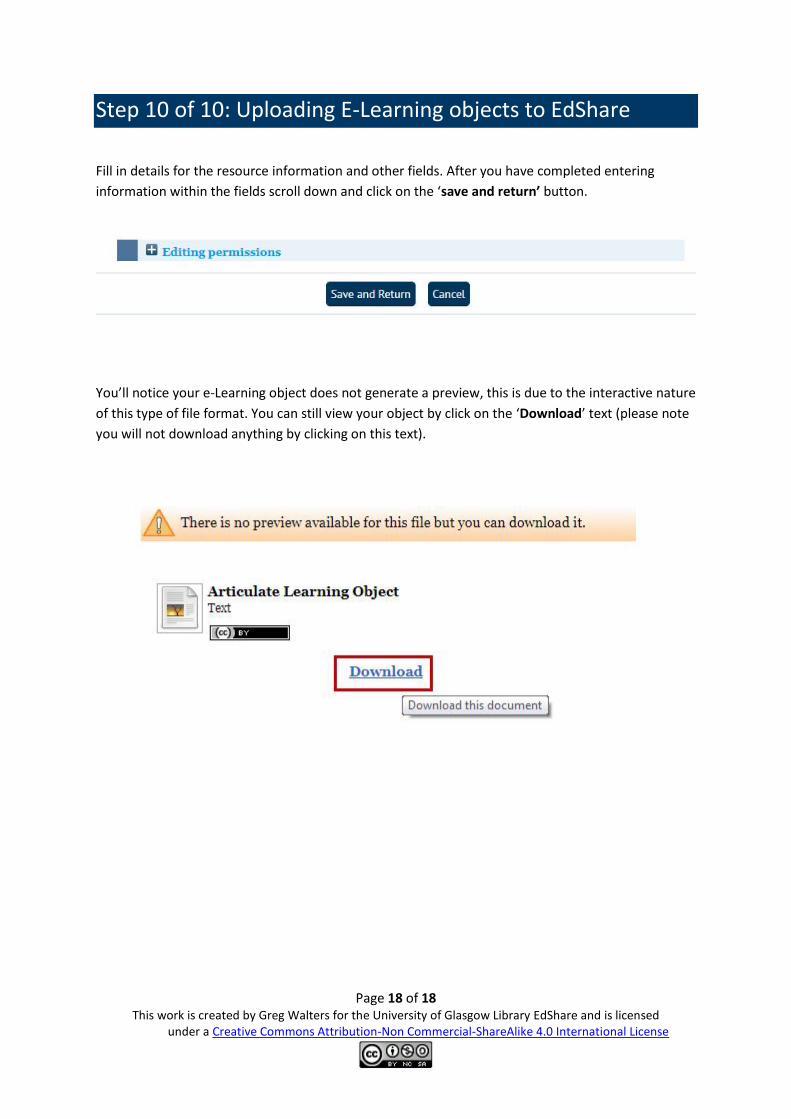
Step 10 of 10: Uploading E-Learning objects to EdShare
Fill in details for the resource information and other fields. After you have completed entering
information within the fields scroll down and click on the ‘save and return’ button.
You’ll notice your e-Learning object does not generate a preview, this is due to the interactive nature
of this type of file format. You can still view your object by click on the ‘Download’ text (please note
you will not download anything by clicking on this text).