Embed Size (px)
Citation preview

EE-565-Lab3ROS Interface with Low Level
Control - Arduino
Dr. –Ing. Ahmad Kamal Nasir

Today's Objectives
• Introduction to Arduino
• Writing simple Arduino sketches• Serial Communication
• Motor Speed Control
• Quadrature Encoder Interface
• PID Library
• Interface with ROS
• Writing a publisher/subscriber node
10 Feb 2016 Dr. -Ing. Ahmad Kamal Nasir 2

Arduino Mega- Hardware
10 Feb 2016 Dr. -Ing. Ahmad Kamal Nasir 3

Arduino IDE- Software
10 Feb 2016 Dr. -Ing. Ahmad Kamal Nasir 4
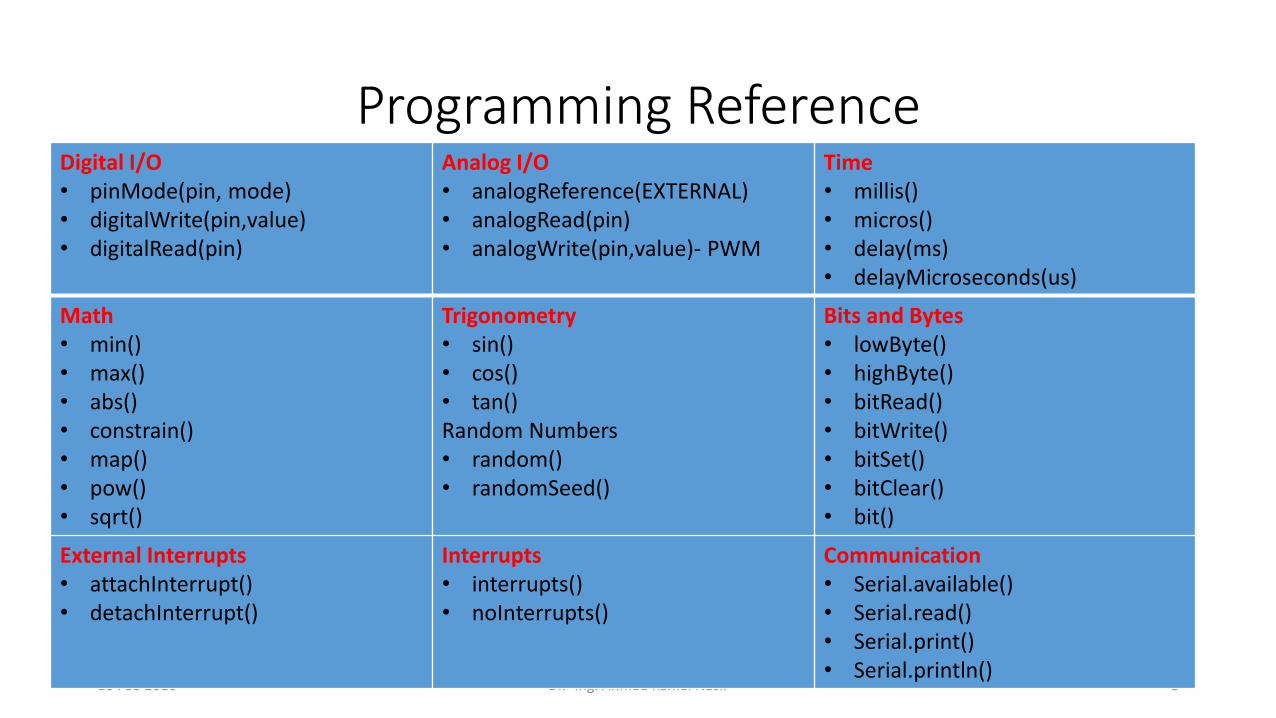
Programming Reference
10 Feb 2016 Dr. -Ing. Ahmad Kamal Nasir 5
Digital I/O• pinMode(pin, mode)• digitalWrite(pin,value)• digitalRead(pin)
Analog I/O• analogReference(EXTERNAL)• analogRead(pin)• analogWrite(pin,value)- PWM
Time• millis()• micros()• delay(ms)• delayMicroseconds(us)
Math• min()• max()• abs()• constrain()• map()• pow()• sqrt()
Trigonometry• sin()• cos()• tan()Random Numbers• random()• randomSeed()
Bits and Bytes• lowByte()• highByte()• bitRead()• bitWrite()• bitSet()• bitClear()• bit()
External Interrupts• attachInterrupt()• detachInterrupt()
Interrupts• interrupts()• noInterrupts()
Communication• Serial.available()• Serial.read()• Serial.print()• Serial.println()

Getting Started• Check out: http://arduino.cc/en/Guide/HomePage
1. Install Arduino environment • sudo apt-get install arduino
2. Connect the board to your computer using USB cable
3. Launch Arduino IDE
10 Feb 2016 Dr. -Ing. Ahmad Kamal Nasir 6

Getting Started• Check out: http://arduino.cc/en/Guide/HomePage
1. Install Arduino environment • sudo apt-get install arduino
2. Connect the board to your computer using USB cable
3. Launch Arduino IDE
4. Select Board
10 Feb 2016 Dr. -Ing. Ahmad Kamal Nasir 7

Getting Started• Check out: http://arduino.cc/en/Guide/HomePage
1. Install Arduino environment • sudo apt-get install arduino
2. Connect the board to your computer using USB cable
3. Launch Arduino IDE
4. Select Board
5. Select your serial port
10 Feb 2016 Dr. -Ing. Ahmad Kamal Nasir 8

Getting Started• Check out: http://arduino.cc/en/Guide/HomePage
1. Install Arduino environment • sudo apt-get install arduino
2. Connect the board to your computer using USB cable
3. Launch Arduino IDE
4. Select Board
5. Select your serial port
6. Open the blink example
10 Feb 2016 Dr. -Ing. Ahmad Kamal Nasir 9

Getting Started• Check out: http://arduino.cc/en/Guide/HomePage
1. Install Arduino environment • sudo apt-get install arduino
2. Connect the board to your computer using USB cable
3. Launch Arduino IDE
4. Select Board
5. Select your serial port
6. Open the blink example
7. Upload the Program
10 Feb 2016 Dr. -Ing. Ahmad Kamal Nasir 10

Development Lifecycle
• Write your sketch
• Press Compile button
• Press upload button to
download your sketch into the
microcontroller
10 Feb 2016 Dr. -Ing. Ahmad Kamal Nasir 11

Serial Communication
10 Feb 2016 Dr. -Ing. Ahmad Kamal Nasir 12

Task 1: Arduino Getting Started
• Try it out with the “SerialEvent” sketch
• Run by executing arduino in terminal
• Load “File-> Examples-> Communication->SerialEvent”
• Select the correct Tools->Board
• And then right Serial Port. If your Serial Port option is greyed out, run sudo chmod a+rw /dev/ttyACM0
10 Feb 2016 Dr. -Ing. Ahmad Kamal Nasir 13

Serial Event - Sketch
10 Feb 2016 Dr. -Ing. Ahmad Kamal Nasir 14

Serial Monitor
10 Feb 2016 Dr. -Ing. Ahmad Kamal Nasir 15

Task 2: Open Loop Speed Control
• Download and modify "motorSpeed" sketch
• Concepts to be learned• DC Motor Speed Control (open-loop)
• H-Bridge
• Digital Outputs & PWM generation
10 Feb 2016 Dr. -Ing. Ahmad Kamal Nasir 16

H-Bridge- Concept
10 Feb 2016 Dr. -Ing. Ahmad Kamal Nasir 17
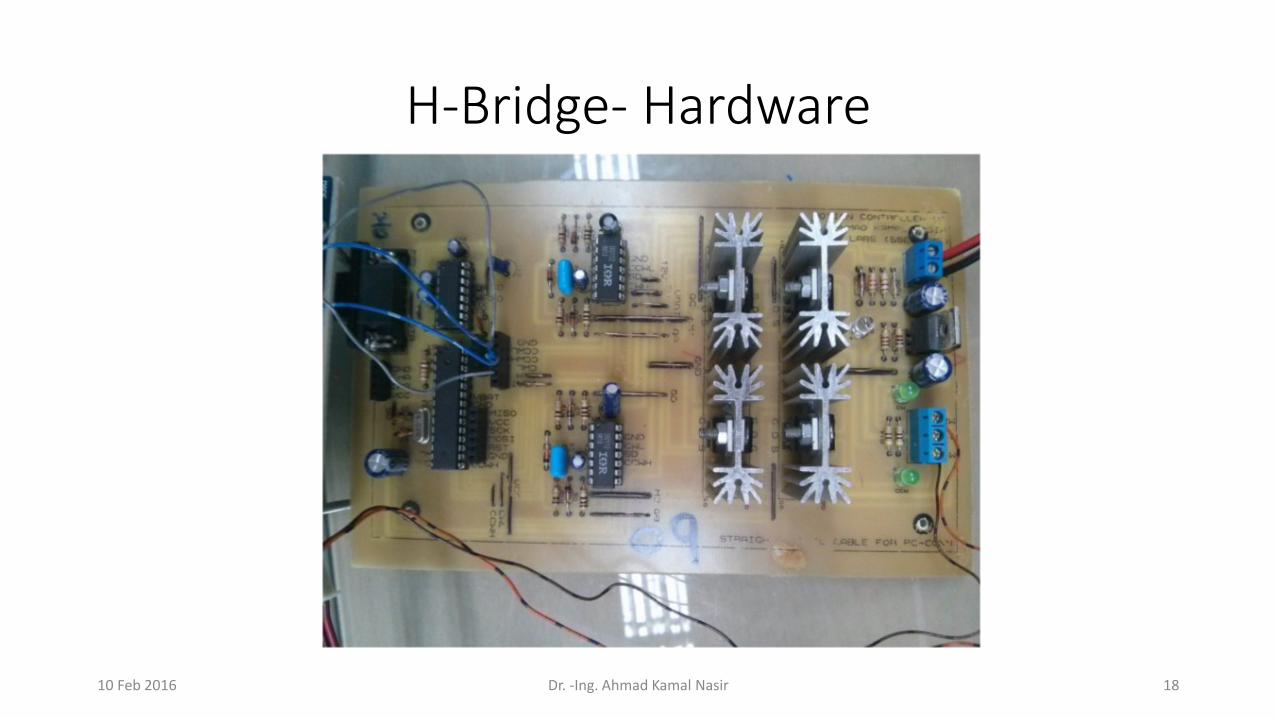
H-Bridge- Hardware
10 Feb 2016 Dr. -Ing. Ahmad Kamal Nasir 18

Generating PWM
10 Feb 2016 Dr. -Ing. Ahmad Kamal Nasir 19

Hardware + Software Setup
• Download
“motorSpeed” sketch
from LMS
• Connect the motor
power wires to the H-Bridge output
• Connect the arduino
control signals to the H-Bridge input
10 Feb 2016 Dr. -Ing. Ahmad Kamal Nasir 20

Motor Speed Control (Open-Loop)
10 Feb 2016 Dr. -Ing. Ahmad Kamal Nasir 21

Task 3: Velocity Feedback using Quadrature Encoder
• Download and modify “encoder” sketch to periodically transmit calculated velocity• Quadrature encoder interface
• Interrupts processing
10 Feb 2016 Dr. -Ing. Ahmad Kamal Nasir 22

Quadrature Encoder
• Measure rotation direction and velocity
• Specified by the number of pulses per
revolution
• Some recent microcontrollers have
specialized hardware unit for interface
10 Feb 2016 Dr. -Ing. Ahmad Kamal Nasir 23

H-Bridge Control + Encoder Wiring Setup
10 Feb 2016 Dr. -Ing. Ahmad Kamal Nasir 24

Quadrature Encoder for velocity measurement
10 Feb 2016 Dr. -Ing. Ahmad Kamal Nasir 25
#define encoder0PinA 2#define encoder0PinB 3
volatile signed long encoder0Pos = 0;float currTicks=0, prevTicks=0, dTicks=0, velDPS=0 ,velRPS=0;
unsigned long currentTime, prevTime, dTime, finalTime;
void setup(){
pinMode(encoder0PinA, INPUT);pinMode(encoder0PinB, INPUT);attachInterrupt(0, doEncoderA, CHANGE);attachInterrupt(1, doEncoderB, CHANGE);finalTime = micros();
}
void loop(){
currentTime = micros();dTime = currentTime - prevTime;prevTime = currentTime;currTicks = encoder0Pos;
dTicks = currTicks-prevTicks;prevTicks = currTicks;
velDPS = (dTicks*360/400)*1000000/dTime;velRPS = velDPS/360;if ( currentTime >= finalTime ){
Serial.println (velRPS);finalTime = currentTime + 1e6;
}}

Quadrature Encoder for velocity measurement (Cont.)
10 Feb 2016 Dr. -Ing. Ahmad Kamal Nasir 26
void doEncoderA(){// look for a low-to-high on channel Aif (digitalRead(encoder0PinA) == HIGH) {
// check channel B to see which way encoder is turning
(digitalRead(encoder0PinB) == LOW) ? encoder0Pos++ : encoder0Pos-- ;
}
else // must be a high-to-low edge on channel A{// check channel B to see which way encoder is turning
(digitalRead(encoder0PinB) == HIGH) ? encoder0Pos++ : encoder0Pos-- ;
}}
void doEncoderB(){// look for a low-to-high on channel Bif (digitalRead(encoder0PinB) == HIGH) {// check channel A to see which way encoder is turning(digitalRead(encoder0PinA) == HIGH) ? encoder0Pos++ : encoder0Pos-- ;}else // Look for a high-to-low on channel B{// check channel B to see which way encoder is turning(digitalRead(encoder0PinA) == LOW) ? encoder0Pos++ : encoder0Pos-- ;
}}

PID in Arduino
• PID arduino library• PID (&Input, &Output, &Setpoint, Kp, Ki, Kd, Direction)
• Compute()
• SetMode (AUTOMATIC or MANUAL)
• SetOutputLimits (min, max)
• SetTunings (Kp, Ki, Kd)
• SetSampleTime (SampleTime)
• SetControllerDirection (DIRECT or REVERSE)
10 Feb 2016 Dr. -Ing. Ahmad Kamal Nasir 27

PID Library Example
10 Feb 2016 Dr. -Ing. Ahmad Kamal Nasir 28

Arduino with ROS
• We can interface Arduino with ROS using rosserial node
10 Feb 2016 Dr. -Ing. Ahmad Kamal Nasir 29

Rosserial Package
10 Feb 2016 Dr. -Ing. Ahmad Kamal Nasir 30

Installing Rosserial Packages in Ubuntu
10 Feb 2016 Dr. -Ing. Ahmad Kamal Nasir 31
• Install• sudo apt-get install ros-indigo-ros-serial
ros-indigo-rosserial-arduino
ros-indigo-rosserial-server
• Go to your sketchbook folder ( /home/user/sketchbook)
• cd libraries
• rosrun rosserial_arduino make_libraries.py .
• rosserial_arduino is ROS client for arduino
which communicates using UART and
publish topics/services/TF like a ROS node.
• make_libraries.py will generate libraries for Arduino

Understanding ROS node API in Arduino
• ros::NodeHandle nh• should be declared before setup()
• nh.initNode()• Initializes Handle Node.
• nh.spinOnce();• should be in loop()
• ros::subscribe<std_msgs::string>...• subscribe to any ROS topic
10 Feb 2016 Dr. -Ing. Ahmad Kamal Nasir 32

Task-4: ROS Publisher Node in Arduino
10 Feb 2016 Dr. -Ing. Ahmad Kamal Nasir 33
// Open example "Helloworld" in arduino roslib#include <ros.h>#include <std_msgs/String.h>ros::NodeHandle nh;std_msgs::String str_msg;ros::Publisher chatter("chatter", &str_msg);char hello[13] = "hello world!";void setup(){
nh.initNode();nh.advertise(chatter);
}void loop(){
str_msg.data = hello;chatter.publish( &str_msg ); nh.spinOnce();delay(1000);
}
• rosrun rosserial_python serial_node.py /dev/ttyACM0• rostopic list
• we will see topics of "chatter" and "talker"• rostopic pub -r 5 talker std_msgs/String "Hello World"

Lab Assignment
• Build a complete DC Motor Speed Control application, interfaced with ROS. Use the Arduino code available on LMS. Each group will be provided with the following equipment:
• Motion controller board (H-Bridge + Arduino Board)
• DC Motor having an attached encoder sensor.
• Cable for serial communication between PC and Arduino
• Boiler code for Motor Speed Control (using PID library) is available on LMS. This should be interfaced with ROS framework, through ROS Topics. Motion controller will take a reference motor speed as input from the serial port, and with its built-in feedback loop, control the DC Motor. The controller will also publish the Odometery data (current motor speed) to another topic for internal ROS use (as geometry_msgs/Twist).
10 Feb 2016 Dr. -Ing. Ahmad Kamal Nasir 34

Lab Assignment
10 Feb 2016 Dr. -Ing. Ahmad Kamal Nasir 35
• DELIVERABLES :• Publish motor encoder data as rostopic. This will require writing a
publisher node in Arduino code that will take the encoder's data to publish to a ROS topic (geometry_msgs/Twist in revolutions/second). This topic may not be used inside ROS for now, but it should be visible and working. [For this deliverable you can write your own Arduino code as well.]
• Using the sign of linear velocity (x-axis) (i.e. +ve/-ve) from turtlebot's cmd_vel to decide the direction of motor rotation. This will require a subscriber node. Move the motor with any constant speed with the given direction.
• Implement speed control. Based on turtlebot's linear velocity (x-axis), specifiy reference speed and direction for your motor. In the end, your motor should move according to the speed and direction of turtlebot. [It is highly recommended to use turtlebot_teleop package instead of turtlesim.]