Embed Size (px)
Citation preview

Escalation Efengie Campaign 5
Escalation Campaign
Battleplans, fiction, maps, photography, and miniatures by Duncan Hall and friends.
Some background textures and stock art came from the internet
and/or Warhammer: Age of Sigmar documents.
This document is completely unofficial and in no way endorsed by Games Workshop Limited. It is solely not-for-profit and is in no way
intended to infringe on copyrights held by Games Workshop.
An Unofficial Warhammer: Age of Sigmar Supplement
Contents A History of Violence 3 Campaign: Escalation 5 Nations of Ennarvia Allegiances 6 Battleplan: Dawning of a New Age 9 Battleplan: On the Lamellian Fields 11 Battleplan: A Long Expected Battle 13 Battleplan: Before the Storm 15 Sailing the Soulless Seas 17 Battleplan: A Storm on the Soulless Sea 18
2
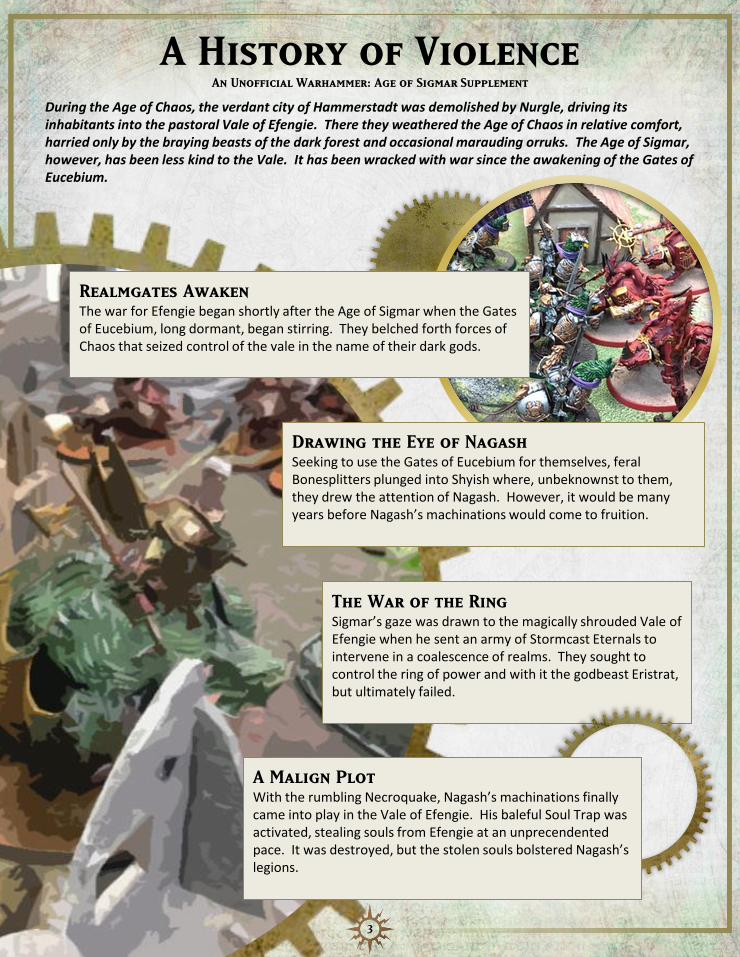
A History of Violence An Unofficial Warhammer: Age of Sigmar Supplement
During the Age of Chaos, the verdant city of Hammerstadt was demolished by Nurgle, driving its inhabitants into the pastoral Vale of Efengie. There they weathered the Age of Chaos in relative comfort, harried only by the braying beasts of the dark forest and occasional marauding orruks. The Age of Sigmar, however, has been less kind to the Vale. It has been wracked with war since the awakening of the Gates of Eucebium.
Realmgates Awaken The war for Efengie began shortly after the Age of Sigmar when the Gates of Eucebium, long dormant, began stirring. They belched forth forces of Chaos that seized control of the vale in the name of their dark gods.
The War of the Ring Sigmar’s gaze was drawn to the magically shrouded Vale of Efengie when he sent an army of Stormcast Eternals to intervene in a coalescence of realms. They sought to control the ring of power and with it the godbeast Eristrat, but ultimately failed.
3
Drawing the Eye of Nagash Seeking to use the Gates of Eucebium for themselves, feral Bonesplitters plunged into Shyish where, unbeknownst to them, they drew the attention of Nagash. However, it would be many years before Nagash’s machinations would come to fruition.
A Malign Plot With the rumbling Necroquake, Nagash’s machinations finally came into play in the Vale of Efengie. His baleful Soul Trap was activated, stealing souls from Efengie at an unprecendented pace. It was destroyed, but the stolen souls bolstered Nagash’s legions.

Ennarvia During the Age of Chaos, Kytos and Vivax were riven with worshippers of the dark gods. Lamellia has kept the flame of civilization burning through the long millennia, but the forces at their northern border grow powerful. They need a new ally in their long war. Though Eucebium was previously thought to be overrun with Orruks and the undead, its own wars have revealed the secluded Vale of Efengie to the world, and it is time for them to join the larger conflict.
An Unofficial Warhammer: Age of Sigmar Supplement
Everwinter Kytos is locked in eternal
winter. The hardy folk who live there rely
heavily on fur trade with farmers from Ghur for
their survival.
Dead Mountains The mountains of Kytos
and Akitmaa are littered with the tombs
of ancient Duardin kingdoms.
A Bitter Tide Appearances of
Idoneth raiders suggest that their city is
somewhere within the Soulless Maelstrom.
Vale of Efengie
Soulless Vortex
Karak Uzgul
Azyrspire
Glimmering Basin
Witherweald
Eucebium
Kytos
Vivax
Lamellia
Trolgotha
Bleeding Gate
Ox’totl’s Reach
Furyford
Mutter’s Crossing
Dreadchapel
Ruins of Hammerstadt
Waaagh! End
Festermarsh
Trollrock Estuary
Escalation Campaign An Unofficial Warhammer: Age of Sigmar Supplement
Rules
1. Diplomacy First You’ve entered into a larger conflict. But perhaps it can still be averted with careful application of diplomatic tact. Play the Dawning of a New Age battleplan on page 9.
To The Victor Go The Spoils The winner gets to choose where the next battle takes place. Any player who scores Laurels of Victory from Diplomacy receives D3 Command Points at the beginning of the next battle.
3. The Ring Returns
The ring is here somewhere, amongst the midden and the squalor. You pinch your nose, one step into Farmer Maggoth’s field, and this will be the closest you’ve ever been to Waaagh! End. Play the A Long Expected Battle battleplan on page 13.
To The Victor Go The Spoils The winner gets to choose where the next battle takes place. Whichever player controls the Ring at the end of the battle may have one of their Hero models bear the Ring of Power (pg 12) in the next battle.
2. Jungle Treasure It seems unlikely that this dewy, steaming jungle would be the home of powerful treasures, but that’s what the scouts say. Riches like these could turn the tide of the war. Play the On the Lamellian Fields battleplan on page 11.
To The Victor Go The Spoils Any Hero that had a Legendary Artefact at the end of the battle may carry it in the next battle in addition to their other artefacts.
4. Ship Rustlin’ Whoever controls the shipyards controls the seas! Play the Before the Storm battleplan on page 14.
To The Victor Go The Spoils The winner gets to choose where the next battle takes place. If the battle took place at Dreadchapel, one of the winner’s Warships is a Geistwood Warship. If the battle took place at Trollrock Estuary, one of the winner’s Warships is a Trollwood Warship. Geistwood Warship: During your hero phase, roll a dice for each enemy unit that is within 3” of this Warship. On a 4+, that unit suffers a mortal wound. Trollwood Warship: Whenever a unit crewing this Warship would suffer a wound or mortal wound, roll a dice. On a 6, that wound is ignored.
5. Into the Vortex What horrible machinations could Kytos be crafting? Play Battles 1 and 2 of the A Storm on the Soulless Seas battleplan on page 18.
To The Victor Go The Spoils The winner of the final battle wins the campaign!
Narrative Ideas Put together armies for the narrative Allegiances on the pages that follow! Modify the keyword restrictions as needed to fit your collection(s). Alternatively, continue to use the Warring Nations rules from the first battleplan throughout the campaign.
5
During the Age of Chaos, Kytos was ruled by a caste of Slaughterpriests dedicated to the worship of Khorne. At the dawning of the Age of Sigmar, Khorne’s attentions were drawn to the war in Aqshy and the more devoted of Khorne were drafted into conflict throughout the mortal realms. The weakening of the theocracy led to a sharing of power with the coastal Aelves, and eventually the Idoneth Deepkin. Now, Kytos is ruled by the bloodthirsty sea born tyrant, Malichthys Tideslaughter. Though Khorne worship is popular, it is no longer mandatory, but Kytos is still no friend to the trickery of sorcerers.
Allegiance Abilities If every unit in your army has the Khorne or Aelf keywords and your army does not contain any Wizard models or named Heroes, you may choose to declare your Allegiance to the nation-state of Kytos instead of any other Allegiance. If you do, units in your army gain the Bloodpact of Kytos keyword. The Blood Tide: The warriors of Kytos march to war wreathed in a blood red mist. As they slay their enemies, the air fills with choking blood drowning their enemies in the Blood Tide. Whenever an enemy unit is slain, place a Blood Tide marker on the battlefield within 3” of the last model removed. Your Bloodpact of Kytos units have cover and add 1 to the Attacks characteristic of their melee weapons as long as each model in the unit is wholly within 6” of one or more Blood Tide markers. During your hero phase, roll a dice for each enemy unit that is within 6” of one or more Blood Tide markers. On a roll of 4 or higher, it suffers a mortal wound.
Bloodpact of Kytos An Unofficial Warhammer: Age of Sigmar Supplement
Allegiance
Artefacts D3 1 Arch-Reaver’s Gore-hook: Many great heroes of
Kytos have wielded this great hook carved from sea-titan bone.
Choose one of the bearer’s melee weapons to be the Gore-hook. At the end of the combat phase, if any enemy models were slain by the Gore-hook, add 1 to its Attacks characteristic for the remainder of the battle.
2 Cloak of the Blood Sea: This cloak was woven by the fisher aelves of the coast. It is infused with the blood of the Blood Sea to the west of Kytos.
The bearer has the ability to fly and can charge
even if they ran in the same turn.
3 Heartblood Vial: This vial of blood can invoke the power of the blood tide.
Once per battle, during your hero phase, you may
place a Blood marker on the battlefield within 6” of the bearer.
Command Traits D3 1 Kytosian Gore-King: Malichthys’ lieutenants rule
the many smaller kingdoms within Kytos and bear the title of Gore-King.
Re-roll hit rolls of 1 for friendly Bloodpact of Kytos units that are wholly within 18” of your general.
2 Slaughtercaste Faithful: A large portion of Kytos’ leadership is still devoted to Khorne and follows the devotionals of the Slaughterpriests.
Your general gains the Priest keyword, and the
Bloodfuelled Prayers ability from the Slaughterpriest warscroll.
3 Soulstealing Reaver: Kytosian Reavers attack neighboring nations and coastal settlements to collect souls to slake Malichthys’ hunger.
At the end of the combat phase, if any enemy
models were slain by this model’s melee attacks, this model heals 1 wound suffered during the battle.
6

During the Age of Chaos, Lamellia was by all appearances untouched by the ravages of Khorne and Nurgle. That was, however, and illusion. In truth, it was subject to a great hollowing infiltration by the cultists of Slaanesh with whom the rulers of Lamellia were only too happy to bargain. Now, the once great nation of heroes is over-reliant on sellswords from neighboring nations to fight their battles for them while their so-called heroes hide in their temple-cities.
Allegiance Abilities If every unit in your army has the Duardin, Human, Ogor, or Slaanesh keywords and your army does not include any named Heroes, you may choose to declare your Allegiance to the nation-state of Lamellia instead of any other Allegiance. If you do, units in your army gain the Lamellian Sellswords keyword. Your Hero models have the Soldiers of Fortune command ability. Command Ability – Soldiers of Fortune: Nothing motivates sellswords quite like gold. Promise them a rich pay day and they’ll follow you to the realm’s edge. Place a Bounty token on an enemy unit within 12”. Your Lamellian Sellswords units may re-roll failed charges and hit rolls against any unit with a Bounty token on it.
Lamellian Sellswords An Unofficial Warhammer: Age of Sigmar Supplement
Allegiance
Artefacts D3 1 Concealed Pistol: Never go into battle without
one.
Once per battle, after attacking during the combat phase, the bearer may choose to attack with their Concealed Pistol. If they do, choose an enemy unit within 9”. That unit suffers D3 mortal wounds.
2 Ur-Silvered Weapon: Sometimes it pays to be a little superstitious.
Choose one of the bearer’s melee weapons to be
coated in Ur-Silver. Wounds inflicted by the chosen weapon cannot be prevented by spells or abilities (but they do allow save rolls as normal).
3 Cape of the Mountebank: The original owner was a magician from Mutter’s Crossing. It has seen many owners since.
Once per battle during your hero phase, you may
remove the bearer from the battlefield and replace them at least 9” away from their original position and more than 3” from any enemy models.
Command Traits D3 1 Dirty Fighter: Better to win by cheating than die
following the rules.
After this model attacks during the combat phase, you may move up to D6”.
2 Paymaster: Anyone can be bought, it’s all just a question of price.
Whenever an model flees from an enemy unit that
is within 6” of your general, roll a dice. On a 4+, add 1 model (with no more wounds than the fleeing model) to a friendly unit within 6” of your general.
3 Beloved Champion: Some mercenary generals have favored men, their Regiment of Renown, that they have fought alongside for many seasons.
Choose another unit in your army to be your
general’s Regiment of Renown. When you choose your general to pile in and attack during the combat phase, if the Regiment of Renown is within 3” of your general, it may pile in and attack as well.
7

Efengie is a nation at war with itself, wracked by rampaging magical energies. In the aftermath of the Necroquake, the kingdoms of Efengie have ceded much power to the wizards of the Ivory Tower to combat the dual threats of Chaos and of the endless spells that run rampant throughout the region.
Allegiance Abilities If your army is led by a Wizard and includes units from at least 2 different Grand Alliances and your army does not include any named Heroes, you may choose to declare your Allegiance to the nation-state of Efengie instead of any other Allegiance. If you do, units in your army gain the Magi of Efengie keyword. Magi of the Ivory Tower: The magi have spend millennia honing their magical craft, sculpting their minds to become the most powerful cabal of wizards in all of Ghyran. Whenever one of your Wizards successfully casts a spell on a 10+ and it is not unbound, choose an enemy unit within 18” that is visible to the caster. That unit suffers a mortal wound. Magi of Efengie Wizards can cast any endless spells regardless of restrictions on what models can cast them.
Magi of Efengie An Unofficial Warhammer: Age of Sigmar Supplement
Allegiance
Artefacts D3 1 Ivory Spellbinder: The Magi of the Ivory Tower
have innovated heavily in the domain of magical artefacts
When the bearer unbinds a spell cast by an enemy Wizard, add the spell to the list of spells that the bearer can cast for the remainder of the battle.
2 Wand of Power: They say that the Wand of Power was crafted from a shard of Nagash’s rib.
When the bearer successfully casts a spell on a roll
of doubles, the spell cannot be unbound.
3 The Mystic Arts, Vol.XII: An important tome for any student of arcana.
If the bearer is a Wizard, they can cast an
additional spell in each of your hero phases, and attempt to unbind an additional spell in each enemy hero phase.
Command Traits D3 1 Professor of the Dark Arts: The Magi study all of
walks of magic.
When your general inflicts a mortal wound with the Magic of the Ivory Tower ability, they heal a wound they suffered during the battle as well.
2 Spellhunter: After the Necroquake, many aspiring young magi have joined the ranks of the Spellhunters who cleanse the Vale of Efengie of rampaging endless spells.
During your hero phase, your general may
attempt to unbind one additional Endless Spell that is within 18” of them.
3 Adjunct Magus: It is expensive to send a fully tenured magus into the field, but adjuncts are cheap!
At the end of the combat phase, if any enemy
models were slain by this model’s melee attacks, this model heals 1 wound suffered during the battle.
8
The Armies Create armies in any way that is agreeable to both players. If one player has a clear advantage, then their opponent is the Underdog.
The Battlefield If you are battling at Karak Uzgul, consider exploring the duardin crypts or mountainous ruins. If you are battling at Furyford, you should include chaos altars, forges, and rivers of blood (if available).
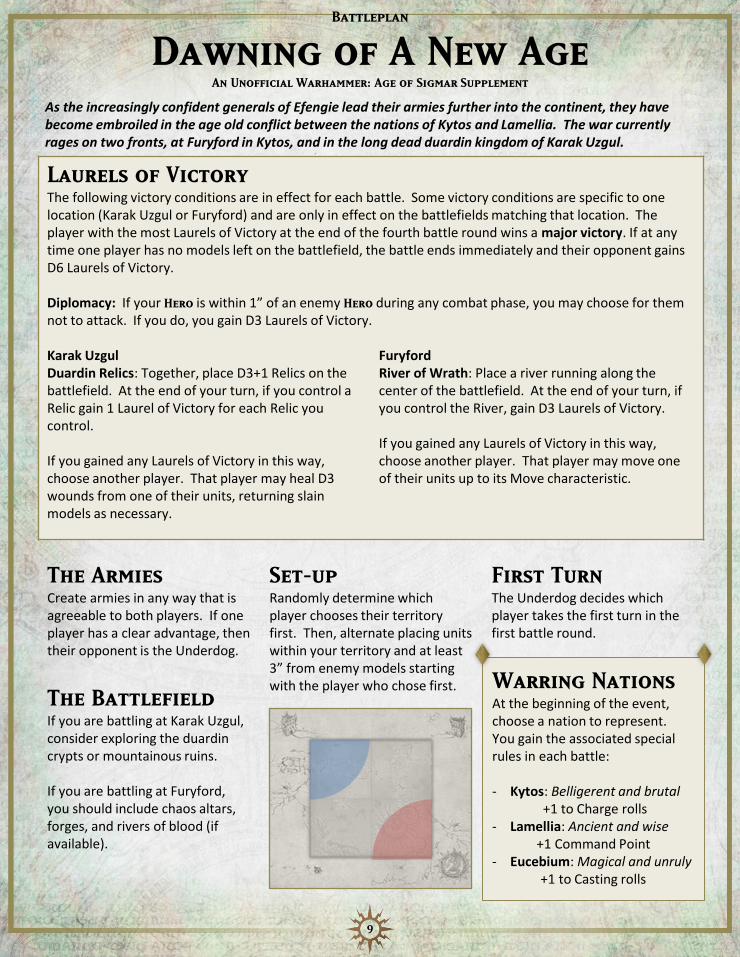
Set-up Randomly determine which player chooses their territory first. Then, alternate placing units within your territory and at least 3” from enemy models starting with the player who chose first.
First Turn The Underdog decides which player takes the first turn in the first battle round.
Warring Nations At the beginning of the event, choose a nation to represent. You gain the associated special rules in each battle: - Kytos: Belligerent and brutal
+1 to Charge rolls - Lamellia: Ancient and wise
+1 Command Point - Eucebium: Magical and unruly
+1 to Casting rolls
Dawning of A New Age An Unofficial Warhammer: Age of Sigmar Supplement
As the increasingly confident generals of Efengie lead their armies further into the continent, they have become embroiled in the age old conflict between the nations of Kytos and Lamellia. The war currently rages on two fronts, at Furyford in Kytos, and in the long dead duardin kingdom of Karak Uzgul.
Battleplan
9
Laurels of Victory The following victory conditions are in effect for each battle. Some victory conditions are specific to one location (Karak Uzgul or Furyford) and are only in effect on the battlefields matching that location. The player with the most Laurels of Victory at the end of the fourth battle round wins a major victory. If at any time one player has no models left on the battlefield, the battle ends immediately and their opponent gains D6 Laurels of Victory. Diplomacy: If your Hero is within 1” of an enemy Hero during any combat phase, you may choose for them not to attack. If you do, you gain D3 Laurels of Victory. Karak Uzgul Duardin Relics: Together, place D3+1 Relics on the battlefield. At the end of your turn, if you control a Relic gain 1 Laurel of Victory for each Relic you control. If you gained any Laurels of Victory in this way, choose another player. That player may heal D3 wounds from one of their units, returning slain models as necessary.
Furyford River of Wrath: Place a river running along the center of the battlefield. At the end of your turn, if you control the River, gain D3 Laurels of Victory. If you gained any Laurels of Victory in this way, choose another player. That player may move one of their units up to its Move characteristic.

Let’s Talk About This After her defeat at Fort S’nak, it seems Iradrüll went in search of new allies and found them in Lamellia. Meanwhile, Usidore the Blue of Foon has returned to Ghyran with a stronger army, ready to fight on behalf of Eucebium. Though his free peoples were grossly outmatched by the daemons, Usidore and his trusted lieutenant Jack Vorpal managed to talk the daemons to a standstill; even after additional Heralds of Slaanesh were summoned to cite by-laws and negotiate sweeter deals!
Diplomacy First An Unofficial Warhammer: Age of Sigmar Supplement
Battles raged along the border of Kytos and Lamellia, but canny diplomacy showed Eucebium the path to victory.
Friends and Rivals Daemons of Khorne and Nurgle clashed at Furyford in service to other motivations. The Shepherds of Rot came from Eucebium as an exploratory force, but soon found themselves embattled by a Bloodthirster and his pack of flesh hounds. Eucebium was able to take control of Furyford, but at a hefty cost.
10
The Flooding of Karak Uzgul Meanwhile, amongst the ruins of Karak Uzgul, Idoneth Raiders clashed with the Heartstealer Tribe of ogors. As the Akhelian Leviodon drew its last breath, all but slain by ferocious Ironguts, it dealt a crushing blow to Gnarla the Subtle taking her out of action.
The Armies Create armies in any way that is agreeable to both players. If one player has a clear advantage, then their opponent is the Underdog.
The Battlefield If possible, your battlefield should include jungles, ziggurats, and overgrown stonework.
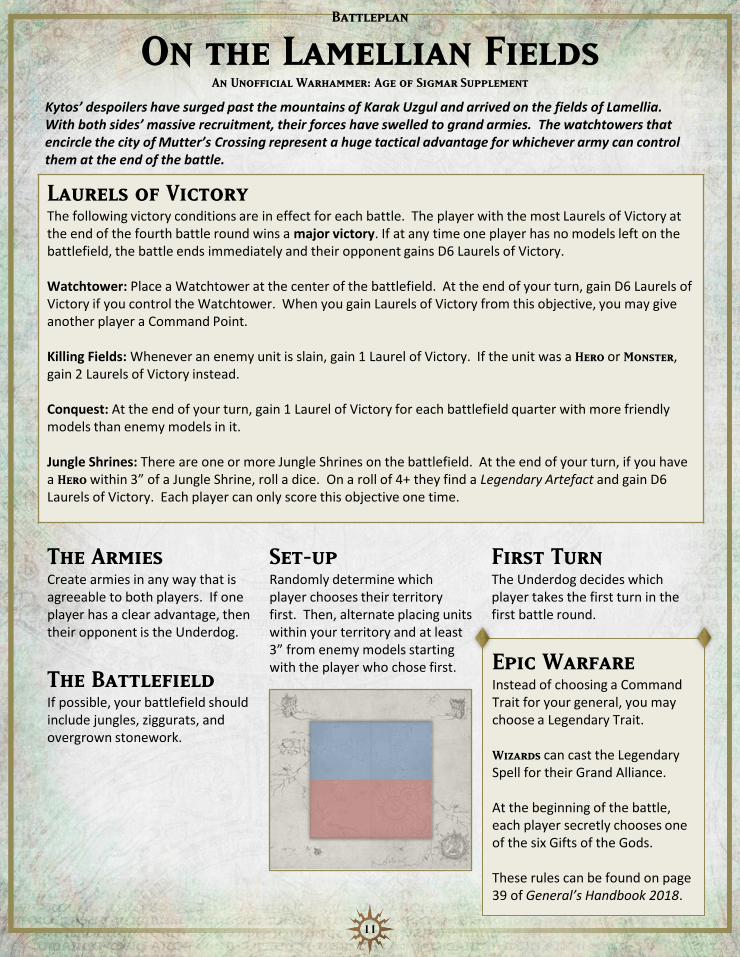
Set-up Randomly determine which player chooses their territory first. Then, alternate placing units within your territory and at least 3” from enemy models starting with the player who chose first.
First Turn The Underdog decides which player takes the first turn in the first battle round.
Epic Warfare Instead of choosing a Command Trait for your general, you may choose a Legendary Trait. Wizards can cast the Legendary Spell for their Grand Alliance. At the beginning of the battle, each player secretly chooses one of the six Gifts of the Gods. These rules can be found on page 39 of General’s Handbook 2018.
On the Lamellian Fields An Unofficial Warhammer: Age of Sigmar Supplement
Kytos’ despoilers have surged past the mountains of Karak Uzgul and arrived on the fields of Lamellia. With both sides’ massive recruitment, their forces have swelled to grand armies. The watchtowers that encircle the city of Mutter’s Crossing represent a huge tactical advantage for whichever army can control them at the end of the battle.
Battleplan
11
Laurels of Victory The following victory conditions are in effect for each battle. The player with the most Laurels of Victory at the end of the fourth battle round wins a major victory. If at any time one player has no models left on the battlefield, the battle ends immediately and their opponent gains D6 Laurels of Victory. Watchtower: Place a Watchtower at the center of the battlefield. At the end of your turn, gain D6 Laurels of Victory if you control the Watchtower. When you gain Laurels of Victory from this objective, you may give another player a Command Point. Killing Fields: Whenever an enemy unit is slain, gain 1 Laurel of Victory. If the unit was a Hero or Monster, gain 2 Laurels of Victory instead. Conquest: At the end of your turn, gain 1 Laurel of Victory for each battlefield quarter with more friendly models than enemy models in it. Jungle Shrines: There are one or more Jungle Shrines on the battlefield. At the end of your turn, if you have a Hero within 3” of a Jungle Shrine, roll a dice. On a roll of 4+ they find a Legendary Artefact and gain D6 Laurels of Victory. Each player can only score this objective one time.
Artefacts of Efengie An Unofficial Warhammer: Age of Sigmar Supplement
Rules
12
Instead of discovering a Legendary Artefact from the General’s Handbook, you may choose to discover these fabled artefacts from the Vale of Efengie’s history.
Artefacts of Efengie D6 Artefact 1 Siegebreaker: This monumental hammer can
fell a castle wall in a single mighty blow! Any who seek to assault Fort S’nak would be wise to seekSiegebreaker before mounting their attack.
During your hero phase, you may choose a single piece of terrain within 3” of the bearer and roll a dice. On a 3+, that terrain piece is destroyed and you must roll a dice for each model that was wholly within the terrain piece. For each 6+, the unit of the model being rolled for suffers a mortal wound.
2 von Hortlak Signet Ring: The von Hortlak line of
vampires has made their home in the Geistwald for countless generations. Those who wear the family’s signet ring reap the benefits of many treaties with the arcane elements of Ghyran.
Whenever the bearer would be affected by an enemy spell, roll a dice. On a 4+, ignore the effects of that spell.
3 Red Dragonhide Armour: Throughout the history of Efengie, there have been many suits of armour crafted from the spawn of Colossal Red. Each of these suits grants the wearer a small amount of draconic power.
Once during the battle, during your hero phase, you may activate the armour’s draconic power. If you do, the bearer gains the ability to fly until the end of the turn. During the shooting phase, you may choose one enemy unit within 9” of the bearer. That unit suffers D3 mortal wounds. During the charge phase the bearer may re-roll failed charge rolls.
D6 Artefact 4 Paymaster’s Keyblade: The famed duardin
mercenary Olgrund Goldbeard carried this keyblade that served both as a weapon and as a safeguard to his company’s pay.
Whenever an enemy model is slain by the bearer, your units that are within 6” of the bearer add 1 to the Attacks characteristic of their melee weapons.
5 The Ivory Stave: This wizard’s staff, crafted in
the heart of the Painted Spires, imbues the bearer with great power over the aesthetic elements of the mortal realms.
Painted units from your army may re-roll failed hit rolls while they are within 12” of the bearer.
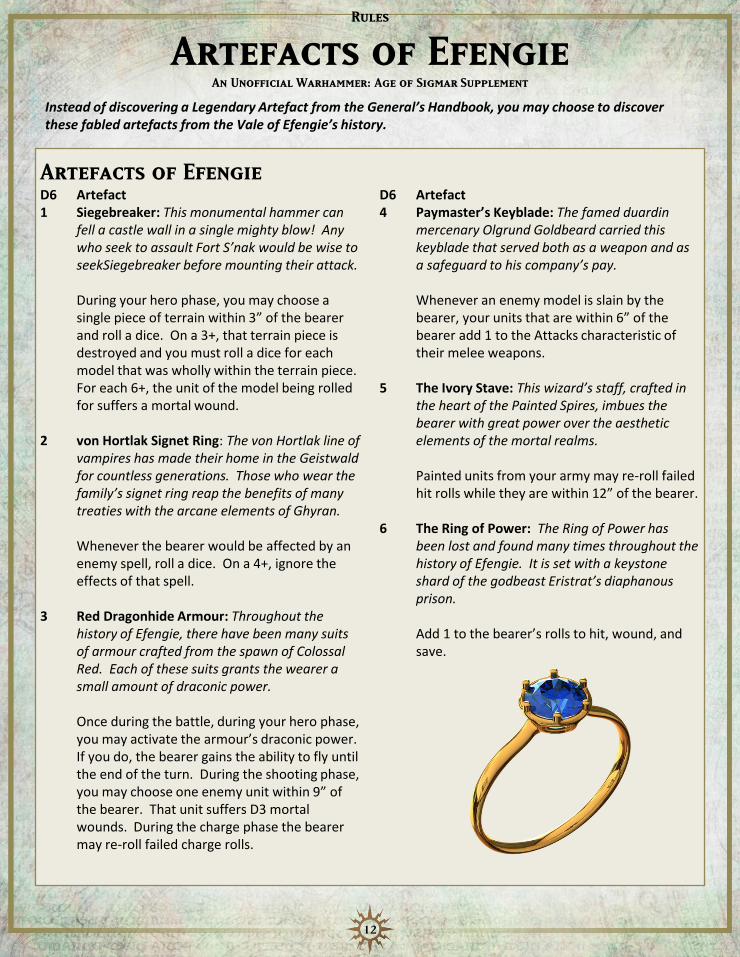
6 The Ring of Power: The Ring of Power has
been lost and found many times throughout the history of Efengie. It is set with a keystone shard of the godbeast Eristrat’s diaphanous prison.
Add 1 to the bearer’s rolls to hit, wound, and
save.

The Armies Create armies in any way that is agreeable to both players. If one player has a clear advantage, then their opponent is the Underdog.
The Battlefield If you are battling at Waaagh! End, your battlefield should include orky huts, houses, fields, and wooded area. Also, Idols of Gorkamorka. If you are battling at Farmer Maggoth’s Fields include fences, one or more farmhouses, and low foliage or crops.
Set-up Randomly determine which player chooses their territory first. Then, alternate placing units within your territory and at least 3” from enemy models starting with the player who chose first.
First Turn The Underdog decides which player takes the first turn in the first battle round.
An Unexpected Battle Before setting up each unit, roll a dice. On a roll of 1, set that unit up in reserve. Units in reserve can be placed on the battlefield wholly within 6” of any battlefield edge and at least 9” from any enemy units at the end of any of your movement phases.
A Long Expected Battle An Unofficial Warhammer: Age of Sigmar Supplement
Rumours have been circulating that the Ring of Power, lost for years now, has been found in an orruk stash at the village of Waaagh! End.
Battleplan
X
Laurels of Victory The following victory conditions are in effect for each battle. Some victory conditions are specific to one location (Waaagh! End and the Farmer Maggoth’s Field) and are only in effect on the battlefields matching that location. The player with the most Laurels of Victory at the end of the fourth battle round wins a major victory. If at any time one player has no models left on the battlefield, the battle ends immediately and their opponent gains D6 Laurels of Victory. A Little Gold Ring: Place a Little Gold Ring along the centerline of the battlefield. At the end of your turn, if you control the Little Gold Ring gain D3 Laurels of Victory and, if nobody is carrying it, one of your units within 1” of the Ring may pick it up. A unit that is carrying the Ring controls it. When the unit carrying the Ring is slain, place the Ring within 3” of the last model removed. At the end of the battle, if you control the Ring, gain D3 Laurels of Victory. Waaagh! End Pillage the Village: Place a Hut at the center of each battlefield quarter. At the end of your turn, gain 1 Laurel of Victory for each Hut you control. Then, you can choose to set the Hut ablaze if you like. A Blazing Hut inflicts D3 mortal wounds on each unit within 6” of it during that unit’s controller’s hero phase.
Farmer Maggoth’s Field Grim Harvest: Place Farmer Maggoth at the center of the battlefield. During your movement phase, move Farmer Maggoth up to 2D6” and inflict D6 mortal wounds to one unit within 6” of Farmer Maggoth. Whenever a unit is wiped out by Farmer Maggoth during your turn gain D3 Laurels of Victory.
13

A Ring on the Finger After a long day of warfare, Master
Harpist Khadroth Netherforged discovered the Ring of Power deep within a well in the town of Waaagh! End. She
possessed it only briefly though, as Archduke Marrowgnawer liberated it
from her in short order. However, he was no match for the daemons that followed, and he was, in turn, defeated. As he fell in battle, the ring bounced from his grasp
and rolled away, returning to myth.
Found and Lost An Unofficial Warhammer: Age of Sigmar Supplement
Sigmar’s forces have returned to Eucebium upon hearing rumours of the Ring of Power’s return. They were not alone though, for the generals of Efengie also sought the ring for themselves, and the power it would bring.
Sigmar Returns For many months the Stormcast Eternals in Efengie have been sequestered within their Obsidian Citadel unseen by mortals. It seems they must have been waiting for the lost Ring to resurface, because the Hammers of Sigmar brought a strong force to bear under the leadership of the Celestant Prime.
14
The Maw Opens While pilfering veggies in Farmer Maggoth’s Fields, Gutbuster Butcher Slogg Sexipants (proprietor of Slogg’s Sexi Soup Kitchen in Reaper) summoned the gaping Maw to devour the Dark Moon Tribe of beastmen, and devour it did! The Maw bit seven times in a row consuming nearly the entire herd.
The Armies Create armies in any way that is agreeable to both players. If one player has a clear advantage, then their opponent is the Underdog.
The Battlefield Add a coastline to your battlefield if possible, and anything that might resemble a shipyard or dock. If you are battling at Dreadchapel, include graveyards, cairns, gnarled woods, and watery terrain. If you are battling at Trollrock Estuary, include stony terrain features, deadly marshes, and hilly fields.
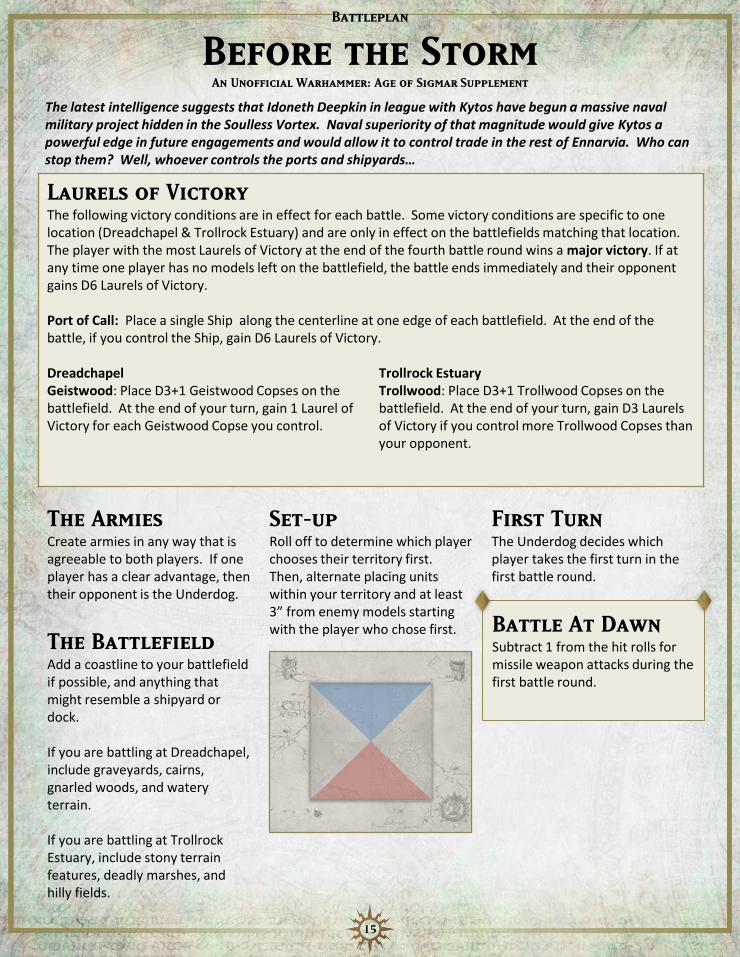
Set-up Roll off to determine which player chooses their territory first. Then, alternate placing units within your territory and at least 3” from enemy models starting with the player who chose first.
First Turn The Underdog decides which player takes the first turn in the first battle round.
Battle At Dawn Subtract 1 from the hit rolls for missile weapon attacks during the first battle round.
Before the Storm An Unofficial Warhammer: Age of Sigmar Supplement
The latest intelligence suggests that Idoneth Deepkin in league with Kytos have begun a massive naval military project hidden in the Soulless Vortex. Naval superiority of that magnitude would give Kytos a powerful edge in future engagements and would allow it to control trade in the rest of Ennarvia. Who can stop them? Well, whoever controls the ports and shipyards…
Battleplan
15
Laurels of Victory The following victory conditions are in effect for each battle. Some victory conditions are specific to one location (Dreadchapel & Trollrock Estuary) and are only in effect on the battlefields matching that location. The player with the most Laurels of Victory at the end of the fourth battle round wins a major victory. If at any time one player has no models left on the battlefield, the battle ends immediately and their opponent gains D6 Laurels of Victory. Port of Call: Place a single Ship along the centerline at one edge of each battlefield. At the end of the battle, if you control the Ship, gain D6 Laurels of Victory. Dreadchapel Geistwood: Place D3+1 Geistwood Copses on the battlefield. At the end of your turn, gain 1 Laurel of Victory for each Geistwood Copse you control.
Trollrock Estuary Trollwood: Place D3+1 Trollwood Copses on the battlefield. At the end of your turn, gain D3 Laurels of Victory if you control more Trollwood Copses than your opponent.

The Reign of Depravity Continues The chains are stirring, and She Who Thirsts whispers grow stronger. Khadroth Netherforged’s latest performances have been channelling those whispers through Bertin du Chastel’s body. Other cells of the Pretenders have been building a navy to pursue a rumoured key on a remote island deep in the Soulless Sea. Khadroth sees little point in building when she can just take what she needs. Even better if ships are given freely, and she can be quite convincing.
Woods of Slaughter An Unofficial Warhammer: Age of Sigmar Supplement
To counter Kytos’ machinations in the Soulless Seas, the generals of Efengie and Lamellia had to first establish their own naval strength. This meant taking control of the shipyards at Trollrock Estuary in Trolgotha and at Dradchapel in Eucebium. The fight was bloody, but it appears that Lamellia’s Slaaneshi puppets came out on top… for now.
Skink Harvest Lord Cueyatl’s skinks proved nearly a match for Gnarla the Subtle’s Ironguts. They stood strong as Grim Jack slashed at them repeatedly with his scythe. Though the ogors eventually finished the job, they were thoroughly embarrassed.
16
Fabled Deeds The forces of Slaanesh were shaking in their boots when Cueyatl reminded them of his many fabled deeds. For example, one time at band camp, he ate a hot dog that was bigger than himself.

Sailing the Soulless Sea An Unofficial Warhammer: Age of Sigmar Supplement
Naval combat requires carefully positioning your line of battle. Massive and unwieldy vessels pick off small maneuverable flanking ships, and large scale boarding actions dominate the swirling center.
Rules
17
Warship Each player may include any number of Warships in their army. Warships can vary in size, shape, and design, but all follow the rules laid out below: - Ship of the Fleet: Warships in your army are
friendly units, and have any keywords that are shared by all of its Crew.
- Crew: When you set up a Warship on the battlefield, you may place units from your army in it as a Garrison (Age of Sigmar Core Rules: Terrain). Additional units can be set up in it later if you like. A Warship can carry up to one Hero, one War Machine, and one other unit, as long as all of the models can physically fit on its decks.
- Moving: During your movement phase, you may pick up and rotate your Warship about its center to face any direction and then move it up to 2D6”. When a Warship moves, advances, or retreats, the units within it count as having done so as well.
- Prepare for Boarding: During your charge phase, you may pick up and rotate your Warship to face any direction, and may then make a charge move up to 2D6” in a straight line that must end within ½” of an enemy model (Warship or otherwise). When a Warship charges, the units within it count as having charged.
- Boarding: Each time you select a unit to fight in the combat phase, if it is on a Warship, the Warship may pile in 3” towards the nearest enemy model (The pile in move may be in any direction, but no part of the ship can move more than 3”).
- Scuttled: At any time if a Warship no longer has any models crewing it, it is scuttled and sinks.
- Reminders: All units on Warships count as being in cover except on a turn in which they charge, and measure all ranges for weapons and abilities from the any point on the Warship. Additionally, subtract 1 from the hit rolls of attacks made against a unit on a Warship.
Flagships After choosing your general, choose a Flagship for your Armada. Your Flagship can be a nautical conversion (like a Steam Tank Boat), or a Warship built to follow these rules. Your Flagship has one of the Flagship Traits below: Brutal: After a Brutal Flagship ends a charge move, choose one enemy unit within 1/2”. That unit suffers D3 mortal wounds.
Mysterious: A Mysterious Flagship is a Wizard can attempt to cast one spell in each of your hero phases, and unbind one spell in each enemy hero phase. Commanding: During your hero phase, one Hero within 3” of a Commanding Flagship can use a command ability without spending a Command Point.
Wading in the Soulless Sea Only Warships and nautical units can move freely in water (although flying units can of course fly over it). Other units can “wade” in water while wholly within 6” of land.

The Armies Create armies in any way that is agreeable to both players. If one player has a clear advantage, then their opponent is the Underdog.
The Battlefield Try scattering a few smaller islands on the battlefield in addition to the large central island. Add fog banks or smoke clouds to your battlefield, they can have special terrain rules, but you can also allow warships to move through them.
Set-up Randomly determine which player chooses their territory first. Then, alternate placing units within your territory and at least 3” from enemy models starting with the player who chose first.
First Turn The Underdog decides which player takes the first turn in the first battle round.
Multiplayer After each player’s turn in each battle round, the remaining players roll for initiative to determine who goes next. During your combat phase, other players may only attack your units. After you attack with a unit, choose which of the remaining players attacks next.
A Storm on the Soulless Sea An Unofficial Warhammer: Age of Sigmar Supplement
On a mysterious island in the Soulless Sea, there are crystallized gems made from pure, compressed souls. This must be related to the Idoneth’s secret contraption, a Soularium, reverse engineered and modified from Nagash’s Soul Trap. This Soularium would be of great value in the ongoing Soul Wars.
Battleplan
18
Laurels of Victory The player with the most Laurels of Victory at the end of the fourth battle round wins a major victory. If at any time after the first battle round only one player has models left on the battlefield, the battle ends immediately and that player gains D6 Laurels of Victory. Capture the Flagship: When you destroy an enemy Flagship, gain 3 Laurels of Victory. Battle 1 – The Mysterious Islands Soul Crystals: Place a Mysterious Island in the center of the battlefield. Then, each player places a Soul Crystal on the Mysterious Island. At the end of your turn, if you control a Soul Crystal, you may have a friendly unit within 6” pick it up. When the unit is slain, the crystal passes to an enemy unit within 3” if there is one, or a friendly unit within 3” if not. If there are no units within 3”, it is destroyed. At the end of the battle, gain D3 Laurels of Victory for each Soul Crystal you possess. Your units continue to carry any Soul Crystals into Round 2.
Battle 2 – The Soulless Vortex The Soularium: Place the Soularium at the center of the battlefield. At the end of your turn, if you control the Soularium, choose an enemy unit within 12” of the Soularium. That unit suffers D3 mortal wounds. If any models are slain in this way, one of your units within 6” of the Soularium gains a Soul Crystal (it follows the rules for picking up and dropping described in Battle 1). At the end of the battle, gain D3 Laurels of Victory for each Soul Crystal you possess.
12”

Rotbelly’s Big Adventure Rotbelly was too big to fit aboard Larvulous’ flagship The Flying Tallyman, so he was loaded onto a longboat with a few nurglings to keep him company, and pushed out to sea. Sadly, his voyage came to an end when his longboat was boarded by the crew of the Interminable Debauchery. Despite being soundly defeated, Rotbelly had a great time smelling the sea air and splashing around in the shallows.
The Dread Pirate Gnarla Very little is known about Gnarla the Subtle's mysterious past before she came to be Lady Vendetta's right hand cow. But today it was learned that she spent some time plying the open seas as a privateer under the banner of dread pirate, "Black" Angus Magog, Captain of the Asterion Jr. Gnarla is calling in a favor from her old ship-mate, and the mighty galleon will be at her command to take control of the mysterious island and the Soularium.
Mysterious Islands An Unofficial Warhammer: Age of Sigmar Supplement
Lookouts reported seeing iridescent crystals glinting on the uncharted islands of the Soulless Sea. Upon collecting the crystals, it became apparent that they were made of the compacted stuff of souls.
The Mountain Kings After the fall of one of their coastal holds to an Idoneth raid, the Hammers of Grungni have sworn a grudge against the deepkin and many of their seafaring allies. To settle such a score the clan has taken to the open seas. Although it is not a dorf's natural habitat, The Hammers of Grungni have pooled their ingenuity to create a flotilla of nigh unsinkable ironclad warships to challenge for naval superiority. The Iron Fleet descends upon its foes with a roar of steam engines and cannon-fire, and leaves nothing but the smoldering remains of lesser vessels in its wake.
19
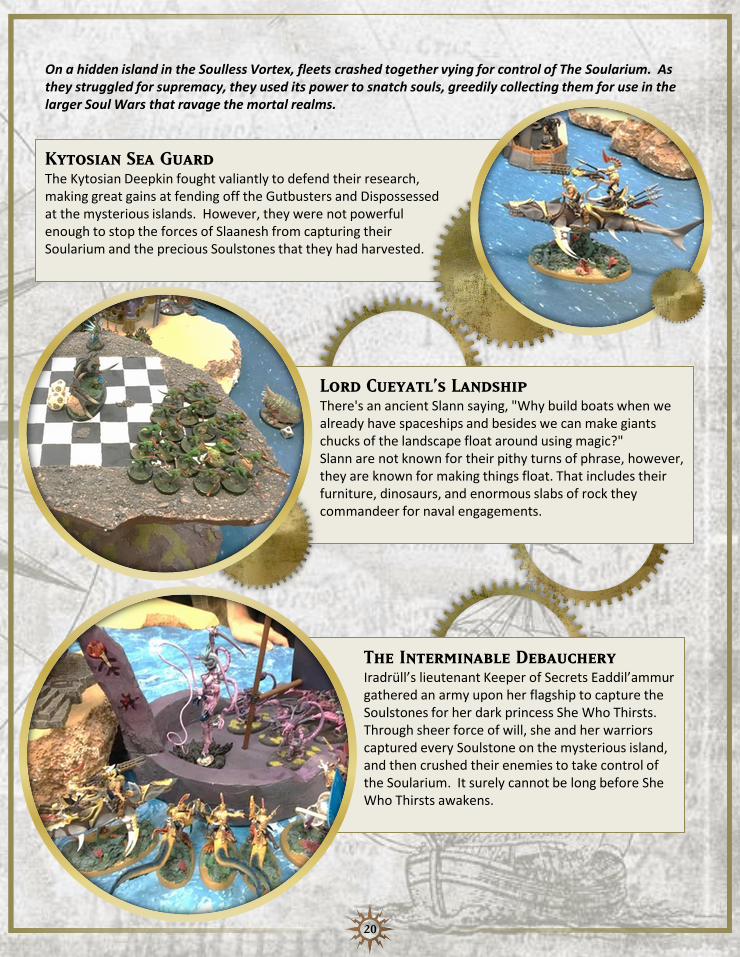
Lord Cueyatl’s Landship There's an ancient Slann saying, "Why build boats when we already have spaceships and besides we can make giants chucks of the landscape float around using magic?" Slann are not known for their pithy turns of phrase, however, they are known for making things float. That includes their furniture, dinosaurs, and enormous slabs of rock they commandeer for naval engagements.
The Interminable Debauchery Iradrüll’s lieutenant Keeper of Secrets Eaddil’ammur gathered an army upon her flagship to capture the Soulstones for her dark princess She Who Thirsts. Through sheer force of will, she and her warriors captured every Soulstone on the mysterious island, and then crushed their enemies to take control of the Soularium. It surely cannot be long before She Who Thirsts awakens.
Kytosian Sea Guard The Kytosian Deepkin fought valiantly to defend their research, making great gains at fending off the Gutbusters and Dispossessed at the mysterious islands. However, they were not powerful enough to stop the forces of Slaanesh from capturing their Soularium and the precious Soulstones that they had harvested.
20
On a hidden island in the Soulless Vortex, fleets crashed together vying for control of The Soularium. As they struggled for supremacy, they used its power to snatch souls, greedily collecting them for use in the larger Soul Wars that ravage the mortal realms.

Replay epic adventures on the continent of Ennarvia! The fifth
installment of the Efengie Campaign includes:
Battleplans – Five new
battleplans for narrative play.
Allegiances – New narrative allegiances to create armies for
the Bloodpact of Kytos, Lamellian Mercenaries, and the
Magi of Efengie
Sailing the Soulless Seas – Easy to use rules for naval combat in
the Age of Sigmar!
Tales of Efengie – Read about the history of Efengie and enjoy
new stories to go with each battleplan.
Linked Battles – A two-player campaign to relive the glory of the first season of the Efengie
campaign.
Welcome to Ennarvia
Efengie
5 – Escalatio
n