Embed Size (px)
Citation preview
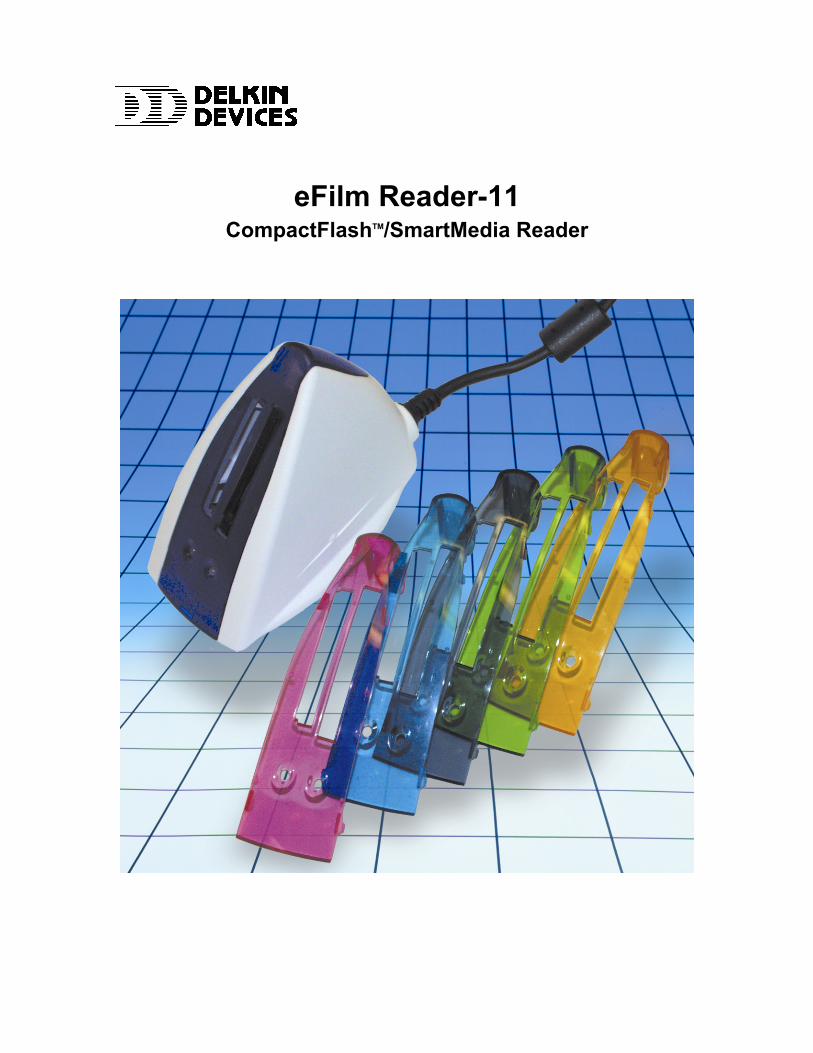
eFilm Reader-11 CompactFlashTM/SmartMedia Reader
2
Introduction Thank you and congratulations on your purchase of the eFilm Reader-11 combination CompactFlash Type II and SmartMedia to USB reader/writer. Before you begin use of this product, please take some time to read all instructions and warranty information. The Reader-11 is designed to read and write to Compact Flash Cards Type I and II and SmartMedia Cards of every capacity. It is a convenient bridge between your PC or Mac and CompactFlash/SmartMedia applications. Both types of media cards are accessed the same as a removable drive. In Windows the Reader will appear as two separate drive icons in My Computer, one for each slot, and on a Macintosh computer the installed card appears as an icon on the desktop. Please look to our web site at http://www.delkin.com for FAQs and current information on compatibility issues as well as the latest drivers. Windows 2000 support will be available in a future software update.
Included Components eFilm Reader-11 Driver CD Registration Card QuickStart Guide iMac Color Kit
System Requirements IBM compatible desktop or laptop PC • Windows ME, Windows 98/98 SE, Windows 2000 • USB port Apple Macintosh desktop or laptop • MAC OS 8.6 • USB port
Features • Quick transfer of digital files • Works with the most popular digital film storage cards: CompatFlash, CF+, IBM Microdrive, and SmartMedia • No external power source is necessary • Compatible with USB equipped Macintosh and PC computers • Supports hot plugging – no need to restart your computer
3
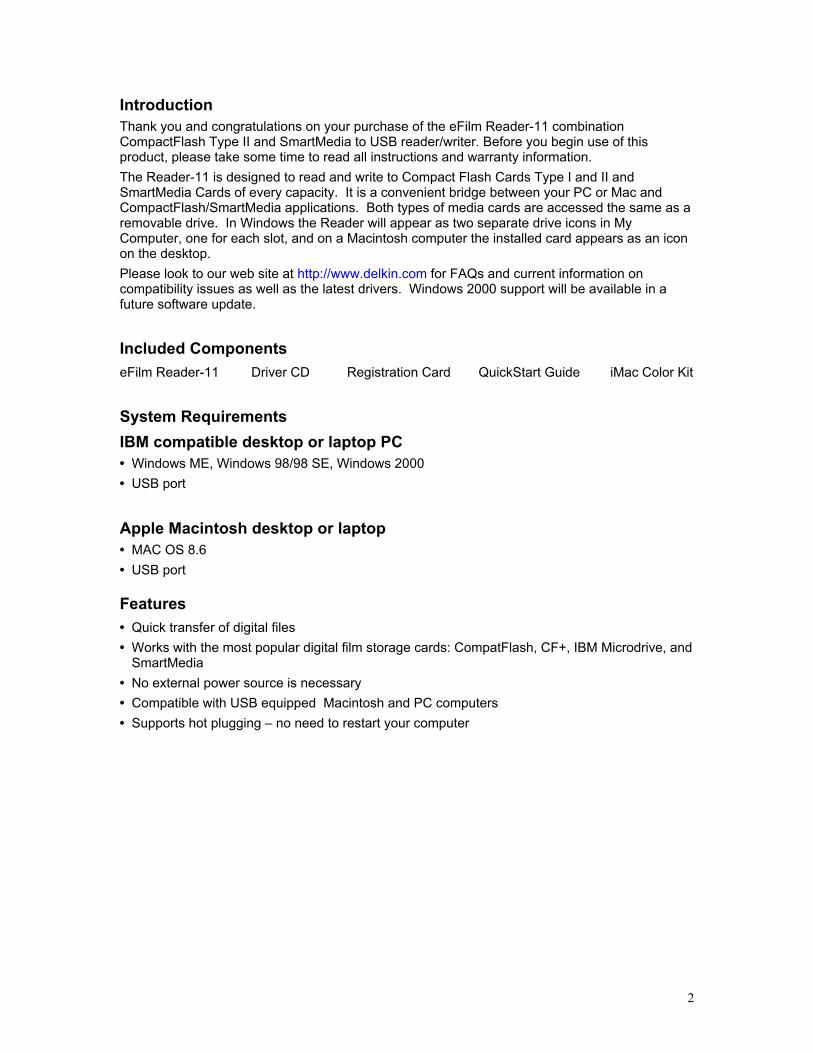
Hardware Installation for Windows and Macintosh Insert the USB plug of the eFilm Reader-11 into the USB port of your computer or hub.
4
Installation Procedure for Windows® 98/ME/2000 Before using the eFilm Reader-11, you must install the device drivers located on the accompanying CD-ROM. The drivers are plug-and-play and will be installed by the Windows Hardware Wizard upon detection of the Reader-11. Uninstall any previous driver versions before proceeding.
Driver Installation Procedure 1. Start Windows and plug the eFilm Reader-11 into a USB port on your computer or hub. 2. The Hardware Wizard will detect new hardware. 3. Insert eFilm Driver installation CD and choose “Search for the best driver for your device”. 4. Use the “Browse” button to select the eFilm Reader-11 folder located on the installation CD.
On some systems, the Wizard will automatically detect the drivers on the CD. 5. Follow the on-screen prompts to complete the installation. 6. When complete, two removable disk icons will be visible in My Computer – one for each card
slot of the Reader-11. They will be assigned the next two available drive letters. When a card is inserted, it can be accessed by clicking on the the appropriate icon.
Uninstall Procedure Unplug the Reader-11 before running the unistall application. 1. Right click the CD-ROM icon in My Computer. 2. Select Explore from the menu. 3. Run the Uninstall application in the Reader-11 folder.
5
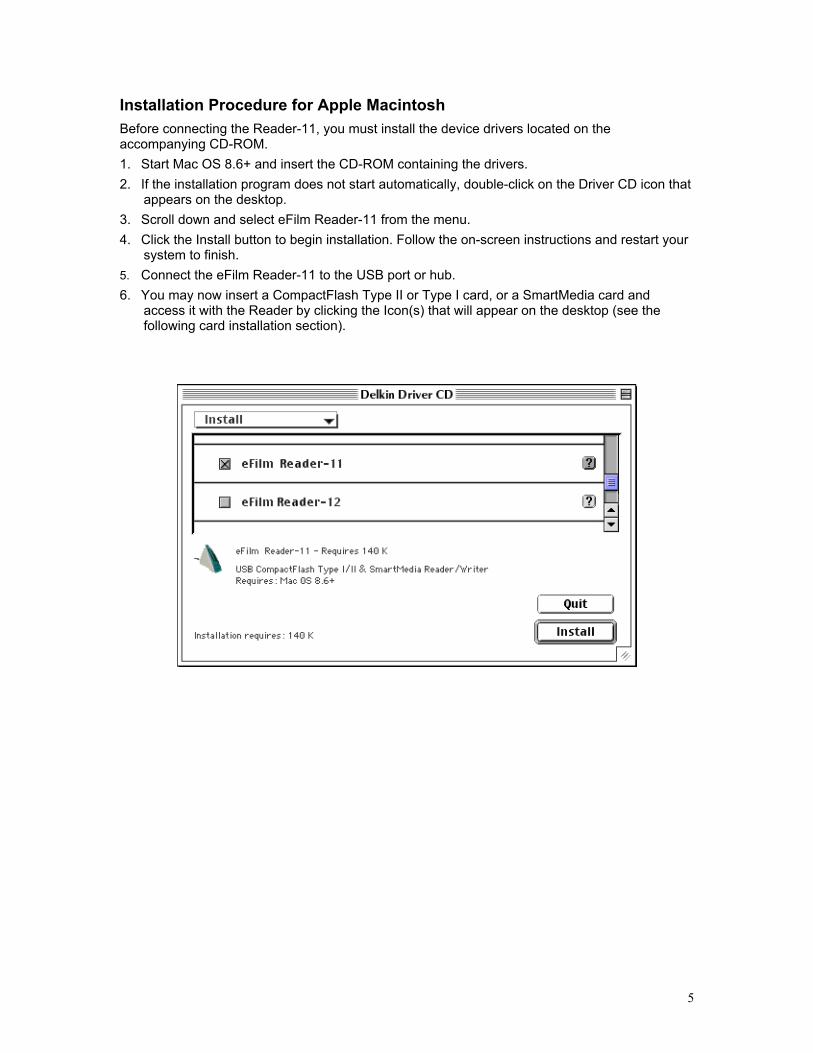
Installation Procedure for Apple Macintosh Before connecting the Reader-11, you must install the device drivers located on the accompanying CD-ROM. 1. Start Mac OS 8.6+ and insert the CD-ROM containing the drivers. 2. If the installation program does not start automatically, double-click on the Driver CD icon that
appears on the desktop. 3. Scroll down and select eFilm Reader-11 from the menu. 4. Click the Install button to begin installation. Follow the on-screen instructions and restart your
system to finish. 5. Connect the eFilm Reader-11 to the USB port or hub. 6. You may now insert a CompactFlash Type II or Type I card, or a SmartMedia card and
access it with the Reader by clicking the Icon(s) that will appear on the desktop (see the following card installation section).
6
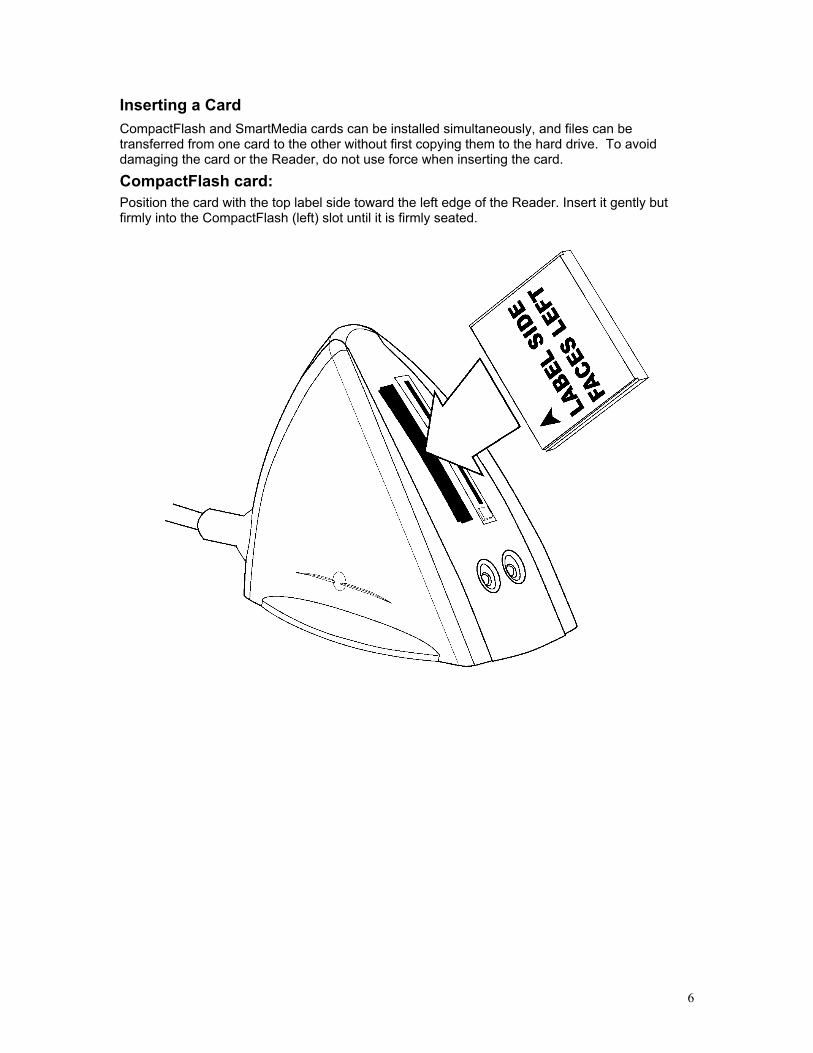
Inserting a Card CompactFlash and SmartMedia cards can be installed simultaneously, and files can be transferred from one card to the other without first copying them to the hard drive. To avoid damaging the card or the Reader, do not use force when inserting the card. CompactFlash card: Position the card with the top label side toward the left edge of the Reader. Insert it gently but firmly into the CompactFlash (left) slot until it is firmly seated.

7
SmartMedia card: Position the card with the gold side toward the left edge of the Reader. Insert it gently but firmly into the SmartMedia (right) slot of the Reader until it is firmly seated.
Removing a CompactFlash or SmartMedia Card First and foremost, close any files residing on the card that are open. This will prevent errors from a program trying to access data on a card no longer in the Reader. On a Macintosh, drag the card icon to the Trash before removing the card. • DO NOT remove a CompactFlash or SmartMedia card while files are being accessed or
transferred. This could result in loss of data and/or damage to the card.
To remove a CompactFlash card, simply pull it from the Reader. SmartMedia cards can ejected by pressing the eject button located under the card slot.
8
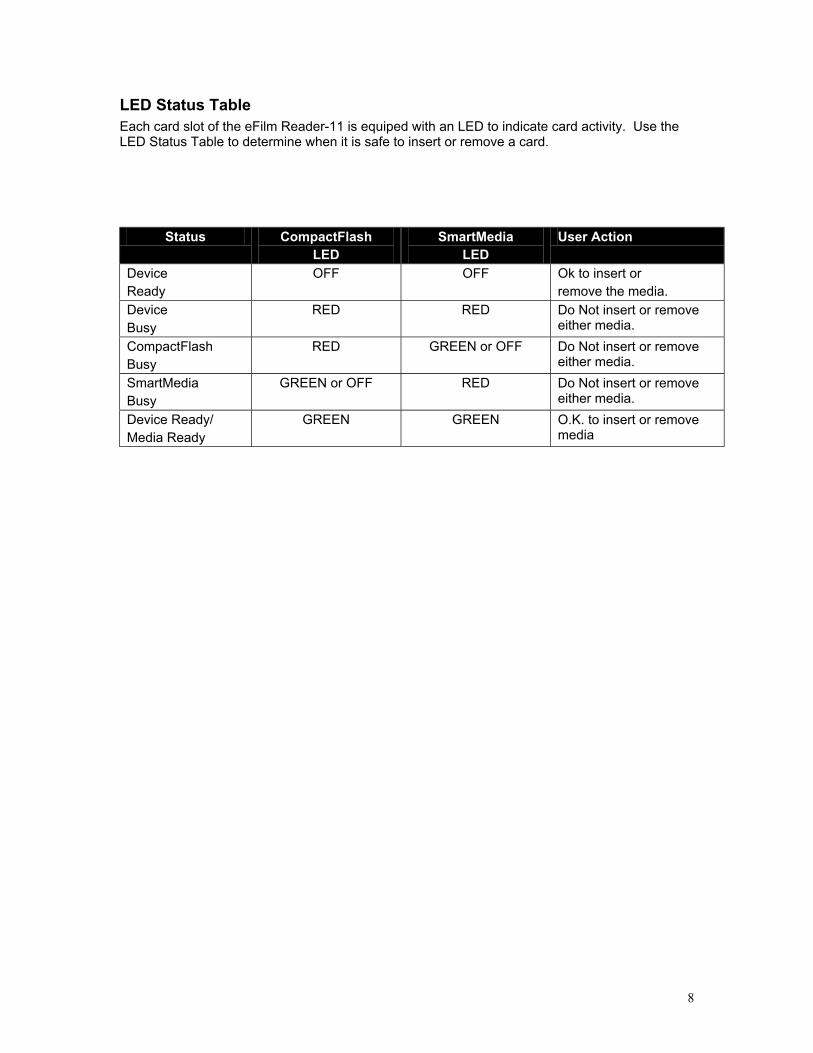
LED Status Table Each card slot of the eFilm Reader-11 is equiped with an LED to indicate card activity. Use the LED Status Table to determine when it is safe to insert or remove a card.
Status CompactFlash LED
SmartMedia LED
User Action
Device Ready
OFF OFF Ok to insert or remove the media.
Device Busy
RED RED Do Not insert or remove either media.
CompactFlash Busy
RED GREEN or OFF Do Not insert or remove either media.
SmartMedia Busy
GREEN or OFF RED Do Not insert or remove either media.
Device Ready/ Media Ready
GREEN GREEN O.K. to insert or remove media
9
First Time CompactFlash Card Use Under Windows When a CompactFlash card is first installed under Windows, an ADD NEW HARDWARE Wizard will appear. In most cases, the software will be loaded automatically. Otherwise, it will be necessary to implement the steps below the first time any new brand, or type of CF card is installed. 1. Click the “NEXT” button in the Wizard screen. 2. Select “SEARCH” for the best driver for your device and click “NEXT”. 3. In the following screen, click “NEXT” to start the search. The result of the driver file search
will be: Standard IDE/ESDI Hard Disk controller*. 4. Click “NEXT” to continue. The final Wizard screen will state: “Windows has finished installing
the software that your new hardware device requires”. 5. Click “FINISH” to complete installation. *Note: If the result of the driver search is not the Standard IDE/ESDI Hard Disk controller, go back and use the “Display a list…” option and select the Standard IDE/ESDI Hard Disk controller from the “Show all hardware” list. This can also be done using “Update driver” in Device Manager.
10
Basic Operation Windows When the Reader is connected, two “Removable Disk” drive icons will appear in “My Computer”, one for each card slot. The first one will be the CompactFlash slot and the second will be for the SmartMedia slot. The letters assigned to these icons will vary acording to the configuration of your computer. Only the slot with a card currently inserted can be accessed. To copy files from your card to your hard disk or vice versa, perform the following steps: 1. Double-click on “My Computer”. 2. Double-click on the “Removable Disk” icon. 3. Simpy “drag and drop” folders or individual files to a desired location. Macintosh An untitled disk icon will be placed on the desktop when a card is inserted into the Reader. The card can then be accessed the same as a removable disk drive. To copy files from your card to your hard disk or vice versa, perform the following steps: 1. Double-click on the icon that appears on the desktop. 2. Simpy “drag and drop” folders or individual files to a desired location while holding down the
Option key.
Windows and Macintosh users please note the following: • In order to access file formats, such as JPEG, TIFF or MP3, you may need a software program
(i.e. Photoshop for TIFFs, or WinAmp for MP3s) that can open or use these files. Most digital devices that use specific formats will include software to access the files. Refer to your device manual for more information.
• When transferring files to a common location on your computer, it is recommended that you re-name the files to avoid overwriting previous pictures. Most cameras simply number the picture files and begin at 001 when a blank card is inserted. This can result in two or more files on your computer having the same name, prompting you to overwrite.
Formatting a CompactFlash or SmartMedia Card Although most cards are factory formatted, some cameras and other appliances may require the card to be formatted in the device before initial use. Note: Some devices, such as MP3 players, use a proprietary format that will make the card unrecognizable to the computer or camera. Refer to the device manual for more information. Macintosh users: It is strongly recommended that you DO NOT format cards with the computer, as the Mac format and file system is not recognized by most devices and could make the card unreadable by your device. • Formatting a CompactFlash or SmartMedia Card will erase all pictures or files on the card. • Formatting should be performed in the camera/device to insure compatibility. • Formatting should not be used to clear unwanted files from the card. If you wish to format a card with the computer, perform the following steps: 1. Double-click on “My Computer”. 2. Right-click on the appropriate “Removable Disk” 3. Select “Format” and follow on-screen instructions. 4. Select “Full” and press start. After formatting, the card is ready for use.
11
Operational Notes The eFilm Reader-11 is compatible with all CompactFlash™ Cards that comply with specifications regulated and certified by the CompactFlash Association (CFA), and SmartMedia Cards that comply with specifications set forth by the SSFDC Forum. • A corrupt file on your CompactFlash or SmartMedia card can cause a device failure or system
crash when transferring files to your computer. Recovery programs such as Scandisk can be used to detect and repair most disk errors. It may also be necessary to re-format the card, which will erase all files stored on the card. Some of the causes of file corruption are:
> Unsteady power supply while transferring files, such as a low camera battery or improperly connected Reader.
> Card removed from Reader or camera, or any other type of interruption while transferring or accessing files.
> Improperly formatted card. • A CompactFlash or SmartMedia card that cannot be accessed by the Reader can be placed
back in the camera, where the cameras picture viewing option can be used to determine if the card is functioning normally. If the card no longer functions in the camera, this may indicate a file corruption or other problem with the card.
• Minor malfunctions while using the Reader-11, such as system hangs, can usually be resolved by simply re-booting the computer. Serious or recurring malfunctions may require a re-installation of the eFilm Reader drivers.
Your new Reader is part of a system of seven primary components. Each must function correctly and compatibly in order to complete the simple process of moving files from your device to your computer. The seven components involved are the eFilm Reader-11, your digital camera or multimedia device, the CompactFlash card, the USB Interface, the computer (and its numerous components), the software drivers, and the operating system.
Test Drive Your Equipment Your new Reader is part of a system of components that must function correctly and compatibly in order to complete the simple process of moving pictures from your camera to your computer. The components involved are the Reader, Camera/Multimedia device, Storage Card, Computer (and its numerous components), USB Interface, Software Drivers, and Operating System. Many of the pictures you take will be irriplacable, so we advise that you put all of your equipment through a dry run before taking pictures of your vacation, wedding, etc. This will not only insure that your equipment is functioning, but will also familliarize you with the process of file transfer. Take a few pictures with your camera and use the viewing option to check that they are stored correctly. Then insert the card into the Reader and use the transfer method you are most comfortalble with – drag and drop, copy and paste, etc. We recommend that you do not use any third party transfer software, such as that supplied with many cameras, in conjunction with the Reader, as the results can be unpredictable. Some multimedia devices, such as MP3 players, may require a specific media program to format or transfer files. Once the pictures are stored on your hard drive, open them one at a time and check that they are to your satisfaction. Remember that picture quality is determined first by the resolution option chosen when taking the picture, and then by the screen resolution and color quality settings of your monitor. Experiment until you are happy with the results and comfortable with the process. Then you can simply delete the test pictures from the card to return it to its original state. One of the advantages of digital media is its re-usability.
12
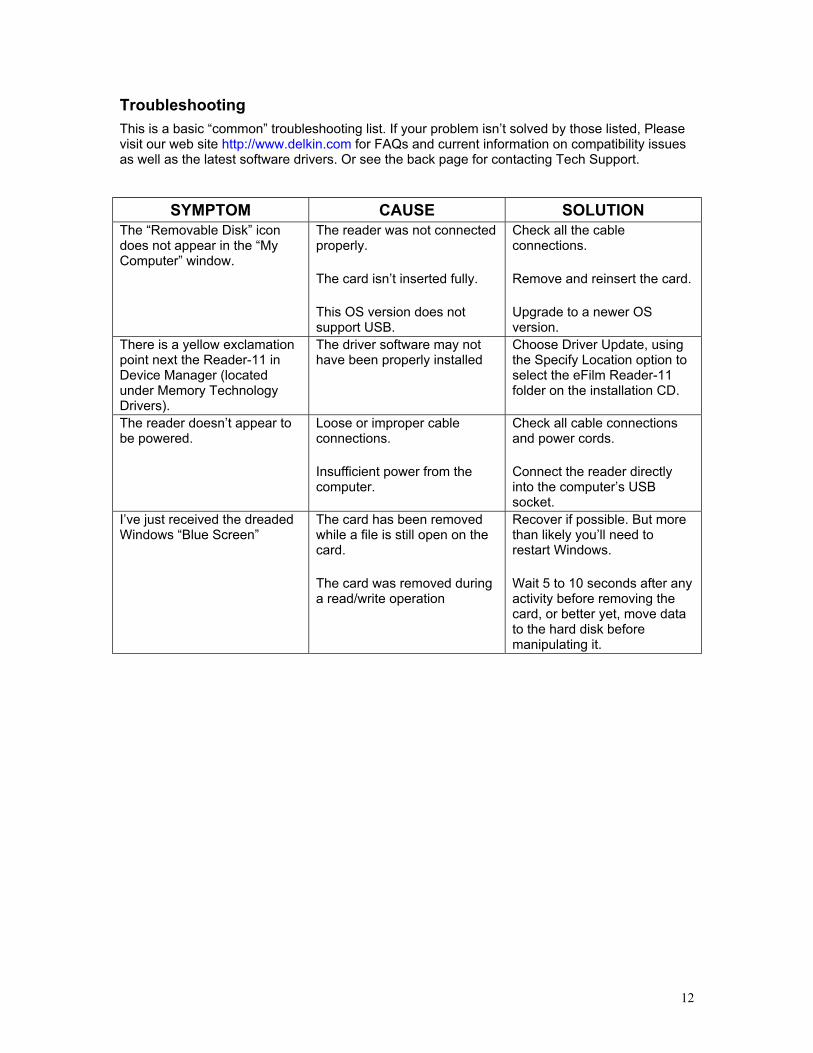
Troubleshooting This is a basic “common” troubleshooting list. If your problem isn’t solved by those listed, Please visit our web site http://www.delkin.com for FAQs and current information on compatibility issues as well as the latest software drivers. Or see the back page for contacting Tech Support.
SYMPTOM CAUSE SOLUTION The “Removable Disk” icon does not appear in the “My Computer” window.
The reader was not connected properly. The card isn’t inserted fully. This OS version does not support USB.
Check all the cable connections. Remove and reinsert the card. Upgrade to a newer OS version.
There is a yellow exclamation point next the Reader-11 in Device Manager (located under Memory Technology Drivers).
The driver software may not have been properly installed
Choose Driver Update, using the Specify Location option to select the eFilm Reader-11 folder on the installation CD.
The reader doesn’t appear to be powered.
Loose or improper cable connections. Insufficient power from the computer.
Check all cable connections and power cords. Connect the reader directly into the computer’s USB socket.
I’ve just received the dreaded Windows “Blue Screen”
The card has been removed while a file is still open on the card. The card was removed during a read/write operation
Recover if possible. But more than likely you’ll need to restart Windows. Wait 5 to 10 seconds after any activity before removing the card, or better yet, move data to the hard disk before manipulating it.
13
ONE YEAR PRODUCT WARRANTY Delkin Devices, Inc. (DDI) warrants that this product has been thoroughly tested and is free from defects in material and workmanship. This warranty is expressly limited to product repair, modification, or replacement, at the sole discretion of DDI. The maximum liability for any aspect of this warranty will be limited to an amount not exceeding the original product purchase price. This warranty is contingent upon proper use of the product in the application for which it is intended and does not cover any product that has been modified, misused, neglected or subjected to unusual physical stress. DDI will not repair or replace products that fail solely because their estimated ‘life’ has expired. The defective product must be returned to DDI. All shipping costs/ shall be the responsibility of the purchaser. State and local laws may apply. You will need a Return Merchandise Authorization (RMA) number before you return the product. Please contact DDI for assistance in getting an RMA number. Disclaimer Except as provided herein, there are no express or implied warranties of merchantability or fitness for a particular purpose. Under no circumstances will DDI be liable in any way for any damages, including but not limited to lost revenue, lost wages, or any other incidental or consequential damages arising from the use of or inability to use this product. The warranty set forth above is exclusive and no other warranty, whether written or oral, is expressed or implied. Delkin reserves the right to change specifications of hardware, software and instructions without notice. Delkin Devices does not extend warranty to batteries. If batteries are supplied with the product, it is as a convenience only, and as such, are covered by the battery manufacturer’s warranty. 100% COMPATIBLE GUARANTEE All Delkin Devices products are 100% guaranteed compatible with OEM machines for which they are designed. TECHNICAL SUPPORT Delkin Devices can provide technical assistance with installation of a Delkin Devices product. Any phone/e-mail charges are the responsibility of the purchaser. CONTACTING DELKIN DEVICES For Technical Support or Warranty information you can contact Delkin Devices by: • phone at 858-391-1234 (9:00AM to 5:00PM PST Mon-Fri) • e-mail at [email protected]. • on the web at http://www.delkin.com.