Embed Size (px)
Citation preview
ENHANCED FILE TRANSFER™ (EFT™) V7 INSTALLATION GUIDE
GlobalSCAPE, Inc. (GSB)
Address: 4500 Lockhill-Selma Road, Suite 150 San Antonio, TX (USA) 78249
Sales: (210) 308-8267
Sales (Toll Free): (800) 290-5054
Technical Support: (210) 366-3993
Web Support: http://www.globalscape.com/support/
© 2004-2014 GlobalSCAPE, Inc. All Rights Reserved
Last updated: August 6, 2014
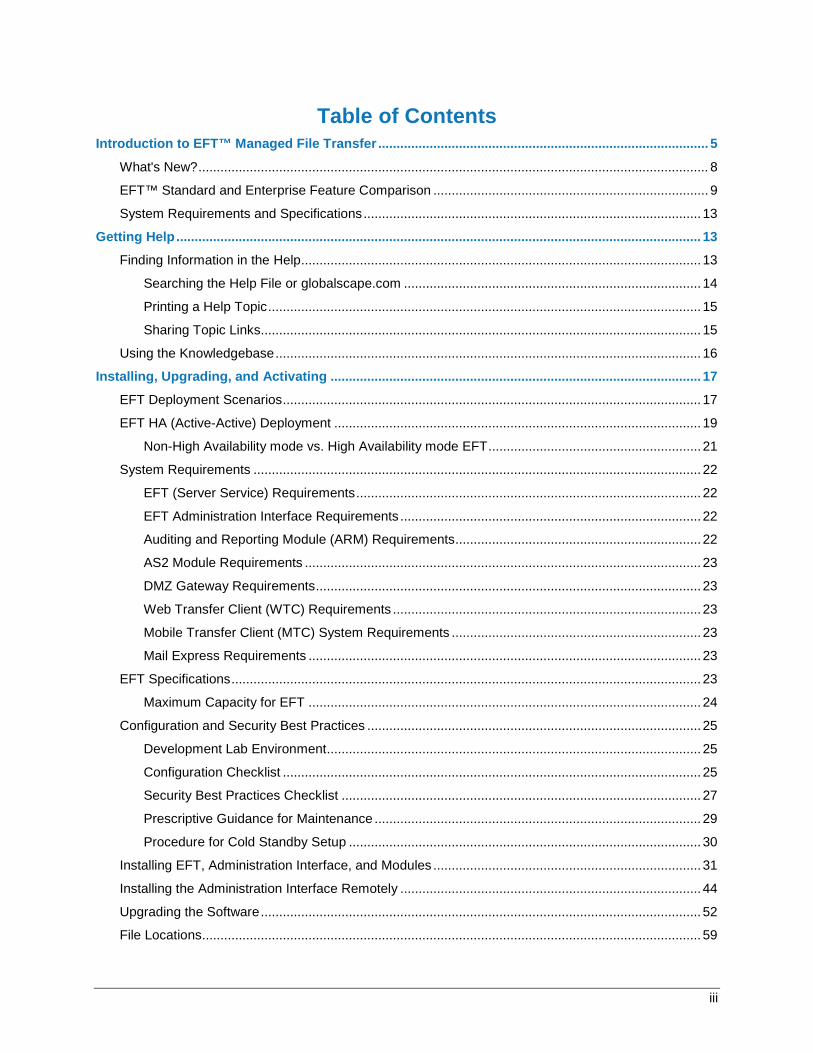
Table of Contents Introduction to EFT™ Managed File Transfer .......................................................................................... 5
What's New? ........................................................................................................................................... 8
EFT™ Standard and Enterprise Feature Comparison ........................................................................... 9
System Requirements and Specifications ............................................................................................ 13 Getting Help ............................................................................................................................................... 13
Finding Information in the Help ............................................................................................................. 13
Searching the Help File or globalscape.com ................................................................................. 14
Printing a Help Topic ...................................................................................................................... 15
Sharing Topic Links ........................................................................................................................ 15
Using the Knowledgebase .................................................................................................................... 16 Installing, Upgrading, and Activating ..................................................................................................... 17
EFT Deployment Scenarios .................................................................................................................. 17
EFT HA (Active-Active) Deployment .................................................................................................... 19
Non-High Availability mode vs. High Availability mode EFT .......................................................... 21
System Requirements .......................................................................................................................... 22
EFT (Server Service) Requirements .............................................................................................. 22
EFT Administration Interface Requirements .................................................................................. 22 Auditing and Reporting Module (ARM) Requirements ................................................................... 22
AS2 Module Requirements ............................................................................................................ 23
DMZ Gateway Requirements ......................................................................................................... 23
Web Transfer Client (WTC) Requirements .................................................................................... 23
Mobile Transfer Client (MTC) System Requirements .................................................................... 23 Mail Express Requirements ........................................................................................................... 23
EFT Specifications ................................................................................................................................ 23
Maximum Capacity for EFT ........................................................................................................... 24
Configuration and Security Best Practices ........................................................................................... 25
Development Lab Environment ...................................................................................................... 25
Configuration Checklist .................................................................................................................. 25 Security Best Practices Checklist .................................................................................................. 27
Prescriptive Guidance for Maintenance ......................................................................................... 29
Procedure for Cold Standby Setup ................................................................................................ 30
Installing EFT, Administration Interface, and Modules ......................................................................... 31
Installing the Administration Interface Remotely .................................................................................. 44
Upgrading the Software ........................................................................................................................ 52 File Locations ........................................................................................................................................ 59
iii
EFT v7 Installation and Administration Guide
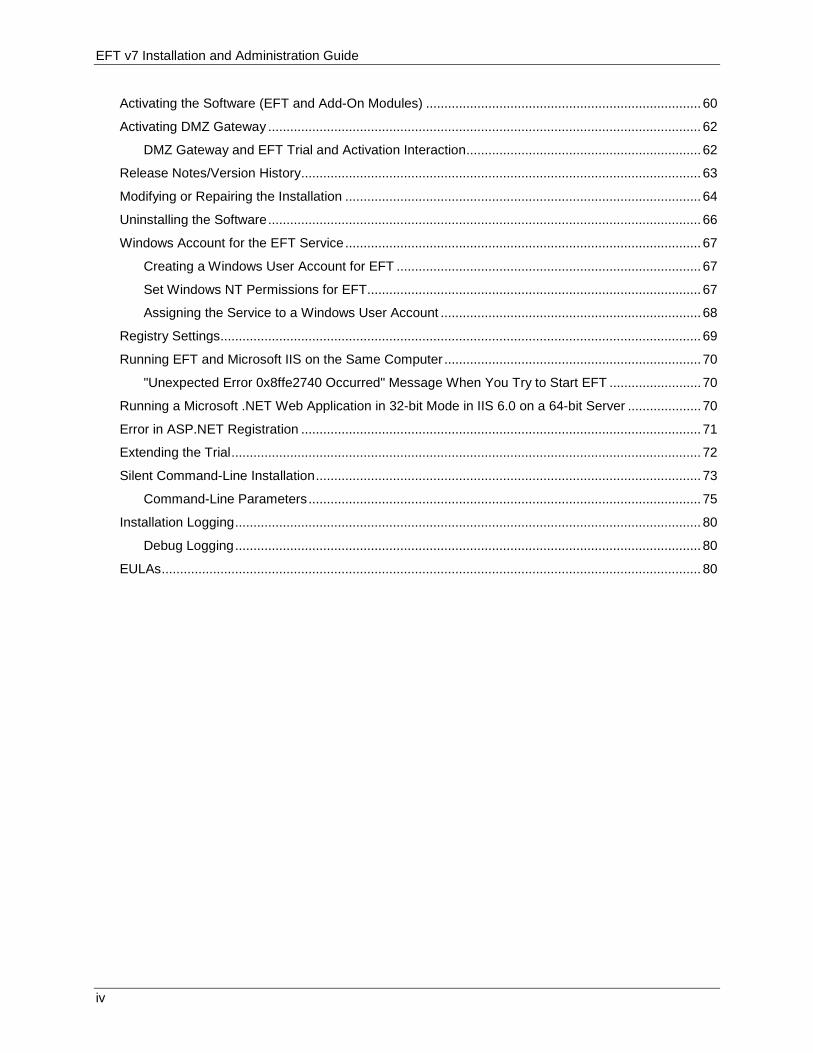
Activating the Software (EFT and Add-On Modules) ........................................................................... 60
Activating DMZ Gateway ...................................................................................................................... 62
DMZ Gateway and EFT Trial and Activation Interaction ................................................................ 62 Release Notes/Version History ............................................................................................................. 63
Modifying or Repairing the Installation ................................................................................................. 64
Uninstalling the Software ...................................................................................................................... 66
Windows Account for the EFT Service ................................................................................................. 67
Creating a Windows User Account for EFT ................................................................................... 67
Set Windows NT Permissions for EFT ........................................................................................... 67 Assigning the Service to a Windows User Account ....................................................................... 68
Registry Settings................................................................................................................................... 69
Running EFT and Microsoft IIS on the Same Computer ...................................................................... 70
"Unexpected Error 0x8ffe2740 Occurred" Message When You Try to Start EFT ......................... 70
Running a Microsoft .NET Web Application in 32-bit Mode in IIS 6.0 on a 64-bit Server .................... 70
Error in ASP.NET Registration ............................................................................................................. 71 Extending the Trial ................................................................................................................................ 72
Silent Command-Line Installation ......................................................................................................... 73
Command-Line Parameters ........................................................................................................... 75
Installation Logging ............................................................................................................................... 80
Debug Logging ............................................................................................................................... 80
EULAs ................................................................................................................................................... 80
iv
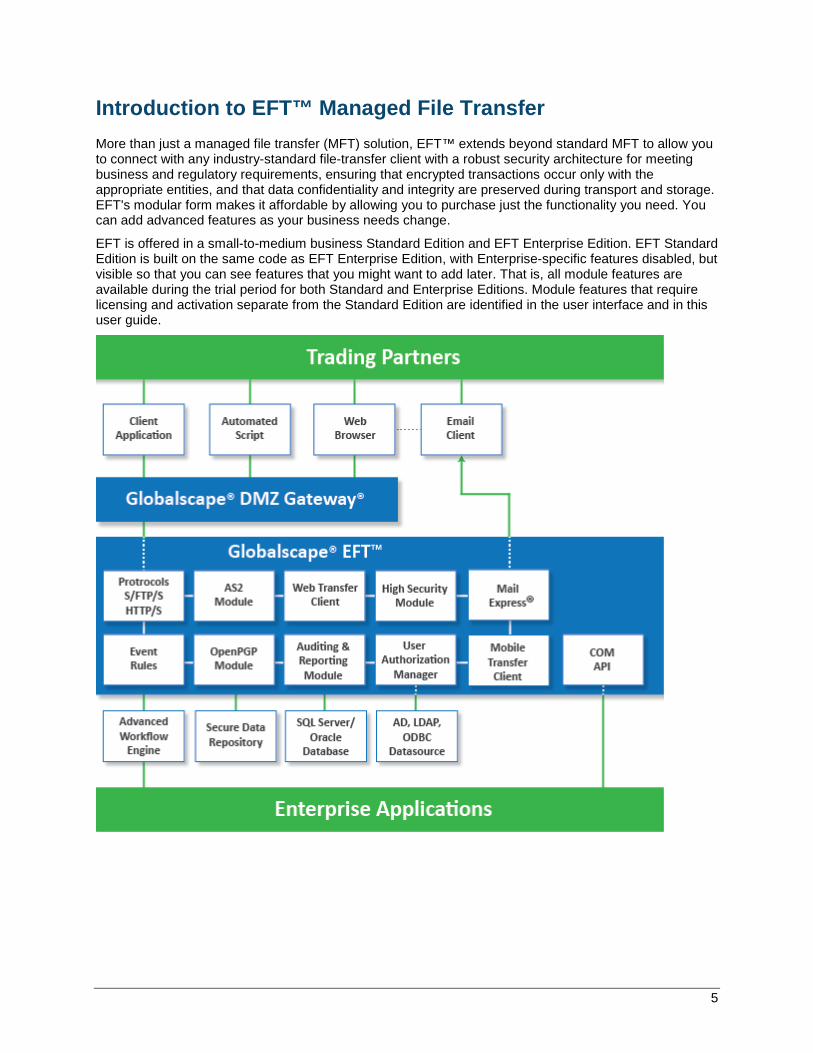
Introduction to EFT™ Managed File Transfer More than just a managed file transfer (MFT) solution, EFT™ extends beyond standard MFT to allow you to connect with any industry-standard file-transfer client with a robust security architecture for meeting business and regulatory requirements, ensuring that encrypted transactions occur only with the appropriate entities, and that data confidentiality and integrity are preserved during transport and storage. EFT's modular form makes it affordable by allowing you to purchase just the functionality you need. You can add advanced features as your business needs change.
EFT is offered in a small-to-medium business Standard Edition and EFT Enterprise Edition. EFT Standard Edition is built on the same code as EFT Enterprise Edition, with Enterprise-specific features disabled, but visible so that you can see features that you might want to add later. That is, all module features are available during the trial period for both Standard and Enterprise Editions. Module features that require licensing and activation separate from the Standard Edition are identified in the user interface and in this user guide.
5
EFT v7 Installation and Administration Guide
EFT™ Standard and EFT Enterprise™ each provide the following features:
• Data Protection and Encryption - EFT protects intellectual property, trade secrets, and customer files transferred over the Internet using secure protocols including FTPS (SSL/TLS), SFTP (SSH2), and HTTP/S (SSL).
• Guaranteed Delivery and Data Integrity - EFT extends the industry-standard FTP protocol with strong reliability features, including post transmission integrity verification, mid-file recovery, and automatic restart.
• Tracking and Auditing - Secure data delivery requires strong audit trails for tracking and non-repudiation. EFT provides industry-standard logging (W3C, NCSA, Microsoft IIS Extended), e-mail notification of completed transactions, and digital certificates for proof of identity.
• Programmatic Interface - EFT can be controlled through its administration interface or through its Component Object Model (COM) interface. The COM API is a programmatic interface that lets you control EFT from your own custom applications using any COM-enabled programming language.
• Accelerated Transfers - EFT supports multi-part (segmented) transfers for faster delivery of large files over large geographical distances. Multi-part transfers require the use of compatible clients such as CuteFTP.
• Life-Cycle Management - EFT helps you quickly and efficiently manage users, temporary accounts, and expired or compromised public-keys or certificates.
• Authentication and Authorization - EFT supports password, public-key, or one-time-password authentication. User profiles can be managed internally or externally through NTLM, Active Directory (AD), or ODBC data sources.
• User and Group Management - Manage system resources including bandwidth, folder access, file types, and more using granular or Site-wide controls provided for user and group management. Visually manage folder permissions via the Windows Explorer-like Virtual File System (VFS). Inherit or override permissions, grant administrative, guest, or anonymous permissions, or deny access altogether. Manage client connections with real-time monitoring and on-the-spot disconnection of users. Administrators can force users to reset their passwords upon initial login, require complex passwords, remove/disable inactive accounts automatically.
• Specify SSL ciphers and version levels - EFT provides administrators the ability to specify symmetric key cipher(s) and the ordering of those ciphers for establishing SSL sessions. EFT validates inbound SSL sessions and allows or denies connections based on specified or approved ciphers.
EFT Enterprise™ provides each of the features of EFT™ Standard, plus:
• SFTP (SSH) and HTTPS modules are included
• LDAP authentication functionality
• SSL certificate-only authentication
• Delegated administration for user-only, Site-only, or Server-only management
• Auditing and Reporting Module support for Oracle database (with optional ARM module)
• DMZ Gateway multi-site configuration (with optional DMZ Gateway)
• AS2 support (with optional AS2 module)
6
What's New?
The available modules include:
HTTPS (Included in the Enterprise edition) - The HTTPS add-on module allows you to set up a secure connection to anyone in minutes using any Web browser. The HTTPS module adds the HTTPS protocol to EFT, enabling you to support secure browser-based transfers without having to install a Web server. HTTPS encrypts the session data using the SSL (Secure Socket Layer) protocol, which provides protection from eavesdroppers and man-in-the-middle attacks.
SFTP (Included in the Enterprise edition) - SFTP is a subset of the popular SSH protocol and is a platform independent, secure transfer protocol. SFTP provides a single connection port for easy firewall navigation, password and public key authentication, and strong data encryption, to prevent login, data, and session information from being intercepted and/or modified in transit. The SFTP module enables EFT to authenticate and transfer data securely with SFTP-ready FTP clients, such as CuteFTP Professional.
AS2 (Available in EFT Enterprise only) - The AS2 (Applicability Statement 2) specification supports the exchange of structured business data securely on top of the HTTP or HTTP/S protocol.
OpenPGP - EFT employs industry-standard OpenPGP (based on the open source implementation of Pretty Good Privacy) technology to safeguard data at rest. The OpenPGP data encryption or decryption process is directed by Event Rules that specify how data files are treated in a particular context. EFT uses OpenPGP to encrypt uploaded data and the off-load capabilities of EFT to move the file to another location.
High Security Module (HSM) - The High Security module (HSM) achieves or exceeds security practices mandated by PCI DSS, HIPAA, and Sarbanes-Oxley for data transfer, access, and storage. The HSM protects data in transit by enforcing the use of secure protocols, strong ciphers and encryption keys, and maintaining strict password policies. For a list of features in the HSM, refer to Features of the High Security Module.
Auditing and Reporting Module (ARM) - The Auditing and Reporting module captures all of the transactions passing through EFT. You can query the data and create/view reports from within EFT's administration interface. A new database is created when upgrading to version 6. (The Standard edition does not offer support for Oracle databases.)
Web Transfer Client (WTC) - The Web Transfer Client (WTC) can deploy automatically upon client connection to EFT and can be used by any trading partner using virtually any Web browser. (Limited to 5 concurrent users in the SMB edition.)
Mobile Transfer Client (MTC) - The Mobile Transfer Client (MTC) mobile application (app) provides a way for your iOS and Android phone and tablet users to securely connect to EFT and upload and download files while providing a number of centrally managed security controls for safeguarding your corporate data.
Advanced Workflow Engine (Available in EFT Enterprise only) - Similar to EFT's Commands, EFT's Advanced Workflows add additional automation capabilities, allowing you to add scripting and variables to Workflow Tasks, then add these reusable Workflows to Event Rules. A Workflow is a series of steps that can perform file transfers, batch data processing, application testing, and so on, and are defined to run automatically when started by some event.
DMZ Gateway - DMZ Gateway is used in combination with EFT to create a multi-tier security solution for data storage and retrieval. The DMZ Gateway resides at the edge of the network, brokering data between EFT residing behind your corporate firewall and your clients in the outside world. (Multiple-Site configuration is only available in Enterprise edition.)
Mail Express module - Mail Express™ allows you to send large email file attachments to recipients inside or outside of your organization quickly, reliably, and securely, while reducing the load on your mail server.
COM API - Using the COM API, you can interact directly with EFT from your own custom applications using any COM-enabled programming language such as Visual Basic (VB), Java, or C++. You can create a script with the development IDE of your choice.
7
EFT v7 Installation and Administration Guide
What's New? Release notes (version history) for all versions of EFT are available in the installation folder and online at http://www.globalscape.com/mft/history.aspx.
EFT v7 includes the following changes:
• Support for high availability (HA), active-active clustering and load balancing without requiring Windows Clustering Services nor Veritas Clustering
• Support for load balanced Folder Monitor and Timer Event Rules in HA mode
• The Web Transfer Client was completely rebuilt using HTML5 features to eliminate the need for the Java Runtime Environment.
• Updated High Security module to facilitate compliance with PCI DSS v3
• For ARM connection failures, automatically attempt to reconnect every <n> seconds, and email notification of each disconnect/reconnect
• Updated ARM schema for active-active clustering
• COM API modifications for Auditing and Reporting database features
• COM API modifications for active-active clustering
• Updated OpenSSL library to version 0.9.8za (non-FIPS)
• Updated PGP library
• Updated AS2 library
8

EFT™ Standard and Enterprise Feature Comparison
EFT™ Standard and Enterprise Feature Comparison Globalscape EFT™ is available in a small-to-medium business Standard Edition and an Enterprise Edition. Each edition is built on the same foundation and offers similar core functionality to enable organizations to receive files from business partners or end users over a variety of Internet standard protocols, such as FTP/S, SFTP, and HTTP/S. Add-on modules are available to both products that extend auditing from simple flat-file logging to database driven auditing and customizable reports; provide advanced security controls typically needed by organizations that must comply with security standards such as PCI DSS, HIPAA, or SoX; facilitate ad hoc provisioning of users; and provide a richer experience when transferring data over a web browser.
During the evaluation period, all functionality is enabled and visible in the EFT administration interface. After the trial expires, the functions and modules that are enabled and visible depend on the license purchased. (EFT's Web Services interface, Oracle support, AWE, and AS2 are available only in the Enterprise edition.)
The tables below compare the features available in each edition. Certain features require the activation of one or more of the following modules, as indicated by one or more superscript numbers after "Optional." For example, "Optional, 6,7" indicates that the feature requires the High Security module (6) and the Auditing and Reporting module (7).
1. SFTP module (included in EFT Enterprise)
2. HTTP/S module (included in EFT Enterprise)
3. OpenPGP Encryption/Decryption module
4. Mail Express ad hoc transfer
5. Web Transfer Client (Requires HTTP/S module; the basic edition is limited to maximum of 5 concurrent users)
6. High Security module (Requires ARM to run PCI DSS reports)
7. Auditing and Reporting (ARM) (Oracle support available in EFT Enterprise only)
8. DMZ Gateway (Outbound proxy support in EFT Enterprise only)
9. AS2 Module (Available in EFT Enterprise only; requires ARM module)
10. Advanced Workflow Engine (AWE module) (Available in EFT Enterprise only)
11. Business Activity Monitoring (BAM) dashboard
12. Mobile Transfer Client (MTC) module
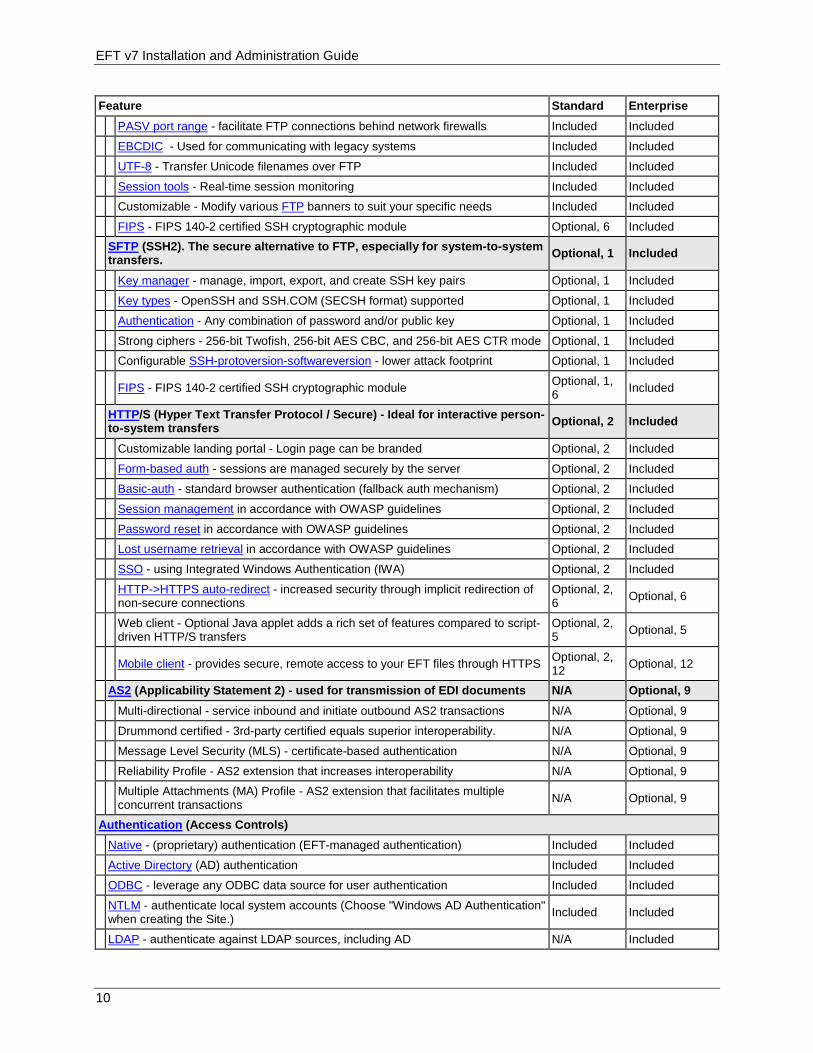
Feature Standard Enterprise Protocols (Inbound Listeners)
FTP/S (File Transfer Protocol / Secure) - still used for communications with legacy systems. Included Included
SSL/TLS - secure FTP communications Included Included
SSL key manager - manage, import, export, and create SSL certificates Included Included
SSL Config - specify ciphers and versions allowed (SSL v2, v3, and TLS v1) Included Included
Checkpoint restart - resume interrupted transfers Included Included
Compression - inline compression of ASCII files Included Included
Acceleration - reduce transfer time over poor connections Included Included
Verification - guarantee integrity by comparing checksums Included Included
Command blocking - prevent unwanted behavior Included Included
S-key OTP - One-time-password scheme for plain-text FTP Included Included
9
EFT v7 Installation and Administration Guide
Feature Standard Enterprise PASV port range - facilitate FTP connections behind network firewalls Included Included
EBCDIC - Used for communicating with legacy systems Included Included
UTF-8 - Transfer Unicode filenames over FTP Included Included
Session tools - Real-time session monitoring Included Included
Customizable - Modify various FTP banners to suit your specific needs Included Included
FIPS - FIPS 140-2 certified SSH cryptographic module Optional, 6 Included
SFTP (SSH2). The secure alternative to FTP, especially for system-to-system transfers. Optional, 1 Included
Key manager - manage, import, export, and create SSH key pairs Optional, 1 Included
Key types - OpenSSH and SSH.COM (SECSH format) supported Optional, 1 Included
Authentication - Any combination of password and/or public key Optional, 1 Included
Strong ciphers - 256-bit Twofish, 256-bit AES CBC, and 256-bit AES CTR mode Optional, 1 Included
Configurable SSH-protoversion-softwareversion - lower attack footprint Optional, 1 Included
FIPS - FIPS 140-2 certified SSH cryptographic module Optional, 1, 6 Included
HTTP/S (Hyper Text Transfer Protocol / Secure) - Ideal for interactive person-to-system transfers Optional, 2 Included
Customizable landing portal - Login page can be branded Optional, 2 Included
Form-based auth - sessions are managed securely by the server Optional, 2 Included
Basic-auth - standard browser authentication (fallback auth mechanism) Optional, 2 Included
Session management in accordance with OWASP guidelines Optional, 2 Included
Password reset in accordance with OWASP guidelines Optional, 2 Included
Lost username retrieval in accordance with OWASP guidelines Optional, 2 Included
SSO - using Integrated Windows Authentication (IWA) Optional, 2 Included
HTTP->HTTPS auto-redirect - increased security through implicit redirection of non-secure connections
Optional, 2, 6 Optional, 6
Web client - Optional Java applet adds a rich set of features compared to script-driven HTTP/S transfers
Optional, 2, 5 Optional, 5
Mobile client - provides secure, remote access to your EFT files through HTTPS Optional, 2, 12 Optional, 12
AS2 (Applicability Statement 2) - used for transmission of EDI documents N/A Optional, 9 Multi-directional - service inbound and initiate outbound AS2 transactions N/A Optional, 9
Drummond certified - 3rd-party certified equals superior interoperability. N/A Optional, 9
Message Level Security (MLS) - certificate-based authentication N/A Optional, 9
Reliability Profile - AS2 extension that increases interoperability N/A Optional, 9
Multiple Attachments (MA) Profile - AS2 extension that facilitates multiple concurrent transactions N/A Optional, 9
Authentication (Access Controls) Native - (proprietary) authentication (EFT-managed authentication) Included Included
Active Directory (AD) authentication Included Included
ODBC - leverage any ODBC data source for user authentication Included Included
NTLM - authenticate local system accounts (Choose "Windows AD Authentication" when creating the Site.) Included Included
LDAP - authenticate against LDAP sources, including AD N/A Included
10
EFT™ Standard and Enterprise Feature Comparison
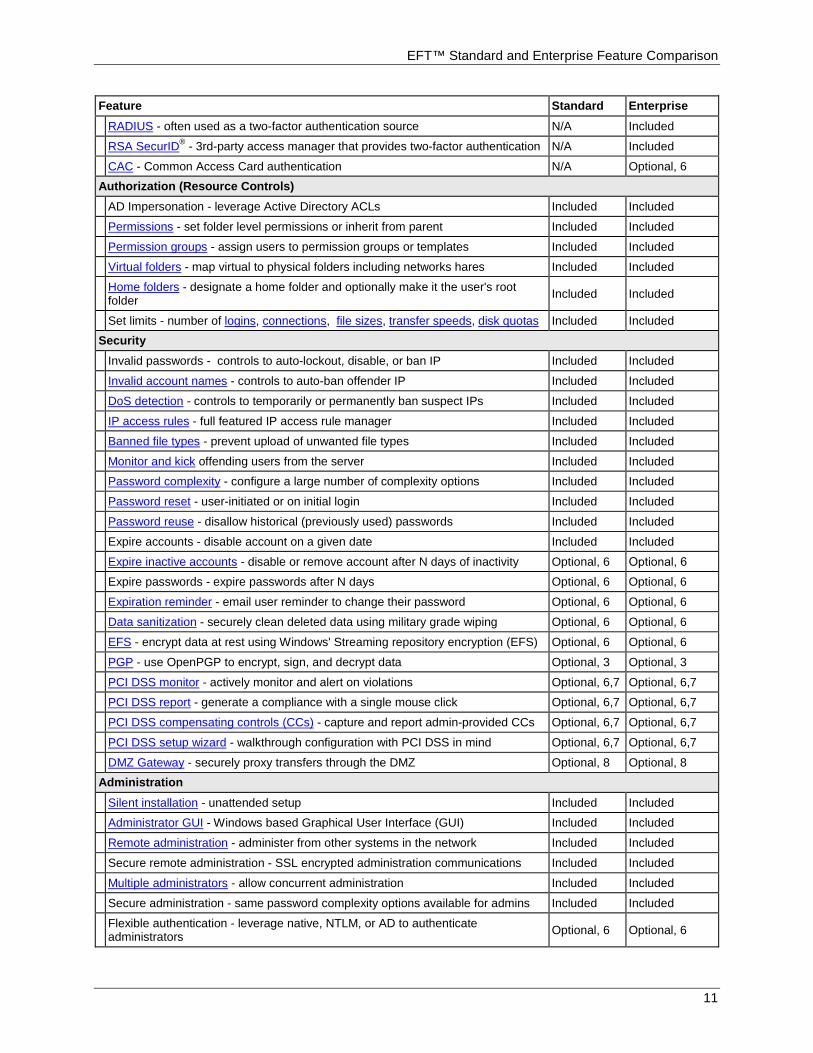
Feature Standard Enterprise RADIUS - often used as a two-factor authentication source N/A Included
RSA SecurID® - 3rd-party access manager that provides two-factor authentication N/A Included
CAC - Common Access Card authentication N/A Optional, 6 Authorization (Resource Controls)
AD Impersonation - leverage Active Directory ACLs Included Included
Permissions - set folder level permissions or inherit from parent Included Included
Permission groups - assign users to permission groups or templates Included Included
Virtual folders - map virtual to physical folders including networks hares Included Included
Home folders - designate a home folder and optionally make it the user's root folder Included Included
Set limits - number of logins, connections, file sizes, transfer speeds, disk quotas Included Included Security
Invalid passwords - controls to auto-lockout, disable, or ban IP Included Included
Invalid account names - controls to auto-ban offender IP Included Included
DoS detection - controls to temporarily or permanently ban suspect IPs Included Included
IP access rules - full featured IP access rule manager Included Included
Banned file types - prevent upload of unwanted file types Included Included
Monitor and kick offending users from the server Included Included
Password complexity - configure a large number of complexity options Included Included
Password reset - user-initiated or on initial login Included Included
Password reuse - disallow historical (previously used) passwords Included Included
Expire accounts - disable account on a given date Included Included
Expire inactive accounts - disable or remove account after N days of inactivity Optional, 6 Optional, 6
Expire passwords - expire passwords after N days Optional, 6 Optional, 6
Expiration reminder - email user reminder to change their password Optional, 6 Optional, 6
Data sanitization - securely clean deleted data using military grade wiping Optional, 6 Optional, 6
EFS - encrypt data at rest using Windows' Streaming repository encryption (EFS) Optional, 6 Optional, 6
PGP - use OpenPGP to encrypt, sign, and decrypt data Optional, 3 Optional, 3
PCI DSS monitor - actively monitor and alert on violations Optional, 6,7 Optional, 6,7
PCI DSS report - generate a compliance with a single mouse click Optional, 6,7 Optional, 6,7
PCI DSS compensating controls (CCs) - capture and report admin-provided CCs Optional, 6,7 Optional, 6,7
PCI DSS setup wizard - walkthrough configuration with PCI DSS in mind Optional, 6,7 Optional, 6,7
DMZ Gateway - securely proxy transfers through the DMZ Optional, 8 Optional, 8 Administration
Silent installation - unattended setup Included Included
Administrator GUI - Windows based Graphical User Interface (GUI) Included Included
Remote administration - administer from other systems in the network Included Included
Secure remote administration - SSL encrypted administration communications Included Included
Multiple administrators - allow concurrent administration Included Included
Secure administration - same password complexity options available for admins Included Included
Flexible authentication - leverage native, NTLM, or AD to authenticate administrators Optional, 6 Optional, 6
11
EFT v7 Installation and Administration Guide
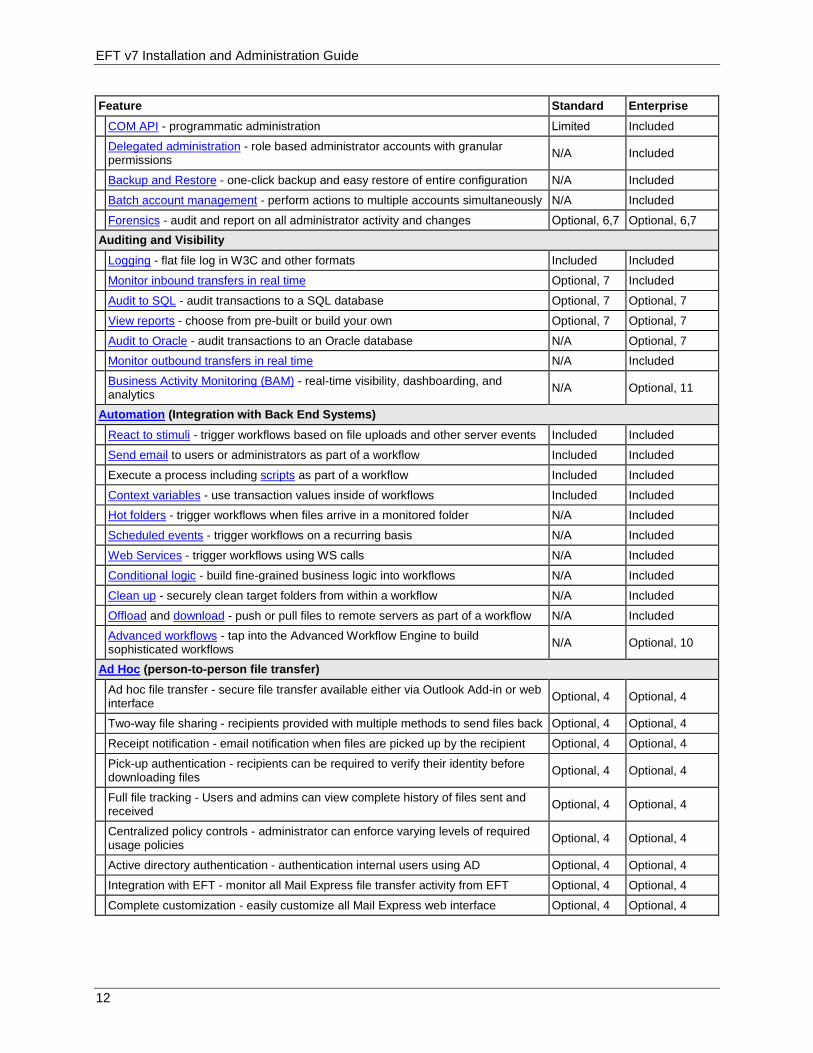
Feature Standard Enterprise COM API - programmatic administration Limited Included
Delegated administration - role based administrator accounts with granular permissions N/A Included
Backup and Restore - one-click backup and easy restore of entire configuration N/A Included
Batch account management - perform actions to multiple accounts simultaneously N/A Included
Forensics - audit and report on all administrator activity and changes Optional, 6,7 Optional, 6,7 Auditing and Visibility
Logging - flat file log in W3C and other formats Included Included
Monitor inbound transfers in real time Optional, 7 Included
Audit to SQL - audit transactions to a SQL database Optional, 7 Optional, 7
View reports - choose from pre-built or build your own Optional, 7 Optional, 7
Audit to Oracle - audit transactions to an Oracle database N/A Optional, 7
Monitor outbound transfers in real time N/A Included
Business Activity Monitoring (BAM) - real-time visibility, dashboarding, and analytics N/A Optional, 11
Automation (Integration with Back End Systems) React to stimuli - trigger workflows based on file uploads and other server events Included Included
Send email to users or administrators as part of a workflow Included Included
Execute a process including scripts as part of a workflow Included Included
Context variables - use transaction values inside of workflows Included Included
Hot folders - trigger workflows when files arrive in a monitored folder N/A Included
Scheduled events - trigger workflows on a recurring basis N/A Included
Web Services - trigger workflows using WS calls N/A Included
Conditional logic - build fine-grained business logic into workflows N/A Included
Clean up - securely clean target folders from within a workflow N/A Included
Offload and download - push or pull files to remote servers as part of a workflow N/A Included
Advanced workflows - tap into the Advanced Workflow Engine to build sophisticated workflows N/A Optional, 10
Ad Hoc (person-to-person file transfer) Ad hoc file transfer - secure file transfer available either via Outlook Add-in or web interface Optional, 4 Optional, 4
Two-way file sharing - recipients provided with multiple methods to send files back Optional, 4 Optional, 4
Receipt notification - email notification when files are picked up by the recipient Optional, 4 Optional, 4
Pick-up authentication - recipients can be required to verify their identity before downloading files Optional, 4 Optional, 4
Full file tracking - Users and admins can view complete history of files sent and received Optional, 4 Optional, 4
Centralized policy controls - administrator can enforce varying levels of required usage policies Optional, 4 Optional, 4
Active directory authentication - authentication internal users using AD Optional, 4 Optional, 4
Integration with EFT - monitor all Mail Express file transfer activity from EFT Optional, 4 Optional, 4
Complete customization - easily customize all Mail Express web interface Optional, 4 Optional, 4
12
System Requirements and Specifications
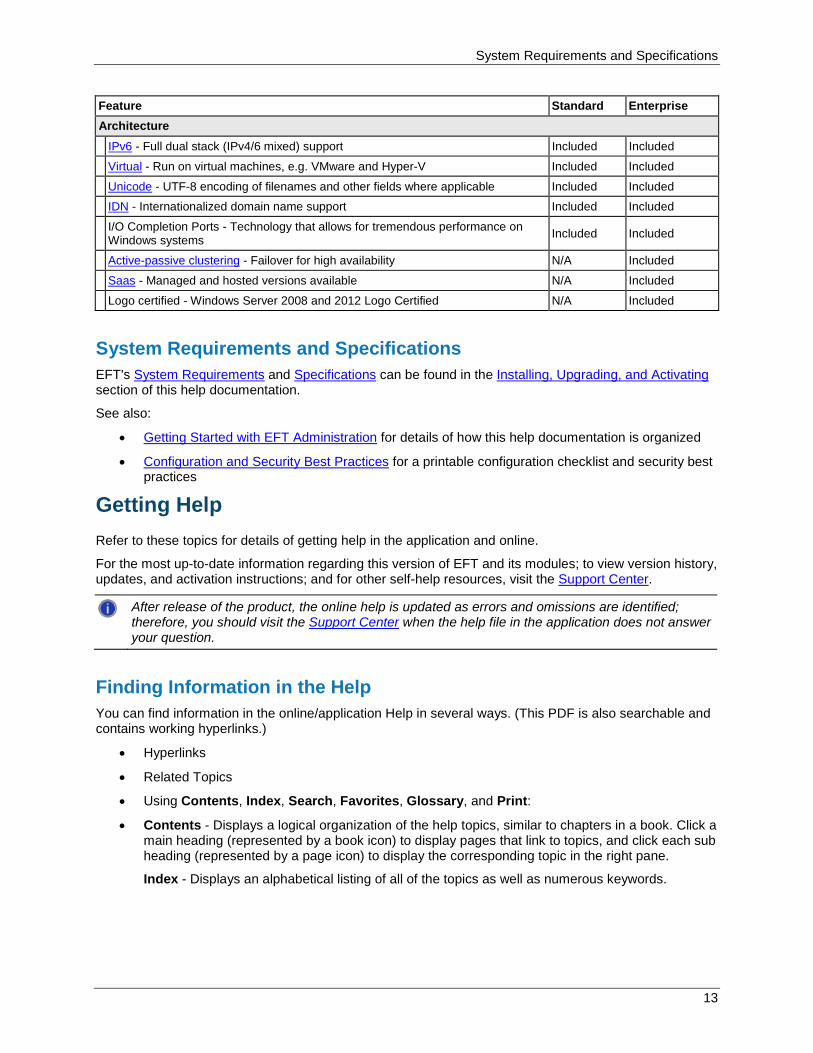
Feature Standard Enterprise Architecture IPv6 - Full dual stack (IPv4/6 mixed) support Included Included
Virtual - Run on virtual machines, e.g. VMware and Hyper-V Included Included
Unicode - UTF-8 encoding of filenames and other fields where applicable Included Included
IDN - Internationalized domain name support Included Included
I/O Completion Ports - Technology that allows for tremendous performance on Windows systems Included Included
Active-passive clustering - Failover for high availability N/A Included
Saas - Managed and hosted versions available N/A Included
Logo certified - Windows Server 2008 and 2012 Logo Certified N/A Included
System Requirements and Specifications EFT's System Requirements and Specifications can be found in the Installing, Upgrading, and Activating section of this help documentation.
See also:
• Getting Started with EFT Administration for details of how this help documentation is organized
• Configuration and Security Best Practices for a printable configuration checklist and security best practices
Getting Help Refer to these topics for details of getting help in the application and online.
For the most up-to-date information regarding this version of EFT and its modules; to view version history, updates, and activation instructions; and for other self-help resources, visit the Support Center.
After release of the product, the online help is updated as errors and omissions are identified; therefore, you should visit the Support Center when the help file in the application does not answer your question.
Finding Information in the Help You can find information in the online/application Help in several ways. (This PDF is also searchable and contains working hyperlinks.)
• Hyperlinks
• Related Topics
• Using Contents, Index, Search, Favorites, Glossary, and Print:
• Contents - Displays a logical organization of the help topics, similar to chapters in a book. Click a main heading (represented by a book icon) to display pages that link to topics, and click each sub heading (represented by a page icon) to display the corresponding topic in the right pane.
Index - Displays an alphabetical listing of all of the topics as well as numerous keywords.
13
EFT v7 Installation and Administration Guide
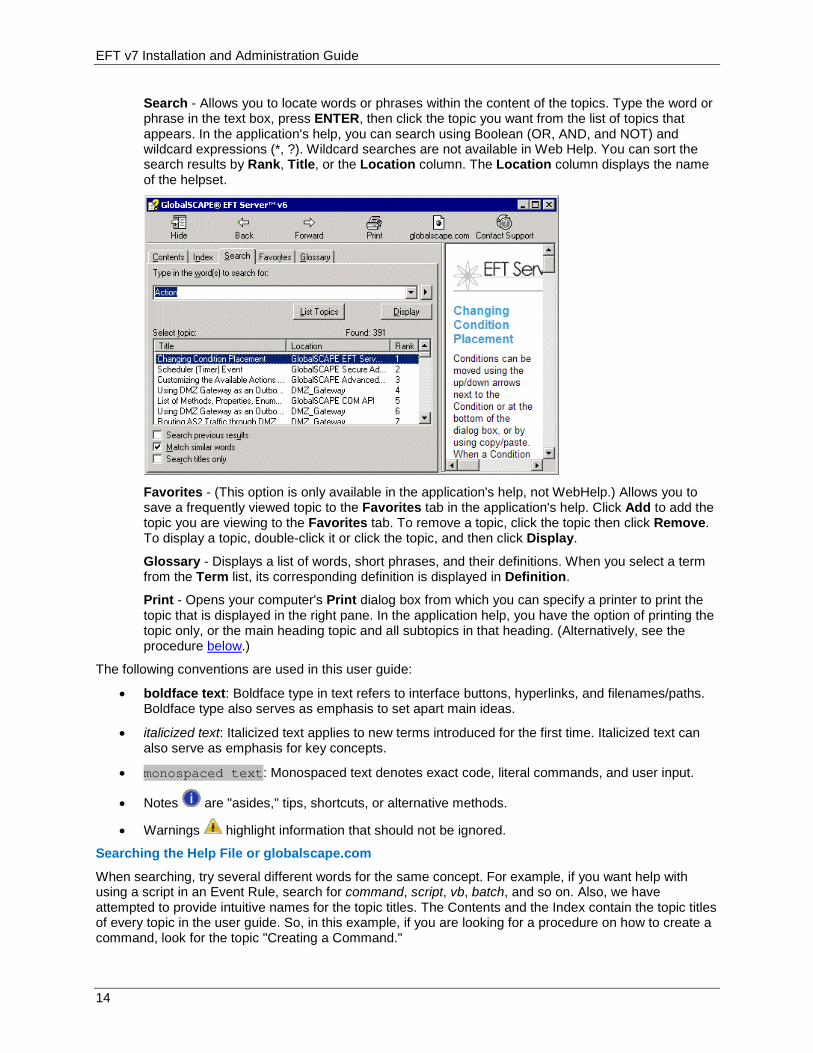
Search - Allows you to locate words or phrases within the content of the topics. Type the word or phrase in the text box, press ENTER, then click the topic you want from the list of topics that appears. In the application's help, you can search using Boolean (OR, AND, and NOT) and wildcard expressions (*, ?). Wildcard searches are not available in Web Help. You can sort the search results by Rank, Title, or the Location column. The Location column displays the name of the helpset.
Favorites - (This option is only available in the application's help, not WebHelp.) Allows you to save a frequently viewed topic to the Favorites tab in the application's help. Click Add to add the topic you are viewing to the Favorites tab. To remove a topic, click the topic then click Remove. To display a topic, double-click it or click the topic, and then click Display.
Glossary - Displays a list of words, short phrases, and their definitions. When you select a term from the Term list, its corresponding definition is displayed in Definition.
Print - Opens your computer's Print dialog box from which you can specify a printer to print the topic that is displayed in the right pane. In the application help, you have the option of printing the topic only, or the main heading topic and all subtopics in that heading. (Alternatively, see the procedure below.)
The following conventions are used in this user guide:
• boldface text: Boldface type in text refers to interface buttons, hyperlinks, and filenames/paths. Boldface type also serves as emphasis to set apart main ideas.
• italicized text: Italicized text applies to new terms introduced for the first time. Italicized text can also serve as emphasis for key concepts.
• monospaced text: Monospaced text denotes exact code, literal commands, and user input.
• Notes are "asides," tips, shortcuts, or alternative methods.
• Warnings highlight information that should not be ignored.
Searching the Help File or globalscape.com
When searching, try several different words for the same concept. For example, if you want help with using a script in an Event Rule, search for command, script, vb, batch, and so on. Also, we have attempted to provide intuitive names for the topic titles. The Contents and the Index contain the topic titles of every topic in the user guide. So, in this example, if you are looking for a procedure on how to create a command, look for the topic "Creating a Command."
14
Finding Information in the Help
Printing a Help Topic
To print a Help topic
1. Click Print Topic in the Navigation pane, or right-click in the topic (in the right pane), and then click Print. The Print dialog box for your operating system appears.
2. In the Print dialog box, click Print. The topic is printed to the specified printer.
Sharing Topic Links
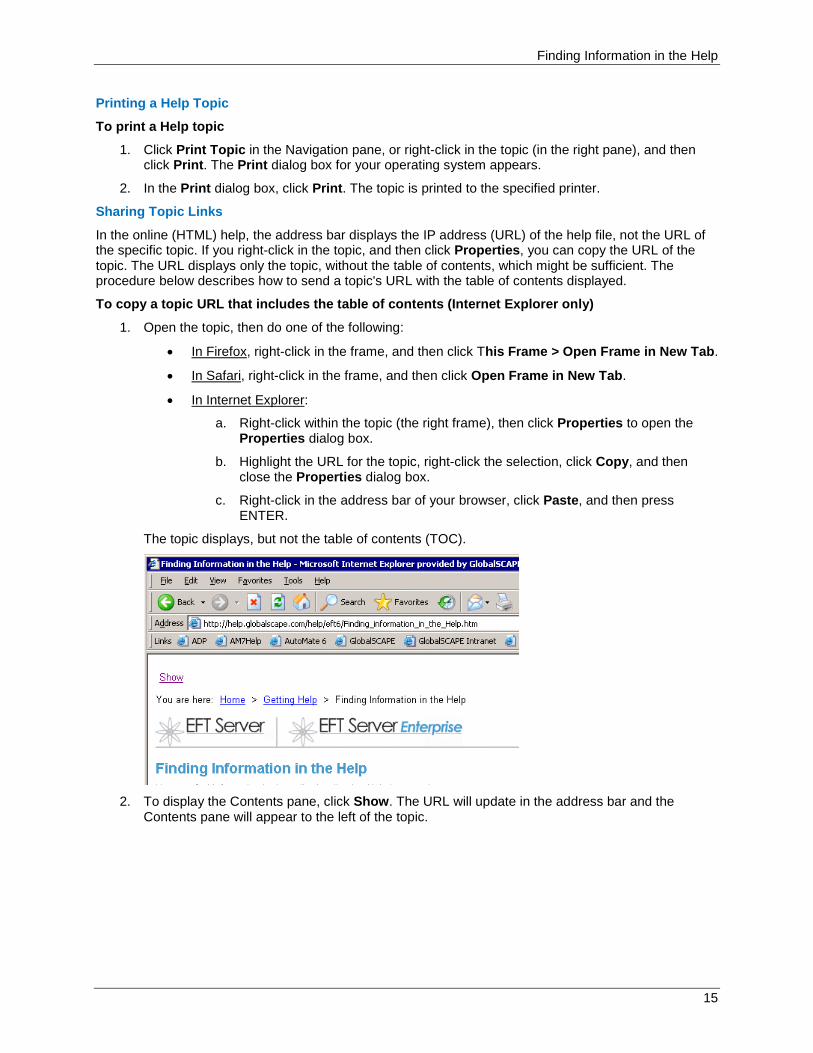
In the online (HTML) help, the address bar displays the IP address (URL) of the help file, not the URL of the specific topic. If you right-click in the topic, and then click Properties, you can copy the URL of the topic. The URL displays only the topic, without the table of contents, which might be sufficient. The procedure below describes how to send a topic's URL with the table of contents displayed.
To copy a topic URL that includes the table of contents (Internet Explorer only)
1. Open the topic, then do one of the following:
• In Firefox, right-click in the frame, and then click This Frame > Open Frame in New Tab.
• In Safari, right-click in the frame, and then click Open Frame in New Tab.
• In Internet Explorer:
a. Right-click within the topic (the right frame), then click Properties to open the Properties dialog box.
b. Highlight the URL for the topic, right-click the selection, click Copy, and then close the Properties dialog box.
c. Right-click in the address bar of your browser, click Paste, and then press ENTER.
The topic displays, but not the table of contents (TOC).
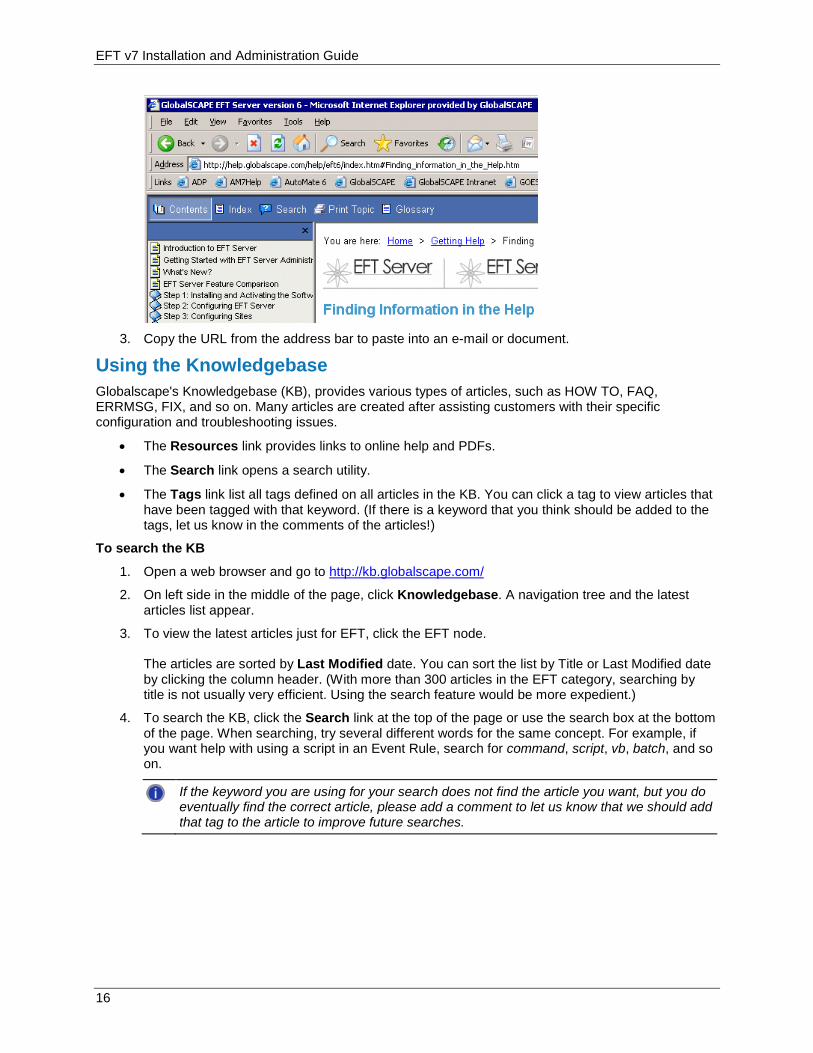
2. To display the Contents pane, click Show. The URL will update in the address bar and the
Contents pane will appear to the left of the topic.
15
EFT v7 Installation and Administration Guide
3. Copy the URL from the address bar to paste into an e-mail or document.
Using the Knowledgebase Globalscape's Knowledgebase (KB), provides various types of articles, such as HOW TO, FAQ, ERRMSG, FIX, and so on. Many articles are created after assisting customers with their specific configuration and troubleshooting issues.
• The Resources link provides links to online help and PDFs.
• The Search link opens a search utility.
• The Tags link list all tags defined on all articles in the KB. You can click a tag to view articles that have been tagged with that keyword. (If there is a keyword that you think should be added to the tags, let us know in the comments of the articles!)
To search the KB
1. Open a web browser and go to http://kb.globalscape.com/
2. On left side in the middle of the page, click Knowledgebase. A navigation tree and the latest articles list appear.
3. To view the latest articles just for EFT, click the EFT node. The articles are sorted by Last Modified date. You can sort the list by Title or Last Modified date by clicking the column header. (With more than 300 articles in the EFT category, searching by title is not usually very efficient. Using the search feature would be more expedient.)
4. To search the KB, click the Search link at the top of the page or use the search box at the bottom of the page. When searching, try several different words for the same concept. For example, if you want help with using a script in an Event Rule, search for command, script, vb, batch, and so on.
If the keyword you are using for your search does not find the article you want, but you do eventually find the correct article, please add a comment to let us know that we should add that tag to the article to improve future searches.
16
EFT Deployment Scenarios
Installing, Upgrading, and Activating These topics provide information regarding installing and activating EFT, and configuring EFT on your network.
Before you run the installer, review the Deployment Scenarios, System Requirements, EFT Specifications, and Configuration and Best Practices.
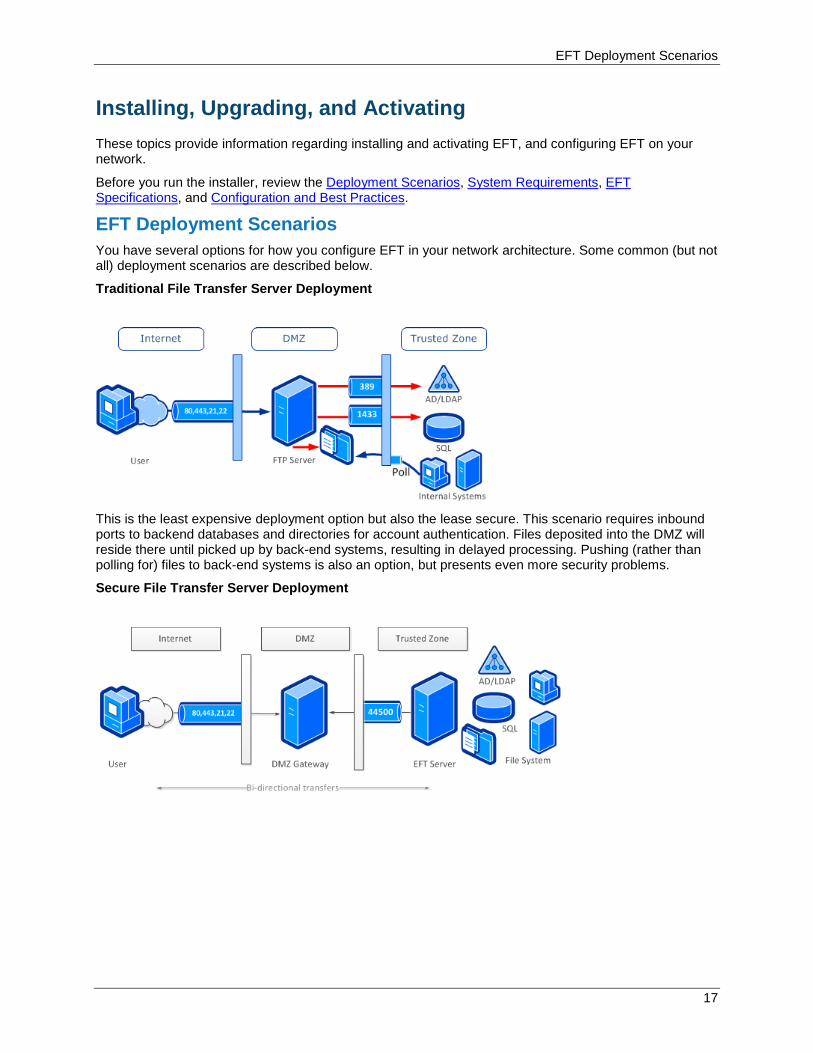
EFT Deployment Scenarios You have several options for how you configure EFT in your network architecture. Some common (but not all) deployment scenarios are described below.
Traditional File Transfer Server Deployment
This is the least expensive deployment option but also the lease secure. This scenario requires inbound ports to backend databases and directories for account authentication. Files deposited into the DMZ will reside there until picked up by back-end systems, resulting in delayed processing. Pushing (rather than polling for) files to back-end systems is also an option, but presents even more security problems.
Secure File Transfer Server Deployment
17
EFT v7 Installation and Administration Guide
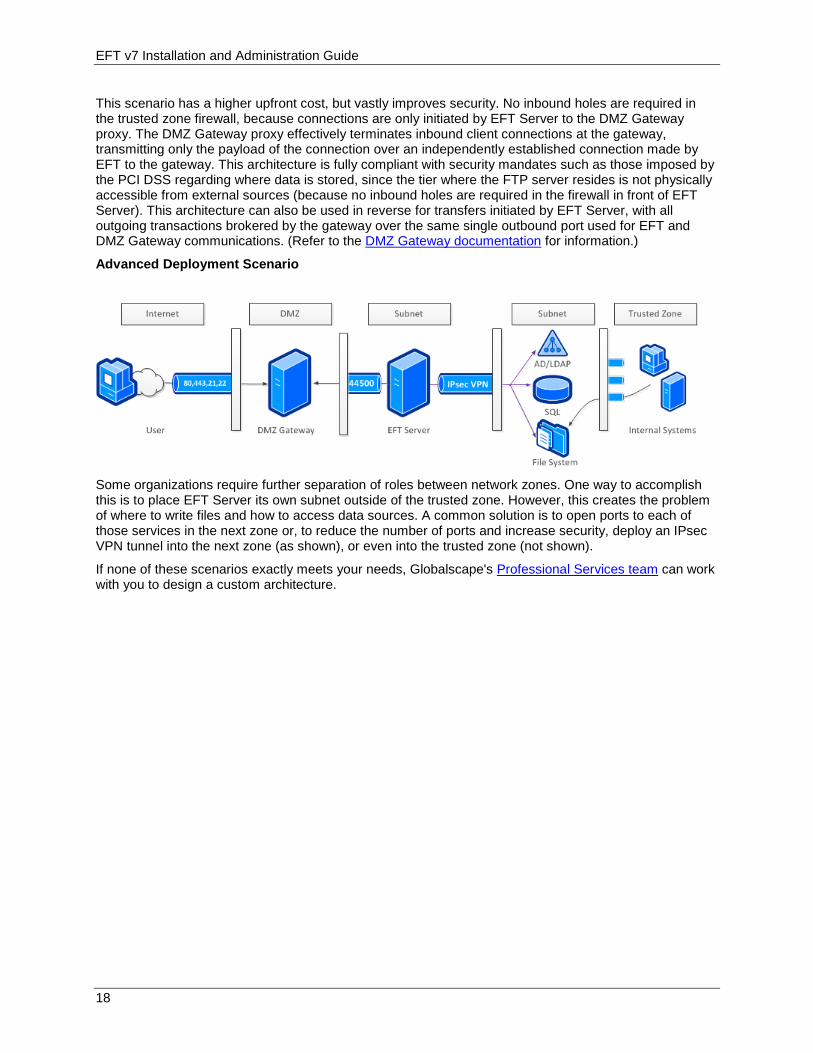
This scenario has a higher upfront cost, but vastly improves security. No inbound holes are required in the trusted zone firewall, because connections are only initiated by EFT Server to the DMZ Gateway proxy. The DMZ Gateway proxy effectively terminates inbound client connections at the gateway, transmitting only the payload of the connection over an independently established connection made by EFT to the gateway. This architecture is fully compliant with security mandates such as those imposed by the PCI DSS regarding where data is stored, since the tier where the FTP server resides is not physically accessible from external sources (because no inbound holes are required in the firewall in front of EFT Server). This architecture can also be used in reverse for transfers initiated by EFT Server, with all outgoing transactions brokered by the gateway over the same single outbound port used for EFT and DMZ Gateway communications. (Refer to the DMZ Gateway documentation for information.)
Advanced Deployment Scenario
Some organizations require further separation of roles between network zones. One way to accomplish this is to place EFT Server its own subnet outside of the trusted zone. However, this creates the problem of where to write files and how to access data sources. A common solution is to open ports to each of those services in the next zone or, to reduce the number of ports and increase security, deploy an IPsec VPN tunnel into the next zone (as shown), or even into the trusted zone (not shown).
If none of these scenarios exactly meets your needs, Globalscape's Professional Services team can work with you to design a custom architecture.
18
EFT HA (Active-Active) Deployment
EFT HA (Active-Active) Deployment EFT Enterprise can be configured in an active-active cluster configuration, known as EFT High Availability (HA). In an HA deployment, two or more EFTs can be configured in an active-active cluster with a shared configuration. EFT acts as its own cluster manager and requires a network load balancer (NLB) for distribute incoming protocol traffic. EFTs HA nodes process file transfers at the network level as the NLB directs traffic to it, and can process Folder Monitor and Timer Event Rules in a round-robin fashion (i.e., executing the event actions on the first node, then the second, and so on until it comes back to the first node in the list).
The following facts must be considered when creating an HA cluster:
• HA can only be installed as a new installation; upgrades from 6.4.x and 6.5.x to an HA installation or not allowed. A stand-alone server cannot be converted to an HA node.
• The FTP.cfg file for the clustered EFT nodes and users' files must be stored on a network share (e.g., Samba, SAN). HA shared storage was tested with Samba v1.2.63 and Windows File Share (Windows 2008, 2012).
• HA mode uses Microsoft Message Queueing (MSMQ) to distribute messages among nodes in the cluster, including a reliable multicast protocol (Pragmatic General Multicast, or PGM). Proper communication among nodes requires:
o Network adapters on all HA nodes that enable Reliable Multicast Protocol
o All nodes must be able to send and receive multicast messages, which requires they been on the same LAN subnet
o Firewalls on the computers, or between the computers, must allow the reliable multicast protocols ports to pass traffic in and out of the computers (Windows Firewall will automatically enable the proper ports when enabling the MSMQ feature.)
• To make an HA node a stand-alone server, you must uninstall EFT and then reinstall as a stand-alone server. Please contact Sales, Support, or Professional Services for assistance in migrating any existing non-HA deployments to a corresponding HA configuration.
• The shared configuration file PATH cannot be changed unless you uninstall and then reinstall the node.
• HA nodes must listen on all IP addresses, rather than each listening on a specific IP address. Do not change the Listening IP address for an HA node.
• HA mode of operation for EFT v7 supports IPv6 addressing for inbound and outbound connections. The message queue addressing of nodes within the cluster is not supported on IPv6 addresses. Message queue addressing uses NetBIOS names, not IP addresses, and should be tied to IPv4 on the local LAN subnet that all nodes share.
• Only Globalscape authentication is allowed on EFT HA nodes. However, you can configure Sites on non-HA nodes with other authentication to cooperate with the HA clustered Sites. For example, you could use an AD-authenticated Site on a non-HA node for domain user uploads and downloads, but use the Globalscape-authenticated Sites in the HA cluster for load balancing Event Rules that take place on the files transferred. The non-clustered AD Site would transfer files using the HA shared configuration path (e.g., \\x.x.x.x\inetput\EFTRoot\mySite\Usr\username) as the site root folder, or using virtual folders; the Event Rule Actions would take place on the files on the Globalscape-authenticated Site. If you attempt to create a new Site on an HA node, in the User Authentication Provider Settings page of the Site Setup Wizard, Globalscape EFT Server Authentication is selected and no other options are available. The Advanced Authentication Options
19
EFT v7 Installation and Administration Guide
• When configuration changes are made to SSH, trusted SSL certificates, PGP key materials, and AML files (Advanced Workflow Engine workflows), those files are cached locally, then MSMQ uploads safely synchronized to the network share. The other nodes then update their local cache from the central location. Thus, the central share always contains the most up-to-date version of those files.
• Folder Sweep and archive should be enabled on load balanced Folder Monitor rules to clean up and notify on any events that occur when the primary Event Rule monitor goes down. It is possible to lose some events between when the primary goes down and the next node takes over.
• The ARM reports identify nodes based on computer name. If the node's computer name changes, ARM will see it as a new node and not associate it with the old computer name. ARM will now install an additional set of reports in a "High Availability" folder. These reports are a duplicate of the existing reports, except they report based on Node name.
• The "Run On One of" feature in Event Rules currently only supports computer (NetBIOS) names. Refer to Event Rule Load Balancing for more information about the "Run On One of" feature.
• Do not start or provision a new node immediately after making changes to the Event Rule configuration. Give the system at least 30 seconds to process and synchronize the configuration changes.
• Nodes should be brought online one at a time to avoid getting the nodes out of sync.
• If you are using DMZ Gateway, each EFT must have its own DMZ Gateway; the DMZ Gateway cannot be shared among nodes.
• When operating in HA mode, Timer and Folder Monitor Event Rules will execute on all of the nodes of the cluster unless you specify at least one High Availability node on which to operate.
• For visibility into node status, enable cluster logging. Logging.cfg has new logging options specifically for HA.
• In every HA cluster there will be a "Master" node that performs the Event Rule load balancing assignments.
• Only one node at a time is allowed to server the administration interface or COM connection. That is, you cannot administer more than one node at a time. (However, more than one administrator can administer the SAME node at the same time, just as in non-HA configurations.) Attempts to administer more than one HA node at a time will prompt an error on nodes other than the first.
• To support High Availability mode of operation, EFT depends upon the MSMQ service.
• Any node may be master, if a master node goes offline, another node will take over as master. Whichever node declares master first becomes master. A node doesn’t take over as master until at least one load balanced Event Rule exists on the system. Prior to a load-balanced Event Rule’s existence, all nodes will claim to be master. A master can go down if for example the MSMQ is stopped, or the network can no longer communicate with the master or the EFT Service for some reason goes down.
• Every 10 seconds each node broadcasts a heartbeat using the MSMQ system to communicate that they are alive and online. This serves two purposes: 1) Notifies that the master node is up, if the master goes down, then a new node will resume master responsibilities and broadcast that they are now master; 2) Notifies the cluster that the node is online and should be included to handle load balanced Event Rules.
• Nodes should be brought online one at a time to avoid getting the nodes out of sync. A node can get out of sync if 1) on administrator login, if the configuration in memory does not match the configuration file on the shared drive; or 2) when the node fails to receive a configuration change message. In either case, the EFT server service will restart and load the latest configuration.
20
EFT HA (Active-Active) Deployment
• On HA installations, the EFT server service is configured to restart upon failure on the Recovery tab of the service's properties. (Non-HA installations are configured to “take no action” upon failure.)
• The API was updated to include HA-specific calls.
Non-High Availability mode vs. High Availability mode EFT
Function Non-High Availability mode High Availability mode Startup Searches for FTP.CFG’s in different
folders, tries FTP.BAK’s to handle broken configuration, etc. Always creates "clean" configuration if no FTP.CFG/FTP.BAK is loaded.
Loads only <PATH>\FTP.CFG. Creates "clean" configuration only if no FTP.CFG present in the <PATH> folder. Fails to start if cannot load existing <PATH>\FTP.CFG.
Shutdown Updated FTP.CFG with latest settings
Does not update FTP.CFG
Authentication managers GS, NTAD, ODBC, LDAP GS only
User database refresh Allowed Not allowed
PCI cleanup (administrator/user remove/disable for inactivity and send Password Expiration Notifications)
Nightly timer + Every time server deals with user/administrator (user/administrator connection, exposing user/administrator to GUI/COM etc.)
Nightly timer
Client Expiration Every time when server deals with user (user connection, exposing user to GUI/COM etc.)
Nightly timer
Turning off Autosave and using ApplyChanges via COM
Allowed Not allowed
GUI/COM connection Always allowed Only one node at a time is allowed to serve GUI/COM connection
Saving changes made by administrator to FTP.CFG
Background task accumulating changes and saving settings
Always synchronously
Server restore from backup
Allowed Not allowed
Trial state FTP.CFG + registry (duplicated) Registry
OTP passwords for clients Allowed Not allowed
Legacy password hashes Allowed Not allowed
User lock state Continues after service restart Breaks after service restart
Invalid login history Continues after service restart Resets on service restart
Related topics
• Event Rule Load Balancing
• High Availability Message Queuing
• Server Configuration and Administration
• High Availability Tab of a Server
21
EFT v7 Installation and Administration Guide
System Requirements The Globalscape Quality Assurance (QA) team tested EFT Standard and EFT Enterprise with a variety of operating systems, software, and hardware. It is possible for EFT to function with other software and hardware than those listed below, but Globalscape only offers support for EFT with the software/hardware listed.
EFT (Server Service) Requirements
• Operating systems: Windows Server 2008 R2 (Standard, Enterprise, and Datacenter editions), Windows Server 2012, Windows Server 2012 R2, all editions.
• 2 GB free RAM (More RAM could be required for large file transfers over the AS2 protocol. AS2 transfers can use up to 40% of the Server's RAM.)
• Microsoft .NET Framework 4.0 (all components, including AWE and AS2)
• Microsoft Windows Installer 4.5
• For HA (active-active) installations, Microsoft Message Queuing (MSMQ) must be installed.
• If accessing or monitoring Samba network shares, version 3.0.25 or later of Samba
• The EFT service must have full administrative rights to the folder in which you install EFT.
EFT Administration Interface Requirements
The administration interface must be installed on the same computer as EFT, but also can be installed on other computers for remote administration. (Refer to the ARM, AWE, and AS2 requirements below if you plan to use those modules remotely.)
• Windows 7, Windows 8.1, Windows Server 2008 R2 (Standard, Enterprise, and Datacenter editions), and Windows 2012 (requires GUI component).
• 1 GB of free RAM
• 1024x768 resolution or higher display
• Microsoft Windows Installer 4.5
• Microsoft .NET Framework 4.0
Auditing and Reporting Module (ARM) Requirements
• Microsoft® ActiveX Data Objects (ADO)
• Microsoft SQL Server 2008 R2 Native Client is installed automatically, regardless of whether SQL Server will be used (so that ADO will work with IPv6).
• 3GB minimum hard drive space for the initial database size. Space requirements for transactions depend on estimated Event Rule activity, number of connections, and types of transactions. A general estimate is 3MB to 5 MB per 1000 files uploaded.
• PDF-viewing software (such as Adobe Reader) to view PDF reports.
• Access to a SQL Server or an Oracle database.
• The installer includes SQL Server 2008 R2 Express for both 32- and 64-bit operating systems (intended for evaluation purposes only). For SQL Server system requirements, refer to http://www.microsoft.com/sqlserver/en/us/learning-center/resources.aspx. EFT is supported with the following SQL Server versions:
o SQL Server 2008 R2 Express
o SQL Server 2008 R2
o SQL Server 2012
22
EFT Specifications
• Oracle requires EFT Enterprise; refer to Oracle's documentation regarding Oracle system requirements. Be sure to reboot after you install the Oracle Data Access Components (ODAC). You need to use the 32-bit ODAC, even if EFT Enterprise is installed on a 64-bit operating system. EFT Enterprise is supported with the following Oracle versions:
o Oracle Database 11g Release 2: 11.2.0.1–11.2.0.3 (patchset as of September 2011)
• A good database maintenance plan is important to keeping space requirements to a minimum (aging/archiving/warehousing/truncating old data).
• For better database performance, follow the standard SQL/Oracle tuning guidelines in their user documentation. See also Purging Data from the Database.
• If you are using SQL Server 2008 Developer and Enterprise editions for your EFT database, refer to the MSDN article Creating Compressed Tables and Indexes.
• For ARM upgrades, Microsoft .NET Framework 4.0
AS2 Module Requirements
• More RAM could be required for large, non-EDI file transfers. AS2 transfers can use up to 40% of the Server's RAM for file transfers.
• Refer to Installing and Activating the AS2 Module for detailed prerequisites.
DMZ Gateway Requirements
Refer to the System Requirements in the DMZ Gateway documentation.
Web Transfer Client (WTC) Requirements
For information regarding system requirements for the Web Transfer Client, refer to Web Transfer Client.
Mobile Transfer Client (MTC) System Requirements
For information regarding system requirements for the Mobile Transfer Client, refer to MTC System Requirements.
Mail Express Requirements
The EFT installer is bundled with a compatible version of Mail Express. EFT version 7.0 is compatible with Mail Express version 4.0.4. (Mail Express version 4.0.4 is not compatible with previous versions of EFT.) Please refer to the Mail Express system requirements for more information.
EFT Specifications This topic is intended as a quick reference of EFT specifications. The information is provided in detail in the applicable procedures.
Item Description Server's Windows user account
The EFT service runs under a user account, which must have full administrative rights to the folder in which you install EFT. With administrative rights, the service can save all of your settings. If the service does not have administrative rights, you will lose settings and user accounts whenever you restart the EFT service, and you will need to reset permissions on the computer on which the EFT service is running. If you are using Active Directory, there are other considerations regarding permissions.
Protocols allowed FTP/S (SSL/TLS), SFTP (SSH2), HTTP/S, and AS2 (Certain protocols require optional modules and/or EFT Enterprise.)
Authentication types Globalscape, AD/NTLM, LDAP, ODBC
Log formats W3C, Microsoft IIS, and NCSA
SSL Certificate Key lengths supported
Key lengths supported: 1024, 2048, 3072, and 4096 bits
23
EFT v7 Installation and Administration Guide
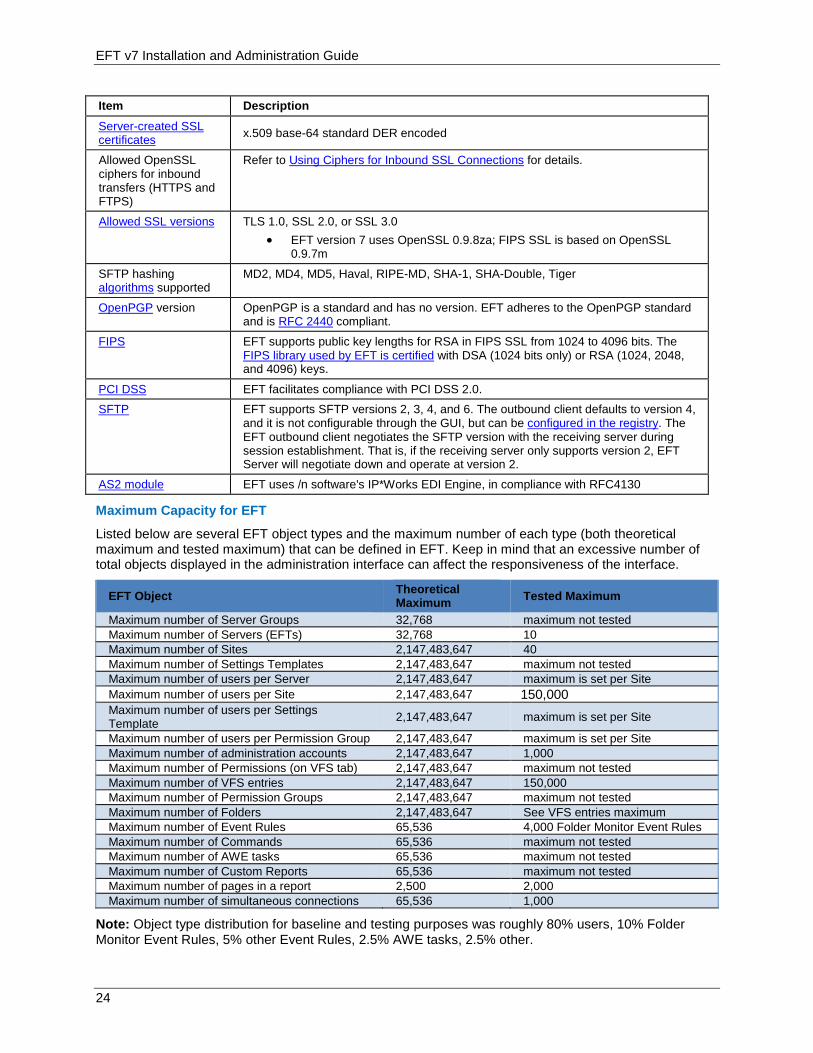
Item Description Server-created SSL certificates
x.509 base-64 standard DER encoded
Allowed OpenSSL ciphers for inbound transfers (HTTPS and FTPS)
Refer to Using Ciphers for Inbound SSL Connections for details.
Allowed SSL versions TLS 1.0, SSL 2.0, or SSL 3.0 • EFT version 7 uses OpenSSL 0.9.8za; FIPS SSL is based on OpenSSL
0.9.7m
SFTP hashing algorithms supported
MD2, MD4, MD5, Haval, RIPE-MD, SHA-1, SHA-Double, Tiger
OpenPGP version OpenPGP is a standard and has no version. EFT adheres to the OpenPGP standard and is RFC 2440 compliant.
FIPS EFT supports public key lengths for RSA in FIPS SSL from 1024 to 4096 bits. The FIPS library used by EFT is certified with DSA (1024 bits only) or RSA (1024, 2048, and 4096) keys.
PCI DSS EFT facilitates compliance with PCI DSS 2.0.
SFTP EFT supports SFTP versions 2, 3, 4, and 6. The outbound client defaults to version 4, and it is not configurable through the GUI, but can be configured in the registry. The EFT outbound client negotiates the SFTP version with the receiving server during session establishment. That is, if the receiving server only supports version 2, EFT Server will negotiate down and operate at version 2.
AS2 module EFT uses /n software's IP*Works EDI Engine, in compliance with RFC4130
Maximum Capacity for EFT
Listed below are several EFT object types and the maximum number of each type (both theoretical maximum and tested maximum) that can be defined in EFT. Keep in mind that an excessive number of total objects displayed in the administration interface can affect the responsiveness of the interface.
EFT Object Theoretical Maximum Tested Maximum
Maximum number of Server Groups 32,768 maximum not tested Maximum number of Servers (EFTs) 32,768 10 Maximum number of Sites 2,147,483,647 40 Maximum number of Settings Templates 2,147,483,647 maximum not tested Maximum number of users per Server 2,147,483,647 maximum is set per Site Maximum number of users per Site 2,147,483,647 150,000 Maximum number of users per Settings Template 2,147,483,647 maximum is set per Site
Maximum number of users per Permission Group 2,147,483,647 maximum is set per Site Maximum number of administration accounts 2,147,483,647 1,000 Maximum number of Permissions (on VFS tab) 2,147,483,647 maximum not tested Maximum number of VFS entries 2,147,483,647 150,000 Maximum number of Permission Groups 2,147,483,647 maximum not tested Maximum number of Folders 2,147,483,647 See VFS entries maximum Maximum number of Event Rules 65,536 4,000 Folder Monitor Event Rules Maximum number of Commands 65,536 maximum not tested Maximum number of AWE tasks 65,536 maximum not tested Maximum number of Custom Reports 65,536 maximum not tested Maximum number of pages in a report 2,500 2,000 Maximum number of simultaneous connections 65,536 1,000
Note: Object type distribution for baseline and testing purposes was roughly 80% users, 10% Folder Monitor Event Rules, 5% other Event Rules, 2.5% AWE tasks, 2.5% other.
24
Configuration and Security Best Practices
Configuration and Security Best Practices Below is a collection of suggestions and guidelines for installing, configuring, and deploying EFT in a production environment, including best practices for security.
Development Lab Environment
As with any mission-critical software or hardware, it is recommended that a testing, validation, development, or usability lab be established to provide a "sandbox" into which EFT and DMZ Gateway Server software can be deployed. This initial deployment allows for validation of the interoperability with other dependent components as well the validation of expected usage scenarios.
The lab environment should emulate (if not duplicate) the production environment at a network topography and application level. To do this, a clear vision of the production network and the proposed deployment of EFT and DMZ Gateway must exist. Typical deployments of EFT and DMZ Gateway consist of many other components from the enterprise, including Active Directory Server, SQL Server, SMTP Server, and a storage system such as a SAN. For DMZ Gateway, a firewall such as Microsoft ISA might be applicable. Finally, some deployments also include Clustering, in which case various components are replicated to provide clustered resources.
For increased business continuity and risk mitigation, you should use the development lab environment as the starting point for any configuration changes in the system. That is, make the change in development and validate it prior to making the change in production. A good testing tool is CuteFTP.
Configuration Checklist
The installation and configuration of EFT in either a lab or a production environment should be validated by EFT administrators/operators to ensure that the functions are working as expected. Use the checklist below to validate key items for an EFT and DMZ Gateway deployment. Print this topic to check off items as you test. Also refer to the section below this table for Security Best Practices.
Service
Make sure that the EFT Server service is started on the computer.
Make sure that the service is listening on the expected IP:PORT socket addresses on EFT. (To view the listening sockets, use "netstat -ona" from a command line or an application such as PrcView or TcpView.)
Check the Event Viewer log to ensure that there are no errors in the Application log related to EFT or DMZ Gateway.
Confirm that the administration interface shows the status of the system when it is launched and connected to EFT.
Server User Management
For each Site on EFT, ensure that the expected user accounts exist.
To ensure that authentication is working as expected, attempt to log in to EFT as a user account on the system (using any protocol).
To confirm that permissions for the user account are working as expected, attempt a file transfer.
Protocol/Network
For each protocol enabled on EFT, attempt a connection directly to EFT using a client that supports that protocol.
For each protocol enabled through DMZ Gateway, attempt a connection to the appropriate DMZ Gateway IP:PORT and confirm that this route works as expected.
Auditing/Logging
View the audit traces generated by the validation steps above.
Confirm that the Auditing and Reporting module database has been populated with appropriate data (using either EFT Reporting interface or direct access to the SQL Server being used).
Confirm that the text log files generated by EFT have been populated with the appropriate data.
25
EFT v7 Installation and Administration Guide
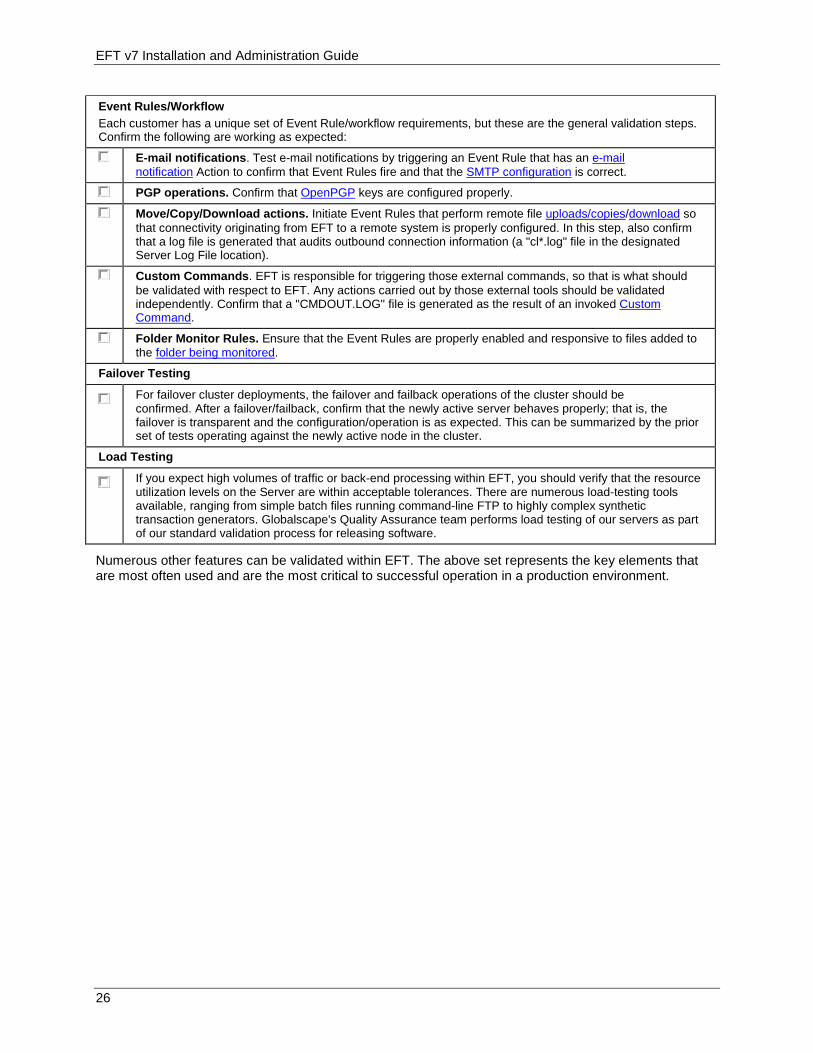
Event Rules/Workflow Each customer has a unique set of Event Rule/workflow requirements, but these are the general validation steps. Confirm the following are working as expected:
E-mail notifications. Test e-mail notifications by triggering an Event Rule that has an e-mail notification Action to confirm that Event Rules fire and that the SMTP configuration is correct.
PGP operations. Confirm that OpenPGP keys are configured properly.
Move/Copy/Download actions. Initiate Event Rules that perform remote file uploads/copies/download so that connectivity originating from EFT to a remote system is properly configured. In this step, also confirm that a log file is generated that audits outbound connection information (a "cl*.log" file in the designated Server Log File location).
Custom Commands. EFT is responsible for triggering those external commands, so that is what should be validated with respect to EFT. Any actions carried out by those external tools should be validated independently. Confirm that a "CMDOUT.LOG" file is generated as the result of an invoked Custom Command.
Folder Monitor Rules. Ensure that the Event Rules are properly enabled and responsive to files added to the folder being monitored.
Failover Testing
For failover cluster deployments, the failover and failback operations of the cluster should be confirmed. After a failover/failback, confirm that the newly active server behaves properly; that is, the failover is transparent and the configuration/operation is as expected. This can be summarized by the prior set of tests operating against the newly active node in the cluster.
Load Testing
If you expect high volumes of traffic or back-end processing within EFT, you should verify that the resource utilization levels on the Server are within acceptable tolerances. There are numerous load-testing tools available, ranging from simple batch files running command-line FTP to highly complex synthetic transaction generators. Globalscape's Quality Assurance team performs load testing of our servers as part of our standard validation process for releasing software.
Numerous other features can be validated within EFT. The above set represents the key elements that are most often used and are the most critical to successful operation in a production environment.
26

Configuration and Security Best Practices
Security Best Practices Checklist
The following settings are recommended for increased security.
Administration Security
Create a specific AD account on which EFT’s service is to run with the minimum necessary permissions.
Create an Event Rule to back up the entire Server configuration to a separate drive at least daily.
Do not use any default administrator names (e.g., "admin").
Do not use the default administration port (1100).
Only turn on remote administration if necessary. If remote administration is needed, then ban all IPs except those trusted IPs necessary to access the server for administration.
Turn on SSL if using remote administration.
Create sub-administrator accounts with the least amount of privileges necessary for help desk or operational administrators.
Do not give sub-administrators access to COM or the ARM (report) module unless absolutely necessary
If giving ARM (report) access to a sub-administrator, use the ReportsConnectionString registry override to define an alternate (least privileged) database connection string for database queries.
Set administrator passwords to expire every 90 days (or according to internal best practices/policies).
Set a complex security scheme for administrator passwords.
Lockout administrators for an extended period after multiple failed login attempts.
Run a PCI DSS report to detect any lax security configuration settings (either manually or on a schedule with an Event Rule).
Periodically check the Globalscape support site for the latest version and upgrade accordingly. One more high priority bug fixes or fixes for security vulnerabilities are often included.
User/Password Security
Expire accounts that are non-active for a specified period.
Set user passwords to expire every 60 or 90 days.
Define complex password security scheme for users.
Prohibit password reuse/history.
When using HTTP/S and/or SFTP protocols, require that the user reset their password upon initial use (requires KIA support by the SFTP client. FTP/S protocol does not support password reset upon initial login).
Briefly lockout users after repeated failed logins.
Automatically ban IP addresses with repeated failed username attempts.
E-mail user login credentials separately or only send username and communicate password via phone or other means (i.e., out-of-band delivery).
27
EFT v7 Installation and Administration Guide
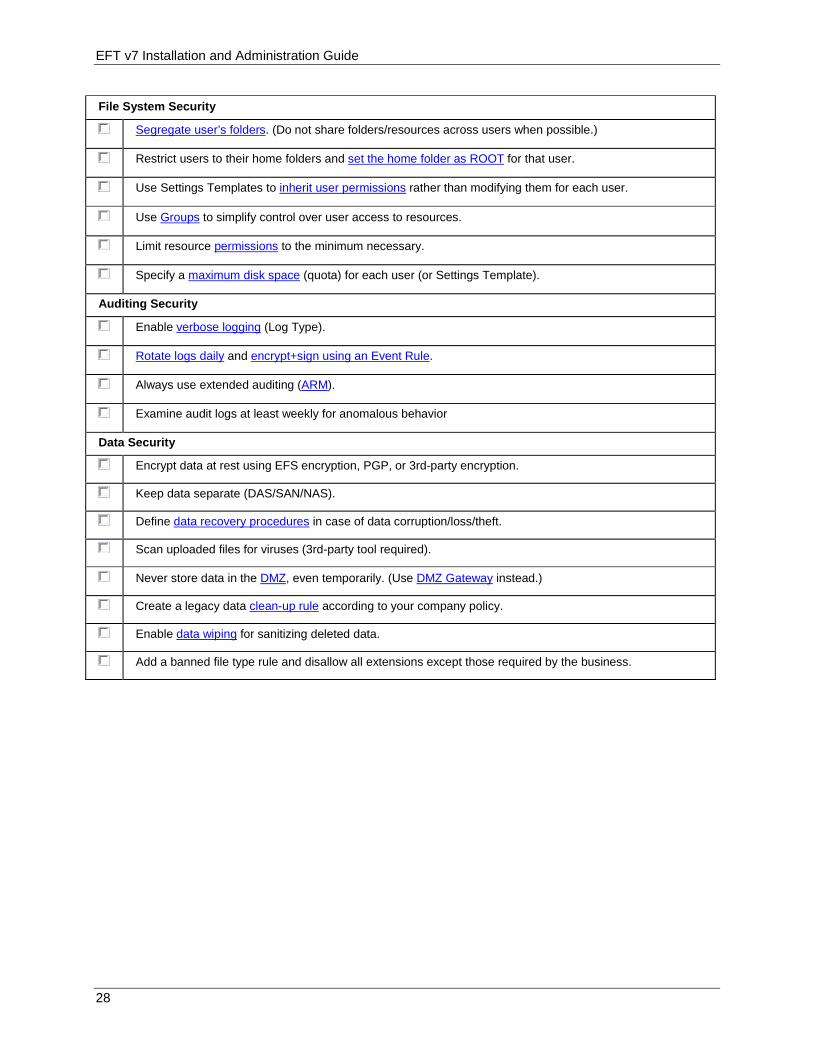
File System Security
Segregate user’s folders. (Do not share folders/resources across users when possible.)
Restrict users to their home folders and set the home folder as ROOT for that user.
Use Settings Templates to inherit user permissions rather than modifying them for each user.
Use Groups to simplify control over user access to resources.
Limit resource permissions to the minimum necessary.
Specify a maximum disk space (quota) for each user (or Settings Template).
Auditing Security
Enable verbose logging (Log Type).
Rotate logs daily and encrypt+sign using an Event Rule.
Always use extended auditing (ARM).
Examine audit logs at least weekly for anomalous behavior
Data Security
Encrypt data at rest using EFS encryption, PGP, or 3rd-party encryption.
Keep data separate (DAS/SAN/NAS).
Define data recovery procedures in case of data corruption/loss/theft.
Scan uploaded files for viruses (3rd-party tool required).
Never store data in the DMZ, even temporarily. (Use DMZ Gateway instead.)
Create a legacy data clean-up rule according to your company policy.
Enable data wiping for sanitizing deleted data.
Add a banned file type rule and disallow all extensions except those required by the business.
28
Configuration and Security Best Practices
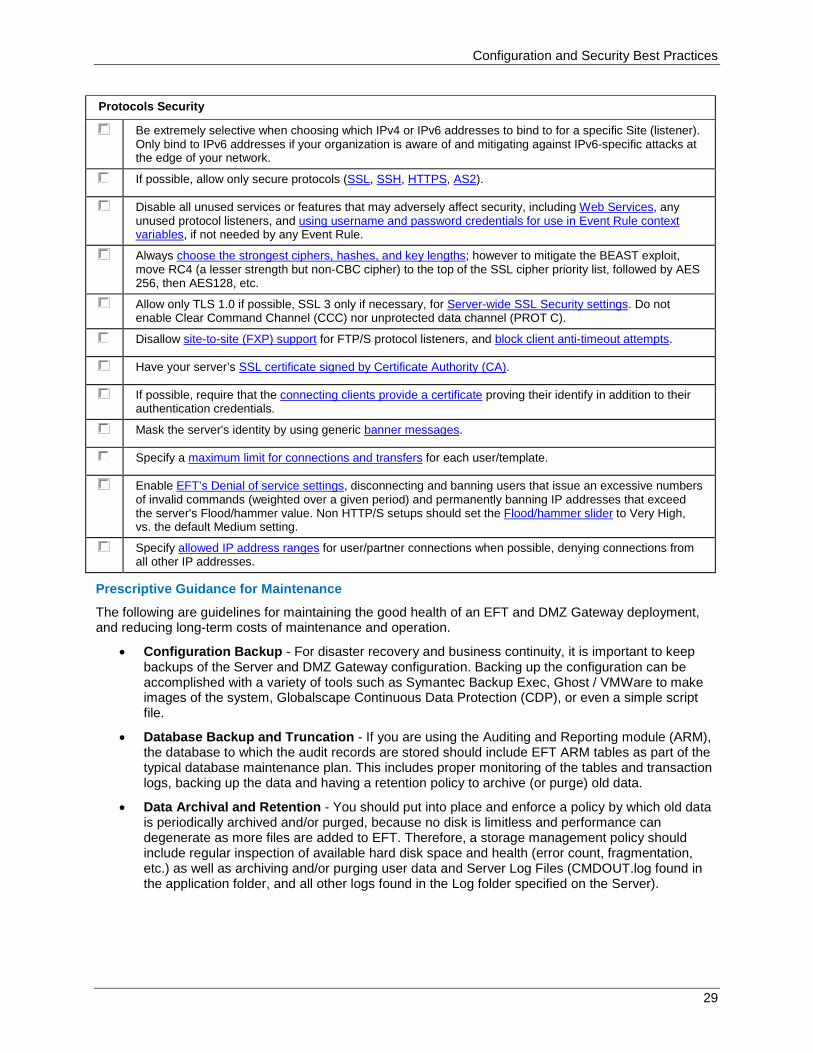
Protocols Security
Be extremely selective when choosing which IPv4 or IPv6 addresses to bind to for a specific Site (listener). Only bind to IPv6 addresses if your organization is aware of and mitigating against IPv6-specific attacks at the edge of your network.
If possible, allow only secure protocols (SSL, SSH, HTTPS, AS2).
Disable all unused services or features that may adversely affect security, including Web Services, any unused protocol listeners, and using username and password credentials for use in Event Rule context variables, if not needed by any Event Rule.
Always choose the strongest ciphers, hashes, and key lengths; however to mitigate the BEAST exploit, move RC4 (a lesser strength but non-CBC cipher) to the top of the SSL cipher priority list, followed by AES 256, then AES128, etc.
Allow only TLS 1.0 if possible, SSL 3 only if necessary, for Server-wide SSL Security settings. Do not enable Clear Command Channel (CCC) nor unprotected data channel (PROT C).
Disallow site-to-site (FXP) support for FTP/S protocol listeners, and block client anti-timeout attempts.
Have your server’s SSL certificate signed by Certificate Authority (CA).
If possible, require that the connecting clients provide a certificate proving their identify in addition to their authentication credentials.
Mask the server's identity by using generic banner messages.
Specify a maximum limit for connections and transfers for each user/template.
Enable EFT’s Denial of service settings, disconnecting and banning users that issue an excessive numbers of invalid commands (weighted over a given period) and permanently banning IP addresses that exceed the server's Flood/hammer value. Non HTTP/S setups should set the Flood/hammer slider to Very High, vs. the default Medium setting.
Specify allowed IP address ranges for user/partner connections when possible, denying connections from all other IP addresses.
Prescriptive Guidance for Maintenance
The following are guidelines for maintaining the good health of an EFT and DMZ Gateway deployment, and reducing long-term costs of maintenance and operation.
• Configuration Backup - For disaster recovery and business continuity, it is important to keep backups of the Server and DMZ Gateway configuration. Backing up the configuration can be accomplished with a variety of tools such as Symantec Backup Exec, Ghost / VMWare to make images of the system, Globalscape Continuous Data Protection (CDP), or even a simple script file.
• Database Backup and Truncation - If you are using the Auditing and Reporting module (ARM), the database to which the audit records are stored should include EFT ARM tables as part of the typical database maintenance plan. This includes proper monitoring of the tables and transaction logs, backing up the data and having a retention policy to archive (or purge) old data.
• Data Archival and Retention - You should put into place and enforce a policy by which old data is periodically archived and/or purged, because no disk is limitless and performance can degenerate as more files are added to EFT. Therefore, a storage management policy should include regular inspection of available hard disk space and health (error count, fragmentation, etc.) as well as archiving and/or purging user data and Server Log Files (CMDOUT.log found in the application folder, and all other logs found in the Log folder specified on the Server).
29
EFT v7 Installation and Administration Guide
• Restarting Services - Given the facility of the Microsoft Cluster in failing over and failing back while providing high resource availability, it is recommended that you design a maintenance schedule in which the EFT service is cycled at least once per quarter to once per month. Failing over to the backup node, restarting the service, then failing back and restarting the other node would suffice in re-establishing a baseline state of the EFT service to ensure optimal health.
• Event Log Alerting - EFT will log error conditions to the standard Windows Event Viewer. It is recommended that the operations team for an enterprise include EFT error checks in their monitoring techniques, looking for an ERROR event generated with a source of "EFT," "EFT Enterprise," or "Globalscape."
Procedure for Cold Standby Setup
Below are few recommendations for achieving a backup server image that is ready to be turned on quickly and accept "real" traffic.
In all situations, if you are copying a configuration file from one system to another, care must be taken with hardware-specific resources, such as IP addresses, physical paths/partitions, and so on. If possible, it is recommended that the EFT configuration use the generic "All Incoming" IP Address for incoming socket connections so that differences in computer IP addresses do not prevent proper operation of the system if the Cold Standby comes online. Furthermore, you must take care with the connections and IP-access restriction lists between EFT and DMZ Gateway. If DMZ Gateway is configured to allow only one EFT IP address to connect to it, then the Cold Standby server must have the same IP address to connect; alternately, the DMZ Gateway IP access list must include all possible IP addresses (possibly a Class C subnet) so that multiple servers from the approved network segment may connect.
• Virtualization Software - A great solution from a cost- and resource-saving standpoint, virtualization software is also quite easy to manage due to the "software" nature of the solution. The approach would be to create an image within a virtual system (using a tool such as VMWare or Microsoft Virtual PC) by installing and activating the EFT or DMZ Gateway software. Once this is done, the steps required to bring the system online include first copying the configuration files (which were backed up using a process described above), then bringing the virtual image online and starting the service.
• System Backup Software - Another quick and easy option is to create a disk or system image of a configured EFT or DMZ Gateway (using a product such as Norton Ghost); when a Cold standby needs to be "stood up" and made hot, the image can be installed on a computer, backup configuration copied, and the service started.
• Periodic Backup to Cold Standby Machine - If resources permit, the quickest way to get a "Cold" computer to become "Hot" is to have a computer dedicated to this function. It should have EFT and/or DMZ Gateway installed and activated, but the service should be stopped. A process to copy the configuration periodically from the "Hot" server to the "Cold" server would keep the two in synch, and if the "Hot" system goes down, the "Cold" system can simply start the service.
30
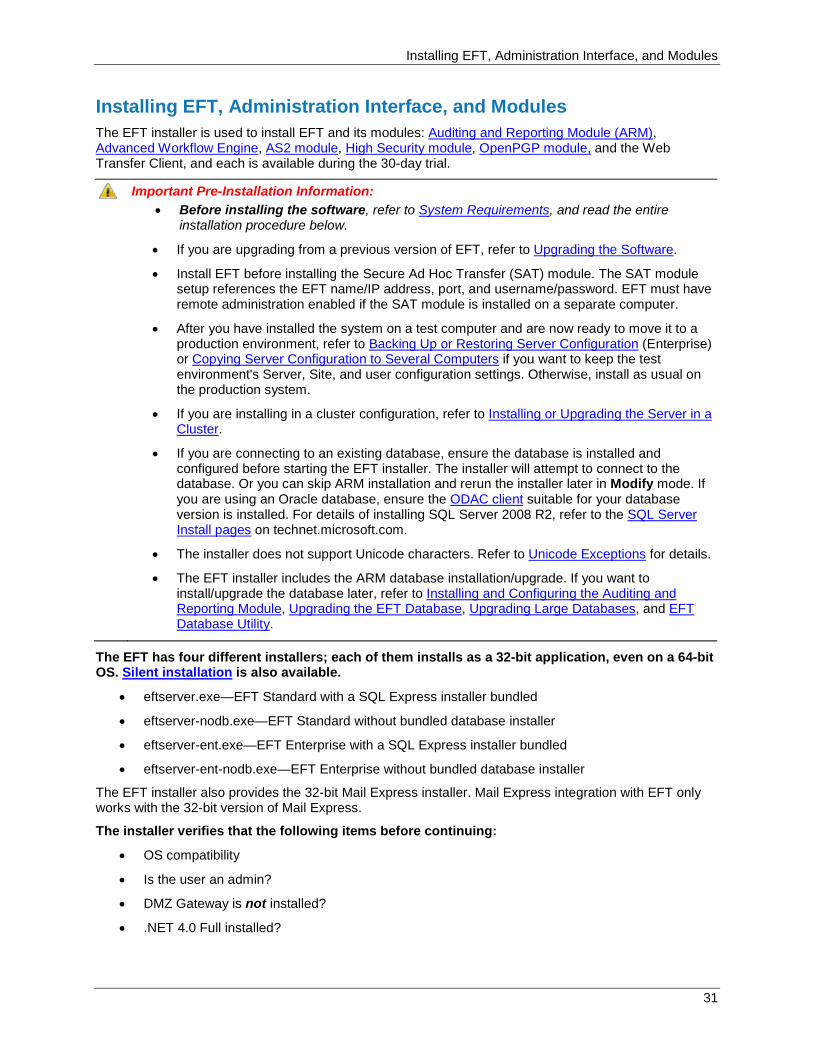
Installing EFT, Administration Interface, and Modules
Installing EFT, Administration Interface, and Modules The EFT installer is used to install EFT and its modules: Auditing and Reporting Module (ARM), Advanced Workflow Engine, AS2 module, High Security module, OpenPGP module, and the Web Transfer Client, and each is available during the 30-day trial.
Important Pre-Installation Information: • Before installing the software, refer to System Requirements, and read the entire
installation procedure below.
• If you are upgrading from a previous version of EFT, refer to Upgrading the Software.
• Install EFT before installing the Secure Ad Hoc Transfer (SAT) module. The SAT module setup references the EFT name/IP address, port, and username/password. EFT must have remote administration enabled if the SAT module is installed on a separate computer.
• After you have installed the system on a test computer and are now ready to move it to a production environment, refer to Backing Up or Restoring Server Configuration (Enterprise) or Copying Server Configuration to Several Computers if you want to keep the test environment's Server, Site, and user configuration settings. Otherwise, install as usual on the production system.
• If you are installing in a cluster configuration, refer to Installing or Upgrading the Server in a Cluster.
• If you are connecting to an existing database, ensure the database is installed and configured before starting the EFT installer. The installer will attempt to connect to the database. Or you can skip ARM installation and rerun the installer later in Modify mode. If you are using an Oracle database, ensure the ODAC client suitable for your database version is installed. For details of installing SQL Server 2008 R2, refer to the SQL Server Install pages on technet.microsoft.com.
• The installer does not support Unicode characters. Refer to Unicode Exceptions for details.
• The EFT installer includes the ARM database installation/upgrade. If you want to install/upgrade the database later, refer to Installing and Configuring the Auditing and Reporting Module, Upgrading the EFT Database, Upgrading Large Databases, and EFT Database Utility.
The EFT has four different installers; each of them installs as a 32-bit application, even on a 64-bit OS. Silent installation is also available.
• eftserver.exe—EFT Standard with a SQL Express installer bundled
• eftserver-nodb.exe—EFT Standard without bundled database installer
• eftserver-ent.exe—EFT Enterprise with a SQL Express installer bundled
• eftserver-ent-nodb.exe—EFT Enterprise without bundled database installer
The EFT installer also provides the 32-bit Mail Express installer. Mail Express integration with EFT only works with the 32-bit version of Mail Express.
The installer verifies that the following items before continuing:
• OS compatibility
• Is the user an admin?
• DMZ Gateway is not installed?
• .NET 4.0 Full installed?
31
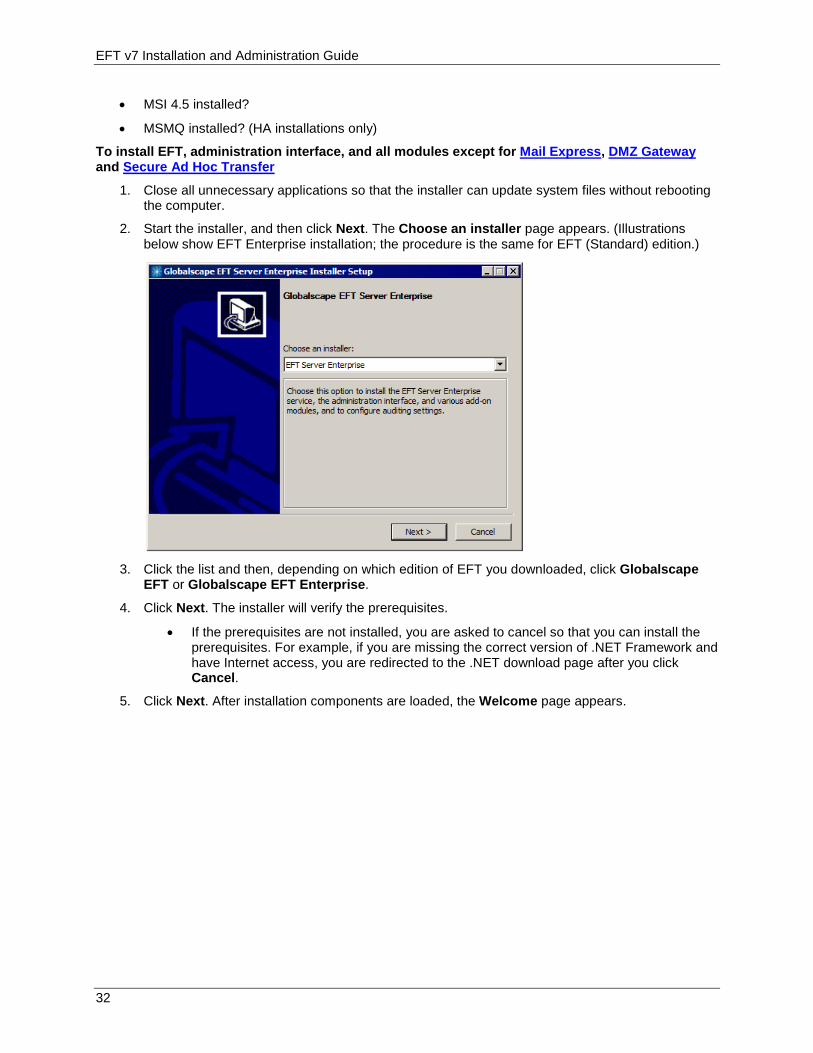
EFT v7 Installation and Administration Guide
• MSI 4.5 installed?
• MSMQ installed? (HA installations only)
To install EFT, administration interface, and all modules except for Mail Express, DMZ Gateway and Secure Ad Hoc Transfer
1. Close all unnecessary applications so that the installer can update system files without rebooting the computer.
2. Start the installer, and then click Next. The Choose an installer page appears. (Illustrations below show EFT Enterprise installation; the procedure is the same for EFT (Standard) edition.)
3. Click the list and then, depending on which edition of EFT you downloaded, click Globalscape
EFT or Globalscape EFT Enterprise.
4. Click Next. The installer will verify the prerequisites.
• If the prerequisites are not installed, you are asked to cancel so that you can install the prerequisites. For example, if you are missing the correct version of .NET Framework and have Internet access, you are redirected to the .NET download page after you click Cancel.
5. Click Next. After installation components are loaded, the Welcome page appears.
32
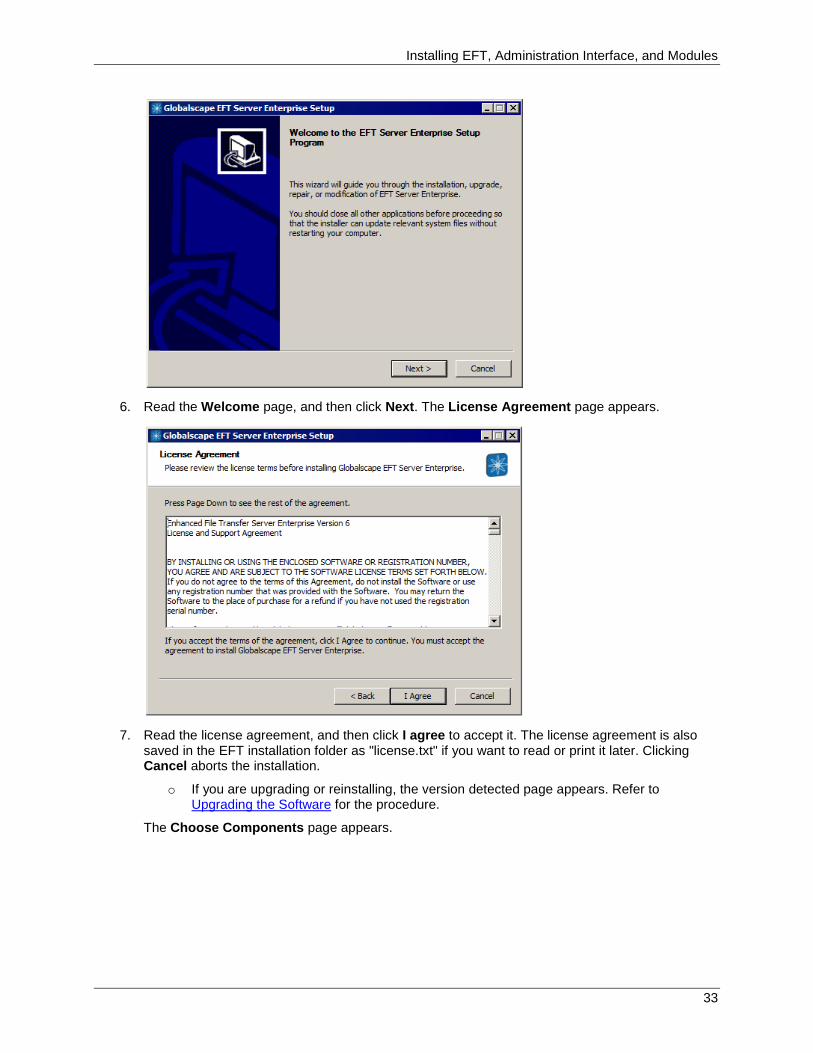
Installing EFT, Administration Interface, and Modules
6. Read the Welcome page, and then click Next. The License Agreement page appears.
7. Read the license agreement, and then click I agree to accept it. The license agreement is also
saved in the EFT installation folder as "license.txt" if you want to read or print it later. Clicking Cancel aborts the installation.
o If you are upgrading or reinstalling, the version detected page appears. Refer to Upgrading the Software for the procedure.
The Choose Components page appears.
33
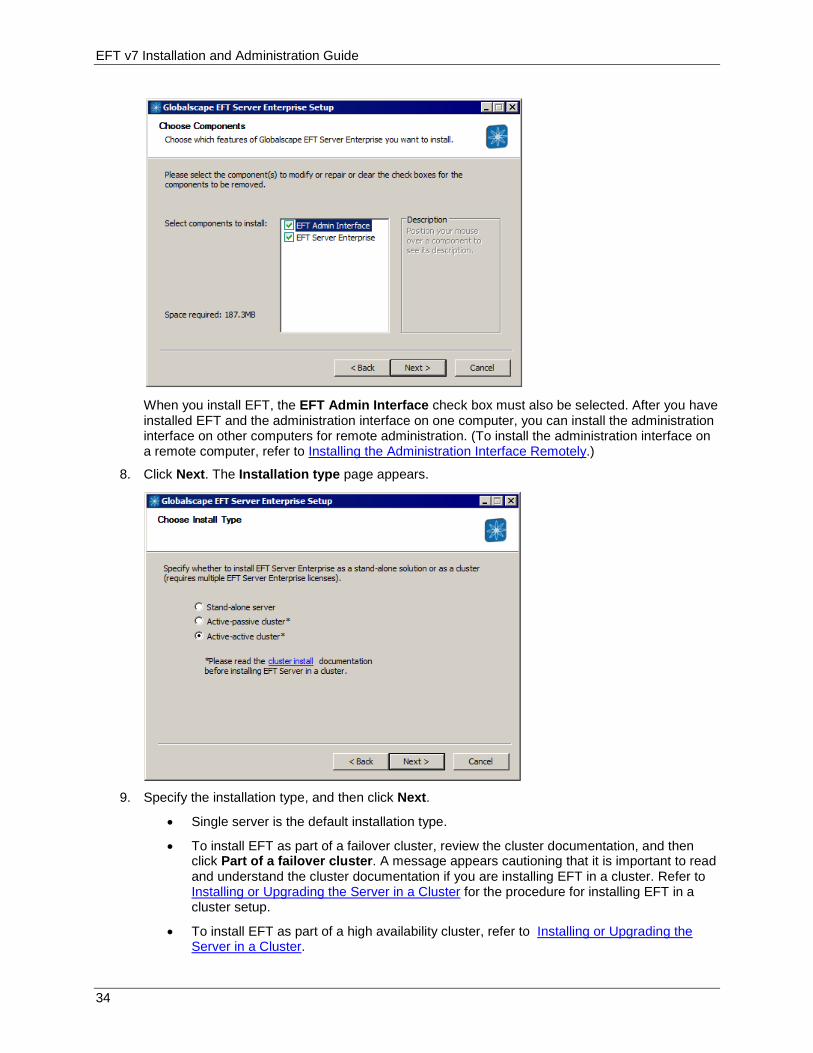
EFT v7 Installation and Administration Guide
When you install EFT, the EFT Admin Interface check box must also be selected. After you have installed EFT and the administration interface on one computer, you can install the administration interface on other computers for remote administration. (To install the administration interface on a remote computer, refer to Installing the Administration Interface Remotely.)
8. Click Next. The Installation type page appears.
9. Specify the installation type, and then click Next.
• Single server is the default installation type.
• To install EFT as part of a failover cluster, review the cluster documentation, and then click Part of a failover cluster. A message appears cautioning that it is important to read and understand the cluster documentation if you are installing EFT in a cluster. Refer to Installing or Upgrading the Server in a Cluster for the procedure for installing EFT in a cluster setup.
• To install EFT as part of a high availability cluster, refer to Installing or Upgrading the Server in a Cluster.
34
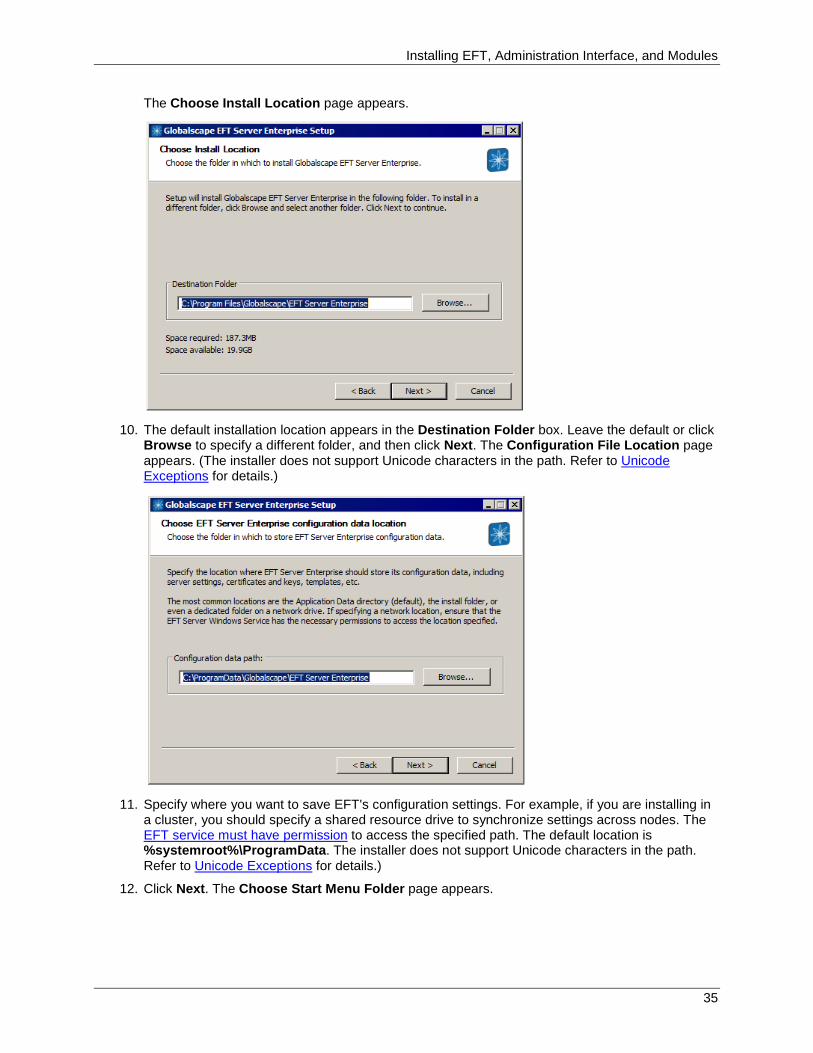
Installing EFT, Administration Interface, and Modules
The Choose Install Location page appears.
10. The default installation location appears in the Destination Folder box. Leave the default or click
Browse to specify a different folder, and then click Next. The Configuration File Location page appears. (The installer does not support Unicode characters in the path. Refer to Unicode Exceptions for details.)
11. Specify where you want to save EFT's configuration settings. For example, if you are installing in
a cluster, you should specify a shared resource drive to synchronize settings across nodes. The EFT service must have permission to access the specified path. The default location is %systemroot%\ProgramData. The installer does not support Unicode characters in the path. Refer to Unicode Exceptions for details.)
12. Click Next. The Choose Start Menu Folder page appears.
35
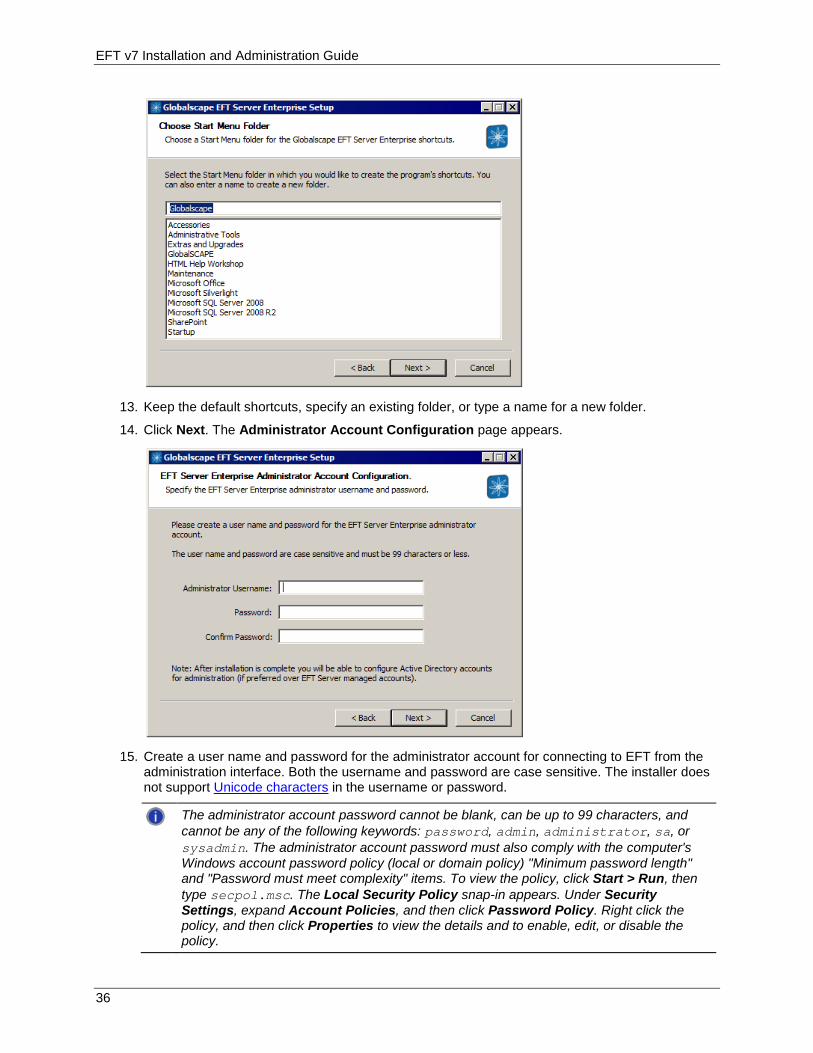
EFT v7 Installation and Administration Guide
13. Keep the default shortcuts, specify an existing folder, or type a name for a new folder.
14. Click Next. The Administrator Account Configuration page appears.
15. Create a user name and password for the administrator account for connecting to EFT from the
administration interface. Both the username and password are case sensitive. The installer does not support Unicode characters in the username or password.
The administrator account password cannot be blank, can be up to 99 characters, and cannot be any of the following keywords: password, admin, administrator, sa, or sysadmin. The administrator account password must also comply with the computer's Windows account password policy (local or domain policy) "Minimum password length" and "Password must meet complexity" items. To view the policy, click Start > Run, then type secpol.msc. The Local Security Policy snap-in appears. Under Security Settings, expand Account Policies, and then click Password Policy. Right click the policy, and then click Properties to view the details and to enable, edit, or disable the policy.
36
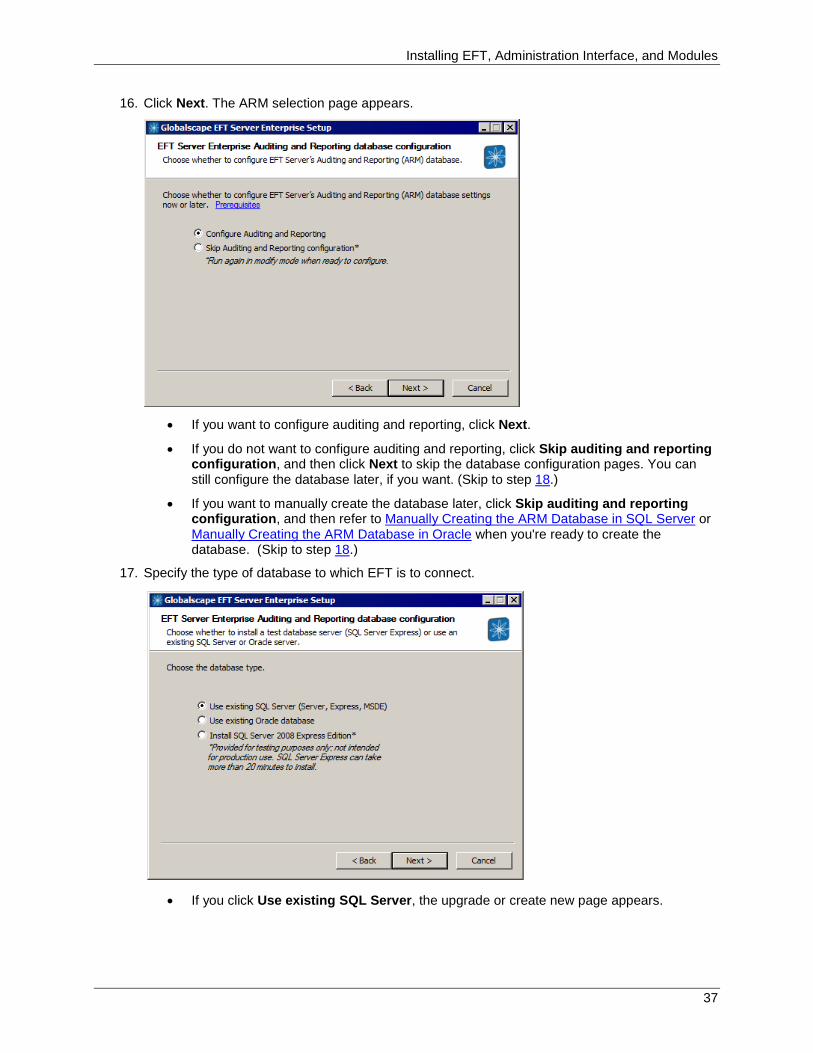
Installing EFT, Administration Interface, and Modules
16. Click Next. The ARM selection page appears.
• If you want to configure auditing and reporting, click Next.
• If you do not want to configure auditing and reporting, click Skip auditing and reporting configuration, and then click Next to skip the database configuration pages. You can still configure the database later, if you want. (Skip to step 18.)
• If you want to manually create the database later, click Skip auditing and reporting configuration, and then refer to Manually Creating the ARM Database in SQL Server or Manually Creating the ARM Database in Oracle when you're ready to create the database. (Skip to step 18.)
17. Specify the type of database to which EFT is to connect.
• If you click Use existing SQL Server, the upgrade or create new page appears.
37
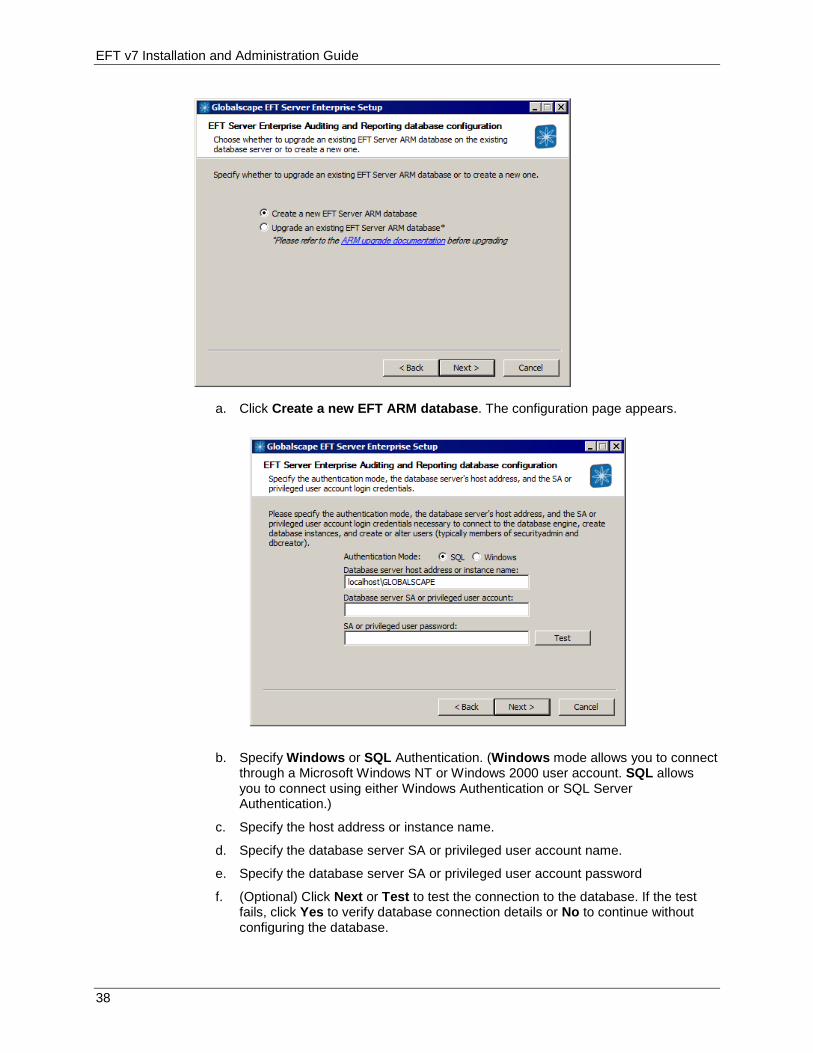
EFT v7 Installation and Administration Guide
a. Click Create a new EFT ARM database. The configuration page appears.
b. Specify Windows or SQL Authentication. (Windows mode allows you to connect through a Microsoft Windows NT or Windows 2000 user account. SQL allows you to connect using either Windows Authentication or SQL Server Authentication.)
c. Specify the host address or instance name.
d. Specify the database server SA or privileged user account name.
e. Specify the database server SA or privileged user account password
f. (Optional) Click Next or Test to test the connection to the database. If the test fails, click Yes to verify database connection details or No to continue without configuring the database.
38
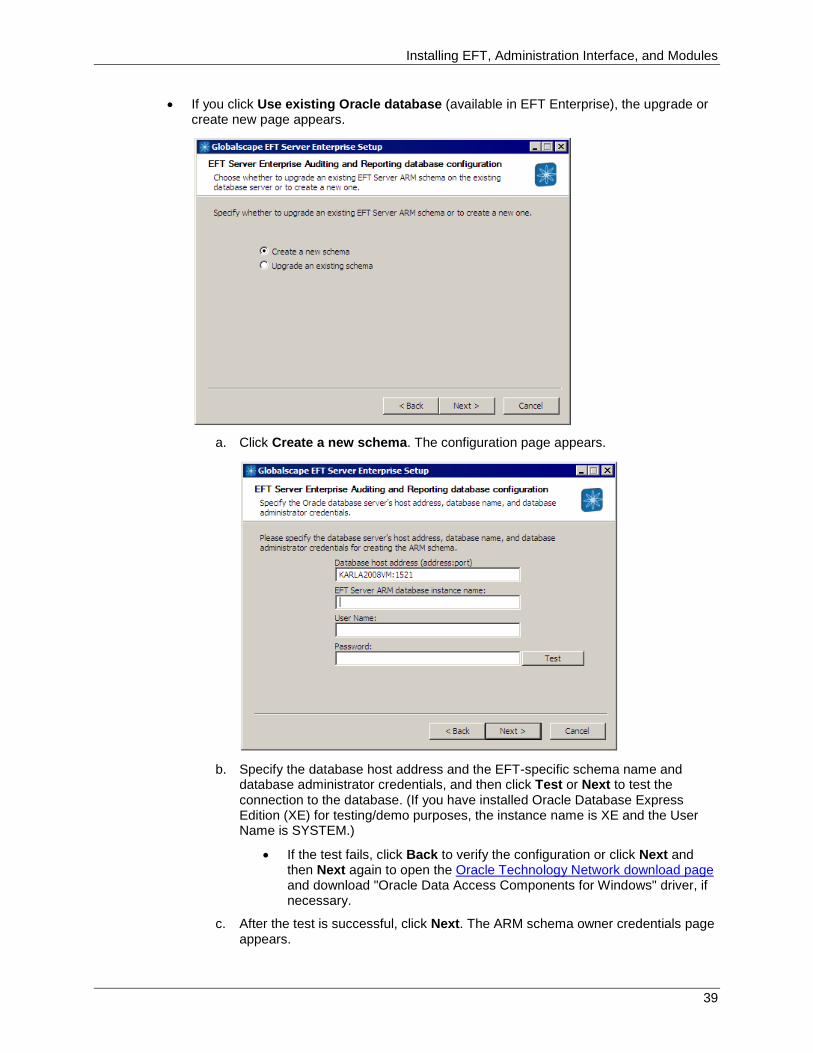
Installing EFT, Administration Interface, and Modules
• If you click Use existing Oracle database (available in EFT Enterprise), the upgrade or create new page appears.
a. Click Create a new schema. The configuration page appears.
b. Specify the database host address and the EFT-specific schema name and
database administrator credentials, and then click Test or Next to test the connection to the database. (If you have installed Oracle Database Express Edition (XE) for testing/demo purposes, the instance name is XE and the User Name is SYSTEM.)
• If the test fails, click Back to verify the configuration or click Next and then Next again to open the Oracle Technology Network download page and download "Oracle Data Access Components for Windows" driver, if necessary.
c. After the test is successful, click Next. The ARM schema owner credentials page appears.
39
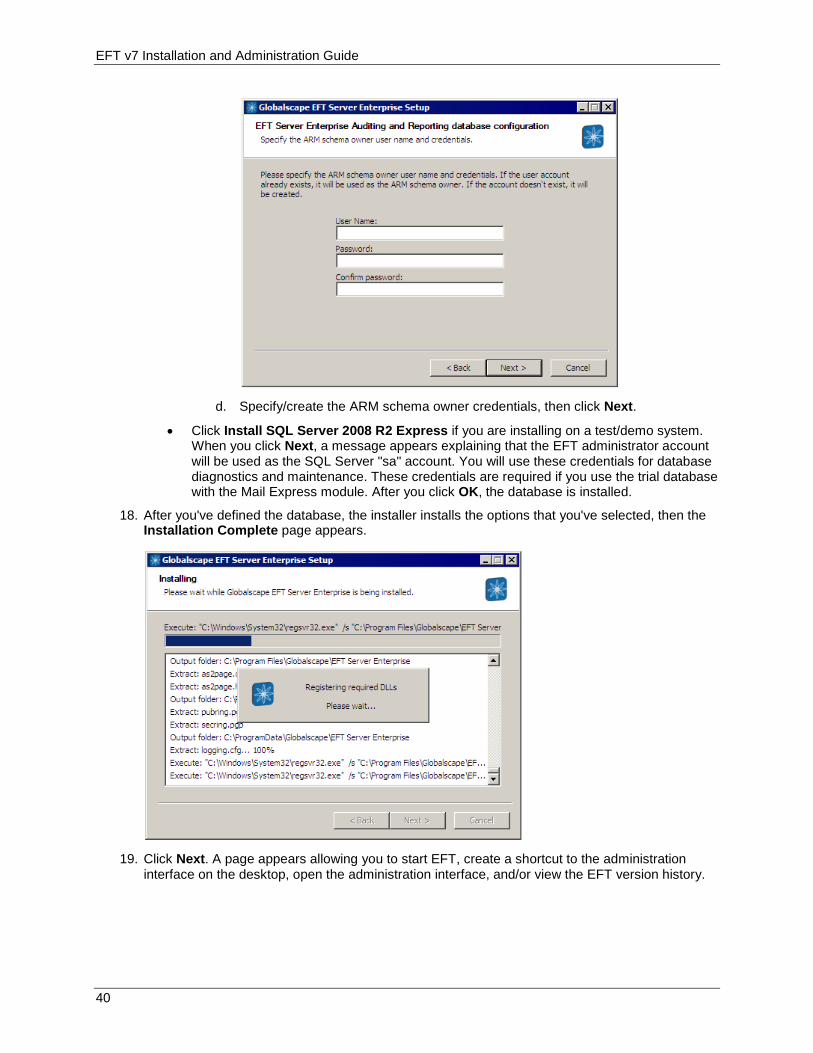
EFT v7 Installation and Administration Guide
d. Specify/create the ARM schema owner credentials, then click Next.
• Click Install SQL Server 2008 R2 Express if you are installing on a test/demo system. When you click Next, a message appears explaining that the EFT administrator account will be used as the SQL Server "sa" account. You will use these credentials for database diagnostics and maintenance. These credentials are required if you use the trial database with the Mail Express module. After you click OK, the database is installed.
18. After you've defined the database, the installer installs the options that you've selected, then the Installation Complete page appears.
19. Click Next. A page appears allowing you to start EFT, create a shortcut to the administration
interface on the desktop, open the administration interface, and/or view the EFT version history.
40
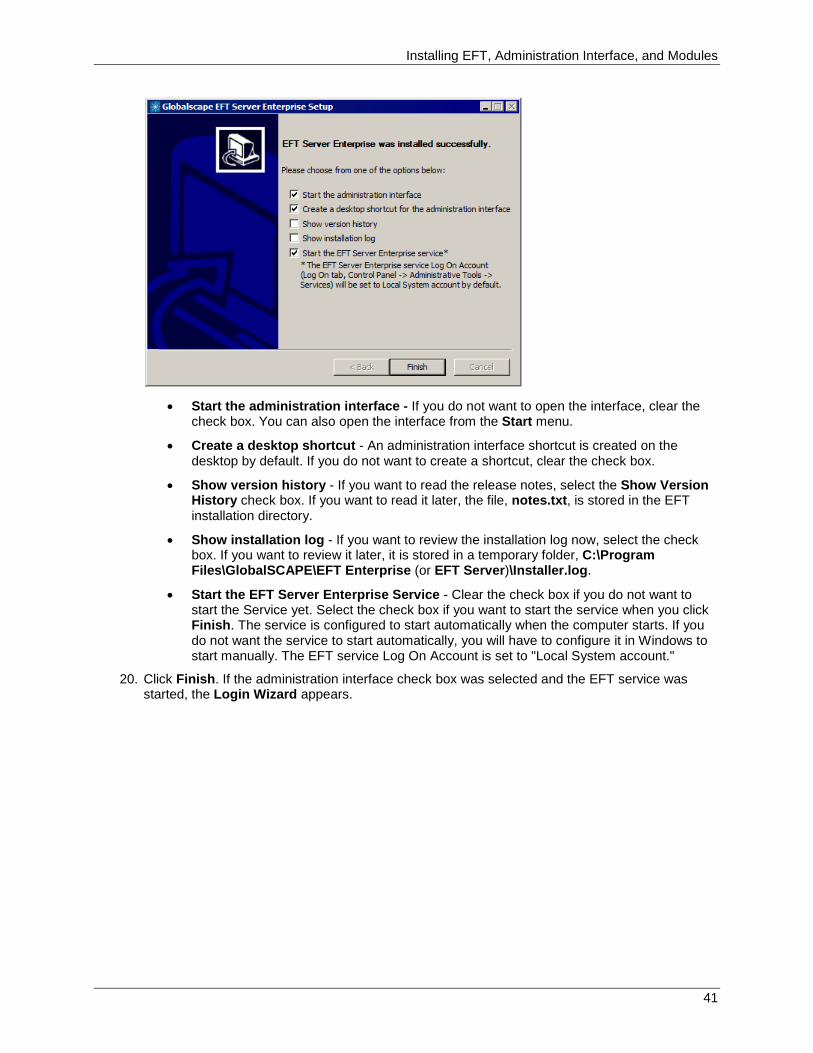
Installing EFT, Administration Interface, and Modules
• Start the administration interface - If you do not want to open the interface, clear the
check box. You can also open the interface from the Start menu.
• Create a desktop shortcut - An administration interface shortcut is created on the desktop by default. If you do not want to create a shortcut, clear the check box.
• Show version history - If you want to read the release notes, select the Show Version History check box. If you want to read it later, the file, notes.txt, is stored in the EFT installation directory.
• Show installation log - If you want to review the installation log now, select the check box. If you want to review it later, it is stored in a temporary folder, C:\Program Files\GlobalSCAPE\EFT Enterprise (or EFT Server)\Installer.log.
• Start the EFT Server Enterprise Service - Clear the check box if you do not want to start the Service yet. Select the check box if you want to start the service when you click Finish. The service is configured to start automatically when the computer starts. If you do not want the service to start automatically, you will have to configure it in Windows to start manually. The EFT service Log On Account is set to "Local System account."
20. Click Finish. If the administration interface check box was selected and the EFT service was started, the Login Wizard appears.
41
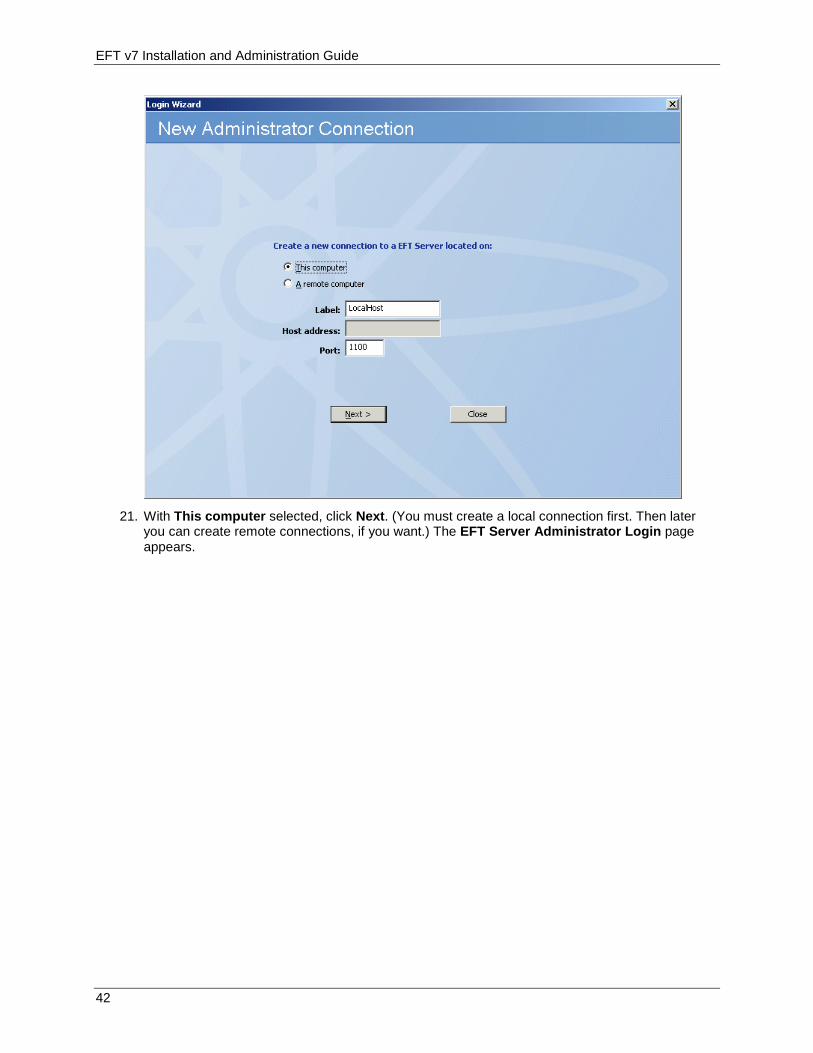
EFT v7 Installation and Administration Guide
21. With This computer selected, click Next. (You must create a local connection first. Then later
you can create remote connections, if you want.) The EFT Server Administrator Login page appears.
42
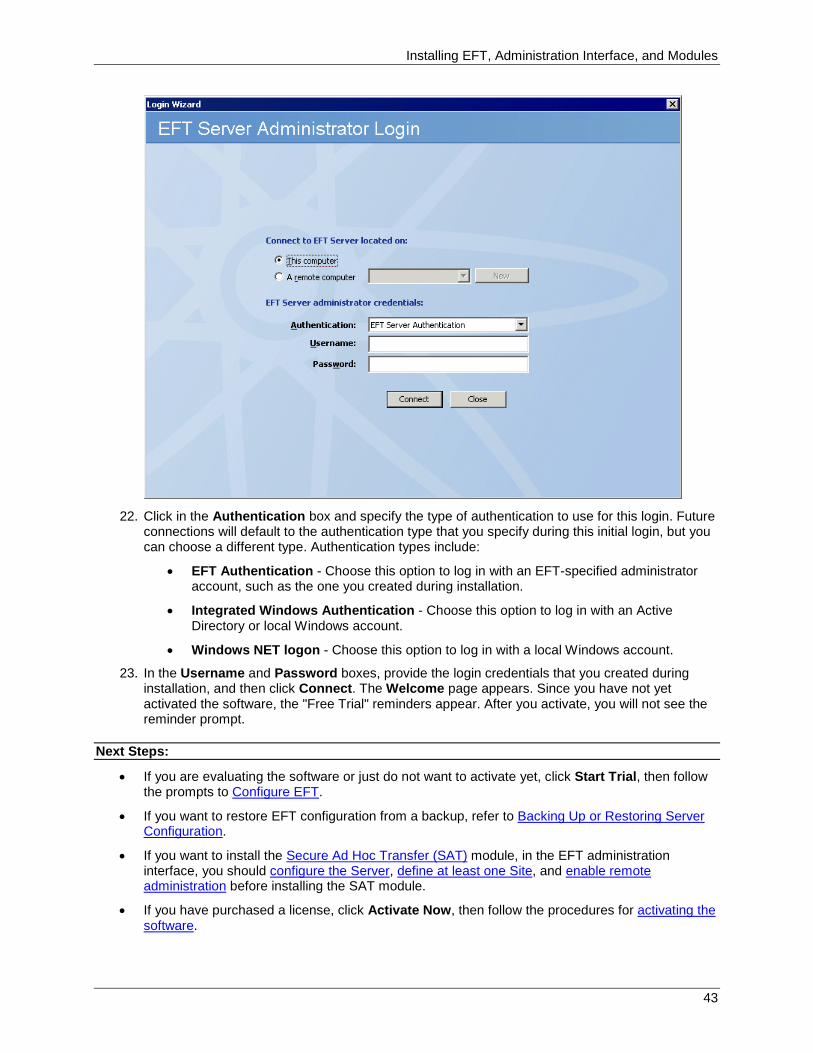
Installing EFT, Administration Interface, and Modules
22. Click in the Authentication box and specify the type of authentication to use for this login. Future
connections will default to the authentication type that you specify during this initial login, but you can choose a different type. Authentication types include:
• EFT Authentication - Choose this option to log in with an EFT-specified administrator account, such as the one you created during installation.
• Integrated Windows Authentication - Choose this option to log in with an Active Directory or local Windows account.
• Windows NET logon - Choose this option to log in with a local Windows account.
23. In the Username and Password boxes, provide the login credentials that you created during installation, and then click Connect. The Welcome page appears. Since you have not yet activated the software, the "Free Trial" reminders appear. After you activate, you will not see the reminder prompt.
Next Steps:
• If you are evaluating the software or just do not want to activate yet, click Start Trial, then follow the prompts to Configure EFT.
• If you want to restore EFT configuration from a backup, refer to Backing Up or Restoring Server Configuration.
• If you want to install the Secure Ad Hoc Transfer (SAT) module, in the EFT administration interface, you should configure the Server, define at least one Site, and enable remote administration before installing the SAT module.
• If you have purchased a license, click Activate Now, then follow the procedures for activating the software.
43
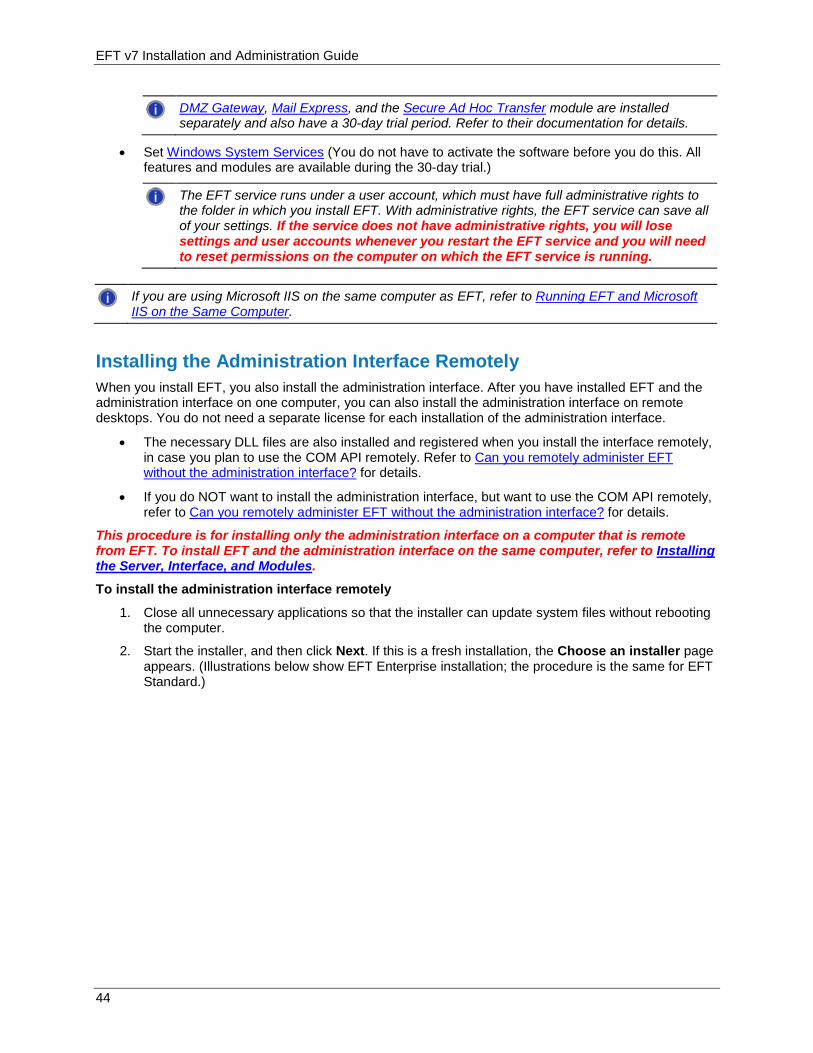
EFT v7 Installation and Administration Guide
DMZ Gateway, Mail Express, and the Secure Ad Hoc Transfer module are installed separately and also have a 30-day trial period. Refer to their documentation for details.
• Set Windows System Services (You do not have to activate the software before you do this. All features and modules are available during the 30-day trial.)
The EFT service runs under a user account, which must have full administrative rights to the folder in which you install EFT. With administrative rights, the EFT service can save all of your settings. If the service does not have administrative rights, you will lose settings and user accounts whenever you restart the EFT service and you will need to reset permissions on the computer on which the EFT service is running.
If you are using Microsoft IIS on the same computer as EFT, refer to Running EFT and Microsoft IIS on the Same Computer.
Installing the Administration Interface Remotely When you install EFT, you also install the administration interface. After you have installed EFT and the administration interface on one computer, you can also install the administration interface on remote desktops. You do not need a separate license for each installation of the administration interface.
• The necessary DLL files are also installed and registered when you install the interface remotely, in case you plan to use the COM API remotely. Refer to Can you remotely administer EFT without the administration interface? for details.
• If you do NOT want to install the administration interface, but want to use the COM API remotely, refer to Can you remotely administer EFT without the administration interface? for details.
This procedure is for installing only the administration interface on a computer that is remote from EFT. To install EFT and the administration interface on the same computer, refer to Installing the Server, Interface, and Modules.
To install the administration interface remotely
1. Close all unnecessary applications so that the installer can update system files without rebooting the computer.
2. Start the installer, and then click Next. If this is a fresh installation, the Choose an installer page appears. (Illustrations below show EFT Enterprise installation; the procedure is the same for EFT Standard.)
44
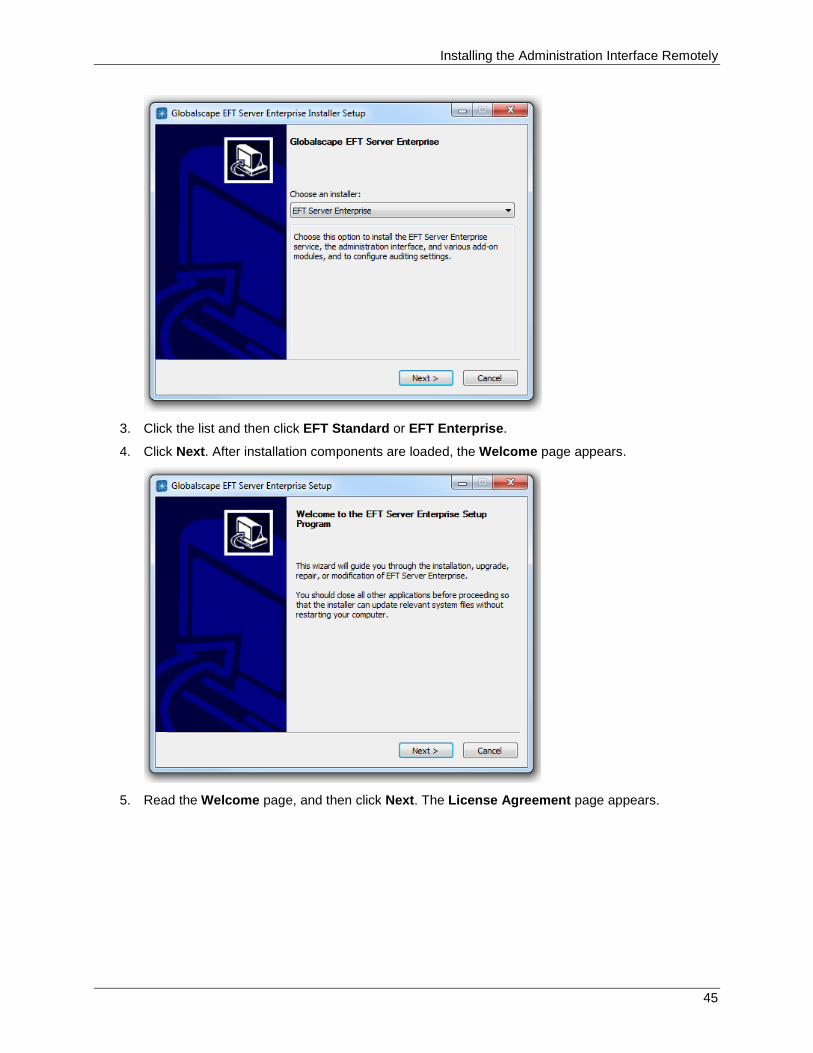
Installing the Administration Interface Remotely
3. Click the list and then click EFT Standard or EFT Enterprise.
4. Click Next. After installation components are loaded, the Welcome page appears.
5. Read the Welcome page, and then click Next. The License Agreement page appears.
45
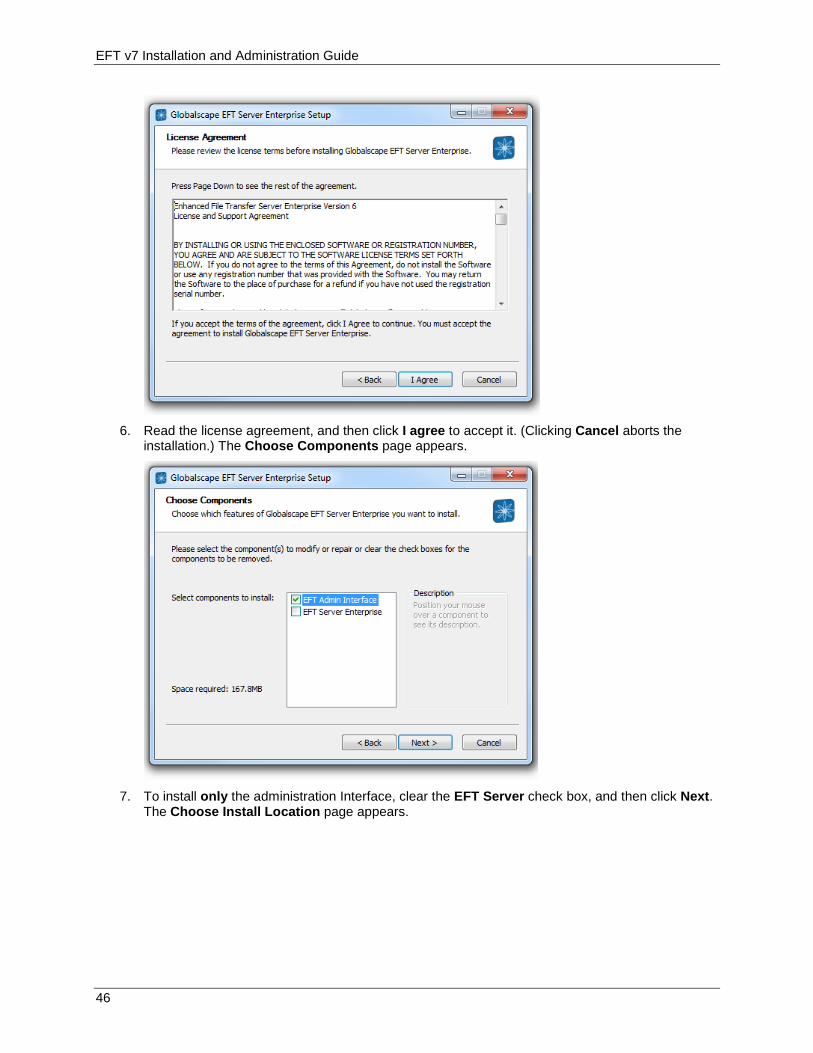
EFT v7 Installation and Administration Guide
6. Read the license agreement, and then click I agree to accept it. (Clicking Cancel aborts the
installation.) The Choose Components page appears.
7. To install only the administration Interface, clear the EFT Server check box, and then click Next.
The Choose Install Location page appears.
46
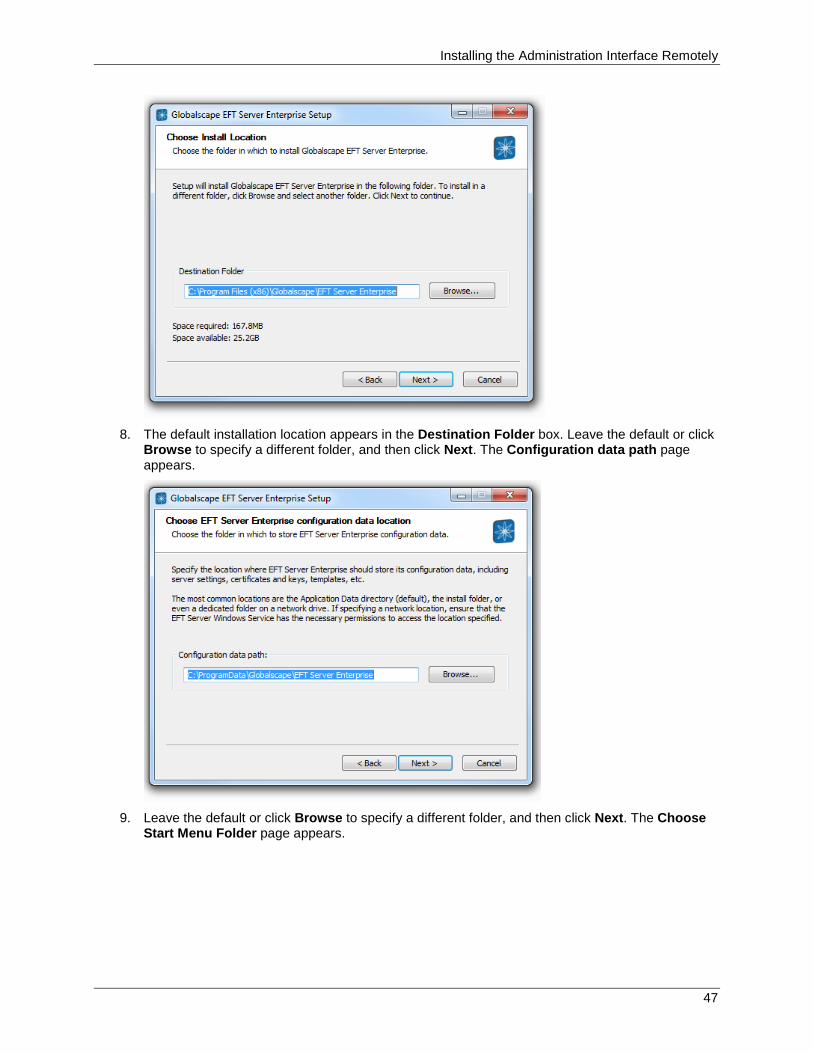
Installing the Administration Interface Remotely
8. The default installation location appears in the Destination Folder box. Leave the default or click
Browse to specify a different folder, and then click Next. The Configuration data path page appears.
9. Leave the default or click Browse to specify a different folder, and then click Next. The Choose
Start Menu Folder page appears.
47
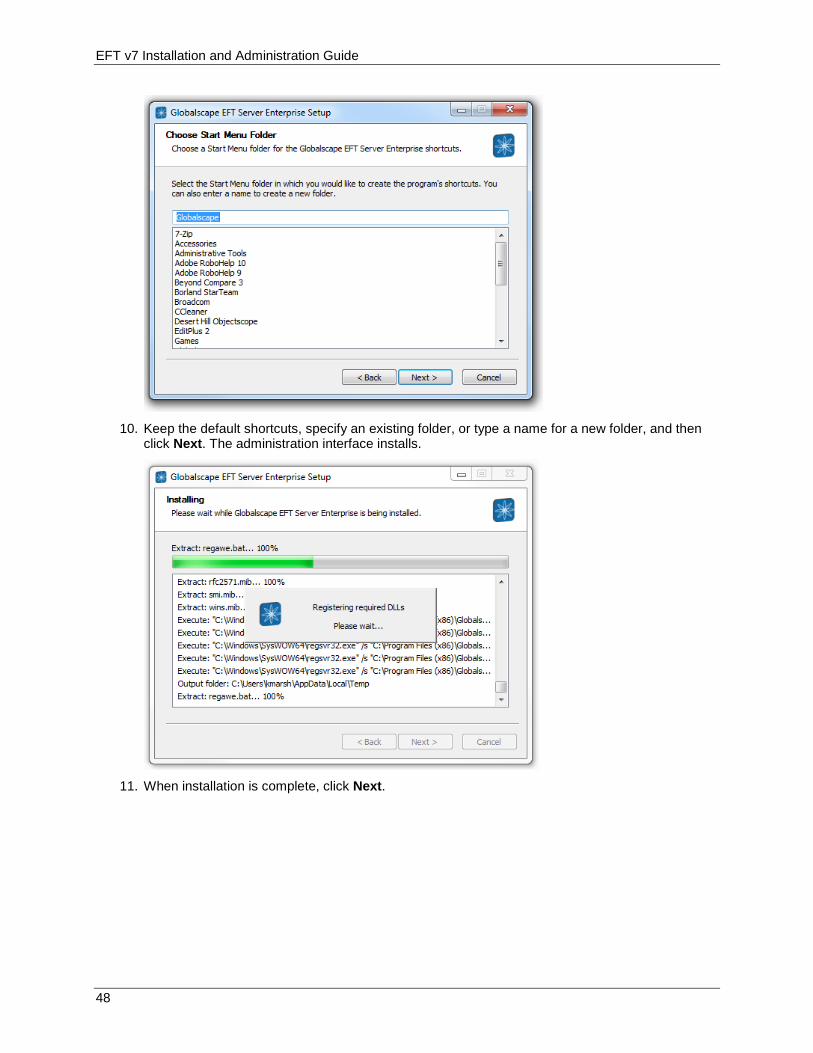
EFT v7 Installation and Administration Guide
10. Keep the default shortcuts, specify an existing folder, or type a name for a new folder, and then
click Next. The administration interface installs.
11. When installation is complete, click Next.
48
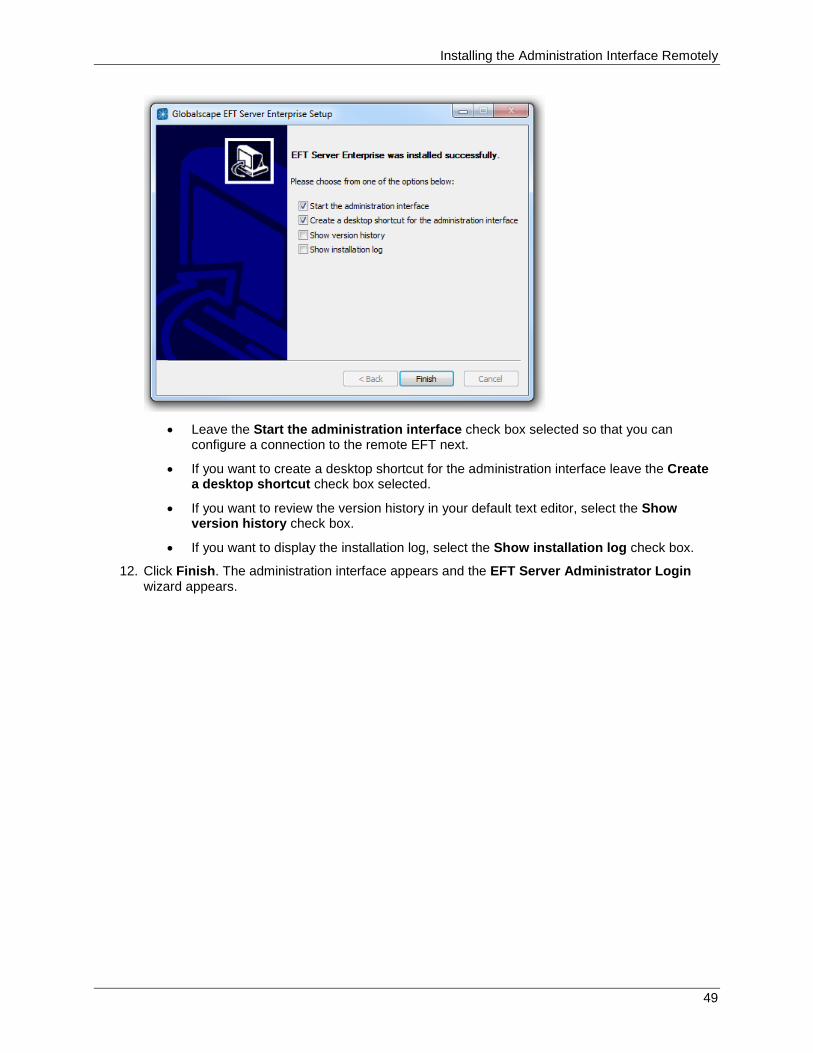
Installing the Administration Interface Remotely
• Leave the Start the administration interface check box selected so that you can
configure a connection to the remote EFT next.
• If you want to create a desktop shortcut for the administration interface leave the Create a desktop shortcut check box selected.
• If you want to review the version history in your default text editor, select the Show version history check box.
• If you want to display the installation log, select the Show installation log check box.
12. Click Finish. The administration interface appears and the EFT Server Administrator Login wizard appears.
49

EFT v7 Installation and Administration Guide
13. Click A remote computer, then ensure the remote EFT's IP address appears in the drop-down
list. If the remote EFT's IP address does not appear in the list, ensure you can connect to it from this computer and that remote administration is allowed on EFT. Otherwise, click New and configure the remote connection.
50
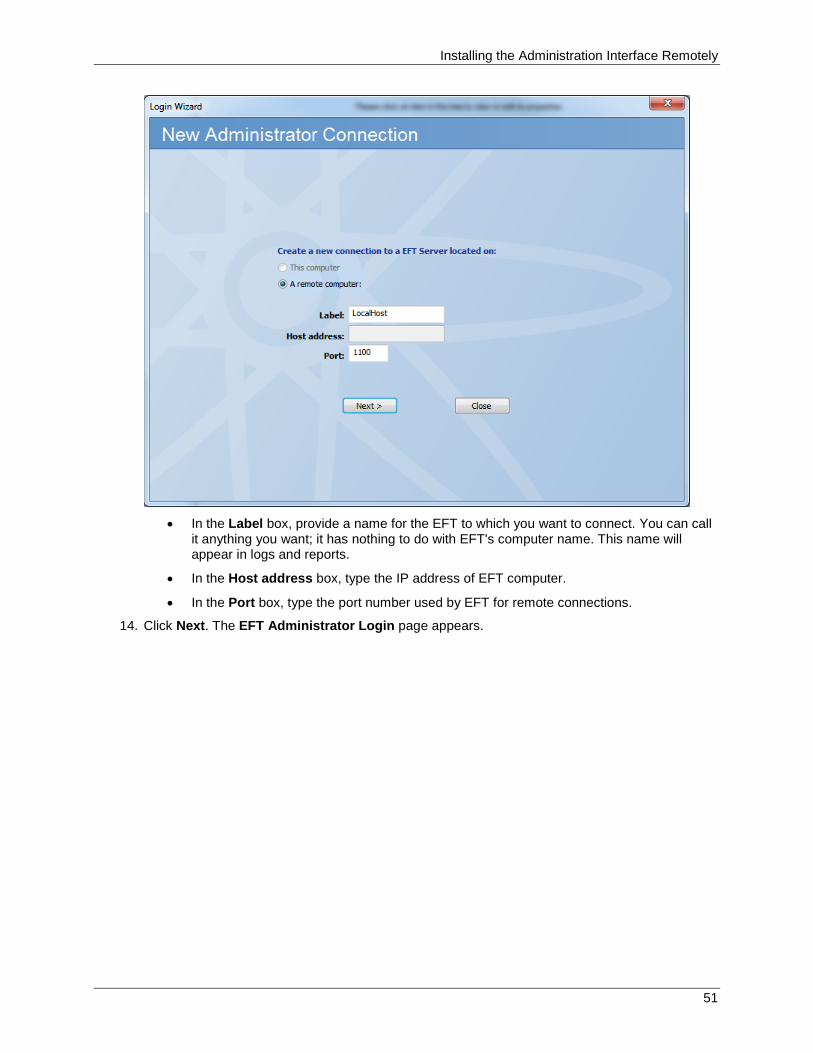
Installing the Administration Interface Remotely
• In the Label box, provide a name for the EFT to which you want to connect. You can call
it anything you want; it has nothing to do with EFT's computer name. This name will appear in logs and reports.
• In the Host address box, type the IP address of EFT computer.
• In the Port box, type the port number used by EFT for remote connections.
14. Click Next. The EFT Administrator Login page appears.
51
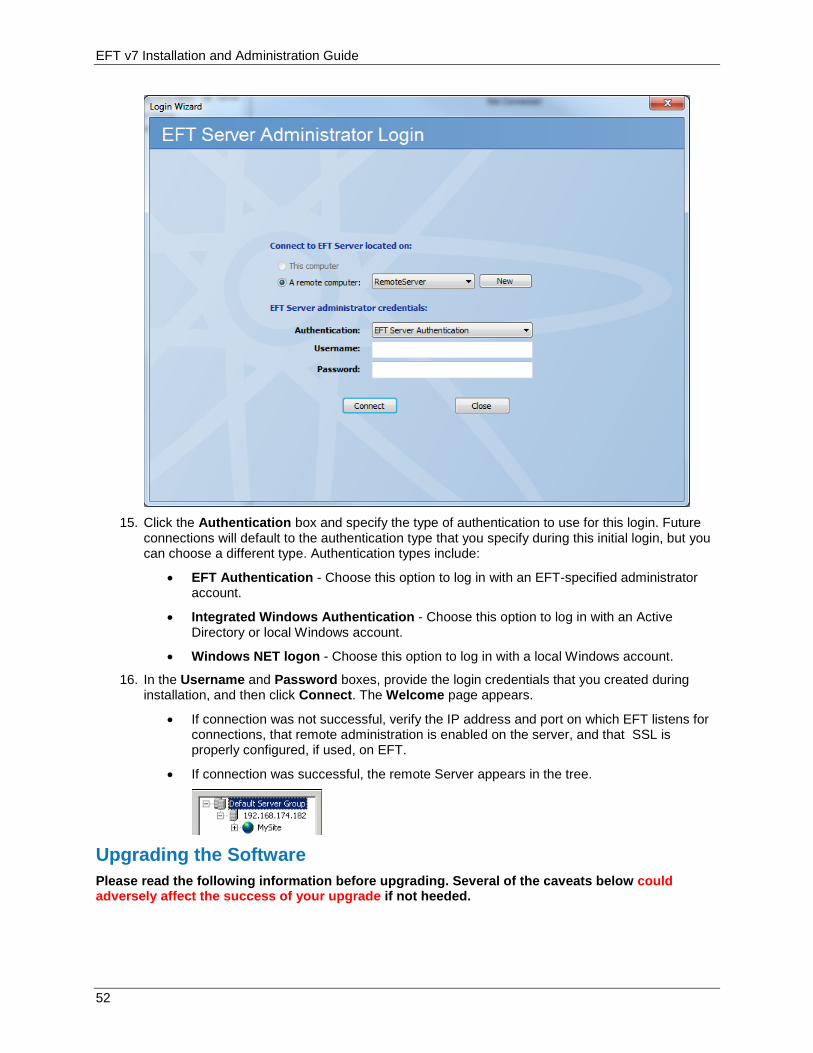
EFT v7 Installation and Administration Guide
15. Click the Authentication box and specify the type of authentication to use for this login. Future
connections will default to the authentication type that you specify during this initial login, but you can choose a different type. Authentication types include:
• EFT Authentication - Choose this option to log in with an EFT-specified administrator account.
• Integrated Windows Authentication - Choose this option to log in with an Active Directory or local Windows account.
• Windows NET logon - Choose this option to log in with a local Windows account.
16. In the Username and Password boxes, provide the login credentials that you created during installation, and then click Connect. The Welcome page appears.
• If connection was not successful, verify the IP address and port on which EFT listens for connections, that remote administration is enabled on the server, and that SSL is properly configured, if used, on EFT.
• If connection was successful, the remote Server appears in the tree.
Upgrading the Software Please read the following information before upgrading. Several of the caveats below could adversely affect the success of your upgrade if not heeded.
52
Upgrading the Software
• EFT's installer detects and prevents upgrades of more than two versions prior to the current version.
o Upgrading is supported from EFT Enterprise v6.4.x or v6.5.x to EFT Enterprise v7.x
o Upgrading is supported from EFT Standard 6.4.x or 6.5.x to EFT SMB 7.x
o Upgrading is supported from EFT Standard v7 to EFT Enterprise v7 (requires purchase of Enterprise license)
• If you are upgrading from EFT Standard edition to EFT Enterprise, you may have to update the path to the .aud file in the Authentication Options dialog box for each Site. Refer to Globalscape Authentication or Changing and Testing LDAP Authentication Options for instructions, depending on the authentication type. When the EFT service starts, it looks for a .cfg file. If the .cfg file is not found, corrupted, or not compatible, EFT creates a new .cfg file in the default location. If the .cfg file is corrupted or the wrong version, the bad .cfg file is backed up and an error is written to the Event log. The .cfg file points to the Sites' .aud files. EFT searches for the .aud file near the ftp.cfg file if the path to the .aud file appears to be incorrect. You cannot edit the .cfg file. (If you have installed the previous version for the sole purpose of upgrading, you must create at least a Server object in the administration interface to create a .cfg file before you can upgrade.)
• If you are adding any modules, you may receive a new activation serial number. If so, then it may be necessary to activate the software when you start it for the first time.
• Contact the Sales team to obtain a new registration serial number or to determine your eligibility for an upgrade. If you are moving an EFT from one computer to another, contact the Globalscape customer service team or your account manager so that we can adjust your account on our activation and registration server. Activation on the new computer will not be possible until the adjustment is made. If you want to test or verify an update prior to introduction into your production environment, do not use your production serial number for testing purposes.
• If you are upgrading a cluster, refer to Installing or Upgrading EFT in a Cluster. (You cannot upgrade EFT in an active-active cluster.)
• If you are upgrading from Secure FTP Server, refer to: Upgrading Secure FTP Server v3.3 to EFT Server v6.x
• DMZ Gateway: If you are also upgrading DMZ Gateway, upgrade DMZ Gateway first, then upgrade EFT.
• ARM:
o If you will be upgrading the ARM database, refer to Upgrading the EFT Database, Upgrading Large Databases, and ARM Database Schema Change Tracking for important information. A new process is used to upgrade the ARM database. Refer to Upgrading the EFT Database for details.
o When upgrading from versions prior to EFT v6.4, if you upgrade the SQL Server ARM database with the installer, the default schema name is now dbo.
o During updates or upgrades, EFT Server needs full DB Owner access to update the schema. Once it is set up, EFT Server only needs to be able to read, write, and execute stored procedures. Refer to the Knowledgebase article "Configuring EFT Server Permissions in SQL Server" for more information.
53
EFT v7 Installation and Administration Guide
• COM API:
o COM API resources including SFTPCOMInterface.DLL and associated files are saved in C:\Program Files\Common Files\Globalscape\SFTPCOMInterface so that they can be shared with other Globalscape applications, such as the Secure Ad Hoc Transfer module and Mail Express, ensuring that each application is using the same DLL.
o Any scripts that use the v6.2 COM API for Timer Events must be updated to the new API.
o The IP Access/IP Ban has increased functionality, and the COM interface has been modified to match the new functionality.
• WTC (Java-enabled version):
o When upgrading the WTC, workstations might receive a Java error, but then the WTC will load and be functional. Refer to KB article#10654 for details.
o When upgrading, the \web\custom\ and \web\public\ folders are backed up and renamed with the date and time (e.g., \customBackup_9-28-2010_16-18\ and \publicBackup_9-28-2010_16-18\). The new versions of the files may have some updated content, so rather than overwriting the new files with your old files, you should manually copy your customizations to the new files after upgrading. This applies to any edits for the per-Site and per-Server login pages, Web Transfer Client (WTC) interface, Account Management interface, and AS2 Management interface.
o End users will need to clear their browser cache: refer to KB http://kb.globalscape.com/KnowledgebaseArticle10654.aspx for more information.
o FTP requires UPLOAD permission in addition to APPEND to resume a partial file transfer.
• Event Rules:
o The Folder Monitor Event Rule trigger was improved to provide better reliability for the handling of file events. The current Folder Monitor algorithm uses more resources (threads) than the v6.2 algorithm. EFTs with more than 250 Folder Monitor Rules should use the v6.2 algorithm, which uses fewer resources. The 6.2 Folder Monitor algorithm can be selected via a registry key.
o The Event Rule file Copy/Move wizard provides control for overwrite options. The overwrite options were set in earlier versions using registry keys. Any associated registry keys will now be ignored and you should update your Event Rule Actions with the desired overwrite option.
o EFT supports PORT mode when using the SOCKS protocol to the outbound gateway/proxy. Event Rules that were configured for SOCKS PORT mode in v6.2, will switch from acting as a PASV mode connection to a PORT mode connection in later versions.
o During the upgrade, if a non file-trigger rule contains an %FS.FILE_NAME% variable, it will be converted to %SOURCE.FILE_NAME% and a WARNING will record the change in the EFT.log. Refer to Variables (List) for more information about the %SOURCE.FILE_NAME% variable.
o By default, IP Access-related Event Rules are limited to 1000 rules. If you upgrade with more than 1000 denied IP addresses, the rule count overflows and you cannot create new rules. Refer to Knowledgebase article "Cannot create new Event Rules after upgrading" for a registry fix.
• In cases where ASCII strings with >127 characters were used for RADIUS in the prior version, there is some risk of loss of fidelity when converting to UTF-8 (depending on the code page) for v6.5. You may need to re-enter values, disable and then re-enable RADIUS, or restart the Site to refresh the values.
54
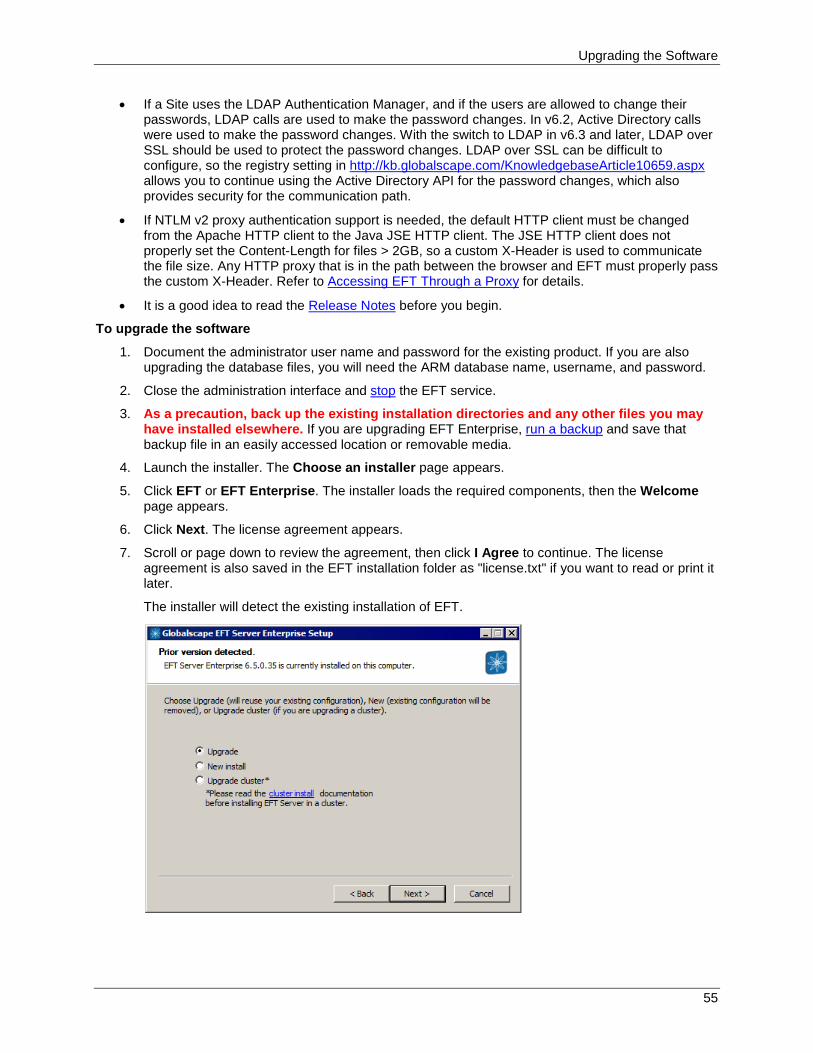
Upgrading the Software
• If a Site uses the LDAP Authentication Manager, and if the users are allowed to change their passwords, LDAP calls are used to make the password changes. In v6.2, Active Directory calls were used to make the password changes. With the switch to LDAP in v6.3 and later, LDAP over SSL should be used to protect the password changes. LDAP over SSL can be difficult to configure, so the registry setting in http://kb.globalscape.com/KnowledgebaseArticle10659.aspx allows you to continue using the Active Directory API for the password changes, which also provides security for the communication path.
• If NTLM v2 proxy authentication support is needed, the default HTTP client must be changed from the Apache HTTP client to the Java JSE HTTP client. The JSE HTTP client does not properly set the Content-Length for files > 2GB, so a custom X-Header is used to communicate the file size. Any HTTP proxy that is in the path between the browser and EFT must properly pass the custom X-Header. Refer to Accessing EFT Through a Proxy for details.
• It is a good idea to read the Release Notes before you begin.
To upgrade the software
1. Document the administrator user name and password for the existing product. If you are also upgrading the database files, you will need the ARM database name, username, and password.
2. Close the administration interface and stop the EFT service.
3. As a precaution, back up the existing installation directories and any other files you may have installed elsewhere. If you are upgrading EFT Enterprise, run a backup and save that backup file in an easily accessed location or removable media.
4. Launch the installer. The Choose an installer page appears.
5. Click EFT or EFT Enterprise. The installer loads the required components, then the Welcome page appears.
6. Click Next. The license agreement appears.
7. Scroll or page down to review the agreement, then click I Agree to continue. The license agreement is also saved in the EFT installation folder as "license.txt" if you want to read or print it later.
The installer will detect the existing installation of EFT.
55
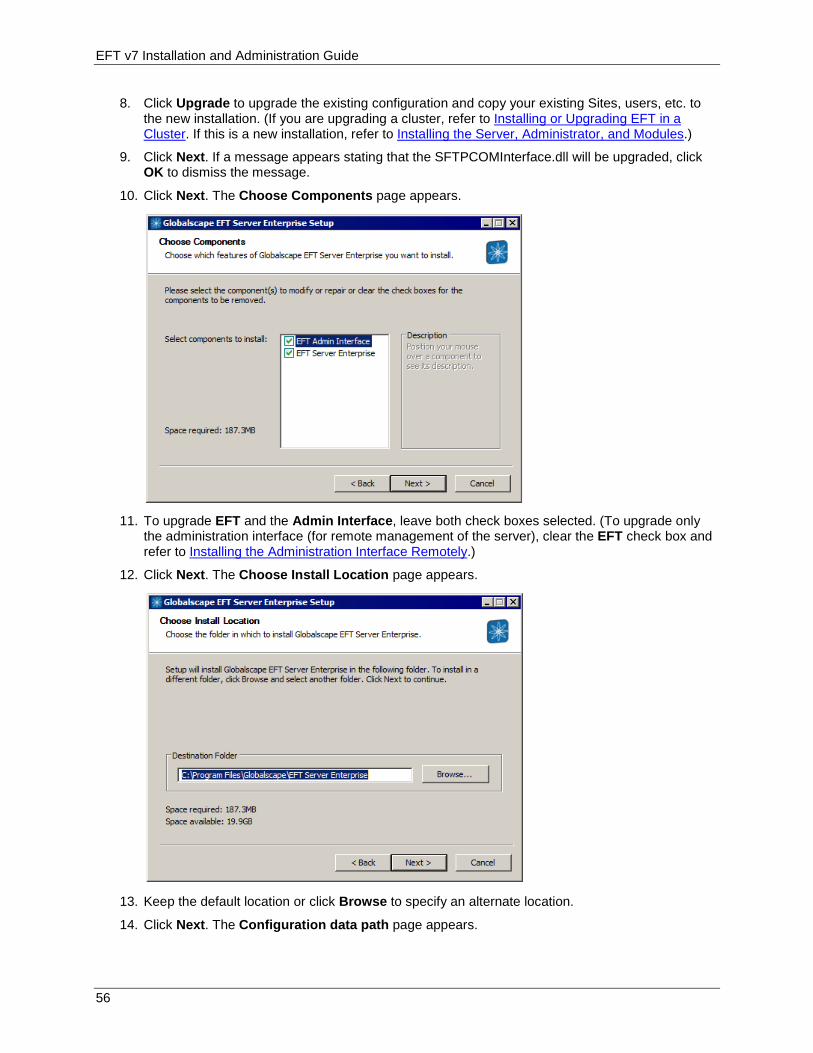
EFT v7 Installation and Administration Guide
8. Click Upgrade to upgrade the existing configuration and copy your existing Sites, users, etc. to the new installation. (If you are upgrading a cluster, refer to Installing or Upgrading EFT in a Cluster. If this is a new installation, refer to Installing the Server, Administrator, and Modules.)
9. Click Next. If a message appears stating that the SFTPCOMInterface.dll will be upgraded, click OK to dismiss the message.
10. Click Next. The Choose Components page appears.
11. To upgrade EFT and the Admin Interface, leave both check boxes selected. (To upgrade only
the administration interface (for remote management of the server), clear the EFT check box and refer to Installing the Administration Interface Remotely.)
12. Click Next. The Choose Install Location page appears.
13. Keep the default location or click Browse to specify an alternate location.
14. Click Next. The Configuration data path page appears.
56
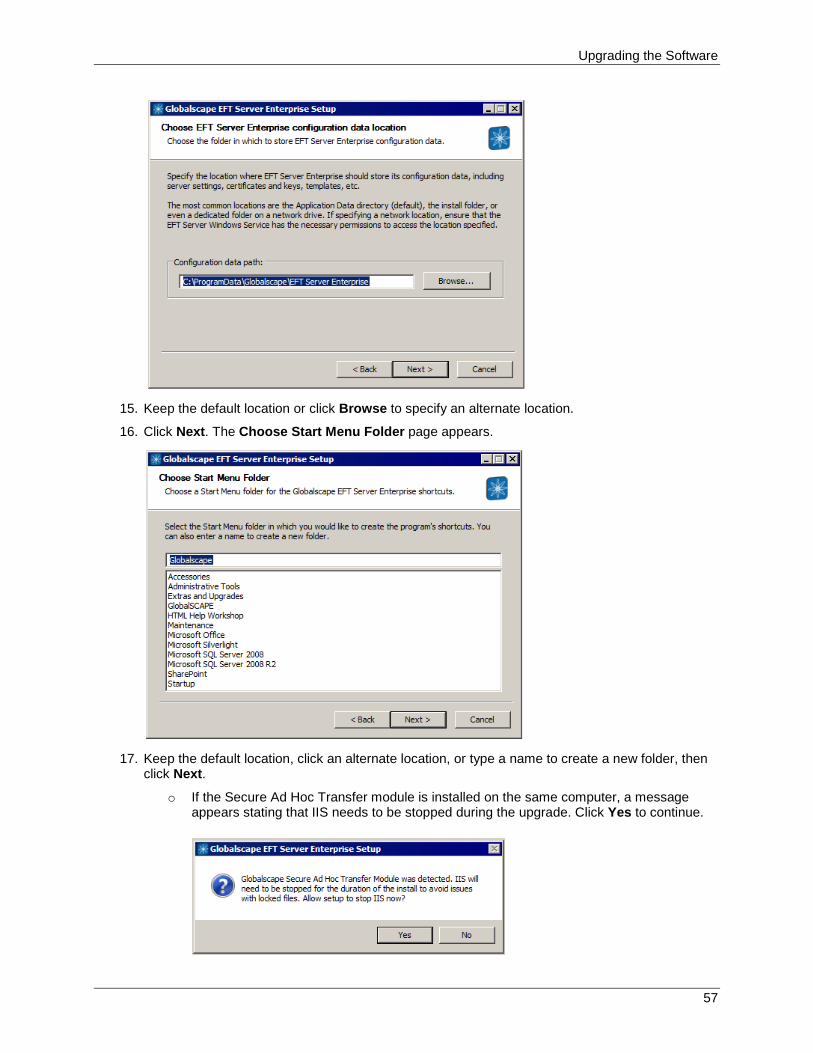
Upgrading the Software
15. Keep the default location or click Browse to specify an alternate location.
16. Click Next. The Choose Start Menu Folder page appears.
17. Keep the default location, click an alternate location, or type a name to create a new folder, then
click Next.
o If the Secure Ad Hoc Transfer module is installed on the same computer, a message appears stating that IIS needs to be stopped during the upgrade. Click Yes to continue.
57
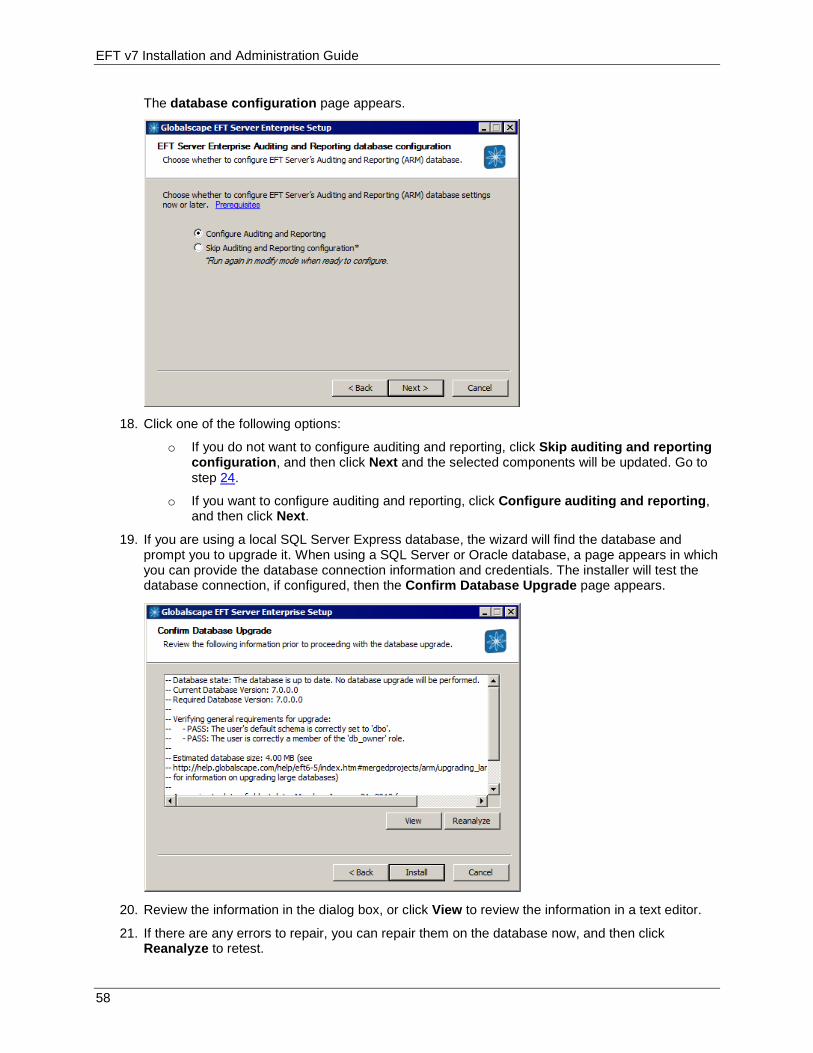
EFT v7 Installation and Administration Guide
The database configuration page appears.
18. Click one of the following options:
o If you do not want to configure auditing and reporting, click Skip auditing and reporting configuration, and then click Next and the selected components will be updated. Go to step 24.
o If you want to configure auditing and reporting, click Configure auditing and reporting, and then click Next.
19. If you are using a local SQL Server Express database, the wizard will find the database and prompt you to upgrade it. When using a SQL Server or Oracle database, a page appears in which you can provide the database connection information and credentials. The installer will test the database connection, if configured, then the Confirm Database Upgrade page appears.
20. Review the information in the dialog box, or click View to review the information in a text editor.
21. If there are any errors to repair, you can repair them on the database now, and then click Reanalyze to retest.
58
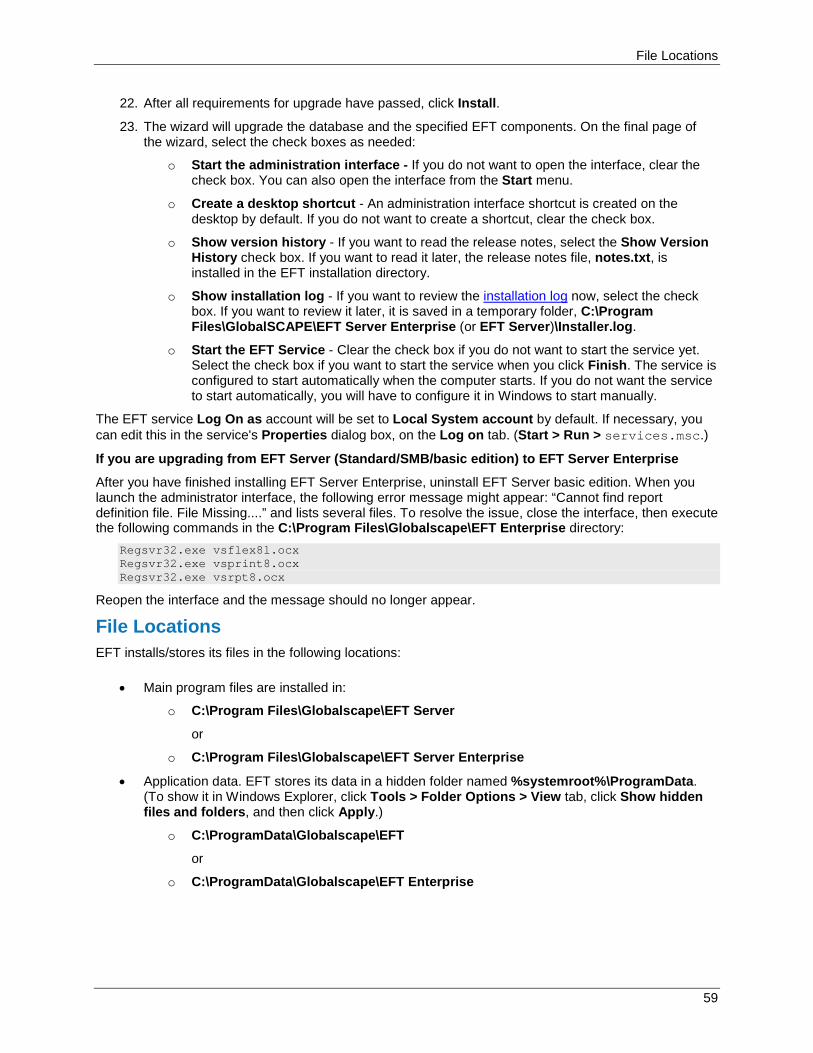
File Locations
22. After all requirements for upgrade have passed, click Install.
23. The wizard will upgrade the database and the specified EFT components. On the final page of the wizard, select the check boxes as needed:
o Start the administration interface - If you do not want to open the interface, clear the check box. You can also open the interface from the Start menu.
o Create a desktop shortcut - An administration interface shortcut is created on the desktop by default. If you do not want to create a shortcut, clear the check box.
o Show version history - If you want to read the release notes, select the Show Version History check box. If you want to read it later, the release notes file, notes.txt, is installed in the EFT installation directory.
o Show installation log - If you want to review the installation log now, select the check box. If you want to review it later, it is saved in a temporary folder, C:\Program Files\GlobalSCAPE\EFT Server Enterprise (or EFT Server)\Installer.log.
o Start the EFT Service - Clear the check box if you do not want to start the service yet. Select the check box if you want to start the service when you click Finish. The service is configured to start automatically when the computer starts. If you do not want the service to start automatically, you will have to configure it in Windows to start manually.
The EFT service Log On as account will be set to Local System account by default. If necessary, you can edit this in the service's Properties dialog box, on the Log on tab. (Start > Run > services.msc.)
If you are upgrading from EFT Server (Standard/SMB/basic edition) to EFT Server Enterprise
After you have finished installing EFT Server Enterprise, uninstall EFT Server basic edition. When you launch the administrator interface, the following error message might appear: “Cannot find report definition file. File Missing....” and lists several files. To resolve the issue, close the interface, then execute the following commands in the C:\Program Files\Globalscape\EFT Enterprise directory:
Regsvr32.exe vsflex8l.ocx Regsvr32.exe vsprint8.ocx Regsvr32.exe vsrpt8.ocx
Reopen the interface and the message should no longer appear.
File Locations EFT installs/stores its files in the following locations:
• Main program files are installed in:
o C:\Program Files\Globalscape\EFT Server
or
o C:\Program Files\Globalscape\EFT Server Enterprise
• Application data. EFT stores its data in a hidden folder named %systemroot%\ProgramData. (To show it in Windows Explorer, click Tools > Folder Options > View tab, click Show hidden files and folders, and then click Apply.)
o C:\ProgramData\Globalscape\EFT
or
o C:\ProgramData\Globalscape\EFT Enterprise
59
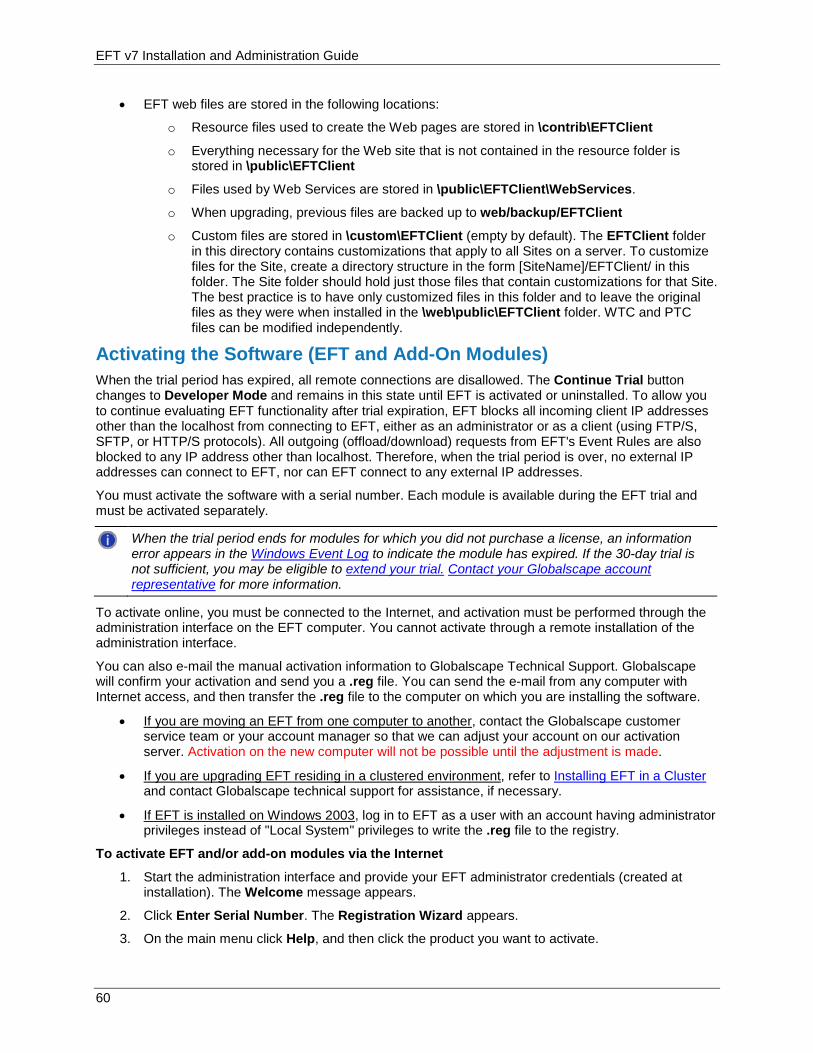
EFT v7 Installation and Administration Guide
• EFT web files are stored in the following locations:
o Resource files used to create the Web pages are stored in \contrib\EFTClient
o Everything necessary for the Web site that is not contained in the resource folder is stored in \public\EFTClient
o Files used by Web Services are stored in \public\EFTClient\WebServices.
o When upgrading, previous files are backed up to web/backup/EFTClient
o Custom files are stored in \custom\EFTClient (empty by default). The EFTClient folder in this directory contains customizations that apply to all Sites on a server. To customize files for the Site, create a directory structure in the form [SiteName]/EFTClient/ in this folder. The Site folder should hold just those files that contain customizations for that Site. The best practice is to have only customized files in this folder and to leave the original files as they were when installed in the \web\public\EFTClient folder. WTC and PTC files can be modified independently.
Activating the Software (EFT and Add-On Modules) When the trial period has expired, all remote connections are disallowed. The Continue Trial button changes to Developer Mode and remains in this state until EFT is activated or uninstalled. To allow you to continue evaluating EFT functionality after trial expiration, EFT blocks all incoming client IP addresses other than the localhost from connecting to EFT, either as an administrator or as a client (using FTP/S, SFTP, or HTTP/S protocols). All outgoing (offload/download) requests from EFT's Event Rules are also blocked to any IP address other than localhost. Therefore, when the trial period is over, no external IP addresses can connect to EFT, nor can EFT connect to any external IP addresses.
You must activate the software with a serial number. Each module is available during the EFT trial and must be activated separately.
When the trial period ends for modules for which you did not purchase a license, an information error appears in the Windows Event Log to indicate the module has expired. If the 30-day trial is not sufficient, you may be eligible to extend your trial. Contact your Globalscape account representative for more information.
To activate online, you must be connected to the Internet, and activation must be performed through the administration interface on the EFT computer. You cannot activate through a remote installation of the administration interface.
You can also e-mail the manual activation information to Globalscape Technical Support. Globalscape will confirm your activation and send you a .reg file. You can send the e-mail from any computer with Internet access, and then transfer the .reg file to the computer on which you are installing the software.
• If you are moving an EFT from one computer to another, contact the Globalscape customer service team or your account manager so that we can adjust your account on our activation server. Activation on the new computer will not be possible until the adjustment is made.
• If you are upgrading EFT residing in a clustered environment, refer to Installing EFT in a Cluster and contact Globalscape technical support for assistance, if necessary.
• If EFT is installed on Windows 2003, log in to EFT as a user with an account having administrator privileges instead of "Local System" privileges to write the .reg file to the registry.
To activate EFT and/or add-on modules via the Internet
1. Start the administration interface and provide your EFT administrator credentials (created at installation). The Welcome message appears.
2. Click Enter Serial Number. The Registration Wizard appears.
3. On the main menu click Help, and then click the product you want to activate.
60
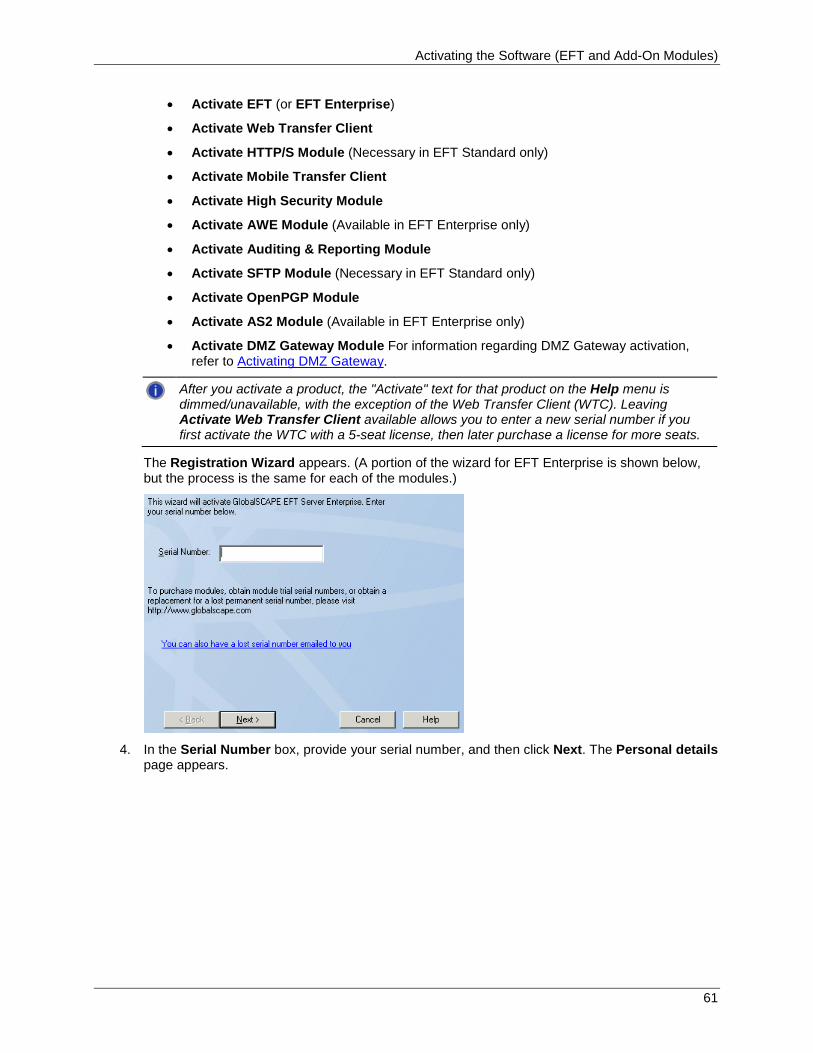
Activating the Software (EFT and Add-On Modules)
• Activate EFT (or EFT Enterprise)
• Activate Web Transfer Client
• Activate HTTP/S Module (Necessary in EFT Standard only)
• Activate Mobile Transfer Client
• Activate High Security Module
• Activate AWE Module (Available in EFT Enterprise only)
• Activate Auditing & Reporting Module
• Activate SFTP Module (Necessary in EFT Standard only)
• Activate OpenPGP Module
• Activate AS2 Module (Available in EFT Enterprise only)
• Activate DMZ Gateway Module For information regarding DMZ Gateway activation, refer to Activating DMZ Gateway.
After you activate a product, the "Activate" text for that product on the Help menu is dimmed/unavailable, with the exception of the Web Transfer Client (WTC). Leaving Activate Web Transfer Client available allows you to enter a new serial number if you first activate the WTC with a 5-seat license, then later purchase a license for more seats.
The Registration Wizard appears. (A portion of the wizard for EFT Enterprise is shown below, but the process is the same for each of the modules.)
4. In the Serial Number box, provide your serial number, and then click Next. The Personal details
page appears.
61
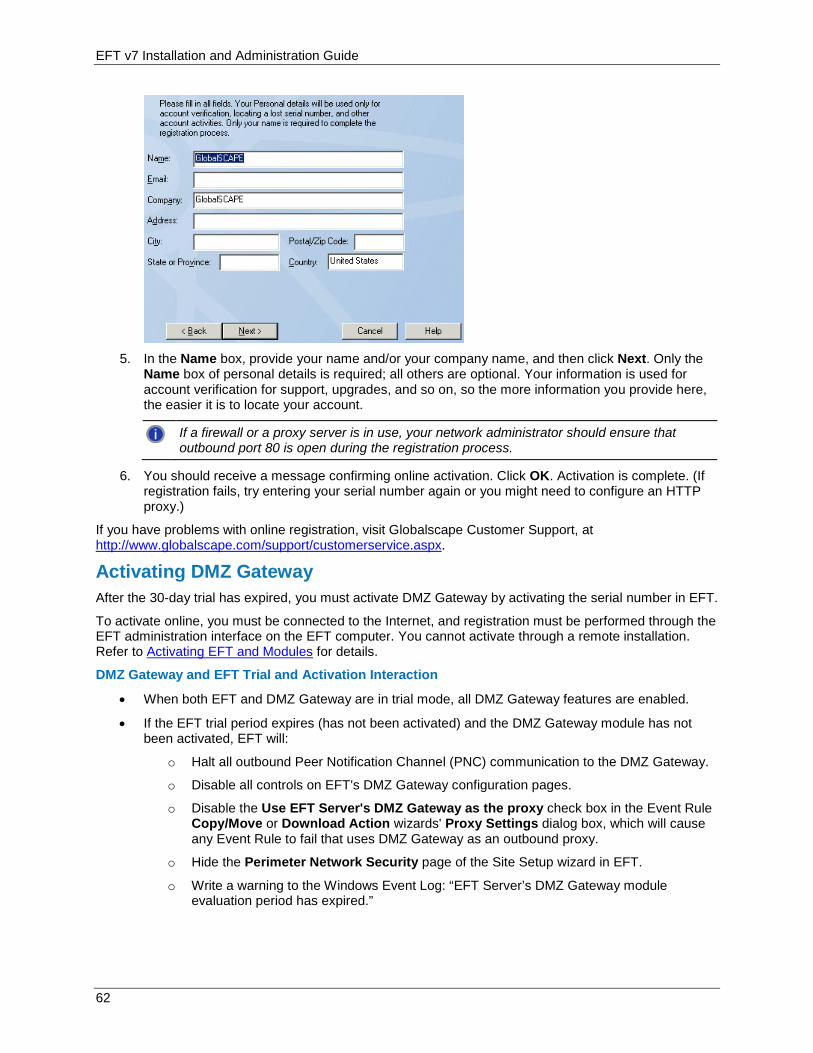
EFT v7 Installation and Administration Guide
5. In the Name box, provide your name and/or your company name, and then click Next. Only the
Name box of personal details is required; all others are optional. Your information is used for account verification for support, upgrades, and so on, so the more information you provide here, the easier it is to locate your account.
If a firewall or a proxy server is in use, your network administrator should ensure that outbound port 80 is open during the registration process.
6. You should receive a message confirming online activation. Click OK. Activation is complete. (If registration fails, try entering your serial number again or you might need to configure an HTTP proxy.)
If you have problems with online registration, visit Globalscape Customer Support, at http://www.globalscape.com/support/customerservice.aspx.
Activating DMZ Gateway After the 30-day trial has expired, you must activate DMZ Gateway by activating the serial number in EFT.
To activate online, you must be connected to the Internet, and registration must be performed through the EFT administration interface on the EFT computer. You cannot activate through a remote installation. Refer to Activating EFT and Modules for details.
DMZ Gateway and EFT Trial and Activation Interaction
• When both EFT and DMZ Gateway are in trial mode, all DMZ Gateway features are enabled.
• If the EFT trial period expires (has not been activated) and the DMZ Gateway module has not been activated, EFT will:
o Halt all outbound Peer Notification Channel (PNC) communication to the DMZ Gateway.
o Disable all controls on EFT's DMZ Gateway configuration pages.
o Disable the Use EFT Server's DMZ Gateway as the proxy check box in the Event Rule Copy/Move or Download Action wizards' Proxy Settings dialog box, which will cause any Event Rule to fail that uses DMZ Gateway as an outbound proxy.
o Hide the Perimeter Network Security page of the Site Setup wizard in EFT.
o Write a warning to the Windows Event Log: “EFT Server’s DMZ Gateway module evaluation period has expired.”
62
Release Notes/Version History
• If EFT is activated, but DMZ Gateway is in trial mode, the DMZ Gateway is fully functional until the DMZ Gateway trial expires. Once DMZ Gateway expires, all functionality and controls in EFT are disabled (unless you activate DMZ Gateway).
• If DMZ Gateway is activated using a single-Site serial number:
o EFT allows only one DMZ Gateway site to be enabled.
o If more than one DMZ Gateway node was enabled prior to activation, all but one node will be disabled, the PNC of each of the disabled Sites is disconnected, and an error is written to the Windows Event Log: "EFT – One or more DMZ Gateway connections were disabled due to licensing restrictions. Make sure your DMZ Gateway module license matches the number of DMZ Gateway ‘Sites’ enabled. Contact your Globalscape account representative for further assistance.”
o EFT's COM engine will return an error if you attempt to start a DMZ Gateway when one is already enabled.
• If DMZ Gateway is activated using a multiple-Site serial number:
o EFT allows up to 15 DMZ Gateways to be enabled (one per EFT Site).
Release Notes/Version History Release notes/version history for EFT are available in the installation directory (by default, C:\Program Files\Globalscape\EFT\notes.txt).
• Version history for EFT is available online at http://www.globalscape.com/eft/history.aspx. (The notes.txt file is available in the installation directory.)
• Version history for Secure FTP Server is available online at http://www.globalscape.com/gsftps/history.aspx.
Please visit our Knowledge Base for updates and self-help support: http://kb.globalscape.com.
63
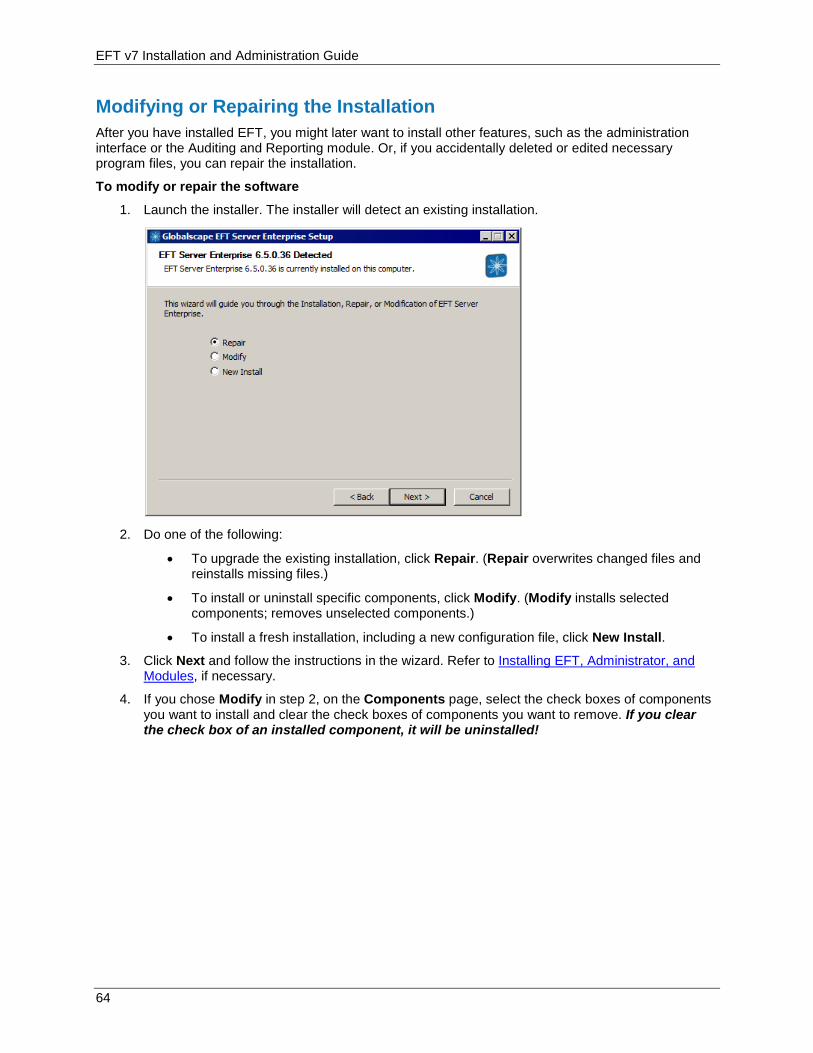
EFT v7 Installation and Administration Guide
Modifying or Repairing the Installation After you have installed EFT, you might later want to install other features, such as the administration interface or the Auditing and Reporting module. Or, if you accidentally deleted or edited necessary program files, you can repair the installation.
To modify or repair the software
1. Launch the installer. The installer will detect an existing installation.
2. Do one of the following:
• To upgrade the existing installation, click Repair. (Repair overwrites changed files and reinstalls missing files.)
• To install or uninstall specific components, click Modify. (Modify installs selected components; removes unselected components.)
• To install a fresh installation, including a new configuration file, click New Install.
3. Click Next and follow the instructions in the wizard. Refer to Installing EFT, Administrator, and Modules, if necessary.
4. If you chose Modify in step 2, on the Components page, select the check boxes of components you want to install and clear the check boxes of components you want to remove. If you clear the check box of an installed component, it will be uninstalled!
64
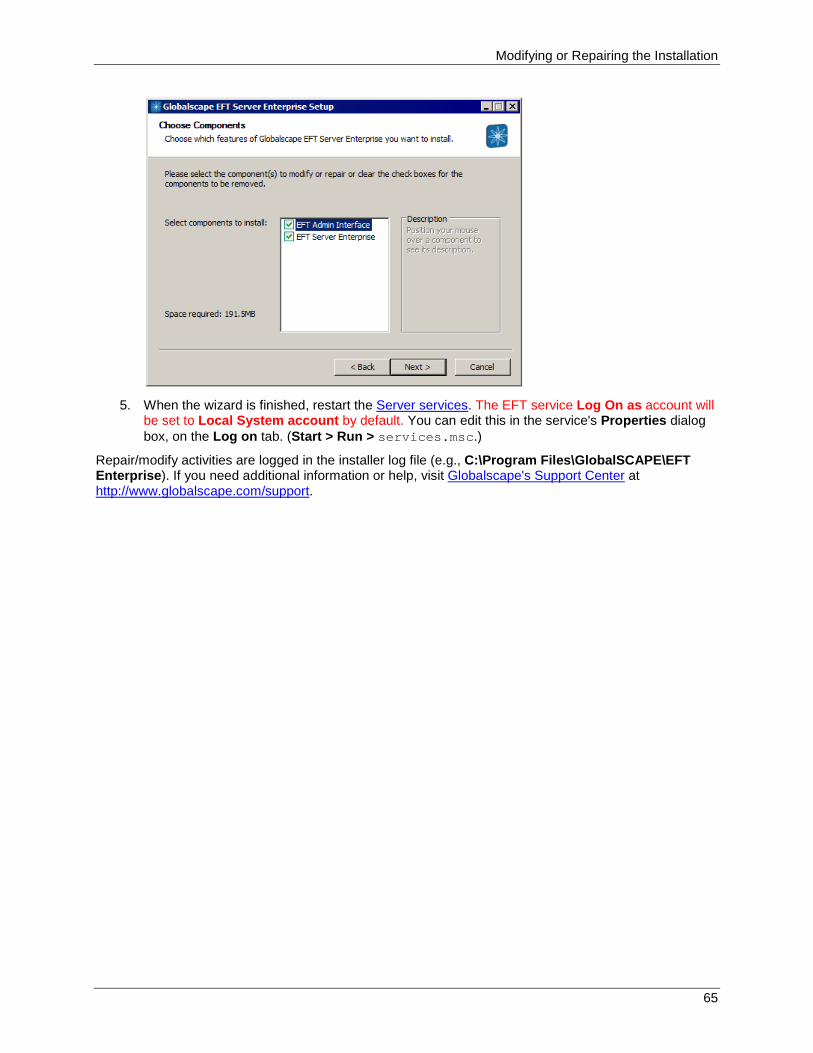
Modifying or Repairing the Installation
5. When the wizard is finished, restart the Server services. The EFT service Log On as account will
be set to Local System account by default. You can edit this in the service's Properties dialog box, on the Log on tab. (Start > Run > services.msc.)
Repair/modify activities are logged in the installer log file (e.g., C:\Program Files\GlobalSCAPE\EFT Enterprise). If you need additional information or help, visit Globalscape's Support Center at http://www.globalscape.com/support.
65
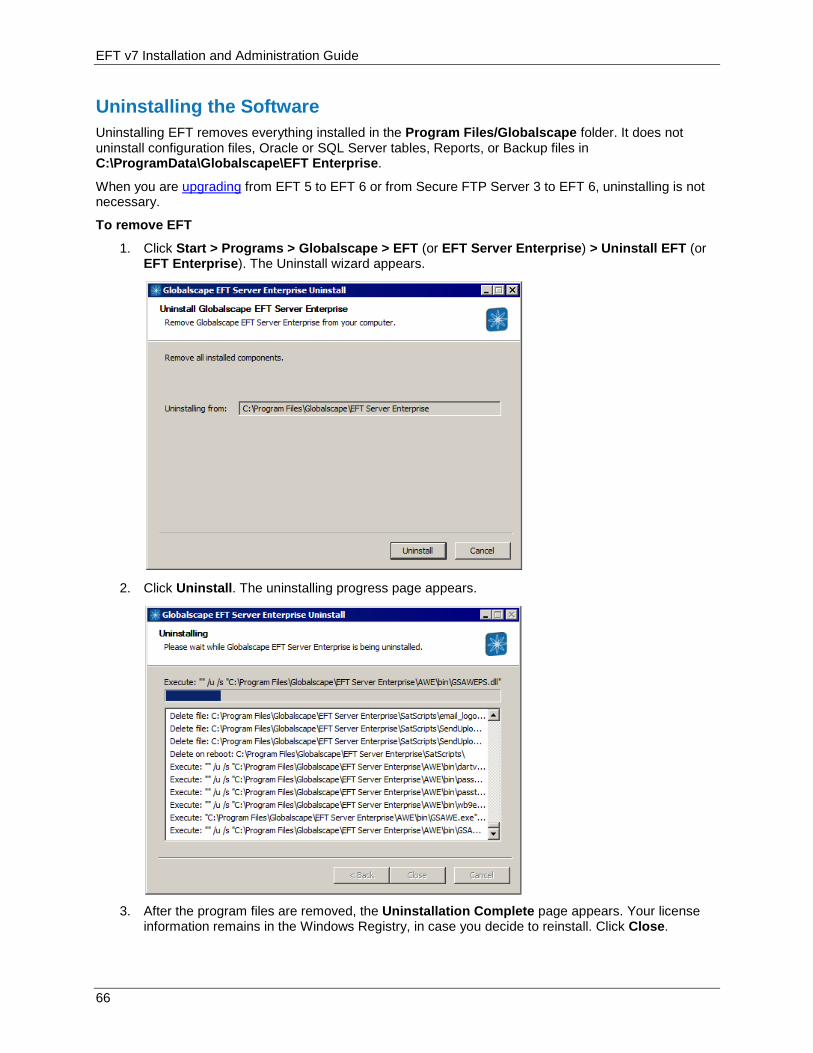
EFT v7 Installation and Administration Guide
Uninstalling the Software Uninstalling EFT removes everything installed in the Program Files/Globalscape folder. It does not uninstall configuration files, Oracle or SQL Server tables, Reports, or Backup files in C:\ProgramData\Globalscape\EFT Enterprise.
When you are upgrading from EFT 5 to EFT 6 or from Secure FTP Server 3 to EFT 6, uninstalling is not necessary.
To remove EFT
1. Click Start > Programs > Globalscape > EFT (or EFT Server Enterprise) > Uninstall EFT (or EFT Enterprise). The Uninstall wizard appears.
2. Click Uninstall. The uninstalling progress page appears.
3. After the program files are removed, the Uninstallation Complete page appears. Your license
information remains in the Windows Registry, in case you decide to reinstall. Click Close.
66
Windows Account for the EFT Service
Windows Account for the EFT Service The EFT service must have full administrative rights to the folder in which you install EFT and to the location in which the users' home folders are stored. The EFT service must also have administrative rights to map a virtual folder to a network drive. With administrative rights, the service can save all of your settings. If the service does not have administrative rights, you will lose settings and user accounts whenever you restart the EFT service, and you will need to reset permissions on the computer on which the EFT service is running. After it is installed, EFT has access to local folders and files. To run EFT as a service with permissions to the network and mapped drives, you must create an NT account, assign the EFT service to the account, and log EFT on as a service. Security policies should allow user accounts to log in locally.
Refer to Local Security Policy Setting when Using Active Directory Authentication for more information about configuring EFT on an AD network. Consult with your AD network administrator for assistance, if necessary.
After you have installed EFT, created a Windows account for EFT, and assigned permissions to the account, you should edit the service itself so that it will not run as a "System Account" (the default account choice). Running the service as System Account poses the potential hazard of giving users complete access to your system.
Creating a Windows User Account for EFT
To create a user account in Windows
1. After you install EFT, open the Computer Management console.
2. Expand the Local users and Groups node, right-click Users, then click New User. The New User dialog box appears.
3. Create a user account for EFT (e.g., EFTUser), clear the User must change password at next logon check box, and then click Create, and then click Close.
4. Close the Computer Management console.
5. In Administrative Tools, click Local Security Policy. The Local Security Policy dialog box appears.
6. Expand the Local Policies node, and then click User Rights Assignment.
7. In the right pane, in the Policy column, double-click Act as part of the operating system. The Properties dialog box appears.
8. Click Add user or Group. The Select Users or Groups dialog box appears.
9. Select the new user you just added (e.g., EFTServer), click Add, then click OK.
10. If necessary, assign permissions for this user account in Windows.
11. Assign EFT to the new user account and log EFT on as a service.
Set Windows NT Permissions for EFT
After you have created a new Windows user account for EFT, use Windows' permissions to set the permissions for folders, files, or drives for the account. Permissions should be as restrictive as possible while still allowing EFT enough permission to run.
Using Windows NT’s permissions, set the permissions for files or drives of this user to be as restrictive as possible, while still allowing EFT to run. After carefully determining which files and network folders your users will need to access, gradually increase the permissions.
67
EFT v7 Installation and Administration Guide
Make sure that full permissions are granted to the EFT service domain user account for the following locations:
• Installation folder
• Application data folder
• Windows Temp folder
• Any shared drive paths required by EFT
• Any output directories that EFT may need to read/write files to
If you run into permissions issues, run Process Monitor or similar tools and isolate non-success results caused by cftpsai.exe, cftpstes.exe, gsawe.exe, and any other EFT-related processes.
Using NT Authentication, user permissions override EFT's permissions. For example, if EFT has read-only access to folder1, but user John Doe has read and write permission to folder1, John Doe has the same permission when he accesses folder1 through EFT.
Windows NT permissions can be edited through the Security tab in the Properties of a file or folder. On the Security tab, select Permissions to display and edit the permissions for the object. The appearance of this dialog box is slightly different for files and directories, but in both cases, the following permissions can be granted to users or groups:
• R (Read)
• W (Write)
• D (Delete)
• P (Edit permissions)
• O (Take ownership)
Keep in mind that you have the option to grant or withhold read and write permissions. Read-only permissions are the most secure, because they allow users to access a file, but not to change it. For example, most users will need limited read access to the Windows folders (C, WinNT); however, most FTP Servers will not need any access to these directories at all.
In addition to the individual permissions, Windows NT permissions also provide access levels that are simply pre-built sets of the existing permissions. Typically, you assign an access level to a user rather than granting individual permissions. One such access level is called "No Access," which does not contain any permissions.
To view and edit the permissions for a folder or file
1. In Windows Explorer, right-click the file or folder, then click Properties.
2. On the Security tab, click Permissions. The appearance of this dialog box is slightly different for files and directories and for different versions of Windows (W2K, XP, etc.).
For more information about setting permissions to folders and files, refer to the Windows Help documentation for your specific operating system. (e.g., click Start > Help and Support, then search on keyword permission.)
Assigning the Service to a Windows User Account
To assign the service to a Windows user account
1. Click Start > Run, type services.msc, then press ENTER.
2. Right-click EFT or EFT Enterprise, and then click Properties.
3. Follow the Windows Operating System procedures for selecting an account under which the service will run.
68
Registry Settings
Registry Settings EFT stores some of its configuration information in the Windows Registry. EFT modifies the system registry as needed, and continually references this information during operation.
Refer to the topics listed below for details of these commonly configured registry settings. To view details of other registry settings, please see the Globalscape Knowledge Base article http://kb.globalscape.com/article.aspx?id=10411.
In many of the older registry entries, a version of EFT is listed in the path. DO NOT change the version number, regardless of which version of EFT you are using. For example, HKEY_LOCAL_MACHINE\SOFTWARE\GlobalSCAPE Inc.\EFT Server 3.0\UseMD5PasswordHash should be created exactly like that (on 32-bit systems).
• Upgrading the Software—If a Site uses the LDAP Authentication Manager, and if the users are allowed to change their passwords, LDAP calls are used to make the password changes. In v6.2, Active Directory calls were used to make the password changes. With the switch to LDAP in v6.3 and later, LDAP over SSL should be used to protect the password changes. LDAP over SSL can be difficult to configure, so setting the ChangePassByAD DWORD value to 1 allows you to continue using the Active Directory API for the password changes, which also provides security for the communication path.
• Allowing Multipart Transfers (COMB Command)—Enable client offload/download multipart transfers over FTP/FTPS with the DWORDs MultipartValue and EnableMultipart.
• Changing the Number of Concurrent Threads Used by Event Rules:
o Override the initial worker thread count in Folder Monitor rules with the DWORD FolderMonitorWorkerThreadCount.
o Specify the global maximum number of connections for EFT's transfer engine (the default is 100) with the DWORD MaxNumberConnections.
• Accessing EFT Through a Proxy—The default HTTP client for the WTC is based on the Apache library, but if the proxy you are trying to connect through requires NTLM v2 authentication, the WTC will need to use an alternate HTTP client based on the JSE 6 application library. You can force the WTC to use the JSE HTTP client by configuring the DWORD use_JSE_HTTP_Client. For CAC-enabled Sites the JSE client is automatically used regardless of the registry setting.
• AD Password Expiration—On NTAD/LDAP Sites, you can configure EFT to send an e-mail notifying users that their password is about to expire in <n> days by setting the DWORD PasswordChg_EmailInterval.
• Changing an AD Password via the WTC—The WTC NTAD/LDAP change password capability can be turned on/off through the DWORD PasswordChg_NTADLDAP. On AD/LDAP Sites, if you have enabled the "User must change password at next logon" feature in AD, you must enable (set to "on") the registry setting. If you have enabled the "User cannot change password" feature in AD, users will not be able to change their passwords.
• Allow Server to Accept ODBC Database Passwords that are MD5 Hashed—When you create user accounts within EFT, the ODBC database is populated with the username and a SHA-256 hash of the account password. The DWORD UseMD5PasswordHash will cause ODBC to use MD5 instead.
• Session Timeout—The DWORD WTCTimeout specifies the number of minutes that you want the WTC session to be active, but idle, before the session is released.
• Specifying the Value Returned by the FTP SYST Command—If your server requires a particular response, EFT provides a registry setting with which you can specify the value returned by the FTP SYST command (DWORD FTPSYSTResponse).
69
EFT v7 Installation and Administration Guide
• Integrated Windows Authentication for Single Sign On (SSO)—Enabled for AD users using Internet Explorer with DWORD use_registry and enable_iwa.
• The Client Log (Event Rule Logging)—A tenth column can be added to the CL log by defining a registry entry, DWORD Enable10ColumnInClientLog.
• The EFT.log File—EFT can be instructed to log specific or all HTTP request headers when DWORD log_request is set to 1.
• EFT Server Web Services—The Web Services timeout is set to 60 seconds. You can change the timeout value in DWORD WebServiceTimeout.
Running EFT and Microsoft IIS on the Same Computer By default, the FTP server in Microsoft IIS binds to port 21 on all IP addresses. If you are running IIS FTP server and EFT on the same computer, you must disable socket pooling for the IIS FTP server.
To disable socket pooling in IIS FTP server
In Microsoft IIS, stop the FTP site as described below:
1. Open a command prompt.
2. Change directory to C:\InetPub\Adminscripts: cd C:\InetPub\Adminscripts
3. Type: CSCRIPT ADSUTIL.VBS SET MSFTPSVC/DisableSocketPooling TRUE
4. Then press ENTER. You should get the following response: disablesocketpooling : (BOOLEAN) True
5. Exit the command prompt and restart the FTP site. This should prevent IIS from binding to all IP addresses on port 21, freeing up an IP address on port 21 (the default FTP port).
For more information on Microsoft IIS socket pooling, refer to the following articles:
http://support.microsoft.com/default.aspx?scid=kb;en-us;259349
http://support.microsoft.com/default.aspx?scid=kb;EN-US;238131
The articles linked above discuss the IIS Web server, but the same information applies to the IIS FTP server.
"Unexpected Error 0x8ffe2740 Occurred" Message When You Try to Start EFT
Microsoft IIS uses port 80 for HTTP communication. If you are running the IIS FTP server and EFT on the same computer, you can do either of the following:
• In IIS Manager, change the port bindings for the website to a port other than port 80.
• Stop the application that is using port 80, and then start the website from IIS Manager.
For more information, refer to the Microsoft Knowledge Base article #816944.
http://support.microsoft.com/kb/816944/en-us
Running a Microsoft .NET Web Application in 32-bit Mode in IIS 6.0 on a 64-bit Server First, you need to configure IIS to run 32-bit Web applications on 64-bit Windows, then you need to register the ASP.NET application, then restart the Web publishing service.
1. Enable IIS 6.0 to run 32-bit Web applications on 64-bit Windows
a. Open a command prompt and navigate to the \Inetpub\AdminScripts directory.
70
Error in ASP.NET Registration
b. Type the following: cscript.exe adsutil.vbs set W3SVC/AppPools/Enable32BitAppOnWin64 "true"
c. Press ENTER.
2. Register the ASP.NET application
a. Open a command prompt and navigate to the directory that contains the ASP.NET executable. For example, type
cd WINDOWS\Microsoft.NET\Framework\v2.0.50727
b. Type the following, then press ENTER: aspnet_regiis.exe -i
For more information about the ASP.NET IIS Registration Tool (aspnet_regiis.exe), refer to http://msdn2.microsoft.com/en-us/library/k6h9cz8h(VS.80).aspx
3. Start the World Wide Web Publishing Service
a. Click Start > Run, type services.msc, then press ENTER.
b. In the list of services, right-click World Wide Web Publishing Service, and then click Start (or Restart).
Error in ASP.NET Registration Microsoft .NET Framework is required for the AS2 module, Advanced Workflows Engine, and for the Secure Ad Hoc Transfer (SAT) module.
• If you do NOT have the .NET framework installed on your system, you can download and install it from the Microsoft Developer Network.
• If you have the framework installed, but IIS still does not show any .NET-related information (such as the ASP.NET tab), run the ASP.NET IIS Registration Tool, found in the .NET installation folder (e.g., C:\WINDOWS\Microsoft.NET\Framework\v2.0.50727). The file is called aspnet_regiis.exe and you must pass in the "-i" parameter.
To run the ASP.NET Registration Tool
1. At a command prompt, change to the directory that contains the executable. For example, type
cd WINDOWS\Microsoft.NET\Framework\v2.0.50727
2. Type the following, then press ENTER: aspnet_regiis.exe -i
ASP.NET is installed and registered.
For more information about the ASP.NET IIS Registration Tool (aspnet_regiis.exe), refer to http://msdn2.microsoft.com/en-us/library/k6h9cz8h(VS.80).aspx.
71
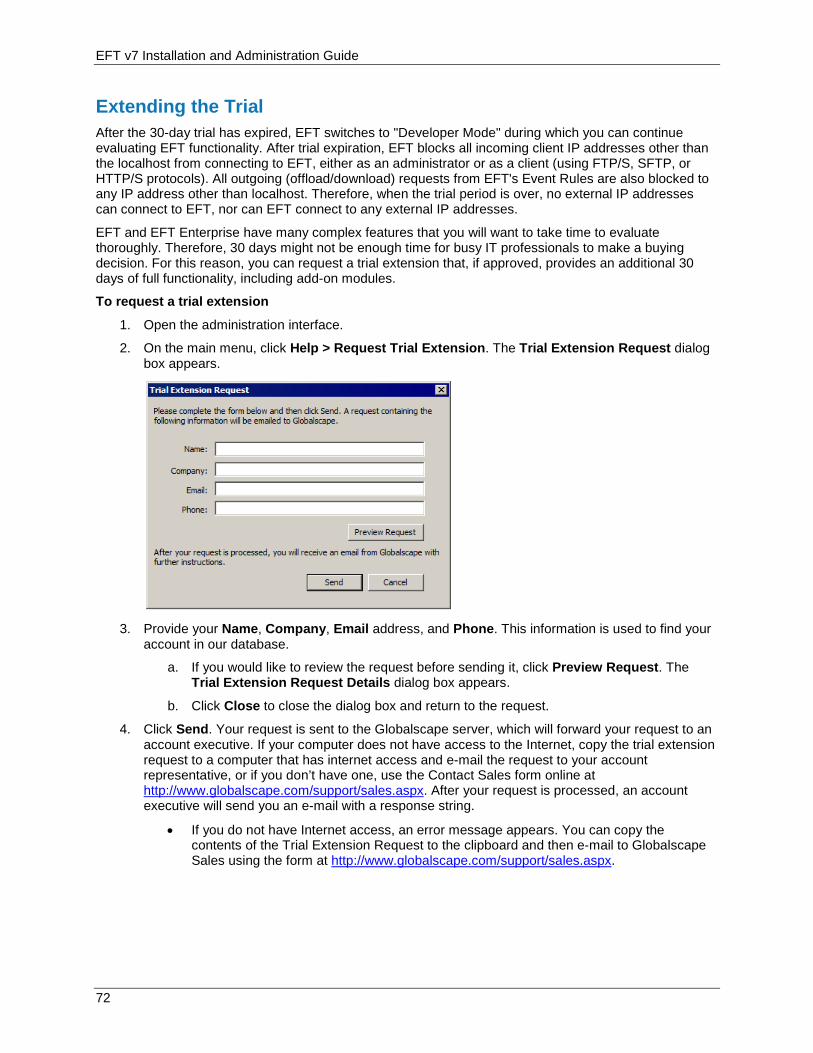
EFT v7 Installation and Administration Guide
Extending the Trial After the 30-day trial has expired, EFT switches to "Developer Mode" during which you can continue evaluating EFT functionality. After trial expiration, EFT blocks all incoming client IP addresses other than the localhost from connecting to EFT, either as an administrator or as a client (using FTP/S, SFTP, or HTTP/S protocols). All outgoing (offload/download) requests from EFT's Event Rules are also blocked to any IP address other than localhost. Therefore, when the trial period is over, no external IP addresses can connect to EFT, nor can EFT connect to any external IP addresses.
EFT and EFT Enterprise have many complex features that you will want to take time to evaluate thoroughly. Therefore, 30 days might not be enough time for busy IT professionals to make a buying decision. For this reason, you can request a trial extension that, if approved, provides an additional 30 days of full functionality, including add-on modules.
To request a trial extension
1. Open the administration interface.
2. On the main menu, click Help > Request Trial Extension. The Trial Extension Request dialog box appears.
3. Provide your Name, Company, Email address, and Phone. This information is used to find your
account in our database.
a. If you would like to review the request before sending it, click Preview Request. The Trial Extension Request Details dialog box appears.
b. Click Close to close the dialog box and return to the request.
4. Click Send. Your request is sent to the Globalscape server, which will forward your request to an account executive. If your computer does not have access to the Internet, copy the trial extension request to a computer that has internet access and e-mail the request to your account representative, or if you don’t have one, use the Contact Sales form online at http://www.globalscape.com/support/sales.aspx. After your request is processed, an account executive will send you an e-mail with a response string.
• If you do not have Internet access, an error message appears. You can copy the contents of the Trial Extension Request to the clipboard and then e-mail to Globalscape Sales using the form at http://www.globalscape.com/support/sales.aspx.
72
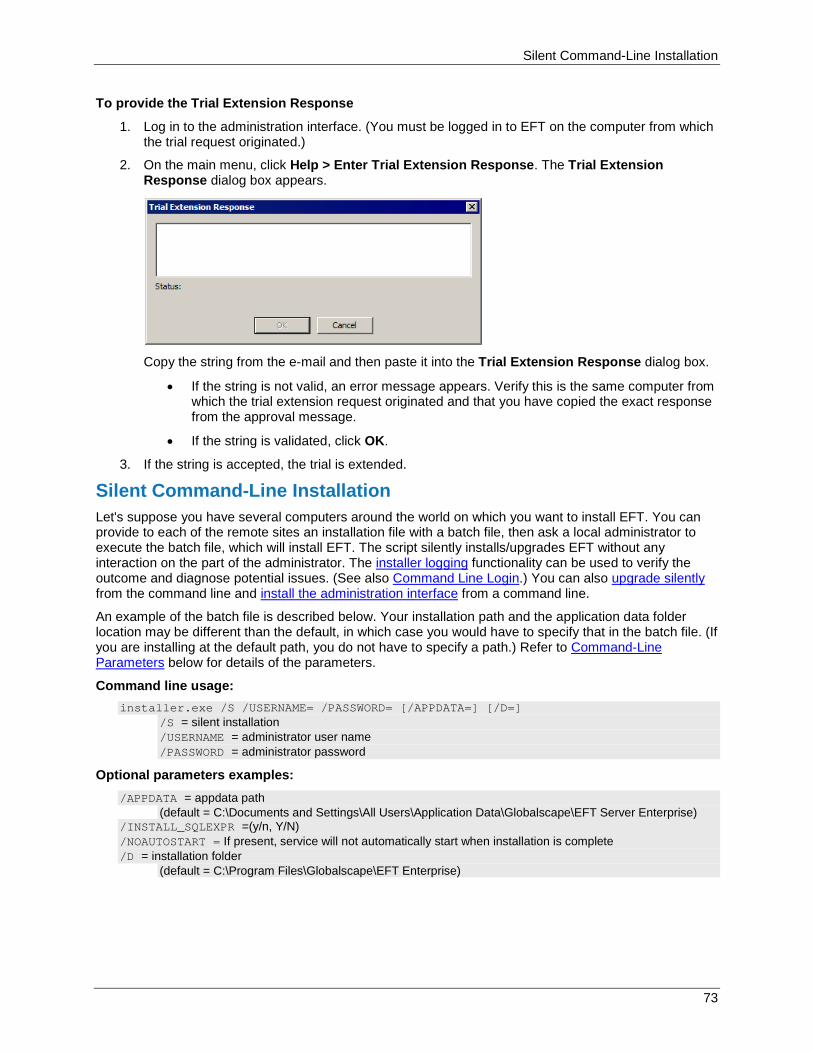
Silent Command-Line Installation
To provide the Trial Extension Response
1. Log in to the administration interface. (You must be logged in to EFT on the computer from which the trial request originated.)
2. On the main menu, click Help > Enter Trial Extension Response. The Trial Extension Response dialog box appears.
Copy the string from the e-mail and then paste it into the Trial Extension Response dialog box.
• If the string is not valid, an error message appears. Verify this is the same computer from which the trial extension request originated and that you have copied the exact response from the approval message.
• If the string is validated, click OK.
3. If the string is accepted, the trial is extended.
Silent Command-Line Installation Let's suppose you have several computers around the world on which you want to install EFT. You can provide to each of the remote sites an installation file with a batch file, then ask a local administrator to execute the batch file, which will install EFT. The script silently installs/upgrades EFT without any interaction on the part of the administrator. The installer logging functionality can be used to verify the outcome and diagnose potential issues. (See also Command Line Login.) You can also upgrade silently from the command line and install the administration interface from a command line.
An example of the batch file is described below. Your installation path and the application data folder location may be different than the default, in which case you would have to specify that in the batch file. (If you are installing at the default path, you do not have to specify a path.) Refer to Command-Line Parameters below for details of the parameters.
Command line usage: installer.exe /S /USERNAME= /PASSWORD= [/APPDATA=] [/D=]
/S = silent installation /USERNAME = administrator user name /PASSWORD = administrator password
Optional parameters examples: /APPDATA = appdata path
(default = C:\Documents and Settings\All Users\Application Data\Globalscape\EFT Server Enterprise) /INSTALL_SQLEXPR =(y/n, Y/N) /NOAUTOSTART = If present, service will not automatically start when installation is complete /D = installation folder
(default = C:\Program Files\Globalscape\EFT Enterprise)
73

EFT v7 Installation and Administration Guide
New install – No Sample Database
This path will instruct the installer to install a stand-alone server.
• Required Parameters
o /S
o /USERNAME=<username>
o /PASSWORD=<password>
• Optional Parameters
o /D=<path>
o /debug
o /aionly
o /CLUSTERNODE=<option>
o /APPDATA=<DATA_PATH>
o /NOAUTOSTART
Administration interface-only install
This path will instruct the installer to install the administration interface without installing EFT. This is useful if you want to do remote administration of EFT. (This path is only applicable when the Server is not installed.)
• Required Parameters
o /S
o /aionly
• Optional Parameters
o /D=<path> -- If used, this must be the last parameter used in the command line and must not contain any quotes, even if the path contains spaces. Only absolute paths are supported.
o /debug
Silent Upgrade
The installer can also be run in silent mode for upgrades.
To do a silent upgrade of EFT
1. Close all instances of EFT administration interface, both local and remote connections.
2. At the command prompt enter the following command: eftserver-ent-nodb.exe /S
The executable exits silently (without notification) and the upgrade continues in the background.
Running this executable will kick off two processes, EFTCoreEnterpriseSetup-nodb.exe and eftserver-ent-nodb.exe. (These can be monitored in Windows Task Manager)
After approximately 5 minutes, the silent upgrade process will complete and the EFT Server service will be automatically restarted.
A record of the upgrade can be found in the EFT Server Enterprise installation directory file Installer.log
74
Silent Command-Line Installation
Note: ARM must be upgraded separately, because the silent installer will not upgrade ARM. The “/INSTALL_SQLEXPR” flag does not work with doing a silent install Upgrade.
Batch File Examples:
• If you are installing EFT Enterprise without a database at the default path: eftserver-ent-nodb.exe /S /USERNAME=test /PASSWORD=test
• If you are installing EFT Enterprise at the default path with SQL Express: eftserver-ent.exe /S /USERNAME=test /PASSWORD=test /INSTALL_SQLEXPR=y
More Examples: eftserver-ent-nodb.exe /S /USERNAME=admin /PASSWORD=password eftserver-ent.exe /S /USERNAME=admin /PASSWORD=alaska /INSTALL_SQLEXPR=y /NOAUTOSTART eftserver-ent.exe /S /USERNAME=admin /PASSWORD=alaska /aionly /debug eftserver-ent.exe /S /USERNAME=admin /PASSWORD=alaska /APPDATA=c:\eft data dir /D=c:\eft inst dir
Command-Line Parameters
The installer supports specification of the following command line parameters. When running the installer in silent mode, using the /S switch, these parameters are used to specify both the required and optional values as detailed below.
Parameter Definitions
• /S
o Applicable installation types: active-active, active-passive, standalone
o Description: Initiates a silent installation.
o Default: The installer defaults to graphical user interface mode.
o Example: /S
• /D=<path>
o Applicable installation types: active-active, active-passive, standalone
o Description: The installation directory.
o Default:
Enterprise - C:\Program Files\Globalscape\EFT Server Enterprise
Base - C:\Program Files\Globalscape\EFT
o Example: /D=C:\Program Files\GlobalSCAPE\EFT Enterprise
• /debug
o Applicable installation types: active-active, active-passive, standalone
o Description: Enables logging to the Windows system debug log. This log may be viewed in real time using tools such as DebugView that is part of the SysInternals Suite from Microsoft.
o Default: Disabled by default
o Example: /debug
75
EFT v7 Installation and Administration Guide
• /aionly
o Description: Do not install the full server. Install only the files needed for the administration interface.
o Default: The installer deploys both the administration interface and EFT by default
o Example: /aionly
• /CLUSTERNODE=<option>
o Applicable installation types: active-passive
o Description: This install will be part of an active-passive cluster.
o Options:
1 - This is the primary
2 - This is not the primary
o Default: Default installations are non-clustered
o Example: /CLUSTERNODE=1
• /HACLUSTERNODE=<option>
o Applicable installation types: active-active
o Description: This install will be part of an active-active cluster.
o Options:
1. This is the first node in the cluster
2. This is NOT the first node in the cluster
o Default: Default installations are non-clustered
o Example: /HACLUSTERNODE=1
• /APPDATA=<DATA_PATH>
o Applicable installation types: active-active, active-passive, standalone
o Description: Use an alternate location for EFT application data
o Default: EFT usually writes application data to the OS standard location
Enterprise
Win2k8: C:\ProgramData\Globalscape\EFT Server Enterprise
Win2k3: C:\Documents and Settings\All Users\Application Data\Globalscape\EFT Enterprise
Base
Win2k8: C:\ProgramData\Globalscape\EFT Server
Win2k3: C:\Documents and Settings\All Users\Application Data\Globalscape\EFT
o Example: /APPDATA=C:\EFTData
76
Silent Command-Line Installation
• /SHAREDCONFIGPATH=“<SHARED_PATH>”
o Applicable installation types: active-active nodes
o Description: Specify the location of an active-active cluster’s shared configuration data.
o Default: none
o Example: /SHAREDCONFIGPATH=“\\host\sharedfolder”
• /USERNAME=<username>
o Applicable installation types: active-active, active-passive, standalone
o Description: The username to use for the initial administration account.
o Default: None
o Example: /USERNAME=EFTAdmin
• /PASSWORD=<password>
o Applicable installation types: active-active, active-passive, standalone
o Requirements: Must be used in conjunction with the /USERNAME switch
o Description: The password to use for the initial administration account.
o Default: None
o Example: /PASSWORD=wkBG2YxgzBpR
• /DMZGW=”<EFT site>/<DMZ host>/<DMZ port>|…”
o Applicable installation types: active-active, active-passive, standalone
o Description: Specify the gateway(s) for given EFT site(s) on the current node.
o Example: /DMZGW="MySite/192.168.10.210/44500|Site2/192.168.10.210/44500"
• /NOAUTOSTART
o Applicable installation types: active-active, active-passive, standalone
o Description: Skips launching of the EFT Windows service that typically occurs at the end of installation, reinstallation, upgrade, or database settings modification.
o Default: Service automatically starts on new installs
o Example: /NOAUTOSTART
• /INSTALL_SQLEXPR=<option>
o Description: Whether to install the bundled MSSQL Express Installer
o Options:
Y - Install the bundled MSSQL Express
N - Do not install the bundled MSSQL Express
o Prerequisites: Can only be used with EFT installs that contain a bundled MSSQL Express installer.
o Example: /INSTALL_SQLEXPR=Y
77
EFT v7 Installation and Administration Guide
• /NOREQS
o Applicable installation types: active-active, active-passive, standalone
o Description: If specified, the installer will skip checking of the common prerequisites that occurs during initial installer launch. This setting is mainly used for debugging purposes or when the checks have errors that are preventing a valid install in the field.
Check #1 - Check for Minimum OS
Check #2 - Check if user currently has administrator privileges
Check #3 - Check if DMZ is installed
Check #4 - As of EFT 6.5 Unicode DotNet 4.0 FULL is a requirement
Check #5 - EFT is of two prior versions
o Default: The common prerequisites will be checked by default
o Example: /NOREQS
• /logfile=<file>
o Applicable installation types: active-active, active-passive, standalone
o Description: Log installation messages to the specified file (this is in addition to the internal log that is always created by the installer).
o Default: None
o Example: /logfile=C:\Temp\EFTInstall.log
• /SkipValidateSQLServerPassword
o Description: By default the installer will validate the EFT Server administrator password against the SQL Server Express password requirements (e.g. the Windows account password policy plus some additional illegal keywords). This option provides a way to instruct the installer to skip this validation check.
o Default: Disabled by default
o Example: /SkipValidateSQLServerPassword
• /COHERENCEQUEUE=“<name>”
o Applicable installation types: active-active
o Description: Use an alternate name for EFT’s coherence queue.
o Default: EFTCoherenceQueue
o Example: /COHERENCEQUEUE=NewCoherenceQueueName
• /EVENTQUEUE=”<name>”
o Applicable installation types: active-active
o Description: Use an alternate name for EFT’s event queue.
o Default: EFTEventQueue
o Example: /EVENTQUEUE=NewEventQueueName
78
Silent Command-Line Installation
• /MULTICASTADDRESS=”<ip>”
o Applicable installation types: active-active
o Description: Use an alternate multicast address for MSMQ.
o Default: 234.1.1.1
o Example: /MULTICASTADDRESS="234.9.9.9"
• /MULTICASTPORT=“<port>”
o Applicable installation types: active-active
o Description: Use an alternate multicast port for MSMQ.
o Default: 8001
o Example: /MULTICASTPORT="9999"
• Product and module registration parameters
o Applicable installation types: active-active, active-passive, standalone
o Example (registering EFT Enterprise): /EFTLICENSE=“A92463BH4RY7”
o /REGISTRATIONPROXY=“<ip>:<port>”
Description: If registering during installation, specify the ip and port of the proxy to send registration traffic through.
Default: not used
Example: /REGISTRATIONPROXY="192.168.100.248:3128"
o /EFTUSER=”<name>”
Description: If product registration is performed during installation, this name will be used to register all modules for which serials are provided.
Example: /EFTUSER=“Tom Petty”
o /SMBLICENSE=“<serial>”
Description: Register EFT SMB during installation.
o /EFTLICENSE=“<serial>”
Description: Register EFT Enterprise during installation.
o /ARMLICENSE=”<serial>”
Description Register ARM during installation.
o /AS2LICENSE=”<serial>”
Description: Register AS2 during installation.
o /AWELICENSE=”<serial>”
Description: Register AWE during installation.
o /HSMLICENSE=“<serial>”
Description: Register the HSM during installation.
o /MTCLICENSE=”<serial>”
Description: Register the MTC during installation.
79
EFT v7 Installation and Administration Guide
o /PGPLICENSE=”<serial>”
Description: Register the OpenPGP module during installation.
o /WTCLICENSE=”<serial>”
Description: Register the WTC during installation.
o /DMZSINGLELICENSE=“<serial>”
Description: Register singlesite DMZ during installation.
o /DMZMULTILICENSE=“<serial>”
Description: Register multisite DMZ during installation.
Installation Logging The installation log file is intended for debugging purposes and contains messages that may help resolve issues that arise during installation.
• During installation and maintenance, the installer creates an Installer.log file in the %TEMP%\<Product Name> directory. For example:
o C:\Users\Administrator\AppData\Local\Temp\EFT Server\Installer.log
o C:\Users\Administrator\AppData\Local\Temp\EFT Server Enterprise\Installer.log
• At the completion of the installation, either due to success or failure, the installer copies the final log to the <InstallDir>\logs directory, if it exists. If the installer fails during an initial clean installation, the <InstallDir>\logs directory may not exist. In this case, the final log file remains in the %TEMP%\<Product Name> directory.
• The installer attempts to append to the existing log file on subsequent runs of the installer (e.g., if the user performs a Reinstall). It does this by copying any existing Installer.log file from the installation directory into the Temp directory, writing to it during installation, and then copying it back to the <InstallDir>\logs directory when the installation is finished.
• You can write out the same log messages to another log file of your choosing using the /logfile=<Log file> command line switch to the installer. (Refer to Command Line Parameters.)
Debug Logging
The installer is capable of writing the same messages that go to the Main Installer Log using the Windows debug logging infrastructure. These messages may be viewed using a utility such as SysInternal’s DebugView application. To enable this logging, the installer must be run from the command line with the /debug switch. (Refer to Command Line Parameters.
EULAs When you installed the product, the End-User License Agreement (EULA) appeared, and you had to click I Agree before the installation could continue. If you want to view the EULA again, it is available in the installation folder.
For your convenience, you can download the EULAs from the links below:
EFT Enterprise: http://help.globalscape.com/help/eft7/license.txt
EFT SMB: http://help.globalscape.com/help/eft7/license_core.txt
80
Index A
Activating .............................................. 17, 60, 62 ARM .............................................................. 60 AS2 Module .................................................. 60 AWE Module ................................................. 60 DMZ Gateway ......................................... 60, 62 EFT ......................................................... 17, 60 High Security Module ................................... 60 HTTP ............................................................ 60 OpenPGP Module ........................................ 60 SFTP Module ................................................ 60 Software........................................................ 60 Web Transfer Client ...................................... 60
Activating the Software .................................... 60 Allowing the EFT Service Administrative Rights
...................................................................... 67 APPDATA......................................................... 73 Application Data ......................................... 59, 73 ARM requirements ........................................... 13 AS2
AS2 requirements ......................................... 13 ASP.NET .......................................................... 71 aspnet_regiis.exe ....................................... 70, 71
B
Best Practices for Configuration and Validation ...................................................................... 25
C
ChangePassByAD ..................................... 52, 69 Configuration Checklist .............................. 13, 25 configure........................................................... 17
EFT ............................................................... 17 Continue Trial button ........................................ 60 Create ............................................................... 67
Windows User Account ................................ 67
D
Data Security .................................................... 25 database requirements .............................. 21, 25 debug logging ................................................... 80 Developer Mode ......................................... 60, 72 DMZ Gateway .................................................. 62
Activating ...................................................... 62
E
EFT ................................................... 5, 17, 66, 67 activating....................................................... 17 configuring .................................................... 17 Introduction ..................................................... 5 Set Windows NT Permissions ...................... 67 Uninstalling ................................................... 66
EFT Deployment Scenarios ............................. 17 EFT Feature Comparison .................................. 9 EFT requirements ...................................... 21, 25 EFT Service Administrative Rights .................. 67 EFT Specifications ........................................... 23 EFTServer ........................................................ 67 eftserver-ent.exe .............................................. 73 eftserver-ent-nodb.exe ..................................... 73 EFTUser ........................................................... 67 Enable
32BitAppOnWin64 ........................................ 70 Multipart ........................................................ 69
enable_iwa ....................................................... 69 Enable10ColumnInClientLog ........................... 69 Enable32BitAppOnWin64 ................................ 70 Enter Trial Extension Response ...................... 72 Error in ASP.NET Registration ........................ 71 EULAs .............................................................. 80
view .............................................................. 80 evaluating ................................................... 60, 72 Extending the Trial ........................................... 72
F
Feature Comparison .......................................... 9 File Location Changes ..................................... 59 Finding Information in the Help ........................ 13 Folder
Folder Options .............................................. 59 FolderMonitorWorkerThreadCount .............. 69
FTPSYSTResponse......................................... 69
G
Getting Help ..................................................... 13
H
HELP ................................................................ 13 Help File ........................................................... 13
Searching ..................................................... 13 Help Topic ........................................................ 13
Printing ......................................................... 13 Hybrid Configuration ........................................ 17
I
IIS ..................................................................... 70 IIS 6.0 ............................................................... 70 Index ................................................................ 13 INSTALL_SQLEXPR ....................................... 73 Installation .................................................. 31, 80
Silient installation.......................................... 73 Installation Logging .......................................... 80 Installer.log ....................................................... 80 Installing and Activating the Software .............. 17 Installing EFT Administrator and Modules ....... 31
81
EFT v7 Installation and Administration Guide
Installing the Administration Interface Remotely ...................................................................... 44
K
Knowledgebase ................................................ 16
L
Licenses ........................................................... 80 links .................................................................. 13 Locations .......................................................... 59 log ..................................................................... 80
log_request ................................................... 69 Logfile ........................................................... 80
logins Logging ......................................................... 80
M
MaxNumberConnections .................................. 69 Modifying or Repairing the Software ................ 64 MultipartValue .................................................. 69
N
NET IIS Registration Tool ................................ 70 NET Registration Tool ...................................... 71 NET Web Application ....................................... 70 NOAUTOSTART .............................................. 73
P
Password PasswordChg_EmailInterval ........................ 69 PasswordChg_NTADLDAP .......................... 69
Peer Notification Channel ................................ 62 Perimeter Network Security ............................. 62 PNC .................................................................. 62 Program Files ................................................... 59 ProgramData .................................................... 59
R
register ............................................................. 70 ASP ............................................................... 70
Registration Wizard .......................................... 60 Registrations .................................................... 80 Registrations Licenses End-User Agreement .. 80 Registry Settings .............................................. 69 Release Notes .................................................. 63 Remote Administration ..................................... 44 Repairing .......................................................... 64
Installation..................................................... 64 Reporting
Reporting Module ......................................... 60 requirements ........................................ 13, 21, 25 Running a Microsoft .NET Web Application in
32-bit Mode in IIS 6.0 on a 64-bit Server ...... 70 Running EFT and Microsoft IIS on the Same
Computer ...................................................... 70
S
Security Security Best Practices Checklist................. 25
Serial Number .................................................. 60 Server
Server Administration ................................... 25 Server Cluster .............................................. 17 server requirements ............................... 21, 25
Server Specifications ....................................... 23 Server-to-Server Deployment .......................... 17 Set Windows NT Permissions ......................... 67 SFTP ................................................................ 60 sharing ............................................................. 13 silent ................................................................. 73 Silent Installation .............................................. 73 Software ........................................................... 66
Activating ...................................................... 60 Uninstalling ................................................... 66
specifications ................................................... 23 System Account ............................................... 67 System Requirements ............................... 13, 21 System Requirements and Specifications ....... 13 System Requirements for EFT ........................ 21 systemroot ....................................................... 59
T
Topic Links ....................................................... 13 Sharing ......................................................... 13
Trial .................................................................. 72 Trial Extension Request ................................... 72 Trial Extension Request Details ....................... 72 Trial Extension Response ................................ 72 Two DMZ Gateways ........................................ 17
U
Unexpected error 0x8ffe2740 occurred ........... 70 Unicode .............................................................. 8 Uninstall EFT ................................................... 66 Uninstalling ...................................................... 66 Uninstalling the Software ................................. 66 upgrading ................................................... 52, 60
ARM ............................................................. 52 DMZ Gateway .............................................. 52 EFT ......................................................... 52, 60 EFT Enterprise ............................................. 52
Upgrading the Software ................................... 52 use_registry ..................................................... 69 User Account
User License Agreement .............................. 80 User Rights Assignment ............................... 67
Using NT Authentication .................................. 67 Using the Knowledge Base .............................. 16 UTF8 .................................................................. 8
82
Index
V
Version History ............................................. 8, 63 Viewing ............................................................. 80
EULA ............................................................ 80
W
Web Services ................................................... 69
WebServiceTimeout......................................... 69 What's New? ...................................................... 8 Windows Event Log ......................................... 62 Windows Registry ............................................ 69 WTCTimeout .................................................... 69
83