Embed Size (px)
Citation preview

UNIT PEMODENAN TADBIRAN DAN PERANCANGAN MALAYSIA (MAMPU)
EG Service Desk Web Access
Guide for End User
LANDesk Service Desk System
EG Service Desk Web Access Guide for End User
Page 2
Acceptance
This Acceptance Certificate confirms that the EG Service Desk Web Access Guide
for End User has been prepared in accordance as below.
For and on Behalf of Intisari Tuah:
Prepared By
Name Dodiy Munadi Date
Title Solution Consultant
Reviewed By
Name Sherlyn Low Cheah Hui Date
Title LANDesk Team Manager
Approved By
Name Muhammad Azmi Hamzah Date
Title Project Manager
For and on Behalf of MAMPU:
Reviewed By
Name Puan Sharifah Noorjuliana bt. Syed Salim Date
Title Senior Assistant Director
Approved By
_________________________________________
Name Puan Safiah bt. Ghani Date
Title Deputy Director

EG Service Desk Web Access Guide for End User
Page 3
Change History
Date Doc
Version Change Description/Details
Prepared
By
01/02/2012 1.0 Document creation Dodiy
14/02/2012 2.0 Add Knowledge Base Dodiy
27/02/2012 3.0 Add Contact Us Dodiy
08/03/2012 4.0 Add Group Policy for Single-Sign On Dodiy

EG Service Desk Web Access Guide for End User
Page 4
Table of Contents
1 Introduction ................................................................................................................................. 6
1.1 Overview .............................................................................................................................. 6
2 Setup Your Web Browser for Single-Sign On ....................................................................... 7
2.1 Set Trusted Sites................................................................................................................... 7
2.2 Set Current User name and Password ......................................................................... 8
3 Access EG Service Desk Web Access ................................................................................ 10
3.1 Login to EG Service Desk Web Access ...................................................................... 10
4 Support Me Dashboard ......................................................................................................... 12
4.1 Creating a New Incident ticket ................................................................................... 13
4.1.1 Incident Status .......................................................................................................... 14
4.1.2 Affected User Details .............................................................................................. 14
4.1.3 Affected Location ................................................................................................... 15
4.1.4 Incident Details ......................................................................................................... 16
4.1.5 Creation Details ........................................................................................................ 17
4.2 Working on Incident ticket ............................................................................................ 17
4.2.1 Add Attachment...................................................................................................... 18
4.2.2 Add Comment ......................................................................................................... 19
4.2.3 Survey .......................................................................................................................... 20
4.2.4 Support Team Working on Incident .................................................................... 20
4.3 Creating a New Service Request ticket .................................................................... 22
4.3.1 Service Request Status ........................................................................................... 22
4.3.2 Affected User Details .............................................................................................. 22
4.3.3 Service Request Details .......................................................................................... 23
4.3.4 Creation Details ........................................................................................................ 24
4.4 Working on Service Request ticket ............................................................................. 24
4.4.1 Add Attachment...................................................................................................... 25
4.4.2 Add Comment ......................................................................................................... 26
4.4.3 Survey .......................................................................................................................... 27
5 Knowledge Base ...................................................................................................................... 29
5.1 Search Article and Document ..................................................................................... 29
6 Preferences ................................................................................................................................ 30

EG Service Desk Web Access Guide for End User
Page 5
6.1 Set Time Zone .................................................................................................................... 30
6.2 Change Password ........................................................................................................... 30
6.3 Log Off from EG Service Desk system ........................................................................ 31
7 Contact Us ................................................................................................................................. 32
7.1 Email .................................................................................................................................... 32
7.1.1 Send email to create Incident ticket ................................................................. 32
7.1.2 Send email to create Service Request ticket .................................................. 32
7.2 Telephone .......................................................................................................................... 32
7.3 SMS (Short Messaging Services) ................................................................................... 32
7.3.1 SMS Create Incident ............................................................................................... 32
7.3.2 SMS Create Service Request ................................................................................ 32
7.3.3 SMS Check Status of Ticket ................................................................................... 33

EG Service Desk Web Access Guide for End User
Page 6
1 Introduction
1.1 Overview
This documentation functions as a guideline for End User to use MAMPU EG Service
Desk Web Access.
EG Service Desk Web Access Guide for End User
Page 7
2 Setup Your Web Browser for Single-Sign On
The following steps need to be done only at first time to access into EG Service Desk
and it only apply to users those are the staff of MAMPU and their computer/laptop
had join the domain MAMPU.
2.1 Set Trusted Sites
1. In your computer/laptop, go to Control Panel. Go to Start Control Panel
For Windows XP, change the view by select “Switch to Classic View”.
For Windows Vista/Windows 7, change the view by select “Large icons”.
2. Select the Internet Options icon. . Internet Properties
window displayed.
EG Service Desk Web Access Guide for End User
Page 8
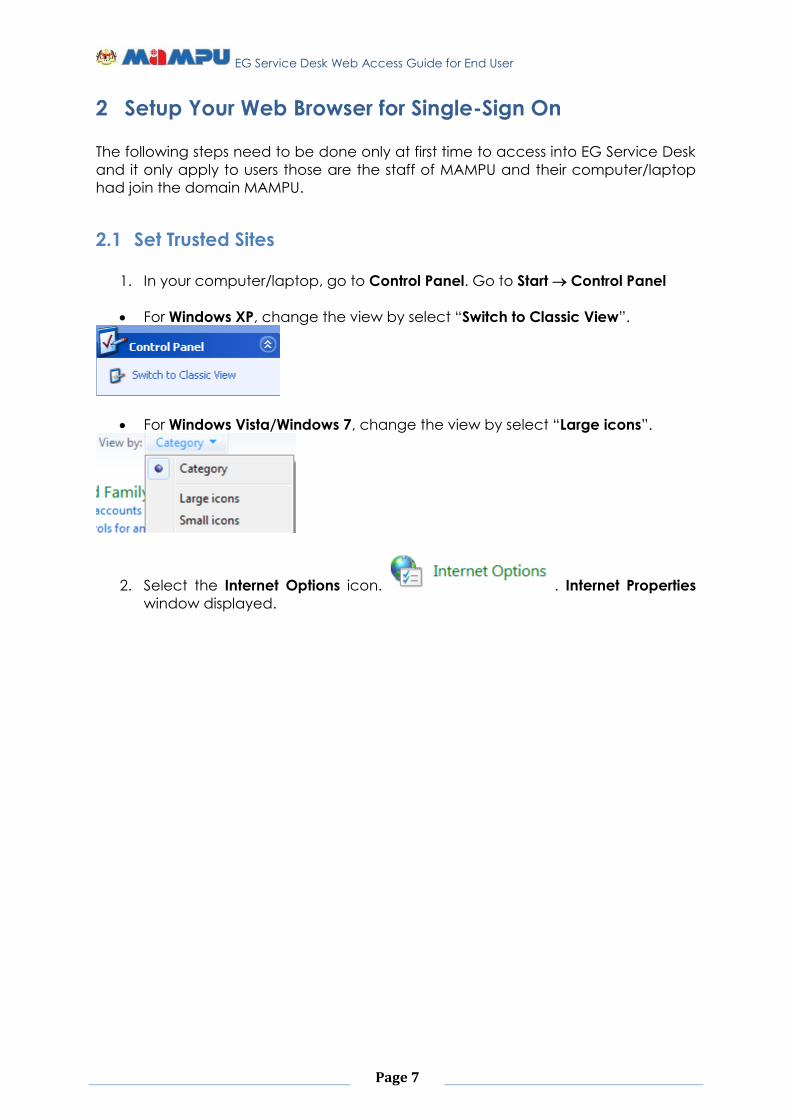
Figure 1.1: Internet Properties window
3. Select Security tab and select Trusted Sites. Select Sites button. Trusted Sites
window displayed.
4. In the field “Add this website to the zone:”, key in
http://servicedesk.mampu.gov.my and click button Add.
5. Please make sure do NOT tick the checkbox “Require server verification
(https:) for all sites in the zone”.
6. After you had done, click button “Close”. Trusted Sites window will be
disappeared.
2.2 Set Current User name and Password
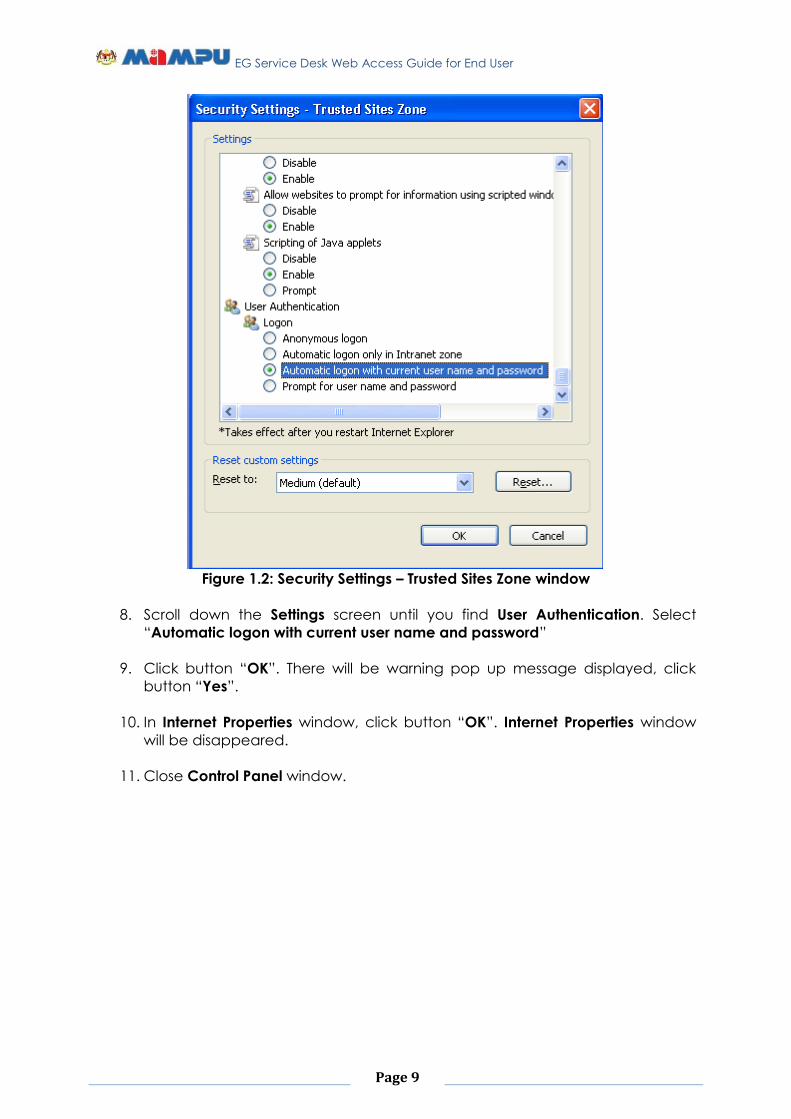
7. In Internet Properties window, click button “Custom Level”. Security Settings –
Trusted Sites Zone window will be displayed.
EG Service Desk Web Access Guide for End User
Page 9
Figure 1.2: Security Settings – Trusted Sites Zone window
8. Scroll down the Settings screen until you find User Authentication. Select
“Automatic logon with current user name and password”
9. Click button “OK”. There will be warning pop up message displayed, click
button “Yes”.
10. In Internet Properties window, click button “OK”. Internet Properties window
will be disappeared.
11. Close Control Panel window.
EG Service Desk Web Access Guide for End User
Page 10
3 Access EG Service Desk Web Access
3.1 Login to EG Service Desk Web Access
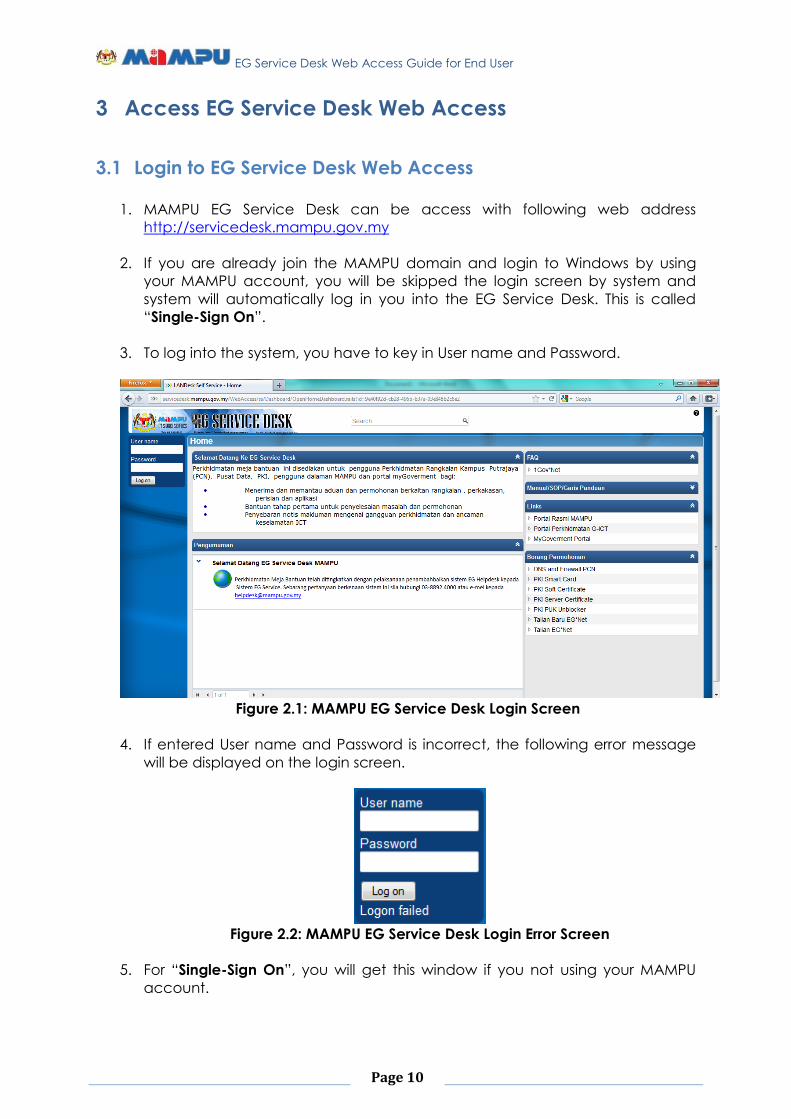
1. MAMPU EG Service Desk can be access with following web address
http://servicedesk.mampu.gov.my
2. If you are already join the MAMPU domain and login to Windows by using
your MAMPU account, you will be skipped the login screen by system and
system will automatically log in you into the EG Service Desk. This is called
“Single-Sign On”.
3. To log into the system, you have to key in User name and Password.
Figure 2.1: MAMPU EG Service Desk Login Screen
4. If entered User name and Password is incorrect, the following error message
will be displayed on the login screen.
Figure 2.2: MAMPU EG Service Desk Login Error Screen
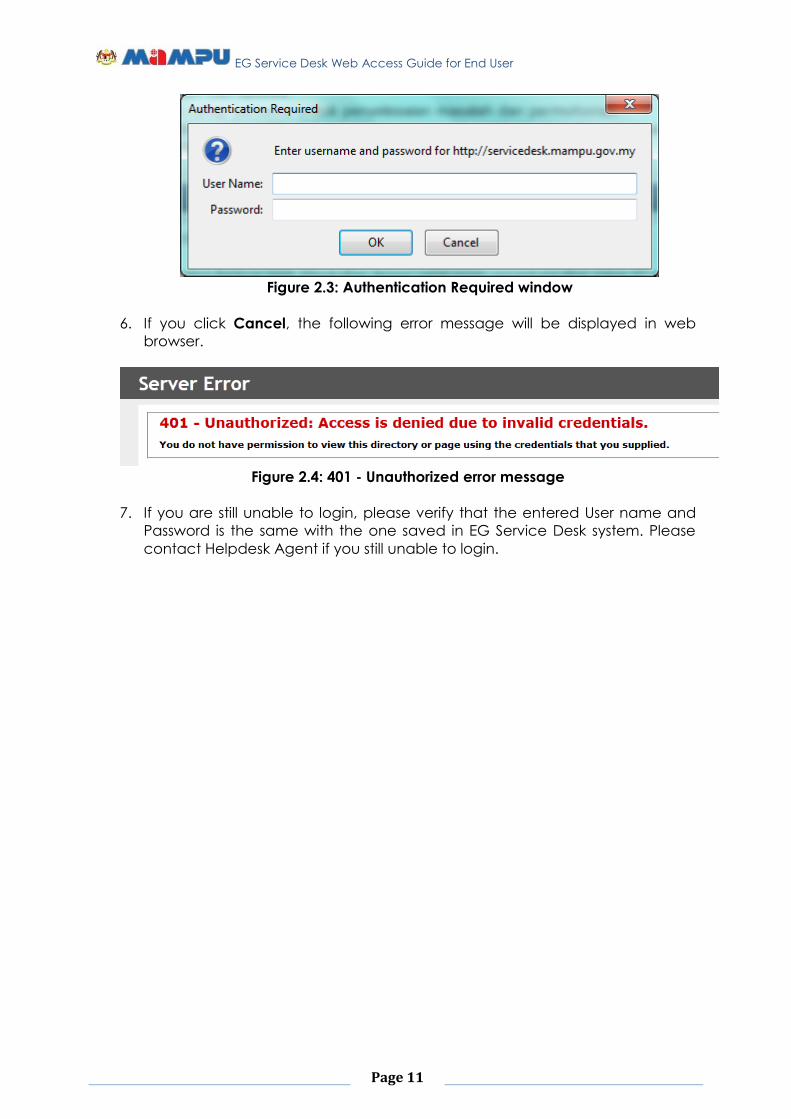
5. For “Single-Sign On”, you will get this window if you not using your MAMPU
account.
EG Service Desk Web Access Guide for End User
Page 11
Figure 2.3: Authentication Required window
6. If you click Cancel, the following error message will be displayed in web
browser.
Figure 2.4: 401 - Unauthorized error message
7. If you are still unable to login, please verify that the entered User name and
Password is the same with the one saved in EG Service Desk system. Please
contact Helpdesk Agent if you still unable to login.

EG Service Desk Web Access Guide for End User
Page 12
4 Support Me Dashboard
1. The following screen is for End User. It gives access to the tickets those you
had submitted and/or created by Helpdesk for you.
2. However, there are limited actions can be performed by End User that will be
discussed in this document later.
Figure 3.1: Support Me Dashboard
3. The following table is quick definition for Support Me Dashboard
Item Definition
Help Me…
a. Create Incident This shortcut is to create/raise new incident ticket.
b. Create Service
Request
This shortcut is to create/raise new service request ticket.
Open Incidents
Submitted By Me
This panel will show the list of Open Incident tickets those
had been submitted by you and/or created by Helpdesk for
you.
Open Service Requests
Submitted By Me
This panel will show the list of Open Service Request tickets
those had been submitted by you and/or created by
Helpdesk for you.
View Cases Submitted By Me
a. Open Incidents
Submitted By Me
This shortcut will show the list of Open Incident tickets those
had been submitted by you and/or created by Helpdesk for
you.
b. Open Service
Requests Submitted By
Me
This shortcut will show the list of Open Service Request tickets
those had been submitted by you and/or created by
Helpdesk for you.
c. All Incidents Submitted
By Me
This shortcut will show the list of All Incident tickets those had
been submitted by you and/or created by Helpdesk for you.
EG Service Desk Web Access Guide for End User
Page 13
d. All Service Requests
Submitted By Me
This shortcut will show the list of All Service Request tickets
those had been submitted by you and/or created by
Helpdesk for you.
e. Incidents Awaiting My
Survey
This shortcut will show the list of Incidents those need you to
complete the survey.
f. Service Requests
Awaiting My Survey
This shortcut will show the list of Service Requests those need
you to complete the survey.
Figure 3.2: Table of Definition for Support Me Dashboard
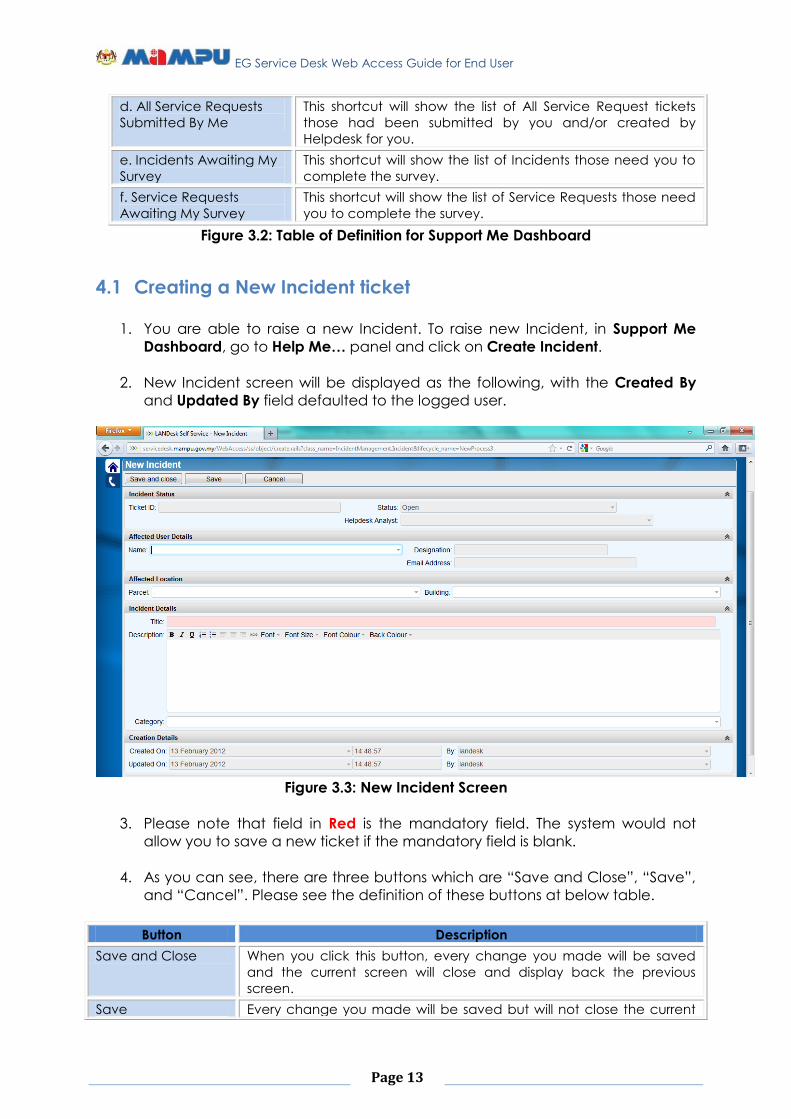
4.1 Creating a New Incident ticket
1. You are able to raise a new Incident. To raise new Incident, in Support Me
Dashboard, go to Help Me… panel and click on Create Incident.
2. New Incident screen will be displayed as the following, with the Created By
and Updated By field defaulted to the logged user.
Figure 3.3: New Incident Screen
3. Please note that field in Red is the mandatory field. The system would not
allow you to save a new ticket if the mandatory field is blank.
4. As you can see, there are three buttons which are “Save and Close”, “Save”,
and “Cancel”. Please see the definition of these buttons at below table.
Button Description
Save and Close When you click this button, every change you made will be saved
and the current screen will close and display back the previous
screen.
Save Every change you made will be saved but will not close the current
EG Service Desk Web Access Guide for End User
Page 14
screen.
Cancel When you click this button, every change you made will NOT be
saved and the current screen will close and display back the previous
screen.
4.1.1 Incident Status
In this panel, there are Ticket ID, Status, and Helpdesk Analyst fields.
Ticket ID: display the ticket reference number.
Status: display the status of Incident ticket.
Helpdesk Analyst: display the Helpdesk agent that handles this ticket.
You are not able to do anything in this panel as it only to display the Incident
Ticket ID, status and Helpdesk agent who working in this ticket.
4.1.2 Affected User Details
5. If the Affected User is your name, please leave this field in blank. When you
save new Incident, this field will automatically fill in your name.
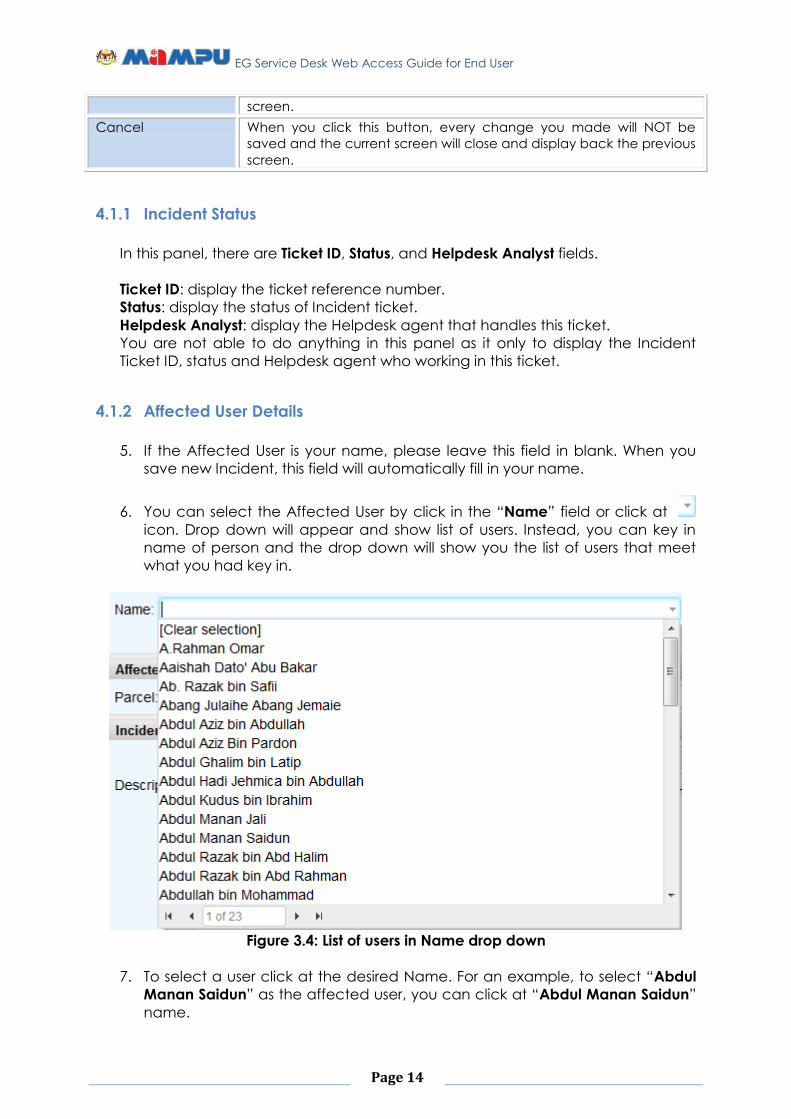
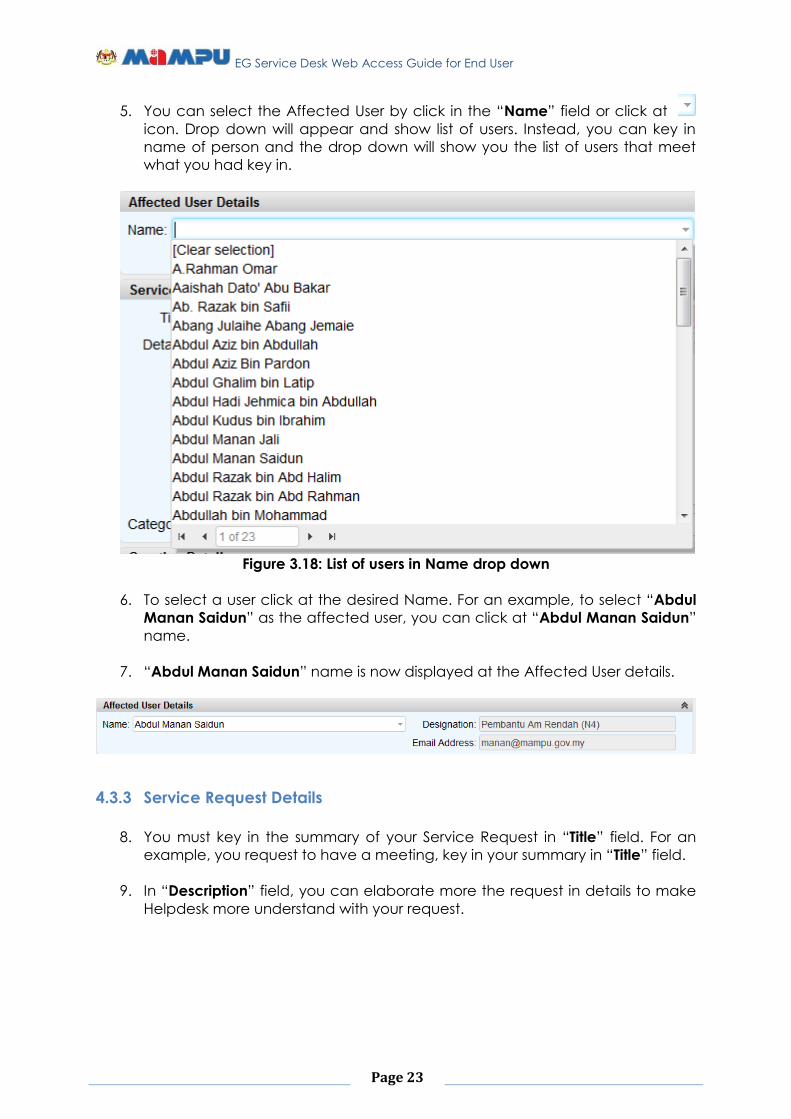
6. You can select the Affected User by click in the “Name” field or click at
icon. Drop down will appear and show list of users. Instead, you can key in
name of person and the drop down will show you the list of users that meet
what you had key in.
Figure 3.4: List of users in Name drop down
7. To select a user click at the desired Name. For an example, to select “Abdul
Manan Saidun” as the affected user, you can click at “Abdul Manan Saidun”
name.
EG Service Desk Web Access Guide for End User
Page 15
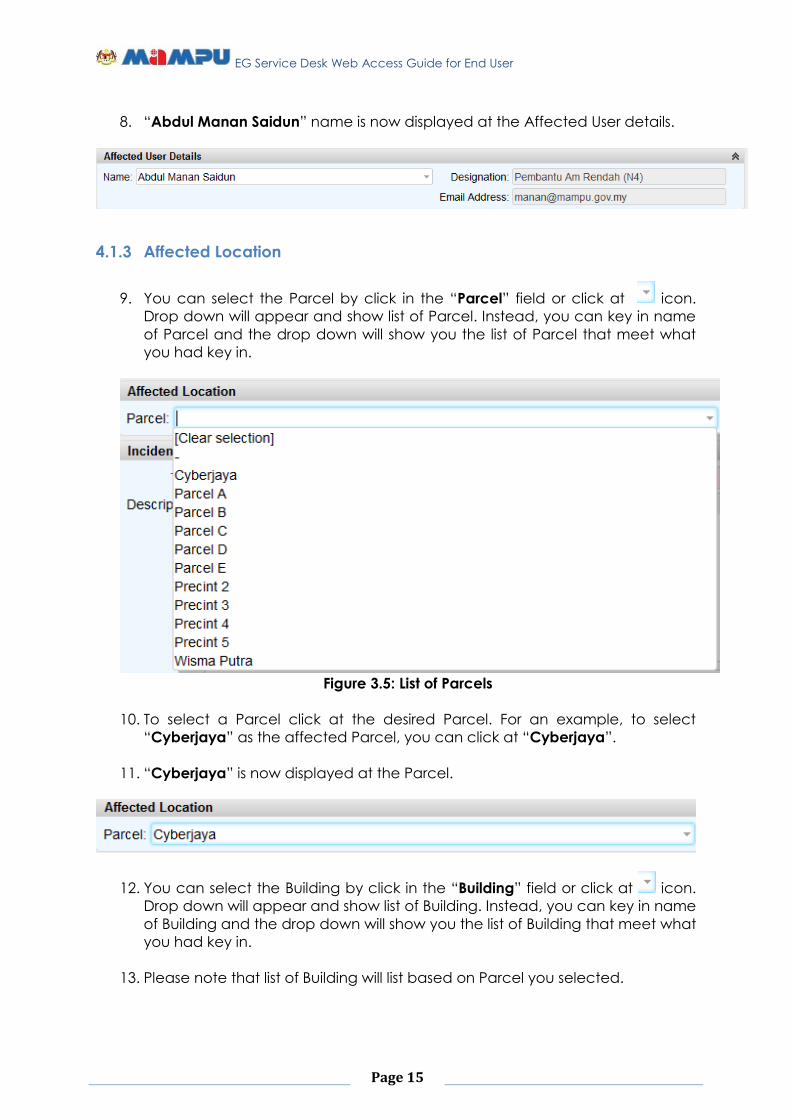
8. “Abdul Manan Saidun” name is now displayed at the Affected User details.
4.1.3 Affected Location
9. You can select the Parcel by click in the “Parcel” field or click at icon.
Drop down will appear and show list of Parcel. Instead, you can key in name
of Parcel and the drop down will show you the list of Parcel that meet what
you had key in.
Figure 3.5: List of Parcels
10. To select a Parcel click at the desired Parcel. For an example, to select
“Cyberjaya” as the affected Parcel, you can click at “Cyberjaya”.
11. “Cyberjaya” is now displayed at the Parcel.
12. You can select the Building by click in the “Building” field or click at icon.
Drop down will appear and show list of Building. Instead, you can key in name
of Building and the drop down will show you the list of Building that meet what
you had key in.
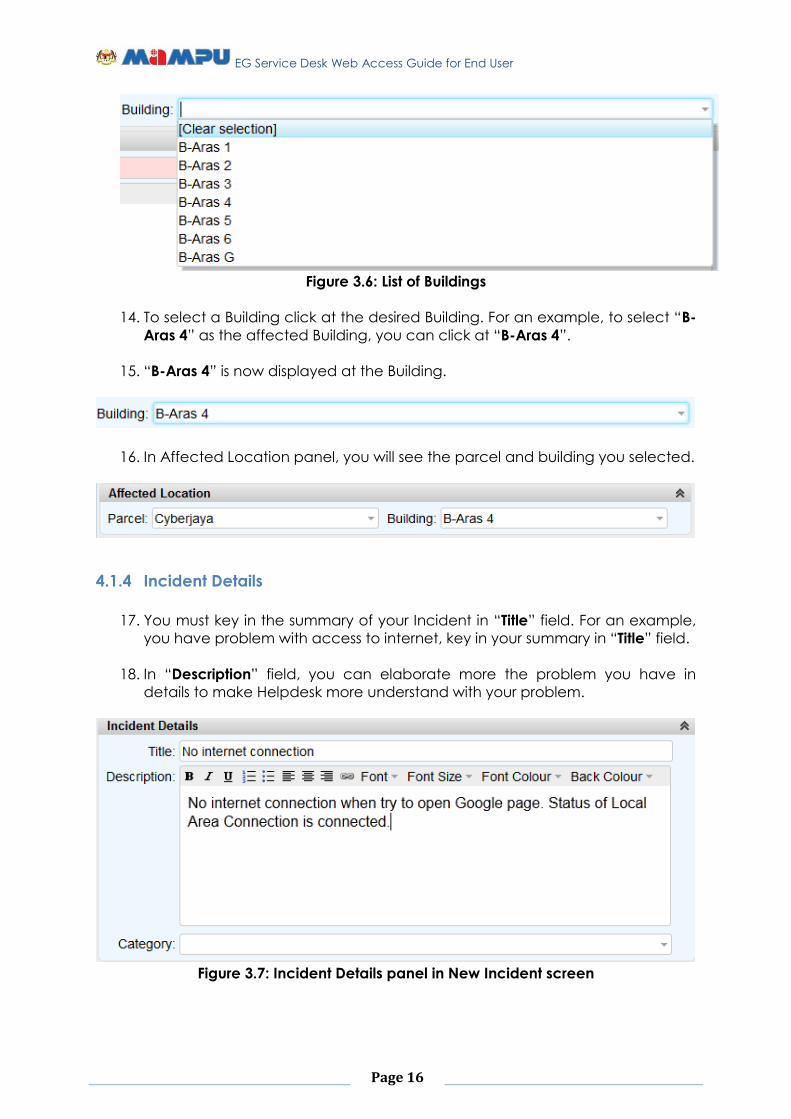
13. Please note that list of Building will list based on Parcel you selected.
EG Service Desk Web Access Guide for End User
Page 16
Figure 3.6: List of Buildings
14. To select a Building click at the desired Building. For an example, to select “B-
Aras 4” as the affected Building, you can click at “B-Aras 4”.
15. “B-Aras 4” is now displayed at the Building.
16. In Affected Location panel, you will see the parcel and building you selected.
4.1.4 Incident Details
17. You must key in the summary of your Incident in “Title” field. For an example,
you have problem with access to internet, key in your summary in “Title” field.
18. In “Description” field, you can elaborate more the problem you have in
details to make Helpdesk more understand with your problem.
Figure 3.7: Incident Details panel in New Incident screen

EG Service Desk Web Access Guide for End User
Page 17
19. You can select the Category by click in the “Category” field or click at
icon. Drop down will appear and show list of Category.
20. To select a Category click at the desired Category. For an example, to select
“Network” as the Category, you can click at “Network”.
21. “Network” is now displayed at the Category.
4.1.5 Creation Details
In this panel, there are Created On followed by By (Created By), and Updated On
followed by By (Updated By) fields.
Created On: display date and time when Incident created.
Created By: display the name of user who create Incident.
Updated On: display latest date and time when Incident updated.
Updated By: display the latest user who update Incident.
You are not able to do anything in this panel as it only to display date and time
when create and update the Incident and a user who create and update the
Incident.
4.2 Working on Incident ticket
There are a few actions available can be performed by End User in Incident ticket.
The actions are Add Attachment, Add Comment, and Survey. You can see available
actions in the Actions panel at left side of Incident screen.
Figure 3.8: Actions panel
EG Service Desk Web Access Guide for End User
Page 18
4.2.1 Add Attachment
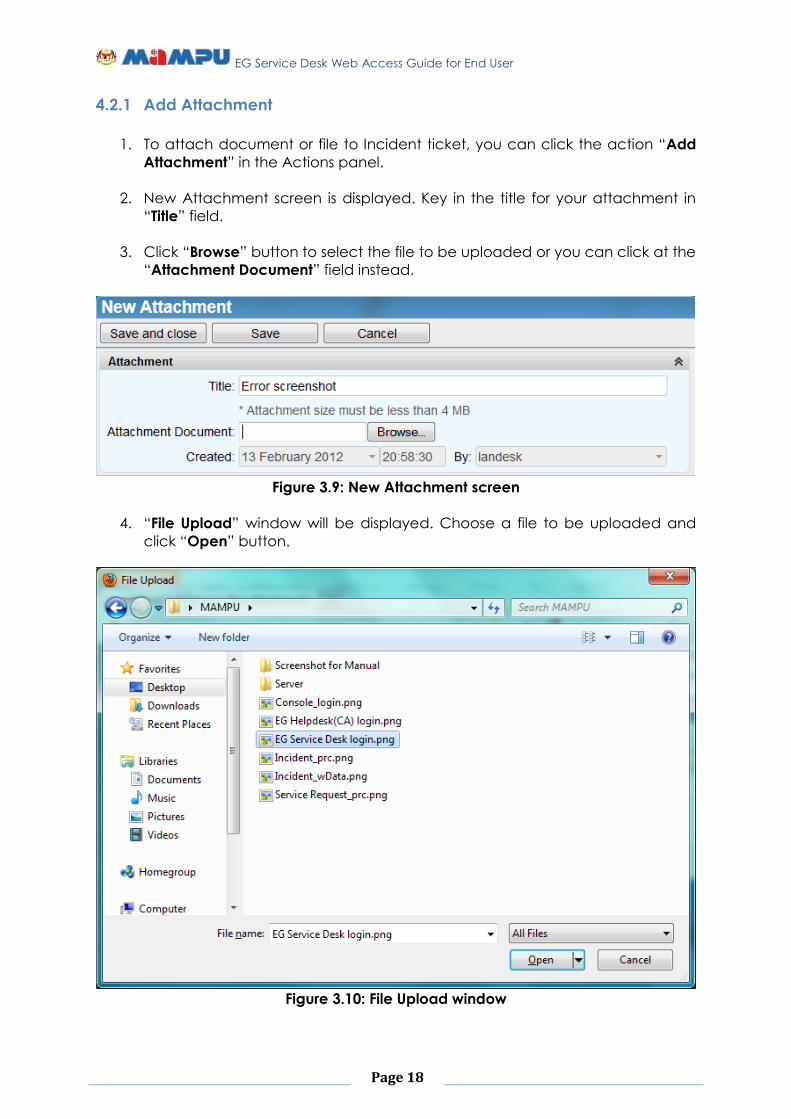
1. To attach document or file to Incident ticket, you can click the action “Add
Attachment” in the Actions panel.
2. New Attachment screen is displayed. Key in the title for your attachment in
“Title” field.
3. Click “Browse” button to select the file to be uploaded or you can click at the
“Attachment Document” field instead.
Figure 3.9: New Attachment screen
4. “File Upload” window will be displayed. Choose a file to be uploaded and
click “Open” button.
Figure 3.10: File Upload window
EG Service Desk Web Access Guide for End User
Page 19
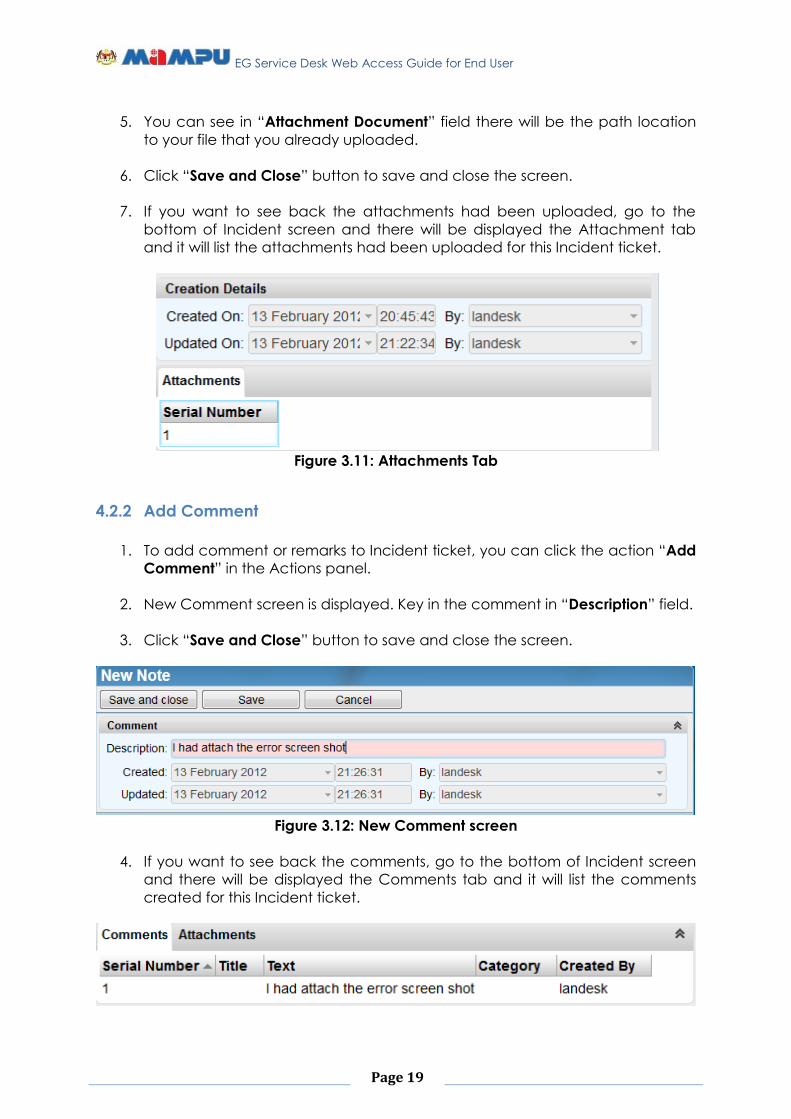
5. You can see in “Attachment Document” field there will be the path location
to your file that you already uploaded.
6. Click “Save and Close” button to save and close the screen.
7. If you want to see back the attachments had been uploaded, go to the
bottom of Incident screen and there will be displayed the Attachment tab
and it will list the attachments had been uploaded for this Incident ticket.
Figure 3.11: Attachments Tab
4.2.2 Add Comment
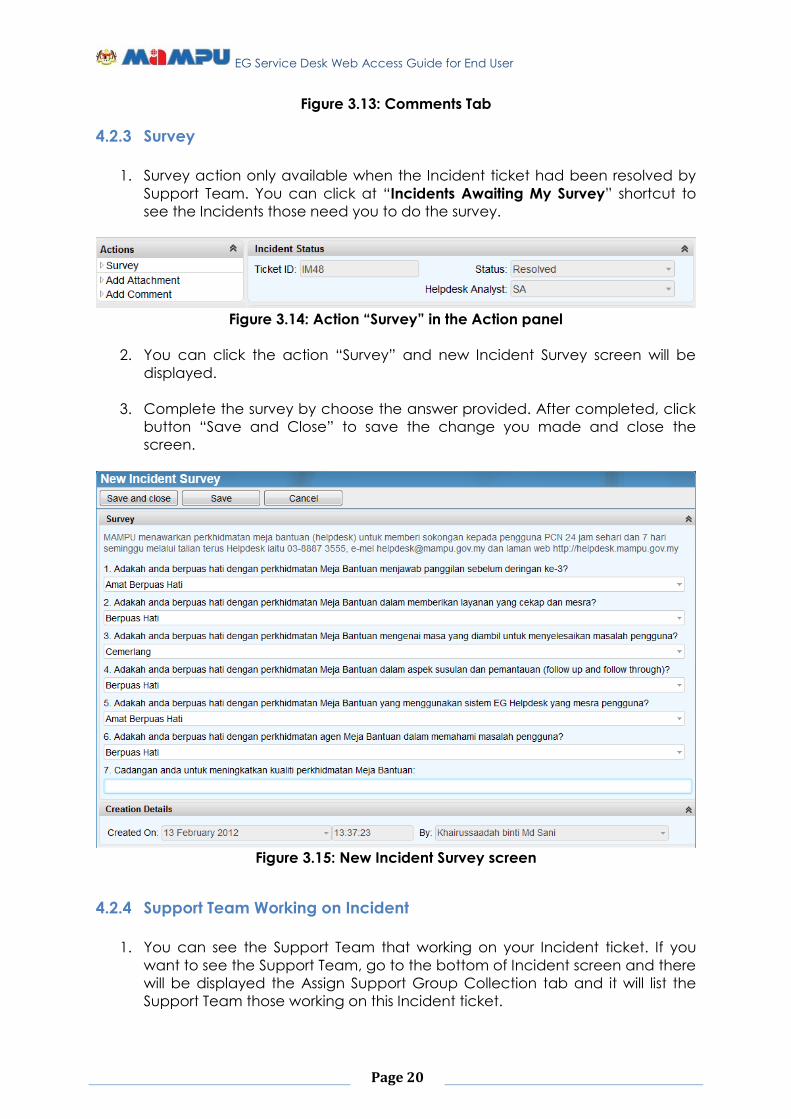
1. To add comment or remarks to Incident ticket, you can click the action “Add
Comment” in the Actions panel.
2. New Comment screen is displayed. Key in the comment in “Description” field.
3. Click “Save and Close” button to save and close the screen.
Figure 3.12: New Comment screen
4. If you want to see back the comments, go to the bottom of Incident screen
and there will be displayed the Comments tab and it will list the comments
created for this Incident ticket.
EG Service Desk Web Access Guide for End User
Page 20
Figure 3.13: Comments Tab
4.2.3 Survey
1. Survey action only available when the Incident ticket had been resolved by
Support Team. You can click at “Incidents Awaiting My Survey” shortcut to
see the Incidents those need you to do the survey.
Figure 3.14: Action “Survey” in the Action panel
2. You can click the action “Survey” and new Incident Survey screen will be
displayed.
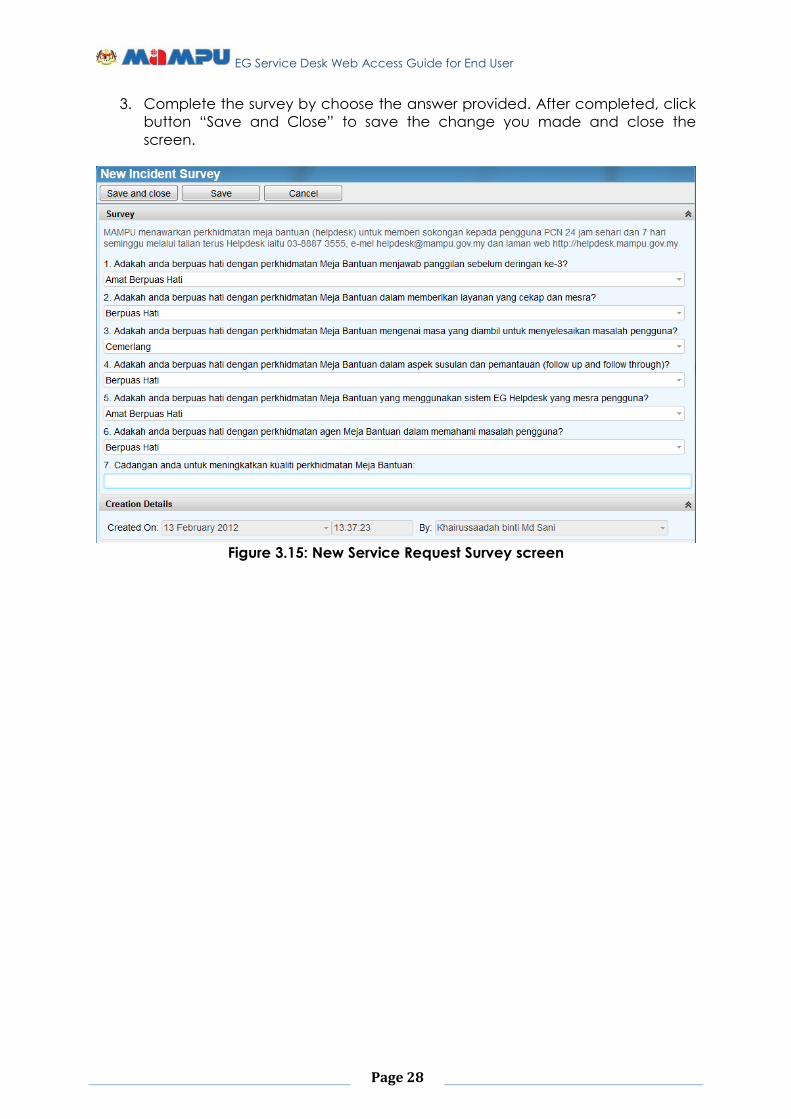
3. Complete the survey by choose the answer provided. After completed, click
button “Save and Close” to save the change you made and close the
screen.
Figure 3.15: New Incident Survey screen
4.2.4 Support Team Working on Incident
1. You can see the Support Team that working on your Incident ticket. If you
want to see the Support Team, go to the bottom of Incident screen and there
will be displayed the Assign Support Group Collection tab and it will list the
Support Team those working on this Incident ticket.
EG Service Desk Web Access Guide for End User
Page 21
Figure 3.16: Assign Support Group Collection Tab
EG Service Desk Web Access Guide for End User
Page 22
4.3 Creating a New Service Request ticket
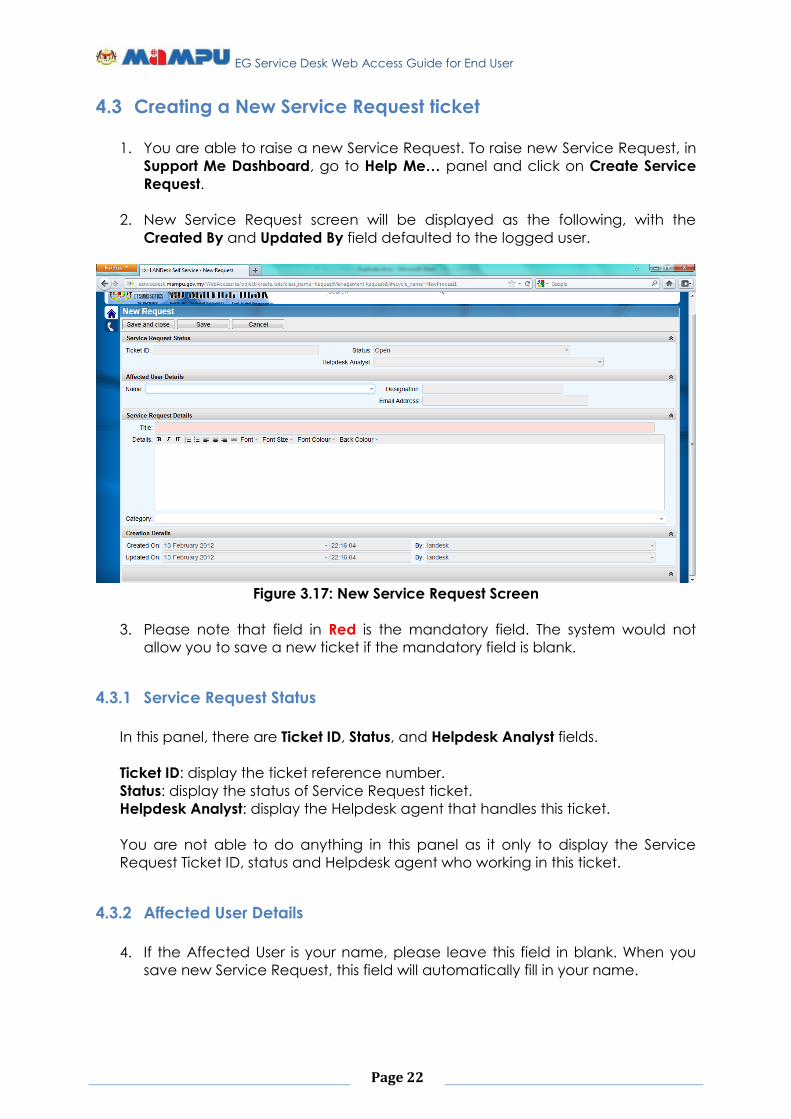
1. You are able to raise a new Service Request. To raise new Service Request, in
Support Me Dashboard, go to Help Me… panel and click on Create Service
Request.
2. New Service Request screen will be displayed as the following, with the
Created By and Updated By field defaulted to the logged user.
Figure 3.17: New Service Request Screen
3. Please note that field in Red is the mandatory field. The system would not
allow you to save a new ticket if the mandatory field is blank.
4.3.1 Service Request Status
In this panel, there are Ticket ID, Status, and Helpdesk Analyst fields.
Ticket ID: display the ticket reference number.
Status: display the status of Service Request ticket.
Helpdesk Analyst: display the Helpdesk agent that handles this ticket.
You are not able to do anything in this panel as it only to display the Service
Request Ticket ID, status and Helpdesk agent who working in this ticket.
4.3.2 Affected User Details
4. If the Affected User is your name, please leave this field in blank. When you
save new Service Request, this field will automatically fill in your name.
EG Service Desk Web Access Guide for End User
Page 23
5. You can select the Affected User by click in the “Name” field or click at
icon. Drop down will appear and show list of users. Instead, you can key in
name of person and the drop down will show you the list of users that meet
what you had key in.
Figure 3.18: List of users in Name drop down
6. To select a user click at the desired Name. For an example, to select “Abdul
Manan Saidun” as the affected user, you can click at “Abdul Manan Saidun”
name.
7. “Abdul Manan Saidun” name is now displayed at the Affected User details.
4.3.3 Service Request Details
8. You must key in the summary of your Service Request in “Title” field. For an
example, you request to have a meeting, key in your summary in “Title” field.
9. In “Description” field, you can elaborate more the request in details to make
Helpdesk more understand with your request.

EG Service Desk Web Access Guide for End User
Page 24
Figure 3.19: Service Request Details panel in New Service Request screen
10. You can select the Category by click in the “Category” field or click at
icon. Drop down will appear and show list of Category.
11. To select a Category click at the desired Category. For an example, to select
“Meeting – EG Help Desk” as the Category, you can click at “Meeting” > “EG
Help Desk”.
12. “Meeting – EG Help Desk” is now displayed at the Category.
4.3.4 Creation Details
In this panel, there are Created On followed by By (Created By), and Updated On
followed by By (Updated By) fields.
Created On: display date and time when Service Request created.
Created By: display the name of user who create Service Request.
Updated On: display latest date and time when Service Request updated.
Updated By: display the latest user who update Service Request.
You are not able to do anything in this panel as it only to display date and time
when create and update the Service Request and a user who create and update
the Service Request.
4.4 Working on Service Request ticket
There are a few actions available can be performed by End User in Service Request
ticket. The actions are Add Attachment, Add Comment, and Survey. You can see
available actions in the Actions panel at left side of Service Request screen.

EG Service Desk Web Access Guide for End User
Page 25
Figure 3.20: Actions panel
4.4.1 Add Attachment
1. To attach document or file to Service Request ticket, you can click the action
“Add Attachment” in the Actions panel.
2. New Attachment screen is displayed. Key in the title for your attachment in
“Title” field.
3. Click “Browse” button to select the file to be uploaded or you can click at the
“Attachment Document” field instead.
Figure 3.21: New Attachment screen
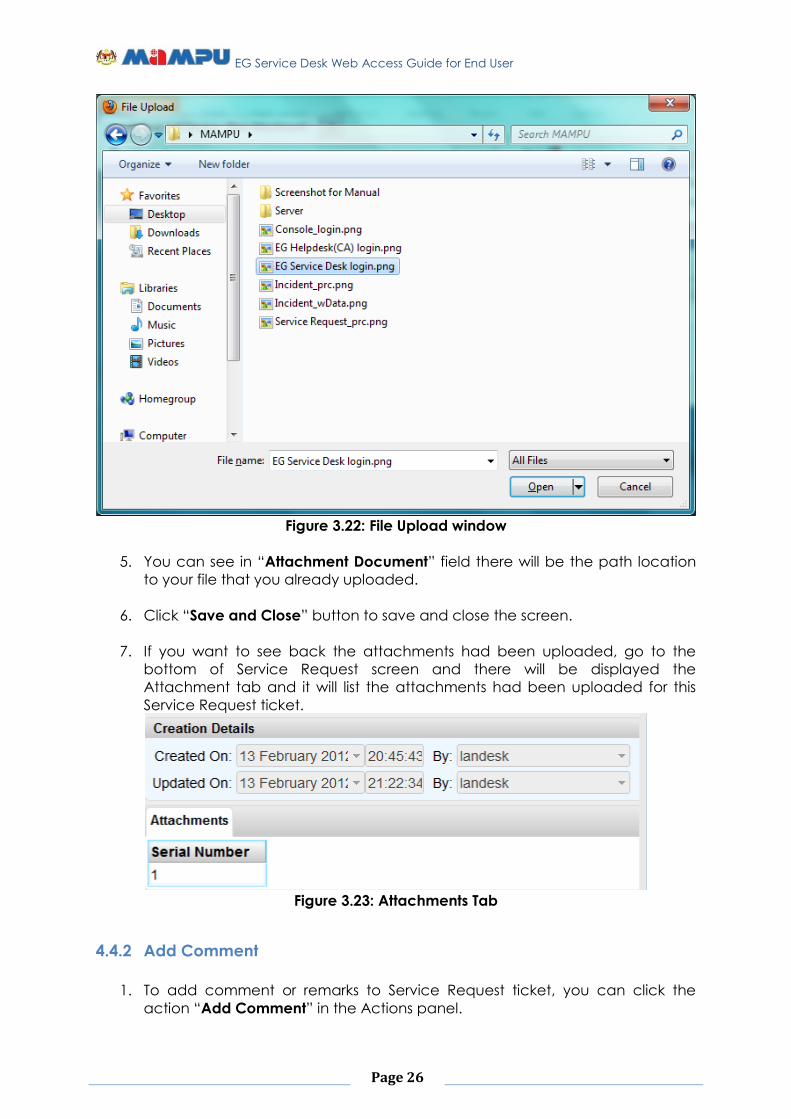
4. “File Upload” window will be displayed. Choose a file to be uploaded and
click “Open” button.
EG Service Desk Web Access Guide for End User
Page 26
Figure 3.22: File Upload window
5. You can see in “Attachment Document” field there will be the path location
to your file that you already uploaded.
6. Click “Save and Close” button to save and close the screen.
7. If you want to see back the attachments had been uploaded, go to the
bottom of Service Request screen and there will be displayed the
Attachment tab and it will list the attachments had been uploaded for this
Service Request ticket.
Figure 3.23: Attachments Tab
4.4.2 Add Comment
1. To add comment or remarks to Service Request ticket, you can click the
action “Add Comment” in the Actions panel.

EG Service Desk Web Access Guide for End User
Page 27
2. New Comment screen is displayed. Key in the comment in “Description” field.
3. Click “Save and Close” button to save and close the screen.
Figure 3.24: New Comment screen
4. If you want to see back the comments, go to the bottom of Incident screen
and there will be displayed the Comments tab and it will list the comments
created for this Service Request ticket.
Figure 3.24: Comments Tab
4.4.3 Survey
1. Survey action only available when the Service Request ticket had been
resolved by Support Team. You can click at “Service Request Awaiting My
Survey” shortcut to see the Service Requests those need you to do the survey.
Figure 3.25: Action “Survey” in the Action panel
2. You can click the action “Survey” and new Service Request Survey screen will
be displayed.
EG Service Desk Web Access Guide for End User
Page 28
3. Complete the survey by choose the answer provided. After completed, click
button “Save and Close” to save the change you made and close the
screen.
Figure 3.15: New Service Request Survey screen
EG Service Desk Web Access Guide for End User
Page 29
5 Knowledge Base
5.1 Search Article and Document
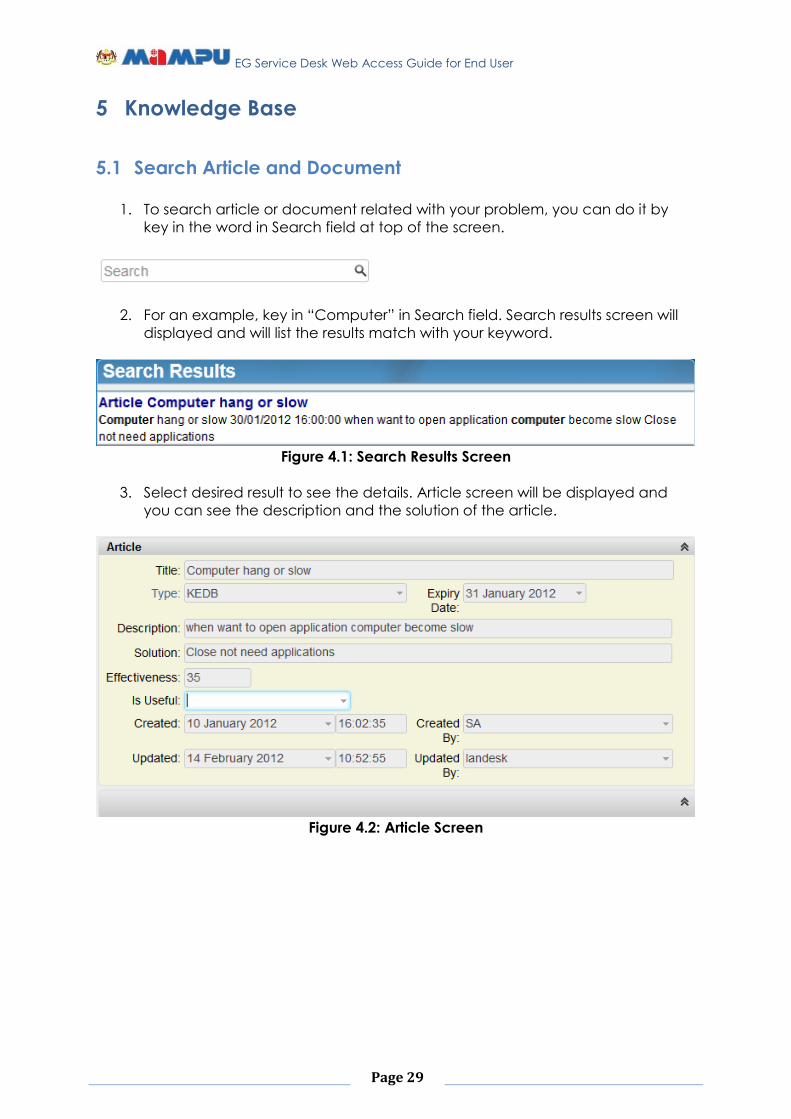
1. To search article or document related with your problem, you can do it by
key in the word in Search field at top of the screen.
2. For an example, key in “Computer” in Search field. Search results screen will
displayed and will list the results match with your keyword.
Figure 4.1: Search Results Screen
3. Select desired result to see the details. Article screen will be displayed and
you can see the description and the solution of the article.
Figure 4.2: Article Screen

EG Service Desk Web Access Guide for End User
Page 30
6 Preferences
6.1 Set Time Zone
1. To set time zone, go to the Preferences icon at Top-Right of the screen.
Click it and My Preferences screen will be displayed.
2. At “Time zone” field, select “(UTC+08:00) Kuala Lumpur, Singapore” for your
time zone.
3. Please note that the time zone you selected will affect date and time of your
ticket. Please choose the Time Zone wisely.
4. Click “Save and Close” to save and close the change you had made.
Figure 5.1: Time zone selection
6.2 Change Password
1. To set new password, go to the Preferences icon at Top Right of the
screen. Click it and My Preferences screen will be displayed.
2. There will be button “Change Password” available. Click it and Change
Password window displayed.
3. Key in your current password in “Current Password” field. In “New Password”
and “Confirm Password” field, key in your new password.
4. Click button “OK” to save the change you made.
Figure 5.2: Change Password window

EG Service Desk Web Access Guide for End User
Page 31
6.3 Log Off from EG Service Desk system
1. To log out from EG Service Desk system, there is Log Off icon at Top-Right of
the screen. Click on it and you will be log out from the system.
EG Service Desk Web Access Guide for End User
Page 32
7 Contact Us
EG Service Desk can be contacted via these channels.
7.1 Email
You can send email to [email protected] either to create ticket/request
or ask the ticket status.
7.1.1 Send email to create Incident ticket
In your email’s subject, please insert this “INC:” keyword at the beginning. With this
keyword, a new Incident will be created in EG Service Desk system.
For an example: INC: summary of your problem/incident
7.1.2 Send email to create Service Request ticket
In your email’s subject, please insert this “SRQ:” keyword at beginning. With this
keyword, a new Service Request will be created in EG Service Desk system.
For an example: SRQ: summary of your request
7.2 Telephone
EG Service Desk Agent can be contacted via these numbers.
+603-8892 4000 (General Line)
+603-8892 4001 (EG Service Desk)
+603-8892 4002 (Portal myGovernment)
7.3 SMS (Short Messaging Services)
With SMS, you can create Incident or Service Request and also can check the
current status for your ticket.
7.3.1 SMS Create Incident
MAMPU HELPDESK ADUAN <summary of your problem/incident> and send to 15888.
7.3.2 SMS Create Service Request
MAMPU HELPDESK MOHON <summary of your request> and send to 15888.
EG Service Desk Web Access Guide for End User
Page 33
7.3.3 SMS Check Status of Ticket
MAMPU HELPDESK SEMAK <ticket no.> and send to 15888.