Embed Size (px)
Citation preview

INSTALLATION MANUAL
EK-Quantum Kinetic TBE DDC PWMPUMP & RESERVOIR COMBO
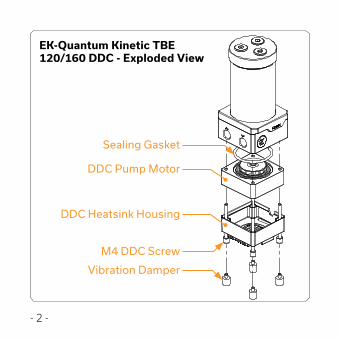
- 2 -
Sealing Gasket
EK-Quantum Kinetic TBE 120/160 DDC - Exploded View
DDC Pump Motor
DDC Heatsink Housing
M4 DDC Screw
Vibration Damper
- 3 -
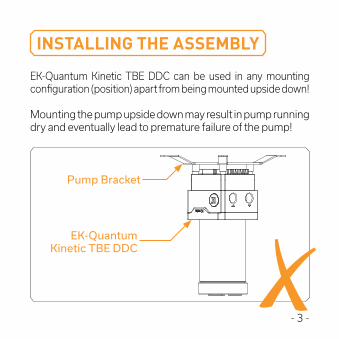
EK-Quantum Kinetic TBE DDC can be used in any mounting configuration (position) apart from being mounted upside down!
Mounting the pump upside down may result in pump running dry and eventually lead to premature failure of the pump!
INSTALLING THE ASSEMBLY
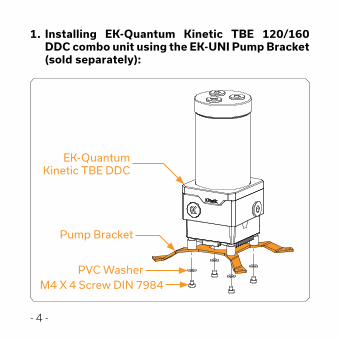
EK-Quantum Kinetic TBE DDC
Pump Bracket
- 4 -
EK-Quantum Kinetic TBE DDC
Pump Bracket
PVC Washer
1. Installing EK-Quantum Kinetic TBE 120/160 DDC combo unit using the EK-UNI Pump Bracket (sold separately):
M4 X 4 Screw DIN 7984
- 5 -
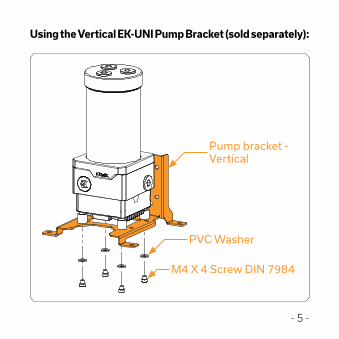
Pump bracket - Vertical
Using the Vertical EK-UNI Pump Bracket (sold separately):
PVC Washer
M4 X 4 Screw DIN 7984
- 6 -
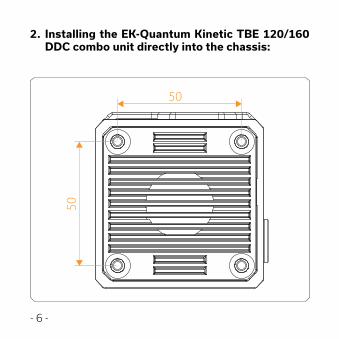
2. Installing the EK-Quantum Kinetic TBE 120/160 DDC combo unit directly into the chassis:
50
50
- 7 -
The assembly can be mounted on any flat surface inside your computer chassis. You must drill four (4) 4.2 mm holes using the power drill in a 50 x 50 mm square pattern. Please follow these steps:- Screw on the Vibration Dampers on DDC Screws- Drill four (4) 4.2 mm holes into the chassis - Use enclosed M4 x 4 mm screws and PVC washers to
secure the reservoir to the chassis
CAUTION Mounting holes pattern (Not in 1:1 scale)
- 8 -
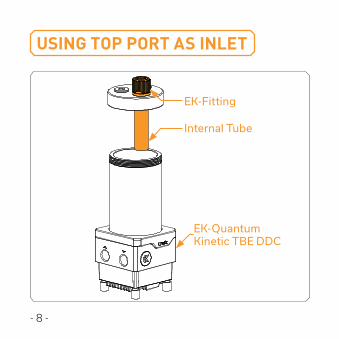
USING TOP PORT AS INLET
Internal Tube
EK-Quantum Kinetic TBE DDC
EK-Fitting
- 9 -
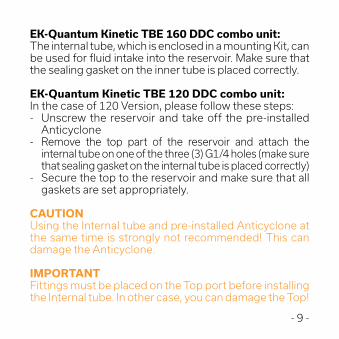
EK-Quantum Kinetic TBE 160 DDC combo unit:The internal tube, which is enclosed in a mounting Kit, can be used for fluid intake into the reservoir. Make sure that the sealing gasket on the inner tube is placed correctly.
EK-Quantum Kinetic TBE 120 DDC combo unit:In the case of 120 Version, please follow these steps: - Unscrew the reservoir and take off the pre-installed
Anticyclone- Remove the top part of the reservoir and attach the
internal tube on one of the three (3) G1/4 holes (make sure that sealing gasket on the internal tube is placed correctly)
- Secure the top to the reservoir and make sure that all gaskets are set appropriately.
CAUTION Using the Internal tube and pre-installed Anticyclone at the same time is strongly not recommended! This can damage the Anticyclone.
IMPORTANTFittings must be placed on the Top port before installing the Internal tube. In other case, you can damage the Top!

- 10 -
ATTACHING FITTINGS
INLET
OUTLET
EK-Plugs G1/4
- 11 -
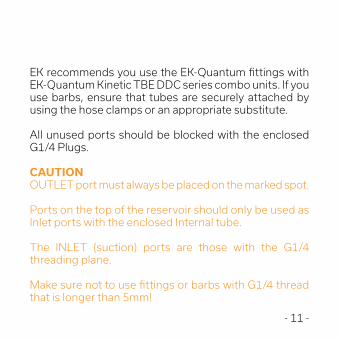
EK recommends you use the EK-Quantum fittings with EK-Quantum Kinetic TBE DDC series combo units. If you use barbs, ensure that tubes are securely attached by using the hose clamps or an appropriate substitute.
All unused ports should be blocked with the enclosed G1/4 Plugs.
CAUTION OUTLET port must always be placed on the marked spot.
Ports on the top of the reservoir should only be used as Inlet ports with the enclosed Internal tube.
The INLET (suction) ports are those with the G1/4 threading plane.
Make sure not to use fittings or barbs with G1/4 thread that is longer than 5mm!
- 12 -
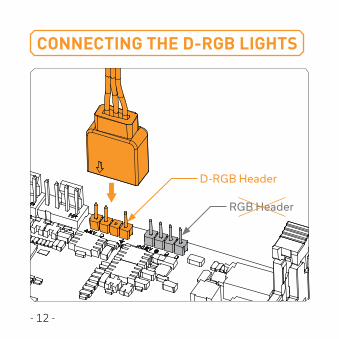
CONNECTING THE D-RGB LIGHTS
D-RGB Header
RGB Header

- 13 -
Plug the 3-pin connector from the EK-Quantum Kinetic TBE DDC to the D-RGB header on the motherboard. The LEDs will work if the pin layout on the header is +5V GRB.
Please ensure that the arrow on the connector is plugged into the +5V line, as indicated on your motherboard.
Failure to do so will damage your motherboard or the LED strip.
- 14 -
TESTING THE LOOP
To make sure the installation of EK components was successful, we recommend you perform a leak test for 24 hours.
When your loop is complete and filled with coolant, connect the pump to a PSU outside of your system. Do not connect the power to any of the other components.
Turn on the PSU and let the pump run continuously. It is usual for the coolant level to drop during this process as air collects in the reservoir.
Inspect all the parts of the loop, and in the case of coolant leaks, fix the issue, and repeat the testing process. Ensure that all hardware is dry before the system is powered on in order to prevent any damage.

For assistance please contact:http://support.ekwb.com/
EKWB d.o.o.Pod lipami 181218 KomendaSlovenia - EU
SUPPORT AND SERVICE
SOCIAL MEDIA