Embed Size (px)
Citation preview
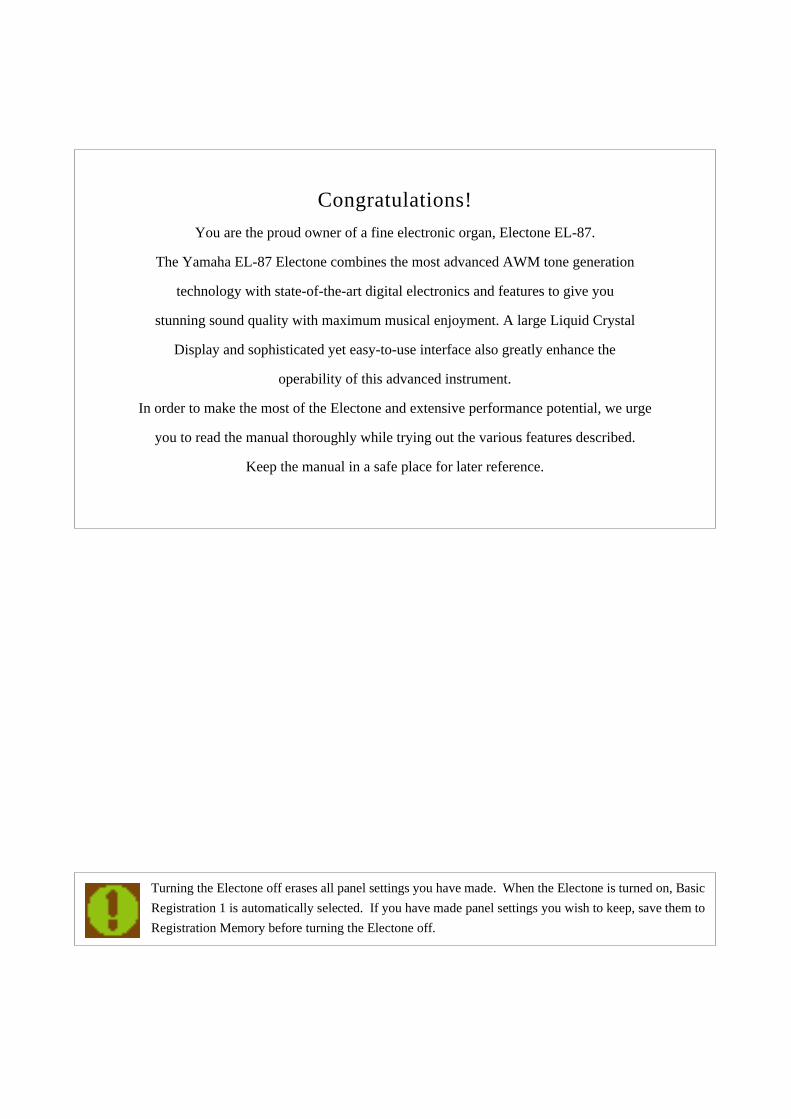
Turning the Electone off erases all panel settings you have made. When the Electone is turned on, Basic
Registration 1 is automatically selected. If you have made panel settings you wish to keep, save them to
Registration Memory before turning the Electone off.
Congratulations!
You are the proud owner of a fine electronic organ, Electone EL-87.
The Yamaha EL-87 Electone combines the most advanced AWM tone generation
technology with state-of-the-art digital electronics and features to give you
stunning sound quality with maximum musical enjoyment. A large Liquid Crystal
Display and sophisticated yet easy-to-use interface also greatly enhance the
operability of this advanced instrument.
In order to make the most of the Electone and extensive performance potential, we urge
you to read the manual thoroughly while trying out the various features described.
Keep the manual in a safe place for later reference.
1
Table of ContentsPanel Layout........................................2
Main Features......................................5
1 Quick Introductory Guide...............6
1 Getting Started.............................................. 62 Basic Registrations ....................................... 73 Registration Menu Disk................................ 84 Basic Operation .......................................... 155 Using the LCD Display .............................. 166 Voice List................................................... 20
2 Voice Sections ................................22
1 Selecting Voices from the Panel ................. 222 Selecting Voices from the Dotted Buttons.. 253 Voice Menus .............................................. 27
3 Flute Voices (Organ Sounds).........32
1 Creating Flute Voices ................................. 322 Save to User Flute Voice ............................ 343 Using Preset and User Voices..................... 35
4 Voice Controls and Effects ............36
1 Selecting from Voice Condition Pages ....... 37[PAGE 1] .................................................... 37(1) Touch Tone.......................................... 37(2) Feet ...................................................... 38(3) Effect (On/Off)..................................... 38(4) Pan ....................................................... 38(5) Brilliance.............................................. 38(6) Volume ................................................ 38
[PAGE 2] .................................................... 39(1) Vibrato ................................................. 39(2) Touch Vibrato ...................................... 39(3) Slide (Lead Voice Only)....................... 39(4) Tune (Lead Voice Only)....................... 39
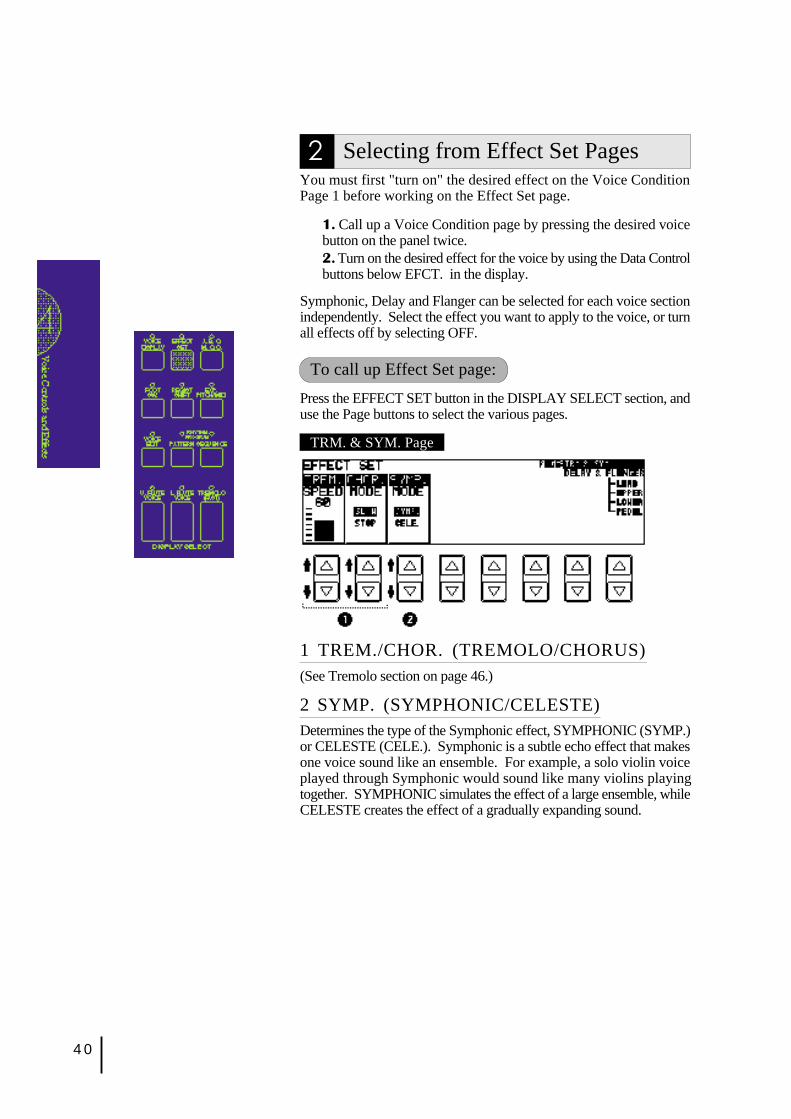
2 Selecting from Effect Set Pages.................. 40(1) Tremolo/Chorus ................................... 40(2) Symphonic/Celeste............................... 40(3) Delay.................................................... 41(4) Flanger................................................. 41
3 Selecting from the Panel............................. 42(1) Reverb.................................................. 42(2) Sustain.................................................. 45(3) Tremolo/Chorus ................................... 46
5 Rhythm and Accompaniment .......49
1 Selecting Rhythms from the Panel.............. 492 Rhythm Condition Page.............................. 523 Dotted Buttons and User Rhythms.............. 534 Rhythm Menus........................................... 545 Automatic Accompaniment-Auto Bass Chord
(A.B.C.)...................................................... 566 Accompaniment Controls........................... 587 Keyboard Percussion .................................. 598 Melody On Chord (M.O.C.) ....................... 61
6 Registration Memory.....................62
1 Storing Registrations .................................. 622 Selecting Registrations ............................... 623 Saving the Registration Data to Disk .......... 634 Registration Shift........................................ 64
7 Music Disk Recorder .....................68
1 Precautions ................................................. 682 Formatting a Disk....................................... 703 Recording ................................................... 714 Recording Registrations (and Bulk Data) ... 775 Recalling Recorded Registrations
(and BulkData) ........................................... 786 Replacing Registrations.............................. 787 Playback..................................................... 798 Other Functions.......................................... 81
8 Voice Edit.......................................88
1 Editing a Voice........................................... 882 Saving Your New Voice............................. 933 Quitting Voice Edit..................................... 944 Recalling an Edited Voice .......................... 945 Selecting Voices from a Voice Disk (Optional).. 956 Voice Editing Basics .................................. 96
9 Rhythm Pattern Program and Rhythm Sequence Program .108
Outline of the Rhythm Programming Operation ... 1081 Rhythm Pattern Program .......................... 109
(1) Entering Rhythm Pattern Program...... 109(2) Percussion Sounds Used for
Rhythm Pattern Program.................... 111(3) Step Write and Real Time Write ........ 112(4) Selecting Step Write or
Real Time Write Operation ................ 112(5) Setting the Beat/Quantize Values....... 112(6) Entering Percussion Sounds
to a Rhythm Pattern............................ 113(7) Editing with Step Write...................... 114(8) Editing with Real Time Write ............ 118(9) Selecting Accompaniment Patterns.... 119
(10) Saving Rhythm Patterns..................... 120(11) Quitting Rhythm Pattern Program...... 121(12) Recalling User Rhythm Patterns......... 122
2 Rhythm Sequence Program ...................... 123(1) Selecting a Sequence.......................... 123(2) Programming a Sequence................... 124(3) Quitting Rhythm Sequence Program.. 127(4) Playing Rhythm Sequences................ 127(5) Playing All Sequences in Order.......... 128
10 Footswitches, Knee Leverand Expression Pedals................130
1 Footswitch................................................ 1302 Knee Lever............................................... 1323 Expression Pedals..................................... 134
11 Transpose And Pitch Controls ..136
12 MIDI...........................................137
13 Accessory Jacks and Controls ...139
14 Appendix ....................................140
MIDI............................................................. 140MIDI Data Format ........................................ 141MIDI Implementation Chart ......................... 145Troubleshooting............................................ 146Specifications................................................ 149Index............................................................. 150
2
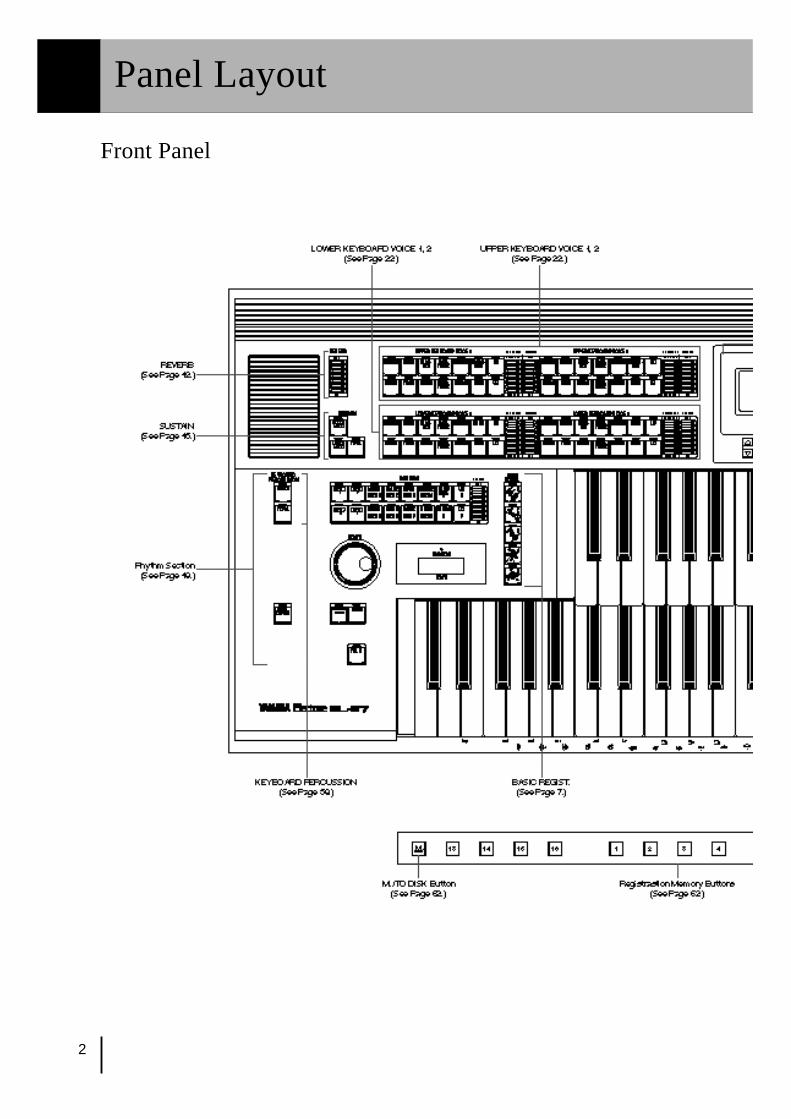
Panel Layout
Front Panel
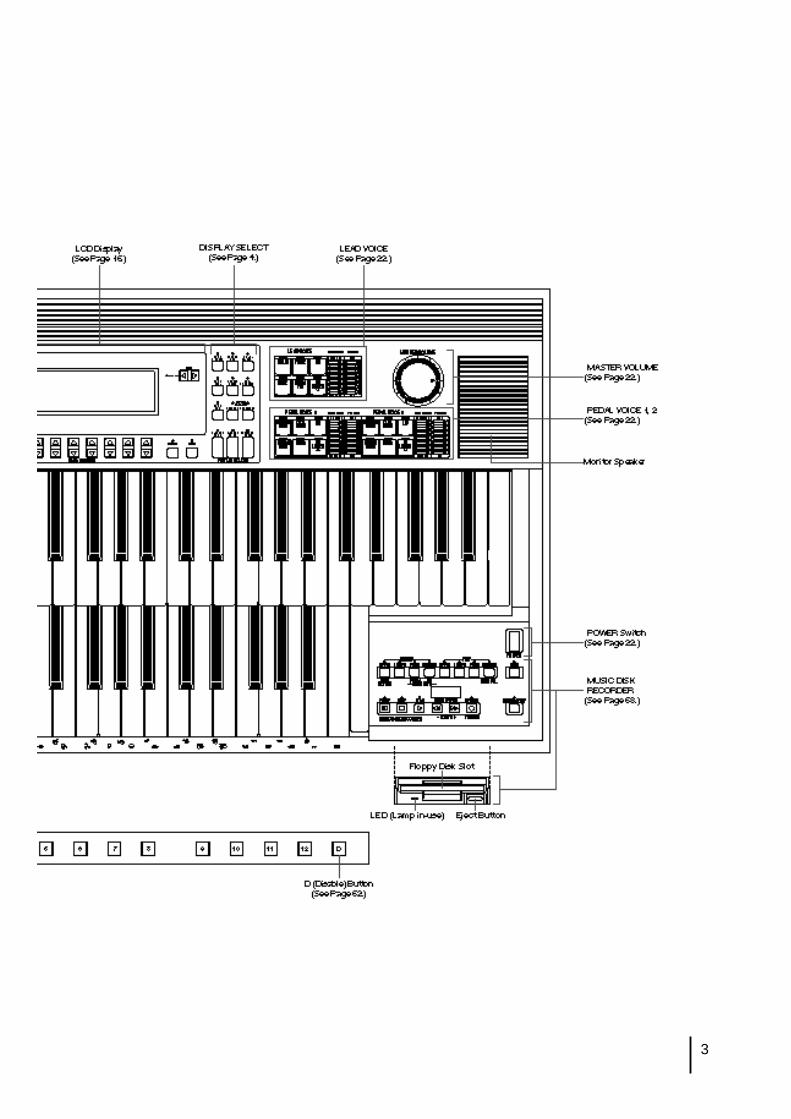
3
4
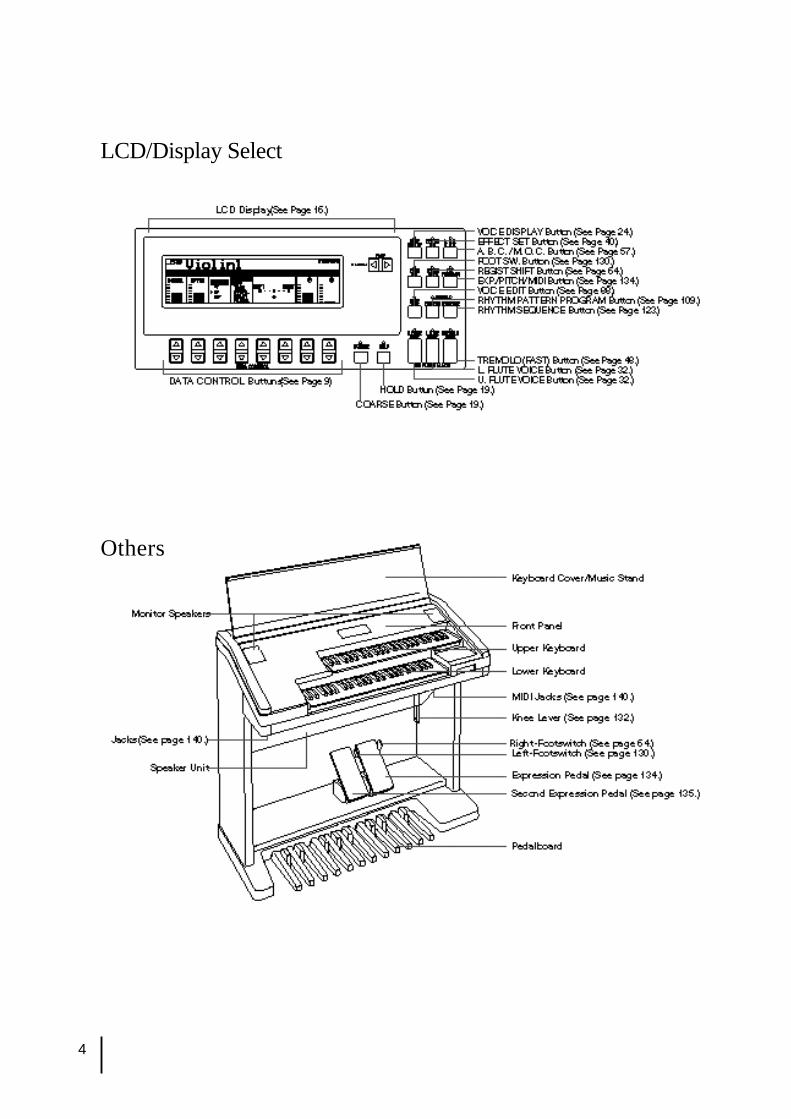
LCD/Display Select
Others
5
Main FeaturesYour Yamaha Electone is packed with many sophisticated functions. Yet is amazinglyeasy to use. The main features are briefly described here so that you can quicklyunderstand the capabilities of your Electone.Included among the main features are:
1 Astoundingly True-to-life SoundsThe new AWM (Advanced Wave Memory) and FM (Frequency Modulation) tone generationtechnologies combined with authentic touch response for individual instrument voices, makethis Electone a truly expressive musical instrument. (See page 22.)
2 Limitless Variety of Organ SoundsThe Electone also has separate voice sections that feature classic organ sounds-from jazzand pop to church and theater-and lets you easily create your own organ sounds by adjustingthe volumes of the various flute footages. (See page 32.)
3 Original Voice CreationThe Electone also provides easy-to-use voice editing tools for manipulating the sophisticatedAWM and FM tone generation technologies, allowing you to create your own originalElectone voices. (See page 88.)
4 Dynamic and Programmable Rhythm PatternsThe Rhythm section of the Electone features authentic drum and percussion sounds, usedby expert rhythm programmers in creating a total of 66 rhythm patterns, ranging across allstyles of music. (See page 49.)Along with the Keyboard Percussion function, which lets you play percussion sounds fromthe keyboard, the Rhythm Pattern Programmer and Rhythm Sequence Programmer let yourecord your own rhythm patterns and connect them to make songs. (See page 108.)
5 Wide Variety of EffectsElectone voices can also be enhanced with a full range of high-quality effects, ranging fromTremolo (for reproducing the sound of a rotating speaker) and Reverb to Flanger and Delay.(See page 36.)
6 Recording of Performances with the Music Disk RecorderThe Electone also features a Music Disk Recorder for recording your registrations andperformances. The recording is completely digital and is stored to disk, which means thatno matter how many times you play back the recording, it will always sound exactly thesame as the original performance. (See page 68.)
7 Large LCD for Systematic, Intuitive OperationThe large LCD display provides comprehensive and easy-to-understand control over virtuallyall of the operations of the Electone. (See page 16.)

6
1 Getting Started
1 Plug the power cord in to an appropriate electrical outlet.
1 Quick Introductory Guide
Whether you are an advanced Electone performer or have never touched an electronic keyboard inyour life, we recommend that you take the time to go through this basic section. It shows you in thesimplest possible manner how to start playing your Electone. The basic operations and functionsthat you learn in this section will also be important when you later use the Electone's more advancedfeatures.
2 Turn on the Electone by pressing the POWER switch.
When you turn on the Electone, the following displays willappear one after the other in the LCD display:
This last display shows the currently assigned voice settings foreach voice section, as well as the overall balance between theUpper and Lower voices.
When the Electone is turned on, Basic Registration 1 isautomatically selected.
Yamaha products are manufacturedspecifically for the supply voltage in thearea where they are to be sold. If youshould move, or if any doubt exists aboutthe supply voltage, please consult with aqualified technician.
7
Turning the Electone off erases all panelsettings you have made. When theElectone is turned on, Basic Registration1 is automatically selected.
If you have made panel settings you wish to keep, save them toRegistration Memory (see p. 62) before turning the Electone off.You can, however, restore the panel settings that were made beforethe Electone was last turned off. See page 67 for more information.
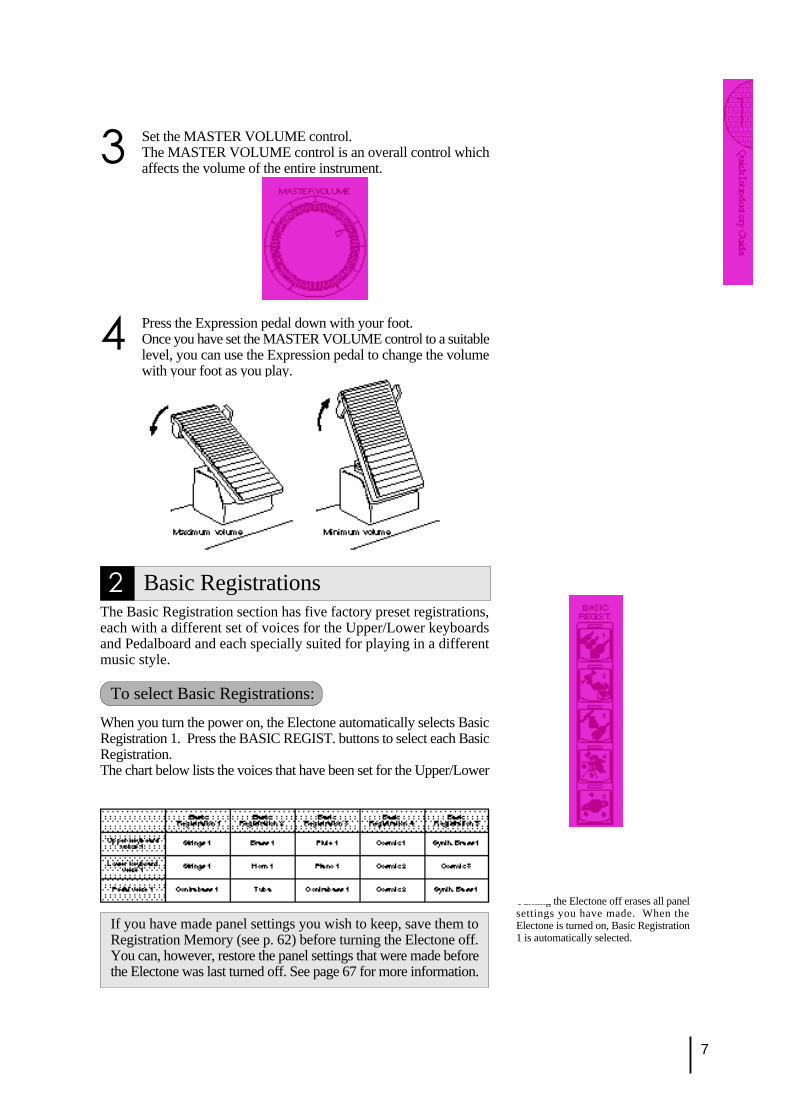
3 Set the MASTER VOLUME control.The MASTER VOLUME control is an overall control whichaffects the volume of the entire instrument.
4 Press the Expression pedal down with your foot.Once you have set the MASTER VOLUME control to a suitablelevel, you can use the Expression pedal to change the volumewith your foot as you play.
2 Basic RegistrationsThe Basic Registration section has five factory preset registrations,each with a different set of voices for the Upper/Lower keyboardsand Pedalboard and each specially suited for playing in a differentmusic style.
To select Basic Registrations:
When you turn the power on, the Electone automatically selects BasicRegistration 1. Press the BASIC REGIST. buttons to select each BasicRegistration.The chart below lists the voices that have been set for the Upper/Lowerkeyboards and Pedalboard in each of the five Basic Registrations.
8
2 Press the Page button to select the various menu "pages" ofregistrations available on the disk.
When the page numbers are displayed at the top right corner,you can select the pages by pressing the Page buttons, [>] toselect next page and [<] to select previous page.
NOTE:
See page 68 for more information on theMusic Disk Recorder.
NOTE:
See page 10 for the complete list of theRegistration Menus.
NOTE:
While you are in the Voice Edit mode orRhythm Pattern/Sequence Programmode, the Registration Menus cannot bedisplayed on the LCD.
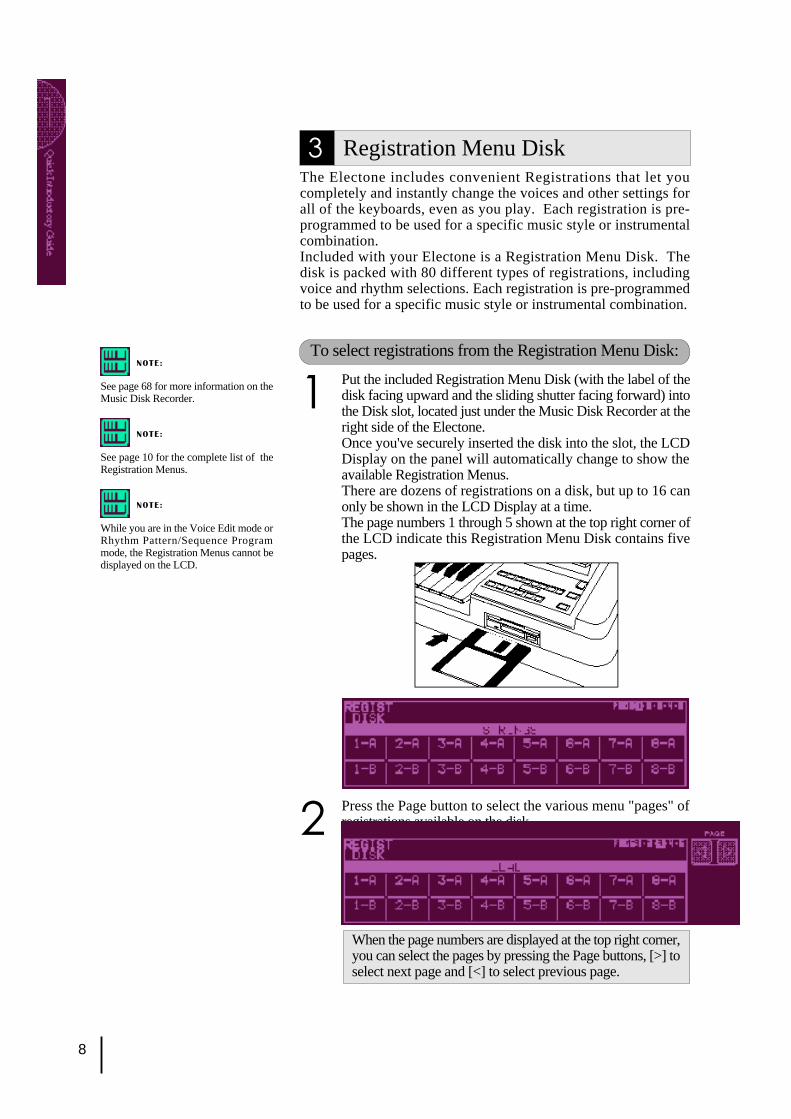
3 Registration Menu DiskThe Electone includes convenient Registrations that let youcompletely and instantly change the voices and other settings forall of the keyboards, even as you play. Each registration is pre-programmed to be used for a specific music style or instrumentalcombination.Included with your Electone is a Registration Menu Disk. Thedisk is packed with 80 different types of registrations, includingvoice and rhythm selections. Each registration is pre-programmedto be used for a specific music style or instrumental combination.
To select registrations from the Registration Menu Disk:
1 Put the included Registration Menu Disk (with the label of thedisk facing upward and the sliding shutter facing forward) intothe Disk slot, located just under the Music Disk Recorder at theright side of the Electone.Once you've securely inserted the disk into the slot, the LCDDisplay on the panel will automatically change to show theavailable Registration Menus.There are dozens of registrations on a disk, but up to 16 canonly be shown in the LCD Display at a time.The page numbers 1 through 5 shown at the top right corner ofthe LCD indicate this Registration Menu Disk contains fivepages.
9
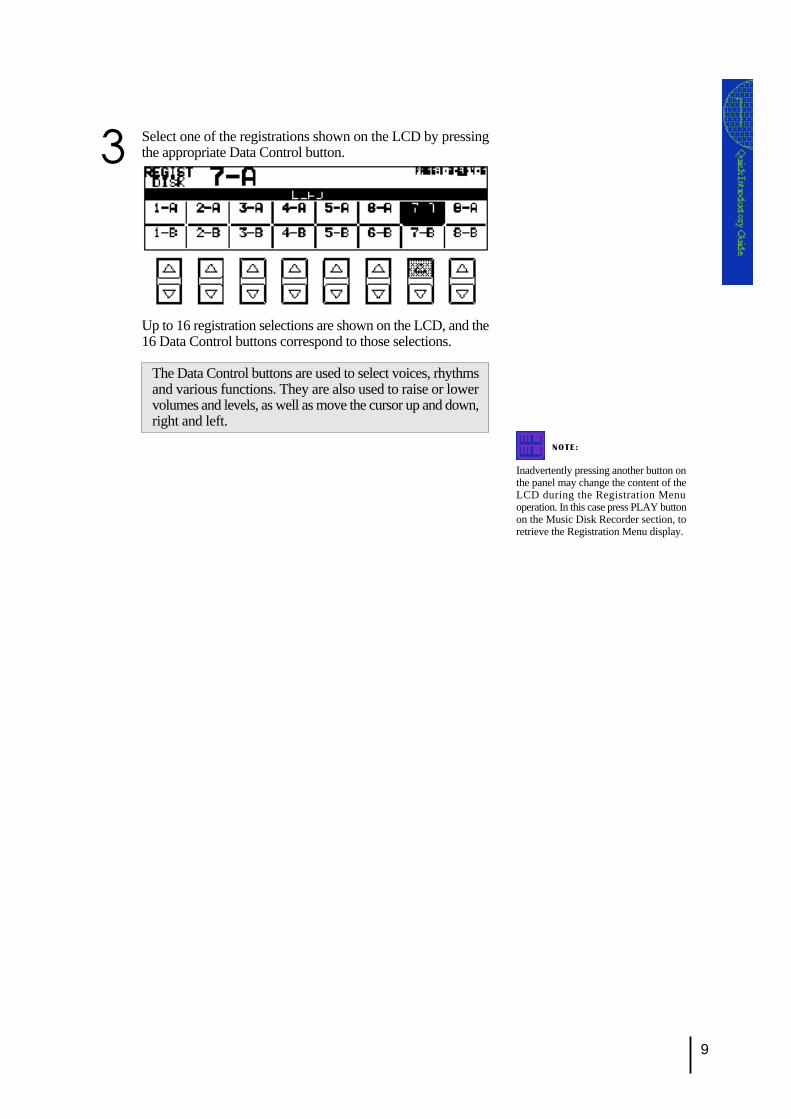
3 Select one of the registrations shown on the LCD by pressingthe appropriate Data Control button.
Up to 16 registration selections are shown on the LCD, and the16 Data Control buttons correspond to those selections.
The Data Control buttons are used to select voices, rhythmsand various functions. They are also used to raise or lowervolumes and levels, as well as move the cursor up and down,right and left.
NOTE:
Inadvertently pressing another button onthe panel may change the content of theLCD during the Registration Menuoperation. In this case press PLAY buttonon the Music Disk Recorder section, toretrieve the Registration Menu display.
10
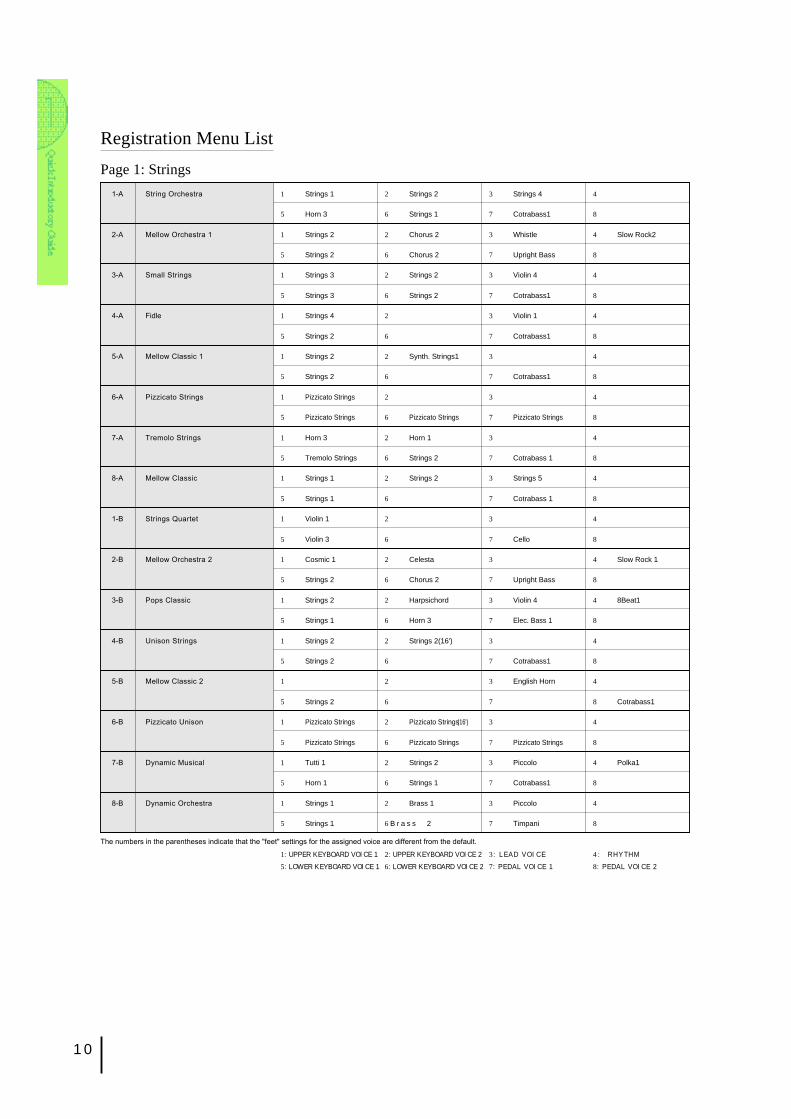
Registration Menu List
1: UPPER KEYBOARD VOICE 1 2: UPPER KEYBOARD VOICE 2 3: LEAD VOICE 4 : RHYTHM
5: LOWER KEYBOARD VOICE 1 6: LOWER KEYBOARD VOICE 2 7: PEDAL VOICE 1 8: PEDAL VOICE 2
Page 1: Strings
The numbers in the parentheses indicate that the "feet" settings for the assigned voice are different from the default.
1-A String Orchestra 1 Strings 1 2 Strings 2 3 Strings 4 4
5 Horn 3 6 Strings 1 7 Cotrabass1 8
2-A Mellow Orchestra 1 1 Strings 2 2 Chorus 2 3 Whistle 4 Slow Rock2
5 Strings 2 6 Chorus 2 7 Upright Bass 8
3-A Small Strings 1 Strings 3 2 Strings 2 3 Violin 4 4
5 Strings 3 6 Strings 2 7 Cotrabass1 8
4-A Fidle 1 Strings 4 2 3 Violin 1 4
5 Strings 2 6 7 Cotrabass1 8
5-A Mellow Classic 1 1 Strings 2 2 Synth. Strings1 3 4
5 Strings 2 6 7 Cotrabass1 8
6-A Pizzicato Strings 1 Pizzicato Strings 2 3 4
5 Pizzicato Strings 6 Pizzicato Strings 7 Pizzicato Strings 8
7-A Tremolo Strings 1 Horn 3 2 Horn 1 3 4
5 Tremolo Strings 6 Strings 2 7 Cotrabass 1 8
8-A Mellow Classic 1 Strings 1 2 Strings 2 3 Strings 5 4
5 Strings 1 6 7 Cotrabass 1 8
1-B Strings Quartet 1 Violin 1 2 3 4
5 Violin 3 6 7 Cello 8
2-B Mellow Orchestra 2 1 Cosmic 1 2 Celesta 3 4 Slow Rock 1
5 Strings 2 6 Chorus 2 7 Upright Bass 8
3-B Pops Classic 1 Strings 2 2 Harpsichord 3 Violin 4 4 8Beat1
5 Strings 1 6 Horn 3 7 Elec. Bass 1 8
4-B Unison Strings 1 Strings 2 2 Strings 2(16') 3 4
5 Strings 2 6 7 Cotrabass1 8
5-B Mellow Classic 2 1 2 3 English Horn 4
5 Strings 2 6 7 8 Cotrabass1
6-B Pizzicato Unison 1 Pizzicato Strings 2 Pizzicato Strings(16') 3 4
5 Pizzicato Strings 6 Pizzicato Strings 7 Pizzicato Strings 8
7-B Dynamic Musical 1 Tutti 1 2 Strings 2 3 Piccolo 4 Polka1
5 Horn 1 6 Strings 1 7 Cotrabass1 8
8-B Dynamic Orchestra 1 Strings 1 2 Brass 1 3 Piccolo 4
5 Strings 1 6 B r a s s 2 7 Timpani 8
11
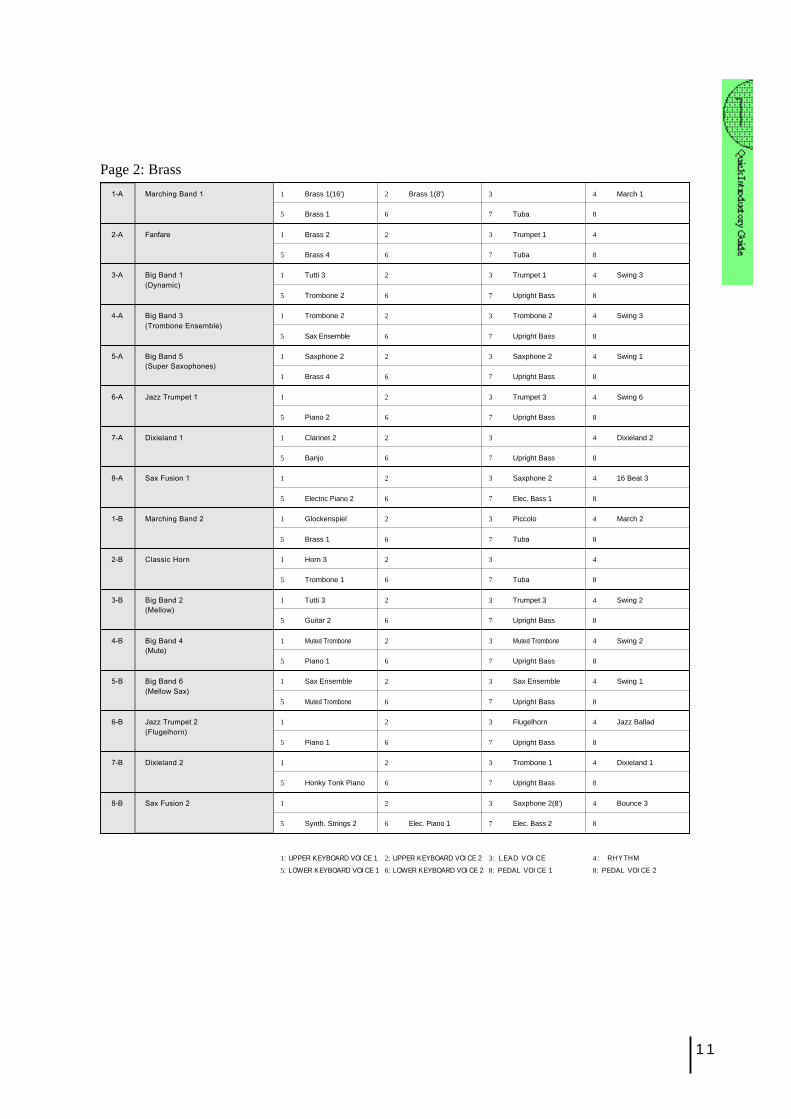
Page 2: Brass
1: UPPER KEYBOARD VOICE 1 2: UPPER KEYBOARD VOICE 2 3: LEAD VOICE 4 : RHYTHM
5: LOWER KEYBOARD VOICE 1 6: LOWER KEYBOARD VOICE 2 8: PEDAL VOICE 1 8: PEDAL VOICE 2
1-A Marching Band 1 1 Brass 1(16') 2 Brass 1(8') 3 4 March 1
5 Brass 1 6 7 Tuba 8
2-A Fanfare 1 Brass 2 2 3 Trumpet 1 4
5 Brass 4 6 7 Tuba 8
3-A Big Band 1 1 Tutti 3 2 3 Trumpet 1 4 Swing 3(Dynamic)
5 Trombone 2 6 7 Upright Bass 8
4-A Big Band 3 1 Trombone 2 2 3 Trombone 2 4 Swing 3(Trombone Ensemble)
5 Sax Ensemble 6 7 Upright Bass 8
5-A Big Band 5 1 Saxphone 2 2 3 Saxphone 2 4 Swing 1(Super Saxophones)
1 Brass 4 6 7 Upright Bass 8
6-A Jazz Trumpet 1 1 2 3 Trumpet 3 4 Swing 6
5 Piano 2 6 7 Upright Bass 8
7-A Dixieland 1 1 Clarinet 2 2 3 4 Dixieland 2
5 Banjo 6 7 Upright Bass 8
8-A Sax Fusion 1 1 2 3 Saxphone 2 4 16 Beat 3
5 Electric Piano 2 6 7 Elec. Bass 1 8
1-B Marching Band 2 1 Glockenspiel 2 3 Piccolo 4 March 2
5 Brass 1 6 7 Tuba 8
2-B Classic Horn 1 Horn 3 2 3 4
5 Trombone 1 6 7 Tuba 8
3-B Big Band 2 1 Tutti 3 2 3 Trumpet 3 4 Swing 2(Mellow)
5 Guitar 2 6 7 Upright Bass 8
4-B Big Band 4 1 Muted Trombone 2 3 Muted Trombone 4 Swing 2(Mute)
5 Piano 1 6 7 Upright Bass 8
5-B Big Band 6 1 Sax Ensemble 2 3 Sax Ensemble 4 Swing 1(Mellow Sax)
5 Muted Trombone 6 7 Upright Bass 8
6-B Jazz Trumpet 2 1 2 3 Flugelhorn 4 Jazz Ballad(Flugelhorn)
5 Piano 1 6 7 Upright Bass 8
7-B Dixieland 2 1 2 3 Trombone 1 4 Dixieland 1
5 Honky Tonk Piano 6 7 Upright Bass 8
8-B Sax Fusion 2 1 2 3 Saxphone 2(8') 4 Bounce 3
5 Synth. Strings 2 6 Elec. Piano 1 7 Elec. Bass 2 8
12
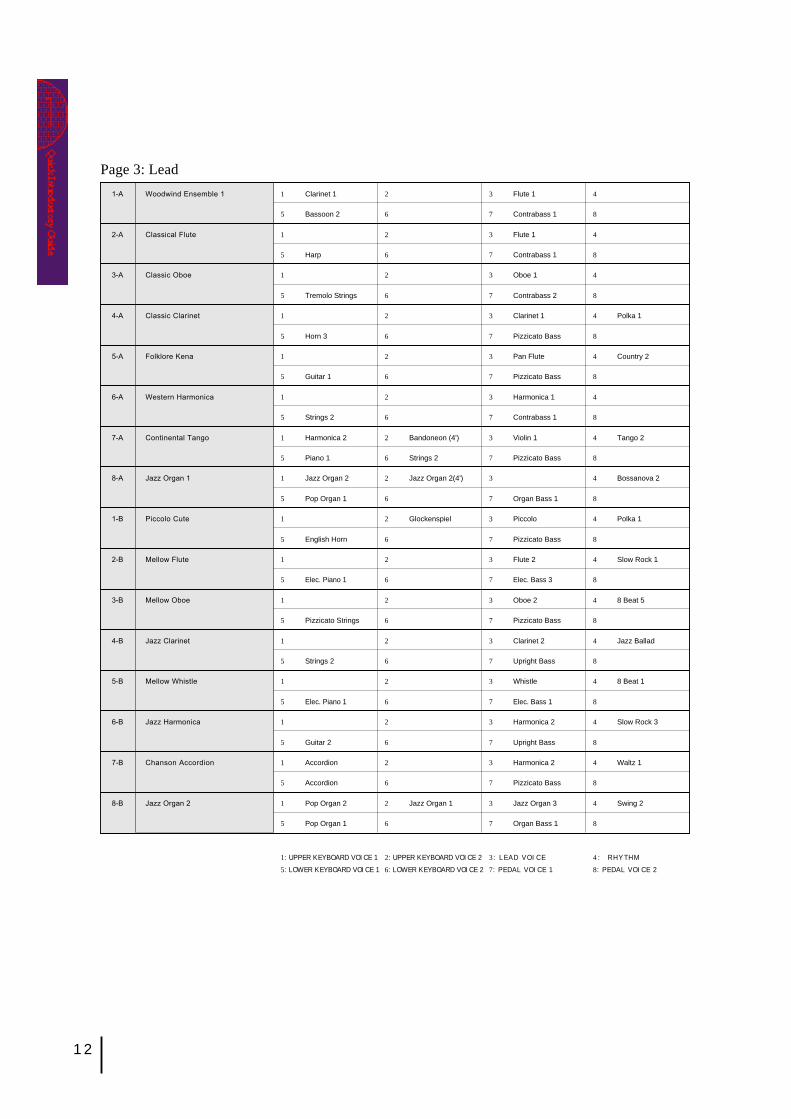
Page 3: Lead
1: UPPER KEYBOARD VOICE 1 2: UPPER KEYBOARD VOICE 2 3: LEAD VOICE 4 : RHYTHM
5: LOWER KEYBOARD VOICE 1 6: LOWER KEYBOARD VOICE 2 7: PEDAL VOICE 1 8: PEDAL VOICE 2
1-A Woodwind Ensemble 1 1 Clarinet 1 2 3 Flute 1 4
5 Bassoon 2 6 7 Contrabass 1 8
2-A Classical Flute 1 2 3 Flute 1 4
5 Harp 6 7 Contrabass 1 8
3-A Classic Oboe 1 2 3 Oboe 1 4
5 Tremolo Strings 6 7 Contrabass 2 8
4-A Classic Clarinet 1 2 3 Clarinet 1 4 Polka 1
5 Horn 3 6 7 Pizzicato Bass 8
5-A Folklore Kena 1 2 3 Pan Flute 4 Country 2
5 Guitar 1 6 7 Pizzicato Bass 8
6-A Western Harmonica 1 2 3 Harmonica 1 4
5 Strings 2 6 7 Contrabass 1 8
7-A Continental Tango 1 Harmonica 2 2 Bandoneon (4') 3 Violin 1 4 Tango 2
5 Piano 1 6 Strings 2 7 Pizzicato Bass 8
8-A Jazz Organ 1 1 Jazz Organ 2 2 Jazz Organ 2(4') 3 4 Bossanova 2
5 Pop Organ 1 6 7 Organ Bass 1 8
1-B Piccolo Cute 1 2 Glockenspiel 3 Piccolo 4 Polka 1
5 English Horn 6 7 Pizzicato Bass 8
2-B Mellow Flute 1 2 3 Flute 2 4 Slow Rock 1
5 Elec. Piano 1 6 7 Elec. Bass 3 8
3-B Mellow Oboe 1 2 3 Oboe 2 4 8 Beat 5
5 Pizzicato Strings 6 7 Pizzicato Bass 8
4-B Jazz Clarinet 1 2 3 Clarinet 2 4 Jazz Ballad
5 Strings 2 6 7 Upright Bass 8
5-B Mellow Whistle 1 2 3 Whistle 4 8 Beat 1
5 Elec. Piano 1 6 7 Elec. Bass 1 8
6-B Jazz Harmonica 1 2 3 Harmonica 2 4 Slow Rock 3
5 Guitar 2 6 7 Upright Bass 8
7-B Chanson Accordion 1 Accordion 2 3 Harmonica 2 4 Waltz 1
5 Accordion 6 7 Pizzicato Bass 8
8-B Jazz Organ 2 1 Pop Organ 2 2 Jazz Organ 1 3 Jazz Organ 3 4 Swing 2
5 Pop Organ 1 6 7 Organ Bass 1 8

13
Page 4: Decay
1: UPPER KEYBOARD VOICE 1 2: UPPER KEYBOARD VOICE 2 3: LEAD VOICE 4 : RHYTHM
5: LOWER KEYBOARD VOICE 1 6: LOWER KEYBOARD VOICE 2 7: PEDAL VOICE 1 8: PEDAL VOICE 2
1-A Classic Piano 1 Piano 1 2 3 4
5 Piano 1 6 7 Pizzicato Bass 8
2-A Electric Piano 1 1 Elec. Piano 1 2 3 4 16 Beat 3
5 Elec. Piano 1 6 7 Elec. Bass 3 8
3-A Honky Tonk 1 Honky Tonk Piano 2 3 4 Dixieland 1
5 Honky Tonk Piano 6 7 Upright Bass 8
4-A Jazz Guitar 1 2 3 Guitar 2 4 Bossanova 1
5 Elec. PIano 1 6 Strings 2 7 Upright Bass 8
5-A Latin Mrimba 1 Marimba 2 3 4 Samba1
5 Piano 1 6 7 Upright Bass 8
6-A Romantic Music Box 1 Celesta 2 3 Whisle 4 Slow Rock 1
5 Chorus 2 6 Strings 2 7 Pizzicato Bass 8
7-A Guitar, Oldies 1 Elec. Guitar 2 2 3 4 8 Beat 3
5 Elec. Guitar 1 6 7 Elec. Bass 3 8
8-A Steel Drum 1 Steel Drum 2 3 4 Reggae 2
5 Pop Organ 1 6 7 Elec. Bass 1 8
1-B European Mellow Piano 1 Piano 2 2 3 4 8 Beat 5
5 Piano 2 6 Strings 2 7 Elec. Bass 1 8
2-B Electric Piano 2 1 Elec. Piano 2 2 3 4 8 Beat 1
5 Elec. Piano 2 2 7 Elec. Bass 3 8
3-B Western Guitar 1 2 3 Whistle 4 Country 1
5 Guitar 1 6 7 Upright Bass 8
4-B Classic Guitar 1 Guitar 3 2 3 4 Samba 2
5 Guitar 1 6 7 Upright Bass 8
5-B Canzone Mandolin 1 Mandolin 2 Chorus 3 3 Violin 3 4 Tango 1
5 Strings 4 6 7 Pizzicato Bass 8
6-B Xmas Chime 1 Synth. Chime 2 Chime 3 Glockenspiel 4 Polka 1
5 Theatre Organ 1 6 Chorus 2 7 Organ Bass 2 8
7-B Heavy Metal 1 Distorted Guitar 2 3 Distorted Guitar 4 Bounce 3
5 Elec. Guitar 1 6 7 Elec. Bass 2 8
8-B Japanese Tradition 1 Koto 2 3 4 Beguine
5 Strings 3 6 7 Contrabass1 8

14
Page 5: Synth
1: UPPER KEYBOARD VOICE 1 2: UPPER KEYBOARD VOICE 2 3: LEAD VOICE 4 : RHYTHM
5: LOWER KEYBOARD VOICE 1 6: LOWER KEYBOARD VOICE 2 7: PEDAL VOICE 1 8: PEDAL VOICE 2
1-A Contemporary 1 1 2 3 Soprano Sax 4 8 Beat 4(Fusion 1)
5 Elec. Guitar 2 6 7 Elec. Bass 3 8
2-A Contemporary 3 1 Synth. Brass 2 2 3 Synth. Brass 2 4 Dance Pop 2 (Dance Beat 1)
5 Elec. Guitar 1 6 7 Elec. Bass 2 8
3-A Contemporary 5 1 Synth. Brass 1 2 Glockenspiel 3 Recorder 4 8 Beat 4(Japanese New Music 1)
5 Elec. Piano 1 6 Synth. Strings 2 7 Elec. Bass 1 8
4-A Contemporary 7 1 Brass 3 2 Brass 3 (16') 3 Trumpet 4 4 Dance Pop 4(Dance Beat 3)
5 Elec. Guitar 1 6 7 Elec. Bass 2 8
5-A Contemporary 9 1 Elec. Guitar 1 2 3 Elec. Guitar 2 4 16 Beat Funk 1(Fusion 3)
5 Elec. Piano 1 6 Strings 2 7 Elec. Bass 2 8
6-A Synth Classic 1 1 Cosmic 7 2 Cosmic 1 3 Whistle (4') 4
5 Cosmic 5 6 Cosmic 1 7 Contrabass 2 8
7-A Contemporary 11 1 Cosmic 3 2 3 Cosmic 4 4 8 Beat 2 (Dance Beat 4)
5 Elec. Guitar 1 6 Synth. Strings 1 7 Elec. Bass 3 8
8-A Synth Brass Orchestra 1 1 Tutti 4 2 Brass 2 3 Synth. Brass 2 4 Bounce 3
5 Clavi (8') 6 Synth. Clarinet 7 Synth. Bass 3 8
1-B Contemporary 2 1 2 3 Saxphone 2 4 8 Beat 5 (Fusion 2)
5 Piano 2 6 7 Elec. Bass 1 8
2-B Contemporary 4 1 Synth. Brass 1 2 Synth. Brass 2 3 Synth. Brass 1 4 Dance Pop 3
(Dance Beat 2)
5 Cosmic 3 6 Elec. Guitar 1 7 Elec. Bass 2 8
3-B Contemporary 6 1 2 3 Whistle 4 8 Beat 5 (Japanese New Music 2)
5 PIano 2 6 7 Elec. Bass 1 8
4-B Contemporary 8 1 2 3 Flugelhorn 4 Jazz Waltz 2 (Waltz)
5 Elec. Piano 1 6 Cosmic 4 7 Elec. Bass 1 8
5-B Contemporary 10 1 2 Brass 2 3 Trumpet 3 4 16 Beat 4 (Fusion 4)
5 Elec. Guitar 1 6 7 Elec. Bass 2 8
6-B Synth Classic 2 1 Cosmic 6 2 Cosmic 3(4') 3 Marimba 4
5 Cosmic 9 6 Chorus 2 7 Contrabass 2 8
7-B Contemporary 12 1 Glockenspiel 2 Synth. Brass 1(16') 3 Synth. Bass 3 4 Dance Pop 1(Dance Beat 5)
5 Piano 2 6 Synth. Strings 1 7 Elec. Bass 2 8
8-B Synth Brass Orchestra 2 1 Brass 3 2 Synth. Brass 1 3 Trumpet 4 4 16 Beat 3
5 Elec. Piano 1 6 Cosmic 3 7 Elec. Bass 3 8
15
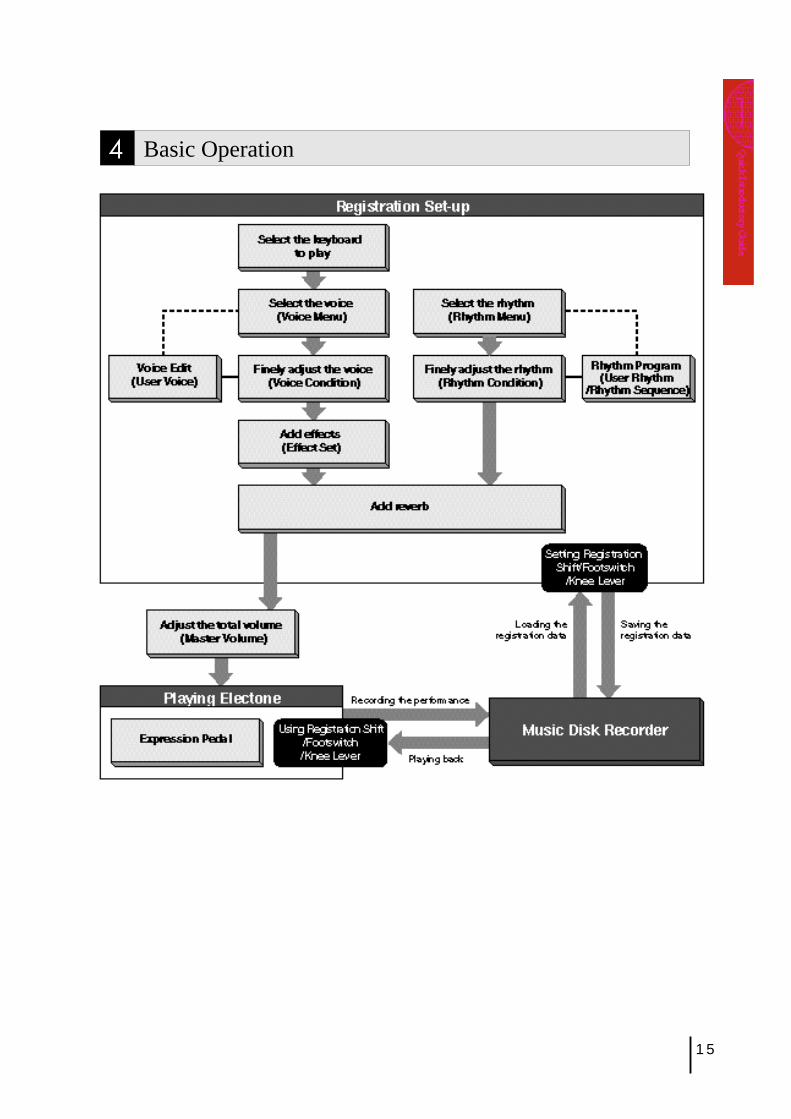
4 Basic Operation
16
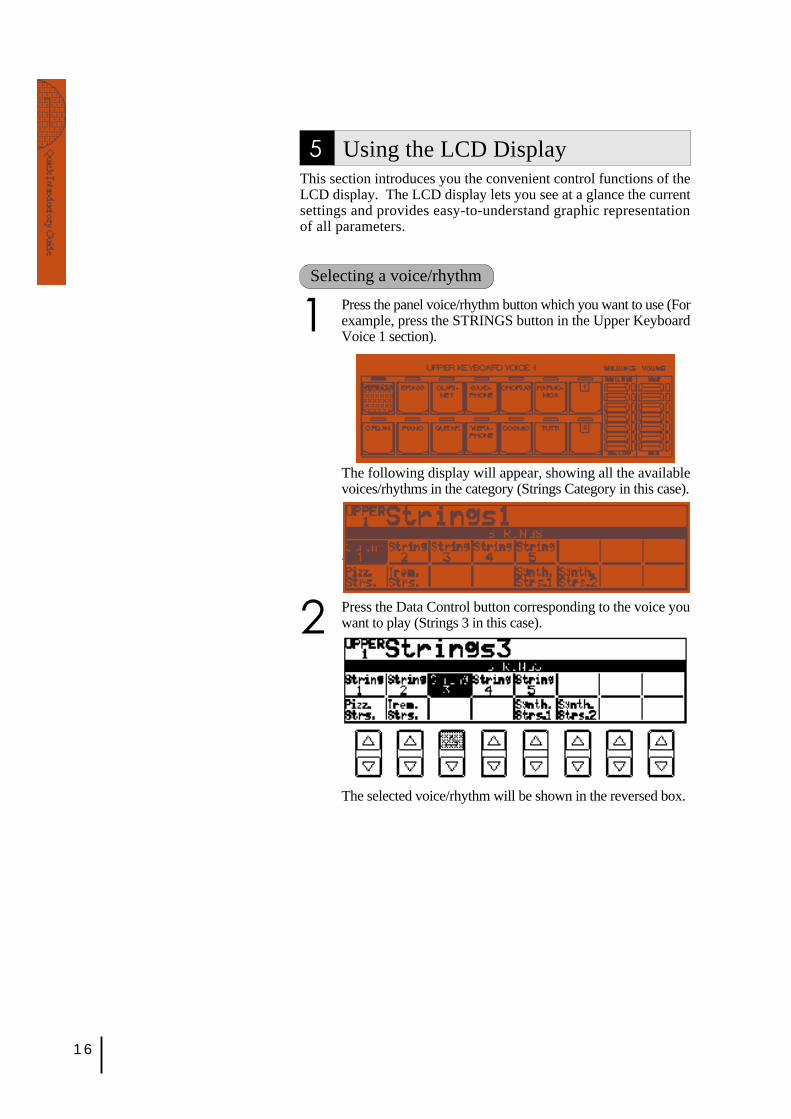
5 Using the LCD DisplayThis section introduces you the convenient control functions of theLCD display. The LCD display lets you see at a glance the currentsettings and provides easy-to-understand graphic representationof all parameters.
Selecting a voice/rhythm
1 Press the panel voice/rhythm button which you want to use (Forexample, press the STRINGS button in the Upper KeyboardVoice 1 section).
The following display will appear, showing all the availablevoices/rhythms in the category (Strings Category in this case).
.
2 Press the Data Control button corresponding to the voice youwant to play (Strings 3 in this case).
The selected voice/rhythm will be shown in the reversed box.
17
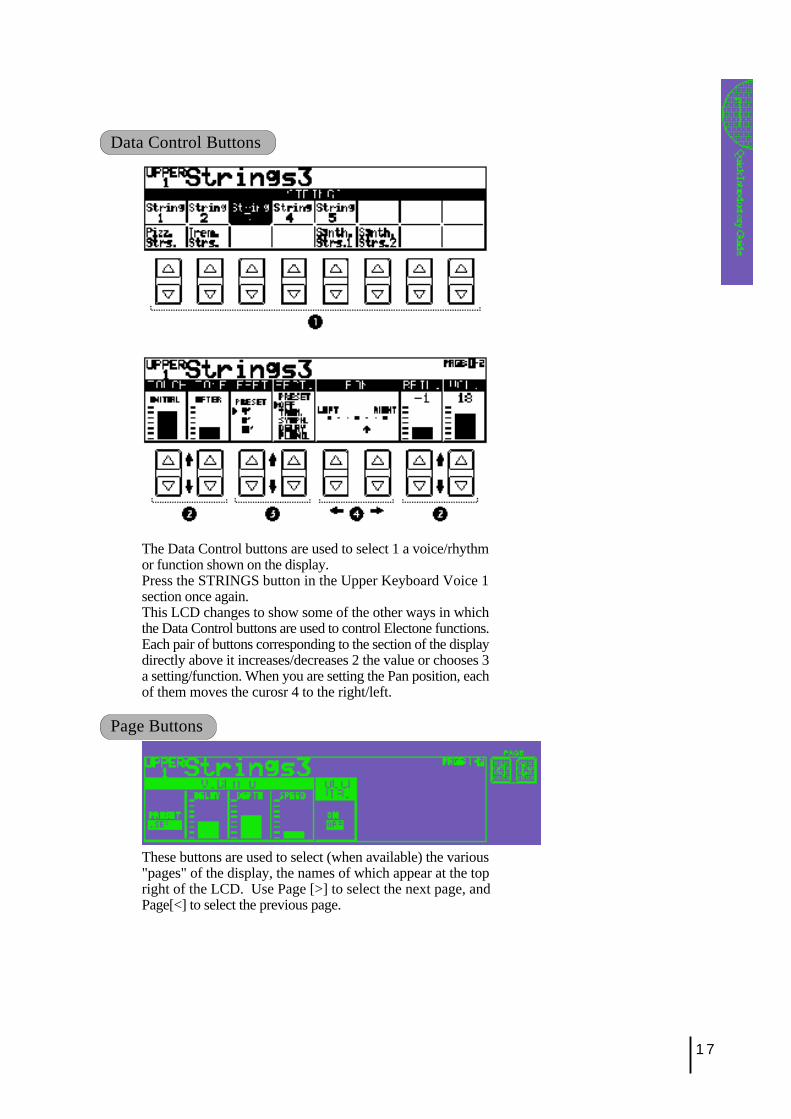
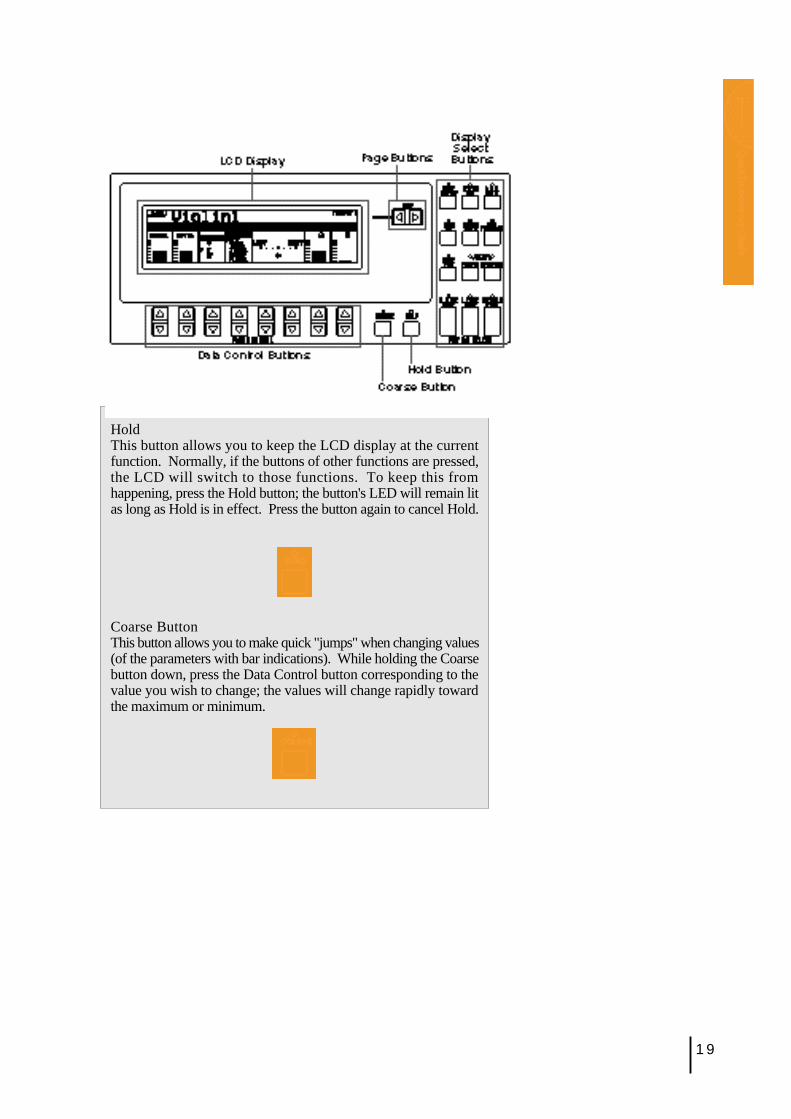
Data Control Buttons
The Data Control buttons are used to select 1 a voice/rhythmor function shown on the display.Press the STRINGS button in the Upper Keyboard Voice 1section once again.This LCD changes to show some of the other ways in whichthe Data Control buttons are used to control Electone functions.Each pair of buttons corresponding to the section of the displaydirectly above it increases/decreases 2 the value or chooses 3a setting/function. When you are setting the Pan position, eachof them moves the curosr 4 to the right/left.
Page Buttons
These buttons are used to select (when available) the various"pages" of the display, the names of which appear at the topright of the LCD. Use Page [>] to select the next page, andPage[<] to select the previous page.
18
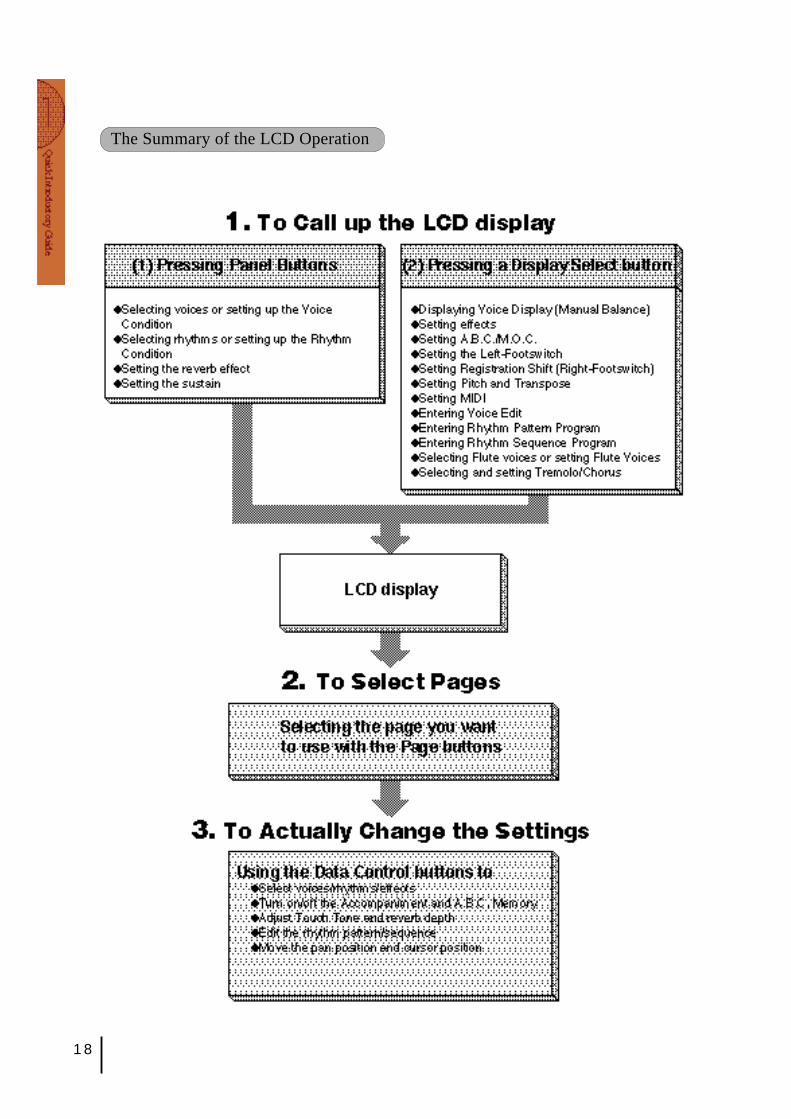
The Summary of the LCD Operation
19
HoldThis button allows you to keep the LCD display at the currentfunction. Normally, if the buttons of other functions are pressed,the LCD will switch to those functions. To keep this fromhappening, press the Hold button; the button's LED will remain litas long as Hold is in effect. Press the button again to cancel Hold.
Coarse ButtonThis button allows you to make quick "jumps" when changing values(of the parameters with bar indications). While holding the Coarsebutton down, press the Data Control button corresponding to thevalue you wish to change; the values will change rapidly towardthe maximum or minimum.
22
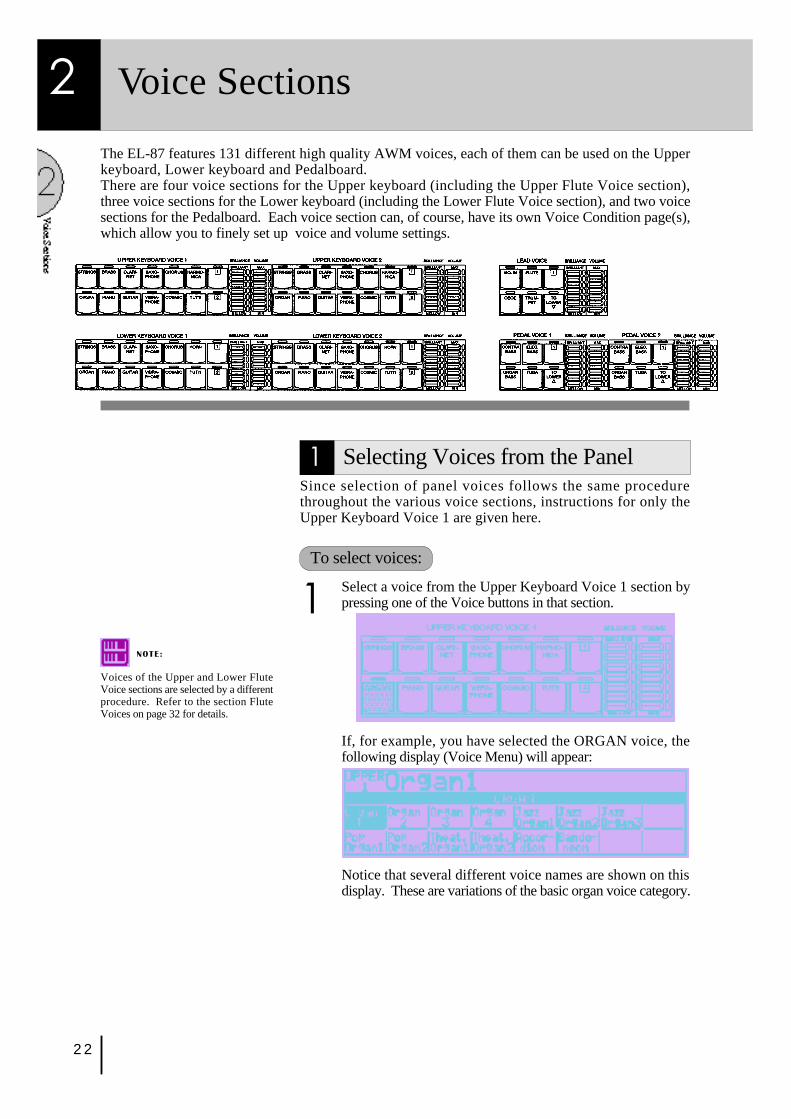
The EL-87 features 131 different high quality AWM voices, each of them can be used on the Upperkeyboard, Lower keyboard and Pedalboard.There are four voice sections for the Upper keyboard (including the Upper Flute Voice section),three voice sections for the Lower keyboard (including the Lower Flute Voice section), and two voicesections for the Pedalboard. Each voice section can, of course, have its own Voice Condition page(s),which allow you to finely set up voice and volume settings.
1 Selecting Voices from the PanelSince selection of panel voices follows the same procedurethroughout the various voice sections, instructions for only theUpper Keyboard Voice 1 are given here.
To select voices:
1 Select a voice from the Upper Keyboard Voice 1 section bypressing one of the Voice buttons in that section.
2 Voice Sections
NOTE:
Voices of the Upper and Lower FluteVoice sections are selected by a differentprocedure. Refer to the section FluteVoices on page 32 for details.
If, for example, you have selected the ORGAN voice, thefollowing display (Voice Menu) will appear:
Notice that several different voice names are shown on thisdisplay. These are variations of the basic organ voice category.
23
NOTE:
Pressing a voice button once calls up thatvoice's Voice Menu display. Pressing ita second time calls up the Voice Conditiondisplay. Successive presses alternatebetween the two displays.
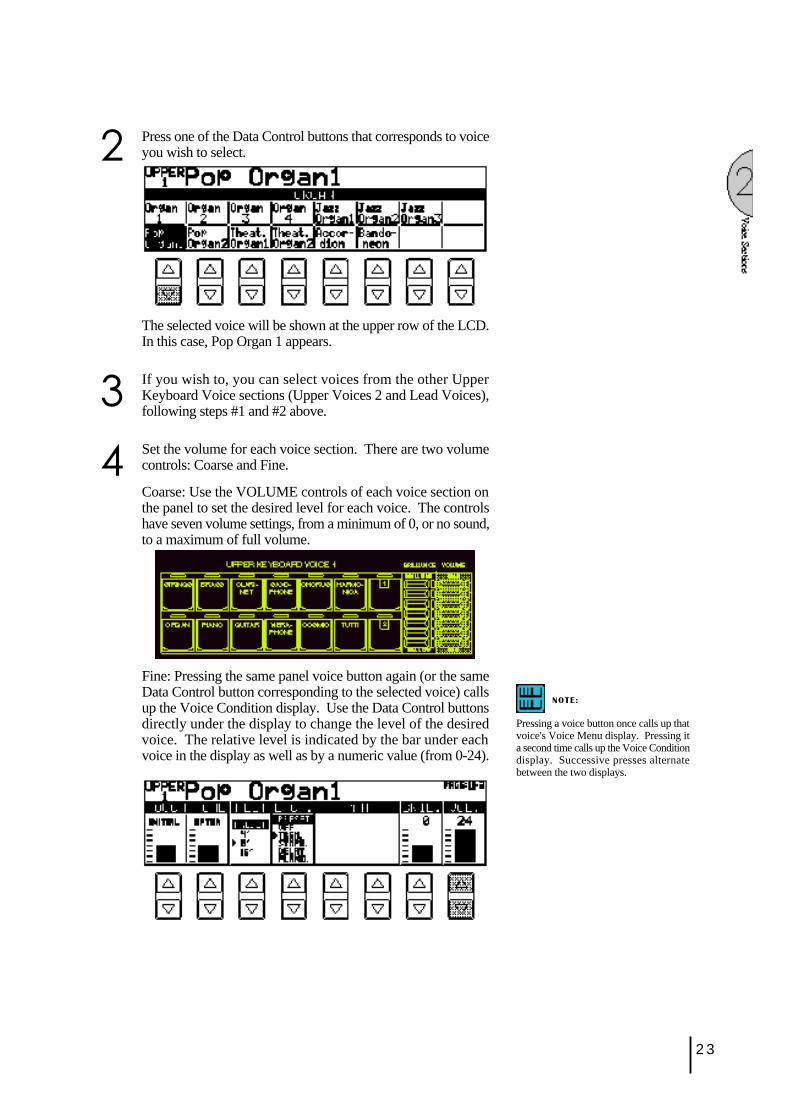
2 Press one of the Data Control buttons that corresponds to voiceyou wish to select.
The selected voice will be shown at the upper row of the LCD.In this case, Pop Organ 1 appears.
3 If you wish to, you can select voices from the other UpperKeyboard Voice sections (Upper Voices 2 and Lead Voices),following steps #1 and #2 above.
4 Set the volume for each voice section. There are two volumecontrols: Coarse and Fine.
Coarse: Use the VOLUME controls of each voice section onthe panel to set the desired level for each voice. The controlshave seven volume settings, from a minimum of 0, or no sound,to a maximum of full volume.
Fine: Pressing the same panel voice button again (or the sameData Control button corresponding to the selected voice) callsup the Voice Condition display. Use the Data Control buttonsdirectly under the display to change the level of the desiredvoice. The relative level is indicated by the bar under eachvoice in the display as well as by a numeric value (from 0-24).
24
5 Now select voices for the Lower keyboard and Pedalboard asyou did for the Upper keyboard above. Also set the volumes ofthe voices.
6 Adjust the volume balance between the Upper and Lower Voiceswith the Balance Control provided on the Voice Display.
1. Return to the Voice Display by pressing the VOICE DISPLAYbutton in the DISPLAY SELECT section.
2. Adjust the balance with the corresponding Data Control buttons.
Pressing this pair of DataControl buttons at the sametime restores the balance tothe center position.
About TO LOWER - Playing Lead and Pedal voicesfrom the Lower keyboard:
The Electone has a special "To Lower" function that lets you assignLead or Bass voices to the Lower keyboard. Simply press the TOLOWER button on the voice section you wish to assign, and thatvoice will be playable from the Lower keyboard.When the TO LOWER button is turned
on, the Lead voices and Pedal voicescannot be played on the Upper keyboardand Pedalboard, respectively.
Turning the Electone off erases all panelsettings you have made. When theElectone is turned on, Basic Registration1 is automatically selected.If you have made panel settings you wishto keep, save them to RegistrationMemory (see page 62) before turning theElectone off.You can, however, restore the panelsettings that were made before theElectone was last turned off. See page 67for more information.
About Mute function:
The voices of the three voice sections of the Upper keyboard (twoin the Lower and Pedal) sound together in a layer, and the balanceof the voices in the layer is determined by these VOLUME controls.You can easily mute the voice of a voice section by holding downthe COARSE button and pressing the panel volume control of thevoice section you wish to mute. Repeating the procedure restoresthe original volume setting.
NOTE:
The Lead and Pedal Voices sound onenote at a time; when you simultaneouslypress two or more keys, only the highestnote will sound.
25
2 Selecting Voices from the Dotted Buttons—Dotted Buttons and User Voices—
The EL-87 has a wide variety of voices from which you can choose-far greater than what is immediately apparent from the front panelcontrols. You've already learned in the section above how to selectthe different voices that are available in the Voice Menu display ofeach panel voice. The Electone also has dotted buttons in eachvoice section, giving you access to even more voices by includingspace for storing and recalling voices you've created yourself (Uservoices) by using Voice Edit function(See page 88.). Optional VoiceDisk voices containing many new voices are also being madeavailable for the EL-87(See page 95.).
Each voice section has one or two dotted buttons, found on theright side of each voice section. These dotted buttons function as"wild card" Voice Menu selectors; any internal or User voices canbe selected from these buttons.
The dotted buttons have three basic uses:
● For playing any voice of the Voice Menus from any of thekeyboards or Pedalboard. You can play on the Upper keyboard,for example, voices from the twenty-two Voice Menu pages(including User), and not be limited to only the twelve buttons(equivalent to twelve Voice Menu pages) that make up the UpperVoice section. Another advantage to this feature is that whenthe normally monophonic (one note) Lead and Pedal voices areassigned to the Upper or Lower keyboard Voice sections, theycan be played polyphonically.
● For having three different voices from the same Voice Menupage available for selection in the same song. For example,you can assign one of the voices to a dotted button in the UpperKeyboard Voice 1 section, the second voice to the other dottedbutton in the same section, and the third one on the Voice Menu.
● For playing the User voices of your own creation or those froma Voice Disk. (See page 88.)
26
NOTE:
You can directly view and select VoiceMenu pages by holding down one of theDotted buttons and simultaneouslypressing the desired voice buttons insuccession.
To select voices from the dotted buttons:
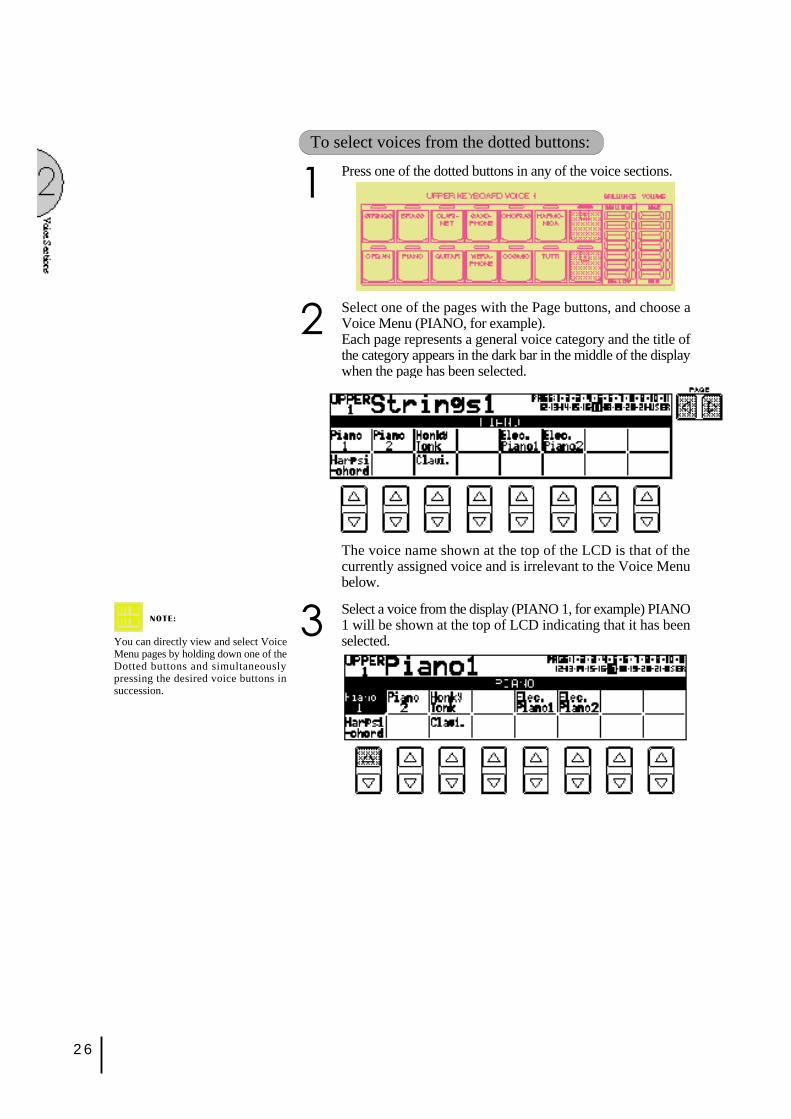
1 Press one of the dotted buttons in any of the voice sections.
2 Select one of the pages with the Page buttons, and choose aVoice Menu (PIANO, for example).Each page represents a general voice category and the title ofthe category appears in the dark bar in the middle of the displaywhen the page has been selected.
The voice name shown at the top of the LCD is that of thecurrently assigned voice and is irrelevant to the Voice Menubelow.
3 Select a voice from the display (PIANO 1, for example) PIANO1 will be shown at the top of LCD indicating that it has beenselected.
27
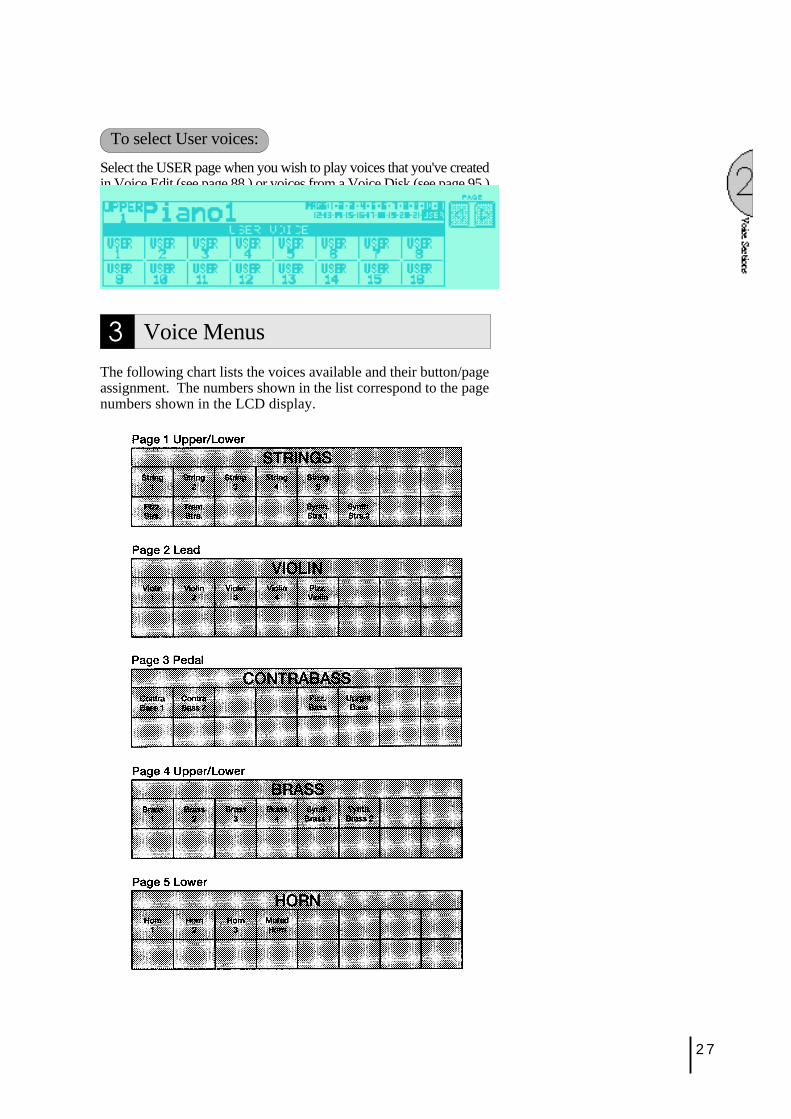
To select User voices:
Select the USER page when you wish to play voices that you've createdin Voice Edit (see page 88.) or voices from a Voice Disk (see page 95.)
3 Voice Menus
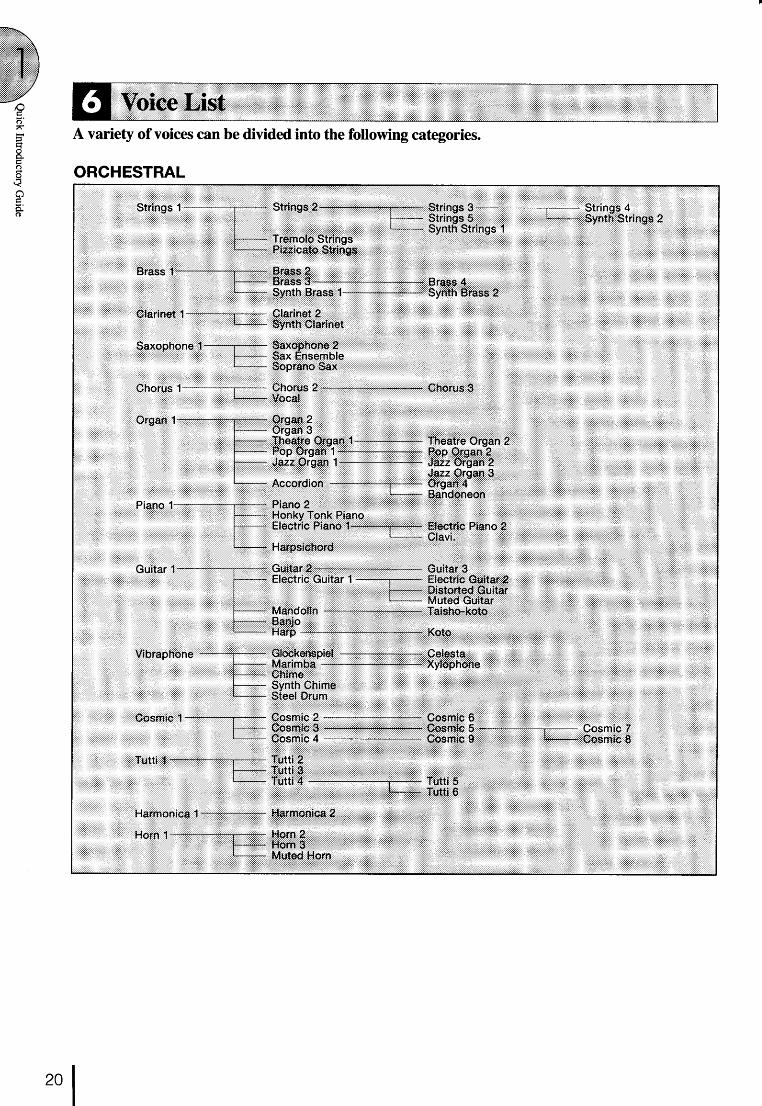
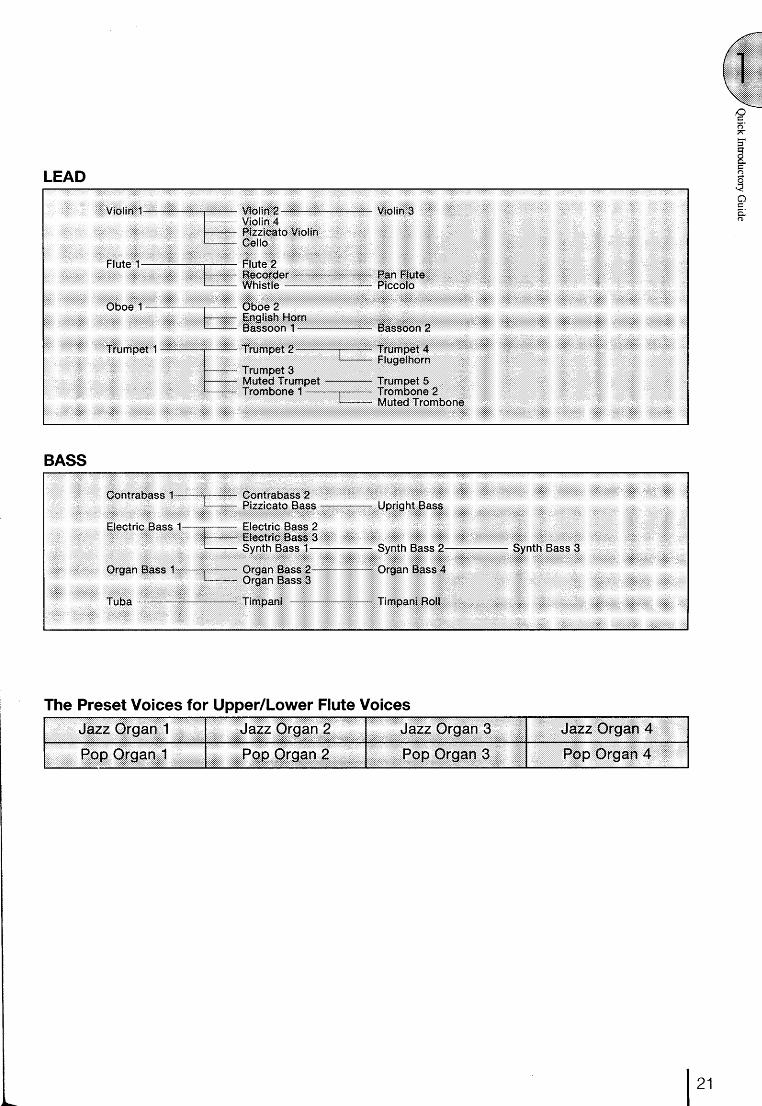
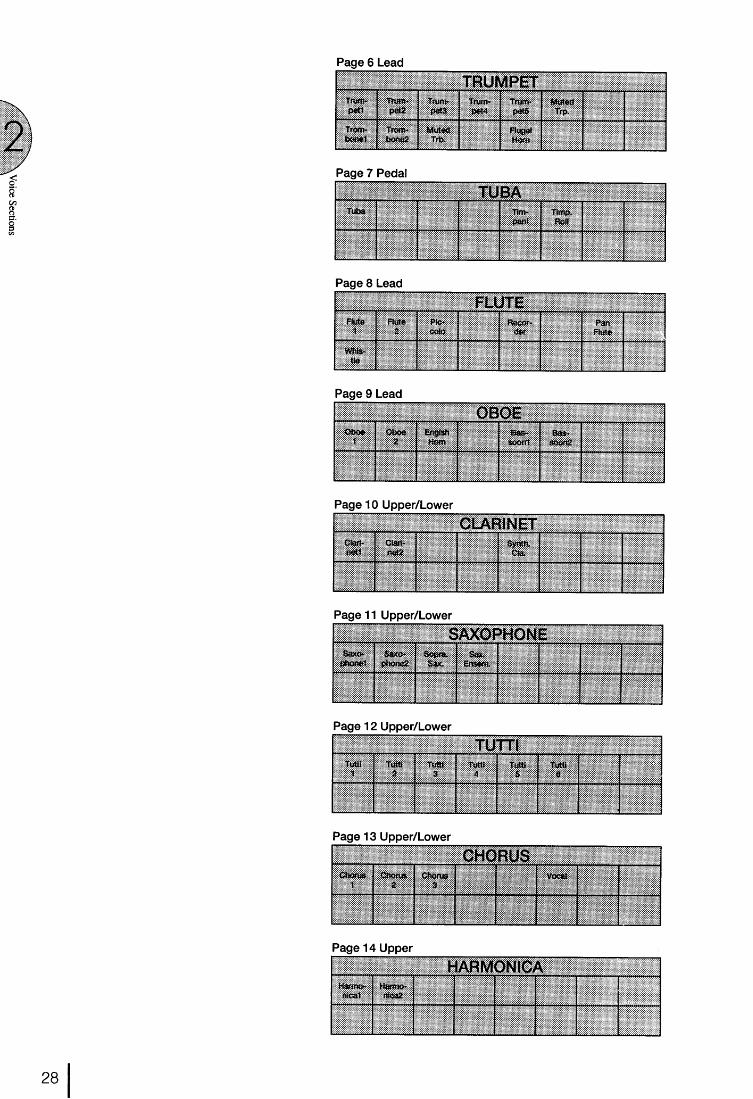
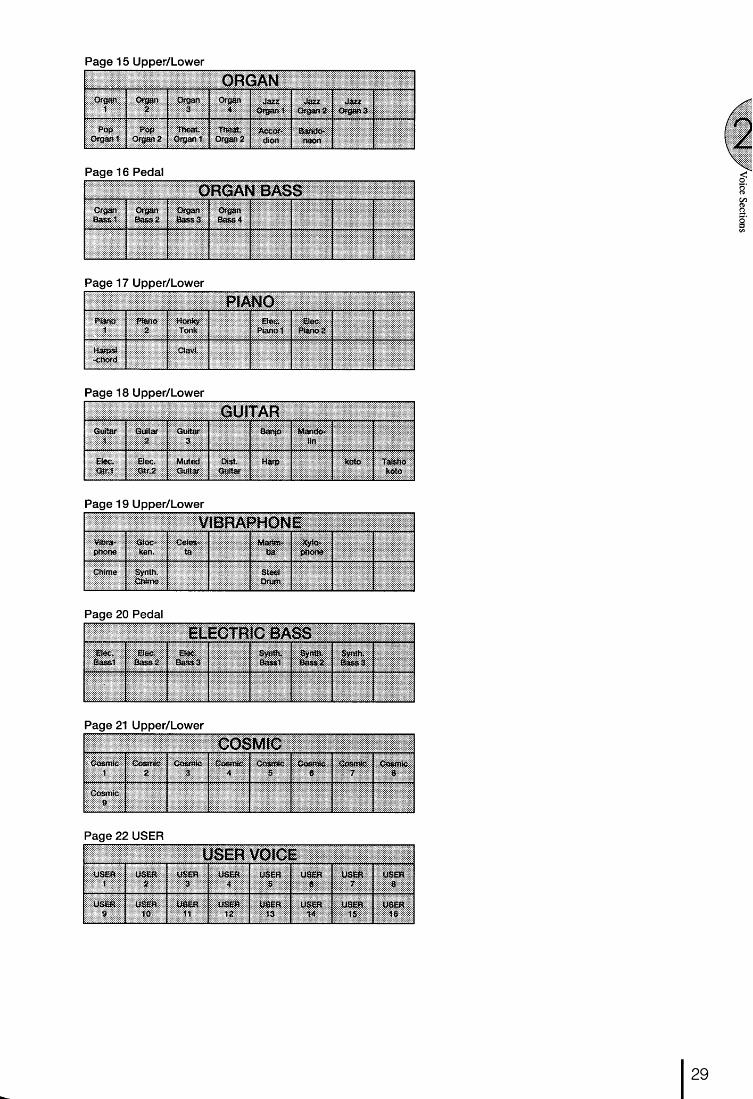
The following chart lists the voices available and their button/pageassignment. The numbers shown in the list correspond to the pagenumbers shown in the LCD display.
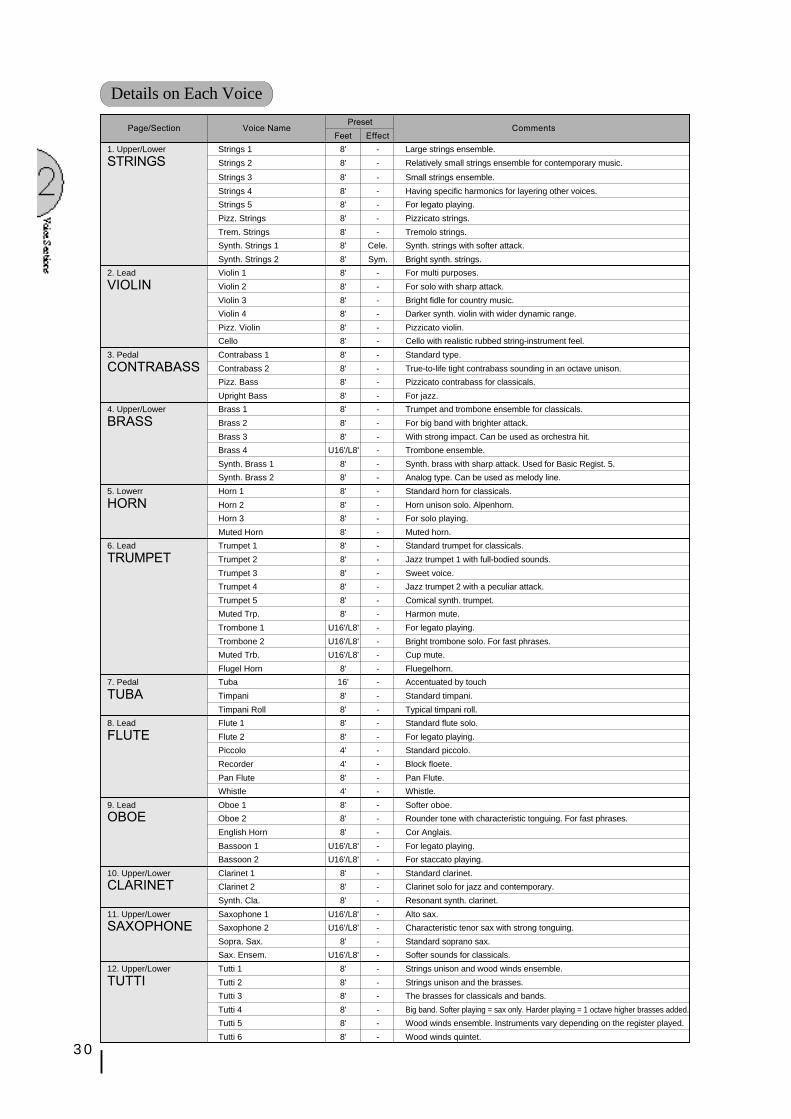
30
Page/Section Voice NamePreset
CommentsFeet Effect
1. Upper/Lower Strings 1 8' - Large strings ensemble.
STRINGS Strings 2 8' - Relatively small strings ensemble for contemporary music.
Strings 3 8' - Small strings ensemble.
Strings 4 8' - Having specific harmonics for layering other voices.
Strings 5 8' - For legato playing.
Pizz. Strings 8' - Pizzicato strings.
Trem. Strings 8' - Tremolo strings.
Synth. Strings 1 8' Cele. Synth. strings with softer attack.
Synth. Strings 2 8' Sym. Bright synth. strings.
2. Lead Violin 1 8' - For multi purposes.
VIOLIN Violin 2 8' - For solo with sharp attack.
Violin 3 8' - Bright fidle for country music.
Violin 4 8' - Darker synth. violin with wider dynamic range.
Pizz. Violin 8' - Pizzicato violin.
Cello 8' - Cello with realistic rubbed string-instrument feel.
3. Pedal Contrabass 1 8' - Standard type.
CONTRABASS Contrabass 2 8' - True-to-life tight contrabass sounding in an octave unison.
Pizz. Bass 8' - Pizzicato contrabass for classicals.
Upright Bass 8' - For jazz.
4. Upper/Lower Brass 1 8' - Trumpet and trombone ensemble for classicals.
BRASS Brass 2 8' - For big band with brighter attack.
Brass 3 8' - With strong impact. Can be used as orchestra hit.
Brass 4 U16'/L8' - Trombone ensemble.
Synth. Brass 1 8' - Synth. brass with sharp attack. Used for Basic Regist. 5.
Synth. Brass 2 8' - Analog type. Can be used as melody line.
5. Lowerr Horn 1 8' - Standard horn for classicals.
HORN Horn 2 8' - Horn unison solo. Alpenhorn.
Horn 3 8' - For solo playing.
Muted Horn 8' - Muted horn.
6. Lead Trumpet 1 8' - Standard trumpet for classicals.
TRUMPET Trumpet 2 8' - Jazz trumpet 1 with full-bodied sounds.
Trumpet 3 8' - Sweet voice.
Trumpet 4 8' - Jazz trumpet 2 with a peculiar attack.
Trumpet 5 8' - Comical synth. trumpet.
Muted Trp. 8' - Harmon mute.
Trombone 1 U16'/L8' - For legato playing.
Trombone 2 U16'/L8' - Bright trombone solo. For fast phrases.
Muted Trb. U16'/L8' - Cup mute.
Flugel Horn 8' - Fluegelhorn.
7. Pedal Tuba 16' - Accentuated by touch
TUBA Timpani 8' - Standard timpani.
Timpani Roll 8' - Typical timpani roll.
8. Lead Flute 1 8' - Standard flute solo.
FLUTE Flute 2 8' - For legato playing.
Piccolo 4' - Standard piccolo.
Recorder 4' - Block floete.
Pan Flute 8' - Pan Flute.
Whistle 4' - Whistle.
9. Lead Oboe 1 8' - Softer oboe.
OBOE Oboe 2 8' - Rounder tone with characteristic tonguing. For fast phrases.
English Horn 8' - Cor Anglais.
Bassoon 1 U16'/L8' - For legato playing.
Bassoon 2 U16'/L8' - For staccato playing.
10. Upper/Lower Clarinet 1 8' - Standard clarinet.
CLARINET Clarinet 2 8' - Clarinet solo for jazz and contemporary.
Synth. Cla. 8' - Resonant synth. clarinet.
11. Upper/Lower Saxophone 1 U16'/L8' - Alto sax.
SAXOPHONE Saxophone 2 U16'/L8' - Characteristic tenor sax with strong tonguing.
Sopra. Sax. 8' - Standard soprano sax.
Sax. Ensem. U16'/L8' - Softer sounds for classicals.
12. Upper/Lower Tutti 1 8' - Strings unison and wood winds ensemble.
TUTTI Tutti 2 8' - Strings unison and the brasses.
Tutti 3 8' - The brasses for classicals and bands.
Tutti 4 8' - Big band. Softer playing = sax only. Harder playing = 1 octave higher brasses added.
Tutti 5 8' - Wood winds ensemble. Instruments vary depending on the register played.
Tutti 6 8' - Wood winds quintet.
Details on Each Voice
31
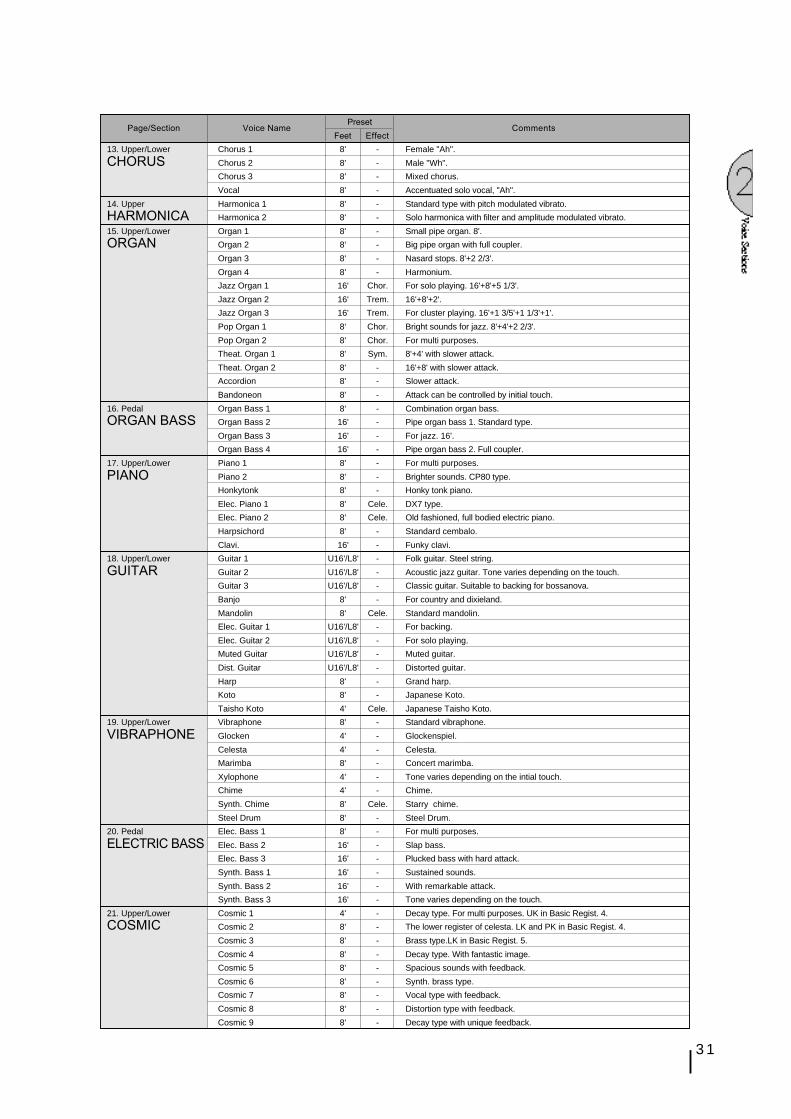
Page/Section Voice NamePreset
CommentsFeet Effect
13. Upper/Lower Chorus 1 8' - Female "Ah".
CHORUS Chorus 2 8' - Male "Wh".
Chorus 3 8' - Mixed chorus.
Vocal 8' - Accentuated solo vocal, "Ah".
14. Upper Harmonica 1 8' - Standard type with pitch modulated vibrato.
HARMONICA Harmonica 2 8' - Solo harmonica with filter and amplitude modulated vibrato.
15. Upper/Lower Organ 1 8' - Small pipe organ. 8'.
ORGAN Organ 2 8' - Big pipe organ with full coupler.
Organ 3 8' - Nasard stops. 8'+2 2/3'.
Organ 4 8' - Harmonium.
Jazz Organ 1 16' Chor. For solo playing. 16'+8'+5 1/3'.
Jazz Organ 2 16' Trem. 16'+8'+2'.
Jazz Organ 3 16' Trem. For cluster playing. 16'+1 3/5'+1 1/3'+1'.
Pop Organ 1 8' Chor. Bright sounds for jazz. 8'+4'+2 2/3'.
Pop Organ 2 8' Chor. For multi purposes.
Theat. Organ 1 8' Sym. 8'+4' with slower attack.
Theat. Organ 2 8' - 16'+8' with slower attack.
Accordion 8' - Slower attack.
Bandoneon 8' - Attack can be controlled by initial touch.
16. Pedal Organ Bass 1 8' - Combination organ bass.
ORGAN BASS Organ Bass 2 16' - Pipe organ bass 1. Standard type.
Organ Bass 3 16' - For jazz. 16'.
Organ Bass 4 16' - Pipe organ bass 2. Full coupler.
17. Upper/Lower Piano 1 8' - For multi purposes.
PIANO Piano 2 8' - Brighter sounds. CP80 type.
Honkytonk 8' - Honky tonk piano.
Elec. Piano 1 8' Cele. DX7 type.
Elec. Piano 2 8' Cele. Old fashioned, full bodied electric piano.
Harpsichord 8' - Standard cembalo.
Clavi. 16' - Funky clavi.
18. Upper/Lower Guitar 1 U16'/L8' - Folk guitar. Steel string.
GUITAR Guitar 2 U16'/L8' - Acoustic jazz guitar. Tone varies depending on the touch.
Guitar 3 U16'/L8' - Classic guitar. Suitable to backing for bossanova.
Banjo 8' - For country and dixieland.
Mandolin 8' Cele. Standard mandolin.
Elec. Guitar 1 U16'/L8' - For backing.
Elec. Guitar 2 U16'/L8' - For solo playing.
Muted Guitar U16'/L8' - Muted guitar.
Dist. Guitar U16'/L8' - Distorted guitar.
Harp 8' - Grand harp.
Koto 8' - Japanese Koto.
Taisho Koto 4' Cele. Japanese Taisho Koto.
19. Upper/Lower Vibraphone 8' - Standard vibraphone.
VIBRAPHONE Glocken 4' - Glockenspiel.
Celesta 4' - Celesta.
Marimba 8' - Concert marimba.
Xylophone 4' - Tone varies depending on the intial touch.
Chime 4' - Chime.
Synth. Chime 8' Cele. Starry chime.
Steel Drum 8' - Steel Drum.
20. Pedal Elec. Bass 1 8' - For multi purposes.
ELECTRIC BASS Elec. Bass 2 16' - Slap bass.
Elec. Bass 3 16' - Plucked bass with hard attack.
Synth. Bass 1 16' - Sustained sounds.
Synth. Bass 2 16' - With remarkable attack.
Synth. Bass 3 16' - Tone varies depending on the touch.
21. Upper/Lower Cosmic 1 4' - Decay type. For multi purposes. UK in Basic Regist. 4.
COSMIC Cosmic 2 8' - The lower register of celesta. LK and PK in Basic Regist. 4.
Cosmic 3 8' - Brass type.LK in Basic Regist. 5.
Cosmic 4 8' - Decay type. With fantastic image.
Cosmic 5 8' - Spacious sounds with feedback.
Cosmic 6 8' - Synth. brass type.
Cosmic 7 8' - Vocal type with feedback.
Cosmic 8 8' - Distortion type with feedback.
Cosmic 9 8' - Decay type with unique feedback.
32
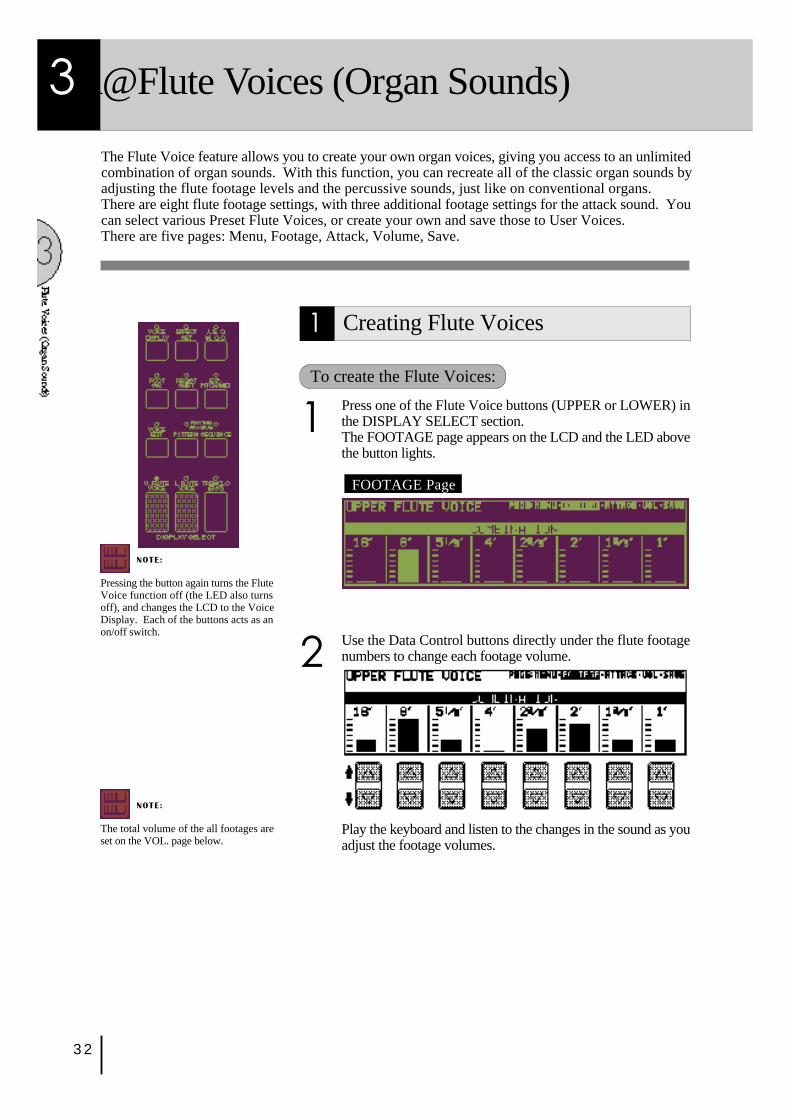
1 Creating Flute Voices
To create the Flute Voices:
1 Press one of the Flute Voice buttons (UPPER or LOWER) inthe DISPLAY SELECT section.The FOOTAGE page appears on the LCD and the LED abovethe button lights.
FOOTAGE Page
3Å@Flute Voices (Organ Sounds)
The Flute Voice feature allows you to create your own organ voices, giving you access to an unlimitedcombination of organ sounds. With this function, you can recreate all of the classic organ sounds byadjusting the flute footage levels and the percussive sounds, just like on conventional organs.There are eight flute footage settings, with three additional footage settings for the attack sound. Youcan select various Preset Flute Voices, or create your own and save those to User Voices.There are five pages: Menu, Footage, Attack, Volume, Save.
NOTE:
Pressing the button again turns the FluteVoice function off (the LED also turnsoff), and changes the LCD to the VoiceDisplay. Each of the buttons acts as anon/off switch.
2 Use the Data Control buttons directly under the flute footagenumbers to change each footage volume.
Play the keyboard and listen to the changes in the sound as youadjust the footage volumes.
NOTE:
The total volume of the all footages areset on the VOL. page below.
33
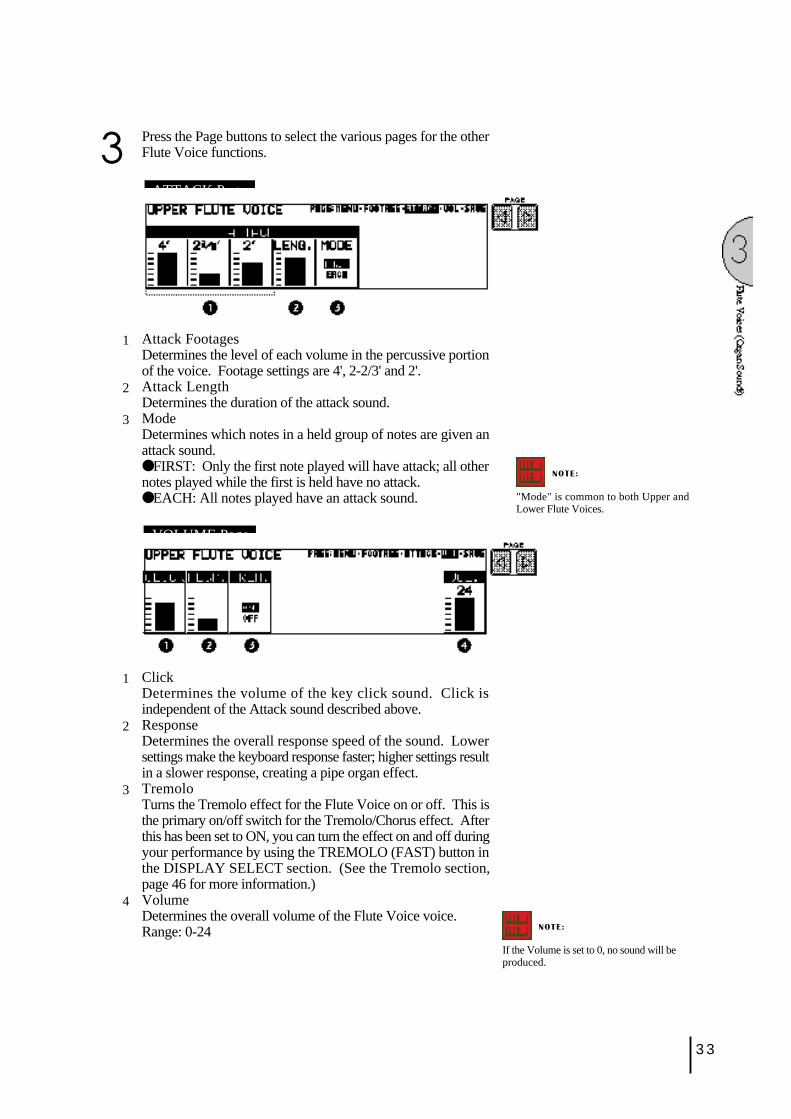
3 Press the Page buttons to select the various pages for the otherFlute Voice functions.
ATTACK Page
1 Attack FootagesDetermines the level of each volume in the percussive portionof the voice. Footage settings are 4', 2-2/3' and 2'.
2 Attack LengthDetermines the duration of the attack sound.
3 ModeDetermines which notes in a held group of notes are given anattack sound.●FIRST: Only the first note played will have attack; all othernotes played while the first is held have no attack.●EACH: All notes played have an attack sound.
VOLUME Page
1 ClickDetermines the volume of the key click sound. Click isindependent of the Attack sound described above.
2 ResponseDetermines the overall response speed of the sound. Lowersettings make the keyboard response faster; higher settings resultin a slower response, creating a pipe organ effect.
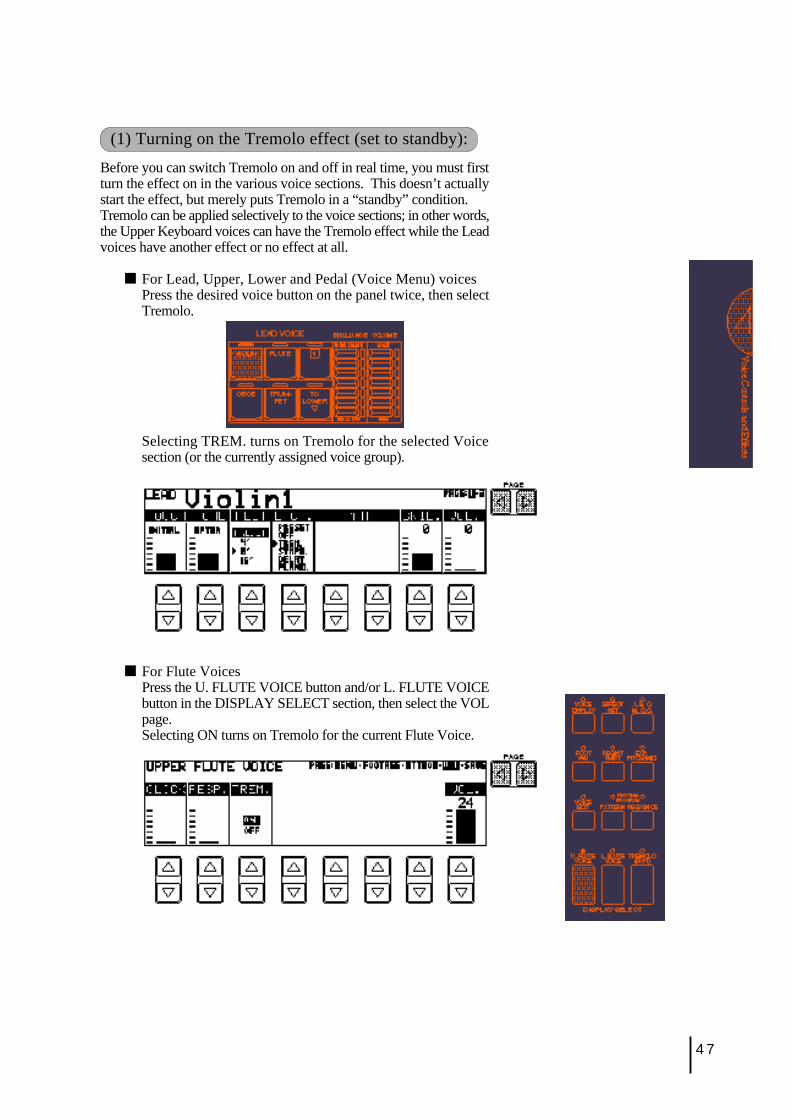
3 TremoloTurns the Tremolo effect for the Flute Voice on or off. This isthe primary on/off switch for the Tremolo/Chorus effect. Afterthis has been set to ON, you can turn the effect on and off duringyour performance by using the TREMOLO (FAST) button inthe DISPLAY SELECT section. (See the Tremolo section,page 46 for more information.)
4 VolumeDetermines the overall volume of the Flute Voice voice.Range: 0-24
NOTE:
"Mode" is common to both Upper andLower Flute Voices.
NOTE:
If the Volume is set to 0, no sound will beproduced.
34
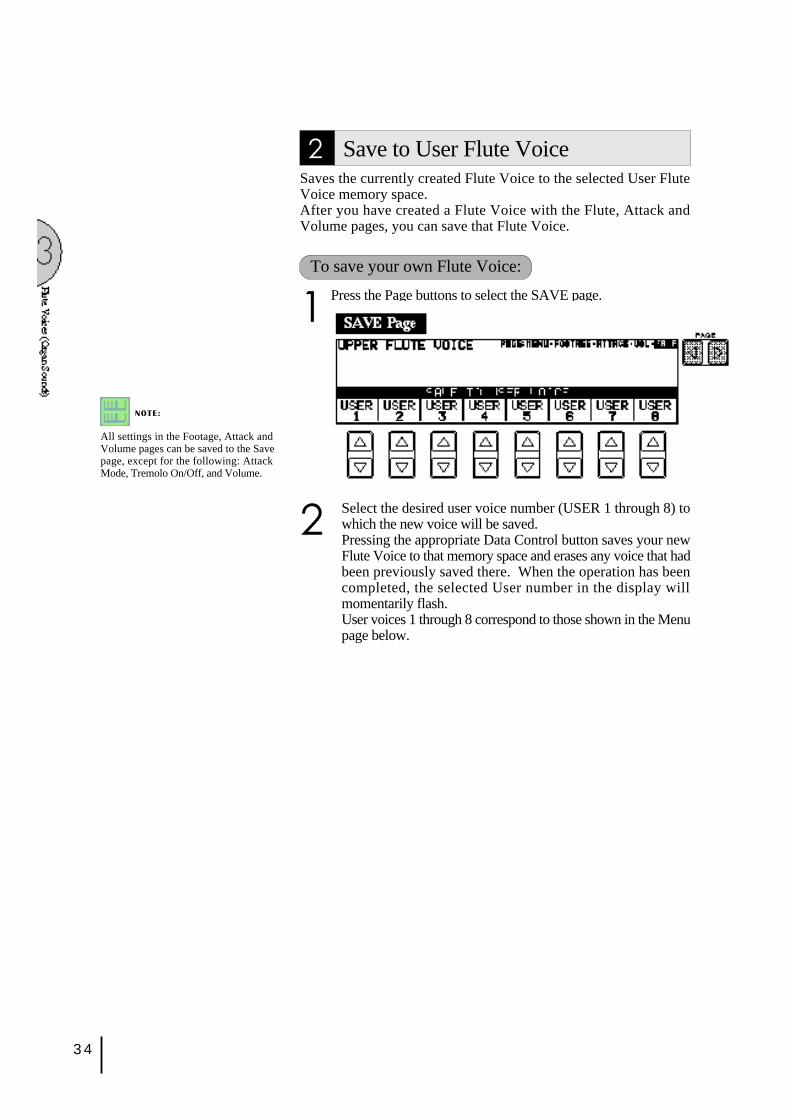
2 Save to User Flute VoiceSaves the currently created Flute Voice to the selected User FluteVoice memory space.After you have created a Flute Voice with the Flute, Attack andVolume pages, you can save that Flute Voice.
To save your own Flute Voice:
1 Press the Page buttons to select the SAVE page.
2 Select the desired user voice number (USER 1 through 8) towhich the new voice will be saved.Pressing the appropriate Data Control button saves your newFlute Voice to that memory space and erases any voice that hadbeen previously saved there. When the operation has beencompleted, the selected User number in the display willmomentarily flash.User voices 1 through 8 correspond to those shown in the Menupage below.
NOTE:
All settings in the Footage, Attack andVolume pages can be saved to the Savepage, except for the following: AttackMode, Tremolo On/Off, and Volume.

35
3 Using Preset and User Voices
To call up the Preset Voices and User Voices:
1 Press the Page buttons to select the MENU page.
2 Select Preset or User Flute Voices.Eight factory-preset voices (four Jazz Organ and four Pop Organvoices) are set to the upper row, and the eight User voices in thebottom row are for selecting voices you created and stored withthe SAVE page.
NOTE:
The User area described in this section has norelation to that of the Voice Menu page.
NOTE:
When you use the Upper/Lower Flute Voicesand/or other voices at the same time, only oneof the voices can be displayed at a time, eventhough all voices may be operative and bothof the Upper and Lower Flute Voice LEDsare lit.
NOTE:
Remember that the UPPER and LOWERFLUTE VOICE buttons are on/off switches.In the process of turning on a Flute Voice, thenswitching to another function and returning tothe Flute Voice, you may unintentionally turnthe Flute Voice off. Check whether the FluteVoice LEDs are on or off before you start toplay.
36
4 Voice Controls and Effects
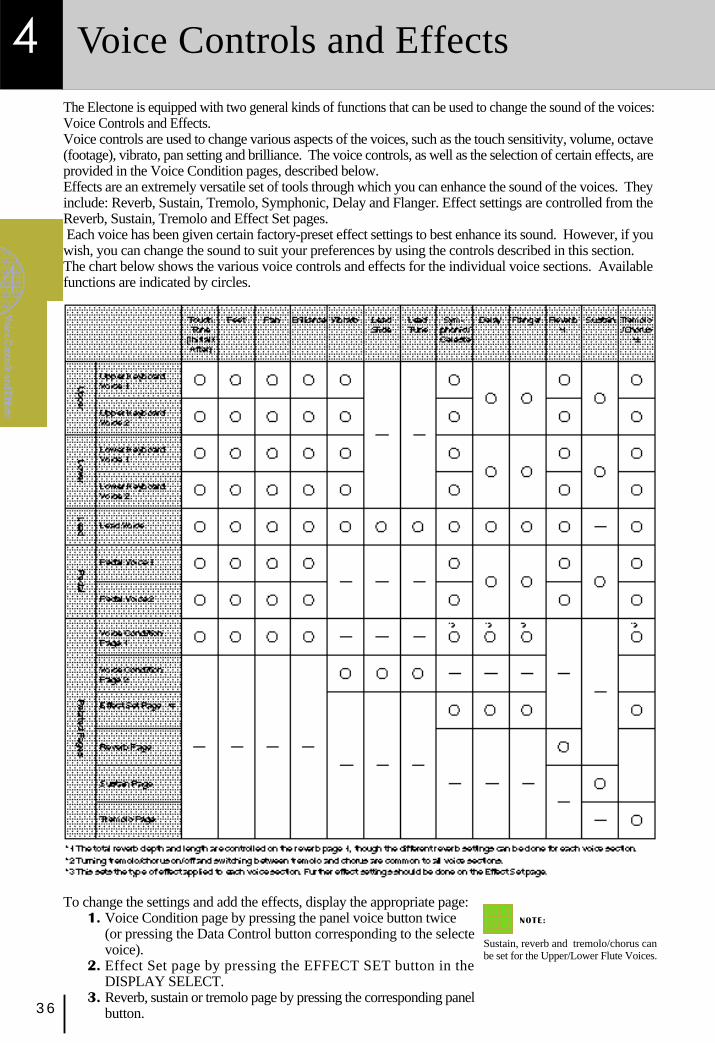
The Electone is equipped with two general kinds of functions that can be used to change the sound of the voices:Voice Controls and Effects.Voice controls are used to change various aspects of the voices, such as the touch sensitivity, volume, octave(footage), vibrato, pan setting and brilliance. The voice controls, as well as the selection of certain effects, areprovided in the Voice Condition pages, described below.Effects are an extremely versatile set of tools through which you can enhance the sound of the voices. Theyinclude: Reverb, Sustain, Tremolo, Symphonic, Delay and Flanger. Effect settings are controlled from theReverb, Sustain, Tremolo and Effect Set pages. Each voice has been given certain factory-preset effect settings to best enhance its sound. However, if youwish, you can change the sound to suit your preferences by using the controls described in this section.The chart below shows the various voice controls and effects for the individual voice sections. Availablefunctions are indicated by circles.
To change the settings and add the effects, display the appropriate page:1. Voice Condition page by pressing the panel voice button twice
(or pressing the Data Control button corresponding to the selectevoice).
2. Effect Set page by pressing the EFFECT SET button in theDISPLAY SELECT.
3. Reverb, sustain or tremolo page by pressing the corresponding panelbutton.
NOTE:
Sustain, reverb and tremolo/chorus canbe set for the Upper/Lower Flute Voices.
37
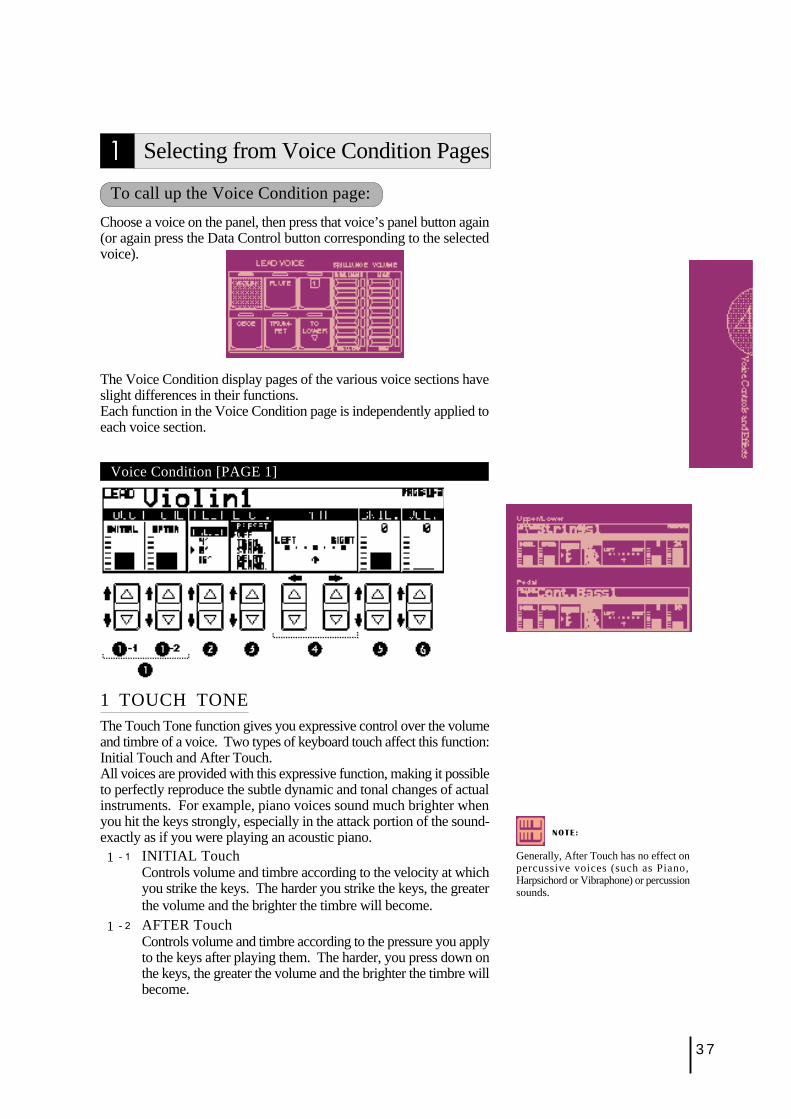
1 Selecting from Voice Condition Pages
To call up the Voice Condition page:
Choose a voice on the panel, then press that voice’s panel button again(or again press the Data Control button corresponding to the selectedvoice).
The Voice Condition display pages of the various voice sections haveslight differences in their functions.Each function in the Voice Condition page is independently applied toeach voice section.
Voice Condition [PAGE 1]
1 TOUCH TONEThe Touch Tone function gives you expressive control over the volumeand timbre of a voice. Two types of keyboard touch affect this function:Initial Touch and After Touch.All voices are provided with this expressive function, making it possibleto perfectly reproduce the subtle dynamic and tonal changes of actualinstruments. For example, piano voices sound much brighter whenyou hit the keys strongly, especially in the attack portion of the sound-exactly as if you were playing an acoustic piano.1 - 1 INITIAL Touch
Controls volume and timbre according to the velocity at whichyou strike the keys. The harder you strike the keys, the greaterthe volume and the brighter the timbre will become.
1 - 2 AFTER TouchControls volume and timbre according to the pressure you applyto the keys after playing them. The harder, you press down onthe keys, the greater the volume and the brighter the timbre willbecome.
NOTE:
Generally, After Touch has no effect onpercussive voices (such as Piano,Harpsichord or Vibraphone) or percussionsounds.
38
2 FEETDetermines the octave setting of the voice. PRESET is the original(factory) setting; 4' is the highest and 16' is the lowest.
3 EFFECT (On/Off)Determines the effect type applied to the voice section. This is essentiallyan on/off switch for the effects; settings and adjustments to the effectsare made from other pages. (For more information, see page 40.)
3 - 1 PRESET:Selects the original (factory) effect.
3 - 2 OFF:Cancels the effect.
3 - 3 TREM (TREMOLO):Selects tremolo/chorus. See page 46 for the details of the tremolo/chorus setting.
3 - 4 SYMPH (SYMPHONIC):Selects symphonic/celeste. See page 40 for the details of thesymphonic/celeste setting.
3 - 5 DELAY:Selects delay. See page 41 for the details of the delay setting.
3 - 6 FLANG. (FLANGER):Selects flanger. See page 41 for the details of the flanger setting.
4 PANDetermines the position of the voice in the stereo image. Seven panpositions are available.
5 BRIL. (BRILLIANCE)Adjustment of the voice tone. Higher settings make the voice brighter.(This control is the same as on the panel.) Range: -3- +3
6 VOL. (VOLUME)Fine adjustment of the voice volume. See page 23 for more information. NOTE:
These effects are applied in differentdegrees depending on the voice groupyou’ve selected.
NOTE:
The Pan effect is displayed and active onlywhen other effects are set to OFF (in theEFFECT parameter above).
NOTE:
Each effect may not be noticeable eventhough you select the effect here, if thecorresponding settings on the Effect Setpage (See pages 40 and 41) are notappropriate.

39
Voice Condition [PAGE 2]
Press Page buttons to select PAGE 2.
The Pedal voice sections have PAGE 1 settings only (no PAGE 2).The Lead Slide and Lead Tune functions are only available with theLead voice section.
1 VIBRATO
1 - 1 PRESET/USERSelects Preset, which calls up the original (factory) vibratosettings for the voice, or User, which lets you adjust the vibratosettings yourself.
1 - 2 DELAYDetermines the amount of time that elapses between the playingof a key and the start of the vibrato effect (see diagram). Highersettings increase the delay of the vibrato onset.
1 - 3 DEPTHDetermines the intensity of the vibrato effect (see diagram).Higher settings result in a more pronounced vibrato.
1 - 4 SPEEDDetermines the speed of the vibrato effect (see diagram).
NOTE:
The Slide function cannot be used whenthe Pitch Bend function (See page 135) isapplied.
4 TUNE (Lead voices only)Determines the pitch of the Lead voice. This control lets you detunethe Lead voice relative to the other voices of the Electone, for producinga richer sound. The higher the value set, the higher the pitch. Range:0-14 (max. 16.4cents; 1 step= Ca.1.2cents)
NOTE:
The Delay, Depth and Speed settings arenot displayed and cannot be adjustedunless USER has been selected in thissetting.
NOTE:
The User vibrato may not be effective forsome voices such as Harmonica2, ElectricPiano1 and Synth. Chime.
3 SLIDE (Lead voices only)Slide applies a portamento effect to notes played in legato. For example,if you play one note, then play another before completely releasing thefirst note, the pitch of the first note will “slide” up or down to the secondnote. The Slide function is effective within a one-octave range.
3 - 1 ON/KNEE/OFFOn/Off switch and knee lever selector for the Slide effect.
3 - 2 TIMEDetermines the speed of the slide or portamento effect. Thehigher the value that is set, the slower the speed. Range: 0-14
2 TOUCH VIB. (TOUCH VIBRATO)On/Off switch for the Touch Vibrato function.Touch Vibrato lets you apply vibrato to individual notes as you playthem. While playing a key, press down harder on it to give the notevibrato. The harder you press the key down, the greater the vibratowill be.
NOTE:
When you set the DEPTH to 0, the TouchVibrato function will be inactive.
40
2 Selecting from Effect Set PagesYou must first "turn on" the desired effect on the Voice ConditionPage 1 before working on the Effect Set page.
1. Call up a Voice Condition page by pressing the desired voicebutton on the panel twice.2. Turn on the desired effect for the voice by using the Data Controlbuttons below EFCT. in the display.
Symphonic, Delay and Flanger can be selected for each voice sectionindependently. Select the effect you want to apply to the voice, or turnall effects off by selecting OFF.
To call up Effect Set page:
Press the EFFECT SET button in the DISPLAY SELECT section, anduse the Page buttons to select the various pages.
TRM. & SYM. Page
1 TREM./CHOR. (TREMOLO/CHORUS)(See Tremolo section on page 46.)
2 SYMP. (SYMPHONIC/CELESTE)Determines the type of the Symphonic effect, SYMPHONIC (SYMP.)or CELESTE (CELE.). Symphonic is a subtle echo effect that makesone voice sound like an ensemble. For example, a solo violin voiceplayed through Symphonic would sound like many violins playingtogether. SYMPHONIC simulates the effect of a large ensemble, whileCELESTE creates the effect of a gradually expanding sound.
41
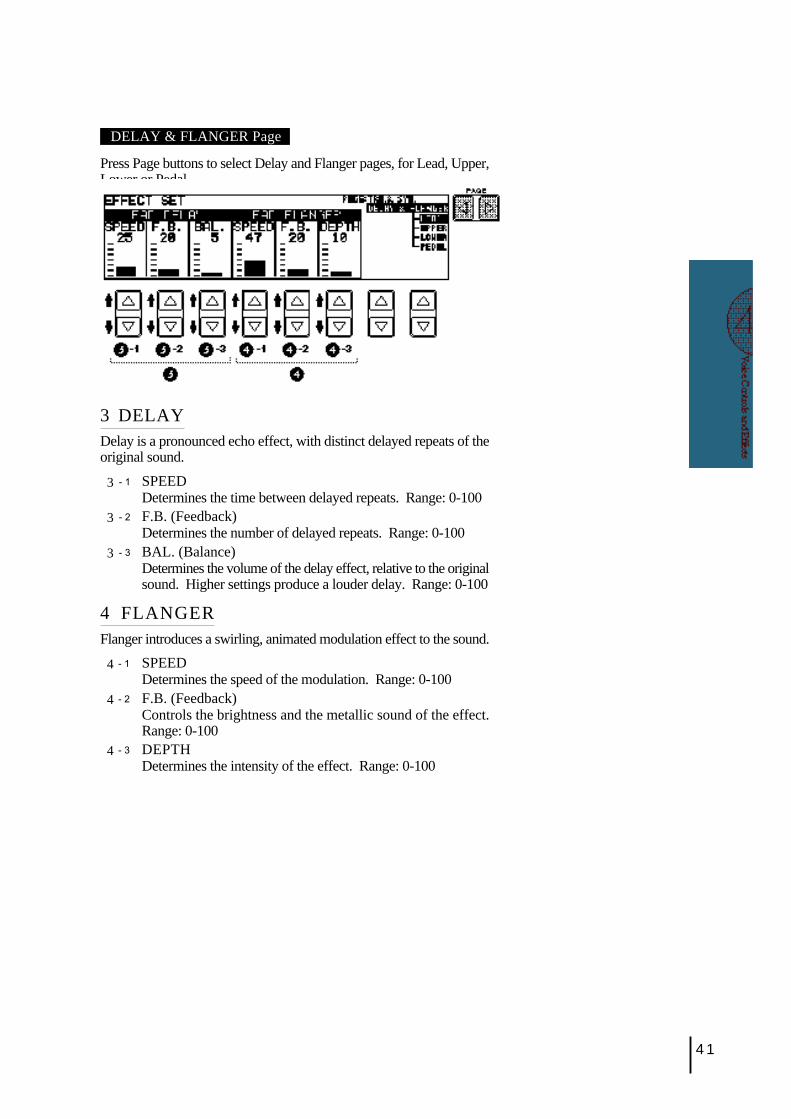
DELAY & FLANGER Page
Press Page buttons to select Delay and Flanger pages, for Lead, Upper,Lower or Pedal.
3 DELAYDelay is a pronounced echo effect, with distinct delayed repeats of theoriginal sound.
3 - 1 SPEEDDetermines the time between delayed repeats. Range: 0-100
3 - 2 F.B. (Feedback)Determines the number of delayed repeats. Range: 0-100
3 - 3 BAL. (Balance)Determines the volume of the delay effect, relative to the originalsound. Higher settings produce a louder delay. Range: 0-100
4 FLANGERFlanger introduces a swirling, animated modulation effect to the sound.
4 - 1 SPEEDDetermines the speed of the modulation. Range: 0-100
4 - 2 F.B. (Feedback)Controls the brightness and the metallic sound of the effect.Range: 0-100
4 - 3 DEPTHDetermines the intensity of the effect. Range: 0-100
42
3 Selecting from the PanelReverb, Sustain and Tremolo/Chorus pages are called up bypressing the respective panel buttons.
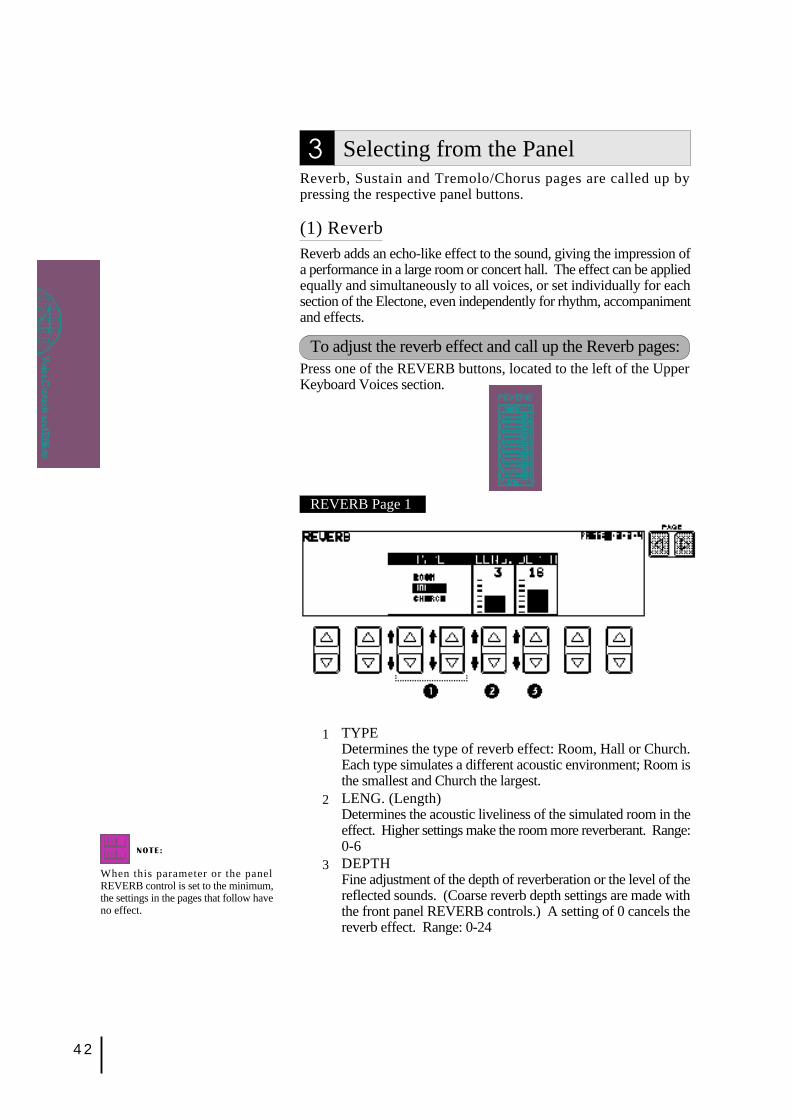
(1) ReverbReverb adds an echo-like effect to the sound, giving the impression ofa performance in a large room or concert hall. The effect can be appliedequally and simultaneously to all voices, or set individually for eachsection of the Electone, even independently for rhythm, accompanimentand effects.
To adjust the reverb effect and call up the Reverb pages:Press one of the REVERB buttons, located to the left of the UpperKeyboard Voices section.
REVERB Page 1
1 TYPEDetermines the type of reverb effect: Room, Hall or Church.Each type simulates a different acoustic environment; Room isthe smallest and Church the largest.
2 LENG. (Length)Determines the acoustic liveliness of the simulated room in theeffect. Higher settings make the room more reverberant. Range:0-6
3 DEPTHFine adjustment of the depth of reverberation or the level of thereflected sounds. (Coarse reverb depth settings are made withthe front panel REVERB controls.) A setting of 0 cancels thereverb effect. Range: 0-24
NOTE:
When this parameter or the panelREVERB control is set to the minimum,the settings in the pages that follow haveno effect.
43
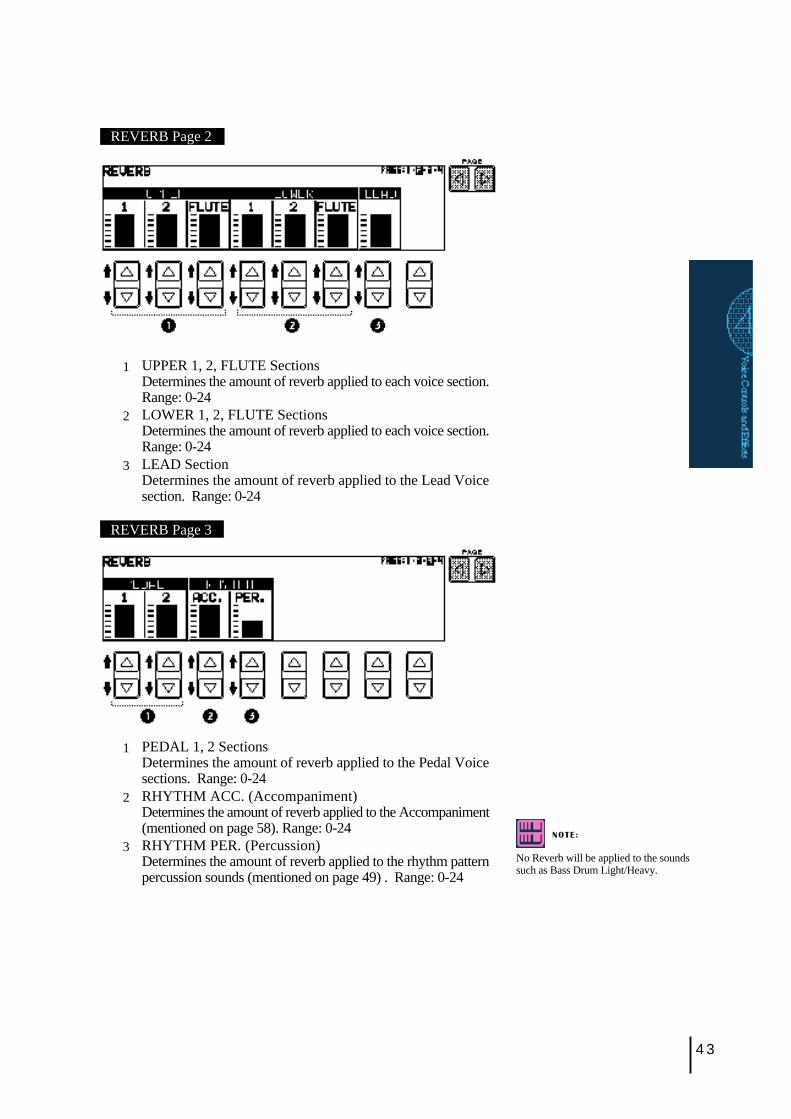
REVERB Page 2
1 UPPER 1, 2, FLUTE SectionsDetermines the amount of reverb applied to each voice section.Range: 0-24
2 LOWER 1, 2, FLUTE SectionsDetermines the amount of reverb applied to each voice section.Range: 0-24
3 LEAD SectionDetermines the amount of reverb applied to the Lead Voicesection. Range: 0-24
REVERB Page 3
1 PEDAL 1, 2 SectionsDetermines the amount of reverb applied to the Pedal Voicesections. Range: 0-24
2 RHYTHM ACC. (Accompaniment)Determines the amount of reverb applied to the Accompaniment(mentioned on page 58). Range: 0-24
3 RHYTHM PER. (Percussion)Determines the amount of reverb applied to the rhythm patternpercussion sounds (mentioned on page 49) . Range: 0-24
NOTE:
No Reverb will be applied to the soundssuch as Bass Drum Light/Heavy.
44
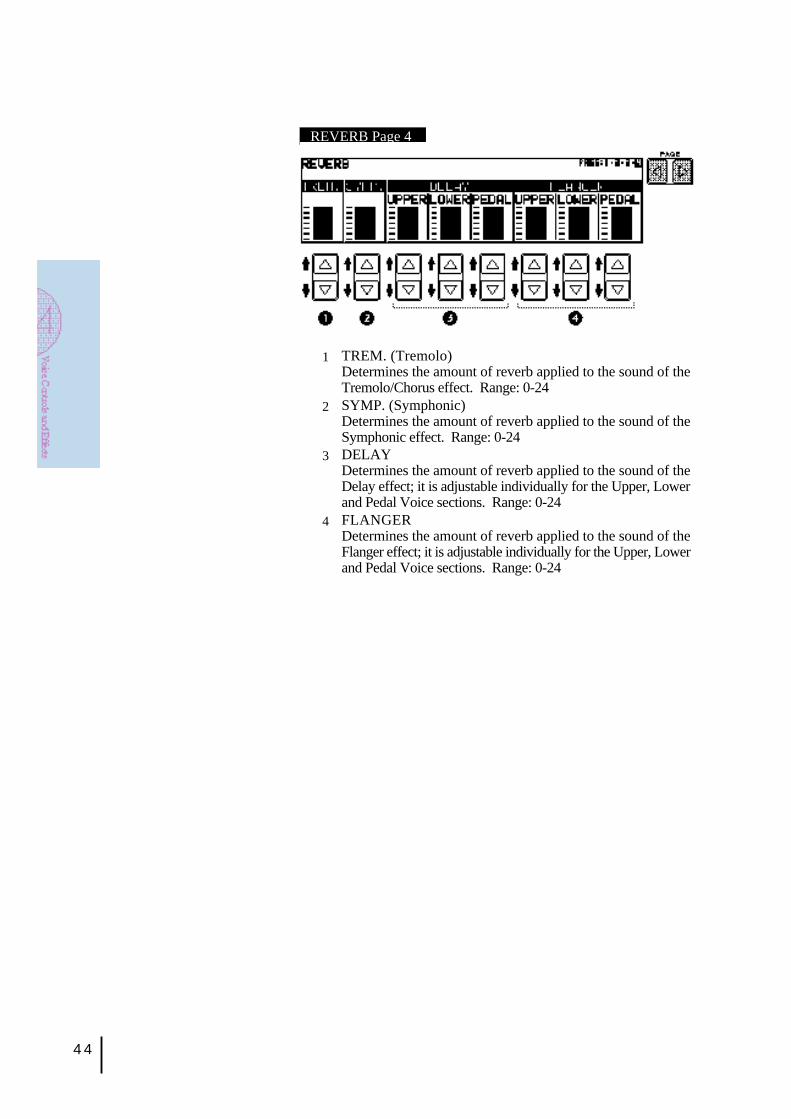
REVERB Page 4
1 TREM. (Tremolo)Determines the amount of reverb applied to the sound of theTremolo/Chorus effect. Range: 0-24
2 SYMP. (Symphonic)Determines the amount of reverb applied to the sound of theSymphonic effect. Range: 0-24
3 DELAYDetermines the amount of reverb applied to the sound of theDelay effect; it is adjustable individually for the Upper, Lowerand Pedal Voice sections. Range: 0-24
4 FLANGERDetermines the amount of reverb applied to the sound of theFlanger effect; it is adjustable individually for the Upper, Lowerand Pedal Voice sections. Range: 0-24
45
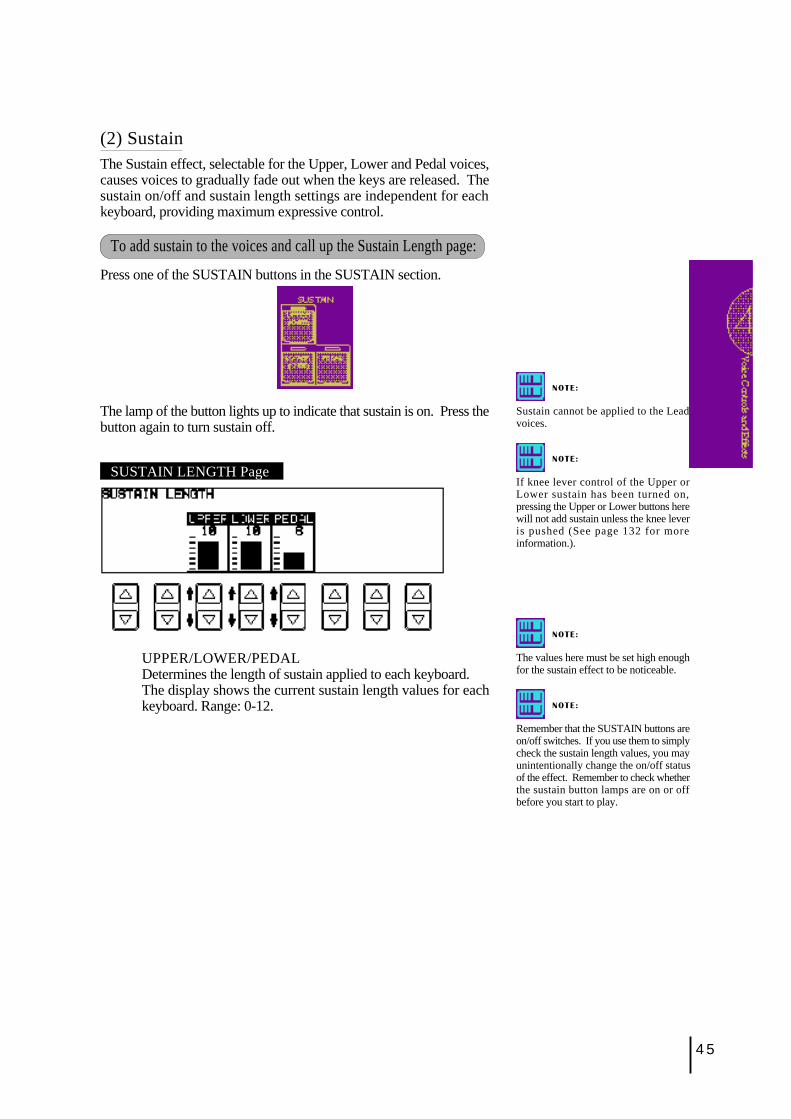
(2) SustainThe Sustain effect, selectable for the Upper, Lower and Pedal voices,causes voices to gradually fade out when the keys are released. Thesustain on/off and sustain length settings are independent for eachkeyboard, providing maximum expressive control.
To add sustain to the voices and call up the Sustain Length page:
Press one of the SUSTAIN buttons in the SUSTAIN section.
The lamp of the button lights up to indicate that sustain is on. Press thebutton again to turn sustain off.
SUSTAIN LENGTH Page
NOTE:
Sustain cannot be applied to the Leadvoices.
NOTE:
If knee lever control of the Upper orLower sustain has been turned on,pressing the Upper or Lower buttons herewill not add sustain unless the knee leveris pushed (See page 132 for moreinformation.).
UPPER/LOWER/PEDALDetermines the length of sustain applied to each keyboard.The display shows the current sustain length values for eachkeyboard. Range: 0-12.
NOTE:
The values here must be set high enoughfor the sustain effect to be noticeable.
NOTE:
Remember that the SUSTAIN buttons areon/off switches. If you use them to simplycheck the sustain length values, you mayunintentionally change the on/off statusof the effect. Remember to check whetherthe sustain button lamps are on or offbefore you start to play.
46
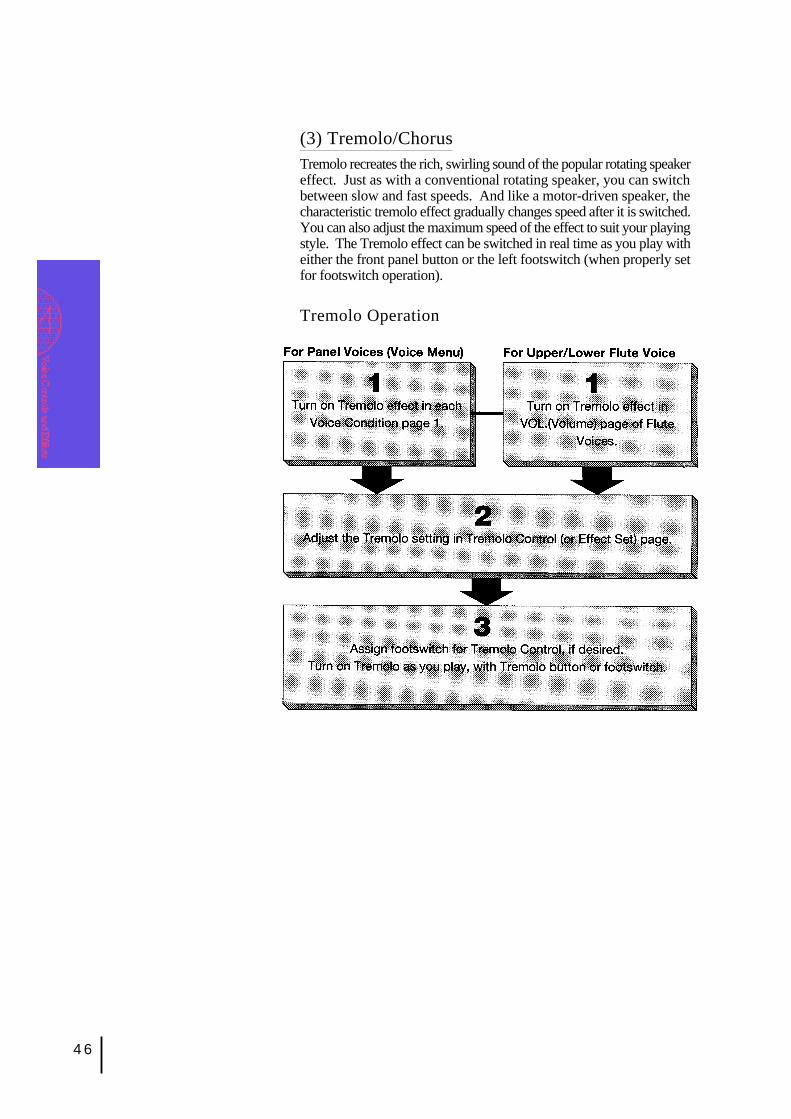
(3) Tremolo/ChorusTremolo recreates the rich, swirling sound of the popular rotating speakereffect. Just as with a conventional rotating speaker, you can switchbetween slow and fast speeds. And like a motor-driven speaker, thecharacteristic tremolo effect gradually changes speed after it is switched.You can also adjust the maximum speed of the effect to suit your playingstyle. The Tremolo effect can be switched in real time as you play witheither the front panel button or the left footswitch (when properly setfor footswitch operation).
Tremolo Operation
47
(1) Turning on the Tremolo effect (set to standby):
Before you can switch Tremolo on and off in real time, you must firstturn the effect on in the various voice sections. This doesn’t actuallystart the effect, but merely puts Tremolo in a “standby” condition.Tremolo can be applied selectively to the voice sections; in other words,the Upper Keyboard voices can have the Tremolo effect while the Leadvoices have another effect or no effect at all.
■ For Lead, Upper, Lower and Pedal (Voice Menu) voicesPress the desired voice button on the panel twice, then selectTremolo.
Selecting TREM. turns on Tremolo for the selected Voicesection (or the currently assigned voice group).
■ For Flute VoicesPress the U. FLUTE VOICE button and/or L. FLUTE VOICEbutton in the DISPLAY SELECT section, then select the VOLpage.Selecting ON turns on Tremolo for the current Flute Voice.
48
NOTE:
The EL-87’s various effects include Glideeffect. See page 131 for the informationon Glide.
(2) Setting the Tremolo effect
Tremolo setting made here are global; in other words , they are appliedthe same to all voices for which Tremolo has been turned on (set tostandby).
To turn on the Tremolo effect and call up the Tremolo Control page:Press the TREMOLO (FAST) button in the DISPLAY SELECTsection.The lamp of the button lights up to indicate that Tremolo is on.Press the button again to turn Tremolo off and Chorus on (theLED turns off).
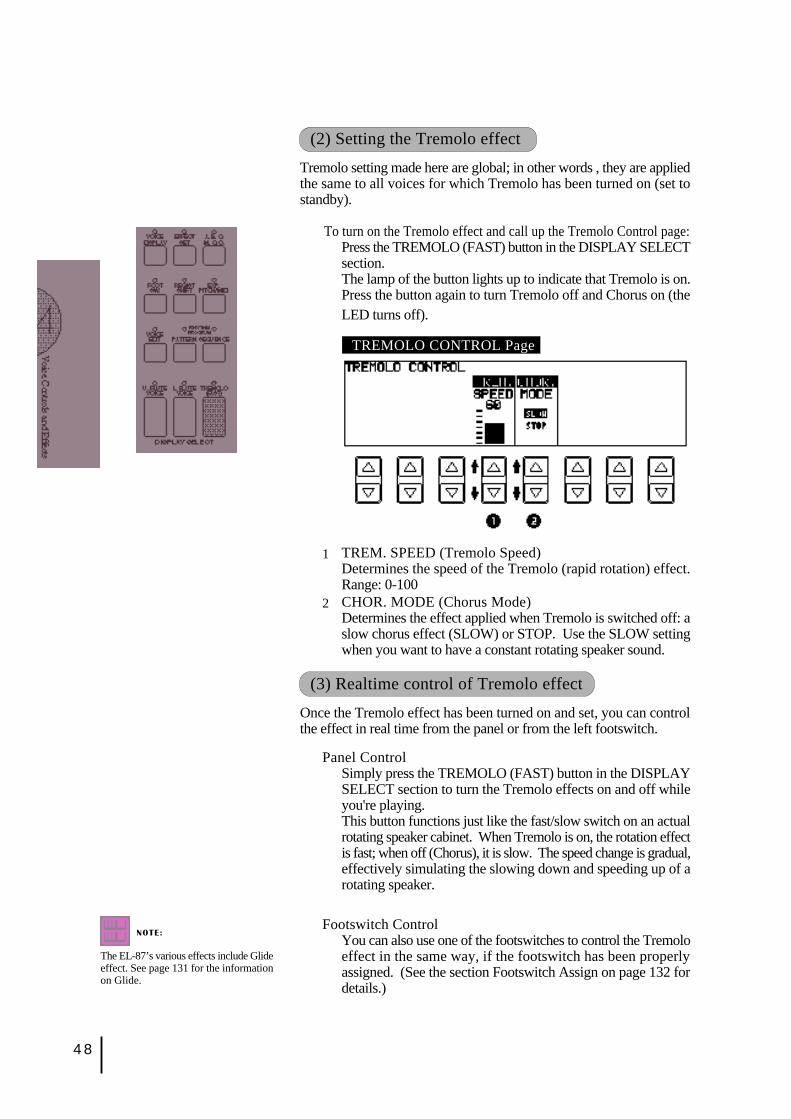
TREMOLO CONTROL Page
1 TREM. SPEED (Tremolo Speed)Determines the speed of the Tremolo (rapid rotation) effect.Range: 0-100
2 CHOR. MODE (Chorus Mode)Determines the effect applied when Tremolo is switched off: aslow chorus effect (SLOW) or STOP. Use the SLOW settingwhen you want to have a constant rotating speaker sound.
(3) Realtime control of Tremolo effect
Once the Tremolo effect has been turned on and set, you can controlthe effect in real time from the panel or from the left footswitch.
Panel ControlSimply press the TREMOLO (FAST) button in the DISPLAYSELECT section to turn the Tremolo effects on and off whileyou're playing.This button functions just like the fast/slow switch on an actualrotating speaker cabinet. When Tremolo is on, the rotation effectis fast; when off (Chorus), it is slow. The speed change is gradual,effectively simulating the slowing down and speeding up of arotating speaker.
Footswitch ControlYou can also use one of the footswitches to control the Tremoloeffect in the same way, if the footswitch has been properlyassigned. (See the section Footswitch Assign on page 132 fordetails.)
49
5 Rhythm and Accompaniment
The Rhythm features of the Electone use actual drum and percussion sampled sounds to automaticallyplay various rhythms. Automatic Accompainment functions are used with the rhythms, providingappropriate and completely automatic accompaniment to match the style of the rhythm selected.Moreover, the Electone has a Keyboard Percussion feature that allows you to play drum and percussionsounds from the Lower keyboard and Pedalboard.
1 Selecting Rhythms from the PanelTen different rhythm categories in various styles can be instantlyselected from the front panel. The Electone has many more"hidden" rhythms, however. A total of 66 rhythms are available,and can be selected by using the display.
(1) To select and play a rhythm:
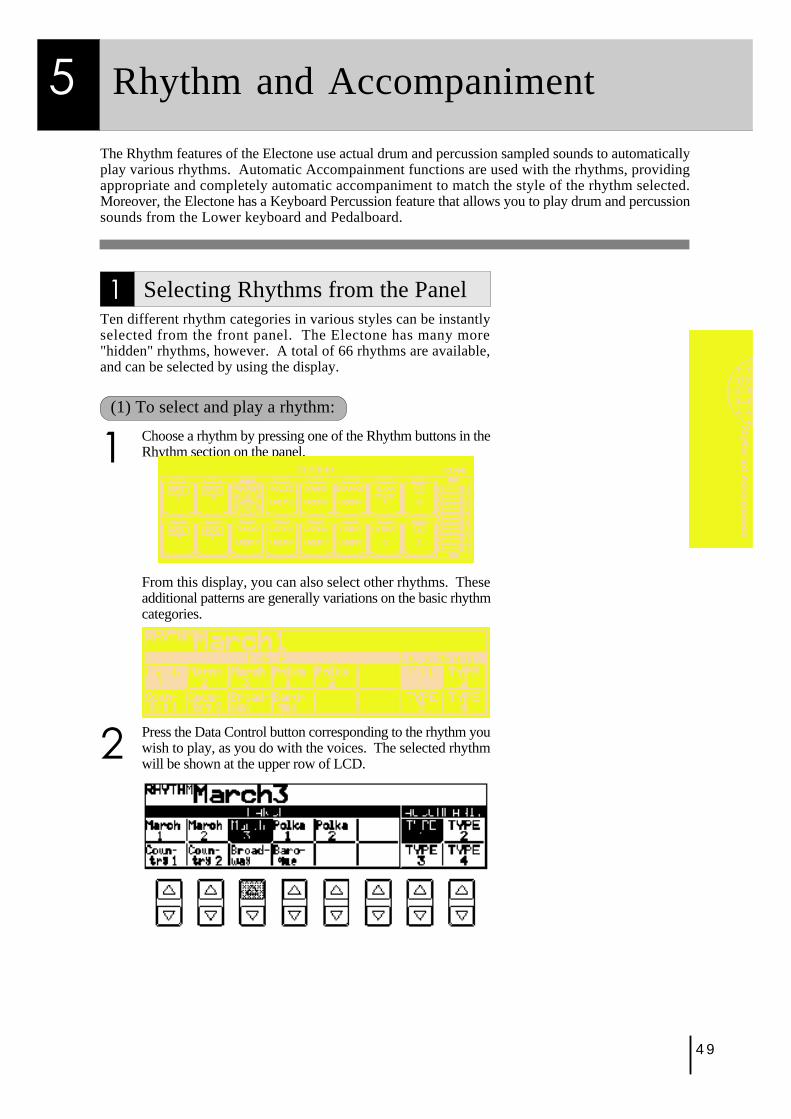
1 Choose a rhythm by pressing one of the Rhythm buttons in theRhythm section on the panel.
From this display, you can also select other rhythms. Theseadditional patterns are generally variations on the basic rhythmcategories.
2 Press the Data Control button corresponding to the rhythm youwish to play, as you do with the voices. The selected rhythmwill be shown at the upper row of LCD.
50
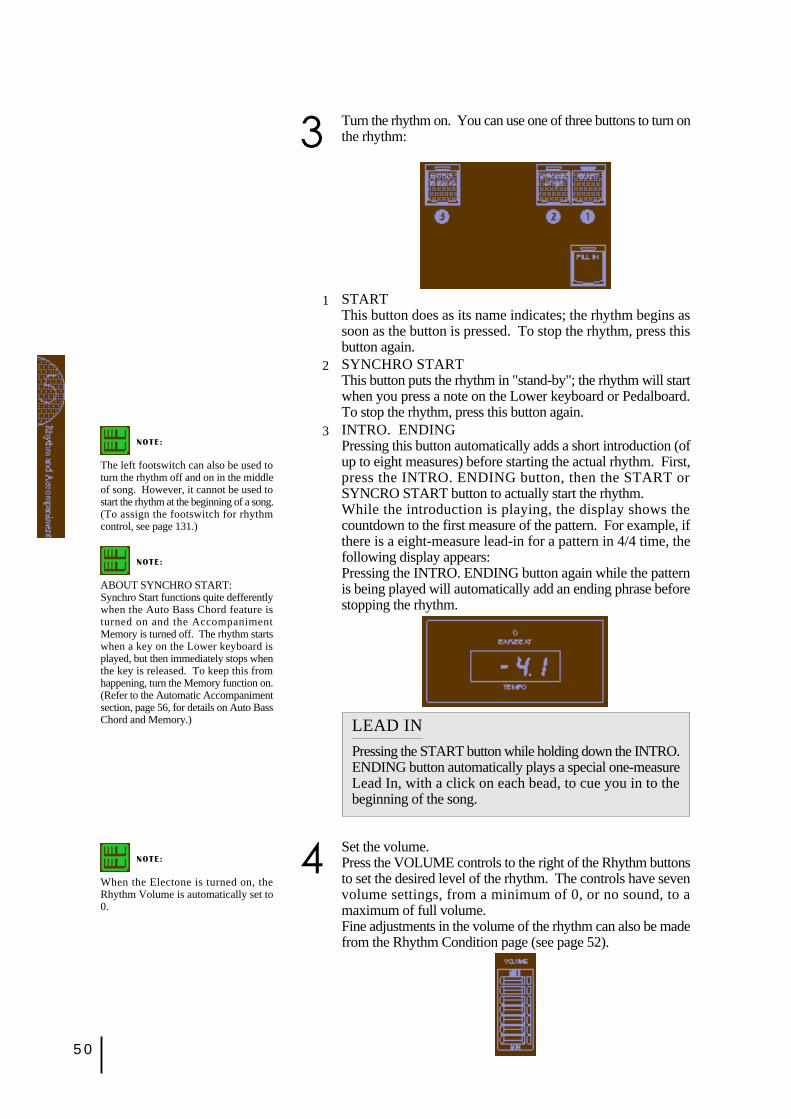
3 Turn the rhythm on. You can use one of three buttons to turn onthe rhythm:
1 STARTThis button does as its name indicates; the rhythm begins assoon as the button is pressed. To stop the rhythm, press thisbutton again.
2 SYNCHRO STARTThis button puts the rhythm in "stand-by"; the rhythm will startwhen you press a note on the Lower keyboard or Pedalboard.To stop the rhythm, press this button again.
3 INTRO. ENDINGPressing this button automatically adds a short introduction (ofup to eight measures) before starting the actual rhythm. First,press the INTRO. ENDING button, then the START orSYNCRO START button to actually start the rhythm.While the introduction is playing, the display shows thecountdown to the first measure of the pattern. For example, ifthere is a eight-measure lead-in for a pattern in 4/4 time, thefollowing display appears:Pressing the INTRO. ENDING button again while the patternis being played will automatically add an ending phrase beforestopping the rhythm.
NOTE:
The left footswitch can also be used toturn the rhythm off and on in the middleof song. However, it cannot be used tostart the rhythm at the beginning of a song.(To assign the footswitch for rhythmcontrol, see page 131.)
NOTE:
ABOUT SYNCHRO START:Synchro Start functions quite defferentlywhen the Auto Bass Chord feature isturned on and the AccompanimentMemory is turned off. The rhythm startswhen a key on the Lower keyboard isplayed, but then immediately stops whenthe key is released. To keep this fromhappening, turn the Memory function on.(Refer to the Automatic Accompanimentsection, page 56, for details on Auto BassChord and Memory.) LEAD IN
Pressing the START button while holding down the INTRO.ENDING button automatically plays a special one-measureLead In, with a click on each bead, to cue you in to thebeginning of the song.
4 Set the volume.Press the VOLUME controls to the right of the Rhythm buttonsto set the desired level of the rhythm. The controls have sevenvolume settings, from a minimum of 0, or no sound, to amaximum of full volume.Fine adjustments in the volume of the rhythm can also be madefrom the Rhythm Condition page (see page 52).
NOTE:
When the Electone is turned on, theRhythm Volume is automatically set to0.
51
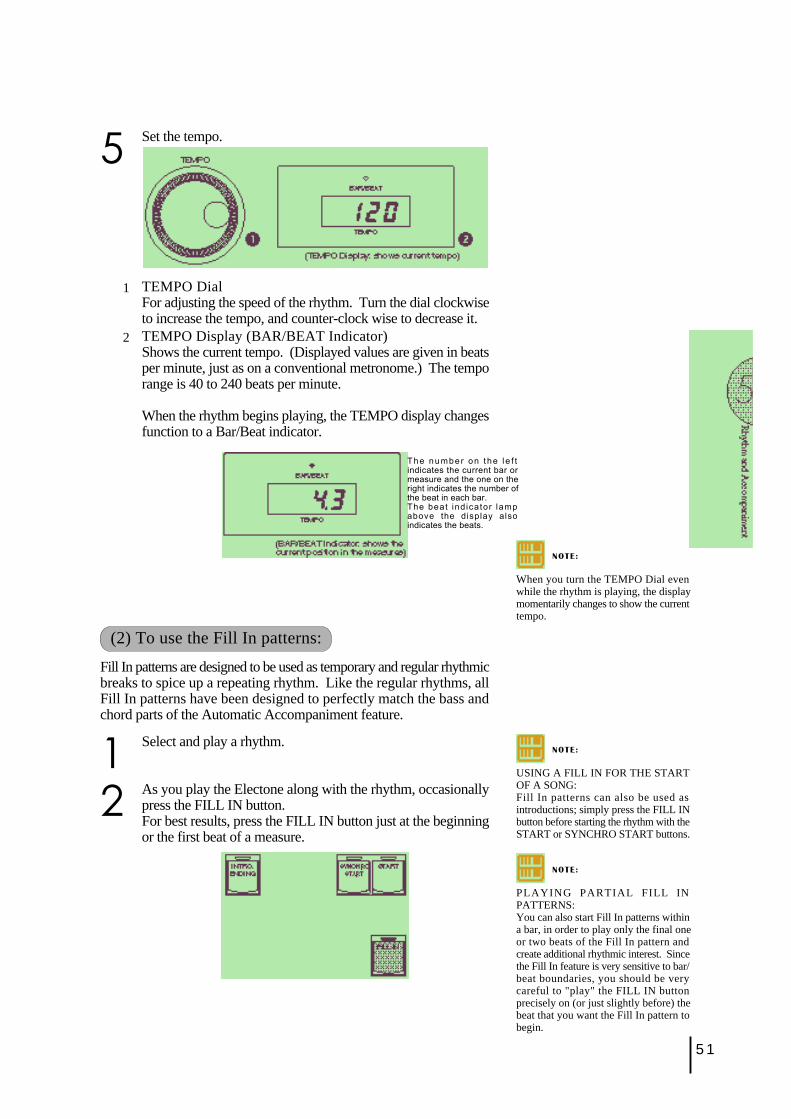
5 Set the tempo.
1 TEMPO DialFor adjusting the speed of the rhythm. Turn the dial clockwiseto increase the tempo, and counter-clock wise to decrease it.
2 TEMPO Display (BAR/BEAT Indicator)Shows the current tempo. (Displayed values are given in beatsper minute, just as on a conventional metronome.) The temporange is 40 to 240 beats per minute.
When the rhythm begins playing, the TEMPO display changesfunction to a Bar/Beat indicator.
The number on the l e f tindicates the current bar ormeasure and the one on theright indicates the number ofthe beat in each bar.The beat ind icator lampabove the display alsoindicates the beats.
NOTE:
When you turn the TEMPO Dial evenwhile the rhythm is playing, the displaymomentarily changes to show the currenttempo.
NOTE:
USING A FILL IN FOR THE STARTOF A SONG:Fill In patterns can also be used asintroductions; simply press the FILL INbutton before starting the rhythm with theSTART or SYNCHRO START buttons.
NOTE:
PLAYING PARTIAL FILL INPATTERNS:You can also start Fill In patterns withina bar, in order to play only the final oneor two beats of the Fill In pattern andcreate additional rhythmic interest. Sincethe Fill In feature is very sensitive to bar/beat boundaries, you should be verycareful to "play" the FILL IN buttonprecisely on (or just slightly before) thebeat that you want the Fill In pattern tobegin.
(2) To use the Fill In patterns:
Fill In patterns are designed to be used as temporary and regular rhythmicbreaks to spice up a repeating rhythm. Like the regular rhythms, allFill In patterns have been designed to perfectly match the bass andchord parts of the Automatic Accompaniment feature.
1 Select and play a rhythm.
2 As you play the Electone along with the rhythm, occasionallypress the FILL IN button.For best results, press the FILL IN button just at the beginningor the first beat of a measure.
52
2 Rhythm Condition PageThe Rhythm Condition page includes Auto Variation, Percussion,and Accompaniment Volume Controls.
To select the Rhythm Condition page:
Choose a rhythm, and press that pattern's panel button again (or againpress the Data Control button corresponding to the selected rhythm).(The button should be pressed only once if the Rhythm display hasalready been called up; otherwise press the button twice.)
Rhythm Condition Page
1 AUTO VARI. (Auto Variation)The Auto Variation function lets you set pattern variations to beplayed automatically. When set to ON, Auto Variationautomatically substitutes additional pattern variations to makethe rhythm more interesting and complex.
2 PERCUSSION BAL. (Balance)Determines the balance between two main sound types of therhythms: the drum sounds and the cymbal sounds. Highersettings emphasize the cymbal sounds, while lower settingsemphasize the drums.
3 PERCUSSION VOL. (Volume)Fine adjustment of the overall volume of the rhythms andKeyboard Percussion (see page 59).
4 ACC. VOL. (Accompaniment Volume)(This control is the same as that described in the Accompanimentsection, page 58.)
NOTE:
See page 56 for the information on A.B.C.
NOTE:
The Auto Variation function is not appliedto some of the rhythms.
53
3 Dotted Buttons and User RhythmsThe Rhythm section also has, like the voice sections, dotted buttonsfrom which rhythms can be selected. These dotted buttons functionas "wild card" rhythm selectors; any of the rhythms available fromthe panel buttons, the Rhythm Menus or User rhythms can beselected from these buttons.
NOTE:
As with the Voice sections dotted buttons,you can set two or three rhythms from thesame page to be selected from differentbuttons (one from the original Rhythmbutton, and the others from the dottedbuttons).
(1) To select a rhythm from a dotted button:
1 Press one of the dotted buttons on the right side of the Rhythmsection.
The Rhythm Menu page appears.
2 Select one of the pages with the Page buttons.
Each page represents the same general rhythm types as thoseselected from the panel buttons. The currently assigned rhythmname appears at the top of the display when the page has beenselected.The rhythm name shown at the top of the LCD is that of thecurrently assigned rhythm and is irrelevant to the Rhythm Menubelow.
3 Press the Data Control button corresponding to the rhythm youwish to use.
54
(2) To call up the User rhythms:
You can select the User page and rhythm when you wish to playrhythms you've created with the Rhythm Pattern Programmerfunction. (See page 122.)
1 Press Page buttons to select the USER page.
2 Press to select the User rhythm number and its Type.
4 Rhythm MenusThis chart lists all 66 of the rhythms available on the Electone. Thenumbers in the chart correspond to the page numbers shown inthe display.

55
NOTE:
The Baroque on the March page isconfigured with accompaniment only; itdoes not contain any drum or percussion.
56
5 Automatic Accompaniment - AutoBass Chord (A.B.C.)
The Auto Bass Chord (A.B.C.) function works with the Rhythm sectionof the Electone to automatically produce chord and bass accompanimentas you play. It adds a entirely new dimension to your performance byeffectively putting a full backing band at your disposal. Depending on thefeature or mode selected, you can play anything from a single note to afull chord on the Lower key board and hear complete, rhythmical bassand chord accompaniment.
(1) To select the A.B.C. function, call up the Rhythm Condition page:
Choose a rhythm on the panel, then press that rhythm's panel button again (oragain press the Data Control button corresponding to the selected rhythm).
Rhythm Condition Page
1 A.B.C.1 - 1 OFFCancels the Auto Bass Chord function.1 - 2 Single Finger ModeThe Single Finger mode provides the fastest and easiest meansto obtain many different chord/bass combinations, by simplyusing one, or at most, two or three fingers to play the chords.1 - 3 Fingered Chord ModeThe Fingered Chord mode automatically produces bass andchord accompaniment for chords played in the Lower keyboard.It allows you to use a wider range of chord types than in theSingle Finger mode. In the Fingered Chord mode, you play allthe notes of the chord while the Auto Bass Chord functionautomatically selects the appropriate bass pattern.1 - 4 Custom A.B.C. ModeThe Custom A.B.C. mode is a slight variation on the FingeredChod mode. It allows you to determine what bass notes will beplayed in the accompaniment by playing a note on the Pedalboardalong with the chords you play in the Lower keyboard.
2 MEM.(Memory)The Memory function allows you to have the bass and chordaccompaniment continue even after you release your fingers from thekeyboard. The Memory function can also be used independently fromthe A.B.C. feature but is effective only when rhythms are used.2 - 1 LOWERSelecting this keeps the chord accompaniment of the Lower Keyboardvoices playing even after you release your fingers from the Lowerkeyboard.2 - 2 PEDALSelecting this keeps the bass accompaniment of the Pedalboard voicesplaying even after you release your fingers from the Lower keyboard.
57
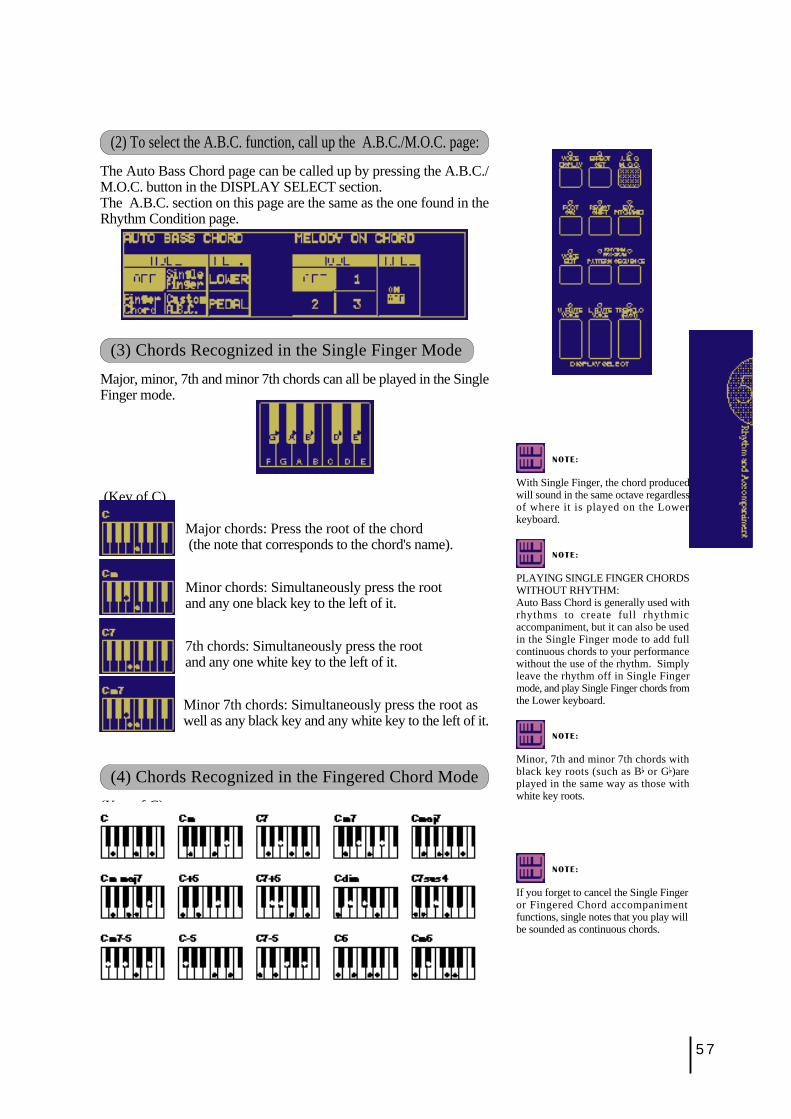
(2) To select the A.B.C. function, call up the A.B.C./M.O.C. page:
The Auto Bass Chord page can be called up by pressing the A.B.C./M.O.C. button in the DISPLAY SELECT section.The A.B.C. section on this page are the same as the one found in theRhythm Condition page.
(3) Chords Recognized in the Single Finger Mode
Major, minor, 7th and minor 7th chords can all be played in the SingleFinger mode.
NOTE:
With Single Finger, the chord producedwill sound in the same octave regardlessof where it is played on the Lowerkeyboard.
NOTE:
PLAYING SINGLE FINGER CHORDSWITHOUT RHYTHM:Auto Bass Chord is generally used withrhythms to create full rhythmicaccompaniment, but it can also be usedin the Single Finger mode to add fullcontinuous chords to your performancewithout the use of the rhythm. Simplyleave the rhythm off in Single Fingermode, and play Single Finger chords fromthe Lower keyboard.
NOTE:
Minor, 7th and minor 7th chords withblack key roots (such as Bb or Gb)areplayed in the same way as those withwhite key roots.
(Key of C)
Major chords: Press the root of the chord (the note that corresponds to the chord's name).
Minor chords: Simultaneously press the rootand any one black key to the left of it.
7th chords: Simultaneously press the rootand any one white key to the left of it.
Minor 7th chords: Simultaneously press the root aswell as any black key and any white key to the left of it.
(4) Chords Recognized in the Fingered Chord Mode
(Key of C)
NOTE:
If you forget to cancel the Single Fingeror Fingered Chord accompanimentfunctions, single notes that you play willbe sounded as continuous chords.
58
Rhythm Menu Page
ACCOMPANI. (Accompaniment)1 Type 1-Type 4
These settings provide various types of rhythmic and melodicaccompaniment, and generally become more complex accordingto the type number.
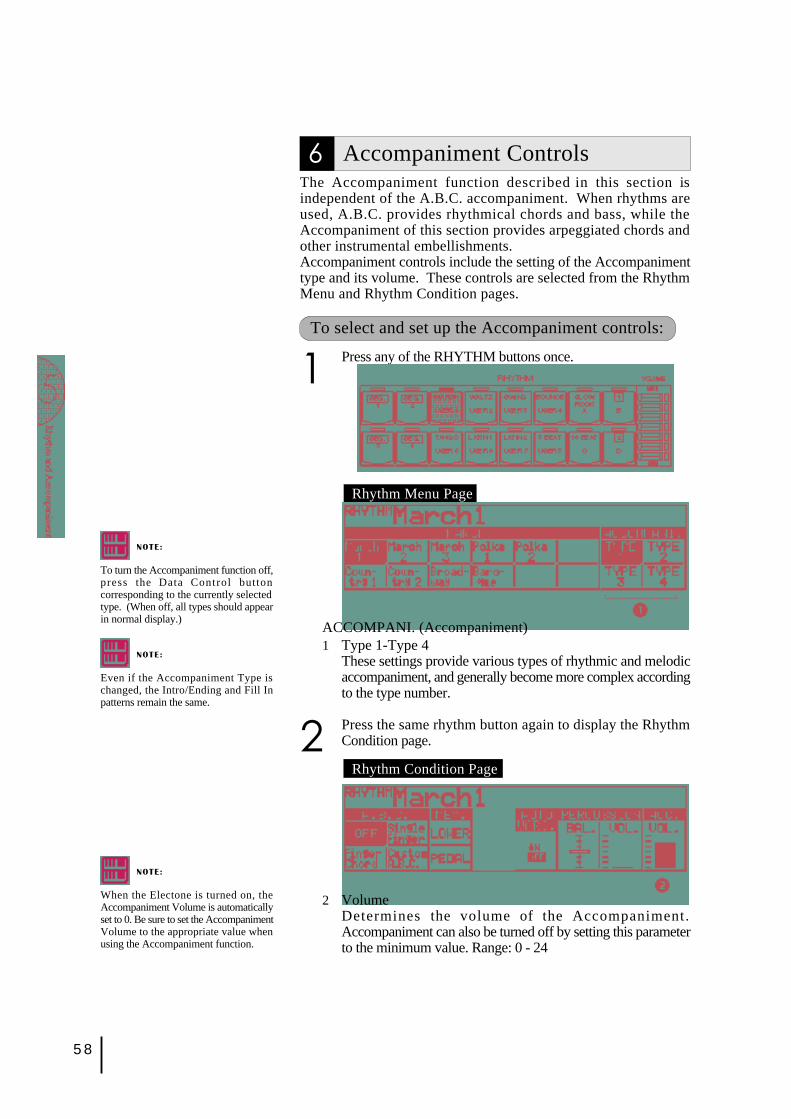
2 Press the same rhythm button again to display the RhythmCondition page.
Rhythm Condition Page
6 Accompaniment ControlsThe Accompaniment function described in this section isindependent of the A.B.C. accompaniment. When rhythms areused, A.B.C. provides rhythmical chords and bass, while theAccompaniment of this section provides arpeggiated chords andother instrumental embellishments.Accompaniment controls include the setting of the Accompanimenttype and its volume. These controls are selected from the RhythmMenu and Rhythm Condition pages.
To select and set up the Accompaniment controls:
1 Press any of the RHYTHM buttons once.
2 VolumeDetermines the volume of the Accompaniment.Accompaniment can also be turned off by setting this parameterto the minimum value. Range: 0 - 24
NOTE:
To turn the Accompaniment function off,press the Data Control buttoncorresponding to the currently selectedtype. (When off, all types should appearin normal display.)
NOTE:
Even if the Accompaniment Type ischanged, the Intro/Ending and Fill Inpatterns remain the same.
NOTE:
When the Electone is turned on, theAccompaniment Volume is automaticallyset to 0. Be sure to set the AccompanimentVolume to the appropriate value whenusing the Accompaniment function.
59
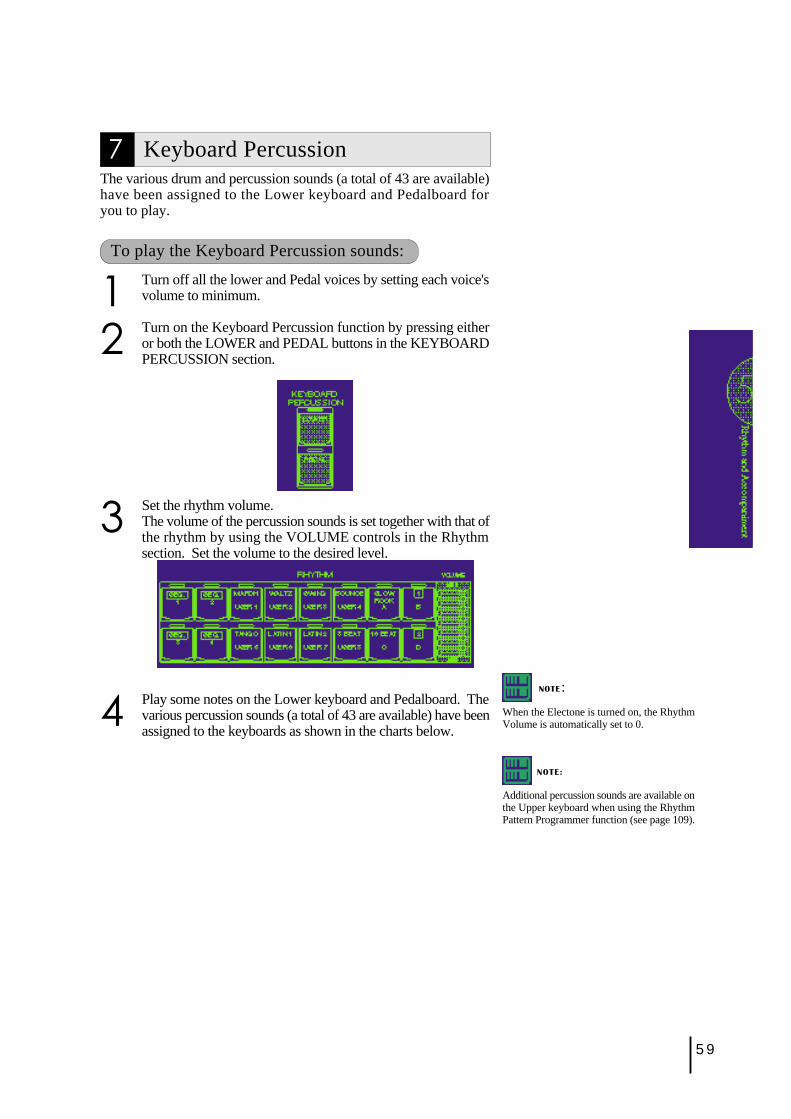
7 Keyboard PercussionThe various drum and percussion sounds (a total of 43 are available)have been assigned to the Lower keyboard and Pedalboard foryou to play.
To play the Keyboard Percussion sounds:
1 Turn off all the lower and Pedal voices by setting each voice'svolume to minimum.
2 Turn on the Keyboard Percussion function by pressing eitheror both the LOWER and PEDAL buttons in the KEYBOARDPERCUSSION section.
3 Set the rhythm volume.The volume of the percussion sounds is set together with that ofthe rhythm by using the VOLUME controls in the Rhythmsection. Set the volume to the desired level.
4 Play some notes on the Lower keyboard and Pedalboard. Thevarious percussion sounds (a total of 43 are available) have beenassigned to the keyboards as shown in the charts below.
NOTE:
When the Electone is turned on, the RhythmVolume is automatically set to 0.
NOTE:
Additional percussion sounds are available onthe Upper keyboard when using the RhythmPattern Programmer function (see page 109).
60
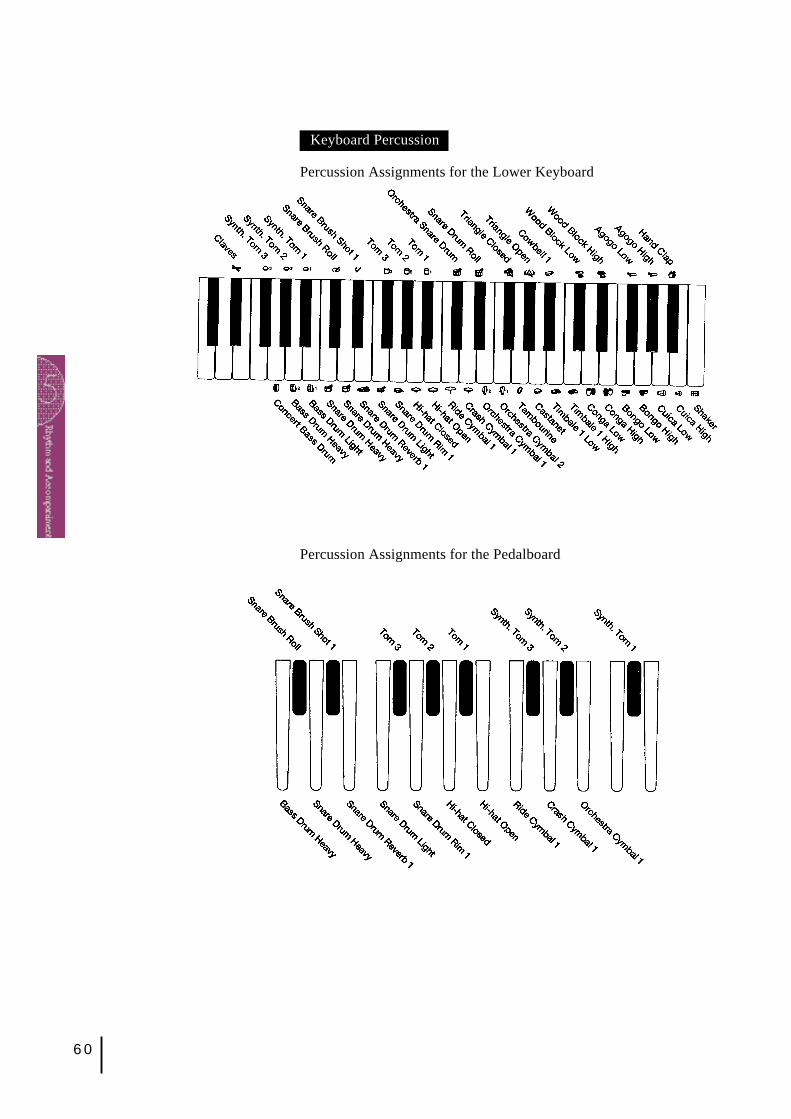
Keyboard Percussion
Percussion Assignments for the Lower Keyboard
Percussion Assignments for the Pedalboard
61
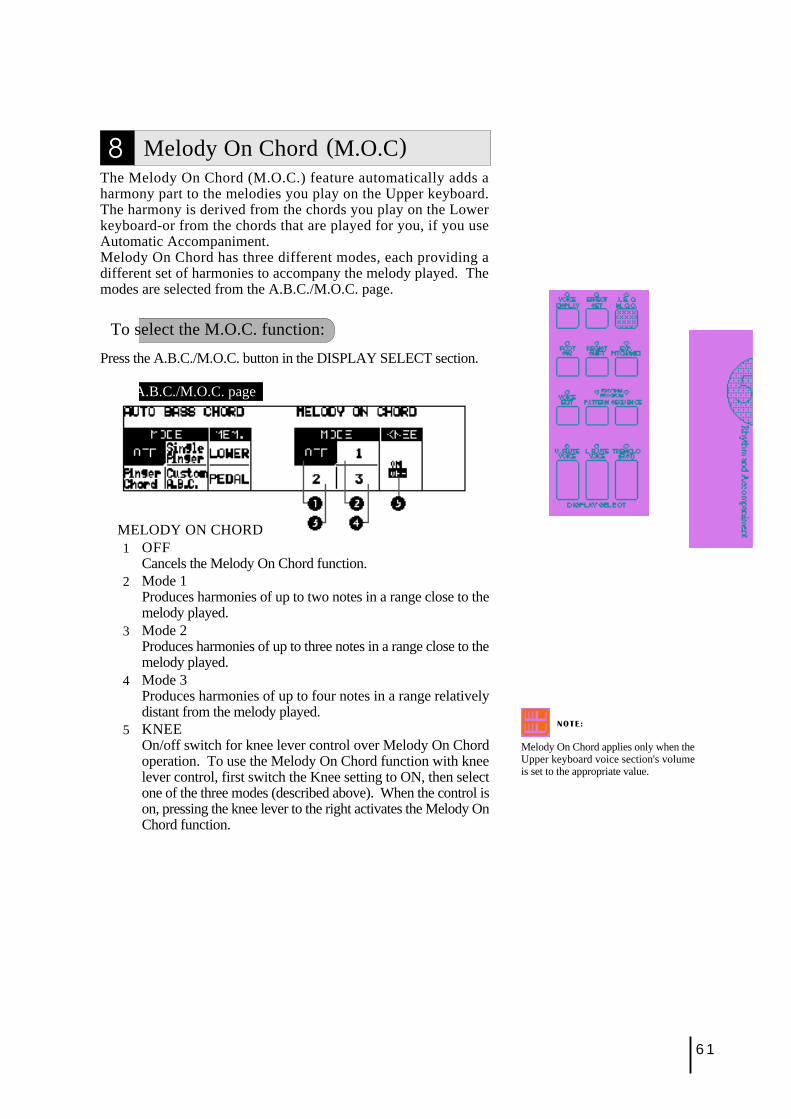
8 Melody On Chord (M.O.C)The Melody On Chord (M.O.C.) feature automatically adds aharmony part to the melodies you play on the Upper keyboard.The harmony is derived from the chords you play on the Lowerkeyboard-or from the chords that are played for you, if you useAutomatic Accompaniment.Melody On Chord has three different modes, each providing adifferent set of harmonies to accompany the melody played. Themodes are selected from the A.B.C./M.O.C. page.
To select the M.O.C. function:
Press the A.B.C./M.O.C. button in the DISPLAY SELECT section.
A.B.C./M.O.C. page
MELODY ON CHORD1 OFF
Cancels the Melody On Chord function.2 Mode 1
Produces harmonies of up to two notes in a range close to themelody played.
3 Mode 2Produces harmonies of up to three notes in a range close to themelody played.
4 Mode 3Produces harmonies of up to four notes in a range relativelydistant from the melody played.
5 KNEEOn/off switch for knee lever control over Melody On Chordoperation. To use the Melody On Chord function with kneelever control, first switch the Knee setting to ON, then selectone of the three modes (described above). When the control ison, pressing the knee lever to the right activates the Melody OnChord function.
NOTE:
Melody On Chord applies only when theUpper keyboard voice section's volumeis set to the appropriate value.
62
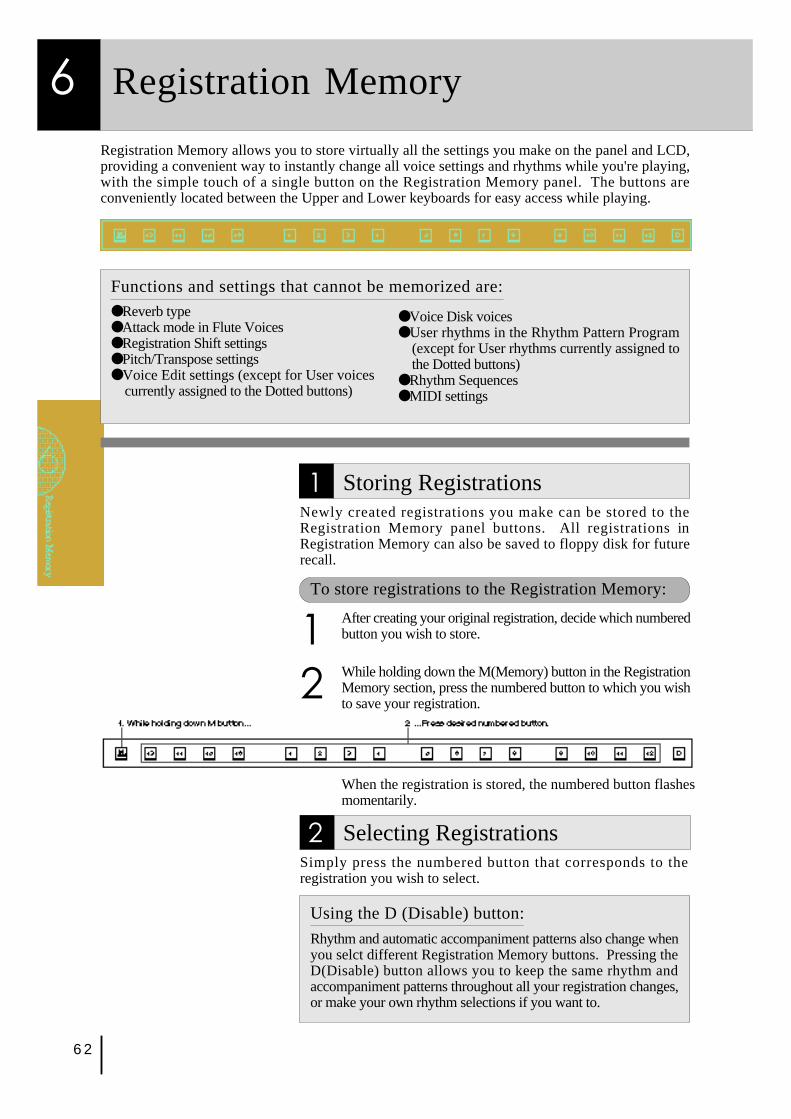
2 Selecting RegistrationsSimply press the numbered button that corresponds to theregistration you wish to select.
Using the D (Disable) button:
Rhythm and automatic accompaniment patterns also change whenyou selct different Registration Memory buttons. Pressing theD(Disable) button allows you to keep the same rhythm andaccompaniment patterns throughout all your registration changes,or make your own rhythm selections if you want to.
6 Registration Memory
Registration Memory allows you to store virtually all the settings you make on the panel and LCD,providing a convenient way to instantly change all voice settings and rhythms while you're playing,with the simple touch of a single button on the Registration Memory panel. The buttons areconveniently located between the Upper and Lower keyboards for easy access while playing.
●Reverb type●Attack mode in Flute Voices●Registration Shift settings●Pitch/Transpose settings●Voice Edit settings (except for User voices
currently assigned to the Dotted buttons)
●Voice Disk voices●User rhythms in the Rhythm Pattern Program
(except for User rhythms currently assigned tothe Dotted buttons)
●Rhythm Sequences●MIDI settings
When the registration is stored, the numbered button flashesmomentarily.
Functions and settings that cannot be memorized are:
1 Storing RegistrationsNewly created registrations you make can be stored to theRegistration Memory panel buttons. All registrations inRegistration Memory can also be saved to floppy disk for futurerecall.
To store registrations to the Registration Memory:
1 After creating your original registration, decide which numberedbutton you wish to store.
2 While holding down the M(Memory) button in the RegistrationMemory section, press the numbered button to which you wishto save your registration.

63
3 Saving the Registration Data to Disk
1 Insert a formatted disk into the disk slot under the Music DiskRecorder (M.D.R.).Make certain that the disk is either blank or has data you canerase. If the disk is new and unformatted, you will have toformat it. Refer to the instructions how to formatt a disk (Seepage 70).
NOTE:
See pages 77 and 78 for the details onsaving/recalling registrations to/from theM.D.R.
2 Select a song number on the M.D.R. by using the SONGSELECT buttons.
There are 40 songs, or memory locations, available on a singledisk.
3 While holding down the RECORD button on the M.D.R., pressthe M (Memory) button in Registration Memory.
This operation saves all 16 registrations in Registration Memoryto one song. The other 39 available songs on the disk can beused for saving additional batches of 16 registrations.
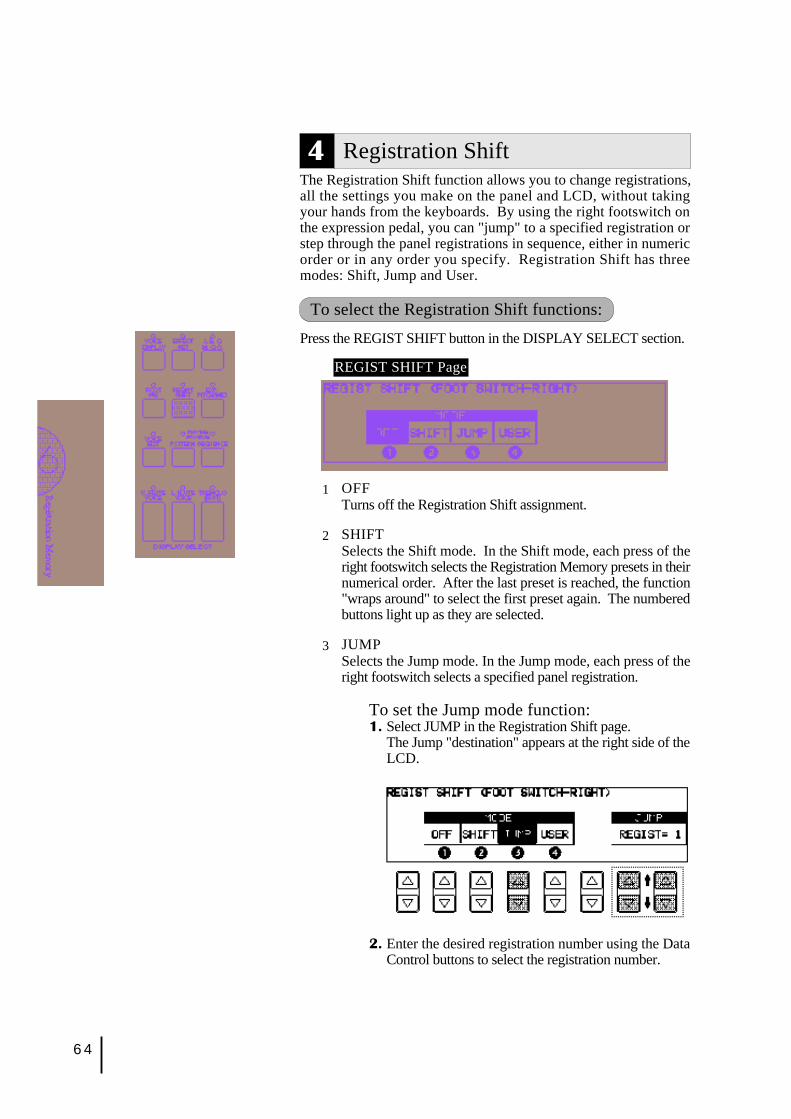
64
4 Registration ShiftThe Registration Shift function allows you to change registrations,all the settings you make on the panel and LCD, without takingyour hands from the keyboards. By using the right footswitch onthe expression pedal, you can "jump" to a specified registration orstep through the panel registrations in sequence, either in numericorder or in any order you specify. Registration Shift has threemodes: Shift, Jump and User.
To select the Registration Shift functions:
Press the REGIST SHIFT button in the DISPLAY SELECT section.
REGIST SHIFT Page
1 OFFTurns off the Registration Shift assignment.
2 SHIFTSelects the Shift mode. In the Shift mode, each press of theright footswitch selects the Registration Memory presets in theirnumerical order. After the last preset is reached, the function"wraps around" to select the first preset again. The numberedbuttons light up as they are selected.
3 JUMPSelects the Jump mode. In the Jump mode, each press of theright footswitch selects a specified panel registration.
To set the Jump mode function:1. Select JUMP in the Registration Shift page.
The Jump "destination" appears at the right side of theLCD.
2. Enter the desired registration number using the DataControl buttons to select the registration number.
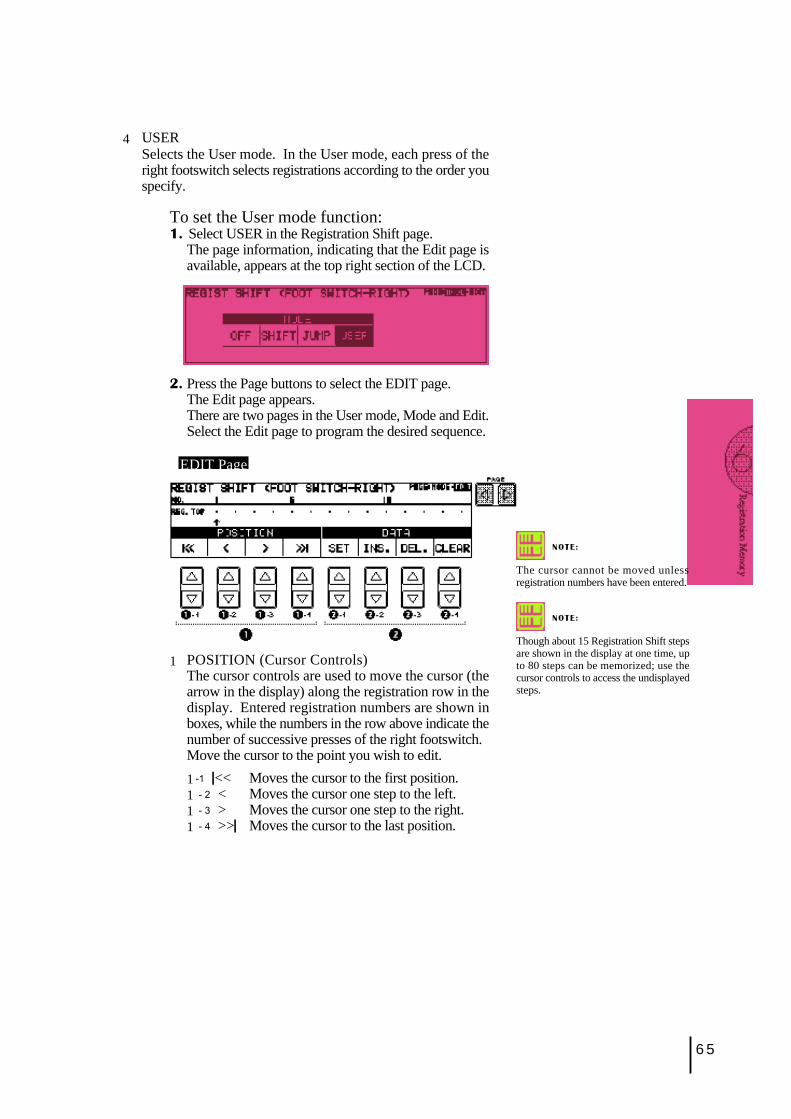
65
4 USERSelects the User mode. In the User mode, each press of theright footswitch selects registrations according to the order youspecify.
To set the User mode function:1. Select USER in the Registration Shift page.
The page information, indicating that the Edit page isavailable, appears at the top right section of the LCD.
2. Press the Page buttons to select the EDIT page.The Edit page appears.There are two pages in the User mode, Mode and Edit.Select the Edit page to program the desired sequence.
EDIT Page
1 POSITION (Cursor Controls)The cursor controls are used to move the cursor (thearrow in the display) along the registration row in thedisplay. Entered registration numbers are shown inboxes, while the numbers in the row above indicate thenumber of successive presses of the right footswitch.Move the cursor to the point you wish to edit.
1 -1 ❘<< Moves the cursor to the first position.1 - 2 < Moves the cursor one step to the left.1 - 3 > Moves the cursor one step to the right.1 - 4 >>❘ Moves the cursor to the last position.
NOTE:
The cursor cannot be moved unlessregistration numbers have been entered.
NOTE:
Though about 15 Registration Shift stepsare shown in the display at one time, upto 80 steps can be memorized; use thecursor controls to access the undisplayedsteps.
66
2 DATA (Data Controls)The data controls are used to enter and delete registrationnumbers in the registration row. Move the cursor to thedesired position and edit the registration data.2 -1 SETFor initially entering a registration number to a blankspace in the registration row, or for replacing a numberat the current cursor position. To enter a number, pressthe desired Registration Memory button (the selectedbutton will light), then press the Data Control buttoncorresponding to SET. After using SET to enterregistrations, the cursor can be moved among thenumbers.2 -2 INS. (Insert)For inserting a registration number just before the currentcursor position. The new registration number is insertedat the cursor position and all other numbers to the rightof the cursor are moved to accommodate the newnumbers. To perform the operation, first move thecursor to a numbered position. Then press the desiredRegistration Memory button (the selected button willlight), and press the Data Control button correspondingto INS.2 -3 DEL. (Delete)For deleting a registration number at the current cursorposition. To delete the unnecessary number, move thecursor to a numbered position and press the Data Controlbutton corresponding to DEL.2 -4 CLEARFor erasing all current user Registration Shift Settings.
After selecting CLEAR, the following display appears:
Select OK to clear all data. The message "Completed!!"momentarily appears on the LCD and returns to theprevious display.
Select Cancel to abort the operation.
67
Registration numbers cannot be entered beyond the theRegistration Shift function's capacity of 80. Thefollowing message momentarily appears when the 80spaces have been filled:First delete unnecessary registrations, then perform theoperation again.
All current settings including Registration Memories, User voicesand User rhythms can be deleted at once by using the Power OnReset function.
To reset the all settings:
1 Turn off the power.
2 While holding down the top left Data Control button, turn thepower back on.
Be careful when using this operation,since it erases all your existing data.Always save your important data to afloppy disk using M.D.R. (see page 68)in advance.
Turning the Electone off erases all panel settings you have made.When the Electone is turned on, Basic Registration 1 isautomatically selected. If you have made panel settings you wishto keep, save them to Registration Memory before turning theElectone off. You can, however, restore the panel settings thatwere made before the Electone was last turned off. In doing this,first be careful NOT to press any panel buttons (excepting those inBasic Registration) after you turn the Electone back on. Then, torestore the previous settings, hold down the M (Memory) buttonand press D (Disable) button.
Resetting the Electone to the Factory Preset (Power On Reset)
68
Compatible Disk Type
3.5” 2DD and 2HD type floppy disks can beused. A blank 2DD floppy disk has beenincluded with your Electone for you to recordyour performances.
Inserting/Ejecting Floppy Disks
To insert a floppy disk into the disk drive:Hold the disk so that the label of the disk is facing upwardand the sliding shutter is facing forward, towards thedisk slot. Carefully insert the disk into the slot, slowlypushing it all the way in until it clicks into place and theeject button pops out.
NOTE:
When the EL-87 is turned on, the LED below the floppydisk slot will be lit indicating that the M.D.R. is readyto use.
7 Music Disk Recorder
The Music Disk Recorder (M.D.R.) is a sophisticated recording device built into the Electone thatlets you record your performances and registration settings. The Music Disk Recorder not onlyrecords the notes you play; it also remembers the voices and rhythms you select, the front panelcontrols you change, as well as all expression pedal, footswitch and knee lever positions, to reproduceyour performance exactly as you play it. Moreover, you can separately record different parts of yourperformance, building up a song part by part.
1 PrecautionsBe sure to handle floppy disks and treat the disk drive with care. Follow the important precautionsbelow.
To eject a floppy disk:
Before ejecting the disk, be sure to confirmthat the M.D.R. is stopped (check if the LEDabove the STOP button in the M.D.R. sectionis lit).
Press the eject button slowly as far as it willgo; the disk will automatically pop out. Whenthe disk is fully ejected, carefully remove itby hand.
Never attempt to remove the disk or turn thepower off during recording, reading andplaying back. Doing so can damage the diskand possibly the disk drive.
If the eject button is pressed too quickly, or ifit is not pressed in as far as it will go, the diskmay not eject properly. The eject button maybecome stuck in a half-pressed position withthe disk extending from the drive slot by onlya few millimeters. If this happens, do notattempt to pull out the partially ejected disk,since using force in this situation can damagethe disk drive mechanism or the floppy disk.To remove a partially ejected disk, trypressing the eject button once again, or pushthe disk back into the slot and then repeat theeject procedure.
Be sure to remove the floppy disk from thedisk drive before turning off the power. Afloppy disk left in the drive for extendedperiods can easily pick up dust and dirt thatcan cause data read and write errors.

69
Å°To protect your data (Write-protect Tab):To prevent accidental erasure of important data,slide the disk’s write-protect tab to the “protect”position (tab open). If you attempt to modify thedisk when the write-protect tab is set to “on”position, “Prot (Protected)” will appear on theLED display in the M.D.R. section indicatingthat the operation is not possible.
Å° Data backupFor maximum data security Yamaharecommends that you keep two copies ofimportant data on separate floppy disks. Thisgives you a backup if one disk is lost or damaged.To make a backup disk use the Disk Copyfunction on page 84.
Cleaning the Disk Drive Read/Write Head
● Clean the read/write head regularly. Thisinstrument employs a precision magnetic read/write head which, after an extended period ofuse, will pick up a layer of magnetic particlesfrom the disks used that will eventually causeread and write errors.
● To maintain the disk drive in optimum workingorder Yamaha recommends that you use acommercially-available dry-type head cleaningdisk to clean the head about once a month. Askyour Yamaha dealer about the availability ofproper head-cleaning disks.
Never insert anything but floppy disks intothe disk drive. Other objects may causedamage to the disk drive or floppy disks.
About the Floppy Disks
Å° To handle floppy disks with care:
Do not place heavy objects on a disk or bendor apply pressure to the disk in any way.Always keep floppy disks in their protectivecases when they are not in use.
Do not expose the disk to direct sunlight,extremely high or low temperatures, orexcessive humidity, dust or liquids.
Do not open the sliding shutter and touch theexposed surface of the floppy disk inside.
Do not expose the disk to magnetic fields,such as those produced by televisions,speakers, motors, etc., since magnetic fieldscan partially or completely erase data on thedisk, rendering it unreadable.
Never use a floppy disk with a deformedshutter or housing.
Do not attach anything other than theprovided labels to a floppy disk. Also makesure that labels are attached in the properlocation.
70
If you format a disk that contains previously recordeddata, all data on the disk will be erased. To avoidinadvertently formatting a disk after this step, press theSTOP button.
2 Formatting a DiskBefore recording a performance to your blank disk, thedisk must first be formatted.
To format a disk:
1 Put the disk, label facing up, into the disk drive(insertion slot).“Fort” will appear on the LED display indicating thatthe inserted disk requires to be formatted.
2 While holding down the SHIFT button, press theFORMAT button.This step puts the format operation on stand-by,indicated by the dashes on the LED display and theflashing LED above the FORMAT button.
3 Press the FORMAT button again to begin formatting.The LED above the FORMAT button stays lit. Thenumber “160” appears on the LED display and countsdown to “001” as the disk is being formatted. Whenformatting is completed, operation returns to theoriginal STOP status.
About SHIFT button:
You will find the SHIFT button (printed in green) at thetop right side of the M.D.R. section. Some buttons in theM.D.R. section have dual functions: the first function isprinted in white above each button; the second functionis printed in green below each button. The SHIFT buttonis used to select the second functions by pressing eachfunction button while holding down the SHIFT.
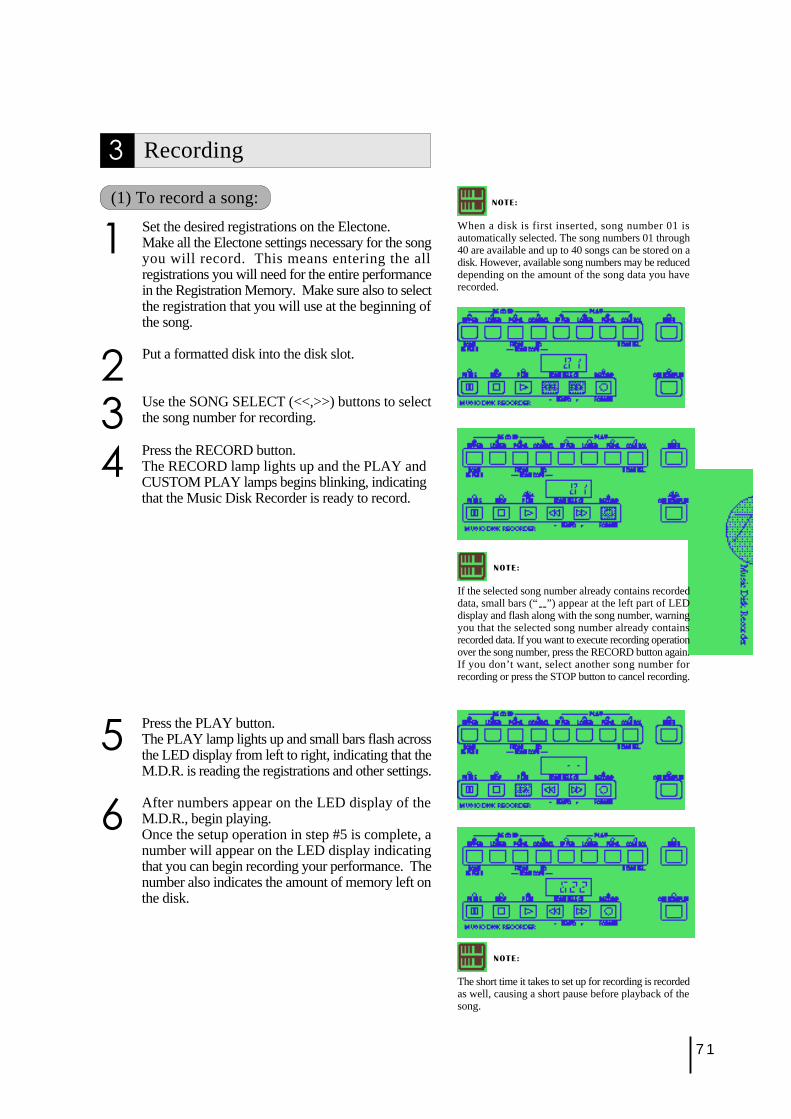
71
3 Recording
(1) To record a song:
1 Set the desired registrations on the Electone.Make all the Electone settings necessary for the songyou will record. This means entering the allregistrations you will need for the entire performancein the Registration Memory. Make sure also to selectthe registration that you will use at the beginning ofthe song.
2 Put a formatted disk into the disk slot.
3 Use the SONG SELECT (<<,>>) buttons to selectthe song number for recording.
5 Press the PLAY button.The PLAY lamp lights up and small bars flash acrossthe LED display from left to right, indicating that theM.D.R. is reading the registrations and other settings.
6 After numbers appear on the LED display of theM.D.R., begin playing.Once the setup operation in step #5 is complete, anumber will appear on the LED display indicatingthat you can begin recording your performance. Thenumber also indicates the amount of memory left onthe disk.
NOTE:
The short time it takes to set up for recording is recordedas well, causing a short pause before playback of thesong.
NOTE:
If the selected song number already contains recordeddata, small bars (“--”) appear at the left part of LEDdisplay and flash along with the song number, warningyou that the selected song number already containsrecorded data. If you want to execute recording operationover the song number, press the RECORD button again.If you don’t want, select another song number forrecording or press the STOP button to cancel recording.
NOTE:
When a disk is first inserted, song number 01 isautomatically selected. The song numbers 01 through40 are available and up to 40 songs can be stored on adisk. However, available song numbers may be reduceddepending on the amount of the song data you haverecorded.
4 Press the RECORD button.The RECORD lamp lights up and the PLAY andCUSTOM PLAY lamps begins blinking, indicatingthat the Music Disk Recorder is ready to record.
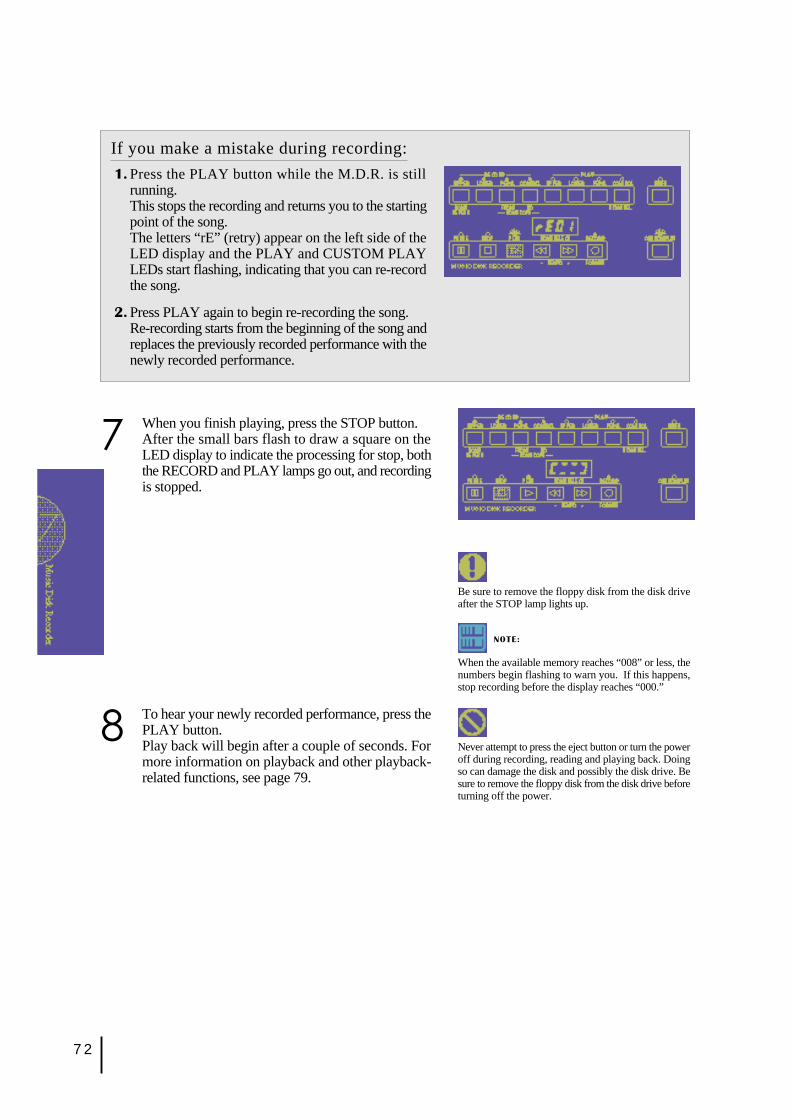
72
If you make a mistake during recording:
1. Press the PLAY button while the M.D.R. is stillrunning.This stops the recording and returns you to the startingpoint of the song.The letters “rE” (retry) appear on the left side of theLED display and the PLAY and CUSTOM PLAYLEDs start flashing, indicating that you can re-recordthe song.
2. Press PLAY again to begin re-recording the song.Re-recording starts from the beginning of the song andreplaces the previously recorded performance with thenewly recorded performance.
7 When you finish playing, press the STOP button.After the small bars flash to draw a square on theLED display to indicate the processing for stop, boththe RECORD and PLAY lamps go out, and recordingis stopped.
Be sure to remove the floppy disk from the disk driveafter the STOP lamp lights up.
NOTE:
When the available memory reaches “008” or less, thenumbers begin flashing to warn you. If this happens,stop recording before the display reaches “000.”
8 To hear your newly recorded performance, press thePLAY button.Play back will begin after a couple of seconds. Formore information on playback and other playback-related functions, see page 79.
Never attempt to press the eject button or turn the poweroff during recording, reading and playing back. Doingso can damage the disk and possibly the disk drive. Besure to remove the floppy disk from the disk drive beforeturning off the power.
73
Outline of M.D.R. Operation
Though the M.D.R. is as easy to operate as a cassette tape recorder, it is far move versatil. Since itrecords all Electone settings and control movements as well as the notes you play as digital data, itallows you much more flexibility and control than even the most sophisticated tape recorder. Basically,the M.D.R. independently records the following three types of data:
1. Registration data (including Bulk data)All registrations stored to the Registration Memory numbered buttons as well as the registration currentlyset to the panel, are recorded at the beginning of a song, before the actual recording of your performance.Bulk data is also saved to the song with the Registration data. Bulk data includes: Registration Shiftsettings, Rhythm Pattern (User rhythms) and Rhythm Sequence data, and User voices.
2. Performance dataThe M.D.R. records your performance on the keyboards and pedalboard of the Electone exactly as youplay it, even recording the strength at which you play the keys and how hard you press them down whileplaying. The various types of performance data-Upper, Lower, Pedal and Lead-are recorded toindependent “tracks,” so that you can change any one of them without affecting the others.
3. Control dataAll changes you make on the Electone during your performance are recorded in real time. Theseinclude registration changes, the use of the expression pedals, footswitches and knee lever.
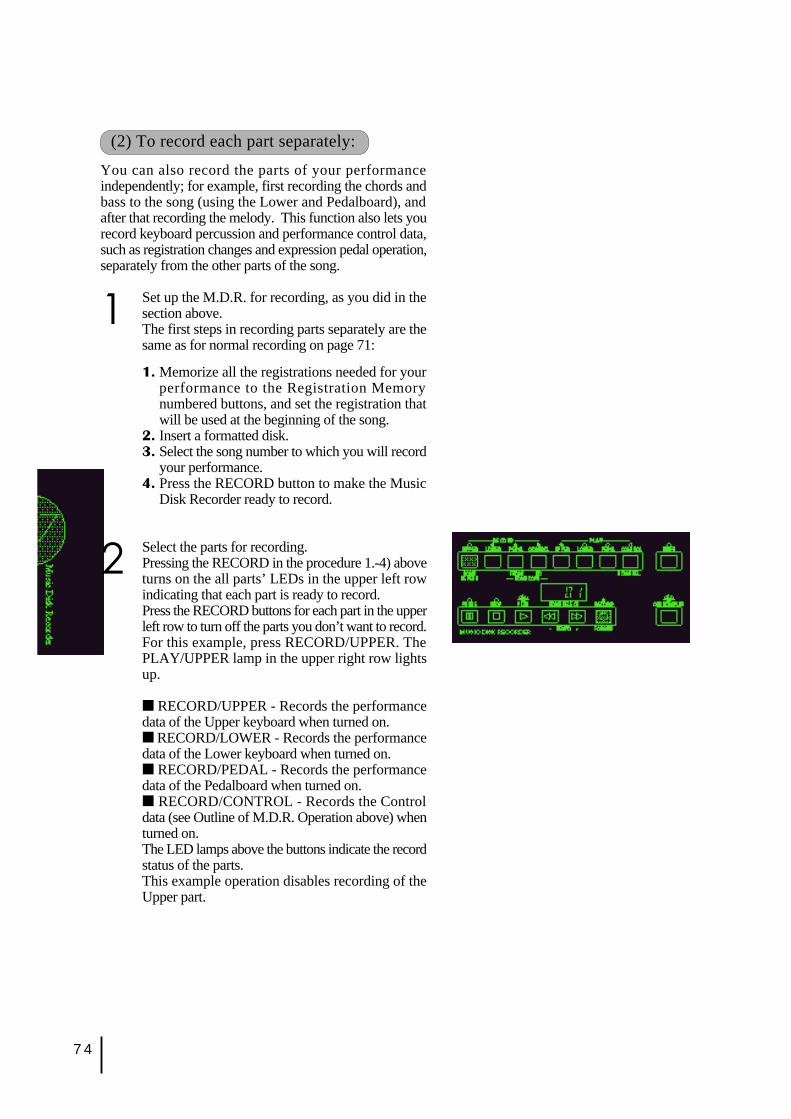
74
(2) To record each part separately:
You can also record the parts of your performanceindependently; for example, first recording the chords andbass to the song (using the Lower and Pedalboard), andafter that recording the melody. This function also lets yourecord keyboard percussion and performance control data,such as registration changes and expression pedal operation,separately from the other parts of the song.
1 Set up the M.D.R. for recording, as you did in thesection above.The first steps in recording parts separately are thesame as for normal recording on page 71:
1. Memorize all the registrations needed for yourperformance to the Registration Memorynumbered buttons, and set the registration thatwill be used at the beginning of the song.
2. Insert a formatted disk.3. Select the song number to which you will record
your performance.4. Press the RECORD button to make the Music
Disk Recorder ready to record.
2 Select the parts for recording.Pressing the RECORD in the procedure 1.-4) aboveturns on the all parts’ LEDs in the upper left rowindicating that each part is ready to record.Press the RECORD buttons for each part in the upperleft row to turn off the parts you don’t want to record.For this example, press RECORD/UPPER. ThePLAY/UPPER lamp in the upper right row lightsup.
■ RECORD/UPPER - Records the performancedata of the Upper keyboard when turned on.■ RECORD/LOWER - Records the performancedata of the Lower keyboard when turned on.■ RECORD/PEDAL - Records the performancedata of the Pedalboard when turned on.■ RECORD/CONTROL - Records the Controldata (see Outline of M.D.R. Operation above) whenturned on.The LED lamps above the buttons indicate the recordstatus of the parts.This example operation disables recording of theUpper part.
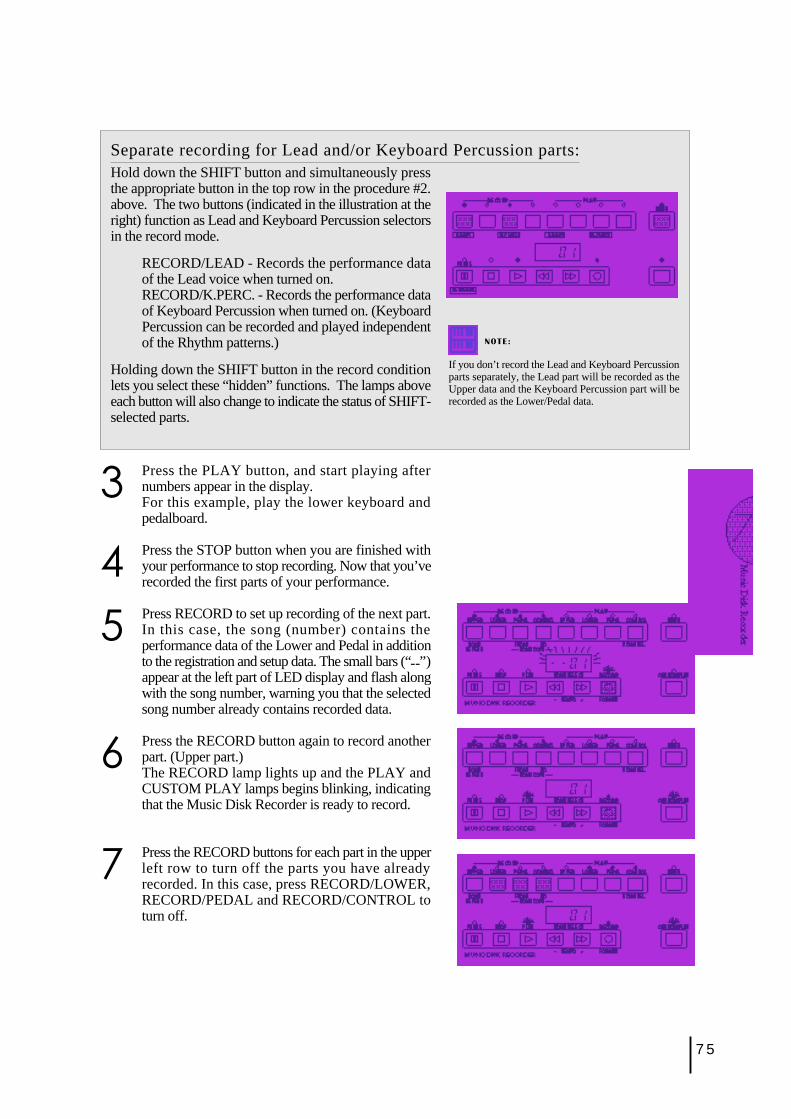
75
Separate recording for Lead and/or Keyboard Percussion parts:Hold down the SHIFT button and simultaneously pressthe appropriate button in the top row in the procedure #2.above. The two buttons (indicated in the illustration at theright) function as Lead and Keyboard Percussion selectorsin the record mode.
RECORD/LEAD - Records the performance dataof the Lead voice when turned on.RECORD/K.PERC. - Records the performance dataof Keyboard Percussion when turned on. (KeyboardPercussion can be recorded and played independentof the Rhythm patterns.)
Holding down the SHIFT button in the record conditionlets you select these “hidden” functions. The lamps aboveeach button will also change to indicate the status of SHIFT-selected parts.
NOTE:
If you don’t record the Lead and Keyboard Percussionparts separately, the Lead part will be recorded as theUpper data and the Keyboard Percussion part will berecorded as the Lower/Pedal data.
3 Press the PLAY button, and start playing afternumbers appear in the display.For this example, play the lower keyboard andpedalboard.
4 Press the STOP button when you are finished withyour performance to stop recording. Now that you’verecorded the first parts of your performance.
5 Press RECORD to set up recording of the next part.In this case, the song (number) contains theperformance data of the Lower and Pedal in additionto the registration and setup data. The small bars (“--”)appear at the left part of LED display and flash alongwith the song number, warning you that the selectedsong number already contains recorded data.
6 Press the RECORD button again to record anotherpart. (Upper part.)The RECORD lamp lights up and the PLAY andCUSTOM PLAY lamps begins blinking, indicatingthat the Music Disk Recorder is ready to record.
7 Press the RECORD buttons for each part in the upperleft row to turn off the parts you have alreadyrecorded. In this case, press RECORD/LOWER,RECORD/PEDAL and RECORD/CONTROL toturn off.

76
8 Press the CUSTOMPLAY button to start recordingof the new part or parts. (Upper part.)Playback of the previously recorded parts startsimmediately.The CUSTOM PLAY button is used here to recordonly the parts that have been selected for recording,and play back only those parts that have been selectedfor playback. Since registration data has alreadybeen recorded with the first parts of the song,recording begins immediately.While you listen to the parts being played back, startplaying the melody on the Upper keyboard.When the end of the recorded performance isreached, playback is automatically stopped and theSTOP status is resumed.
NOTE:
The CUSTOM PLAY button is used to record or playback the specified track(s).
NOTE:
The length of a subesquently recorded part cannotexceed the length of the previously recorded parts. Ifyou want to change the song length, first delete theexisiting song (see Song Delete on page 84) and recordagain.
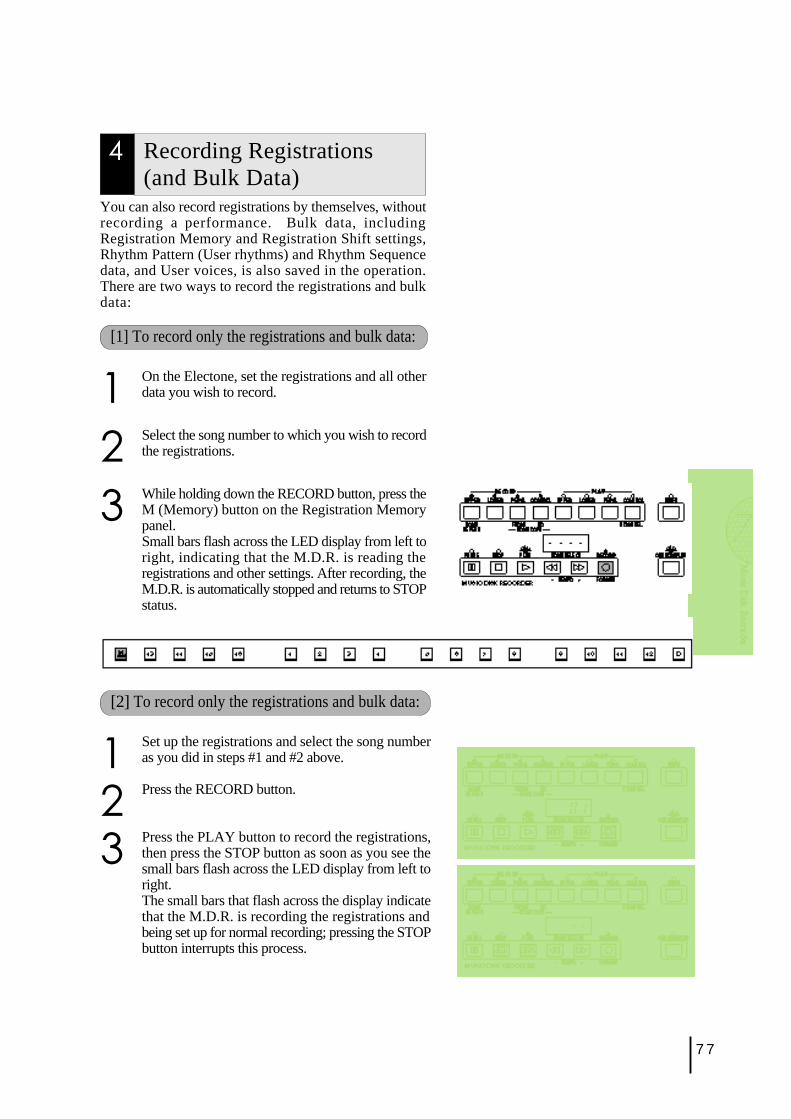
77
[2] To record only the registrations and bulk data:
1 Set up the registrations and select the song numberas you did in steps #1 and #2 above.
2 Press the RECORD button.
3 Press the PLAY button to record the registrations,then press the STOP button as soon as you see thesmall bars flash across the LED display from left toright.The small bars that flash across the display indicatethat the M.D.R. is recording the registrations andbeing set up for normal recording; pressing the STOPbutton interrupts this process.
4 Recording Registrations(and Bulk Data)
You can also record registrations by themselves, withoutrecording a performance. Bulk data, includingRegistration Memory and Registration Shift settings,Rhythm Pattern (User rhythms) and Rhythm Sequencedata, and User voices, is also saved in the operation.There are two ways to record the registrations and bulkdata:
[1] To record only the registrations and bulk data:
1 On the Electone, set the registrations and all otherdata you wish to record.
2 Select the song number to which you wish to recordthe registrations.
3 While holding down the RECORD button, press theM (Memory) button on the Registration Memorypanel.Small bars flash across the LED display from left toright, indicating that the M.D.R. is reading theregistrations and other settings. After recording, theM.D.R. is automatically stopped and returns to STOPstatus.
78
5 Recalling RecordedRegistrations (and Bulk Data)
The registrations (and bulk data) recorded to songnumbers in the above operation can be loaded back tothe Electone by simply selecting the appropriate songnumber and pressing the PLAY button. When theoperation has been completed, the M.D.R. returns toSTOP status.
The M.D.R. also makes it possible to use more than the 16Registration Memory registrations in a performance—without having to alter the current panel settings. This wouldcome in handy when performing several songs in successionthat use more than 16 registrations.
6 Replacing Registrations
The M.D.R. also lets you change the registrations of anexisting song without changing the performance data.The procedure is the same as that of RecordingRegistrations mentioned in the previous page.
To do this:
1 First record the registrations you need into severalsong numbers on the M.D.R. before theperformance. (You should also try to record themin the order that you’ll use them, if possible.)
2 During the performance, after all 16 registrationsfrom a certain song number have been used, selectthe next song number and press the PLAY buttonon the M.D.R. This replaces all 16 registrations inRegistration Memory with the new ones from theselected song number.
3 By repeating the above steps, you can run throughan entire performance without having to changethe panel settings.
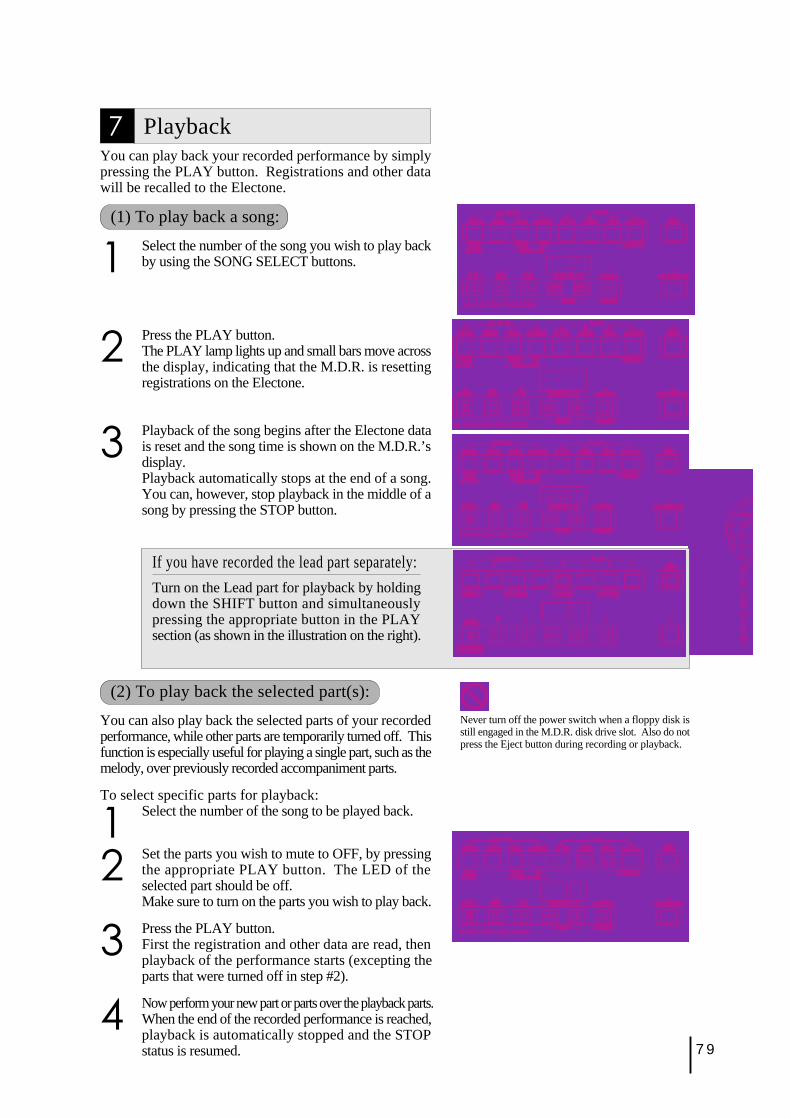
79
7 PlaybackYou can play back your recorded performance by simplypressing the PLAY button. Registrations and other datawill be recalled to the Electone.
(1) To play back a song:
1 Select the number of the song you wish to play backby using the SONG SELECT buttons.
2 Press the PLAY button.The PLAY lamp lights up and small bars move acrossthe display, indicating that the M.D.R. is resettingregistrations on the Electone.
3 Playback of the song begins after the Electone datais reset and the song time is shown on the M.D.R.’sdisplay.Playback automatically stops at the end of a song.You can, however, stop playback in the middle of asong by pressing the STOP button.
If you have recorded the lead part separately:
Turn on the Lead part for playback by holdingdown the SHIFT button and simultaneouslypressing the appropriate button in the PLAYsection (as shown in the illustration on the right).
(2) To play back the selected part(s):
You can also play back the selected parts of your recordedperformance, while other parts are temporarily turned off. Thisfunction is especially useful for playing a single part, such as themelody, over previously recorded accompaniment parts.
To select specific parts for playback:
1 Select the number of the song to be played back.
2 Set the parts you wish to mute to OFF, by pressingthe appropriate PLAY button. The LED of theselected part should be off.Make sure to turn on the parts you wish to play back.
3 Press the PLAY button.First the registration and other data are read, thenplayback of the performance starts (excepting theparts that were turned off in step #2).
4 Now perform your new part or parts over the playback parts.When the end of the recorded performance is reached,playback is automatically stopped and the STOPstatus is resumed.
Never turn off the power switch when a floppy disk isstill engaged in the M.D.R. disk drive slot. Also do notpress the Eject button during recording or playback.
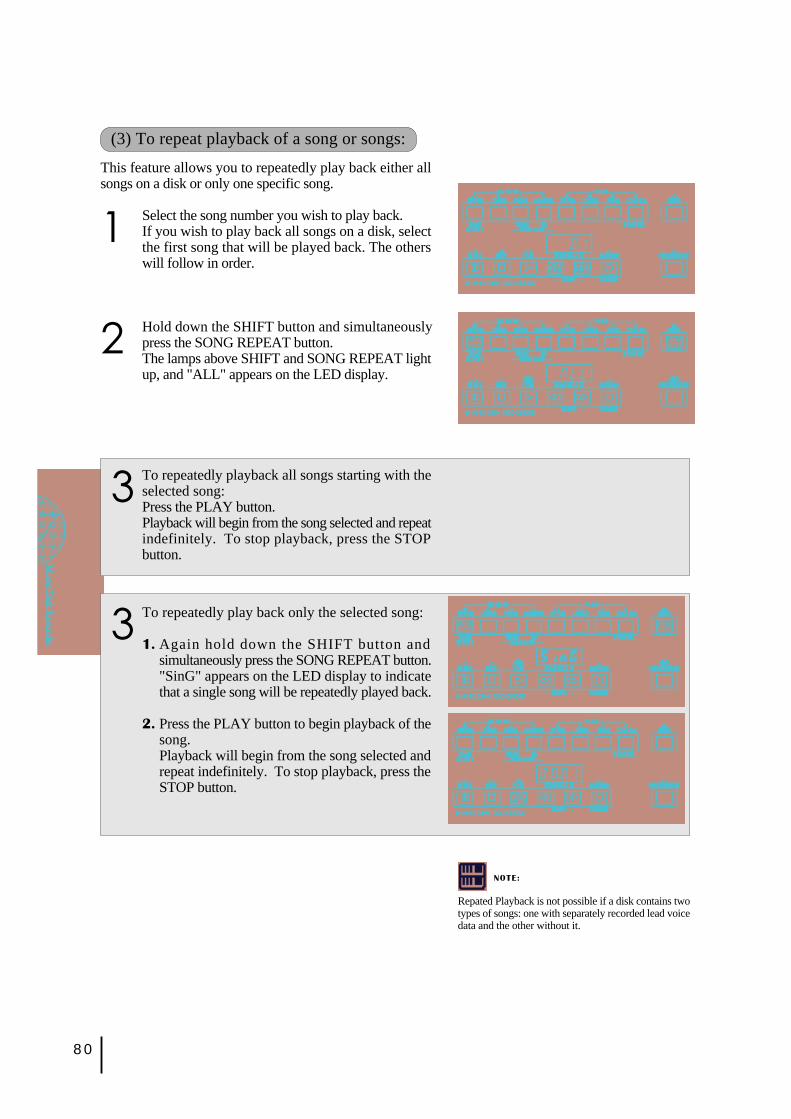
80
(3) To repeat playback of a song or songs:
This feature allows you to repeatedly play back either allsongs on a disk or only one specific song.
1 Select the song number you wish to play back.If you wish to play back all songs on a disk, selectthe first song that will be played back. The otherswill follow in order.
2 Hold down the SHIFT button and simultaneouslypress the SONG REPEAT button.The lamps above SHIFT and SONG REPEAT lightup, and "ALL" appears on the LED display.
3 To repeatedly play back only the selected song:
1. Again hold down the SHIFT button andsimultaneously press the SONG REPEAT button."SinG" appears on the LED display to indicatethat a single song will be repeatedly played back.
2. Press the PLAY button to begin playback of thesong.Playback will begin from the song selected andrepeat indefinitely. To stop playback, press theSTOP button.
NOTE:
Repated Playback is not possible if a disk contains twotypes of songs: one with separately recorded lead voicedata and the other without it.
3 To repeatedly playback all songs starting with theselected song:Press the PLAY button.Playback will begin from the song selected and repeatindefinitely. To stop playback, press the STOPbutton.
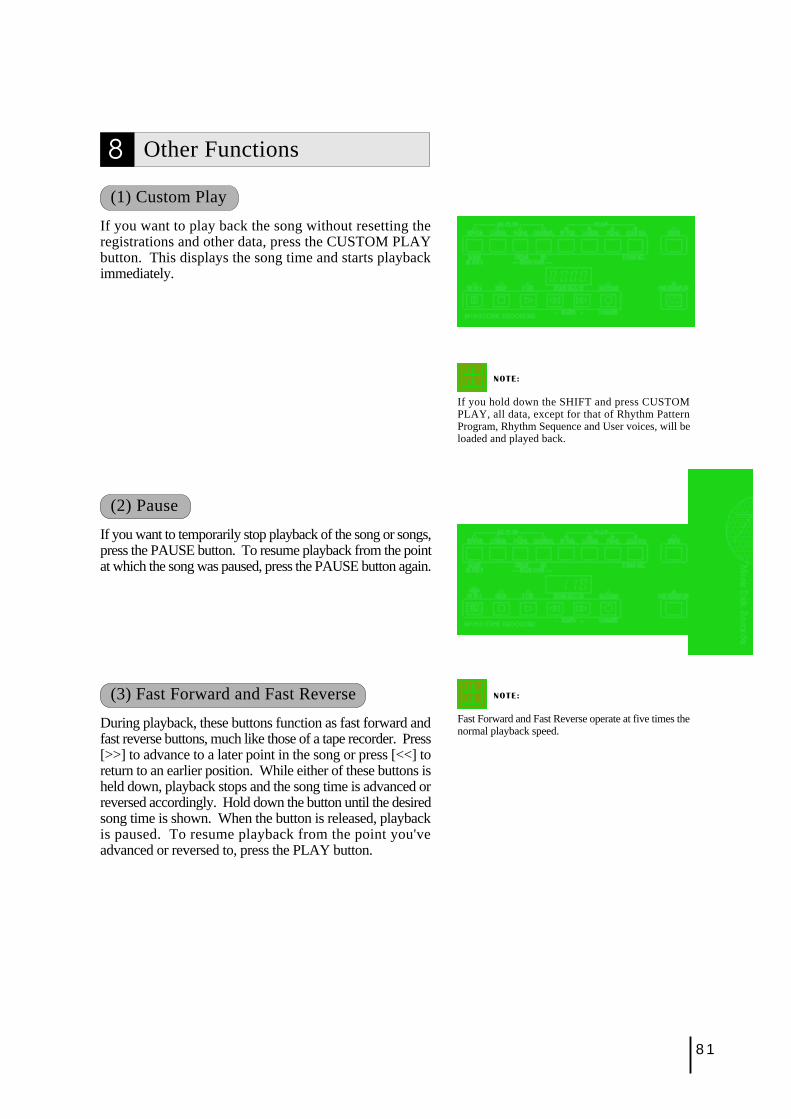
81
(3) Fast Forward and Fast Reverse
During playback, these buttons function as fast forward andfast reverse buttons, much like those of a tape recorder. Press[>>] to advance to a later point in the song or press [<<] toreturn to an earlier position. While either of these buttons isheld down, playback stops and the song time is advanced orreversed accordingly. Hold down the button until the desiredsong time is shown. When the button is released, playbackis paused. To resume playback from the point you'veadvanced or reversed to, press the PLAY button.
8 Other Functions
(1) Custom Play
If you want to play back the song without resetting theregistrations and other data, press the CUSTOM PLAYbutton. This displays the song time and starts playbackimmediately.
NOTE:
If you hold down the SHIFT and press CUSTOMPLAY, all data, except for that of Rhythm PatternProgram, Rhythm Sequence and User voices, will beloaded and played back.
(2) Pause
If you want to temporarily stop playback of the song or songs,press the PAUSE button. To resume playback from the pointat which the song was paused, press the PAUSE button again.
NOTE:
Fast Forward and Fast Reverse operate at five times thenormal playback speed.
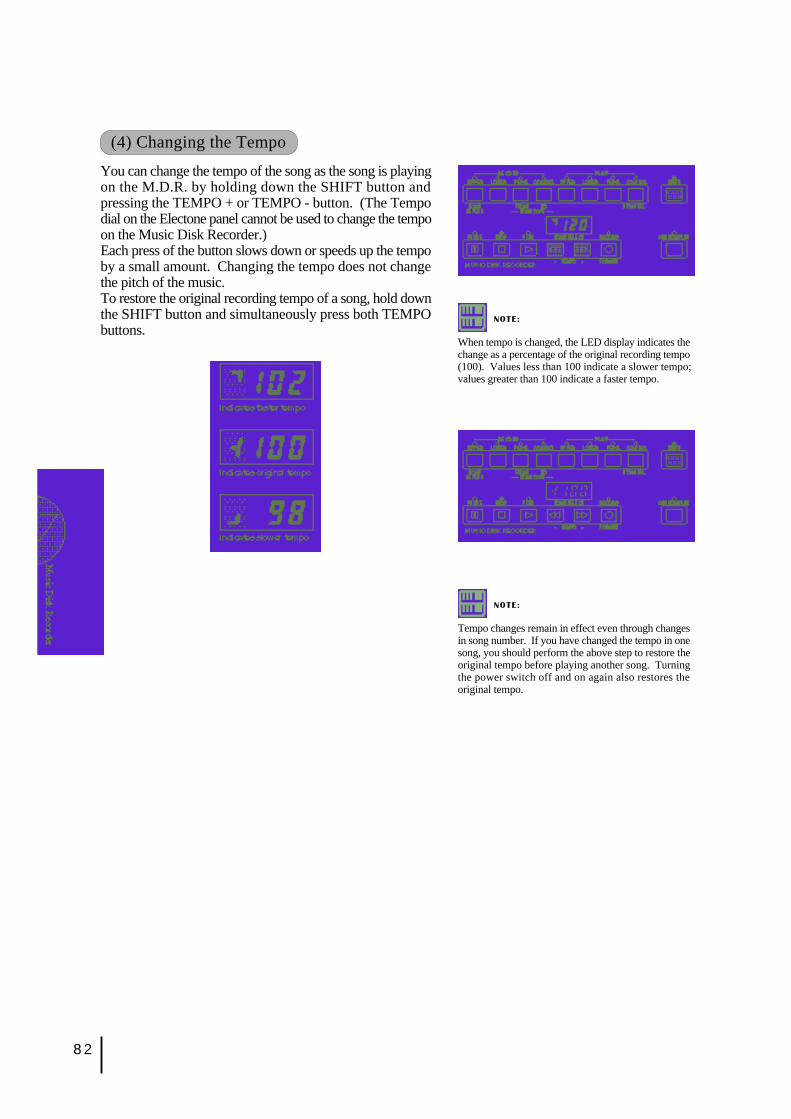
82
(4) Changing the Tempo
You can change the tempo of the song as the song is playingon the M.D.R. by holding down the SHIFT button andpressing the TEMPO + or TEMPO - button. (The Tempodial on the Electone panel cannot be used to change the tempoon the Music Disk Recorder.)Each press of the button slows down or speeds up the tempoby a small amount. Changing the tempo does not changethe pitch of the music.To restore the original recording tempo of a song, hold downthe SHIFT button and simultaneously press both TEMPObuttons.
NOTE:
When tempo is changed, the LED display indicates thechange as a percentage of the original recording tempo(100). Values less than 100 indicate a slower tempo;values greater than 100 indicate a faster tempo.
NOTE:
Tempo changes remain in effect even through changesin song number. If you have changed the tempo in onesong, you should perform the above step to restore theoriginal tempo before playing another song. Turningthe power switch off and on again also restores theoriginal tempo.
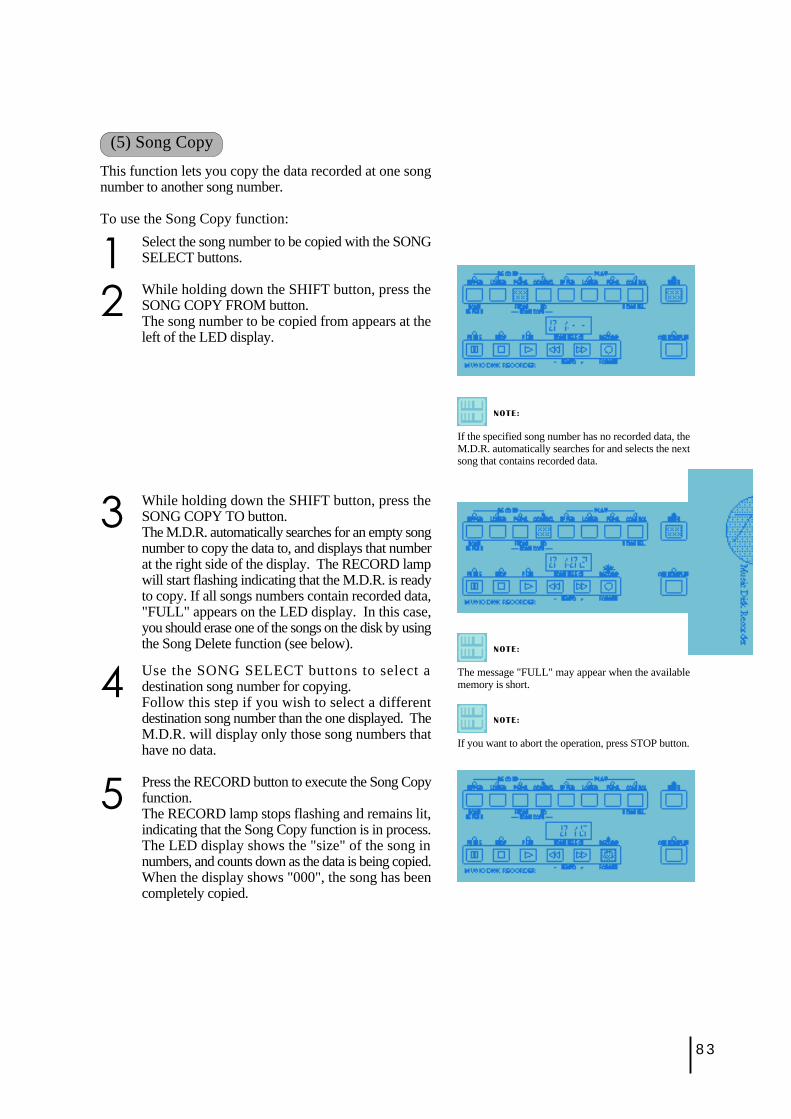
83
(5) Song Copy
This function lets you copy the data recorded at one songnumber to another song number.
To use the Song Copy function:
1 Select the song number to be copied with the SONGSELECT buttons.
2 While holding down the SHIFT button, press theSONG COPY FROM button.The song number to be copied from appears at theleft of the LED display.
NOTE:
If the specified song number has no recorded data, theM.D.R. automatically searches for and selects the nextsong that contains recorded data.
3 While holding down the SHIFT button, press theSONG COPY TO button.The M.D.R. automatically searches for an empty songnumber to copy the data to, and displays that numberat the right side of the display. The RECORD lampwill start flashing indicating that the M.D.R. is readyto copy. If all songs numbers contain recorded data,"FULL" appears on the LED display. In this case,you should erase one of the songs on the disk by usingthe Song Delete function (see below). NOTE:
The message "FULL" may appear when the availablememory is short.
NOTE:
If you want to abort the operation, press STOP button.
4 Use the SONG SELECT buttons to select adestination song number for copying.Follow this step if you wish to select a differentdestination song number than the one displayed. TheM.D.R. will display only those song numbers thathave no data.
5 Press the RECORD button to execute the Song Copyfunction.The RECORD lamp stops flashing and remains lit,indicating that the Song Copy function is in process.The LED display shows the "size" of the song innumbers, and counts down as the data is being copied.When the display shows "000", the song has beencompletely copied.
84
(6) Song Delete
You can delete a song on disk by performing this function.
To use Song Delete:
1 Use the SONG SELECT buttons to select the numberof the song you wish to delete.
2 While holding down the SHIFT button, press theSONG DEL. button.
The letters "dL" appear on the left side of the LEDdisplay, next to the selected song number. RECORDlamp flashes to indicate that the M.D.R. is ready todelete the song. If you wish to, you can still select adifferent song number in this step by using the SONGSELECT buttons.
3 Press the RECORD button to execute the Song Deletefunction.The RECORD lamp stops flashing and remains lit,indicating that the Song Delete function has begun.When the Song Delete function is completed, theSTOP status is automatically resumed.
(7) Disk Copy
You can duplicate a floppy disk by copying the contents.Yamaha recommends that you keep two copies of importantdata on separate floppy disks by using this function.
1 Prepare the source disk and the formatted blank diskto be copied.
The disk type of both source disk and destination diskmust be the same. For example, use 2DD for the disk tobe copied (destination) if the source disk is 2DD type.
Be sure to set the Write-protect tab on the source disk toON. On the contrary, set the Write-protect tab on thedestination disk to OFF. The message "Prot" may appearif you insert the destination disk with the Write-protecttab ON. In this case, the Disk Copy function cannot beexecuted.
2 While holding down the SHIFT button, press theLOWER button in the RECORD part."In 1" appears on the LED display to indicate thatthe M.D.R. is ready to execute the Disk Copy.
NOTE:
If you want to abort the operation, press STOP button.
85
NOTE:
If you want to cancel the Disk Copy operation in themiddle of procedures, eject the disk and turn the poweroff. In this case, you are required to format the destinationdisk again.
3 Insert the source disk into the disk slot.The M.D.R. starts reading the data in the source disk."out 1" appears on the LED display.
4 Press the eject button to take out the source disk."In 2" appears on the LED display to urge you toinsert the destination disk.
5 Insert the destination disk.The number "160" appears on the LED display andcounting down is initiated as the disk is being copied."out 2" appears on the LED display.
6 Eject the destination disk."In 1" appears on the LED display again.
7 Repeat the procedures #3 through #6 as indicated onthe LED display.
The number of times you repeat depend on the sizeof the data to be copied and the disk type (2DD type:2 ~ 16 times; 2HD: 2 ~ 31).
When finished, "End" will appear on the LCD displayfor 2 or 3 seconds.
NOTE:
"Fort" or "bAd" may appear if an error occur in themiddle of the operation. If this happen, please retryformatting the destination disk and copying disk.
Follow the M.D.R. direction to eject/insert the disksdurinmg the operation. Do not eject/insert the disksfrivolously ignoring the M.D.R. direction. Doing socan damage the disk and possibly the disk drive.
86
(8) Checking the Remaining Memory
While plaback is stopped, you can check the amount ofmemory available for additional recording. To do this,simultaneously hold down the SHIFT button and the PAUSEbutton (indicated in the illustration at right as REM. MEM.:Remaining Memory). The maximum amount of memory is620 for 2DD disks and 1240 for 2HD disks.
(9) Registration Menus and Voice Disks
The M.D.R. also allows you to select registrations and voicesfrom disks. For more information about Registration Menus,see page 8; for more on Voice Disks, see page 95.
(10) Copy Protect
Some of the Disks available for the Electone are purposelyprotected from being copied or erased. You cannot save thedata to another floppy disk. If you try to load data from sucha "copy-protected" disk to the Electone, a "Protected Disk"(Pr##) message will appear on the LED display. The datacannot be saved to the disk.
87
Messages on the M.D.R. LED DisplayDisplay Description of the Messages
No disk is installed. Install a disk.
1) The installed disk is write-protected, so the Record, Song Copy, and Song Delete jobs cannot be performed.
Set the disk's Write-protect tab to OFF. (see page 69.)
2) If you are using a copy-protected playback-only disk, this message may appear when you attempt the Record,
Song Copy, or Song Delete operations.
3) When executing Disk Copy, set the Write-protect tab on the source disk to ON.
The installed disk is not formatted. Format the disk. (see page 70.)
1) The disk's memory capacity is full, so the Record or Song Copy operation cannot be performed. Use another
formatted disk.
2) Data is already recorded at all song numbers, so the Song Copy operation cannot be performed. Press the
STOP button, then delete any unnecessary songs.
None of the song numbers contain recorded data, so the Song Copy operation cannot be performed. Press the
STOP button.
An error occurred because the disk was removed during recording or playback. Press the STOP button, and
replace the disk, then start the operation over again.
The installed disk cannot be played back on the M.D.R. Press the STOP button, then insert a compatible disk.
Recording cannot be performed because too much data was received at once. Press the STOP button.
The disk is defective and cannot be formatted. Press the STOP button, then insert another disk.
An error occurred during the transmission or reception of data. Press the STOP button.
You are trying to record to the song number which already contains recorded data. Select the other blank song
number by pressing the SONG SELECT buttons. * "XX" indicates a song number (01 through 40).
When you insert the "copy-protected" disk to the Electone, this message will appear on the LED display. You
cannot overwrite or save the changes. * "XX" indicates a song number (01 through 40).
In the case of Voice Disk operation, an incompatible Voice Disk has been inserted.
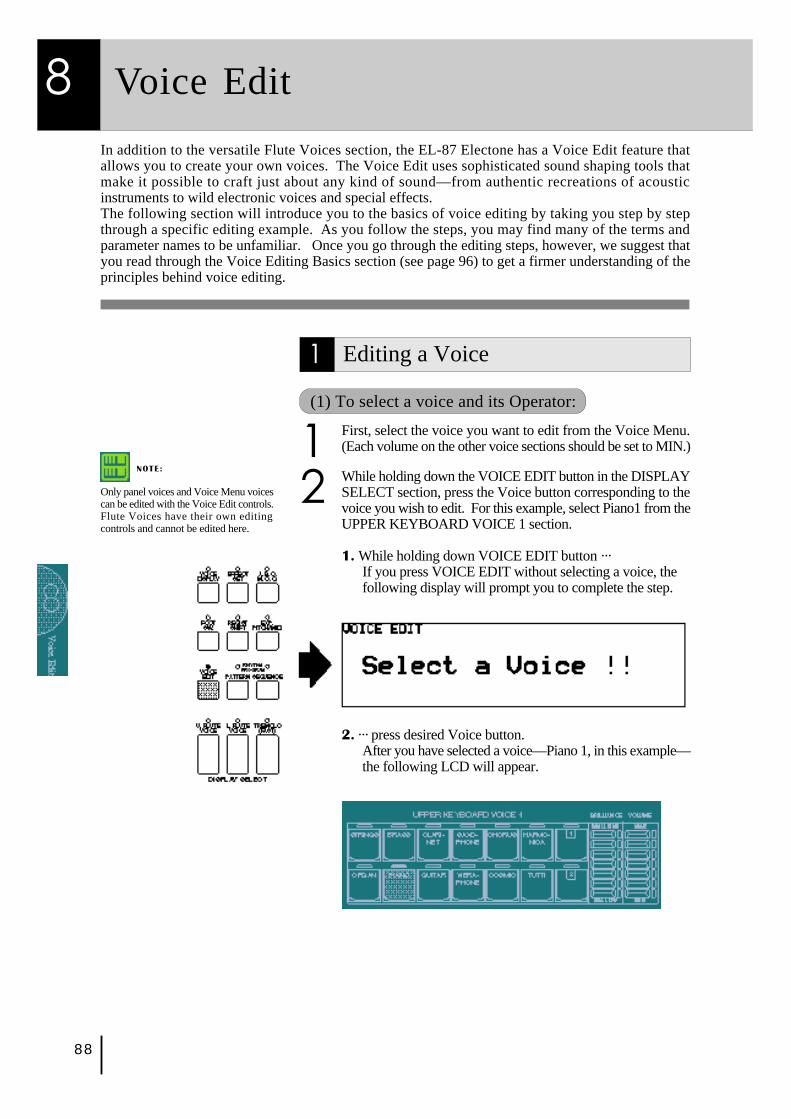
88
In addition to the versatile Flute Voices section, the EL-87 Electone has a Voice Edit feature thatallows you to create your own voices. The Voice Edit uses sophisticated sound shaping tools thatmake it possible to craft just about any kind of sound—from authentic recreations of acousticinstruments to wild electronic voices and special effects.The following section will introduce you to the basics of voice editing by taking you step by stepthrough a specific editing example. As you follow the steps, you may find many of the terms andparameter names to be unfamiliar. Once you go through the editing steps, however, we suggest thatyou read through the Voice Editing Basics section (see page 96) to get a firmer understanding of theprinciples behind voice editing.
NOTE:
Only panel voices and Voice Menu voicescan be edited with the Voice Edit controls.Flute Voices have their own editingcontrols and cannot be edited here.
2. ··· press desired Voice button.After you have selected a voice—Piano 1, in this example—the following LCD will appear.
8 Voice Edit
2 While holding down the VOICE EDIT button in the DISPLAYSELECT section, press the Voice button corresponding to thevoice you wish to edit. For this example, select Piano1 from theUPPER KEYBOARD VOICE 1 section.
1. While holding down VOICE EDIT button ···If you press VOICE EDIT without selecting a voice, thefollowing display will prompt you to complete the step.
1 Editing a Voice
(1) To select a voice and its Operator:
1 First, select the voice you want to edit from the Voice Menu.(Each volume on the other voice sections should be set to MIN.)
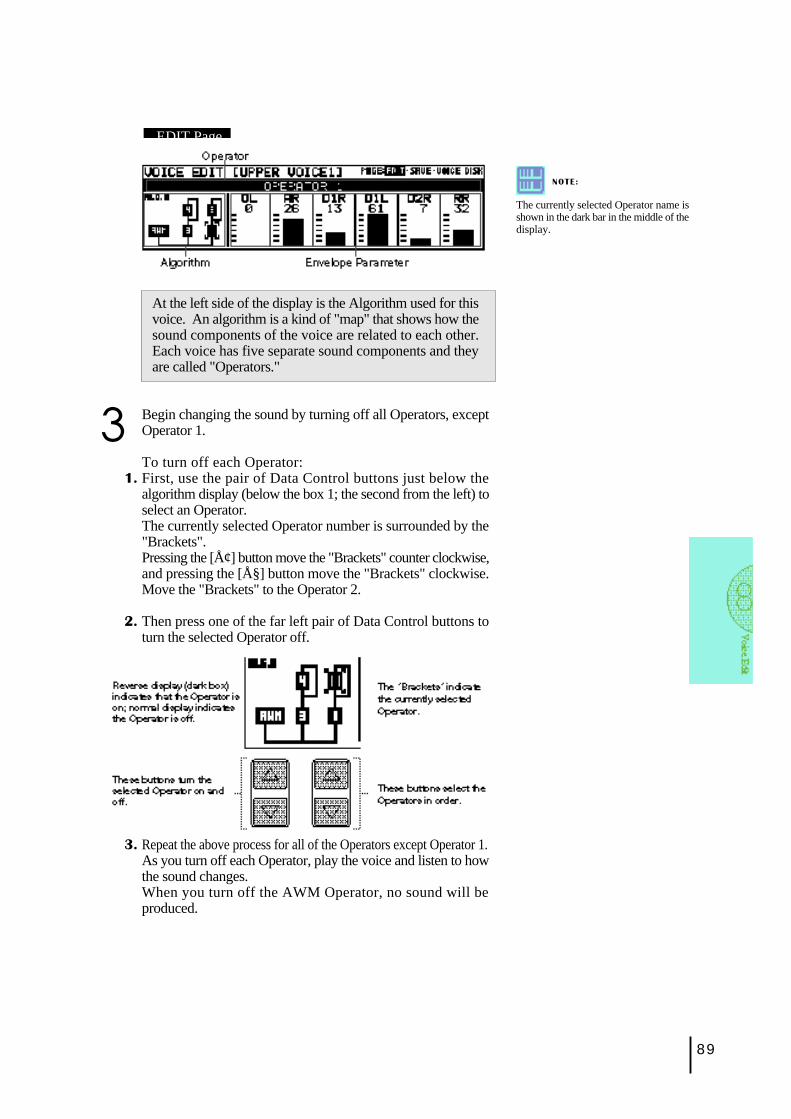
89
EDIT Page
At the left side of the display is the Algorithm used for thisvoice. An algorithm is a kind of "map" that shows how thesound components of the voice are related to each other.Each voice has five separate sound components and theyare called "Operators."
3 Begin changing the sound by turning off all Operators, exceptOperator 1.
To turn off each Operator:1. First, use the pair of Data Control buttons just below the
algorithm display (below the box 1; the second from the left) toselect an Operator.The currently selected Operator number is surrounded by the"Brackets".Pressing the [Ţ] button move the "Brackets" counter clockwise,and pressing the [ŧ] button move the "Brackets" clockwise.Move the "Brackets" to the Operator 2.
2. Then press one of the far left pair of Data Control buttons toturn the selected Operator off.
3. Repeat the above process for all of the Operators except Operator 1.As you turn off each Operator, play the voice and listen to howthe sound changes.When you turn off the AWM Operator, no sound will beproduced.
NOTE:
The currently selected Operator name isshown in the dark bar in the middle of thedisplay.
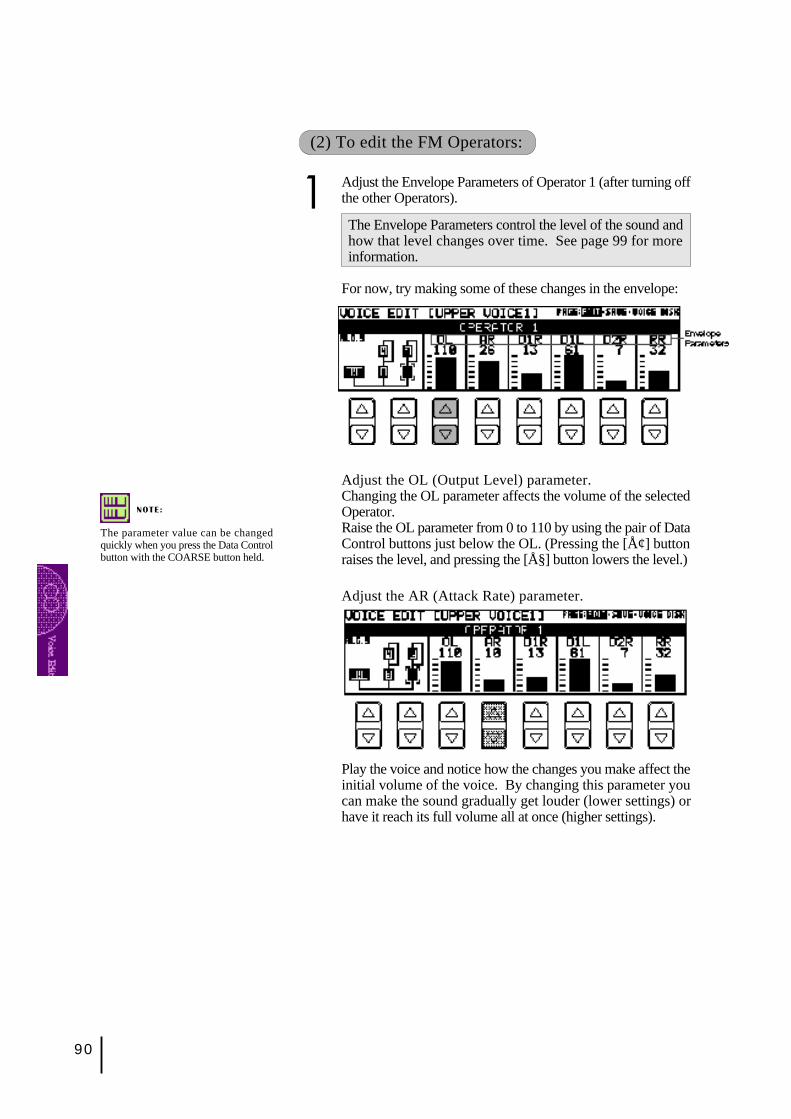
90
NOTE:
The parameter value can be changedquickly when you press the Data Controlbutton with the COARSE button held.
Adjust the AR (Attack Rate) parameter.
Play the voice and notice how the changes you make affect theinitial volume of the voice. By changing this parameter youcan make the sound gradually get louder (lower settings) orhave it reach its full volume all at once (higher settings).
(2) To edit the FM Operators:
1 Adjust the Envelope Parameters of Operator 1 (after turning offthe other Operators).
The Envelope Parameters control the level of the sound andhow that level changes over time. See page 99 for moreinformation.
For now, try making some of these changes in the envelope:
Adjust the OL (Output Level) parameter.Changing the OL parameter affects the volume of the selectedOperator.Raise the OL parameter from 0 to 110 by using the pair of DataControl buttons just below the OL. (Pressing the [Ţ] buttonraises the level, and pressing the [ŧ] button lowers the level.)
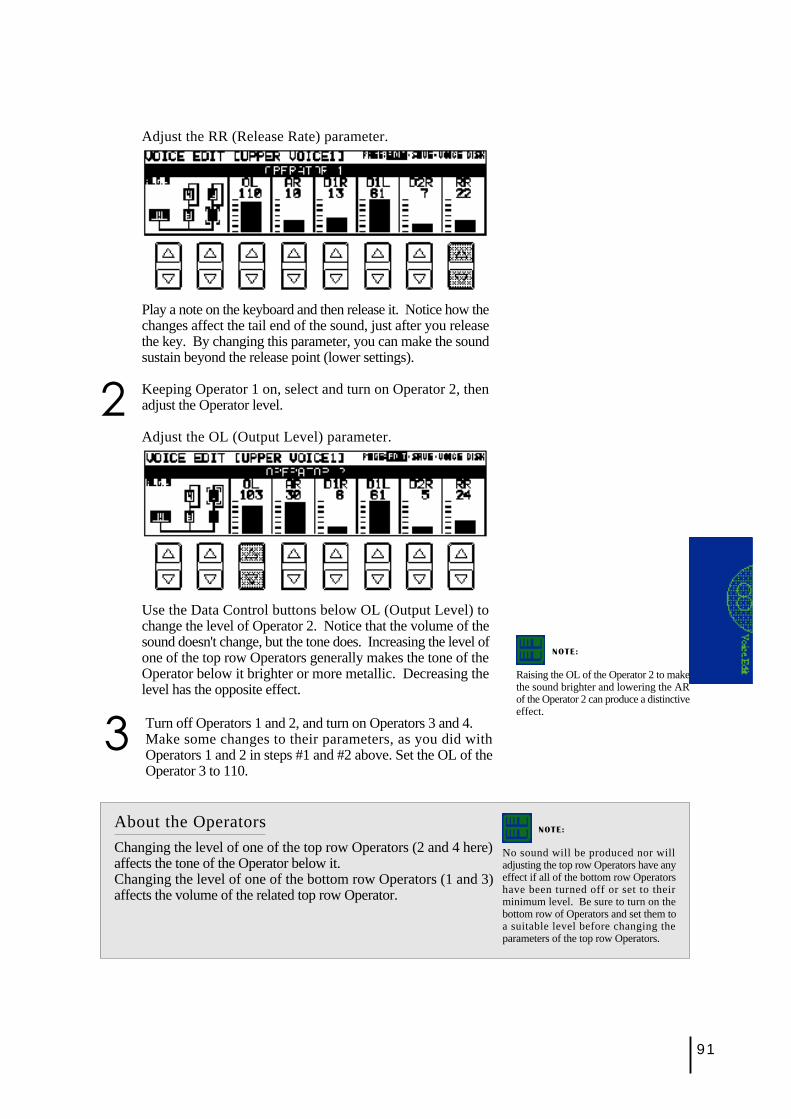
91
3 Turn off Operators 1 and 2, and turn on Operators 3 and 4.Make some changes to their parameters, as you did withOperators 1 and 2 in steps #1 and #2 above. Set the OL of theOperator 3 to 110.
About the Operators
Changing the level of one of the top row Operators (2 and 4 here)affects the tone of the Operator below it.Changing the level of one of the bottom row Operators (1 and 3)affects the volume of the related top row Operator.
Adjust the RR (Release Rate) parameter.
Play a note on the keyboard and then release it. Notice how thechanges affect the tail end of the sound, just after you releasethe key. By changing this parameter, you can make the soundsustain beyond the release point (lower settings).
2 Keeping Operator 1 on, select and turn on Operator 2, thenadjust the Operator level.
Adjust the OL (Output Level) parameter.
Use the Data Control buttons below OL (Output Level) tochange the level of Operator 2. Notice that the volume of thesound doesn't change, but the tone does. Increasing the level ofone of the top row Operators generally makes the tone of theOperator below it brighter or more metallic. Decreasing thelevel has the opposite effect.
NOTE:
No sound will be produced nor willadjusting the top row Operators have anyeffect if all of the bottom row Operatorshave been turned off or set to theirminimum level. Be sure to turn on thebottom row of Operators and set them toa suitable level before changing theparameters of the top row Operators.
NOTE:
Raising the OL of the Operator 2 to makethe sound brighter and lowering the ARof the Operator 2 can produce a distinctiveeffect.
92
(3) To edit the AWM Operator:
Next, we'll make some changes in the sound of the AWM Operator.The AWM Operator is a specially recorded waveform with an actualinstrumental sound, unlike the pure electronic sounds of the otherOperators. Before you actually change it, try listening to this sound onits own, with the other four Operators turned off.
1 Turn off all of the Operators, except for the AWM Operator.The AWM Operator has its own page with a different group ofsettings. The AWM Operator display appears as soon as theAWM Operator has been selected.
2 Adjust the C-OFF (Cut-off) setting, and listen to how they affectthe sound.Changing this parameter determines the frequency cut-off point.Lowering this parameter decreases the overtones to make thesound darker, and raising this increase the overtones to makethe sound brighter.
3 Adjust the RES. (Resonance) setting, and listen to how theyaffect the sound.The higher setting results in a more pronounced sound.
NOTE:
The resonance setting may depend on thefrequency cut-off point you set. Stressingthe resonance after lowering the cut-offpoint can produce a remarkable effect.Stressing the resonance may cause anoise.
4 Finally, turn all of the other Operators back on and adjust eachOperator's level.
You have got the full-bodied ringing electronic piano sounds.
NOTE:
The Operator on/off settings you madehere are temporary. Even though you turnoff an Operator when editing a voice, theon/off status of the Operators will forciblybe changed and saved as "on" in a Uservoice.If you want an Operator muted, set theOL parameter of the selected Operator tothe minimum.
NOTE:
After making changes in the voice, youcan restore the original voice by switchingto another function. If, however, you wishto keep the newly created voice for futureuse, you should save it. (See followingsection.)
93
2 Saving Your New VoiceOnce you have created a sound you are satisfied with, you'll want tosave that sound for future use.
To save your newly created voice:
1 Use the Page buttons to select the SAVE page.The following display appears.
SAVE Page
2 Press the Data Control button that corresponds to the User voicenumber you wish to save to.
The following display appears, prompting confirmation of theoperation. (Saving a new voice automatically erases the voicepreviously stored to the selected User number.)
3 Press any of the Data Control buttons below "OK" to save thevoice, or press any of the buttons below "Cancel" to abort theoperation.
When the voice has been saved, the message "Completed!!"temporarily appears.
This Save page shows the same voices as the last page (USER)of the dotted buttons' Voice Menu.
This operation automatically erases anyvoice that had been previously saved tothe selected User voice number. Youshould check the User voices (see page27.) before saving a voice to make surethat you will not be erasing any importantvoices.
NOTE:
The on/off status cannot be saved. If youwant an Operator muted, set the OLparameter of the selected Operator to theminimum.
94
3 Quitting Voice EditYou can quit the Voice Edit function from any of its display pages.
To quit:
1 Press the VOICE EDIT button in the DISPLAY SELECTsection once again.The following display will appear, prompting confirmation ofthe operation.
2 Select "OK" to quit the Voice Edit function, or "Cancel" to abortthe operation and return to the previous display.
4 Recalling an Edited VoiceOnce the voice has been saved, it can be selected from the last page(USER) of the dotted buttons' Voice Menu (see page 27).
To recall a User voice:
1 Press one of the dotted buttons in the voice section you want touse.
2 Use Page buttons to select the USER page.
3 Press the Data Control button corresponding to the saved voice.
95
5 Selecting Voices From a Voice Disk(Optional)
You can also load voices from optional Voice Disks to the 16 Uservoices in the Voice Menu.
To do this:
1 Hold down the VOICE EDIT button in the DISPLAY SELECTsection and simultaneously press any one of the panel voicebuttons.
4 Using any of the Data Control button pairs, select the voice youwish to load.
5 Play the keyboard to check the sound of the voice. Select othervoices (as you did in step #4 above) and check those sounds as well.
6 If you want to save the current voice to a User Voice space,select the previous page, "SAVE" with the Page buttons.
7 Press the Data Control button that corresponds to the User Voicenumber you wish to save to.Press one of the four Data Control buttons below "OK" in the displayto save the voice, or one of the four buttons below "Cancel" to abortthe operation and return to the previous display.When the voice has been saved, a "completed!!" message appears.
2 Select the VOICE DISK page with the Page buttons.The message "Insert Voice Disk!!" appears and prompts you theoperation.
3 Insert the Voice Disk into the disk slot under the Music DiskRecorder.The voice number and name of the Voice Disk appears.
VOICE DISK Page
NOTE:
Any one of the voice sections can be usedhere. Make sure that the volumes of allother voices are set to off (the minimumvalue).
Pressing these buttons steps throughthe voice numbers; the name of eachvoice appears on the display as well.Refer to the list included with your VoiceDisk for voice numbers and names.
96
6 Voice Editing BasicsThe EL-87 Electone uses a versatile tone generation systemdeveloped by Yamaha that is capable of producing an exceptionallywide range of voices. To be more specific, the system uses individualsound sources that "modulate" each other's frequencies and thuscreate complex sounds not possible by the ordinary mixing of thosesound sources.
(1) Operators
Along with the sophisticated AWM sound sources that are the backboneof the Electone's authentic voices, the tone generation system featuresother sound sources called "Operators." An Operator is a soundgenerator that produces one very simple type of sound: a pure sinewave. A sine wave by itself is not very interesting to listen to; however,when one sine wave is used to modulate a second sine wave, togetherthey result in a new, complex waveform.
(2) Modulators, Carriers and Algorithms
The top Operator, which sends the modulation signal is, not surprisingly,called the modulator. The bottom Operator, which receives or "carries"the modulated sine wave and outputs the resulting sound, is called thecarrier. The complexity or brightness of the sound depends on theoutput level of the modulator.This kind of arrangement in which Operators are "stacked" together iscalled an algorithm. With four sine wave Operators available forstacking, the various algorithms can produce a wide variety of sounds.
Voice Algorithm Examples
97
(3) AWM Operators
Each algorithm also has a special AWM (Advanced Wave Memory)Operator. AWM Operators are not sine waves like the other Operators,but are digital recordings of actual instrument sounds, such as piano,violin, guitar, and so on. The AWM Operator's sound is mixed withthe sounds of the other Operators in the algorithm to create realisticvoices.
AWM Operator
1 OL (Output Level)Determines the level of the AWM sound. Range: 0-127
2 C-OFF (Cut-off)Determines the cut-off frequency filter, or the frequency pointto filter out the specific frequency range. See diagram below.Range: -128- +127
The filter removes a specified range of frequencies from thesound and allows the rest to pass through, thus giving youpowerful control over the sound's characteristics. The EL-87has three types of filters: High Pass Filter which passes thefrequencies above the cut-off point, Low Pass Filter which passesthe frequencies below the cut-off point and Band Pass Filterwhich passes only the specified range of the frequencies.The filter type used and the effective cut-off point depend onthe selected voice.
98
Cut-off Brighter sound. Higher setting.
Darker sound. Lower setting.
Resonance Pronounced sound. Higher setting.
Softer sound. Lower setting.
(4) FM Operators
The Operators 1 through 4 are the sine wave Operators of thealgorithm.When one of these Operators has been selected, the followingparameters are displayed:
1 OL (Output Level)Determines the level of the selected Operator's sound.Range: 0-127
2 AR (Attack Rate)Determines how quickly the Operator will reach its maximumlevel after the key is played. Lower values produce a slowerattack. Range: 0-31
3 D1R (Decay 1 Rate)Determines how much time it takes for the Operator to reach itssecond level, set in the Decay 1 Level parameter. Range: 0-31
4 D1L (Decay 1 Level)Determines the second level setting of the Operator. Range: 0-63
5 D2R (Decay 2 Rate)Determines how much time it takes for the Operator to reach itsthird level, or the minimum level before the key is released.Range: 0-31
6 RR (Release Rate)Determines how much time it takes for the level to reach 0 afterthe key is released. Range: 0-63
3 RES. (Resonance)Determines the emphasis around the cut-off frequency point,set in Cut-off above. See diagram below. Range: -128-+127
NOTE:
With the too stressed resonance a noisemay occur or no sound may be produced.
NOTE:
Some voices may not have remarkableresonance effect.
NOTE:
When the D2R is set to 0, the level set bythe D1L will be maintained until the keyis released.The higher setting of the D2R rapidlylower the level.
NOTE:
With the RR set too low, the soundcontinues to sound.
Example of low pass f i l teroperat ion,with a posit iveResonance setting.
99
Envelope Parameters
By using the modulators and setting them to various output levels,you can create all kinds of sounds. These sounds will be static,however, unless you have the output levels change in time. That isprecisely what an envelope does. It varies the output of an Operatorin time so that you can vary the tone or the level. If the output of themodulator changes, the tone will change. If the output level of thecarrier changes, the volume will change.
Feedback
The output of a modulator can also be circled back to its input,allowing it to modulate itself as well as the Operator below it. Thisis called feedback, and it adds harmonic complexity to the tone.Operators using feedback are indicated by a line that encircles theright side of the Operator. Feedback cannot be directly controlled;however, you can adjust the parameters of Operators that havefeedback to change the characteristics of the feedback sound.
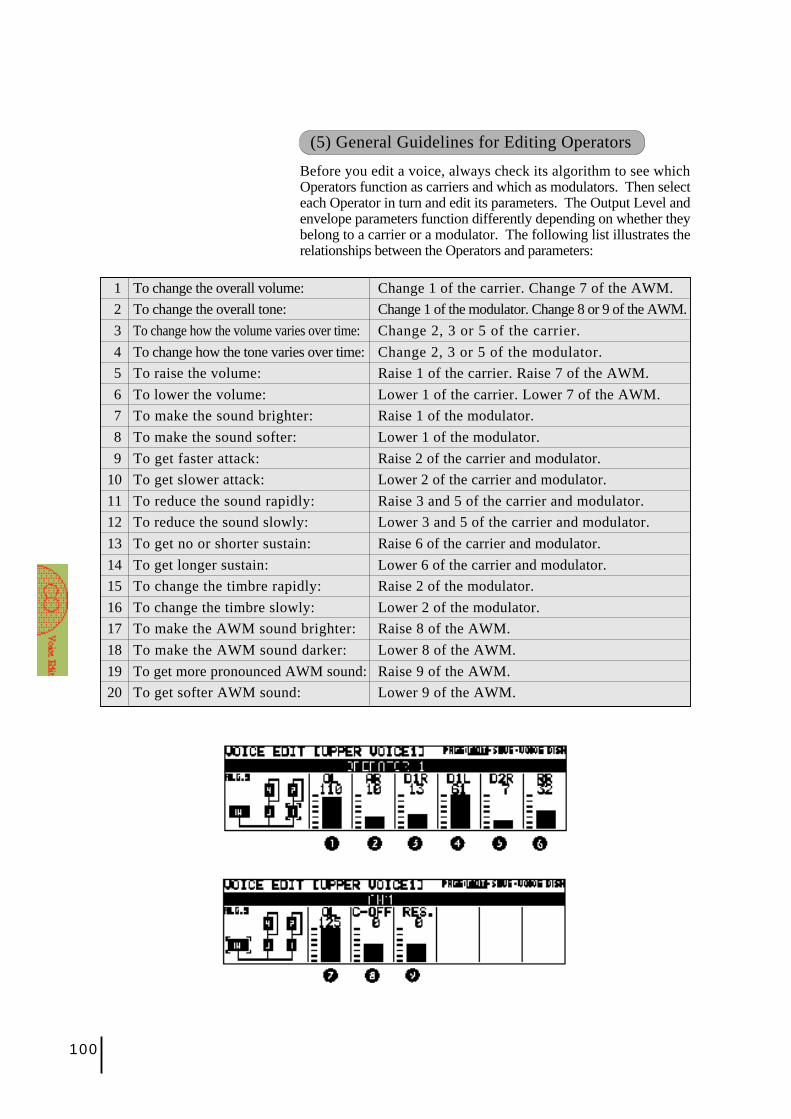
100
(5) General Guidelines for Editing Operators
Before you edit a voice, always check its algorithm to see whichOperators function as carriers and which as modulators. Then selecteach Operator in turn and edit its parameters. The Output Level andenvelope parameters function differently depending on whether theybelong to a carrier or a modulator. The following list illustrates therelationships between the Operators and parameters:
1 To change the overall volume: Change 1 of the carrier. Change 7 of the AWM.
2 To change the overall tone: Change 1 of the modulator. Change 8 or 9 of the AWM.
3 To change how the volume varies over time: Change 2, 3 or 5 of the carrier.
4 To change how the tone varies over time: Change 2, 3 or 5 of the modulator.
5 To raise the volume: Raise 1 of the carrier. Raise 7 of the AWM.
6 To lower the volume: Lower 1 of the carrier. Lower 7 of the AWM.
7 To make the sound brighter: Raise 1 of the modulator.
8 To make the sound softer: Lower 1 of the modulator.
9 To get faster attack: Raise 2 of the carrier and modulator.
10 To get slower attack: Lower 2 of the carrier and modulator.
11 To reduce the sound rapidly: Raise 3 and 5 of the carrier and modulator.
12 To reduce the sound slowly: Lower 3 and 5 of the carrier and modulator.
13 To get no or shorter sustain: Raise 6 of the carrier and modulator.
14 To get longer sustain: Lower 6 of the carrier and modulator.
15 To change the timbre rapidly: Raise 2 of the modulator.
16 To change the timbre slowly: Lower 2 of the modulator.
17 To make the AWM sound brighter: Raise 8 of the AWM.
18 To make the AWM sound darker: Lower 8 of the AWM.
19 To get more pronounced AWM sound: Raise 9 of the AWM.
20 To get softer AWM sound: Lower 9 of the AWM.
101
(6) Some Voice Editing Examples
The following examples illustrate some specific uses of the Voice Editcontrols. Make the changes as described in the examples, then go on toexplore some other voices on your own, making changes as you like.
■ Ex. 1: Emphasizing the attack of the "Banjo" voiceThis voice is composed mainly of the AWM sampled sound, withthe other Operators providing the noise attack sound, simulating thepicking of the string.
Try changing the sound of the attack by increasing the Output Level(OL) of Operator 1.
■ Ex.2: Adding "bite" to the "Jazz Organ1" voice (ORGAN Voice Menu)Operator 1 provides the 16' footage sound, Operator 2 the 8', andOperator 3 the 5-1/3'.
You can make the sound warmer by decreasing the Output Level ofOperator 2. Increasing the Output Level of Operator 3 makes for arougher edge or more "bite" in the organ sound.
■ Ex.3: Adding a "Piccolo" sound to the "Glocken." voiceThis example shows how the AWM Operator can be used to addanother instrument sound to an existing voice. The glockenspielsound is provided by the FM Operators.
In this case, a piccolo sound has been specially programmed withthe AWM Operator, but cannot be heard since the output has beenset to 0. By increasing the Output Level of the AWM Operator, thepiccolo sound is added to the glockenspiel voice.
■ Ex.4: Changing the "Trumpet5" voice to a funny trumpetNot all the Operators are used to create a voice. Replace theactive Operators with the inactive Operator.
You can get a funny trumpet by decreasing the OL of theOperators 1 and 3 to 0 and increasing the OL of the AWM tothe maximum.
■ Ex.5: Creating an electronic piano sounds suitable to use as thebackings for the ballad from "E.Piano1".Increasing the OL of the AWM from 0 to 124 to layer the AWMsounds to the FM sounds.
■ Ex.6: Changing the "Jazz Org.1" to "tap-dance" sounds.Raising the resonance to create a pronounced sound.
You can get a "tap-dance" sounds by decreasing the OL of theOperators 1, 2 and 3 to 0, and increasing both the OL and RES.of the AWM to the maximum.
■ Ex.7: Turning the "Timp.Roll" to a spacious SFX.Changing the AWM Operators to make the initial and aftertouch sensitive.
Setting the C-OFF parameter to -20 and the RES. to themaximum.
NOTE:
Try the tap-dance rhythm on the Lowerkeyboard (effective range is lower andmiddle).
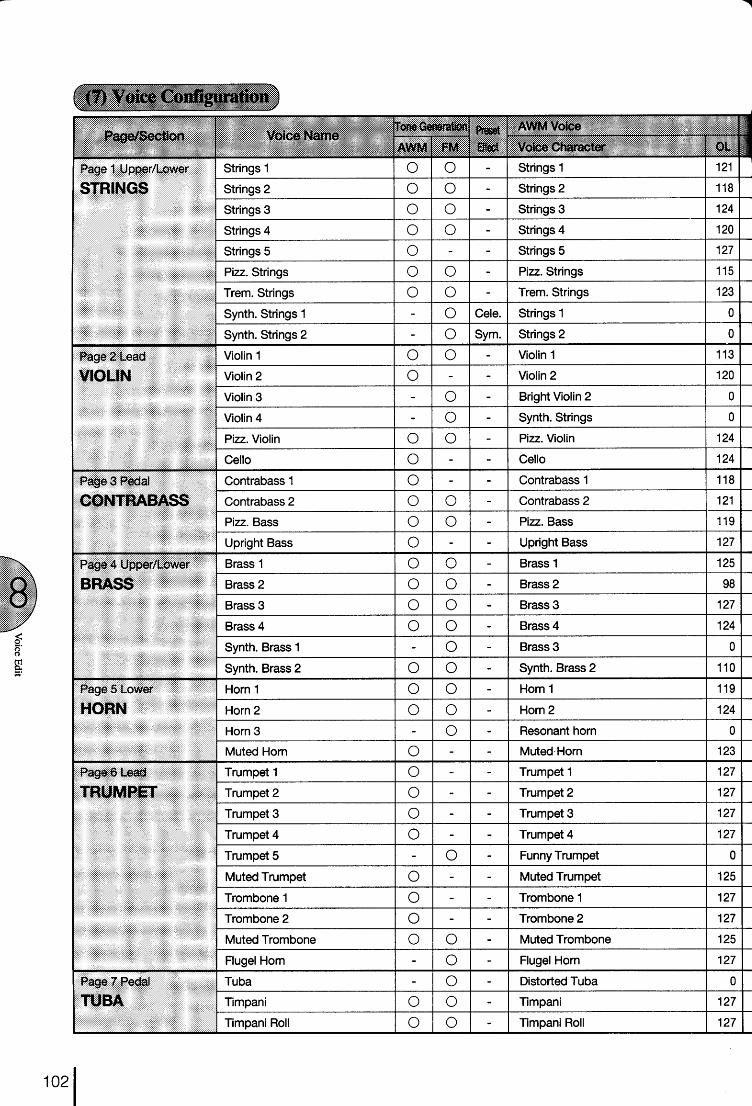
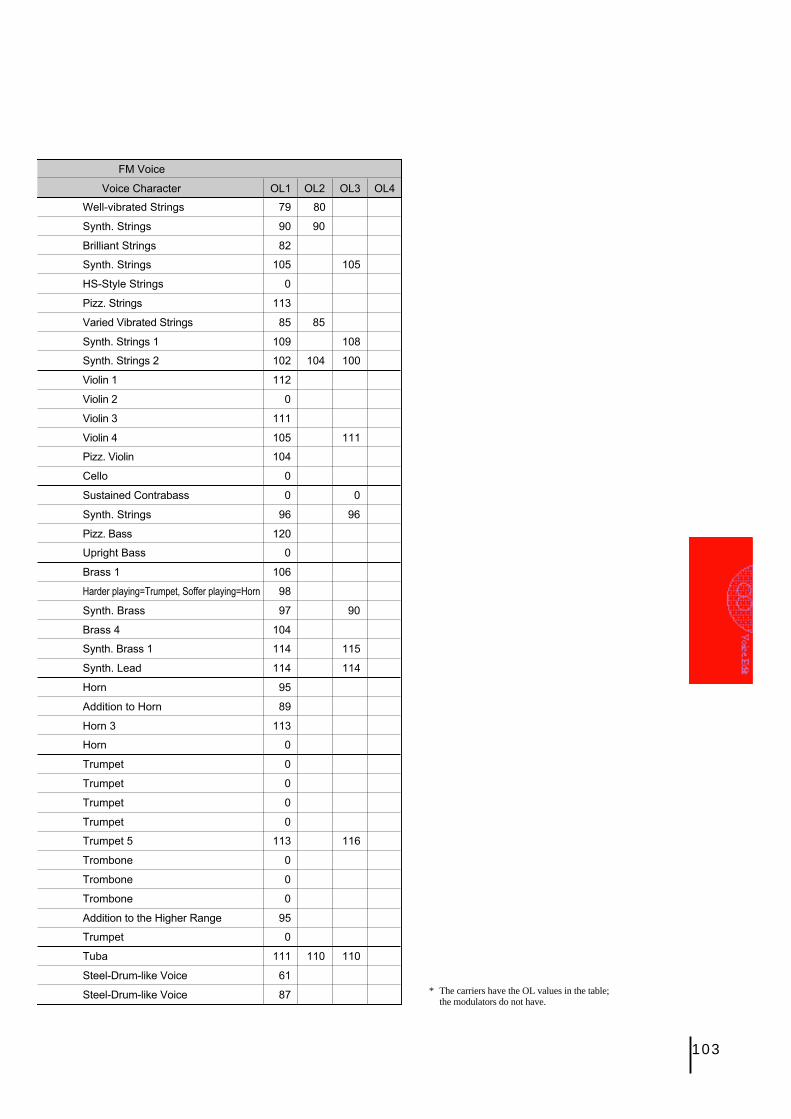
103
* The carriers have the OL values in the table;the modulators do not have.
Well-vibrated Strings 79 80
Synth. Strings 90 90
Brilliant Strings 82
Synth. Strings 105 105
HS-Style Strings 0
Pizz. Strings 113
Varied Vibrated Strings 85 85
Synth. Strings 1 109 108
Synth. Strings 2 102 104 100
Violin 1 112
Violin 2 0
Violin 3 111
Violin 4 105 111
Pizz. Violin 104
Cello 0
Sustained Contrabass 0 0
Synth. Strings 96 96
Pizz. Bass 120
Upright Bass 0
Brass 1 106
Harder playing=Trumpet, Soffer playing=Horn 98
Synth. Brass 97 90
Brass 4 104
Synth. Brass 1 114 115
Synth. Lead 114 114
Horn 95
Addition to Horn 89
Horn 3 113
Horn 0
Trumpet 0
Trumpet 0
Trumpet 0
Trumpet 0
Trumpet 5 113 116
Trombone 0
Trombone 0
Trombone 0
Addition to the Higher Range 95
Trumpet 0
Tuba 111 110 110
Steel-Drum-like Voice 61
Steel-Drum-like Voice 87
FM Voice
Voice Character OL1 OL2 OL3 OL4
105
FM Voice
Voice Character OL1 OL2 OL3 OL4
Addition to Flute 75
Flute 0
Breath 105
Recorder 0
Addition to the Lower Range 103
OL1:Whistle OL3:Noise 116 62
Oboe 68
Oboe 0
Oboe 81
Bassoon 0
Bassoon 0
Clarinet 0
Clarinet 74
Harder playing=Syn.Cla, Soffer playing=Cosmic 107 107
Saxophone 16' 0
Saxophone 16' 0
Saxophone 4' 0
Saxophone 8' 0
OL1:Clarinet OL3:Flute 110 116
OL1:Slow Strings OL3:Synth. Brass 91 107
Brass 107
Brass 105
Horn 104
Horn 109
Vocal 77 72
Vocal 69 64
Vocal 51 63
Vocal 0 0
Harmonica 1 114
Harmonica 2 77
Jazz Organ 83 71 75
Briliant Organ 103 92 86
Organ 3 95 105
Organ 4 109 93 104
Jazz Organ 1 108 108 100
Jazz Organ 2 109 92 91
Jazz Organ 3 105 95 100 78
Pop Organ 1 92 94 101
Pop Organ 2 100 99 96
Organ 88 75 70
White Noise 57
Accordion 91 81
Accordion 0 0
107
FM Voice
Voice Character OL1 OL2 OL3 OL4
Organ Bass 1 116 108
Organ Bass 2 100 95 105
Organ Bass 3 118 112 107
Lower Range 114 91 111
Elec. Piano 0 0
Harpsichord 0
Soft Elec. Piano 0
Elec. Piano 1 110 112
Elec. Piano 2 102 85 121
Harpsichord 16' 0
Clavi. 120
Guitar 67
Addition to Guitar 97
Guitar 0
Plucking Voice 102
Mandolin 109 105
Elec. Guitar 93
Dist. Guitar 0
Elec. Bass 8' 0
Harmonics 116 109
Harp 0
Koto 115
Harpsichord in the Lower Range 102
Cosmic 96 106 124
Glocken 107 112 114
Celesta 115 121 106
Marimba's Support 87 77
OL1:Sine Wave (decay) OL3:One Octave Higher 93 0
Chime 4' 0 0
Synth. Chime 106 100
Steel Drum (Lower range) 95
Addition to the Lower Range 112 105
Addition to the Higher Range 108
Addition to Elec. Bass 87
Synth. Bass 1 115
Addition to Synth. Bass 2 112 112
Addition to Synth. Bass 3 122
Basic Regist 4 (U.K.) 110 110
Basic Regist 4 (L.K.) 107 102
Cosmic 3 111 55 103
Cosmic 4 112
Cosmic + Noise 102
Pizz. Str. + Synth. Brass 104 104
Vocal + Synth. Strings 99 99
Delayed Synth. Strings 105 105
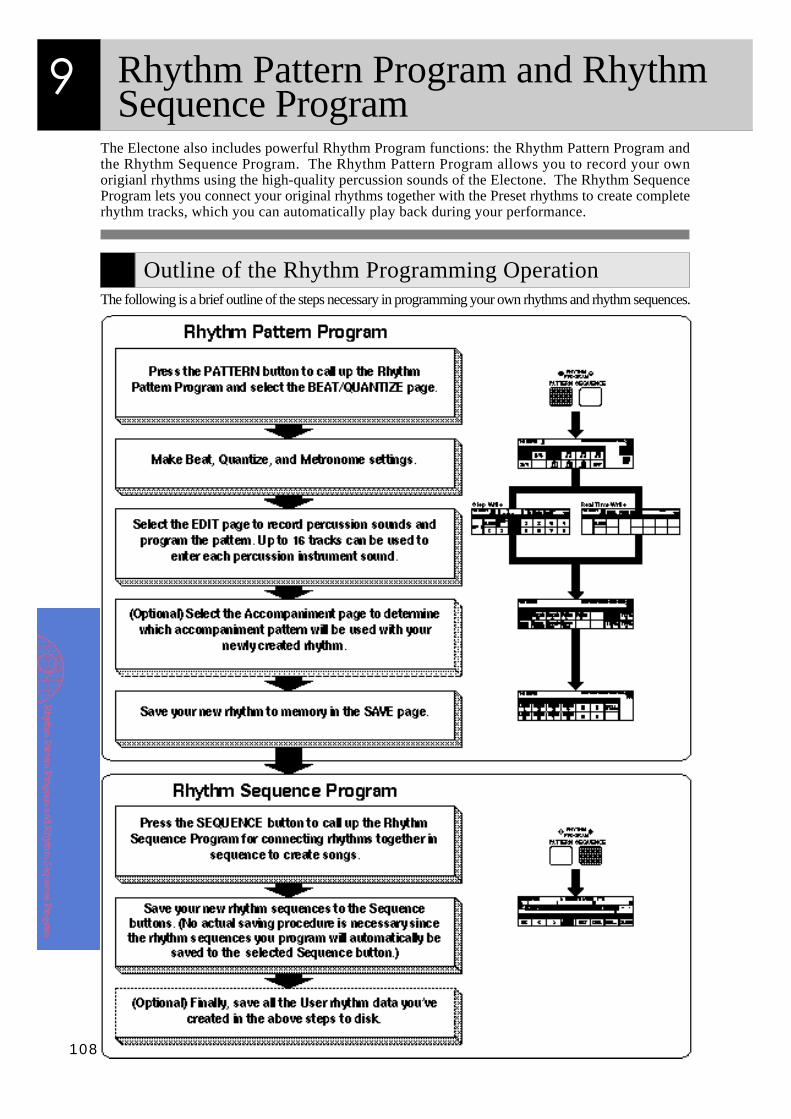
108
The Electone also includes powerful Rhythm Program functions: the Rhythm Pattern Program andthe Rhythm Sequence Program. The Rhythm Pattern Program allows you to record your ownorigianl rhythms using the high-quality percussion sounds of the Electone. The Rhythm SequenceProgram lets you connect your original rhythms together with the Preset rhythms to create completerhythm tracks, which you can automatically play back during your performance.
9 Rhythm Pattern Program and RhythmSequence Program
Outline of the Rhythm Programming OperationThe following is a brief outline of the steps necessary in programming your own rhythms and rhythm sequences.
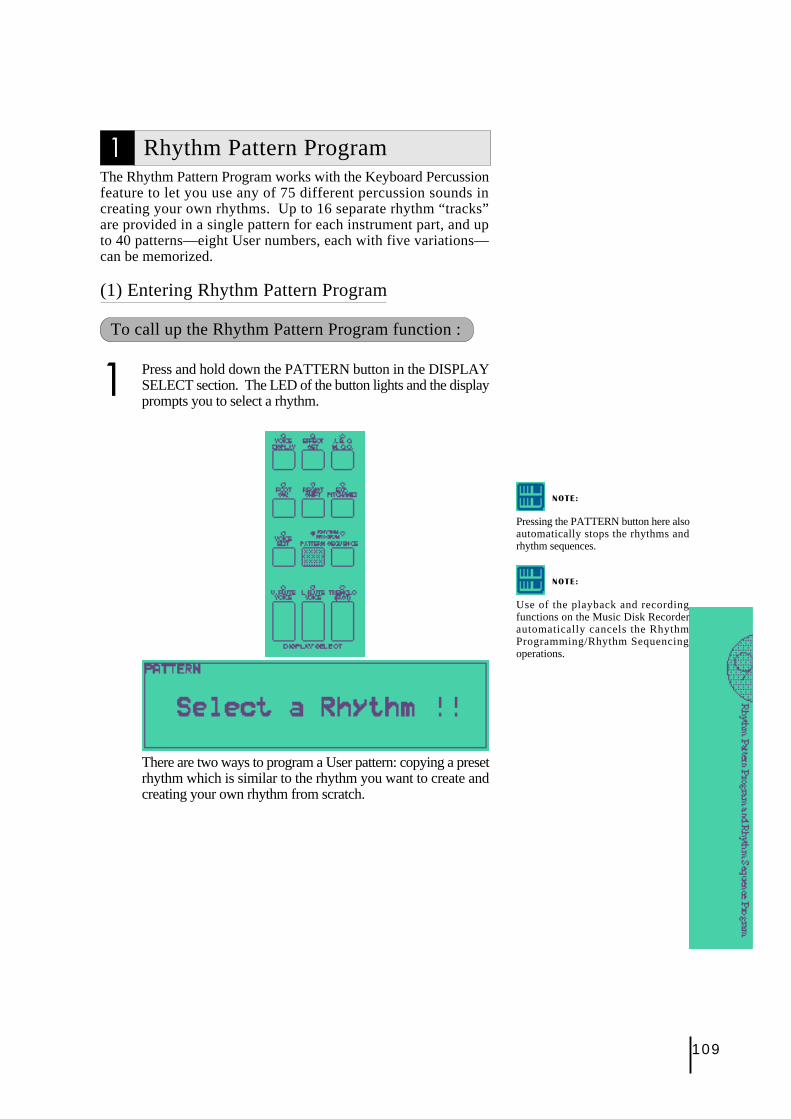
109
1 Rhythm Pattern ProgramThe Rhythm Pattern Program works with the Keyboard Percussionfeature to let you use any of 75 different percussion sounds increating your own rhythms. Up to 16 separate rhythm “tracks”are provided in a single pattern for each instrument part, and upto 40 patterns—eight User numbers, each with five variations—can be memorized.
(1) Entering Rhythm Pattern Program
To call up the Rhythm Pattern Program function :
1 Press and hold down the PATTERN button in the DISPLAYSELECT section. The LED of the button lights and the displayprompts you to select a rhythm.
NOTE:
Pressing the PATTERN button here alsoautomatically stops the rhythms andrhythm sequences.
NOTE:
Use of the playback and recordingfunctions on the Music Disk Recorderautomatically cancels the RhythmProgramming/Rhythm Sequencingoperations.
There are two ways to program a User pattern: copying a presetrhythm which is similar to the rhythm you want to create andcreating your own rhythm from scratch.
110
2 2.-1 To copy a preset rhythm:While holding down the PATTERN button, select a presetrhythm to be copied to the Rhythm Pattern Program.Copying a preset rhythm lets you make changes to an existingrhythm, saving you time if you want to program a rhythm thatis similar to an existing preset pattern. Two measures of theselected rhythm will be copied to the Rhythm Pattern Program.In this case, you need to select a specific rhythm from the RhythmMenu beforehand.
Copying the Fill Ins and Endings:
The similar procedure can be used with the FILL IN andINTRO. ENDING buttons for copying Fill In and Endingpatterns. Select the rhythm to which the desired Fill In orEnding belongs beforehand. Then press the FILL IN orINTRO. ENDING button while holding down thePATTERN button.
NOTE:
The User rhythm you have created canalso be copied to the Rhythm PatternProgram. You can edit it again andimprove it.
NOTE:
When preset rhythms are copied to theRhythm Pattern Program, the copiedpatterns may differ in volume from theoriginal patterns.
NOTE:
Some Ending patterns consists of morethan two measures. If you copy such apattern, only the first two measures canbe copied but the rest cannot be copied.
NOTE:
The Intro. patterns cannot be copied.2.-2 To create your own rhythm from scratchPressing the PATTERN button, and releasing it without selectinga rhythm loads a blank pattern to the Rhythm Pattern Program.
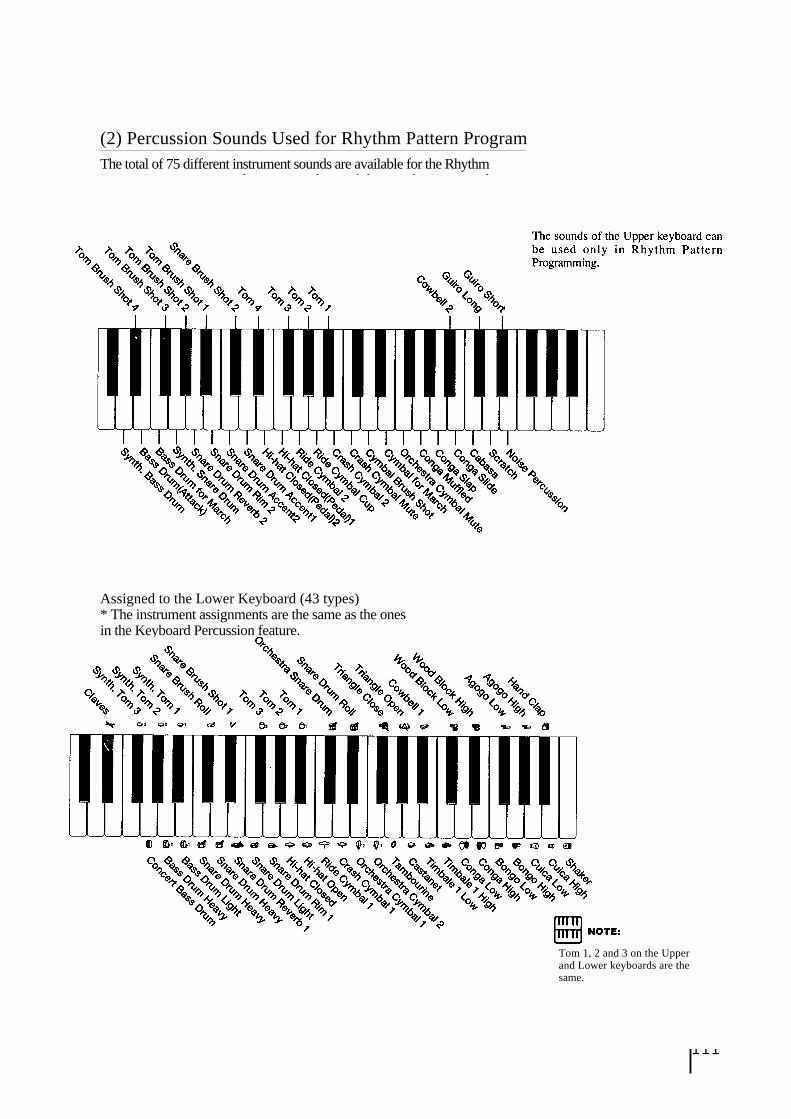
111
The total of 75 different instrument sounds are available for the RhythmPattern Programming and are assigned to each key on the Upper andLower keyboard, as shown in the following chart..
Assigned to the Upper Keyboard (35 types)
Assigned to the Lower Keyboard (43 types)* The instrument assignments are the same as the onesin the Keyboard Percussion feature.
NOTE:
Tom 1, 2 and 3 on the Upperand Lower keyboards are thesame.
(2) Percussion Sounds Used for Rhythm Pattern Program
NOTE:
The sounds of the Upper keyboard canbe used only in Rhythm PatternProgramming.
112
Each method has its own advantages and uses. Step Write is good forprecision and for entering percussion sounds whose note placementand rhythmic value has been determined, such as a bass drum that playsevery beat in a measure. Real Time Write is best for capturing the“feel” of a rhythm, because it allows you to actually play the pattern asyou are creating it. Which method you use depends partly on the typeof rhythm you intend to create and partly on your own personalpreference. You can even switch between the two methods in editingto create a single rhythm by the use of both methods. This would comein handy, for example, in programming the basic beats of a rhythmwith Step Write, then using Real Time Write to add percussion accentsand embellishments.
(4) Selecting Step Write or Real Time Write OperationStep Write and Real Time Write can be selected from either the BEAT/QUANTIZE page or the EDIT page. Which mode of operation isselected depends on the play status of the rhythm. If the rhythm isstopped, Step Write is automatically selected. If the rhythm is playing,Real Time Write is selected. Simply press the START button in theRhythm section on the panel to start or stop the rhythm and switchbetween the two modes.
(5) Setting the Beat/Quantize ValuesThe BEAT/QUANTIZE page is automatically displayed when callingup the Rhythm Pattern Program. It is used in both Step Write and RealTime Write for selecting the basic timing settings of the pattern.
(3) Step Write and Real Time WriteThere are two different methods you can use to program rhythms: StepWrite and Real Time Write.Step Write allows you to enter percussion sounds as individual notevalues. As a method, it is very similar to writing down the notes on asheet of music paper; each note is entered one at a time, and though youcan hear each individual note entered, you cannot actually hear thepattern playing as you create it.Real Time Write on the other hand, is similar to using a multitrack taperecorder; you can hear previously recorded parts of the pattern as yourecord new parts on top.
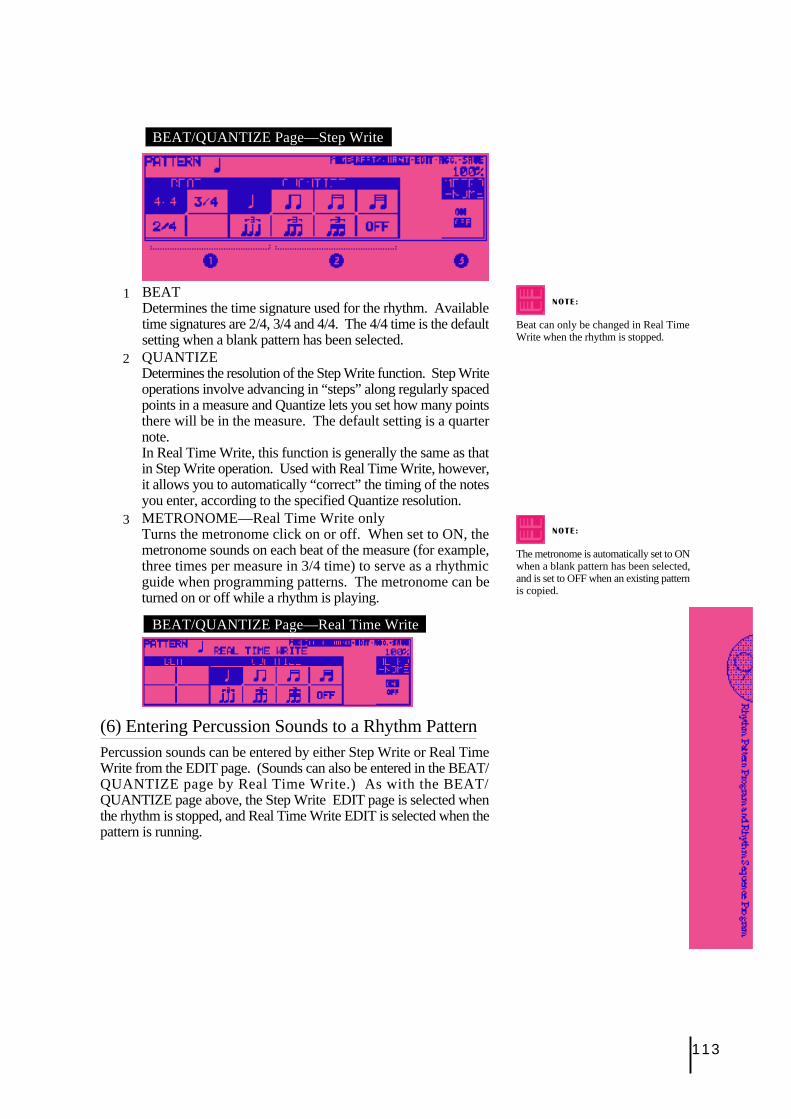
113
BEAT/QUANTIZE Page—Step Write
1 BEATDetermines the time signature used for the rhythm. Availabletime signatures are 2/4, 3/4 and 4/4. The 4/4 time is the defaultsetting when a blank pattern has been selected.
NOTE:
Beat can only be changed in Real TimeWrite when the rhythm is stopped.
2 QUANTIZEDetermines the resolution of the Step Write function. Step Writeoperations involve advancing in “steps” along regularly spacedpoints in a measure and Quantize lets you set how many pointsthere will be in the measure. The default setting is a quarternote.In Real Time Write, this function is generally the same as thatin Step Write operation. Used with Real Time Write, however,it allows you to automatically “correct” the timing of the notesyou enter, according to the specified Quantize resolution.
3 METRONOME—Real Time Write onlyTurns the metronome click on or off. When set to ON, themetronome sounds on each beat of the measure (for example,three times per measure in 3/4 time) to serve as a rhythmicguide when programming patterns. The metronome can beturned on or off while a rhythm is playing.
NOTE:
The metronome is automatically set to ONwhen a blank pattern has been selected,and is set to OFF when an existing patternis copied.
BEAT/QUANTIZE Page—Real Time Write
(6) Entering Percussion Sounds to a Rhythm PatternPercussion sounds can be entered by either Step Write or Real TimeWrite from the EDIT page. (Sounds can also be entered in the BEAT/QUANTIZE page by Real Time Write.) As with the BEAT/QUANTIZE page above, the Step Write EDIT page is selected whenthe rhythm is stopped, and Real Time Write EDIT is selected when thepattern is running.
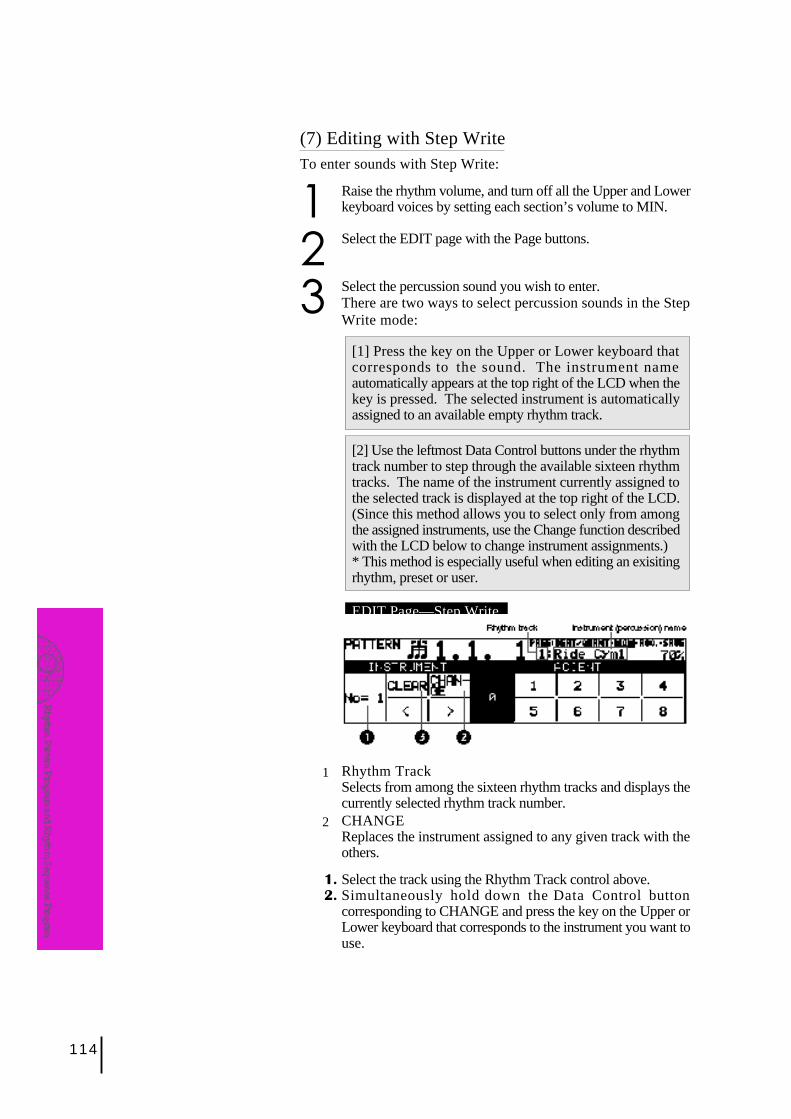
114
(7) Editing with Step WriteTo enter sounds with Step Write:
1 Raise the rhythm volume, and turn off all the Upper and Lowerkeyboard voices by setting each section’s volume to MIN.
2 Select the EDIT page with the Page buttons.
3 Select the percussion sound you wish to enter.There are two ways to select percussion sounds in the StepWrite mode:
[1] Press the key on the Upper or Lower keyboard thatcorresponds to the sound. The instrument nameautomatically appears at the top right of the LCD when thekey is pressed. The selected instrument is automaticallyassigned to an available empty rhythm track.
[2] Use the leftmost Data Control buttons under the rhythmtrack number to step through the available sixteen rhythmtracks. The name of the instrument currently assigned tothe selected track is displayed at the top right of the LCD.(Since this method allows you to select only from amongthe assigned instruments, use the Change function describedwith the LCD below to change instrument assignments.)* This method is especially useful when editing an exisitingrhythm, preset or user.
EDIT Page—Step Write
1 Rhythm TrackSelects from among the sixteen rhythm tracks and displays thecurrently selected rhythm track number.
2 CHANGEReplaces the instrument assigned to any given track with theothers.
1. Select the track using the Rhythm Track control above.2. Simultaneously hold down the Data Control button
corresponding to CHANGE and press the key on the Upper orLower keyboard that corresponds to the instrument you want touse.
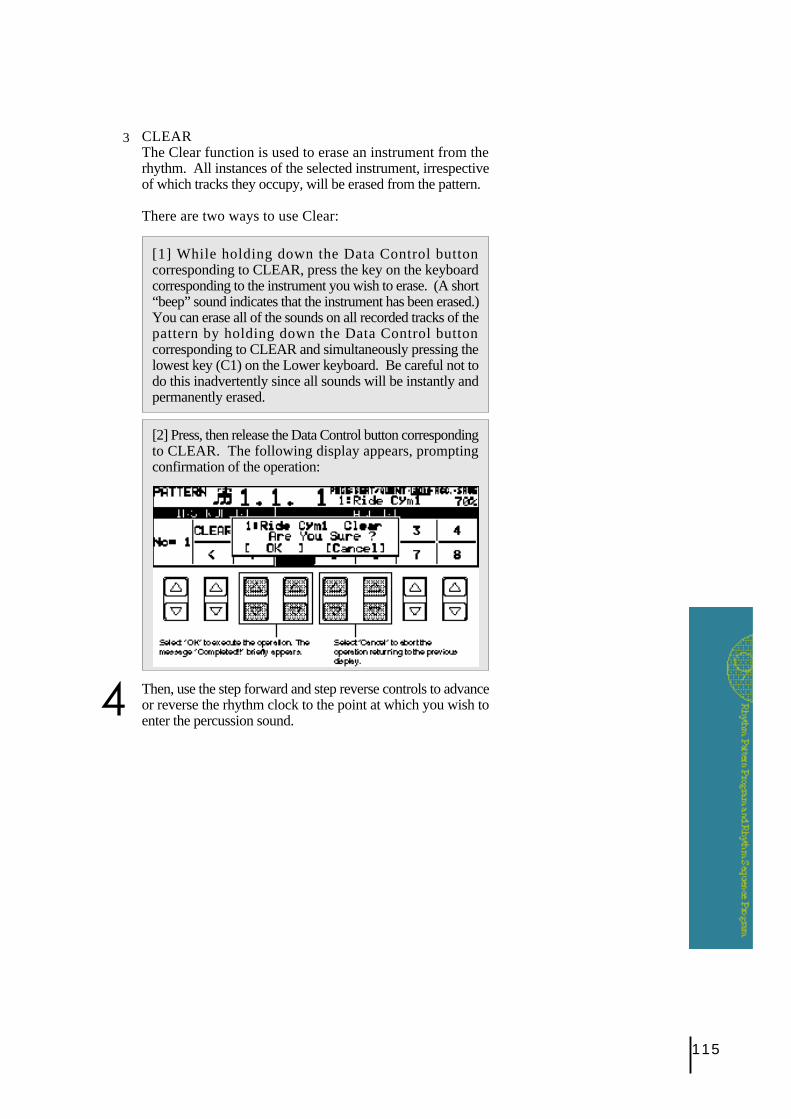
115
3 CLEARThe Clear function is used to erase an instrument from therhythm. All instances of the selected instrument, irrespectiveof which tracks they occupy, will be erased from the pattern.
There are two ways to use Clear:
[1] While holding down the Data Control buttoncorresponding to CLEAR, press the key on the keyboardcorresponding to the instrument you wish to erase. (A short“beep” sound indicates that the instrument has been erased.)You can erase all of the sounds on all recorded tracks of thepattern by holding down the Data Control buttoncorresponding to CLEAR and simultaneously pressing thelowest key (C1) on the Lower keyboard. Be careful not todo this inadvertently since all sounds will be instantly andpermanently erased.
[2] Press, then release the Data Control button correspondingto CLEAR. The following display appears, promptingconfirmation of the operation:
4 Then, use the step forward and step reverse controls to advanceor reverse the rhythm clock to the point at which you wish toenter the percussion sound.
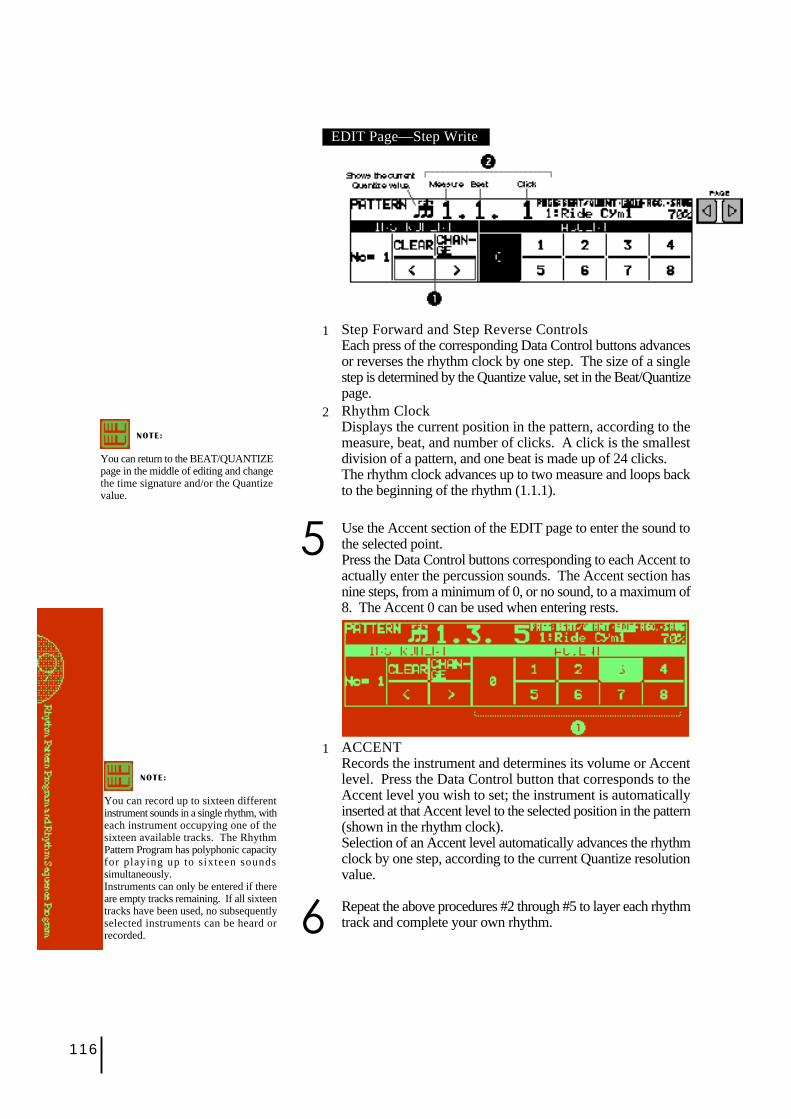
116
EDIT Page—Step Write
1 Step Forward and Step Reverse ControlsEach press of the corresponding Data Control buttons advancesor reverses the rhythm clock by one step. The size of a singlestep is determined by the Quantize value, set in the Beat/Quantizepage.
2 Rhythm ClockDisplays the current position in the pattern, according to themeasure, beat, and number of clicks. A click is the smallestdivision of a pattern, and one beat is made up of 24 clicks.The rhythm clock advances up to two measure and loops backto the beginning of the rhythm (1.1.1).
NOTE:
You can return to the BEAT/QUANTIZEpage in the middle of editing and changethe time signature and/or the Quantizevalue.
5 Use the Accent section of the EDIT page to enter the sound tothe selected point.Press the Data Control buttons corresponding to each Accent toactually enter the percussion sounds. The Accent section hasnine steps, from a minimum of 0, or no sound, to a maximum of8. The Accent 0 can be used when entering rests.
1 ACCENTRecords the instrument and determines its volume or Accentlevel. Press the Data Control button that corresponds to theAccent level you wish to set; the instrument is automaticallyinserted at that Accent level to the selected position in the pattern(shown in the rhythm clock).Selection of an Accent level automatically advances the rhythmclock by one step, according to the current Quantize resolutionvalue.
6 Repeat the above procedures #2 through #5 to layer each rhythmtrack and complete your own rhythm.
NOTE:
You can record up to sixteen differentinstrument sounds in a single rhythm, witheach instrument occupying one of thesixteen available tracks. The RhythmPattern Program has polyphonic capacityfor playing up to sixteen soundssimultaneously.Instruments can only be entered if thereare empty tracks remaining. If all sixteentracks have been used, no subsequentlyselected instruments can be heard orrecorded.
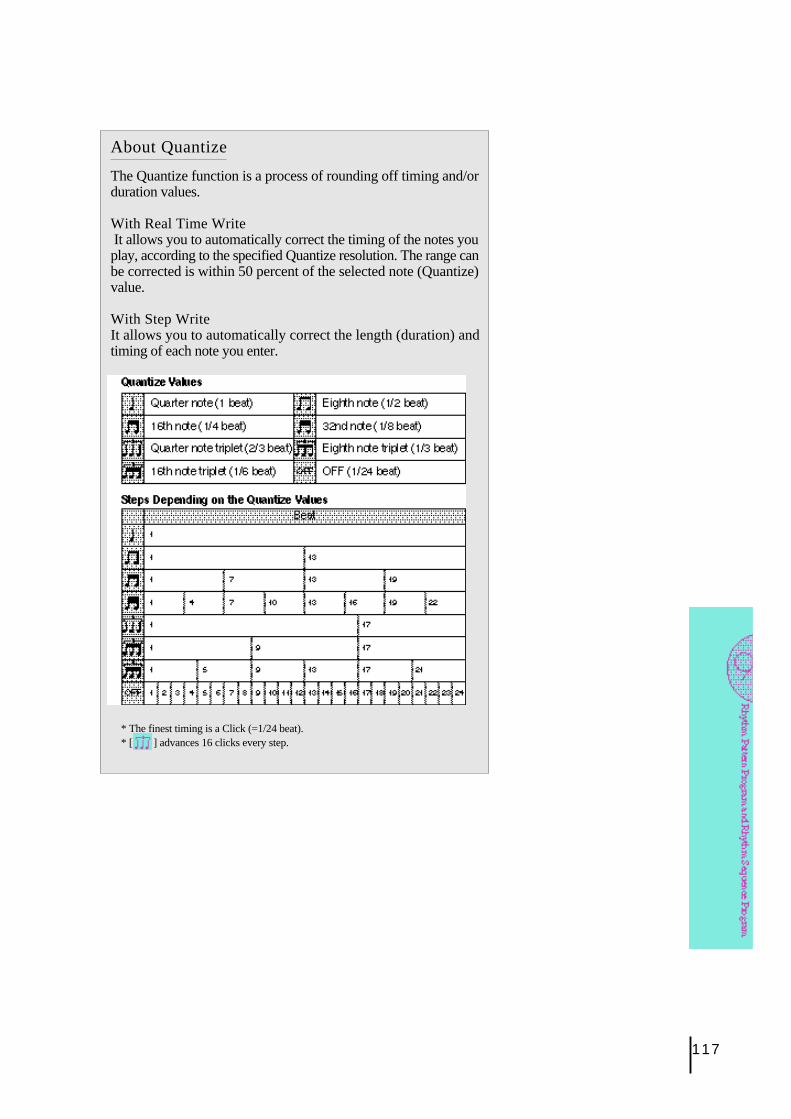
117
About Quantize
The Quantize function is a process of rounding off timing and/orduration values.
With Real Time Write It allows you to automatically correct the timing of the notes youplay, according to the specified Quantize resolution. The range canbe corrected is within 50 percent of the selected note (Quantize)value.
With Step WriteIt allows you to automatically correct the length (duration) andtiming of each note you enter.
* The finest timing is a Click (=1/24 beat).* [ ] advances 16 clicks every step.
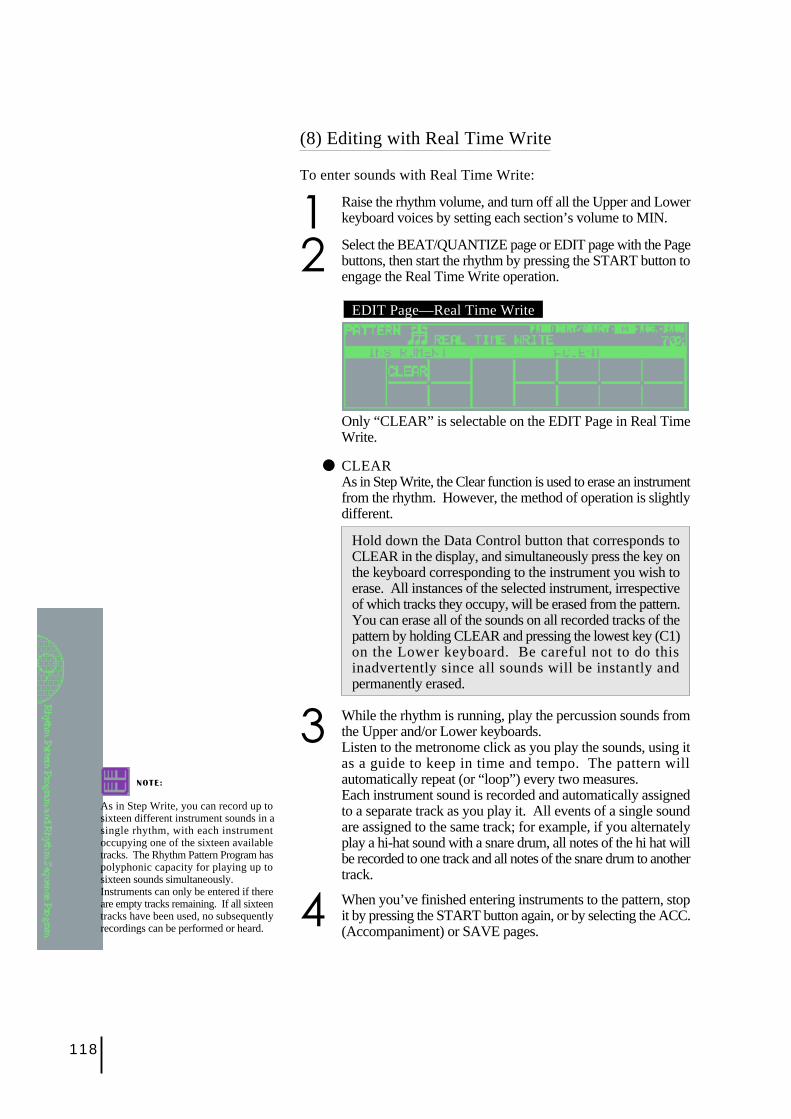
118
(8) Editing with Real Time Write
To enter sounds with Real Time Write:
1 Raise the rhythm volume, and turn off all the Upper and Lowerkeyboard voices by setting each section’s volume to MIN.
2 Select the BEAT/QUANTIZE page or EDIT page with the Pagebuttons, then start the rhythm by pressing the START button toengage the Real Time Write operation.
EDIT Page—Real Time Write
Only “CLEAR” is selectable on the EDIT Page in Real TimeWrite.
● CLEARAs in Step Write, the Clear function is used to erase an instrumentfrom the rhythm. However, the method of operation is slightlydifferent.
Hold down the Data Control button that corresponds toCLEAR in the display, and simultaneously press the key onthe keyboard corresponding to the instrument you wish toerase. All instances of the selected instrument, irrespectiveof which tracks they occupy, will be erased from the pattern.You can erase all of the sounds on all recorded tracks of thepattern by holding CLEAR and pressing the lowest key (C1)on the Lower keyboard. Be careful not to do thisinadvertently since all sounds will be instantly andpermanently erased.
3 While the rhythm is running, play the percussion sounds fromthe Upper and/or Lower keyboards.Listen to the metronome click as you play the sounds, using itas a guide to keep in time and tempo. The pattern willautomatically repeat (or “loop”) every two measures.Each instrument sound is recorded and automatically assignedto a separate track as you play it. All events of a single soundare assigned to the same track; for example, if you alternatelyplay a hi-hat sound with a snare drum, all notes of the hi hat willbe recorded to one track and all notes of the snare drum to anothertrack.
NOTE:
As in Step Write, you can record up tosixteen different instrument sounds in asingle rhythm, with each instrumentoccupying one of the sixteen availabletracks. The Rhythm Pattern Program haspolyphonic capacity for playing up tosixteen sounds simultaneously.Instruments can only be entered if thereare empty tracks remaining. If all sixteentracks have been used, no subsequentlyrecordings can be performed or heard. 4 When you’ve finished entering instruments to the pattern, stop
it by pressing the START button again, or by selecting the ACC.(Accompaniment) or SAVE pages.
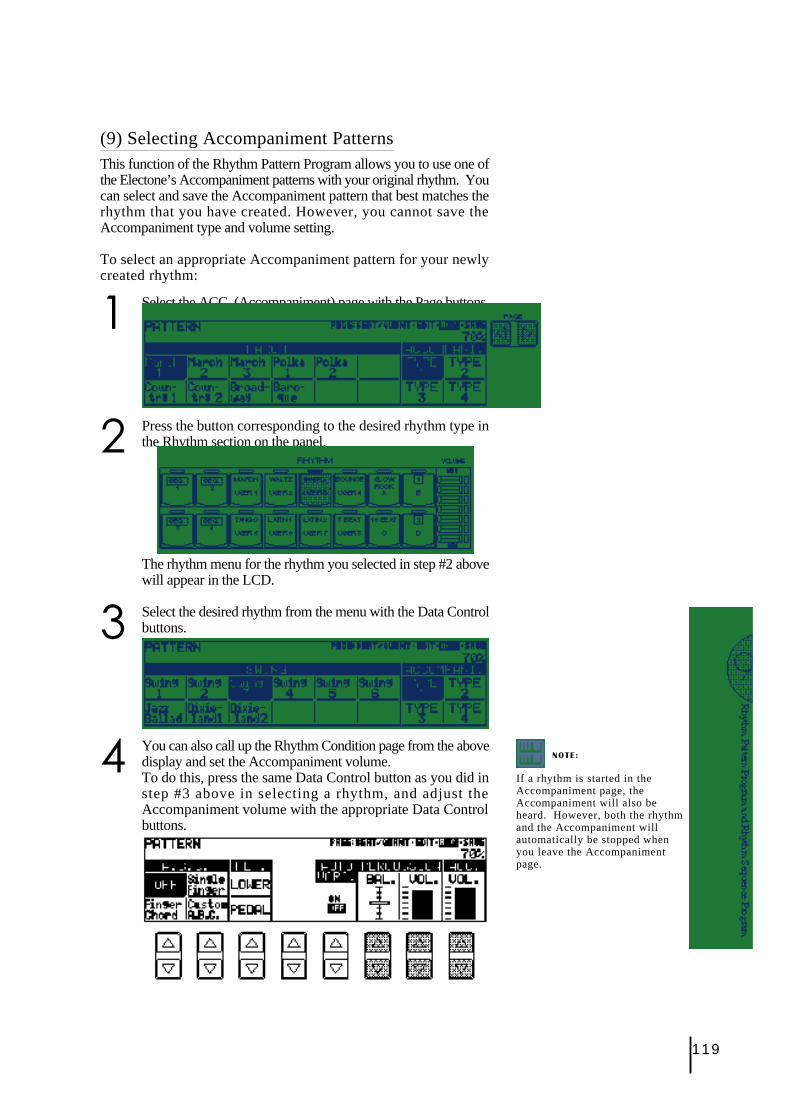
119
(9) Selecting Accompaniment PatternsThis function of the Rhythm Pattern Program allows you to use one ofthe Electone’s Accompaniment patterns with your original rhythm. Youcan select and save the Accompaniment pattern that best matches therhythm that you have created. However, you cannot save theAccompaniment type and volume setting.
To select an appropriate Accompaniment pattern for your newlycreated rhythm:
1 Select the ACC. (Accompaniment) page with the Page buttons.
2 Press the button corresponding to the desired rhythm type inthe Rhythm section on the panel.
The rhythm menu for the rhythm you selected in step #2 abovewill appear in the LCD.
3 Select the desired rhythm from the menu with the Data Controlbuttons.
4 You can also call up the Rhythm Condition page from the abovedisplay and set the Accompaniment volume.To do this, press the same Data Control button as you did instep #3 above in selecting a rhythm, and adjust theAccompaniment volume with the appropriate Data Controlbuttons.
NOTE:
If a rhythm is started in theAccompaniment page, theAccompaniment will also beheard. However, both the rhythmand the Accompaniment willautomatically be stopped whenyou leave the Accompanimentpage.
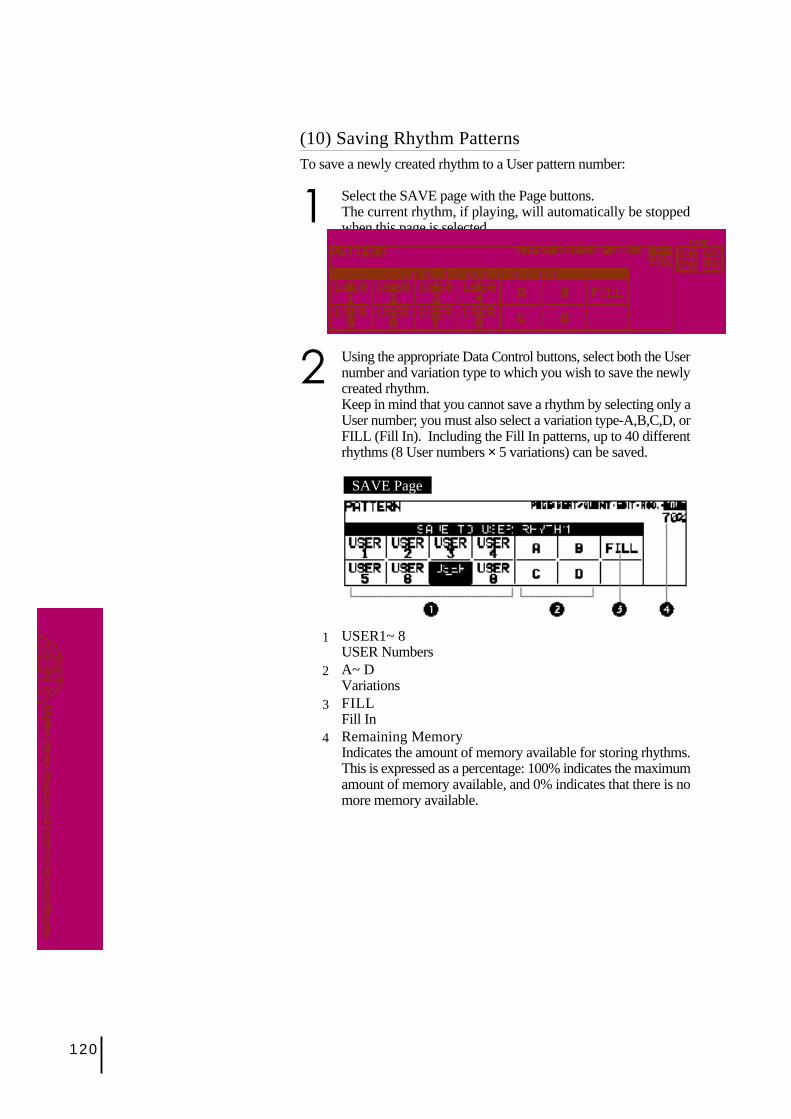
120
(10) Saving Rhythm PatternsTo save a newly created rhythm to a User pattern number:
1 Select the SAVE page with the Page buttons.The current rhythm, if playing, will automatically be stoppedwhen this page is selected.
2 Using the appropriate Data Control buttons, select both the Usernumber and variation type to which you wish to save the newlycreated rhythm.Keep in mind that you cannot save a rhythm by selecting only aUser number; you must also select a variation type-A,B,C,D, orFILL (Fill In). Including the Fill In patterns, up to 40 differentrhythms (8 User numbers × 5 variations) can be saved.
SAVE Page
1 USER1~ 8USER Numbers
2 A~ DVariations
3 FILLFill In
4 Remaining MemoryIndicates the amount of memory available for storing rhythms.This is expressed as a percentage: 100% indicates the maximumamount of memory available, and 0% indicates that there is nomore memory available.
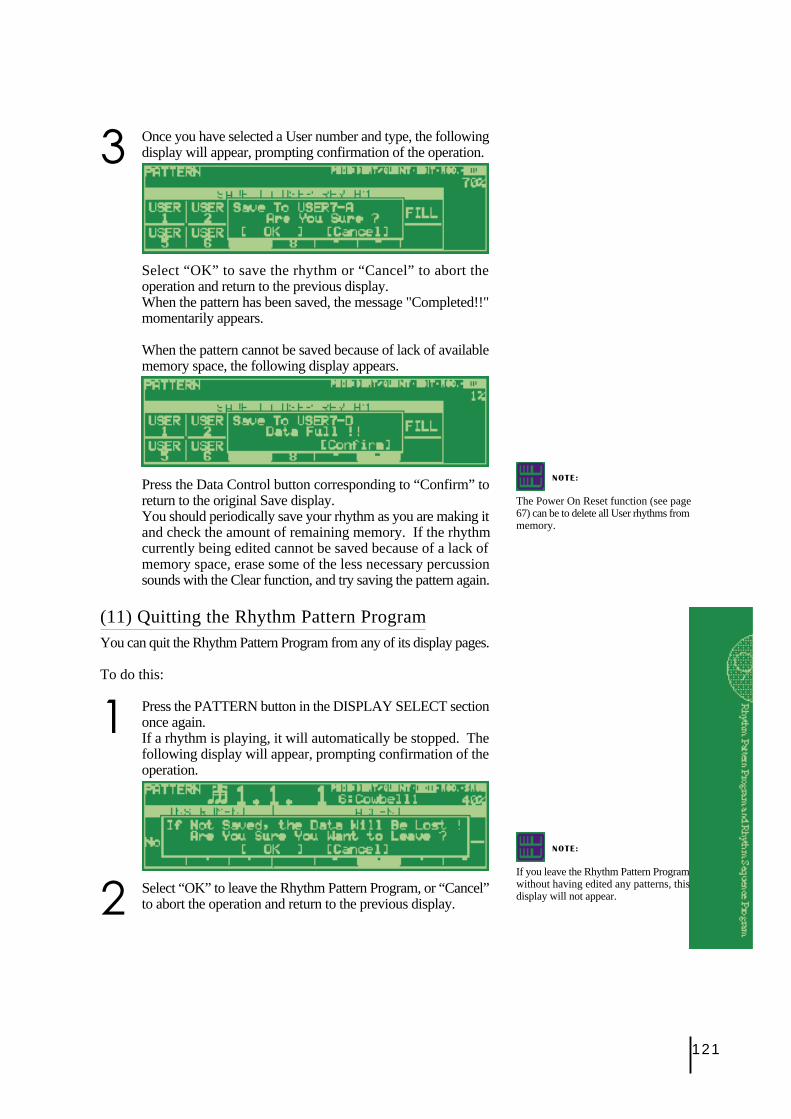
121
3 Once you have selected a User number and type, the followingdisplay will appear, prompting confirmation of the operation.
Select “OK” to save the rhythm or “Cancel” to abort theoperation and return to the previous display.When the pattern has been saved, the message "Completed!!"momentarily appears.
When the pattern cannot be saved because of lack of availablememory space, the following display appears.
Press the Data Control button corresponding to “Confirm” toreturn to the original Save display.You should periodically save your rhythm as you are making itand check the amount of remaining memory. If the rhythmcurrently being edited cannot be saved because of a lack ofmemory space, erase some of the less necessary percussionsounds with the Clear function, and try saving the pattern again.
(11) Quitting the Rhythm Pattern ProgramYou can quit the Rhythm Pattern Program from any of its display pages.
To do this:
1 Press the PATTERN button in the DISPLAY SELECT sectiononce again.If a rhythm is playing, it will automatically be stopped. Thefollowing display will appear, prompting confirmation of theoperation.
2 Select “OK” to leave the Rhythm Pattern Program, or “Cancel”to abort the operation and return to the previous display.
NOTE:
The Power On Reset function (see page67) can be to delete all User rhythms frommemory.
NOTE:
If you leave the Rhythm Pattern Programwithout having edited any patterns, thisdisplay will not appear.
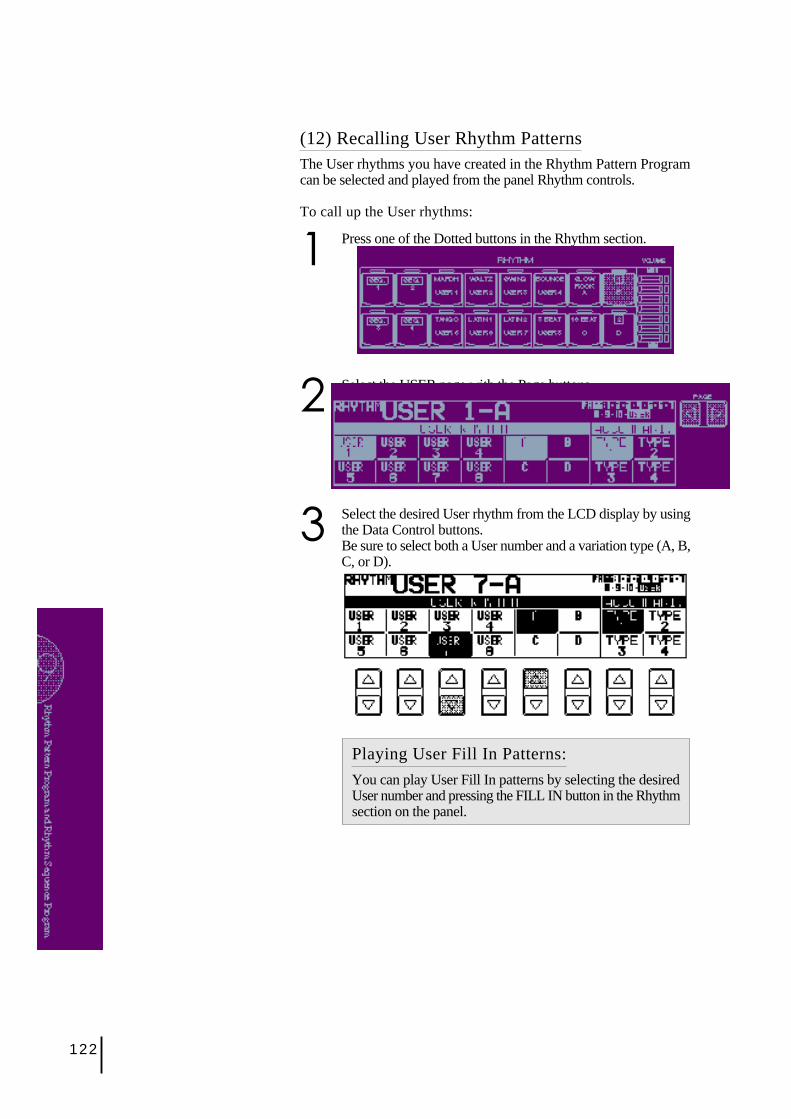
122
(12) Recalling User Rhythm PatternsThe User rhythms you have created in the Rhythm Pattern Programcan be selected and played from the panel Rhythm controls.
To call up the User rhythms:
1 Press one of the Dotted buttons in the Rhythm section.
2 Select the USER page with the Page buttons.
3 Select the desired User rhythm from the LCD display by usingthe Data Control buttons.Be sure to select both a User number and a variation type (A, B,C, or D).
Playing User Fill In Patterns:
You can play User Fill In patterns by selecting the desiredUser number and pressing the FILL IN button in the Rhythmsection on the panel.
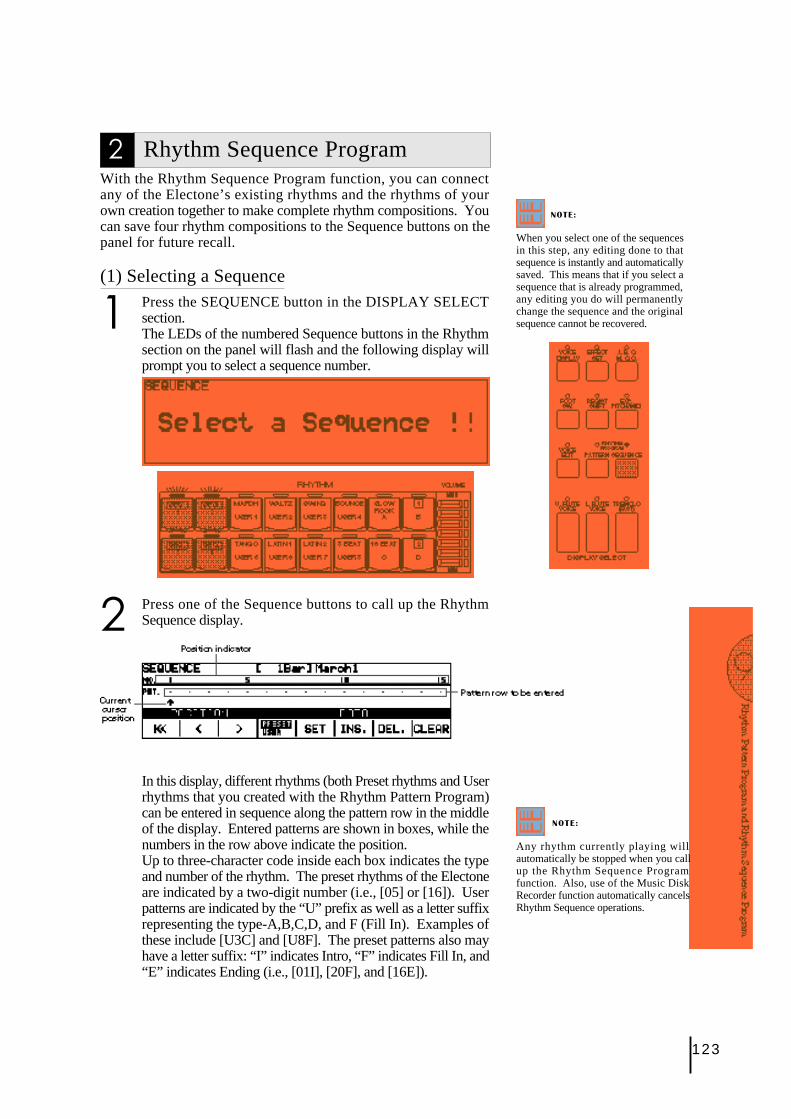
123
NOTE:
Any rhythm currently playing willautomatically be stopped when you callup the Rhythm Sequence Programfunction. Also, use of the Music DiskRecorder function automatically cancelsRhythm Sequence operations.
NOTE:
When you select one of the sequencesin this step, any editing done to thatsequence is instantly and automaticallysaved. This means that if you select asequence that is already programmed,any editing you do will permanentlychange the sequence and the originalsequence cannot be recovered.
2 Rhythm Sequence ProgramWith the Rhythm Sequence Program function, you can connectany of the Electone’s existing rhythms and the rhythms of yourown creation together to make complete rhythm compositions. Youcan save four rhythm compositions to the Sequence buttons on thepanel for future recall.
(1) Selecting a Sequence
1 Press the SEQUENCE button in the DISPLAY SELECTsection.The LEDs of the numbered Sequence buttons in the Rhythmsection on the panel will flash and the following display willprompt you to select a sequence number.
2 Press one of the Sequence buttons to call up the RhythmSequence display.
In this display, different rhythms (both Preset rhythms and Userrhythms that you created with the Rhythm Pattern Program)can be entered in sequence along the pattern row in the middleof the display. Entered patterns are shown in boxes, while thenumbers in the row above indicate the position.Up to three-character code inside each box indicates the typeand number of the rhythm. The preset rhythms of the Electoneare indicated by a two-digit number (i.e., [05] or [16]). Userpatterns are indicated by the “U” prefix as well as a letter suffixrepresenting the type-A,B,C,D, and F (Fill In). Examples ofthese include [U3C] and [U8F]. The preset patterns also mayhave a letter suffix: “I” indicates Intro, “F” indicates Fill In, and“E” indicates Ending (i.e., [01I], [20F], and [16E]).
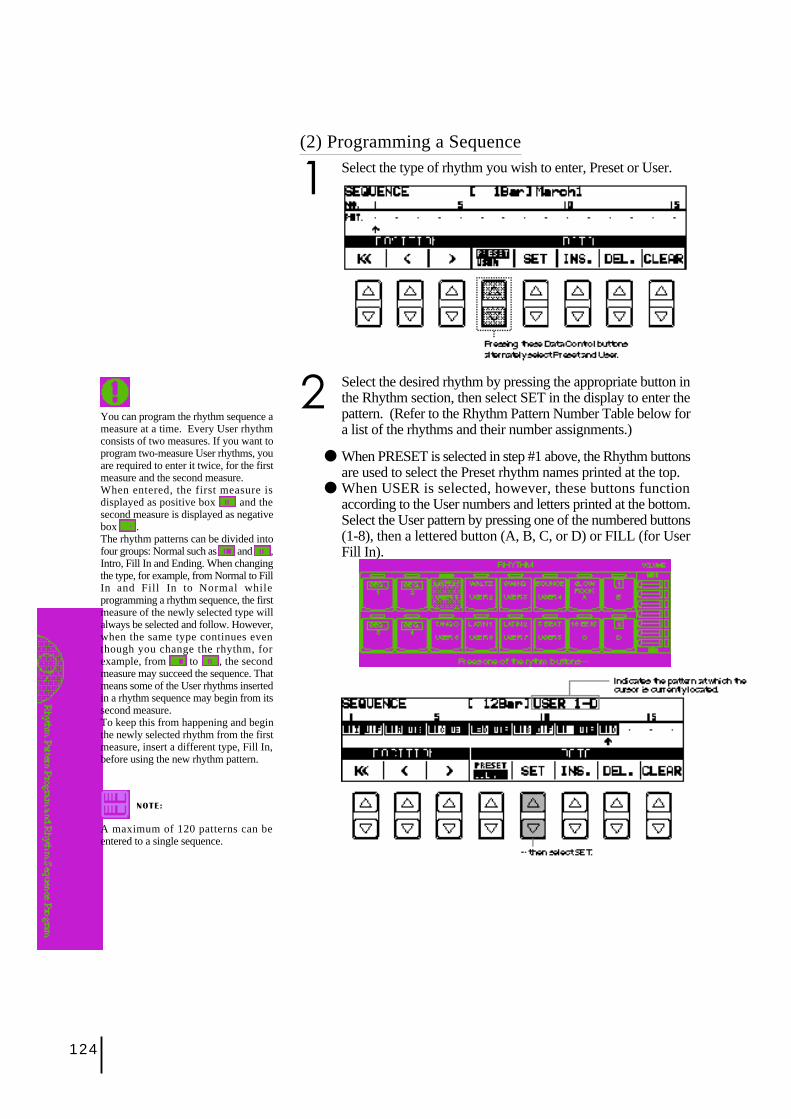
124
NOTE:
A maximum of 120 patterns can beentered to a single sequence.
You can program the rhythm sequence ameasure at a time. Every User rhythmconsists of two measures. If you want toprogram two-measure User rhythms, youare required to enter it twice, for the firstmeasure and the second measure.When entered, the first measure isdisplayed as positive box and thesecond measure is displayed as negativebox .The rhythm patterns can be divided intofour groups: Normal such as and ,Intro, Fill In and Ending. When changingthe type, for example, from Normal to FillIn and Fill In to Normal whileprogramming a rhythm sequence, the firstmeasure of the newly selected type willalways be selected and follow. However,when the same type continues eventhough you change the rhythm, forexample, from to , the secondmeasure may succeed the sequence. Thatmeans some of the User rhythms insertedin a rhythm sequence may begin from itssecond measure.To keep this from happening and beginthe newly selected rhythm from the firstmeasure, insert a different type, Fill In,before using the new rhythm pattern.
(2) Programming a Sequence
1 Select the type of rhythm you wish to enter, Preset or User.
2 Select the desired rhythm by pressing the appropriate button inthe Rhythm section, then select SET in the display to enter thepattern. (Refer to the Rhythm Pattern Number Table below fora list of the rhythms and their number assignments.)
● When PRESET is selected in step #1 above, the Rhythm buttonsare used to select the Preset rhythm names printed at the top.
● When USER is selected, however, these buttons functionaccording to the User numbers and letters printed at the bottom.Select the User pattern by pressing one of the numbered buttons(1-8), then a lettered button (A, B, C, or D) or FILL (for UserFill In).
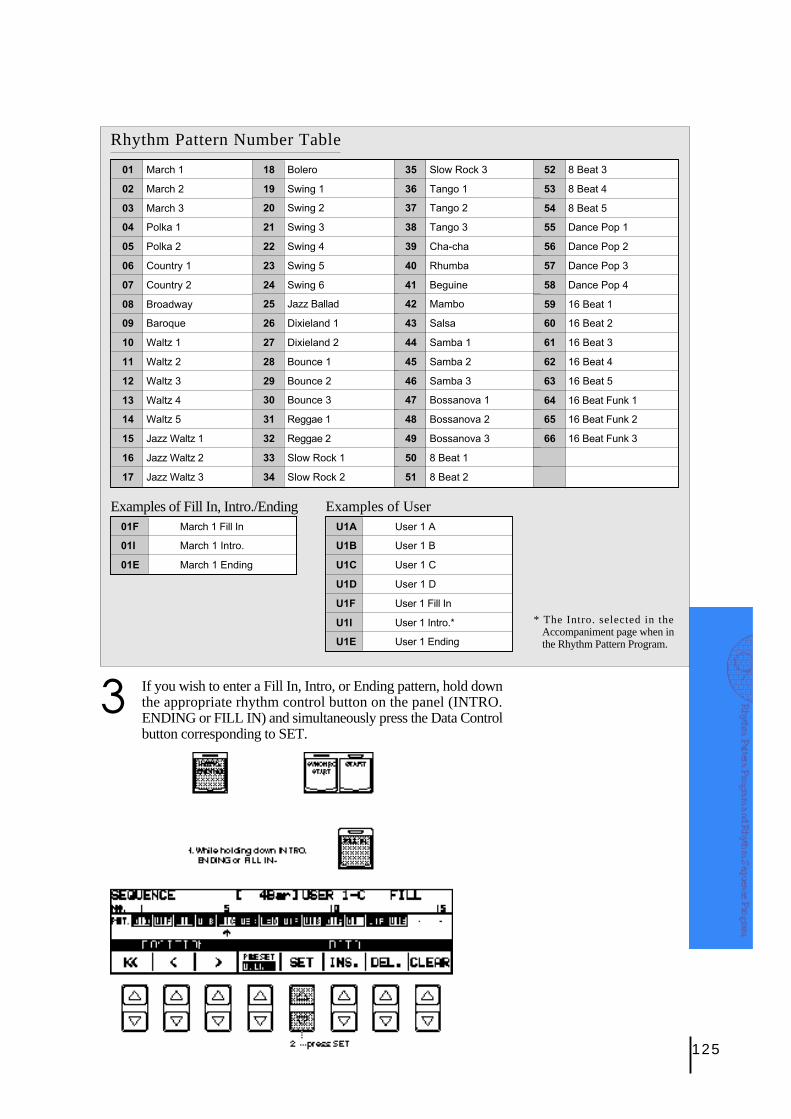
125
Rhythm Pattern Number Table
35 Slow Rock 3
36 Tango 1
37 Tango 2
38 Tango 3
39 Cha-cha
40 Rhumba
41 Beguine
42 Mambo
43 Salsa
44 Samba 1
45 Samba 2
46 Samba 3
47 Bossanova 1
48 Bossanova 2
49 Bossanova 3
50 8 Beat 1
51 8 Beat 2
52 8 Beat 3
53 8 Beat 4
54 8 Beat 5
55 Dance Pop 1
56 Dance Pop 2
57 Dance Pop 3
58 Dance Pop 4
59 16 Beat 1
60 16 Beat 2
61 16 Beat 3
62 16 Beat 4
63 16 Beat 5
64 16 Beat Funk 1
65 16 Beat Funk 2
66 16 Beat Funk 3
* The Intro. selected in theAccompaniment page when inthe Rhythm Pattern Program.
3 If you wish to enter a Fill In, Intro, or Ending pattern, hold downthe appropriate rhythm control button on the panel (INTRO.ENDING or FILL IN) and simultaneously press the Data Controlbutton corresponding to SET.
01 March 1
02 March 2
03 March 3
04 Polka 1
05 Polka 2
06 Country 1
07 Country 2
08 Broadway
09 Baroque
10 Waltz 1
11 Waltz 2
12 Waltz 3
13 Waltz 4
14 Waltz 5
15 Jazz Waltz 1
16 Jazz Waltz 2
17 Jazz Waltz 3
18 Bolero
19 Swing 1
20 Swing 2
21 Swing 3
22 Swing 4
23 Swing 5
24 Swing 6
25 Jazz Ballad
26 Dixieland 1
27 Dixieland 2
28 Bounce 1
29 Bounce 2
30 Bounce 3
31 Reggae 1
32 Reggae 2
33 Slow Rock 1
34 Slow Rock 2
Examples of UserU1A User 1 A
U1B User 1 B
U1C User 1 C
U1D User 1 D
U1F User 1 Fill In
U1I User 1 Intro.*
U1E User 1 Ending
Examples of Fill In, Intro./Ending01F March 1 Fill In
01I March 1 Intro.
01E March 1 Ending
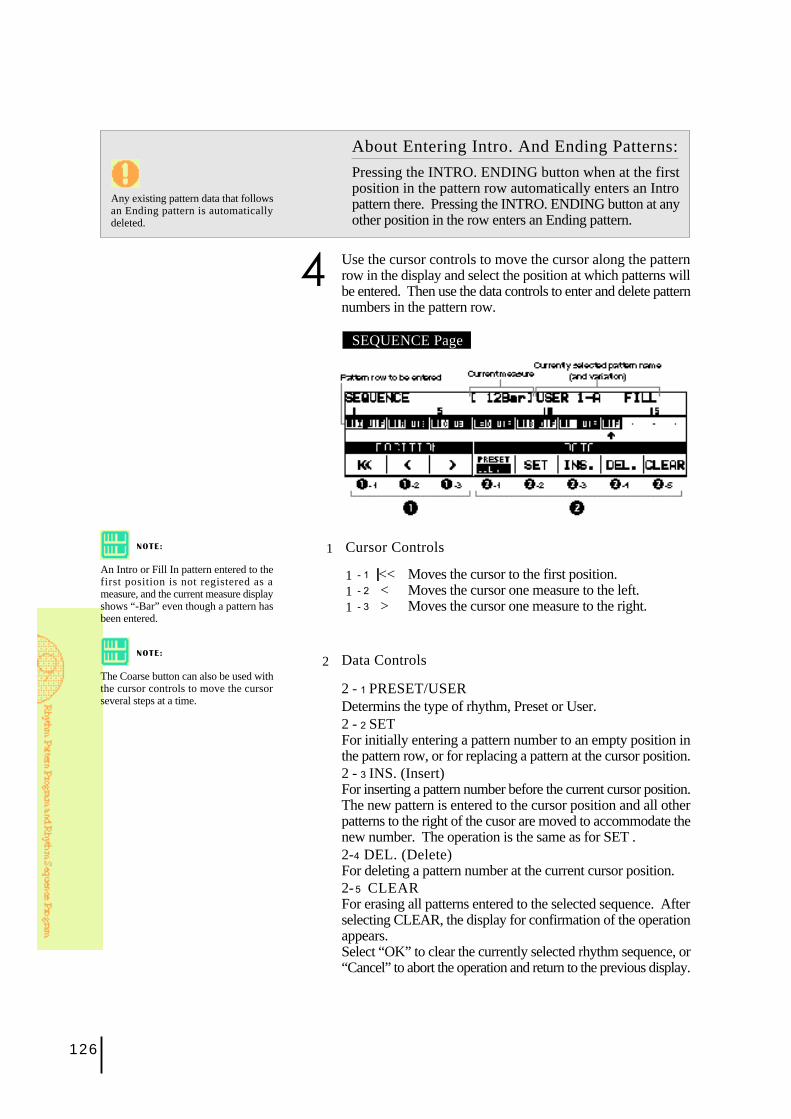
126
4 Use the cursor controls to move the cursor along the patternrow in the display and select the position at which patterns willbe entered. Then use the data controls to enter and delete patternnumbers in the pattern row.
SEQUENCE Page
About Entering Intro. And Ending Patterns:
Pressing the INTRO. ENDING button when at the firstposition in the pattern row automatically enters an Intropattern there. Pressing the INTRO. ENDING button at anyother position in the row enters an Ending pattern.
Any existing pattern data that followsan Ending pattern is automaticallydeleted.
NOTE:
The Coarse button can also be used withthe cursor controls to move the cursorseveral steps at a time.
1 Cursor Controls
1 - 1 ❘<< Moves the cursor to the first position.1 - 2 < Moves the cursor one measure to the left.1 - 3 > Moves the cursor one measure to the right.
NOTE:
An Intro or Fill In pattern entered to thefirst position is not registered as ameasure, and the current measure displayshows “-Bar” even though a pattern hasbeen entered.
2 Data Controls
2 - 1 PRESET/USERDetermins the type of rhythm, Preset or User.2 - 2 SETFor initially entering a pattern number to an empty position inthe pattern row, or for replacing a pattern at the cursor position.2 - 3 INS. (Insert)For inserting a pattern number before the current cursor position.The new pattern is entered to the cursor position and all otherpatterns to the right of the cusor are moved to accommodate thenew number. The operation is the same as for SET .2-4 DEL. (Delete)For deleting a pattern number at the current cursor position.2-5 CLEARFor erasing all patterns entered to the selected sequence. Afterselecting CLEAR, the display for confirmation of the operationappears.Select “OK” to clear the currently selected rhythm sequence, or“Cancel” to abort the operation and return to the previous display.
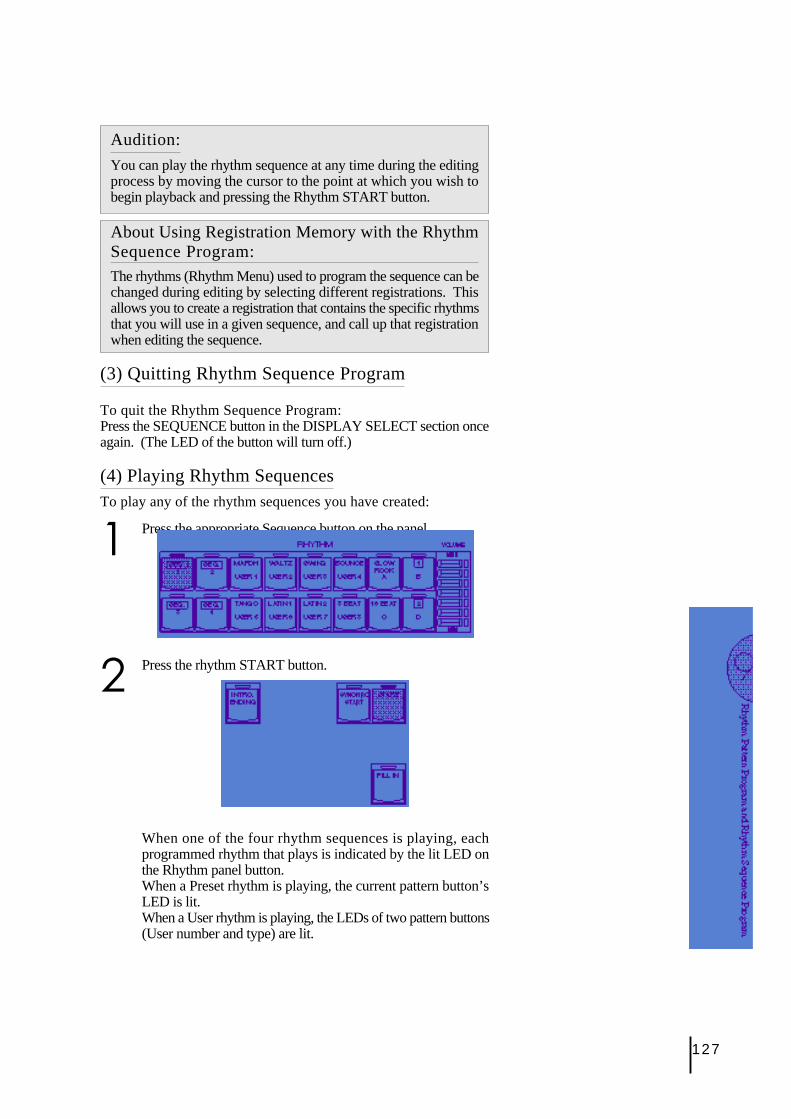
127
Audition:
You can play the rhythm sequence at any time during the editingprocess by moving the cursor to the point at which you wish tobegin playback and pressing the Rhythm START button.
About Using Registration Memory with the RhythmSequence Program:The rhythms (Rhythm Menu) used to program the sequence can bechanged during editing by selecting different registrations. Thisallows you to create a registration that contains the specific rhythmsthat you will use in a given sequence, and call up that registrationwhen editing the sequence.
(3) Quitting Rhythm Sequence Program
To quit the Rhythm Sequence Program:Press the SEQUENCE button in the DISPLAY SELECT section onceagain. (The LED of the button will turn off.)
(4) Playing Rhythm SequencesTo play any of the rhythm sequences you have created:
1 Press the appropriate Sequence button on the panel.
2 Press the rhythm START button.
When one of the four rhythm sequences is playing, eachprogrammed rhythm that plays is indicated by the lit LED onthe Rhythm panel button.When a Preset rhythm is playing, the current pattern button’sLED is lit.When a User rhythm is playing, the LEDs of two pattern buttons(User number and type) are lit.
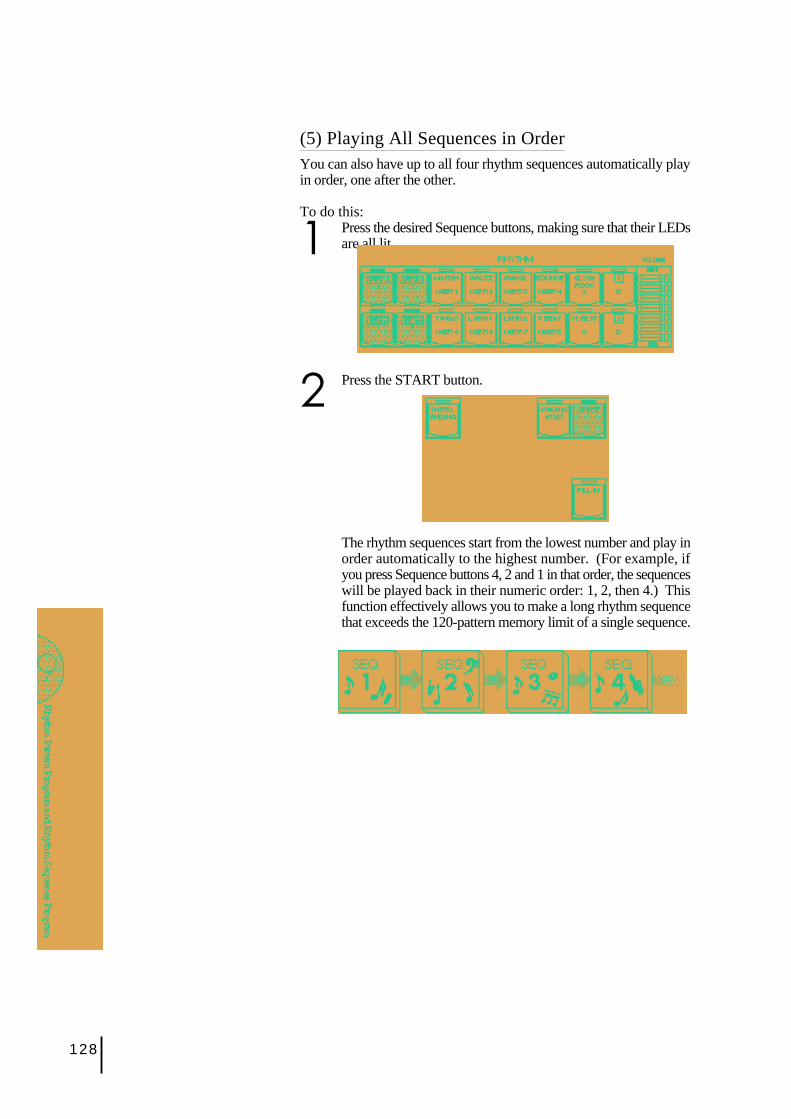
128
(5) Playing All Sequences in OrderYou can also have up to all four rhythm sequences automatically playin order, one after the other.
To do this:
1 Press the desired Sequence buttons, making sure that their LEDsare all lit.
2 Press the START button.
The rhythm sequences start from the lowest number and play inorder automatically to the highest number. (For example, ifyou press Sequence buttons 4, 2 and 1 in that order, the sequenceswill be played back in their numeric order: 1, 2, then 4.) Thisfunction effectively allows you to make a long rhythm sequencethat exceeds the 120-pattern memory limit of a single sequence.
129
Saving Rhythm Pattern and Rhythm Sequence Data to Disk:
Once you have created your own rhythms and rhythm sequences, you’llwant to save them to disk. Doing so allows you to free up memory inthe Electone for creating additional rhythms and sequences. Also, theUser rhythms and sequences you’ve saved to disk can be loaded back tothe Electone any time.Rhythm Pattern and Rhythm Sequence data are included in the bulkdata that is saved when you record registrations to disk. Refer to thesection Recording Registrations, page 77, for instructions.
Loading Rhythm Pattern and Rhythm Sequence Data from Disk:
The Rhythm Pattern and Rhythm Sequence data saved to disk aspart of bulk data, can instantly be loaded back to the Electone. Referto the section Recalling Recorded Registrations, page 78, forinstructions.
NOTE:
When loading your original RhythmProgram data back to the Electone, besure to stop the rhythm if it is playing.Loading cannot be executed when arhythm is running.

130
1 FootswitchThe Electone has two footswitches on the main expression pedalthat can be used to control various functions. The right footswitchis used for the Registration Shift functions (see page 64). The leftfootswitch can be set to control one of the following functions: Glide,Tremolo, rhythm controls.
Assignments of the functions are made in the Foot Switch pages.
To select the Foot Switch pages:Press the FOOT SW. button in the DISPLAY SELECT section.
FOOT SWITCH page
OFFCancels left footswitch control.
These leg- and foot-operated controls allow you to turn on and execute various performance functionswithout taking your hands from the keyboards.
10 Footswitches, Knee Lever andExpression Pedals
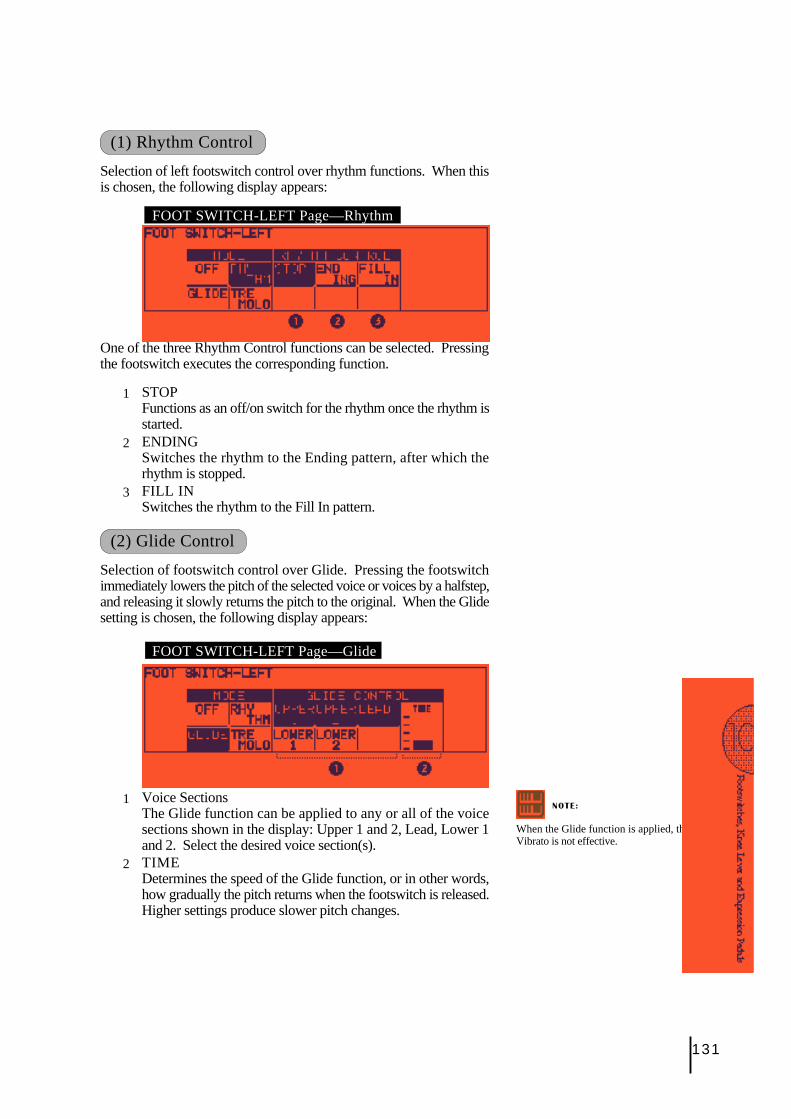
131
(1) Rhythm Control
Selection of left footswitch control over rhythm functions. When thisis chosen, the following display appears:
FOOT SWITCH-LEFT Page—Rhythm
One of the three Rhythm Control functions can be selected. Pressingthe footswitch executes the corresponding function.
1 STOPFunctions as an off/on switch for the rhythm once the rhythm isstarted.
2 ENDINGSwitches the rhythm to the Ending pattern, after which therhythm is stopped.
3 FILL INSwitches the rhythm to the Fill In pattern.
(2) Glide Control
Selection of footswitch control over Glide. Pressing the footswitchimmediately lowers the pitch of the selected voice or voices by a halfstep,and releasing it slowly returns the pitch to the original. When the Glidesetting is chosen, the following display appears:
FOOT SWITCH-LEFT Page—Glide
1 Voice SectionsThe Glide function can be applied to any or all of the voicesections shown in the display: Upper 1 and 2, Lead, Lower 1and 2. Select the desired voice section(s).
2 TIMEDetermines the speed of the Glide function, or in other words,how gradually the pitch returns when the footswitch is released.Higher settings produce slower pitch changes.
NOTE:
When the Glide function is applied, theVibrato is not effective.
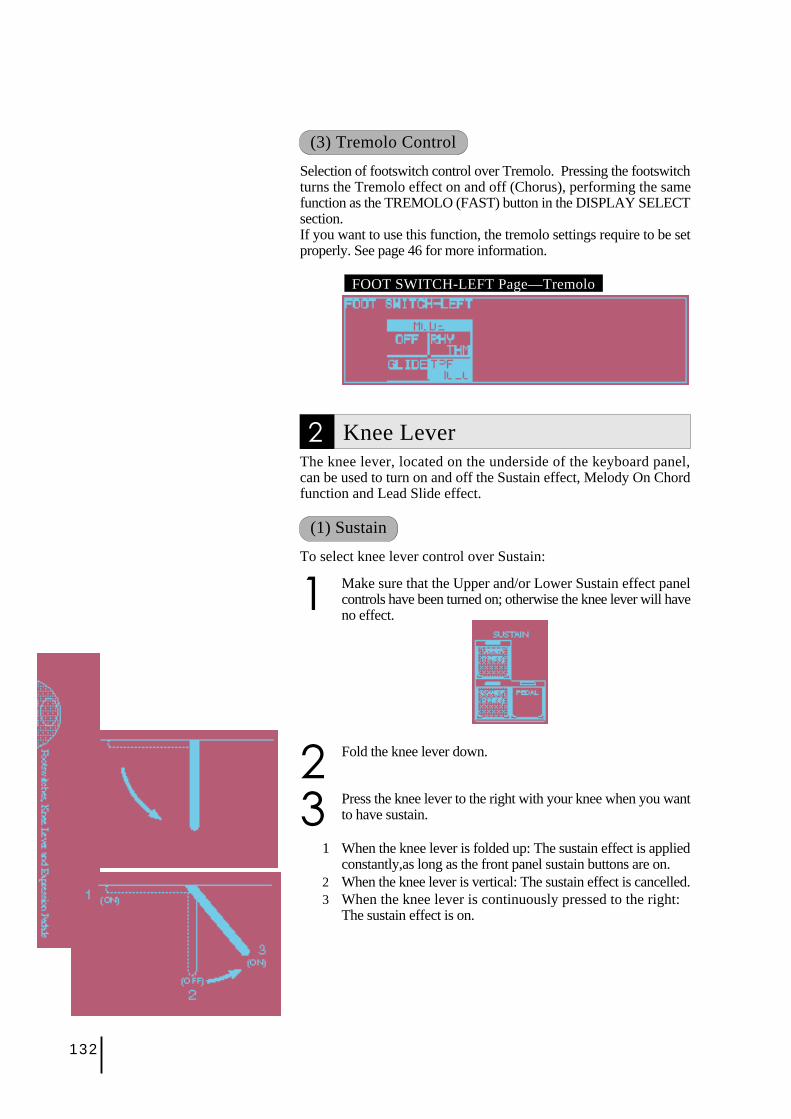
132
(3) Tremolo Control
Selection of footswitch control over Tremolo. Pressing the footswitchturns the Tremolo effect on and off (Chorus), performing the samefunction as the TREMOLO (FAST) button in the DISPLAY SELECTsection.If you want to use this function, the tremolo settings require to be setproperly. See page 46 for more information.
FOOT SWITCH-LEFT Page—Tremolo
2 Knee LeverThe knee lever, located on the underside of the keyboard panel,can be used to turn on and off the Sustain effect, Melody On Chordfunction and Lead Slide effect.
(1) Sustain
To select knee lever control over Sustain:
1 Make sure that the Upper and/or Lower Sustain effect panelcontrols have been turned on; otherwise the knee lever will haveno effect.
2 Fold the knee lever down.
3 Press the knee lever to the right with your knee when you wantto have sustain.
1 When the knee lever is folded up: The sustain effect is appliedconstantly,as long as the front panel sustain buttons are on.
2 When the knee lever is vertical: The sustain effect is cancelled.3 When the knee lever is continuously pressed to the right:
The sustain effect is on.
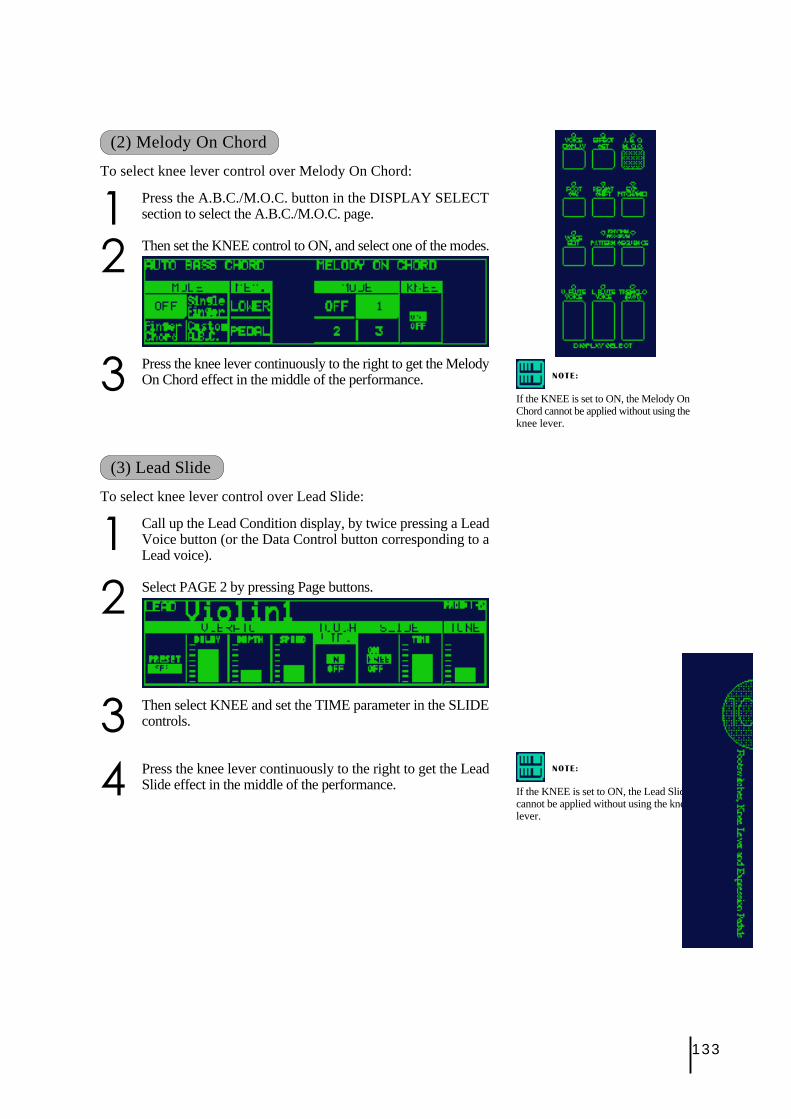
133
(2) Melody On Chord
To select knee lever control over Melody On Chord:
1 Press the A.B.C./M.O.C. button in the DISPLAY SELECTsection to select the A.B.C./M.O.C. page.
2 Then set the KNEE control to ON, and select one of the modes.
3 Press the knee lever continuously to the right to get the MelodyOn Chord effect in the middle of the performance. NOTE:
If the KNEE is set to ON, the Melody OnChord cannot be applied without using theknee lever.
(3) Lead Slide
To select knee lever control over Lead Slide:
1 Call up the Lead Condition display, by twice pressing a LeadVoice button (or the Data Control button corresponding to aLead voice).
2 Select PAGE 2 by pressing Page buttons.
3 Then select KNEE and set the TIME parameter in the SLIDEcontrols.
4 Press the knee lever continuously to the right to get the LeadSlide effect in the middle of the performance.
NOTE:
If the KNEE is set to ON, the Lead Slidecannot be applied without using the kneelever.
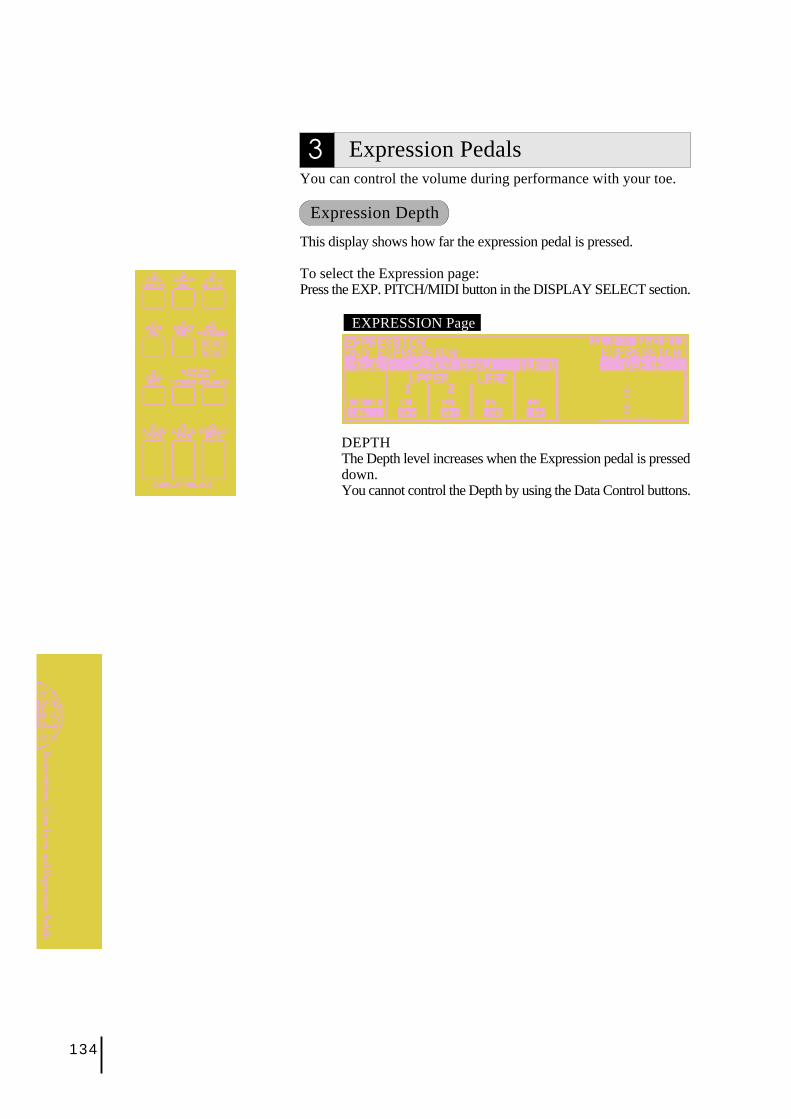
134
3 Expression PedalsYou can control the volume during performance with your toe.
Expression Depth
This display shows how far the expression pedal is pressed.
To select the Expression page:Press the EXP. PITCH/MIDI button in the DISPLAY SELECT section.
EXPRESSION Page
DEPTHThe Depth level increases when the Expression pedal is presseddown.You cannot control the Depth by using the Data Control buttons.
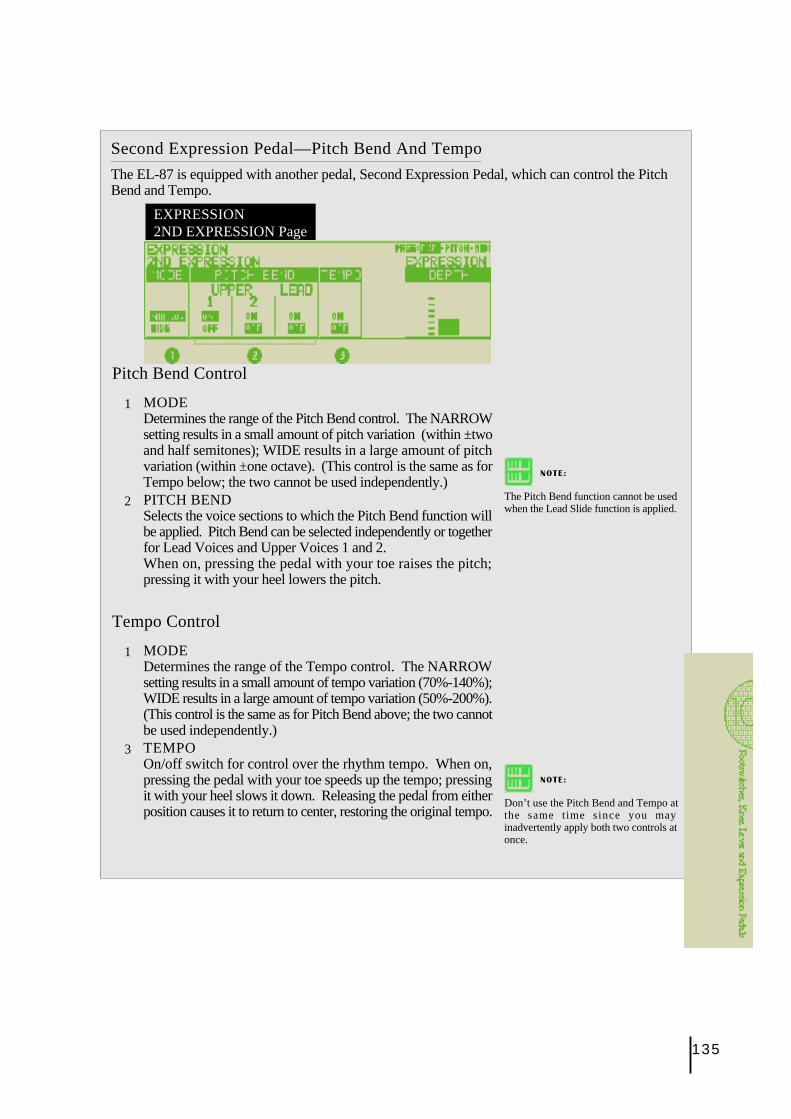
135
NOTE:
Don’t use the Pitch Bend and Tempo atthe same time since you mayinadvertently apply both two controls atonce.
NOTE:
The Pitch Bend function cannot be usedwhen the Lead Slide function is applied.
Second Expression Pedal—Pitch Bend And Tempo
The EL-87 is equipped with another pedal, Second Expression Pedal, which can control the PitchBend and Tempo.
EXPRESSION2ND EXPRESSION Page
Pitch Bend Control
1 MODEDetermines the range of the Pitch Bend control. The NARROWsetting results in a small amount of pitch variation (within ±twoand half semitones); WIDE results in a large amount of pitchvariation (within ±one octave). (This control is the same as forTempo below; the two cannot be used independently.)
2 PITCH BENDSelects the voice sections to which the Pitch Bend function willbe applied. Pitch Bend can be selected independently or togetherfor Lead Voices and Upper Voices 1 and 2.When on, pressing the pedal with your toe raises the pitch;pressing it with your heel lowers the pitch.
Tempo Control
1 MODEDetermines the range of the Tempo control. The NARROWsetting results in a small amount of tempo variation (70%-140%);WIDE results in a large amount of tempo variation (50%-200%).(This control is the same as for Pitch Bend above; the two cannotbe used independently.)
3 TEMPOOn/off switch for control over the rhythm tempo. When on,pressing the pedal with your toe speeds up the tempo; pressingit with your heel slows it down. Releasing the pedal from eitherposition causes it to return to center, restoring the original tempo.
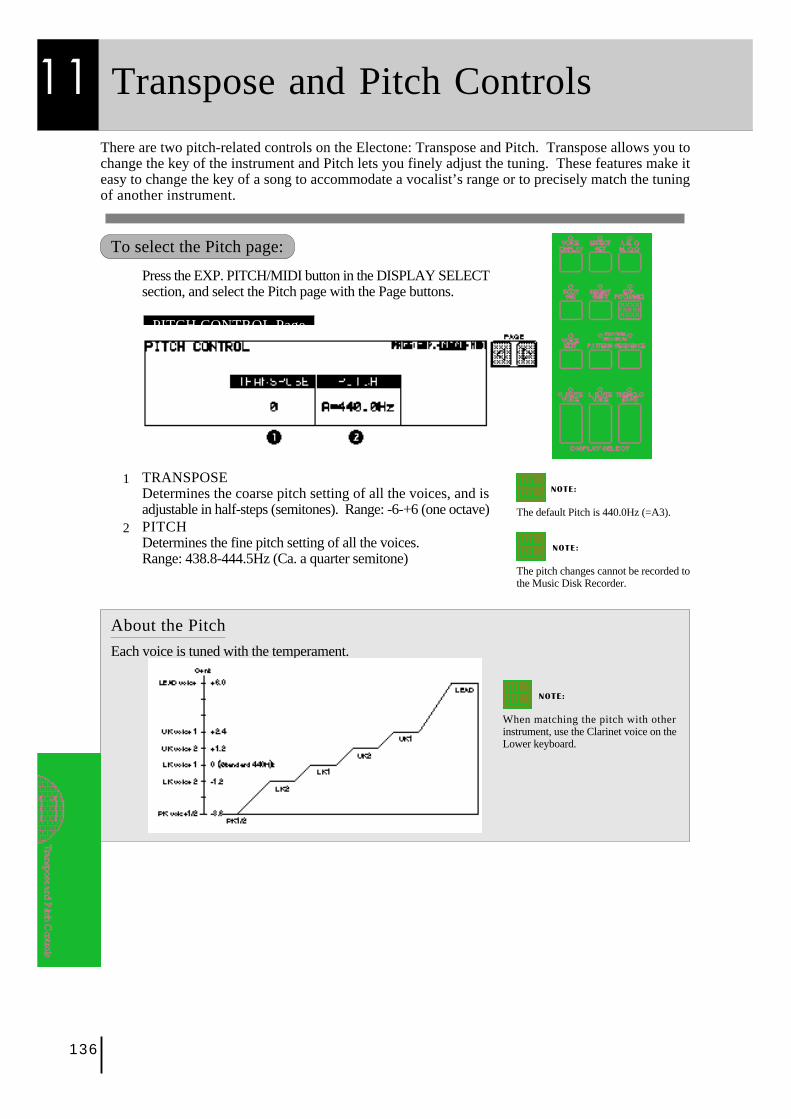
136
To select the Pitch page:
Press the EXP. PITCH/MIDI button in the DISPLAY SELECTsection, and select the Pitch page with the Page buttons.
PITCH CONTROL Page
1 TRANSPOSEDetermines the coarse pitch setting of all the voices, and isadjustable in half-steps (semitones). Range: -6-+6 (one octave)
2 PITCHDetermines the fine pitch setting of all the voices.Range: 438.8-444.5Hz (Ca. a quarter semitone)
11 Transpose and Pitch Controls
There are two pitch-related controls on the Electone: Transpose and Pitch. Transpose allows you tochange the key of the instrument and Pitch lets you finely adjust the tuning. These features make iteasy to change the key of a song to accommodate a vocalist’s range or to precisely match the tuningof another instrument.
NOTE:
The default Pitch is 440.0Hz (=A3).
NOTE:
The pitch changes cannot be recorded tothe Music Disk Recorder.
About the Pitch
Each voice is tuned with the temperament.
NOTE:
When matching the pitch with otherinstrument, use the Clarinet voice on theLower keyboard.
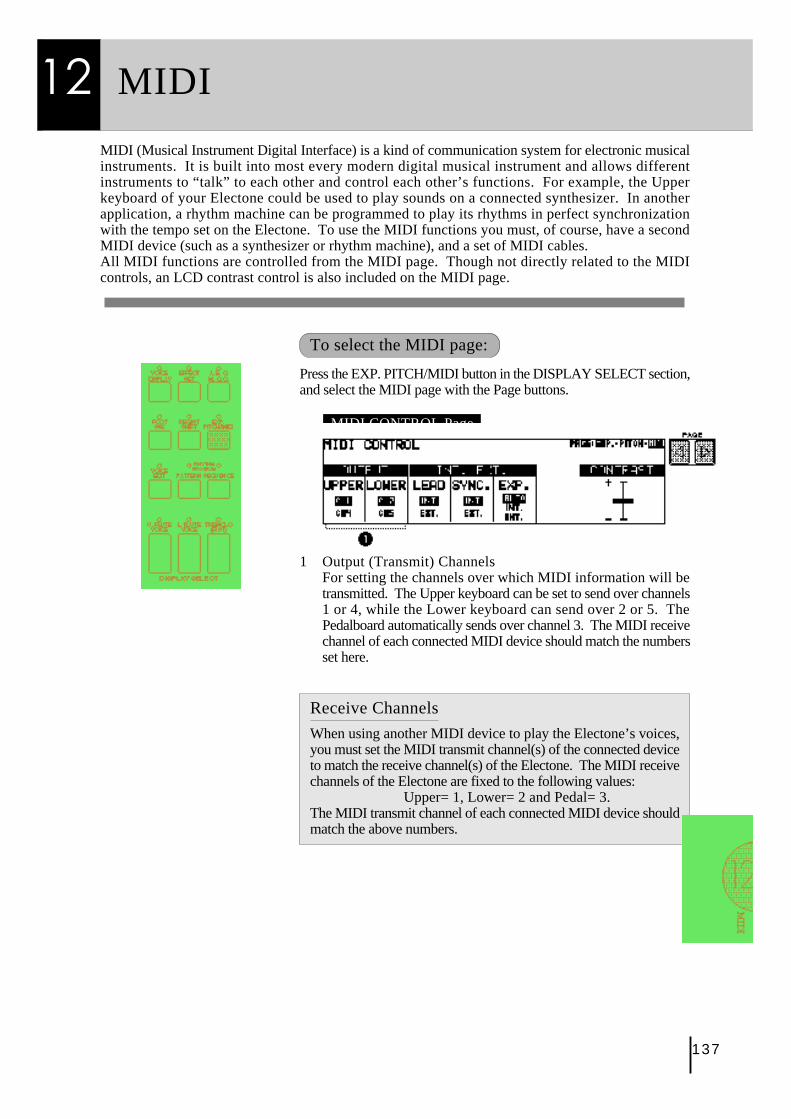
137
12 MIDI
MIDI (Musical Instrument Digital Interface) is a kind of communication system for electronic musicalinstruments. It is built into most every modern digital musical instrument and allows differentinstruments to “talk” to each other and control each other’s functions. For example, the Upperkeyboard of your Electone could be used to play sounds on a connected synthesizer. In anotherapplication, a rhythm machine can be programmed to play its rhythms in perfect synchronizationwith the tempo set on the Electone. To use the MIDI functions you must, of course, have a secondMIDI device (such as a synthesizer or rhythm machine), and a set of MIDI cables.All MIDI functions are controlled from the MIDI page. Though not directly related to the MIDIcontrols, an LCD contrast control is also included on the MIDI page.
To select the MIDI page:
Press the EXP. PITCH/MIDI button in the DISPLAY SELECT section,and select the MIDI page with the Page buttons.
MIDI CONTROL Page
1 Output (Transmit) ChannelsFor setting the channels over which MIDI information will betransmitted. The Upper keyboard can be set to send over channels1 or 4, while the Lower keyboard can send over 2 or 5. ThePedalboard automatically sends over channel 3. The MIDI receivechannel of each connected MIDI device should match the numbersset here.
Receive Channels
When using another MIDI device to play the Electone’s voices,you must set the MIDI transmit channel(s) of the connected deviceto match the receive channel(s) of the Electone. The MIDI receivechannels of the Electone are fixed to the following values:
Upper= 1, Lower= 2 and Pedal= 3.The MIDI transmit channel of each connected MIDI device shouldmatch the above numbers.
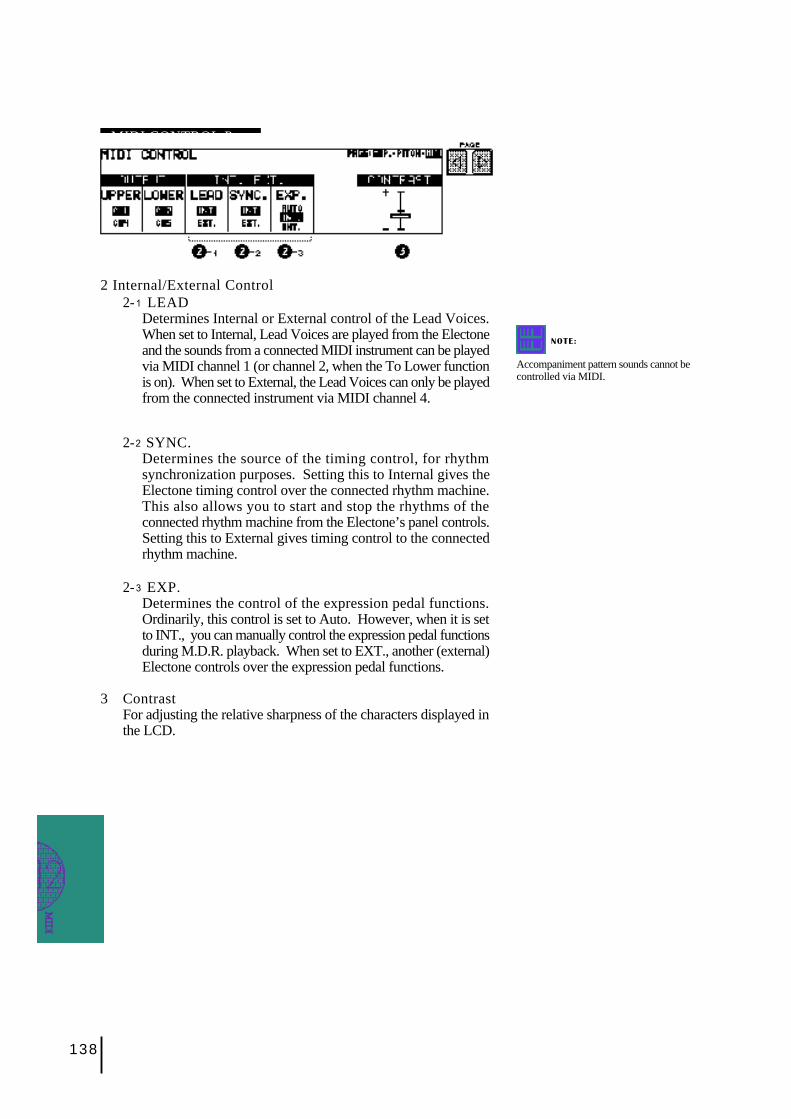
138
MIDI CONTROL Page
2 Internal/External Control2-1 LEAD
Determines Internal or External control of the Lead Voices.When set to Internal, Lead Voices are played from the Electoneand the sounds from a connected MIDI instrument can be playedvia MIDI channel 1 (or channel 2, when the To Lower functionis on). When set to External, the Lead Voices can only be playedfrom the connected instrument via MIDI channel 4.
NOTE:
Accompaniment pattern sounds cannot becontrolled via MIDI.
2-2 SYNC.Determines the source of the timing control, for rhythmsynchronization purposes. Setting this to Internal gives theElectone timing control over the connected rhythm machine.This also allows you to start and stop the rhythms of theconnected rhythm machine from the Electone’s panel controls.Setting this to External gives timing control to the connectedrhythm machine.
2-3 EXP.Determines the control of the expression pedal functions.Ordinarily, this control is set to Auto. However, when it is setto INT., you can manually control the expression pedal functionsduring M.D.R. playback. When set to EXT., another (external)Electone controls over the expression pedal functions.
3 ContrastFor adjusting the relative sharpness of the characters displayed inthe LCD.
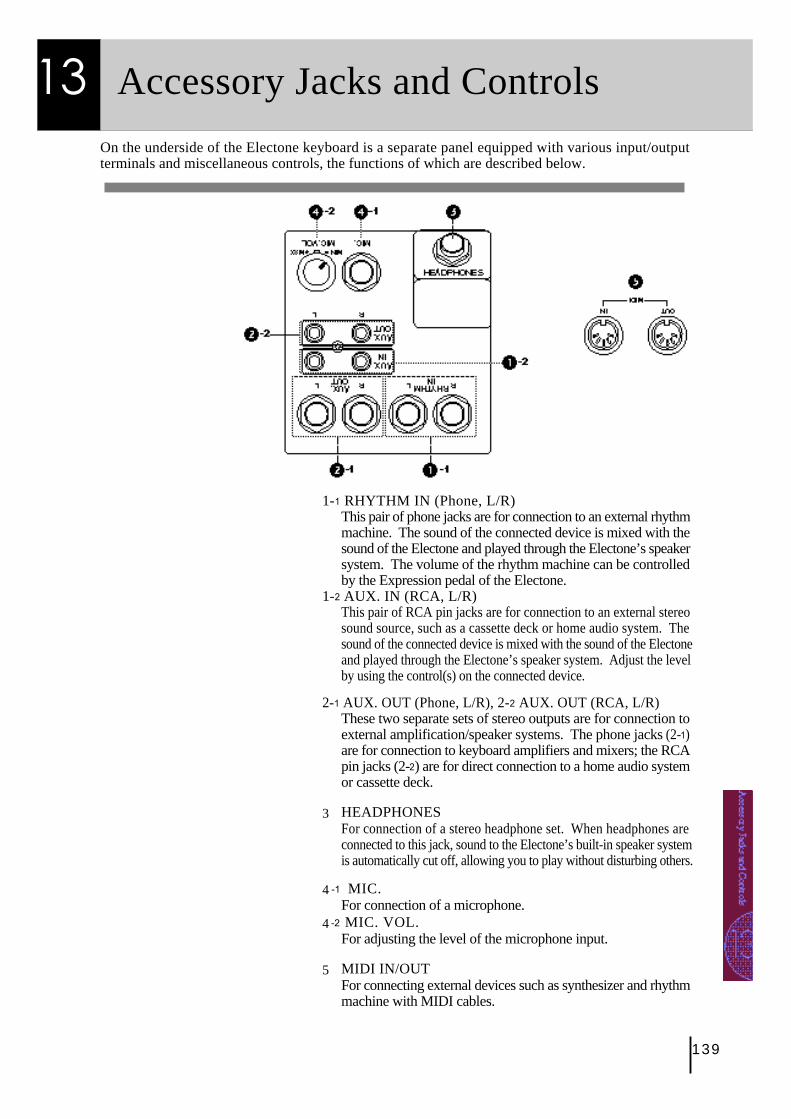
139
13 Accessory Jacks and Controls
On the underside of the Electone keyboard is a separate panel equipped with various input/outputterminals and miscellaneous controls, the functions of which are described below.
1-1 RHYTHM IN (Phone, L/R)This pair of phone jacks are for connection to an external rhythmmachine. The sound of the connected device is mixed with thesound of the Electone and played through the Electone’s speakersystem. The volume of the rhythm machine can be controlledby the Expression pedal of the Electone.
1-2 AUX. IN (RCA, L/R)This pair of RCA pin jacks are for connection to an external stereosound source, such as a cassette deck or home audio system. Thesound of the connected device is mixed with the sound of the Electoneand played through the Electone’s speaker system. Adjust the levelby using the control(s) on the connected device.
2-1 AUX. OUT (Phone, L/R), 2-2 AUX. OUT (RCA, L/R)These two separate sets of stereo outputs are for connection toexternal amplification/speaker systems. The phone jacks (2-1)are for connection to keyboard amplifiers and mixers; the RCApin jacks (2-2) are for direct connection to a home audio systemor cassette deck.
3 HEADPHONESFor connection of a stereo headphone set. When headphones areconnected to this jack, sound to the Electone’s built-in speaker systemis automatically cut off, allowing you to play without disturbing others.
4 -1 MIC.For connection of a microphone.
4 -2 MIC. VOL.For adjusting the level of the microphone input.
5 MIDI IN/OUTFor connecting external devices such as synthesizer and rhythmmachine with MIDI cables.
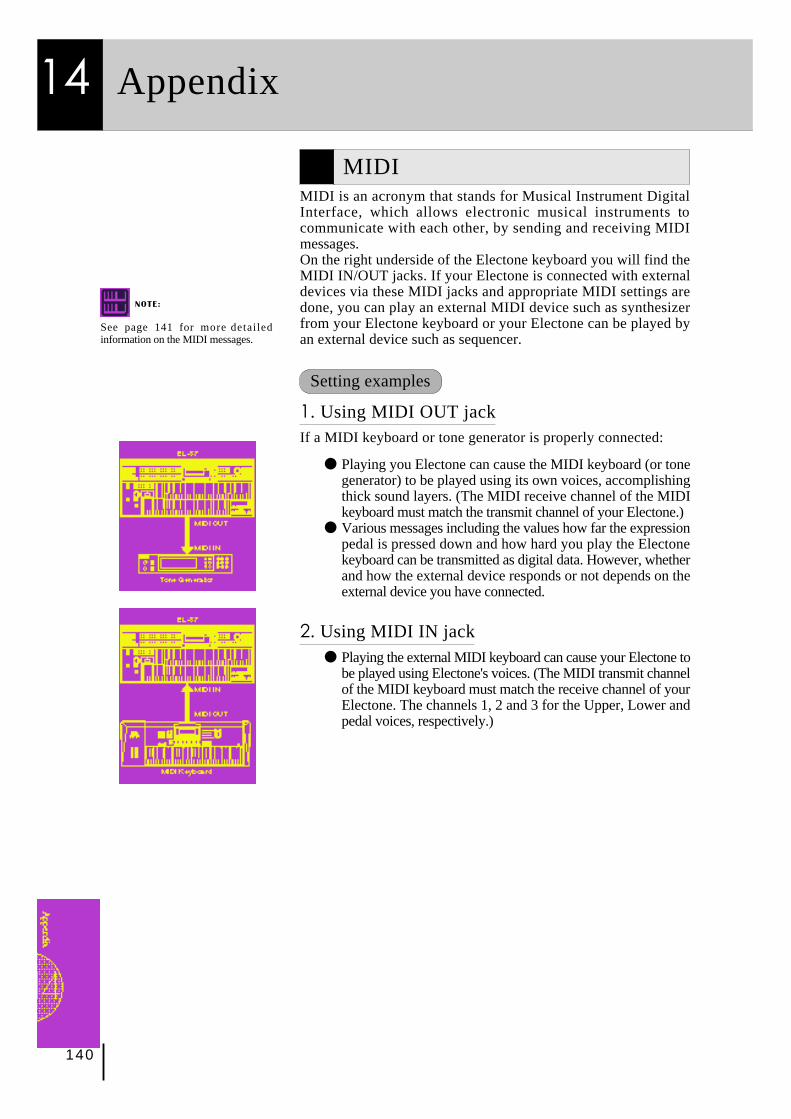
140
MIDIMIDI is an acronym that stands for Musical Instrument DigitalInterface, which allows electronic musical instruments tocommunicate with each other, by sending and receiving MIDImessages.On the right underside of the Electone keyboard you will find theMIDI IN/OUT jacks. If your Electone is connected with externaldevices via these MIDI jacks and appropriate MIDI settings aredone, you can play an external MIDI device such as synthesizerfrom your Electone keyboard or your Electone can be played byan external device such as sequencer.
14 Appendix
NOTE:
See page 141 for more detailedinformation on the MIDI messages.
Setting examples
1. Using MIDI OUT jackIf a MIDI keyboard or tone generator is properly connected:
● Playing you Electone can cause the MIDI keyboard (or tonegenerator) to be played using its own voices, accomplishingthick sound layers. (The MIDI receive channel of the MIDIkeyboard must match the transmit channel of your Electone.)
● Various messages including the values how far the expressionpedal is pressed down and how hard you play the Electonekeyboard can be transmitted as digital data. However, whetherand how the external device responds or not depends on theexternal device you have connected.
2. Using MIDI IN jack● Playing the external MIDI keyboard can cause your Electone to
be played using Electone's voices. (The MIDI transmit channelof the MIDI keyboard must match the receive channel of yourElectone. The channels 1, 2 and 3 for the Upper, Lower andpedal voices, respectively.)
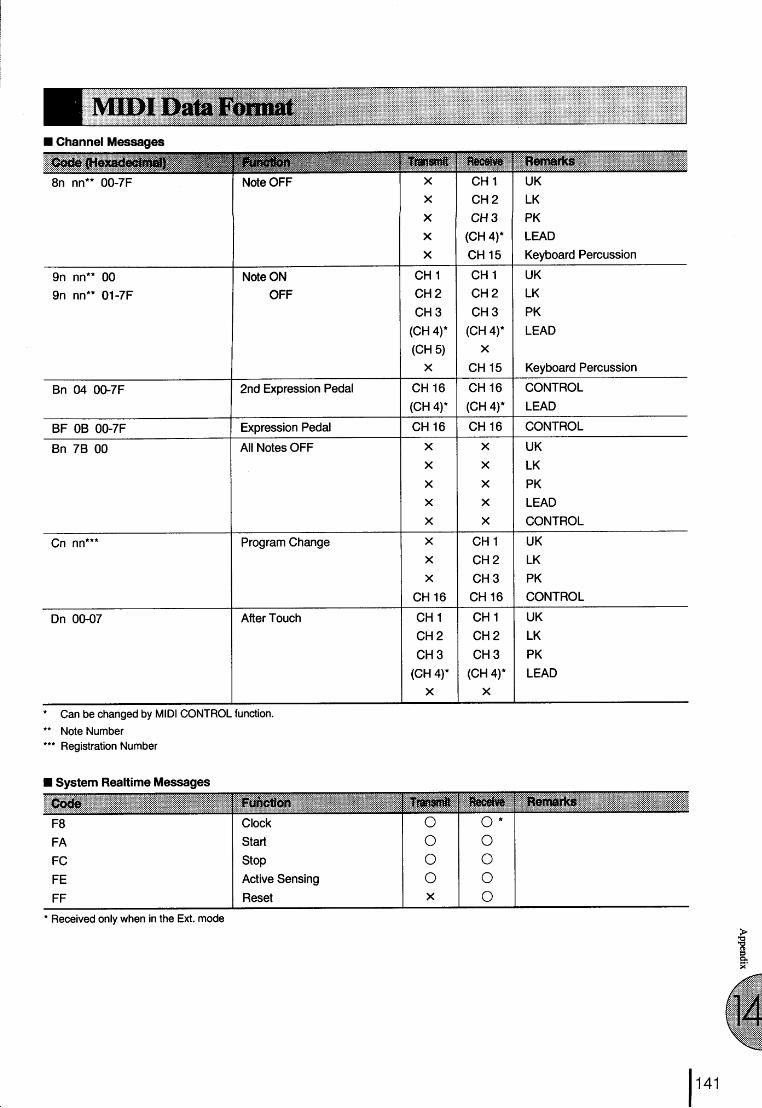
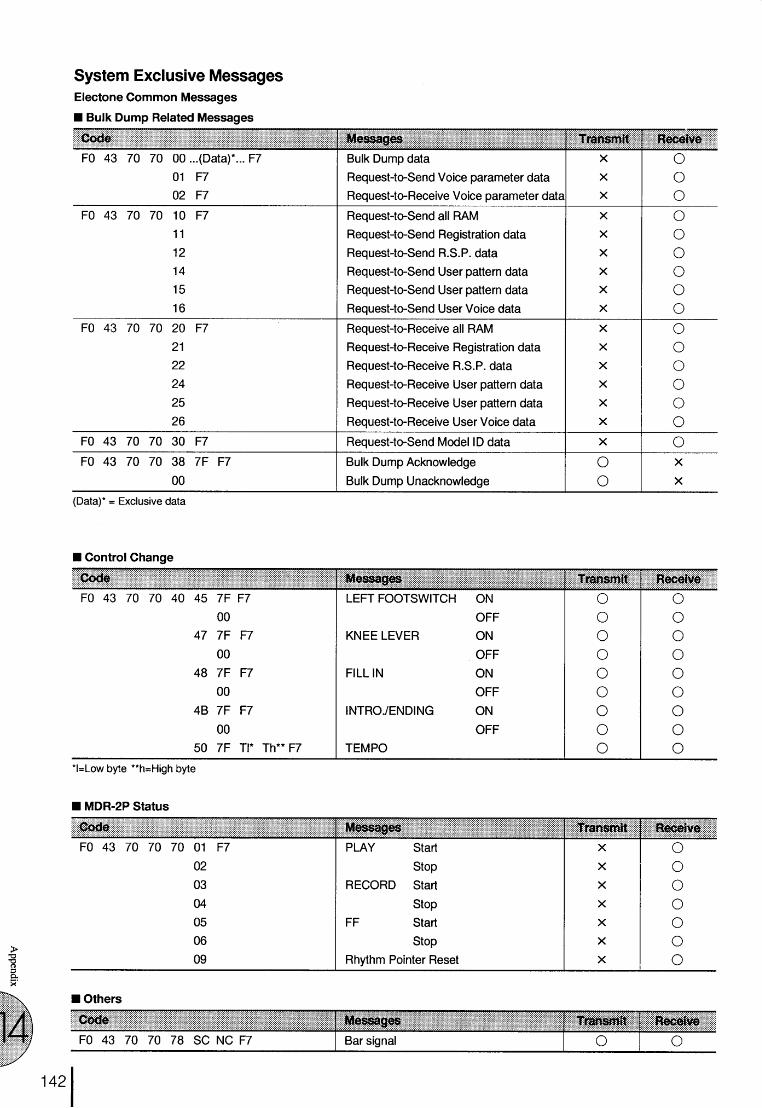
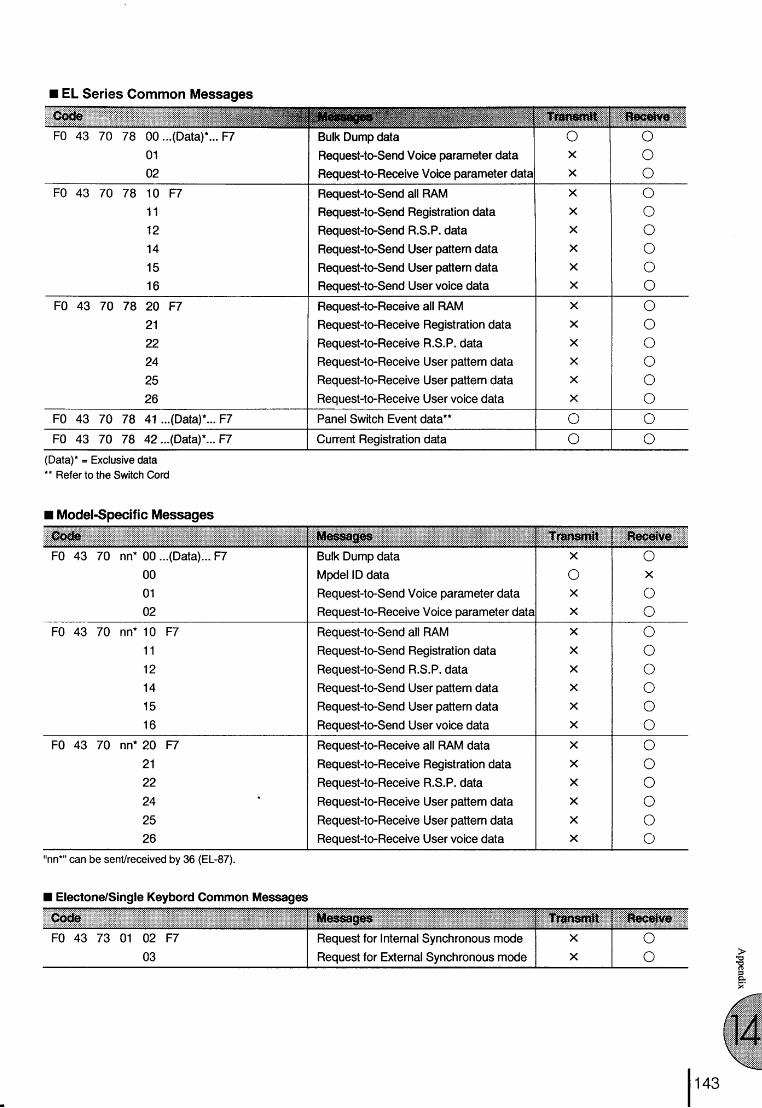
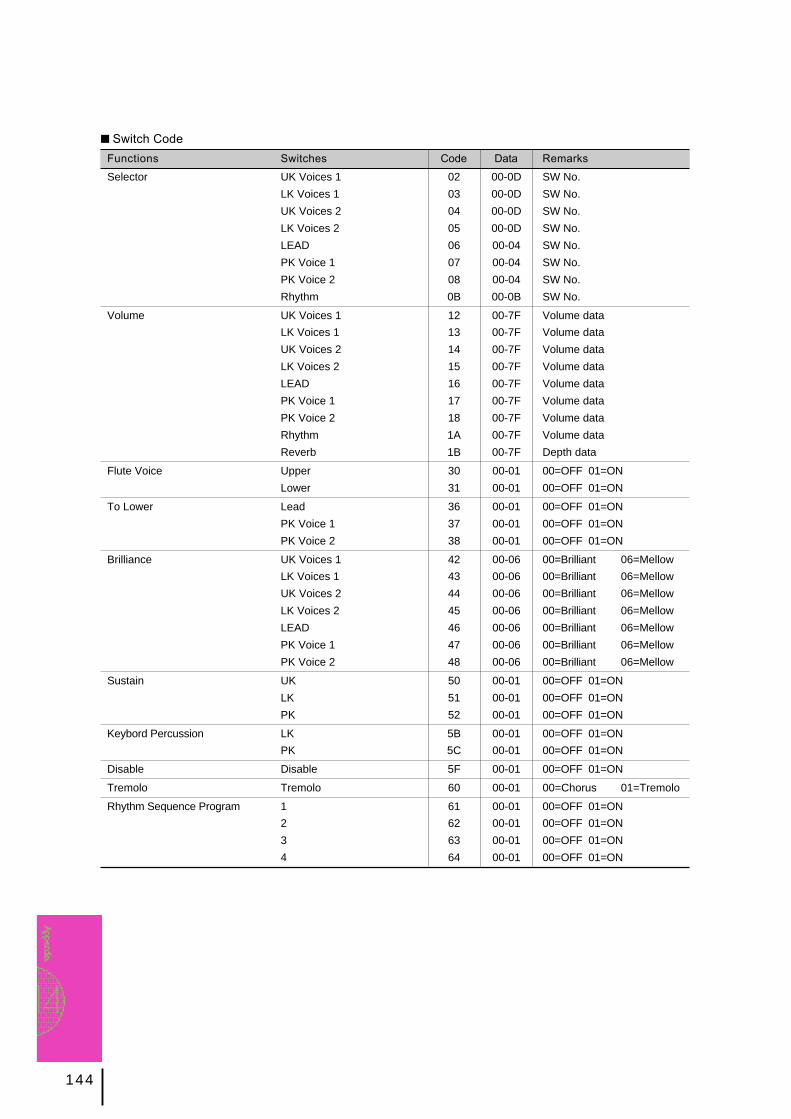
144
■ Switch Code
Functions Switches Code Data Remarks
Selector UK Voices 1 02 00-0D SW No.
LK Voices 1 03 00-0D SW No.
UK Voices 2 04 00-0D SW No.
LK Voices 2 05 00-0D SW No.
LEAD 06 00-04 SW No.
PK Voice 1 07 00-04 SW No.
PK Voice 2 08 00-04 SW No.
Rhythm 0B 00-0B SW No.
Volume UK Voices 1 12 00-7F Volume data
LK Voices 1 13 00-7F Volume data
UK Voices 2 14 00-7F Volume data
LK Voices 2 15 00-7F Volume data
LEAD 16 00-7F Volume data
PK Voice 1 17 00-7F Volume data
PK Voice 2 18 00-7F Volume data
Rhythm 1A 00-7F Volume data
Reverb 1B 00-7F Depth data
Flute Voice Upper 30 00-01 00=OFF 01=ON
Lower 31 00-01 00=OFF 01=ON
To Lower Lead 36 00-01 00=OFF 01=ON
PK Voice 1 37 00-01 00=OFF 01=ON
PK Voice 2 38 00-01 00=OFF 01=ON
Brilliance UK Voices 1 42 00-06 00=Brilliant 06=Mellow
LK Voices 1 43 00-06 00=Brilliant 06=Mellow
UK Voices 2 44 00-06 00=Brilliant 06=Mellow
LK Voices 2 45 00-06 00=Brilliant 06=Mellow
LEAD 46 00-06 00=Brilliant 06=Mellow
PK Voice 1 47 00-06 00=Brilliant 06=Mellow
PK Voice 2 48 00-06 00=Brilliant 06=Mellow
Sustain UK 50 00-01 00=OFF 01=ON
LK 51 00-01 00=OFF 01=ON
PK 52 00-01 00=OFF 01=ON
Keybord Percussion LK 5B 00-01 00=OFF 01=ON
PK 5C 00-01 00=OFF 01=ON
Disable Disable 5F 00-01 00=OFF 01=ON
Tremolo Tremolo 60 00-01 00=Chorus 01=Tremolo
Rhythm Sequence Program 1 61 00-01 00=OFF 01=ON
2 62 00-01 00=OFF 01=ON
3 63 00-01 00=OFF 01=ON
4 64 00-01 00=OFF 01=ON
144

145
145
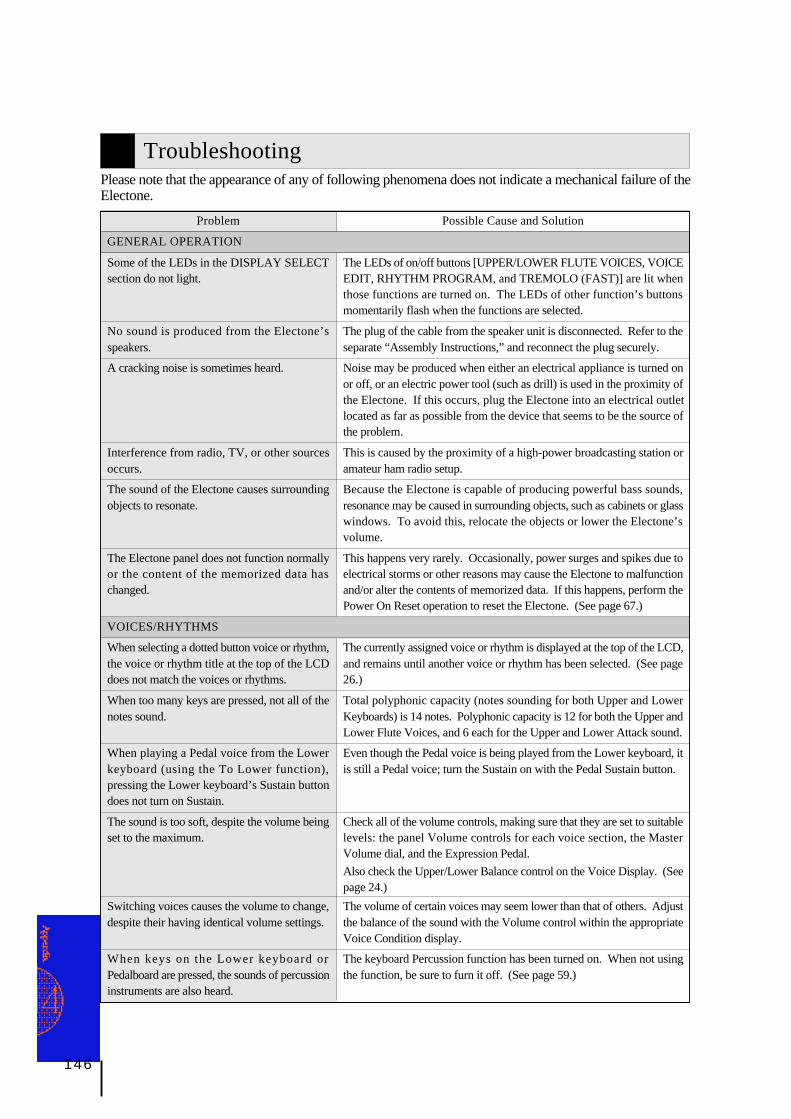
146
TroubleshootingPlease note that the appearance of any of following phenomena does not indicate a mechanical failure of theElectone.
Problem
GENERAL OPERATION
Some of the LEDs in the DISPLAY SELECTsection do not light.
No sound is produced from the Electone’sspeakers.
A cracking noise is sometimes heard.
Interference from radio, TV, or other sourcesoccurs.
The sound of the Electone causes surroundingobjects to resonate.
The Electone panel does not function normallyor the content of the memorized data haschanged.
VOICES/RHYTHMS
When selecting a dotted button voice or rhythm,the voice or rhythm title at the top of the LCDdoes not match the voices or rhythms.
When too many keys are pressed, not all of thenotes sound.
When playing a Pedal voice from the Lowerkeyboard (using the To Lower function),pressing the Lower keyboard’s Sustain buttondoes not turn on Sustain.
The sound is too soft, despite the volume beingset to the maximum.
Switching voices causes the volume to change,despite their having identical volume settings.
When keys on the Lower keyboard orPedalboard are pressed, the sounds of percussioninstruments are also heard.
Possible Cause and Solution
The LEDs of on/off buttons [UPPER/LOWER FLUTE VOICES, VOICEEDIT, RHYTHM PROGRAM, and TREMOLO (FAST)] are lit whenthose functions are turned on. The LEDs of other function’s buttonsmomentarily flash when the functions are selected.
The plug of the cable from the speaker unit is disconnected. Refer to theseparate “Assembly Instructions,” and reconnect the plug securely.
Noise may be produced when either an electrical appliance is turned onor off, or an electric power tool (such as drill) is used in the proximity ofthe Electone. If this occurs, plug the Electone into an electrical outletlocated as far as possible from the device that seems to be the source ofthe problem.
This is caused by the proximity of a high-power broadcasting station oramateur ham radio setup.
Because the Electone is capable of producing powerful bass sounds,resonance may be caused in surrounding objects, such as cabinets or glasswindows. To avoid this, relocate the objects or lower the Electone’svolume.
This happens very rarely. Occasionally, power surges and spikes due toelectrical storms or other reasons may cause the Electone to malfunctionand/or alter the contents of memorized data. If this happens, perform thePower On Reset operation to reset the Electone. (See page 67.)
The currently assigned voice or rhythm is displayed at the top of the LCD,and remains until another voice or rhythm has been selected. (See page26.)
Total polyphonic capacity (notes sounding for both Upper and LowerKeyboards) is 14 notes. Polyphonic capacity is 12 for both the Upper andLower Flute Voices, and 6 each for the Upper and Lower Attack sound.
Even though the Pedal voice is being played from the Lower keyboard, itis still a Pedal voice; turn the Sustain on with the Pedal Sustain button.
Check all of the volume controls, making sure that they are set to suitablelevels: the panel Volume controls for each voice section, the MasterVolume dial, and the Expression Pedal.
Also check the Upper/Lower Balance control on the Voice Display. (Seepage 24.)
The volume of certain voices may seem lower than that of others. Adjustthe balance of the sound with the Volume control within the appropriateVoice Condition display.
The keyboard Percussion function has been turned on. When not usingthe function, be sure to furn it off. (See page 59.)
146
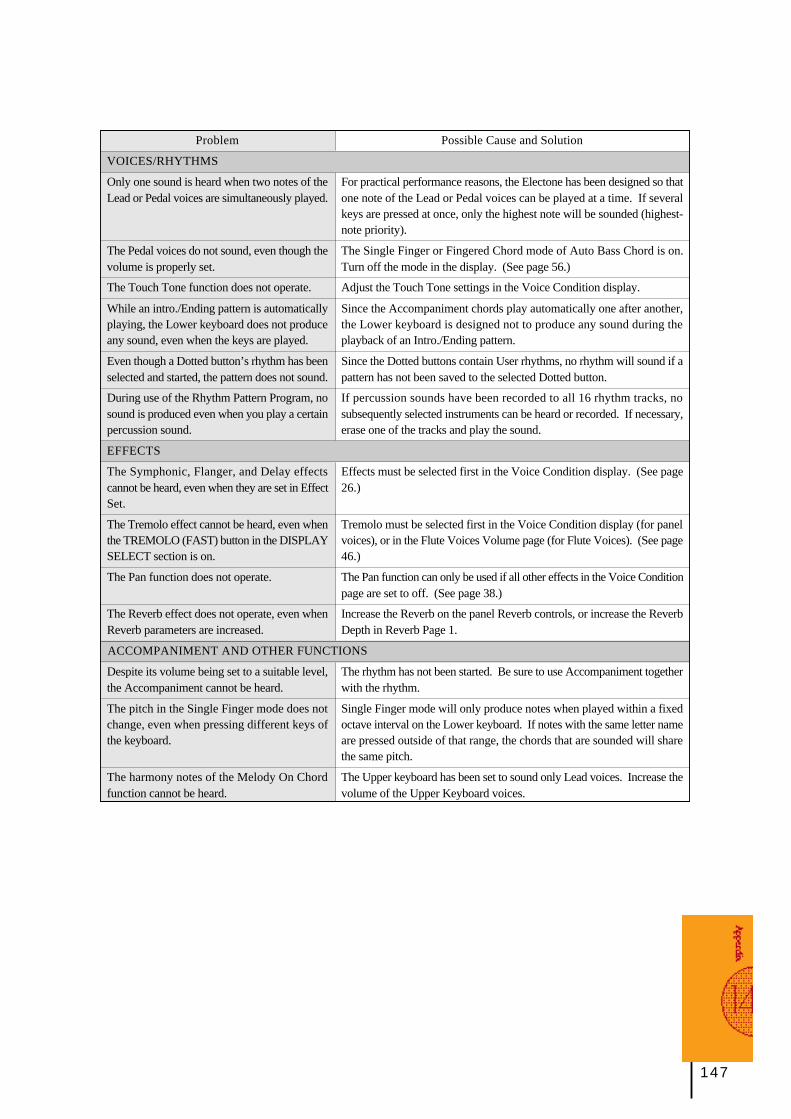
147
ACCOMPANIMENT AND OTHER FUNCTIONS
Problem
VOICES/RHYTHMS
Only one sound is heard when two notes of theLead or Pedal voices are simultaneously played.
The Pedal voices do not sound, even though thevolume is properly set.
The Touch Tone function does not operate.
While an intro./Ending pattern is automaticallyplaying, the Lower keyboard does not produceany sound, even when the keys are played.
Even though a Dotted button’s rhythm has beenselected and started, the pattern does not sound.
During use of the Rhythm Pattern Program, nosound is produced even when you play a certainpercussion sound.
EFFECTS
The Symphonic, Flanger, and Delay effectscannot be heard, even when they are set in EffectSet.
The Tremolo effect cannot be heard, even whenthe TREMOLO (FAST) button in the DISPLAYSELECT section is on.
The Pan function does not operate.
The Reverb effect does not operate, even whenReverb parameters are increased.
Despite its volume being set to a suitable level,the Accompaniment cannot be heard.
The pitch in the Single Finger mode does notchange, even when pressing different keys ofthe keyboard.
The harmony notes of the Melody On Chordfunction cannot be heard.
Possible Cause and Solution
For practical performance reasons, the Electone has been designed so thatone note of the Lead or Pedal voices can be played at a time. If severalkeys are pressed at once, only the highest note will be sounded (highest-note priority).
The Single Finger or Fingered Chord mode of Auto Bass Chord is on.Turn off the mode in the display. (See page 56.)
Adjust the Touch Tone settings in the Voice Condition display.
Since the Accompaniment chords play automatically one after another,the Lower keyboard is designed not to produce any sound during theplayback of an Intro./Ending pattern.
Since the Dotted buttons contain User rhythms, no rhythm will sound if apattern has not been saved to the selected Dotted button.
If percussion sounds have been recorded to all 16 rhythm tracks, nosubsequently selected instruments can be heard or recorded. If necessary,erase one of the tracks and play the sound.
Effects must be selected first in the Voice Condition display. (See page26.)
Tremolo must be selected first in the Voice Condition display (for panelvoices), or in the Flute Voices Volume page (for Flute Voices). (See page46.)
The Pan function can only be used if all other effects in the Voice Conditionpage are set to off. (See page 38.)
Increase the Reverb on the panel Reverb controls, or increase the ReverbDepth in Reverb Page 1.
The rhythm has not been started. Be sure to use Accompaniment togetherwith the rhythm.
Single Finger mode will only produce notes when played within a fixedoctave interval on the Lower keyboard. If notes with the same letter nameare pressed outside of that range, the chords that are sounded will sharethe same pitch.
The Upper keyboard has been set to sound only Lead voices. Increase thevolume of the Upper Keyboard voices.
147
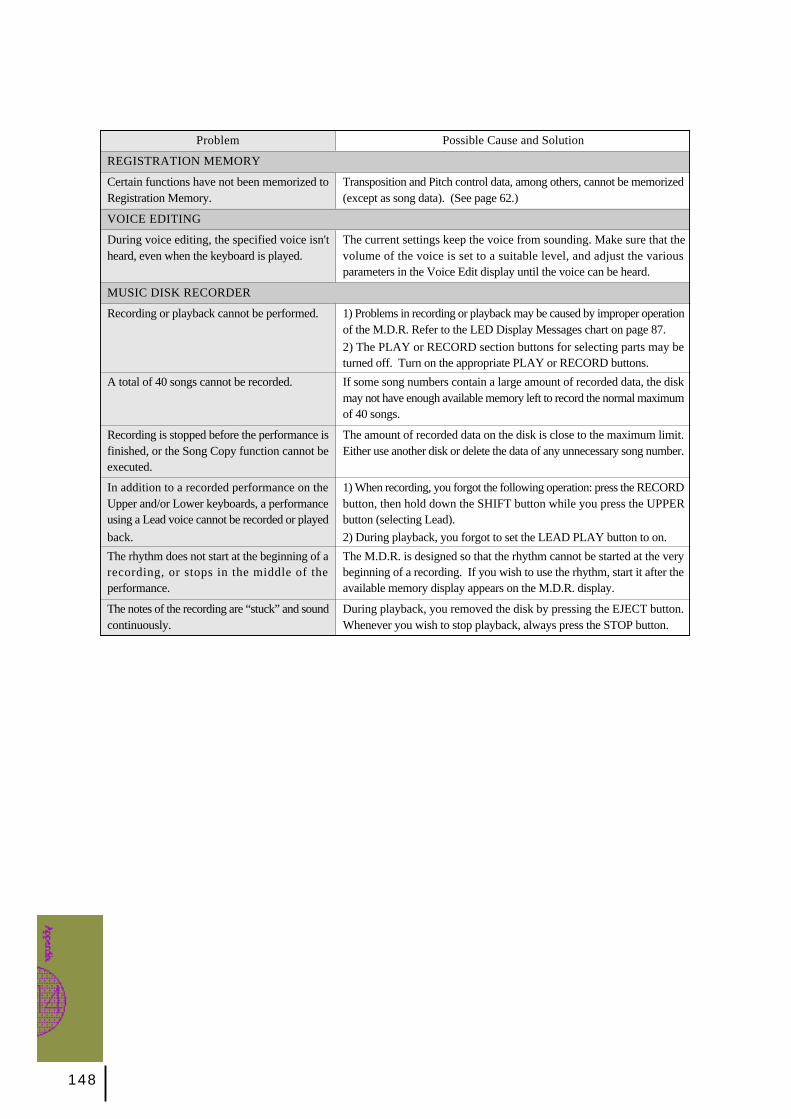
148
Possible Cause and Solution
Transposition and Pitch control data, among others, cannot be memorized(except as song data). (See page 62.)
The current settings keep the voice from sounding. Make sure that thevolume of the voice is set to a suitable level, and adjust the variousparameters in the Voice Edit display until the voice can be heard.
1) Problems in recording or playback may be caused by improper operationof the M.D.R. Refer to the LED Display Messages chart on page 87.
2) The PLAY or RECORD section buttons for selecting parts may beturned off. Turn on the appropriate PLAY or RECORD buttons.
If some song numbers contain a large amount of recorded data, the diskmay not have enough available memory left to record the normal maximumof 40 songs.
The amount of recorded data on the disk is close to the maximum limit.Either use another disk or delete the data of any unnecessary song number.
1) When recording, you forgot the following operation: press the RECORDbutton, then hold down the SHIFT button while you press the UPPERbutton (selecting Lead).
2) During playback, you forgot to set the LEAD PLAY button to on.
The M.D.R. is designed so that the rhythm cannot be started at the verybeginning of a recording. If you wish to use the rhythm, start it after theavailable memory display appears on the M.D.R. display.
During playback, you removed the disk by pressing the EJECT button.Whenever you wish to stop playback, always press the STOP button.
Problem
REGISTRATION MEMORY
Certain functions have not been memorized toRegistration Memory.
VOICE EDITING
During voice editing, the specified voice isn'theard, even when the keyboard is played.
MUSIC DISK RECORDER
Recording or playback cannot be performed.
A total of 40 songs cannot be recorded.
Recording is stopped before the performance isfinished, or the Song Copy function cannot beexecuted.
In addition to a recorded performance on theUpper and/or Lower keyboards, a performanceusing a Lead voice cannot be recorded or played
back.
The rhythm does not start at the beginning of arecording, or stops in the middle of theperformance.
The notes of the recording are “stuck” and soundcontinuously.
148
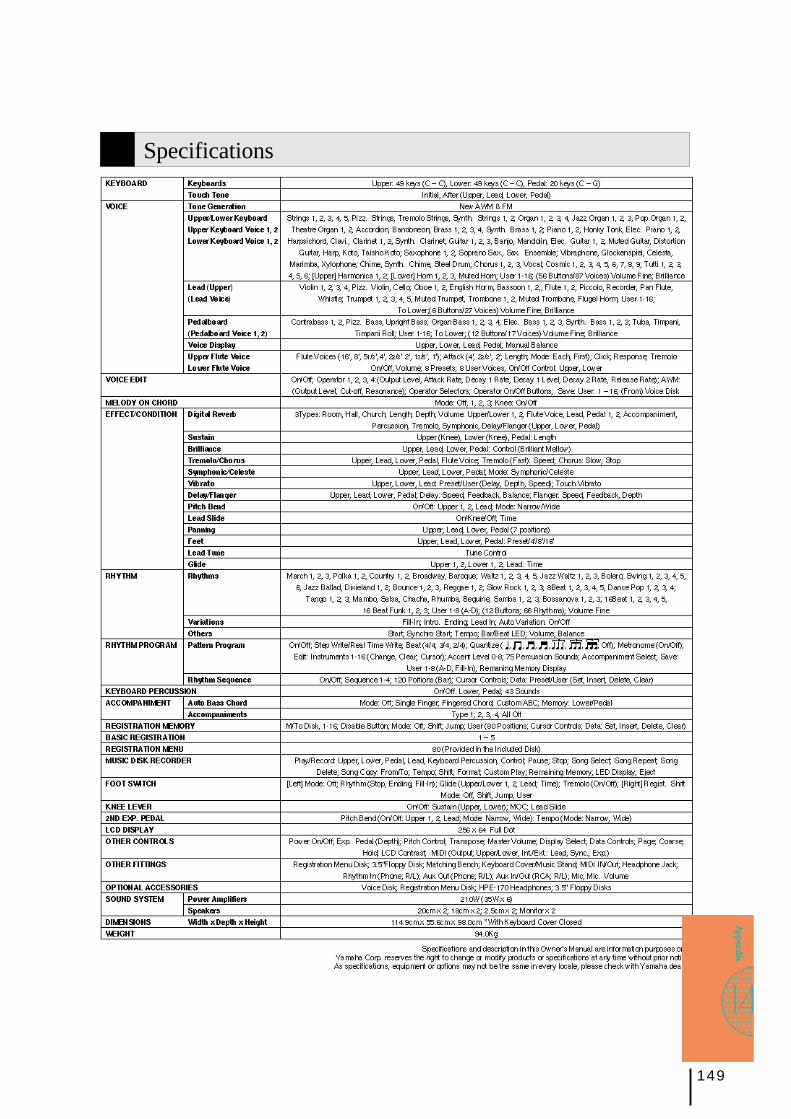
149
Specifications
149
150
INDEX
AA.B.C............................................................56A.B.C./M.O.C ..........................................57, 61ACC. (ACCOMPANIMENT).............................58ACC. (RHYTHM PROGRAM).........................119ACCENT(RHYTHM PROGRAM)....................116AFTER..........................................................37ALG (ALGORITHM) .................................89, 96AR (VOICE EDIT)...........................................98ATTACK .......................................................33Attack Rate ...................................................98AUTO VARI...................................................52AUX IN/OUT................................................139AWM............................................................97
BBAL. (DELAY)................................................41BAL. (PERCUSSION).....................................52BAR/BEAT ....................................................51BASIC REGIST. .............................................. 7BEAT..........................................................113BRIL. (BRILLIANCE) ......................................38
CC-OFF ..........................................................97Carrier ..........................................................96CELESTE................................................ 38, 40CHANGE (RHYTHM PROGRAM) ..................114CHOR. (CHORUS)...................................40, 48CHURCH (REVERB) ......................................42CLEAR (REGIST SHIFT) .................................66CLEAR (RHYTHM PROGRAM)...............115, 118CLEAR (SEQUENCE)...................................126CLICK ..........................................................33COARSE.......................................................19COMBINATION.............................................32CONTRAST.................................................138Control Data..................................................73Copy Protect.................................................86Cursor (Registration Shift)...............................65Cursor (Sequence) ......................................126Custom A.B.C. ..............................................56CUSTOM PLAY ....................................... 71, 81
DD (Disable)....................................................62D1L (VOICE EDIT) .........................................98D1R (VOICE EDIT).........................................98D2R (VOICE EDIT).........................................98DATA (REGIST SHIFT) ...................................65DATA (SEQUENCE).....................................126DATA CONTROL..................................... 17, 18DEL. (REGIST SHIFT).....................................66DEL. (SEQUENCE) ......................................126DELAY....................................................38, 40DELAY (VIBRATO).........................................39Delete (Song)................................................84DEPTH (EXPRESSION).................................134DEPTH (FLANGER)........................................41DEPTH (REVERB)..........................................42DEPTH (VIBRATO).........................................39Disk Copy.....................................................84DISPLAY SELECT..........................................18Dotted Button (Rhythm)..................................53Dotted Button (Voice).....................................25
EEACH (FLUTE VOICE)....................................33EDIT (REGIST SHIFT).....................................65EDIT (RHYTHM PROGRAM) ..................114, 118EDIT (VOICE EDIT) ........................................89EFFECT........................................................38EFFECT SET .................................................40Eject.............................................................68ENDING........................................................50Envelope Parameter.......................................99EXP. (EXPRESSION)....................................134EXP./PITCH/MIDI.......................... 134, 136, 137Expression Pedal..................................... 7, 134
FFast Forward/Reverse....................................81FB. (DELAY)..................................................41FB. (FLANGER).............................................41Feed Back (VOICE EDIT) ...............................99FEET ............................................................38FILL IN..........................................................51Fingered Chord.............................................56FIRST (FLUTE VOICE)....................................33FLANG. (FLANGER) ................................ 38, 40Floppy Disk...................................................69Flute Voice....................................................32FM ...............................................................98FOOT SW....................................................130FOOT SWITCH-LEFT....................................130FOOT SWITCH-RIGHT ...................................64FOOTAGE.....................................................32FORMAT.......................................................70FROM PRESET & USER VOICE.......................35
GGLIDE CONTROL........................................131
HHALL (REVERB) ............................................42HEADPHONES............................................139High Pass Filter .............................................97HOLD...........................................................19
IINITIAL .........................................................37INS. (REGIST SHIFT)......................................66INS. (SEQUENCE) .......................................126Insert Voice Disk !!.........................................95INSTRUMENT (RHYTHM PROGRAM)............114INT./EXT. ....................................................138INTRO. ENDING............................................50
JJUMP (REGIST SHIFT)...................................64
KKEYBOARD PERCUSSION.............................59KNEE .........................................................132
LL. FLUTE VOICE............................................32LCD Display..................................................16LEAD VOICE.................................................22LENG. (FLUTE VOICE)...................................33LENG. (REVERB)...........................................42LENGTH (SUSTAIN) ......................................45LOAD FROM VOICE DISK..............................95Low Pass Filter ..............................................97LOWER KEYBOARD VOICE ...........................22
MM./TO DISK...................................................62M.D.R...........................................................68M.O.C. (MELODY ON CHORD).......................61MASTER VOLUME.......................................... 7MEM. (MEMORY) ..........................................56MENU (FLUTE VOICE)...................................35METRONOME.............................................113MIC............................................................139MIC.VOL.....................................................139MIDI ............................................ 137, 139, 141MODE (CHORUS) ...................................40, 48MODE (FLUTE VOICE)...................................33MODE (M.O.C)..............................................61MODE (PITCH BEND, TEMPO) .....................135MODE (REGIST SHIFT) ..................................65MODE (SYMPHONIC)....................................40Modulator .....................................................96
OOL (VOICE EDIT)..................................... 97, 98OPERATOR........................................89, 91, 96OUTPUT (MIDI) ...........................................137Output Level (OL).....................................97,98Output(Transmit) Channel ............................137
PPAGE ..................................................... 17, 18PAN..............................................................38PATTERN....................................................109PAUSE .........................................................81PEDAL VOICE...............................................22PERCUSSION ...............................................52Performance Data..........................................73PITCH.........................................................136PITCH BEND(2ND EXPRESSION) .................135PLAY...................................................... 71, 79Playback.......................................................79POSITION (REGIST SHIFT).............................65POSITION (SEQUENCE) ..............................126POWER ......................................................... 6Power On Reset.............................................67PRESET (EFFECT) .........................................38PRESET (FLUTE VOICE) ................................35PRESET (SEQUENCE) .................................126PRESET (VIBRATO) .......................................39
QQUANTIZE..................................................113
150
151
RREAL TIME WRITE.......................................118RECORD ......................................................71REGIST SHIFT...............................................64Registration Data...........................................73Registration Memory......................................62Registration Menu Disk1...................................8Remaining Memory (MDR) .............................86Remaining Memory (Rhythm Pattern) ............120Repeat (Song)...............................................80RES. (RESONANCE)......................................98RESP. (FLUTE VOICE) ...................................33Retry (M.D.R) ................................................72REVERB .......................................................42RHYTHM.......................................................49Rhythm Clock..............................................116Rhythm Condition Page..................................52RHYTHM CONTROL....................................131RHYTHM IN ................................................139Rhythm Menus ..............................................54Rhythm Pattern Program ..............................109RHYTHM PROGRAM ...................................108Rhythm Sequence Program..........................123Rhythm Track..............................................114ROOM (REVERB) ..........................................42RR (VOICE EDIT)...........................................98
SSAVE (FLUTE VOICE) ....................................34SAVE (RHYTHM PROGRAM) ........................120SAVE (VOICE EDIT).......................................93SAVE TO USER RHYTHM.............................120SAVE TO USER VOICE...................................93SAVE TO USER VOICE (FLUTE)......................342ND EXPRESSION.......................................135Select a Rhythm !! .......................................109Select a Sequence !! ...................................123Select a Voice !! ............................................88SEQ. (SEQUENCE)......................................123SET (REGIST SHIFT)......................................66SET (SEQUENCE) .......................................126SHIFT (MDR).................................................70SHIFT (REGIST SHIFT)...................................64Single Finger.................................................56SLIDE...........................................................39SLOW (CHORUS)..........................................48SONG COPY.................................................83SONG DEL....................................................84SONG REPEAT..............................................80SONG SELECT..............................................71SPEED (FLANGER)........................................41SPEED (TREMOLO)................................. 40, 48SPEED (VIBRATO).........................................39SPEED(DELAY) .............................................41START..........................................................50STEP WRITE ...............................................114STOP (CHORUS)..................................... 40, 48STOP (MDR) ........................................... 72, 79SUSTAIN ......................................................45SYMPH. (SYMPHONIC)............................ 38, 40SYNCHRO START .........................................50
TTEMPO (2ND EXPRESSION).........................135TEMPO (MDR)...............................................82TEMPO (RHYTHM) ........................................51TIME (GLIDE)..............................................131TIME (SLIDE) ................................................39TO LOWER ...................................................24TOUCH TONE...............................................37TOUCH VIB...................................................39TRANSPOSE...............................................136TREM. (TREMOLO).............................38, 40, 47TREMOLO. (FAST).........................................48TUNE ...........................................................39TYPE (ACCOMPANIMENT).............................58TYPE (REVERB).............................................42
UU. FLUTE VOICE ...........................................32UPPER KEYBOARD VOICE ............................22USER (FLUTE VOICE)....................................34USER (REGIST SHIFT) ...................................64USER (RHYTHM)...........................................54USER (SEQUENCE).....................................126USER (VIBRATO)...........................................39USER (VOICE)......................................... 27, 94User Fill In.............................................120,122
VVIBRATO ......................................................39Voice Condition Page.....................................39VOICE DISK..................................................95VOICE DISPLAY............................................24VOICE EDIT ..................................................88Voice List......................................................20Voice Menus .................................................27VOL. (FLUTE VOICE) .....................................33VOL. (PERCUSSION).....................................52VOL. (VOLUME; ACCOMPANIMENT)..............58VOL. (VOLUME; VOICE)........................... 23, 38
WWrite-Protect .................................................69
151