Embed Size (px)
Citation preview

Elastic Load Balancing Auto Scaling
CSCI E90 Cloud Computing
Harvard University Extension School Zoran B. Djordjević
@Zoran B. Djordjevic 1

ELB & AS • Amazon AWS offers several services that let you applications
handle large volumes of users or large computational loads. • Two most basic services that help you applications scale are
AWS Elastic Load Balancing and AWS Auto Scaling.
@Zoran B. Djordjevic 2
Elastic Load Balancing
@Zoran B. Djordjevic 3
Elastic Load Balancing • Elastic Load Balancing automatically distributes incoming TCP
application traffic across multiple Amazon EC2 instances. • We can use load balancing to achieve fault tolerance in our
applications and seamlessly provide the amount capacity we need in response to incoming application traffic.
• As traffic goes up, we might need to run our web application on multiple instances to make sure it says highly available.
• A single URL, such as www.my-great-idea.com, could represent several instances in several zones.
• ELB makes it easy to scale in response to he growth of incoming traffic.
• ELB can easily distribute traffic to multiple zones.
@Zoran B. Djordjevic 4
Overview of ELB • Our application cluster is exposed through the DNS name of
the Elastic Load Balancer. • All traffic goes to load balancer. Load balancer distributes
requests to multiple EC2 instances. • A load balancer can span multiple zones with the same
region, but it cannot span multiple regions. • For critical applications, it is a good idea to have instances in
multiple regions. Incoming traffic should be load balanced equally across all Availability Zones.
• It is a good idea to have equal capacity in each availability zone.
@Zoran B. Djordjevic 5
Features • Elastic Load Balancing supports Amazon EC2 instances with
any operating system currently supported by the Amazon EC2 service.
• You can perform load balancing for the following TCP ports: 25, 80, 443, and 1024-65535.
• Each Elastic Load Balancer has an associated IPv4, IPv6, and dualstack (both IPv4 and IPv6) DNS name. IPv6 is not supported in VPC at this time.
• You can configure your Amazon EC2 instances to only accept traffic from the Elastic Load Balancer.
• If using Amazon Virtual Private Cloud, you can configure security groups for the front-end of your Elastic Load Balancer.
• You can map HTTP port 80 and HTTPS port 443 to a single Elastic Load Balancer.
@Zoran B. Djordjevic 6
Features • Elastic Load Balancer does not cap the number of connections
that it can attempt to establish with your load balanced Amazon EC2 instances. You can expect this number to scale with the number of concurrent HTTP, HTTPS, or SSL requests or the number of concurrent TCP connections that the Elastic Load Balancer receives.
• Manually registering a Paid AMI based Amazon EC2 instance with the Elastic Load Balancer or using a Paid AMI with an Auto Scaling Group that is associated with the Elastic Load Balancer is not supported.
@Zoran B. Djordjevic 7

Sticky Session • By default a load balancer routes each request independently
to the application instance with the smallest load. • However, we can use the sticky session feature (also known as
session affinity) which enables the load balancer to bind a user's session to a specific application instance.
• Session affinity ensures that all requests coming from the user during the session will be sent to the same application instance what simplifies your application design and in some cases results in faster response times.
@Zoran B. Djordjevic 8
HTTPS Support • HTTPS Support is a feature that allows you to use the SSL/TLS
protocol for encrypted connections (also known as SSL offload).
• HTTPS Support enables traffic encryption between your load balancer and clients that initiate HTTPS sessions with your load balancer.
• This frees resources on your application instances and could improve overall performance.
@Zoran B. Djordjevic 9

Identify Client’s IP, X-Forwarded-For
• The X-Forwarded-For request header helps us identify the IP address of a client.
• Because load balancers intercept traffic between clients and servers, our server access logs contain only the IP address of the load balancer.
• The IP address of the client can be read from X-Forwarded-For request header. • Elastic Load Balancing stores the IP address of the client in
the X-Forwarded-For request header and passes the header along to the servers.
@Zoran B. Djordjevic 10
Demo of Load Balancing • In the following application we will demonstrate how a load
balancer distributes incoming requests to servers in the cluster we assigned to the balancer.
• We will install an Apache server on a standard AWS Linux instance and add a small PHP script, which will identify for us the server which received the request and sent back the response to the client.
@Zoran B. Djordjevic 11

Create a New Linux Instance • We will select ami-51792c38 and create a small or micro
instance
@Zoran B. Djordjevic 12
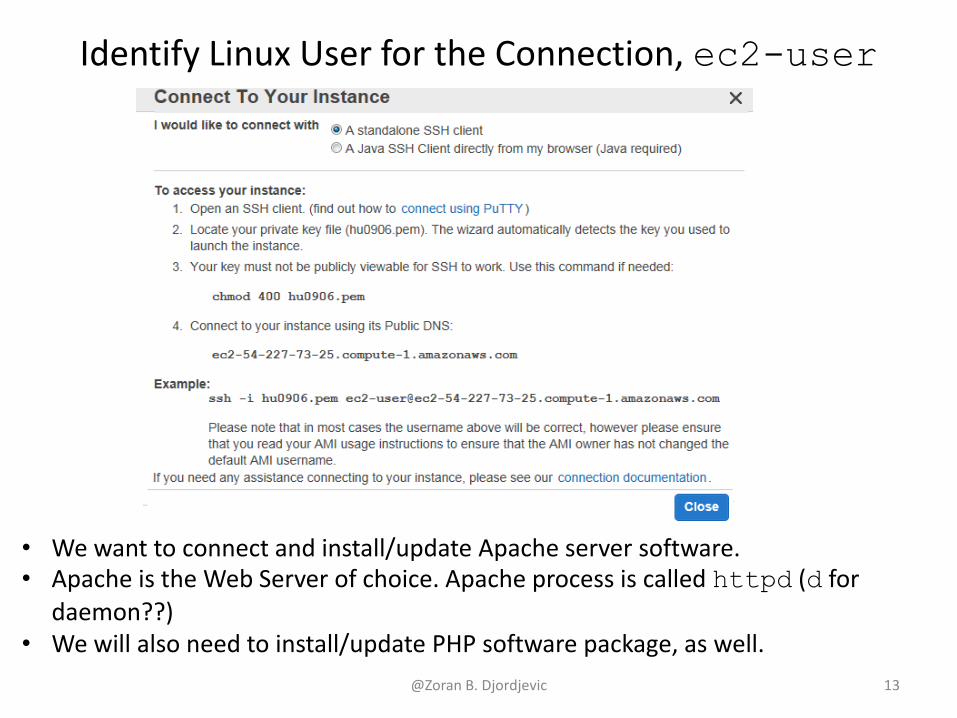
Identify Linux User for the Connection, ec2-user
@Zoran B. Djordjevic 13
• We want to connect and install/update Apache server software. • Apache is the Web Server of choice. Apache process is called httpd (d for
daemon??) • We will also need to install/update PHP software package, as well.

Connect $ ssh -i hu0906.pem [email protected] The authenticity of host 'ec2-54-227-73-25.compute-1.amazonaws.com (54.227.73.25)' can't be established. RSA key fingerprint is 7e:82:55:1f:a9:ef:5f:15:51:89:79:bf:44:c4:3f:68. Are you sure you want to continue connecting (yes/no)? yes Warning: Permanently added 'ec2-54-227-73-25.compute-1.amazonaws.com,54.227.73.25' (RSA) to the list of known hosts. __| __|_ ) _| ( / Amazon Linux AMI ___|\___|___| https://aws.amazon.com/amazon-linux-ami/2013.09-release-notes/ [ec2-user@ip-10-238-185-225 ~]$ Run "sudo yum update" to apply all updates. [ec2-user@ip-10-238-185-225 ~]$ sudo yum update
@Zoran B. Djordjevic 14

As sudo Install Apache Server, httpd Install 1 Package (+5 Dependent packages) Total download size: 2.0 M Installed size: 3.9 M Is this ok [y/d/N]: y Downloading packages: (1/6): apr-1.4.6-1.10.amzn1.i686.rpm | 109 kB 00:00 (2/6): apr-util-1.4.1-4.14.amzn1.i686.rpm | 84 kB 00:00 (3/6): apr-util-ldap-1.4.1-4.14.amzn1.i686.rpm | 17 kB 00:00 (4/6): generic-logos-17.0.0-2.5.amzn1.noarch.rpm | 589 kB 00:00 (5/6): httpd-2.2.25-1.0.amzn1.i686.rpm | 1.1 MB 00:00 (6/6): httpd-tools-2.2.25-1.0.amzn1.i686.rpm | 78 kB 00:00 ---------------------------------------------------------------------------------------------------- Total 3.4 MB/s | 2.0 MB 00:00 Running transaction check Running transaction test Transaction test succeeded Running transaction Installing : apr-1.4.6-1.10.amzn1.i686 1/6 Installing : generic-logos-17.0.0-2.5.amzn1.noarch 2/6 Installing : apr-util-1.4.1-4.14.amzn1.i686 3/6 Verifying : httpd-2.2.25-1.0.amzn1.i686 1/6 Verifying : apr-1.4.6-1.10.amzn1.i686 2/6 Verifying : httpd-tools-2.2.25-1.0.amzn1.i686 3/6 Verifying : generic-logos-17.0.0-2.5.amzn1.noarch 4/6 Verifying : apr-util-1.4.1-4.14.amzn1.i686 5/6 Verifying : apr-util-ldap-1.4.1-4.14.amzn1.i686 6/6 Installed: httpd.i686 0:2.2.25-1.0.amzn1 Dependency Installed: apr.i686 0:1.4.6-1.10.amzn1 apr-util.i686 0:1.4.1-4.14.amzn1 apr-util-ldap.i686 0:1.4.1-4.14.amzn1 generic-logos.noarch 0:17.0.0-2.5.amzn1 httpd-tools.i686 0:2.2.25-1.0.amzn1 Complete!
@Zoran B. Djordjevic 15
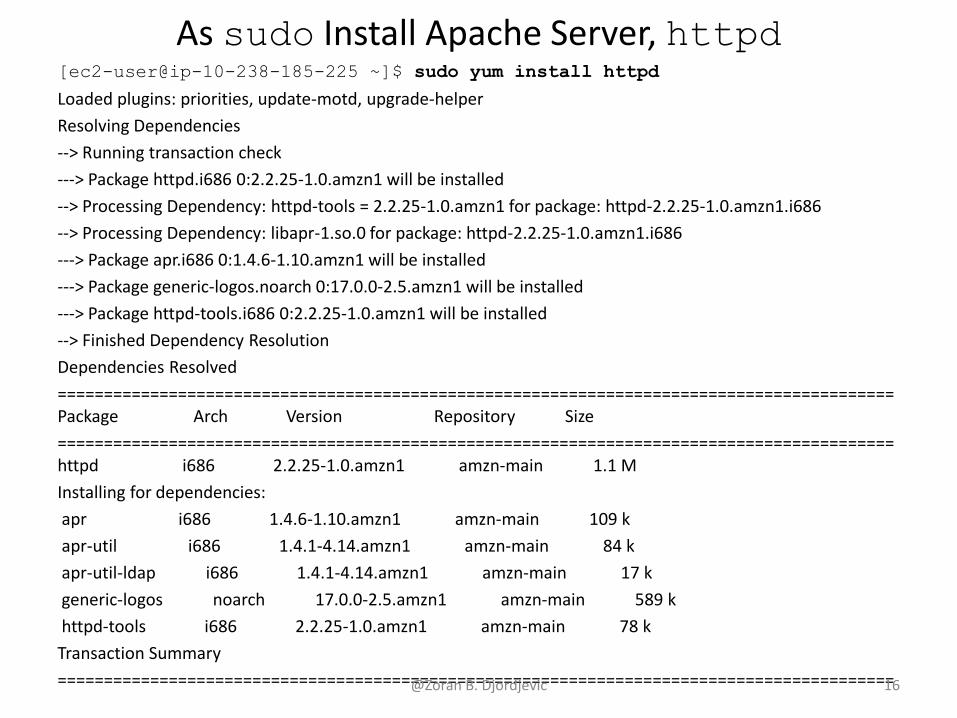
As sudo Install Apache Server, httpd [ec2-user@ip-10-238-185-225 ~]$ sudo yum install httpd Loaded plugins: priorities, update-motd, upgrade-helper Resolving Dependencies --> Running transaction check ---> Package httpd.i686 0:2.2.25-1.0.amzn1 will be installed --> Processing Dependency: httpd-tools = 2.2.25-1.0.amzn1 for package: httpd-2.2.25-1.0.amzn1.i686 --> Processing Dependency: libapr-1.so.0 for package: httpd-2.2.25-1.0.amzn1.i686 ---> Package apr.i686 0:1.4.6-1.10.amzn1 will be installed ---> Package generic-logos.noarch 0:17.0.0-2.5.amzn1 will be installed ---> Package httpd-tools.i686 0:2.2.25-1.0.amzn1 will be installed --> Finished Dependency Resolution Dependencies Resolved ========================================================================================== Package Arch Version Repository Size ========================================================================================== httpd i686 2.2.25-1.0.amzn1 amzn-main 1.1 M Installing for dependencies: apr i686 1.4.6-1.10.amzn1 amzn-main 109 k apr-util i686 1.4.1-4.14.amzn1 amzn-main 84 k apr-util-ldap i686 1.4.1-4.14.amzn1 amzn-main 17 k generic-logos noarch 17.0.0-2.5.amzn1 amzn-main 589 k httpd-tools i686 2.2.25-1.0.amzn1 amzn-main 78 k Transaction Summary ========================================================================================== @Zoran B. Djordjevic 16

Start Apache [ec2-user@ip-10-238-185-225 ~]$ sudo /etc/init.d/httpd start Starting httpd: [ OK ] [ec2-user@ip-10-238-185-225 ~]$ ps -ef | grep httpd
root 4272 1 0 21:46 ? 00:00:00 /usr/sbin/httpd apache 4274 4272 0 21:46 ? 00:00:00 /usr/sbin/httpd apache 4275 4272 0 21:46 ? 00:00:00 /usr/sbin/httpd apache 4276 4272 0 21:46 ? 00:00:00 /usr/sbin/httpd apache 4277 4272 0 21:46 ? 00:00:00 /usr/sbin/httpd apache 4278 4272 0 21:46 ? 00:00:00 /usr/sbin/httpd apache 4279 4272 0 21:46 ? 00:00:00 /usr/sbin/httpd apache 4280 4272 0 21:46 ? 00:00:00 /usr/sbin/httpd apache 4281 4272 0 21:46 ? 00:00:00 /usr/sbin/httpd ec2-user 4283 1245 0 21:47 pts/0 00:00:00 grep httpd
@Zoran B. Djordjevic 17
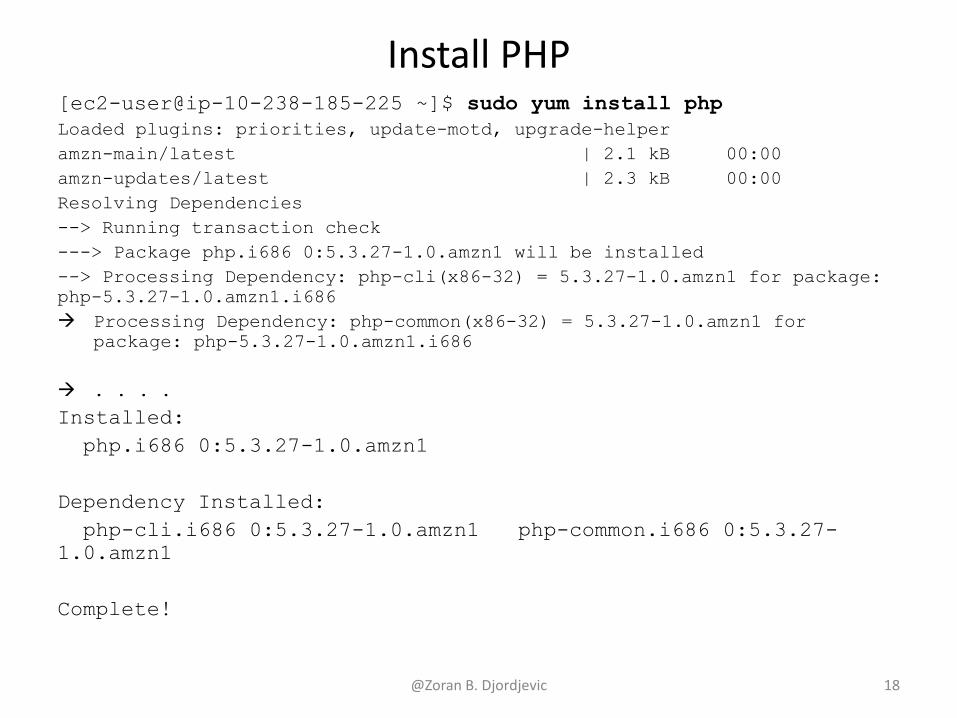
Install PHP [ec2-user@ip-10-238-185-225 ~]$ sudo yum install php Loaded plugins: priorities, update-motd, upgrade-helper amzn-main/latest | 2.1 kB 00:00 amzn-updates/latest | 2.3 kB 00:00 Resolving Dependencies --> Running transaction check ---> Package php.i686 0:5.3.27-1.0.amzn1 will be installed --> Processing Dependency: php-cli(x86-32) = 5.3.27-1.0.amzn1 for package: php-5.3.27-1.0.amzn1.i686 Æ Processing Dependency: php-common(x86-32) = 5.3.27-1.0.amzn1 for
package: php-5.3.27-1.0.amzn1.i686
Æ . . . . Installed: php.i686 0:5.3.27-1.0.amzn1 Dependency Installed: php-cli.i686 0:5.3.27-1.0.amzn1 php-common.i686 0:5.3.27-1.0.amzn1 Complete!
@Zoran B. Djordjevic 18

Create index.php file [ec2-user@ip-10-238-185-225 ~]$ cd /var/www/html [ec2-user@ip-10-238-185-225 ~]$ sudo vi index.php <?php echo "Helo! My IP addres is: ".$_SERVER['SERVER_ADDR']; ?>
• In the EC2 Dashboard, select Security Groups and add port 80 to the security group launch-wizard-2
@Zoran B. Djordjevic 19
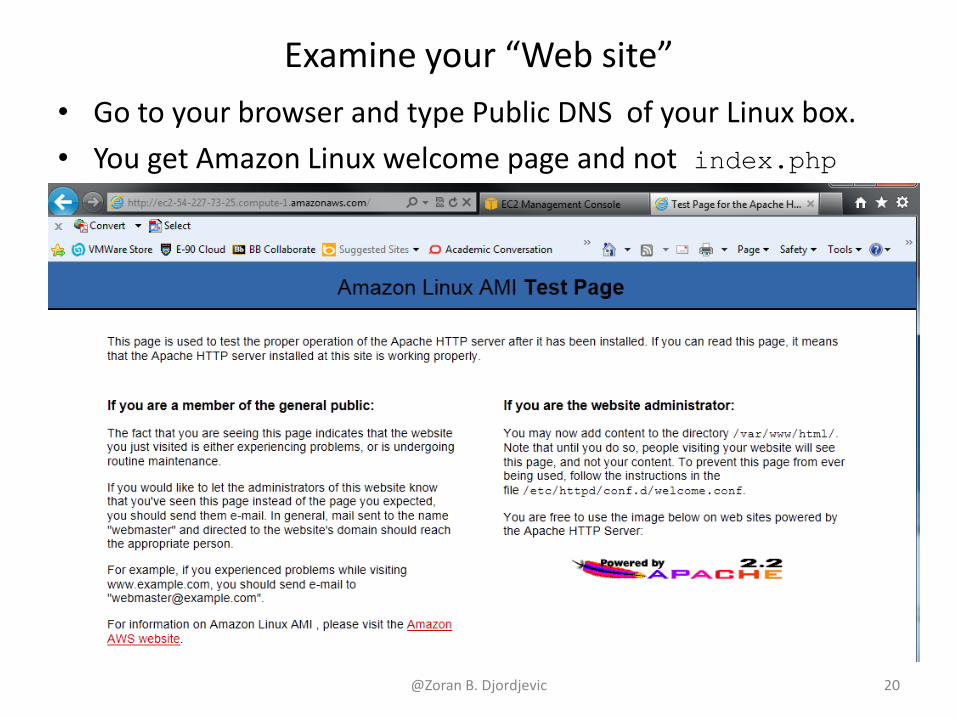
Examine your “Web site” • Go to your browser and type Public DNS of your Linux box. • You get Amazon Linux welcome page and not index.php
@Zoran B. Djordjevic 20
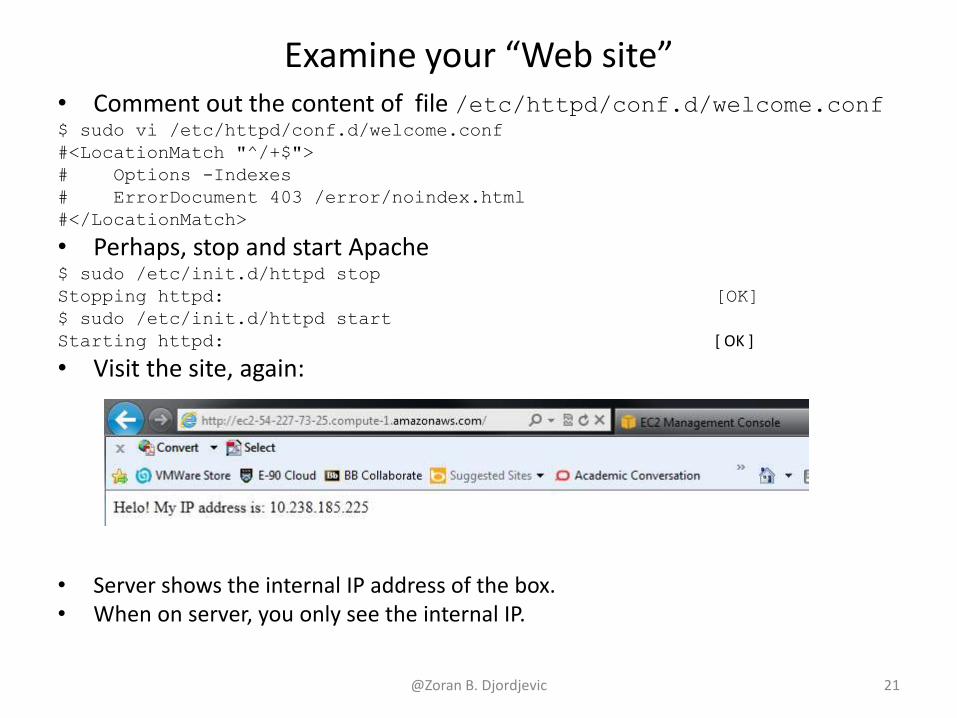
Examine your “Web site” • Comment out the content of file /etc/httpd/conf.d/welcome.conf $ sudo vi /etc/httpd/conf.d/welcome.conf #<LocationMatch "^/+$"> # Options -Indexes # ErrorDocument 403 /error/noindex.html #</LocationMatch>
• Perhaps, stop and start Apache $ sudo /etc/init.d/httpd stop Stopping httpd: [OK] $ sudo /etc/init.d/httpd start Starting httpd: [ OK ]
• Visit the site, again:
• Server shows the internal IP address of the box. • When on server, you only see the internal IP.
@Zoran B. Djordjevic 21
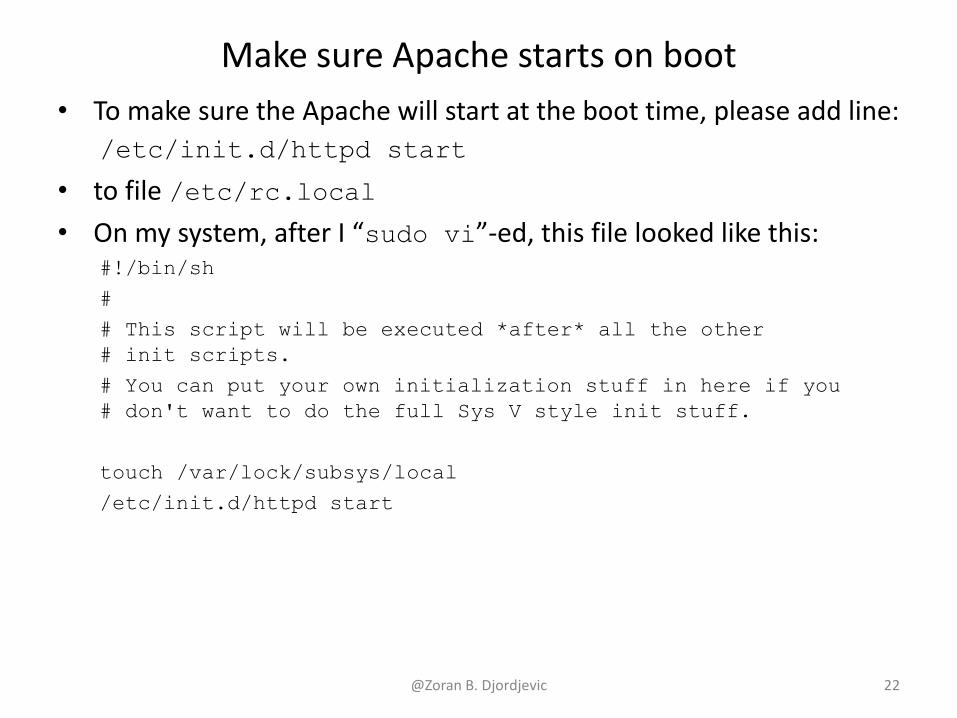
Make sure Apache starts on boot • To make sure the Apache will start at the boot time, please add line:
/etc/init.d/httpd start
• to file /etc/rc.local • On my system, after I “sudo vi”-ed, this file looked like this:
#!/bin/sh # # This script will be executed *after* all the other # init scripts. # You can put your own initialization stuff in here if you # don't want to do the full Sys V style init stuff. touch /var/lock/subsys/local /etc/init.d/httpd start
@Zoran B. Djordjevic 22
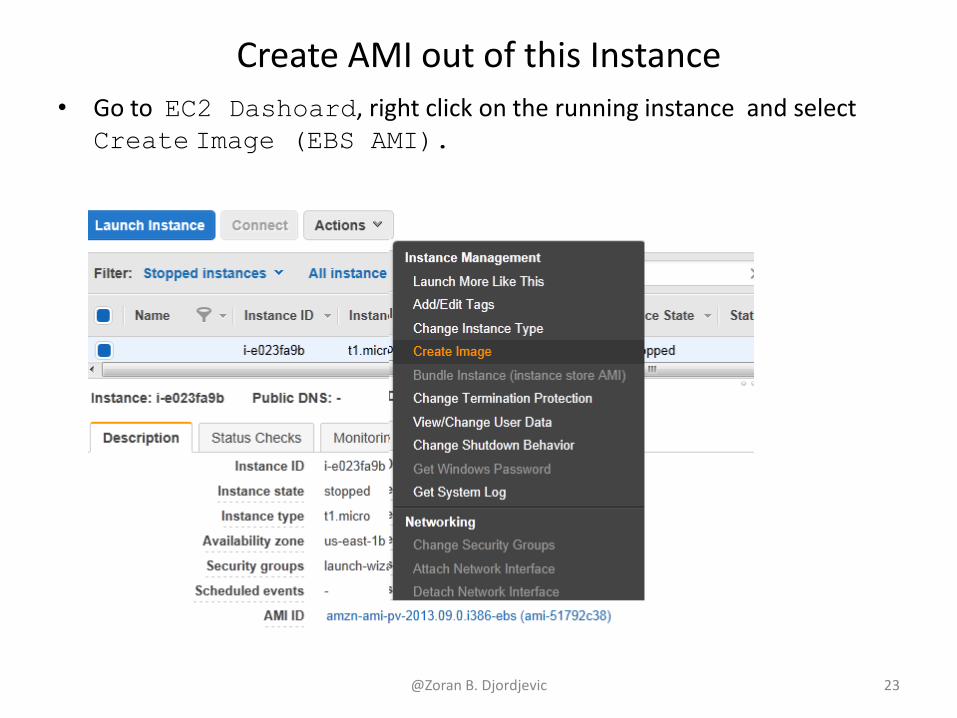
Create AMI out of this Instance • Go to EC2 Dashoard, right click on the running instance and select
Create Image (EBS AMI).
@Zoran B. Djordjevic 23

Create New Image Wizard
@Zoran B. Djordjevic 24

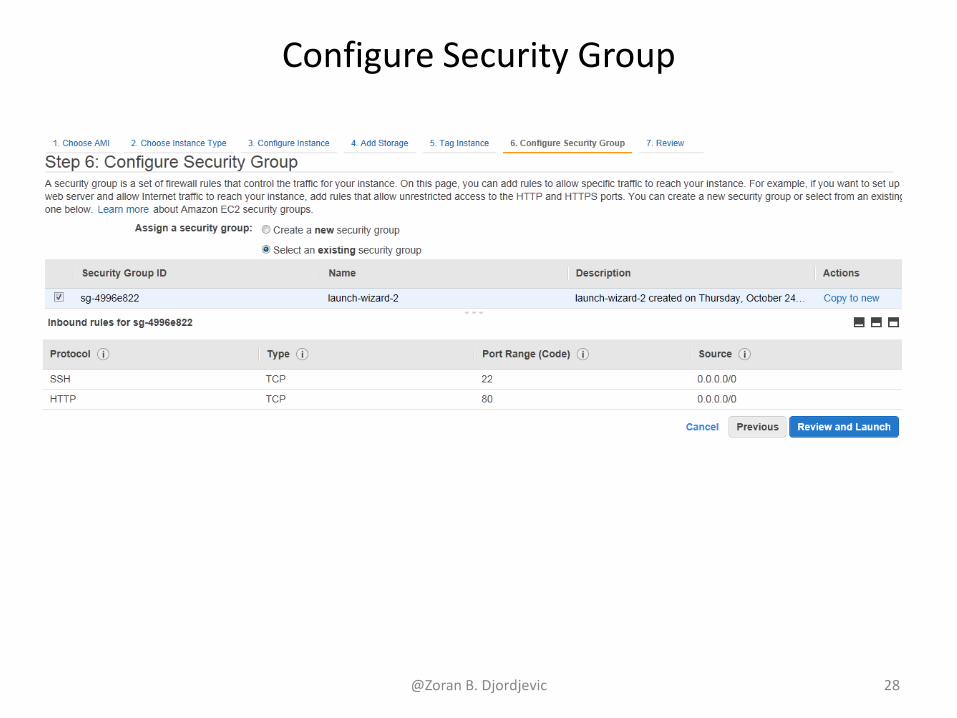
Configure Security Group
@Zoran B. Djordjevic 25
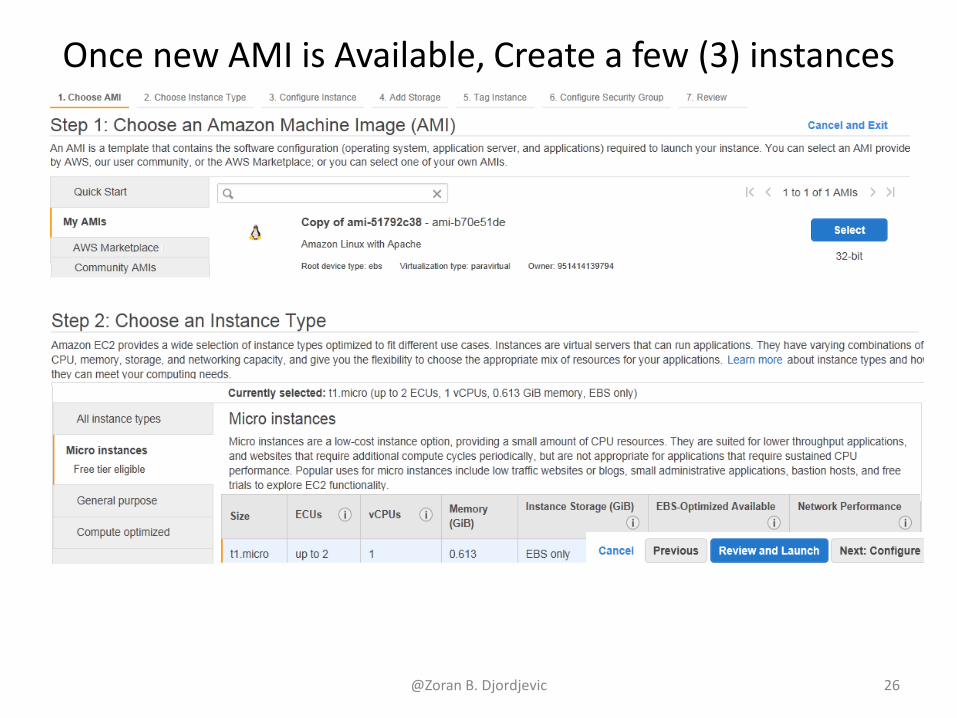
Once new AMI is Available, Create a few (3) instances
@Zoran B. Djordjevic 26

Configure Instance Details, Number of Instances
@Zoran B. Djordjevic 27
Configure Security Group
@Zoran B. Djordjevic 28

Review and Launch
@Zoran B. Djordjevic 29
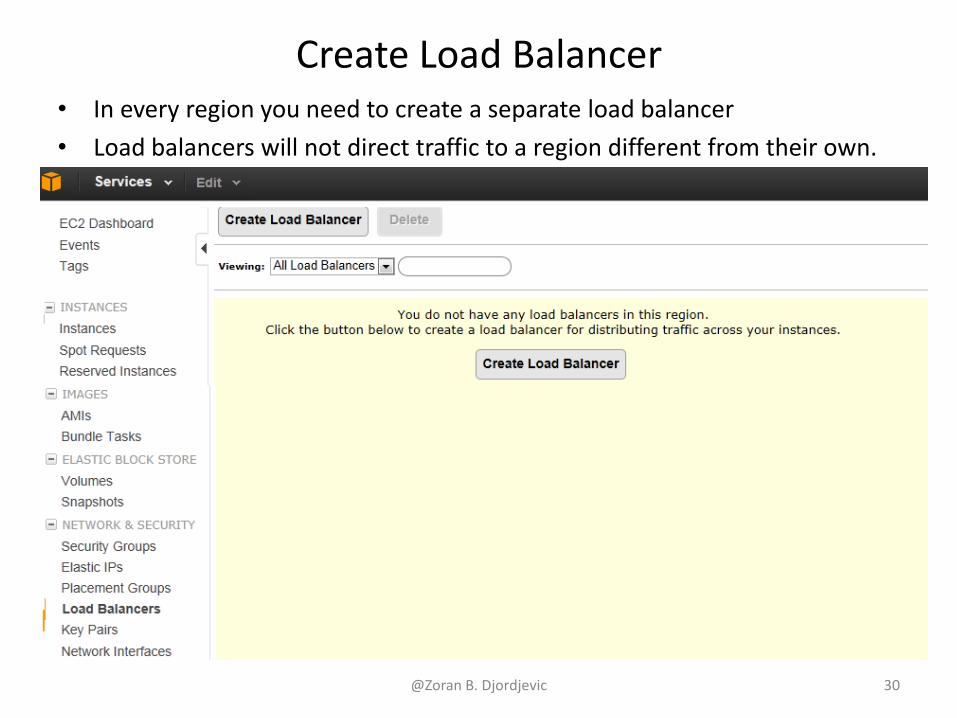
Create Load Balancer • In every region you need to create a separate load balancer • Load balancers will not direct traffic to a region different from their own.
@Zoran B. Djordjevic 30
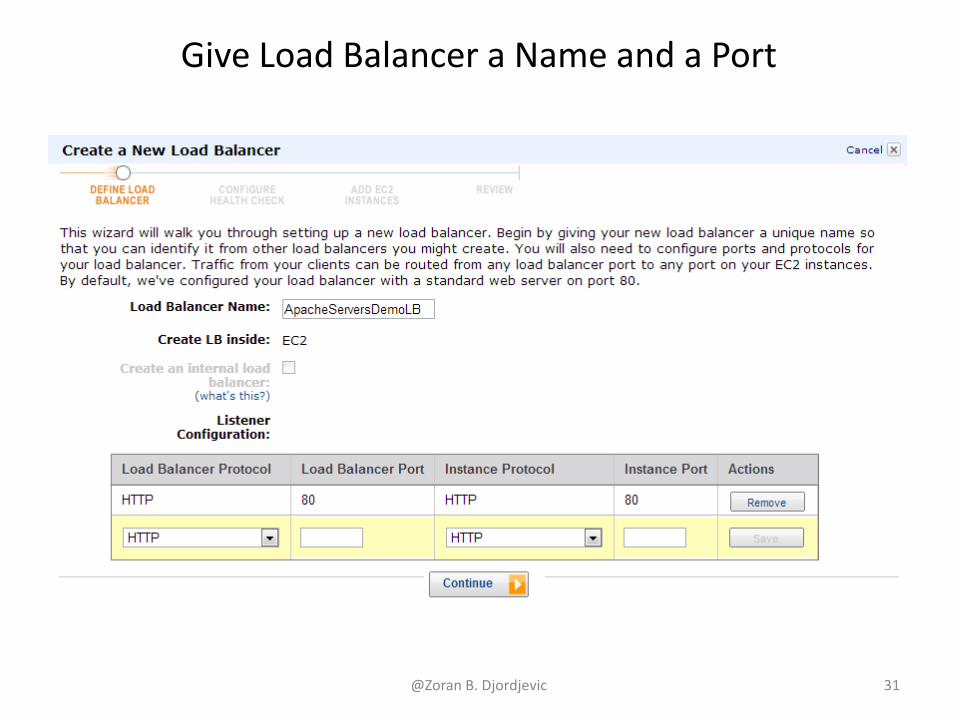
Give Load Balancer a Name and a Port
@Zoran B. Djordjevic 31
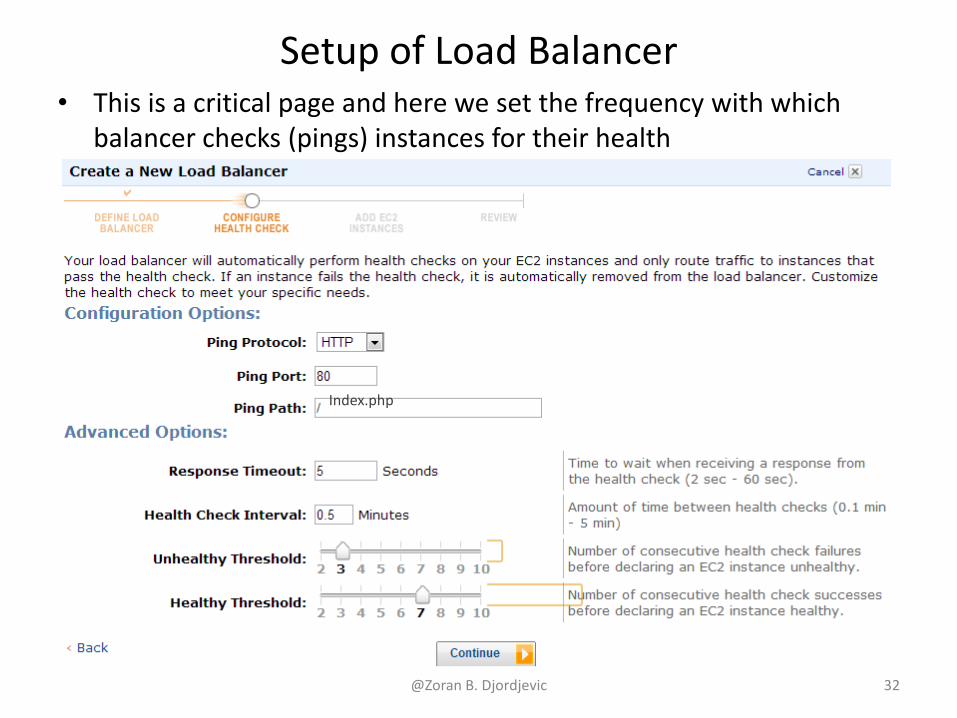
Setup of Load Balancer • This is a critical page and here we set the frequency with which
balancer checks (pings) instances for their health
@Zoran B. Djordjevic 32
Index.php
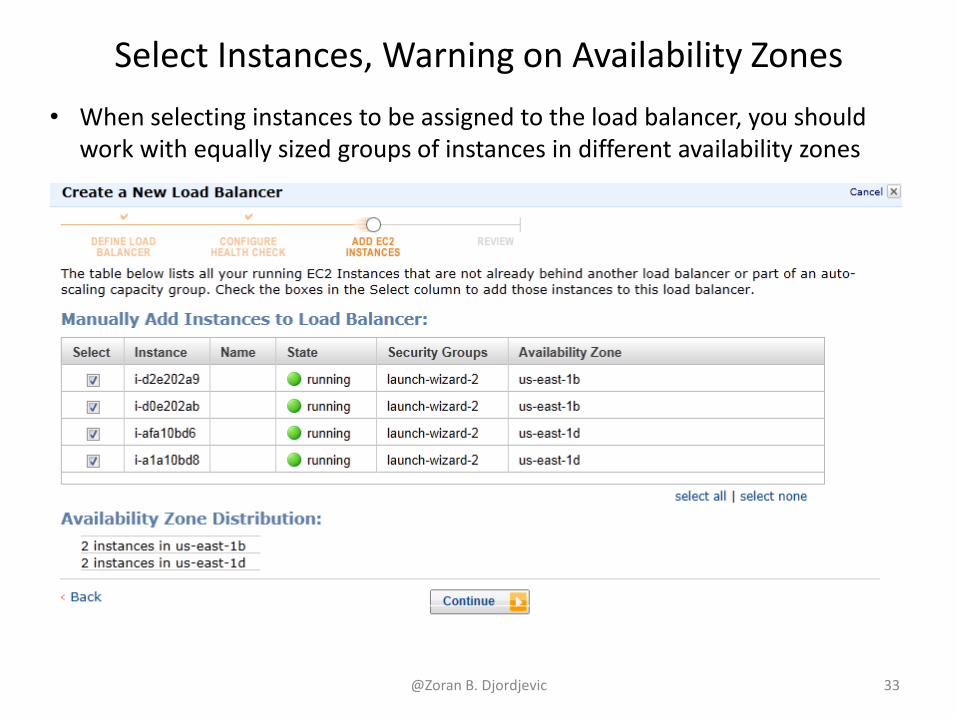
Select Instances, Warning on Availability Zones
@Zoran B. Djordjevic 33
• When selecting instances to be assigned to the load balancer, you should work with equally sized groups of instances in different availability zones
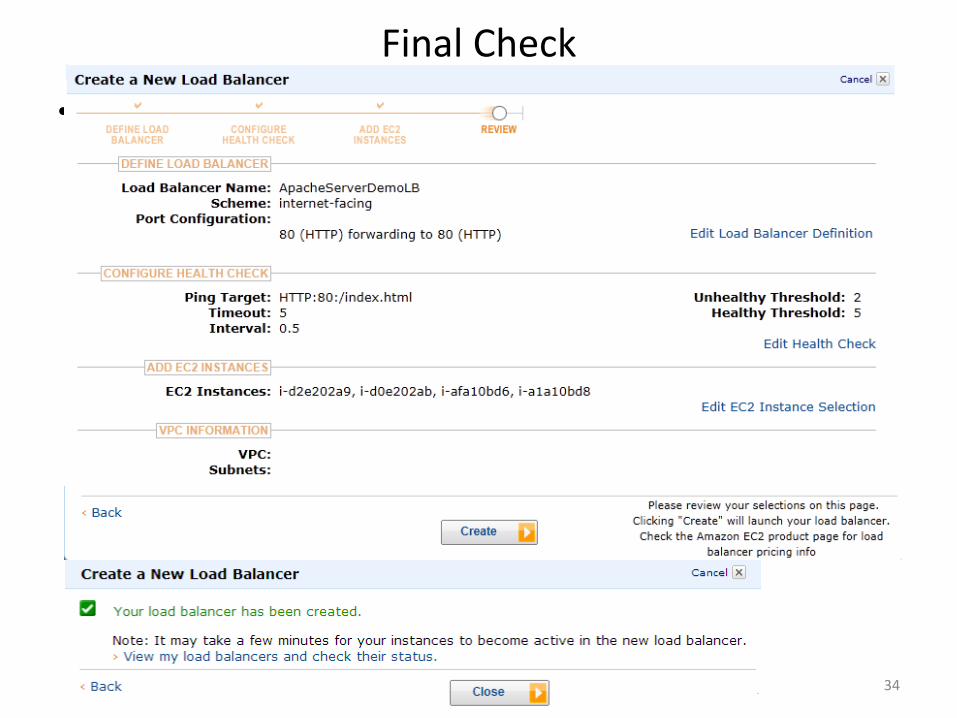
Final Check • Some text
@Zoran B. Djordjevic 34
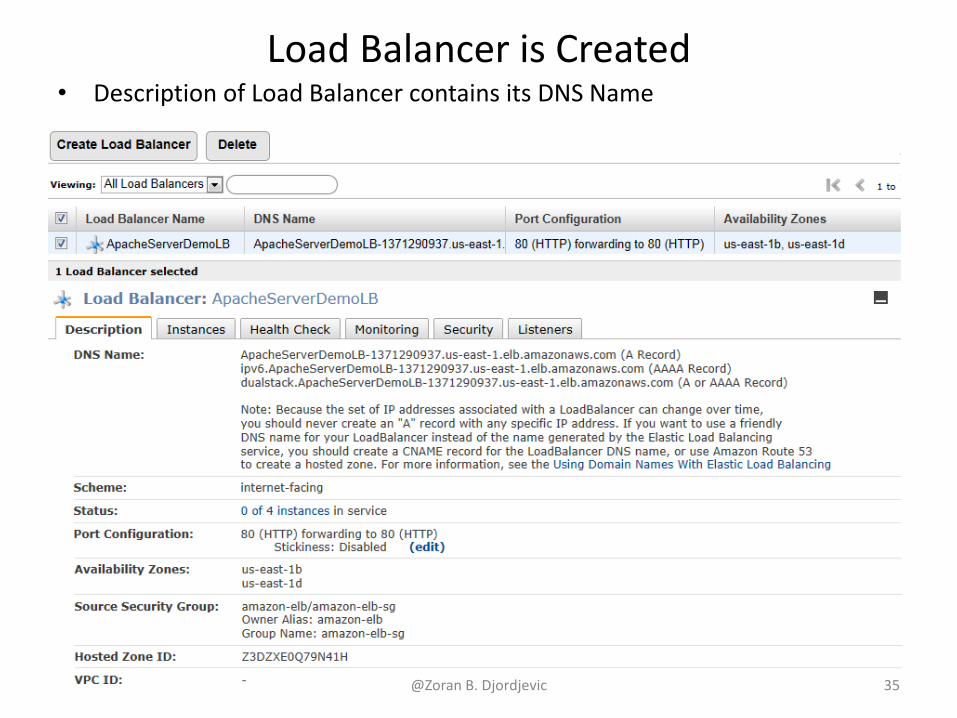
Load Balancer is Created
@Zoran B. Djordjevic 35
• Description of Load Balancer contains its DNS Name
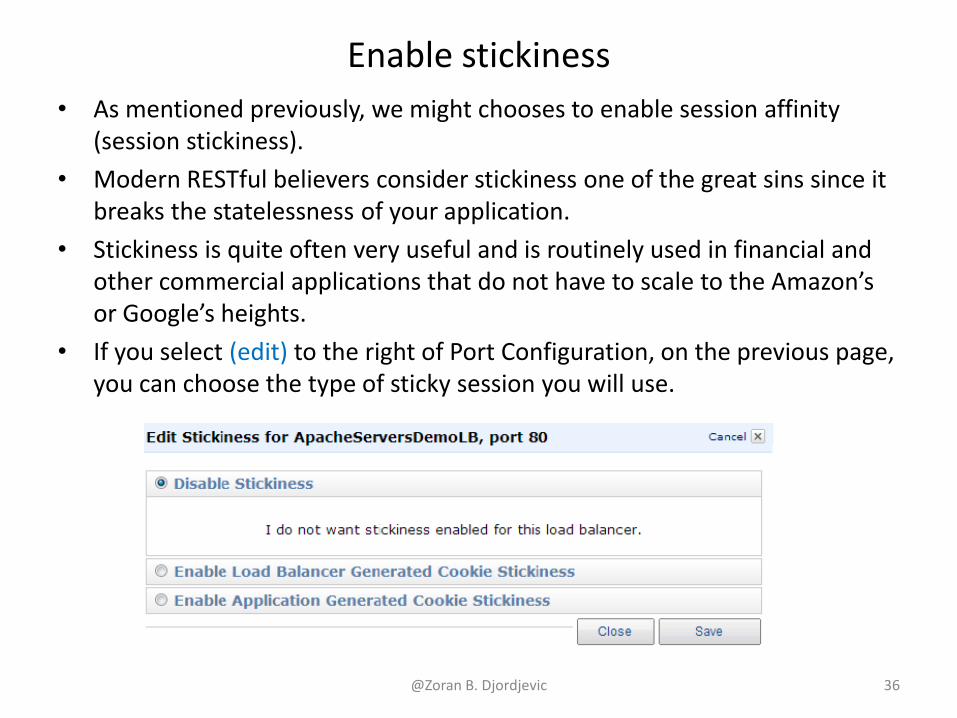
Enable stickiness • As mentioned previously, we might chooses to enable session affinity
(session stickiness). • Modern RESTful believers consider stickiness one of the great sins since it
breaks the statelessness of your application. • Stickiness is quite often very useful and is routinely used in financial and
other commercial applications that do not have to scale to the Amazon’s or Google’s heights.
• If you select (edit) to the right of Port Configuration, on the previous page, you can choose the type of sticky session you will use.
@Zoran B. Djordjevic 36
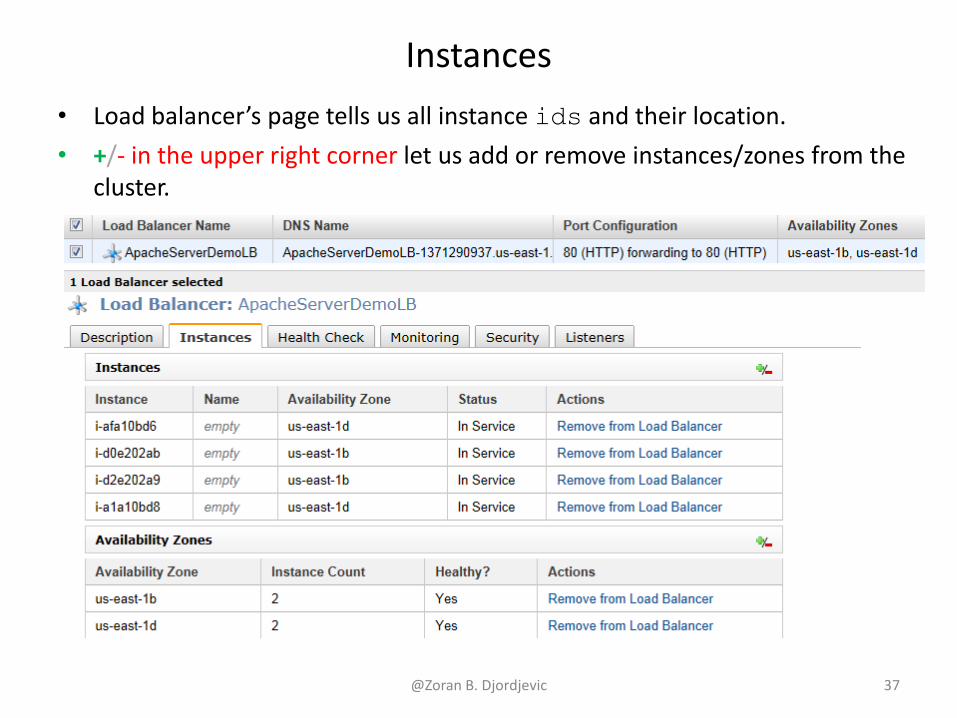
Instances • Load balancer’s page tells us all instance ids and their location. • +/- in the upper right corner let us add or remove instances/zones from the
cluster.
@Zoran B. Djordjevic 37

Listeners, Health Check Status • You can edit parameters of the Health Check
@Zoran B. Djordjevic 38
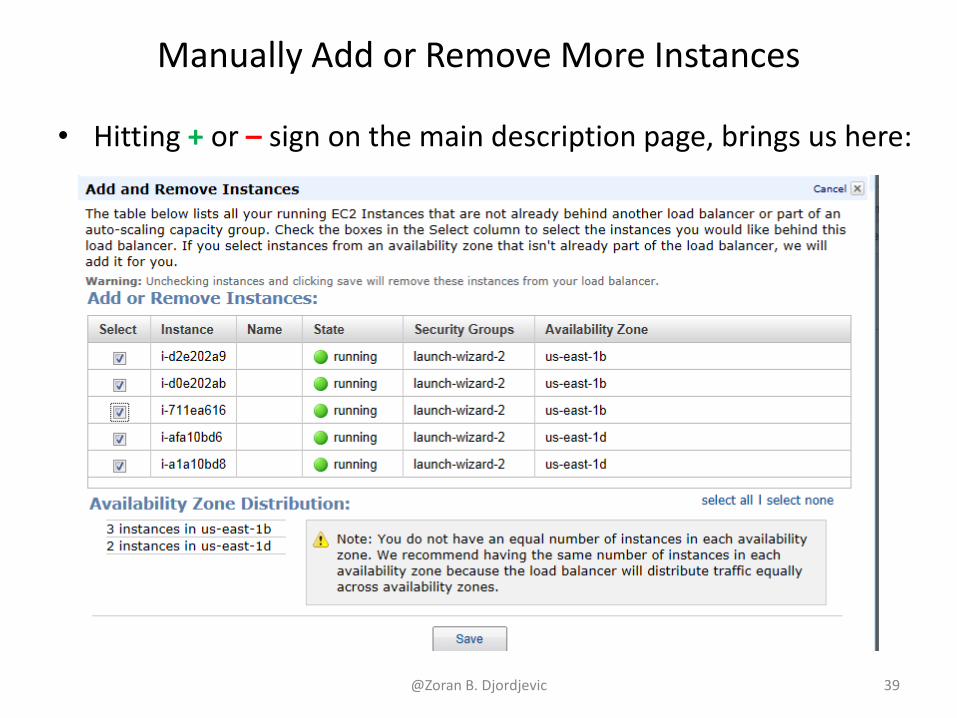
Manually Add or Remove More Instances
• Hitting + or – sign on the main description page, brings us here:
@Zoran B. Djordjevic 39
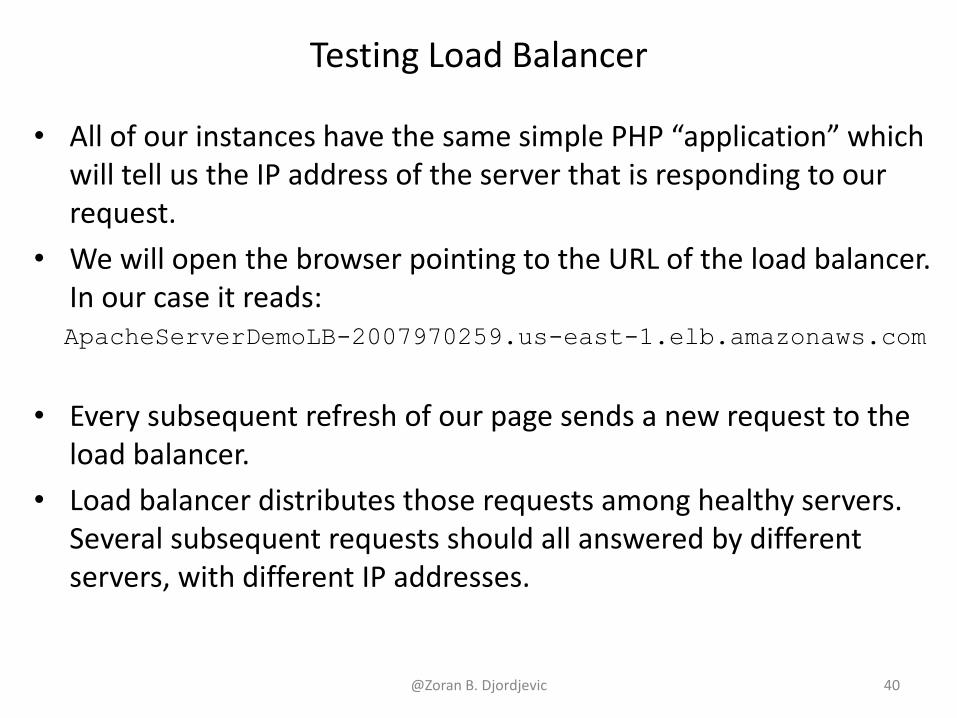
Testing Load Balancer
• All of our instances have the same simple PHP “application” which will tell us the IP address of the server that is responding to our request.
• We will open the browser pointing to the URL of the load balancer. In our case it reads:
ApacheServerDemoLB-2007970259.us-east-1.elb.amazonaws.com
• Every subsequent refresh of our page sends a new request to the load balancer.
• Load balancer distributes those requests among healthy servers. Several subsequent requests should all answered by different servers, with different IP addresses.
@Zoran B. Djordjevic 40
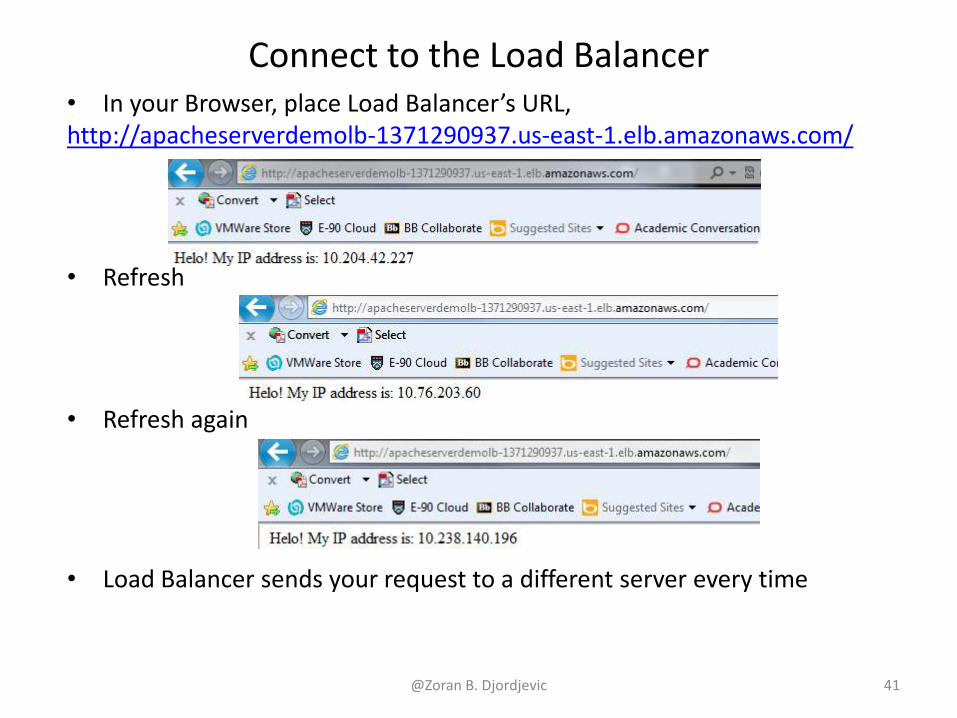
Connect to the Load Balancer • In your Browser, place Load Balancer’s URL, http://apacheserverdemolb-1371290937.us-east-1.elb.amazonaws.com/
• Refresh
• Refresh again
• Load Balancer sends your request to a different server every time @Zoran B. Djordjevic 41
Domain Name • Our load balancer had this long name: • http://apacheserversdemolb-1371290937.us-east-1.elb.amazonaws.com/
• We paste the DNS name generated by Elastic Load Balancing into the address field of a Web browser to connect to load balancer.
• We would prefer to use a user-friendly domain name, such as www.example.com, instead of the load balancer DNS name.
• We can create a custom domain name and then associate the custom domain name with the load balancer DNS name. When a request is placed to the load balancer using the custom domain name that we created, it resolves to the load balancer DNS name.
• To use a custom domain name for our load balancer instance, we have to first register our domain name with a Registrars service provider. List of registrars can be found at ICANN.org
• Amazon AWS is not registrars service provider.
@Zoran B. Djordjevic 42

What is Route 53 • Route 53 is a scalable Domain Name System (DNS) service. • Route 53 provides secure and reliable routing to the
infrastructure that uses Amazon Web Services (AWS) products, such as Amazon Elastic Compute Cloud (Amazon EC2), Elastic Load Balancing, or Amazon Simple Storage Service (Amazon S3).
• We can also use Route 53 to route users to the infrastructure outside of AWS.
• Route 53 is an authoritative DNS service, meaning it translates friendly domains names like www.example.com into IP addresses like 192.0.2.1.
• Route 53 responds to DNS queries using a global network of authoritative DNS servers, which reduces latency.
@Zoran B. Djordjevic 43
Amazon Route 53 • Create a domain using Amazon Route 53 as the DNS service Amazon Route
53 stores information about your domain in a hosted zone. • A hosted zone is an Amazon Route 53 concept that is similar to a zone file
on a DNS name server. Like a zone file, a hosted zone contains information about your domain name, including the subdomain names within the domain and mappings between names and IP addresses
• You’ll use Amazon Route 53 to create a hosted zone for your domain (for example, example.com), and then create alias resource record sets.
• An alias resource record set contains a pointer to a resource record set that contains your DNS resource records. For example, an alias resource record set for your domain, example.com, can point to the DNS name of your Elastic Load Balancing load balancer instance apacheserversdemolb-2007970259.us-east-1.elb.amazonaws.com
• After creating a hosted zone, you can also create alias resource record sets to associate subdomain names with your Elastic Load Balancing instance.
@Zoran B. Djordjevic 44

AWS Auto Scaling
@Zoran B. Djordjevic 45
AWS Auto Scaling • Auto Scaling is a web service designed to launch or terminate EC2
instances automatically based on user-defined policies, schedules, and health.
• We scale up, meaning increase the number of instances that respond to requests of users, when there is a spike in demand.
• Increased number of instances maintain performance, i.e. responsiveness of the system. Rather than waiting for one server to respond to many users, users’ requests are spread over several or many servers.
• We scale down when the demand decreases. • We scale down to keep costs down. • Scaling is seamless and automated. Auto Scaling can be combined
with other Amazon services like CloudWatch and/or Elastic Load Balancing to provide a flexible and configurable solution to keep up with the demand. @Zoran B. Djordjevic 46
Benefits of AWS Auto Scaling • Elastic Capacity
– Automatically add compute capacity when application usage rises and remove it when usage drops.
• Ease of Use – Manage your instances spread across either one or several Availability
Zones as a single collective entity, using simple command line tools or programmatically via an easy-to-use web service API.
• Cost Savings – Save compute costs by terminating underused instances automatically and
launching new instances when you need them, without the need for manual intervention.
• Geographic Redundancy and Scalability – Distribute, scale, and balance applications automatically over multiple
Availability Zones within a region. • Easier Maintenance
– Replace lost or unhealthy instances automatically based on predefined alarms and thresholds.
• Scheduled Actions – Schedule scaling actions for future times and dates when you expect to
need more or less capacity.
@Zoran B. Djordjevic 47
Auto Scaling Group, Launch Configuration • Auto scaling group is the fleet of instances that the auto scaling
service manages. • We define a Launch Configuration for auto scaling groups,
telling the service, the AMI id of instances in a scaling group as well as: key pairs, security group, block device mapping, etc.
• Auto Scaling can be set: – By schedule, according to a defined time and date, when demand
follows a predictable pattern – By policy, based on some metrics so dynamically scales up and down,
according to triggers – To maintain current scaling level, using health checks to terminate and
replace instances with degraded performance
@Zoran B. Djordjevic 48
Triggers • A trigger is a concept that combines two AWS features: a
CloudWatch alarm (configured to watch a specified CloudWatch metric) and an Auto Scaling policy that describes what should happen when the alarm threshold is crossed.
• In most cases, we need two triggers—one trigger for scaling up and another for scaling down.
• For example, if we want to scale up when CPU usage increases to 80 percent, we need to configure a CloudWatch alarm and create an Auto Scaling policy. The alarm detects when the CPU usage has reached 80 percent and sends a message to Auto Scaling. Auto Scaling determines what to do by using the instructions in the scaling policy.
• If we want to scale down when CPU usage decreases to 40 percent, you need a second trigger. In other words, we need to configure a separate CloudWatch alarm to detect the 40 percent threshold and create a separate Auto Scaling policy that scales down.
@Zoran B. Djordjevic 49
Policies • A policy is a set of instructions for Auto Scaling that tells the
service how to respond to CloudWatch alarm messages. You can configure a CloudWatch alarm to send a message to Auto Scaling whenever a specific metric has reached a triggering value. When the alarm sends the message, Auto Scaling executes the associated policy on an Auto Scaling group to scale the group up or down.
@Zoran B. Djordjevic 50

CloudWatch • AWS CloudWatch lets you monitor several different EC2 server
performance metrics in real time, including… – CPU Utilization (%) – Memory Utilization (%) – Network Out Utilization (MB) – Memory Used (MB) – Memory Available (MB) – Swap Utilization (%) – Swap Used (MB) – Disk Space Utilization (%) – Disk Space Used (GB) – Disk Space Available (GB)
• …and many more. It’s up to you what to monitor, but the metrics most useful for knowing when you should scale up and add another server or scale down by terminating a server are probably CPU utilization, memory utilization or network utilization.
@Zoran B. Djordjevic 51
Auto Scaling by Schedule • When auto scaling by schedule, we define scheduled actions
with a time and date and how many instances should be up in the group.
• We can also schedule recurrent actions in the same fashion as the cron job in Unix.
• For example, we can specify that the group will scale down to 2 instances every Sunday, and then scale up to 7 instances every Monday.
• Scheduled scaling always specify an absolute number of desired instances (capacity).
@Zoran B. Djordjevic 52
Auto Scaling by Policy • When auto scaling by policy, we configure auto scaling policies, or
how the group must be scaled (or scaling actions). • Policies tell whether the scaling should go up or down and can
specify the new group size as an absolute number, an increment, or a percentage of the current group size.
• For example, it is possible to adjust the number of instances by increments of 10%, or by 3 instances every time, or set the capacity to 5 instances.
• Auto Scaling provides command to create policies. • We have to wire trigger to implement policies. • We could use CloudWatch, AWS Monitoring service, which provides
many types of metrics for each of AWS services. • For example, for EC2 instances, we can set alarms according to CPU
utilization, bytes read or written to disk, etc. • When CPU utilization reaches a configured threshold, CloudWatch
sends a notification to a configured SNS topic. Based on this notification, you can execute an auto scaling policy.
@Zoran B. Djordjevic 53
Features • Speeds of scaling up and scaling down do not have to be the
same – For example, we can define a scale up condition to increase EC2
capacity by 10% and a scale down condition to decrease it by 5%.
• Selection of instances to terminate on scale down – When selecting an instance to terminate Auto Scaling attempts
to preserve instances with the current launch configuration, and will terminate instances with older launch configuration.
– Auto Scaling will terminate the instance running for the longest portion of a billable instance-hour (without running over). We can configure a policy to terminate the oldest or newest instance instead.
– We target a specific instance for immediate termination with TerminateInstanceInAutoScalingGroup API.
@Zoran B. Djordjevic 54
Features • Cannot scale up beyond your EC2 limit. • Auto Scaling will not allow you to delete an Auto Scaling
Group if it contains running Amazon EC2 instances. • You have to empty the Auto Scaling Group by setting its size to
0 using the as-set-desired-capacity command from the command line.
• You can safely delete your Auto Scaling Group once it is empty
@Zoran B. Djordjevic 55
Use Cases for Auto Scaling • Typically we use Auto Scaling when we can predict that the
demand for our application will peak at a certain time. • For example, if we have a Black Friday promotion, that day
will have a greater volume of requests than the rest of the month.
• Similarly, when the stock market opens and closes, there are pronounced spikes in the number of transactions as compared with the rest of the day.
• Above examples can be solved with Auto Scaling by Schedule, where we can define the date and time when we want to scale up, and similarly the date and time when we want to scale down.
@Zoran B. Djordjevic 56
Demonstration Application • We have created a simple application where the client side
acts as a producer, sending messages to an SQS queue. • The server side is the consumer of messages from this queue. • The client is configured to send messages faster than the
server side consumer can read them. • We use Thread.sleep() in between message reads on the
server side to simulate slow response to some “complicated processing” of messages in the server.
• We will start our auto scaling group with a small number of servers and use auto scaling to add new instances when server responses slow down.
@Zoran B. Djordjevic 57
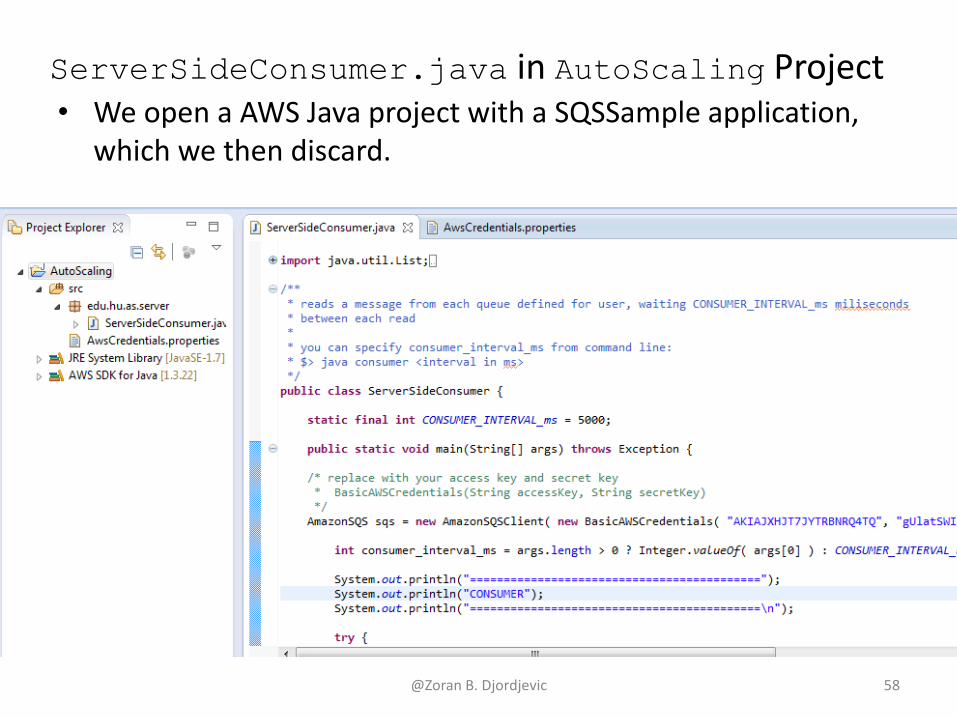
ServerSideConsumer.java in AutoScaling Project • We open a AWS Java project with a SQSSample application,
which we then discard.
@Zoran B. Djordjevic 58
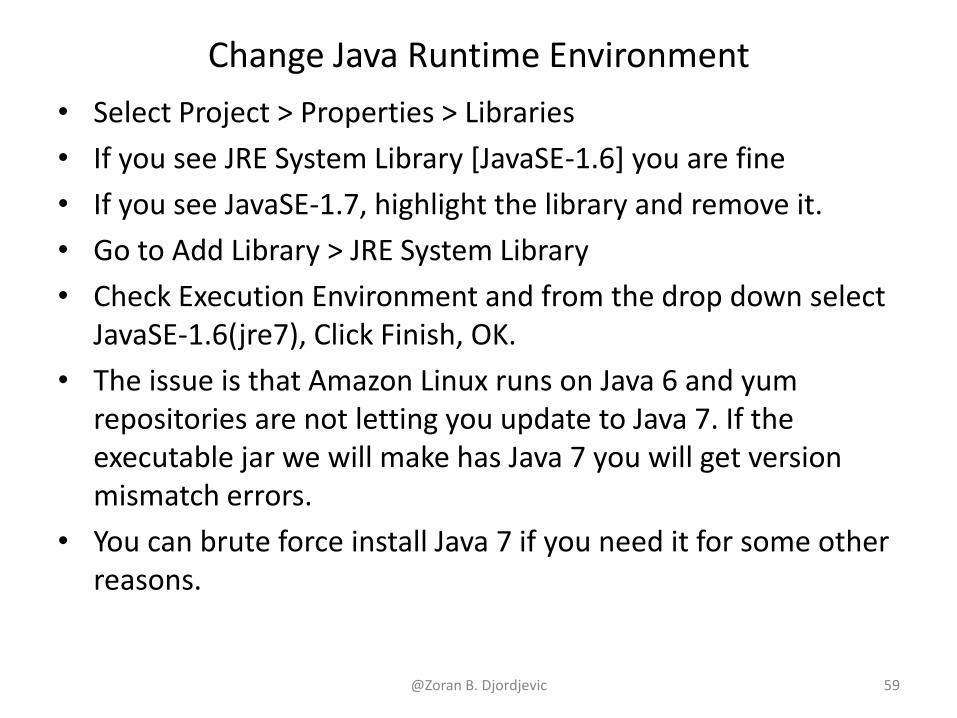
Change Java Runtime Environment • Select Project > Properties > Libraries • If you see JRE System Library [JavaSE-1.6] you are fine • If you see JavaSE-1.7, highlight the library and remove it. • Go to Add Library > JRE System Library • Check Execution Environment and from the drop down select
JavaSE-1.6(jre7), Click Finish, OK. • The issue is that Amazon Linux runs on Java 6 and yum
repositories are not letting you update to Java 7. If the executable jar we will make has Java 7 you will get version mismatch errors.
• You can brute force install Java 7 if you need it for some other reasons.
@Zoran B. Djordjevic 59
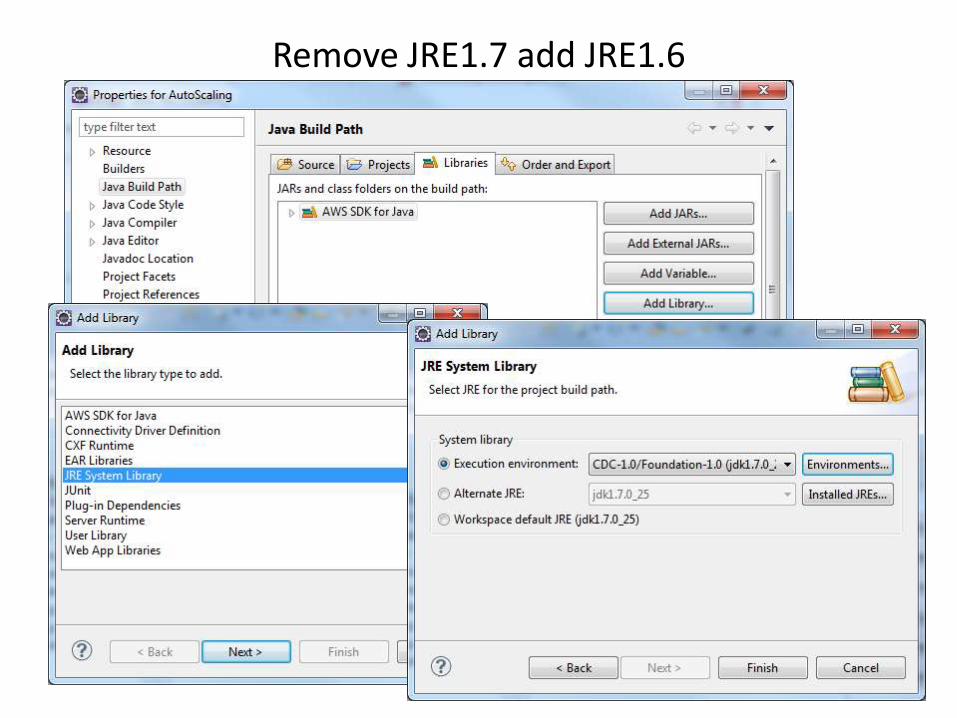
Remove JRE1.7 add JRE1.6
@Zoran B. Djordjevic 60

Adding JavaSE-1.6 Runtime Environment
@Zoran B. Djordjevic 61
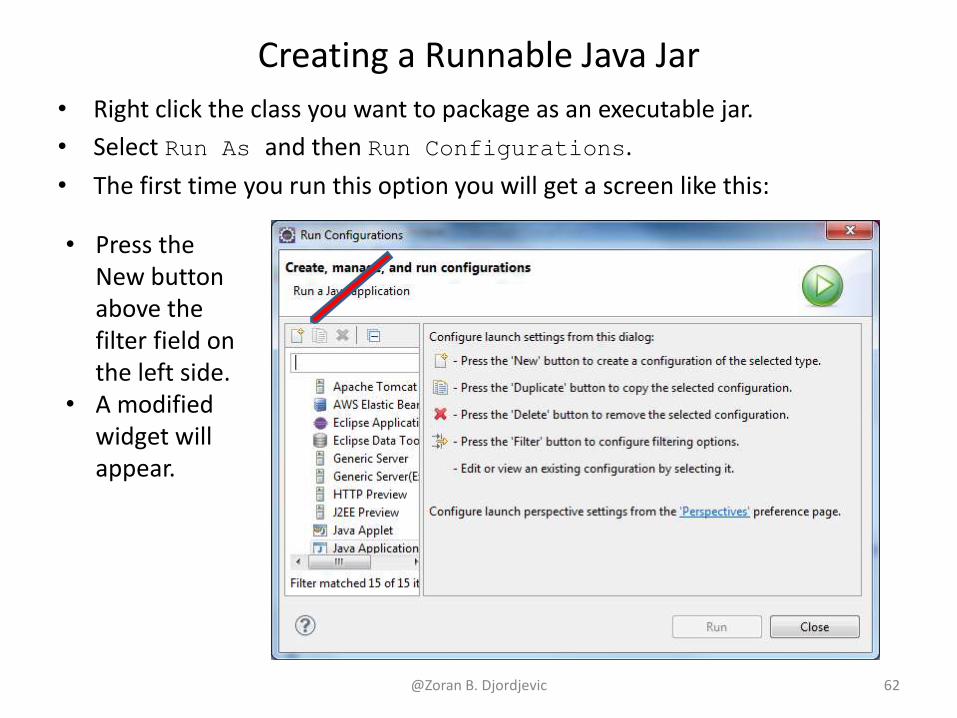
Creating a Runnable Java Jar • Right click the class you want to package as an executable jar. • Select Run As and then Run Configurations. • The first time you run this option you will get a screen like this:
@Zoran B. Djordjevic 62
• Press the New button above the filter field on the left side.
• A modified widget will appear.
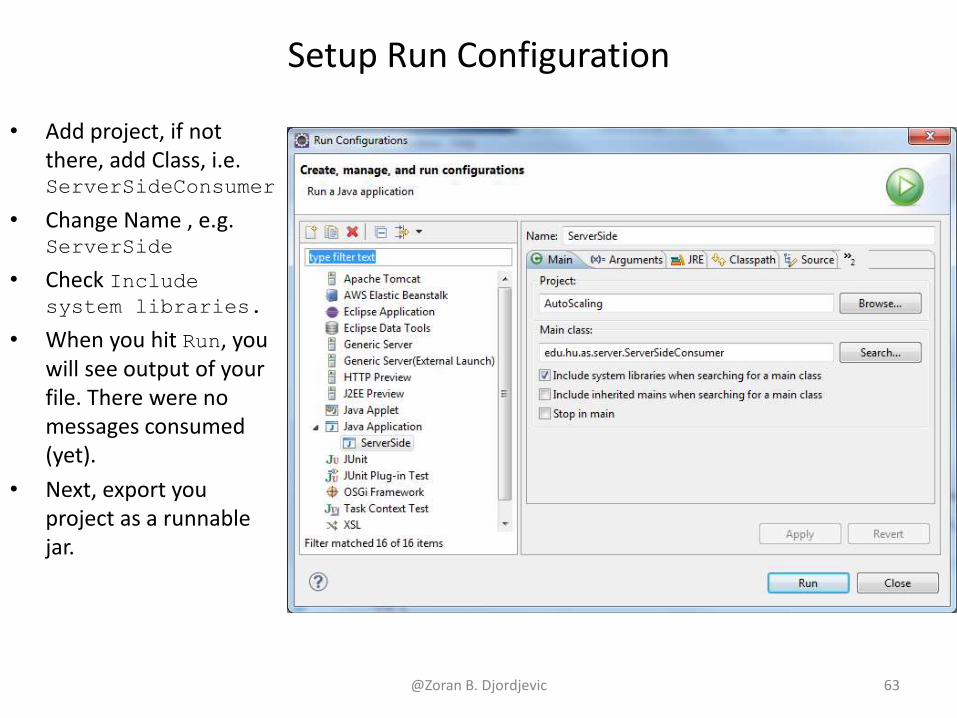
Setup Run Configuration
• Add project, if not there, add Class, i.e. ServerSideConsumer
• Change Name , e.g. ServerSide
• Check Include system libraries.
• When you hit Run, you will see output of your file. There were no messages consumed (yet).
• Next, export you project as a runnable jar.
@Zoran B. Djordjevic 63
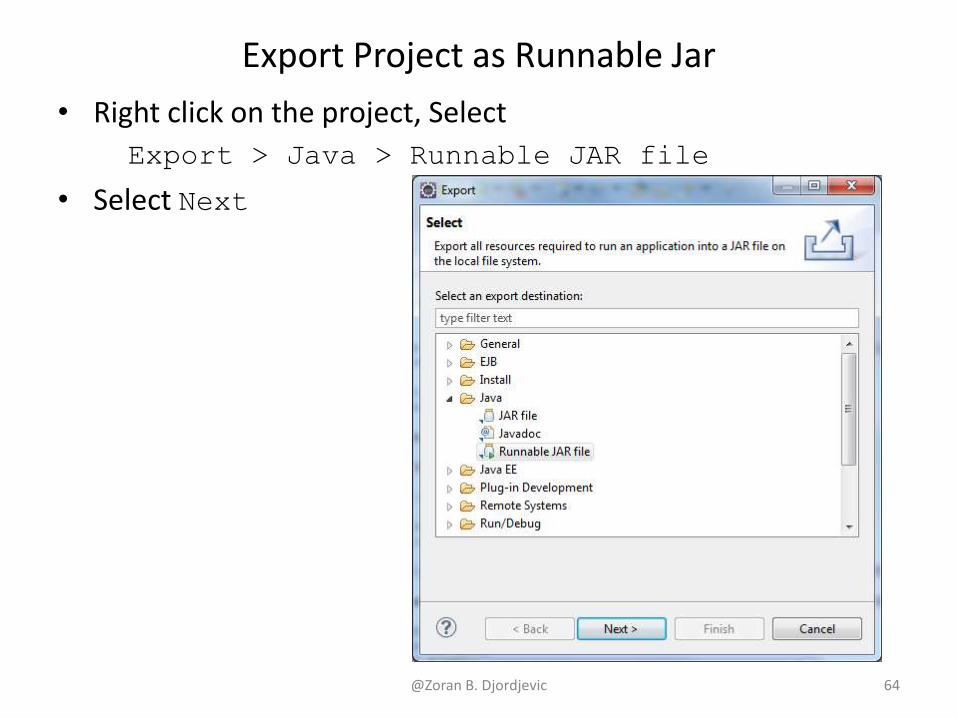
Export Project as Runnable Jar • Right click on the project, Select Export > Java > Runnable JAR file
• Select Next
@Zoran B. Djordjevic 64
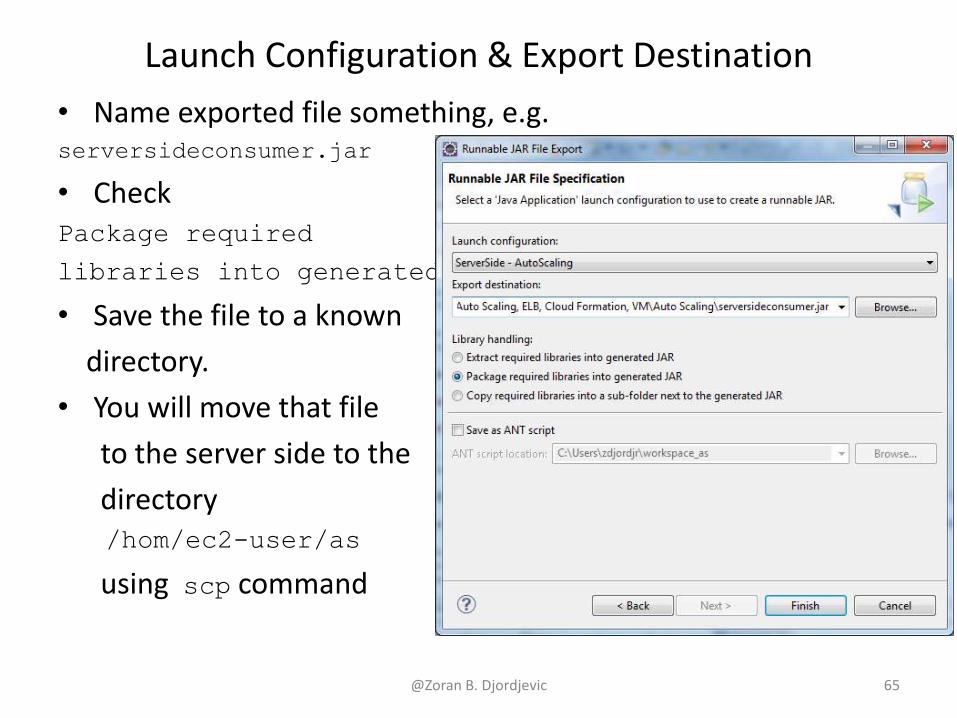
Launch Configuration & Export Destination • Name exported file something, e.g. serversideconsumer.jar
• Check Package required libraries into generated JAR
• Save the file to a known directory. • You will move that file to the server side to the directory /hom/ec2-user/as
using scp command
@Zoran B. Djordjevic 65
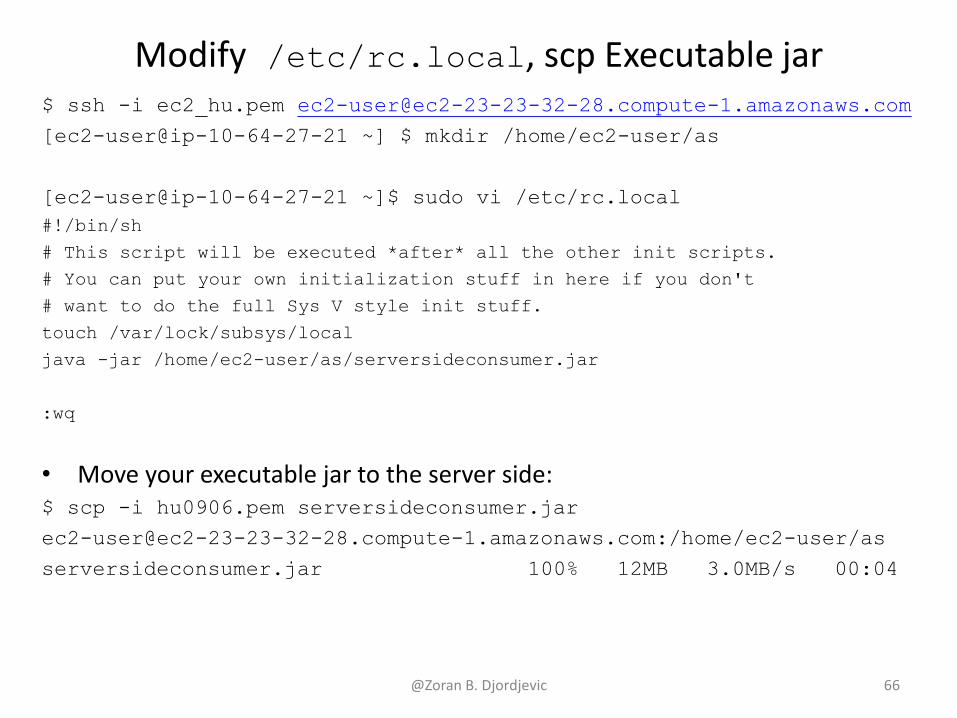
Modify /etc/rc.local, scp Executable jar $ ssh -i ec2_hu.pem [email protected] [ec2-user@ip-10-64-27-21 ~] $ mkdir /home/ec2-user/as [ec2-user@ip-10-64-27-21 ~]$ sudo vi /etc/rc.local #!/bin/sh # This script will be executed *after* all the other init scripts. # You can put your own initialization stuff in here if you don't # want to do the full Sys V style init stuff. touch /var/lock/subsys/local java -jar /home/ec2-user/as/serversideconsumer.jar :wq
• Move your executable jar to the server side: $ scp -i hu0906.pem serversideconsumer.jar [email protected]:/home/ec2-user/as serversideconsumer.jar 100% 12MB 3.0MB/s 00:04
@Zoran B. Djordjevic 66
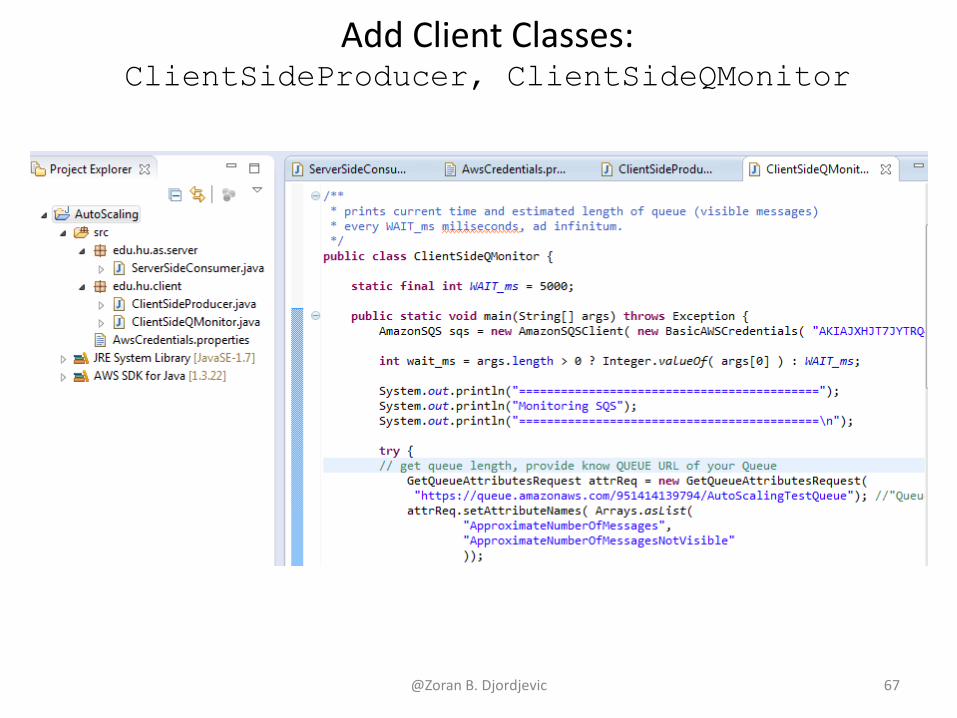
Add Client Classes: ClientSideProducer, ClientSideQMonitor
@Zoran B. Djordjevic 67
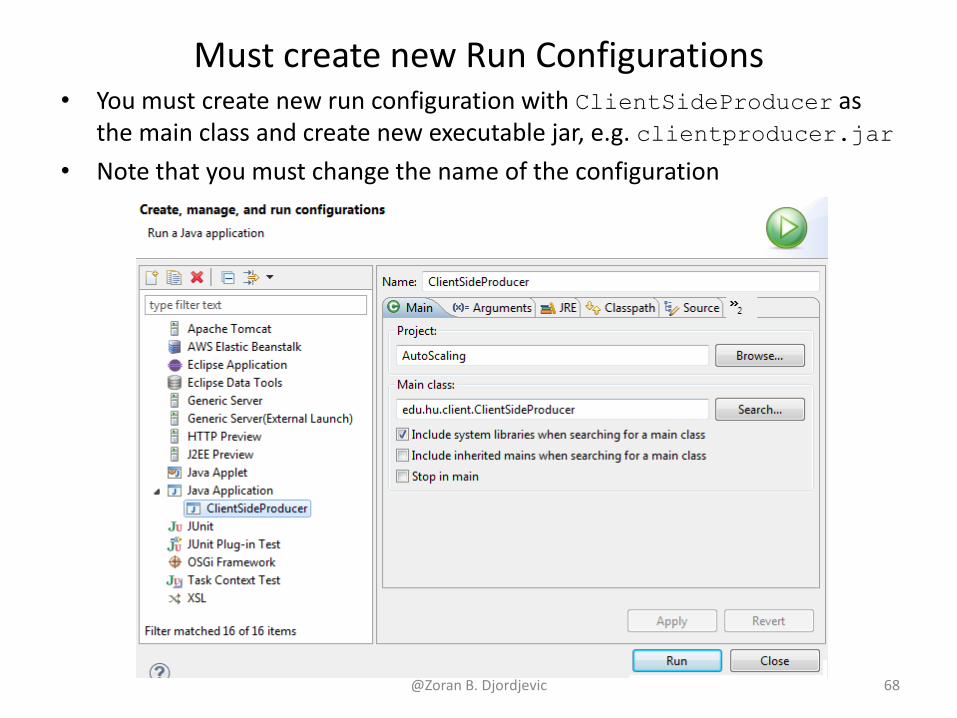
Must create new Run Configurations • You must create new run configuration with ClientSideProducer as
the main class and create new executable jar, e.g. clientproducer.jar • Note that you must change the name of the configuration
@Zoran B. Djordjevic 68
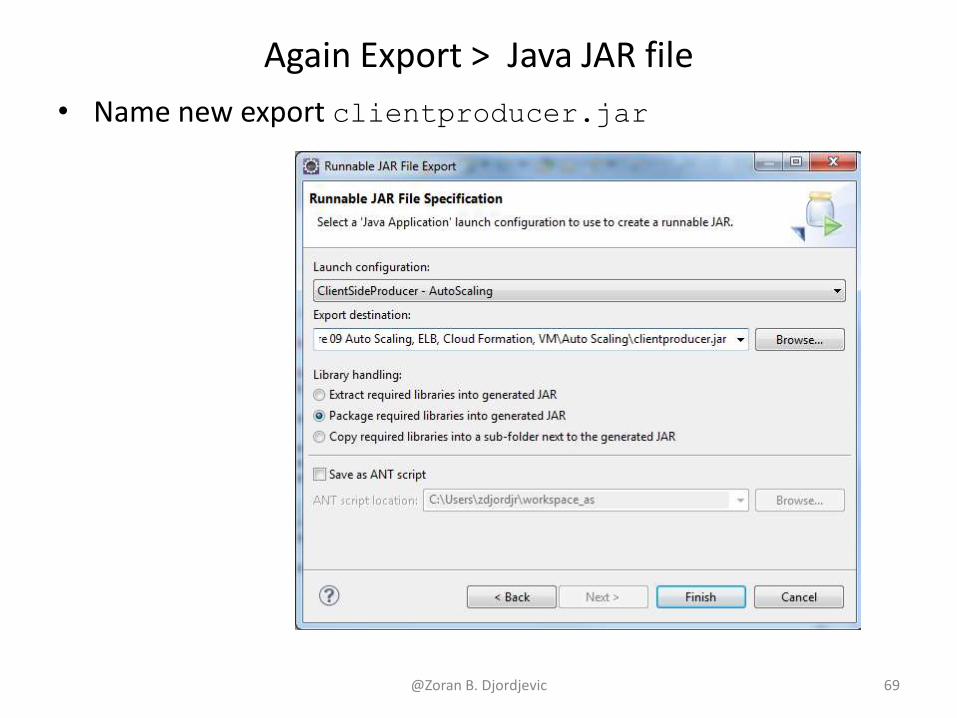
Again Export > Java JAR file • Name new export clientproducer.jar
@Zoran B. Djordjevic 69
Test Server Side Consumer • You can create an SQS queue and enter its URL in the
ClientProducer.java. If you run that ClientProducer class as a Java application it will send a bunch of messages to the queue.
• On the server side, you could go to /home/ec2-user/as directory and type:
$ chmod 777 serversideconsumer.jar $ java –jar serversideconsumer.jar
• You will see the printout acknowledging that the class ServerSideConsumer did read messages accumulated in the queue.
• The server side instance is ready and can be cloned.
@Zoran B. Djordjevic 70

Set Up AutoScaling CLI Environment • Download AutoScaling tools from
http://aws.amazon.com/developertools/2535
• Expand the ZIP file, e.g. C:\AWS\AutoScaling-1.0.61.3 • Create the following environmental variables: • JAVA_HOME=C:\Program Files\Java\jdk1.7.0_07 • AWS_AUTO_SCALING_HOME=C:\AWS\AutoScaling-1.0.61.3
• Add AWS_AUTO_SCALING_HOME\bin to your PATH • set PATH=%PATH%;%AWS_AUTO_SCALING_HOME%\bin
• Do not set AWS_CREDENTIAL_FILE variable. • AS CLI will use your EC2_CERT and EC2_PRIVATE_KEY variables • Do not set your REGION to us-east-1 if you are on the East
Cost. Change to appropriate region, if you are somewhere else AWS_AUTO_SCALING_URL=https://autoscaling.us-west-1.amazonaws.com
@Zoran B. Djordjevic 71

List Auto Scaling CLI commands, type: as-cmd as-create-auto-scaling-group Create a new Auto Scaling group. as-create-launch-config Creates a new launch configuration. as-create-or-update-tags Create or update tags. as-delete-auto-scaling-group Deletes the specified Auto Scaling group. as-delete-launch-config Deletes the specified launch configuration. as-delete-notification-configuration Deletes the specified notification configuration. as-delete-policy Deletes the specified policy. as-delete-scheduled-action Deletes the specified scheduled action. as-delete-tags Delete the specified tags
@Zoran B. Djordjevic 72
List Auto Scaling CLI commands, type: as-cmd as-describe-adjustment-types Describes all policy adjustment types. as-describe-auto-scaling-groups Describes the specified Auto Scaling groups. as-describe-auto-scaling-instances Describes the specified Auto Scaling instances. as-describe-auto-scaling-notification-types Describes all Auto Scaling notification types. as-describe-launch-configs Describes the specified launch configurations. as-describe-metric-collection-types Describes all metric colle... metric granularity types. as-describe-notification-configurations Describes all notification...given Auto Scaling groups. as-describe-policies Describes the specified policies. as-describe-process-types Describes all Auto Scaling process types.
@Zoran B. Djordjevic 73
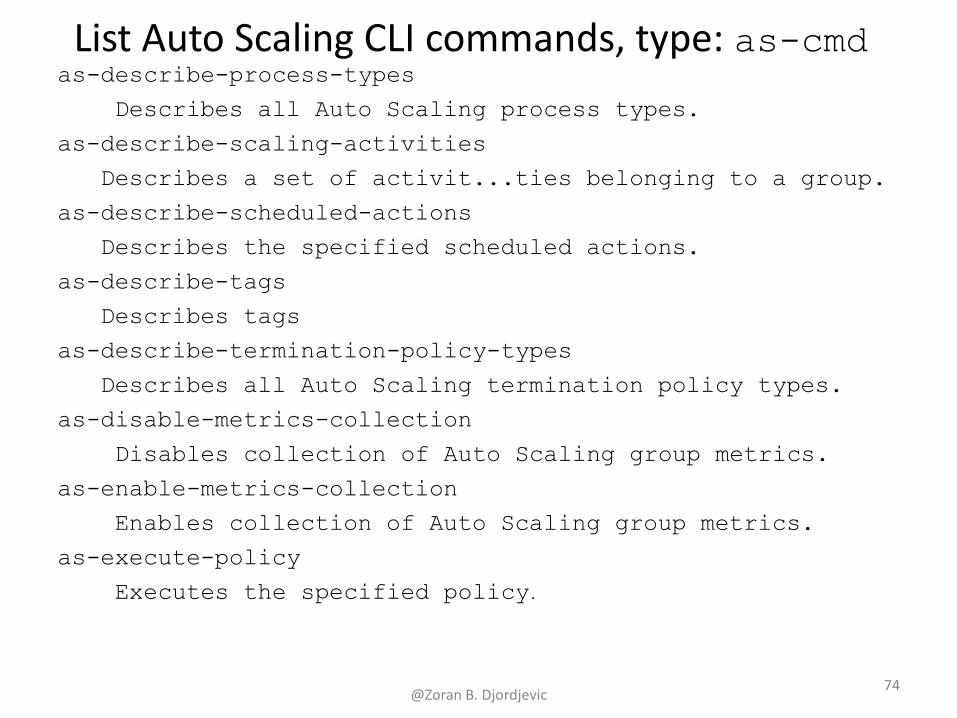
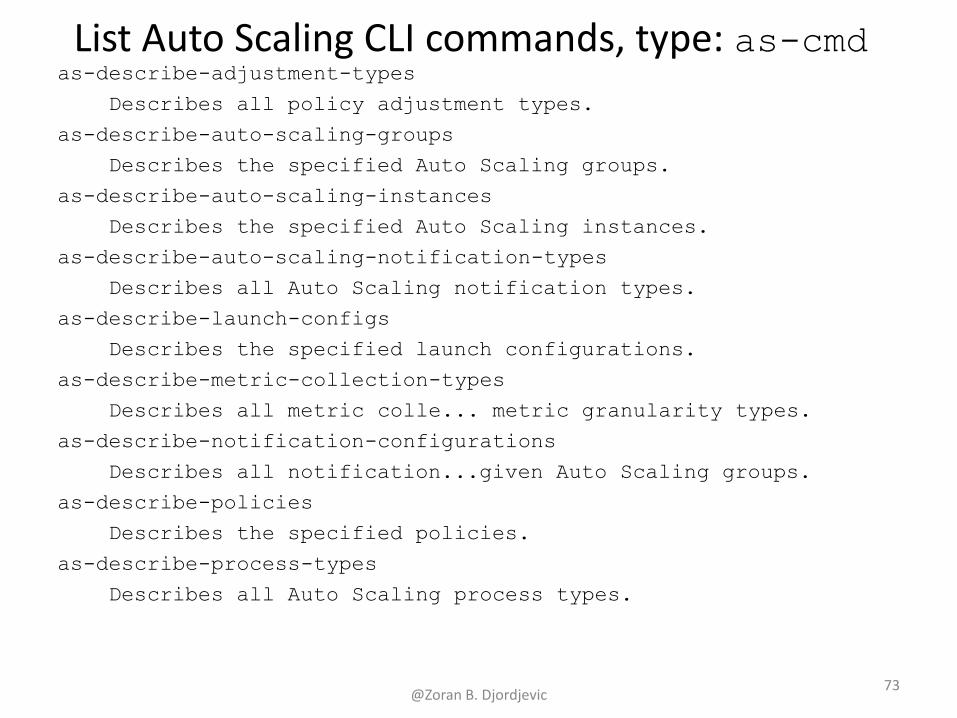
List Auto Scaling CLI commands, type: as-cmd as-describe-process-types Describes all Auto Scaling process types. as-describe-scaling-activities Describes a set of activit...ties belonging to a group. as-describe-scheduled-actions Describes the specified scheduled actions. as-describe-tags Describes tags as-describe-termination-policy-types Describes all Auto Scaling termination policy types. as-disable-metrics-collection Disables collection of Auto Scaling group metrics. as-enable-metrics-collection Enables collection of Auto Scaling group metrics. as-execute-policy Executes the specified policy.
@Zoran B. Djordjevic 74
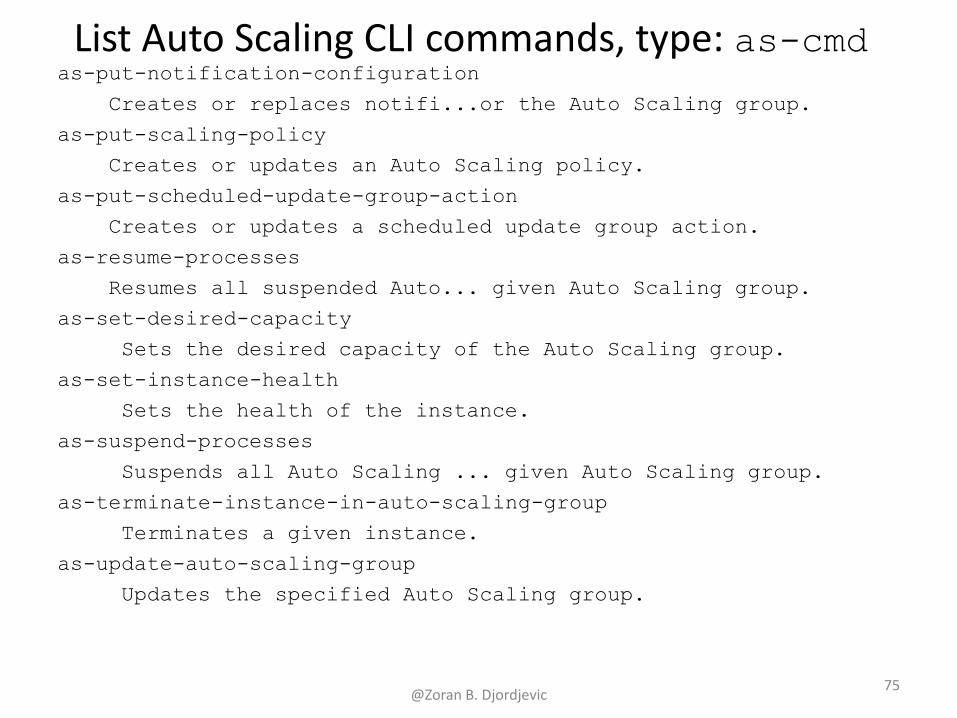
List Auto Scaling CLI commands, type: as-cmd as-put-notification-configuration Creates or replaces notifi...or the Auto Scaling group. as-put-scaling-policy Creates or updates an Auto Scaling policy. as-put-scheduled-update-group-action Creates or updates a scheduled update group action. as-resume-processes Resumes all suspended Auto... given Auto Scaling group. as-set-desired-capacity Sets the desired capacity of the Auto Scaling group. as-set-instance-health Sets the health of the instance. as-suspend-processes Suspends all Auto Scaling ... given Auto Scaling group. as-terminate-instance-in-auto-scaling-group Terminates a given instance. as-update-auto-scaling-group Updates the specified Auto Scaling group.
@Zoran B. Djordjevic 75
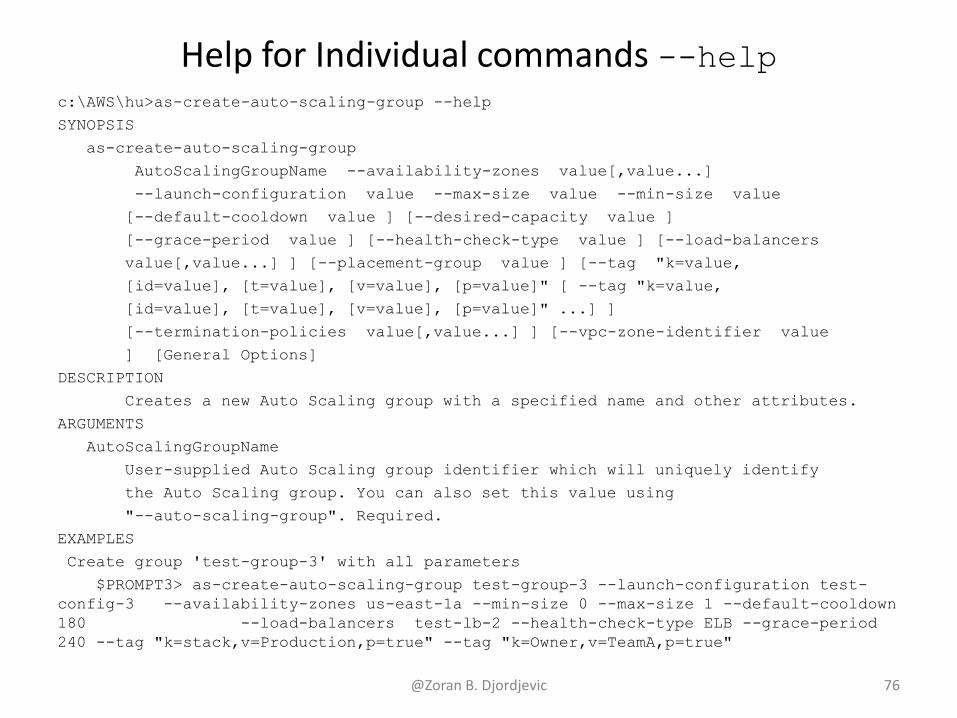
Help for Individual commands --help c:\AWS\hu>as-create-auto-scaling-group --help SYNOPSIS as-create-auto-scaling-group AutoScalingGroupName --availability-zones value[,value...] --launch-configuration value --max-size value --min-size value [--default-cooldown value ] [--desired-capacity value ] [--grace-period value ] [--health-check-type value ] [--load-balancers value[,value...] ] [--placement-group value ] [--tag "k=value, [id=value], [t=value], [v=value], [p=value]" [ --tag "k=value, [id=value], [t=value], [v=value], [p=value]" ...] ] [--termination-policies value[,value...] ] [--vpc-zone-identifier value ] [General Options] DESCRIPTION Creates a new Auto Scaling group with a specified name and other attributes. ARGUMENTS AutoScalingGroupName User-supplied Auto Scaling group identifier which will uniquely identify the Auto Scaling group. You can also set this value using "--auto-scaling-group". Required. EXAMPLES Create group 'test-group-3' with all parameters $PROMPT3> as-create-auto-scaling-group test-group-3 --launch-configuration test-config-3 --availability-zones us-east-1a --min-size 0 --max-size 1 --default-cooldown 180 --load-balancers test-lb-2 --health-check-type ELB --grace-period 240 --tag "k=stack,v=Production,p=true" --tag "k=Owner,v=TeamA,p=true"
@Zoran B. Djordjevic 76
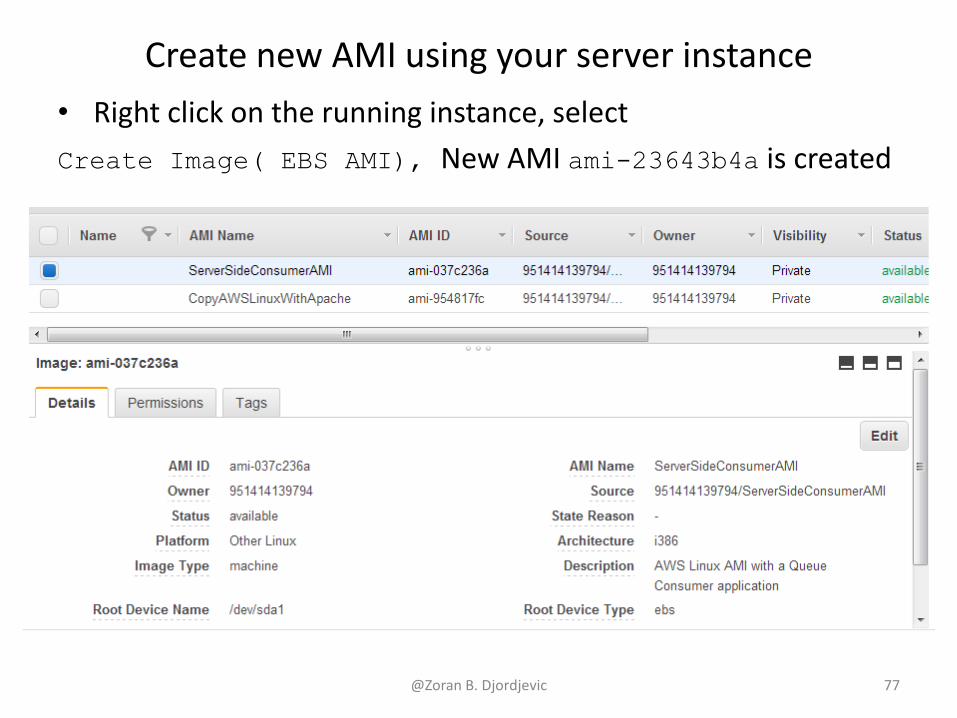
Create new AMI using your server instance • Right click on the running instance, select Create Image( EBS AMI), New AMI ami-23643b4a is created
@Zoran B. Djordjevic 77
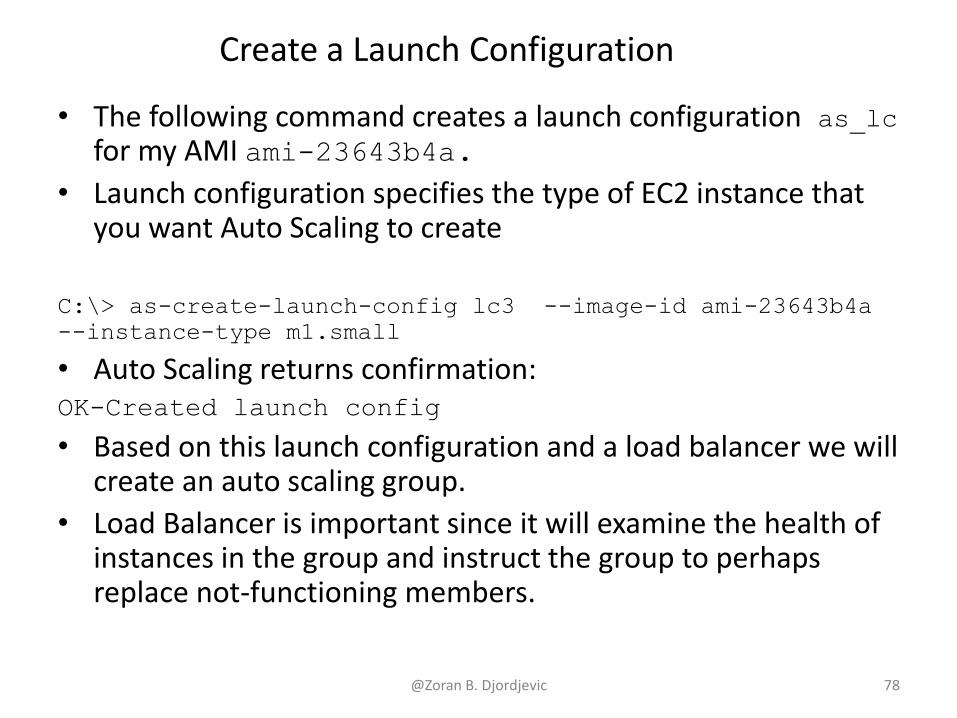
Create a Launch Configuration • The following command creates a launch configuration as_lc
for my AMI ami-23643b4a. • Launch configuration specifies the type of EC2 instance that
you want Auto Scaling to create
C:\> as-create-launch-config lc3 --image-id ami-23643b4a --instance-type m1.small
• Auto Scaling returns confirmation: OK-Created launch config
• Based on this launch configuration and a load balancer we will create an auto scaling group.
• Load Balancer is important since it will examine the health of instances in the group and instruct the group to perhaps replace not-functioning members.
@Zoran B. Djordjevic 78
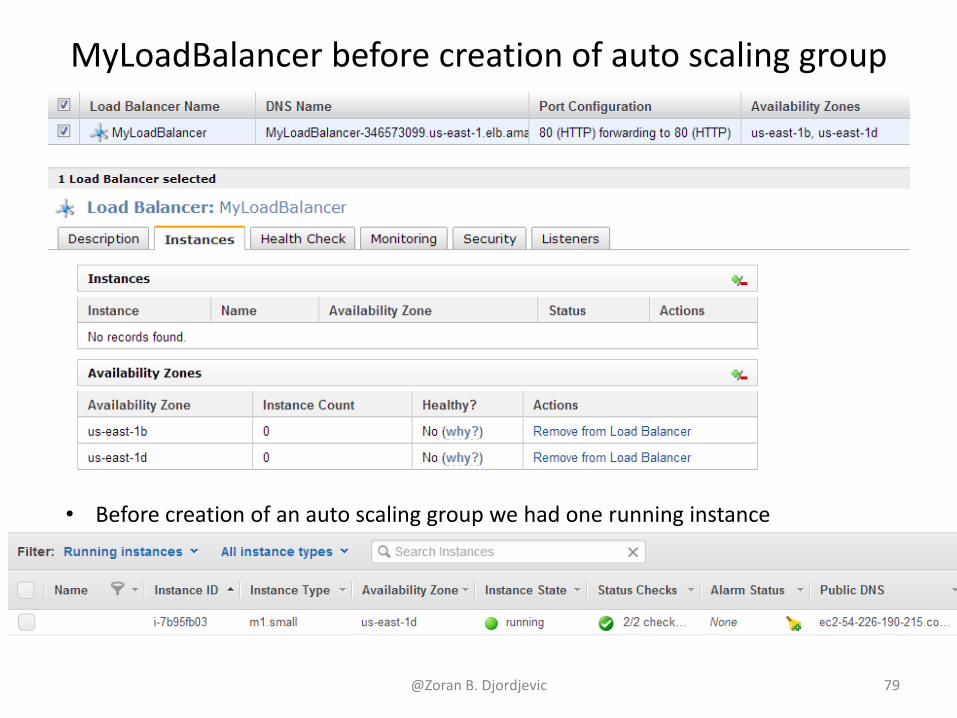
MyLoadBalancer before creation of auto scaling group
@Zoran B. Djordjevic 79
• Before creation of an auto scaling group we had one running instance
Create Auto Scaling Group
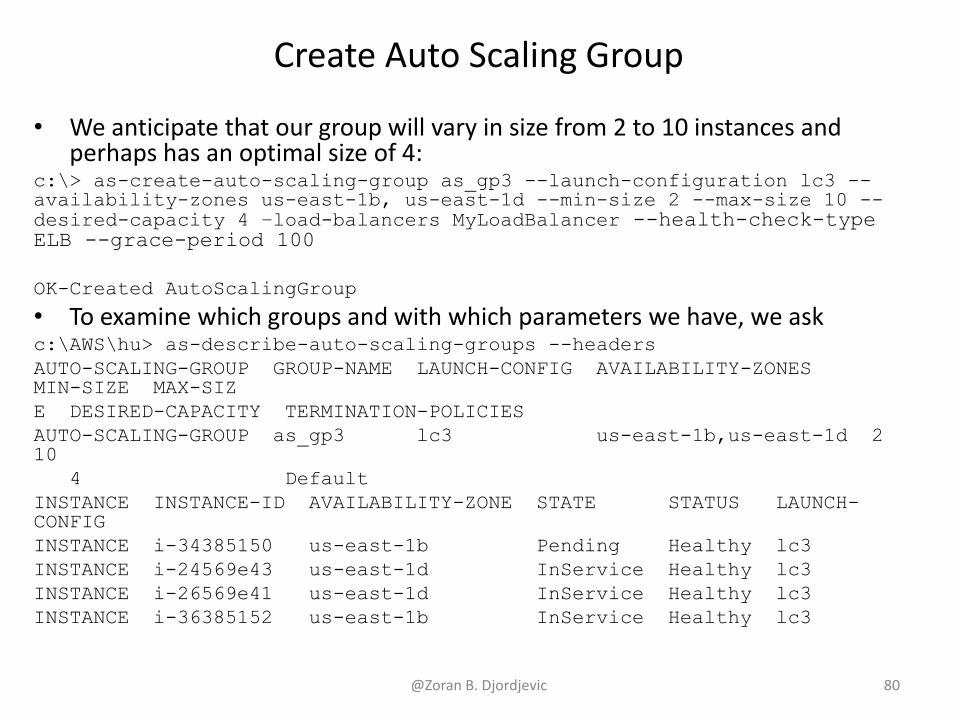
• We anticipate that our group will vary in size from 2 to 10 instances and perhaps has an optimal size of 4:
c:\> as-create-auto-scaling-group as_gp3 --launch-configuration lc3 --availability-zones us-east-1b, us-east-1d --min-size 2 --max-size 10 --desired-capacity 4 –load-balancers MyLoadBalancer --health-check-type ELB --grace-period 100 OK-Created AutoScalingGroup
• To examine which groups and with which parameters we have, we ask c:\AWS\hu> as-describe-auto-scaling-groups --headers AUTO-SCALING-GROUP GROUP-NAME LAUNCH-CONFIG AVAILABILITY-ZONES MIN-SIZE MAX-SIZ E DESIRED-CAPACITY TERMINATION-POLICIES AUTO-SCALING-GROUP as_gp3 lc3 us-east-1b,us-east-1d 2 10 4 Default INSTANCE INSTANCE-ID AVAILABILITY-ZONE STATE STATUS LAUNCH-CONFIG INSTANCE i-34385150 us-east-1b Pending Healthy lc3 INSTANCE i-24569e43 us-east-1d InService Healthy lc3 INSTANCE i-26569e41 us-east-1d InService Healthy lc3 INSTANCE i-36385152 us-east-1b InService Healthy lc3
@Zoran B. Djordjevic 80
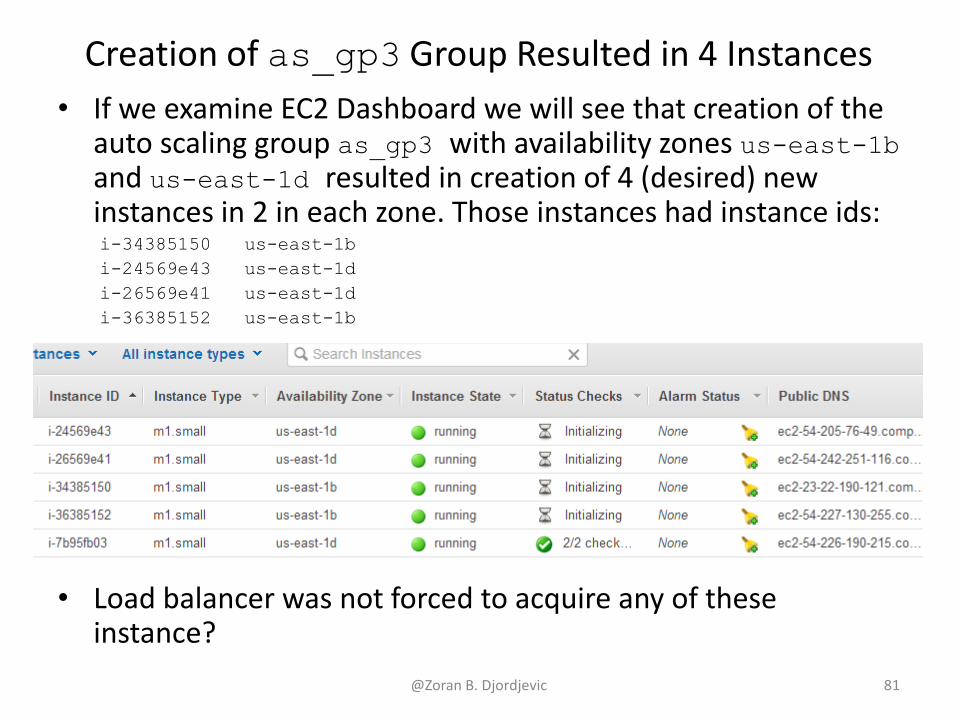
Creation of as_gp3 Group Resulted in 4 Instances • If we examine EC2 Dashboard we will see that creation of the
auto scaling group as_gp3 with availability zones us-east-1b and us-east-1d resulted in creation of 4 (desired) new instances in 2 in each zone. Those instances had instance ids: i-34385150 us-east-1b i-24569e43 us-east-1d i-26569e41 us-east-1d i-36385152 us-east-1b
• Load balancer was not forced to acquire any of these instance?
@Zoran B. Djordjevic 81
Change parameters of auto scaling group as_gp3 • We can change properties of an existing auto scaling group C:\> as-update-auto-scaling-group as_gp3 --health-check-type ELB --grace-period 100
• Parameter health-check ELB specifies that the auto scaling group will rely on the load balancer for the assessment of the health of the group.
• Parameter grace-period tells the group that it does not have to recheck its compliance with the conditions more frequently than once in 100 seconds.
@Zoran B. Djordjevic 82
If you need to drop an Auto Scaling Group • Sometimes you need to drop an auto scaling group and create
new one. • Normally you would first remove instances from the group C:\> as-update-auto-scaling-group as_gp3 --min-size 0 --max-size 0
• By the way, you can use that same command to increase the size of a auto scaling group
• Now, you can delete the group C:\> as-delete-auto-scaling-group as_gp3 Are you sure you want to delete this AutoScalingGroup? [Ny]y OK-Deleted AutoScalingGroup
• Finally, you can delete the launch configuration c:\AWS\hu> as-delete-launch-config as_lc3 Are you sure you want to delete this launch configuration? [Ny]y OK-Deleted launch configuration
@Zoran B. Djordjevic 83
Auto Scaling Policies • In a typical situation, we will periodically check the CPU
utilization of our servers or some other metrics and based on the observed value issue instruction to the group to increase or decrease its number of instances.
• Objects that hold the information about the action that should take place when we increase or decrease the number of instances in an auto scaling group are called auto scaling policies.
• We need two policies. One will specify how many instances we will add to the group when we want to increase the number of instances and the other will specify how many we will terminate when we want to decrease the number of instances. Numbers do not have to be the same.
• In our case, both the increment and decrement will be 1 @Zoran B. Djordjevic 84
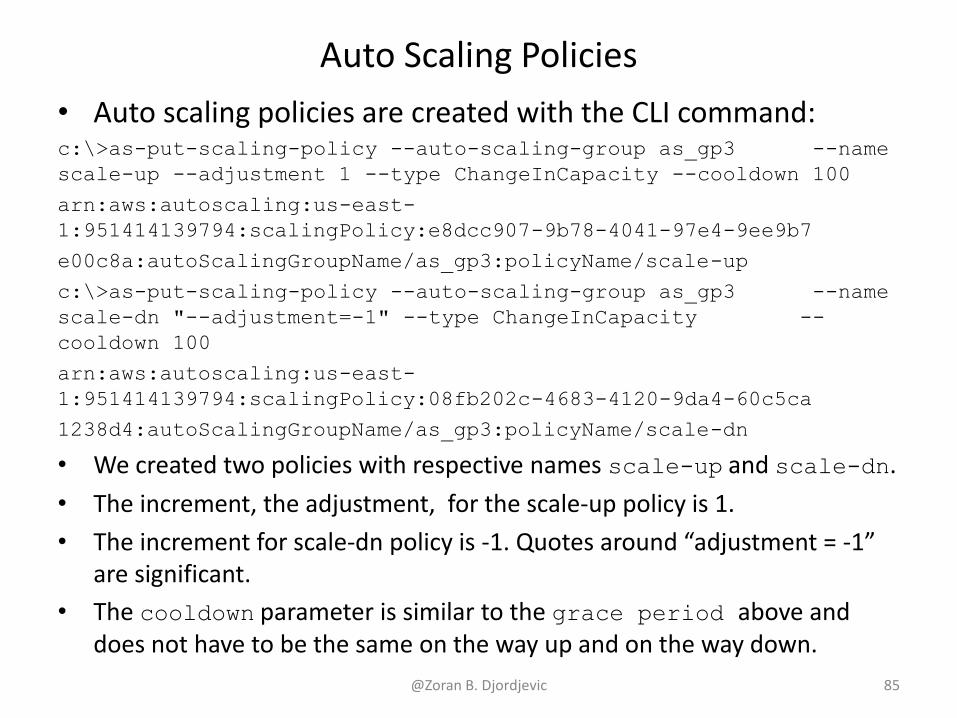
Auto Scaling Policies • Auto scaling policies are created with the CLI command: c:\>as-put-scaling-policy --auto-scaling-group as_gp3 --name scale-up --adjustment 1 --type ChangeInCapacity --cooldown 100 arn:aws:autoscaling:us-east-1:951414139794:scalingPolicy:e8dcc907-9b78-4041-97e4-9ee9b7 e00c8a:autoScalingGroupName/as_gp3:policyName/scale-up c:\>as-put-scaling-policy --auto-scaling-group as_gp3 --name scale-dn "--adjustment=-1" --type ChangeInCapacity --cooldown 100 arn:aws:autoscaling:us-east-1:951414139794:scalingPolicy:08fb202c-4683-4120-9da4-60c5ca 1238d4:autoScalingGroupName/as_gp3:policyName/scale-dn
• We created two policies with respective names scale-up and scale-dn. • The increment, the adjustment, for the scale-up policy is 1. • The increment for scale-dn policy is -1. Quotes around “adjustment = -1”
are significant. • The cooldown parameter is similar to the grace period above and
does not have to be the same on the way up and on the way down. @Zoran B. Djordjevic 85
Auto Scaling Policy’s arn • The long strings that start with arn:aws: and end with
/scale-dn or /scale-up are Amazon Resource Notations (arn-s) for two policies. Those arn-s identify those policies uniquely.
• We still do not know what will trigger changes. • We need to define triggers and let them activate or execute
policies. We will use Cloud Watch Alarms for the triggers.
@Zoran B. Djordjevic 86

Create a Topic • We will need to send notifications about events taking place
in our auto scaling group. Let us create an SNS Topic for that purpose.
@Zoran B. Djordjevic 87
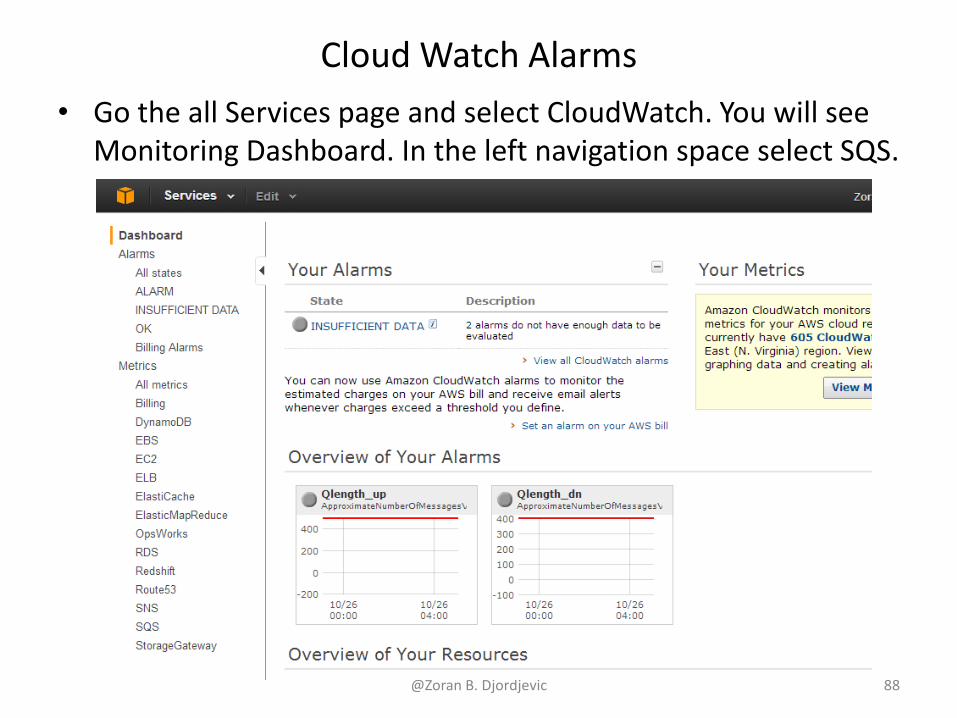
Cloud Watch Alarms • Go the all Services page and select CloudWatch. You will see
Monitoring Dashboard. In the left navigation space select SQS.
@Zoran B. Djordjevic 88

SQS: Queue Metrics page • ASTestQueue is the queue we set up for ClientProducer and
ServerSideConsumer message exchange. Queue Metrics page lists metrics Cloud Watch monitors on an SQS queue:
@Zoran B. Djordjevic 89
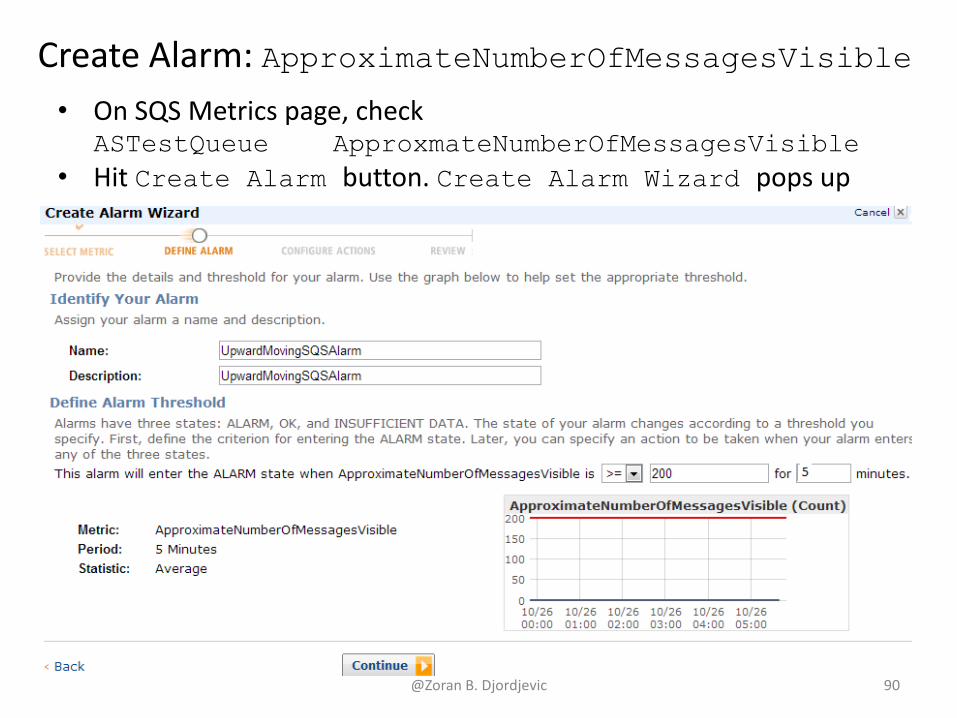
Create Alarm: ApproximateNumberOfMessagesVisible • On SQS Metrics page, check ASTestQueue ApproxmateNumberOfMessagesVisible • Hit Create Alarm button. Create Alarm Wizard pops up
@Zoran B. Djordjevic 90

Specify Action following the Alarm • On the next page, under Take action select Send notification and
under Action details select the name of one of our ASTestTopics. • Save the alarm and use ClientProducer to push the number of
messages in the queue past the threshold we set for the alarm (200).
@Zoran B. Djordjevic 91
Alarm will send Notification to the Subscriber • We can reduce the wait time of ClientProducer and it will
fairly quickly pump a substantial number of messages into ASTestQueue.
• Cloud Watch examines its metrics with a 5 minute interval. This means that some 5 minutes after starting the ClientProducer, the alarm will take place and we will receive an email notification informing us that the queue has more messages than the threshold (200) we set in the alarm, etc.
• Notification email contains useful information.
@Zoran B. Djordjevic 92
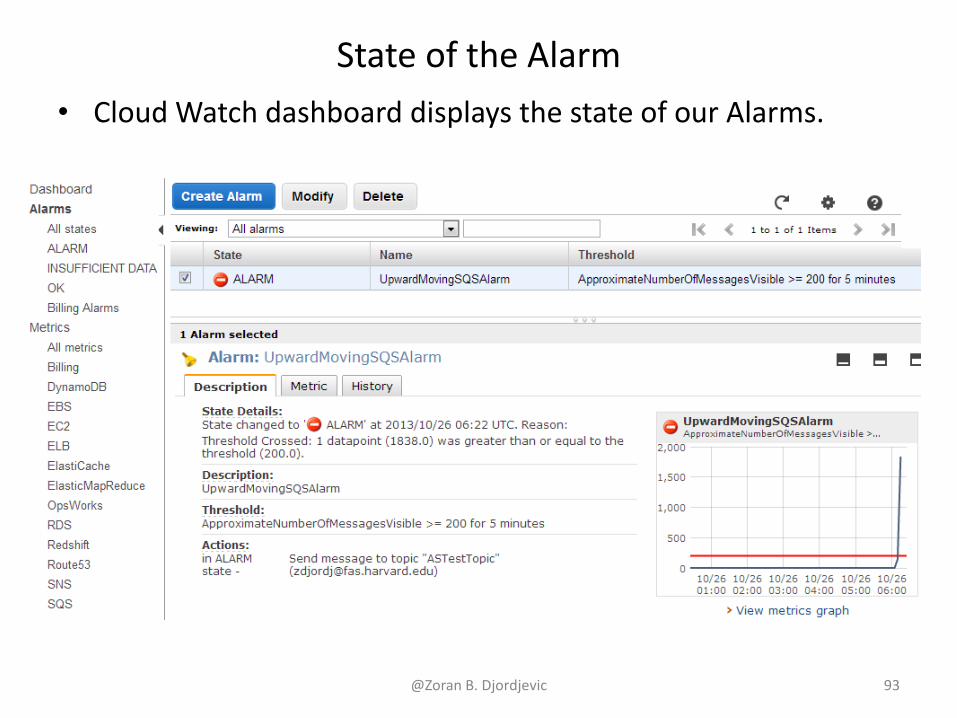
State of the Alarm • Cloud Watch dashboard displays the state of our Alarms.
@Zoran B. Djordjevic 93
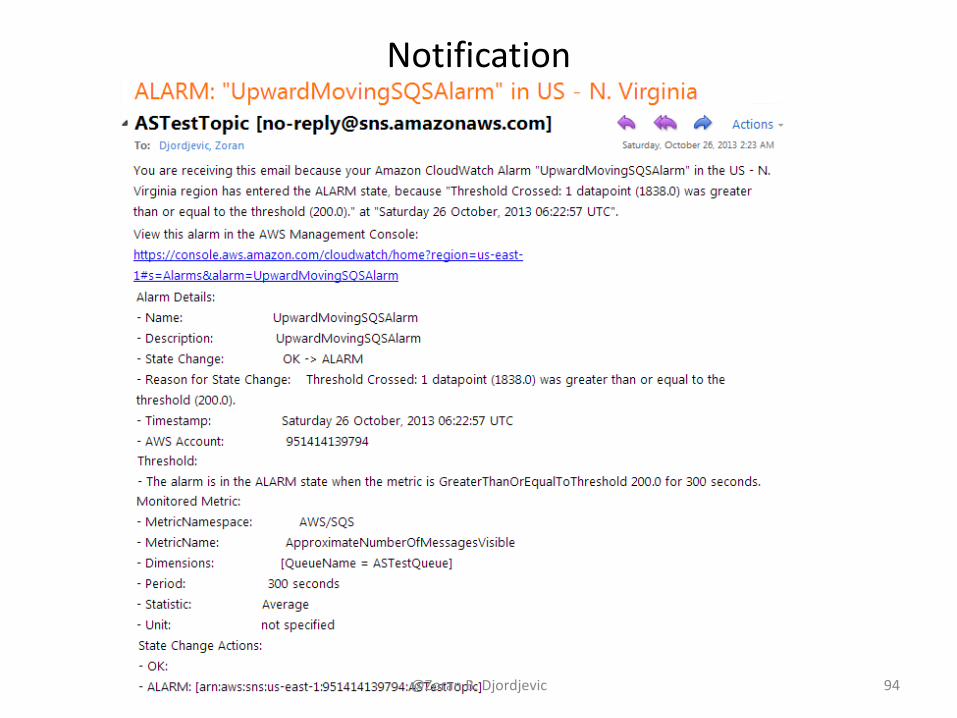
Notification
@Zoran B. Djordjevic 94
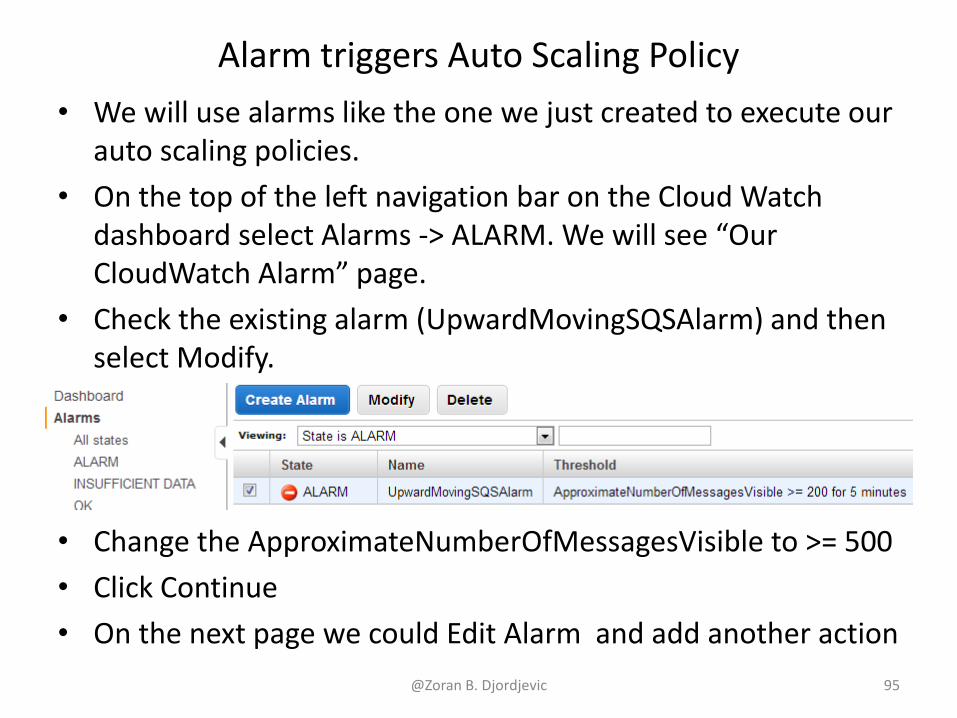
Alarm triggers Auto Scaling Policy • We will use alarms like the one we just created to execute our
auto scaling policies. • On the top of the left navigation bar on the Cloud Watch
dashboard select Alarms -> ALARM. We will see “Our CloudWatch Alarm” page.
• Check the existing alarm (UpwardMovingSQSAlarm) and then select Modify.
• Change the ApproximateNumberOfMessagesVisible to >= 500 • Click Continue • On the next page we could Edit Alarm and add another action
@Zoran B. Djordjevic 95
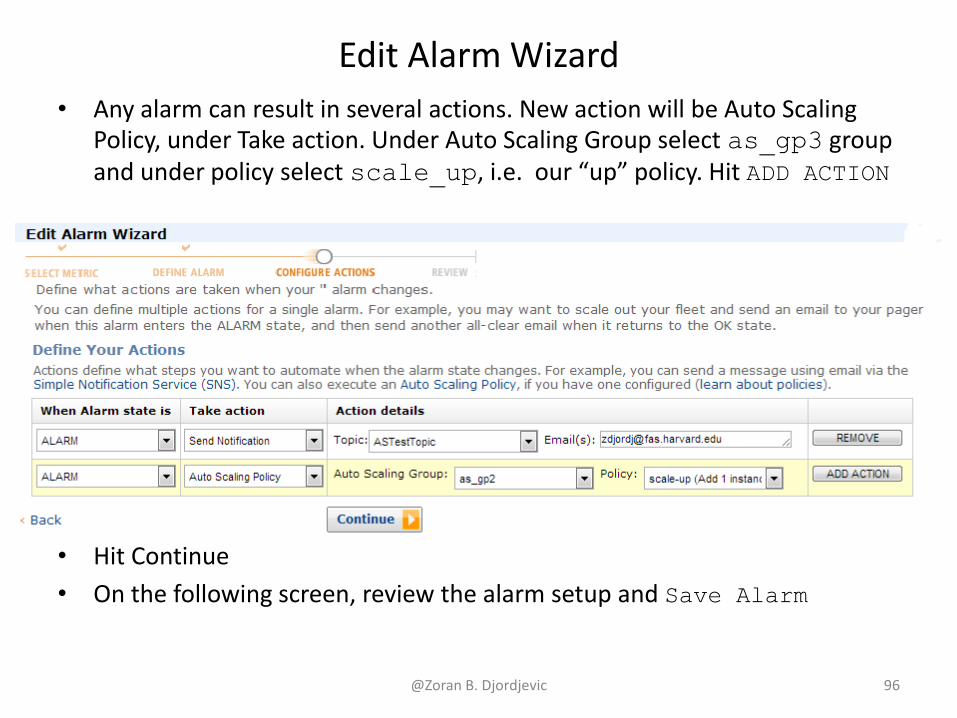
Edit Alarm Wizard • Any alarm can result in several actions. New action will be Auto Scaling
Policy, under Take action. Under Auto Scaling Group select as_gp3 group and under policy select scale_up, i.e. our “up” policy. Hit ADD ACTION
• Hit Continue • On the following screen, review the alarm setup and Save Alarm
@Zoran B. Djordjevic 96
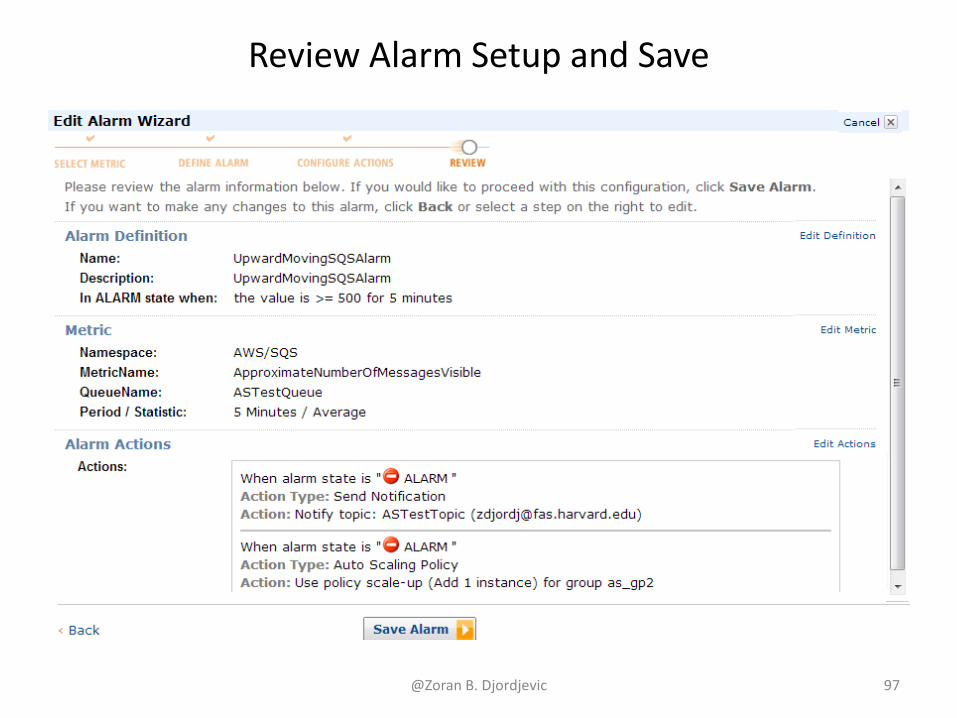
Review Alarm Setup and Save
@Zoran B. Djordjevic 97

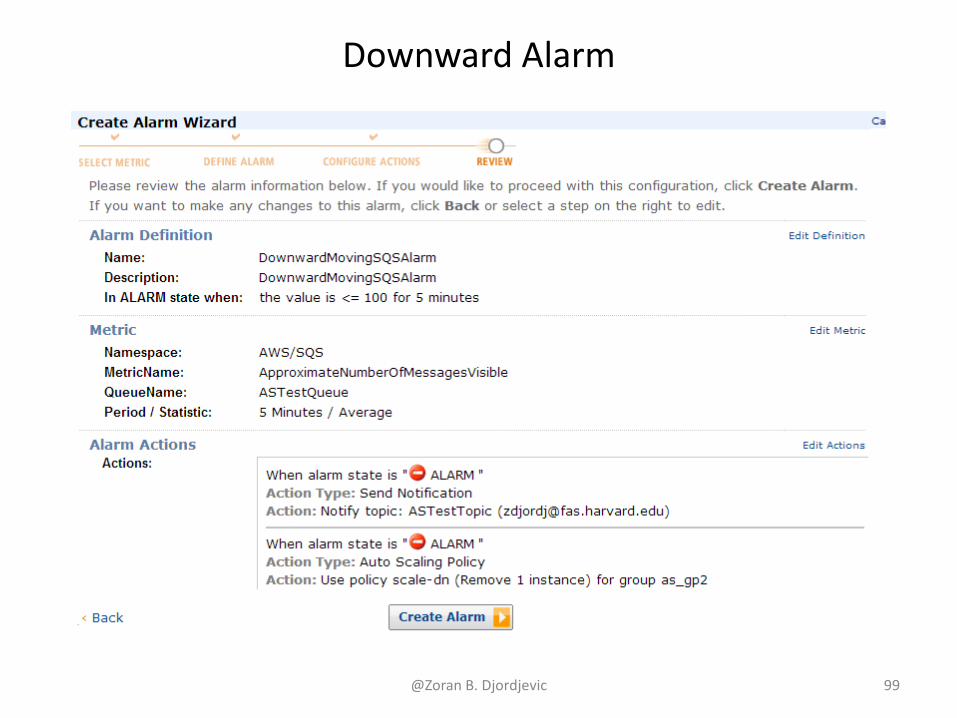
Configure Downward Alarm • We again select SQS: Queue Metrics page and hit Create
Alarm button. • This time we will create a downward moving Alarm that will
react when the number of messages in ASTestQueue falls bellow a threshold. We will call that alarm DownwardMovingSQSAlarm.
• The alarm will send a notification to the topic ASTestTopic and invoke scale-dn auto scaling policy on group as_gp3.
@Zoran B. Djordjevic 98
Downward Alarm
@Zoran B. Djordjevic 99
EC2 Dashboard, Instances and Load Balancer • EC2 Dashboard will most probably show several instances. • Only when the queue message count falls bellow the lower
threshold will the number of instances in as_gp3 group start to decrease.
• Load balancer should also show all of the instances under its monitoring.
• Cloud Watch reports the metrics every 5 minute. That makes these processes somewhat slow.
• One needs to learn the properties of all relevant processes in order to establish an efficient control over the number of EC2 instances.
@Zoran B. Djordjevic 100
Once done • These experiments require a substantial number of instances. • Empty your auto scaling group c:\> as-update-auto-scaling-group as_gp3 --min-size 0 --max-size 0
• Delete your auto scaling group c:\>as-delete-auto-scaling-group as_group2
• Drop launch_configuration • Terminate all involved instances and AMI-s if any persist. • Terminate your Queues and Topics • Terminate Load Balancers
@Zoran B. Djordjevic 101


![[AWSマイスターシリーズ]Amazon Elastic Load Balancing (ELB)](https://img.pdfslide.net/doc/110x75/547ce53f5906b552378b45ad/awsamazon-elastic-load-balancing-elb.jpg)