Embed Size (px)
Citation preview

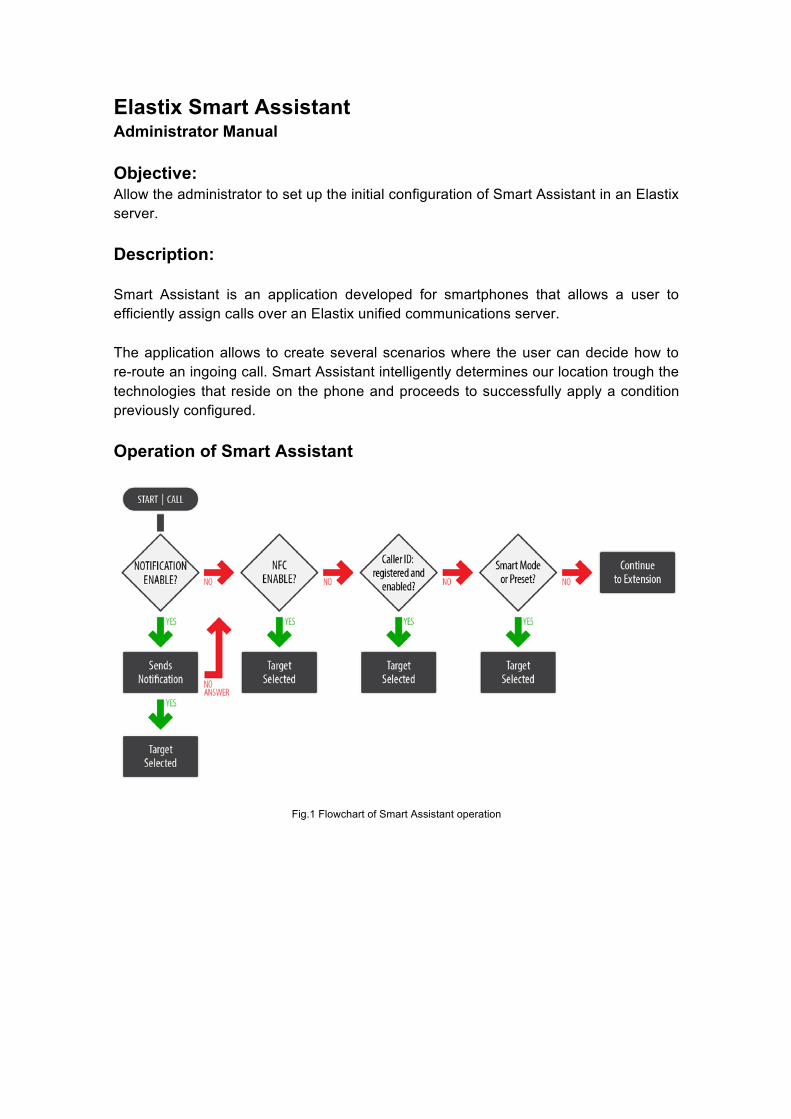
Elastix Smart Assistant Administrator Manual Objective: Allow the administrator to set up the initial configuration of Smart Assistant in an Elastix server. Description: Smart Assistant is an application developed for smartphones that allows a user to efficiently assign calls over an Elastix unified communications server. The application allows to create several scenarios where the user can decide how to re-route an ingoing call. Smart Assistant intelligently determines our location trough the technologies that reside on the phone and proceeds to successfully apply a condition previously configured. Operation of Smart Assistant
Fig.1 Flowchart of Smart Assistant operation
Installation Go to your Addons module on your Elastix server’s web interface. Search for the module Smart Assistant, and click on install.
Fig.2 Elastix Market Place
It’s important to mention that users must install as well the Smartphone app of Smart Assistant on their devices. This app is available in Google Play web store. When these two steps have been completed, you can go to the Smart Assistant menu on the Elastix web administration interface.
Fig.3 Selecting Smart Assistant Menu
Once there, click on Add Device. A form will appear where you can enter the User’s Device ID, and associate it with the user with its extension. The information required for completing the user registration is:
§ Device ID: An identifier with 20 alphanumeric characters that is generated for the user’s phone by the application.
§ Extension: The user’s extension on the Elastix Server (example: 100). § Allow Create Targets: It allows the creation of destinations. § License File: The administrator can enter the license generated when the user
made the purchase.
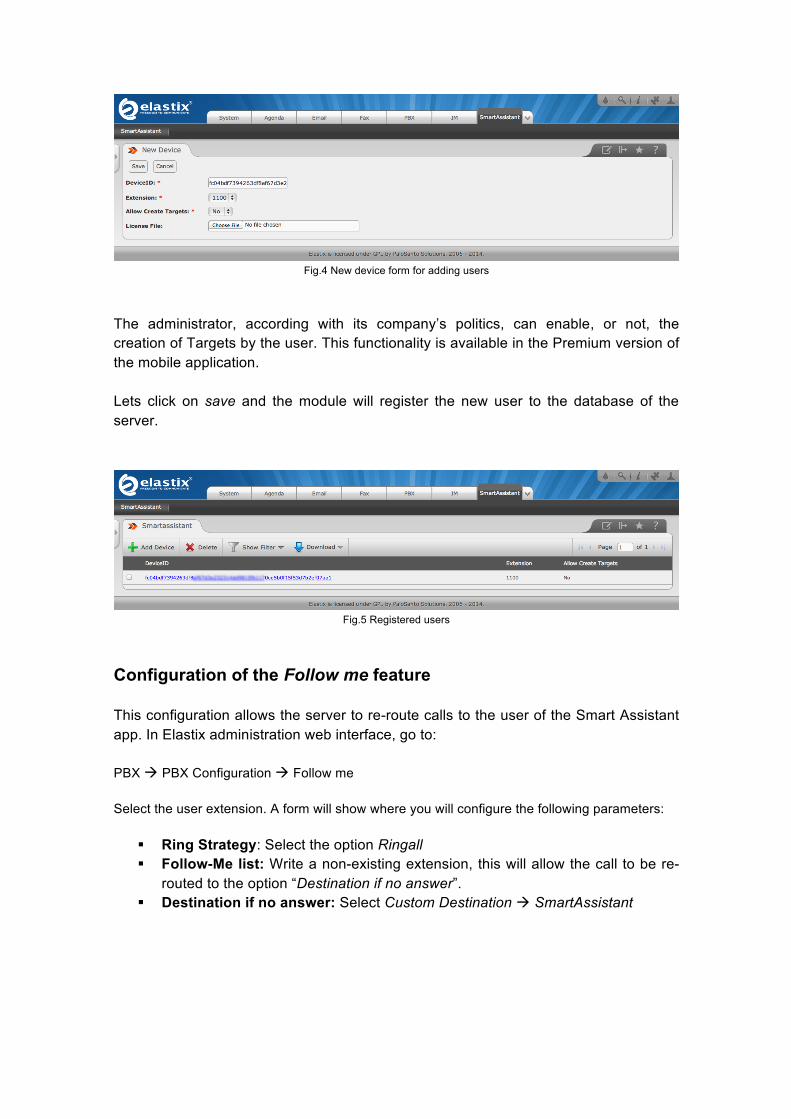
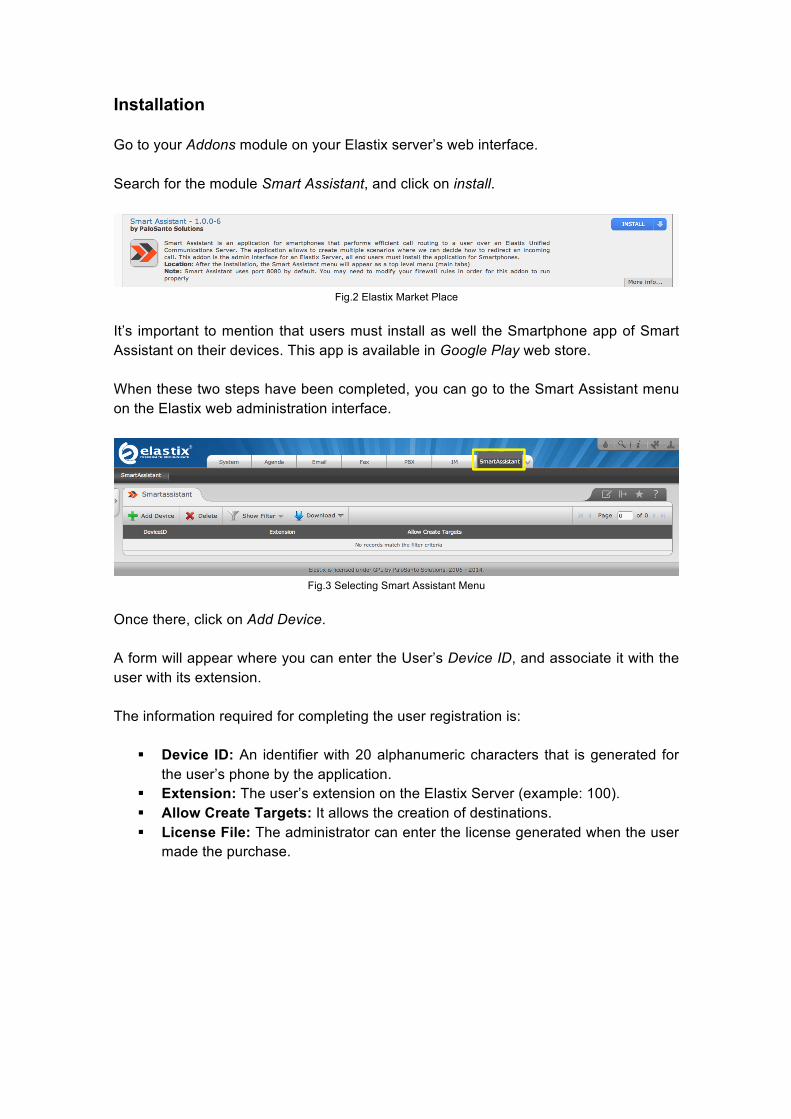
Fig.4 New device form for adding users
The administrator, according with its company’s politics, can enable, or not, the creation of Targets by the user. This functionality is available in the Premium version of the mobile application. Lets click on save and the module will register the new user to the database of the server.
Fig.5 Registered users
Configuration of the Follow me feature This configuration allows the server to re-route calls to the user of the Smart Assistant app. In Elastix administration web interface, go to: PBX à PBX Configuration à Follow me Select the user extension. A form will show where you will configure the following parameters:
§ Ring Strategy: Select the option Ringall § Follow-Me list: Write a non-existing extension, this will allow the call to be re-
routed to the option “Destination if no answer”. § Destination if no answer: Select Custom Destination à SmartAssistant
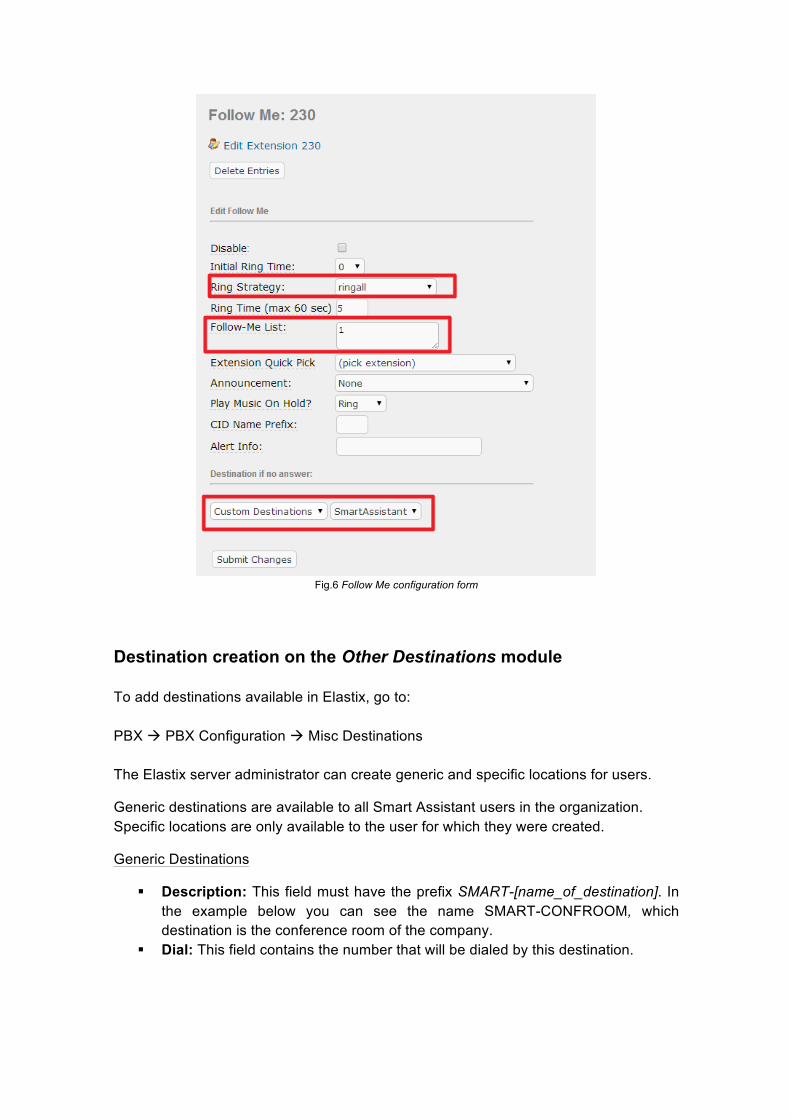
Fig.6 Follow Me configuration form
Destination creation on the Other Destinations module To add destinations available in Elastix, go to: PBX à PBX Configuration à Misc Destinations The Elastix server administrator can create generic and specific locations for users.
Generic destinations are available to all Smart Assistant users in the organization. Specific locations are only available to the user for which they were created.
Generic Destinations
§ Description: This field must have the prefix SMART-[name_of_destination]. In the example below you can see the name SMART-CONFROOM, which destination is the conference room of the company.
§ Dial: This field contains the number that will be dialed by this destination.
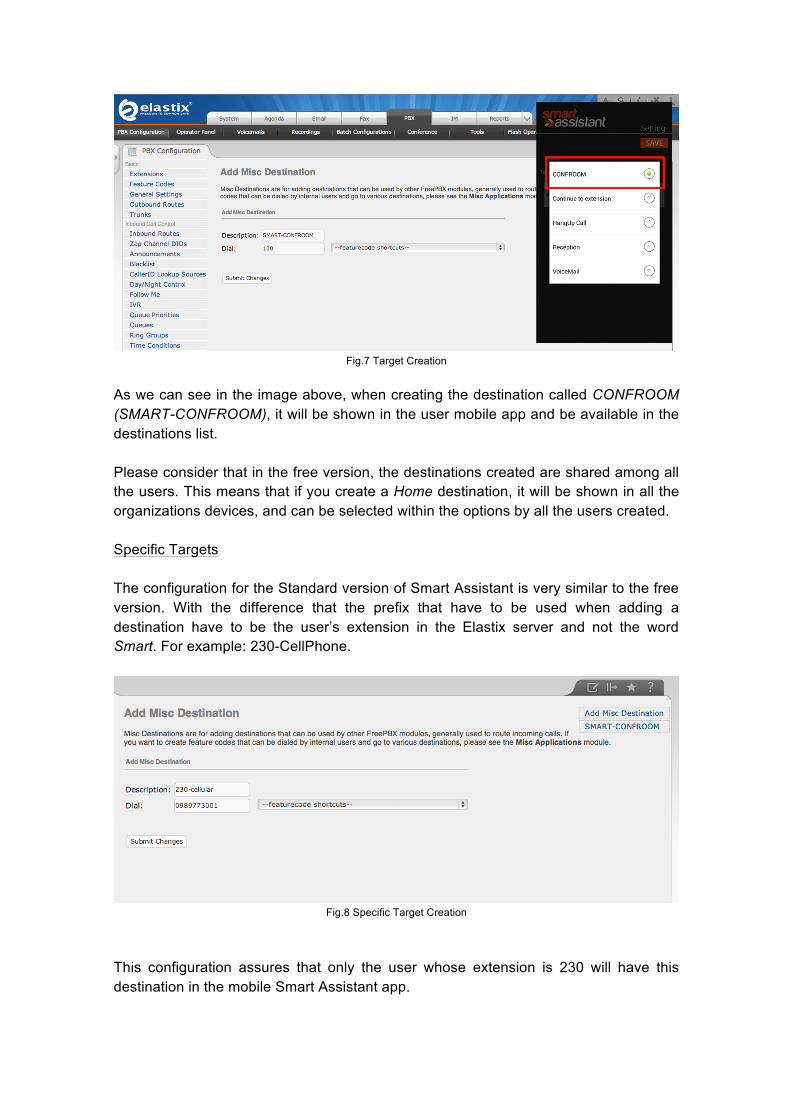
Fig.7 Target Creation
As we can see in the image above, when creating the destination called CONFROOM (SMART-CONFROOM), it will be shown in the user mobile app and be available in the destinations list. Please consider that in the free version, the destinations created are shared among all the users. This means that if you create a Home destination, it will be shown in all the organizations devices, and can be selected within the options by all the users created. Specific Targets The configuration for the Standard version of Smart Assistant is very similar to the free version. With the difference that the prefix that have to be used when adding a destination have to be the user’s extension in the Elastix server and not the word Smart. For example: 230-CellPhone.
Fig.8 Specific Target Creation
This configuration assures that only the user whose extension is 230 will have this destination in the mobile Smart Assistant app.
The administrator can create as many targets as necessary; these targets will be shown on a list.
Fig.9 List of available targets
To allow the user the selection of a specific destination from the application, he/she must purchase a Standard license. Adding a license A user can purchase a Standard or Premium license at: http://store.palosanto.com/index.php/elastix-addons/elastix-smartassistant.html Each license has additional features that allow to extend the functionality of the application. Once the user has purchased a license, he/she will receive a file with a ".lic" extension and the following format:
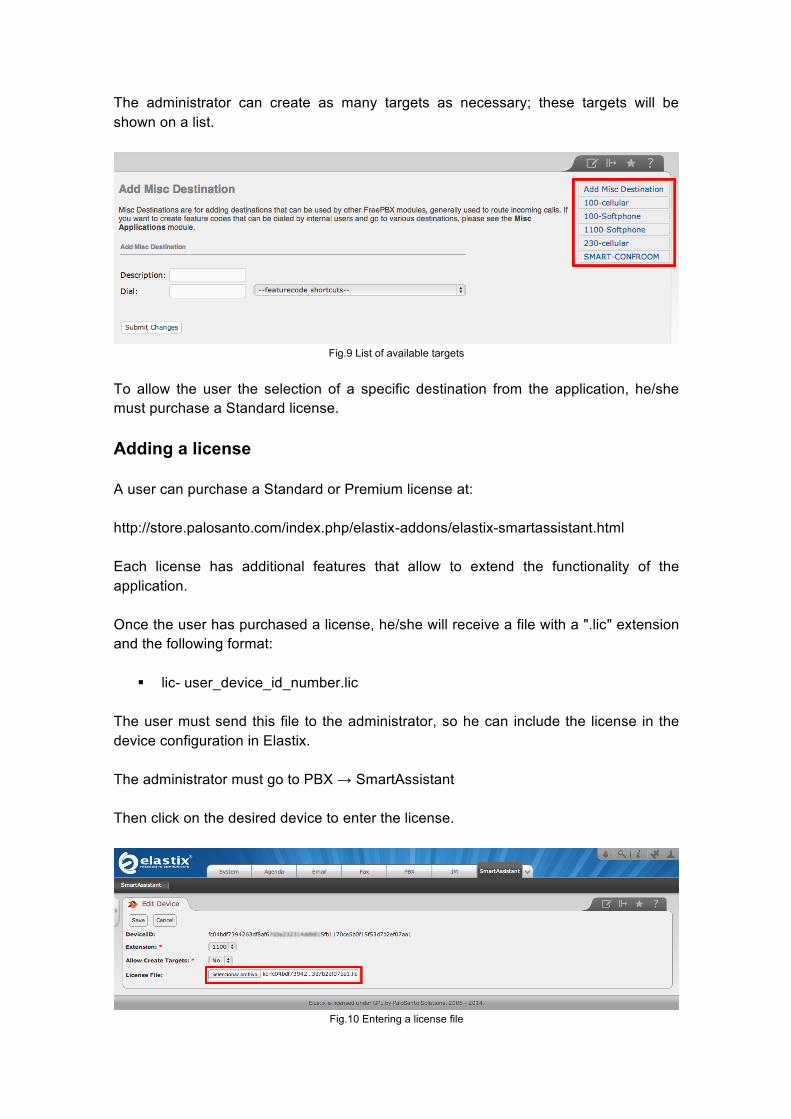
§ lic- user_device_id_number.lic The user must send this file to the administrator, so he can include the license in the device configuration in Elastix. The administrator must go to PBX → SmartAssistant Then click on the desired device to enter the license.
Fig.10 Entering a license file
Once in the configuration interface, the administrator can add the license file by clicking on "Select File", then browse to find it, uploaded and click on "Save." The user will have all the available functionalities in the application automatically. Smart Assistant Advanced Configuration Changing ports for sending packets between the application and Smart Assistant
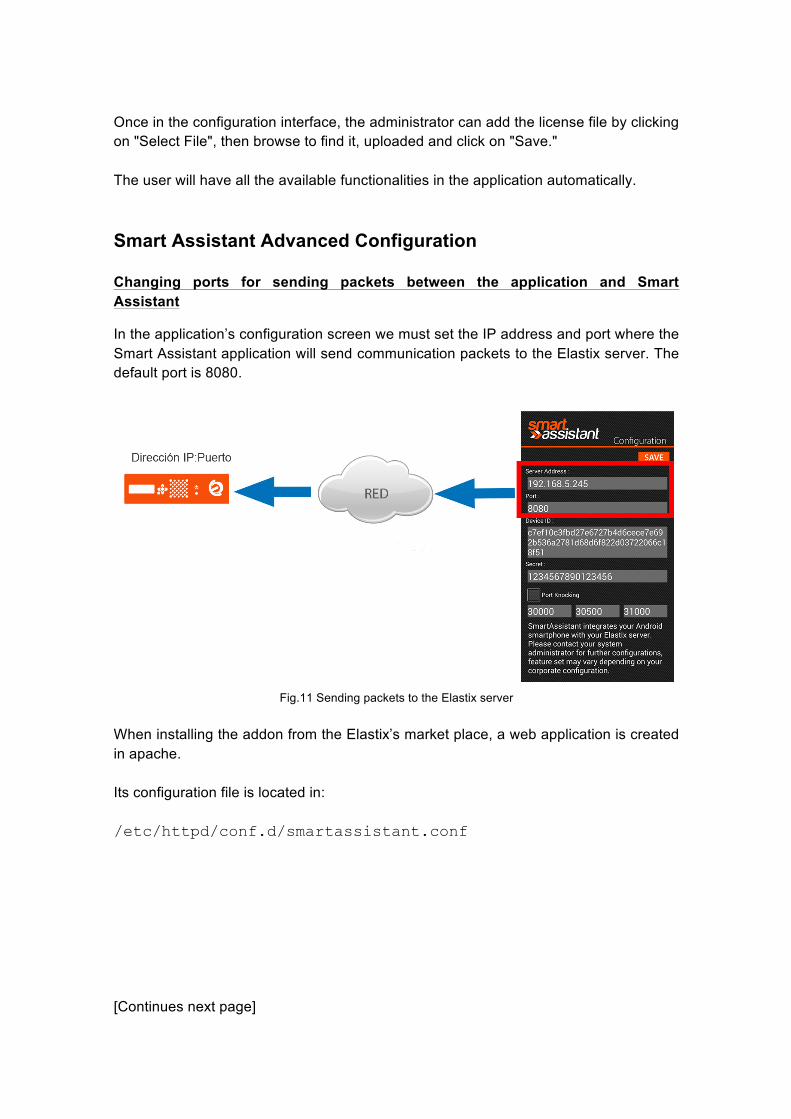
In the application’s configuration screen we must set the IP address and port where the Smart Assistant application will send communication packets to the Elastix server. The default port is 8080.
Fig.11 Sending packets to the Elastix server
When installing the addon from the Elastix’s market place, a web application is created in apache. Its configuration file is located in: /etc/httpd/conf.d/smartassistant.conf [Continues next page]

Fig.12 SmartAssistant’s Configuration
Note: we can edit the file using vim If we want to change the communication port we must do so the two instances where it is set. In the following example we change the listening port to 39000
Fig.13 Changing the communication port in SmartAssistant’s configuration file
Save the changes and leave the file, then restart apache for the changes to take effect. service httpd restart Encrypted communication
To improve the security of your application, all communication between the application and the Elastix server is encrypted. The encryption key is unique per server and the default value is 1234567890123456, both on the server side (addon) and the application on the Smartphone. The administrator can edit this value.
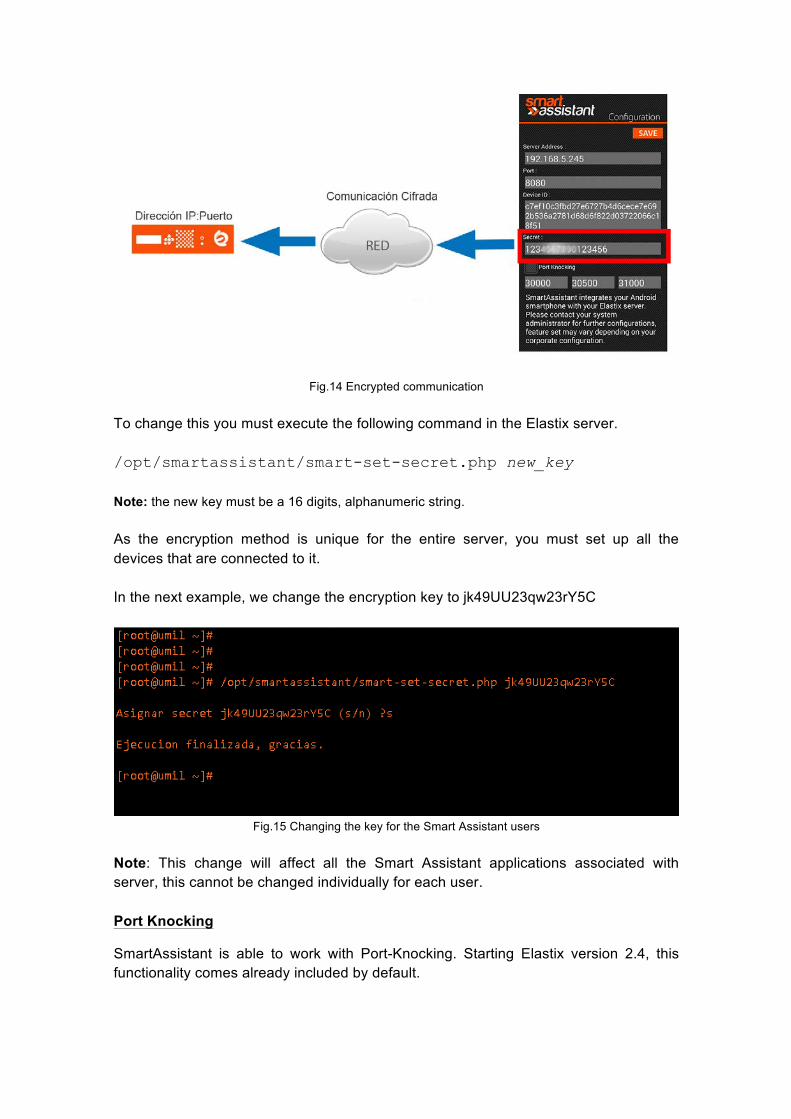
Fig.14 Encrypted communication
To change this you must execute the following command in the Elastix server. /opt/smartassistant/smart-set-secret.php new_key Note: the new key must be a 16 digits, alphanumeric string. As the encryption method is unique for the entire server, you must set up all the devices that are connected to it. In the next example, we change the encryption key to jk49UU23qw23rY5C
Fig.15 Changing the key for the Smart Assistant users
Note: This change will affect all the Smart Assistant applications associated with server, this cannot be changed individually for each user. Port Knocking
SmartAssistant is able to work with Port-Knocking. Starting Elastix version 2.4, this functionality comes already included by default.
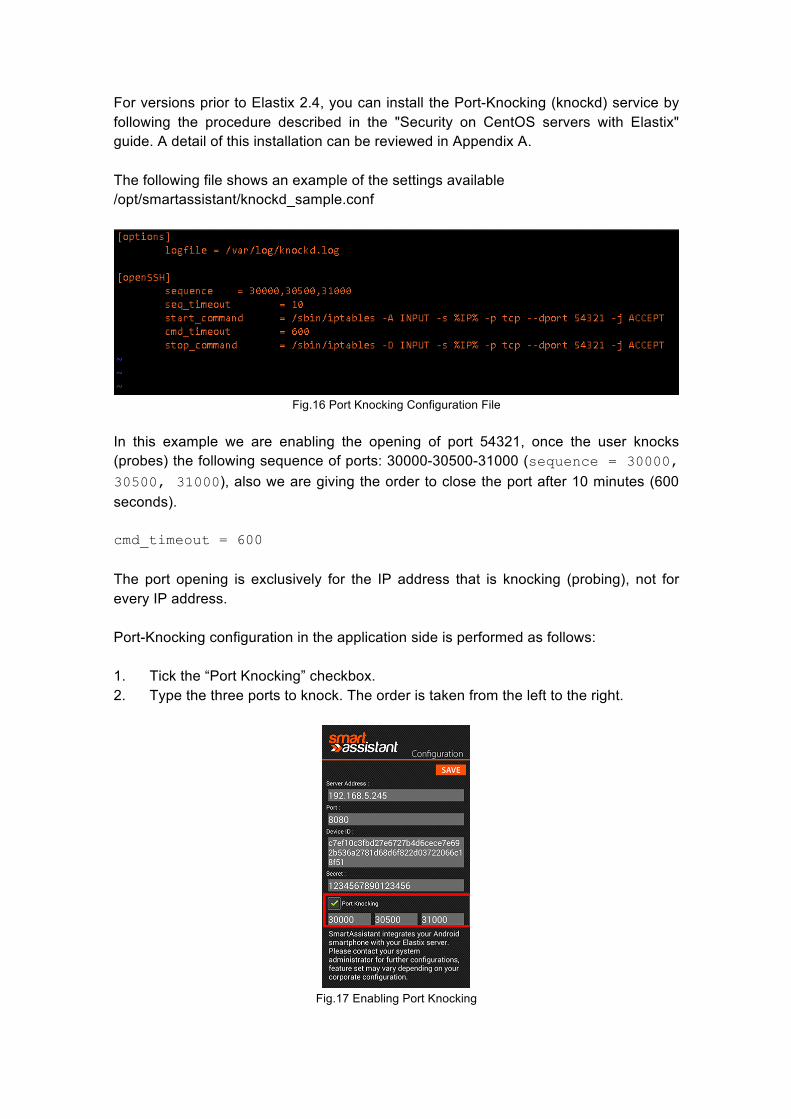
For versions prior to Elastix 2.4, you can install the Port-Knocking (knockd) service by following the procedure described in the "Security on CentOS servers with Elastix" guide. A detail of this installation can be reviewed in Appendix A. The following file shows an example of the settings available /opt/smartassistant/knockd_sample.conf
Fig.16 Port Knocking Configuration File
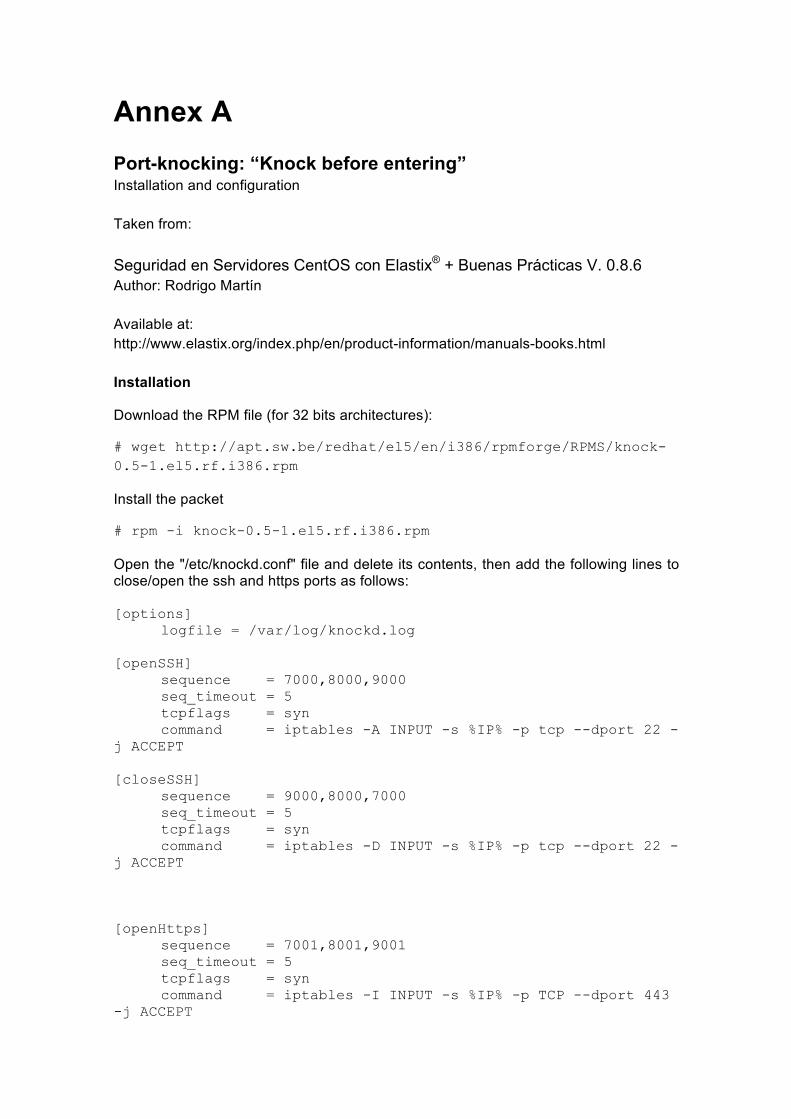
In this example we are enabling the opening of port 54321, once the user knocks (probes) the following sequence of ports: 30000-30500-31000 (sequence = 30000, 30500, 31000), also we are giving the order to close the port after 10 minutes (600 seconds). cmd_timeout = 600 The port opening is exclusively for the IP address that is knocking (probing), not for every IP address. Port-Knocking configuration in the application side is performed as follows: 1. Tick the “Port Knocking” checkbox. 2. Type the three ports to knock. The order is taken from the left to the right.
Fig.17 Enabling Port Knocking

Fail2Ban
We can find a sample configuration for fail2ban, in the directory /opt/smartassistant/
§ Configuration example: fail2ban_filter_smartAssistant.conf § Jail example: fail2ban_jail.sample
Support / Questions For support or further inquiries, please write to:
@_SmartAssistant
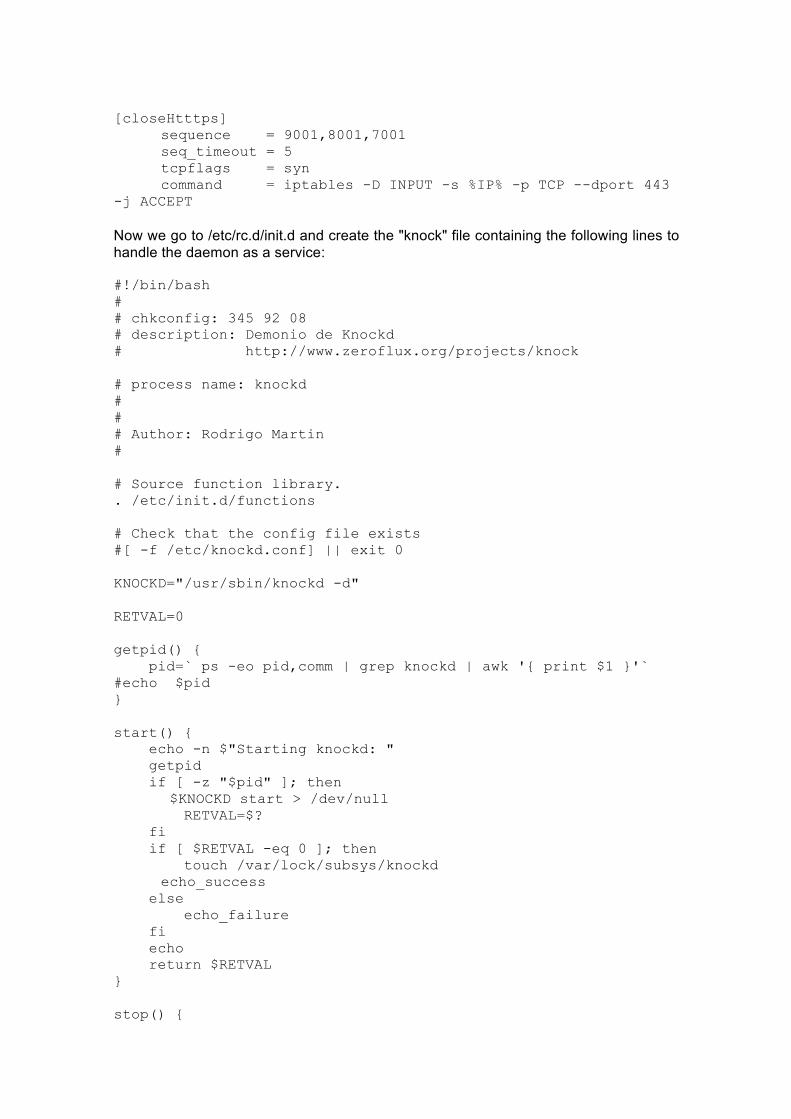
Annex A Port-knocking: “Knock before entering” Installation and configuration Taken from: Seguridad en Servidores CentOS con Elastix® + Buenas Prácticas V. 0.8.6 Author: Rodrigo Martín Available at: http://www.elastix.org/index.php/en/product-information/manuals-books.html Installation
Download the RPM file (for 32 bits architectures):
# wget http://apt.sw.be/redhat/el5/en/i386/rpmforge/RPMS/knock-0.5-1.el5.rf.i386.rpm
Install the packet
# rpm -i knock-0.5-1.el5.rf.i386.rpm
Open the "/etc/knockd.conf" file and delete its contents, then add the following lines to close/open the ssh and https ports as follows: [options] logfile = /var/log/knockd.log [openSSH] sequence = 7000,8000,9000 seq_timeout = 5 tcpflags = syn command = iptables -A INPUT -s %IP% -p tcp --dport 22 -j ACCEPT [closeSSH] sequence = 9000,8000,7000 seq_timeout = 5 tcpflags = syn command = iptables -D INPUT -s %IP% -p tcp --dport 22 -j ACCEPT [openHttps] sequence = 7001,8001,9001 seq_timeout = 5 tcpflags = syn command = iptables -I INPUT -s %IP% -p TCP --dport 443 -j ACCEPT
[closeHtttps] sequence = 9001,8001,7001 seq_timeout = 5 tcpflags = syn command = iptables -D INPUT -s %IP% -p TCP --dport 443 -j ACCEPT Now we go to /etc/rc.d/init.d and create the "knock" file containing the following lines to handle the daemon as a service: #!/bin/bash # # chkconfig: 345 92 08 # description: Demonio de Knockd # http://www.zeroflux.org/projects/knock # process name: knockd # # # Author: Rodrigo Martin # # Source function library. . /etc/init.d/functions # Check that the config file exists #[ -f /etc/knockd.conf] || exit 0 KNOCKD="/usr/sbin/knockd -d" RETVAL=0 getpid() { pid=` ps -eo pid,comm | grep knockd | awk '{ print $1 }'` #echo $pid } start() { echo -n $"Starting knockd: " getpid if [ -z "$pid" ]; then $KNOCKD start > /dev/null RETVAL=$? fi if [ $RETVAL -eq 0 ]; then touch /var/lock/subsys/knockd echo_success else echo_failure fi echo return $RETVAL } stop() {
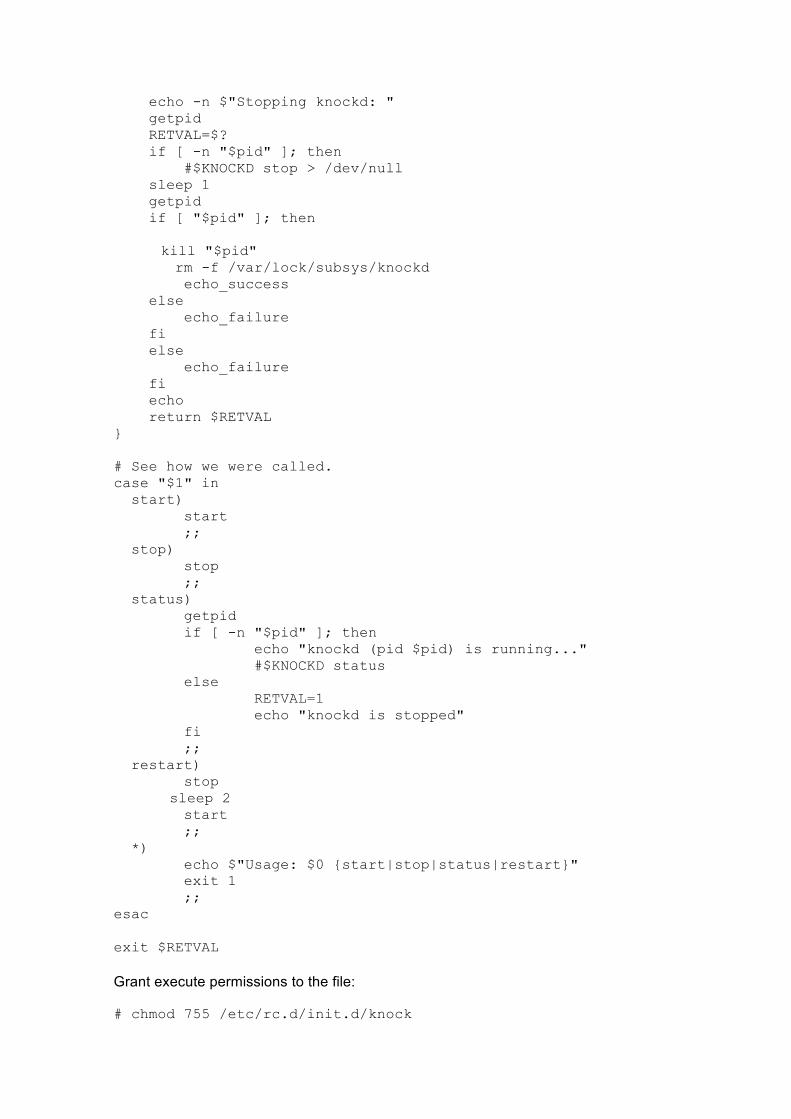
echo -n $"Stopping knockd: " getpid RETVAL=$? if [ -n "$pid" ]; then #$KNOCKD stop > /dev/null sleep 1 getpid if [ "$pid" ]; then kill "$pid" rm -f /var/lock/subsys/knockd echo_success else echo_failure fi else echo_failure fi echo return $RETVAL } # See how we were called. case "$1" in start) start ;; stop) stop ;; status) getpid if [ -n "$pid" ]; then echo "knockd (pid $pid) is running..." #$KNOCKD status else RETVAL=1 echo "knockd is stopped" fi ;; restart) stop sleep 2 start ;; *) echo $"Usage: $0 {start|stop|status|restart}" exit 1 ;; esac exit $RETVAL Grant execute permissions to the file: # chmod 755 /etc/rc.d/init.d/knock
Configure so that it is always loaded when the server is started # chkconfig knock on Start the service # service knock start To test the port-knocking we must have the involved ports closed in the iptables Usage example: from another Linux PC do the "port knocking" to open the https port as follows: # telnet elastix.server.ip.address 7001 ; telnet elastix.server.ip.address 8001 ; telnet elastix.server.ip.address 9001 Then press Ctrl+c 4 times and our server will open the specified port for our IP address, we can close it by knocking the same ports in reverse order. If we need to "knock" from a Windows PC we can do it using the "knock-win32-port" (32-bit application).


![Elastix Book Comunicaciones Unificadas Con Elastix Vol1 V0.8[2]](https://img.pdfslide.net/doc/110x75/557b2878d8b42a71798b518e/elastix-book-comunicaciones-unificadas-con-elastix-vol1-v082.jpg)