Embed Size (px)
Citation preview
Last Updated 01/30/2018
Election Judge Training Manual Election Judge Hotline
(217) 384-3724 For Supplies, Text (217) 200-9791
Gordy Hulten Champaign County Clerk
1776 East Washington Street, Urbana, IL 61802 www.champaigncountyclerk.com

2
Table of Contents General Information ............................................................................................................................. 3-10
Opening the Polling Place ................................................................................................................ .11-29
While the Polling Place is open ............................................................................................................. 29
Station #1 –Greeting and Processing Voters .................................................................................. 30-36
Station #2 –Issuing Ballots ................................................................................................................ 37-44
Station #3 –Tabulation ....................................................................................................................... 44-46
Closing the Polling Place .................................................................................................................. 47-56
Appendix A:Grace Period Registration ............................................................................................ 57-64
3
Letter from Champaign County Clerk, Gordy Hulten
Dear Election Judge,
Thank you for your service as Champaign County Election Judges for the 2018 General Primary Election. Without your dedication and assistance we simply would not be able to hold elections. The role you play on Election Day is a vital service for the voters of Champaign County.
This manual contains the information you need to perform the duties of an election judge to ensure that voters have a positive experience at the polling place on Election Day. At times this may seem like an overwhelming amount of information to process, but please remember that the most important job for election judges is ensuring that all registered voters have the opportunity to vote efficiently and privately.
Thank you once again for your service to the community and as always should you have any questions or concerns please do not hesitate to contact me or my staff at your convenience at (217) 384-3724 or [email protected].
Sincerely,
Gordy Hulten Champaign County Clerk

4
This page left blank intentionally
5
Election Judge Information Election Judge Requirements All Election Judges must meet all of the following requirements: 1) United States citizens 2) Registered to vote in Champaign County 3) Be of good repute and character 4) Able to speak, read and write the English language 5) Be skilled in the four fundamental rules of mathematics 6) Be of good understanding and capable 7) Not be a candidate for any office in the precinct & not be an elected precinct committeeperson Equal Authority There is no such thing as a “head judge.” All judges have equal authority in the polling place on Election Day! Any questions or concerns you have may be addressed with your coordinator or by calling the Election Hotline at (217) 384-3724. Working Hours Illinois law requires that the polls be open from 6:00 a.m. until 7:00 p.m. All judges are required to arrive at the polls no later than 5:00 a.m. Judges are required to remain in the polling place all day on Election Day. Short breaks on the premises are permitted; leaving the polling place is prohibited. If an emergency arises that prevents a judge from serving, the judge must notify the Election Authority at (217) 384-3724 as soon as possible. Election Judge Pay Judges must sign & return the Champaign County Election Expense Bill (Pay sheet) on Election Day in the Clear Pouch in the Red Binder Election judges who attend training are paid $200. There are additional tasks judges can perform which allow them to earn additional pay. An additional $5 is paid to judges (one per polling place) who agree to pick-up supplies from the Election Supply Building the day before the election. An additional $10 is given to judges who set-up materials the night before the Election. At the end of Election Day at least one judge from each party must ride together (in the same car) to return the election supplies. The judge driving receives an additional $5 plus mileage, the passenger earns $5 additional. Please do not call our office immediately following the election asking when you will receive your judge pay. Our office processes all the necessary paperwork to distribute pay as soon as we possibly can. Handling of Election Materials Only the election judges can handle the election materials, supplies, equipment and ballots. Any items which are sealed must be opened in the presence of two election judges, one of each party.
6
Electioneering Electioneering is defined as working for, against, or in the interest of a candidate, party or proposition. Electioneering is not allowed in the polling place or within 100 feet of the entrance of the room in which voting is taking place. No one is permitted to wear campaign buttons, display political literature or engage in any political discussion within the restricted area. Rotate Duty Station Positions When possible, each judge should learn the various duties associated with each judge position and be able to perform each task satisfactorily. Rotating duties helps prevent errors and prohibits certain types of vote fraud. When rotating stations, two judges, (one from each major political party if possible), should be present at Station #1 at all times. Election Judge Etiquette On Election Day please dress comfortably but neatly. Please use good judgment, be modest with your choice of attire. Judges must not wear anything that can be viewed as electioneering. Electioneering items may include but are not limited to clothing, hats, buttons, stickers, etc. Ensure you have transportation to and from your assigned precinct; we are unable to provide transportation for you. Be patient, speak clearly, make eye contact and use your manners. Be courteous and professional to everyone. Keep conversations polite and nonpolitical. Electronic devices (laptops, kindles, nooks, etc.) are permitted in the polling place; however, they may not display political messages. These devices should not be disruptive to voters or other judges and may not distract from a judge’s first priority of handling voters. Keep any necessary calls brief and non-disruptive to voters and other judges. Keep food and drinks away from the ballots and poll books. Respect every voter’s privacy. Do not grab ballots from voters if a problem occurs, only handle a voter’s ballot if asked to do so by the voter. When working at Station #3, the ballot box/tabulator judge should remain approximately 5 feet away from the tabulator unless a voter requests assistance. Do not insert a voter’s ballot into the tabulator unless asked by the voter for assistance. If you are uncomfortable with the behavior of one of your fellow election judges or there is a problem with your polling place please contact your coordinator or the Election Hotline (217) 384-3724.
7
Voting in Champaign County Voting Equipment Champaign County utilizes paper ballots which voters use to fill in the oval for candidates and/or propositions they wish to vote for. In accordance with the Help America Vote Act (HAVA), those paper ballots are inserted into tabulators by voters, which count and record votes. In accordance with the Americans with Disabilities Act (ADA) Voter Assistance Terminals are available at each precinct in Champaign County. A Voter Assistance Terminal (VAT) is a marking tool which allows voters with disabilities the opportunity to vote without assistance. Voters (or those assisting them) insert the ballot; which is then displayed on the screen, allowing the voter to mark their candidate/proposition selections using the touch screen or a stylus. Upon completion of voting, the VAT marks their selections on the ballot and ejects it so it can be fed into the tabulator and counted and recorded with all other ballots. Although designed with the physically disabled voter in mind, the VAT can be used by any voter. Electronic Poll Books Electronic poll books (laptops) are used by election judges to lookup voters, verify the voter’s registration information and receive instruction on how to properly process voters who either are already registered or need to register on Election Day Polling Places There are currently 118 precincts and 95 polling places in Champaign County. Some polling places are combined, serving two precincts. Combined polling places function with one set of materials and equipment. All Champaign County polling places are wheelchair accessible at either the main entrance, or an alternate entrance. Please familiarize yourself with the entrance at your polling place. Who May Vote? All active and inactive voters in Champaign County are listed in the electronic poll book program. When a voter is successfully located in the database and the person currently resides at the address on the record, they should be considered a qualified voter. If a voter is registered to vote in a different polling place, the poll book laptop is designed to notify judges of the name and location of the voter’s correct polling place. Remember that people are able to register to vote and vote on Election Day under the changes to the Grace Registration law.

8
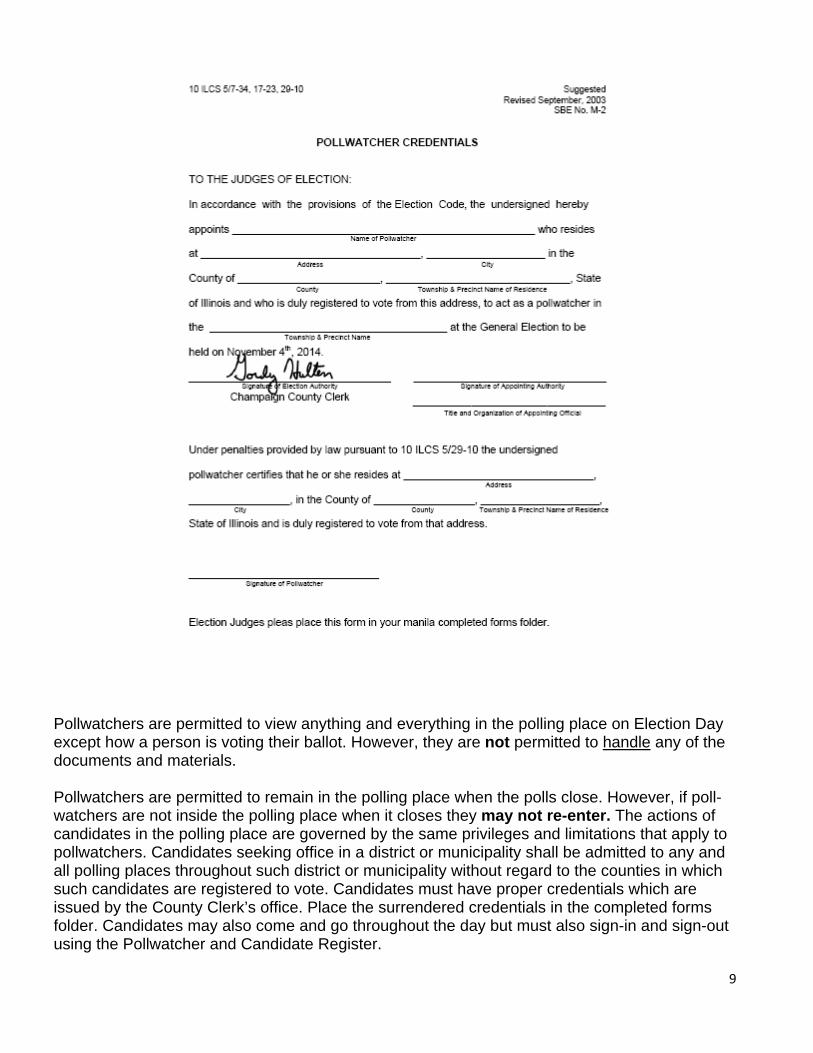
Pollwatcher and Candidate Information Pollwatchers are appointed by candidates, political parties, qualified civic organizations, State civic organizations and proponents and opponents to a proposition. The only qualification to be a Pollwatcher is that the person must be a registered voter somewhere in the State of Illinois. Pollwatchers receive credentials which are issued by the County Clerk’s Office (or by the State Board of Elections); these credentials are signed (signatures may be copied) by the appointing authority. Pollwatchers must have a separate credential for each polling place they enter. Upon arrival at the polling place by a pollwatcher:
1. Pollwatcher credentials must be surrendered to election judges and placed in Folder 4 of the Red Binder to be returned to the Election Authority after the polls close.
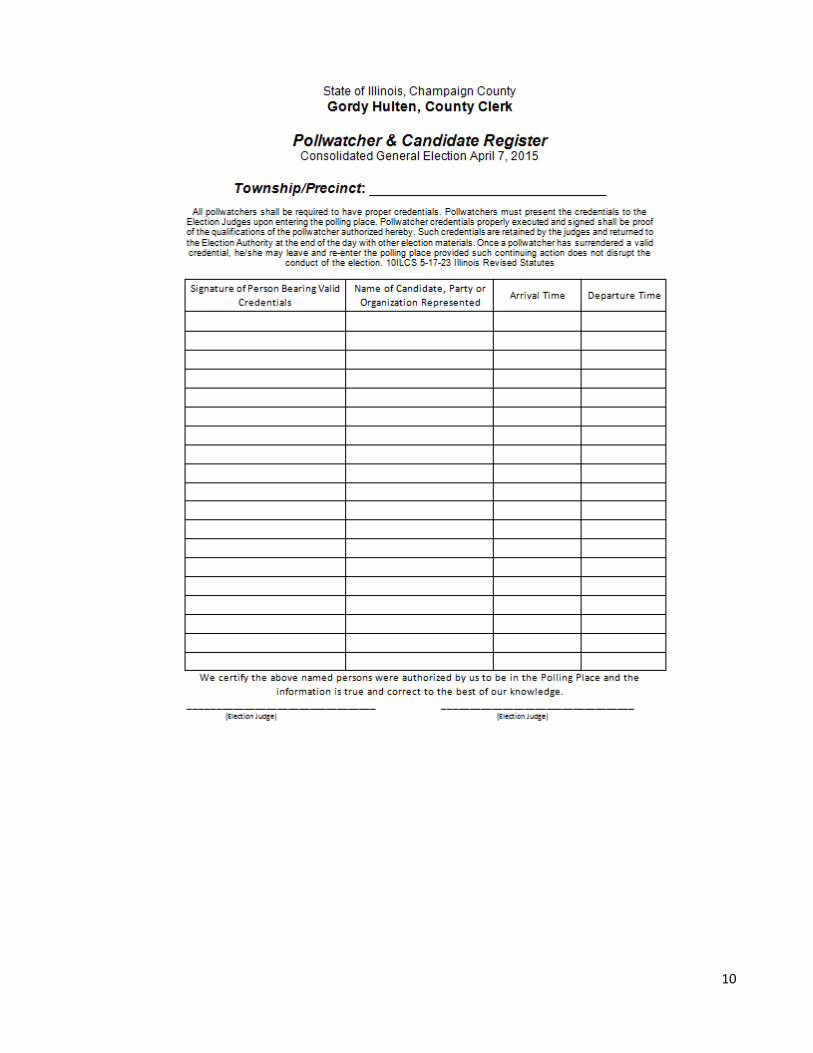
2. Pollwatchers must sign-in and sign-out using the Pollwatcher and Candidate Register (located in Folder 4 of the red binder). Pollwatchers are permitted to leave and return throughout Election Day.
In order to be valid, credentials must contain the following information:
• The actual or facsimile signature of the election authority; • The actual or facsimile signature of the candidate, state or local party chairman, the
presiding officer of a civic organization, the chairman of a group of proponents for or opponents to a proposition;
• The signature & address of the poll-watcher; and • A statement that the poll-watcher is registered to vote at the address shown on the
credential.
9
Pollwatchers are permitted to view anything and everything in the polling place on Election Day except how a person is voting their ballot. However, they are not permitted to handle any of the documents and materials. Pollwatchers are permitted to remain in the polling place when the polls close. However, if poll-watchers are not inside the polling place when it closes they may not re-enter. The actions of candidates in the polling place are governed by the same privileges and limitations that apply to pollwatchers. Candidates seeking office in a district or municipality shall be admitted to any and all polling places throughout such district or municipality without regard to the counties in which such candidates are registered to vote. Candidates must have proper credentials which are issued by the County Clerk’s office. Place the surrendered credentials in the completed forms folder. Candidates may also come and go throughout the day but must also sign-in and sign-out using the Pollwatcher and Candidate Register.
10
11
Opening the Polling Place...
Setting Up the Polling Place All judges must arrive at 5:00 a.m., or earlier if needed, to make certain the polls are open and ready for voting at 6:00 a.m. sharp. If you cannot gain access to the polling place or the judge assigned to pick up supplies is late, call the Election Judge hotline at (217) 384-3724. Under no circumstances are judges permitted to turn away voters, please call the election hotline immediately to report any problems. Many judges prefer to set-up the polling place the night prior to Election Day and we strongly encourage doing so in polling places where this is an option. In order to encourage early set-up, we are offering an additional $10 to judges who do so. If your group of judges wishes to set-up early, please contact the polling place to make arrangements to set up the night before. Your assignment letters will tell you who your fellow judges are. We encourage you to contact each other in advance to make set-up arrangements. Remember to confirm with the polling place that the supplies have been delivered and are available. Please do not contact your coordinators until Election Day itself. If you have questions about early set-up or any other issues before Election Day, please contact the Election Judge hotline. Early setup is not possible in some polling places. There are directions that follow regarding what should be set-up the night before if you’re doing early set-up, so that the steps that require one judge from each political party are completed on Election Day. You do not need judges from both parties for the set-up steps that are done the night before. Although in the past, judges were discouraged from bringing ballot transfer cases and ballot tabulators to the polling place the night before, this is no longer the case. Poll Books may be set-up the night before and left on (and plugged in for the duration of the evening) to ensure that they are connected to the internet and properly synching to the voter program. Ballot transfer cases, tabulators and ballot boxes can be brought to the polling place the night before, the tabulator should not be removed from the case, the ballot box should remain locked (except to remove the blue suitcase and the blue bag) and the ballot transfer case should remain sealed if setting up the night before so that those final steps can be completed the morning of the election when judges from both parties are present.
12
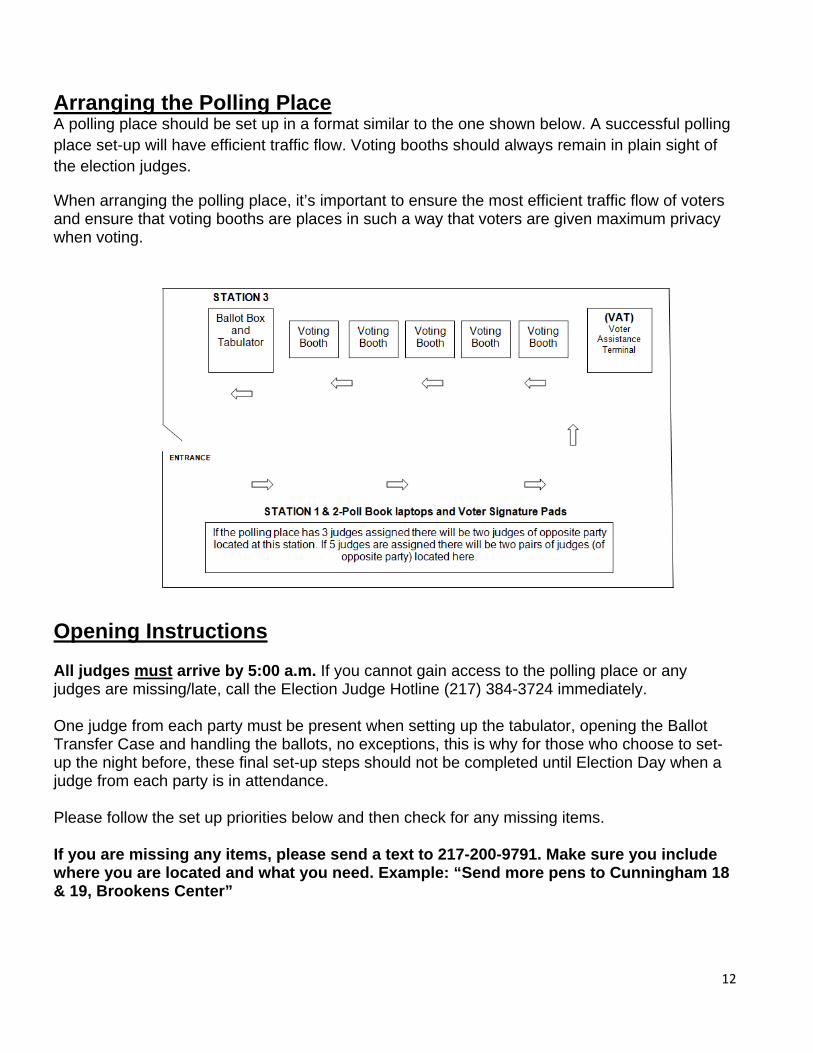
Arranging the Polling Place A polling place should be set up in a format similar to the one shown below. A successful polling place set-up will have efficient traffic flow. Voting booths should always remain in plain sight of the election judges.
When arranging the polling place, it’s important to ensure the most efficient traffic flow of voters and ensure that voting booths are places in such a way that voters are given maximum privacy when voting.
Opening Instructions All judges must arrive by 5:00 a.m. If you cannot gain access to the polling place or any judges are missing/late, call the Election Judge Hotline (217) 384-3724 immediately. One judge from each party must be present when setting up the tabulator, opening the Ballot Transfer Case and handling the ballots, no exceptions, this is why for those who choose to set-up the night before, these final set-up steps should not be completed until Election Day when a judge from each party is in attendance. Please follow the set up priorities below and then check for any missing items. If you are missing any items, please send a text to 217-200-9791. Make sure you include where you are located and what you need. Example: “Send more pens to Cunningham 18 & 19, Brookens Center”
13
All polling places should be equipped with the following supplies: M100 Vote Tabulator Voter Assistance Terminal (VAT) Ballot Box (Metal in town and likely Plastic in Outlying polling places) Ballot Privacy Cover Return Bin Booths (Regular and Accessible with attached accessible sign) ‘Vote Here Today’/’No Electioneering’ sign with wires Additionally, election judges will be equipped with the following supplies that will be needed throughout the day:
Laptop bag(s) containing:
• Laptop & mouse • ID Scanner (In some polling places) • 3-prong white extension cord with multiple plugs (one for every two
laptops) • White AT&T Wi-Fi hotspot device (one per polling place) • County or City Map • Specimen Ballots • Red binder (one per polling place, see below for contents)
14
Red Binder (located in laptop bag) containing the following: • Front Pocket
o Official Ballot Record (OBR) o Write-In Tally Sheet o Judges Pay Sheet o List of Write-In Candidates
• Clear Pouch • Zippered Pouch containing key lanyard and two blue seals • Election Judge training manual • Table of Contents • Last Minute Instructions • Folder 1
o Pocket A-Opening Instructions o Pocket B-Closing Instructions/Return Checklist
• Folder 2 o Pocket A-Election Judge Oath o Pocket B-Judge Vacancy Oath/Emergency Leave Timesheet
• Folder 3 o Pocket A-Blank Voting Affidavits o Pocket B-Place Completed Voting Affidavits
• Folder 4 o Pocket A-Pollwatcher Register/Pollwatcher Credentials o Pocket B-Hearing Impaired Kit
• Folder 5 o Pocket A-Precinct Voter List(s) o Pocket B-Precinct Map(s)
• Folder 6 o Pocket A-Tabulator Re-Seal Form o Pocket B-Deceased/Moved Persons Report
• Back Pocket o Precinct Placard o Judge Comment Sheet
• Manila Spoiled Ballot Envelope (back of red binder)
Ballot Transfer Case Containing: • Ballots • Signature Pads • Empty Red Vinyl Bag (used during closing)
15
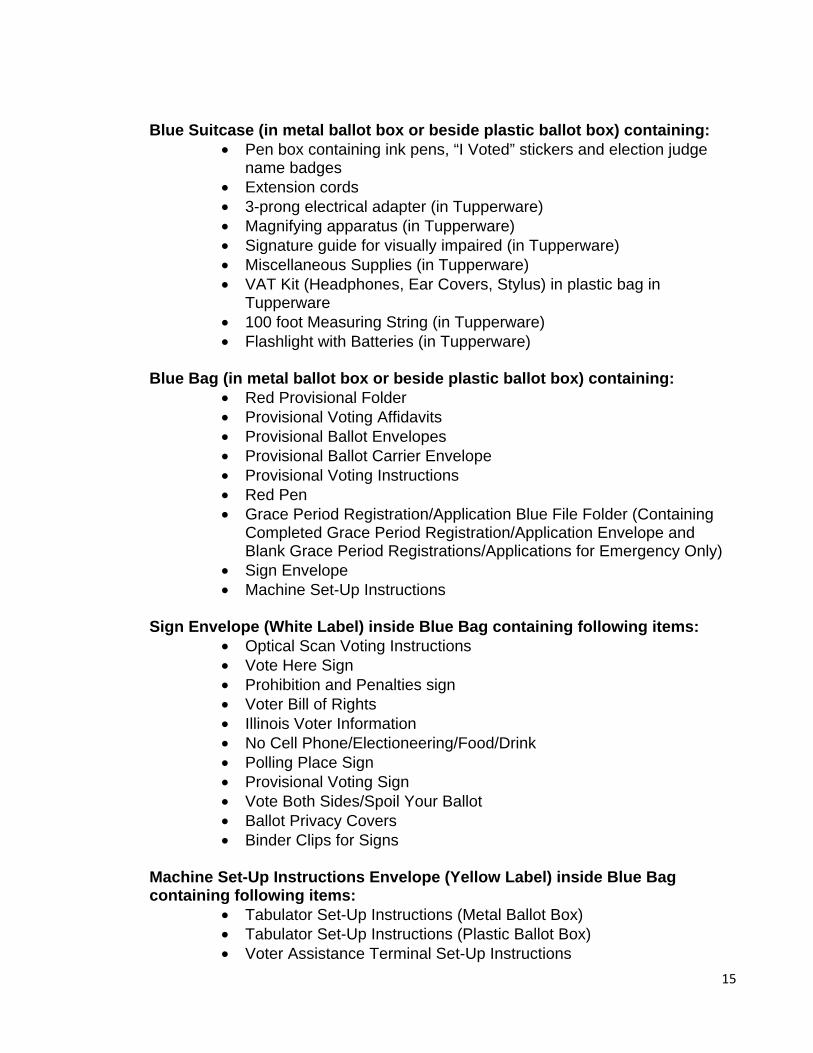
Blue Suitcase (in metal ballot box or beside plastic ballot box) containing:
• Pen box containing ink pens, “I Voted” stickers and election judge name badges
• Extension cords • 3-prong electrical adapter (in Tupperware) • Magnifying apparatus (in Tupperware) • Signature guide for visually impaired (in Tupperware) • Miscellaneous Supplies (in Tupperware) • VAT Kit (Headphones, Ear Covers, Stylus) in plastic bag in
Tupperware • 100 foot Measuring String (in Tupperware) • Flashlight with Batteries (in Tupperware)
Blue Bag (in metal ballot box or beside plastic ballot box) containing:
• Red Provisional Folder • Provisional Voting Affidavits • Provisional Ballot Envelopes • Provisional Ballot Carrier Envelope • Provisional Voting Instructions • Red Pen • Grace Period Registration/Application Blue File Folder (Containing
Completed Grace Period Registration/Application Envelope and Blank Grace Period Registrations/Applications for Emergency Only)
• Sign Envelope • Machine Set-Up Instructions
Sign Envelope (White Label) inside Blue Bag containing following items:
• Optical Scan Voting Instructions • Vote Here Sign • Prohibition and Penalties sign • Voter Bill of Rights • Illinois Voter Information • No Cell Phone/Electioneering/Food/Drink • Polling Place Sign • Provisional Voting Sign • Vote Both Sides/Spoil Your Ballot • Ballot Privacy Covers • Binder Clips for Signs
Machine Set-Up Instructions Envelope (Yellow Label) inside Blue Bag containing following items:
• Tabulator Set-Up Instructions (Metal Ballot Box) • Tabulator Set-Up Instructions (Plastic Ballot Box) • Voter Assistance Terminal Set-Up Instructions
16
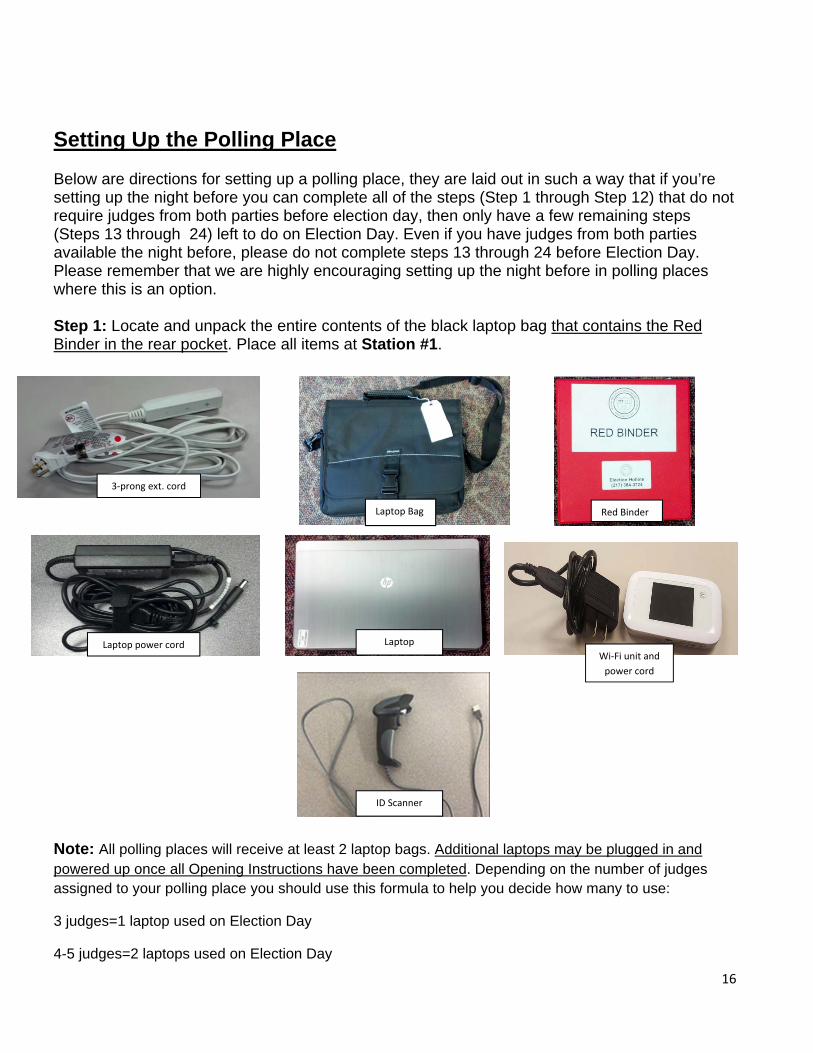
Setting Up the Polling Place Below are directions for setting up a polling place, they are laid out in such a way that if you’re setting up the night before you can complete all of the steps (Step 1 through Step 12) that do not require judges from both parties before election day, then only have a few remaining steps (Steps 13 through 24) left to do on Election Day. Even if you have judges from both parties available the night before, please do not complete steps 13 through 24 before Election Day. Please remember that we are highly encouraging setting up the night before in polling places where this is an option. Step 1: Locate and unpack the entire contents of the black laptop bag that contains the Red Binder in the rear pocket. Place all items at Station #1.
Note: All polling places will receive at least 2 laptop bags. Additional laptops may be plugged in and powered up once all Opening Instructions have been completed. Depending on the number of judges assigned to your polling place you should use this formula to help you decide how many to use:
3 judges=1 laptop used on Election Day
4-5 judges=2 laptops used on Election Day
Laptop Bag Red Binder
3-prong ext. cord
Laptop power cord Wi-Fi unit and
power cord
Laptop
ID Scanner
17
7 judges=3 laptops used on Election Day
9 judges=4 laptops used on Election Day
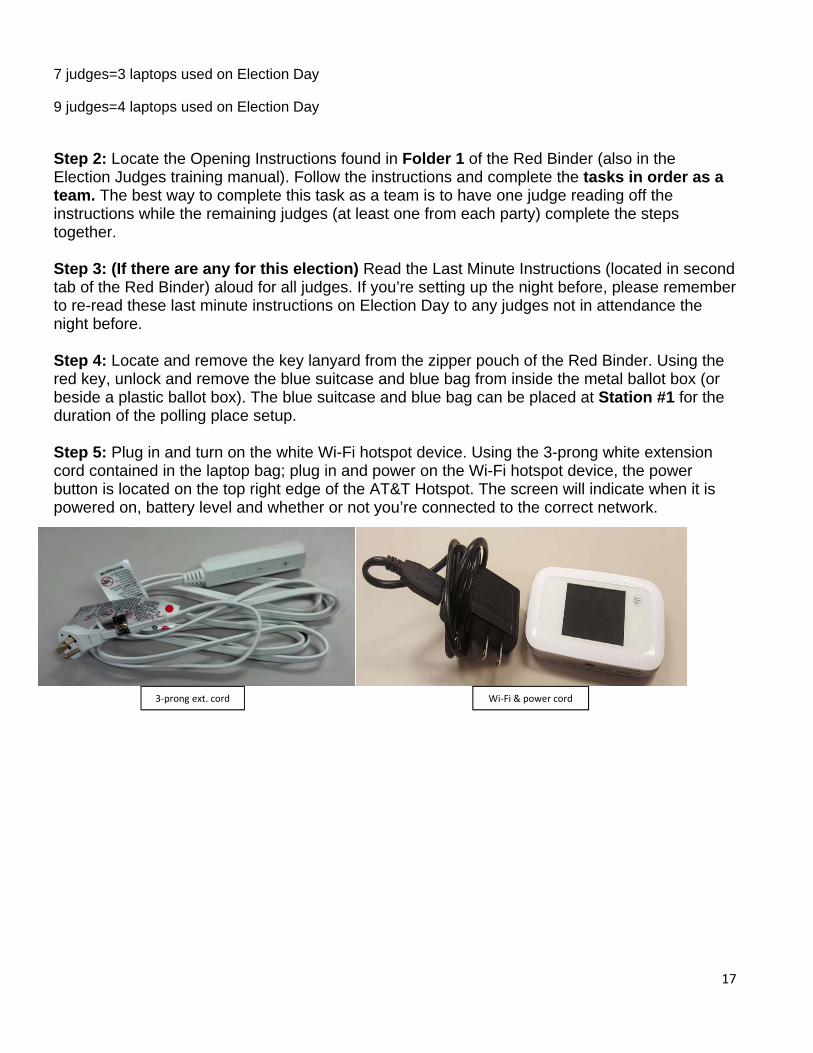
Step 2: Locate the Opening Instructions found in Folder 1 of the Red Binder (also in the Election Judges training manual). Follow the instructions and complete the tasks in order as a team. The best way to complete this task as a team is to have one judge reading off the instructions while the remaining judges (at least one from each party) complete the steps together. Step 3: (If there are any for this election) Read the Last Minute Instructions (located in second tab of the Red Binder) aloud for all judges. If you’re setting up the night before, please remember to re-read these last minute instructions on Election Day to any judges not in attendance the night before. Step 4: Locate and remove the key lanyard from the zipper pouch of the Red Binder. Using the red key, unlock and remove the blue suitcase and blue bag from inside the metal ballot box (or beside a plastic ballot box). The blue suitcase and blue bag can be placed at Station #1 for the duration of the polling place setup. Step 5: Plug in and turn on the white Wi-Fi hotspot device. Using the 3-prong white extension cord contained in the laptop bag; plug in and power on the Wi-Fi hotspot device, the power button is located on the top right edge of the AT&T Hotspot. The screen will indicate when it is powered on, battery level and whether or not you’re connected to the correct network.
3-prong ext. cord Wi-Fi & power cord
18
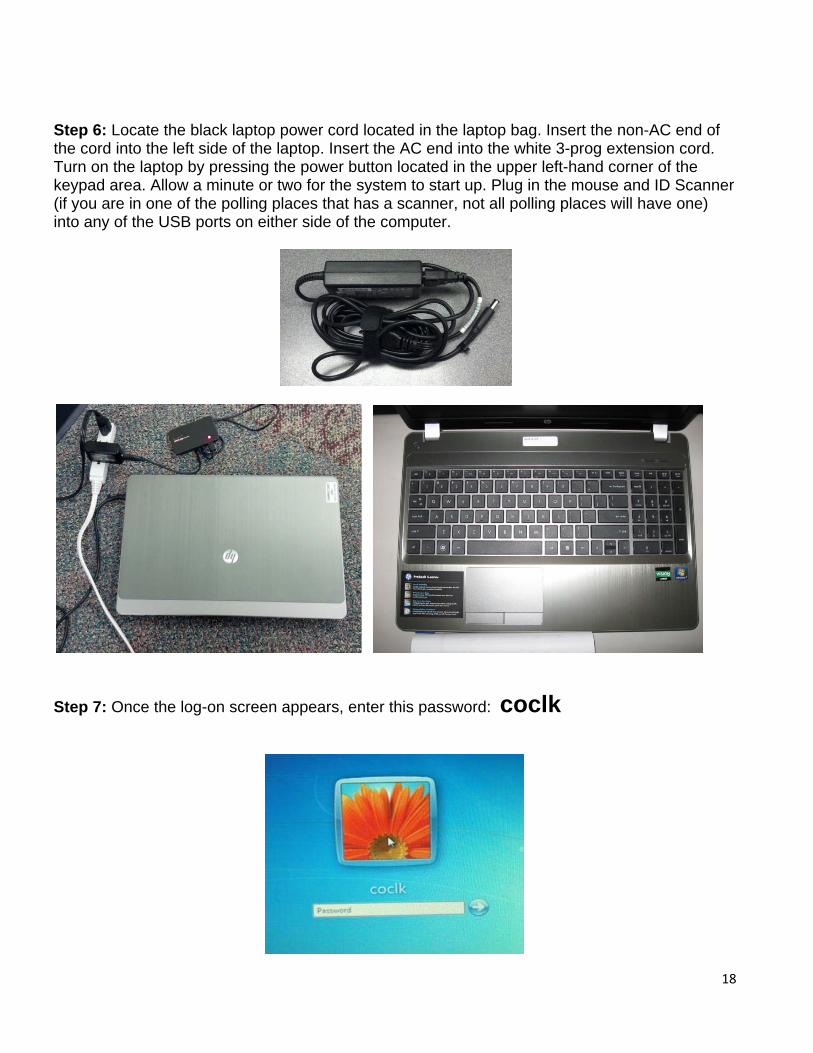
Step 6: Locate the black laptop power cord located in the laptop bag. Insert the non-AC end of the cord into the left side of the laptop. Insert the AC end into the white 3-prog extension cord. Turn on the laptop by pressing the power button located in the upper left-hand corner of the keypad area. Allow a minute or two for the system to start up. Plug in the mouse and ID Scanner (if you are in one of the polling places that has a scanner, not all polling places will have one) into any of the USB ports on either side of the computer.
Step 7: Once the log-on screen appears, enter this password: coclk
19
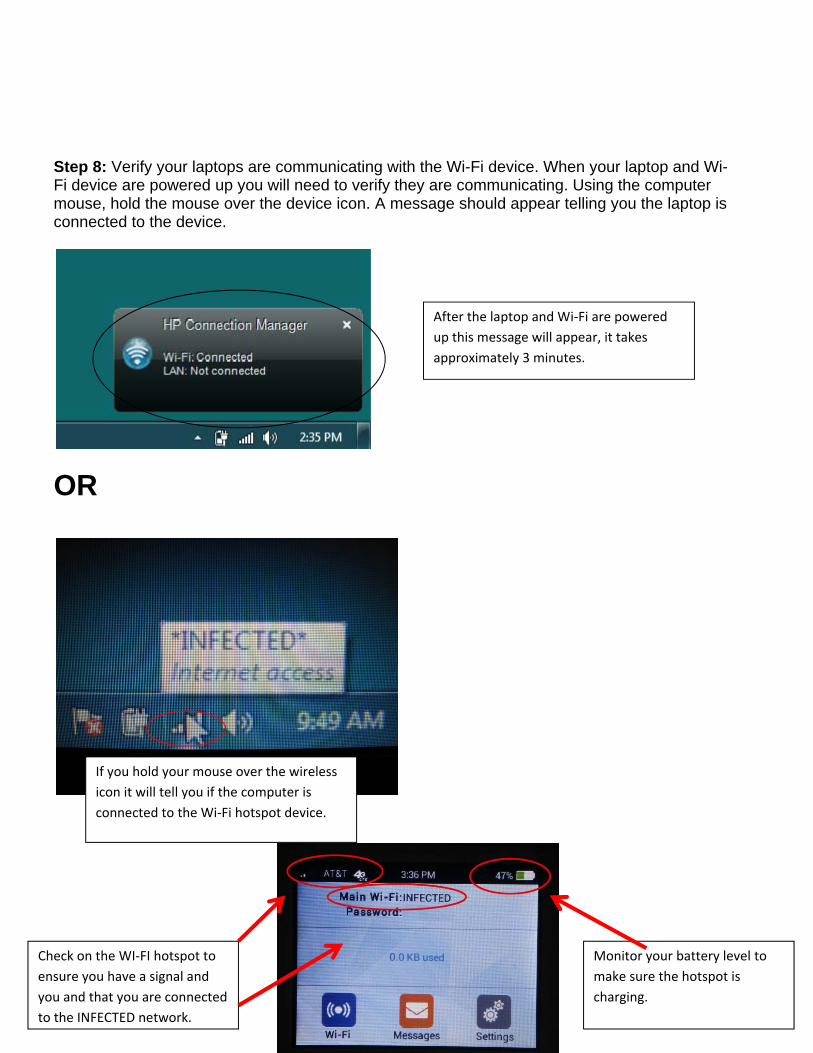
Step 8: Verify your laptops are communicating with the Wi-Fi device. When your laptop and Wi-Fi device are powered up you will need to verify they are communicating. Using the computer mouse, hold the mouse over the device icon. A message should appear telling you the laptop is connected to the device.
OR
After the laptop and Wi-Fi are powered up this message will appear, it takes approximately 3 minutes.
If you hold your mouse over the wireless icon it will tell you if the computer is connected to the Wi-Fi hotspot device.
Check on the WI-FI hotspot to ensure you have a signal and you and that you are connected to the INFECTED network.
Monitor your battery level to make sure the hotspot is charging.
20
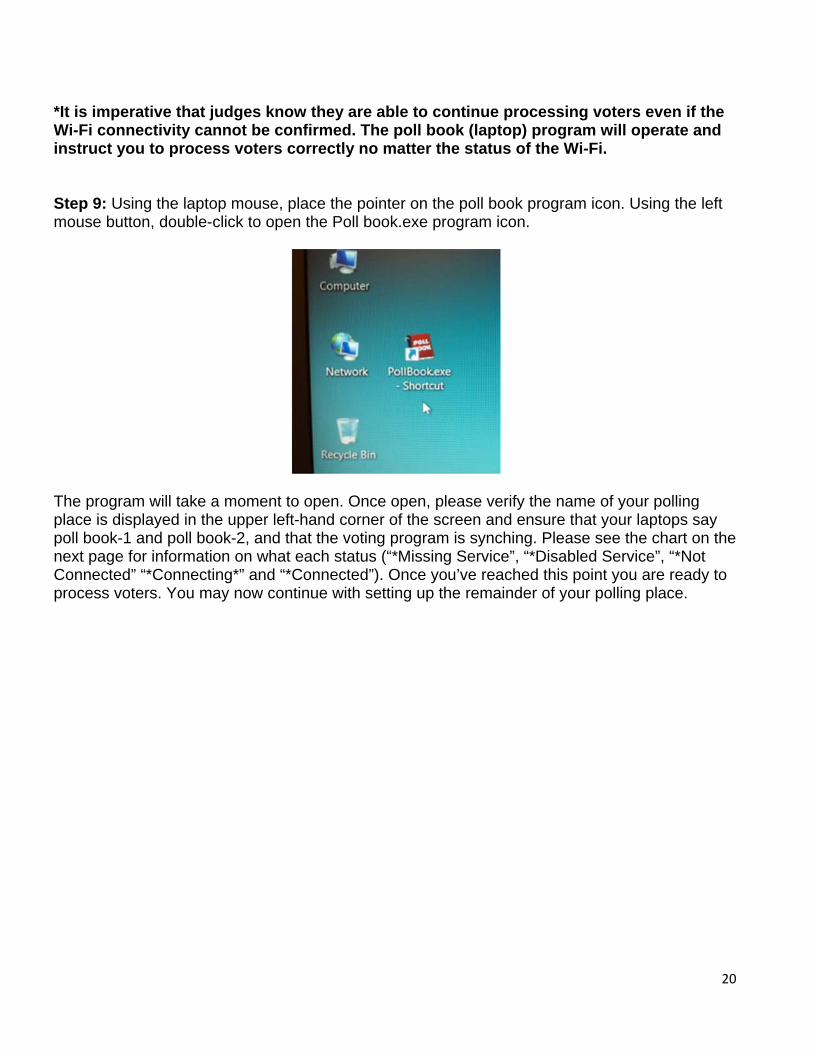
*It is imperative that judges know they are able to continue processing voters even if the Wi-Fi connectivity cannot be confirmed. The poll book (laptop) program will operate and instruct you to process voters correctly no matter the status of the Wi-Fi. Step 9: Using the laptop mouse, place the pointer on the poll book program icon. Using the left mouse button, double-click to open the Poll book.exe program icon.
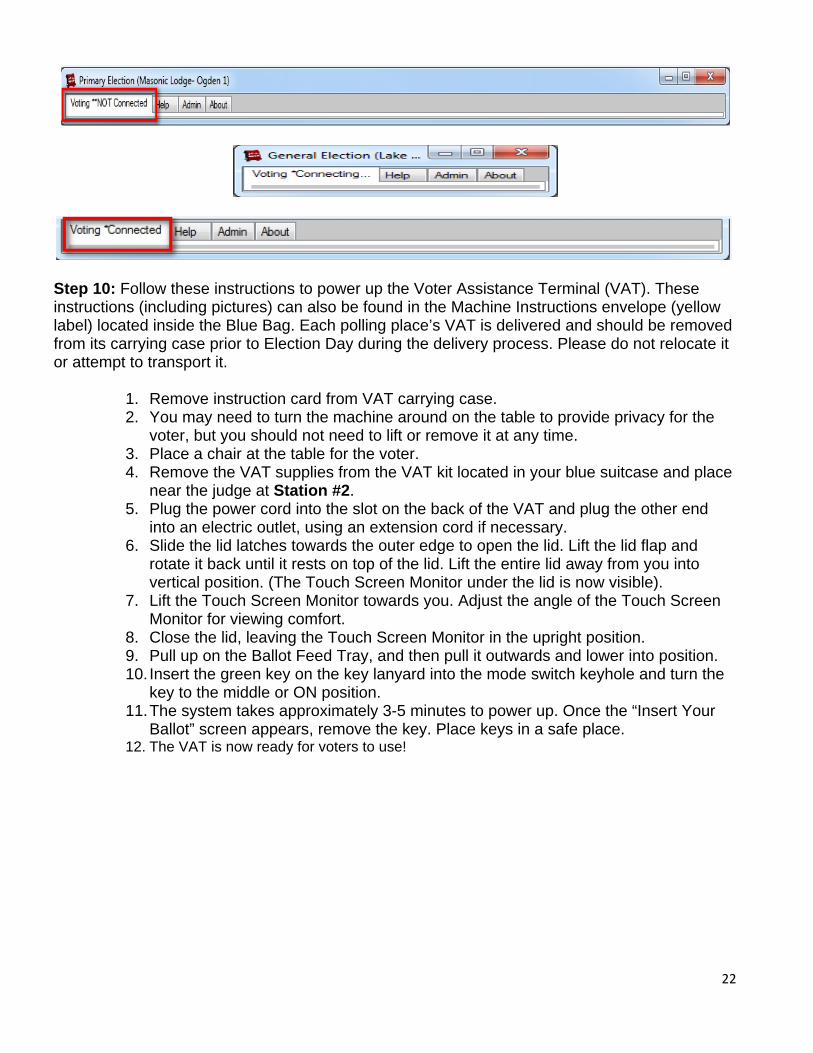
The program will take a moment to open. Once open, please verify the name of your polling place is displayed in the upper left-hand corner of the screen and ensure that your laptops say poll book-1 and poll book-2, and that the voting program is synching. Please see the chart on the next page for information on what each status (“*Missing Service”, “*Disabled Service”, “*Not Connected” “*Connecting*” and “*Connected”). Once you’ve reached this point you are ready to process voters. You may now continue with setting up the remainder of your polling place.
21
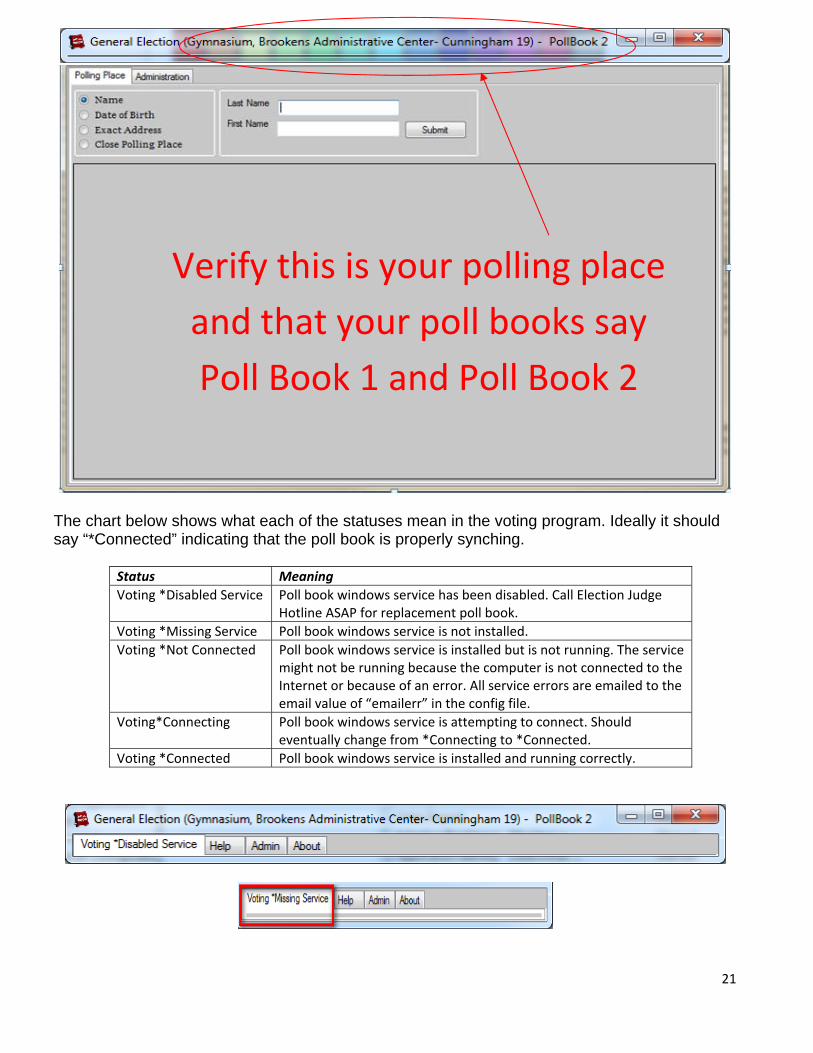
The chart below shows what each of the statuses mean in the voting program. Ideally it should say “*Connected” indicating that the poll book is properly synching.
Status Meaning Voting *Disabled Service Poll book windows service has been disabled. Call Election Judge
Hotline ASAP for replacement poll book. Voting *Missing Service Poll book windows service is not installed. Voting *Not Connected Poll book windows service is installed but is not running. The service
might not be running because the computer is not connected to the Internet or because of an error. All service errors are emailed to the email value of “emailerr” in the config file.
Voting*Connecting Poll book windows service is attempting to connect. Should eventually change from *Connecting to *Connected.
Voting *Connected Poll book windows service is installed and running correctly.
Verify this is your polling place and that your poll books say Poll Book 1 and Poll Book 2
22
Step 10: Follow these instructions to power up the Voter Assistance Terminal (VAT). These instructions (including pictures) can also be found in the Machine Instructions envelope (yellow label) located inside the Blue Bag. Each polling place’s VAT is delivered and should be removed from its carrying case prior to Election Day during the delivery process. Please do not relocate it or attempt to transport it.
1. Remove instruction card from VAT carrying case. 2. You may need to turn the machine around on the table to provide privacy for the
voter, but you should not need to lift or remove it at any time. 3. Place a chair at the table for the voter. 4. Remove the VAT supplies from the VAT kit located in your blue suitcase and place
near the judge at Station #2. 5. Plug the power cord into the slot on the back of the VAT and plug the other end
into an electric outlet, using an extension cord if necessary. 6. Slide the lid latches towards the outer edge to open the lid. Lift the lid flap and
rotate it back until it rests on top of the lid. Lift the entire lid away from you into vertical position. (The Touch Screen Monitor under the lid is now visible).
7. Lift the Touch Screen Monitor towards you. Adjust the angle of the Touch Screen Monitor for viewing comfort.
8. Close the lid, leaving the Touch Screen Monitor in the upright position. 9. Pull up on the Ballot Feed Tray, and then pull it outwards and lower into position. 10. Insert the green key on the key lanyard into the mode switch keyhole and turn the
key to the middle or ON position. 11. The system takes approximately 3-5 minutes to power up. Once the “Insert Your
Ballot” screen appears, remove the key. Place keys in a safe place. 12. The VAT is now ready for voters to use!
23
Step 11: Posting ‘No Electioneering’ sign and other signage
1. Using the 100 foot measuring string found in the blue suitcase, measure 100 feet from the front entrance of the room in which voting is taking place and post the No Electioneering signs with wires. If 100 feet places the sign on private property then post it at the property line of the polling place. If 100 feet places the sign within a church or school building, place the sign at the entrance to the building. If 100 feet places the sign within any other building used as a polling place, place the sign at that point within the building. Place the “If you have a Disability that prevents you from entering the polling place” sign right next to “No Electioneering” sign. Note: You can wait until morning to put the ‘Vote Here/No-Electioneering’ sign outside the building if you are worried about it being outside overnight.
2. Inside each booth and on one wall of your polling place, post the Optical Scan
Voting instruction sign. You can use the binder clips in your supplies clip these signs to the booth as opposed to tape.
3. Post the following signs (found in Sign Envelope in Blue Bag) inside the polling
place: • Vote Here Sign • Prohibition and Penalties sign • Voter Bill of Rights • Illinois Voter Information • No Cell Phone/Electioneering/Food/Drink • Polling Place Sign • Provisional Voting Sign • Vote Both Sides/Spoil Your Ballot • Post Any Maps that you’re Issued
Step 12: Posting specimen ballots. Specimen ballots can be found in the laptop bag and should be posted in clear view so they can be seen by voters. Post all specimen ballots that you’re issued.
STOP If you are setting-up the polling place the night before, you must stop at this point. All of the remaining steps require election judges from each party to be present AND must not be done until election morning. On election morning please continue setting up the polling place by following the instructions on the following pages.
24
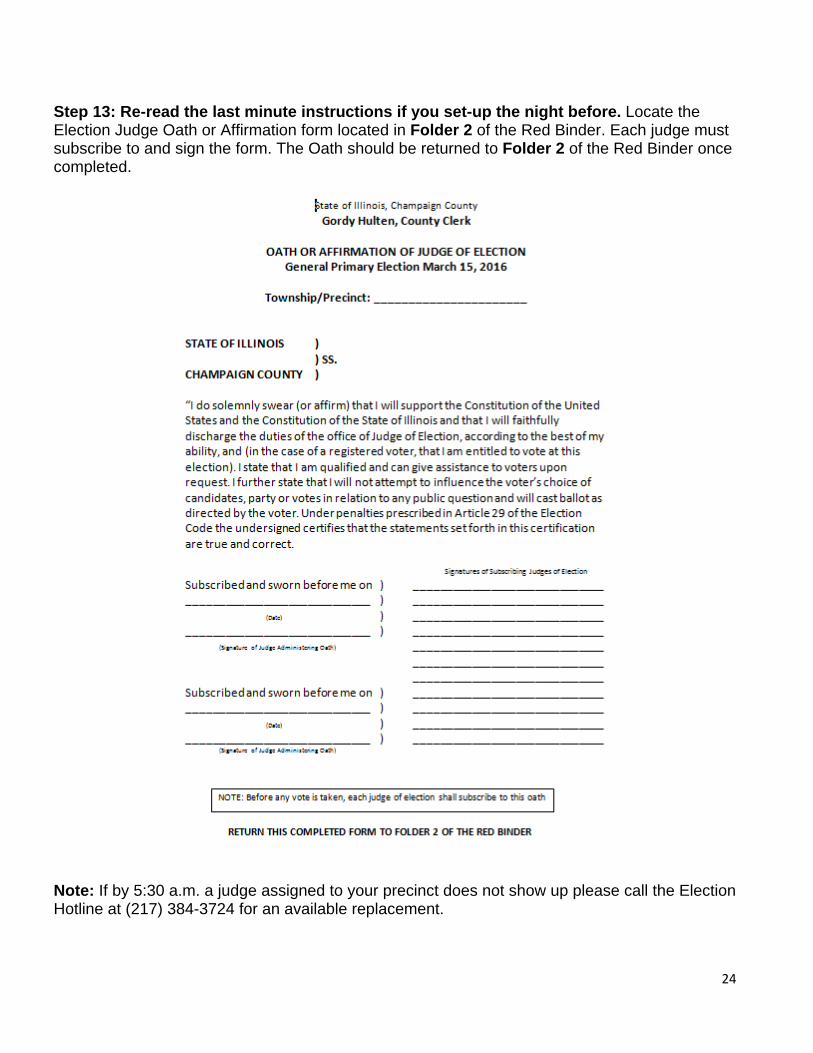
Step 13: Re-read the last minute instructions if you set-up the night before. Locate the Election Judge Oath or Affirmation form located in Folder 2 of the Red Binder. Each judge must subscribe to and sign the form. The Oath should be returned to Folder 2 of the Red Binder once completed.
Note: If by 5:30 a.m. a judge assigned to your precinct does not show up please call the Election Hotline at (217) 384-3724 for an available replacement.
25
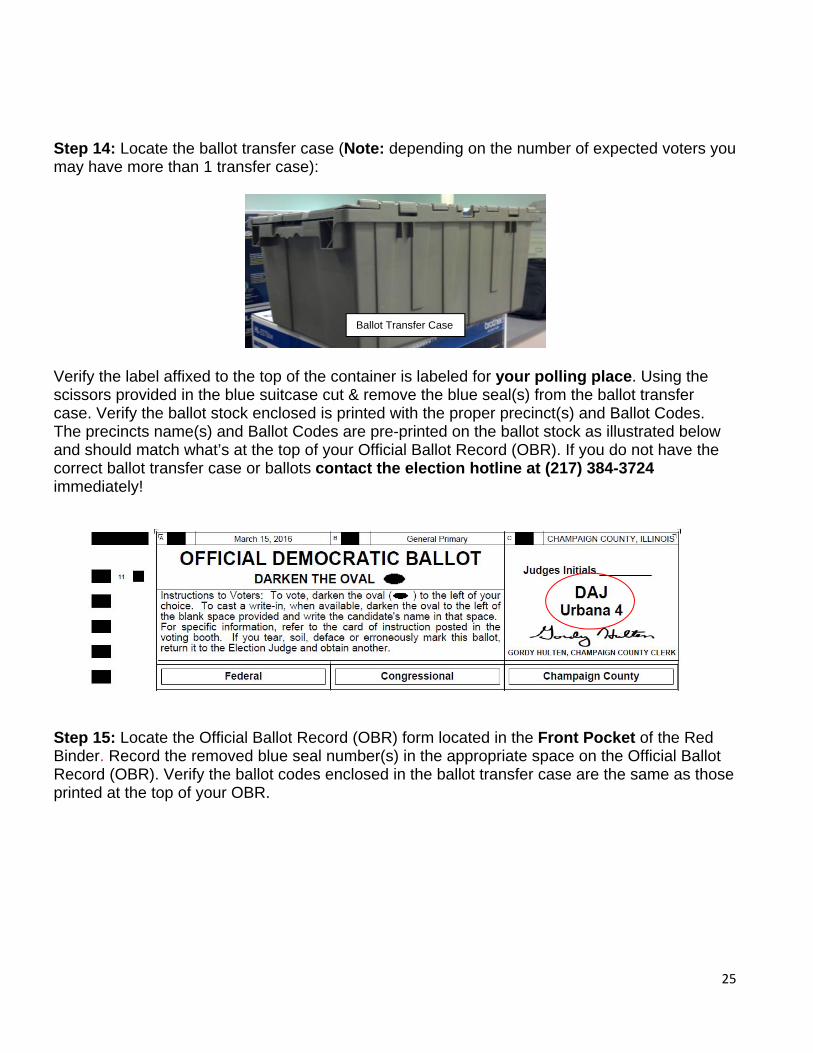
Step 14: Locate the ballot transfer case (Note: depending on the number of expected voters you may have more than 1 transfer case):
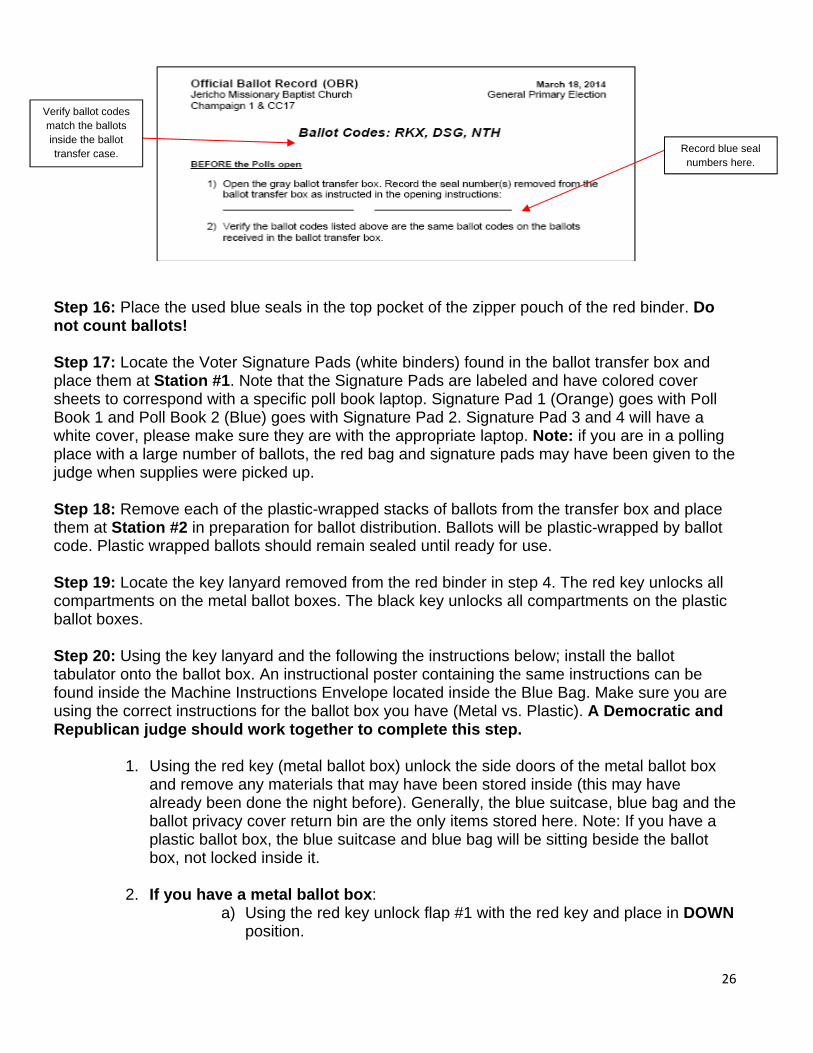
Verify the label affixed to the top of the container is labeled for your polling place. Using the scissors provided in the blue suitcase cut & remove the blue seal(s) from the ballot transfer case. Verify the ballot stock enclosed is printed with the proper precinct(s) and Ballot Codes. The precincts name(s) and Ballot Codes are pre-printed on the ballot stock as illustrated below and should match what’s at the top of your Official Ballot Record (OBR). If you do not have the correct ballot transfer case or ballots contact the election hotline at (217) 384-3724 immediately!
Step 15: Locate the Official Ballot Record (OBR) form located in the Front Pocket of the Red Binder. Record the removed blue seal number(s) in the appropriate space on the Official Ballot Record (OBR). Verify the ballot codes enclosed in the ballot transfer case are the same as those printed at the top of your OBR.
Ballot Transfer Case
26
Step 16: Place the used blue seals in the top pocket of the zipper pouch of the red binder. Do not count ballots! Step 17: Locate the Voter Signature Pads (white binders) found in the ballot transfer box and place them at Station #1. Note that the Signature Pads are labeled and have colored cover sheets to correspond with a specific poll book laptop. Signature Pad 1 (Orange) goes with Poll Book 1 and Poll Book 2 (Blue) goes with Signature Pad 2. Signature Pad 3 and 4 will have a white cover, please make sure they are with the appropriate laptop. Note: if you are in a polling place with a large number of ballots, the red bag and signature pads may have been given to the judge when supplies were picked up. Step 18: Remove each of the plastic-wrapped stacks of ballots from the transfer box and place them at Station #2 in preparation for ballot distribution. Ballots will be plastic-wrapped by ballot code. Plastic wrapped ballots should remain sealed until ready for use. Step 19: Locate the key lanyard removed from the red binder in step 4. The red key unlocks all compartments on the metal ballot boxes. The black key unlocks all compartments on the plastic ballot boxes. Step 20: Using the key lanyard and the following the instructions below; install the ballot tabulator onto the ballot box. An instructional poster containing the same instructions can be found inside the Machine Instructions Envelope located inside the Blue Bag. Make sure you are using the correct instructions for the ballot box you have (Metal vs. Plastic). A Democratic and Republican judge should work together to complete this step.
1. Using the red key (metal ballot box) unlock the side doors of the metal ballot box and remove any materials that may have been stored inside (this may have already been done the night before). Generally, the blue suitcase, blue bag and the ballot privacy cover return bin are the only items stored here. Note: If you have a plastic ballot box, the blue suitcase and blue bag will be sitting beside the ballot box, not locked inside it.
2. If you have a metal ballot box:
a) Using the red key unlock flap #1 with the red key and place in DOWN position.
Verify ballot codes match the ballots inside the ballot transfer case. Record blue seal
numbers here.
27
b) Unlock and raise flap #2. Flap #2 MUST remain in the UP position for ballots to be properly inserted & accepted by the tabulator.
c) Open and remove the tabulator from the large black storage case. Place the tabulator on top of the ballot box by sliding it into the indented rails. Do not push the tabulator all the way back yet.
d) Insert the non-AC end of the power cord through hole on side of ballot box; feed it through so it comes out near flap #2.
e) Insert the non-AC end of the power cord into the back of the tabulator then slide backwards until rear of tabulator is touching the ballot box.
f) Once your tabulator is installed on the ballot box, verify that the seal on the front of the tabulator covering the memory card is intact. Do not cut the seal. If it is missing, broken or tampered with, contact the Election Judge Hotline at (217) 384-3724.
g) Raise flap #1 into the UP position and lock to secure the tabulator. h) Attach magnetic ballot privacy cover bin to side of ballot box. i) Attach plastic pen return bin to Velcro strips on top of the ballot box. j) Plug the AC end of the power cord into an outlet.
3. If you have a plastic ballot box: a) Using the black key unlock flap #1 and place in DOWN position b) Lift the top privacy shield c) Remove the Tabulator and power cord from the black storage case d) Insert power cord through hole on side of ballot box e) Install the tabulator on top of the ballot box. f) Insert the non-AC end of the power cord into the tabulator and slide
the tabulator backwards until rear of tabulator is touching the ballot box.
g) Plug the AC end of the power cord into an outlet. h) Once your tabulator is installed on the ballot box, verify that the seal
on the front of the tabulator covering the memory card is intact. Do not cut the seal. If it is missing, broken or tampered with, contact the Election Judge Hotline at (217) 384-3724 immediately.
i) Raise flap #1 to the up position and lock with the black key. j) Install privacy cover bin using hooks provided to side of ballot box.
4. Remove the gray vinyl tape cover on the tabulator. 5. Open the key compartment on the tabulator by squeezing lid cut-out area with your
finger and lifting up. 6. Insert yellow key into tabulator and turn to the right to “Open/Close Poll”. The
tabulator will take approximately 1 minute to start up. Do not turn the key all the way to “Vote”.
7. The tabulator screen will display “Election Card Inserted, Open Polls Now?” Press the YES button to open the polls.
8. The tabulator will beep and display “Please turn Key/Switch to Vote”. Turn the key to the right to the “Vote” position. Remove key.
9. The tabulator will print a Zero Totals Report/Status Report for your precinct(s). At least two judges, one from each party must verify the zero totals for each candidate and the zero certification for any propositions.
28
10. All judges must sign the tape. Do not tear the tape. After the judges have verified and signed the tape, roll the tape up and place in the key compartment and close the key compartment lid.
11. Place the gray vinyl tape cover back on the top of the tabulator so that it hides the tape. The display will now read “Insert Ballot, Number of Voters: 0”. The tabulator is ready for the opening of the polls and to accept ballots.
12. Using your ballot box key, open the ballot box door and have all judges observe that the ballot box is empty. Do not store anything in the ballot box as it could obstruct the path for voted ballots.
13. Unlock the emergency bin and check that it is also empty. Close and relock. 14. The tabulator is now ready for the first voter!
Step 21: Return the key lanyard to the zipper pouch of the red binder. The key lanyard should remain in this neutral location throughout the day so it can be found by all judges at all times. Judges are not permitted to wear the key for any reason. Step 22: Place the remaining supplies at the appropriate stations: Station #1 and #2 (poll book/ballot judge) supplies:
• Any poll book laptop(s) that will be used • Start Here, No Smoking, Please Turn Off Cell Phone & No Electioneering
Signs • Pens (blue suitcase) • Voter Signature Pads (inside sealed ballot transfer case) • Red Binder (located in outer pocket of laptop bag) • Ballot Privacy Covers (located in your Sign Envelope inside Blue Bag) • VAT Instructions • Provisional Voting Supplies Canvas bag (located in blue bag, don’t open
unless needed)
Station #3 (tabulator judge) supplies: • “I Voted” stickers • Signs: Did You Vote Both Sides of the Ballot / If You Spoil Your Ballot (post
on ballot box) • Privacy Cover & pen return bins (attach to side of ballot box with either
hooks provided or magnets) Step 23: Inside the pen container found in the blue suitcase; locate the election judge name badge supplies. Each judge is required to prepare and wear a name badge at all times on Election Day. Badges must include the judge’s name. (Precincts using plastic ballot boxes will find the blue suitcase either beside or on top of the ballot box.) Step 24: Open the polling place at exactly 6:00 a.m., unlock the doors, and announce “The polls are open”. Return the “Opening Instructions” to Folder 1 of the Red Binder. All polling places
29
must open at exactly 6:00 a.m. If you anticipate there being an issue opening the polling place at exactly 6:00 a.m., please call the Election Hotline at (217) 384-3724 immediately.
While the Polling Place is
open… Who is permitted in the Polling Place on Election Day?
• Voters who are being processed.
• Minor children in the company of their parents or guardians who are voting. State Law allows children of all ages to accompany a parent or guardian into the voting booth as long as the election judge doesn’t believe that the children will disrupt the voting process.
• Members of the media have been directed to specific polling places by the County Clerk.
If media become disruptive please contact the Elections Hotline at (217) 384-3724.
• Law enforcement officers on official duty, Representatives of the State Board of Elections, Offices of the State’s Attorney and Attorney General and Representatives of the Election Authority should be permitted to remain in the polling place with the election judges throughout the day. They may be there before the polls open, during voting hours or after the polls close. These individuals are only required to show their official credentials or other identification to the election judges as they enter the polling place.
Only pollwatchers and candidates are required to provide credentials to the election judges at the polls on Election Day.
30
Station #1 Station #1 (formerly known as the Application station) is where the poll book laptop is located. Voters are greeted and processed at this station. The ballot judge is seated directly next to the poll book judges. The judges serving at the poll book and ballot stations should always be of opposite party affiliation. Depending on voter turnout some polling places will have more than one poll book/ballot station. Each station operates independently.
Processing voters and acceptable identification
1. Greet the Voter.
2. Ask the voter to state his/her name. You may enter the first few letters of the voters first
and last name into the poll book program, then select “Submit”. A list of all voters in the database matching the information you entered will appear. If more than one voter appears, birth dates and street addresses will also appear to assist you with selecting the correct voter. You may also use any of these search criteria to look-up voters. Please be sure you are selecting the correct voter! Once you have located the correct voter in the database, click the “Select Record” link. If election judges are unable to find a voter in the poll book after searching by name, address and birth date they should register the voter using the Grace Period instructions in Appendix A at the back of the manual.
3. Follow the prompts on the poll book screen to verify the voter’s address. If an address change has occurred, follow the prompts on the screen on how to proceed. The computer will prompt you to begin the Grace Period Registration process on the poll book laptop.
4. Follow the prompts on the poll book screen to verify the voter’s name. If a name change has occurred, follow the prompts on the screen on how to proceed.
Acceptable forms of identification are as follows:
• Current and valid Government issued photo ID • A college issued photo ID with either a copy of the applicant’s lease or any mail,
showing the delivery address, delivered to the applicant at that address. • A current utility bill, bank statement, government check, paycheck, shipping
notification or other document that shows name and address (may be electronic); Note: An ID without an address or one that does not have the correct voter registration address will not prohibit someone from voting. If the voter does not have a valid ID as mentioned above, they would vote provisionally. A Voter Registration Card is not an acceptable form of identification but is considered valid proof of residence. Registered voters who live in University of Illinois residence halls may bring a copy (or electronic proof) of their move-in notice
• A registered voter may verify residence by completing an Affidavit of Supporting Witness.
31
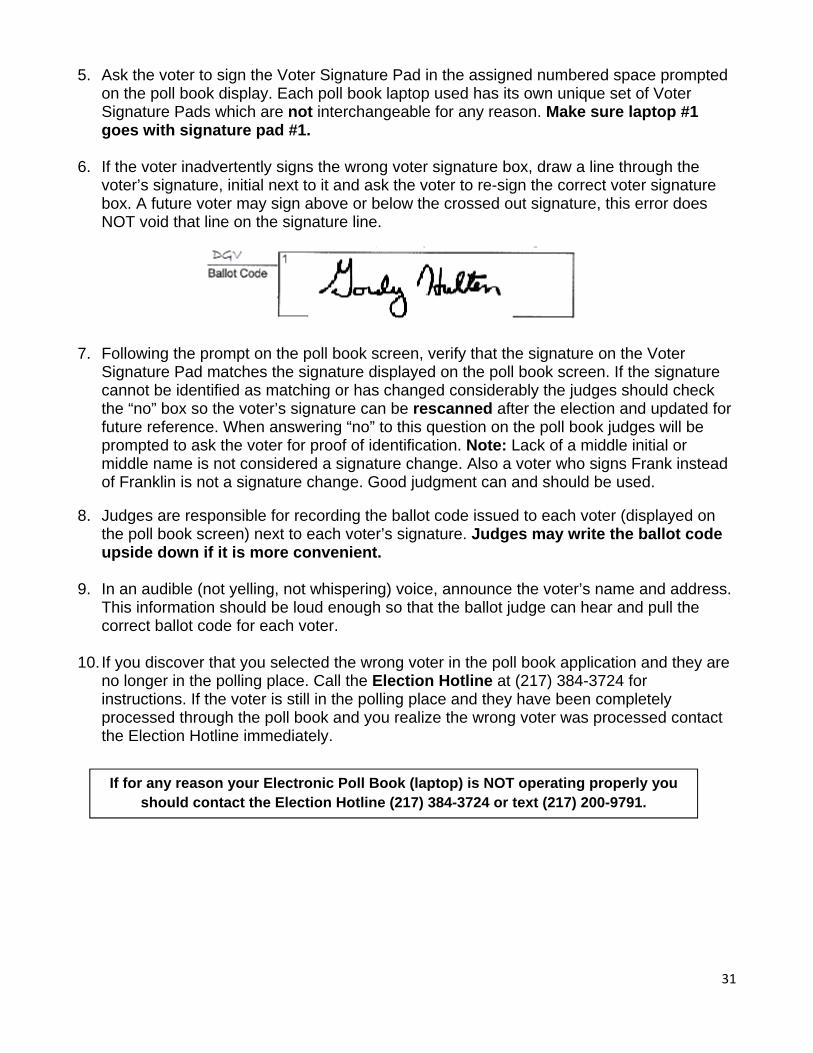
5. Ask the voter to sign the Voter Signature Pad in the assigned numbered space prompted on the poll book display. Each poll book laptop used has its own unique set of Voter Signature Pads which are not interchangeable for any reason. Make sure laptop #1 goes with signature pad #1.
6. If the voter inadvertently signs the wrong voter signature box, draw a line through the voter’s signature, initial next to it and ask the voter to re-sign the correct voter signature box. A future voter may sign above or below the crossed out signature, this error does NOT void that line on the signature line.
7. Following the prompt on the poll book screen, verify that the signature on the Voter Signature Pad matches the signature displayed on the poll book screen. If the signature cannot be identified as matching or has changed considerably the judges should check the “no” box so the voter’s signature can be rescanned after the election and updated for future reference. When answering “no” to this question on the poll book judges will be prompted to ask the voter for proof of identification. Note: Lack of a middle initial or middle name is not considered a signature change. Also a voter who signs Frank instead of Franklin is not a signature change. Good judgment can and should be used.
8. Judges are responsible for recording the ballot code issued to each voter (displayed on
the poll book screen) next to each voter’s signature. Judges may write the ballot code upside down if it is more convenient.
9. In an audible (not yelling, not whispering) voice, announce the voter’s name and address.
This information should be loud enough so that the ballot judge can hear and pull the correct ballot code for each voter.
10. If you discover that you selected the wrong voter in the poll book application and they are
no longer in the polling place. Call the Election Hotline at (217) 384-3724 for instructions. If the voter is still in the polling place and they have been completely processed through the poll book and you realize the wrong voter was processed contact the Election Hotline immediately.
If for any reason your Electronic Poll Book (laptop) is NOT operating properly you should contact the Election Hotline (217) 384-3724 or text (217) 200-9791.
32
Who has the right to vote on Election Day? Poll books are designed to guide judges through questions for voters when they check in on Election Day. The Ballot Entitlement Chart is built into the voter program which is installed in the electronic poll books used by election judges. The voter program will guide judges through special situations regarding address changes, name changes, non-registered voters, etc. Grace Period Registration Beginning in July 2015, Illinois state election law mandated the implementation of Grace Period Registration in the polling place. This means that a person could register to vote (or change their address) and vote in their polling place on Election Day. In the past Grace Period voting had to be done at the office of the election authority and it ended prior to Election Day.
The instructions for the correct way to process a voter needing to register for the first time in Champaign County (or change their address within Champaign County) are located in Appendix A on page 57. Remember that if you have any questions about processing a Grace Period Registration, please do not hesitate to contact the Election Judge Hotline at 217-384-3724.
Early and Vote by Mail voters Vote by mail and Early voters are unable to vote at the polling place on Election Day for various reasons. When opening the Voter Program, Early and vote by mail updates will begin updating automatically provided that the computer is properly synching. The names of all Early and Vote by Mail voters will be uploaded to each precinct’s electronic poll book (laptop) as having already voted. Early and Vote by Mail voters will be flagged in the voter program. The voter program will prompt election judges when an Early/Vote by Mail voter attempts to vote on Election Day; and will assist the judges in how to proceed in these situations. These voters must not be permitted to vote twice, their votes have already been counted. If a voter is flagged as being sent a Vote by Mail ballot in the voter program, but not voting, the poll book will prompt the judges to determine whether or not the voter received their ballot. If a voter has received a vote by mail ballot in the mail, only those voters who surrender their Vote by Mail ballot to election judges, may vote at the polling place on Election Day. If the voter is unable to surrender their vote by mail ballot they must vote provisionally. If a voter says that they never received their vote by mail ballot and they are willing to complete an affidavit stating as such, they may in fact vote a regular ballot. This will be a rare occurrence but the poll book will prompt you how to handle this situation. Using the Voting Affidavit When voter name changes occur, the voter program may prompt judges to instruct the voter to complete specific sections on the Voting Affidavit located in Folder 3 of the red binder, to reflect the changes.
33
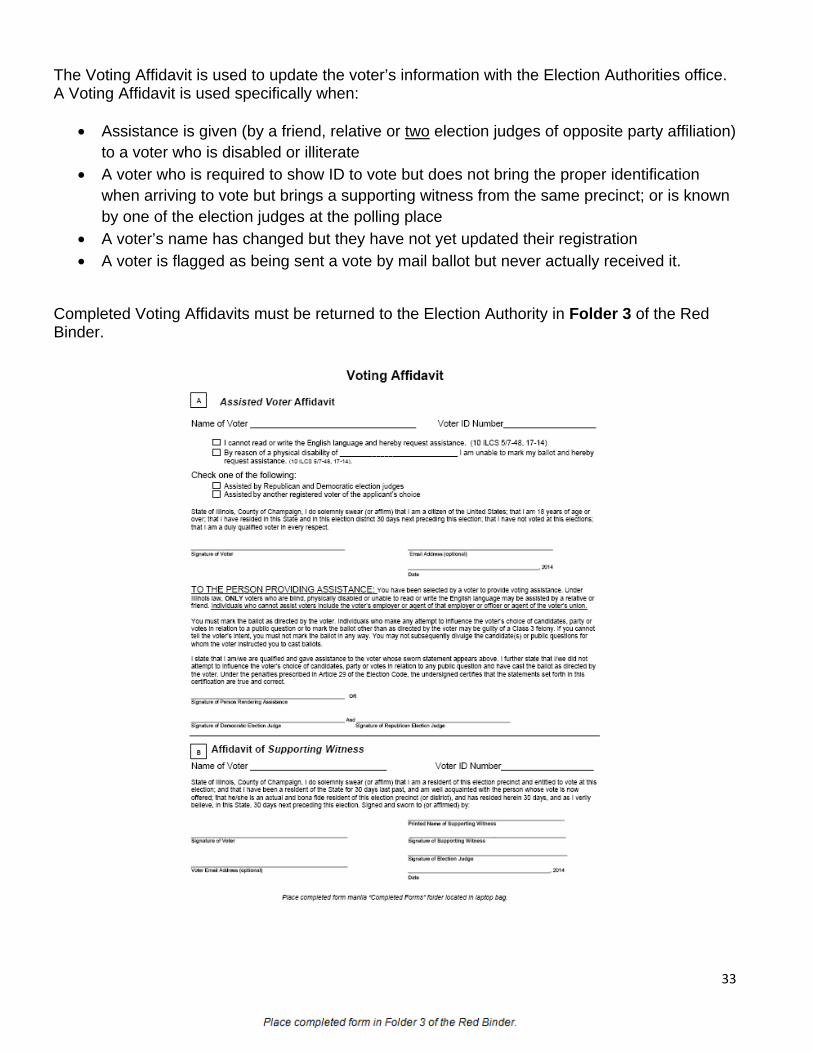
The Voting Affidavit is used to update the voter’s information with the Election Authorities office. A Voting Affidavit is used specifically when:
• Assistance is given (by a friend, relative or two election judges of opposite party affiliation) to a voter who is disabled or illiterate
• A voter who is required to show ID to vote but does not bring the proper identification when arriving to vote but brings a supporting witness from the same precinct; or is known by one of the election judges at the polling place
• A voter’s name has changed but they have not yet updated their registration • A voter is flagged as being sent a vote by mail ballot but never actually received it.
Completed Voting Affidavits must be returned to the Election Authority in Folder 3 of the Red Binder.
34
Inactive voters Voters are often considered inactive because at least two consecutive mail pieces (voter card and a confirmation letter) sent to their address of record have been returned by the Postal Service as undeliverable. Our office has very specific procedures in place to ensure that registered voters reside at the address used for voter registration. When mail pieces are returned, a multi-step confirmation process is used before a voter is placed on inactive status. In specific instances inactive voters are permitted to vote on Election Day. Following the poll book prompts, judges will be instructed how to proceed with inactive voters on an individual basis. Inactive voters will appear in the poll book search results highlighted in yellow. Challenged voters A voter may be challenged on their qualifications to vote by an Election Judge, a Pollwatcher, or any legal voter from the same polling place. Some reasons for challenging the voter may include: 1) There is no record that the person is registered 2) The person is not the same voter that is registered 4) The person has already voted at that polling place or by Vote by Mail ballot 5) The voter has had a name change by marriage or otherwise and had moved outside the precinct. Deciding a Challenge:
a) The Election Judges act as a board and vote to decide a challenge. b) A majority of the judges - no one else - determines whether to sustain or overrule a
challenge. c) In instances where a voter’s residency is being challenged and the judges feel that the
challenge has merit, judges should request verification of the voters current address. d) If a majority of the judges decide to overrule the challenge, the voter is permitted to vote
following the same process as any unchallenged voter. If the challenge is sustained, judges must inform the voter of their right to cast a Provisional Ballot. Provisional voting
1. A person who claims to be a legally qualified registered voter in the precinct in which he seeks to vote, is entitled to cast a Provisional Ballot under one of the following six circumstances: a) The person’s name does not appear on the list of eligible voters for the precinct in
which the person seeks to vote;
b) The person’s voting status has been challenged by an election judge, a pollwatcher, or any legal voter in that precinct and that challenge has been sustained by a majority of the election judges;
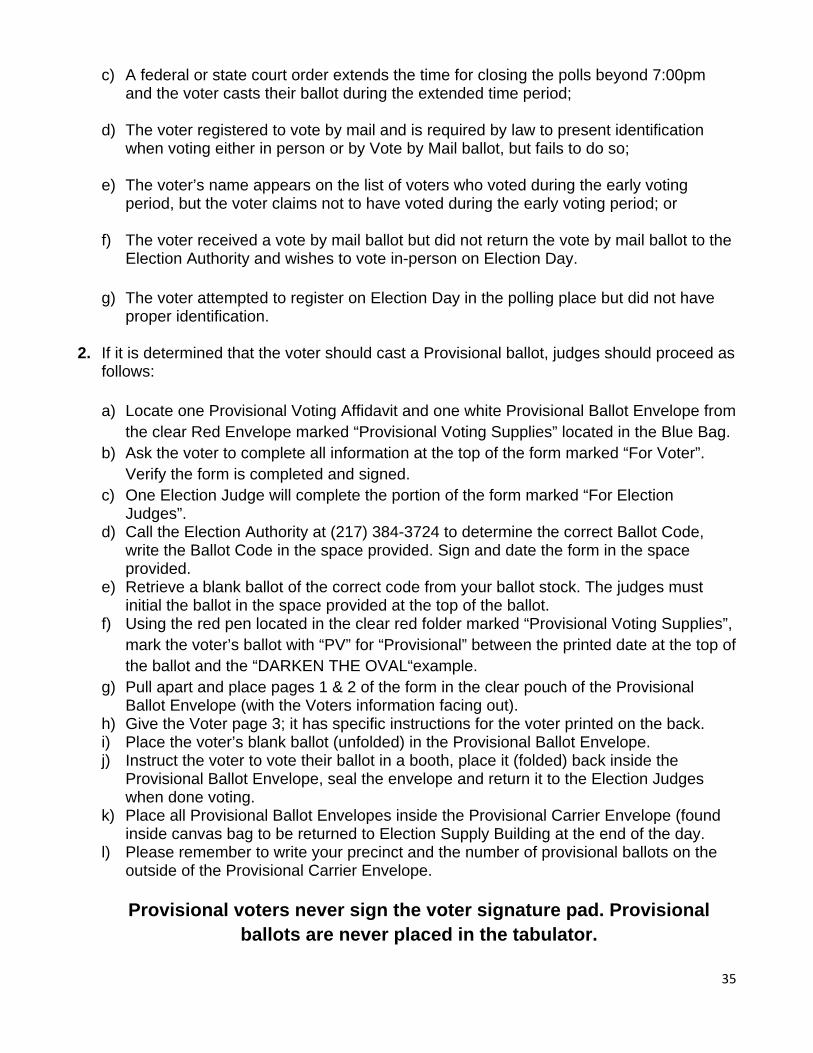
35
c) A federal or state court order extends the time for closing the polls beyond 7:00pm and the voter casts their ballot during the extended time period;
d) The voter registered to vote by mail and is required by law to present identification
when voting either in person or by Vote by Mail ballot, but fails to do so; e) The voter’s name appears on the list of voters who voted during the early voting
period, but the voter claims not to have voted during the early voting period; or f) The voter received a vote by mail ballot but did not return the vote by mail ballot to the
Election Authority and wishes to vote in-person on Election Day. g) The voter attempted to register on Election Day in the polling place but did not have
proper identification.
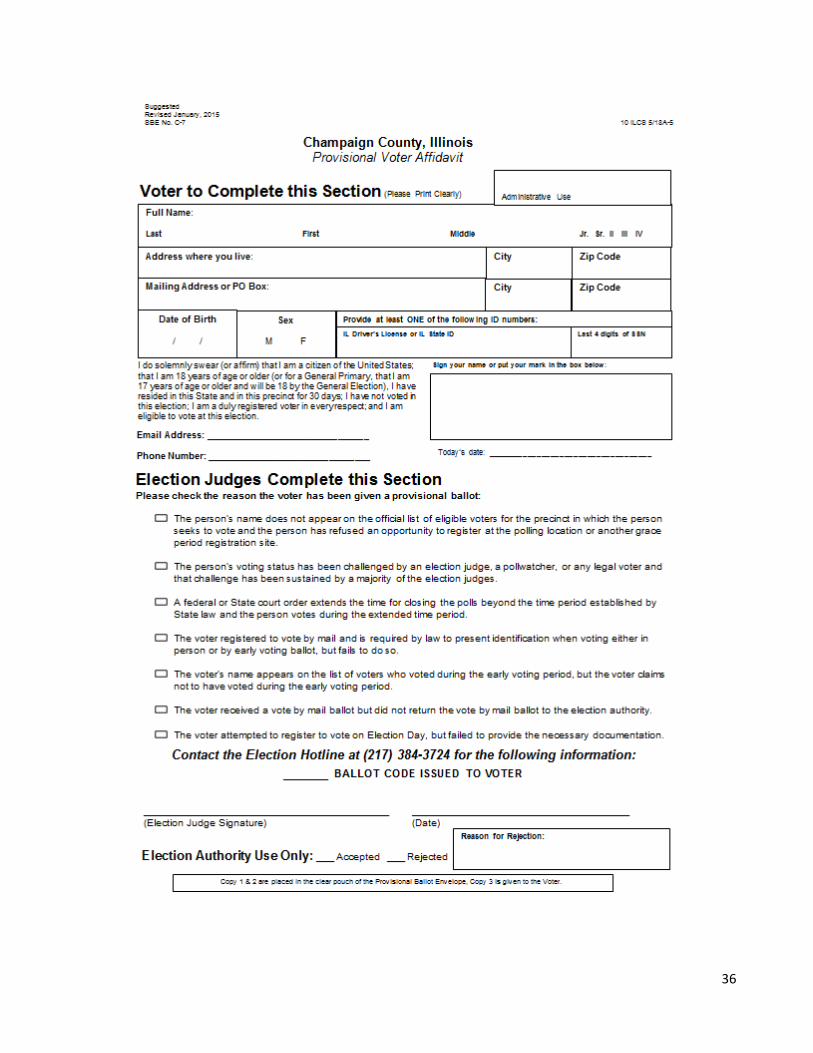
2. If it is determined that the voter should cast a Provisional ballot, judges should proceed as follows: a) Locate one Provisional Voting Affidavit and one white Provisional Ballot Envelope from
the clear Red Envelope marked “Provisional Voting Supplies” located in the Blue Bag. b) Ask the voter to complete all information at the top of the form marked “For Voter”.
Verify the form is completed and signed. c) One Election Judge will complete the portion of the form marked “For Election
Judges”. d) Call the Election Authority at (217) 384-3724 to determine the correct Ballot Code,
write the Ballot Code in the space provided. Sign and date the form in the space provided.
e) Retrieve a blank ballot of the correct code from your ballot stock. The judges must initial the ballot in the space provided at the top of the ballot.
f) Using the red pen located in the clear red folder marked “Provisional Voting Supplies”, mark the voter’s ballot with “PV” for “Provisional” between the printed date at the top of the ballot and the “DARKEN THE OVAL“example.
g) Pull apart and place pages 1 & 2 of the form in the clear pouch of the Provisional Ballot Envelope (with the Voters information facing out).
h) Give the Voter page 3; it has specific instructions for the voter printed on the back. i) Place the voter’s blank ballot (unfolded) in the Provisional Ballot Envelope. j) Instruct the voter to vote their ballot in a booth, place it (folded) back inside the
Provisional Ballot Envelope, seal the envelope and return it to the Election Judges when done voting.
k) Place all Provisional Ballot Envelopes inside the Provisional Carrier Envelope (found inside canvas bag to be returned to Election Supply Building at the end of the day.
l) Please remember to write your precinct and the number of provisional ballots on the outside of the Provisional Carrier Envelope.
Provisional voters never sign the voter signature pad. Provisional
ballots are never placed in the tabulator.
36
37
Station #2 Station #2 is where ballot distribution takes place. Ballot judges work as a team, seated directly next to the poll book/laptop judge. The judges at the poll book and ballot distribution station should always be a team (Ideally 1 Republican/1 Democrat). If your precinct is using more than one poll book laptop on Election Day there will be multiple “teams” at each poll book when voters are processed and ballots are issued. Each poll book/ballot judge “team” operates independently with their own laptop and voter signature pad. The ballot judge is responsible for issuing the correct ballot to every voter. This is also where judges offer proper ballot marking demonstration and instruct the voter on proper Ballot Privacy Cover use. In special cases, the poll book and ballot judge are also responsible for properly processing those voters who will be voting provisionally. Spoiled ballots are also returned and replaced by the ballot judge.
Issuing ballots and keeping track of numbers
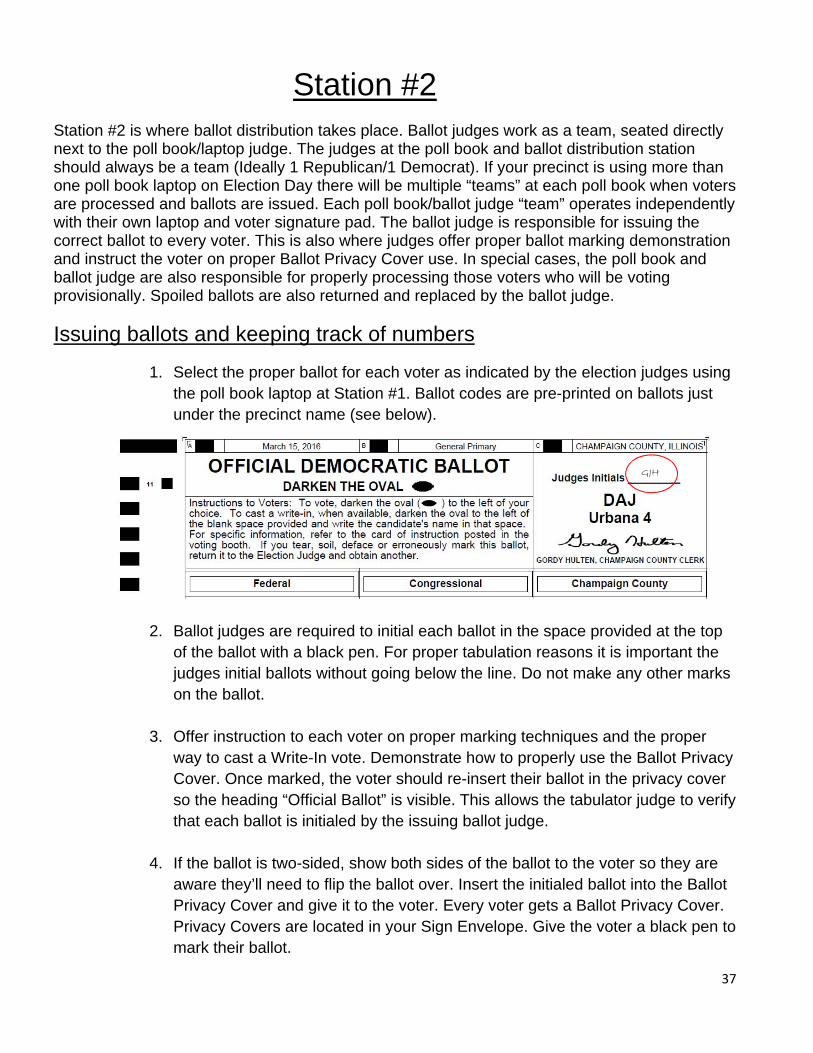
1. Select the proper ballot for each voter as indicated by the election judges using the poll book laptop at Station #1. Ballot codes are pre-printed on ballots just under the precinct name (see below).
2. Ballot judges are required to initial each ballot in the space provided at the top of the ballot with a black pen. For proper tabulation reasons it is important the judges initial ballots without going below the line. Do not make any other marks on the ballot.
3. Offer instruction to each voter on proper marking techniques and the proper way to cast a Write-In vote. Demonstrate how to properly use the Ballot Privacy Cover. Once marked, the voter should re-insert their ballot in the privacy cover so the heading “Official Ballot” is visible. This allows the tabulator judge to verify that each ballot is initialed by the issuing ballot judge.
4. If the ballot is two-sided, show both sides of the ballot to the voter so they are
aware they’ll need to flip the ballot over. Insert the initialed ballot into the Ballot Privacy Cover and give it to the voter. Every voter gets a Ballot Privacy Cover. Privacy Covers are located in your Sign Envelope. Give the voter a black pen to mark their ballot.
GJH

38
5. Direct the voter to the voting booth. Do not distribute more ballots than the
number of booths available to voters. Do not initial ballots ahead of time, initial ballots as they are issued to voters.
6. The Poll book laptop keeps track of ballot quantities issued and will
electronically notify the Election Hotline if additional ballots are needed at your polling place, provided that you are synching to the system. Additional ballot supplies are no longer recorded at the polling place.
7. Using the OBR forms located in the Front Pocket of the Red Binder, verify that
your voter signature pad total. This verification should be done every hour or two but only recorded at the times designated on the OBR.
Write-In votes 1. A voter may vote for a person whose name is not on the ballot (even though it
may not be counted). a) A voter writes the name of the candidate in the space provided on the
ballot and darkens the oval next to it (see below). b) Lines will appear on the ballot only in contests where there are eligible
write-in candidates.
2. Write-In votes are recorded and counted only for those candidates who filed a
Declaration of Intent to Be a Write-In Candidate. a) A list of valid write-in candidates for your precinct will be included in the
Front Pocket of the Red Binder.
39
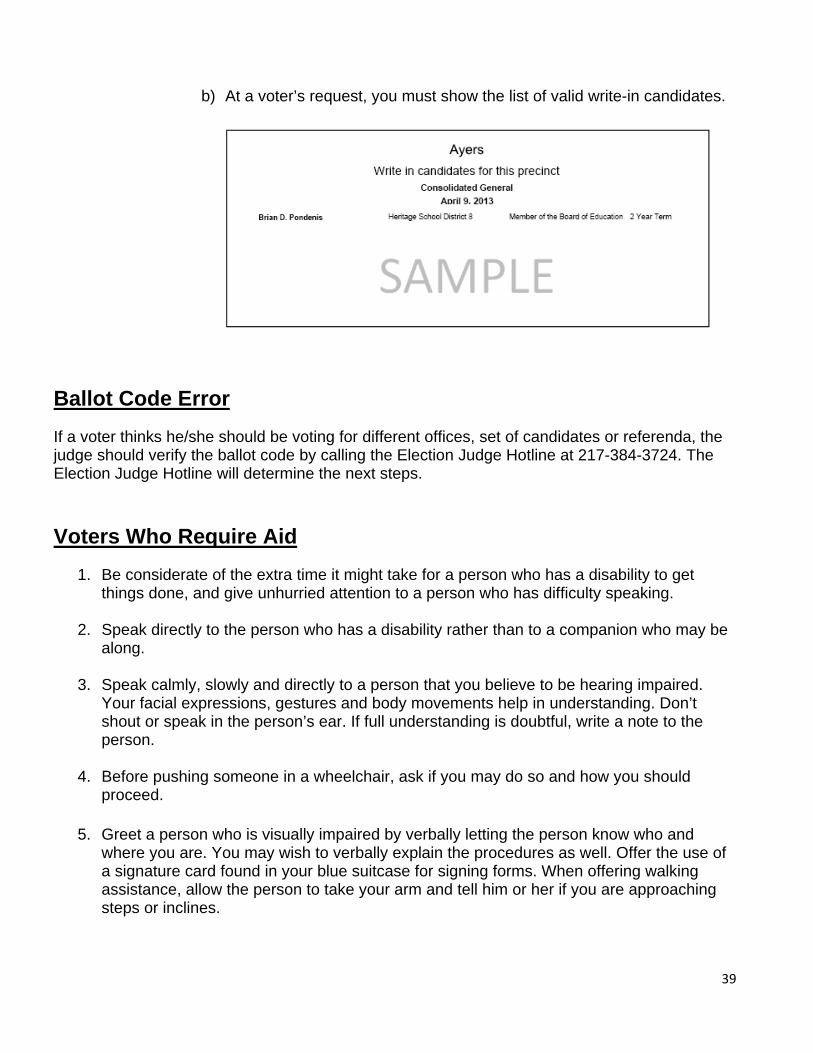
b) At a voter’s request, you must show the list of valid write-in candidates.
Ballot Code Error If a voter thinks he/she should be voting for different offices, set of candidates or referenda, the judge should verify the ballot code by calling the Election Judge Hotline at 217-384-3724. The Election Judge Hotline will determine the next steps.
Voters Who Require Aid 1. Be considerate of the extra time it might take for a person who has a disability to get
things done, and give unhurried attention to a person who has difficulty speaking.
2. Speak directly to the person who has a disability rather than to a companion who may be along.
3. Speak calmly, slowly and directly to a person that you believe to be hearing impaired. Your facial expressions, gestures and body movements help in understanding. Don’t shout or speak in the person’s ear. If full understanding is doubtful, write a note to the person.
4. Before pushing someone in a wheelchair, ask if you may do so and how you should proceed.
5. Greet a person who is visually impaired by verbally letting the person know who and where you are. You may wish to verbally explain the procedures as well. Offer the use of a signature card found in your blue suitcase for signing forms. When offering walking assistance, allow the person to take your arm and tell him or her if you are approaching steps or inclines.
40
6. Be aware that dogs that assist people with disabilities should be admitted into all buildings.
7. Be aware that federal law allows voters with disabilities to be accompanied by and to
receive the assistance of another person in the voting booth.
8. Take the appropriate precautions to ensure that the privacy of the voter and the secrecy of the ballot are not compromised.
9. The handicapped accessible booth is provided for the physically disabled voter who is able to fill out his or her own ballot. However, any voter may use it.
10. Giving Voting Assistance
a. “Assistance” is the actual marking of the ballot for the voter by specified
persons in the privacy of the voting booth.
b. When assistance is given (only upon the voter’s request) completion of Part A of the Voting Affidavit located in Folder 3 of the Red Binder is necessary. The persons giving and receiving assistance are required to sign the Voting Affidavit.
c. Only two groups of voters may receive assistance; the disabled or the illiterate
voter.
d. Assistance is only given in the secrecy of the voting booth. Anyone giving assistance must cast the vote as directed by the voter and shall not disclose how the vote was cast.
e. Federal law reads: “Any voter who requires assistance to vote by reason of blindness, disability, or inability to read or write may be given assistance by a person of the voter’s choice, other than the voter’s employer or agent of that employer or an officer or agent of the voter’s union.”
f. Should the voter not specify an individual to assist them in voting, they shall be
assisted by two judges, one from each political party. Election judges who assist are also required to sign the Voting Affidavit.
g. Assisting the illiterate voter. An illiterate voter is a registered, qualified voter
who cannot read or write English sufficiently to cast his ballot. Before receiving assistance, the voter shall sign, or make his mark on the Voting Affidavit form located in Folder 3 of the Red Binder. The person assisting is required to sign an oath of assistance on the Voting Affidavit
h. Assisting the physically disabled voter. A physically disabled voter is one
who is physically unable to mark his ballot or is blind. A person who is intoxicated does not qualify as physically disabled and
41
may not receive assistance. The voter must complete the Voting Affidavit form located in Folder 3 of the Red Binder stating his specific physical disability.
i. Assisting the deaf voter. A kit is provided in Folder 4 of your red binder to assist you in communicating with the voter. The kit contains cards printed with common questions and instructions for the voter. For additional questions not addressed on the cards, please use pen and paper.
j. Your supplies contain many aids for persons with disabilities. They include: Magnifier Sheet Small Magnifying Glass Signature Guide Gray Sponge Roller to be placed on Voter’s Pen
VAT Kit in clear Tupperware in blue suitcase (containing headphones, ear covers and stylus)
The Voter Assistance Terminal (VAT)
The Voter Assistance Terminal (VAT) is a ballot-marking system designed to provide privacy and accessibility to voters who are blind, vision-impaired, or have a disability or condition that would make it difficult or impossible to mark their own ballot with a pen. However, any voter may use it. Do not put Demonstration Ballots in the VAT.
Voters may use the touch screen or enlarge the screen, or they may use the audio feature to listen to the candidates and propositions and make their selection on the keypad which is marked in Braille.
The VAT also accommodates a Sip-N-Puff tube or a paddle, which are personal ADA devices brought by the voter. a. Although designed with the physically disabled voter in mind, the VAT features can be
very helpful to many voters. Please introduce the VAT to each voter in case they might have a need that is not obvious.
b. Voting with the VAT:
• Judges should understand how the voting process works using the VAT, but judges
should not be involved in the vote selection process unless they are assisting a voter and have completed the Voting Affidavit.
• There are several ways to interact with the VAT: Touch Screen, Earphones and
Keypad which includes Braille, Paddle, Sip-N-Puff.
42
c. Vote using the Touch Screen Monitor
• When the monitor displays “Please Insert Your Ballot”, feed the blank ballot into the Ballot Feed Tray. (The ballot may be fed into the VAT head-in, bottom-in or face down and the VAT will still read and mark the ballot). After the ballot is scanned press ‘Next’.
• The Contest Screen displays the first office listed on the ballot for consideration.
• Touching the screen, select either the candidate name or the oval next to their name
to indicate your selection. The selection displays a filled in oval next to the name of your choice.
• To vote for a Write-In candidate, press the write in button under the contest screen. Under the Write-In Pop-Up screen, use the keyboard display that appears on the Touch Screen Monitor to type the name of the write-in candidate. Press ‘OK’ to return to the previous screen.
• Press next until you consider all contests and questions on the ballot.
• The Summary Screen appears when you have considered all contests and
questions for your ballot. Review your ballot on the screen. No selections have been marked on the ballot at this point.
• To change any selection, press the contest or question you wish to change
on the Summary Screen. Touch your original selection to deselect your choice. Touch your new response and press next to return to the Summary Screen.
• Press ‘Next’ when the selections are correct.
• Press ‘Mark Ballot’ to print your selections onto the ballot.
• Remove ballot from the VAT (pull firmly), place the ballot in the Ballot
Privacy Cover and insert it in the Tabulator.
d. Vote using the headphones and keypad
• A voter who commonly uses ADA equipment with audio components may bring their own headphones which can be used with the VAT. If not, a set of headphones is included in the VAT Kit located in your Blue Precinct Kit. Place a fresh set of ear covers on the headphones for each new voter using them.
• When “Please Insert Your Ballot” is heard through the headphones, feed the blank
ballot into the Ballot Feed Tray. (The ballot may be fed into the VAT head-in, bottom-in, face down and the tabulator will still read and mark the ballot). After the ballot is scanned press the down key.
43
• The first office listed on the ballot is read through the headphones for consideration.
• To select this candidate, press the ‘Select’ Key; to go to the next candidate, press the
‘Right Arrow’ key. • To vote for a Write-In candidate, press the ‘Left Arrow’ key and use the ‘Up’ and
‘Down’ arrows to hear each letter. Once you hear the letter you want, press ‘Select’. Press the ‘Right Arrow’ key to return to the previous screen.
• Repeat this process until you consider all contests and questions on the ballot.
• The Summary Screen will be read through the headphones when you have
considered all contests and questions for your ballot. No selections have been made on the ballot at this point.
• To change any selection, press the ‘Down Arrow’ key until you hear the contest you
wish to change. Press the ‘Select’ Key to de-select your choice. Use the ‘Up’ or ‘Down’ arrow to find your new response and press the ‘Select’ key, then the ‘Right Arrow’ to return to the Summary Screen.
• Press the ‘Right Arrow’ key when the selections are correct.
• Press the ‘Select’ key to print your selections onto the ballot.
• Remove ballot from the VAT (pull firmly), insert the ballot into the Ballot Privacy Cover
and take to the Tabulator; and insert it as you would any other ballot.
e. Using the Sip-N-Puff or paddle
• A Sip-N-Puff or paddle are devices commonly used by persons with disabilities using his/her mouth on a straw or a foot or hand paddle to send inputs to the VAT.
• The voter uses the device to indicate a “Yes” or “No”.
• Using this technique, the voter can navigate through all screens.
f. Additional features:
• The VAT has a Zoom feature which allows a voter to enlarge the screen. Using the
Touch Screen the voter can select Zoom in/out to enlarge the text and by selecting zoom in/out again the screen resets to the original size text.
• The High Contrast feature changes the background to black and the text white. To
return to the original text, the voter selects High Contrast again.

44
• Two rubber tipped stylus’ are provided with the VAT for persons who have trouble pointing to touch the screen.
• Voters using the headphones and keypad can have the text repeated by pressing the
Repeat button on the keypad.
• Voters using the headphones and keypad can change the volume by pressing the Volume button; right to increase; left to decrease volume.
• Voters using the headphones and keypad can change tempo by pressing right to
increase and left to decrease the speed.
Station #3
The election judge at Station #3 is responsible for the final steps that voters complete after they’ve completed marking their ballot.
1. Voter privacy is the first priority! At no time should an election judge handle or insert a
voter’s ballot-unless the voter requests assistance for some reason. Secrecy of a voter’s ballot is of the utmost importance.
2. To ensure voter privacy judges at Station #3 must remain at least 5 feet away from the
ballot box. The Station #3 judge must maintain clear view of voters leaving booths and approaching the tabulator to ensure no ballots leave the polling place uncounted.
3. The tabulator should be placed away from the judges at Station #1 & #2 to ensure privacy. The tabulator judge may ask the voter if they have finished voting. Remind the voter that some ballots have contests printed on both sides of the ballot.
4. Before the voter deposits the ballot in the tabulator, and without removing the ballot from the Ballot Privacy Cover, verify the ballot is initialed by the ballot judge. If the initials are missing, the ballot must be returned to the ballot judge. The un-initialed ballot is to be treated as a spoiled ballot and replaced with a new, initialed ballot. Once a ballot is deposited in the tabulator and accepted into the ballot box, a new ballot cannot be issued-voting is complete.
5. The tabulator will accept and tabulate ballots inserted in any direction.
6. Offer an “I Voted” sticker to each voter.
7. Return pens and ballot privacy covers to the ballot judge station throughout the day to ensure they have sufficient supplies to continue processing voters at all times.
45
Spoiled Ballots
If a voter spoils his/her ballot, by making an error or by changing his/her mind, before the ballot is placed in the tabulator, a new ballot may be issued. 1. Have the voter return the spoiled ballot to the ballot judge.
2. Instruct the voter to fold the ballot to ensure their vote marks cannot be seen. 3. Mark the folded ballot “SPOILED” and place it in the manila Spoiled Ballot Envelope
located in the back of the precincts red binder. 4. Issue the voter a new initialed ballot and send them to the booth to vote it.
Tabulator beeps and messages
If the tabulator beeps after the voter has inserted their ballot, there are two possibilities:
1. The ballot has been returned to the voter there are several possibilities:
• If the ballot has been returned automatically, it is unreadable by the tabulator for
some reason. The voter should turn the ballot over and reinsert it.
• If it is the first ballot of the day and you are using a metal ballot box, the judge should instruct the voter to cover their ballot and then approach the tabulator, being careful not to look or appear to look at the voter’s ballot. Check that flap #2 is in the “up” position. This will require unlocking flap #1, placing it in the down position and sliding the tabulator forward so you can unlock and lift flap #2. Slide the tabulator back into position. Lift flap #1 and relock into position. Step away from the tabulator and instruct the voter to reinsert their ballot.
If at any time the Ballot Tabulator stops functioning, voting does not need to stop. Contact the Election Hotline at (217) 384-3724 immediately. You may be
instructed to open the emergency bin of your ballot box where voters can deposit their ballots for the remainder of the day. Whenever possible, ballots
placed in the emergency bin are tabulated by the election judges after the polls close.
46
• If this is not the case or you are using a plastic ballot box, the judge should ask the
voter to read the message on the screen.
• If it reads, “# Races Have Unreadable Marks” this indicates that the voter may not have properly filled in the ovals on his/her ballot. Instruct the voter to return their ballot to Station #2 to receive a new ballot (see instructions for spoiled ballots) and receive instruction on how to complete the ballot correctly. Do this in the most discreet manner possible. Do not shout across the polling place, as it might embarrass the voter.
• If this is not the problem, call your coordinator or Election Judge Hotline for
instructions.
• If it reads, “Missed Orientation Marks” or “Missed Timing Marks”, call the Election Judge Hotline (217) 384-3724 for instructions.
2. The ballot is being held by the tabulator and the tabulator is beeping.
• If the tabulator is holding the ballot, it is likely an over-vote, meaning more votes
were cast in a race than were allowed. When notified the voter has two options:
o Spoil the ballot and receive a new one to correct the error. OR
o Accept ballot “as is”, by pushing the ‘Accept’ button on the tabulator. By accepting the ballot “as is”, there would be no votes cast for the over-voted offices, but the rest of the ballot will be counted as marked.
• If you’re the judge by the ballot box and this situation occurs, it’s best to ask the
voter “if they have voted for everyone they intended to vote for” and determine how the voter would like to proceed before the voter leaves the polling place.
• The judge should ask the voter to read the display-the voter must select either the “accept” or “return” buttons themselves.
• The judge should give the voter time to resolve this issue and give the voter as
much assistance as they ask for or need. The election judge should always strive to maintain the secrecy of the voter’s ballot. It is illegal for election judges to reveal to anyone what they saw on a voter’s ballot or on the screen of the tabulator.
• If the voter wishes to have a new ballot, follow the instructions for spoiled ballots.
3. Only approach the tabulator or press the button for the voter if they ask for and require
assistance. Judges at this station should take extra precaution not to look at or appear to look at any voter’s ballot.
47
Closing the Polling Place...
Who Can Remain in the Polling Place AFTER the polls are closed?
Authorized Persons Permitted in Polling Place After 7:00 P.M.
• Election Judges and Coordinators
• Pollwatchers and/or candidates with valid credentials who are inside the polling place at the time the doors are locked. Pollwatchers and/or Candidates may not enter after the polling place is locked.
• County Clerk and/or State Board of Elections representatives
• State’s Attorney’s and Attorney General’s representatives
• Law enforcement officers
Closing Instructions Step 1: At 6:30 p.m., judges should announce “the polls will close in thirty minutes” in a clear, audible voice.
Step 2: Locate the “Closing Instructions” in Folder 1 of the red binder (also in the election judges training manual in the front of the red binder).
Step 3: At 7:00 p.m. judges announce “the polls are closed.” Any person in line to vote must be permitted to vote. One judge (or a coordinator) should stand at the end of the line to inform voters who arrive after 7:00 p.m. that they are too late to vote. Once the last eligible voter has entered the polling place, close and lock the doors.
Step 4: Once all voters have been processed, voted, placed their voted ballot in the tabulator and exited the judges will begin the closing procedures. Please do not begin the closing instructions until all eligible voters have left the polling place. Please leave the computer on and the program up and running during the closing procedures.

48
Step 5: Locate the key lanyard in the zipper pouch of the red binder. Using the red key (black if you’re using a plastic ballot box) open the Emergency Bin on the front of the ballot box. If there are ballots in the bin, insert the ballots into the tabulator. Note: If you did not use the Emergency Bin, there should not be any ballots inside; however, you are required to verify the emergency bin is empty. Re-lock the emergency bin. Verify there are no ballots inserted in the Voter Assistance Terminal (VAT).
Step 6: Locate the Official Ballot Record (OBR) located in the Front Pocket of the Red Binder. On the back side of the form, enter the following information:
• Enter the total number of voter signatures (combined total if using more than one
Voter Signature Pad) in the “Final Signature Pad Total” box. • Enter the “Final Tabulator Total” and; • Enter the “Total PROVISIONAL Ballots Cast” in the appropriate boxes. Enter zero
on the OBR if you had no provisional ballots cast. If you leave the box blank the receiving staff at the election supply building will assume you skipped this step.
• If your Signature Pad Total does not equal your Tabulator totals and you know why, please document the reason in the appropriate lines of the OBR. If you do not know why your numbers do not match, please call the Election Judge Hotline for further instruction.
Leave the OBR out for now, it will be used again later in the closing instructions.
Step 7: Place the Voter Signature Pads (used & unused) and unused ballots in the red vinyl bag and zip it closed. Step 8: If you had to use any Grace Period Registration forms (either because there was an address not in the system or you were instructed to do so by the County Clerk’s Office) place
49
your completed Grace Period Registrations/Applications in your manila Completed Grace Period Registration/Application Envelope and complete the front label. This envelope and its contents must be placed in Grace Period Registrations/Applications Blue File Folder and hand carried to the Election Supply Building at the end of the night if you used any. Note: the Grace Period Registration forms are only to be used if your computers fail or there is an address not in the system, which is highly unlikely. In all likelihood, you will not have used any forms meaning this step would be skipped.
Step 9: Remove the grey Velcro cover from the tabulator then squeeze and open the key compartment. Step 10: Using the following instructions, (also provided on the instructional poster included in the tabulator case) shut down the tabulator and print the precinct results tapes:
A. Insert the yellow key into the tabulator; turn the key to the “OPEN/CLOSE POLL”
position.
B. On the display press the “CLOSE POLLS” button, the results tape will immediately begin printing. Allow the reports to print freely while continuing with the next steps. The Ballot Tabulator will automatically print two (2) “Voting Results Reports” tapes. The first copy of the results tape (immediately follows the Zero Results Tape that was printed when the polls were opened) should remain attached. All judges should sign in the lines provided. If you are in a polling place with two precincts, do not cut the precincts apart.
C. Remove the yellow key from the tabulator (the tapes will continue printing). Using the red or black key open the ballot boxes door(s) and carefully remove the ballots from the ballot box. All judges and Pollwatchers witness the unlocking of the ballot box. Be sure to look inside the ballot box to ensure no ballots are stuck anywhere in the box. Occasionally ballots get hung up at the top. All judges must observe that the ballot box is empty.
D. Once all the ballots are removed close and lock the ballot box doors. Place the yellow key back into the tabulator.
E. In your blue tri-fold precinct folder, locate the list(s) of valid Write-In candidates and
your Write-in Tally Sheet(s). There will be a Write-In Tally Sheet for each precinct if your polling place is combined. If your precinct(s) has no write-in candidates listed, check the second box on the Write-In Tally Sheet(s) indicating there were none. Skip to step H below if there are no Write-In Candidates.
F. Once a complete “Voting Results Report” tape has run for your precinct (each
precinct, if you are a combined precinct), review your “Voting Results Report” tape to the find the total write-in votes recorded by your tabulator. It is necessary to check each office individually on the tape where there is a valid Write-In candidate. At the end of each office the number of write-in votes recorded by the tabulator for that office will be listed.

50
G. If your precinct(s) has write-in candidates, check the first box on the Write-In Tally Sheet indicating that you, the election judges have counted the write-ins. And process the write-in votes as follows:
a. Process the Write-In Votes as follows:
i. Write the number of write-in votes from the results tape in the boxes for
the corresponding races on the Write-In Tally Sheet in the boxes marked “Write-in Votes from Tape”.
ii. Write-In votes are counted only for those candidates whose names appear on the list of valid Write-In candidates provided in the blue tri-fold precinct folder.
iii. On the ballots, write-in votes will appear in the spaces provided under
each eligible office listed on the ballot. Sort the stack of voted ballots into two piles - one stack with ovals darkened next to the write-in line, and one with no ovals darkened next to the write-in line. Set aside the stack of ballots with no ovals darkened next to the write-in line (regardless if there is a name written on the line).
iv. If you are a combined precinct, you will need to separate the ballots with ovals darkened next to the write-in line by precinct, as each precinct has their own Write-In Tally Sheet.
v. Examine only the stack of ballots with ovals darkened next to the write-
in line. To be VALID, the write-in oval must be darkened and a valid candidate name (one from the list of valid Write-In candidates) must be written on the line. The spelling of the candidate’s name and handwriting/script/printing need not be exact as long as the intention of the voter can be determined by the election judges. The use of stickers or rubber stamps by a voter does not constitute a valid write-in vote.
vi. On the Write-In Tally Sheet, using hash marks, record the number of
valid write-in votes for each candidate. Place the total in the box under the Total column.
vii. Invalid write-in votes are for candidates not listed on the list of Write-In
candidates or any candidate who may already be otherwise listed on the ballot.
viii. On the Write-In Tally Sheet, using hash marks, record the number of
invalid write-in votes. Place the total in the box under the Total column.
ix. The sum of all valid and invalid write in votes in the total column must equal the number of votes in the box labeled “Write-In Votes from Tape,” which was the number from the tabulator tape.
51
H. Place the list of valid Write-In candidates back in the Red Binder.
I. All judges should sign the Write-In Tally Sheet. Place the Write-In Tally Sheet(s) in the clear pouch located in your Red Binder. If write-in votes are not tallied in the precinct, the judges returning the supplies will be asked to do so upon returning to the Election Supply Building. All judges must sign the write-in tally sheet-even if there are no write-in candidates for your precinct(s).
J. Once the tabulator tapes have printed completely tear them off gently. Using the scissors provided in the blue suitcase cut the first and second printout apart. The first copy (has the zero reports tape that was generated in the morning at the beginning) must be signed by ALL judges.
K. Fold the tape so that the judge’s signatures are visible and place in the clear pink
pouch located in the Red Binder.
L. Turn the yellow key in the tabulator to the “OFF” position. Close the key compartment and place the gray vinyl cover back on the tape area.
M. Use the red or black key to unlock and lower Flap #1 on the front of the tabulator. Use
the scissors to cut the red seal securing the memory card on the front of the tabulator. N. Record the red seal number in the space provided on the OBR.
O. Place the cut red seal in the zipper pouch of the Red Binder. Remove the memory
card from the tabulator and place it in the clear pink pouch located in the Red Binder to be returned to the election supply building.
P. Unplug the black power cord from the electrical outlet and from the rear of the
tabulator.
Q. Slide the tabulator slightly forward to expose the back of the machine. Remove the power cord from back of unit. Place the power cord in the bottom of the tabulator storage case. Carefully remove the tabulator and place it in the black storage case. Place the instructional poster on top, close and lock the case.
R. If you have a metal ballot box, raise flap #1 back into UP position and lock. Lower flap #2 into the DOWN position and lock. Ballot boxes remain in the polling place after the polls close. Place the key lanyard back in the zipper pouch of the red binder.
The tabulator in the black carrying case must be brought back to the election supply building. If you leave the tabulator
in the polling place, you will be sent back to retrieve it.
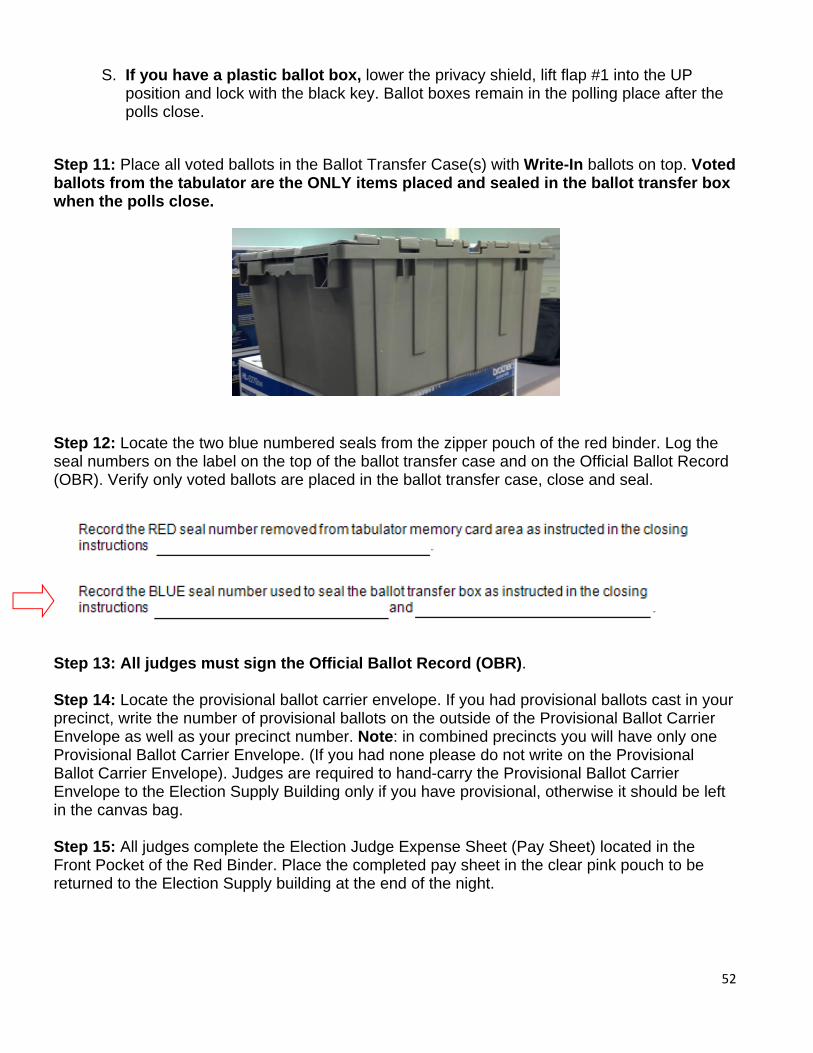
52
S. If you have a plastic ballot box, lower the privacy shield, lift flap #1 into the UP position and lock with the black key. Ballot boxes remain in the polling place after the polls close.
Step 11: Place all voted ballots in the Ballot Transfer Case(s) with Write-In ballots on top. Voted ballots from the tabulator are the ONLY items placed and sealed in the ballot transfer box when the polls close.
Step 12: Locate the two blue numbered seals from the zipper pouch of the red binder. Log the seal numbers on the label on the top of the ballot transfer case and on the Official Ballot Record (OBR). Verify only voted ballots are placed in the ballot transfer case, close and seal.
Step 13: All judges must sign the Official Ballot Record (OBR). Step 14: Locate the provisional ballot carrier envelope. If you had provisional ballots cast in your precinct, write the number of provisional ballots on the outside of the Provisional Ballot Carrier Envelope as well as your precinct number. Note: in combined precincts you will have only one Provisional Ballot Carrier Envelope. (If you had none please do not write on the Provisional Ballot Carrier Envelope). Judges are required to hand-carry the Provisional Ballot Carrier Envelope to the Election Supply Building only if you have provisional, otherwise it should be left in the canvas bag. Step 15: All judges complete the Election Judge Expense Sheet (Pay Sheet) located in the Front Pocket of the Red Binder. Place the completed pay sheet in the clear pink pouch to be returned to the Election Supply building at the end of the night.
53
Step 16: Place the completed and signed OBR in the clear pink pouch. The clear pink pouch should now contain the memory card, the tabulator tape with judge’s signatures facing out, the Write-In Tally sheet, the Judges Pay Sheet and the OBR. Judges are required to hand-carry the clear pouch to the Election Supply Building (removed from the Red Binder). Step 17: If there are Spoiled Ballots, complete the information on the front of the Spoiled Ballot envelope by writing the total and having all judges sign on the lines provided and leave the Spoiled Ballot envelope in the red binder. Spoiled ballots are no longer recorded on the OBR. Step 18: Leave the computer on and the program up and running but remove the power cord from the side of the laptop. Remove the other end of the power cord from the 3-prong extension cord. Place the laptop, the mouse the power cord and the ID Scanner (if you had one in your polling place) in the black laptop bag (It will still be powered on inside the laptop bag, this is ok). Step 19: Press the power button on the Wi-Fi device to power it off. Remove the Wi-Fi power cord from the 3-prong white extension cord. Remove the 3-prong extension cord from the outlet. Place the Wi-Fi device, its power cord and the 3-prong extension cord in the black laptop bag. Step 20: Close down the VAT using the Open/Close Instruction Poster in Machine Instructions Envelope or the instructions below:
• Insert green key into the mode switch and turn the key to the OFF position. • Remove the key. • Unplug the headphones. Throw away any used ear covers. Place any unused ear
covers in the VAT kit. • Take the black cardboard privacy screen apart and place it back in the storage
envelope. Follow the instructions on the storage envelope for returning or storing the screen.
• Lift under the front of the ballot feed tray and fold it inwards. • Open the lid and fold the Touch Screen back into the recessed area. • Lower the lid over the Touch Screen Monitor. • Lower lid flap over the ballot feed tray. • Move the lid latches inward to secure the lid. • Place the VAT kit in the blue suitcase. The ballot box, VAT and blue suitcase are
left in the polling place. If you have a metal ballot box, lock the blue suitcase inside the ballot box.
Step 21: Take Down All Signs and Specimen Ballots. Remove wire VOTE HERE TODAY signs. Judges in City of Champaign, Cunningham and Urbana Townships will return these signs to the Election Supply Building. Judges in the outlying Townships will leave the signs inside the polling place facility.
54
Step 22: Pack up the Remaining Supplies and place in the locations described below a. Place these items in the Red Bag/s:
• Used and un-used Voter Signature Pads • Unused Ballots
b. The following items should be hand carried to the Election supply Building:
• Clear pouch (removed from Red Binder) containing 1. Tabulator Memory Card 2. Tabulator Results Tape with judge’s signatures facing out 3. Signed Official Ballot Record (OBR) 4. Signed Write-In Tally sheet 5. Judges Pay Sheet
• Voted Provisional Ballots in Provisional Carrier Envelope • Keys to the polling place (if issued) • Completed Grace Period Registration Manilla folder (if you had any
c. Place these items in the blue suitcase:
• Specimen Ballots • County or City Map • Extension Cords • 3-prong Electrical Adapter • Magnifying Apparatus • Signature Guide for visually impaired • Work Set (Badges, Tape, Correction Pen, Yellow Highlighters, Rubber
Fingers, Scissors, note pads) • 100 ft. Measuring String • Flashlight with Batteries • VAT Kit containing head phones, ear covers, stylus’ • Pen Box with “I Voted” Stickers placed inside • Pen return bin
55
d. Place these items in the Blue Bag:
• Sign Envelope with the following items: 1. Vote Here Sign 2. Prohibition and Penalties sign 3. Voter Bill of Rights 4. Illinois Voter Information 5. No Cell Phone/Electioneering/Food/Drink 6. Polling Place Sign 7. Provisional Voting Sign 8. Vote Both Sides/Spoil Your Ballot 9. Ballot Privacy Covers 10. Black Binder Clips
• Machine Set-Up Instructions Envelope (Yellow Label) with the following items:
1. Tabulator Set-Up Instructions (Metal Ballot Box) 2. Tabulator Set-Up Instructions (Plastic Ballot Box) 3. Voter Assistance Terminal Set-Up Instructions
• Provisional Voting Flyers • Unused Provisional Voting Supplies • Provisional Stamp and Red Stamp Pad
Step 23: If you have a metal ballot box (City of Champaign, Cunningham and Urbana Townships), use the red key to unlock the ballot box. Place the blue suitcase, blue bag and the ballot privacy cover bin in the ballot box. Re-lock the ballot box with red key. If you have a black plastic ballot box (Outlying Townships), place the blue suitcase, blue bag and the ballot privacy cover bin along with the “Vote Here Today” and “No Electioneering” signs near the ballot box. Lock the ballot box with the black key. Step 24: Prepare to return to the Election Supply Building. Using the Return Checklist located in Folder 1 of the red binder, confirm that you have placed your supplies and reports in the proper locations. Place the checklist back in Folder 1 of the Red Binder. Step 25: Place colored precinct placard found in the Back Pocket of the red binder in car window so that staff knows what precinct(s) you are returning materials from when you arrive at Election Supply Building. Step 26: Place the key lanyard back in the zipper pouch of the Red Binder. Place the Red Binder in the back exterior pocket of the black laptop bag. Step 27: Load the laptop bags, red vinyl bag, ballot transfer case, tabulator (in its black case), and all of your signs with wires (City of Champaign, Cunningham and Urbana townships only) to return to the Election Supply Building. Make sure you also have your Pink Pouch and Provisional Envelope if you had any Provisionals) in your hand when you return to the Election Supply Building.
Step 28: If you were issued polling place keys, please lock your facility and hand carry the keys to the Election Supply Building. Do not put polling place keys in the Red Binder.
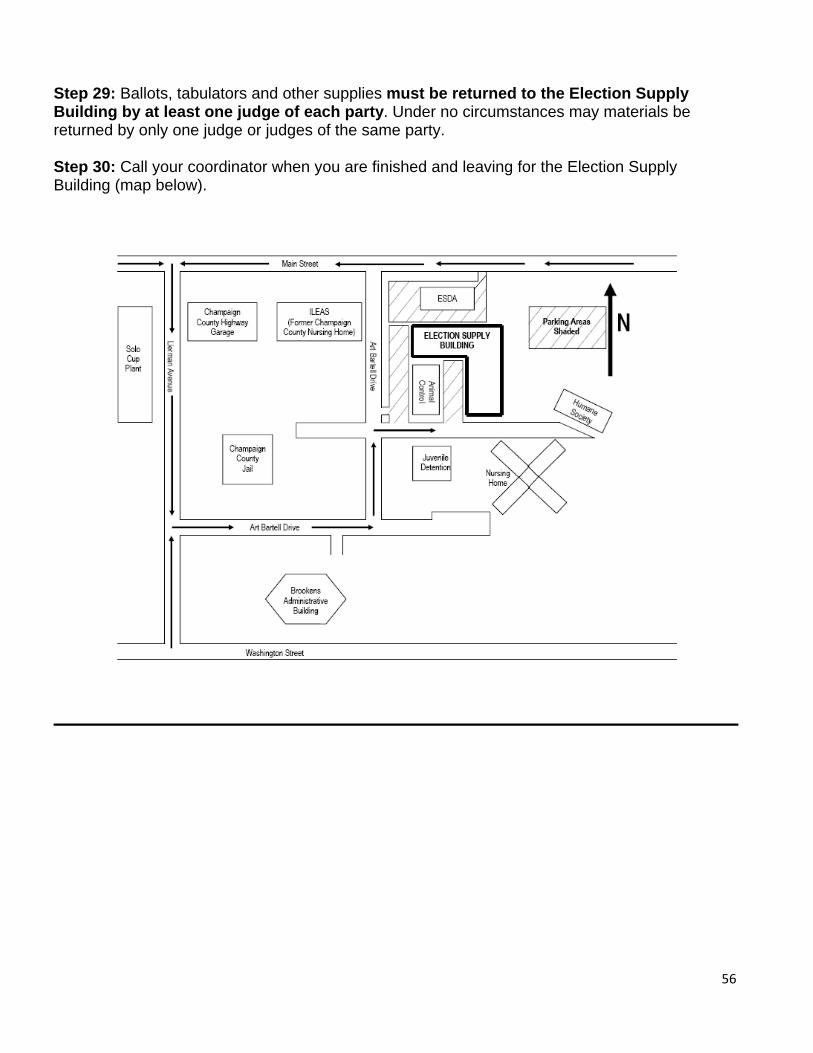
56
Step 29: Ballots, tabulators and other supplies must be returned to the Election Supply Building by at least one judge of each party. Under no circumstances may materials be returned by only one judge or judges of the same party. Step 30: Call your coordinator when you are finished and leaving for the Election Supply Building (map below).
57
Appendix A
Grace Period Registration The instructions that follow are the correct way to process a voter needing to register for the first time in Champaign County (or change their address within Champaign County). Remember that if you have any questions about processing a Grace Period Registration, please do not hesitate to contact the Election Judge Hotline at 217-384-3724.
In the Pollbook program, if you are unable to find a voter and you’ve tried searching by Name, Date of Birth and Address and the voter wishes to register to vote and cast a ballot, the computer will prompt you to begin the Grace Period Registration process using the pollbook laptop.
OR
If you have a voter who has changed their address and has not updated their registration, when you select “Yes” to ‘Has Voter’s Address Changed?’ the computer will prompt you to begin the Grace Period Registration process using the pollbook. (Note: The Grace Period paper applications that are in your Blue Bag are for emergency use only, i.e. the voter lives at an address that is not in the system and we can’t push out the address to you. All Grace voters can now be processed on the laptop and sign the Signature Pad, do not use your paper Grace Period Applications unless instructed to do so by the Office of the County Clerk.)
If the voter is registering in Champaign County for the first time, they must show two forms of ID. Both forms must have their name and at least one must have a current Champaign County address and something must have a picture. (Example: a valid driver’s license with their old address and a bill or a piece of mail with their current address). The proof of address can be digital (e.g., a Move-In notice from the University)
If the voter is simply changing their address within Champaign County, they are not required to show ID, they just have to tell you their new address.
SEE NEXT PAGE FOR STEP BY STEP INSTRUCTIONS
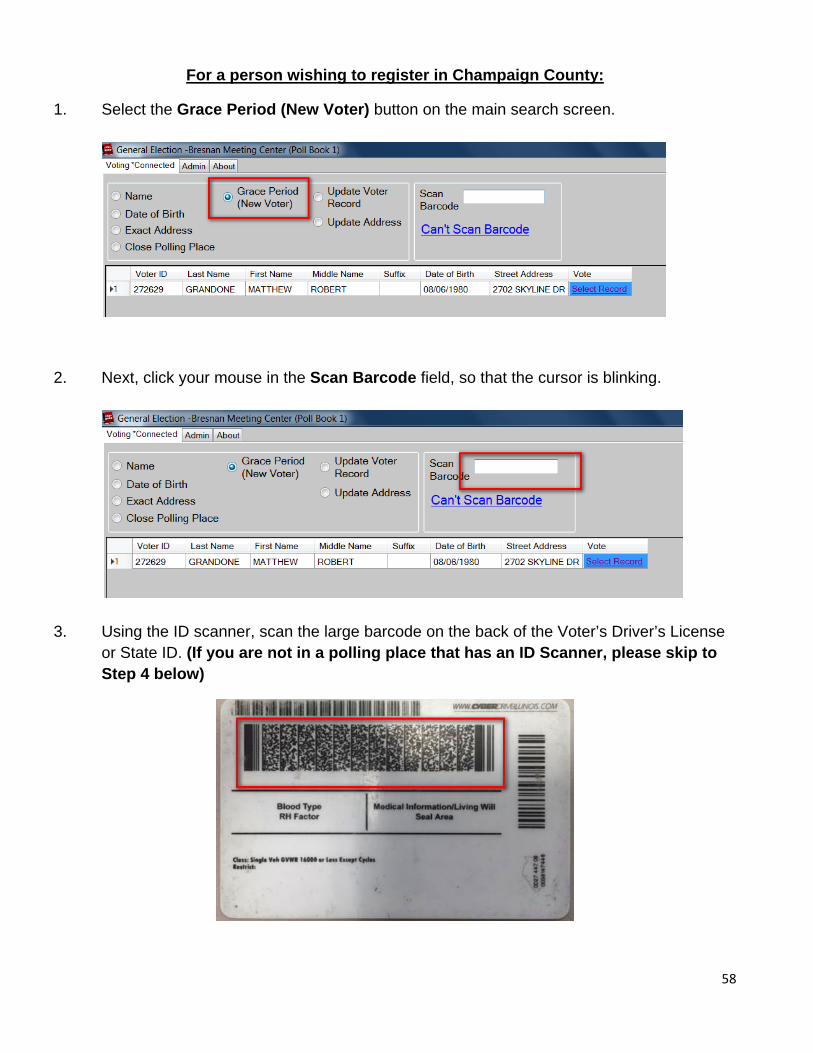
58
For a person wishing to register in Champaign County:
1. Select the Grace Period (New Voter) button on the main search screen.
2. Next, click your mouse in the Scan Barcode field, so that the cursor is blinking.
3. Using the ID scanner, scan the large barcode on the back of the Voter’s Driver’s License or State ID. (If you are not in a polling place that has an ID Scanner, please skip to Step 4 below)
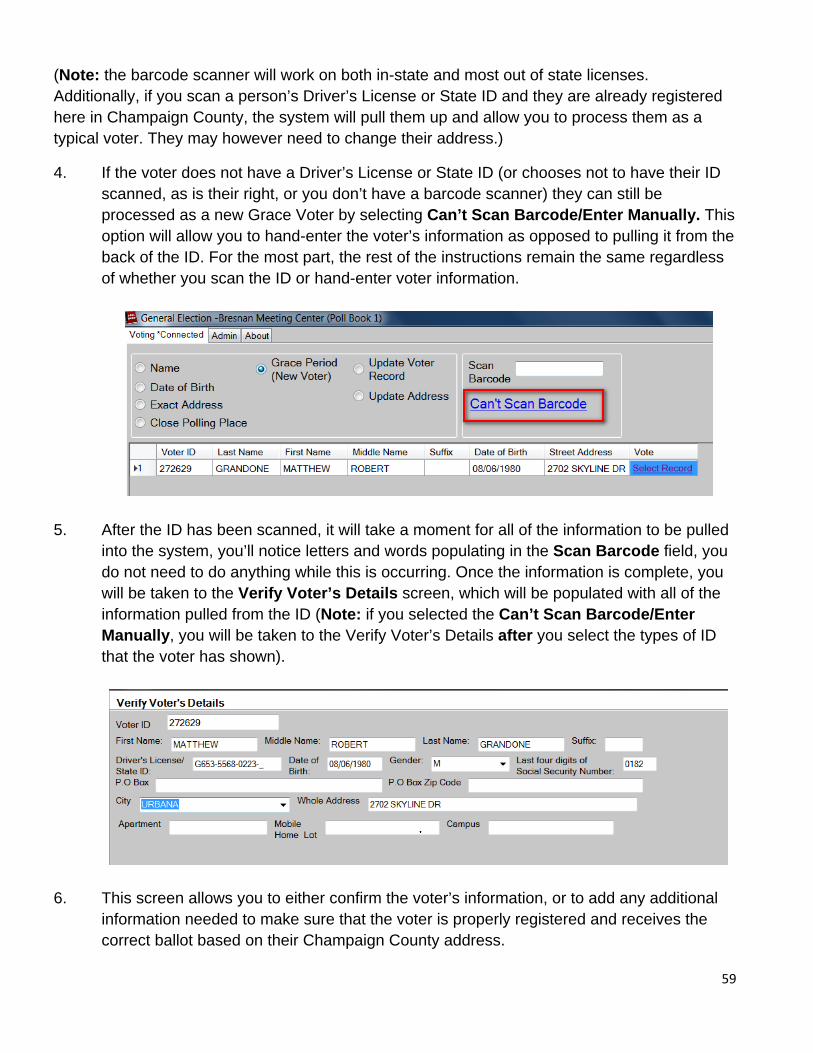
59
(Note: the barcode scanner will work on both in-state and most out of state licenses. Additionally, if you scan a person’s Driver’s License or State ID and they are already registered here in Champaign County, the system will pull them up and allow you to process them as a typical voter. They may however need to change their address.)
4. If the voter does not have a Driver’s License or State ID (or chooses not to have their ID scanned, as is their right, or you don’t have a barcode scanner) they can still be processed as a new Grace Voter by selecting Can’t Scan Barcode/Enter Manually. This option will allow you to hand-enter the voter’s information as opposed to pulling it from the back of the ID. For the most part, the rest of the instructions remain the same regardless of whether you scan the ID or hand-enter voter information.
5. After the ID has been scanned, it will take a moment for all of the information to be pulled into the system, you’ll notice letters and words populating in the Scan Barcode field, you do not need to do anything while this is occurring. Once the information is complete, you will be taken to the Verify Voter’s Details screen, which will be populated with all of the information pulled from the ID (Note: if you selected the Can’t Scan Barcode/Enter Manually, you will be taken to the Verify Voter’s Details after you select the types of ID that the voter has shown).
6. This screen allows you to either confirm the voter’s information, or to add any additional information needed to make sure that the voter is properly registered and receives the correct ballot based on their Champaign County address.
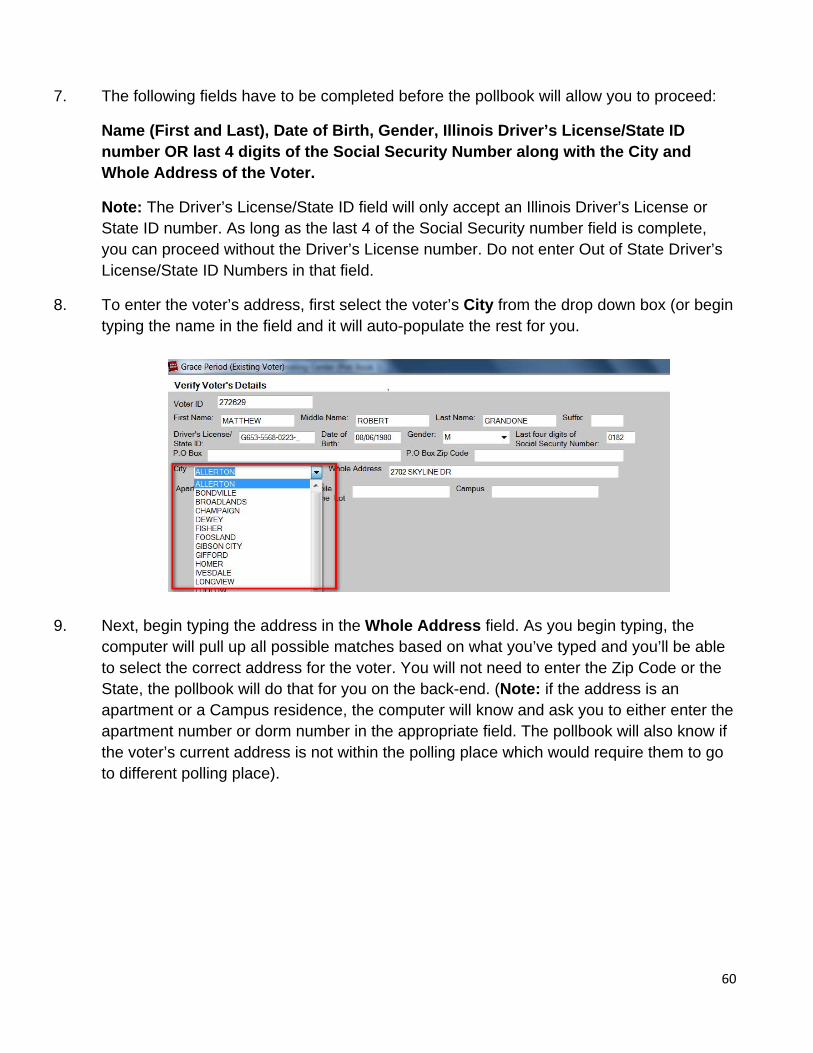
60
7. The following fields have to be completed before the pollbook will allow you to proceed:
Name (First and Last), Date of Birth, Gender, Illinois Driver’s License/State ID number OR last 4 digits of the Social Security Number along with the City and Whole Address of the Voter.
Note: The Driver’s License/State ID field will only accept an Illinois Driver’s License or State ID number. As long as the last 4 of the Social Security number field is complete, you can proceed without the Driver’s License number. Do not enter Out of State Driver’s License/State ID Numbers in that field.
8. To enter the voter’s address, first select the voter’s City from the drop down box (or begin typing the name in the field and it will auto-populate the rest for you.
9. Next, begin typing the address in the Whole Address field. As you begin typing, the computer will pull up all possible matches based on what you’ve typed and you’ll be able to select the correct address for the voter. You will not need to enter the Zip Code or the State, the pollbook will do that for you on the back-end. (Note: if the address is an apartment or a Campus residence, the computer will know and ask you to either enter the apartment number or dorm number in the appropriate field. The pollbook will also know if the voter’s current address is not within the polling place which would require them to go to different polling place).
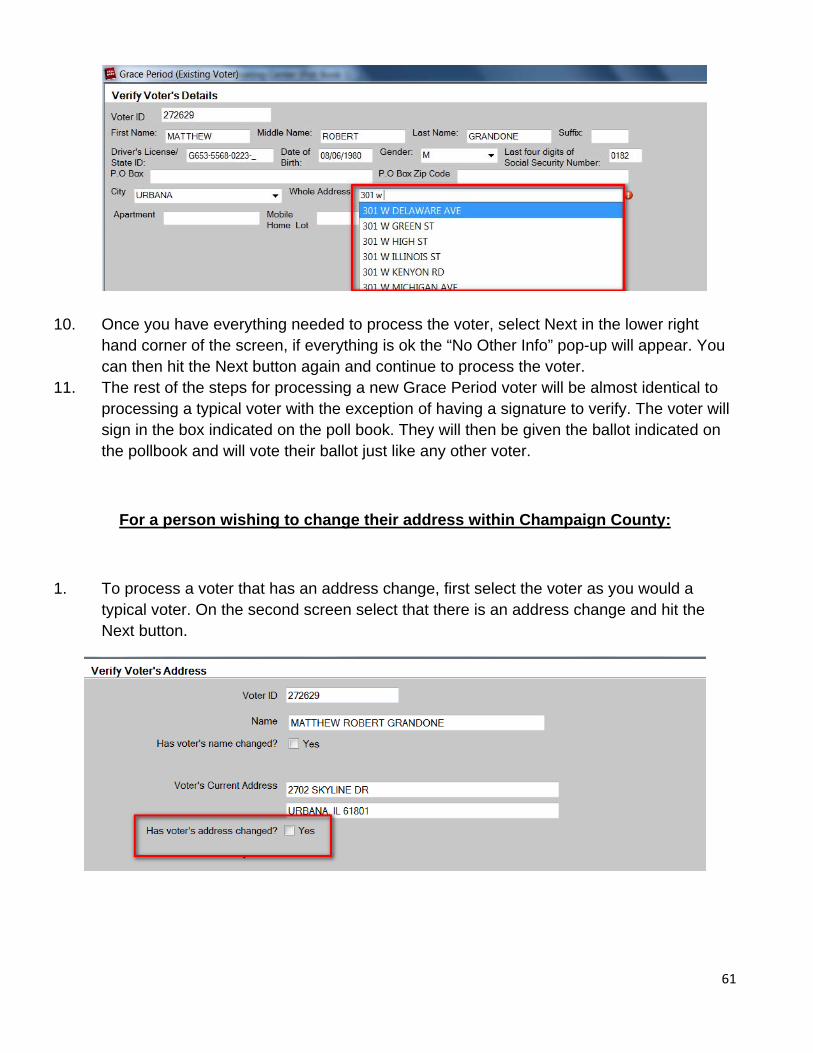
61
10. Once you have everything needed to process the voter, select Next in the lower right hand corner of the screen, if everything is ok the “No Other Info” pop-up will appear. You can then hit the Next button again and continue to process the voter.
11. The rest of the steps for processing a new Grace Period voter will be almost identical to processing a typical voter with the exception of having a signature to verify. The voter will sign in the box indicated on the poll book. They will then be given the ballot indicated on the pollbook and will vote their ballot just like any other voter.
For a person wishing to change their address within Champaign County:
1. To process a voter that has an address change, first select the voter as you would a typical voter. On the second screen select that there is an address change and hit the Next button.
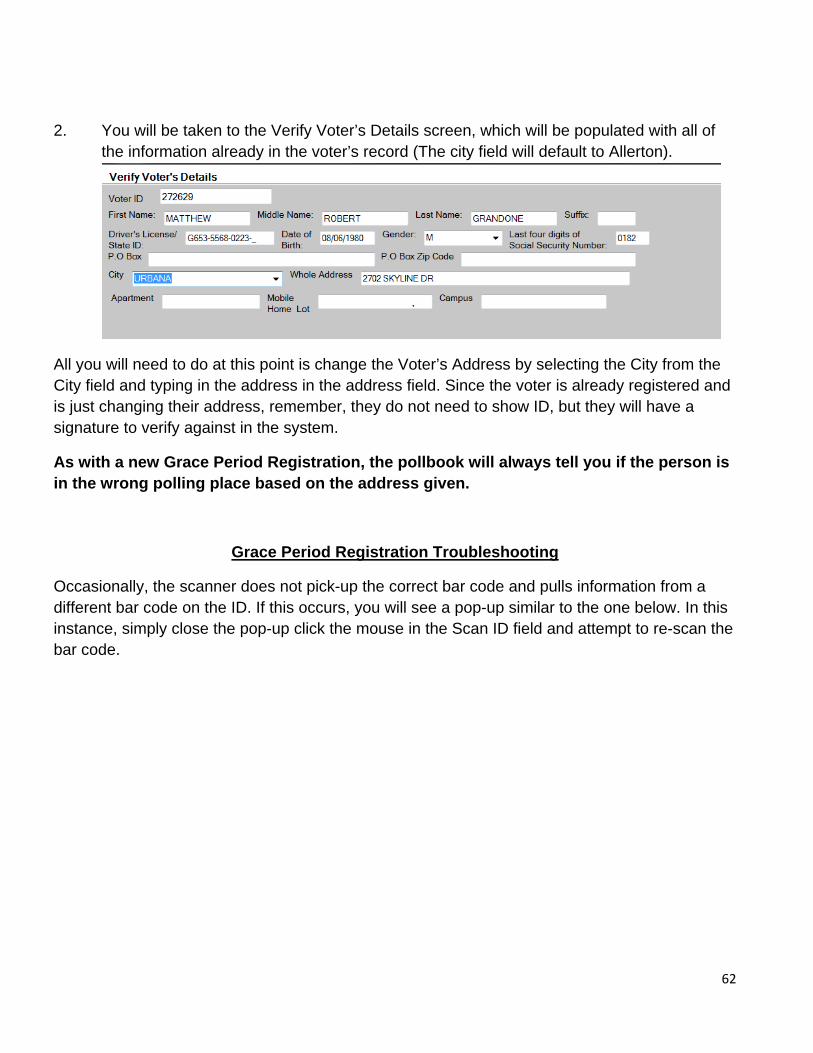
62
2. You will be taken to the Verify Voter’s Details screen, which will be populated with all of
the information already in the voter’s record (The city field will default to Allerton).
All you will need to do at this point is change the Voter’s Address by selecting the City from the City field and typing in the address in the address field. Since the voter is already registered and is just changing their address, remember, they do not need to show ID, but they will have a signature to verify against in the system.
As with a new Grace Period Registration, the pollbook will always tell you if the person is in the wrong polling place based on the address given.
Grace Period Registration Troubleshooting
Occasionally, the scanner does not pick-up the correct bar code and pulls information from a different bar code on the ID. If this occurs, you will see a pop-up similar to the one below. In this instance, simply close the pop-up click the mouse in the Scan ID field and attempt to re-scan the bar code.
63
On the Verify Voter’s Details screen, if you try to proceed without completing all of the required information, a pop-up will appear informing you of this and the missing fields will be highlighted with a question mark. Once you’ve completed the missing information, the pollbook will allow you to proceed. The most common error we’ve seen when processing Grace Period Registrations is leaving the Gender field blank. This field must be filled in or you will get an error message.
If the address is invalid, the pollbook will let you know with a pop-up.
64
Be sure that you’ve type the information correctly. Sometimes you have to play around with the address a little bit to ensure that you have it there correctly, i.e. entering it without the North/South/East/West abbreviations In a worst-case scenario, enter just the street numbers and scroll down through what appears to find the correct address. If after a few attempts you are still unable to find the address, please call the Election Judge Hotline at 217-384-3724. There is a list of common U of I Residence Halls on the following page.
65
Common University of Illinois Residence Hall Addresses