Embed Size (px)
Citation preview
53 Electrical Equivalent of Heat 53 - Page 1 of 5
Electrical Equivalent of Heat
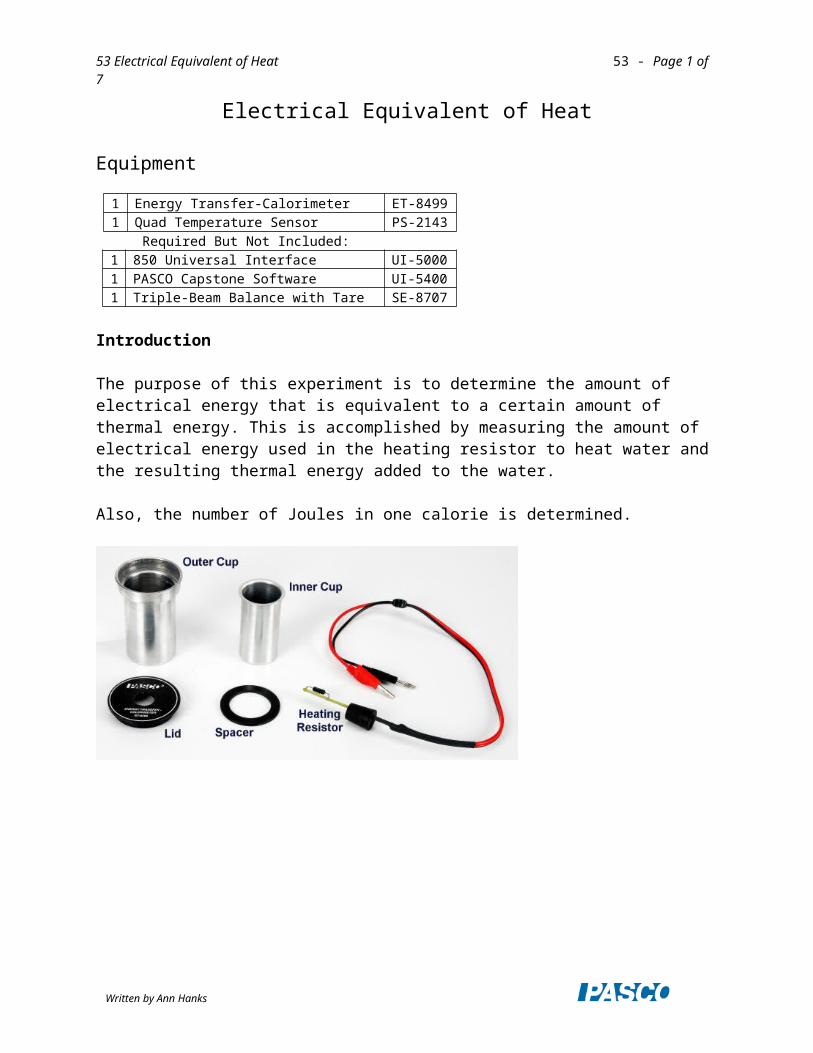
Equipment
1 Energy Transfer-Calorimeter ET-84991 Quad Temperature Sensor PS-2143 Required But Not Included:1 850 Universal Interface UI-50001 PASCO Capstone Software UI-54001 Triple-Beam Balance with Tare SE-8707
Introduction
The purpose of this experiment is to determine the amount of electrical energy that is equivalent to a certain amount of thermal energy. This is accomplished by measuring the amount of electrical energy used in the heating resistor to heat water and the resulting thermal energy added to the water.
Also, the number of Joules in one calorie is determined.
Written by Ann Hanks
53 Electrical Equivalent of Heat 53 - Page 2 of 5
Theory
When heat is added to a solid or a liquid, that energy goes into increasing the materials internal energy, and thus increasing its temperature. The relationship between the heat and the resulting change in temperature is given by
Q = mcΔT (1)
Q = Heat m = mass c = specific heatΔT= change in Temperature
There are two things changing temperature in this experiment: The water and the aluminum calorimetry cup. The water and cup have different masses and specific heats, but we assume that they both have the same change in temperature.
In this experiment, heat is added to the calorimeter by the use of a heating resistor. Work is done by the students, turning the crank on an electrical generator which produces an electrical current.
The generated electrical energy is converted into heat in the resistor, increasing the temperature of the water and the cup. Historically, this has been referred to as the Electrical Equivalent of Heat.
Electrical Power is determined by the Voltage produced by the generator, and the resulting Current that is produced.
P = IV (2)
I = Current through the resistor (Amps)V = Voltage across the resistor (Volts)P = Power (Watts = Joules/sec)
Power is the rate at which energy is generated or used: Power= Energy/time. Thus Energy can be calculated by
Energy = (Power)(time) (3)
or, in a case as with this lab where the power is not constant, Energy is the area under a Power vs. time graph.
Written by Ann Hanks
53 Electrical Equivalent of Heat 53 - Page 3 of 5
Pre-Lab Questions
1. There are two cups in a calorimeter, separated by an insulating ring (see Figure 1). What is the purpose of having two cups?
2. Only one of the cups is used in the calculations. Which one and why? 3. Which takes less energy to raise the temperature of one gram one degree Celsius: water
or aluminum?4. Is there anything else that heats up besides the water and the cup? If so, what? Does this
affect your results? 5. What is a Watt-second?
Setup
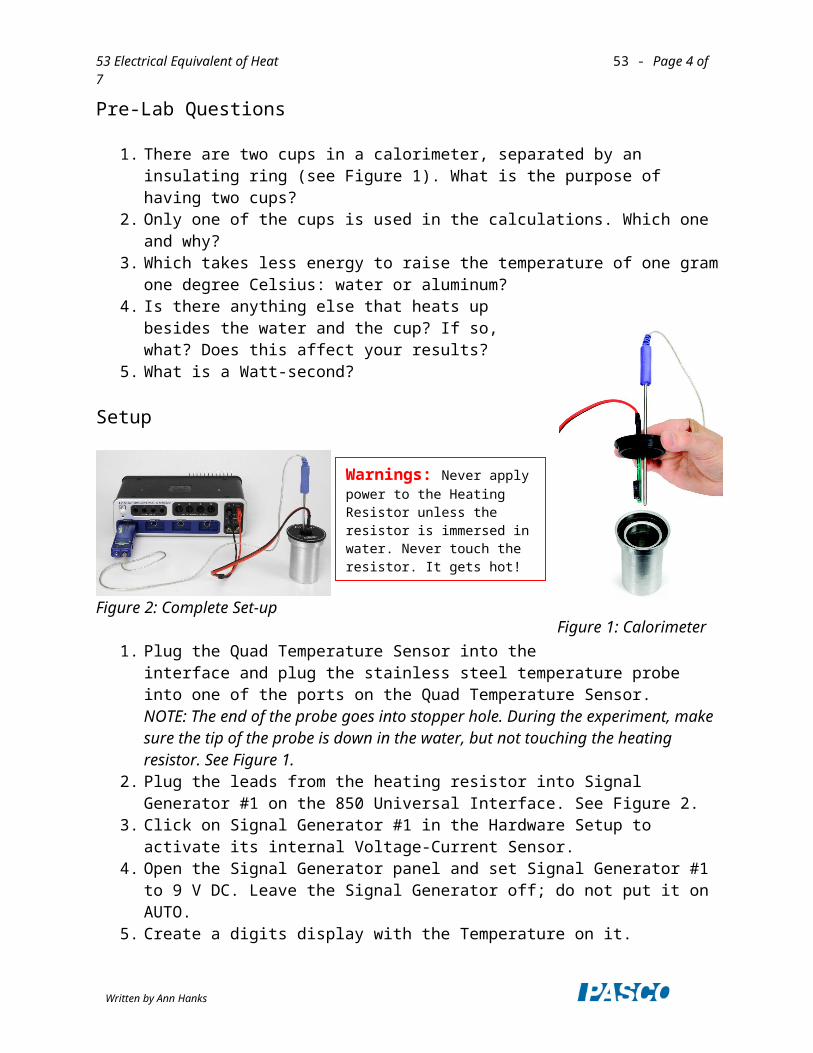
Figure 2: Complete Set-up
1. Plug the Quad Temperature Sensor into the interface and plug the stainless steel temperature probe into one of the ports on the Quad Temperature Sensor. NOTE: The end of the probe goes into stopper hole. During the experiment, make sure the tip of the probe is down in the water, but not touching the heating resistor. See Figure 1.
2. Plug the leads from the heating resistor into Signal Generator #1 on the 850 Universal Interface. See Figure 2.
3. Click on Signal Generator #1 in the Hardware Setup to activate its internal Voltage-Current Sensor.
4. Open the Signal Generator panel and set Signal Generator #1 to 9 V DC. Leave the Signal Generator off; do not put it on AUTO.
5. Create a digits display with the Temperature on it.6. Create a calculation for the power using Equation (2). The current and voltage
measurements are from the Signal Generator Voltage-Current Sensor.7. Create a graph of Temperature vs. time. Add a plot area and put Power vs. time on it.
Procedure
1. With the dry Temperature Probe lying on the table, press record to read the ambient temperature of the room. Then press STOP.
2. Measure the mass of the inner aluminum cup from the Calorimeter. Only the inner cup changes temperature and is part of the experiment. The outer (bigger) cup acts only as a
Written by Ann Hanks
Warnings: Never apply power to the Heating Resistor unless the resistor is immersed in water. Never touch the resistor. It gets hot! Do not apply over 10 Volts.
Figure 1: Calorimeter
53 Electrical Equivalent of Heat 53 - Page 4 of 5
holder, and due to the air gap in between, helps to insulate the inner cup. Record the mass in the box below.
3. Prepare some water that is about 5oC below room temperature. Add about 50 g of water to the inner cup. After the cup and water have come to equilibrium and you are ready to start the experiment, you will want the temperature to be about 3oC below room temperature. This is necessary to compensate for any heat leaks between the room and the cup.
4. Measure the mass of the cup plus water, and calculate the mass of the water. Record the mass in the box below.
5. Assemble the cup, using the spacer to suspend the inner cup inside the bigger cup. Put on the lid, and insert the heating resistor stopper in the hole. Insert the temperature probe in the stopper hole, making sure that the tip is under the water.
6. Check the temperature of the water again. If the water gets too warm before you can start, you can place the cup and water in an ice bath to cool it down. Wipe off any moisture on the cup before placing it back into the outer cup. If the water is too cold, you can use the signal generator to heat it, but don't overdo it! Gently swirl the cup to stir the water and wait for equilibrium before starting the data run.
7. Start recording.
8. Turn on the Signal Generator and watch the power graph. Always stay below 10 Watts. 9. Gently swirl the calorimeter cup to mix the water during the entire recording time. 10. Watch the temperature graph until the water is above room temperature by about the
same amount as it started below room temperature. Then turn off the Signal Generator but DO NOT stop recording.
11. Continue to record data until the temperature has reached a plateau or is decreasing. Don't forget to swirl the water!
12. Stop recording.
Written by Ann Hanks
53 Electrical Equivalent of Heat 53 - Page 5 of 5
ANALYSIS
1. Use the Coordinates Tool and its Delta Tool on the graph to find the change in temperature, ΔT.
2. Calculate the total amount of heat, Q, added to the water and the aluminum cup. Use the proper specific heat for each. Use specific heats in units of cal/goC so the heat will have units of calories. (cwater= 1.00 cal/goC and cAluminum= 0.215 cal/goC)
Q = QWater + QCup
Q = mcΔT
3. Find the area under the Power vs. time graph by selecting Area on the Statistics menu. This is the energy which was delivered to the water and the calorimeter cup.
4. Set the heat (in calories) equal to the energy delivered (in Joules). Calculate how many Joules are equivalent to one calorie. Look up the accepted value and calculate the percent difference between it and your answer.
QUESTIONS
1. In this experiment, was energy lost or gained? Explain your results using the concept of conservation of energy.
2. Was your answer larger or smaller than the accepted value? What about the experiment would cause this error?
3. Why is it necessary to start below room temperature and stop above room temperature by the same temperature difference?
4. The type of calorie (with a capital C) that you eat is actually a kilocalorie. 1 Cal = 1000 cal. How many Calories did you add to the water and cup? If you expended the amount of energy that you added to the water by lifting the water instead, how far could you lift the water?
Written by Ann Hanks