Embed Size (px)
Citation preview
Agilent A-Line Electronic Crimping and Decapping Tools
Operation Guide
5191-5613 5191-5614 5191-5615 5191-5616

Notices© Agilent Technologies, Inc. 2018No part of this manual may be reproduced in any form or by any means (including electronic storage and retrieval or translation into a for-eign language) without prior agree-ment and written consent from Agilent Technologies, Inc. as gov-erned by United States and interna-tional copyright laws.
Manual Part Number5191-5625
EditionFirst edition, October 2018Printed in USAAgilent Technologies, Inc. 5301 Stevens Creek Boulevard Santa Clara, CA 95051 USA
WarrantyThe material contained in this docu-ment is provided “as is,” and is sub-ject to being changed, without notice, in future editions. Further, to the maximum extent permitted by applicable law, Agilent disclaims all warranties, either express or implied, with regard to this manual and any information contained herein, including but not limited to the implied warranties of merchant-ability and fitness for a particular purpose. Agilent shall not be liable for errors or for incidental or conse-quential damages in connection with the furnishing, use, or perfor-mance of this document or of any information contained herein. Should Agilent and the user have a separate written agreement with warranty terms covering the mate-rial in this document that conflict with these terms, the warranty terms in the separate agreement shall control.
Technology Licenses The hardware and/or software described in this document are fur-nished under a license and may be used or copied only in accordance with the terms of such license.
Restricted Rights LegendU.S. Government Restricted Rights. Software and technical data rights granted to the federal government include only those rights customar-ily provided to end user customers. Agilent provides this customary commercial license in Software and technical data pursuant to FAR 12.211 (Technical Data) and 12.212 (Computer Software) and, for the Department of Defense, DFARS 252.227-7015 (Technical Data -Commercial Items) and DFARS 227.7202-3 (Rights in Com-mercial Computer Software or Computer Software Documenta-tion).
Safety Notices
CAUTION
A CAUTION notice denotes a hazard. It calls attention to an oper-ating procedure, practice, or the like that, if not correctly performed or adhered to, could result in dam-age to the product or loss of important data. Do not proceed beyond a CAUTION notice until the indicated conditions are fully understood and met.
WARNINGA WARNING notice denotes a haz-ard. It calls attention to an operat-ing procedure, practice, or the like that, if not correctly performed or adhered to, could result in personal injury or death. Do not proceed beyond a WARNING notice until the indicated conditions are fully understood and met.
A-Line Electronic Crimping and Decapping Tools Operation Guide 3
ContentsSafety and Regulatory Certifications 4
Warnings, Intended Use, and Limits 6
Set Up 7
Crimping 9
Decapping 12
Statistics and Log 13
Troubleshooting, Maintenance, and Repair 15
The Agilent A-Line Electronic Crimping Tools can be used to crimp and decap standard crimp caps on laboratory sample vials. Jaw sets are available to accommodate the most popular sizes.
Please read through this entire guide to familiarize yourself with the operation of the tool before proceeding. Use the same degree of care as you would with any precision instrument.
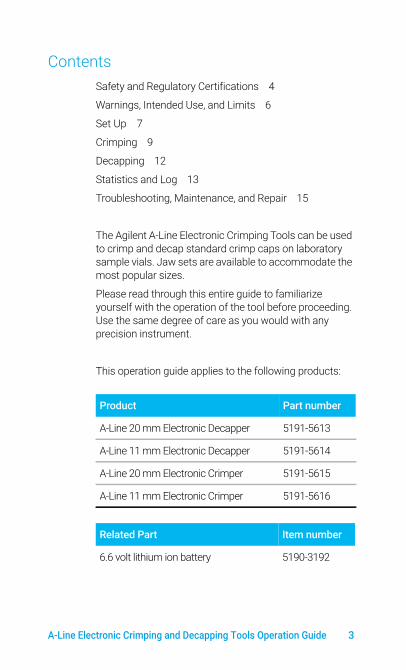
This operation guide applies to the following products:
Product Part number
A-Line 20 mm Electronic Decapper 5191-5613
A-Line 11 mm Electronic Decapper 5191-5614
A-Line 20 mm Electronic Crimper 5191-5615
A-Line 11 mm Electronic Crimper 5191-5616
Related Part Item number
6.6 volt lithium ion battery 5190-3192

4 A-Line Electronic Crimping and Decapping Tools Operation Guide
Safety and Regulatory Certifications
The A-Line Electronic Crimping Tools are designed and manufactured under a quality system registered to ISO 9001.
SymbolsWarnings in the manual or on the instrument must be observed during all phases of operation, service, and repair of this instrument. Failure to comply with these precautions violates safety standards of design and the intended use of the instrument. Agilent Technologies assumes no liability for the customer’s failure to comply with these requirements. See accompanying instructions for more information. Wear safety glasses when crimping or decapping.
The crimper or decapper jaws can pinch severely.
Never insert fingers into the crimping tool jaws. Do not discard this electrical/electronic product in domestic household waste.
Korean regulatory approval.
California Energy Commission for devices with a Battery Charger. Environment-friendly use period. (EFUP)
Regulatory compliance mark for Australia and New Zealand.
A-Line Electronic Crimping and Decapping Tools Operation Guide 5
Sound emission declaration
Sound pressureSound pressure LpA <70.1 dB according to EN 27779:1991.
Class A EMC declarationThis equipment has been evaluated for its suitability for use in a commercial environment. When used in a domestic environment, there is a risk of radio interference.
Intended useThe A-Line Electronic Crimping Tools is intended for use in a laboratory environment. All other uses are prohibited.
LimitsTemperature: 15°C to 35°C
Maximum humidity: 75%
Pressure: 0.75 to 1 bar
6 A-Line Electronic Crimping and Decapping Tools Operation Guide
Warnings, Intended Use, and Limits
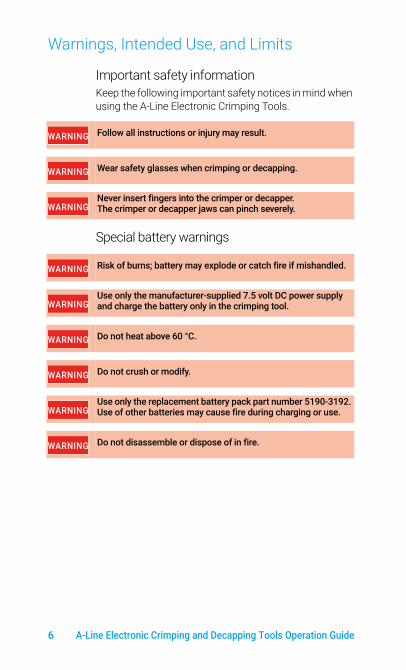
Important safety informationKeep the following important safety notices in mind when using the A-Line Electronic Crimping Tools.
Special battery warnings
WARNING Follow all instructions or injury may result.
WARNING Wear safety glasses when crimping or decapping.
WARNINGNever insert fingers into the crimper or decapper. The crimper or decapper jaws can pinch severely.
WARNING Risk of burns; battery may explode or catch fire if mishandled.
WARNINGUse only the manufacturer-supplied 7.5 volt DC power supply and charge the battery only in the crimping tool.
WARNING Do not heat above 60 °C.
WARNING Do not crush or modify.
WARNINGUse only the replacement battery pack part number 5190-3192. Use of other batteries may cause fire during charging or use.
WARNING Do not disassemble or dispose of in fire.
A-Line Electronic Crimping and Decapping Tools Operation Guide 7
Set UpRemove the tool, power supply, cable, and USB drive from the shipping container. Inspect the crimping tool and any jaw sets. If there is any visible damage, contact your supplier immediately.
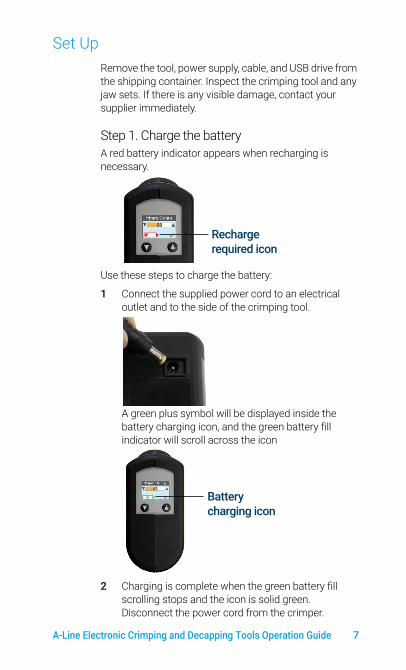
Step 1. Charge the batteryA red battery indicator appears when recharging is necessary.
Use these steps to charge the battery:
1 Connect the supplied power cord to an electrical outlet and to the side of the crimping tool.
A green plus symbol will be displayed inside the battery charging icon, and the green battery fill indicator will scroll across the icon
2 Charging is complete when the green battery fill scrolling stops and the icon is solid green. Disconnect the power cord from the crimper.
Battery charging icon
Recharge required icon
8 A-Line Electronic Crimping and Decapping Tools Operation Guide
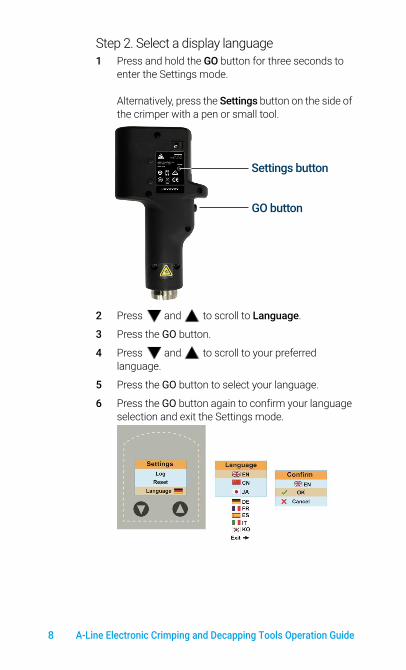
Step 2. Select a display language1 Press and hold the GO button for three seconds to
enter the Settings mode. Alternatively, press the Settings button on the side of the crimper with a pen or small tool.
2 Press and to scroll to Language.
3 Press the GO button.
4 Press and to scroll to your preferred language.
5 Press the GO button to select your language.
6 Press the GO button again to confirm your language selection and exit the Settings mode.
Settings button
GO button
A-Line Electronic Crimping and Decapping Tools Operation Guide 9
CrimpingOnce you have set up your crimper (Set Up on page 7), you can follow these steps to crimp continuously as long as the battery remains charged and Reset All (Reset on page 18) is not applied.
Use standard aluminum, steel caps or two-part caps with aluminum sides and magnetic tops, together with seals of standard size and thickness.
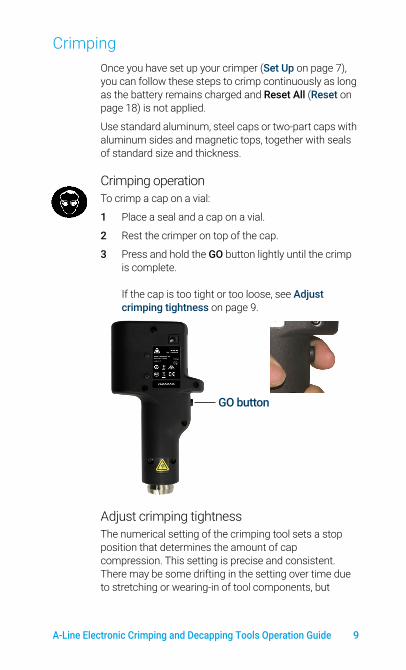
Crimping operationTo crimp a cap on a vial:
1 Place a seal and a cap on a vial.
2 Rest the crimper on top of the cap.
3 Press and hold the GO button lightly until the crimp is complete. If the cap is too tight or too loose, see Adjust crimping tightness on page 9.
Adjust crimping tightnessThe numerical setting of the crimping tool sets a stop position that determines the amount of cap compression. This setting is precise and consistent. There may be some drifting in the setting over time due to stretching or wearing-in of tool components, but
GO button
10 A-Line Electronic Crimping and Decapping Tools Operation Guide
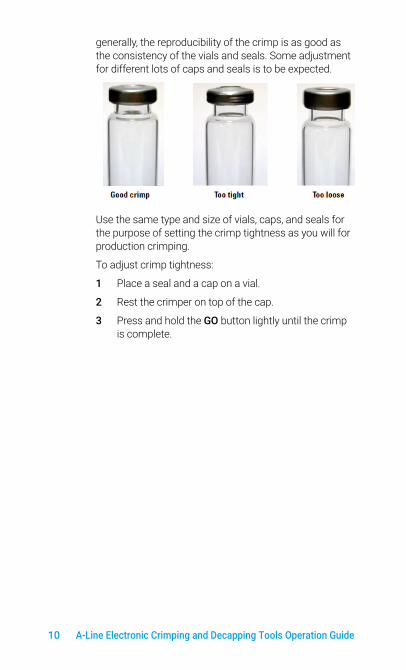
generally, the reproducibility of the crimp is as good as the consistency of the vials and seals. Some adjustment for different lots of caps and seals is to be expected.
Use the same type and size of vials, caps, and seals for the purpose of setting the crimp tightness as you will for production crimping.
To adjust crimp tightness:
1 Place a seal and a cap on a vial.
2 Rest the crimper on top of the cap.
3 Press and hold the GO button lightly until the crimp is complete.
A-Line Electronic Crimping and Decapping Tools Operation Guide 11
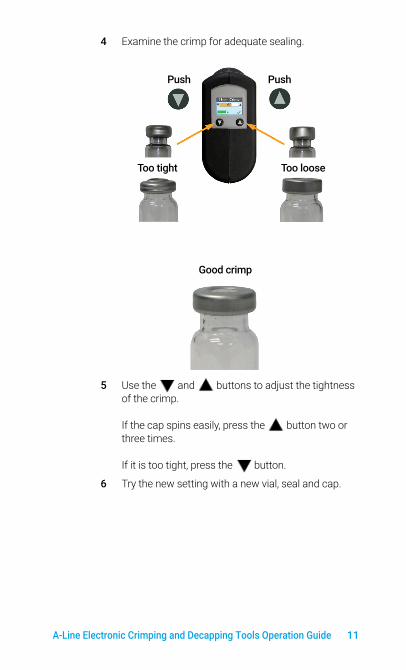
4 Examine the crimp for adequate sealing.
5 Use the and buttons to adjust the tightness of the crimp. If the cap spins easily, press the button two or three times. If it is too tight, press the button.
6 Try the new setting with a new vial, seal and cap.
Too tight Too loose
PushPush
Good crimp
12 A-Line Electronic Crimping and Decapping Tools Operation Guide
DecappingOnce you have set up your decapper to decap (Set Up on page 7), you can follow these steps to decap continuously as long as the battery remains charged and Reset All (Reset on page 18) is not applied.
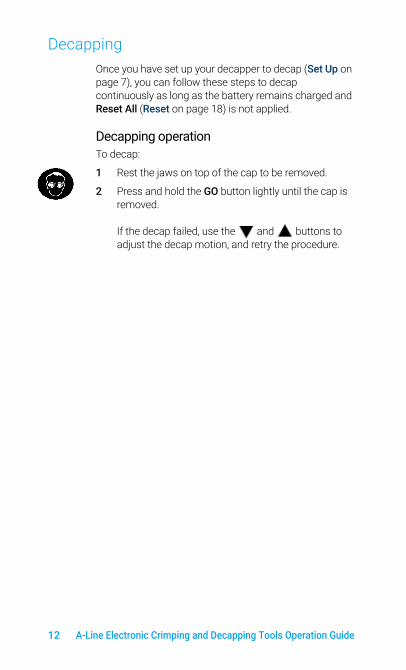
Decapping operationTo decap:
1 Rest the jaws on top of the cap to be removed.
2 Press and hold the GO button lightly until the cap is removed. If the decap failed, use the and buttons to adjust the decap motion, and retry the procedure.
A-Line Electronic Crimping and Decapping Tools Operation Guide 13
Statistics and LogUse the statistics and log displays to see information about the history of your tool.
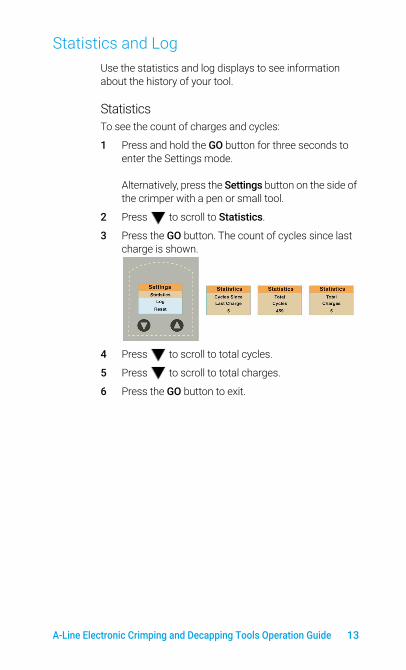
StatisticsTo see the count of charges and cycles:
1 Press and hold the GO button for three seconds to enter the Settings mode. Alternatively, press the Settings button on the side of the crimper with a pen or small tool.
2 Press to scroll to Statistics.
3 Press the GO button. The count of cycles since last charge is shown.
4 Press to scroll to total cycles.
5 Press to scroll to total charges.
6 Press the GO button to exit.
14 A-Line Electronic Crimping and Decapping Tools Operation Guide
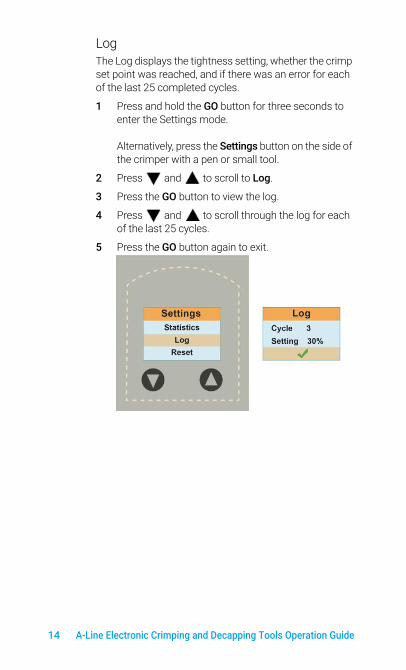
LogThe Log displays the tightness setting, whether the crimp set point was reached, and if there was an error for each of the last 25 completed cycles.
1 Press and hold the GO button for three seconds to enter the Settings mode. Alternatively, press the Settings button on the side of the crimper with a pen or small tool.
2 Press and to scroll to Log.
3 Press the GO button to view the log.
4 Press and to scroll through the log for each of the last 25 cycles.
5 Press the GO button again to exit.
A-Line Electronic Crimping and Decapping Tools Operation Guide 15
Troubleshooting, Maintenance, and Repair
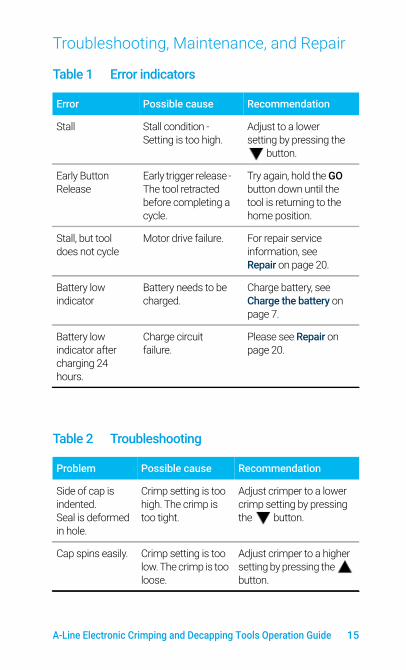
Table 1 Error indicators
Error Possible cause Recommendation
Stall Stall condition - Setting is too high.
Adjust to a lower setting by pressing the
button.
Early Button Release
Early trigger release - The tool retracted before completing a cycle.
Try again, hold the GO button down until the tool is returning to the home position.
Stall, but tool does not cycle
Motor drive failure. For repair service information, see Repair on page 20.
Battery low indicator
Battery needs to be charged.
Charge battery, see Charge the battery on page 7.
Battery low indicator after charging 24 hours.
Charge circuit failure.
Please see Repair on page 20.
Table 2 Troubleshooting
Problem Possible cause Recommendation
Side of cap is indented.Seal is deformed in hole.
Crimp setting is too high. The crimp is too tight.
Adjust crimper to a lower crimp setting by pressing the button.
Cap spins easily. Crimp setting is too low. The crimp is too loose.
Adjust crimper to a higher setting by pressing the button.

16 A-Line Electronic Crimping and Decapping Tools Operation Guide
Cannot find a good crimp setting.
The crimper is far out of adjustment.
Return crimper to factory setting. See Battery replacement on page 17.
Crimping is inconsistent. Some vials are good and some are not.
Vials, caps or seals are inconsistent.
Check crimper by using some standard, approved, vials caps and seals.
Electronic failure in crimper.
Please see instructions in Repair on page 20.
11mm decapper leaves caps hanging on vials
Decapper adjustment is too low.
Adjust the decapper to a higher setting by pressing the button.
Jaws are worn or broken.
Please see Repair on page 20.
Motor does not come on or moves in one direction only.
Drive circuit failure. Please see Repair on page 20.
Battery does not get a full charge.
Charging cable disconnected early.
Leave tool on charger overnight.
Battery is worn out. Battery is rated to deliver 60% of capacity after 1500 charges
Replace battery.
Table 2 Troubleshooting
Problem Possible cause Recommendation
A-Line Electronic Crimping and Decapping Tools Operation Guide 17
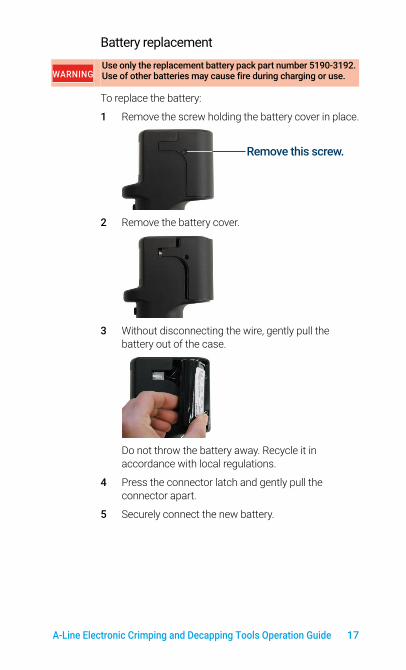
Battery replacement
To replace the battery:
1 Remove the screw holding the battery cover in place.
2 Remove the battery cover.
3 Without disconnecting the wire, gently pull the battery out of the case.
Do not throw the battery away. Recycle it in accordance with local regulations.
4 Press the connector latch and gently pull the connector apart.
5 Securely connect the new battery.
WARNINGUse only the replacement battery pack part number 5190-3192. Use of other batteries may cause fire during charging or use.
Remove this screw.
18 A-Line Electronic Crimping and Decapping Tools Operation Guide
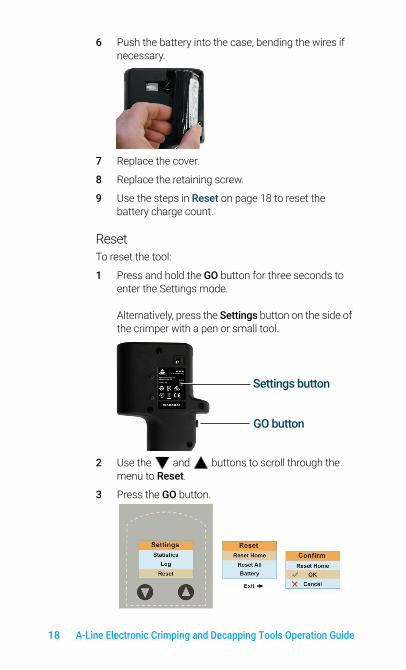
6 Push the battery into the case, bending the wires if necessary.
7 Replace the cover.
8 Replace the retaining screw.
9 Use the steps in Reset on page 18 to reset the battery charge count.
ResetTo reset the tool:
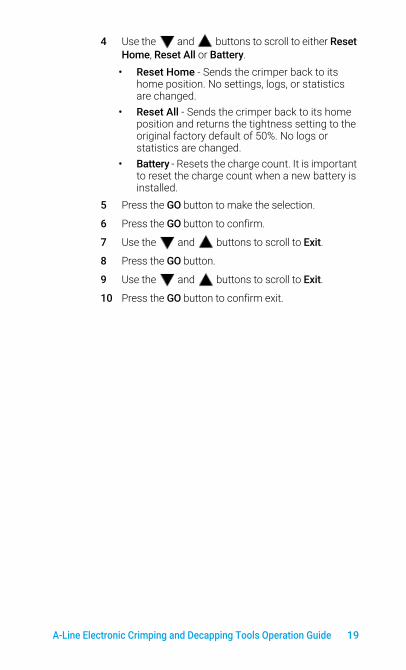
1 Press and hold the GO button for three seconds to enter the Settings mode. Alternatively, press the Settings button on the side of the crimper with a pen or small tool.
2 Use the and buttons to scroll through the menu to Reset.
3 Press the GO button.
Settings button
GO button
A-Line Electronic Crimping and Decapping Tools Operation Guide 19
4 Use the and buttons to scroll to either Reset Home, Reset All or Battery.
• Reset Home - Sends the crimper back to its home position. No settings, logs, or statistics are changed.
• Reset All - Sends the crimper back to its home position and returns the tightness setting to the original factory default of 50%. No logs or statistics are changed.
• Battery - Resets the charge count. It is important to reset the charge count when a new battery is installed.
5 Press the GO button to make the selection.
6 Press the GO button to confirm.
7 Use the and buttons to scroll to Exit.
8 Press the GO button.
9 Use the and buttons to scroll to Exit.
10 Press the GO button to confirm exit.
www.agilent.comAgilent Technologies, Inc. 2018First edition, October 2018*5191-5625*5191-5625
Maintenance
Serviceable partsThe electronic crimping tool does not contain user serviceable parts.
CleaningDo not immerse the crimping tool in water or solvent. To clean the unit, disconnect the power and wipe down with a damp, lint-free cloth. Do not get the electronics wet.
Avoid permitting metal parts of the crimping tool to come into contact with corrosive material during use. If they do, try to wipe them clean with a suitable mild neutralizing solution.
RepairIf the crimping tool is still in the warranty period, contact your Agilent office or dealer. If the warranty period has expired, please visit www.agilent.com/chem/crimper-repair for information about the crimper repair service.
RecyclingFor recycling, contact your local Agilent sales office.