Embed Size (px)
Citation preview
1
Electronic Discharge Monitoring Reporting (eDMR)
User’s Guide
Revised July 14, 2014
2
Contents
Logging into the System ................................................................................................................................ 3
Creating a New eDMR ................................................................................................................................... 4
Entering DMR Information ............................................................................................................................ 9
Manual Entry ........................................................................................................................................... 10
Load from File ......................................................................................................................................... 18
Required Attachments ................................................................................................................................ 24
Replacing “Load from File” .CSV File ........................................................................................................... 27
Worksheet Certification .............................................................................................................................. 30
Submitting the eDMR to DEP ...................................................................................................................... 32
Deleting eDMRs Created in Error ................................................................................................................ 36
Contact Information .................................................................................................................................... 38
3
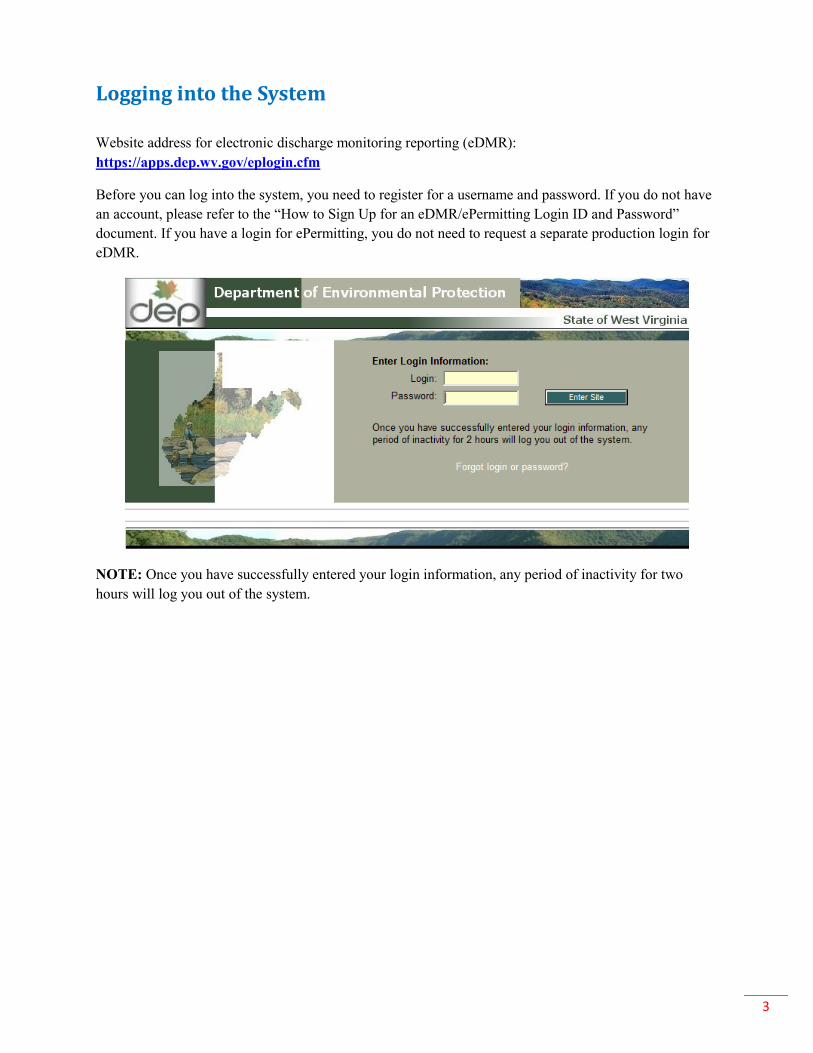
Logging into the System
Website address for electronic discharge monitoring reporting (eDMR): https://apps.dep.wv.gov/eplogin.cfm
Before you can log into the system, you need to register for a username and password. If you do not have an account, please refer to the “How to Sign Up for an eDMR/ePermitting Login ID and Password” document. If you have a login for ePermitting, you do not need to request a separate production login for eDMR.
NOTE: Once you have successfully entered your login information, any period of inactivity for two hours will log you out of the system.
4
Creating a New eDMR
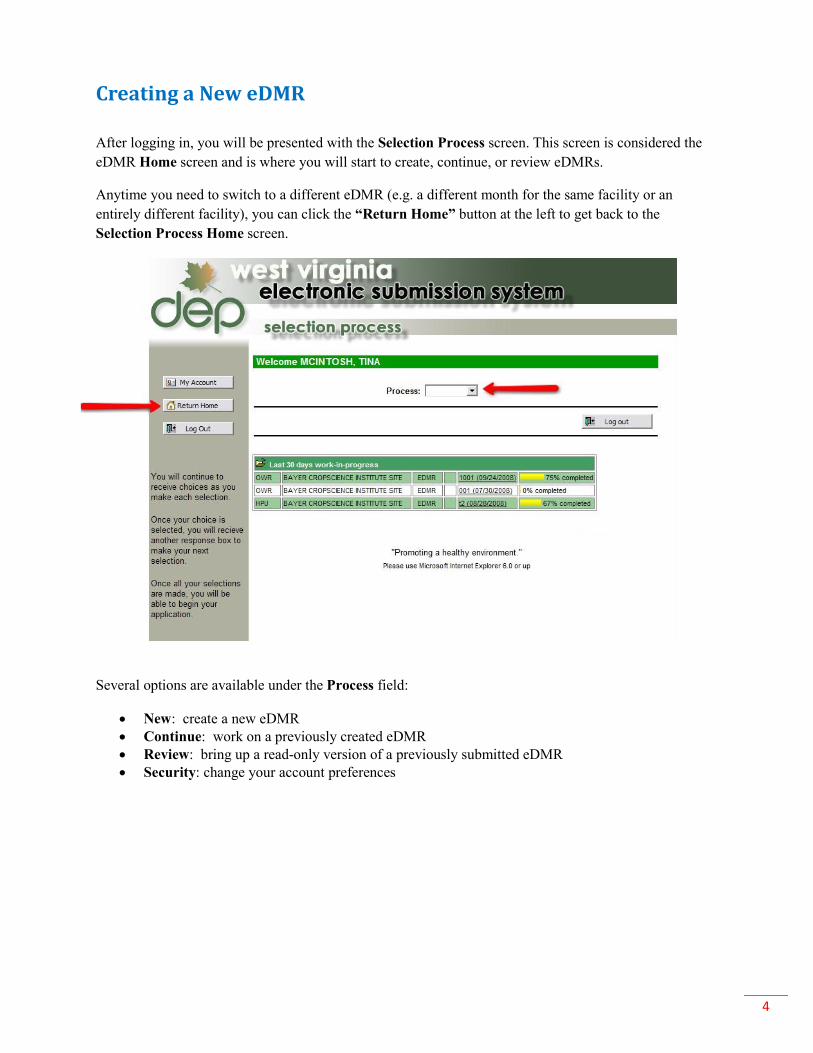
After logging in, you will be presented with the Selection Process screen. This screen is considered the eDMR Home screen and is where you will start to create, continue, or review eDMRs.
Anytime you need to switch to a different eDMR (e.g. a different month for the same facility or an entirely different facility), you can click the “Return Home” button at the left to get back to the Selection Process Home screen.
Several options are available under the Process field:
• New: create a new eDMR • Continue: work on a previously created eDMR • Review: bring up a read-only version of a previously submitted eDMR • Security: change your account preferences
5
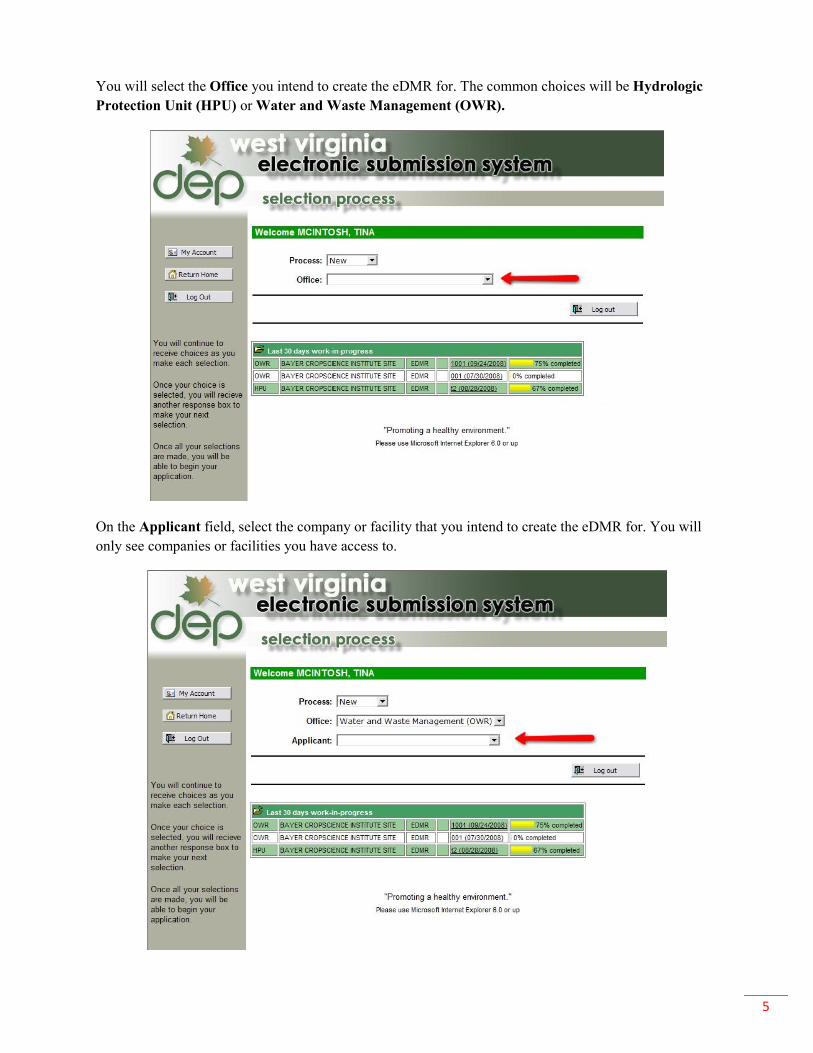
You will select the Office you intend to create the eDMR for. The common choices will be Hydrologic Protection Unit (HPU) or Water and Waste Management (OWR).
On the Applicant field, select the company or facility that you intend to create the eDMR for. You will only see companies or facilities you have access to.
6
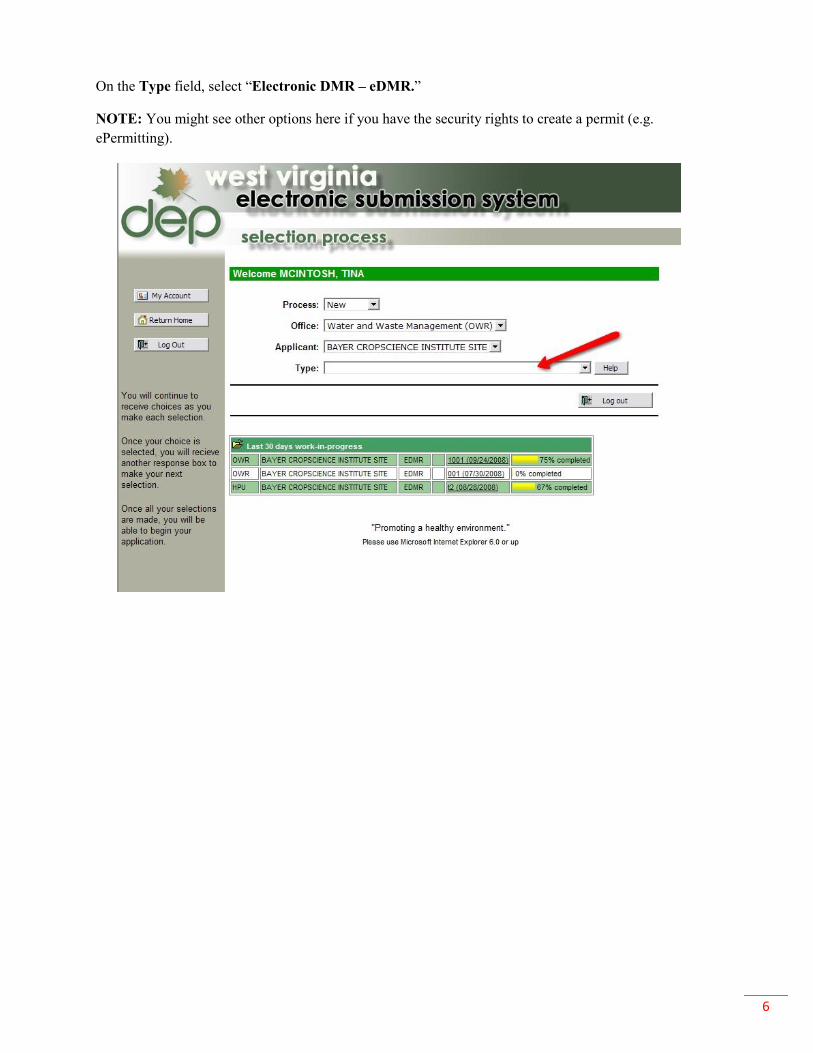
On the Type field, select “Electronic DMR – eDMR.”
NOTE: You might see other options here if you have the security rights to create a permit (e.g. ePermitting).
7
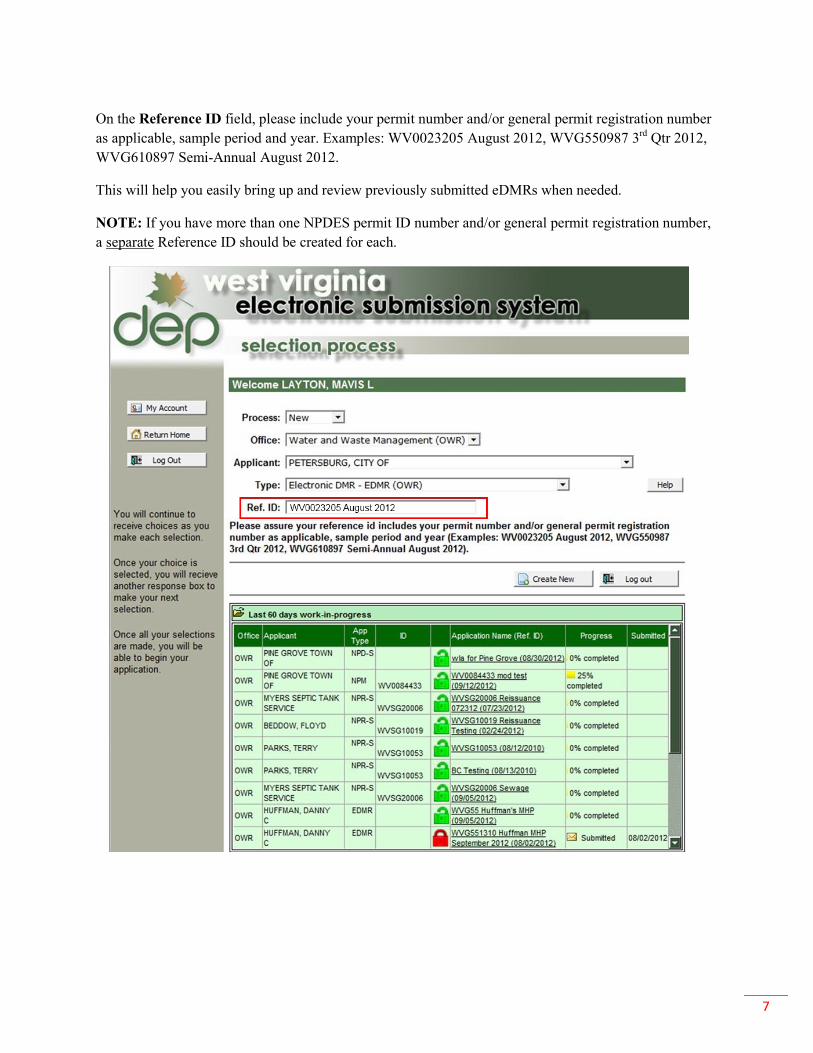
On the Reference ID field, please include your permit number and/or general permit registration number as applicable, sample period and year. Examples: WV0023205 August 2012, WVG550987 3rd Qtr 2012, WVG610897 Semi-Annual August 2012.
This will help you easily bring up and review previously submitted eDMRs when needed.
NOTE: If you have more than one NPDES permit ID number and/or general permit registration number, a separate Reference ID should be created for each.
8
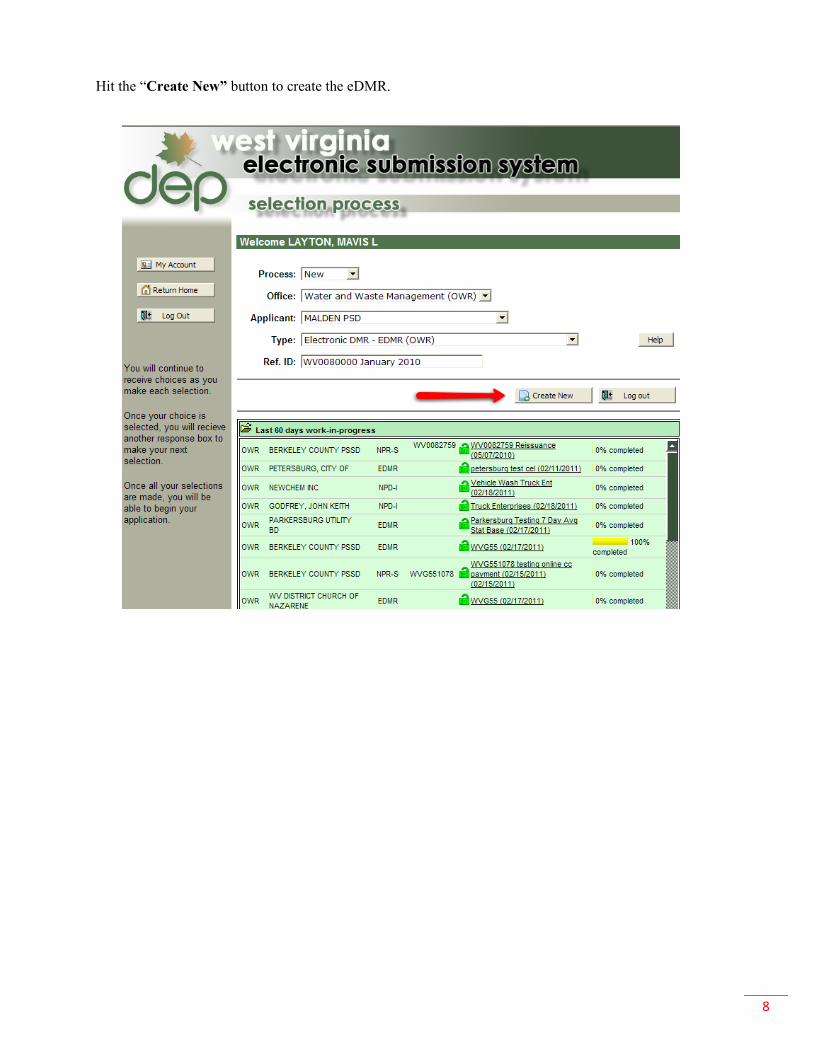
Hit the “Create New” button to create the eDMR.
9
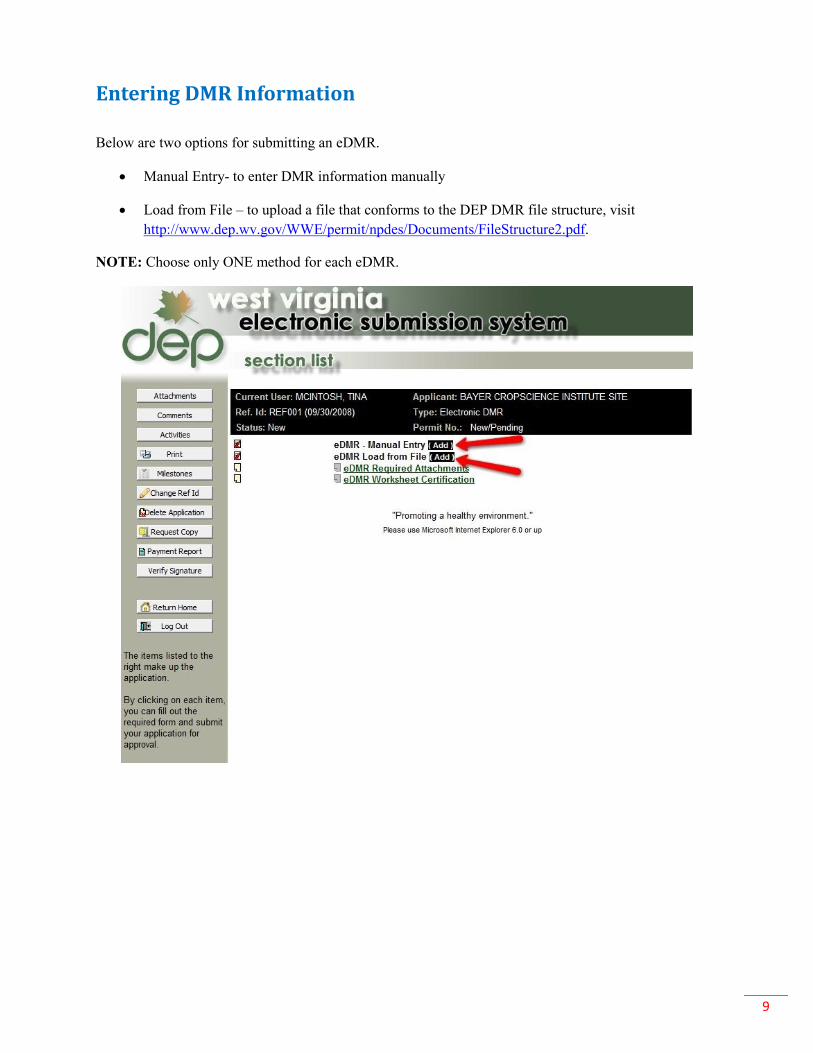
Entering DMR Information
Below are two options for submitting an eDMR.
• Manual Entry- to enter DMR information manually
• Load from File – to upload a file that conforms to the DEP DMR file structure, visit http://www.dep.wv.gov/WWE/permit/npdes/Documents/FileStructure2.pdf.
NOTE: Choose only ONE method for each eDMR.
10
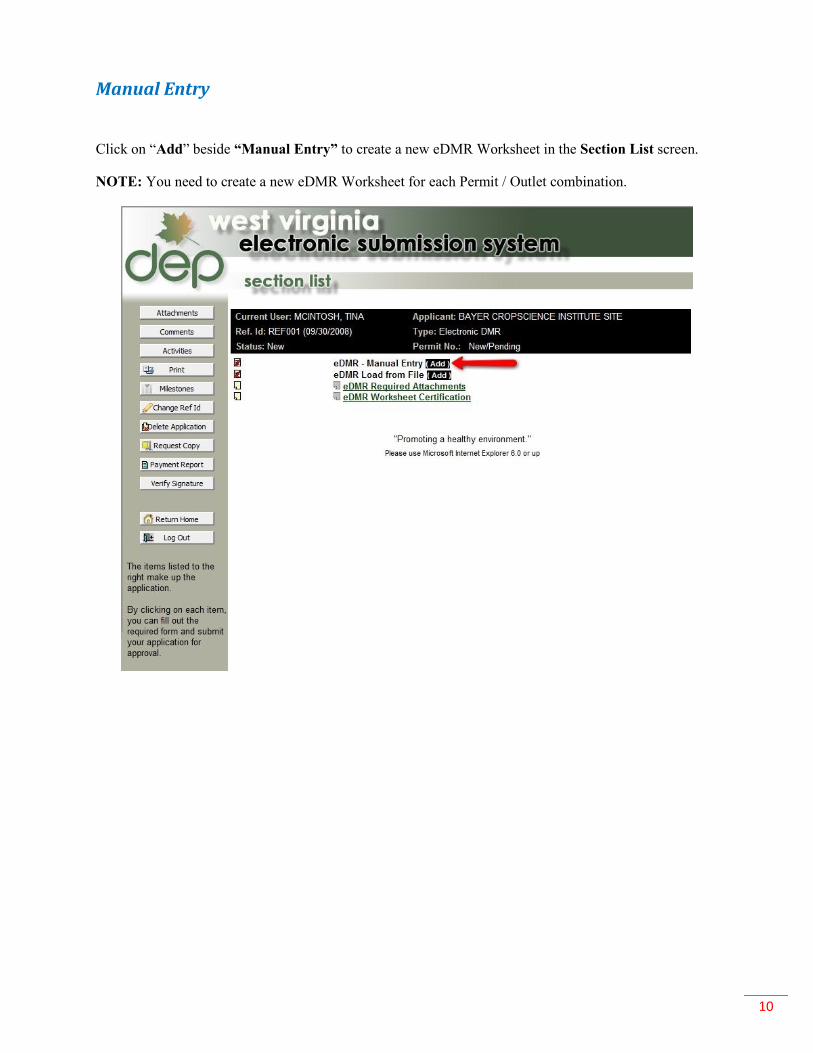
Manual Entry
Click on “Add” beside “Manual Entry” to create a new eDMR Worksheet in the Section List screen.
NOTE: You need to create a new eDMR Worksheet for each Permit / Outlet combination.

11
To start entering information, click on the green “eDMR Worksheet” link.
NOTE: You can delete unwanted worksheets by clicking on “Remove” beside the worksheet link.
12
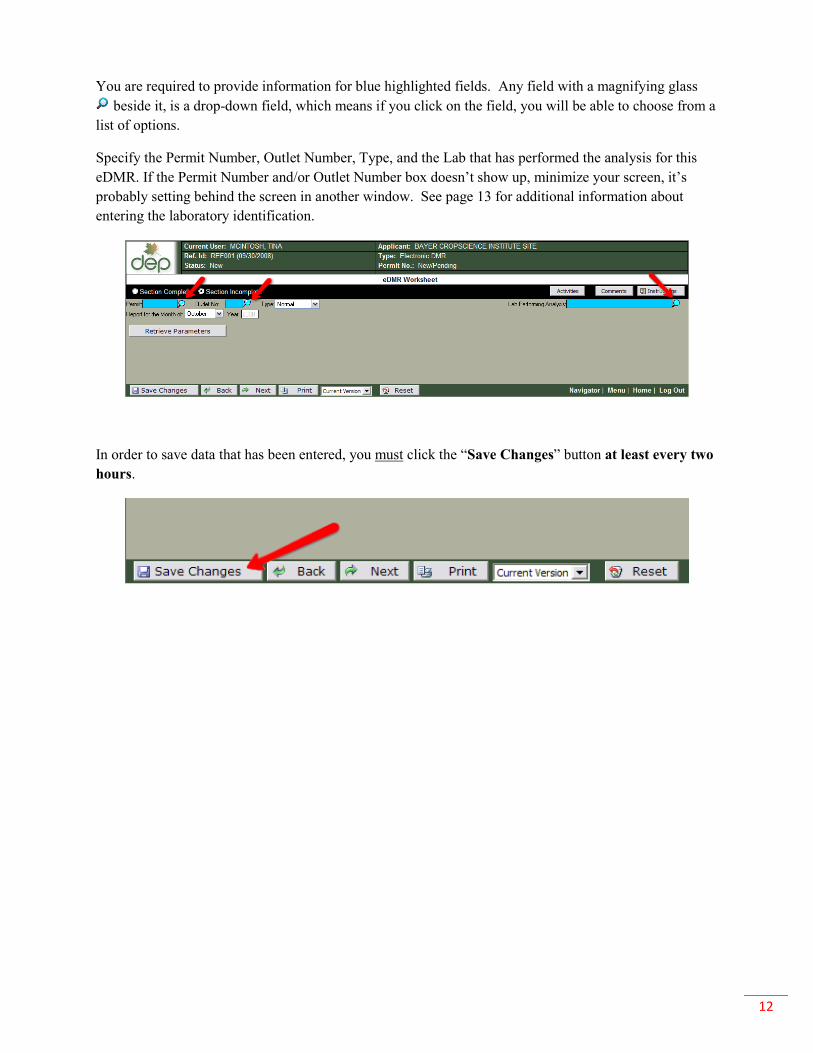
You are required to provide information for blue highlighted fields. Any field with a magnifying glass beside it, is a drop-down field, which means if you click on the field, you will be able to choose from a
list of options.
Specify the Permit Number, Outlet Number, Type, and the Lab that has performed the analysis for this eDMR. If the Permit Number and/or Outlet Number box doesn’t show up, minimize your screen, it’s probably setting behind the screen in another window. See page 13 for additional information about entering the laboratory identification.
In order to save data that has been entered, you must click the “Save Changes” button at least every two hours.
13
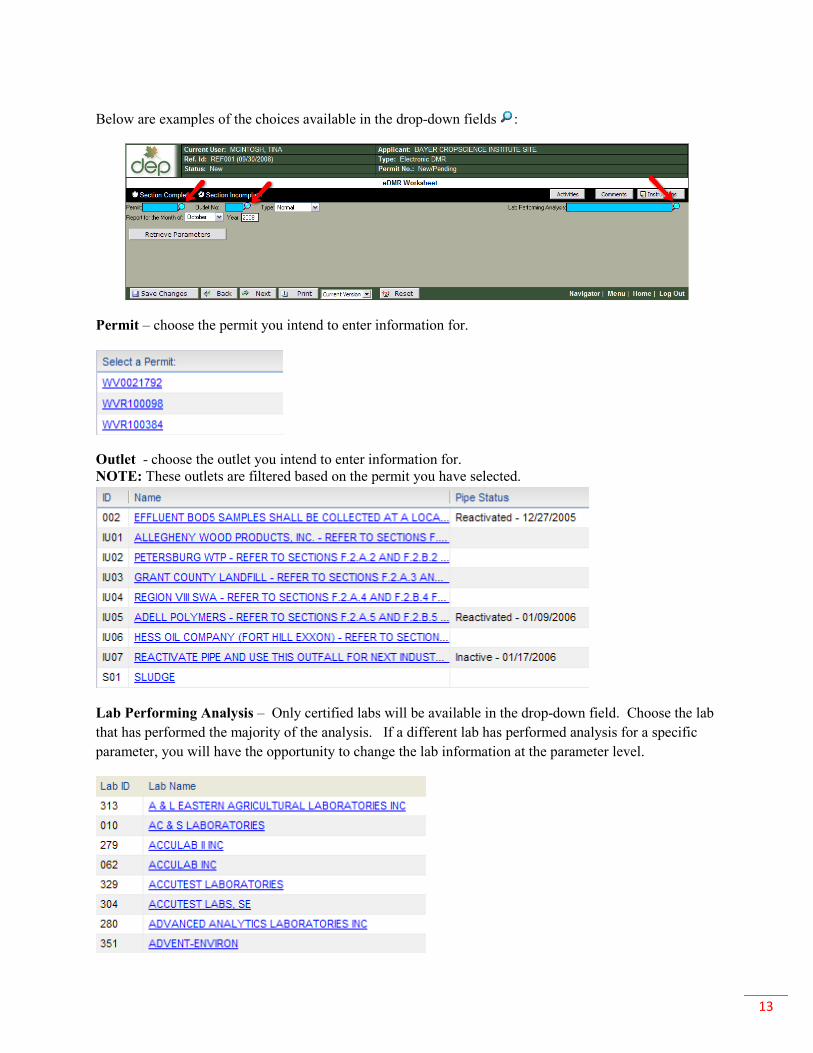
Below are examples of the choices available in the drop-down fields :
Permit – choose the permit you intend to enter information for.
Outlet - choose the outlet you intend to enter information for. NOTE: These outlets are filtered based on the permit you have selected.
Lab Performing Analysis – Only certified labs will be available in the drop-down field. Choose the lab that has performed the majority of the analysis. If a different lab has performed analysis for a specific parameter, you will have the opportunity to change the lab information at the parameter level.
14
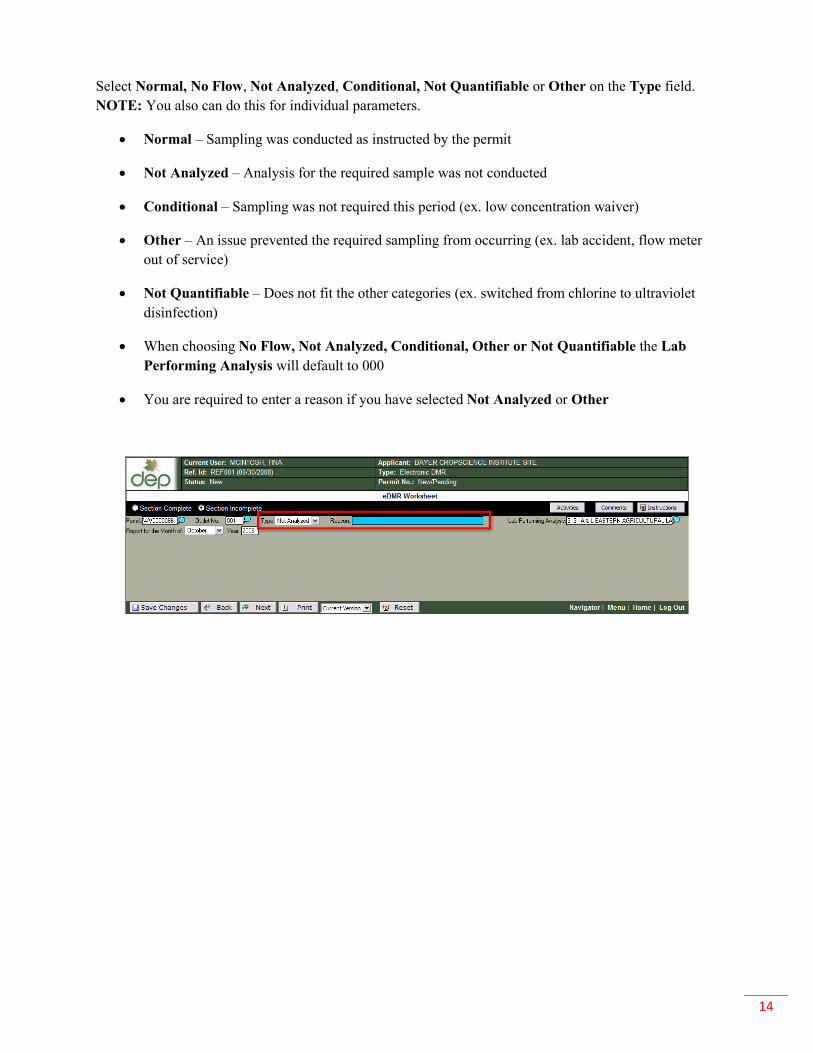
Select Normal, No Flow, Not Analyzed, Conditional, Not Quantifiable or Other on the Type field. NOTE: You also can do this for individual parameters.
• Normal – Sampling was conducted as instructed by the permit
• Not Analyzed – Analysis for the required sample was not conducted
• Conditional – Sampling was not required this period (ex. low concentration waiver)
• Other – An issue prevented the required sampling from occurring (ex. lab accident, flow meter out of service)
• Not Quantifiable – Does not fit the other categories (ex. switched from chlorine to ultraviolet disinfection)
• When choosing No Flow, Not Analyzed, Conditional, Other or Not Quantifiable the Lab Performing Analysis will default to 000
• You are required to enter a reason if you have selected Not Analyzed or Other

15
Enter the appropriate month in the Report for the Month of field and the appropriate year.
The following information is provided to assist you in determining what month you are reporting.
For permitted facilities that are required to submit a discharge monitoring report on a quarterly, semi-annual, or annual basis, the eDMR system will only allow you to submit the data in the month that it is required. Examples:
• If your permit was effective prior to July 1, 2011 the following will apply:
o A quarterly reporting requirement is based on the calendar quarters; therefore, the quarterly discharge monitoring data can only be entered and submitted in eDMR in March, June, September and December.
o If a permit requires semi-annual or annual reporting of DMR data based on the effective date of the permit (Individual Industrial and Municipal permits) the reporting month is as follows:
Effective date of the permit is prior to the 15th day of a month, the reporting month is determined by counting from the first day of that month forward six months (e.g., if effective date is February 11th, the reporting month is July).
Effective date of the permit is the 15th day of a month or after, the reporting month is determined by counting from the first day of the following month forward six months (e.g. if effective date is February 17th, the reporting month is August).
o If a permit requires semi-annual or annual reporting of DMR data based on the issued (or reissued) date of the permit (General Permits), the reporting month is as follows:
Issued (or reissued) date of the permit is prior to the 15th day of a month, the reporting month is determined by counting from the first day of that month forward six months (e.g., if issued or reissued date is February 11th, the reporting month is July).
Issued (or reissued) date of the permit is the 15th day of a month or after, the reporting month is determined by counting from the first day of the following month forward six months (e.g. if issued or reissued date is February 17th, the reporting month is August).
16
• If your permit was effective after July 1, 2011 the following will apply:
o A quarterly reporting requirement is based on the calendar quarters; therefore, the quarterly discharge monitoring data can only be entered and submitted in eDMR in March, June, September and December.
o For Individual Permits - If a permit requires semi-annual or annual reporting of DMR data the reporting month is six or twelve months forward from the effective date of the permit (e.g., if the effective date is February 1st, the reporting month is July).
o For General Permits - If a permit registration approval requires semi-annual or annual
reporting of DMR data the reporting month is determined by counting from the first day of the following month past the issuance date of the permit (e.g., if the issuance date is February 17th, start your limit report period on March 1st and count forward six months, making the reporting month August).
Please refer to your permit to determine your reporting frequency of sampling analysis data.
Permittees are required to submit their eDMR 20 days following the end of the reporting period. In other words, if your reporting month is August, you have until September 20th to submit your eDMR.
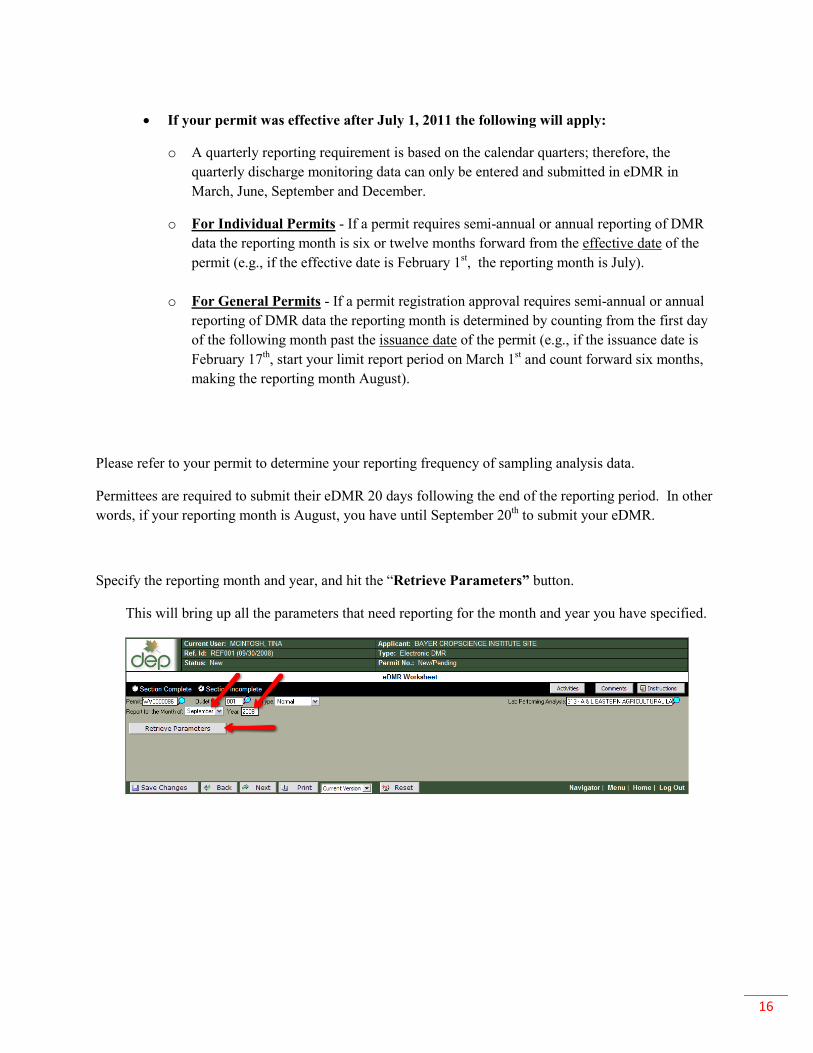
Specify the reporting month and year, and hit the “Retrieve Parameters” button.
This will bring up all the parameters that need reporting for the month and year you have specified.
17
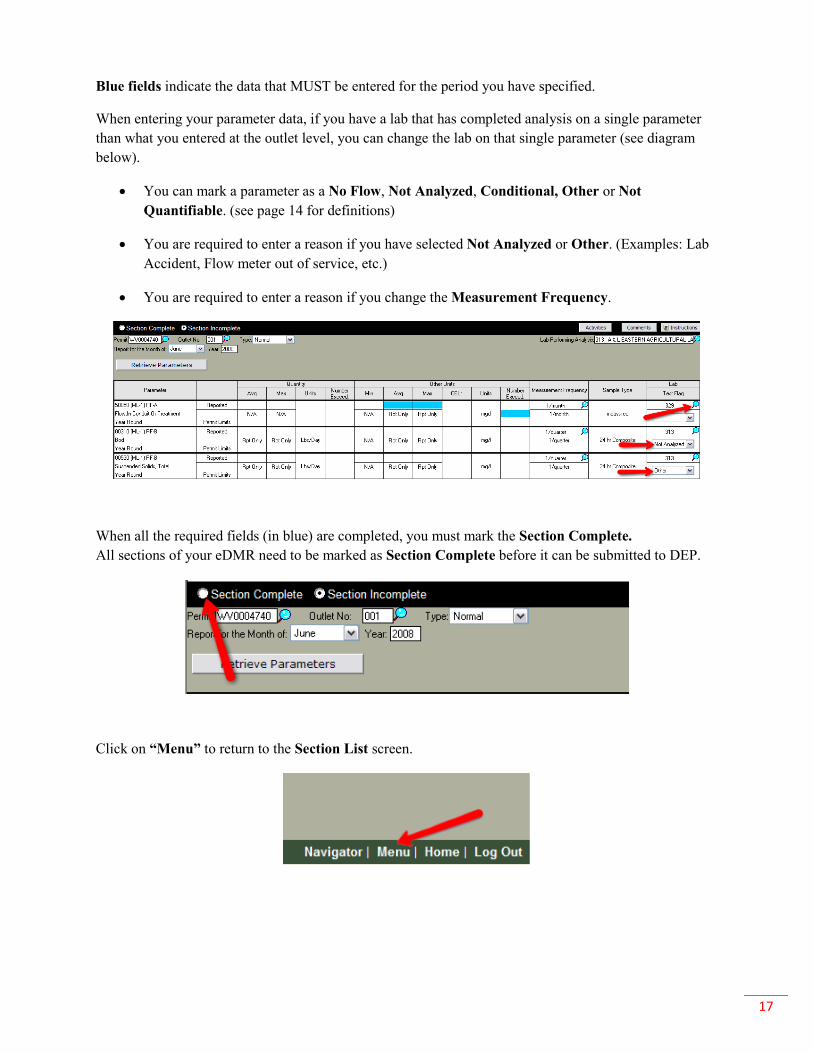
Blue fields indicate the data that MUST be entered for the period you have specified.
When entering your parameter data, if you have a lab that has completed analysis on a single parameter than what you entered at the outlet level, you can change the lab on that single parameter (see diagram below).
• You can mark a parameter as a No Flow, Not Analyzed, Conditional, Other or Not Quantifiable. (see page 14 for definitions)
• You are required to enter a reason if you have selected Not Analyzed or Other. (Examples: Lab Accident, Flow meter out of service, etc.)
• You are required to enter a reason if you change the Measurement Frequency.
When all the required fields (in blue) are completed, you must mark the Section Complete. All sections of your eDMR need to be marked as Section Complete before it can be submitted to DEP.
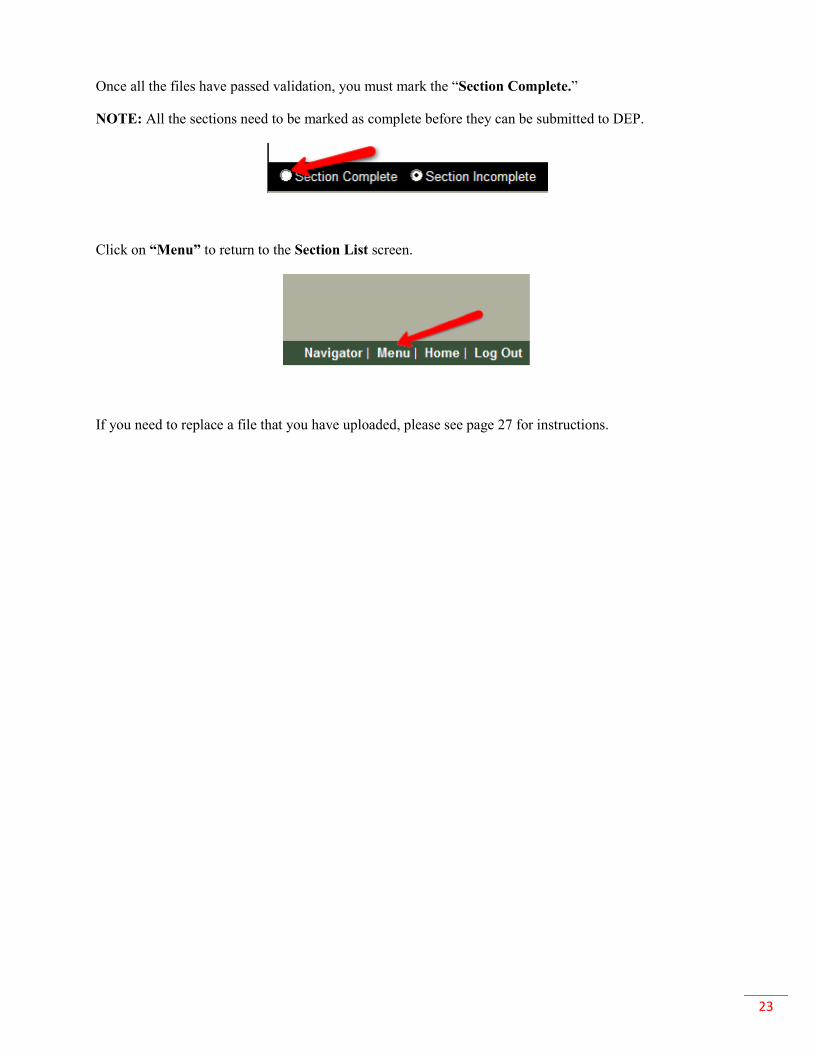
Click on “Menu” to return to the Section List screen.
18
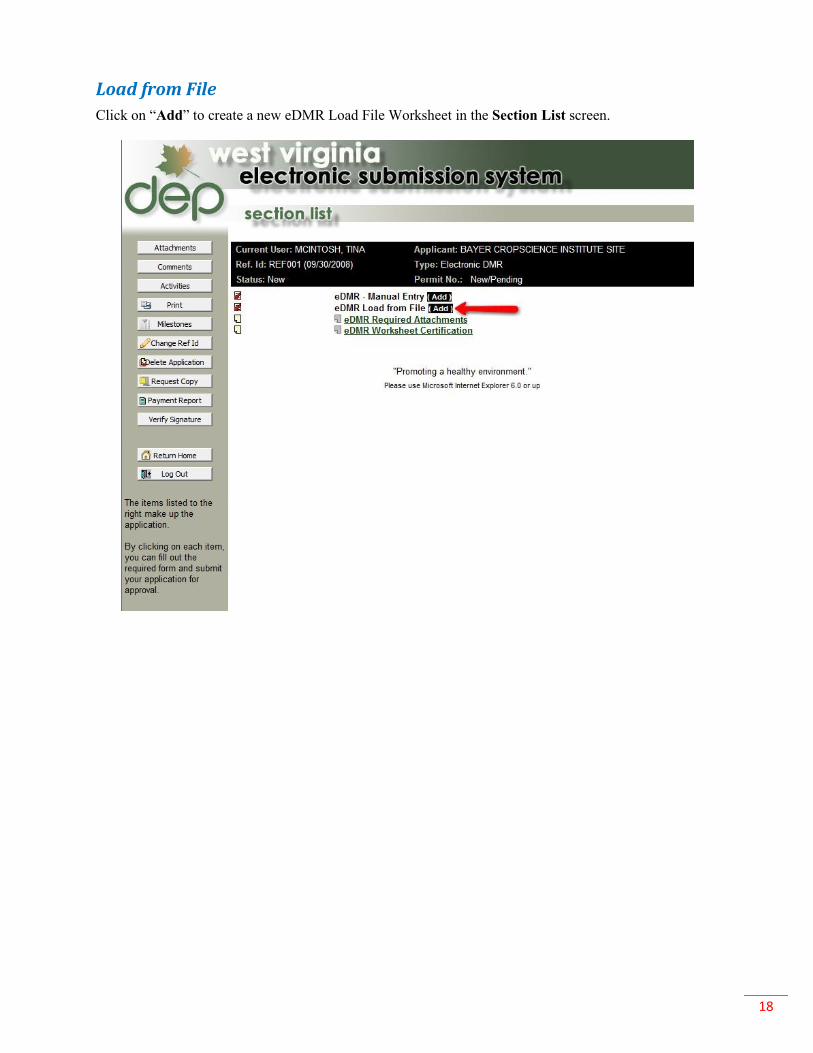
Load from File Click on “Add” to create a new eDMR Load File Worksheet in the Section List screen.
19
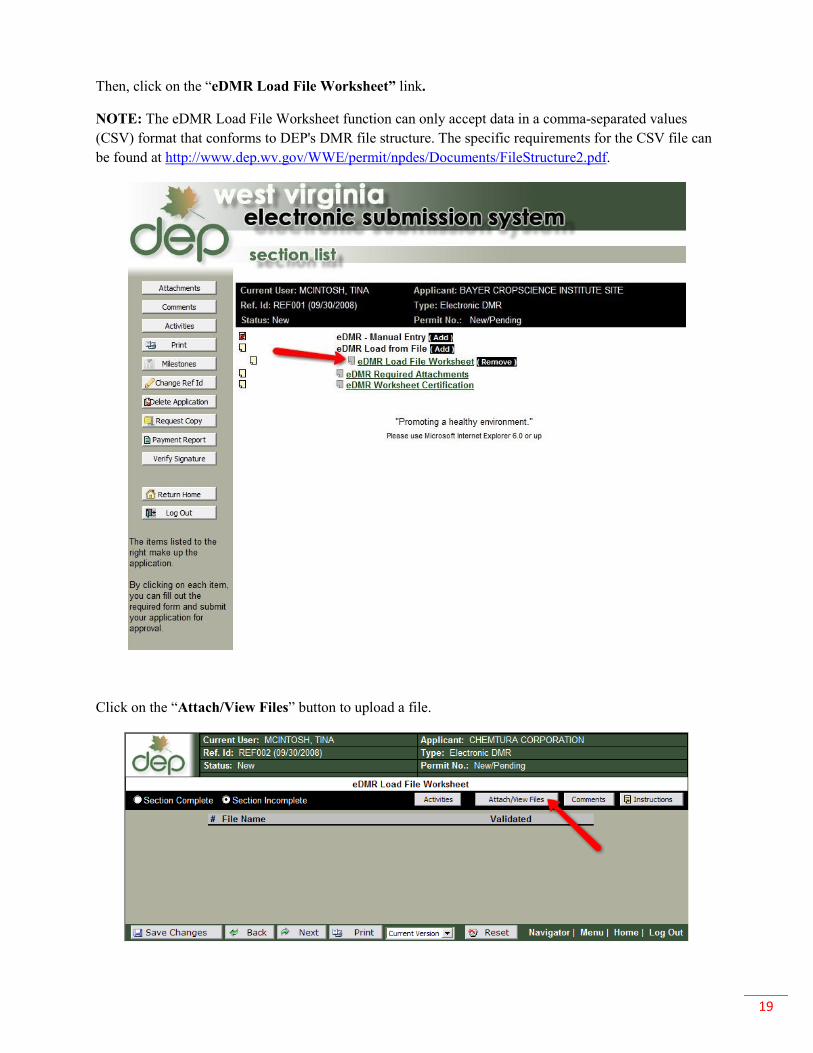
Then, click on the “eDMR Load File Worksheet” link.
NOTE: The eDMR Load File Worksheet function can only accept data in a comma-separated values (CSV) format that conforms to DEP's DMR file structure. The specific requirements for the CSV file can be found at http://www.dep.wv.gov/WWE/permit/npdes/Documents/FileStructure2.pdf.
Click on the “Attach/View Files” button to upload a file.
20
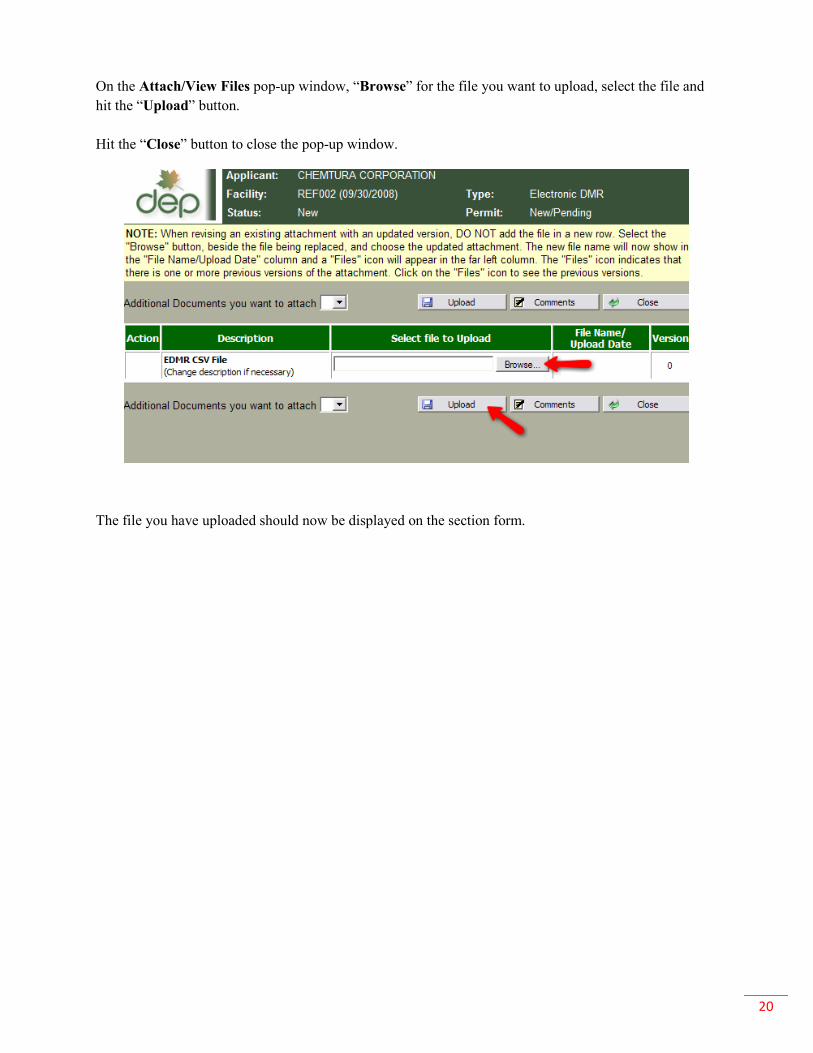
On the Attach/View Files pop-up window, “Browse” for the file you want to upload, select the file and hit the “Upload” button. Hit the “Close” button to close the pop-up window.
The file you have uploaded should now be displayed on the section form.
21
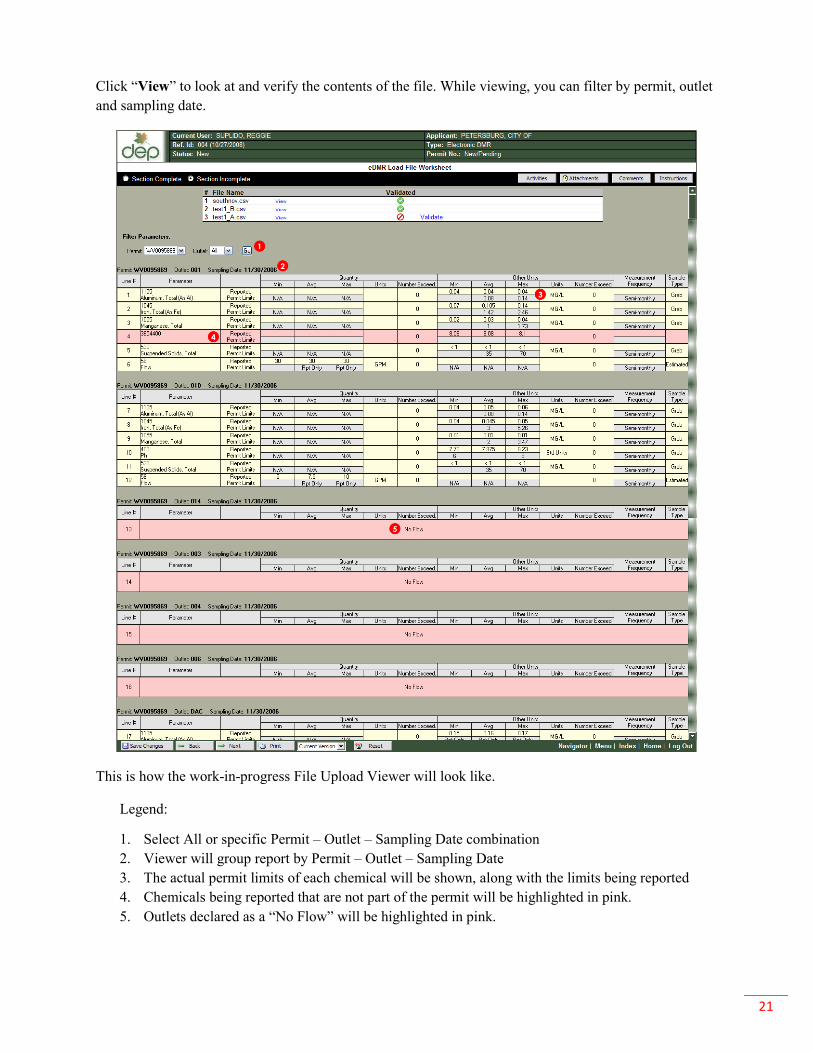
Click “View” to look at and verify the contents of the file. While viewing, you can filter by permit, outlet and sampling date.
This is how the work-in-progress File Upload Viewer will look like.
Legend:
1. Select All or specific Permit – Outlet – Sampling Date combination 2. Viewer will group report by Permit – Outlet – Sampling Date 3. The actual permit limits of each chemical will be shown, along with the limits being reported 4. Chemicals being reported that are not part of the permit will be highlighted in pink. 5. Outlets declared as a “No Flow” will be highlighted in pink.
22
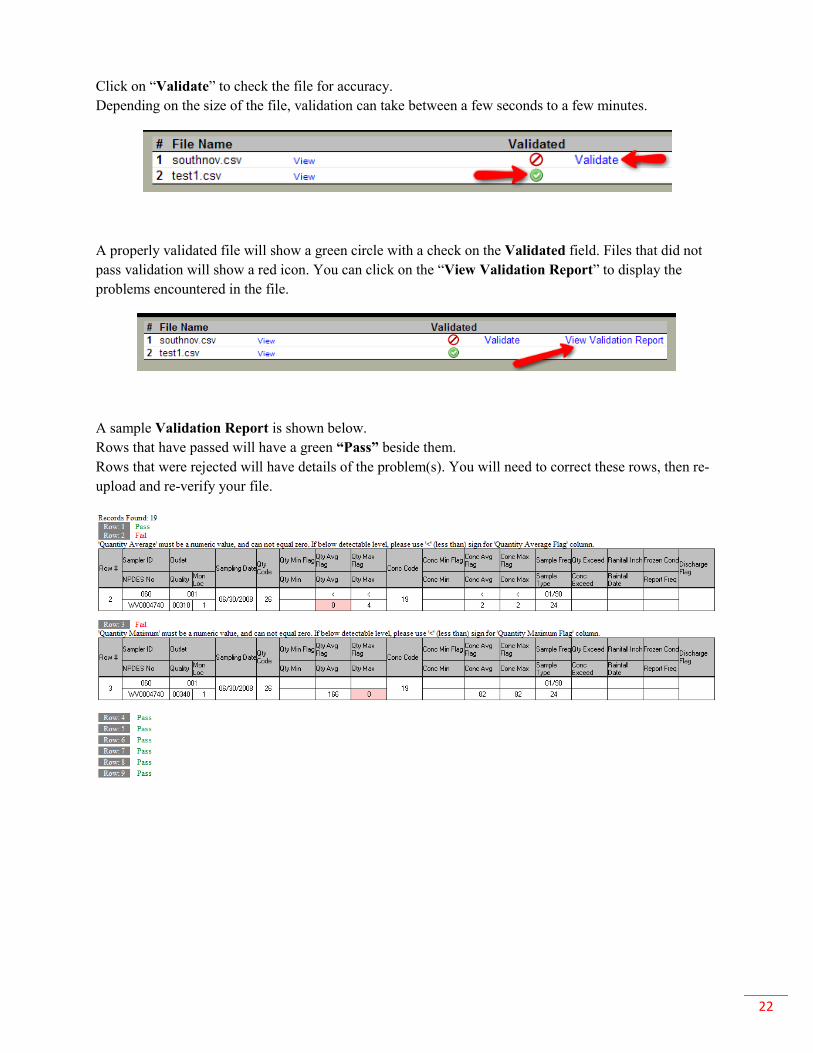
Click on “Validate” to check the file for accuracy. Depending on the size of the file, validation can take between a few seconds to a few minutes.
A properly validated file will show a green circle with a check on the Validated field. Files that did not pass validation will show a red icon. You can click on the “View Validation Report” to display the problems encountered in the file.
A sample Validation Report is shown below. Rows that have passed will have a green “Pass” beside them. Rows that were rejected will have details of the problem(s). You will need to correct these rows, then re-upload and re-verify your file.
23
Once all the files have passed validation, you must mark the “Section Complete.”
NOTE: All the sections need to be marked as complete before they can be submitted to DEP.
Click on “Menu” to return to the Section List screen.
If you need to replace a file that you have uploaded, please see page 27 for instructions.
24
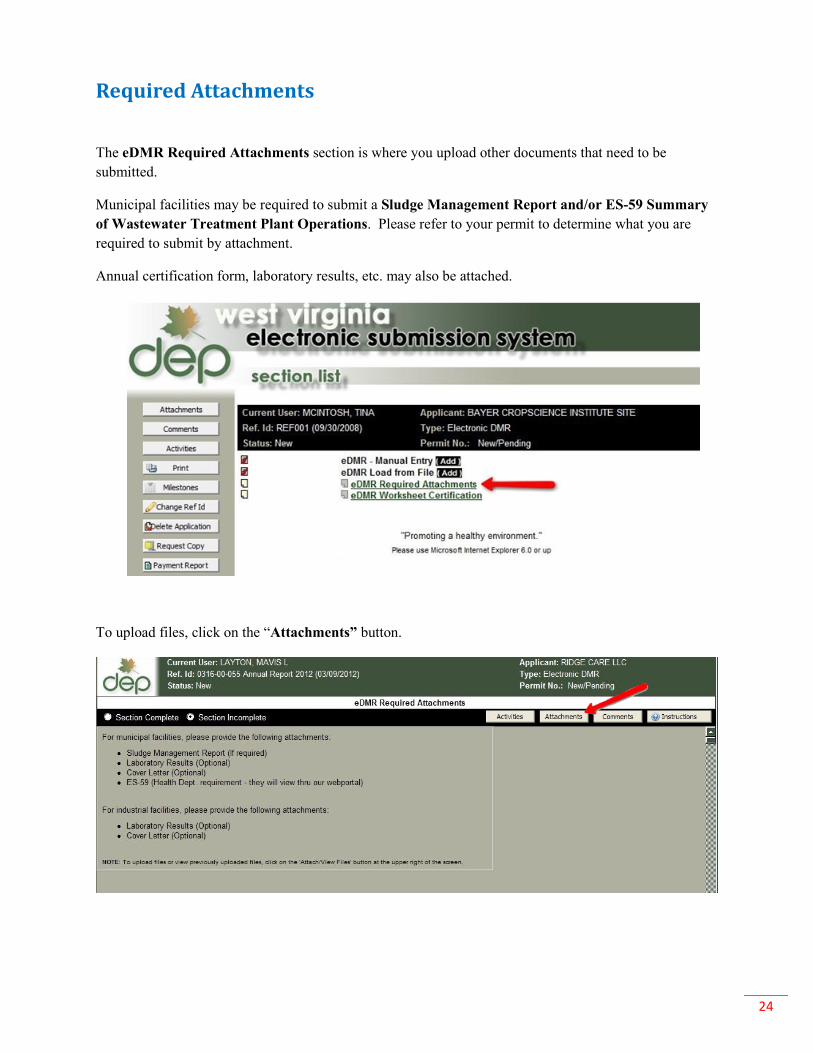
Required Attachments
The eDMR Required Attachments section is where you upload other documents that need to be submitted.
Municipal facilities may be required to submit a Sludge Management Report and/or ES-59 Summary of Wastewater Treatment Plant Operations. Please refer to your permit to determine what you are required to submit by attachment.
Annual certification form, laboratory results, etc. may also be attached.
To upload files, click on the “Attachments” button.
25
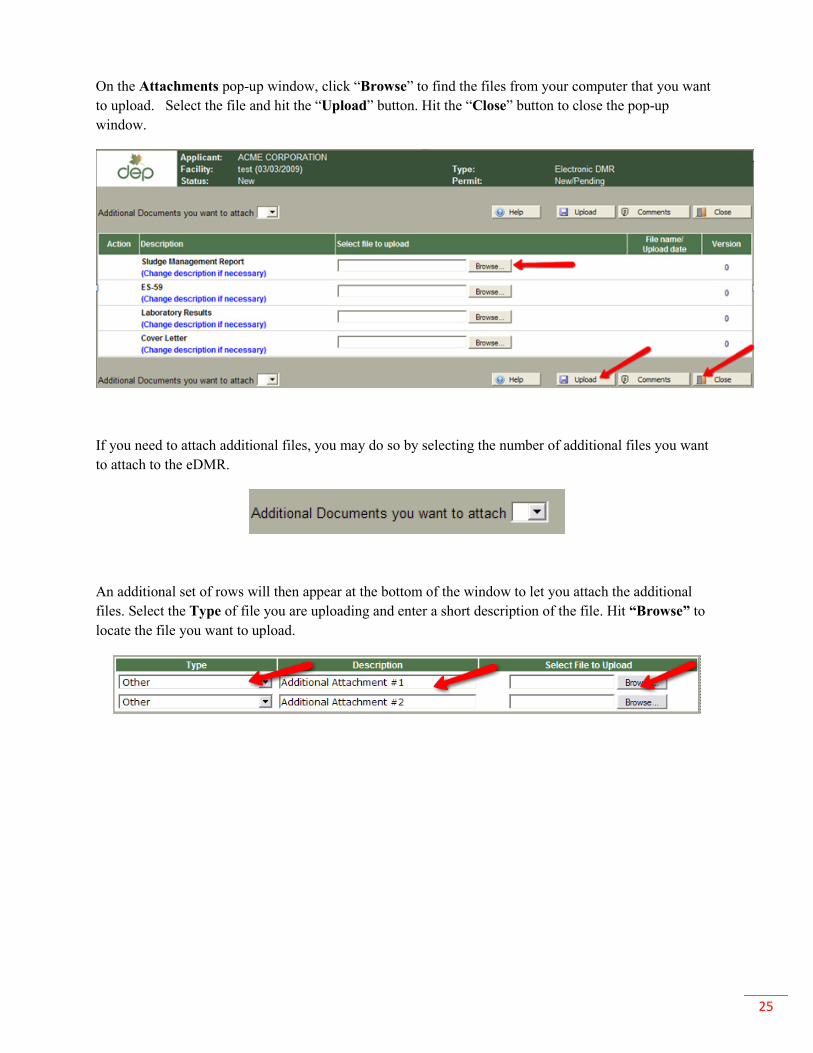
On the Attachments pop-up window, click “Browse” to find the files from your computer that you want to upload. Select the file and hit the “Upload” button. Hit the “Close” button to close the pop-up window.
If you need to attach additional files, you may do so by selecting the number of additional files you want to attach to the eDMR.
An additional set of rows will then appear at the bottom of the window to let you attach the additional files. Select the Type of file you are uploading and enter a short description of the file. Hit “Browse” to locate the file you want to upload.
26
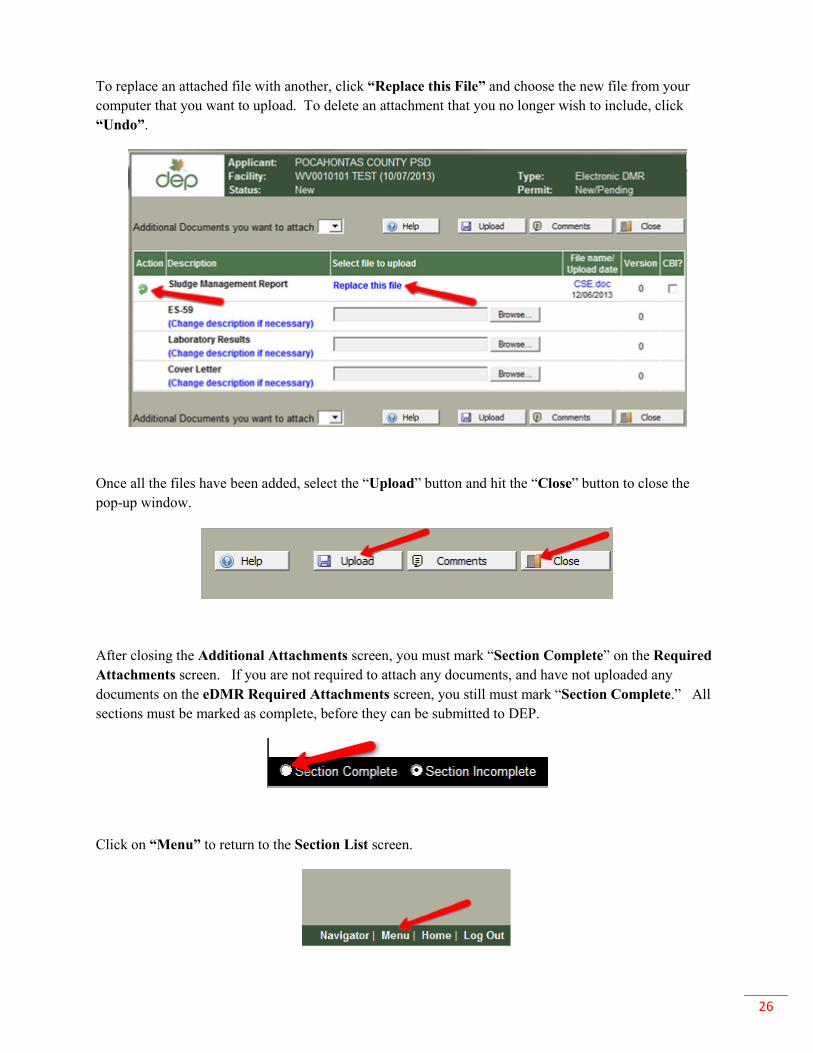
To replace an attached file with another, click “Replace this File” and choose the new file from your computer that you want to upload. To delete an attachment that you no longer wish to include, click “Undo”.
Once all the files have been added, select the “Upload” button and hit the “Close” button to close the pop-up window.
After closing the Additional Attachments screen, you must mark “Section Complete” on the Required Attachments screen. If you are not required to attach any documents, and have not uploaded any documents on the eDMR Required Attachments screen, you still must mark “Section Complete.” All sections must be marked as complete, before they can be submitted to DEP.
Click on “Menu” to return to the Section List screen.
27
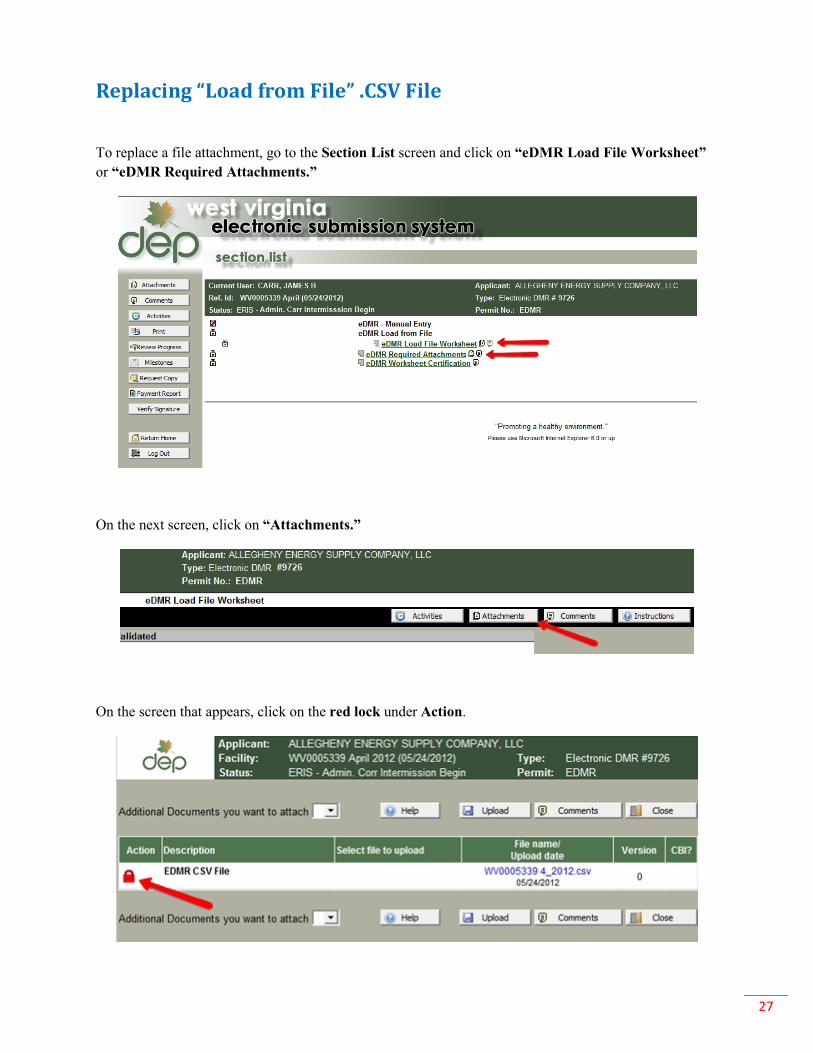
Replacing “Load from File” .CSV File
To replace a file attachment, go to the Section List screen and click on “eDMR Load File Worksheet” or “eDMR Required Attachments.”
On the next screen, click on “Attachments.”
On the screen that appears, click on the red lock under Action.
28
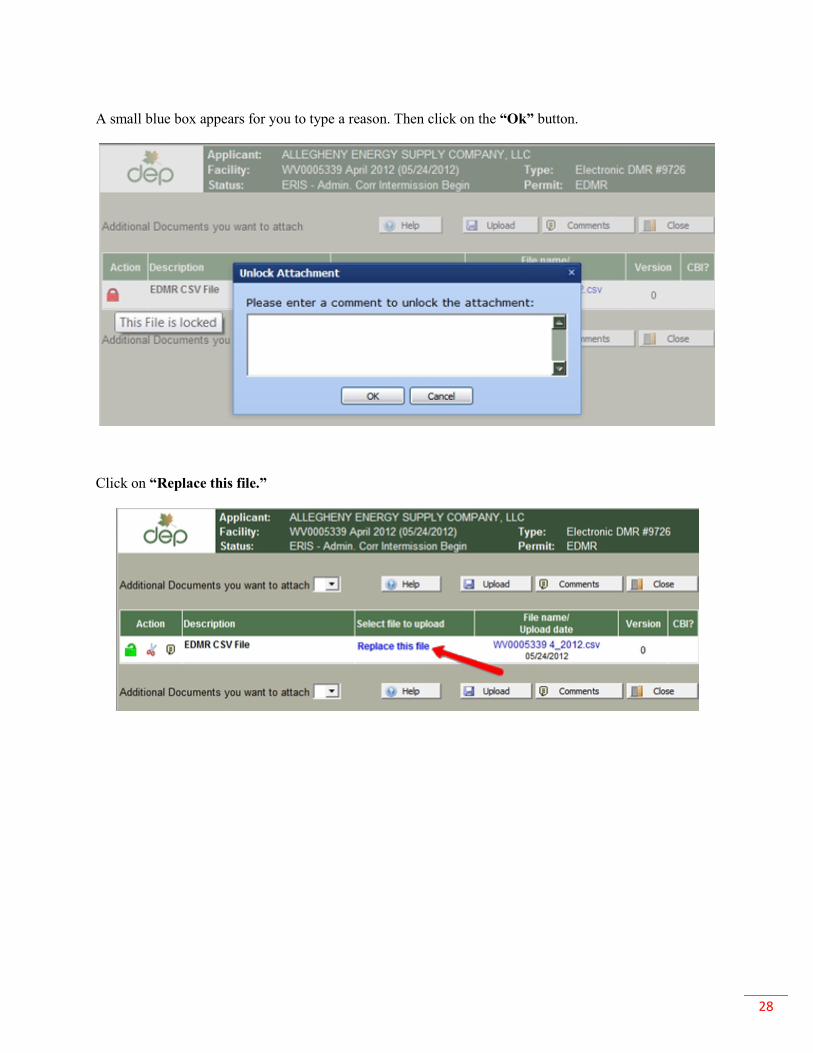
A small blue box appears for you to type a reason. Then click on the “Ok” button.
Click on “Replace this file.”
29
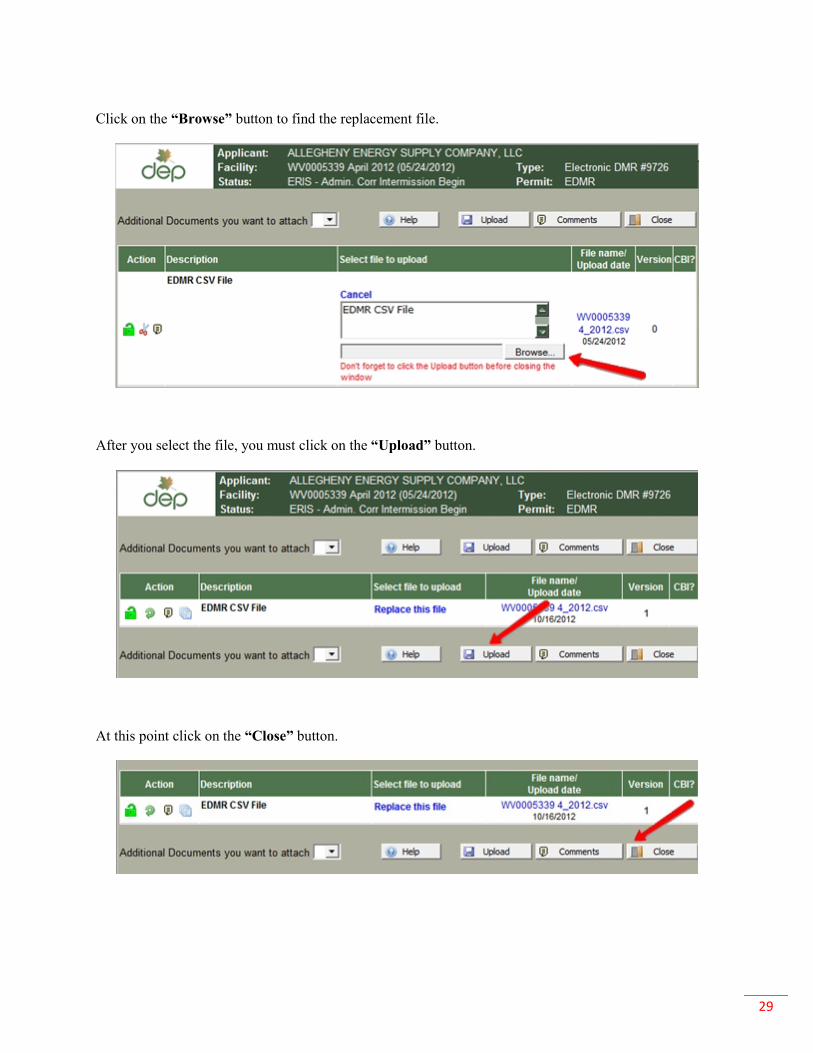
Click on the “Browse” button to find the replacement file.
After you select the file, you must click on the “Upload” button.
At this point click on the “Close” button.
30
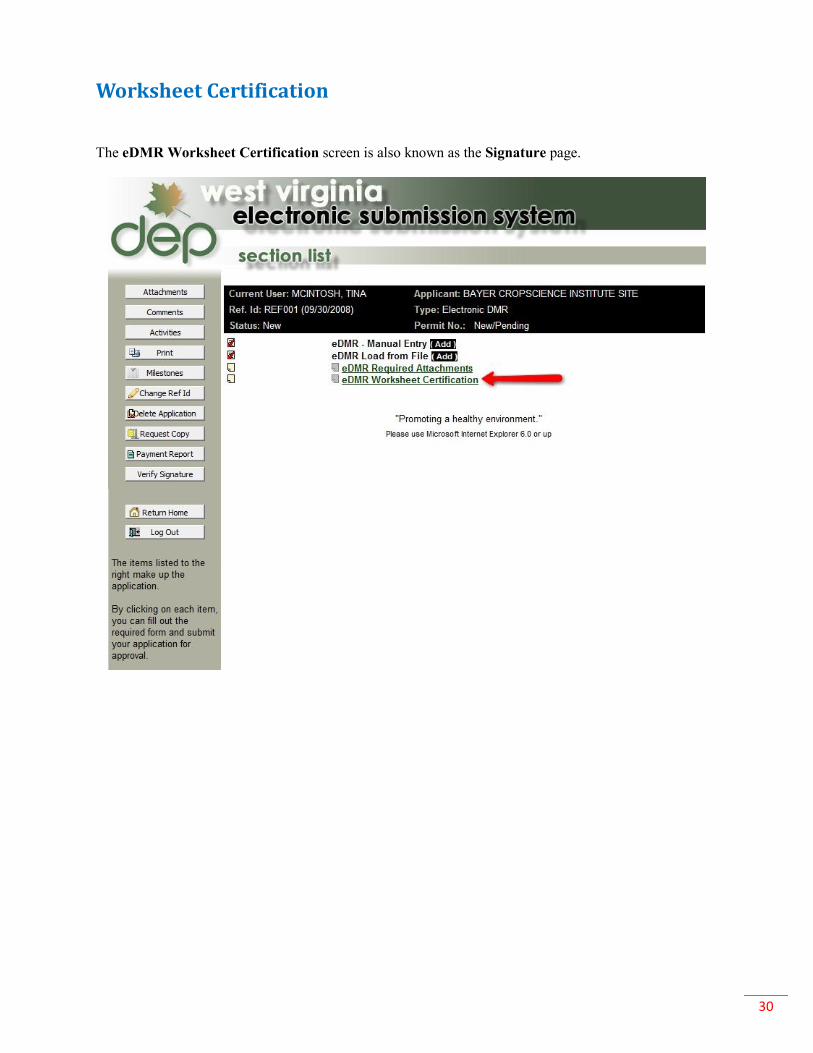
Worksheet Certification
The eDMR Worksheet Certification screen is also known as the Signature page.
31
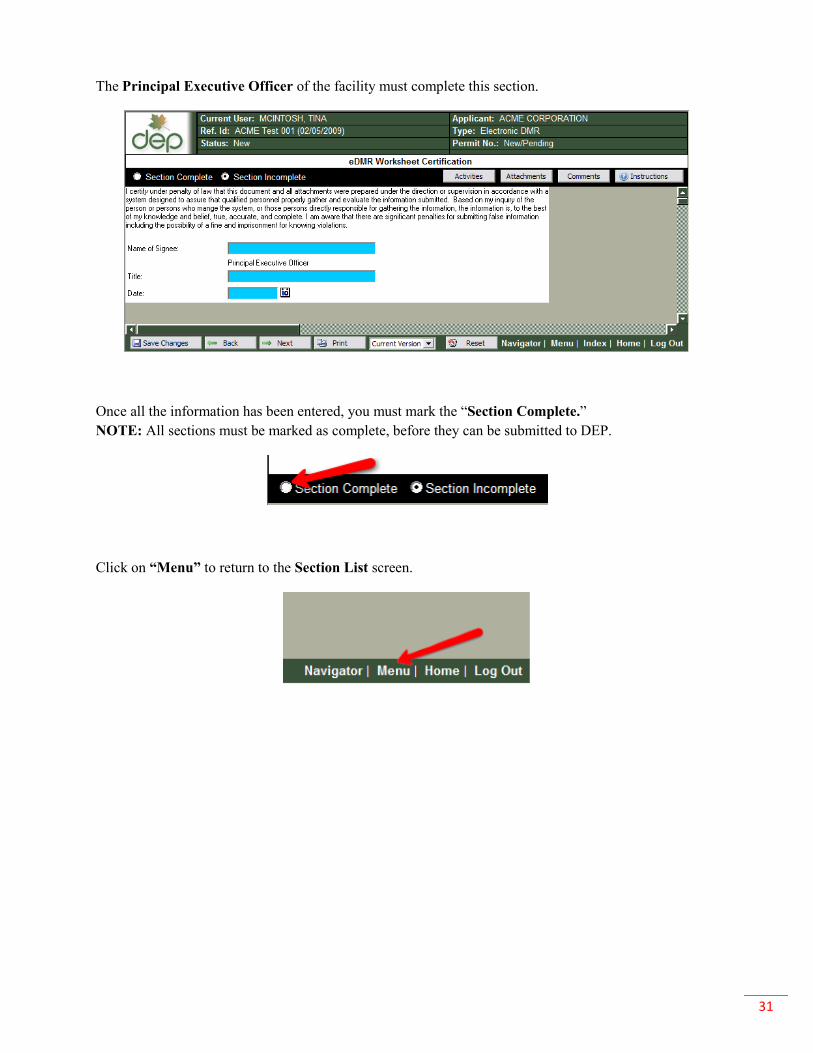
The Principal Executive Officer of the facility must complete this section.
Once all the information has been entered, you must mark the “Section Complete.” NOTE: All sections must be marked as complete, before they can be submitted to DEP.
Click on “Menu” to return to the Section List screen.
32
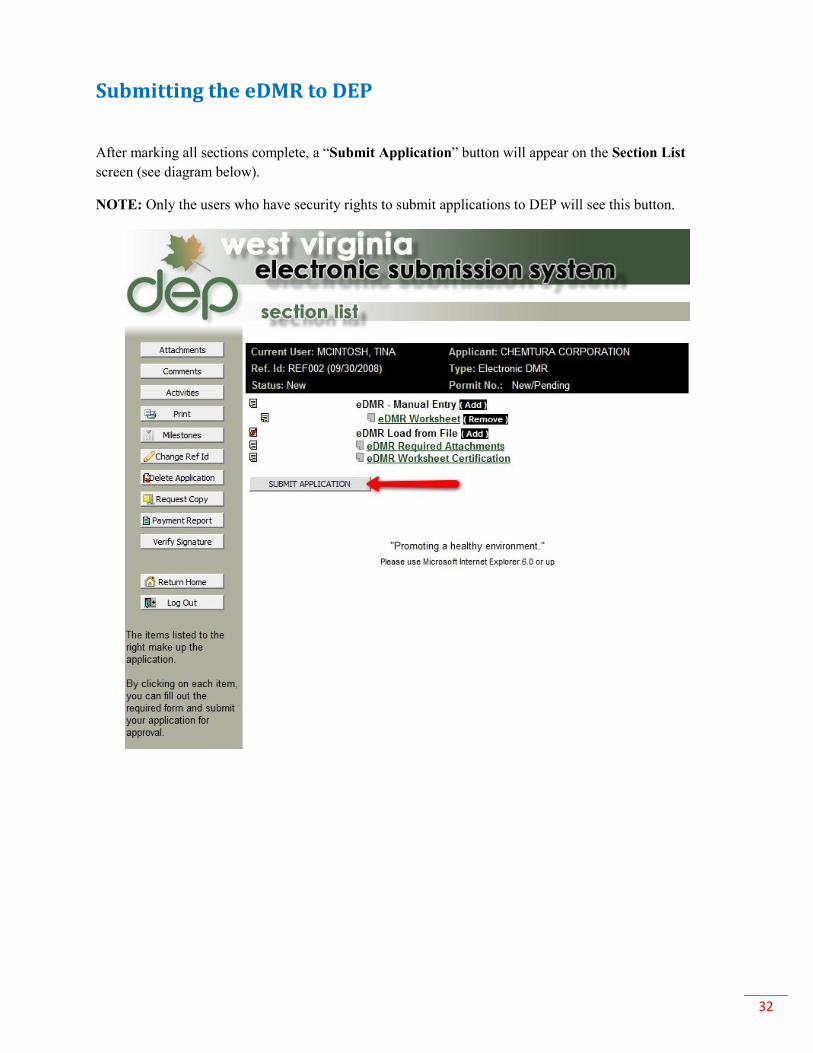
Submitting the eDMR to DEP
After marking all sections complete, a “Submit Application” button will appear on the Section List screen (see diagram below).
NOTE: Only the users who have security rights to submit applications to DEP will see this button.
33
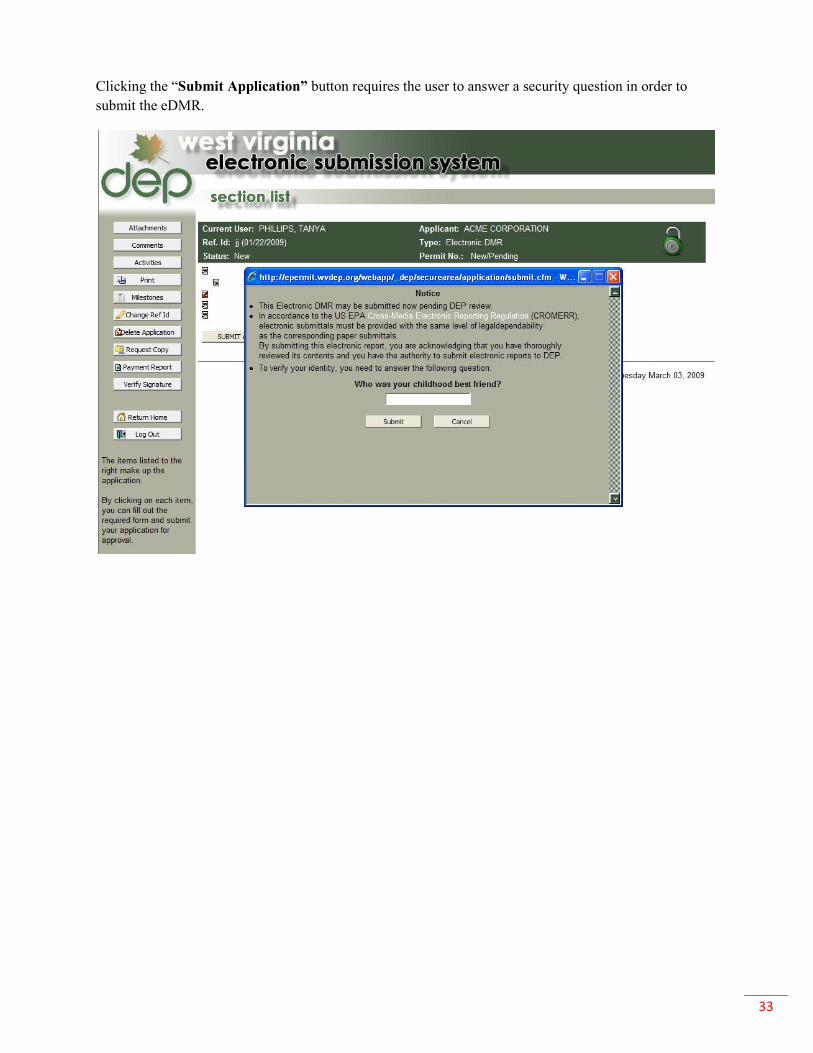
Clicking the “Submit Application” button requires the user to answer a security question in order to submit the eDMR.
34
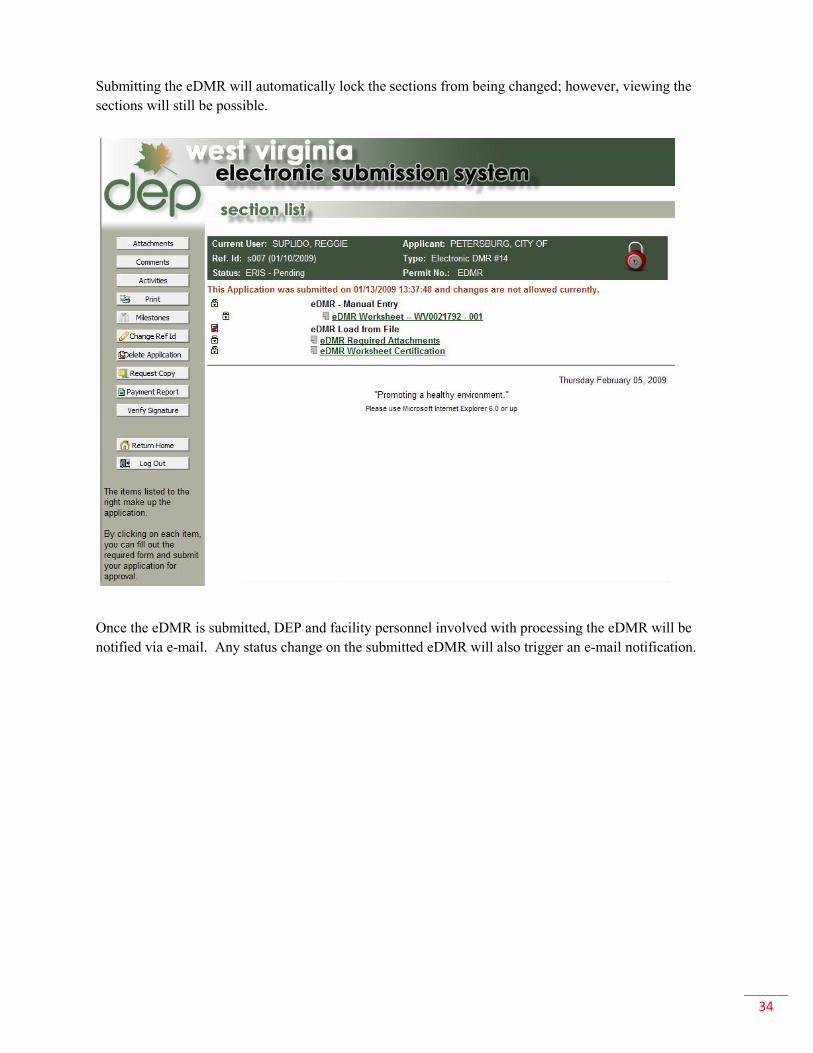
Submitting the eDMR will automatically lock the sections from being changed; however, viewing the sections will still be possible.
Once the eDMR is submitted, DEP and facility personnel involved with processing the eDMR will be notified via e-mail. Any status change on the submitted eDMR will also trigger an e-mail notification.
35
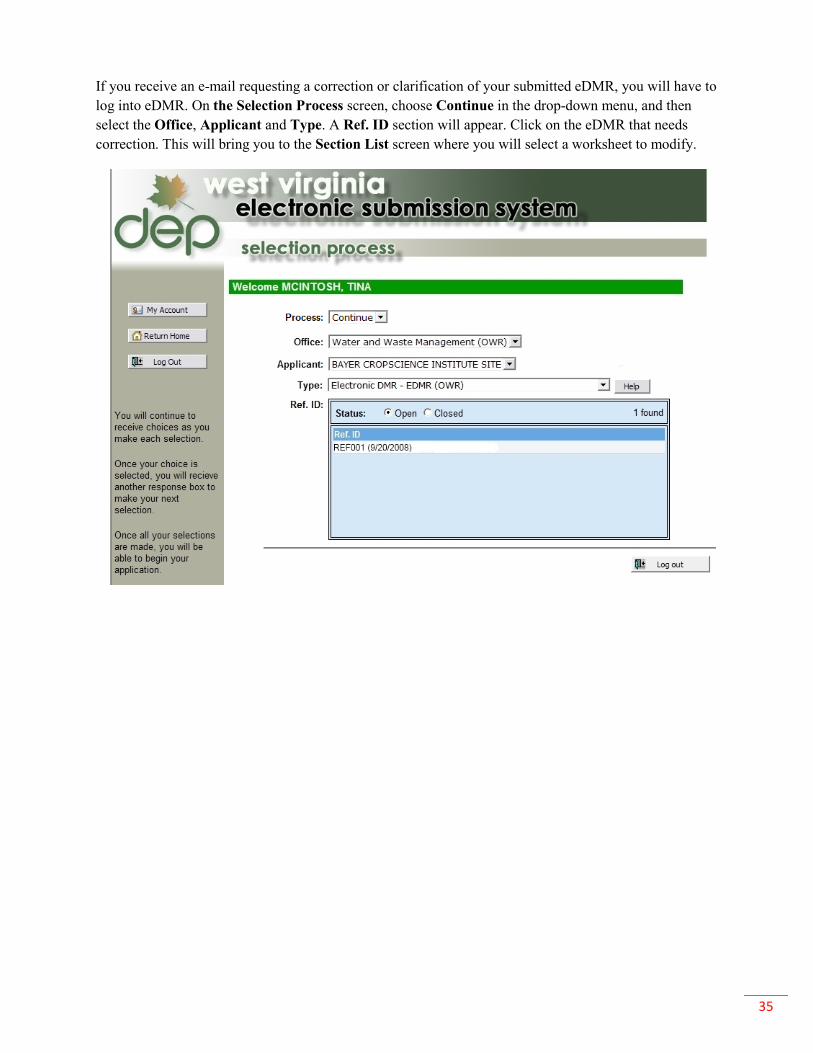
If you receive an e-mail requesting a correction or clarification of your submitted eDMR, you will have to log into eDMR. On the Selection Process screen, choose Continue in the drop-down menu, and then select the Office, Applicant and Type. A Ref. ID section will appear. Click on the eDMR that needs correction. This will bring you to the Section List screen where you will select a worksheet to modify.
36
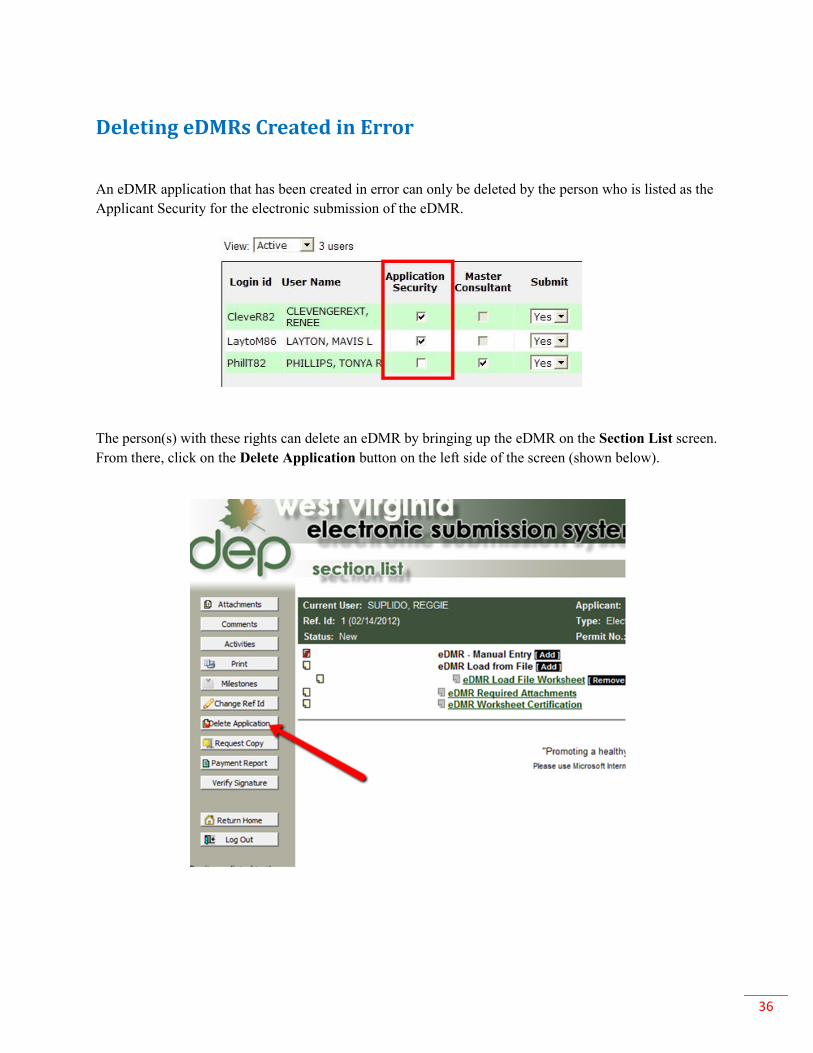
Deleting eDMRs Created in Error
An eDMR application that has been created in error can only be deleted by the person who is listed as the Applicant Security for the electronic submission of the eDMR.
The person(s) with these rights can delete an eDMR by bringing up the eDMR on the Section List screen. From there, click on the Delete Application button on the left side of the screen (shown below).
37
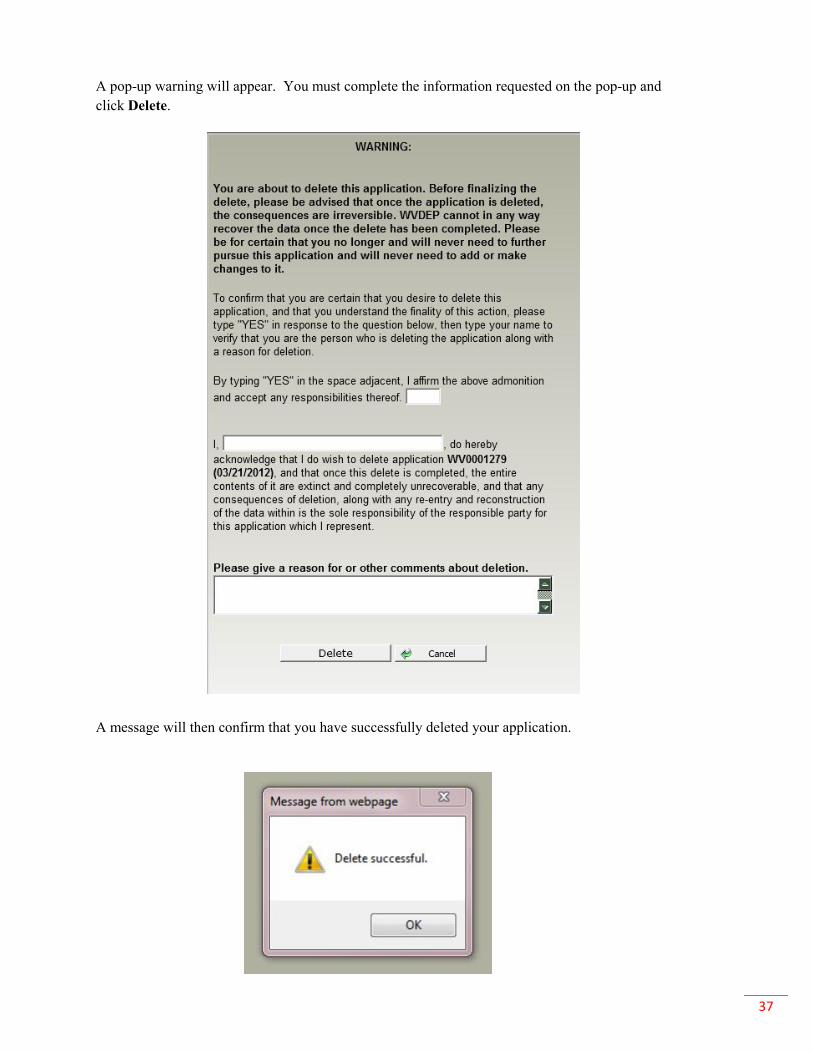
A pop-up warning will appear. You must complete the information requested on the pop-up and click Delete.
A message will then confirm that you have successfully deleted your application.
38
Contact Information For individual eDMRs:
Tonya Phillips (304) 926-0499 Ext. 1010 or by e-mail at [email protected]
Savannah Perry (304) 926-0499 Ext. 1011 or by e-mail at [email protected]
For Stormwater eDMRs (WVG61s):
Patrick Burch (304) 926-0499 Ext. 1067 or by e-mail at [email protected]
For UIC eDMRs:
Michelle Finney (304) 926-0499 Ext. 1047 or by e-mail at [email protected]
For Mining and Reclamation eDMRs:
Mary McDonald (304) 926-0499 Ext. 1527 or by e-mail at [email protected]
Allie Hughes (304) 926-0499 Ext. 1049 or by e-mail at [email protected]
For all other General Permit eDMRs:
Thomas Sowers (304) 926-0499 Ext. 1012 or by e-mail at [email protected]
Backup for all of the above with the exception of mining related eDMRs and current contact for any type
not listed above:
Mavis Layton (304) 926-0499 Ext. 1025 or by e-mail at [email protected]