Embed Size (px)
Citation preview

Electronic Health Record (EHR) 1
For:
eClinicalWorks V10

2 Table of Contents
eClin
ical
Wo
rks
Table of Contents
Module 1: Clinical Navigation ................................................................................................................. 5
Learning Objectives ........................................................................................................................ 5
eClinicalWorks Functions ................................................................................................................ 6
Starting eClinicalWorks ................................................................................................................... 6
Identifying the Parts of the eClinicalWorks Work Area .................................................................. 7
eClinicalWorks Work Area Detail ................................................................................................... 8
Menus ....................................................................................................................................... 8
Patient Lookup Icon .................................................................................................................. 8
Navigation Toolbar .................................................................................................................... 9
Show/Hide Toggle Buttons (Olives) .......................................................................................... 9
Using the Dashboard Taskbar - Menus & Jelly Beans ............................................................... 9
Left Navigation Pane ............................................................................................................... 10
Navigation Bands .................................................................................................................. 100
The Practice Band ................................................................................................................... 11
The Patient Hub ...................................................................................................................... 12
The Progress Notes Window……………………………………………………………………………………………….13
Progress Notes Dashboard ........................................................................................................... 14
Patient Information ...................................................................................................................... 14
Intra-Office Messaging ................................................................................................................ 155
Sending Messages ...................................................................................................................... 155
Reading and Replying to Messages .............................................................................................. 17
Deleting Messages ..................................................................................................................... 197
Module 1. Review - Test Your Knowledge .................................................................................... 20
Module 2: Office Visits ......................................................................................................................... 21
Learning Objectives ...................................................................................................................... 21
Office Visits Window ..................................................................................................................... 22
Check Patients into the Back Office .............................................................................................. 26
Specify Room Numbers for Patients ............................................................................................. 27
Update Encounter Statuses .......................................................................................................... 28
View Visit Wait Times ................................................................................................................... 28

Electronic Health Record (EHR) 1 3
eClin
ical
Wo
rks
View Billing Data and Orders ........................................................................................................ 29
Module 2. Review – Using the Office Visits Window ................................................................... 31
Module 3: Progress Notes – Patient Intake .......................................................................................... 32
Learning Objectives ...................................................................................................................... 32
Progress Notes Overview ............................................................................................................. 33
Accessing Progress Notes ............................................................................................................. 35
Types of Progress Notes ............................................................................................................... 36
Physical Visit ................................................................................................................................. 36
Regular Visits ................................................................................................................................ 36
Intervention .................................................................................................................................. 36
Operative Report .......................................................................................................................... 37
Navigating within Progress Notes ................................................................................................ 38
Patient Dashboard ........................................................................................................................ 38
Interactive Clinical Wizard (Right Chart Panel)…………………………………………………………………….40
Patient Dashboard Notes…………………………………………………………………………………………………….42
Chart Links…………………………………………………………………………………………………………………………..43
SOAP Hyperlinks………………………………………………………………………………………………………………….44
Dashboard Icon Toolbar………………………………………………………………………………………………………46
Progress Note Navigation Buttons……………………………………………………………………………………...47
Documenting Chief Complaint(s) ................................................................................................. 48
Documenting Current Medications .............................................................................................. 52
Adding New Medications ............................................................................................................. 54
Displaying Past Rx History ……………………………………………………………………………………………………….55
Documenting Patient Allergies ..................................................................................................... 58
Documenting Vitals ...................................................................................................................... 63
Entering Vitals Manually ............................................................................................................... 64
Entering Vitals Using Pop-ups....................................................................................................... 65
Using Growth Charts .................................................................................................................... 66
Viewing Patient Graphs ................................................................................................................ 67
Completing Vitals.......................................................................................................................... 68
Use Visit Status Indicators ............................................................................................................ 68
Module 3. Review Patient Intake – Progress Notes ..................................................................... 69

4 Table of Contents
eClin
ical
Wo
rks
Module 4: Patient History - Progress Notes …………………………………………………………………………………….70
Learning Objectives ...................................................................................................................... 70
Documenting Medical History ...................................................................................................... 71
Documenting Surgical History ...................................................................................................... 74
Documenting Past Hospitalizations .............................................................................................. 76
Documenting Family History......................................................................................................... 77
Documenting Social History .......................................................................................................... 80
Module 4. Review - Patient History & Progress Notes ................................................................. 82
Module 5: Telephone Encounters……………………………………………………………………………………..…………….83
Learning Objectives ...................................................................................................................... 83
Creating Telephone Encounters ................................................................................................... 84
Respond to a Telephone Encounter ............................................................................................. 86
Refilling Prescriptions in a Telephone Encounter ......................................................................... 88
ePrescribing a Prescription Refill ................................................................................................. 90
Faxing a Prescription Refill ........................................................................................................... 91
Ordering Lab/Diagnostic Imaging Tests Using the Virtual Visit Tab ............................................. 93
Selecting an Assessment in the Virtual Visit ................................................................................ 94
Order Lab Tests for Today in a Virtual Visit ................................................................................. 97
Faxing Lab Orders from a Virtual Visit ......................................................................................... 99
Ordering Future Lab Tests in a Virtual Visit ............................................................................... 102
Ordering Diagnostic Imaging Tests in a Virtual Visit .................................................................. 104
Look Up a Patient’s Encounters .................................................................................................. 107
Attach Addendums to a Telephone Encounter .......................................................................... 109
Glossary .............................................................................................................................................. 111
Index................................................................................................................................................... 116

Electronic Health Record (EHR) 1 5
Module 1: Clinical Navigation
Learning Objectives
After completing this module you will be able to
Describe the purpose and major functions of eClinicalWorks.
Start the eClinicalWorks program and log into and out of the system.
Change your password.
Identify and access the major parts of the eClinicalWorks work area (active screen).
Navigate the eClinicalWorks Menus.
Use the Toggle Buttons (Olives)
Use the Quick Launch Task Buttons (Jelly Beans)
Use the Navigation Pane and Bands.
Access the Patient Lookup window from the Navigation Toolbar, Patient Hub, Patient Dashboard, or from any window with a patient field.
Describe the Patient Hub and access the Patient Hub from different windows in eClinicalWorks.
Use eClinicalWorks’ intra-office message feature.

6 Module 1: Clinical Navigation
eClin
ical
Wo
rks
eClinicalWorks Functions
eClinicalWorks has two major components:
1. eClinicalWorks Electronic Medical Record (EMR). The EMR function allows access to secure electronic patient records either in-house or remotely. EMR communicates electronically with referring physicians and sends consulting notes and clinical data.
2. eClinicalWorks Electronic Practice Management (EPM). The EPM function allows practices to submit claims electronically, track the status of claims, and communicate online with payers to confirm patient eligibility/services covered and discuss payments.
Starting eClinicalWorks
To start the eClinicalWorks application program:
Select the Windows “Start Menu”, then select “eClinicalWorks”, OR
“Double-click” the “eClinicalWorks” icon on the desktop:
A login screen will appear:
To log into the system:
Enter the “Login ID” and “Password” you’ve been assigned; then, select the “Log In” button. The eClinicalWorks work area (active screen) will then be displayed.
To log out of the system:
Select “File > Exit” from the “Menu” or select the button in the upper-right corner of the eClinicalWorks window. Select “Yes” to confirm that you want to exit the application.
How to
How to

Electronic Health Record (EHR) 1 7
eClin
ical
Wo
rks
To change your password:
Select “File > Change Password” from the “Menu”.
Enter your old password. Then, enter your new password twice. Select “OK”.
Identifying the Parts of the eClinicalWorks Work Area
The eClinicalWorks application window presents a complete work area for the front office, billing, and the clinical staff. The following table highlights the major areas of the eClinicalWorks application window. Refer to subsequent sections for further details.
Area Description
1. Menus Permanently displayed text primarily used for changing program settings;
2. Pt. Lookup Provides access to patient information. Opens the “Patient Lookup” window;
3. Olives “Show/Hide” buttons (“Olives”) show or hide application elements;
4. Taskbar The “Dashboard Taskbar” contains the “Jelly Beans” that provide shortcuts to items needing attention;
5. Bands Located in the “Left Navigation Pane”, Bands sort and categorize icons and functions;
6. Schedule, Appointments and Views
Used to search, schedule or view an appointment or change the display of the “Resource Schedule”;
7. Left Navigation Pane
Provides access to all functionality granted to the user by the “Security Settings”;
8. Visit Type Color
The “Color Block” to the left of the “Appointment” used to indicate the “Visit Type”.
How to

8 Module 1: Clinical Navigation
eClin
ical
Wo
rks
eClinicalWorks Work Area Detail
Menus
Menus are the permanently displayed text in the light blue section at the very top of the application that when clicked, offer lists of options generally related to setup and administration. There are 13 Menus: “File”, “Patient”, “Schedule”, “EMR”, “Billing”, “Reports”, “CCD”, “Fax”, “Tools”, “Community”, “Meaningful Use”, “Lock” (clicking this locks your computer directly), and “Help”. The Menus are primarily used for changing program settings. They are rarely used by clinical users for everyday tasks.
Patient Lookup Icon
The Patient Lookup icon is the permanently displayed icon located near the top of the application in the Navigation Toolbar. Selecting the Patient Lookup icon opens the “Patient Lookup window”. This window allows users to search for any patient in the system.
To look up a patient using the Patient Lookup Icon:
Select the Patient Lookup Icon. The Patient Lookup window opens:
1. Select (enable) the “RTS” check box to use the “Real Time Search” feature;
2. Enter the patient’s Last Name (or just the first few characters of the name) in the Search Patient field to look up a patient in the database. Select “OK” to open the “Patient Hub”;
3. Use the search features to look up a patient by SSN, DOB, Acct No., Phone No., Subscriber No., Previous Name, Home/Work/Cell Phone, Medical Record No., or Guarantor Name.
How to

Electronic Health Record (EHR) 1 9
eClin
ical
Wo
rks
Navigation Toolbar
The Navigation Toolbar is the permanently displayed dark blue toolbar near the top of the application, just beneath the Menus. This toolbar contains the “Patient Lookup” icon, the “Olives”, and the “Jelly Beans”.
Show/Hide Toggle Buttons (Olives)
Olives are the three permanently displayed green octagonal buttons (with dark green circles in their centers), located in the Navigation Toolbar near the top of the application. Selecting an Olive once will “Hide” the associated feature, turning the circle in the center red. Selecting the Olive again will “Show” the associated feature, turning the circle back to dark green:
Left Olive - Shows/Hides the “Navigation Pane”.
Middle Olive - Shows/Hides the “Patient Dashboard”.
Right Olive - Shows/Hides the “Chart Panel”.
Using the Dashboard Taskbar - Menus & Jelly Beans
The Dashboard Taskbar, consist of Menus and Buttons that provide quick access to the most-used areas of the application. The Dashboard Taskbar consists of underlined letters and icon links (known as Quick-Launch Buttons or “Jelly Beans”). When selected, the Menus display a drop-down list of options; while the Jelly Beans display the numerical real-time totals for the various sections, such as checked-in patients, referrals, and documents ready for review.
The following table presents a detailed description of the Dashboard Taskbar Menus and Buttons:
Click Menu Items “Jelly Bean” Buttons
P Displays the number of patients pre-registered through the Patient Portal.
Select the button to open the Patient Pre-Registration window.
N Transcription. Select:
- Completed - All - Open
Displays total open Transcriptions for the date range.
Select the button to open the Transcription window.
The e-Prescription window listing refill requests. The E appears for practices using SureScripts-RxHub© e-prescribing (physicians only).
Select the button to open the e-Prescription window.
S Scheduling. Select: Review Progress
Notes Office Visit Resource Schedule
The number displayed indicates the total number of patients who came into the office as scheduled on the present day.
Select the button to open the Office Visits window.
10 Module 1: Clinical Navigation
eClin
ical
Wo
rks
Click Menu Items “Jelly Bean” Buttons
D Documents. Select: Fax inbox Fax outbox
The number displayed indicates the total of outstanding documents currently listed on the Review Documents window.
Select the button to open the Review Documents window and display the documents by Status.
R Referrals. Select: Referrals incoming Referrals outgoing
The number displayed indicates the total number of referrals assigned to the logged-on user.
Select the button to open the Referrals Outgoing window.
T Telephone & Web encounters. Select: Telephone Enc Web Enc Claims Action New Telephone Enc New Action
The number displayed indicates the total number of Telephone & Web Encounters currently listed on the Telephone/Web Encounters window.
Select the button to open the Telephone/Web Encounters window and display the encounters by Status (Open, Addressed, All, All Open).
L Labs/Imaging: The total number of labs and images assigned to the logged-on user displays in parentheses next to each category.
The number displayed indicates the total Labs and Imaging orders currently listed on the Labs/Imaging window.
Select the button to open the To be Reviewed Tab on the Labs/Imaging window and display the Labs/Imaging by Status (Outstanding, Reviewed, To Be Reviewed, Future, By Patient, All, and Copies).
M Messages. Select: Messages Inbox Messages Outbox Deleted Messages Create New Message
The number displays the total of new Messages in the Inbox for the logged-in user.
Select the button to open the Messages Inbox window.
Left Navigation Pane
The Left Navigation Pane is the permanently displayed pane on the far left side of the eClinicalWorks application. This pane contains bands, which in turn contain the Icons used to access the various windows in the system. The Icons are grouped and categorized by Bands. This manual covers the Bands and Icons commonly used by Providers and Clinical Staff.
Navigation Bands
The Navigation Bands are the rectangular gray buttons on the left side of the eClinicalWorks Navigation Pane that contain Icons. There are six bands (seven for administrators): Admin (displayed for administrators only), Practice, Registry, Referrals, Messages, Documents, and Billing.

Electronic Health Record (EHR) 1 11
eClin
ical
Wo
rks
The Practice Band
The Practice Band provides the Icons used to schedule appointments, document office visits and patient encounters, order labs and imaging, and access progress notes.
To go to the Resource Schedule using the navigation bands:
Select the Practice Band > Resource Schedule icon:
The “Resource Schedule” screen appears. This is the screen that the Front Office Staff will work in to schedule appointments, verify insurance and manage schedules for the Clinical Providers and Resources. Refer to the Front Office Manual for more information on using the Resource Schedule.
Resource Scheduling Window
The Office Visits Window
To go to the Office Visits window using the navigation bands:
Select the Practice Band > Office Visits icon:
The “Office Visits” window appears. Refer to Office Visits in Module 2 for more information:
How to
How to

12 Module 1: Clinical Navigation
eClin
ical
Wo
rks
Office Visits Window
The Patient Hub
The Patient Hub is the patient’s electronic medical record. From the Patient Hub you can access all of the items in the patient’s chart. The Patient Hub is a patient-specific window containing basic information about a patient and many buttons to access more detailed information about a patient. You can access the Patient Hub window from both the Patient Lookup and Progress Notes Dashboard. Select a patient from the Patient Lookup window to open the Patient Hub:
The Patient Hub
Area Description
1. Patient Hub Toolbar
Provides access to the patient's past and present test results (labs and diagnostic imaging), immunizations, referrals, allergies, alerts, and notes.
2. Patient Information
A snapshot of patient information, including the last and next visits, and outstanding balances.

Electronic Health Record (EHR) 1 13
eClin
ical
Wo
rks
Area Description
3. Leave Message
When the “Leave message” box is checked on the Patient Information window, an envelope icon displays on the Patient Hub indicating that the patient has agreed to messages being left at number indicated.
4. Hub Buttons
The Hub Buttons provide quick access to medical record, billing and other information. Perform frequent office tasks using these buttons, such as scheduling a new appointment, logging a telephone call, or sending a message or letter.
5. Chart Panel (ICW)
The Chart Panel commonly referred to as the Interactive Clinical Wizard, or ICW, displays a quick reference of the patient's Progress Notes window—giving the provider easy access to the patient's current and past information, such as medications, allergies, alerts, and immunizations. The ICW is divided at the top by “Tabs” and “Bands” to catagorize information.
The Progress Notes Window
To access the patient’s Progress Notes from the Patient Hub:
From the Patient Hub, select the Progress Notes button. The Progress Notes window opens:
The Progress Notes window provides a secure, central location to access all patient data. There are different visit types and each type of visit that you select determines the format and content of the Progress Notes for the corresponding visit. Providers will record the details of patient office visits in the Progress Notes instead of documenting this information in a paper chart.
How to

14 Module 1: Clinical Navigation
eClin
ical
Wo
rks
Progress Notes Dashboard
The Progress Notes Dashboard is the section icons appearing near the top of most Pop-Up windows accessed from the Progress Notes. Selecting from these icons allows users to navigate quickly between the various sections of the Progress Notes.
To select a new patient from the Progress Notes window:
1. Select the button to open the Patient Lookup window.
To access the Patient Hub from the Progress Notes window:
2. Select the button to open the Patient Hub window.
Patient Information
The Patient Information window containing a patient's demographic information. It can be accessed from the Patient Lookup, Patient Hub, Progress Notes Dashboard, and Progress Notes Menus.
To review the patient’s demographic information from the Progress Notes window:
3. Select the button. The Patient Information window opens:
How to
How to
How to
Electronic Health Record (EHR) 1 15
eClin
ical
Wo
rks
Select “OK” or “Cancel” to close the Patient Information window.
Select the Practice band > Resource Schedule to return to the eClinicalWorks work area.
Intra-Office Messaging
The message feature in eClinicalWorks is similar to email, but it is for intra-office communication only. You can access the message feature either in the M Jelly Bean menu or in the Messages band.
Sending Messages
To compose a new message:
1. In the Jelly Beans, select the “M” to pull down the Messages Menu:
2. Select “Create New Message” from the list. The Send Message window opens:
3. Select the icon to open the Staff Lookup window:
How to

16 Module 1: Clinical Navigation
eClin
ical
Wo
rks
5. Alternatively, if you wish to send the message to all providers and staff, select
“All Providers & Staff” from the drop-down menu; 6. Enter the subject for your message in the Subject field:
7. Type your message in the Message field; 8. Select the Send button to send out the message.
4. Select the box(es) next
to the name of the
person(s) that you want
to send your message
to, then Select “OK”.

Electronic Health Record (EHR) 1 17
eClin
ical
Wo
rks
Reading and Replying to Messages
The M Jelly Bean will display how many unread messages are in your Message Inbox:
To access your Message Inbox:
1. Select the M Jelly Bean; OR
2. Select the M Jelly Bean Menu > Inbox; OR
3. Select Messages band > Inbox:
The Messages Inbox is displayed:
1. Select a message to display the Message Detail window:
How to

18 Module 1: Clinical Navigation
eClin
ical
Wo
rks
To reply to the message:
2. Select the Reply button to reply to the person who sent the message; OR
3. Select the Reply All button to reply to the sender and all other message recipients;
The Send Message window opens:
4. Type in your response, then select the Send button.
How to

Electronic Health Record (EHR) 1 19
eClin
ical
Wo
rks
Deleting Messages
To delete messages:
5. From the Message Detail window (refer to diagram on previous page), select the Delete Message button. Select the “Yes” button to confirm deletion; OR
6. From the Messages Inbox window, check the box next to the Message(s) you wish to delete;
7. Select Delete;
8. Select “Yes” to confirm.
9. Deleted messages are sent to the Deleted Items folder. You can access these by selecting the Messages band > Deleted Items.
How to

20 Module 1: Clinical Navigation
eClin
ical
Wo
rks
Module 1. Test Your Knowledge
Let’s review how to navigate in the eClinicalWorks system through hands-on practice:
1. Logout from eClinicalWorks.
2. Start eClinicalWorks and login to the system again.
3. Point to the following items in the eClinicalWorks work area:
a. Navigation bands
b. Olives
c. Menus
d. Jelly beans
e. Patient Lookup icon
4. Look up a patient in the database named Test.
5. Look up a patient with a DOB of _______________.
6. Go to the patient’s hub.
7. Show the patient’s demographic information.
8. Go back to the patient’s hub.
9. Show the patient’s Progress Notes.
10. Select a new patient from the Progress Notes.
11. Where can you see the patient’s insurance information in the Progress Notes screen?
12. Send a message to someone in the class.
13. If someone sent you a message, open the message and send a reply.
14. Delete the message.

Electronic Health Record (EHR) 1 21
Module 2: Office Visits
Learning Objectives
After completing this module you will be able to:
Monitor the progress of your clinical workday in the Office Visits window.
Check patients into the back office.
Specify room numbers for patients.
Update patient statuses.
View visit wait times.
View billing data and orders.

Module 2: Office Visits 22
Office Visits Window
Clinical users typically spend most of their time in the Office Visits window.
Accessing the Office Visits Window
To access the Office Visits window:
1. Select the Practice band > Office Visits icon from the Left Navigation Pane; OR
2. Select the S Jelly Bean on the Dashboard Taskbar; OR
3. Select Office Visits from the S Menu drop-down list on the Dashboard Taskbar.
Setting eClinicalWorks to Auto-Start to “My Home Screen”.
To make the Office Visits screen your home screen:
Select File > Settings > My Settings from the Menus;
Select the User Settings tab. Locate the My Home Screen option and select Office Visits from the drop-down menu. Select “OK” to save your settings and close the window.
Using the Office Visits Window
After checking patients in at the front office, they must still be checked-in at the mid office level. When sending the patient from the waiting room to an exam room, a separate check-in procedure is performed.
Use the Office Visits window to monitor the patient schedule for the day, to display the patient flow from the time the patient checks in at the front desk, and to track patients’ visits with Providers and Resources. The Office Visits window displays the appointments that the front office staff booked in the Resource Schedule.
How to
How to
Note the caret that permits
you to scroll through the
Left Navigation Pane icons
if there are more than can
visibly fit in the Pane.
Electronic Health Record (EHR) 1 23
eClin
ical
Wo
rks
Office Visit Window Features
The following image and table illustrates the Office Visits window and its features:
Area Description
Olives 1. Use the Olives to show/hide parts of the Office Visits window:
Select the left Olive to hide the navigation bands;
Select the left Olive again to show the navigation bands.
Filters The Office Visits Filters allow you to narrow your search for a particular Office Visit or a group of visits. Office Visit Filters include:
2. Provider/Resources field – Select the More button to display a list of Providers and Resources. Choose to display the appointments for All Providers (or All Providers by Billing Facility or Primary Service Location), All Resources, All Providers and Resources, or select an individual Provider or Resource name.
3. Appt. Time – Select to set the filter to show All Day, Morning, or Afternoon appointments.
4. View – Displays only those patients with a status of Checked-In Only, Checked-Out Only, Locked Only, or Unlocked Only.
5. Facility – Select a Facility, Facility Group, or Department from the drop-down list.
Recommended Settings:
Select Facility for non-provider based clinics.
Select Facl. Grp for provider-based clinics.
6. Sel – Select to display the Facility, Facility Group, or Department List window and select the appropriate option.
7. Date – To select a Date, select the Back and Forward arrows (<>), or select the down-arrow to select a Date from the Calendar.
8. Sort By – Select the down-arrow to sort the list by Appointment Time, Patient Name, Check-In Status, or Provider Appointment Time.

24 Module 2: Office Visits
eClin
ical
Wo
rks
Area Description
Action Buttons/Links
9. The Action Buttons and Links on the Office Visits window provide Information about the patients on the provider’s schedule. Action Buttons & Links include:
Visit Type – Displays the indicator for the Visit Type selected when the patient made the appointment.
Appt Time – The scheduled time of the appointment.
Patient Name – The name of the scheduled patient.
Insurance – The name of the patient’s insurance.
P/R – The name of the Provider or Resource scheduled for the appointment with the patient.
Reason – The reason for the visit, as entered at the time the appointment was scheduled.
Sex – The patient’s gender.
Age – The patient’s age.
Visit Status – The current appointment status: ARR (Arrived), ChkIn (Checked-In), etc.
Arr Time – The time of day the patient actually arrived for the scheduled appointment. When the front office staff selects the Arr option, eCW captures the Arrival Time and displays it in the Arr Time column.
Duration – The length of the scheduled visit, in minutes, after the front office checks the patient into the office.
Room – To identify the room where the patient is waiting or being seen, select the field in the Room column.
Status – Select the field in the Action Button/Links column to enter the Patient Status – this is not the Appointment Status; this is the status of the checked-in patient. Examples include: “Waiting Room”, “Exam Room”, “Ready for Provider”, etc.
Notes Sts – Indicates the current status of the Patient’s Progress Notes.
Vitals Taken – A stethoscope displays after a Nurse/MA takes a patient’s vital signs and checks the “Vitals Taken” option from the Vitals window of the Progress Notes.
Indicating the visit is ready for Billing – A check mark displays after the Provider completes the patient’s Progress Notes and selects “Done” from the Billing window, indicating the Visit is ready for Billing.
Office Visits 10. Office Visits – Displays a list of Office Visits as defined by the selected Filters.
Double-click on an Office Visit in the list to open the related Progress Notes.
Button Bar Panel
11. Button Bar Panel – The Button Bar Panel at the bottom of the Office Visit window provides additional ways to manage Progress Notes and Orders as well as check patients in/out of the back office, view the patient’s claim for today’s visit, mass lock your Progress Notes, or launch eCliniForms.

Electronic Health Record (EHR) 1 25
eClin
ical
Wo
rks
Button Bar Panel Features in the Office Visits Window
The following images illustrate the features accessible from the Button Bar Panel at the bottom of the Office Visits window:
Left Side:
Right Side:
The following table provides descriptions of the features available from the Button Bar Panel:
Area Description
1. Page Count The number of Encounters to display per page.
2. Navigation Count Lists the number of filtered Encounters.
3. Navigation Page Use the <<Prev and Next >> buttons to page through the list.
4. View Progress Notes
Display the Progress Notes for the selected patient.
5. Check In/Out Only a clinical check in and out. Opens the Encounter window from where staff can:
Enter the time the patient was shown into an exam room;
Assign a room number;
Enter the time the patient left the exam room. Note: Does not reflect the patient’s actual Visit Status.
6. Billing Data Display the Billing window of the Progress Notes.
7. Refresh Update the Office Visit grid with new information.
8. View Orders Displays the Patients Orders window for the patient.
9. Lock Progress Notes
Locks the Progress Notes with the default style. Select the down-arrow to lock the Progress Note in a different style.
10. eCliniForms Access eCliniForms.
11. Encounter # Displays the number of Encounters in the list.
12. Global Alert Select to assign an Alert.
13. Messenger Select to access eClinical Messenger (if activated).
Hands On Practice:

26 Module 2: Office Visits
eClin
ical
Wo
rks
Check Patients into the Back Office
After checking patients in at the front office, they must still be checked-in at the mid office level. Let’s practice performing several common tasks that can be accomplished from the Office Visits window:
To check a patient into the back office:
From the Office Visits window, select a patient to check in. The appointment will be highlighted in the in the Office Visit window;
Select the “Check In/Out” button located on the Button Bar Panel at the bottom of the window. The Encounter window will open:
1. The patient’s name, DOB, sex, appointment time, and reason for visit are
displayed.
2. To edit the patient’s information on the Encounter window, select the “Info” button to open the Patient Information window;
3. The Total Time (after Arrival) will display. It represents the amount of time that has elapsed since the patient was Checked In by the front office staff;
4. The Total Time (after Check In) will display. It represents the amount of time that has elapsed since the patient was Checked In by a nurse or MA at the mid-office level;
5. Select the Check In check box. eClinicalWorks will auto-fill the “Time In” field with the current time;
6. Enter the patient’s exam room number in the Room No field;
7. Select the next to the Status field. The Status Codes window will open:
How to

Electronic Health Record (EHR) 1 27
eClin
ical
Wo
rks
8. Select a practice-defined Status Code from the list, e.g. “Provider in Room”;
9. Note: New Status Codes can be added and existing Status Codes can be updated or deleted using the buttons on the Status Codes window; however, this is a Practice Level table and changes made here will affect the entire practice.
10. Select “OK” to save and return to the Encounter window;
11. Select “OK” to close the Encounter window (previous page). The patient’s Duration and Status columns will update in the Office Visits window.
Specify Room Numbers for Patients
The exam Room Number for the patient can be entered in the Encounter window when checking in the patient (as in the previous “How to” above). Alternatively, the exam Room Number can be entered in directly from the Office Visits window.
To document a room number for a patient from the Office Visits window:
1. From the Office Visits window, click directly in the Room field for a patient. The Room No. window opens:
2. Enter the Room Number by typing in the Room No. field or by selecting the Number buttons;
3. Select “OK” to close the Room No. window and populate the Room field.
How to

28 Module 2: Office Visits
eClin
ical
Wo
rks
Update Encounter Statuses
The Status field in the Office Visits window is dynamic to reflect the changing Statuses throughout the patient’s visit in the clinic. Updating the patient’s Status can be done in the Encounter window when Checking In the patient, or it can be entered directly in the Office Visits window (as in the previous “How to” lesson). Note: Status Codes can be customized for each Practice or Clinic.
To update encounter statuses in the Office Visits window:
1. From the Office Visits window, click directly in the Status field for a patient. The Status Codes window opens:
2. Select the appropriate Status Code form the list;
3. Select “OK” to close the Status Codes window and update the Status field in the Office Visits window.
View Visit Wait Times
To see how long the patient has been waiting:
The Duration column in the Office Visits window tracks how long the patient is in the back office for their appointment. The time starts when the Status Code is updated in the back office, e.g. the nurse is with the patient;
Select the “Check In/Out” button at the bottom of the Office Visits window. The Encounter window opens;
The Total Time (after Arrival) is the amount of time that has elapsed since the patient was Checked In by the front office staff;
The Total Time (after Check In) is the amount of time that has elapsed since the patient was Checked In by a nurse or MA in the back office. This is the same as the Duration displayed in the Office Visits window.
Hands On Practice:
How to
How to

Electronic Health Record (EHR) 1 29
eClin
ical
Wo
rks
View Billing Data and Orders
To view Billing Information for the patient:
Select the patient from the Office Visits window;
Select the “Billing Data” button in the Button Bar Panel to open the Billing window:
The Billing window summarizes the billing information for the patient’s visit:
Assessments – ICD-10 (diagnosis) codes will be listed here.
Procedure Codes – E&M (office visit, professional level codes) and CPT (procedure) codes will be listed here.
Billing Notes – notes or questions for the billing staff are entered here.
Follow Up – the provider must specify a recommended follow up interval, choose prn for follow up as needed, or check the Follow up N/A if a follow up visit is not needed. Completing this step is required and will help the front office staff to schedule follow up appointments.
Reason – a reason for the follow up may be entered here.
Select the “Done” button when all the billing information has been completed by the provider and the desired Follow Up has been documented. A check mark will now appear in the Office Visit window for this patient as a visual indicator that the Billing process can now proceed.
How to

30 Module 2: Office Visits
eClin
ical
Wo
rks
Patient Orders
To view Patient Orders:
Select the patient in the Office Visits window.
Select the “View Orders” button in the Button Bar Panel. The Patient Orders window opens:
If the provider has ordered Labs, Diagnostic Imaging, Procedures, Prescription Medications, Immunizations, or an outgoing Referral, those details will be summarized in this window. Note also that Labs, Diagnostic Imaging, and Procedures can be ordered for today (current), or for the future;
The Patient Orders window is helpful to Nursing or Lab Staff to see what Labs or Immunizations the Provider has ordered for the patient. It can also helpful to staff member who Check Out patients after their visit. Staff can review Orders and direct the patient where and when to go for Labs, Diagnostic Imaging, Procedures, or where to pick up Prescription Medications.
How to

Electronic Health Record (EHR) 1 31
eClin
ical
Wo
rks
Module 2. Review – Using the Office Visits Window
Let’s review how to use the Office Visits window in eClinicalWorks to monitor the workflow in the back office:

32 Module 4: Patient History - Progress Notes
Module 3: Progress Notes – Patient Intake
Learning Objectives
After completing this module you will be able to
Open Progress Notes for a patient.
Navigate within the Progress Notes.
Verify the patient’s chief complaint(s).
Document/review the patient’s current medications.
Verify the patient’s allergies.
Record the patient’s vitals.
Use status indicators in the Office Visits window.

Electronic Health Record (EHR) 1 33
eClin
ical
Wo
rks
Progress Notes Overview
The Progress Notes window provides a secure, central location to access the patient's chart. Access to Progress Notes is available to Providers, Nurses, other clinical staff, and authorized office personnel. The Practice is responsible to establish and maintain the security permissions. eClinicalWorks provides for HIPAA compliant security by user role to protect confidential patient information. Refer to your System Administration Manual for more information.
After the patient has Checked In at the Front Desk, the Nurse or other medical staff may use Progress Notes to record Vital Signs, administer an Immunization, or take Social History. Some In-House Labs, like Urinalysis or Blood Draw, may also be performed before the Provider sees the patient. When seeing the patient, Nurses and Providers use the Progress Notes to document patient's medical information and records.
Sample of a Progress Note prior to completion and Locking:

34 Module 3: Progress Notes – Patient Intake
eClin
ical
Wo
rks
Sample of a Locked Progress Note:

Electronic Health Record (EHR) 1 35
eClin
ical
Wo
rks
Accessing Progress Notes
Patient care workflow varies greatly among staff members with different job tasks, so Progress Notes must be readily accessible from a number of work areas in the system. For this reason, in eCW the patient's Progress Notes can be accessed in multiple ways.
The following table describes some of the various methods for accessing a patient's Progress Notes:
From the Office Visits window: Select the patient and select the View Progress Notes button at the bottom of the Office Visit window OR double-click on the patient’s name.
From the Left Navigation Pane: If you have had a patient’s Progress Notes open, select the Practice Band, and then select the Progress Notes icon to refresh the Progress Note.
From an appointment on the Resource Schedule window:
Right-click the appointment and select View Progress Notes.
From the Patient Hub: Select the Progress Notes button.
Hands On Practice:

36 Module 3: Progress Notes – Patient Intake
eClin
ical
Wo
rks
Types of Progress Notes
eClinicalWorks generates the Progress Notes format for an encounter directly from the Visit Type associated with the Visit Type Code selected in the Appointment window. Practices can establish any number of Visit Type Codes in the Admin Settings, and each new Visit Type Code must be assigned a Visit Type. There are four Visit Types. It is important to understand the difference between Visit Types and Visit Type Codes.
Visit Type – The selected Visit Type determines the format and content of the Progress Notes for the corresponding visit. Visit Types introduced here include: (1) Physical Visit; (2) Regular Visit; (3) Intervention; and, (4) Operative Report.
Visit Type Codes - Are Appointment Types created to fit the needs and schedules of each Provider. These codes are associated with specific functions of the practice, have an assigned duration, and are associated with one of the following four Visit Types.
Physical Visit
The majority of visits for a practice are Physical Visits, typically the most comprehensive visit type. The Progress Notes for these Visit Types include: Family History, Social History, Surgical History, Hospitalization, Physical Examination, and Preventive Medicine. Physical Visits are indicated with a blue V in the Encounters drop-down list on the Progress Notes window.
Regular Visits
A Regular Visit is a stripped-down version of a Physical Visit, and it is less comprehensive. The Regular Visit includes the Medical History for a patient, but omits all of the other histories and Physical Examination. Regular Visits are commonly used for Follow-Up Visits and Brief Consultations. Using Regular Visits help physicians quickly document a brief visit without having to work through a number of unnecessary categories. Regular Visits are indicated with a green V in the Encounters drop-down list on the Progress Notes window.
Intervention
Practices commonly use the Intervention Visit type for brief office visits with a nurse or lab technician. A simple Phlebotomy appointment is a good example of an Intervention Visit. Intervention Visits are also indicated with a green V in the Encounters drop-down list on the Progress Notes window.
The Intervention window contains the following linked headings:
Reason - Information displayed next to the Reason heading is populated from the Reason field on the Appointment window when a new appointment is created. The Reason field on the Intervention window is used for free text, which displays under the Reason heading as well on the Progress Notes.
Allergies - Opens the Progress Notes Allergies window. Displays the list of known allergies for the patient, and Providers may add any drug or non-drug allergies for the patient.
Examinations - Opens the Progress Notes Allergies window. Add notes concerning the exam.
Labs - Opens the Labs window and displays Labs ordered for the Intervention.

Electronic Health Record (EHR) 1 37
eClin
ical
Wo
rks
Interventions - Displays the Interventions section, select “Add” to open the Procedures/Immunizations window and select CPT codes related to the Intervention.
Notes - The Notes field is used for free text notes, which display under the Notes heading on the Progress Notes.
Medical History – Opens the Past Medical History window. The patient’s medical history displays under the linked heading. Add any medical history for the patient to this window.
Assessments – Opens the Assessments window. The Assessments, which are ICD codes that translate to the patient’s insurance claim for billing information, display under the linked heading in the Progress Notes.
Note: Providers must carry the Current Meds forward on an Intervention Visit; otherwise, the Current Meds are moved to the RX History for the patient.
Operative Report
The Operative (OP) Report Progress Note is used for a Visit Type to indicate a surgical or other type of procedure. Visit Type codes, set up as an administrative function, dictate whether the appointment (visit) warranted the use of an Operative Report Progress Note. Selecting an Operational Procedure from the Visit Type drop-down list for the current appointment results in the use of an Operative Report Progress Note. Note: Current Meds must be carried forward on an Intervention visit; otherwise, the system moves them to the Rx History for the patient.

38 Module 3: Progress Notes – Patient Intake
eClin
ical
Wo
rks
Navigating within Progress Notes
Patient Dashboard
The Patient Dashboard is a horizontal band with a blue background at the top of the Progress Notes window that displays various types of information and tools for navigating to other sections of the application:
Select the middle “Show/Hide” button (Olive) at the top of the application to alternate between displaying and hiding the Patient Dashboard:
Patient Dashboard - Demographic Information
The Patient Dashboard contains brief demographic information identifying the patient (patient’s name, age, gender, address, date of birth and telephone number), and indicates whether any alerts are in effect (allergy or billing alerts), as indicated by the yellow font and red check mark in the check box. If a photo of the patient is available, it would also display on the Patient Dashboard.
Three buttons allow access to other windows:
- Displays the Patient Lookup window.
- Displays the patient’s full Demographic window.
- Displays the patient’s Hub window.
To access the Progress Notes
There are several ways to access a patient’s Progress Note:
1. From the Office Visits window, double-click on the patient Appointment to open the Progress Notes window; OR
2. Click on the button on the Patient Dashboard to open the Patient Lookup window, and then select a patient to view their Progress Notes; OR
How to

Electronic Health Record (EHR) 1 39
eClin
ical
Wo
rks
3. Go to the Resource Schedule by selecting the “Practice band > Resource
Scheduling”, then right-click on a patient Appointment and select “View Progress Notes” from the pull-down menu; OR
4. Select “Resource Schedule” from the S Menu drop-down list, then right-click on a patient Appointment and select “View Progress Notes” from the pull-down menu; OR
5. In the Resource Schedule right click on a patient Appointment and select “View Progress Notes” from the pull-down menu; OR
6. From a patient’s Progress Notes window, select the button to go to the Patient Hub. From the Patient Hub, click on the button.
7. From a patient’s Progress Notes window, select the visit you wish to view the Progress Notes for from the Encounters drop-down list.
Note: The blue V denotes a Physical Visit, the green V denotes a Regular Visit, and a red T denotes a Telephone Encounter.
Hands On Practice:

40 Module 3: Progress Notes – Patient Intake
eClin
ical
Wo
rks
Interactive Clinical Wizard
The Interactive Clinical Wizard (formerly known as the Right Chart Panel) displays on the right side of the window, showing tabbed sections that provide additional, relevant information about the patient:
1. Under the Interactive Clinical Wizard’s Overview and History Tabs, select and move information from the Interactive Clinical Wizard directly into the Progress Notes by selecting the single blue arrow on the left side of the ICW, OR
2. Move all items listed in that section by selecting the “All” blue arrow.
3. Add information to the Tabs by selecting the orange “More” (…) button and opening the “Add” window.

Electronic Health Record (EHR) 1 41
eClin
ical
Wo
rks
To customize the Progress Notes Interactive Clinical Wizard:
Select File > Settings > My Settings > Show/Hide tab.
Select the Progress Notes Right Panel “Show” Radio button to always display the Right Panel (Interactive Clinical Wizard) in the Progress Notes:
At the bottom of the “Show/Hide” Tab of the “Settings” window, select the Tabs to display in the Progress Notes Interactive Clinical Wizard. Note: the Interactive Clinical Wizard now permits unlimited Tabs, but requires a minimum of 2 to be displayed.
eClinicalWorks carries the information contained in the Interactive Clinical Wizard from one encounter to the other, in order to view the patient’s past relevant medical information without having to exit the Progress Notes. Use the Interactive Clinical Wizard to move patient’s information documented in the past to the current Progress Note.
Hands On Practice:
How to

42 Module 3: Progress Notes – Patient Intake
eClin
ical
Wo
rks
Patient Dashboard - Notes
The next section of the Dashboard lists several colored notes. Only users with full permissions will see all notes. Each of these items displays a quick view of specific information about the patient. You cannot edit the orange and green notes. DO NOT use the patient dashboard notes to record medical information intended to go into the patient chart.
Orange: The orange note includes information such as the patient’s weight, date of last appointment, primary care provider (PCP), the patient’s native language, and whether or not the patient needs a translator.
Green: The green note includes Primary Insurance, Account balance, Guarantor name, Guarantor balance, and the rendering provider as listed on the demographics window.
Yellow: The yellow note, an editable sticky note, displays for anyone with permission to view the Progress Notes. To edit this note, select this note to display the Modify Sticky Notes window: Enter general, non-sensitive information concerning this patient here. This information is not added to the patient’s chart, i.e. Likes to be called “Bob.” Select the “OK” button when you are finished. To modify the info on the Sticky Note, select the Sticky Note to open the Modify Sticky Notes window, then edit or delete the info and select “OK”.
Pink (requires permission): The pink note is an editable Secure Sticky Notes to record sensitive information. The application controls the access to this note by the security attribute Secure Notes Panel, assigned under Security Settings. Only users with permissions to this attribute may create, view, or modify this note. Only users with the appropriate security access rights can view this information.

Electronic Health Record (EHR) 1 43
eClin
ical
Wo
rks
Patient Dashboard – Chart Links
Across the Patient Dashboard is a horizontal menu of links to windows providing targeted information about the patient:
Select the corresponding links to display the following windows:
Link Window
Medical Summary Patient Medical Summary window, consolidating several sections of the Progress Notes.
CDSS CDSS Alerts window for the patient, showing measures, status, and orders, with links to all patient alerts.
Labs Labs window for the patient, defaulting to All Lab Categories.
DI Patient’s Diagnostic Imaging window, defaulting to All DI Categories.
Procedures Patient’s Procedures window, defaulting to All Procedure Categories.
Growth Chart Displays various chart types showing norms for age/weight/ height. Used for Girls/Boys (0 - 20 years).
Immunizations Displays the current patient’s Immunizations window, listing all.
Encounters Displays the Encounters window, listing the current patient’s Encounters.
Patient Docs Displays the Documents window listing all the current patient’s Documents on file.
Flowsheets Displays the patient’s Flowsheet window, listing all on file by category.
Notes Displays the Additional Notes window.
44 Module 3: Progress Notes – Patient Intake
eClin
ical
Wo
rks
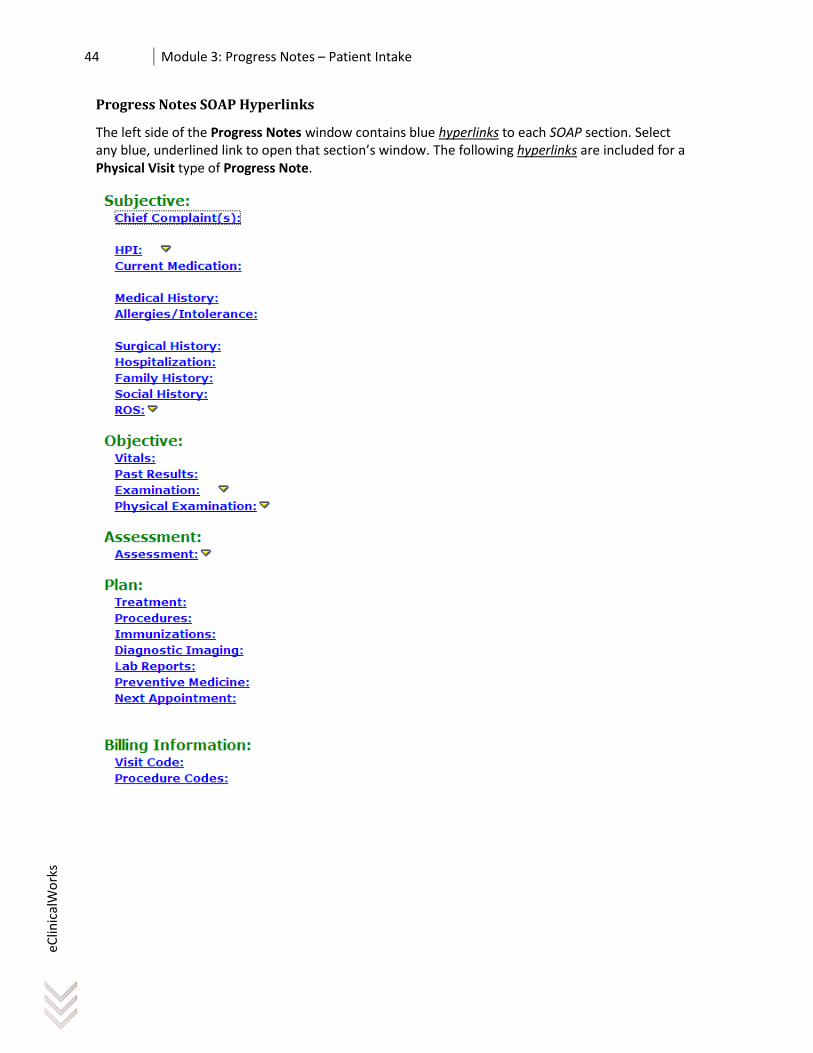
Progress Notes SOAP Hyperlinks
The left side of the Progress Notes window contains blue hyperlinks to each SOAP section. Select any blue, underlined link to open that section’s window. The following hyperlinks are included for a Physical Visit type of Progress Note.

Electronic Health Record (EHR) 1 45
eClin
ical
Wo
rks
To use the SOAP hyperlinks in the Progress Notes:
Open a patient’s Progress Notes;
Select the hyperlink for Chief Complaint(s). The Chief Complaints window opens:
1. Add or remove patient Chief Complaints using the “Add” and/or “Remove”
buttons;
2. Use the “Browse” button to search for a pre-defined Complaint;
3. Use the “Up” and “Down” arrows to change the order and prioritize the Chief Complaints;
4. Close the Chief Complaints window by selecting the “X” in the upper right corner of the window.
How to

46 Module 3: Progress Notes – Patient Intake
eClin
ical
Wo
rks
Progress Notes Dashboard Icon Toolbar
The Icon Toolbar is displayed in each of the Progress Notes data entry window:
Hover your mouse pointer over the icons to display a pop-up describing the button’s function.
Allergies/Medical History
Appointment
Complaints/Current Medications
Preventive Medicine
Medication Reconciliation
Labs
Vitals
Diagnostic Imaging
HPI (History of Present Illness)
Alerts
Family History
Review Patient Orders
Social History
eCliniSense
Surgical History/Hospitalization
Claim
ROS (Review of Systems)
Template
Examination (Physical Examination)
Specialty Forms
Regular Examination
Super Bill
Procedure
Lab Requisition Form
Assessment
Order Set
Treatment

Electronic Health Record (EHR) 1 47
eClin
ical
Wo
rks
In each of the Progress Notes window, there are also Navigation Buttons in the (1) lower left and (2) lower right corners. These buttons appear in a pre-programmed order. Use these buttons to go the “next” or “previous” sections of the Progress Notes.
Hands On Practice:

48 Module 3: Progress Notes – Patient Intake
eClin
ical
Wo
rks
Documenting Chief Complaint(s)
The Chief Complaints window is where the Provider records the Primary Symptoms or Complaints for a patient's visit or encounter.
To open the Chief Complaints window:
Select the Chief Complaints hyperlink in the Subjective section of a patient’s Progress Notes. The Chief Complaints window opens:
If a Reason for the Visit was entered in the Reason field of the Patient
Appointment window, the reason will display in the Chief Complaints window. You can then edit or remove this, or add more complaints to the existing list.
New Complaints can be added by typing directly in the Chief Complaints window or by selecting the “Browse” button to browse through a list of pre-programmed complaints.
To add a new complaint by typing directly in the Chief Complaints window:
Select the button in the Chief Complaints window. The application will add a new row with the cursor on the new blank line. Type the patient’s new complaint:
How to
How to

Electronic Health Record (EHR) 1 49
eClin
ical
Wo
rks
To select a Chief Complaint from an existing list:
Select the “Browse” button in the Chief Complaints window to open the Chief Complaints Keywords window:
1. Use the “Find” text search field to locate the desired complaint from a list of pre-programed selections;
2. Click on a Complaint to select it. The Complaint you select will appear under Selected Complaints on the right side of the window. Select additional Complaints as necessary;
3. Select the remove (<) button to remove a Complaint from the Selected Complaints pane;
4. Select the remove all (<<) button to remove all items from the Selected Complaints pane;
5. Select the “Star” to the left of the Complaint to add the Complaint to your Favorites (the Star will turn gold);
6. Select the Show “My Favorites” Star to filter the Complaints list to include only your Favorites.
7. Select “OK” to save and apply your Selected Complaints; or select “Cancel” to close the window without selecting any of the Complaints.
How to
50 Module 3: Progress Notes – Patient Intake
eClin
ical
Wo
rks
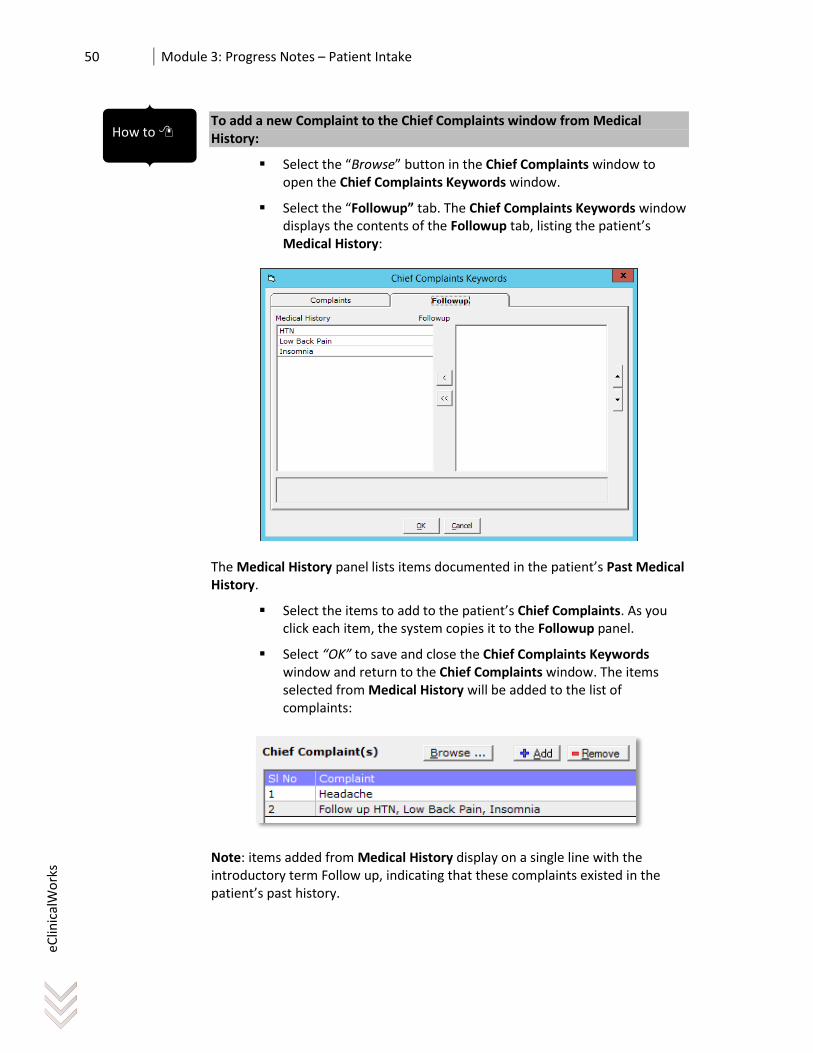
To add a new Complaint to the Chief Complaints window from Medical History:
Select the “Browse” button in the Chief Complaints window to open the Chief Complaints Keywords window.
Select the “Followup” tab. The Chief Complaints Keywords window displays the contents of the Followup tab, listing the patient’s Medical History:
The Medical History panel lists items documented in the patient’s Past Medical History.
Select the items to add to the patient’s Chief Complaints. As you click each item, the system copies it to the Followup panel.
Select “OK” to save and close the Chief Complaints Keywords window and return to the Chief Complaints window. The items selected from Medical History will be added to the list of complaints:
Note: items added from Medical History display on a single line with the introductory term Follow up, indicating that these complaints existed in the patient’s past history.
How to

Electronic Health Record (EHR) 1 51
eClin
ical
Wo
rks
To add new Chief Complaint keywords:
From the Progress Notes, select Chief Complaints. Select the “Browse” button to display the Chief Complaints Keywords window.
From the Complaints Tab, select the “New” button to open the New Item/Category window:
In the Name field, type a name for the complaint.
(Optional) In the Notes field, enter a descriptive note. When notes are entered, selecting the complaint, will add only the information entered in the Notes Section to the Progress Notes. The Name will NOT be added. If only the Name is entered and the Notes field is blank, selecting this will add the Name to the Progress Notes.
Select “OK” to return to the Chief Complaint Keywords window.
To update or delete chief complaint keywords:
Select a keyword in the Chief Complaints keyword window.
Select the green arrow next to the “New” button in the Chief Complaint Keywords window:
To update a keyword, select Update from the menu and edit the keyword;
To delete a keyword, select Delete from the menu.
Hands On Practice:
How to
How to

52 Module 3: Progress Notes – Patient Intake
eClin
ical
Wo
rks
Documenting Current Medications
Providers can carry the patient’s Current Medications forward from one visit to another. Failure to document the patient’s Current Medications at each encounter will eventually move the patient’s Current Medications into their Rx History. Although the medication information will be retained, it will make the Providers workflow faster and simpler to update the Current Medications section at each and every encounter.
During a patient’s visit, use the Medication Reconciliation feature to track the medications a patient is taking or to review the prescription history for a patient.
To automatically enter the Current Medications in the Progress Notes:
Select File > Settings > Practice Defaults;
In the Practice Defaults window, click on the Mid Office tab. In the Current Medication section, check the following box:
Note: Changing a “Practice Default” will apply the changes to the entire Practice, not just the current Provider.
To access the Medication Reconciliation window for existing patients:
From the Progress Notes, select the Current Medication hyperlink. The Medication Reconciliation window opens with current medications displayed.
From the Medication Reconciliation window, Providers can add medications that a patient is currently taking during a visit, track patient’s current medications, review patient’s prescription history, and check patient’s prescription history from an external source.
The following table describes the features available from the Medication Reconciliation window:
Feature Description
Current Medication
Select to review medications the patient is currently taking, and add or change the status of any medications under the Current Medications tab in the Medications Reconciliation window.
Past Rx History Select to review patient’s medication history from past visits under the Past Rx History tab in the Medication Reconciliation window.
External Rx History
Select to obtain and review the patient’s prescription history from an external source, if permitted by the patient. Providers can also add medications from the patient’s external Rx History to the Current Medications tab.
Add Medication
Type the name of the medication in the Add Medication field to display options for that medication.
How to
How to

Electronic Health Record (EHR) 1 53
eClin
ical
Wo
rks
Review Current Medications the patient is taking, and add or change the status:
From the Progress Notes, select the Current Medication hyperlink. The Medication Reconciliation window opens with current medications displayed:
Refer to the following table for options found on the Current Medication tab:
Option Description
1. Add Medication
Enter the Medication Name to add a medication that the patient is currently taking. Select the filter icon to filter the search.
2. Verified Check this box to indicate that the Provider reviewed the Current Medications with the patient. Note: the Verified Status displays in the Progress Notes as “Medication list reviewed and reconciled with the patient.”
3. Rx Name Only
To add a medication that the patient is currently taking without noting the Strength, Take, Frequency, Start Date and Stop Date information, select the “Rx Name Only” box. IMPORTANT – USE WITH CAUTION: You must uncheck this box after the name-only medication is added. If you don’t uncheck it, all future medications will not display with strengths, frequency, etc.
4. Drug Interaction
Select this button to check drug interactions for the medications that are listed in Taking, Not Taking, and Unknown status.
5. Cancel Select the Close button to close the Medication Reconcilitation window without making any changes.
6. Apply Status from Prior Visit
Select this button to apply the status T, N, U, or D to the Medication Reconciliation window from the previous encounter.
7. Mark All As Select the T, N, U, or D button to change the status of all medications in the group to the selected status.
How to
54 Module 3: Progress Notes – Patient Intake
eClin
ical
Wo
rks
8. T - Taking Select to change the status of a medication to Taking, if the patient is currently taking the medication. The default status is Taking whenever a new medication is added.
9. N - Not Taking
Select to change the status of a medication to Not Taking, if the patient is not currently taking the medication.
10. D - Discontinued
Select to change the status of a medication to Discontinued, if the Provider has asked the patient to stop taking the medication.
11. U – Unknown
Select to change the status of a medication to Unknown, if the patient or Provider is unaware of the status.
12. Minus Button
Select the Minus button next to a medication to remove it from Current Medications.
13. Date Fields The first date field displays the Start Date of the medication and the second date field displays the Stop Date of the medication. To edit the date, click in the field, and then select a date from the calendar tool.
14. Pre-Defined Notes
Select the Note Icon to select pre-defined keywords to add notes for the medication.
15. Notes Add free-text notes for the medication, such as the reason for discontinuing the medication.
16. Source Displays the Name of the Provider that prescribed the medication. When adding or discontinuing a medication, enter the Name of the Provider that prescribed or stopped the medication.
Adding New Medications
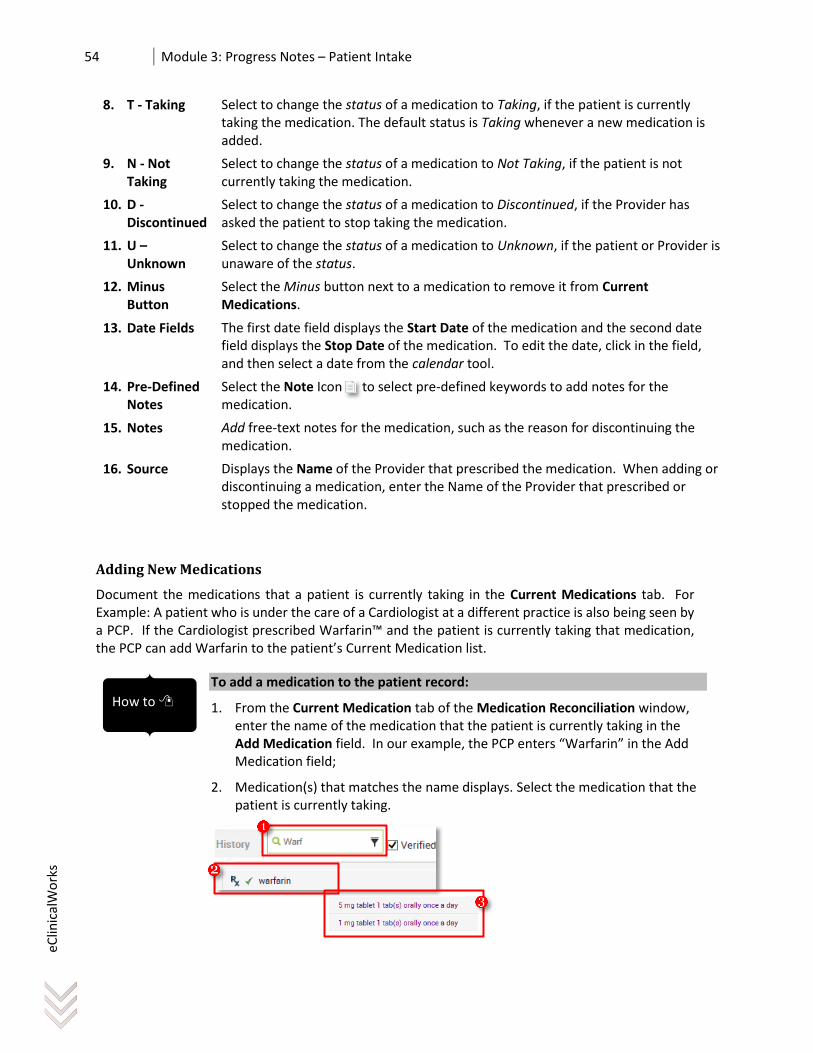
Document the medications that a patient is currently taking in the Current Medications tab. For Example: A patient who is under the care of a Cardiologist at a different practice is also being seen by a PCP. If the Cardiologist prescribed Warfarin™ and the patient is currently taking that medication, the PCP can add Warfarin to the patient’s Current Medication list.
To add a medication to the patient record:
1. From the Current Medication tab of the Medication Reconciliation window, enter the name of the medication that the patient is currently taking in the Add Medication field. In our example, the PCP enters “Warfarin” in the Add Medication field;
2. Medication(s) that matches the name displays. Select the medication that the patient is currently taking.
How to

Electronic Health Record (EHR) 1 55
eClin
ical
Wo
rks
3. A list of Strengths displays. Select the correct strength to add the medication.
4. Enter the Reason for prescribing this medication in the Notes field or select the Reason from the Pre-Defined Notes.
5. Enter the Name of the Provider who Prescribed the medication in the Source field. In the previous example, the PCP entered the Cardiologist’s name:
Displaying the Patient Past Rx History
Providers can review patient’s medication history from the past visits under the Past Rx History tab in Medication Reconciliation.
To display the patient Past Rx History in Medication Reconciliation:
1. From the Medication Reconciliation window, select the Past Rx History tab. The patient’s Past Rx History displays:
Option Description
2. Group By Select from the drop-down list to group medications by Date, Medication Name or Provider who prescribed the medication.
3. Expand/Collapse Group
Select the Minus Icon to collapse a group of medications. Select the Plus Icon to expand a group of medications.
How to
56 Module 3: Progress Notes – Patient Intake
eClin
ical
Wo
rks
4. Medication by Visit Date
In this example, medications are grouped by Visit Date, displaying Stop Date and Statuses.
5. T, N T – Taking: If the patient is currently Taking the medication. N – Not Taking if the patient is temporarily Not Taking the medication during the current visit.
6. H Select to display the History of a specific medication.
Adding Medication from Past Rx History to Current Medication
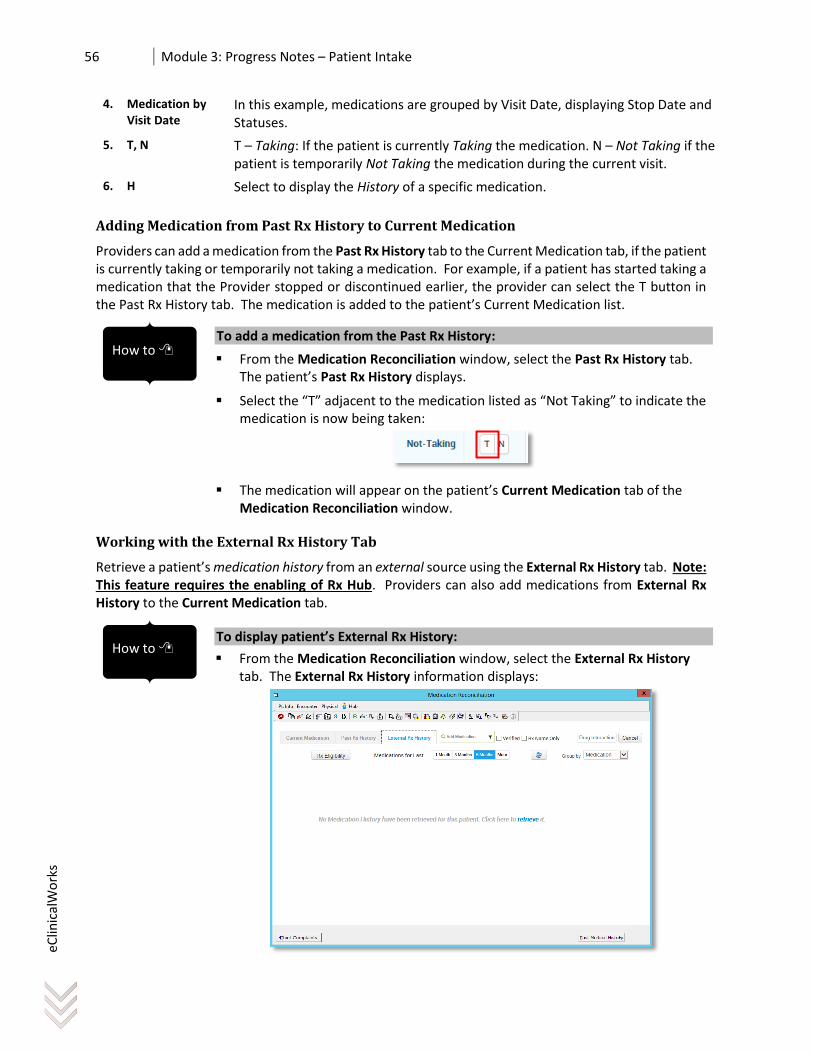
Providers can add a medication from the Past Rx History tab to the Current Medication tab, if the patient is currently taking or temporarily not taking a medication. For example, if a patient has started taking a medication that the Provider stopped or discontinued earlier, the provider can select the T button in the Past Rx History tab. The medication is added to the patient’s Current Medication list.
To add a medication from the Past Rx History:
From the Medication Reconciliation window, select the Past Rx History tab. The patient’s Past Rx History displays.
Select the “T” adjacent to the medication listed as “Not Taking” to indicate the
medication is now being taken:
The medication will appear on the patient’s Current Medication tab of the Medication Reconciliation window.
Working with the External Rx History Tab
Retrieve a patient’s medication history from an external source using the External Rx History tab. Note: This feature requires the enabling of Rx Hub. Providers can also add medications from External Rx History to the Current Medication tab.
To display patient’s External Rx History:
From the Medication Reconciliation window, select the External Rx History tab. The External Rx History information displays:
How to
How to

Electronic Health Record (EHR) 1 57
eClin
ical
Wo
rks
To retrieve the patient’s External Rx History from your RxHub Service, select the “retrieve” hyperlink. The Consent Statement displays:
To indicate the patient consented to the check, select the “Yes” box and then select the “OK” button. Note: Once the patient’s consent has been obtained, indicate the consent in the Rx History Consent field in the Patient Information window (demographics) to avoid the Consent Statement:
The system then prompts to perform Rx Eligibility. Select the RX Eligibility button to proceed.
The following table describes the options in the External Rx History tab:
Option Description
Get More History
Select to add to the information with more history.
5 Days, 3 Months, 6 Months
Select to retrieve External Rx History for that time period. Select More (…) to display history beyond 6 months.
Group By Select the arrow and choose Medication or Provider, to group the medications by that category.
Rx History Details
Date – Displays the date the medication was ordered.
Qty – Displays the quantity of medication prescribed.
Duration – Displays the duration of the medication prescribed.
Minus Icon Select to collapse a group.
Plus Icon Select to expand a group.
T Select to add a medication to a patient’s Current Medication with the status Taking, if the patient is currently taking the medication.
N Select to add a medication to a patient’s Current Medication with the status Not Taking, if the patient is temporarily not taking the medication during the current visit.
Hands On Practice:

58 Module 3: Progress Notes – Patient Intake
eClin
ical
Wo
rks
Documenting Patient Allergies
To access the Allergies/Medical History window:
From the patient’s Progress Notes, select the Allergies/Intolerance hyperlink. OR
Select the icon if you are already entering Progress Notes information in another section. The Past Medical History window opens (the Allergies section is in the lower half of the window):
eClinicalWorks categorizes allergies as:
Structured (drug allergies), or
Non-structured (environmental allergies such as bee stings or pollen).
Important: Only Structured allergies are included in eClinicalWorks’ automated drug-allergy checking. Try to use Structured whenever possible.
To enter a patient’s drug allergies (structured allergies):
1. Select the “Add” button in the Allergies section. This adds a blank line at the end of the listed allergies;
2. Select the blank line’s Structured/Non Structured drop-down list. Select Structured or Non-Structured.
How to
How to

Electronic Health Record (EHR) 1 59
eClin
ical
Wo
rks
3. Click in the Agent/Substance field. The Select Rx window opens:
1. The left pane of the window displays a list of drug categories or drug databases
such as MedispanRx™ or MultumRx™. Select the drug category/ database from which you will select a drug. The system highlights that category and displays a list of related drugs;
2. Type the first letter(s) of the drug name in the Find field to locate the drug that begins with that letter or letters. The more letters you type, the more specific will be the display, OR
3. Select the Previous (Prev) or Next buttons to scroll through the entire list of drugs;
4. Click on the drug to select it;
5. The selected drug will be displayed in the right Selected Rx pane;
6. Drugs may be removed from the Selected Rx list by selecting the drug and clicking the < button. To remove all selected drugs, click the << button;
7. Select “OK” to save and close the Select Rx window and return to the Past Medical History window:
1. Click in the Reaction field and select a Reaction from the drop-down list, or
type an entry that describes the reaction this patients experiences when exposed to this substance.

60 Module 3: Progress Notes – Patient Intake
eClin
ical
Wo
rks
2. Click in the Type field to document the type of allergy:
Allergy - Patient experiences an allergic reaction to this substance.
Side Effects - Patient experiences some side effects when using this substance.
Contraindication - The use of this substance is inadvisable for this patient due to their particular circumstances.
Lack of Therapeutic Effect - The use of this substance does not produce the usual beneficial effects for this patient.
3. Select the Status for the Allergy from the drop-down list, either Active or Inactive.
To enter a patient’s other Allergies (non-structured):
From the Allergy pane of the Medical History window, select the “Add” button. A new row is added to the list of allergies. The Structured/Non Structured field is highlighted;
Select “Non-structured” from the drop-down list. A warning message is displayed:
Select the “OK” button to continue;
How to

Electronic Health Record (EHR) 1 61
eClin
ical
Wo
rks
1. Type the Agent/Substance that the patient is allergic to, OR select a substance
from the drop-down list;
2. Type the Reaction that the patient has when exposed to the Agent/Substance,
OR select a Reaction from the drop-down list;
3. Select the Type field to document the Type of Allergy:
- Allergy - Patient experiences an allergic reaction to this substance.
- Side Effects - Patient experiences some side effects when using this substance.
- Contraindication - The use of this substance is inadvisable for this patient due to their particular circumstances.
- Lack of Therapeutic Effect - The use of this substance does not produce the usual beneficial effects for this patient.
4. Select the Status for the Allergy from the drop-down list, either Active or Inactive.
The Agent/Substances and the Reaction will be added to the Allergies/Intolerance section of the Progress Notes:
The Allergy and Reaction information will also be displayed in the Interactive Clinical Wizard (right Chart Panel), Overview tab, Allergy section:

62 Module 3: Progress Notes – Patient Intake
eClin
ical
Wo
rks
To remove an Allergy from the list:
1. In the Allergies section of the Past Medical History window, click on the line to select the allergy to be removed. Note the Agent/Substances is highlighted;
2. Select the “Remove” button.
Allergy Log
The Allergy Log tracks the changes made to this patient’s Allergy information, including: the action taken, the name of the person who accessed the log, the date and time the action took place, and the data for the allergy in question.
To view the Allergy Log:
Select the Allergy Log button at the top of the Allergies pane. The system displays the Allergy Access Log:
To indicate that the patient has No Known Drug Allergies (NKDA):
Select the “N.K.D.A.” box in the Allergies section of the Past Medical History window. Note: Checking N.K.D.A. will display N.K.D.A. in the Interactive Clinical Wizard (right Chart Panel), Overview tab, Allergy section.
The “Allergies Verified” bow is checked automatically when N.K.D.A. is selected.
To indicate that the patient allergy information has been entered and reviewed:
Check the Allergies Verified box to insert the allergies information into the patient’s Progress Notes and allow its completion.
Hands On Practice:
How to
How to
How to
How to

Electronic Health Record (EHR) 1 63
eClin
ical
Wo
rks
Documenting Vitals
Vital signs are present-time indications of the patient's health recorded during a patient encounter. The Vitals window includes a complete history of all the vitals taken during each patient encounter. The Vitals entry window allows you to tab through the vitals preconfigured for your practice and enter values for each one from the same window.
To access the Vitals window:
From the patient’s Progress Notes, select the Vitals hyperlink in the Objective section; OR
Select the Vitals Icon if you are already entering Progress Notes information in another section. The Vitals window opens:
1. Vitals can be entered either manually or using pop-up windows. Select the
“Pop Up” check box to document Vitals using the Vitals “Pop Up” window.
2. The yellow row indicates the current encounter for which the Progress Notes are open. This indication is useful when the patient has more than one encounter for the same date. Users cannot edit vitals from previous or future encounters.
Note: Vitals can be customized for your practice including which vitals measurements should be included and in what order they should appear.
How to
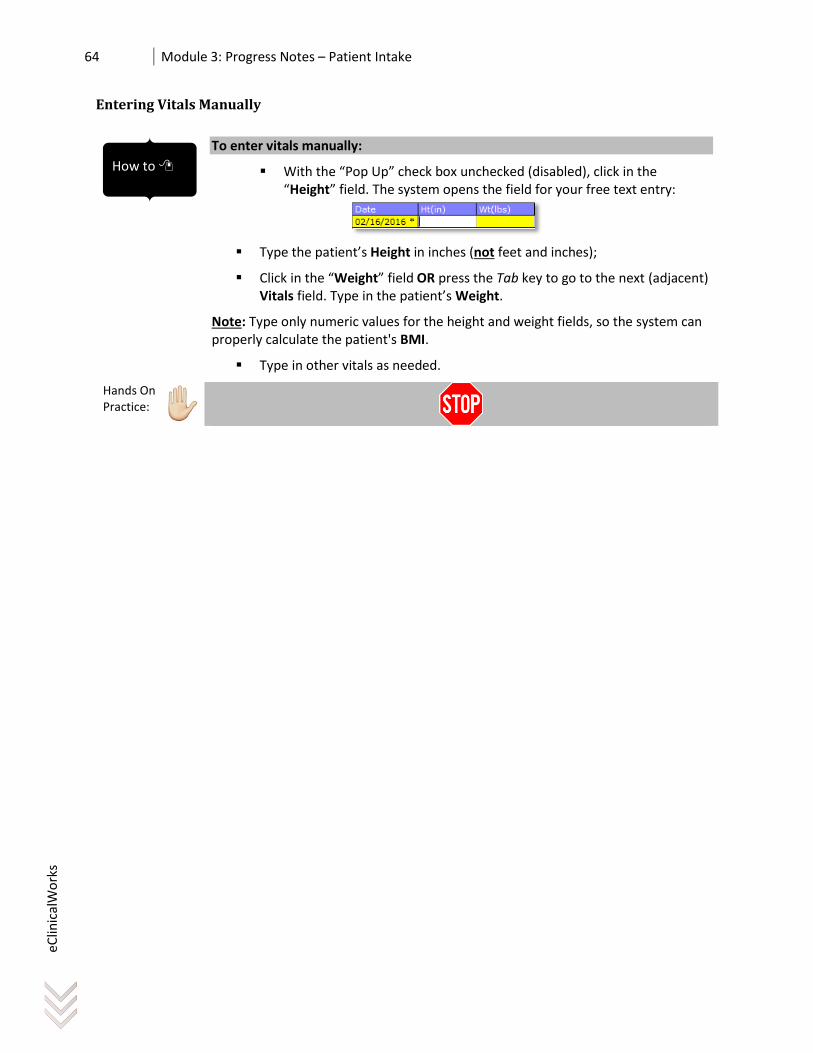
64 Module 3: Progress Notes – Patient Intake
eClin
ical
Wo
rks
Entering Vitals Manually
To enter vitals manually:
With the “Pop Up” check box unchecked (disabled), click in the “Height” field. The system opens the field for your free text entry:
Type the patient’s Height in inches (not feet and inches);
Click in the “Weight” field OR press the Tab key to go to the next (adjacent) Vitals field. Type in the patient’s Weight.
Note: Type only numeric values for the height and weight fields, so the system can properly calculate the patient's BMI.
Type in other vitals as needed.
Hands On Practice:
How to

Electronic Health Record (EHR) 1 65
eClin
ical
Wo
rks
Entering Vitals Using Pop-ups
As an alternative to manual entry, select the “Pop-Up” check box to enable pop-ups and proceed through separate windows for each Vitals field.
To enter vitals using pop-ups:
Check the “Pop Up” check box in the upper right part of the Vitals window to enable pop-up windows;
Click in the Height field. A pop-up window for entering Height opens:
Enter the patient’s Height in the option fields (meters, centimeters, feet and/or inches). You can enter the numbers by typing in the field or by clicking on the number pad in the window.
Click on to enter the number. Then select to close the window OR select to go to the next Vitals field.
Enter additional fields using the pop-up windows.
Hands On Practice:
How to

66 Module 3: Progress Notes – Patient Intake
eClin
ical
Wo
rks
Using Growth Charts
Use the Growth Charts to graph the growth of patients up to the age of 20 years old.
To display a Growth Chart for a young patient:
Select in the Vitals window OR select the Growth Chart button on the Progress Notes dashboard. The default Growth Charts window is displayed:
How to

Electronic Health Record (EHR) 1 67
eClin
ical
Wo
rks
Viewing Patient Graphs
The patient graph shows the patient’s results on a scale for each Vital that has been entered. Vitals should have been entered for at least two encounters in order for the graphs to display.
To view the patient graph:
Select in the Vitals window. The Patient Graph window opens:
Click the “Select a Vital” drop-down list and choose a Vital category to
plot, as desired. A graph of the selected Vital category displays according to the information captured in each patient encounter.
How to

68 Module 3: Progress Notes – Patient Intake
eClin
ical
Wo
rks
Completing Vitals
When all Vitals information has been collected for the patient, the Vitals process can be completed and the patient prepared to be seen.
To complete the vitals process:
Select the check box in the Vitals window;
Close the Vitals window or proceed to another section of the Progress Notes by selecting an Icon in the Toolbar.
When the Vitals window is closed the Vitals are entered into the Progress Notes:
Using Visit Status Indicators
Visit Status Indicators can be used to track the progress of a visit. In the “Notes Sts” column of the Office Visits window, a stethoscope indicates that the nurse has checked vitals. A checkmark in this column indicates the Billing and Follow Up information have been completed by the Provider.
To see how the visit status indicators work:
Open a Test patient’s Appointment from the Office Visits window and go to the patient’s Progress Notes;
In the Objective section of the Progress Notes, click on the Vitals hyperlink. The Vitals window opens. Confirm that the Vitals Taken check box has been checked. Click on the “X” in the upper right corner of the window to close the Vitals window.
Select Practice > Office Visits to return to the Office Visits window. A stethoscope icon now appears in the “Notes Sts” column indicating that Vitals have been taken.
Return to the Test patient’s Progress Notes. Select the Billing hyperlink to open the Billing window.
Note: After the Provider completes the Billing information and specifies Follow Up requirements, he or she should check the button. This places the check mark in the Office Visits window for the patient.
Hands On Practice:
How to
How to

Electronic Health Record (EHR) 1 69
eClin
ical
Wo
rks
Module 3. Review Patient Intake – Progress Notes
Let’s review how to use the Progress Notes in eClinicalWorks during the Patient Intake Process:

70 Module 4: Patient History - Progress Notes
Module 4: Patient History - Progress Notes
Learning Objectives
After completing this module you will be able to:
Document the patient’s medical history.
Document the patient’s surgical history.
Document the patient’s past hospitalizations.
Document the patient’s family history.
Document the patient’s social history.

Electronic Health Record (EHR) 1 71
eClin
ical
Wo
rks
Documenting Medical History
Medical History is a record of the patient's medical background. It includes all the conditions for which the patient has complained, both prior to the patient’s first visit to the practice and since the first visit.
To access, enter, and review a patient’s Medical History:
From the Progress Notes, select the Medical History hyperlink; OR
Select the Allergies/Medical History Icon from the Progress Notes Dashboard:
The Past Medical History window opens:
How to

72 Module 4: Patient History - Progress Notes
eClin
ical
Wo
rks
To add Medical History from a Keyword Structured List:
1. From the Medical History section, select the Keyword radio button;
2. Then, select the Medical History More (…) button:
The Medical History List window opens:
To apply a Medical History item to the patient's record:
3. Locate the item in the left pane by typing a keyword in the Find field;
4. Click the row containing the item to add it to the Selected Medical History list in the right pane;
5. Click OK to add these items to the patient's record;
6. To “Add” a new item to the predefined list, select and add the item;
7. To flag the item as a “Favorite”, select the Star next to the item. The Star will turn gold to indicate it is a Favorite;
8. To remove items from the Selected Medical History list:
- Click the item to highlight it, and then select to remove it.
- Click to remove all items from the list.
How to

Electronic Health Record (EHR) 1 73
eClin
ical
Wo
rks
To add Medical History by typing in free text:
1. Select in the Past Medical History window to create a new line;
2. Type free text unique to the current patient.
Using the Pregnancy, Breast Feeding, and History Verified flags in Medical History:
Check boxes on the Medical History window of the Progress Notes allow you to set flags to indicate whether a patient is either:
1. Pregnant and/or;
2. Breastfeeding:
Note: If either of these boxes is checked, a note is added to the Progress Notes in the Medical History section.
3. Select “Hx Verified” to indicate that the Medical History information
displayed was verified by the patient during the visit.
Hands On Practice:
How to
How to
Type the new text here

74 Module 4: Patient History - Progress Notes
eClin
ical
Wo
rks
Documenting Surgical History
Information about the patient's previous surgeries is part of the Progress Notes. Surgical History is entered as part of a Physical Visit.
To access Surgical History and Hospitalization:
From the Progress Notes window, select the Surgical History/ Hospitalization hyperlink; OR
Select the Surgical History icon that displays in the Progress Notes Dashboard:
How to

Electronic Health Record (EHR) 1 75
eClin
ical
Wo
rks
To add Surgical History Information:
1. Select the “Add” button in the Surgical History section. The cursor automatically focuses on the Date field for the newly added row;
2. Enter the Date of the Surgery;
3. Press the Enter key to move the cursor’s focus to the Surgery column. Type the name of the Surgery; OR
4. Select the “Keyword” or “CPT” radio button and then select the More (…) button to use the Find feature. The Keywords or Procedures/Immunizations window opens:
5. After completing documentation of the Surgical History information, select the “Surgical Hx Verified” box to indicate the Surgical History information entered has been verified with the patient. The information becomes part of the Progress Notes:
How to

76 Module 4: Patient History - Progress Notes
eClin
ical
Wo
rks
Documenting Past Hospitalizations
To add Hospitalization information for the patient:
1. Select the “Add” button in the Hospitalization section of the Surgical History window. The cursor automatically focuses on the Date field for the newly added row;
2. Enter the Date of the Hospitalization;
3. Press the Enter key to move the cursor’s focus to the Reason column. Type the Reason for the Hospitalization; OR
4. Select the “Browse” button to use the Find feature. The Keywords window opens:
5. After completing documentation of the Hospitalization information, select the “Hospitalization Verified” box to indicate the Hospitalization information entered has been verified with the patient. The information becomes part of the Progress Notes:
Hands On Practice:
How to

Electronic Health Record (EHR) 1 77
eClin
ical
Wo
rks
Documenting Family History
To add Family History information:
From the Progress Notes window, select the Family History hyperlink; OR
Select the Family History icon that displays in the Progress Notes Dashboard:
Use this window to complete the following steps for each known family member in the Family History list:
1. Click the Status column for the listed relative. Select from Alive, Deceased, or Unknown;
2. Click the YOB field and enter the relative’s Year of Birth (yyyy);
3. If the relative was given a Status of Alive, the system automatically calculates the relative’s age and inserts it into the Age field. Age is not calculated if the family member has been indicated as Deceased. In this case, enter the family member's age at death manually.
4. Select the Notes field icon to open the Keywords window. Note: If a Note is created for a family member, the icon changes to:
How to

78 Module 4: Patient History - Progress Notes
eClin
ical
Wo
rks
1. Select a known family condition from the Keywords list in the left pane; OR
2. Type the condition in the Find field to narrow the choices in the Keyword list;
3. Click on the condition to add it to the Selected category in the center pane. Alternatively, you can make a free-text entry in the center pane;
4. Click the Relatives in the right pane that are known to have the condition. You may select more than one relative for each condition if necessary. Selected relative(s) are shaded purple;
5. Repeat this process for each known condition and the corresponding relatives. Click “OK” to save the information and return to the Family History window:

Electronic Health Record (EHR) 1 79
eClin
ical
Wo
rks
6. Under Siblings, enter the number of Brothers and Sisters. Check the Healthy box if all are healthy. If one or more of the siblings are not healthy, leave the Healthy check box blank, and enter the sibling's health information into the free-text Notes section at the bottom of the window;
7. Under Children, enter the number of Sons and Daughters. Check the Healthy box if all are healthy. If one or more of the children are not healthy, leave the Healthy check box blank, and enter the children's health information into the free-text Notes section at the bottom of the window;
8. Enter any general notes into the Notes section at the bottom of the window. The Notes field is for free text, and it includes a Browse feature. Select Browse to open the Keywords window and choose an item to add to the notes;
9. If the family conditions listed are not contributing to the patient's current condition, click the Non-Contributory check box at the top of the window. A Non-Contributory note will display at the bottom of the patient's Family History section on the Progress Notes, along with the remaining Family History data that has been added.
10. Check the “Family History Verified” box to indicate that the Family History information entered on this Progress Notes has been verified with the patient. This information becomes part of the Progress Notes:
Hands On Practice:

80 Module 4: Patient History - Progress Notes
eClin
ical
Wo
rks
Documenting Social History
To add Family History information:
From the Progress Notes window, select the Social History hyperlink; OR
Select the Social History icon that displays icon that displays in the Progress Notes Dashboard:
1. A list of the patient’s Social History categories displays in the left column (note the blue S in the first column that denotes “Structured” data;
2. Select the Options field next to a Social History item that is applicable to the patient. The first Option displays:
Click the field until the desired Option is displayed. The number of options depends upon how the Social History items are established for the practice;
Some Options have existing Details included, and the Details may remain visible even if another option is selected. To clear the Details field, click in the field to open the Social History Notes window, and then select “Clear”;
Click the “Select Default” button to populate the Options column with the practice's established defaults. Select “Clear All” to remove all information from the Options and Details fields specific to a category.

Electronic Health Record (EHR) 1 81
eClin
ical
Wo
rks
3. Select the Details field for a Social History item to document additional details. The Social History Notes window opens to either the “Free-Form” or “Structured” tab denoted by the blue S:
Enter any additional information using the free-text field on the right:
- Select “Clear” to remove any information from the field;
- Select “TimeStamp” to add a user name and time/date to the note;
- Select “Spell Check” to resolve any spelling or grammatical errors;
- Select “Custom” to customize the available option in the left pane.
Select “OK” to return to the Social History window.
4. Use the Notes section at the bottom of the Social History window to enter free-text information about the patient's Social History:
5. Use the “Browse” button to display related keywords to speed up the documentation process. The Notes entered here display on the patient's Progress Notes, beneath any information added in the previous steps.
6. Select “Custom” to add, edit, or delete Social History items from the list.
7. Select “Social History Verified” to indicate that the Social History information entered on this Progress Notes has been verified with the patient. This information becomes part of the Progress Notes:

82 Module 4: Patient History - Progress Notes
eClin
ical
Wo
rks
Module 4. Review - Patient History & Progress Notes
Let’s review how to use the Progress Notes in eClinicalWorks to document the patient’s medical, surgical, hospitalization, family, and social histories:

Electronic Health Record (EHR) 1 83
Module 5: Telephone Encounters
Learning Objectives
After completing this module you will be able to
Create a new telephone encounter.
Respond to a telephone encounter.
Refill a prescription in a telephone encounter.
Order lab tests using the virtual visit tab.
Look up a patient’s telephone encounter.
Attach addendums to a telephone encounter.

84 Module 5: Telephone Encounters
eClin
ical
Wo
rks
Creating Telephone Encounters
Encounters are contacts or events between patients and the practice. Telephone encounters may include face-to-face encounters in or out of the office and telephone conversations with the patient, a family member, or a third party such as the hospital. Encounters must be documented as part of the patient’s record in order to maintain a complete history of the patient’s health and interaction with the practice. New encounters may be added to the system and previous encounters may be accessed to review information about the patient’s history.
To create a new telephone encounter:
In the Patient Hub, select ; OR
Select “New Telephone Encounter” from the T Jelly Bean Menu.
The Telephone Encounter window opens:
How to

Electronic Health Record (EHR) 1 85
eClin
ical
Wo
rks
1. The top section of the Telephone Encounter window is for information about
the patient, the staff member who opened the telephone encounter, the patient’s pharmacy, the Reason for the contact, and the staff member or provider to whom the encounter is assigned;
The system automatically adds default information including Answered by (the person answering the call), the Date and Time of the call, Open status, Facility, and the Assigned To field (defaults to the person opening the telephone encounter).
If you create a new telephone encounter from the Patient Hub, the Patient information, Provider, and Pharmacy are also filled in automatically from the patient’s demographic information.
2. Click to select a patient, if needed
3. Select a Provider from the pull-down list of click to find a different Provider, if needed;
4. Enter the name of the Caller, this may be the patient, family member, of third party such as the hospital;
5. Enter a Reason for the Call. This can be typed free text or selected from the list;
6. Select a colleague in the Assigned To field who should review the telephone encounter, if appropriate. The “Assigned To” person’s T jelly Bean will show an additional telephone encounter to be reviewed (the count will increase by one):
7. Select if urgent action is required by the person in the Assigned To field. The Assign To person’s T jelly Bean will turn red:
8. Enter the patient message in the Message section.
Select “OK” to save and close the Telephone Encounter window.
Hands On Practice:

86 Module 5: Telephone Encounters
eClin
ical
Wo
rks
Respond to a Telephone Encounter
When a colleague assigns a Telephone Encounter to you, it shows up in your T jelly Bean.
To respond to a Telephone Encounter:
Click on the T Jelly Bean OR Select Telephone Enc from the pull down menu. The Telephone Encounters window opens:
1. Select the Telephone Encounter you wish to review. The Telephone Encounter
window opens:
2. Enter your response and any actions taken in the Action Taken box;
3. Clicking the Time Stamp button records the date and time next to your note;
4. Clicking the Action Taken button opens the Keywords window, where you can select from a list of pre-defined responses. Notes entered under Action Taken cannot be modified.
How to

Electronic Health Record (EHR) 1 87
eClin
ical
Wo
rks
5. Click on a Keyword to add it to the Selected list;
6. Use the Remove (<) or Remove All (<<) feature to remove a selected Keyword or all Keywords;
7. Click “OK” to return to the Telephone Encounter window;
8. If all follow up has been completed for the Telephone Encounter, select “Addressed” in the Status section of the window.
9. If you need to assign this encounter to another colleague, select their name in the Assigned To field;
10. Click “OK” to send the Telephone Encounter to your colleague’s T jelly Bean (if assigned) and complete the Telephone Encounter.
Hands On Practice:

88 Module 5: Telephone Encounters
eClin
ical
Wo
rks
Refilling Prescriptions in a Telephone Encounter
Patient prescriptions can be refilled in a Telephone Encounter using the Rx Tab window.
To refill a patient’s prescription in a Telephone Encounter:
Locate the patient using the Patient Lookup icon;
Go to the selected patient’s Hub;
Select the button to open the Telephone Encounter window:
1. Enter the Caller name;
2. Select the Reason for the call from the list, or type the Reason;
3. Select the Provider, if appropriate;
4. Select the patient’s Pharmacy. A default Pharmacy is automatically entered based on data provided in the Patient Information window. Click the Ellipsis button (…) in the Pharmacy section of the Telephone Encounter to select a different Pharmacy from the database;
5. Select the Rx Tab;
6. To refill a Current Medication, select the “Cur Rx” button;

Electronic Health Record (EHR) 1 89
eClin
ical
Wo
rks
The Manage Orders window opens:
7. Select the medication to refill;
8. The medication is added to the “Selected Meds” section;
9. Select “OK” to return to the Telephone Encounter window.
10. The medication appears in the Refilled Medicines section of the Rx tab.
11. Select the Comments field. A Comments window pops up:
12. Select “Refill” then “Close” to return to the Telephone Encounter. The Comments field should now say “Refill”.
13. To make any changes to the Prescription details, select the Strength field (or any other field to the right). The Prescription Information window opens:

90 Module 5: Telephone Encounters
eClin
ical
Wo
rks
Use the Prescription Information window to select different options for
the Refill of the medication. Either select predefined options from the list or click in the yellow boxes to edit text directly. Click “OK” to continue.
If you need to get the Provider’s approval before sending the Prescription to the pharmacy, select the Provider’s name in the Assigned To field. Click “OK”.
ePrescribing a Prescription Refill
If the pharmacy has a displayed, you can ePrescribe the medication.
To ePrescribe a Prescription refill:
From the Telephone Encounter window, select the green down arrow next to “Send Rx” and select ePrescription Rx. The ePrescribe Rx window opens:
Double check that the Provider name and Pharmacy are correct;
Click to send the Prescription to the Pharmacy.
How to

Electronic Health Record (EHR) 1 91
eClin
ical
Wo
rks
Faxing a Prescription Refill
To fax a Prescription Refill:
From the Telephone Encounter window, select the green drop-down arrow and select Fax Script:
The Fax Rx window opens:
How to

92 Module 5: Telephone Encounters
eClin
ical
Wo
rks
Select to see what the fax will look like at the Pharmacy:
1. Verify that the name of the Pharmacy in the Fax Preview window is correct;
2. Verify the existance of a fax number and that it is correct;
IMPORTANT: You must add a “1” in front of the Fax Number for long distance numbers.
3. To CC the Referring Physician, click “Browse” and select the Provider from the list;
4. Make sure the correct Provider name is entered and their signature appears on the fax preview. Otherwise, Cancel out of the Fax Preview window and select the correct Provider in the Telephone Encounter window;
5. Select the option to see a larger portion of the fax page, including the provider’s electronic signature;
6. Select “Send Fax” to send the Prescription via Fax to the Pharmacy;
7. Select “Print” to print the Prescription to the Default printer.
Hands On Practice:

Electronic Health Record (EHR) 1 93
eClin
ical
Wo
rks
Ordering Lab/Diagnostic Imaging Tests Using the Virtual Visit Tab
A Lab or Diagnostic Imaging (DI) can be ordered from the Telephone Encounter window by using either the Labs/DI Tab or the Virtual Visit Tab. However, the Labs/DI Tab does not link Lab/DI test to an assessment, therefore the Lab or Imaging Facility will not have a basis for billing. For this reason, we recommend using the Virtual Visit tab that permits selecting an assessment (ICD-10 code), that can be then be linked to a Lab/DI order.
To order a Lab or Diagnostic Imaging test in a Telephone Encounter:
Select the Patient Lookup icon. Look up the desired patient, then go to the patient’s Patient Hub;
Select to open the Telephone Encounter window;
Enter the Caller name and Reason for the call. Select the Provider, as appropriate;
Assign the Telephone Encounter to the appropriate Provider or clinical staff member (depending on who should be reviewing test results in your clinic);
Select the tab. The Virtual Visit provides a Progress Notes form like an actual Physical Visit:
How to

94 Module 5: Telephone Encounters
eClin
ical
Wo
rks
Selecting an Assessment in the Virtual Visit
To select an Assessment (Diagnosis Code) in the Virtual Visit:
Click on the Patient Lookup icon. Look up the patient to go to the Patient Hub.
Select to open the Telephone Encounter window, or select the
“Encounters” button to open an existing Encounter;
1. Select the Virtual Visit Tab to view the Virtual Progress Notes:
2. Scroll down to view the Assessment and Treatment hyperlinks in the
Virtual Progress Notes;
3. Select the Assessment hyperlink in the Virtual Progress Notes. The
Assessments window opens:
How to
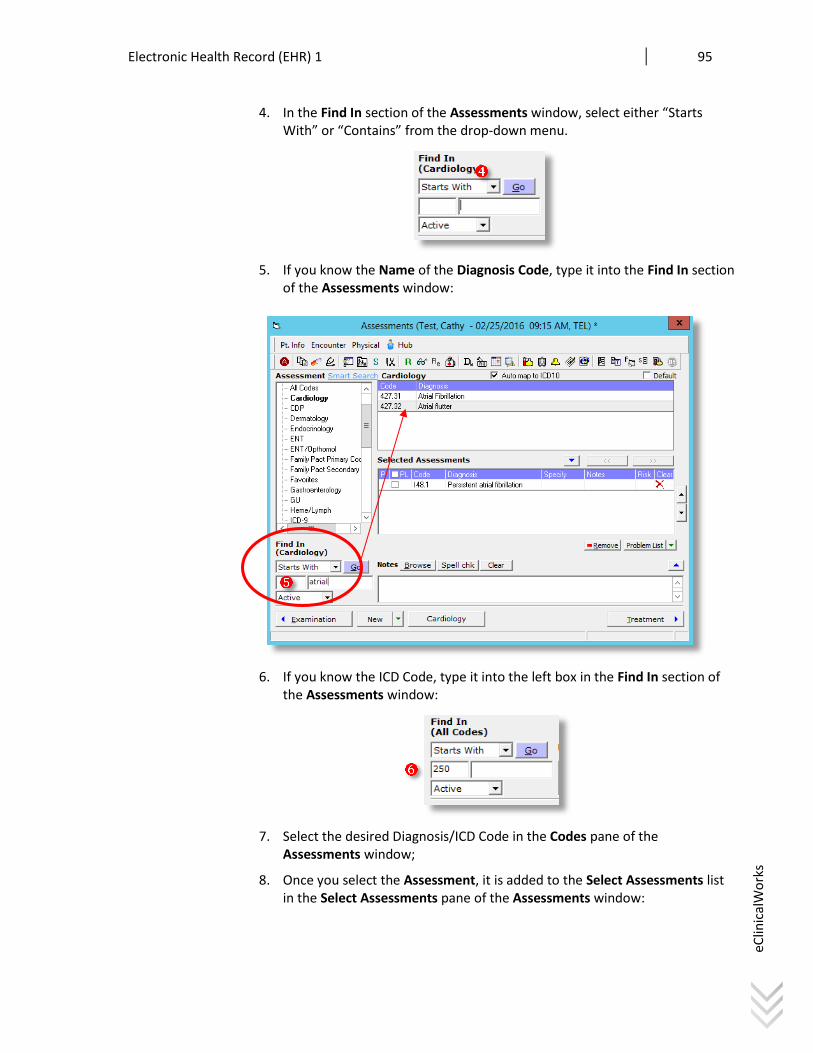
Electronic Health Record (EHR) 1 95
eClin
ical
Wo
rks
4. In the Find In section of the Assessments window, select either “Starts
With” or “Contains” from the drop-down menu.
5. If you know the Name of the Diagnosis Code, type it into the Find In section
of the Assessments window:
6. If you know the ICD Code, type it into the left box in the Find In section of
the Assessments window:
7. Select the desired Diagnosis/ICD Code in the Codes pane of the
Assessments window;
8. Once you select the Assessment, it is added to the Select Assessments list in the Select Assessments pane of the Assessments window:

96 Module 5: Telephone Encounters
eClin
ical
Wo
rks
Hands On Practice:

Electronic Health Record (EHR) 1 97
eClin
ical
Wo
rks
Order Lab Tests for Today in a Virtual Visit
To order a Lab test for today in a Virtual Visit:
Select the Treatment hyperlink in the Virtual Progress Notes. The Treatment window opens:
1. To order a Lab test, select the “Browse” button in the Labs section of the
Treatment window. The Manage Orders window opens to the Add New Order Tab:
How to

98 Module 5: Telephone Encounters
eClin
ical
Wo
rks
2. Select the appropriate Assessment from the Assessments pane to link the Lab
you are about to Order to the Assessment;
3. Type in the Name of the Lab test in the Lookup field of the Labs window to
narrow the list;
4. Select the Name of the Lab to Order. The Lab will now appear in the Today’s
Orders section of the Manage Orders window;
5. If the Lab needs to be done immediately, select the “S” for Stat check box;
6. If the Lab is a Fasting Lab, select the “F” for Fasting check box.
7. To verify or change the Assessment associated with the Lab Order, select the
Ellipse (…) button;
8. Select “OK” to return to the Treatment window. The Lab Order should now
appear in the Labs section of the window under the corresponding Assessment Tab:
Hands On Practice:

Electronic Health Record (EHR) 1 99
eClin
ical
Wo
rks
Faxing Lab Orders from a Virtual Visit
To fax the Lab Order to the Lab:
1. From the Treatment window, select the green arrow next to the “Print Orders” button, then select “Fax Labs” from the drown-down menu:
The Print/Fax window opens:
2. Select the Order(s) to fax;
3. Select the Lab Company from the drop-down list;
4. Select from the Account Number Categories as appropriate;
5. Enter any comments in the Comments field, or select the “Browse” button to select from pre-defined Comments;
6. Select “OK”.
How to

100 Module 5: Telephone Encounters
eClin
ical
Wo
rks
7. The Fax Preview window opens. Scroll down to view the Lab Ordered and make sure the Provider signature appears on the fax:
8. Select to select or change the Lab Company. The Lab Company List
window opens. Select the Lab Company you wish to use. Select “OK” from the Lab Company List window to return to the Print/Fax Preview.
9. Select to complete faxing the Order to the selected Lab and close the Print/Fax window;
10. If no additional tests are needed, close the Treatment window and return to
the Telephone Encounter by clicking on the in the upper right corner. The Virtual Visit will be updated with the assessment and treatment plan:
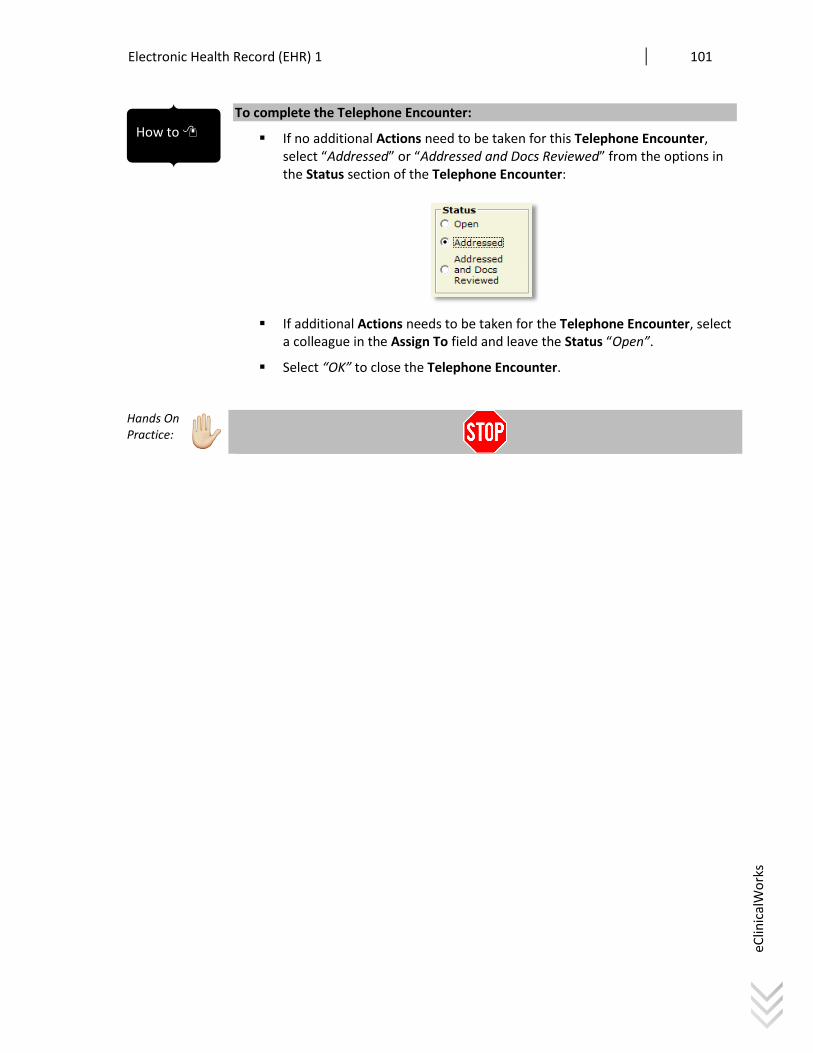
Electronic Health Record (EHR) 1 101
eClin
ical
Wo
rks
To complete the Telephone Encounter:
If no additional Actions need to be taken for this Telephone Encounter, select “Addressed” or “Addressed and Docs Reviewed” from the options in the Status section of the Telephone Encounter:
If additional Actions needs to be taken for the Telephone Encounter, select a colleague in the Assign To field and leave the Status “Open”.
Select “OK” to close the Telephone Encounter.
Hands On Practice:
How to

102 Module 5: Telephone Encounters
eClin
ical
Wo
rks
Ordering Future Lab Tests in a Virtual Visit
To order a Future Lab test in a Virtual Visit:
Select the T Jelly Bean Menu > New Telephone Encounter. The Telephone Encounter window opens;
Select to select a patient in the Patient Lookup window. Select the Provider, as appropriate;
Enter the Caller name and Reason for the call, as appropriate;
Select the Virtual Visit tab in the Telephone Encounter window;
Scroll down to the Assessment section of the Progress Note in the Virtual
Visit Tab. Select the Assessment hyperlink to open the Assessments window:
1. From the Assessments window, select a Diagnosis/ICD Code; 2. Select the “Treatment” button to navigate to the Treatment window; OR
3. Select the Treatment Icon from the Navigation Toolbar;
4. Select the “Browse” button in the Lab section to open the Manage Orders
window:
How to

Electronic Health Record (EHR) 1 103
eClin
ical
Wo
rks
5. Select the Assessment associated with the Future Lab;
6. Select the Futures Orders band to make it Active (green);
9. Type in the Name of the Lab test in the Lookup field of the Labs window to
narrow the list;
10. Select the Name of the Lab to Order. The Lab will now appear in the Today’s
Orders section of the Manage Orders window;
11. If the Lab is a Fasting Lab, select the “F” for Fasting check box.
12. Select the Order Date for the Future Lab by clicking on the date to open the
Calendar Tool:
13. To verify or change the Assessment associated with the Lab Order, select the
Ellipse (…) button; 14. Select “OK” to return to the Treatment window.
Hands On Practice:
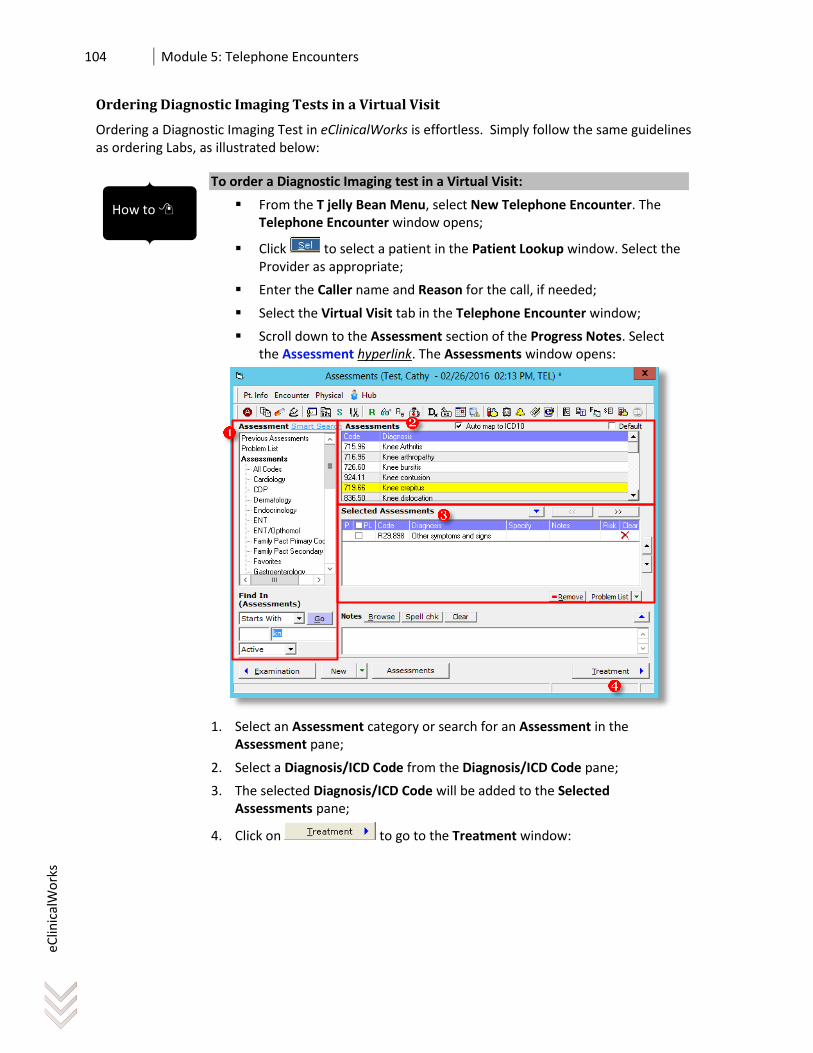
104 Module 5: Telephone Encounters
eClin
ical
Wo
rks
Ordering Diagnostic Imaging Tests in a Virtual Visit
Ordering a Diagnostic Imaging Test in eClinicalWorks is effortless. Simply follow the same guidelines as ordering Labs, as illustrated below:
To order a Diagnostic Imaging test in a Virtual Visit:
From the T jelly Bean Menu, select New Telephone Encounter. The Telephone Encounter window opens;
Click to select a patient in the Patient Lookup window. Select the Provider as appropriate;
Enter the Caller name and Reason for the call, if needed;
Select the Virtual Visit tab in the Telephone Encounter window;
Scroll down to the Assessment section of the Progress Notes. Select
the Assessment hyperlink. The Assessments window opens:
1. Select an Assessment category or search for an Assessment in the
Assessment pane;
2. Select a Diagnosis/ICD Code from the Diagnosis/ICD Code pane;
3. The selected Diagnosis/ICD Code will be added to the Selected Assessments pane;
4. Click on to go to the Treatment window:
How to

Electronic Health Record (EHR) 1 105
eClin
ical
Wo
rks
5. Select in the Diagnostic Imaging section of the Treatment window
to go to the Add New Order tab of the Manage Orders window:
6. Select the Assessment associated with the Diagnostic Imaging test; 7. Select the Today’s Orders or Futures Orders band to make it Active (green);
8. Type in the Name of the Diagnostic Imaging test in the Lookup field of the Diagnostic Imaging window to narrow the list;
9. Select the Name of the Diagnostic Imaging test to add it to Today’s Orders
or Futures Orders. If the test is for a Future Order, also select the Date;
10. Select “OK” to return to the Telephone Encounter window.

106 Module 5: Telephone Encounters
eClin
ical
Wo
rks
Hands On Practice:
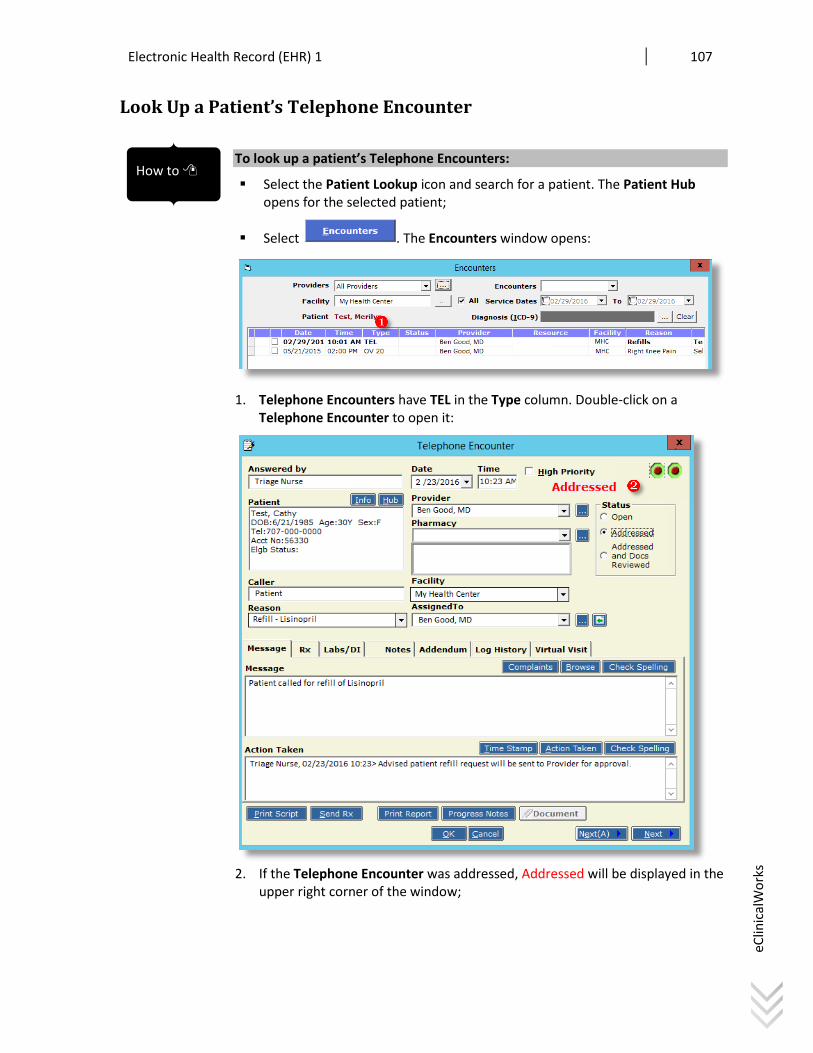
Electronic Health Record (EHR) 1 107
eClin
ical
Wo
rks
Look Up a Patient’s Telephone Encounter
To look up a patient’s Telephone Encounters:
Select the Patient Lookup icon and search for a patient. The Patient Hub opens for the selected patient;
Select . The Encounters window opens:
1. Telephone Encounters have TEL in the Type column. Double-click on a Telephone Encounter to open it:
2. If the Telephone Encounter was addressed, Addressed will be displayed in the
upper right corner of the window;
How to

108 Module 5: Telephone Encounters
eClin
ical
Wo
rks
3. If a Virtual Visit was created from the Telephone Encounter, the Progress
Notes will be displayed in the Locked format:

Electronic Health Record (EHR) 1 109
eClin
ical
Wo
rks
Attach Addendums to a Telephone Encounter
Once a Telephone Encounter has been Addressed, you cannot edit it. If you need to add additional information to a Telephone Encounter, use the Addendum tab.
To attach an Addendum to a Telephone Encounter:
Open the Addressed Telephone Encounter:
1. Select the Addendum tab;
2. Select the “Add” button. The Addendum window opens:
3. Type the Addendum and select “OK”.
4. The text is entered on the Addendum tab with a date/time stamp and the User ID of the person who added the addendum.
How to

110 Module 5: Telephone Encounters
eClin
ical
Wo
rks
5. The Addendum tab will display a “notepad” icon if an Addendum is present;
6. Close the Telephone Encounter window.
Hands On Practice:

Electronic Health Record (EHR) 1 111
Glossary
Appointment Toolbar - Permanently displayed toolbar at the top of the Appointment window— provides quick access to the Encounters window, Appointment Search & Multiple Appointment Booking window, Patient Information logs, patient outgoing and/or incoming referrals, patient orders, the Process Bubble Sheet document window, and to delete the appointment.
Bands - Rectangular gray buttons on the left side of the eClinicalWorks navigation pane that contain icons. There are six bands (seven for administrators): Admin (displayed for administrators only), Practice, Registry, Referrals, Messages, Documents, and Billing.
Button - Small raised areas containing text, most often rectangular, that open a new window when clicked.
Chart Panel - Tabbed Pane at the far right of the Progress Notes. Clicking these tabs displays useful information concerning a patient, often allowing users to import information into the encounter. Provides access to an UpToDate search (Optional).
CDSS Quality Measures - Clinical Decision Support System (CDSS) Alerts based on Quality Measures definitions that are triggered by diagnoses, gender, and age, for the appropriate treatment and care of patients and preventative screenings.
Check box - A square box, that when selected displays a check mark indicating the associated feature is enabled. Clicking a selected check box clears the check mark and disables the associated feature.
Confirmation Window - A window that pops up to either inform users of an action's status, or to obtain confirmation from the user before the eClinicalWorks system executes a requested action.
Drop-Down Calendar - Date-related Fields with adjacent downward-facing arrows. Clicking in these fields opens a calendar, used in the same manner as the calendar on the Resource Schedule window.
Drop-Down List - Fields with adjacent downward-facing arrows. Clicking the arrow in these fields opens a list of options, used to select and populate the field.
Editable Drop-Down Lists - Add and deleted text from these drop-down lists. To open the drop-down list, click the adjacent arrow. Clicking in the Field itself inserts a text cursor, used to add or delete text from that point. These fields may be populated manually by typing, automatically by selecting an option from the drop-down list, or by a combination of the two.
Non-Editable Drop-Down Lists - Contents of these fields must be selected from the options provided in the drop-down list and cannot be added to or deleted. Users can click in any area of these fields to open the drop-down list.
Table Drop-Down Lists - These lists display in table fields, usually hidden until the field is clicked. To use these drop-down lists, click in the field to display the downward-facing arrow, and then click that arrow to open the drop-down list.
112 Glossary
eClin
ical
Wo
rks
e-Prescription - (Optional) an eClinicalWorks extra feature used to write and send prescriptions electronically to local pharmacies. e-Prescription uses a service called SureScripts to forward prescriptions from the physician to the pharmacist. e-Prescription uses the Multum drug database.
Field - Rectangular space allocated for a particular item of information. These can also be called Text boxes. A field can be required, optional, or calculated. Data must be entered into a required field, while an optional field may be blank. The eClinicalWorks system automatically determines the value of a calculated field. eClinicalWorks presents two types of fields:
Read-Only fields - Non-editable fields; display with a grey tint.
Editable fields - These fields display with a white background. Change, add, or delete the information in these fields by clicking in the white area; a cursor displays at the insertion point.
Flowsheets - Flowsheets are spreadsheet-like documents that contain a set of patient information you track over time.
Hot keys - Buttons that have a letter underlined have hot keys associated with them. In most cases, pressing the Alt key and the underlined letter on your keyboard at the same time clicks the associated button. If the same letter is used more than once on a window, holding the Alt key and pressing the underlined letter multiple times rotates the focus through the associated buttons. In this case, once the focus is on the desired button (indicated by a box of dots around the text on the button) users can press the Enter key on their keyboard to click that button.
Icon - Picture representing a window or status.
Status Icon - Indicates a status of the associated item. For example, the W Status icon in the Web Column on the Patient Lookup window indicates the patient is Web enabled.
Window Icon - An icon that is also a button. Clicking this icon opens the window associated with that icon. For example, the Resource Schedule icon in the navigation pane is a window icon.
Jelly Beans - see Quick-Launch Buttons.
Left Navigation Pane - Permanently displayed pane on the far left side of the eClinicalWorks application. This pane contains bands, which in turn contain the icons used to access the various windows in the system.
Link - Text that when clicked opens a new window— often underlined.
Menus - Permanently displayed text in the light blue section at the very top of the application that when clicked, offer lists of options generally related to set-up and administration. There are 11 menus: File, Patient, Schedule, EHR, Billing, Reports, Fax, Tools, Community, Lock Workstation (clicking this locks your computer directly), and Help.
More or Ellipsis (...) button - Displays next to some fields. Clicking the ellipsis (…) opens selection dialogs, usually lookup windows, which allow users to populate the associated field with the information selected.
Mouse Over - - Hovering the mouse cursor over an item on the window.

Electronic Medical Record (EHR) 1 113
eClin
ical
Wo
rks
Medical Record Numbers (MRN) - A method of identifying a patient and patient/medical record information based on the use of Medical Record Numbers. Each provider organization maintains a Master Patient Index (MPI) and the Medical Record Number is issued and maintained through this index. The MPI contains the patient's information. The MRN is unique only within the same organization.
Navigation Toolbar - Permanently displayed dark blue toolbar near the top of the application, just beneath the Menus. This toolbar contains the Patient Lookup icon, the Show/Hide Buttons, the Quick- Launch Buttons, and the Quick-Launch Links.
Order Sets - A group of treatment options (prescriptions, labs, diagnostic imaging, procedures, referrals, etc.) pre-configured to ensure all necessary elements for a particular condition are ordered.
Option - Selectable items in drop-down lists and menus.
Pane - Rectangular areas of windows clearly separated from each other by borders.
Patient Dashboard - Dark blue pane at the top of the Progress Notes, Telephone Encounter Document Review and Lab Results/Diagnostic Imaging window. This pane displays basic information about a patient and contains buttons to access detailed patient information, Sticky Notes to record miscellaneous information about a patient, Links to access areas of their Progress Notes, and various drop-down lists. Do not confuse with the Progress Notes Dashboard.
Patient Hub - Patient-specific window containing basic information about a patient and many buttons to access more detailed information about a patient and modify it as necessary. Access this window from both the Patient Lookup and Progress Notes Dashboard
Patient Information - Window containing a patient's demographic information, accessed from the Patient Lookup, Patient Hub, Progress Notes Dashboard, and Progress Notes Menus (Pt. Info menu).
Patient Lookup - Window that allows users to search for any patient in the system. Access this window from the Patient Lookup icon, Progress Notes Dashboard, Patient Hub, and the More (...) buttons associated with many Patient and Name fields.
Patient Lookup Icon - Permanently displayed icon displaying a human torso and magnifying glass on a white background, located near the top of the application in the Navigation Toolbar.
Pop-Up Window - Small windows that open when a button or link is clicked.
Progress Notes Dashboard - Section of icons near the top of most Pop-Up windows accessed from the Progress Notes. Clicking these icons allows users to navigate quickly between the various sections of the Progress Notes.
Progress Notes Menus - Section of text at the very top of most Pop-Up windows accessed from the Progress Notes. Clicking these menus opens lists of Options related to the current patient. There are three Progress Notes menus: Pt. Info, Encounter, and Physical.

114 Glossary
eClin
ical
Wo
rks
Progress Notes - Provides a secure, central location to access all patient data. There are four different Visit Types: Physical, Regular, Intervention, and OP Report. Each type of visit that you select determines the format and content of the Progress Notes for the corresponding visit.
Quick-Launch buttons - Located on the Patient Dashboard taskbar, the quick-launch buttons consist of lettered menus and buttons that provide direct access to areas of the application practices use most often. Each menu includes a companion button to the right; these quick-launch buttons display the numerical real-time totals for the various sections, such as checked-in patients, referrals, and documents ready for review.
Quick-Launch Link - Permanently displayed links, to the left of the associated quick-launch button, near the upper-right of the application in the navigation toolbar. Clicking any of these links opens a drop-down List with options that allow users easy access to commonly used areas of the system.
Radio Button - Used to select the associated item from a group of displayed options. One item in the group of radio buttons must be selected. To deselect a radio buttons, click another item in the group. They cannot be clicked again to deselect the associated item—as is true with Check boxes.
Read-Only - Information that displays on the window but cannot be edited directly.
Resource Schedule - Offers the options for viewing and managing staff schedules and patient appointments.
Centralized scheduling allows you to make appointments for providers based on the facility selected.
Facility-based scheduling makes it easier to manage appointments for providers who switch between facilities. The facilities appointment slots are color coded, indicating appointments scheduled at different facilities.
Show/Hide Buttons - Three permanently displayed green octagonal buttons with dark green circles in their centers, located in the Navigation toolbar near the top of the application. Clicking one of these buttons once hides the associated feature and turns the circle in the center red, and clicking that button again shows the associated feature and turns the circle back to dark green:
Left Show/Hide button - Shows/hides the navigation pane.
Middle Show/Hide button - Shows/hides the Patient Dashboard.
Right Show/Hide button - Shows/hides the Chart Panel.
Smart Forms - Specialty forms containing structured data. Smart Forms measure the severity of select conditions and interact with the Progress Notes using structured data.
Specialty Forms - Specialty Forms are standardized medical forms for a wide variety of medical situations, and they are included in the eClinicalWorks installation process. Use these forms to document a patient's condition quickly and accurately or to create a standardized letter for a patient. –
Sticky Notes - Yellow and pink boxes in the Patient Dashboard. Clicking in these boxes opens Pop-Up windows, from which users may enter miscellaneous notes about a patient.

Electronic Medical Record (EHR) 1 115
eClin
ical
Wo
rks
Super Bills - An electronic bill used to select commonly used ICD, CPT, and E/M codes.
Table - Grid of fields that contain information, most-often entered by the user. Column - Vertical line of fields in a Table. Row - Horizontal line of fields in a Table.
Text box - See field.
Tooltip - A Popup window that displays useful information about an item on the window when you Mouse Over that item.
Up-to-date - A clinical reference service that is separate from eClinicalWorks. A license must be obtained from the Up-to-date website (www.uptodate.com) to use it with eClinicalWorks.
Visit Codes - Appointment types created to fit the needs and schedules of each provider. These codes are associated with specific functions of the practice, have an assigned duration, and are associated with one of the four Visit Types. For example, a general practice creates Visit Codes called Pregnancy Visit and Preschool Visit. These new Visit Codes are associated with a Physical Visit Type.
Visit Types - Defines the length of time for an appointment type (or Visit Code) and the format for the type of Progress Notes attached to the visit. There are four different Visit Types: Physical, Regular, Intervention, and OP Report. Each type of visit determines the format and content of the Progress Notes for the corresponding visit. You can customize Visit Types to meet the needs of your practice.

116 Index
eClin
ical
Wo
rks
Index
Actions, 10 Addendum to Telephone Encounter, 109 Addressed Telephone Encounter, 107 Admin Settings, 36 Allergies, 36, 58, 60
Agent/Substance, 61 Allergies Verified, 62 Allergy Log, 62 Chart Panel Overview Tab, 61 Drug Interaction Checking, 58 Environmental, 58 N.K.D.A., 62 Structured/Nonstructured, 58, 60
Appointments, 11, 35, 39, 48 Assessments, 29, 40, 93, 94, 95, 102 Billing
Billing Data, 25, 29 Billing Notes, 29 Billing Window, 29, 68
BMI – Body Mass Index, 64 Breastfeeding, 73 CDSS Alerts, 43 Change Password, 7 Chart Panel, 40, 61, 62
Customizing, 41 Check In/Out, 25, 26 Chief Complaints, 45, 48, 49, 50, 51 Coding, 29, 94, 95, 102, 104 Contraindication, 60, 61 CPT Codes, 29 Current Medications, 37, 48, 52, 54, 88 Demographic Information, 12, 14, 38 Diagnosis Code, 95, 102, 104 Diagnostic Imaging, 10, 30, 43, 93, 104, 105 Documents, 10, 43 Drug
Drug Allergies, 58 Drug-Allergy Checking, 58
Duration of Visit, 26, 28 E&M Codes, 29 eCliniForms, 25 Encounters, 26, 28, 36, 39, 43, 107 Environmental Allergies, 58 ePrescribe, 10, 90
Examinations, 36 Family History, 36, 77
Family History Verified, 79 Fax
Inbox/Outbox, 10 Lab Orders, 99 Long Distance Numbers, 92 Prescription Refill, 91 Preview, 92, 100
Flowsheets, 43 Follow Up, 29 Growth Charts, 43, 66 History of Present Illness (HPI), 45 Home Screen, 22 Hospitalization, 36
Hospitalization Verified, 76 ICD-9 Code, 95, 102, 104 Immunizations, 30, 33, 43 Interventions, 37 Intra-office Messaging, 16
Creating a Message, 16 Deleting Messages, 19 Reading and Replying to a Message, 17 Sending a Message, 16
Jelly Beans, 9 Lab Company, 100 Labs, 10, 30, 33, 36, 43, 97
Faxing, 99 Future Labs, 30, 102 Stat, 98
Lack of Therapeutic Effect, 60, 61 Lock Progress Notes, 25, 34 Logging In/Out of eClinicalWorks, 6 M Jelly Bean, 17 Medical History, 36, 50, 71
History Verified, 73 Medical Summary, 43 Medication History, 37 Medispan Pharmaceutical List, 59 Menus, 8 Messages, 10 Messages Band, 17 Messaging. See Intra-office Messaging Multum Pharmaceutical List, 59

Front Office 1 117
eClin
ical
Wo
rks
My Settings, 41 N.K.D.A., 62 Navigation Bands, 10, 23 Navigation Toolbar, 9 New Telephone Encounter, 84, 88 Nonstructured Allergies, 58 Office Visits, 10, 22, 35, 68 Olives, 9, 23 Operative Report, 37 Order, 30
Diagnostic Imaging, 93, 104 Future Labs, 102 Labs, 93 View Orders, 25
Parts of the eClinicalWorks Screen, 7 Past Medical History, 58, 62, 71, 73 Patient Dashboard Taskbar, 9 Patient Graphs, 67 Patient Hub, 12, 14, 35, 38, 39, 93, 94
Hub Buttons, 13 Patient Hub Chart Panel, 13 Patient Hub Toolbar, 12
Patient Information, 12, 14 Patient Lookup, 8, 14, 38, 93, 94, 102, 104,
107 Physical Visit, 36, 44, 74 Practice Band, 22, 35, 39 Practice Defaults, 52 Pregnant, 73 Prescription Medications, 30 Preventive Medicine, 36 Print/Fax Window, 99 Problem List, 40 Procedure Codes, 29 Procedures, 30, 43 Professional Level Codes, 29 Progress Notes, 10, 33, 37, 93, 94
Accessing Progress Notes, 13, 35, 38 Chart Panel, 40, 41 Dashboard, 14 Demographic Information, 38 Lock Progress Notes, 25 Navigating, 38 Navigation Toolbar, 46 Patient Dashboard, 38 Patient Dashboard Chart Links, 43 Patient Dashboard Notes, 42 SOAP Hyperlinks, 44, 45
Types of Progress Notes, 36 Viewing, 25, 39
Reaction, 59, 61 Reason for Call, 85, 102, 104 Reason for Visit, 29, 36, 48 Referrals, 10, 30 Refilled Medicines, 89 Refresh Office Visits Window, 25 Regular Visit, 36 Resource Schedule, 10, 11, 35, 39 Room Number, 26, 27 Rx
Rx History, 37 Schedule
S Jelly Bean, 22 Side Effects, 60, 61 SOAP Notes, 44, 45 Social History, 33, 36, 80
Social History Verified, 81 Starting eClinicalWorks, 6 Status Codes, 26 Stethoscope Indicator, 68 Structured Allergies, 58 SureScripts, 10 Surgical History, 36, 74
History Verified, 75 T Jelly Bean, 84, 102 Telephone Encounter, 10
Action Taken, 87 Addendums, 109 Addressed, 87 Assign To Field, 85, 87, 93 Caller Field, 85, 93, 102, 104 Completing the Telephone Encounter, 101 Diagnostic Imaging, 93, 104 Fax Prescription, 91 High Priority, 85 Labs, 93 Locked Telephone Encounter, 107 Message Tab, 87 New Telephone Encounter, 84, 93, 94, 102 Reason for Call, 85, 102, 104 Respond to Telephone Encounter, 86 Rx Tab, 88, 89 Select a Patient, 85 Status, 101 Virtual Tab, 93
Treatment, 94, 104

118 Index
eClin
ical
Wo
rks
User Settings, 22 View
Orders, 25 Progress Notes, 25, 35, 39
Virtual Visit, 93, 100, 102, 104 Visit
Duration, 26, 28 Follow Up, 29 Physical Visit, 36, 44
Reason for Visit, 29, 36, 48 Regular Visit, 36 Visit Type Codes, 36 Visit Types, 36 Wait Time, 28
Vitals, 63, 64, 65, 68 Growth Charts, 66 Patient Graphs, 67 Weight, 64