Embed Size (px)
Citation preview

Mike Anderson [email protected]
Herndon High School
FRC Team #116
Embedded Linux Moves into High School
ELC-SanJose-0324-2 Copyright 2015, The PTR Group, Inc.
Goals
Why switch controls?
The roboRIO Controller
Peripherals
CAN bus
Example code
Summary

ELC-SanJose-0324-3 Copyright 2015, The PTR Group, Inc.
Goals
The goal of this presentation discuss the
deployment of embedded Linux into high
school robotics programs
New FIRST Robotics Competition roboRIO
controller
But, you should leave here some idea of the new
direction for FIRST controllers
Come to the showcase for more info

ELC-SanJose-0324-4 Copyright 2015, The PTR Group, Inc.
FIRST High School Robotics
FIRST Robotics Competition (http://USFirst.org) For Inspiration and Recognition of Science and Technology Founded by Dean Kamen (inventor of Segway among others) ~2904 teams reaching ~73,000 students in 19 countries
Two primary programs in high schools FIRST Tech Challenge
New game every year Smaller robots using newly announced Android-based robot controller
Code in Java (maybe C/C++ via NDK)
FIRST Robotics Competition New game every year 6 week build season Robots up to 120 lbs Powered by 12V SLA battery Code in labVIEW, C/C++ or Java
ELC-SanJose-0324-5 Copyright 2015, The PTR Group, Inc.
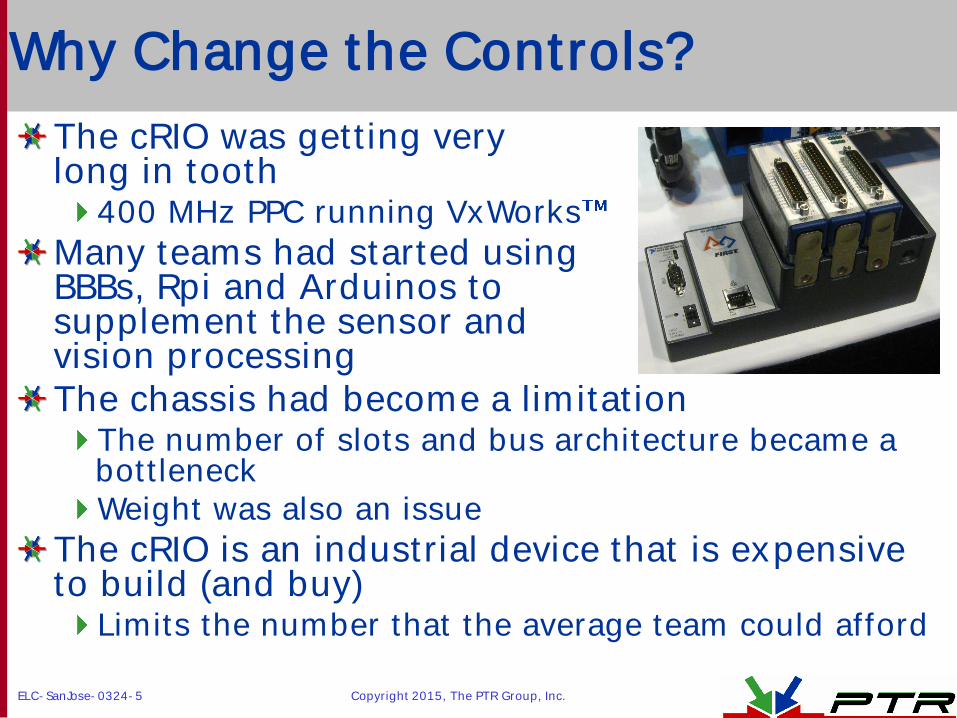
Why Change the Controls?
The cRIO was getting very long in tooth
400 MHz PPC running VxWorks
Many teams had started using BBBs, Rpi and Arduinos to supplement the sensor and vision processing The chassis had become a limitation
The number of slots and bus architecture became a bottleneck Weight was also an issue
The cRIO is an industrial device that is expensive to build (and buy)
Limits the number that the average team could afford
ELC-SanJose-0324-6 Copyright 2015, The PTR Group, Inc.
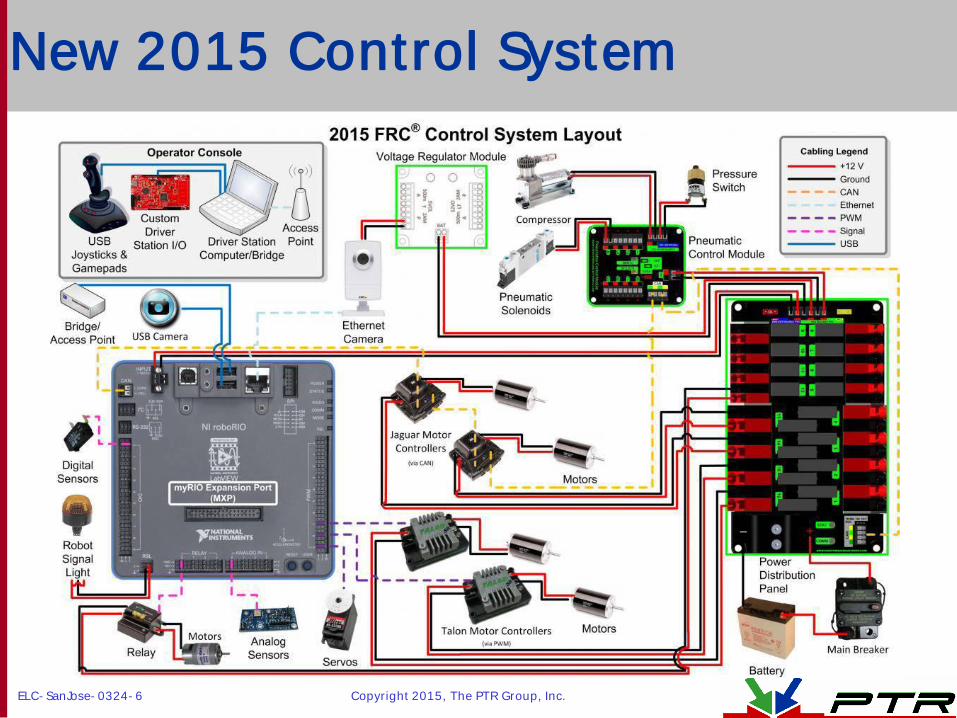
New 2015 Control System

ELC-SanJose-0324-7 Copyright 2015, The PTR Group, Inc.
The RoboRIO
Made by National Instruments expressly for high school STEM applications
Similar to myRIO unit built for college-level applications
An ARM-based single board computer that increases performance and combines the digital side car into a smaller and lighter platform
Dual-core, 667 MHz ARM Cortex A9 with:
256 MBs RAM (232 MBs usable) 512 MBs flash (386 MBs usable) Xilinx Zync-7020 All Programmable SoC
Running NI RT-Linux 3.2.35-rt52 Linux kernel
File system is derived from Yocto/OE project Uses the same packages as the ARM Angstrom/Poky distribution ipk format packages that use opkg package manager
ELC-SanJose-0324-8 Copyright 2015, The PTR Group, Inc.
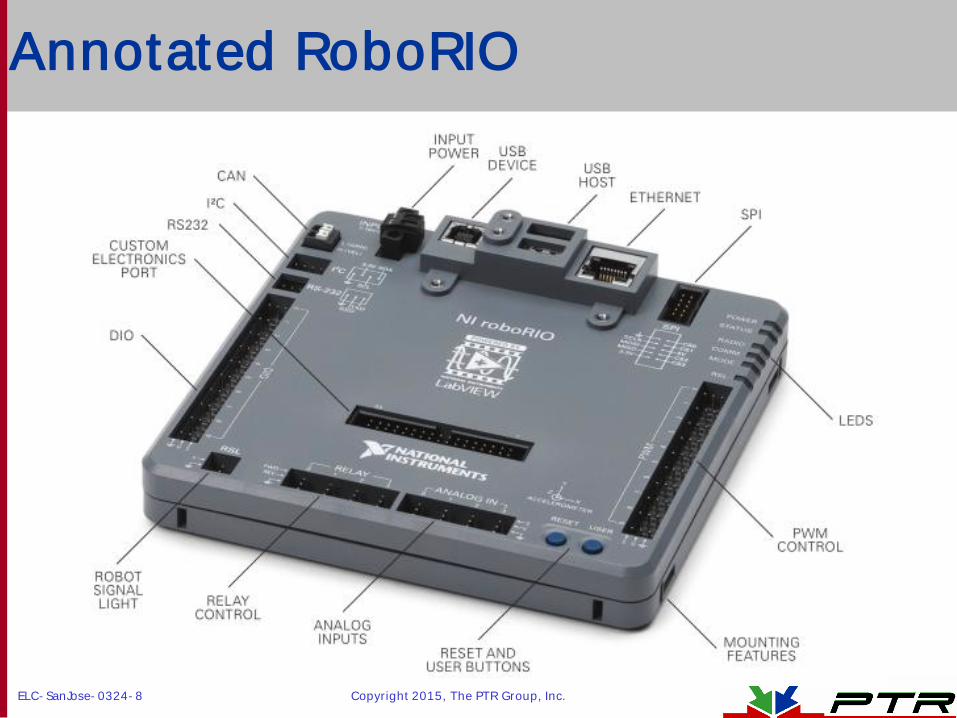
Annotated RoboRIO

ELC-SanJose-0324-9 Copyright 2015, The PTR Group, Inc.
Power-Related Info
The RoboRIO requires 7-16VDC Max current 45W Idle current 5W
Most of the signals are 5V tolerant Voltages are:
3.3V (max 1.225A) 5V (max 1A) 6V (max 2.2A) 7-16V (120mA)
The UART is 5V EIA RS232 Ready to plug into a PC Do not plug directly into BBB, Rpi or Arduinos
Need to use level shifters on the UART or the magic blue smoke will escape!
ELC-SanJose-0324-10 Copyright 2015, The PTR Group, Inc.
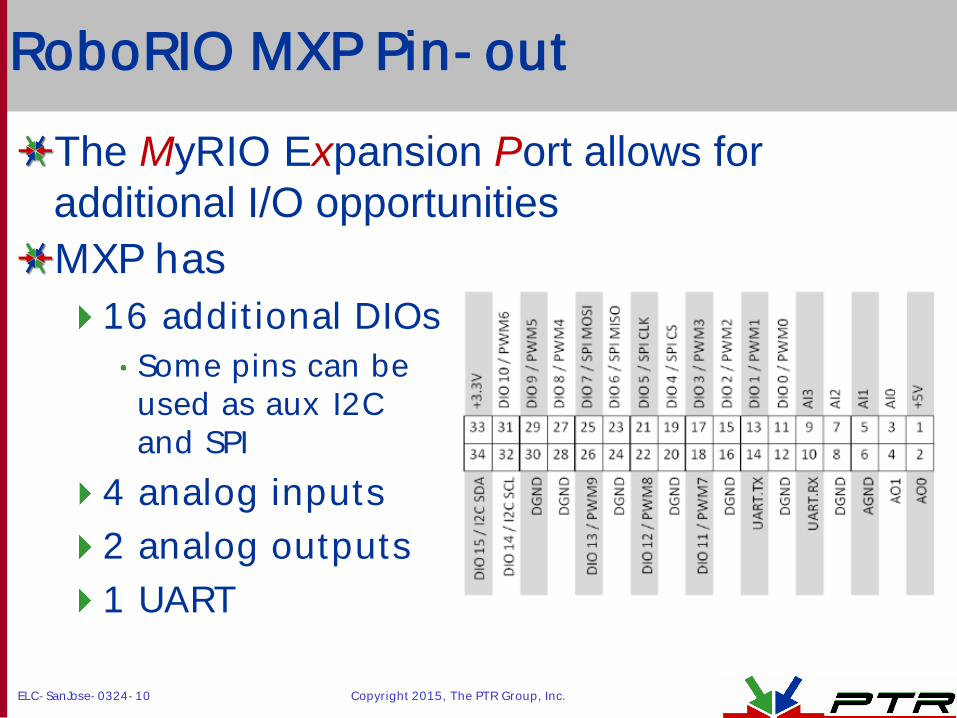
RoboRIO MXP Pin-out
The MyRIO Expansion Port allows for
additional I/O opportunities
MXP has
16 additional DIOs
Some pins can be used as aux I2C and SPI
4 analog inputs
2 analog outputs
1 UART
ELC-SanJose-0324-11 Copyright 2015, The PTR Group, Inc.
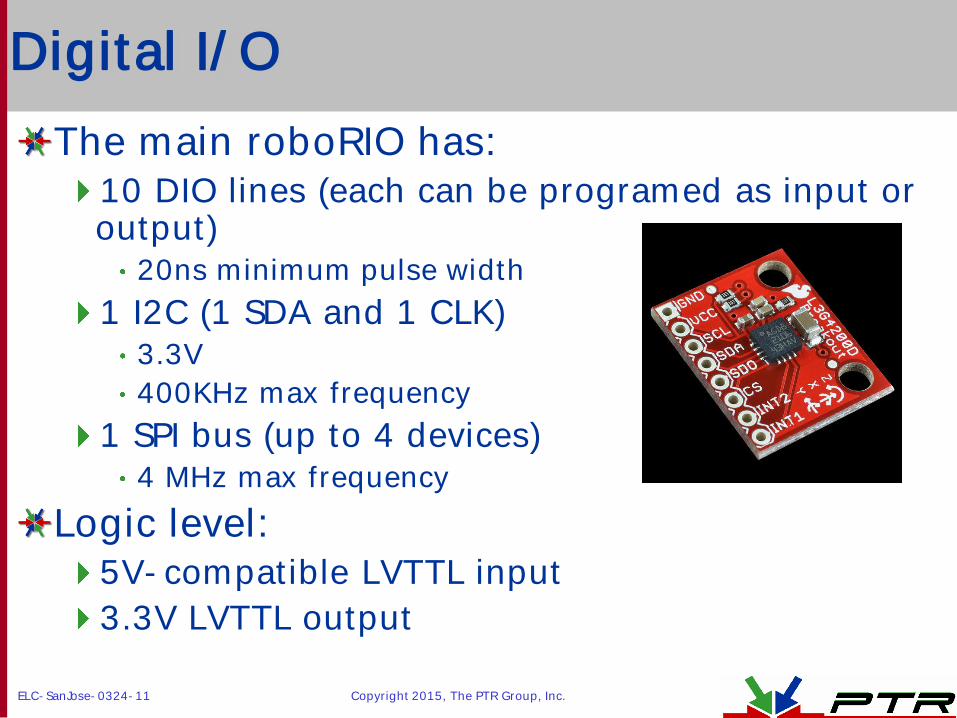
Digital I/O
The main roboRIO has: 10 DIO lines (each can be programed as input or output)
20ns minimum pulse width
1 I2C (1 SDA and 1 CLK) 3.3V
400KHz max frequency
1 SPI bus (up to 4 devices) 4 MHz max frequency
Logic level: 5V-compatible LVTTL input
3.3V LVTTL output
ELC-SanJose-0324-12 Copyright 2015, The PTR Group, Inc.
PWM and Relay Lines
10 PWM channels Output only 15mA max output current 330 ohm resistor in series
4 relay channels 4 forward, 4 reverse 5V output 7.5mA max current 680 ohm resistor in series
Max frequency 150 KHz Output High Voltage: 4.75V-5.25V max Output Low Voltage: 0.0V-0.25V max

ELC-SanJose-0324-13 Copyright 2015, The PTR Group, Inc.
Analog I/O
Analog input:
500 kS/s @ 12-bit resolution
+/- 16V overvoltage protection
500k ohm input impedance @ 500 kS/s
Analog output:
345 kS/s @ 12-bit resolution
+/- 16V overvoltage protection
0-5V output range
50 mV accuracy
3mA current drive

ELC-SanJose-0324-14 Copyright 2015, The PTR Group, Inc.
Onboard 3-axis Accelerometer
+/- 8G range
12-bit resolution
800 S/s
Very little information available during the beta
cycle about programming
ELC-SanJose-0324-15 Copyright 2015, The PTR Group, Inc.
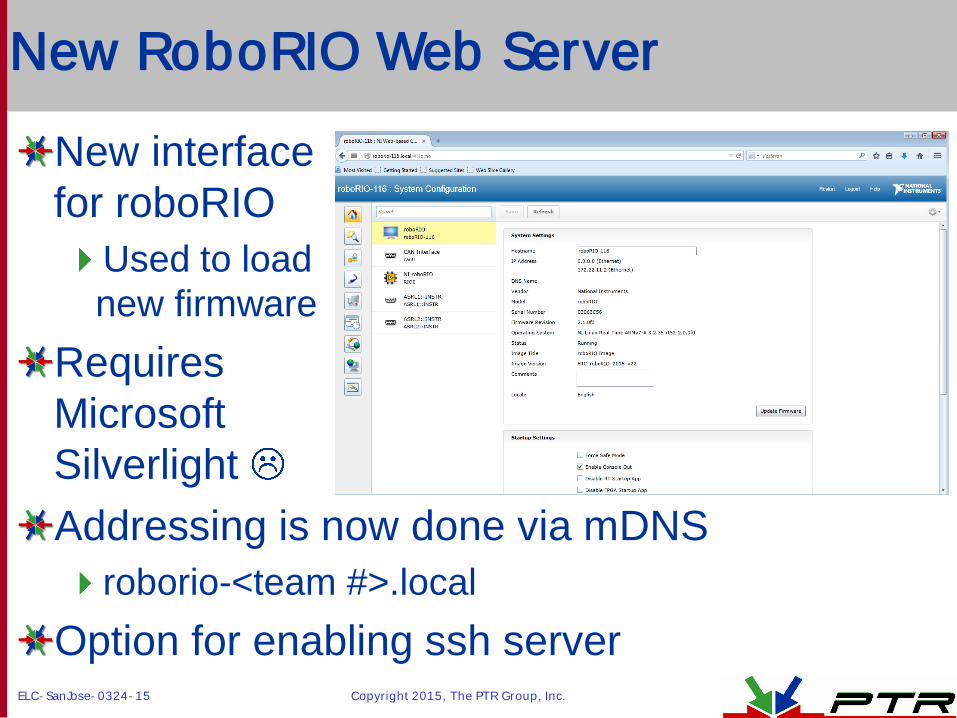
New RoboRIO Web Server
New interface
for roboRIO
Used to load
new firmware
Requires
Microsoft
Silverlight
Addressing is now done via mDNS
roborio-<team #>.local
Option for enabling ssh server
ELC-SanJose-0324-16 Copyright 2015, The PTR Group, Inc.
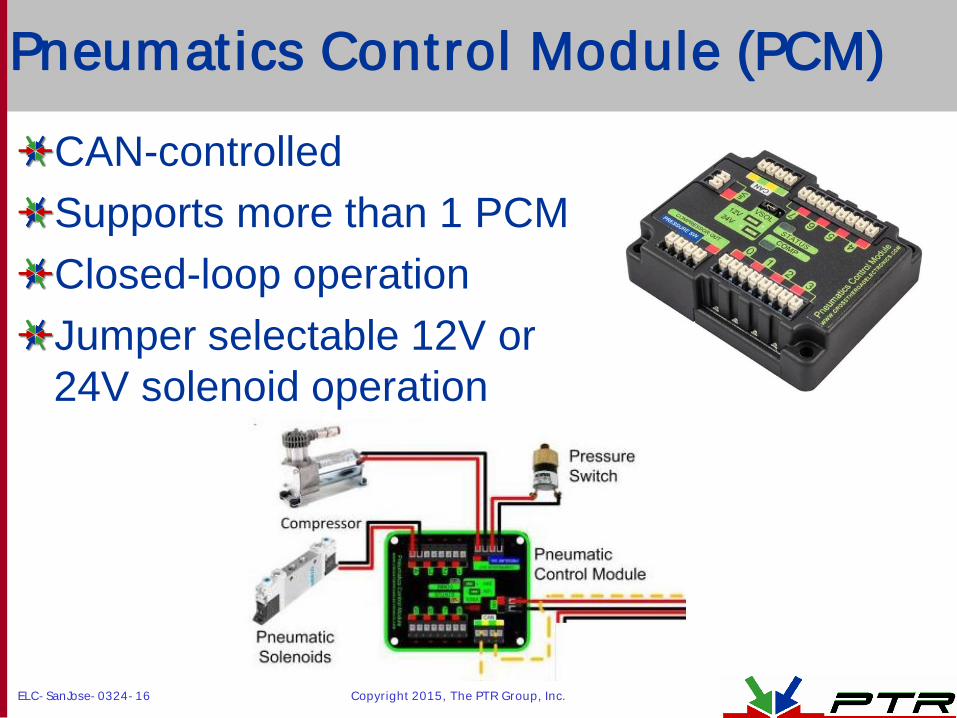
Pneumatics Control Module (PCM)
CAN-controlled
Supports more than 1 PCM
Closed-loop operation
Jumper selectable 12V or
24V solenoid operation

ELC-SanJose-0324-17 Copyright 2015, The PTR Group, Inc.
Voltage Regulator Module
Regulated 5V and
12V
Both 500mA and
2A
Great for powering
Wi-Fi access point
Good brown-out
capability
ELC-SanJose-0324-18 Copyright 2015, The PTR Group, Inc.
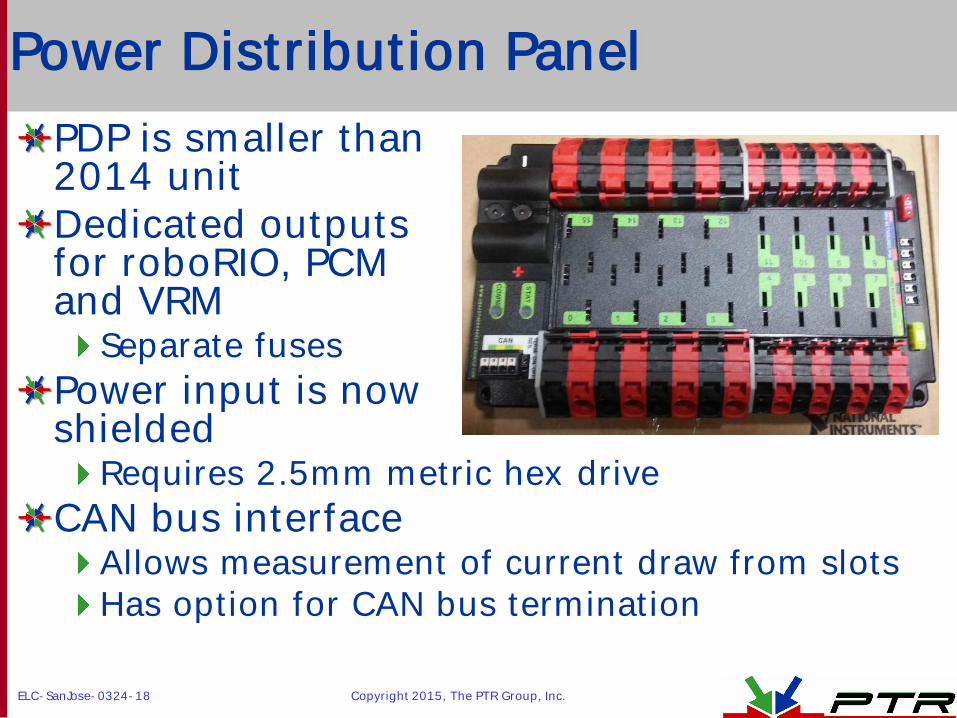
Power Distribution Panel
PDP is smaller than 2014 unit Dedicated outputs for roboRIO, PCM and VRM
Separate fuses
Power input is now shielded
Requires 2.5mm metric hex drive
CAN bus interface Allows measurement of current draw from slots Has option for CAN bus termination
ELC-SanJose-0324-19 Copyright 2015, The PTR Group, Inc.
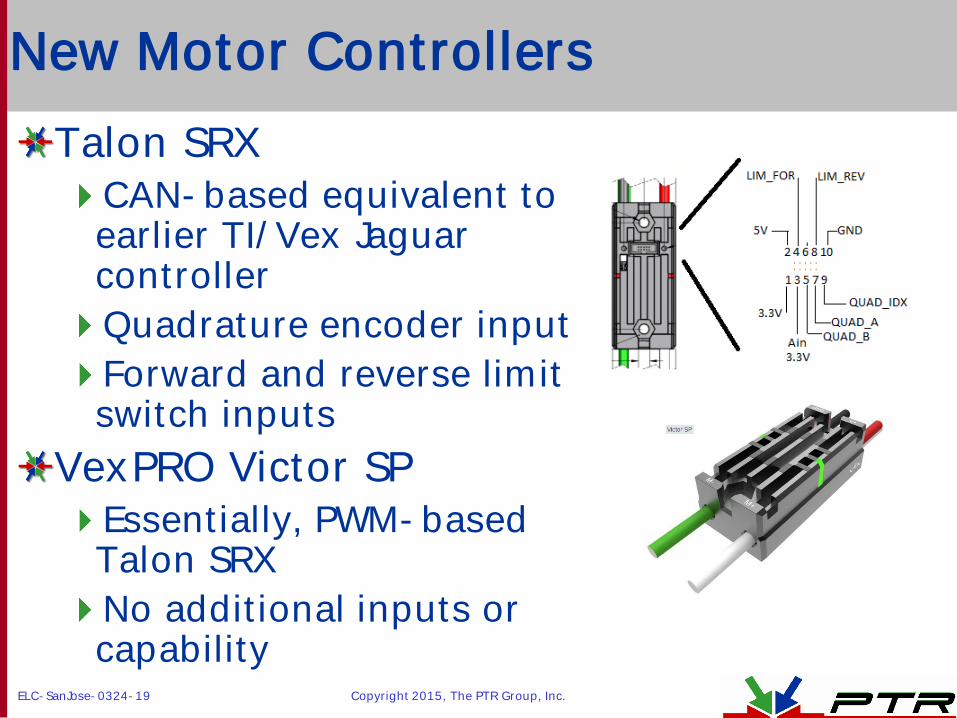
New Motor Controllers
Talon SRX CAN-based equivalent to earlier TI/Vex Jaguar controller
Quadrature encoder input
Forward and reverse limit switch inputs
VexPRO Victor SP Essentially, PWM-based Talon SRX
No additional inputs or capability

ELC-SanJose-0324-20 Copyright 2015, The PTR Group, Inc.
CAN Bus
Controller Area Network
CAN is very reliable
CAN bus got a bad rep from the early Jaguar motor controllers
Finicky RJ12 (6P4C) connectors Tricky termination requirements Slow update speeds Thin traces would melt if the motor stalled for excessive time
If you want to use Jaguars, they must be wired separately
Their CAN packet format is different than the rest of the CAN control system Suggest using CTRE 2CAN to speed Jaguar CAN updates
ELC-SanJose-0324-21 Copyright 2015, The PTR Group, Inc.
CAN Bus #2
New PCM, PDP, Talon SRX and roboRIO all have CAN bus support
Two-wire daisy chain with fail-through capability
Much faster than serial CAN from earlier seasons
RoboRIO has CAN termination
PDP has a jumper to select termination option
CAN bus is *required* for PCM and PDP (if you want current-related data)
You can have more than one PCM on the robot if you need more solenoids
ELC-SanJose-0324-22 Copyright 2015, The PTR Group, Inc.
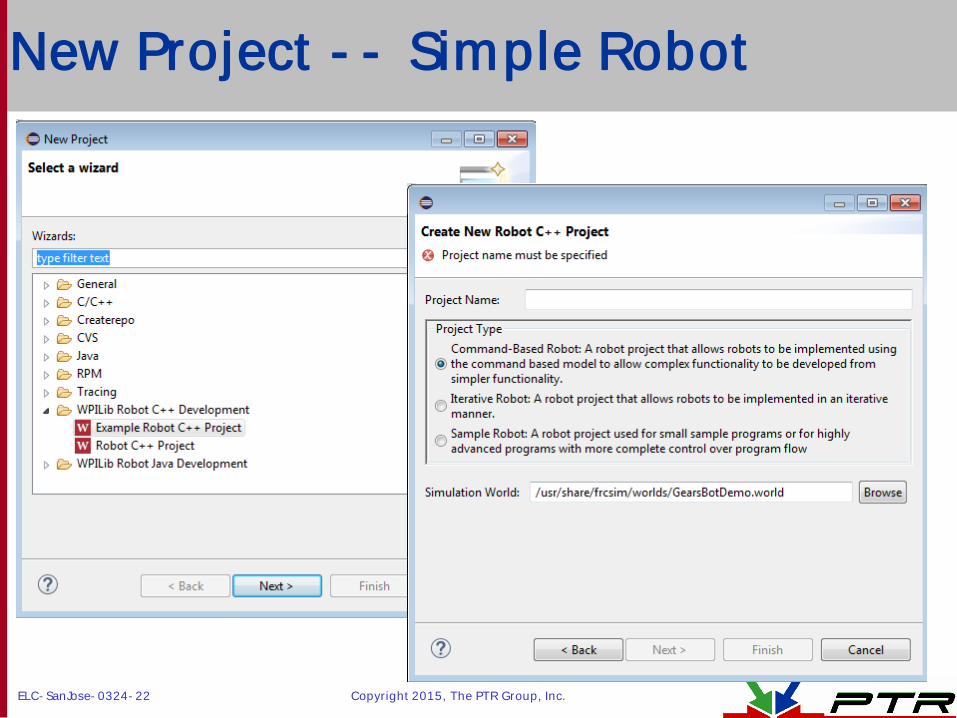
New Project -- Simple Robot

ELC-SanJose-0324-23 Copyright 2015, The PTR Group, Inc.
New Project Result

ELC-SanJose-0324-24 Copyright 2015, The PTR Group, Inc.
Build the Project
Eclipse will default to building the project automatically
However, you can clean and build the project manually
Use the Project menu to configure the auto-build feature
ELC-SanJose-0324-25 Copyright 2015, The PTR Group, Inc.
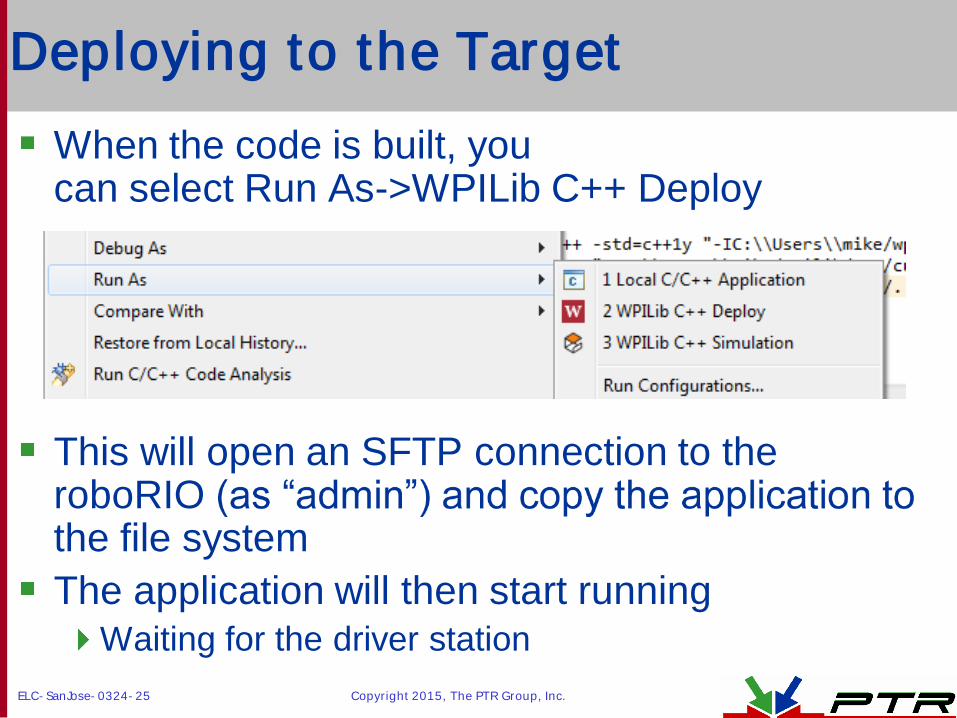
Deploying to the Target
When the code is built, you can select Run As->WPILib C++ Deploy
This will open an SFTP connection to the roboRIO the file system
The application will then start running Waiting for the driver station

ELC-SanJose-0324-26 Copyright 2015, The PTR Group, Inc.
Example WPILib Robot Program
#include "WPILib.h"
#include "CameraFeeds.h"
class IntermediateVisionRobot: public SampleRobot {
CANTalon *m_motor1;
CANTalon *m_motor2;
CANTalon *m_motor3;
CANTalon *m_motor4;
// Camerafeeds
CAMERAFEEDS *cameraFeeds;
// Encoder
Encoder *omniWheel;
// Joystick with which to control the relay.
Joystick *m_stick;
RobotDrive *robotDrive; // robot drive system
// Numbers of the buttons to be used for controlling the Relay.
const int kCam0Button = 1;
const int kCam1Button = 2;
const bool kError = false;
const bool kOk = true;
ELC-SanJose-0324-27 Copyright 2015, The PTR Group, Inc.
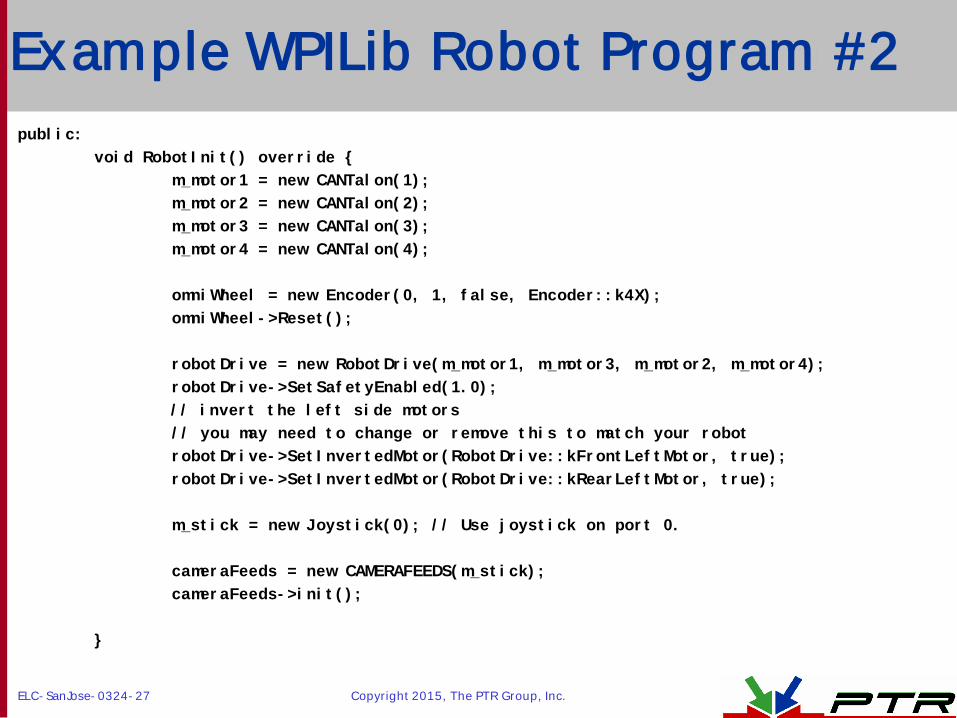
Example WPILib Robot Program #2
public:
void RobotInit() override {
m_motor1 = new CANTalon(1);
m_motor2 = new CANTalon(2);
m_motor3 = new CANTalon(3);
m_motor4 = new CANTalon(4);
omniWheel = new Encoder(0, 1, false, Encoder::k4X);
omniWheel->Reset();
robotDrive = new RobotDrive(m_motor1, m_motor3, m_motor2, m_motor4);
robotDrive->SetSafetyEnabled(1.0);
// invert the left side motors
// you may need to change or remove this to match your robot
robotDrive->SetInvertedMotor(RobotDrive::kFrontLeftMotor, true);
robotDrive->SetInvertedMotor(RobotDrive::kRearLeftMotor, true);
m_stick = new Joystick(0); // Use joystick on port 0.
cameraFeeds = new CAMERAFEEDS(m_stick);
cameraFeeds->init();
}
ELC-SanJose-0324-28 Copyright 2015, The PTR Group, Inc.
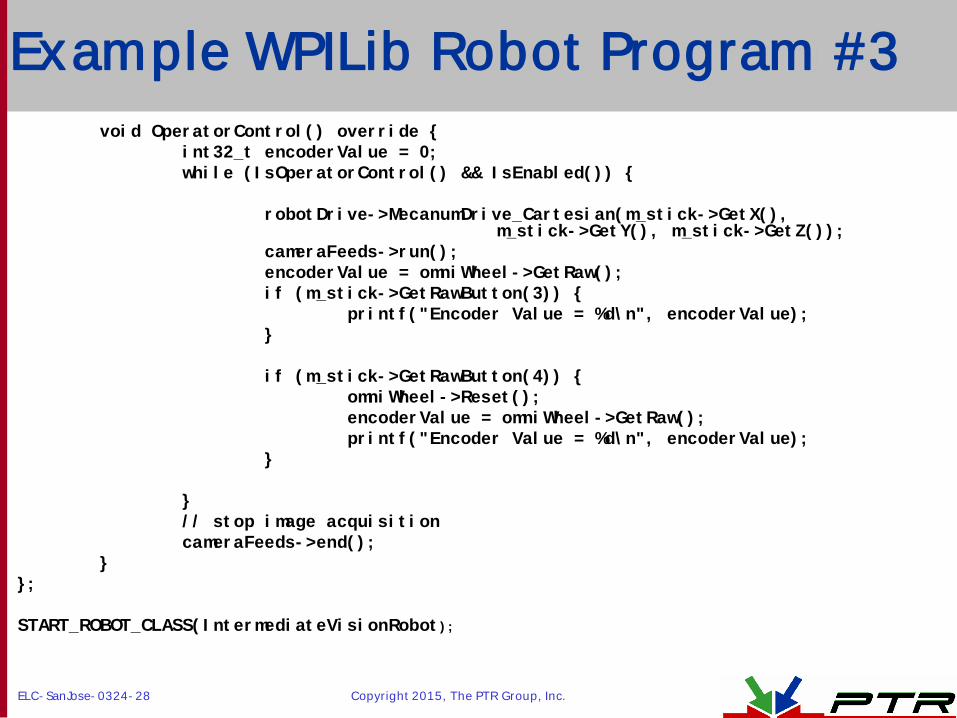
Example WPILib Robot Program #3
void OperatorControl() override { int32_t encoderValue = 0; while (IsOperatorControl() && IsEnabled()) { robotDrive->MecanumDrive_Cartesian(m_stick->GetX(), m_stick->GetY(), m_stick->GetZ()); cameraFeeds->run(); encoderValue = omniWheel->GetRaw(); if (m_stick->GetRawButton(3)) { printf("Encoder Value = %d\n", encoderValue); } if (m_stick->GetRawButton(4)) { omniWheel->Reset(); encoderValue = omniWheel->GetRaw(); printf("Encoder Value = %d\n", encoderValue); } } // stop image acquisition cameraFeeds->end(); } }; START_ROBOT_CLASS(IntermediateVisionRobot);
ELC-SanJose-0324-29 Copyright 2015, The PTR Group, Inc.
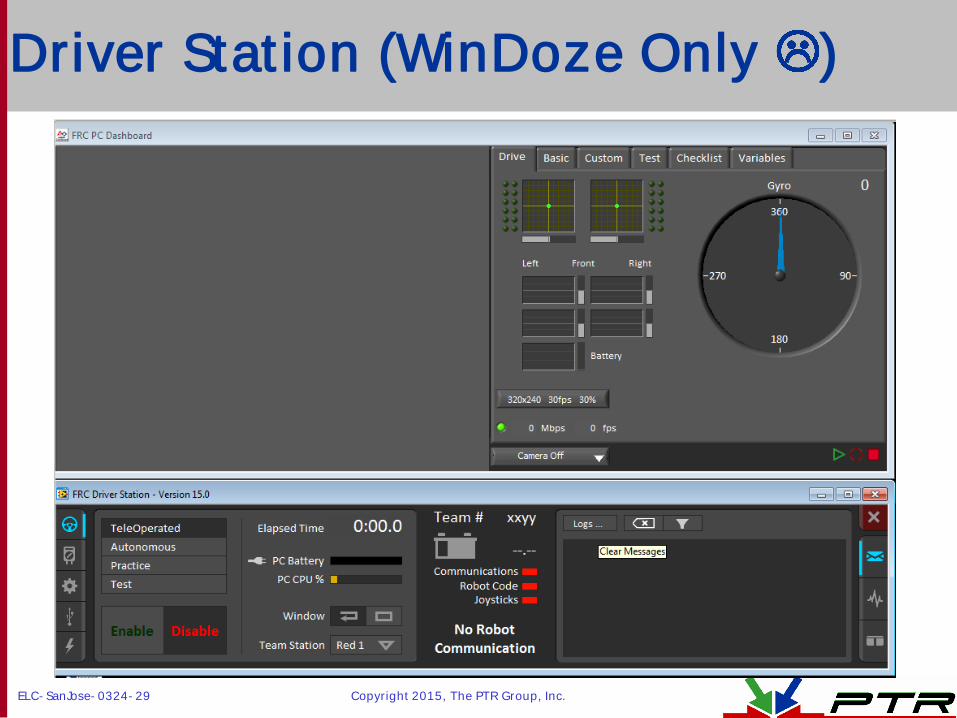
Driver Station (WinDoze Only )
ELC-SanJose-0324-30 Copyright 2015, The PTR Group, Inc.
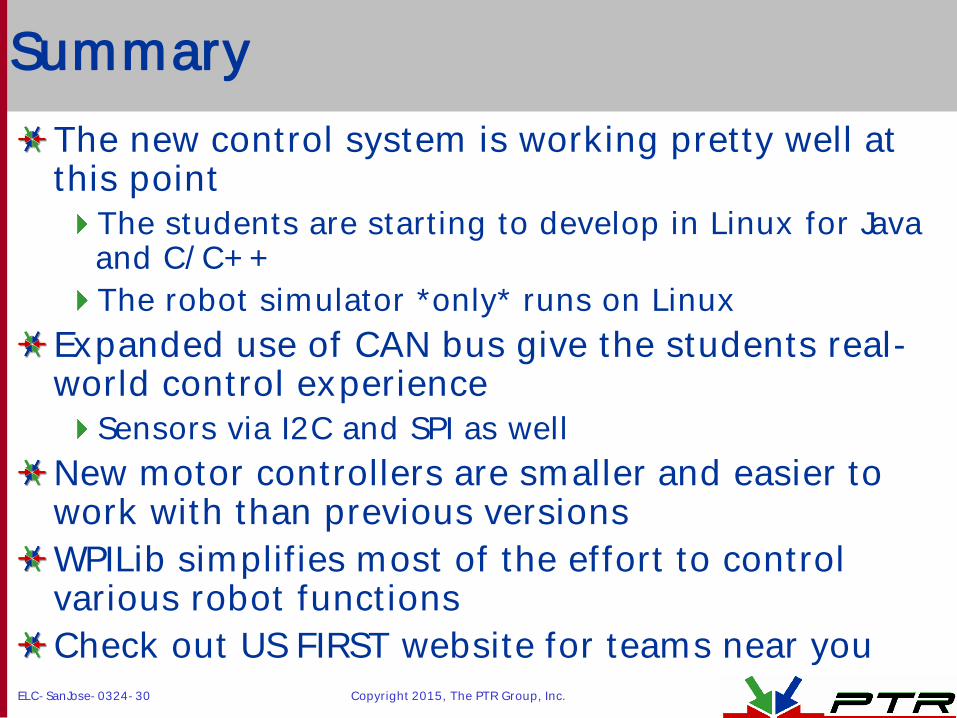
Summary
The new control system is working pretty well at this point
The students are starting to develop in Linux for Java and C/C++
The robot simulator *only* runs on Linux
Expanded use of CAN bus give the students real-world control experience
Sensors via I2C and SPI as well
New motor controllers are smaller and easier to work with than previous versions
WPILib simplifies most of the effort to control various robot functions
Check out US FIRST website for teams near you