Embed Size (px)
Citation preview
Embedded Studio forRISC-V Reference Manual
Version: 6.10
Copyright 2014-2021 SEGGER Microcontroller GmbH
Copyright 1997-2021 Rowley Associates Ltd.

Embedded Studio for RISC-V Reference Manual
2
Embedded Studio for RISC-V Reference Manual Contents
3
ContentsIntroduction ............................................................................................................................................................................................... 11
What is SEGGER Embedded Studio for RISC-V? ........................................................................................................... 12
What we don't tell you ........................................................................................................................................................... 13
Getting Started ........................................................................................................................................................................... 14
Text conventions ....................................................................................................................................................................... 15
Release notes .............................................................................................................................................................................. 17
SEGGER Embedded Studio User Guide .......................................................................................................................................... 29
SEGGER Embedded Studio standard layout ................................................................................................................. 30
Menu bar ........................................................................................................................................................................ 31
Title bar ........................................................................................................................................................................... 32
Status bar ....................................................................................................................................................................... 33
Editing workspace ...................................................................................................................................................... 35
Docking windows ....................................................................................................................................................... 36
Dashboard ...................................................................................................................................................................... 37
SEGGER Embedded Studio help and assistance .......................................................................................................... 38
Creating and managing projects ....................................................................................................................................... 40
Solutions and projects .............................................................................................................................................. 41
Creating a project ....................................................................................................................................................... 44
Adding existing files to a project ........................................................................................................................ 45
Adding new files to a project ................................................................................................................................ 46
Removing a file, folder, project, or project link ............................................................................................. 47
Building your application ...................................................................................................................................................... 48
Creating variants using configurations ............................................................................................................ 50
Embedded Studio for RISC-V Reference Manual Contents
4
Project options ............................................................................................................................................................. 52
Configurations and project options ................................................................................................................... 54
Project macros ............................................................................................................................................................. 56
Dependencies and build order ............................................................................................................................. 58
Linking and section placement ............................................................................................................................ 59
Using source control ................................................................................................................................................................ 61
Source control capabilities ..................................................................................................................................... 62
Configuring source-control providers ............................................................................................................... 63
Connecting to the source-control system ....................................................................................................... 64
File source-control status ........................................................................................................................................ 65
Source-control operations ...................................................................................................................................... 66
Adding files to source control .............................................................................................................................. 67
Updating files ............................................................................................................................................................... 68
Committing files .......................................................................................................................................................... 69
Reverting files ............................................................................................................................................................... 70
Locking files .................................................................................................................................................................. 71
Unlocking files .............................................................................................................................................................. 72
Removing files from source control ................................................................................................................... 73
Showing differences between files ..................................................................................................................... 74
Source-control properties ....................................................................................................................................... 75
Subversion provider .................................................................................................................................................. 76
CVS provider ................................................................................................................................................................. 78
Package management ............................................................................................................................................................ 80
Exploring your application ................................................................................................................................................... 84
Project explorer ........................................................................................................................................................... 85
Source navigator window ....................................................................................................................................... 90
References window .................................................................................................................................................... 92
Symbol browser window ......................................................................................................................................... 93
Stack usage window .................................................................................................................................................. 98
Memory usage window ............................................................................................................................................ 99
Bookmarks window ................................................................................................................................................. 102
Code Outline Window ............................................................................................................................................ 103
Analyzing Source Code .......................................................................................................................................... 104
Editing your code ................................................................................................................................................................... 105
Basic editing ............................................................................................................................................................... 106
Moving the insertion point ................................................................................................................... 107
Adding text ................................................................................................................................................... 109
Deleting text ................................................................................................................................................ 110
Using the clipboard .................................................................................................................................. 111
Undo and redo ............................................................................................................................................ 112
Drag and drop ............................................................................................................................................. 113
Embedded Studio for RISC-V Reference Manual Contents
5
Searching ....................................................................................................................................................... 114
Advanced editing ..................................................................................................................................................... 115
Indenting source code ............................................................................................................................. 116
Commenting out sections of code ..................................................................................................... 118
Adjusting letter case ................................................................................................................................ 119
Using bookmarks ...................................................................................................................................................... 120
Find and Replace window .................................................................................................................................... 122
Clipboard Ring window ......................................................................................................................................... 124
Mouse-click accelerators ....................................................................................................................................... 126
Regular expressions ................................................................................................................................................ 128
Debugging windows ............................................................................................................................................................. 130
Locals window ........................................................................................................................................................... 130
Globals window ........................................................................................................................................................ 132
Watch window ........................................................................................................................................................... 134
Register window ....................................................................................................................................................... 137
Memory window ....................................................................................................................................................... 140
Breakpoints window ............................................................................................................................................... 144
Call Stack window .................................................................................................................................................... 148
Threads window ....................................................................................................................................................... 151
Execution Profile window ..................................................................................................................................... 155
Execution Trace window ....................................................................................................................................... 156
Debug file search editor ........................................................................................................................................ 157
Debug Terminal window ...................................................................................................................................... 159
Breakpoint expressions ........................................................................................................................................................ 160
Debug expressions ................................................................................................................................................................. 161
Utility windows ........................................................................................................................................................................ 162
Terminal emulator window ................................................................................................................................. 162
Command-line options ....................................................................................................................................................................... 163
-D (Define macro) ................................................................................................................................................................... 164
-noclang (Disable Clang support) .................................................................................................................................... 165
-noload (Disable loading of last project) ..................................................................................................................... 166
-packagesdir (Specify packages directory) .................................................................................................................. 167
-permit-multiple-studio-instances (Permit multiple studio instances) ........................................................... 168
-rootuserdir (Set the root user data directory) .......................................................................................................... 169
-save-settings-off (Disable saving of environment settings) ............................................................................... 170
-set-setting (Set environment setting) .......................................................................................................................... 171
-templatesfile (Set project templates path) ................................................................................................................ 172
Uninstalling SEGGER Embedded Studio for RISC-V ............................................................................................................... 173
Using the SEGGER Linker ................................................................................................................................................................... 177
Using the SEGGER Runtime Library .............................................................................................................................................. 179
C++ Library User Guide ...................................................................................................................................................................... 181

Embedded Studio for RISC-V Reference Manual Contents
6
Standard template library .................................................................................................................................................. 183
Subset API reference ............................................................................................................................................................. 184
<new> - memory allocation ................................................................................................................................ 185
operator delete ......................................................................................................................................................... 186
operator new .............................................................................................................................................................. 187
set_new_handler ...................................................................................................................................................... 188
Utilities Reference ................................................................................................................................................................................. 189
Compiler driver ........................................................................................................................................................................ 190
File naming conventions ...................................................................................................................................... 191
Command-line options .......................................................................................................................................... 192
-allow-multiple-definition (Allow multiple symbol definition) .............................................. 193
-ansi (Warn about potential ANSI problems) ................................................................................. 194
-ar (Archive output) .................................................................................................................................. 195
-abi (RISC-V abi) .......................................................................................................................................... 196
-arch (RISC-V architecture) ..................................................................................................................... 197
-builtins (Use Builtins) .............................................................................................................................. 198
-c (Compile to object code, do not link) .......................................................................................... 199
-clang (Use clang compiler/assembler) ............................................................................................ 200
-codec (Set file codec) .............................................................................................................................. 201
-common (Allocate globals in common) ......................................................................................... 202
-d (Define linker symbol) ........................................................................................................................ 203
-depend (Generate dependency file) ................................................................................................ 204
-D (Define macro symbol) ...................................................................................................................... 205
-emit-relocs (Emit relocations) ............................................................................................................. 206
-e (Set entry point symbol) .................................................................................................................... 207
-exceptions (Enable C++ Exception Support) ................................................................................ 208
-E (Preprocess) ............................................................................................................................................. 209
-fill (Fill gaps) ............................................................................................................................................... 210
-framepointer (Enable generation of framepointer) .................................................................. 211
-F (Set output format) .............................................................................................................................. 212
-g (Generate debugging information) .............................................................................................. 213
-help (Display help information) ......................................................................................................... 214
-instrument (Instrument functions) ................................................................................................... 215
-I (Define user include directories) ..................................................................................................... 216
-I- (Exclude standard include directories) ....................................................................................... 217
-J (Define system include directories) ............................................................................................... 218
-kasm (Keep assembly code) ................................................................................................................ 219
-kldscript (Keep linker script) ............................................................................................................... 220
-kpp (Keep preprocessor output) ....................................................................................................... 221
-K (Keep linker symbol) ........................................................................................................................... 222
-l- (Do not link standard libraries) ...................................................................................................... 223
Embedded Studio for RISC-V Reference Manual Contents
7
-lto (Enable link time optimization) ................................................................................................... 224
-L (Set library directory path) ............................................................................................................... 225
-memorymap (Memory map file) ........................................................................................................ 226
-memorymapmacros (Memory map macros) ................................................................................ 227
-M (Display linkage map) ....................................................................................................................... 228
-n (Dry run, no execution) ...................................................................................................................... 229
-nostderr (No stderr output) ................................................................................................................. 230
-O (Optimize output) ................................................................................................................................ 231
-o (Set output file name) ........................................................................................................................ 232
-patch (Run patch command) ............................................................................................................... 233
-placement (Section placement file) ................................................................................................. 234
-placementmacros (Section placement macros) .......................................................................... 235
-placementsegments (Section placement segments) ................................................................ 236
-printf (Select printf capability) ........................................................................................................... 237
-rtti (Enable C++ RTTI Support) ........................................................................................................... 238
-R (Set section name) ............................................................................................................................... 239
-scanf (Select scanf capability) ............................................................................................................. 240
-segger (Use SEGGER assembler/compiler/linker) ....................................................................... 241
-std (Select language standard) .......................................................................................................... 242
-strip (Strip symbols from executable) ............................................................................................. 243
-symbols (Link symbols) ......................................................................................................................... 244
-T (Supply linker script) ........................................................................................................................... 245
-U (Undefine macro symbol) ................................................................................................................. 246
-unwindtables (Generate unwind tables) ....................................................................................... 247
-v (Verbose execution) ............................................................................................................................. 248
-w (Suppress warnings) ........................................................................................................................... 249
-we (Treat warnings as errors) ............................................................................................................. 250
-W (Pass option to tool) .......................................................................................................................... 251
-x (Specify file types) ................................................................................................................................ 252
Command-Line Project Builder ........................................................................................................................................ 253
Building with a SEGGER Embedded Studio project file ........................................................................... 254
Building without a SEGGER Embedded Studio project file .................................................................... 256
Command-line options .......................................................................................................................................... 257
-batch (Batch build) .................................................................................................................................. 258
-config (Select build configuration) ................................................................................................... 259
-clean (Remove output files) ................................................................................................................. 260
-D (Define macro) ...................................................................................................................................... 261
-echo (Show command lines) ............................................................................................................... 262
-file (Build a named file) ......................................................................................................................... 263
-packagesdir (Specify packages directory) ..................................................................................... 264
-project (Specify project to build) ...................................................................................................... 265
Embedded Studio for RISC-V Reference Manual Contents
8
-property (Set project property) ......................................................................................................... 266
-rebuild (Always rebuild) ........................................................................................................................ 267
-show (Dry run, don't execute) ............................................................................................................ 268
-solution (Specify solution to build) .................................................................................................. 269
-studiodir (Specify SEGGER Embedded Studio directory) ........................................................ 270
-template (Specify project template) ................................................................................................ 271
-time (Time the build) .............................................................................................................................. 272
-threadnum (Specify number of build threads) ............................................................................ 273
-type (Specify project type) ................................................................................................................... 274
-verbose (Show build information) .................................................................................................... 275
Command-Line Simulator ................................................................................................................................................... 276
Command-line options .......................................................................................................................................... 277
file (Elf executable file) ............................................................................................................................ 278
-segments (Specify memory segments) ........................................................................................... 279
args (User arguments) ............................................................................................................................. 280
Command-Line Scripting .................................................................................................................................................... 281
Command-line options .......................................................................................................................................... 282
-define (Define global variable) ........................................................................................................... 283
-help (Show usage) ................................................................................................................................... 284
-load (Load script file) .............................................................................................................................. 285
-define (Verbose output) ........................................................................................................................ 286
emScript classes ........................................................................................................................................................ 287
Example uses .............................................................................................................................................................. 288
Embed .......................................................................................................................................................................................... 289
Command-Line License Manager .................................................................................................................................... 290
Header file generator ............................................................................................................................................................ 291
Using the header generator ................................................................................................................................ 292
Command line options .......................................................................................................................................... 293
-regbaseoffsets (Use offsets from peripheral base) .................................................................... 294
-nobitfields (Inhibit bitfield macros) ................................................................................................. 295
Linker script file generator ................................................................................................................................................. 296
Command-line options .......................................................................................................................................... 297
-check-segment-overflow ....................................................................................................................... 298
-disable-missing-runin-error ................................................................................................................. 299
-memory-map-file ...................................................................................................................................... 300
-memory-map-macros ............................................................................................................................. 301
-no-check-unplaced-sections ................................................................................................................ 302
-section-placement-file ............................................................................................................................ 303
-section-placement-macros ................................................................................................................... 304
-symbols ......................................................................................................................................................... 305
Package generator ................................................................................................................................................................. 306
Embedded Studio for RISC-V Reference Manual Contents
9
Package manager ................................................................................................................................................................... 308
Appendices ............................................................................................................................................................................................... 309
Technical ..................................................................................................................................................................................... 310
File formats ................................................................................................................................................................. 310
Memory Map file format ......................................................................................................................... 311
Section Placement file format .............................................................................................................. 313
Project file format ...................................................................................................................................... 314
Project Templates file format ............................................................................................................... 315
Property Groups file format .................................................................................................................. 317
Package Description file format .......................................................................................................... 319
External Tools file format ....................................................................................................................... 323
Debugger Type Interpretation file format ...................................................................................... 326
Environment Options ............................................................................................................................................. 328
Building Environment Options ............................................................................................................ 328
Debugging Environment Options ...................................................................................................... 330
IDE Environment Options ...................................................................................................................... 333
Programming Language Environment Options ........................................................................... 339
Source Control Environment Options ............................................................................................... 342
Text Editor Environment Options ....................................................................................................... 344
Windows Environment Options .......................................................................................................... 356
Project Options ......................................................................................................................................................... 366
Code Options ............................................................................................................................................... 366
Debug Options ............................................................................................................................................ 389
Macros ........................................................................................................................................................................... 396
System Macros ............................................................................................................................................ 396
Build Macros ................................................................................................................................................. 399
Script classes .............................................................................................................................................................. 403
BinaryFile ....................................................................................................................................................... 403
CWSys .............................................................................................................................................................. 404
Debug .............................................................................................................................................................. 405
ElfFile ............................................................................................................................................................... 406
TargetInterface ............................................................................................................................................ 407
WScript ........................................................................................................................................................... 409

Embedded Studio for RISC-V Reference Manual Contents
10
Embedded Studio for RISC-V Reference Manual Introduction
11
IntroductionThis guide is divided into a number of sections:
IntroductionCovers installing SEGGER Embedded Studio for RISC-V on your machine and verifying that it operates
correctly, followed by a brief guide to the operation of the SEGGER Embedded Studio integrated
development environment, debugger, and other software supplied in the product.
SEGGER Embedded Studio User GuideContains information on how to use the SEGGER Embedded Studio development environment to manage
your projects, build, and debug your applications.
library_referenceContains documentation for the functions in the standard C library supplied in SEGGER Embedded Studio
for RISC-V.
riscv_target_supportContains a description of system files used for startup and debugging of 32-bit RISC-V applications.
Embedded Studio for RISC-V Reference Manual Introduction
12
What is SEGGER Embedded Studio for RISC-V?SEGGER Embedded Studio for RISC-V is a complete C/C++ development system for 32-bit RISC-V,
microcontrollers and microprocessors that runs on Windows, Mac OS and Linux.
C compiler
SEGGER Embedded Studio for RISC-V C is a faithful implementation of the ANSI and ISO standards for the
programming language C. We have added some extensions that enhance usability in a microcontroller
environment.
SEGGER Embedded Studio for RISC-V C Library
SEGGER Embedded Studio for RISC-V has its own royalty-free ANSI and ISO C compliant C library that has been
specifically designed for use within embedded systems.
SEGGER Embedded Studio IDE
SEGGER Embedded Studio for RISC-V is a streamlined integrated development environment for building, testing,
and deploying your applications. SEGGER Embedded Studio provides:
Source Code Editor:A powerful source code editor with multi-level undo and redo, makes editing your
code a breeze.
Project System:A complete project system organizes your source code and build rules.
Build System:With a single key press you can build all your applications in a solution, ready for them to be
loaded onto a target microcontroller.
Debugger and Flash Programming:You can download your programs directly into Flash and debug them
seamlessly from within the IDE using a wide range of target interfaces.
Help system:The built-in help system provides context-sensitive help and a complete reference to the
SEGGER Embedded Studio IDE and tools.
Core Simulator:As well as providing cross-compilation technology, SEGGER Embedded Studio for RISC-V
provides a PC-based fully functional simulation of the target microcontroller core so you can debug parts
of your application without waiting for hardware.
SEGGER Embedded Studio for RISC-V Tools
SEGGER Embedded Studio for RISC-V supplies command line tools that enable you to build your application on
the command line using the same project file that the IDE uses.
Embedded Studio for RISC-V Reference Manual Introduction
13
What we don't tell youThis documentation does not attempt to teach the C or assembly language programming; rather, you should
seek out one of the many introductory texts available. And similarly the documentation doesn't cover the RISCV
architecture or microcontroller application development in any great depth.
We also assume that you're fairly familiar with the operating system of the host computer being used.
C programming guides
These are must-have books for any C programmer:
Kernighan, B.W. and Ritchie, D.M., The C Programming Language (2nd edition, 1988). Prentice-Hall,
Englewood Cliffs, NJ, USA. ISBN 0-13-110362-8.
The original C bible, updated to cover the essentials of ANSI C (1990 version).
Harbison, S.P. and Steele, G.L., C: A Reference Manual (second edition, 1987). Prentice-Hall, Englewood
Cliffs, NJ, USA. ISBN 0-13-109802-0.
A nice reference guide to C, including a useful amount of information on ANSI C. Co-authored by Guy
Steele, a noted language expert.
ANSI C reference
If you're serious about C programming, you may want to have the ISO standard on hand:
ISO/IEC 9899:1990, C Standard and ISO/IEC 9899:1999, C Standard. The standard is available from your
national standards body or directly from ISO at http://www.iso.ch/.
Embedded Studio for RISC-V Reference Manual Introduction
14
Getting StartedYou will need to install a CPU support package:
Choose Tools > Package Manager
Choose the CPU support packages you wish to install and complete the dialog.
You will need to create a project:
Choose File > New Project
Select the appropriate Executable project type
Specify a location for the project
Complete the dialog selecting the appropriate Target Processor value
You will need to build the project:
Choose Build | Build 'Project'
To debug on the simulator
Choose Project | Options... to show the project options dialog
In the Search Options type in Simulator
Choose Simulator for the Target Connection option
To debug on hardware
Choose Project | Options... to show the project options dialog
In the Search Options type in J-Link
Choose J-Link for the Target Connection option
To start debugging
Choose Debug | Go
The debugger will stop the program at the main, you can now debug the application.

Embedded Studio for RISC-V Reference Manual Introduction
15
Text conventions
Menus and user interface elements
When this document refers to any user interface element, it will do so in bold font. For instance, you will often
see reference to the Project Explorer, which is taken to mean the project explorer window. Similarly, you'll see
references to the Standard toolbar which is positioned at the top of the SEGGER Embedded Studio window, just
below the menu bar on Windows and Linux.
When you are directed to select an item from a menu in SEGGER Embedded Studio, we use the form menu-
name > item-name. For instance, File > Save means that you need to click the File menu in the menu bar and
then select the Save item. This form extends to items in sub-menus, so File > Open With Binary Editor has the
obvious meaning.
Keyboard accelerators
Frequently-used commands are assigned keyboard accelerators to speed up common tasks. SEGGER Embedded
Studio uses standard Windows and Mac OS keyboard accelerators wherever possible.
Windows and Linux have three key modifiers which are Ctrl, Alt, and Shift. For instance, Ctrl+Alt+P means that
you should hold down the Ctrl and Alt buttons whilst pressing the P key; and Shift+F5 means that you should
hold down the Shift key whilst pressing F5.
Mac OS has four key modifiers which are (command), (option), (control), and (shift). Generally there is a one-
to-one correspondence between the Windows modifiers and the Mac OS modifiers: Ctrl is , Alt is , and Shift
is . SEGGER Embedded Studio on Mac OS has its own set of unique key sequences using (control) that have no
direct Windows equivalent.
SEGGER Embedded Studio on Windows and Linux also uses key chords to expand the set of accelerators. Key
chords are key sequences composed of two or more key presses. For instance, the key chord Ctrl+T, D means
that you should type Ctrl+T followed by D; and Ctrl+K, Ctrl+Z means that you should type Ctrl+T followed by
Ctrl+Z. Mac OS does not support accelerator key chords.
Code examples and human interaction
Throughout the documentation, text printed in this typeface represents verbatim communication with the
computer: for example, pieces of C text, commands to the operating system, or responses from the computer.
In examples, text printed in this typeface is not to be used verbatim: it represents a class of items, one of which
should be used. For example, this is the format of one kind of compilation command:
hcl source-file
This means that the command consists of:
The word hcl, typed exactly like that.
A source-file: not the text source-file, but an item of the source-file class, for example myprog.c.

Embedded Studio for RISC-V Reference Manual Introduction
16
Whenever commands to and responses from the computer are mixed in the same example, the commands
(i.e. the items which you enter) will be presented in this typeface. For example, here is a dialog with the
computer using the format of the compilation command given above:
c:\code\examples>hcl -v myprog.c
The user types the text hcl -v myprog.c and then presses the enter key (which is assumed and is not shown); the
computer responds with the rest.
Embedded Studio for RISC-V Reference Manual Introduction
17
Release notes
Version 6.10
Build
Updated segger-cc compiler to version 13.0.0
Updated segger-cc-ng compiler to version 13.91.1
Updated segger-ld to version 4.18.0.
Updated the Andes Technology RISC-V GCC/BINUTILS tools build to use the ast-v3_2_4-release-v5 source
release.
Add build support for RV64 instruction set. This is limited to targets that have a 32-bit address space.
Removed legacy Embedded Studio RTL.
The build macro $(LibExt) now supports Balanced library names.
Added the build macro $(MemorySegments) to pre/post link commands.
Debug
Updated J-Link software to version V7.58c.
Add debug support for RV64 instruction set. This is limited to targets that have a 32-bit address space.
IDE
Added pkg command line package manager tool.
Editor
Added code folding.
Added Edit > Others > Toggle Split Window.
Added Text Editor > Visual Appearance > Show Caret Position In Vertical Scroll Bar option.
Added Text Editor > Visual Appearance > Show Breakpoints In Vertical Scroll Bar option.
Added Text Editor > Visual Appearance > Show Bookmarks In Vertical Scroll Bar option.
Added Text Editor > Visual Appearance > Show Errors In Vertical Scroll Bar option.
Added Text Editor > Visual Appearance > Show Warnings In Vertical Scroll Bar option.
Improved appearance of gutter icons on high resolution displays.
Improved performance of delimiter matching when editing a large file.
Installer
Fixed Linux file association.
Embedded Studio for RISC-V Reference Manual Introduction
18
Version 5.66
Build
Updated segger-cc compiler to version 12.4.0
Updated segger-cc-ng compiler to version 12.95.0
Debug
Fixed size display of unsized arrays in variables display.
Display C file level statics and C++ static members in globals window.
Updated J-Link software to version V7.56d.
IDE
The Set Active Project dialog now initially selects the current active project.
Version 5.64
Build
Updated segger-rtl to version 2.28.0.
Updated segger-ld to version 4.16.1.
Debug
Updated J-Link software to version V7.56a.
Editor
Fixed tab characters not being inserted when in block selection mode.
Fixed positioning of cursor when carrying out a block insertion past the end of a line and the Use Tabs
option is set to Yes.
Editor now syntax colors files with .html file extensions.
IDE
Fixed problem reading the environment.xml file on certain systems.
Project Explorer context menu action Save Solution As... now generates a sorted project file.
Version 5.62
Build
Updated segger-cc compiler to version 12.2.4
Embedded Studio for RISC-V Reference Manual Introduction
19
Updated segger-cc-ng compiler to version 12.93.2
Updated segger-rtl to version 2.24.0.
Add support for clang, segger-cc and segger-cc-ng compilers.
Add support for RV32EC, RV32IC architectures.
Add Balanced segger-rtl library builds, selectable with Library Optimization property.
Fixed removing of project output files when project items are removed/added/excluded.
Fixed -show option for emBuild.
Updated segger-ld to version 4.14.0.
The Release configuration will now set Debugging Level to Level 2 and Optimization Level to Level 2
Balanced.
Debug
Fixed crash when displaying libcxx containers.
Fixed variable view tooltip truncating uint64_t decimal values to 19 digits.
Add debug project options Restrict Memory Access and Memory Upload Page Size.
Fix debug project option Start From Entry Point.
Add debug project option Type Interpretation File and type interpretation files for STLPort, libstdc++
and libc++.
Add disassembly support for V and B extensions.
Add array slice to debug expressions.
Updated J-Link software to version V7.54b.
Editor
Fixed syntax coloring of numerical escape codes.
Fixed syntax coloring of #include filenames.
Fixed incorrect indentation when inserting a tab character before another tab character.
IDE
Fixed the find in files dialog not remembering the "Search In" selection between sessions.
Fixed the find in files dialog not enabling the find button under certain circumstances.
Fixed font selection when using macOS 12 (Monterey) BETA.
The project explorer's build configuration combo box now displays the configuration name as the tooltip
if the configuration name is wider than the combo box.
The build configuration search now matches on each word rather than the entire string.
Assembly code syntax colorer now colors FIXME, ATTENTION and Lint comment tags.
Package manager groups can now be collapsed and expanded.
Double clicking in terminal windows now selects words.
Added BuildLinkProject command (Ctrl+P, K).
Added OpenLinkerLogFile command (Ctrl+P, G).
Added OpenLinkerMapFile command (Ctrl+P, M).
Embedded Studio for RISC-V Reference Manual Introduction
20
Added "Show Labels In Disassembly" and "Show Source In Disassembly" environment options to
disassembly window context menu.
Fixed project window keyboard accelerators not being enabled and disabled correctly when selecting
project nodes.
Fixed manual package installation not selecting all dependee packages for installation.
Fixed display of find and replace window results containing tabs.
Version 5.60
Build
Fixed lzss unpacking by the segger-ld runtime initialization code.
Updated segger-ld to version 4.12.1.
Updated segger-rtl to version 2.22.0.
Debug
Updated J-Link software to version V7.52b.
IDE
Fixed crash after closing disassembly window.
Fixed crash when using find in files to search in the current document and there is no editor currently
focused.
Build log can now handle colored compiler diagnostics.
Peripheral registers are now displayed in registers window.
Floating point registers will now be displayed in floating point format when Decimal format is selected.
Manual package install now removes existing version of package if already installed.
Improved appearance of macOS combo box dropdowns containing icons.
Fixed external tools not appearing when the match element is omitted from the tool definition in external
tools file.
Fixed crash when carrying out clipboard operations on files located in output files folder.
Fixed display of tab characters in terminal emulator window.
Fixed property values in project explorer not updating when modified using dark theme.
The selected folder in the find and replace window is now persistent between sessions.
Opening the new project wizard while debugging now shows the "Stop debugging?" prompt.
Fixed editor grouping C/C++ source and header files together in the "Single Title Button For All
Documents" file selection menu.
Embedded Studio for RISC-V Reference Manual Introduction
21
Version 5.50
Debug
Updated J-Link software to version V7.20b.
IDE
Memory usage window no longer displays zero length segments.
Fixed drag and drop of files on macOS.
Version 5.44
Build
Add project property Enable Use Of __cxa_atexit.
Updated segger-ld to version 4.10.1.
Updated the GCC/BINUTILS tools build to use the SiFive Freedom Tools 2020-12 source release.
Add support for Andes toolchain.
Add support for target input when RTT/SWO Library I/O is used.
Debug
Copy text selection in the memory window now copies the exact text to the clipboard.
Fixed syntax coloring of disassembly when visible whitespace option is enabled.
Add support for Andes ISA extensions to simulator and debugger.
Updated J-Link software to version V7.20.
Editor
Fixed scrolling with horizontal scroll wheel.
Go to definition and declaration operations now highlight the symbol being searched for.
Fixed the previous horizontal scroll position not being correctly restored when opening a solution and
the editor is not docked in the default dock site.
Fixed the previous cursor column position not being restored when opening a solution.
C/C++ syntax coloring is now applied to files with no extension.
Added "String", "String Delimiter", "String Escape", "XML Delimiter", "Spelling Error", "Line Number" and
"Line Number Highlight" to customizable color scheme.
Added EditDeleteLine command (Ctrl+Shift+L).
Fixed text appearing behind editor scroll bars when using dark theme.
IDE
Added Export to Text Editor to debug terminal.
Embedded Studio for RISC-V Reference Manual Introduction
22
Line editor now scrolls when cursor reaches button or status message rather than removing it.
Fixed file selector combo box not moving file list if parent window is moved.
Fixed file selector combo box keeping file list on top of all windows.
Fixed selecting of files from the file selector combo box file list when using the mouse.
Find dialogs now preserve the state of the show options button.
Version 5.42
Build
Fixed BinaryFile.pokeUint32() script function ignoring the littleEndian option.
The build macro $(RelInputDir) is set to dot for files that are not relative to the project.
Updated segger-rtl to version 2.4.2.
Updated segger-ld to version 4.10.0.
Add project property Compile C Files As C++.
Debug
Fixed GDB server target interface not working with GDB servers that do not support no ACK mode.
Fixed crash when GDB server terminates during debug session.
Fixed crash when debugging if evaluating a preprocessor definition that expands to itself.
Improved error reporting if download fails using J-Link target interface.
The target_device_name property now defaults to $(Target:).
Changing the PC value in the registers window will now updated the debugger windows.
Fixed output window still showing 'Working' after chip erase operation has completed.
Updated J-Link software to version V6.98c.
Editor
Fixed syntax coloring of XML comments.
Fixed incorrect syntax coloring of certain C/C++ comments containing ampersand characters.
Fixed syntax coloring of XML documents when visible whitespace option is enabled.
Fixed highlighting of text containing tab characters.
Fixed highlighting of text containing whitespace characters when visible whitespace option is enabled..
The editor now supports highlighting of C/C++ raw string literals.
Improved graying of inactive code on lines containing C preprocessor directives.
Fixed duplicated " or < characters when selecting #include code suggestions.
Scroll wheel can now be used while selecting text with the mouse.
Auto-indentation now uses the indentation level of the last non-empty line if enter is pressed on an
empty line.
Embedded Studio for RISC-V Reference Manual Introduction
23
IDE
Project Explorer context menu action Convert to Regular Folder now operates recursively and can
subsequently be modified like a regular folder.
Fixed edit actions (cut, copy etc) on project nodes in Project Explorer.
Fixed Code Outline window not updating when editor is saved.
Dropping project files onto the dashboard window will now open the project in the project explorer.
Manual package installation now warns of package dependency errors when the depdendee package is
unknown to the package system.
Fixed crash when activating J-Link license and user does not have permission to access J-Link.
Line numbers are now shown in find and replace results.
Version 5.40
Build
Replace Run Static Code Analyzer with Analyze action on project explorer context menu.
clang-tidy now used for Static Code Analyzer, checks are specified in project property Clang Tidy
Checks.
Add project property Analyze After Compile to enable the analyzer to run when a source file is compiled.
Debug
Added 64-bit view to memory window.
Updated J-Link software to version V6.94a.
Add debug support for restrict types.
IDE
Fixed memory usage window incorrectly representing empty sections.
Added linker and section placement chooser to new Generic project types.
Debug terminal no longer erases line if the line been output ends with "\r\r\n".
Version 5.34
Build
Debug support added to gcc LTO built executables.
Fixed gcc LTO support for C++ programs that have the same symbol defined multiple times.
Fixed llvm LTO support discarding weak symbol definitions.
The build macros $(RelInputDir) and $(RelInputPath) are now defined for project level build commands.
Updated SEGGER linker to version 4.6.0.
Embedded Studio for RISC-V Reference Manual Introduction
24
Escape ; in exported build commands on Linux/macOS.
Debug
Updated J-Link software to version V6.92.
IDE
Fixed memory usage window incorrectly representing sections that span multiple segments.
Version 5.32
Build
Fixed double counting of initialized data size statistic in project explorer.
Fixed lock up when removing Externally Built projects that have the Clean Command property set.
Updated SEGGER linker to version 4.2.0.
Debug
Updated J-Link software to version V6.88b.
IDE
Improved appearance of memory usage windows when window is small.
Version 5.30
Build
Add Disable Function Inlining option to code generation options.
Updated the GCC/BINUTILS tools build to use the SiFive Freedom Tools 2020-04 source release.
Integrated SEGGER linker.
Added Enable Linker Relaxation option to code generation options.
Changed gcc startup code to enable linker relaxation.
Add Linker Search Path option to linker options.
Debug
Added Debug > GDB Server > Breakpoint Types project option.
Updated J-Link software to version V6.88a.
Improved type interpretation for STLPort, libstdc++ and added support for libc++.
Add support for .debug_macinfo debug sections.
Embedded Studio for RISC-V Reference Manual Introduction
25
Version 5.20
Build
Symbol renaming of __vfprintf/__vfscanf/__do_debug_operation done by linker command-line rather
than in generated ld script.
rtti can now be used without exceptions enabled.
Fixed crash when adding files to project folder with no project node selected.
Fixed clang/segger-cc compiler option for Merge Globals.
Debug
Object file disassembly now contains intermixed source code.
Improved disassembly window's update speed when scrolling.
Updated J-Link software to version V6.86e.
Editor
Fixed extension of multi-line cursor after multi-line text insert.
Fixed matching of delimiters that are within strings.
Fixed tab characters not being used for auto indentation when tabs are enabled.
Fixed loading of files from a file system that does not support file locking (Windows only).
IDE
Fixed project explorer's Open With > System Web Browser menu option doing nothing on Linux.
Fixed opening of package source files from help contents window.
Fixed file selector dialog not remembering selected file type filter.
Fixed GUI locking up when find in files on large files.
Version 5.10
Build
Correct names of 64-bit clz/ctz helper functions.
Fixed vfscanf implementation always including support for character classes.
Added missing wide character, float point implementations of vfprintf.
Fixed passing Additional Assembler Options to compile step assembler command.
Add SEGGER RTL includes/libraries and project option to select.
Add Run Preprocessor option to assembler options.
Added BinaryFile.loadAppend() script function.
Debug
Add Confirm Automatically Build Before Debug environment option.

Embedded Studio for RISC-V Reference Manual Introduction
26
Improve cast support in debug expressions.
Error now displayed when GDB server breakpoints cannot be set.
Debugger will now set one breakpoint on the first instruction of a statement.
Fixed GDB server target interface not using software breakpoints when setting breakpoints on RAM
addresses.
Add Erase All project property.
Fixed watch windows resetting the radix of child nodes when parent node is selected.
Replace Clear Disassembly Breakpoints On Debug Stop with Disassembly Breakpoints environment
option.
Source breakpoints are shown in the disassembly window and vice-versa.
Updated J-Link software to version V6.82c.
Editor
Fixed code formatter corrupting characters that cannot be represented using Latin 1 character encoding.
Fixed code formatter marking file as modified when it has made no changes to the file.
Fixed code formatter removing all breakpoints and bookmarks.
Fixed file auto recovery appending characters to the end of recovered file in some circumstances.
Updated code templates to fit SEGGER coding standard.
Selection highlight is now visible on text that has a background color specified in the color scheme.
Fixed syntax coloring of assembly files not working when visible whitespace is enabled.
Shift+Tab now reduces indentation of current line when no text has been selected.
Text editor's horizontal scroll bar now uses maximum line length for maximum scroll value.
Changed the Linux version's default keyboard shortcut for the EditUppercase command to "Ctrl+K, U" in
order to avoid a clash with the Ibus input method's default Unicode Code Point shortcut. The original key
sequence of "Ctrl+Shift+U" remains defined as an alternative shortcut.
Added Edit > Selection > Toggle Comment (Ctrl+K, Ctrl+/) command.
Selection comment and uncomment operations now add and remove comments at indentation level of
selection rather than only at the start of the line.
Added syntax highlighting for Python source files.
Fixed inactive code coloring being cleared when file is saved.
Fixed navigation commands being disabled when file is saved.
The Edit > Others > Duplicate (Ctrl+D) command will now duplicate selected text.
Spell check now ignores camel case words.
IDE
Fixed launcher presenting option to select from two identical versions of ES when 32-bit Windows variant
is installed on 64-bit Windows system.
Fixed crash when opening editors on project load.
Fixed the restoring of main window position when located on a display arranged above or to the left of
the display containing the menu bar (macOS only).
Embedded Studio for RISC-V Reference Manual Introduction
27
Fixed context menus not appearing on a display arranged above the display containing the menu bar
(macOS only).
Fixed crash when starting and stopping the debugger using the editor toolbar buttons.
Symbol browser, watch, trace and register windows now save exported text files to the project directory
by default.
Memory usage window now shows the percentage used of segments and sections.
Build summary now shows size of segments.
Memory window columns are now grouped in auto column mode.

Embedded Studio for RISC-V Reference Manual Introduction
28
Embedded Studio for RISC-V Reference Manual SEGGER Embedded Studio User Guide
29
SEGGER Embedded Studio User GuideThis is the user guide for the SEGGER Embedded Studio integrated development environment (IDE). The SEGGER
Embedded Studio IDE consists of:
a project system to organize your source files
a build system to build your applications
programmer aids to navigate and work effectively
a target programmer to download applications into RAM or flash
a debugger to pinpoint bugs
Embedded Studio for RISC-V Reference Manual SEGGER Embedded Studio User Guide
30
SEGGER Embedded Studio standard layoutSEGGER Embedded Studio's main window is divided into the following areas:
Title bar:Displays the name of the current solution.
Menu bar:Menus for editing, building, and debugging your program.
Toolbars:Frequently used actions are quickly accessible on toolbars below the menu bar.
Editing area:A tabbed view of any open editor windows and the HTML viewer.
Docked windows:SEGGER Embedded Studio has many windows that dock to the left, right, or below the
editing area. You can configure which windows will be visible, and their placement, when editing and
debugging.
Status bar At the bottom of the main window, the status bar contains useful information about the
current editor, build status, and debugging environment.

Embedded Studio for RISC-V Reference Manual SEGGER Embedded Studio User Guide
31
Menu barThe menu bar contains menus for editing, building, and debugging your program. You can navigate menus
using the keyboard or the mouse.
Navigating menus using the mouse
To navigate menus using the mouse:
1. Click a menu title in the menu bar to show the related menu.
2. Click the desired command in the menu to execute that command.
or
1. Click and hold the mouse on a menu title in the menu bar to show the related menu.
2. Drag the mouse to the desired command in the menu.
3. Release the mouse while it is over the command to execute that command.
Navigating menus with the keyboard
To navigate menus using the keyboard:
1. Tap the Alt key activate the menu bar.
2. Tap Return to display the menu.
3. Use the Left and Right keys to select the required menu.
4. Use the Up or Down key to select the required command or submenu.
5. Press Enter to execute the selected command.
6. Press Alt or Esc at any time to cancel menu selection.
After you press the Alt key once, each menu on the menu bar has one letter underlinedits shortcut key. So, to
activate a menu using the keyboard:
While holding down the Alt key, type the desired menu's shortcut key.
After the menu appears, you can navigate it using the cursor keys:
Use Up and Down to move up and down the list of menu items.
Use Esc to cancel a menu.
Use Right or Enter to open a submenu.
Use Left or Esc to close a submenu and return to the parent menu.
Type the underlined letter in a command's name to execute that command.

Embedded Studio for RISC-V Reference Manual SEGGER Embedded Studio User Guide
32
Title barThe first item shown in the title bar is SEGGER Embedded Studio's name. Because SEGGER Embedded Studio
can be used to target different processors, the name of the target processor family is also shown, to help you
distinguish between instances of SEGGER Embedded Studio when debugging multi-processor or multi-core
systems.
The filename of the active editor follows SEGGER Embedded Studio's name; you can configure the presentation
of this filename as described below.
After the filename, the title bar displays status information on SEGGER Embedded Studio's state:
[building] SEGGER Embedded Studio is building a solution, building a project, or compiling a file.
[run] An application is running under control of SEGGER Embedded Studio's debugger.
[break] The debugger is stopped at a breakpoint.
[autostep] The debugger is single stepping the application without user interaction (autostepping).
Embedded Studio for RISC-V Reference Manual SEGGER Embedded Studio User Guide
33
Status barAt the bottom of the window, the status bar contains useful information about the current editor, build status,
and debugging environment. The status bar is divided into two regions: one contains a set of fixed panels and
the other is used for messages.
The message area
The leftmost part of the status bar is a message area used for things such as status tips, progress information,
warnings, errors, and other notifications.
Status bar panels
You can show or hide the following panels on the status bar:
Panel Description
Target device status
Displays the connected target interface. Whenconnected, this panel contains the selected targetinterface's name and, if applicable, the processor towhich the target interface is connected. The LED iconflashes green when a program is running, is solid redwhen stopped at a breakpoint, and is yellow whenconnected to a target but not running a program.Double-clicking this panel displays the Targets pane,and right-clicking it invokes the Target shortcut menu.
Cycle count panel Displays the number of processor cycles used by theexecuting program. This panel is only visible if theconnected target supports performance countersthat can report the total number of cycles executed.Double-clicking this panel resets the cycle counter tozero, and right-clicking it brings up the Cycle Countshortcut menu.
Insert/overwrite status Indicates whether the current editor is in insert oroverwrite mode. In overwrite mode, the panel displays"OVR"; in insert mode, the panel displays "INS".
Read-only status Indicates whether the editor is in read-only mode. Ifthe editor is editing a read-only file or is in read-onlymode, the panel display "R/O"; if the editor is in read-write mode, the panel displays "R/W".
Build status Indicates the success or failure of the last build. Ifthe last build completed without errors or warnings,the build status pane contains Built OK; otherwise, itcontains the number of errors and warnings reported.If there were errors, double-clicking this panel displaysthe Build Log in the Output pane.
Embedded Studio for RISC-V Reference Manual SEGGER Embedded Studio User Guide
34
Caret position Indicates the insertion position position in the editorwindow. For text files, the caret position pane displaysthe line number and column number of the insertionpoint in the active window; when editing binary files, itdisplays the address being edited.
Time panel Displays the current time.
Configuring the status bar panels
To configure which panels are shown on the status bar:
Choose View > Status Bar.
From the status bar menu, select the panels to display and deselect the ones you want hidden.
or
Right-click the status bar.
From the status bar menu, select the panels to display and deselect the ones you want to hide.
To show or hide the status bar:
Choose View > Status Bar.
From the status bar menu, select or deselect the Status Bar item.
You can choose to hide or display the size grip when SEGGER Embedded Studio's main window is not maximized.
(The size grip is never shown in full-screen mode or when maximized.)
To show or hide the size grip
Choose View > Status Bar.
From the status bar menu, select or deselect the Size Grip item.

Embedded Studio for RISC-V Reference Manual SEGGER Embedded Studio User Guide
35
Editing workspaceThe main area of SEGGER Embedded Studio is the editing workspace. It contains any files being edited, the on-
line help system's HTML browser, and the Dashboard.
Embedded Studio for RISC-V Reference Manual SEGGER Embedded Studio User Guide
36
Docking windowsSEGGER Embedded Studio has a flexible docking system you can use to position windows as you like them. You
can dock windows in the SEGGER Embedded Studio window or in the four head-up display windows. SEGGER
Embedded Studio will remember the position of the windows when you leave the IDE and will restore them
when you return.
Window groups
You can organize SEGGER Embedded Studio windows into window groups. A window group has multiple
windows docked in it, only one of which is active at a time. The window group displays the active window's title
for each of the windows docked in the group.
Clicking on the window icons in the window group's header changes the active window. Hovering over a
docked window's icon in the header will display that window's title in a tooltip.
To dock a window to a different window group:
Press and hold the left mouse button over the title of the window you wish to move.
As you start dragging, all window groups, including hidden window groups, become visible.
Drag the window over the window group to dock in.
Release the mouse button.
Holding Ctrl when moving the window will prevent the window from being docked. If you do not dock a
window on a window group, the window will float in a new window group.
Perspectives
SEGGER Embedded Studio remembers the dock position and visibility of each window in each perspective. The
most common use for this is to lay your windows out in the Standard perspective, which is the perspective
used when you are editing and not debugging. When SEGGER Embedded Studio starts to debug a program,
it switches to the Debug perspective. You can now lay out your windows in this perspective and SEGGER
Embedded Studio will remember how you laid them them out. When you stop debugging, SEGGER Embedded
Studio will revert to the Standard perspective and that window layout for editing; when you return to Debug
perspective on the next debug session, the windows will be restored to how you laid them out in that for
debugging.
SEGGER Embedded Studio remembers the layout of windows, in all perspectives, such that they can be restored
when you run SEGGER Embedded Studio again. However, you may wish to revert back to the standard docking
positions; to do this:

Embedded Studio for RISC-V Reference Manual SEGGER Embedded Studio User Guide
37
DashboardWhen SEGGER Embedded Studio starts, it presents the Dashboard, a collection of panels that provide useful
information, one-click loading of recent projects, and at-a-glance summaries of activity relevant to you.
Tasks
The Tasks panel indicates tasks you need to carry out before SEGGER Embedded Studio for RISC-V is fully
functionalfor instance, whether you need to activate SEGGER Embedded Studio for RISC-V, install packages, and
so on.
Updates
The Updates panel indicates whether any packages you have installed are now out of date because a newer
version is available. You can install each new package individually by clicking the Install button under each
notification, or install all packages by clicking the Install all updates link at the bottom of the panel.
Projects
The Projects panel contains links to projects you have worked on recently. You can load a project by clicking the
appropriate link, or clear the project history by clicking the Clear List button. To manage the contents of the list,
click the Manage Projects link and edit the list of projects in the Recent Projects window.
News
The News panel summarizes the activity of any RSS and Atom feeds you have subscribed to. Clicking a link will
display the published article in an external web browser. You can manage your feed subscriptions to by clicking
the Manage Feeds link at the end of the News panel and pinning the feeds in the Favorites windowyou are only
subscribed to the pinned feeds.
Links
The Links panel is a handy set of links to your favorite websites. If you pin a link in the Favorites window, it
appears in the Links panel.

Embedded Studio for RISC-V Reference Manual SEGGER Embedded Studio User Guide
38
SEGGER Embedded Studio help and assistanceSEGGER Embedded Studio provides context-sensitive help in increasing detail:
TooltipsWhen you position the pointer over a button and keep it still, a small window displays a brief description of
the button and its keyboard shortcut, if it has one.
Status tipsIn addition to tooltips, SEGGER Embedded Studio provides a longer description in the status bar when you
hover over a button or menu item.
Online manualSEGGER Embedded Studio has links from all windows to the online help system.
The browser
Documentation pages are shown in the Browser.
Help using SEGGER Embedded Studio
SEGGER Embedded Studio provides an extensive, HTML-based help system that is available at all times.
To view the help text for a particular window or other user-interface element:
Click to select the item with which you want assistance.
Choose Help > Help or press F1.
Help within the text editor
The text editor is linked to the help system in a special way. If you place the insertion point within a word and
press F1, the help-system page most likely to be useful is displayed in the HTML browser. This a great way to
quickly find the help text for functions provided in the library.
Browsing the documentation
The Contents window lists all the topics in the SEGGER Embedded Studio for RISC-V documentation and gives a
way to search through them.
The highlighted entry indicates the current help topic. When you click a topic, the corresponding page appears
in the Browser window.

Embedded Studio for RISC-V Reference Manual SEGGER Embedded Studio User Guide
39
The Next Topic and Previous Topic items in the Help menu, or the buttons on the Contents window toolbar,
help navigate through topics.
To search the online documentation, type a search phrase into the Search box on the Contents window toolbar.
To search the online documentation:
Choose Help > Contents or press Ctrl+Alt+F1.
Enter your search phrase in the Search box and press Enter (or Return on Macs).
The search commences and the table of contents is replaced by links to pages matching your query, listed in
order of relevance. To clear the search and return to the table of contents, click the clear icon in the Search box.

Embedded Studio for RISC-V Reference Manual SEGGER Embedded Studio User Guide
40
Creating and managing projectsA SEGGER Embedded Studio project is a container for everything required to build your applications. It contains
all the assorted resources and maintains the relationships between them.
A project is a convenient place to find every file and piece of information associated with your work. You place
projects into a solution, which can contain one or more projects.
This chapter introduces the various parts of a project, shows how to create projects, and describes how to
organize the contents of a project. It describes how to use the Project Explorer and Project Manager for project-
management tasks.

Embedded Studio for RISC-V Reference Manual SEGGER Embedded Studio User Guide
41
Solutions and projectsTo develop a product using SEGGER Embedded Studio, you must understand the concepts of projects and
solutions.
A project contains and organizes everything you need to create a single application or a library.
A solution is a collection of projects and configurations.
Organizing your projects into a solution allows you to build all the projects in a solution with a single keystroke,
and to load them onto the target ready for debugging.
In your SEGGER Embedded Studio for RISC-V project, you
organize build-system inputs for building a product.
add information about items in the project, and their relationships, to assist you in the development
process.
Projects in a solution can reside in the same or different directories. Project directories are always relative to the
directory of the solution file, which enables you to more-easily move or share project-file hierarchies.
The Project Explorer organizes your projects and files, and provides quick access to the commands that operate
on them. A toolbar at the top of the window offers quick access to commonly used commands.
Solutions
When you have created a solution, it is stored in a project file. Project files are text files, with the file extension
emProject, that contain an XML description of your project. See Project file format for a description of the
project-file format.
Projects
The projects you create within a solution have a project type SEGGER Embedded Studio uses to determine how
to build the project. The project type is selected when you use the New Project dialog. The available project
types depend on the SEGGER Embedded Studio for RISC-V variant you are using, but the following are present in
most SEGGER Embedded Studio for RISC-V variants:
Executable: a program that can be loaded and executed.
Externally Built Executable: an executable that is not built by the SEGGER Embedded Studio for RISC-V
internal build process.
Library: a group of object files collected into a single file (sometimes called an archive).
Externally Built Library: a library that is not built by the SEGGER Embedded Studio for RISC-V internal build
process.
Embedded Studio for RISC-V Reference Manual SEGGER Embedded Studio User Guide
42
Object File: the result of a single compilation.
Staging: a project that will apply a user-defined command to each file in a project.
Combining: a project that can be used to apply a user-defined command when any files in a project have
changed.
Project options and configurations
Project options are attached to project nodes. They are usually used in the build process, for example, to define
C preprocessor symbols. You can assign different values to the same project option, based on a configuration:
for example, you can assign one value to a C preprocessor symbol for release build and a different value for a
debug build.
Folders and Dynamic Folders
Projects can contain folders, which are used to group related files. Automated grouping uses the files' extensions
to, for example, put all .c files in one folder, etc. Grouping also can be done manually by explicitly creating a
file within a folder. Note that these project folders do not map onto directories in the file system, they are used
solely to structure the display of content shown in the Project Explorer.
Projects can also contain dynamic folders which will can show the directories and files contained in the file
system in the project explorer. You can specify if the dynamic folder is recursive and use wildcards to include and
exclude files.
Source files
Source files are all the files used to build a product. These include source code files and also section-placement
files, memory-map files, and script files. All the source files you use for a particular product, or for a suite of
related products, are managed in a SEGGER Embedded Studio project. A project can also contain files that
are not directly used by SEGGER Embedded Studio to build a product but contain information you use during
development, such as documentation. You edit source files during development using SEGGER Embedded
Studio's built-in text editor, and you organize files into a target (described next) to define the build-system
inputs for creating the product.
The source files of your project can be placed in folders or directly in the project. Ideally, the paths to files
placed in a project should be relative to the project directory, but at times you might want to refer to a file in an
absolute location and this is supported by the project system.
When you add a file to a project, the project system detects whether the file is in the project directory. If a
file is not in the project directory, the project system tries to make a relative path from the file to the project
directory. If the file isn't relative to the project directory, the project system detects whether the file is relative to
Embedded Studio for RISC-V Reference Manual SEGGER Embedded Studio User Guide
43
the $(StudioDir) directory; if so, the filename is defined using $(StudioDir). If a file is not relative to the project
directory or to $(StudioDir), the full, absolute pathname is used.
The project system will allow (with a warning) duplicate files to be put into a project.
The project system uses a file's extension to determine the appropriate build action to perform on the file:
A file with the extension .c will be compiled by a C compiler.
A file with the extension .s or .asm will be compiled by an assembler.
A file with the object-file extension .hzo will be linked.
A file with the library-file extension .hza will be linked.
A file with the extension .xml will be opened and its file type determined by the XML document type.
Files with other file extensions will not be compiled or linked.
You can modify this behavior by setting a file's File Type project option with the Common configuration
selected, which enables files with non-standard extensions to be compiled by the project system.
Externally Built Executables
You can use an external build process for Externally Built Executable project types by setting the Build
Command project option, for example to make target. Alternatively you can set command lines for specific
build steps to compile/assemble and link. When you create an Externally Built Executable project type
configurations will be created that create command lines for a variety of external tool chains.
Solution links
You can create links to existing project files from a solution, which enables you to create hierarchical builds. For
example, you could have a solution that builds a library together with a stub test driver executable. You can
link to that solution from your current solution by right-clicking the solution node of the Project Explorer and
selecting Add Existing Project. Your current solution can then use the library built by the other project.
Session files
When you exit SEGGER Embedded Studio for RISC-V, details of your current session are stored in a session file.
Session files are text files, with the file extension emSession, that contain details such as which files you have
opened in the editor and what breakpoints you have set in the Breakpoint window.

Embedded Studio for RISC-V Reference Manual SEGGER Embedded Studio User Guide
44
Creating a projectYou can create a new solution for each project or place multiple projects in an existing solution.
To create a new project in an existing solution:
1. Choose Project > Add New Project.
2. In the New Project wizard, select the type of project you wish to create and specify where it will be
placed.
3. Ensure that Add the project to current solution is checked.
4. Click OK to go to next stage or Cancel to cancel the project's creation.
The project name must be unique to the solution and, ideally, the project directory should be relative to the
solution directory. The project system will use the project directory as the current directory when it builds your
project. Once complete, the Project Explorer displays the new solution, project, and files contained in the
project. To add another project to the solution, repeat the above steps.
To create a new project in a new solution:
1. Choose File > New Project or press Ctrl+Shift+N.
2. Select the type of project you wish to create and where it will be placed.
3. Click OK.
Embedded Studio for RISC-V Reference Manual SEGGER Embedded Studio User Guide
45
Adding existing files to a projectYou can add existing files to a project in a number of ways.
To add existing files to the active project:
Choose Project > Add Existing File or press Ctrl+P, A.
Using the Open File dialog, navigate to the directory containing the files and select the ones you wish to add to
the project.
Click OK.
The selected files are added to the folders whose filter matches the extension of each of the files. If no filter
matches a file's extension, the file is placed underneath the project node.
To add existing files to a specific project:
1. In the Project Explorer, right-click the project to which you wish to add a new file.
2. Choose Add Existing File.
To add existing files to a specific folder:
1. In the Project Explorer, right-click the folder to which you wish to add a new file.
2. Choose Add Existing File.
The files are added to the specified folder without using filter matching.
To create a dynamic folder:
1. In the Project Explore, right click on the project to which you wish to add a new folder.
2. Choose New Folder....
3. Using the New Folder dialog name the folder and then show the dynamic folder options.
4. Specify the required Source Folder and the Filter Specification.
The files that match the filter specification in the source folder will appear in the newly created folder.
Embedded Studio for RISC-V Reference Manual SEGGER Embedded Studio User Guide
46
Adding new files to a projectYou can add new files to a project in a number of ways.
To add new files to the active project:
Choose Project > Add New File or press Ctrl+N.
To add a new file to a project:
1. In the Project Explorer, right-click the project to which you wish to add a new file.
2. Choose Add New File.
When adding a new file, SEGGER Embedded Studio displays the New File dialog, from which you can choose
the type of file to add, its filename, and where it will be stored. Once created, the new file is added to the folder
whose filter matches the extension of the newly added file. If no filter matches the newly added file extension,
the new file is placed underneath the project node.
To add new files to a folder:
1. In the Project Explorer, right-click the folder to which you wish to add a new file.
2. Choose Add New File.
The new file is added to the folder without using filter matching.
Embedded Studio for RISC-V Reference Manual SEGGER Embedded Studio User Guide
47
Removing a file, folder, project, or project linkYou can remove whole projects, folders, or files from a project, or you can remove a project from a solution,
using the Remove button on the Project Explorer toolbar. Note that removing a source file from a project does
not remove it from disk.
To remove an item from the solution:
1. In the Project Explorer, select the item to remove.
2. Choose Edit > Delete or press Del.
or
1. In the Project Explorer, right-click the item to remove.
2. Choose Remove.

Embedded Studio for RISC-V Reference Manual SEGGER Embedded Studio User Guide
48
Building your applicationSEGGER Embedded Studio builds your application using the resources and build rules it finds in your solution.
When SEGGER Embedded Studio builds your application, it tries to avoid building files that have not changed
since they were last built. It does this by comparing the modification dates of the generated files with the
modification dates of the dependent files together with the modification dates of the project options that
pertain to the build. But if you are copying files, sometimes the modification dates may not be updated when
the file is copiedin this instance, it is wise to use the Rebuild command rather than the Build command.
You can see the build rationale SEGGER Embedded Studio currently is using by setting the Environment
Options > Building > Show Build Information environment option. To see the build commands themselves, set
the Environment Options > Building > Echo Build Command environment option.
You may have a solution that contains several interdependent projects. Typically, you might have several
executable projects and some library projects. The Project Dependencies dialog specifies the dependencies
between projects and to see the effect of those dependencies on the solution build order. Note that
dependencies can be set on a per-configuration basis, but the default is for dependencies to be defined in the
Common configuration.
You will also notice that a new folder titled Dependencies has appeared in the Project Explorer. This folder
contains the list of newly generated files and the files from which they were generated. To see if one of files
can be decoded and displayed in the editor, right-click the file to see if the View command is available on the
shortcut menu.
If you have the Symbols window open, it will be updated with the symbol and section information of all
executable files built in the solution.
To generalize your builds, you can define macro values that are substituted when the project options are used.
These macro values can be defined globally at the solution and project level, and can be defined on a per-
configuration basis.
The combination of configurations, project options with inheritance, dependencies, and macros provides a
very powerful build-management system. However, such systems can become complicated. To understand the
implications of changing build settings, right-click a node in the Project Explorer and select Options to view a
dialog that shows which macros and project options apply to that project node.
To build all projects in the solution:
1. Choose Build > Build Solution or press Shift+F7.
or
1. Right-click the solution in the Project Explorer window.
2. Choose Build from the shortcut menu.

Embedded Studio for RISC-V Reference Manual SEGGER Embedded Studio User Guide
49
To build a single project:
1. Select the required project in the Project Explorer.
2. Choose Build > Build or press F7.
or
1. Right-click the project in the Project Explorer.
2. Choose Build.
To compile a single file:
1. In the Project Explorer, click to select the source file to compile.
2. Choose Build > Compile or press Ctrl+F7.
or
1. In the Project Explorer, right-click the source file to compile.
2. Choose Compile from the shortcut menu.
Correcting errors after building
The results of a build are recorded in a Build Log that is displayed in the Output window. Errors are highlighted
in red, warnings are highlighted in yellow. Double-clicking an error, warning, or note will move the insertion
point to the line of source code that triggered that log entry.
You can move forward and backward through errors using Search > Next Location and Search > Next Location.
When you build a single project in a single configuration, the Transcript will display the memory used by the
application and a summary for each memory area.
Embedded Studio for RISC-V Reference Manual SEGGER Embedded Studio User Guide
50
Creating variants using configurationsSEGGER Embedded Studio provides a facility to build projects in various configurations. Project configurations
are used to create different software builds for your projects.
A configuration defines a set of project options. For example, the output of a compilation can be put into
different directories, dependent upon the configuration. When you create a solution, some default project
configurations are created.
Build configurations and their uses
Configurations are typically used to differentiate debug builds from release builds. For example, the compiler
options for debug builds will differ from those of a release build: a debug build will set options so the project can
be debugged easily, whereas a release build will enable optimization to reduce program size or to increase its
speed. Configurations have other uses; for example, you can use configurations to produce variants of software,
such as custom libraries for several different hardware variants.
Configurations inherit project options from other configurations. This provides a single point of change for
definitions common to several configurations. A particular project option can be overridden in a particular
configuration to provide configuration-specific settings.
When a solution is created, two configurations are generated Debug and Release and you can create additional
configurations by choosing Build > Build Configurations. Before you build, ensure that the appropriate
configuration is set using Build > Set Active Build Configuration or, alternatively, the Active Configuration
combo box in the Project Explorer.
Selecting a configuration
To set the configuration that affects your building and debugging, use the combo box in the Project Explorer or
select Build > Set Active Build Configuration
Creating a configuration
To create your own configurations, select Build > Build Configurations to invoke the Configurations dialog. The
New button will produce a dialog allowing you to name your configuration. You can now specify the existing
configurations from which your new configuration will inherit values.
Deleting a configuration
You can delete a configuration by selecting it and clicking the Remove button. This deletion cannot be undone
or canceled, so beware.

Embedded Studio for RISC-V Reference Manual SEGGER Embedded Studio User Guide
51
Private configurations
Some configurations are defined purely for inheriting and, as such, should not appear in the Build combo box.
When you select a configuration in the Configuration dialog, you can choose to hide that configuration.
Embedded Studio for RISC-V Reference Manual SEGGER Embedded Studio User Guide
52
Project optionsFor solutions, projects, folders, and files, project options can be defined that are used by the project system in
the build process. These project options can be viewed and modified by using the Options dialog in conjunction
with the Project Explorer.
Some project options are only applicable to a given item type. For example, linker project options are only
applicable to a project that builds an executable file. However, other project options can be applied either at
the file, project, or solution project node. For example, a compiler project option can be applied to a solution,
project, or individual file. By setting a project option at the solution level, you enable all files of the solution to
use that project option's value.
Unique project options
A unique project option has one value. When a build is done, the value of a unique project option is the first one
defined in the project hierarchy. For example, the Treat Warnings As Errors project option could be set to Yes
at the solution level, which would then be applicable to every file in the solution that is compiled, assembled,
and linked. You can then selectively define project options for other project items. For example, a particular
source file may have warnings you decide are allowable, so you set the Treat Warnings As Errors to No for that
particular file.
solution Treat Warnings As Errors = Yes project1 Treat Warnings As Errors = Yes file1 Treat Warnings As Errors = Yes file2 Treat Warnings As Errors = No project2 Treat Warnings As Errors = No file1 Treat Warnings As Errors = No file2 Treat Warnings As Errors = Yes
In the above example, the files will be compiled with these values for Treat Warnings As Errors:
project1/file1 Yes
project1/file2 No
project2/file1 No
project2/file2 Yes
Aggregate project options
An aggregating project option collects all the values defined for it in the project hierarchy. For example, when a
C file is compiled, the Preprocessor Definitions project option will take all the values defined at the file, project,
and solution levels.
solution Preprocessor Definitions = SolutionDef
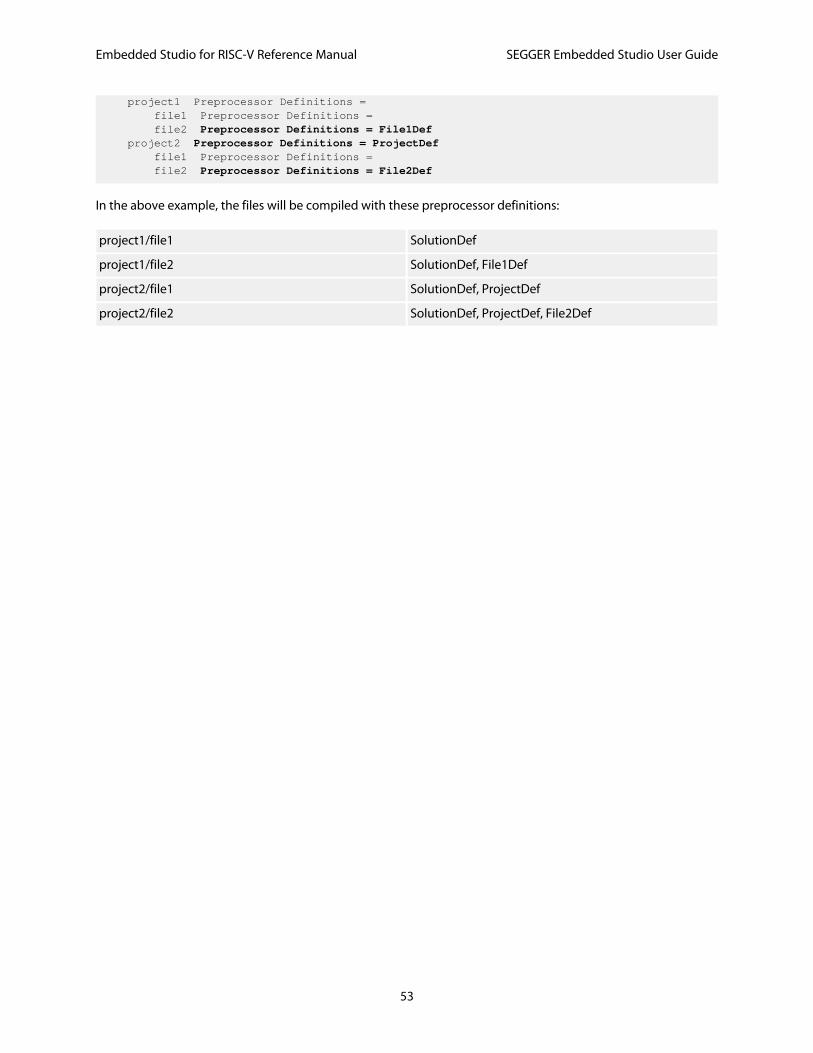
Embedded Studio for RISC-V Reference Manual SEGGER Embedded Studio User Guide
53
project1 Preprocessor Definitions = file1 Preprocessor Definitions = file2 Preprocessor Definitions = File1Def project2 Preprocessor Definitions = ProjectDef file1 Preprocessor Definitions = file2 Preprocessor Definitions = File2Def
In the above example, the files will be compiled with these preprocessor definitions:
project1/file1 SolutionDef
project1/file2 SolutionDef, File1Def
project2/file1 SolutionDef, ProjectDef
project2/file2 SolutionDef, ProjectDef, File2Def
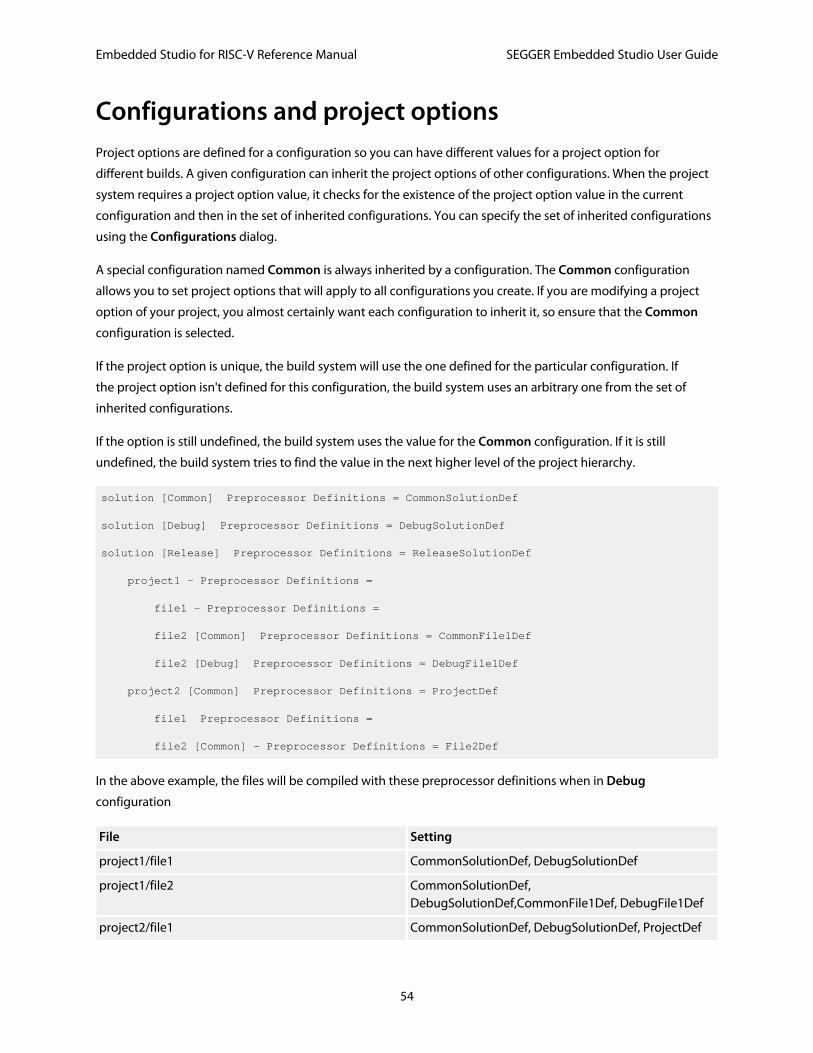
Embedded Studio for RISC-V Reference Manual SEGGER Embedded Studio User Guide
54
Configurations and project optionsProject options are defined for a configuration so you can have different values for a project option for
different builds. A given configuration can inherit the project options of other configurations. When the project
system requires a project option value, it checks for the existence of the project option value in the current
configuration and then in the set of inherited configurations. You can specify the set of inherited configurations
using the Configurations dialog.
A special configuration named Common is always inherited by a configuration. The Common configuration
allows you to set project options that will apply to all configurations you create. If you are modifying a project
option of your project, you almost certainly want each configuration to inherit it, so ensure that the Common
configuration is selected.
If the project option is unique, the build system will use the one defined for the particular configuration. If
the project option isn't defined for this configuration, the build system uses an arbitrary one from the set of
inherited configurations.
If the option is still undefined, the build system uses the value for the Common configuration. If it is still
undefined, the build system tries to find the value in the next higher level of the project hierarchy.
solution [Common] Preprocessor Definitions = CommonSolutionDef
solution [Debug] Preprocessor Definitions = DebugSolutionDef
solution [Release] Preprocessor Definitions = ReleaseSolutionDef
project1 - Preprocessor Definitions =
file1 - Preprocessor Definitions =
file2 [Common] Preprocessor Definitions = CommonFile1Def
file2 [Debug] Preprocessor Definitions = DebugFile1Def
project2 [Common] Preprocessor Definitions = ProjectDef
file1 Preprocessor Definitions =
file2 [Common] - Preprocessor Definitions = File2Def
In the above example, the files will be compiled with these preprocessor definitions when in Debug
configuration
File Setting
project1/file1 CommonSolutionDef, DebugSolutionDef
project1/file2 CommonSolutionDef,DebugSolutionDef,CommonFile1Def, DebugFile1Def
project2/file1 CommonSolutionDef, DebugSolutionDef, ProjectDef
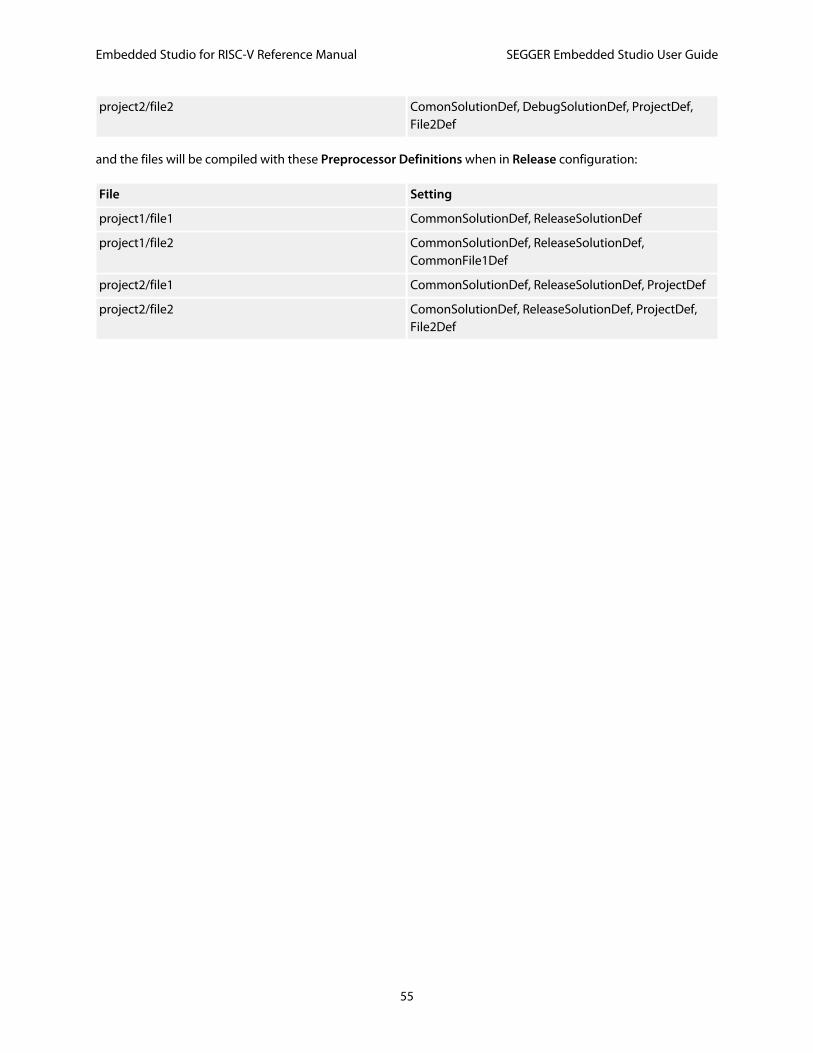
Embedded Studio for RISC-V Reference Manual SEGGER Embedded Studio User Guide
55
project2/file2 ComonSolutionDef, DebugSolutionDef, ProjectDef,File2Def
and the files will be compiled with these Preprocessor Definitions when in Release configuration:
File Setting
project1/file1 CommonSolutionDef, ReleaseSolutionDef
project1/file2 CommonSolutionDef, ReleaseSolutionDef,CommonFile1Def
project2/file1 CommonSolutionDef, ReleaseSolutionDef, ProjectDef
project2/file2 ComonSolutionDef, ReleaseSolutionDef, ProjectDef,File2Def
Embedded Studio for RISC-V Reference Manual SEGGER Embedded Studio User Guide
56
Project macrosYou can use macros to modify the way the project system refers to files.
Macros are divided into four classes:
System macros defined by SEGGER Embedded Studio relay information about the environment, such as
paths to common directories.
Global macros are saved in the environment and are shared across all solutions and projects. Typically,
you would set up paths to libraries and any external items here.
Project macros are saved as project options in the project file and can define values specific to the solution
or project in which they are defined.
Build macros are generated by the project system when you build your project.
System macros
System macros are defined by SEGGER Embedded Studio itself and as such are read-only. System macros can be
used in project options, environment settings and to refer to files. See System macros list for the list of System
macros.
Global macros
Global macros are store in the environment option Build Macros.
To define a global macro:
1. Use Tools > Options to show the environment options dialog.
2. In the Environment Options dialog's Building group, select the Build Macros option.
3. Click the ellipsis button on the right.
4. Set the macro using the syntax name = replacement text.
Project macros
To define a project macro:
To set the project macros:
1. Select the appropriate solution/project in the Project Explorer.
2. Use Project > Options to show the project options dialog.
3. In the Project Options dialog's General Options group, select the Macros option.
4. Click the ellipsis button on the right.
5. Set the macro using the syntax name = replacement text.
Embedded Studio for RISC-V Reference Manual SEGGER Embedded Studio User Guide
57
Build macros
Build macros are defined by the project system for a build of a given project node. See Build macros list for the
list of build macros.
Using macros
You can use a macro for a project option or environment setting by using the $(macro) syntax. For example, the
Object File Name option has a default value of $(IntDir)/$(InputName)$(OBJ).
You can also specify a default value for a macro if it is undefined using the $(macro:default) syntax. For example,
$(MyMacro:0) would expand to 0 if the macro MyMacro has not been defined.

Embedded Studio for RISC-V Reference Manual SEGGER Embedded Studio User Guide
58
Dependencies and build orderYou can set up dependency relationships between projects using the Project Dependencies dialog. Project
dependencies make it possible to build solutions in the correct order and, where the target permits, to load
and delete applications and libraries in the correct order. A typical usage of project dependencies is to make
an executable project dependent upon a library executable. When you elect to build the executable, the build
system will ensure that the library it depends upon is up to date. In the case of a dependent library, the output
file of the library build is supplied as an input to the executable build, so you don't have to worry about it.
Project dependencies are stored as project options and, as such, can be defined differently based upon the
selected configuration. You almost always want project dependencies to be independent of the configuration,
so the Project Dependencies dialog selects the Common configuration by default.
To make one project dependent upon another:
1. Choose Project > Project Dependencies.
2. From the Project dropdown, select the target project that depends upon other projects.
3. In the Depends Upon list box, select the projects the target project depends upon and deselect the
projects it does not depend upon.
Some items in the Depends Upon list box may be dimmed, indicating that a circular dependency would result
if any of those projects were selected. In this way, SEGGER Embedded Studio prevents you from constructing
circular dependencies using the Project Dependencies dialog.
If your target supports loading multiple projects, the Build Order also reflects the order in which projects are
loaded onto the target. Projects will load, in order, from top to bottom. Generally, libraries need to be loaded
before the applications that use them, and you can ensure this happens by making the application dependent
upon the library. With this dependency set, the library gets built and loaded before the application does.
Applications are deleted from a target in reverse of their build order; in this way, applications are removed
before the libraries on which they depend.
Embedded Studio for RISC-V Reference Manual SEGGER Embedded Studio User Guide
59
Linking and section placementExecutable programs consist of a number of sections. Typically, there are program sections for code, initialized
data, and zeroed data. There is often more than one code section and they must be placed at specific addresses
in memory.
To describe how the program sections of your program are positioned in memory, the SEGGER Embedded
Studio for RISC-V project system uses memory-map files and section-placement files. These XML-formatted
files are described in Memory Map file format and Section Placement file format. They can be edited with
the SEGGER Embedded Studio for RISC-V text editor. The memory-map file specifies the start address and
size of target memory segments. The section-placement file specifies where to place program sections in the
target's memory segments. Separating the memory map from the section-placement scheme enables a single
hardware description to be shared across projects and also enables a project to be built for a variety of hardware
descriptions.
For example, a memory-map file representing a device with two memory segments called FLASH and SRAM
could look something like this in the memory-map editor.
<Root name="Device1"> <MemorySegment name="FLASH" start="0x10000000" size="0x10000" /> <MemorySegment name="SRAM" start="0x20000000" size="0x1000" />
A corresponding section-placement file will refer to the memory segments of the memory-map file and will
list the sections to be placed in those segments. This is done by using a memory-segment name in the section-
placement file that matches the corresponding memory-segment name in the memory-map file.
For example, a section-placement file that places a section called .stack in the SRAM segment and the .vectors
and .text sections in the FLASH segment would look like this:
<Root name="Flash Section Placement"> <MemorySegment name="FLASH" > <ProgramSection name=".vectors" load="Yes" /> <ProgramSection name=".text" load="Yes" /> </MemorySegment> <MemorySegment name="SRAM" > <ProgramSection name=".stack" load="No" /> </MemorySegment></Root>
Note that the order of section placement within a segment is top down; in this example .vectors is placed at
lower addresses than .text.
The memory-map file and section-placement file to use for linkage can be included as a part of the project or,
alternatively, they can be specified in the project's linker options.
You can create a new program section using either the assembler or the compiler. For the C compiler, this can be
achieved using one of the #pragma directives. For example:
#pragma codeseg(".foo")
Embedded Studio for RISC-V Reference Manual SEGGER Embedded Studio User Guide
60
void foobar(void);#pragma codeseq(default)
This will allocate foobar in the section called .foo. Alternatively, you can specify the names for the code,
constant, data, and zeroed-data sections of an entire compilation unit by using the Section Options options.
You can now place the section into the section placement file using the editor so that it will be located after the
vectors sections as follows:
<Root name="Flash Section Placement"> <MemorySegment name="FLASH"> <ProgramSection name=".vectors" load="Yes" /> <ProgramSection name=".foo" load="Yes" /> <ProgramSection name=".text" load="Yes" /> </MemorySegment> <MemorySegment name="SRAM"> <ProgramSection name=".stack" load="No" /> </MemorySegment></Root>
If you are modifying a section-placement file that is supplied in the SEGGER Embedded Studio for RISC-V
distribution, you will need to import it into your project using the Project Explorer.
Sections containing code and constant data should have their load project option set to Yes. Some sections
don't require any loading, such as stack sections and zeroed-data sections; such sections should have their load
project option set to No.
You can specify that initialization data is stored in the default program section using the INIT directive, and you
can refer to the start and end of the section using the SFE and SFB directives. If, for example, you create a new
data section called IDATA2, you can store this in the program by putting the following into the startup code:
_data2_init_begin:: INIT "IDATA2"_data2_init_end::
You can then use these symbols to copy the stored section information into the data section using (an assembly-
coded version of):
/* Section image located in flash */extern const unsigned char data2_init_begin[];extern const unsigned char data2_init_end[];
memcpy(SFB(IDATA2), data2_init_begin, data2_init_end-data2_init_end)
Embedded Studio for RISC-V Reference Manual SEGGER Embedded Studio User Guide
61
Using source controlSource control is an essential tool for individuals or development teams. SEGGER Embedded Studio integrates
with several popular source-control systems to provide this feature for files in your SEGGER Embedded Studio for
RISC-V projects.
Source-control capability is implemented by a number of third-party providers, but the set of functions provided
by SEGGER Embedded Studio for RISC-V aims to be provider independent.
Embedded Studio for RISC-V Reference Manual SEGGER Embedded Studio User Guide
62
Source control capabilitiesThe source-control integration capability provides:
Connecting to the source-control repository and mapping files in the SEGGER Embedded Studio for RISC-
V project to those in source control.
Showing the source-control status of files in the project.
Adding files in the project to source control.
Fetching files in the project from source control.
Optionally locking and unlocking files in the project for editing.
Comparing a file in the project with the latest version in source control.
Updating a file in the project by merging changes from the latest version in source control.
Committing changes made to project files into source control.
Embedded Studio for RISC-V Reference Manual SEGGER Embedded Studio User Guide
63
Configuring source-control providersSEGGER Embedded Studio supports Subversion, Git, and Mercurial as source-control systems. To enable
SEGGER Embedded Studio to utilize source-control features, you need to install, on your operating system, the
appropriate command line client for the source-control systems that you will use.
Once you have installed the command line client, you must configure SEGGER Embedded Studio to use it.
To configure Subversion:
1. Choose Tools > Options or press Alt+,.
2. Select the Source Control category in the options dialog.
3. Set the Executable environment option of the Subversion Options group to point to Subversion svn
command. On Windows operating systems, the Subversion command is svn.exe.
To configure Git:
1. Choose Tools > Options or press Alt+,.
2. Select the Source Control category in the options dialog.
3. Set the Executable environment option of the Git Options group to point to Git git command. On
Windows operating systems, the Git command is git.exe.
To configure Mercurial:
1. Choose Tools > Options or press Alt+,.
2. Select the Source Control category in the options dialog.
3. Set the Executable environment option of the Mercurial Options group to point to Git hg command. On
Windows operating systems, the Git command is hg.exe.
Embedded Studio for RISC-V Reference Manual SEGGER Embedded Studio User Guide
64
Connecting to the source-control systemWhen SEGGER Embedded Studio loads a project, it examines the file system folder that contains the project to
determine the source-control system the project uses. If SEGGER Embedded Studio cannot determine, from the
file system, the source-control system in use, it disables source-control integration.
That is, if you have not set up the paths to the source-control command line clients, even if a working copy exists
and the appropriate command line client is installed, SEGGER Embedded Studio cannot establish source-control
integration for the project.
User credentials
You can set the credentials that the source-control system uses, for commands that require credentials, using
VCS > Options > Configure. From here you can set the user name and password. These details are saved to the
session file (the password is encrypted) so you won't need to specify this information each time the project is
loaded.
Note
SEGGER Embedded Studio has no facility to create repositories from scratch, nor to clone, pull, or checkout
repositories to a working copy: it is your responsibility to create a working copy outside of SEGGER Embedded
Studio using your selected command-line client or Windows Explorer extension.
The "Tortoise" products are a popular set of tools to provide source-control facilities in the Windows shell. Use
Google to find TortoiseSVN, TortoiseGit, and TortoiseHG and see if you like them.
Embedded Studio for RISC-V Reference Manual SEGGER Embedded Studio User Guide
65
File source-control statusDetermining the source-control status of a file can be expensive for large repositories, so SEGGER Embedded
Studio for RISC-V updates the source-control status in the background. Priority is given to items that are
displayed.
A file will be in one of the following states:
Clean:The file is in source control and matches the tip revision.
Not Controlled:The file is not in source control.
Conflicted:The file is in conflict with changes made to the repository.
Locked:The file is locked.
Update Available:The file is older than the most-recent version in source control.
Added:The file is scheduled to be added to the repository.
Removed:The file is scheduled to be removed from the repository.
If the file has been modified, its status is displayed in red in the Project Explorer. Note that if a file is not under
the local root, it will not have a source-control status.
You can reset any stored source-control file status by choosing VCS > Refresh.

Embedded Studio for RISC-V Reference Manual SEGGER Embedded Studio User Guide
66
Source-control operationsSource-control operations can be performed on single files or recursively on multiple files in the Project
Explorer hierarchy. Single-file operations are available on the Source Control toolbar and on the text editor's
shortcut menu. All operations are available using the VCS menu. The operations are described in terms of the
Project Explorer shortcut menu.
Embedded Studio for RISC-V Reference Manual SEGGER Embedded Studio User Guide
67
Adding files to source control
To add files to the source-control system:
1. In the Project Explorer, select the file to add. If you select a folder, project, or solution, any eligible child
items will also be added to source control.
2. choose Source Control > Add or press Ctrl+R, A.
3. The dialog will list the files that can be added.
4. In that dialog, you can deselect any files you don't want to add to source control.
5. Click Add.
Note
Files are scheduled to be added to source control and will only be committed to source control (and seen by
others) when you commit the file.
Enabling the VCS > Options > Add Immediately option will bypass the dialog and immediately add (but not
commit) the files.
Embedded Studio for RISC-V Reference Manual SEGGER Embedded Studio User Guide
68
Updating files
To update files from source control:
1. In the Project Explorer, select the file to update. If you select a folder, project, or solution, any eligible
child items will also be updated from source control.
2. choose Source Control > Update or press Ctrl+R, U.
3. The dialog will list the files that can be updated.
4. In that dialog, you can deselect any files you don't want to update from source control.
5. Click Update.
Note
Enabling the VCS > Options > Update Immediately option will bypass the dialog and immediately update the
files.

Embedded Studio for RISC-V Reference Manual SEGGER Embedded Studio User Guide
69
Committing files
To commit files:
1. In the Project Explorer, select the file to commit. If you select a folder, project, or solution, any eligible
child items will also be committed.
2. Choose Source Control > Commit or press Ctrl+R, C.
3. The dialog will list the files that can be committed.
4. In that dialog, you can deselect any files you don't want to commit and enter an optional comment.
5. Click Commit.
Note
Enabling the VCS > Options > Commit Immediately option will bypass the dialog and immediately commit the
files without a comment.
Embedded Studio for RISC-V Reference Manual SEGGER Embedded Studio User Guide
70
Reverting files
To revert files:
1. In the Project Explorer, select the file to revert. If you select a folder, project, or solution, any eligible child
items will also be reverted.
2. Choose Source Control > Revert or press Ctrl+R, V.
3. The dialog will list the files that can be reverted.
4. In that dialog, you can deselect any files you don't want to revert.
5. Click Revert.
Note
Enabling the VCS > Options > Revert Immediately option will bypass the dialog and immediately revert files.
Embedded Studio for RISC-V Reference Manual SEGGER Embedded Studio User Guide
71
Locking files
To lock files:
1. In the Project Explorer, select the file to lock. If you select a folder, project, or solution, any eligible child
items will also be locked.
2. Choose Source Control > Lock or press Ctrl+R, L.
3. The dialog will list the files that can be locked.
4. In that dialog, you can deselect any files you don't want to lock and enter an optional comment.
5. Click Lock.
Note
Enabling the VCS > Options > Lock Immediately option will bypass the dialog and immediately lock files
without a comment.
Embedded Studio for RISC-V Reference Manual SEGGER Embedded Studio User Guide
72
Unlocking files
To unlock files:
1. In the Project Explorer, select the file to lock. If you select a folder, project, or solution, any eligible child
items will also be unlocked.
2. Choose Source Control > Unlock or press Ctrl+R, N.
3. The dialog will list the files that can be unlocked.
4. In that dialog, you can deselect any files you don't want to unlock.
5. Click Unlock.
Note
Enabling the VCS > Options > Unlock Immediately option will bypass the dialog and immediately unlock files.

Embedded Studio for RISC-V Reference Manual SEGGER Embedded Studio User Guide
73
Removing files from source control
To remove files from source control:
1. In the Project Explorer, select the file to remove. If you select a folder, project, or solution, any eligible
child items will also be removed.
2. choose Source Control > Remove or press Ctrl+R, R.
3. The dialog will list the files that can be removed.
4. In that dialog, you can deselect any files you don't want to remove.
5. Click Remove.
Note
Files are scheduled to be removed from source control and will still be and seen by others, giving you the
opportunity to revert the removal. When you commit the file, the file is removed from source control.
Enabling the VCS > Options > Remove Immediately option will bypass the dialog and immediately remove (but
not commit) files.

Embedded Studio for RISC-V Reference Manual SEGGER Embedded Studio User Guide
74
Showing differences between filesTo show the differences between the file in the project and the version checked into source control, do the
following:
1. In the Project Explorer, right-click the file.
2. From the shortcut menu, choose Source Control > Show Differences.
You can use an external diff tool in preference to the built-in SEGGER Embedded Studio for RISC-V diff tool. To
define the diff command line SEGGER Embedded Studio for RISC-V generates, choose Tools > Options > Source
Control > Diff Command Line. The command line is defined as a list of strings to avoid problems with spaces in
arguments. The diff command line can contain the following macros:
$(localfile):The filename of the file in the project.
$(remotefile):The filename of the latest version of the file in source control.
$(localname):A display name for $(localfile).
$(remotename):A display name for $(remotefile).
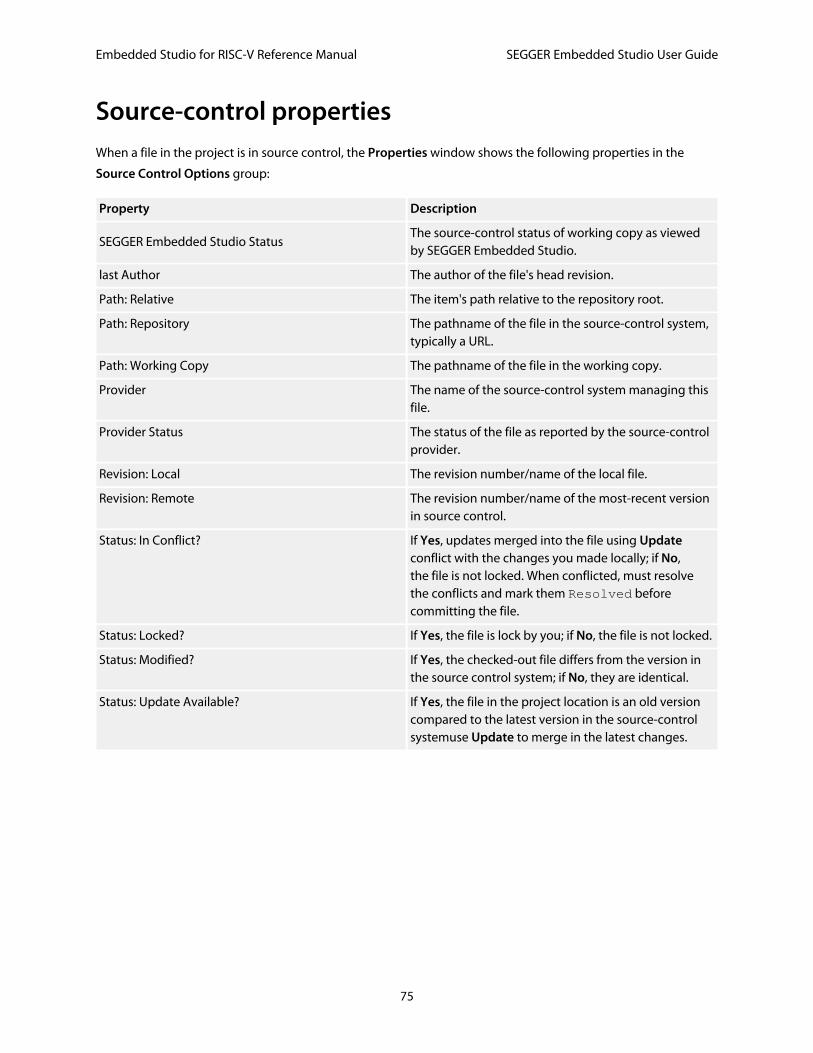
Embedded Studio for RISC-V Reference Manual SEGGER Embedded Studio User Guide
75
Source-control propertiesWhen a file in the project is in source control, the Properties window shows the following properties in the
Source Control Options group:
Property Description
SEGGER Embedded Studio StatusThe source-control status of working copy as viewedby SEGGER Embedded Studio.
last Author The author of the file's head revision.
Path: Relative The item's path relative to the repository root.
Path: Repository The pathname of the file in the source-control system,typically a URL.
Path: Working Copy The pathname of the file in the working copy.
Provider The name of the source-control system managing thisfile.
Provider Status The status of the file as reported by the source-controlprovider.
Revision: Local The revision number/name of the local file.
Revision: Remote The revision number/name of the most-recent versionin source control.
Status: In Conflict? If Yes, updates merged into the file using Updateconflict with the changes you made locally; if No,the file is not locked. When conflicted, must resolvethe conflicts and mark them Resolved beforecommitting the file.
Status: Locked? If Yes, the file is lock by you; if No, the file is not locked.
Status: Modified? If Yes, the checked-out file differs from the version inthe source control system; if No, they are identical.
Status: Update Available? If Yes, the file in the project location is an old versioncompared to the latest version in the source-controlsystemuse Update to merge in the latest changes.
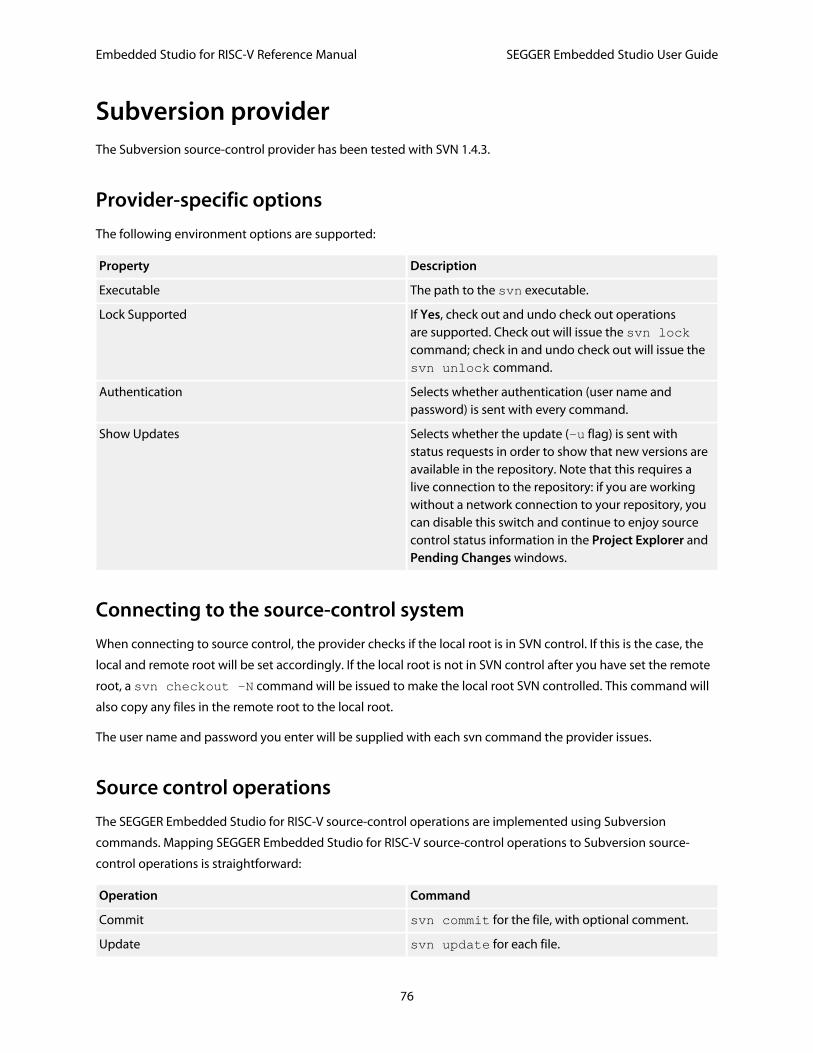
Embedded Studio for RISC-V Reference Manual SEGGER Embedded Studio User Guide
76
Subversion providerThe Subversion source-control provider has been tested with SVN 1.4.3.
Provider-specific options
The following environment options are supported:
Property Description
Executable The path to the svn executable.
Lock Supported If Yes, check out and undo check out operationsare supported. Check out will issue the svn lockcommand; check in and undo check out will issue thesvn unlock command.
Authentication Selects whether authentication (user name andpassword) is sent with every command.
Show Updates Selects whether the update (-u flag) is sent withstatus requests in order to show that new versions areavailable in the repository. Note that this requires alive connection to the repository: if you are workingwithout a network connection to your repository, youcan disable this switch and continue to enjoy sourcecontrol status information in the Project Explorer andPending Changes windows.
Connecting to the source-control system
When connecting to source control, the provider checks if the local root is in SVN control. If this is the case, the
local and remote root will be set accordingly. If the local root is not in SVN control after you have set the remote
root, a svn checkout -N command will be issued to make the local root SVN controlled. This command will
also copy any files in the remote root to the local root.
The user name and password you enter will be supplied with each svn command the provider issues.
Source control operations
The SEGGER Embedded Studio for RISC-V source-control operations are implemented using Subversion
commands. Mapping SEGGER Embedded Studio for RISC-V source-control operations to Subversion source-
control operations is straightforward:
Operation Command
Commit svn commit for the file, with optional comment.
Update svn update for each file.
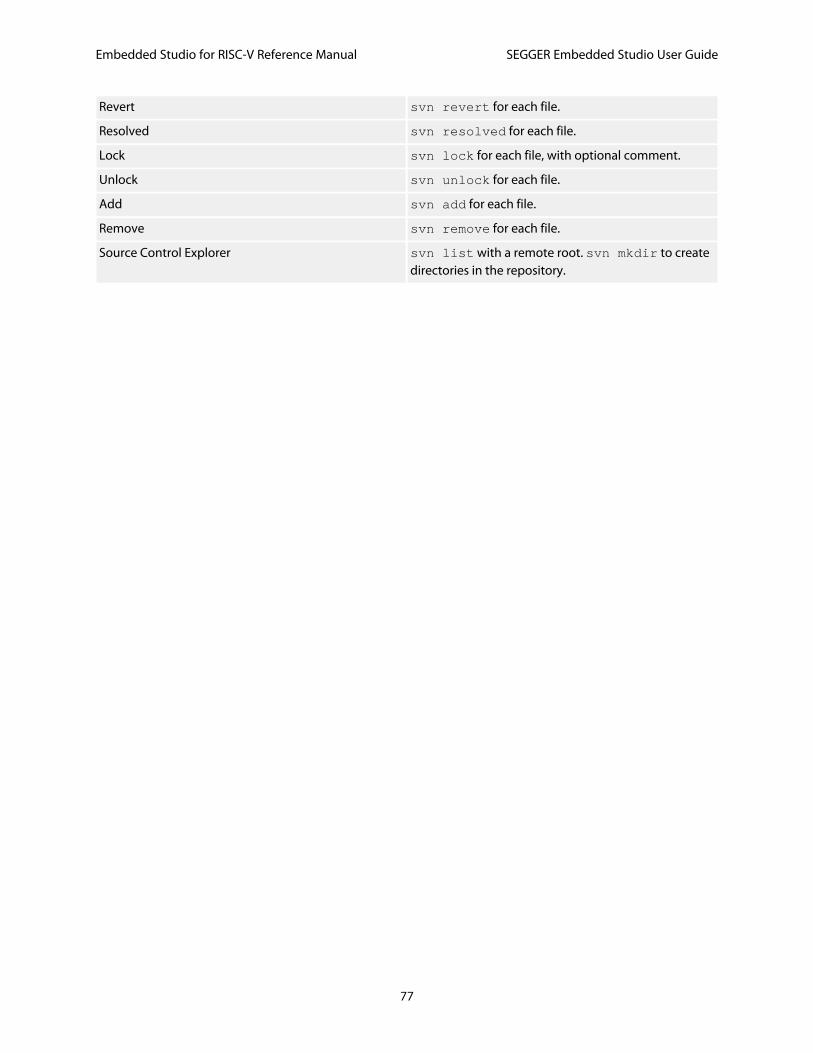
Embedded Studio for RISC-V Reference Manual SEGGER Embedded Studio User Guide
77
Revert svn revert for each file.
Resolved svn resolved for each file.
Lock svn lock for each file, with optional comment.
Unlock svn unlock for each file.
Add svn add for each file.
Remove svn remove for each file.
Source Control Explorer svn list with a remote root. svn mkdir to createdirectories in the repository.
Embedded Studio for RISC-V Reference Manual SEGGER Embedded Studio User Guide
78
CVS providerThe CVS source-control provider has been tested with CVSNT 2.5.03. The CVS source-control provider uses the
CVS rls command to browse the repositorythis command is implemented in CVS 1.12 but usage of . as the root
of the module name is not supported.
Provider-specific options
The following environment options are supported:
Property Description
CVSROOT The CVSROOT value to access the repository.
Edit/Unedit Supported If Yes, Check Out and Undo Check Out commandsare supported. Any check-out operation will issue thecvs edit command; any check-in or undo-check-out operation will issue the cvs unedit command;the status operation will issue the cvs ss command.
Executable The path to the cvs executable.
Login/Logout Required If Yes, Connect will issue the cvs login command.
Connecting to the source-control system
When connecting to source control, the provider checks if the local root is in CVS control. If this is the case, the
local and remote root will be set accordingly. If the local root is not in CVS control after you have set the remote
root, a cvs checkout -l -d command will be issued to make the local root CVS controlled. This command
will also copy any files in the remote root to the local root.
Source-control operations
The SEGGER Embedded Studio for RISC-V source-control operations have been implemented using CVS
commands. There are no multiple-file operations, each operation is done on a single file and committed as part
of the operation.
Operation Command
Get Statuscvs status and optional cvs editors for localdirectories in CVS control. cvs rls -e for directoriesin the repository.
Add To Source Control cvs add for each directory not in CVS control.cvs add for the file. cvs commit for the file anddirectories.
Embedded Studio for RISC-V Reference Manual SEGGER Embedded Studio User Guide
79
Get Latest cvs update -l -d for each directory not in CVScontrol. cvs update to merge the local file. cvsupdate -C to overwrite the local file.
Check Out Optional cvs update -C to get the latest version.cvs edit to lock the file.
Undo Check Out cvs unedit to unlock the file. Optional cvsupdate to get the latest version.
Check In cvs commit for the file.
Source Control Explorer cvs rls -e with a remote root starting with .. cvsimport to create directories in the repository.
Embedded Studio for RISC-V Reference Manual SEGGER Embedded Studio User Guide
80
Package managementAdditional target-support functions can be added to, and removed from, SEGGER Embedded Studio for RISC-V
with packages.
A SEGGER Embedded Studio for RISC-V package is an archive file containing a collection of target-support files.
Installing a package involves copying the files it contains to an appropriate destination directory and registering
the package with SEGGER Embedded Studio for RISC-V's package system. Keeping target-support files separate
from the main SEGGER Embedded Studio for RISC-V installation allows us to support new hardware and issue
bug fixes for existing hardware-support files between SEGGER Embedded Studio for RISC-V releases, and it
allows third parties to develop their own support packages.
Installing packages
Use the Package Manager to automate the download, installation, upgrade and removal of packages.
To activate the Package Manager:
Choose Tools > Manage Packages.
In some situations, such as using SEGGER Embedded Studio for RISC-V on a computer without Internet access or
when you want to install packages that are not on the website, you cannot use the Package Manager to install
packages and it will be necessary to manually install them.
To manually install a package:
1. Choose Tools > Manually Install Packages.
2. Select one or more package files you want to install.
3. Click Open to install the packages.
Choose Tools > Show Installed Packages to see more information on the installed packages.
The Package Manager window will remove manually installed packages.
The package manager
The Package Manager manages the support packages installed on your system. It lists the available packages,
shows the installed packages, and allows you to install, update, reinstall, and remove them.
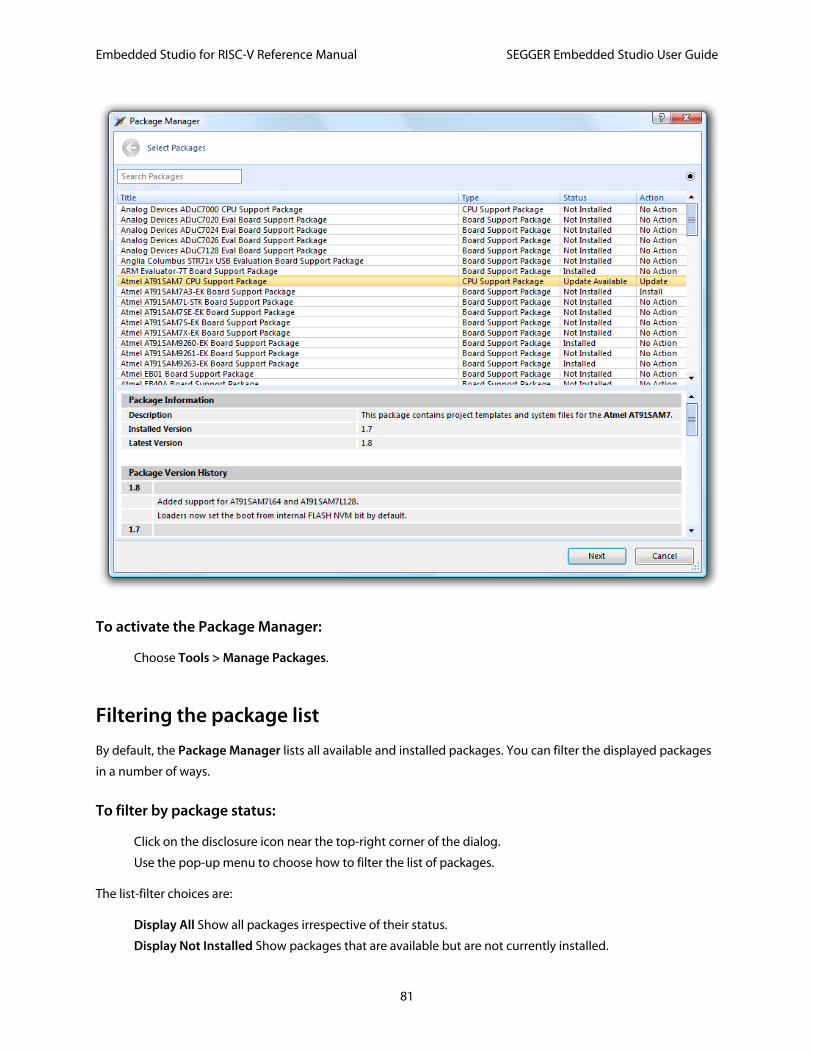
Embedded Studio for RISC-V Reference Manual SEGGER Embedded Studio User Guide
81
To activate the Package Manager:
Choose Tools > Manage Packages.
Filtering the package list
By default, the Package Manager lists all available and installed packages. You can filter the displayed packages
in a number of ways.
To filter by package status:
Click on the disclosure icon near the top-right corner of the dialog.
Use the pop-up menu to choose how to filter the list of packages.
The list-filter choices are:
Display All Show all packages irrespective of their status.
Display Not Installed Show packages that are available but are not currently installed.

Embedded Studio for RISC-V Reference Manual SEGGER Embedded Studio User Guide
82
Display Installed Only show packages that are installed.
Display Updates Only show packages that are installed but are not up-to-date because a newer version is
available.
You can also filter the list of packages by the text in the package's title and documentation.
To filter packages by keyword:
Type the keyword into the Search Packages box at the top-left corner of the dialog.
Installing a package
The package-installation operation downloads a package to $(PackagesDir)/downloads, if it has not been
downloaded already, and unpacks the files contained within the package to their destination directory.
To install a package:
1. Choose Tools > Package Manager and set the status filter to Display Not Installed.
2. Select the package or packages you wish to install.
3. Right-click the selected packages and choose Install Selected Packages from the shortcut menu.
4. Click Next; you will be see the actions the Package Manager is about to carry out.
5. Click Next and the Package Manager will install the selected packages.
6. When installation is complete, click Finish to close the Package Manager.
Updating a package
The package-update operation first removes existing package files, then it downloads the updated package to
$(PackagesDir)/downloads and unpacks the files contained within the package to their destination directory.
To update a package:
1. Choose Tools > Package Manager and set the status filter to Display Updates.
2. Select the package or packages you wish to update.
3. Right-click the selected packages and choose Update Selected Packages from the shortcut menu.
4. Click Next; you will see the actions the Package Manager is about to carry out.
5. Click Next and the Package Manager will update the package(s).
6. When the update is complete, click Finish to close the Package Manager.
Removing a package
The package-remove operation removes all the files that were extracted when the package was installed.
Embedded Studio for RISC-V Reference Manual SEGGER Embedded Studio User Guide
83
To remove a package:
1. Choose Tools > Package Manager and set the status filter to Display Installed.
2. Select the package or packages you wish to remove.
3. Right-click the selected packages and choose Remove Selected Packages from the shortcut menu.
4. Click Next; you will see the actions the Package Manager is about to carry out.
5. Click Next and the Package Manager will remove the package(s).
6. When the operation is complete, click Finish to close the Package Manager.
Reinstalling a package
The package-reinstall operation carries out a package-remove operation followed by a package-install
operation.
To reinstall a package:
1. Choose Tools > Package Manager and set the status filter to Display Installed.
2. Select the package or packages you wish to reinstall.
3. Right-click the packages to reinstall and choose Reinstall Selected Packages from the shortcut menu.
4. Click Next; you will see the actions the Package Manager is about to carry out.
5. Click Next and the Package Manager will reinstall the packages.
6. When the operation is complete, click Finish to close the Package Manager.

Embedded Studio for RISC-V Reference Manual SEGGER Embedded Studio User Guide
84
Exploring your applicationIn this section, we discuss the SEGGER Embedded Studio tools that help you examine how your application is
built.
Embedded Studio for RISC-V Reference Manual SEGGER Embedded Studio User Guide
85
Project explorerThe Project Explorer is the user interface of the SEGGER Embedded Studio for RISC-V project system. It organizes
your projects and files and provides access to the commands that operate on them. A toolbar at the top of the
window offers quick access to commonly used commands for the selected project node or the active project.
Right-click to reveal a shortcut menu with a larger set of commands that will work on the selected project node,
ignoring the active project.
The selected project node determines what operations you can perform. For example, the Compile operation
will compile a single file if a file project node is selected; if a folder project node is selected, each of the files in
the folder are compiled.
You can select project nodes by clicking them in the Project Explorer. Additionally, as you switch between files
in the editor, the selection in the Project Explorer changes to highlight the file you're editing.
To activate the Project Explorer:
Choose View > Project Explorer or press Ctrl+Alt+P.
Left-click operations
The following operations are available in the Project Explorer with a left-click of the mouse:
Action Description
Single clickSelect the node. If the node is already selected andis a solution, project, or folder node, a rename editorappears.
Double click Double-clicking a solution node or folder node willreveal or hide the node's children. Double-clicking aproject node selects it as the active project. Double-clicking a file opens the file with the default editor forthat file's type.
Toolbar commands
The following buttons are on the toolbar:
Button Description
Add a new file to the active project using the New Filedialog.
Add existing files to the active project.
Embedded Studio for RISC-V Reference Manual SEGGER Embedded Studio User Guide
86
Remove files, folders, projects, and links from theproject.
Create a new folder in the active project.
Menu of build operations.
Disassemble the active project.
Menu of Project Explorer options.
Display the properties dialog for the selected item.
Shortcut menu commands
The shortcut menu, displayed by right-clicking, contains the commands listed below.
For solutions:
Item Description
Build and Batch BuildBuild all projects under the solution in the current orbatch build configuration.
Rebuild and Batch Rebuild Rebuild all projects under the solution in the current orbatch build configuration.
Clean and Batch Clean Remove all output and intermediate build files for theprojects under the solution in the current or batchbuild configuration.
Export Build and Batch Export Build Create an editor with the build commands for theprojects under the solution in the current or batchbuild configuration.
Add New Project Add a new project to the solution.
Add Existing Project Create a link from an existing solution to this solution.
Paste Paste a copied project into the solution.
Remove Remove the link to another solution from the solution.
Rename Rename the solution node.
Source Control Operations Source-control operations on the project file andrecursive operations on all files in the solution.
Edit Solution As Text Create an editor containing the project file.
Save Solution As Change the filename of the project filenote that thesaved project file is not reloaded.
Properties Show the Properties dialog with the solution nodeselected.

Embedded Studio for RISC-V Reference Manual SEGGER Embedded Studio User Guide
87
For projects:
Item Description
Build and Batch BuildBuild the project in the current or batch buildconfiguration.
Rebuild and Batch Rebuild Reuild the project in the current or batch buildconfiguration.
Clean and Batch Clean Remove all output and intermediate build files for theproject in the current or batch build configuration.
Export Build and Batch Export Build Create an editor with the build commands for theproject in the current or batch build configuration.
Link Perform the project node build operation: link for anExecutable project type, archive for a Library projecttype, and the combine command for a Combiningproject type.
Set As Active Project Set the project to be the active project.
Debugging Commands For Executable and Externally Built Executable projecttypes, the following debugging operations areavailable on the project node: Start Debugging, StepInto Debugging, Reset And Debug, Start WithoutDebugging, Attach Debugger, and Verify.
Memory-Map Commands For Executable project types that don't have memory-map files in the project and have the memory-map fileproject option set, there are commands to view thememory-map file and to import it into the project.
Section-Placement Commands For Executable project types that don't have section-placement files in the project but have the section-placement file project option set, there are commandsto view the section-placement file and to import it intothe project.
Target Processor For Executable and Externally Built Executable projecttypes that have a Target Processor option group, theselected target can be changed.
Add New File Add a new file to the project.
Add Existing File Add an existing file to the project.
New Folder Create a new folder in the project.
Cut Cut the project from the solution.
Copy Copy the project from the solution.
Paste Paste a copied folder or file into the project.
Remove Remove the project from the solution.
Rename Rename the project.
Embedded Studio for RISC-V Reference Manual SEGGER Embedded Studio User Guide
88
Source Control Operations Source-control, recursive operations on all files in theproject.
Find in Project Files Run Find in Files in the project directory.
Properties Show the Project Manager dialog and select theproject node.
For folders:
Item Description
Add New File Add a new file to the folder.
Add Existing File Add an existing file to the folder.
New Folder Create a new folder in the folder.
Cut Cut the folder from the project or folder.
Copy Copy the folder from the project or folder.
Paste Paste a copied folder or file into the folder.
Remove Remove the folder from the project or folder.
Rename Rename the folder.
Source Control Operations Source-control recursive operations on all files in thefolder.
Compile Compile each file in the folder.
Properties Show the properties dialog with the folder nodeselected.
For files:
Item Description
Open Edit the file with the default editor for the file's type.
Open With Edit the file with a selected editor. You can choosefrom the Binary Editor, Text Editor, and Web Browser.
Select in File Explorer Create a operating system file system window with thefile selected.
Compile Compile the file.
Export Build Create an editor window containing the commands tocompile the file in the active build configuration.
Exclude From Build Set the Exclude From Build option to Yes for thisproject node in the active build configuration.
Disassemble Disassemble the output file of the compile into aneditor window.
Preprocess Run the C preprocessor on the file and show theoutput in an editor window.
Cut Cut the file from the project or folder.

Embedded Studio for RISC-V Reference Manual SEGGER Embedded Studio User Guide
89
Copy Copy the file from the project or folder.
Remove Remove the file from the project or folder.
Import Import the file into the project.
Source Control Operations Source-control operations on the file.
Properties Show the properties dialog with the file node selected.
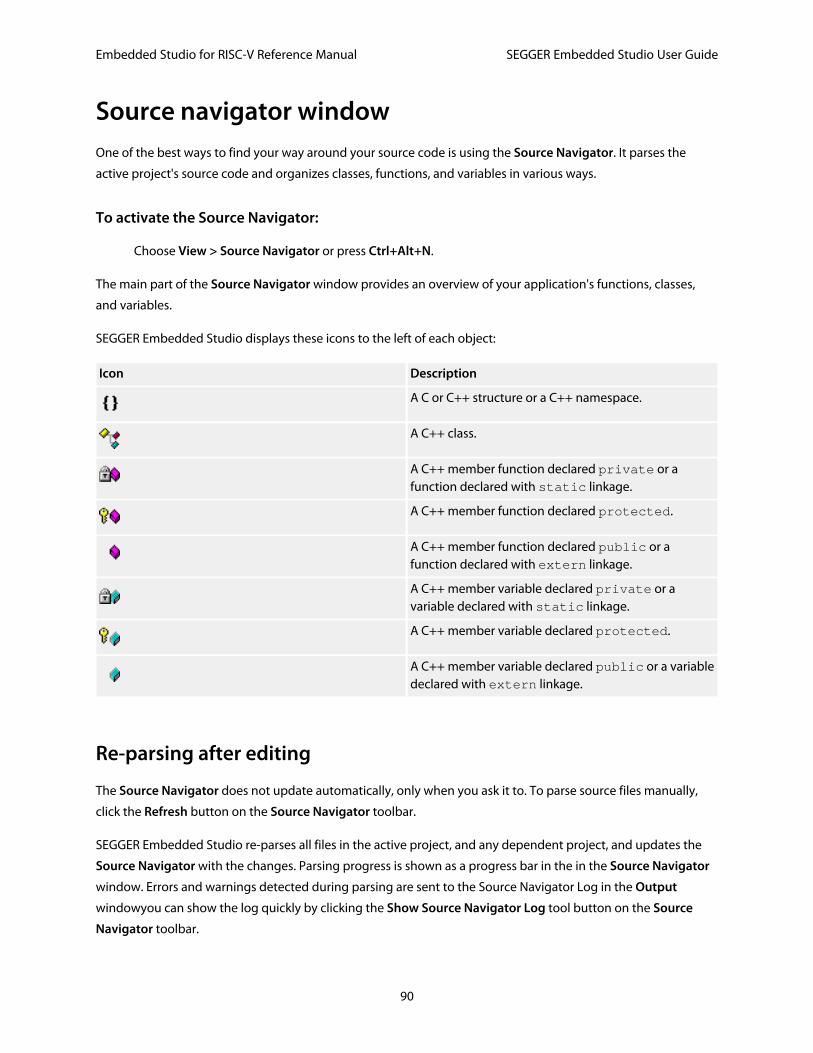
Embedded Studio for RISC-V Reference Manual SEGGER Embedded Studio User Guide
90
Source navigator windowOne of the best ways to find your way around your source code is using the Source Navigator. It parses the
active project's source code and organizes classes, functions, and variables in various ways.
To activate the Source Navigator:
Choose View > Source Navigator or press Ctrl+Alt+N.
The main part of the Source Navigator window provides an overview of your application's functions, classes,
and variables.
SEGGER Embedded Studio displays these icons to the left of each object:
Icon Description
A C or C++ structure or a C++ namespace.
A C++ class.
A C++ member function declared private or afunction declared with static linkage.
A C++ member function declared protected.
A C++ member function declared public or afunction declared with extern linkage.
A C++ member variable declared private or avariable declared with static linkage.
A C++ member variable declared protected.
A C++ member variable declared public or a variabledeclared with extern linkage.
Re-parsing after editing
The Source Navigator does not update automatically, only when you ask it to. To parse source files manually,
click the Refresh button on the Source Navigator toolbar.
SEGGER Embedded Studio re-parses all files in the active project, and any dependent project, and updates the
Source Navigator with the changes. Parsing progress is shown as a progress bar in the in the Source Navigator
window. Errors and warnings detected during parsing are sent to the Source Navigator Log in the Output
windowyou can show the log quickly by clicking the Show Source Navigator Log tool button on the Source
Navigator toolbar.
Embedded Studio for RISC-V Reference Manual SEGGER Embedded Studio User Guide
91
Setting indexing threads
You can configure how many threads SEGGER Embedded Studio launches to index your project.
To set the number of threads launched when indexing a project:
Choose View > Source Navigator or press Ctrl+Alt+N.
Click the Options dropdown button at the right of the toolbar.
Move the slider to select the number of threads to launch.
Increasing the number of threads will complete indexing faster, but may reduce the responsiveness of SEGGER
Embedded Studio when editing, for example. You should choose a setting that you are comfortable with
for your PC. By default, SEGGER Embedded Studio launches 16 threads to index the project and is a good
compromise for a desktop quad-core PC.
Sorting and grouping
You can group objects by their type; that is, whether they are classes, functions, namespaces, structures, or
variables. Each object is placed into a folder according to its type.
To group objects by type:
1. On the Source Navigator toolbar, click the arrow to the right of the Cycle Grouping button.
2. Choose Group By Type
Embedded Studio for RISC-V Reference Manual SEGGER Embedded Studio User Guide
92
References windowThe References window shows the results of the last Find References operation. The Find References facility
is closely related to the Source Navigator in that it indexes your project and searches for references within the
active source code regions.
To activate the References window:
If you have hidden the References window and want to see it again:
Choose View > References or press Ctrl+Alt+R.
To find all references in a project:
1. Open a source file that is part of the active project, or one of its dependent projects.
2. In the editor, move the insertion point within the name of the function, variable, method, or macro to
find.
3. Choose Navigate > Find References or press Alt+R.
4. SEGGER Embedded Studio shows the References window, without moving focus, and searches your
project in the background.
You can also find references directly from the text editor's context menu: right-click the item to find and choose
Find References. As a convenience, SEGGER Embedded Studio is configured to also run Find References when
you Alt+Right-click in the text editorsee Mouse-click accelerators.
To search within the results:
Type the text to search for in the Reference window's search box. As you type, the search results are
narrowed.
Click the close button to clear the search text and show all references.
To replace within the results:
Type the replacement text in the Reference window's replace box.
Use the buttons to navigate and replace the text.
The documents that have had replaced text will appear unsaved in the text editor.

Embedded Studio for RISC-V Reference Manual SEGGER Embedded Studio User Guide
93
Symbol browser windowThe Symbol Browser shows useful information about your linked application and complements the information
displayed in the Project Explorer window. You can select different ways to filter and group the information in
the Symbol Browser to provide an at-a-glance overview of your application. You can use the Symbol Browser to
drill down to see the size and location of each part of your program. The way symbols are sorted and grouped is
saved between runs; so, when you rebuild an application, SEGGER Embedded Studio automatically updates the
Symbol Browser so you can see the effect of your changes on the memory layout of your program.
User interface
Button Description
Group symbols by source filename.
Group symbols by symbol type (equates, functions,labels, sections, and variables).
Group symbols by the section where they are defined.
Move the insertion point to the statement that definedthe symbol.
Select columns to display.
The main part of the Symbol Browser displays each symbol (both external and static) that is linked into an
application. SEGGER Embedded Studio displays the following icons to the left of each symbol:
Icon Description
Private Equate A private symbol not defined relative toa section.
Public Equate A public symbol that is not definedrelative to a section.
Private Function A private function symbol.
Public Function A public function symbol.
Private Label A private data symbol, defined relative toa section.
Public Label A public data symbol, defined relative to asection.
Section A program section.

Embedded Studio for RISC-V Reference Manual SEGGER Embedded Studio User Guide
94
Choosing what to show
To activate the Symbol Browser window:
Choose View > Symbol Browser or press Ctrl+Alt+Y.
You can choose to display the following fields for each symbol:
Value:The value of the symbol. For labels, code, and data symbols, this will be the address of the symbol.
For absolute or symbolic equates, this will be the value of the symbol.
Range:The range of addresses the code or data item covers. For code symbols that correspond to high-
level functions, the range is the range of addresses used for that function's code. For data addresses that
correspond to high-level static or extern variables, the range is the range of addresses used to store that
data item. These ranges are only available if the corresponding source file was compiled with debugging
information turned on: if no debugging information is available, the range will simply be the first address
of the function or data item.
Size:The size, in bytes, of the code or data item. The Size column is derived from the Range of the symbol:
if the symbol corresponds to a high-level code or data item and has a range, Size is calculated as the
difference between the start and end addresses of the range. If a symbol has no range, the size column is
blank.
Section:The section in which the symbol is defined. If the symbol is not defined within a section, the
Section column is blank.
Type:The high-level type for the data or code item. If the source file that defines the symbol is compiled
with debugging information turned off, type information is not available and the Type column is blank.
Frame Size:The amount of stack space used by a call to the function symbol. If the source file that defines
the symbol is compiled with debugging information turned off, frame size information is not available
and the Type column is blank.
Initially the Range and Size columns are shown in the Symbol Browser. To select which columns to display, use
the Field Chooser button on the Symbol Browser toolbar.
To select the fields to display:
1. Click the Field Chooser button on the Symbol Browser toolbar.
2. Select the fields you wish to display and deselect the fields you wish to hide.
Organizing and sorting symbols
When you group symbols by section, each symbol is grouped underneath the section in which it is defined.
Symbols that are absolute or are not defined within a section are grouped beneath (No Section).
To group symbols by section:
1. On the Symbol Browser toolbar, click the arrow next to the Cycle Grouping button.
Embedded Studio for RISC-V Reference Manual SEGGER Embedded Studio User Guide
95
2. From the pop-up menu, choose Group By Section.
The Cycle Grouping icon will change to indicate that the Symbol Browser is grouping symbols by section.
When you group symbols by type, each symbol is classified as one of the following:
An Equate has an absolute value and is not defined as relative to, or inside, a section.
A Function is defined by a high-level code sequence.
A Variable is defined by a high-level data declaration.
A Label is defined by an assembly language module. Label is also used when high-level modules are
compiled with debugging information turned off.
When you group symbols by source file, each symbol is grouped underneath the source file in which it is
defined. Symbols that are absolute, are not defined within a source file, or are compiled without debugging
information, are grouped beneath (Unknown).
To group symbols by type:
1. On the Symbol Browser toolbar, click the arrow next to the Cycle Grouping button.
2. Choose Group By Type from the pop-up menu.
The Cycle Grouping icon will change to indicate that the Symbol Browser is grouping symbols by type.
To group symbols by source file:
1. On the Symbol Browser toolbar, click the arrow next to the Cycle Grouping button.
2. Choose Group By Source File.
The Cycle Grouping icon will change to indicate that the Symbol Browser is grouping symbols by source file.
When you sort symbols alphabetically, all symbols are displayed in a single list in alphabetical order.
To list symbols alphabetically:
1. On the Symbol Browser toolbar, click the arrow next to the Cycle Grouping button.
2. Choose Sort Alphabetically.
The Cycle Grouping icon will change to indicate that the Symbol Browser is grouping symbols alphabetically.
Filtering and finding symbols
When you're dealing with big projects with hundreds, or even thousands, of symbols, a way to filter those
symbols in order to isolate just the ones you need is very useful. The Symbol Browser's toolbar provides an
editable combobox} you can use to specify the symbols you'd like displayed. You can type * to match a sequence
of zero or more characters and ? to match exactly one character.
Embedded Studio for RISC-V Reference Manual SEGGER Embedded Studio User Guide
96
The symbols are filtered and redisplayed as you type into the combo box. Typing the first few characters of a
symbol name is usually enough to narrow the display to the symbol you need. Note: the C compiler prefixes all
high-level language symbols with an underscore character, so the variable extern int u or the function
void fn(void) have low-level symbol names _u and _fn. The Symbol Browser uses the low-level symbol
name when displaying and filtering, so you must type the leading underscore to match high-level symbols.
To display symbols that start with a common prefix:
Type the desired prefix text into the combo box, optionally followed by a "*".
For instance, to display all symbols that start with "i2c_", type "i2c_" and all matching symbols are displayedyou
don't need to add a trailing "*" in this case, because it is implied.
To display symbols that end with a common suffix:
Type * into the combo box, followed by the required suffix.
For instance, to display all symbols that end in _data, type *_data and all matching symbols are displayedin this
case, the leading * is required.
When you have found the symbol you're interested in and your source files have been compiled with debugging
information turned on, you can jump to a symbol's definition using the Go To Definition button.
To jump to the definition of a symbol:
1. Select the symbol from the list of symbols.
2. On the Symbol Browser toolbar, click Go To Definition.
or
1. Right-click the symbol in the list of symbols.
2. Choose Go To Definition from the shortcut menu.
Watching symbols
If a symbol's range and type is known, you can add it to the most recently opened Watch window or Memory
window.
To add a symbol to the Watch window:
1. In the Symbol Browser, right-click the symbol you wish to add to the Watch window.
2. On the shortcut menu, choose Add To Watch.
To add a symbol to the Memory window:
1. In the Symbol Browser, right-click the symbol you wish to add to the Memory window.

Embedded Studio for RISC-V Reference Manual SEGGER Embedded Studio User Guide
97
2. Choose Locate Memory from the shortcut menu.
Using size information
Here are a few common ways to use the Symbol Browser:
What function uses the most code space? What requires the most data space?
1. Choose View > Symbol Browser or press Ctrl+Alt+Y.
2. In the Grouping button menu on the Symbol Browser toolbar, select Group By Type.
3. Ensure the Size field is checked in the Field Chooser button's menu.
4. Ensure that the filter on the Symbol Browser toolbar is empty.
5. Click on the Size field in the header to sort by data size.
6. The sizes of variables and of functions are shown in separate lists.
What's the overall size of my application?
1. Choose View > Symbol Browser or press Ctrl+Alt+Y.
2. In the Grouping button menu on the Symbol Browser toolbar, select Group By Section.
3. Ensure the Range and Size fields are checked in the Field Chooser button's menu.
4. Read the section sizes and ranges of each section in the application.
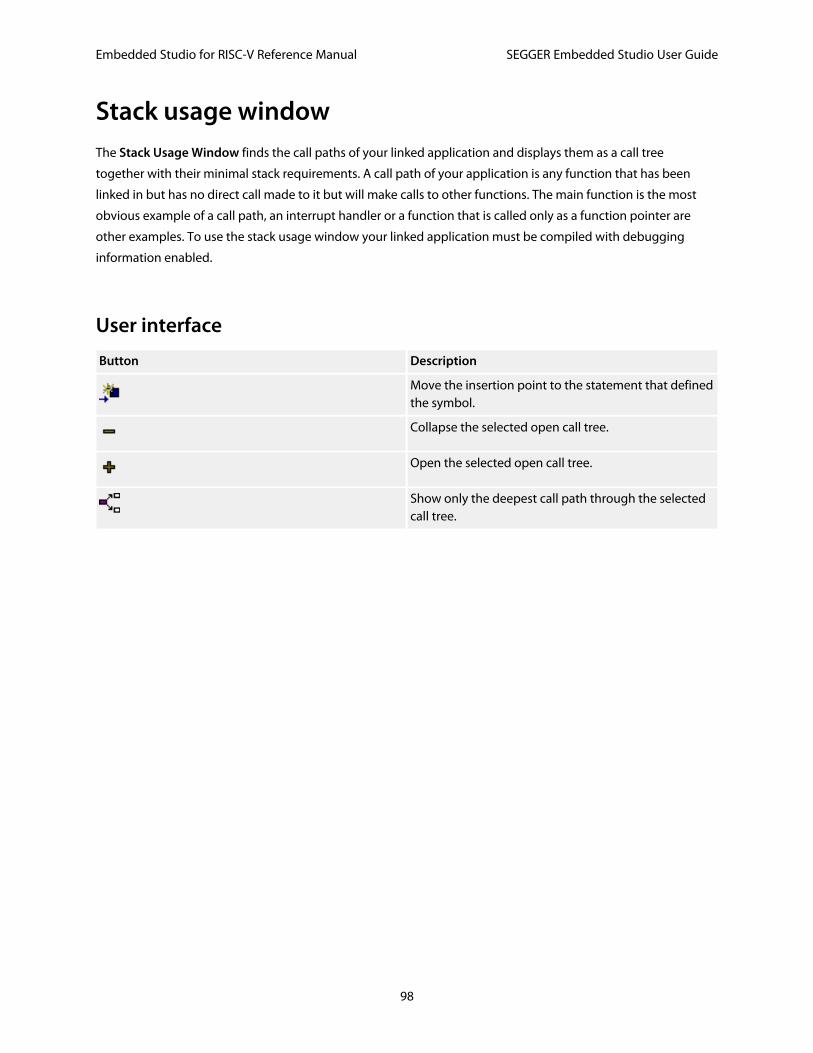
Embedded Studio for RISC-V Reference Manual SEGGER Embedded Studio User Guide
98
Stack usage windowThe Stack Usage Window finds the call paths of your linked application and displays them as a call tree
together with their minimal stack requirements. A call path of your application is any function that has been
linked in but has no direct call made to it but will make calls to other functions. The main function is the most
obvious example of a call path, an interrupt handler or a function that is called only as a function pointer are
other examples. To use the stack usage window your linked application must be compiled with debugging
information enabled.
User interface
Button Description
Move the insertion point to the statement that definedthe symbol.
Collapse the selected open call tree.
Open the selected open call tree.
Show only the deepest call path through the selectedcall tree.
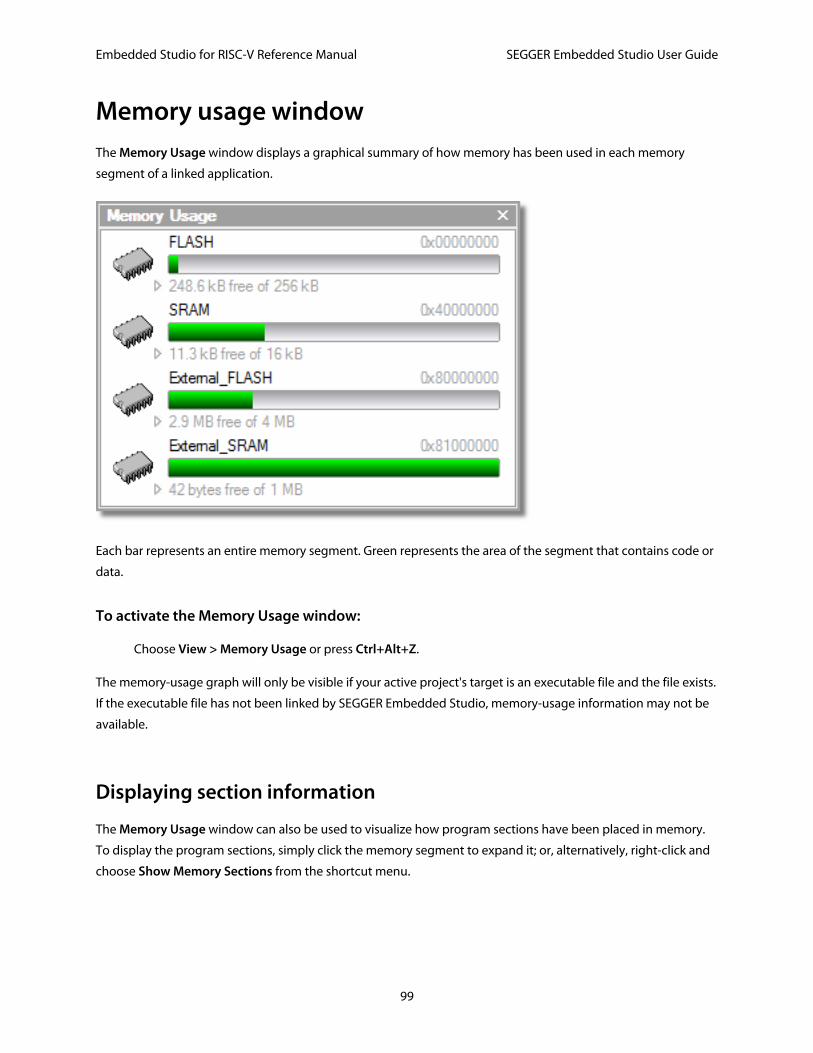
Embedded Studio for RISC-V Reference Manual SEGGER Embedded Studio User Guide
99
Memory usage windowThe Memory Usage window displays a graphical summary of how memory has been used in each memory
segment of a linked application.
Each bar represents an entire memory segment. Green represents the area of the segment that contains code or
data.
To activate the Memory Usage window:
Choose View > Memory Usage or press Ctrl+Alt+Z.
The memory-usage graph will only be visible if your active project's target is an executable file and the file exists.
If the executable file has not been linked by SEGGER Embedded Studio, memory-usage information may not be
available.
Displaying section information
The Memory Usage window can also be used to visualize how program sections have been placed in memory.
To display the program sections, simply click the memory segment to expand it; or, alternatively, right-click and
choose Show Memory Sections from the shortcut menu.
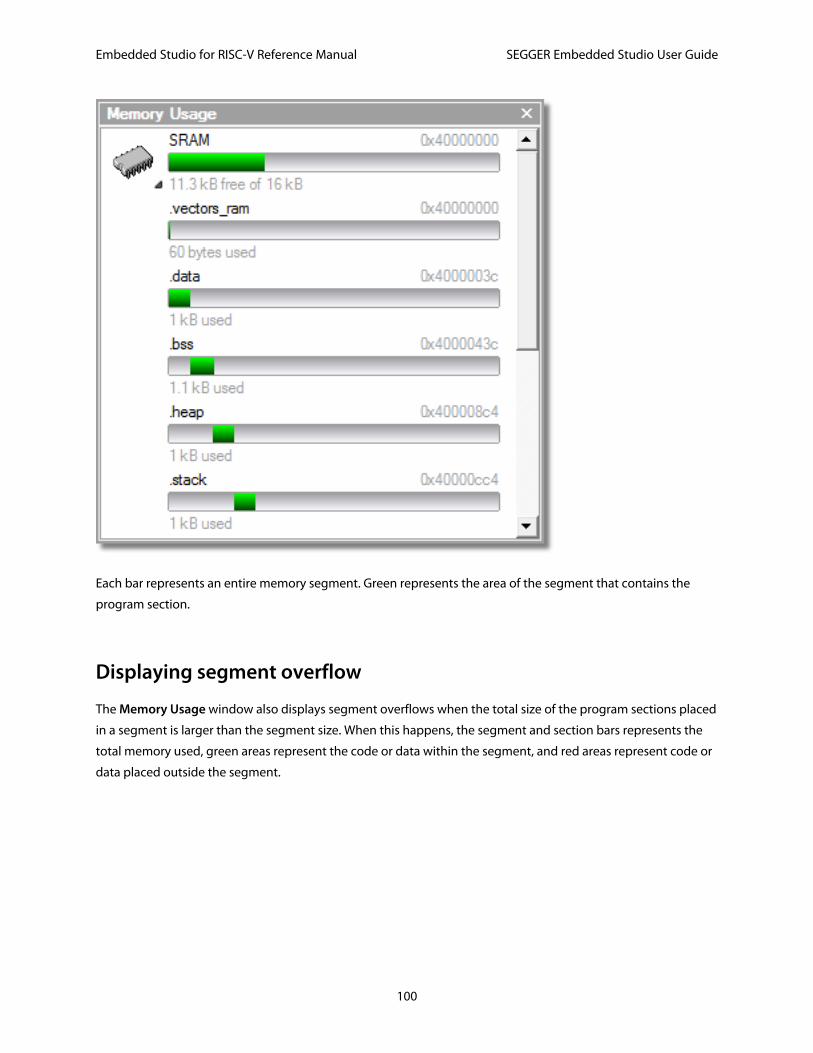
Embedded Studio for RISC-V Reference Manual SEGGER Embedded Studio User Guide
100
Each bar represents an entire memory segment. Green represents the area of the segment that contains the
program section.
Displaying segment overflow
The Memory Usage window also displays segment overflows when the total size of the program sections placed
in a segment is larger than the segment size. When this happens, the segment and section bars represents the
total memory used, green areas represent the code or data within the segment, and red areas represent code or
data placed outside the segment.

Embedded Studio for RISC-V Reference Manual SEGGER Embedded Studio User Guide
101
Getting more-detailed information
If you require more-detailed information than that provided by the Memory Usage window, such as the location
of specific objects within memory, use the Symbol browser window.
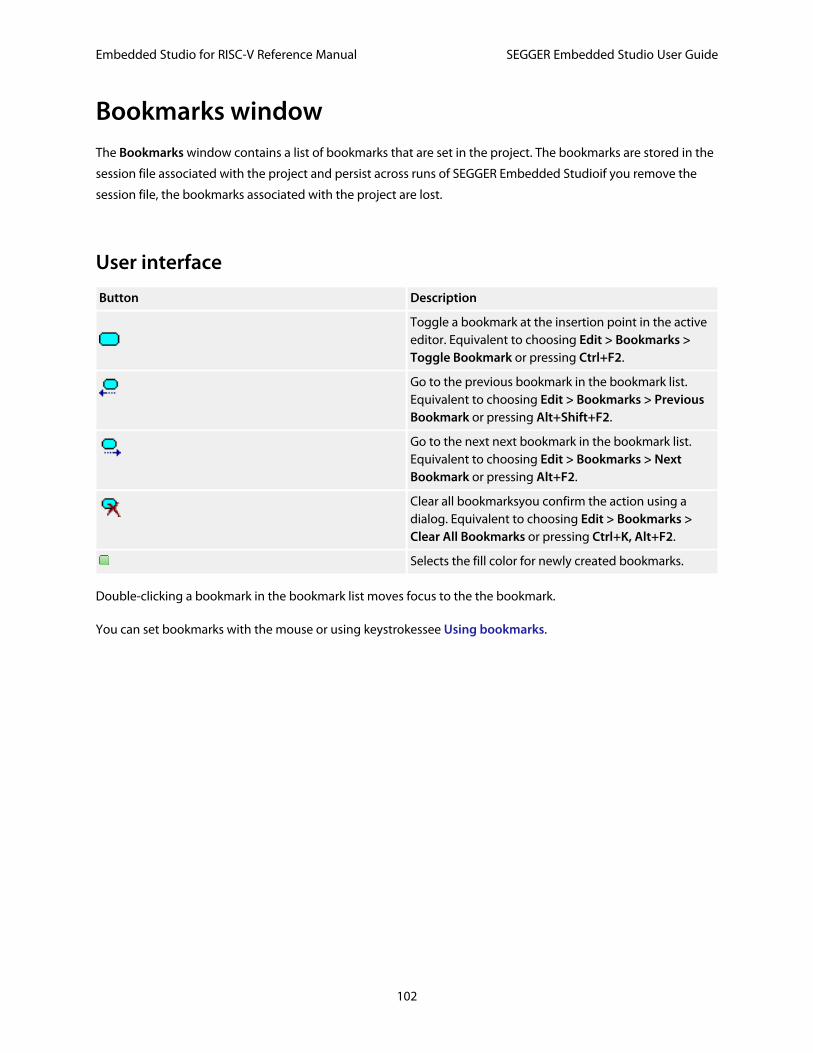
Embedded Studio for RISC-V Reference Manual SEGGER Embedded Studio User Guide
102
Bookmarks windowThe Bookmarks window contains a list of bookmarks that are set in the project. The bookmarks are stored in the
session file associated with the project and persist across runs of SEGGER Embedded Studioif you remove the
session file, the bookmarks associated with the project are lost.
User interface
Button Description
Toggle a bookmark at the insertion point in the activeeditor. Equivalent to choosing Edit > Bookmarks >Toggle Bookmark or pressing Ctrl+F2.
Go to the previous bookmark in the bookmark list.Equivalent to choosing Edit > Bookmarks > PreviousBookmark or pressing Alt+Shift+F2.
Go to the next next bookmark in the bookmark list.Equivalent to choosing Edit > Bookmarks > NextBookmark or pressing Alt+F2.
Clear all bookmarksyou confirm the action using adialog. Equivalent to choosing Edit > Bookmarks >Clear All Bookmarks or pressing Ctrl+K, Alt+F2.
Selects the fill color for newly created bookmarks.
Double-clicking a bookmark in the bookmark list moves focus to the the bookmark.
You can set bookmarks with the mouse or using keystrokessee Using bookmarks.
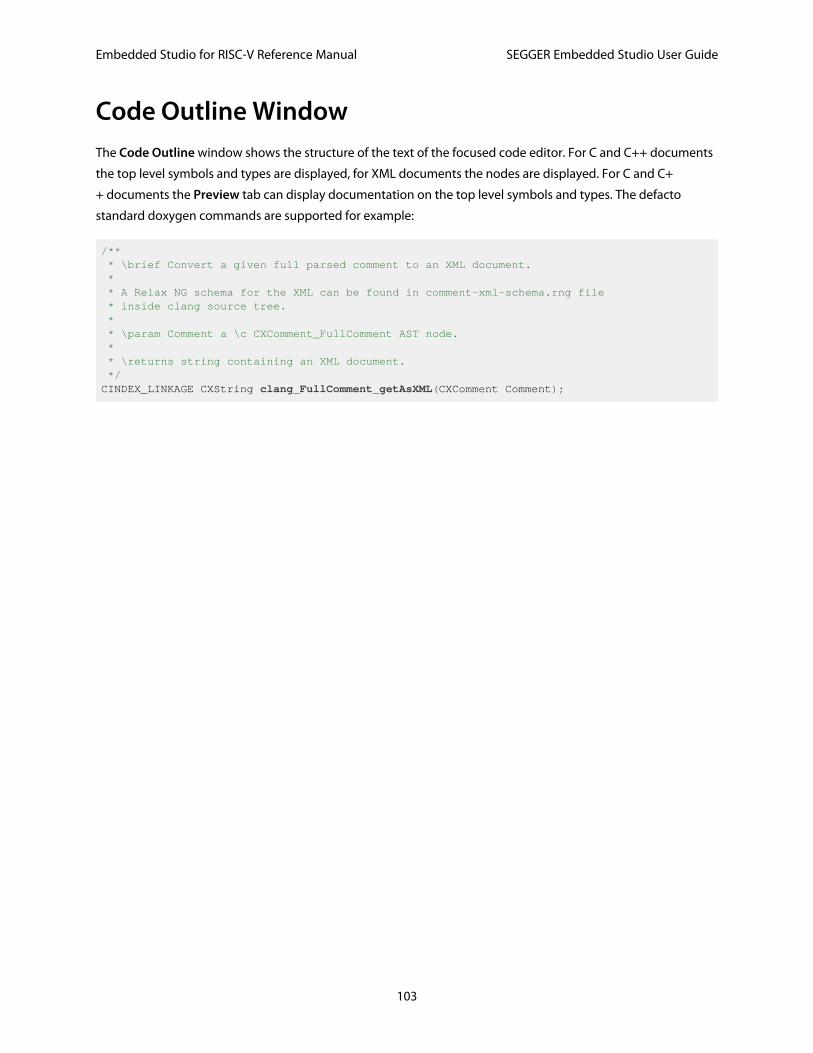
Embedded Studio for RISC-V Reference Manual SEGGER Embedded Studio User Guide
103
Code Outline WindowThe Code Outline window shows the structure of the text of the focused code editor. For C and C++ documents
the top level symbols and types are displayed, for XML documents the nodes are displayed. For C and C+
+ documents the Preview tab can display documentation on the top level symbols and types. The defacto
standard doxygen commands are supported for example:
/** * \brief Convert a given full parsed comment to an XML document. * * A Relax NG schema for the XML can be found in comment-xml-schema.rng file * inside clang source tree. * * \param Comment a \c CXComment_FullComment AST node. * * \returns string containing an XML document. */CINDEX_LINKAGE CXString clang_FullComment_getAsXML(CXComment Comment);
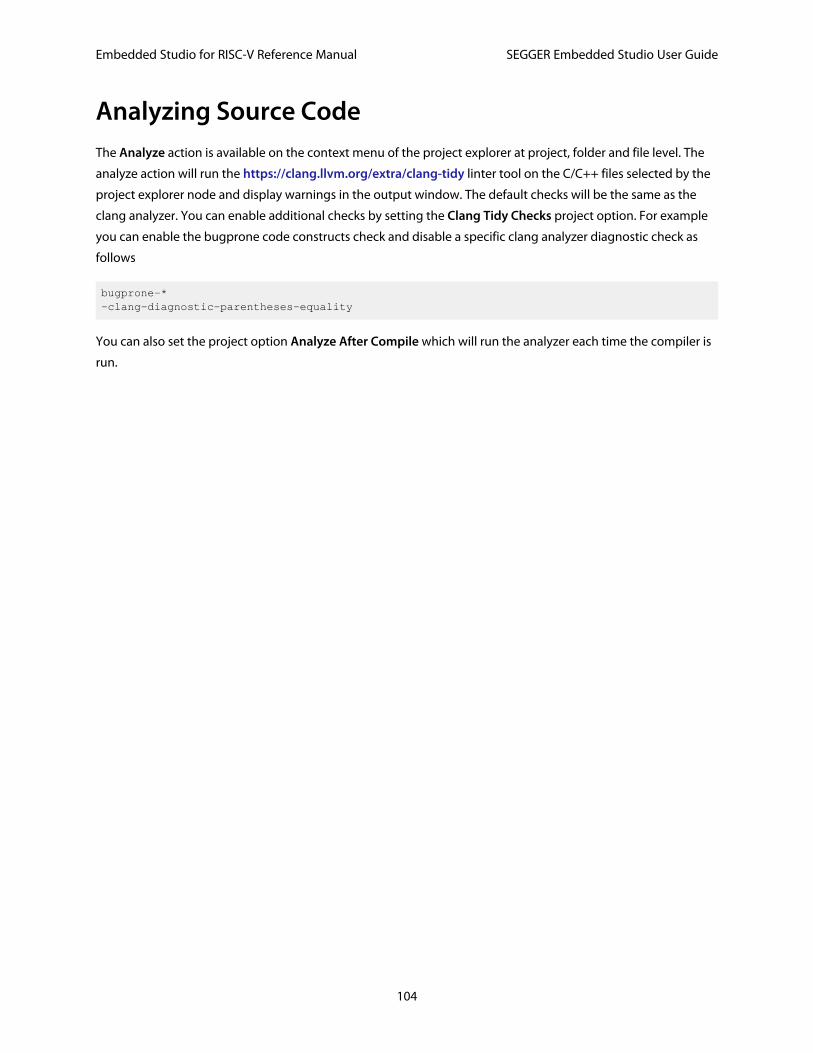
Embedded Studio for RISC-V Reference Manual SEGGER Embedded Studio User Guide
104
Analyzing Source CodeThe Analyze action is available on the context menu of the project explorer at project, folder and file level. The
analyze action will run the https://clang.llvm.org/extra/clang-tidy linter tool on the C/C++ files selected by the
project explorer node and display warnings in the output window. The default checks will be the same as the
clang analyzer. You can enable additional checks by setting the Clang Tidy Checks project option. For example
you can enable the bugprone code constructs check and disable a specific clang analyzer diagnostic check as
follows
bugprone-*-clang-diagnostic-parentheses-equality
You can also set the project option Analyze After Compile which will run the analyzer each time the compiler is
run.
Embedded Studio for RISC-V Reference Manual SEGGER Embedded Studio User Guide
105
Editing your codeSEGGER Embedded Studio has a built-in editor that allows you to edit text, but some features make it particularly
well suited to editing code.
You can open multiple code editors to browse or edit project source code, and you can copy and paste among
them. The Windows menu contains a list of all open code editors.
The code editor supports the language of the source file it is editing, showing code with syntax highlighting and
offering smart indenting.
You can open a code editor in several ways, some of which are:
By double-clicking a file in the Project Explorer or by right-clicking a file and selecting Open from the
shortcut menu.
Using the File > New File or File > Open commands.
Elements of the code editor
The code editor is composed of several elements, which are described here.
Code pane:The area where you edit code. You can set options that affect the code pane's text indents,
tabs, drag-and-drop behavior, and so forth.
Margin gutter:A gray area on the left side of the code editor where margin indicators such as breakpoints,
bookmarks, and shortcuts are displayed. Clicking this area sets a breakpoint on the corresponding line of
code.
Horizontal and vertical scroll bars:You can scroll the code pane horizontally and vertically to view code that
extends beyond the edges of the pane.
Embedded Studio for RISC-V Reference Manual SEGGER Embedded Studio User Guide
106
Basic editingThis section is a whirlwind tour of the basic editing features SEGGER Embedded Studio's code editor provides.
Whether you are editing code, HTML, or plain text, the code editor is just like many other text editors or word
processors. For code that is part of a project, the project's programming language support provides syntax
highlighting (colorization), indentation, and so on.
This section is not a reference for everything the code editor provides; for that, look in the following sections.
Embedded Studio for RISC-V Reference Manual SEGGER Embedded Studio User Guide
107
Moving the insertion pointThe most common way to navigate through text is to use use the mouse or the keyboard's cursor keys.
Using the mouse
You can move the insertion point within a document by clicking the mouse inside the editor window.
Using the keyboard
The keystrokes most commonly used to navigate through a document are:
Keystroke Description
Up Move the insertion point up one line
Down Move the insertion point down one line
Left Move the insertion point left one character
Right Move the insertion point right one character
Home Move the insertion point to the first non-whitespacecharacter on the line pressing Home a second timemoves the insertion point to the leftmost column
End Move the insertion point to the end of the line
PageUp Move the insertion point up one page
PageDown Move the insertion point down one page
Ctrl+Home Move the insertion point to the start of the document
Ctrl+End Move the insertion point to the end of the document
Ctrl+Left Move the insertion point left one word
Ctrl+Right Move the insertion point right one word
SEGGER Embedded Studio offers additional movement keystrokes, though most users are more comfortable
using repeated simple keystrokes to accomplish the same thing:
Keystroke Description
Alt+Up Move the insertion point up five lines
Alt+Down Move the insertion point down five lines
Alt+Home Move the insertion point to the top of the window
Alt+End Move the insertion point to the bottom of the window
Ctrl+Up Scroll the document up one line in the windowwithout moving the insertion point
Embedded Studio for RISC-V Reference Manual SEGGER Embedded Studio User Guide
108
Ctrl+Down Scroll the document down one line in the windowwithout moving the insertion point
If you are editing source code, the are source-related keystrokes too:
Keystroke Description
Ctrl+PgUpMove the insertion point backwards to the previousfunction or method.
Ctrl+PgDn Move the insertion point forwards to the next functionor method.
Embedded Studio for RISC-V Reference Manual SEGGER Embedded Studio User Guide
109
Adding textThe editor has two text-input modes:
Insertion mode:As you type on the keyboard, text is entered at the insertion point and any text to the right
of the insertion point is shifted along. A visual indication of insertion mode is that the cursor is a flashing
line.
Overstrike mode:As you type on the keyboard, text at the insertion point is replaced with your typing. A
visual indication of insertion mode is that the cursor is a flashing block.
Insert and overstrike modes are common to all editors: if one editor is in insert mode, all editors are in insert
mode. To configure the cursor appearance, choose Tools > Options.
To toggle between insertion and overstrike mode:
Click Insert.
When overstrike mode is enabled, the mode indicator changes from INS to OVR and the cursor will change to
the overstrike cursor.
To add or insert text:
1. Move the insertion point to the place text is to be inserted.
2. Enter the text using the keyboard.
To overwrite characters in an existing line, press the Insert key to place the editor into overstrike mode.
To add or insert text on multiple lines:
1. Hold down the Alt key and use block selection to mark the place text is to be inserted.
2. Enter the text using the keyboard.
Embedded Studio for RISC-V Reference Manual SEGGER Embedded Studio User Guide
110
Deleting textThe text editor supports the following common editing keystrokes:
Keystroke Description
Backspace Delete the character before the insertion point
Delete Delete the character after the insertion point
Ctrl+Backspace Delete one word before the insertion point
Ctrl+Delete Delete one word after the insertion point
To delete characters or words:
1. Place the insertion point before the word or letter you want to delete.
2. Press Delete as many times as needed.
or
1. Place the insertion point after the letter or word you want to delete.
2. Press Backspace as many times as needed.
To delete text that spans more than a few characters:
1. Select the text you want to delete.
2. Press Delete or Backspace to delete it.
To delete a text block:
1. Hold down the Alt key and use block selection to mark the text you want to delete.
2. Press Delete or Backspace to delete it.
To delete characters on multiple lines:
1. Hold down the Alt key and use block selection to mark the lines.
2. Press Delete or Backspace as many times as needed to delete the characters.

Embedded Studio for RISC-V Reference Manual SEGGER Embedded Studio User Guide
111
Using the clipboardYou can select text by using the keyboard or the mouse.
To select text with the keyboard:
Hold down the Shift key while using the cursor keys.
To select text with the mouse:
1. Click the start of the selection.
2. Drag the mouse to mark the selection.
3. Release the mouse to end selecting.
To select a block of text with the keyboard:
Hold down the Shift+Alt keys while using the cursor keys.
To select a block of text with the mouse:
1. Hold down the Alt key.
2. Click the start of the selection.
3. Drag the mouse to mark the selection.
4. Release the mouse to end selecting.
To copy selected text to the clipboard:
Choose Edit > Copy or press Ctrl+C.
The standard Windows key sequence Ctrl+Ins also copies text to the clipboard.
To cut selected text to the clipboard:
Choose Edit > Cut or press Ctrl+X.
The standard Windows key sequence Shift+Del also cuts text to the clipboard.
To insert the clipboard content at the insertion point:
Choose Edit > Paste or press Ctrl+V.
The standard Windows key sequence Shift+Ins also inserts the clipboard content at the insertion point.
Embedded Studio for RISC-V Reference Manual SEGGER Embedded Studio User Guide
112
Undo and redoThe editor has an undo facility to undo previous editing actions. The redo feature can be used to re-apply
previously undone actions.
To undo one editing action:
Choose Edit > Undo or press Ctrl+Z.
The standard Windows key sequence Alt+Backspace also undoes an edit.
To undo multiple editing actions:
1. On the Standard toolbar, click the arrow next to the Undo button.
2. Select the editing operations to undo.
To undo all edits:
Choose Edit > Others > Undo All or press Ctrl+K, Ctrl+Z.
To redo one editing action:
Choose Edit > Redo or press Ctrl+Y.
The standard Windows key sequence Alt+Shift+Backspace also redoes an edit.
To redo multiple editing actions:
1. On the Standard toolbar, click the arrow next to the Redo tool button.
2. From the pop-up menu, select the editing operations to redo.
To redo all edits:
Choose Edit > Others > Redo All or press Ctrl+K, Ctrl+Y.
Embedded Studio for RISC-V Reference Manual SEGGER Embedded Studio User Guide
113
Drag and dropYou can select text, then drag it to another location. You can drop the text at a different location in the same
window or in another one.
To drag and drop text:
1. Select the text you want to move.
2. Press and hold the mouse button to drag the selected text to where you want to place it.
3. Release the mouse button to drop the text.
Dragging text moves it to the new location. To copy it to a new location, hold down the Ctrl key while dragging
the text: the mouse pointer changes to indicate a copy operation. Press the Esc key while dragging text to cancel
the drag-and-drop edit.
By default, drag-and drop-editing is disabled and you must enable it if you want to use it.
To enable or disable drag-and-drop editing:
1. Choose Tools > Options or press Alt+,.
2. Click Text Editor.
3. Set Allow Drag and Drop Editing to Yes to enable or to No to disable drag-and-drop editing.

Embedded Studio for RISC-V Reference Manual SEGGER Embedded Studio User Guide
114
Searching
To find text in the current file:
1. Press Ctrl+F.
2. Enter the string to search for.
As you type, the editor searches the file for a match. The pop-up shows how many matches are in the current file.
To move through the matches while the Find box is still active, press Tab or F3 to move to the next match and
Shift+Tab or Shift+F3 to move to the previous match.
If you press Ctrl+F a second time, SEGGER Embedded Studio pops up the standard Find dialog to search the file.
If you wish to bring up the Find dialog without pressing Ctrl+F twice, choose Search > Find.

Embedded Studio for RISC-V Reference Manual SEGGER Embedded Studio User Guide
115
Advanced editingYou can do anything using its basic code-editing features, but the SEGGER Embedded Studio text editor has a
host of labor-saving features that make editing programs a snap.
This section describes the code-editor features intended to make editing source code easier.

Embedded Studio for RISC-V Reference Manual SEGGER Embedded Studio User Guide
116
Indenting source codeThe editor uses the Tab key to increase or decrease the indentation level of the selected text.
To increase indentation:
Select the text to indent.
Choose Selection > Increase Line Indent or press Tab.
To decrease indentation:
Select the text to indent.
Choose Selection > Decrease Line Indent or press Shift+Tab.
The indentation size can be changed in the Language Properties pane of the editor's Properties window, as can
all the indent-related features listed below.
To change indentation size:
Choose Tools > Options or press Alt+,.
Select the Languages page.
Set the Indent Size environment option for the required language.
You can choose to use spaces or tab tab characters to fill whitespace when indenting.
To set tab or space fill when indenting:
Choose Tools > Options or press Alt+,.
Select the Languages page.
Set the Use Tabs environment option for the required language. Note: changing this setting does not add
or remove existing tabs from files, the change will only affect new indents.
The editor can assist with source code indentation while inserting text. There are three levels of indentation
assistance:
None:The indentation of the source code is left to the user.
Indent:This is the default. The editor maintains the current indentation level. When you press Return or
Enter, the editor moves the insertion point down one line and indented to the same level as the now-
previous line.
Smart:The editor analyzes the source code to compute the appropriate indentation level for each line.
You can change how many lines before the insertion point will be analyzed for context. The smart-indent
mode can be configured to indent either open and closing braces or the lines following the braces.
Changing indentation options:
To change the indentation mode:

Embedded Studio for RISC-V Reference Manual SEGGER Embedded Studio User Guide
117
Set the Indent Mode environment option for the required language.
To change whether opening braces are indented in smart-indent mode:
Set the Indent Opening Brace environment option for the required language.
To change whether closing braces are indented in smart-indent mode:
Set the Indent Closing Brace environment option for the required language.
To change the number of previous lines used for context in smart-indent mode:
Set the Indent Context Lines environment option for the required language.
Embedded Studio for RISC-V Reference Manual SEGGER Embedded Studio User Guide
118
Commenting out sections of code
To comment selected text:
Choose Selection > Comment or press Ctrl+/.
To uncomment selected text:
Choose Selection > Uncomment or press Ctrl+Shift+/.
You can also toggle the commenting of a selection by typing /. This has no menu equivalent.

Embedded Studio for RISC-V Reference Manual SEGGER Embedded Studio User Guide
119
Adjusting letter caseThe editor can change the case of the current word or the selection. The editor will change the case of the
selection, if there is a selection, otherwise it will change the case of word at the insertion point.
To change text to uppercase:
Choose Selection > Make Uppercase or press Ctrl+K, U.
This changes, for instance, Hello to HELLO.
To change text to lowercase:
Choose Selection > Make Lowercase or press Ctrl+U.
This changes, for instance, Hello to hello.
To switch between uppercase and lowercase:
Choose Selection > Switch Case.
This changes, for instance, Hello to hELLO.
With large software teams or imported source code, sometimes identifiers don't conform to your local coding
style. To assist in conversion between two common coding styles for identifiers, SEGGER Embedded Studio's
editor offers the following two shortcuts:
To change from split case to camel case:
Choose Selection > Camel Case or press Ctrl+K, Ctrl+Shift+U.
This changes, for instance, this_is_wrong to thisIsWrong.
To change from camel case to split case:
Choose Selection > Split Case or press Ctrl+K, Ctrl+U.
This changes, for instance, thisIsWrong to this_is_wrong.

Embedded Studio for RISC-V Reference Manual SEGGER Embedded Studio User Guide
120
Using bookmarksTo edit a document elsewhere and then return to your current location, add a bookmark. The Bookmarks
window maintains a list of the bookmarks set in source files see Bookmarks window.
To place a bookmark:
1. Move the insertion point to the line you wish to bookmark.
2. Choose Edit > Bookmarks > Toggle Bookmark or press Ctrl+F2.
A bookmark symbol appears next to the line in the indicator margin to show the bookmark is set.
To place a bookmark using the mouse:
1. Right-click the margin gutter where the bookmark should be set.
2. Choose Toggle Bookmark.
The default color to use for new bookmarks is configured in the Bookmarks window. You can choose a specific
color for the bookmark as follows:
1. Press and hold the Alt key.
2. Click the margin gutter where the bookmark should be set.
3. From the palette, click the bookmark color to use for the bookmark.
To navigate forward through bookmarks:
1. Choose Edit > Bookmarks > Next Bookmark In Document or press F2.
2. The editor moves the insertion point to the next bookmark in the document.
If there is no following bookmark, the insertion point moves to the first bookmark in the document.
To navigate backward through bookmarks:
1. Choose Edit > Bookmarks > Previous Bookmark In Document or press Shift+F2.
2. The editor moves the insertion point to the previous bookmark in the document.
If there is no previous bookmark, the insertion point moves to the last bookmark in the document.
To remove a bookmark:
1. Move the insertion point to the line containing the bookmark.
2. Choose Edit > Bookmarks > Toggle Bookmark or press Ctrl+F2.
The bookmark symbol disappears, indicating the bookmark is no longer set.
To remove all bookmarks in a document:
Choose Edit > Bookmarks > Clear Bookmarks In Document or press Ctrl+K, F2.
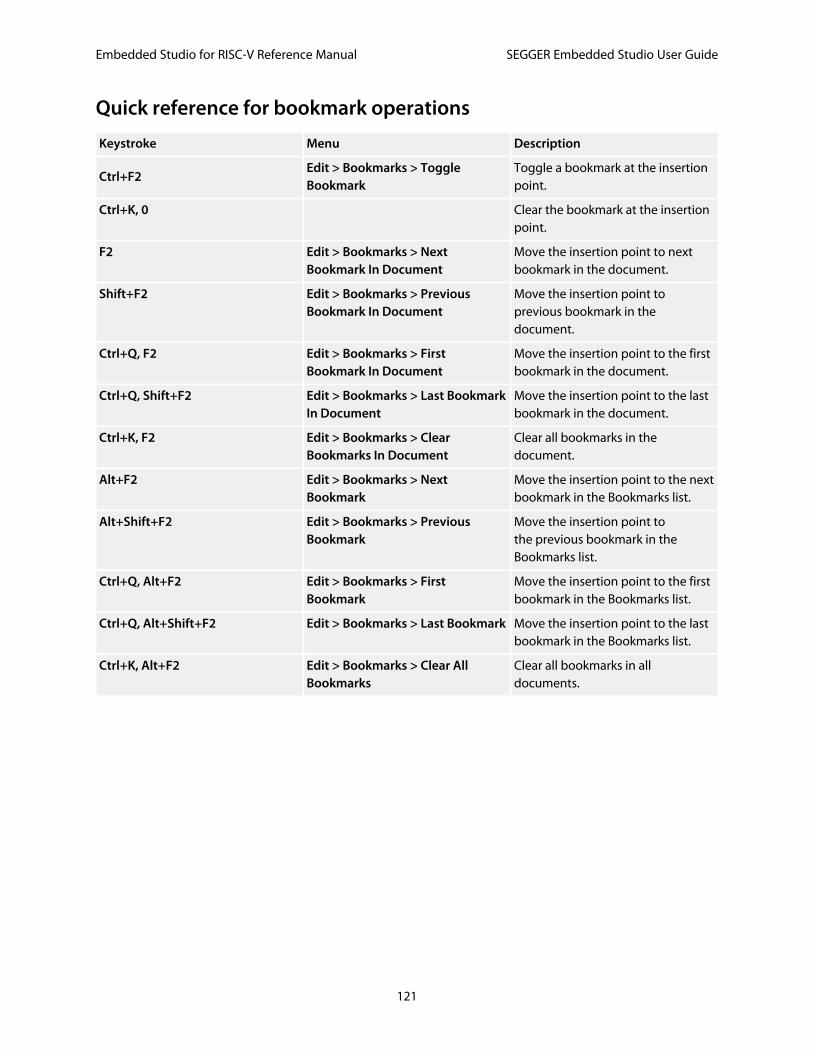
Embedded Studio for RISC-V Reference Manual SEGGER Embedded Studio User Guide
121
Quick reference for bookmark operations
Keystroke Menu Description
Ctrl+F2Edit > Bookmarks > ToggleBookmark
Toggle a bookmark at the insertionpoint.
Ctrl+K, 0 Clear the bookmark at the insertionpoint.
F2 Edit > Bookmarks > NextBookmark In Document
Move the insertion point to nextbookmark in the document.
Shift+F2 Edit > Bookmarks > PreviousBookmark In Document
Move the insertion point toprevious bookmark in thedocument.
Ctrl+Q, F2 Edit > Bookmarks > FirstBookmark In Document
Move the insertion point to the firstbookmark in the document.
Ctrl+Q, Shift+F2 Edit > Bookmarks > Last BookmarkIn Document
Move the insertion point to the lastbookmark in the document.
Ctrl+K, F2 Edit > Bookmarks > ClearBookmarks In Document
Clear all bookmarks in thedocument.
Alt+F2 Edit > Bookmarks > NextBookmark
Move the insertion point to the nextbookmark in the Bookmarks list.
Alt+Shift+F2 Edit > Bookmarks > PreviousBookmark
Move the insertion point tothe previous bookmark in theBookmarks list.
Ctrl+Q, Alt+F2 Edit > Bookmarks > FirstBookmark
Move the insertion point to the firstbookmark in the Bookmarks list.
Ctrl+Q, Alt+Shift+F2 Edit > Bookmarks > Last Bookmark Move the insertion point to the lastbookmark in the Bookmarks list.
Ctrl+K, Alt+F2 Edit > Bookmarks > Clear AllBookmarks
Clear all bookmarks in alldocuments.
Embedded Studio for RISC-V Reference Manual SEGGER Embedded Studio User Guide
122
Find and Replace windowThe Find and Replace window allows you to search for and replace text in the current document or in a range of
specified files.
To activate the Find and Replace window:
Choose Search > Replace in Files or press Ctrl+Alt+F.
To find text in a single file:
Select Current Document in the context combo box.
Enter the string to be found in the text edit input.
If the search will be case sensitive, set the Match case option.
If the search will be for a whole wordi.e., there will be whitespace, such as spaces or the beginning or end
of the line, on both sides of the string being searched forset the Whole word option.
If the search string is a regular expression, set the Use regexp option.
Click the Find button to find all occurrences of the string in the current document.
To find and replace text in a single file:
Click the Replace button on the toolbar.
Enter the string to search for into the Find what input.
Enter the replacement string into the Replace with input. If the search string is a regular expression, the n
back-reference can be used in the replacement string to reference captured text.
If the search will be case sensitive, set the Match case option.
If the search will be for a whole wordi.e., there will be whitespace, such as spaces or the beginning or end
of the line, on both sides of the string being searched forset the Match whole word option.
If the search string is a regular expression, set the Use regular expression option.
Click the Find Next button to find next occurrence of the string, then click the Replace button to replace
the found string with the replacement string; or click Replace All to replace all occurrences of the search
string without prompting.
To find text in multiple files:
Click the Find In Files button on the toolbar.
Enter the string to search for into the Find what input.
Select the appropriate option in the Look in input to select whether to carry out the search in all open
documents, all documents in the current project, all documents in the current solution, or all files in a
specified folder.
If you have specified that you want to search in a folder, select the folder you want to search by entering
its path in the Folder input and use the Look in files matching input to specify the type of files you want
to search.
Embedded Studio for RISC-V Reference Manual SEGGER Embedded Studio User Guide
123
If the search will be case sensitive, set the Match case option.
If the search will be for a whole wordi.e., there will be whitespace, such as spaces or the beginning or end
of the line, on both sides of the string being searched forset the Match whole word option.
If the search string is a regular expression, set the Use regular expression option.
Click the Find All button to find all occurrences of the string in the specified files, or click the Bookmark
All button to bookmark all the occurrences of the string in the specified files.
To replace text in multiple files:
Click the Replace In Files button on the toolbar.
Enter the string to search for into the Find what input.
Enter the replacement string into the Replace with input. If the search string is a regular expression, the n
back-reference can be used in the replacement string to reference captured text.
Select the appropriate option in the Look in input to select whether you want to carry out the search and
replace in the current or in all open documents.
If you have specified that you want to search in a folder, select the folder you want to search by entering
its path in the Folder input and use the Look in files matching input to specify the type of files you want
to search.
If the search will be case sensitive, set the Match case option.
If the search will be for a whole wordi.e., there will be whitespace, such as spaces or the beginning or end
of the line, on both sides of the string being searched forset the Match whole word option.
If the search string is a regular expression, set the Use regular expression option.
Click the Replace All button to replace all occurrences of the string in the specified files.
Embedded Studio for RISC-V Reference Manual SEGGER Embedded Studio User Guide
124
Clipboard Ring windowThe code editor captures all cut and copy operations, and stores the cut or copied item on the clipboard ring. The
clipboard ring stores the last 20 cut or copied text items, but you can configure the maximum number by using
the environment options dialog. The clipboard ring is an excellent place to store scraps of text when you're
working with many documents and need to cut and paste between them.
To activate the clipboard ring:
Choose Edit > Clipboard Ring > Clipboard Ring or press Ctrl+Alt+C.
To paste from the clipboard ring:
1. Cut or copy some text from your code. The last item you cut or copy into the clipboard ring is the current
item for pasting.
2. Press Ctrl+Shift+V to paste the clipboard ring's current item into the current document.
3. Repeatedly press Ctrl+Shift+V to cycle through the entries in the clipboard ring until you get to the one
you want to permanently paste into the document. Each time you press Ctrl+Shift+V, the editor replaces
the last entry you pasted from the clipboard ring, so you end up with just the last one you selected. The
item you stop on then becomes the current item.
4. Move to another location or cancel the selection. You can use Ctrl+Shift+V to paste the current item
again or to cycle the clipboard ring to a new item.
Clicking an item in the clipboard ring makes it the current item.
To paste a specific item from the clipboard ring:
1. Move the insertion point to the position to paste the item in the document.
2. Click the arrow at the right of the item to paste.
3. Choose Paste from the pop-up menu.
or
1. Click the item to paste to make it the current item.
2. Move the insertion point to the position to paste the item in the document.
3. Press Ctrl+Shift+V.
To paste all items into a document:
To paste all items on the clipboard ring into the current document, move the insertion point to where you want
to paste the items and do one of the following:
Choose Edit > Clipboard Ring > Paste All.
or
Embedded Studio for RISC-V Reference Manual SEGGER Embedded Studio User Guide
125
On the Clipboard Ring toolbar, click the Paste All button.
To remove an item from the clipboard ring:
1. Click the arrow at the right of the item to remove.
2. Choose Delete from the pop-up menu.
To remove all items from the clipboard ring:
Choose Edit > Clipboard Ring > Clear Clipboard Ring.
or
On the Clipboard Ring toolbar, click the Clear Clipboard Ring button.
To configure the clipboard ring:
1. Choose Tools > Options or press Alt+,.
2. Click the Windows category to show the Clipboard Ring Options group.
3. Select Preserve Contents Between Runs to save the content of the clipboard ring between runs, or
deselect it to start with an empty clipboard ring.
4. Change Maximum Items Held In Ring to configure the maximum number of items stored on the
clipboard ring.

Embedded Studio for RISC-V Reference Manual SEGGER Embedded Studio User Guide
126
Mouse-click acceleratorsSEGGER Embedded Studio provides a number of mouse-click accelerators in the editor that speed access to
commonly used functions. The mouse-click accelerators are user configurable using Tools > Options.
Default mouse-click assignments
Click Default
Left Not configurable start selection.
Shift+Left Not configurable extend selection.
Ctrl+Left Select word.
Alt+Left Execute Go To Definition.
Middle No action.
Shift+Middle Display Go To Include menu.
Ctrl+Middle No action.
Alt+Middle Display Go To Method menu.
Right Not configurable show context menu.
Shift+Right No action.
Ctrl+Right No action.
Alt+Right Execute Find References.
Each accelerator can be assigned one of the following actions:
Default:The system default for that click.
Go To Definition:Go to the definition of the item clicked, equivalent to choosing Navigate > Go To
Definition or pressing Alt+G.
Find References:Find references to the item clicked, equivalent to choosing Navigate > Find References or
pressing Alt+R.
Find in Solution:Textually find the item clicked in all the files in the solution, equivalent to choosing Search
> Find Extras > Find in Solution or pressing Alt+U.
Find Help:Use F1-help on the item clicked, equivalent to choosing Help > Help or pressing F1.
Go To Method:Display the Go To Method menu, equivalent to choosing Navigate > Find Method or
pressing Ctrl+M.
Go To Include:Display the Go To Include menu, equivalent to choosing Navigate > Find Include or
pressing Ctrl+Shift+M.
Paste:Paste the clipboard at the position clicked, equivalent to choosing Edit > Paste or pressing Ctrl+V.
Configuring Mac OS X
On Mac OS X you must configure the mouse to pass middle clicks and right clicks to the application if you wish
to use mouse-click accelerators in SEGGER Embedded Studio. Configure the mouse preferences in the Mouse
control panel in Mac OS X System Preferences to the following:

Embedded Studio for RISC-V Reference Manual SEGGER Embedded Studio User Guide
127
Right mouse button set to Secondary Button.
Middle mouse button set to Button 3.
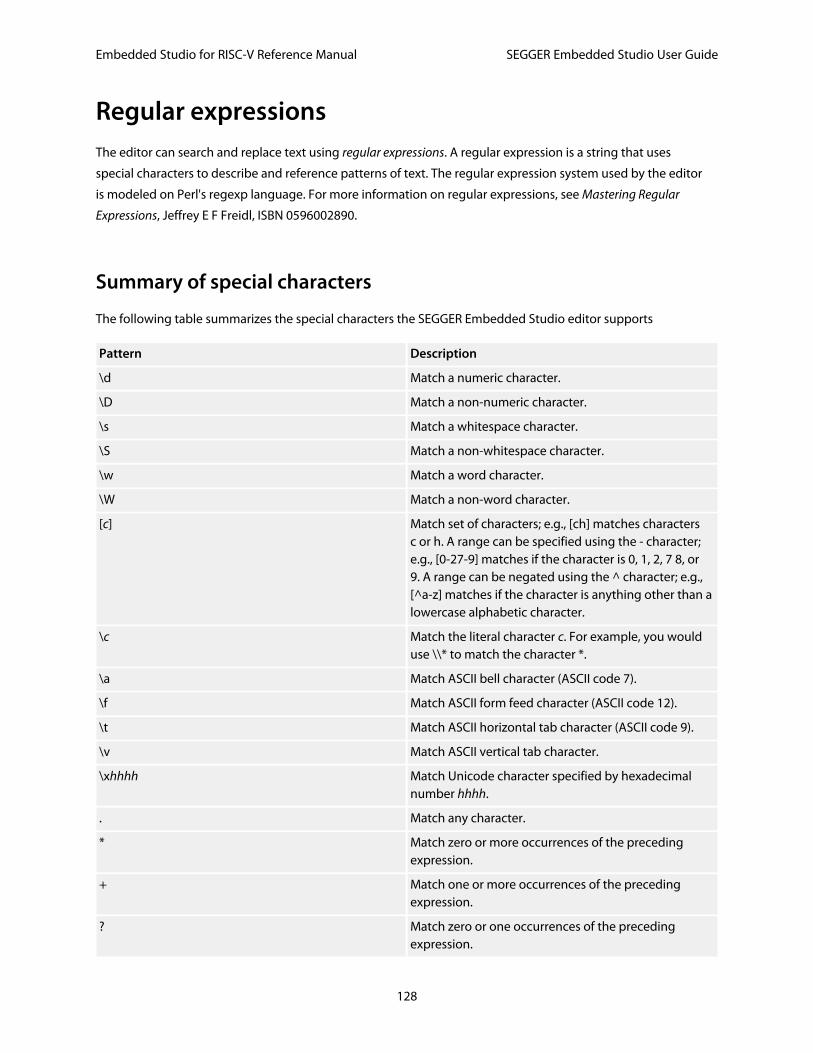
Embedded Studio for RISC-V Reference Manual SEGGER Embedded Studio User Guide
128
Regular expressionsThe editor can search and replace text using regular expressions. A regular expression is a string that uses
special characters to describe and reference patterns of text. The regular expression system used by the editor
is modeled on Perl's regexp language. For more information on regular expressions, see Mastering Regular
Expressions, Jeffrey E F Freidl, ISBN 0596002890.
Summary of special characters
The following table summarizes the special characters the SEGGER Embedded Studio editor supports
Pattern Description
\d Match a numeric character.
\D Match a non-numeric character.
\s Match a whitespace character.
\S Match a non-whitespace character.
\w Match a word character.
\W Match a non-word character.
[c] Match set of characters; e.g., [ch] matches charactersc or h. A range can be specified using the - character;e.g., [0-27-9] matches if the character is 0, 1, 2, 7 8, or9. A range can be negated using the ^ character; e.g.,[^a-z] matches if the character is anything other than alowercase alphabetic character.
\c Match the literal character c. For example, you woulduse \\* to match the character *.
\a Match ASCII bell character (ASCII code 7).
\f Match ASCII form feed character (ASCII code 12).
\t Match ASCII horizontal tab character (ASCII code 9).
\v Match ASCII vertical tab character.
\xhhhh Match Unicode character specified by hexadecimalnumber hhhh.
. Match any character.
* Match zero or more occurrences of the precedingexpression.
+ Match one or more occurrences of the precedingexpression.
? Match zero or one occurrences of the precedingexpression.
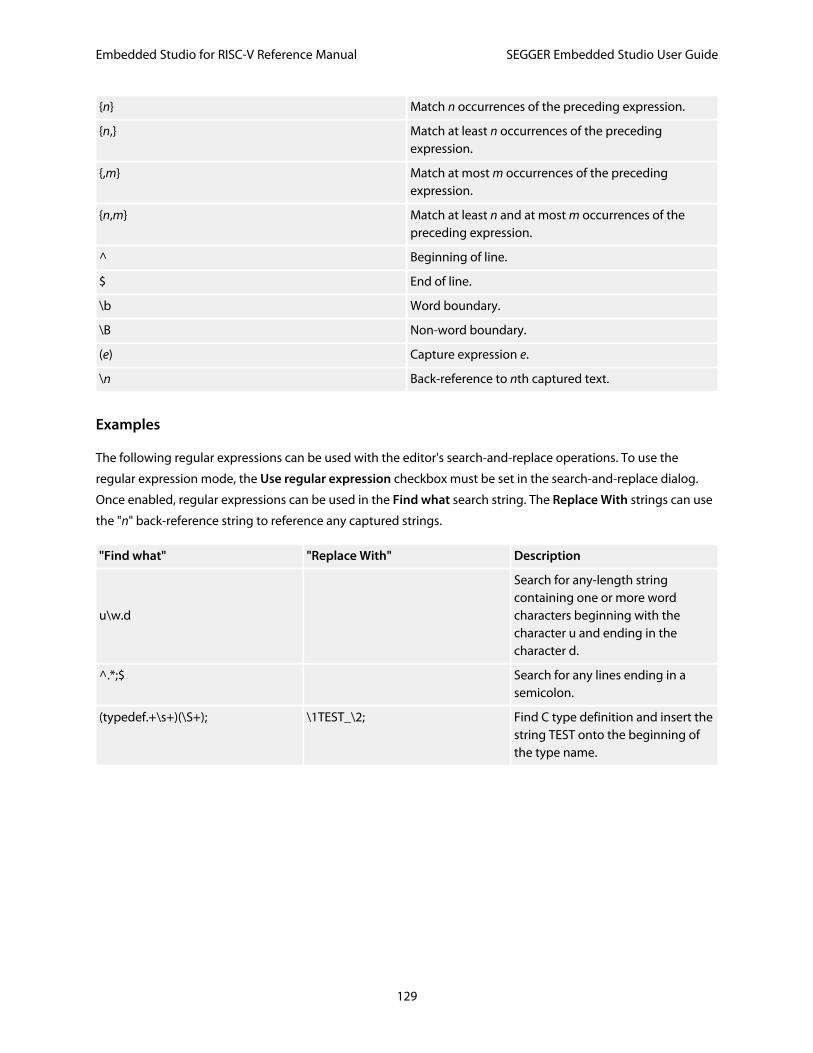
Embedded Studio for RISC-V Reference Manual SEGGER Embedded Studio User Guide
129
{n} Match n occurrences of the preceding expression.
{n,} Match at least n occurrences of the precedingexpression.
{,m} Match at most m occurrences of the precedingexpression.
{n,m} Match at least n and at most m occurrences of thepreceding expression.
^ Beginning of line.
$ End of line.
\b Word boundary.
\B Non-word boundary.
(e) Capture expression e.
\n Back-reference to nth captured text.
Examples
The following regular expressions can be used with the editor's search-and-replace operations. To use the
regular expression mode, the Use regular expression checkbox must be set in the search-and-replace dialog.
Once enabled, regular expressions can be used in the Find what search string. The Replace With strings can use
the "n" back-reference string to reference any captured strings.
"Find what" "Replace With" Description
u\w.d
Search for any-length stringcontaining one or more wordcharacters beginning with thecharacter u and ending in thecharacter d.
^.*;$ Search for any lines ending in asemicolon.
(typedef.+\s+)(\S+); \1TEST_\2; Find C type definition and insert thestring TEST onto the beginning ofthe type name.
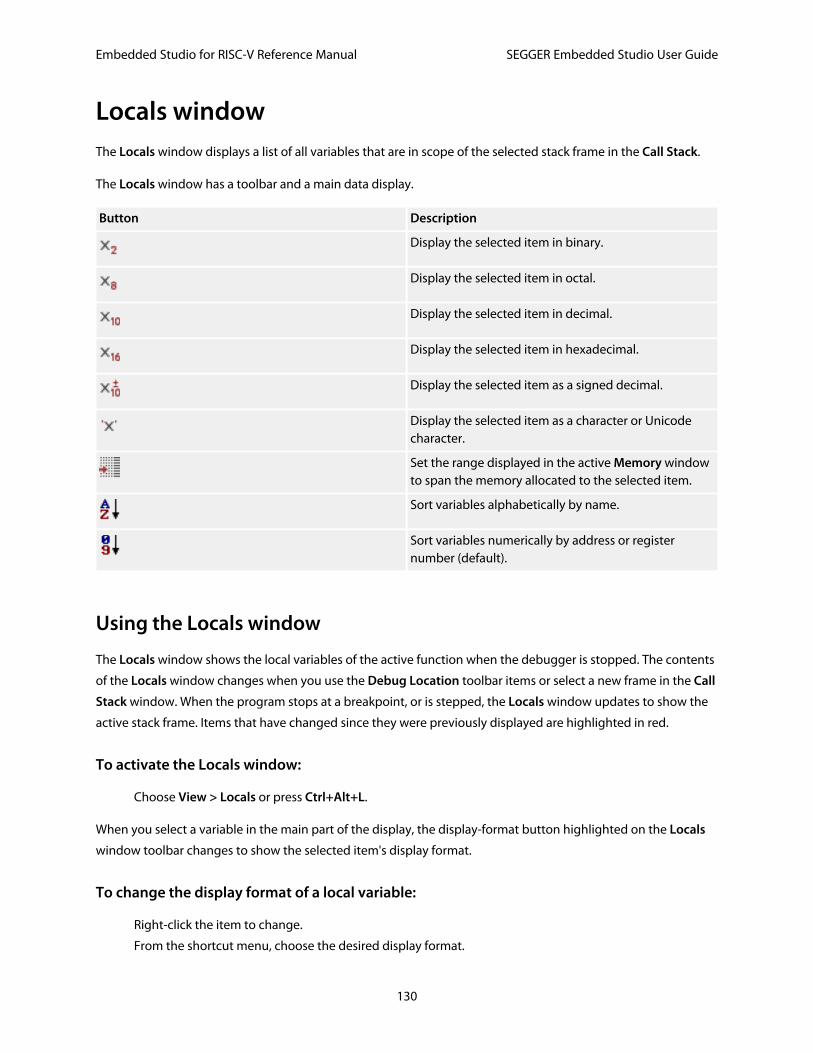
Embedded Studio for RISC-V Reference Manual SEGGER Embedded Studio User Guide
130
Locals windowThe Locals window displays a list of all variables that are in scope of the selected stack frame in the Call Stack.
The Locals window has a toolbar and a main data display.
Button Description
Display the selected item in binary.
Display the selected item in octal.
Display the selected item in decimal.
Display the selected item in hexadecimal.
Display the selected item as a signed decimal.
Display the selected item as a character or Unicodecharacter.
Set the range displayed in the active Memory windowto span the memory allocated to the selected item.
Sort variables alphabetically by name.
Sort variables numerically by address or registernumber (default).
Using the Locals window
The Locals window shows the local variables of the active function when the debugger is stopped. The contents
of the Locals window changes when you use the Debug Location toolbar items or select a new frame in the Call
Stack window. When the program stops at a breakpoint, or is stepped, the Locals window updates to show the
active stack frame. Items that have changed since they were previously displayed are highlighted in red.
To activate the Locals window:
Choose View > Locals or press Ctrl+Alt+L.
When you select a variable in the main part of the display, the display-format button highlighted on the Locals
window toolbar changes to show the selected item's display format.
To change the display format of a local variable:
Right-click the item to change.
From the shortcut menu, choose the desired display format.

Embedded Studio for RISC-V Reference Manual SEGGER Embedded Studio User Guide
131
or
Click the item to change.
On the Locals window toolbar, select the desired display format.
To modify the value of a local variable:
Click the value of the local variable to modify.
Enter the new value for the local variable. Prefix hexadecimal numbers with 0x, binary numbers with 0b,
and octal numbers with 0.
or
Right-click the value of the local variable to modify.
From the shortcut menu, select one of the commands to modify the local variable's value.
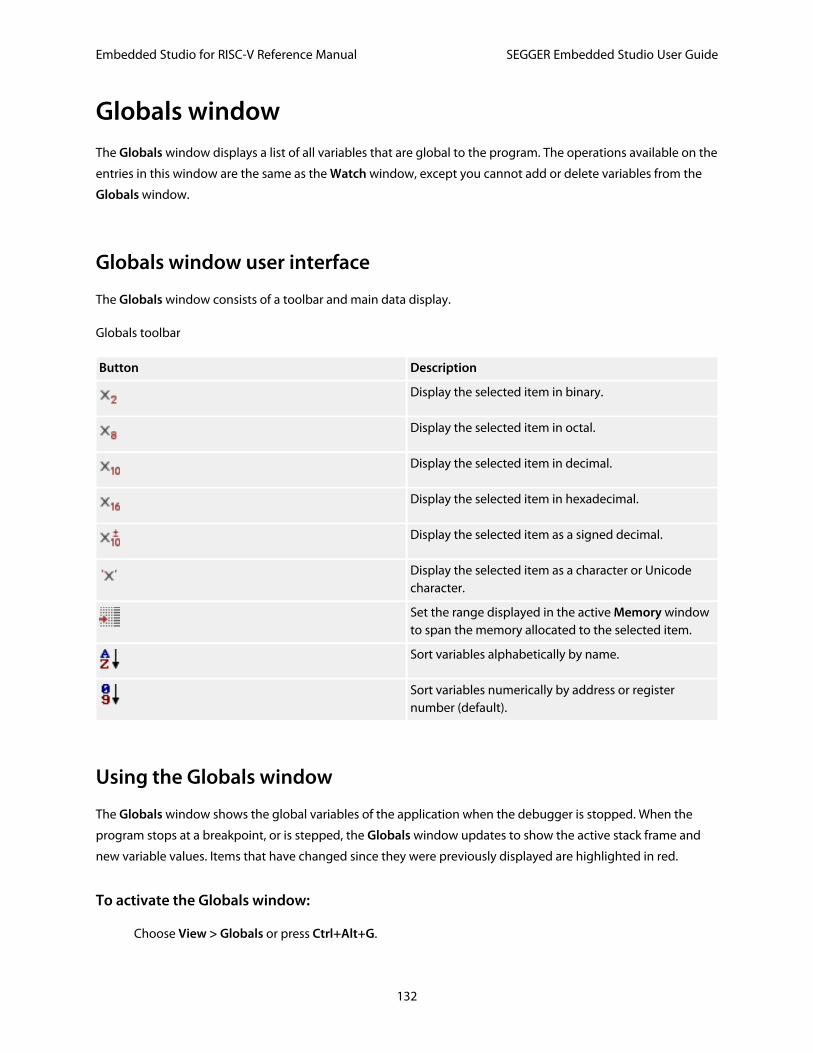
Embedded Studio for RISC-V Reference Manual SEGGER Embedded Studio User Guide
132
Globals windowThe Globals window displays a list of all variables that are global to the program. The operations available on the
entries in this window are the same as the Watch window, except you cannot add or delete variables from the
Globals window.
Globals window user interface
The Globals window consists of a toolbar and main data display.
Globals toolbar
Button Description
Display the selected item in binary.
Display the selected item in octal.
Display the selected item in decimal.
Display the selected item in hexadecimal.
Display the selected item as a signed decimal.
Display the selected item as a character or Unicodecharacter.
Set the range displayed in the active Memory windowto span the memory allocated to the selected item.
Sort variables alphabetically by name.
Sort variables numerically by address or registernumber (default).
Using the Globals window
The Globals window shows the global variables of the application when the debugger is stopped. When the
program stops at a breakpoint, or is stepped, the Globals window updates to show the active stack frame and
new variable values. Items that have changed since they were previously displayed are highlighted in red.
To activate the Globals window:
Choose View > Globals or press Ctrl+Alt+G.

Embedded Studio for RISC-V Reference Manual SEGGER Embedded Studio User Guide
133
Changing the display format
When you select a variable in the main part of the display, the display-format button highlighted on the Globals
window toolbar changes to show the item's display format.
To change the display format of a global variable:
Right-click the item to change.
From the shortcut menu, choose the desired display format.
or
Click the item to change.
On the Globals window toolbar, select the desired display format.
To modify the value of a global variable:
Click the value of the global variable to modify.
Enter the new value for the global variable. Prefix hexadecimal numbers with 0x, binary numbers with 0b,
and octal numbers with 0.
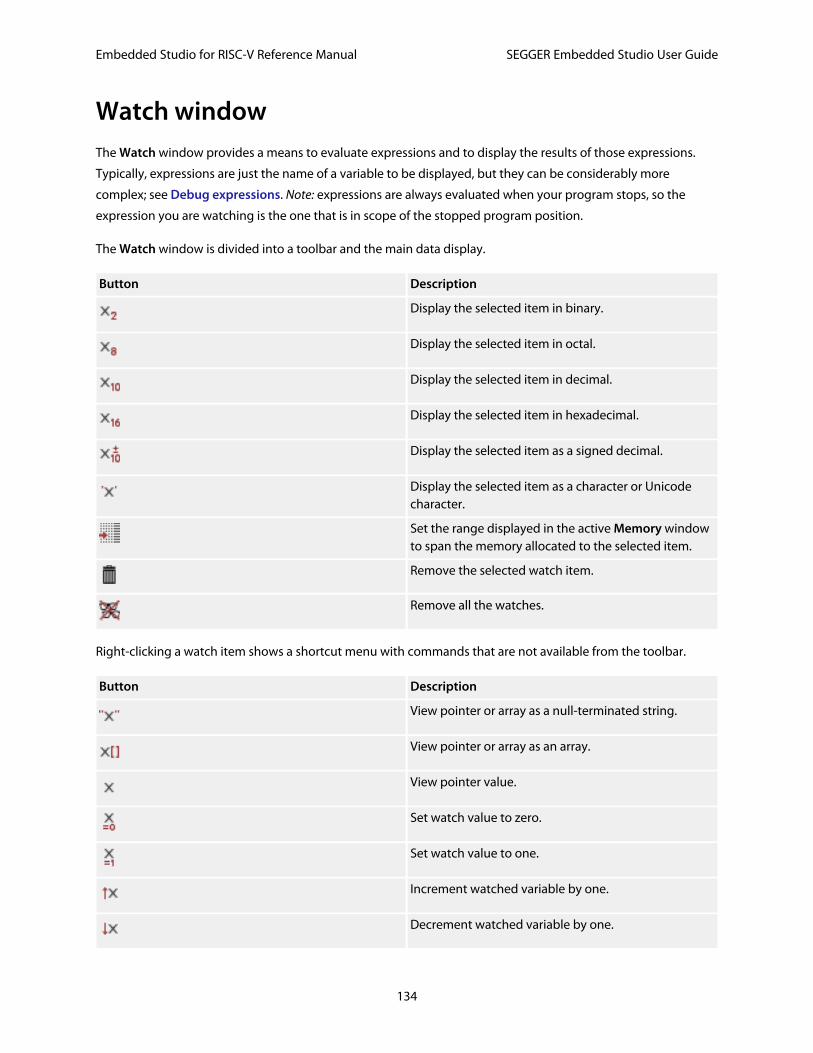
Embedded Studio for RISC-V Reference Manual SEGGER Embedded Studio User Guide
134
Watch windowThe Watch window provides a means to evaluate expressions and to display the results of those expressions.
Typically, expressions are just the name of a variable to be displayed, but they can be considerably more
complex; see Debug expressions. Note: expressions are always evaluated when your program stops, so the
expression you are watching is the one that is in scope of the stopped program position.
The Watch window is divided into a toolbar and the main data display.
Button Description
Display the selected item in binary.
Display the selected item in octal.
Display the selected item in decimal.
Display the selected item in hexadecimal.
Display the selected item as a signed decimal.
Display the selected item as a character or Unicodecharacter.
Set the range displayed in the active Memory windowto span the memory allocated to the selected item.
Remove the selected watch item.
Remove all the watches.
Right-clicking a watch item shows a shortcut menu with commands that are not available from the toolbar.
Button Description
View pointer or array as a null-terminated string.
View pointer or array as an array.
View pointer value.
Set watch value to zero.
Set watch value to one.
Increment watched variable by one.
Decrement watched variable by one.

Embedded Studio for RISC-V Reference Manual SEGGER Embedded Studio User Guide
135
Negated watched variable.
Invert watched variable.
View the properties of the watch value.
You can view details of the watched item using the Properties dialog.
FilenameThe filename context of the watch item.
Line numberThe line number context of the watch item.
(Name)The name of the watch item.
AddressThe address or register of the watch item.
ExpressionThe debug expression of the watch item.
Previous ValueThe previous watch value.
Size In BytesThe size of the watch item in bytes.
TypeThe type of the watch item.
ValueThe value of the watch item.
Using the Watch window
Each expression appears as a row in the display. Each row contains the expression and its value. If the value of an
expression is structured (for example, an array), you can open the structure to see its contents.
The display updates each time the debugger locates to source code. So it will update each time your program
stops on a breakpoint, or single steps, and whenever you traverse the call stack. Items that have changed since
they were previously displayed are highlighted in red.
To activate the Watch window:
Choose View > Watch > Watch 1 or press Ctrl+T, W, 1.

Embedded Studio for RISC-V Reference Manual SEGGER Embedded Studio User Guide
136
You can show other Watch windows similarly.
You can add a new expression to be watched by clicking and typing into the last entry in the Watch window.
You can change an expression by clicking its entry and editing its contents.
When you select a variable in the main part of the display, the display format button highlighted on the Watch
window toolbar changes to show the item's display format.
To change the display format of an expression:
Right-click the item to change.
From the shortcut menu, choose the desired display format.
or
Click the item to change.
On the Watch window toolbar, select the desired display format.
The selected display format will then be used for all subsequent displays and will be preserved after the debug
session stops.
For C programs, the interpretation of pointer types can be changed by right-clicking and selecting from the
shortcut menu. A pointer can be interpreted as:
a null-terminated ASCII string
an array
an integer
dereferenced
To modify the value of an expression:
Click the value of the local variable to modify.
Enter the new value of the local variable. Prefix hexadecimal numbers with 0x, binary numbers with 0b,
and octal numbers with 0.
or
Right-click the value of the local variable to modify.
From the shortcut menu, choose one of the commands to modify the variable's value.
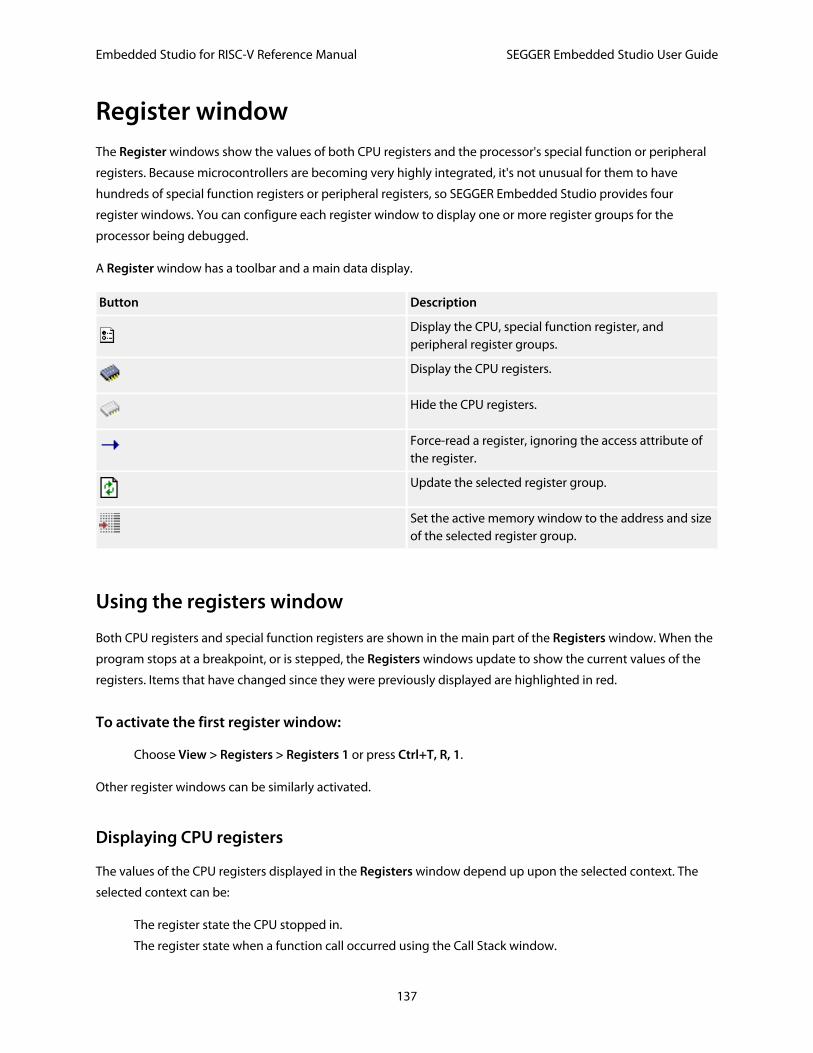
Embedded Studio for RISC-V Reference Manual SEGGER Embedded Studio User Guide
137
Register windowThe Register windows show the values of both CPU registers and the processor's special function or peripheral
registers. Because microcontrollers are becoming very highly integrated, it's not unusual for them to have
hundreds of special function registers or peripheral registers, so SEGGER Embedded Studio provides four
register windows. You can configure each register window to display one or more register groups for the
processor being debugged.
A Register window has a toolbar and a main data display.
Button Description
Display the CPU, special function register, andperipheral register groups.
Display the CPU registers.
Hide the CPU registers.
Force-read a register, ignoring the access attribute ofthe register.
Update the selected register group.
Set the active memory window to the address and sizeof the selected register group.
Using the registers window
Both CPU registers and special function registers are shown in the main part of the Registers window. When the
program stops at a breakpoint, or is stepped, the Registers windows update to show the current values of the
registers. Items that have changed since they were previously displayed are highlighted in red.
To activate the first register window:
Choose View > Registers > Registers 1 or press Ctrl+T, R, 1.
Other register windows can be similarly activated.
Displaying CPU registers
The values of the CPU registers displayed in the Registers window depend up upon the selected context. The
selected context can be:
The register state the CPU stopped in.
The register state when a function call occurred using the Call Stack window.
Embedded Studio for RISC-V Reference Manual SEGGER Embedded Studio User Guide
138
The register state of the currently selected thread using the the Threads window.
The register state you supplied with the Debug > Locate operation.
To display a group of CPU registers:
On the Registers window toolbar, click the Groups button.
From the pop-up menu, select the register groups to display and deselect the ones to hide.
You can deselect all CPU register groups to allow more space in the display for special function registers or
peripheral registers. So, for instance, you can have one register window showing the CPU registers and other
register windows showing different peripheral registers.
Displaying special function or peripheral registers
The Registers window shows the set of register groups defined in the memory-map file the application was built
with. If there is no memory-map file associated with a project, the Registers window will show only the CPU
registers.
To display a special function or peripheral register:
On the Registers toolbar, click the Groups button.
From the pop-up menu, select the register groups to display and deselect the ones to hide.
Changing display format
When you select a register in the main part of the display, the display-format button highlighted on the
Registers window toolbar changes to show the item's display format.
To change the display format of a register:
Right-click the item to change.
From the shortcut menu, choose the desired display format.
or
Click the item to change.
On the Registers window toolbar, select the desired display format.
Modifying register values
To modify the value of a register:
Click the value of the register to modify.

Embedded Studio for RISC-V Reference Manual SEGGER Embedded Studio User Guide
139
Enter the new value for the register. Prefix hexadecimal numbers with 0x, binary numbers with 0b, and
octal numbers with 0.
or
Right-click the value of the register to modify.
From the shortcut menu, choose one of the commands to modify the register value.
Modifying the saved register value of a function or thread may not be supported.
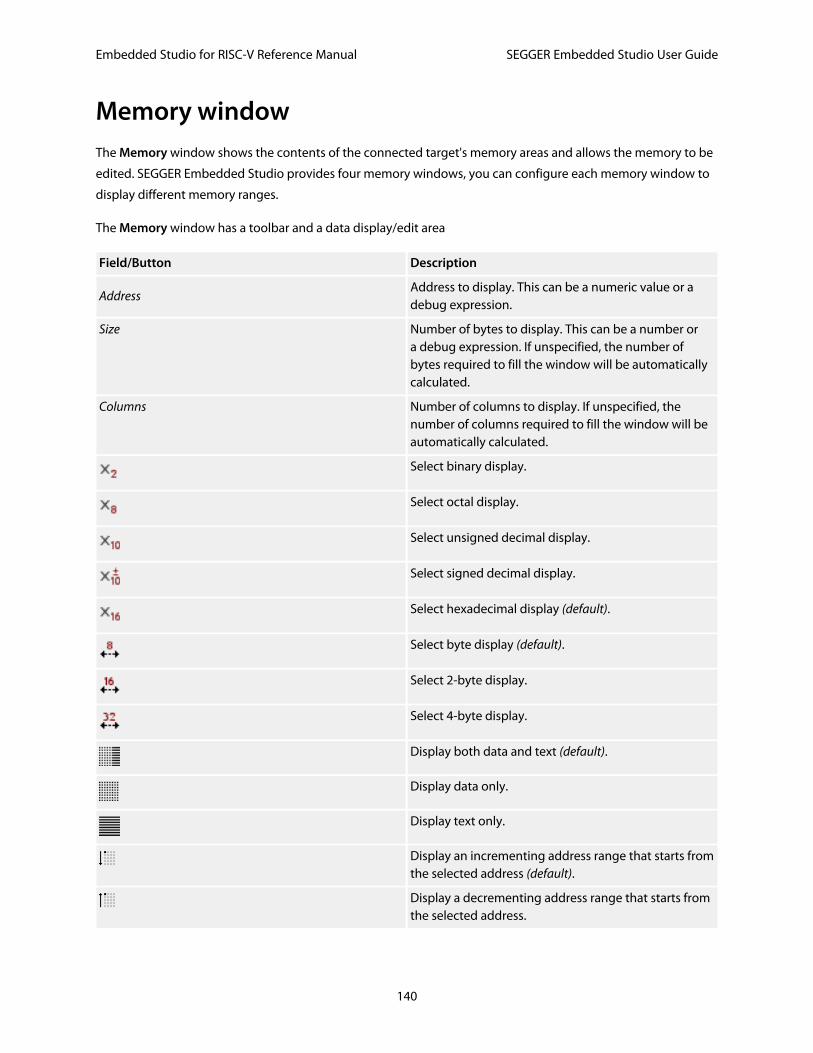
Embedded Studio for RISC-V Reference Manual SEGGER Embedded Studio User Guide
140
Memory windowThe Memory window shows the contents of the connected target's memory areas and allows the memory to be
edited. SEGGER Embedded Studio provides four memory windows, you can configure each memory window to
display different memory ranges.
The Memory window has a toolbar and a data display/edit area
Field/Button Description
AddressAddress to display. This can be a numeric value or adebug expression.
Size Number of bytes to display. This can be a number ora debug expression. If unspecified, the number ofbytes required to fill the window will be automaticallycalculated.
Columns Number of columns to display. If unspecified, thenumber of columns required to fill the window will beautomatically calculated.
Select binary display.
Select octal display.
Select unsigned decimal display.
Select signed decimal display.
Select hexadecimal display (default).
Select byte display (default).
Select 2-byte display.
Select 4-byte display.
Display both data and text (default).
Display data only.
Display text only.
Display an incrementing address range that starts fromthe selected address (default).
Display a decrementing address range that starts fromthe selected address.
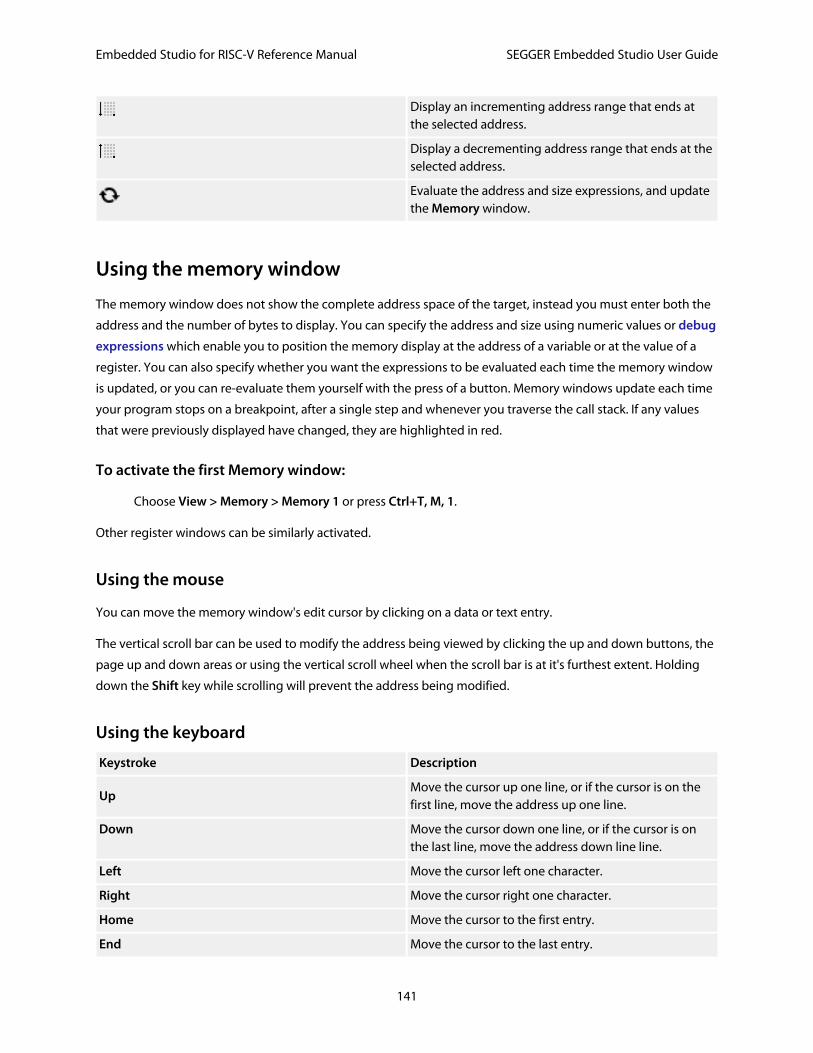
Embedded Studio for RISC-V Reference Manual SEGGER Embedded Studio User Guide
141
Display an incrementing address range that ends atthe selected address.
Display a decrementing address range that ends at theselected address.
Evaluate the address and size expressions, and updatethe Memory window.
Using the memory window
The memory window does not show the complete address space of the target, instead you must enter both the
address and the number of bytes to display. You can specify the address and size using numeric values or debug
expressions which enable you to position the memory display at the address of a variable or at the value of a
register. You can also specify whether you want the expressions to be evaluated each time the memory window
is updated, or you can re-evaluate them yourself with the press of a button. Memory windows update each time
your program stops on a breakpoint, after a single step and whenever you traverse the call stack. If any values
that were previously displayed have changed, they are highlighted in red.
To activate the first Memory window:
Choose View > Memory > Memory 1 or press Ctrl+T, M, 1.
Other register windows can be similarly activated.
Using the mouse
You can move the memory window's edit cursor by clicking on a data or text entry.
The vertical scroll bar can be used to modify the address being viewed by clicking the up and down buttons, the
page up and down areas or using the vertical scroll wheel when the scroll bar is at it's furthest extent. Holding
down the Shift key while scrolling will prevent the address being modified.
Using the keyboard
Keystroke Description
UpMove the cursor up one line, or if the cursor is on thefirst line, move the address up one line.
Down Move the cursor down one line, or if the cursor is onthe last line, move the address down line line.
Left Move the cursor left one character.
Right Move the cursor right one character.
Home Move the cursor to the first entry.
End Move the cursor to the last entry.
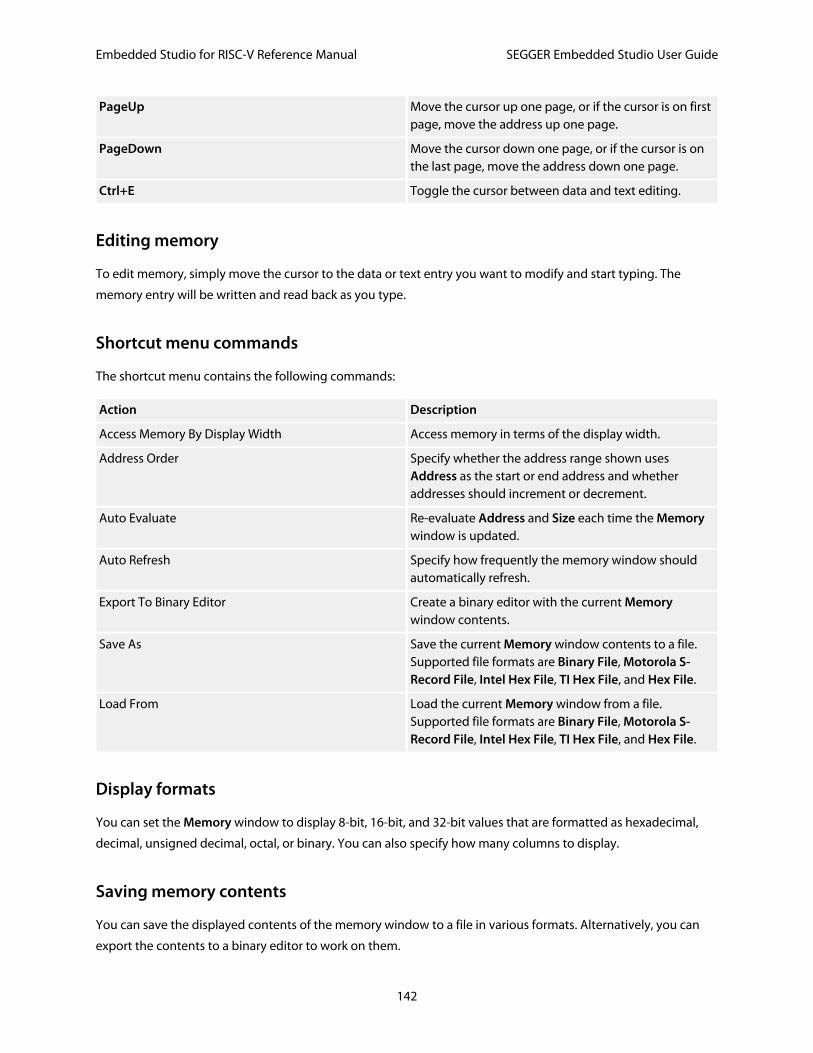
Embedded Studio for RISC-V Reference Manual SEGGER Embedded Studio User Guide
142
PageUp Move the cursor up one page, or if the cursor is on firstpage, move the address up one page.
PageDown Move the cursor down one page, or if the cursor is onthe last page, move the address down one page.
Ctrl+E Toggle the cursor between data and text editing.
Editing memory
To edit memory, simply move the cursor to the data or text entry you want to modify and start typing. The
memory entry will be written and read back as you type.
Shortcut menu commands
The shortcut menu contains the following commands:
Action Description
Access Memory By Display Width Access memory in terms of the display width.
Address Order Specify whether the address range shown usesAddress as the start or end address and whetheraddresses should increment or decrement.
Auto Evaluate Re-evaluate Address and Size each time the Memorywindow is updated.
Auto Refresh Specify how frequently the memory window shouldautomatically refresh.
Export To Binary Editor Create a binary editor with the current Memorywindow contents.
Save As Save the current Memory window contents to a file.Supported file formats are Binary File, Motorola S-Record File, Intel Hex File, TI Hex File, and Hex File.
Load From Load the current Memory window from a file.Supported file formats are Binary File, Motorola S-Record File, Intel Hex File, TI Hex File, and Hex File.
Display formats
You can set the Memory window to display 8-bit, 16-bit, and 32-bit values that are formatted as hexadecimal,
decimal, unsigned decimal, octal, or binary. You can also specify how many columns to display.
Saving memory contents
You can save the displayed contents of the memory window to a file in various formats. Alternatively, you can
export the contents to a binary editor to work on them.
Embedded Studio for RISC-V Reference Manual SEGGER Embedded Studio User Guide
143
You can save the displayed memory values as a binary file, Motorola S-record file, Intel hex file, or a Texas
Instruments TXT file.
To save the current state of memory to a file:
Select the start address and number of bytes to save by editing the Start Address and Size fields in the
Memory window toolbar.
Right-click the main memory display.
From the shortcut menu, select Save As, then choose the format from the submenu.
To export the current state of memory to a binary editor:
Select the start address and number of bytes to save by editing the Start Address and Size fields in the
Memory window toolbar.
Right-click the main memory display.
Choose Export to Binary Editor from the shortcut menu.
Note that subsequent modifications in the binary editor will not modify memory in the target.
Copying to clipboard
You can copy the contents of the memory window to the clipboard as text. If an address range is selected, the
data or text of the selected range will be copied to the clipboard depending on whether the selection has been
made in the data or text view. If no address range is selected, the current memory window view will be copied to
the clipboard.
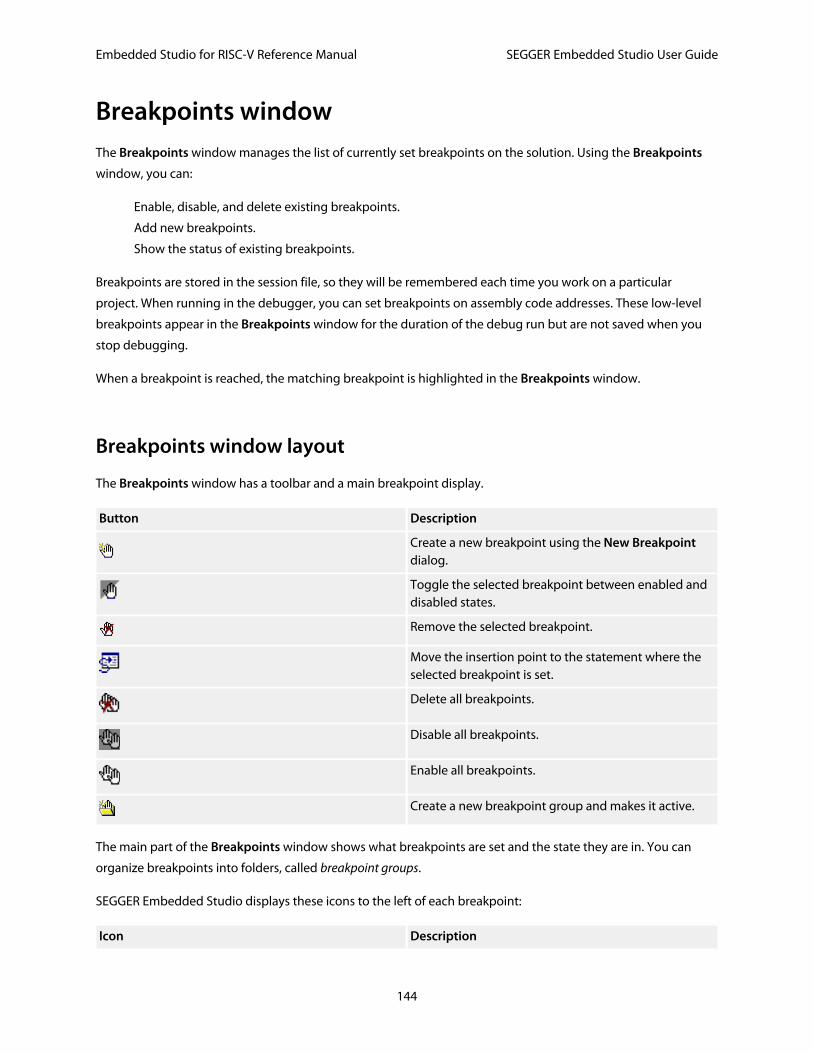
Embedded Studio for RISC-V Reference Manual SEGGER Embedded Studio User Guide
144
Breakpoints windowThe Breakpoints window manages the list of currently set breakpoints on the solution. Using the Breakpoints
window, you can:
Enable, disable, and delete existing breakpoints.
Add new breakpoints.
Show the status of existing breakpoints.
Breakpoints are stored in the session file, so they will be remembered each time you work on a particular
project. When running in the debugger, you can set breakpoints on assembly code addresses. These low-level
breakpoints appear in the Breakpoints window for the duration of the debug run but are not saved when you
stop debugging.
When a breakpoint is reached, the matching breakpoint is highlighted in the Breakpoints window.
Breakpoints window layout
The Breakpoints window has a toolbar and a main breakpoint display.
Button Description
Create a new breakpoint using the New Breakpointdialog.
Toggle the selected breakpoint between enabled anddisabled states.
Remove the selected breakpoint.
Move the insertion point to the statement where theselected breakpoint is set.
Delete all breakpoints.
Disable all breakpoints.
Enable all breakpoints.
Create a new breakpoint group and makes it active.
The main part of the Breakpoints window shows what breakpoints are set and the state they are in. You can
organize breakpoints into folders, called breakpoint groups.
SEGGER Embedded Studio displays these icons to the left of each breakpoint:
Icon Description
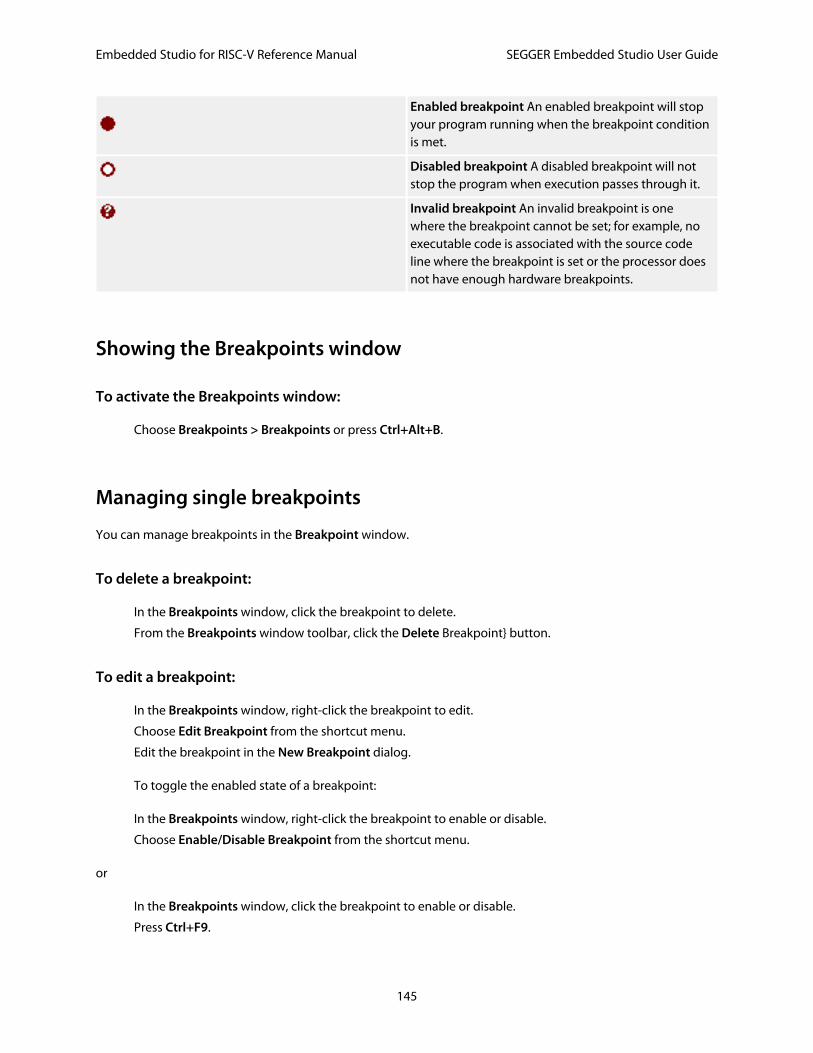
Embedded Studio for RISC-V Reference Manual SEGGER Embedded Studio User Guide
145
Enabled breakpoint An enabled breakpoint will stopyour program running when the breakpoint conditionis met.
Disabled breakpoint A disabled breakpoint will notstop the program when execution passes through it.
Invalid breakpoint An invalid breakpoint is onewhere the breakpoint cannot be set; for example, noexecutable code is associated with the source codeline where the breakpoint is set or the processor doesnot have enough hardware breakpoints.
Showing the Breakpoints window
To activate the Breakpoints window:
Choose Breakpoints > Breakpoints or press Ctrl+Alt+B.
Managing single breakpoints
You can manage breakpoints in the Breakpoint window.
To delete a breakpoint:
In the Breakpoints window, click the breakpoint to delete.
From the Breakpoints window toolbar, click the Delete Breakpoint} button.
To edit a breakpoint:
In the Breakpoints window, right-click the breakpoint to edit.
Choose Edit Breakpoint from the shortcut menu.
Edit the breakpoint in the New Breakpoint dialog.
To toggle the enabled state of a breakpoint:
In the Breakpoints window, right-click the breakpoint to enable or disable.
Choose Enable/Disable Breakpoint from the shortcut menu.
or
In the Breakpoints window, click the breakpoint to enable or disable.
Press Ctrl+F9.

Embedded Studio for RISC-V Reference Manual SEGGER Embedded Studio User Guide
146
Breakpoint groups
Breakpoints are divided into breakpoint groups. You can use breakpoint groups to specify sets of breakpoints
that are applicable to a particular project in the solution or for a particular debug scenario. Initially, there is a
single breakpoint group, named Default, to which all new breakpoints are added.
To create a new breakpoint group:
From the Breakpoints window toolbar, click the New Breakpoint Group button.
or
From the Debug menu, choose Breakpoints then New Breakpoint Group.
or
Right-click anywhere in the Breakpoints window.
Choose New Breakpoint Group from the shortcut menu.
In the New Breakpoint Group dialog, enter the name of the breakpoint group.
When you create a breakpoint, it is added to the active breakpoint group.
To make a group the active group:
In the Breakpoints window, right-click the breakpoint group to make active.
Choose Set as Active Group from the shortcut menu.
To delete a breakpoint group:
In the Breakpoints window, right-click the breakpoint group to delete.
Choose Delete Breakpoint Group from the shortcut menu.
You can enable all breakpoints within a group at once.
To enable all breakpoints in a group:
In the Breakpoints window, right-click the breakpoint group to enable.
Choose Enable Breakpoint Group from the shortcut menu.
You can disable all breakpoints within a group at once.
To disable all breakpoints in a group:
In the Breakpoints window, right-click the breakpoint group to disable.
Choose Disable Breakpoint Group from the shortcut menu.
Managing all breakpoints
You can delete, enable, or disable all breakpoints at once.

Embedded Studio for RISC-V Reference Manual SEGGER Embedded Studio User Guide
147
To delete all breakpoints:
Choose Breakpoints > Clear All Breakpoints or press Ctrl+Shift+F9.
or
On the Breakpoints window toolbar, click the Delete All Breakpoints button.
To enable all breakpoints:
Choose Breakpoints > Enable All Breakpoints or press Ctrl+B, N.
or
On the Breakpoints window toolbar, click the Enable All Breakpoints button.
To disable all breakpoints:
Choose Breakpoints > Disable All Breakpoints or press Ctrl+B, X.
or
On the Breakpoints window toolbar, click the Disable All Breakpoints button.
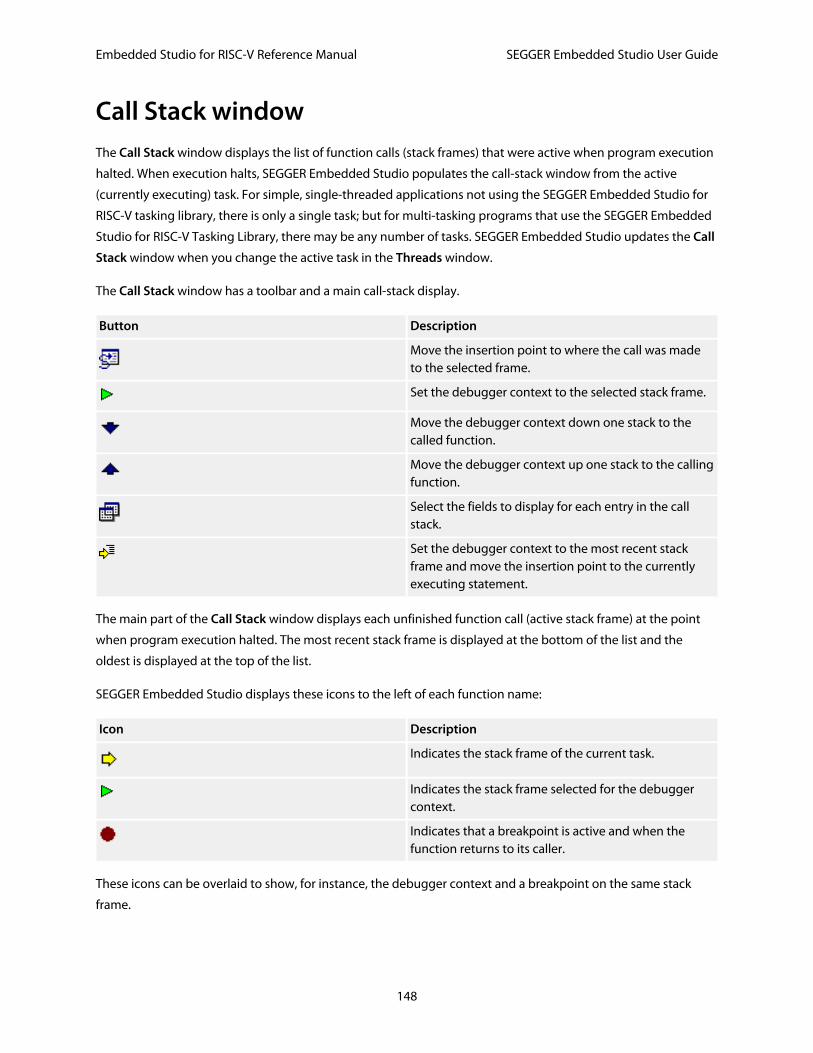
Embedded Studio for RISC-V Reference Manual SEGGER Embedded Studio User Guide
148
Call Stack windowThe Call Stack window displays the list of function calls (stack frames) that were active when program execution
halted. When execution halts, SEGGER Embedded Studio populates the call-stack window from the active
(currently executing) task. For simple, single-threaded applications not using the SEGGER Embedded Studio for
RISC-V tasking library, there is only a single task; but for multi-tasking programs that use the SEGGER Embedded
Studio for RISC-V Tasking Library, there may be any number of tasks. SEGGER Embedded Studio updates the Call
Stack window when you change the active task in the Threads window.
The Call Stack window has a toolbar and a main call-stack display.
Button Description
Move the insertion point to where the call was madeto the selected frame.
Set the debugger context to the selected stack frame.
Move the debugger context down one stack to thecalled function.
Move the debugger context up one stack to the callingfunction.
Select the fields to display for each entry in the callstack.
Set the debugger context to the most recent stackframe and move the insertion point to the currentlyexecuting statement.
The main part of the Call Stack window displays each unfinished function call (active stack frame) at the point
when program execution halted. The most recent stack frame is displayed at the bottom of the list and the
oldest is displayed at the top of the list.
SEGGER Embedded Studio displays these icons to the left of each function name:
Icon Description
Indicates the stack frame of the current task.
Indicates the stack frame selected for the debuggercontext.
Indicates that a breakpoint is active and when thefunction returns to its caller.
These icons can be overlaid to show, for instance, the debugger context and a breakpoint on the same stack
frame.

Embedded Studio for RISC-V Reference Manual SEGGER Embedded Studio User Guide
149
Showing the call-stack window
To activate the Call Stack window:
Choose View > Call Stack or press Ctrl+Alt+S.
Configuring the call-stack window
Each entry in the Call Stack window displays the function name and, additionally, parameter names, types, and
values. You can configure the Call Stack window to show varying amounts of information for each stack frame.
By default, SEGGER Embedded Studio displays all information.
To show or hide a field:
1. On the Call Stack toolbar, click the Options button on the far right.
2. Select the fields to show, and deselect the ones that should be hidden.
Changing the debugger context
You can select the stack frame for the debugger context from the Call Stack window.
To move the debugger context to a specific stack frame:
In the Call Stack window, double-click the stack frame to move to.
or
In the Call Stack window, select the stack frame to move to.
On the Call Stack window's toolbar, click the Switch To Frame button.
or
In the Call Stack window, right-click the stack frame to move to.
Choose Switch To Frame from the shortcut menu.
The debugger moves the insertion point to the statement where the call was made. If there is no debug
information for the statement at the call location, SEGGER Embedded Studio opens a disassembly window at the
instruction.
To move the debugger context up one stack frame:
On the Call Stack window's toolbar, click the Up One Stack Frame button.
or
Embedded Studio for RISC-V Reference Manual SEGGER Embedded Studio User Guide
150
On the Debug Location toolbar, click the Up One Stack Frame button.
or
Press Alt+-.
The debugger moves the insertion point to the statement where the call was made. If there is no debug
information for the statement at the call location, SEGGER Embedded Studio opens a disassembly window at the
instruction.
To move the debugger context down one stack frame:
On the Call Stack window's toolbar, click the Down One Stack Frame button.
or
On the Debug Location toolbar, click the Down One Stack Frame button.
or
Press Alt++.
The debugger moves the insertion point to the statement where the call was made. If there is no debug
information for the statement at the call location, SEGGER Embedded Studio opens a disassembly window at the
instruction.
Setting a breakpoint on a return to a function
To set a breakpoint on return to a function:
In the Call Stack window, click the stack frame on the function to stop at on return.
On the Build toolbar, click the Toggle Breakpoint button.
or
In the Call Stack window, click the stack frame on the function to stop at on return.
Press F9.
or
In the Call Stack window, right-click the function to stop at on return.
Choose Toggle Breakpoint from the shortcut menu.
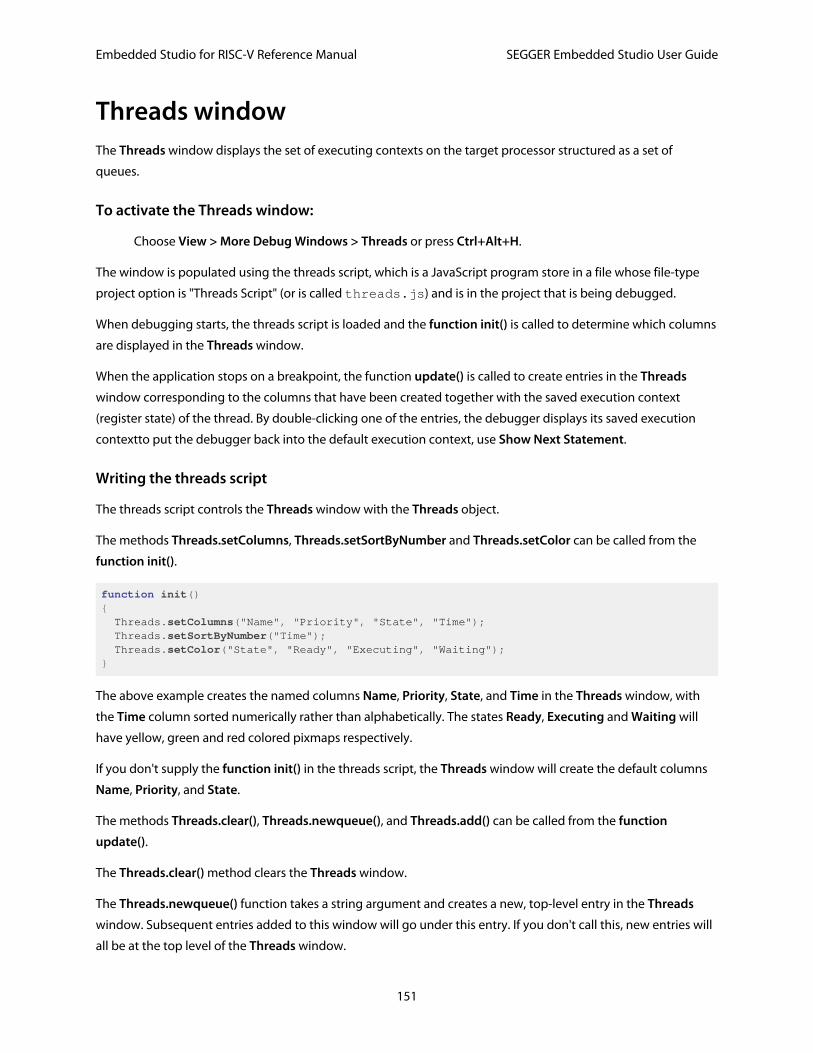
Embedded Studio for RISC-V Reference Manual SEGGER Embedded Studio User Guide
151
Threads windowThe Threads window displays the set of executing contexts on the target processor structured as a set of
queues.
To activate the Threads window:
Choose View > More Debug Windows > Threads or press Ctrl+Alt+H.
The window is populated using the threads script, which is a JavaScript program store in a file whose file-type
project option is "Threads Script" (or is called threads.js) and is in the project that is being debugged.
When debugging starts, the threads script is loaded and the function init() is called to determine which columns
are displayed in the Threads window.
When the application stops on a breakpoint, the function update() is called to create entries in the Threads
window corresponding to the columns that have been created together with the saved execution context
(register state) of the thread. By double-clicking one of the entries, the debugger displays its saved execution
contextto put the debugger back into the default execution context, use Show Next Statement.
Writing the threads script
The threads script controls the Threads window with the Threads object.
The methods Threads.setColumns, Threads.setSortByNumber and Threads.setColor can be called from the
function init().
function init(){ Threads.setColumns("Name", "Priority", "State", "Time"); Threads.setSortByNumber("Time"); Threads.setColor("State", "Ready", "Executing", "Waiting");}
The above example creates the named columns Name, Priority, State, and Time in the Threads window, with
the Time column sorted numerically rather than alphabetically. The states Ready, Executing and Waiting will
have yellow, green and red colored pixmaps respectively.
If you don't supply the function init() in the threads script, the Threads window will create the default columns
Name, Priority, and State.
The methods Threads.clear(), Threads.newqueue(), and Threads.add() can be called from the function
update().
The Threads.clear() method clears the Threads window.
The Threads.newqueue() function takes a string argument and creates a new, top-level entry in the Threads
window. Subsequent entries added to this window will go under this entry. If you don't call this, new entries will
all be at the top level of the Threads window.
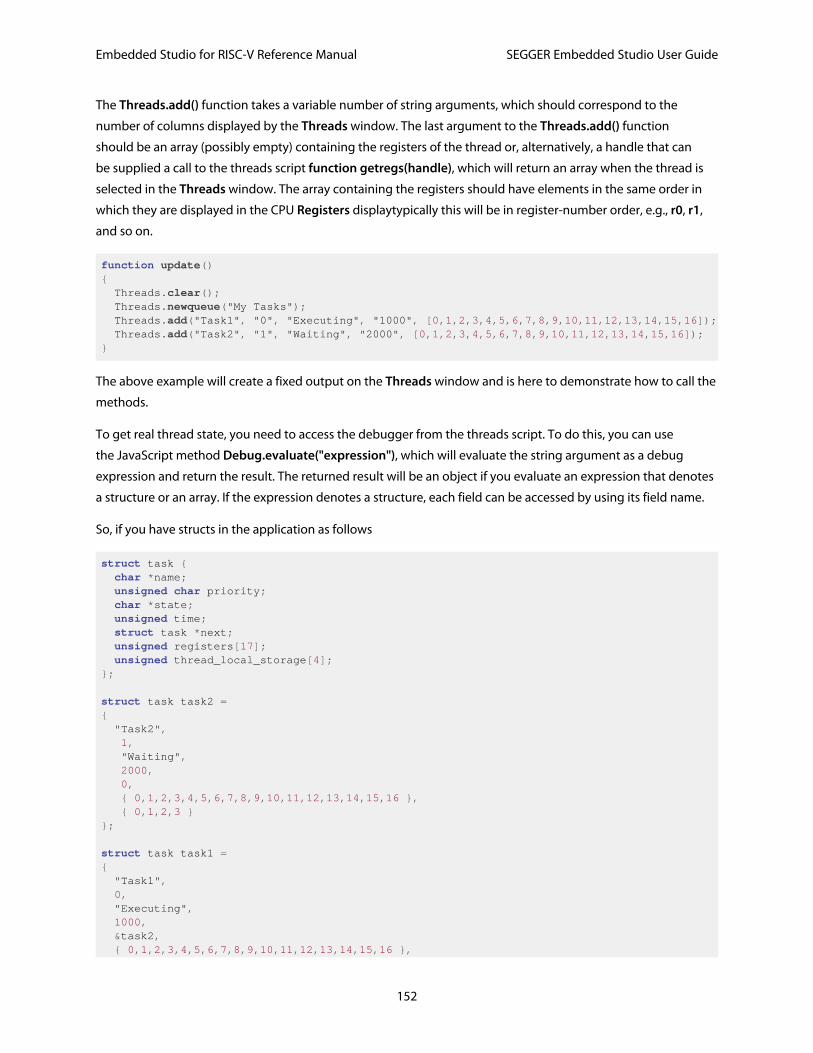
Embedded Studio for RISC-V Reference Manual SEGGER Embedded Studio User Guide
152
The Threads.add() function takes a variable number of string arguments, which should correspond to the
number of columns displayed by the Threads window. The last argument to the Threads.add() function
should be an array (possibly empty) containing the registers of the thread or, alternatively, a handle that can
be supplied a call to the threads script function getregs(handle), which will return an array when the thread is
selected in the Threads window. The array containing the registers should have elements in the same order in
which they are displayed in the CPU Registers displaytypically this will be in register-number order, e.g., r0, r1,
and so on.
function update(){ Threads.clear(); Threads.newqueue("My Tasks"); Threads.add("Task1", "0", "Executing", "1000", [0,1,2,3,4,5,6,7,8,9,10,11,12,13,14,15,16]); Threads.add("Task2", "1", "Waiting", "2000", [0,1,2,3,4,5,6,7,8,9,10,11,12,13,14,15,16]);}
The above example will create a fixed output on the Threads window and is here to demonstrate how to call the
methods.
To get real thread state, you need to access the debugger from the threads script. To do this, you can use
the JavaScript method Debug.evaluate("expression"), which will evaluate the string argument as a debug
expression and return the result. The returned result will be an object if you evaluate an expression that denotes
a structure or an array. If the expression denotes a structure, each field can be accessed by using its field name.
So, if you have structs in the application as follows
struct task { char *name; unsigned char priority; char *state; unsigned time; struct task *next; unsigned registers[17]; unsigned thread_local_storage[4];};
struct task task2 ={ "Task2", 1, "Waiting", 2000, 0, { 0,1,2,3,4,5,6,7,8,9,10,11,12,13,14,15,16 }, { 0,1,2,3 }};
struct task task1 ={ "Task1", 0, "Executing", 1000, &task2, { 0,1,2,3,4,5,6,7,8,9,10,11,12,13,14,15,16 },
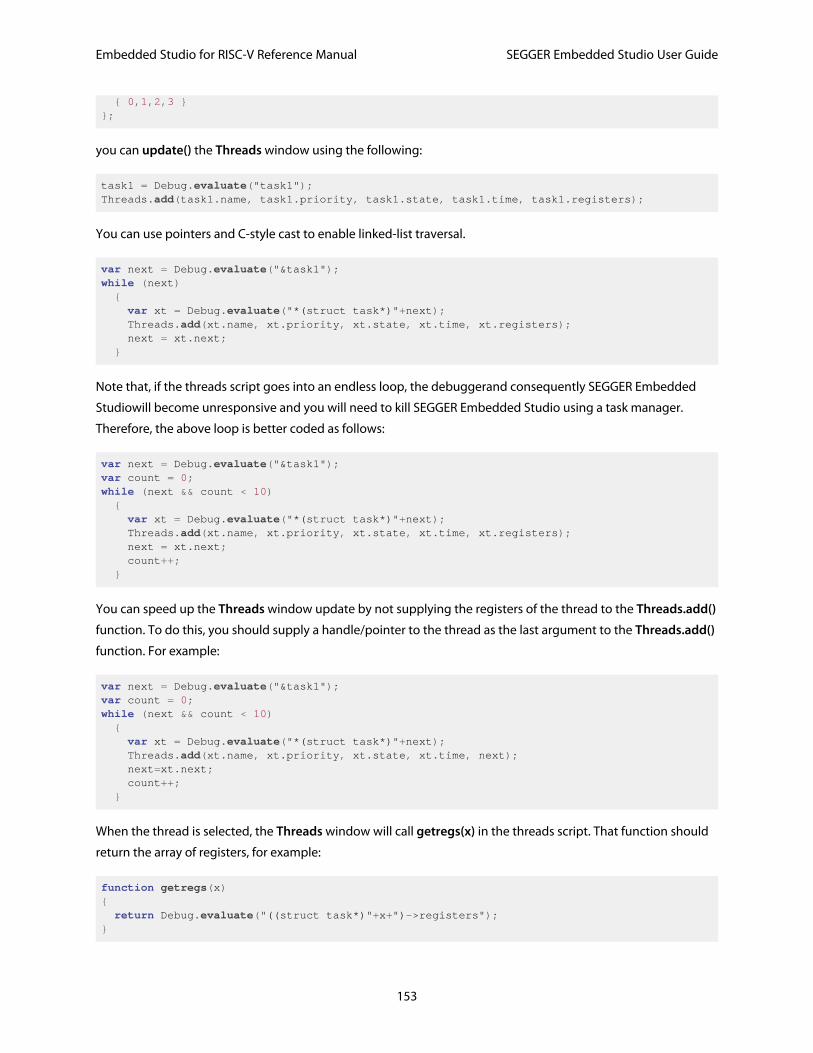
Embedded Studio for RISC-V Reference Manual SEGGER Embedded Studio User Guide
153
{ 0,1,2,3 }};
you can update() the Threads window using the following:
task1 = Debug.evaluate("task1");Threads.add(task1.name, task1.priority, task1.state, task1.time, task1.registers);
You can use pointers and C-style cast to enable linked-list traversal.
var next = Debug.evaluate("&task1");while (next) { var xt = Debug.evaluate("*(struct task*)"+next); Threads.add(xt.name, xt.priority, xt.state, xt.time, xt.registers); next = xt.next; }
Note that, if the threads script goes into an endless loop, the debuggerand consequently SEGGER Embedded
Studiowill become unresponsive and you will need to kill SEGGER Embedded Studio using a task manager.
Therefore, the above loop is better coded as follows:
var next = Debug.evaluate("&task1");var count = 0;while (next && count < 10) { var xt = Debug.evaluate("*(struct task*)"+next); Threads.add(xt.name, xt.priority, xt.state, xt.time, xt.registers); next = xt.next; count++; }
You can speed up the Threads window update by not supplying the registers of the thread to the Threads.add()
function. To do this, you should supply a handle/pointer to the thread as the last argument to the Threads.add()
function. For example:
var next = Debug.evaluate("&task1");var count = 0;while (next && count < 10) { var xt = Debug.evaluate("*(struct task*)"+next); Threads.add(xt.name, xt.priority, xt.state, xt.time, next); next=xt.next; count++; }
When the thread is selected, the Threads window will call getregs(x) in the threads script. That function should
return the array of registers, for example:
function getregs(x){ return Debug.evaluate("((struct task*)"+x+")->registers");}
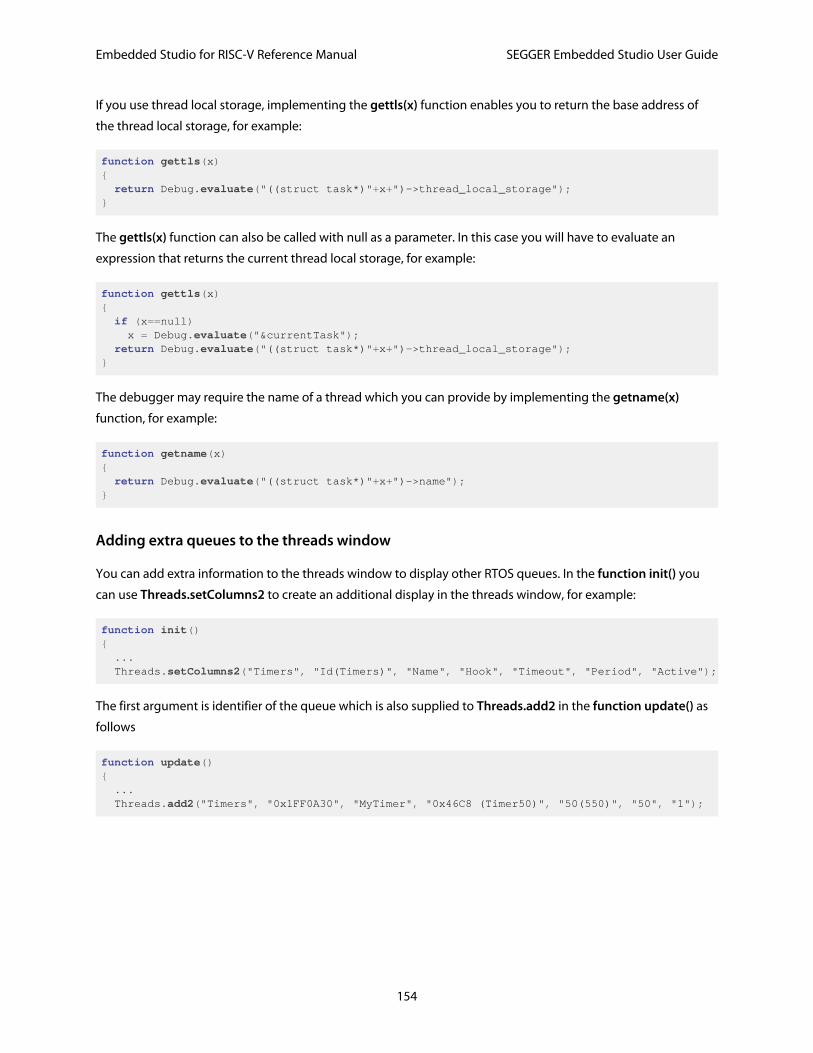
Embedded Studio for RISC-V Reference Manual SEGGER Embedded Studio User Guide
154
If you use thread local storage, implementing the gettls(x) function enables you to return the base address of
the thread local storage, for example:
function gettls(x){ return Debug.evaluate("((struct task*)"+x+")->thread_local_storage");}
The gettls(x) function can also be called with null as a parameter. In this case you will have to evaluate an
expression that returns the current thread local storage, for example:
function gettls(x){ if (x==null) x = Debug.evaluate("¤tTask"); return Debug.evaluate("((struct task*)"+x+")->thread_local_storage");}
The debugger may require the name of a thread which you can provide by implementing the getname(x)
function, for example:
function getname(x){ return Debug.evaluate("((struct task*)"+x+")->name");}
Adding extra queues to the threads window
You can add extra information to the threads window to display other RTOS queues. In the function init() you
can use Threads.setColumns2 to create an additional display in the threads window, for example:
function init(){ ... Threads.setColumns2("Timers", "Id(Timers)", "Name", "Hook", "Timeout", "Period", "Active");
The first argument is identifier of the queue which is also supplied to Threads.add2 in the function update() as
follows
function update(){ ... Threads.add2("Timers", "0x1FF0A30", "MyTimer", "0x46C8 (Timer50)", "50(550)", "50", "1");
Embedded Studio for RISC-V Reference Manual SEGGER Embedded Studio User Guide
155
Execution Profile windowThe Execution Profile window shows a list of source locations and the number of times those source locations
have been executed. This window is only available for targets that support the collection of jump trace
information.
To activate the Execution Profile window:
Choose View > More Debug Windows > Execution Profile or press Ctrl+T, P.
The count value displayed is the number of times the first instruction of the source code location has been
executed. The source locations displayed are target dependent: they could represent each statement of the
program or each jump target of the program. If however the debugger is in intermixed or disassembly mode
then the count values will be displayed on a per instruction basis.
The execution counts window is updated each time your program stops and the window is visible so if you have
this window displayed then single stepping may be slower than usual.
Embedded Studio for RISC-V Reference Manual SEGGER Embedded Studio User Guide
156
Execution Trace windowThe trace window displays historical information on the instructions executed by the target.
To activate the Trace window:
Choose View > More Debug Windows > Execution Trace or press Ctrl+T, T.
The type and number of the trace entries depends upon the target that is connected when gathering trace
information. Some targets may trace all instructions, others may trace jump instructions, and some may trace
modifications to variables. You'll find the trace capabilities of your target on the shortcut menu.
Each entry in the trace window has a unique number, and the lower the number the earlier the trace. You can
click on the header to show earliest to latest or the latest to earliest trace entries. If a trace entry can have source
code located to it then double-clicking the trace entry will show the appropriate source display.
Some targets may provide timing information which will be displayed in the ticks column.
The trace window is updated each time the debugger stops when it is visible so single stepping is likely to be
slower if you have this window displayed.
Embedded Studio for RISC-V Reference Manual SEGGER Embedded Studio User Guide
157
Debug file search editorWhen a program is built with debugging enabled, the debugging information contains the paths and filenames
of all the source files for the program in order to allow the debugger to find them. If a program or library linked
into the program is on a different machine than the one on which it was compiled, or if the source files were
moved after the program was compiled, the debugger will not be able to find the source files.
In this situation, the simplest way to help SEGGER Embedded Studio find the source files is to add the directory
containing the source files to one of its source-file search paths. Alternatively, if SEGGER Embedded Studio
cannot find a source file, it will prompt you for its location and will record its new location in the source-file map.
Debug source-file search paths
Debug's source-file search paths can be used to help the debugger locate source files that are no longer located
where they were at compile time. When a source file cannot be found, the search-path directories will be
checked, in turn, to see if they contain the source file. SEGGER Embedded Studio maintains two debug source-
file search paths:
Project-session search path:This path is for the current project session and does not apply to all projects.
The global search path:This system-wide path applies to all projects.
The project-session search path is checked before the global search path.
To edit the debug search paths:
Choose Debug > Options > Search Paths.
Debug source file map
If a source file cannot be found while debugging and the debugger has to prompt the user for its location,
the results are stored in the debug source file map. The debug source file map simply correlates, or maps, the
original pathnames to the new locations. When a file cannot be found at its original location or in the debug
search paths, the debug source file map is checked to see if a new location has been recorded for the file or if the
user has specified that the file does not exist. Each project session maintains its own source file map, the map is
not shared by all projects.
To view the debug source file map:
Choose Debug > Options > Search Paths.
To remove individual entries from the debug source file map:
Choose Debug > Options > Search Paths.
Embedded Studio for RISC-V Reference Manual SEGGER Embedded Studio User Guide
158
Right-click the mapping to delete.
Choose Delete Mapping from the shortcut menu.
To remove all entries from the debug source file map:
Choose Debug > Options > Search Paths.
Right-click any mapping.
Choose Delete All Mappings from the shortcut menu.
Embedded Studio for RISC-V Reference Manual SEGGER Embedded Studio User Guide
159
Debug Terminal windowThe Debug Terminal window displays debug output from the target application and can also be used to be
provide debug input to the target application.
To activate the Debug Terminal window:
Choose View > Debug Terminal.
Embedded Studio for RISC-V Reference Manual SEGGER Embedded Studio User Guide
160
Breakpoint expressionsThe debugger can set breakpoints by evaluating simple C-like expressions. Note that the exact capabilities
offered by the hardware to assist in data breakpointing will vary from target to target; please refer to the
particular target interface you are using and the capabilities of your target silicon for exact details. The simplest
expression supported is a symbol name. If the symbol name is a function, a breakpoint occurs when the first
instruction of the symbol is about to be executed. If the symbol name is a variable, a breakpoint occurs when the
symbol has been accessed; this is termed a data breakpoint. For example, the expression x will breakpoint when
x is accessed. You can use a debug expression (see Debug expressions) as a breakpoint expression. For example,
x[4] will breakpoint when element 4 of array x is accessed, and @sp will breakpoint when the sp register is
accessed.
Data breakpoints can be specified, using the == operator, to occur when a symbol is accessed with a specific
value. The expression x == 4 will breakpoint when x is accessed and its value is 4. The operators <, >=, >;, >=,
==, and != can be used similarly. For example, @sp <= 0x1000 will breakpoint when register sp is accessed
and its value is less than or equal to 0x1000.
You can use the operator & to mask the value you wish to break on. For example, (x & 1) == 1 will
breakpoint when x is accessed and has an odd value.
You can use the operator && to combine comparisons. For example
(x >= 2) && (x <= 14)
will breakpoint when x is accessed and its value is between 2 and 14.
You can specify an arbitrary memory range using an array cast expression. For example, (char[256])
(0x1000) will breakpoint when the memory region 0x10000x10FF is accessed.
You can specify an inverse memory range using the ! operator. For example !(char[256])(0x1000) will
breakpoint when memory outside the range 0x10000x10FF is accessed.

Embedded Studio for RISC-V Reference Manual SEGGER Embedded Studio User Guide
161
Debug expressionsThe debugger can evaluate simple expressions that can be displayed in the Watch window or as a tool-tip in the
code editor.
The simplest expression is an identifier the debugger tries to interpret in the following order:
an identifier that exists in the scope of the current context.
the name of a global identifier in the program of the current context.
Numbers can be used in expressions. Hexadecimal numbers must be prefixed with 0x.
Registers can be referenced by prefixing the register name with @.
The standard C and C++ operators !, ~, *, /, %, +, -, >>, <<, <, <=, >, >=, ==, |, &, ^, &&, and || are supported
on numeric types.
The standard assignment operators =, +=, -=, *=, /=, %=, >>, >>=, <<=, &=, |=, ^= are supported on numeric
types.
The array subscript operator [] is supported on array and pointer types.
The structure access operator . is supported on structured types (this also works on pointers to structures), and -
> works similarly.
The dereference operator (prefix *) is supported on pointers, the address-of (prefix &) and sizeof operators are
supported.
The addressof(filename, linenumber) operator will return the address of the specified source code line
number.
Function calling with parameters and return results.
Casting to basic pointer types is supported. For example, (unsigned char *)0x300 can be used to display the
memory at a given location.
Casting to basic array types is supported. For example, (unsigned char[256])0x100 can be used to reference a
memory region.
Arrays can be sliced using [a:b] where a is the first element and b is the last element to display.
Operators have the precedence and associativity one expects of a C-like programming language.
Embedded Studio for RISC-V Reference Manual SEGGER Embedded Studio User Guide
162
Terminal emulator windowThe Terminal Emulator window contains a basic serial-terminal emulator that allows you to receive and transmit
data over a serial interface.
To activate the Terminal Emulator window:
Choose Tools > Terminal Emulator > Terminal Emulator or press Ctrl+Alt+M.
To use the terminal emulator:
1. Set the required terminal emulator properties.
2. Connect the terminal emulator to the communications port by clicking the button on the toolbar or by
selecting Connect from the shortcut menu.
Once connected, any input in the Terminal Emulator window is sent to the communications port and any data
received from the communications port is displayed on the terminal.
Connection may be refused if the communication port is in use by another application or if the port doesn't
exist.
To disconnect the terminal emulator:
1. Disconnect the communications port by clicking the Disconnect icon on the toolbar or by right-clicking
to select Disconnect from the shortcut menu.
This will release the communications port for use in other applications.
Supported control codes
The terminal supports a limited set of control codes:
Control code Description
<BS> Backspace
<CR> Carriage return
<LF> Linefeed
<ESC>[{attr1};...;{attrn}m Set display attributes. The attributes 2-Dim, 5-Blink, 7-Reverse, and 8-Hidden are not supported.
Embedded Studio for RISC-V Reference Manual Command-line options
163
Command-line optionsThis section describes the command-line options accepted by SEGGER Embedded Studio.
Usage
emStudio [options] [files]
Embedded Studio for RISC-V Reference Manual Command-line options
164
-D (Define macro)
Syntax
-D macro=value
Description
Define a SEGGER Embedded Studio for RISC-V macro value.
Embedded Studio for RISC-V Reference Manual Command-line options
165
-noclang (Disable Clang support)
Syntax
-noclang
Description
Disable Clang support.
Embedded Studio for RISC-V Reference Manual Command-line options
166
-noload (Disable loading of last project)
Syntax
-noload
Description
Disable loading of last project on startup.
Embedded Studio for RISC-V Reference Manual Command-line options
167
-packagesdir (Specify packages directory)
Syntax
-packagesdir dir
Description
Override the default value of the $(PackagesDir) macro.
Embedded Studio for RISC-V Reference Manual Command-line options
168
-permit-multiple-studio-instances (Permit multiplestudio instances)
Syntax
-permit-multiple-studio-instances
Description
Allow multiple instances of SEGGER Embedded Studio to run at the same time. This behaviour can also be
enabled using the Environment > Startup Options > Allow Multiple SEGGER Embedded Studios environment
option.
Embedded Studio for RISC-V Reference Manual Command-line options
169
-rootuserdir (Set the root user data directory)
Syntax
-rootuserdir dir
Description
Set the SEGGER Embedded Studio for RISC-V root user data directory.
Embedded Studio for RISC-V Reference Manual Command-line options
170
-save-settings-off (Disable saving of environmentsettings)
Syntax
-save-settings-off
Description
Disable the saving of modified environment settings.
Embedded Studio for RISC-V Reference Manual Command-line options
171
-set-setting (Set environment setting)
Syntax
-set-setting environment_setting=value
Description
Sets an environment setting to a specified value. For example:
-set-setting "Environment/Build/Show Command Lines=Yes"

Embedded Studio for RISC-V Reference Manual Command-line options
172
-templatesfile (Set project templates path)
Syntax
-templatesfile path
Description
Sets the search path for finding project template files.
Embedded Studio for RISC-V Reference Manual Uninstalling SEGGER Embedded Studio for RISC-V
173
Uninstalling SEGGER Embedded Studio for
RISC-VThis section describes how to completely uninstall SEGGER Embedded Studio for RISC-V for each supported
operating system:
Uninstalling SEGGER Embedded Studio for RISC-V from Windows
Uninstalling SEGGER Embedded Studio for RISC-V from Mac OS X
Uninstalling SEGGER Embedded Studio for RISC-V from Linux
Uninstalling SEGGER Embedded Studio for RISC-V fromWindows
Removing user data and settings
The uninstaller does not remove any user data such as settings or installed packages. To completely remove the
user data you will need to carry out the following operations for each user that has used SEGGER Embedded
Studio for RISC-V on your system.
To remove user data using SEGGER Embedded Studio:
1. Start SEGGER Embedded Studio.

Embedded Studio for RISC-V Reference Manual Uninstalling SEGGER Embedded Studio for RISC-V
174
2. Click Tools > Admin > Remove All User Data...
Alternatively, if SEGGER Embedded Studio for RISC-V has already been uninstalled you can manually remove the
user data as follows:
1. Click the Windows Start button.
2. Type %LOCALAPPDATA% in the search field and press enter to open the local application data folder.
3. Open the SEGGER folder.
4. Open the SEGGER Embedded Studio for RISC-V folder.
5. Delete the v6 folder.
6. If you want to delete user data for all versions of the software, delete the SEGGER Embedded Studio for
RISC-V folder as well.
Uninstalling SEGGER Embedded Studio for RISC-V
To uninstall SEGGER Embedded Studio for RISC-V:
1. If SEGGER Embedded Studio is running, click File > Exit to shut it down.
2. Click the Start Menu and select Control Panel. The Control Panel window will open.
3. In the Control Panel window, click the Uninstall a program link under the Programs section.
4. From the list of currently installed programs, select SEGGER Embedded Studio for RISC-V 6.10.
5. To begin the uninstall, click the Uninstall button at the top of the list.
Uninstalling SEGGER Embedded Studio for RISC-V from MacOS X
Removing user data and settings
Uninstalling does not remove any user data such as settings or installed packages. To completely remove the
user data you will need to carry out the following operations for each user that has used SEGGER Embedded
Studio for RISC-V on your system.
To remove user data using SEGGER Embedded Studio:
1. Start SEGGER Embedded Studio.
2. Click Tools > Admin > Remove All User Data...
Alternatively, if SEGGER Embedded Studio for RISC-V has already been uninstalled you can manually remove the
user data as follows:
1. Open Finder.
2. Go to the $HOME/Library/SEGGER/SEGGER Embedded Studio for RISC-V directory.
Embedded Studio for RISC-V Reference Manual Uninstalling SEGGER Embedded Studio for RISC-V
175
3. Drag the v6 folder to the Trash.
4. If you want to delete user data for all versions of the software, drag the SEGGER Embedded Studio for RISC-
V folder to the Trash as well.
Uninstalling SEGGER Embedded Studio for RISC-V
To uninstall SEGGER Embedded Studio for RISC-V:
1. If SEGGER Embedded Studio is running, shut it down.
2. Open the Applications folder in Finder.
3. Drag the SEGGER Embedded Studio for RISC-V 6.10 folder to the Trash.
Uninstalling SEGGER Embedded Studio for RISC-V from Linux
Removing user data and settings
The uninstaller does not remove any user data such as settings or installed packages. To completely remove the
user data you will need to carry out the following operations for each user that has used SEGGER Embedded
Studio for RISC-V on your system.
To remove user data using SEGGER Embedded Studio:
1. Start SEGGER Embedded Studio.
2. Click Tools > Admin > Remove All User Data...
Alternatively, if SEGGER Embedded Studio for RISC-V has already been uninstalled you can manually remove the
user data as follows:
1. Open a terminal window or file browser.
2. Go to the $HOME/.segger/SEGGER Embedded Studio for RISC-V directory.
3. Delete the v6 directory.
4. If you want to delete user data for all versions of the software, delete the SEGGER Embedded Studio for
RISC-V directory as well.
Uninstalling SEGGER Embedded Studio for RISC-V
To uninstall SEGGER Embedded Studio for RISC-V:
1. If SEGGER Embedded Studio is running, click File > Exit to shut it down.
2. Open a terminal window.
3. Go to the SEGGER Embedded Studio for RISC-V bin directory (this is /usr/share/
segger_embedded_studio_for_risc-v_6.10/bin by default).
4. Run sudo ./uninstall to start the uninstaller.

Embedded Studio for RISC-V Reference Manual Uninstalling SEGGER Embedded Studio for RISC-V
176
Embedded Studio for RISC-V Reference Manual Using the SEGGER Linker
177
Using the SEGGER LinkerYou can create a new project that builds using the SEGGER linker by choosing the project template
A C executable (segger-ld) for a RISCV processor
from the New Project wizard. Alternatively you can modify an existing project as follows:
Set the project option Linker to SEGGER.
Set the project option Linker Script File to $(StudioDir)/samples/SEGGER_RISCV_Flash.icf.
Set the project option Supply Memory Segments To Linker to Yes.
Set the project option Exclude From Build on the riscv_crt0.s file in your project.
Add the startup file $(StudioDir)/samples/SEGGER_RISCV_crt0.s to your project.

Embedded Studio for RISC-V Reference Manual Using the SEGGER Linker
178
Embedded Studio for RISC-V Reference Manual Using the SEGGER Runtime Library
179
Using the SEGGER Runtime LibraryYou can create a new project that builds using the SEGGER Runtime Library by choosing the project template
A C executable for a RISC-V processor
from the New Project wizard. Alternatively you can modify an existing project as follows:
Set the project option Run Time Library to SEGGER.

Embedded Studio for RISC-V Reference Manual Using the SEGGER Runtime Library
180
Embedded Studio for RISC-V Reference Manual C++ Library User Guide
181
C++ Library User GuideSEGGER Embedded Studio for RISC-V provides a limited C++ library suitable for use in an embedded application.
Standard library
The following C++ standard header files are provided in $(StudioDir)/include:
File Description
<cassert> C++ wrapper on assert.h.
<cctype> C++ wrapper on ctype.h.
<cerrno> C++ wrapper on errno.h.
<cfloat> C++ wrapper on float.h.
<ciso646> C++ wrapper on iso646.h.
<climits> C++ wrapper on limits.h.
<clocale> C++ wrapper on locale.h.
<cmath> C++ wrapper on math.h.
<csetjmp> C++ wrapper on setjmp.h.
<cstdarg> C++ wrapper on stdarg.h.
<cstddef> C++ wrapper on stddef.h.
<cstdint> C++ wrapper on stdint.h.
<cstdio> C++ wrapper on stdio.h.
<cstdlib> C++ wrapper on stdlib.h.
Embedded Studio for RISC-V Reference Manual C++ Library User Guide
182
<cstring> C++ wrapper on string.h.
<ctime> C++ wrapper on time.h.
<cwchar> C++ wrapper on wchar.h.
<cwctype> C++ wrapper on wctype.h.
<exception> Definitions for exceptions.
<new> Types and definitions for placement new and delete.
<typeinfo> Definitions for RTTI.
Embedded Studio for RISC-V Reference Manual C++ Library User Guide
183
Standard template libraryThe C++ STL functionality of STLPort is provided as a separate library package use Tools > Package Manager to
install this package.
Embedded Studio for RISC-V Reference Manual C++ Library User Guide
184
Subset API referenceThis section contains a subset reference to the SEGGER Embedded Studio for RISC-V C++ library.

Embedded Studio for RISC-V Reference Manual C++ Library User Guide
185
<new> - memory allocationThe header file <new> defines functions for memory allocation.
Functions
set_new_handler Establish a function which is called when memoryallocation fails.
Operators
operator delete Heap storage deallocators operator.
operator new Heap storage allocators operator.
Embedded Studio for RISC-V Reference Manual C++ Library User Guide
186
operator delete
Synopsis
void operator delete(void *ptr) throw();
void operator delete[](void *ptr) throw();
Description
operator delete deallocates space of an object.
operator delete will do nothing if ptr is null. If ptr is not null then it should have been returned from a call to
operator new.
operator delete[] has the same behaviour as operator delete but is used for array deallocation.
Portability
Standard C++.
Embedded Studio for RISC-V Reference Manual C++ Library User Guide
187
operator new
Synopsis
void *operator new(size_t size) throw();
void *operator new[](size_t size) throw();
Description
operator new allocates space for an object whose size is specified by size and whose value is indeterminate.
operator new returns a null pointer if the space for the object cannot be allocated from free memory; if space for
the object can be allocated, operator new returns a pointer to the start of the allocated space.
operator new[] has the same behaviour as operator new but is used for array allocation.
Portability
The implementation is not standard. The standard C++ implementation should throw an exception if memory
allocation fails.
Embedded Studio for RISC-V Reference Manual C++ Library User Guide
188
set_new_handler
Synopsis
typedef void (*new_handler)();
new_handler set_new_handler(new_handler) throw();
Description
set_new_handler establishes a new_handler function.
set_new_handler establishes a new_handler function that is called when operator new fails to allocate the
requested memory. If the new_handler function returns then operator new will attempt to allocate the memory
again. The new_handler function can throw an exception to implement standard C++ behaviour for memory
allocation failure.
Portability
Standard C++.

Embedded Studio for RISC-V Reference Manual Utilities Reference
189
Utilities Reference
Embedded Studio for RISC-V Reference Manual Utilities Reference
190
Compiler driverThis section describes the switches accepted by the compiler driver, cc. The compiler driver is capable of
controlling compilation by all supported language compilers and the final link by the linker. It can also construct
libraries automatically.
In contrast to many compilation and assembly language development systems, with SEGGER Embedded Studio
for RISC-V you don't invoke the assembler or compiler directly. Instead you'll normally use the compiler driver cc
as it provides an easy way to get files compiled, assembled, and linked. This section will introduce you to using
the compiler driver to convert your source files to object files, executables, or other formats.
We recommend that you use the compiler driver rather than use the assembler or compiler directly because
there the driver can assemble multiple files using one command line and can invoke the linker for you too. There
is no reason why you should not invoke the assembler or compiler directly yourself, but you'll find that typing in
all the required options is quite tedious-and why do that when cc will provide them for you automatically?
Embedded Studio for RISC-V Reference Manual Utilities Reference
191
File naming conventionsThe compiler driver uses file extensions to distinguish the language the source file is written in. The compiler
driver recognizes the extension .c as C source files, .cpp, .cc or .cxx as C++ source files, .s and .asm as assembly
code files.
The compiler driver recognizes the extension .o as object files, .a as library files, .ld as linker script files and .xml
as special-purpose XML files.
We strongly recommend that you adopt these extensions for your source files and object files because you'll find
that using the tools is much easier if you do.
C language files
When the compiler driver finds a file with a .c extension, it runs the C compiler to convert it to object code.
C++ language files
When the compiler driver finds a file with a .cpp extension, it runs the C++ compiler to convert it to object code.
Assembly language files
When the compiler driver finds a file with a .s or .asm extension, it runs the C preprocessor and then the
assembler to convert it to object code.
Object code files
When the compiler driver finds a file with a .o or .a extension, it passes it to the linker to include it in the final
application.
Embedded Studio for RISC-V Reference Manual Utilities Reference
192
Command-line optionsThis section describes the command-line options accepted by the SEGGER Embedded Studio for RISC-V compiler
driver.
Embedded Studio for RISC-V Reference Manual Utilities Reference
193
-allow-multiple-definition (Allow multiple symboldefinition)
Syntax
-allow-multiple-definition
Description
Do not generate an error when linking multiple symbols of the same name.
Embedded Studio for RISC-V Reference Manual Utilities Reference
194
-ansi (Warn about potential ANSI problems)
Syntax
-ansi
Description
Warn about potential problems that conflict with the relevant ANSI or ISO standard for the files that are
compiled.
Embedded Studio for RISC-V Reference Manual Utilities Reference
195
-ar (Archive output)
Syntax
-ar
Description
This switch instructs the compiler driver to archive all output files into a library. Using -ar implies -c.
Example
The following command compiles file1.c, file2.asm, and file3.c to object code and archives them into the library
file libfunc.a together with the object file file4.o.
cc -ar file1.c file2.asm file3.c file4.o -o libfunc.a
Embedded Studio for RISC-V Reference Manual Utilities Reference
196
-abi (RISC-V abi)
Syntax
-abi=a
-abi=list
Description
Specifies the RISC-V abi to generate code for and the library variants to link with.
Example
To force compilation for the single precision floating point subset you would use:
cc -abi=ilp32f
To list supported architectures:
cc -abi=list
Embedded Studio for RISC-V Reference Manual Utilities Reference
197
-arch (RISC-V architecture)
Syntax
-arch=a
-arch=list
Description
Specifies the RISC-V architecture to generate code for and the library variants to link with.
Example
To force compilation for the base integer architecture you would use:
cc -arch=rv32i
To list supported architectures:
cc -arch=list
Embedded Studio for RISC-V Reference Manual Utilities Reference
198
-builtins (Use Builtins)
Syntax
-builtins
Description
Use builtin compiler functions, for example memcpy. Default does not use builtin compiler functions.
Embedded Studio for RISC-V Reference Manual Utilities Reference
199
-c (Compile to object code, do not link)
Syntax
-c
Description
All named files are compiled to object code modules, but are not linked. You can use the -o option to name the
output if you just supply one input filename.
Example
The following command compiles file1.c and file4.c to produce the object files file1.o and file4.o.
cc -c file1.c file4.c
The following command compiles file1.c and produces the object file obj/file1.o.
cc -c file.c -o obj/file1.o
Embedded Studio for RISC-V Reference Manual Utilities Reference
200
-clang (Use clang compiler/assembler)
Syntax
-clang
Description
Use the clang compiler and assembler. Default is to use the GNU compiler and assembler.
Embedded Studio for RISC-V Reference Manual Utilities Reference
201
-codec (Set file codec)
Syntax
-codec=c
-codec=list
Description
Set the file codec to use for the source file.
Example
To set the codec for a utf-8 encoded file:
cc -codec=utf-8
To list supported codecs:
cc -codec=list

Embedded Studio for RISC-V Reference Manual Utilities Reference
202
-common (Allocate globals in common)
Syntax
-common
Description
Allocate declarations of zero initialized variables. This enables variables that have been declared (perhaps
multiple times) but not defined to be allocated. The default requires a single definition of each zero initialized
variable.
Embedded Studio for RISC-V Reference Manual Utilities Reference
203
-d (Define linker symbol)
Syntax
-dname=value
Description
You can define linker symbols using the -d option. The symbol definitions are passed to linker.
Example
The following defines the symbol, STACK_SIZE with a value of 512.
-dSTACK_SIZE=512
Embedded Studio for RISC-V Reference Manual Utilities Reference
204
-depend (Generate dependency file)
Syntax
-depend file
Description
Create a dependency file in file (suitable for inclusion into a makefile) when compiling a source file.
cc -c main.c -depend main.d
Embedded Studio for RISC-V Reference Manual Utilities Reference
205
-D (Define macro symbol)
Syntax
-Dname
-Dname=value
Description
You can define preprocessor macros using the -D option. The macro definitions are passed on to the respective
language compiler which is responsible for interpreting the definitions and providing them to the programmer
within the language.
The first form above defines the macro name but without an associated replacement value, and the second
defines the same macro with the replacement value value.
Example
The following defines two macros, SUPPORT_FLOAT with a value of 1 and LITTLE_ENDIAN with no replacement
value.
-DSUPPORT_FLOAT=1 -DLITTLE_ENDIAN

Embedded Studio for RISC-V Reference Manual Utilities Reference
206
-emit-relocs (Emit relocations)
Syntax
-emit-relocs
Description
Keep relocations in the executable file
Embedded Studio for RISC-V Reference Manual Utilities Reference
207
-e (Set entry point symbol)
Syntax
-ename
Description
Linker option to set the entry point symbol to be name. The debugger will start execution from this symbol.

Embedded Studio for RISC-V Reference Manual Utilities Reference
208
-exceptions (Enable C++ Exception Support)
Syntax
-exceptions
Description
Enables C++ exceptions to be compiled.
Embedded Studio for RISC-V Reference Manual Utilities Reference
209
-E (Preprocess)
Syntax
-E
Description
This option preprocesses the supplied file and outputs the result to the standard output.
Example
The following preprocesses the file file.c supplying the macros, SUPPORT_FLOAT with a value of 1 and
LITTLE_ENDIAN.
-E -DSUPPORT_FLOAT=1 -DLITTLE_ENDIAN file.c

Embedded Studio for RISC-V Reference Manual Utilities Reference
210
-fill (Fill gaps)
Syntax
-fill=b
Description
Specify the byte value b to fill gaps in the output file produced by the linker.
Embedded Studio for RISC-V Reference Manual Utilities Reference
211
-framepointer (Enable generation of framepointer)
Syntax
-framepointer
Description
The -framepointer option instructs the compiler to store the stack frame pointer in a register.
Embedded Studio for RISC-V Reference Manual Utilities Reference
212
-F (Set output format)
Syntax
-Ffmt
Description
The -F option instructs the compiler driver to generate an additional output file in the format fmt. The compiler
driver supports the following formats:
-Fbin Create a .bin file
-Fhex Create a .hex file
-Fsrec Create a .srec file
The compiler driver will always output a .elf file as specified with the -o option. The name of the additional
output file is the same as the .elf file with the file extension changed.
For example
cc file.c -o file.elf -Fbin
will generate the files file.elf and file.bin.
Embedded Studio for RISC-V Reference Manual Utilities Reference
213
-g (Generate debugging information)
Syntax
-g
-g1
-g2
-g3
Description
The -g option instructs the compiler and assembler to generate source level debugging information.
The -g1 option instructs the compiler to generate backtrace and line number debugging information.
The -g2 option instructs the compiler to generate backtrace, line number and variable display debugging
information.
The -g3 option instructs the compiler to generate backtrace, line number, variable display and macro display
debugging information.
The default is to not generate any debugging information.

Embedded Studio for RISC-V Reference Manual Utilities Reference
214
-help (Display help information)
Syntax
-help
Description
Displays a short summary of the options accepted by the compiler driver.
Embedded Studio for RISC-V Reference Manual Utilities Reference
215
-instrument (Instrument functions)
Syntax
-instrument
Description
This option causes the compiler to insert instrumentation calls on function entry and exit
Embedded Studio for RISC-V Reference Manual Utilities Reference
216
-I (Define user include directories)
Syntax
-Idirectory
Description
In order to find include files the compiler driver arranges for the compilers to search a number of standard
directories. You can add directories to the search path using the -I switch which is passed on to each of the
language processors.
You can specify more than one include directory by separating each directory component with either a comma
or semicolon.
Embedded Studio for RISC-V Reference Manual Utilities Reference
217
-I- (Exclude standard include directories)
Syntax
-I-
Description
Usually the compiler and assembler search for include files in the standard include directory created when the
product is installed. If for some reason you wish to exclude these system locations from being searched when
compiling a file, the -I- option will do this for you.
Embedded Studio for RISC-V Reference Manual Utilities Reference
218
-J (Define system include directories)
Syntax
-Jdirectory
Description
The -J option adds directory to the end of the list of directories to search for source files included (using
triangular brackets) by the #include preprocessor command.
You can specify more than one include directory by separating each directory component with either a comma
or semicolon in the property
Embedded Studio for RISC-V Reference Manual Utilities Reference
219
-kasm (Keep assembly code)
Syntax
-kasm
Description
The -kasm option instructs the compiler driver to keep intermediate assembly code files.

Embedded Studio for RISC-V Reference Manual Utilities Reference
220
-kldscript (Keep linker script)
Syntax
-kldscript
Description
The -kldscript option instructs the compiler driver to keep generated linker script files.
Embedded Studio for RISC-V Reference Manual Utilities Reference
221
-kpp (Keep preprocessor output)
Syntax
-kpp
Description
The -kpp option instructs the compiler driver to generate and keep intermediate preprocessor files.
Embedded Studio for RISC-V Reference Manual Utilities Reference
222
-K (Keep linker symbol)
Syntax
-Kname
Description
The linker removes unused code and data from the output file. This process is called deadstripping. To prevent
the linker from deadstripping unreferenced code and data you wish to keep, you must use the -K command line
option to force inclusion of symbols.
Example
If you have a C function, contextSwitch that must be kept in the output file (and which the linker will normally
remove), you can force its inclusion using:
-KcontextSwitch
Embedded Studio for RISC-V Reference Manual Utilities Reference
223
-l- (Do not link standard libraries)
Syntax
-l-
Description
The -l option instructs the compiler driver not to link standard libraries. If you use this option you must supply
your own library functions or libraries.
Embedded Studio for RISC-V Reference Manual Utilities Reference
224
-lto (Enable link time optimization)
Syntax
-lto
Description
The -lto option causes the compiler to generate intermediate code which is optimized before the link.
Embedded Studio for RISC-V Reference Manual Utilities Reference
225
-L (Set library directory path)
Syntax
-Ldir
Description
Sets the library directory to dir. If -L is not specified on the command line, the default location to search for
libraries is set to $(InstallDir)/lib.
Embedded Studio for RISC-V Reference Manual Utilities Reference
226
-memorymap (Memory map file)
Syntax
-memorymap file
Description
The -memorymap option supplies the memory map file which is used to define the memory segments
referenced in the section placement file. See Memory Map file format for a description of the memory map file
format.
Example
-memorymap MemoryMap.xml
Embedded Studio for RISC-V Reference Manual Utilities Reference
227
-memorymapmacros (Memory map macros)
Syntax
-memorymapmacros macros
Description
The -memorymapmacros option supplies macro definitions that are applied to the memory map file.
Example
The macros FLASH_START and FLASH_SIZE are defined for the memory map using:
-memorymapmacros "FLASH_START=0x08000000;FLASH_SIZE=0x10000"

Embedded Studio for RISC-V Reference Manual Utilities Reference
228
-M (Display linkage map)
Syntax
-M
Description
The -M option prints a linkage map named the same as the linker output file with the .map file extension.
Embedded Studio for RISC-V Reference Manual Utilities Reference
229
-n (Dry run, no execution)
Syntax
-n
Description
When -n is specified, the compiler driver processes options as usual, but does not execute any subprocesses to
compile, assemble, archive or link applications.
Embedded Studio for RISC-V Reference Manual Utilities Reference
230
-nostderr (No stderr output)
Syntax
-nostderr
Description
When -nostderr is specified, any stderr output of subprocesses is redirected to stdout.
Embedded Studio for RISC-V Reference Manual Utilities Reference
231
-O (Optimize output)
Syntax
-Ox
Description
Pass the optimization option -Ox to the compiler and select library variant. The following options are supported:
-O0 No optimization, use libraries built with -O1.
-O1 Level 1 optimization, use libraries built with -O1.
-O2 Level 2 optimization, use libraries built with -O1.
-O3 Level 3 optimization, use libraries built with -O1.
-Oz Optimize for more size, use libraries built with -Os.
-Os Optimize for size, use libraries built with -Os.

Embedded Studio for RISC-V Reference Manual Utilities Reference
232
-o (Set output file name)
Syntax
-o filename
Description
The -o option instructs the compiler driver to write linker or archiver output to filename.
Embedded Studio for RISC-V Reference Manual Utilities Reference
233
-patch (Run patch command)
Syntax
-patch cmd
Description
The -patch option instructs the compiler driver to run the cmd after the link but before the creation of the
additional output file. The macro $(TargetPath) is expanded to the full path of the linked executable.
Example
This example will run the command mypatch replacing $(TargetPath) with myoutput.elf
-patch "mypatch $(TargetPath)" -o myoutput.elf -Fbin
The mypatch command can modify myoutput.elf before the creation of the myouput.bin.
Embedded Studio for RISC-V Reference Manual Utilities Reference
234
-placement (Section placement file)
Syntax
-placement file
Description
The -placement option supplies the section placement file which is used to control the placement of program
sections in the memory map segments. See Section Placement file format for a description of the section
placement file format.
Example
-memorymap MemoryMap.xml -placement flash.xml
Embedded Studio for RISC-V Reference Manual Utilities Reference
235
-placementmacros (Section placement macros)
Syntax
-placementmacros macros
Description
The -placementmacros option supplies macro definitions that are applied to the section placement file.
Example
The macros FLASH_START and FLASH_SIZE are defined for the section placement using:
-placementmacros "FLASH_START=0x08000000;FLASH_SIZE=0x10000"
Embedded Studio for RISC-V Reference Manual Utilities Reference
236
-placementsegments (Section placement segments)
Syntax
-placementsegments segments
Description
The -placementsegments option supplies segments descriptions to the section placement file. You can use this
rather than supplying a memory map file.
Example
A simple memory map with FLASH and SRAM can be supplied as follows:
-placementsegments "FLASH RX 0x0 0x10000;SRAM RWX 0x20000000 0x10000" -placement flash.xml
Embedded Studio for RISC-V Reference Manual Utilities Reference
237
-printf (Select printf capability)
Syntax
-printf=c
Description
The -printf option selects the printf capability for the linked executable. The options are:
-printf=i[p][w] integer is supported, optional width and precision and optional wchar
-printf=l[p][w] long integer is supported, optional width and precision and optional wchar
-printf=ll[p][w] long long integer is supported, optional width and precision and optional wchar
-printf=f[ll][w] float, width and precision supported, optional long long and optional wchar
-printf=d[ll][w] double, width and precision supported, optional long long and optional wchar
Example
The minimal sized printf
-printf=i
The maximal functionality printf
-printf=dllw

Embedded Studio for RISC-V Reference Manual Utilities Reference
238
-rtti (Enable C++ RTTI Support)
Syntax
-rtti
Description
Enables C++ run-time type information to be compiled.
Embedded Studio for RISC-V Reference Manual Utilities Reference
239
-R (Set section name)
Syntax
-Rx name
Description
These options name the default name of the sections generated by the compiler/assembler to be name. The
options are:
-Rc name change the default name of the code section
-Rd name change the default name of the data section
-Rk name change the default name of the const section
-Rz name change the default name of the bss section
Embedded Studio for RISC-V Reference Manual Utilities Reference
240
-scanf (Select scanf capability)
Syntax
-scanf= c
Description
The -scanf option selects the scanf capability for the linked executable. The options are:
-scanf=i[c] integer is supported, optional %[...] and %[^...] character class
-scanf=l[c] long integer is supported, optional %[...] and %[^...] character class
-scanf=ll[c] long long integer is supported, optional %[...] and %[^...] character class
-scanf=d[ll][c] floating point is supported, optional long long and %[...] and %[^...] character class
Example
The minimal sized scanf
-scanf=i
The maximal functionality scanf
-scanf=dllc
Embedded Studio for RISC-V Reference Manual Utilities Reference
241
-segger (Use SEGGER assembler/compiler/linker)
Syntax
-clang
Description
Use the SEGGER assembler, compiler and linker. Default is to use the GNU assembler, compiler and linker.
Embedded Studio for RISC-V Reference Manual Utilities Reference
242
-std (Select language standard)
Syntax
-std=s
-std=list
Description
The -std option sets the language standard to use.
Example
To set the language to c99 core you would use:
cc -std=c99
To list supported language standards:
cc -std=list
Embedded Studio for RISC-V Reference Manual Utilities Reference
243
-strip (Strip symbols from executable)
Syntax
-stripsymbols
-stripdebug
Description
The -stripsymbols removes symbols from the linked executable.
The -stripdebug removes debugging information from the linked executable.
Embedded Studio for RISC-V Reference Manual Utilities Reference
244
-symbols (Link symbols)
Syntax
-symbols=s
Description
The -symbols option supplies the symbols file s to the linker.

Embedded Studio for RISC-V Reference Manual Utilities Reference
245
-T (Supply linker script)
Syntax
-Tfile
Description
The -T option supplies the file to the linker as a linker script.

Embedded Studio for RISC-V Reference Manual Utilities Reference
246
-U (Undefine macro symbol)
Syntax
-Uname
Description
The -U option undefines the preprocessor macro name.

Embedded Studio for RISC-V Reference Manual Utilities Reference
247
-unwindtables (Generate unwind tables)
Syntax
-unwindtables
Description
The -unwind option instructs the compiler to generate unwind tables.
Embedded Studio for RISC-V Reference Manual Utilities Reference
248
-v (Verbose execution)
Syntax
-v
Description
The -v switch displays command lines executed by the compiler driver.

Embedded Studio for RISC-V Reference Manual Utilities Reference
249
-w (Suppress warnings)
Syntax
-w
Description
This option instructs the compiler, assembler, and linker not to issue any warnings.

Embedded Studio for RISC-V Reference Manual Utilities Reference
250
-we (Treat warnings as errors)
Syntax
-we
Description
This option directs the compiler, assembler, and linker to treat all warnings as errors.
Embedded Studio for RISC-V Reference Manual Utilities Reference
251
-W (Pass option to tool)
Syntax
-Wtool option
Description
The -W command-line option passes option directly to the specified tool. Supported tools are
-Wa pass option to assembler
-Wc pass option to compiler
-Wl pass option to linker
Example
The following example passes the (compiler specific) -version option to the compiler
cc -Wc-version
Embedded Studio for RISC-V Reference Manual Utilities Reference
252
-x (Specify file types)
Syntax
-x type
Description
The -x option causes the compiler driver to treat subsequent files to be of the following file type
-xa archives/libraries
-xasm assembly code files
-xc C code files
-xc++ C++ code files
-xo object code files
Example
The following command line enables an assembly code file with the extension .arm to be assembled.
cc -xasm a.arm
Embedded Studio for RISC-V Reference Manual Utilities Reference
253
Command-Line Project BuilderemBuild is a program used to build your software from the command line without using SEGGER Embedded
Studio. You can, for example, use emBuild for nightly (automated) builds, production builds, and batch builds.
Embedded Studio for RISC-V Reference Manual Utilities Reference
254
Building with a SEGGER Embedded Studio project fileYou can specify a SEGGER Embedded Studio project file:
Syntax
emBuild [options] project-file
You must specify a configuration to build using -config. For instance:
emBuild -config "V5T Thumb LE Release" arm.emProject
The above example uses the configuration V5T Thumb LE Release to build all projects in the solution contained
in arm.emProject.
To build a specific project that is in a solution, you can specify it using the -project option. For example:
emBuild -config "V5T Thumb LE Release" -project "libm" libc.emProject
This example will use the configuration V5T Thumb LE Release to build the project libm that is contained in
libc.emProject.
If your project file imports other project files (using the <import> mechanism), when denoting projects you must
specify the solution names as a comma-separated list in parentheses after the project name:
emBuild -config "V5T Thumb LE Release" -project "libc(C Library)" arm.emProject
libc(C Library) specifies the libc project in the C Library solution that has been imported by the project file
arm.emProject.
To build a specific solution that has been imported from other project files, you can use the -solution option.
This option takes the solution names as a comma-separated list. For example:
emBuild -config "ARM Debug" -solution "ARM Targets,EB55" arm.emProject
In this example, ARM Targets,EB55 specifies the EB55 solution imported by the ARM Targets solution, which
was itself imported by the project file arm.emProject.
You can do a batch build using the -batch option:
emBuild -config "ARM Debug" -batch libc.emProject
This will build the projects in libc.emProject that are marked for batch build in the configuration ARM Debug.
By default, a make-style build will be donei.e., the dates of input files are checked against the dates of output
files, and the build is avoided if the output is up to date. You can force a complete build by using the -rebuild
option. Alternatively, to remove all output files, use the -clean option.

Embedded Studio for RISC-V Reference Manual Utilities Reference
255
To see the commands being used in the build, use the -echo option. To also see why commands are being
executed, use the -verbose option. You can see what commands will be executed, without executing them, by
using the -show option.
Embedded Studio for RISC-V Reference Manual Utilities Reference
256
Building without a SEGGER Embedded Studio projectfileTo use emBuild without a SEGGER Embedded Studio project, specify the name of an installed project template,
the name of the project, and the files to build. For example:
emBuild -config -template LM3S_EXE -project myproject -file main.c
Or, instead of a template, you can specify a project type:
emBuild -config -type "Library" -project myproject -file main.c
You can specify project properties with the -property option:
emBuild -property Target=LM3S811
Embedded Studio for RISC-V Reference Manual Utilities Reference
257
Command-line optionsThis section describes the command-line options accepted by emBuild.
Embedded Studio for RISC-V Reference Manual Utilities Reference
258
-batch (Batch build)
Syntax
-batch
Description
Perform a batch build.
Embedded Studio for RISC-V Reference Manual Utilities Reference
259
-config (Select build configuration)
Syntax
-config name
Description
Specify the configuration for a build. If the configuration name can't be found, emBuild will list the available
configurations.
Embedded Studio for RISC-V Reference Manual Utilities Reference
260
-clean (Remove output files)
Syntax
-clean
Description
Remove all output files resulting from the build process.
Embedded Studio for RISC-V Reference Manual Utilities Reference
261
-D (Define macro)
Syntax
-D macro=value
Description
Define a SEGGER Embedded Studio for RISC-V macro value for the build process.

Embedded Studio for RISC-V Reference Manual Utilities Reference
262
-echo (Show command lines)
Syntax
-echo
Description
Show the command lines as they are executed.
Embedded Studio for RISC-V Reference Manual Utilities Reference
263
-file (Build a named file)
Syntax
-file name
Description
Build the file name. Use with -template or -type.
Embedded Studio for RISC-V Reference Manual Utilities Reference
264
-packagesdir (Specify packages directory)
Syntax
-packagesdir dir
Description
Override the default value of the $(PackagesDir) macro.

Embedded Studio for RISC-V Reference Manual Utilities Reference
265
-project (Specify project to build)
Syntax
-project name
Description
Specify the name of the project to build. When used with a project file, if emBuild can't find the specified project,
the names of available projects are listed.

Embedded Studio for RISC-V Reference Manual Utilities Reference
266
-property (Set project property)
Syntax
-property name=value
Description
Specify the value of a project property use with -template or -type. If emBuild cannot find the specified
property, a list of the properties is shown.
Embedded Studio for RISC-V Reference Manual Utilities Reference
267
-rebuild (Always rebuild)
Syntax
-rebuild
Description
Always execute the build commands.
Embedded Studio for RISC-V Reference Manual Utilities Reference
268
-show (Dry run, don't execute)
Syntax
-show
Description
Show the command lines that would be executed, but do not execute them.
Embedded Studio for RISC-V Reference Manual Utilities Reference
269
-solution (Specify solution to build)
Syntax
-solution name
Description
Specify the name of the solution to build. If emBuild cannot find the given solution, the valid solution names are
listed.
Embedded Studio for RISC-V Reference Manual Utilities Reference
270
-studiodir (Specify SEGGER Embedded Studiodirectory)
Syntax
-studiodir name
Description
Override the default value of the $(StudioDir) macro.

Embedded Studio for RISC-V Reference Manual Utilities Reference
271
-template (Specify project template)
Syntax
-template name
Description
Specify the project template to use. If emBuild cannot find the specified template then a list of template names
is shown.
Embedded Studio for RISC-V Reference Manual Utilities Reference
272
-time (Time the build)
Syntax
-time
Description
Show the time taken for the build.

Embedded Studio for RISC-V Reference Manual Utilities Reference
273
-threadnum (Specify number of build threads)
Syntax
-threadnum n
Description
Specify the number of build threads to use for the build. The default is zero which will use the number of
processor cores on your machine.

Embedded Studio for RISC-V Reference Manual Utilities Reference
274
-type (Specify project type)
Syntax
-type name
Description
Specify the project type to use. If emBuild cannot find the specified project type then a list of project type names
is shown.
Embedded Studio for RISC-V Reference Manual Utilities Reference
275
-verbose (Show build information)
Syntax
-verbose
Description
Show extra information relating to the build process.
Embedded Studio for RISC-V Reference Manual Utilities Reference
276
Command-Line SimulatoremSim is a program that allows you to run SEGGER Embedded Studio's instruction set simulator from the
command line.
The primary purpose of emSim is to enable command line tests to be run.
Syntax
emSim file [options] args

Embedded Studio for RISC-V Reference Manual Utilities Reference
277
Command-line optionsThis section describes the command-line options accepted by emSim.
Embedded Studio for RISC-V Reference Manual Utilities Reference
278
file (Elf executable file)
Description
This is the name of the elf file to run on the simulator. The file will be run until it makes a debug request to exit.
The simulator will allocate memory regions based on the elf program sections.
Example
emSim app.elf
Embedded Studio for RISC-V Reference Manual Utilities Reference
279
-segments (Specify memory segments)
Syntax
-segments start;size;
Description
Specify the memory segments to simulate.
Example
emSim app.elf -segments 0x08000000;0x10000;0x20000000;0x10000
Embedded Studio for RISC-V Reference Manual Utilities Reference
280
args (User arguments)
Description
The arguments supplied to the elf file in the argc/argv parameters to the main function.
emSim app.elf hello world
Embedded Studio for RISC-V Reference Manual Utilities Reference
281
Command-Line ScriptingemScript is a program that allows you to run SEGGER Embedded Studio's JavaScript (ECMAScript) interpreter
from the command line.
The primary purpose of emScript is to facilitate the creation of platform-independent build scripts.
Syntax
emScript [options] file

Embedded Studio for RISC-V Reference Manual Utilities Reference
282
Command-line optionsThis section describes the command-line options accepted by emScript.

Embedded Studio for RISC-V Reference Manual Utilities Reference
283
-define (Define global variable)
Syntax
-define variable=value
Description
Embedded Studio for RISC-V Reference Manual Utilities Reference
284
-help (Show usage)
Syntax
-help
Description
Display usage information and command line options.

Embedded Studio for RISC-V Reference Manual Utilities Reference
285
-load (Load script file)
Syntax
-load path
Description
Loads the script file path.
Embedded Studio for RISC-V Reference Manual Utilities Reference
286
-define (Verbose output)
Syntax
-verbose
Description
Produces verbose output.
Embedded Studio for RISC-V Reference Manual Utilities Reference
287
emScript classesemScript provides the following predefined classes:
BinaryFile
CWSys
WScript
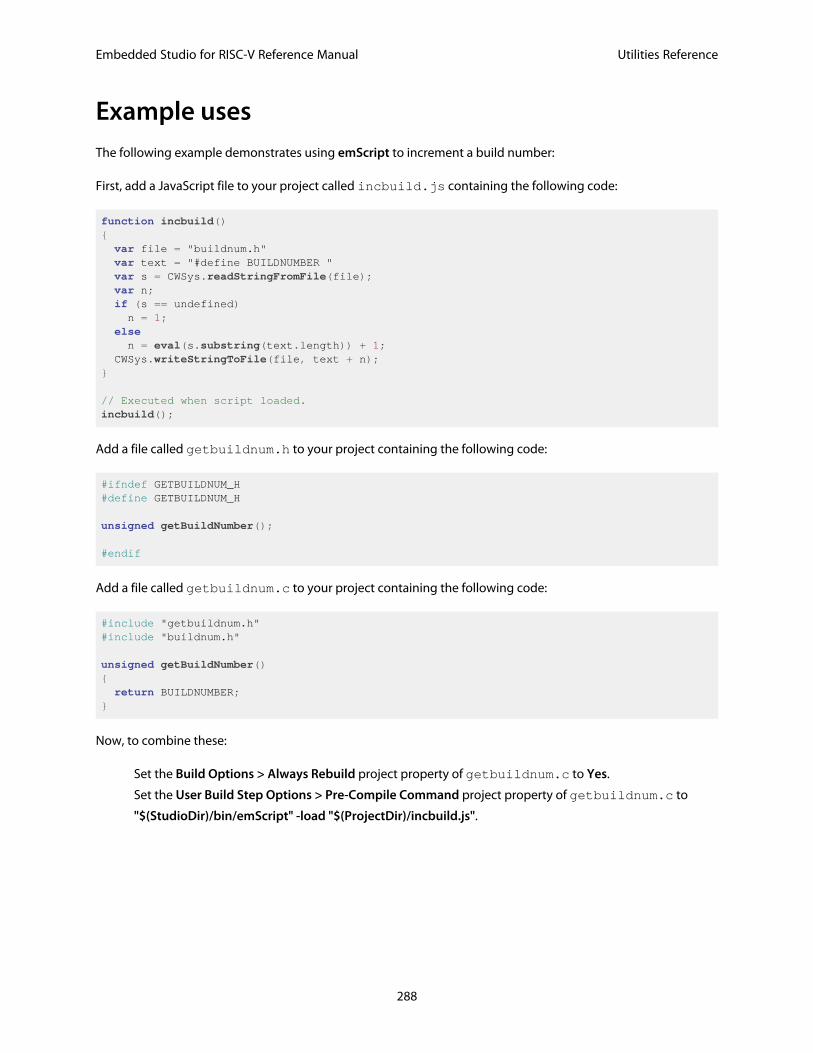
Embedded Studio for RISC-V Reference Manual Utilities Reference
288
Example usesThe following example demonstrates using emScript to increment a build number:
First, add a JavaScript file to your project called incbuild.js containing the following code:
function incbuild(){ var file = "buildnum.h" var text = "#define BUILDNUMBER " var s = CWSys.readStringFromFile(file); var n; if (s == undefined) n = 1; else n = eval(s.substring(text.length)) + 1; CWSys.writeStringToFile(file, text + n);}
// Executed when script loaded.incbuild();
Add a file called getbuildnum.h to your project containing the following code:
#ifndef GETBUILDNUM_H#define GETBUILDNUM_H
unsigned getBuildNumber();
#endif
Add a file called getbuildnum.c to your project containing the following code:
#include "getbuildnum.h"#include "buildnum.h"
unsigned getBuildNumber(){ return BUILDNUMBER;}
Now, to combine these:
Set the Build Options > Always Rebuild project property of getbuildnum.c to Yes.
Set the User Build Step Options > Pre-Compile Command project property of getbuildnum.c to
"$(StudioDir)/bin/emScript" -load "$(ProjectDir)/incbuild.js".
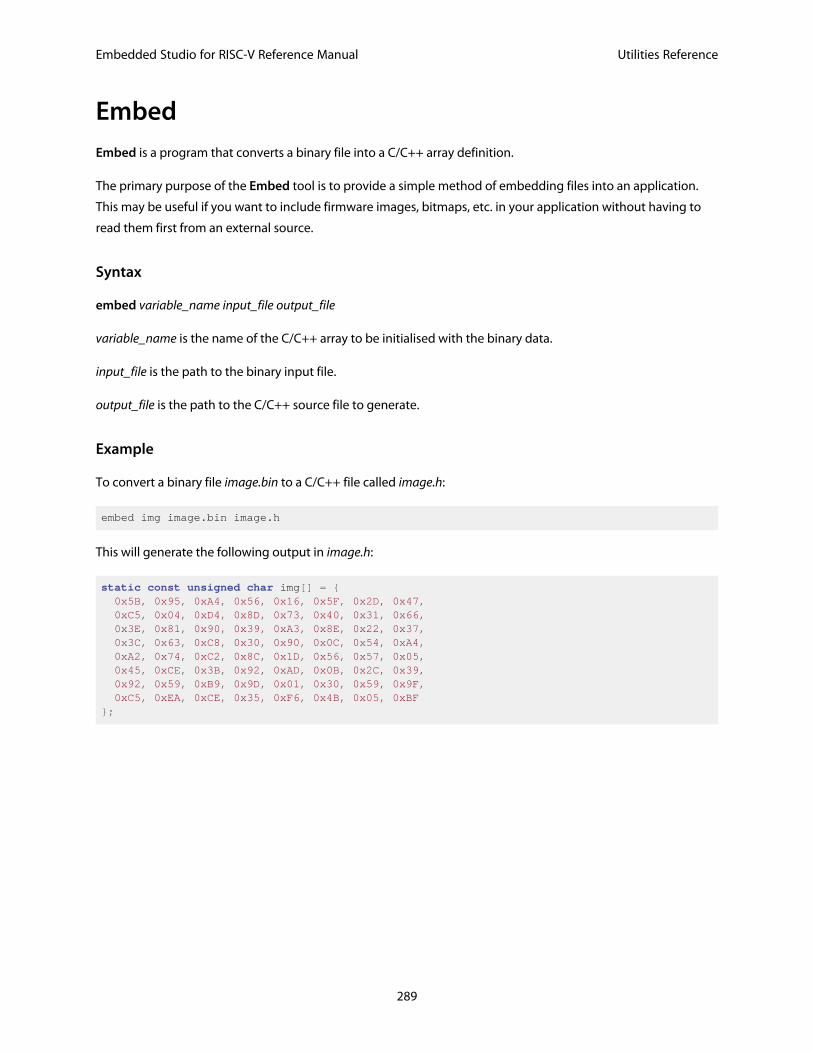
Embedded Studio for RISC-V Reference Manual Utilities Reference
289
EmbedEmbed is a program that converts a binary file into a C/C++ array definition.
The primary purpose of the Embed tool is to provide a simple method of embedding files into an application.
This may be useful if you want to include firmware images, bitmaps, etc. in your application without having to
read them first from an external source.
Syntax
embed variable_name input_file output_file
variable_name is the name of the C/C++ array to be initialised with the binary data.
input_file is the path to the binary input file.
output_file is the path to the C/C++ source file to generate.
Example
To convert a binary file image.bin to a C/C++ file called image.h:
embed img image.bin image.h
This will generate the following output in image.h:
static const unsigned char img[] = { 0x5B, 0x95, 0xA4, 0x56, 0x16, 0x5F, 0x2D, 0x47, 0xC5, 0x04, 0xD4, 0x8D, 0x73, 0x40, 0x31, 0x66, 0x3E, 0x81, 0x90, 0x39, 0xA3, 0x8E, 0x22, 0x37, 0x3C, 0x63, 0xC8, 0x30, 0x90, 0x0C, 0x54, 0xA4, 0xA2, 0x74, 0xC2, 0x8C, 0x1D, 0x56, 0x57, 0x05, 0x45, 0xCE, 0x3B, 0x92, 0xAD, 0x0B, 0x2C, 0x39, 0x92, 0x59, 0xB9, 0x9D, 0x01, 0x30, 0x59, 0x9F, 0xC5, 0xEA, 0xCE, 0x35, 0xF6, 0x4B, 0x05, 0xBF};
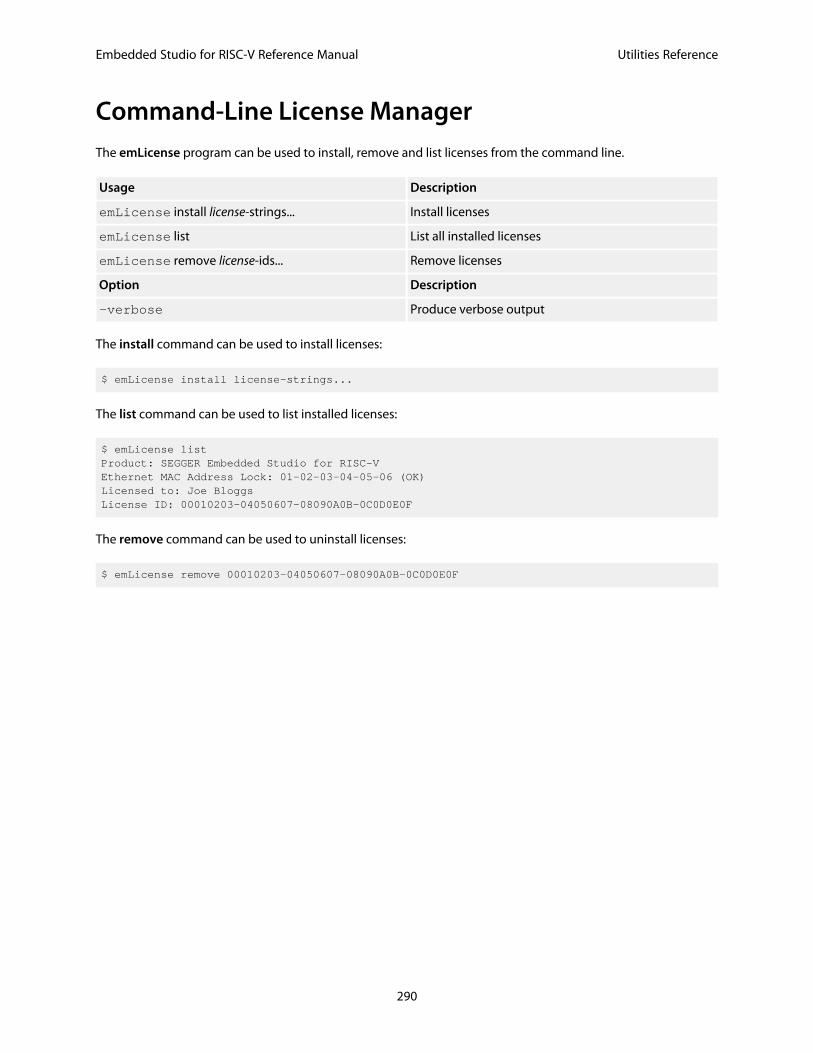
Embedded Studio for RISC-V Reference Manual Utilities Reference
290
Command-Line License ManagerThe emLicense program can be used to install, remove and list licenses from the command line.
Usage Description
emLicense install license-strings... Install licenses
emLicense list List all installed licenses
emLicense remove license-ids... Remove licenses
Option Description
-verbose Produce verbose output
The install command can be used to install licenses:
$ emLicense install license-strings...
The list command can be used to list installed licenses:
$ emLicense listProduct: SEGGER Embedded Studio for RISC-VEthernet MAC Address Lock: 01-02-03-04-05-06 (OK)Licensed to: Joe BloggsLicense ID: 00010203-04050607-08090A0B-0C0D0E0F
The remove command can be used to uninstall licenses:
$ emLicense remove 00010203-04050607-08090A0B-0C0D0E0F
Embedded Studio for RISC-V Reference Manual Utilities Reference
291
Header file generatorThe command line program mkhdr generates a C or C++ header file from a SEGGER Embedded Studio for RISC-V
memory map file.
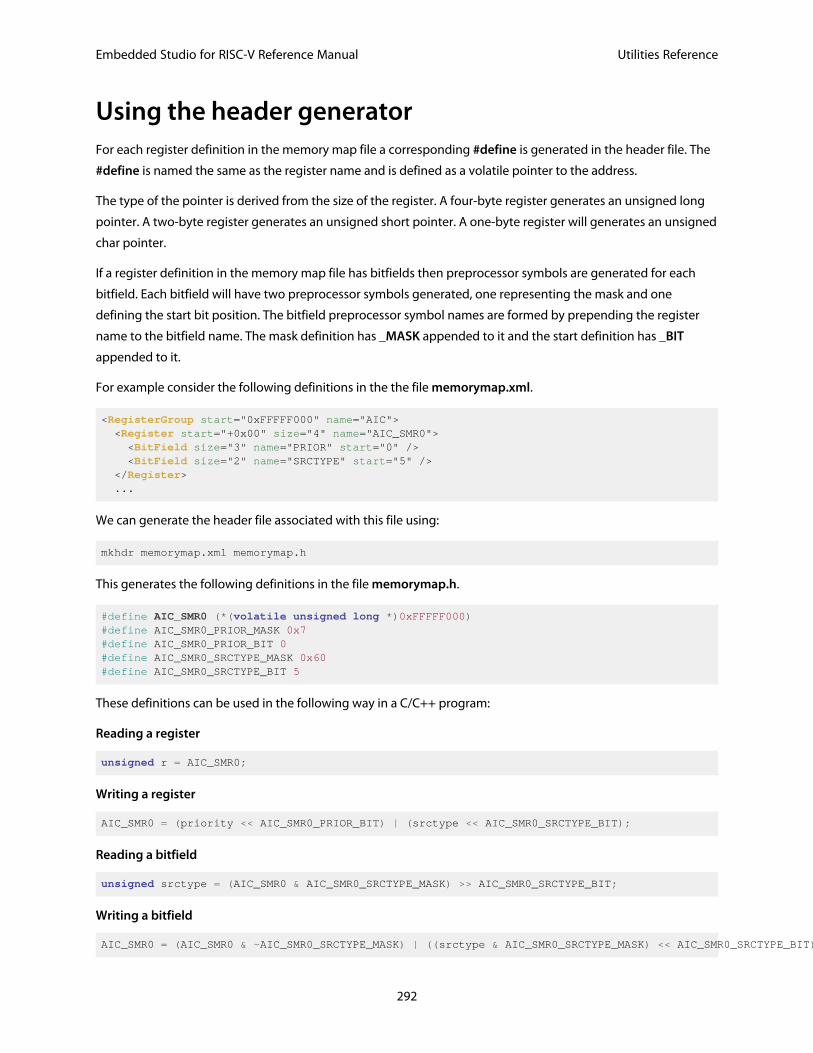
Embedded Studio for RISC-V Reference Manual Utilities Reference
292
Using the header generatorFor each register definition in the memory map file a corresponding #define is generated in the header file. The
#define is named the same as the register name and is defined as a volatile pointer to the address.
The type of the pointer is derived from the size of the register. A four-byte register generates an unsigned long
pointer. A two-byte register generates an unsigned short pointer. A one-byte register will generates an unsigned
char pointer.
If a register definition in the memory map file has bitfields then preprocessor symbols are generated for each
bitfield. Each bitfield will have two preprocessor symbols generated, one representing the mask and one
defining the start bit position. The bitfield preprocessor symbol names are formed by prepending the register
name to the bitfield name. The mask definition has _MASK appended to it and the start definition has _BIT
appended to it.
For example consider the following definitions in the the file memorymap.xml.
<RegisterGroup start="0xFFFFF000" name="AIC"> <Register start="+0x00" size="4" name="AIC_SMR0"> <BitField size="3" name="PRIOR" start="0" /> <BitField size="2" name="SRCTYPE" start="5" /> </Register> ...
We can generate the header file associated with this file using:
mkhdr memorymap.xml memorymap.h
This generates the following definitions in the file memorymap.h.
#define AIC_SMR0 (*(volatile unsigned long *)0xFFFFF000)#define AIC_SMR0_PRIOR_MASK 0x7#define AIC_SMR0_PRIOR_BIT 0#define AIC_SMR0_SRCTYPE_MASK 0x60#define AIC_SMR0_SRCTYPE_BIT 5
These definitions can be used in the following way in a C/C++ program:
Reading a register
unsigned r = AIC_SMR0;
Writing a register
AIC_SMR0 = (priority << AIC_SMR0_PRIOR_BIT) | (srctype << AIC_SMR0_SRCTYPE_BIT);
Reading a bitfield
unsigned srctype = (AIC_SMR0 & AIC_SMR0_SRCTYPE_MASK) >> AIC_SMR0_SRCTYPE_BIT;
Writing a bitfield
AIC_SMR0 = (AIC_SMR0 & ~AIC_SMR0_SRCTYPE_MASK) | ((srctype & AIC_SMR0_SRCTYPE_MASK) << AIC_SMR0_SRCTYPE_BIT);
Embedded Studio for RISC-V Reference Manual Utilities Reference
293
Command line optionsThis section describes the command line options accepted by the header file generator.
Syntax
mkhdr inputfile outputfile targetname [option]
inputfile is the name of the source SEGGER Embedded Studio for RISC-V memory map file. outputfile is the the
name of the file to write.

Embedded Studio for RISC-V Reference Manual Utilities Reference
294
-regbaseoffsets (Use offsets from peripheral base)
Syntax
-regbaseoffsets
Description
Instructs the header generator to include offsets of registers from the peripheral base.
Embedded Studio for RISC-V Reference Manual Utilities Reference
295
-nobitfields (Inhibit bitfield macros)
Syntax
-nobitfields
Description
Instructs the header generator not to generate any definitions for bitfields.
Embedded Studio for RISC-V Reference Manual Utilities Reference
296
Linker script file generatorThe command line program mkld generates a GNU ld linker script from a SEGGER Embedded Studio for RISC-V
memory map or section placement file.
Syntax
mkld -memory-map-file inputfile outputfile [options]
inputfile is the name of the SEGGER Embedded Studio for RISC-V memory map file to generate the ld script
from. outputfile is the the name of the ld script file to write.
Embedded Studio for RISC-V Reference Manual Utilities Reference
297
Command-line optionsThis section describes the command-line options accepted by mkld.
Embedded Studio for RISC-V Reference Manual Utilities Reference
298
-check-segment-overflow
Syntax
-check-segment-overflow
Description
Add checks for memory segment overflow to the linker script.
Embedded Studio for RISC-V Reference Manual Utilities Reference
299
-disable-missing-runin-error
Syntax
-disable-missing-runin-error
Description
Discard any sections with a missing run in section.
Embedded Studio for RISC-V Reference Manual Utilities Reference
300
-memory-map-file
Syntax
-memory-map-file filename
Description
Generate a GNU ld linker script from the SEGGER Embedded Studio for RISC-V memory map file filename.
Embedded Studio for RISC-V Reference Manual Utilities Reference
301
-memory-map-macros
Syntax
-memory-map-macros macro=value[;macro=value]
Description
Define SEGGER Embedded Studio for RISC-V macros to use when reading a memory map file.

Embedded Studio for RISC-V Reference Manual Utilities Reference
302
-no-check-unplaced-sections
Syntax
-no-check-unplaced-sections
Description
Removes checks for unplaced memory sections from the linker script.
Embedded Studio for RISC-V Reference Manual Utilities Reference
303
-section-placement-file
Syntax
-section-placement-file filename
Description
Generate a GNU ld linker script from the SEGGER Embedded Studio for RISC-V section placement file filename. If
this option is used, a memory map file should also be specified with the -memory-map-file option.
Embedded Studio for RISC-V Reference Manual Utilities Reference
304
-section-placement-macros
Syntax
-section-placement-macros macro=value[;macro=value]
Description
Define SEGGER Embedded Studio for RISC-V macros to use when reading a section placement file.
Embedded Studio for RISC-V Reference Manual Utilities Reference
305
-symbols
Syntax
-symbols symbol=value[;symbol=value]
Description
Add extra symbol definitions to the ld linker script.

Embedded Studio for RISC-V Reference Manual Utilities Reference
306
Package generatorTo create a package the program mkpkg can be used. The set of files to put into the package should be
in the desired location in the $(PackagesDir) directory. The mkpkg command should be run with
$(PackagesDir) as the working directory and all files to go into the package must be referred to using
relative paths. A package must have a package description file that is placed in the $(PackagesDir)/
packages directory. The package description file name must end with _package.xml. If a package is to
create entries in the new project wizard then it must have a file name project_templates.xml.
For example, a package for the mythical FX150 processor would supply the following files:
A project template file called targets/FX150/project_templates.xml. The format of the
project templates file is described in Project Templates file format.
The $(PackagesDir)-relative files that define the functionality of the package.
A package description file called packages/FX150_package.xml. The format of the package
description file is described in Package Description file format.
The package file FX150.emPackage would be created using the following command line:
mkpkg -c packages/FX150.emPackage targets/FX150/project_templates.xml packages/FX150_package.xml
You can exclude specific files or directories from being added to a package using the -exclude option:
mkpkg -c packages/FX150.emPackage targets/FX150 -exclude targets/FX150/excluded_file.txt -exclude targets/FX150/excluded_directory packages/FX150_package.xml
You can list the contents of the package using the -t option:
mkpkg -t packages/FX150.emPackage
You can remove an entry from a package using the -d option:
mkpkg -d packages/FX150.emPackage -d fileName
You can add or replace a file into an existing package using the -r option:
mkpkg -r packages/FX150.emPackage -r fileName
You can extract files from an existing package using the -x option:
mkpkg -x packages/FX150.emPackage outputDirectory
You can automate the package creation process using a Combining project type.
Using the new project wizard create a combining project in the directory $(PackagesDir).
Set the Output File Path property to be $(PackagesDir)/packages/mypackage.emPackage.
Set the Combine command property to $(StudioDir)/bin/mkpkg -c $(CombiningOutputFilePath)
$(CombiningRelInputPaths).
Embedded Studio for RISC-V Reference Manual Utilities Reference
307
Add the files you want to go into the package into the project using the Project Explorer.
Right-click the project node in the Project Explorer and choose Build.
When a package is installed, the files in the package are copied into the desired $(PackagesDir)-relative
locations. When a file is copied into the $(PackagesDir)/packages directory and its filename ends with
_package.xml the file $(PackagesDir)/packages/installed_packages.xml is updated with an
entry:
<include filename="FX150_package.xml" />
During development of a package you can manually edit this file. The same applies to the file
$(PackagesDir)/targets/project_templates.xml which will contain a reference to your
project_templates.xml file.
Usage:
mkpkg [options] packageFileName file1 file2
Option Description
-c Create a new package.
-compress level Change compression level (0 for none, 9 formaximum).
-d Remove files from a package.
-exclude path Exclude path when adding files to a package
-f Output files to stdout.
-r Replace files in a package.
-readonly Force all files to have read only attribute.
-t List the contents of a package.
-v Be chatty.
-V Show version information.
-x Extract files from a package.
Embedded Studio for RISC-V Reference Manual Utilities Reference
308
Package managerThe pkg program can be used to download, install, remove and search for packages from the command line.
Usage Description
pkg install package_names... Download and install packages
pkg install -manual package_files... Manually install package files
pkg list List all available packagess
pkg list -installed List installed packages
pkg remove package_names... Remove packages
pkg remove -all Remove all packages
pkg search keywords... Search for packages
pkg update Update list of available packages
pkg upgrade Upgrade all installed packages
pkg upgrade package_names... Upgrade selected packages
Option Description
-rootuserdir directory Set the root user data directory to directory
-packagesdir directory Set $(PackagesDir) to be directory
-quiet Do not output any progress messages
-verbose Produce verbose output
-yes Answer yes to all questions without prompting
Before you can download, install or search for packages you must first update the local list of available packages:
$ pkg update
The search command can be used to search for a specific package:
$ pkg search STLSTLport (1.0) - STLport Library Package
The install command can be used to install a package:
$ pkg install STLport
The list command can be used to list installed packages:
$ pkg list -installedSTLport (1.0) - STLport Library Package
The remove command can be used to uninstall a package:
$ pkg remove STLport
Embedded Studio for RISC-V Reference Manual Appendices
309
Appendices
Embedded Studio for RISC-V Reference Manual Appendices
310
File formatsThis section describes the file formats SEGGER Embedded Studio for RISC-V uses:
Memory Map file formatDescribes the memory map file format that defines memory regions and registers in a microcontroller.
Section Placement file formatDescribes the section placement file format that maps program sections to memory areas in the target
microcontroller.
Project file formatDescribes the format of SEGGER Embedded Studio project files.
Project Templates file formatDescribes the format of project template files used by the New Project wizard.
Property Groups file formatDescribes the format of the property groups file you can use to define meta-properties.
Package Description file formatDescribes the format of the package description files you use to create packages other users can install in
SEGGER Embedded Studio.
External Tools file formatDescribes the format of external tool configuration files you use to extend SEGGER Embedded Studio.
Debugger Type Interpretation file formatDescribes the format of the debugger type interpretation file.
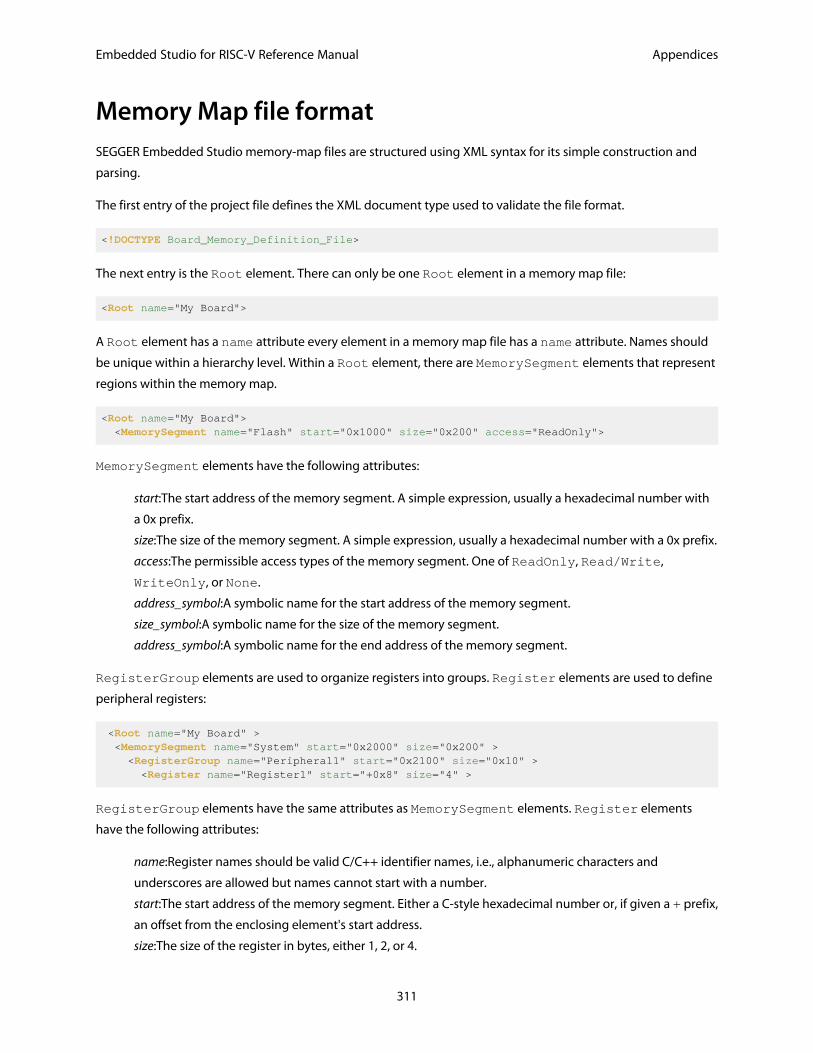
Embedded Studio for RISC-V Reference Manual Appendices
311
Memory Map file formatSEGGER Embedded Studio memory-map files are structured using XML syntax for its simple construction and
parsing.
The first entry of the project file defines the XML document type used to validate the file format.
<!DOCTYPE Board_Memory_Definition_File>
The next entry is the Root element. There can only be one Root element in a memory map file:
<Root name="My Board">
A Root element has a name attribute every element in a memory map file has a name attribute. Names should
be unique within a hierarchy level. Within a Root element, there are MemorySegment elements that represent
regions within the memory map.
<Root name="My Board"> <MemorySegment name="Flash" start="0x1000" size="0x200" access="ReadOnly">
MemorySegment elements have the following attributes:
start:The start address of the memory segment. A simple expression, usually a hexadecimal number with
a 0x prefix.
size:The size of the memory segment. A simple expression, usually a hexadecimal number with a 0x prefix.
access:The permissible access types of the memory segment. One of ReadOnly, Read/Write,
WriteOnly, or None.
address_symbol:A symbolic name for the start address of the memory segment.
size_symbol:A symbolic name for the size of the memory segment.
address_symbol:A symbolic name for the end address of the memory segment.
RegisterGroup elements are used to organize registers into groups. Register elements are used to define
peripheral registers:
<Root name="My Board" > <MemorySegment name="System" start="0x2000" size="0x200" > <RegisterGroup name="Peripheral1" start="0x2100" size="0x10" > <Register name="Register1" start="+0x8" size="4" >
RegisterGroup elements have the same attributes as MemorySegment elements. Register elements
have the following attributes:
name:Register names should be valid C/C++ identifier names, i.e., alphanumeric characters and
underscores are allowed but names cannot start with a number.
start:The start address of the memory segment. Either a C-style hexadecimal number or, if given a + prefix,
an offset from the enclosing element's start address.
size:The size of the register in bytes, either 1, 2, or 4.
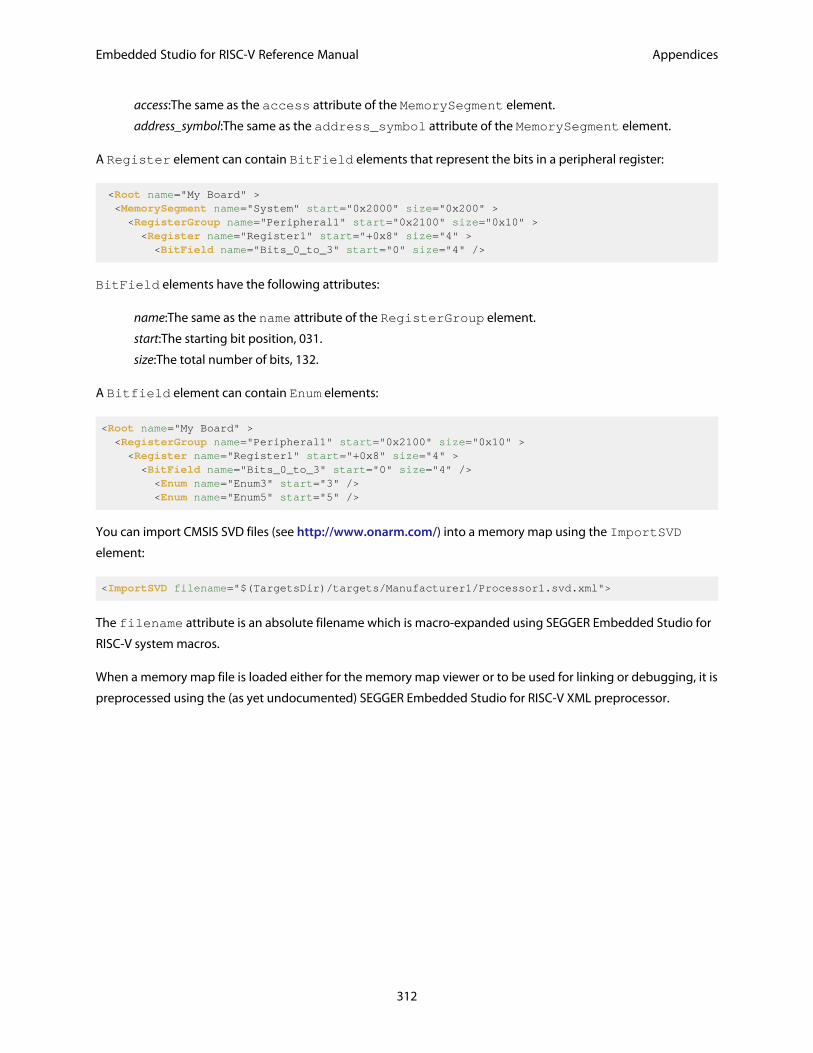
Embedded Studio for RISC-V Reference Manual Appendices
312
access:The same as the access attribute of the MemorySegment element.
address_symbol:The same as the address_symbol attribute of the MemorySegment element.
A Register element can contain BitField elements that represent the bits in a peripheral register:
<Root name="My Board" > <MemorySegment name="System" start="0x2000" size="0x200" > <RegisterGroup name="Peripheral1" start="0x2100" size="0x10" > <Register name="Register1" start="+0x8" size="4" > <BitField name="Bits_0_to_3" start="0" size="4" />
BitField elements have the following attributes:
name:The same as the name attribute of the RegisterGroup element.
start:The starting bit position, 031.
size:The total number of bits, 132.
A Bitfield element can contain Enum elements:
<Root name="My Board" > <RegisterGroup name="Peripheral1" start="0x2100" size="0x10" > <Register name="Register1" start="+0x8" size="4" > <BitField name="Bits_0_to_3" start="0" size="4" /> <Enum name="Enum3" start="3" /> <Enum name="Enum5" start="5" />
You can import CMSIS SVD files (see http://www.onarm.com/) into a memory map using the ImportSVD
element:
<ImportSVD filename="$(TargetsDir)/targets/Manufacturer1/Processor1.svd.xml">
The filename attribute is an absolute filename which is macro-expanded using SEGGER Embedded Studio for
RISC-V system macros.
When a memory map file is loaded either for the memory map viewer or to be used for linking or debugging, it is
preprocessed using the (as yet undocumented) SEGGER Embedded Studio for RISC-V XML preprocessor.
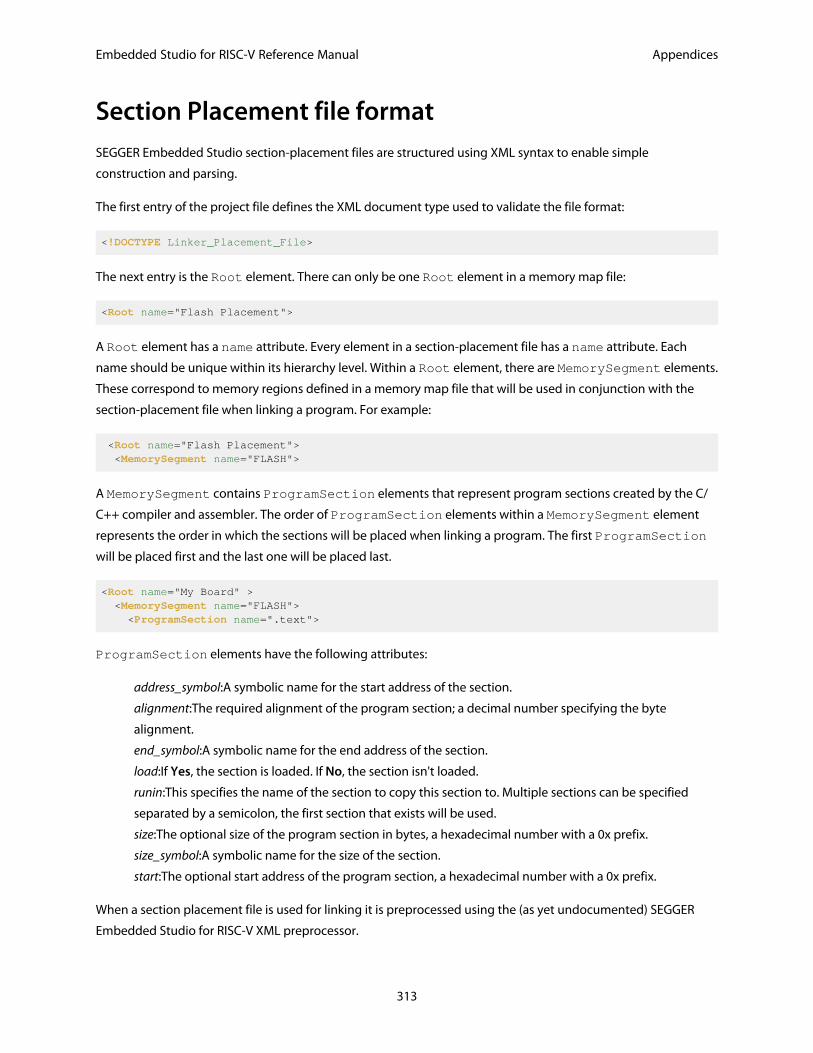
Embedded Studio for RISC-V Reference Manual Appendices
313
Section Placement file formatSEGGER Embedded Studio section-placement files are structured using XML syntax to enable simple
construction and parsing.
The first entry of the project file defines the XML document type used to validate the file format:
<!DOCTYPE Linker_Placement_File>
The next entry is the Root element. There can only be one Root element in a memory map file:
<Root name="Flash Placement">
A Root element has a name attribute. Every element in a section-placement file has a name attribute. Each
name should be unique within its hierarchy level. Within a Root element, there are MemorySegment elements.
These correspond to memory regions defined in a memory map file that will be used in conjunction with the
section-placement file when linking a program. For example:
<Root name="Flash Placement"> <MemorySegment name="FLASH">
A MemorySegment contains ProgramSection elements that represent program sections created by the C/
C++ compiler and assembler. The order of ProgramSection elements within a MemorySegment element
represents the order in which the sections will be placed when linking a program. The first ProgramSection
will be placed first and the last one will be placed last.
<Root name="My Board" > <MemorySegment name="FLASH"> <ProgramSection name=".text">
ProgramSection elements have the following attributes:
address_symbol:A symbolic name for the start address of the section.
alignment:The required alignment of the program section; a decimal number specifying the byte
alignment.
end_symbol:A symbolic name for the end address of the section.
load:If Yes, the section is loaded. If No, the section isn't loaded.
runin:This specifies the name of the section to copy this section to. Multiple sections can be specified
separated by a semicolon, the first section that exists will be used.
size:The optional size of the program section in bytes, a hexadecimal number with a 0x prefix.
size_symbol:A symbolic name for the size of the section.
start:The optional start address of the program section, a hexadecimal number with a 0x prefix.
When a section placement file is used for linking it is preprocessed using the (as yet undocumented) SEGGER
Embedded Studio for RISC-V XML preprocessor.
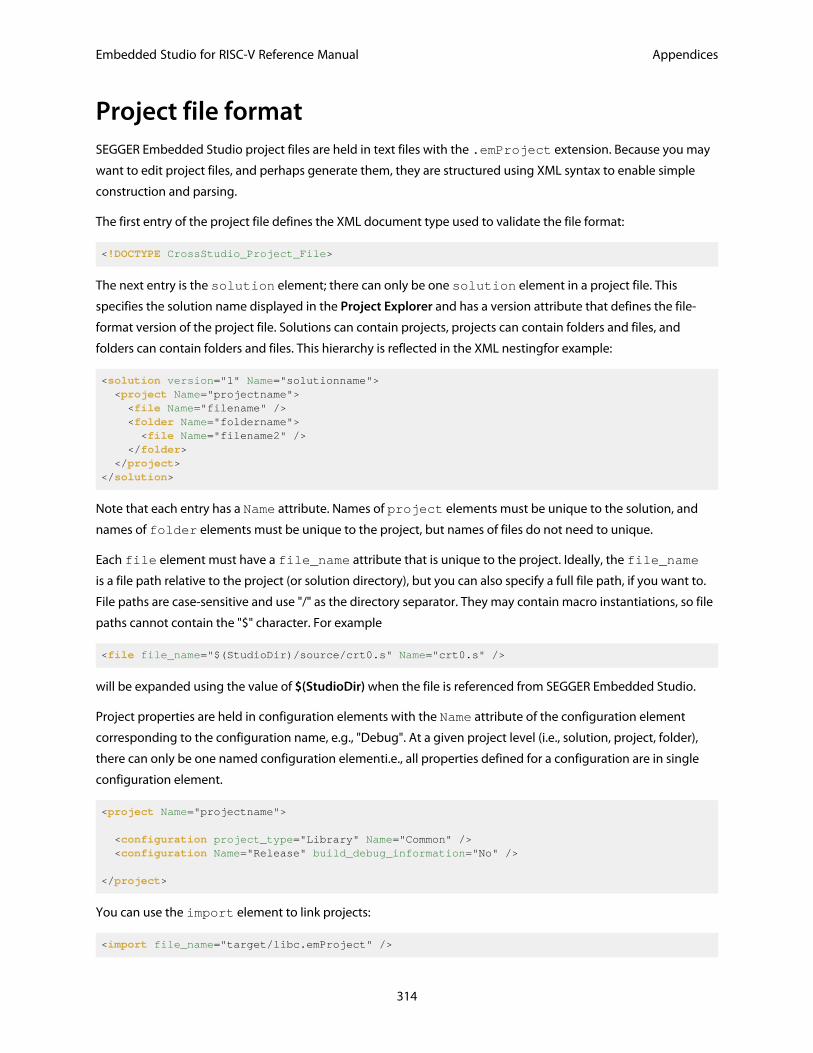
Embedded Studio for RISC-V Reference Manual Appendices
314
Project file formatSEGGER Embedded Studio project files are held in text files with the .emProject extension. Because you may
want to edit project files, and perhaps generate them, they are structured using XML syntax to enable simple
construction and parsing.
The first entry of the project file defines the XML document type used to validate the file format:
<!DOCTYPE CrossStudio_Project_File>
The next entry is the solution element; there can only be one solution element in a project file. This
specifies the solution name displayed in the Project Explorer and has a version attribute that defines the file-
format version of the project file. Solutions can contain projects, projects can contain folders and files, and
folders can contain folders and files. This hierarchy is reflected in the XML nestingfor example:
<solution version="1" Name="solutionname"> <project Name="projectname"> <file Name="filename" /> <folder Name="foldername"> <file Name="filename2" /> </folder> </project></solution>
Note that each entry has a Name attribute. Names of project elements must be unique to the solution, and
names of folder elements must be unique to the project, but names of files do not need to unique.
Each file element must have a file_name attribute that is unique to the project. Ideally, the file_name
is a file path relative to the project (or solution directory), but you can also specify a full file path, if you want to.
File paths are case-sensitive and use "/" as the directory separator. They may contain macro instantiations, so file
paths cannot contain the "$" character. For example
<file file_name="$(StudioDir)/source/crt0.s" Name="crt0.s" />
will be expanded using the value of $(StudioDir) when the file is referenced from SEGGER Embedded Studio.
Project properties are held in configuration elements with the Name attribute of the configuration element
corresponding to the configuration name, e.g., "Debug". At a given project level (i.e., solution, project, folder),
there can only be one named configuration elementi.e., all properties defined for a configuration are in single
configuration element.
<project Name="projectname"> <configuration project_type="Library" Name="Common" /> <configuration Name="Release" build_debug_information="No" /> </project>
You can use the import element to link projects:
<import file_name="target/libc.emProject" />
Embedded Studio for RISC-V Reference Manual Appendices
315
Project Templates file formatThe SEGGER Embedded Studio New Project dialog works from a file called project_templates.xml in the
targets subdirectory of the SEGGER Embedded Studio installation directory. Because you may want to add
your own new project types, they are structured using XML syntax to enable simple construction and parsing.
The first entry of the project file defines the XML document type used to validate the file format:
<!DOCTYPE Project_Templates_File>
The next entry is the projects element, which is used to group a set of new project entries into an XML
hierarchy.
<projects> <project> </projects>
Each entry has a project element that contains the class of the project (attribute caption), the name of the
project (attribute name), its type (attribute type) and a description (attribute description). For example:
<project caption="ARM Evaluator7T" name="Executable" description="An executable for an ARM Evaluator7T." type="Executable"/>
The project type can be one of these:
Executable: a fully linked executable.
Library: a static library.
Object file: an object file.
Staging: a staging project.
Combining: a combining project.
Externally Built Executable: an externally built executable.
The configurations to be created for the project are defined using the configuration element, which must
have a name attribute:
<configuration name="ARM RAM Release"/>
The property values to be created for the project are defined using the property element. If you have a
defined value, you can specify this using the value attribute and, optionally, set the property in a defined
configuration, such as:
<property name="target_reset_script" configuration="RAM" value="Evaluator7T_ResetWithRamAtZero()" />
Alternatively, you can include a property that will be shown to the user, prompting them to supply a value as
part of the new-project process.
<property name="linker_output_format"/>
Embedded Studio for RISC-V Reference Manual Appendices
316
The folders to be created are defined using the folder element. The folder element must have a name
attribute and can also have a filter attribute. For example:
<folder name="Source Files" filter="c;cpp;cxx;cc;h;s;asm;inc" />
The files to be in the project are specified using the file element. You can use build-system macros (see
Project macros) to specify files located in the SEGGER Embedded Studio installation directory. Files will be
copied to the project directory or just left as references, depending on the value of the source attribute:
<file name="main.c" source="$(StudioDir)/samples/Shared/main.c"/><file name="$(StudioDir)/source/thumb_crt0.s"/>
You can define the set of configurations that can be referred to in the top-level configurations element:
<configurations> <configuration> </configurations>
This contains the set of all configurations that can be created when a project is created. Each configuration is
defined using a configuration element, which can define the property values for that configuration. For
example:
<configuration name="Debug"> <property name="build_debug_information" value="Yes">
Embedded Studio for RISC-V Reference Manual Appendices
317
Property Groups file formatThe SEGGER Embedded Studio project system provides a means to create new properties that change a number
of project property settings and can also set C pre-processor definitions when selected. Such properties are
called property groups and are defined in a property-groups file. The property-group file to use for a project
is defined by the Property Groups File property. These files usually define target-specific properties and are
structured using XML syntax to enable simple construction and parsing.
The first entry of the property groups file defines the XML document type, which is used to validate the file
format:
<!DOCTYPE CrossStudio_Group_Values>
The next entry is the propertyGroups element, which is used to group a set of property groups entries into
an XML hierarchy:
<propertyGroups> <grouphdots <grouphdots</propertyGroups>
Each group has the name of the group (attribute name), the name of the options category (attribute group),
short (attribute short) and long (attribute long) help descriptions, and a default value (attribute default).
For example:
<group short="Target Processor" group="Build Options" short="Target Processor" long="Select a set of target options" name="Target" default="STR912FW44" />
Each group has a number of groupEntry elements that define the enumerations of the group.
<group\> <groupEntry> <groupEntry></group>
Each groupEntry has the name of the entry (attribute name), e.g.:
<groupEntry name="STR910FW32">
A groupEntry has the property values and C pre-processor definitions that are set when the groupEntry is
selected; they are specified with property and cdefine elements. For example:
<groupEntry> <property> <cdefine> <property></groupEntry>
Embedded Studio for RISC-V Reference Manual Appendices
318
A property element has the property's name (attribute name), its value (attribute value), and an optional
configuration (attribute configuration):
<property name="linker_memory_map_file" value="$(StudioDir)/targets/ST_STR91x/ST_STR910FM32_MemoryMap.xml" />
A cdefine element has the C preprocessor name (attribute name) and its value (attribute value):
<cdefine value="STR910FM32" name="TARGET_PROCESSOR" />
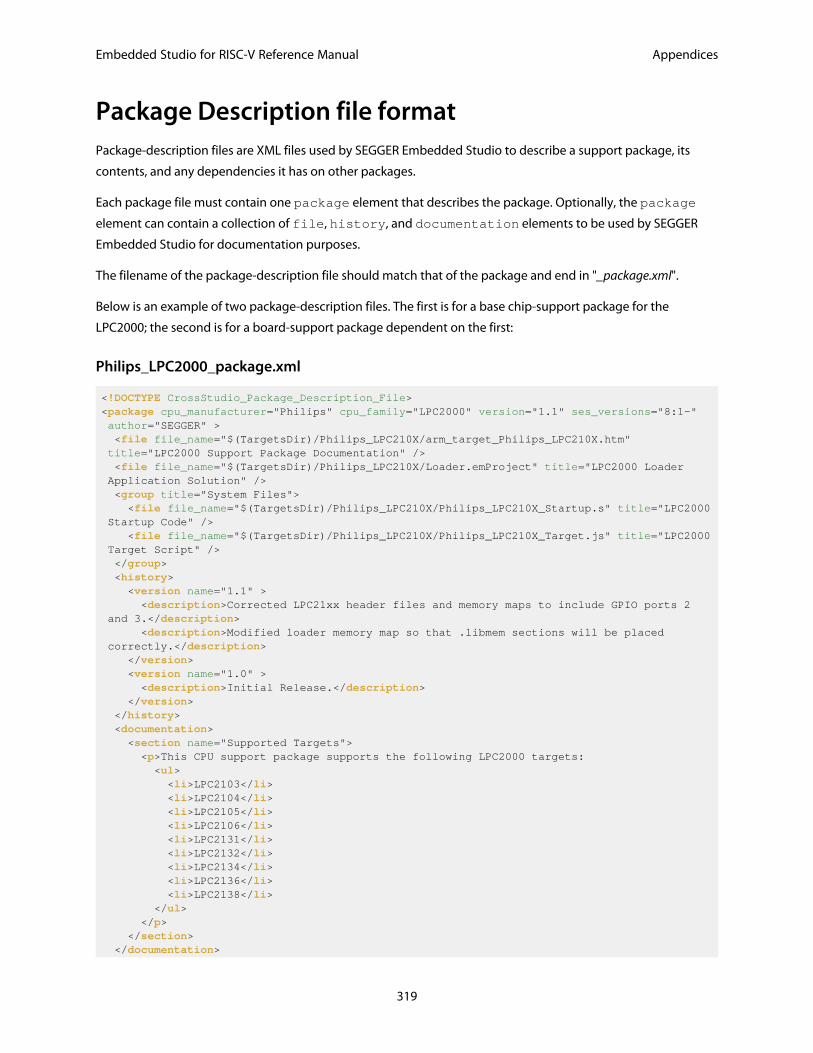
Embedded Studio for RISC-V Reference Manual Appendices
319
Package Description file formatPackage-description files are XML files used by SEGGER Embedded Studio to describe a support package, its
contents, and any dependencies it has on other packages.
Each package file must contain one package element that describes the package. Optionally, the package
element can contain a collection of file, history, and documentation elements to be used by SEGGER
Embedded Studio for documentation purposes.
The filename of the package-description file should match that of the package and end in "_package.xml".
Below is an example of two package-description files. The first is for a base chip-support package for the
LPC2000; the second is for a board-support package dependent on the first:
Philips_LPC2000_package.xml
<!DOCTYPE CrossStudio_Package_Description_File><package cpu_manufacturer="Philips" cpu_family="LPC2000" version="1.1" ses_versions="8:1-" author="SEGGER" > <file file_name="$(TargetsDir)/Philips_LPC210X/arm_target_Philips_LPC210X.htm" title="LPC2000 Support Package Documentation" /> <file file_name="$(TargetsDir)/Philips_LPC210X/Loader.emProject" title="LPC2000 Loader Application Solution" /> <group title="System Files"> <file file_name="$(TargetsDir)/Philips_LPC210X/Philips_LPC210X_Startup.s" title="LPC2000 Startup Code" /> <file file_name="$(TargetsDir)/Philips_LPC210X/Philips_LPC210X_Target.js" title="LPC2000 Target Script" /> </group> <history> <version name="1.1" > <description>Corrected LPC21xx header files and memory maps to include GPIO ports 2 and 3.</description> <description>Modified loader memory map so that .libmem sections will be placed correctly.</description> </version> <version name="1.0" > <description>Initial Release.</description> </version> </history> <documentation> <section name="Supported Targets"> <p>This CPU support package supports the following LPC2000 targets: <ul> <li>LPC2103</li> <li>LPC2104</li> <li>LPC2105</li> <li>LPC2106</li> <li>LPC2131</li> <li>LPC2132</li> <li>LPC2134</li> <li>LPC2136</li> <li>LPC2138</li> </ul> </p> </section> </documentation>
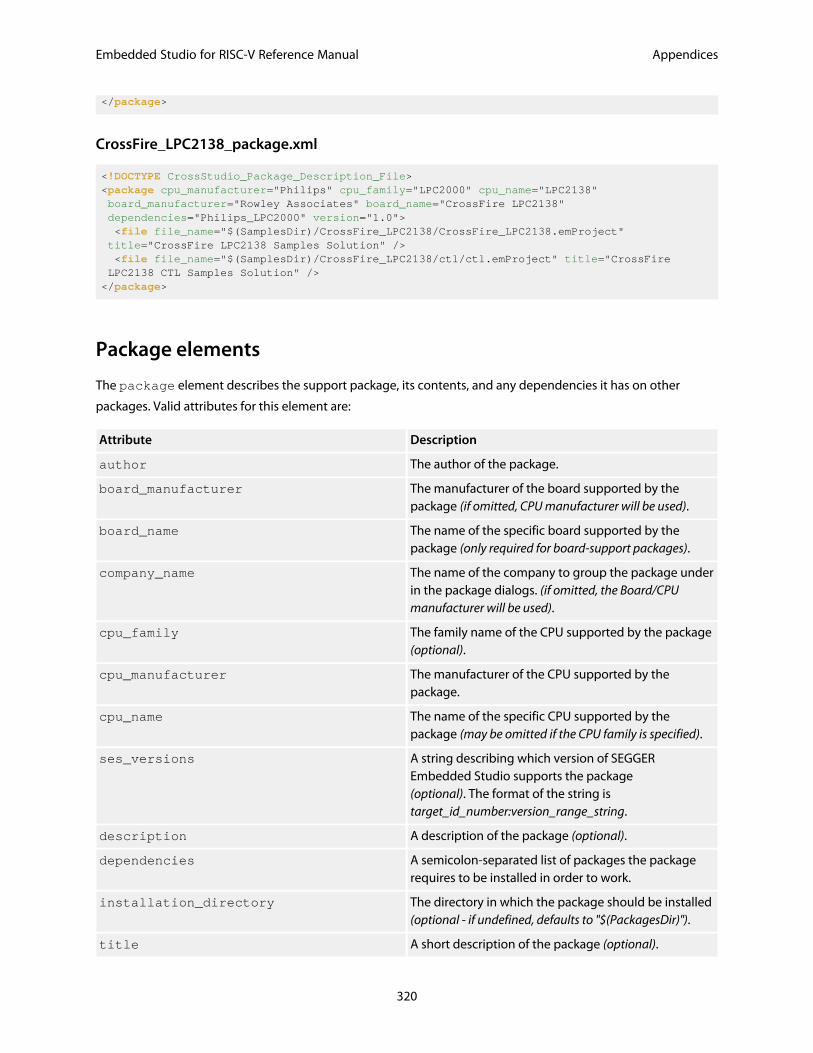
Embedded Studio for RISC-V Reference Manual Appendices
320
</package>
CrossFire_LPC2138_package.xml
<!DOCTYPE CrossStudio_Package_Description_File><package cpu_manufacturer="Philips" cpu_family="LPC2000" cpu_name="LPC2138" board_manufacturer="Rowley Associates" board_name="CrossFire LPC2138" dependencies="Philips_LPC2000" version="1.0"> <file file_name="$(SamplesDir)/CrossFire_LPC2138/CrossFire_LPC2138.emProject" title="CrossFire LPC2138 Samples Solution" /> <file file_name="$(SamplesDir)/CrossFire_LPC2138/ctl/ctl.emProject" title="CrossFire LPC2138 CTL Samples Solution" /></package>
Package elements
The package element describes the support package, its contents, and any dependencies it has on other
packages. Valid attributes for this element are:
Attribute Description
author The author of the package.
board_manufacturer The manufacturer of the board supported by thepackage (if omitted, CPU manufacturer will be used).
board_name The name of the specific board supported by thepackage (only required for board-support packages).
company_name The name of the company to group the package underin the package dialogs. (if omitted, the Board/CPUmanufacturer will be used).
cpu_family The family name of the CPU supported by the package(optional).
cpu_manufacturer The manufacturer of the CPU supported by thepackage.
cpu_name The name of the specific CPU supported by thepackage (may be omitted if the CPU family is specified).
ses_versions A string describing which version of SEGGEREmbedded Studio supports the package(optional). The format of the string istarget_id_number:version_range_string.
description A description of the package (optional).
dependencies A semicolon-separated list of packages the packagerequires to be installed in order to work.
installation_directory The directory in which the package should be installed(optional - if undefined, defaults to "$(PackagesDir)").
title A short description of the package (optional).

Embedded Studio for RISC-V Reference Manual Appendices
321
version The package version number.
File elements
The file element is used by SEGGER Embedded Studio for documentation purposes by adding links to files of
interest within the package such as example project files and documentation.
Attribute Description
file_name The file path of the file.
title A description of the file.
Optionally, file elements can be grouped into categories using the group element.
Group elements
The group element is used for categorizing files described by file elements into a particular group.
Attribute Description
title Title of the group.
History elements
The history element is used to hold a description of the package's version history.
The history element should contain a collection of version elements.
Version element
The version element is used to hold the description of a particular version of the package.
Attribute Description
name The name of the version being described.
The version element should contain a collection of description elements.
Description elements
Each description element contains text that describes a feature of the package version.
Embedded Studio for RISC-V Reference Manual Appendices
322
Documentation elements
The documentation element is used to provide arbitrary documentation for the package.
The documentation element should contain a collection of one or more section elements.
Section elements
The section element contains package documentation in XHTML format.
Attribute Description
name The title of the documentation section.
target_id_number
The following table lists the possible target ID numbers:
Target ID
ARM 8
RISC-V 20
version_range_string
The version_range_string can be any of the following:
version_number:The package will only work on version_number.
version_number-:The package will work on version_number or any future version.
-version_number:The package will work on version_number or any earlier version.
low_version_number-high_version_number:The package will work on low_version_number,
high_version_number or any version in between.
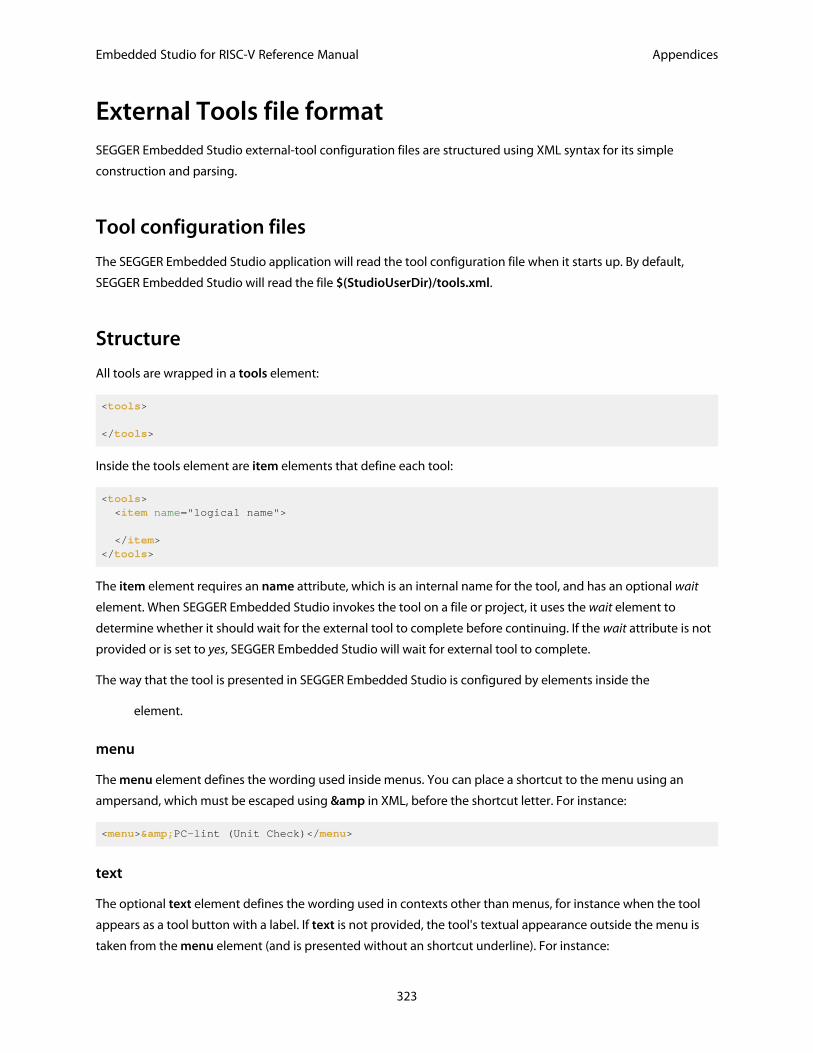
Embedded Studio for RISC-V Reference Manual Appendices
323
External Tools file formatSEGGER Embedded Studio external-tool configuration files are structured using XML syntax for its simple
construction and parsing.
Tool configuration files
The SEGGER Embedded Studio application will read the tool configuration file when it starts up. By default,
SEGGER Embedded Studio will read the file $(StudioUserDir)/tools.xml.
Structure
All tools are wrapped in a tools element:
<tools> </tools>
Inside the tools element are item elements that define each tool:
<tools> <item name="logical name"> </item></tools>
The item element requires an name attribute, which is an internal name for the tool, and has an optional wait
element. When SEGGER Embedded Studio invokes the tool on a file or project, it uses the wait element to
determine whether it should wait for the external tool to complete before continuing. If the wait attribute is not
provided or is set to yes, SEGGER Embedded Studio will wait for external tool to complete.
The way that the tool is presented in SEGGER Embedded Studio is configured by elements inside the
element.
menu
The menu element defines the wording used inside menus. You can place a shortcut to the menu using an
ampersand, which must be escaped using & in XML, before the shortcut letter. For instance:
<menu>&PC-lint (Unit Check)</menu>
text
The optional text element defines the wording used in contexts other than menus, for instance when the tool
appears as a tool button with a label. If text is not provided, the tool's textual appearance outside the menu is
taken from the menu element (and is presented without an shortcut underline). For instance:
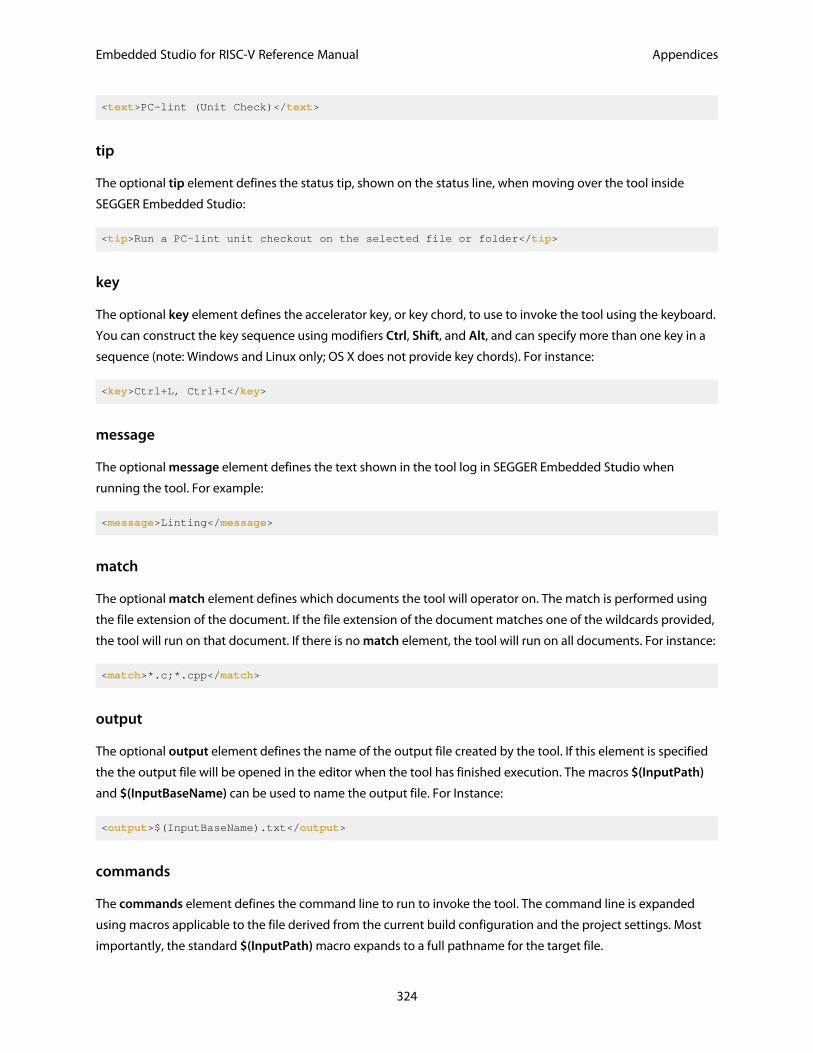
Embedded Studio for RISC-V Reference Manual Appendices
324
<text>PC-lint (Unit Check)</text>
tip
The optional tip element defines the status tip, shown on the status line, when moving over the tool inside
SEGGER Embedded Studio:
<tip>Run a PC-lint unit checkout on the selected file or folder</tip>
key
The optional key element defines the accelerator key, or key chord, to use to invoke the tool using the keyboard.
You can construct the key sequence using modifiers Ctrl, Shift, and Alt, and can specify more than one key in a
sequence (note: Windows and Linux only; OS X does not provide key chords). For instance:
<key>Ctrl+L, Ctrl+I</key>
message
The optional message element defines the text shown in the tool log in SEGGER Embedded Studio when
running the tool. For example:
<message>Linting</message>
match
The optional match element defines which documents the tool will operator on. The match is performed using
the file extension of the document. If the file extension of the document matches one of the wildcards provided,
the tool will run on that document. If there is no match element, the tool will run on all documents. For instance:
<match>*.c;*.cpp</match>
output
The optional output element defines the name of the output file created by the tool. If this element is specified
the the output file will be opened in the editor when the tool has finished execution. The macros $(InputPath)
and $(InputBaseName) can be used to name the output file. For Instance:
<output>$(InputBaseName).txt</output>
commands
The commands element defines the command line to run to invoke the tool. The command line is expanded
using macros applicable to the file derived from the current build configuration and the project settings. Most
importantly, the standard $(InputPath) macro expands to a full pathname for the target file.
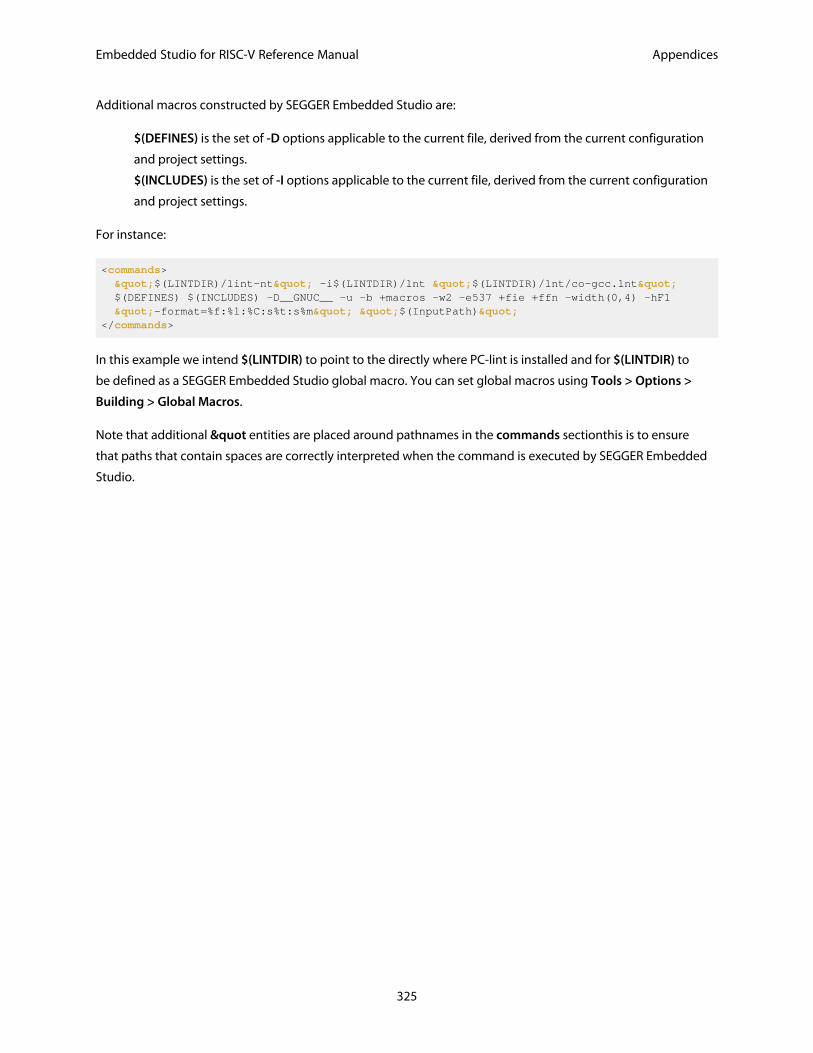
Embedded Studio for RISC-V Reference Manual Appendices
325
Additional macros constructed by SEGGER Embedded Studio are:
$(DEFINES) is the set of -D options applicable to the current file, derived from the current configuration
and project settings.
$(INCLUDES) is the set of -I options applicable to the current file, derived from the current configuration
and project settings.
For instance:
<commands> "$(LINTDIR)/lint-nt" -i$(LINTDIR)/lnt "$(LINTDIR)/lnt/co-gcc.lnt" $(DEFINES) $(INCLUDES) -D__GNUC__ -u -b +macros -w2 -e537 +fie +ffn -width(0,4) -hF1 "-format=%f:%l:%C:s%t:s%m" "$(InputPath)"</commands>
In this example we intend $(LINTDIR) to point to the directly where PC-lint is installed and for $(LINTDIR) to
be defined as a SEGGER Embedded Studio global macro. You can set global macros using Tools > Options >
Building > Global Macros.
Note that additional " entities are placed around pathnames in the commands sectionthis is to ensure
that paths that contain spaces are correctly interpreted when the command is executed by SEGGER Embedded
Studio.
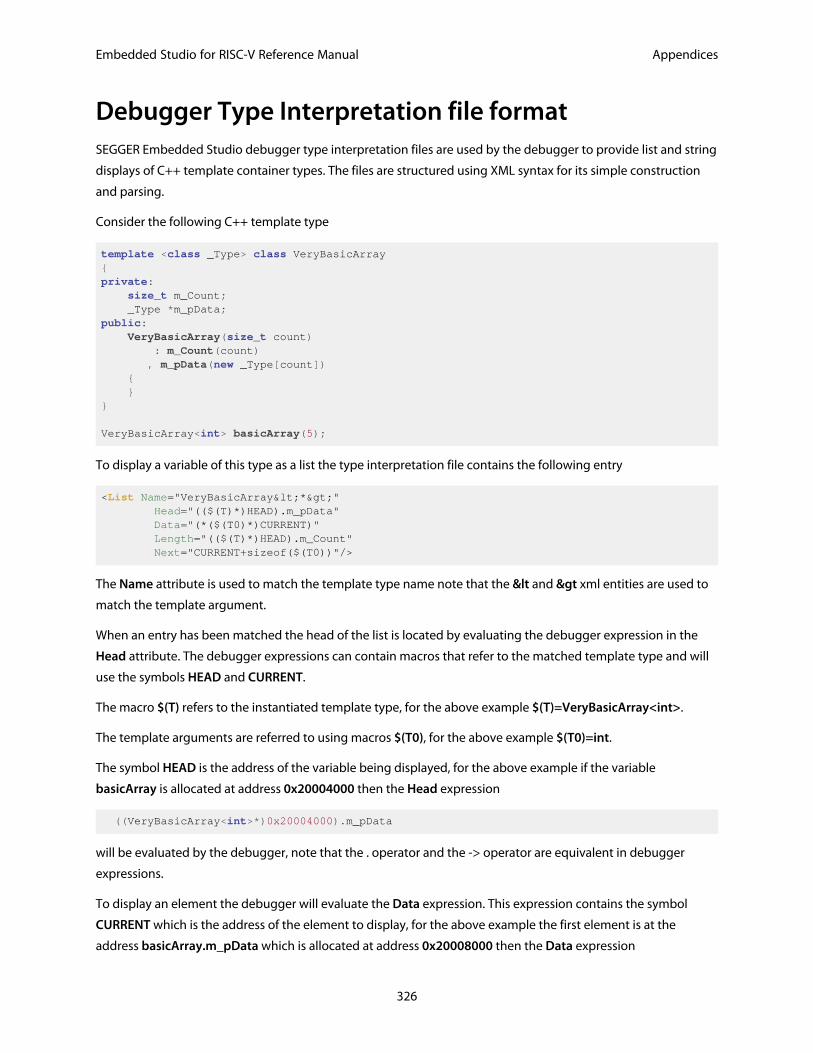
Embedded Studio for RISC-V Reference Manual Appendices
326
Debugger Type Interpretation file formatSEGGER Embedded Studio debugger type interpretation files are used by the debugger to provide list and string
displays of C++ template container types. The files are structured using XML syntax for its simple construction
and parsing.
Consider the following C++ template type
template <class _Type> class VeryBasicArray{private: size_t m_Count; _Type *m_pData; public: VeryBasicArray(size_t count) : m_Count(count) , m_pData(new _Type[count]) { }}
VeryBasicArray<int> basicArray(5);
To display a variable of this type as a list the type interpretation file contains the following entry
<List Name="VeryBasicArray<*>" Head="(($(T)*)HEAD).m_pData" Data="(*($(T0)*)CURRENT)" Length="(($(T)*)HEAD).m_Count" Next="CURRENT+sizeof($(T0))"/>
The Name attribute is used to match the template type name note that the < and > xml entities are used to
match the template argument.
When an entry has been matched the head of the list is located by evaluating the debugger expression in the
Head attribute. The debugger expressions can contain macros that refer to the matched template type and will
use the symbols HEAD and CURRENT.
The macro $(T) refers to the instantiated template type, for the above example $(T)=VeryBasicArray<int>.
The template arguments are referred to using macros $(T0), for the above example $(T0)=int.
The symbol HEAD is the address of the variable being displayed, for the above example if the variable
basicArray is allocated at address 0x20004000 then the Head expression
((VeryBasicArray<int>*)0x20004000).m_pData
will be evaluated by the debugger, note that the . operator and the -> operator are equivalent in debugger
expressions.
To display an element the debugger will evaluate the Data expression. This expression contains the symbol
CURRENT which is the address of the element to display, for the above example the first element is at the
address basicArray.m_pData which is allocated at address 0x20008000 then the Data expression
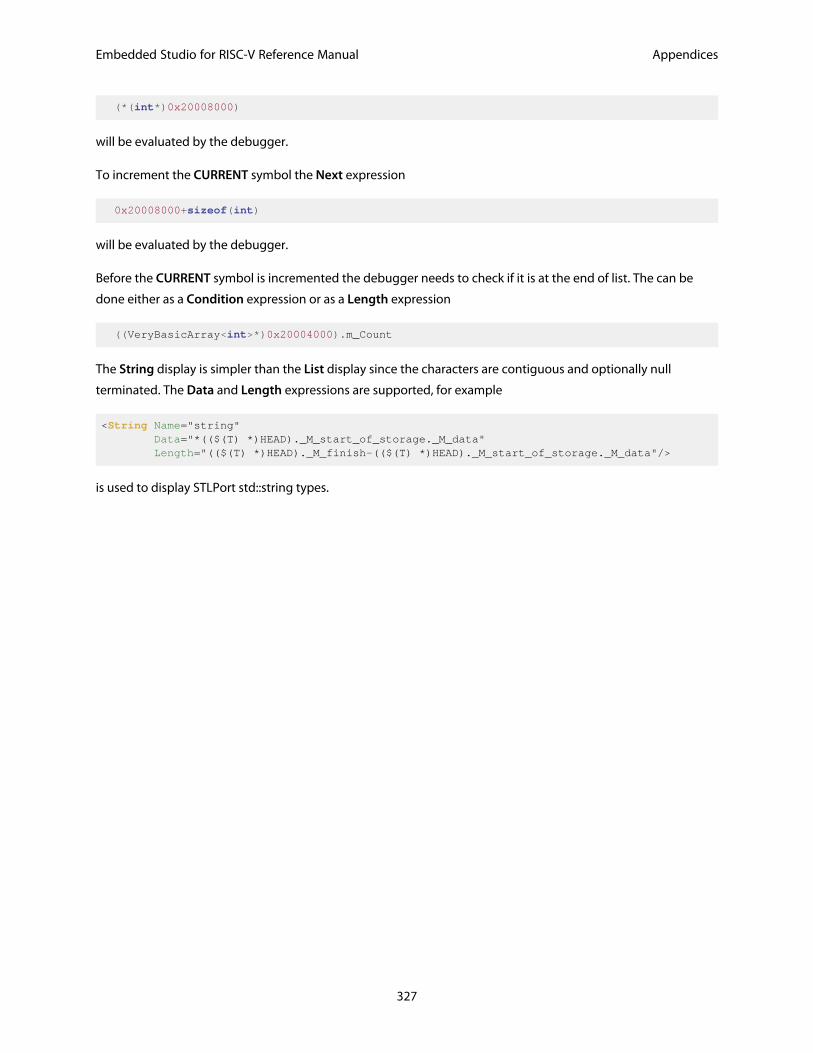
Embedded Studio for RISC-V Reference Manual Appendices
327
(*(int*)0x20008000)
will be evaluated by the debugger.
To increment the CURRENT symbol the Next expression
0x20008000+sizeof(int)
will be evaluated by the debugger.
Before the CURRENT symbol is incremented the debugger needs to check if it is at the end of list. The can be
done either as a Condition expression or as a Length expression
((VeryBasicArray<int>*)0x20004000).m_Count
The String display is simpler than the List display since the characters are contiguous and optionally null
terminated. The Data and Length expressions are supported, for example
<String Name="string" Data="*(($(T) *)HEAD)._M_start_of_storage._M_data" Length="(($(T) *)HEAD)._M_finish-(($(T) *)HEAD)._M_start_of_storage._M_data"/>
is used to display STLPort std::string types.
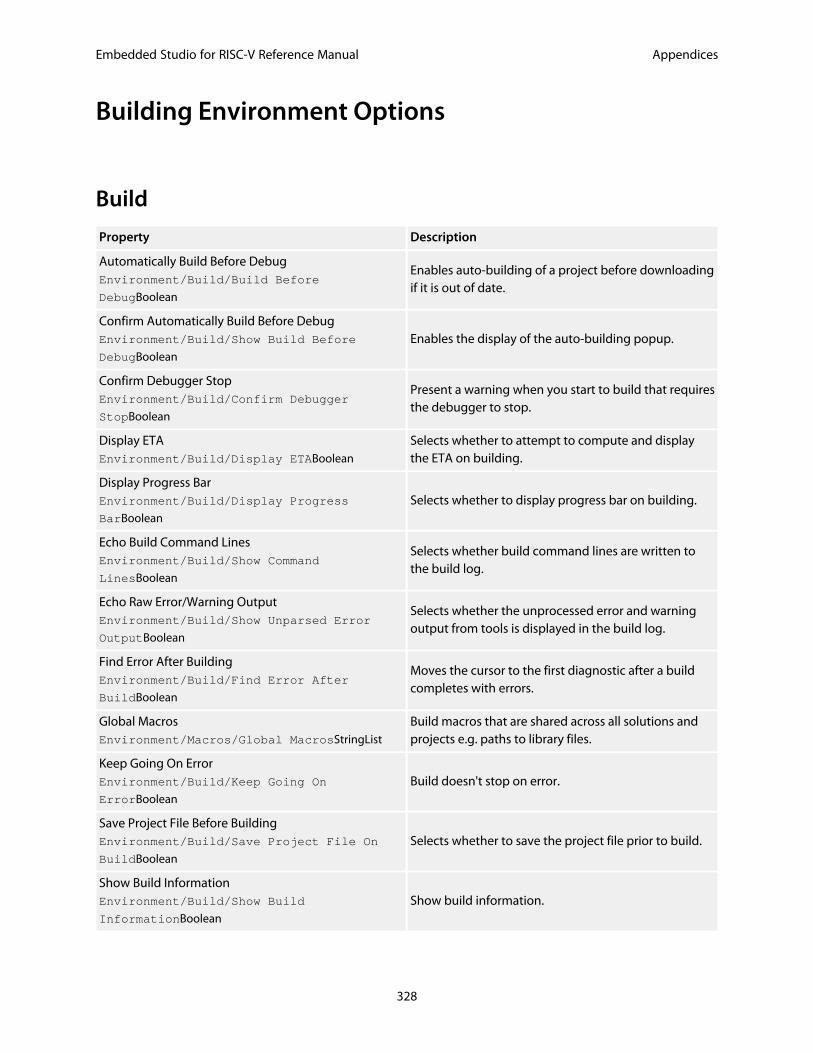
Embedded Studio for RISC-V Reference Manual Appendices
328
Building Environment Options
Build
Property Description
Automatically Build Before DebugEnvironment/Build/Build Before
DebugBoolean
Enables auto-building of a project before downloadingif it is out of date.
Confirm Automatically Build Before DebugEnvironment/Build/Show Build Before
DebugBoolean
Enables the display of the auto-building popup.
Confirm Debugger StopEnvironment/Build/Confirm Debugger
StopBoolean
Present a warning when you start to build that requiresthe debugger to stop.
Display ETAEnvironment/Build/Display ETABoolean
Selects whether to attempt to compute and displaythe ETA on building.
Display Progress BarEnvironment/Build/Display Progress
BarBoolean
Selects whether to display progress bar on building.
Echo Build Command LinesEnvironment/Build/Show Command
LinesBoolean
Selects whether build command lines are written tothe build log.
Echo Raw Error/Warning OutputEnvironment/Build/Show Unparsed Error
OutputBoolean
Selects whether the unprocessed error and warningoutput from tools is displayed in the build log.
Find Error After BuildingEnvironment/Build/Find Error After
BuildBoolean
Moves the cursor to the first diagnostic after a buildcompletes with errors.
Global MacrosEnvironment/Macros/Global MacrosStringList
Build macros that are shared across all solutions andprojects e.g. paths to library files.
Keep Going On ErrorEnvironment/Build/Keep Going On
ErrorBoolean
Build doesn't stop on error.
Save Project File Before BuildingEnvironment/Build/Save Project File On
BuildBoolean
Selects whether to save the project file prior to build.
Show Build InformationEnvironment/Build/Show Build
InformationBoolean
Show build information.
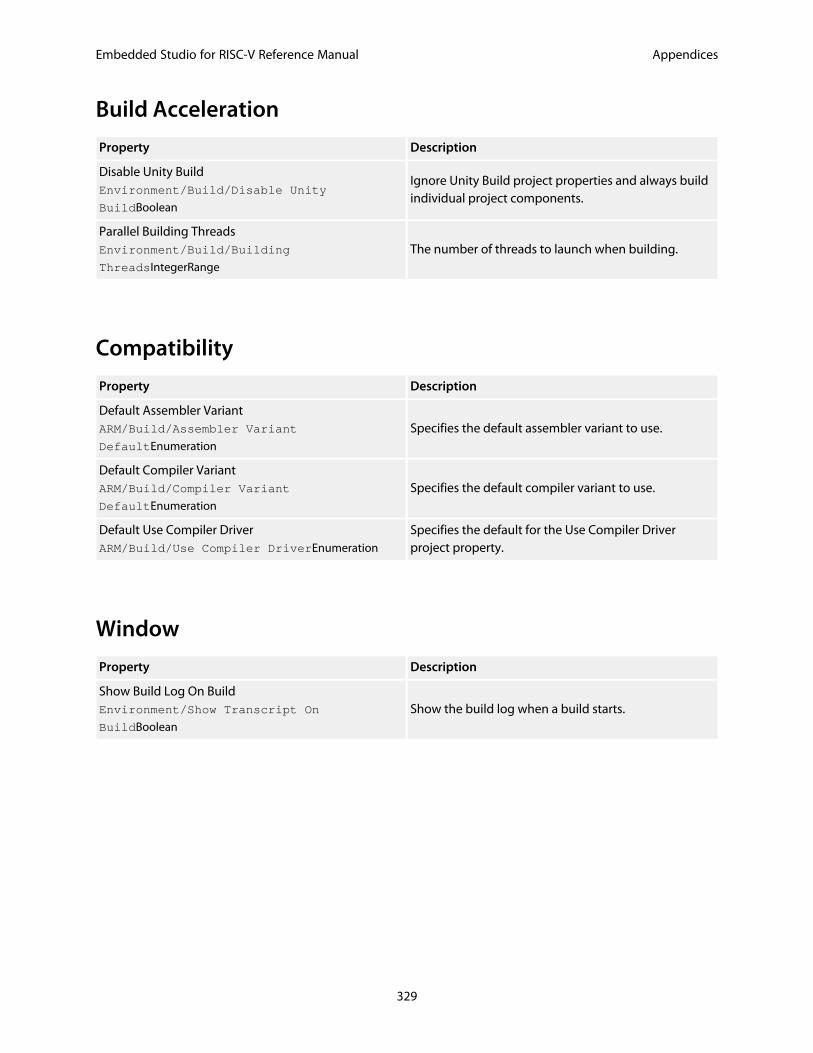
Embedded Studio for RISC-V Reference Manual Appendices
329
Build Acceleration
Property Description
Disable Unity BuildEnvironment/Build/Disable Unity
BuildBoolean
Ignore Unity Build project properties and always buildindividual project components.
Parallel Building ThreadsEnvironment/Build/Building
ThreadsIntegerRange
The number of threads to launch when building.
Compatibility
Property Description
Default Assembler VariantARM/Build/Assembler Variant
DefaultEnumeration
Specifies the default assembler variant to use.
Default Compiler VariantARM/Build/Compiler Variant
DefaultEnumeration
Specifies the default compiler variant to use.
Default Use Compiler DriverARM/Build/Use Compiler DriverEnumeration
Specifies the default for the Use Compiler Driverproject property.
Window
Property Description
Show Build Log On BuildEnvironment/Show Transcript On
BuildBoolean
Show the build log when a build starts.
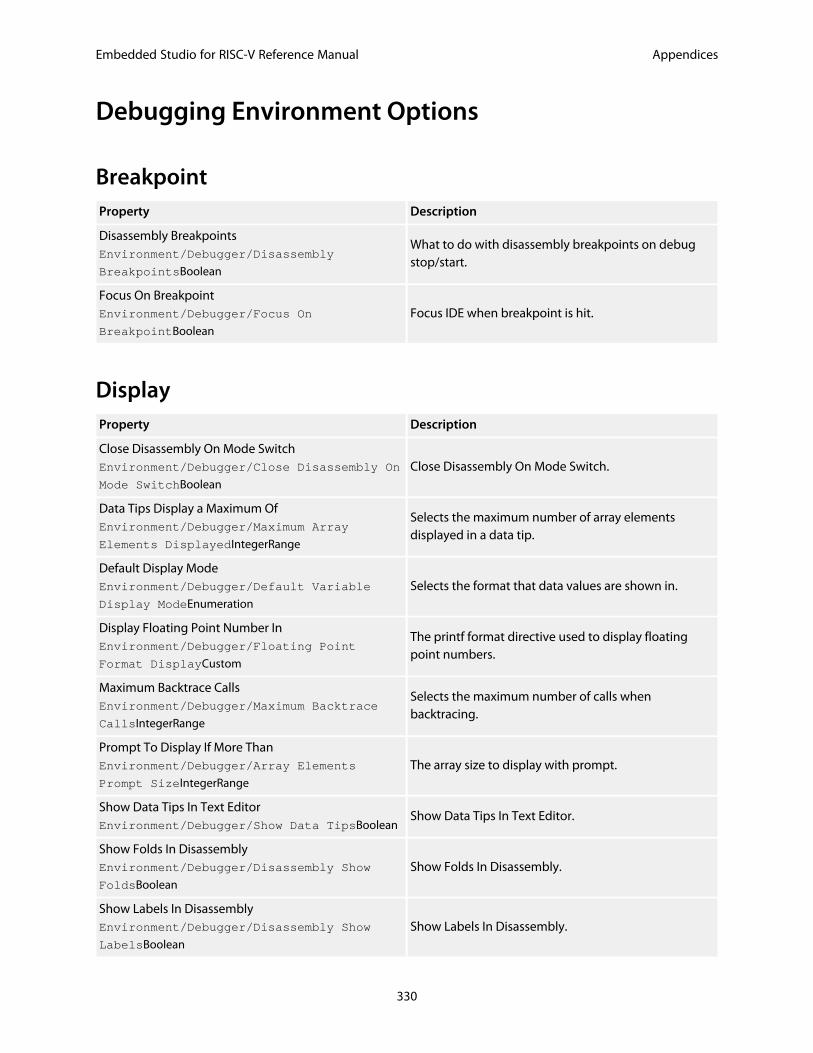
Embedded Studio for RISC-V Reference Manual Appendices
330
Debugging Environment Options
BreakpointProperty Description
Disassembly BreakpointsEnvironment/Debugger/Disassembly
BreakpointsBoolean
What to do with disassembly breakpoints on debugstop/start.
Focus On BreakpointEnvironment/Debugger/Focus On
BreakpointBoolean
Focus IDE when breakpoint is hit.
DisplayProperty Description
Close Disassembly On Mode SwitchEnvironment/Debugger/Close Disassembly On
Mode SwitchBoolean
Close Disassembly On Mode Switch.
Data Tips Display a Maximum OfEnvironment/Debugger/Maximum Array
Elements DisplayedIntegerRange
Selects the maximum number of array elementsdisplayed in a data tip.
Default Display ModeEnvironment/Debugger/Default Variable
Display ModeEnumeration
Selects the format that data values are shown in.
Display Floating Point Number InEnvironment/Debugger/Floating Point
Format DisplayCustom
The printf format directive used to display floatingpoint numbers.
Maximum Backtrace CallsEnvironment/Debugger/Maximum Backtrace
CallsIntegerRange
Selects the maximum number of calls whenbacktracing.
Prompt To Display If More ThanEnvironment/Debugger/Array Elements
Prompt SizeIntegerRange
The array size to display with prompt.
Show Data Tips In Text EditorEnvironment/Debugger/Show Data TipsBoolean
Show Data Tips In Text Editor.
Show Folds In DisassemblyEnvironment/Debugger/Disassembly Show
FoldsBoolean
Show Folds In Disassembly.
Show Labels In DisassemblyEnvironment/Debugger/Disassembly Show
LabelsBoolean
Show Labels In Disassembly.
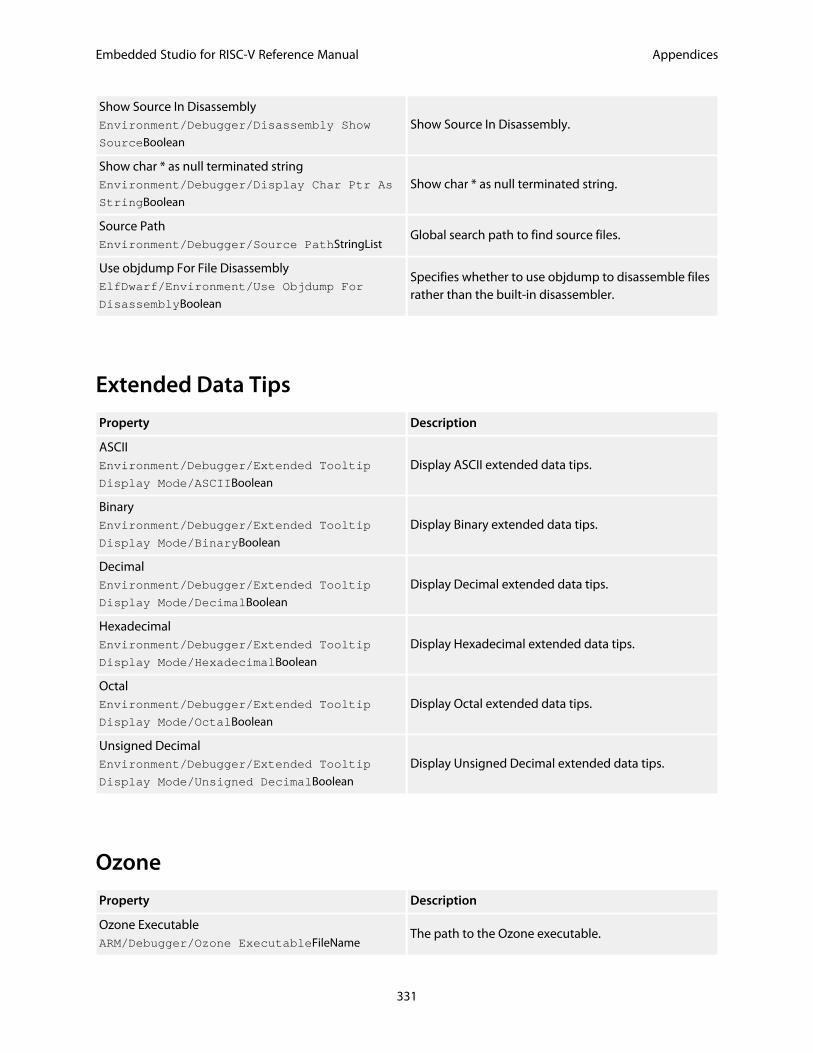
Embedded Studio for RISC-V Reference Manual Appendices
331
Show Source In DisassemblyEnvironment/Debugger/Disassembly Show
SourceBoolean
Show Source In Disassembly.
Show char * as null terminated stringEnvironment/Debugger/Display Char Ptr As
StringBoolean
Show char * as null terminated string.
Source PathEnvironment/Debugger/Source PathStringList
Global search path to find source files.
Use objdump For File DisassemblyElfDwarf/Environment/Use Objdump For
DisassemblyBoolean
Specifies whether to use objdump to disassemble filesrather than the built-in disassembler.
Extended Data Tips
Property Description
ASCIIEnvironment/Debugger/Extended Tooltip
Display Mode/ASCIIBoolean
Display ASCII extended data tips.
BinaryEnvironment/Debugger/Extended Tooltip
Display Mode/BinaryBoolean
Display Binary extended data tips.
DecimalEnvironment/Debugger/Extended Tooltip
Display Mode/DecimalBoolean
Display Decimal extended data tips.
HexadecimalEnvironment/Debugger/Extended Tooltip
Display Mode/HexadecimalBoolean
Display Hexadecimal extended data tips.
OctalEnvironment/Debugger/Extended Tooltip
Display Mode/OctalBoolean
Display Octal extended data tips.
Unsigned DecimalEnvironment/Debugger/Extended Tooltip
Display Mode/Unsigned DecimalBoolean
Display Unsigned Decimal extended data tips.
Ozone
Property Description
Ozone ExecutableARM/Debugger/Ozone ExecutableFileName
The path to the Ozone executable.
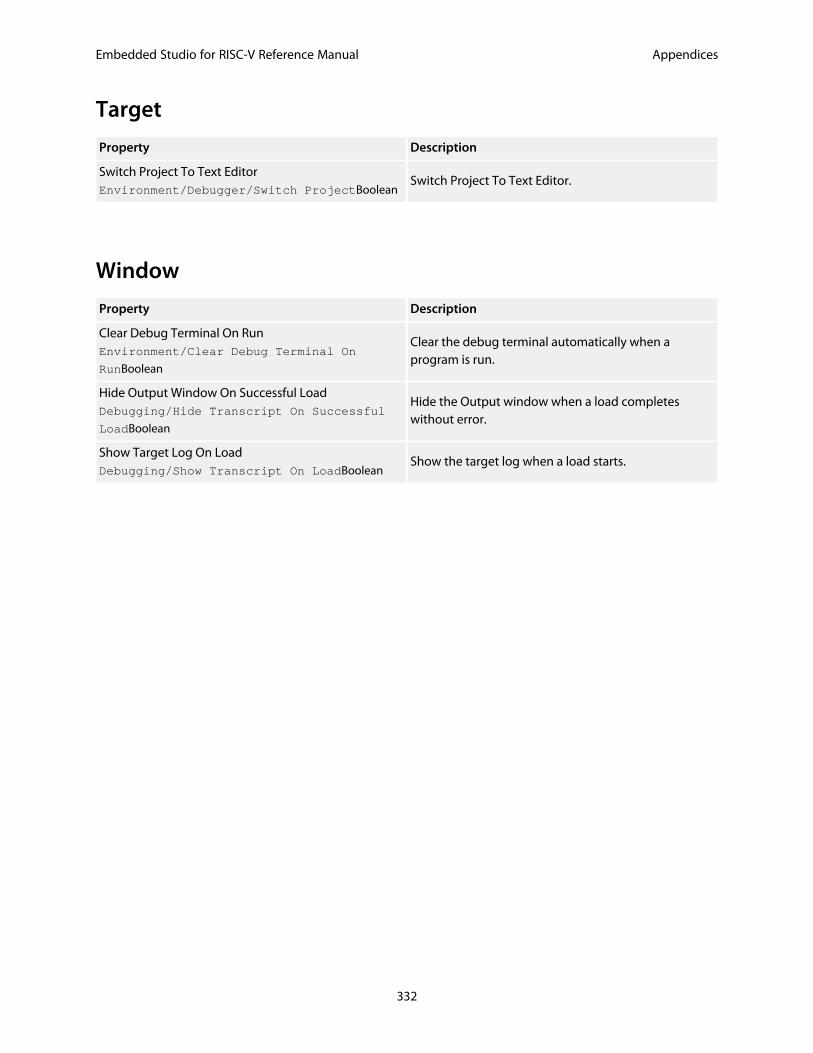
Embedded Studio for RISC-V Reference Manual Appendices
332
Target
Property Description
Switch Project To Text EditorEnvironment/Debugger/Switch ProjectBoolean
Switch Project To Text Editor.
Window
Property Description
Clear Debug Terminal On RunEnvironment/Clear Debug Terminal On
RunBoolean
Clear the debug terminal automatically when aprogram is run.
Hide Output Window On Successful LoadDebugging/Hide Transcript On Successful
LoadBoolean
Hide the Output window when a load completeswithout error.
Show Target Log On LoadDebugging/Show Transcript On LoadBoolean
Show the target log when a load starts.

Embedded Studio for RISC-V Reference Manual Appendices
333
IDE Environment Options
BrowserProperty Description
Text SizeEnvironment/Browser/Text SizeEnumeration
Sets the text size of the integrated HTML and helpbrowser.
Underline Hyperlinks In BrowserEnvironment/Browser/Underline Web
LinksBoolean
Enables underlining of hypertext links in theintegrated HTML and help browser.
File ExtensionProperty Description
ELF Archive File ExtensionsElfDwarf/Environment/Archive File
ExtensionsStringList
The file extensions used for ELF archive files.
ELF Executable File ExtensionsElfDwarf/Environment/Executable File
ExtensionsStringList
The file extensions used for ELF executable files.
ELF Object File ExtensionsElfDwarf/Environment/Object File
ExtensionsStringList
The file extensions used for ELF object files.
Show ELF HeaderElfDwarf/Environment/Show ELF
HeaderBoolean
Display ELF Headers when executable and object filesare displayed in text editor.
File SearchProperty Description
Collapse Search ResultsFind In Files/Collapse ResultsBoolean
Whether to initially collapse search results.
Files To ExcludeFind In Files/Exclude File TypesStringList
The wildcard used to exclude files in Find In Filessearches.
Files To SearchFind In Files/File TypeStringList
The wildcard used to match files in Find In Filessearches.
Find HistoryFind In Files/Find HistoryStringList
The list of strings recently used in searches.
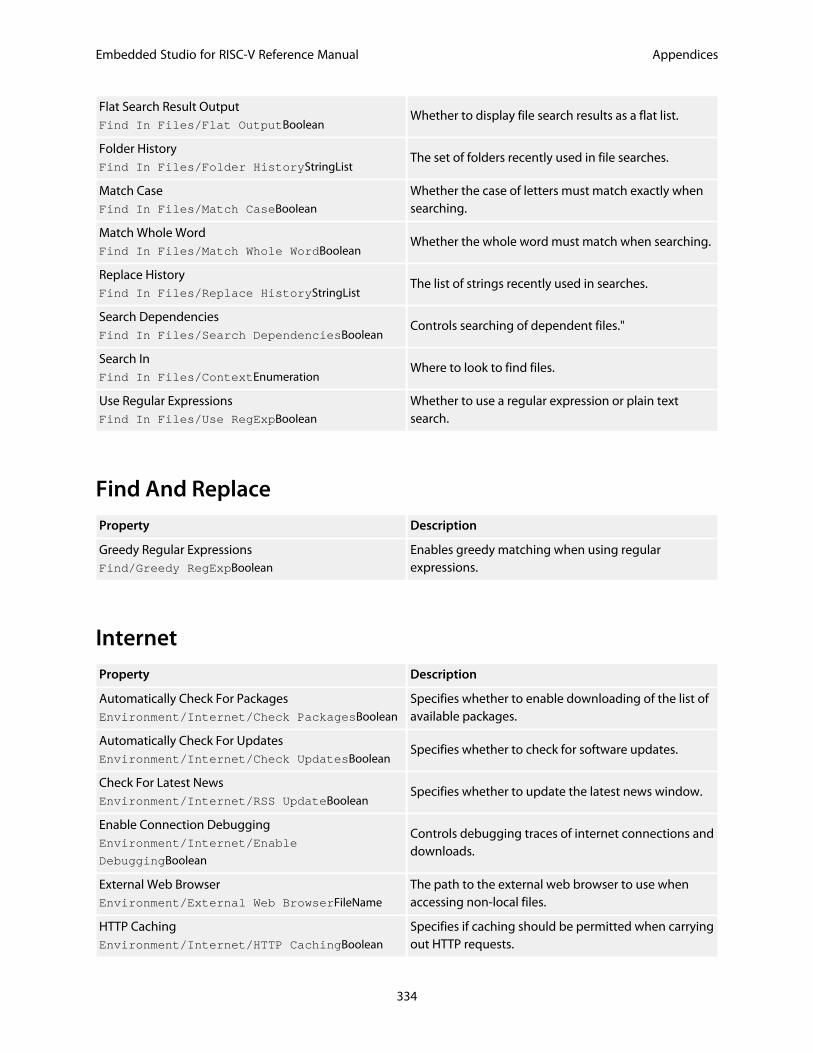
Embedded Studio for RISC-V Reference Manual Appendices
334
Flat Search Result OutputFind In Files/Flat OutputBoolean
Whether to display file search results as a flat list.
Folder HistoryFind In Files/Folder HistoryStringList
The set of folders recently used in file searches.
Match CaseFind In Files/Match CaseBoolean
Whether the case of letters must match exactly whensearching.
Match Whole WordFind In Files/Match Whole WordBoolean
Whether the whole word must match when searching.
Replace HistoryFind In Files/Replace HistoryStringList
The list of strings recently used in searches.
Search DependenciesFind In Files/Search DependenciesBoolean
Controls searching of dependent files."
Search InFind In Files/ContextEnumeration
Where to look to find files.
Use Regular ExpressionsFind In Files/Use RegExpBoolean
Whether to use a regular expression or plain textsearch.
Find And Replace
Property Description
Greedy Regular ExpressionsFind/Greedy RegExpBoolean
Enables greedy matching when using regularexpressions.
Internet
Property Description
Automatically Check For PackagesEnvironment/Internet/Check PackagesBoolean
Specifies whether to enable downloading of the list ofavailable packages.
Automatically Check For UpdatesEnvironment/Internet/Check UpdatesBoolean
Specifies whether to check for software updates.
Check For Latest NewsEnvironment/Internet/RSS UpdateBoolean
Specifies whether to update the latest news window.
Enable Connection DebuggingEnvironment/Internet/Enable
DebuggingBoolean
Controls debugging traces of internet connections anddownloads.
External Web BrowserEnvironment/External Web BrowserFileName
The path to the external web browser to use whenaccessing non-local files.
HTTP CachingEnvironment/Internet/HTTP CachingBoolean
Specifies if caching should be permitted when carryingout HTTP requests.

Embedded Studio for RISC-V Reference Manual Appendices
335
HTTP Proxy HostEnvironment/Internet/HTTP Proxy
ServerString
Specifies the IP address or hostname of the HTTP proxyserver. If empty, no HTTP proxy server will be used.
HTTP Proxy PortEnvironment/Internet/HTTP Proxy
PortIntegerRange
Specifies the HTTP proxy server's port number.
Maximum Download History ItemsEnvironment/Internet/Max Download History
ItemsIntegerRange
The maximum amount of download history kept in thedownloads window.
Use Content Delivery NetworkEnvironment/Package/Use Content Delivery
NetworkBoolean
Specifies whether to use content delivery network todeliver packages."
Launcher
Property Description
Confirm Check Solution TargetEnvironment/Launcher/Confirm Check
Solution TargetBoolean
Specifies whether the SEGGER Embedded Studiolauncher should present a warning if the solutionbeing launched targets a device it does not support.
Launch Latest Installations OnlyEnvironment/Launcher Use Latest
Installations OnlyBoolean
Specifies whether the SEGGER Embedded Studiolauncher should only consider the latest installationswhen deciding which one to use.
Launcher EnabledEnvironment/Launcher EnabledBoolean
Specifies whether the SEGGER Embedded Studiolauncher should be used when the operating systemor an external application requests a file to be opened.
Licensing
Property Description
Check J-Link For LicensesEnvironment/Check J-Link LicensesBoolean
Specifies whether to check J-Link's for licenses.
Package Manager
Property Description
Check Solution Package DependenciesEnvironment/Package/Check Solution
Package DependenciesBoolean
Specifies whether to check package dependencieswhen a solution is loaded.
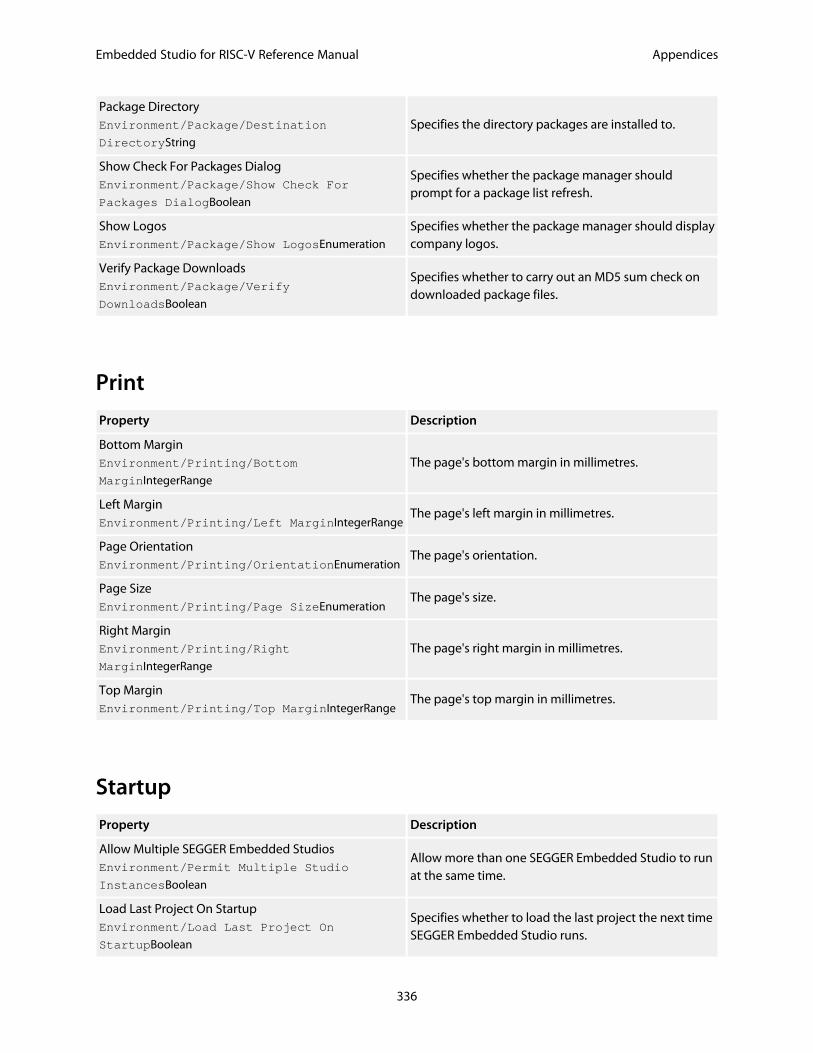
Embedded Studio for RISC-V Reference Manual Appendices
336
Package DirectoryEnvironment/Package/Destination
DirectoryString
Specifies the directory packages are installed to.
Show Check For Packages DialogEnvironment/Package/Show Check For
Packages DialogBoolean
Specifies whether the package manager shouldprompt for a package list refresh.
Show LogosEnvironment/Package/Show LogosEnumeration
Specifies whether the package manager should displaycompany logos.
Verify Package DownloadsEnvironment/Package/Verify
DownloadsBoolean
Specifies whether to carry out an MD5 sum check ondownloaded package files.
Property Description
Bottom MarginEnvironment/Printing/Bottom
MarginIntegerRange
The page's bottom margin in millimetres.
Left MarginEnvironment/Printing/Left MarginIntegerRange
The page's left margin in millimetres.
Page OrientationEnvironment/Printing/OrientationEnumeration
The page's orientation.
Page SizeEnvironment/Printing/Page SizeEnumeration
The page's size.
Right MarginEnvironment/Printing/Right
MarginIntegerRange
The page's right margin in millimetres.
Top MarginEnvironment/Printing/Top MarginIntegerRange
The page's top margin in millimetres.
Startup
Property Description
Allow Multiple SEGGER Embedded StudiosEnvironment/Permit Multiple Studio
InstancesBoolean
Allow more than one SEGGER Embedded Studio to runat the same time.
Load Last Project On StartupEnvironment/Load Last Project On
StartupBoolean
Specifies whether to load the last project the next timeSEGGER Embedded Studio runs.
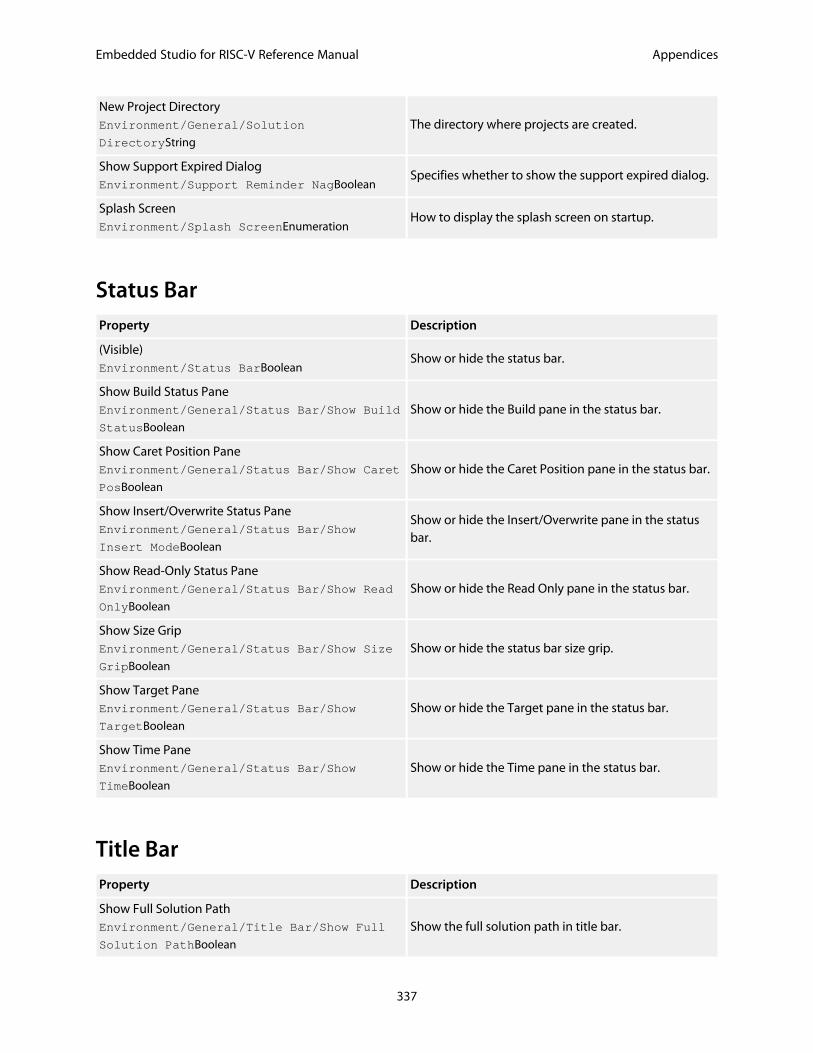
Embedded Studio for RISC-V Reference Manual Appendices
337
New Project DirectoryEnvironment/General/Solution
DirectoryString
The directory where projects are created.
Show Support Expired DialogEnvironment/Support Reminder NagBoolean
Specifies whether to show the support expired dialog.
Splash ScreenEnvironment/Splash ScreenEnumeration
How to display the splash screen on startup.
Status BarProperty Description
(Visible)Environment/Status BarBoolean
Show or hide the status bar.
Show Build Status PaneEnvironment/General/Status Bar/Show Build
StatusBoolean
Show or hide the Build pane in the status bar.
Show Caret Position PaneEnvironment/General/Status Bar/Show Caret
PosBoolean
Show or hide the Caret Position pane in the status bar.
Show Insert/Overwrite Status PaneEnvironment/General/Status Bar/Show
Insert ModeBoolean
Show or hide the Insert/Overwrite pane in the statusbar.
Show Read-Only Status PaneEnvironment/General/Status Bar/Show Read
OnlyBoolean
Show or hide the Read Only pane in the status bar.
Show Size GripEnvironment/General/Status Bar/Show Size
GripBoolean
Show or hide the status bar size grip.
Show Target PaneEnvironment/General/Status Bar/Show
TargetBoolean
Show or hide the Target pane in the status bar.
Show Time PaneEnvironment/General/Status Bar/Show
TimeBoolean
Show or hide the Time pane in the status bar.
Title BarProperty Description
Show Full Solution PathEnvironment/General/Title Bar/Show Full
Solution PathBoolean
Show the full solution path in title bar.
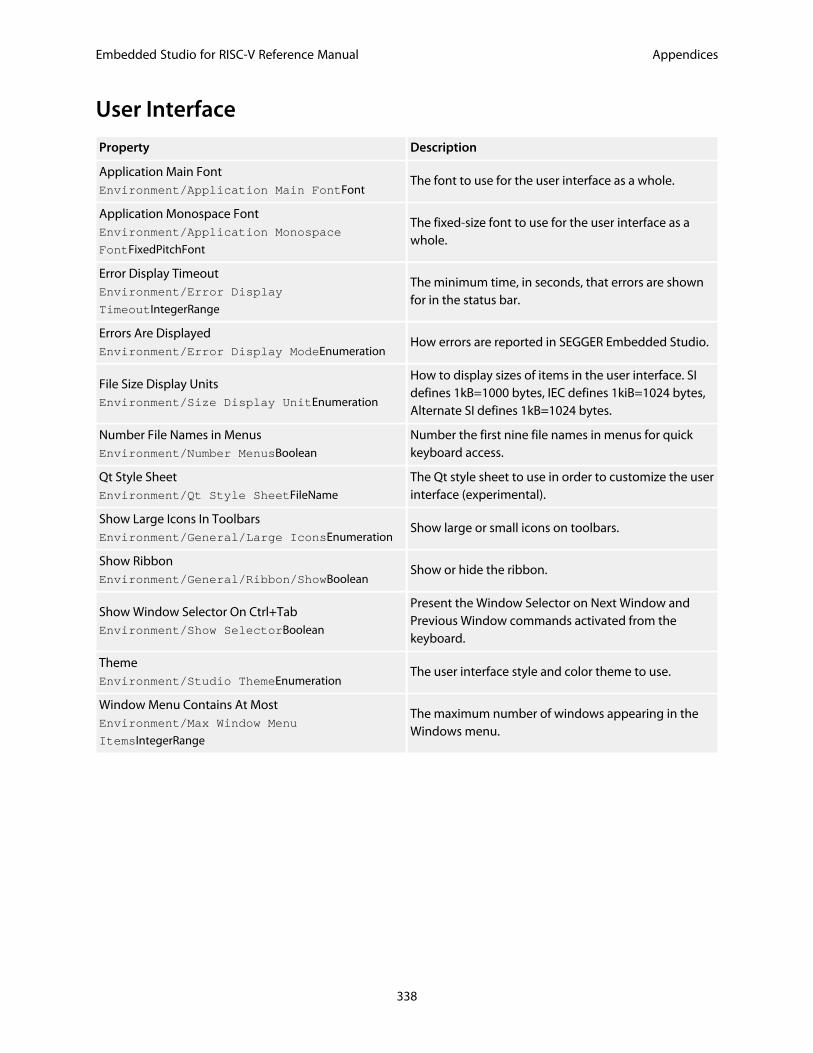
Embedded Studio for RISC-V Reference Manual Appendices
338
User Interface
Property Description
Application Main FontEnvironment/Application Main FontFont
The font to use for the user interface as a whole.
Application Monospace FontEnvironment/Application Monospace
FontFixedPitchFont
The fixed-size font to use for the user interface as awhole.
Error Display TimeoutEnvironment/Error Display
TimeoutIntegerRange
The minimum time, in seconds, that errors are shownfor in the status bar.
Errors Are DisplayedEnvironment/Error Display ModeEnumeration
How errors are reported in SEGGER Embedded Studio.
File Size Display UnitsEnvironment/Size Display UnitEnumeration
How to display sizes of items in the user interface. SIdefines 1kB=1000 bytes, IEC defines 1kiB=1024 bytes,Alternate SI defines 1kB=1024 bytes.
Number File Names in MenusEnvironment/Number MenusBoolean
Number the first nine file names in menus for quickkeyboard access.
Qt Style SheetEnvironment/Qt Style SheetFileName
The Qt style sheet to use in order to customize the userinterface (experimental).
Show Large Icons In ToolbarsEnvironment/General/Large IconsEnumeration
Show large or small icons on toolbars.
Show RibbonEnvironment/General/Ribbon/ShowBoolean
Show or hide the ribbon.
Show Window Selector On Ctrl+TabEnvironment/Show SelectorBoolean
Present the Window Selector on Next Window andPrevious Window commands activated from thekeyboard.
ThemeEnvironment/Studio ThemeEnumeration
The user interface style and color theme to use.
Window Menu Contains At MostEnvironment/Max Window Menu
ItemsIntegerRange
The maximum number of windows appearing in theWindows menu.
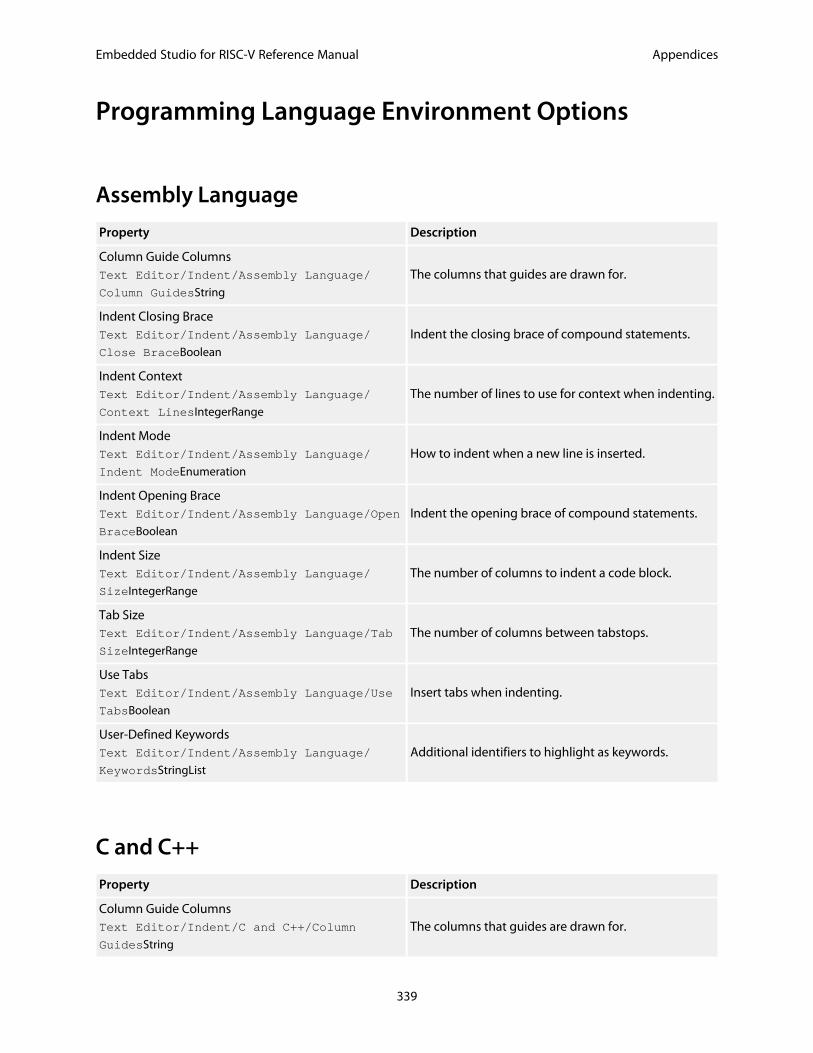
Embedded Studio for RISC-V Reference Manual Appendices
339
Programming Language Environment Options
Assembly Language
Property Description
Column Guide ColumnsText Editor/Indent/Assembly Language/
Column GuidesString
The columns that guides are drawn for.
Indent Closing BraceText Editor/Indent/Assembly Language/
Close BraceBoolean
Indent the closing brace of compound statements.
Indent ContextText Editor/Indent/Assembly Language/
Context LinesIntegerRange
The number of lines to use for context when indenting.
Indent ModeText Editor/Indent/Assembly Language/
Indent ModeEnumeration
How to indent when a new line is inserted.
Indent Opening BraceText Editor/Indent/Assembly Language/Open
BraceBoolean
Indent the opening brace of compound statements.
Indent SizeText Editor/Indent/Assembly Language/
SizeIntegerRange
The number of columns to indent a code block.
Tab SizeText Editor/Indent/Assembly Language/Tab
SizeIntegerRange
The number of columns between tabstops.
Use TabsText Editor/Indent/Assembly Language/Use
TabsBoolean
Insert tabs when indenting.
User-Defined KeywordsText Editor/Indent/Assembly Language/
KeywordsStringList
Additional identifiers to highlight as keywords.
C and C++
Property Description
Column Guide ColumnsText Editor/Indent/C and C++/Column
GuidesString
The columns that guides are drawn for.
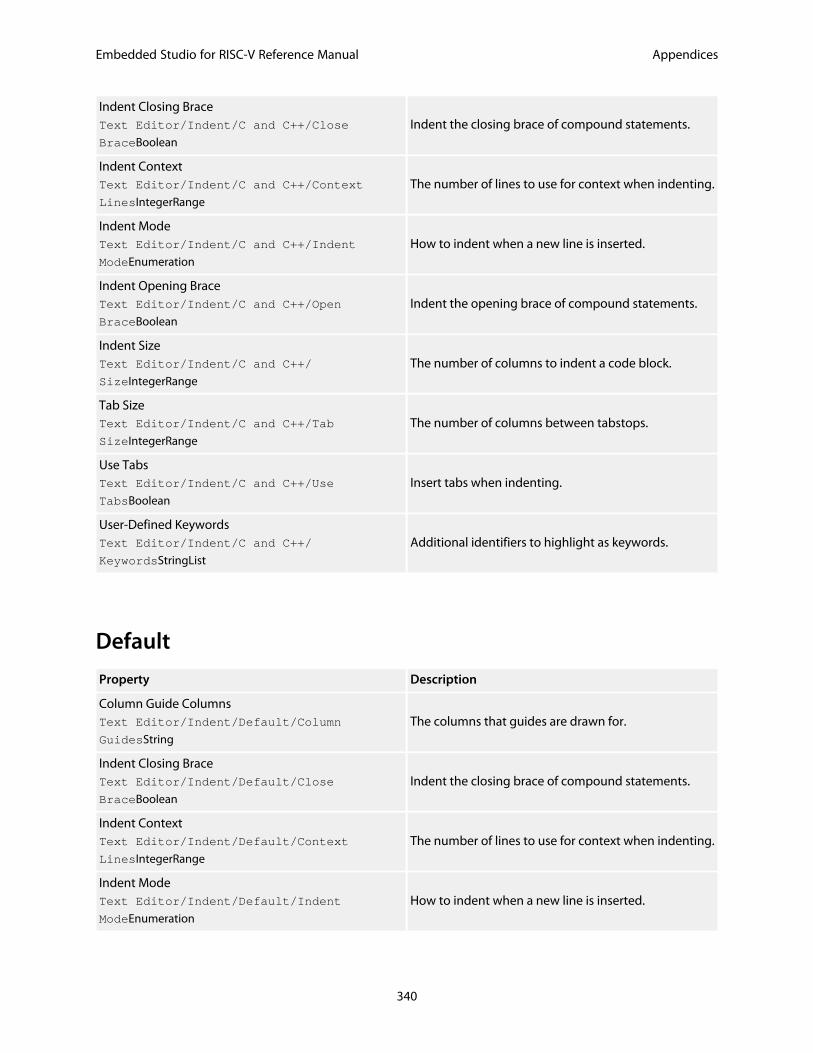
Embedded Studio for RISC-V Reference Manual Appendices
340
Indent Closing BraceText Editor/Indent/C and C++/Close
BraceBoolean
Indent the closing brace of compound statements.
Indent ContextText Editor/Indent/C and C++/Context
LinesIntegerRange
The number of lines to use for context when indenting.
Indent ModeText Editor/Indent/C and C++/Indent
ModeEnumeration
How to indent when a new line is inserted.
Indent Opening BraceText Editor/Indent/C and C++/Open
BraceBoolean
Indent the opening brace of compound statements.
Indent SizeText Editor/Indent/C and C++/
SizeIntegerRange
The number of columns to indent a code block.
Tab SizeText Editor/Indent/C and C++/Tab
SizeIntegerRange
The number of columns between tabstops.
Use TabsText Editor/Indent/C and C++/Use
TabsBoolean
Insert tabs when indenting.
User-Defined KeywordsText Editor/Indent/C and C++/
KeywordsStringList
Additional identifiers to highlight as keywords.
Default
Property Description
Column Guide ColumnsText Editor/Indent/Default/Column
GuidesString
The columns that guides are drawn for.
Indent Closing BraceText Editor/Indent/Default/Close
BraceBoolean
Indent the closing brace of compound statements.
Indent ContextText Editor/Indent/Default/Context
LinesIntegerRange
The number of lines to use for context when indenting.
Indent ModeText Editor/Indent/Default/Indent
ModeEnumeration
How to indent when a new line is inserted.
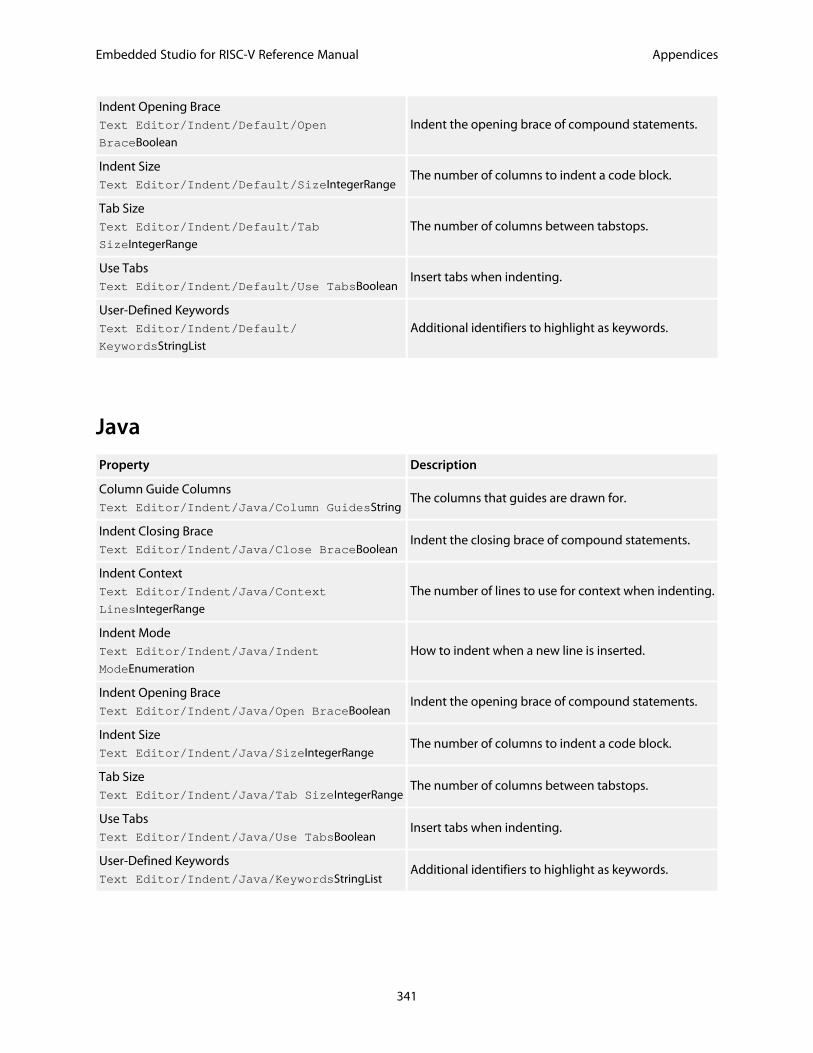
Embedded Studio for RISC-V Reference Manual Appendices
341
Indent Opening BraceText Editor/Indent/Default/Open
BraceBoolean
Indent the opening brace of compound statements.
Indent SizeText Editor/Indent/Default/SizeIntegerRange
The number of columns to indent a code block.
Tab SizeText Editor/Indent/Default/Tab
SizeIntegerRange
The number of columns between tabstops.
Use TabsText Editor/Indent/Default/Use TabsBoolean
Insert tabs when indenting.
User-Defined KeywordsText Editor/Indent/Default/
KeywordsStringList
Additional identifiers to highlight as keywords.
Java
Property Description
Column Guide ColumnsText Editor/Indent/Java/Column GuidesString
The columns that guides are drawn for.
Indent Closing BraceText Editor/Indent/Java/Close BraceBoolean
Indent the closing brace of compound statements.
Indent ContextText Editor/Indent/Java/Context
LinesIntegerRange
The number of lines to use for context when indenting.
Indent ModeText Editor/Indent/Java/Indent
ModeEnumeration
How to indent when a new line is inserted.
Indent Opening BraceText Editor/Indent/Java/Open BraceBoolean
Indent the opening brace of compound statements.
Indent SizeText Editor/Indent/Java/SizeIntegerRange
The number of columns to indent a code block.
Tab SizeText Editor/Indent/Java/Tab SizeIntegerRange
The number of columns between tabstops.
Use TabsText Editor/Indent/Java/Use TabsBoolean
Insert tabs when indenting.
User-Defined KeywordsText Editor/Indent/Java/KeywordsStringList
Additional identifiers to highlight as keywords.
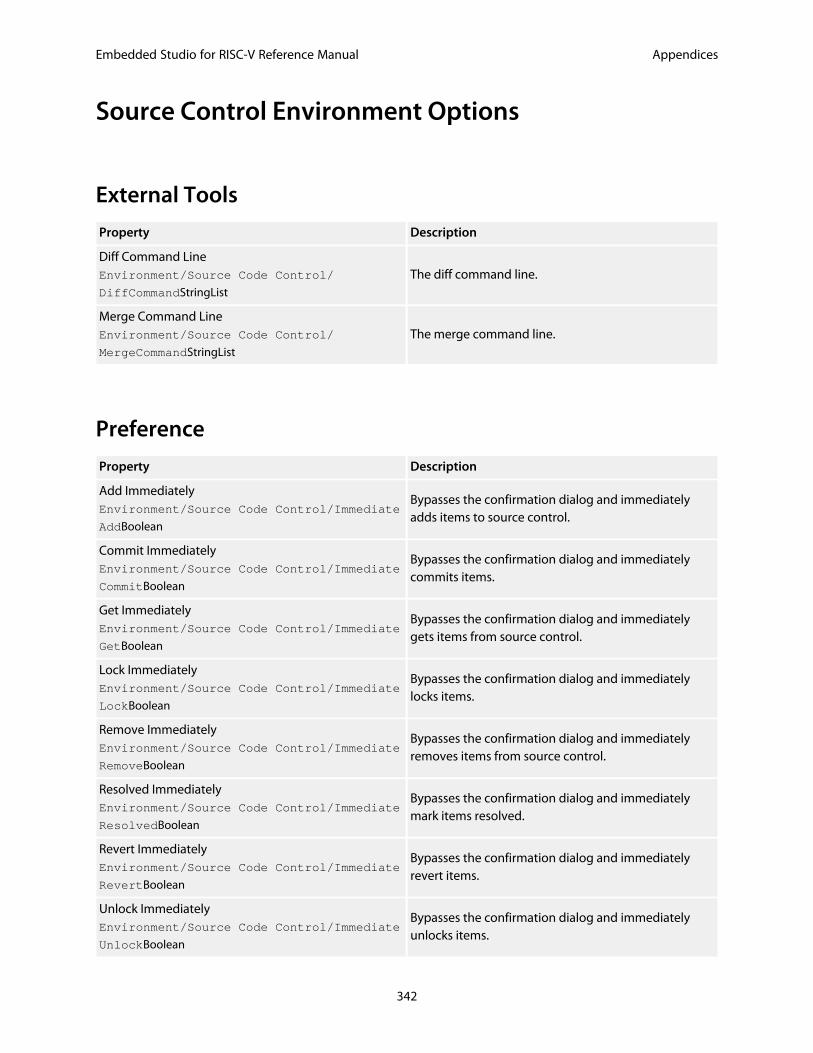
Embedded Studio for RISC-V Reference Manual Appendices
342
Source Control Environment Options
External Tools
Property Description
Diff Command LineEnvironment/Source Code Control/
DiffCommandStringList
The diff command line.
Merge Command LineEnvironment/Source Code Control/
MergeCommandStringList
The merge command line.
Preference
Property Description
Add ImmediatelyEnvironment/Source Code Control/Immediate
AddBoolean
Bypasses the confirmation dialog and immediatelyadds items to source control.
Commit ImmediatelyEnvironment/Source Code Control/Immediate
CommitBoolean
Bypasses the confirmation dialog and immediatelycommits items.
Get ImmediatelyEnvironment/Source Code Control/Immediate
GetBoolean
Bypasses the confirmation dialog and immediatelygets items from source control.
Lock ImmediatelyEnvironment/Source Code Control/Immediate
LockBoolean
Bypasses the confirmation dialog and immediatelylocks items.
Remove ImmediatelyEnvironment/Source Code Control/Immediate
RemoveBoolean
Bypasses the confirmation dialog and immediatelyremoves items from source control.
Resolved ImmediatelyEnvironment/Source Code Control/Immediate
ResolvedBoolean
Bypasses the confirmation dialog and immediatelymark items resolved.
Revert ImmediatelyEnvironment/Source Code Control/Immediate
RevertBoolean
Bypasses the confirmation dialog and immediatelyrevert items.
Unlock ImmediatelyEnvironment/Source Code Control/Immediate
UnlockBoolean
Bypasses the confirmation dialog and immediatelyunlocks items.

Embedded Studio for RISC-V Reference Manual Appendices
343
Update ImmediatelyEnvironment/Source Code Control/Immediate
UpdateBoolean
Bypasses the confirmation dialog and immediatelyupdates items.
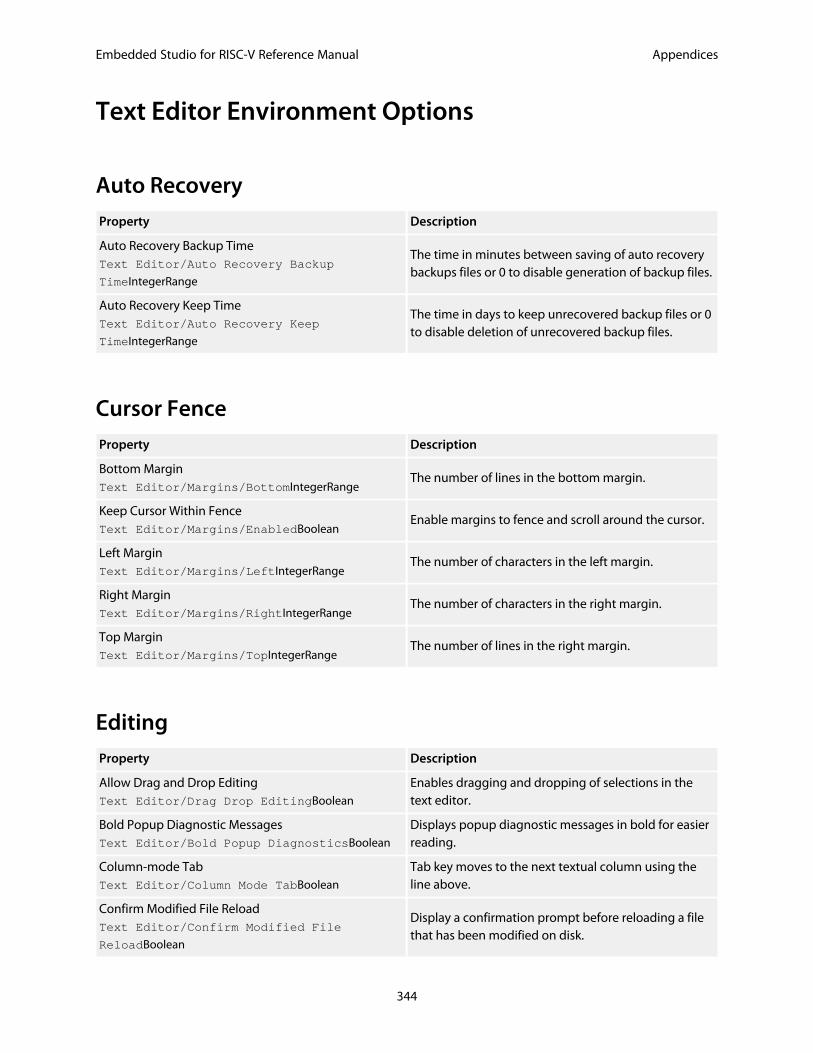
Embedded Studio for RISC-V Reference Manual Appendices
344
Text Editor Environment Options
Auto RecoveryProperty Description
Auto Recovery Backup TimeText Editor/Auto Recovery Backup
TimeIntegerRange
The time in minutes between saving of auto recoverybackups files or 0 to disable generation of backup files.
Auto Recovery Keep TimeText Editor/Auto Recovery Keep
TimeIntegerRange
The time in days to keep unrecovered backup files or 0to disable deletion of unrecovered backup files.
Cursor FenceProperty Description
Bottom MarginText Editor/Margins/BottomIntegerRange
The number of lines in the bottom margin.
Keep Cursor Within FenceText Editor/Margins/EnabledBoolean
Enable margins to fence and scroll around the cursor.
Left MarginText Editor/Margins/LeftIntegerRange
The number of characters in the left margin.
Right MarginText Editor/Margins/RightIntegerRange
The number of characters in the right margin.
Top MarginText Editor/Margins/TopIntegerRange
The number of lines in the right margin.
EditingProperty Description
Allow Drag and Drop EditingText Editor/Drag Drop EditingBoolean
Enables dragging and dropping of selections in thetext editor.
Bold Popup Diagnostic MessagesText Editor/Bold Popup DiagnosticsBoolean
Displays popup diagnostic messages in bold for easierreading.
Column-mode TabText Editor/Column Mode TabBoolean
Tab key moves to the next textual column using theline above.
Confirm Modified File ReloadText Editor/Confirm Modified File
ReloadBoolean
Display a confirmation prompt before reloading a filethat has been modified on disk.
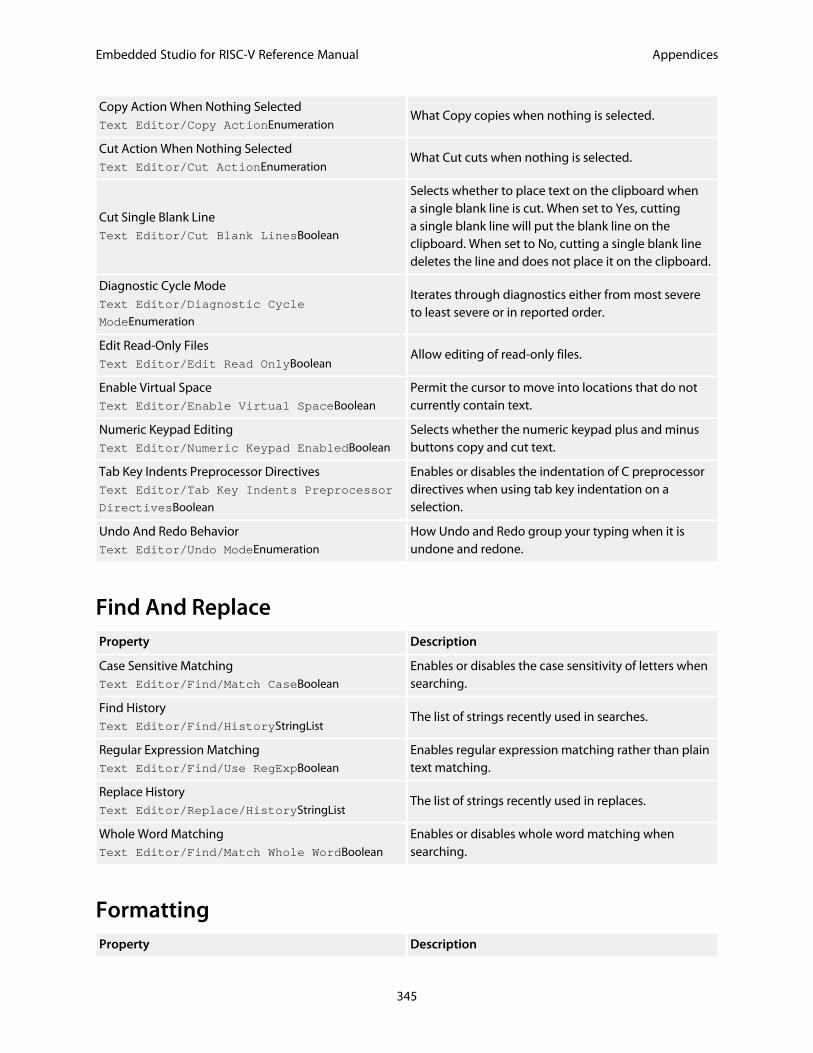
Embedded Studio for RISC-V Reference Manual Appendices
345
Copy Action When Nothing SelectedText Editor/Copy ActionEnumeration
What Copy copies when nothing is selected.
Cut Action When Nothing SelectedText Editor/Cut ActionEnumeration
What Cut cuts when nothing is selected.
Cut Single Blank LineText Editor/Cut Blank LinesBoolean
Selects whether to place text on the clipboard whena single blank line is cut. When set to Yes, cuttinga single blank line will put the blank line on theclipboard. When set to No, cutting a single blank linedeletes the line and does not place it on the clipboard.
Diagnostic Cycle ModeText Editor/Diagnostic Cycle
ModeEnumeration
Iterates through diagnostics either from most severeto least severe or in reported order.
Edit Read-Only FilesText Editor/Edit Read OnlyBoolean
Allow editing of read-only files.
Enable Virtual SpaceText Editor/Enable Virtual SpaceBoolean
Permit the cursor to move into locations that do notcurrently contain text.
Numeric Keypad EditingText Editor/Numeric Keypad EnabledBoolean
Selects whether the numeric keypad plus and minusbuttons copy and cut text.
Tab Key Indents Preprocessor DirectivesText Editor/Tab Key Indents Preprocessor
DirectivesBoolean
Enables or disables the indentation of C preprocessordirectives when using tab key indentation on aselection.
Undo And Redo BehaviorText Editor/Undo ModeEnumeration
How Undo and Redo group your typing when it isundone and redone.
Find And ReplaceProperty Description
Case Sensitive MatchingText Editor/Find/Match CaseBoolean
Enables or disables the case sensitivity of letters whensearching.
Find HistoryText Editor/Find/HistoryStringList
The list of strings recently used in searches.
Regular Expression MatchingText Editor/Find/Use RegExpBoolean
Enables regular expression matching rather than plaintext matching.
Replace HistoryText Editor/Replace/HistoryStringList
The list of strings recently used in replaces.
Whole Word MatchingText Editor/Find/Match Whole WordBoolean
Enables or disables whole word matching whensearching.
FormattingProperty Description
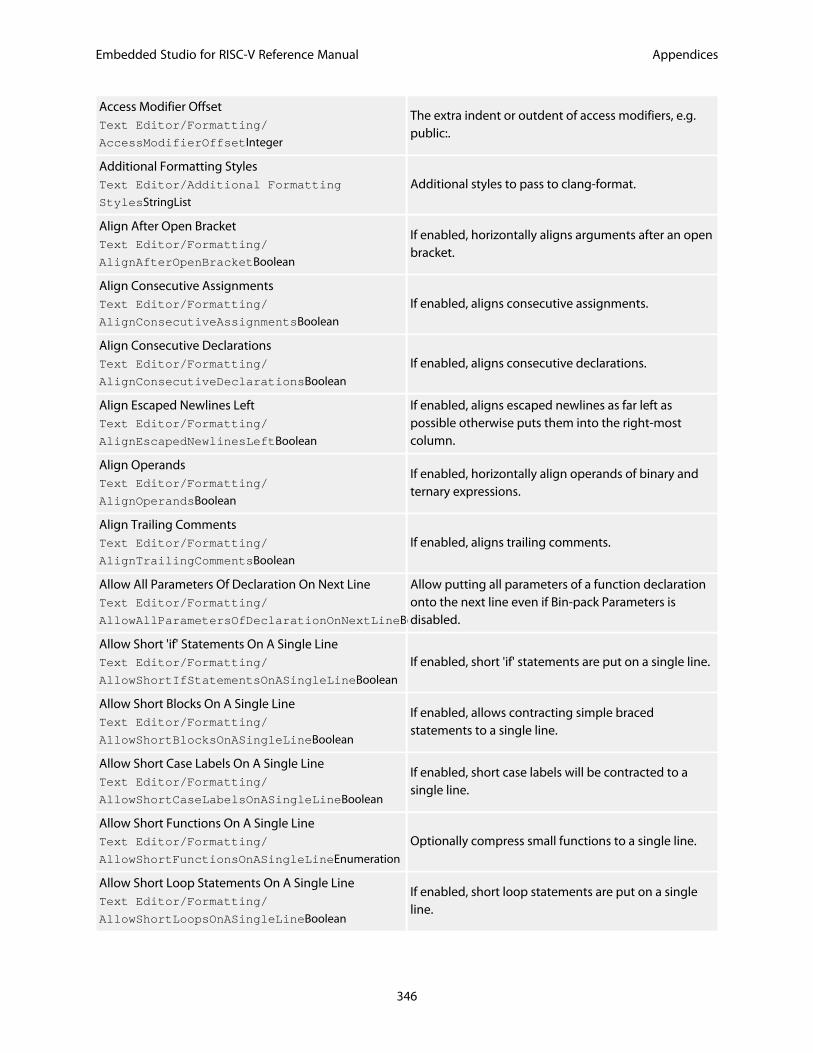
Embedded Studio for RISC-V Reference Manual Appendices
346
Access Modifier OffsetText Editor/Formatting/
AccessModifierOffsetInteger
The extra indent or outdent of access modifiers, e.g.public:.
Additional Formatting StylesText Editor/Additional Formatting
StylesStringList
Additional styles to pass to clang-format.
Align After Open BracketText Editor/Formatting/
AlignAfterOpenBracketBoolean
If enabled, horizontally aligns arguments after an openbracket.
Align Consecutive AssignmentsText Editor/Formatting/
AlignConsecutiveAssignmentsBoolean
If enabled, aligns consecutive assignments.
Align Consecutive DeclarationsText Editor/Formatting/
AlignConsecutiveDeclarationsBoolean
If enabled, aligns consecutive declarations.
Align Escaped Newlines LeftText Editor/Formatting/
AlignEscapedNewlinesLeftBoolean
If enabled, aligns escaped newlines as far left aspossible otherwise puts them into the right-mostcolumn.
Align OperandsText Editor/Formatting/
AlignOperandsBoolean
If enabled, horizontally align operands of binary andternary expressions.
Align Trailing CommentsText Editor/Formatting/
AlignTrailingCommentsBoolean
If enabled, aligns trailing comments.
Allow All Parameters Of Declaration On Next LineText Editor/Formatting/
AllowAllParametersOfDeclarationOnNextLineBoolean
Allow putting all parameters of a function declarationonto the next line even if Bin-pack Parameters isdisabled.
Allow Short 'if' Statements On A Single LineText Editor/Formatting/
AllowShortIfStatementsOnASingleLineBoolean
If enabled, short 'if' statements are put on a single line.
Allow Short Blocks On A Single LineText Editor/Formatting/
AllowShortBlocksOnASingleLineBoolean
If enabled, allows contracting simple bracedstatements to a single line.
Allow Short Case Labels On A Single LineText Editor/Formatting/
AllowShortCaseLabelsOnASingleLineBoolean
If enabled, short case labels will be contracted to asingle line.
Allow Short Functions On A Single LineText Editor/Formatting/
AllowShortFunctionsOnASingleLineEnumeration
Optionally compress small functions to a single line.
Allow Short Loop Statements On A Single LineText Editor/Formatting/
AllowShortLoopsOnASingleLineBoolean
If enabled, short loop statements are put on a singleline.
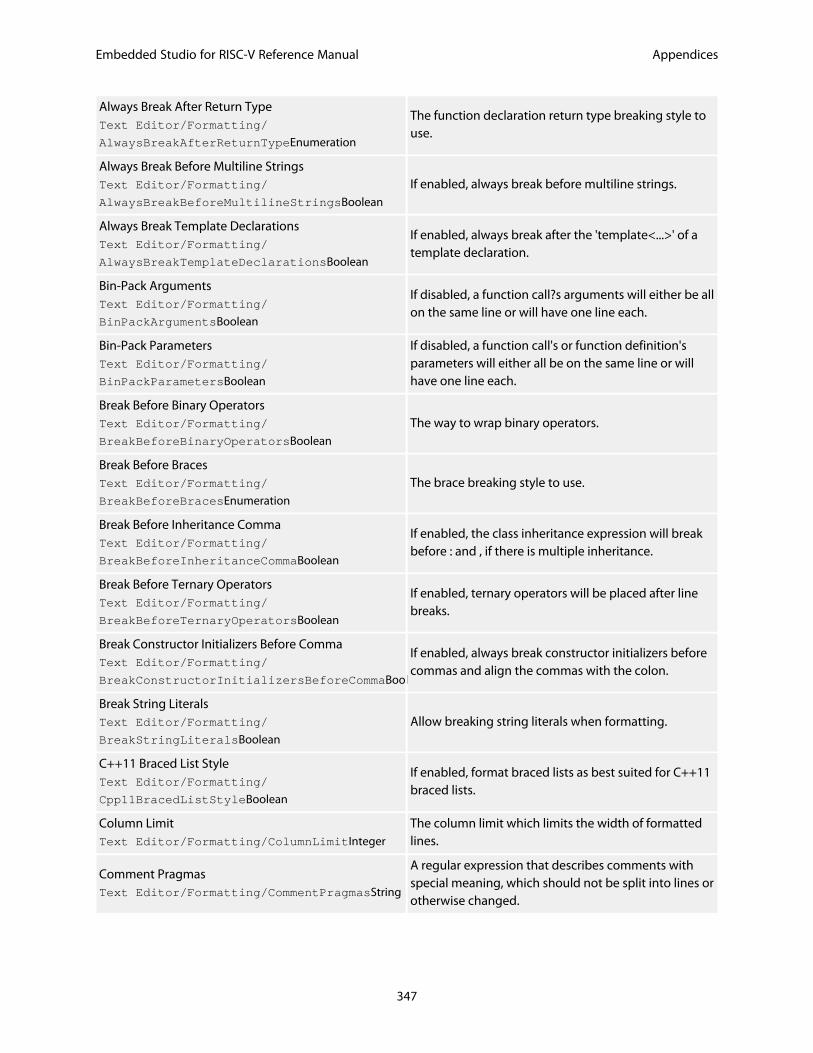
Embedded Studio for RISC-V Reference Manual Appendices
347
Always Break After Return TypeText Editor/Formatting/
AlwaysBreakAfterReturnTypeEnumeration
The function declaration return type breaking style touse.
Always Break Before Multiline StringsText Editor/Formatting/
AlwaysBreakBeforeMultilineStringsBoolean
If enabled, always break before multiline strings.
Always Break Template DeclarationsText Editor/Formatting/
AlwaysBreakTemplateDeclarationsBoolean
If enabled, always break after the 'template<...>' of atemplate declaration.
Bin-Pack ArgumentsText Editor/Formatting/
BinPackArgumentsBoolean
If disabled, a function call?s arguments will either be allon the same line or will have one line each.
Bin-Pack ParametersText Editor/Formatting/
BinPackParametersBoolean
If disabled, a function call's or function definition'sparameters will either all be on the same line or willhave one line each.
Break Before Binary OperatorsText Editor/Formatting/
BreakBeforeBinaryOperatorsBoolean
The way to wrap binary operators.
Break Before BracesText Editor/Formatting/
BreakBeforeBracesEnumeration
The brace breaking style to use.
Break Before Inheritance CommaText Editor/Formatting/
BreakBeforeInheritanceCommaBoolean
If enabled, the class inheritance expression will breakbefore : and , if there is multiple inheritance.
Break Before Ternary OperatorsText Editor/Formatting/
BreakBeforeTernaryOperatorsBoolean
If enabled, ternary operators will be placed after linebreaks.
Break Constructor Initializers Before CommaText Editor/Formatting/
BreakConstructorInitializersBeforeCommaBoolean
If enabled, always break constructor initializers beforecommas and align the commas with the colon.
Break String LiteralsText Editor/Formatting/
BreakStringLiteralsBoolean
Allow breaking string literals when formatting.
C++11 Braced List StyleText Editor/Formatting/
Cpp11BracedListStyleBoolean
If enabled, format braced lists as best suited for C++11braced lists.
Column LimitText Editor/Formatting/ColumnLimitInteger
The column limit which limits the width of formattedlines.
Comment PragmasText Editor/Formatting/CommentPragmasString
A regular expression that describes comments withspecial meaning, which should not be split into lines orotherwise changed.
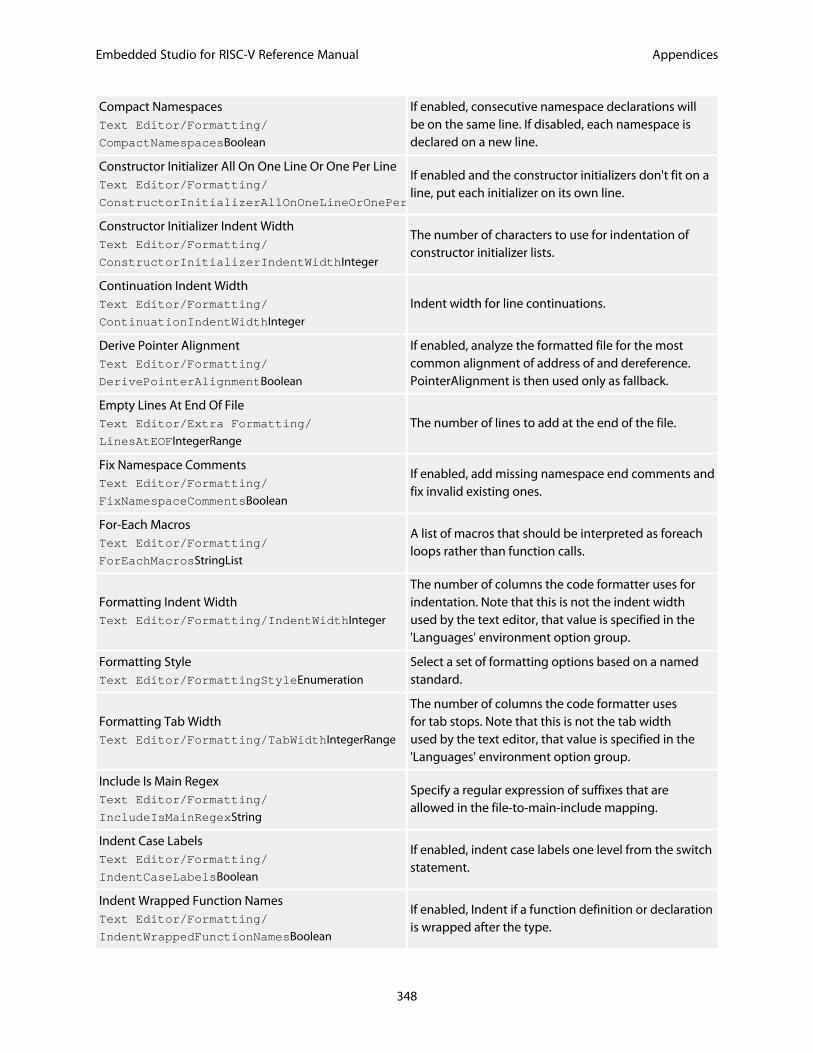
Embedded Studio for RISC-V Reference Manual Appendices
348
Compact NamespacesText Editor/Formatting/
CompactNamespacesBoolean
If enabled, consecutive namespace declarations willbe on the same line. If disabled, each namespace isdeclared on a new line.
Constructor Initializer All On One Line Or One Per LineText Editor/Formatting/
ConstructorInitializerAllOnOneLineOrOnePerLineBoolean
If enabled and the constructor initializers don't fit on aline, put each initializer on its own line.
Constructor Initializer Indent WidthText Editor/Formatting/
ConstructorInitializerIndentWidthInteger
The number of characters to use for indentation ofconstructor initializer lists.
Continuation Indent WidthText Editor/Formatting/
ContinuationIndentWidthInteger
Indent width for line continuations.
Derive Pointer AlignmentText Editor/Formatting/
DerivePointerAlignmentBoolean
If enabled, analyze the formatted file for the mostcommon alignment of address of and dereference.PointerAlignment is then used only as fallback.
Empty Lines At End Of FileText Editor/Extra Formatting/
LinesAtEOFIntegerRange
The number of lines to add at the end of the file.
Fix Namespace CommentsText Editor/Formatting/
FixNamespaceCommentsBoolean
If enabled, add missing namespace end comments andfix invalid existing ones.
For-Each MacrosText Editor/Formatting/
ForEachMacrosStringList
A list of macros that should be interpreted as foreachloops rather than function calls.
Formatting Indent WidthText Editor/Formatting/IndentWidthInteger
The number of columns the code formatter uses forindentation. Note that this is not the indent widthused by the text editor, that value is specified in the'Languages' environment option group.
Formatting StyleText Editor/FormattingStyleEnumeration
Select a set of formatting options based on a namedstandard.
Formatting Tab WidthText Editor/Formatting/TabWidthIntegerRange
The number of columns the code formatter usesfor tab stops. Note that this is not the tab widthused by the text editor, that value is specified in the'Languages' environment option group.
Include Is Main RegexText Editor/Formatting/
IncludeIsMainRegexString
Specify a regular expression of suffixes that areallowed in the file-to-main-include mapping.
Indent Case LabelsText Editor/Formatting/
IndentCaseLabelsBoolean
If enabled, indent case labels one level from the switchstatement.
Indent Wrapped Function NamesText Editor/Formatting/
IndentWrappedFunctionNamesBoolean
If enabled, Indent if a function definition or declarationis wrapped after the type.
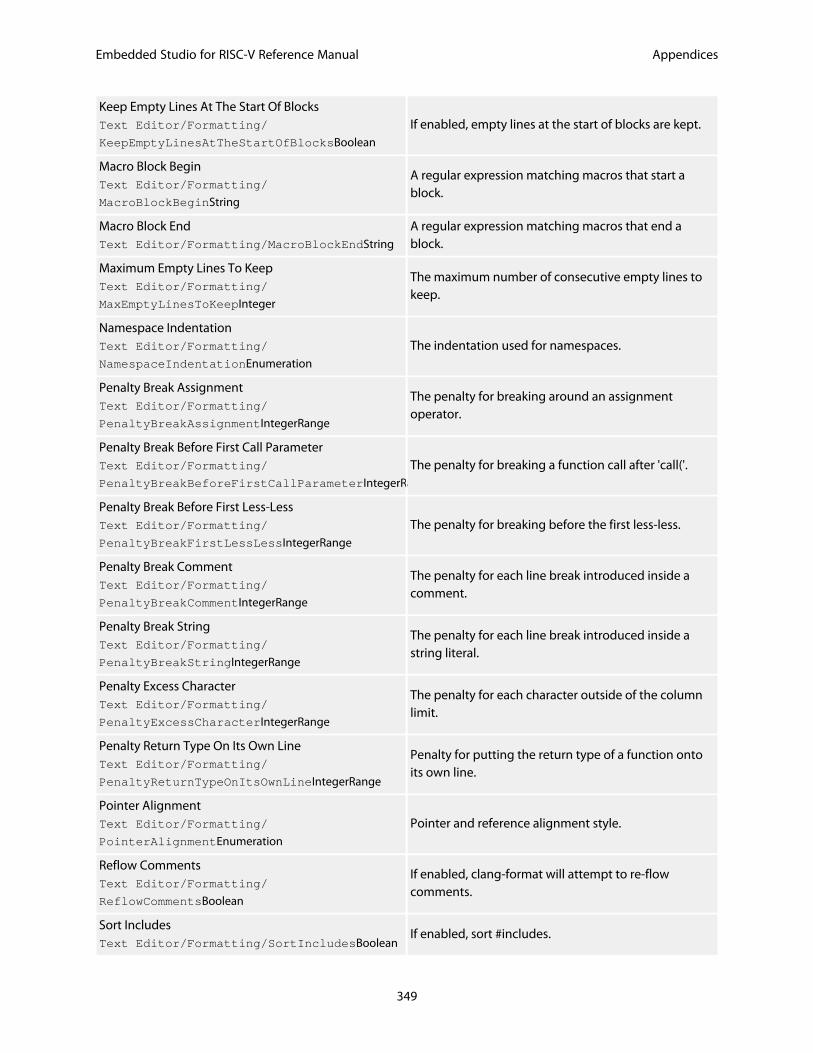
Embedded Studio for RISC-V Reference Manual Appendices
349
Keep Empty Lines At The Start Of BlocksText Editor/Formatting/
KeepEmptyLinesAtTheStartOfBlocksBoolean
If enabled, empty lines at the start of blocks are kept.
Macro Block BeginText Editor/Formatting/
MacroBlockBeginString
A regular expression matching macros that start ablock.
Macro Block EndText Editor/Formatting/MacroBlockEndString
A regular expression matching macros that end ablock.
Maximum Empty Lines To KeepText Editor/Formatting/
MaxEmptyLinesToKeepInteger
The maximum number of consecutive empty lines tokeep.
Namespace IndentationText Editor/Formatting/
NamespaceIndentationEnumeration
The indentation used for namespaces.
Penalty Break AssignmentText Editor/Formatting/
PenaltyBreakAssignmentIntegerRange
The penalty for breaking around an assignmentoperator.
Penalty Break Before First Call ParameterText Editor/Formatting/
PenaltyBreakBeforeFirstCallParameterIntegerRange
The penalty for breaking a function call after 'call('.
Penalty Break Before First Less-LessText Editor/Formatting/
PenaltyBreakFirstLessLessIntegerRange
The penalty for breaking before the first less-less.
Penalty Break CommentText Editor/Formatting/
PenaltyBreakCommentIntegerRange
The penalty for each line break introduced inside acomment.
Penalty Break StringText Editor/Formatting/
PenaltyBreakStringIntegerRange
The penalty for each line break introduced inside astring literal.
Penalty Excess CharacterText Editor/Formatting/
PenaltyExcessCharacterIntegerRange
The penalty for each character outside of the columnlimit.
Penalty Return Type On Its Own LineText Editor/Formatting/
PenaltyReturnTypeOnItsOwnLineIntegerRange
Penalty for putting the return type of a function ontoits own line.
Pointer AlignmentText Editor/Formatting/
PointerAlignmentEnumeration
Pointer and reference alignment style.
Reflow CommentsText Editor/Formatting/
ReflowCommentsBoolean
If enabled, clang-format will attempt to re-flowcomments.
Sort IncludesText Editor/Formatting/SortIncludesBoolean
If enabled, sort #includes.

Embedded Studio for RISC-V Reference Manual Appendices
350
Sort Using DeclarationsText Editor/Formatting/
SortUsingDeclarationsBoolean
If enabled, sort using declarations.
Space After C Style CastText Editor/Formatting/
SpaceAfterCStyleCastBoolean
If enabled, a space may be inserted after C style casts.
Space After Template KeywordText Editor/Formatting/
SpaceAfterTemplateKeywordBoolean
If enabled, a space will be inserted after the ?template?keyword.
Space Before Assignment OperatorsText Editor/Formatting/
SpaceBeforeAssignmentOperatorsBoolean
If disabled spaces will be removed before assignmentoperators.
Space Before ParenthesesText Editor/Formatting/
SpaceBeforeParensEnumeration
Defines in which cases to put a space before openingparentheses.
Space In Empty ParenthesesText Editor/Formatting/
SpaceInEmptyParenthesesBoolean
If enabled, spaces may be inserted into '()'.
Spaces Before Trailing CommentsText Editor/Formatting/
SpacesBeforeTrailingCommentsIntegerRange
The number of spaces before trailing line comments.
Spaces In AnglesText Editor/Formatting/
SpacesInAnglesBoolean
If enabled, spaces will be inserted around the anglebrackets in template argument lists.
Spaces In C-style Cast ParenthesesText Editor/Formatting/
SpacesInCStyleCastParenthesesBoolean
If enabled, spaces may be inserted into C style casts.
Spaces In Container LiteralsText Editor/Formatting/
SpacesInContainerLiteralsBoolean
If enabled, spaces are inserted inside container literals.
Spaces In ParenthesesText Editor/Formatting/
SpacesInParenthesesBoolean
If true, spaces will be inserted after '(' and before ')'.
Spaces In Square BracketsText Editor/Formatting/
SpacesInSquareBracketsBoolean
If true, spaces will be inserted after '[' and before ']'.
StandardText Editor/Formatting/StandardEnumeration
Format compatible with this standard
Tab StyleText Editor/Formatting/UseTabEnumeration
The way to use hard tab characters in the resulting file.
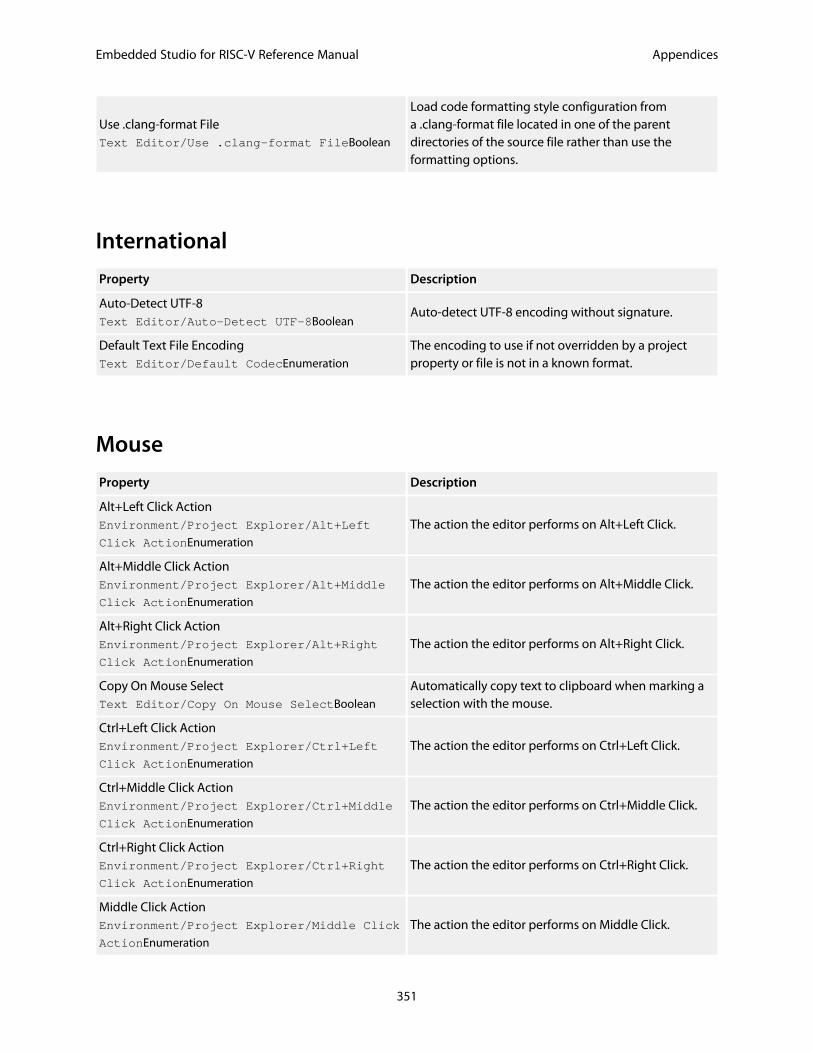
Embedded Studio for RISC-V Reference Manual Appendices
351
Use .clang-format FileText Editor/Use .clang-format FileBoolean
Load code formatting style configuration froma .clang-format file located in one of the parentdirectories of the source file rather than use theformatting options.
International
Property Description
Auto-Detect UTF-8Text Editor/Auto-Detect UTF-8Boolean
Auto-detect UTF-8 encoding without signature.
Default Text File EncodingText Editor/Default CodecEnumeration
The encoding to use if not overridden by a projectproperty or file is not in a known format.
Mouse
Property Description
Alt+Left Click ActionEnvironment/Project Explorer/Alt+Left
Click ActionEnumeration
The action the editor performs on Alt+Left Click.
Alt+Middle Click ActionEnvironment/Project Explorer/Alt+Middle
Click ActionEnumeration
The action the editor performs on Alt+Middle Click.
Alt+Right Click ActionEnvironment/Project Explorer/Alt+Right
Click ActionEnumeration
The action the editor performs on Alt+Right Click.
Copy On Mouse SelectText Editor/Copy On Mouse SelectBoolean
Automatically copy text to clipboard when marking aselection with the mouse.
Ctrl+Left Click ActionEnvironment/Project Explorer/Ctrl+Left
Click ActionEnumeration
The action the editor performs on Ctrl+Left Click.
Ctrl+Middle Click ActionEnvironment/Project Explorer/Ctrl+Middle
Click ActionEnumeration
The action the editor performs on Ctrl+Middle Click.
Ctrl+Right Click ActionEnvironment/Project Explorer/Ctrl+Right
Click ActionEnumeration
The action the editor performs on Ctrl+Right Click.
Middle Click ActionEnvironment/Project Explorer/Middle Click
ActionEnumeration
The action the editor performs on Middle Click.
Embedded Studio for RISC-V Reference Manual Appendices
352
Mouse Wheel Adjusts Font SizeText Editor/Mouse Wheel Adjusts Font
SizeBoolean
Enable or disable resizing of font by mouse wheelwhen CTRL key pressed.
Shift+Middle Click ActionEnvironment/Project Explorer/Shift+Middle
Click ActionEnumeration
The action the editor performs on Shift+Middle Click.
Shift+Right Click ActionEnvironment/Project Explorer/Shift+Right
Click ActionEnumeration
The action the editor performs on Shift+Right Click.
Programmer AssistanceProperty Description
ATTENTION Tag ListText Editor/ATTENTION TagsStringList
Set the tags to display as ATTENTION comments.
Ask For IndexText Editor/Ask For IndexBoolean
Ask to index the project if goto symbol fails in currenteditor context.
Auto-Comment TextText Editor/Auto CommentBoolean
Enable or disable automatically swappingcommenting on source lines by typing '/' with anactive selection.
Auto-Surround TextText Editor/Auto SurroundBoolean
Enable or disable automatically surrounding selectedtext when typing triangular brackets, quotation marks,parentheses, brackets, or braces.
Check SpellingText Editor/Spell CheckingBoolean
Enable spell checking in comments.
Code Completion Replaces Existing WordText Editor/Completion Replaces Existing
WordBoolean
Replace existing word with completion suggestion ifcursor is located on one.
Code Completion Suggestion Selection KeyText Editor/Suggestion Selection
KeyEnumeration
The key used to select a code completion suggestion.
Display Code Completion Suggestions While TypingText Editor/Suggest Completion While
TypingBoolean
Enable code completion as you type without needingto use the show suggestions key (Ctrl+J).
Enable Popup DiagnosticsText Editor/Enable Popup
DiagnosticsBoolean
Enables on-screen diagnostics in the text editor.
FIXME Tag ListText Editor/FIXME TagsStringList
Set the tags to display as FIXME comments.
Inactive Code OpacityText Editor/Inactive Code
OpacityIntegerRange
Specifies the opacity of code that has beenconditionally excluded by the preprocessor.
Embedded Studio for RISC-V Reference Manual Appendices
353
Include Preprocessor Definitions in SuggestionsText Editor/Preprocessor Definition
SuggestionsBoolean
Include or exclude preprocessor definitions in codecompletion suggestions.
Include Templates in SuggestionsText Editor/Template SuggestionsBoolean
Include or exclude templates in code completionsuggestions.
Lint Tag ListText Editor/LINT TagsStringList
Set the tags to display as Lint directives.
Show Inactive CodeText Editor/Show Inactive CodeBoolean
Show code that has been conditionally excluded bythe preprocessor.
Show Symbol Declaration TooltipsText Editor/Show TooltipBoolean
Show tooltips when hovering over symbols.
Template Characters To MatchText Editor/Template Suggestions
CharactersIntegerRange
The number of characters to match before suggestinga template.
SaveProperty Description
Backup File History DepthText Editor/Backup File DepthIntegerRange
The number of backup files to keep when saving anexisting file.
Default Line EndingsText Editor/Default Line EndingsEnumeration
The line ending format to use for a new file or a filewhere the existing line ending format cannot bedetermined.
Delete Trailing Space On SaveText Editor/Delete Trailing Space On
SaveBoolean
Deletes trailing whitespace from each line when a fileis saved.
Tab Cleanup On SaveText Editor/Cleanup Tabs On SaveEnumeration
Cleans up tabs when a file is saved.
Visual AppearanceProperty Description
FontText Editor/FontFixedPitchFont
The font to use for text editors.
Font RenderingText Editor/Font RenderingEnumeration
The font rendering scheme to use in text editors.
Font Smoothing ThresholdText Editor/Antialias ThresholdIntegerRange
The minimum size for font smoothing: font sizessmaller than this will have antialiasing turned off.
Hide Cursor When TypingText Editor/Hide Cursor When TypingBoolean
Hide or show the I-beam cursor when you start to type.
Embedded Studio for RISC-V Reference Manual Appendices
354
Highlight All Selected TextText Editor/Highlight All Selected
TextBoolean
Enable or disable visually highlighting all text thatmatches the current selection.
Highlight Cursor LineText Editor/Highlight Cursor LineBoolean
Enable or disable visually highlighting the cursor line.
Horizontal Scroll BarText Editor/HScroll BarEnumeration
Show or hide the horizontal scroll bar.
Insert Caret StyleText Editor/Insert Caret StyleEnumeration
How the caret is displayed with the editor in insertmode.
Line NumbersText Editor/Line Number ModeEnumeration
How often line numbers are displayed in the margin.
Mate Match Off ScreenText Editor/Mate Match Off ScreenBoolean
Specifies whether braces, brackets, and parenthesesare matched when off screen.
Mate Matching ModeText Editor/Mate Matching ModeEnumeration
Controls when braces, brackets, and parentheses arematched.
Minimum Scroll WidthText Editor/Minimum Scroll WidthIntegerRange
Specifies the minimum width of the scrolling region incharacters.
Overwrite Caret StyleText Editor/Overwrite Caret
StyleEnumeration
How the caret is displayed with the editor in overwritemode.
Selection OpacityText Editor/Selection OpacityIntegerRange
Specifies the opacity of text selection.
Show Bookmarks In Vertical Scroll BarText Editor/Show Bookmarks In Vertical
Scroll BarBoolean
Annotate the vertical scroll bar with bookmarkpositions.
Show Breakpoints In Vertical Scroll BarText Editor/Show Breakpoints In Vertical
Scroll BarBoolean
Annotate the vertical scroll bar with breakpointpositions.
Show Caret Position In Vertical Scroll BarText Editor/Show Caret In Vertical Scroll
BarBoolean
Annotate the vertical scroll bar with the caret'sposition within the document.
Show Diagnostic Icons In GutterText Editor/Diagnostic IconsBoolean
Enables display of diagnostic icons in the icon gutter.
Show Errors In Vertical Scroll BarText Editor/Show Errors In Vertical
Scroll BarBoolean
Annotate the vertical scroll bar with error positions.
Show Fold GutterText Editor/Fold GutterBoolean
Show or hide the left-hand gutter containing foldingcontrols.
Show Icon GutterText Editor/Icon GutterBoolean
Show or hide the left-hand gutter containingbreakpoint, bookmark, and optional diagnostic icons.
Embedded Studio for RISC-V Reference Manual Appendices
355
Show Mini ToolbarText Editor/Mini ToolbarBoolean
Show the mini toolbar when selecting text with themouse.
Show ToolbarText Editor/ShowWidgetStripBoolean
Show or hide the Editor toolbar in the dock window.
Show Warnings In Vertical Scroll BarText Editor/Show Warnings In Vertical
Scroll BarBoolean
Annotate the vertical scroll bar with warning positions.
Use I-beam CursorText Editor/Ibeam cursorBoolean
Show an I-beam or arrow cursor in the text editor.
Vertical Scroll BarText Editor/VScroll BarEnumeration
Show or hide the vertical scroll bar.
View WhitespaceText Editor/View WhitespaceBoolean
Make whitespace characters visible in the text editor.
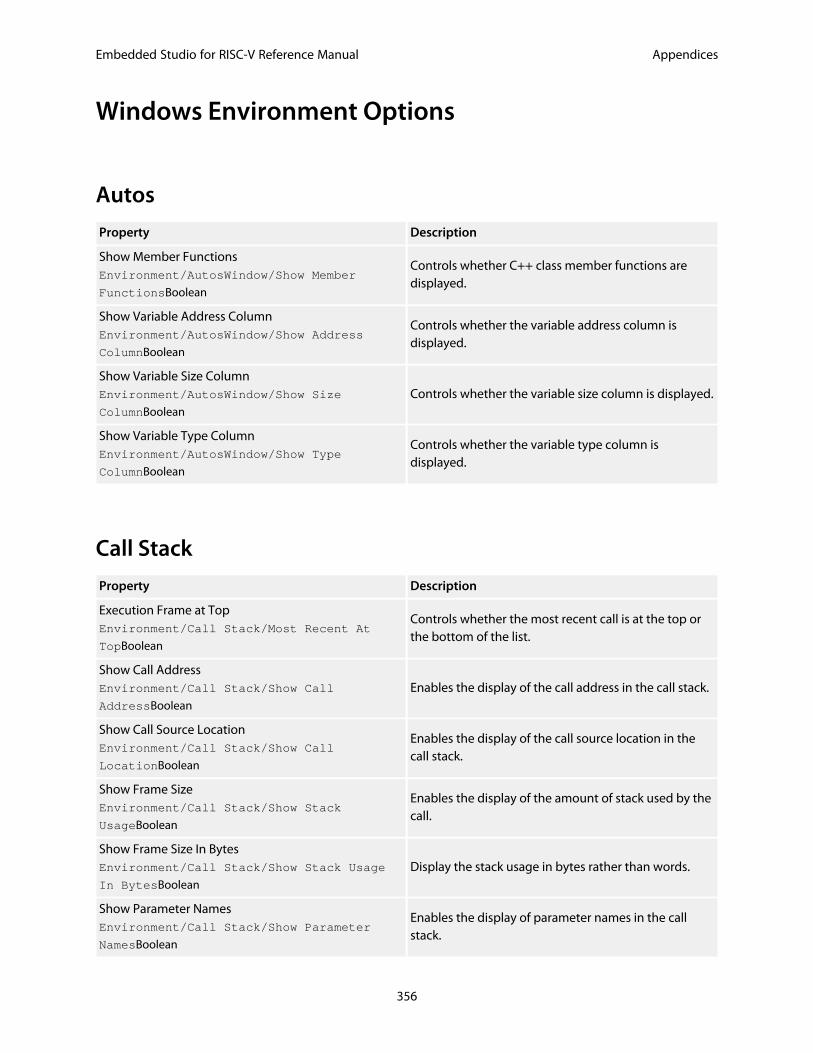
Embedded Studio for RISC-V Reference Manual Appendices
356
Windows Environment Options
Autos
Property Description
Show Member FunctionsEnvironment/AutosWindow/Show Member
FunctionsBoolean
Controls whether C++ class member functions aredisplayed.
Show Variable Address ColumnEnvironment/AutosWindow/Show Address
ColumnBoolean
Controls whether the variable address column isdisplayed.
Show Variable Size ColumnEnvironment/AutosWindow/Show Size
ColumnBoolean
Controls whether the variable size column is displayed.
Show Variable Type ColumnEnvironment/AutosWindow/Show Type
ColumnBoolean
Controls whether the variable type column isdisplayed.
Call Stack
Property Description
Execution Frame at TopEnvironment/Call Stack/Most Recent At
TopBoolean
Controls whether the most recent call is at the top orthe bottom of the list.
Show Call AddressEnvironment/Call Stack/Show Call
AddressBoolean
Enables the display of the call address in the call stack.
Show Call Source LocationEnvironment/Call Stack/Show Call
LocationBoolean
Enables the display of the call source location in thecall stack.
Show Frame SizeEnvironment/Call Stack/Show Stack
UsageBoolean
Enables the display of the amount of stack used by thecall.
Show Frame Size In BytesEnvironment/Call Stack/Show Stack Usage
In BytesBoolean
Display the stack usage in bytes rather than words.
Show Parameter NamesEnvironment/Call Stack/Show Parameter
NamesBoolean
Enables the display of parameter names in the callstack.
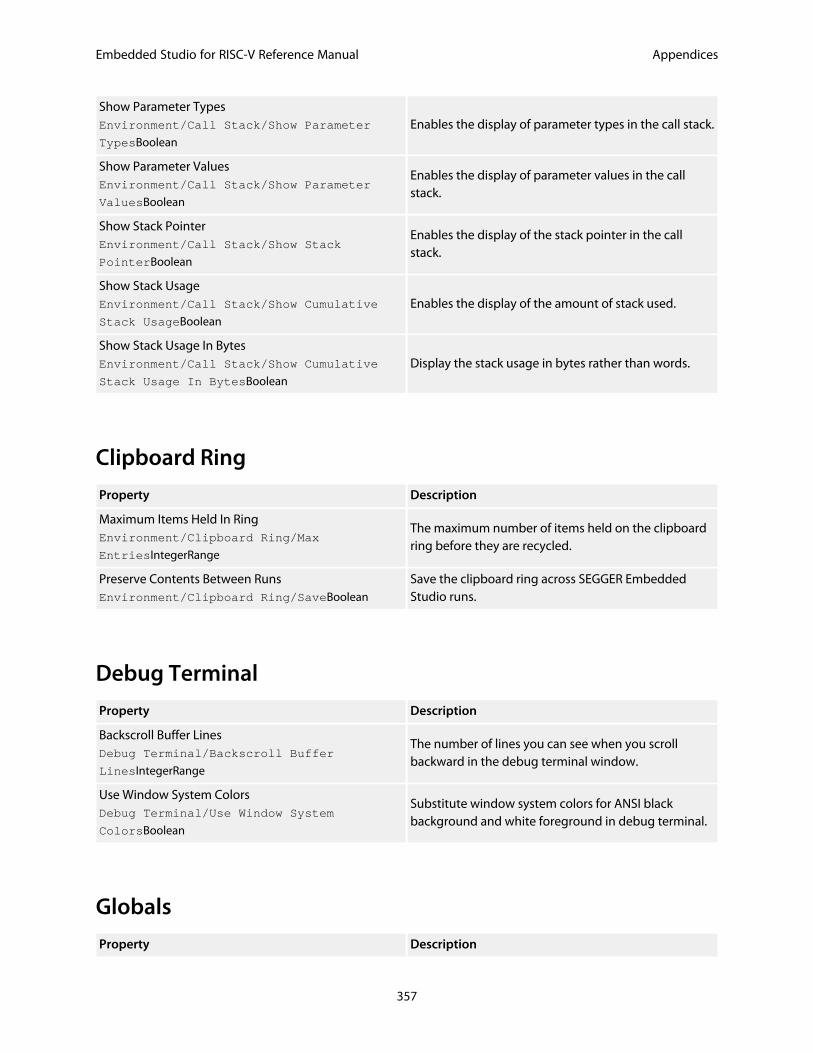
Embedded Studio for RISC-V Reference Manual Appendices
357
Show Parameter TypesEnvironment/Call Stack/Show Parameter
TypesBoolean
Enables the display of parameter types in the call stack.
Show Parameter ValuesEnvironment/Call Stack/Show Parameter
ValuesBoolean
Enables the display of parameter values in the callstack.
Show Stack PointerEnvironment/Call Stack/Show Stack
PointerBoolean
Enables the display of the stack pointer in the callstack.
Show Stack UsageEnvironment/Call Stack/Show Cumulative
Stack UsageBoolean
Enables the display of the amount of stack used.
Show Stack Usage In BytesEnvironment/Call Stack/Show Cumulative
Stack Usage In BytesBoolean
Display the stack usage in bytes rather than words.
Clipboard Ring
Property Description
Maximum Items Held In RingEnvironment/Clipboard Ring/Max
EntriesIntegerRange
The maximum number of items held on the clipboardring before they are recycled.
Preserve Contents Between RunsEnvironment/Clipboard Ring/SaveBoolean
Save the clipboard ring across SEGGER EmbeddedStudio runs.
Debug Terminal
Property Description
Backscroll Buffer LinesDebug Terminal/Backscroll Buffer
LinesIntegerRange
The number of lines you can see when you scrollbackward in the debug terminal window.
Use Window System ColorsDebug Terminal/Use Window System
ColorsBoolean
Substitute window system colors for ANSI blackbackground and white foreground in debug terminal.
Globals
Property Description
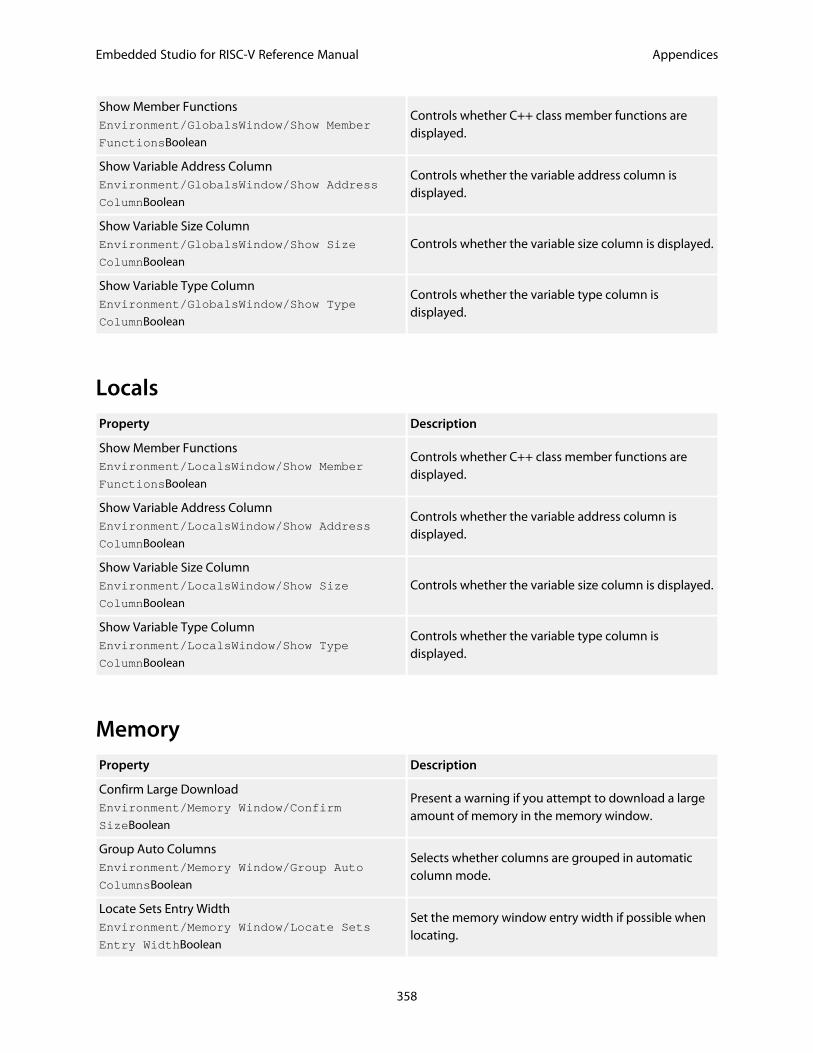
Embedded Studio for RISC-V Reference Manual Appendices
358
Show Member FunctionsEnvironment/GlobalsWindow/Show Member
FunctionsBoolean
Controls whether C++ class member functions aredisplayed.
Show Variable Address ColumnEnvironment/GlobalsWindow/Show Address
ColumnBoolean
Controls whether the variable address column isdisplayed.
Show Variable Size ColumnEnvironment/GlobalsWindow/Show Size
ColumnBoolean
Controls whether the variable size column is displayed.
Show Variable Type ColumnEnvironment/GlobalsWindow/Show Type
ColumnBoolean
Controls whether the variable type column isdisplayed.
LocalsProperty Description
Show Member FunctionsEnvironment/LocalsWindow/Show Member
FunctionsBoolean
Controls whether C++ class member functions aredisplayed.
Show Variable Address ColumnEnvironment/LocalsWindow/Show Address
ColumnBoolean
Controls whether the variable address column isdisplayed.
Show Variable Size ColumnEnvironment/LocalsWindow/Show Size
ColumnBoolean
Controls whether the variable size column is displayed.
Show Variable Type ColumnEnvironment/LocalsWindow/Show Type
ColumnBoolean
Controls whether the variable type column isdisplayed.
MemoryProperty Description
Confirm Large DownloadEnvironment/Memory Window/Confirm
SizeBoolean
Present a warning if you attempt to download a largeamount of memory in the memory window.
Group Auto ColumnsEnvironment/Memory Window/Group Auto
ColumnsBoolean
Selects whether columns are grouped in automaticcolumn mode.
Locate Sets Entry WidthEnvironment/Memory Window/Locate Sets
Entry WidthBoolean
Set the memory window entry width if possible whenlocating.

Embedded Studio for RISC-V Reference Manual Appendices
359
Locate Sets SizeEnvironment/Memory Window/Locate Sets
SizeBoolean
Set the memory window size when locating.
Scroll Wheel Modifies Start AddressEnvironment/Memory Window/Scroll Wheel
Modifies Start AddressBoolean
Selects whether the mouse scroll wheel can changethe memory window start address.
Outline
Property Description
Group #define DirectivesWindows/Outline/Group DefinesBoolean
Group consecutive #define and #undef preprocessordirectives.
Group #include DirectivesWindows/Outline/Group IncludesBoolean
Group consecutive #include preprocessor directives.
Group Top-Level DeclarationsWindows/Outline/Group Top Level
ItemsBoolean
Group consecutive top-level variable and typedeclarations.
Project Explorer
Property Description
Add Filename Replace MacrosEnvironment/Project Explorer/Filename
Replace MacrosStringList
Macros (system and global) used to replace the start ofa filename on project file addition.
Check Solution TargetEnvironment/Project Explorer/Check
Solution TargetBoolean
Specifies whether to check target is correct whenloading a solution.
Color Project NodesEnvironment/Project Explorer/Color
NodesBoolean
Show the project nodes colored for identification inthe Project Explorer.
Confirm Configuration Folder DeleteProject Explorer/Confirm Configuration
Folder DeleteBoolean
Display a confirmation prompt before deleting aconfiguration folder cotaining properties.
Confirm File Replacement WarningProject Explorer/Confirm File Replacement
WarningBoolean
Display a confirmation prompt before replacingproject files for import and creation
Confirm Forget Modified OptionsProject Explorer/Confirm Reject Property
ChangesBoolean
Display a confirmation prompt before forgettingoption modifications.
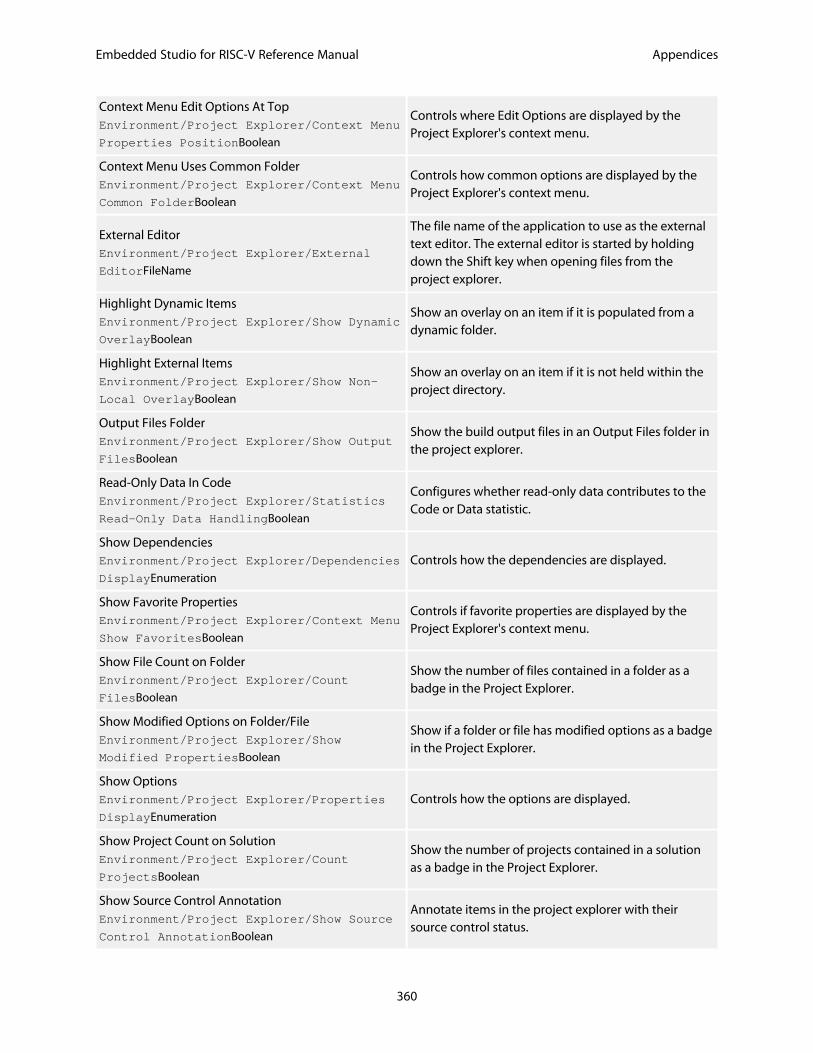
Embedded Studio for RISC-V Reference Manual Appendices
360
Context Menu Edit Options At TopEnvironment/Project Explorer/Context Menu
Properties PositionBoolean
Controls where Edit Options are displayed by theProject Explorer's context menu.
Context Menu Uses Common FolderEnvironment/Project Explorer/Context Menu
Common FolderBoolean
Controls how common options are displayed by theProject Explorer's context menu.
External EditorEnvironment/Project Explorer/External
EditorFileName
The file name of the application to use as the externaltext editor. The external editor is started by holdingdown the Shift key when opening files from theproject explorer.
Highlight Dynamic ItemsEnvironment/Project Explorer/Show Dynamic
OverlayBoolean
Show an overlay on an item if it is populated from adynamic folder.
Highlight External ItemsEnvironment/Project Explorer/Show Non-
Local OverlayBoolean
Show an overlay on an item if it is not held within theproject directory.
Output Files FolderEnvironment/Project Explorer/Show Output
FilesBoolean
Show the build output files in an Output Files folder inthe project explorer.
Read-Only Data In CodeEnvironment/Project Explorer/Statistics
Read-Only Data HandlingBoolean
Configures whether read-only data contributes to theCode or Data statistic.
Show DependenciesEnvironment/Project Explorer/Dependencies
DisplayEnumeration
Controls how the dependencies are displayed.
Show Favorite PropertiesEnvironment/Project Explorer/Context Menu
Show FavoritesBoolean
Controls if favorite properties are displayed by theProject Explorer's context menu.
Show File Count on FolderEnvironment/Project Explorer/Count
FilesBoolean
Show the number of files contained in a folder as abadge in the Project Explorer.
Show Modified Options on Folder/FileEnvironment/Project Explorer/Show
Modified PropertiesBoolean
Show if a folder or file has modified options as a badgein the Project Explorer.
Show OptionsEnvironment/Project Explorer/Properties
DisplayEnumeration
Controls how the options are displayed.
Show Project Count on SolutionEnvironment/Project Explorer/Count
ProjectsBoolean
Show the number of projects contained in a solutionas a badge in the Project Explorer.
Show Source Control AnnotationEnvironment/Project Explorer/Show Source
Control AnnotationBoolean
Annotate items in the project explorer with theirsource control status.
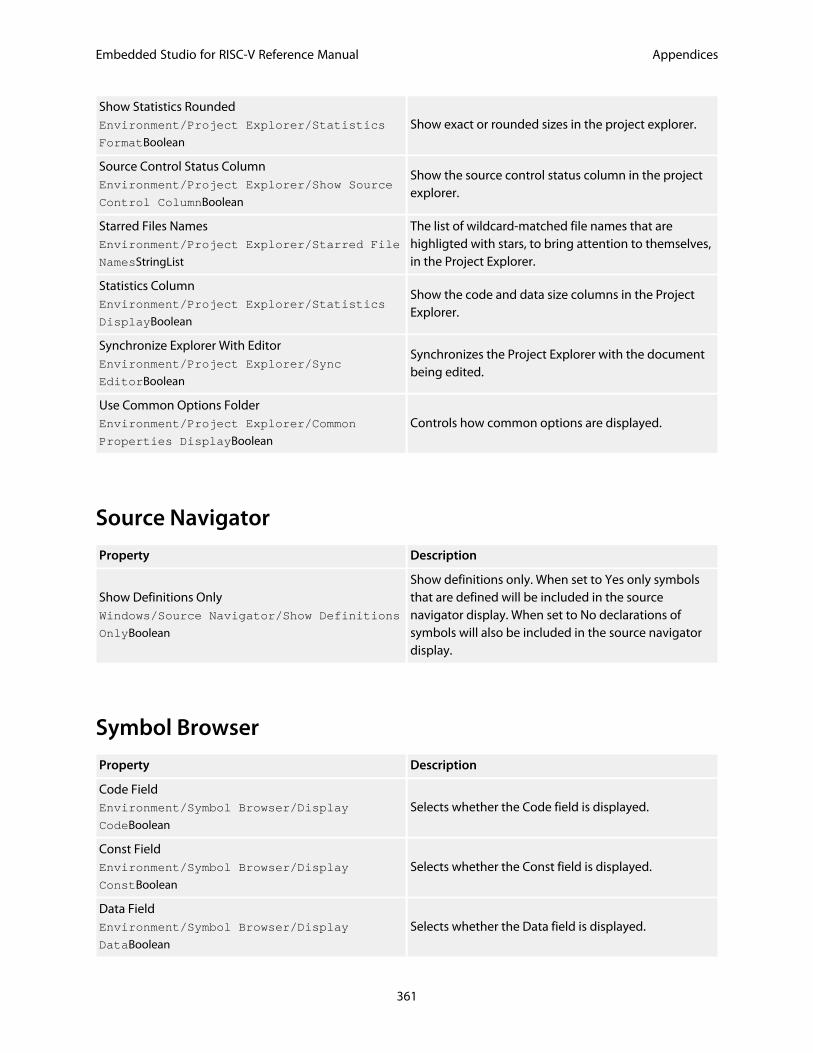
Embedded Studio for RISC-V Reference Manual Appendices
361
Show Statistics RoundedEnvironment/Project Explorer/Statistics
FormatBoolean
Show exact or rounded sizes in the project explorer.
Source Control Status ColumnEnvironment/Project Explorer/Show Source
Control ColumnBoolean
Show the source control status column in the projectexplorer.
Starred Files NamesEnvironment/Project Explorer/Starred File
NamesStringList
The list of wildcard-matched file names that arehighligted with stars, to bring attention to themselves,in the Project Explorer.
Statistics ColumnEnvironment/Project Explorer/Statistics
DisplayBoolean
Show the code and data size columns in the ProjectExplorer.
Synchronize Explorer With EditorEnvironment/Project Explorer/Sync
EditorBoolean
Synchronizes the Project Explorer with the documentbeing edited.
Use Common Options FolderEnvironment/Project Explorer/Common
Properties DisplayBoolean
Controls how common options are displayed.
Source Navigator
Property Description
Show Definitions OnlyWindows/Source Navigator/Show Definitions
OnlyBoolean
Show definitions only. When set to Yes only symbolsthat are defined will be included in the sourcenavigator display. When set to No declarations ofsymbols will also be included in the source navigatordisplay.
Symbol Browser
Property Description
Code FieldEnvironment/Symbol Browser/Display
CodeBoolean
Selects whether the Code field is displayed.
Const FieldEnvironment/Symbol Browser/Display
ConstBoolean
Selects whether the Const field is displayed.
Data FieldEnvironment/Symbol Browser/Display
DataBoolean
Selects whether the Data field is displayed.
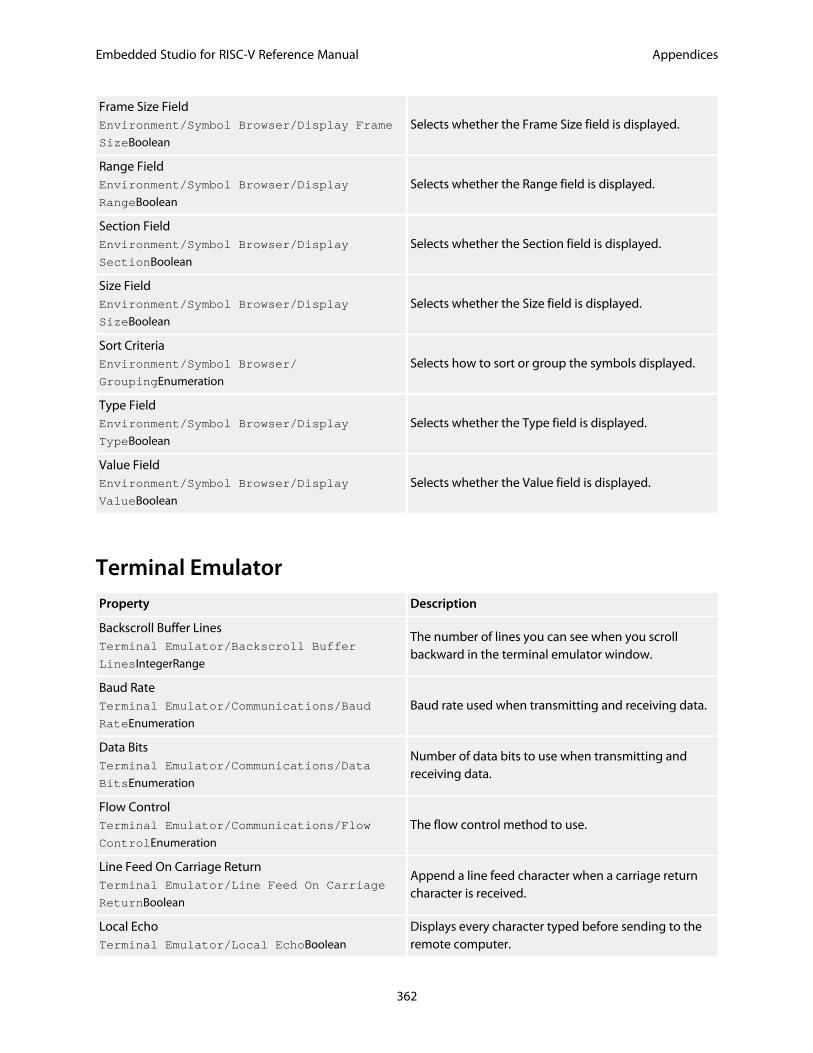
Embedded Studio for RISC-V Reference Manual Appendices
362
Frame Size FieldEnvironment/Symbol Browser/Display Frame
SizeBoolean
Selects whether the Frame Size field is displayed.
Range FieldEnvironment/Symbol Browser/Display
RangeBoolean
Selects whether the Range field is displayed.
Section FieldEnvironment/Symbol Browser/Display
SectionBoolean
Selects whether the Section field is displayed.
Size FieldEnvironment/Symbol Browser/Display
SizeBoolean
Selects whether the Size field is displayed.
Sort CriteriaEnvironment/Symbol Browser/
GroupingEnumeration
Selects how to sort or group the symbols displayed.
Type FieldEnvironment/Symbol Browser/Display
TypeBoolean
Selects whether the Type field is displayed.
Value FieldEnvironment/Symbol Browser/Display
ValueBoolean
Selects whether the Value field is displayed.
Terminal EmulatorProperty Description
Backscroll Buffer LinesTerminal Emulator/Backscroll Buffer
LinesIntegerRange
The number of lines you can see when you scrollbackward in the terminal emulator window.
Baud RateTerminal Emulator/Communications/Baud
RateEnumeration
Baud rate used when transmitting and receiving data.
Data BitsTerminal Emulator/Communications/Data
BitsEnumeration
Number of data bits to use when transmitting andreceiving data.
Flow ControlTerminal Emulator/Communications/Flow
ControlEnumeration
The flow control method to use.
Line Feed On Carriage ReturnTerminal Emulator/Line Feed On Carriage
ReturnBoolean
Append a line feed character when a carriage returncharacter is received.
Local EchoTerminal Emulator/Local EchoBoolean
Displays every character typed before sending to theremote computer.
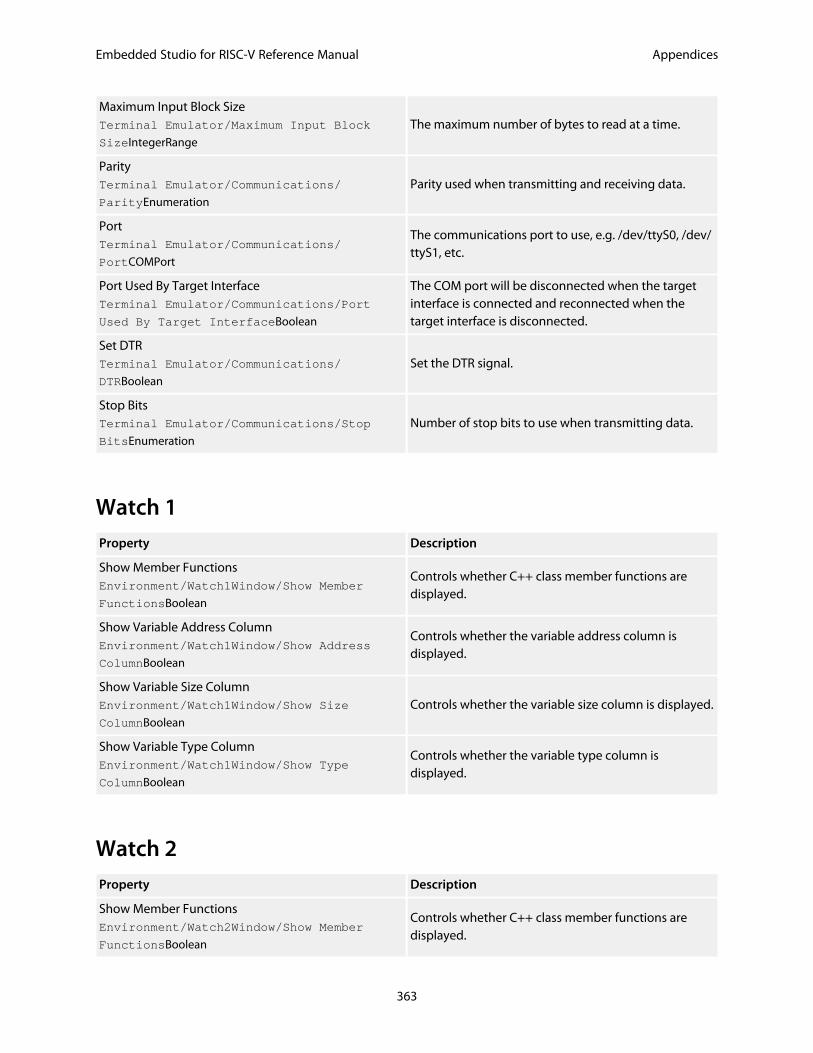
Embedded Studio for RISC-V Reference Manual Appendices
363
Maximum Input Block SizeTerminal Emulator/Maximum Input Block
SizeIntegerRange
The maximum number of bytes to read at a time.
ParityTerminal Emulator/Communications/
ParityEnumeration
Parity used when transmitting and receiving data.
PortTerminal Emulator/Communications/
PortCOMPort
The communications port to use, e.g. /dev/ttyS0, /dev/ttyS1, etc.
Port Used By Target InterfaceTerminal Emulator/Communications/Port
Used By Target InterfaceBoolean
The COM port will be disconnected when the targetinterface is connected and reconnected when thetarget interface is disconnected.
Set DTRTerminal Emulator/Communications/
DTRBoolean
Set the DTR signal.
Stop BitsTerminal Emulator/Communications/Stop
BitsEnumeration
Number of stop bits to use when transmitting data.
Watch 1Property Description
Show Member FunctionsEnvironment/Watch1Window/Show Member
FunctionsBoolean
Controls whether C++ class member functions aredisplayed.
Show Variable Address ColumnEnvironment/Watch1Window/Show Address
ColumnBoolean
Controls whether the variable address column isdisplayed.
Show Variable Size ColumnEnvironment/Watch1Window/Show Size
ColumnBoolean
Controls whether the variable size column is displayed.
Show Variable Type ColumnEnvironment/Watch1Window/Show Type
ColumnBoolean
Controls whether the variable type column isdisplayed.
Watch 2Property Description
Show Member FunctionsEnvironment/Watch2Window/Show Member
FunctionsBoolean
Controls whether C++ class member functions aredisplayed.
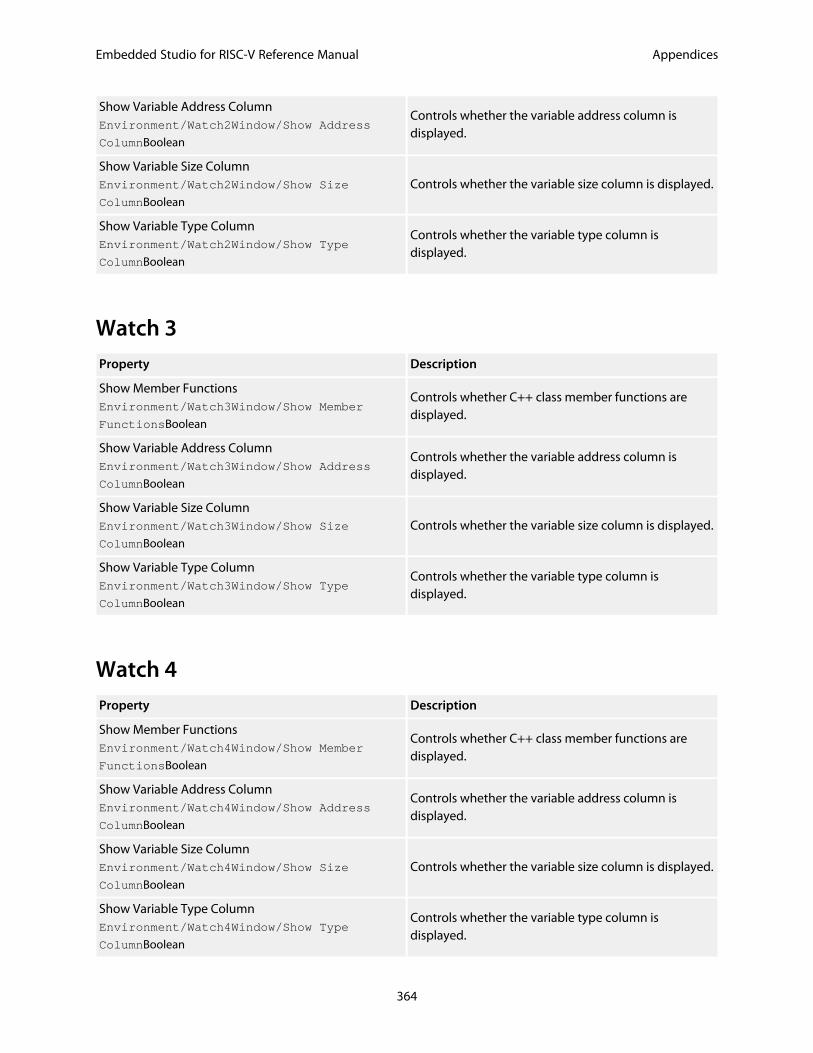
Embedded Studio for RISC-V Reference Manual Appendices
364
Show Variable Address ColumnEnvironment/Watch2Window/Show Address
ColumnBoolean
Controls whether the variable address column isdisplayed.
Show Variable Size ColumnEnvironment/Watch2Window/Show Size
ColumnBoolean
Controls whether the variable size column is displayed.
Show Variable Type ColumnEnvironment/Watch2Window/Show Type
ColumnBoolean
Controls whether the variable type column isdisplayed.
Watch 3Property Description
Show Member FunctionsEnvironment/Watch3Window/Show Member
FunctionsBoolean
Controls whether C++ class member functions aredisplayed.
Show Variable Address ColumnEnvironment/Watch3Window/Show Address
ColumnBoolean
Controls whether the variable address column isdisplayed.
Show Variable Size ColumnEnvironment/Watch3Window/Show Size
ColumnBoolean
Controls whether the variable size column is displayed.
Show Variable Type ColumnEnvironment/Watch3Window/Show Type
ColumnBoolean
Controls whether the variable type column isdisplayed.
Watch 4Property Description
Show Member FunctionsEnvironment/Watch4Window/Show Member
FunctionsBoolean
Controls whether C++ class member functions aredisplayed.
Show Variable Address ColumnEnvironment/Watch4Window/Show Address
ColumnBoolean
Controls whether the variable address column isdisplayed.
Show Variable Size ColumnEnvironment/Watch4Window/Show Size
ColumnBoolean
Controls whether the variable size column is displayed.
Show Variable Type ColumnEnvironment/Watch4Window/Show Type
ColumnBoolean
Controls whether the variable type column isdisplayed.
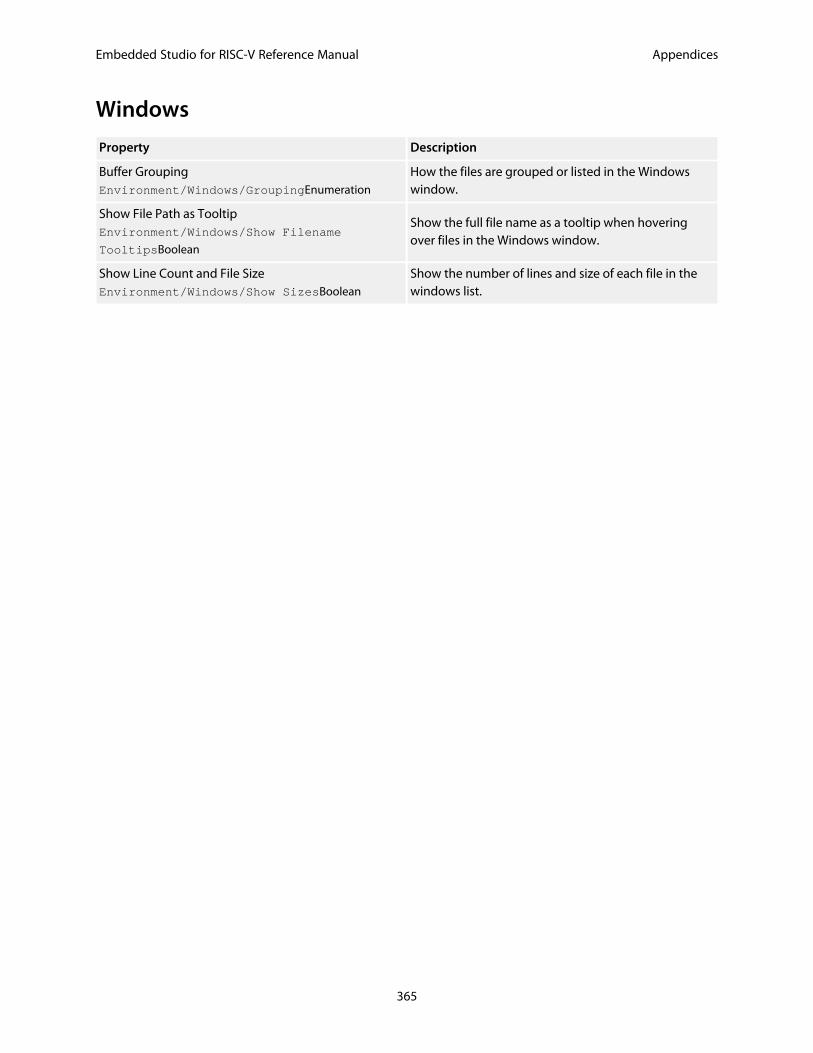
Embedded Studio for RISC-V Reference Manual Appendices
365
Windows
Property Description
Buffer GroupingEnvironment/Windows/GroupingEnumeration
How the files are grouped or listed in the Windowswindow.
Show File Path as TooltipEnvironment/Windows/Show Filename
TooltipsBoolean
Show the full file name as a tooltip when hoveringover files in the Windows window.
Show Line Count and File SizeEnvironment/Windows/Show SizesBoolean
Show the number of lines and size of each file in thewindows list.
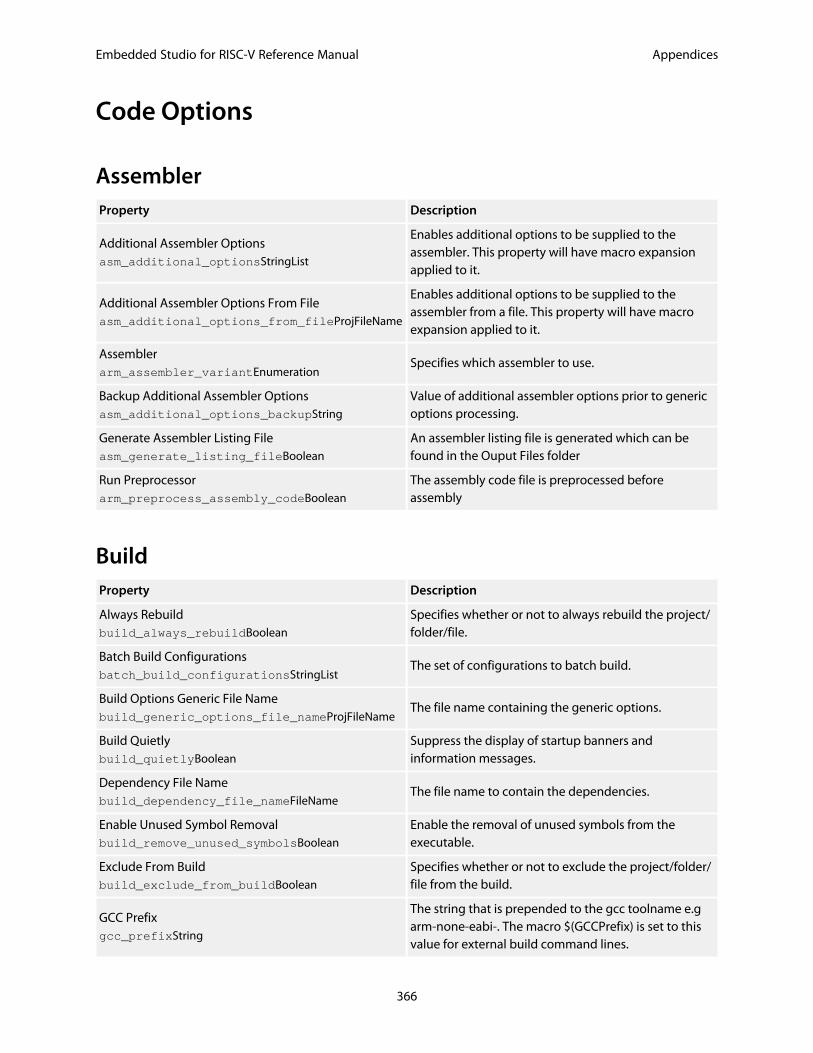
Embedded Studio for RISC-V Reference Manual Appendices
366
Code Options
AssemblerProperty Description
Additional Assembler Optionsasm_additional_optionsStringList
Enables additional options to be supplied to theassembler. This property will have macro expansionapplied to it.
Additional Assembler Options From Fileasm_additional_options_from_fileProjFileName
Enables additional options to be supplied to theassembler from a file. This property will have macroexpansion applied to it.
Assemblerarm_assembler_variantEnumeration
Specifies which assembler to use.
Backup Additional Assembler Optionsasm_additional_options_backupString
Value of additional assembler options prior to genericoptions processing.
Generate Assembler Listing Fileasm_generate_listing_fileBoolean
An assembler listing file is generated which can befound in the Ouput Files folder
Run Preprocessorarm_preprocess_assembly_codeBoolean
The assembly code file is preprocessed beforeassembly
BuildProperty Description
Always Rebuildbuild_always_rebuildBoolean
Specifies whether or not to always rebuild the project/folder/file.
Batch Build Configurationsbatch_build_configurationsStringList
The set of configurations to batch build.
Build Options Generic File Namebuild_generic_options_file_nameProjFileName
The file name containing the generic options.
Build Quietlybuild_quietlyBoolean
Suppress the display of startup banners andinformation messages.
Dependency File Namebuild_dependency_file_nameFileName
The file name to contain the dependencies.
Enable Unused Symbol Removalbuild_remove_unused_symbolsBoolean
Enable the removal of unused symbols from theexecutable.
Exclude From Buildbuild_exclude_from_buildBoolean
Specifies whether or not to exclude the project/folder/file from the build.
GCC Prefixgcc_prefixString
The string that is prepended to the gcc toolname e.garm-none-eabi-. The macro $(GCCPrefix) is set to thisvalue for external build command lines.
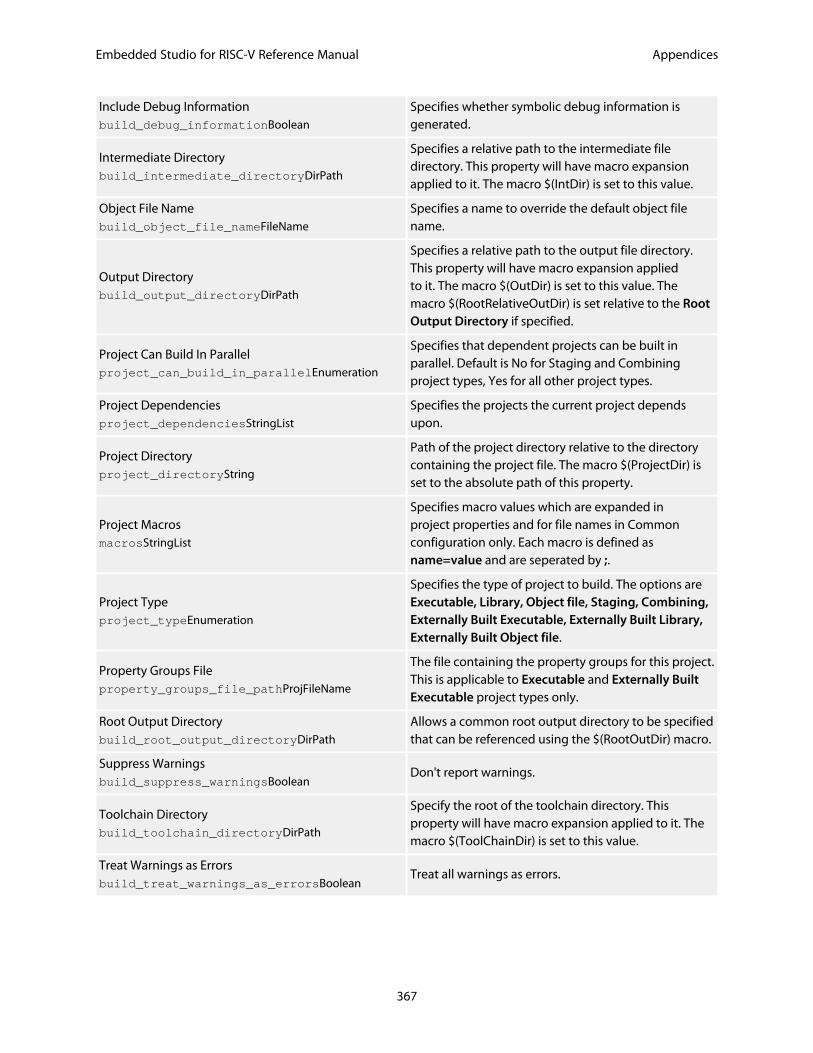
Embedded Studio for RISC-V Reference Manual Appendices
367
Include Debug Informationbuild_debug_informationBoolean
Specifies whether symbolic debug information isgenerated.
Intermediate Directorybuild_intermediate_directoryDirPath
Specifies a relative path to the intermediate filedirectory. This property will have macro expansionapplied to it. The macro $(IntDir) is set to this value.
Object File Namebuild_object_file_nameFileName
Specifies a name to override the default object filename.
Output Directorybuild_output_directoryDirPath
Specifies a relative path to the output file directory.This property will have macro expansion appliedto it. The macro $(OutDir) is set to this value. Themacro $(RootRelativeOutDir) is set relative to the RootOutput Directory if specified.
Project Can Build In Parallelproject_can_build_in_parallelEnumeration
Specifies that dependent projects can be built inparallel. Default is No for Staging and Combiningproject types, Yes for all other project types.
Project Dependenciesproject_dependenciesStringList
Specifies the projects the current project dependsupon.
Project Directoryproject_directoryString
Path of the project directory relative to the directorycontaining the project file. The macro $(ProjectDir) isset to the absolute path of this property.
Project MacrosmacrosStringList
Specifies macro values which are expanded inproject properties and for file names in Commonconfiguration only. Each macro is defined asname=value and are seperated by ;.
Project Typeproject_typeEnumeration
Specifies the type of project to build. The options areExecutable, Library, Object file, Staging, Combining,Externally Built Executable, Externally Built Library,Externally Built Object file.
Property Groups Fileproperty_groups_file_pathProjFileName
The file containing the property groups for this project.This is applicable to Executable and Externally BuiltExecutable project types only.
Root Output Directorybuild_root_output_directoryDirPath
Allows a common root output directory to be specifiedthat can be referenced using the $(RootOutDir) macro.
Suppress Warningsbuild_suppress_warningsBoolean
Don't report warnings.
Toolchain Directorybuild_toolchain_directoryDirPath
Specify the root of the toolchain directory. Thisproperty will have macro expansion applied to it. Themacro $(ToolChainDir) is set to this value.
Treat Warnings as Errorsbuild_treat_warnings_as_errorsBoolean
Treat all warnings as errors.
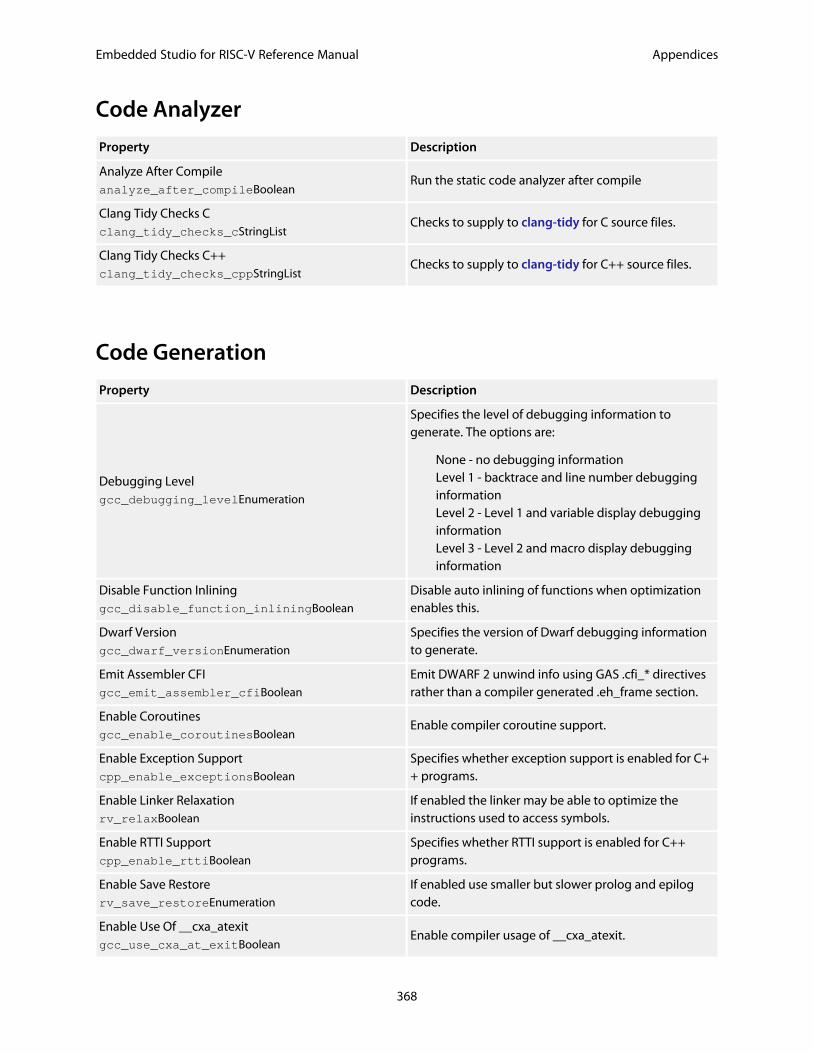
Embedded Studio for RISC-V Reference Manual Appendices
368
Code Analyzer
Property Description
Analyze After Compileanalyze_after_compileBoolean
Run the static code analyzer after compile
Clang Tidy Checks Cclang_tidy_checks_cStringList
Checks to supply to clang-tidy for C source files.
Clang Tidy Checks C++clang_tidy_checks_cppStringList
Checks to supply to clang-tidy for C++ source files.
Code Generation
Property Description
Debugging Levelgcc_debugging_levelEnumeration
Specifies the level of debugging information togenerate. The options are:
None - no debugging informationLevel 1 - backtrace and line number debugginginformationLevel 2 - Level 1 and variable display debugginginformationLevel 3 - Level 2 and macro display debugginginformation
Disable Function Inlininggcc_disable_function_inliningBoolean
Disable auto inlining of functions when optimizationenables this.
Dwarf Versiongcc_dwarf_versionEnumeration
Specifies the version of Dwarf debugging informationto generate.
Emit Assembler CFIgcc_emit_assembler_cfiBoolean
Emit DWARF 2 unwind info using GAS .cfi_* directivesrather than a compiler generated .eh_frame section.
Enable Coroutinesgcc_enable_coroutinesBoolean
Enable compiler coroutine support.
Enable Exception Supportcpp_enable_exceptionsBoolean
Specifies whether exception support is enabled for C++ programs.
Enable Linker Relaxationrv_relaxBoolean
If enabled the linker may be able to optimize theinstructions used to access symbols.
Enable RTTI Supportcpp_enable_rttiBoolean
Specifies whether RTTI support is enabled for C++programs.
Enable Save Restorerv_save_restoreEnumeration
If enabled use smaller but slower prolog and epilogcode.
Enable Use Of __cxa_atexitgcc_use_cxa_at_exitBoolean
Enable compiler usage of __cxa_atexit.
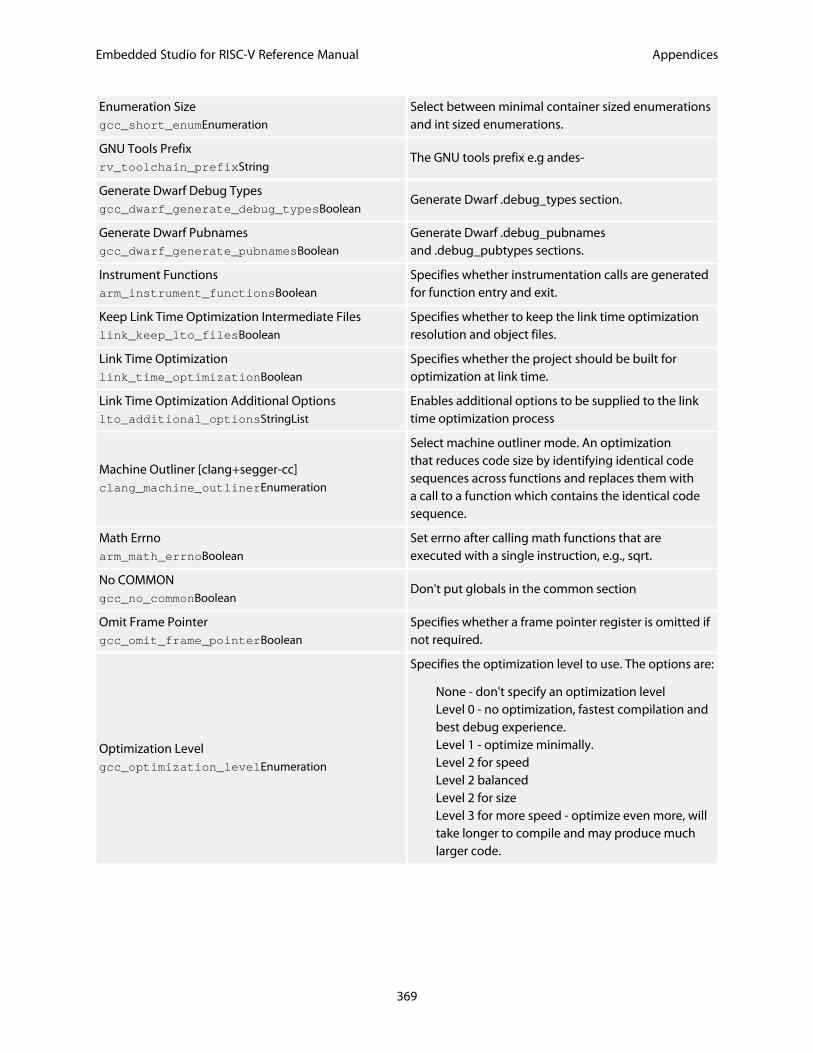
Embedded Studio for RISC-V Reference Manual Appendices
369
Enumeration Sizegcc_short_enumEnumeration
Select between minimal container sized enumerationsand int sized enumerations.
GNU Tools Prefixrv_toolchain_prefixString
The GNU tools prefix e.g andes-
Generate Dwarf Debug Typesgcc_dwarf_generate_debug_typesBoolean
Generate Dwarf .debug_types section.
Generate Dwarf Pubnamesgcc_dwarf_generate_pubnamesBoolean
Generate Dwarf .debug_pubnamesand .debug_pubtypes sections.
Instrument Functionsarm_instrument_functionsBoolean
Specifies whether instrumentation calls are generatedfor function entry and exit.
Keep Link Time Optimization Intermediate Fileslink_keep_lto_filesBoolean
Specifies whether to keep the link time optimizationresolution and object files.
Link Time Optimizationlink_time_optimizationBoolean
Specifies whether the project should be built foroptimization at link time.
Link Time Optimization Additional Optionslto_additional_optionsStringList
Enables additional options to be supplied to the linktime optimization process
Machine Outliner [clang+segger-cc]clang_machine_outlinerEnumeration
Select machine outliner mode. An optimizationthat reduces code size by identifying identical codesequences across functions and replaces them witha call to a function which contains the identical codesequence.
Math Errnoarm_math_errnoBoolean
Set errno after calling math functions that areexecuted with a single instruction, e.g., sqrt.
No COMMONgcc_no_commonBoolean
Don't put globals in the common section
Omit Frame Pointergcc_omit_frame_pointerBoolean
Specifies whether a frame pointer register is omitted ifnot required.
Optimization Levelgcc_optimization_levelEnumeration
Specifies the optimization level to use. The options are:
None - don't specify an optimization levelLevel 0 - no optimization, fastest compilation andbest debug experience.Level 1 - optimize minimally.Level 2 for speedLevel 2 balancedLevel 2 for sizeLevel 3 for more speed - optimize even more, willtake longer to compile and may produce muchlarger code.
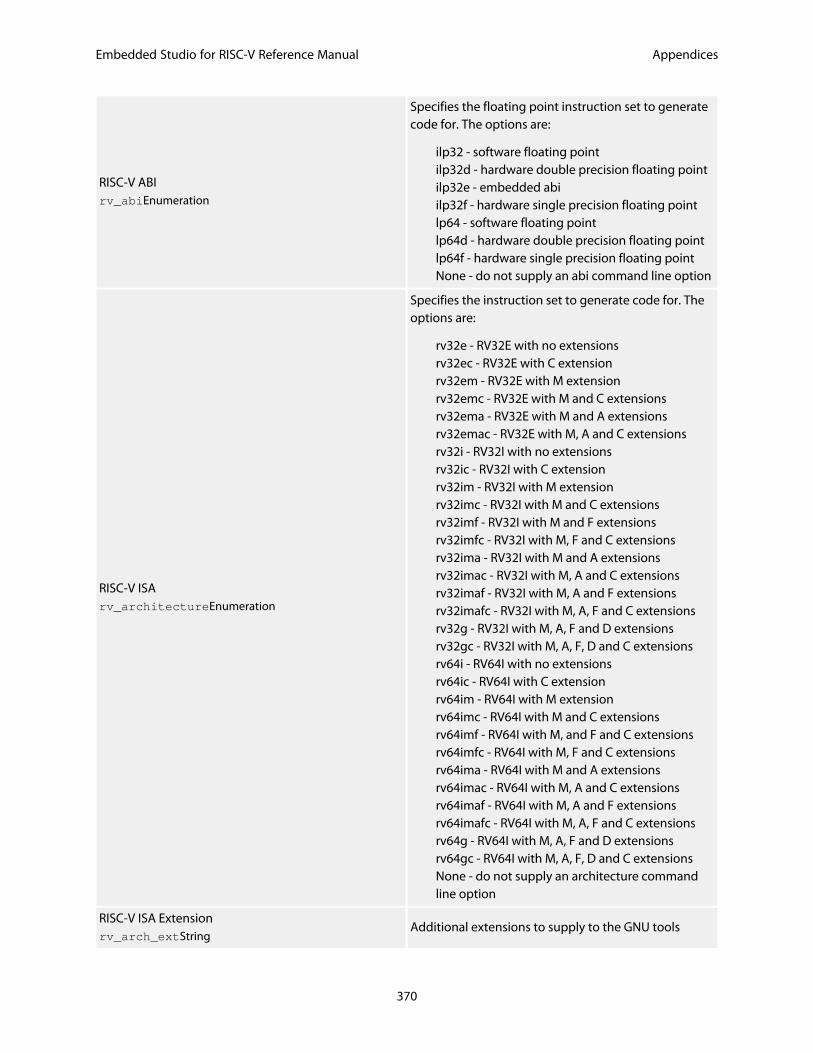
Embedded Studio for RISC-V Reference Manual Appendices
370
RISC-V ABIrv_abiEnumeration
Specifies the floating point instruction set to generatecode for. The options are:
ilp32 - software floating pointilp32d - hardware double precision floating pointilp32e - embedded abiilp32f - hardware single precision floating pointlp64 - software floating pointlp64d - hardware double precision floating pointlp64f - hardware single precision floating pointNone - do not supply an abi command line option
RISC-V ISArv_architectureEnumeration
Specifies the instruction set to generate code for. Theoptions are:
rv32e - RV32E with no extensionsrv32ec - RV32E with C extensionrv32em - RV32E with M extensionrv32emc - RV32E with M and C extensionsrv32ema - RV32E with M and A extensionsrv32emac - RV32E with M, A and C extensionsrv32i - RV32I with no extensionsrv32ic - RV32I with C extensionrv32im - RV32I with M extensionrv32imc - RV32I with M and C extensionsrv32imf - RV32I with M and F extensionsrv32imfc - RV32I with M, F and C extensionsrv32ima - RV32I with M and A extensionsrv32imac - RV32I with M, A and C extensionsrv32imaf - RV32I with M, A and F extensionsrv32imafc - RV32I with M, A, F and C extensionsrv32g - RV32I with M, A, F and D extensionsrv32gc - RV32I with M, A, F, D and C extensionsrv64i - RV64I with no extensionsrv64ic - RV64I with C extensionrv64im - RV64I with M extensionrv64imc - RV64I with M and C extensionsrv64imf - RV64I with M, and F and C extensionsrv64imfc - RV64I with M, F and C extensionsrv64ima - RV64I with M and A extensionsrv64imac - RV64I with M, A and C extensionsrv64imaf - RV64I with M, A and F extensionsrv64imafc - RV64I with M, A, F and C extensionsrv64g - RV64I with M, A, F and D extensionsrv64gc - RV64I with M, A, F, D and C extensionsNone - do not supply an architecture commandline option
RISC-V ISA Extensionrv_arch_extString
Additional extensions to supply to the GNU tools

Embedded Studio for RISC-V Reference Manual Appendices
371
RISC-V Memory Code Modelrv_mcmodelEnumeration
Specifies the 64-bit code model to generate code for.The options are:
medlow - memory map has address ranges of-2Gb to +2Gbmedany - memory map has address ranges of+2GbNone - do not supply an mcmodel command lineoption
Relocation Model [clang+segger-cc]clang_relocation_modelEnumeration
Select relocation model.
Stack Usage [clang+segger-cc]generate_stack_usageBoolean
Generate stack size section
Unwind Tablesarm_unwind_tablesBoolean
Generate unwind tables for C code.
Use Builtinsarm_use_builtinsBoolean
Use built-in library functions e.g. scanf.
Wide Character Sizegcc_wchar_sizeEnumeration
Select between standard 32-bit or shorter 16-bit sizefor wide characters and wchar_t.
Combining
Property Description
Combine Commandcombine_commandCommandLine
The command to execute. This property will havemacro expansion applied to it with the macro$(CombiningOutputFilePath) set to the outputfilepath of the combine command and the macro$(CombiningRelInputPaths) is set to the (projectrelative) names of all of the files in the project.
Combine Command Working Directorycombine_command_wdString
The working directory in which the combine commandis run. This property will have macro expansion appliedto it.
Output File Pathcombine_output_filepathString
The output file path the stage command will create.This property will have macro expansion applied to it.
Set To Read-onlycombine_set_readonlyEnumeration
Set the output file to read only or read/write.
Compiler
Property Description
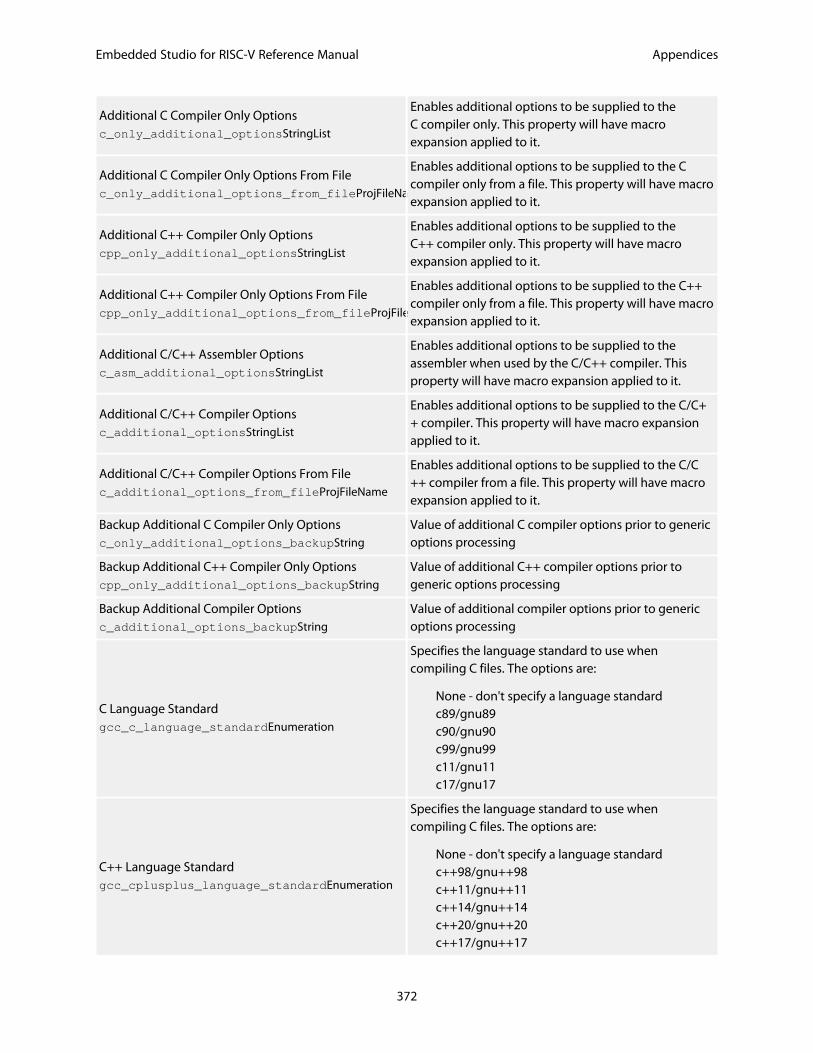
Embedded Studio for RISC-V Reference Manual Appendices
372
Additional C Compiler Only Optionsc_only_additional_optionsStringList
Enables additional options to be supplied to theC compiler only. This property will have macroexpansion applied to it.
Additional C Compiler Only Options From Filec_only_additional_options_from_fileProjFileName
Enables additional options to be supplied to the Ccompiler only from a file. This property will have macroexpansion applied to it.
Additional C++ Compiler Only Optionscpp_only_additional_optionsStringList
Enables additional options to be supplied to theC++ compiler only. This property will have macroexpansion applied to it.
Additional C++ Compiler Only Options From Filecpp_only_additional_options_from_fileProjFileName
Enables additional options to be supplied to the C++compiler only from a file. This property will have macroexpansion applied to it.
Additional C/C++ Assembler Optionsc_asm_additional_optionsStringList
Enables additional options to be supplied to theassembler when used by the C/C++ compiler. Thisproperty will have macro expansion applied to it.
Additional C/C++ Compiler Optionsc_additional_optionsStringList
Enables additional options to be supplied to the C/C++ compiler. This property will have macro expansionapplied to it.
Additional C/C++ Compiler Options From Filec_additional_options_from_fileProjFileName
Enables additional options to be supplied to the C/C++ compiler from a file. This property will have macroexpansion applied to it.
Backup Additional C Compiler Only Optionsc_only_additional_options_backupString
Value of additional C compiler options prior to genericoptions processing
Backup Additional C++ Compiler Only Optionscpp_only_additional_options_backupString
Value of additional C++ compiler options prior togeneric options processing
Backup Additional Compiler Optionsc_additional_options_backupString
Value of additional compiler options prior to genericoptions processing
C Language Standardgcc_c_language_standardEnumeration
Specifies the language standard to use whencompiling C files. The options are:
None - don't specify a language standardc89/gnu89c90/gnu90c99/gnu99c11/gnu11c17/gnu17
C++ Language Standardgcc_cplusplus_language_standardEnumeration
Specifies the language standard to use whencompiling C files. The options are:
None - don't specify a language standardc++98/gnu++98c++11/gnu++11c++14/gnu++14c++20/gnu++20c++17/gnu++17
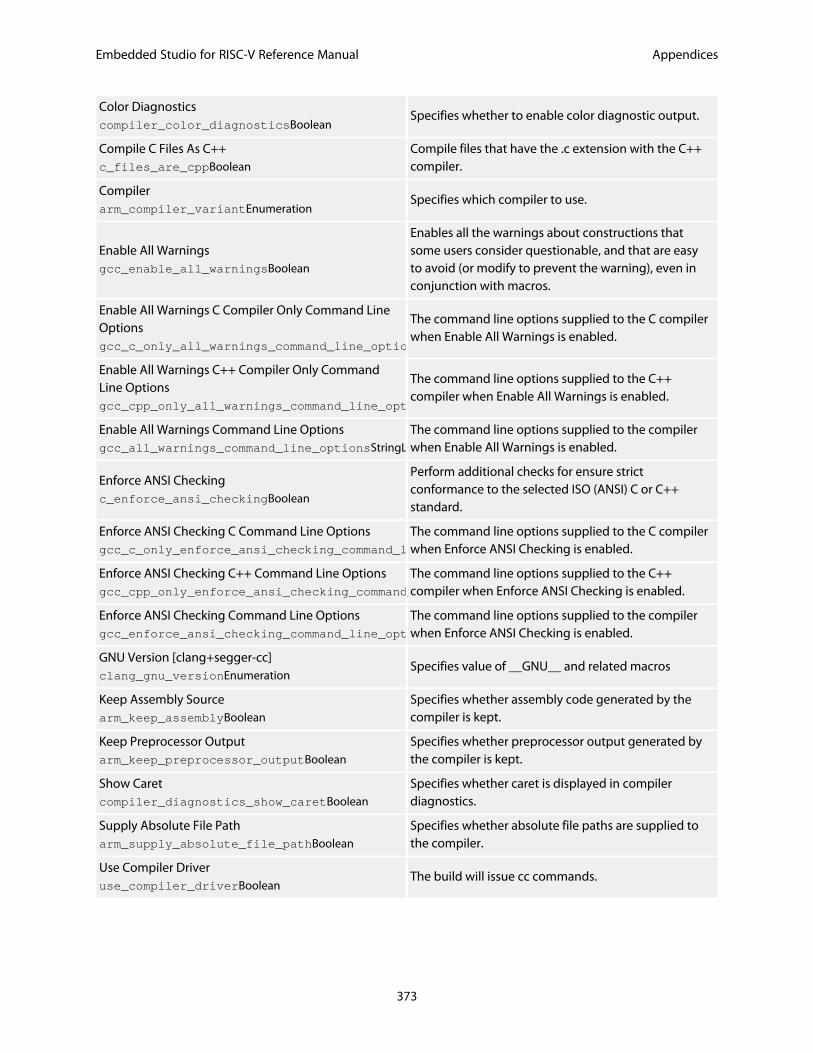
Embedded Studio for RISC-V Reference Manual Appendices
373
Color Diagnosticscompiler_color_diagnosticsBoolean
Specifies whether to enable color diagnostic output.
Compile C Files As C++c_files_are_cppBoolean
Compile files that have the .c extension with the C++compiler.
Compilerarm_compiler_variantEnumeration
Specifies which compiler to use.
Enable All Warningsgcc_enable_all_warningsBoolean
Enables all the warnings about constructions thatsome users consider questionable, and that are easyto avoid (or modify to prevent the warning), even inconjunction with macros.
Enable All Warnings C Compiler Only Command LineOptionsgcc_c_only_all_warnings_command_line_optionsStringList
The command line options supplied to the C compilerwhen Enable All Warnings is enabled.
Enable All Warnings C++ Compiler Only CommandLine Optionsgcc_cpp_only_all_warnings_command_line_optionsStringList
The command line options supplied to the C++compiler when Enable All Warnings is enabled.
Enable All Warnings Command Line Optionsgcc_all_warnings_command_line_optionsStringList
The command line options supplied to the compilerwhen Enable All Warnings is enabled.
Enforce ANSI Checkingc_enforce_ansi_checkingBoolean
Perform additional checks for ensure strictconformance to the selected ISO (ANSI) C or C++standard.
Enforce ANSI Checking C Command Line Optionsgcc_c_only_enforce_ansi_checking_command_line_optionsStringList
The command line options supplied to the C compilerwhen Enforce ANSI Checking is enabled.
Enforce ANSI Checking C++ Command Line Optionsgcc_cpp_only_enforce_ansi_checking_command_line_optionsStringList
The command line options supplied to the C++compiler when Enforce ANSI Checking is enabled.
Enforce ANSI Checking Command Line Optionsgcc_enforce_ansi_checking_command_line_optionsStringList
The command line options supplied to the compilerwhen Enforce ANSI Checking is enabled.
GNU Version [clang+segger-cc]clang_gnu_versionEnumeration
Specifies value of __GNU__ and related macros
Keep Assembly Sourcearm_keep_assemblyBoolean
Specifies whether assembly code generated by thecompiler is kept.
Keep Preprocessor Outputarm_keep_preprocessor_outputBoolean
Specifies whether preprocessor output generated bythe compiler is kept.
Show Caretcompiler_diagnostics_show_caretBoolean
Specifies whether caret is displayed in compilerdiagnostics.
Supply Absolute File Patharm_supply_absolute_file_pathBoolean
Specifies whether absolute file paths are supplied tothe compiler.
Use Compiler Driveruse_compiler_driverBoolean
The build will issue cc commands.
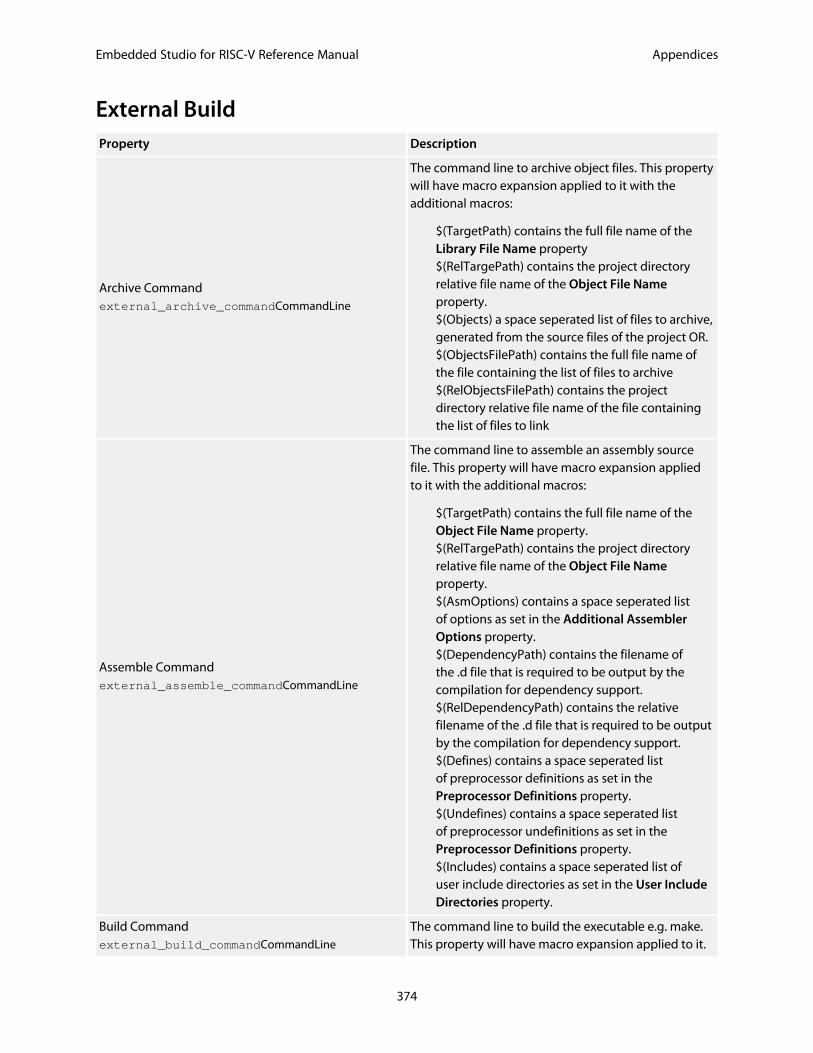
Embedded Studio for RISC-V Reference Manual Appendices
374
External BuildProperty Description
Archive Commandexternal_archive_commandCommandLine
The command line to archive object files. This propertywill have macro expansion applied to it with theadditional macros:
$(TargetPath) contains the full file name of theLibrary File Name property$(RelTargePath) contains the project directoryrelative file name of the Object File Nameproperty.$(Objects) a space seperated list of files to archive,generated from the source files of the project OR.$(ObjectsFilePath) contains the full file name ofthe file containing the list of files to archive$(RelObjectsFilePath) contains the projectdirectory relative file name of the file containingthe list of files to link
Assemble Commandexternal_assemble_commandCommandLine
The command line to assemble an assembly sourcefile. This property will have macro expansion appliedto it with the additional macros:
$(TargetPath) contains the full file name of theObject File Name property.$(RelTargePath) contains the project directoryrelative file name of the Object File Nameproperty.$(AsmOptions) contains a space seperated listof options as set in the Additional AssemblerOptions property.$(DependencyPath) contains the filename ofthe .d file that is required to be output by thecompilation for dependency support.$(RelDependencyPath) contains the relativefilename of the .d file that is required to be outputby the compilation for dependency support.$(Defines) contains a space seperated listof preprocessor definitions as set in thePreprocessor Definitions property.$(Undefines) contains a space seperated listof preprocessor undefinitions as set in thePreprocessor Definitions property.$(Includes) contains a space seperated list ofuser include directories as set in the User IncludeDirectories property.
Build Commandexternal_build_commandCommandLine
The command line to build the executable e.g. make.This property will have macro expansion applied to it.
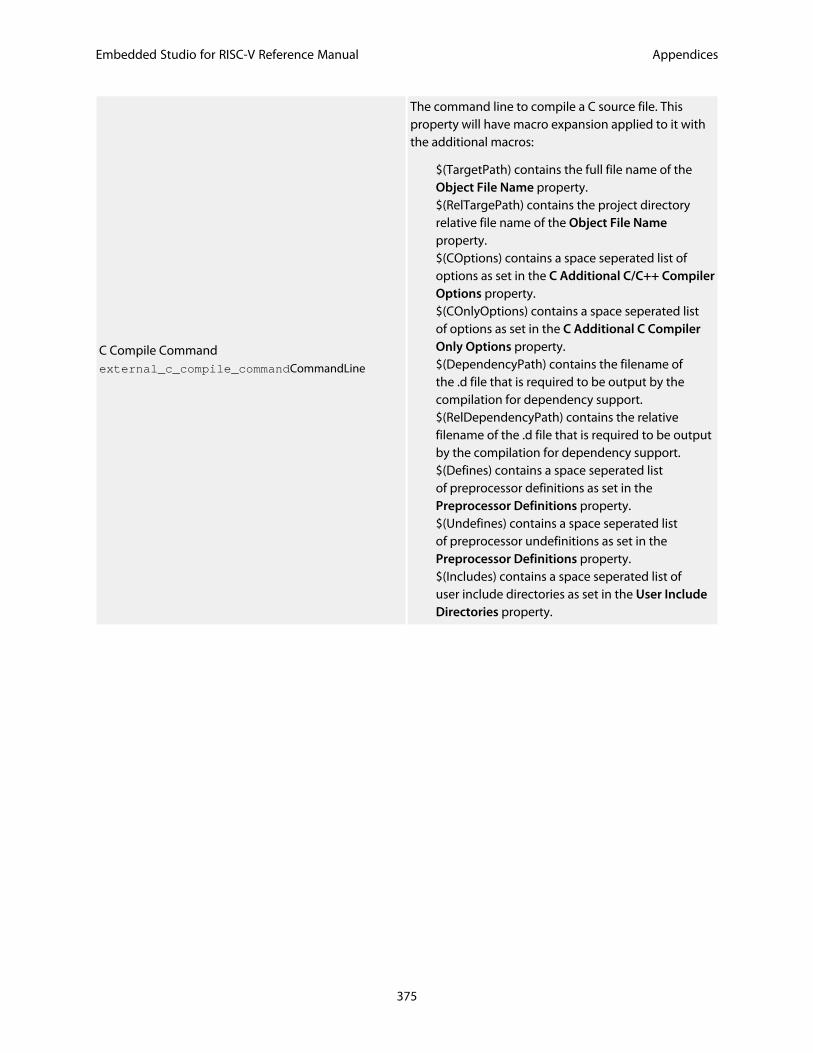
Embedded Studio for RISC-V Reference Manual Appendices
375
C Compile Commandexternal_c_compile_commandCommandLine
The command line to compile a C source file. Thisproperty will have macro expansion applied to it withthe additional macros:
$(TargetPath) contains the full file name of theObject File Name property.$(RelTargePath) contains the project directoryrelative file name of the Object File Nameproperty.$(COptions) contains a space seperated list ofoptions as set in the C Additional C/C++ CompilerOptions property.$(COnlyOptions) contains a space seperated listof options as set in the C Additional C CompilerOnly Options property.$(DependencyPath) contains the filename ofthe .d file that is required to be output by thecompilation for dependency support.$(RelDependencyPath) contains the relativefilename of the .d file that is required to be outputby the compilation for dependency support.$(Defines) contains a space seperated listof preprocessor definitions as set in thePreprocessor Definitions property.$(Undefines) contains a space seperated listof preprocessor undefinitions as set in thePreprocessor Definitions property.$(Includes) contains a space seperated list ofuser include directories as set in the User IncludeDirectories property.
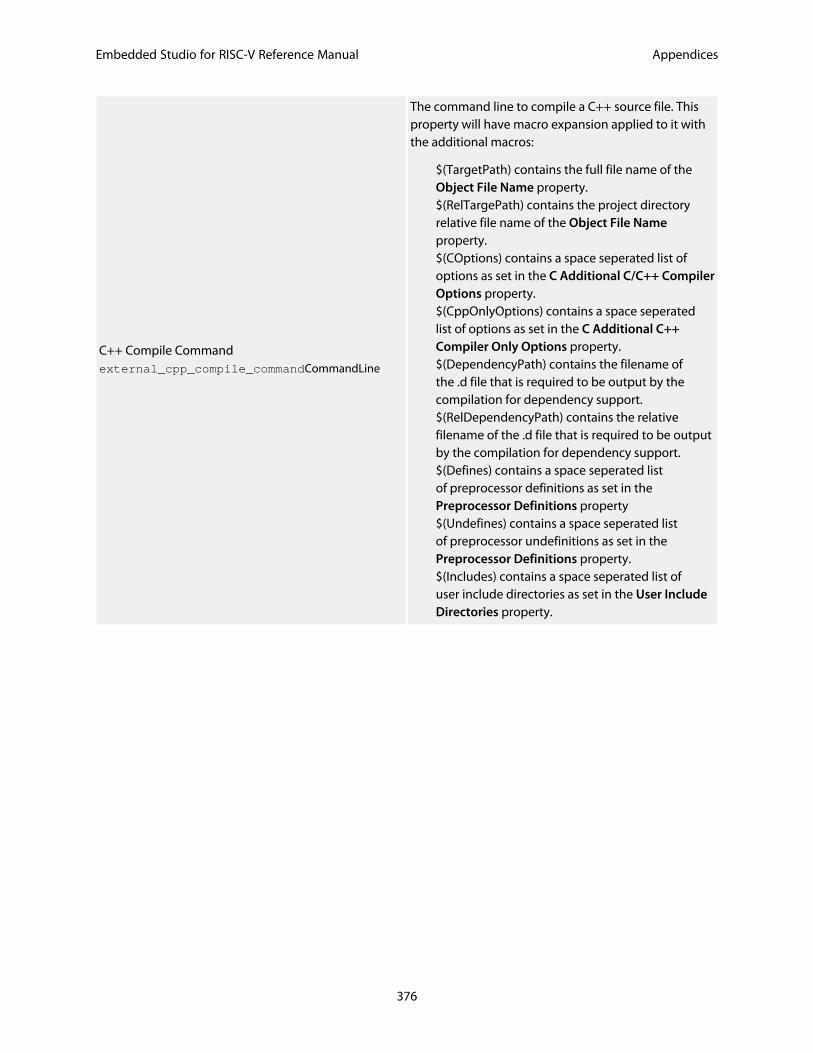
Embedded Studio for RISC-V Reference Manual Appendices
376
C++ Compile Commandexternal_cpp_compile_commandCommandLine
The command line to compile a C++ source file. Thisproperty will have macro expansion applied to it withthe additional macros:
$(TargetPath) contains the full file name of theObject File Name property.$(RelTargePath) contains the project directoryrelative file name of the Object File Nameproperty.$(COptions) contains a space seperated list ofoptions as set in the C Additional C/C++ CompilerOptions property.$(CppOnlyOptions) contains a space seperatedlist of options as set in the C Additional C++Compiler Only Options property.$(DependencyPath) contains the filename ofthe .d file that is required to be output by thecompilation for dependency support.$(RelDependencyPath) contains the relativefilename of the .d file that is required to be outputby the compilation for dependency support.$(Defines) contains a space seperated listof preprocessor definitions as set in thePreprocessor Definitions property$(Undefines) contains a space seperated listof preprocessor undefinitions as set in thePreprocessor Definitions property.$(Includes) contains a space seperated list ofuser include directories as set in the User IncludeDirectories property.
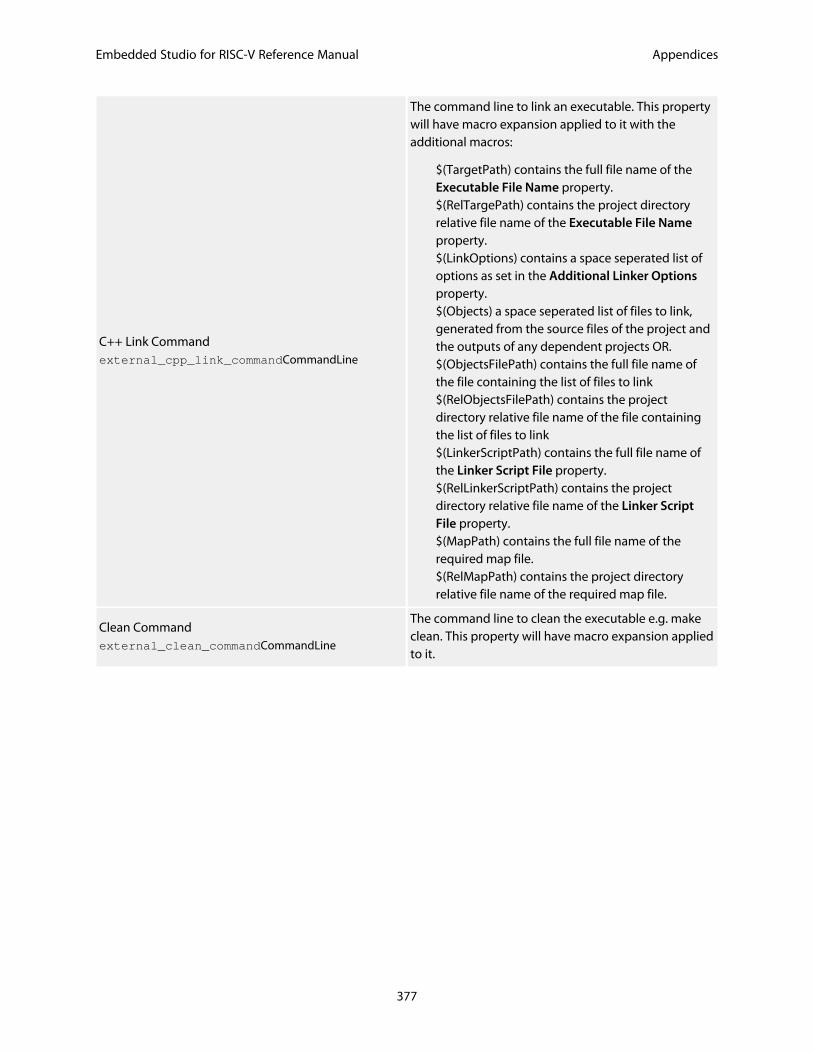
Embedded Studio for RISC-V Reference Manual Appendices
377
C++ Link Commandexternal_cpp_link_commandCommandLine
The command line to link an executable. This propertywill have macro expansion applied to it with theadditional macros:
$(TargetPath) contains the full file name of theExecutable File Name property.$(RelTargePath) contains the project directoryrelative file name of the Executable File Nameproperty.$(LinkOptions) contains a space seperated list ofoptions as set in the Additional Linker Optionsproperty.$(Objects) a space seperated list of files to link,generated from the source files of the project andthe outputs of any dependent projects OR.$(ObjectsFilePath) contains the full file name ofthe file containing the list of files to link$(RelObjectsFilePath) contains the projectdirectory relative file name of the file containingthe list of files to link$(LinkerScriptPath) contains the full file name ofthe Linker Script File property.$(RelLinkerScriptPath) contains the projectdirectory relative file name of the Linker ScriptFile property.$(MapPath) contains the full file name of therequired map file.$(RelMapPath) contains the project directoryrelative file name of the required map file.
Clean Commandexternal_clean_commandCommandLine
The command line to clean the executable e.g. makeclean. This property will have macro expansion appliedto it.

Embedded Studio for RISC-V Reference Manual Appendices
378
Link Commandexternal_link_commandCommandLine
The command line to link an executable. This propertywill have macro expansion applied to it with theadditional macros:
$(TargetPath) contains the full file name of theExecutable File Name property.$(RelTargePath) contains the project directoryrelative file name of the Executable File Nameproperty.$(LinkOptions) contains a space seperated list ofoptions as set in the Additional Linker Optionsproperty.$(Objects) a space seperated list of files to link,generated from the source files of the project andthe outputs of any dependent projects OR.$(ObjectsFilePath) contains the full file name ofthe file containing the list of files to link$(RelObjectsFilePath) contains the projectdirectory relative file name of the file containingthe list of files to link$(LinkerScriptPath) contains the full file name ofthe Linker Script File property.$(RelLinkerScriptPath) contains the projectdirectory relative file name of the Linker ScriptFile property.$(MapPath) contains the full file name of therequired map file.$(RelMapPath) contains the project directoryrelative file name of the required map file.
Objects Fileexternal_objects_file_nameCommandLine
The name of the file containing the list of files toarchive or link, generated from the source files ofthe project.This property will have macro expansionapplied to it. The macro $(ObjectsFilePath) is set to thisvalue.
File
Property Description
File Encodingfile_codecEnumeration
Specifies the encoding to use when reading andwriting the file.
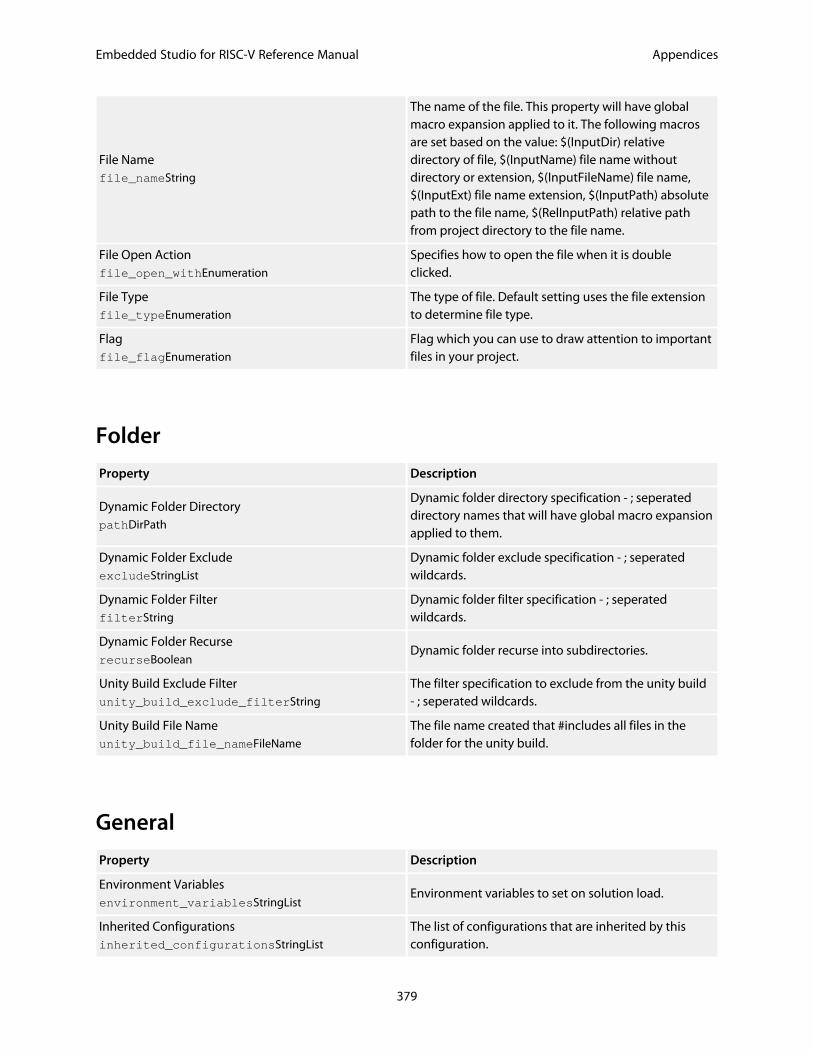
Embedded Studio for RISC-V Reference Manual Appendices
379
File Namefile_nameString
The name of the file. This property will have globalmacro expansion applied to it. The following macrosare set based on the value: $(InputDir) relativedirectory of file, $(InputName) file name withoutdirectory or extension, $(InputFileName) file name,$(InputExt) file name extension, $(InputPath) absolutepath to the file name, $(RelInputPath) relative pathfrom project directory to the file name.
File Open Actionfile_open_withEnumeration
Specifies how to open the file when it is doubleclicked.
File Typefile_typeEnumeration
The type of file. Default setting uses the file extensionto determine file type.
Flagfile_flagEnumeration
Flag which you can use to draw attention to importantfiles in your project.
Folder
Property Description
Dynamic Folder DirectorypathDirPath
Dynamic folder directory specification - ; seperateddirectory names that will have global macro expansionapplied to them.
Dynamic Folder ExcludeexcludeStringList
Dynamic folder exclude specification - ; seperatedwildcards.
Dynamic Folder FilterfilterString
Dynamic folder filter specification - ; seperatedwildcards.
Dynamic Folder RecurserecurseBoolean
Dynamic folder recurse into subdirectories.
Unity Build Exclude Filterunity_build_exclude_filterString
The filter specification to exclude from the unity build- ; seperated wildcards.
Unity Build File Nameunity_build_file_nameFileName
The file name created that #includes all files in thefolder for the unity build.
General
Property Description
Environment Variablesenvironment_variablesStringList
Environment variables to set on solution load.
Inherited Configurationsinherited_configurationsStringList
The list of configurations that are inherited by thisconfiguration.
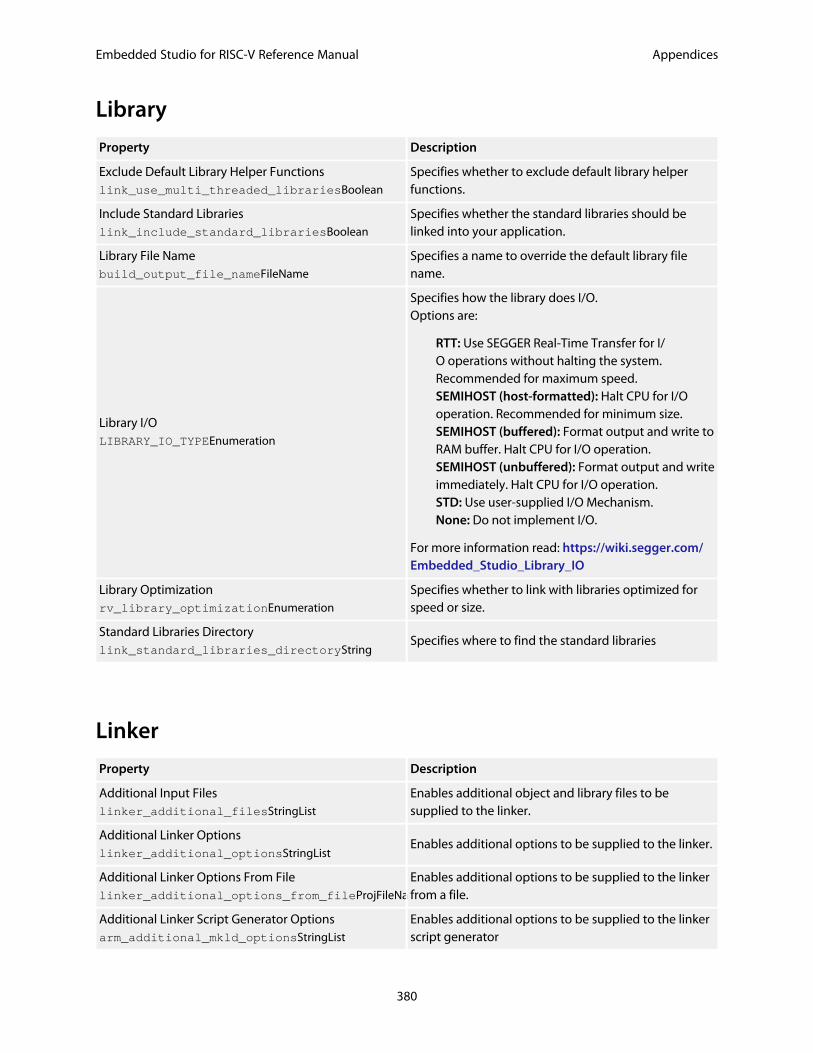
Embedded Studio for RISC-V Reference Manual Appendices
380
Library
Property Description
Exclude Default Library Helper Functionslink_use_multi_threaded_librariesBoolean
Specifies whether to exclude default library helperfunctions.
Include Standard Librarieslink_include_standard_librariesBoolean
Specifies whether the standard libraries should belinked into your application.
Library File Namebuild_output_file_nameFileName
Specifies a name to override the default library filename.
Library I/OLIBRARY_IO_TYPEEnumeration
Specifies how the library does I/O.Options are:
RTT: Use SEGGER Real-Time Transfer for I/O operations without halting the system.Recommended for maximum speed.SEMIHOST (host-formatted): Halt CPU for I/Ooperation. Recommended for minimum size.SEMIHOST (buffered): Format output and write toRAM buffer. Halt CPU for I/O operation.SEMIHOST (unbuffered): Format output and writeimmediately. Halt CPU for I/O operation.STD: Use user-supplied I/O Mechanism.None: Do not implement I/O.
For more information read: https://wiki.segger.com/Embedded_Studio_Library_IO
Library Optimizationrv_library_optimizationEnumeration
Specifies whether to link with libraries optimized forspeed or size.
Standard Libraries Directorylink_standard_libraries_directoryString
Specifies where to find the standard libraries
Linker
Property Description
Additional Input Fileslinker_additional_filesStringList
Enables additional object and library files to besupplied to the linker.
Additional Linker Optionslinker_additional_optionsStringList
Enables additional options to be supplied to the linker.
Additional Linker Options From Filelinker_additional_options_from_fileProjFileName
Enables additional options to be supplied to the linkerfrom a file.
Additional Linker Script Generator Optionsarm_additional_mkld_optionsStringList
Enables additional options to be supplied to the linkerscript generator
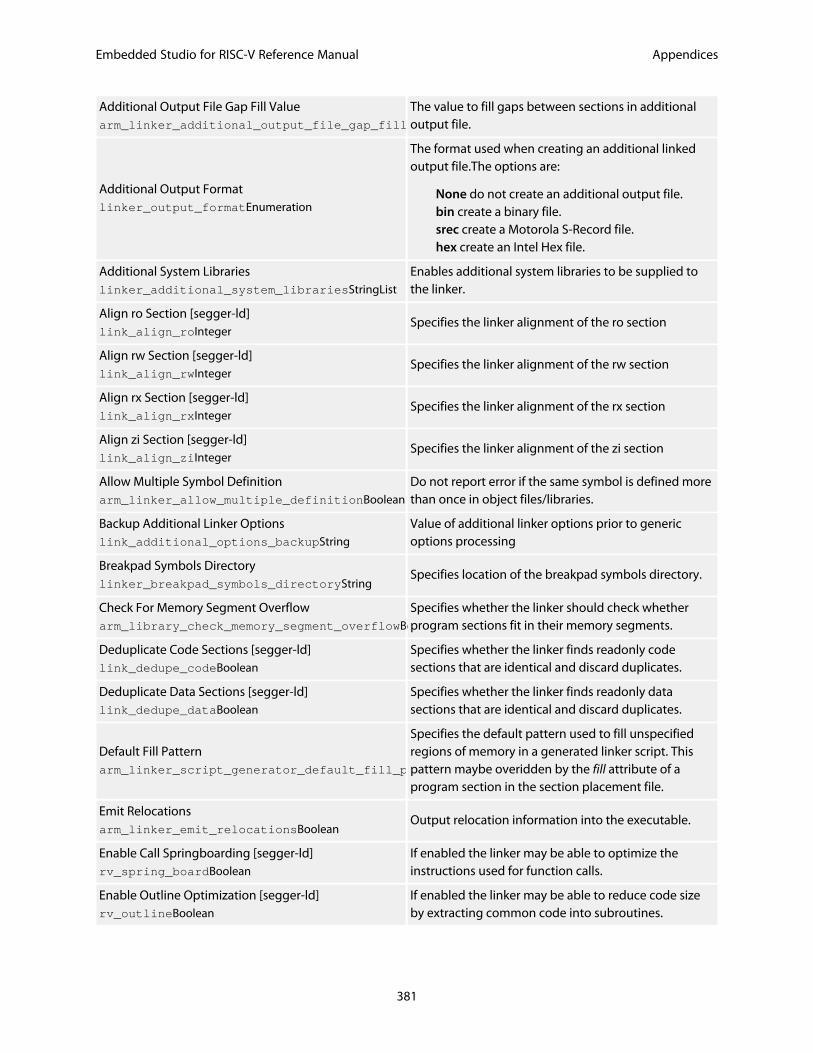
Embedded Studio for RISC-V Reference Manual Appendices
381
Additional Output File Gap Fill Valuearm_linker_additional_output_file_gap_fillString
The value to fill gaps between sections in additionaloutput file.
Additional Output Formatlinker_output_formatEnumeration
The format used when creating an additional linkedoutput file.The options are:
None do not create an additional output file.bin create a binary file.srec create a Motorola S-Record file.hex create an Intel Hex file.
Additional System Librarieslinker_additional_system_librariesStringList
Enables additional system libraries to be supplied tothe linker.
Align ro Section [segger-ld]link_align_roInteger
Specifies the linker alignment of the ro section
Align rw Section [segger-ld]link_align_rwInteger
Specifies the linker alignment of the rw section
Align rx Section [segger-ld]link_align_rxInteger
Specifies the linker alignment of the rx section
Align zi Section [segger-ld]link_align_ziInteger
Specifies the linker alignment of the zi section
Allow Multiple Symbol Definitionarm_linker_allow_multiple_definitionBoolean
Do not report error if the same symbol is defined morethan once in object files/libraries.
Backup Additional Linker Optionslink_additional_options_backupString
Value of additional linker options prior to genericoptions processing
Breakpad Symbols Directorylinker_breakpad_symbols_directoryString
Specifies location of the breakpad symbols directory.
Check For Memory Segment Overflowarm_library_check_memory_segment_overflowBoolean
Specifies whether the linker should check whetherprogram sections fit in their memory segments.
Deduplicate Code Sections [segger-ld]link_dedupe_codeBoolean
Specifies whether the linker finds readonly codesections that are identical and discard duplicates.
Deduplicate Data Sections [segger-ld]link_dedupe_dataBoolean
Specifies whether the linker finds readonly datasections that are identical and discard duplicates.
Default Fill Patternarm_linker_script_generator_default_fill_patternString
Specifies the default pattern used to fill unspecifiedregions of memory in a generated linker script. Thispattern maybe overidden by the fill attribute of aprogram section in the section placement file.
Emit Relocationsarm_linker_emit_relocationsBoolean
Output relocation information into the executable.
Enable Call Springboarding [segger-ld]rv_spring_boardBoolean
If enabled the linker may be able to optimize theinstructions used for function calls.
Enable Outline Optimization [segger-ld]rv_outlineBoolean
If enabled the linker may be able to reduce code sizeby extracting common code into subroutines.

Embedded Studio for RISC-V Reference Manual Appendices
382
Enable Tail Merging [segger-ld]rv_tail_mergeBoolean
If enabled the linker may be able to reduce code sizeby extracting common code immediately beforefunction return.
Entry Pointgcc_entry_pointString
Specifies the entry point of the program.
Generate Breakpad Symbolslinker_generate_breakpad_symbolsBoolean
Specifies whether to generate breakpad symbols fromthe linked image.
Generate Log File [segger-ld]linker_log_fileBoolean
Specifies whether to generate a linkage log file.
Generate Map Filelinker_map_fileBoolean
Specifies whether to generate a linkage map file.
Generate Map File [segger-ld]link_map_fileEnumeration
Specifies whether to generate a linkage map file.
Indirect File Supportedlinker_use_indirect_filesBoolean
Linker can use @indirect file for input files.
Inline Small Functions [segger-ld]link_inlineBoolean
Specifies whether the linker inlines small functions atthe call site rather than calling the function.
Keep Symbolslinker_keep_symbolsStringList
Specifies the symbols that should be kept by the linkereven if they are not reachable.
Link Dependent Projectslink_dependent_projectsBoolean
Specifies whether to link the output of dependentlibrary projects.
Linkerarm_linker_variantEnumeration
Specifies which linker to use.
Linker Script Filelink_linker_script_fileProjFileName
The name of the manual linker script file.
Linker Search Patharm_linker_search_pathStringList
Specify the linker script search path.
Linker Symbol Definitionslink_symbol_definitionsStringList
Specifies one or more linker symbol definitions.
Map File Format [segger-ld]link_map_file_formatEnumeration
Specifies map file format generated by the linker.
Memory Map Filelinker_memory_map_fileProjFileName
The name of the file containing the memory mapdescription.
Memory Map Macroslinker_memory_map_macrosStringList
Macro values to substitue in memory map nodes. Eachmacro is defined as name=value and are seperated by;.
Memory Segmentslinker_section_placements_segmentsString
The start, access and size of named segments in thetarget, these are used when no memory map file isavailable.Each segment is specified by NAME RWXHEXSTART HEXSIZE for example FLASH RX 0x080000000x00010000
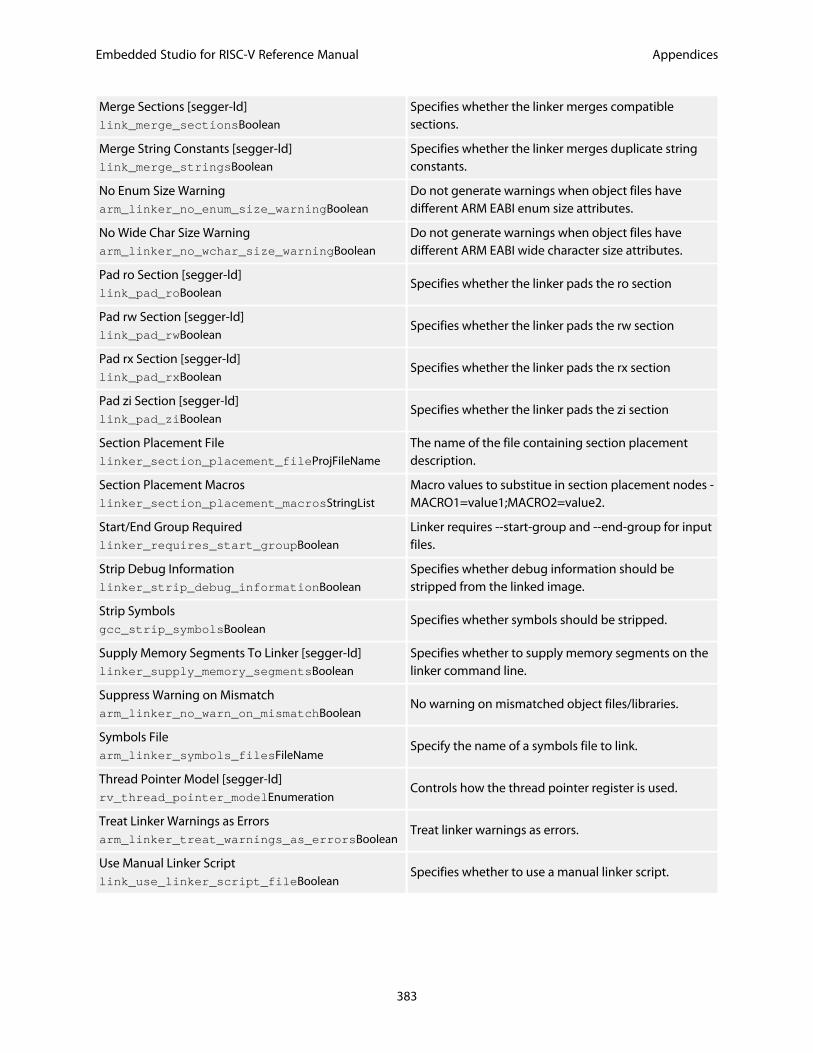
Embedded Studio for RISC-V Reference Manual Appendices
383
Merge Sections [segger-ld]link_merge_sectionsBoolean
Specifies whether the linker merges compatiblesections.
Merge String Constants [segger-ld]link_merge_stringsBoolean
Specifies whether the linker merges duplicate stringconstants.
No Enum Size Warningarm_linker_no_enum_size_warningBoolean
Do not generate warnings when object files havedifferent ARM EABI enum size attributes.
No Wide Char Size Warningarm_linker_no_wchar_size_warningBoolean
Do not generate warnings when object files havedifferent ARM EABI wide character size attributes.
Pad ro Section [segger-ld]link_pad_roBoolean
Specifies whether the linker pads the ro section
Pad rw Section [segger-ld]link_pad_rwBoolean
Specifies whether the linker pads the rw section
Pad rx Section [segger-ld]link_pad_rxBoolean
Specifies whether the linker pads the rx section
Pad zi Section [segger-ld]link_pad_ziBoolean
Specifies whether the linker pads the zi section
Section Placement Filelinker_section_placement_fileProjFileName
The name of the file containing section placementdescription.
Section Placement Macroslinker_section_placement_macrosStringList
Macro values to substitue in section placement nodes -MACRO1=value1;MACRO2=value2.
Start/End Group Requiredlinker_requires_start_groupBoolean
Linker requires --start-group and --end-group for inputfiles.
Strip Debug Informationlinker_strip_debug_informationBoolean
Specifies whether debug information should bestripped from the linked image.
Strip Symbolsgcc_strip_symbolsBoolean
Specifies whether symbols should be stripped.
Supply Memory Segments To Linker [segger-ld]linker_supply_memory_segmentsBoolean
Specifies whether to supply memory segments on thelinker command line.
Suppress Warning on Mismatcharm_linker_no_warn_on_mismatchBoolean
No warning on mismatched object files/libraries.
Symbols Filearm_linker_symbols_filesFileName
Specify the name of a symbols file to link.
Thread Pointer Model [segger-ld]rv_thread_pointer_modelEnumeration
Controls how the thread pointer register is used.
Treat Linker Warnings as Errorsarm_linker_treat_warnings_as_errorsBoolean
Treat linker warnings as errors.
Use Manual Linker Scriptlink_use_linker_script_fileBoolean
Specifies whether to use a manual linker script.
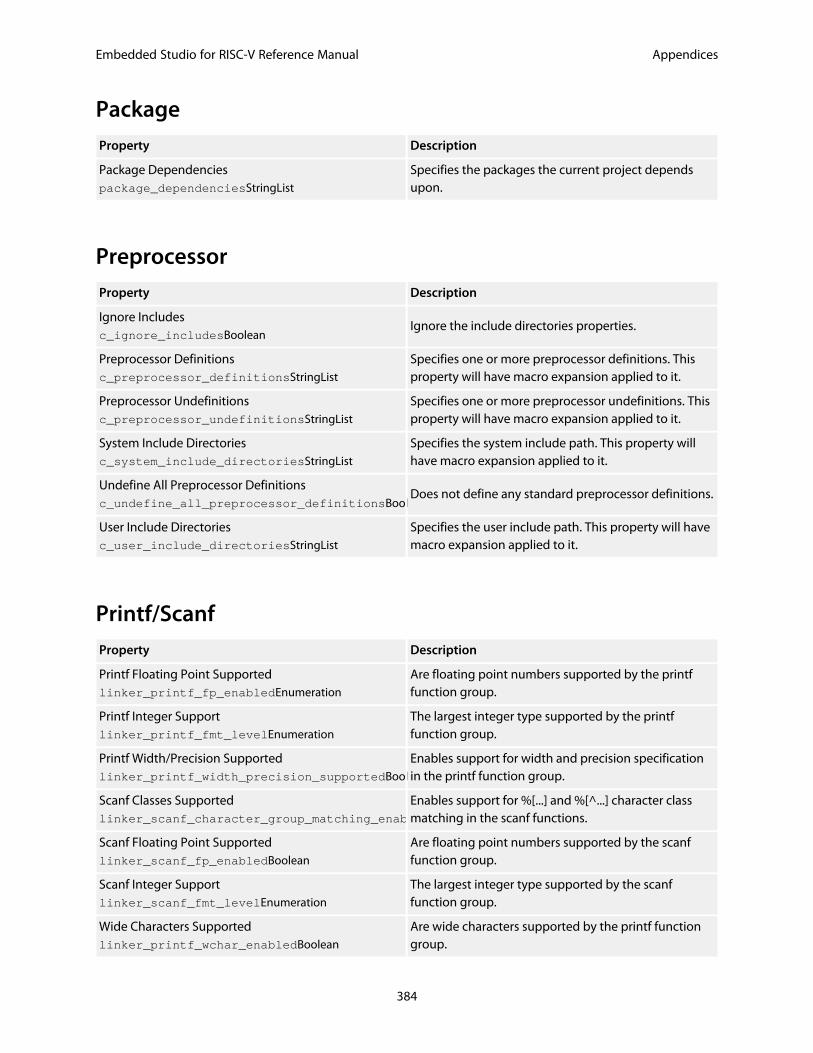
Embedded Studio for RISC-V Reference Manual Appendices
384
PackageProperty Description
Package Dependenciespackage_dependenciesStringList
Specifies the packages the current project dependsupon.
PreprocessorProperty Description
Ignore Includesc_ignore_includesBoolean
Ignore the include directories properties.
Preprocessor Definitionsc_preprocessor_definitionsStringList
Specifies one or more preprocessor definitions. Thisproperty will have macro expansion applied to it.
Preprocessor Undefinitionsc_preprocessor_undefinitionsStringList
Specifies one or more preprocessor undefinitions. Thisproperty will have macro expansion applied to it.
System Include Directoriesc_system_include_directoriesStringList
Specifies the system include path. This property willhave macro expansion applied to it.
Undefine All Preprocessor Definitionsc_undefine_all_preprocessor_definitionsBoolean
Does not define any standard preprocessor definitions.
User Include Directoriesc_user_include_directoriesStringList
Specifies the user include path. This property will havemacro expansion applied to it.
Printf/ScanfProperty Description
Printf Floating Point Supportedlinker_printf_fp_enabledEnumeration
Are floating point numbers supported by the printffunction group.
Printf Integer Supportlinker_printf_fmt_levelEnumeration
The largest integer type supported by the printffunction group.
Printf Width/Precision Supportedlinker_printf_width_precision_supportedBoolean
Enables support for width and precision specificationin the printf function group.
Scanf Classes Supportedlinker_scanf_character_group_matching_enabledBoolean
Enables support for %[...] and %[^...] character classmatching in the scanf functions.
Scanf Floating Point Supportedlinker_scanf_fp_enabledBoolean
Are floating point numbers supported by the scanffunction group.
Scanf Integer Supportlinker_scanf_fmt_levelEnumeration
The largest integer type supported by the scanffunction group.
Wide Characters Supportedlinker_printf_wchar_enabledBoolean
Are wide characters supported by the printf functiongroup.
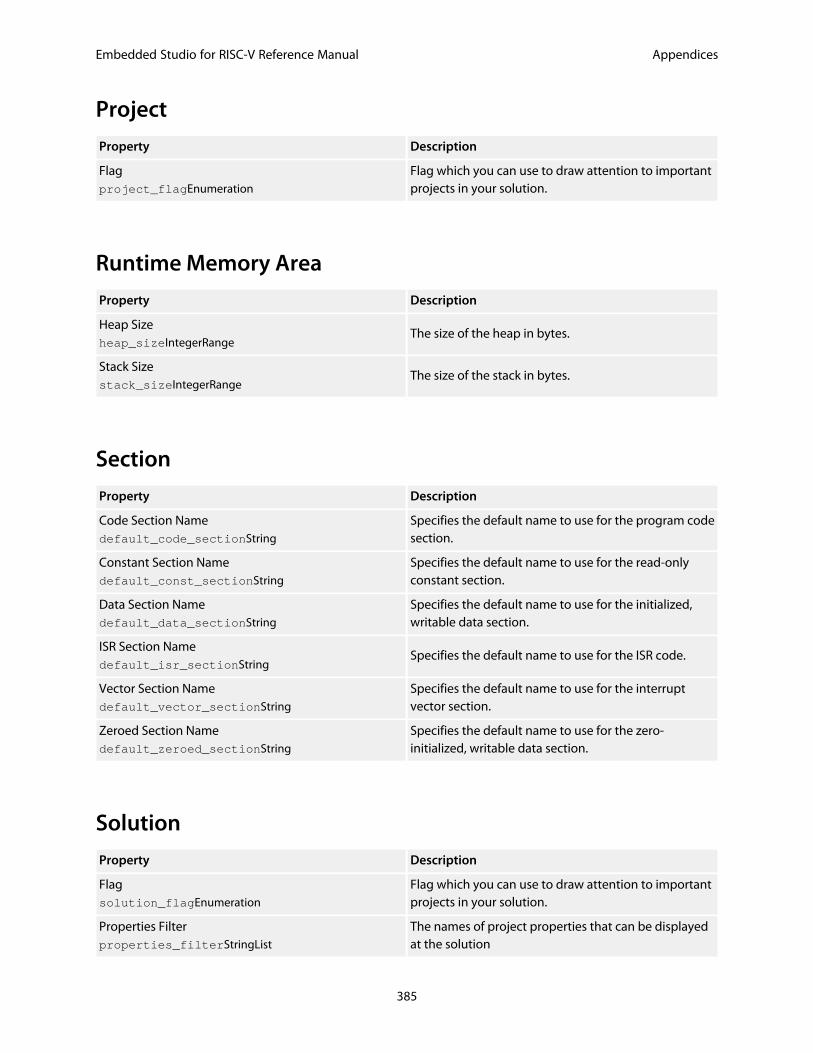
Embedded Studio for RISC-V Reference Manual Appendices
385
Project
Property Description
Flagproject_flagEnumeration
Flag which you can use to draw attention to importantprojects in your solution.
Runtime Memory Area
Property Description
Heap Sizeheap_sizeIntegerRange
The size of the heap in bytes.
Stack Sizestack_sizeIntegerRange
The size of the stack in bytes.
Section
Property Description
Code Section Namedefault_code_sectionString
Specifies the default name to use for the program codesection.
Constant Section Namedefault_const_sectionString
Specifies the default name to use for the read-onlyconstant section.
Data Section Namedefault_data_sectionString
Specifies the default name to use for the initialized,writable data section.
ISR Section Namedefault_isr_sectionString
Specifies the default name to use for the ISR code.
Vector Section Namedefault_vector_sectionString
Specifies the default name to use for the interruptvector section.
Zeroed Section Namedefault_zeroed_sectionString
Specifies the default name to use for the zero-initialized, writable data section.
Solution
Property Description
Flagsolution_flagEnumeration
Flag which you can use to draw attention to importantprojects in your solution.
Properties Filterproperties_filterStringList
The names of project properties that can be displayedat the solution
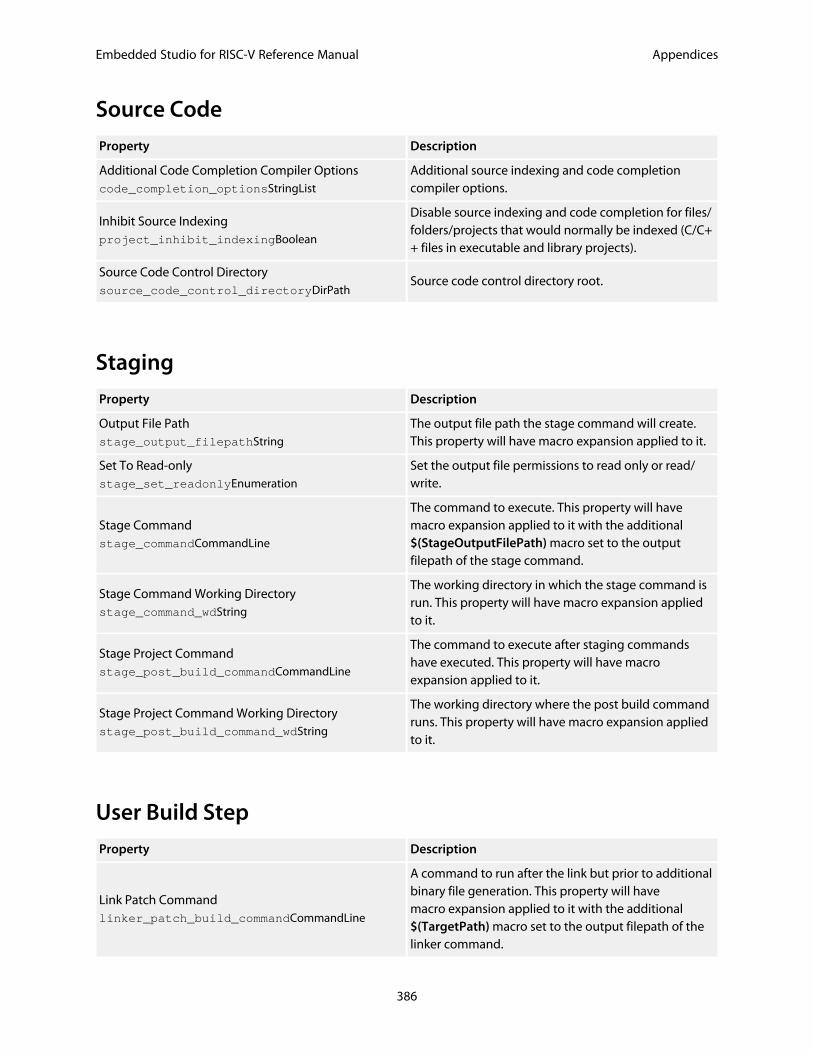
Embedded Studio for RISC-V Reference Manual Appendices
386
Source Code
Property Description
Additional Code Completion Compiler Optionscode_completion_optionsStringList
Additional source indexing and code completioncompiler options.
Inhibit Source Indexingproject_inhibit_indexingBoolean
Disable source indexing and code completion for files/folders/projects that would normally be indexed (C/C++ files in executable and library projects).
Source Code Control Directorysource_code_control_directoryDirPath
Source code control directory root.
Staging
Property Description
Output File Pathstage_output_filepathString
The output file path the stage command will create.This property will have macro expansion applied to it.
Set To Read-onlystage_set_readonlyEnumeration
Set the output file permissions to read only or read/write.
Stage Commandstage_commandCommandLine
The command to execute. This property will havemacro expansion applied to it with the additional$(StageOutputFilePath) macro set to the outputfilepath of the stage command.
Stage Command Working Directorystage_command_wdString
The working directory in which the stage command isrun. This property will have macro expansion appliedto it.
Stage Project Commandstage_post_build_commandCommandLine
The command to execute after staging commandshave executed. This property will have macroexpansion applied to it.
Stage Project Command Working Directorystage_post_build_command_wdString
The working directory where the post build commandruns. This property will have macro expansion appliedto it.
User Build Step
Property Description
Link Patch Commandlinker_patch_build_commandCommandLine
A command to run after the link but prior to additionalbinary file generation. This property will havemacro expansion applied to it with the additional$(TargetPath) macro set to the output filepath of thelinker command.
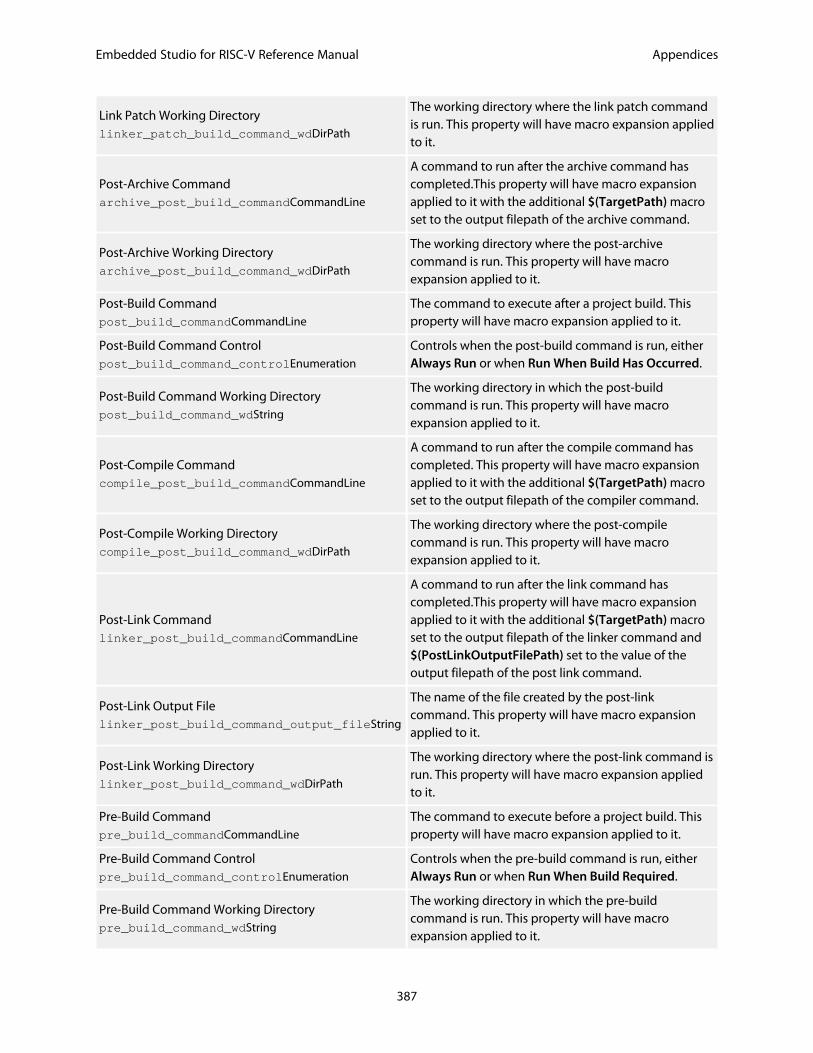
Embedded Studio for RISC-V Reference Manual Appendices
387
Link Patch Working Directorylinker_patch_build_command_wdDirPath
The working directory where the link patch commandis run. This property will have macro expansion appliedto it.
Post-Archive Commandarchive_post_build_commandCommandLine
A command to run after the archive command hascompleted.This property will have macro expansionapplied to it with the additional $(TargetPath) macroset to the output filepath of the archive command.
Post-Archive Working Directoryarchive_post_build_command_wdDirPath
The working directory where the post-archivecommand is run. This property will have macroexpansion applied to it.
Post-Build Commandpost_build_commandCommandLine
The command to execute after a project build. Thisproperty will have macro expansion applied to it.
Post-Build Command Controlpost_build_command_controlEnumeration
Controls when the post-build command is run, eitherAlways Run or when Run When Build Has Occurred.
Post-Build Command Working Directorypost_build_command_wdString
The working directory in which the post-buildcommand is run. This property will have macroexpansion applied to it.
Post-Compile Commandcompile_post_build_commandCommandLine
A command to run after the compile command hascompleted. This property will have macro expansionapplied to it with the additional $(TargetPath) macroset to the output filepath of the compiler command.
Post-Compile Working Directorycompile_post_build_command_wdDirPath
The working directory where the post-compilecommand is run. This property will have macroexpansion applied to it.
Post-Link Commandlinker_post_build_commandCommandLine
A command to run after the link command hascompleted.This property will have macro expansionapplied to it with the additional $(TargetPath) macroset to the output filepath of the linker command and$(PostLinkOutputFilePath) set to the value of theoutput filepath of the post link command.
Post-Link Output Filelinker_post_build_command_output_fileString
The name of the file created by the post-linkcommand. This property will have macro expansionapplied to it.
Post-Link Working Directorylinker_post_build_command_wdDirPath
The working directory where the post-link command isrun. This property will have macro expansion appliedto it.
Pre-Build Commandpre_build_commandCommandLine
The command to execute before a project build. Thisproperty will have macro expansion applied to it.
Pre-Build Command Controlpre_build_command_controlEnumeration
Controls when the pre-build command is run, eitherAlways Run or when Run When Build Required.
Pre-Build Command Working Directorypre_build_command_wdString
The working directory in which the pre-buildcommand is run. This property will have macroexpansion applied to it.
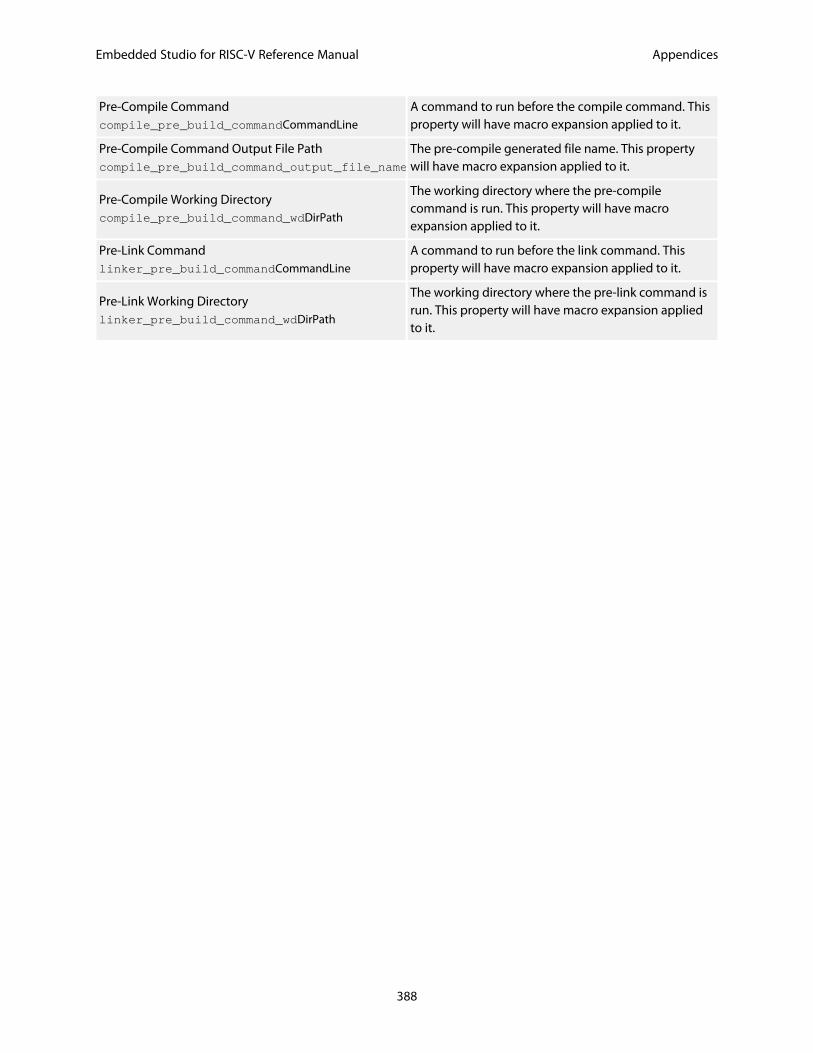
Embedded Studio for RISC-V Reference Manual Appendices
388
Pre-Compile Commandcompile_pre_build_commandCommandLine
A command to run before the compile command. Thisproperty will have macro expansion applied to it.
Pre-Compile Command Output File Pathcompile_pre_build_command_output_file_nameString
The pre-compile generated file name. This propertywill have macro expansion applied to it.
Pre-Compile Working Directorycompile_pre_build_command_wdDirPath
The working directory where the pre-compilecommand is run. This property will have macroexpansion applied to it.
Pre-Link Commandlinker_pre_build_commandCommandLine
A command to run before the link command. Thisproperty will have macro expansion applied to it.
Pre-Link Working Directorylinker_pre_build_command_wdDirPath
The working directory where the pre-link command isrun. This property will have macro expansion appliedto it.
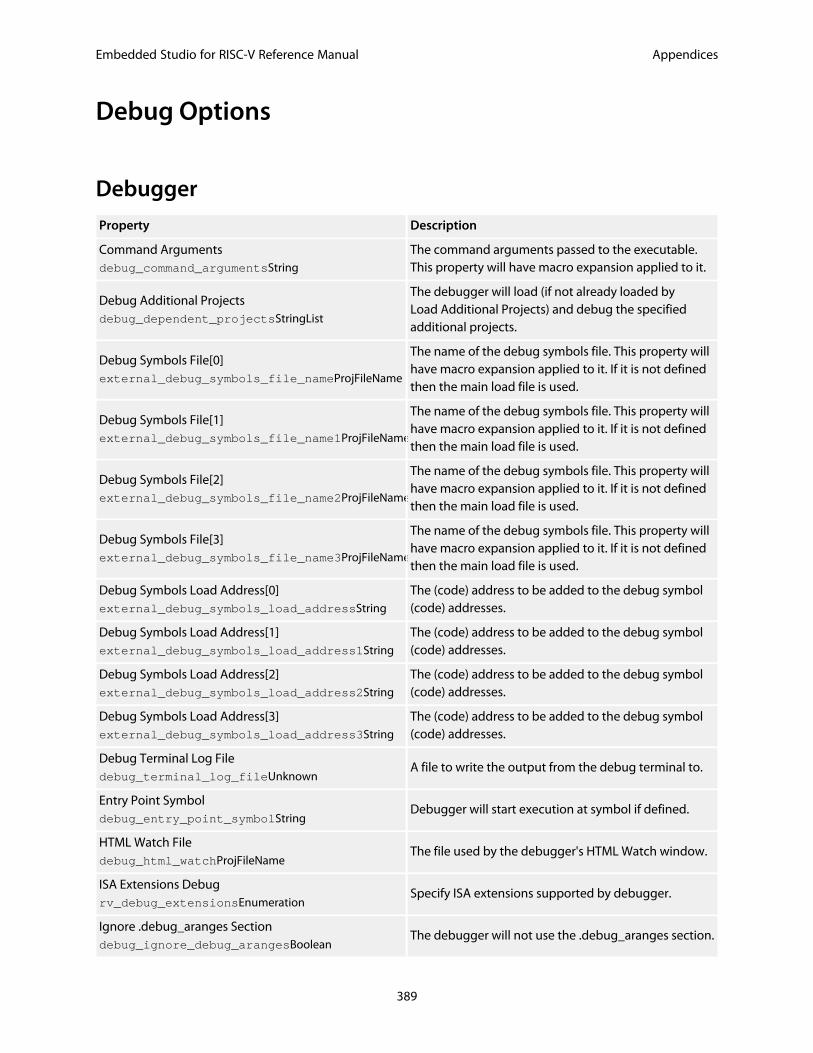
Embedded Studio for RISC-V Reference Manual Appendices
389
Debug Options
Debugger
Property Description
Command Argumentsdebug_command_argumentsString
The command arguments passed to the executable.This property will have macro expansion applied to it.
Debug Additional Projectsdebug_dependent_projectsStringList
The debugger will load (if not already loaded byLoad Additional Projects) and debug the specifiedadditional projects.
Debug Symbols File[0]external_debug_symbols_file_nameProjFileName
The name of the debug symbols file. This property willhave macro expansion applied to it. If it is not definedthen the main load file is used.
Debug Symbols File[1]external_debug_symbols_file_name1ProjFileName
The name of the debug symbols file. This property willhave macro expansion applied to it. If it is not definedthen the main load file is used.
Debug Symbols File[2]external_debug_symbols_file_name2ProjFileName
The name of the debug symbols file. This property willhave macro expansion applied to it. If it is not definedthen the main load file is used.
Debug Symbols File[3]external_debug_symbols_file_name3ProjFileName
The name of the debug symbols file. This property willhave macro expansion applied to it. If it is not definedthen the main load file is used.
Debug Symbols Load Address[0]external_debug_symbols_load_addressString
The (code) address to be added to the debug symbol(code) addresses.
Debug Symbols Load Address[1]external_debug_symbols_load_address1String
The (code) address to be added to the debug symbol(code) addresses.
Debug Symbols Load Address[2]external_debug_symbols_load_address2String
The (code) address to be added to the debug symbol(code) addresses.
Debug Symbols Load Address[3]external_debug_symbols_load_address3String
The (code) address to be added to the debug symbol(code) addresses.
Debug Terminal Log Filedebug_terminal_log_fileUnknown
A file to write the output from the debug terminal to.
Entry Point Symboldebug_entry_point_symbolString
Debugger will start execution at symbol if defined.
HTML Watch Filedebug_html_watchProjFileName
The file used by the debugger's HTML Watch window.
ISA Extensions Debugrv_debug_extensionsEnumeration
Specify ISA extensions supported by debugger.
Ignore .debug_aranges Sectiondebug_ignore_debug_arangesBoolean
The debugger will not use the .debug_aranges section.
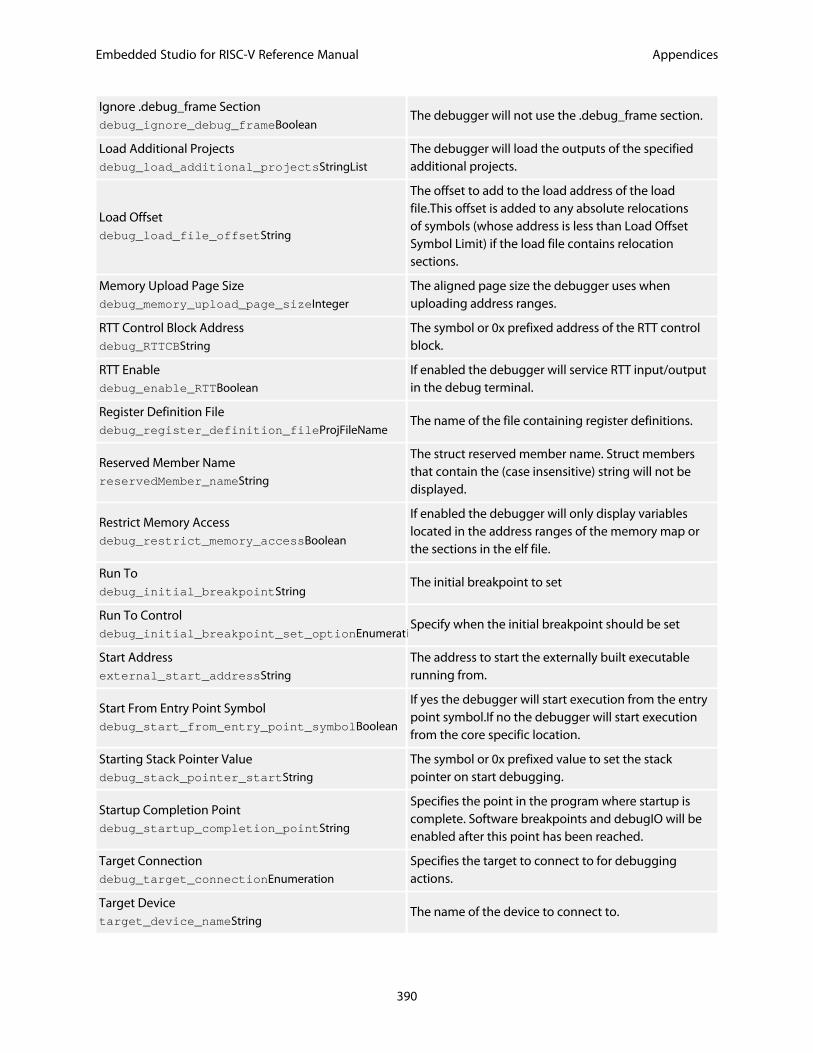
Embedded Studio for RISC-V Reference Manual Appendices
390
Ignore .debug_frame Sectiondebug_ignore_debug_frameBoolean
The debugger will not use the .debug_frame section.
Load Additional Projectsdebug_load_additional_projectsStringList
The debugger will load the outputs of the specifiedadditional projects.
Load Offsetdebug_load_file_offsetString
The offset to add to the load address of the loadfile.This offset is added to any absolute relocationsof symbols (whose address is less than Load OffsetSymbol Limit) if the load file contains relocationsections.
Memory Upload Page Sizedebug_memory_upload_page_sizeInteger
The aligned page size the debugger uses whenuploading address ranges.
RTT Control Block Addressdebug_RTTCBString
The symbol or 0x prefixed address of the RTT controlblock.
RTT Enabledebug_enable_RTTBoolean
If enabled the debugger will service RTT input/outputin the debug terminal.
Register Definition Filedebug_register_definition_fileProjFileName
The name of the file containing register definitions.
Reserved Member NamereservedMember_nameString
The struct reserved member name. Struct membersthat contain the (case insensitive) string will not bedisplayed.
Restrict Memory Accessdebug_restrict_memory_accessBoolean
If enabled the debugger will only display variableslocated in the address ranges of the memory map orthe sections in the elf file.
Run Todebug_initial_breakpointString
The initial breakpoint to set
Run To Controldebug_initial_breakpoint_set_optionEnumeration
Specify when the initial breakpoint should be set
Start Addressexternal_start_addressString
The address to start the externally built executablerunning from.
Start From Entry Point Symboldebug_start_from_entry_point_symbolBoolean
If yes the debugger will start execution from the entrypoint symbol.If no the debugger will start executionfrom the core specific location.
Starting Stack Pointer Valuedebug_stack_pointer_startString
The symbol or 0x prefixed value to set the stackpointer on start debugging.
Startup Completion Pointdebug_startup_completion_pointString
Specifies the point in the program where startup iscomplete. Software breakpoints and debugIO will beenabled after this point has been reached.
Target Connectiondebug_target_connectionEnumeration
Specifies the target to connect to for debuggingactions.
Target Devicetarget_device_nameString
The name of the device to connect to.
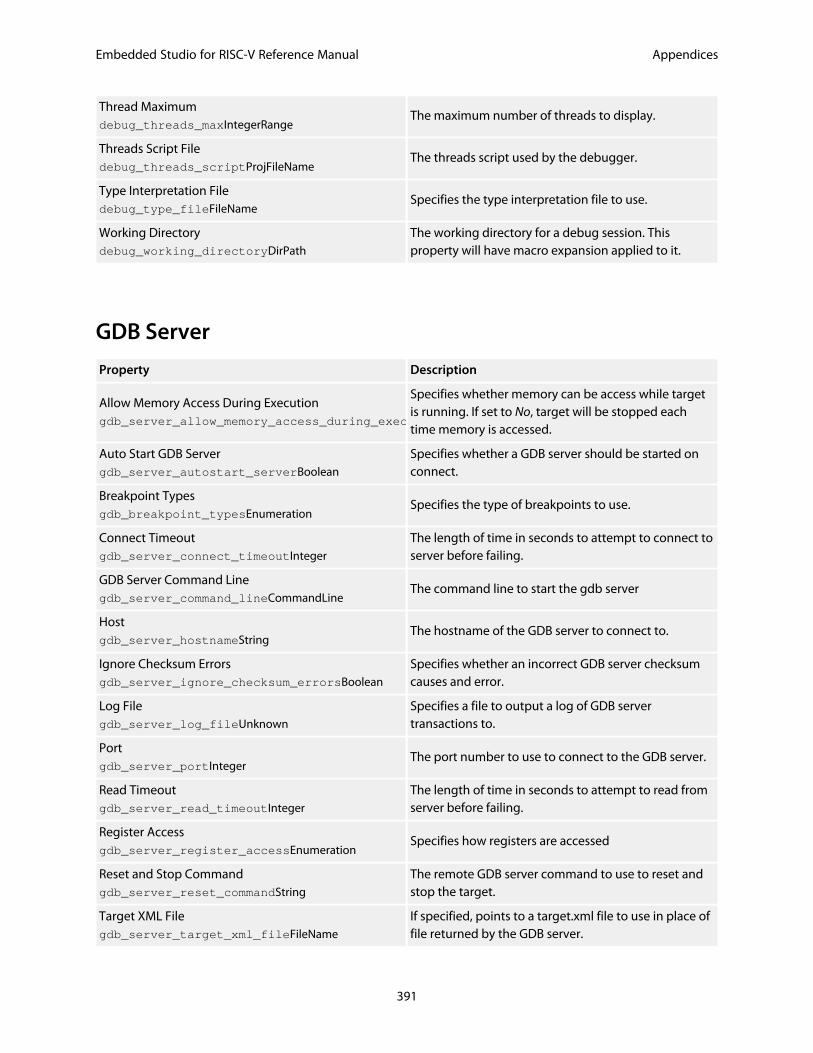
Embedded Studio for RISC-V Reference Manual Appendices
391
Thread Maximumdebug_threads_maxIntegerRange
The maximum number of threads to display.
Threads Script Filedebug_threads_scriptProjFileName
The threads script used by the debugger.
Type Interpretation Filedebug_type_fileFileName
Specifies the type interpretation file to use.
Working Directorydebug_working_directoryDirPath
The working directory for a debug session. Thisproperty will have macro expansion applied to it.
GDB Server
Property Description
Allow Memory Access During Executiongdb_server_allow_memory_access_during_executionBoolean
Specifies whether memory can be access while targetis running. If set to No, target will be stopped eachtime memory is accessed.
Auto Start GDB Servergdb_server_autostart_serverBoolean
Specifies whether a GDB server should be started onconnect.
Breakpoint Typesgdb_breakpoint_typesEnumeration
Specifies the type of breakpoints to use.
Connect Timeoutgdb_server_connect_timeoutInteger
The length of time in seconds to attempt to connect toserver before failing.
GDB Server Command Linegdb_server_command_lineCommandLine
The command line to start the gdb server
Hostgdb_server_hostnameString
The hostname of the GDB server to connect to.
Ignore Checksum Errorsgdb_server_ignore_checksum_errorsBoolean
Specifies whether an incorrect GDB server checksumcauses and error.
Log Filegdb_server_log_fileUnknown
Specifies a file to output a log of GDB servertransactions to.
Portgdb_server_portInteger
The port number to use to connect to the GDB server.
Read Timeoutgdb_server_read_timeoutInteger
The length of time in seconds to attempt to read fromserver before failing.
Register Accessgdb_server_register_accessEnumeration
Specifies how registers are accessed
Reset and Stop Commandgdb_server_reset_commandString
The remote GDB server command to use to reset andstop the target.
Target XML Filegdb_server_target_xml_fileFileName
If specified, points to a target.xml file to use in place offile returned by the GDB server.
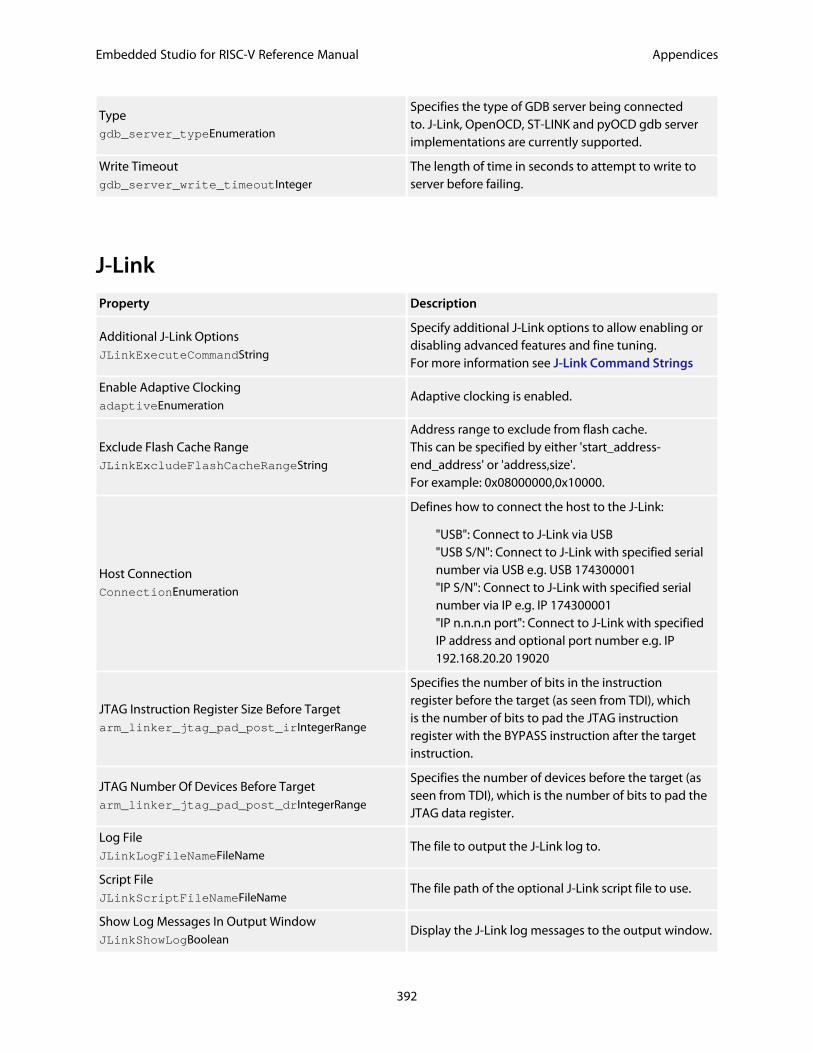
Embedded Studio for RISC-V Reference Manual Appendices
392
Typegdb_server_typeEnumeration
Specifies the type of GDB server being connectedto. J-Link, OpenOCD, ST-LINK and pyOCD gdb serverimplementations are currently supported.
Write Timeoutgdb_server_write_timeoutInteger
The length of time in seconds to attempt to write toserver before failing.
J-Link
Property Description
Additional J-Link OptionsJLinkExecuteCommandString
Specify additional J-Link options to allow enabling ordisabling advanced features and fine tuning.For more information see J-Link Command Strings
Enable Adaptive ClockingadaptiveEnumeration
Adaptive clocking is enabled.
Exclude Flash Cache RangeJLinkExcludeFlashCacheRangeString
Address range to exclude from flash cache.This can be specified by either 'start_address-end_address' or 'address,size'.For example: 0x08000000,0x10000.
Host ConnectionConnectionEnumeration
Defines how to connect the host to the J-Link:
"USB": Connect to J-Link via USB"USB S/N": Connect to J-Link with specified serialnumber via USB e.g. USB 174300001"IP S/N": Connect to J-Link with specified serialnumber via IP e.g. IP 174300001"IP n.n.n.n port": Connect to J-Link with specifiedIP address and optional port number e.g. IP192.168.20.20 19020
JTAG Instruction Register Size Before Targetarm_linker_jtag_pad_post_irIntegerRange
Specifies the number of bits in the instructionregister before the target (as seen from TDI), whichis the number of bits to pad the JTAG instructionregister with the BYPASS instruction after the targetinstruction.
JTAG Number Of Devices Before Targetarm_linker_jtag_pad_post_drIntegerRange
Specifies the number of devices before the target (asseen from TDI), which is the number of bits to pad theJTAG data register.
Log FileJLinkLogFileNameFileName
The file to output the J-Link log to.
Script FileJLinkScriptFileNameFileName
The file path of the optional J-Link script file to use.
Show Log Messages In Output WindowJLinkShowLogBoolean
Display the J-Link log messages to the output window.

Embedded Studio for RISC-V Reference Manual Appendices
393
SpeedspeedIntegerRange
The required JTAG clock frequency in kHz (0 to auto-detect best possible).
Supply PowersupplyPowerBoolean
The J-Link supplies power to the target.
Target Has Cycle Counterriscv_has_cycle_counterBoolean
The target device implements the mcycle CSR.
Target Interface Typetarget_interface_typeEnumeration
Specifies the type of interface the target has. Theoptions are:
JTAG - Use JTAG interfaceSWD - Use SWD interfacecJTAG - Use cJTAG interface
Loader
Property Description
Additional Load File Address[0]debug_additional_load_file_addressString
The address to load the additional load file.
Additional Load File Address[1]debug_additional_load_file_address1String
The address to load the additional load file.
Additional Load File Address[2]debug_additional_load_file_address2String
The address to load the additional load file.
Additional Load File Address[3]debug_additional_load_file_address3String
The address to load the additional load file.
Additional Load File Type[0]debug_additional_load_file_typeEnumeration
The file type of the additional load file. The options areDetect, elf, bin, ihex, hex, tihex, srec.
Additional Load File Type[1]debug_additional_load_file_type1Enumeration
The file type of the additional load file. The options areDetect, elf, bin, ihex, hex, tihex, srec.
Additional Load File Type[2]debug_additional_load_file_type2Enumeration
The file type of the additional load file. The options areDetect, elf, bin, ihex, hex, tihex, srec.
Additional Load File Type[3]debug_additional_load_file_type3Enumeration
The file type of the additional load file. The options areDetect, elf, bin, ihex, hex, tihex, srec.
Additional Load File[0]debug_additional_load_fileProjFileName
Additional file to load on debug load. This property willhave macro expansion applied to it.
Additional Load File[1]debug_additional_load_file1ProjFileName
Additional file to load on debug load. This property willhave macro expansion applied to it.
Additional Load File[2]debug_additional_load_file2ProjFileName
Additional file to load on debug load. This property willhave macro expansion applied to it.
Additional Load File[3]debug_additional_load_file3ProjFileName
Additional file to load on debug load. This property willhave macro expansion applied to it.
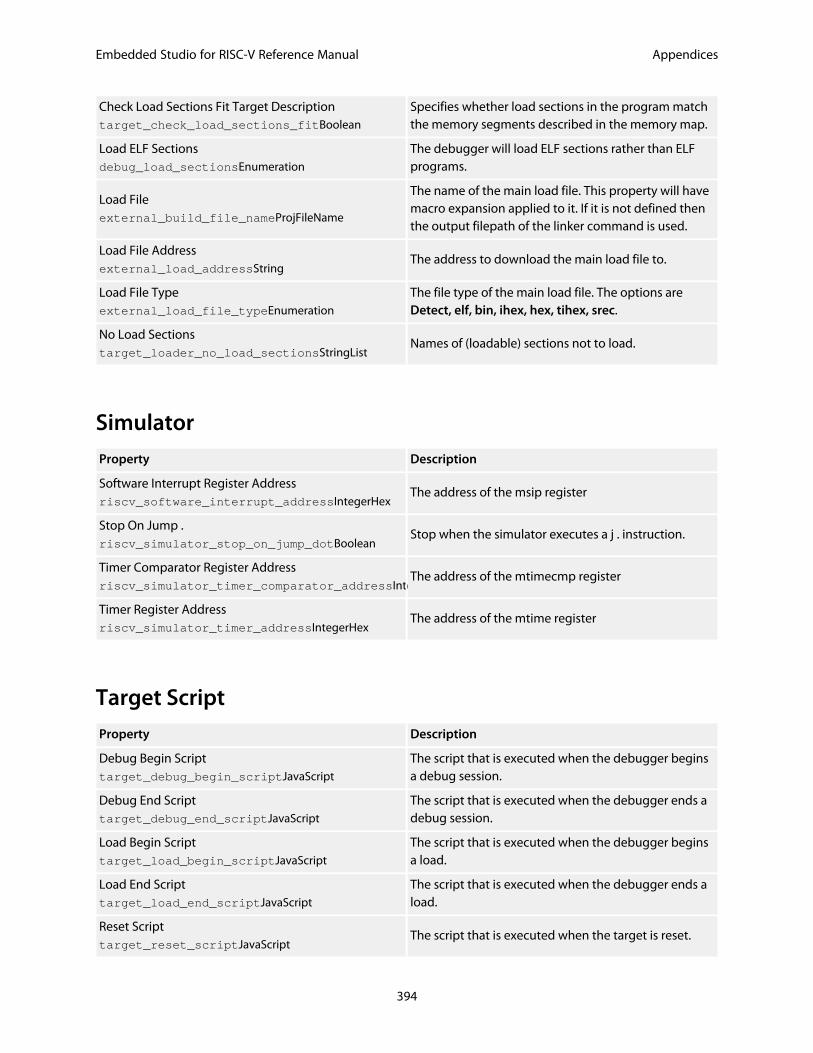
Embedded Studio for RISC-V Reference Manual Appendices
394
Check Load Sections Fit Target Descriptiontarget_check_load_sections_fitBoolean
Specifies whether load sections in the program matchthe memory segments described in the memory map.
Load ELF Sectionsdebug_load_sectionsEnumeration
The debugger will load ELF sections rather than ELFprograms.
Load Fileexternal_build_file_nameProjFileName
The name of the main load file. This property will havemacro expansion applied to it. If it is not defined thenthe output filepath of the linker command is used.
Load File Addressexternal_load_addressString
The address to download the main load file to.
Load File Typeexternal_load_file_typeEnumeration
The file type of the main load file. The options areDetect, elf, bin, ihex, hex, tihex, srec.
No Load Sectionstarget_loader_no_load_sectionsStringList
Names of (loadable) sections not to load.
Simulator
Property Description
Software Interrupt Register Addressriscv_software_interrupt_addressIntegerHex
The address of the msip register
Stop On Jump .riscv_simulator_stop_on_jump_dotBoolean
Stop when the simulator executes a j . instruction.
Timer Comparator Register Addressriscv_simulator_timer_comparator_addressIntegerHex
The address of the mtimecmp register
Timer Register Addressriscv_simulator_timer_addressIntegerHex
The address of the mtime register
Target Script
Property Description
Debug Begin Scripttarget_debug_begin_scriptJavaScript
The script that is executed when the debugger beginsa debug session.
Debug End Scripttarget_debug_end_scriptJavaScript
The script that is executed when the debugger ends adebug session.
Load Begin Scripttarget_load_begin_scriptJavaScript
The script that is executed when the debugger beginsa load.
Load End Scripttarget_load_end_scriptJavaScript
The script that is executed when the debugger ends aload.
Reset Scripttarget_reset_scriptJavaScript
The script that is executed when the target is reset.
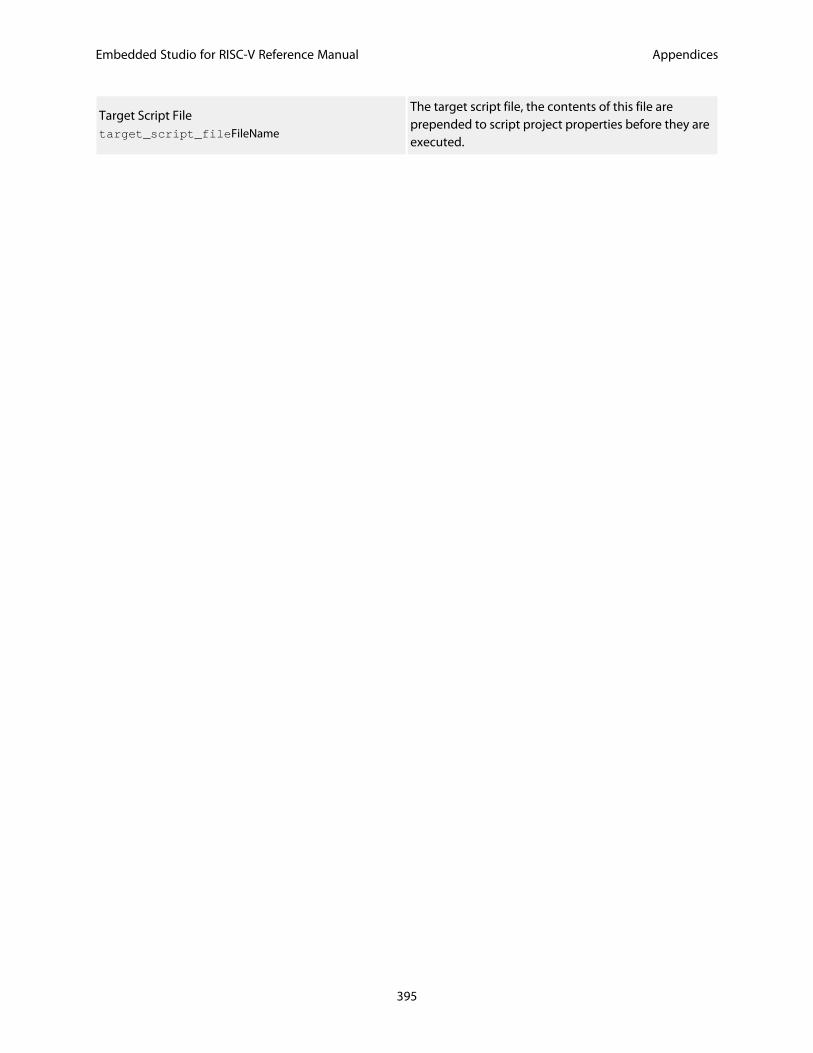
Embedded Studio for RISC-V Reference Manual Appendices
395
Target Script Filetarget_script_fileFileName
The target script file, the contents of this file areprepended to script project properties before they areexecuted.
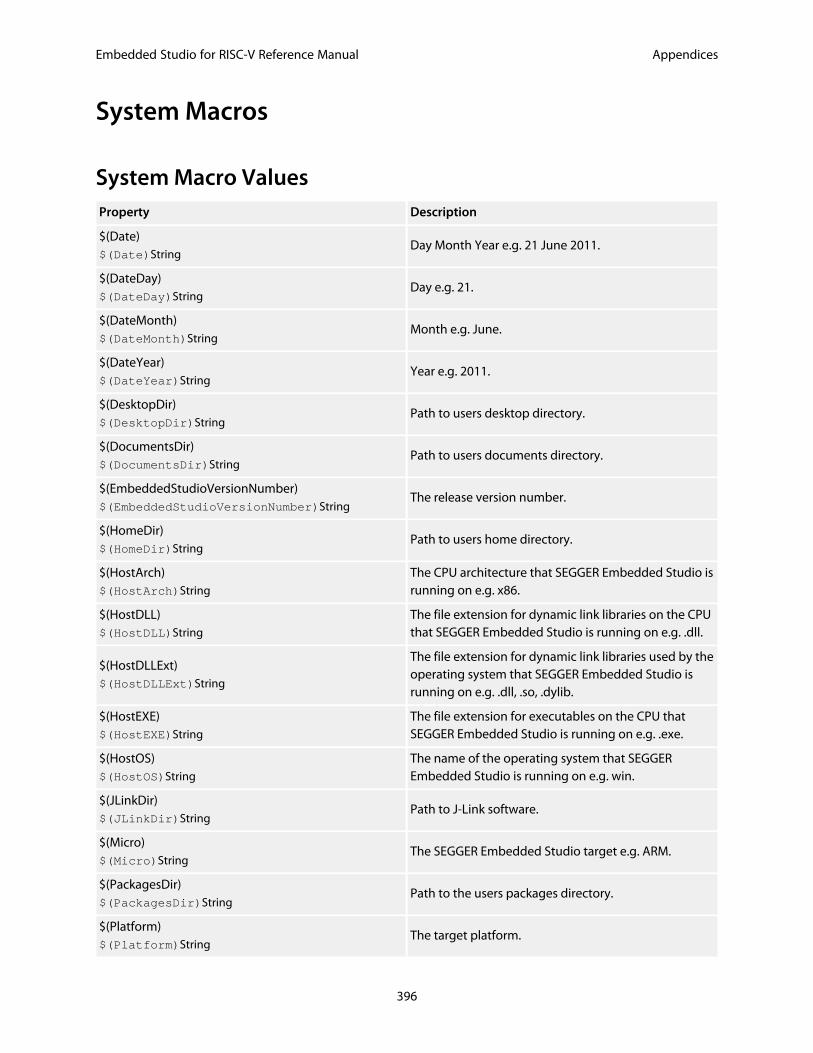
Embedded Studio for RISC-V Reference Manual Appendices
396
System Macros
System Macro ValuesProperty Description
$(Date)$(Date)String
Day Month Year e.g. 21 June 2011.
$(DateDay)$(DateDay)String
Day e.g. 21.
$(DateMonth)$(DateMonth)String
Month e.g. June.
$(DateYear)$(DateYear)String
Year e.g. 2011.
$(DesktopDir)$(DesktopDir)String
Path to users desktop directory.
$(DocumentsDir)$(DocumentsDir)String
Path to users documents directory.
$(EmbeddedStudioVersionNumber)$(EmbeddedStudioVersionNumber)String
The release version number.
$(HomeDir)$(HomeDir)String
Path to users home directory.
$(HostArch)$(HostArch)String
The CPU architecture that SEGGER Embedded Studio isrunning on e.g. x86.
$(HostDLL)$(HostDLL)String
The file extension for dynamic link libraries on the CPUthat SEGGER Embedded Studio is running on e.g. .dll.
$(HostDLLExt)$(HostDLLExt)String
The file extension for dynamic link libraries used by theoperating system that SEGGER Embedded Studio isrunning on e.g. .dll, .so, .dylib.
$(HostEXE)$(HostEXE)String
The file extension for executables on the CPU thatSEGGER Embedded Studio is running on e.g. .exe.
$(HostOS)$(HostOS)String
The name of the operating system that SEGGEREmbedded Studio is running on e.g. win.
$(JLinkDir)$(JLinkDir)String
Path to J-Link software.
$(Micro)$(Micro)String
The SEGGER Embedded Studio target e.g. ARM.
$(PackagesDir)$(PackagesDir)String
Path to the users packages directory.
$(Platform)$(Platform)String
The target platform.
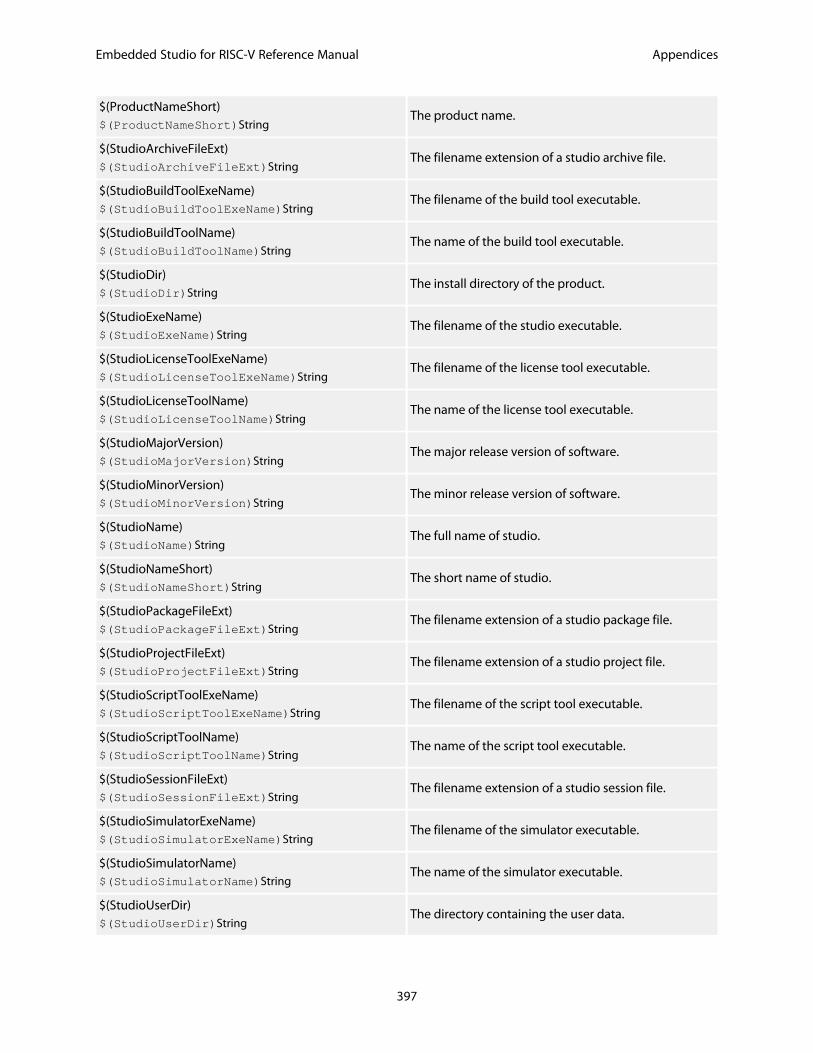
Embedded Studio for RISC-V Reference Manual Appendices
397
$(ProductNameShort)$(ProductNameShort)String
The product name.
$(StudioArchiveFileExt)$(StudioArchiveFileExt)String
The filename extension of a studio archive file.
$(StudioBuildToolExeName)$(StudioBuildToolExeName)String
The filename of the build tool executable.
$(StudioBuildToolName)$(StudioBuildToolName)String
The name of the build tool executable.
$(StudioDir)$(StudioDir)String
The install directory of the product.
$(StudioExeName)$(StudioExeName)String
The filename of the studio executable.
$(StudioLicenseToolExeName)$(StudioLicenseToolExeName)String
The filename of the license tool executable.
$(StudioLicenseToolName)$(StudioLicenseToolName)String
The name of the license tool executable.
$(StudioMajorVersion)$(StudioMajorVersion)String
The major release version of software.
$(StudioMinorVersion)$(StudioMinorVersion)String
The minor release version of software.
$(StudioName)$(StudioName)String
The full name of studio.
$(StudioNameShort)$(StudioNameShort)String
The short name of studio.
$(StudioPackageFileExt)$(StudioPackageFileExt)String
The filename extension of a studio package file.
$(StudioProjectFileExt)$(StudioProjectFileExt)String
The filename extension of a studio project file.
$(StudioScriptToolExeName)$(StudioScriptToolExeName)String
The filename of the script tool executable.
$(StudioScriptToolName)$(StudioScriptToolName)String
The name of the script tool executable.
$(StudioSessionFileExt)$(StudioSessionFileExt)String
The filename extension of a studio session file.
$(StudioSimulatorExeName)$(StudioSimulatorExeName)String
The filename of the simulator executable.
$(StudioSimulatorName)$(StudioSimulatorName)String
The name of the simulator executable.
$(StudioUserDir)$(StudioUserDir)String
The directory containing the user data.
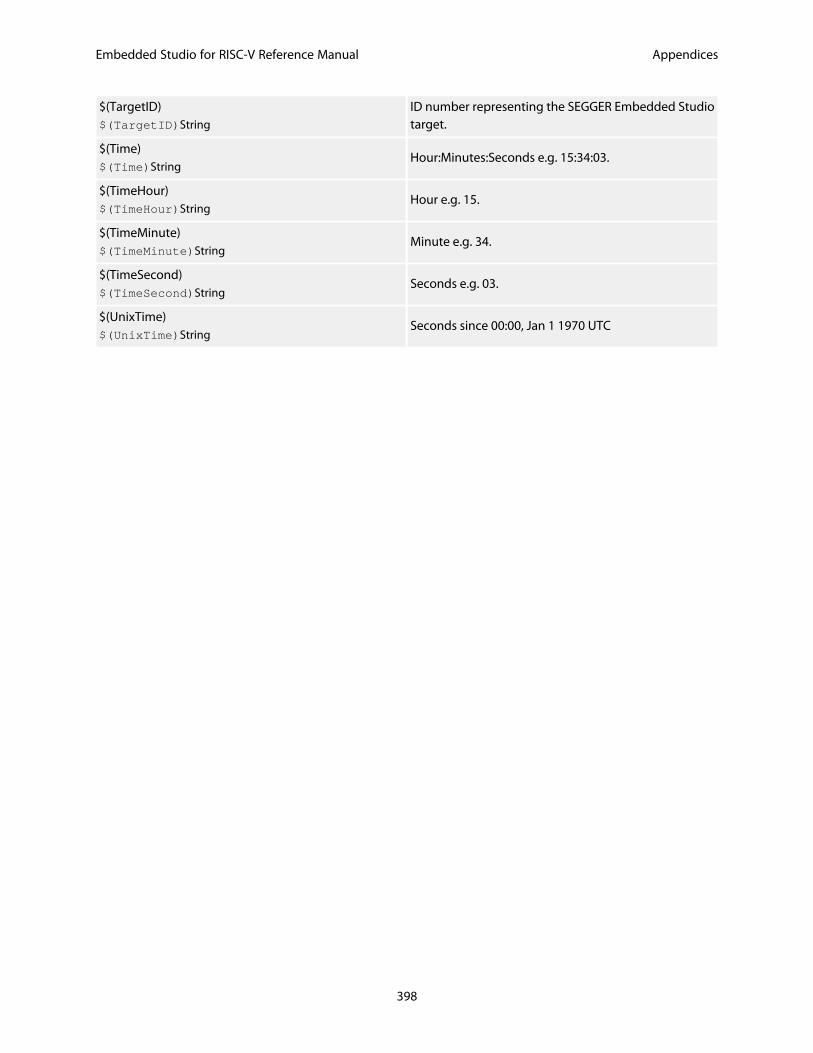
Embedded Studio for RISC-V Reference Manual Appendices
398
$(TargetID)$(TargetID)String
ID number representing the SEGGER Embedded Studiotarget.
$(Time)$(Time)String
Hour:Minutes:Seconds e.g. 15:34:03.
$(TimeHour)$(TimeHour)String
Hour e.g. 15.
$(TimeMinute)$(TimeMinute)String
Minute e.g. 34.
$(TimeSecond)$(TimeSecond)String
Seconds e.g. 03.
$(UnixTime)$(UnixTime)String
Seconds since 00:00, Jan 1 1970 UTC
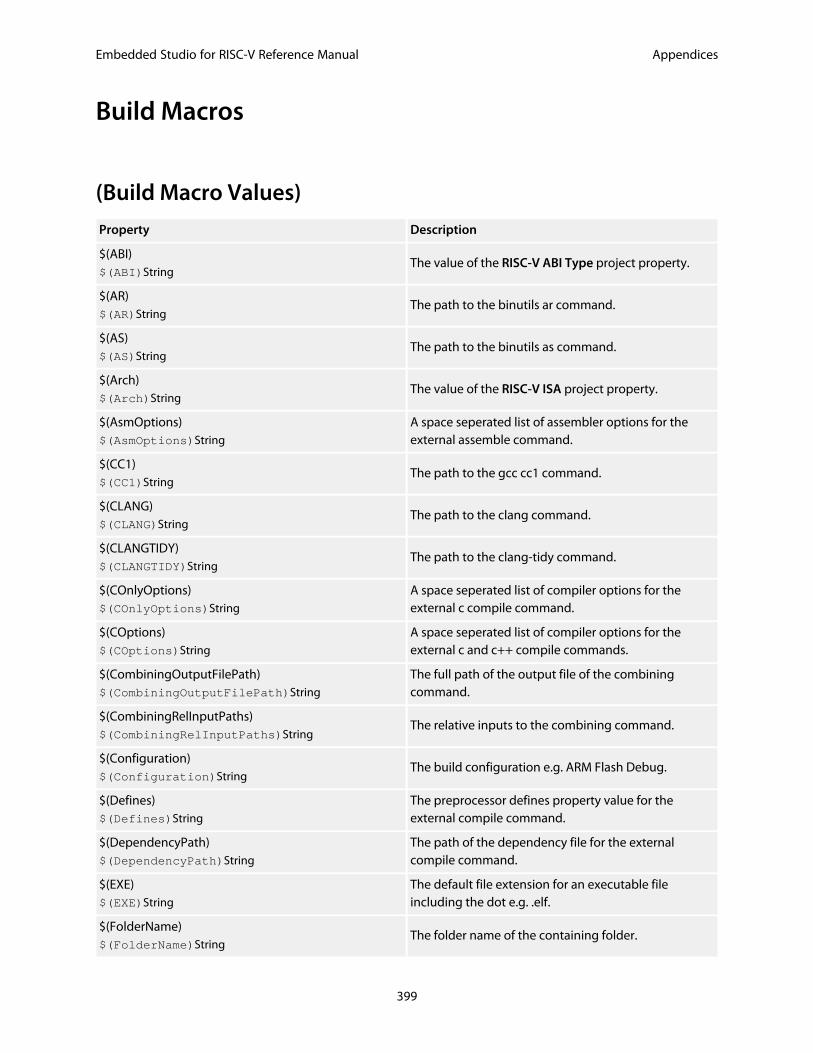
Embedded Studio for RISC-V Reference Manual Appendices
399
Build Macros
(Build Macro Values)
Property Description
$(ABI)$(ABI)String
The value of the RISC-V ABI Type project property.
$(AR)$(AR)String
The path to the binutils ar command.
$(AS)$(AS)String
The path to the binutils as command.
$(Arch)$(Arch)String
The value of the RISC-V ISA project property.
$(AsmOptions)$(AsmOptions)String
A space seperated list of assembler options for theexternal assemble command.
$(CC1)$(CC1)String
The path to the gcc cc1 command.
$(CLANG)$(CLANG)String
The path to the clang command.
$(CLANGTIDY)$(CLANGTIDY)String
The path to the clang-tidy command.
$(COnlyOptions)$(COnlyOptions)String
A space seperated list of compiler options for theexternal c compile command.
$(COptions)$(COptions)String
A space seperated list of compiler options for theexternal c and c++ compile commands.
$(CombiningOutputFilePath)$(CombiningOutputFilePath)String
The full path of the output file of the combiningcommand.
$(CombiningRelInputPaths)$(CombiningRelInputPaths)String
The relative inputs to the combining command.
$(Configuration)$(Configuration)String
The build configuration e.g. ARM Flash Debug.
$(Defines)$(Defines)String
The preprocessor defines property value for theexternal compile command.
$(DependencyPath)$(DependencyPath)String
The path of the dependency file for the externalcompile command.
$(EXE)$(EXE)String
The default file extension for an executable fileincluding the dot e.g. .elf.
$(FolderName)$(FolderName)String
The folder name of the containing folder.
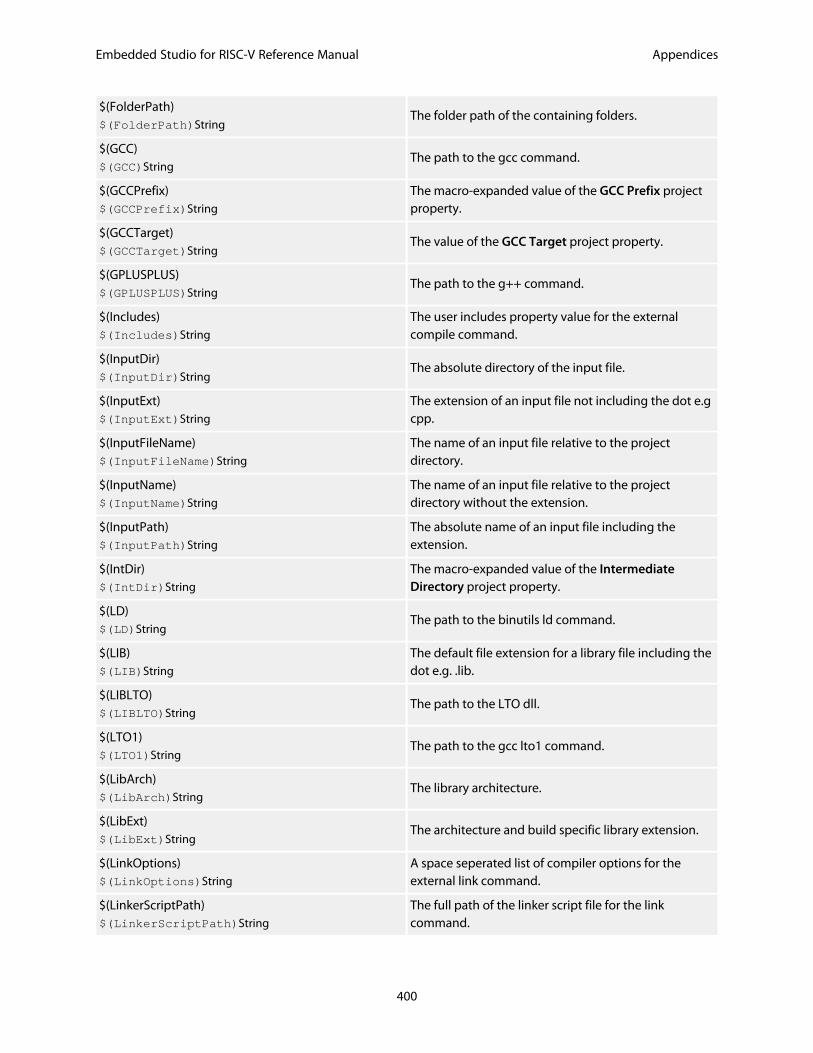
Embedded Studio for RISC-V Reference Manual Appendices
400
$(FolderPath)$(FolderPath)String
The folder path of the containing folders.
$(GCC)$(GCC)String
The path to the gcc command.
$(GCCPrefix)$(GCCPrefix)String
The macro-expanded value of the GCC Prefix projectproperty.
$(GCCTarget)$(GCCTarget)String
The value of the GCC Target project property.
$(GPLUSPLUS)$(GPLUSPLUS)String
The path to the g++ command.
$(Includes)$(Includes)String
The user includes property value for the externalcompile command.
$(InputDir)$(InputDir)String
The absolute directory of the input file.
$(InputExt)$(InputExt)String
The extension of an input file not including the dot e.gcpp.
$(InputFileName)$(InputFileName)String
The name of an input file relative to the projectdirectory.
$(InputName)$(InputName)String
The name of an input file relative to the projectdirectory without the extension.
$(InputPath)$(InputPath)String
The absolute name of an input file including theextension.
$(IntDir)$(IntDir)String
The macro-expanded value of the IntermediateDirectory project property.
$(LD)$(LD)String
The path to the binutils ld command.
$(LIB)$(LIB)String
The default file extension for a library file including thedot e.g. .lib.
$(LIBLTO)$(LIBLTO)String
The path to the LTO dll.
$(LTO1)$(LTO1)String
The path to the gcc lto1 command.
$(LibArch)$(LibArch)String
The library architecture.
$(LibExt)$(LibExt)String
The architecture and build specific library extension.
$(LinkOptions)$(LinkOptions)String
A space seperated list of compiler options for theexternal link command.
$(LinkerScriptPath)$(LinkerScriptPath)String
The full path of the linker script file for the linkcommand.
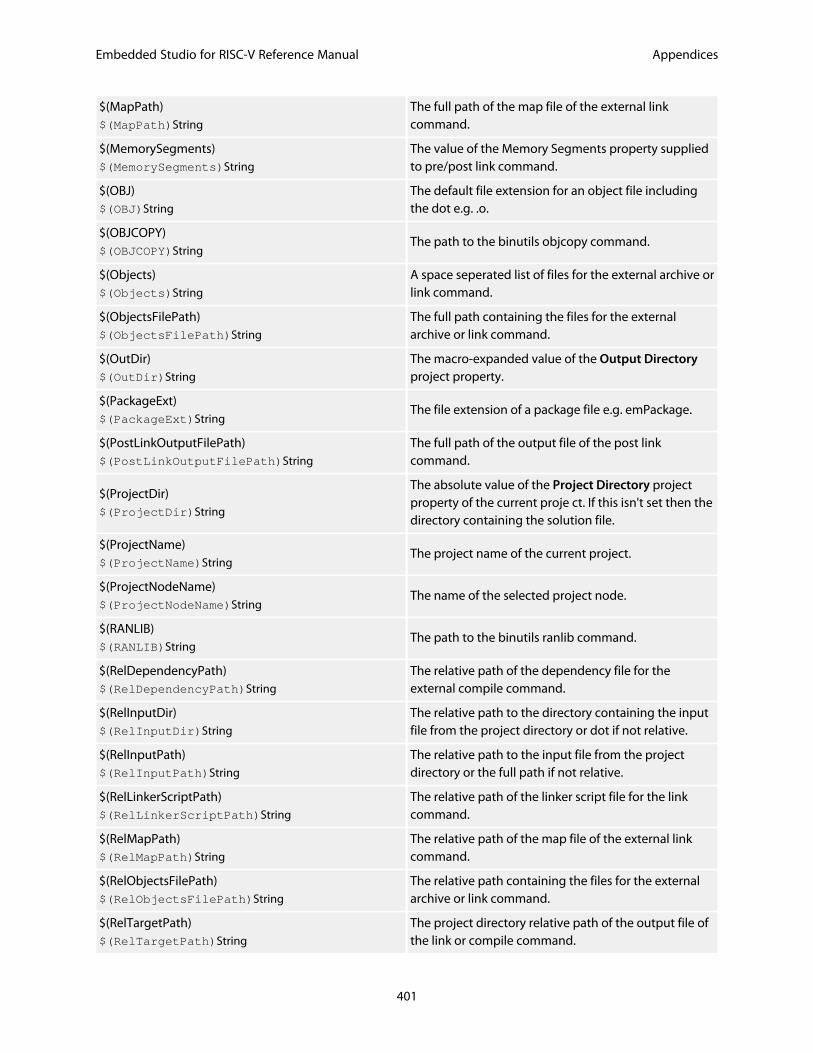
Embedded Studio for RISC-V Reference Manual Appendices
401
$(MapPath)$(MapPath)String
The full path of the map file of the external linkcommand.
$(MemorySegments)$(MemorySegments)String
The value of the Memory Segments property suppliedto pre/post link command.
$(OBJ)$(OBJ)String
The default file extension for an object file includingthe dot e.g. .o.
$(OBJCOPY)$(OBJCOPY)String
The path to the binutils objcopy command.
$(Objects)$(Objects)String
A space seperated list of files for the external archive orlink command.
$(ObjectsFilePath)$(ObjectsFilePath)String
The full path containing the files for the externalarchive or link command.
$(OutDir)$(OutDir)String
The macro-expanded value of the Output Directoryproject property.
$(PackageExt)$(PackageExt)String
The file extension of a package file e.g. emPackage.
$(PostLinkOutputFilePath)$(PostLinkOutputFilePath)String
The full path of the output file of the post linkcommand.
$(ProjectDir)$(ProjectDir)String
The absolute value of the Project Directory projectproperty of the current proje ct. If this isn't set then thedirectory containing the solution file.
$(ProjectName)$(ProjectName)String
The project name of the current project.
$(ProjectNodeName)$(ProjectNodeName)String
The name of the selected project node.
$(RANLIB)$(RANLIB)String
The path to the binutils ranlib command.
$(RelDependencyPath)$(RelDependencyPath)String
The relative path of the dependency file for theexternal compile command.
$(RelInputDir)$(RelInputDir)String
The relative path to the directory containing the inputfile from the project directory or dot if not relative.
$(RelInputPath)$(RelInputPath)String
The relative path to the input file from the projectdirectory or the full path if not relative.
$(RelLinkerScriptPath)$(RelLinkerScriptPath)String
The relative path of the linker script file for the linkcommand.
$(RelMapPath)$(RelMapPath)String
The relative path of the map file of the external linkcommand.
$(RelObjectsFilePath)$(RelObjectsFilePath)String
The relative path containing the files for the externalarchive or link command.
$(RelTargetPath)$(RelTargetPath)String
The project directory relative path of the output file ofthe link or compile command.
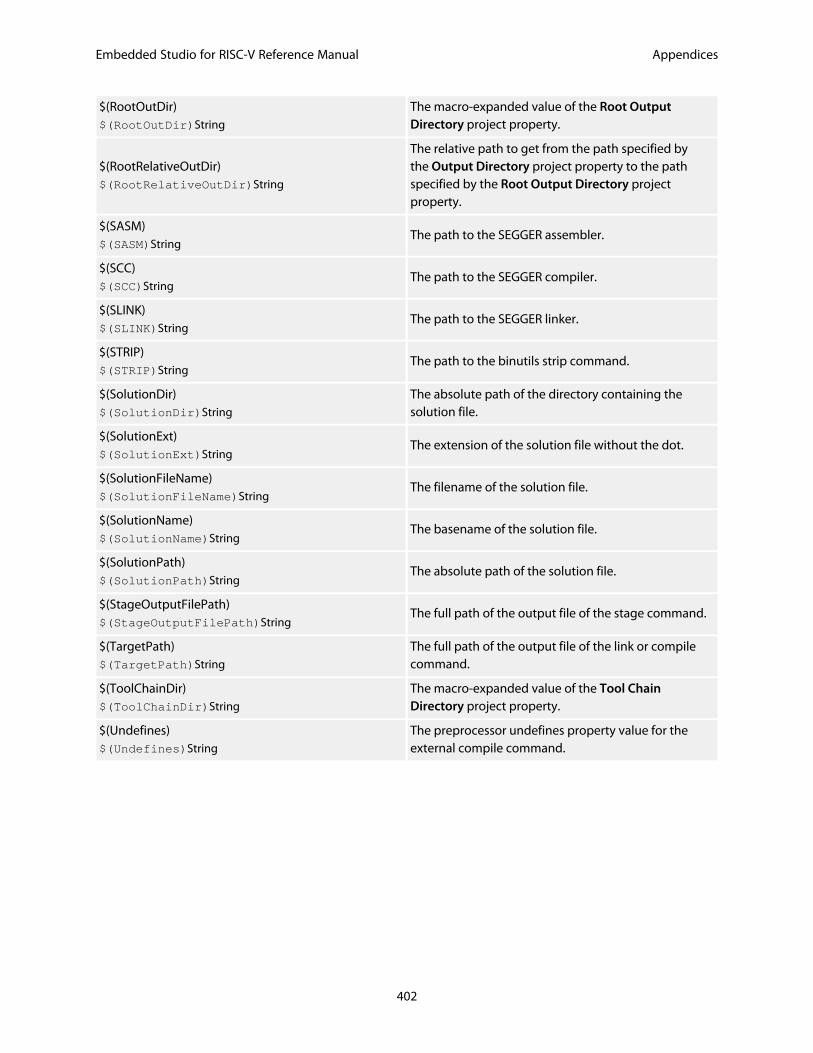
Embedded Studio for RISC-V Reference Manual Appendices
402
$(RootOutDir)$(RootOutDir)String
The macro-expanded value of the Root OutputDirectory project property.
$(RootRelativeOutDir)$(RootRelativeOutDir)String
The relative path to get from the path specified bythe Output Directory project property to the pathspecified by the Root Output Directory projectproperty.
$(SASM)$(SASM)String
The path to the SEGGER assembler.
$(SCC)$(SCC)String
The path to the SEGGER compiler.
$(SLINK)$(SLINK)String
The path to the SEGGER linker.
$(STRIP)$(STRIP)String
The path to the binutils strip command.
$(SolutionDir)$(SolutionDir)String
The absolute path of the directory containing thesolution file.
$(SolutionExt)$(SolutionExt)String
The extension of the solution file without the dot.
$(SolutionFileName)$(SolutionFileName)String
The filename of the solution file.
$(SolutionName)$(SolutionName)String
The basename of the solution file.
$(SolutionPath)$(SolutionPath)String
The absolute path of the solution file.
$(StageOutputFilePath)$(StageOutputFilePath)String
The full path of the output file of the stage command.
$(TargetPath)$(TargetPath)String
The full path of the output file of the link or compilecommand.
$(ToolChainDir)$(ToolChainDir)String
The macro-expanded value of the Tool ChainDirectory project property.
$(Undefines)$(Undefines)String
The preprocessor undefines property value for theexternal compile command.
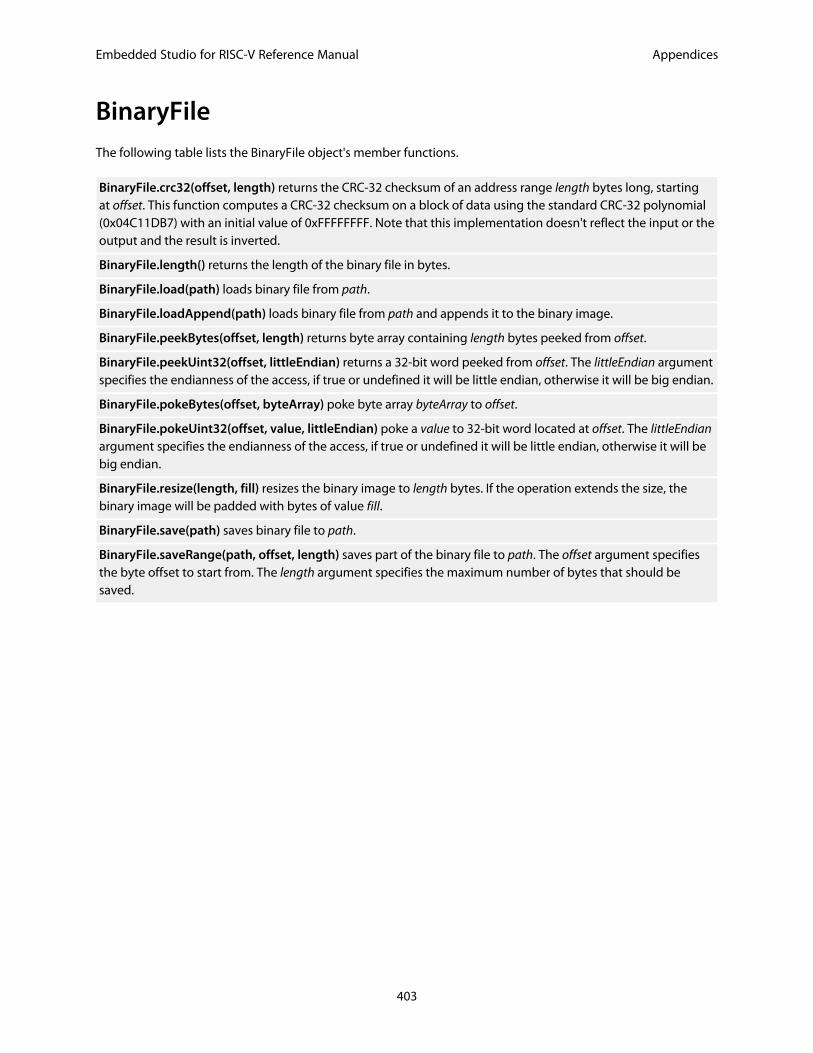
Embedded Studio for RISC-V Reference Manual Appendices
403
BinaryFileThe following table lists the BinaryFile object's member functions.
BinaryFile.crc32(offset, length) returns the CRC-32 checksum of an address range length bytes long, startingat offset. This function computes a CRC-32 checksum on a block of data using the standard CRC-32 polynomial(0x04C11DB7) with an initial value of 0xFFFFFFFF. Note that this implementation doesn't reflect the input or theoutput and the result is inverted.
BinaryFile.length() returns the length of the binary file in bytes.
BinaryFile.load(path) loads binary file from path.
BinaryFile.loadAppend(path) loads binary file from path and appends it to the binary image.
BinaryFile.peekBytes(offset, length) returns byte array containing length bytes peeked from offset.
BinaryFile.peekUint32(offset, littleEndian) returns a 32-bit word peeked from offset. The littleEndian argumentspecifies the endianness of the access, if true or undefined it will be little endian, otherwise it will be big endian.
BinaryFile.pokeBytes(offset, byteArray) poke byte array byteArray to offset.
BinaryFile.pokeUint32(offset, value, littleEndian) poke a value to 32-bit word located at offset. The littleEndianargument specifies the endianness of the access, if true or undefined it will be little endian, otherwise it will bebig endian.
BinaryFile.resize(length, fill) resizes the binary image to length bytes. If the operation extends the size, thebinary image will be padded with bytes of value fill.
BinaryFile.save(path) saves binary file to path.
BinaryFile.saveRange(path, offset, length) saves part of the binary file to path. The offset argument specifiesthe byte offset to start from. The length argument specifies the maximum number of bytes that should besaved.
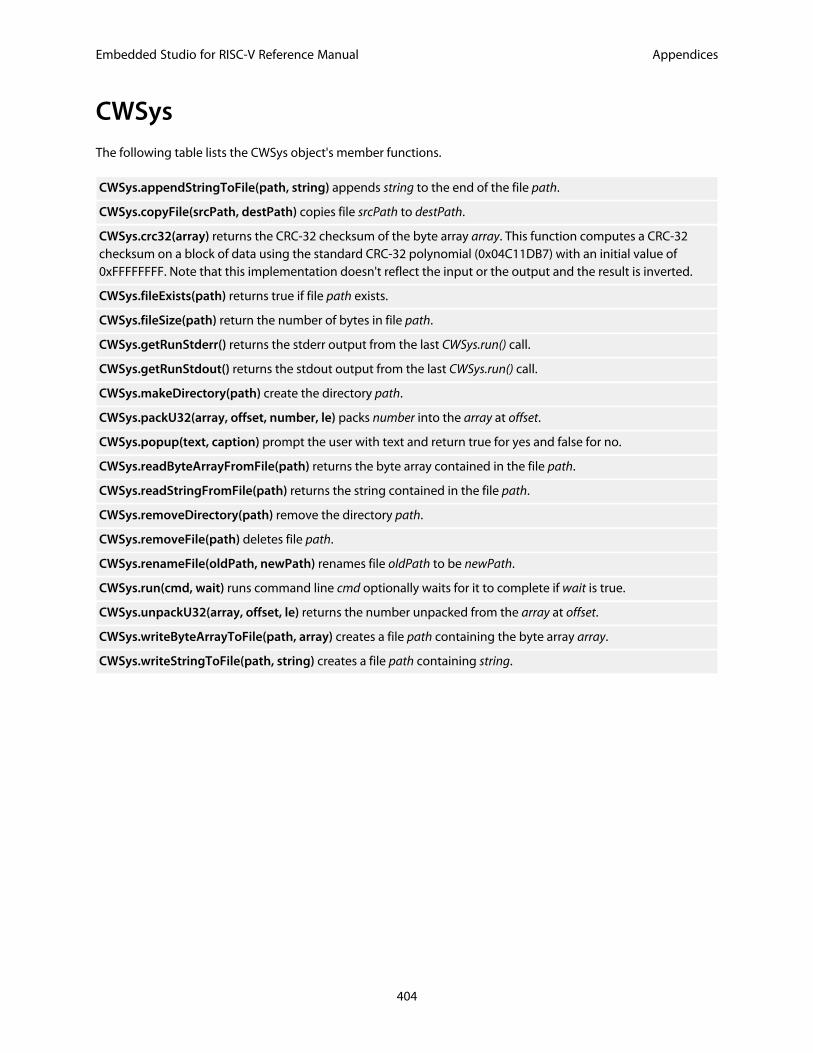
Embedded Studio for RISC-V Reference Manual Appendices
404
CWSysThe following table lists the CWSys object's member functions.
CWSys.appendStringToFile(path, string) appends string to the end of the file path.
CWSys.copyFile(srcPath, destPath) copies file srcPath to destPath.
CWSys.crc32(array) returns the CRC-32 checksum of the byte array array. This function computes a CRC-32checksum on a block of data using the standard CRC-32 polynomial (0x04C11DB7) with an initial value of0xFFFFFFFF. Note that this implementation doesn't reflect the input or the output and the result is inverted.
CWSys.fileExists(path) returns true if file path exists.
CWSys.fileSize(path) return the number of bytes in file path.
CWSys.getRunStderr() returns the stderr output from the last CWSys.run() call.
CWSys.getRunStdout() returns the stdout output from the last CWSys.run() call.
CWSys.makeDirectory(path) create the directory path.
CWSys.packU32(array, offset, number, le) packs number into the array at offset.
CWSys.popup(text, caption) prompt the user with text and return true for yes and false for no.
CWSys.readByteArrayFromFile(path) returns the byte array contained in the file path.
CWSys.readStringFromFile(path) returns the string contained in the file path.
CWSys.removeDirectory(path) remove the directory path.
CWSys.removeFile(path) deletes file path.
CWSys.renameFile(oldPath, newPath) renames file oldPath to be newPath.
CWSys.run(cmd, wait) runs command line cmd optionally waits for it to complete if wait is true.
CWSys.unpackU32(array, offset, le) returns the number unpacked from the array at offset.
CWSys.writeByteArrayToFile(path, array) creates a file path containing the byte array array.
CWSys.writeStringToFile(path, string) creates a file path containing string.
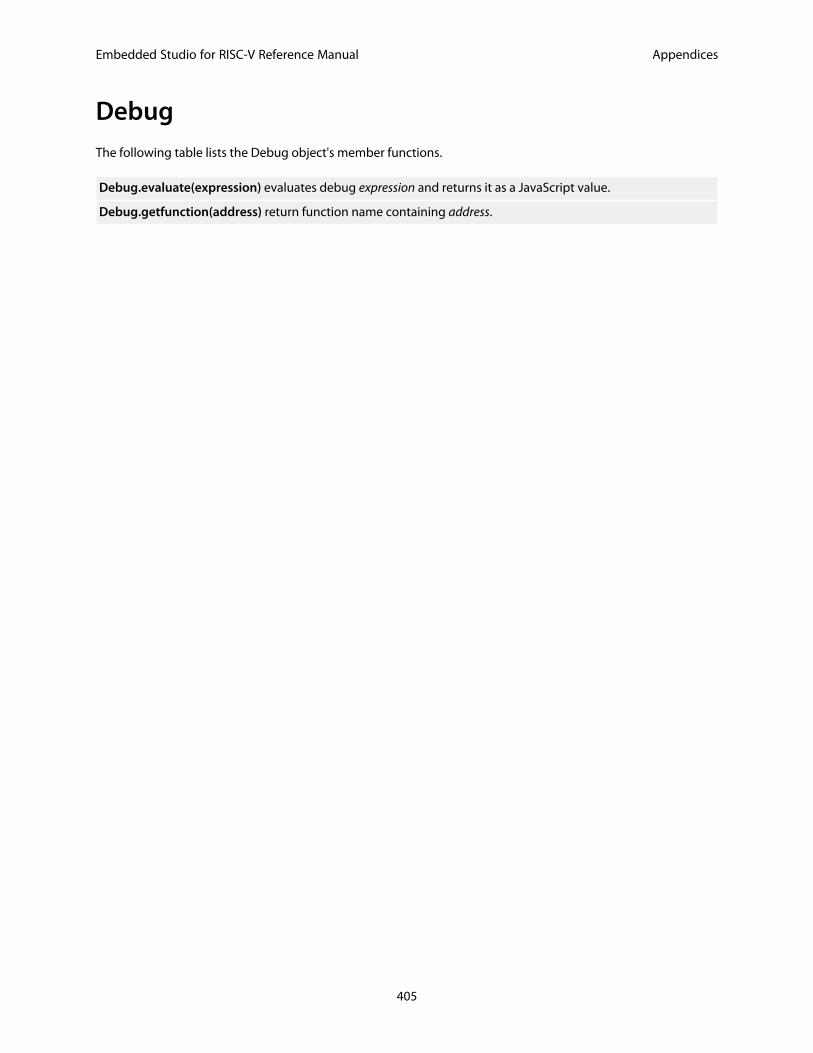
Embedded Studio for RISC-V Reference Manual Appendices
405
DebugThe following table lists the Debug object's member functions.
Debug.evaluate(expression) evaluates debug expression and returns it as a JavaScript value.
Debug.getfunction(address) return function name containing address.
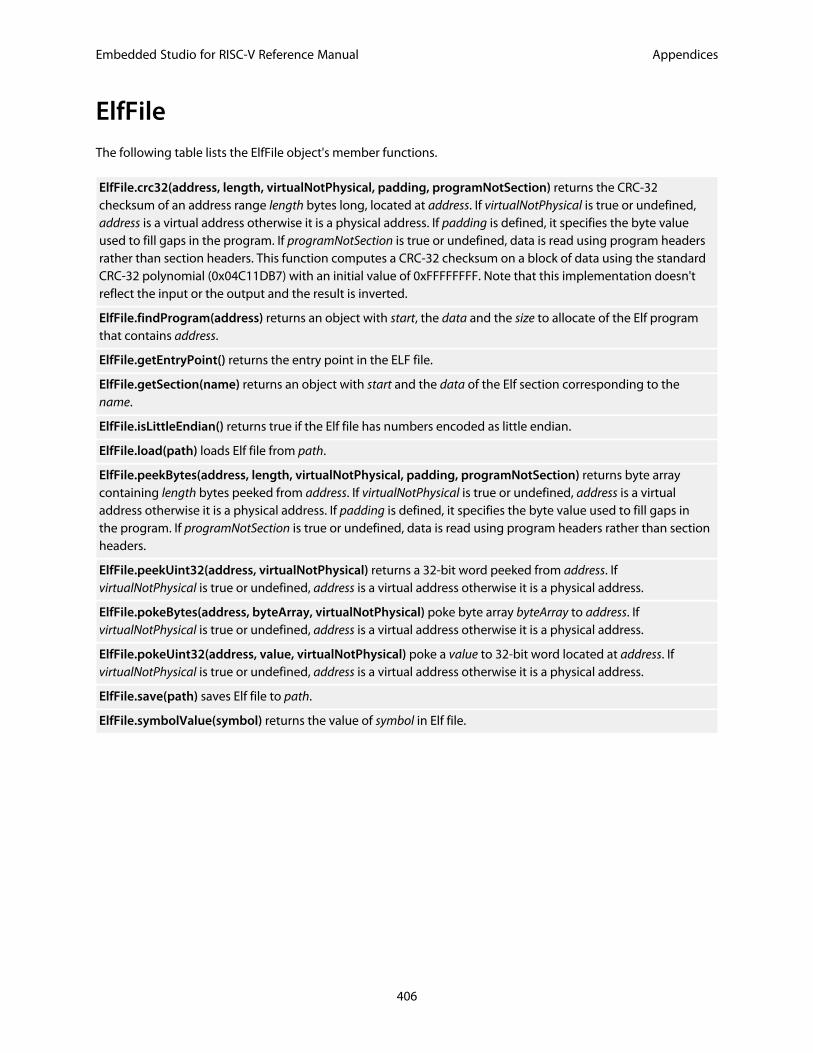
Embedded Studio for RISC-V Reference Manual Appendices
406
ElfFileThe following table lists the ElfFile object's member functions.
ElfFile.crc32(address, length, virtualNotPhysical, padding, programNotSection) returns the CRC-32checksum of an address range length bytes long, located at address. If virtualNotPhysical is true or undefined,address is a virtual address otherwise it is a physical address. If padding is defined, it specifies the byte valueused to fill gaps in the program. If programNotSection is true or undefined, data is read using program headersrather than section headers. This function computes a CRC-32 checksum on a block of data using the standardCRC-32 polynomial (0x04C11DB7) with an initial value of 0xFFFFFFFF. Note that this implementation doesn'treflect the input or the output and the result is inverted.
ElfFile.findProgram(address) returns an object with start, the data and the size to allocate of the Elf programthat contains address.
ElfFile.getEntryPoint() returns the entry point in the ELF file.
ElfFile.getSection(name) returns an object with start and the data of the Elf section corresponding to thename.
ElfFile.isLittleEndian() returns true if the Elf file has numbers encoded as little endian.
ElfFile.load(path) loads Elf file from path.
ElfFile.peekBytes(address, length, virtualNotPhysical, padding, programNotSection) returns byte arraycontaining length bytes peeked from address. If virtualNotPhysical is true or undefined, address is a virtualaddress otherwise it is a physical address. If padding is defined, it specifies the byte value used to fill gaps inthe program. If programNotSection is true or undefined, data is read using program headers rather than sectionheaders.
ElfFile.peekUint32(address, virtualNotPhysical) returns a 32-bit word peeked from address. IfvirtualNotPhysical is true or undefined, address is a virtual address otherwise it is a physical address.
ElfFile.pokeBytes(address, byteArray, virtualNotPhysical) poke byte array byteArray to address. IfvirtualNotPhysical is true or undefined, address is a virtual address otherwise it is a physical address.
ElfFile.pokeUint32(address, value, virtualNotPhysical) poke a value to 32-bit word located at address. IfvirtualNotPhysical is true or undefined, address is a virtual address otherwise it is a physical address.
ElfFile.save(path) saves Elf file to path.
ElfFile.symbolValue(symbol) returns the value of symbol in Elf file.
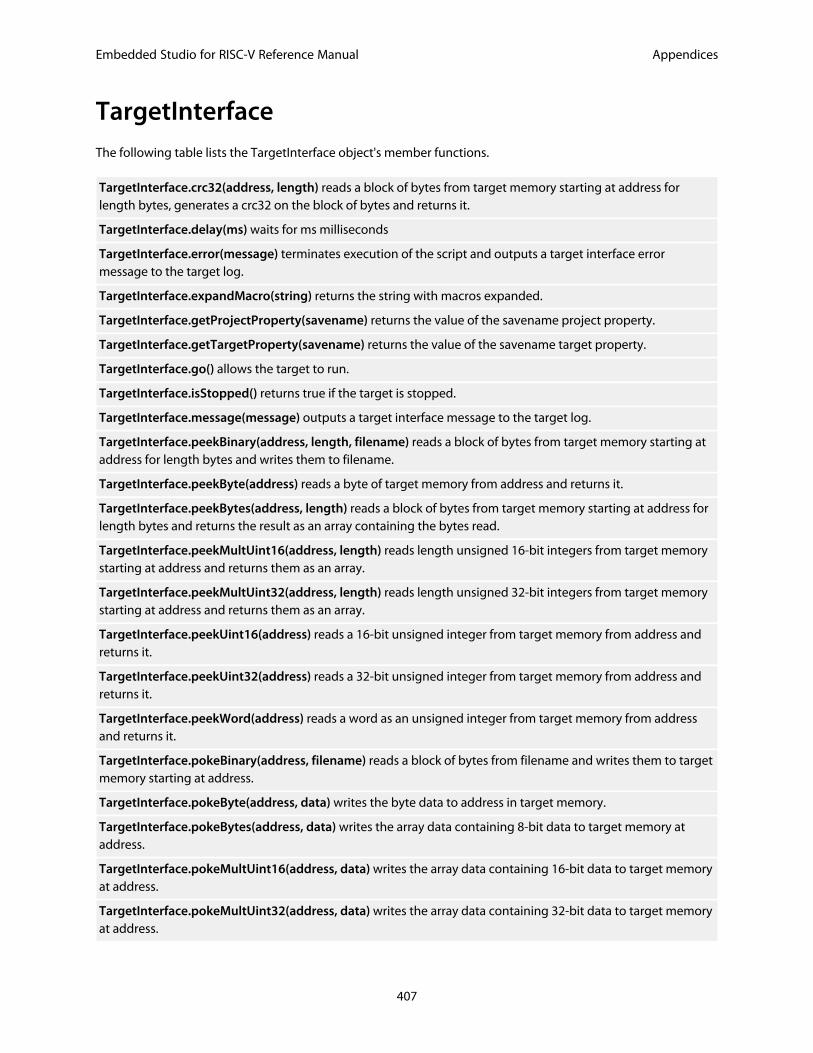
Embedded Studio for RISC-V Reference Manual Appendices
407
TargetInterfaceThe following table lists the TargetInterface object's member functions.
TargetInterface.crc32(address, length) reads a block of bytes from target memory starting at address forlength bytes, generates a crc32 on the block of bytes and returns it.
TargetInterface.delay(ms) waits for ms milliseconds
TargetInterface.error(message) terminates execution of the script and outputs a target interface errormessage to the target log.
TargetInterface.expandMacro(string) returns the string with macros expanded.
TargetInterface.getProjectProperty(savename) returns the value of the savename project property.
TargetInterface.getTargetProperty(savename) returns the value of the savename target property.
TargetInterface.go() allows the target to run.
TargetInterface.isStopped() returns true if the target is stopped.
TargetInterface.message(message) outputs a target interface message to the target log.
TargetInterface.peekBinary(address, length, filename) reads a block of bytes from target memory starting ataddress for length bytes and writes them to filename.
TargetInterface.peekByte(address) reads a byte of target memory from address and returns it.
TargetInterface.peekBytes(address, length) reads a block of bytes from target memory starting at address forlength bytes and returns the result as an array containing the bytes read.
TargetInterface.peekMultUint16(address, length) reads length unsigned 16-bit integers from target memorystarting at address and returns them as an array.
TargetInterface.peekMultUint32(address, length) reads length unsigned 32-bit integers from target memorystarting at address and returns them as an array.
TargetInterface.peekUint16(address) reads a 16-bit unsigned integer from target memory from address andreturns it.
TargetInterface.peekUint32(address) reads a 32-bit unsigned integer from target memory from address andreturns it.
TargetInterface.peekWord(address) reads a word as an unsigned integer from target memory from addressand returns it.
TargetInterface.pokeBinary(address, filename) reads a block of bytes from filename and writes them to targetmemory starting at address.
TargetInterface.pokeByte(address, data) writes the byte data to address in target memory.
TargetInterface.pokeBytes(address, data) writes the array data containing 8-bit data to target memory ataddress.
TargetInterface.pokeMultUint16(address, data) writes the array data containing 16-bit data to target memoryat address.
TargetInterface.pokeMultUint32(address, data) writes the array data containing 32-bit data to target memoryat address.
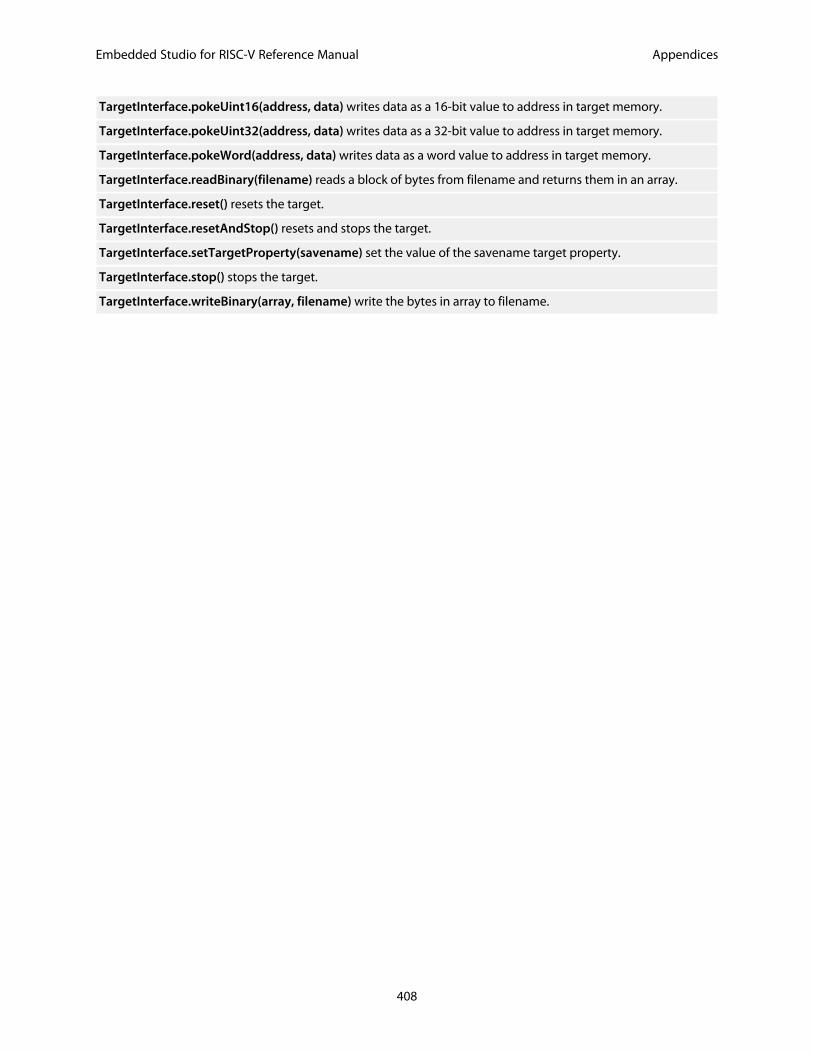
Embedded Studio for RISC-V Reference Manual Appendices
408
TargetInterface.pokeUint16(address, data) writes data as a 16-bit value to address in target memory.
TargetInterface.pokeUint32(address, data) writes data as a 32-bit value to address in target memory.
TargetInterface.pokeWord(address, data) writes data as a word value to address in target memory.
TargetInterface.readBinary(filename) reads a block of bytes from filename and returns them in an array.
TargetInterface.reset() resets the target.
TargetInterface.resetAndStop() resets and stops the target.
TargetInterface.setTargetProperty(savename) set the value of the savename target property.
TargetInterface.stop() stops the target.
TargetInterface.writeBinary(array, filename) write the bytes in array to filename.
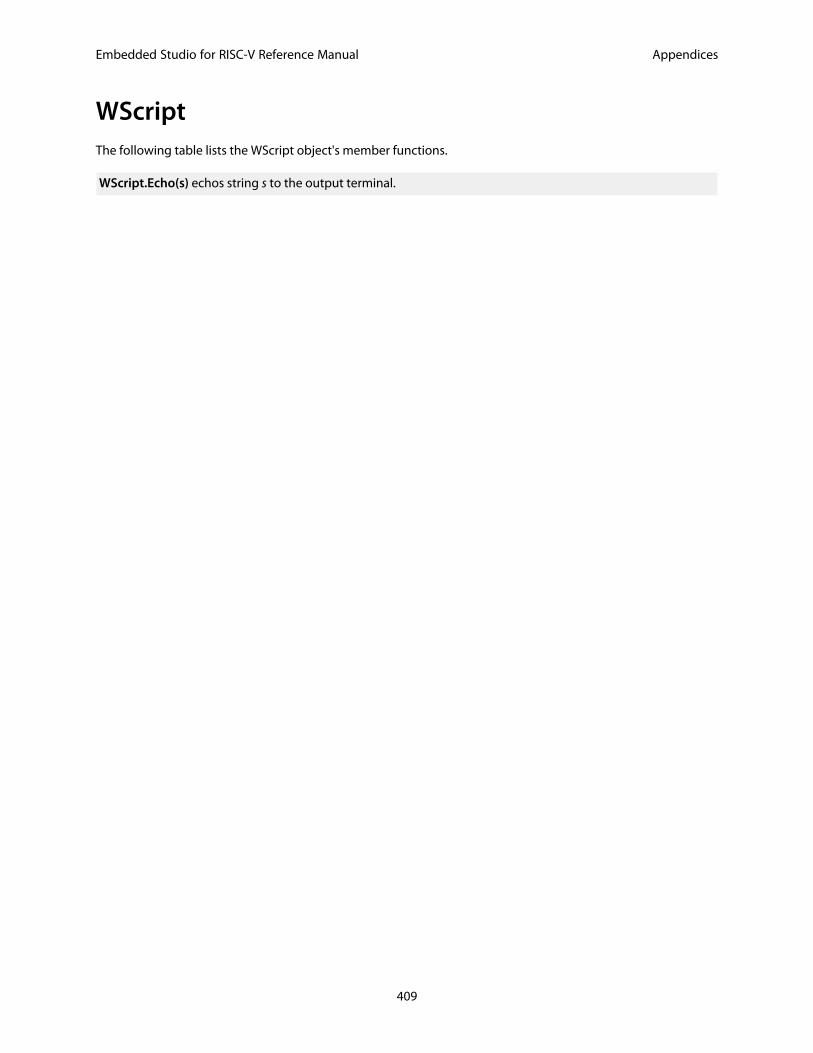
Embedded Studio for RISC-V Reference Manual Appendices
409
WScriptThe following table lists the WScript object's member functions.
WScript.Echo(s) echos string s to the output terminal.