1
Embossed Rose Window Designs (art + geometry; art + history) Rose windows emerged in western Europe during the Renaissance as part of the Gothic style of elaborate architecture and design. Enormous cathedrals built during this period showcased stained glass that was intended to create a sense of awe and wonder in the viewer. These colorful windows wove images and symbols together with perfect geometry and intricate patterns, and the delicate appearance of the stained glass overshadowed the fact that they were fabricated from iron and stone. Simplified, a classic rose window design is a circle with perfectly spaced lines radiating from a center point, or what we would probably refer to as a “pie.” The “slices” contain a pattern that simply rotates around the circle on each axis to form a whole design. Rose windows are an artistic way to illustrate the geometric terms “radius” and “symmetry.” This classroom-friendly tooling project uses ArtEmboss — a soft and flexible metal that is easily manipulated without applying heavy pressure. It cuts easily with student-quality scissors and doesn't form dangerously sharp edges the way that regular tooling foil does. The matte- black surface coats both sides and it won't chip or flake off during embossing. The best feature of ArtEmboss is that it readily accepts drawing media, such as colored pencil, so that students can emboss and draw at the same time. Grade Levels 5-12 Objectives • Students will learn to employ a basic metalworking technique by embossing lines and textures into a soft metal • Students will apply design elements and principles including line, form, pattern, color, balance, and unity • Students will understand how geometry principles including diameter, radius, and symmetry work together to make an artistic design • Students will explore the centuries-old art form of stained glass design and use historical examples as a reference tool for executing their own artwork Historical and Cultural Relativity • Show examples of Gothic rose windows found in the Cathedrals of St.Denis, Notre Dame de Paris, Notre Dame de Reims, Chartres, Westminister Abbey, and Strausburg Cathedral • If available in your area, take photos to share or visit buildings with rose windows • View Universal Stained Glass Slide Set with 25 slides (71907-1509) Preparation 1. Have students use drawing paper to create an 8-section, 4" diameter “pie” to use as a template, or use the one shown in illustration (A) at right. Use compass and protractor to create precise radius. 2. Students need to keep a magazine or 1/4" stack of newspapers beneath the metal as they work it. Embossing directly on a tabletop will not provide enough cushion to create dimension. ArtEmboss will tear if over-manipulated, so encourage students to draw firmly, but not to poke sharply through the material. You may wish to have small scraps of the material available so that students can test their pressure. Process 1. Students should use the “pie” for their preliminary drawings. In one slice, they will create a pattern of simple lines and shapes that will mirror itself. Consider how the pattern will connect by repeat- ing the pattern in the next slice. Use multi- ple slices if needed. ArtEmboss cannot be reworked once it has been tooled, so careful planning before execution is important. 2. Once it is determined that the pattern will repeat seamlessly, cut the “pie” out and center it on the piece of ArtEmboss. Use the graphite pencil to trace just the “pie” circle and radial lines onto the metal. Use enough pressure to make a gentle embossing. A ruler will be helpful in making sure the radial lines are straight. Remove the pattern and cut out the slice that has the best pattern drawing on it. Place the slice over the metal and trace the pattern onto a slice on the metal. Continue for all slices to fill the circle. Higher grades may prefer to draw the pattern on the metal directly, without using a pattern. 3. Turn the design over to examine the embossing. If embossed lines are too light, use one of the Blick colored pencils to retrace them and deep- en them. Since this is the back side, color choice is not important. 4. On the front side, select colors to fill in the “stained glass” between the lines. Use the areas of the foil outside the circle to test colors. Some colors have more opacity than others and will look brighter on the black metal. Other colors are more transparent and look gray. 5. Begin by tracing a line right against the embossed line, but not on top of it. This will push the metal down right against the embossed line and raise it higher. It will also protect the line from being accidentally colored over. Next, fill the areas between the lines with color, embossing the metal down even lower. Work small areas at a time. Blick colored pencils have a soft core that creates very little drag against the metal. Pencils may be sharpened to reach tight areas between the embossed lines. 6. When the rose window design is completed, mount the metal to the matboard using a permanent, craft-quality glue such as 3M Quick Dry Tacky Adhesive. Options If desired, duplicate the rose window design for the other side and hang as an ornament. Copyright © 2006 Dick Blick Art Materials. All rights reserved. National Standards C ont ent S tandar d #1 Understanding and applying media, techniques and processes 5-8 Students intentionally take advantage of the qualities and characteristics of art media, techniques and processes to enhance communication of their experience and ideas 9-12 Students apply media, techniques and processes with sufficient skill, confidence and sensitivity that their intentions are carried out in their artworks C ont ent S tandar d #4 Understanding the visual arts in relation to history and cultures 5-8 Students know and compare the characteristics of artworks in various eras and cultures 9-12 Students describe the origins of specific images and ideas and explain why they are of value in their artworks and in the work of others C ont ent S tandar d #6 — Making connections between visual arts and other disciplines 5-8 Students describe ways in which the principles and subject matter of other disciplines taught in the school are interrelated with the visual arts 9-12 (advanced) Students synthesize the creative and analytical principles and techniques of the visual arts and selected other arts disciplines, the humanities or the sciences Materials ArtEmboss Matte Black, 9-1/4" x 12", pkg of 12 sheets (60518-2050). Cut 6 pieces per sheet, size 4” x 4-1/2” to make 72 pieces per package Blick Colored Pencils, assorted colors (22063-), distribute throughout class Black Matboard with black core, 32" x 40" (13007-2467), cut into 4" diameter circles, 72 pieces per board Magazines, newspapers, etc. to provide a soft working surface Blick White Sulphite Drawing Paper , (10209-1013) for preliminary drawings. Cut 9" x 12" sheets into six 4" x 4-1/2" pieces, one per student Fiskars® School Scissors (57011-1005) School Pencil Compass (55491-1055) 4" Semicircular Protractor (55671-1004) 12" Wooden Ruler (55425-1012) Blick Economy Graphite Pencils (20302-2009) 3M Quick Dry Tacky Adhesive (23861-1004) Optional X-Acto® Magnetic Circle Cutter (57153-1001), for easy and precise circles (A)

Embossed Rose Window Designs - Art Supply Store · stained glass overshadowed the fact that they were fabricated from iron and stone. Simplified, a classic rose window design is a

Embed Size (px)

Citation preview

EmbossedRose Window Designs(art + geometry; art + history)

Rose windows emerged in western Europeduring the Renaissance as part of the Gothicstyle of elaborate architecture and design.Enormous cathedrals built during this periodshowcased stained glass that was intended tocreate a sense of awe and wonder in the viewer.These colorful windows wove images and symbols together with perfect geometry and intricate patterns, and the delicate appearance of thestained glass overshadowed the fact that they werefabricated from iron and stone.

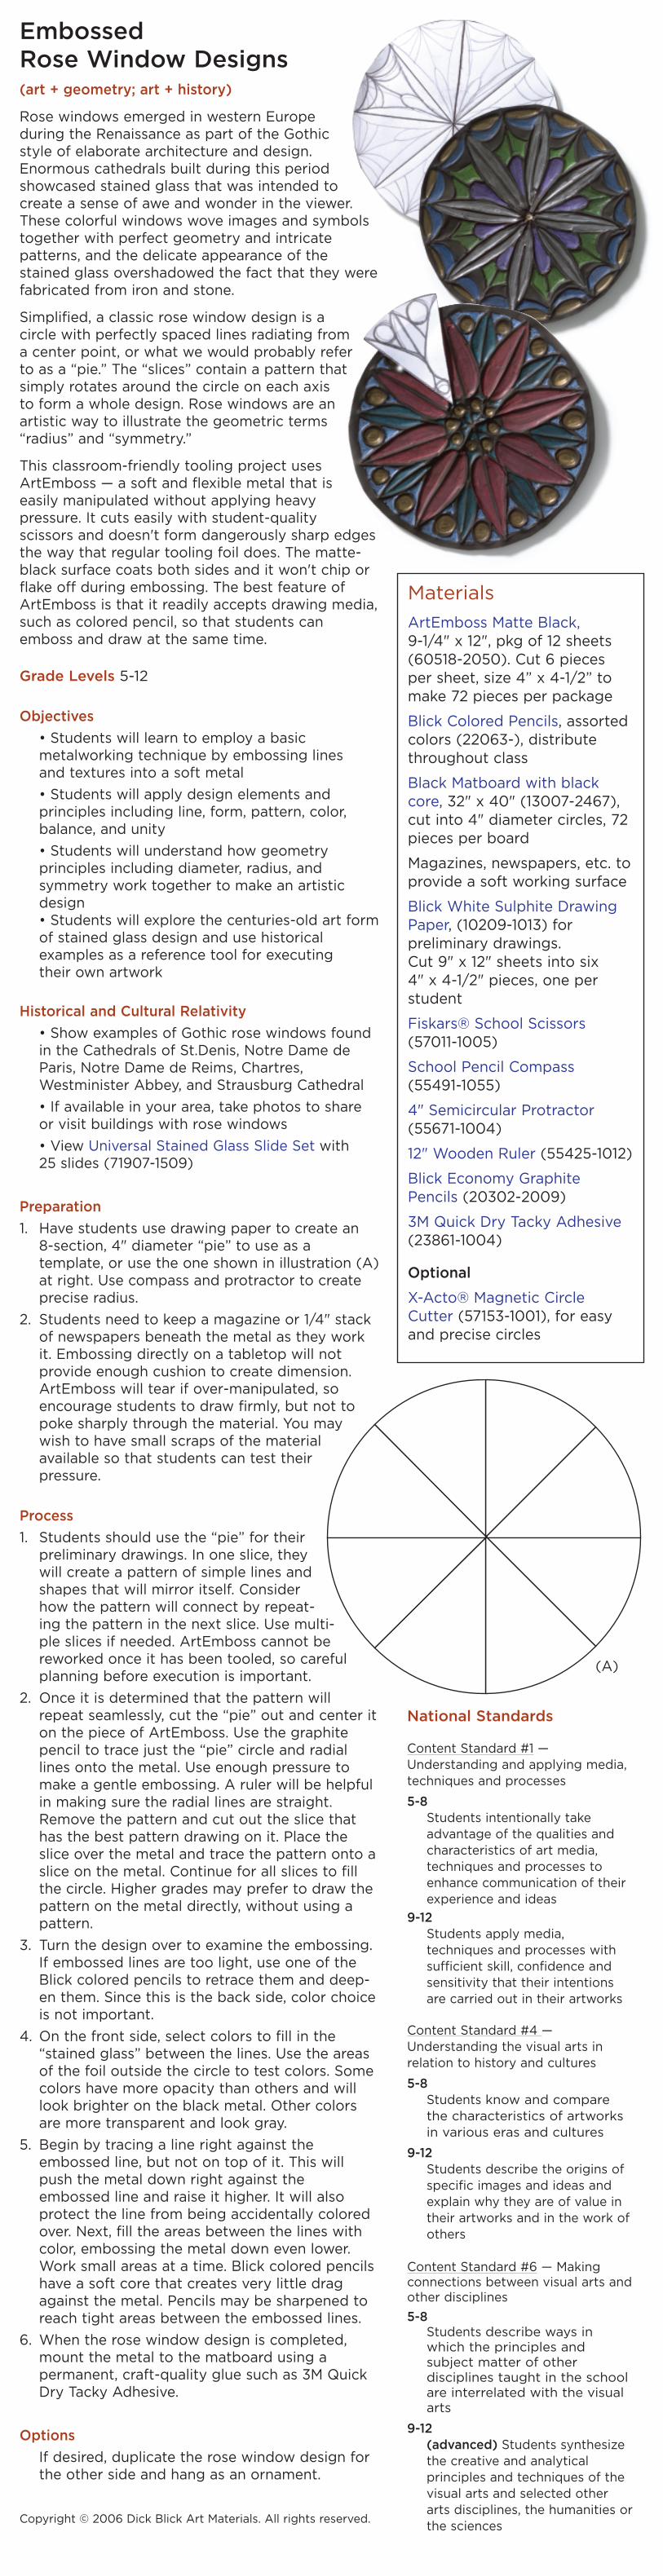
Simplified, a classic rose window design is a circle with perfectly spaced lines radiating froma center point, or what we would probably referto as a “pie.” The “slices” contain a pattern thatsimply rotates around the circle on each axisto form a whole design. Rose windows are anartistic way to illustrate the geometric terms“radius” and “symmetry.”

This classroom-friendly tooling project usesArtEmboss — a soft and flexible metal that iseasily manipulated without applying heavypressure. It cuts easily with student-quality scissors and doesn't form dangerously sharp edgesthe way that regular tooling foil does. The matte-black surface coats both sides and it won't chip orflake off during embossing. The best feature ofArtEmboss is that it readily accepts drawing media,such as colored pencil, so that students canemboss and draw at the same time.

Grade Levels 5-12

Objectives

• Students will learn to employ a basic metalworking technique by embossing lines and textures into a soft metal

• Students will apply design elements and principles including line, form, pattern, color, balance, and unity

• Students will understand how geometry principles including diameter, radius, and symmetry work together to make an artisticdesign• Students will explore the centuries-old art formof stained glass design and use historical examples as a reference tool for executing their own artwork

Historical and Cultural Relativity

• Show examples of Gothic rose windows foundin the Cathedrals of St.Denis, Notre Dame deParis, Notre Dame de Reims, Chartres,Westminister Abbey, and Strausburg Cathedral

• If available in your area, take photos to shareor visit buildings with rose windows

• View Universal Stained Glass Slide Set with 25 slides (71907-1509)

Preparation

1. Have students use drawing paper to create an 8-section, 4" diameter “pie” to use as a template, or use the one shown in illustration (A)at right. Use compass and protractor to createprecise radius.

2. Students need to keep a magazine or 1/4" stackof newspapers beneath the metal as they workit. Embossing directly on a tabletop will not provide enough cushion to create dimension.ArtEmboss will tear if over-manipulated, soencourage students to draw firmly, but not topoke sharply through the material. You maywish to have small scraps of the materialavailable so that students can test theirpressure.

Process

1. Students should use the “pie” for their preliminary drawings. In one slice, theywill create a pattern of simple lines andshapes that will mirror itself. Considerhow the pattern will connect by repeat-ing the pattern in the next slice. Use multi-ple slices if needed. ArtEmboss cannot bereworked once it has been tooled, so carefulplanning before execution is important.

2. Once it is determined that the pattern willrepeat seamlessly, cut the “pie” out and center iton the piece of ArtEmboss. Use the graphitepencil to trace just the “pie” circle and radiallines onto the metal. Use enough pressure tomake a gentle embossing. A ruler will be helpfulin making sure the radial lines are straight.Remove the pattern and cut out the slice thathas the best pattern drawing on it. Place theslice over the metal and trace the pattern onto aslice on the metal. Continue for all slices to fillthe circle. Higher grades may prefer to draw thepattern on the metal directly, without using apattern.

3. Turn the design over to examine the embossing.If embossed lines are too light, use one of theBlick colored pencils to retrace them and deep-en them. Since this is the back side, color choiceis not important.

4. On the front side, select colors to fill in the“stained glass” between the lines. Use the areasof the foil outside the circle to test colors. Somecolors have more opacity than others and willlook brighter on the black metal. Other colorsare more transparent and look gray.

5. Begin by tracing a line right against theembossed line, but not on top of it. This willpush the metal down right against theembossed line and raise it higher. It will also protect the line from being accidentally coloredover. Next, fill the areas between the lines withcolor, embossing the metal down even lower.Work small areas at a time. Blick colored pencilshave a soft core that creates very little dragagainst the metal. Pencils may be sharpened toreach tight areas between the embossed lines.

6. When the rose window design is completed,mount the metal to the matboard using a permanent, craft-quality glue such as 3M QuickDry Tacky Adhesive.

Options

If desired, duplicate the rose window design forthe other side and hang as an ornament.

Copyright © 2006 Dick Blick Art Materials. All rights reserved.

National Standards

Content Standard #1 —Understanding and applying media,techniques and processes

5-8Students intentionally takeadvantage of the qualities andcharacteristics of art media, techniques and processes toenhance communication of theirexperience and ideas

9-12Students apply media, techniques and processes withsufficient skill, confidence andsensitivity that their intentionsare carried out in their artworks

Content Standard #4 —Understanding the visual arts in relation to history and cultures

5-8Students know and comparethe characteristics of artworksin various eras and cultures

9-12Students describe the origins ofspecific images and ideas andexplain why they are of value intheir artworks and in the work ofothers

Content Standard #6 — Making connections between visual arts andother disciplines

5-8Students describe ways inwhich the principles and subject matter of other disciplines taught in the schoolare interrelated with the visualarts

9-12(advanced) Students synthesizethe creative and analytical principles and techniques of thevisual arts and selected otherarts disciplines, the humanities orthe sciences

Materials

ArtEmboss Matte Black, 9-1/4" x 12", pkg of 12 sheets(60518-2050). Cut 6 piecesper sheet, size 4” x 4-1/2” tomake 72 pieces per package

Blick Colored Pencils, assortedcolors (22063-), distributethroughout class

Black Matboard with blackcore, 32" x 40" (13007-2467),cut into 4" diameter circles, 72pieces per board

Magazines, newspapers, etc. toprovide a soft working surface

Blick White Sulphite DrawingPaper, (10209-1013) for preliminary drawings. Cut 9" x 12" sheets into six 4" x 4-1/2" pieces, one per student

Fiskars® School Scissors(57011-1005)

School Pencil Compass(55491-1055)

4" Semicircular Protractor(55671-1004)

12" Wooden Ruler (55425-1012)

Blick Economy GraphitePencils (20302-2009)

3M Quick Dry Tacky Adhesive(23861-1004)

Optional

X-Acto® Magnetic CircleCutter (57153-1001), for easyand precise circles

(A)