Embed Size (px)
Citation preview

EMC® Avamar® 7.2 for VMware
User Guide302-001-811
REV 03

Copyright © 2001-2015 EMC Corporation. All rights reserved. Published in USA.
Published August, 2015
EMC believes the information in this publication is accurate as of its publication date. The information is subject to changewithout notice.
The information in this publication is provided as is. EMC Corporation makes no representations or warranties of any kind withrespect to the information in this publication, and specifically disclaims implied warranties of merchantability or fitness for aparticular purpose. Use, copying, and distribution of any EMC software described in this publication requires an applicablesoftware license.
EMC², EMC, and the EMC logo are registered trademarks or trademarks of EMC Corporation in the United States and othercountries. All other trademarks used herein are the property of their respective owners.
For the most up-to-date regulatory document for your product line, go to EMC Online Support (https://support.emc.com).
EMC CorporationHopkinton, Massachusetts 01748-91031-508-435-1000 In North America 1-866-464-7381www.EMC.com
2 EMC Avamar 7.2 for VMware User Guide

7
9
11
Introduction 15
Data protection overview...............................................................................16Image backup.................................................................................. 16Guest backup...................................................................................18Considerations.................................................................................19
Changed block tracking.................................................................................21Image backup virtual machine quiescing.......................................................21
Configuration and Setup 23
Best practices............................................................................................... 24(Optional) Configuring support for multiple vCenters..................................... 24Installing Avamar Administrator software...................................................... 25Configuring vCenter-to-Avamar authentication.............................................. 25
Adding vCenter authentication certificates to the MCS keystore....... 25Disabling MCS certificate authentication..........................................27
Creating a dedicated vCenter user account....................................................27Adding a vCenter client................................................................................. 30Deploying proxies......................................................................................... 31
Proxy Deployment Manager..............................................................31Deploying proxies with Proxy Deployment Manger............................34(Optional) Configuring proxy certificate authentication.....................35
Upgrading proxies......................................................................................... 377.0 proxy compatibility with upgraded 7.2 servers........................... 37Upgrading Avamar proxy software.................................................... 37
Maintaining proxies...................................................................................... 41Reregistering a proxy with an Avamar server.....................................41Changing the proxy guest operating system root password.............. 41
Additional Avamar server configuration......................................................... 42Configuring automatic proxy selection..............................................42Configuring the MCS to support both guest and image backup.........43
Administration 45
Clients and containers...................................................................................46Dynamic versus static containers..................................................... 46Dynamic container behavior.............................................................46How independent and container protection interact......................... 47Icons and what they mean................................................................47
Adding clients and containers....................................................................... 48Editing clients and containers....................................................................... 50Viewing protected virtual machines...............................................................50
Figures
Tables
Preface
Chapter 1
Chapter 2
Chapter 3
CONTENTS
EMC Avamar 7.2 for VMware User Guide 3

Viewing a replicated virtual machine name....................................................51Monitoring the vCenter connection................................................................51Manually synchronizing Avamar Administrator with a vCenter....................... 51Renaming a vCenter client............................................................................. 52VMware Image Dataset..................................................................................53Adding guest backup throttling parameters to a dataset................................53Groups.......................................................................................................... 54
Default Proxy Group......................................................................... 54Default Virtual Machine Group......................................................... 54Virtual machine and proxy relationships within groups.................... 54
Changing proxy datastore and group assignments........................................ 55
Backup 57
Limitations....................................................................................................58Performing an on-demand backup.................................................................59Scheduling backups......................................................................................60Monitoring backups...................................................................................... 61Canceling backups........................................................................................61
Restore 63
Overview....................................................................................................... 64Image and file-level restore guidelines.......................................................... 64Limitations....................................................................................................64Restoring the full image or selected drives to the original virtual machine..... 66Restoring the full image or selected drives to a different virtual machine....... 67Restoring the full image or selected drives to a new virtual machine..............69Restoring specific folders or files to the original virtual machine....................71Restoring specific folders or files to a different virtual machine..................... 72Instant access............................................................................................... 74
Restoring the virtual machine...........................................................74Performing post-restore migration and clean-up...............................76
Mounting Windows VMDKs from an image backup........................................ 76Configuring the recovery target machine.......................................... 76Restoring and mounting the Windows VMDKs.................................. 77
Monitoring restores.......................................................................................78Canceling restores.........................................................................................78
Backup Validation 79
Overview....................................................................................................... 80What is validated............................................................................. 80VM Backup Validation groups.......................................................... 80
Performing an on-demand backup validation................................................ 80Scheduling backup validations..................................................................... 82
Protecting the vCenter Management Infrastructure 85
Overview....................................................................................................... 86Backing up the vCenter management infrastructure.......................................86
Implementing guest backups of vCenter management infrastructure........................................................................................................ 86Creating a dataset for vCenter management infrastructure backups........................................................................................................ 87
Chapter 4
Chapter 5
Chapter 6
Chapter 7
CONTENTS
4 EMC Avamar 7.2 for VMware User Guide

Adding a backup client for vCenter database hosts.......................... 88Recovering vCenter management infrastructure from Avamar backups.......... 88
Protecting ESX Hosts 89
Overview....................................................................................................... 90Limitations.......................................................................................90Task List...........................................................................................90
Adding ESX host authentication certificates to the MCS keystore...................91Creating a dedicated ESX host user account.................................................. 92Adding an ESX host as a vCenter client..........................................................94Deploying a proxy in a standalone ESX host.................................................. 95
Deploying a proxy appliance in an ESX host using the vSphere Client........................................................................................................ 95Manually configuring proxy network settings....................................96Registering and activating the proxy with the Avamar server.............97
Disassociating an ESX host from a vCenter.................................................... 98
Manually deploying proxies 99
Overview..................................................................................................... 100Downloading the proxy appliance template file........................................... 100Deploying the proxy appliance in vCenter.................................................... 100Deploying a proxy appliance in vCenter using the vSphere Web Client.........100Registering and activating the proxy with the Avamar server........................103Configuring proxy settings in Avamar Administrator.....................................103Performing optional proxy performance optimization.................................. 104
vSphere Data Ports 105
Required data ports.....................................................................................106
Plug-in Options 107
How to set plug-in options...........................................................................108Windows VMware Image plug-in options..................................................... 108Windows VMware GLR plug-in options.........................................................109
Troubleshooting 111
Installation and configuration problems and solutions................................112Problems adding vCenter Server as Avamar client.......................... 112Proxy network settings................................................................... 112Error when registering guest backup or Windows recovery target client...................................................................................................... 112
Backup problems and solutions.................................................................. 112Backup does not start.................................................................... 112Backups fail with “No Proxy” or “No VM” errors..............................113Changed block tracking does not take effect.................................. 113Proxies are not assigned to backup jobs........................................ 113VM snapshot fails backups due to incorrect pre-evaluation ofavailable space..............................................................................113
Restore problems and solutions.................................................................. 113Preexisting snapshots cause restores to fail...................................113
Chapter 8
Appendix A
Appendix B
Appendix C
Appendix D
CONTENTS
EMC Avamar 7.2 for VMware User Guide 5

Restore to new virtual machine not available when physical RDM disksare involved................................................................................... 114
115Glossary
CONTENTS
6 EMC Avamar 7.2 for VMware User Guide

Image backup diagram.................................................................................................. 16Example independent and container protection.............................................................47Virtual machine and proxy relationships within groups.................................................. 54Example nested container structure...............................................................................58Example nested container structure...............................................................................65
12345
FIGURES
EMC Avamar 7.2 for VMware User Guide 7

FIGURES
8 EMC Avamar 7.2 for VMware User Guide

Revision history............................................................................................................. 11Typographical conventions............................................................................................ 12Guest backup installation resources.............................................................................. 18Default vCenter certificate locations...............................................................................26Minimum required vCenter user account privileges........................................................28Example chart for gathering proxy information............................................................... 38Example chart for gathering proxy information, continued............................................. 38Avamar Administrator icons and what they mean...........................................................47Image restore toolbar buttons........................................................................................64Important vCenter management infrastructure components...........................................87Minimum required ESX host user account privileges...................................................... 92Required vSphere data ports....................................................................................... 106Backup options for Avamar Windows VMware Image plug-in........................................108Restore options for Avamar Windows VMware Image plug-in........................................109
1234567891011121314
TABLES
EMC Avamar 7.2 for VMware User Guide 9

TABLES
10 EMC Avamar 7.2 for VMware User Guide

Preface
As part of an effort to improve its product lines, EMC periodically releases revisions of itssoftware and hardware. Some versions of the software or hardware currently in use donot support every function that this document describes. The product release notesprovide the most up-to-date information on product features.
If a product does not function correctly or does not function as described in thisdocument contact an EMC technical support professional.
Note
This document was accurate at publication time. Go to EMC Online Support (https://support.EMC.com) to find the latest version of this document.
PurposeThis publication describes various methods and strategies for protecting VMware virtualmachines.
AudienceThe information in this publication is intended for system administrators familiar with:
l Basic Avamar system administration principles, and procedures found in the EMCAvamar Administration Guide
l Other Avamar client software information (primarily installation, and configurationprocedures) found in various Avamar client guides
A comprehensive discussion of basic Avamar system administration concepts andprinciples, such as clients, datasets, schedules, retention policies, groups, and grouppolicy, is beyond the scope of this publication. The EMC Avamar Administration Guideprovides details.
Revision historyThe following table presents the revision history of this document.
Table 1 Revision history
Revision Date Description
01 June, 2015 Initial release of Avamar 7.2.
02 August 2015 General availability release of Avamar 7.2, initial verson.
03 August 2015 Added the section Existing proxy configuration on page 37.
Related documentationThe following EMC publications provide additional information:
l EMC Avamar Compatibility and Interoperability Matrix
l EMC Avamar Release Notes
l EMC Avamar Administration Guide
l EMC Avamar Operational Best Practices Guide
l EMC Avamar Product Security Guide
EMC Avamar 7.2 for VMware User Guide 11

l EMC Avamar Backup Clients User Guide
l EMC Avamar for Exchange VSS User Guide
l EMC Avamar for IBM DB2 User Guide
l EMC Avamar for Lotus Domino User Guide
l EMC Avamar for Oracle User Guide
l EMC Avamar for SharePoint VSS User Guide
l EMC Avamar for SQL Server User Guide
The following VMware publications provide additional information:
l Introduction to VMware vSphere
l Getting Started with ESX
l vSphere Basic System Administration
l vSphere Resource Management Guide
l vSphere Web Access Administrator's Guide
l ESX and vCenter Server Installation Guide
l ESX Configuration Guide
l VMware Data Recovery Administration Guide
Special notice conventions used in this documentEMC uses the following conventions to alert the reader to particular information.
NOTICE
The Notice convention emphasizes important information about the current topic.
Note
The Note convention addresses specific information that is related to the current topic.
Typographical conventionsIn this document, EMC uses the typographical conventions that are shown in thefollowing table.
Table 2 Typographical conventions
Convention Example Description
Bold typeface Click More Options. Use for names of interface elements,such as names of windows, dialogboxes, buttons, fields, tab names, keynames, and menu paths (what a userspecifically selects or clicks).
Italic typeface EMC Avamar Administration Guide Use for full titles of publications thatare referenced in text.
Monospace font Event Type =INFORMATIONEvent Severity = OKEvent Summary = Newgroup created
Use for:
l System code
l System output, such as an errormessage or script
Preface
12 EMC Avamar 7.2 for VMware User Guide

Table 2 Typographical conventions (continued)
Convention Example Description
l Pathnames, file names, prompts,and syntax
l Commands and options
Monospace fontwith italictypeface
Type Avamar_server, where
Avamar_server is the DNS name or IPaddress of the Avamar server.
Use for variables.
Monospace fontwith bold typeface
Type yes. Use for user input.
Square brackets [--domain=String(/)] --name=String
Square brackets enclose optionalvalues.
Vertical bar [--domain=String(/)] | --name=String
Vertical bar indicates alternateselections - the bar means “or”.
Braces {[--domain=String(/)] | --name=String}
Braces enclose content that the usermust specify.
Ellipses valid hfs ... Ellipses indicate nonessentialinformation that is omitted from theexample.
Where to get helpThe Avamar support page provides access to licensing information, productdocumentation, advisories, and downloads, as well as how-to and troubleshootinginformation. This information may enable you to resolve a product issue before youcontact EMC Customer Support.
To access the Avamar support page:
1. Go to https://support.EMC.com/products.
2. Type a product name in the Find a Product box.
3. Select the product from the list that appears.
4. Click the arrow next to the Find a Product box.
5. (Optional) Add the product to the My Products list by clicking Add to my products inthe upper right corner of the Support by Product page.
DocumentationThe Avamar product documentation provides a comprehensive set of feature overview,operational task, and technical reference information. Review the following documents tosupplement the information in product administration and user guides:
l Release notes provide an overview of new features and known limitations for arelease.
l Technical notes provide technical details about specific product features, includingstep-by-step tasks, where necessary.
l White papers provide an in-depth technical perspective of a product or products asapplied to critical business issues or requirements.
Preface
EMC Avamar 7.2 for VMware User Guide 13

KnowledgebaseThe EMC Knowledgebase contains applicable solutions that you can search for either bysolution number (for example, esgxxxxxx) or by keyword.
To search the EMC Knowledgebase:
1. Click Search at the top of the page.
2. Type either the solution number or keywords in the search box.
3. (Optional) Limit the search to specific products by typing a product name in theScope by product box and then selecting the product from the list that appears.
4. Select Knowledgebase from the Scope by resource list.
5. (Optional) Specify advanced options by clicking Advanced options and specifyingvalues in the available fields.
6. Click Search.
Online communitiesGo to EMC Community Network at http://community.EMC.com for peer contacts,conversations, and content on product support and solutions. Interactively engage onlinewith customers, partners, and certified professionals for all EMC products.
Live chatTo engage EMC Customer Support by using live interactive chat, click Join Live Chat onthe Service Center panel of the Avamar support page.
Service RequestsFor in-depth help from EMC Customer Support, submit a service request by clickingCreate Service Requests on the Service Center panel of the Avamar support page.
Note
To open a service request, you must have a valid support agreement. Contact an EMCsales representative for details about obtaining a valid support agreement or withquestions about an account.
To review an open service request, click the Service Center link on the Service Centerpanel, and then click View and manage service requests.
Enhancing supportEMC recommends that you enable ConnectEMC and Email Home on all Avamar systems:
l ConnectEMC automatically generates service requests for high priority events.
l Email Home sends configuration, capacity, and general system information to EMCCustomer Support.
Comments and suggestionsComments and suggestions help EMC to continue to improve the accuracy, organization,and overall quality of the user publications. Send comments and suggestions about thisdocument to [email protected].
Please include the following information:
l Product name and version
l Document name, part number, and revision (for example, 01)
l Page numbers
l Other details to help address documentation issues
Preface
14 EMC Avamar 7.2 for VMware User Guide

CHAPTER 1
Introduction
This chapter includes the following topics:
l Data protection overview.......................................................................................16l Changed block tracking.........................................................................................21l Image backup virtual machine quiescing...............................................................21
Introduction 15

Data protection overviewEMC® Avamar® offers two basic ways to protect data residing on VMware virtualmachines:
l Image backup
l Guest backup
Image backupImage backup uses VMware vStorage API for Data Protection (VADP) to protect virtualmachine data.
Image backup is fully integrated with vCenter Server to provide detection of virtualmachine clients, and enable efficient centralized management of backup jobs.
Figure 1 Image backup diagram
ProxiesImage backups and restores require deployment of proxy virtual machines within thevCenter.
Proxies run Avamar software inside a Linux virtual machine, and are deployed using anappliance template (.ova) file or the Proxy Deployment Manager.
Once deployed, each proxy provides these capabilities:
l Backup of Microsoft Windows and Linux virtual machines (entire images or specificdrives)
l Restore of Microsoft Windows and Linux virtual machines (entire images or specificdrives)
Introduction
16 EMC Avamar 7.2 for VMware User Guide

l Selective restore of individual folders and files to Microsoft Windows and Linuxvirtual machines
Each proxy is capable of performing eight simultaneous backup or restore operations, inany combination.
Proxies are allowed in any part of the Avamar Administrator account management treeexcept the vCenter Server domain or subdomains.
Although it is possible to restore across datacenters (that is, use a proxy deployed in onedatacenter to restore files to a virtual machine in another datacenter), restores takenoticeably longer than if the proxy and the target virtual machine are both located in thesame datacenter. Therefore, for best performance, use the Proxy Deployment Manager torecommend the ideal deployment configuration.
SnapshotsThe image backup process requires temporary creation of a virtual machine snapshot.
If the virtual machine is running at the time of backup, this snapshot can impact disk I/Oand consume disk space on the datastore in which the virtual machine resides. Snapshotcreation and deletion can take a long time if the virtual machine runs a heavy disk I/Oworkload during backup
Avamar image backup supports the following types of virtual disks:
l Flat (version 1 and 2)
l Raw Device Mapped (RDM) in virtual mode only (version 1 and 2)
l Sparse (version 1 and 2)
Other virtual disk types are not supported.
Supported storage architectures
Image backup fully supports the following storage architectures:
l Fiber channel SAN storage hosting VMFS or RDMS
l iSCSI SAN storage
l NFS
Image backup system limitationsThe following system-wide limitations apply to image backups.
Special characters are not allowed in datacenter, datastore, folder, or virtual machinenamesBecause of a known limitation in the vCenter software, when special characters are usedin the datacenter, datastore, folder, or virtual machine names, the .vmx file is notincluded in the backup.
This issue is seen when special characters like %, &, *, $, #, @, !, \, /, :, *, ?, ", <, >, |, ;, ',+,=,?,~ are used.As a long-term solution for this issue, upgrade the VMware software to a version wherethis issue is resolved. However, until a fix is provided by VMware, rename the datacenter,datastore, folder, or virtual machine names without using these special characters.
Avamar server upgrades require proxy rebootsAfter you upgrade Avamar server software, you must manually reboot all proxiesconnected to that server.
Introduction
Image backup 17

Guest backupGuest backup protects virtual machine data by installing Avamar client software on thevirtual machine just as if it were a physical machine, then registering and activating thatclient with an Avamar server. No special configuration is required.
Note
When registering virtual machine clients protected by guest backup, do not register themto a vCenter domain. Doing so prevents you from locating or managing that virtualmachine in Avamar Administrator. Instead register any virtual machine clients protectedby guest backup to some other domain or subdomain (for example, /clients).
The following table lists Avamar client guides, which provide detailed instructions forinstalling Avamar client software in virtual machines.
Table 3 Guest backup installation resources
Client Publication
IBM AIX file systems EMC Avamar Backup Clients User Guide
Linux file systems:
l Debian
l CentOS
l Red Hat
l SUSE
l Ubuntu
EMC Avamar Backup Clients User Guide
Novell NetWare file systems EMC Avamar Backup Clients User Guide
UNIX file systems:
l FreeBSD
l HP-UX
l SCO Open Server and UnixWare
l Solaris
EMC Avamar Backup Clients User Guide
IBM DB2 databases hosted on IBM AIX, Red Hat andSUSE Linux, and Microsoft Windows
EMC Avamar for IBM DB2 User Guide
Lotus Domino databases EMC Avamar for Lotus Domino User Guide
Mac OS X file systems EMC Avamar Backup Clients User Guide
Microsoft Exchange databases EMC Avamar for Exchange VSS User Guide
Microsoft Office SharePoint implementations EMC Avamar for SharePoint VSS User Guide
Microsoft SQL Server databases EMC Avamar for SQL Server User Guide
Microsoft Windows file systems EMC Avamar Backup Clients User Guide
Oracle databases hosted on IBM AIX, Red Hat, andSUSE Linux, Sun Solaris, and Microsoft Windows
EMC Avamar for Oracle User Guide
Introduction
18 EMC Avamar 7.2 for VMware User Guide

ConsiderationsThese are the various considerations of using either image or guest backup to protectvirtual machine data.
General use case guidelinesFor virtual machines hosted in a vCenter, image backup enables you to protect multiplevirtual machines with the least amount of effort.
On Windows Vista/2008 and later virtual machines, image backups are fully application-consistent and sufficient for most use cases involving Microsoft Exchange, MicrosoftOffice SharePoint, and Microsoft SQL Server. However, because image backup is limitedto functionality offered by the VMware vStorage API for Data Protection (VADP), somedeployments might require more advanced functionality than that offered by VADP. Inthese situations, the additional functionality provided by guest backup might be offer abetter solution.
The following deployments are known to benefit from using guest backup instead ofimage backup:
l Exchange Database Availability Groups (DAGs)
l SharePoint Server Farms
l SQLServer Clusters
l Exchange, SharePoint and SQLServer deployments requiring log truncation
Guest backup is the only way to protect virtual machines that are not hosted in a vCenter(for example, desktops and laptops).
Ease of implementationImage backup:
l Can leverage vCenter to discover virtual machines, and add them to the Avamarserver in batches.
l Requires a moderate amount of initial setup and configuration.
Guest backup:
l Supports any virtual machine running an operating system for which Avamar clientsoftware is available.
l Supports applications such as DB2, Exchange, Oracle, and SQL Server databases.
l Easily fits into most existing backup schemes; day-to-day backup procedures do notchange.
l Avamar client software must be individually installed, and managed inside eachvirtual machine.
EfficiencyImage backup:
l Offers moderate deduplication efficiency.
l Does not consume guest virtual machine CPU, RAM, and disk resources duringbackups.
l Does consume ESX Server CPU, RAM, and disk resources during backups.
Guest backup:
Introduction
Considerations 19

l Offers the highest level of data deduplication efficiency.
l Does consume small amounts of guest virtual machine CPU, RAM, and disk resourcesduring backups.
l Does not consume ESX Server CPU, RAM, and disk resources during backups.
Backup and restoreImage backup:
l Image backups are supported for all machines currently supported by VMware.
l Backups can comprise an entire virtual machine image (all drives) or selected drives(.vmdk files).
l Individual folder and file restores supported for both Windows and Linux virtualmachines.
l Backups are not optimized (temp files, swap files, and so forth are included).
l Unused file system space is backed up.
l Virtual machines need not have a network connection to Avamar server.
l Virtual machines need not be running for backups to occur.
Guest backup:
l Backups are highly optimized (temp files, swap files, and so forth are not included).
l Backups are highly customizable (supports full range of include and excludefeatures).
l Database backups support transaction log truncation, and other advanced features.
l Unused file system space is not backed up.
l Individual folder and file restores are supported for all supported virtual machines(not just Linux and Windows)
l Backup and restore jobs can execute pre- and post-processing scripts.
l Virtual machines must have a network connection to Avamar server.
l Virtual machines must be running for backups to occur.
Required VMware knowledgeImage backup requires moderate VMware knowledge. Integrators should have workingknowledge of the vCenter topology in use at that customer site (that is, which ESX Servershost each datastore, and which datastores store each virtual machine’s data), and theability to log in to vCenter with administrator privileges.
Guest backup and restore requires no advanced scripting or VMware knowledge.
Using both image and guest backupA virtual machine can be protected by both guest backup and image backup. Forexample, a daily guest backup might be used to protect selective files, and a lessfrequent or on-demand full image backup might be used to protect the full machine. Thisscheme accommodates scenarios with limited backup windows.
In order to support using both image and guest backup to protect the same virtualmachine, you must configure the Avamar MCS to allow duplicate client names.
Introduction
20 EMC Avamar 7.2 for VMware User Guide

Changed block trackingChanged block tracking is a VMware feature that tracks which file system blocks on avirtual machine have changed between backups.
Changed block tracking identifies unused space on a virtual disk during the initialbackup of the virtual machine, and also empty space that has not changed since theprevious backup. Avamar data deduplication performs a similar function. However, usingthis feature provides valuable I/O reduction earlier in the backup process. Changed blocktracking dramatically improves performance if SAN connectivity is not available.
If changed block tracking is not enabled, each virtual machine file system image must befully processed for each backup, possibly resulting in unacceptably long backupwindows, and excessive back-end storage read/write activity.
Changed block tracking can also reduce the time required to restore (“roll back”) a virtualmachine to a recent backup image by automatically eliminating unnecessary writesduring the restore process.
Changed block tracking is only available with the following types of virtual machines thatuse the following types of virtual disk formats:
l Virtual machine versions 7 and laterThe earlier version 4 is commonly used on ESX 3.X hosts and in virtual machinesdeployed from templates that support both ESX 3.x and 4.0 hosts. The version of avirtual machine does not change when the underlying ESX host is upgraded. Manycommercial appliances exist in version 4 to allow deployment on ESX 3.x hosts.
vCenter version 4 provides the ability to upgrade version 4 virtual machine hardwarefrom to version 7 virtual machine hardware. This upgrade is irreversible and makesthe virtual machine incompatible with earlier versions of VMware software products.vCenter online help provides details.
l Disks cannot be physical compatibility RDM
l The same disk cannot be mounted by multiple virtual machines
l Virtual machines must be in a configuration that supports snapshots
Enabling changed block tracking does not take effect until any of the following actionsoccur on the virtual machine: reboot, power on, resume after suspend, or migrate.
Image backup virtual machine quiescingImage backup does not provide any additional virtual machine quiescing capabilitiesother than those provided by VMware vStorage API for Data Protection (VADP).
Prior to performing an image backup, three levels of virtual machine quiescing arepossible:
l Crash-consistent quiescing
l File system-consistent quiescing
l Application-consistent quiescing
Crash-consistent quiescing is the least desirable level of quiescing because the virtualdisk image being backed up is consistent with what would occur by interrupting power toa physical computer. File system writes might or might not be in progress when power isinterrupted. Because of that, there is always a chance of some data loss.
File system-consistent quiescing is more desirable because the virtual machine isallowed to complete any file system writes before the disk is backed up. This level of
Introduction
Changed block tracking 21

quiescing is only available on Windows virtual machines capable of providing WindowsVolume Snapshot Service (VSS) services, and that are running VMware Tools.
Application-consistent quiescing is the most desirable level of quiescing because, inaddition to the advantages provided by file system-consistent quiescing, applications arenotified that a backup has occurred so that they can clear their transaction logs.
Application-consistent quiescing is only available on Windows Vista/2008 and latervirtual machines that are running VMware Tools. Additionally, for application-consistentquiescing to be available, the following conditions must be met:
l This issue is seen when special characters like
%, &, *, $, #, @, !, \, /, :, *, ?, ", <, >, |, ;, 'etc are contained in names of vSphere entities like virtual machine name, clustername, datastore/folder/file name etc.
The UUID attribute must be enabled. This is enabled by default on virtual machinescreated on ESX hosts.
l The virtual machine must use only SCSI disks.
l The virtual machine cannot use dynamic disks.
Introduction
22 EMC Avamar 7.2 for VMware User Guide

CHAPTER 2
Configuration and Setup
This chapter includes the following topics:
l Best practices....................................................................................................... 24l (Optional) Configuring support for multiple vCenters............................................. 24l Installing Avamar Administrator software.............................................................. 25l Configuring vCenter-to-Avamar authentication...................................................... 25l Creating a dedicated vCenter user account............................................................27l Adding a vCenter client......................................................................................... 30l Deploying proxies................................................................................................. 31l Upgrading proxies................................................................................................. 37l Maintaining proxies.............................................................................................. 41l Additional Avamar server configuration................................................................. 42
Configuration and Setup 23
Best practicesFollow these best practices when configuring your system.
Verify ESX and vCenter certificatesUse properly registered certificates from a trusted provider that match DNS names for ESXand vCenter.
Use fully qualified ESX Server hostnamesWhen adding new ESX Servers to vCenter environments, you should adhere to theVMware recommended practice of naming ESX Servers with fully qualified hostnames(not an IP address or simple hostname). Using anything other than a fully qualifiedhostname can result in network connection failures due to incorrect SSL certificatehandling.
Recommendations for high change-rate clientsWhen protecting high change rate clients, such as database hosts, use guest backup, orstore image backups on a Data Domain system.
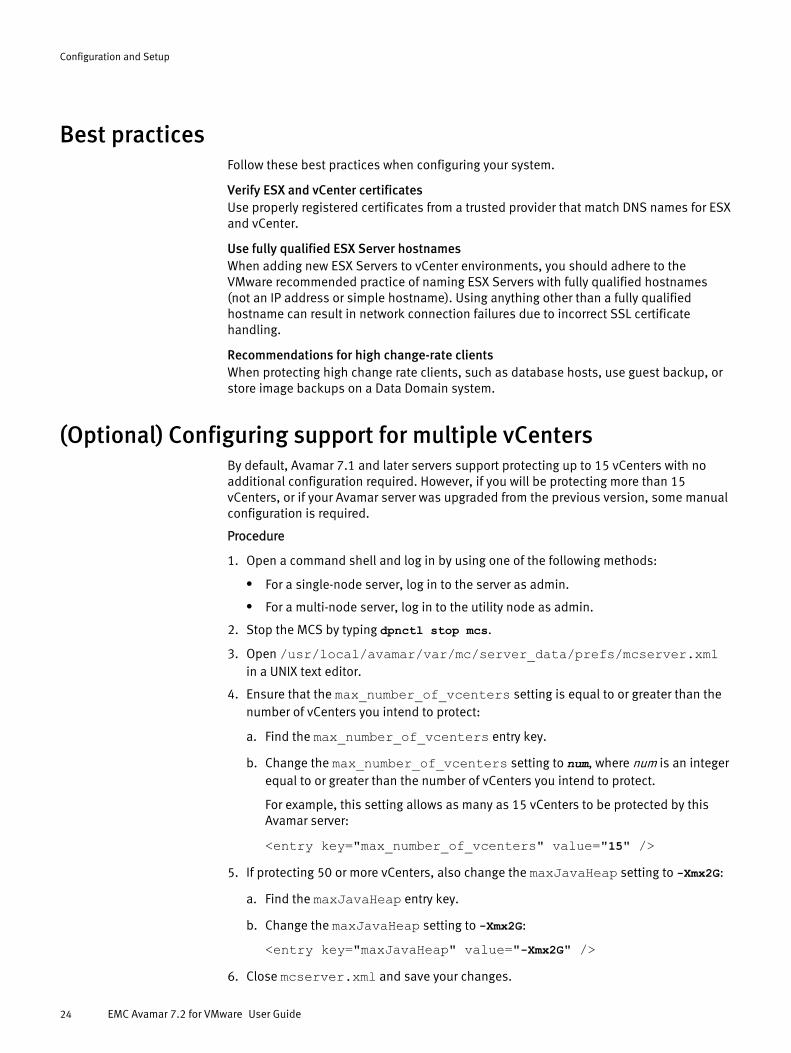
(Optional) Configuring support for multiple vCentersBy default, Avamar 7.1 and later servers support protecting up to 15 vCenters with noadditional configuration required. However, if you will be protecting more than 15vCenters, or if your Avamar server was upgraded from the previous version, some manualconfiguration is required.
Procedure
1. Open a command shell and log in by using one of the following methods:
l For a single-node server, log in to the server as admin.
l For a multi-node server, log in to the utility node as admin.
2. Stop the MCS by typing dpnctl stop mcs.
3. Open /usr/local/avamar/var/mc/server_data/prefs/mcserver.xmlin a UNIX text editor.
4. Ensure that the max_number_of_vcenters setting is equal to or greater than thenumber of vCenters you intend to protect:
a. Find the max_number_of_vcenters entry key.
b. Change the max_number_of_vcenters setting to num, where num is an integerequal to or greater than the number of vCenters you intend to protect.
For example, this setting allows as many as 15 vCenters to be protected by thisAvamar server:
<entry key="max_number_of_vcenters" value="15" />5. If protecting 50 or more vCenters, also change the maxJavaHeap setting to -Xmx2G:
a. Find the maxJavaHeap entry key.
b. Change the maxJavaHeap setting to -Xmx2G:
<entry key="maxJavaHeap" value="-Xmx2G" />6. Close mcserver.xml and save your changes.
Configuration and Setup
24 EMC Avamar 7.2 for VMware User Guide

7. Start the MCS and the scheduler by typing:
dpnctl start mcsdpnctl start sched
Installing Avamar Administrator softwareInstall Avamar Administrator software on your Windows computer.
Procedure
1. Open a web browser and type the following URL:
https://Avamar-server
where Avamar-server is the Avamar server network hostname or IP address.
The EMC Avamar Web Restore page appears.
2. Click Downloads.
3. Navigate to the folder containing 32-bit Windows software installation packages.
4. Locate the Java Runtime Environment (JRE) install package (it is typically the last entryin the folder).
5. If the JRE on the client computer is older than the JRE hosted on the Avamar server,download and install the newer JRE:
a. Click the jre-version-windows-i586-p link.
b. Open the installation file, or download the file, and then open it from the savedlocation.
c. Follow the onscreen instructions to complete the JRE installation.
6. Click the AvamarConsoleMultiple-windows-x86-version.exe link.
7. Open the installation file, or download the file, and then open it from the savedlocation.
8. Follow the onscreen instructions to complete the Avamar Administrator softwareinstallation.
Configuring vCenter-to-Avamar authenticationConfigure vCenter-to-Avamar authentication for each vCenter you intend to protect.
The most secure method for configuring vCenter-to-Avamar authentication is to addvCenter authentication certificates to the Avamar MCS keystore. You must do this for eachvCenter you intend to protect .
If you do not want to add vCenter authentication certificates to the Avamar MCS keystore,you must disable certificate authentication for all vCenter-to-Avamar MCScommunications.
Adding vCenter authentication certificates to the MCS keystoreConfigure vCenter-to-Avamar authentication by adding a vCenter authenticationcertificate to the MCS keystore. Do this for each vCenter you intend to protect.
This procedure uses the java keytool utility, which manages certificate keys. Thekeytool utility is located in the Java bin folder (/usr/java/version/bin), where
Configuration and Setup
Installing Avamar Administrator software 25

version is the Java Runtime Environment (JRE) version currently installed on the MCS. Ifthis folder is not in your path, you can either add it to the path, or specify the completepath when using keytool.
Procedure
1. Open a command shell and log in by using one of the following methods:
l For a single-node server, log in to the server as admin.
l For a multi-node server, log in to the utility node as admin.
2. Stop the MCS by typing dpnctl stop mcs.
3. Switch user to root by typing su -.
4. Copy rui.crt from the vCenter machine to /tmp on the Avamar utility node orsingle-node server.
The following table lists the default locations for vCenter certificates.
Table 4 Default vCenter certificate locations
vCenter host OS Default certificate location
Windows 2008 and above C:\ProgramData\VMware\vCenterServer\cfg\certs
Other Windows versions C:\Documents and Settings\All Users\ApplicationData\VMware\VMware VirtualCenter\SSL\rui.crt
Linux /etc/vmware-vpx/ssl/rui.crt
5. Copy the MCS keystore to /tmp by typing:
cp /usr/local/avamar/lib/rmi_ssl_keystore /tmp/
This creates a temporary version of the live MCS keystore in /tmp.
6. Add the default vCenter certificate to the temporary MCS keystore file by typing:
cd /tmp$JAVA_HOME/bin/keytool –import –file rui.crt -alias alias -keystorermi_ssl_keystore
where alias is a user-defined name for this certificate, which can often be the filename.
7. Type the keystore password.
8. Type yes, and press Enter to trust this certificate.
9. (Optional) If you will be protecting more than one vCenter with this Avamar server, addthose vCenter certificates now.
10.Back up the live MCS keystore by typing:
cd /usr/local/avamar/libcp rmi_ssl_keystore rmi_ssl_keystore.date
where date is today's date.
11.Copy the temporary MCS keystore to the live location by typing:
cp /tmp/rmi_ssl_keystore /usr/local/avamar/lib/
Configuration and Setup
26 EMC Avamar 7.2 for VMware User Guide
12.Exit the root subshell by typing exit.
13.Start the MCS and the scheduler by typing:
dpnctl start mcsdpnctl start sched
Disabling MCS certificate authenticationIf you do not want to add vCenter authentication certificates to the Avamar MCS keystore,you must disable certificate authentication for all vCenter-to-Avamar MCScommunications.
Procedure
1. Open a command shell and log in by using one of the following methods:
l For a single-node server, log in to the server as admin.
l For a multi-node server, log in to the utility node as admin.
2. Stop the MCS by typing dpnctl stop mcs.
3. Open /usr/local/avamar/var/mc/server_data/prefs/mcserver.xmlin a UNIX text editor.
4. Find the ignore_vc_cert entry key.
5. Change the ignore_vc_cert setting to true.
<entry key="ignore_vc_cert" value="true" />6. Close mcserver.xml and save your changes.
7. Start the MCS and the scheduler by typing:
dpnctl start mcsdpnctl start sched
Creating a dedicated vCenter user accountEMC strongly recommends that you set up a separate user account on each vCenter thatis strictly dedicated for use with Avamar.
Use of a generic user account such as “Administrator” might hamper futuretroubleshooting efforts because it might not be clear which actions are actuallyinterfacing or communicating with the Avamar server. Using a separate vCenter useraccount ensures maximum clarity if it becomes necessary to examine vCenter logs.
Note
The user account must be added to the top (root) level in each vCenter you intend toprotect.
Procedure
1. Create a vCenter user account with privileges listed in the following table.
Configuration and Setup
Disabling MCS certificate authentication 27

Note
You must create this user account at the vCenter level. If you create it at any otherlevel (for example, at a datacenter level), backups will fail.
Table 5 Minimum required vCenter user account privileges
Privilege type vCenter 6.0 vCenter 5.5/5.5U2 vCenter 5.1
Alarms l Create alarm l Create alarm l Create alarm
Datastore l Allocate space
l Browse datastore
l Configure datastore
l Low level file operations
l Move datastore
l Remove datastore
l Remove file
l Rename datastore
l Allocate space
l Browse datastore
l Configure datastore
l Low level file operations
l Move datastore
l Remove datastore
l Remove file
l Rename datastore
l Allocate space
l Browse datastore
l Low level file operations
l Move datastore
l Remove datastore
l Remove file
l Rename datastore
Extension l Register extension
l Unregister extension
l Update extension
l Register extension
l Unregister extension
l Update extension
l Register extension
l Unregister extension
l Update extension
Folder l Create folder l Create folder l Create folder
Global l Cancel task
l Disable methods
l Enable methods
l Licenses
l Log event
l Manage custom attributes
l Set custom attribute
l Settings
l Cancel task
l Disable methods
l Enable methods
l Licenses
l Log event
l Manage custom attributes
l Set custom attribute
l Settings
l Cancel task
l Disable methods
l Enable methods
l Licenses
l Log event
l Manage custom attributes
l Set custom attribute
l Settings
Host l Configuration > Storage partitionconfiguration
Network l Assign network
l Configure
l Assign network
l Configure
l Assign network
l Configure
Resource l Assign virtual machine toresource pool
l Assign virtual machine toresource pool
l Assign virtual machine toresource pool
Sessions l Validate session l Validate session l Validate session
Tasks l Create task
l Update task
l Create task
l Update task
l Create task
l Update task
Configuration and Setup
28 EMC Avamar 7.2 for VMware User Guide
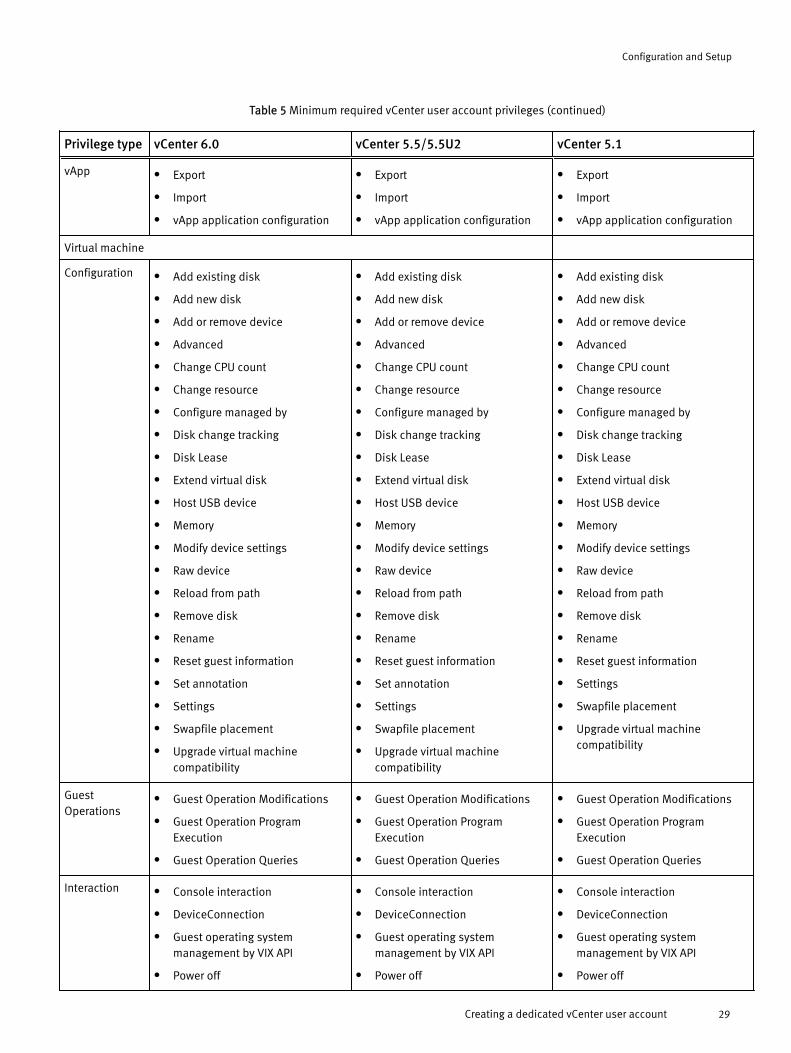
Table 5 Minimum required vCenter user account privileges (continued)
Privilege type vCenter 6.0 vCenter 5.5/5.5U2 vCenter 5.1
vApp l Export
l Import
l vApp application configuration
l Export
l Import
l vApp application configuration
l Export
l Import
l vApp application configuration
Virtual machine
Configuration l Add existing disk
l Add new disk
l Add or remove device
l Advanced
l Change CPU count
l Change resource
l Configure managed by
l Disk change tracking
l Disk Lease
l Extend virtual disk
l Host USB device
l Memory
l Modify device settings
l Raw device
l Reload from path
l Remove disk
l Rename
l Reset guest information
l Set annotation
l Settings
l Swapfile placement
l Upgrade virtual machinecompatibility
l Add existing disk
l Add new disk
l Add or remove device
l Advanced
l Change CPU count
l Change resource
l Configure managed by
l Disk change tracking
l Disk Lease
l Extend virtual disk
l Host USB device
l Memory
l Modify device settings
l Raw device
l Reload from path
l Remove disk
l Rename
l Reset guest information
l Settings
l Swapfile placement
l Upgrade virtual machinecompatibility
GuestOperations
l Guest Operation Modifications
l Guest Operation ProgramExecution
l Guest Operation Queries
l Guest Operation Modifications
l Guest Operation ProgramExecution
l Guest Operation Queries
l Guest Operation Modifications
l Guest Operation ProgramExecution
l Guest Operation Queries
Interaction l Console interaction
l DeviceConnection
l Guest operating systemmanagement by VIX API
l Power off
l Console interaction
l DeviceConnection
l Guest operating systemmanagement by VIX API
l Power off
l Console interaction
l DeviceConnection
l Guest operating systemmanagement by VIX API
l Power off
Configuration and Setup
Creating a dedicated vCenter user account 29
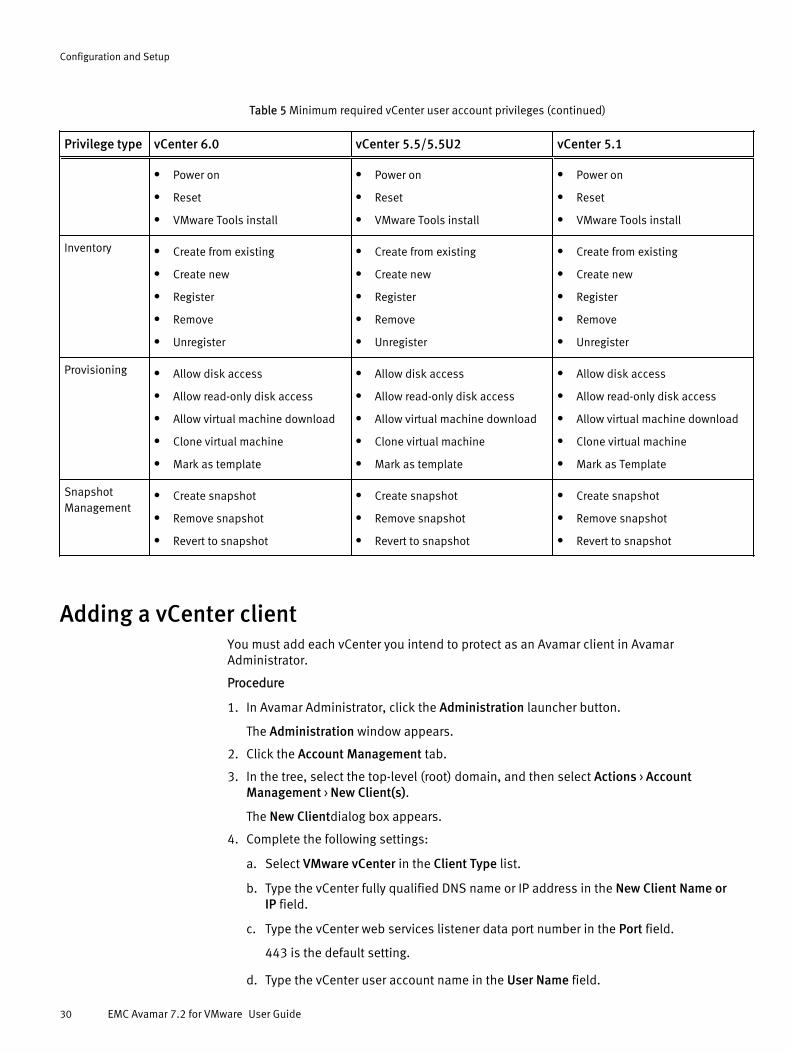
Table 5 Minimum required vCenter user account privileges (continued)
Privilege type vCenter 6.0 vCenter 5.5/5.5U2 vCenter 5.1
l Power on
l Reset
l VMware Tools install
l Power on
l Reset
l VMware Tools install
l Power on
l Reset
l VMware Tools install
Inventory l Create from existing
l Create new
l Register
l Remove
l Unregister
l Create from existing
l Create new
l Register
l Remove
l Unregister
l Create from existing
l Create new
l Register
l Remove
l Unregister
Provisioning l Allow disk access
l Allow read-only disk access
l Allow virtual machine download
l Clone virtual machine
l Mark as template
l Allow disk access
l Allow read-only disk access
l Allow virtual machine download
l Clone virtual machine
l Mark as template
l Allow disk access
l Allow read-only disk access
l Allow virtual machine download
l Clone virtual machine
l Mark as Template
SnapshotManagement
l Create snapshot
l Remove snapshot
l Revert to snapshot
l Create snapshot
l Remove snapshot
l Revert to snapshot
l Create snapshot
l Remove snapshot
l Revert to snapshot
Adding a vCenter clientYou must add each vCenter you intend to protect as an Avamar client in AvamarAdministrator.
Procedure
1. In Avamar Administrator, click the Administration launcher button.
The Administration window appears.
2. Click the Account Management tab.
3. In the tree, select the top-level (root) domain, and then select Actions > AccountManagement > New Client(s).
The New Clientdialog box appears.
4. Complete the following settings:
a. Select VMware vCenter in the Client Type list.
b. Type the vCenter fully qualified DNS name or IP address in the New Client Name orIP field.
c. Type the vCenter web services listener data port number in the Port field.
443 is the default setting.
d. Type the vCenter user account name in the User Name field.
Configuration and Setup
30 EMC Avamar 7.2 for VMware User Guide

e. Type the vCenter user account password in the Password field.
f. Type the vCenter user account password again in the Verify Password field.
g. (Optional) Type a contact name in the Contact field.
h. (Optional) Type a contact telephone number in the Phone field
i. (Optional) Type a contact email address in the Email field.
j. (Optional) Type a contact location in the Location field.
5. Click OK.
Results
Adding a vCenter client in Avamar Administrator automatically:
l Adds the vCenter client to the Default Group.However, this client is not activated as normal Avamar clients are. Therefore, nobackups are performed for it on behalf of the Default Group.
l Creates vCenter Server domain hierarchy.
l Creates a VirtualMachines subdomain within that vCenter Server domain hierarchy.
l Creates a Default Virtual Machine Group.This group performs scheduled backups for the target virtual machines. This groupcannot be deleted without first deleting the virtual center domain.
If the vCenter was already registered as a normal backup client (for example, to supportguest level backup), attempting to add that same vCenter as a vCenter client will failbecause the system will not allow you to register the same client twice. If this occurs, youmust:
1. Retire the existing vCenter client in Avamar Administrator.
2. Add the vCenter as a vCenter client (using this procedure).
3. Reinvite the retired vCenter client as a normal client to support guest level backupfrom the vCenter Server.
Deploying proxiesDeploy one or more proxies on each vCenter you intend to protect with image backup.
Proxy Deployment ManagerProxy Deployment Manager is an Avamar Administrator feature that assistsadministrators with deploying and managing Avamar proxies in vCenter environments.
Beginning with Avamar 7.2, Proxy Deployment Manager is the preferred method fordeploying proxies. Manual proxy deployment is still supported if necessary.
When you select a vCenter from the list, the tree pane shows the vCenter topology. Anyexisting proxies that were previously deployed with Proxy Deployment Manager areshown beneath ESX hosts.
The Recent Tasks pane shows status for all deployment tasks in the past two hours.
You can cancel tasks that have not completed by selecting the task and clicking Cancel.
Configuration and Setup
Deploying proxies 31

Functional overviewProxy Deployment Manager assists administrators with proxy deployment by offering arecommendation as to the number of proxies that should be deployed in each vCenter,and a recommended ESX host location for each proxy.
When generating a recommendation, Proxy Deployment Manager performs a static point-in-time analysis of the virtual infrastructure. This analysis gathers data about the virtualinfrastructure, such as the number of virtual machines, the number of datastores, and thenumber of virtual machines hosted in each datastore.
Users specify a data change rate and backup window duration for their site.
Proxy Deployment manager then calculates the optimum number of proxies required toback up those virtual machines in the time allotted by the backup window. ProxyDeployment Manager also considers the datastore and ESX host topology, and suggestsan optimal ESX host location for each proxy so that all datastores are protected.
This calculated proxy deployment topology is offered as a recommendation. Thisrecommendation can be accepted as offered, or modified to meet specific siterequirements.
Before proxies can be deployed, each recommended proxy must be configured byspecifying:
l Proxy name
l Avamar server domain where the proxy will reside
l Proxy IP address
l Datastore assignment
l Network settings:
n Which existing virtual network to use
n DNS server(s)
n Network gateway
n Network mask
After all proxies are configured, clicking Apply creates the proxy virtual machines with thespecified configuration settings.
You can generate new proxy deployment recommendations at any time. This is useful forperiodically reevaluating and optimizing proxy deployments when significant changeshave occurred in the virtual infrastructure.
Considerations and best practicesProxy Deployment Manager has been intentionally designed to ensure broadcompatibility with most customer environments. This necessitated making certain designassumptions about typical customer environments and reasonable proxy capabilities inthose environments. Understanding these design assumptions can help you to betterunderstand Proxy Deployment Manager's recommendations in order to potentially furtheroptimize proxy deployment at your site. Some best practices are also discussed.
Data change rateThe data change rate is the percentage of a client file system that actually changesbetween backups. Data change rates directly impact the number of proxies required tosuccessfully back up all required virtual machines in the time allotted by the backupwindow. More data to be backed up requires more time, more proxies, or both.
Configuration and Setup
32 EMC Avamar 7.2 for VMware User Guide
Even though empirical field data routinely reports client data change rates of 3-4% perday, by default Proxy Deployment Manager assumes a client data change rate of 12% perday. The intentionally conservative use of 12% as a design assumption provides a buffer.
If client data change rates at your site are routinely lower or higher than these assumedvalues, you can add or delete proxies as needed. You can also shorten or lengthen thebackup window.
Proxy data ingestion rateProxy data ingestion rate is another parameter that directly impacts the number ofproxies required to successfully back up all required virtual machines in the time allottedby the backup window. By default, Proxy Deployment Manager assumes that each proxycan run 8 concurrent backup jobs and process 500 GB of data per hour.
While an assumed proxy data ingestion rate of 500 GB per hour is a very conservativeestimate, a number of factors at each customer site directly affect the actual proxy dataingestion rate. Some of these factors are the:
l Avamar server architecture (physical Avamar server using a Data Domain system forback end storage versus a virtual Avamar server hosted in vCenter)
l Type of storage media used for proxy storage
l Network infrastructure and connectivity speed
l SAN infrastructure and connectivity speed
If proxy data ingestion rates at your site are routinely lower or higher than 500 GB perhour, you can add or delete proxies as needed. You can also shorten or lengthen thebackup window.
If your site consistently experiences substantially different proxy data ingestion rates(that is, either substantially lower or higher than 500 GB per hour), you can permanentlychange the default proxy data ingestion rate setting, which will affect all future proxydeployment recommendations. To do this:
1. Open a command shell and log in to the Avamar server as user admin.
2. Switch user to root by typing su - .
3. Open /etc/vcs/dm.properties in a UNIX text editor.
4. Change the proxy_ingest_rate_gb_per_hour setting.
5. Save your changes and close /etc/vcs/dm.properties.
Protecting against proxy over commitBy default, each Avamar proxy is configured to allow 8 concurrent backup jobs. Thissetting is known to work well for most customer sites.
EMC recommends against increasing the number of concurrent jobs to more than 8because it can lead to a condition in which too many backup jobs are queued for a givenproxy (proxy over commit). This causes uneven distribution of backup jobs amongproxies, and can also cause a bottleneck in which backup jobs to take longer to completethan they otherwise might.
Some sites might benefit from configuring some proxies to allow fewer concurrent backupjobs. This generally requires deploying additional proxies, but can result in more evendistribution of backup jobs among proxies, as opposed to concentrating or clusteringbackups in a certain area of the virtual infrastructure.
Optimization for level-1 incremental change block backupsWhen Proxy Deployment Manager generates a proxy deploy recommendation, it does soby calculating how many proxies are required to sustain normal backup operations. Oneof the assumptions about normal backup operation is that backups will be level-1incremental or changed block backups, not level-0 full backups.
Configuration and Setup
Proxy Deployment Manager 33

Level-0 backups inherently take longer and use more proxy resources. Therefore, largenew virtual machine deployments can adversely affect the ability to complete all requiredbackups in the time allotted by the backup window.
For this reason, whenever possible phase-in large new virtual machine deployments inorder to give the system an opportunity to ingest the necessary level-0 backups.
If a phased-in deployment is not possible, another approach is to tolerate the failedbackups that will occur due to proxy over commit. Once the system begins to settle, proxyresources will be under committed, and those virtual machines will eventually be backedup. Administrators should monitor the situation closely to ensure that the system doessettle and that the virtual machines eventually do successfully back up.
Note
Avamar will attempt to deploy proxies where needed, but it is impossible to know alldetails about the environment so it is important you verify the proxy deployment managerdoes not over allocate proxies beyond the maximum supported.
Deploying proxies with Proxy Deployment MangerProcedure
1. In Avamar Administrator, select VMware > Proxy Deployment Manger.
The Proxy Deployment Manger window appears.
2. Choose a vCenter.
3. Complete the following settings:
a. Set the Data change rate.
The default data change rate of 12% (.12) is a conservative setting that is known towork with most customer sites.
b. Set the Backup window minutes.
c. To include virtual machines using direct attached storage in this recommendation,select Protect VM's on local storage.
4. Click Create Recommendation.
The tree pane shows the proposed deployment topology. Proposed new proxiesappear under each ESX host with the name New proxy.
5. For each recommended proxy you intend to deploy, configure the proxy as follows:
a. In the tree pane, select a New proxy.
b. Click Edit.
The New Proxy dialog box appears.
c. Type the proxy name in the Name field.
d. Select an Avamar server Domain where this proxy will reside.
e. Type the IP address in the IP field.
f. Select a datastore from the Datastore list.
g. Select a virtual network from the Network list.
h. Type the fully qualified DNS server name or IP address in the DNS String field.
i. Type the network gateway IP address in the Gateway field.
Configuration and Setup
34 EMC Avamar 7.2 for VMware User Guide

j. Type the network mask in the Netmask field.
k. Click Save.
6. (Optional) Add other proxies you want to deploy:
Note
You must be prepared to specify the proxy name, IP address, fully qualified DNSserver name or IP address, network gateway and network mask for each proxy youadd.
a. In the tree pane, select an ESX host.
b. Click New Proxy.
The New Proxy dialog box appears.
c. Type the proxy hostname in the Name field.
d. Select an Avamar server Domain where this proxy will reside.
e. Type the IP address in the IP field.
f. Select a datastore from the Datastore list.
g. Select a virtual network from the Network list.
h. Type the fully qualified DNS server name or IP address in the DNS String field.
i. Type the network gateway IP address in the Gateway field.
j. Type the network mask in the Netmask field.
k. Click Save.
7. (Optional) Delete any proxies you do not want to deploy:
a. In the tree pane, select a proxy.
b. Click Delete.
c. Click Yes to confirm the deletion.
8. When the proposed deployment topology is satisfactory, click Apply to deploy theproxies.
Results
If a proxy fails to deploy for any reason, it is completely deleted from the system. Thathostname and IP address will be available for subsequent proxy deployments.
(Optional) Configuring proxy certificate authenticationBy default, Avamar proxies do not validate SSL certificates when connecting to thevCenter Server. This can leave the vCenter Server vulnerable to a man-in-the-middleexploitation, which might result in unauthorized access to the vCenter Server. Configuringeach Avamar proxy to use SSL certificate authentication when connecting to the vCenterServer corrects this vulnerability.
Before you begin
Ensure that a Certificate Authority (CA) signed SSL certificate is installed on the vCenterServer.
Detailed instructions for generating and installing a CA signed SSL certificate andinstalling it on the vCenter Server are found in the VMware Knowledge Base.
Configuration and Setup
(Optional) Configuring proxy certificate authentication 35

This procedure supports both standalone certificates and chained permission files. Forthe remainder of this procedure, certificate-file can be either a standalone certificate orchained permission file. Use the correct certificate-file for your site.
Procedure
1. Open a command shell and log in to the proxy as root.
2. Copy the vCenter Server certificate or chained permission file to /usr/local/avamarclient/bin on the proxy.
3. Set the proper operating system permissions on the certificate by typing:
chmod 600 /usr/local/avamarclient/bin/certificate-file
where certificate-file is a standalone certificate or chained permission file.
4. Open /usr/local/avamarclient/var/avvcbimageAll.cmd in a UNIX texteditor.
5. Append the following entry to the end of the file:
--ssl_server_authentication_file=/usr/local/avamarclient/bin/certificate-file
where certificate-file is the actual certificate name.
6. Save the changes and close avvcbimageAll.cmd.
7. Open /usr/local/avamarclient/var/avvmwfileAll.cmdin a UNIX texteditor.
8. Append the following entry to the end of the file:
--ssl_server_authentication_file=/usr/local/avamarclient/bin/certificate-file
where certificate-file is a standalone certificate or chained permission file.
9. Save the changes and close avvmwfileAll.cmd.
10.Open /etc/vmware/config in a UNIX text editor.
11.Append the following lines to the end of the file:
vix.enableSslCertificateCheck = "true"vix.sslCertificateFile = "/usr/local/avamarclient/bin/certificate-file"
where certificate-file is a standalone certificate or chained permission file.
12.Save the changes and close config in a UNIX text editor.
13.Open /usr/local/avamarclient/var/vddkconfig.iniin a UNIX text editor.
14.Find the vixDiskLib.linuxSSL.verifyCertificates=0 entry.
15.Change the value of the vixDiskLib.linuxSSL.verifyCertificates=0entry to 1.
vixDiskLib.linuxSSL.verifyCertificates=116.Save the changes and close vddkconfig.ini.
17.Ensure that there are no running backup or restore jobs on this proxy.
18.Restart the avagent and vmwareflr services by typing:
Configuration and Setup
36 EMC Avamar 7.2 for VMware User Guide

service avagent restartservice vmwareflr restart
After you finish
Repeat this procedure for each Avamar proxy.
Upgrading proxies
7.0 proxy compatibility with upgraded 7.2 serversYou cannot use both 7.0 and 7.2 proxies with the same Avamar server.
Each 7.0 proxy hosts eight separate avagent plug-ins, each of which can process onebackup or restore job. Each 7.0 proxy can therefore process as many as eightsimultaneous backup or restore jobs.
Each 7.2 proxy hosts a single avagent plug-in, but that single avagent plug-in canperform up to eight simultaneous backup or restore jobs. The maximum simultaneous joblimitation is still eight.
In order to precisely control the maximum number of simultaneous jobs allowed for eachproxy, Avamar 7.2 introduced a new setting in mcserver.xml:max_jobs_per_proxy. The default setting is 8.
You cannot use both 7.0 and 7.2 proxies with the same Avamar server. This is becausethe Avamar server max_jobs_per_proxy setting is global. It applies to every proxy inthe environment. Therefore, in a heterogeneous environment comprising both 7.0 and7.2 proxies, a max_jobs_per_proxy=8 setting would work fine for 7.2 proxies, butmight result in 7.0 proxies attempting to process as many as 64 simultaneous backup orrestore jobs (that is, eight jobs for each of the eight avagent processes). This mightcause degraded performance. Similarly, a max_jobs_per_proxy=1 setting wouldwork fine for 7.0 proxies, but would limit 7.2 proxies to performing only one backup orrestore job at a time. This would drastically underutilize each 7.2 proxy.
These proxy compatibility issues only affect customers who upgrade their Avamar 7.0servers to 7.2. Customers deploying new 7.2 servers in their environments will deploynew 7.2 proxies. Customers using existing 7.0 servers will already have 7.0 proxies intheir environment, and can deploy additional 7.0 proxies to support that server.
EMC suggests the following solutions for these proxy compatibility issues:
l If 7.2 proxies will be deployed, the preferred solution is to upgrade all existing 7.0proxies to 7.2.
l If new 7.2 proxies will never be simultaneously deployed with the existing 7.0proxies, change the mcserver.xml max_jobs_per_proxy setting to 1.
Upgrading Avamar proxy softwarePerform this procedure when a newer version of the Avamar proxy software is availablefor download from the Avamar server.
Existing proxy configuration
The following information should be gathered prior to upgrading proxies in order torestore the proxy settings to the values that existed prior to the upgrade:
Configuration and Setup
Upgrading proxies 37

l VM container
n Name
n Host
n Datastore
n Network
n Folder
l VM client
n IP address
n Gateway
n DNS servers
n Netmask
l Policy
n Domain
n Datastores protecting
n Group membership
The following example charts demonstrate how this information should be gathered priorto upgrading proxies:
Table 6 Example chart for gathering proxy information
Name Host Datastore Network Folder IP
Proxy1 vcenter.com/host1 DS2 NW1 /proxies x.x.x.x
Proxy2 vcenter.com/host2 DS2 NW1 /proxies x.x.x.x
Table 7 Example chart for gathering proxy information, continued
Gateway DNS Netmask Domain Datastoreprotecting
Groups protecting
x.x.x.x x.x.x.x,x.x.x.x x.x.x.x /clients DS1,DS2 Default Virtual MachineGroup
x.x.x.x x.x.x.x,x.x.x.x x.x.x.x /clients DS1,DS2 Other Group
Viewing VM configurationProcedure
1. In the vSphere Client or vSphere Web Client, navigate to VMs and Templates view.
2. Locate existing proxies. For each proxy:
a. Note the VM and folder names.
b. Select the Summary tab.
c. Note the host, storage (datastore) and network.
d. Right click and select Edit Settings....
Configuration and Setup
38 EMC Avamar 7.2 for VMware User Guide

l If using the vSphere Web Client, navigate to the vApp Options tab and note the IP,gateway, DNS, and netmask.
l If using the vSphere Client (Windows):
a. Navigate to the Options tab.
b. Select vApp Options > Advanced.
The right pane shows the vApp option fields.
c. Click Properties > Properties in the right pane.
The Advanced Properties Configuration window appears.
d. From the Properties table, note the IP address, gateway, DNS, and netmask valuesfrom the Value column corresponding to the following keys in the Key column:
Key Value
vami.ip0.EMC_Avamar_Virtual_Machine_Combined_Proxy IP address
vami.gateway.EMC_Avamar_Virtual_Machine_Combined_Proxy Gateway
vami.DNS.EMC_Avamar_Virtual_Machine_Combined_Proxy DNS servers
vami.netmask0.EMC_Avamar_Virtual_Machine_Combined_Proxy Netmask
Viewing datastore assignments and group membership
Procedure
1. In Avamar Administrator, click the Administration launcher button.
The Administration window appears.
2. Click the Account Management tab.
3. Locate the proxy and note the domain.
4. Select a proxy and click Edit.
The Edit Client dialog box appears.
5. Click the Datastores tab and note which datastores are selected.
6. Click the Groups tab and note which groups are selected.
7. Uncheck all groups in preparation for deleting this proxy.
8. Click OK.
Removing existing proxies
Procedure
1. In the vSphere Client or Web Client, locate existing proxies.
2. For each proxy:
a. Right click and select Power > Power off.
b. Wait for the proxy to power off, then right-click and select Delete from Disk.
The Confirm Delete confirmation windows appears.
c. Click Yes.
3. In Avamar Administrator, click the Administration launcher button.
The Administration window appears.
Configuration and Setup
Upgrading Avamar proxy software 39

4. Click the Account Management tab.
5. Locate existing proxies, and for each proxy:
a. Right click and select Retire Client....
The Retire Client window appears.
b. Click OK.
Re-deploying proxies using the Proxy Deployment Manager
Procedure
1. In Avamar Administrator, select VMware > Proxy Deployment Manger.
The Proxy Deployment Manger window appears.
2. Choose a vCenter.
3. Set the Data change rate to 0.
This ensures that the Proxy Development Manager will not recommend proxies basedon its analysis of your VMware environment.
4. Click Create Recommendation.
The tree pane shows your VMware topology. Verify that there are no recommendedproxies labeled New proxy.
5. For each proxy in the chart created in Existing proxy configuration on page 37:
a. Locate and select the host in the Proxy Deployment Manager.
b. Click New Proxy....
The New Proxy window appears.
c. Complete the Name, Domain, IP, Datastore, Network, DNS, Gateway, and Netmaskbased on the information in the chart.
d. Click Save.
6. Click Apply to deploy the proxies.
The new proxies will be deployed and registered. If any failures occur, the operationcan be retried by clicking Apply again.
Restoring datastore assignments and group membershipProcedure
1. In Avamar Administrator, click the Administration launcher button.
The Administration window appears.
2. Click the Account Management tab.
3. Select the updated proxy and click Edit.
The Edit Client dialog box appears.
4. Click the Datastores tab and verify the Datastore protecting the client, based on thechart created in Existing proxy configuration on page 37.
5. Click the Groups tab and verify the proxies that are members of this group, based onthe chart created in Existing proxy configuration on page 37.
6. Click OK.
Configuration and Setup
40 EMC Avamar 7.2 for VMware User Guide
Maintaining proxies
Reregistering a proxy with an Avamar serverUse these instructions to reregister an existing proxy with an Avamar server.
Procedure
1. Launch the vSphere Client or vSphere Web Client, and log in to the vCenter Server.
2. Locate the proxy you want to reregister.
3. Right click Power > Shut Down Guest.
4. Click Yes to confirm that you want to shut down the guest operating system.
5. Right click Power > Power Off.
6. Click Yes to confirm that you want to power off the proxy virtual machine.
7. Right-clickOpen Console.
A console window appears.
8. Right click Power > Power On.
9. Monitor the console window until the following message appears:
Please press a key now if you want to re-register this proxywith Avamar Administrator. Continuing in 10 seconds...
10.Click inside the console window and press Enter.
11.Type the Avamar server DNS name, and then press Enter.
12.Type an Avamar server domain name, and then press Enter.
The default domain is “clients.” However, your Avamar system administrator mayhave defined other domains, and subdomains. Consult your Avamar systemadministrator for the domain you should use when registering this client.
Note
If typing a subdomain (for example, clients/MyClients), do not include a slash (/) asthe first character. Including a slash as the first character will cause an error, andprevent you from registering this client.
Changing the proxy guest operating system root passwordProcedure
1. Open a command shell and log in to the proxy as root.
2. Type passwd.
3. Type the current guest operating system root password, and then press Enter.
4. Type the new guest operating system root password, and then press Enter.
5. Confirm the new password by typing it again, and then pressing Enter.
Configuration and Setup
Maintaining proxies 41
Additional Avamar server configuration
Configuring automatic proxy selectionThe automatic intelligent proxy selection feature provides three different algorithms fordetermining which proxy to use to backup and restore operations. The algorithm can onlybe configured by manually modifying the mcserver.xml proxy_selection_algorithmsetting.
Procedure
1. Open a command shell and log in by using one of the following methods:
l For a single-node server, log in to the server as admin.
l For a multi-node server, log in to the utility node as admin.
2. Stop the MCS by typing dpnctl stop mcs.
3. Open /usr/local/avamar/var/mc/server_data/prefs/mcserver.xmlin a UNIX text editor.
4. Find the proxy_selection_algorithm entry key.
5. Change the proxy_selection_algorithm setting to one of the following values:
l hot_add_preferred—The MCS intelligently prefers and automatically selectsproxies based on hot-add capabilities. If none are found, then the MCS will fallback to using proxies without hot-add capabilities. This is the default setting.
l hot_add_only—The MCS intelligently prefers and automatically selects proxiesbased on hot-add capabilities. If none are found, then the MCS will pause thebackup or restore operation and wait for a hot-add capable proxy to becomeavailable.
l ignore_associated_datastores—This setting causes known proxy-datastore associations to be ignored during the selection process. This allows theMCS to select a proxy from a larger pool of available proxies. Like thehot_add_preferred setting, proxies with hot-add capabilities are stillpreferred over proxies without hot-add capabilities. But if no hot-add capableproxies are found, then the MCS will fall back to using proxies without hot-addcapabilities.
For example:
<entry key=" proxy_selection_algorithm"value="hot_add_only" /> configures the automatic proxy selection mechanismto use the hot_add_only algorithm.
6. Close mcserver.xml and save your changes.
7. Start the MCS and the scheduler by typing:
dpnctl start mcsdpnctl start sched
Configuration and Setup
42 EMC Avamar 7.2 for VMware User Guide
Configuring the MCS to support both guest and image backupIn order to support using both image and guest backup to protect the same virtualmachine, you must configure the Avamar MCS to allow duplicate client names.
Procedure
1. Open a command shell and log in by using one of the following methods:
l For a single-node server, log in to the server as admin.
l For a multi-node server, log in to the utility node as admin.
2. Stop the MCS by typing dpnctl stop mcs.
3. Open /usr/local/avamar/var/mc/server_data/prefs/mcserver.xmlin a UNIX text editor.
4. Find the allow_duplicate_client_names entry key.
5. Change the allow_duplicate_client_names setting to true.
<entry key="allow_duplicate_client_names" value="true" />6. Close mcserver.xml and save your changes.
7. Start the MCS and the scheduler by typing:
dpnctl start mcsdpnctl start sched
Configuration and Setup
Configuring the MCS to support both guest and image backup 43

Configuration and Setup
44 EMC Avamar 7.2 for VMware User Guide

CHAPTER 3
Administration
This chapter includes the following topics:
l Clients and containers...........................................................................................46l Adding clients and containers............................................................................... 48l Editing clients and containers............................................................................... 50l Viewing protected virtual machines.......................................................................50l Viewing a replicated virtual machine name............................................................51l Monitoring the vCenter connection........................................................................51l Manually synchronizing Avamar Administrator with a vCenter............................... 51l Renaming a vCenter client..................................................................................... 52l VMware Image Dataset..........................................................................................53l Adding guest backup throttling parameters to a dataset........................................53l Groups.................................................................................................................. 54l Changing proxy datastore and group assignments................................................ 55
Administration 45

Clients and containersImage backup can be used manage and protect any of the following VMware entities in avCenter:
l Virtual machines
l vApps
l Virtual machine folders (that is, any folder residing below the datacenter level)
l Resource pools
In Avamar Administrator, virtual machines and vApps are managed as clients; folders andresource pools are managed as containers.
Containers provide the capability of managing multiple virtual machines, vApps, virtualmachine folders, and resource pools as a single logical object.
Note
Empty containers such as a folder or resource pool are allowed to be added to MCS.When VMs or vApps are added to a container, they are automatically protected byAvamar. During a backup, MCS will skip a container if it is empty.
Dynamic versus static containersWhen containers are added to Avamar Administrator, you define them to be eitherdynamic or static.
Dynamic containers—include all contents of the vCenter container, but also continuouslymonitor the container entity in vCenter, so that if changes occur (for example, virtualmachines or folders are added or deleted), those changes will automatically be reflectedin Avamar Administrator.
Static containers—only include what is in the vCenter container at the time it is added toAvamar. If subsequent changes occur in vCenter, they will not be reflected in AvamarAdministrator.
Dynamic container behaviorWhen adding a dynamic container, only the first level of child entities is added to AvamarAdministrator. Virtual machines or vApps residing in subcontainers must be manuallyadded to Avamar Administrator in order for those entities to be protected by imagebackup.
If a virtual machine client is deleted from a container in vCenter, and that container wasbeing protected as a dynamic container in Avamar Administrator, that virtual machineclient will continue to exist in Avamar as part of that dynamic container. However, theicon changes change color from blue to gray. This enables past backups to be used forfuture restores. However, no new backups will occur because the virtual machine clientno longer exists in vCenter.
If you need to delete or retire one or more virtual machine clients from an Avamardynamic container, you must first change that container to a static container. Analternative method is to move those virtual machine clients to another container invCenter.
Administration
46 EMC Avamar 7.2 for VMware User Guide

How independent and container protection interactWhen a virtual machine is protected independently and as a container member, retiringor deleting that virtual machine are some special conditions.
Consider the following example nested container structure and scenario:
Figure 2 Example independent and container protection
First, vm-1 is added to Avamar as a virtual machine client; it is said to be independentlyprotected. Next, the vApp-1 container is added to Avamar; vm-1 is also protected as amember of the vApp-1 container. At this point, Avamar recognizes that the same virtualmachine exists in two contexts:
l Independently protected as standalone virtual machine client vm-1
l Protected as a member of vApp-1 container
However, if the vApp-1 container is retired or deleted, vm-1 will continue to exist inAvamar as a standalone virtual machine client because it was explicitly added that waybefore it was protected as a member of the vApp-1 container. The standalone contextsupercedes the container member context. Therefore, if you need to retire or delete vm-1,you cannot simply delete or retire vApp-1 container. You must also retire or delete thestandalone instance as well. Otherwise, vm-1 will continue to be protected by scheduledbackups.
Icons and what they meanIn order to differentiate between the various types of entities, Avamar Administrator usesvarious icons to communicate VMware entity type and state.
Table 8 Avamar Administrator icons and what they mean
Icon Description
vCenter Servers
Activated. This is the same icon used to show nonvirtual machine clients.
Replicated. This icon is only visible in the REPLICATE domain.
Unactivated
Note
Unless you are also protecting the vCenter Server with guest backup, vCenter Servers arenot activated as normal Avamar clients. Therefore, this can be the normal state for avCenter Server.
Virtual machine clients
Powered off.
Powered on.
Administration
How independent and container protection interact 47
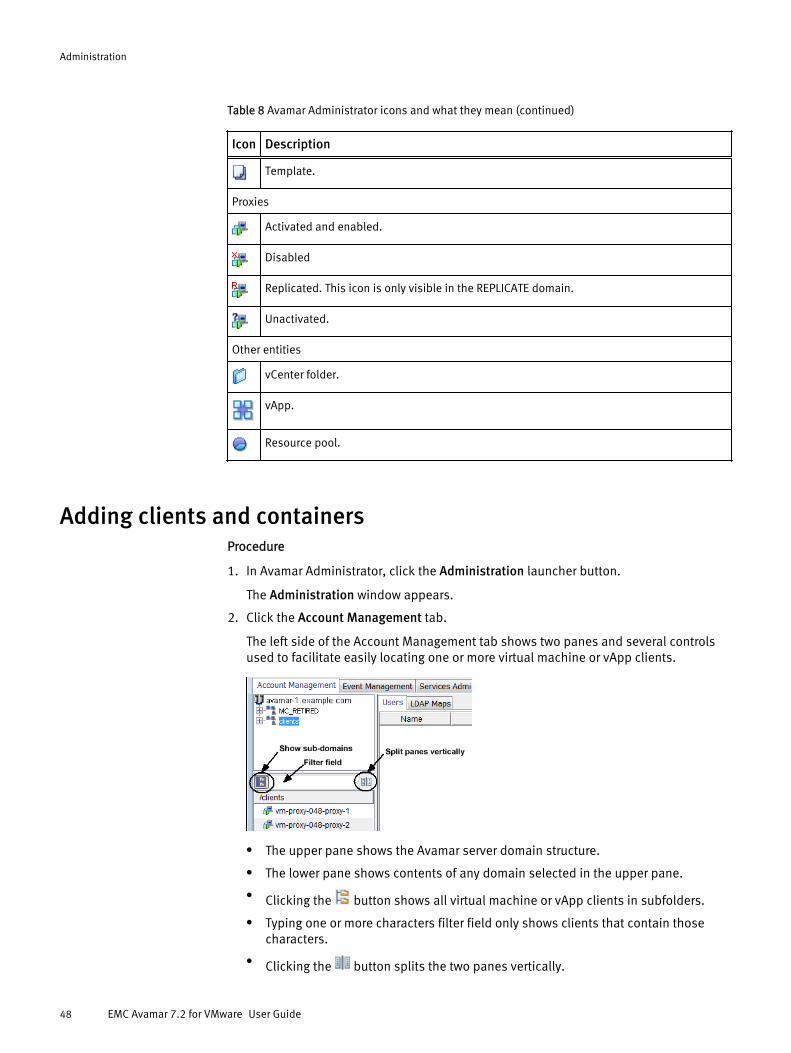
Table 8 Avamar Administrator icons and what they mean (continued)
Icon Description
Template.
Proxies
Activated and enabled.
Disabled
Replicated. This icon is only visible in the REPLICATE domain.
Unactivated.
Other entities
vCenter folder.
vApp.
Resource pool.
Adding clients and containersProcedure
1. In Avamar Administrator, click the Administration launcher button.
The Administration window appears.
2. Click the Account Management tab.
The left side of the Account Management tab shows two panes and several controlsused to facilitate easily locating one or more virtual machine or vApp clients.
l The upper pane shows the Avamar server domain structure.
l The lower pane shows contents of any domain selected in the upper pane.
l Clicking the button shows all virtual machine or vApp clients in subfolders.
l Typing one or more characters filter field only shows clients that contain thosecharacters.
l Clicking the button splits the two panes vertically.
Administration
48 EMC Avamar 7.2 for VMware User Guide

3. In the upper tree, select a vCenter domain or subdomain.
4. Select Actions > Account Management > New Client(s).
The Select VMware Entity dialog box appears.
l The VMs & Templates tab is equivalent to the vSphere Virtual Machines andTemplate view.
l The Hosts & Clusters tab is equivalent to the vSphere Hosts and Clusters view.
Note
Resource pools are not visible in the VMs & Templates tab. They are only visible inthe Hosts & Clusters tab.
l VMware entities that already exist as Avamar clients are grayed out.
l Proxy virtual machines cannot be selected.
l For each VMware entity, the following information is shown in the right propertiespane:
n Name—Entity name.
n Location—Folder location.
l The following information is shown in the right properties pane for virtualmachines:
n Guest OS—Virtual machine operating system.
n Server—ESX Server or cluster hostname where the virtual machine resides.
n Template—Whether or not the virtual machine is a template.
n Powered On—Whether or not the virtual machine is currently powered on.
n Changed Block—Whether or not changed block tracking is turned on.
5. In the tree, select a folder that contains a VMware entity.
Contents of the folder are listed in the right properties pane.
6. (Optional) To view all entities within the selected folder, select Show sub-entities.
7. In the right properties pane, select a folder, resource pool, virtual machine or vApp.
8. If adding a container, set the Dynamic checkbox to make this a dynamic container, orset the Static checkbox to make this a static container.
9. To enable changed block tracking, select Enable changed block tracking.
If changed block tracking is not enabled, each virtual machine image must be fullyprocessed for each backup, which might result in unacceptably long backup windows,or excessive back-end storage read/write activity.
Note
Enabling changed block tracking will not take effect until any of the following actionsoccur on the virtual machine: reboot, power on, resume after suspend, or migrate.
10.Click OK.
11.(Optional) If adding a client, type the following contact information:
a. Contact name.
b. Contact telephone (Phone) number.
Administration
Adding clients and containers 49

c. Contact Email address.
d. Contact Location.
12.Click OK.
13.Click OK to dismiss the confirmation message.
14.If you enabled changed block tracking:
a. In the vSphere Client or vSphere Web Client, locate the virtual machine.
b. Perform any of the following actions for each virtual machine: reboot, power on,resume after suspend, or migrate.
Editing clients and containersProcedure
1. In Avamar Administrator, click the Policy launcher button.
The Policy window appears.
2. Click the Policy Management tab, and then click the Clients tab.
3. Select a virtual machine, proxy, or container.
The Edit Client dialog box appears.Editing VMware clients is similar to editing other Avamar clients. The primarydifference is that when editing client properties from the Policy window, each EditClientdialog box includes an additional VMware tab that contains client propertiesrelating to vCenter, proxy, or virtual machine clients. This tab is not shown fornonvirtual clients.
Contents of the VMware tab differ according to the type of client:
l When editing a vCenter Server, editable credentials are shown.
l When editing a proxy, two tabs are shown:
n The Datstores tab is used to select all vCenter datastores that host virtualmachines you want to protect with this image proxy.
n The Groups tab is used to assign an image proxy to one or more existinggroups.
l When editing a virtual machine client, datastores on which that virtual machineresides are shown.
l When editing a container, the Properties tab shows a Dynamic Mode checkbox,which is used to enable or disable dynamic inclusion for that container.
Viewing protected virtual machinesYou can view the backup protection state for all virtual machines from the Protection tab.You cannot take any actions on this tab.
Procedure
1. In Avamar Administrator, click the Administration launcher button.
The Administration window appears.
2. Click on vCenter domain.
3. Click the Account Management tab.
Administration
50 EMC Avamar 7.2 for VMware User Guide
4. Click the Protection tab.
Viewing a replicated virtual machine nameThis feature is used to view the virtual machine name of any virtual machine in theREPLICATE domain.
This feature is disabled anywhere other than in the REPLICATE domain.
If you try to view information for a nonvirtual machine client, No Informationappears..
Procedure
1. In Avamar Administrator, click the Administration launcher button.
The Administration window appears.
2. Click the Account Management tab.
3. In the tree, select a virtual machine client in the REPLICATE domain.
4. Select Actions > Account Management > View Information.
A dialog box appears, which shows the virtual machine name.
5. Click OK.
Monitoring the vCenter connectionAvamar Administrator maintains a pool of connections to the vCenter Server. As withother essential services, the Administration window Services Administration tabprovides continuous status for the vCenter connection.
Procedure
1. In Avamar Administrator, click the Administration launcher button.
The Administration window appears.
2. Click the Services Administration tab.
3. Double-click the VMware vCenter Connection Monitor services entry.
The VMware vCenter Connection Monitor dialog box appears. Valid connection statesare Active and Idle.
Results
Connections to the vCenter can be stopped, started, and restarted. Stop the connectionsfor vCenter upgrades, and start them when the upgrade has completed. If vCenter isshutdown, connections become invalid and must be reestablished. If this occurs, AvamarAdministrator cannot display the vCenter structure or virtual machines.
Manually synchronizing Avamar Administrator with a vCenterAlthough Avamar Administrator automatically synchronizes with any vCenter it monitorsat regular intervals, you can also perform a manual synchronization at any time.
Procedure
1. In Avamar Administrator, click the Administration launcher button.
The Administration window appears.
Administration
Viewing a replicated virtual machine name 51

2. Click the Account Management tab.
3. In the tree, select a vCenter.
4. Select Actions > Account Management > Sync. with vCenter..
5. Click Yes to dismiss the confirmation message.
Renaming a vCenter clientIf an existing vCenter client’s DNS name changes, the Avamar server will lose itsconnection to that vCenter. This will prevent any interaction with that vCenter, includingscheduled backups, from occurring. If this occurs, you must manually rename thatvCenter client in Avamar Administrator.
This is the only method by which you should ever rename a vCenter client. In AvamarAdministrator, the vCenter client name must always be the fully qualified DNS name or avalid IP address.
Procedure
1. In Avamar Administrator, click the Administration launcher button.
The Administration window appears.
2. Click the Account Management tab.
3. In the tree, select the vCenter client.
4. Select Actions > Account Management > Edit Client.
The Edit Client dialog box appears.
5. In the New Client Name or IP box, type the new fully qualified DNS name.
6. Click OK.
7. Open a command shell and log in by using one of the following methods:
l For a single-node server, log in to the server as admin.
l For a multi-node server:
a. Log in to the utility node as admin.
b. Load the admin OpenSSH key by typing:
ssh-agent bashssh-add ~admin/.ssh/admin_key
c. When prompted, type the admin_key passphrase and press Enter.
8. Stop the MCS by typing dpnctl stop mcs.
9. Start the MCS and the scheduler by typing:
dpnctl start mcsdpnctl start sched
10.Reboot every Avamar proxy in this vCenter:
a. Launch the vSphere Client or vSphere Web Client, and log in to the vCenter Server.
b. Locate an Avamar proxy.
c. Right-click Power > Shut Down Guest.
d. Click Yes to confirm that you want to shut down the guest operating system.
Administration
52 EMC Avamar 7.2 for VMware User Guide

e. Right-click Power > Off.
f. Click Yes to confirm that you want to power off the virtual machine.
g. Right-click Power > On.
VMware Image DatasetThe VMware Image Dataset is the default dataset for protecting VMware entities withimage backup.
In many respects, the VMware Image Dataset is simpler than most other datasets:
l The only available source data plug-ins are Linux and Windows virtual disks, andboth are selected by default.
l The Select Files and/or Folders option, as well as the Exclusions and Inclusions tabs,are disabled.
l Change block tracking is enabled by default using an embeddedutilize_changed_block_list=true plug-in option statement.
Adding guest backup throttling parameters to a datasetWhen performing scheduled guest backups of virtual machines on the same ESX Server,add throttling parameters to the Avamar dataset.
The reason for doing this is that Avamar tries to initiate as many backups as possible,subject to certain load restrictions on the Avamar MCS. However, if multiple guestbackups are attempted on virtual machines on the same ESX Server, this can spike CPUusage, which will have an adverse effect on overall ESX Server performance.
Procedure
1. In Avamar Administrator, select Tools > Manage Datasets.
The Manage All Datasets window appears.
2. Select a dataset from the list and click Edit.
TheEdit Dataset dialog box appears.
3. Click the Options tab, and then click Show Advanced Options.
4. If the client supports Network usage throttle, type a nonzero value in the Networkusage throttle (Mbps) field.
Begin with a low value such as 20. Then monitor the next backup session to verify thatthis has resolved any ESX Server CPU usage issues.
5. Click OK.
Administration
VMware Image Dataset 53

GroupsGroups have important behavioral differences when used with image backup and restore.
Default Proxy GroupThe Default Proxy Group is where all proxies reside. This group cannot be deleted.
Default Virtual Machine GroupThe Default Virtual Machine Group is where new virtual machine clients are automaticallyadded when they are registered. This group cannot be manually deleted but isautomatically deleted if the vCenter domain is deleted.
Virtual machine and proxy relationships within groupsConsider the following simplified example configuration:
Figure 3 Virtual machine and proxy relationships within groups
Virtual machines VM-1 and VM-2 store their data in DATASTORE-1 and DATASTORE-2,respectively.
Within Avamar Administrator, proxies have been assigned to protect vCenter datastoresas follows:
l PROXY-1 has been assigned to DATASTORE-1 and DATASTORE-2
l PROXY-2 has been assigned to DATASTORE-2
l PROXY-3 has been assigned to DATASTORE-3
Datastore assignments are made at the proxy level in the Edit Client dialog box.
A group (GROUP-1) is created, to which virtual machines VM-1 and VM-2 are added.
In order to protect these virtual machines, proxies must also be added to the group asfollows:
l PROXY-1, because it is assigned to both DATASTORE-1 and DATASTORE-2, can protectboth VM-1 and VM-2.
l PROXY-2, because it is only assigned to DATASTORE-2, is optional as long as Proxy-1exists in the group.
Administration
54 EMC Avamar 7.2 for VMware User Guide

l PROXY-3, because it is only assigned to DATASTORE-3, cannot protect either VM-1 orVM-2.
Every group must include enough proxies to support all the datastores assigned to everyclient. Otherwise, when a backup is initiated and a proxy cannot be located to performthe backup, the backup will fail with an Activity monitor status of no proxy.
Changing proxy datastore and group assignmentsProcedure
1. In Avamar Administrator, click the Policy launcher button.
The Policy window appears.
2. Click the Policy Management tab, and then click the Clients tab.
3. Select a proxy and click Edit.
Note
Click Show sub-domain clients to show all available virtual machine clients.
The Edit Client dialog box appears.
4. Click the VMware tab, and then click the Datastores tab.
5. Select one or more datastores.
6. Click the Groups tab.
7. Select one or more groups.
8. Click OK.
Administration
Changing proxy datastore and group assignments 55

Administration
56 EMC Avamar 7.2 for VMware User Guide

CHAPTER 4
Backup
This chapter includes the following topics:
l Limitations............................................................................................................58l Performing an on-demand backup.........................................................................59l Scheduling backups..............................................................................................60l Monitoring backups.............................................................................................. 61l Canceling backups................................................................................................61
Backup 57

LimitationsThese are the known limitations of Avamar for VMware image backup.
All backups must be initiated from Avamar AdministratorAll image backups must be initiated from Avamar Administrator. You cannot initiatebackups from the virtual machine or proxy.
Changing a virtual machine's disk configuration forces a full backupChanging a virtual machine’s disk configuration (either adding or removing a disk),causes the next entire image backup to be processed as a full backup (that is, all virtualdisks are processed and changed block tracking is not used), which will requireadditional time to complete. Backups of specific disks are not affected, unless that diskis previously unknown to Avamar.
Version 8 or higher virtual machines with disks on multiple datastoresIf backing up a hardware version 8 or 9 virtual machine that has multiple disks residingon different datastores, not all datastores will be checked for orphaned snapshots. Theonly known remedy is to reconfigure the virtual machine such that all virtual disks resideon the same datastore.
Backups involving physical RDM disksWhen backing up a virtual machine that has both virtual disks and physical RDM disks,the backup will successfully process the virtual disks, bypass the RDM disks, andcomplete with the following event code:
Event Code: 30929Category: ApplicationSeverity: ProcessSummary: Virtual machine client contains disks that cannot bebacked up or restored.
ContainerClients domainThe ContainerClients domain is a special system domain, which is populated with virtualmachines residing in VMware container entities. Avamar assumes that when you add aVMware container to Avamar, that you will always manage the container and all virtualmachines within it as a single object. Therefore, if only you add these virtual machines toa backup group as individual machines, rather than adding the parent VMware container,they will not be backed up.
Nested container limitationsWhen backing up a VMware container that contains other containers (that is, a nestedcontainer structure), , Avamar only backs up the top-level of the hierarchy. Consider thefollowing example nested container structure:
Figure 4 Example nested container structure
When vApp-1 is backed up to Avamar, the vApp backup image will only contain virtualmachine backup images for vm-1 and vm-2. When vApp-1 backup is restored, only vm-1and vm-2 data will be restored. vApp-2 and vm-3 containers will also be present but willnot contain any data.
Backup
58 EMC Avamar 7.2 for VMware User Guide

Two interim solutions exist for this limitation:
l Flatten the container structure.For example, move vm-3 under vApp-1. Then all three virtual machines will be backedup when vApp-1 is backed up.
l Add both vApp-1 and vApp-2 to Avamar as separate container entities so that theycan be backed up separately.When restoring, restore vApp-1 first, then restore vApp-2 into vApp-1
vApp backups fail if any subvirtual machine fails to backupWhen backing up a vApp, all virtual machines within the vApp must successfullycomplete the back up otherwise that entire back up will not be recorded. Backups forvirtual machines that did successfully complete are found in the ContainerClientsdomain. All backup failures should be promptly investigated and remedied in order toensure maximum data protection.
Performing an on-demand backupProcedure
1. In Avamar Administrator, click the Backup & Restore launcher button.
The Backup, Restore and Manage window appears.
2. Click the Backup tab.
The top-left pane contains a list of domains.
3. Select a domain in the upper tree, and then select a virtual machine client, VMwarefolder, resource pool, or vApp in the lower tree.
4. In the Browse for File, Folders, or Directories pane, select the data to back up:
l Select the top (root) folder to back up the entire image.
l Select one or more disks to only back up those specific virtual disks.
5. Select Actions > Backup Now.
The On Demand Backup Options dialog box appears.
6. Select the backup retention setting:
l To automatically delete this backup from the Avamar server after a specific amountof time, select Retention period and then specify the number of days, weeks,months, or years for the retention period.
l To automatically delete this backup from the Avamar server on a specific calendardate, select End date and browse to that date on the calendar.
l To keep this backup for as long as this client remains active in the Avamar server,select No end date.
7. From the Avamar encryption method list, select the encryption method to use for datatransfer between the client and the Avamar server during the backup.
The encryption technology and bit strength for a client/server connection depends onseveral factors, including the client operating system and Avamar server version. TheEMC Avamar Product Security Guide provides additional information.
8. (Optional) Optionally select a proxy to perform backup.
The default setting is Automatic, which enables the Avamar server to choose the bestproxy for this operation.
Backup
Performing an on-demand backup 59

9. (Optional) Set plug-in options:
a. Click More Options.
The Backup Command Line Options dialog box appears.
b. Select the Show Advanced Options checkbox.
c. To enable changed block tracking, select the Use Changed Block Tracking (CBT) toincrease performance checkbox.
d. To store this backup on a Data Domain system, select the Store backup on DataDomain System checkbox, then select a Data Domain system from the list.
e. From the Encryption method to Data Domain system list, select the encryptionmethod to use for data transfer between the client and the Data Domain systemduring the backup.
f. To run a script before or after the backup, type a virtual machine guest OS useraccount name and password with sufficient privileges to run scripts.
g. To run a script before the vmdk snapshot, type the full path and filename of thescript that will be run. Also ensure that the script timeout is sufficient for the scriptto complete.
h. To run a script after the backup completes and the vmdk snapshot is removed,type the full path and filename of the script that will be run. Also ensure that thescript timeout is sufficient for the script to complete.
i. Click OK.
These settings are all optional. In most cases, system default settings are theoptimum settings for on-demand image backups.
10.Click OK.
The On Demand Backup Options dialog box closes and the following status messageappears: Backup initiated.
11.Click OK.
Scheduling backupsScheduled backups run automatically to ensure that backups occur on an ongoing basis.You can schedule backups to run daily, weekly, or monthly.
Procedure
1. Create a dataset for the backups.
2. Create a group for the backups.
During the group creation process, you:
a. Assign the new dataset to the new group.
By default, dataset entries use absolute path notation. For example:
[datastore1] VM1/VM1.vmdkHowever, you can use relative path notation to ensure that a particular .vmdk isalways included in a backup, even if that virtual machine is migrated to anotherdatastore using Storage vMotion. For example, the following equivalent datasetentry uses relative path notation:
\[.*\] VM1/VM1.vmdk
Backup
60 EMC Avamar 7.2 for VMware User Guide

b. Assign a schedule to the new group.
c. Assign a retention policy to the new group.
d. Add one or more clients to the new group.
The EMC Avamar Administration Guide provides more information about groups, grouppolicy, datasets, schedules, and retention policies.
3. Enable scheduling for the group.
Monitoring backupsYou can monitor backups to ensure that the backups complete successfully and totroubleshoot issues. The Activity Monitor in Avamar Administrator enables you to viewstatus information for both on-demand and scheduled backups.
Procedure
1. In Avamar Administrator, click the Activity launcher button.
The Activity window appears.
2. Click the Activity Monitor tab.
A list of all activities appears.
3. To filter the results to display only backup activity, select Actions > Filter.
The Filter Activity dialog box appears.
4. Select All Backups from the Type list.
5. Click OK.
Canceling backupsYou can cancel a backup any time before it completes. The cancellation might take fiveminutes or longer. The backup may complete before the cancellation finishes.
Procedure
1. In Avamar Administrator, click the Activity launcher button.
The Activity window appears.
2. Click the Activity Monitor tab.
A list of all activities appears.
3. Select the backup from the list.
4. Select Actions > Cancel Activity.
A confirmation message appears.
5. Click Yes.
Backup
Monitoring backups 61

Backup
62 EMC Avamar 7.2 for VMware User Guide
CHAPTER 5
Restore
This chapter includes the following topics:
l Overview............................................................................................................... 64l Image and file-level restore guidelines.................................................................. 64l Limitations............................................................................................................64l Restoring the full image or selected drives to the original virtual machine............. 66l Restoring the full image or selected drives to a different virtual machine............... 67l Restoring the full image or selected drives to a new virtual machine......................69l Restoring specific folders or files to the original virtual machine............................71l Restoring specific folders or files to a different virtual machine............................. 72l Instant access....................................................................................................... 74l Mounting Windows VMDKs from an image backup................................................ 76l Monitoring restores............................................................................................... 78l Canceling restores.................................................................................................78
Restore 63

OverviewImage backup offers three levels of restore functionality: image restore, file-level restore,and the capability to mount specific drives from a Windows image backup in order tosupport application-level recovery.
Three buttons are provided above the Select for Restore contents pane, which are notshown if a non-VMware image backup is selected:
Table 9 Image restore toolbar buttons
Button Tooltip Description
Browse for Image Restore Initiates an image restore.
Browse for Granular Restore Initiates a file-level restore.
Mount Windows VMDK Mounts selected drives in a Windows image backup inorder to support application-level recovery.
When performing an image restore, the Restore Options dialog box is slightly differentfrom the typical Restore Options dialog box. The primary differences are that virtualmachine information is shown and three choices for restore destinations are offered:
l Original virtual machine
l Different (existing) virtual machine
l New virtual machine
Once the destination selection is made, each procedure varies slightly from that pointforward.
Image and file-level restore guidelinesAvamar provides two distinct mechanisms for restoring virtual machine data: imagerestores, which can restore an entire image or selected drives, and file-level restores,which can restore specific folders or files.
Image restores are less resource intensive and are best used for restoring large amountsof data quickly.
File-level restores are more resource intensive and are best used to restore a relativelysmall amounts of data.
If you restore a large numbers of folders or files, you will experience better performance ifyou restore an entire image or selected drives to a temporary location (for example, a newtemporary virtual machine), then copy those files to the desired location following therestore.
LimitationsThese are the limitations of restoring data from an image backup.
All restores must be initiated from Avamar AdministratorAll restores from image backups must be initiated from Avamar Administrator. You cannotinitiate restores from the virtual machine or proxy.
Restore
64 EMC Avamar 7.2 for VMware User Guide
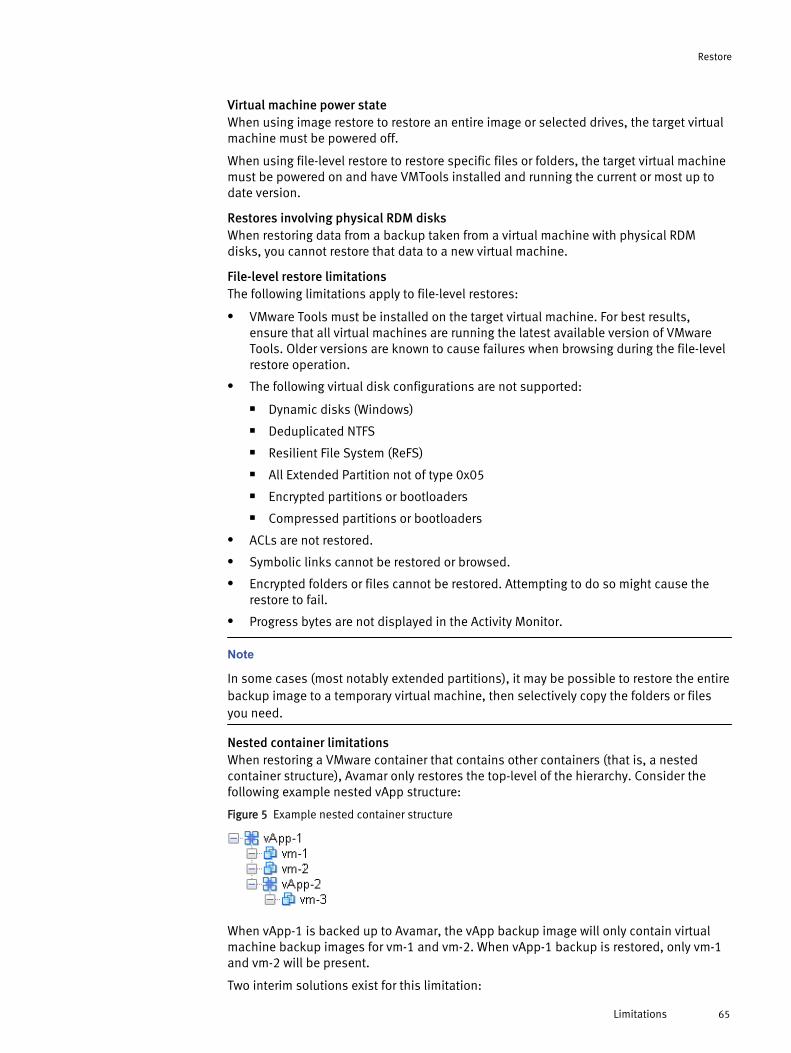
Virtual machine power stateWhen using image restore to restore an entire image or selected drives, the target virtualmachine must be powered off.
When using file-level restore to restore specific files or folders, the target virtual machinemust be powered on and have VMTools installed and running the current or most up todate version.
Restores involving physical RDM disksWhen restoring data from a backup taken from a virtual machine with physical RDMdisks, you cannot restore that data to a new virtual machine.
File-level restore limitationsThe following limitations apply to file-level restores:
l VMware Tools must be installed on the target virtual machine. For best results,ensure that all virtual machines are running the latest available version of VMwareTools. Older versions are known to cause failures when browsing during the file-levelrestore operation.
l The following virtual disk configurations are not supported:
n Dynamic disks (Windows)
n Deduplicated NTFS
n Resilient File System (ReFS)
n All Extended Partition not of type 0x05
n Encrypted partitions or bootloaders
n Compressed partitions or bootloaders
l ACLs are not restored.
l Symbolic links cannot be restored or browsed.
l Encrypted folders or files cannot be restored. Attempting to do so might cause therestore to fail.
l Progress bytes are not displayed in the Activity Monitor.
Note
In some cases (most notably extended partitions), it may be possible to restore the entirebackup image to a temporary virtual machine, then selectively copy the folders or filesyou need.
Nested container limitationsWhen restoring a VMware container that contains other containers (that is, a nestedcontainer structure), Avamar only restores the top-level of the hierarchy. Consider thefollowing example nested vApp structure:
Figure 5 Example nested container structure
When vApp-1 is backed up to Avamar, the vApp backup image will only contain virtualmachine backup images for vm-1 and vm-2. When vApp-1 backup is restored, only vm-1and vm-2 will be present.
Two interim solutions exist for this limitation:
Restore
Limitations 65

l Flatten the container structure.For example, move vm-3 under vApp-1. Then all three virtual machines will be backedup when vApp-1 is backed up.
l Add both vApp-1 and vApp-2 to Avamar as separate container entities so that theycan be backed up separately.When restoring, restore vApp-1 first, then restore vApp-2 into vApp-1
Restoring the full image or selected drives to the original virtualmachine
Procedure
1. In the vSphere Client or vSphere Web Client, ensure that the target virtual machine ispowered off.
2. In Avamar Administrator, click the Backup & Restore launcher button.
The Backup, Restore and Manage window appears.
3. Click the Restore tab.
The upper left pane contains a list of domains.
4. Select a virtual machine client or VMware container:
a. Select the domain that contains the virtual machine client or VMware container.
You cannot view clients outside the domain for the login account. To view allclients, log in to the root domain.
A list of Avamar clients appears in the pane under the domains list.
b. From the list of clients, select the virtual machine client or VMware container.
5. Select a backup:
a. Click the By Date tab.
b. Select the backup date from the calendar. Valid backups occurred on dates with ayellow highlight.
A list of backups on that date appears in the Backups table next to the calendar.
c. Select a backup from the Backups table.
6. Click the Browse for Image Restore button ( ) directly above the contents pane.
7. In the contents pane:
l Select the All virtual disks folder checkbox to restore the entire image.
l Select one or more drives to only restore those specific drives.
8. Select Actions > Restore Now.
The Restore Options dialog box appears.
9. Select Restore to original virtual machine as the restore destination.
Note
When restoring an image backup to the original virtual machine, the ConfigureDestination button is disabled (grayed out).
10.(Optional) If you want to restore VMware configuration files, select Restore virtualmachine configuration.
Restore
66 EMC Avamar 7.2 for VMware User Guide

11.(Optional) Optionally select a proxy to perform restore.
The default setting is Automatic, which enables the Avamar server to choose the bestproxy for this operation.
12.Click More Options.
The Restore Command Line Options dialog box appears.
13.Select or clear Use Changed Block Tracking (CBT) to increase performance.
14.From the Encryption method from Data Domain system list, select the encryptionmethod to use for data transfer between the Data Domain system and the clientduring the restore.
15.Select one of the following settings in the Select Post Restore Options list:
l Do not power on VM after restore.
l Power on VM with NICs enabled.
l Power on VM with NICs disabled.
16.(Optional) To include additional plug-in options with this restore, type Enter Attributeand Enter Attribute Value settings.
17.Click OK on the Restore Command Line Options dialog box.
18.Click OK on the Restore Options dialog box.
The following status message appears: Restore initiated.
19.Click OK.
20.If the restore target virtual machine will be using changed block tracking for futurebackups, enable changed block tracking by performing any of the following actions onthat virtual machine: reboot, power on, resume after suspend, or migrate.
Restoring the full image or selected drives to a different virtualmachine
Procedure
1. In the vSphere Client or vSphere Web Client, ensure that the target virtual machine ispowered off.
2. In Avamar Administrator, click the Backup & Restore launcher button.
The Backup, Restore and Manage window appears.
3. Click the Restore tab.
The upper left pane contains a list of domains.
4. Select a virtual machine client or VMware container:
a. Select the domain that contains the virtual machine client or VMware container.
You cannot view clients outside the domain for the login account. To view allclients, log in to the root domain.
A list of Avamar clients appears in the pane under the domains list.
b. From the list of clients, select the virtual machine client or VMware container.
5. Select a backup:
a. Click the By Date tab.
Restore
Restoring the full image or selected drives to a different virtual machine 67

b. Select the backup date from the calendar. Valid backups occurred on dates with ayellow highlight.
A list of backups on that date appears in the Backups table next to the calendar.
c. Select a backup from the Backups table.
6. Click the Browse for Image Restore button ( ) directly above the contents pane.
7. In the contents pane:
l Select the All virtual disks folder checkbox to restore the entire image.
l Select one or more drives to only restore those specific drives.
8. Select Actions > Restore Now.
The Restore Options dialog box appears.
9. Select Restore to a different (existing) virtual machine as the restore destination.
Note
When restoring an image backup to a different (existing) virtual machine, the Restorevirtual machine configuration option is disabled (grayed out).
10.Click Configure Destination.
The Configure Virtual Machine dialog box appears.
11.Click Browse.
The Select VMware Entity dialog box appears.
12.Select the destination virtual machine and click OK.
Note
Only virtual machines that are powered off can be selected from the list; all others aredisabled. You are also prevented from selecting the original virtual machine.
13.Click OK on the Configure Virtual Machine dialog box.
14.From the Avamar encryption method list, select the encryption method to use for datatransfer between the Avamar server and the client during the restore.
The encryption technology and bit strength for a client/server connection depends onseveral factors, including the client operating system and Avamar server version. TheEMC Avamar Product Security Guide provides additional information.
15.(Optional) Optionally select a proxy to perform restore.
The default setting is Automatic, which enables the Avamar server to choose the bestproxy for this operation.
16.Click More Options.
The Restore Command Line Options dialog box appears.
17.Select or clear Use Changed Block Tracking (CBT) to increase performance.
18.From the Encryption method from Data Domain system list, select the encryptionmethod to use for data transfer between the Data Domain system and the clientduring the restore.
19.Select one of the following settings in the Select Post Restore Options list:
l Do not power on VM after restore.
Restore
68 EMC Avamar 7.2 for VMware User Guide

l Power on VM with NICs enabled.
l Power on VM with NICs disabled.
20.(Optional) To include additional plug-in options with this restore, type Enter Attributeand Enter Attribute Value settings.
21.Click OK on the Restore Command Line Options dialog box.
22.Click OK on the Restore Options dialog box.
The following status message appears: Restore initiated.
23.Click OK.
24.If the restore target virtual machine will be using changed block tracking for futurebackups, enable changed block tracking by performing any of the following actions onthat virtual machine: reboot, power on, resume after suspend, or migrate.
Restoring the full image or selected drives to a new virtualmachine
Procedure
1. In Avamar Administrator, click the Backup & Restore launcher button.
The Backup, Restore and Manage window appears.
2. Click the Restore tab.
The upper left pane contains a list of domains.
3. Select a virtual machine client or VMware container:
a. Select the domain that contains the virtual machine client or VMware container.
You cannot view clients outside the domain for the login account. To view allclients, log in to the root domain.
A list of Avamar clients appears in the pane under the domains list.
b. From the list of clients, select the virtual machine client or VMware container.
4. Select a backup:
a. Click the By Date tab.
b. Select the backup date from the calendar. Valid backups occurred on dates with ayellow highlight.
A list of backups on that date appears in the Backups table next to the calendar.
c. Select a backup from the Backups table.
5. Click the Browse for Image Restore button ( ) directly above the contents pane.
6. In the contents pane:
l Select the All virtual disks folder checkbox to restore the entire image.
l Select one or more drives to only restore those specific drives.
7. Select Actions > Restore Now.
The Restore Options dialog box appears.
8. Select Restore to a new virtual machine as the restore destination.
Restore
Restoring the full image or selected drives to a new virtual machine 69

Note
When restoring an image backup to a new virtual machine, the Restore virtualmachine configuration option is selected and disabled (grayed out) because theseconfiguration files are always required to configure the new virtual machine.
9. Specify a location and settings for the new virtual machine:
a. Click Configure Destination.
The Configure Virtual Machine dialog box appears.
b. Click Browse.
The New Virtual Machine wizard appears.
c. In the Name and Location screen, type a unique Name for the new virtual machine,select a datacenter and folder location in the inventory tree, and then click Next.
d. In the Summary screen, review the information, and then Finish.
e. Click OK on the Configure Virtual Machine dialog box.
10.From the Avamar encryption method list, select the encryption method to use for datatransfer between the Avamar server and the client during the restore.
The encryption technology and bit strength for a client/server connection depends onseveral factors, including the client operating system and Avamar server version. TheEMC Avamar Product Security Guide provides additional information.
11.(Optional) Optionally select a proxy to perform restore.
The default setting is Automatic, which enables the Avamar server to choose the bestproxy for this operation.
12.Click More Options.
The Restore Command Line Options dialog box appears.
13.Select or clear Use Changed Block Tracking (CBT) to increase performance.
14.From the Encryption method from Data Domain system list, select the encryptionmethod to use for data transfer between the Data Domain system and the clientduring the restore.
15.Select one of the following settings in the Select Post Restore Options list:
l Do not power on VM after restore.
l Power on VM with NICs enabled.
l Power on VM with NICs disabled.
16.(Optional) To include additional plug-in options with this restore, type Enter Attributeand Enter Attribute Value settings.
17.Click OK on the Restore Command Line Options dialog box.
18.Click OK on the Restore Options dialog box.
The following status message appears: Restore initiated.
19.Click OK.
20.If the restore target virtual machine will be using changed block tracking for futurebackups, enable changed block tracking by performing any of the following actions onthat virtual machine: reboot, power on, resume after suspend, or migrate.
Restore
70 EMC Avamar 7.2 for VMware User Guide

Restoring specific folders or files to the original virtual machineBefore you begin
You cannot restore more than 5,000 folders or files in the same file-level restoreoperation.
Where folders and files are actually restored differs according to the target virtualmachine operating system:
l Linux virtual machinesFor best results when restoring specific folders or files to the original Linux virtualmachine (that is, the same virtual machine from which the backup was originallytaken), ensure that all partitions on all VMDKs are correctly mounted and that thefstab file, which persists partition remounting on reboot, is correct. This will ensurethat files and folders are restored to original locations at the time of backup.
If partitions are not mounted correctly, or the fstab file is not correct, partitions will beprefixed with standard Linux disk designations (for example, sda, sdb, sdc1, sdc2,and so forth). In these situations, folders and files are restored to the relative pathfrom root in the original backup.
Procedure
1. In the vSphere Client or vSphere Web Client, ensure that the target virtual machine ispowered on.
2. In Avamar Administrator, click the Backup & Restore launcher button.
The Backup, Restore and Manage window appears.
3. Click the Restore tab.
The upper left pane contains a list of domains.
4. Select a virtual machine client or VMware container:
a. Select the domain that contains the virtual machine client or VMware container.
You cannot view clients outside the domain for the login account. To view allclients, log in to the root domain.
A list of Avamar clients appears in the pane under the domains list.
b. From the list of clients, select the virtual machine client or VMware container.
5. Select a backup:
a. Click the By Date tab.
b. Select the backup date from the calendar. Valid backups occurred on dates with ayellow highlight.
A list of backups on that date appears in the Backups table next to the calendar.
c. Select a backup from the Backups table.
6. Click the Browse for Granular Restore button ( ).
7. Optionally select a proxy to perform browse and restore, and then click OK.
The default setting is Automatic, which enables the Avamar server to choose the bestproxy for this operation.
8. Select one or more folders or files you want to restore.
9. Select Actions > Restore Now.
Restore
Restoring specific folders or files to the original virtual machine 71
The Restore Options dialog box appears.
10.Select Restore everything to its original location.
11.From the Avamar encryption method list, select the encryption method to use for datatransfer between the Avamar server and the client during the restore.
The encryption technology and bit strength for a client/server connection depends onseveral factors, including the client operating system and Avamar server version. TheEMC Avamar Product Security Guide provides additional information.
12.Click More Options.
The Restore Command Line Options dialog box appears.
13.(Optional) If restoring Linux folders or files, select Restore Access Control List (ACL) torestore Linux ACLs.
14.(Optional) To include additional plug-in options with this restore, type Enter Attributeand Enter Attribute Value settings.
15.Click OK on the Restore Command Line Options dialog box.
16.Click OK on the Restore Options dialog box.
The following status message appears: Restore initiated.
17.Click OK.
Restoring specific folders or files to a different virtual machineBefore you begin
You cannot restore more than 5,000 folders or files in the same file-level restoreoperation.
Procedure
1. In the vSphere Client or vSphere Web Client, ensure that the target virtual machine ispowered on.
2. In Avamar Administrator, click the Backup & Restore launcher button.
The Backup, Restore and Manage window appears.
3. Click the Restore tab.
The upper left pane contains a list of domains.
4. Select a virtual machine client or VMware container:
a. Select the domain that contains the virtual machine client or VMware container.
You cannot view clients outside the domain for the login account. To view allclients, log in to the root domain.
A list of Avamar clients appears in the pane under the domains list.
b. From the list of clients, select the virtual machine client or VMware container.
5. Select a backup:
a. Click the By Date tab.
b. Select the backup date from the calendar. Valid backups occurred on dates with ayellow highlight.
A list of backups on that date appears in the Backups table next to the calendar.
Restore
72 EMC Avamar 7.2 for VMware User Guide

c. Select a backup from the Backups table.
6. Click the Browse for Granular Restore button ( ).
7. Optionally select a proxy to perform browse and restore, and then click OK.
The default setting is Automatic, which enables the Avamar server to choose the bestproxy for this operation.
8. Select one or more folders or files you want to restore.
9. Select Actions > Restore Now.
The Restore Options dialog box appears.
10.Select Restore everything to a different location.
11.Select the target virtual machine that will receive the restored data:
a. Click Browse next to the Absolute Destination box.
The Browse for Restore Client dialog box appears.
b. Locate and select the target virtual machine that will receive the restored data.
c. In the Browse for Folders or Directories pane, expand the tree by clicking +.
The Log into Virtual Machine dialog box appears.
d. Type virtual machine client login credentials in the User name and Passwordfields.
Note
These login credentials must have administration privileges on the virtual machineguest operating system.
e. Click Log On.
f. In the Browse for Restore Client dialog box, select the destination folder that willreceive the restored data.
g. Click OK.
12.Click More Options.
The Restore Command Line Options dialog box appears.
13.(Optional) If restoring Linux folders or files, select Restore Access Control List (ACL) torestore Linux ACLs.
14.(Optional) To include additional plug-in options with this restore, type Enter Attributeand Enter Attribute Value settings.
15.Click OK on the Restore Command Line Options dialog box.
16.Click OK on the Restore Options dialog box.
The following status message appears: Restore initiated.
17.Click OK.
Restore
Restoring specific folders or files to a different virtual machine 73

Instant accessIf restoring an entire virtual machine from backups stored on a Data Domain system, aspecial feature called “instant access” is available.
Instant access is similar to restoring an image backup to a new virtual machine, exceptthat the restored virtual machine can be booted directly from the Data Domain system.This reduces the amount of time required to restore an entire virtual machine.
Instant access comprises the following tasks:
1. Restoring the virtual machine:
l Instant access is initiated.
l Selected VMware backup is copied to temporary NFS share on the Data Domainsystem.
2. Performing post-restore migration and clean-up:
l From the vSphere Client or vSphere Web Client, power on the virtual machine, andthen use Storage vMotion to migrate the virtual machine from the Data DomainNFS share to a datastore within the vCenter.
l When Storage vMotion is complete, the restored virtual machine files no longerexist on the Data Domain system.
l From Avamar Administrator, ensure that the Data Domain NFS share has beendeleted.
Note
In order to minimize operational impact to the Data Domain system, only one instantaccess is permitted at a time. Therefore, it is important to unmount the NFS share aftereach instant access so that subsequent instant access operations are not impacted.
Restoring the virtual machineBefore you begin
Instant access requires the following:
l Avamar 7.0 or later
l Data Domain Operating System 5.2.1, 5.3.x, and 5.4.x
Procedure
1. In Avamar Administrator, click the Backup & Restore launcher button.
The Backup, Restore and Manage window appears.
2. Click the Restore tab.
The upper left pane contains a list of domains.
3. Select a virtual machine client or VMware container:
a. Select the domain that contains the virtual machine client or VMware container.
You cannot view clients outside the domain for the login account. To view allclients, log in to the root domain.
A list of Avamar clients appears in the pane under the domains list.
Restore
74 EMC Avamar 7.2 for VMware User Guide

b. From the list of clients, select the virtual machine client or VMware container.
4. Select a backup:
a. Click the By Date tab.
b. Select the backup date from the calendar. Valid backups occurred on dates with ayellow highlight.
A list of backups on that date appears in the Backups table next to the calendar.
c. Select a backup from the Backups table.
5. Click the Browse for Image Restore button ( ) directly above the contents pane.
6. In the contents pane, select the All virtual disks folder checkbox to restore the entireimage.
7. Select Actions > Instant Access.
The Restore Options dialog box appears.
8. Select Restore to a new virtual machine as the restore destination.
Note
When restoring an image backup to a new virtual machine, the Restore virtualmachine configuration option is selected and disabled (grayed out) because theseconfiguration files are always required to configure the new virtual machine.
9. Specify a location and settings for the new virtual machine:
a. Click Configure Destination.
The Configure Virtual Machine dialog box appears.
b. Click Browse.
The New Virtual Machine wizard appears.
c. In the Name and Location screen, type a unique Name for the new virtual machine,select a datacenter and folder location in the inventory tree, and then click Next.
d. In the Summary screen, review the information, and then Finish.
e. Click OK on the Configure Virtual Machine dialog box.
10.Ignore the Avamar encryption method setting.
Because no client/server data transfer takes place, the Avamar encryption methodsetting has no effect.
11.(Optional) Optionally select a proxy to perform restore.
The default setting is Automatic, which enables the Avamar server to choose the bestproxy for this operation.
12.Click More Options.
The Restore Command Line Options dialog box appears.
13.Select or clear Use Changed Block Tracking (CBT) to increase performance.
14.Select one of the following settings in the Select Post Restore Options list:
l Do not power on VM after restore.
l Power on VM with NICs enabled.
l Power on VM with NICs disabled.
Restore
Restoring the virtual machine 75
15.(Optional) To include additional plug-in options with this restore, type Enter Attributeand Enter Attribute Value settings.
16.Click OK on the Restore Command Line Options dialog box.
17.Click OK on the Restore Options dialog box.
The following status message appears: Restore initiated.
18.Click OK.
Performing post-restore migration and clean-upProcedure
1. Launch the vSphere Client or vSphere Web Client, and log in to the vCenter Server.
2. Locate the virtual machine you restored.
3. Use Storage vMotion to migrate that virtual machine from the Data Domain NFS shareto a datastore within the vCenter.
When Storage vMotion is complete, the restored virtual machine files no longer existon the Data Domain system.
The MCS NFS datastore poller automatically unmounts unused Data Domain NFSmounts once daily. However, it is still a good practice to ensure that the NFS mounthas been unmounted and removed by performing the remainder of this procedure.
4. In Avamar Administrator, click the Server launcher button.
The Server window appears.
5. Click the Data Domain NFS Datastores tab.
6. Ensure that there is no entry for the virtual machine you restored.
If an entry is found, select it, and then click Unmount/Remove.
Mounting Windows VMDKs from an image backupAvamar provides a mechanism for mounting VMDKs from VMware image backups ofWindows virtual machines. This feature is typically used to enable third party tools suchas Kroll OnTrack PowerControls to perform data mining and advanced data recovery.
Configuring the recovery target machineThis task configures a physical or virtual Windows machine to be a recovery target formounting Windows VMDKs from an image backup.
Before you begin
The recovery target machine must be a 64-bit Windows physical or virtual machine.
Note
Recovery targets can be physical or virtual machines. If you intend to use a virtualmachine as a recovery target, install the Avamar software directly on the virtual machinejust as you would if implementing guest backup.
Procedure
1. Using instructions in the EMC Avamar Backup Clients User Guide, install AvamarWindows client software on the recovery target machine.
Restore
76 EMC Avamar 7.2 for VMware User Guide

2. Using instructions in the EMC Avamar Backup Clients User Guide, register the recoverytarget machine as a client with the same Avamar server storing the image backup tobe mounted.
3. Install the Windows VMware GLR plug-in software:
a. Log in to the recovery target machine with Windows administrator privileges.
b. Download the AvamarVMWareGLR-windows-x86_64-version.msi install packagefrom the Avamar server.
c. Open the install package, and then follow the on screen instructions.
d. Reboot the computer.
Restoring and mounting the Windows VMDKs
Before you begin
Ensure that the recovery target machine has been properly configured:
l The Avamar Windows client, and Windows VMware GLR plug-in software is installed
l The recovery target machine is registered and activated as a client with the sameAvamar server storing the image backup from which the VMDK will be mounted
Procedure
1. In the vSphere Client or vSphere Web Client, ensure that the target virtual machine ispowered on.
2. In Avamar Administrator, click the Backup & Restore launcher button.
The Backup, Restore and Manage window appears.
3. Click the Restore tab.
The upper left pane contains a list of domains.
4. Select a virtual machine client or VMware container:
a. Select the domain that contains the virtual machine client or VMware container.
You cannot view clients outside the domain for the login account. To view allclients, log in to the root domain.
A list of Avamar clients appears in the pane under the domains list.
b. From the list of clients, select the virtual machine client or VMware container.
5. Select a backup:
a. Click the By Date tab.
b. Select the backup date from the calendar. Valid backups occurred on dates with ayellow highlight.
A list of backups on that date appears in the Backups table next to the calendar.
c. Select a backup from the Backups table.
6. In the contents pane, select a virtual disk.
7. Click the Mount Windows VMDK button ( ).
The Select Destination Client dialog box appears.
8. Click Browse next to the Client box.
The Browse for Restore Destination Client dialog box appears.
Restore
Restoring and mounting the Windows VMDKs 77
9. Select the recovery target virtual machine, and then click OK.
The Browse Backup Status dialog box appears.
10.Click OK to confirm that the operation should continue.
The Restore Browse Options dialog box appears.
11.Select a time out value from the Amount of time to leave VMDKs mounted list, andthen click OK.
Results
A folder path appears in the right backup contents pane. The Windows VMDK is nowmounted to that folder.
Monitoring restoresYou can monitor restores to ensure that the restores complete successfully and totroubleshoot issues. The Activity Monitor in Avamar Administrator enables you to viewstatus information for restores.
Procedure
1. In Avamar Administrator, click the Activity launcher button.
The Activity window appears.
2. Click the Activity Monitor tab.
A list of all activities appears.
3. To filter the results to display only restore activity, select Actions > Filter.
The Filter Activity dialog box appears.
4. Select Restore from the Type list.
5. Click OK.
Canceling restoresYou can cancel a restore any time before the restore completes. The cancellation mighttake five minutes or longer. The restore may complete before the cancellation finishes.
Procedure
1. In Avamar Administrator, click the Activity launcher button.
The Activity window appears.
2. Click the Activity Monitor tab.
A list of all activities appears.
3. Select the restore from the list.
4. Select Actions > Cancel Activity.
A confirmation message appears.
5. Click Yes.
Restore
78 EMC Avamar 7.2 for VMware User Guide

CHAPTER 6
Backup Validation
This chapter includes the following topics:
l Overview............................................................................................................... 80l Performing an on-demand backup validation........................................................ 80l Scheduling backup validations............................................................................. 82
Backup Validation 79

OverviewFor image backups, the backup validation mechanism is similar to restoring a virtualmachine backup to a new virtual machine, except that once the backup is validated, thenew virtual machine is automatically deleted from vCenter.
Backup validations can be initiated for a single virtual machine backup as needed (on-demand), or scheduled for an entire group of virtual machines. Scheduled backupvalidations always use the latest completed backup for each virtual machine groupmember.
What is validatedThe default validation verifies that the virtual machine powers on and that the operatingsystem starts following the restore.
Backup validations also provide an optional capability for running a user-defined script inorder to perform custom application-level verifications. The script must exist in thebackup to be validated. You cannot run external scripts during a backup validation.
Supported script types are shell scripts for Linux virtual machines, and DOS batch filesfor Windows virtual machines. Perl scripts are not supported.
VM Backup Validation groupsScheduled backup validations are implemented using special VM Backup Validationgroups. These groups are only used to perform automated backup validations, theycannot be used for any other purpose.
VM Backup Validation groups differ from other groups as follows:
l VM Backup Validation groups do not have retention policies assigned to them.
l The dataset assigned to each VM Backup Validation group is automatically createdwhen the group is created. The dataset name is the same as the VM BackupValidation group name.
l Each VM Backup Validation group also stores a location where new virtual machinesare temporarily created during the backup validation (that is, an ESX host or cluster,datastore, and folder).
Performing an on-demand backup validationProcedure
1. In Avamar Administrator, click the Backup & Restore launcher button.
The Backup, Restore and Manage window appears.
2. Click the Manage tab.
3. Select a virtual machine client or VMware container:
a. Select the domain that contains the virtual machine client or VMware container.
You cannot view clients outside the domain for the login account. To view allclients, log in to the root domain.
A list of Avamar clients appears in the pane under the domains list.
b. From the list of clients, select the virtual machine client or VMware container.
Backup Validation
80 EMC Avamar 7.2 for VMware User Guide

4. Select a backup:
a. Click the By Date tab.
b. Select the backup date from the calendar. Valid backups occurred on dates with ayellow highlight.
A list of backups on that date appears in the Backups table next to the calendar.
c. Select a backup from the Backups table.
5. Select Actions > Validate Backup.
The Validate Options dialog box appears.
6. Click Configure Destination.
The Configure Location wizard appears.
7. Select a vCenter, and then click Next.
8. Type an inventory location name, select a datacenter folder in the tree, and then clickNext.
9. Select a host or cluster and then click Next.
10.Select a resource pool and then click Next.
11.Select a datastore and then click Next.
12.At the Summary screen, click Finish.
13.From the Avamar encryption method list, select the encryption method to use for datatransfer between the client and the Avamar server during the backup validation.
The encryption technology and bit strength for a client/server connection depends onseveral factors, including the client operating system and Avamar server version. TheEMC Avamar Product Security Guide provides additional information.
14.(Optional) To run a user-defined script as part of the validation:
Note
The script must already be in the backup to be validated. You cannot run externalscripts during a backup validation.
a. Click More Options.
The Validate Command Line Options dialog box appears.
b. Type a virtual machine guest OS user account name and password with sufficientprivileges to run scripts.
c. Type the full path and filename of the validation script.
Note
If this is a Windows virtual machine, type exit /B exitcode after the script pathand filename, where exitcode is a user-defined exit message.
d. Ensure that the Maximum script run time (minutes) setting allows sufficient timefor the script to complete.
e. Click OK.
15.Click OK on the Validate Options box.
The following status message appears: Restore request initiating.
Backup Validation
Performing an on-demand backup validation 81

16.Click Close.
Scheduling backup validationsTo schedule backup validations for an entire group of virtual machines, create a VMBackup Validation Group.
Procedure
1. In Avamar Administrator, click the Policy launcher button.
The Policy window appears.
2. Click the Policy Management tab, and then click the Groups tab.
3. In the tree, select a location for the group.
4. Select Actions > Group > New > VM Backup Validation Group.
The New VM Backup Validation Group wizard appears.
5. In the General screen:
a. Type a Group name.
b. Select or clear the Disabled checkbox.
Select this checkbox to delay the start of scheduled backups for this group.Otherwise, clear this checkbox to enable scheduled backups for this group thenext time the assigned schedule runs.
c. Select an Avamar encryption method for client/server data transfers during thebackup validation.
Note
The encryption technology and bit strength for a client/server connection dependson several factors, including the client operating system and Avamar serverversion. The EMC Avamar Product Security Guide provides details.
d. Click Next.
6. In the Membership screen:
a. Select checkboxes next to the virtual machines you want to be members of thisvalidation group.
b. Click Next.
7. In the Location screen:
a. Click Configure Location.
The Configure VM Backup Validation Location wizard appears.
b. Select a vCenter, and then click Next.
c. Select a datacenter folder in the tree, and then click Next.
d. Select a host or cluster, and then click Next.
e. Select a resource pool, and then click Next.
f. Select a datastore, and then click Next.
g. In the Summary screen, review your settings, and then click Finish.
Backup Validation
82 EMC Avamar 7.2 for VMware User Guide

h. Click Next.
8. In the Schedule screen, select a schedule from the list, and then click Next.
9. In the Overview screen, review your settings, and then click Finish.
10.Ensure that the scheduler is running.
Backup Validation
Scheduling backup validations 83

Backup Validation
84 EMC Avamar 7.2 for VMware User Guide

CHAPTER 7
Protecting the vCenter ManagementInfrastructure
This chapter includes the following topics:
l Overview............................................................................................................... 86l Backing up the vCenter management infrastructure...............................................86l Recovering vCenter management infrastructure from Avamar backups.................. 88
Protecting the vCenter Management Infrastructure 85

OverviewThis topic discusses how to protect the vCenter management infrastructure (not thevirtual machines within that environment).
The vCenter runs on a 32- or 64-bit Windows host. It also comprises a database serverwhich can run on a different host. Some optional vSphere components require additionaldatabases that can be hosted on the same host as vCenter or on different databaseserver hosts.
The methodology for protecting vCenter management infrastructure is to implement guestbackup on each virtual host. The dataset should only back up the following importantvCenter management infrastructure components:
l License files
l SSL certificates
l Audit logs
l Windows guest customization (sysprep) files
l Database-hosted configuration settings
l UpdateManager database
l Site Recovery Manager (SRM) database
Recovering vCenter management infrastructure using Avamar backups is a two-stepprocess in which you first create a restore target virtual machine with a fresh operatingsystem image, then restore the vCenter management infrastructure components from thelatest Avamar backup.
One advantage to protecting a vCenter management infrastructure with Avamar is thatyou can also use the Avamar backup to facilitate vCenter upgrades (for example,upgrading the vCenter host from a 32- or 64-bit Windows virtual machine).
Backing up the vCenter management infrastructureThe methodology for protecting vCenter management infrastructure is to implement guestbackup on each virtual host using a custom dataset that only backs up important vCentermanagement infrastructure components.
You should then add the vCenter Avamar clients to a group and schedule these backupsat regular intervals.
Implementing guest backups of vCenter management infrastructureProcedure
1. Install and register Avamar Client for Windows software on the vCenter host asdescribed in the EMC Avamar Backup Clients User Guide.
2. Install and register the correct Avamar database software on each database host asdescribed in various database-specific documentation such as the EMC Avamar forSQL Server User Guide.
Protecting the vCenter Management Infrastructure
86 EMC Avamar 7.2 for VMware User Guide

Creating a dataset for vCenter management infrastructure backupsFor best results, define a custom dataset strictly for use in backing up vCentermanagement infrastructure components.
Use of a custom dataset will not only shorten backup and restore times, but will alsoallow you to use Avamar backups to facilitate vCenter upgrades (for example, upgradingthe vCenter host from a 32- to a 64-bit Windows virtual machine).
Procedure
1. In Avamar Administrator, select Tools > Manage Datasets.
The Manage All Datasets window appears.
2. Click New.
The New Dataset dialog box appears.
3. Type a name for this new dataset (for example, vCenter-1).
4. Click the Source Data tab.
5. Select Enter Explicitly, and then select the Windows File System plug-in from theSelect Plug-In Type list.
6. In the list of backup targets at the bottom of the dialog box, delete every entry exceptfor the Windows File System plug-in by selecting an entry, and then clicking -.
7. Add each vCenter management infrastructure component to the dataset:
a. Select Files and/or Folders and click ...
The Select Files And/Or Folders dialog box appears.
b. Locate a vCenter management infrastructure component and select it.
Table 10 Important vCenter management infrastructure components
Component Default Location
License files The exact location depends on the specific VMware and Windowsversion, but is typically one of the following folders:
C:\Program Files(x86)\VMware\Infrastructure\VirtualCenter Server\licenses\siteC:\Program Files\VMware\VMware License Server\Licenses
SSL certificates The exact location depends on the specific VMware and Windowsversion, but is typically one of the following folders:
C:\Documents and Settings\All Users\ApplicationData\VMware\VMware VirtualCenter\SSLC:\ProgramData\VMWare\VMware VirtualCenter\SSL
Audit logs The exact location depends on the specific VMware and Windowsversion, but is typically one of the following folders:
C:\Documents and Settings\All Users\ApplicationData\VMware\VMware VirtualCenter\LogsC:\ProgramData\VMWare\VMware VirtualCenter\Logs
Protecting the vCenter Management Infrastructure
Creating a dataset for vCenter management infrastructure backups 87

Table 10 Important vCenter management infrastructure components (continued)
Component Default Location
Windows guestcustomization(sysprep) files
The exact location depends on the specific VMware and Windowsversion, but is typically one of the following folders:
C:\Documents and Settings\All Users\ApplicationData\VMware\VMware VirtualCenter\sysprepC:\ProgramData\VMWare\VMware VirtualCenter\sysprep
c. Click OK.
d. Repeat these steps for each important vCenter management infrastructurecomponent.
8. Click OK.
Adding a backup client for vCenter database hostsThe location of the database used by vCenter, Update Manager, SRM, and so forth can bedetermined by running the Windows Data Sources (ODBC) administrative tool.
Procedure
1. Install Avamar database backup agents on the database hosts as described in thedatabase-specific documentation, such as the EMC Avamar for SQL Server User Guide.
2. Configure a scheduled backup to protect the databases.
You should truncate vCenter database transaction logs after each backup. This can bedone by selecting the Truncate database log option in the SQL Server plug-in .Truncating database transaction logs ensures that logs will not grow too large, andconsume excessive amounts of space on the Avamar server.
Recovering vCenter management infrastructure from Avamarbackups
Recovering vCenter management infrastructure from Avamar backups is a two-stepprocess in which you first create a restore target virtual machine with a fresh operatingsystem image, then restore the vCenter management infrastructure components from thelatest Avamar backup. The EMC Avamar Administration Guide provides details. EMC AvamarAdministration Guide
Protecting the vCenter Management Infrastructure
88 EMC Avamar 7.2 for VMware User Guide

CHAPTER 8
Protecting ESX Hosts
This chapter includes the following topics:
l Overview............................................................................................................... 90l Adding ESX host authentication certificates to the MCS keystore...........................91l Creating a dedicated ESX host user account.......................................................... 92l Adding an ESX host as a vCenter client..................................................................94l Deploying a proxy in a standalone ESX host.......................................................... 95l Disassociating an ESX host from a vCenter............................................................ 98
Protecting ESX Hosts 89
OverviewImage backup can be configured to protect virtual machines residing in standalone ESXhosts.
There are two primary uses for this feature:
1. Support for minimal customer configurations.Some customer sites use a simple VMware topology, comprising a single ESX host,with one or more virtual machines residing on that ESX host. These sites typically donot implement a vCenter management layer. However, the virtual machines residingon a standalone ESX host still must be backed up in order to protect against dataloss. Adding the standalone ESX host as an Avamar vCenter client enables thosevirtual machines to be backed up with image backup, rather than guest backup.
2. Virtual vCenter disaster recovery.Adding an ESX host as an Avamar vCenter client can be useful when virtual machinesresiding on a particular ESX host must be restored, but the vCenter is not operational.This is often the case when a virtual vCenter must be recovered from Avamarbackups. Adding the standalone ESX host as an Avamar vCenter client enables thevCenter management infrastructure virtual machines to be restored so that thevCenter can be restarted.
LimitationsThese are the known limitation of protecting virtual machines residing in a standaloneESX host in Avamar.
ESX versionsSupport for this feature is limited to ESX 5.0 or higher. Older versions are not supported.
Virtual vCenter disaster recoveryIf you are using this feature for the purpose of recovering a virtualized vCenter from anESX host, you must first disassociate that ESX host from the vCenter before restoring anyvirtual machines to that ESX host.
Task ListIn order to protect virtual machines residing in a standalone ESX host, perform thefollowing tasks:
1. Ensure that the Avamar server can communicate and authenticate with the ESX host.Add the ESX host certificate to the Avamar MCS keystore. Otherwise, you mustdisable certificate authentication for all MCS communications.
2. (Optional) Create a dedicated user account on the ESX host for use with Avamar.
3. Add the ESX host to Avamar as a vCenter client.This enables dynamic discovery of virtual machines residing on that ESX host, so thatthey can be backed up with image backup rather than guest backup.
4. Deploy one or more proxies on the ESX host.
5. Perform on-demand or scheduled image backups of virtual machines residing on thatESX host.
Protecting ESX Hosts
90 EMC Avamar 7.2 for VMware User Guide

Adding ESX host authentication certificates to the MCS keystoreAdd an ESX host authentication certificate to the MCS keystore. Do this for each ESX hostyou intend to protect.
This procedure uses the java keytool utility, which manages certificate keys. Thekeytool utility is located in the Java bin folder (/usr/java/version/bin), whereversion is the Java Runtime Environment (JRE) version currently installed on the MCS. Ifthis folder is not in your path, you can either add it to the path, or specify the completepath when using keytool.
Procedure
1. Open a command shell and log in by using one of the following methods:
l For a single-node server, log in to the server as admin.
l For a multi-node server, log in to the utility node as admin.
2. Stop the MCS by typing dpnctl stop mcs.
3. Switch user to root by typing su -.
4. Copy /etc/vmware/ssl/rui.crt from the ESX host machine to /tmp on theAvamar utility node or single-node server.
5. Copy the MCS keystore to /tmp by typing:
cp /usr/local/avamar/lib/rmi_ssl_keystore /tmp/
This creates a temporary version of the live MCS keystore in /tmp.
6. Add the default ESX host certificate to the temporary MCS keystore file by typing:
cd /tmp$JAVA_HOME/bin/keytool –import –file rui.crt -alias alias -keystorermi_ssl_keystore
where alias is a user-defined name for this certificate, which can often be the filename.
7. Type the keystore password.
8. Type yes, and press Enter to trust this certificate.
9. (Optional) If you will be protecting more than one ESX host with this Avamar server,add those ESX host certificates now.
10.Back up the live MCS keystore by typing:
cd /usr/local/avamar/libcp rmi_ssl_keystore rmi_ssl_keystore.date
where date is today's date.
11.Copy the temporary MCS keystore to the live location by typing:
cp /tmp/rmi_ssl_keystore /usr/local/avamar/lib/
12.Exit the root subshell by typing exit.
13.Start the MCS and the scheduler by typing:
Protecting ESX Hosts
Adding ESX host authentication certificates to the MCS keystore 91

dpnctl start mcsdpnctl start sched
Creating a dedicated ESX host user accountEMC strongly recommends that you set up a separate user account on each ESX host thatis strictly dedicated for use with Avamar.
Use of a generic user account such as “Administrator” might hamper futuretroubleshooting efforts because it might not be clear which actions are actuallyinterfacing or communicating with the Avamar server. Using a separate ESX host useraccount ensures maximum clarity if it becomes necessary to examine ESX host logs.
Note
The user account must be added to the top (root) level in each ESX host you intend toprotect.
Procedure
1. Create a ESX host user account with privileges listed in the following table.
Table 11 Minimum required ESX host user account privileges
Privilege type ESX 5.5 ESX 5.0
Alarms l Create alarm l Create alarm
Datastore l Allocate space
l Browse datastore
l Low level file operations
l Remove file
l Allocate space
l Browse datastore
l Low level file operations
l Remove file
Extension l Register extension
l Unregister extension
l Update extension
l Register extension
l Unregister extension
l Update extension
Folder l Create folder l Create folder
Global l Cancel task
l Disable methods
l Enable methods
l Licenses
l Log event
l Manage custom attributes
l Settings
l Cancel task
l Disable methods
l Enable methods
l Licenses
l Log event
l Manage custom attributes
l Settings
Host >Configuration
l Connection
l Storage partition configuration
l Connection
l Storage partition configuration
Protecting ESX Hosts
92 EMC Avamar 7.2 for VMware User Guide

Table 11 Minimum required ESX host user account privileges (continued)
Privilege type ESX 5.5 ESX 5.0
Network l Assign network
l Configure
l Assign network
l Configure
Resource l Assign virtual machine to resourcepool
l Assign virtual machine to resourcepool
Sessions l Validate session l Validate session
Tasks l Create task
l Update task
l Create task
l Update task
vApp l Import l Import
Virtual machine
Configuration l Add existing disk
l Add new disk
l Add or remove device
l Advanced
l Change CPU count
l Change resource
l Disk change tracking
l Disk Lease
l Extend virtual disk
l Host USB device
l Memory
l Modify device settings
l Raw device
l Reload from path
l Remove disk
l Rename
l Reset guest information
l Settings
l Swapfile placement
l Upgrade virtual machinecompatibility
l Add existing disk
l Add new disk
l Add or remove device
l Advanced
l Change CPU count
l Change resource
l Disk change tracking
l Disk Lease
l Extend virtual disk
l Host USB device
l Memory
l Modify device settings
l Raw device
l Reload from path
l Remove disk
l Rename
l Reset guest information
l Settings
l Swapfile placement
l Upgrade virtual machinecompatibility
GuestOperations
l Guest Operation Modifications
l Guest Operation ProgramExecution
l Guest Operation Queries
l Guest Operation Modifications
l Guest Operation ProgramExecution
l Guest Operation Queries
Protecting ESX Hosts
Creating a dedicated ESX host user account 93

Table 11 Minimum required ESX host user account privileges (continued)
Privilege type ESX 5.5 ESX 5.0
Interaction l Console interaction
l DeviceConnection
l Guest operating systemmanagement by VIX API
l Power off
l Power on
l Reset
l VMware Tools install
l Console interaction
l DeviceConnection
l Power off
l Power on
l Reset
l VMware Tools install
Inventory l Create new
l Register
l Remove
l Unregister
l Create new
l Register
l Remove
l Unregister
Provisioning l Allow disk access
l Allow read-only disk access
l Allow virtual machine download
l Mark as Template
l Allow disk access
l Allow read-only disk access
l Allow virtual machine download
l Mark as Template
SnapshotManagement
l Create snapshot
l Remove snapshot
l Revert to snapshot
l Management
State l Create snapshot
l Remove snapshot
l Revert to snapshot
Adding an ESX host as a vCenter clientProcedure
1. In Avamar Administrator, click the Administration launcher button.
The Administration window appears.
2. Click the Account Management tab.
3. In the tree, select the top-level (root) domain, and then select Actions > AccountManagement > New Client(s).
The New Client dialog box appears.
4. Complete the following settings:
Protecting ESX Hosts
94 EMC Avamar 7.2 for VMware User Guide
a. Select VMware vCenter in the Client Type list.
b. Type the ESX host fully qualified DNS name or IP address in the New Client Nameor IP field.
c. Type the ESX host web services listener data port number in the Port field.
443 is the default setting.
d. Type the ESX host administrative user account name in the User Name field.
e. Type the ESX host administrative user account password in the Password field.
f. Type the ESX host administrative user account password again in the VerifyPassword field.
g. (Optional) Type a contact name in the Contact field.
h. (Optional) Type a contact telephone number in the Phone field
i. (Optional) Type a contact email address in the Email field.
j. (Optional) Type a contact location in the Location field.
5. Click OK.
Deploying a proxy in a standalone ESX hostBefore you begin
1. Add DNS entries for each proxy you intend to deploy.During proxy deployment, you will be asked to assign a unique IP address to eachproxy. The ESX host performs a reverse DNS lookup of that IP address to ensure that itis resolvable to a hostname. For best results, configure all required DNS entries forproxies you plan to deploy before proceeding with the remainder of this procedure.
2. Download the proxy appliance template file from the Avamar server.
3. Install the vSphere Client on your Windows computer.
Deploying a proxy appliance in an ESX host using the vSphere ClientProcedure
1. Launch the vSphere Client and log in to the ESX host.
2. Select File > Deploy OVF Template.
The Deploy OVF Template wizard appears.
3. In the Source screen:
a. Click Browse.
The Open dialog box appears.
b. Select Ova files (*.ova) from the Files of Type list.
c. Browse to the appliance template file that was previously downloaded.
d. Select the appliance template file and click Open.
The full path to the appliance template file appears in the Source screen Deployfrom file field.
e. Click Next.
4. In the OVF Template Details screen:
Protecting ESX Hosts
Deploying a proxy in a standalone ESX host 95

a. Ensure that the template information is correct.
b. Click Next.
5. In the Name and Location screen:
a. Type a unique fully qualified hostname in the Name field.
A proxy can potentially have three different names:
l The name of the virtual machine on which the proxy runs.
l The DNS name assigned to the proxy virtual machine.
l The Avamar client name after the proxy registers and activates with server.
Note
In order to avoid confusion and potential problems, EMC strongly recommendsthat you consistently use the same fully qualified hostname for this proxy in allthree contexts.
b. Click Next.
6. In the Resource Pool screen:
a. Select an ESX host or a resource pool.
b. Click Next.
7. In the Storage screen:
a. Select a storage location for this proxy.
b. Click Next.
8. In the Disk Format screen:
a. Select a disk format for this proxy.
b. Click Next.
9. In the Network Mapping screen:
a. Select a destination network from list.
b. Click Next.
10.In the Ready To Complete screen:
a. Ensure that the information is correct.
b. Click Finish.
Manually configuring proxy network settingsProcedure
1. Launch the vSphere Client and log in to the ESX host.
2. Locate the proxy you want to configure.
3. Right-click Open Console.
A console window appears.
4. In the console Main Menu, press 2 to quit.
5. In the welcome screen, select Log in, and then press Enter.
Protecting ESX Hosts
96 EMC Avamar 7.2 for VMware User Guide

6. Log in as root:
a. Type root, and then press Enter.
b. Type the root password, and then press Enter.
7. Type /opt/vmware/share/vami/vami_config_net, and then press Enter.
A Main Menu appears.
8. In the Main Menu, select 6, and then press Enter to configure the IP address for eth0.
You can configure an IPv6 address, a static IPv4 address, or a dynamic IPv4 address.Follow the on-screen prompts to configure the correct address type for your site.
9. In the Main Menu, select 4, and then press Enter to configure DNS.
Follow the on-screen prompts to specify the primary and secondary DNS servers in useat your site.
10.In the Main Menu, select 3, and then press Enter to configure the hostname.
11.Type the proxy hostname, and then press Enter.
12.In the Main Menu, select 2, and then press Enter to configure the default gateway.
13.Type the IPv4 default gateway, and then press Enter.
14.Press Enter to accept the default IPv6 default gateway.
15.In the Main Menu, press Enter to show the current configuration.
16.Ensure that the settings are correct.
17.Press 1 to exit the program.
Registering and activating the proxy with the Avamar serverRegister and activate each proxy deployed in vCenter with the Avamar server.
Before you begin
1. Deploy the proxy appliance in vCenter.
2. Add the ESX host as a vCenter client in Avamar.
Note
For best results, always register and activate proxies as described in this task. Using thealternative method of inviting the proxy from Avamar Administrator is known to haveunpredictable results.
Perform this task for every proxy you deploy in an ESX host.
Procedure
1. From the vSphere client, locate and select an Avamar image backup proxy.
2. Right-click Power > Power On.
3. Right-clickOpen Console.
A console window appears.
4. From the Main Menu, type 1, and then press Enter.
5. Type the Avamar server DNS name, and then press Enter.
6. Type an Avamar server domain name, and then press Enter.
Protecting ESX Hosts
Registering and activating the proxy with the Avamar server 97

The default domain is “clients.” However, your Avamar system administrator mayhave defined other domains, and subdomains. Consult your Avamar systemadministrator for the domain you should use when registering this client.
Note
If typing a subdomain (for example, clients/MyClients), do not include a slash (/) asthe first character. Including a slash as the first character will cause an error, andprevent you from registering this client.
7. From the Main Menu, type 2, and then press Enter to quit.
8. (optional) If proxy certificate authentication is required, see Configuring vCenter-to-Avamar authentication on page 25
Disassociating an ESX host from a vCenterOnly perform this task if you are restoring virtual machines to an ESX host while theassociated vCenter is not operational.
Procedure
1. Launch the vSphere Client or vSphere Web Client, and log in to the ESX host.
2. Click the Summary tab.
3. In the Host Management pane, click Disassociate host from vCenter Server.
4. Click Yes to confirm the action.
Protecting ESX Hosts
98 EMC Avamar 7.2 for VMware User Guide
APPENDIX A
Manually deploying proxies
This appendix includes the following topics:
l Overview............................................................................................................. 100l Downloading the proxy appliance template file................................................... 100l Deploying the proxy appliance in vCenter............................................................ 100l Deploying a proxy appliance in vCenter using the vSphere Web Client.................100l Registering and activating the proxy with the Avamar server................................103l Configuring proxy settings in Avamar Administrator.............................................103l Performing optional proxy performance optimization.......................................... 104
Manually deploying proxies 99

OverviewBeginning with Avamar 7.2, the Proxy Deployment Manager is the preferred method fordeploying proxies. Manual proxy deployment is still supported if necessary.
Downloading the proxy appliance template fileDownload the proxy appliance template file from the Avamar server.
Note
If adding more than one proxy, you only need to perform this task once.
Procedure
1. Open a web browser and type the following URL:
https://Avamar-server
where Avamar-server is the Avamar server network hostname or IP address.
The EMC Avamar Web Restore page appears.
2. Click Downloads.
3. Navigate to the VMware vSphere > EMC Avamar VMware Image Backup/FLR Appliancefolder.
4. Click the AvamarCombinedProxy-linux-sles11_64-version.ova link.
5. Save AvamarCombinedProxy-linux-sles11_64-version.ova to a temporary folder, suchas C:\Temp, or the desktop.
Deploying the proxy appliance in vCenterUse either the vSphere Client running on a Windows computer (also known as the "thickclient"), or the vSphere Web Client to deploy one or more proxies in each vCenter youintend to protect with image backup.
Before you begin
1. Add DNS entries for each proxy you intend to deploy.During proxy deployment, you will be asked to assign a unique IP address to eachproxy. The vCenter performs a reverse DNS lookup of that IP address to ensure that itis resolvable to a hostname. For best results, configure all required DNS entries forproxies you plan to deploy before proceeding with the remainder of this procedure.
2. Download the proxy appliance template file from the Avamar server.
Deploying a proxy appliance in vCenter using the vSphere WebClient
Procedure
1. Connect to the vCenter Server by opening a web browser, and then typing thefollowing URL:
http://vCenter-server:9443/
Manually deploying proxies
100 EMC Avamar 7.2 for VMware User Guide

where vCenter-server is the vCenter Server network hostname or IP address.
The vSphere Web Client page appears.
2. Download and install the vSphere Client Integration Plug-in:
Note
These steps only need to be performed the first time you connect to this vCenterServer using the vSphere Web Client. You can skip these steps on subsequentvSphere Web Client sessions.
a. Click the Download Client Integration Plug-in link.
b. Either open the installation file in place (on the server), or double-click thedownloaded installation file.
The installation wizard appears.
c. Follow the onscreen instructions.
3. Reconnect to the vCenter Server by opening a web browser, and then typing thefollowing URL:
http://vCenter-server:9443/
where vCenter-server is the vCenter Server network hostname or IP address.
The vSphere Web Client page appears.
4. Log in to the vCenter Server by typing your User name and Password, and thenclicking Login.
5. Select Home > vCenter > Hosts and Clusters.
6. Select Actions > Deploy OVF Template.
7. Allow plug-in access control.
The Deploy OVF Template wizard appears.
8. In the Source screen:
a. Select Local file, and then click Browse.
The Open dialog box appears.
b. Select Ova files (*.ova) from the Files of Type list.
c. Browse to the appliance template file that was previously downloaded.
d. Select the appliance template file and click Open.
The full path to the appliance template file appears in the Source screen Deployfrom file field.
e. Click Next.
9. In the OVF Template Details screen:
a. Ensure that the template information is correct.
b. Click Next.
10.In the Select name and Location screen:
a. Type a unique fully qualified hostname in the Name field.
A proxy can potentially have three different names:
Manually deploying proxies
Deploying a proxy appliance in vCenter using the vSphere Web Client 101

l The name of the virtual machine on which the proxy runs. This is also the namemanaged and visible within vCenter.
l The DNS name assigned to the proxy virtual machine.
l The Avamar client name after the proxy registers and activates with server.
Note
In order to avoid confusion and potential problems, EMC strongly recommendsthat you consistently use the same fully qualified hostname for this proxy in allthree contexts.
b. In the tree, select a datacenter and folder location for this proxy.
c. Click Next.
11.In the Select a resource screen:
a. Select an ESX host, cluster, vApp or resource pool.
b. Click Next.
12.In the Select Storage screen:
a. Select a storage location for this proxy.
b. Click Next.
13.In the Setup networks screen:
a. Select a Destination network from list.
b. Select an IP protocol from the list.
c. Click Next.
14.In the Customize template screen:
Note
Proxy network settings are difficult to change once they proxy is registered andactivated with the Avamar server. Therefore, ensure that the settings you enter in theCustomize template screen are correct.
a. Enter the default gateway IP address for the network in the Default Gateway field
b. If not using DHCP, type one or more Domain Name Server (DNS) IP addresses in theDNS field. Separate multiple entries with commas.
c. If not using DHCP, type a valid IP address for this proxy in the Isolated Network IPAddress field
d. Type the network mask in the Isolated Network Netmask field.
e. Click Next.
15.In the Ready To Complete screen:
a. Ensure that the information is correct.
b. Click Finish
Manually deploying proxies
102 EMC Avamar 7.2 for VMware User Guide

Registering and activating the proxy with the Avamar serverRegister and activate each proxy deployed in vCenter with the Avamar server.
Before you begin
1. Deploy the proxy appliance in vCenter.
2. Add the ESX host as a vCenter client in Avamar.
Note
For best results, always register and activate proxies as described in this task. Using thealternative method of inviting the proxy from Avamar Administrator is known to haveunpredictable results.
Perform this task for every proxy you deploy in an ESX host.
Procedure
1. From the vSphere client, locate and select an Avamar image backup proxy.
2. Right-click Power > Power On.
3. Right-clickOpen Console.
A console window appears.
4. From the Main Menu, type 1, and then press Enter.
5. Type the Avamar server DNS name, and then press Enter.
6. Type an Avamar server domain name, and then press Enter.
The default domain is “clients.” However, your Avamar system administrator mayhave defined other domains, and subdomains. Consult your Avamar systemadministrator for the domain you should use when registering this client.
Note
If typing a subdomain (for example, clients/MyClients), do not include a slash (/) asthe first character. Including a slash as the first character will cause an error, andprevent you from registering this client.
7. From the Main Menu, type 2, and then press Enter to quit.
8. (optional) If proxy certificate authentication is required, see Configuring vCenter-to-Avamar authentication on page 25
Configuring proxy settings in Avamar AdministratorAfter deploying a proxy appliance in vCenter and registering it with the Avamar server,configure datastore, group and optional contact settings in Avamar Administrator.
Before you begin
1. Deploy a proxy appliance in vCenter.
2. Register and activate the proxy with the Avamar server.
Procedure
1. In Avamar Administrator, click the Administration launcher button.
Manually deploying proxies
Registering and activating the proxy with the Avamar server 103

The Administration window appears.
2. Click the Account Management tab.
3. In the tree, select the proxy, and then select Actions > Account Management > ClientEdit.
The Edit Client dialog box appears.
4. Click the Datastores tab, and then select all vCenter datastores that host virtualmachines you want to protect with this proxy.
5. Click the Groups tab, and then assign this proxy to one or more groups by clicking theSelect checkbox next to each group.
6. (Optional) provide contact information:
a. Type a contact name in the Contact field.
b. Type a contact telephone number in the Phone field.
c. Type a contact email address in the Email field.
d. Type a contact location in the Location field.
7. Click OK.
Performing optional proxy performance optimizationBy default, Avamar proxies are configured with four virtual CPU sockets and one core persocket. However, if your ESXi host has two or more physical CPUs, changing the proxyconfiguration to four virtual CPU sockets and two cores per socket will achieve betterbackup and restore performance.
Manually deploying proxies
104 EMC Avamar 7.2 for VMware User Guide

APPENDIX B
vSphere Data Ports
This appendix includes the following topics:
l Required data ports.............................................................................................106
vSphere Data Ports 105

Required data portsThese are the required data ports in a vSphere environment.
Table 12 Required vSphere data ports
Port Source Destination Function Additionalinformation
22 AvamarAdministrator
Proxies SSH Diagnostic support.Optional, butrecommended.
53 Proxies DNS server DNS UDP+TCP
443 Avamar MCS vCenter vSphere API
443 Proxies vCenter vSphere API
902 Proxies ESX hosts VDDK
7444 Avamar MCS vCenter Test vCentercredentials
27000 Proxies Avamar server GSAN communication Non-securedcommunication
28009 Avamar MCS Proxies Access proxy logs
28102 - 28109 Avamar MCS Proxies avagent paging port Avamar 7.0 and 7.1
29000 Proxies Avamar server GSAN communication Securedcommunication
30001 Proxies Avamar MCS avagent to MCS
communication
Avamar 7.2
30102-30109 Avamar MCS Proxies avagent paging port Avamar 7.2
Note
All ports are TCP unless otherwise noted.
vSphere Data Ports
106 EMC Avamar 7.2 for VMware User Guide
APPENDIX C
Plug-in Options
This appendix includes the following topics:
l How to set plug-in options...................................................................................108l Windows VMware Image plug-in options............................................................. 108l Windows VMware GLR plug-in options.................................................................109
Plug-in Options 107

How to set plug-in optionsPlug-in options enable you to control specific actions for on-demand backups, restores,and scheduled backups. The plug-in options that are available depend on the operationtype and plug-in type.
You specify plug-in options in Avamar Administrator for on-demand backup or restoreoperations, or when you create a dataset for a scheduled backup. You set plug-in optionswith the graphical user interface (GUI) controls (text boxes, checkboxes, radio buttons,and so forth). In addition to using the GUI controls for the options, you can type an optionand its value in the Enter Attribute and Enter Attribute Value fields.
NOTICE
The Avamar software does not check or validate the information that you type in the EnterAttribute and Enter Attribute Value fields. In addition, the values in the Enter Attributeand Enter Attribute Value fields override settings that you specify with the GUI controlsfor the options.
Windows VMware Image plug-in optionsThese backup and restore options are available for the Avamar Windows VMware Imageplug-in.
Table 13 Backup options for Avamar Windows VMware Image plug-in
Setting Description
Use Changed BlockTracking (CBT) to increaseperformance
If selected, the VMware changed block tracking feature is used toidentify areas of the virtual machine file system that have changedsince the last backup and only process those changed areas duringthe next backup.
Note
Changed block tracking must be enabled at the virtual machine levelin order for this feature to work.
Store backups on DataDomain system
To store the backup on a Data Domain system instead of the Avamarserver, select the checkbox and then select the Data Domain systemfrom the list.
Note
To enable this option, add a Data Domain system to the Avamarconfiguration. The EMC Avamar and EMC Data Domain SystemIntegration Guide provides instructions.
Encryption method toData Domain system
Specifies the encryption method for data transfer between the clientand the Data Domain system during the backup.
Guest credentials
Username Guest operating system user account with sufficient privileges to runscripts.
Plug-in Options
108 EMC Avamar 7.2 for VMware User Guide
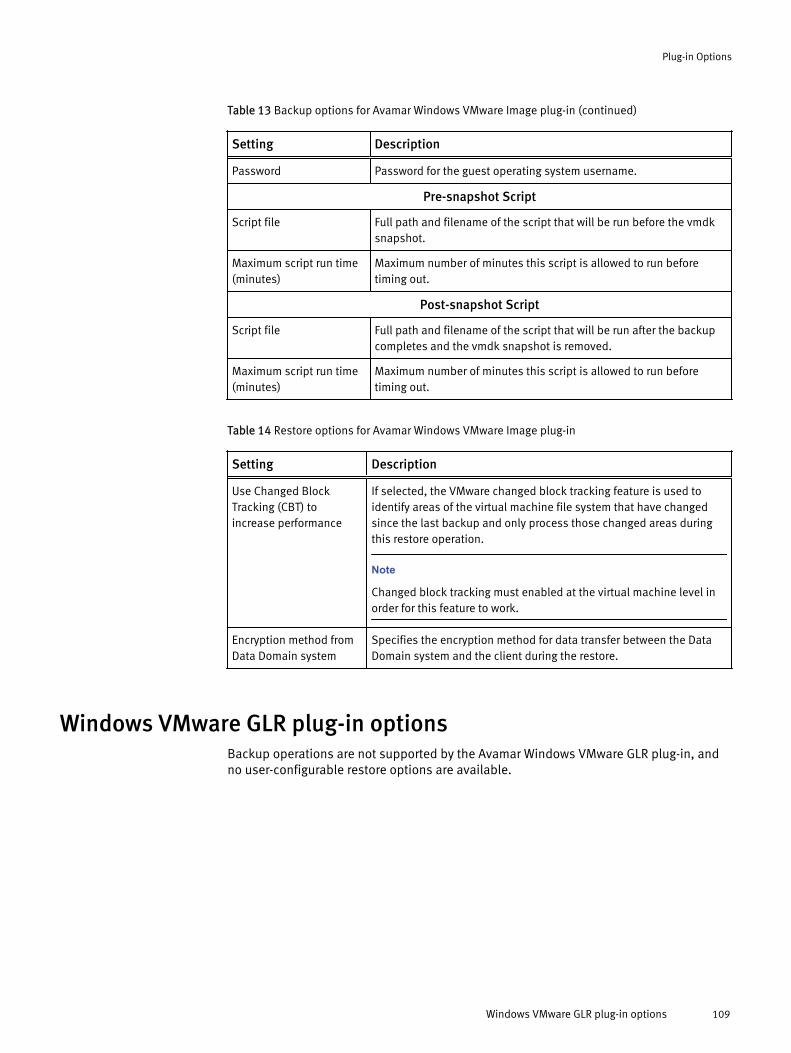
Table 13 Backup options for Avamar Windows VMware Image plug-in (continued)
Setting Description
Password Password for the guest operating system username.
Pre-snapshot Script
Script file Full path and filename of the script that will be run before the vmdksnapshot.
Maximum script run time(minutes)
Maximum number of minutes this script is allowed to run beforetiming out.
Post-snapshot Script
Script file Full path and filename of the script that will be run after the backupcompletes and the vmdk snapshot is removed.
Maximum script run time(minutes)
Maximum number of minutes this script is allowed to run beforetiming out.
Table 14 Restore options for Avamar Windows VMware Image plug-in
Setting Description
Use Changed BlockTracking (CBT) toincrease performance
If selected, the VMware changed block tracking feature is used toidentify areas of the virtual machine file system that have changedsince the last backup and only process those changed areas duringthis restore operation.
Note
Changed block tracking must enabled at the virtual machine level inorder for this feature to work.
Encryption method fromData Domain system
Specifies the encryption method for data transfer between the DataDomain system and the client during the restore.
Windows VMware GLR plug-in optionsBackup operations are not supported by the Avamar Windows VMware GLR plug-in, andno user-configurable restore options are available.
Plug-in Options
Windows VMware GLR plug-in options 109

Plug-in Options
110 EMC Avamar 7.2 for VMware User Guide

APPENDIX D
Troubleshooting
This appendix includes the following topics:
l Installation and configuration problems and solutions........................................ 112l Backup problems and solutions.......................................................................... 112l Restore problems and solutions.......................................................................... 113
Troubleshooting 111

Installation and configuration problems and solutionsThese are common installation and configuration problems and solutions.
Problems adding vCenter Server as Avamar clientIf you encounter problems adding a vCenter Server as an Avamar client, ensure that:
l vCenter hostname, username, and password are correct.
l Port 443 is open between the Avamar server and the vCenter.
If that does not resolve the problem, try turning off certificate authentication for allvCenter-to-Avamar MCS communications.
Proxy network settingsIf a proxy is deployed with an incorrect IP address or DNS entry, it might have registeredwith the Avamar server as localhost instead of the correct hostname.
Because proxies are virtual appliances managed by vCenter, once a proxy registers withthe Avamar server, it is difficult to change network settings. Doing so would involvedeleting it from the Avamar server, changing the network settings in vCenter, thenreactivating it with the Avamar server.
In most cases, the most efficient remedy is to deploy a new proxy with the correctsettings, then delete the old proxy from both Avamar and vCenter.
The vCenter documentation provides instructions for changing virtual appliance networksettings.
Error when registering guest backup or Windows recovery target clientIf a virtual machine has been added to the Avamar server because it resides in a vCenterdomain, and you want to also protect that same virtual machine using guest backup, oruse that same virtual machine as a recovery target for mounting Windows VMDKs, thenyou must change the mcserver.xml allow_duplicate_client_namespreference setting to true.
Backup problems and solutionsThese are common backup problems and solutions.
Backup does not startIf a backup activity fails to start:
l Ensure that an Avamar Image Backup Proxy has been correctly deployed.
l Ensure that the datastore for the source virtual machine has been selected on arunning proxy server.
If that does not resolve the problem, the account used to connect to vCenter might nothave sufficient privileges. To verify account privileges, log in to the vSphere Client orvSphere Web Client with that username and password. Ensure that you can accessdatastores on that client. If you cannot, that account does not have the requiredprivileges.
Troubleshooting
112 EMC Avamar 7.2 for VMware User Guide

Backups fail with “No Proxy” or “No VM” errorsIf backups fail with “No Proxy” or “No VM” errors, try manually synchronizing AvamarAdministrator with the vCenter hosting the virtual machines or proxies.
Changed block tracking does not take effectEnabling changed block tracking in Avamar Administrator does not take effect until any ofthe following actions occur on the virtual machine: reboot, power on, resume aftersuspend, or migrate.
Therefore, if you enable changed block tracking but do not experience the expectedperformance increase, use the vSphere Client or vSphere Web Client to locate any virtualmachines for which you have enabled changed block tracking, and then perform any ofthe following actions: reboot, power on, resume after suspend, or migrate.
Proxies are not assigned to backup jobsAny time you restart the MCS, it might take some time until all proxies reconnect to theMCS and are available for backups. Additionally, if you stop the MCS and do not restart itwithin five minutes, proxies go into a sleep mode for at least 40 minutes.
To verify that a proxy is able to connect to the MCS, view that proxy's avagent.log file andensure that messages similar to the following appear at the end of the log history:
2014-03-20 20:34:33 avagent Info <5964>:Requesting work from 10.7.245.1612014-03-20 20:34:33 avagent Info <5264>:Workorder received: sleep2014-03-20 20:34:33 avagent Info <5996>:Sleeping 15 seconds
VM snapshot fails backups due to incorrect pre-evaluation of available space.The "snapshot_max_change_percent" flag tells the proxy to pre-evaluate free datastorespace to ensure that there is enough storage for the VM snapshot. The default value is setto 5%. If the proxy incorrectly fails the backup due to the perceived lack of storage, thevalue can be overridden by either changing the percentage to "0" by the user of thepolicy, or by permanently overriding the value in the proxy command file.
To permanently override this check in the proxy, log into each proxy, modify the file"/usr/local/avamarclient/avvcbimageAll.cmd" to include the line:
-- snapshot_max_change_percent=0
This will disable this feature.
Restore problems and solutionsThese are common restore problems and solutions.
Preexisting snapshots cause restores to failVirtual machine restores will fail if a snapshot for that virtual machine already exists.When this occurs, the restore operation will return an error message similar to thefollowing:
Troubleshooting
Backups fail with “No Proxy” or “No VM” errors 113

2012-12-07 09:30:26 avvcbimage FATAL <0000>: The pre-existingsnapshots from VMX '[VNXe3300-Datastore1] vm-example/vm-example.vmx' will not permit a restore.2012-12-07 09:30:26 avvcbimage FATAL <0000>: If necessary, usethe '--skip_snapshot_check' flag to override this pre-existingsnapshot check.2012-12-07 09:30:26 avvcbimage Error <9759>: createSnapshot:snapshot creation failedTo resolve this condition, you must perform a new restore of the affected virtual machineand include the skip_snapshot_check plug-in option in the Restore Options dialogbox. This will force that restore operation to overwrite the existing snapshot, which willenable the restore to successfully complete.
To perform a restore using the skip_snapshot_check plug-in option:
1. Initiate an image restore of the affected virtual machine.
2. When you reach the point in the procedure that instructs you to set restore options inthe Restore Options dialog box, perform the following additional steps:
a. Click More Options.The Restore Command Line Options dialog box appears.
b. Click More.
c. Type [avvcbimage]skip_snapshot_check in the Enter Attribute field.
d. Type true in the Enter Attribute Value field.
e. Click +.The [avvcbimage]skip_snapshot_check=true entry appears in the plug-in optionslist.
f. Click OK.
3. Proceed with the remainder of the restore procedure.
Restore to new virtual machine not available when physical RDM disks are involvedIf you back up a virtual machine that has both virtual disks and physical Raw DeviceMapping (RDM) disks, the backup will successfully process the virtual disks, bypass theRDM disks.
However, when restoring data from one of these backups, you can restore the data to theoriginal virtual machine, or redirect it to another existing virtual machine. However, youcannot restore data to a new virtual machine.
Note that because the physical RDM disks were not processed during the backup, dataresiding on the physical RDM disks cannot be restored at all.
If you need to restore data to a new virtual machine, you must:
1. Manually create a new virtual machine in vCenter.
2. This new virtual machine must have the same number of virtual disks as the originalvirtual machine from which the backup was taken.
3. Manually add the new virtual machine to Avamar.
4. Restore the data to this virtual machine.
Troubleshooting
114 EMC Avamar 7.2 for VMware User Guide

GLOSSARY
A
activation The process of passing the client ID (CID) back to the client, where it is stored in anencrypted file on the client file system. See also client activation
application-consistent The state of a virtual machine in which the virtual file system writes have been completedand all running applications have been quiesced.
Avamar Administrator A graphical management console software application that is used to remotely administeran Avamar system from a supported Windows or Linux client computer.
Avamar server The server component of the Avamar client/server system. Avamar server is a fault-tolerant, high-availability system that efficiently stores the backups from all protectedclients. It also provides essential processes and services required for data restores, clientaccess, and remote system administration. Avamar server runs as a distributed applicationacross multiple networked storage nodes.
B
backup A point-in-time copy of client data that can be restored as individual files, selected data, oras an entire backup.
C
changed block tracking(CBT)
A VMware feature that tracks which virtual machine file system blocks have changedbetween backups.
client activation The process of passing the client ID (CID) back to the client, where it is stored in anencrypted file on the client file system. See also activation
client registration The process of establishing an identity with the Avamar server. When Avamar recognizesthe client, it assigns a unique client ID (CID), which it passes back to the client duringclient activation. See also registration
crash-consistent The state of a virtual machine that is consistent with what would occur by interruptingpower to a physical computer. Because file system writes might or might not be in progresswhen power is interrupted, there is always the possibility of some data loss when backingup a crash-consistent file system.
EMC Avamar 7.2 for VMware User Guide 115

D
datacenter In VMware vSphere environments, a datacenter comprises the basic physical buildingblocks. These physical building blocks include virtualization servers, storage networks andarrays, IP networks, and a management server. Each vSphere vCenter can manage multipledatacenters.
Data Domain system Disk-based deduplication appliances and gateways that provide data protection anddisaster recovery (DR) in the enterprise environment.
dataset A policy that defines a set of files, directories, and file systems for each supported platformthat are included or excluded in backups across a group of clients. A dataset is apersistent and reusable Avamar policy that can be named and attached to multiple groups.
datastore In VMware vSphere environments, a datastore is the storage resources used by adatacenter.
E
ESX/ESXi Server A virtualization layer run on physical servers that abstracts processor, memory, storage,and resources into multiple virtual machines. ESX Servers provide an integrated serviceconsole; ESXi Servers do not.
F
file system-consistent The state of a virtual machine in which the virtual file system has been quiesced (that is,all file system writes have been completed).
G
group A level of organization in Avamar Administrator for one or more Avamar clients. All clientsin an Avamar group use the same group policies, which include the dataset, schedule, andretention policy.
group policy The dataset, schedule, and retention policy for all clients in an Avamar group.
guest backup A method of protecting a virtual machine in which backup software is installed directly inthe guest operating system just as if it were a physical machine.
I
image backup A method for protecting virtual machines hosted in a vCenter in which a backup is taken ofentire virtual disk images. is fully integrated with vCenter Server to provide detection ofvirtual machine clients, and enable efficient centralized management of backup jobs.
Glossary
116 EMC Avamar 7.2 for VMware User Guide

M
MCS Management console server. The server subsystem that provides centralizedadministration (scheduling, monitoring, and management) for the Avamar server. The MCSalso runs the server-side processes used by Avamar Administrator.
P
plug-in Avamar client software that recognizes a particular kind of data resident on that client.
plug-in options Options that you specify during backup or restore to control backup or restorefunctionality.
proxy A virtual machine that is used to perform image backups, image restores, and file-levelrestores of other virtual machines. Proxies run Avamar software inside a Linux virtualmachine, and are deployed in a vCenter using an appliance template (.ova) file.
R
registration The process of establishing an identity with the Avamar server. When Avamar recognizesthe client, it assigns a unique client ID (CID), which it passes back to the client duringclient activation. See also client registration
restore An operation that retrieves one or more file systems, directories, files, or data objects froma backup and writes the data to a designated location.
retention The time setting to automatically delete backups on an Avamar server. Retention can beset to permanent for backups that should not be deleted from an Avamar server. Retentionis a persistent and reusable Avamar policy that can be named and attached to multiplegroups.
S
schedule The ability to control the frequency and the start and end time each day for backups ofclients in a group. A schedule is a persistent and reusable Avamar policy that can benamed and attached to multiple groups.
Storage vMotion A VMware feature the enables migration of a live virtual machine from one datastore toanother.
V
vCenter Server A centralized single point of management and control for one or more VMware datacenters.
vSphere Client A VMware software application used to control and manage a vCenter. The vSphere Clientis also known as the "thick client."
vSphere Web Client A VMware web interface used to control and manage a vCenter.
Glossary
EMC Avamar 7.2 for VMware User Guide 117

Glossary
118 EMC Avamar 7.2 for VMware User Guide