Embed Size (px)
Citation preview

EMC® Secure Remote ServicesRelease 3.24
Installation Guide
REV 01
ESRS Installation Guide2
Copyright © 2017 EMC Corporation. All rights reserved. Published in the USA.
Published October 2017
EMC believes the information in this publication is accurate as of its publication date. The information is subject to change without notice.
The information in this publication is provided as is. EMC Corporation makes no representations or warranties of any kind with respect to the information in this publication, and specifically disclaims implied warranties of merchantability or fitness for a particular purpose. Use, copying, and distribution of any EMC software described in this publication requires an applicable software license.
EMC2, EMC, and the EMC logo are registered trademarks or trademarks of EMC Corporation in the United States and other countries. All other trademarks used herein are the property of their respective owners.
For the most up-to-date regulatory document for your product line, go to Dell EMC Online Support (https://support.emc.com).
CONTENTS
Preface
Chapter 1 System requirements
Preparing your environment ........................................................................ 10 Specifications for ESRS Virtual Edition and ESRS Docker Edition.................. 10
Chapter 2 Installing
Overview..................................................................................................... 12Install options .......................................................................... 12
Configuring ESRS on Linux host using Docker Engine (ESRS DE)................... 12Prerequisites............................................................................ 12ESRS Installation Instructions................................................... 13Upgrading Docker..................................................................... 15
Configuring Operating System for VM (ESRS VE) .......................................... 16Configure Network.................................................................... 16
Chapter 3 Provisioning
Root logon and Admin setup ....................................................................... 30 Provisioning screens/ESRS setup ................................................................ 33
Registration.............................................................................. 33Email Configuration.................................................................. 43Policy Manager......................................................................... 44Connect Home.......................................................................... 45
Appendix A IP Addresses used by ESRS
Key information........................................................................................... 50 Article access.............................................................................................. 50
Appendix B ESRS v3.x on Hyper-V Install Process
Procedure ................................................................................................... 52
Glossary
ESRS Installation Guide 3

Contents
4 ESRS Installation Guide
PREFACE
As part of an effort to improve its product lines, EMC periodically releases revisions of its software and hardware. Therefore, some functions described in this document might not be supported by all versions of the software or hardware currently in use. The product release notes provide the most up-to-date information on product features.
Contact your EMC technical support professional if a product does not function properly or does not function as described in this document.
Note: This document was accurate at publication time. Go to Dell EMC Online Support (https://support.emc.com) to ensure that you are using the latest version of this document.
PurposeThis guide is part of the EMC Secure Remote Services (ESRS) Release 3.24 documentation set, and is intended for use by customers and prospective customers.
Readers of this guide are expected to be familiar with the following topics:
◆ Local network administration
◆ Internet protocols
◆ EMC storage system characteristics and administration
Related documentationThe following EMC publications provide additional information:
◆ EMC Secure Remote Services Release Notes
◆ EMC Secure Remote Services Technical Description
◆ EMC Secure Remote Services Pre-Site Checklist
◆ EMC Secure Remote Services Site Planning Guide
◆ EMC Secure Remote Services Port Requirements
◆ EMC Secure Remote Services Installation Guide
◆ EMC Secure Remote Services Operations Guide
◆ EMC Secure Remote Services Policy Manager Operations Guide
◆ ESRS Policy Manager 6.8 Installation Guide - Standard Windows
◆ ESRS Policy Manager 6.8 Installation Guide - Integrated AD (Windows)
Documentation conventionsEMC uses the following conventions for special notices:
ESRS Installation Guide 5
Preface
DANGER indicates a hazardous situation which, if not avoided, will result in death or serious injury.
WARNING indicates a hazardous situation which, if not avoided, could result in death or serious injury.
CAUTION, used with the safety alert symbol, indicates a hazardous situation which, if not avoided, could result in minor or moderate injury.
NOTICE is used to address practices not related to personal injury.
Note: A note presents information that is important, but not hazard-related.
Typographical conventions
EMC uses the following type style conventions in this document:
Where to get helpEMC support, product, and licensing information can be obtained as follows:
Product information — For documentation, release notes, software updates, or information about EMC products, go to Dell EMC Online Support at:
https://support.emc.com
Bold Use for names of interface elements, such as names of windows, dialog boxes, buttons, fields, tab names, key names, and menu paths (what the user specifically selects or clicks)
Italic Use for full titles of publications referenced in text and for variables in body text.
Monospace Use for:• System output, such as an error message or script• System code• Pathnames, file names, prompts, and syntax• Commands and options
Monospace italic Use for variables.
Monospace bold Use for user input.
[ ] Square brackets enclose optional values
| Vertical bar indicates alternate selections — the bar means “or”
{ } Braces enclose content that the user must specify, such as x or y or z
... Ellipses indicate nonessential information omitted from the example
6 ESRS Installation Guide

Preface
Technical support — Go to Dell EMC Online Support and click Service Center. You will see several options for contacting EMC Technical Support. Note that to open a service request, you must have a valid support agreement. Contact your EMC sales representative for details about obtaining a valid support agreement or with questions about your account.
Your commentsYour suggestions will help us continue to improve the accuracy, organization, and overall quality of the user publications. Send your opinions of this document to:
ESRS Installation Guide 7

Preface
8 ESRS Installation Guide
CHAPTER 1System requirements
This chapter provides the specifications that you will need to install and provision ESRS. Topics include:
◆ Preparing your environment......................................................................................... 10◆ Specifications for ESRS Virtual Edition and ESRS Docker Edition ......................... 10
System requirements 9
System requirements
Preparing your environmentFollow the KB solution for the Network Requirements: https://support.emc.com/kb/494729
Port 443 and 8443 have to be allowed outbound.
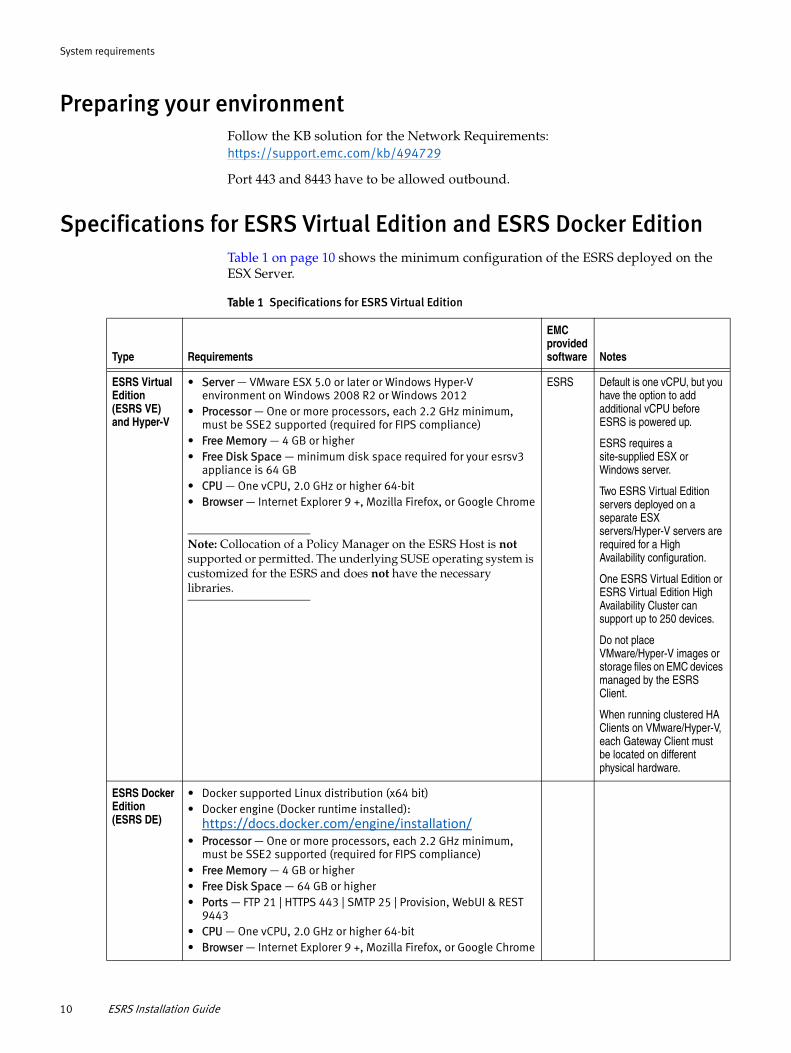
Specifications for ESRS Virtual Edition and ESRS Docker EditionTable 1 on page 10 shows the minimum configuration of the ESRS deployed on the ESX Server.
Table 1 Specifications for ESRS Virtual Edition
Type Requirements
EMC provided software Notes
ESRS Virtual Edition (ESRS VE) and Hyper-V
• Server — VMware ESX 5.0 or later or Windows Hyper-V environment on Windows 2008 R2 or Windows 2012
• Processor — One or more processors, each 2.2 GHz minimum, must be SSE2 supported (required for FIPS compliance)
• Free Memory — 4 GB or higher • Free Disk Space — minimum disk space required for your esrsv3
appliance is 64 GB• CPU — One vCPU, 2.0 GHz or higher 64-bit• Browser — Internet Explorer 9 +, Mozilla Firefox, or Google Chrome
Note: Collocation of a Policy Manager on the ESRS Host is not supported or permitted. The underlying SUSE operating system is customized for the ESRS and does not have the necessary libraries.
ESRS Default is one vCPU, but you have the option to add additional vCPU before ESRS is powered up.
ESRS requires a site-supplied ESX or Windows server.
Two ESRS Virtual Edition servers deployed on a separate ESX servers/Hyper-V servers are required for a High Availability configuration.
One ESRS Virtual Edition or ESRS Virtual Edition High Availability Cluster can support up to 250 devices.
Do not place VMware/Hyper-V images or storage files on EMC devices managed by the ESRS Client.
When running clustered HA Clients on VMware/Hyper-V, each Gateway Client must be located on different physical hardware.
ESRS Docker Edition (ESRS DE)
• Docker supported Linux distribution (x64 bit)• Docker engine (Docker runtime installed): https://docs.docker.com/engine/installation/
• Processor — One or more processors, each 2.2 GHz minimum, must be SSE2 supported (required for FIPS compliance)
• Free Memory — 4 GB or higher • Free Disk Space — 64 GB or higher• Ports — FTP 21 | HTTPS 443 | SMTP 25 | Provision, WebUI & REST
9443• CPU — One vCPU, 2.0 GHz or higher 64-bit• Browser — Internet Explorer 9 +, Mozilla Firefox, or Google Chrome
10 ESRS Installation Guide
CHAPTER 2Installing
This chapter provides the information that you will need to prepare the ESRS server for the installation of ESRS. Topics include:
◆ Overview.......................................................................................................................... 12◆ Configuring ESRS on Linux host using Docker Engine (ESRS DE) ........................ 12◆ Configuring Operating System for VM (ESRS VE).................................................... 16
Installing 11
Installing
OverviewApart from the ESRS backend system, there is an ESRS Gateway that is installed on the customer site either on the product itself (embedded ESRS Device Client), on a separate physical/virtual machine, or as a binary installer for Linux.
Install options There are two install options for ESRS:
◆ ESRS Docker Edition (ESRS DE)
• Can be run on a qualified Linux environment that supports Docker containers
Note: Cloud platform support for the ESRS Docker Edition is best effort. Passive FTP is not supported with ESRS DE.
◆ ESRS Virtual Edition (ESRS VE)
• ESRS can be run 100% virtually
• No additional hardware required
• No additional OS licenses required
The following section describes the binary install for ESRS on a Linux host.
Configuring ESRS on Linux host using Docker Engine (ESRS DE)
Prerequisites To install the ESRS Docker on a Linux host, ESRS requires that specific assigned ports (see Port Requirements section below) on the system be available. If the prerequisites are not provided, then the ESRS application installer aborts the installation.
System Requirements Before installing ESRS on a Linux host, the following must already be installed:
◆ Docker supported Linux distribution (x64 bit)
◆ Docker Engine (Docker runtime)
Using the binary installer, ESRS can be installed on the Linux distributions that support Docker. For a list of Linux distributions that are supported by Docker and for Docker installation instructions, refer to the following address: https://docs.docker.com/engine/installation/.
Note: The Docker Engine is supported on many Linux distributions (such as RHEL, CentOS, OpenSUSE, and SUSE Linux Enterprise), for example, the following is the link for a Docker installation on Red Hat Enterprise Linux (RHEL): https://docs.docker.com/engine/installation/linux/rhel/.
12 ESRS Installation Guide
Installing
Port Requirements ESRS runs its services on the following ports:
ESRS Installation Instructions
The ESRS installer performs the required prerequisite checks. In effect, it validates the system requirements, Docker runtime, and the specified port availability.
To install ESRS:
1. Download the latest ESRS Docker Edition (ESRS DE) for Linux on EMC Online Support and copy to the Linux server running Docker:
https://support.emc.com
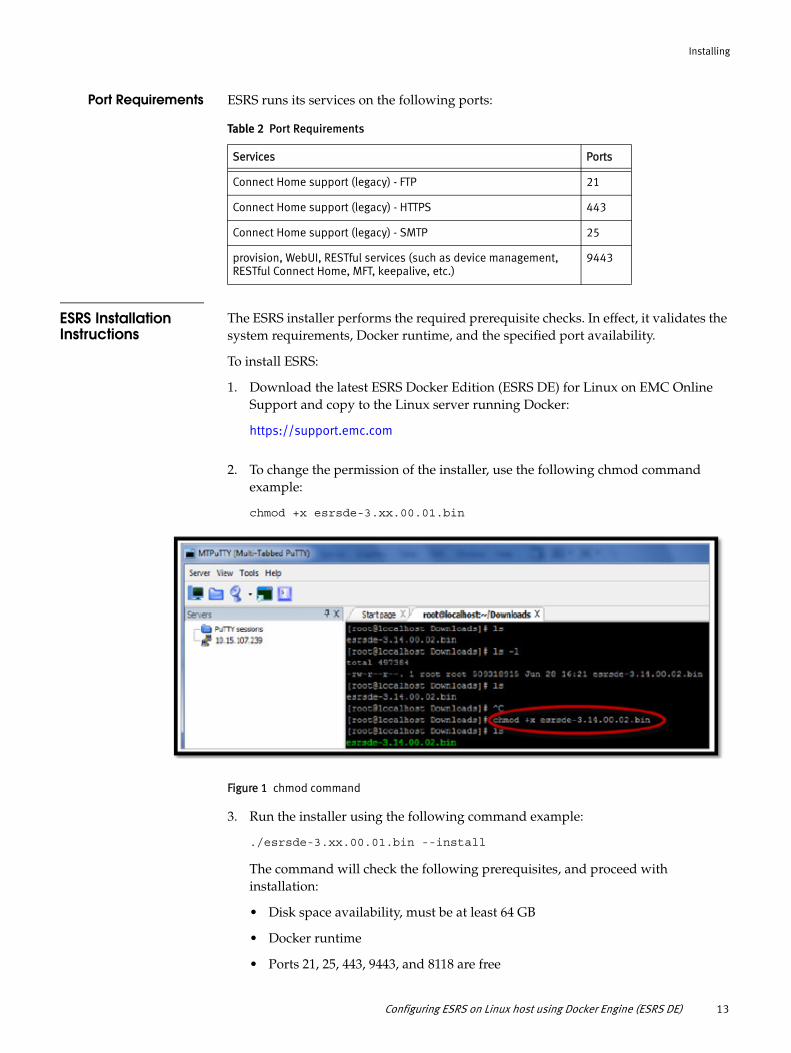
2. To change the permission of the installer, use the following chmod command example:
chmod +x esrsde-3.xx.00.01.bin
Figure 1 chmod command
3. Run the installer using the following command example:
./esrsde-3.xx.00.01.bin --install
The command will check the following prerequisites, and proceed with installation:
• Disk space availability, must be at least 64 GB
• Docker runtime
• Ports 21, 25, 443, 9443, and 8118 are free
Table 2 Port Requirements
Services Ports
Connect Home support (legacy) - FTP 21
Connect Home support (legacy) - HTTPS 443
Connect Home support (legacy) - SMTP 25
provision, WebUI, RESTful services (such as device management, RESTful Connect Home, MFT, keepalive, etc.)
9443
Configuring ESRS on Linux host using Docker Engine (ESRS DE) 13
Installing
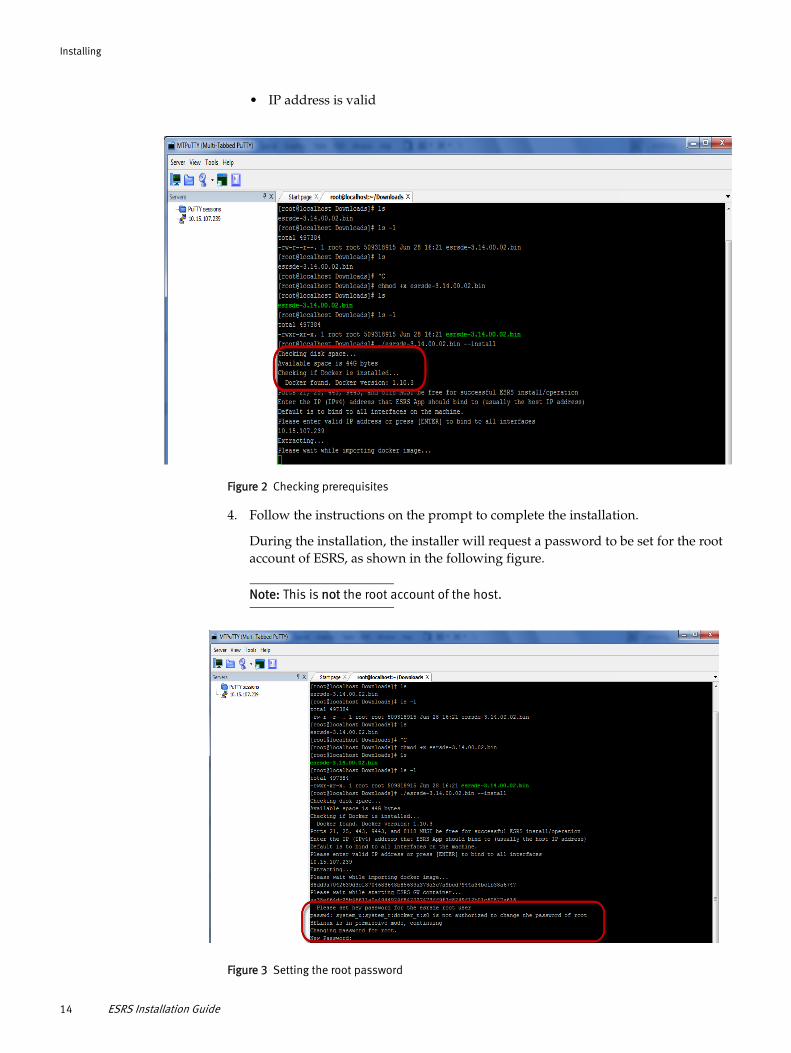
• IP address is valid
Figure 2 Checking prerequisites
4. Follow the instructions on the prompt to complete the installation.
During the installation, the installer will request a password to be set for the root account of ESRS, as shown in the following figure.
Note: This is not the root account of the host.
Figure 3 Setting the root password
14 ESRS Installation Guide
Installing
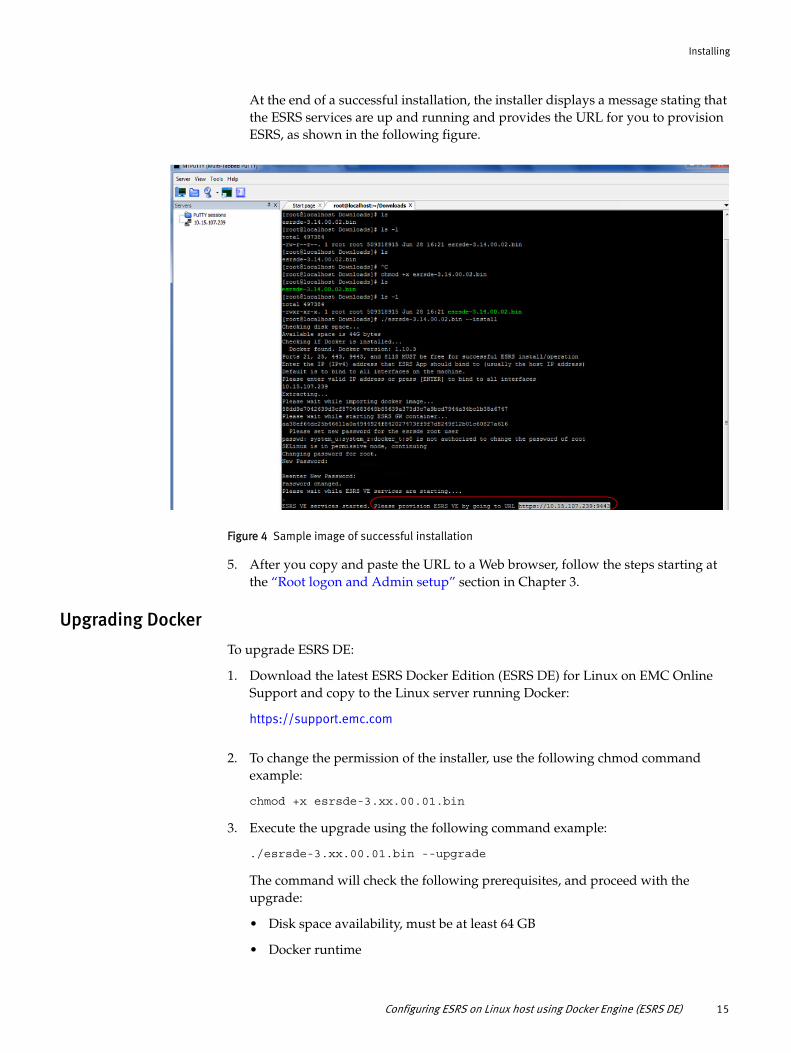
At the end of a successful installation, the installer displays a message stating that the ESRS services are up and running and provides the URL for you to provision ESRS, as shown in the following figure.
Figure 4 Sample image of successful installation
5. After you copy and paste the URL to a Web browser, follow the steps starting at the “Root logon and Admin setup” section in Chapter 3.
Upgrading Docker
To upgrade ESRS DE:
1. Download the latest ESRS Docker Edition (ESRS DE) for Linux on EMC Online Support and copy to the Linux server running Docker:
https://support.emc.com
2. To change the permission of the installer, use the following chmod command example:
chmod +x esrsde-3.xx.00.01.bin
3. Execute the upgrade using the following command example:
./esrsde-3.xx.00.01.bin --upgrade
The command will check the following prerequisites, and proceed with the upgrade:
• Disk space availability, must be at least 64 GB
• Docker runtime
Configuring ESRS on Linux host using Docker Engine (ESRS DE) 15
Installing
• Ports 21, 25, 443, 9443, and 8118 are free
• IP address is valid
4. Follow the instructions on the prompt to complete the upgrade.
During the upgrade, the installer will request a password to be set for the root account of ESRS, as shown in the following figure.
Note: This is not the root account of the host.
Configuring Operating System for VM (ESRS VE)
Configure Network The following are needed to set up ESRS:
◆ IP address
◆ Default gateway
◆ DNS server
The following are optional:
◆ Customer proxy server
◆ ESRS Policy Manager (strongly recommended)
◆ Mail server - if you would like notifications and/or Connect Home failover
Note the following:
◆ Do not change any elements (for example, firewall settings) of ESRS, according to customer security policies.
◆ Do not place VMware/Hyper-V images or storage files on EMC devices managed by ESRS.
◆ When running clustered HA ESRS Virtual Edition Clients on VMware /Hyper-V, each ESRS Virtual Edition Client must be located on a different physical ESX server.
First boot installation Before you can access the ESRS Virtual Edition Web UI, you must perform a first boot installation.
This section provides the steps to install and configure ESRS and to boot it through the ESX Server/HYPERV.
Requirements Before you begin, the following conditions must be met:
◆ The ESRS Virtual Edition software package has been downloaded by the customer and is available for installation
Note: The version downloaded must match the virtual environment to be used.
◆ Enterprise level:
• Hypervisor is available at the customer site
• VMware or Hyper-V is available
◆ Customer must create a VM and install the OS.
16 ESRS Installation Guide
Installing
To configure the ESRS during first boot, follow the steps in the following sections.
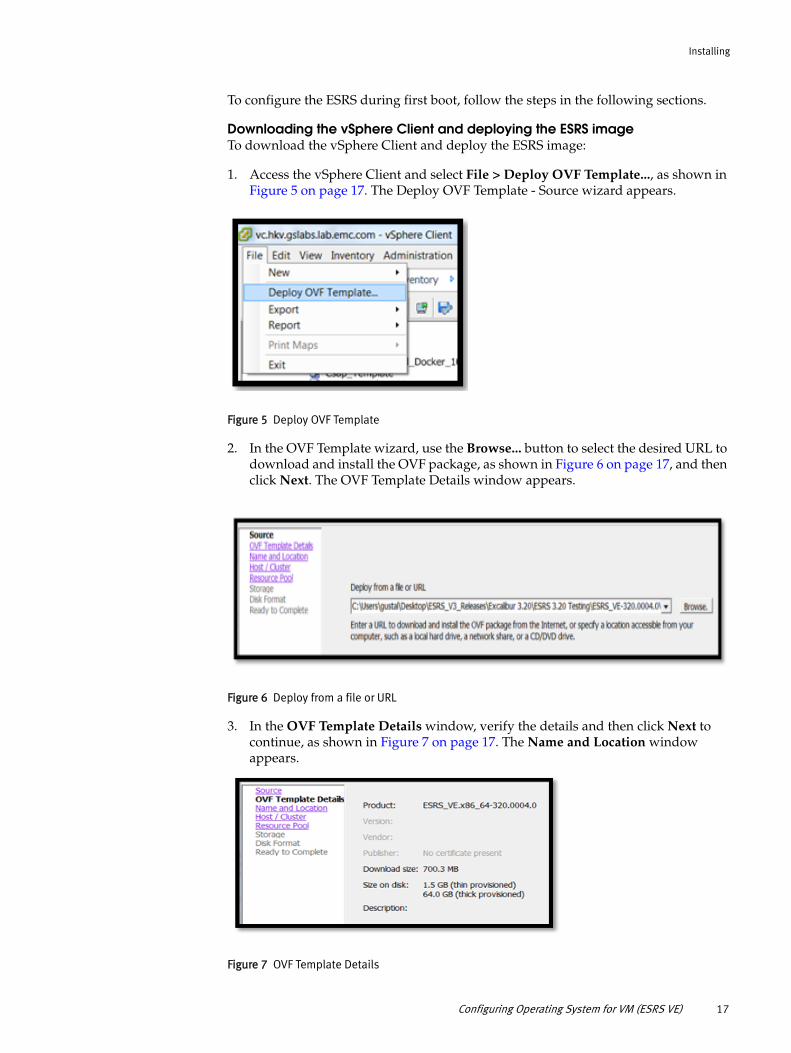
Downloading the vSphere Client and deploying the ESRS imageTo download the vSphere Client and deploy the ESRS image:
1. Access the vSphere Client and select File > Deploy OVF Template..., as shown in Figure 5 on page 17. The Deploy OVF Template - Source wizard appears.
Figure 5 Deploy OVF Template
2. In the OVF Template wizard, use the Browse... button to select the desired URL to download and install the OVF package, as shown in Figure 6 on page 17, and then click Next. The OVF Template Details window appears.
Figure 6 Deploy from a file or URL
3. In the OVF Template Details window, verify the details and then click Next to continue, as shown in Figure 7 on page 17. The Name and Location window appears.
Figure 7 OVF Template Details
Configuring Operating System for VM (ESRS VE) 17
Installing
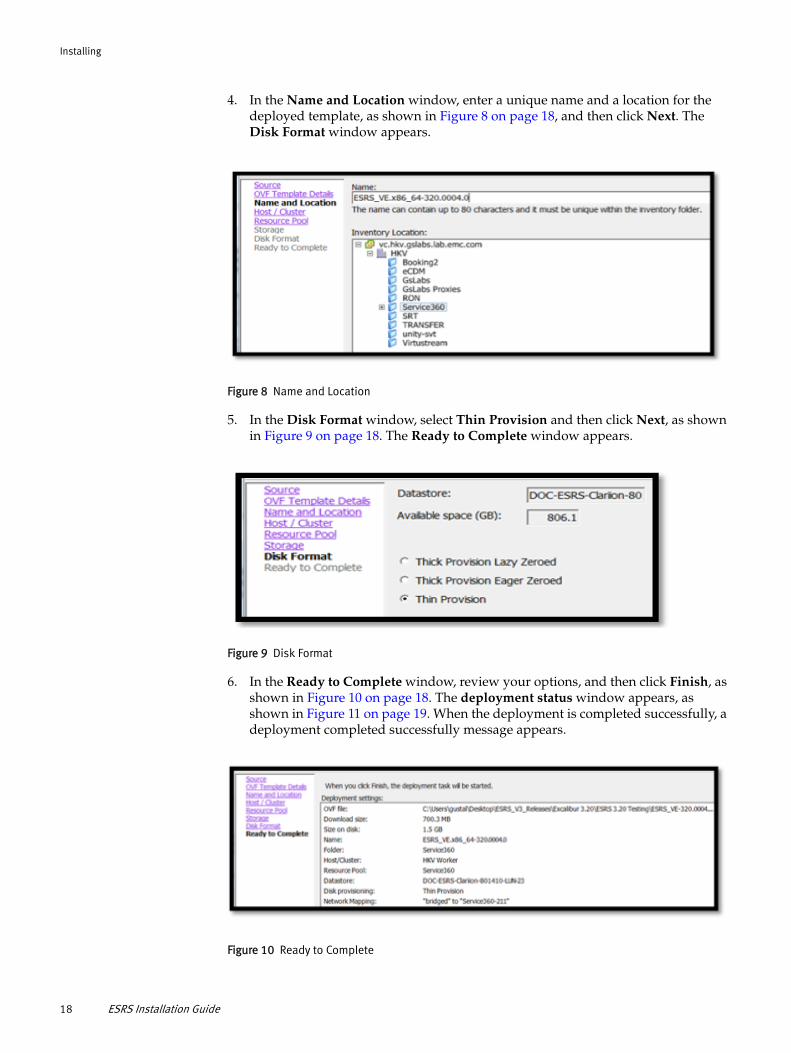
4. In the Name and Location window, enter a unique name and a location for the deployed template, as shown in Figure 8 on page 18, and then click Next. The Disk Format window appears.
Figure 8 Name and Location
5. In the Disk Format window, select Thin Provision and then click Next, as shown in Figure 9 on page 18. The Ready to Complete window appears.
Figure 9 Disk Format
6. In the Ready to Complete window, review your options, and then click Finish, as shown in Figure 10 on page 18. The deployment status window appears, as shown in Figure 11 on page 19. When the deployment is completed successfully, a deployment completed successfully message appears.
Figure 10 Ready to Complete
18 ESRS Installation Guide
Installing
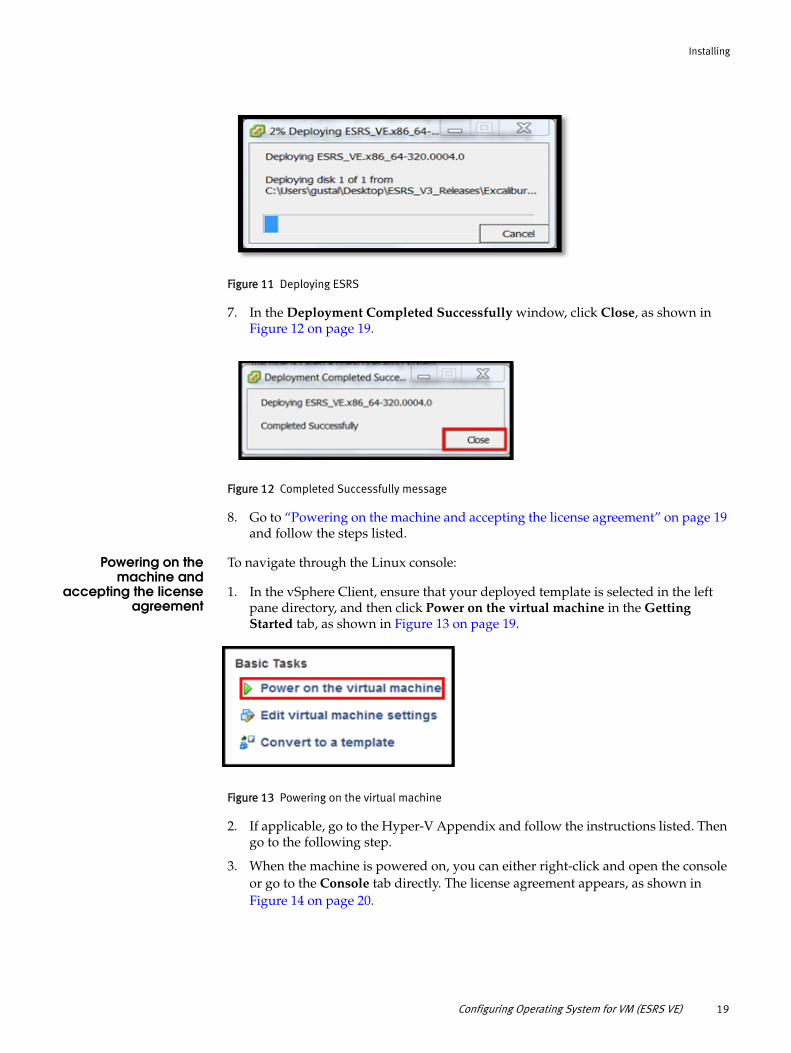
Figure 11 Deploying ESRS
7. In the Deployment Completed Successfully window, click Close, as shown in Figure 12 on page 19.
Figure 12 Completed Successfully message
8. Go to “Powering on the machine and accepting the license agreement” on page 19 and follow the steps listed.
Powering on themachine and
accepting the licenseagreement
To navigate through the Linux console:
1. In the vSphere Client, ensure that your deployed template is selected in the left pane directory, and then click Power on the virtual machine in the Getting Started tab, as shown in Figure 13 on page 19.
Figure 13 Powering on the virtual machine
2. If applicable, go to the Hyper-V Appendix and follow the instructions listed. Then go to the following step.
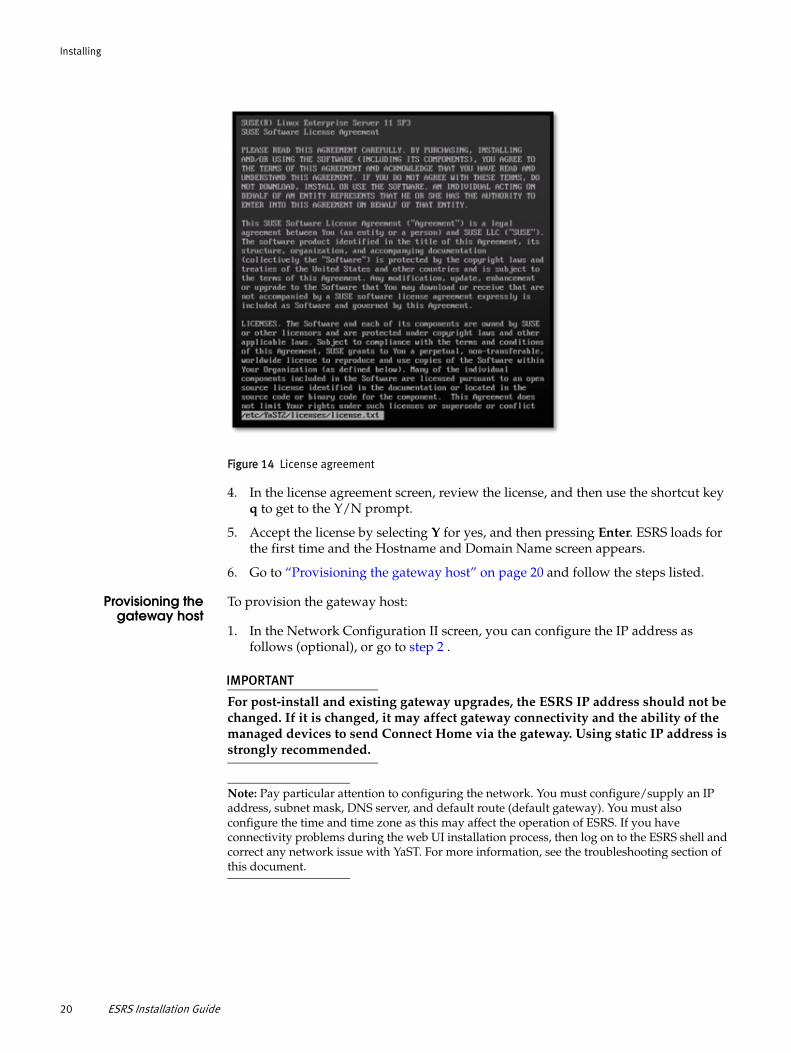
3. When the machine is powered on, you can either right-click and open the console or go to the Console tab directly. The license agreement appears, as shown in Figure 14 on page 20.
Configuring Operating System for VM (ESRS VE) 19
Installing
Figure 14 License agreement
4. In the license agreement screen, review the license, and then use the shortcut key q to get to the Y/N prompt.
5. Accept the license by selecting Y for yes, and then pressing Enter. ESRS loads for the first time and the Hostname and Domain Name screen appears.
6. Go to “Provisioning the gateway host” on page 20 and follow the steps listed.
Provisioning thegateway host
To provision the gateway host:
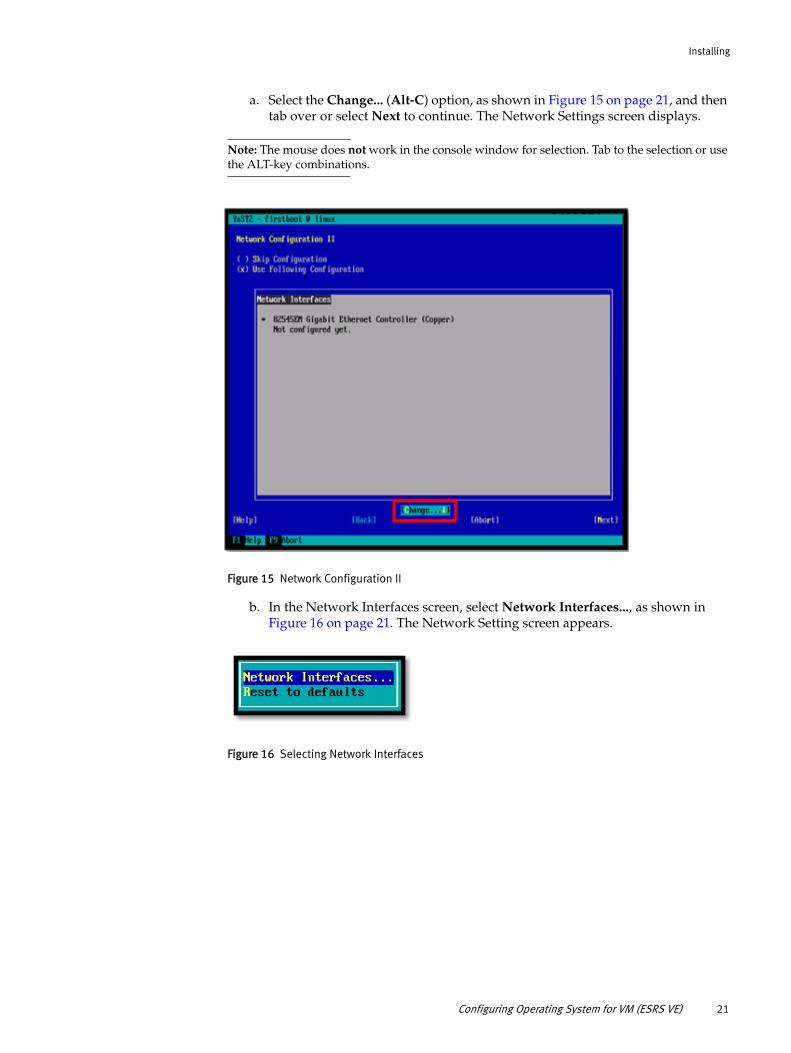
1. In the Network Configuration II screen, you can configure the IP address as follows (optional), or go to step 2 .
IMPORTANT
For post-install and existing gateway upgrades, the ESRS IP address should not be changed. If it is changed, it may affect gateway connectivity and the ability of the managed devices to send Connect Home via the gateway. Using static IP address is strongly recommended.
Note: Pay particular attention to configuring the network. You must configure/supply an IP address, subnet mask, DNS server, and default route (default gateway). You must also configure the time and time zone as this may affect the operation of ESRS. If you have connectivity problems during the web UI installation process, then log on to the ESRS shell and correct any network issue with YaST. For more information, see the troubleshooting section of this document.
20 ESRS Installation Guide
Installing
a. Select the Change... (Alt-C) option, as shown in Figure 15 on page 21, and then tab over or select Next to continue. The Network Settings screen displays.
Note: The mouse does not work in the console window for selection. Tab to the selection or use the ALT-key combinations.
Figure 15 Network Configuration II
b. In the Network Interfaces screen, select Network Interfaces..., as shown in Figure 16 on page 21. The Network Setting screen appears.
Figure 16 Selecting Network Interfaces
Configuring Operating System for VM (ESRS VE) 21

Installing
c. In the Network Settings screen, select Edit (Alt-I), as shown in Figure 17 on page 22. The Network Card Setup screen appears.
Figure 17 Network Settings
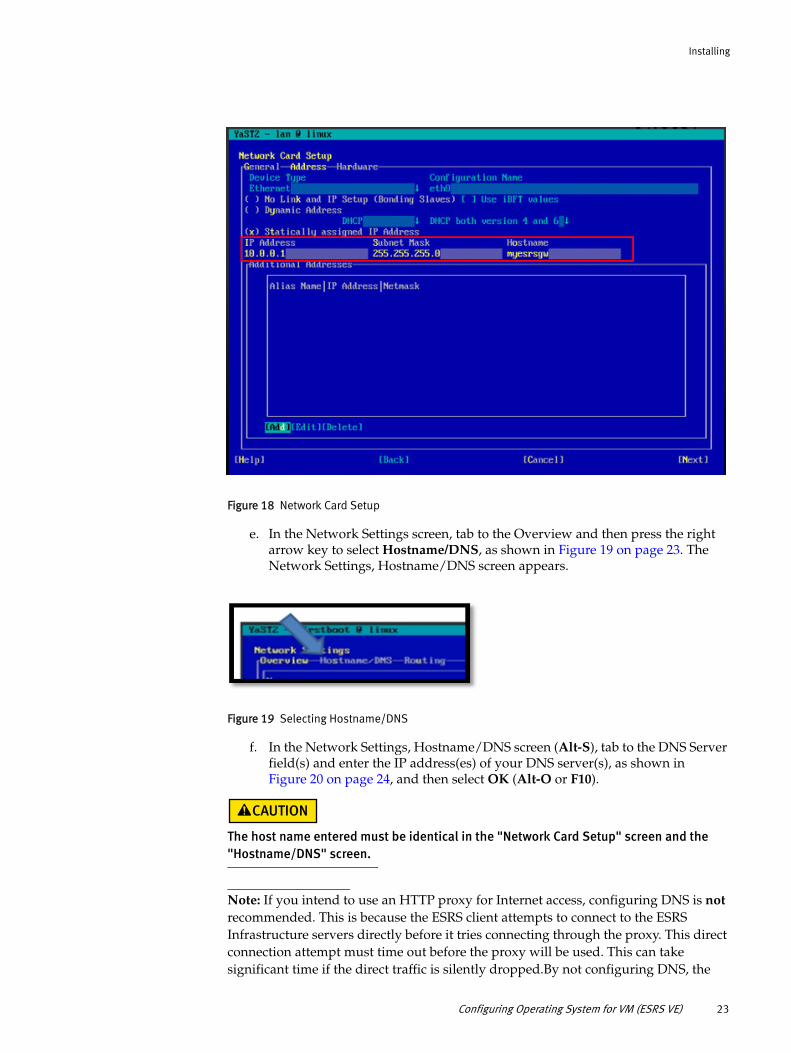
d. In the Network Card Setup screen, tab to the fields and enter the information for static IP address, subnet mask, and host name, as shown in Figure 18 on page 23, and then select Next (Alt-N or F10). The Network Settings screen appears.
The host name entered must be identical in the "Network Card Setup" screen and the "Hostname/DNS" screen.
22 ESRS Installation Guide
Installing
Figure 18 Network Card Setup
e. In the Network Settings screen, tab to the Overview and then press the right arrow key to select Hostname/DNS, as shown in Figure 19 on page 23. The Network Settings, Hostname/DNS screen appears.
Figure 19 Selecting Hostname/DNS
f. In the Network Settings, Hostname/DNS screen (Alt-S), tab to the DNS Server field(s) and enter the IP address(es) of your DNS server(s), as shown in Figure 20 on page 24, and then select OK (Alt-O or F10).
The host name entered must be identical in the "Network Card Setup" screen and the "Hostname/DNS" screen.
Note: If you intend to use an HTTP proxy for Internet access, configuring DNS is not recommended. This is because the ESRS client attempts to connect to the ESRS Infrastructure servers directly before it tries connecting through the proxy. This direct connection attempt must time out before the proxy will be used. This can take significant time if the direct traffic is silently dropped.By not configuring DNS, the
Configuring Operating System for VM (ESRS VE) 23
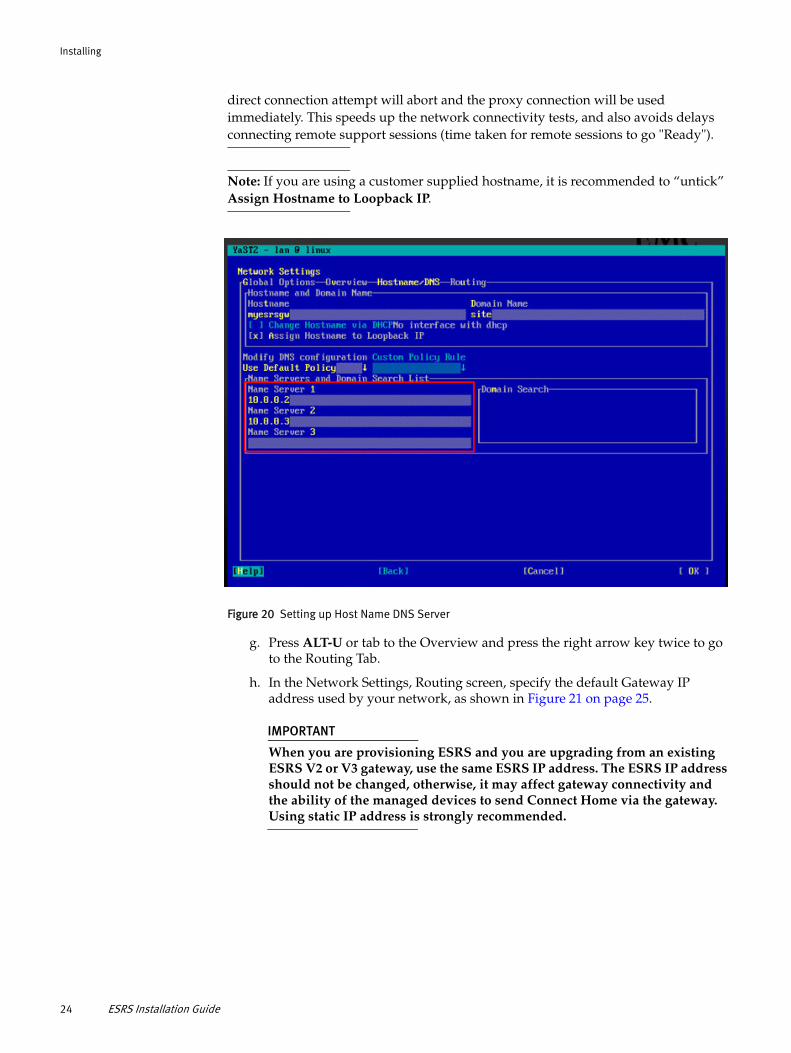
Installing
direct connection attempt will abort and the proxy connection will be used immediately. This speeds up the network connectivity tests, and also avoids delays connecting remote support sessions (time taken for remote sessions to go "Ready").
Note: If you are using a customer supplied hostname, it is recommended to “untick” Assign Hostname to Loopback IP.
Figure 20 Setting up Host Name DNS Server
g. Press ALT-U or tab to the Overview and press the right arrow key twice to go to the Routing Tab.
h. In the Network Settings, Routing screen, specify the default Gateway IP address used by your network, as shown in Figure 21 on page 25.
IMPORTANT
When you are provisioning ESRS and you are upgrading from an existing ESRS V2 or V3 gateway, use the same ESRS IP address. The ESRS IP address should not be changed, otherwise, it may affect gateway connectivity and the ability of the managed devices to send Connect Home via the gateway. Using static IP address is strongly recommended.
24 ESRS Installation Guide
Installing
Figure 21 Specifying the default Gateway IP address
i. Select OK (Alt-O or F10) to continue. The Network Interfaces screen appears again.
j. In the Network Interfaces screen, select Next (Alt-N or F10). The Saving Network Configuration screen appears.
k. In the Saving Network Configuration screen, when configuration is completed, select Next (Alt-N or F10). The Clock and Time Zone screen appears.
l. Go to step 2 .
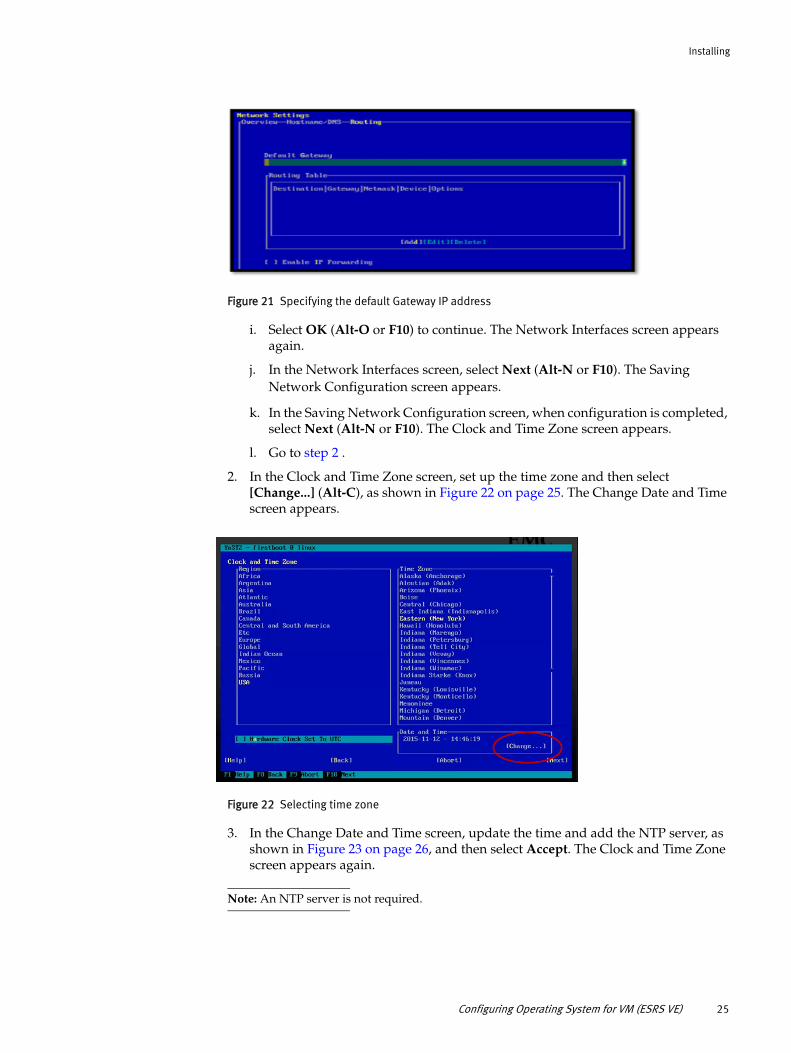
2. In the Clock and Time Zone screen, set up the time zone and then select [Change...] (Alt-C), as shown in Figure 22 on page 25. The Change Date and Time screen appears.
Figure 22 Selecting time zone
3. In the Change Date and Time screen, update the time and add the NTP server, as shown in Figure 23 on page 26, and then select Accept. The Clock and Time Zone screen appears again.
Note: An NTP server is not required.
Configuring Operating System for VM (ESRS VE) 25
Installing
Figure 23 Change Date and Time
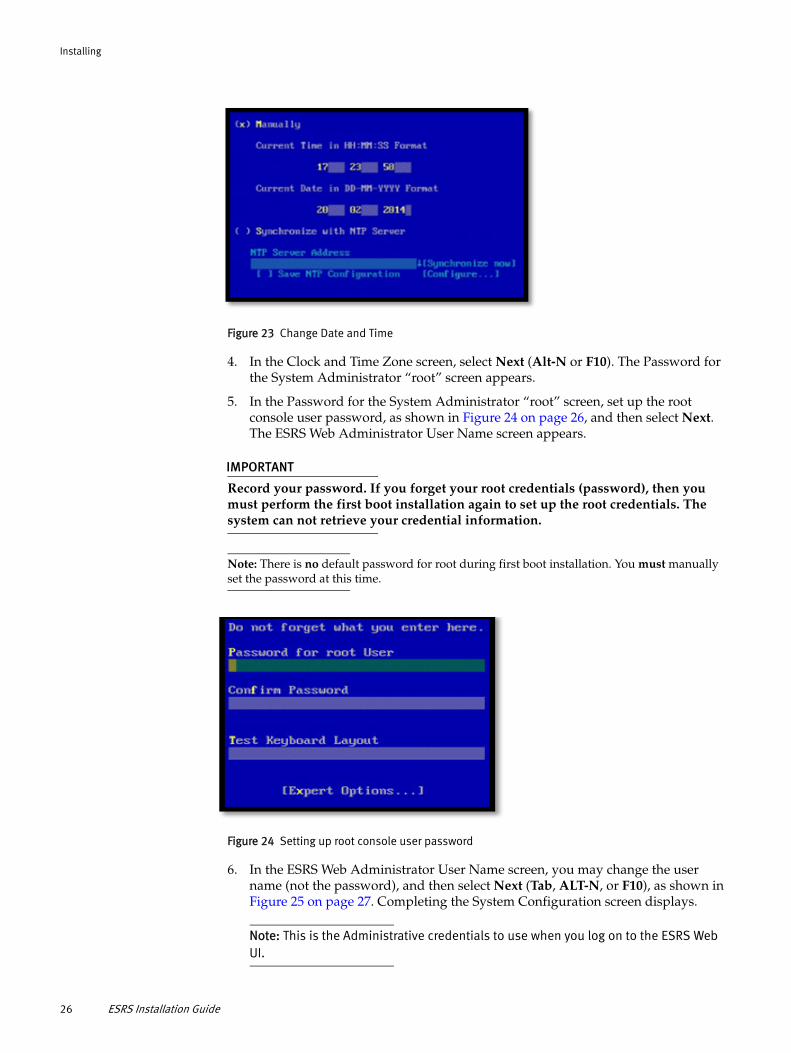
4. In the Clock and Time Zone screen, select Next (Alt-N or F10). The Password for the System Administrator “root” screen appears.
5. In the Password for the System Administrator “root” screen, set up the root console user password, as shown in Figure 24 on page 26, and then select Next. The ESRS Web Administrator User Name screen appears.
IMPORTANT
Record your password. If you forget your root credentials (password), then you must perform the first boot installation again to set up the root credentials. The system can not retrieve your credential information.
Note: There is no default password for root during first boot installation. You must manually set the password at this time.
Figure 24 Setting up root console user password
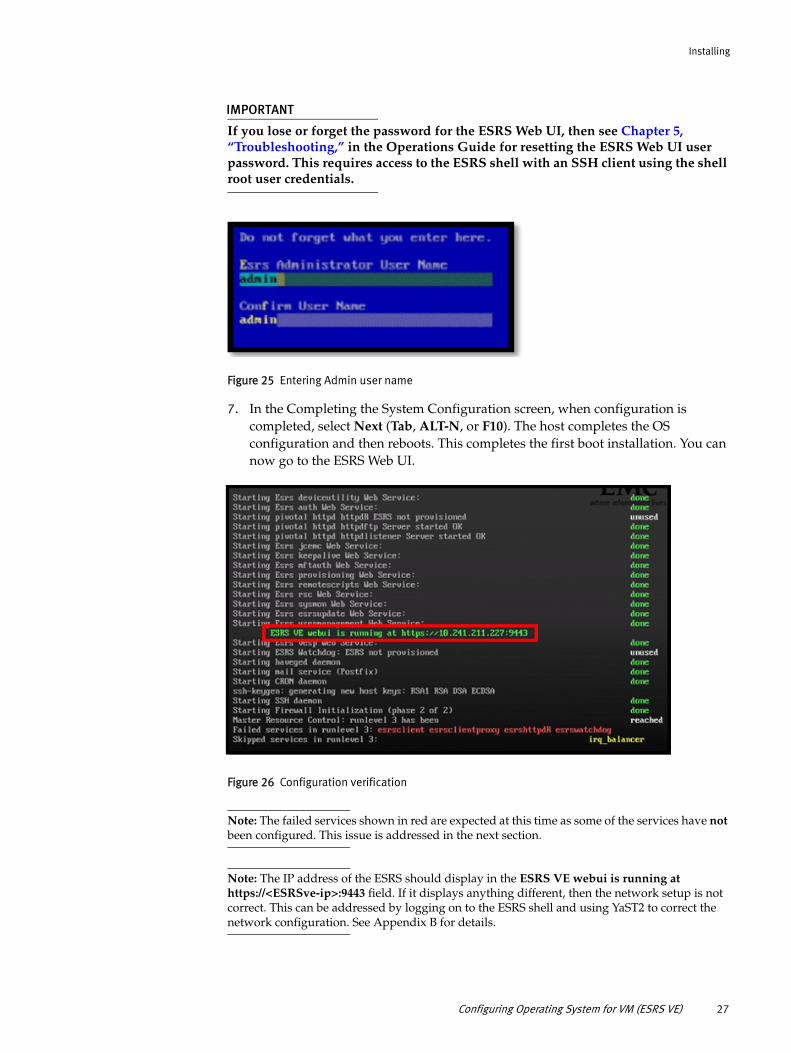
6. In the ESRS Web Administrator User Name screen, you may change the user name (not the password), and then select Next (Tab, ALT-N, or F10), as shown in Figure 25 on page 27. Completing the System Configuration screen displays.
Note: This is the Administrative credentials to use when you log on to the ESRS Web UI.
26 ESRS Installation Guide
Installing
IMPORTANT
If you lose or forget the password for the ESRS Web UI, then see Chapter 5, “Troubleshooting,” in the Operations Guide for resetting the ESRS Web UI user password. This requires access to the ESRS shell with an SSH client using the shell root user credentials.
Figure 25 Entering Admin user name
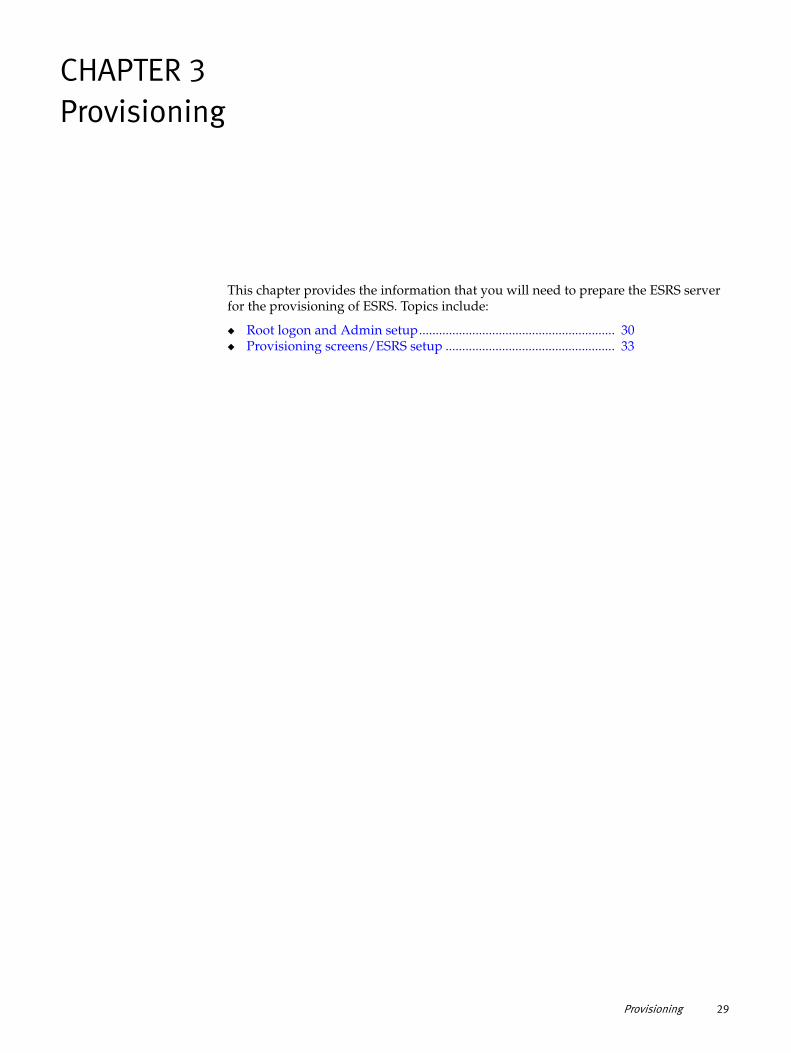
7. In the Completing the System Configuration screen, when configuration is completed, select Next (Tab, ALT-N, or F10). The host completes the OS configuration and then reboots. This completes the first boot installation. You can now go to the ESRS Web UI.
Figure 26 Configuration verification
Note: The failed services shown in red are expected at this time as some of the services have not been configured. This issue is addressed in the next section.
Note: The IP address of the ESRS should display in the ESRS VE webui is running at https://<ESRSve-ip>:9443 field. If it displays anything different, then the network setup is not correct. This can be addressed by logging on to the ESRS shell and using YaST2 to correct the network configuration. See Appendix B for details.
Configuring Operating System for VM (ESRS VE) 27

Note: It is recommended that before you launch the WEB UI portion of the ESRS install, you log on to the shell and verify the network, DNS, and default gateway configurations and connectivity. You can use the CECT to perform these tests. If there are issues with the configuration, then use YaST2 to correct them. See Appendix B for details.
28 ESRS Installation Guide
CHAPTER 3Provisioning
This chapter provides the information that you will need to prepare the ESRS server for the provisioning of ESRS. Topics include:
◆ Root logon and Admin setup........................................................... 30◆ Provisioning screens/ESRS setup ................................................... 33
Provisioning 29
Provisioning
Root logon and Admin setupThe root logon and Admin setup described in this section are only a one-time setup, which is performed after a successful first boot configuration.
To initially log on to the ESRS Web UI after a first boot:
1. Access the ESRS Web UI using the following URL, either in Internet Explorer 9 (IE9) or later, Google Chrome, or Mozilla Firefox web browsers:
https://<ESRSve-ip>:9443/
The Root Login page appears.
Note: The Root Login page, as shown in Figure 27 on page 30, only appears the first time you log on to ESRS, after a successful first boot configuration. Also, when you initially provision ESRS, the version being installed displays in the upper-left corner, after the word ESRS Virtual Edition.
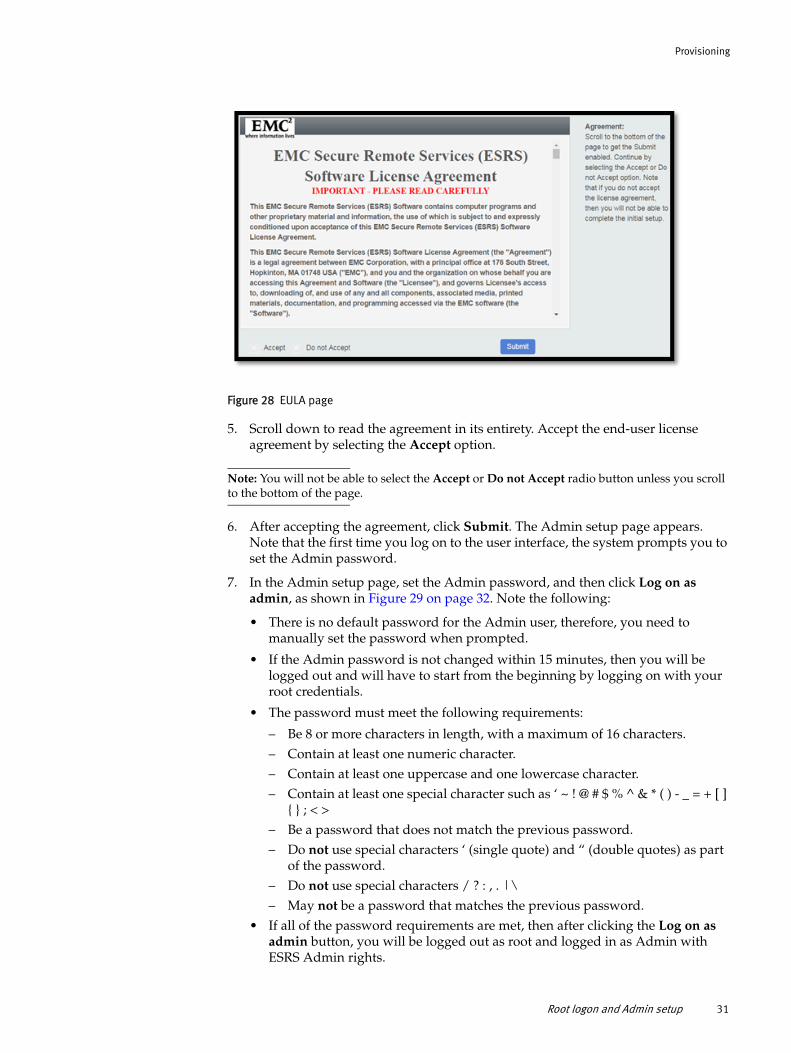
2. In the User Name text box, enter root as the user name, as shown in Figure 27 on page 30.
Figure 27 Login page
3. In the Password text box, enter the root password that you set during the first boot installation.
IMPORTANT
If you forget your root password, not your Admin password, then you must perform the first boot installation again to set up a new root password. The system can not retrieve your root password. To reset your ESRS Version 3 (ESRSv3) Web UI Admin password using the Web UI, see Chapter 5, “Troubleshooting,” in the Operations Guide for resetting the ESRS Web UI user password.
4. Click Login. The EULA license agreement page appears.
30 ESRS Installation Guide
Provisioning
Figure 28 EULA page
5. Scroll down to read the agreement in its entirety. Accept the end-user license agreement by selecting the Accept option.
Note: You will not be able to select the Accept or Do not Accept radio button unless you scroll to the bottom of the page.
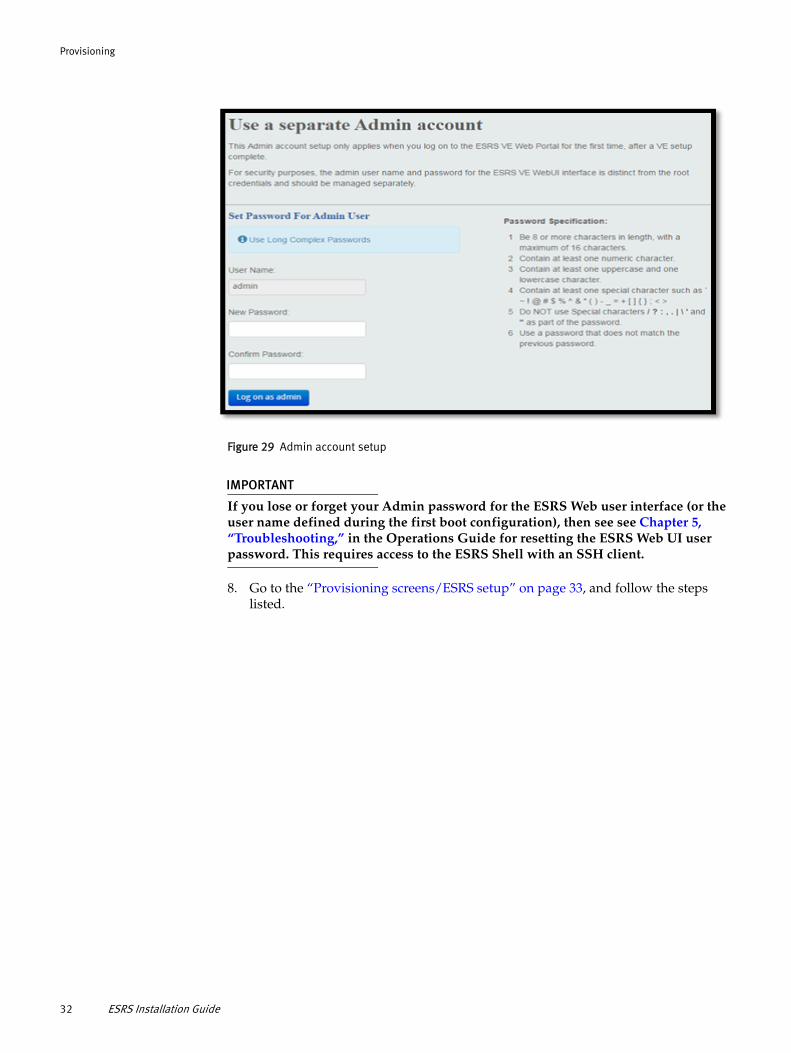
6. After accepting the agreement, click Submit. The Admin setup page appears. Note that the first time you log on to the user interface, the system prompts you to set the Admin password.
7. In the Admin setup page, set the Admin password, and then click Log on as admin, as shown in Figure 29 on page 32. Note the following:
• There is no default password for the Admin user, therefore, you need to manually set the password when prompted.
• If the Admin password is not changed within 15 minutes, then you will be logged out and will have to start from the beginning by logging on with your root credentials.
• The password must meet the following requirements:
– Be 8 or more characters in length, with a maximum of 16 characters. – Contain at least one numeric character. – Contain at least one uppercase and one lowercase character. – Contain at least one special character such as ‘ ~ ! @ # $ % ^ & * ( ) - _ = + [ ]
{ } ; < > – Be a password that does not match the previous password.– Do not use special characters ‘ (single quote) and “ (double quotes) as part
of the password.– Do not use special characters / ? : , . |\– May not be a password that matches the previous password.
• If all of the password requirements are met, then after clicking the Log on as admin button, you will be logged out as root and logged in as Admin with ESRS Admin rights.
Root logon and Admin setup 31
Provisioning
Figure 29 Admin account setup
IMPORTANT
If you lose or forget your Admin password for the ESRS Web user interface (or the user name defined during the first boot configuration), then see see Chapter 5, “Troubleshooting,” in the Operations Guide for resetting the ESRS Web UI user password. This requires access to the ESRS Shell with an SSH client.
8. Go to the “Provisioning screens/ESRS setup” on page 33, and follow the steps listed.
32 ESRS Installation Guide
Provisioning
Provisioning screens/ESRS setup
Registration To register for ESRS:
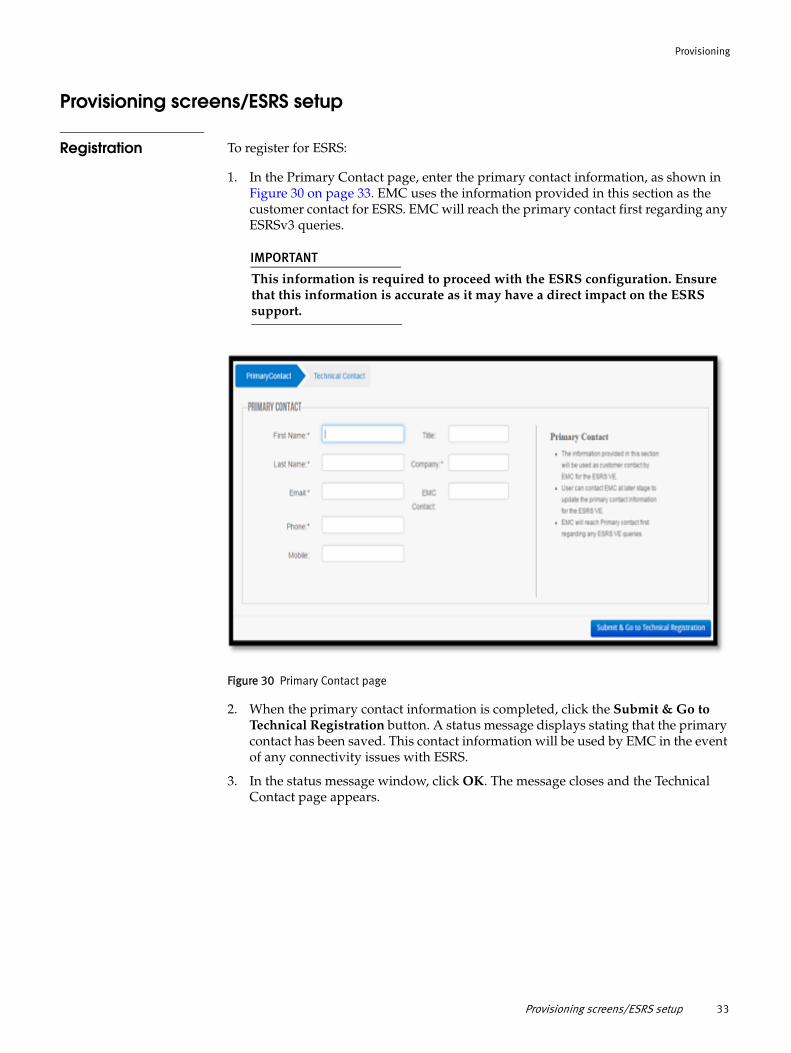
1. In the Primary Contact page, enter the primary contact information, as shown in Figure 30 on page 33. EMC uses the information provided in this section as the customer contact for ESRS. EMC will reach the primary contact first regarding any ESRSv3 queries.
IMPORTANT
This information is required to proceed with the ESRS configuration. Ensure that this information is accurate as it may have a direct impact on the ESRS support.
Figure 30 Primary Contact page
2. When the primary contact information is completed, click the Submit & Go to Technical Registration button. A status message displays stating that the primary contact has been saved. This contact information will be used by EMC in the event of any connectivity issues with ESRS.
3. In the status message window, click OK. The message closes and the Technical Contact page appears.
Provisioning screens/ESRS setup 33
Provisioning
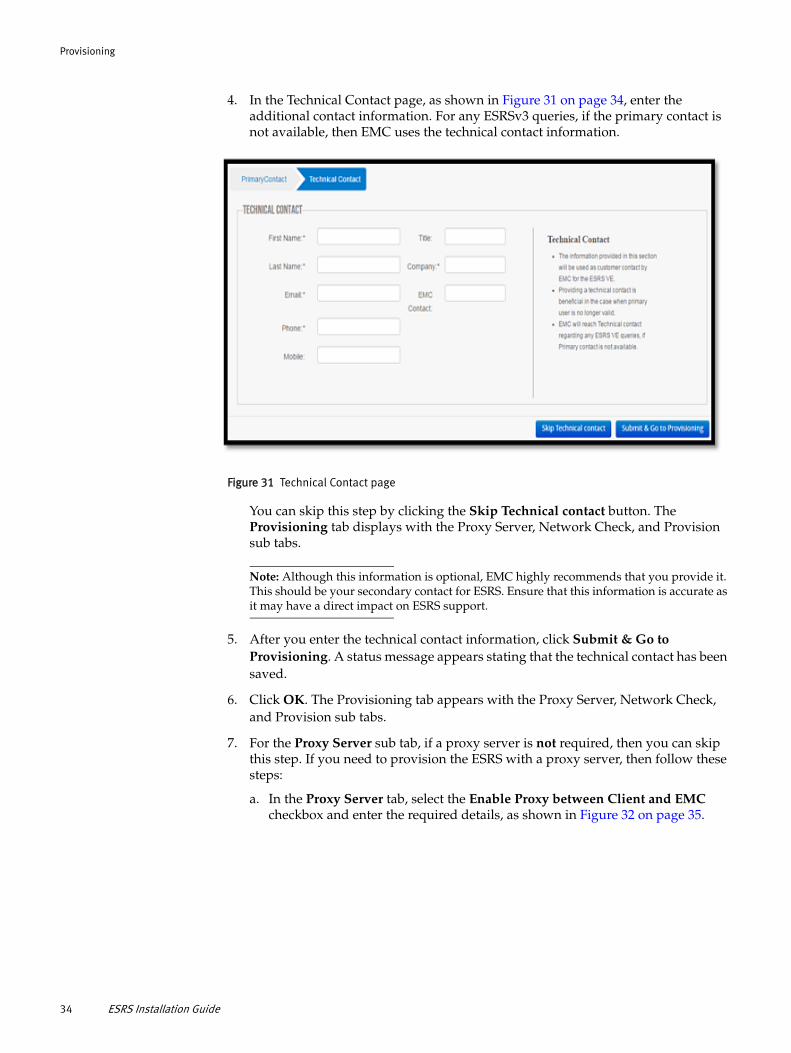
4. In the Technical Contact page, as shown in Figure 31 on page 34, enter the additional contact information. For any ESRSv3 queries, if the primary contact is not available, then EMC uses the technical contact information.
Figure 31 Technical Contact page
You can skip this step by clicking the Skip Technical contact button. The Provisioning tab displays with the Proxy Server, Network Check, and Provision sub tabs.
Note: Although this information is optional, EMC highly recommends that you provide it. This should be your secondary contact for ESRS. Ensure that this information is accurate as it may have a direct impact on ESRS support.
5. After you enter the technical contact information, click Submit & Go to Provisioning. A status message appears stating that the technical contact has been saved.
6. Click OK. The Provisioning tab appears with the Proxy Server, Network Check, and Provision sub tabs.
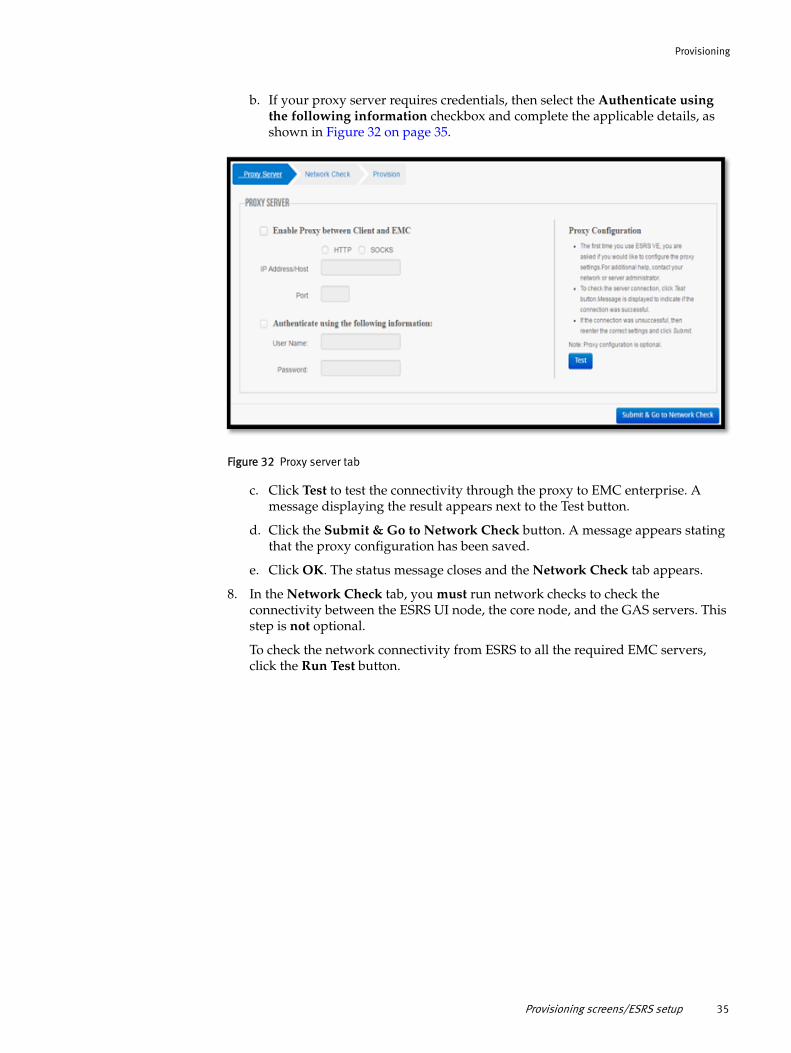
7. For the Proxy Server sub tab, if a proxy server is not required, then you can skip this step. If you need to provision the ESRS with a proxy server, then follow these steps:
a. In the Proxy Server tab, select the Enable Proxy between Client and EMC checkbox and enter the required details, as shown in Figure 32 on page 35.
34 ESRS Installation Guide
Provisioning
b. If your proxy server requires credentials, then select the Authenticate using the following information checkbox and complete the applicable details, as shown in Figure 32 on page 35.
Figure 32 Proxy server tab
c. Click Test to test the connectivity through the proxy to EMC enterprise. A message displaying the result appears next to the Test button.
d. Click the Submit & Go to Network Check button. A message appears stating that the proxy configuration has been saved.
e. Click OK. The status message closes and the Network Check tab appears.
8. In the Network Check tab, you must run network checks to check the connectivity between the ESRS UI node, the core node, and the GAS servers. This step is not optional.
To check the network connectivity from ESRS to all the required EMC servers, click the Run Test button.
Provisioning screens/ESRS setup 35
Provisioning
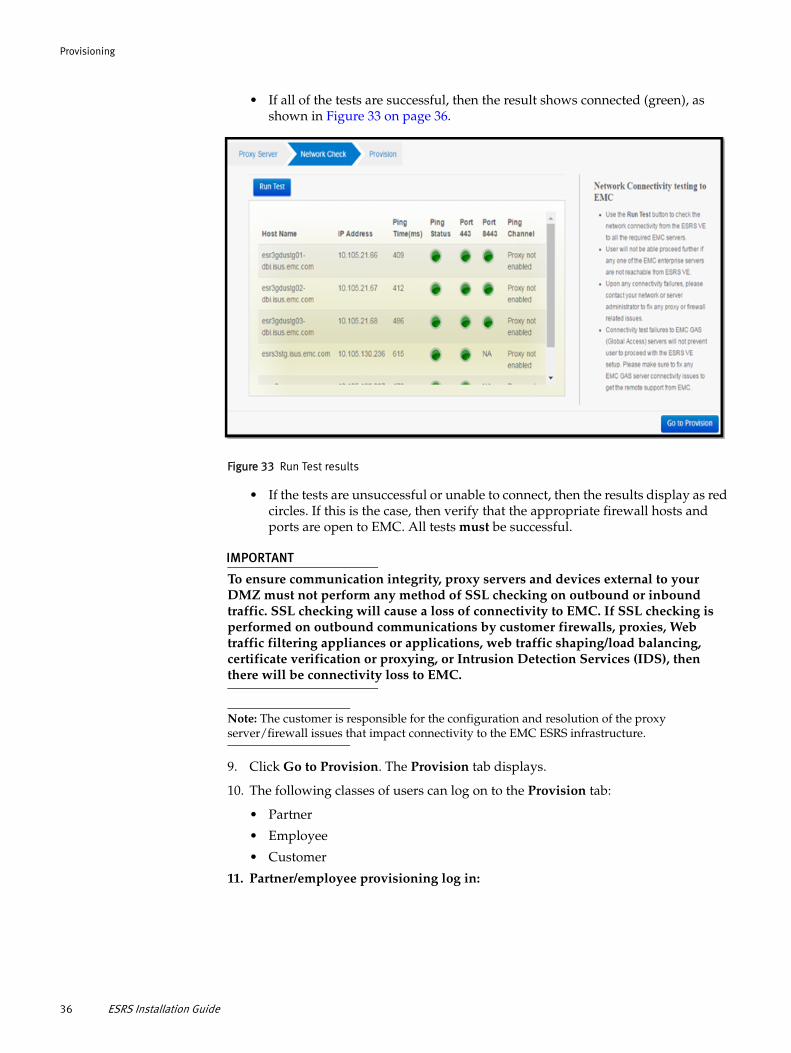
• If all of the tests are successful, then the result shows connected (green), as shown in Figure 33 on page 36.
Figure 33 Run Test results
• If the tests are unsuccessful or unable to connect, then the results display as red circles. If this is the case, then verify that the appropriate firewall hosts and ports are open to EMC. All tests must be successful.
IMPORTANT
To ensure communication integrity, proxy servers and devices external to your DMZ must not perform any method of SSL checking on outbound or inbound traffic. SSL checking will cause a loss of connectivity to EMC. If SSL checking is performed on outbound communications by customer firewalls, proxies, Web traffic filtering appliances or applications, web traffic shaping/load balancing, certificate verification or proxying, or Intrusion Detection Services (IDS), then there will be connectivity loss to EMC.
Note: The customer is responsible for the configuration and resolution of the proxy server/firewall issues that impact connectivity to the EMC ESRS infrastructure.
9. Click Go to Provision. The Provision tab displays.
10. The following classes of users can log on to the Provision tab:
• Partner
• Employee
• Customer
11. Partner/employee provisioning log in:
36 ESRS Installation Guide
Provisioning
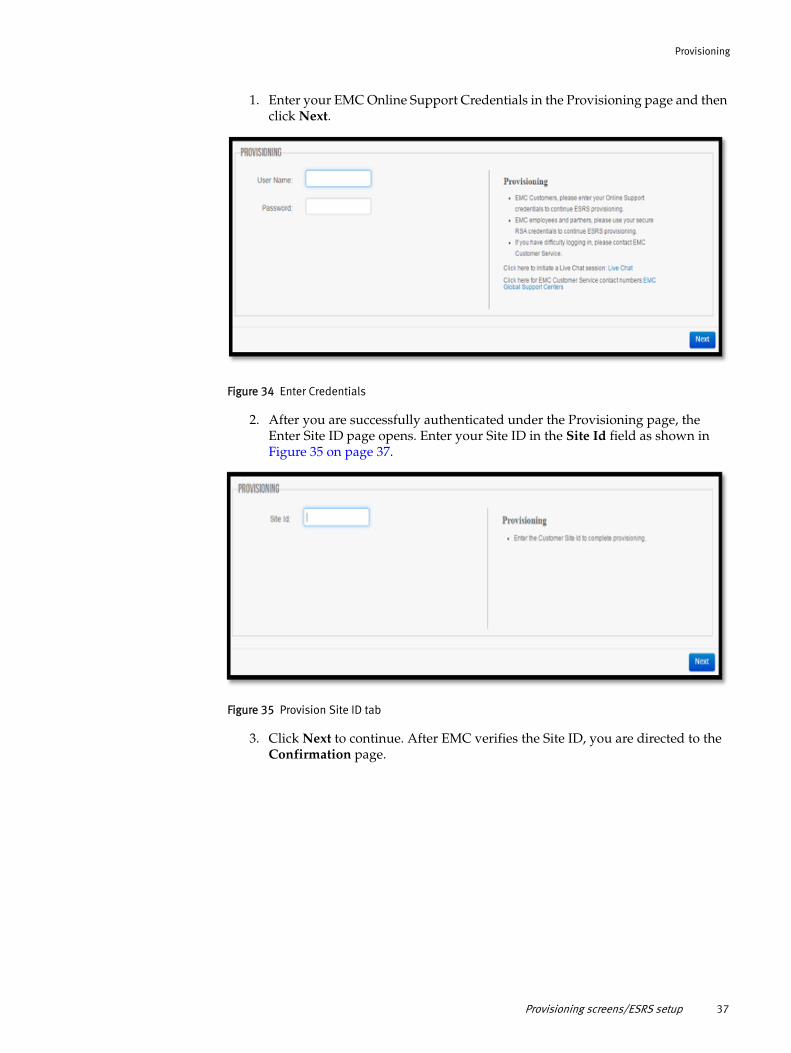
1. Enter your EMC Online Support Credentials in the Provisioning page and then click Next.
Figure 34 Enter Credentials
2. After you are successfully authenticated under the Provisioning page, the Enter Site ID page opens. Enter your Site ID in the Site Id field as shown in Figure 35 on page 37.
Figure 35 Provision Site ID tab
3. Click Next to continue. After EMC verifies the Site ID, you are directed to the Confirmation page.
Provisioning screens/ESRS setup 37
Provisioning
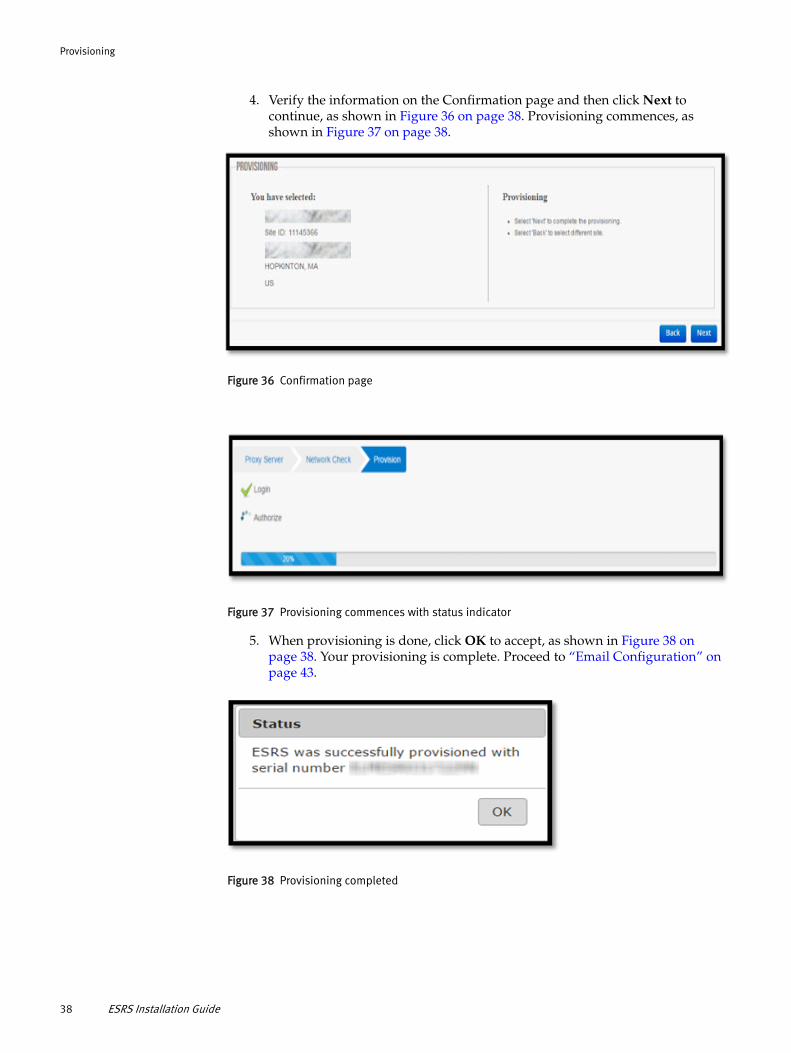
4. Verify the information on the Confirmation page and then click Next to continue, as shown in Figure 36 on page 38. Provisioning commences, as shown in Figure 37 on page 38.
Figure 36 Confirmation page
Figure 37 Provisioning commences with status indicator
5. When provisioning is done, click OK to accept, as shown in Figure 38 on page 38. Your provisioning is complete. Proceed to “Email Configuration” on page 43.
Figure 38 Provisioning completed
38 ESRS Installation Guide
Provisioning
12. Customer provisioning log in:
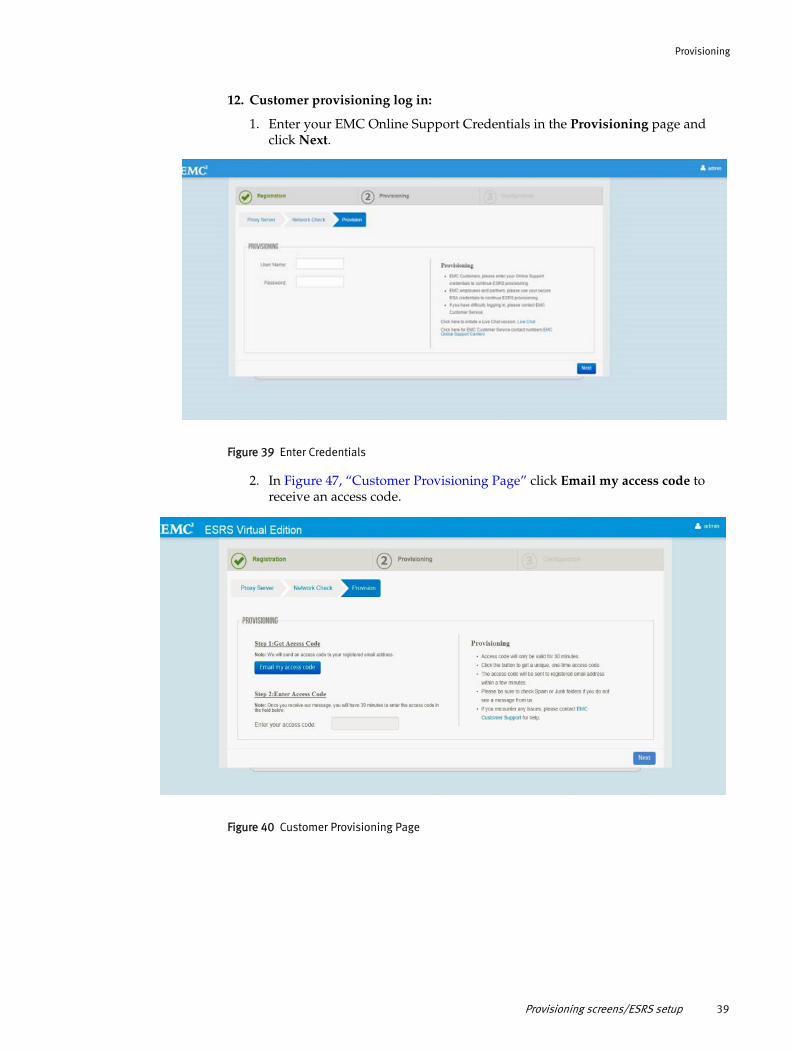
1. Enter your EMC Online Support Credentials in the Provisioning page and click Next.
Figure 39 Enter Credentials
2. In Figure 47, “Customer Provisioning Page” click Email my access code to receive an access code.
Figure 40 Customer Provisioning Page
Provisioning screens/ESRS setup 39
Provisioning
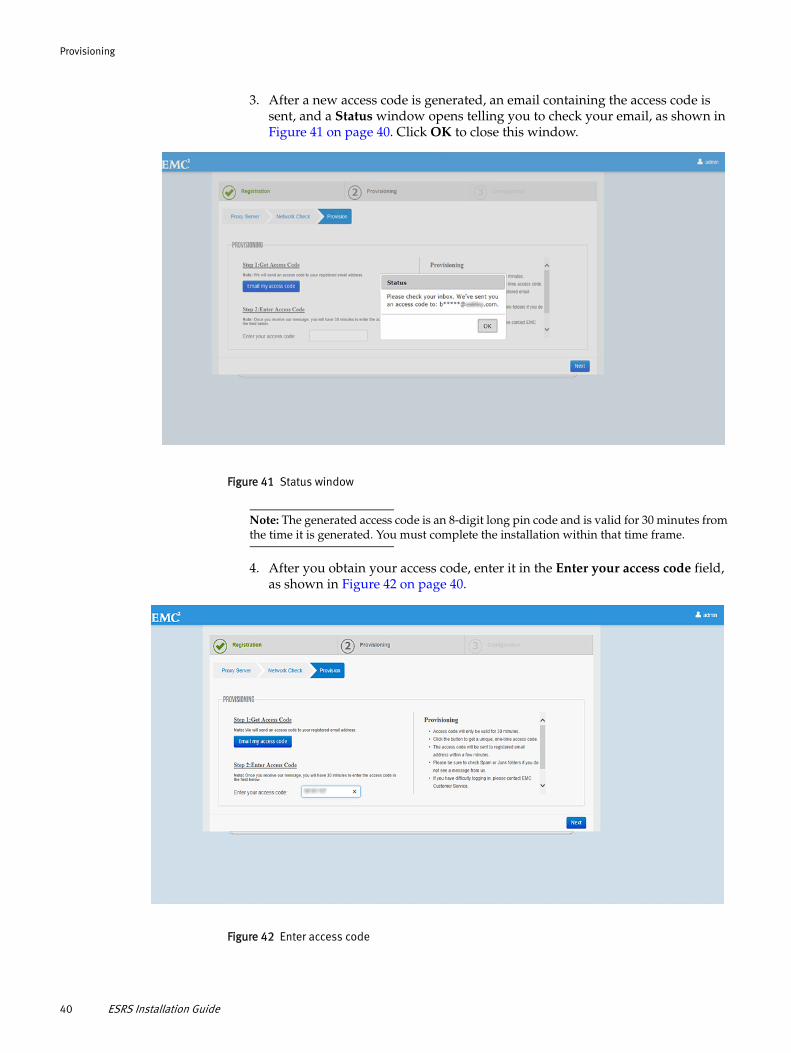
3. After a new access code is generated, an email containing the access code is sent, and a Status window opens telling you to check your email, as shown in Figure 41 on page 40. Click OK to close this window.
Figure 41 Status window
Note: The generated access code is an 8-digit long pin code and is valid for 30 minutes from the time it is generated. You must complete the installation within that time frame.
4. After you obtain your access code, enter it in the Enter your access code field, as shown in Figure 42 on page 40.
Figure 42 Enter access code
40 ESRS Installation Guide
Provisioning
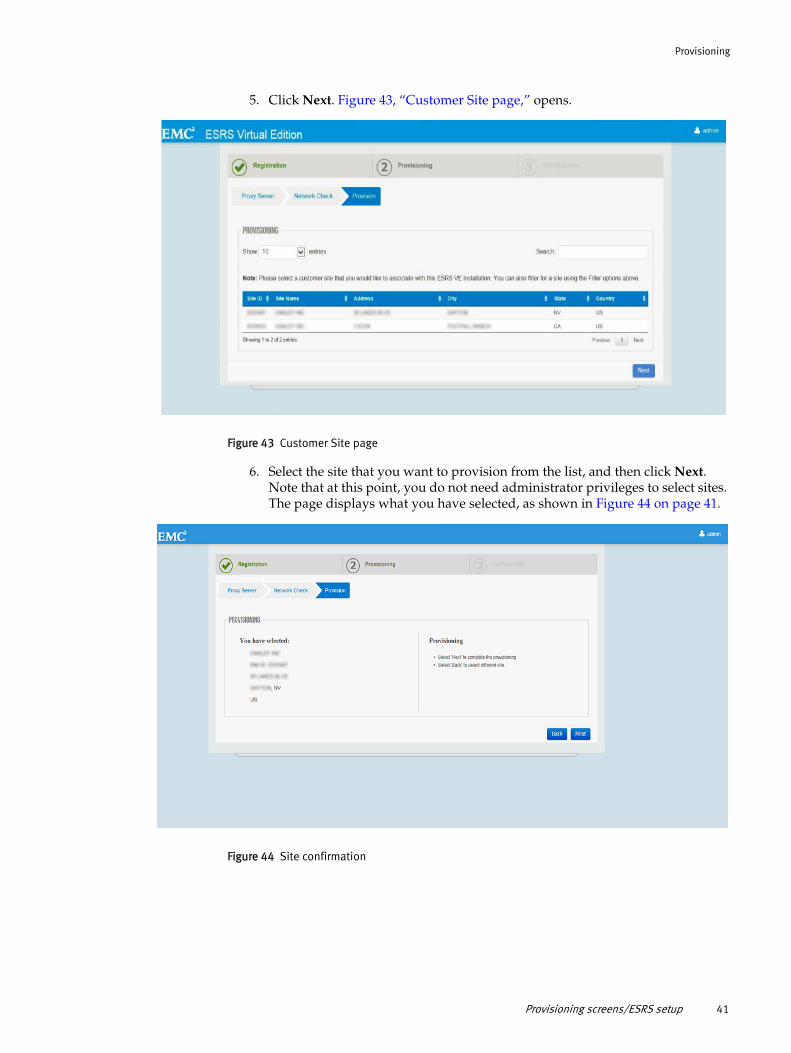
5. Click Next. Figure 43, “Customer Site page,” opens.
Figure 43 Customer Site page
6. Select the site that you want to provision from the list, and then click Next. Note that at this point, you do not need administrator privileges to select sites. The page displays what you have selected, as shown in Figure 44 on page 41.
Figure 44 Site confirmation
Provisioning screens/ESRS setup 41
Provisioning
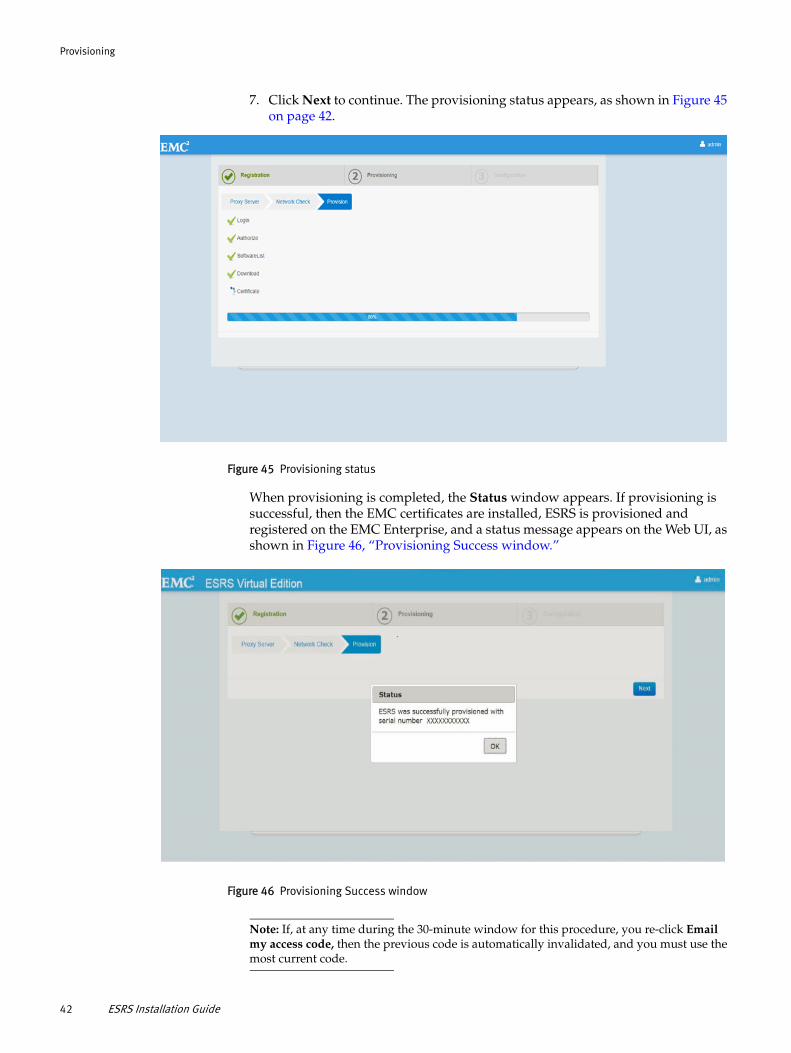
7. Click Next to continue. The provisioning status appears, as shown in Figure 45 on page 42.
Figure 45 Provisioning status
When provisioning is completed, the Status window appears. If provisioning is successful, then the EMC certificates are installed, ESRS is provisioned and registered on the EMC Enterprise, and a status message appears on the Web UI, as shown in Figure 46, “Provisioning Success window.”
Figure 46 Provisioning Success window
Note: If, at any time during the 30-minute window for this procedure, you re-click Email my access code, then the previous code is automatically invalidated, and you must use the most current code.
42 ESRS Installation Guide
Provisioning
8. Click OK to continue. The Email Configuration tab displays.
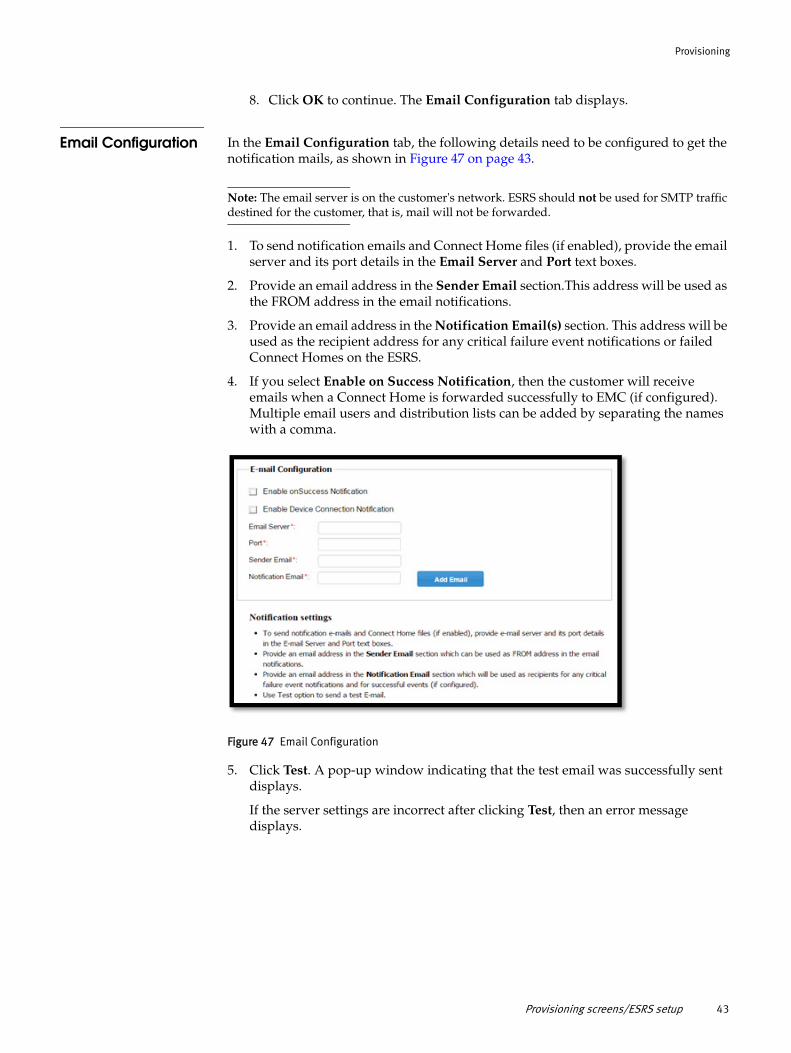
Email Configuration In the Email Configuration tab, the following details need to be configured to get the notification mails, as shown in Figure 47 on page 43.
Note: The email server is on the customer's network. ESRS should not be used for SMTP traffic destined for the customer, that is, mail will not be forwarded.
1. To send notification emails and Connect Home files (if enabled), provide the email server and its port details in the Email Server and Port text boxes.
2. Provide an email address in the Sender Email section.This address will be used as the FROM address in the email notifications.
3. Provide an email address in the Notification Email(s) section. This address will be used as the recipient address for any critical failure event notifications or failed Connect Homes on the ESRS.
4. If you select Enable on Success Notification, then the customer will receive emails when a Connect Home is forwarded successfully to EMC (if configured). Multiple email users and distribution lists can be added by separating the names with a comma.
Figure 47 Email Configuration
5. Click Test. A pop-up window indicating that the test email was successfully sent displays.
If the server settings are incorrect after clicking Test, then an error message displays.
Provisioning screens/ESRS setup 43
Provisioning
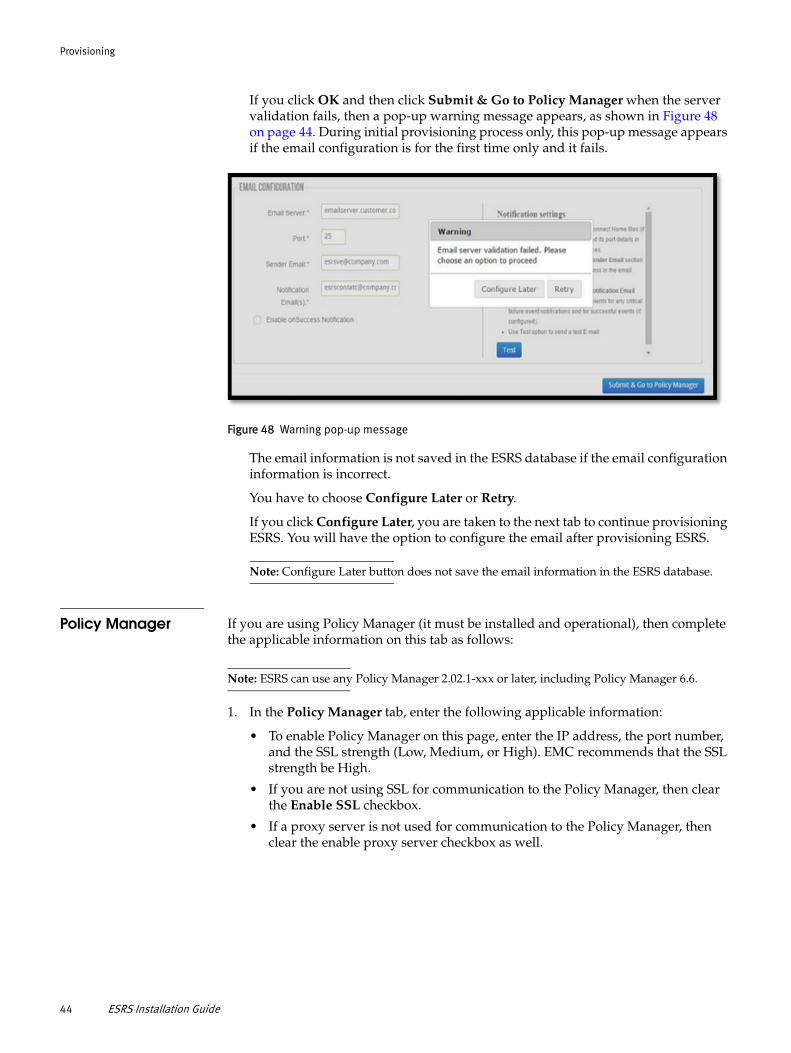
If you click OK and then click Submit & Go to Policy Manager when the server validation fails, then a pop-up warning message appears, as shown in Figure 48 on page 44. During initial provisioning process only, this pop-up message appears if the email configuration is for the first time only and it fails.
Figure 48 Warning pop-up message
The email information is not saved in the ESRS database if the email configuration information is incorrect.
You have to choose Configure Later or Retry.
If you click Configure Later, you are taken to the next tab to continue provisioning ESRS. You will have the option to configure the email after provisioning ESRS.
Note: Configure Later button does not save the email information in the ESRS database.
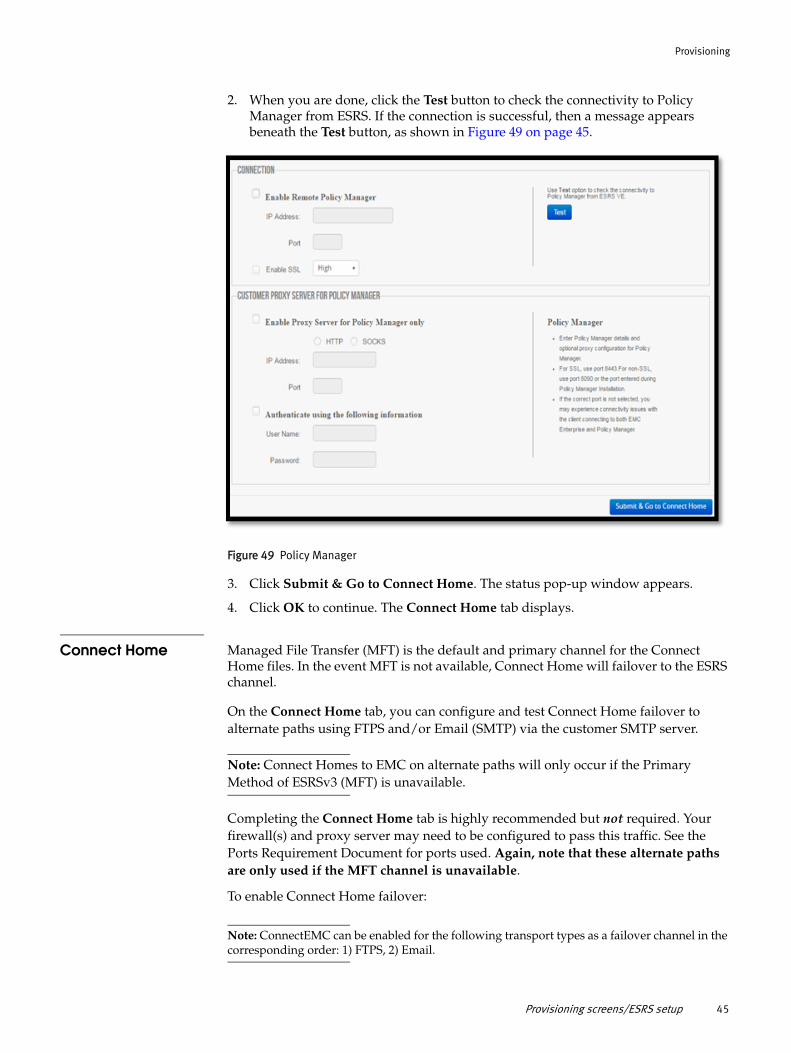
Policy Manager If you are using Policy Manager (it must be installed and operational), then complete the applicable information on this tab as follows:
Note: ESRS can use any Policy Manager 2.02.1-xxx or later, including Policy Manager 6.6.
1. In the Policy Manager tab, enter the following applicable information:
• To enable Policy Manager on this page, enter the IP address, the port number, and the SSL strength (Low, Medium, or High). EMC recommends that the SSL strength be High.
• If you are not using SSL for communication to the Policy Manager, then clear the Enable SSL checkbox.
• If a proxy server is not used for communication to the Policy Manager, then clear the enable proxy server checkbox as well.
44 ESRS Installation Guide
Provisioning
2. When you are done, click the Test button to check the connectivity to Policy Manager from ESRS. If the connection is successful, then a message appears beneath the Test button, as shown in Figure 49 on page 45.
Figure 49 Policy Manager
3. Click Submit & Go to Connect Home. The status pop-up window appears.
4. Click OK to continue. The Connect Home tab displays.
Connect Home Managed File Transfer (MFT) is the default and primary channel for the Connect Home files. In the event MFT is not available, Connect Home will failover to the ESRS channel.
On the Connect Home tab, you can configure and test Connect Home failover to alternate paths using FTPS and/or Email (SMTP) via the customer SMTP server.
Note: Connect Homes to EMC on alternate paths will only occur if the Primary Method of ESRSv3 (MFT) is unavailable.
Completing the Connect Home tab is highly recommended but not required. Your firewall(s) and proxy server may need to be configured to pass this traffic. See the Ports Requirement Document for ports used. Again, note that these alternate paths are only used if the MFT channel is unavailable.
To enable Connect Home failover:
Note: ConnectEMC can be enabled for the following transport types as a failover channel in the corresponding order: 1) FTPS, 2) Email.
Provisioning screens/ESRS setup 45
Provisioning
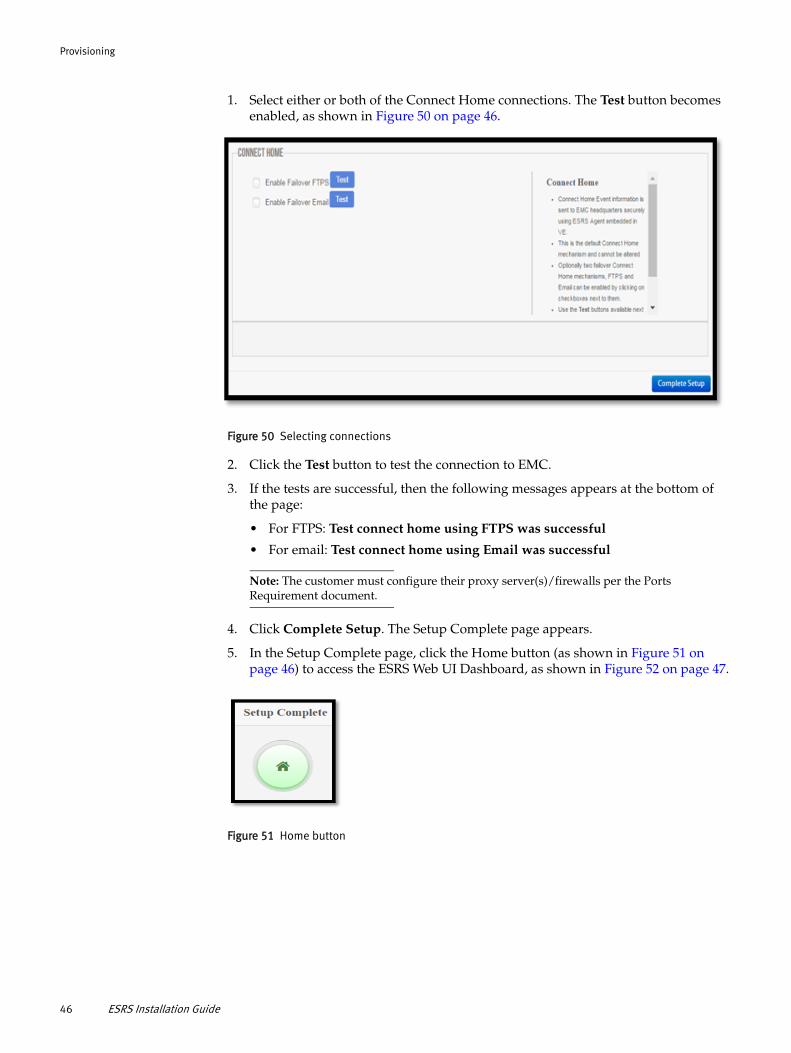
1. Select either or both of the Connect Home connections. The Test button becomes enabled, as shown in Figure 50 on page 46.
Figure 50 Selecting connections
2. Click the Test button to test the connection to EMC.
3. If the tests are successful, then the following messages appears at the bottom of the page:
• For FTPS: Test connect home using FTPS was successful
• For email: Test connect home using Email was successful
Note: The customer must configure their proxy server(s)/firewalls per the Ports Requirement document.
4. Click Complete Setup. The Setup Complete page appears.
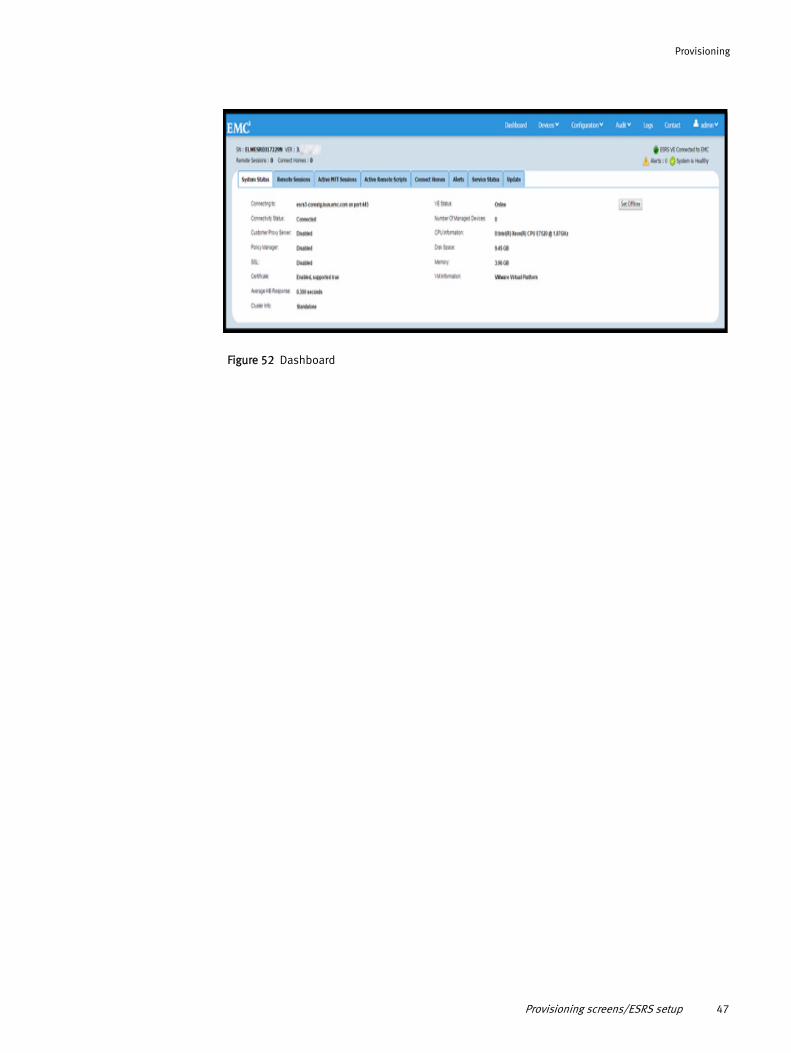
5. In the Setup Complete page, click the Home button (as shown in Figure 51 on page 46) to access the ESRS Web UI Dashboard, as shown in Figure 52 on page 47.
Figure 51 Home button
46 ESRS Installation Guide
Provisioning
Figure 52 Dashboard
Provisioning screens/ESRS setup 47

Provisioning
48 ESRS Installation Guide
APPENDIX AIP Addresses used by ESRS
This appendix lists the article that provides the IP addresses used by the EMC Secure Remote Services Virtual Edition.
◆ Key information ................................................................................. 50◆ Article access ...................................................................................... 50
IP Addresses used by ESRS 49
IP Addresses used by ESRS
Key informationArticle Number: 0000494729
Version: 1
ID: emc238467
Domain: EMC1
Solution Class: 3.X Compatibility
Note: Always check support.emc.com for the latest version of this article as it may have been updated.
Article access
The following is a Primus(R) eServer solution.
Article Title: What IP addresses are used by the EMC Secure Remote Services IP Solution?
This is from KB article 494729. To access this article, go to:
https://support.emc.com/kb/494729
50 ESRS Installation Guide
APPENDIX BESRS v3.x on Hyper-V Install Process
nvisible Body Tag
This appendix describes the Hyper-V install process for ESRS v3.xx.
◆ Procedure ............................................................................................ 52
ESRS v3.x on Hyper-V Install Process 51
ESRS v3.x on Hyper-V Install Process
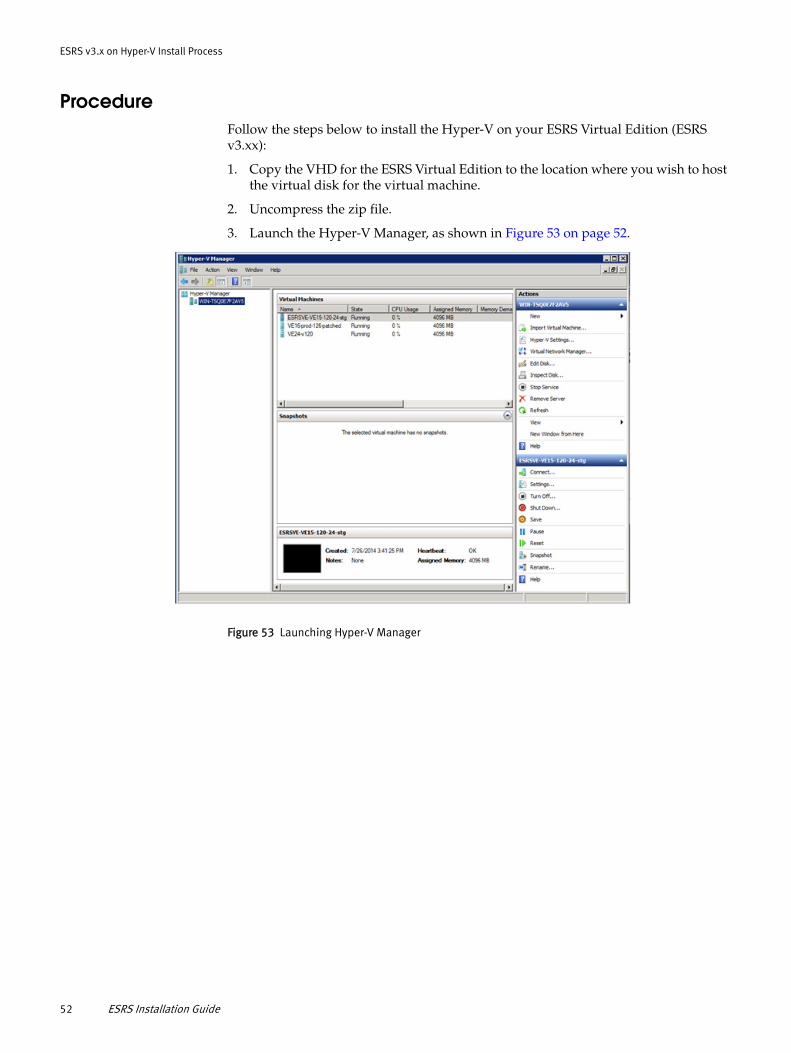
ProcedureFollow the steps below to install the Hyper-V on your ESRS Virtual Edition (ESRS v3.xx):
1. Copy the VHD for the ESRS Virtual Edition to the location where you wish to host the virtual disk for the virtual machine.
2. Uncompress the zip file.
3. Launch the Hyper-V Manager, as shown in Figure 53 on page 52.
Figure 53 Launching Hyper-V Manager
52 ESRS Installation Guide
ESRS v3.x on Hyper-V Install Process
4. Create the virtual machine that will be hosting the ESRS Virtual Edition.
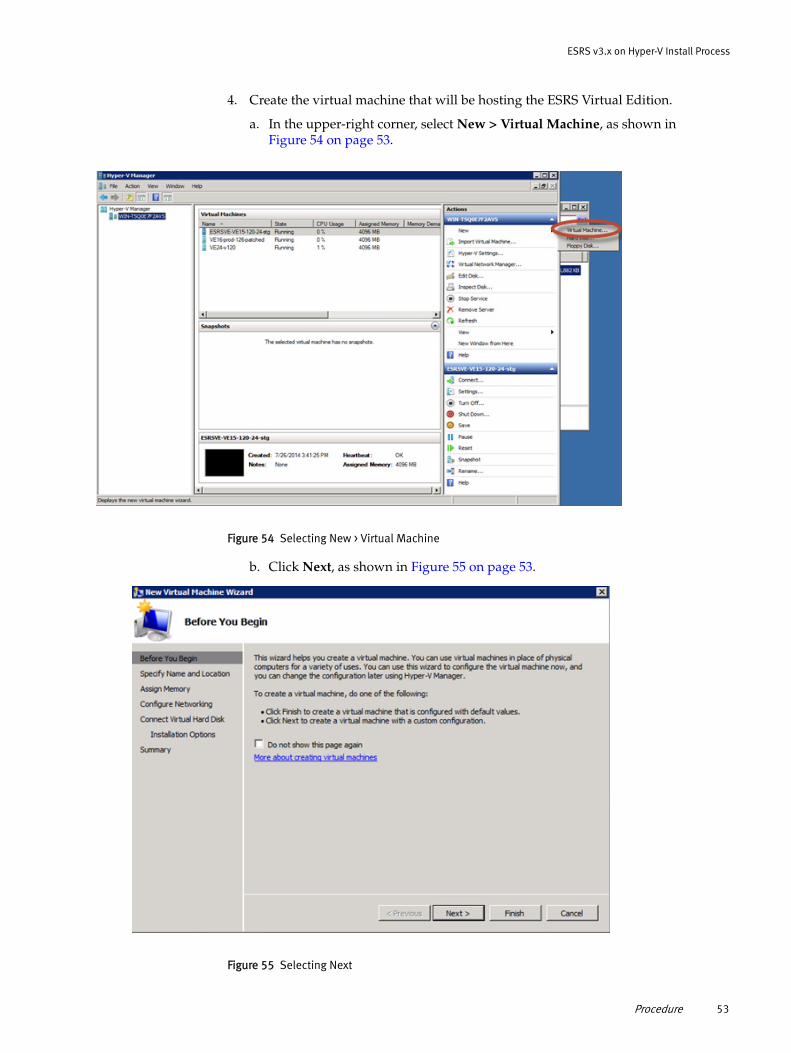
a. In the upper-right corner, select New > Virtual Machine, as shown in Figure 54 on page 53.
Figure 54 Selecting New > Virtual Machine
b. Click Next, as shown in Figure 55 on page 53.
Figure 55 Selecting Next
Procedure 53
ESRS v3.x on Hyper-V Install Process
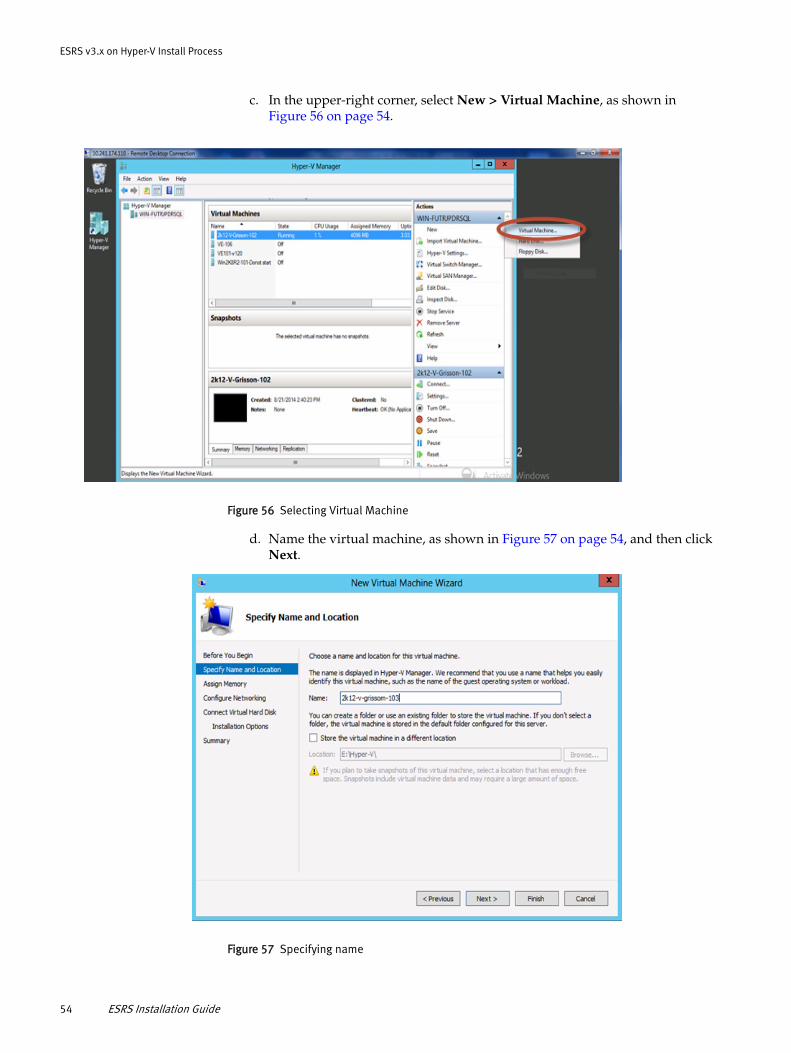
c. In the upper-right corner, select New > Virtual Machine, as shown in Figure 56 on page 54.
Figure 56 Selecting Virtual Machine
d. Name the virtual machine, as shown in Figure 57 on page 54, and then click Next.
Figure 57 Specifying name
54 ESRS Installation Guide
ESRS v3.x on Hyper-V Install Process
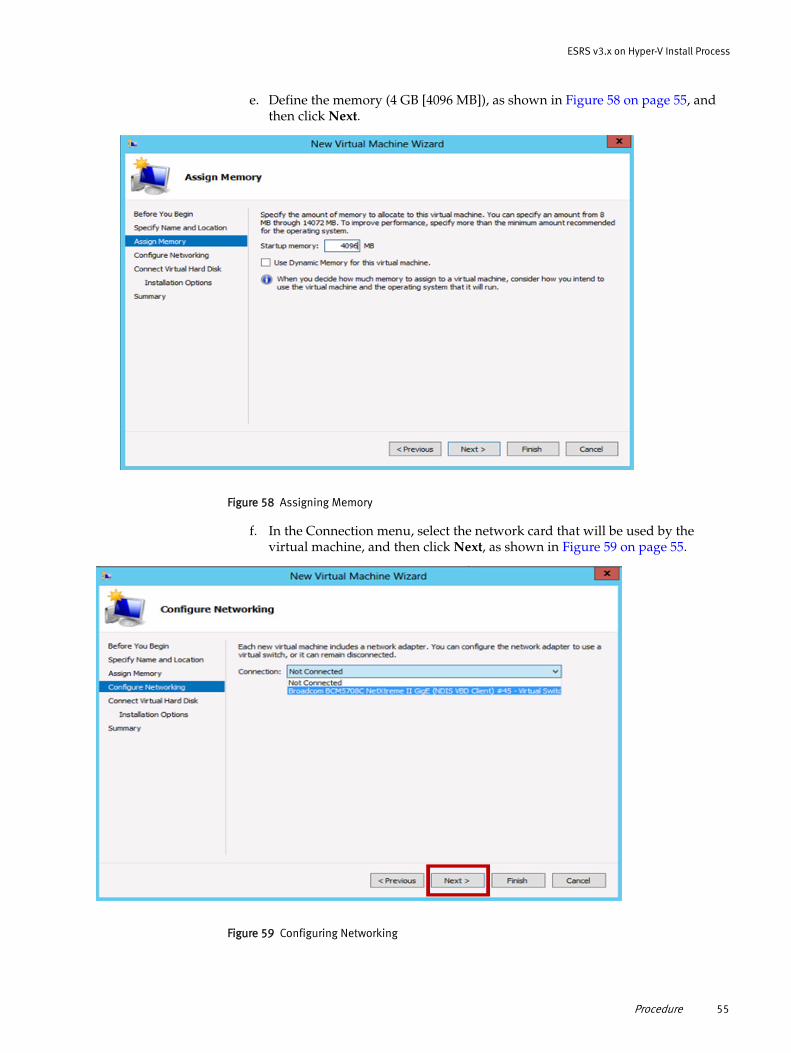
e. Define the memory (4 GB [4096 MB]), as shown in Figure 58 on page 55, and then click Next.
Figure 58 Assigning Memory
f. In the Connection menu, select the network card that will be used by the virtual machine, and then click Next, as shown in Figure 59 on page 55.
Figure 59 Configuring Networking
Procedure 55
ESRS v3.x on Hyper-V Install Process
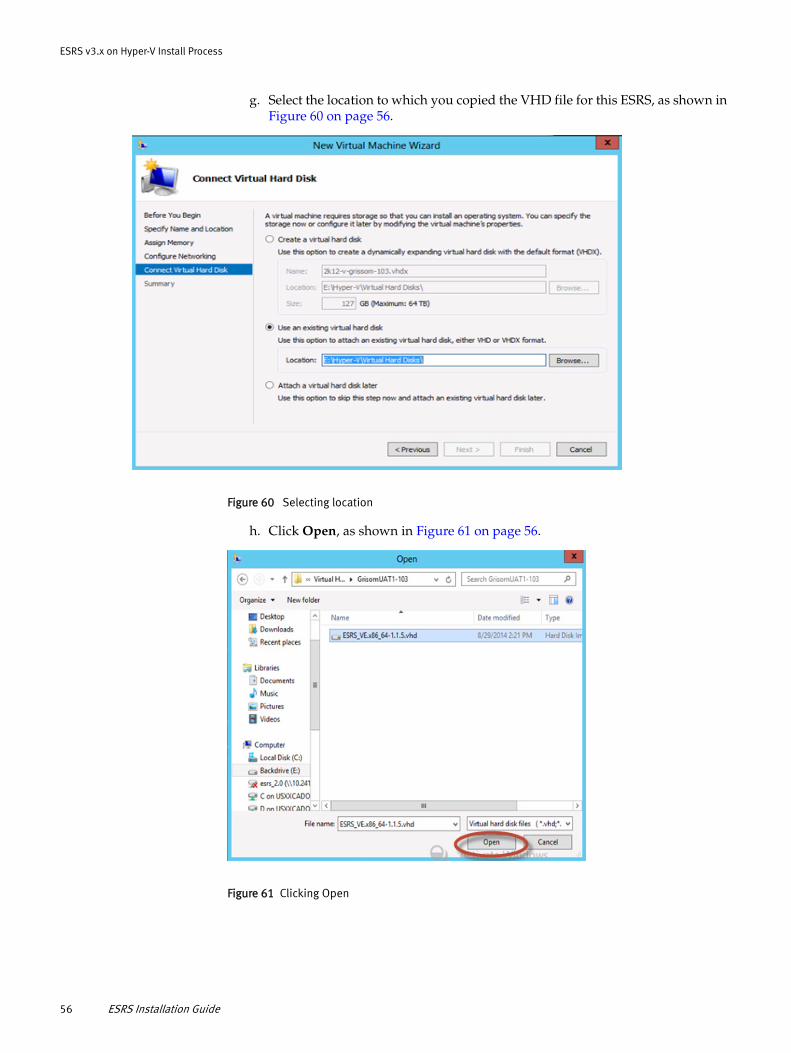
g. Select the location to which you copied the VHD file for this ESRS, as shown in Figure 60 on page 56.
Figure 60 Selecting location
h. Click Open, as shown in Figure 61 on page 56.
Figure 61 Clicking Open
56 ESRS Installation Guide
ESRS v3.x on Hyper-V Install Process
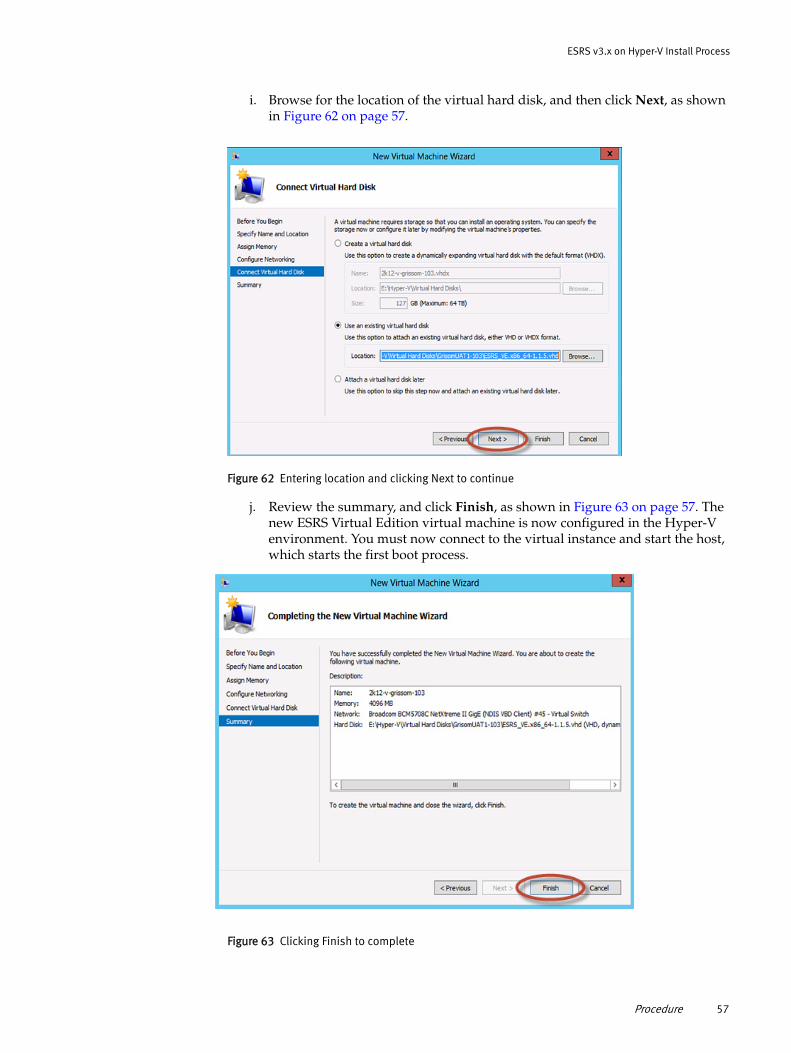
i. Browse for the location of the virtual hard disk, and then click Next, as shown in Figure 62 on page 57.
Figure 62 Entering location and clicking Next to continue
j. Review the summary, and click Finish, as shown in Figure 63 on page 57. The new ESRS Virtual Edition virtual machine is now configured in the Hyper-V environment. You must now connect to the virtual instance and start the host, which starts the first boot process.
Figure 63 Clicking Finish to complete
Procedure 57
ESRS v3.x on Hyper-V Install Process
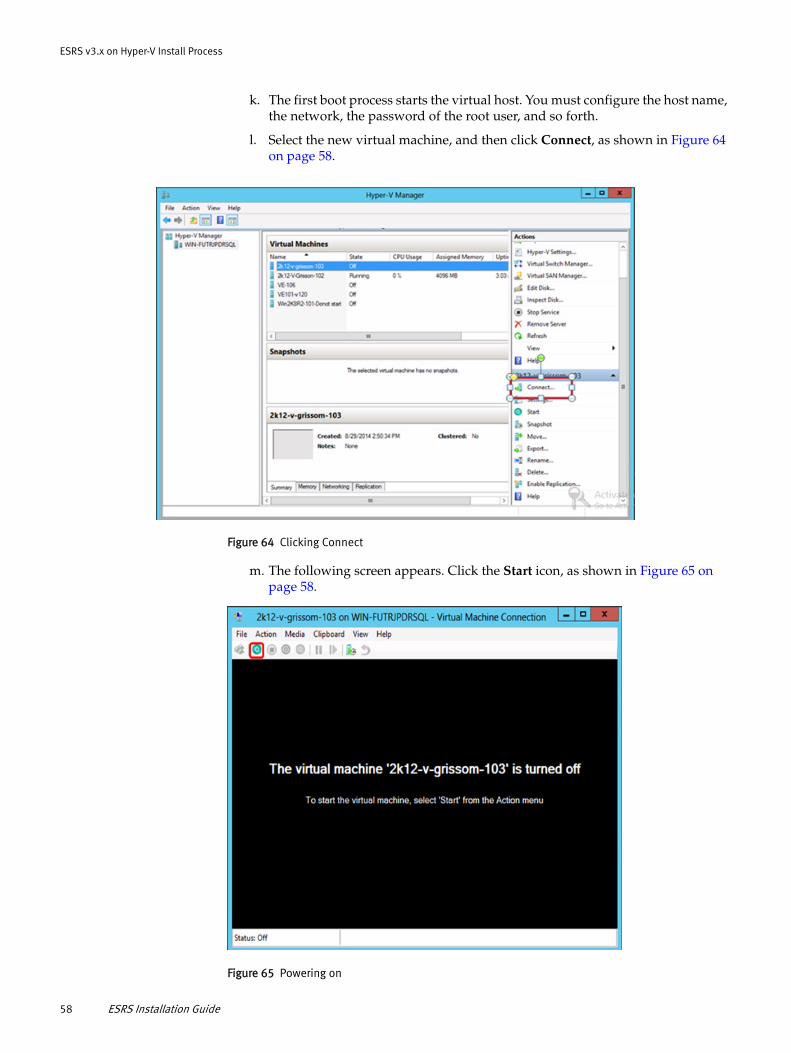
k. The first boot process starts the virtual host. You must configure the host name, the network, the password of the root user, and so forth.
l. Select the new virtual machine, and then click Connect, as shown in Figure 64 on page 58.
Figure 64 Clicking Connect
m. The following screen appears. Click the Start icon, as shown in Figure 65 on page 58.
Figure 65 Powering on
58 ESRS Installation Guide
ESRS v3.x on Hyper-V Install Process
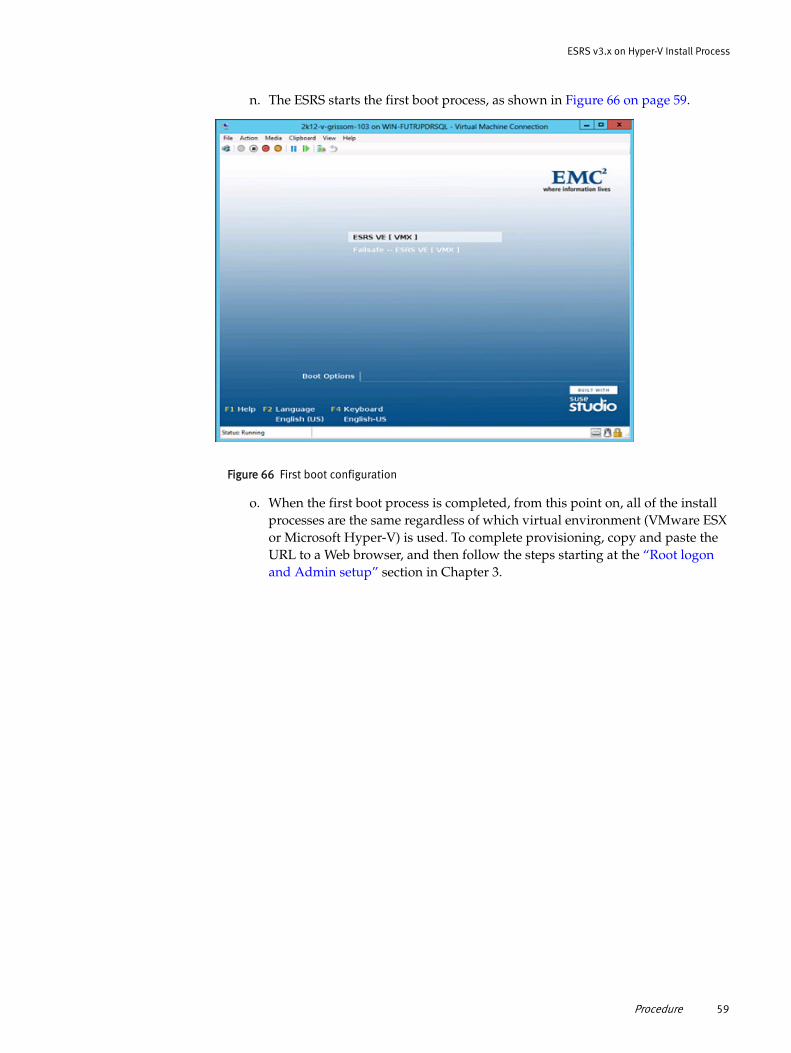
n. The ESRS starts the first boot process, as shown in Figure 66 on page 59.
Figure 66 First boot configuration
o. When the first boot process is completed, from this point on, all of the install processes are the same regardless of which virtual environment (VMware ESX or Microsoft Hyper-V) is used. To complete provisioning, copy and paste the URL to a Web browser, and then follow the steps starting at the “Root logon and Admin setup” section in Chapter 3.
Procedure 59

ESRS v3.x on Hyper-V Install Process
60 ESRS Installation Guide
GLOSSARY
This glossary contains terms related to remote services and ESRS.
Aaccess See Remote Access.
Cconnect home Connecting from a remote site to EMC’s support network.
DDMZ Demilitarized zone — Device used to secure an internal network from unauthorized
external access.
Dynamic IP address An address that is assigned by the access device by which the user's host connects over a dialup telephone line or by a set-top box for an IP over cable network.
EEMC Online Support
SiteWeb-based access on support.emc.com to documentation, downloads, and support information for EMC customers and internal EMC users.
ESRS EMC® Secure Remote Services is an IP-based automated connect home and remote support solution enhanced by a comprehensive security system. ESRS creates both a unified architecture and a common point of access for remote support activities performed on your EMC products.
ESRS Virtual Edition EMC Secure Remote Services, Virtual Edition, which is installed on an ESX or Hyper-V Server, acts as the single point of entry and exit for all connect home and remote support activities
Ffailover The capability to switch over automatically to a standby server upon the failure or
abnormal termination of the previously active server. Failover happens without human intervention and generally without warning.
firewall A hardware or software device that is configured to permit, deny, or proxy data through a computer network which has different levels of trust.
FTP File Transfer Protocol — Used to transfer data from one computer to another, over the Internet or through a network.
GGateway 2.x An ESRS 2.x software component that is installed on a customer-supplied dedicated
server (or servers) or VMware instance. The servers act as the single point of entry and exit for all IP-based EMC remote notification and remote support activity.
ESRS Installation Guide 61
Glossary
PPolicy Manager An ESRS software component that is installed on a customer-supplied server or
servers. It enables customizable control of remote access to customer devices and maintains an audit log of remote connections.
proxy server A server (a computer system or an application program) which services the request of its servers by forwarding request to other servers. A server connects to the proxy server, requesting some service, such as a file, connection, web page, or other resource, available from a different server. The proxy server provides the resource by connecting to the specified server and requesting the service on behalf of the server. A proxy server may optionally alter the server’s request or the server’s response, and sometimes it may serve the request without contacting the specified server.
Rremote access Communication with a processing device from a remote location through a data link.
SSMTP Simple Mail Transfer Protocol — The de facto standard for email transmissions across
the Internet.
Ttopology Network configuration, including firewalls, servers, devices, and ports used for
communication between all devices.
Transport LayerSecurity (TLS) port
A port that uses cryptographic protocols to provide secure Internet communications for data transfers.
62 ESRS Installation Guide