Embed Size (px)
Citation preview
EMC® VNXe® SeriesVersion 3.1
Configuring Hosts to Access CIFS FileSystemsP/N 302-000-191 REV. 03
Copyright © 2014-2015 EMC Corporation. All rights reserved. Published in USA.
Published June, 2015
EMC believes the information in this publication is accurate as of its publication date. The information is subject to changewithout notice.
The information in this publication is provided as is. EMC Corporation makes no representations or warranties of any kind withrespect to the information in this publication, and specifically disclaims implied warranties of merchantability or fitness for aparticular purpose. Use, copying, and distribution of any EMC software described in this publication requires an applicablesoftware license.
EMC², EMC, and the EMC logo are registered trademarks or trademarks of EMC Corporation in the United States and othercountries. All other trademarks used herein are the property of their respective owners.
For the most up-to-date regulatory document for your product line, go to EMC Online Support (https://support.emc.com).
EMC CorporationHopkinton, Massachusetts 01748-91031-508-435-1000 In North America 1-866-464-7381www.EMC.com
2 EMC VNXe Series 3.1 Configuring Hosts to Access CIFS File Systems
Setting up a host for CIFS storage 5
Requirements for setting up a host..................................................................6Overview............................................................................................6VNXe system requirements.................................................................6Network requirements........................................................................6CIFS NAS server in a Windows domain................................................7Stand-alone CIFS NAS server.............................................................. 7
Host software in a CIFS environment................................................................7VNX Common Event Enabler Common Antivirus Agent ....................... 7Management snap-ins........................................................................8Installing host software for CIFS......................................................... 9
Using Windows Continuous Availability.........................................................10Using network high availability......................................................................10
Link aggregations.............................................................................10Configuring a link aggregation..........................................................11
Using CIFS encryption....................................................................................13Configuring CIFS file system storage.............................................................. 13Configuring user access to the CIFS share......................................................13Mapping the CIFS share.................................................................................14
Migrating CIFS Data to the VNXe 15
Migration environment and limitations..........................................................16Migrating data...............................................................................................16
Setting up access to a VNXe share for the CIFS host......................... 17Migrating the data with a manual copy.............................................17
Managing CIFS File System Storage with Windows Tools 19
Opening Computer Management MMC.......................................................... 20Creating shares and setting ACLs.................................................................. 20
Setting ACLs on an existing share.....................................................20Creating a share and setting its ACLs................................................21
Using the home directory feature...................................................................21Home directory restrictions.............................................................. 21Adding a home directory to the Active Directory................................22Adding a home directory with expressions....................................... 22
Using Group Policy objects............................................................................23GPO support on a VNXe NAS server.................................................. 24Supported GPO settings................................................................... 24
Using SMB signing........................................................................................ 26Monitoring NAS server connections and resource usage................................26
Monitoring users on a NAS server.....................................................26Monitoring access to shares on the NAS server................................ 26Monitoring file use on the NAS server...............................................27
Auditing CIFS users and objects.................................................................... 27Enabling auditing on a NAS server....................................................28Viewing the audit events.................................................................. 30Disabling auditing............................................................................30
Accessing the security log for a NAS server....................................................31
Chapter 1
Chapter 2
Chapter 3
CONTENTS
EMC VNXe Series 3.1 Configuring Hosts to Access CIFS File Systems 3

Copying a share snapshot............................................................................. 31Restoring a share snapshot........................................................................... 31
Using FLR with VNXe 33
FLR terminology and concepts....................................................................... 34FLR terminology................................................................................34Basic FLR concepts...........................................................................34How FLR works................................................................................. 35FLR restrictions.................................................................................36
System requirements for FLR ........................................................................ 36Windows .NET Framework requirement.............................................37Window requirements for FLR Monitor.............................................. 37
Installing the FLR Toolkit on a host................................................................ 38Configuring the FLR monitor...........................................................................39Using the FLR monitor....................................................................................39
Committing a read-only file to the FLR state......................................39Creating FLR queries.........................................................................40
Using CEE CAVA with VNXe 41
CAVA overview.............................................................................................. 42VNXe NAS servers............................................................................ 42CEE CAVA virus-checking client........................................................ 42Third-party antivirus software support.............................................. 42CEE CAVA software........................................................................... 43VNX CIFS Management snap-in.........................................................43
System requirements and limitations............................................................ 43File-level retention........................................................................... 43Non-CIFS protocols...........................................................................43
Setting up CEE CAVA for VNXe NAS servers.................................................... 43Configuring the domain user account............................................... 44Configuring virus checker parameters.............................................. 46Installing third-party antivirus software............................................ 48Installing CEE CAVA..........................................................................48Starting the CEE AV engine............................................................... 49
Chapter 4
Chapter 5
CONTENTS
4 EMC VNXe Series 3.1 Configuring Hosts to Access CIFS File Systems
CHAPTER 1
Setting up a host for CIFS storage
This chapter contains the following topics.
l Requirements for setting up a host.......................................................................... 6l Host software in a CIFS environment........................................................................7l Using Windows Continuous Availability.................................................................10l Using network high availability..............................................................................10l Using CIFS encryption............................................................................................13l Configuring CIFS file system storage...................................................................... 13l Configuring user access to the CIFS share..............................................................13l Mapping the CIFS share.........................................................................................14
Setting up a host for CIFS storage 5
Requirements for setting up a hostThis topic describes the system and network requirements for setting up a host to useVNXe storage.
Before you can set up a host to use VNXe storage, these VNXe system and networkrequirements must be met.
OverviewThis topic describes the purpose of this document, its intended audience, and provides alist of related documentation.
This document is part of the EMC VNXe documentation set. It describes how to set up theWindows hosts with clients that need to access Common Internet File System (CIFS) filesystem storage on a VNXe system with VNXe Operating Environment version 3.0 or later.
This document is intended for the person or persons who are responsible for setting upthe hosts to access the VNXe storage.
Readers of this document a should be familiar with VNXe CIFS file system storage and theWindows operating system running on hosts with clients that will access VNXe CIFS filesystem storage.
Other VNXe documents include:
l Installation Guide
l Hardware Information Guide
l Parts Location Guide
l Configuring Hosts to Access NFS File Systems
l Configuring Hosts to Access Fibre Channel (FC) or iSCSI LUNs
l Configuring Hosts to Access VMware NFS or VMware VMFS Datastores
l Unisphere CLI User Guide
EMC Unisphere help provides specific information about the VNXe storage, features, andfunctionality. The Unisphere help and a complete set of VNXe customer documentationare located on the EMC Online Support website: http://www.emc.com/vnxesupport.
VNXe system requirementsThis topic lists the system requirements for the VNXe.
l You have installed and configured the VNXe system using the Configuration Wizard,as described in the Installation Guide for your storage system.
l You have used Unisphere or the VNXe CLI to perform basic configuration of one ormore NAS servers on the storage system.
Network requirementsThis topic lists the network requirements for a host attaching to a VNXe system.
Ensure that you observe these network requirements:
l The host (client) must be in a LAN environment with the VNXe NAS server.
l The VNXe NAS server can be either a member of a Windows Active Directory domainor operate independently of any Windows domain as a stand-alone CIFS server.
Setting up a host for CIFS storage
6 EMC VNXe Series 3.1 Configuring Hosts to Access CIFS File Systems

l For CIFS shares that are in a Windows Active Directory domain, you must alsoconfigure DNS and NTP.
l If the NAS server is enabled for multiprotocol (CIFS and NFS), you must connect it toan NIS server or an LDAP server.
l Unisphere online help describes how to configure Unix Directory Service (either NIS orLDAP) on the VNXe.
l Users can store files on a VNXe NAS server in a Network Information Service (NIS)environment, but you cannot configure a VNXe NAS server as an NIS client.
CIFS NAS server in a Windows domainThis topic describes a CIFS NAS server in a Windows Active Directory domain.
A CIFS NAS server with Active Directory enabled:
l Uses domain-based Kerberos authentication
l Maintains its own identity (computer account) in the domain
l Leverages domain site information to locate services, such as domain controllers.
Associating a CIFS NAS server with a Windows domain allows any users in the domain toconnect to the CIFS server. In addition, authentication and authorization settingsmaintained on the Active Directory server apply to the files and folders on the CIFS filesystem.
A CIFS NAS server with Active Directory enabled requires a Windows domain with anActive Directory (AD) server and a DNS server. You must also configure NTP.
Stand-alone CIFS NAS serverThis topic describes a stand-alone CIFS NAS server.
A stand-alone CIFS NAS server does not have access to a Windows domain or itsassociates services. Only users with local user accounts created and managed on thestand-alone CIFS NAS server can access the server, and the CIFS server performs userauthentication.
A stand-alone CIFS NAS server requires a Windows workgroup.
Host software in a CIFS environmentThis topic provides an overview of the EMC host software for a VNXe system in a CIFSenvironment.
This section describes the EMC host software that is available for a VNXe system in a CIFSenvironment and describes how to install this software on a host that will use VNXe CIFSfile system storage.
VNX Common Event Enabler Common Antivirus AgentThis topic describes the antivirus solution for CIFS clients using VNXe systems.
The VNX Common Event Enabler (CEE) Common AntiVirus Agent (CAVA) provides anantivirus solution for CIFS clients using EMC systems. It uses third-party antivirussoftware to identify and eliminate known viruses before they infect files on the system.CAVA is part of the VNX Common Event Enabler (CEE) software package. The VNXesupport matrix on the EMC Online Support website (http://www.emc.com/vnxesupport)
Setting up a host for CIFS storage
CIFS NAS server in a Windows domain 7
provides information about the third-party antivirus software that CAVA supports. UsingVNX Event Enabler describes how to install the enabler.
Management snap-insThis topic lists the management snap-ins that a VNXe NAS server supports.
A VNXe NAS server supports the EMC VNX CIFS Management snap-ins, which consist ofthe following Microsoft Management Console (MMC) snap-ins that you can use tomanage home directories, security settings, and virus-checking on a NAS server from aWindows Server 2003, Windows Server 2008, Windows Server 2012, or Windows 8computer:
l Home Directory Management snap-in
l Data Mover Management snap-in
l AntiVirus Management snap-in
Home Directory Management snap-inThis topic describes how the home directory feature simplifies administration of personalshares.
You can use the Home Directory Management snap-in to associate a username with adirectory; that directory then acts as the user’s home directory. The home directoryfeature simplifies the administration of personal shares and the process of connecting tothem because it lets you use a single share name, called HOME, to which all users canconnect.
Data Mover Management snap-inThis topic describes how to use the audit policy and user rights assignment nodes of theData Mover Management snap-in.
Audit Policy nodeYou can use the Celerra Audit Policy node to determine which NAS server security eventsare logged in the security log. You can then view the security log by using the WindowsEvent Viewer. You can log successful attempts, failed attempts, both, or neither. Theaudit policies that appear in the Audit Policy node are a subset of the policies availableas group policy objects (GPOs) in Active Domain Users and Computers. Audit policies arelocal policies and apply to the selected NAS server. You cannot use the Audit Policy nodeto manage GPO audit policies.
User Rights Assignment nodeYou can use the User Rights Assignment node to manage which users and groups havelogin and task privileges to a NAS server. The user rights assignments that appear in theUser Rights Assignment node are a subset of the user rights assignments available asGPOs in Active Domain Users and Computers. User rights assignments are local policiesand apply to the selected NAS server. You cannot use the User Rights Assignment node tomanage GPO policies.
Common AntiVirus Management snap-inYou can use the Common AntiVirus Management snap-in to manage the virus-checkingparameters (viruschecker.conf file) used with Common AntiVirus Agent (CAVA) and third-party antivirus programs.
Setting up a host for CIFS storage
8 EMC VNXe Series 3.1 Configuring Hosts to Access CIFS File Systems
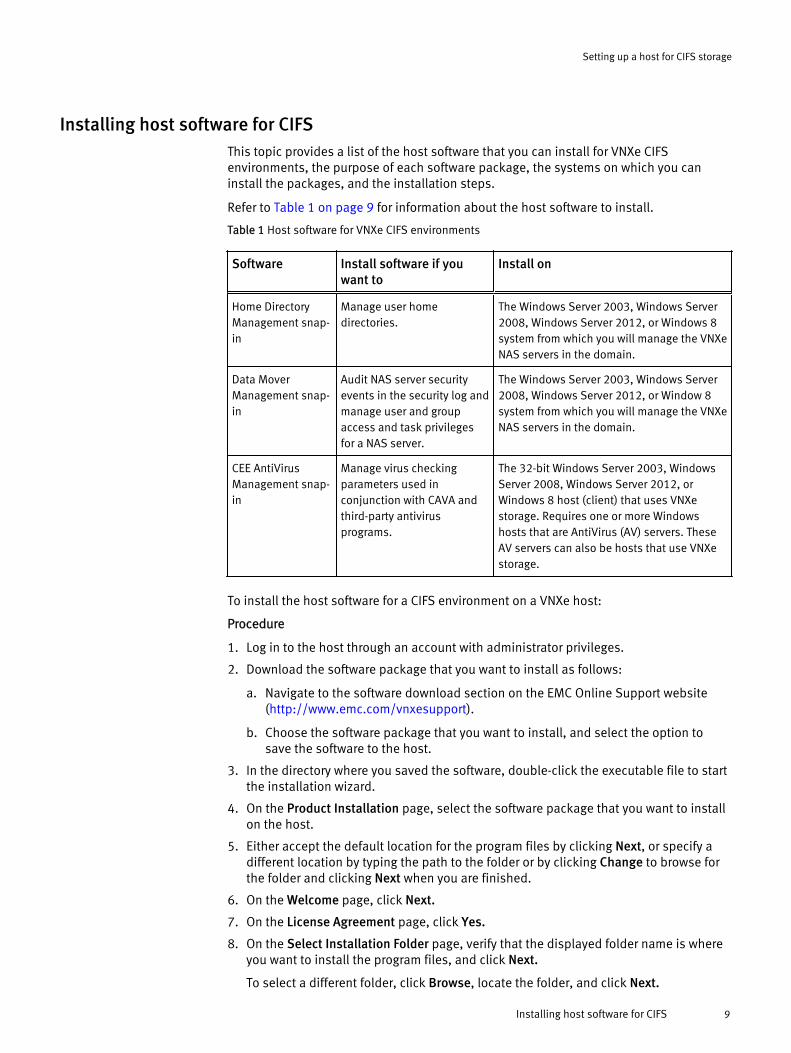
Installing host software for CIFSThis topic provides a list of the host software that you can install for VNXe CIFSenvironments, the purpose of each software package, the systems on which you caninstall the packages, and the installation steps.
Refer to Table 1 on page 9 for information about the host software to install.
Table 1 Host software for VNXe CIFS environments
Software Install software if youwant to
Install on
Home DirectoryManagement snap-in
Manage user homedirectories.
The Windows Server 2003, Windows Server2008, Windows Server 2012, or Windows 8system from which you will manage the VNXeNAS servers in the domain.
Data MoverManagement snap-in
Audit NAS server securityevents in the security log andmanage user and groupaccess and task privilegesfor a NAS server.
The Windows Server 2003, Windows Server2008, Windows Server 2012, or Window 8system from which you will manage the VNXeNAS servers in the domain.
CEE AntiVirusManagement snap-in
Manage virus checkingparameters used inconjunction with CAVA andthird-party antivirusprograms.
The 32-bit Windows Server 2003, WindowsServer 2008, Windows Server 2012, orWindows 8 host (client) that uses VNXestorage. Requires one or more Windowshosts that are AntiVirus (AV) servers. TheseAV servers can also be hosts that use VNXestorage.
To install the host software for a CIFS environment on a VNXe host:
Procedure
1. Log in to the host through an account with administrator privileges.
2. Download the software package that you want to install as follows:
a. Navigate to the software download section on the EMC Online Support website(http://www.emc.com/vnxesupport).
b. Choose the software package that you want to install, and select the option tosave the software to the host.
3. In the directory where you saved the software, double-click the executable file to startthe installation wizard.
4. On the Product Installation page, select the software package that you want to installon the host.
5. Either accept the default location for the program files by clicking Next, or specify adifferent location by typing the path to the folder or by clicking Change to browse forthe folder and clicking Next when you are finished.
6. On the Welcome page, click Next.
7. On the License Agreement page, click Yes.
8. On the Select Installation Folder page, verify that the displayed folder name is whereyou want to install the program files, and click Next.
To select a different folder, click Browse, locate the folder, and click Next.
Setting up a host for CIFS storage
Installing host software for CIFS 9
9. On the Select Components page, select the software package (component) that youwant to install, clear the components you do not want to install, and click Next.
10.On the Start Copying Files page, click Next.
11.On the InstallShield Wizard Complete page, click Finish.
12.When the installation is complete, restart the host.
Using Windows Continuous AvailabilityWindows 8 and Windows 2012 SMB3 environments provide the ability to add high-availability functionality to CIFS resources. Windows CA allows applications running onhosts connected to shares with this property to support transparent server failover. Otherfeatures such as larger I/O size, offload copy, parallel I/O on same session, and directoryleasing provide improvements to performance and user experience.
With CA enabled, you can achieve a transparent server failover for implementationswhere the failover time is no longer than the application timeout. In suchimplementations, hosts can continue to access a CIFS resource without the loss of a CIFSsession state, following a failover event.
Using network high availabilityThis topic describes how to use link aggregation for high availability configurations.
The VNXe system supports link aggregations that allow up to four Ethernet portsconnected to the same physical or logical switch to be combined into a single logical link.This behavior is called link aggregation. To configure link aggregation on a VNXe system,each storage processor (SP) must have the same type and number of Ethernet portsbecause configuring link aggregation actually creates two link aggregations — one oneach SP. This provides high availability as follows. If one of the ports in the linkaggregation fails, the system directs the network traffic to one of the other ports in theaggregation. If you add an Ethernet I/O module to each SP in a VNXe system, you cancreate one additional link aggregation group on the set of ports in the I/O module.
For additional information on data availability in your VNXe system and your connectivityinfrastructure, refer to EMC VNXe3200 High Availability, A Detailed Review white paper.
Link aggregationsThis topic describes the advantages and function of link aggregations.
Link aggregations use the Link Aggregation Control Protocol (LACP) IEEE 802.3adstandard. A link aggregation appears as a single Ethernet link with these advantages:
l High availability of network paths to and from the VNXe system — If one physical portin a link aggregation fails, the system does not lose connectivity.
l Possible increased overall throughput — Because multiple physical ports are bondedinto one logical port with network traffic distributed between the multiple physicalports.
Although link aggregations can provide more overall bandwidth than a single port, theconnection to any single client runs through one physical port and is therefore limited bythe port’s bandwidth. If the connection to one port fails, the switch automaticallyswitches traffic to the remaining ports in the group. When the connection is restored, theswitch automatically resumes using the port as part of the group.
On the VNXe system, you can configure up to four ports in a link aggregation. When youconfigure a link aggregation, you are configuring two link aggregations — one on each SP.
Setting up a host for CIFS storage
10 EMC VNXe Series 3.1 Configuring Hosts to Access CIFS File Systems
If one of the ports in an aggregation fails, the system directs network traffic to one of theother ports in the group.
Switch requirementsThis topic describes switch requirements when using link aggregation.
If the VNXe ports are connected to different network switches, you should configure allswitch ports connected to the VNXe ports to immediately switch from blocking mode toforwarding mode and not pass through spanning tree states of listening and learningwhen an interface comes up. On Cisco switches, this means that you must enable theportfast capability for each switch port connected to a VNXe port to guarantee that theswitch forwards the Ethernet frame that the VNXe system generates when a physical linkis enabled. You enable the portfast capability on a port-to-port basis. When enabled, theportfast variable causes the port to immediately switch from blocking to forwardingmode. Do not use portfast on switch-to-switch connections.
For link aggregation, network switches must have IEEE 802.3ad protocol support andguarantee that packets from a single TCP connection always go through the same link in asingle direction.
Configuring a link aggregationThis topic describes link aggregation configuration and lists the required configurationtasks.
Note
Windows 7 and Windows Server 2003 do not provide link aggregation (NIC teaming)support. Some NIC vendors provide drivers that support NIC teaming. For moreinformation, contact your NIC vendor. Windows Server 2008 does support NIC teaming.
For link aggregation, you have at least one 802.3ad-compliant switch, each with anavailable port for each switch port you want to connect to a VNXe port in the aggregation.
The term NIC teaming refers to all NIC redundancy schemes, including link aggregationwith 802.3ad.
For link aggregation, you need to perform two sets of configuration tasks:
l Configure a link aggregation from the switch to the VNXe
l Configure a link aggregation from the host to the switch
Configuring link aggregation from switch to VNXeThis topic describes how to configure the switch ports and join them into a linkaggregation.
Procedure
1. Configure the switch ports, which are connected to the VNXe, for LACP in active mode.Refer to the documentation provided with your switch.
2. Join the VNXe ports into a link aggregation using the Unisphere AdvancedConfiguration option Settings > More configuration > Port Settings. For information onusing the Advanced Configuration option, refer to the Unisphere online help.
Results
Two link aggregations are created with the same ports — one aggregation on each SP.
Setting up a host for CIFS storage
Configuring a link aggregation 11

Configuring link aggregation from host to switchThis topic describes how to configure link aggregation from host to switch. Steps involveconfiguring switch ports for link aggregation and NIC teaming on the host. These stepsare for an Intel network interface driver.
Procedure
1. Configure the switch ports, which are connected to the host, for link aggregation.
2. Configure NIC teaming on the Windows Server 2008, Windows Server 2012, orWindows 8 host.
Note
Windows Server 2008, Windows Server 2012, and Windows 8 hosts refers to linkaggregation as NIC teaming. Windows 8 automatically detects NIC teaming on theVNXe, and configures the host to use the same interfaces as the VNXe. Manualconfiguration is not necessary.
a. In the Control Panel, select Network and Internet > Network Connections.
b. In the Network Connections dialog box, right-click one NIC you want in the teamand click Properties.
c. Click Configure.
d. In the Properties dialog box, select the Teaming tab.
3. In the Teaming tab:
a. Select Team this adapter with other adapters.
b. Click New Team.
The New Team Wizard opens.
4. In the New Team Wizard:
a. Specify the name for the team and click Next.
b. Select the other NICs that you want in the team and click Next.
c. Select the team type and click Next. For information on a type, select the type andread the information below the selection box.
d. Click Finish.
5. If you selected Adaptive Load Balancing as the team type and you want to use thenew NIC team for Hyper-V virtual machines, disable Receive Load Balancing:
a. Click the Advanced tab.
b. Under Settings, select Receive Load Balancing.
c. Under Values, select Disabled.
d. Click OK.
The new team shows in the Network Connections dialog box as a Local AreaNetwork Connection.
6. To use the new NIC team for a virtual machine:
a. In the Hyper-V Manager, under Virtual Machines, select the virtual machine.
b. Under Actions, select Virtual Network Manager.
Setting up a host for CIFS storage
12 EMC VNXe Series 3.1 Configuring Hosts to Access CIFS File Systems
c. In the Virtual Network Manager, under Virtual Networks, select VM NIC - VirtualMachine Network.
d. Under Connection type, select the network type and the NIC team.
e. Click Apply.
f. When the changes have been appled, click OK.
Using CIFS encryptionWindows 8 and Windows 12 SMB3 environments provide the ability to encrypt datastored on VNXe CIFS file systems as that data moves between the VNXe and the Windowshost.
Encryption at the share level is enabled on the particular share and enforced when theshare is accessed. Optionally, encryption can be enforced at the system level (whereencryption is set in the registry of the NAS server), and all share access would requireencryption. Client-level configuration is not needed.
CIFS encryption is set at the CIFS server level in Unisphere (first) and by modifying theregistry settings of the Windows host.
For more information about SMB 3.0 and CIFS encryption, see EMC VNX Series:Introduction to SMB 3.0 Support on the EMC Online Support website (http://support.emc.com).
Configuring CIFS file system storageProcedure
1. Use Unisphere or the VNXe CLI to create VNXe CIFS file system storage for the host(client).
2. For information on performing these tasks, refer to the Unisphere online help.
Configuring user access to the CIFS shareThis task describes how to configure user access to the CIFS share from the host. You willneed the name or IP address of the VNXe NAS server.
User access to the share is configured per file using the Active Directory:
Procedure
1. Log in to the Windows host with the Active Directory from a domain administratoraccount.
Note
The Windows host must have access to the domain with the VNXe NAS server for theCIFS share.
2. Open the Computer Management window:
a. For Windows Server 2003 — Right-click My Computer or Computer and selectManage.
b. For Windows Server 2008, Windows Server 2012, Windows 7, or Windows 8— ClickStart and select Control Panel > Administrative Tools > Computer Management.
Setting up a host for CIFS storage
Using CIFS encryption 13
3. In the Computer Management tree, right-click Computer Management (local).
4. Select Connect to another computer.
The Select Computer dialog opens.
5. In the Select Computer dialog box, enter the name or IP address of the VNXe NASserver to provide the client CIFS shares.
6. In the Computer Management tree, select System Tools > File Systems > Shares.
The available shares appear on the right. If the VNXe shares do not appear, make surethat you are logged in to the correct domain.
7. Right-click the share whose permissions you want to change and select Properties.
8. Click the Share Permissions tab.
9. Select the user or group and the permissions for the selected user or group.
10.Click OK.
Mapping the CIFS shareThis task directs you to connect the host to the CIFS share. It also describes how to getthe export path for the share.
You will need the export path for the share (\\NASServer\share), which you can findin the VNXe configuration report for the file system with the share. To access this report,use EMC Unisphere software.
Procedure
1. On the Windows host, use the Windows Map Network Drive function to connect thehost to the CIFS share and optionally to reconnect to the share whenever you log in tothe host.
2. If you need the export path for the share, access the VNXe configuration report for thefile system:
a. In EMC Unisphere, select Storage > File Systems.
b. Select the CIFS file system with the share and click Details.
c. Click View Access Details.
If you have read/write access to the share, you can create directories on the share andstore files in the directories (after the share is mapped).
Setting up a host for CIFS storage
14 EMC VNXe Series 3.1 Configuring Hosts to Access CIFS File Systems
CHAPTER 2
Migrating CIFS Data to the VNXe
You can migrate CIFS data to the VNXe system using a manual copy. A manual copyoperation disrupts access to the data and may not preserve the ACLs and permissionswithin the file structure.
This chapter contains the following topics.
l Migration environment and limitations..................................................................16l Migrating data.......................................................................................................16
Migrating CIFS Data to the VNXe 15

Migration environment and limitationsThis topic describes requirements and limitations for data migration.
You can migrate data to the VNXe system with either a manual copy or an application-specific tool, if one is available.
If the NFS configuration that you want to migrate has any of the following, contact yourVNXe service provider:
l More shares than you want to migrate.
l Permissions that you do not want to manually reassign to the VNXe shares.
l Any share that you want to divide between VNXe shares.
l Any share that you want to combine with other shares on the same VNXe share.
Table 2 on page 16 outlines the environment required for data migration. Table 3 onpage 16 lists the characteristics of a manual copy migration.
Table 2 Environment for data migration
Component Requirement
VNXe storage File system with share sized to accommodate the data in the share that you wantto migrate and to allow for data growth
Host Host with read access to the share containing the data to be migrated and withwrite access to the VNXe share for the migrated data
Share Share that you migrate in its entirety to the VNXe share
Table 3 Characteristics of manual copy migration
Component Characteristic
Permissions May not be preserved
Downtime Downtime is relative to the time required for:
l Copying the share contents to the VNXe share
l Reconfiguring the hosts to connect to the VNXe share
For both a manual copy migration and a migration with an application, the downtime isrelative to the time required for:
l Copying the share contents to the VNXe share
l Reconfiguring the hosts to connect to the VNXe share
Migrating dataThis topic lists the tasks for migrating data to a VNXe share.
To migrate data to a VNXe share, set up access to the share. Then migrate the data.
Migrating CIFS Data to the VNXe
16 EMC VNXe Series 3.1 Configuring Hosts to Access CIFS File Systems
Setting up access to a VNXe share for the CIFS hostThis topic lists the steps to configure user access to the new share in the Active Directoryand then map the share.
On the host that you want to use for the data migration:
Procedure
1. Configure user access to the new share in the Active Directory.
For detailed steps, refer to Configuring user access to the CIFS share on page 13.
2. Map the new share.
For detailed steps, refer to Mapping the CIFS share on page 14.
Migrating the data with a manual copyThis topic provides the steps to manually copy data one share at a time (instead of usingan application-specific tool).
A manual copy minimizes the time during which a host cannot access a share beingmigrated.
Procedure
1. If any clients are actively using the share, disconnect these clients and any otherclients that could access the data you are migrating.
2. Use the method that you think is best for copying data from the current storagelocation to the new VNXe share.
This method can be a cut-and-paste or drag-and-drop operation. Ensure that themethod you choose preserves metadata such as file attributes, timestamps, andaccess rights that you need to preserve.
3. When the copy operation is complete, reconnect the clients to the new share exportedby the VNXe system and map a drive to this share as needed.
Migrating CIFS Data to the VNXe
Setting up access to a VNXe share for the CIFS host 17

Migrating CIFS Data to the VNXe
18 EMC VNXe Series 3.1 Configuring Hosts to Access CIFS File Systems
CHAPTER 3
Managing CIFS File System Storage with WindowsTools
This chapter contains the following topics.
l Opening Computer Management MMC.................................................................. 20l Creating shares and setting ACLs.......................................................................... 20l Using the home directory feature...........................................................................21l Using Group Policy objects.................................................................................... 23l Using SMB signing................................................................................................ 26l Monitoring NAS server connections and resource usage........................................26l Auditing CIFS users and objects............................................................................ 27l Accessing the security log for a NAS server............................................................31l Copying a share snapshot..................................................................................... 31l Restoring a share snapshot................................................................................... 31
Managing CIFS File System Storage with Windows Tools 19
Opening Computer Management MMCThis topic describes how to open the Computer Management Microsoft ManagementConsole (MMC) for a specific NAS server.
Procedure
1. Login to the Windows host that is part of the Active Directory with domainadministrator account.
The Windows host must have access to the domain with the VNXe NAS server.
2. Open the Computer Management page:
l For Windows Server 2003, right-click My Computer or Computer and selectManage.
l For Windows Server 2008, Windows Server 2012, and Windows 8, click Start andselect Administrative Tools > Computer Management.
3. Right-click Computer Management (local).
4. Select Connect to another computer.
5. Enter the name of the VNXe NAS server, and click OK.
Log in as the Administrator with Administrator rights to use the MMC snap-ins.
Creating shares and setting ACLsEMC recommends that you use Unisphere to create CIFS shares, as described inUnisphere help, and then use the MMC to set access (ACLs) for the shares. As analternative to using Unisphere, after you create a CIFS file system on the VNXe system,you can use the MMC to create shares within that folder.
To create a Windows share with the MMC, you must:
l Have assigned global identifiers (GIDs) to CIFS users
l Have mounted the VNXe share of the root directory of the file system and created thedirectories you want to share in it
l Be a VNXe administrator
Setting ACLs on an existing shareThis topic describes how to set ACLs on an existing share by using the ComputerManagement MMC.
Procedure
1. Open the Computer Management MMC as described in Opening ComputerManagement MMC on page 20.
2. In the console tree, select File Systems > Shares.
The current shares in use appear on the right.
3. Right-click the share whose permissions you want to change and select Properties.
4. Click the Share Permissions tab.
5. Select the user or group and the permissions for the selected user or group.
6. Click OK.
Managing CIFS File System Storage with Windows Tools
20 EMC VNXe Series 3.1 Configuring Hosts to Access CIFS File Systems
Creating a share and setting its ACLsThis topic provides the steps to create a share and set its ACLs by using the ComputerManagement MMC.
Procedure
1. Open the Computer Management MMC as described in Opening ComputerManagement MMC on page 20.
2. In the console tree, click File Systems > Shares.
The current shares in use appear on the right.
3. Right-click Shares, and select New File Share from the shortcut menu.
The Share a Folder Wizard appears.
4. Enter the name of the folder to share, share name for the folder, and sharedescription. Then click Next.
The wizard prompts you for share permissions.
5. Set permissions by choosing one of the options.
With the Customize Share and Folder Permissions or Customize Permissions option,you can assign permissions to individual groups and users.
6. Click Finish.
Using the home directory featureThe home directory feature, which is provided by the Home Directory snap-in, lets youcreate a single share, called HOME, to which all users connect. You do not have to createindividual shares for each user.
The home directory feature simplifies the administration of personal shares and theprocess of connecting to them by letting you associate a username with a directory thatthen acts as the user’s home directory. The home directory is mapped in a user’s profileso that upon login, the home directory is automatically connected to a network drive.
If a client system (such as Citrix Metaframe or Windows Terminal Server) supports morethan one Windows user concurrently and caches file access information, the VNXe homedirectory feature might not function as desired. With the VNXe home directory capability,a VNXe client sees the same path to the home directory for each user. For example, if auser writes to a file in the home directory, and then another user reads a file in the homedirectory, the second user's request is completed using the cached data from the firstuser's home directory. Because the files have the same pathname, the client systemassumes they are the same file.
The home directory feature is disabled by default. You must have created a CIFS NASserver on the VNXe system before you can enable the home directory. On Windows Server2003, Windows Server 2008, Windows Server 2012, or WIndows 8 systems, you canenable and manage home directories through the Home Directory snap-in for MMC. Thesnap-in online help describes the procedures for enabling and managing homedirectories.
Home directory restrictionsA special share name, HOME, is reserved for the home directory. The followingrestrictions apply. If you have:
Managing CIFS File System Storage with Windows Tools
Creating a share and setting its ACLs 21
l Created a share called HOME, you cannot enable the home directory feature.
l Enabled the home directory feature, you cannot create a share called HOME.
A home directory is configured in a user’s Windows user profile by using the UniversalNaming Convention (UNC) path: \\NAS_server\HOME where NAS_server is the IPaddress, computer name, or NetBIOS name of the VNXe NAS server.
HOME is a special share that is reserved for the home directory feature. When HOME isused in the path for a user’s home directory and the user logs in, the user’s homedirectory is automatically mapped to a network drive and the HOMEDRIVE, HOMEPATH,and HOMESHARE environment variables are automatically set.
Adding a home directory to the Active DirectoryThis topic lists the steps to add a home directory to the Windows Active Directory. AWindows server and domain administrator account are required.
Procedure
1. Log in to the Windows server from a domain administrator account.
2. Click Start and select Programs or All Programs > Administrative Tools > ActiveDirectory Users and Computers.
3. Click Users to display the users in the right pane.
4. Right-click a user and select Properties.
The user’s User Properties window appears.
5. Click the Profile tab and under Home folder:
a. Select Connect.
b. Select the drive letter you want to map to the home directory.
c. In To, type: \\NAS_server\HOME where NAS_server is the IP address, computername, or NetBIOS name of the VNXe NAS server.
6. Click OK.
Adding a home directory with expressionsThis topic lists the steps for adding a home directory by using expressions. Thisprocedure requires a domain administrator account.
Procedure
1. Log in to the Windows server from a domain administrator account.
2. Click Start and select Programs or All Programs > Administrative Tools > CelerraManagement.
3. Right-click the HomeDir folder icon and select New > home directory entry.
The home directory property page appears.
4. Enter the following information:
a. In Domain, type the name of the user’s domain using the NetBIOS name.
NOTICE
Do not use the fully qualified domain name.
For example, if the domain name is Company.local, you can type one of thefollowing: company, comp, or .* (regular expressions must be true for this optionto work).
Managing CIFS File System Storage with Windows Tools
22 EMC VNXe Series 3.1 Configuring Hosts to Access CIFS File Systems
b. In User, type the name of the user or the wildcard string.
For example, if the username is Tom, you can type one of the following: T* forusernames starting with T, * for any username, or [r-v].* for usernames startingwith r, s, t, u, or v (regular expressions must be true for this option to work).
c. In the Path, type the pathname using one of the following methods:
Type the path of the folder, for example, \HomeDirShare\dir1.
Click Browse and either select the folder or create one.
If you want to automatically create the folder, select Auto Create Directory.
Examples of directories are:
l \HomeDirShare\dir1\User1l HomeDirShare\<d>\<u>, which creates a folder with the domain name d
and a directory with the user name u.
5. Click OK.
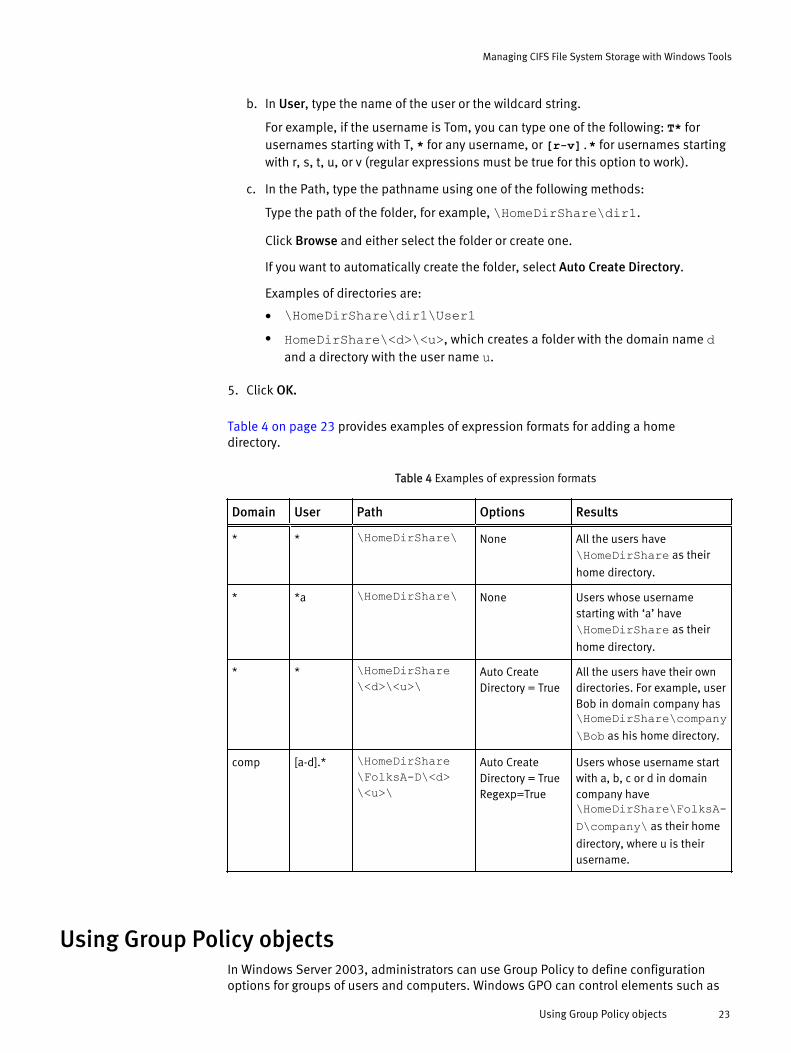
Table 4 on page 23 provides examples of expression formats for adding a homedirectory.
Table 4 Examples of expression formats
Domain User Path Options Results
* * \HomeDirShare\ None All the users have\HomeDirShare as their
home directory.
* *a \HomeDirShare\ None Users whose usernamestarting with ‘a’ have\HomeDirShare as their
home directory.
* * \HomeDirShare\<d>\<u>\
Auto CreateDirectory = True
All the users have their owndirectories. For example, userBob in domain company has\HomeDirShare\company\Bob as his home directory.
comp [a-d].* \HomeDirShare\FolksA-D\<d>\<u>\
Auto CreateDirectory = TrueRegexp=True
Users whose username startwith a, b, c or d in domaincompany have\HomeDirShare\FolksA-D\company\ as their home
directory, where u is theirusername.
Using Group Policy objectsIn Windows Server 2003, administrators can use Group Policy to define configurationoptions for groups of users and computers. Windows GPO can control elements such as
Managing CIFS File System Storage with Windows Tools
Using Group Policy objects 23
local, domain, and network security settings. The Group Policy settings are stored inGPOs that are linked to the site, domain, and organizational unit (OU) containers in theActive Directory. The domain controller replicates GPOs on all domain controllers withinthe domain.
Audit Policy is a component of the Data Mover Management snap-in, which is installed asa Microsoft Management Console (MMC) snap-in into the Management Console on aWindows Server 2003, Windows Server 2008,Windows Server 2012, or Windows 8system.
You can use audit policies to determine which NAS server security events are logged inthe security log. You can choose to log successful attempts, failed attempts, both, orneither. Audited events are viewed in the security log of the Windows Event Viewer.
The audit policies that appear in the Audit Policy node are a subset of the policiesavailable as GPO in Active Directory Users and Computers (ADUC). These audit policiesare local policies and apply only to the selected NAS server. You cannot use the AuditPolicy node to manage GPO audit policies.
If an audit policy is defined as a GPO in ADUC, the GPO setting overrides the local setting.When the domain administrator changes an audit policy on the domain controller, thatchange is reflected on the NAS server and you can view it by using the Audit Policy node.You can change the local audit policy, but it is not in effect until the GPO for that auditpolicy is disabled. If auditing is disabled, the GPO setting remains in the Effective settingcolumn.
You cannot use Microsoft’s Windows Local Policy Setting tools to manage audit policieson a NAS server because in Windows Server 2003 and Windows XP, the Windows LocalPolicy Setting tools do not allow you to manage audit policies remotely.
GPO support on a VNXe NAS serverA VNXe NAS server provides support for GPOs by retrieving and storing a copy of the GPOsettings for each NAS server joined to a Windows Server 2003 domain. A VNXe NAS serverstores the GPO settings in its GPO cache.
When the VNXe system powers up, it reads the settings stored in the GPO cache, andthen retrieves the most recent GPO settings from the Windows domain controller. Afterretrieving the GPO settings, a VNXe NAS server automatically updates the settings basedon the domain’s refresh interval.
Supported GPO settingsA VNXe NAS server currently supports the following GPO Security settings:
Kerberos
l Maximum tolerance for computer clock synchronization (clock skew). Timesynchronization is done per NAS server.
l Maximum lifetime for user ticket
Audit policy
l Audit account logon events
l Audit account management
l Audit directory service access
l Audit logon events
l Audit object access
Managing CIFS File System Storage with Windows Tools
24 EMC VNXe Series 3.1 Configuring Hosts to Access CIFS File Systems
l Audit policy change
l Audit privilege use
l Audit process tracking
l Audit system events
Auditing CIFS users and objects on page 27 provides more information.
User rights
l Access this computer from the network
l Back up files and directories
l Bypass traverse checking
l Deny access to this computer from the network
l EMC virus checking
l Generate security audits
l Manage auditing and security log
l Restore files and directories
l Take ownership of files or other objects
Security options
l Digitally sign client communication (always)
l Digitally sign client communication (when possible)
l Digitally sign server communication (always)
l Digitally sign server communication (when possible)
l LAN Manager Authentication Level
Event logs
l Maximum application log size
l Maximum security log size
l Maximum system log size
l Restrict guest access to application log
l Restrict guest access to security log
l Restrict guest access to system log
l Retain application log
l Retain security log
l Retain system log
l Retention method for application log
l Retention method for security log
l Retention method for system log
Group policy
l Disable background refresh of Group Policy
l Group Policy refresh interval for computers
Managing CIFS File System Storage with Windows Tools
Supported GPO settings 25
Using SMB signingSMB signing ensures that a packet has not been intercepted, changed, or replayed. Thesigning guarantees that a third party has not changed the packet. Signing adds asignature to every packet. The client and VNXe NAS servers use this signature to verify theintegrity of the packet. The VNXe NAS servers support SMB1, SMB2, and SMB3.
For SMB signing to work, the client and the server in a transaction must have SMB signingenabled. SMB signing is always enabled on the VNXe NAS servers, but is not required. Asa result, if SMB signing is enabled on the client, signing is used, and if SMB signing isdisabled on the client, no signing is used.
Monitoring NAS server connections and resource usageYou can use Windows administrative tools to monitor users, share access, and file use onNAS servers.
Monitoring users on a NAS serverThis topic lists the steps to monitor the number of users connected to a NAS server.
Procedure
1. Open the Computer Management MMC for the NAS server you want to monitor asdescribed in Opening Computer Management MMC on page 20.
2. In the console tree, click File Systems > Sessions.
The current users connected to the NAS server appear on the right.
3. Optionally:
l To force disconnections from the NAS server, right-click the username, and selectClose Session from the shortcut menu.
l To force all users to disconnect, right-click Sessions, and select Disconnect AllSessions from the shortcut menu.
Monitoring access to shares on the NAS serverThis topics lists the steps to monitor access to shares on a NAS server.
Procedure
1. Open the Computer Management MMC for the NAS server as described in OpeningComputer Management MMC on page 20.
2. In the console tree, click File Systems > Shares.
The current shares in use appear on the right.
3. Optionally, to force disconnections from a share, right-click the share name, andselect Stop Sharing from the shortcut menu.
Managing CIFS File System Storage with Windows Tools
26 EMC VNXe Series 3.1 Configuring Hosts to Access CIFS File Systems
Monitoring file use on the NAS serverThis topic lists the steps to monitor file use on a NAS server by using the ComputerManagement MMC.
Procedure
1. Open the Computer Management MMC for the NAS server as described in OpeningComputer Management MMC on page 20.
2. In the console tree, click File Systems > Open Files.
The files in use appear on the right.
3. Optionally, to close an open file, right-click the file, and select Close Open File fromthe shortcut menu.
4. To close all open files, right-click the Open Files folder, and select Disconnect AllOpen Files from the shortcut menu.
Auditing CIFS users and objectsTo audit a NAS server, use the Data Mover Management, which is an MMC snap-in. Installing host software for CIFS on page 9 provides information about installing MMCsnap-ins.
By default, auditing is disabled for all Windows object classes. To enable auditing, youmust explicitly turn it on for specific events on a specific NAS server. After it is enabled,auditing is initiated on the relevant NAS server. The Data Mover Management snap-inonline help provides information about setting audit policies.
If the Group Policy Object (GPO) is configured and enabled on the NAS server, then theGPO configuration of the audit settings is used.
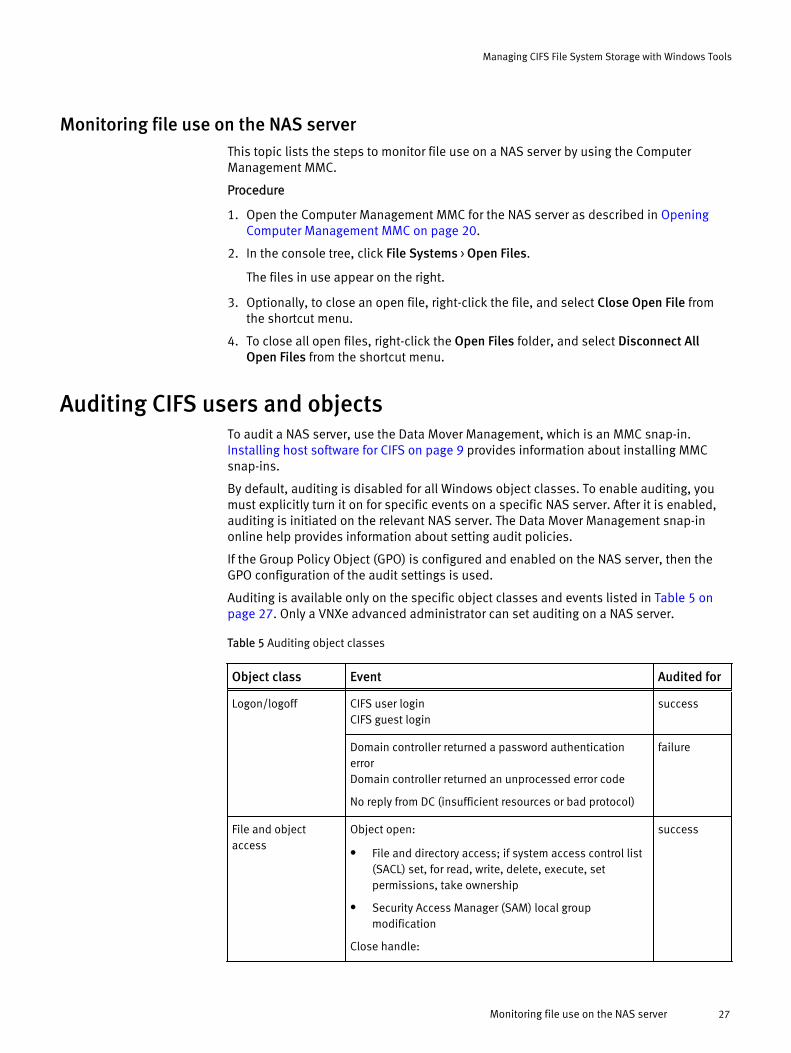
Auditing is available only on the specific object classes and events listed in Table 5 onpage 27. Only a VNXe advanced administrator can set auditing on a NAS server.
Table 5 Auditing object classes
Object class Event Audited for
Logon/logoff CIFS user loginCIFS guest login
success
Domain controller returned a password authenticationerrorDomain controller returned an unprocessed error code
No reply from DC (insufficient resources or bad protocol)
failure
File and objectaccess
Object open:
l File and directory access; if system access control list(SACL) set, for read, write, delete, execute, setpermissions, take ownership
l Security Access Manager (SAM) local groupmodification
Close handle:
success
Managing CIFS File System Storage with Windows Tools
Monitoring file use on the NAS server 27
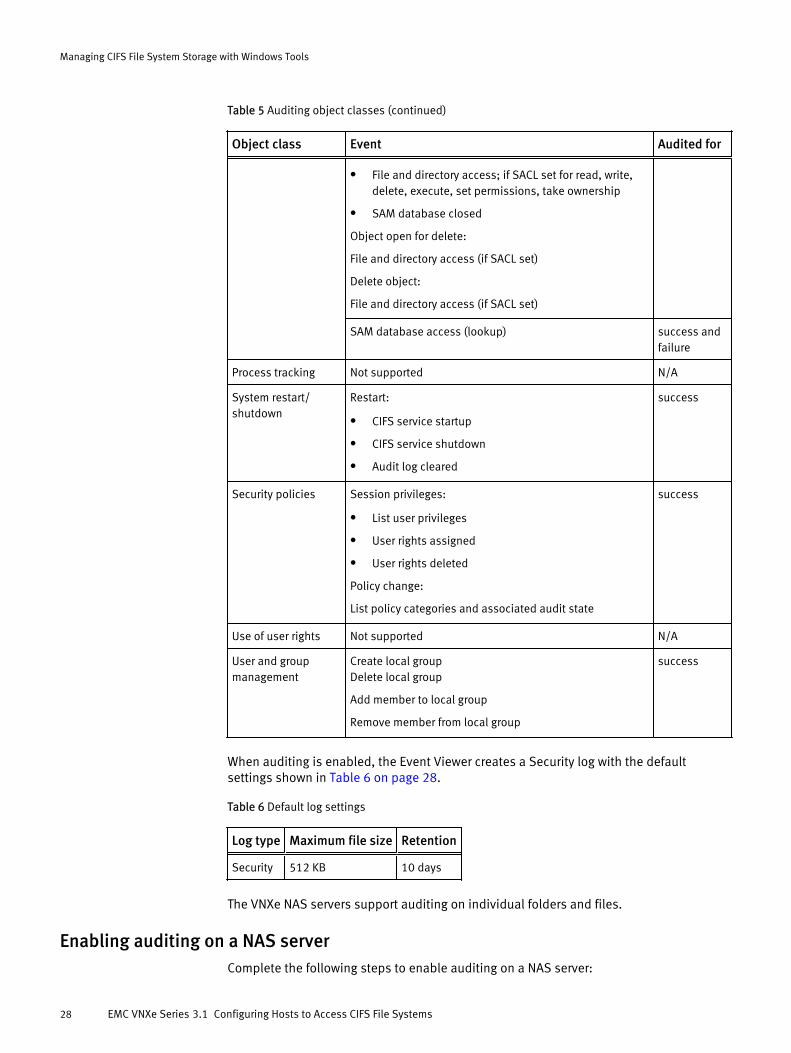
Table 5 Auditing object classes (continued)
Object class Event Audited for
l File and directory access; if SACL set for read, write,delete, execute, set permissions, take ownership
l SAM database closed
Object open for delete:
File and directory access (if SACL set)
Delete object:
File and directory access (if SACL set)
SAM database access (lookup) success andfailure
Process tracking Not supported N/A
System restart/shutdown
Restart:
l CIFS service startup
l CIFS service shutdown
l Audit log cleared
success
Security policies Session privileges:
l List user privileges
l User rights assigned
l User rights deleted
Policy change:
List policy categories and associated audit state
success
Use of user rights Not supported N/A
User and groupmanagement
Create local groupDelete local group
Add member to local group
Remove member from local group
success
When auditing is enabled, the Event Viewer creates a Security log with the defaultsettings shown in Table 6 on page 28.
Table 6 Default log settings
Log type Maximum file size Retention
Security 512 KB 10 days
The VNXe NAS servers support auditing on individual folders and files.
Enabling auditing on a NAS serverComplete the following steps to enable auditing on a NAS server:
Managing CIFS File System Storage with Windows Tools
28 EMC VNXe Series 3.1 Configuring Hosts to Access CIFS File Systems
l Specifying the audit policy on page 29
l Setting the audit log parameters on page 29
Specifying the audit policyThis topic lists the steps to access the Security Management snap-in and specify auditpolicies.
After the Celerra Management Console is installed:
Procedure
1. Open the Computer Management MMC for the NAS server as described in OpeningComputer Management MMC on page 20.
2. Click Start, and select Programs or All Programs > Administrative Tools > EMC CelerraManagement.
3. In the Celerra Management window, do one of the following:
l If a NAS server is selected (a name appears after Data Mover Management), go tostep 4.
l If a NAS server is not selected:
a. Right-click Data Mover Management, and select Connect to Data Mover fromthe shortcut menu.
b. In the Select Data Mover box, select a NAS server using one of the followingmethods:
n In the Look in list, select the domain where the NAS server you want tomanage is located, and then select the NAS server from the list.
n In the Name field, type the network name or IP address of the NAS server.
4. Double-click Data Mover Management, and double-click Data Mover SecuritySettings.
5. Select Audit Policy.
The audit policies appear in the right panel.
6. Right-click Audit Policy, and select Enable Auditing from the shortcut menu.
7. Double-click an audit object in the right panel to define the audit policy for thatobject.
The Data Mover Management snap-in online help provides more information aboutaudit policy.
Setting the audit log parametersThis topic lists the steps to set the audit log parameters by using the ComputerManagement MMC for the NAS server.
Procedure
1. Open the Computer Management MMC for the NAS server as described in OpeningComputer Management MMC on page 20.
2. Double-click Event Viewer and, for Windows Server 2008 or Windows Server 2012,select Windows Logs.
The specific log files are displayed.
3. Right-click the log file, and select Properties from the shortcut menu.
The property sheet for the log appears. Normally, the Maximum log size field islocked.
Managing CIFS File System Storage with Windows Tools
Enabling auditing on a NAS server 29
4. After you have completed the procedure, return to the Application Properties dialogbox for the log and click the arrows to increase or decrease the size of the log.
5. In the Log size area of the dialog box, specify what happens when the maximum logsize is reached:
l Overwrite events as needed: Specifies whether all new events are written to thelog, even if the log is full. When the log is full, each new event replaces the oldestevent.
l Overwrite events older than (n) days: Overwrites events older than the number ofdays specified. Use the arrows to specify the limit, or click the field to enter thelimit. The log file size specified in step 4 is not exceeded. New events are notadded if the maximum log size is reached and there are no events older than thisperiod.
l Do not overwrite events: Fills the log up to the limit specified in step 4. When thelog is full, no new events are written to it until you clear the log.
6. Click OK to save the settings.
Viewing the audit eventsThis topic lists the steps to view the audit events.
Procedure
1. Click Start, and select All Programs > Administrative Tools > Event Viewer.
2. Right-click the Event Viewer icon in the right panel, and select Connect to AnotherComputer from the shortcut menu.
The Select Computer dialog box appears.
3. In the Select Computer dialogue, directly enter the name or IP of the NAS server. Youmay also select Browse to find the NAS server.
4. For Windows Server 2008 or Windows Server 2012, click Windows Logs.
5. Click the log.
The log entries appear in the right panel.
6. Double-click the log entry to view the event detail.
The Event Properties window opens.
Disabling auditingThis topic lists the steps to disable auditing.
Procedure
1. Log in to a Windows Server 2003, Windows Server 2008, or Windows Server 2012domain controller with domain administrator privileges.
2. Click Start, and select Programs or All Programs > Administrative Tools > EMC CelerraManagement.
3. Do one of the following:
l If a NAS server is already selected (name appears after Data Mover Management),go to step 4.
l If a NAS server is not selected:
a. Right-click Data Mover Management, and select Connect to Data Mover fromthe shortcut menu.
Managing CIFS File System Storage with Windows Tools
30 EMC VNXe Series 3.1 Configuring Hosts to Access CIFS File Systems
b. In the Select Data Mover dialog box, select a NAS server using one of thefollowing methods:
n In the Look in list, select the domain in which the NAS server you want tomanage is located, and select the NAS server from the list.
n In the Name field, type the network name or IP address of the NAS server.
4. Double-click Data Mover Management, and double-click Data Mover SecuritySettings.
5. Right-click Audit Policy, and select Disable Auditing from the shortcut menu.
Accessing the security log for a NAS serverBy default, each NAS server stores its Windows security log at c:\security.evt,which has a size limit of 512 KB. You can directly access this security log through the C$share of each NAS server with:
\\storage_server_netbios_name\C$\security.evtwhere storage_server_netbios_name is the NetBIOS name of the NAS server.
Copying a share snapshotThis topic lists the steps to copy a share snapshot by using Windows Explorer.
Procedure
1. Access the NAS server that has the share that you want to copy by one of thesemethods:
l Browse to the NAS server in Windows Explorer.
l Select Start > Run > \\NAS_server_name.
2. In the NAS server, right-click the share with the snapshot that you want to copy, selectProperties.
3. Click the Previous Versions tab.
4. Select the snapshot (previous version) that you want to copy and click Copy.
A writeable copy of the snapshot is created in the location that you specify.
Restoring a share snapshotThis topic lists the steps to restore a share snapshot.
Restoring a storage resource to a snapshot returns (rolls back) the storage resource to theprevious state captured by the snapshot. During the restore, the entire storage resource,including all files and data stored on it, is replaced with the contents of the snapshot.
NOTICE
To prevent data loss, ensure that all clients have completed all read and write operationsto the storage resource that you want to restore.
Procedure
1. Access the NAS server that has the share that you want to copy by one of thesemethods:
Managing CIFS File System Storage with Windows Tools
Accessing the security log for a NAS server 31
l Browse to the NAS server in Windows Explorer.
l Select Start > Run > \\NAS_server_name.
2. In the NAS server, right-click the share with the snapshot that you want to copy, selectProperties.
3. Click the Previous Versions tab.
4. Select the snapshot (previous version) that you want to restore and click Restore.
Results
The restore operation does the following:
l For files that are in the current version, but not in the previous version being restored— Leaves these files unchanged on the share.
l For files that are in both the previous version being restored and the current version— Overwrites the files on the share with the contents of these files from the previousversion.
l For files that are in the previous version being restored, but not in the current version— Adds these files to the share.
For example, suppose the following:
l The current version has files a, b, and f.
l The previous version being restored has files a, f, and g.
The restored version will have file b with the contents from the current version and files a,f, and g with the contents from the previous version.
Managing CIFS File System Storage with Windows Tools
32 EMC VNXe Series 3.1 Configuring Hosts to Access CIFS File Systems
CHAPTER 4
Using FLR with VNXe
This chapter contains the following topics.
l FLR terminology and concepts............................................................................... 34l System requirements for FLR ................................................................................ 36l Installing the FLR Toolkit on a host........................................................................ 38l Configuring the FLR monitor...................................................................................39l Using the FLR monitor............................................................................................39
Using FLR with VNXe 33
FLR terminology and conceptsThis topic defines terminology and describes concepts that are important inunderstanding how file-level retention (FLR) works for file system storage.
The VNXe NAS server supports file-level retention (FLR) for file system storage. FLR allowsyou to set file-based permissions on a file system to limit write access for a specifiedretention period. An FLR-enabled file system:
l Safeguards data while ensuring its integrity and accessibility by letting you create apermanent set of files and directories that users cannot alter through CIFS or FTP.
l Simplifies the task of archiving data on standard rewriteable magnetic disks throughstandard CIFS operations.
l Improves storage management flexibility.
NOTICE
Once you enable FLR for a file system, you cannot disable it. When FLR is enabled, youcan get into situations where you may not be able to delete files that you need to delete.Do not enable FLR unless you are certain that you want to use it and you know what youare doing.
NOTICE
Do not use Windows Explorer to lock files in an FLR-enabled file system. WindowsExplorer sets the time of the file to the current date and time before making it read-only,which causes the file to be locked forever. If you want to use Windows Explorer to set ormanage retention dates or to lock files in an FLR-enabled file system, you must install theFLR toolkit.
FLR terminologyCLEAN state
Initial state of a file when it is created. You treat a CLEAN file in the same manner asany file in a file system not enabled for file-level retention. This means that clientsand users can rename, modify, and delete a CLEAN file until it is committed to FLR.
EXPIRED stateState of a file when its retention period expires. Clients and users can revert a file inthe EXPIRED state back to the FLR state or delete a file in the EXPIRED state from theFLR file system.
FLR stateState of a file when its read/write permission is changed to read-only in a file systemenabled for file-level retention. Clients and users cannot delete files committed tothe FLR state until their retention period expires.
Basic FLR conceptsThis topic describes basic FLR concepts including enabling a file system for FLR, FLRstates, and managing an FLR file system.
You can enable file-level retention on a specified file system only at creation time. Whenyou create a new file system with file-level retention enabled, the file system ispersistently marked as an FLR file system and clients and users can apply FLR protectionon a per-file basis only.
Using FLR with VNXe
34 EMC VNXe Series 3.1 Configuring Hosts to Access CIFS File Systems

A file in an FLR file system is in one of these possible states: CLEAN, FLR, or EXPIRED. Youmanage files in the FLR state by setting retention by directory or batch process, whichmeans you manage the file archives on a file system basis, or by running a script to locateand delete files in the expired state.
You can delete an FLR file system, but you cannot delete or modify files that are in the FLRstate. The path to a file in the FLR state is also protected from modification, which meansthat you cannot rename or delete a directory on an FLR file system unless it is empty.
How FLR worksThis topic describes FLR state transitions for FLR-enabled file systems.
A file in an FLR file system transitions between these possible states: CLEAN, FLR, orEXPIRED. The transition between these states is based on the file's last access time (LAT)and read-only permission.
When a file is created, it is in the CLEAN state. A CLEAN file is treated exactly like a file ina file system that is not enabled for file-level retention; clients and users can rename,modify, or delete the file.
Note
The file's current state is not visible to the user. Also, access to a file in the CLEAN statecauses the file's LAT to change. For example, antivirus scanning, backing up, or searchingfile contents modifies the LAT on a file.
When you change the permissions on a CLEAN file from read/write to read-only, the filetransitions from the CLEAN state to the FLR state, and is committed to FLR. Clients andusers cannot modify or delete a file in the FLR state. Also, the path to any file in the FLRstate is protected from modification. This means that clients and users of a directory onan FLR file system cannot rename or delete the directory unless it is empty, and they candelete FLR files only after their retention date has passed.
A retention date specifies the date and time when a file's FLR protection expires. EMCsuggests specifying a retention period before you lock a file to FLR. Otherwise, the systemdefaults to a infinite retention period. In this case, you can explicitly set a shorterretention period. You can set a file's retention date by modifying the file's last accesstime to a future expiration date and time. This future date and time represents the end ofthe file's retention date.
A file transitions from the FLR state to the EXPIRED state when its reaches its retentiondate. Only a file’s owner or administrator can delete a file in the EXPIRED state. File-levelretention does not perform automatic deletion of files in an EXPIRED state. You mustdelete expired files explicitly by using the FLR Toolkit.
If necessary, you can revert a file from the EXPIRED state back to the FLR state byextending its retention period to a date beyond the expiration date of the originalretention date. To extend a retention period, change the file's LAT to a time beyond theoriginal expiration date. Although you can extend a file's retention period, you cannotshorten it. If you specify a new access time that is before the current access time for thefile, the VNXe NAS server rejects the command. With the exceptions of extending a file'sretention period and modifying a user or group's read permissions to the file, you cannotedit the file's metadata during the retention period.
When you copy a read-only file from a regular file system to a FLR file system, the file isnot committed to the FLR state. When the copy is complete, the file is in the CLEAN state.
Using FLR with VNXe
How FLR works 35
FLR restrictionsThis topic describes the FLR restrictions that you must observe when using FLR to managefile systems.
l You must set the level of file-level retention when you create the file system and youcannot change it after file system creation.
l VNXe clients or users cannot modify or delete Files that are in the FLR state. The pathto a file in the locked state is also protected from modification, which means that adirectory on an FLR-enable file system cannot be renamed or deleted unless it doesnot contain any protected files.
l If you are using the EMC Common AntiVirus Agent (CAVA), EMC strongly recommendsthat you update all the virus definition files on all resident antivirus (AV) engines inthe CAVA pools, and periodically run a full scan of the file system to detect infectedFLR files. When an infected locked file is discovered, the resident AV cannot repair orremove an infected file. Although you can delete the file only after its retention datehas passed, you can change the file’s permission bits to restrict read access to makethe file unavailable to users. CAVA’s scan-on-first read functionality does not detect avirus in a locked file. The CAVA documentation on the EMC Online Support website(http://www.emc.com/vnxesupport) provides information about CAVA.
l Although file-level retention supports all backup functionality, the FLR attribute is notpreserved in a Network Data Management Protocol (NDMP) backup. As a result, whenyou use NDMP backup, you must make sure that the files are restored to a VNXe filesystem with file-level retention enabled. If you restore a file from an NDMP backupwhose retention date has expired, the file system has an infinite retention date afterit is restored. If you want to protect the file, but do not want it to have an infiniteretention date, restore the file to a non-FLR file system, and then copy it back into anFLR system.
l The root file system of a nested mount cannot be a file system with file-level retentionenabled.
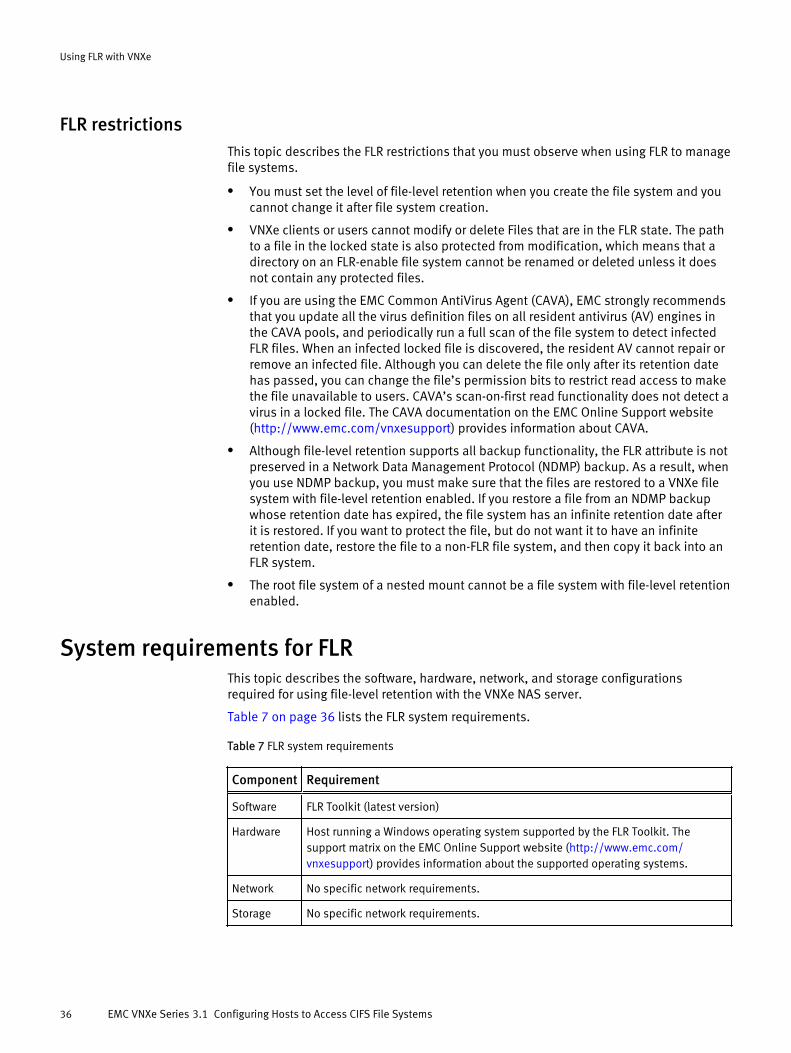
System requirements for FLRThis topic describes the software, hardware, network, and storage configurationsrequired for using file-level retention with the VNXe NAS server.
Table 7 on page 36 lists the FLR system requirements.
Table 7 FLR system requirements
Component Requirement
Software FLR Toolkit (latest version)
Hardware Host running a Windows operating system supported by the FLR Toolkit. Thesupport matrix on the EMC Online Support website (http://www.emc.com/vnxesupport) provides information about the supported operating systems.
Network No specific network requirements.
Storage No specific network requirements.
Using FLR with VNXe
36 EMC VNXe Series 3.1 Configuring Hosts to Access CIFS File Systems
Windows .NET Framework requirementThe Windows .NET Framework 2.0 must be installed on the host for the FLR Toolkitinstallation to be successful.
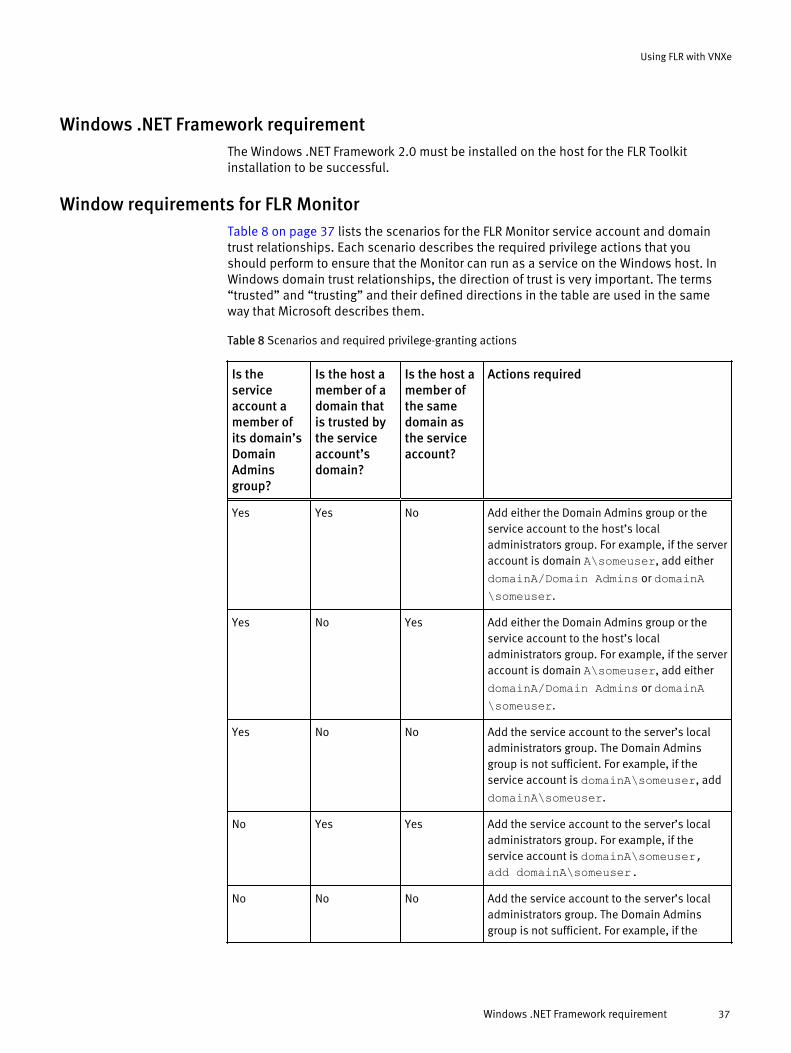
Window requirements for FLR MonitorTable 8 on page 37 lists the scenarios for the FLR Monitor service account and domaintrust relationships. Each scenario describes the required privilege actions that youshould perform to ensure that the Monitor can run as a service on the Windows host. InWindows domain trust relationships, the direction of trust is very important. The terms“trusted” and “trusting” and their defined directions in the table are used in the sameway that Microsoft describes them.
Table 8 Scenarios and required privilege-granting actions
Is theserviceaccount amember ofits domain’sDomainAdminsgroup?
Is the host amember of adomain thatis trusted bythe serviceaccount’sdomain?
Is the host amember ofthe samedomain asthe serviceaccount?
Actions required
Yes Yes No Add either the Domain Admins group or theservice account to the host’s localadministrators group. For example, if the serveraccount is domain A\someuser, add either
domainA/Domain Admins or domainA\someuser.
Yes No Yes Add either the Domain Admins group or theservice account to the host’s localadministrators group. For example, if the serveraccount is domain A\someuser, add either
domainA/Domain Admins or domainA\someuser.
Yes No No Add the service account to the server’s localadministrators group. The Domain Adminsgroup is not sufficient. For example, if theservice account is domainA\someuser, add
domainA\someuser.
No Yes Yes Add the service account to the server’s localadministrators group. For example, if theservice account is domainA\someuser,add domainA\someuser.
No No No Add the service account to the server’s localadministrators group. The Domain Adminsgroup is not sufficient. For example, if the
Using FLR with VNXe
Windows .NET Framework requirement 37
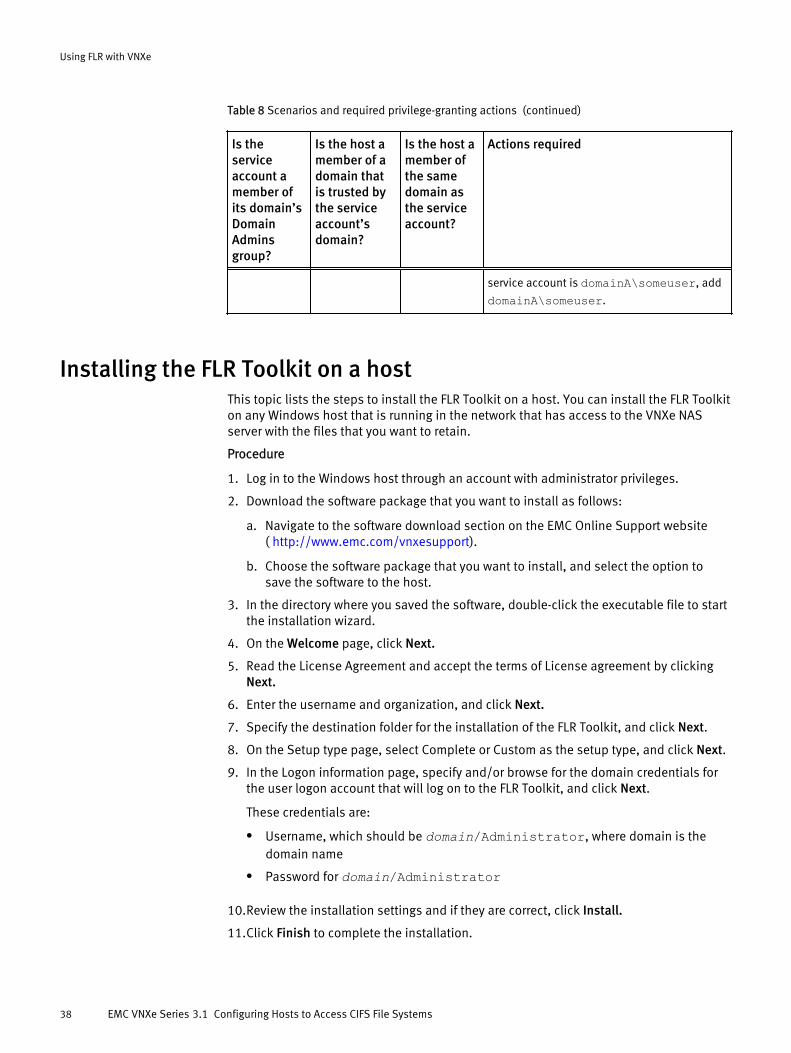
Table 8 Scenarios and required privilege-granting actions (continued)
Is theserviceaccount amember ofits domain’sDomainAdminsgroup?
Is the host amember of adomain thatis trusted bythe serviceaccount’sdomain?
Is the host amember ofthe samedomain asthe serviceaccount?
Actions required
service account is domainA\someuser, add
domainA\someuser.
Installing the FLR Toolkit on a hostThis topic lists the steps to install the FLR Toolkit on a host. You can install the FLR Toolkiton any Windows host that is running in the network that has access to the VNXe NASserver with the files that you want to retain.
Procedure
1. Log in to the Windows host through an account with administrator privileges.
2. Download the software package that you want to install as follows:
a. Navigate to the software download section on the EMC Online Support website( http://www.emc.com/vnxesupport).
b. Choose the software package that you want to install, and select the option tosave the software to the host.
3. In the directory where you saved the software, double-click the executable file to startthe installation wizard.
4. On the Welcome page, click Next.
5. Read the License Agreement and accept the terms of License agreement by clickingNext.
6. Enter the username and organization, and click Next.
7. Specify the destination folder for the installation of the FLR Toolkit, and click Next.
8. On the Setup type page, select Complete or Custom as the setup type, and click Next.
9. In the Logon information page, specify and/or browse for the domain credentials forthe user logon account that will log on to the FLR Toolkit, and click Next.
These credentials are:
l Username, which should be domain/Administrator, where domain is thedomain name
l Password for domain/Administrator
10.Review the installation settings and if they are correct, click Install.
11.Click Finish to complete the installation.
Using FLR with VNXe
38 EMC VNXe Series 3.1 Configuring Hosts to Access CIFS File Systems
Configuring the FLR monitorThis topic lists the steps to configure the FLR monitor that is included with the FLR Toolkit.
Procedure
1. Open the FLR monitor service, which is included with the FLR Toolkit.
2. On the FLR Connections tab, click Add.
3. On the Directory Options tab in the Retention Source Configuration page, clickBrowse to select the retention source.
4. Select the CIFS share that was created over the FLR file system as the retention source.
5. In the Retention Source Configuration page, select the option to monitorsubdirectories and click OK.
6. On the Monitoring Options tab, select the monitoring method:
l Fast (event based) — The retention policy is applied as soon as the archive filesare generated.
l Polling (schedule-based) — The retention policy is applied according to aparticular schedule.
7. On the FLR options tab, set retention to the required retention policy, and click OK.
Note
The incremental date and time policy applies the retention so that the retention dateis applied incrementally for the archive files generated at different points of time.
8. In the FLR monitor service page, on the FLR Connections tab, select the connectionentry and click Apply.
9. In the Confirmation page, click Yes to confirm the application of the retention policy,and click OK.
Using the FLR monitorThis topic describes using the FLR monitor. Tasks include:
l Committing a read-only file to the FLR state on page 39
l Creating FLR queries on page 40
Committing a read-only file to the FLR stateThis topic lists the steps to commit a read-only file to the FLR state. This task is requiredafter copying a file to a CIFS file system enabled for file-level retention.
Procedure
1. Change permission on the file to read/write.
2. Set a retention period.
3. Commit the file to the FLR state.
Additionally, file systems with file-level retention enabled always enforcesynchronization of the DOS (CIFS) read-only bit.
Using FLR with VNXe
Configuring the FLR monitor 39
Creating FLR queriesThis topic lists the steps to create an FLR query by using the FLR Explorer tool.
After the FLR monitor service is started, you can use the FLR Explorer tool, which isautomatically installed with the FLR ToolKit, to create queries for viewing retained orexpired files. You can execute queries on the retention source with the build a queryfeature of FLR Explorer. You can provide the following parameters for the query:
l Type of files — Retained files, files in a non-WORM state, files in specific retentionstate
l Retention source
l Extension of files to include or exclude
l Subdirectories also in the search path
Procedure
1. Open the FLR Explorer application from C:\Program Files (x86)\EMC\FLRToolkit\FLR Explorer.
2. In the FLR Explorer, select Build a Query.
3. In the Query Builder page, provide the type of file to search for, such as retained files,files in specific retention state, or files in non-WORM state.
4. Provide the retention source.
5. Optionally include or exclude files by specifying their extensions.
6. Click OK.
A list of expired files from the FLR Explorer is displayed. Similarly you can display thelist of retained files by building another query using the FLR explorer.
Using FLR with VNXe
40 EMC VNXe Series 3.1 Configuring Hosts to Access CIFS File Systems

CHAPTER 5
Using CEE CAVA with VNXe
This chapter contains the following topics:
l CAVA overview...................................................................................................... 42l System requirements and limitations.................................................................... 43l Setting up CEE CAVA for VNXe NAS servers............................................................ 43
Using CEE CAVA with VNXe 41
CAVA overviewThe VNX Common Event Enabler (CEE) provides an antivirus solution (Common Anti-VirusAgent) for clients using the VNXe system. It uses industry-standard Common Internet FileSystem (CIFS) protocols in a Windows 8, Windows 7, Windows Server 2012, WindowsServer 2008, or Windows Server 2003. The Common Anti-Virus Agent (CAVA) uses third-party antivirus software to identify and eliminate known viruses before they infect files onthe VNXe system. Although the VNXe NAS servers (Data Movers) are resistant to viruses,Windows clients also require protection. The virus protection on the client reduces thechance that the client stores an infected file on the Storage Server and protects the clientif it opens an infected file.
The CEE solution uses the following components:
l VNXe NAS server running the CEE CAVA virus-checking client
l Third-party antivirus (AV) engine
l CEE CAVA software
A third-party AV engine and the CEE CAVA software must be installed on at least oneWindows Server 2012, Windows Server 2008, or Windows Server 2003 or one Windows 7or Windows 8 workstation in the domain with the VNXe system. Such a server is an AVserver.
Note
If the third-party AV software runs on a Windows 7 or Windows 8 workstation, CEE CAVAcan also run on the Windows 7 workstation.
VNXe NAS serversThe VNXe NAS servers manage operations for Windows file systems and shares (CIFS),Linux/UNIX file systems and shares (NFS), or both. For a CEE CAVA solution, the VNXesystem requires one or more NAS servers configured for CIFS shares or for both CIFS andNFS shares.
CEE CAVA virus-checking clientThe virus-checking (VC) client is a CEE CAVA agent that runs on the VNXe NAS server. TheVC client interacts with the AV engine, which processes requests from the VC client.Scanning for viruses is supported only for CIFS access. While the scan or other relatedactions take place, access to the file from any CIFS client is blocked.
The VC client does the following:
l Queues and communicates the names of the files to CEE CAVA for it to scan.
l Provides and acknowledges event triggers for scans. Possible event triggers include:
n A file is renamed on the VNXe system.
n A file is copied or saved to the VNXe system.
n A file is modified and closed on the VNXe system.
Third-party antivirus software supportThe CEE CAVA solution uses third-party antivirus software, called an AV engine, to identifyand eliminate known viruses before they infect files on the VNXe system. For the AV
Using CEE CAVA with VNXe
42 EMC VNXe Series 3.1 Configuring Hosts to Access CIFS File Systems
engines that EMC supports, refer to the VNXe support matrix on the EMC Online Supportwebsite (http://www.emc.com/vnxesupport).
CEE CAVA softwareThe CEE CAVA software is an application developed by EMC that runs on a Windowsserver (called an AV server). It communicates with a standard antivirus engine running onone or more servers to scan CIFS files stored on a VNXe or VNX system or Celerra NetworkServer.
VNX CIFS Management snap-inEMC VNX CIFS Management snap-in is an MMC snap-in to Unisphere. Use this snap-in toview or modify the CEE virus-checking parameters for the VNXe NAS servers.
System requirements and limitationsThe CEE CAVA solution requires the following:
l A VNXe system with a NAS server configured on the network.
l Each VNXe NAS server should have a CAVA pool consisting of a minimum of two CAVAservers. This is specified in the NAS server's viruschecker.conf file.
l EMC VNX CIFS Management snap-in installed on a client system that has access tothe VNXe domain. For information about installing this snap-in, see Installing hostsoftware for CIFS on page 9.
l If you are using Windows Server 2008, you must manually compile the cava.mof filewhile using the EMC cavamon sizing tool.
l Third-party antivirus software running on one or more AV servers in the domain. CEECAVA supports 32-bit and 64-bit Windows environments and corresponding third-party AV engines. The version of the AV engine version that is required depends onthe operating system. For the latest third-party software system requirements, consultthe appropriate third-party vendor website or documentation.
l CEE CAVA software installed on each AV server in the domain.
File-level retentionWe strongly recommend that the antivirus (AV) administrator update the virus definitionfiles on all resident AV engines in the CEE CAVA pools, and periodically run a full scan ofthe file system to detect infected file-level retention (FLR) files.
Non-CIFS protocolsThe CEE CAVA solution is for clients running the CIFS protocol only. If clients use the NFSor FTP protocols to move or modify files, the CEE CAVA solution does not scan these filesfor viruses.
Setting up CEE CAVA for VNXe NAS serversTo implement a CEE CAVA solution for VNXe NAS servers, perform these tasks:
l Configuring the domain user account on page 44
l Configuring virus checker parameters on page 46
Using CEE CAVA with VNXe
CEE CAVA software 43
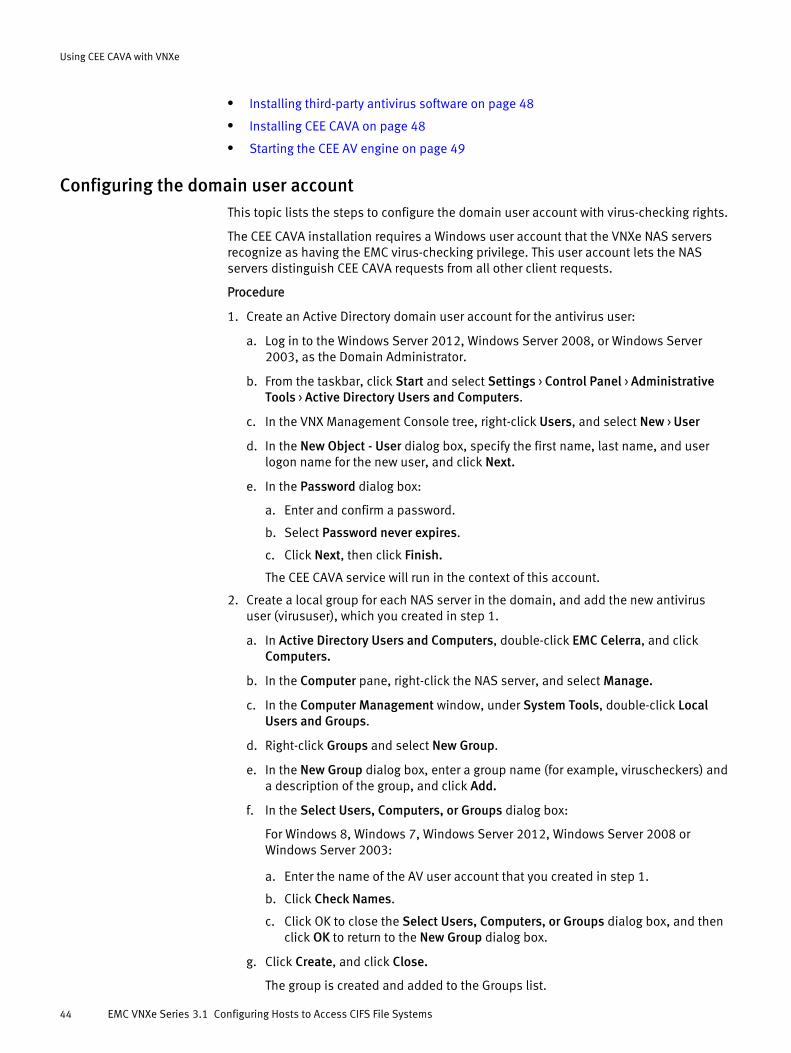
l Installing third-party antivirus software on page 48
l Installing CEE CAVA on page 48
l Starting the CEE AV engine on page 49
Configuring the domain user accountThis topic lists the steps to configure the domain user account with virus-checking rights.
The CEE CAVA installation requires a Windows user account that the VNXe NAS serversrecognize as having the EMC virus-checking privilege. This user account lets the NASservers distinguish CEE CAVA requests from all other client requests.
Procedure
1. Create an Active Directory domain user account for the antivirus user:
a. Log in to the Windows Server 2012, Windows Server 2008, or Windows Server2003, as the Domain Administrator.
b. From the taskbar, click Start and select Settings > Control Panel > AdministrativeTools > Active Directory Users and Computers.
c. In the VNX Management Console tree, right-click Users, and select New > User
d. In the New Object - User dialog box, specify the first name, last name, and userlogon name for the new user, and click Next.
e. In the Password dialog box:
a. Enter and confirm a password.
b. Select Password never expires.
c. Click Next, then click Finish.
The CEE CAVA service will run in the context of this account.
2. Create a local group for each NAS server in the domain, and add the new antivirususer (virususer), which you created in step 1.
a. In Active Directory Users and Computers, double-click EMC Celerra, and clickComputers.
b. In the Computer pane, right-click the NAS server, and select Manage.
c. In the Computer Management window, under System Tools, double-click LocalUsers and Groups.
d. Right-click Groups and select New Group.
e. In the New Group dialog box, enter a group name (for example, viruscheckers) anda description of the group, and click Add.
f. In the Select Users, Computers, or Groups dialog box:
For Windows 8, Windows 7, Windows Server 2012, Windows Server 2008 orWindows Server 2003:
a. Enter the name of the AV user account that you created in step 1.
b. Click Check Names.
c. Click OK to close the Select Users, Computers, or Groups dialog box, and thenclick OK to return to the New Group dialog box.
g. Click Create, and click Close.
The group is created and added to the Groups list.
Using CEE CAVA with VNXe
44 EMC VNXe Series 3.1 Configuring Hosts to Access CIFS File Systems
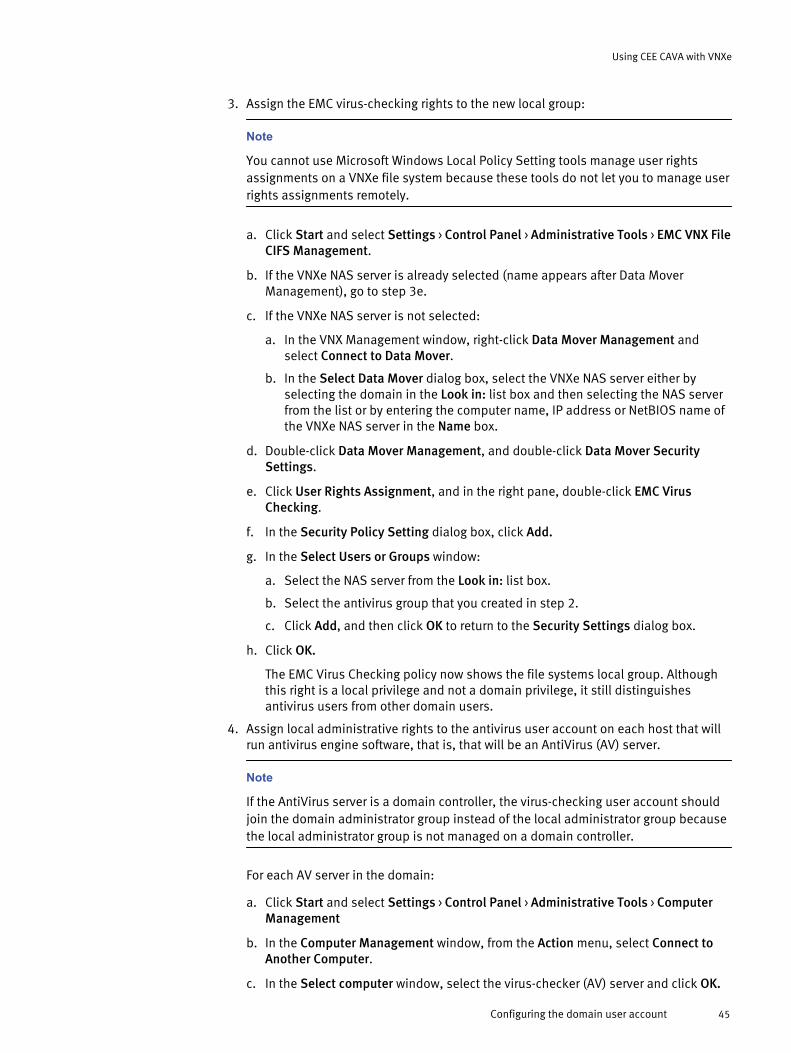
3. Assign the EMC virus-checking rights to the new local group:
Note
You cannot use Microsoft Windows Local Policy Setting tools manage user rightsassignments on a VNXe file system because these tools do not let you to manage userrights assignments remotely.
a. Click Start and select Settings > Control Panel > Administrative Tools > EMC VNX FileCIFS Management.
b. If the VNXe NAS server is already selected (name appears after Data MoverManagement), go to step 3e.
c. If the VNXe NAS server is not selected:
a. In the VNX Management window, right-click Data Mover Management andselect Connect to Data Mover.
b. In the Select Data Mover dialog box, select the VNXe NAS server either byselecting the domain in the Look in: list box and then selecting the NAS serverfrom the list or by entering the computer name, IP address or NetBIOS name ofthe VNXe NAS server in the Name box.
d. Double-click Data Mover Management, and double-click Data Mover SecuritySettings.
e. Click User Rights Assignment, and in the right pane, double-click EMC VirusChecking.
f. In the Security Policy Setting dialog box, click Add.
g. In the Select Users or Groups window:
a. Select the NAS server from the Look in: list box.
b. Select the antivirus group that you created in step 2.
c. Click Add, and then click OK to return to the Security Settings dialog box.
h. Click OK.
The EMC Virus Checking policy now shows the file systems local group. Althoughthis right is a local privilege and not a domain privilege, it still distinguishesantivirus users from other domain users.
4. Assign local administrative rights to the antivirus user account on each host that willrun antivirus engine software, that is, that will be an AntiVirus (AV) server.
Note
If the AntiVirus server is a domain controller, the virus-checking user account shouldjoin the domain administrator group instead of the local administrator group becausethe local administrator group is not managed on a domain controller.
For each AV server in the domain:
a. Click Start and select Settings > Control Panel > Administrative Tools > ComputerManagement
b. In the Computer Management window, from the Action menu, select Connect toAnother Computer.
c. In the Select computer window, select the virus-checker (AV) server and click OK.
Using CEE CAVA with VNXe
Configuring the domain user account 45
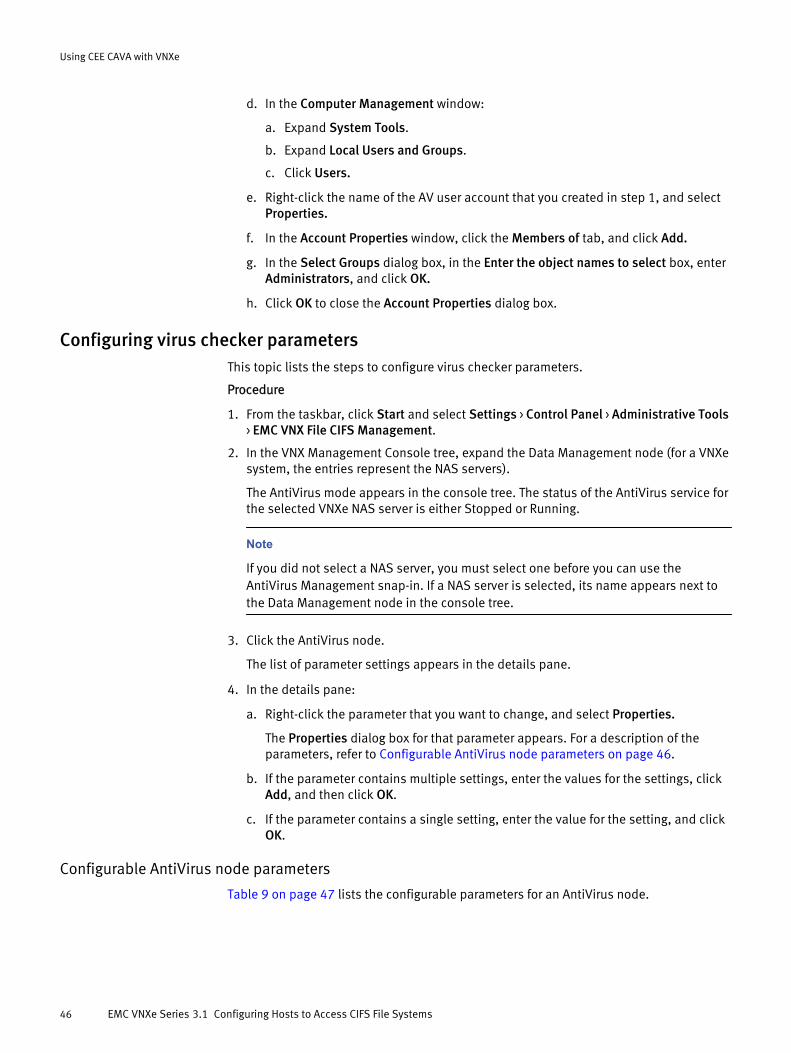
d. In the Computer Management window:
a. Expand System Tools.
b. Expand Local Users and Groups.
c. Click Users.
e. Right-click the name of the AV user account that you created in step 1, and selectProperties.
f. In the Account Properties window, click the Members of tab, and click Add.
g. In the Select Groups dialog box, in the Enter the object names to select box, enterAdministrators, and click OK.
h. Click OK to close the Account Properties dialog box.
Configuring virus checker parametersThis topic lists the steps to configure virus checker parameters.
Procedure
1. From the taskbar, click Start and select Settings > Control Panel > Administrative Tools> EMC VNX File CIFS Management.
2. In the VNX Management Console tree, expand the Data Management node (for a VNXesystem, the entries represent the NAS servers).
The AntiVirus mode appears in the console tree. The status of the AntiVirus service forthe selected VNXe NAS server is either Stopped or Running.
Note
If you did not select a NAS server, you must select one before you can use theAntiVirus Management snap-in. If a NAS server is selected, its name appears next tothe Data Management node in the console tree.
3. Click the AntiVirus node.
The list of parameter settings appears in the details pane.
4. In the details pane:
a. Right-click the parameter that you want to change, and select Properties.
The Properties dialog box for that parameter appears. For a description of theparameters, refer to Configurable AntiVirus node parameters on page 46.
b. If the parameter contains multiple settings, enter the values for the settings, clickAdd, and then click OK.
c. If the parameter contains a single setting, enter the value for the setting, and clickOK.
Configurable AntiVirus node parameters
Table 9 on page 47 lists the configurable parameters for an AntiVirus node.
Using CEE CAVA with VNXe
46 EMC VNXe Series 3.1 Configuring Hosts to Access CIFS File Systems
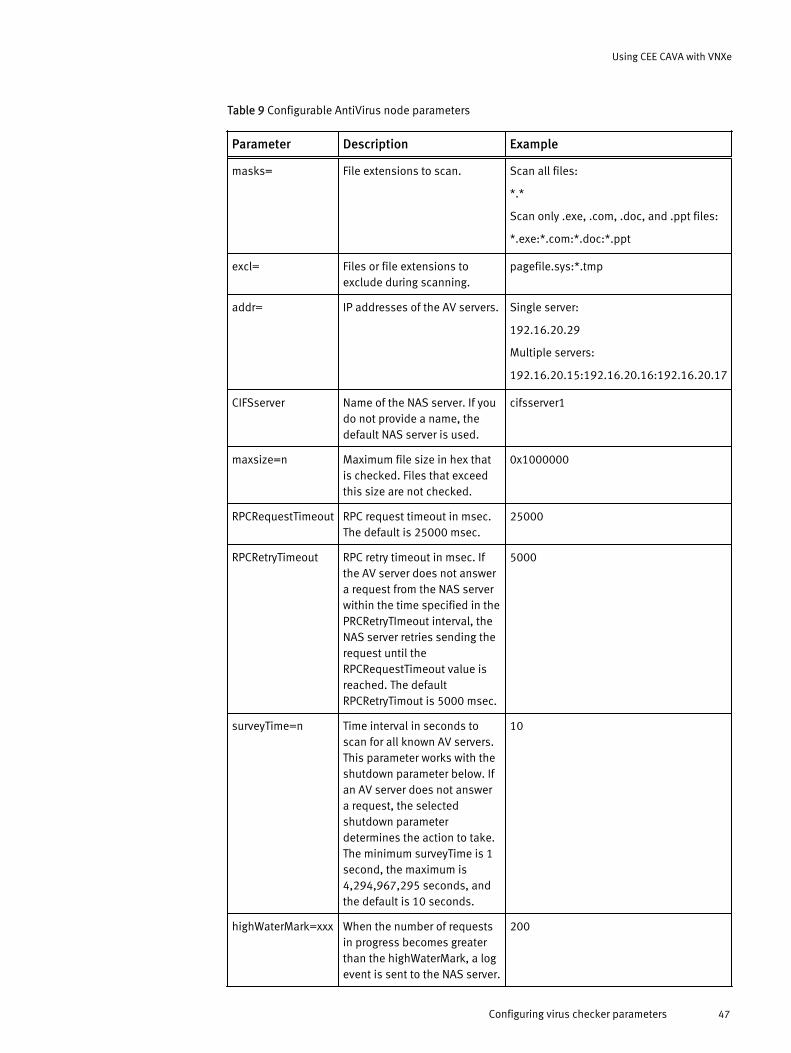
Table 9 Configurable AntiVirus node parameters
Parameter Description Example
masks= File extensions to scan. Scan all files:
*.*
Scan only .exe, .com, .doc, and .ppt files:
*.exe:*.com:*.doc:*.ppt
excl= Files or file extensions toexclude during scanning.
pagefile.sys:*.tmp
addr= IP addresses of the AV servers. Single server:
192.16.20.29
Multiple servers:
192.16.20.15:192.16.20.16:192.16.20.17
CIFSserver Name of the NAS server. If youdo not provide a name, thedefault NAS server is used.
cifsserver1
maxsize=n Maximum file size in hex thatis checked. Files that exceedthis size are not checked.
0x1000000
RPCRequestTimeout RPC request timeout in msec.The default is 25000 msec.
25000
RPCRetryTimeout RPC retry timeout in msec. Ifthe AV server does not answera request from the NAS serverwithin the time specified in thePRCRetryTImeout interval, theNAS server retries sending therequest until theRPCRequestTimeout value isreached. The defaultRPCRetryTimout is 5000 msec.
5000
surveyTime=n Time interval in seconds toscan for all known AV servers.This parameter works with theshutdown parameter below. Ifan AV server does not answera request, the selectedshutdown parameterdetermines the action to take.The minimum surveyTime is 1second, the maximum is4,294,967,295 seconds, andthe default is 10 seconds.
10
highWaterMark=xxx When the number of requestsin progress becomes greaterthan the highWaterMark, a logevent is sent to the NAS server.
200
Using CEE CAVA with VNXe
Configuring virus checker parameters 47
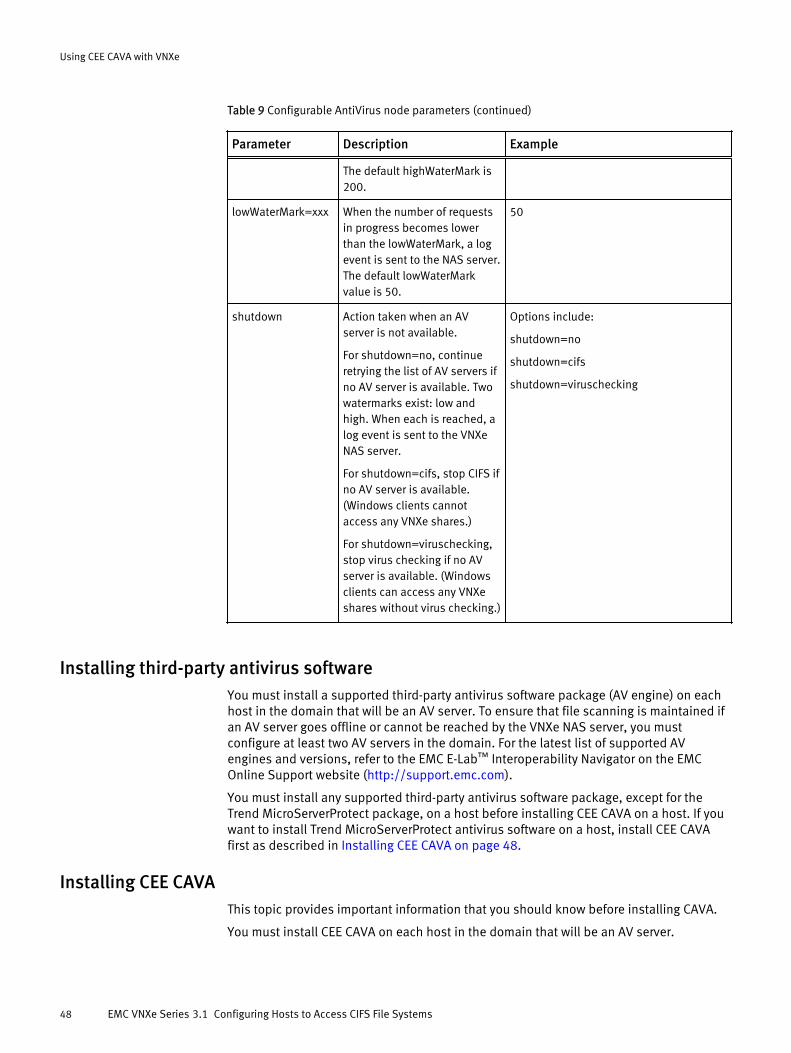
Table 9 Configurable AntiVirus node parameters (continued)
Parameter Description Example
The default highWaterMark is200.
lowWaterMark=xxx When the number of requestsin progress becomes lowerthan the lowWaterMark, a logevent is sent to the NAS server.The default lowWaterMarkvalue is 50.
50
shutdown Action taken when an AVserver is not available.
For shutdown=no, continueretrying the list of AV servers ifno AV server is available. Twowatermarks exist: low andhigh. When each is reached, alog event is sent to the VNXeNAS server.
For shutdown=cifs, stop CIFS ifno AV server is available.(Windows clients cannotaccess any VNXe shares.)
For shutdown=viruschecking,stop virus checking if no AVserver is available. (Windowsclients can access any VNXeshares without virus checking.)
Options include:
shutdown=no
shutdown=cifs
shutdown=viruschecking
Installing third-party antivirus softwareYou must install a supported third-party antivirus software package (AV engine) on eachhost in the domain that will be an AV server. To ensure that file scanning is maintained ifan AV server goes offline or cannot be reached by the VNXe NAS server, you mustconfigure at least two AV servers in the domain. For the latest list of supported AVengines and versions, refer to the EMC E-Lab™ Interoperability Navigator on the EMCOnline Support website (http://support.emc.com).
You must install any supported third-party antivirus software package, except for theTrend MicroServerProtect package, on a host before installing CEE CAVA on a host. If youwant to install Trend MicroServerProtect antivirus software on a host, install CEE CAVAfirst as described in Installing CEE CAVA on page 48.
Installing CEE CAVAThis topic provides important information that you should know before installing CAVA.
You must install CEE CAVA on each host in the domain that will be an AV server.
Using CEE CAVA with VNXe
48 EMC VNXe Series 3.1 Configuring Hosts to Access CIFS File Systems
Removing old versions of CEE CAVAIf an AV server has a previous version of CEE CAVA installed, remove that version of CEECAVA, reboot the server, and then install the new version of CEE CAVA. Use the WindowsControl Panel’s Add/Remove Programs window to remove old versions of CEE CAVA. Youmust have local administrative privileges to remove programs.
Note
If you do not remove the previous version of CEE CAVA before upgrading, you can choosethe Remove option on the initial installation page to first remove the previous version,then continue with the installation.
Reinstallation of CEE CAVADuring a reinstallation of CEE CAVA, you may see an overwrite protection message if theinstallation files were previously unpacked to the temporary directory. If you see thismessage, from the Overwrite Protection message window, click Yes to All to overwrite theexisting files. This process ensures that the latest version of the files exist in thetemporary directory.
Install CEE CAVA software from the VNX Event Enabler CD as described in EMC VNXNetwork Server - Using the CEE Common AntiVirus Agent.
Starting the CEE AV engineThis topic lists the steps to start the CEE AV engine (virus-checking agent) on the VNXesystem.
Procedure
1. In the VNXe Unisphere, select Settings > NAS Server Settings.
2. In the Other Options section, click Start Antivirus.
Results
The Antivirus status changes to Antivirus is running.
Note
If the shutdown antivirus node parameter is set to no, the status "running" does not
necessarily mean that the antivirus is working. Check System > System Alerts to verifythat the antivirus servers are online. To avoid issues with client access, ensure that allthe antivirus servers are accessible and there are no issues with the configuration. Formore information on the shutdown antivirus node parameter or other related
parameters, refer to Configurable antivirus node parameters on page 47.
Using CEE CAVA with VNXe
Starting the CEE AV engine 49

Using CEE CAVA with VNXe
50 EMC VNXe Series 3.1 Configuring Hosts to Access CIFS File Systems