Embed Size (px)
Citation preview
eMigrate Services Recruiting Agent Operational Manual V2.0
TCS MEA-OED Confidential i
eMigrate system
Recruiting Agent Operational Procedure
Manual
February 2018
Version 2.0
Notice
© 2018 Ministry of External Affairs-Overseas Employment Division
This is a controlled document. Unauthorized access, copying, replication or usage for a purpose other than for which it is intended, are prohibited.
All trademarks that appear in the document have been used for identification purposes only and belong to their respective companies.
eMigrate Services Recruiting Agent Operational Manual V2.0
TCS MEA-OED Confidential ii
Recruiting Agent Operational Procedure Manual V
MINISTRY OF EXTERNAL AFFAIRS
OVERSEAS EMPLOYMENT DIVISION
GOVERNMENT OF INDIA
AKBAR BHAVAN
CHANAKYA PURI
NEW DELHI
110021
Phone No.: +91-11-26874250
PF3020
Document Release Note
Notice No.: 1
Customer: Ministry of External Affairs-Overseas Employment Division
Project: eMigrate
Document Details
Name Version Number Description
Recruiting Agent
Procedure Manual
Operational 1.0 This document contains
detailed process steps for
all processes for which the
Recruiting Agent uses the
eMigrate system.
Revision Details
Action Taken
(add/del/change)
Previous page New page number Revision description
number
eMigrate Services Recruiting Agent Operational Manual V2.0
TCS MEA-OED Confidential iii
Updated RA
registration Application
NA NA RA under new
scheme added in the
application
procedure;
subsequent changes
mentioned and
displayed
Change Register serial numbers covered:
The documents or revised pages are subject to document control.
Please keep them up-to-date using the release notices from the distributor of the document.
TCS MEA-OED Confidential ii
1.0 These are confidential documents. Unauthorised access or copying is prohibited.
PF2060C
Document Revision List
Document Name: Recruiting Agent Operational Procedure Manual
Release Notice Reference (for release)
Revision
Number
Revision
Date
Revision
Description
Page
Number
Previous
Page
Number
Action
Taken
Addenda/
New Page
Release
Notice
Reference
eMigrate Services Recruiting Agent Operational Manual V2.0
TCS MEA-OED Confidential iv
iii
About this Document
Purpose
This manual has been written to help you understand and use the eMigrate system. It presents the
functional capabilities and operational details of the eMigrate system, and contains the procedures
that you should know for performing your business tasks using the system.
Intended Audience
This manual is intended for the Applicant who want to apply to MEA-OED for becoming a Recruiting
Agents (RA) and also for RAs registered with the Ministry of External Affairs-Overseas Employment
Division (MEA-OED).
Organisation of this Document
Information in this document has been organised as follows:
Table 1: Organisation of the Document Chapter Description
Chapter 1 Introduction to eMigrate System
Chapter 2 Getting Started
eMigrate Services Recruiting Agent Operational Manual V2.0
TCS MEA-OED Confidential v
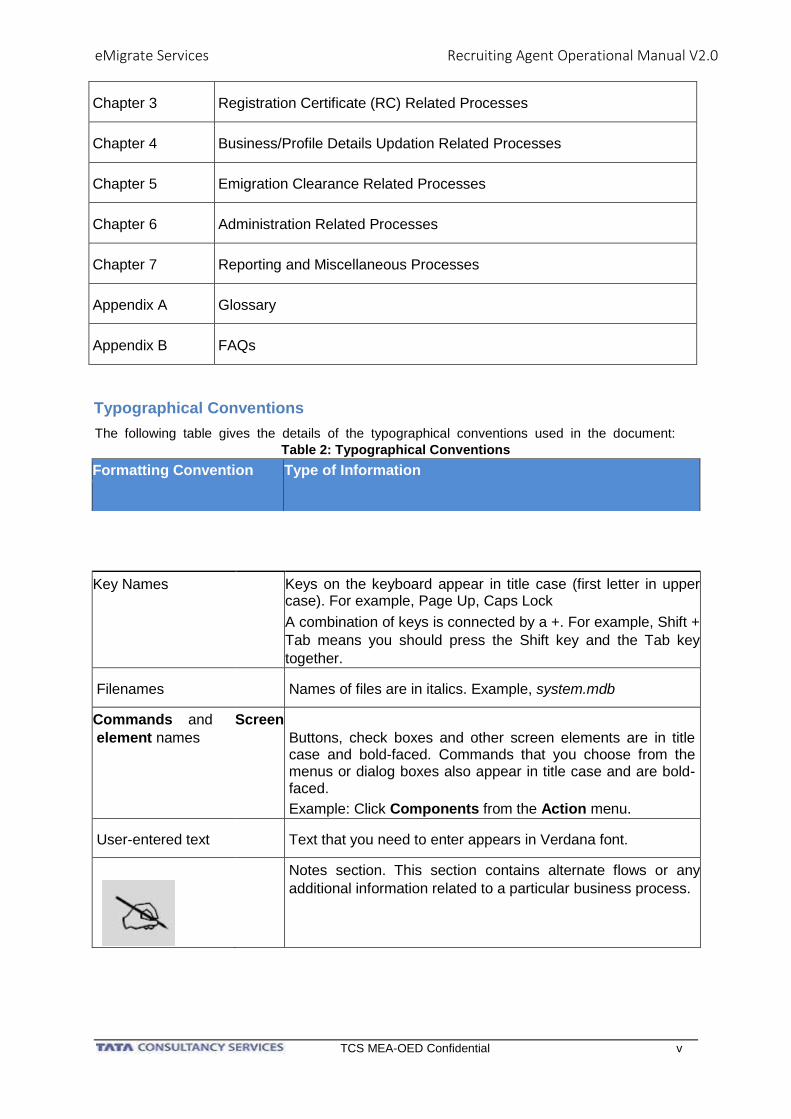
Chapter 3 Registration Certificate (RC) Related Processes
Chapter 4 Business/Profile Details Updation Related Processes
Chapter 5 Emigration Clearance Related Processes
Chapter 6 Administration Related Processes
Chapter 7 Reporting and Miscellaneous Processes
Appendix A Glossary
Appendix B FAQs
Typographical Conventions
The following table gives the details of the typographical conventions used in the document:
Table 2: Typographical Conventions
Key Names Keys on the keyboard appear in title case (first letter in upper case). For example, Page Up, Caps Lock
A combination of keys is connected by a +. For example, Shift +
Tab means you should press the Shift key and the Tab key
together.
Filenames
Names of files are in italics. Example, system.mdb
Commands and
element names
Screen
Buttons, check boxes and other screen elements are in title case and bold-faced. Commands that you choose from the menus or dialog boxes also appear in title case and are bold-faced.
Example: Click Components from the Action menu.
User-entered text
Text that you need to enter appears in Verdana font.
Notes section. This section contains alternate flows or any
additional information related to a particular business process.
Formatting Convention Type of Information

eMigrate Services Recruiting Agent Operational Manual V2.0
TCS MEA-OED Confidential vi
eMigrate Services Recruiting Agent Operational Manual V2.0
TCS MEA-OED Confidential vii
Contents
1. Introduction to eMigrate System ....................................................................... 14 1.1. Features of eMigrate System .................................................................................................... 14
1.2. Software and Hardware Requirements ..................................................................................... 14
1) Software Requirements ........................................................................................................... 14
2) Hardware Requirements ........................................................................................................... 14
1.3. eMigrate System URL ................................................................................................................ 15
2. Getting Started ................................................................................................... 17 2.1. Accessing the System ............................................................................................................... 17
2.2. Using the System Interface ....................................................................................................... 17
1) Header ..................................................................................................................................... 17
2) Navigation Menu ...................................................................................................................... 18
3) Main Body ................................................................................................................................ 20
4) Footer ....................................................................................................................................... 21
5) Buttons ..................................................................................................................................... 21
2.3. Logging in eMigrate System (for RAs) ...................................................................................... 22
2.4. Using the System Interface (for RAs) ....................................................................................... 24
1) Header ..................................................................................................................................... 24
2) Navigation Menu ....................................................................................................................... 25
3) Buttons ......................................................................................................................................
26
3. Registration Certificate (RC) Related Processes ............................................. 27 3.1. Applying for RA Registration ..................................................................................................... 27
3.2. Applying for RC Renewal .......................................................................................................... 40
3.3. Requesting for Duplicate RC..................................................................................................... 44
3.4. Requesting for RC Cancellation / Bank Guarantee Release .................................................... 46
4. Business/Profile Details Update Related Processes ....................................... 47 4.1. Applying for Change in Registered Office ................................................................................. 48
4.2. Declaring Closure of Branch Office ........................................................................................... 50
4.3. Applying for Change in Directors/Partners ................................................................................ 51
4.4. Applying for Addition of New Branch Office .............................................................................. 53
4.5. Applying for Change in Office Status ........................................................................................ 55
4.6. Applying for Change in Company Type .................................................................................... 56
4.7. Applying for Change in Profile Details ...................................................................................... 59
4.8. Applying for Capacity Enhancement ......................................................................................... 61
5. Emigrant Clearance Related Processes ........................................................... 64 5.1. Without Employer Registration ................................................................................................. 64
1) Entering Employer and Demand Details .................................................................................. 64
2) Applying for Interview / Advertisement Permission ................................................................. 71
1.0
eMigrate Services Recruiting Agent Operational Manual V2.0
TCS MEA-OED Confidential viii
3) Applying for Emigration Clearance .......................................................................................... 73
4) Make Bulk Payment ................................................................................................................. 81
5) Applying for Emigration Clearance Cancellation ..................................................................... 82
5.2. With Employer Registration....................................................................................................... 83
1) Acknowledging Demand from Employer .................................................................................. 83
2) Applying for Interview/Advertisement Permission ................................................................... 85
3) Entering Identified Emigrant Details for Visa Arrangement by Employer ................................ 85
4) Applying for Emigration Clearance .......................................................................................... 87
5) Make Bulk Payment .................................................................................................................. 94
6) Applying for Emigration Clearance Cancellation ......................................................................
94
6. Administration Related Processes ................................................................... 94 6.1. Applying for Additional User ID for Employee ........................................................................... 94
6.2. De-activating Employee User ID ............................................................................................... 96
6.3. Acquiring and Registering a Digital Signature Certificate (DSC) ............................................... 97
6.4. Updating DSC ............................................................................................................................ 99
7. Reporting & Miscellaneous Processes .......................................................... 100 7.1. Viewing Application Status ...................................................................................................... 100
7.2. Viewing Emigration Clearance Application ............................................................................. 101
7.3. Viewing Open Jobs ................................................................................................................. 103
7.4. Viewing Grievances Details .................................................................................................... 104
7.5. Paying Appeal Filing Fee ........................................................................................................ 105
7.6. Submit Response Online ......................................................................................................... 106
7.7. Resubmit Application ............................................................................................................... 106
8. Appendix A: Glossary ...................................................................................... 106
eMigrate System Recruiting Agent Operational Procedure Manual V2.0
9
9. Appendix B: FAQs ......................................................................................... 107
List of Figures
Figure 1: eMigrate System Home Page ................................................................................................
16
Figure 2: eMigrate System after Logging in as a RA ............................................................................
16
Figure 3: System Interface- Header ......................................................................................................
18
Figure 4: System Interface- Navigation Bar .........................................................................................
18
Figure 5: System Interface- Main Body ................................................................................................
19
Figure 6: System Access (for RAs) – Register Users Login .................................................................
22
Figure 7: System Access (for RAs) – Register User Type Identification ..............................................
22 Figure 8: System Access (for RAs) – RA Login Page
.......................................................................... 23 Figure 9: System Access (for RAs)- Attaching DSC
during Login ........................................................ 23
Figure 10: System Access (for RAs)- Header .......................................................................................
24
Figure 11: System Access (for RAs)- Navigation Bar ...........................................................................
24
Figure 12: Applying for RA Registration Screen 1 ................................................................................
29
Figure 13: Applying for RA Registration Screen 2 ................................................................................
29
Figure 14: Applying for RA Registration Screen 3 ................................................................................
29
Figure 15: Applying for RA Registration Screen 4 ................................................................................
30
Figure 16: Applying for RA Registration Screen 5 ................................................................................
30
Figure 17: Applying for RA Registration Screen 5(cont.) ......................................................................
30
Figure 18: Applying for RA Registration Screen 6 ................................................................................
31
Figure 19: Applying for RA Registration Screen 7 ................................................................................
31
Figure 20: Applying for RA Registration Screen 8 ................................................................................
31
Figure 21: Applying for RA Registration Screen 9 ................................................................................
32
Figure 22: Applying for RC Renewal Screen 1 .....................................................................................

eMigrate System Recruiting Agent Operational Procedure Manual V2.0
10
37
Figure 23: Applying for RC Renewal Screen 2 .....................................................................................
37
Figure 24: Applying for RC Renewal Screen 3 .....................................................................................
37
Figure 25: Applying for RC Renewal Screen 4 .....................................................................................
37 Figure 26: Applying for RC Renewal Screen 5
..................................................................................... 38
Figure 27: Requesting for Duplicate RC Screen ...................................................................................
40
Figure 28: Applying for RC Cancellation / Bank Guarantee Release Screen .......................................
42
Figure 29: Applying for Change in Registered Office Address Screen .................................................
44
Figure 30: Declaring Closure of Branch Office Screen .........................................................................
45 Figure 31: Applying for Change in Directors/Partners Screen ..............................................................
47
Figure 32: Applying for Addition of New Branch Office Screen ............................................................
49
Figure 33: Applying for Change in Office Status Screen ......................................................................
51
Figure 34: Applying for Change in Business Type Screen ...................................................................
53
Figure 35: Applying for Change in Profile Details Screen .....................................................................
55
Figure 36: Applying for Capacity Enhancement Screen .......................................................................
57
Figure 37: Entering Employer and Demand Details Screen 1 ..............................................................
60
Figure 38: Entering Employer and Demand Details Screen 2 ..............................................................
61
Figure 39: Entering Employer and Demand Details Screen 3 ..............................................................
61
Figure 40: Entering Employer and Demand Details Screen 4 ..............................................................
62 Figure 41: Entering Employer and Demand Details Screen 5
.............................................................. 62
Figure 42: Entering Employer and Demand Details Screen 6 ..............................................................
62
Figure 43: Applying for Interview / Advertisement Screen ....................................................................
67
Figure 44: Applying for Emigration Clearance Screen 1 .......................................................................
eMigrate System Recruiting Agent Operational Procedure Manual V2.0
11
69 Figure 45: Applying for Emigration Clearance Screen 2
....................................................................... 69 Figure 46: Applying for Emigration Clearance Screen
3 .......................................................................
69
Figure 47: Applying for Emigration Clearance Screen 4 .......................................................................
70
Figure 48: Applying for Emigration Clearance Screen 5 .......................................................................
70 Figure 49: Applying for Emigration Clearance Screen 6
....................................................................... 70 Figure 50: Applying for Emigration Clearance Screen
7 ....................................................................... 71
Figure 51: Make Bulk Payment Screen 1 .............................................................................................
76
Figure 52: Applying for Emigrant Cancellation Screen .........................................................................
77
Figure 53: Acknowledging Demand from Employer Screen .................................................................
79
Figure 54: Entering Identified Emigrant Details Screen ........................................................................
80
Figure 55: Applying for Emigration Clearance Screen 1 .......................................................................
82
Figure 56: Applying for Emigration Clearance Screen 2 .......................................................................
83 Figure 57: Applying for Emigration Clearance Screen 3
.......................................................................
83 Figure 58: Applying for Emigration Clearance Screen 4
.......................................................................
83 Figure 59: Applying for Emigration Clearance Screen 5
.......................................................................
84
Figure 60: Applying for Emigration Clearance Screen 6 .......................................................................
84 Figure 61: Applying for Emigration Clearance Screen 7
....................................................................... 84
Figure 62: Applying for Additional User ID Screen ...............................................................................
90
Figure 63: De-activating Employee User ID Screen 1 ..........................................................................
91
Figure 64: Registering DSC Screen 1 ...................................................................................................
92
Figure 65: Registering DSC Screen 2 ...................................................................................................
92 Figure 66: Registering DSC Screen 3
................................................................................................... 93
Figure 67: Updating DSC Screen .........................................................................................................
94
eMigrate System Recruiting Agent Operational Procedure Manual V2.0
12
Figure 68: Viewing Application Transaction Status Screen 1 ...............................................................
95
Figure 69: Viewing Application Transaction Status Screen 2 ...............................................................
96
Figure 70: Viewing Emigration Clearance Application Screen 1 ..........................................................
97
Figure 71: Viewing Emigration Clearance Application Screen 2 ..........................................................
97
Figure 72: Viewing Emigration Clearance Application Screen 3 ..........................................................
98
Figure 73: Viewing Open Jobs Screen 1 ..............................................................................................
99
Figure 74: Viewing Open Jobs Screen 2 ..............................................................................................
99
Figure 75: Viewing Grievances Screen 1 ............................................................................................
100 Figure 76: Viewing Grievances Screen 2
............................................................................................
100
eMigrate System Recruiting Agent Operational Procedure Manual V2.0
13
List of Tables
Table 1: Organisation of the Document .................................................................................................. v
Table 2: Typographical Conventions ...................................................................................................... v
Table 3: Software Requirements .......................................................................................................... 15
Table 4: Hardware Requirements ......................................................................................................... 15
Table 5: Business Processes through eMigrate System ...................................................................... 16
Table 6: System Interface- Header Hyperlinks ..................................................................................... 18
Table 7: System Interface- Navigation Bar Dropdown Menus .............................................................. 18
Table 8: System Interface- Main Body Elements .................................................................................. 19
Table 9: System Interface- Footer hyperlinks ....................................................................................... 20
Table 10: System Interface- Buttons Description ................................................................................. 20
Table 11: System Access (for RAs)- Header Hyperlinks ...................................................................... 24
Table 12: System Access (for RAs)- Navigation Bar Dropdown Menus ............................................... 24
Table 13: System Access (for RAs)- Buttons Description .................................................................... 25
Table 14: RA Registration Form Field Reference Table ....................................................................... 32
Table 15: RC Renewal Form Field Reference Table ............................................................................ 39
Table 16: Request for Duplicate RC Form Field Reference Table ....................................................... 40
Table 17: Request RC Cancellation Form Field Reference Table........................................................ 42
Table 18: Change in Registered Office Form Field Reference Table ................................................... 44
Table 19: Closure of Branch Office Form Field Reference Table ......................................................... 46
Table 20: Change in Directors/Partners Form Field Reference Table ................................................. 48
Table 21: Addition of New Branch Office Form Field Reference Table ................................................ 50
Table 22: Change in Office Status Form Field Reference Table .......................................................... 51
Table 23: Change in Business Type Form Field Reference Table ....................................................... 53
Table 24: Change in Profile Details Form Field Reference Table ........................................................ 55
Table 25: Capacity Enhancement Form Field Reference Table ........................................................... 58
Table 26: Employer and Demand Details Form Field Reference Table ............................................... 63
Table 27: Interview / Advertisement Permission Form Field Reference Table ..................................... 67
Table 28: Emigration Clearance Form Field Reference Table ............................................................. 72
Table 29: Emigration Clearance Cancellation Form Field Reference Table ........................................ 77
Table 30: Acknowledging Demand from Employer Form Field Reference Table................................. 79 Table 31: Entering Identified Emigrant Details Form Field Reference Table ....................................... 81
Table 32: Emigration Clearance Form Field Reference Table ............................................................. 85
Table 33: Addition User ID Form Field Reference Table ...................................................................... 90
Table 34: De-activating Employee User ID Form Field Reference Table ............................................. 91
Table 35: Register Digital Certificate Form Field Reference Table ...................................................... 93
eMigrate System Recruiting Agent Operational Procedure Manual V2.0
14
Table 36: Updating DSC Form Field Reference Table ......................................................................... 94
Table 37: Viewing Application Transaction Status Form Field Reference Table..................................
96 Table 38: Viewing Emigration Clearance Application Form Field Reference Table
............................. 98 Table 39: Viewing Open Jobs Form Field Reference Table
................................................................. 99
Table 40: Paying Appeal Filing Fee Field Reference Table ............................................................... 101
eMigrate System Recruiting Agent Operational Procedure Manual V2.0
15
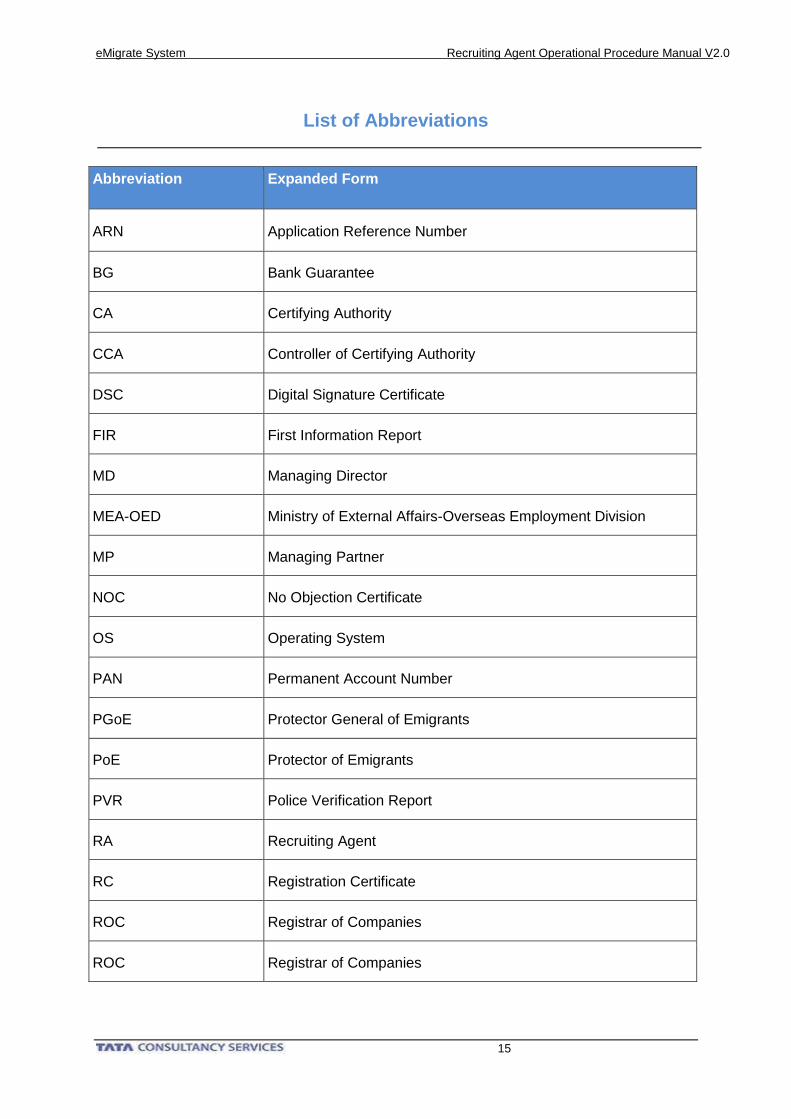
List of Abbreviations
Abbreviation Expanded Form
ARN Application Reference Number
BG Bank Guarantee
CA Certifying Authority
CCA Controller of Certifying Authority
DSC Digital Signature Certificate
FIR First Information Report
MD Managing Director
MEA-OED Ministry of External Affairs-Overseas Employment Division
MP Managing Partner
NOC No Objection Certificate
OS Operating System
PAN Permanent Account Number
PGoE Protector General of Emigrants
PoE Protector of Emigrants
PVR Police Verification Report
RA Recruiting Agent
RC Registration Certificate
ROC Registrar of Companies
ROC Registrar of Companies

eMigrate System Recruiting Agent Operational Procedure Manual V2.0
16
ROF Registrar of Firms
UID Unique Identity
URL Uniform Resource Locator
1. Introduction to eMigrate System
The eMigrate system is an e-governance initiative by the Ministry of External Affairs-Overseas
Employment Division (MEAOED), Government of India. Recruiting agents (RA) registered with MEA-
OED have to use the eMigrate system for various business processes defined in the Emigration Act,
1983.
1.1. Features of eMigrate System
Using the eMigrate system, you can:
• Apply online to MEA-OED as per the various business processes defined in the Emigration Act,
1983.
• Track status of your application.
• Make online payment for application processing fee like RC Renewal Fee, Emigration Clearance
Fee etc.
1.2. Software and Hardware Requirements
This section describes the software and hardware requirements required to access the eMigrate system.
1) Software Requirements
Table 3: Software Requirements
Operating System Windows OS (Vista and later)
Web Browser
Internet Explorer (7 and above), Google Chrome, Firefox
Mozilla
(Best Viewed in Internet Explorer 7.0 and above at
resolution 1024 X 768)
Digital Signature
Certificate (DSC) Type: Class 2 or Class 3
Java Runtime
Environment Version 7 Update 67
Adobe Acrobat Reader Latest version

eMigrate System Recruiting Agent Operational Procedure Manual V2.0
17
2) Hardware Requirements
Table 4: Hardware Requirements
Desktop/Laptop
Any basic model having sufficient Processor speed (1
gigahertz (GHz) or faster), RAM size (Min 512 MB), Hard
Disk (Minimum 20 GB and above) etc.
Network Infrastructure Internet connectivity (Min 512 kbps recommended).
Printer Any basic model capable of printing documents.
Scanner Any basic model capable of scanning documents (Min 300
dpi).
1.3. eMigrate System URL
The eMigrate system can be accessed by the following URL: https://emigrate.gov.in
The Website is meant to be used by applicants who want to apply to MEA-OED for becoming a RA, and
by existing RAs.
Figure 1: eMigrate System Home Page
eMigrate System Recruiting Agent Operational Procedure Manual V2.0
18
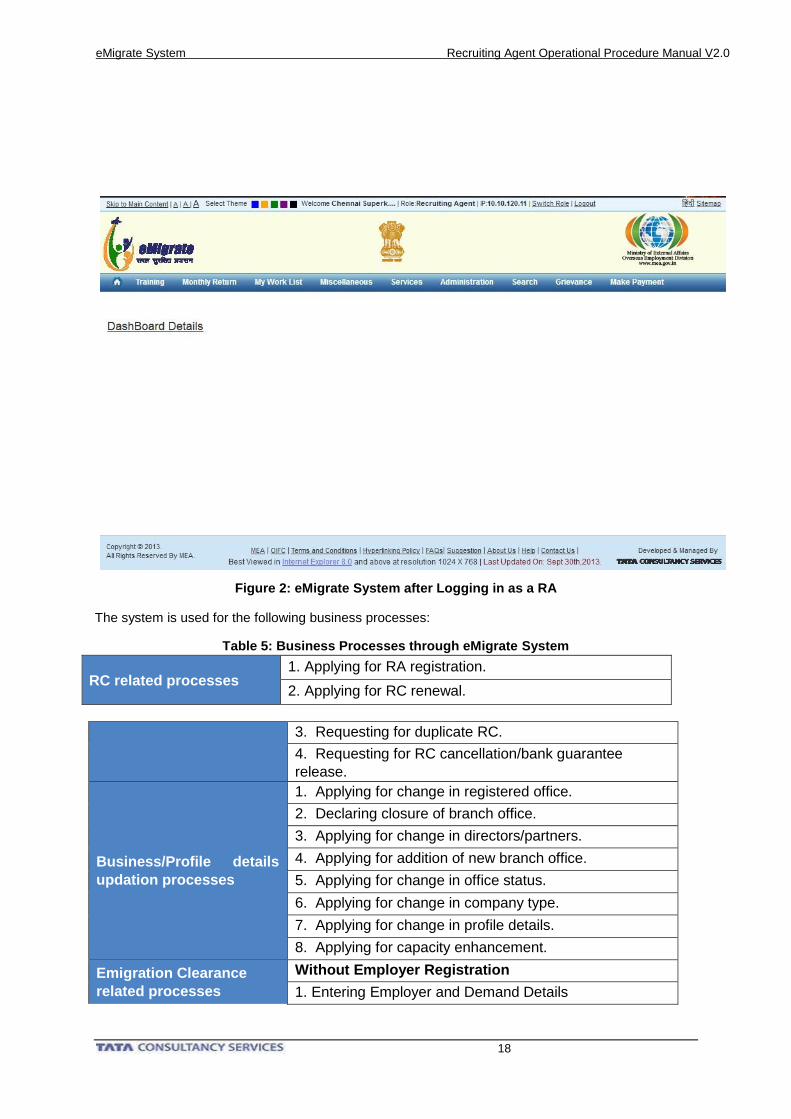
Figure 2: eMigrate System after Logging in as a RA
The system is used for the following business processes:
Table 5: Business Processes through eMigrate System
RC related processes 1. Applying for RA registration.
2. Applying for RC renewal.
3. Requesting for duplicate RC.
4. Requesting for RC cancellation/bank guarantee
release.
Business/Profile details
updation processes
1. Applying for change in registered office.
2. Declaring closure of branch office.
3. Applying for change in directors/partners.
4. Applying for addition of new branch office.
5. Applying for change in office status.
6. Applying for change in company type.
7. Applying for change in profile details.
8. Applying for capacity enhancement.
Emigration Clearance
related processes
Without Employer Registration
1. Entering Employer and Demand Details
eMigrate System Recruiting Agent Operational Procedure Manual V2.0
19
2. Applying for Interview / Advertisement Permission
3. Applying for Emigration Clearance
4. Make Bulk Payment
5. Applying for Emigration Clearance Cancellation
With Employer Registration
1. Acknowledging demand from employer.
2. Applying for interview/advertisement.
3. Entering identified emigrant details for visa arrangement
by employer.
4. Applying for Emigration Clearance
5. Make Bulk Payment
6. Applying for Emigration Clearance cancellation.
Administration Related
1. Applying for additional user ID for employee.
2. De-activating employee user ID.
processes 3. Acquiring and Registering a DSC.
4. Updating DSC.
Miscellaneous processes
1. Viewing transaction status.
2. Viewing approved demand.
3. Viewing Emigration Clearance application.
4. Viewing open jobs.
5. Viewing grievances details.
6. Paying appeal filing fee
7. Submit Response Online
8. Resubmit Application
2. Getting Started
This chapter covers the design and navigation details of the system.
2.1. Accessing the System
To access the system, enter the following URL in a web browser- https:// emigrate.gov.in
2.2. Using the System Interface
This section introduces you to the screen elements of the system (header, navigation menu, main body,
footer and buttons). You can use these screen elements to perform various tasks and operations.
eMigrate System Recruiting Agent Operational Procedure Manual V2.0
20
1) Header
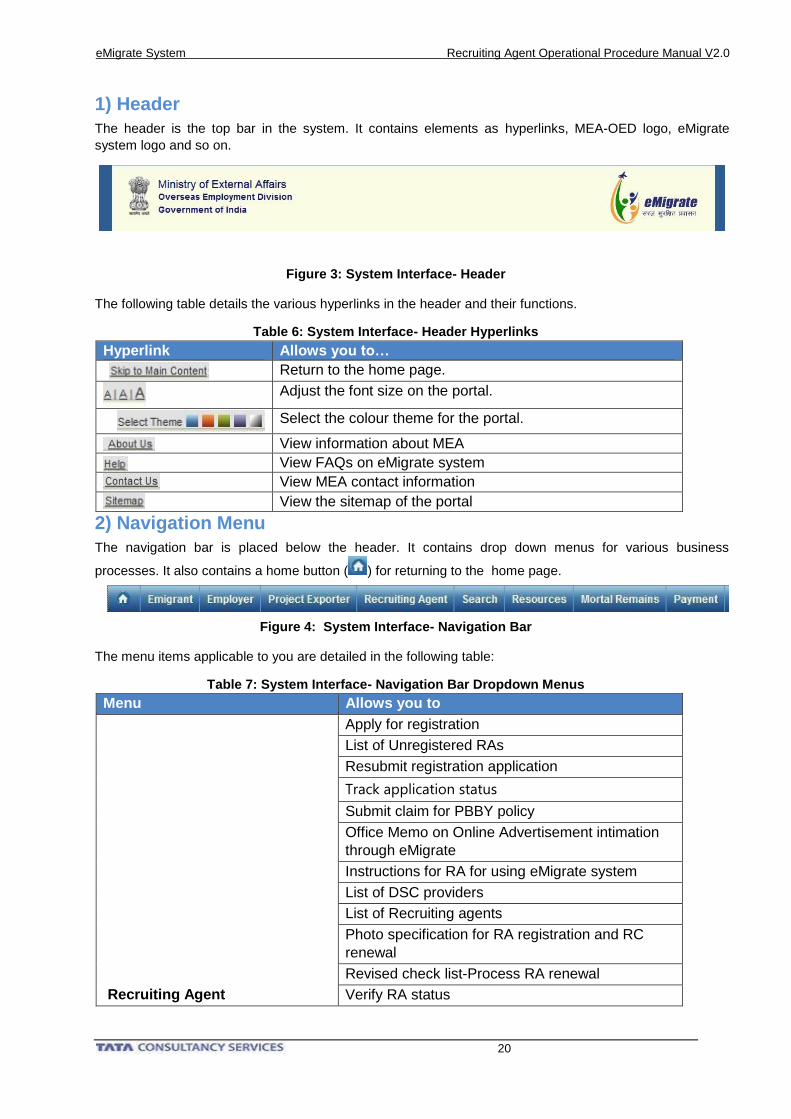
The header is the top bar in the system. It contains elements as hyperlinks, MEA-OED logo, eMigrate
system logo and so on.
Figure 3: System Interface- Header
The following table details the various hyperlinks in the header and their functions.
Table 6: System Interface- Header Hyperlinks
Hyperlink Allows you to…
Return to the home page.
Adjust the font size on the portal.
Select the colour theme for the portal.
View information about MEA
View FAQs on eMigrate system
View MEA contact information
View the sitemap of the portal
2) Navigation Menu
The navigation bar is placed below the header. It contains drop down menus for various business
processes. It also contains a home button ( ) for returning to the home page.
Figure 4: System Interface- Navigation Bar
The menu items applicable to you are detailed in the following table:
Table 7: System Interface- Navigation Bar Dropdown Menus
Menu Allows you to
Recruiting Agent
Apply for registration
List of Unregistered RAs
Resubmit registration application
Track application status
Submit claim for PBBY policy
Office Memo on Online Advertisement intimation
through eMigrate
Instructions for RA for using eMigrate system
List of DSC providers
List of Recruiting agents
Photo specification for RA registration and RC
renewal
Revised check list-Process RA renewal
Verify RA status
eMigrate System Recruiting Agent Operational Procedure Manual V2.0
21
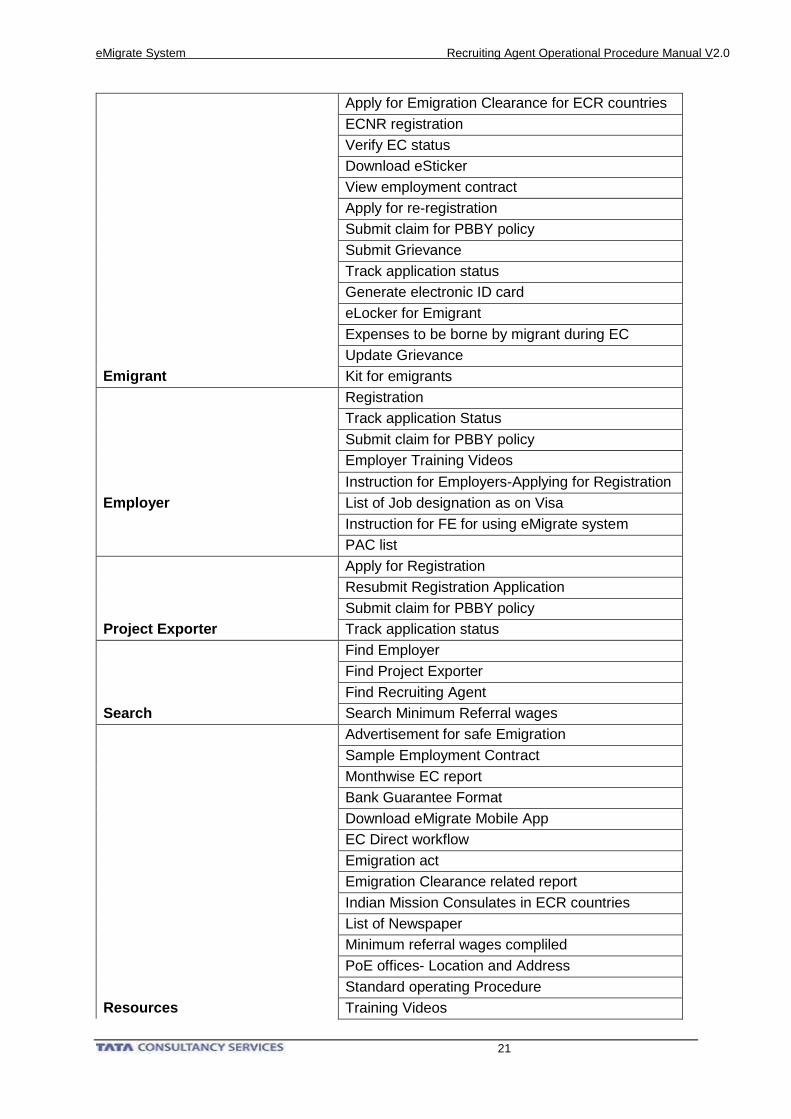
Emigrant
Apply for Emigration Clearance for ECR countries
ECNR registration
Verify EC status
Download eSticker
View employment contract
Apply for re-registration
Submit claim for PBBY policy
Submit Grievance
Track application status
Generate electronic ID card
eLocker for Emigrant
Expenses to be borne by migrant during EC
Update Grievance
Kit for emigrants
Employer
Registration
Track application Status
Submit claim for PBBY policy
Employer Training Videos
Instruction for Employers-Applying for Registration
List of Job designation as on Visa
Instruction for FE for using eMigrate system
PAC list
Project Exporter
Apply for Registration
Resubmit Registration Application
Submit claim for PBBY policy
Track application status
Search
Find Employer
Find Project Exporter
Find Recruiting Agent
Search Minimum Referral wages
Resources
Advertisement for safe Emigration
Sample Employment Contract
Monthwise EC report
Bank Guarantee Format
Download eMigrate Mobile App
EC Direct workflow
Emigration act
Emigration Clearance related report
Indian Mission Consulates in ECR countries
List of Newspaper
Minimum referral wages compliled
PoE offices- Location and Address
Standard operating Procedure
Training Videos
eMigrate System Recruiting Agent Operational Procedure Manual V2.0
22
eMigrate brochure
Payment
Appeal filing fees
Emigration Clearance Fee
RA registration Fee
Office Orders
Recent office orders
Archive office orders
PBBY Policy
List of Authorised agencies
PBBY gazette notification
Purchase PBBY policy online
Instruction for submission of claims for PBBY
policy
Submit claim for PBBY policy
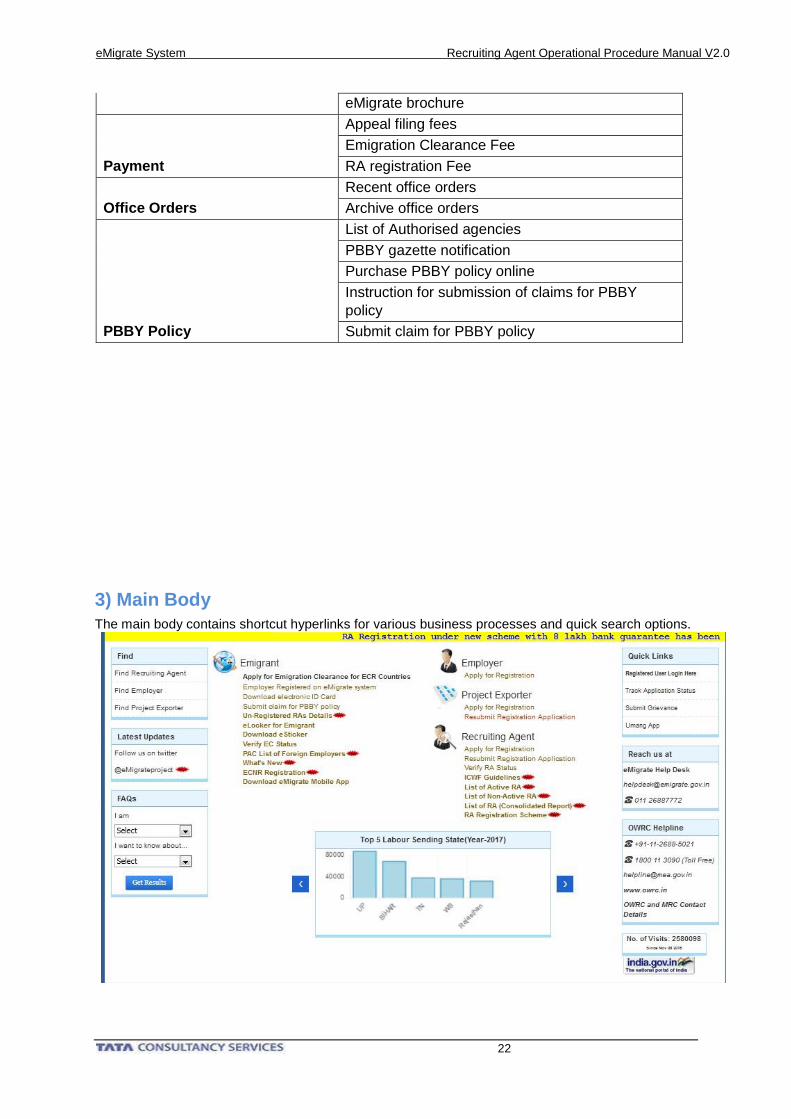
3) Main Body
The main body contains shortcut hyperlinks for various business processes and quick search options.
eMigrate System Recruiting Agent Operational Procedure Manual V2.0
23
Figure 5: System Interface- Main Body
The elements applicable to you are detailed in the following table:
Table 8: System Interface- Main Body Elements
Element Allows you to
Apply for Registration
Resubmit Registration application
Verify RA status
ICWF guidelines
List of active RA
List of non-active RA
List of RA(consolidated report)
RA registration scheme
Element Allows you to
Find an Employer Using Employer Name
and/or Country
Navigate Through FAQs
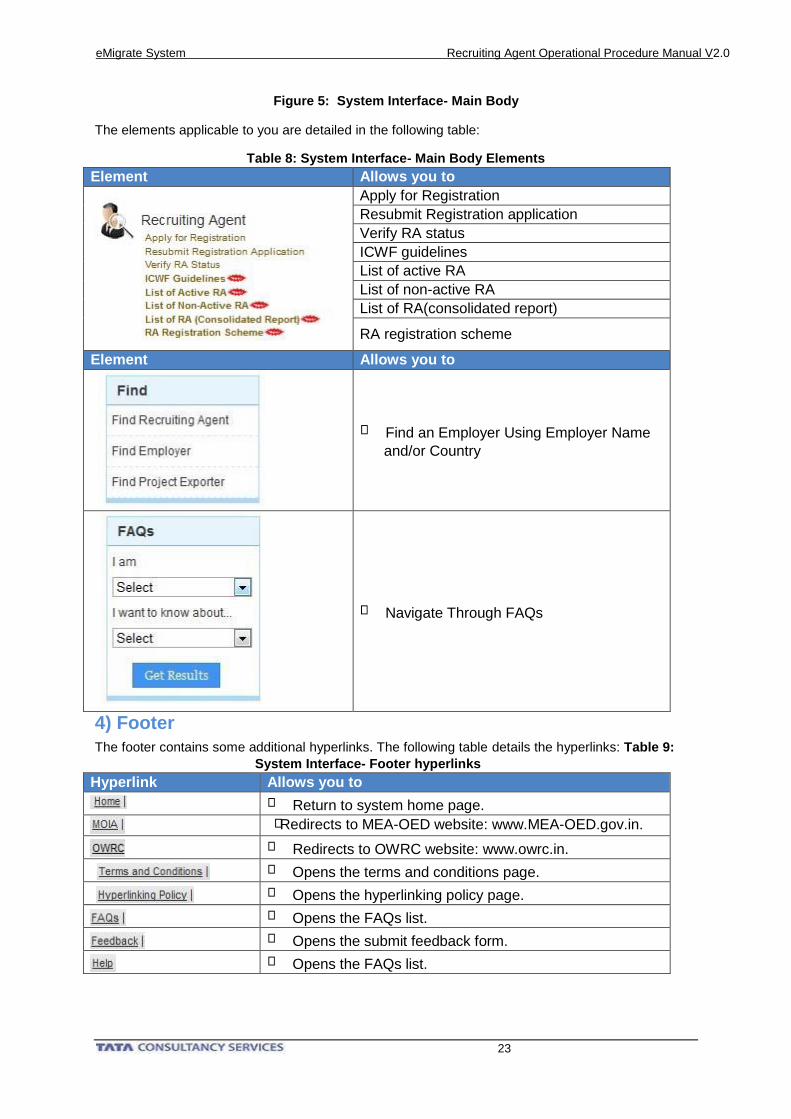
4) Footer
The footer contains some additional hyperlinks. The following table details the hyperlinks: Table 9:
System Interface- Footer hyperlinks
Hyperlink Allows you to
Return to system home page.
Redirects to MEA-OED website: www.MEA-OED.gov.in.
Redirects to OWRC website: www.owrc.in.
Opens the terms and conditions page.
Opens the hyperlinking policy page.
Opens the FAQs list.
Opens the submit feedback form.
Opens the FAQs list.
eMigrate System Recruiting Agent Operational Procedure Manual V2.0
24
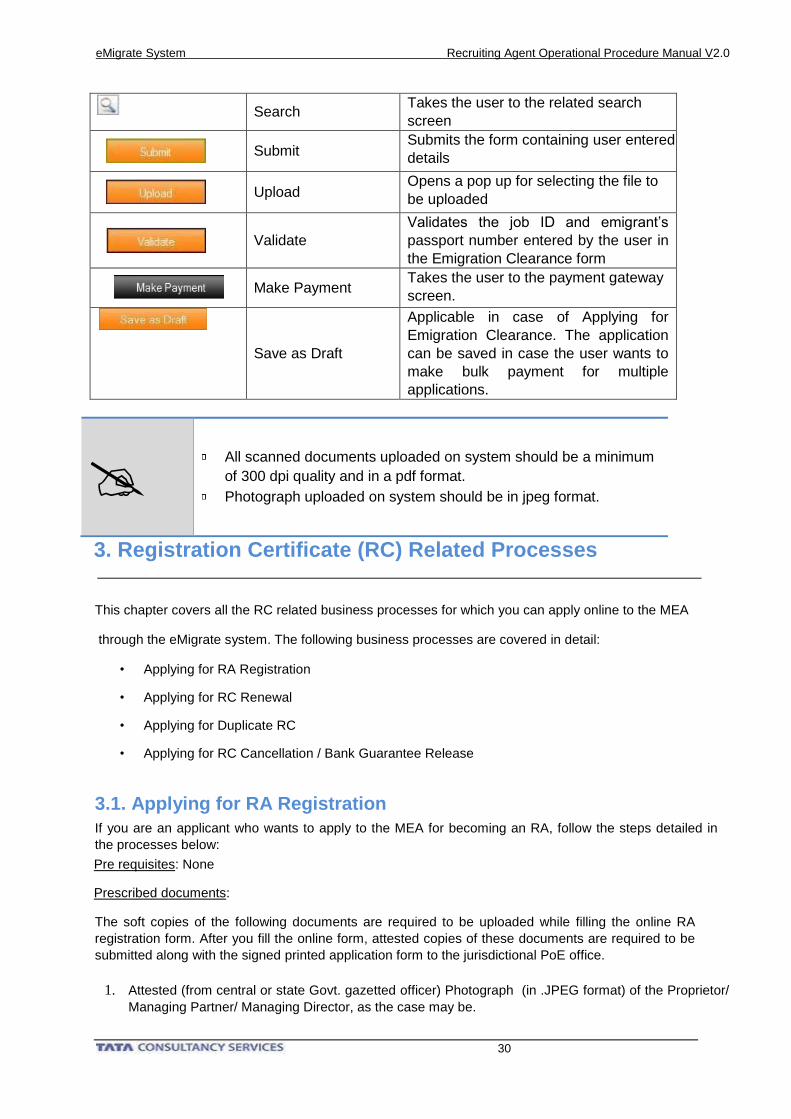
5) Buttons
Various buttons have been used in the system. The following table details the icon, name and description of
the buttons used:
Table 10: System Interface- Buttons Description
Button Icon Name Description
Cancel Takes the user to the home page.
Clear
Resets the current page and clears all the
page content.
Delete Deletes a file uploaded on the form.
Edit
Allows the user to edit the details entered
in the form.
Button Icon Name Description
Next Takes the user to the next page.
Open .pdf file Opens a .pdf file as application form
submitted payment receipt and so on.
Open Calendar Opens the calendar.
Previous Takes the user to the previous page.
Refresh captcha
image Loads a new captcha image on the page.
Save & Next
Saves the details entered by the user and
takes the user to the next page.
Search Searches for information based on
parameters entered by the user.
Submit
Submits the form containing user entered
details.
Upload
Opens a pop up for selecting the file to be
uploaded.
Validate
Validates whether the name and PAN
card number of the agency do not match
with an already registered recruiting
agency.
All scanned documents uploaded on system should be a minimum
of 300 dpi quality and in a pdf format.
Photograph uploaded on system should be in jpeg format.
eMigrate System Recruiting Agent Operational Procedure Manual V2.0
25
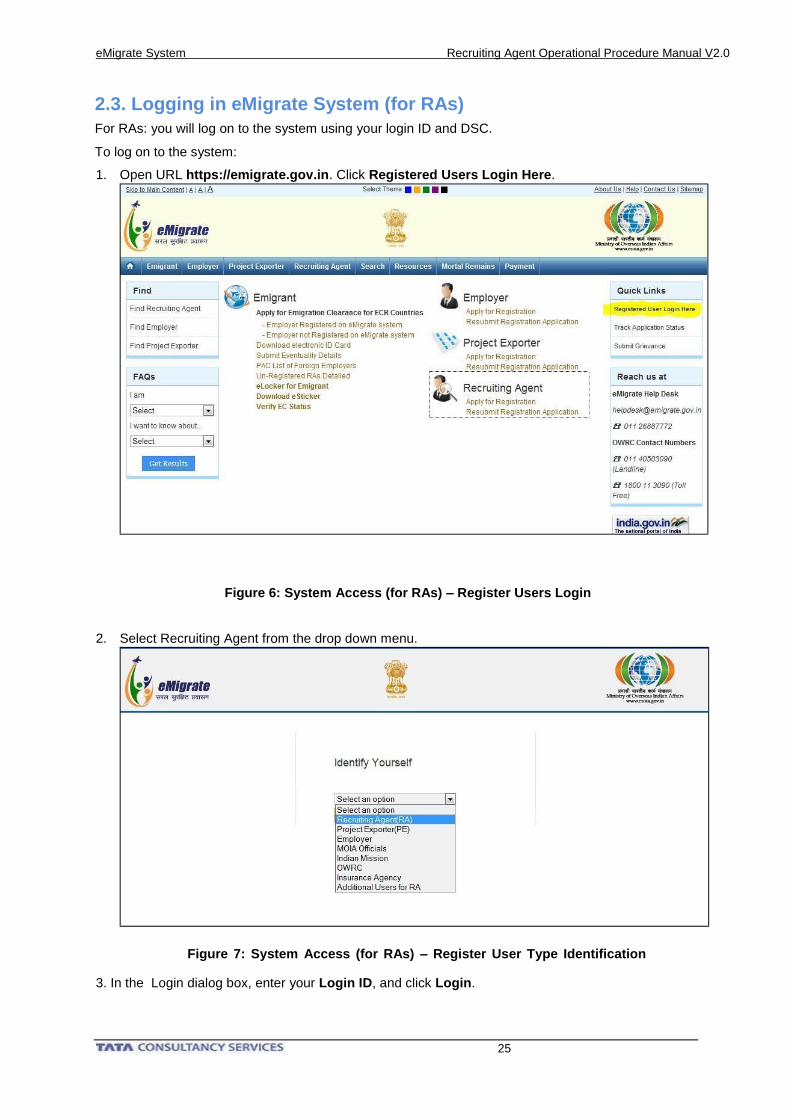
2.3. Logging in eMigrate System (for RAs)
For RAs: you will log on to the system using your login ID and DSC.
To log on to the system:
1. Open URL https://emigrate.gov.in. Click Registered Users Login Here.
Figure 6: System Access (for RAs) – Register Users Login
2. Select Recruiting Agent from the drop down menu.
Figure 7: System Access (for RAs) – Register User Type Identification
3. In the Login dialog box, enter your Login ID, and click Login.
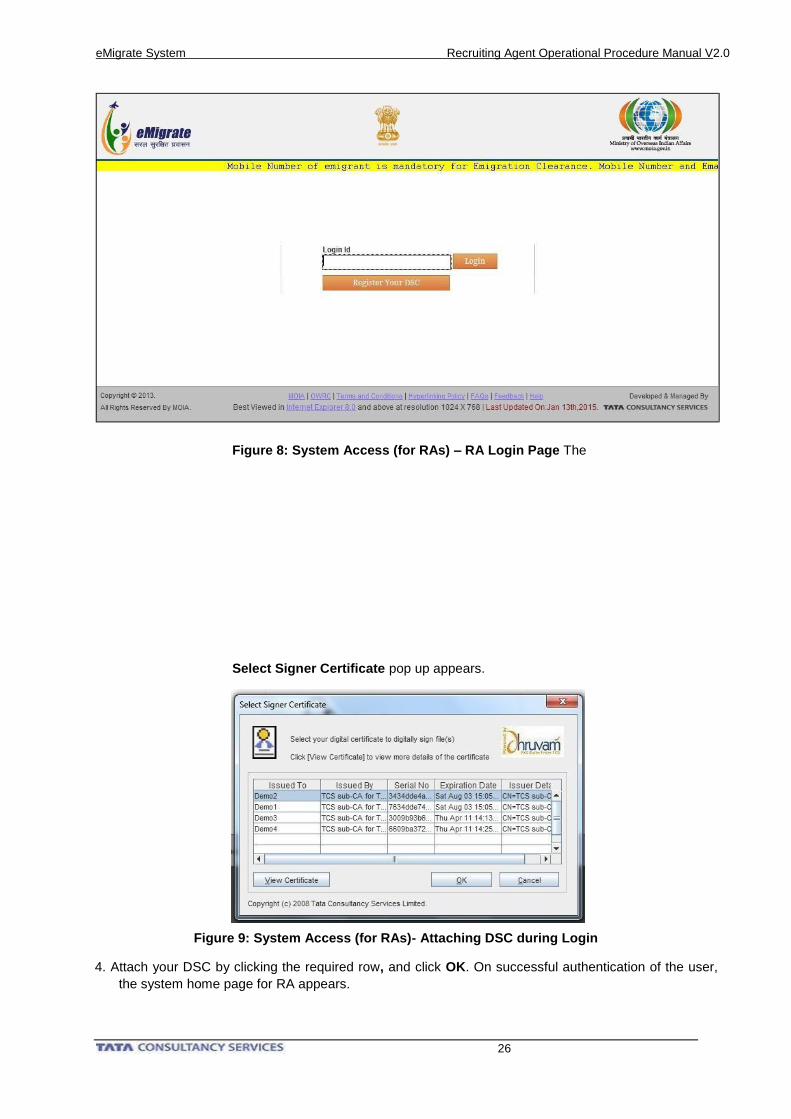
eMigrate System Recruiting Agent Operational Procedure Manual V2.0
26
Figure 8: System Access (for RAs) – RA Login Page The
Select Signer Certificate pop up appears.
Figure 9: System Access (for RAs)- Attaching DSC during Login
4. Attach your DSC by clicking the required row, and click OK. On successful authentication of the user,
the system home page for RA appears.
eMigrate System Recruiting Agent Operational Procedure Manual V2.0
27
Please Note: In case you have not registered your DSC against Login ID in eMigrate
system, you will not be able to login into system. For registering DSC, click ‘Register your
DSC’ in Login Page for RAs. The instructions for registering DSC will be sent by a system
generated email, along with your user credentials, after you get registered with MEA-OED.
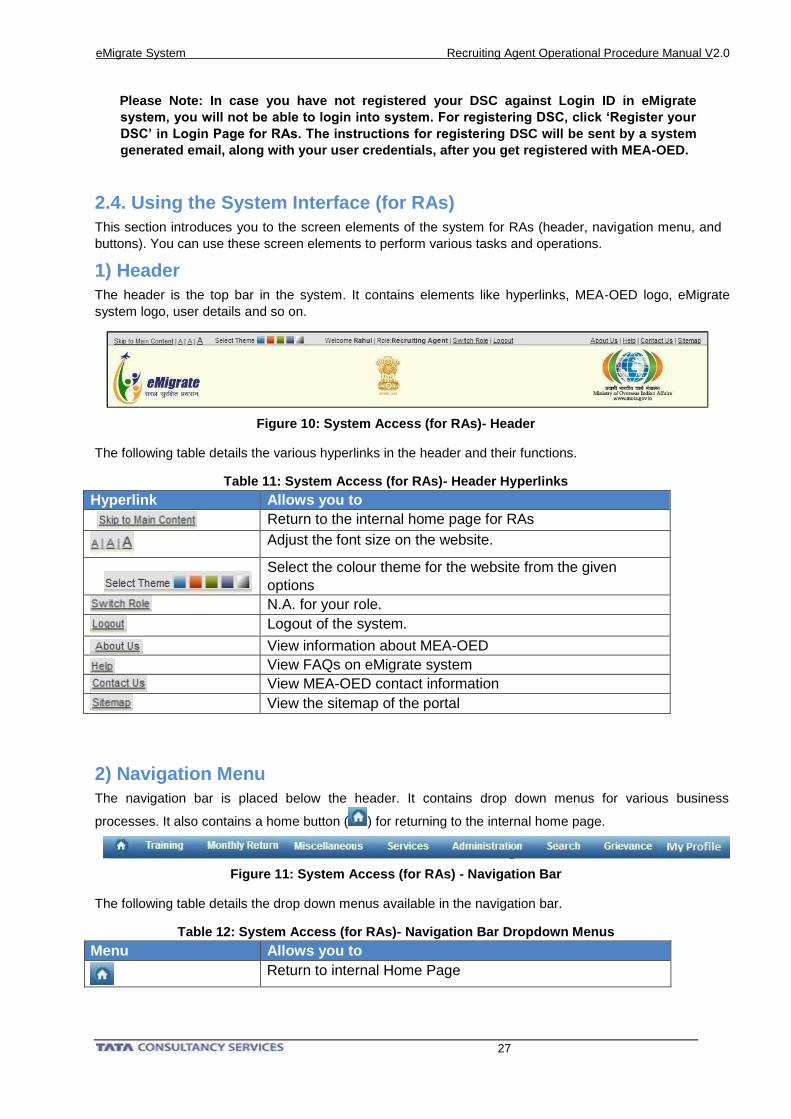
2.4. Using the System Interface (for RAs)
This section introduces you to the screen elements of the system for RAs (header, navigation menu, and
buttons). You can use these screen elements to perform various tasks and operations.
1) Header
The header is the top bar in the system. It contains elements like hyperlinks, MEA-OED logo, eMigrate
system logo, user details and so on.
Figure 10: System Access (for RAs)- Header
The following table details the various hyperlinks in the header and their functions.
Table 11: System Access (for RAs)- Header Hyperlinks
Hyperlink Allows you to
Return to the internal home page for RAs
Adjust the font size on the website.
Select the colour theme for the website from the given
options
N.A. for your role.
Logout of the system.
View information about MEA-OED
View FAQs on eMigrate system
View MEA-OED contact information
View the sitemap of the portal
2) Navigation Menu
The navigation bar is placed below the header. It contains drop down menus for various business
processes. It also contains a home button ( ) for returning to the internal home page.
Figure 11: System Access (for RAs) - Navigation Bar
The following table details the drop down menus available in the navigation bar.
Table 12: System Access (for RAs)- Navigation Bar Dropdown Menus
Menu Allows you to
Return to internal Home Page
eMigrate System Recruiting Agent Operational Procedure Manual V2.0
28
• Download Training Material
• Download Training Video
• Submit Suggestion
• Add Employer and Recruitment Details
• Details of Indian Travelled/Deployed for Overseas Employment
• Details of Indian Recruited for Overseas Employment
• List of Complaint Details
• Form IV(items) Sr. No. 5-8
• Generate Consolidated Report
• View Submitted Monthly Return
• View Monthly Return Filed by RA
• Instructions for Enter FE and Recruitment details
• Update Migrated Data
• Generate Interview Letter
• Edit Rejected Passport Details
• MIS Reports
• Update Employer Registration Number
• Make Bulk Payment
• Track Application Status
• Acknowledge Demand (With Employer Registration)
• Apply for Interview/ Advertisement
• Apply for Capacity Enhancement
• Enter Identified Emigrant Details (With Employer
Accreditation)
• Apply for Change in RA details
• Miscellaneous Fee Payment
• Request for RC Cancellation/ Bank Guarantee
Release
• Resubmit Application (Amendments Suggested by POE Office)
• Enter Employer & Demand Details (Without Employer Registration)
• Apply for Emigration Clearance
• Intimation for Interview / Advertisement published by
RA
Nurse demand
• Update Digital Certificates
• Deactivate Employee User ID
• Apply for RC Renewal
• Apply for Additional User ID
• Apply for New Branch Office
• Apply for Duplicate RC
• Make Payment for RC Renewal
• Make Payment for Additional User ID
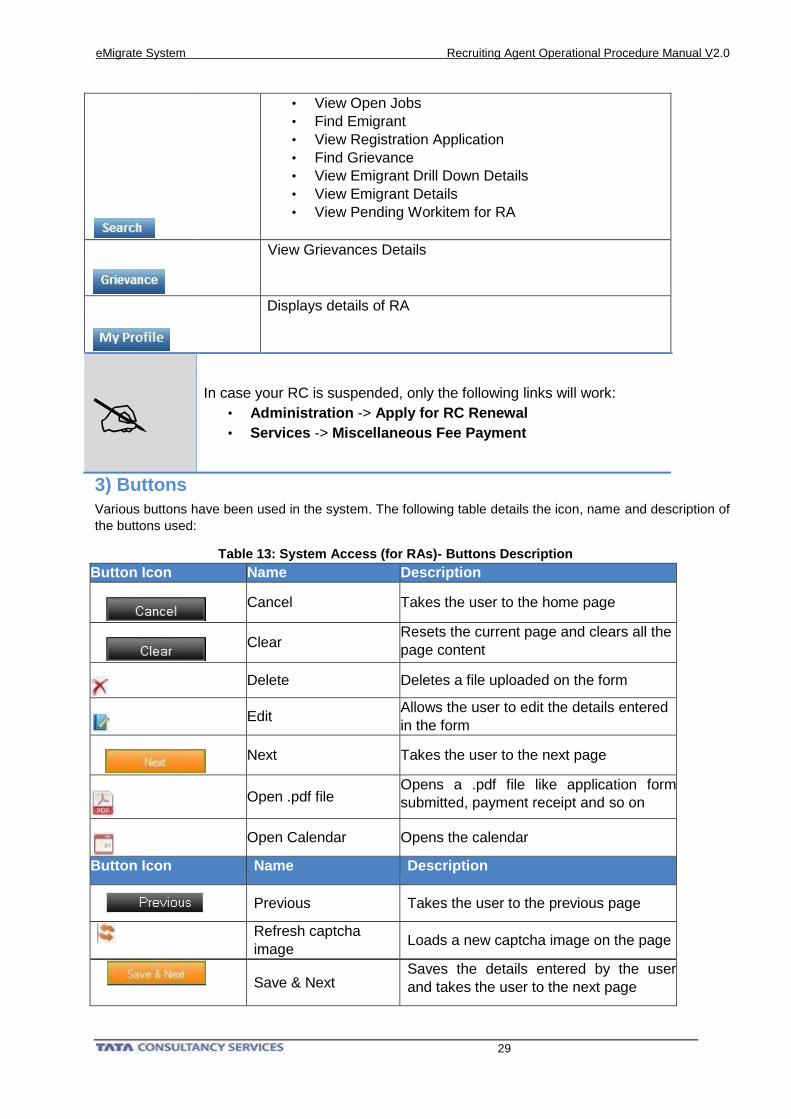
eMigrate System Recruiting Agent Operational Procedure Manual V2.0
29
• View Open Jobs
• Find Emigrant
• View Registration Application
• Find Grievance
• View Emigrant Drill Down Details
• View Emigrant Details
• View Pending Workitem for RA
View Grievances Details
Displays details of RA
In case your RC is suspended, only the following links will work:
• Administration -> Apply for RC Renewal
• Services -> Miscellaneous Fee Payment
3) Buttons
Various buttons have been used in the system. The following table details the icon, name and description of
the buttons used:
Table 13: System Access (for RAs)- Buttons Description
Button Icon Name Description
Cancel Takes the user to the home page
Clear
Resets the current page and clears all the
page content
Delete Deletes a file uploaded on the form
Edit
Allows the user to edit the details entered
in the form
Next Takes the user to the next page
Open .pdf file
Opens a .pdf file like application form
submitted, payment receipt and so on
Open Calendar Opens the calendar
Button Icon Name Description
Previous Takes the user to the previous page
Refresh captcha
image Loads a new captcha image on the page
Save & Next Saves the details entered by the user
and takes the user to the next page
eMigrate System Recruiting Agent Operational Procedure Manual V2.0
30
Search Takes the user to the related search
screen
Submit
Submits the form containing user entered
details
Upload
Opens a pop up for selecting the file to
be uploaded
Validate
Validates the job ID and emigrant’s
passport number entered by the user in
the Emigration Clearance form
Make Payment Takes the user to the payment gateway
screen.
Save as Draft
Applicable in case of Applying for
Emigration Clearance. The application
can be saved in case the user wants to
make bulk payment for multiple
applications.
All scanned documents uploaded on system should be a minimum
of 300 dpi quality and in a pdf format.
Photograph uploaded on system should be in jpeg format.
3. Registration Certificate (RC) Related Processes
This chapter covers all the RC related business processes for which you can apply online to the MEA
through the eMigrate system. The following business processes are covered in detail:
• Applying for RA Registration
• Applying for RC Renewal
• Applying for Duplicate RC
• Applying for RC Cancellation / Bank Guarantee Release
3.1. Applying for RA Registration
If you are an applicant who wants to apply to the MEA for becoming an RA, follow the steps detailed in
the processes below:
Pre requisites: None
Prescribed documents:
The soft copies of the following documents are required to be uploaded while filling the online RA
registration form. After you fill the online form, attested copies of these documents are required to be
submitted along with the signed printed application form to the jurisdictional PoE office.
1. Attested (from central or state Govt. gazetted officer) Photograph (in .JPEG format) of the Proprietor/
Managing Partner/ Managing Director, as the case may be.
eMigrate System Recruiting Agent Operational Procedure Manual V2.0
31
2. Statement showing the name, residential address applicable for last 5 years of Proprietor/ all Partners/
all Directors along with the designation and business activities undertaken during the last five years.
3. Attested (from central or state Govt. gazetted officer) copy of the certificates of educational
qualifications as per rules of the Managing Director/ Managing Partner/ Proprietor in case of
Company/ Partnership Firm/ Proprietorship respectively.
4. Assets and liabilities statement of the Proprietor/ Managing Partner/ Managing Director, as the case
may be for last three years assessed by certified CA with membership number and address. It should
be on a CA’s letterhead.
5. Income Tax return of the Company/ Firm/ Proprietor, All directors/ All partners for the last three
consecutive years.
6. Attested Copy of PAN card of Agency/ Proprietor, Managing Director/ Managing Partner/Directors/
Partners.
7. Ownership Deed/ Proof of office Premise(required in case if office is owned)
8. Valuation Report of assets in office premise by a registered Valuer with registration number and
membership number.
9. NOC from owner of the premise (if office is leased/ rented) on duly notarized affidavit.
10. Duly Notarized Affidavit that agency has not been involved in any recruitment business before.
11. Attested Copy of Registration Certificate under Shop and Establishment Act.
12. Copy of Latest Landline Telephone bill in the name of Agency.
13. Latest Lease/ Rent Receipt( Required if office is on Rent/ Lease).
14. Registered and Notarised Lease/ Rent agreement( Required if office is on Rent/ Lease).
15. Trade Testing Certificate along with Photograph.
16. Blue Print of the Layout Plan of the office Duly signed and stamped by the govt. approved architect
with registration and membership number.
17. Attested copy of Aadhar Card of Proprietor/ MD/ Mg. Part,Directors/Partners (Optional Attachment).
18. Specimen signature of MD/ Mg. Part/ Proprietor duly attested by a Gazette officer.
19. Any other document that may be notified by the Ministry from time to time.
In case of a company, following additional documents are also required:
20. Resolution (Acknowledged by ROC) passed to authorize one of the directors to act as Managing
Director and to sign papers on behalf of the company.
21. A copy of the certificate of registering the company
22. A copy of article of association
23. A copy of memorandum of Association
24. A copy of the balance sheet as at the close of the previous financial year
In case of a partnership, following additional documents are also required:
19. Resolution passed by all the partners authorizing one of the partners to act as Managing Partner and
to sign papers on behalf of the firm .
20. Attested copy of the partnership deed
21. True extracts from registrar of firms in support of registration of the partnership deed.
22. A copy of the balance sheet as at the close of the previous financial year.
eMigrate System Recruiting Agent Operational Procedure Manual V2.0
32
Please note: The Ministry may notify from time to time if any other document(s) are also
required. You are requested to confirm the list of documents with Ministry / Jurisdictional PoE
Office before filing application on eMigrate system. If any other documents are required by
Ministry, the same may be uploaded in ‘Optional Attachments’.
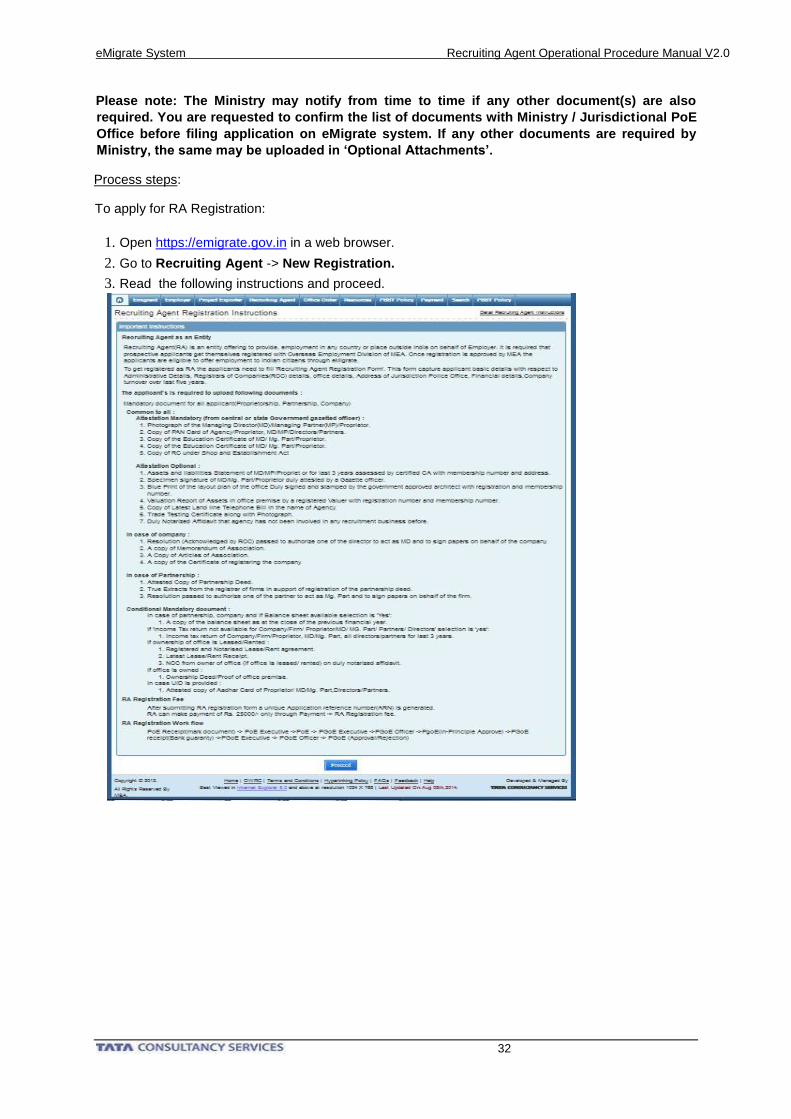
Process steps:
To apply for RA Registration:
1. Open https://emigrate.gov.in in a web browser.
2. Go to Recruiting Agent -> New Registration.
3. Read the following instructions and proceed.
eMigrate System Recruiting Agent Operational Procedure Manual V2.0
33
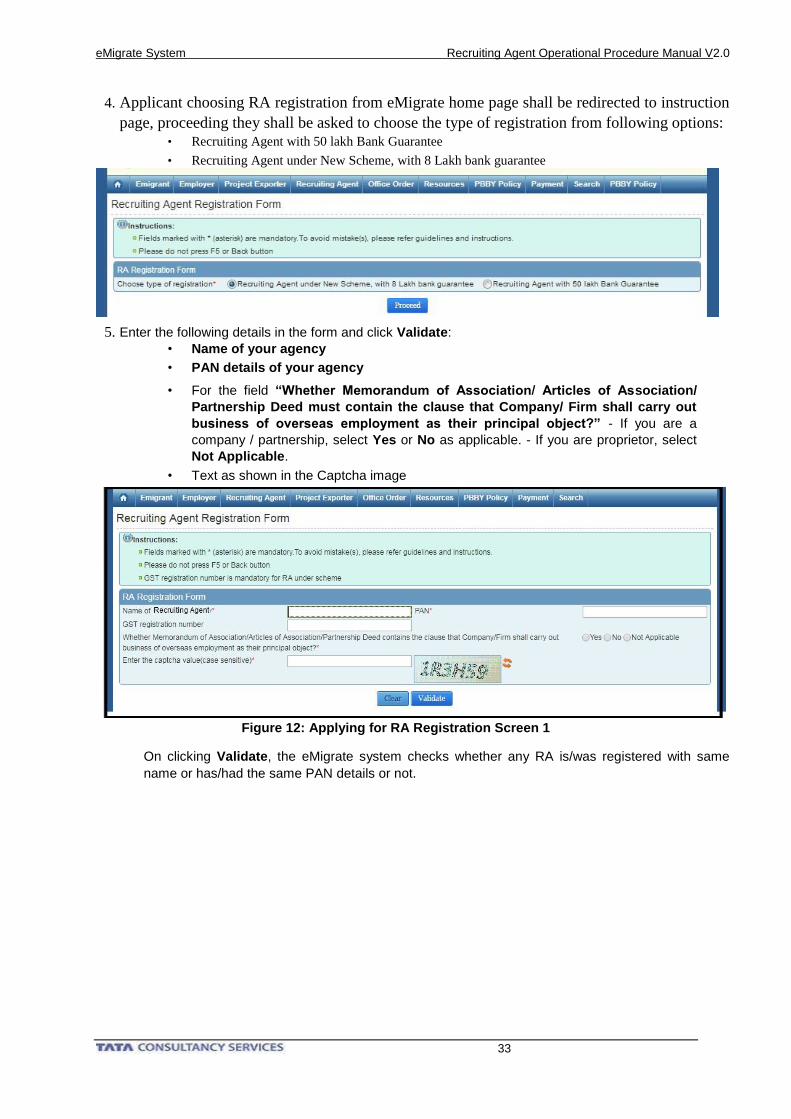
4. Applicant choosing RA registration from eMigrate home page shall be redirected to instruction
page, proceeding they shall be asked to choose the type of registration from following options: • Recruiting Agent with 50 lakh Bank Guarantee
• Recruiting Agent under New Scheme, with 8 Lakh bank guarantee
5. Enter the following details in the form and click Validate:
• Name of your agency
• PAN details of your agency
• For the field “Whether Memorandum of Association/ Articles of Association/
Partnership Deed must contain the clause that Company/ Firm shall carry out
business of overseas employment as their principal object?” - If you are a
company / partnership, select Yes or No as applicable. - If you are proprietor, select
Not Applicable.
• Text as shown in the Captcha image
Figure 12: Applying for RA Registration Screen 1
On clicking Validate, the eMigrate system checks whether any RA is/was registered with same
name or has/had the same PAN details or not.
eMigrate System Recruiting Agent Operational Procedure Manual V2.0
34
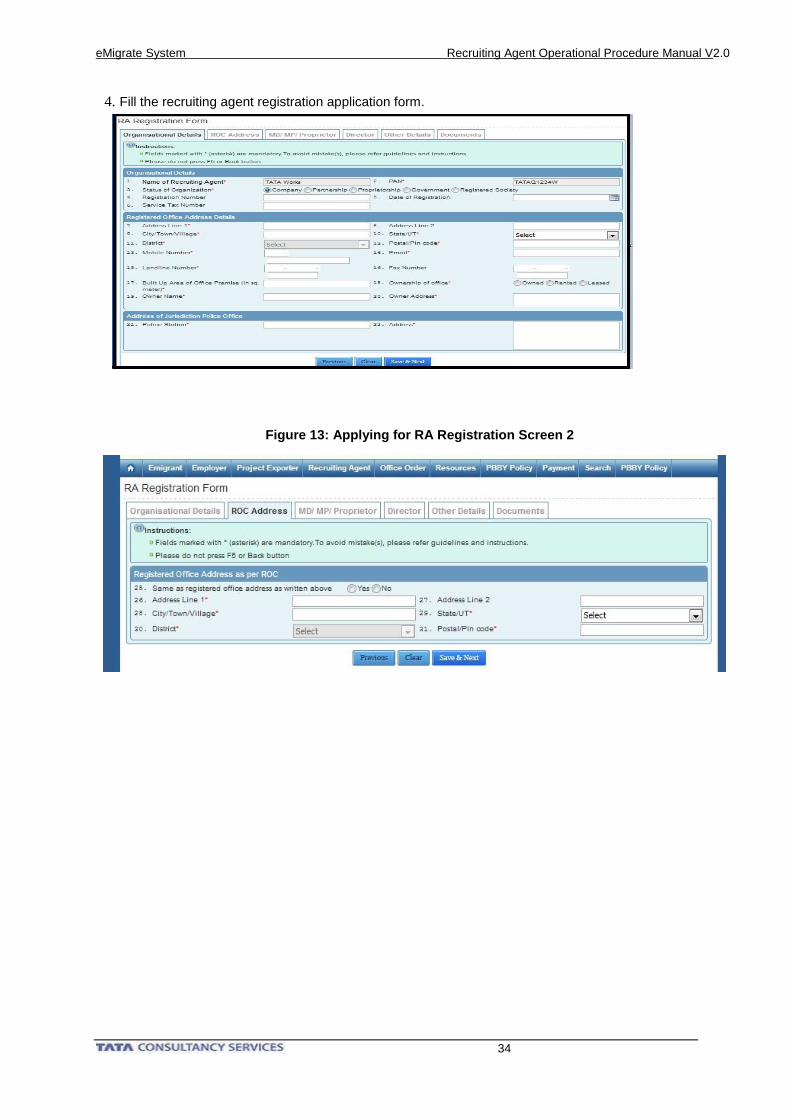
4. Fill the recruiting agent registration application form.
Figure 13: Applying for RA Registration Screen 2
eMigrate System Recruiting Agent Operational Procedure Manual V2.0
35
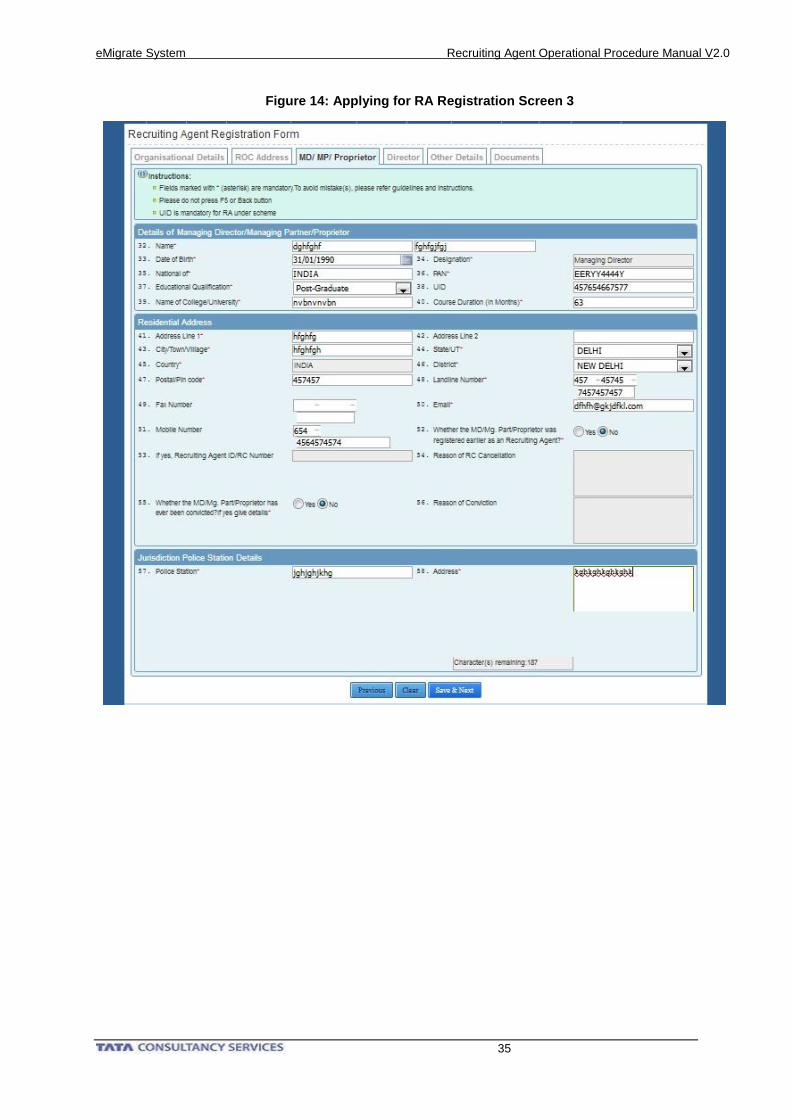
Figure 14: Applying for RA Registration Screen 3
eMigrate System Recruiting Agent Operational Procedure Manual V2.0
36
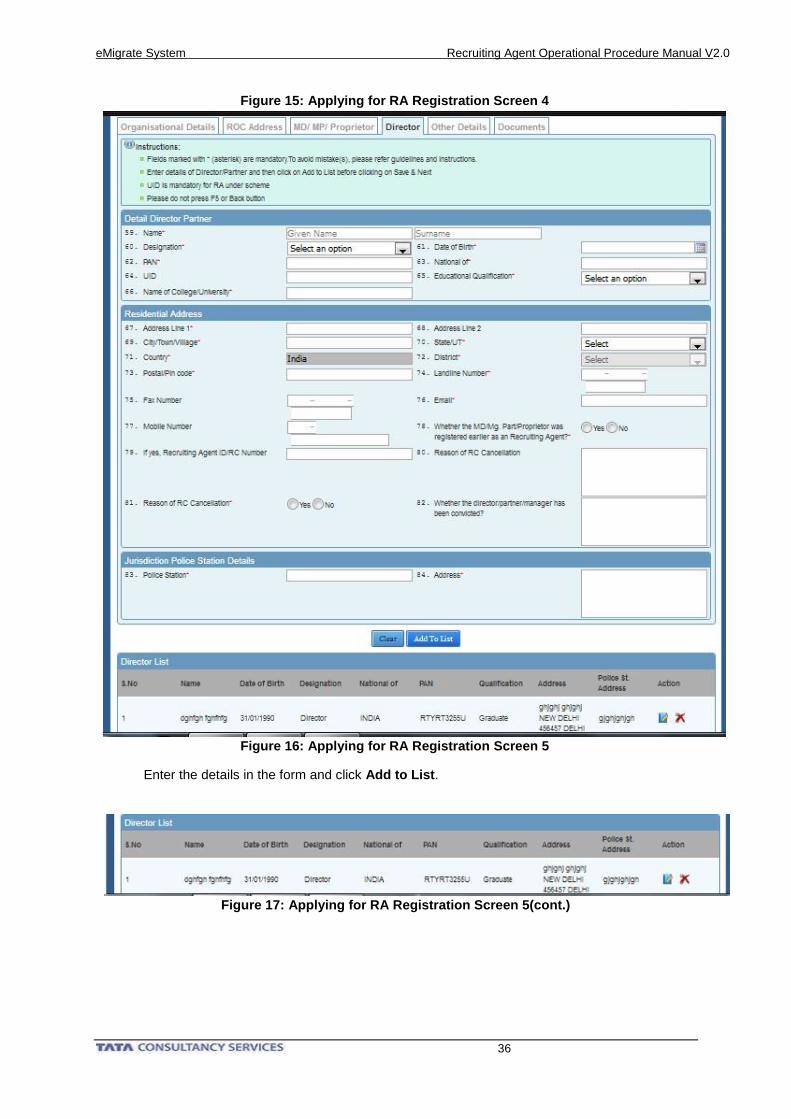
Figure 15: Applying for RA Registration Screen 4
Figure 16: Applying for RA Registration Screen 5
Enter the details in the form and click Add to List.
Figure 17: Applying for RA Registration Screen 5(cont.)
eMigrate System Recruiting Agent Operational Procedure Manual V2.0
37
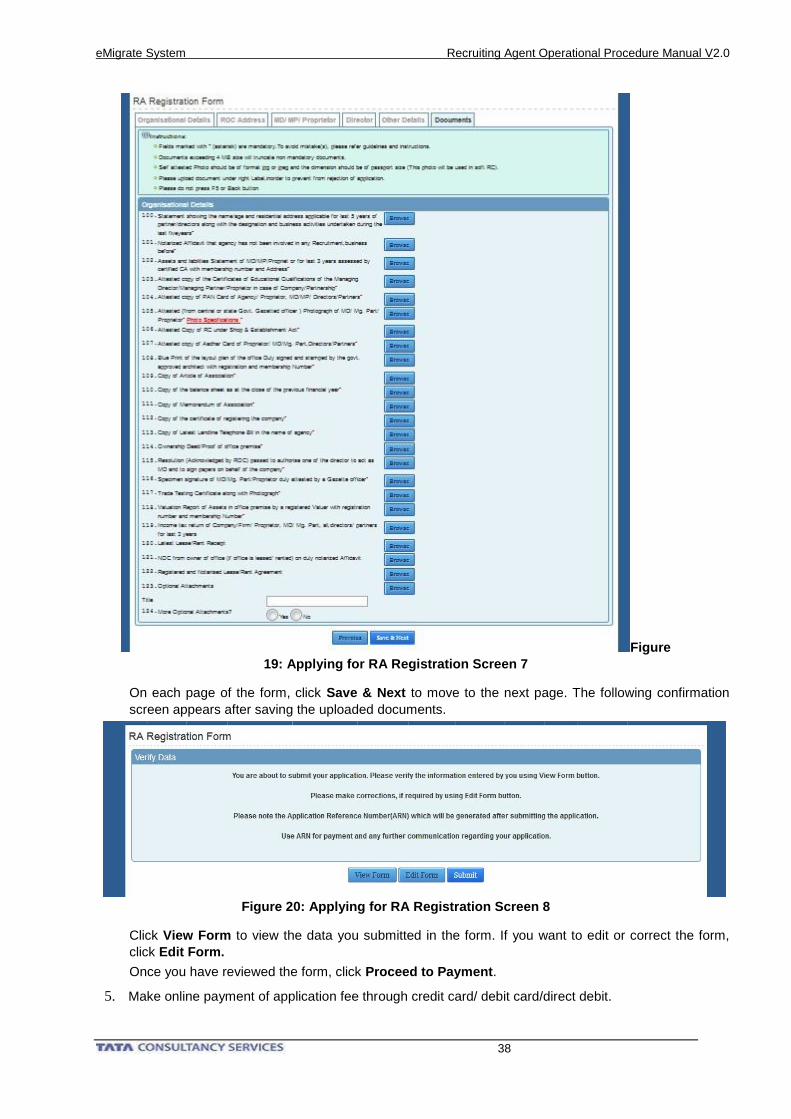
If more director details are to be added, enter their details else click Save & Next.
Figure 18: Applying for RA Registration Screen 6
eMigrate System Recruiting Agent Operational Procedure Manual V2.0
38
Figure
19: Applying for RA Registration Screen 7
On each page of the form, click Save & Next to move to the next page. The following confirmation
screen appears after saving the uploaded documents.
Figure 20: Applying for RA Registration Screen 8
Click View Form to view the data you submitted in the form. If you want to edit or correct the form,
click Edit Form.
Once you have reviewed the form, click Proceed to Payment.
5. Make online payment of application fee through credit card/ debit card/direct debit.
eMigrate System Recruiting Agent Operational Procedure Manual V2.0
39
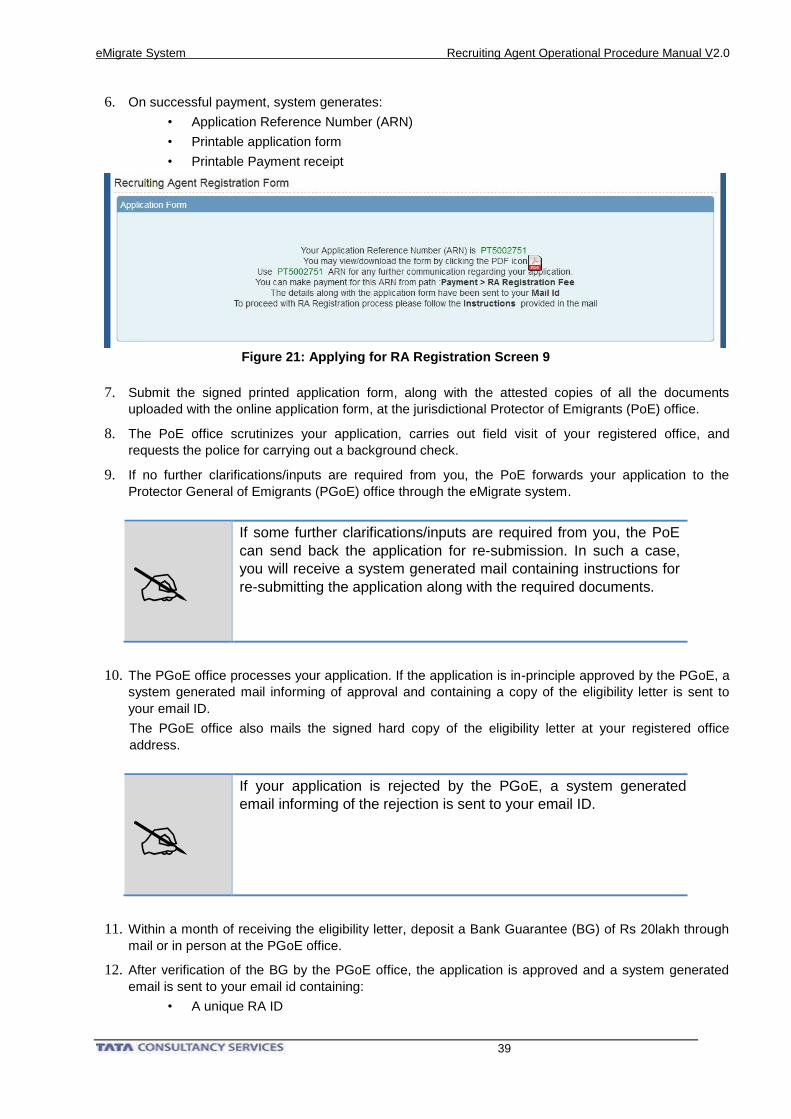
6. On successful payment, system generates:
• Application Reference Number (ARN)
• Printable application form
• Printable Payment receipt
Figure 21: Applying for RA Registration Screen 9
7. Submit the signed printed application form, along with the attested copies of all the documents
uploaded with the online application form, at the jurisdictional Protector of Emigrants (PoE) office.
8. The PoE office scrutinizes your application, carries out field visit of your registered office, and
requests the police for carrying out a background check.
9. If no further clarifications/inputs are required from you, the PoE forwards your application to the
Protector General of Emigrants (PGoE) office through the eMigrate system.
If some further clarifications/inputs are required from you, the PoE
can send back the application for re-submission. In such a case,
you will receive a system generated mail containing instructions for
re-submitting the application along with the required documents.
10. The PGoE office processes your application. If the application is in-principle approved by the PGoE, a
system generated mail informing of approval and containing a copy of the eligibility letter is sent to
your email ID.
The PGoE office also mails the signed hard copy of the eligibility letter at your registered office
address.
If your application is rejected by the PGoE, a system generated
email informing of the rejection is sent to your email ID.
11. Within a month of receiving the eligibility letter, deposit a Bank Guarantee (BG) of Rs 20lakh through
mail or in person at the PGoE office.
12. After verification of the BG by the PGoE office, the application is approved and a system generated
email is sent to your email id containing:
• A unique RA ID
eMigrate System Recruiting Agent Operational Procedure Manual V2.0
40
• A copy of the Registration Certificate
• URL for registering the Digital Signature Certificate (DSC)
• Temporary password for registering the DSC
The PGoE office also mails the signed hard copy of the RC at your registered office address.
The table below details the description of the fields in the RA registration form. The fields are mentioned
in the order in which they appear in the form (first left to right, then top to bottom).
Table 14: RA Registration Form Field Reference Table
Field Name Description
RA Registration Form
1. Name of Recruiting agent
Enter the name of the company / partnership firm /
proprietor.
2. PAN Enter the PAN details
3. Whether Memorandum
of Association/ Articles
of Association/
Partnership Deed must
contain the clause that
Company/ Firm shall
carry out business of
overseas employment
as their principal
object?
If you are a company / partnership, select Yes or No as
applicable.
If you are proprietor, select Not Applicable.
4.GST registration number GST registration mandatory, in case of RA under new
scheme.
5. Text Box Enter the text as shown in the captcha image.
Organization Details
1. Name of Recruiting Agent Display field. The system will populate the field from the
name entered in the previous screen.
2. PAN Display field. The system will populate the field from the
value entered in the previous screen.
3. Status of Organization Select the status of organization from Company /
Partnership / Proprietorship.
4. Registration Number
If you are a company / partnership, enter the registration
number. The number is alphanumeric and twenty
characters long.
5. Date of Registration If you are a company / partnership, select the date of
registration by clicking the calendar button.
6. Service Tax Number Enter the service tax number. The number is alphanumeric
and fifteen digits long.
7 – 16. Registered Office
Address, Email and Contact
Details
Enter the address and contact details of the office which
you want to declare as registered office to MEA.
17. Built up Area of Office
Premises (in sq. meters) Enter the built up area of the registered office.
18. Ownership of Office Select the ownership status of the registered office from
Owned / Rented / Leased.
eMigrate System Recruiting Agent Operational Procedure Manual V2.0
41
19. Owner’s Name If ownership status is selected as Rented or Leased, enter
the owner’s name.
20. Owner’s Address If ownership status is selected as Rented or Leased, enter
the owner’s residential address.
21. Police Station Enter the area police station name.
22. Address Enter the address of police station.
ROC Address
23. Same as registered
office address as written
above
Select Yes if the address registered with ROC / ROF is
same as entered in the form on previous screen.
Else
Select No.
24 – 29. Registered office
address details as per ROC/
ROF
If the previous field is selected as Yes, the eMigrate
system will populate the fields from the values entered in the previous screen.
If the previous field is selected as No, enter the registered
office address details declared with the ROC / ROF.
MD/MP/Proprietor Details
30. Name Enter the name of the MD/MP/Proprietor.
31. Designation Display field.
32. Date of Birth Select date of birth of the MD/MP/Proprietor by clicking the
calendar button.
Field Name Description
33. PAN Enter the PAN details of the MD/MP/Proprietor.
34. National of
Enter the native country of the MD/MP/Proprietor. The
eMigrate system will pop down auto complete options as
you type.
35. UID Enter the 12 digit Aadhar number of MD/MP/Proprietor.
36. Educational Qualification Select the highest qualification of the MD/MP/Proprietor
from the drop down menu.
37. Course Duration
(in Months)
Enter the duration of the course mentioned in the previous
field.
38. Name of
College/University
Enter the name of college/university attended by the
MD/MP/Proprietor.
39 – 49. Residential
Address, Email and
Contact Details of the
MD/MP/Proprietor
Enter the residential address, email and contact details of
the MD/MP/Proprietor.
50. Whether the
MD/MP/Proprietor was
registered earlier as an
Recruiting Agent?
Select Yes if the MD/MP/Proprietor was registered as an
RA earlier.
Else
Select No.
51. If yes, Recruiting Agent
ID / RC Number
If previous field is selected as Yes, enter the earlier RA ID /
RC number.
eMigrate System Recruiting Agent Operational Procedure Manual V2.0
42
52. Reason of RC
Cancellation
If a value is entered in the previous field, enter the reason
of the earlier RA ID / RC cancellation.
53. Whether the
MD/MP/Proprietor has
ever been convicted? If
yes give details.
Select Yes if the MD/MP/Proprietor has ever been
convicted.
Else
Select No.
54. Reason of conviction If the previous field is selected as Yes, enter the reason of
conviction.
55. Police Station Enter the area police station name.
56. Address Enter the address of police station
Director/Partner details
57. Name Enter the name of the Director/Partner.
58. Designation Display field.
59. Date of Birth Select date of birth of the Director/Partner by clicking the
calendar button.
60. PAN Enter the PAN details of the Director/Partner.
61. National of
Enter the native country of the Director/Partner. The
eMigrate system will pop down auto complete options as
you type.
62. UID Enter the 12-digit Aadhaar number of Director/Partner.
63. Educational Qualification Select the highest qualification of the Director/Partner from
the drop down menu.
64. Name of
College/University
Enter the name of college/university attended by the
Director/Partner.
65 – 75. Residential
address, Email and Contact
Details of Director.
Enter the residential address, email and contact details of
the Director/Partner.
76. Whether the
Director/Partner was
registered earlier as a
Recruiting Agent?
Select Yes if the Director/Partner was registered as an RA
earlier.
Else
Select No.
77. If yes, Recruiting Agent
ID / RC Number
If previous field is selected as Yes, enter the earlier RA ID /
RC number.
78. Reason of RC
Cancellation
If a value is entered in the previous field, enter the reason
of the earlier RA ID / RC cancellation.
Field Name Description
79. Whether the
Director/Partner has
ever been convicted? If
yes give details.
Select Yes if the Director/Partner has ever been convicted.
Else
Select No.
80. Reason of conviction If the previous field is selected as Yes, enter the reason of
conviction.
81. Police Station Enter the area police station name.
eMigrate System Recruiting Agent Operational Procedure Manual V2.0
43
82. Address Enter the address of police station
Other Details
83. Name of Bank Enter the name of the banker for your agency.
84. Address of Bank Enter the address of your banker.
85. Account Number Enter the 12 digit current account number.
86. Fixed Assets (Rs in
Lakhs) Enter the agency’s fixed asset details.
87. Liability (Rs in Lakhs) Enter the agency’s liability details.
88. Liquid Assets (Rs in
Lakhs) Enter the agency’s liquid asset details.
89. Net worth (Rs in Lakhs) Display field. This field displays the value of Fixed Assets
+ Liquid Assets – Liability.
90. Financial Turnover for
the Last Five Years (Rs
in Lakhs)
Enter the financial turnover of the agency for the last five
years.
91. Income Tax Return is
available for the
Company/Firm/Proprietor
Select Yes if the Income Tax Return is available for the
Company/Firm/Proprietor.
Else
Select No.
92. IFSC code GST registration mandatory, in case of RA under new
scheme.
93. Whether the applicant
was previously
registered as Recruiting
Agent?
Select Yes if the applicant was previously registered as
RA in eMigrate system. Or else select No
94. If yes, give the
Recruiting
Agent id/RC number
If the above field is selected as No, text filed will be
disabled.
95. Whether any certificate
issued under Emigration
Act,1963 was cancelled?
Select Yes if the applicant’s cerficate was
cancelled. Or else select No
96.Reason for RC
cancellation
Field will be enabled, if applicant selected Yes in above
field.
97. Date of cancellation To be entered if #95 is selected asYes.
98. Income Tax return is
available for Company/
firm?
Select Yes or No as applicable.
99. If no, kindly explain the
reason.
To be entered if above field is selected as No.
100. Audited Balance Sheet is available for the Company/Firm
Select Yes if the Audited Balance Sheet is available for the
Company/Firm.
Else
eMigrate System Recruiting Agent Operational Procedure Manual V2.0
44
Select No.
Documents
Upload Upload the required documents as per the Prescribed
documents list mentioned in this section.
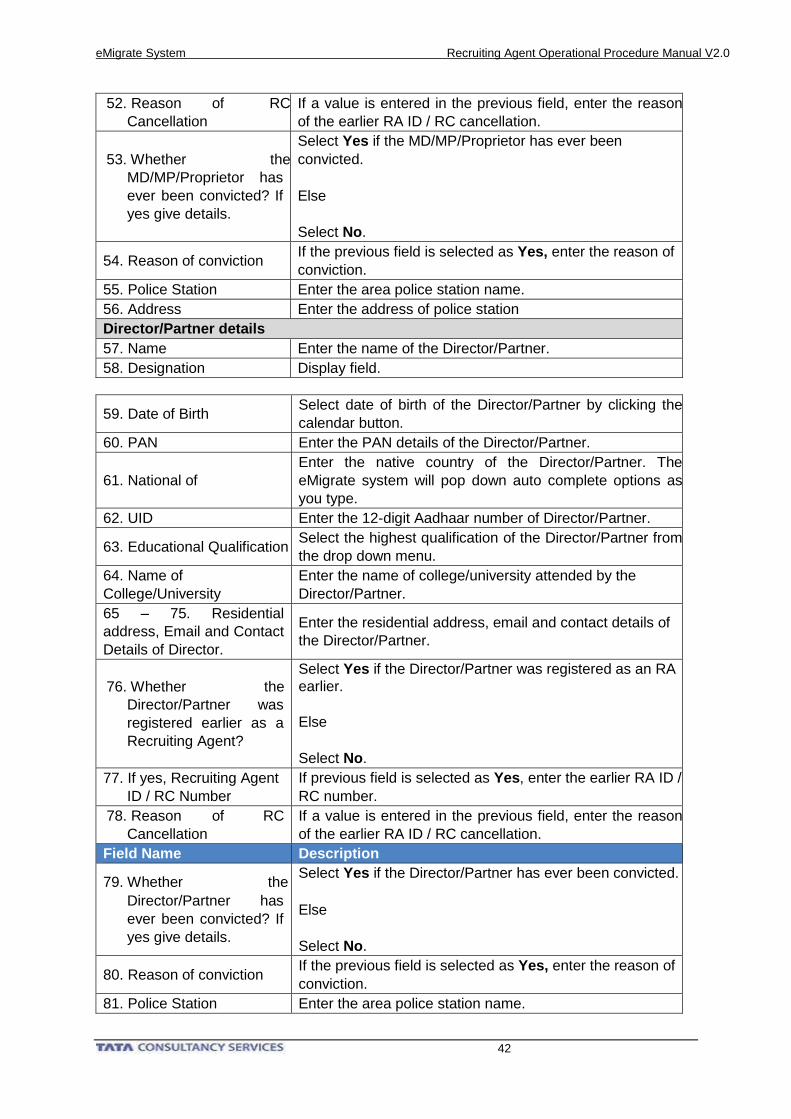
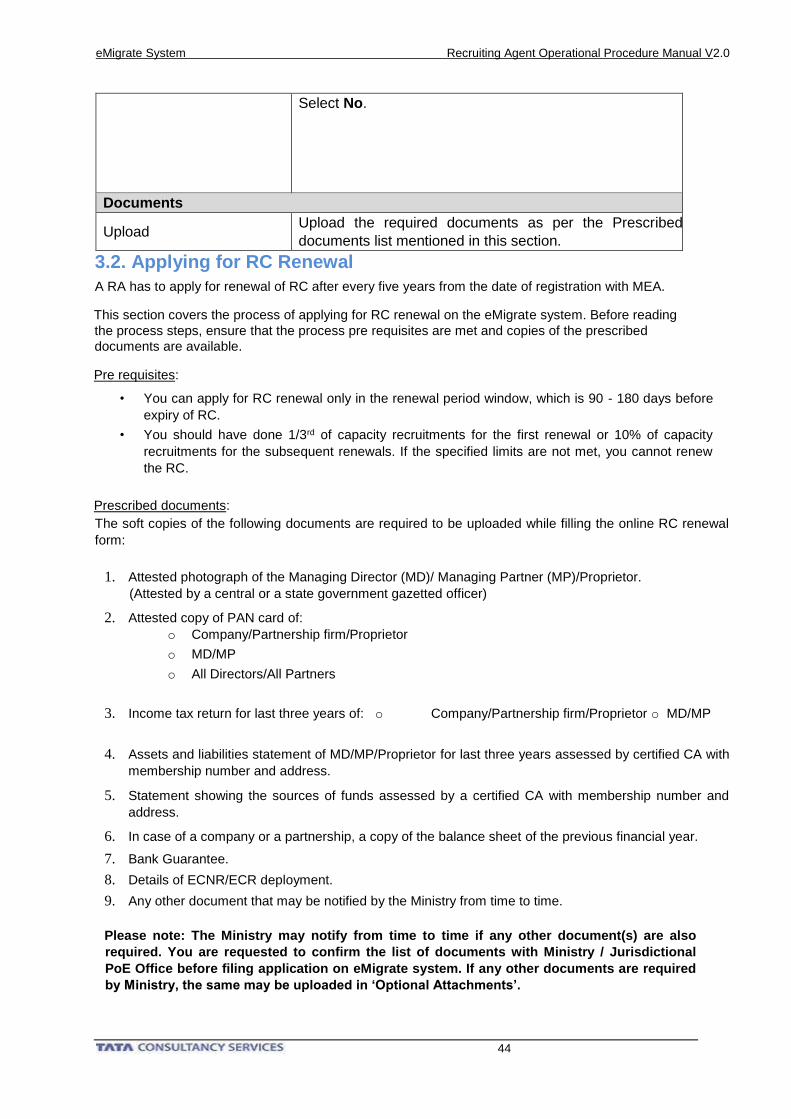
3.2. Applying for RC Renewal
A RA has to apply for renewal of RC after every five years from the date of registration with MEA.
This section covers the process of applying for RC renewal on the eMigrate system. Before reading
the process steps, ensure that the process pre requisites are met and copies of the prescribed
documents are available.
Pre requisites:
• You can apply for RC renewal only in the renewal period window, which is 90 - 180 days before
expiry of RC.
• You should have done 1/3rd of capacity recruitments for the first renewal or 10% of capacity
recruitments for the subsequent renewals. If the specified limits are not met, you cannot renew
the RC.
Prescribed documents:
The soft copies of the following documents are required to be uploaded while filling the online RC renewal
form:
1. Attested photograph of the Managing Director (MD)/ Managing Partner (MP)/Proprietor.
(Attested by a central or a state government gazetted officer)
2. Attested copy of PAN card of:
o Company/Partnership firm/Proprietor
o MD/MP
o All Directors/All Partners
3. Income tax return for last three years of: o Company/Partnership firm/Proprietor o MD/MP
4. Assets and liabilities statement of MD/MP/Proprietor for last three years assessed by certified CA with
membership number and address.
5. Statement showing the sources of funds assessed by a certified CA with membership number and
address.
6. In case of a company or a partnership, a copy of the balance sheet of the previous financial year.
7. Bank Guarantee.
8. Details of ECNR/ECR deployment.
9. Any other document that may be notified by the Ministry from time to time.
Please note: The Ministry may notify from time to time if any other document(s) are also
required. You are requested to confirm the list of documents with Ministry / Jurisdictional
PoE Office before filing application on eMigrate system. If any other documents are required
by Ministry, the same may be uploaded in ‘Optional Attachments’.

eMigrate System Recruiting Agent Operational Procedure Manual V2.0
45
Process steps:
After you have arranged for the required prescribed documents, please follow the below mentioned steps to
apply for RC renewal:
1. Login into eMigrate system as a RA
2. Go to Administration -> Apply for RC Renewal. The Recruiting Agent RC Renewal form appears.
3. Fill the online form.
Figure 22: Applying for RC Renewal Screen 1
Figure 23 : Applying for RC Renewal Screen 2
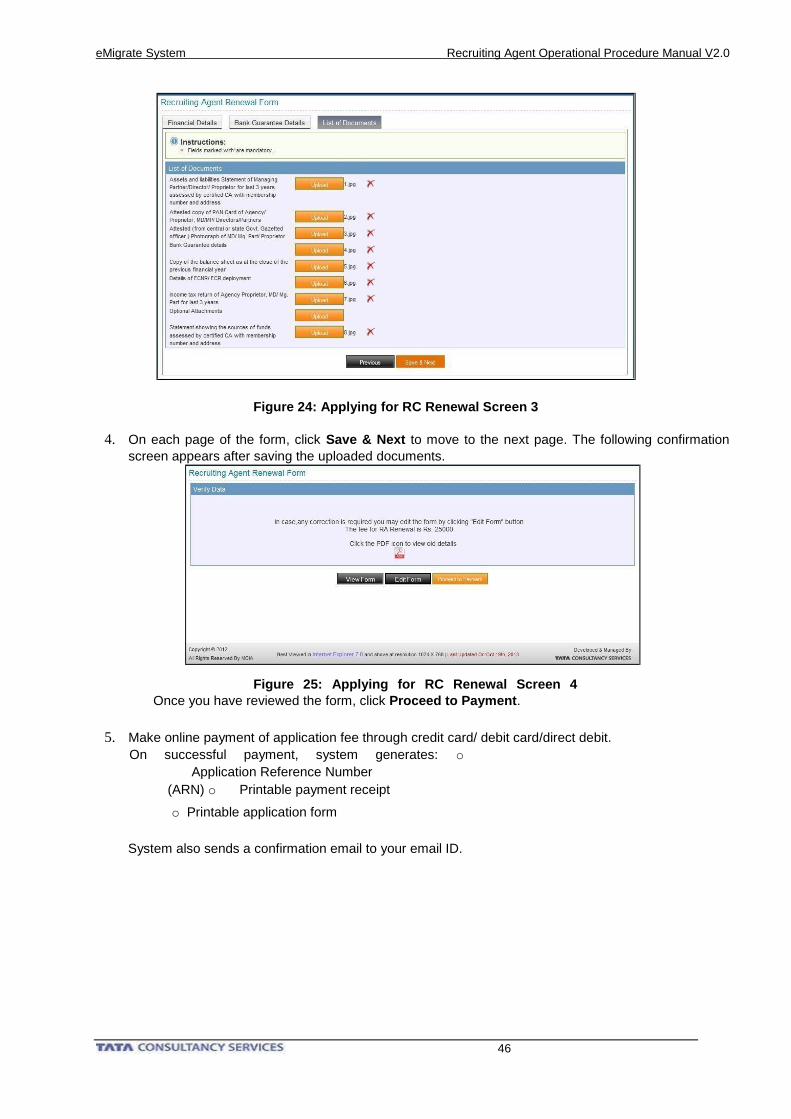
eMigrate System Recruiting Agent Operational Procedure Manual V2.0
46
Figure 24: Applying for RC Renewal Screen 3
4. On each page of the form, click Save & Next to move to the next page. The following confirmation
screen appears after saving the uploaded documents.
Figure 25: Applying for RC Renewal Screen 4
Once you have reviewed the form, click Proceed to Payment.
5. Make online payment of application fee through credit card/ debit card/direct debit.
On successful payment, system generates: o
Application Reference Number
(ARN) o Printable payment receipt
o Printable application form
System also sends a confirmation email to your email ID.
eMigrate System Recruiting Agent Operational Procedure Manual V2.0
47
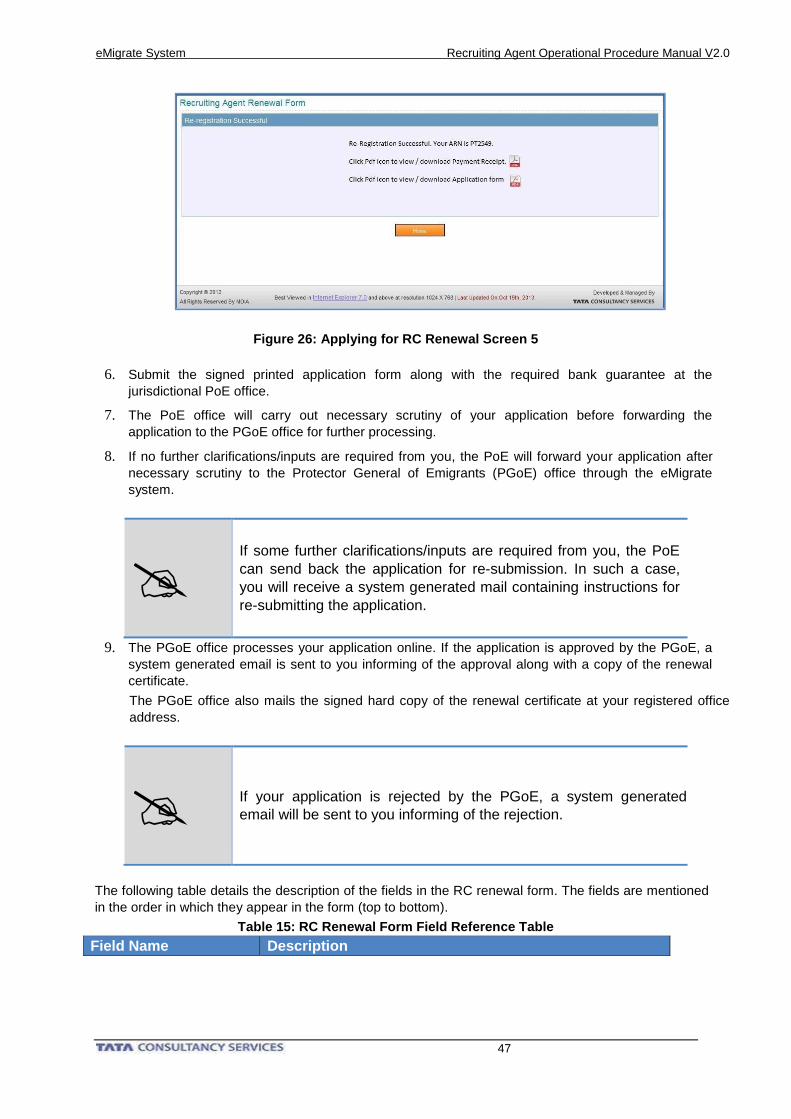
Figure 26: Applying for RC Renewal Screen 5
6. Submit the signed printed application form along with the required bank guarantee at the
jurisdictional PoE office.
7. The PoE office will carry out necessary scrutiny of your application before forwarding the
application to the PGoE office for further processing.
8. If no further clarifications/inputs are required from you, the PoE will forward your application after
necessary scrutiny to the Protector General of Emigrants (PGoE) office through the eMigrate
system.
If some further clarifications/inputs are required from you, the PoE
can send back the application for re-submission. In such a case,
you will receive a system generated mail containing instructions for
re-submitting the application.
9. The PGoE office processes your application online. If the application is approved by the PGoE, a
system generated email is sent to you informing of the approval along with a copy of the renewal
certificate.
The PGoE office also mails the signed hard copy of the renewal certificate at your registered office
address.
If your application is rejected by the PGoE, a system generated
email will be sent to you informing of the rejection.
The following table details the description of the fields in the RC renewal form. The fields are mentioned
in the order in which they appear in the form (top to bottom).
Table 15: RC Renewal Form Field Reference Table
Field Name Description
eMigrate System Recruiting Agent Operational Procedure Manual V2.0
48
1. Total Number of
Deployment of Indian
Workers (including
ECR and ECNR passport holders) since last registration
/renewal.
Enter the total number of workers deployed overseas since
last registration/renewal.
2. Name and Address of
Bank.
Display field. The eMigrate system populates the field from
details available in the system.
3. Fixed Assets Enter the value of agency’s fixed assets.
4. Liquid Assets Enter the value of agency’s liquid assets.
5. Liability Enter the value of agency’s liability.
6. Net Worth Display field. The eMigrate system calculates and displays the
value of- Fixed Assets + Liquid Assets – Liability.
7. Financial Turnover for
the Last Five Years
(Rs in Lakhs)
Enter the financial turnover of the agency for the last five
years.
8. Name of Bank and
Branch
Enter the name of the bank and branch on which the bank
guarantee has been drawn.
9. Bank Guarantee
Amount Enter the bank guarantee amount value.
10. Bank Guarantee
Issue Date Enter the date on which the bank guarantee has been issued.
11. Bank Guarantee
Expiry Date Enter the date on which the bank guarantee will expire.
Documents
Upload Upload the required documents as per the Prescribed
documents list mentioned in this section.
3.3. Requesting for Duplicate RC
A RA can request MEA to issue duplicate RC if the original RC is lost / damaged.
This section covers the process of requesting for duplicate RC on the eMigrate system. Before
reading the process steps, ensure that the process pre requisites are met and copies of the
prescribed documents are available.
Pre-requisites:
Only a Managing Director / Managing Partner / Proprietor logged on to the eMigrate system can raise
this request, not the employees of the firm.
Prescribed documents:
The soft copies of the following documents are required to be uploaded while filling the online duplicate
RC request form:
1. In case of a lost RC, a copy of the FIR filed.
2. Indemnity bond for duplicate RC.
3. Any other document that may be notified by the Ministry from time to time.
eMigrate System Recruiting Agent Operational Procedure Manual V2.0
49
Please note: The Ministry may notify from time to time if any other document(s) are also
required. You are requested to confirm the list of documents with Ministry / Jurisdictional
PoE Office before filing application on eMigrate system. If any other documents are required
by Ministry, the same may be uploaded in ‘Optional Attachments’.
Process steps:
After you have arranged for the required prescribed documents, please follow the below mentioned steps to
request for duplicate RC:
1. Login into eMigrate system as a RA.
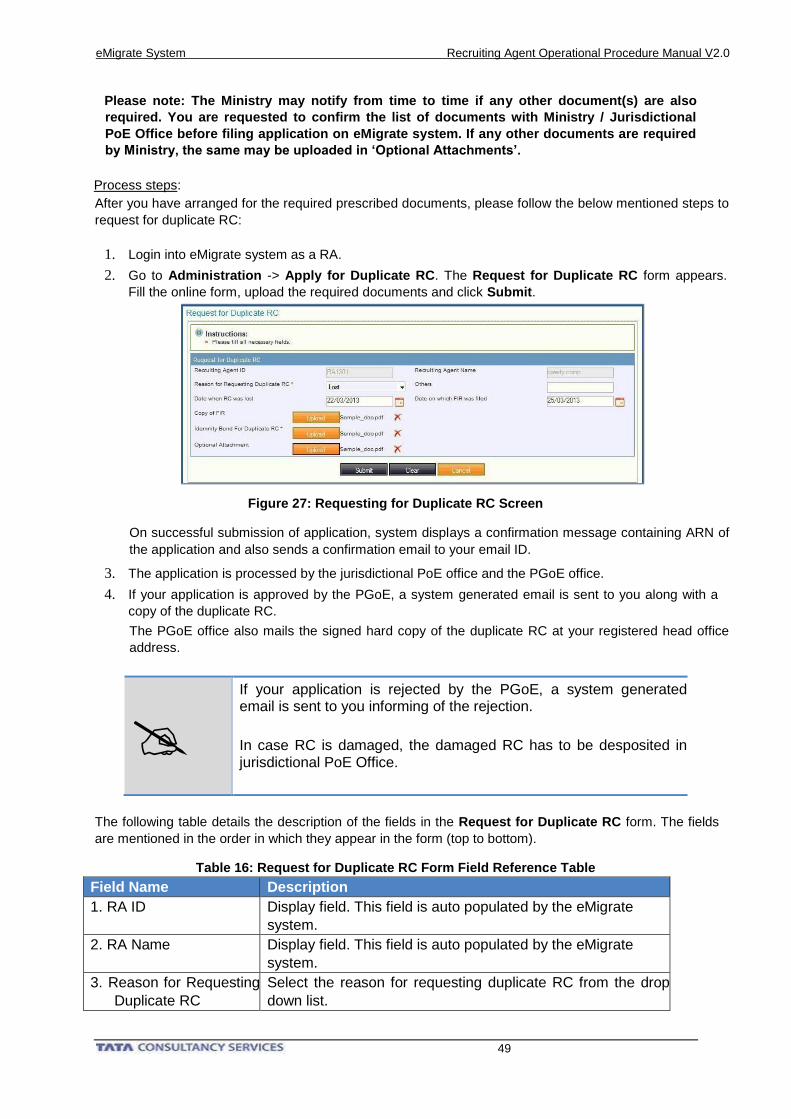
2. Go to Administration -> Apply for Duplicate RC. The Request for Duplicate RC form appears.
Fill the online form, upload the required documents and click Submit.
Figure 27: Requesting for Duplicate RC Screen
On successful submission of application, system displays a confirmation message containing ARN of
the application and also sends a confirmation email to your email ID.
3. The application is processed by the jurisdictional PoE office and the PGoE office.
4. If your application is approved by the PGoE, a system generated email is sent to you along with a
copy of the duplicate RC.
The PGoE office also mails the signed hard copy of the duplicate RC at your registered head office
address.
If your application is rejected by the PGoE, a system generated email is sent to you informing of the rejection.
In case RC is damaged, the damaged RC has to be desposited in jurisdictional PoE Office.
The following table details the description of the fields in the Request for Duplicate RC form. The fields
are mentioned in the order in which they appear in the form (top to bottom).
Table 16: Request for Duplicate RC Form Field Reference Table
Field Name Description
1. RA ID Display field. This field is auto populated by the eMigrate
system.
2. RA Name Display field. This field is auto populated by the eMigrate
system.
3. Reason for Requesting
Duplicate RC
Select the reason for requesting duplicate RC from the drop
down list.
eMigrate System Recruiting Agent Operational Procedure Manual V2.0
50
4. Date when RC was lost If RC is lost, enter the date when the RC was lost.
5. Date on which FIR was
filed If RC is lost, enter the date when the FIR was lodged.
Documents
Upload Upload the required documents as per the Prescribed
documents list mentioned in this section.
3.4. Requesting for RC Cancellation / Bank Guarantee Release
A RA can request for RC cancellation / bank guarantee release if the agency does not want to
continue business. In case a RA is dead, the kin of the RA can make a written request to the
jurisdictional PoE for RC cancellation / bank guarantee release.
This section covers the process of requesting RC cancellation / bank guarantee release on the
eMigrate system. Before reading the process steps, ensure that the process pre requisites are met
and copies of the prescribed documents are available.
Pre requisites:
• You can apply for RC cancellation only after 3.5 years have elapsed since you recruited the last
emigrant.
• Only a Managing Director / Managing Partner / Proprietor can raise this request, not the
employees of the firm.
Prescribed documents:
The soft copies of the following documents are required to be uploaded while filling the online RC
cancellation / bank guarantee release form:
1. An affidavit sworn before the metropolitan/ judicial magistrate stating the date of deployment of last
worker and: not having charged more than the amounts as stipulated under rule-25 of emigration
rules, 1983 from any person with regard to their deployment abroad or otherwise.
2. Copy of insertion in two local leading newspapers (one in English and one in the local language daily)
about intention of closing down recruiting business.
3. Any other document that may be notified by the Ministry from time to time.
In case of a company, following additional documents are also required:
4. A duly passed resolution and registered with the RoC.
In case of a partnership, following additional documents are also required:
4. A duly passed resolution and registered with the RoF.
Please note: The Ministry may notify from time to time if any other document(s) are also
required. You are requested to confirm the list of documents with Ministry / Jurisdictional PoE
Office before filing application on eMigrate system. If any other documents are required by
Ministry, the same may be uploaded in ‘Optional Attachments’.
Process steps:
After you have arranged for the required prescribed documents, please follow the below mentioned steps to
request for RC cancellation / bank guarantee release:
1. Login into eMigrate system as a RA.
2. Go to Services -> Request for RC cancellation / Bank Guarantee Release. The Request RC
Cancellation form appears.
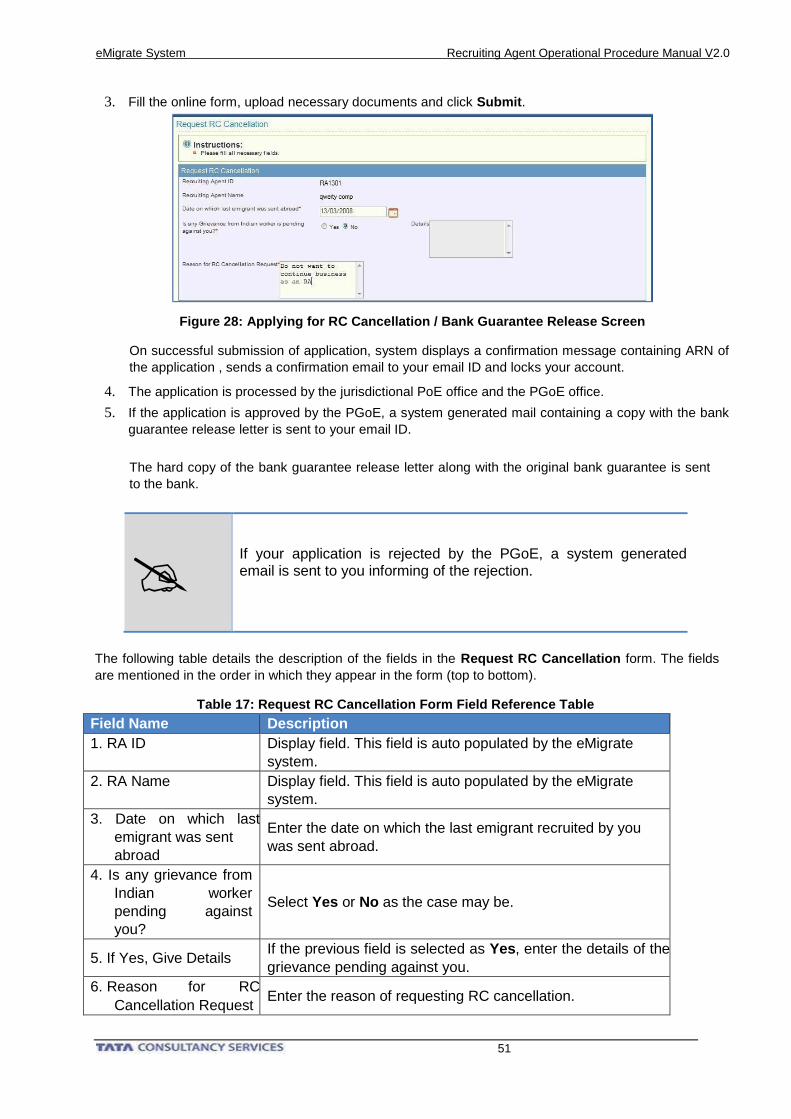
eMigrate System Recruiting Agent Operational Procedure Manual V2.0
51
3. Fill the online form, upload necessary documents and click Submit.
Figure 28: Applying for RC Cancellation / Bank Guarantee Release Screen
On successful submission of application, system displays a confirmation message containing ARN of
the application , sends a confirmation email to your email ID and locks your account.
4. The application is processed by the jurisdictional PoE office and the PGoE office.
5. If the application is approved by the PGoE, a system generated mail containing a copy with the bank
guarantee release letter is sent to your email ID.
The hard copy of the bank guarantee release letter along with the original bank guarantee is sent
to the bank.
If your application is rejected by the PGoE, a system generated email is sent to you informing of the rejection.
The following table details the description of the fields in the Request RC Cancellation form. The fields
are mentioned in the order in which they appear in the form (top to bottom).
Table 17: Request RC Cancellation Form Field Reference Table
Field Name Description
1. RA ID Display field. This field is auto populated by the eMigrate
system.
2. RA Name Display field. This field is auto populated by the eMigrate
system.
3. Date on which last
emigrant was sent
abroad
Enter the date on which the last emigrant recruited by you
was sent abroad.
4. Is any grievance from
Indian worker
pending against
you?
Select Yes or No as the case may be.
5. If Yes, Give Details If the previous field is selected as Yes, enter the details of the
grievance pending against you.
6. Reason for RC
Cancellation Request Enter the reason of requesting RC cancellation.
eMigrate System Recruiting Agent Operational Procedure Manual V2.0
52
Documents
Upload Upload the required documents as per the Prescribed
documents list mentioned in this section.
4. Business/Profile Details Update Related Processes
This chapter covers all the business/profile details updation related business processes for which you
can apply online to the MEA through the eMigrate system. The following business processes are
covered in detail:
• Applying for change in registered office
• Applying for closure of branch office
• Applying for change in directors/partners
• Applying for addition of new branch office
• Applying for change in office status
• Applying for change in company type
• Applying for change in profile details
• Applying for capacity enhancement
4.1. Applying for Change in Registered Office
If an agency changes its registered office, the same has to be updated to the MEA.
This section covers the process of applying for change in registered office on the eMigrate system.
Before reading the process steps, ensure that the process pre requisites are met and copies of the
Prescribed documents are available.
Pre requisites: None
Prescribed documents:
The soft copies of the following documents are required to be uploaded while filling the online change in
registered office form:
1. Valuation report certified by registered valuer with registration number and membership number.
1. Attested copy of the registration certificate under shop and establishment act.
(Attested by a central or a state government gazetted officer)
2. Latest landline telephone bill in the name of agency.
3. Trade test centre certificate along with photograph.
4. A copy of the blue print of the layout plan of the office duly signed and stamped by the government
approved architect with registration and membership number.
In case of a rented or leased office, following additional documents are also required:
5. NOC from owner of the premises on duly notarised affidavit.
6. Rent/Lease receipt.
7. Registered and notarised rent/lease agreement.
8. Any other document that may be notified by the Ministry from time to time.
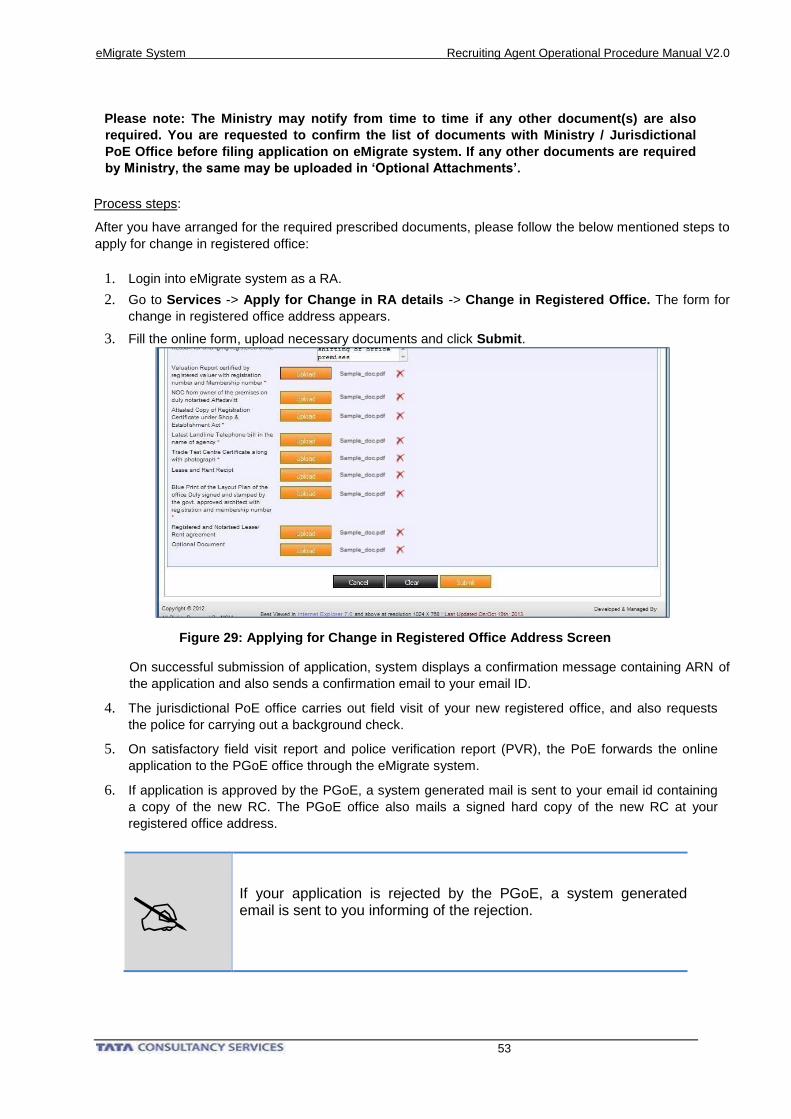
eMigrate System Recruiting Agent Operational Procedure Manual V2.0
53
Please note: The Ministry may notify from time to time if any other document(s) are also
required. You are requested to confirm the list of documents with Ministry / Jurisdictional
PoE Office before filing application on eMigrate system. If any other documents are required
by Ministry, the same may be uploaded in ‘Optional Attachments’.
Process steps:
After you have arranged for the required prescribed documents, please follow the below mentioned steps to
apply for change in registered office:
1. Login into eMigrate system as a RA.
2. Go to Services -> Apply for Change in RA details -> Change in Registered Office. The form for
change in registered office address appears.
3. Fill the online form, upload necessary documents and click Submit.
Figure 29: Applying for Change in Registered Office Address Screen
On successful submission of application, system displays a confirmation message containing ARN of
the application and also sends a confirmation email to your email ID.
4. The jurisdictional PoE office carries out field visit of your new registered office, and also requests
the police for carrying out a background check.
5. On satisfactory field visit report and police verification report (PVR), the PoE forwards the online
application to the PGoE office through the eMigrate system.
6. If application is approved by the PGoE, a system generated mail is sent to your email id containing
a copy of the new RC. The PGoE office also mails a signed hard copy of the new RC at your
registered office address.
If your application is rejected by the PGoE, a system generated email is sent to you informing of the rejection.
eMigrate System Recruiting Agent Operational Procedure Manual V2.0
54
The following table details the description of the fields in the change in registered office form. The fields
are mentioned in the order in which they appear in the form (top to bottom).
Table 18: Change in Registered Office Form Field Reference Table
Field Name Description
1-10. New Registered
Office Address, Email and
Contact Details
Enter the new registered office address, email and contact
details in the respective fields.
Field Name Description
11. Ownership of Office
Select any of the following options:
• Owned
• Rented
• Leased
12. Lease Valid Upto If the previous field is selected as Leased, enter the date upto
which the lease is valid.
13. Lease whether
extendable
If the office ownership is Leased, select Yes or No whichever
is applicable.
14. Owner’s Name and
Address
If the office ownership is Rented or Leased, enter the
owner’s name and address.
15. Built Up Area of
Office Premise (in sq.
mtrs)
Enter the built up area of the new office premise. The new
office area should be more than 50 sq. mtrs.
16. Police Station Enter the area police station name.
17. Address Enter the address of the area police station.
18. Reason for Changing
Registered Office
Enter the reason for changing registered office.
Documents
Upload Upload the required document as per the Prescribed
documents list mentioned in this section.
4.2. Declaring Closure of Branch Office
If an agency closes its branch office, the same has to be updated to MEA-OED.
This section covers the process of declaring closure of branch office on the eMigrate system. Before
reading the process steps, ensure that the process pre requisites are met and copies of the
prescribed documents are available.
Pre requisites: None
Prescribed documents: None (The Ministry may notify a document from time to time)
Please note: The Ministry may notify from time to time if any other document(s) are also
required. You are requested to confirm the list of documents with Ministry / Jurisdictional PoE
Office before filing application on eMigrate system. If any other documents are required by
Ministry, the same may be uploaded in ‘Optional Attachments’. Process steps:
After you have arranged for the required prescribed documents, please follow the below mentioned
steps to declare closure of a branch office:
1. Login into eMigrate system as a RA.
2. Go to Services -> Apply for Change in RA details -> Closure of Branch Office. The Branch
Office Closure form appears.
3. Fill the online form, upload necessary documents and click Submit.

eMigrate System Recruiting Agent Operational Procedure Manual V2.0
55
Figure 30: Declaring Closure of Branch Office Screen
On successful submission of application, system displays a confirmation message containing ARN of
the application and also sends a confirmation email to your email ID.
4. The application is processed by jurisdictional PoE office and PGoE office.
5. If application is approved by the PGoE, a system generated mail is sent to your email ID containing
a copy of the new RC. The PGoE office also mails a signed hard copy of the new RC at your
registered office address.
If your application is rejected by the PGoE, a system generated email is sent to you informing of the rejection.
The following table details the description of the fields in the closure of branch office form. The fields are
mentioned in the order in which they appear in the form (top to bottom).
Table 19: Closure of Branch Office Form Field Reference Table
Field Name Description
1. Reason for
Closing Branch Enter the reason for closing the branch office.
2. Closing Branch Select the branch to be closed from the options given.
4.3. Applying for Change in Directors/Partners
In cases where agency is a company or a partnership, if there is a change in the Director / Partner details of
the agency, the same needs to be updated to the MEA-OED.
This section covers the process of applying for change in directors/partners of the agency on the
eMigrate system. Before reading the process steps, ensure that the process pre requisites are met
and copies of the prescribed documents are available.
Pre requisites: None
Prescribed documents:
The soft copies of the following documents are required to be uploaded while filling the online change in
directors/partners form:
1. Attested photograph of Managing Director (MD)/ Managing Partner (MP).
(Attested by a central or a state government gazetted officer)
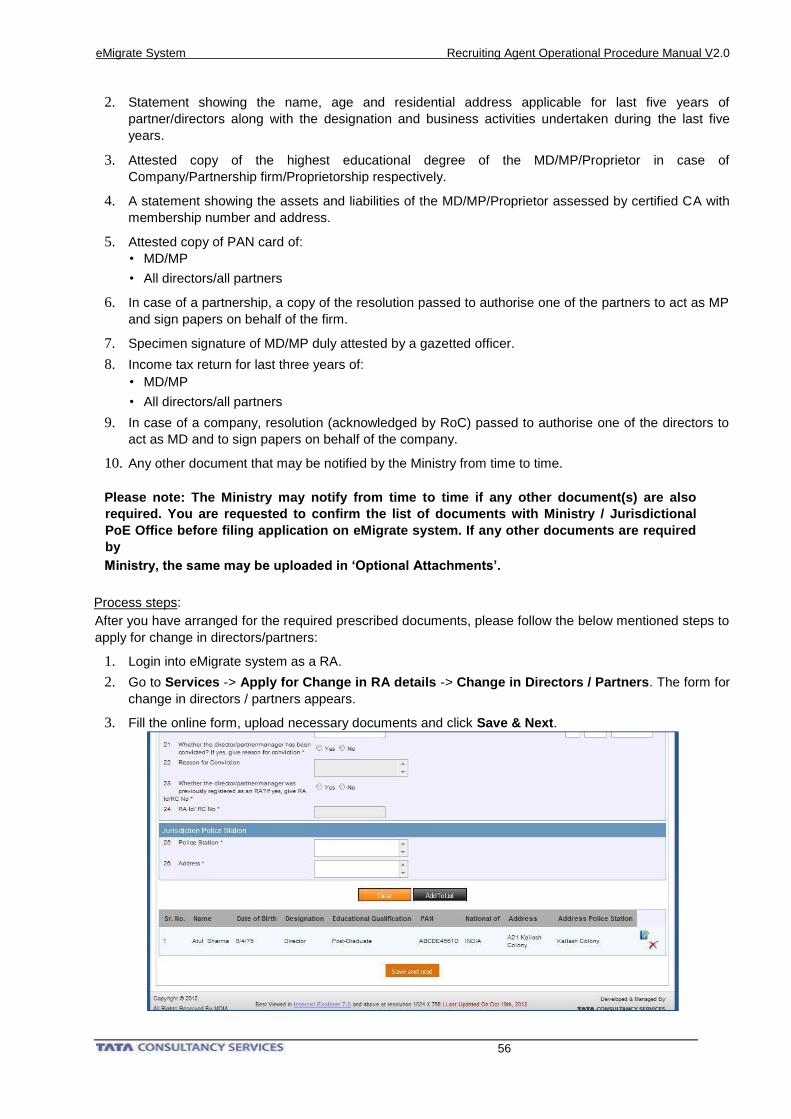
eMigrate System Recruiting Agent Operational Procedure Manual V2.0
56
2. Statement showing the name, age and residential address applicable for last five years of
partner/directors along with the designation and business activities undertaken during the last five
years.
3. Attested copy of the highest educational degree of the MD/MP/Proprietor in case of
Company/Partnership firm/Proprietorship respectively.
4. A statement showing the assets and liabilities of the MD/MP/Proprietor assessed by certified CA with
membership number and address.
5. Attested copy of PAN card of:
• MD/MP
• All directors/all partners
6. In case of a partnership, a copy of the resolution passed to authorise one of the partners to act as MP
and sign papers on behalf of the firm.
7. Specimen signature of MD/MP duly attested by a gazetted officer.
8. Income tax return for last three years of:
• MD/MP
• All directors/all partners
9. In case of a company, resolution (acknowledged by RoC) passed to authorise one of the directors to
act as MD and to sign papers on behalf of the company.
10. Any other document that may be notified by the Ministry from time to time.
Please note: The Ministry may notify from time to time if any other document(s) are also
required. You are requested to confirm the list of documents with Ministry / Jurisdictional
PoE Office before filing application on eMigrate system. If any other documents are required
by
Ministry, the same may be uploaded in ‘Optional Attachments’.
Process steps:
After you have arranged for the required prescribed documents, please follow the below mentioned steps to
apply for change in directors/partners:
1. Login into eMigrate system as a RA.
2. Go to Services -> Apply for Change in RA details -> Change in Directors / Partners. The form for
change in directors / partners appears.
3. Fill the online form, upload necessary documents and click Save & Next.

eMigrate System Recruiting Agent Operational Procedure Manual V2.0
57
Figure 31: Applying for Change in Directors/Partners Screen
On successful submission of application, system displays a confirmation message containing ARN of
the application and also sends a confirmation email to your email ID.
4. The application is processed by jurisdictional PoE office and PGoE office.
5. If application is approved by the PGoE, system disables the earlier MD/MP login ID and a system
generated mail is sent to the new MD/MP email ID containing:
• A unique RA ID assigned
• A copy of the RC
• URL for registering the Digital Signature Certificate (DSC)
• Temporary password for registering the DSC
The PGoE office also mails the signed hard copy of the RC at your registered office address.
If your application is rejected by the PGoE, a system generated email is sent to you informing of the rejection.
The following table details the description of the fields in the change in directors/partners form. The fields
are mentioned in the order in which they appear in the form (top to bottom).
Table 20: Change in Directors/Partners Form Field Reference Table
Field Name Description
1. Name Enter the name of the Director/Partner.
2. Designation Select the role from the options: Director or Partner.
3. Date of Birth Select date of birth of the Director/Partner by clicking the
calendar button.
4. PAN Enter the PAN details of the Director/Partner.
5. National of Enter the native country of the Director/Partner. The eMigrate
system displays auto complete options as you type.
6. UID Enter the 12 digit Aadhar number of Director/Partner.
7. Educational
Qualification
Select the highest qualification of the Director/Partner from
the drop down menu.
8. Name of
College/University
Enter the name of college/university attended by the
Director/Partner.
9 – 19. Residential
address,
Email and
Contact Details of
Director.
Enter the residential address, email and contact details of the
Director/Partner.
20. Whether the
Director/Partner was
registered earlier as
a Recruiting Agent?
Select Yes if the Director/Partner was registered as a RA
earlier.
Otherwise
Select No.
eMigrate System Recruiting Agent Operational Procedure Manual V2.0
58
21. If yes, Recruiting
Agent ID / RC
Number
If previous field is selected as Yes, enter the earlier RA ID /
RC number.
22. Reason of RC
Cancellation
If a value is entered in the previous field, enter the reason of
the earlier RA ID / RC cancellation.
23. Whether the
Director/Partner has
ever been
convicted? If yes
give details.
Select Yes if the Director/Partner has ever been convicted.
Otherwise
Select No.
24. Reason of conviction If the previous field is selected as Yes, enter the reason of
conviction.
4.4. Applying for Addition of New Branch Office
An agency can add new branch offices. The same needs to be updated to the MEA-OED.
This section covers the process of applying for addition of new branch office on the eMigrate system.
Before reading the process steps, ensure that the process pre requisites are met and copies of the
Prescribed documents are available.
Pre requisites: None
Prescribed documents:
The soft copies of the following documents are required to be uploaded while filling the online addition of
new branch office form:
1. Valuation report certified by registered valuer with registration number and membership number.
2. In case of rented or leased office, NOC from owner of the premises on duly notarised affidavit.
3. Attested copy of the registration certificate under shop and establishment act. (Attested by a central
or a state government gazetted officer)
4. Latest landline telephone bill in the name of agency. 5. In case of rented or leased office, rent/lease
receipt.
6. Trade test centre certificate along with photograph.
7. A copy of the blue print of the layout plan of the office duly signed and stamped by the government
approved architect with registration and membership number.
8. In case of rented or leased office, registered and notarised rent/lease agreement.
9. Any other document that may be notified by the Ministry from time to time
Please note: The Ministry may notify from time to time if any other document(s) are also
required. You are requested to confirm the list of documents with Ministry / Jurisdictional
PoE Office before filing application on eMigrate system. If any other documents are
required by Ministry, the same may be uploaded in ‘Optional Attachments’.
Process steps:
After you have arranged for the required prescribed documents, please follow the below mentioned steps to
apply for addition of new branch office:
1. Login into eMigrate system as a RA.
2. Go to Administration -> Apply for New Branch Office. The form for addition of new branch office
appears.
3. Fill the online form, upload necessary documents and click Submit.
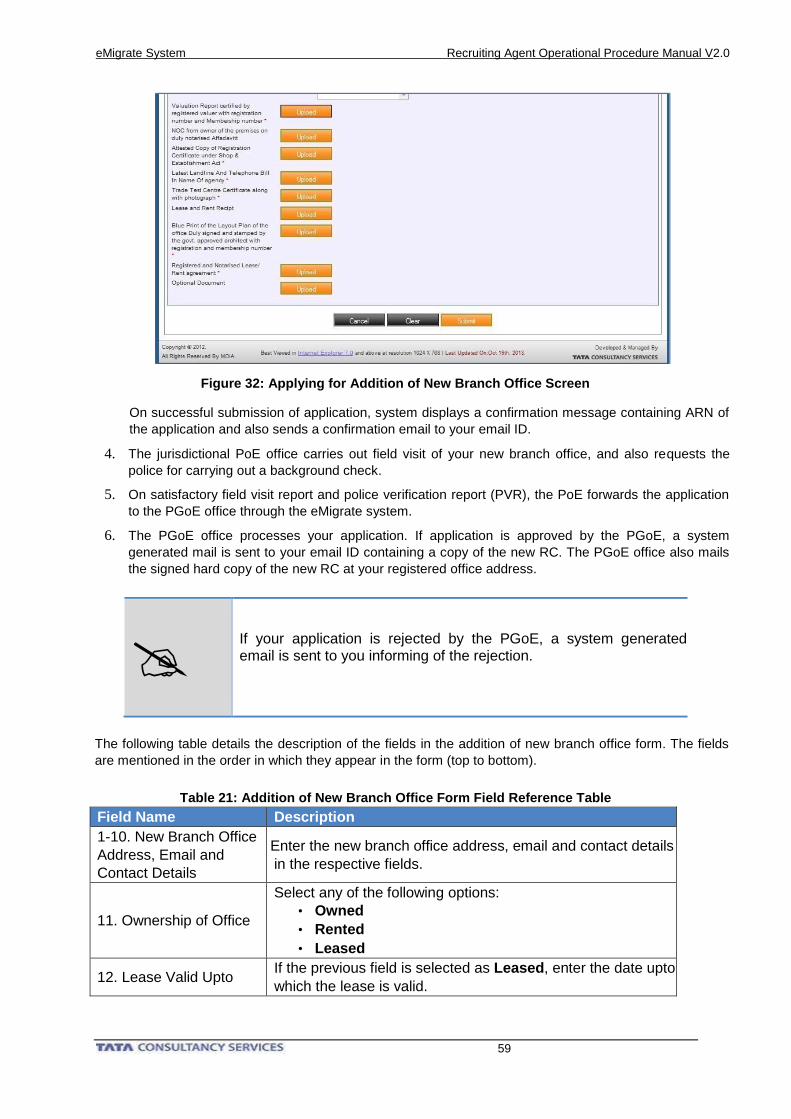
eMigrate System Recruiting Agent Operational Procedure Manual V2.0
59
Figure 32: Applying for Addition of New Branch Office Screen
On successful submission of application, system displays a confirmation message containing ARN of
the application and also sends a confirmation email to your email ID.
4. The jurisdictional PoE office carries out field visit of your new branch office, and also requests the
police for carrying out a background check.
5. On satisfactory field visit report and police verification report (PVR), the PoE forwards the application
to the PGoE office through the eMigrate system.
6. The PGoE office processes your application. If application is approved by the PGoE, a system
generated mail is sent to your email ID containing a copy of the new RC. The PGoE office also mails
the signed hard copy of the new RC at your registered office address.
If your application is rejected by the PGoE, a system generated email is sent to you informing of the rejection.
The following table details the description of the fields in the addition of new branch office form. The fields
are mentioned in the order in which they appear in the form (top to bottom).
Table 21: Addition of New Branch Office Form Field Reference Table
Field Name Description
1-10. New Branch Office
Address, Email and
Contact Details
Enter the new branch office address, email and contact details
in the respective fields.
11. Ownership of Office
Select any of the following options:
• Owned
• Rented
• Leased
12. Lease Valid Upto If the previous field is selected as Leased, enter the date upto
which the lease is valid.
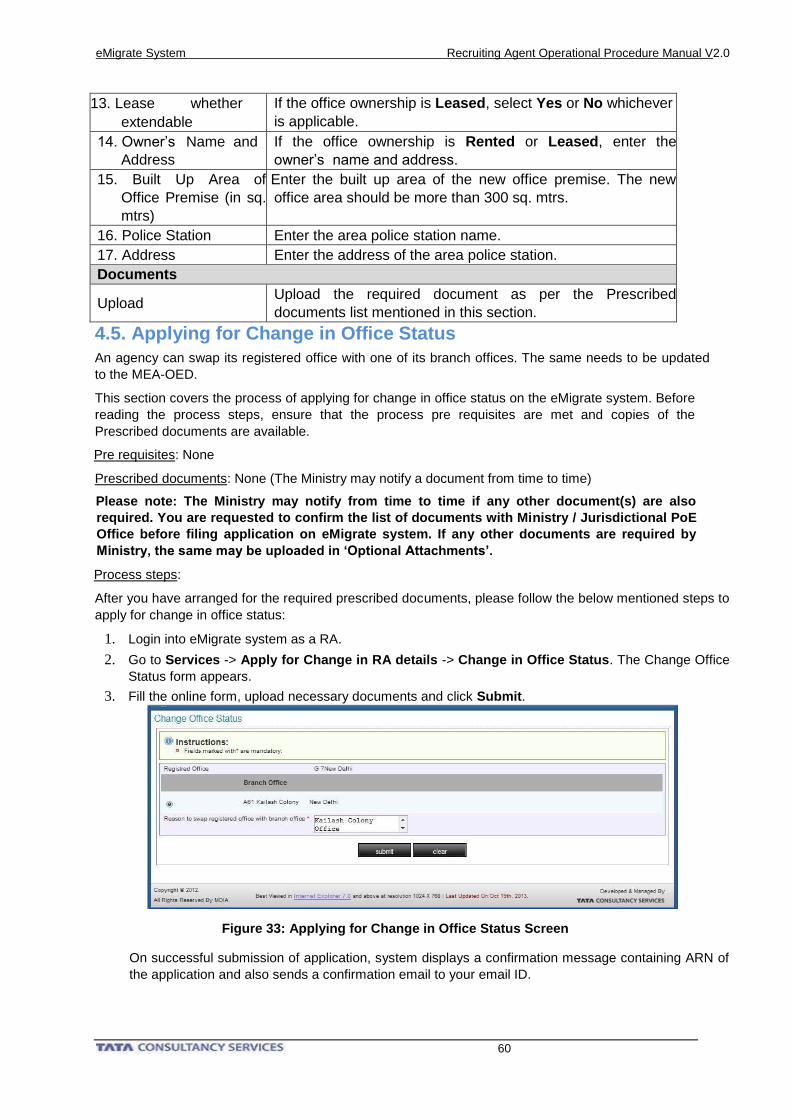
eMigrate System Recruiting Agent Operational Procedure Manual V2.0
60
13. Lease whether
extendable
If the office ownership is Leased, select Yes or No whichever
is applicable.
14. Owner’s Name and
Address
If the office ownership is Rented or Leased, enter the
owner’s name and address.
15. Built Up Area of
Office Premise (in sq.
mtrs)
Enter the built up area of the new office premise. The new
office area should be more than 300 sq. mtrs.
16. Police Station Enter the area police station name.
17. Address Enter the address of the area police station.
Documents
Upload Upload the required document as per the Prescribed
documents list mentioned in this section.
4.5. Applying for Change in Office Status
An agency can swap its registered office with one of its branch offices. The same needs to be updated
to the MEA-OED.
This section covers the process of applying for change in office status on the eMigrate system. Before
reading the process steps, ensure that the process pre requisites are met and copies of the
Prescribed documents are available.
Pre requisites: None
Prescribed documents: None (The Ministry may notify a document from time to time)
Please note: The Ministry may notify from time to time if any other document(s) are also
required. You are requested to confirm the list of documents with Ministry / Jurisdictional PoE
Office before filing application on eMigrate system. If any other documents are required by
Ministry, the same may be uploaded in ‘Optional Attachments’.
Process steps:
After you have arranged for the required prescribed documents, please follow the below mentioned steps to
apply for change in office status:
1. Login into eMigrate system as a RA.
2. Go to Services -> Apply for Change in RA details -> Change in Office Status. The Change Office
Status form appears.
3. Fill the online form, upload necessary documents and click Submit.
Figure 33: Applying for Change in Office Status Screen
On successful submission of application, system displays a confirmation message containing ARN of
the application and also sends a confirmation email to your email ID.

eMigrate System Recruiting Agent Operational Procedure Manual V2.0
61
4. The jurisdictional PoE office carries out field visit of your branch office which you want to convert into
registered office.
5. On satisfactory field visit report, the PoE forwards the online application to the PGoE through the
eMigrate system.
If application is approved by the PGoE, a system generated mail is sent to your email ID
containing a copy of the new RC. The PGoE office also mails a signed hard copy of the new RC
at your new registered office address.
If your application is rejected by the PGoE, a system generated email is sent to you informing of the rejection.
The following table details the description of the fields in the addition of new branch office form. The fields
are mentioned in the order in which they appear in the form (top to bottom).
Table 22: Change in Office Status Form Field Reference Table
Field Name Description
1. Reason to Swap
Registered Office
With Branch Office
Enter the reason for swapping the registered office with
branch office.
2. List of Branch Offices Select the branch to be made the registered office from the
options given.
4.6. Applying for Change in Company Type
An agency can convert from a proprietorship/partnership to a company or from a proprietorship/company to
a partnership. The same has to be updated to the MEA-OED.
This section covers the process of applying for change in business type on the eMigrate system.
Before reading the process steps, ensure that the process pre requisites are met and copies of the
Prescribed documents are available. Pre requisites: None
Prescribed documents:
The soft copies of the following documents are required to be uploaded while filling the online change in
business type form.
In case of proprietorship/partnership to company:
1. Attested photograph of the Managing Director (MD).
(Attested by a central or a state government gazetted officer)
2. Statement showing the name, age and residential address applicable for previous five years of All
directors, along with designation and business activities undertaken during the last five years.
3. Attested copy of the highest educational degree of the MD.
4. Assets and liabilities statement of MD for last three years, assessed by a certified CA with
membership number and address.
5. Attested copy of PAN card of all directors.
6. The resolution passed to authorise one of the directors to act as MD and sign papers on behalf of the
company.
7. A copy of the certificate of registering the company.
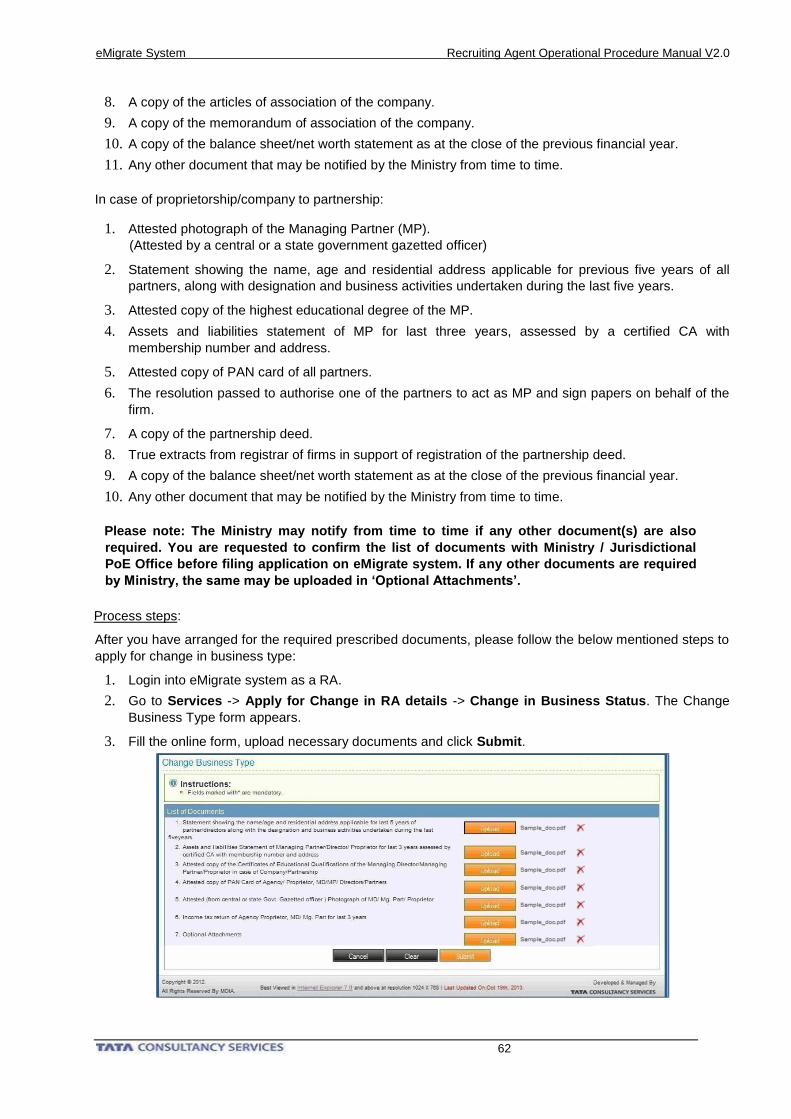
eMigrate System Recruiting Agent Operational Procedure Manual V2.0
62
8. A copy of the articles of association of the company.
9. A copy of the memorandum of association of the company.
10. A copy of the balance sheet/net worth statement as at the close of the previous financial year.
11. Any other document that may be notified by the Ministry from time to time.
In case of proprietorship/company to partnership:
1. Attested photograph of the Managing Partner (MP).
(Attested by a central or a state government gazetted officer)
2. Statement showing the name, age and residential address applicable for previous five years of all
partners, along with designation and business activities undertaken during the last five years.
3. Attested copy of the highest educational degree of the MP.
4. Assets and liabilities statement of MP for last three years, assessed by a certified CA with
membership number and address.
5. Attested copy of PAN card of all partners.
6. The resolution passed to authorise one of the partners to act as MP and sign papers on behalf of the
firm.
7. A copy of the partnership deed.
8. True extracts from registrar of firms in support of registration of the partnership deed.
9. A copy of the balance sheet/net worth statement as at the close of the previous financial year.
10. Any other document that may be notified by the Ministry from time to time.
Please note: The Ministry may notify from time to time if any other document(s) are also
required. You are requested to confirm the list of documents with Ministry / Jurisdictional
PoE Office before filing application on eMigrate system. If any other documents are required
by Ministry, the same may be uploaded in ‘Optional Attachments’.
Process steps:
After you have arranged for the required prescribed documents, please follow the below mentioned steps to
apply for change in business type:
1. Login into eMigrate system as a RA.
2. Go to Services -> Apply for Change in RA details -> Change in Business Status. The Change
Business Type form appears.
3. Fill the online form, upload necessary documents and click Submit.
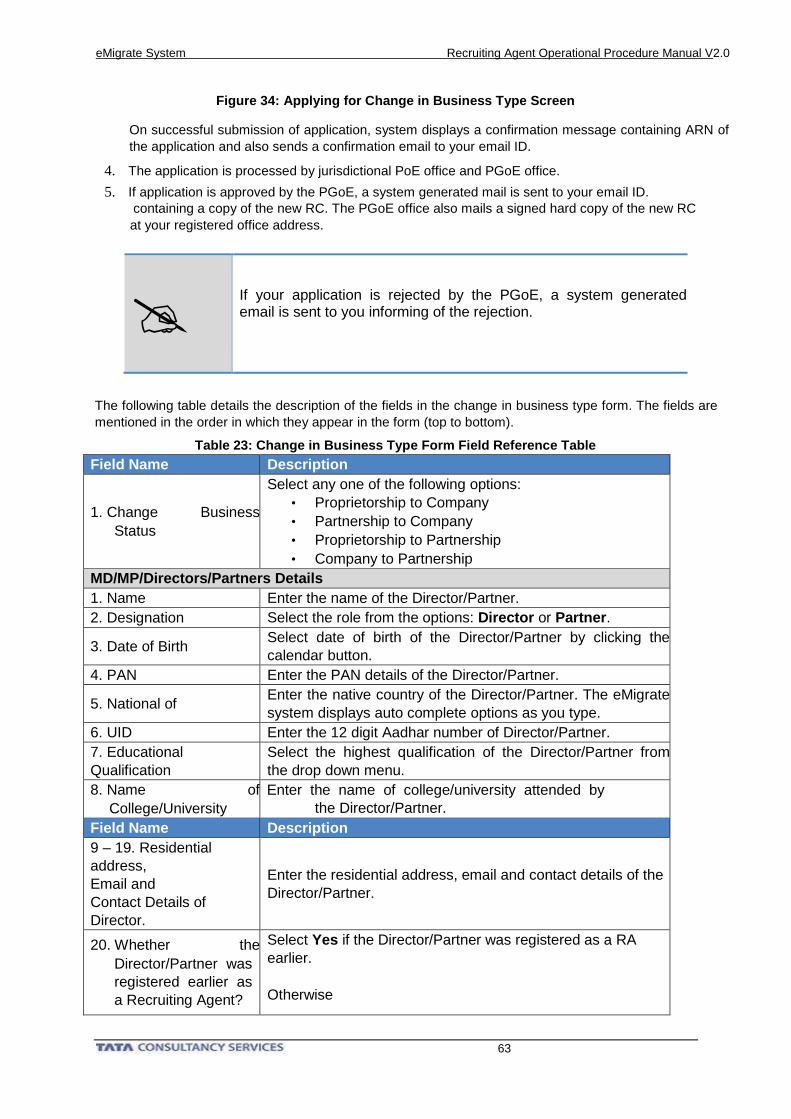
eMigrate System Recruiting Agent Operational Procedure Manual V2.0
63
Figure 34: Applying for Change in Business Type Screen
On successful submission of application, system displays a confirmation message containing ARN of
the application and also sends a confirmation email to your email ID.
4. The application is processed by jurisdictional PoE office and PGoE office.
5. If application is approved by the PGoE, a system generated mail is sent to your email ID.
containing a copy of the new RC. The PGoE office also mails a signed hard copy of the new RC
at your registered office address.
If your application is rejected by the PGoE, a system generated email is sent to you informing of the rejection.
The following table details the description of the fields in the change in business type form. The fields are
mentioned in the order in which they appear in the form (top to bottom).
Table 23: Change in Business Type Form Field Reference Table
Field Name Description
1. Change Business
Status
Select any one of the following options:
• Proprietorship to Company
• Partnership to Company
• Proprietorship to Partnership
• Company to Partnership
MD/MP/Directors/Partners Details
1. Name Enter the name of the Director/Partner.
2. Designation Select the role from the options: Director or Partner.
3. Date of Birth Select date of birth of the Director/Partner by clicking the
calendar button.
4. PAN Enter the PAN details of the Director/Partner.
5. National of Enter the native country of the Director/Partner. The eMigrate
system displays auto complete options as you type.
6. UID Enter the 12 digit Aadhar number of Director/Partner.
7. Educational
Qualification
Select the highest qualification of the Director/Partner from
the drop down menu.
8. Name of
College/University
Enter the name of college/university attended by
the Director/Partner.
Field Name Description
9 – 19. Residential
address,
Email and
Contact Details of
Director.
Enter the residential address, email and contact details of the
Director/Partner.
20. Whether the
Director/Partner was
registered earlier as
a Recruiting Agent?
Select Yes if the Director/Partner was registered as a RA
earlier.
Otherwise
eMigrate System Recruiting Agent Operational Procedure Manual V2.0
64
Select No.
21. If yes, Recruiting
Agent ID / RC
Number
If previous field is selected as Yes, enter the earlier RA ID /
RC number.
22. Reason of RC
Cancellation
If a value is entered in the previous field, enter the reason of
the earlier RA ID / RC cancellation.
23. Whether the
Director/Partner has
ever been
convicted? If yes
give details.
Select Yes if the Director/Partner has ever been convicted.
Otherwise
Select No.
24. Reason of conviction If the previous field is selected as Yes, enter the reason of
conviction.
Documents
Upload Upload the required document as per the Prescribed
documents list mentioned in this section.
4.7. Applying for Change in Profile Details
The following changes in the details of the agency should be updated to the MEA-OED:
• Registered office contact details,
• Branch office contact details,
• MD/MP/Director/Partner/Proprietor Educational/Contact details Bank account details
This section covers the process of applying for change in profile details on the eMigrate system.
Before reading the process steps, ensure that the process pre requisites are met and copies of the
Prescribed documents are available.
Pre requisites: None
Prescribed documents:
The soft copies of the following documents are required to be uploaded while filling the online change in
profile details form:
1. If office is leased/rented, a copy of the registered and notarised lease/hire agreement document of
the registered and branch office (if applicable).
2. If landline number of registered/branch office has changed, a copy of the latest landline telephone
bill of the registered/branch office.
3. Any other document that may be notified by the Ministry from time to time.
Please note: The Ministry may notify from time to time if any other document(s) are also
required. You are requested to confirm the list of documents with Ministry / Jurisdictional
PoE Office before filing application on eMigrate system. If any other documents are
required by Ministry, the same may be uploaded in ‘Optional Attachments’.
Process steps:
After you have arranged for the required prescribed documents, please follow the below mentioned steps to
apply for change in profile details:
1. Login into eMigrate system as a RA.
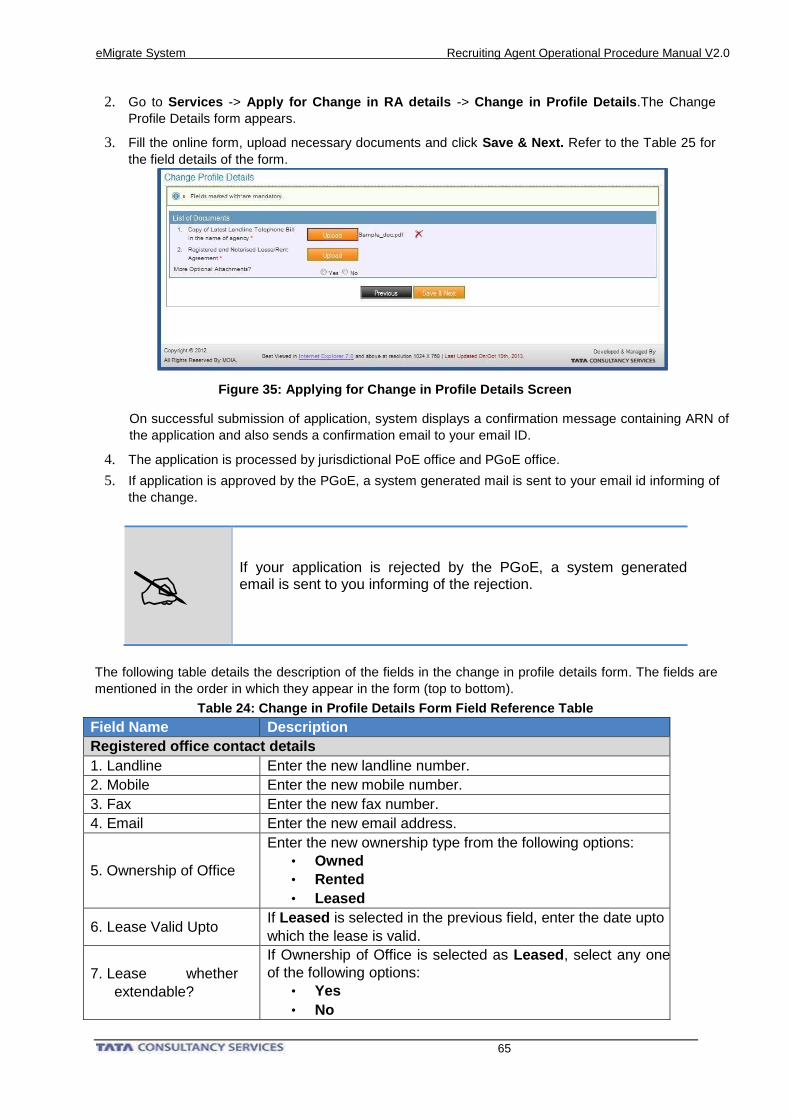
eMigrate System Recruiting Agent Operational Procedure Manual V2.0
65
2. Go to Services -> Apply for Change in RA details -> Change in Profile Details.The Change
Profile Details form appears.
3. Fill the online form, upload necessary documents and click Save & Next. Refer to the Table 25 for
the field details of the form.
Figure 35: Applying for Change in Profile Details Screen
On successful submission of application, system displays a confirmation message containing ARN of
the application and also sends a confirmation email to your email ID.
4. The application is processed by jurisdictional PoE office and PGoE office.
5. If application is approved by the PGoE, a system generated mail is sent to your email id informing of
the change.
If your application is rejected by the PGoE, a system generated email is sent to you informing of the rejection.
The following table details the description of the fields in the change in profile details form. The fields are
mentioned in the order in which they appear in the form (top to bottom).
Table 24: Change in Profile Details Form Field Reference Table
Field Name Description
Registered office contact details
1. Landline Enter the new landline number.
2. Mobile Enter the new mobile number.
3. Fax Enter the new fax number.
4. Email Enter the new email address.
5. Ownership of Office
Enter the new ownership type from the following options:
• Owned
• Rented
• Leased
6. Lease Valid Upto If Leased is selected in the previous field, enter the date upto
which the lease is valid.
7. Lease whether
extendable?
If Ownership of Office is selected as Leased, select any one
of the following options:
• Yes
• No
eMigrate System Recruiting Agent Operational Procedure Manual V2.0
66
8. Owner’s Name and
Address
If Ownership of Office is selected as Leased or Rented, enter
the owner’s name and address in this field.
Field Name Description
9. Built Up Area of Office
Premise (in sq. mtr)
Enter the built up area of the office premise. The value should
be more than 50 sq. mtr.
Documents
Upload the required documents as per the Prescribed
documents list
10. Upload mentioned in this section.
Branch office contact details
1. Landline Enter the new landline number.
2. Mobile Enter the new mobile number.
3. Fax Enter the new fax number.
4. Email Enter the new Email address.
5. Ownership of Office
Enter the new ownership type from the following options:
• Owned
• Rented
• Leased
6. Lease Valid Upto If Leased is selected in the previous field, enter the date upto
which the lease is valid.
7. Lease whether
extendable?
If Ownership of Office is selected as Leased, select any one
of the following options:
• Yes
• No
8. Owner’s Name and
Address
If Ownership of Office is selected as Leased or Rented, enter
the owner’s name and address in this field.
Documents
9. Upload Upload the required documents as per the Prescribed
documents list mentioned in this section.
MD/MP/Director/Partner/Proprietor Educational/Contact Details
1. Educational
Qualification (2 years
diploma or graduate
can apply)
Select the highest educational qualification from any one of the following:
• Doctorate
• Diploma
• Graduate
• Post Graduate
2. Landline Enter the new landline number.
3. Mobile Enter the new mobile number.
4. Fax Enter the new fax number.
5. Email Enter the new email address.
Bank Account Details
1. Bank Name Enter the bank name.
2. Address of Bank Enter the bank’s address.
3. Account Number Enter the bank account number.
4.8. Applying for Capacity Enhancement
RAs registered before system go-live date and having a capacity of 1000 can apply to MEA-OED to
increase the capacity to 1000+.
eMigrate System Recruiting Agent Operational Procedure Manual V2.0
67
This section covers the process of applying for capacity enhancement on the eMigrate system. Before
reading the process steps, ensure that the process pre requisites are met and copies of the
Prescribed documents are available.
Pre requisites:
• You can apply for capacity enhancement if atleast 90 days are left before RC expiry date.
• You cannot apply for capacity enhancement if existing capacity is 1000+.
Prescribed documents:
The soft copies of the following documents are required to be uploaded while filling the online capacity
enhancement form:
1. Bank guarantee.
2. A copy of the income tax return of the company/partnership firm/proprietor for the last three years.
3. Assets and liabilities statement of Managing Director (MD)/ Managing Partner (MP)/ Proprietor for last
three years, assessed by a certified CA with membership number and address.
4. A statement showing the source of funds assessed by a certified CA with membership number and
address.
5. Attested photograph of the MD/MP/Proprietor.
(Attested by a central or a state government gazetted officer)
6. Details of ECR/ECNR deployment.
7. Attested copy of PAN card of:
• Company/Partnership firm/Proprietor
• MD/MP
• All directors/all partners
8. A copy of the balance sheet as at the close of the previous financial year.
9. Any other document that may be notified by the Ministry from time to time.
Please note: The Ministry may notify from time to time if any other document(s) are also
required. You are requested to confirm the list of documents with Ministry / Jurisdictional
PoE Office before filing application on eMigrate system. If any other documents are
required by Ministry, the same may be uploaded in ‘Optional Attachments’.
Process steps:
After you have arranged for the required prescribed documents, please follow the below mentioned steps to
apply for capacity enhancement:
1. Login into eMigrate system as a RA.
2. Go to Services -> Apply for Capacity Enhancement. The Capacity Enhancement form appears.
3. Fill the online form, upload necessary documents and click Submit.
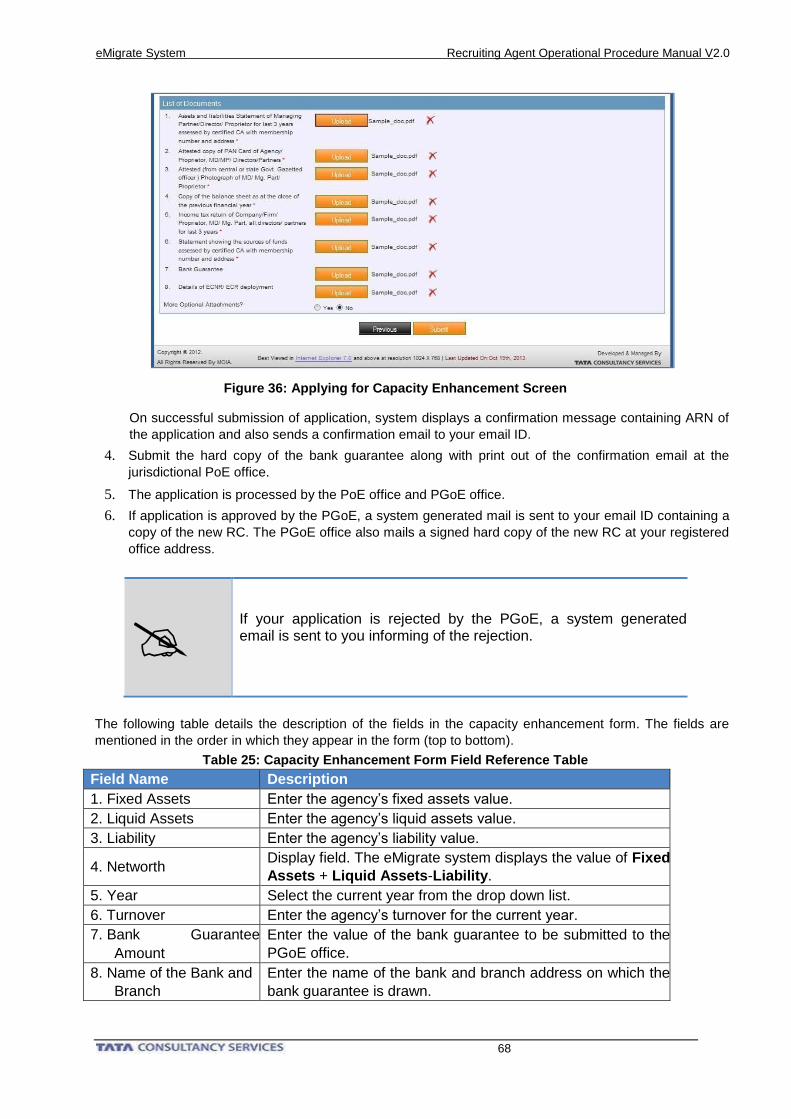
eMigrate System Recruiting Agent Operational Procedure Manual V2.0
68
Figure 36: Applying for Capacity Enhancement Screen
On successful submission of application, system displays a confirmation message containing ARN of
the application and also sends a confirmation email to your email ID.
4. Submit the hard copy of the bank guarantee along with print out of the confirmation email at the
jurisdictional PoE office.
5. The application is processed by the PoE office and PGoE office.
6. If application is approved by the PGoE, a system generated mail is sent to your email ID containing a
copy of the new RC. The PGoE office also mails a signed hard copy of the new RC at your registered
office address.
If your application is rejected by the PGoE, a system generated email is sent to you informing of the rejection.
The following table details the description of the fields in the capacity enhancement form. The fields are
mentioned in the order in which they appear in the form (top to bottom).
Table 25: Capacity Enhancement Form Field Reference Table
Field Name Description
1. Fixed Assets Enter the agency’s fixed assets value.
2. Liquid Assets Enter the agency’s liquid assets value.
3. Liability Enter the agency’s liability value.
4. Networth Display field. The eMigrate system displays the value of Fixed
Assets + Liquid Assets-Liability.
5. Year Select the current year from the drop down list.
6. Turnover Enter the agency’s turnover for the current year.
7. Bank Guarantee
Amount
Enter the value of the bank guarantee to be submitted to the
PGoE office.
8. Name of the Bank and
Branch
Enter the name of the bank and branch address on which the
bank guarantee is drawn.
eMigrate System Recruiting Agent Operational Procedure Manual V2.0
69
9. Bank Guarantee Issue
Date Enter the date on which the bank guarantee was issued.
10. Bank Guarantee
Expiry Date Enter the date on which the bank guarantee will expire.
Documents
11. Upload Upload the required documents as per the Prescribed
documents list mentioned in this section.
5. Emigrant Clearance Related Processes
This chapter covers all the emigrant clearance related business processes for which you apply online
to the MEA-OED through the eMigrate system. The processes are covered depending on whether the
Employer accesses the eMigrate system or not.
The Employer is given login credentials to access eMigrate system only after a process of
Registration, where the Indian Mission in the Employer’s country verifies the genuineness and
authenticity of the Employer. Once registered, the Employer has to apply online to the Indian Mission
for all emigration related processes as applicable.
Without Registration, the Employer has to apply manually to the Indian Mission for all emigration related
processes as applicable.
5.1. Without Employer Registration
In this scenario, the Employer does not access the eMigrate system, gets the Demand Letter, Power
of Attorney and Sample Employment Contract attested by Indian Mission as applicable, and forwards
the documents to the RA.
The following business processes are applicable in this scenario:
• Entering employer and demand details
• Applying for interview/advertisement permission
• Applying for Emigration Clearance
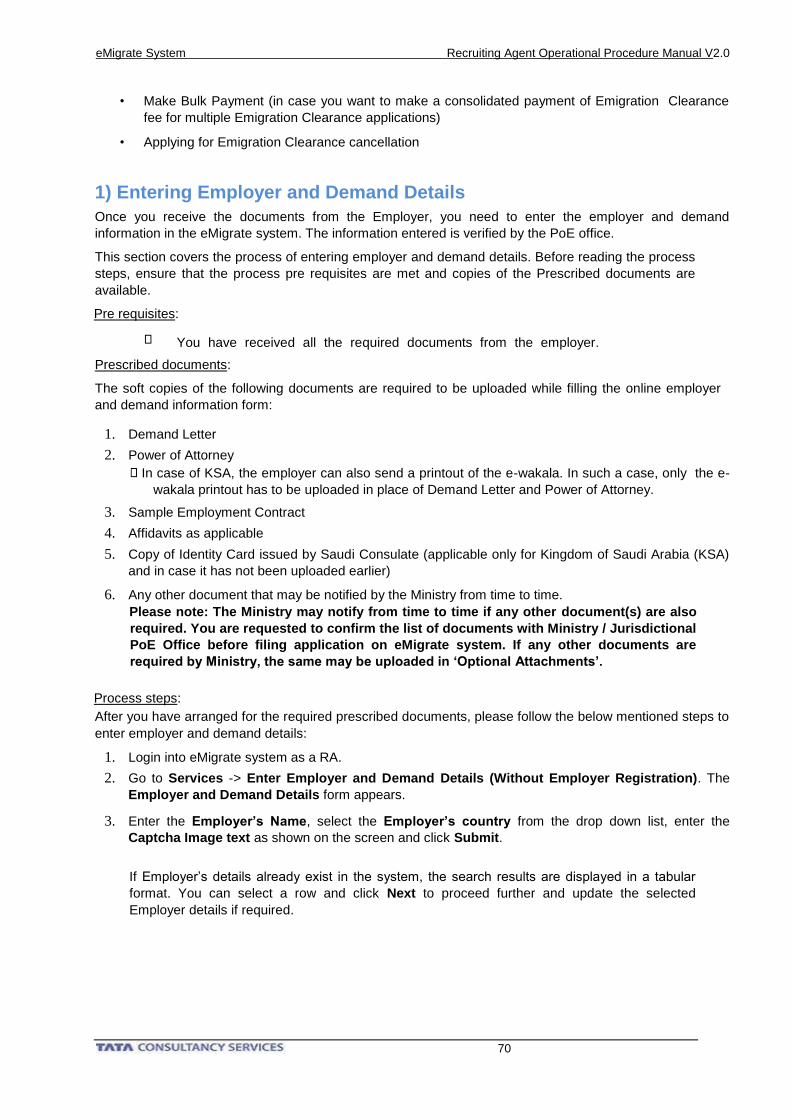
eMigrate System Recruiting Agent Operational Procedure Manual V2.0
70
• Make Bulk Payment (in case you want to make a consolidated payment of Emigration Clearance
fee for multiple Emigration Clearance applications)
• Applying for Emigration Clearance cancellation
1) Entering Employer and Demand Details
Once you receive the documents from the Employer, you need to enter the employer and demand
information in the eMigrate system. The information entered is verified by the PoE office.
This section covers the process of entering employer and demand details. Before reading the process
steps, ensure that the process pre requisites are met and copies of the Prescribed documents are
available.
Pre requisites:
You have received all the required documents from the employer.
Prescribed documents:
The soft copies of the following documents are required to be uploaded while filling the online employer
and demand information form:
1. Demand Letter
2. Power of Attorney
In case of KSA, the employer can also send a printout of the e-wakala. In such a case, only the e-
wakala printout has to be uploaded in place of Demand Letter and Power of Attorney.
3. Sample Employment Contract
4. Affidavits as applicable
5. Copy of Identity Card issued by Saudi Consulate (applicable only for Kingdom of Saudi Arabia (KSA)
and in case it has not been uploaded earlier)
6. Any other document that may be notified by the Ministry from time to time.
Please note: The Ministry may notify from time to time if any other document(s) are also
required. You are requested to confirm the list of documents with Ministry / Jurisdictional
PoE Office before filing application on eMigrate system. If any other documents are
required by Ministry, the same may be uploaded in ‘Optional Attachments’.
Process steps:
After you have arranged for the required prescribed documents, please follow the below mentioned steps to
enter employer and demand details:
1. Login into eMigrate system as a RA.
2. Go to Services -> Enter Employer and Demand Details (Without Employer Registration). The
Employer and Demand Details form appears.
3. Enter the Employer’s Name, select the Employer’s country from the drop down list, enter the
Captcha Image text as shown on the screen and click Submit.
If Employer’s details already exist in the system, the search results are displayed in a tabular
format. You can select a row and click Next to proceed further and update the selected
Employer details if required.
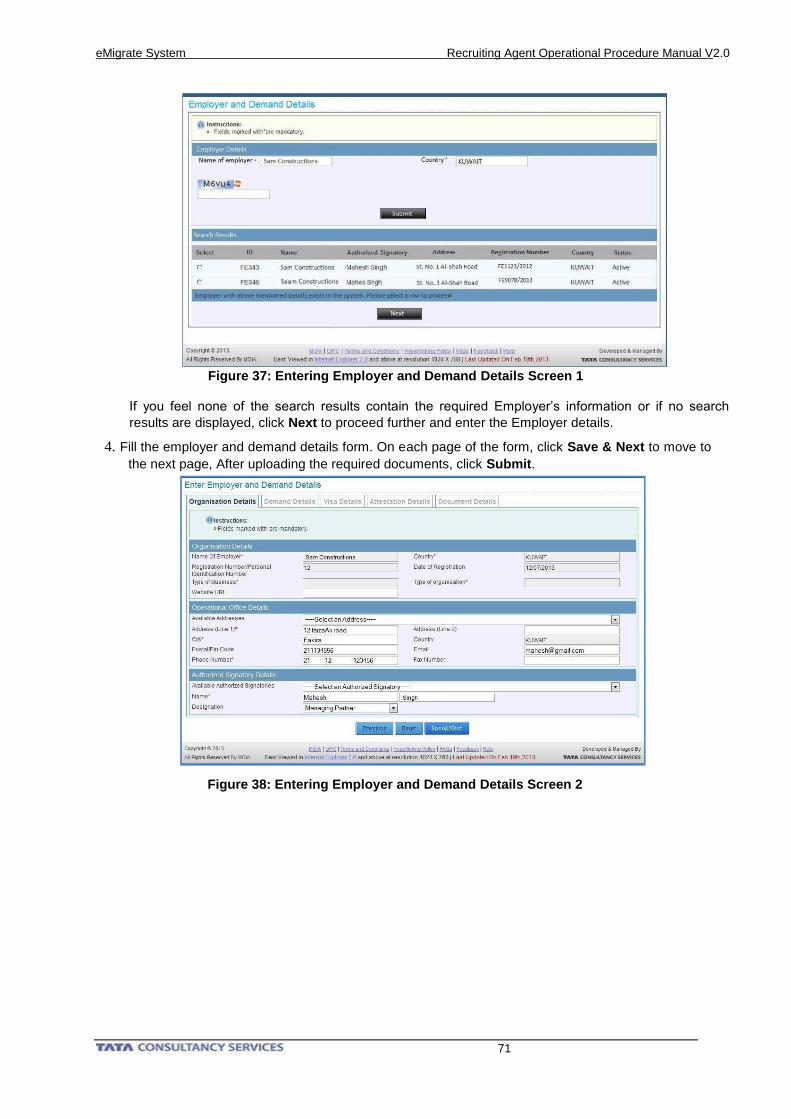
eMigrate System Recruiting Agent Operational Procedure Manual V2.0
71
Figure 37: Entering Employer and Demand Details Screen 1
If you feel none of the search results contain the required Employer’s information or if no search
results are displayed, click Next to proceed further and enter the Employer details.
4. Fill the employer and demand details form. On each page of the form, click Save & Next to move to
the next page, After uploading the required documents, click Submit.
Figure 38: Entering Employer and Demand Details Screen 2
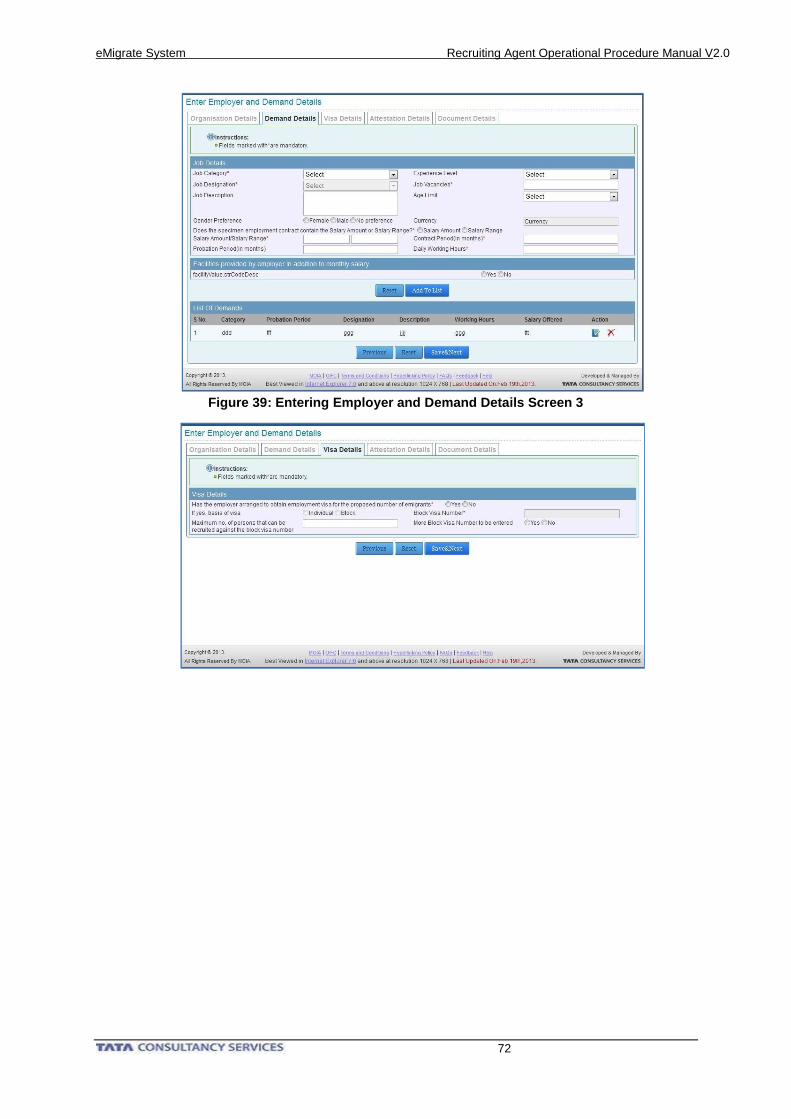
eMigrate System Recruiting Agent Operational Procedure Manual V2.0
72
Figure 39 : Entering Employer and Demand Details Screen 3
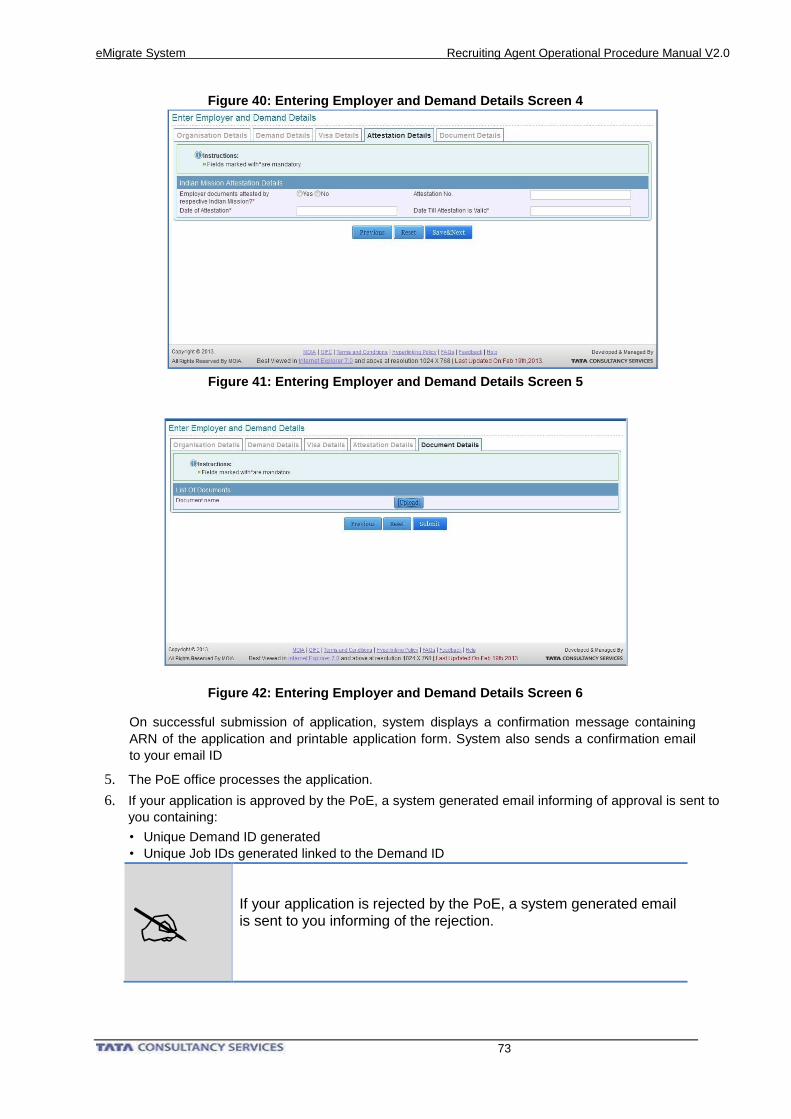
eMigrate System Recruiting Agent Operational Procedure Manual V2.0
73
Figure 40: Entering Employer and Demand Details Screen 4
Figure 42: Entering Employer and Demand Details Screen 6
On successful submission of application, system displays a confirmation message containing
ARN of the application and printable application form. System also sends a confirmation email
to your email ID
5. The PoE office processes the application.
6. If your application is approved by the PoE, a system generated email informing of approval is sent to
you containing:
• Unique Demand ID generated
• Unique Job IDs generated linked to the Demand ID
If your application is rejected by the PoE, a system generated email is sent to you informing of the rejection.
Figure 41: Entering Employer and Demand Details Screen 5
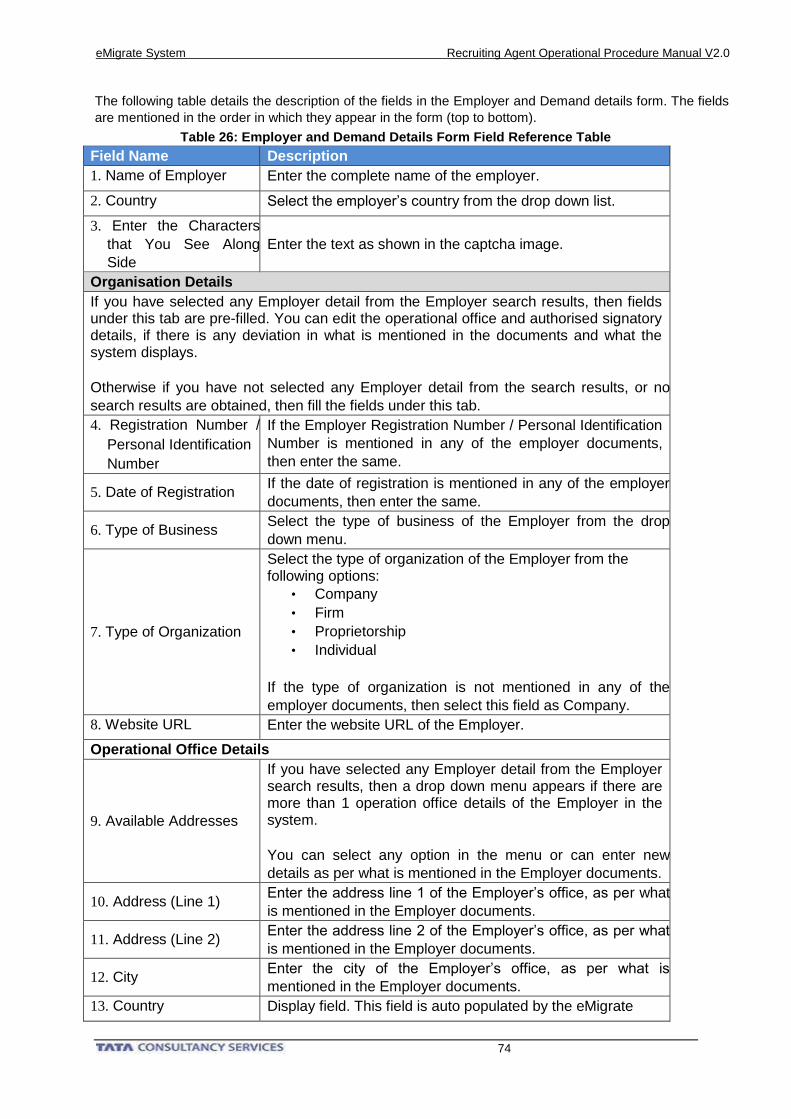
eMigrate System Recruiting Agent Operational Procedure Manual V2.0
74
The following table details the description of the fields in the Employer and Demand details form. The fields
are mentioned in the order in which they appear in the form (top to bottom).
Table 26: Employer and Demand Details Form Field Reference Table
Field Name Description
1. Name of Employer Enter the complete name of the employer.
2. Country Select the employer’s country from the drop down list.
3. Enter the Characters
that You See Along
Side
Enter the text as shown in the captcha image.
Organisation Details
If you have selected any Employer detail from the Employer search results, then fields under this tab are pre-filled. You can edit the operational office and authorised signatory details, if there is any deviation in what is mentioned in the documents and what the system displays.
Otherwise if you have not selected any Employer detail from the search results, or no
search results are obtained, then fill the fields under this tab.
4. Registration Number /
Personal Identification
Number
If the Employer Registration Number / Personal Identification
Number is mentioned in any of the employer documents,
then enter the same.
5. Date of Registration If the date of registration is mentioned in any of the employer
documents, then enter the same.
6. Type of Business Select the type of business of the Employer from the drop
down menu.
7. Type of Organization
Select the type of organization of the Employer from the following options:
• Company
• Firm
• Proprietorship
• Individual
If the type of organization is not mentioned in any of the
employer documents, then select this field as Company.
8. Website URL Enter the website URL of the Employer.
Operational Office Details
9. Available Addresses
If you have selected any Employer detail from the Employer search results, then a drop down menu appears if there are more than 1 operation office details of the Employer in the system.
You can select any option in the menu or can enter new
details as per what is mentioned in the Employer documents.
10. Address (Line 1) Enter the address line 1 of the Employer’s office, as per what
is mentioned in the Employer documents.
11. Address (Line 2) Enter the address line 2 of the Employer’s office, as per what
is mentioned in the Employer documents.
12. City Enter the city of the Employer’s office, as per what is
mentioned in the Employer documents.
13. Country Display field. This field is auto populated by the eMigrate
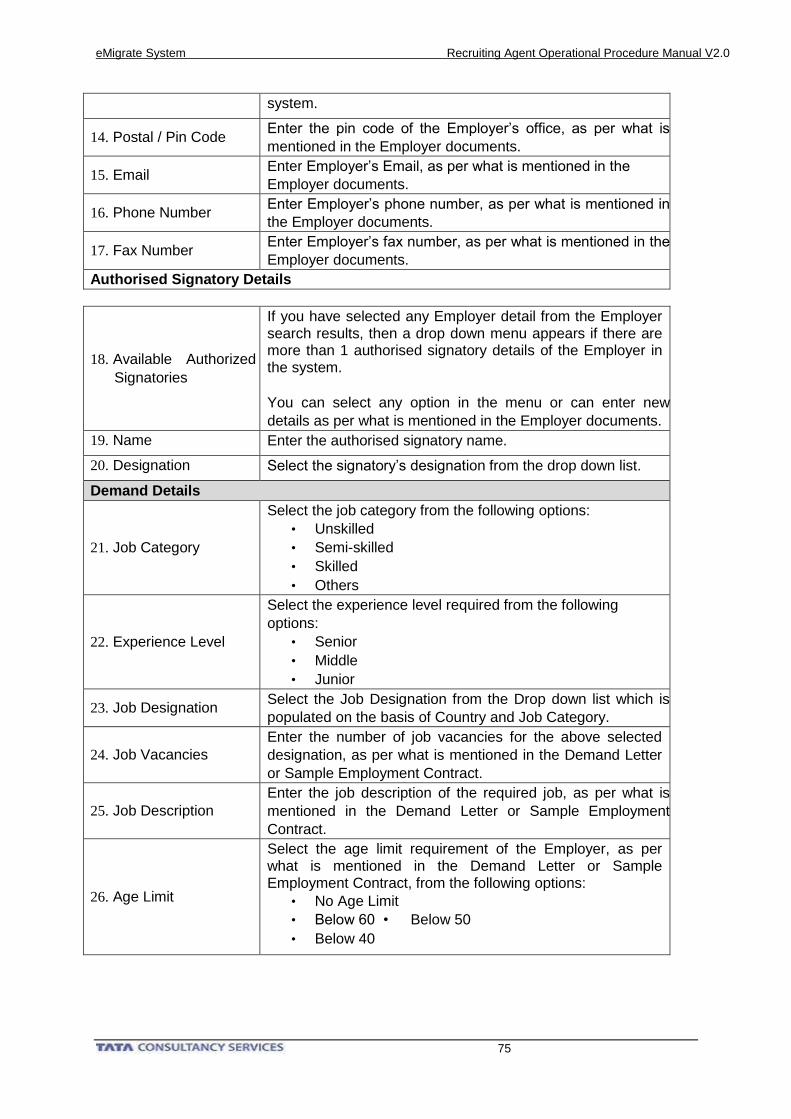
eMigrate System Recruiting Agent Operational Procedure Manual V2.0
75
system.
14. Postal / Pin Code Enter the pin code of the Employer’s office, as per what is
mentioned in the Employer documents.
15. Email Enter Employer’s Email, as per what is mentioned in the
Employer documents.
16. Phone Number Enter Employer’s phone number, as per what is mentioned in
the Employer documents.
17. Fax Number Enter Employer’s fax number, as per what is mentioned in the
Employer documents.
Authorised Signatory Details
18. Available Authorized
Signatories
If you have selected any Employer detail from the Employer search results, then a drop down menu appears if there are more than 1 authorised signatory details of the Employer in the system.
You can select any option in the menu or can enter new
details as per what is mentioned in the Employer documents.
19. Name Enter the authorised signatory name.
20. Designation Select the signatory’s designation from the drop down list.
Demand Details
21. Job Category
Select the job category from the following options:
• Unskilled
• Semi-skilled
• Skilled
• Others
22. Experience Level
Select the experience level required from the following
options:
• Senior
• Middle
• Junior
23. Job Designation Select the Job Designation from the Drop down list which is
populated on the basis of Country and Job Category.
24. Job Vacancies
Enter the number of job vacancies for the above selected
designation, as per what is mentioned in the Demand Letter
or Sample Employment Contract.
25. Job Description
Enter the job description of the required job, as per what is
mentioned in the Demand Letter or Sample Employment
Contract.
26. Age Limit
Select the age limit requirement of the Employer, as per what is mentioned in the Demand Letter or Sample Employment Contract, from the following options:
• No Age Limit
• Below 60 • Below 50
• Below 40
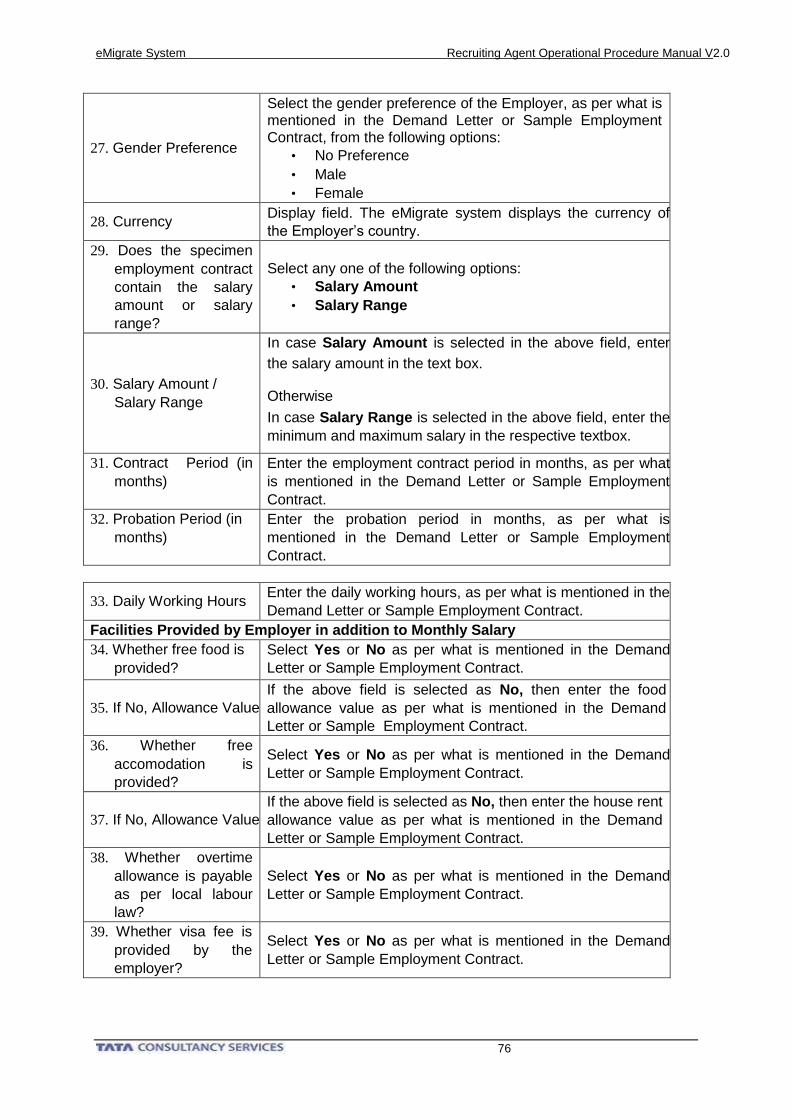
eMigrate System Recruiting Agent Operational Procedure Manual V2.0
76
27. Gender Preference
Select the gender preference of the Employer, as per what is mentioned in the Demand Letter or Sample Employment Contract, from the following options:
• No Preference
• Male
• Female
28. Currency Display field. The eMigrate system displays the currency of
the Employer’s country.
29. Does the specimen
employment contract
contain the salary
amount or salary
range?
Select any one of the following options:
• Salary Amount
• Salary Range
30. Salary Amount /
Salary Range
In case Salary Amount is selected in the above field, enter
the salary amount in the text box.
Otherwise
In case Salary Range is selected in the above field, enter the
minimum and maximum salary in the respective textbox.
31. Contract Period (in
months)
Enter the employment contract period in months, as per what
is mentioned in the Demand Letter or Sample Employment
Contract.
32. Probation Period (in
months) Enter the probation period in months, as per what is
mentioned in the Demand Letter or Sample Employment
Contract.
33. Daily Working Hours Enter the daily working hours, as per what is mentioned in the
Demand Letter or Sample Employment Contract.
Facilities Provided by Employer in addition to Monthly Salary
34. Whether free food is
provided?
Select Yes or No as per what is mentioned in the Demand
Letter or Sample Employment Contract.
35. If No, Allowance Value
If the above field is selected as No, then enter the food
allowance value as per what is mentioned in the Demand
Letter or Sample Employment Contract.
36. Whether free
accomodation is
provided?
Select Yes or No as per what is mentioned in the Demand
Letter or Sample Employment Contract.
37. If No, Allowance Value
If the above field is selected as No, then enter the house rent
allowance value as per what is mentioned in the Demand
Letter or Sample Employment Contract.
38. Whether overtime
allowance is payable
as per local labour
law?
Select Yes or No as per what is mentioned in the Demand
Letter or Sample Employment Contract.
39. Whether visa fee is
provided by the
employer?
Select Yes or No as per what is mentioned in the Demand
Letter or Sample Employment Contract.
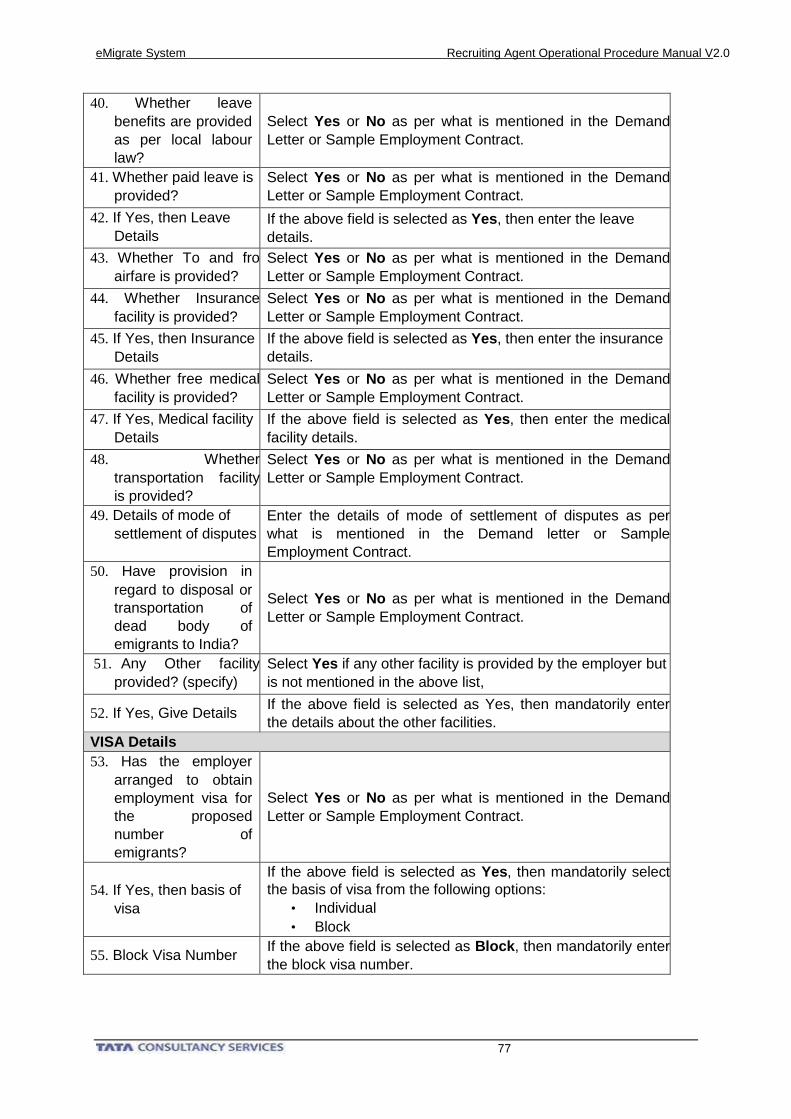
eMigrate System Recruiting Agent Operational Procedure Manual V2.0
77
40. Whether leave
benefits are provided
as per local labour
law?
Select Yes or No as per what is mentioned in the Demand
Letter or Sample Employment Contract.
41. Whether paid leave is
provided? Select Yes or No as per what is mentioned in the Demand
Letter or Sample Employment Contract.
42. If Yes, then Leave
Details If the above field is selected as Yes, then enter the leave
details.
43. Whether To and fro
airfare is provided? Select Yes or No as per what is mentioned in the Demand
Letter or Sample Employment Contract.
44. Whether Insurance
facility is provided? Select Yes or No as per what is mentioned in the Demand
Letter or Sample Employment Contract.
45. If Yes, then Insurance
Details If the above field is selected as Yes, then enter the insurance
details.
46. Whether free medical
facility is provided? Select Yes or No as per what is mentioned in the Demand
Letter or Sample Employment Contract.
47. If Yes, Medical facility
Details If the above field is selected as Yes, then enter the medical
facility details.
48. Whether
transportation facility
is provided?
Select Yes or No as per what is mentioned in the Demand
Letter or Sample Employment Contract.
49. Details of mode of
settlement of disputes Enter the details of mode of settlement of disputes as per
what is mentioned in the Demand letter or Sample
Employment Contract.
50. Have provision in
regard to disposal or
transportation of
dead body of
emigrants to India?
Select Yes or No as per what is mentioned in the Demand
Letter or Sample Employment Contract.
51. Any Other facility
provided? (specify) Select Yes if any other facility is provided by the employer but
is not mentioned in the above list,
52. If Yes, Give Details If the above field is selected as Yes, then mandatorily enter
the details about the other facilities.
VISA Details
53. Has the employer
arranged to obtain
employment visa for
the proposed
number of
emigrants?
Select Yes or No as per what is mentioned in the Demand
Letter or Sample Employment Contract.
54. If Yes, then basis of
visa
If the above field is selected as Yes, then mandatorily select
the basis of visa from the following options:
• Individual
• Block
55. Block Visa Number If the above field is selected as Block, then mandatorily enter
the block visa number.
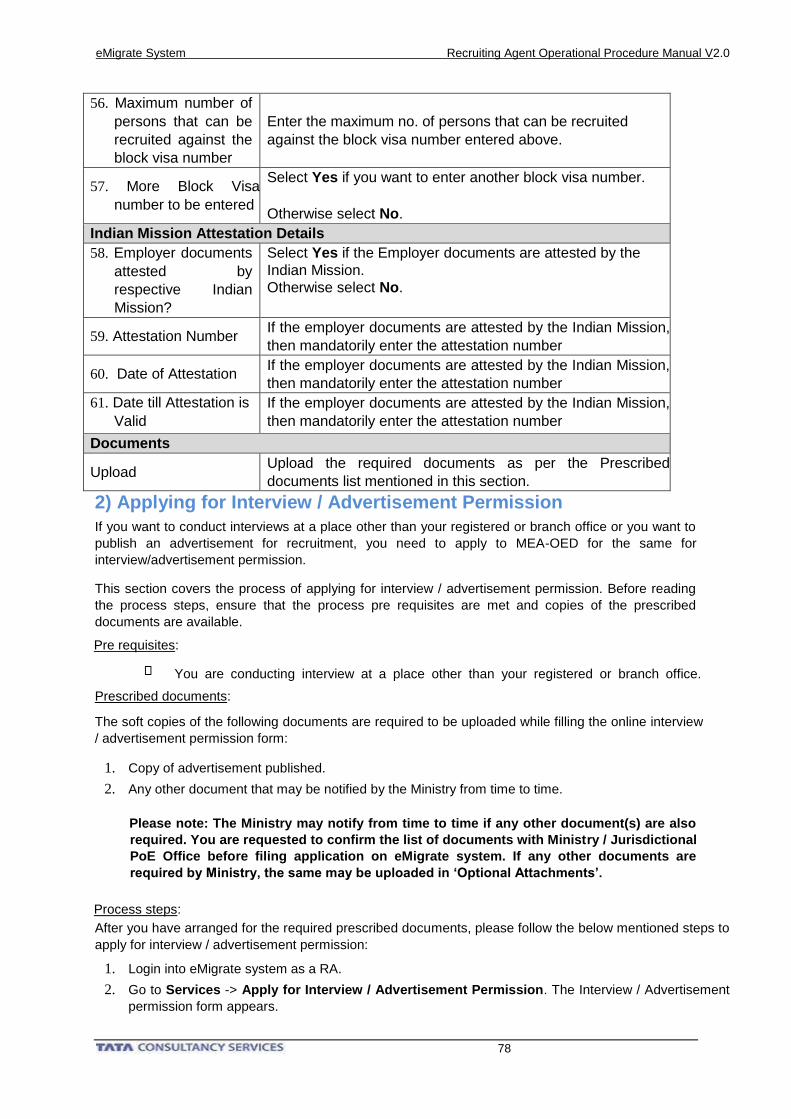
eMigrate System Recruiting Agent Operational Procedure Manual V2.0
78
56. Maximum number of
persons that can be
recruited against the
block visa number
Enter the maximum no. of persons that can be recruited
against the block visa number entered above.
57. More Block Visa
number to be entered
Select Yes if you want to enter another block visa number.
Otherwise select No.
Indian Mission Attestation Details
58. Employer documents
attested by
respective Indian
Mission?
Select Yes if the Employer documents are attested by the
Indian Mission.
Otherwise select No.
59. Attestation Number If the employer documents are attested by the Indian Mission,
then mandatorily enter the attestation number
60. Date of Attestation If the employer documents are attested by the Indian Mission,
then mandatorily enter the attestation number
61. Date till Attestation is
Valid
If the employer documents are attested by the Indian Mission,
then mandatorily enter the attestation number
Documents
Upload Upload the required documents as per the Prescribed
documents list mentioned in this section.
2) Applying for Interview / Advertisement Permission
If you want to conduct interviews at a place other than your registered or branch office or you want to
publish an advertisement for recruitment, you need to apply to MEA-OED for the same for
interview/advertisement permission.
This section covers the process of applying for interview / advertisement permission. Before reading
the process steps, ensure that the process pre requisites are met and copies of the prescribed
documents are available.
Pre requisites:
You are conducting interview at a place other than your registered or branch office.
Prescribed documents:
The soft copies of the following documents are required to be uploaded while filling the online interview
/ advertisement permission form:
1. Copy of advertisement published.
2. Any other document that may be notified by the Ministry from time to time.
Please note: The Ministry may notify from time to time if any other document(s) are also
required. You are requested to confirm the list of documents with Ministry / Jurisdictional
PoE Office before filing application on eMigrate system. If any other documents are
required by Ministry, the same may be uploaded in ‘Optional Attachments’.
Process steps:
After you have arranged for the required prescribed documents, please follow the below mentioned steps to
apply for interview / advertisement permission:
1. Login into eMigrate system as a RA.
2. Go to Services -> Apply for Interview / Advertisement Permission. The Interview / Advertisement
permission form appears.
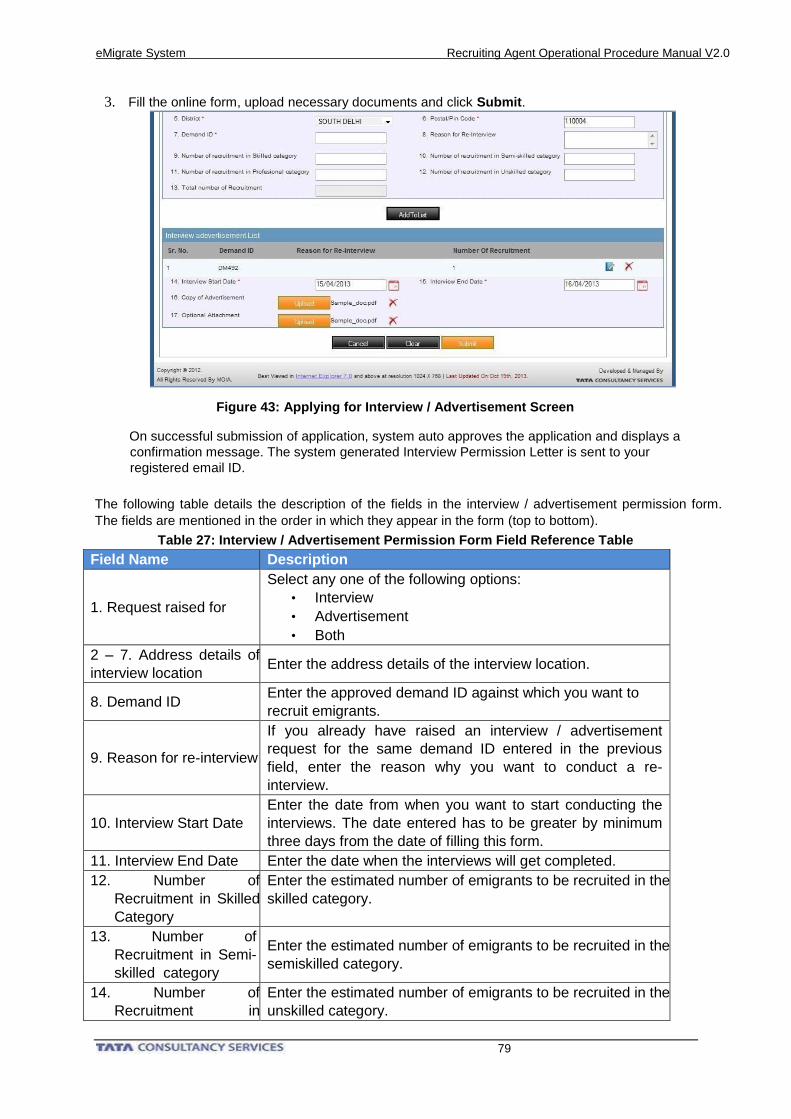
eMigrate System Recruiting Agent Operational Procedure Manual V2.0
79
3. Fill the online form, upload necessary documents and click Submit.
Figure 43: Applying for Interview / Advertisement Screen
On successful submission of application, system auto approves the application and displays a
confirmation message. The system generated Interview Permission Letter is sent to your
registered email ID.
The following table details the description of the fields in the interview / advertisement permission form.
The fields are mentioned in the order in which they appear in the form (top to bottom).
Table 27: Interview / Advertisement Permission Form Field Reference Table
Field Name Description
1. Request raised for
Select any one of the following options:
• Interview
• Advertisement
• Both
2 – 7. Address details of
interview location Enter the address details of the interview location.
8. Demand ID Enter the approved demand ID against which you want to
recruit emigrants.
9. Reason for re-interview
If you already have raised an interview / advertisement
request for the same demand ID entered in the previous
field, enter the reason why you want to conduct a re-
interview.
10. Interview Start Date
Enter the date from when you want to start conducting the
interviews. The date entered has to be greater by minimum
three days from the date of filling this form.
11. Interview End Date Enter the date when the interviews will get completed.
12. Number of
Recruitment in Skilled
Category
Enter the estimated number of emigrants to be recruited in the
skilled category.
13. Number of
Recruitment in Semi-
skilled category
Enter the estimated number of emigrants to be recruited in the
semiskilled category.
14. Number of
Recruitment in
Enter the estimated number of emigrants to be recruited in the
unskilled category.
eMigrate System Recruiting Agent Operational Procedure Manual V2.0
80
Unskilled Category
15. Number of
Recruitment in Other
Category
Enter the estimated number of emigrants to be recruited in the
other category.
16. Total Number of
Recruitments
Display Field. The eMigrate system displays the summation of
the above four fields.
Documents
Upload Upload the required documents as per the Prescribed
documents list mentioned in this section.
3) Applying for Emigration Clearance
After the visa(s) for the identified emigrant(s) have been arranged, RA proceeds to apply for Emigration
Clearance on the eMigrate system.
This section covers the process of Applying for Emigration Clearance. Before reading the process steps,
ensure that the process pre requisites are met and copies of the prescribed documents are available.
Pre requisites:
The employer has sent you the following
documents: o Paper visa(s)/stamped visa(s) for
emigrant(s)
Prescribed documents:
The soft copies of the following documents are required to be uploaded while filling the online Emigration
Clearance form:
1. Copy of the first and last page of passport.
2. Photograph of each emigrant.
3. If emigrant is a female, age is less than 30years and passport is ECNR type-then a copy of emigrant’s
highest educational certificate.
4. If employer’s country is UAE, then contract signed with Ministry of Labour, UAE.
5. In case UID is available, a copy of the aadhar card.
6. Copy of VISA.
7. Copy of PBBY policy.
8. If employer’s country is Libya, then a copy of Rs 20 lakhs life insurance policy.
9. Affidavits as applicable.
10. Any other document that may be notified by the Ministry from time to time.
Please note: The Ministry may notify from time to time if any other document(s) are also
required. You are requested to confirm the list of documents with Ministry / Jurisdictional
PoE Office before filing application on eMigrate system. If any other documents are
required by Ministry, the same may be uploaded in ‘Optional Attachments’.
Process steps:
After you have arranged for the required prescribed documents, please follow the below mentioned steps to
apply for Emigration Clearance:
1. Login into eMigrate system as a RA.
2. Go to Services -> Apply for Emigration Clearance -> Without Employer Registration. The
Emigration Clearance form opens.
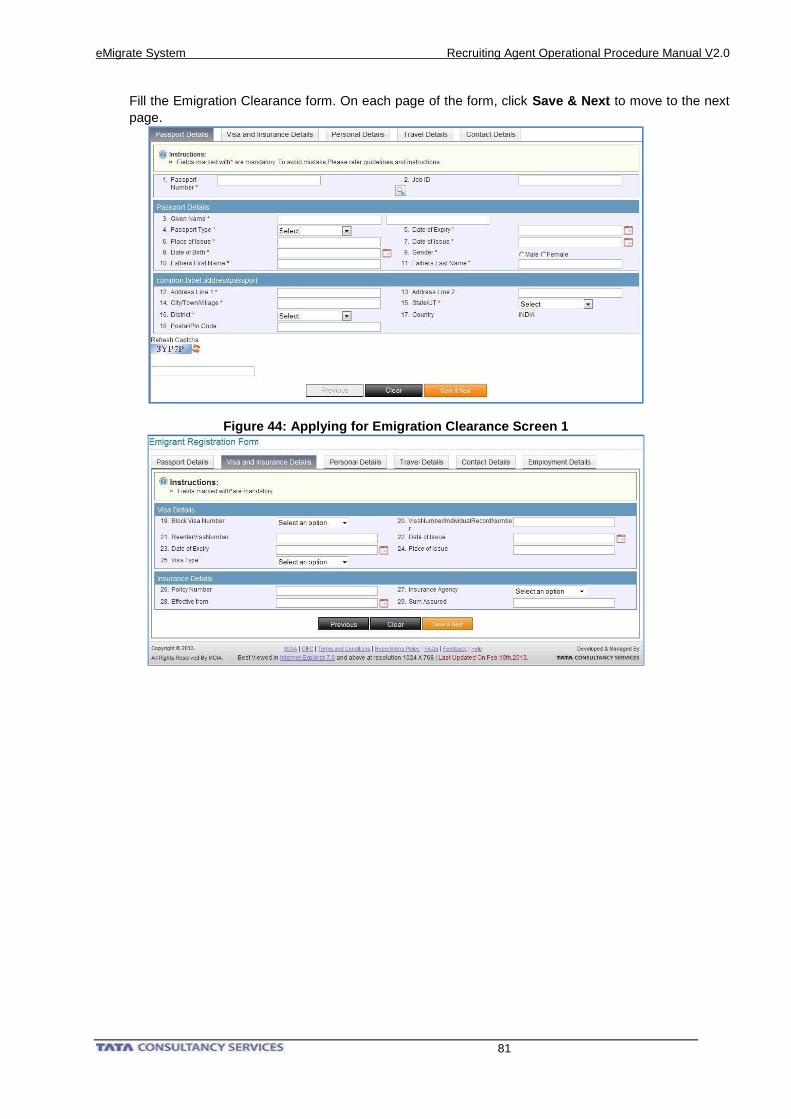
eMigrate System Recruiting Agent Operational Procedure Manual V2.0
81
Fill the Emigration Clearance form. On each page of the form, click Save & Next to move to the next
page.
Figure 44: Applying for Emigration Clearance Screen 1
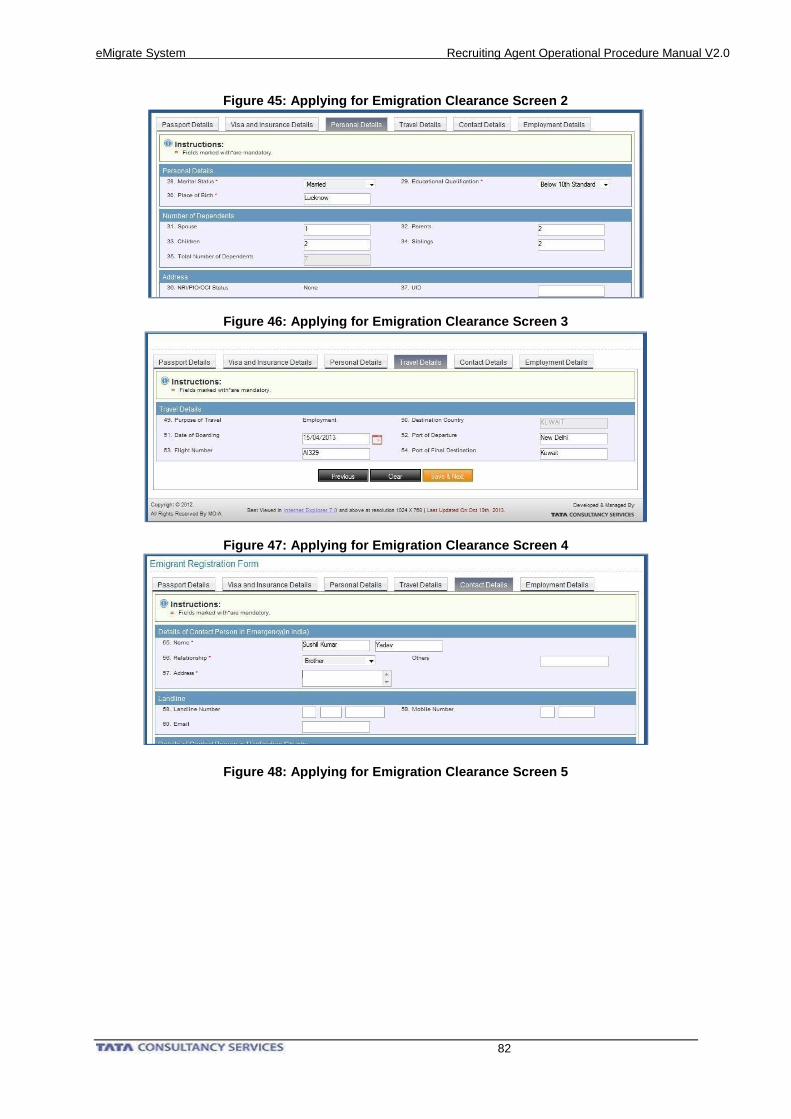
eMigrate System Recruiting Agent Operational Procedure Manual V2.0
82
Figure 45: Applying for Emigration Clearance Screen 2
Figure 48: Applying for Emigration Clearance Screen 5
Figure 46: Applying for Emigration Clearance Screen 3
Figure 47: Applying for Emig ration Clearance Screen 4
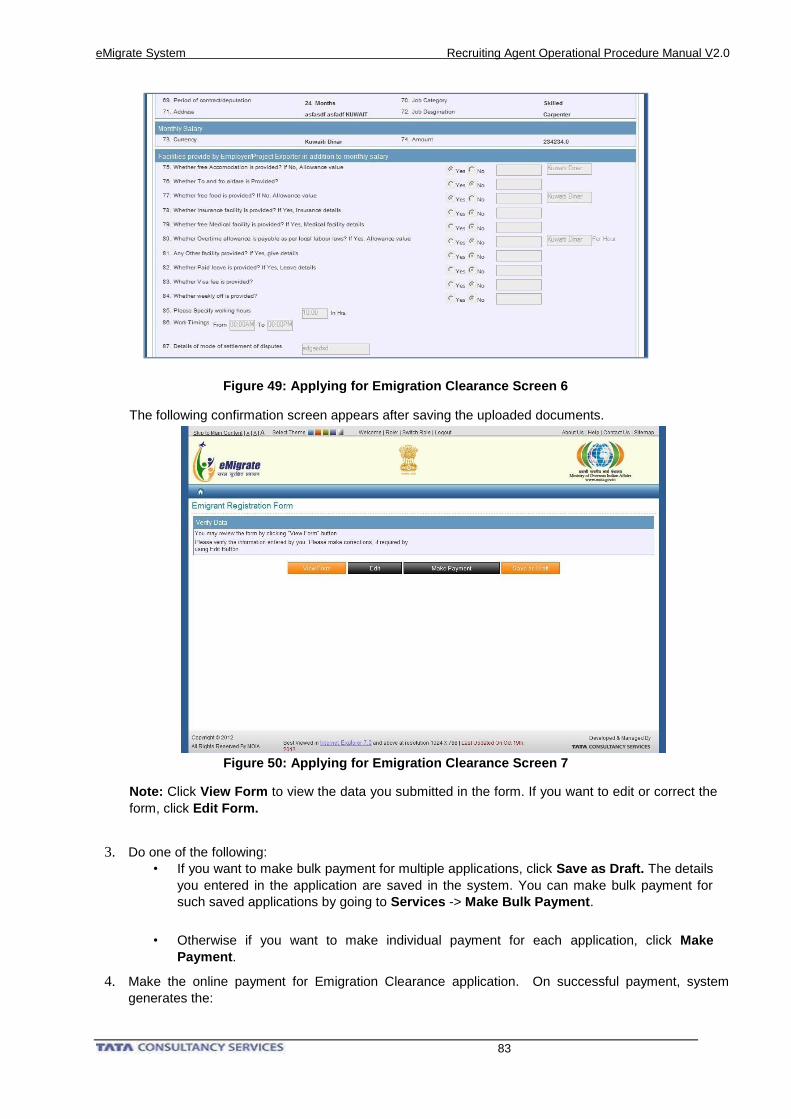
eMigrate System Recruiting Agent Operational Procedure Manual V2.0
83
Figure 49: Applying for Emigration Clearance Screen 6
The following confirmation screen appears after saving the uploaded documents.
Figure 50: Applying for Emigration Clearance Screen 7
Note: Click View Form to view the data you submitted in the form. If you want to edit or correct the
form, click Edit Form.
3. Do one of the following:
• If you want to make bulk payment for multiple applications, click Save as Draft. The details
you entered in the application are saved in the system. You can make bulk payment for
such saved applications by going to Services -> Make Bulk Payment.
• Otherwise if you want to make individual payment for each application, click Make
Payment.
4. Make the online payment for Emigration Clearance application. On successful payment, system
generates the:
eMigrate System Recruiting Agent Operational Procedure Manual V2.0
84
• Application reference number
• Printable registration form
• Payment receipt
System also sends a confirmation email to your email ID.
5. The PoE processes the application.
6. If the PoE approves the application, electronic emigration clearance is granted to the emigrant.
A system generated SMS and email is sent to the Emigrant informing of approval. At the end of
day, a consolidated email is sent to your email ID informing of the applications, filed by you,
approved during the day.
If your application is rejected by the PoE, a system generated SMS
and email is sent to the Emigrant informing of rejection. At the end
of day, a consolidated email is sent to your email ID informing of the
applications, filed by you, rejected during the day.
The following table details the description of the fields in the Emigration Clearance form. The fields are
mentioned in the order in which they appear in the form (top to bottom).
Table 28: Emigration Clearance Form Field Reference Table
Field Name Description
1. Job ID Enter the job ID against which you want to recruit the
emigrant.
2. Passport Number Enter the emigrant passport number whom you want to
recruit.
3. Job ID Code N.A. in case of recruitment through RA.
4. Name Enter the emigrant’s name as per what is mentioned in the
passport.
5. Passport Type Enter the emigrant’s passport type as per what is mentioned
in the passport.
6. Date of Expiry Enter the emigrant’s passport expiry date as per what is
mentioned in the passport.
7. Date of Issue Enter the emigrant’s passport issue date as per what is
mentioned in the passport.
8. Place of Issue Enter the place of issue of the emigrant’s passport as per
what is mentioned in the passport.
9. Date of Birth Enter the emigrant’s date of birth as per what is mentioned in
the passport.
10. Gender Enter the emigrant’s gender as per what is mentioned in the
passport.
11. Fathers Name Enter the emigrant’s father’s name as per what is mentioned
in the passport.
Address as per passport
12. Address Line 1 Enter the emigrant’s address line 1 as per what is mentioned
in the passport.
13. Address Line 2 Enter the emigrant’s address line 2 as per what is mentioned
in the passport.
eMigrate System Recruiting Agent Operational Procedure Manual V2.0
85
14. City / Town / Village Enter the emigrant’s city / town / village as per what is
mentioned in the passport.
15. State / UT Select the emigrant’s state as per what is mentioned in the
passport from the drop down menu.
16. District Enter the emigrant’s district as per what is mentioned in the
passport.
17. Country Display field. The eMigrate system auto populates India in this
field.
18. Postal / Pin Code Enter the emigrant’s pin code as per what is mentioned in the
passport.
Visa Details
19. Block Visa Number Display Field. The eMigrate system displays the details as
entered by you during entering employer and demand details.
20. Visa Number
Enter the VISA details of the Emigrant
21. Date of Issue
22. Date of Expiry
23. Place of Issue
24. Visa Type
Insurance Details
The following details have to be filled only if the emigrant has a ECR type of passport.
25. Policy Number Enter the emigrant’s PBBY number.
26. Insurance Agency Select the insurance agency name from the drop down menu.
27. Effective from Select the date from which PBBY insurance policy is valid.
28. Sum Insured For Enter the sum for which the emigrant is insured for.
Personal Details
29. Marital Status
Select the marital status of the emigrant from the drop down
menu options:
• Single
• Married
• Separated
• Divorced
30. Educational
Qualification
Display field. The eMigrate system auto selects Below 10th
Std for ECR passport holders.
31. Place of Birth Enter the emigrant’s place of birth.
Number of Dependants
32. Spouse Enter the number as appropriate.
33. Parents Enter the number as appropriate.
34. Children Enter the number as appropriate.
35. Siblings Enter the number as appropriate.
36. Total Number
of Dependants
Display field. The eMigrate system displays the summation of
the above four fields.
37. NRI / PIO / OCI
Status
Blank field.
38. UID Enter the Aadhar card number of the emigrant if available.
Address in India
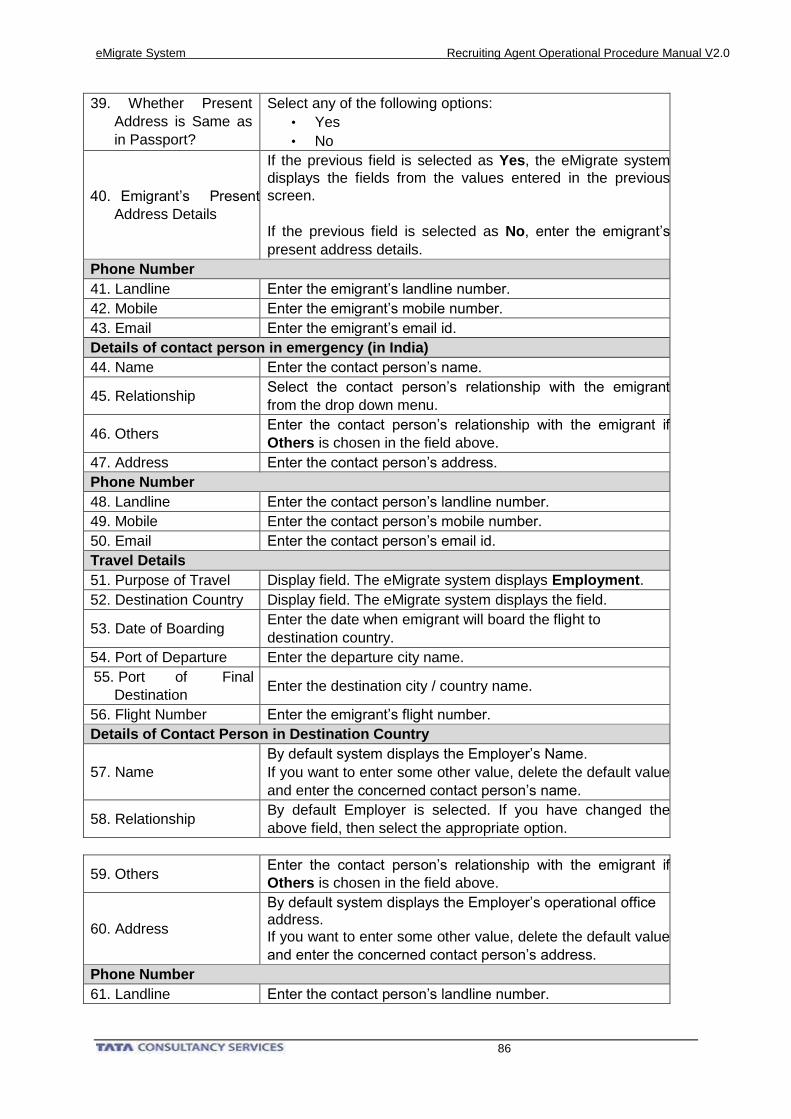
eMigrate System Recruiting Agent Operational Procedure Manual V2.0
86
39. Whether Present
Address is Same as
in Passport?
Select any of the following options:
• Yes
• No
40. Emigrant’s Present
Address Details
If the previous field is selected as Yes, the eMigrate system
displays the fields from the values entered in the previous
screen.
If the previous field is selected as No, enter the emigrant’s
present address details.
Phone Number
41. Landline Enter the emigrant’s landline number.
42. Mobile Enter the emigrant’s mobile number.
43. Email Enter the emigrant’s email id.
Details of contact person in emergency (in India)
44. Name Enter the contact person’s name.
45. Relationship Select the contact person’s relationship with the emigrant
from the drop down menu.
46. Others Enter the contact person’s relationship with the emigrant if
Others is chosen in the field above.
47. Address Enter the contact person’s address.
Phone Number
48. Landline Enter the contact person’s landline number.
49. Mobile Enter the contact person’s mobile number.
50. Email Enter the contact person’s email id.
Travel Details
51. Purpose of Travel Display field. The eMigrate system displays Employment.
52. Destination Country Display field. The eMigrate system displays the field.
53. Date of Boarding Enter the date when emigrant will board the flight to
destination country.
54. Port of Departure Enter the departure city name.
55. Port of Final
Destination Enter the destination city / country name.
56. Flight Number Enter the emigrant’s flight number.
Details of Contact Person in Destination Country
57. Name
By default system displays the Employer’s Name.
If you want to enter some other value, delete the default value
and enter the concerned contact person’s name.
58. Relationship By default Employer is selected. If you have changed the
above field, then select the appropriate option.
59. Others Enter the contact person’s relationship with the emigrant if
Others is chosen in the field above.
60. Address
By default system displays the Employer’s operational office address. If you want to enter some other value, delete the default value
and enter the concerned contact person’s address.
Phone Number
61. Landline Enter the contact person’s landline number.
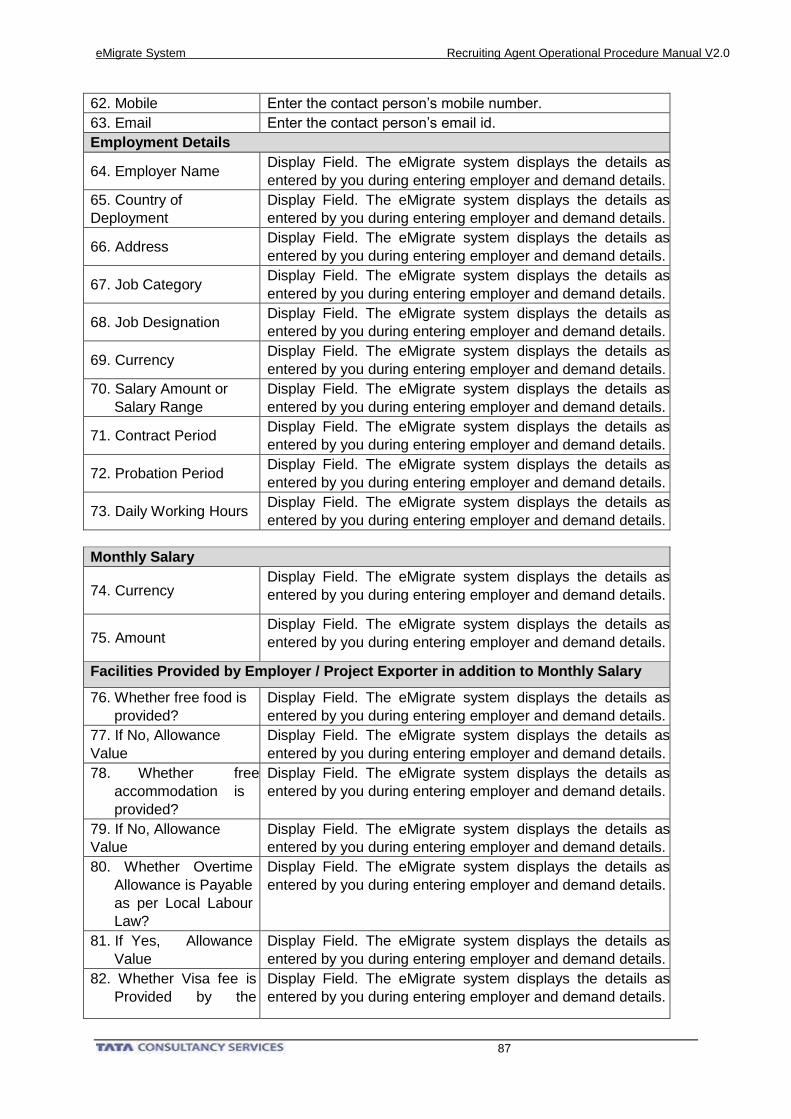
eMigrate System Recruiting Agent Operational Procedure Manual V2.0
87
62. Mobile Enter the contact person’s mobile number.
63. Email Enter the contact person’s email id.
Employment Details
64. Employer Name Display Field. The eMigrate system displays the details as
entered by you during entering employer and demand details.
65. Country of
Deployment
Display Field. The eMigrate system displays the details as
entered by you during entering employer and demand details.
66. Address Display Field. The eMigrate system displays the details as
entered by you during entering employer and demand details.
67. Job Category Display Field. The eMigrate system displays the details as
entered by you during entering employer and demand details.
68. Job Designation Display Field. The eMigrate system displays the details as
entered by you during entering employer and demand details.
69. Currency Display Field. The eMigrate system displays the details as
entered by you during entering employer and demand details.
70. Salary Amount or
Salary Range
Display Field. The eMigrate system displays the details as
entered by you during entering employer and demand details.
71. Contract Period Display Field. The eMigrate system displays the details as
entered by you during entering employer and demand details.
72. Probation Period Display Field. The eMigrate system displays the details as
entered by you during entering employer and demand details.
73. Daily Working Hours Display Field. The eMigrate system displays the details as
entered by you during entering employer and demand details.
Monthly Salary
74. Currency Display Field. The eMigrate system displays the details as
entered by you during entering employer and demand details.
75. Amount Display Field. The eMigrate system displays the details as
entered by you during entering employer and demand details.
Facilities Provided by Employer / Project Exporter in addition to Monthly Salary
76. Whether free food is
provided?
Display Field. The eMigrate system displays the details as
entered by you during entering employer and demand details.
77. If No, Allowance
Value
Display Field. The eMigrate system displays the details as
entered by you during entering employer and demand details.
78. Whether free
accommodation is
provided?
Display Field. The eMigrate system displays the details as
entered by you during entering employer and demand details.
79. If No, Allowance
Value
Display Field. The eMigrate system displays the details as
entered by you during entering employer and demand details.
80. Whether Overtime
Allowance is Payable
as per Local Labour
Law?
Display Field. The eMigrate system displays the details as
entered by you during entering employer and demand details.
81. If Yes, Allowance
Value
Display Field. The eMigrate system displays the details as
entered by you during entering employer and demand details.
82. Whether Visa fee is
Provided by the
Display Field. The eMigrate system displays the details as
entered by you during entering employer and demand details.
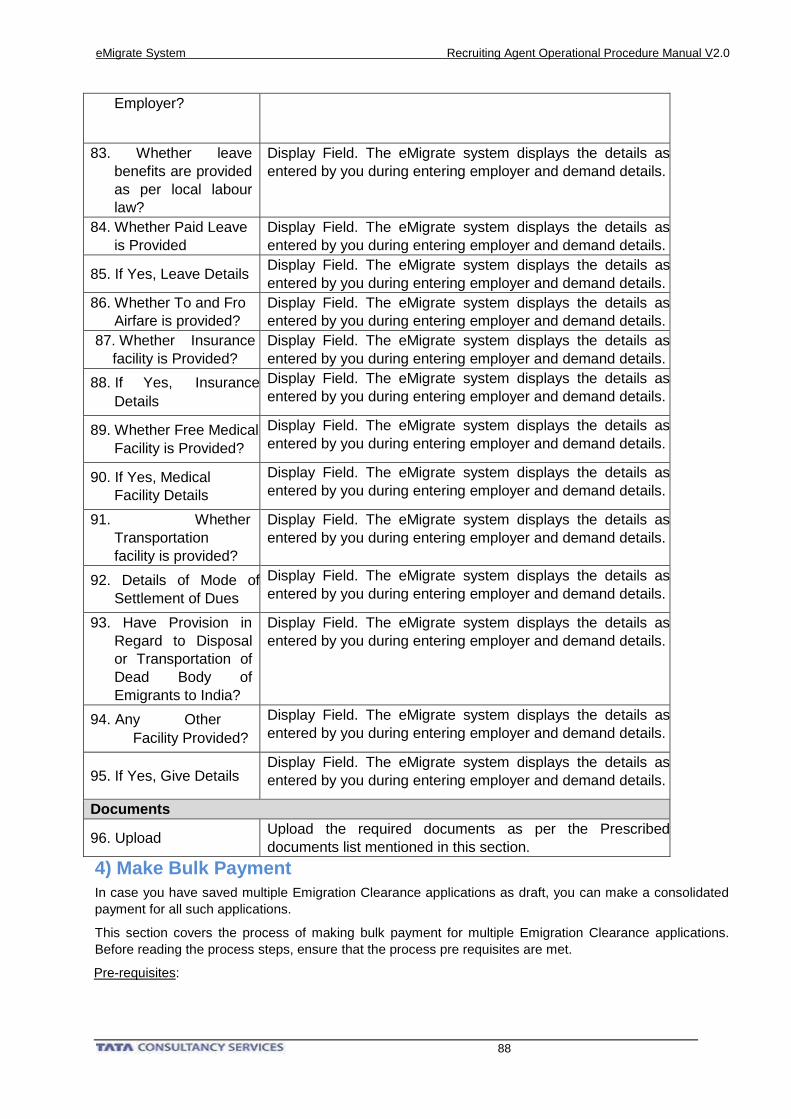
eMigrate System Recruiting Agent Operational Procedure Manual V2.0
88
Employer?
83. Whether leave
benefits are provided
as per local labour
law?
Display Field. The eMigrate system displays the details as
entered by you during entering employer and demand details.
84. Whether Paid Leave
is Provided
Display Field. The eMigrate system displays the details as
entered by you during entering employer and demand details.
85. If Yes, Leave Details Display Field. The eMigrate system displays the details as
entered by you during entering employer and demand details.
86. Whether To and Fro
Airfare is provided?
Display Field. The eMigrate system displays the details as
entered by you during entering employer and demand details.
87. Whether Insurance
facility is Provided?
Display Field. The eMigrate system displays the details as
entered by you during entering employer and demand details.
88. If Yes, Insurance
Details
Display Field. The eMigrate system displays the details as
entered by you during entering employer and demand details.
89. Whether Free Medical
Facility is Provided?
Display Field. The eMigrate system displays the details as
entered by you during entering employer and demand details.
90. If Yes, Medical
Facility Details
Display Field. The eMigrate system displays the details as
entered by you during entering employer and demand details.
91. Whether
Transportation
facility is provided?
Display Field. The eMigrate system displays the details as
entered by you during entering employer and demand details.
92. Details of Mode of
Settlement of Dues
Display Field. The eMigrate system displays the details as
entered by you during entering employer and demand details.
93. Have Provision in
Regard to Disposal
or Transportation of
Dead Body of
Emigrants to India?
Display Field. The eMigrate system displays the details as
entered by you during entering employer and demand details.
94. Any Other
Facility Provided?
Display Field. The eMigrate system displays the details as
entered by you during entering employer and demand details.
95. If Yes, Give Details Display Field. The eMigrate system displays the details as
entered by you during entering employer and demand details.
Documents
96. Upload Upload the required documents as per the Prescribed
documents list mentioned in this section.
4) Make Bulk Payment
In case you have saved multiple Emigration Clearance applications as draft, you can make a consolidated
payment for all such applications.
This section covers the process of making bulk payment for multiple Emigration Clearance applications.
Before reading the process steps, ensure that the process pre requisites are met.
Pre-requisites:
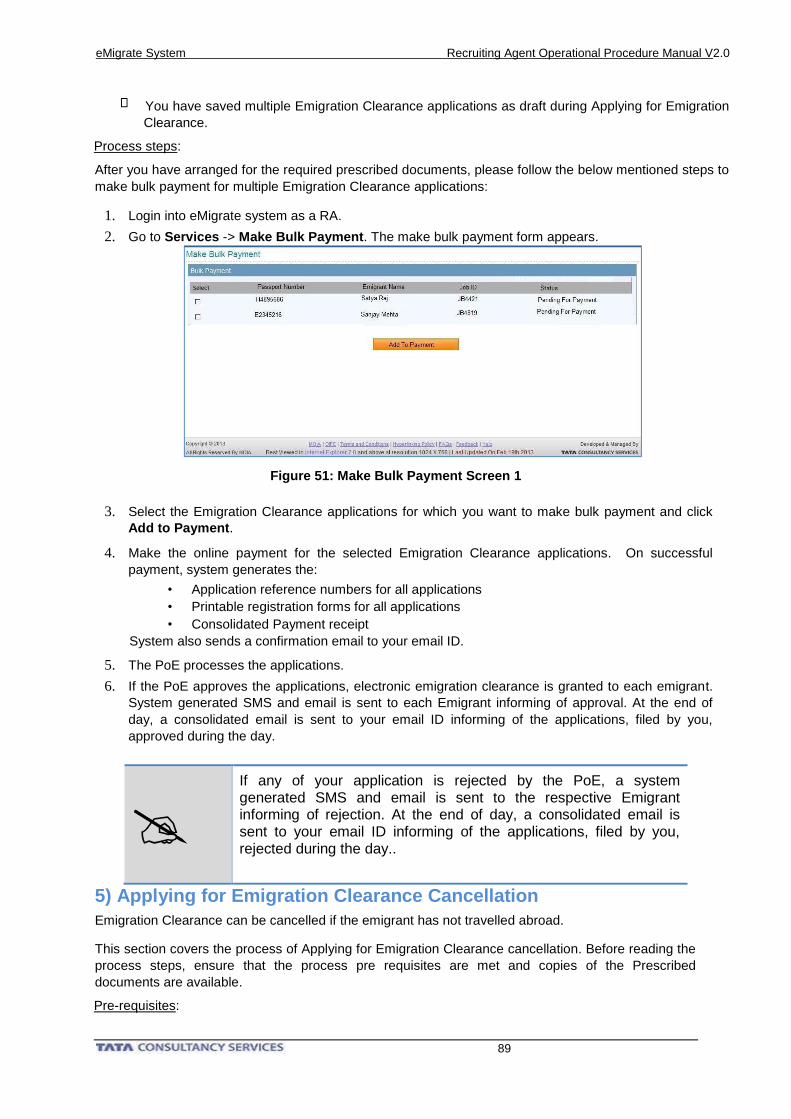
eMigrate System Recruiting Agent Operational Procedure Manual V2.0
89
You have saved multiple Emigration Clearance applications as draft during Applying for Emigration
Clearance.
Process steps:
After you have arranged for the required prescribed documents, please follow the below mentioned steps to
make bulk payment for multiple Emigration Clearance applications:
1. Login into eMigrate system as a RA.
2. Go to Services -> Make Bulk Payment. The make bulk payment form appears.
Figure 51: Make Bulk Payment Screen 1
3. Select the Emigration Clearance applications for which you want to make bulk payment and click
Add to Payment.
4. Make the online payment for the selected Emigration Clearance applications. On successful
payment, system generates the:
• Application reference numbers for all applications
• Printable registration forms for all applications
• Consolidated Payment receipt
System also sends a confirmation email to your email ID.
5. The PoE processes the applications.
6. If the PoE approves the applications, electronic emigration clearance is granted to each emigrant.
System generated SMS and email is sent to each Emigrant informing of approval. At the end of
day, a consolidated email is sent to your email ID informing of the applications, filed by you,
approved during the day.
If any of your application is rejected by the PoE, a system generated SMS and email is sent to the respective Emigrant informing of rejection. At the end of day, a consolidated email is sent to your email ID informing of the applications, filed by you, rejected during the day..
5) Applying for Emigration Clearance Cancellation
Emigration Clearance can be cancelled if the emigrant has not travelled abroad.
This section covers the process of Applying for Emigration Clearance cancellation. Before reading the
process steps, ensure that the process pre requisites are met and copies of the Prescribed
documents are available.
Pre-requisites:
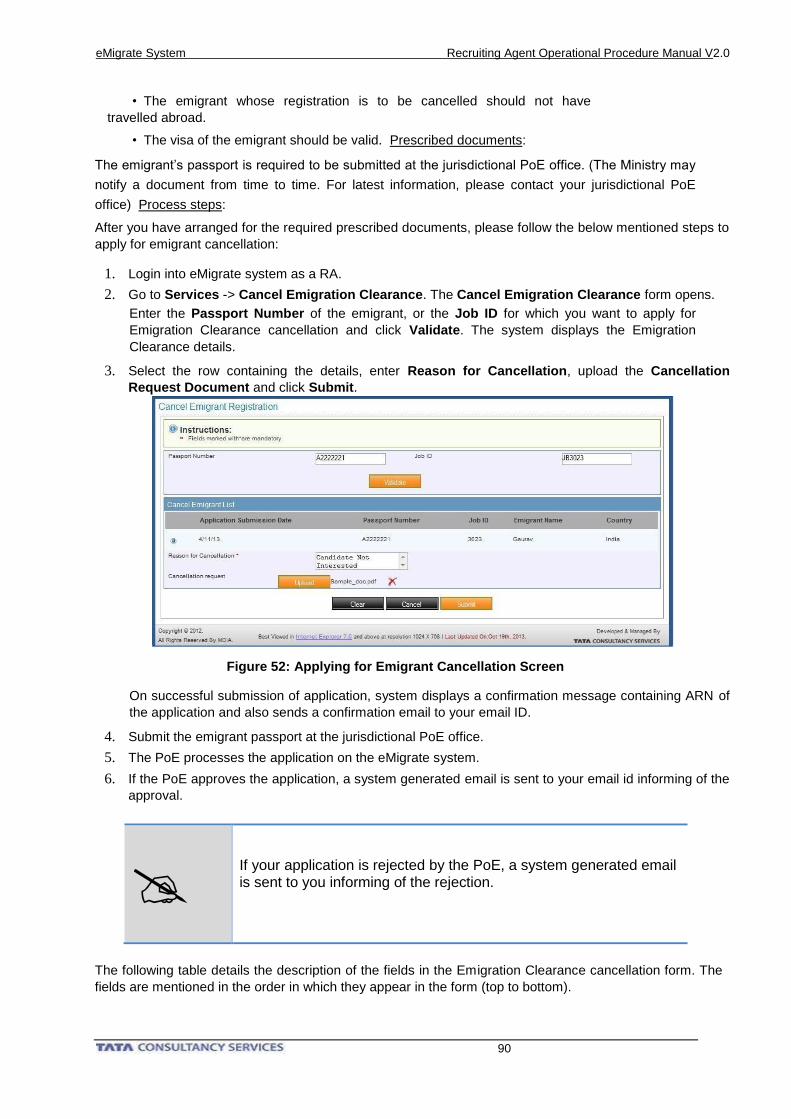
eMigrate System Recruiting Agent Operational Procedure Manual V2.0
90
• The emigrant whose registration is to be cancelled should not have
travelled abroad.
• The visa of the emigrant should be valid. Prescribed documents:
The emigrant’s passport is required to be submitted at the jurisdictional PoE office. (The Ministry may
notify a document from time to time. For latest information, please contact your jurisdictional PoE
office) Process steps:
After you have arranged for the required prescribed documents, please follow the below mentioned steps to
apply for emigrant cancellation:
1. Login into eMigrate system as a RA.
2. Go to Services -> Cancel Emigration Clearance. The Cancel Emigration Clearance form opens.
Enter the Passport Number of the emigrant, or the Job ID for which you want to apply for
Emigration Clearance cancellation and click Validate. The system displays the Emigration
Clearance details.
3. Select the row containing the details, enter Reason for Cancellation, upload the Cancellation
Request Document and click Submit.
Figure 52: Applying for Emigrant Cancellation Screen
On successful submission of application, system displays a confirmation message containing ARN of
the application and also sends a confirmation email to your email ID.
4. Submit the emigrant passport at the jurisdictional PoE office.
5. The PoE processes the application on the eMigrate system.
6. If the PoE approves the application, a system generated email is sent to your email id informing of the
approval.
If your application is rejected by the PoE, a system generated email is sent to you informing of the rejection.
The following table details the description of the fields in the Emigration Clearance cancellation form. The
fields are mentioned in the order in which they appear in the form (top to bottom).
eMigrate System Recruiting Agent Operational Procedure Manual V2.0
91
Table 29: Emigration Clearance Cancellation Form Field Reference Table
Field Name Description
1. Passport Number Enter the emigrant passport number.
2. Job ID Enter the Job ID against which the emigrant is registered.
3. Application Submission
Date Display Field. The eMigrate system displays the field.
4. Emigrant Name Display Field. The eMigrate system displays the field.
5. Country Display Field. The eMigrate system displays the field.
6. Reason of
Cancellation
Enter the reason why you want to apply for Emigration
Clearance cancellation.
5.2. With Employer Registration
In this scenario, the registered Employer accesses the eMigrate system, assigns a demand
electronically to the RA through the eMigrate system, generates Demand Letter and Power of
Attorney through the eMigrate system and forwards the documents to the RA.
The following business processes are applicable in this scenario:
• Acknowledging demand from employer
• Applying for interview/advertisement
• Entering identified emigrant details for visa arrangement by employer
• Applying for Emigration Clearance
• Make Bulk Payment (in case you want to make a consolidated payment of Emigration Clearance
fee for multiple Emigration Clearance applications)
• Applying for Emigration Clearance cancellation
1) Acknowledging Demand from Employer
An employer uses the eMigrate system to raise demand. If the mode of recruitment is through a RA,
the employer assigns an approved demand to a particular RA on the eMigrate system. The RA has to
acknowledge the same on the eMigrate system.
This section covers the process of acknowledging demand from employer. Before reading the process
steps, ensure that the process pre requisites are met and copies of the prescribed documents are
available.
Pre requisites:
An accredited employer has assigned an approved demand to you on the eMigrate system.
Prescribed documents:
The soft copies of the following documents are required to be uploaded while filling the online demand
acknowledgement form:
1. Demand letter signed by the employer and RA
2. Power of attorney signed by the employer
(Not mandatory in case employer country is kingdom of Saudi Arabia)
3. In case employer country is kingdom of Saudi Arabia:
• e-wakala signed by employer
• Affidavit that e-wakala submitted are genuine and relevant to submission
• Copy of identity card issued by Saudi consulate (if not uploaded earlier)
4. Any other document that may be notified by the Ministry from time to time.
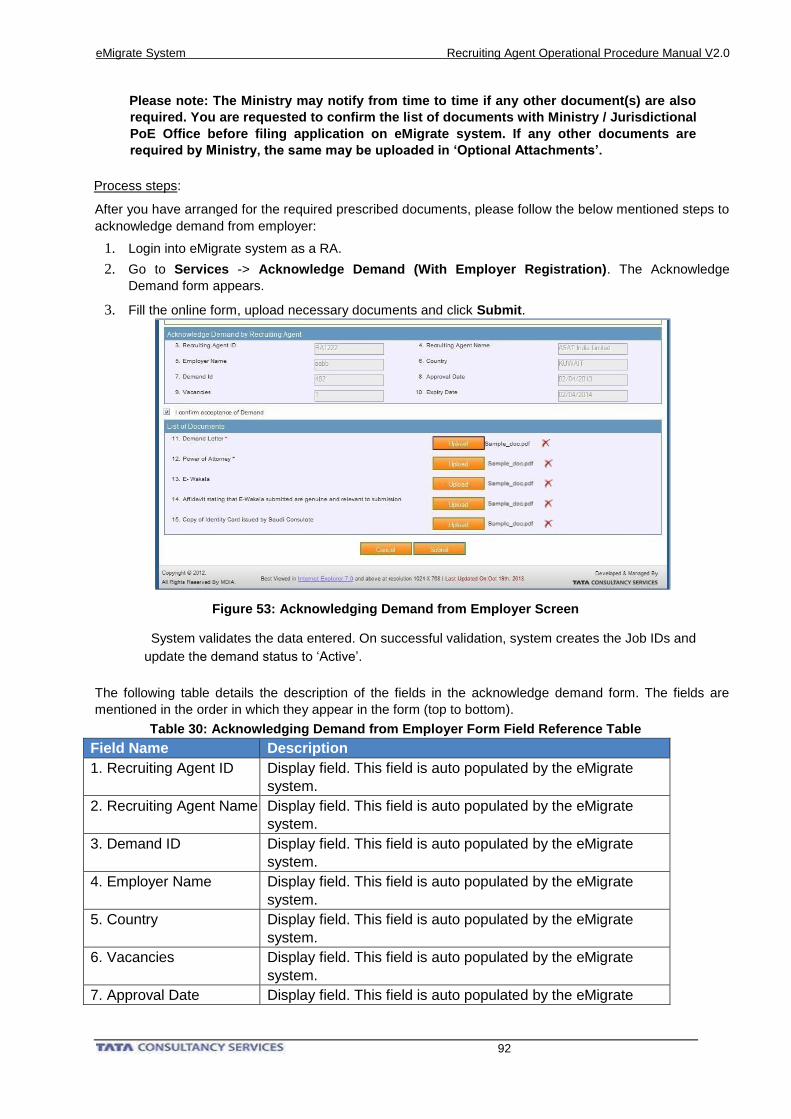
eMigrate System Recruiting Agent Operational Procedure Manual V2.0
92
Please note: The Ministry may notify from time to time if any other document(s) are also
required. You are requested to confirm the list of documents with Ministry / Jurisdictional
PoE Office before filing application on eMigrate system. If any other documents are
required by Ministry, the same may be uploaded in ‘Optional Attachments’.
Process steps:
After you have arranged for the required prescribed documents, please follow the below mentioned steps to
acknowledge demand from employer:
1. Login into eMigrate system as a RA.
2. Go to Services -> Acknowledge Demand (With Employer Registration). The Acknowledge
Demand form appears.
3. Fill the online form, upload necessary documents and click Submit.
Figure 53: Acknowledging Demand from Employer Screen
System validates the data entered. On successful validation, system creates the Job IDs and
update the demand status to ‘Active’.
The following table details the description of the fields in the acknowledge demand form. The fields are
mentioned in the order in which they appear in the form (top to bottom).
Table 30: Acknowledging Demand from Employer Form Field Reference Table
Field Name Description
1. Recruiting Agent ID Display field. This field is auto populated by the eMigrate
system.
2. Recruiting Agent Name Display field. This field is auto populated by the eMigrate
system.
3. Demand ID Display field. This field is auto populated by the eMigrate
system.
4. Employer Name Display field. This field is auto populated by the eMigrate
system.
5. Country Display field. This field is auto populated by the eMigrate
system.
6. Vacancies Display field. This field is auto populated by the eMigrate
system.
7. Approval Date Display field. This field is auto populated by the eMigrate
eMigrate System Recruiting Agent Operational Procedure Manual V2.0
93
system.
8. Expiry Date Display field. This field is auto populated by the eMigrate
system.
9. I confirm acceptance of
Demand Select the option for accepting the demand.
Documents
Upload Upload the required documents as per the Prescribed
documents list mentioned in this section.
2) Applying for Interview/Advertisement Permission
The process is same as mentioned under Applying for Interview / Advertisement permission detailed under
‘Without Employer Registration’ Scenario at section 5.1.2).
3) Entering Identified Emigrant Details for Visa Arrangement by
Employer
RA informs the employer about identified emigrants through the eMigrate system. The employer then
proceeds to arrange visa for the identified emigrants.
This section covers the process of entering identified emigrants details. Before reading the process
steps, ensure that the process pre requisites are met and copies of the prescribed documents are
available.
Pre requisites:
You cannot enter information about an emigrant in the following cases:
o If less than 6months are left for the emigrant’s passport to expire.
o If age of a female emigrant is less than 30years of age and has an ECR type of passport.
(you can apply for a special permission to MEA-OED in case you want to enter such
information)
o If age of an emigrant is less than 18years of age.
Prescribed documents: None (The Ministry may notify a document from time to time)
Please note: The Ministry may notify from time to time if any other document(s) are also
required. You are requested to confirm the list of documents with Ministry / Jurisdictional PoE
Office before filing application on eMigrate system. If any other documents are required by
Ministry, the same may be uploaded in ‘Optional Attachments’.
Process steps:
After you have arranged for the required prescribed documents, please follow the below mentioned steps to
enter identified emigrant details:
1. Login into eMigrate system as a RA.
2. Go to Services -> Enter Identified Emigrant Details (With Employer Registration). The Enter
Identified Emigrant Details form appears.
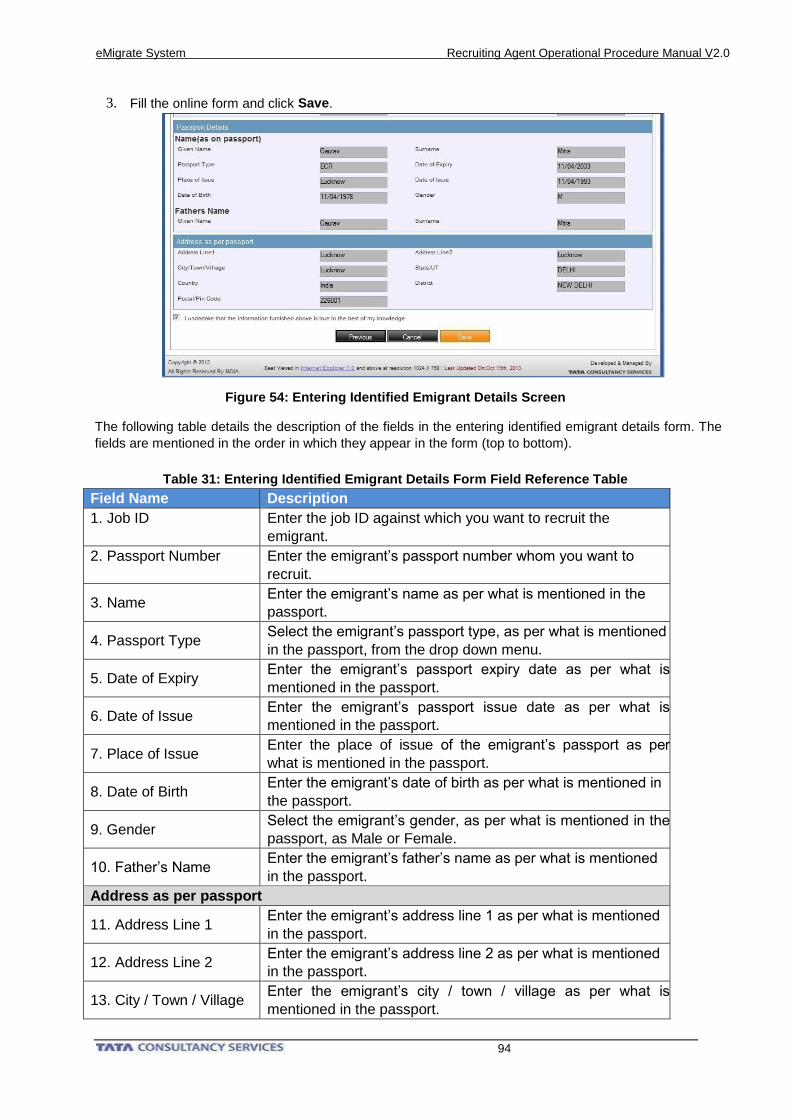
eMigrate System Recruiting Agent Operational Procedure Manual V2.0
94
Figure 54: Entering Identified Emigrant Details Screen
The following table details the description of the fields in the entering identified emigrant details form. The
fields are mentioned in the order in which they appear in the form (top to bottom).
Table 31: Entering Identified Emigrant Details Form Field Reference Table
Field Name Description
1. Job ID Enter the job ID against which you want to recruit the
emigrant.
2. Passport Number Enter the emigrant’s passport number whom you want to
recruit.
3. Name Enter the emigrant’s name as per what is mentioned in the
passport.
4. Passport Type Select the emigrant’s passport type, as per what is mentioned
in the passport, from the drop down menu.
5. Date of Expiry Enter the emigrant’s passport expiry date as per what is
mentioned in the passport.
6. Date of Issue Enter the emigrant’s passport issue date as per what is
mentioned in the passport.
7. Place of Issue Enter the place of issue of the emigrant’s passport as per
what is mentioned in the passport.
8. Date of Birth Enter the emigrant’s date of birth as per what is mentioned in
the passport.
9. Gender Select the emigrant’s gender, as per what is mentioned in the
passport, as Male or Female.
10. Father’s Name Enter the emigrant’s father’s name as per what is mentioned
in the passport.
Address as per passport
11. Address Line 1 Enter the emigrant’s address line 1 as per what is mentioned
in the passport.
12. Address Line 2 Enter the emigrant’s address line 2 as per what is mentioned
in the passport.
13. City / Town / Village Enter the emigrant’s city / town / village as per what is
mentioned in the passport.
3. Fill the online form and click Save .
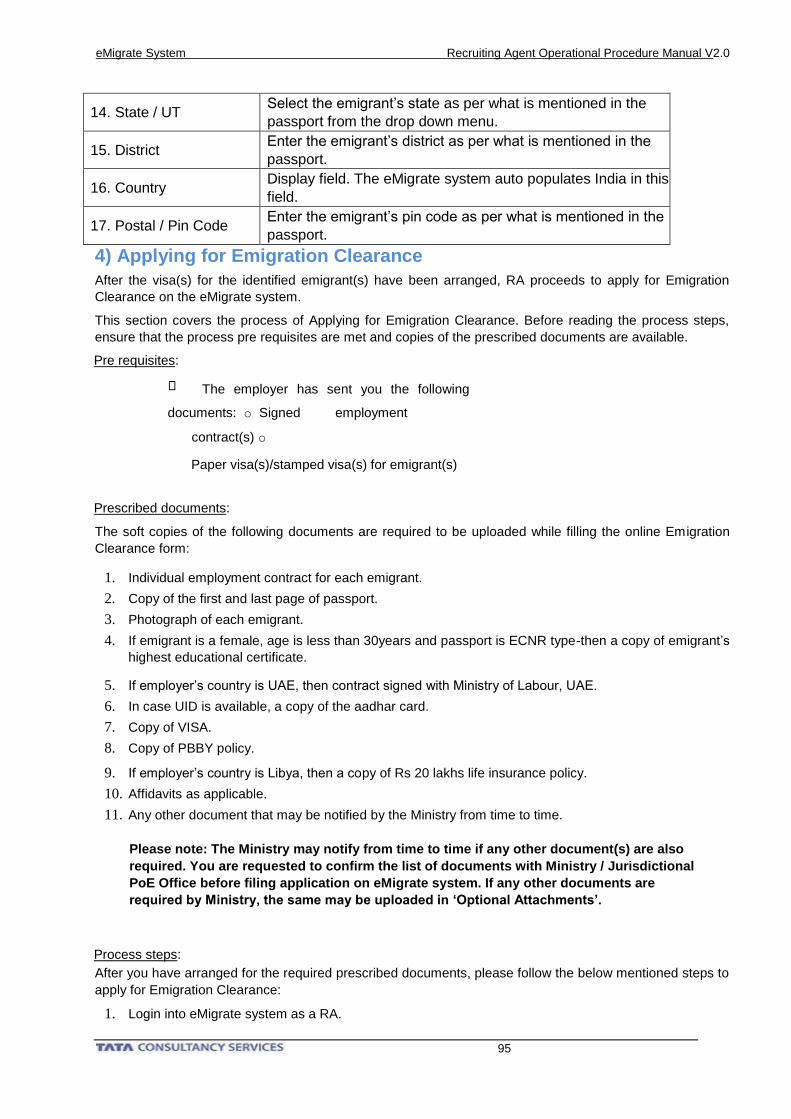
eMigrate System Recruiting Agent Operational Procedure Manual V2.0
95
14. State / UT Select the emigrant’s state as per what is mentioned in the
passport from the drop down menu.
15. District Enter the emigrant’s district as per what is mentioned in the
passport.
16. Country Display field. The eMigrate system auto populates India in this
field.
17. Postal / Pin Code Enter the emigrant’s pin code as per what is mentioned in the
passport.
4) Applying for Emigration Clearance
After the visa(s) for the identified emigrant(s) have been arranged, RA proceeds to apply for Emigration
Clearance on the eMigrate system.
This section covers the process of Applying for Emigration Clearance. Before reading the process steps,
ensure that the process pre requisites are met and copies of the prescribed documents are available.
Pre requisites:
The employer has sent you the following
documents: o Signed employment
contract(s) o
Paper visa(s)/stamped visa(s) for emigrant(s)
Prescribed documents:
The soft copies of the following documents are required to be uploaded while filling the online Emigration
Clearance form:
1. Individual employment contract for each emigrant.
2. Copy of the first and last page of passport.
3. Photograph of each emigrant.
4. If emigrant is a female, age is less than 30years and passport is ECNR type-then a copy of emigrant’s
highest educational certificate.
5. If employer’s country is UAE, then contract signed with Ministry of Labour, UAE.
6. In case UID is available, a copy of the aadhar card.
7. Copy of VISA.
8. Copy of PBBY policy.
9. If employer’s country is Libya, then a copy of Rs 20 lakhs life insurance policy.
10. Affidavits as applicable.
11. Any other document that may be notified by the Ministry from time to time.
Please note: The Ministry may notify from time to time if any other document(s) are also
required. You are requested to confirm the list of documents with Ministry / Jurisdictional
PoE Office before filing application on eMigrate system. If any other documents are
required by Ministry, the same may be uploaded in ‘Optional Attachments’.
Process steps:
After you have arranged for the required prescribed documents, please follow the below mentioned steps to
apply for Emigration Clearance:
1. Login into eMigrate system as a RA.
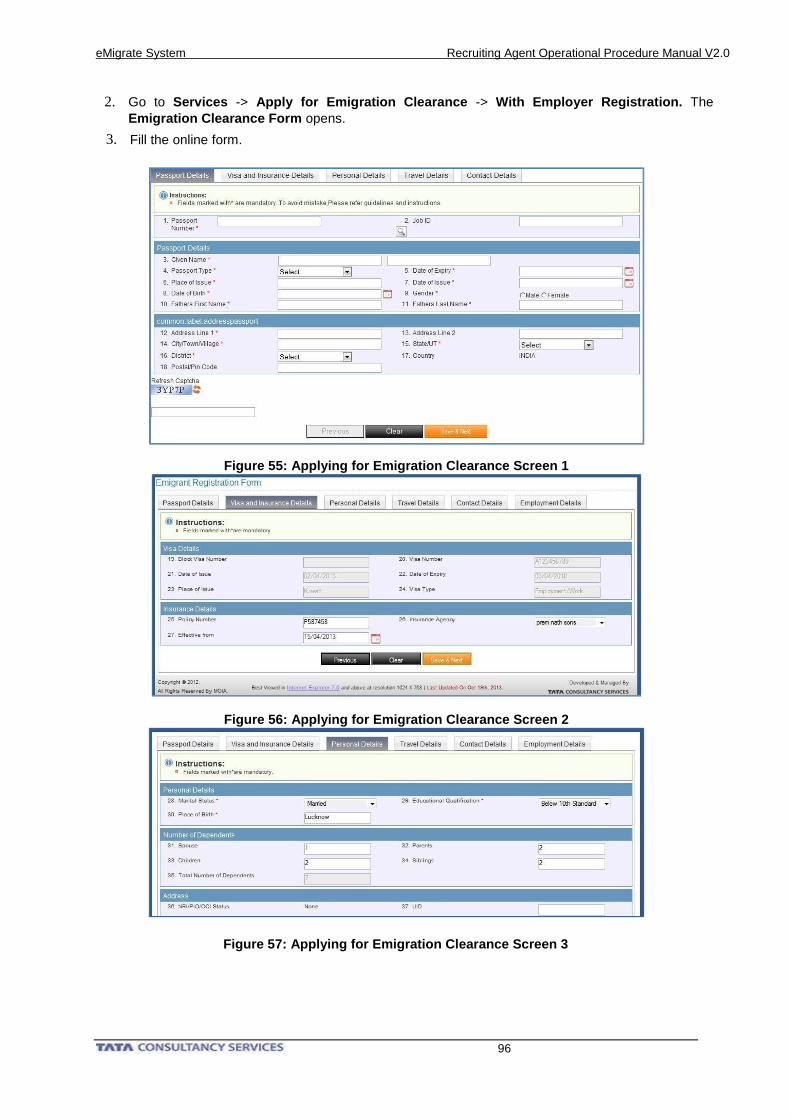
eMigrate System Recruiting Agent Operational Procedure Manual V2.0
96
2. Go to Services -> Apply for Emigration Clearance -> With Employer Registration. The
Emigration Clearance Form opens.
Figure 57: Applying for Emigration Clearance Screen 3
Figure 55: Applying for Emigration Clearance Screen 1
Figure 56: Applying for Emigration Clearance Screen 2
3. Fill the online form.
eMigrate System Recruiting Agent Operational Procedure Manual V2.0
97
Figure 60: Applying for Emigration Clearance Screen 6
4. On each page of the form, click Save & Next to move to the next page. The following confirmation
screen appears after saving the uploaded documents.
Figure 58: Applying for Emigration Clearance Screen 4
Figure 59: Applying for Emigration Clearance Screen 5
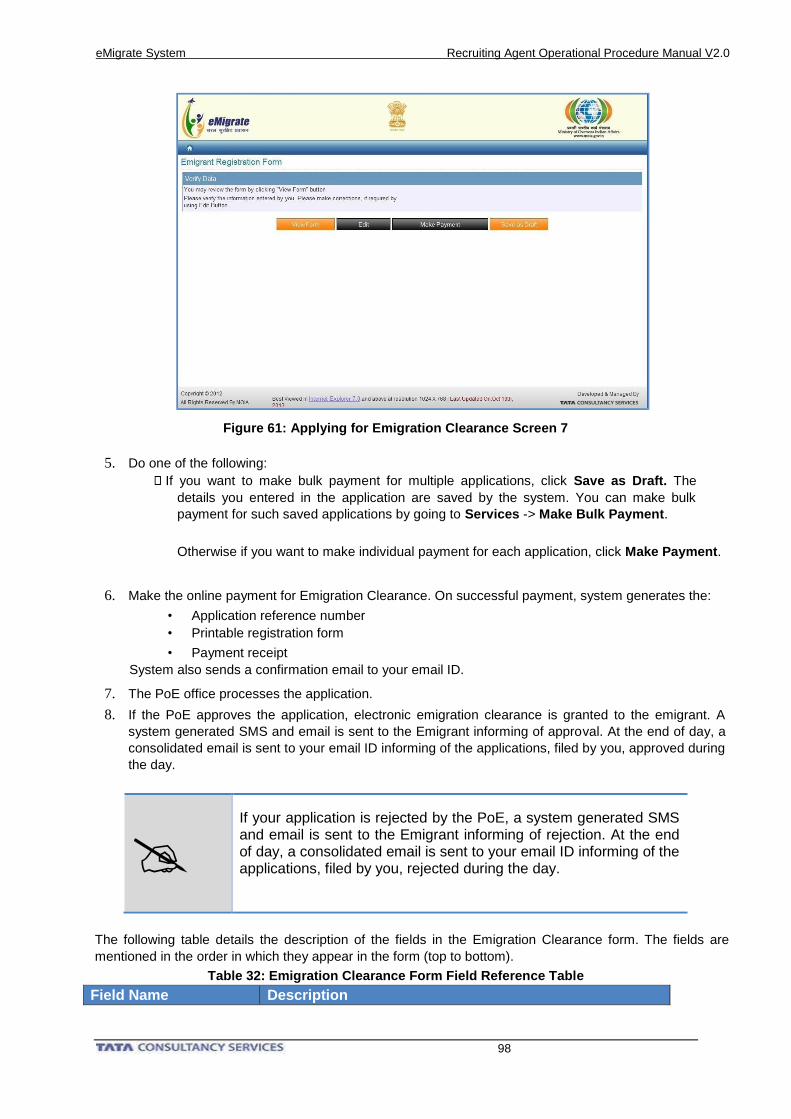
eMigrate System Recruiting Agent Operational Procedure Manual V2.0
98
Figure 61: Applying for Emigration Clearance Screen 7
5. Do one of the following:
If you want to make bulk payment for multiple applications, click Save as Draft. The
details you entered in the application are saved by the system. You can make bulk
payment for such saved applications by going to Services -> Make Bulk Payment.
Otherwise if you want to make individual payment for each application, click Make Payment.
6. Make the online payment for Emigration Clearance. On successful payment, system generates the:
• Application reference number
• Printable registration form
• Payment receipt
System also sends a confirmation email to your email ID.
7. The PoE office processes the application.
8. If the PoE approves the application, electronic emigration clearance is granted to the emigrant. A
system generated SMS and email is sent to the Emigrant informing of approval. At the end of day, a
consolidated email is sent to your email ID informing of the applications, filed by you, approved during
the day.
If your application is rejected by the PoE, a system generated SMS and email is sent to the Emigrant informing of rejection. At the end of day, a consolidated email is sent to your email ID informing of the applications, filed by you, rejected during the day.
The following table details the description of the fields in the Emigration Clearance form. The fields are
mentioned in the order in which they appear in the form (top to bottom).
Table 32: Emigration Clearance Form Field Reference Table
Field Name Description
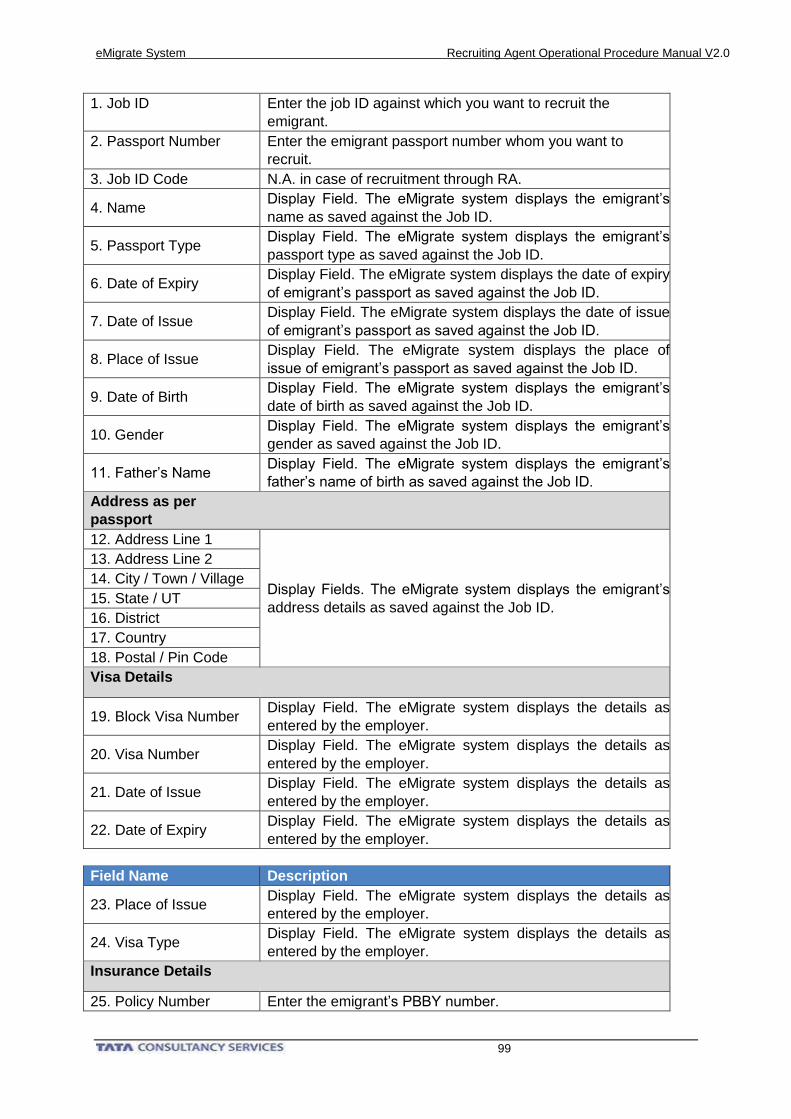
eMigrate System Recruiting Agent Operational Procedure Manual V2.0
99
1. Job ID Enter the job ID against which you want to recruit the
emigrant.
2. Passport Number Enter the emigrant passport number whom you want to
recruit.
3. Job ID Code N.A. in case of recruitment through RA.
4. Name Display Field. The eMigrate system displays the emigrant’s
name as saved against the Job ID.
5. Passport Type Display Field. The eMigrate system displays the emigrant’s
passport type as saved against the Job ID.
6. Date of Expiry Display Field. The eMigrate system displays the date of expiry
of emigrant’s passport as saved against the Job ID.
7. Date of Issue Display Field. The eMigrate system displays the date of issue
of emigrant’s passport as saved against the Job ID.
8. Place of Issue Display Field. The eMigrate system displays the place of
issue of emigrant’s passport as saved against the Job ID.
9. Date of Birth Display Field. The eMigrate system displays the emigrant’s
date of birth as saved against the Job ID.
10. Gender Display Field. The eMigrate system displays the emigrant’s
gender as saved against the Job ID.
11. Father’s Name Display Field. The eMigrate system displays the emigrant’s
father’s name of birth as saved against the Job ID.
Address as per
passport
12. Address Line 1
Display Fields. The eMigrate system displays the emigrant’s
address details as saved against the Job ID.
13. Address Line 2
14. City / Town / Village
15. State / UT
16. District
17. Country
18. Postal / Pin Code
Visa Details
19. Block Visa Number Display Field. The eMigrate system displays the details as
entered by the employer.
20. Visa Number Display Field. The eMigrate system displays the details as
entered by the employer.
21. Date of Issue Display Field. The eMigrate system displays the details as
entered by the employer.
22. Date of Expiry Display Field. The eMigrate system displays the details as
entered by the employer.
Field Name Description
23. Place of Issue Display Field. The eMigrate system displays the details as
entered by the employer.
24. Visa Type Display Field. The eMigrate system displays the details as
entered by the employer.
Insurance Details
25. Policy Number Enter the emigrant’s PBBY number.
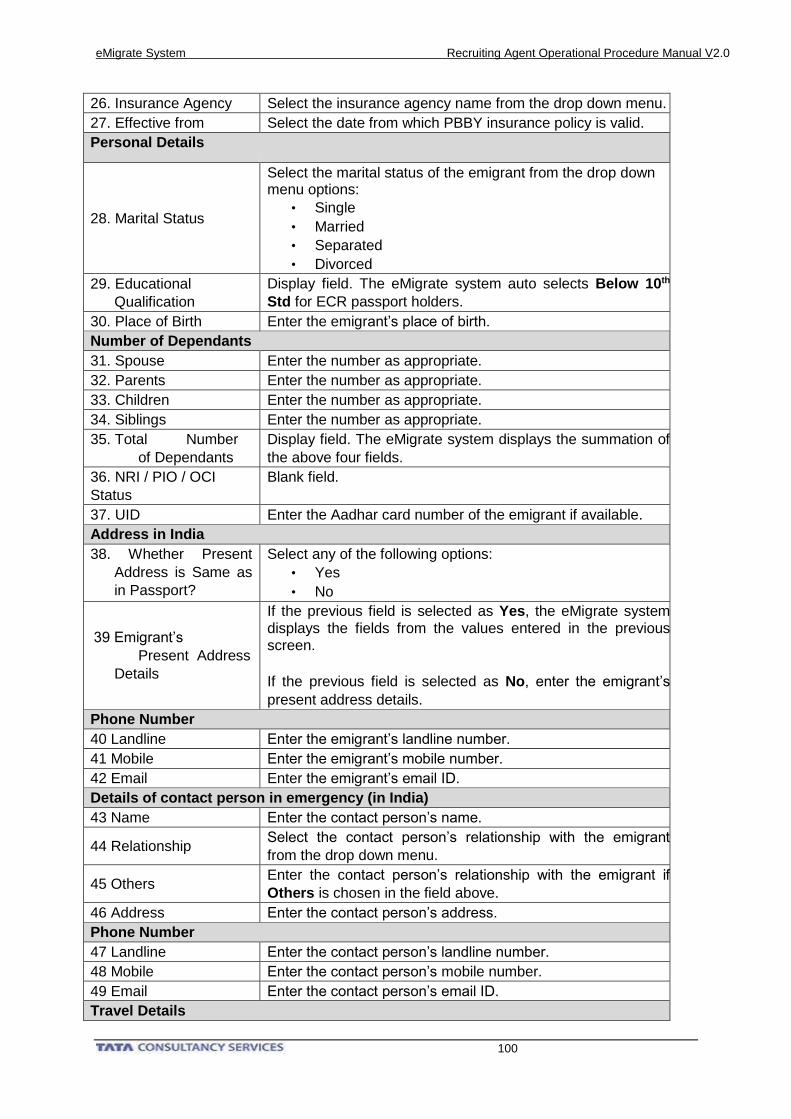
eMigrate System Recruiting Agent Operational Procedure Manual V2.0
100
26. Insurance Agency Select the insurance agency name from the drop down menu.
27. Effective from Select the date from which PBBY insurance policy is valid.
Personal Details
28. Marital Status
Select the marital status of the emigrant from the drop down menu options:
• Single
• Married
• Separated
• Divorced
29. Educational
Qualification
Display field. The eMigrate system auto selects Below 10th
Std for ECR passport holders.
30. Place of Birth Enter the emigrant’s place of birth.
Number of Dependants
31. Spouse Enter the number as appropriate.
32. Parents Enter the number as appropriate.
33. Children Enter the number as appropriate.
34. Siblings Enter the number as appropriate.
35. Total Number
of Dependants
Display field. The eMigrate system displays the summation of
the above four fields.
36. NRI / PIO / OCI
Status
Blank field.
37. UID Enter the Aadhar card number of the emigrant if available.
Address in India
38. Whether Present
Address is Same as
in Passport?
Select any of the following options:
• Yes
• No
39 Emigrant’s
Present Address
Details
If the previous field is selected as Yes, the eMigrate system
displays the fields from the values entered in the previous screen.
If the previous field is selected as No, enter the emigrant’s
present address details.
Phone Number
40 Landline Enter the emigrant’s landline number.
41 Mobile Enter the emigrant’s mobile number.
42 Email Enter the emigrant’s email ID.
Details of contact person in emergency (in India)
43 Name Enter the contact person’s name.
44 Relationship Select the contact person’s relationship with the emigrant
from the drop down menu.
45 Others Enter the contact person’s relationship with the emigrant if
Others is chosen in the field above.
46 Address Enter the contact person’s address.
Phone Number
47 Landline Enter the contact person’s landline number.
48 Mobile Enter the contact person’s mobile number.
49 Email Enter the contact person’s email ID.
Travel Details
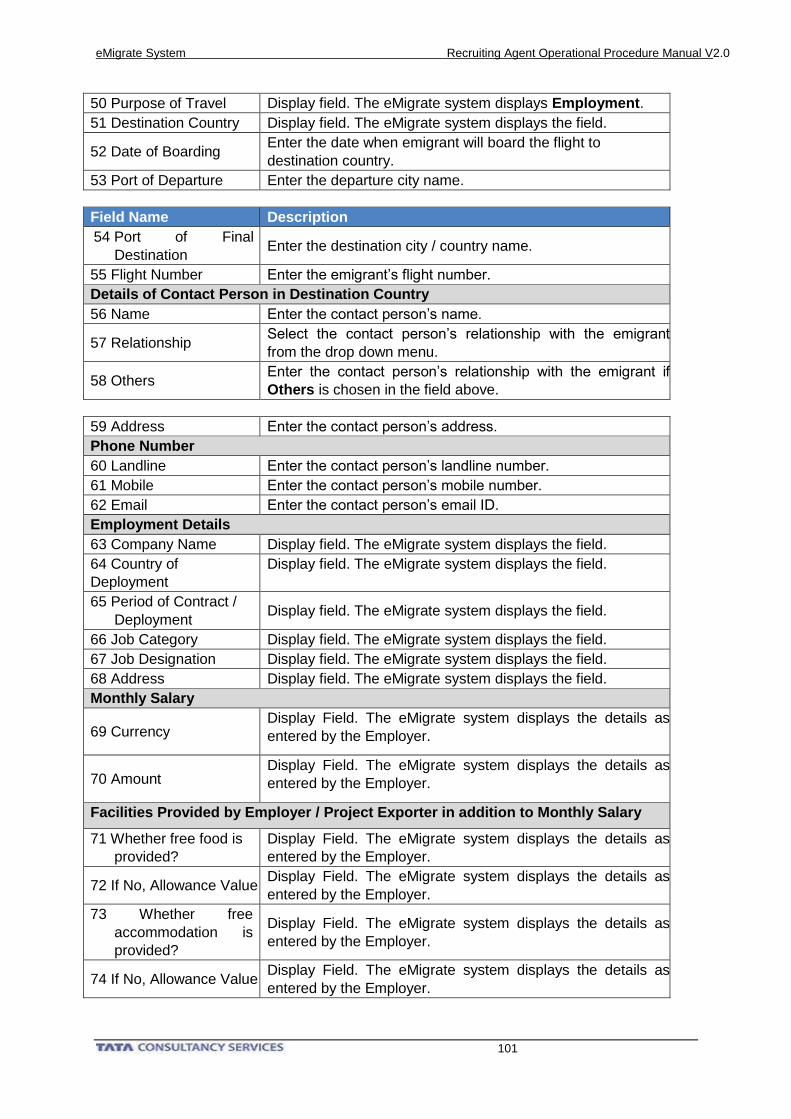
eMigrate System Recruiting Agent Operational Procedure Manual V2.0
101
50 Purpose of Travel Display field. The eMigrate system displays Employment.
51 Destination Country Display field. The eMigrate system displays the field.
52 Date of Boarding Enter the date when emigrant will board the flight to
destination country.
53 Port of Departure Enter the departure city name.
Field Name Description
54 Port of Final
Destination Enter the destination city / country name.
55 Flight Number Enter the emigrant’s flight number.
Details of Contact Person in Destination Country
56 Name Enter the contact person’s name.
57 Relationship Select the contact person’s relationship with the emigrant
from the drop down menu.
58 Others Enter the contact person’s relationship with the emigrant if
Others is chosen in the field above.
59 Address Enter the contact person’s address.
Phone Number
60 Landline Enter the contact person’s landline number.
61 Mobile Enter the contact person’s mobile number.
62 Email Enter the contact person’s email ID.
Employment Details
63 Company Name Display field. The eMigrate system displays the field.
64 Country of
Deployment
Display field. The eMigrate system displays the field.
65 Period of Contract /
Deployment Display field. The eMigrate system displays the field.
66 Job Category Display field. The eMigrate system displays the field.
67 Job Designation Display field. The eMigrate system displays the field.
68 Address Display field. The eMigrate system displays the field.
Monthly Salary
69 Currency Display Field. The eMigrate system displays the details as
entered by the Employer.
70 Amount Display Field. The eMigrate system displays the details as
entered by the Employer.
Facilities Provided by Employer / Project Exporter in addition to Monthly Salary
71 Whether free food is
provided?
Display Field. The eMigrate system displays the details as
entered by the Employer.
72 If No, Allowance Value Display Field. The eMigrate system displays the details as
entered by the Employer.
73 Whether free
accommodation is
provided?
Display Field. The eMigrate system displays the details as
entered by the Employer.
74 If No, Allowance Value Display Field. The eMigrate system displays the details as
entered by the Employer.
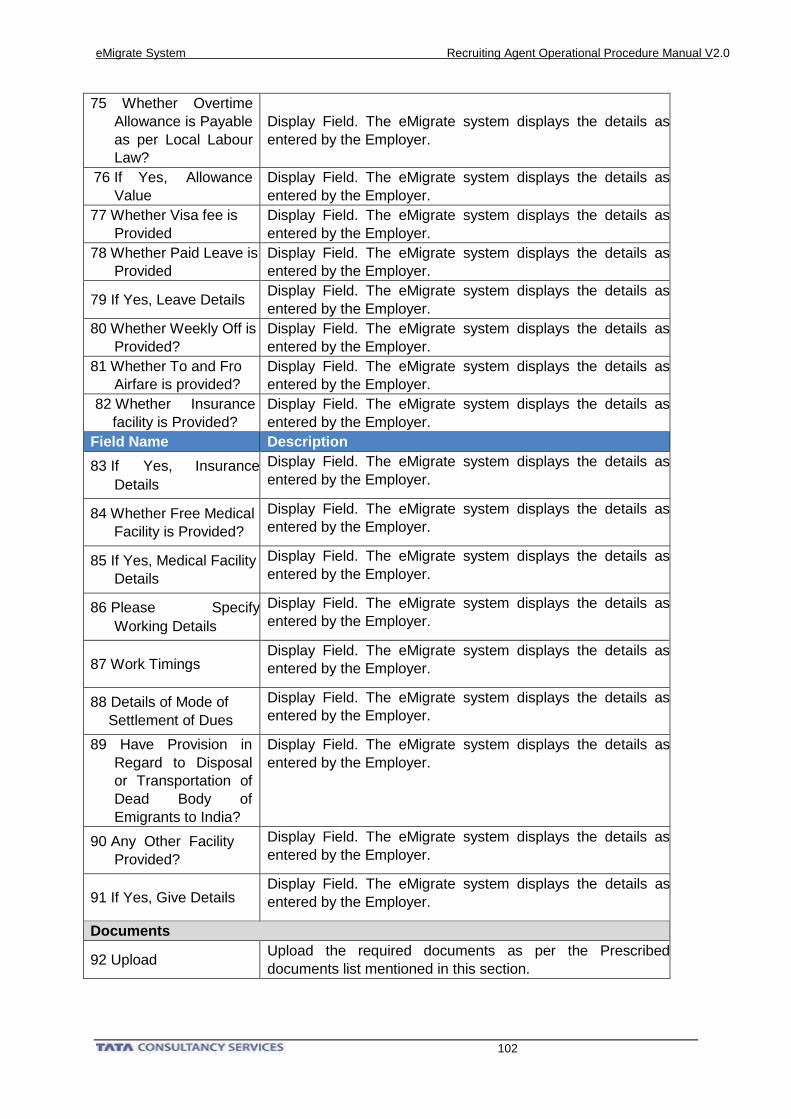
eMigrate System Recruiting Agent Operational Procedure Manual V2.0
102
75 Whether Overtime
Allowance is Payable
as per Local Labour
Law?
Display Field. The eMigrate system displays the details as
entered by the Employer.
76 If Yes, Allowance
Value
Display Field. The eMigrate system displays the details as
entered by the Employer.
77 Whether Visa fee is
Provided
Display Field. The eMigrate system displays the details as
entered by the Employer.
78 Whether Paid Leave is
Provided
Display Field. The eMigrate system displays the details as
entered by the Employer.
79 If Yes, Leave Details Display Field. The eMigrate system displays the details as
entered by the Employer.
80 Whether Weekly Off is
Provided?
Display Field. The eMigrate system displays the details as
entered by the Employer.
81 Whether To and Fro
Airfare is provided?
Display Field. The eMigrate system displays the details as
entered by the Employer.
82 Whether Insurance
facility is Provided?
Display Field. The eMigrate system displays the details as
entered by the Employer.
Field Name Description
83 If Yes, Insurance
Details
Display Field. The eMigrate system displays the details as
entered by the Employer.
84 Whether Free Medical
Facility is Provided?
Display Field. The eMigrate system displays the details as
entered by the Employer.
85 If Yes, Medical Facility
Details
Display Field. The eMigrate system displays the details as
entered by the Employer.
86 Please Specify
Working Details
Display Field. The eMigrate system displays the details as
entered by the Employer.
87 Work Timings Display Field. The eMigrate system displays the details as
entered by the Employer.
88 Details of Mode of
Settlement of Dues
Display Field. The eMigrate system displays the details as
entered by the Employer.
89 Have Provision in
Regard to Disposal
or Transportation of
Dead Body of
Emigrants to India?
Display Field. The eMigrate system displays the details as
entered by the Employer.
90 Any Other Facility
Provided?
Display Field. The eMigrate system displays the details as
entered by the Employer.
91 If Yes, Give Details Display Field. The eMigrate system displays the details as
entered by the Employer.
Documents
92 Upload Upload the required documents as per the Prescribed
documents list mentioned in this section.
eMigrate System Recruiting Agent Operational Procedure Manual V2.0
103
5) Make Bulk Payment
The process is same as mentioned in Make Bulk Payment process detailed under ‘Without Employer
Registration’ Scenario at section 5.1.4).
6) Applying for Emigration Clearance Cancellation
The process is same as mentioned in Applying for Emigration Clearance Cancellation process detailed
under ‘Without Employer Registration’ Scenario at section 5.1.5).
6. Administration Related Processes
RAs can apply for additional user ID for their employees and also register/update DSC against their ID.
All such processes are the administration related processes.
This chapter covers the following business processes in detail:
• Applying for addition user ID for employee
• De-activating employee user ID
• Acquiring and Registering a Digital Signature Certificate (DSC) Updating DSC
6.1. Applying for Additional User ID for Employee
Apart from the RA ID, you can apply for at most two more additional user IDs for your employees to access
the eMigrate system.
This section covers the process of applying for additional user ID for employee. Before reading the
process steps, ensure that the process pre requisites are met and copies of the Prescribed
documents are available.
Pre requisites:
You cannot apply if you already have two additional user IDs.
Prescribed documents: None (The Ministry may notify a document from time to time)
Please note: The Ministry may notify from time to time if any other document(s) are also
required. You are requested to confirm the list of documents with Ministry / Jurisdictional PoE
Office before filing application on eMigrate system. If any other documents are required by
Ministry, the same may be uploaded in ‘Optional Attachments’.
Process steps:
Please follow the below mentioned steps to apply for additional user ID:
1. Login into eMigrate system as a RA.
2. Go to Administration -> Apply for Additional User ID. The Apply for Additional User ID form opens.
3. Fill the Additional User ID form. Click Add To List. The system adds a row, of the details you entered,
in the Employee List.
If you don’t have any other active Employee User ID and want to apply for the second user ID, you
can fill the form again in the similar manner.
eMigrate System Recruiting Agent Operational Procedure Manual V2.0
104
After the employee details are added in the Employee List, click Submit.
Figure 62: Applying for Additional User ID Screen
On successful submission of application, system auto approves the application and displays a
confirmation message . The Employee user credentials are sent to your registered email ID.
The following table details the description of the fields in the applying for additional user ID form. The fields
are mentioned in the order in which they appear in the form (top to bottom).
Table 33: Addition User ID Form Field Reference Table
Field Name Description
1. First Name Enter the first name of the employee.
2. Last Name Enter the last name of the employee.
3. PAN Enter the PAN card number of the employee.
4. UID Enter the Aadhar card number of the employee.
5. Date of Birth Enter the date of birth of the employee.
Address of employee
6. Address Line 1 Enter the address line 1 of the employee.
7. Address Line 2 Enter the address line 2 of the employee.
8. City / Town / Village Enter the city / town / village name of the employee.
9. State / UT Enter the State / UT name of the employee.
10. District Enter the District name of the employee.
11. Country Display Field. The eMigrate system displays the field.
12. Postal / Pin Code Enter the pin code of the employee’s address.
13. Email Enter the email id of the employee.
14. Landline Enter the landline number of the employee.
15. Mobile Enter the mobile number of the employee.
16. Reason for
Requesting User ID Enter the reason for requesting User ID.
6.2. De-activating Employee User ID
You may want to deactivate an employee user ID if the employee is not continuing service in your company.
eMigrate System Recruiting Agent Operational Procedure Manual V2.0
105
This section covers the process of de-activating employee user ID. Before reading the process steps,
ensure that the process pre requisites are met and copies of the prescribed documents are available.
Pre requisites:
Only a Managing Director / Managing Partner / Proprietor can make this request
Prescribed documents: None (The Ministry may notify a document from time to time)
Please note: The Ministry may notify from time to time if any other document(s) are also
required. You are requested to confirm the list of documents with Ministry / Jurisdictional PoE
Office before filing application on eMigrate system. If any other documents are required by
Ministry, the same may be uploaded in ‘Optional Attachments’.
Process steps:
Please follow the below mentioned steps to de-activate the employee user ID:
1. Login into eMigrate system as a RA.
2. Go to Administration -> Deactivate Employee User ID. The Deactivate Employee User ID
screen appears.
Figure 63: De-activating Employee User ID Screen 1
A confirmation screen appears.
4. Click OK. The selected ID is de-activated by the system.
The following table details the description of the fields in the de-activating employee user ID form. The fields
are mentioned in the order in which they appear in the form (top to bottom).
Table 34: De-activating Employee User ID Form Field Reference Table
Field Name Description
1. First Name Enter the first name of the employee.
2. Last Name Enter the last name of the employee.
3. Date of Birth Enter the date of birth of the employee.
6.3. Acquiring and Registering a Digital Signature Certificate (DSC)
You require a Digital Signature Certificate (DSC) along with your user ID to log on the eMigrate system.
Each recruiting agent user ID is linked to a unique DSC.
3. Click Deactivate against the required ID.
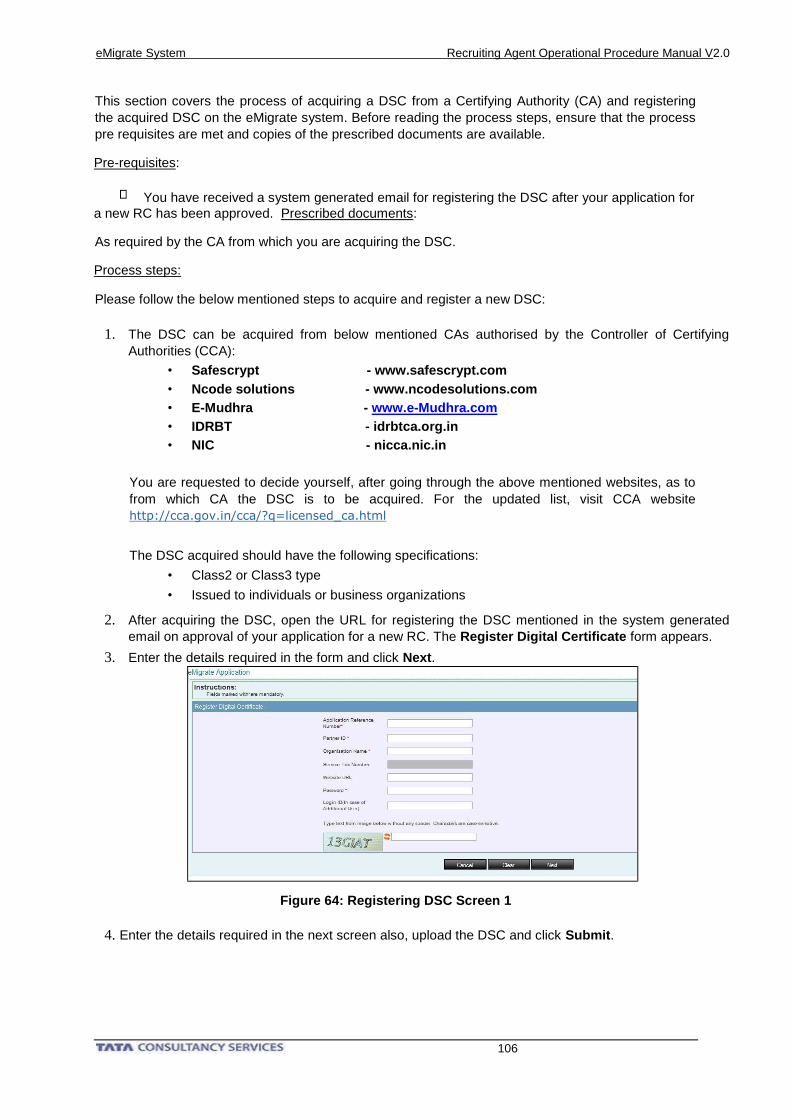
eMigrate System Recruiting Agent Operational Procedure Manual V2.0
106
This section covers the process of acquiring a DSC from a Certifying Authority (CA) and registering
the acquired DSC on the eMigrate system. Before reading the process steps, ensure that the process
pre requisites are met and copies of the prescribed documents are available.
Pre-requisites:
You have received a system generated email for registering the DSC after your application for
a new RC has been approved. Prescribed documents:
As required by the CA from which you are acquiring the DSC.
Process steps:
Please follow the below mentioned steps to acquire and register a new DSC:
1. The DSC can be acquired from below mentioned CAs authorised by the Controller of Certifying
Authorities (CCA):
• Safescrypt - www.safescrypt.com
• Ncode solutions - www.ncodesolutions.com
• E-Mudhra - www.e-Mudhra.com
• IDRBT - idrbtca.org.in
• NIC - nicca.nic.in
You are requested to decide yourself, after going through the above mentioned websites, as to
from which CA the DSC is to be acquired. For the updated list, visit CCA website
http://cca.gov.in/cca/?q=licensed_ca.html
The DSC acquired should have the following specifications:
• Class2 or Class3 type
• Issued to individuals or business organizations
2. After acquiring the DSC, open the URL for registering the DSC mentioned in the system generated
email on approval of your application for a new RC. The Register Digital Certificate form appears.
3. Enter the details required in the form and click Next.
Figure 64: Registering DSC Screen 1
4. Enter the details required in the next screen also, upload the DSC and click Submit.
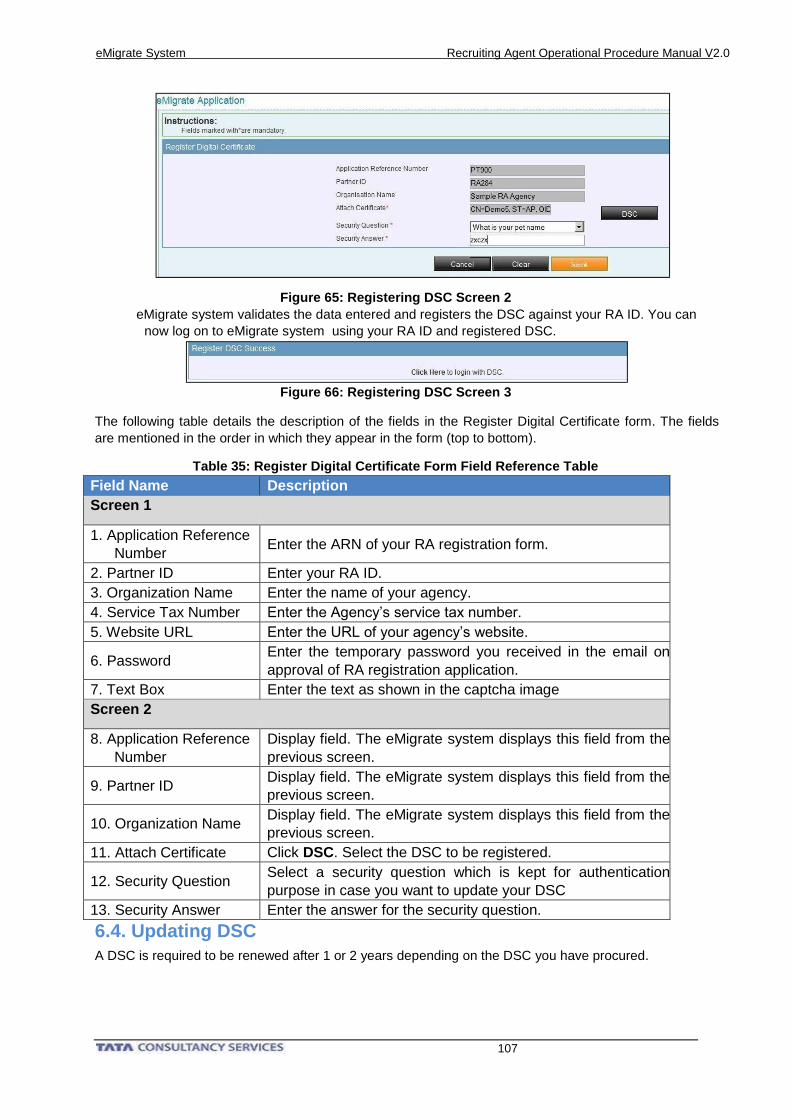
eMigrate System Recruiting Agent Operational Procedure Manual V2.0
107
Figure 65: Registering DSC Screen 2
eMigrate system validates the data entered and registers the DSC against your RA ID. You can
now log on to eMigrate system using your RA ID and registered DSC.
Figure 66: Registering DSC Screen 3
The following table details the description of the fields in the Register Digital Certificate form. The fields
are mentioned in the order in which they appear in the form (top to bottom).
Table 35: Register Digital Certificate Form Field Reference Table
Field Name Description
Screen 1
1. Application Reference
Number Enter the ARN of your RA registration form.
2. Partner ID Enter your RA ID.
3. Organization Name Enter the name of your agency.
4. Service Tax Number Enter the Agency’s service tax number.
5. Website URL Enter the URL of your agency’s website.
6. Password Enter the temporary password you received in the email on
approval of RA registration application.
7. Text Box Enter the text as shown in the captcha image
Screen 2
8. Application Reference
Number
Display field. The eMigrate system displays this field from the
previous screen.
9. Partner ID Display field. The eMigrate system displays this field from the
previous screen.
10. Organization Name Display field. The eMigrate system displays this field from the
previous screen.
11. Attach Certificate Click DSC. Select the DSC to be registered.
12. Security Question Select a security question which is kept for authentication
purpose in case you want to update your DSC
13. Security Answer Enter the answer for the security question.
6.4. Updating DSC
A DSC is required to be renewed after 1 or 2 years depending on the DSC you have procured.
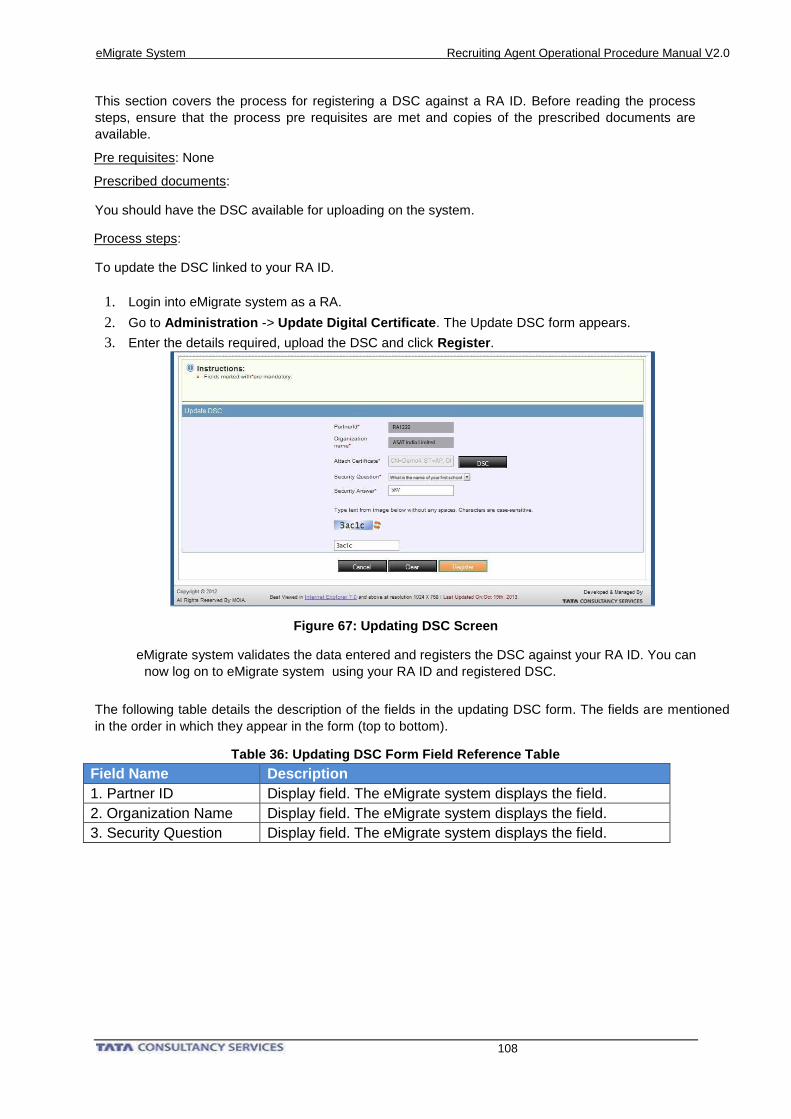
eMigrate System Recruiting Agent Operational Procedure Manual V2.0
108
This section covers the process for registering a DSC against a RA ID. Before reading the process
steps, ensure that the process pre requisites are met and copies of the prescribed documents are
available.
Pre requisites: None
Prescribed documents:
You should have the DSC available for uploading on the system.
Process steps:
To update the DSC linked to your RA ID.
1. Login into eMigrate system as a RA.
2. Go to Administration -> Update Digital Certificate. The Update DSC form appears.
3. Enter the details required, upload the DSC and click Register.
Figure 67: Updating DSC Screen
eMigrate system validates the data entered and registers the DSC against your RA ID. You can
now log on to eMigrate system using your RA ID and registered DSC.
The following table details the description of the fields in the updating DSC form. The fields are mentioned
in the order in which they appear in the form (top to bottom).
Table 36: Updating DSC Form Field Reference Table
Field Name Description
1. Partner ID Display field. The eMigrate system displays the field.
2. Organization Name Display field. The eMigrate system displays the field.
3. Security Question Display field. The eMigrate system displays the field.
eMigrate System Recruiting Agent Operational Procedure Manual V1.0
TCS MEA-OED Confidential 109
4. Security Answer Enter the answer you had set to the above security question.
5. Text Box Enter the text as shown in the captcha image.
Attachments
6. DSC Browse and upload the new DSC.
7. Reporting & Miscellaneous Processes
You can view information like status of their application, Emigration Clearance application, open jobs
and grievances raised against you by emigrants. Also in case you want to file an appeal with the
Secretary, MEA-OED for review of an order, you have to make online payment of the appeal filing fee.
This chapter covers the following processes in detail:
• Viewing application status
• Viewing Emigration Clearance application
• Viewing open jobs
• Viewing grievances details
• Paying appeal filing fee
• Submit Response Online
• Resubmit Application
7.1. Viewing Application Status
You can view the status of your application through the eMigrate system.
Process steps:
To view the application transaction status:
1. Login into eMigrate system as a RA.
2. Go to Search -> Track Status. The Track Status form appears.
3. Enter the ARN in the form and click Submit.
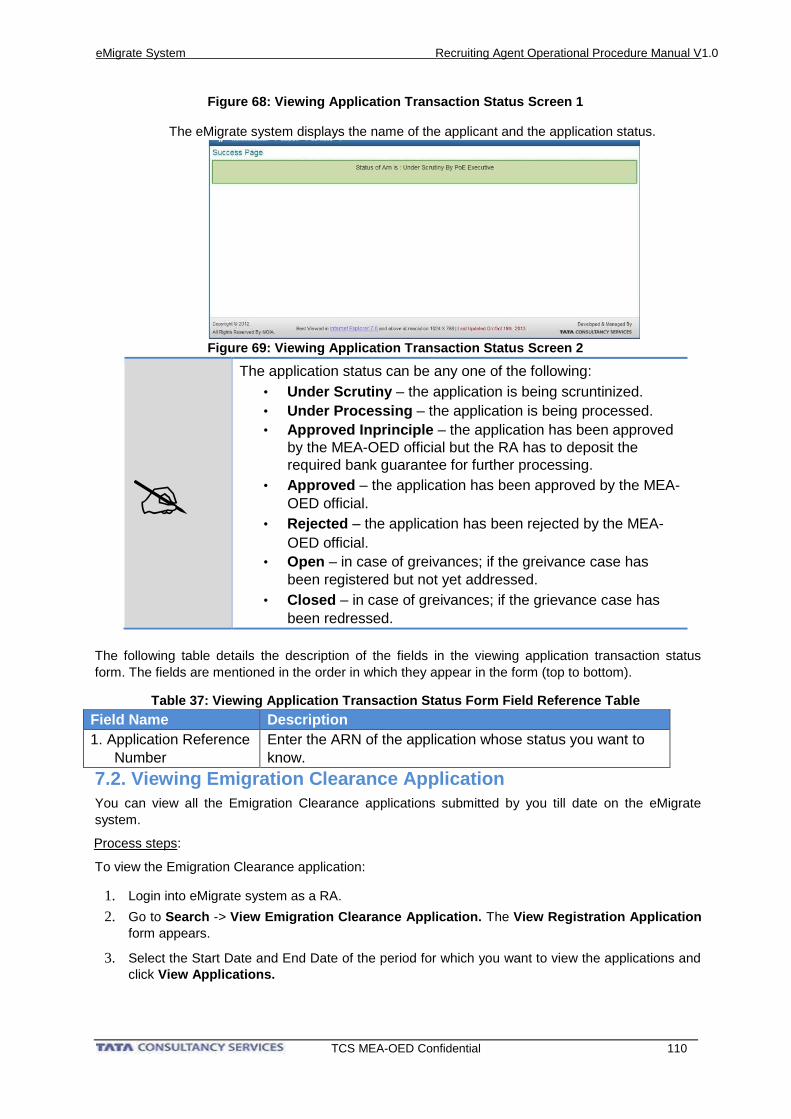
eMigrate System Recruiting Agent Operational Procedure Manual V1.0
TCS MEA-OED Confidential 110
Figure 68: Viewing Application Transaction Status Screen 1
The eMigrate system displays the name of the applicant and the application status.
Figure 69: Viewing Application Transaction Status Screen 2
The application status can be any one of the following:
• Under Scrutiny – the application is being scruntinized.
• Under Processing – the application is being processed.
• Approved Inprinciple – the application has been approved
by the MEA-OED official but the RA has to deposit the
required bank guarantee for further processing.
• Approved – the application has been approved by the MEA-
OED official.
• Rejected – the application has been rejected by the MEA-
OED official.
• Open – in case of greivances; if the greivance case has
been registered but not yet addressed.
• Closed – in case of greivances; if the grievance case has
been redressed.
The following table details the description of the fields in the viewing application transaction status
form. The fields are mentioned in the order in which they appear in the form (top to bottom).
Table 37: Viewing Application Transaction Status Form Field Reference Table
Field Name Description
1. Application Reference
Number
Enter the ARN of the application whose status you want to
know.
7.2. Viewing Emigration Clearance Application
You can view all the Emigration Clearance applications submitted by you till date on the eMigrate
system.
Process steps:
To view the Emigration Clearance application:
1. Login into eMigrate system as a RA.
2. Go to Search -> View Emigration Clearance Application. The View Registration Application
form appears.
3. Select the Start Date and End Date of the period for which you want to view the applications and
click View Applications.
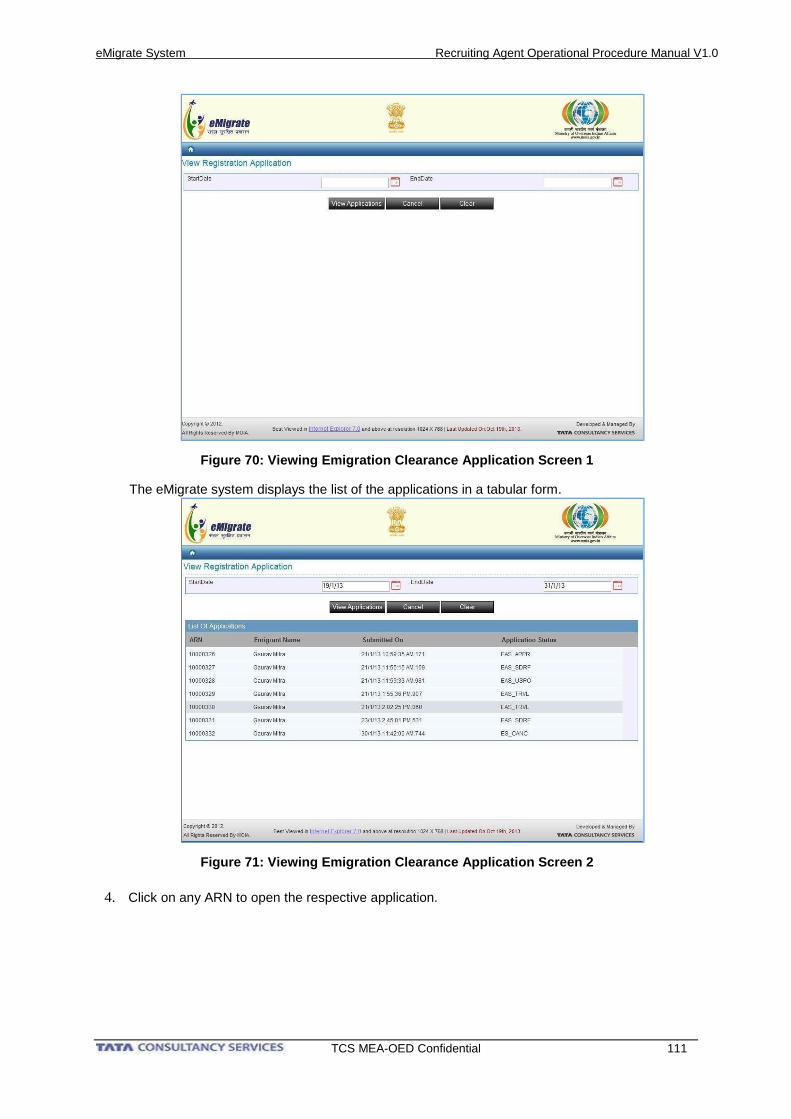
eMigrate System Recruiting Agent Operational Procedure Manual V1.0
TCS MEA-OED Confidential 111
Figure 70: Viewing Emigration Clearance Application Screen 1
The eMigrate system displays the list of the applications in a tabular form.
Figure 71: Viewing Emigration Clearance Application Screen 2
4. Click on any ARN to open the respective application.
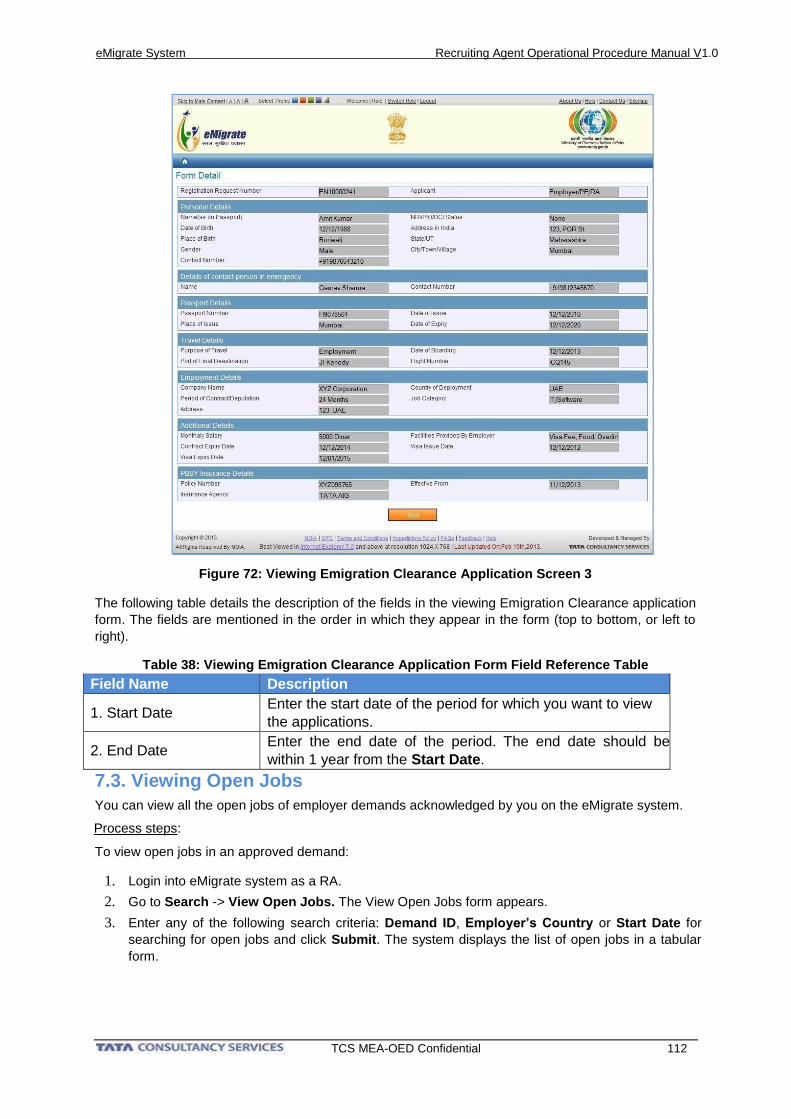
eMigrate System Recruiting Agent Operational Procedure Manual V1.0
TCS MEA-OED Confidential 112
Figure 72: Viewing Emigration Clearance Application Screen 3
The following table details the description of the fields in the viewing Emigration Clearance application
form. The fields are mentioned in the order in which they appear in the form (top to bottom, or left to
right).
Table 38: Viewing Emigration Clearance Application Form Field Reference Table
Field Name Description
1. Start Date Enter the start date of the period for which you want to view
the applications.
2. End Date Enter the end date of the period. The end date should be
within 1 year from the Start Date.
7.3. Viewing Open Jobs
You can view all the open jobs of employer demands acknowledged by you on the eMigrate system.
Process steps:
To view open jobs in an approved demand:
1. Login into eMigrate system as a RA.
2. Go to Search -> View Open Jobs. The View Open Jobs form appears.
3. Enter any of the following search criteria: Demand ID, Employer’s Country or Start Date for
searching for open jobs and click Submit. The system displays the list of open jobs in a tabular
form.
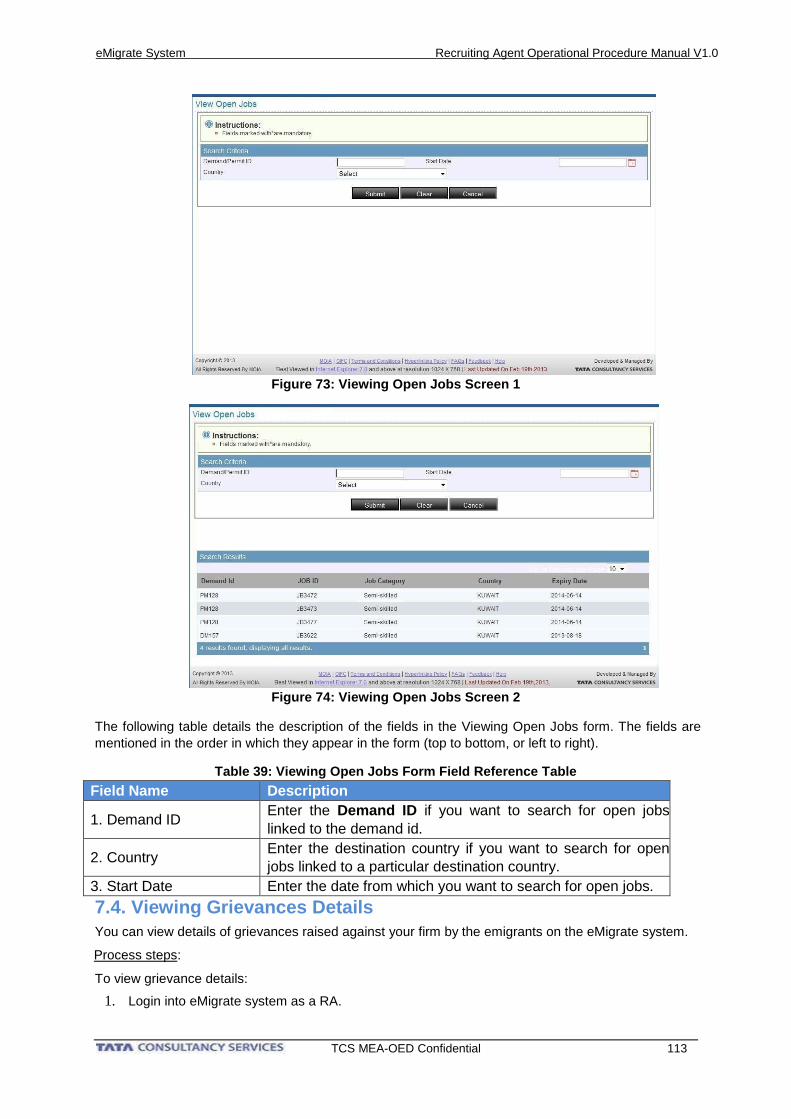
eMigrate System Recruiting Agent Operational Procedure Manual V1.0
TCS MEA-OED Confidential 113
Figure 73: Viewing Open Jobs Screen 1
Figure 74: Viewing Open Jobs Screen 2
The following table details the description of the fields in the Viewing Open Jobs form. The fields are
mentioned in the order in which they appear in the form (top to bottom, or left to right).
Table 39: Viewing Open Jobs Form Field Reference Table
Field Name Description
1. Demand ID Enter the Demand ID if you want to search for open jobs
linked to the demand id.
2. Country Enter the destination country if you want to search for open
jobs linked to a particular destination country.
3. Start Date Enter the date from which you want to search for open jobs.
7.4. Viewing Grievances Details
You can view details of grievances raised against your firm by the emigrants on the eMigrate system.
Process steps:
To view grievance details:
1. Login into eMigrate system as a RA.

eMigrate System Recruiting Agent Operational Procedure Manual V1.0
TCS MEA-OED Confidential 114
2. Go to Search -> View Grievances Details. The View Grievances screen appears. The eMigrate
system displays the list of grievances raised against your firm.
Figure 75: Viewing Grievances Screen 1
3. Click on any Grievance Reference Number to open the respective grievance details.
Figure 76: Viewing Grievances Screen 2
7.5. Paying Appeal Filing Fee
If you want to file an appeal with the Secretary, MEA-OED for review of an order, you have to make
online payment of the appeal filing fee.
Process steps:
To pay appeal filing fee:
1. Login into eMigrate system as a RA.
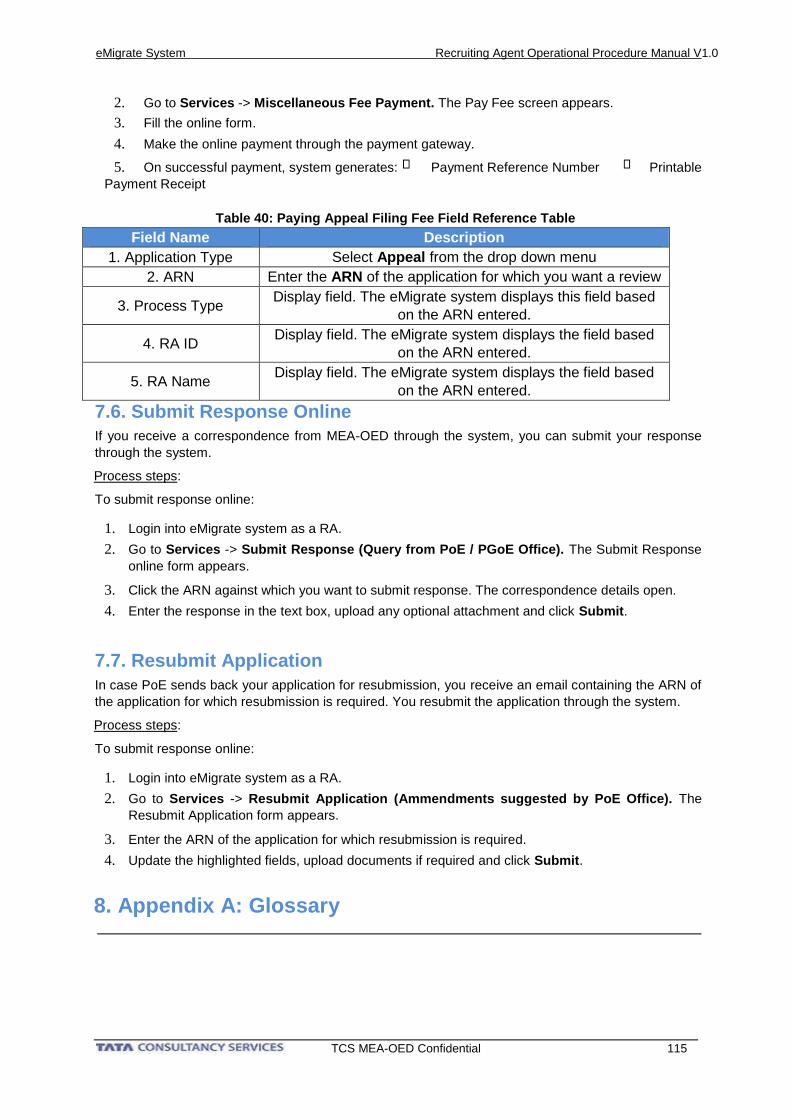
eMigrate System Recruiting Agent Operational Procedure Manual V1.0
TCS MEA-OED Confidential 115
2. Go to Services -> Miscellaneous Fee Payment. The Pay Fee screen appears.
3. Fill the online form.
4. Make the online payment through the payment gateway.
5. On successful payment, system generates: Payment Reference Number Printable
Payment Receipt
Table 40: Paying Appeal Filing Fee Field Reference Table
Field Name Description
1. Application Type Select Appeal from the drop down menu
2. ARN Enter the ARN of the application for which you want a review
3. Process Type Display field. The eMigrate system displays this field based
on the ARN entered.
4. RA ID Display field. The eMigrate system displays the field based
on the ARN entered.
5. RA Name Display field. The eMigrate system displays the field based
on the ARN entered.
7.6. Submit Response Online
If you receive a correspondence from MEA-OED through the system, you can submit your response
through the system.
Process steps:
To submit response online:
1. Login into eMigrate system as a RA.
2. Go to Services -> Submit Response (Query from PoE / PGoE Office). The Submit Response
online form appears.
3. Click the ARN against which you want to submit response. The correspondence details open.
4. Enter the response in the text box, upload any optional attachment and click Submit.
7.7. Resubmit Application
In case PoE sends back your application for resubmission, you receive an email containing the ARN of
the application for which resubmission is required. You resubmit the application through the system.
Process steps:
To submit response online:
1. Login into eMigrate system as a RA.
2. Go to Services -> Resubmit Application (Ammendments suggested by PoE Office). The
Resubmit Application form appears.
3. Enter the ARN of the application for which resubmission is required.
4. Update the highlighted fields, upload documents if required and click Submit.
8. Appendix A: Glossary
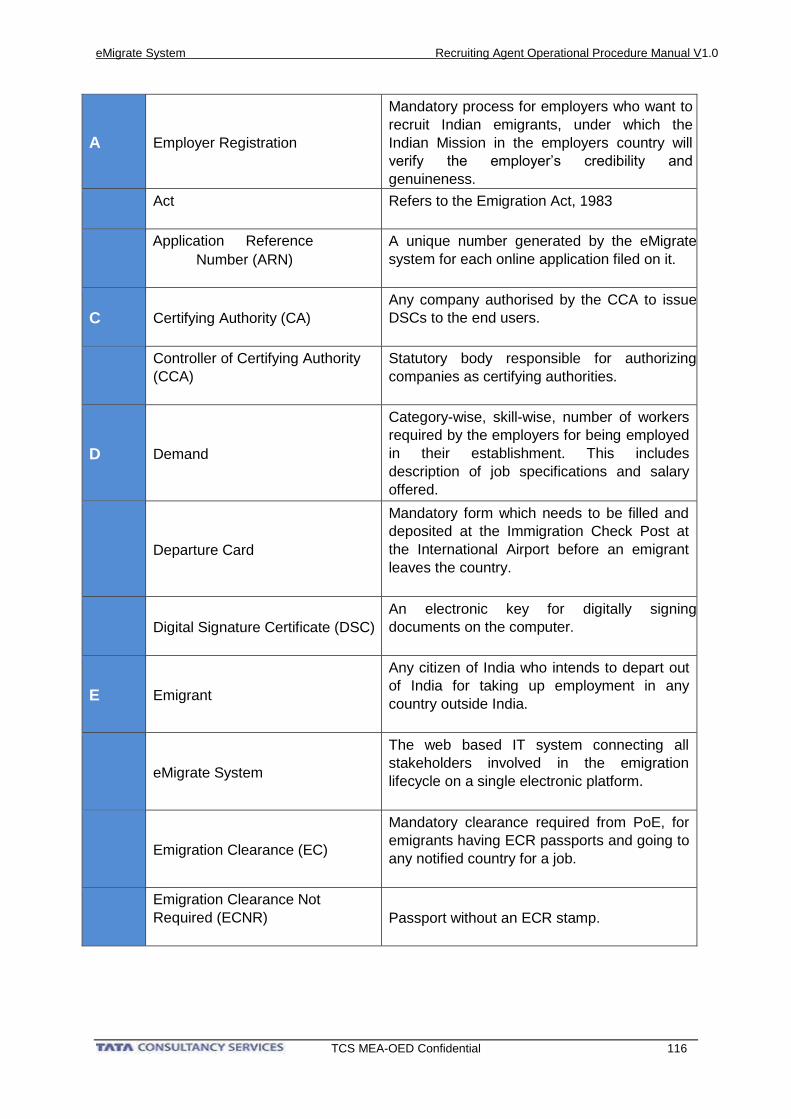
eMigrate System Recruiting Agent Operational Procedure Manual V1.0
TCS MEA-OED Confidential 116
A Employer Registration
Mandatory process for employers who want to
recruit Indian emigrants, under which the
Indian Mission in the employers country will
verify the employer’s credibility and
genuineness.
Act Refers to the Emigration Act, 1983
Application Reference
Number (ARN)
A unique number generated by the eMigrate
system for each online application filed on it.
C Certifying Authority (CA)
Any company authorised by the CCA to issue
DSCs to the end users.
Controller of Certifying Authority
(CCA)
Statutory body responsible for authorizing
companies as certifying authorities.
D Demand
Category-wise, skill-wise, number of workers
required by the employers for being employed
in their establishment. This includes
description of job specifications and salary
offered.
Departure Card
Mandatory form which needs to be filled and
deposited at the Immigration Check Post at
the International Airport before an emigrant
leaves the country.
Digital Signature Certificate (DSC)
An electronic key for digitally signing
documents on the computer.
E Emigrant
Any citizen of India who intends to depart out
of India for taking up employment in any
country outside India.
eMigrate System
The web based IT system connecting all
stakeholders involved in the emigration
lifecycle on a single electronic platform.
Emigration Clearance (EC)
Mandatory clearance required from PoE, for
emigrants having ECR passports and going to
any notified country for a job.
Emigration Clearance Not
Required (ECNR) Passport without an ECR stamp.
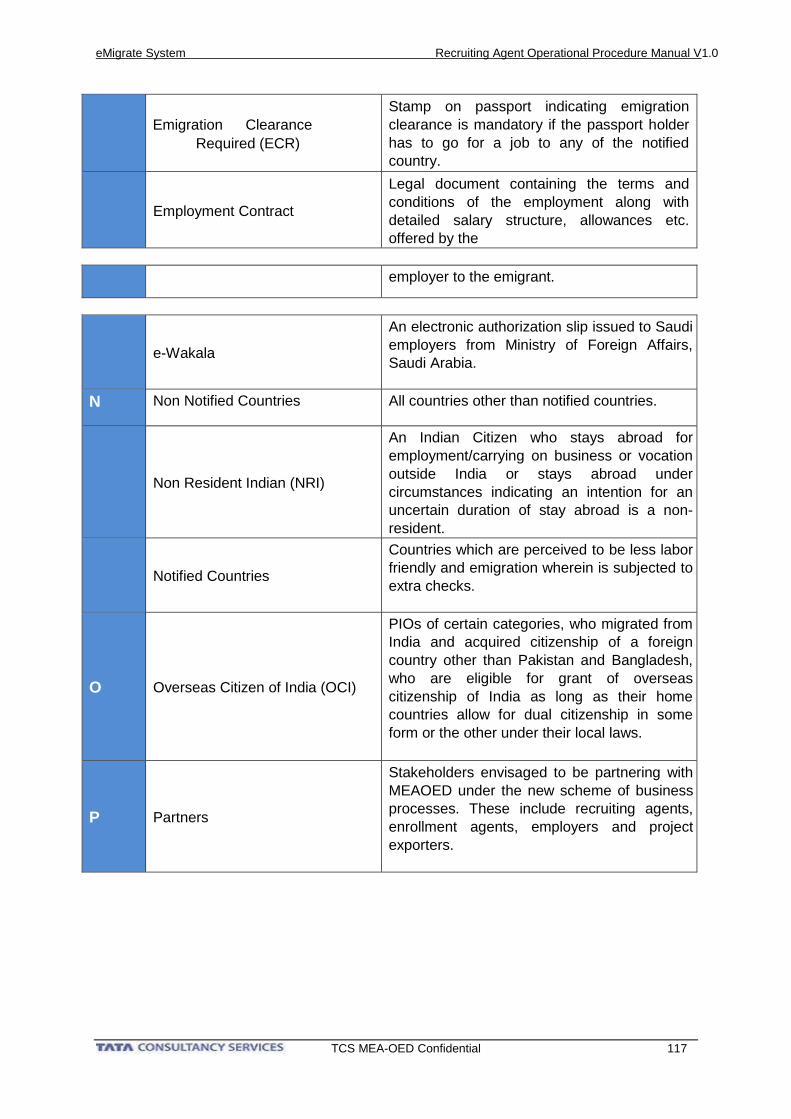
eMigrate System Recruiting Agent Operational Procedure Manual V1.0
TCS MEA-OED Confidential 117
Emigration Clearance
Required (ECR)
Stamp on passport indicating emigration
clearance is mandatory if the passport holder
has to go for a job to any of the notified
country.
Employment Contract
Legal document containing the terms and
conditions of the employment along with
detailed salary structure, allowances etc.
offered by the
employer to the emigrant.
e-Wakala
An electronic authorization slip issued to Saudi
employers from Ministry of Foreign Affairs,
Saudi Arabia.
N Non Notified Countries All countries other than notified countries.
Non Resident Indian (NRI)
An Indian Citizen who stays abroad for
employment/carrying on business or vocation
outside India or stays abroad under
circumstances indicating an intention for an
uncertain duration of stay abroad is a non-
resident.
Notified Countries
Countries which are perceived to be less labor
friendly and emigration wherein is subjected to
extra checks.
O Overseas Citizen of India (OCI)
PIOs of certain categories, who migrated from
India and acquired citizenship of a foreign
country other than Pakistan and Bangladesh,
who are eligible for grant of overseas
citizenship of India as long as their home
countries allow for dual citizenship in some
form or the other under their local laws.
P Partners
Stakeholders envisaged to be partnering with
MEAOED under the new scheme of business
processes. These include recruiting agents,
enrollment agents, employers and project
exporters.
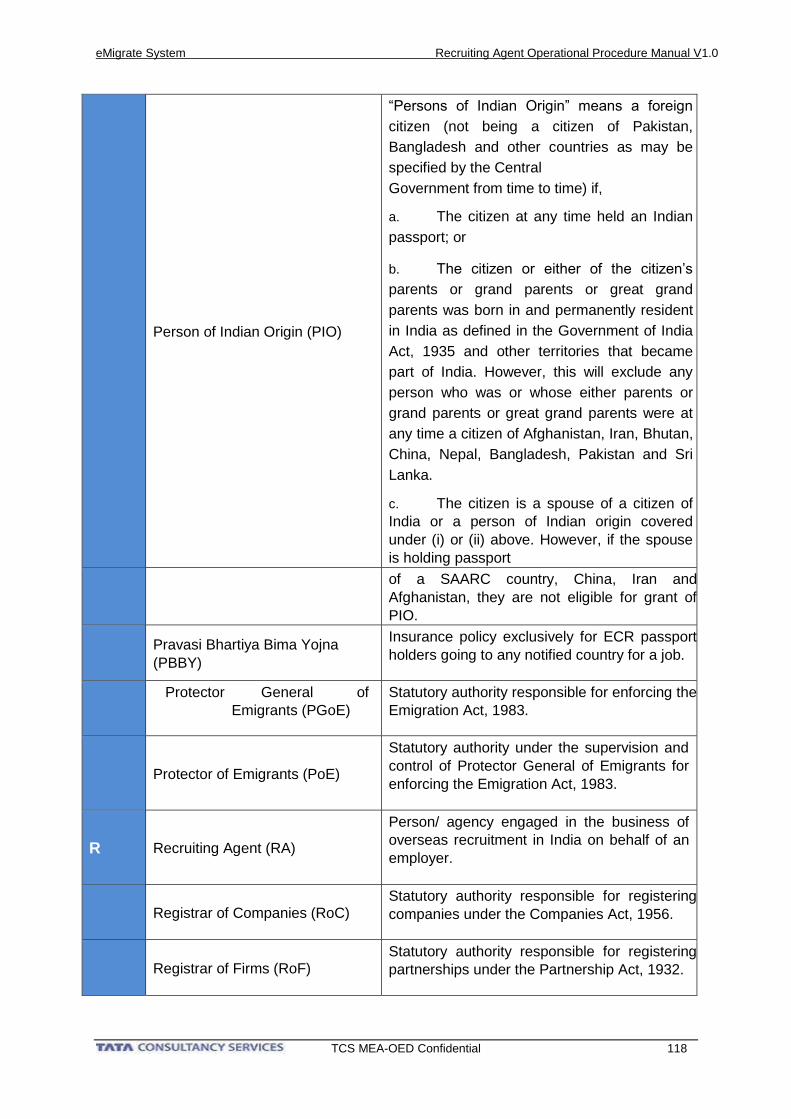
eMigrate System Recruiting Agent Operational Procedure Manual V1.0
TCS MEA-OED Confidential 118
Person of Indian Origin (PIO)
“Persons of Indian Origin” means a foreign
citizen (not being a citizen of Pakistan,
Bangladesh and other countries as may be
specified by the Central
Government from time to time) if,
a. The citizen at any time held an Indian
passport; or
b. The citizen or either of the citizen’s
parents or grand parents or great grand
parents was born in and permanently resident
in India as defined in the Government of India
Act, 1935 and other territories that became
part of India. However, this will exclude any
person who was or whose either parents or
grand parents or great grand parents were at
any time a citizen of Afghanistan, Iran, Bhutan,
China, Nepal, Bangladesh, Pakistan and Sri
Lanka.
c. The citizen is a spouse of a citizen of
India or a person of Indian origin covered
under (i) or (ii) above. However, if the spouse
is holding passport
of a SAARC country, China, Iran and
Afghanistan, they are not eligible for grant of
PIO.
Pravasi Bhartiya Bima Yojna
(PBBY)
Insurance policy exclusively for ECR passport
holders going to any notified country for a job.
Protector General of
Emigrants (PGoE)
Statutory authority responsible for enforcing the
Emigration Act, 1983.
Protector of Emigrants (PoE)
Statutory authority under the supervision and
control of Protector General of Emigrants for
enforcing the Emigration Act, 1983.
R Recruiting Agent (RA)
Person/ agency engaged in the business of
overseas recruitment in India on behalf of an
employer.
Registrar of Companies (RoC) Statutory authority responsible for registering
companies under the Companies Act, 1956.
Registrar of Firms (RoF) Statutory authority responsible for registering
partnerships under the Partnership Act, 1932.
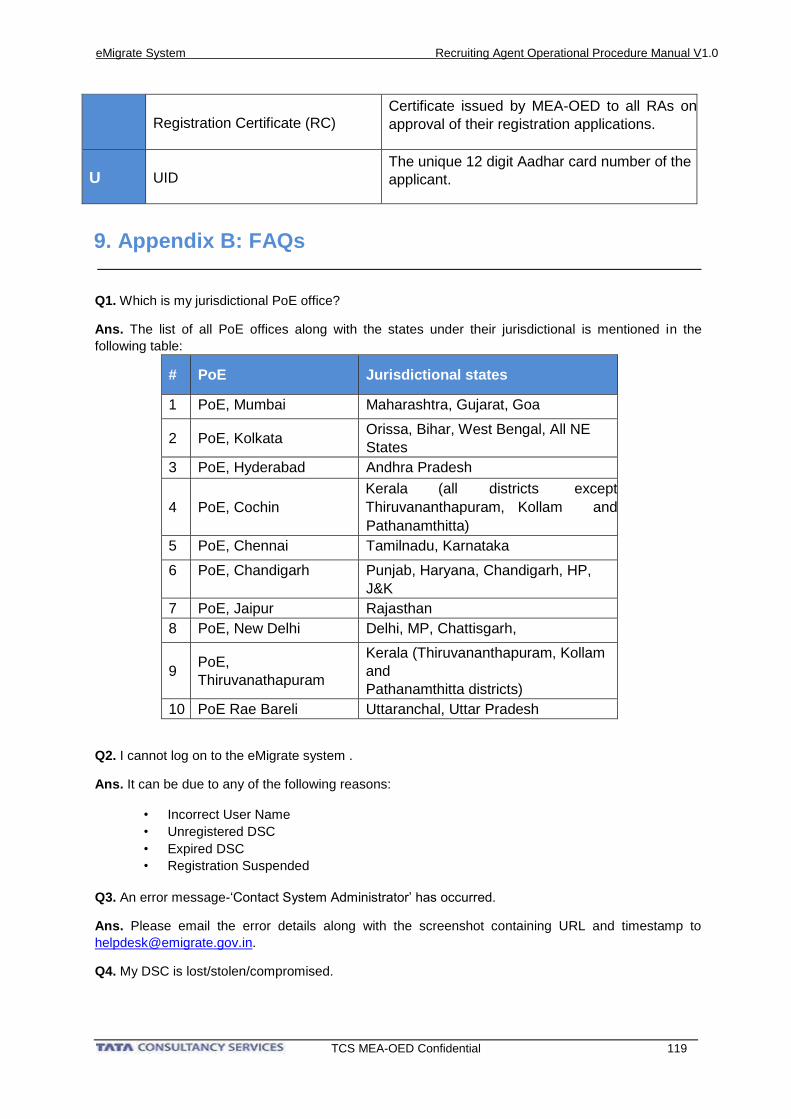
eMigrate System Recruiting Agent Operational Procedure Manual V1.0
TCS MEA-OED Confidential 119
Registration Certificate (RC) Certificate issued by MEA-OED to all RAs on
approval of their registration applications.
U UID The unique 12 digit Aadhar card number of the
applicant.
9. Appendix B: FAQs
Q1. Which is my jurisdictional PoE office?
Ans. The list of all PoE offices along with the states under their jurisdictional is mentioned in the
following table:
# PoE Jurisdictional states
1 PoE, Mumbai Maharashtra, Gujarat, Goa
2 PoE, Kolkata Orissa, Bihar, West Bengal, All NE
States
3 PoE, Hyderabad Andhra Pradesh
4 PoE, Cochin
Kerala (all districts except
Thiruvananthapuram, Kollam and
Pathanamthitta)
5 PoE, Chennai Tamilnadu, Karnataka
6 PoE, Chandigarh Punjab, Haryana, Chandigarh, HP,
J&K
7 PoE, Jaipur Rajasthan
8 PoE, New Delhi Delhi, MP, Chattisgarh,
9 PoE,
Thiruvanathapuram
Kerala (Thiruvananthapuram, Kollam
and
Pathanamthitta districts)
10 PoE Rae Bareli Uttaranchal, Uttar Pradesh
Q2. I cannot log on to the eMigrate system .
Ans. It can be due to any of the following reasons:
• Incorrect User Name
• Unregistered DSC
• Expired DSC
• Registration Suspended
Q3. An error message-‘Contact System Administrator’ has occurred.
Ans. Please email the error details along with the screenshot containing URL and timestamp to
Q4. My DSC is lost/stolen/compromised.
eMigrate System Recruiting Agent Operational Procedure Manual V1.0
TCS MEA-OED Confidential 120
Ans. Please acquire a new DSC from any CA and contact the system admin for instructions on
registering the DSC against your RA ID on the eMigrate system.
Q5. Online payment is applicable for which all applications?
Ans. The fee which have to be paid online are:
• RA registration application fee
• RA renewal fee
• PE permit fee
• Emigration Clearance fee
• Any other fee notified by the Ministry from time to time
Q6. What is an ARN?
Ans. ARN stands for application reference number. Each application you file online to MEA-OED,
through the eMigrate system, has a unique ARN. The format of the ARN is PT<Sequence Number>
ex PT2876, PT96498 etc.
Q7. I do not have all the Prescribed documents for applying for a new RC. Can I apply without some of
the prescribed documents?
Ans. No, all the prescribed documents are required.
Q8. What is a Digital Signature Certificate (DSC)? What is it used for?
Ans: A DSC is an electronic key used for ensuring source authentication, data integrity and ensuring
non-repudiation of digitally signed documents.
Once your application for a new RC is approved by the PGoE, you can log on to the eMigrate system.
For all services of MEA-OED, you have to apply online through this portal. For accessing this system,
you require your RA ID (which is your username) and a DSC (which is your password).
Q9. I do not have a DSC.
Ans: You have to buy a DSC from a certifying authority (CA). The DSC can be acquired from any of
the CAs authorised by the Controller of Certifying Authorities (CCA):
• Safescrypt - www.safescrypt.com
• Ncode solutions - www.ncodesolutions.com
• E-Mudhra - www.e-Mudhra.com
• IDRBT - idrbtca.org.in
• NIC - nicca.nic.in
You are requested to decide yourself, after going through the above mentioned websites, as to from
which CA the DSC is to be acquired. For the updated
list, visit CCA website http://cca.gov.in/cca/?q=licensed_ca.html The
DSC acquired should have the following specifications:
• Class2 or Class3 type
• Issued to individuals or business organizations
Q11. I have acquired a DSC. How to use it?
Ans: To register the acquired DSC on the eMigrate system:
eMigrate System Recruiting Agent Operational Procedure Manual V1.0
TCS MEA-OED Confidential 121
1. Open the URL for registering the DSC mentioned in the system generated email on approval
of your application for a new RC.
2. Enter the details required, upload the DSC and click Register.
3. eMigrate system validates the data entered and registers the DSC against your RA ID.
You can now log on to eMigrate system internal portal using your RA ID (as username) and registered
DSC (as password).
Q12. I have received an email from the eMigrate system for re-submitting my application. What should
I do?
Ans: If some further clarifications/inputs are required from you, the PoE can send back the application
for re-submission. In such a case, you receive a system generated mail containing instructions for
resubmitting the application along with the required documents.