Embed Size (px)
Citation preview
890 Mountain Avenue Murray Hill New Jersey 07974 (908) 795 – 3200 www.adventintermodal.com
eModal Pre Gate System
Creating a Pre Gate (Quick Guide)
eModal Pre Gate Trucker View
2
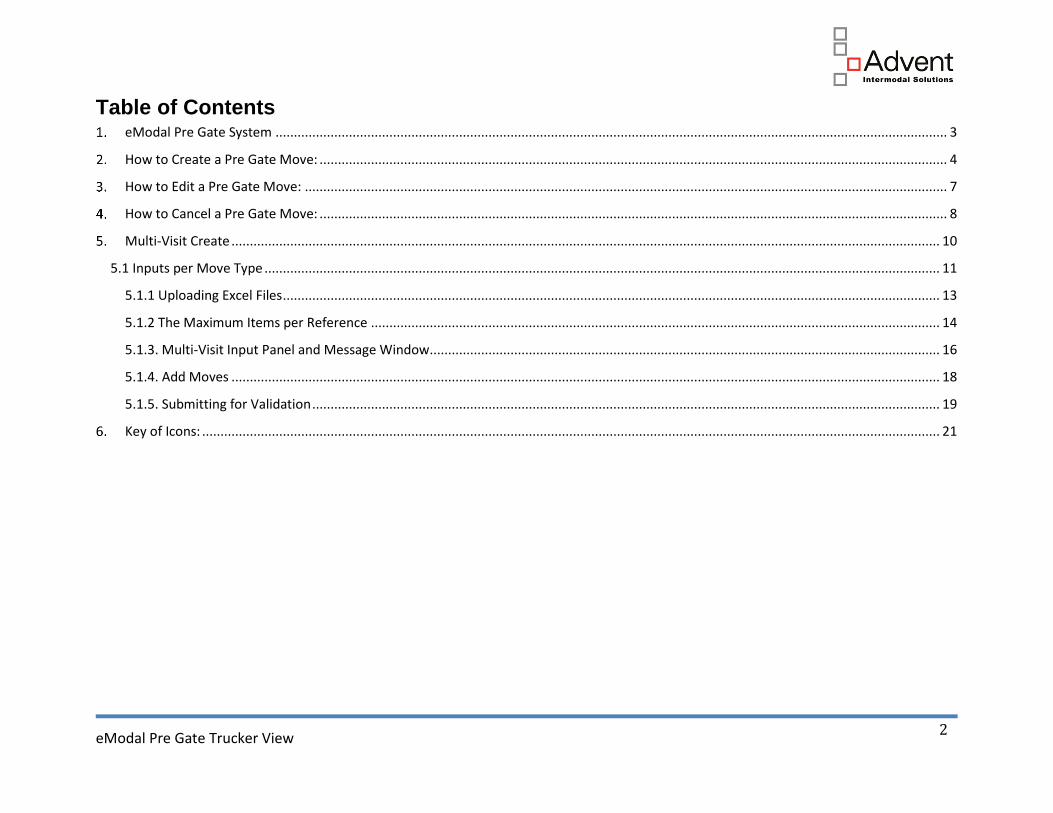
Table of Contents eModal Pre Gate System ....................................................................................................................................................................................... 3
How to Create a Pre Gate Move: ........................................................................................................................................................................... 4
How to Edit a Pre Gate Move: ............................................................................................................................................................................... 7
How to Cancel a Pre Gate Move: ........................................................................................................................................................................... 8
Multi-Visit Create ................................................................................................................................................................................................. 10
5.1 Inputs per Move Type ........................................................................................................................................................................................ 11
5.1.1 Uploading Excel Files ................................................................................................................................................................................... 13
5.1.2 The Maximum Items per Reference ........................................................................................................................................................... 14
5.1.3. Multi-Visit Input Panel and Message Window ........................................................................................................................................... 16
5.1.4. Add Moves ................................................................................................................................................................................................. 18
5.1.5. Submitting for Validation ........................................................................................................................................................................... 19
Key of Icons: ......................................................................................................................................................................................................... 21

eModal Pre Gate Trucker View
3
eModal Pre Gate System To access the Pre-Gate System, navigate to Menu > eCP (eModal Community Portal) > Pre Gate (Appointments 2.0).
eModal Pre Gate Trucker View
4
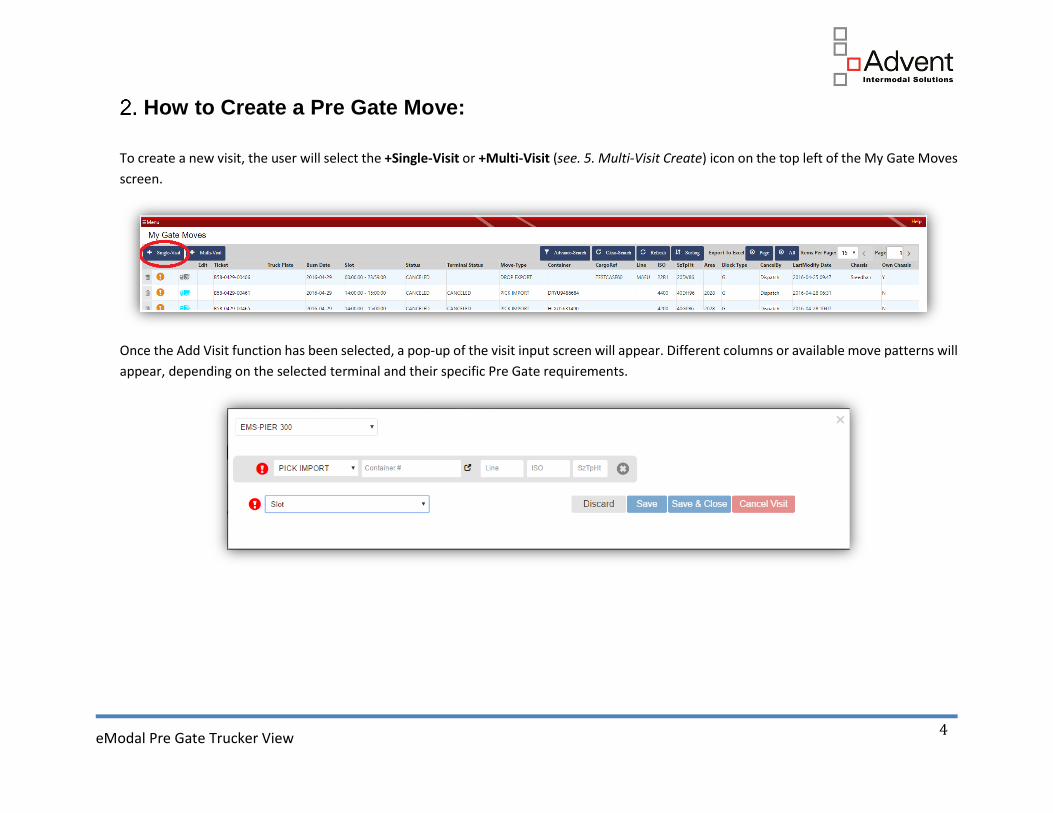
How to Create a Pre Gate Move:
To create a new visit, the user will select the +Single-Visit or +Multi-Visit (see. 5. Multi-Visit Create) icon on the top left of the My Gate Moves
screen.
Once the Add Visit function has been selected, a pop-up of the visit input screen will appear. Different columns or available move patterns will
appear, depending on the selected terminal and their specific Pre Gate requirements.

eModal Pre Gate Trucker View
5
a. Select the terminal
b. Select the move type (drop or pick) if option available
c. After all information has been entered, a notification icon will display and indicate if the entered information is valid, a green check
mark icon should display. If a red exclamation mark icon is displaying, the user will need to click on that icon which will then show the
error message. For example:

eModal Pre Gate Trucker View
6
Once the move(s) have been inputted with valid data, the user should see a green check mark icon display. A user may view additional container
details by clicking on the icon to the right side of the Container field.
If a green check mark icon displays, the user will then be able to proceed with creating the Pre Gate move by selecting the next available time slot
from the Slot drop down.
After selecting the time slot, vailable options are to select either the Save button (which allows the user to submit their Pre Gate move and
continue to create additional moves), or to select the Save & Close button (which closes out the visit details window and returns the user to the
My Gate Moves screen). If desired, the user may also select the Discard button to abandon their Pre Gate Move attempt.

eModal Pre Gate Trucker View
7
How to Edit a Pre Gate Move:
A user may edit an existing Pre Gate move from the My Gate Moves screen up until the END TIME of the slot time selected. The user will need
to select the ‘edit’ icon (highlighted below), which will generate a pop-up displaying that gate move.
Additionally, the user may select the Cancel Visit button if they wish to cancel their existing Pre Gate move request. (see Section 4. How to
Cancel a Pre Gate Move)
The user will then be able to edit any details as necessary and save their
changes.
Notes: Changing certain information, such as the date/time slot, may alter the
Pre Gate ticket number. Please be sure to note any changes.
If you will not be able to Gate In/Out by your Pre Gate slot, you must edit
before the end, or your Pre Gate will be marked as ”MISSED” AFTER midnight
that evening, and you will not be able to make a new Pre Gate for that
container until it is marked as MISSED.

eModal Pre Gate Trucker View
8
How to Cancel a Pre Gate Move:
Cancellation from My Gate Moves
From the My Gate Moves screen, the user can select the trash can icon, which will cancel the move. After the user has selected to cancel
a move, they will receive a confirmation request on the following pop-up to click OK or Cancel
Note: If the trash can icon is displaying in a light gray color, it is an indication that the user will not be able to cancel the move as it is
already missed and not active

eModal Pre Gate Trucker View
9
Cancellation in Edit Mode
To make a cancellation in Edit mode, the user must select the edit icon on the My Gate Moves screen (if available) and then choose
the Cancel Visit option.
It will bring you to the Add/Edit Visit popup, where you will click on the Cancel Visit button.
Upon confirmation, the move will be cancelled.
eModal Pre Gate Trucker View
10
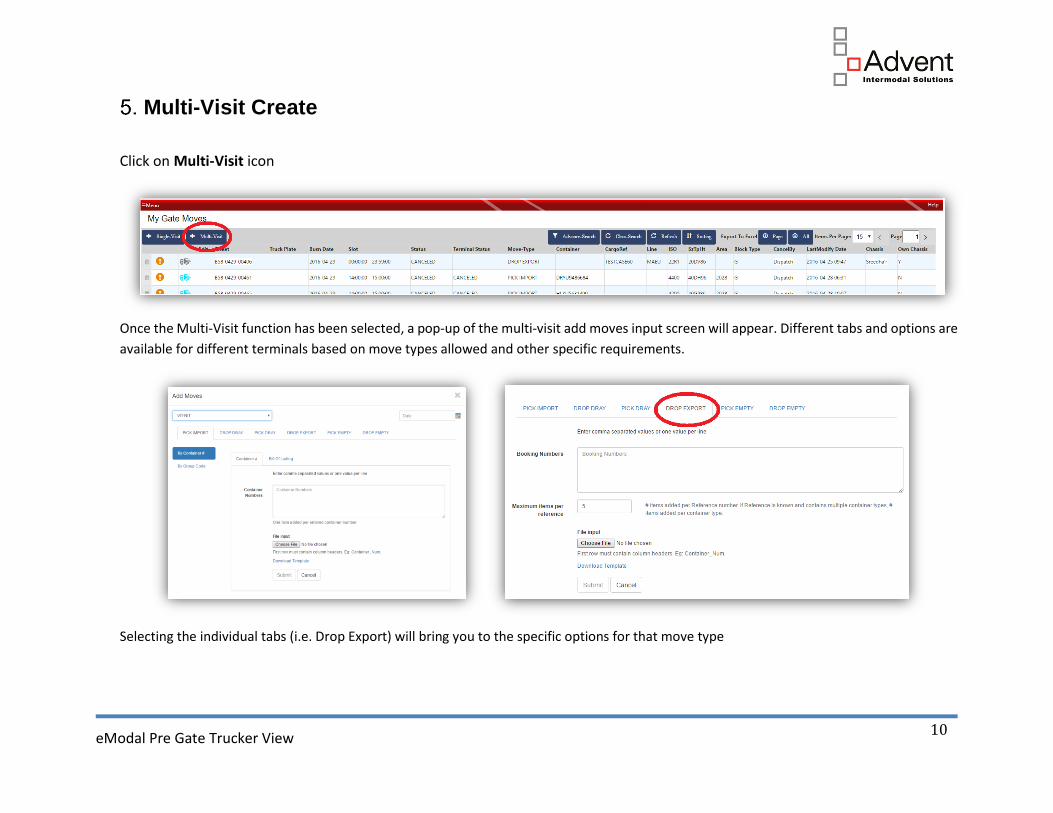
Multi-Visit Create
Click on Multi-Visit icon
Once the Multi-Visit function has been selected, a pop-up of the multi-visit add moves input screen will appear. Different tabs and options are
available for different terminals based on move types allowed and other specific requirements.
Selecting the individual tabs (i.e. Drop Export) will bring you to the specific options for that move type
eModal Pre Gate Trucker View
11
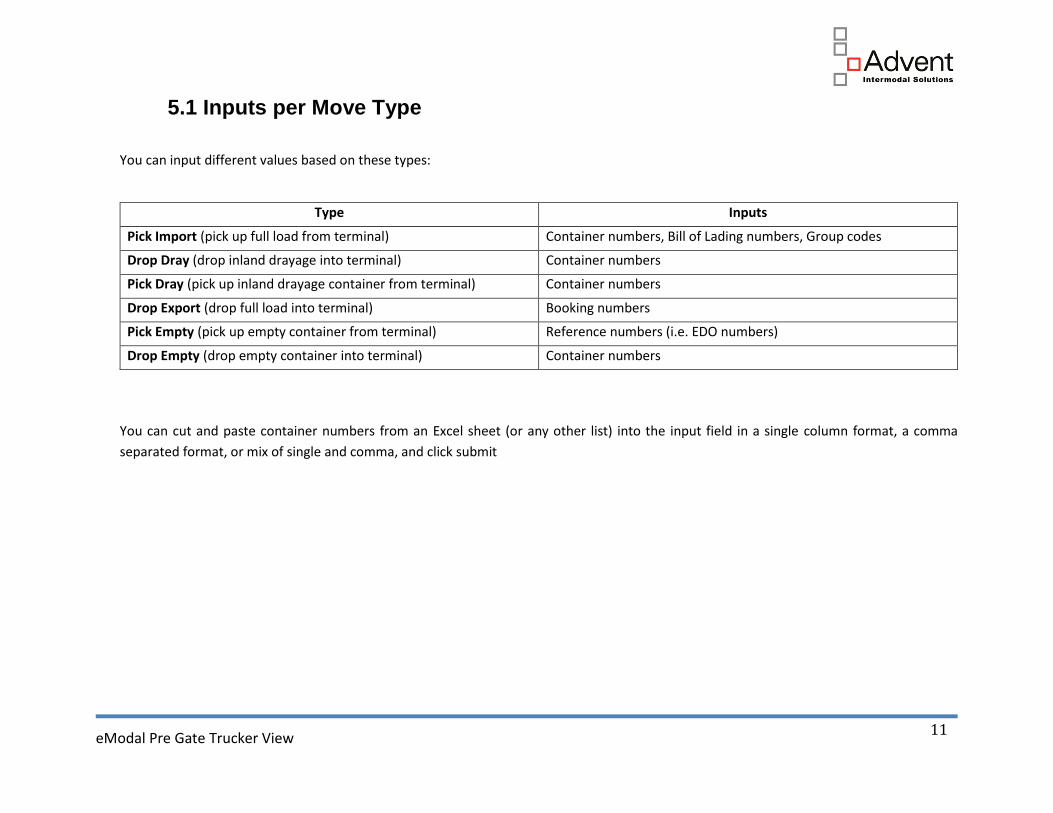
5.1 Inputs per Move Type
You can input different values based on these types:
Type Inputs
Pick Import (pick up full load from terminal) Container numbers, Bill of Lading numbers, Group codes
Drop Dray (drop inland drayage into terminal) Container numbers
Pick Dray (pick up inland drayage container from terminal) Container numbers
Drop Export (drop full load into terminal) Booking numbers
Pick Empty (pick up empty container from terminal) Reference numbers (i.e. EDO numbers)
Drop Empty (drop empty container into terminal) Container numbers
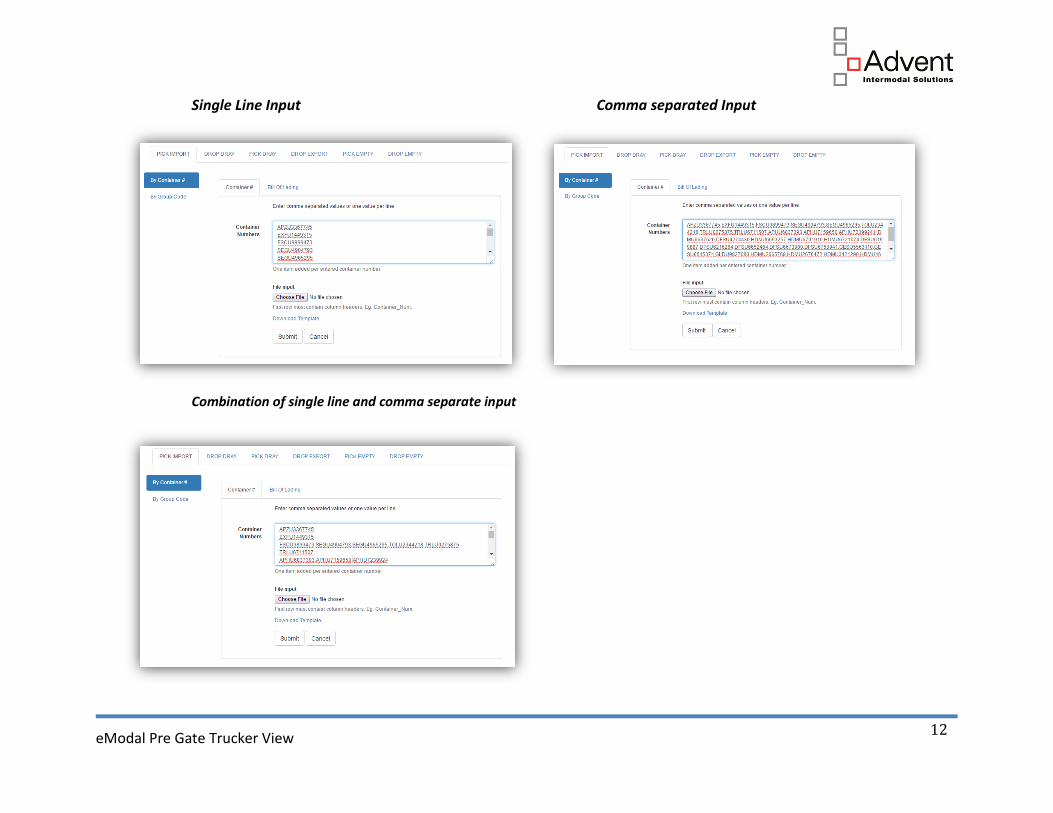
You can cut and paste container numbers from an Excel sheet (or any other list) into the input field in a single column format, a comma
separated format, or mix of single and comma, and click submit
eModal Pre Gate Trucker View
12
Single Line Input Comma separated Input
Combination of single line and comma separate input

eModal Pre Gate Trucker View
13
5.1.1 Uploading Excel Files
Click on Browse and select an Excel file from your computer and click okay. The file location will then display in the location field to eModal and
then click Submit to process the file. The first row of the file must have a header column, examples Container_num, Booking_num, etc. The actual
value is not important, you could use “HEADER” as the value to put into the cell.
You also have the option to download a template. The template will download to your computer to be completed with container numbers or
references in column A. Make sure you DO NOT remove the header row 1. Start filling into information starting with row 2.

eModal Pre Gate Trucker View
14
Upon completion of input, save the list to your computer and upload as an Excel spreadsheet as outlined in the beginning of this section.
5.1.2 The Maximum Items per Reference
For moves types that have references (Booking, EDO, etc.) that allow for more than one container to be picked/dropped, you have the ability
to specify how many instances to create. Example, if you have a booking allowing for two hundred (200) containers, you can input the booking
number and specify that you want to create twenty (20) Pre Gates. Then click on submit and the system will create twenty blank Pre Gates
for that one appointment.

eModal Pre Gate Trucker View
15
Once you have completed all inputs and submitted inputs for edit, you will see a progress task bar (in blue) indicating the progress from
validating to edits created, and then completion
Once upload is completed, you will be returned to the Muti-Visit input panel
eModal Pre Gate Trucker View
16
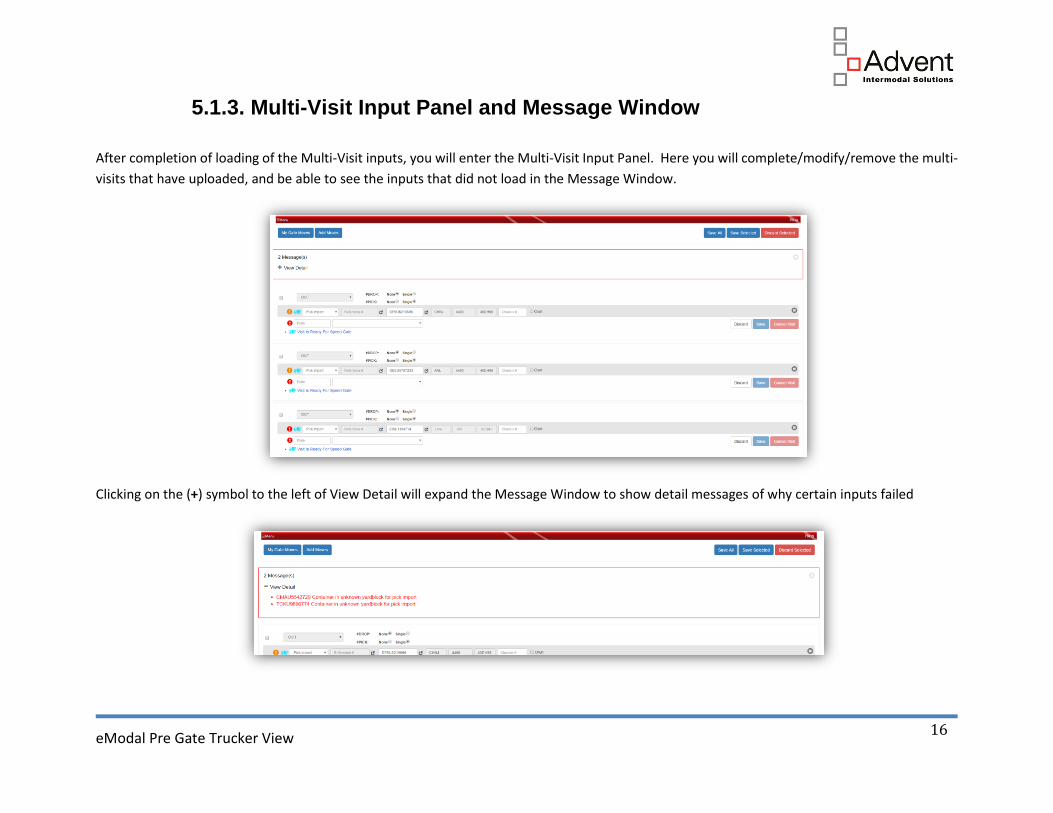
5.1.3. Multi-Visit Input Panel and Message Window
After completion of loading of the Multi-Visit inputs, you will enter the Multi-Visit Input Panel. Here you will complete/modify/remove the multi-
visits that have uploaded, and be able to see the inputs that did not load in the Message Window.
Clicking on the (+) symbol to the left of View Detail will expand the Message Window to show detail messages of why certain inputs failed

eModal Pre Gate Trucker View
17
Depending on how many messages are in the window, clicking the (X) on the top right of the message window will close the message window.
Do not close if you have not viewed all errors, as the window cannot be reopened once closed.
You can now complete each of your Multi-Visits the same as you would in section 2. How to Create a Pre Gate Move or 2.1 How to Create an
Auto Gate Move. You can also select a dual move in the individual Multi-Visit if that terminal allows for dual/double ended moves
eModal Pre Gate Trucker View
18
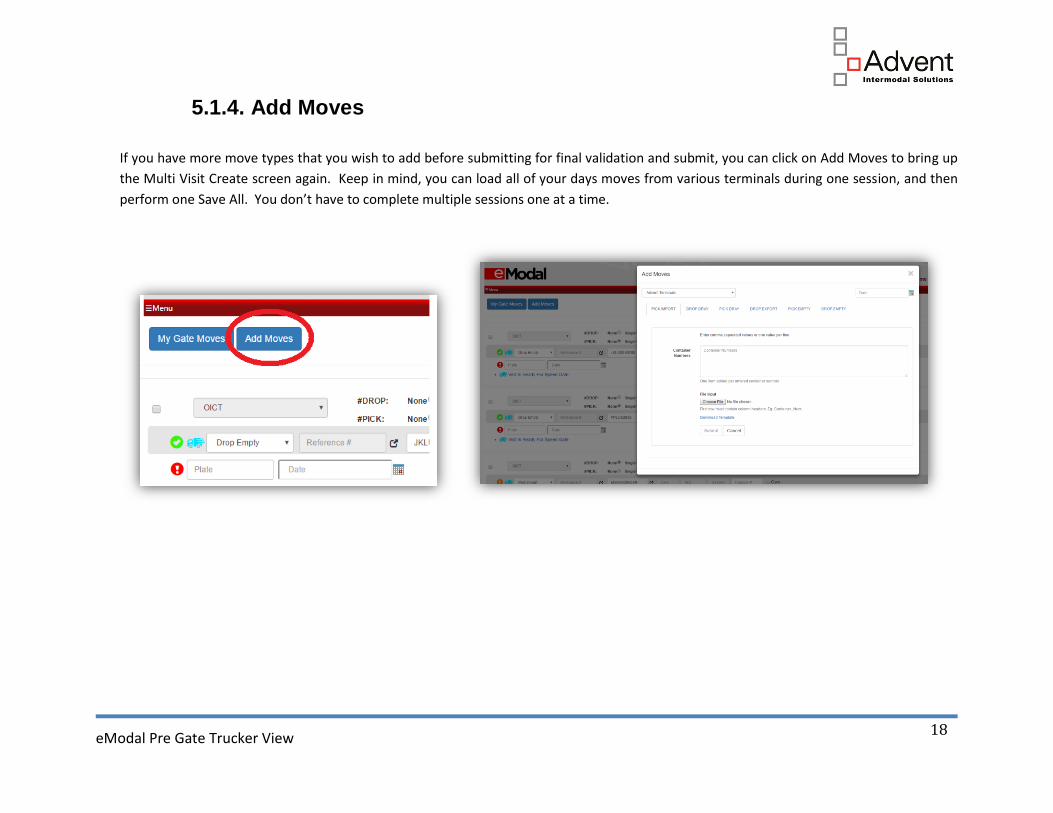
5.1.4. Add Moves
If you have more move types that you wish to add before submitting for final validation and submit, you can click on Add Moves to bring up
the Multi Visit Create screen again. Keep in mind, you can load all of your days moves from various terminals during one session, and then
perform one Save All. You don’t have to complete multiple sessions one at a time.

eModal Pre Gate Trucker View
19
5.1.5. Submitting for Validation
After you’ve completed all inputs, you can select final actions of:
On the top right page command:
Save All – submit all the Multi-Visits you have completed for final validation and Pre Gate / Pre Arrival
Save Selected – submit the Multi-Visits that were checked off to be valdated
Discard Selected – remove the Multi-Visits that you do not want validated
On the individual Multi-Visits:
Discard – remove the Multi-Visit
Save – individual submit for final validation

eModal Pre Gate Trucker View
20
Cancel Visit – cancel this previously approved Pre Gate/Pre Arrival, only available if editing an existing Pre Gate/Pre Arrival, not available
on initial create.
Upon submitting and completion of all validations, you will received a new message in the Message Window informing of any errors, or
how many visits were created. To open the view, click the (+) icon next to View Detail

eModal Pre Gate Trucker View
21
Key of Icons:
: Edit Pre Gate Move
: Indicates that the Pre Gate data is valid
Note: be sure to check the Pre Gate status column to verify move status.
: Informational message
: Warning message, meaning warnings should be cleared prior to gate time to ensure a successful transaction
: Indicates that the Pre Gate Move has errors that must be tended to or you will not successful gate
: Active icon indicates that the Pre Gate Move can be cancelled
: Inactive icon indicates that the Pre Gate Move cannot be cancelled
: Container Information icon, click to view container information
eModal Pre Gate Trucker View
22
Document Control (amendment history & version control)
Version Date Amended By (name) Reason
1.0 Mar. 4, 2016 Advent Created
1.1 Mar. 6, 2016 Advent Additional notes to Sec. 3 for MISSED Pre Gate