Embed Size (px)
Citation preview
125 N. Kickapoo | Lincoln, Illinois 62656 | integrity-data.com | 888.786.6162
**Updated Documentation** visit our website to check for updated user guides.
Employee Email Suite
Employee Email Suite User Guide
For Microsoft Dynamics® GP Version 2015
ii
Copyright
Manual copyright 2014 Integrity Data. All rights reserved.
Limitation of Liability
The content of this manual is furnished for informational use only, is subject to change without notice and should not be construed as a commitment by Integrity Data. Integrity Data assumes no responsibility or liability for any errors or inaccuracies that may appear in this manual. Neither Integrity Data nor anyone else who has been involved in the creation, production or delivery of this documentation shall be liable for any indirect, incidental, special, exemplary or consequential damage, including but not limited to any loss of anticipated profit or benefits, resulting from the use of this documentation or sample code.
Publication Date
January 2015
iii
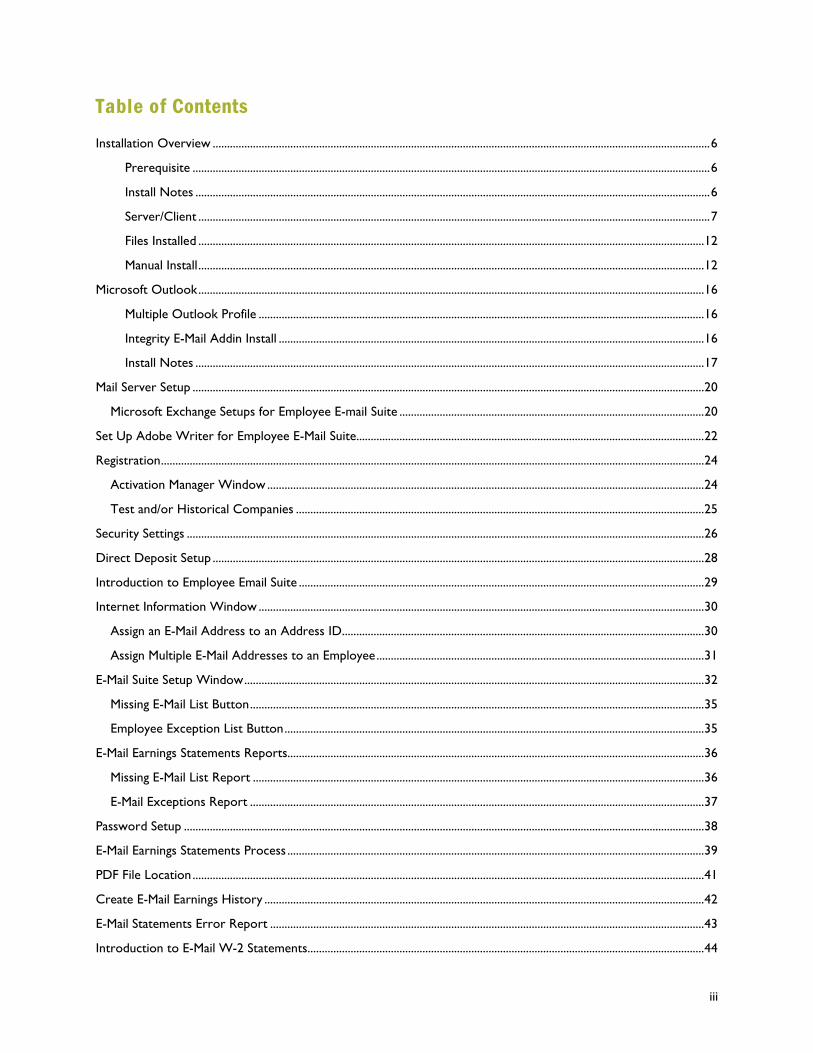
Table of Contents Installation Overview ............................................................................................................................................................................. 6
Prerequisite .................................................................................................................................................................................... 6 Install Notes ................................................................................................................................................................................... 6 Server/Client .................................................................................................................................................................................. 7 Files Installed ................................................................................................................................................................................ 12 Manual Install ................................................................................................................................................................................ 12
Microsoft Outlook ................................................................................................................................................................................ 16 Multiple Outlook Profile ........................................................................................................................................................... 16 Integrity E-Mail Addin Install .................................................................................................................................................... 16 Install Notes ................................................................................................................................................................................. 17
Mail Server Setup .................................................................................................................................................................................. 20 Microsoft Exchange Setups for Employee E-mail Suite .......................................................................................................... 20
Set Up Adobe Writer for Employee E-Mail Suite......................................................................................................................... 22 Registration ............................................................................................................................................................................................. 24
Activation Manager Window ........................................................................................................................................................ 24 Test and/or Historical Companies .............................................................................................................................................. 25
Security Settings .................................................................................................................................................................................... 26 Direct Deposit Setup ........................................................................................................................................................................... 28 Introduction to Employee Email Suite ............................................................................................................................................. 29 Internet Information Window ........................................................................................................................................................... 30
Assign an E-Mail Address to an Address ID.............................................................................................................................. 30 Assign Multiple E-Mail Addresses to an Employee .................................................................................................................. 31
E-Mail Suite Setup Window ................................................................................................................................................................ 32 Missing E-Mail List Button .............................................................................................................................................................. 35 Employee Exception List Button .................................................................................................................................................. 35
E-Mail Earnings Statements Reports................................................................................................................................................. 36 Missing E-Mail List Report ............................................................................................................................................................. 36 E-Mail Exceptions Report .............................................................................................................................................................. 37
Password Setup ..................................................................................................................................................................................... 38 E-Mail Earnings Statements Process ................................................................................................................................................. 39 PDF File Location .................................................................................................................................................................................. 41 Create E-Mail Earnings History ......................................................................................................................................................... 42 E-Mail Statements Error Report ....................................................................................................................................................... 43 Introduction to E-Mail W-2 Statements.......................................................................................................................................... 44
iv
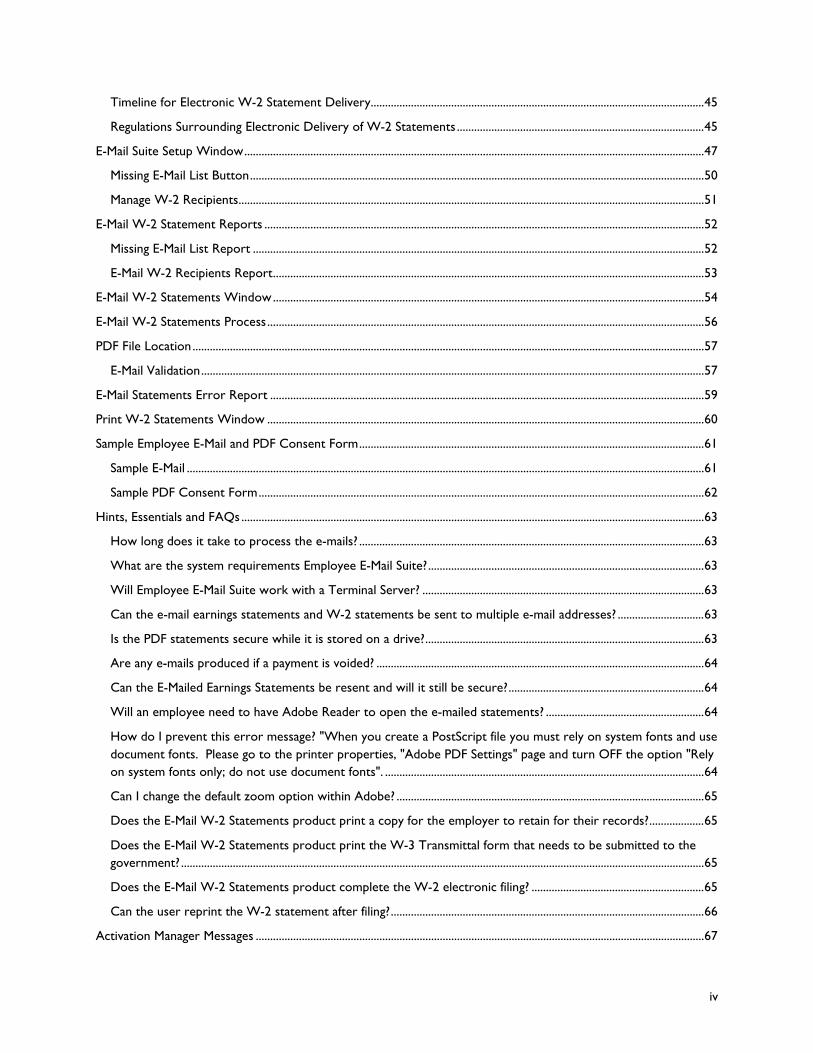
Timeline for Electronic W-2 Statement Delivery.................................................................................................................... 45 Regulations Surrounding Electronic Delivery of W-2 Statements ...................................................................................... 45
E-Mail Suite Setup Window ................................................................................................................................................................ 47 Missing E-Mail List Button .............................................................................................................................................................. 50 Manage W-2 Recipients .................................................................................................................................................................. 51
E-Mail W-2 Statement Reports ......................................................................................................................................................... 52 Missing E-Mail List Report ............................................................................................................................................................. 52 E-Mail W-2 Recipients Report ...................................................................................................................................................... 53
E-Mail W-2 Statements Window ...................................................................................................................................................... 54 E-Mail W-2 Statements Process ........................................................................................................................................................ 56 PDF File Location .................................................................................................................................................................................. 57
E-Mail Validation ............................................................................................................................................................................... 57 E-Mail Statements Error Report ....................................................................................................................................................... 59 Print W-2 Statements Window ........................................................................................................................................................ 60 Sample Employee E-Mail and PDF Consent Form ........................................................................................................................ 61
Sample E-Mail .................................................................................................................................................................................... 61 Sample PDF Consent Form ........................................................................................................................................................... 62
Hints, Essentials and FAQs ................................................................................................................................................................. 63 How long does it take to process the e-mails? ........................................................................................................................ 63 What are the system requirements Employee E-Mail Suite? ................................................................................................ 63 Will Employee E-Mail Suite work with a Terminal Server? .................................................................................................. 63 Can the e-mail earnings statements and W-2 statements be sent to multiple e-mail addresses? .............................. 63 Is the PDF statements secure while it is stored on a drive? ................................................................................................. 63 Are any e-mails produced if a payment is voided? .................................................................................................................. 64 Can the E-Mailed Earnings Statements be resent and will it still be secure? .................................................................... 64 Will an employee need to have Adobe Reader to open the e-mailed statements? ....................................................... 64 How do I prevent this error message? "When you create a PostScript file you must rely on system fonts and use document fonts. Please go to the printer properties, "Adobe PDF Settings" page and turn OFF the option "Rely on system fonts only; do not use document fonts". ............................................................................................................... 64 Can I change the default zoom option within Adobe? ........................................................................................................... 65 Does the E-Mail W-2 Statements product print a copy for the employer to retain for their records? ................... 65 Does the E-Mail W-2 Statements product print the W-3 Transmittal form that needs to be submitted to the government? ...................................................................................................................................................................................... 65 Does the E-Mail W-2 Statements product complete the W-2 electronic filing? ............................................................ 65 Can the user reprint the W-2 statement after filing? ............................................................................................................. 66
Activation Manager Messages ............................................................................................................................................................ 67
v
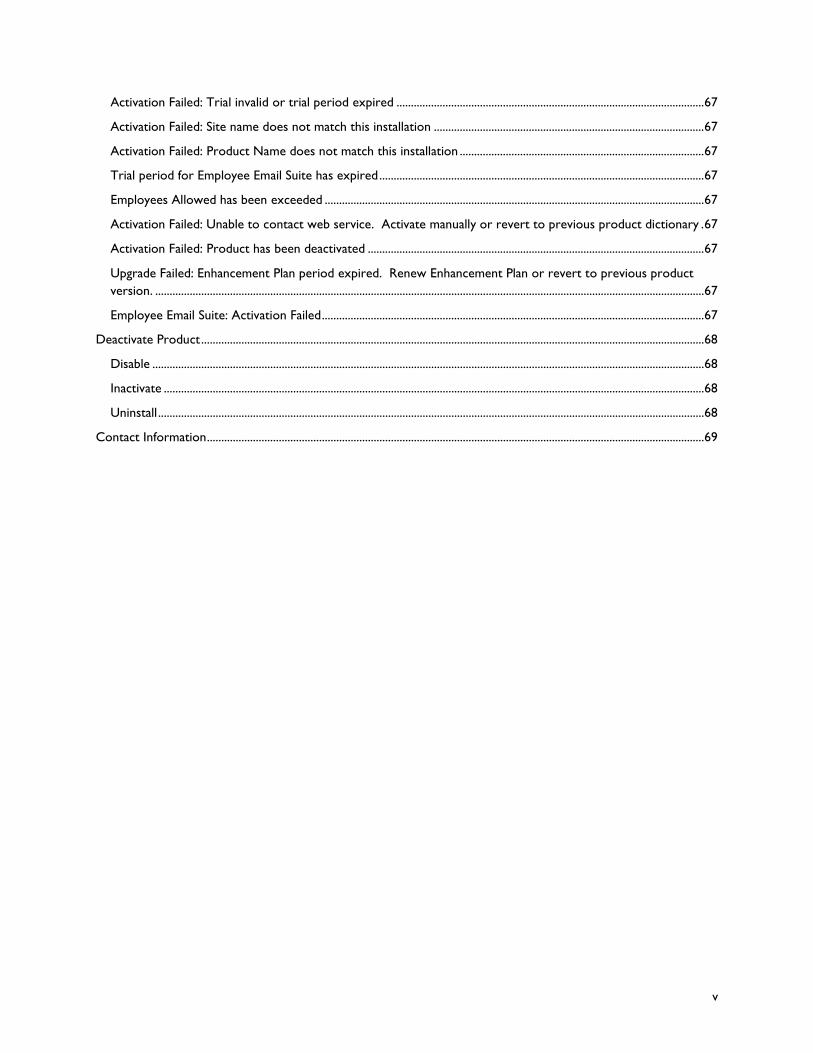
Activation Failed: Trial invalid or trial period expired ........................................................................................................... 67 Activation Failed: Site name does not match this installation .............................................................................................. 67 Activation Failed: Product Name does not match this installation ..................................................................................... 67 Trial period for Employee Email Suite has expired ................................................................................................................. 67 Employees Allowed has been exceeded .................................................................................................................................... 67 Activation Failed: Unable to contact web service. Activate manually or revert to previous product dictionary . 67 Activation Failed: Product has been deactivated ..................................................................................................................... 67 Upgrade Failed: Enhancement Plan period expired. Renew Enhancement Plan or revert to previous product version. ............................................................................................................................................................................................... 67 Employee Email Suite: Activation Failed ..................................................................................................................................... 67
Deactivate Product ............................................................................................................................................................................... 68 Disable ................................................................................................................................................................................................ 68 Inactivate ............................................................................................................................................................................................ 68 Uninstall .............................................................................................................................................................................................. 68
Contact Information ............................................................................................................................................................................. 69
P a g e 6 | 69
Installation Overview This section will discuss the prerequisites, list the files installed and go through the install process.
Prerequisite The Employee E-mail Suite consists of two modules that provide additional capabilities for an existing Microsoft Dynamics GP installation: Employee Email Suite and E-Mail W-2 Statements.
The prerequisites for the Employee E-mail Suite:
• Microsoft Dynamics GP Payroll
• Direct Deposit
• .NET Framework 3.5 or above
• Adobe Acrobat Standard X or XI
• E-Mail Sending Options
o Microsoft Outlook 2010 or 2013 Requires installing Integrity Email Addin and Visual Studio Tools for Office
o SMTP Server
Install Notes Prior to installing validate the steps:
• Confirm all users are logged out of Microsoft Dynamics GP
• Complete all payroll runs and confirm no payroll runs are in process
• Make a backup of the company and Dynamics databases
P a g e 7 | 69
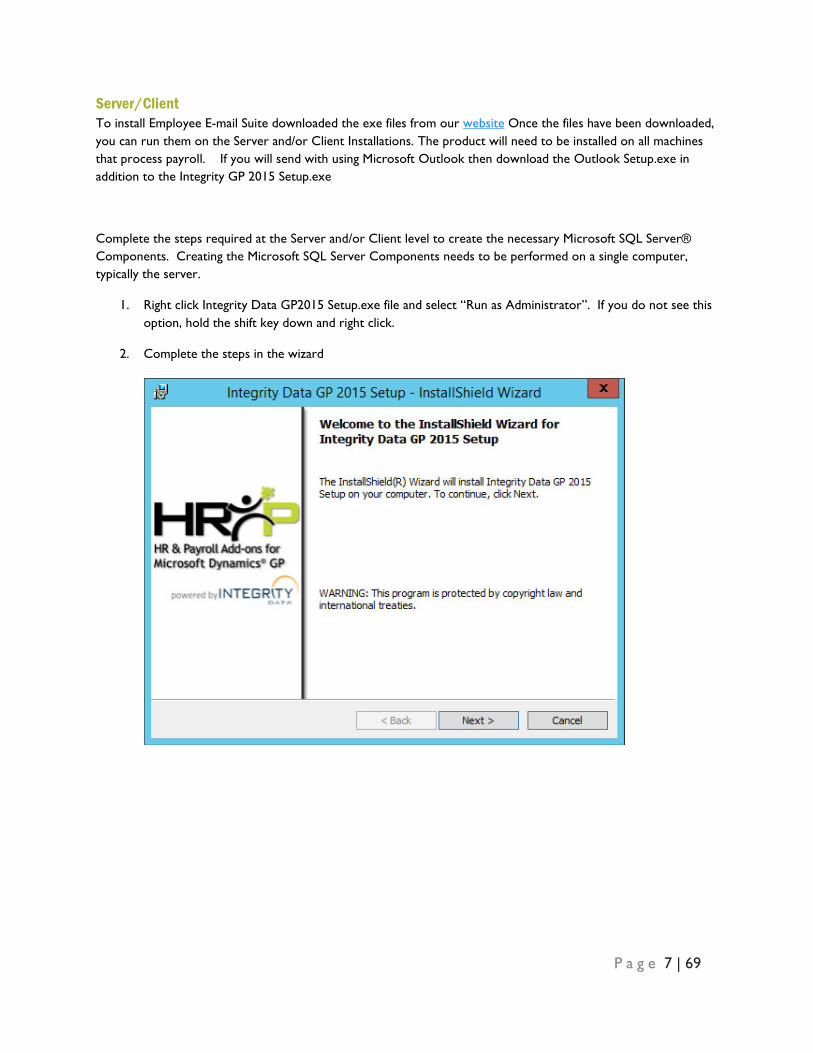
Server/Client To install Employee E-mail Suite downloaded the exe files from our website Once the files have been downloaded, you can run them on the Server and/or Client Installations. The product will need to be installed on all machines that process payroll. If you will send with using Microsoft Outlook then download the Outlook Setup.exe in addition to the Integrity GP 2015 Setup.exe
Complete the steps required at the Server and/or Client level to create the necessary Microsoft SQL Server® Components. Creating the Microsoft SQL Server Components needs to be performed on a single computer, typically the server.
1. Right click Integrity Data GP2015 Setup.exe file and select “Run as Administrator”. If you do not see this option, hold the shift key down and right click.
2. Complete the steps in the wizard
P a g e 8 | 69
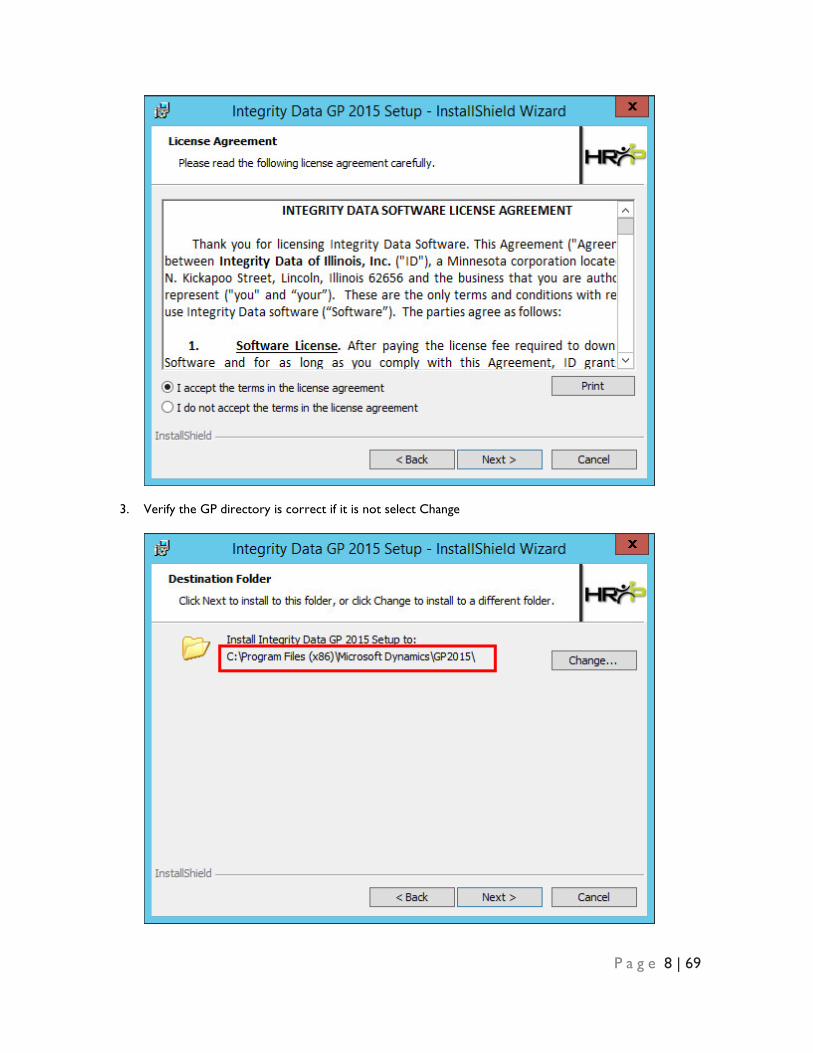
3. Verify the GP directory is correct if it is not select Change
P a g e 9 | 69
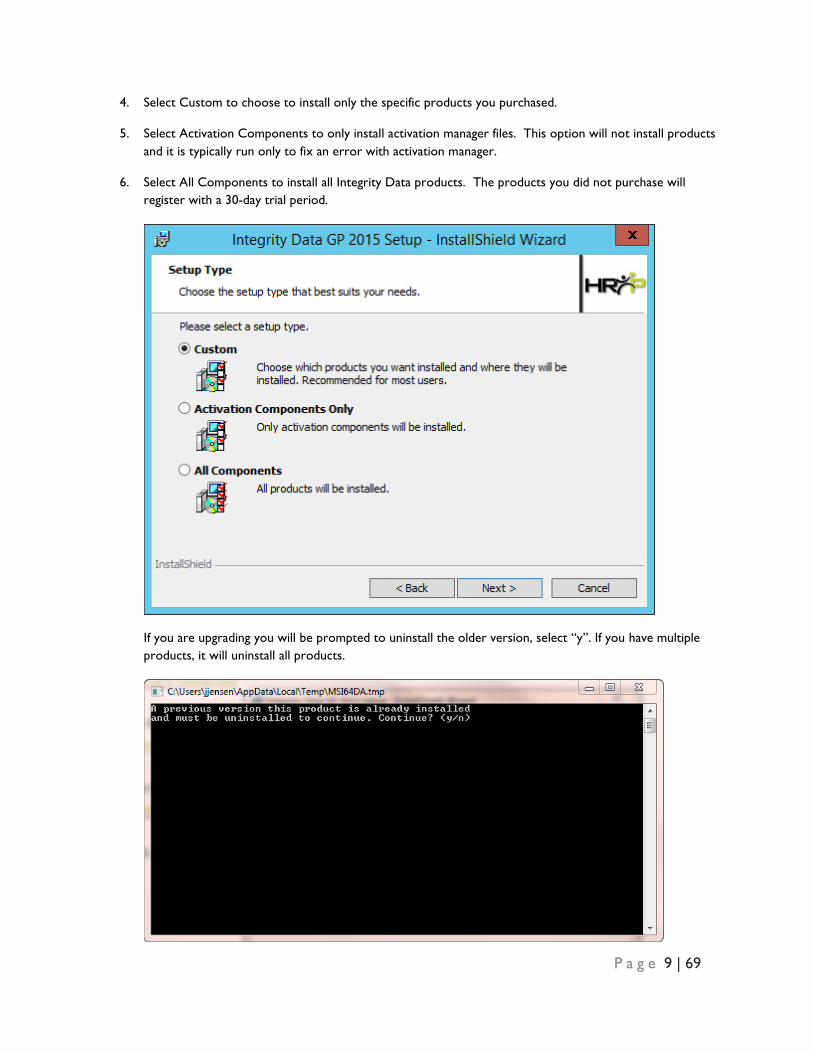
4. Select Custom to choose to install only the specific products you purchased.
5. Select Activation Components to only install activation manager files. This option will not install products and it is typically run only to fix an error with activation manager.
6. Select All Components to install all Integrity Data products. The products you did not purchase will register with a 30-day trial period.
If you are upgrading you will be prompted to uninstall the older version, select “y”. If you have multiple products, it will uninstall all products.
P a g e 10 | 69
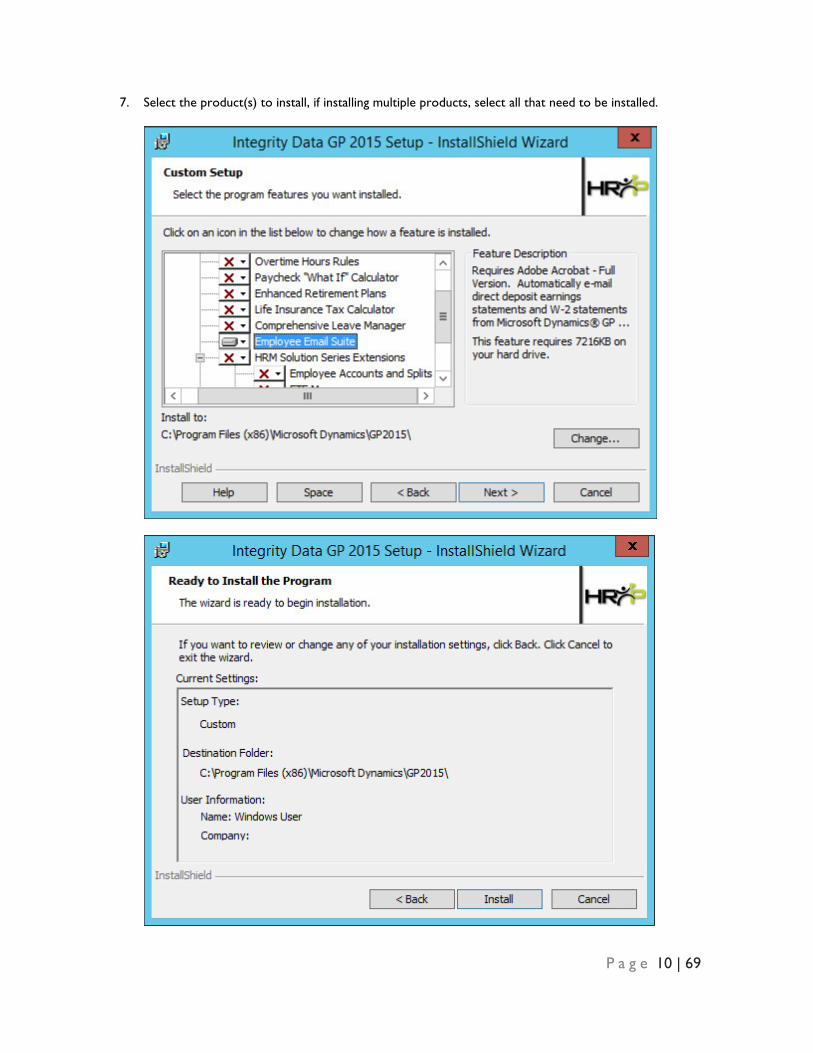
7. Select the product(s) to install, if installing multiple products, select all that need to be installed.
P a g e 11 | 69
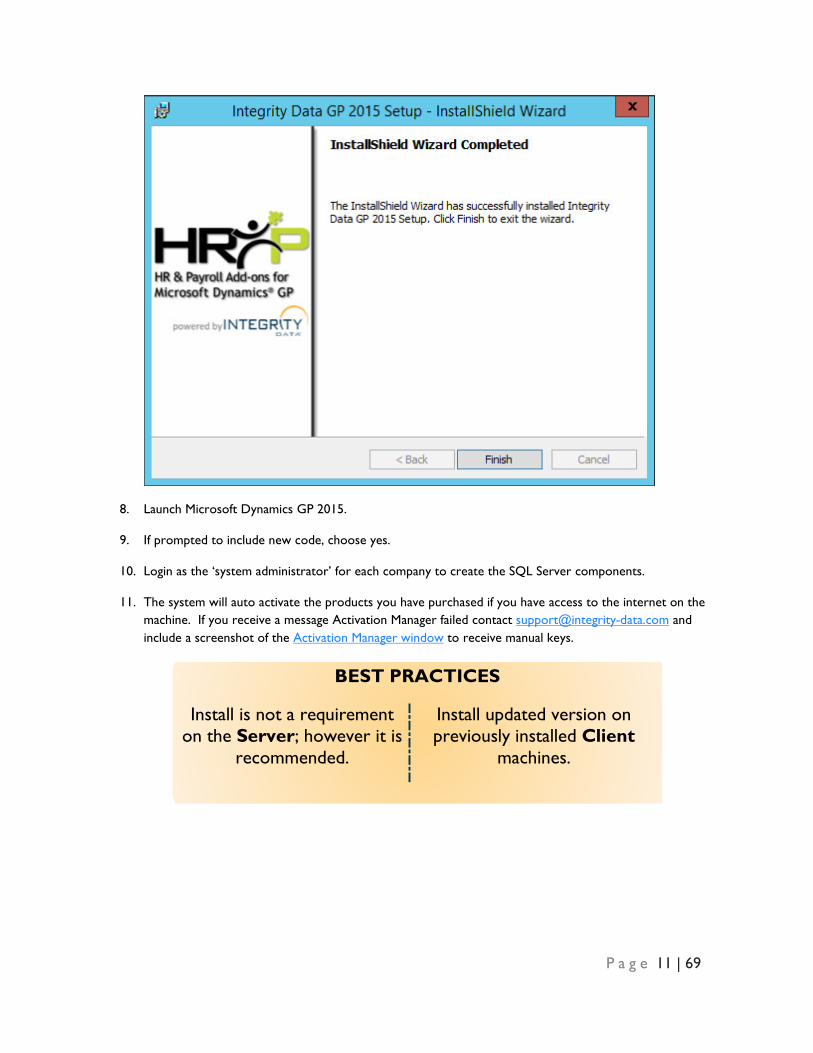
8. Launch Microsoft Dynamics GP 2015.
9. If prompted to include new code, choose yes.
10. Login as the ‘system administrator’ for each company to create the SQL Server components.
11. The system will auto activate the products you have purchased if you have access to the internet on the machine. If you receive a message Activation Manager failed contact [email protected] and include a screenshot of the Activation Manager window to receive manual keys.
BEST PRACTICES
Install is not a requirement on the Server; however it is
recommended.
Install updated version on previously installed Client
machines.
P a g e 12 | 69
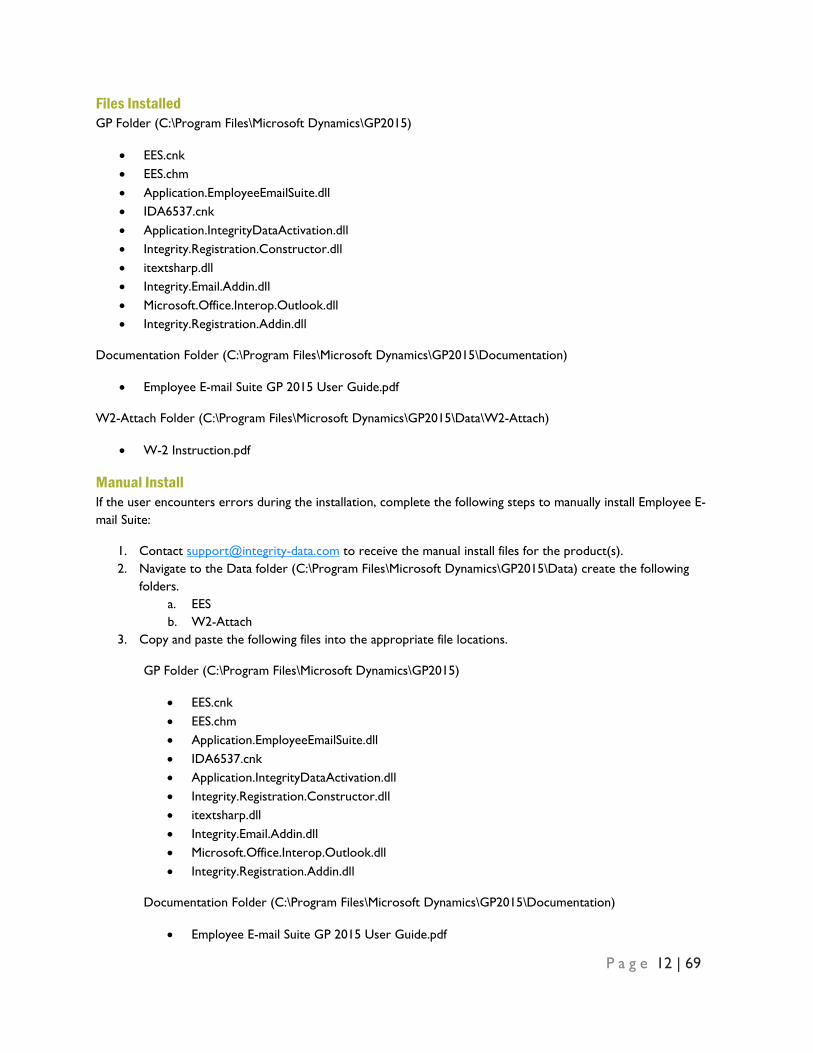
Files Installed GP Folder (C:\Program Files\Microsoft Dynamics\GP2015)
• EES.cnk • EES.chm • Application.EmployeeEmailSuite.dll • IDA6537.cnk • Application.IntegrityDataActivation.dll • Integrity.Registration.Constructor.dll • itextsharp.dll • Integrity.Email.Addin.dll • Microsoft.Office.Interop.Outlook.dll • Integrity.Registration.Addin.dll
Documentation Folder (C:\Program Files\Microsoft Dynamics\GP2015\Documentation)
• Employee E-mail Suite GP 2015 User Guide.pdf
W2-Attach Folder (C:\Program Files\Microsoft Dynamics\GP2015\Data\W2-Attach)
• W-2 Instruction.pdf
Manual Install If the user encounters errors during the installation, complete the following steps to manually install Employee E-mail Suite:
1. Contact [email protected] to receive the manual install files for the product(s). 2. Navigate to the Data folder (C:\Program Files\Microsoft Dynamics\GP2015\Data) create the following
folders. a. EES b. W2-Attach
3. Copy and paste the following files into the appropriate file locations.
GP Folder (C:\Program Files\Microsoft Dynamics\GP2015)
• EES.cnk • EES.chm • Application.EmployeeEmailSuite.dll • IDA6537.cnk • Application.IntegrityDataActivation.dll • Integrity.Registration.Constructor.dll • itextsharp.dll • Integrity.Email.Addin.dll • Microsoft.Office.Interop.Outlook.dll • Integrity.Registration.Addin.dll
Documentation Folder (C:\Program Files\Microsoft Dynamics\GP2015\Documentation)
• Employee E-mail Suite GP 2015 User Guide.pdf
P a g e 13 | 69
W2-Attach Folder (C:\Program Files\Microsoft Dynamics\GP2015\Data\W2-Attach)
• W-2 Instruction.pdf
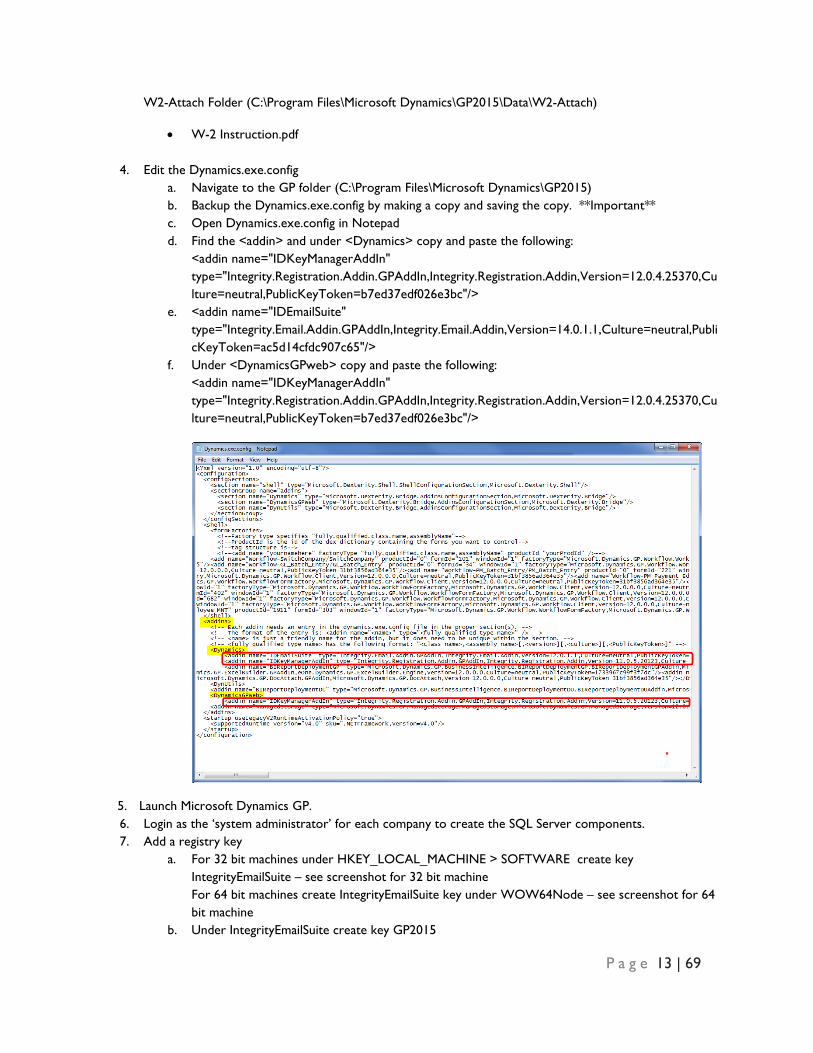
4. Edit the Dynamics.exe.config a. Navigate to the GP folder (C:\Program Files\Microsoft Dynamics\GP2015) b. Backup the Dynamics.exe.config by making a copy and saving the copy. **Important** c. Open Dynamics.exe.config in Notepad d. Find the <addin> and under <Dynamics> copy and paste the following:
<addin name="IDKeyManagerAddIn" type="Integrity.Registration.Addin.GPAddIn,Integrity.Registration.Addin,Version=12.0.4.25370,Culture=neutral,PublicKeyToken=b7ed37edf026e3bc"/>
e. <addin name="IDEmailSuite" type="Integrity.Email.Addin.GPAddIn,Integrity.Email.Addin,Version=14.0.1.1,Culture=neutral,PublicKeyToken=ac5d14cfdc907c65"/>
f. Under <DynamicsGPweb> copy and paste the following: <addin name="IDKeyManagerAddIn" type="Integrity.Registration.Addin.GPAddIn,Integrity.Registration.Addin,Version=12.0.4.25370,Culture=neutral,PublicKeyToken=b7ed37edf026e3bc"/>
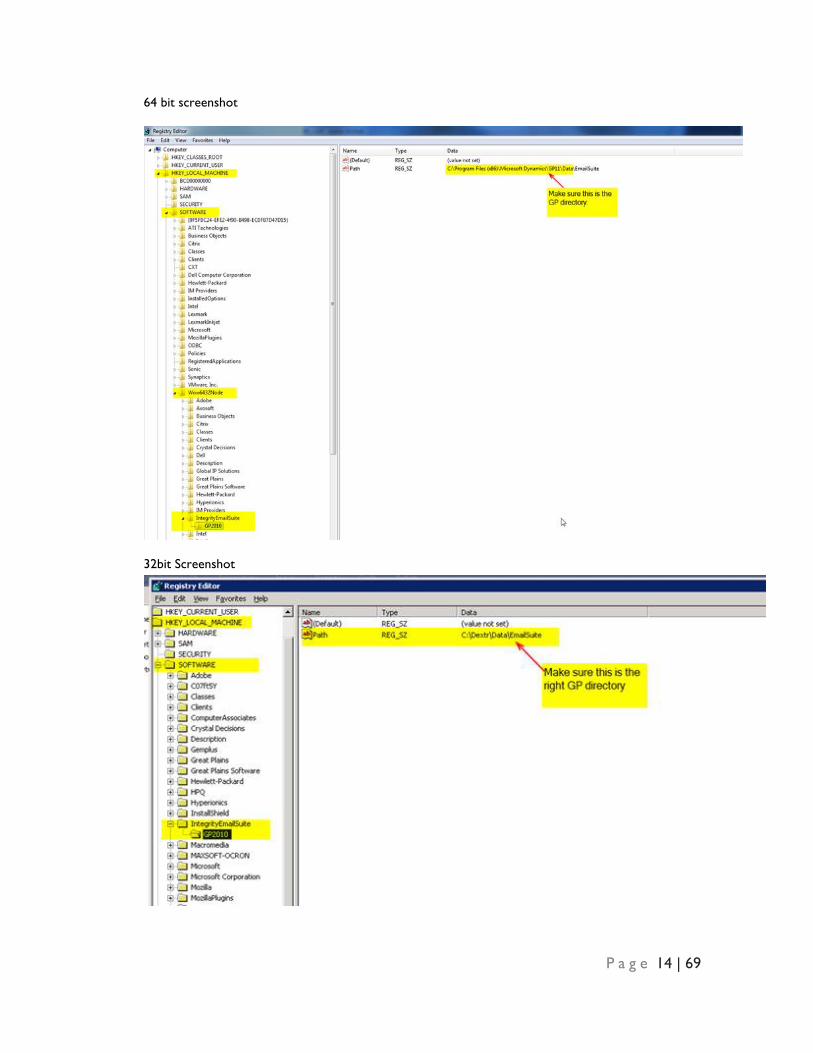
5. Launch Microsoft Dynamics GP. 6. Login as the ‘system administrator’ for each company to create the SQL Server components. 7. Add a registry key
a. For 32 bit machines under HKEY_LOCAL_MACHINE > SOFTWARE create key IntegrityEmailSuite – see screenshot for 32 bit machine For 64 bit machines create IntegrityEmailSuite key under WOW64Node – see screenshot for 64 bit machine
b. Under IntegrityEmailSuite create key GP2015
P a g e 14 | 69
64 bit screenshot
32bit Screenshot
P a g e 15 | 69
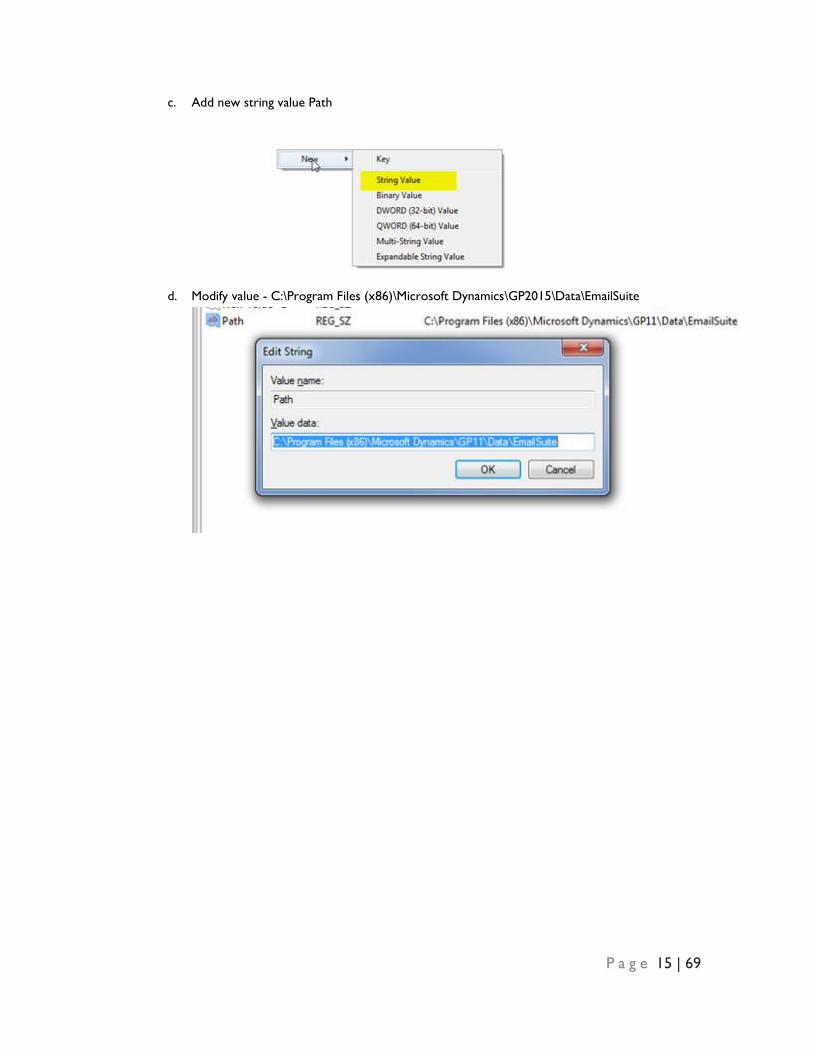
c. Add new string value Path
d. Modify value - C:\Program Files (x86)\Microsoft Dynamics\GP2015\Data\EmailSuite
P a g e 16 | 69
Microsoft Outlook If Microsoft Outlook will be used to send the Employee Email Suite or the E-Mail W-2 Statements file to employees and track returned e-mails. The Integrity E-Mail AddIn must be installed. See further information below for installing Integrity E-Mail AddIn Install.
If the company would like the statement(s) to be sent from a ‘general payroll’ Outlook account and not from a payroll clerk’s personal Outlook account it is recommended to set up Multiple Outlook profiles.
Multiple Outlook Profile Setting up a separate Network account and Outlook profile allows the company to send Employee Email Suite or E-Mail W-2 Statements through a ‘general payroll’ Outlook account instead of using the payroll clerk’s personal Network account and Outlook profile. Contact your IT Department for details on setting up a separate Network account and Outlook profile. Integrity Data does not support Microsoft Outlook functionality.
If the user creates a ‘general payroll’ Outlook profile it is important to verify Microsoft Dynamics GP is connected to the correct Outlook profile. The Employee Email Suite or E-Mail W-2 Statements will be sent from the Outlook profile connected to Microsoft Dynamics GP.
Integrity E-Mail Addin Install If Microsoft Outlook will be used to send the Employee Email Suite or the E-Mail W-2 Statements file to employees and track returned e-mails then the Integrity E-Mail AddIn is required for Employee E-mail Suite.
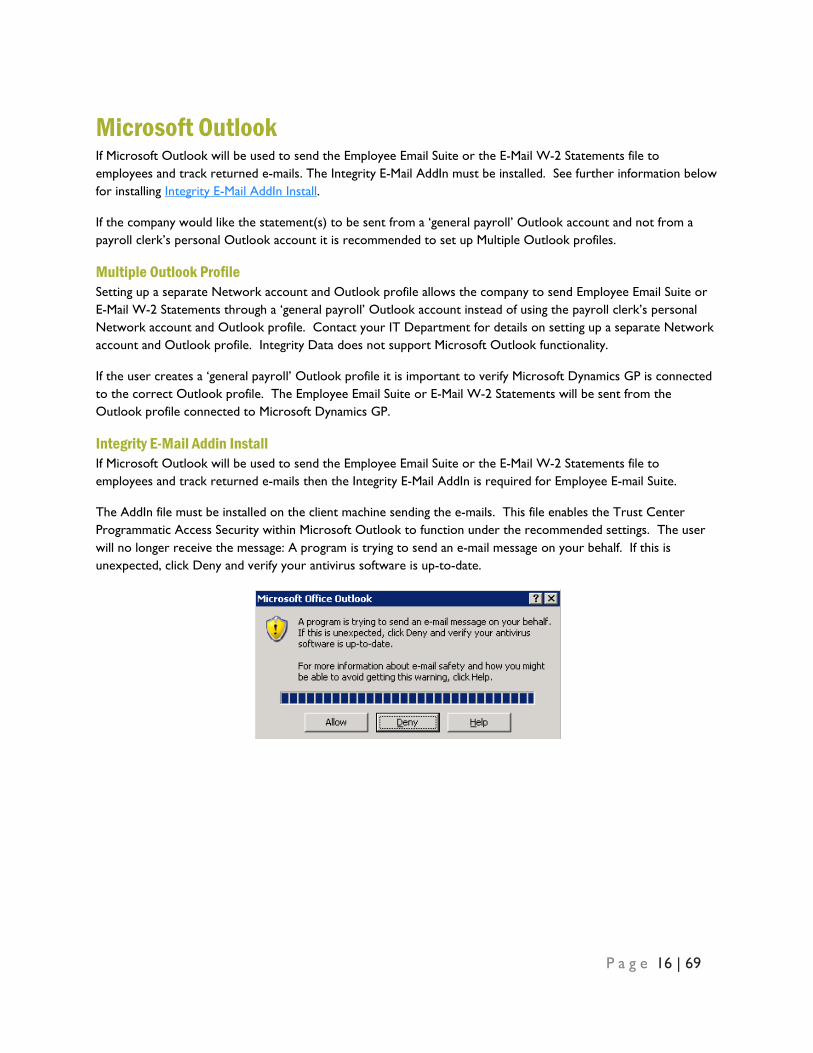
The AddIn file must be installed on the client machine sending the e-mails. This file enables the Trust Center Programmatic Access Security within Microsoft Outlook to function under the recommended settings. The user will no longer receive the message: A program is trying to send an e-mail message on your behalf. If this is unexpected, click Deny and verify your antivirus software is up-to-date.
P a g e 17 | 69
Install Notes Prior to installing:
• Confirm users are logged out of Microsoft Outlook • The install can be ran as the administrator or as the user by right clicking and selecting run as
administrator.
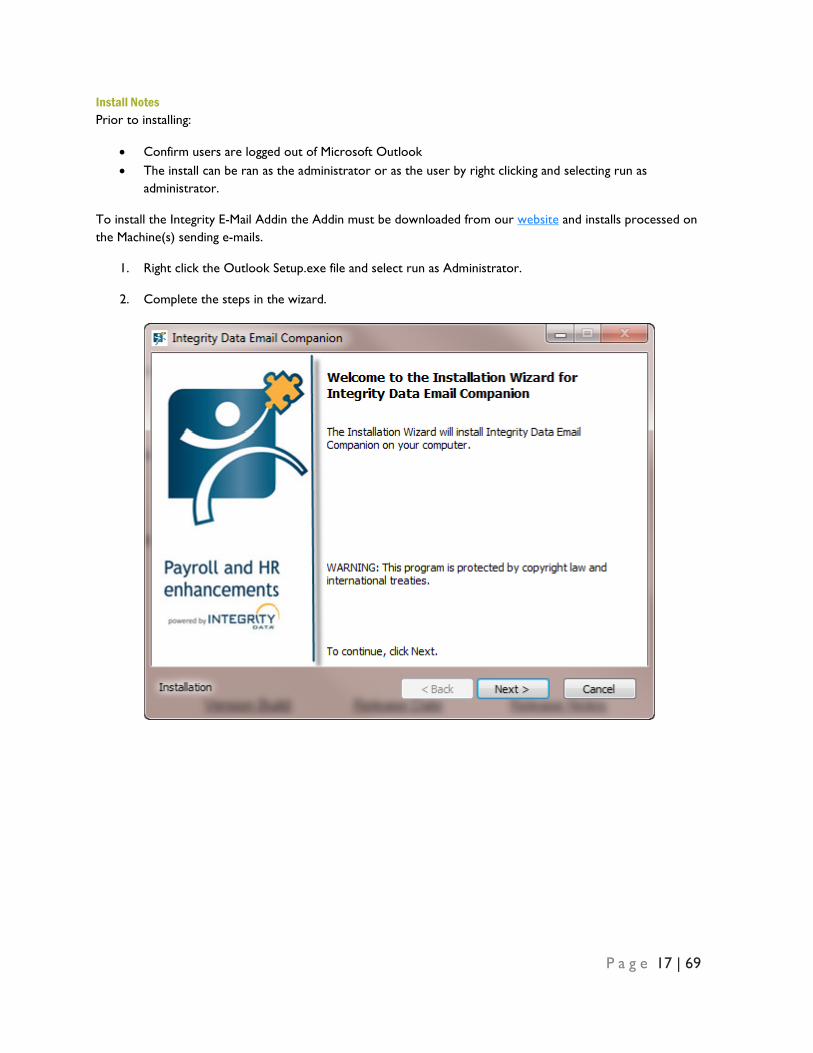
To install the Integrity E-Mail Addin the Addin must be downloaded from our website and installs processed on the Machine(s) sending e-mails.
1. Right click the Outlook Setup.exe file and select run as Administrator.
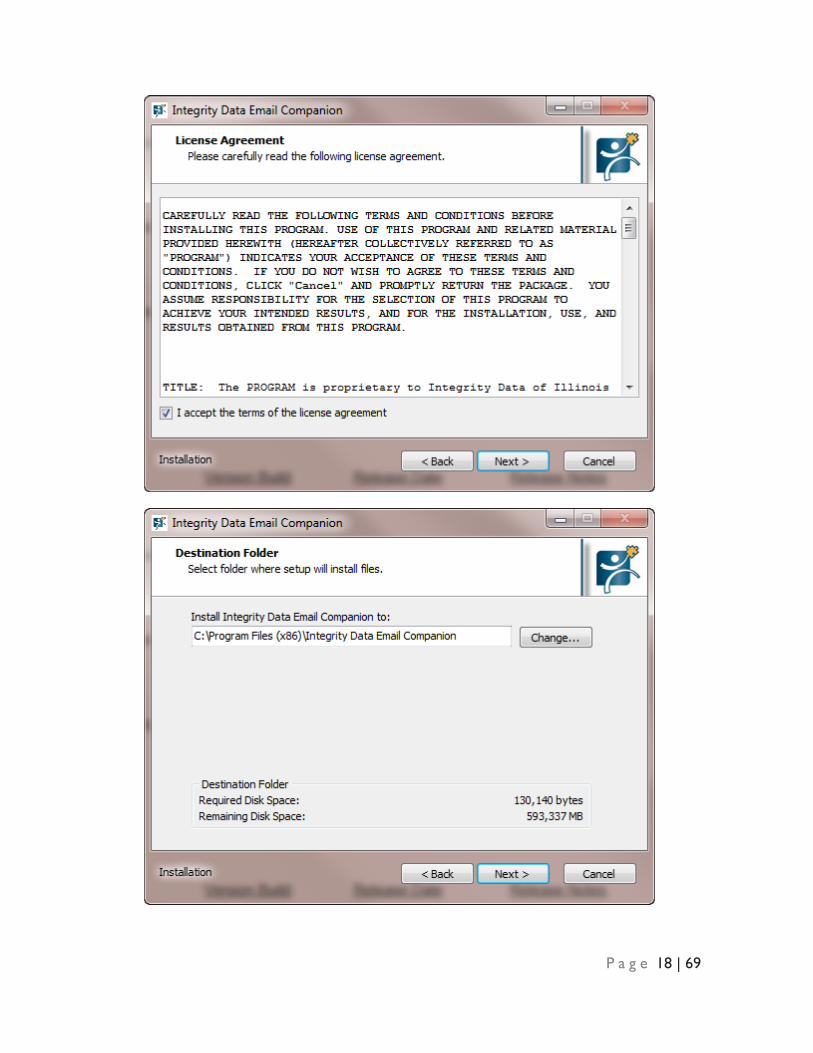
2. Complete the steps in the wizard.
P a g e 18 | 69
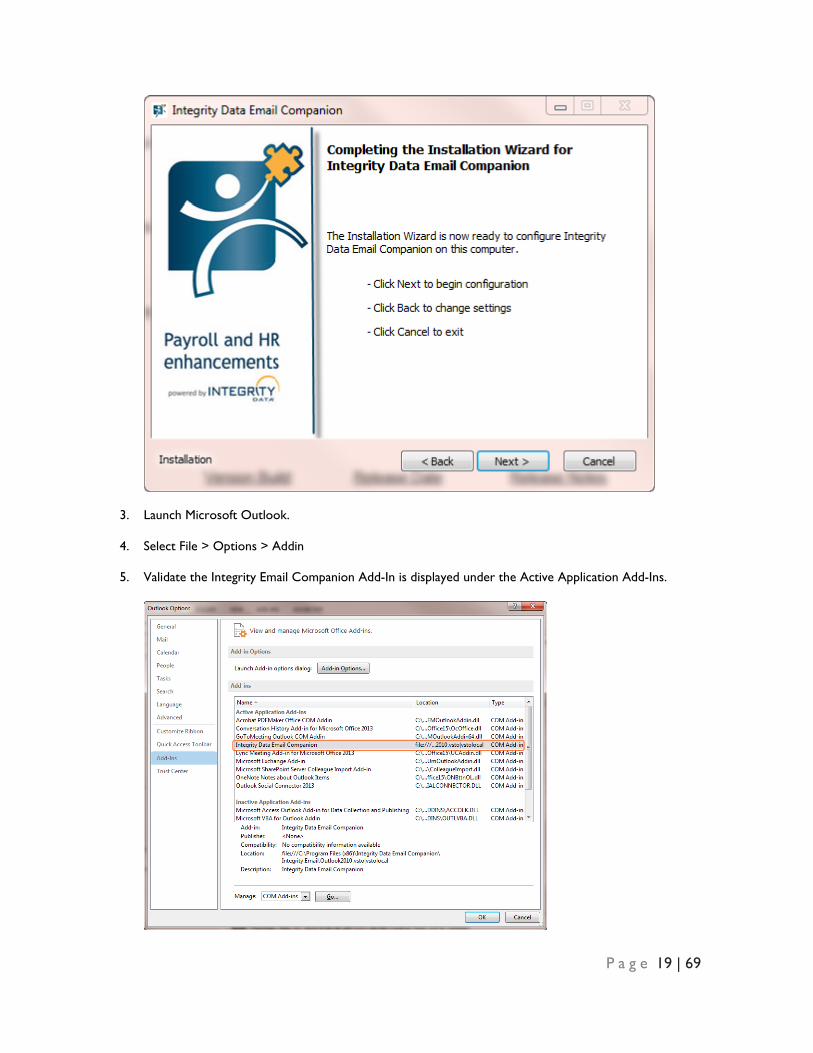
P a g e 19 | 69
3. Launch Microsoft Outlook.
4. Select File > Options > Addin
5. Validate the Integrity Email Companion Add-In is displayed under the Active Application Add-Ins.
P a g e 20 | 69
Mail Server Setup Employee E-mail Suite is designed to send mass amounts of e-mails. Ensure the mail sever will allow the client to send the maximum amount of e-mails for the payroll process.
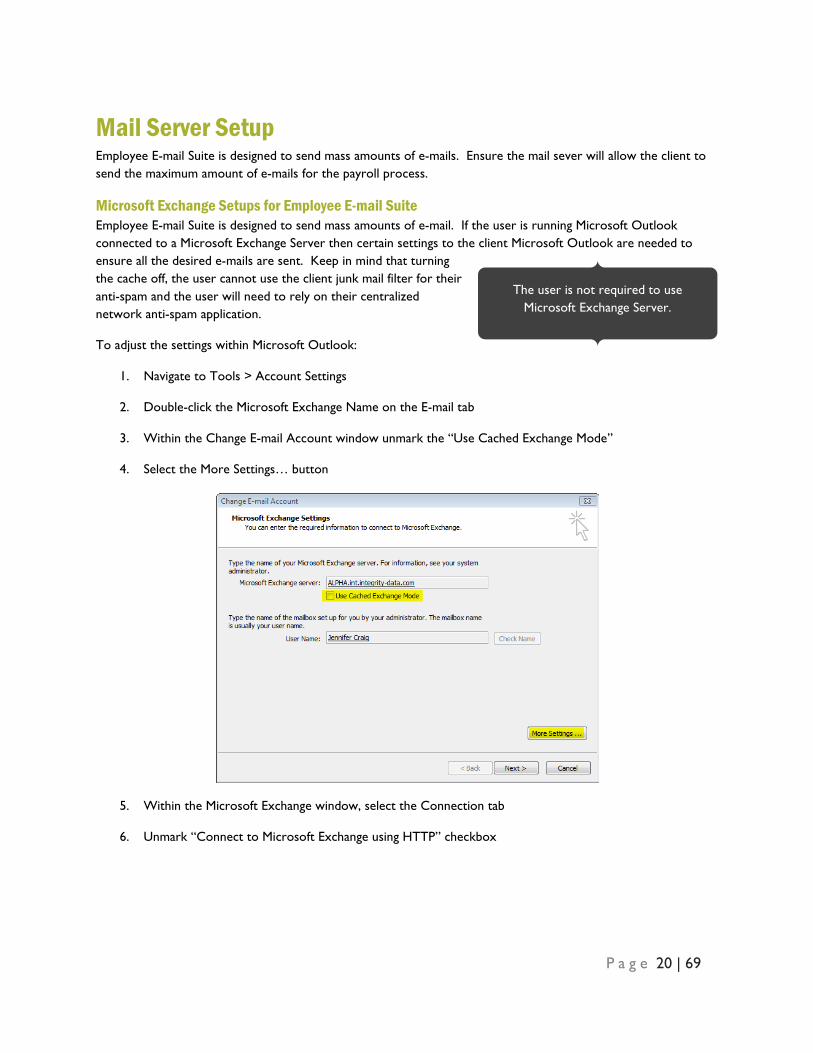
Microsoft Exchange Setups for Employee E-mail Suite Employee E-mail Suite is designed to send mass amounts of e-mail. If the user is running Microsoft Outlook connected to a Microsoft Exchange Server then certain settings to the client Microsoft Outlook are needed to ensure all the desired e-mails are sent. Keep in mind that turning the cache off, the user cannot use the client junk mail filter for their anti-spam and the user will need to rely on their centralized network anti-spam application.
To adjust the settings within Microsoft Outlook:
1. Navigate to Tools > Account Settings
2. Double-click the Microsoft Exchange Name on the E-mail tab
3. Within the Change E-mail Account window unmark the “Use Cached Exchange Mode”
4. Select the More Settings… button
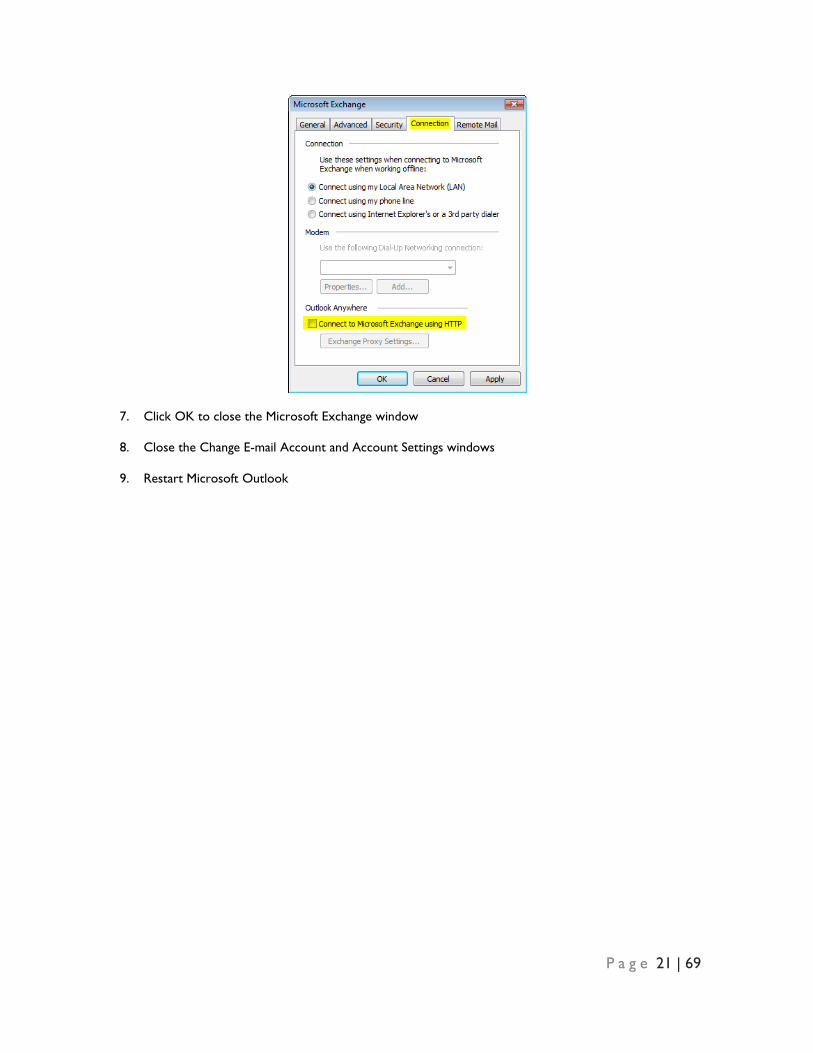
5. Within the Microsoft Exchange window, select the Connection tab
6. Unmark “Connect to Microsoft Exchange using HTTP” checkbox
The user is not required to use Microsoft Exchange Server.
P a g e 21 | 69
7. Click OK to close the Microsoft Exchange window
8. Close the Change E-mail Account and Account Settings windows
9. Restart Microsoft Outlook
P a g e 22 | 69
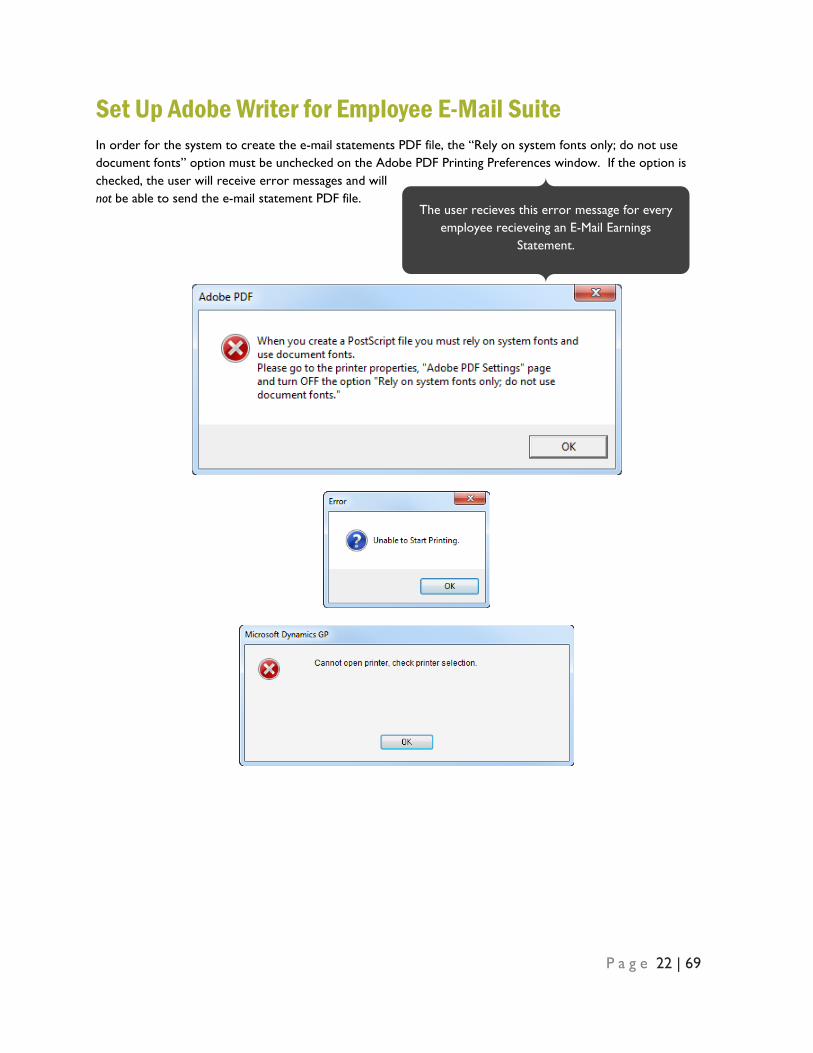
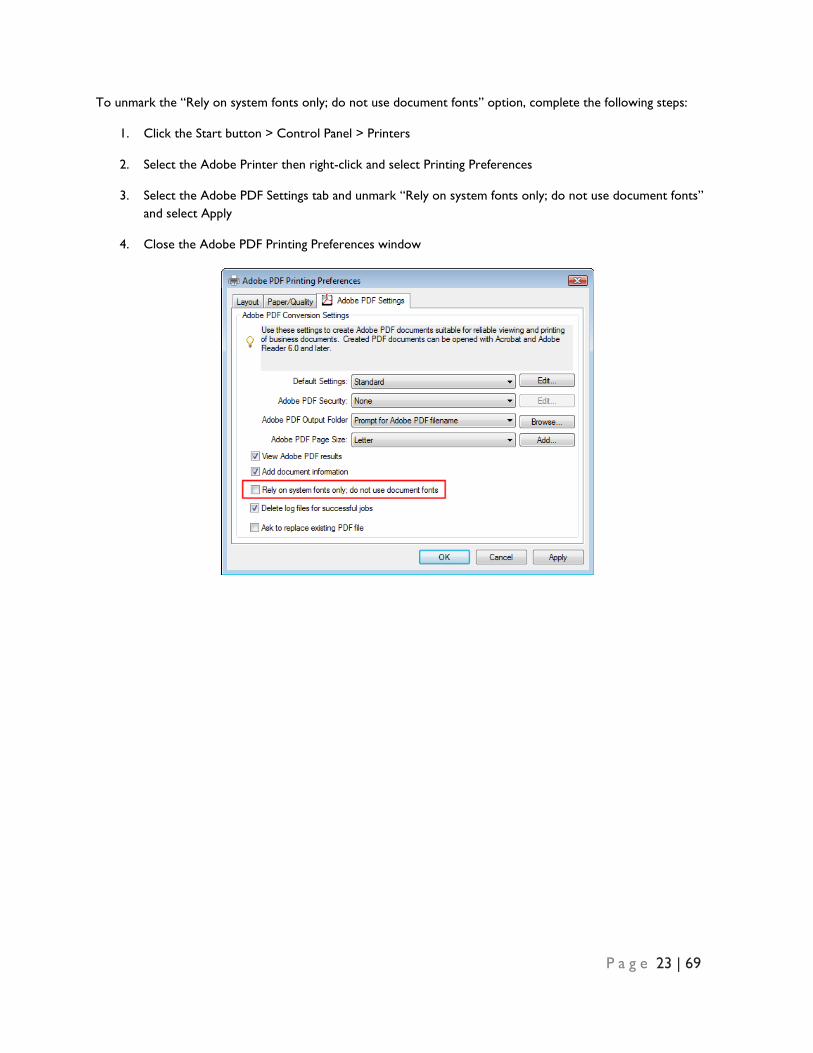
Set Up Adobe Writer for Employee E-Mail Suite In order for the system to create the e-mail statements PDF file, the “Rely on system fonts only; do not use document fonts” option must be unchecked on the Adobe PDF Printing Preferences window. If the option is checked, the user will receive error messages and will not be able to send the e-mail statement PDF file.
The user recieves this error message for every employee recieveing an E-Mail Earnings
Statement.
P a g e 23 | 69
To unmark the “Rely on system fonts only; do not use document fonts” option, complete the following steps:
1. Click the Start button > Control Panel > Printers
2. Select the Adobe Printer then right-click and select Printing Preferences
3. Select the Adobe PDF Settings tab and unmark “Rely on system fonts only; do not use document fonts” and select Apply
4. Close the Adobe PDF Printing Preferences window
P a g e 24 | 69
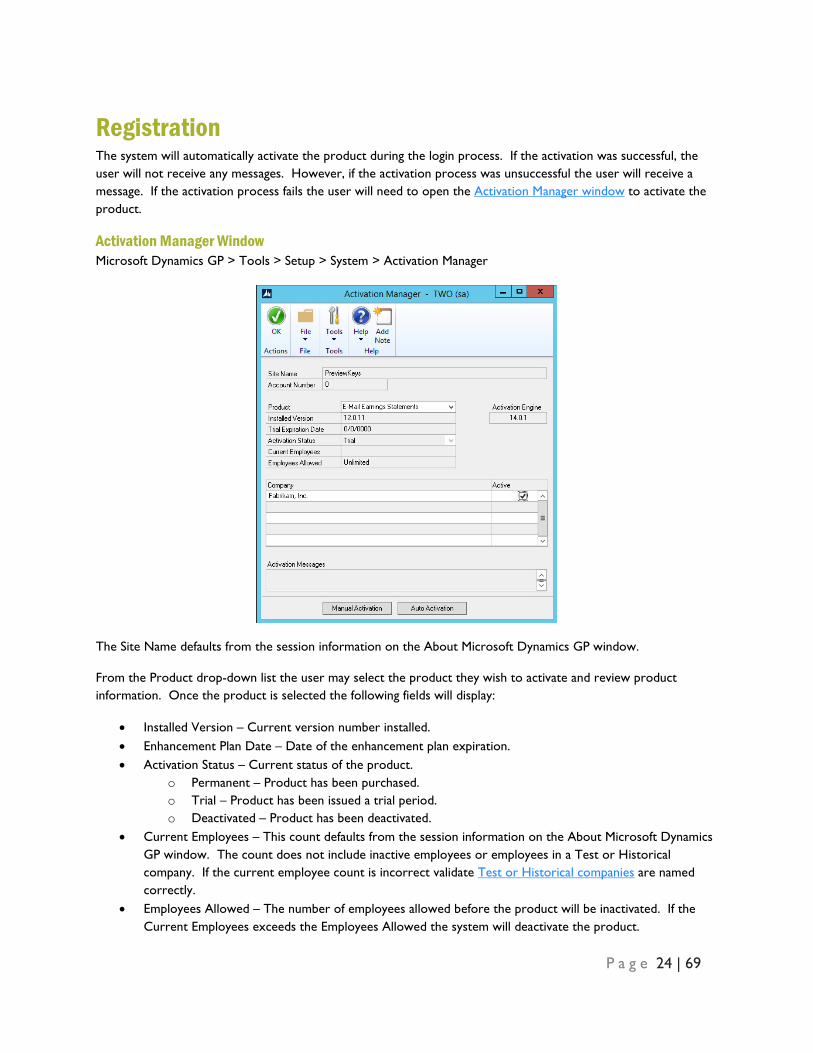
Registration The system will automatically activate the product during the login process. If the activation was successful, the user will not receive any messages. However, if the activation process was unsuccessful the user will receive a message. If the activation process fails the user will need to open the Activation Manager window to activate the product.
Activation Manager Window Microsoft Dynamics GP > Tools > Setup > System > Activation Manager
The Site Name defaults from the session information on the About Microsoft Dynamics GP window.
From the Product drop-down list the user may select the product they wish to activate and review product information. Once the product is selected the following fields will display:
• Installed Version – Current version number installed. • Enhancement Plan Date – Date of the enhancement plan expiration. • Activation Status – Current status of the product.
o Permanent – Product has been purchased. o Trial – Product has been issued a trial period. o Deactivated – Product has been deactivated.
• Current Employees – This count defaults from the session information on the About Microsoft Dynamics GP window. The count does not include inactive employees or employees in a Test or Historical company. If the current employee count is incorrect validate Test or Historical companies are named correctly.
• Employees Allowed – The number of employees allowed before the product will be inactivated. If the Current Employees exceeds the Employees Allowed the system will deactivate the product.
P a g e 25 | 69
The scrolling window contains a list of all companies. By default the product is active for all companies. If the user would like to inactivate a company unmark the company checkbox.
The Auto Activation option may be selected if the user receives a message at login stating the product is not activated. When the user selects the Auto Activation option the system will attempt to automatically activate the product. Once the Auto Activation process is complete the system will display the Activation Messages. For a detailed list of activation messages see the Activation Manager Messages section.
The Manual Activation option is used to manually enter a token. The user would only manually enter a token if they were sent a token by Integrity Data.
Select the OK button to close the window.
Test and/or Historical Companies Registration will not count the active employees in Test or Historical company databases if the Company Name is named correctly, specifically at the end of the Company Name the user must append the following: “<TEST>” or “<HISTORICAL>”. See examples below:
• Dextordinary, Inc. <TEST> • Dextordinary, Inc. <HISTORICAL>
To access and modify the Company Name open the Company Setup window via Microsoft Dynamics GP > Tools > Setup > Company > Company when logged into the Test or Historical Company that needs modified.

P a g e 26 | 69
Security Settings The Security Task Setup window may be used to grant or restrict access to the Employee E-mail Suite windows. To open the window, select the Microsoft Dynamics GP menu, select Tools, select Setup, select System, select Security Tasks and enter the system password.
1. Select the appropriate Task items. To identify the appropriate task item complete the steps below:
• Open the User Security Setup window (Microsoft Dynamics GP > Tools > Setup > System > User Security), select the appropriate user and make a note of the Security Role ID assigned to the user.
• Open the Security Role Setup window (Microsoft Dynamics GP > Tools > Setup > System > Security Roles), select the Role ID that has been assigned to the user and make note of the Security Task ID assigned to the Role. Use this Task ID to grant security to the Employee Email Suite. NOTE: The most common Task ID used is TRX_PAYRL_004 – Print Payroll Checks
2. Select Employee E-mail Suite for the Product.
3. Select Windows for the Type and select 3rd Party for the Series.
4. Use the Access List to grant or restrict access to individual items.
• To grant or restrict access to an item for this Task ID, click the checkbox to mark or unmark the item.
• Click the Mark All button to grant access to all items in the list or click the Unmark All button to restrict access to all items in the list.
5. Click File > Print to print the Security Task Setup Report for the selected Task ID.
6. Choose OK to save your changes.
Employee E-mail Suite> Windows > 3rd Party > Access List • APR Main Menu • E-Mail Earnings Statements • E-Mail Suite Setup • Password Setup • Registration – EES • APR Main Menu • E-Mail Earnings Statements • E-Mail Suite Setup • E-Mail W-2 Statements • Manage W-2 Recipients • Password Setup • Registration - EES
Employee E-mail Suite> Reports > 3rd Party > Access List • Earnings Statement Exceptions • EES Error Report • EES Missing Email Report • Earnings Statement Exceptions
P a g e 27 | 69
• EES Error Report • EES Missing Email Report • E-Mail W2 Recipients • E-Mail W2 Statements • W-2 Employee Copy 2 • W-2 Employee Copy B • W-2 Employee Copy C • W-2 Employee Copy D
P a g e 28 | 69
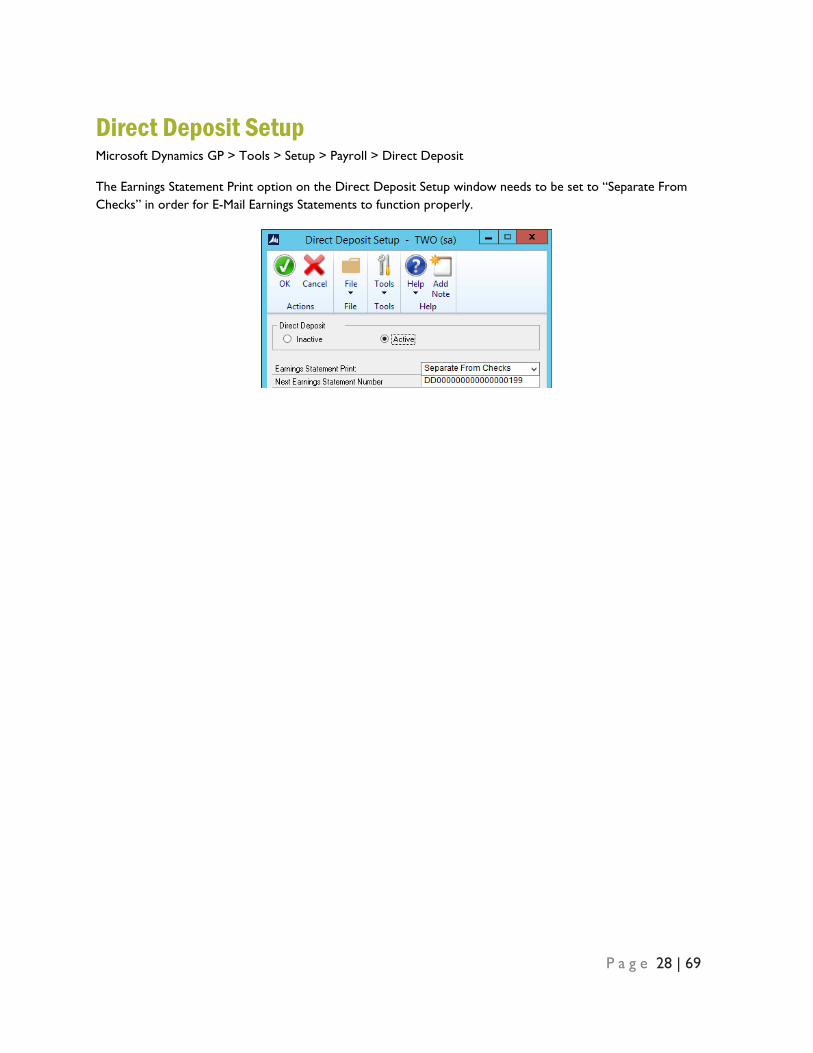
Direct Deposit Setup Microsoft Dynamics GP > Tools > Setup > Payroll > Direct Deposit
The Earnings Statement Print option on the Direct Deposit Setup window needs to be set to “Separate From Checks” in order for E-Mail Earnings Statements to function properly.
P a g e 29 | 69
Introduction to Employee Email Suite Organizations are increasingly moving toward payroll processing using Direct Deposit. The E-Mail Earnings Statements extends the payroll process functionality of Microsoft Dynamics GP to support the e-mailing of Earnings Statements as an added option during the print checks portion of the payroll process.
The system will allow the user to:
• Specify setup options for employees to receive e-mail earnings statements; • Add employees to an E-Mail Exceptions Report; • Password protect the e-mailed earnings statements (up to 15 characters); • Validate employees address ID on the Missing E-Mail List Report; • Generate individual earnings statements for employees and • E-Mail the statements to employees.
The user will complete the following setup options:
• E-Mail Configuration information
o E-Mail Method o Subject Line o E-Mail Body o Blind Carbon Copy o Password o PDF file location
• Employee Exceptions
o Employee ID o Employee Name o E-Mail Address
E-Mail Earnings Statements will process if the following conditions are met:
• The Employee E-Mail Suite is installed and registered; • The user has selected the Activate E-Mail Earnings Statements checkbox; • The employee has an e-mail address assigned on the Internet Information window; • Direct deposit must be active and setup for the employee and • The employee must be included in the payroll run and not appear on the Exception List Report.
P a g e 30 | 69
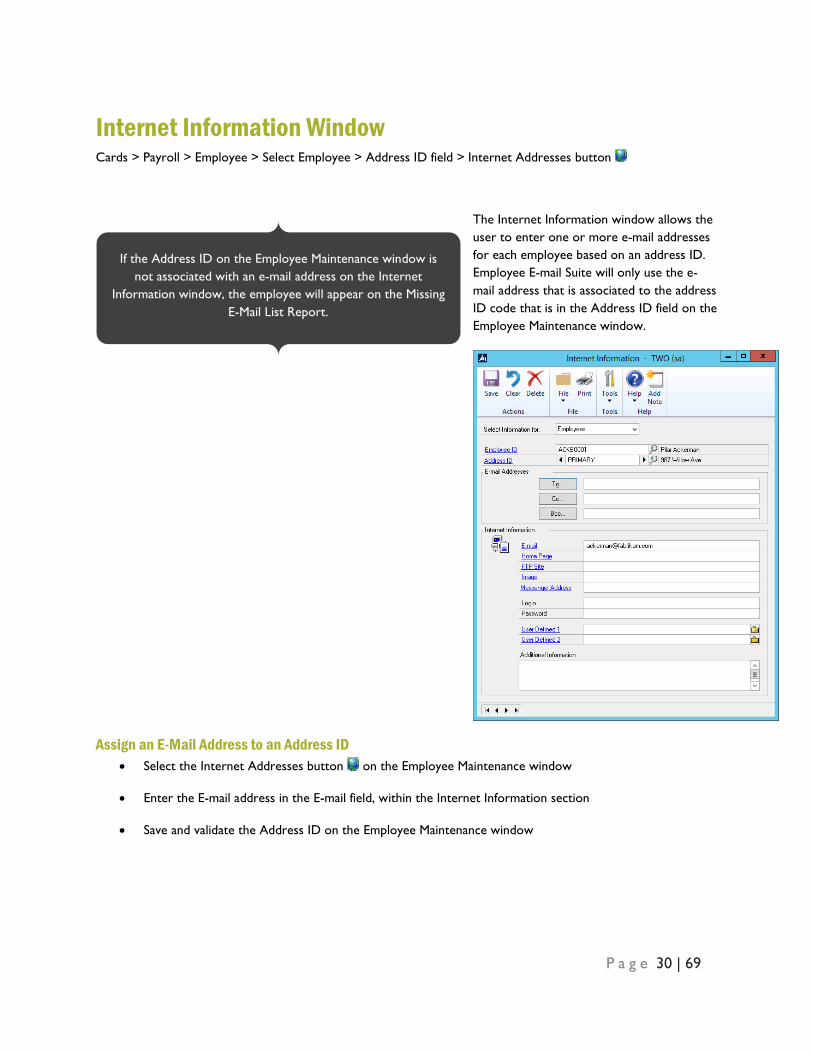
Internet Information Window Cards > Payroll > Employee > Select Employee > Address ID field > Internet Addresses button
The Internet Information window allows the user to enter one or more e-mail addresses for each employee based on an address ID. Employee E-mail Suite will only use the e-mail address that is associated to the address ID code that is in the Address ID field on the Employee Maintenance window.
Assign an E-Mail Address to an Address ID • Select the Internet Addresses button on the Employee Maintenance window
• Enter the E-mail address in the E-mail field, within the Internet Information section
• Save and validate the Address ID on the Employee Maintenance window
If the Address ID on the Employee Maintenance window is not associated with an e-mail address on the Internet
Information window, the employee will appear on the Missing E-Mail List Report.
P a g e 31 | 69
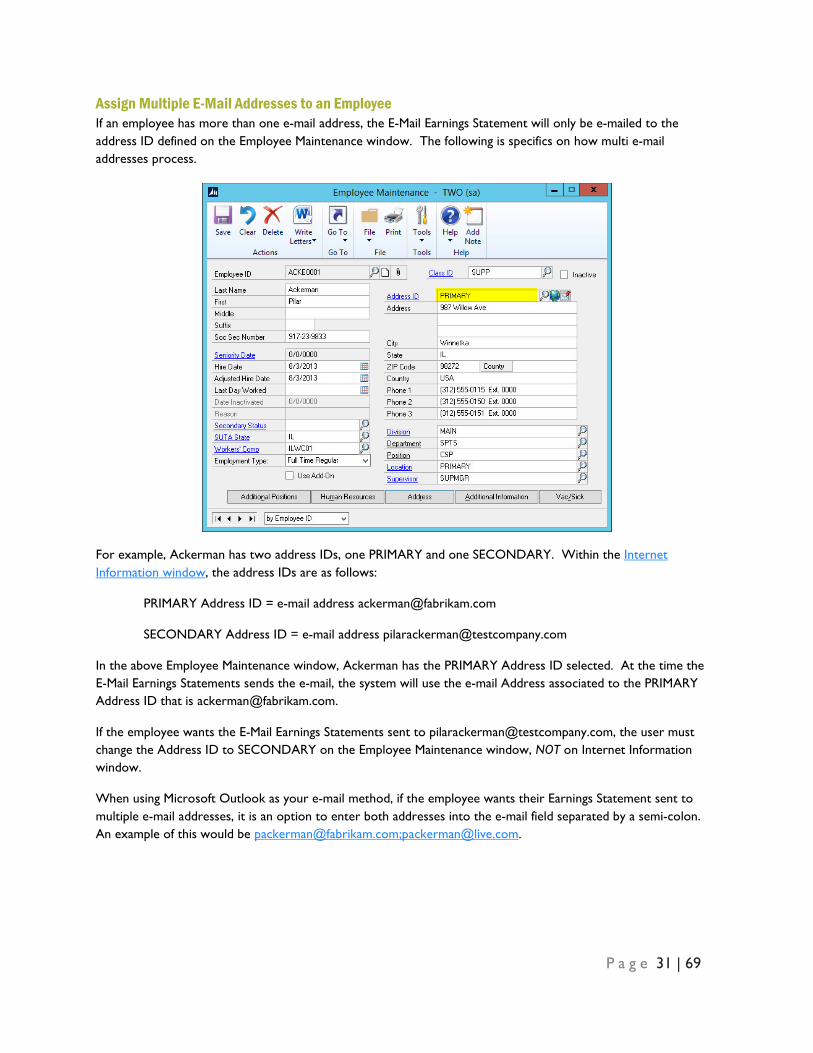
Assign Multiple E-Mail Addresses to an Employee If an employee has more than one e-mail address, the E-Mail Earnings Statement will only be e-mailed to the address ID defined on the Employee Maintenance window. The following is specifics on how multi e-mail addresses process.
For example, Ackerman has two address IDs, one PRIMARY and one SECONDARY. Within the Internet Information window, the address IDs are as follows:
PRIMARY Address ID = e-mail address [email protected]
SECONDARY Address ID = e-mail address [email protected]
In the above Employee Maintenance window, Ackerman has the PRIMARY Address ID selected. At the time the E-Mail Earnings Statements sends the e-mail, the system will use the e-mail Address associated to the PRIMARY Address ID that is [email protected].
If the employee wants the E-Mail Earnings Statements sent to [email protected], the user must change the Address ID to SECONDARY on the Employee Maintenance window, NOT on Internet Information window.
When using Microsoft Outlook as your e-mail method, if the employee wants their Earnings Statement sent to multiple e-mail addresses, it is an option to enter both addresses into the e-mail field separated by a semi-colon. An example of this would be [email protected];[email protected].
P a g e 32 | 69
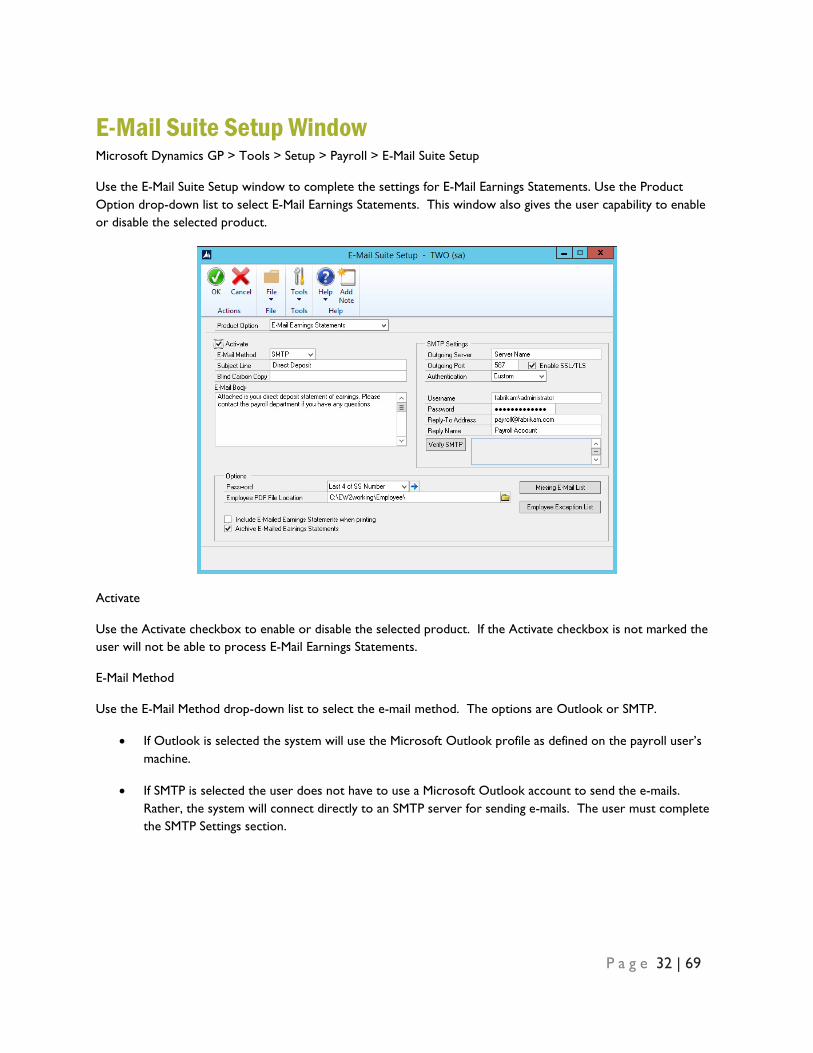
E-Mail Suite Setup Window Microsoft Dynamics GP > Tools > Setup > Payroll > E-Mail Suite Setup
Use the E-Mail Suite Setup window to complete the settings for E-Mail Earnings Statements. Use the Product Option drop-down list to select E-Mail Earnings Statements. This window also gives the user capability to enable or disable the selected product.
Activate
Use the Activate checkbox to enable or disable the selected product. If the Activate checkbox is not marked the user will not be able to process E-Mail Earnings Statements.
E-Mail Method
Use the E-Mail Method drop-down list to select the e-mail method. The options are Outlook or SMTP.
• If Outlook is selected the system will use the Microsoft Outlook profile as defined on the payroll user’s machine.
• If SMTP is selected the user does not have to use a Microsoft Outlook account to send the e-mails. Rather, the system will connect directly to an SMTP server for sending e-mails. The user must complete the SMTP Settings section.
P a g e 33 | 69
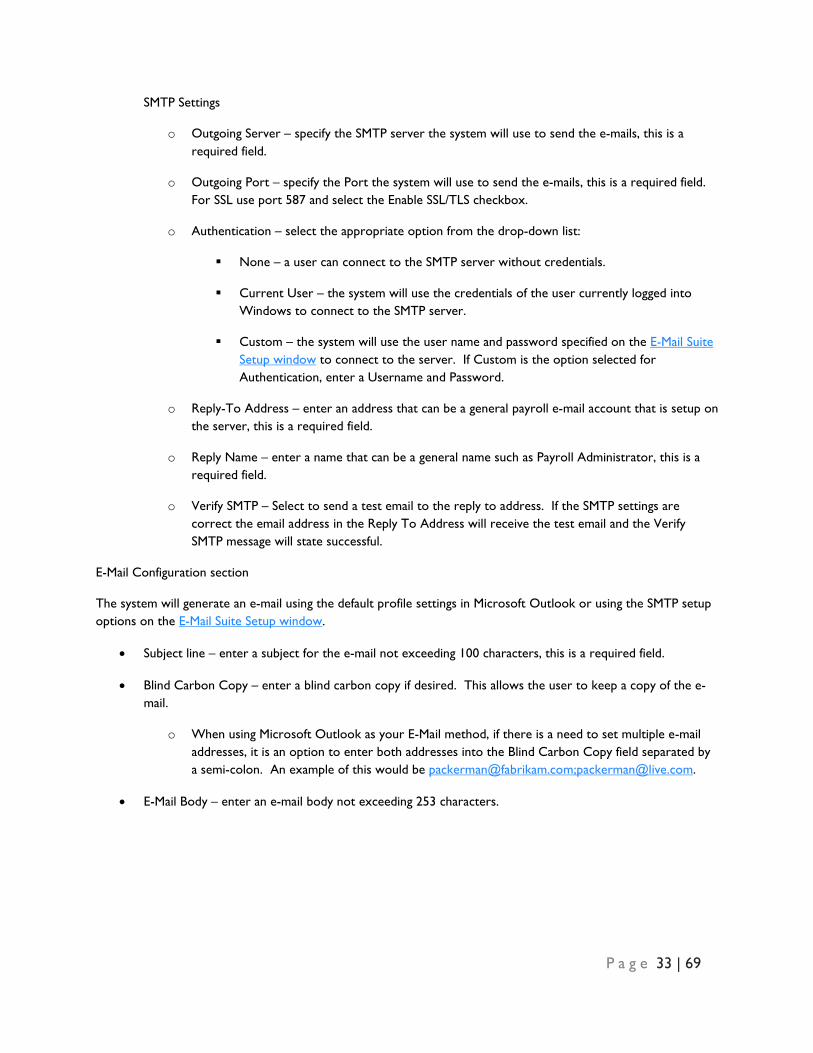
SMTP Settings
o Outgoing Server – specify the SMTP server the system will use to send the e-mails, this is a required field.
o Outgoing Port – specify the Port the system will use to send the e-mails, this is a required field. For SSL use port 587 and select the Enable SSL/TLS checkbox.
o Authentication – select the appropriate option from the drop-down list:
None – a user can connect to the SMTP server without credentials.
Current User – the system will use the credentials of the user currently logged into Windows to connect to the SMTP server.
Custom – the system will use the user name and password specified on the E-Mail Suite Setup window to connect to the server. If Custom is the option selected for Authentication, enter a Username and Password.
o Reply-To Address – enter an address that can be a general payroll e-mail account that is setup on the server, this is a required field.
o Reply Name – enter a name that can be a general name such as Payroll Administrator, this is a required field.
o Verify SMTP – Select to send a test email to the reply to address. If the SMTP settings are correct the email address in the Reply To Address will receive the test email and the Verify SMTP message will state successful.
E-Mail Configuration section
The system will generate an e-mail using the default profile settings in Microsoft Outlook or using the SMTP setup options on the E-Mail Suite Setup window.
• Subject line – enter a subject for the e-mail not exceeding 100 characters, this is a required field.
• Blind Carbon Copy – enter a blind carbon copy if desired. This allows the user to keep a copy of the e-mail.
o When using Microsoft Outlook as your E-Mail method, if there is a need to set multiple e-mail addresses, it is an option to enter both addresses into the Blind Carbon Copy field separated by a semi-colon. An example of this would be [email protected];[email protected].
• E-Mail Body – enter an e-mail body not exceeding 253 characters.
P a g e 34 | 69
Options
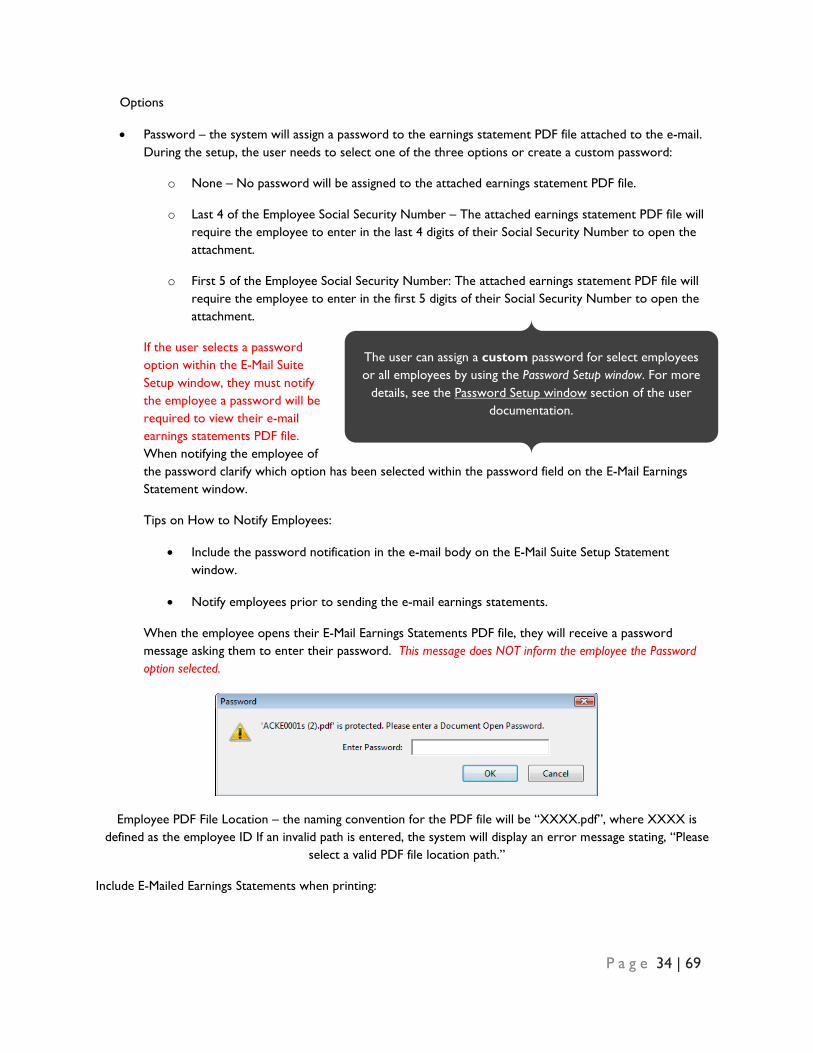
• Password – the system will assign a password to the earnings statement PDF file attached to the e-mail. During the setup, the user needs to select one of the three options or create a custom password:
o None – No password will be assigned to the attached earnings statement PDF file.
o Last 4 of the Employee Social Security Number – The attached earnings statement PDF file will require the employee to enter in the last 4 digits of their Social Security Number to open the attachment.
o First 5 of the Employee Social Security Number: The attached earnings statement PDF file will require the employee to enter in the first 5 digits of their Social Security Number to open the attachment.
If the user selects a password option within the E-Mail Suite Setup window, they must notify the employee a password will be required to view their e-mail earnings statements PDF file. When notifying the employee of the password clarify which option has been selected within the password field on the E-Mail Earnings Statement window.
Tips on How to Notify Employees:
• Include the password notification in the e-mail body on the E-Mail Suite Setup Statement window.
• Notify employees prior to sending the e-mail earnings statements.
When the employee opens their E-Mail Earnings Statements PDF file, they will receive a password message asking them to enter their password. This message does NOT inform the employee the Password option selected.
Employee PDF File Location – the naming convention for the PDF file will be “XXXX.pdf”, where XXXX is defined as the employee ID If an invalid path is entered, the system will display an error message stating, “Please
select a valid PDF file location path.”
Include E-Mailed Earnings Statements when printing:
The user can assign a custom password for select employees or all employees by using the Password Setup window. For more
details, see the Password Setup window section of the user documentation.
P a g e 35 | 69
• Mark this checkbox if the user would like to have a printed copy of the e-mailed earnings statement. The system will print the e-mailed statements during the Print Earnings Statements process on the Post window.
• Unmark this checkbox if the user does not want the e-mailed earnings statements to print during the Print Earnings Statements process on the Post window.
Archive E-Mailed Earnings Statements:
• Mark this checkbox if the user would like to have a copy of the e-mailed earnings statement PDF file saved. The system will create a folder with the Audit Trail Code as the label in the Employee PDF File Location. After sending the PDF Files the system will copy the PDF files into the Audit Trail Code folder before deleting the PDF files from the Employee PDF File Location.
• Unmark this checkbox if the user does not want to have a copy of the e-mailed earnings statements PDF file saved.
Missing E-Mail List Button
The Missing E-Mail List Button allows the user to print the Missing E-Mail List Report which contains the employees who do not have an E-Mail address associated the Address ID on the Employee Maintenance window. The employees on this list will not receive an E-Mail Earnings Statement.
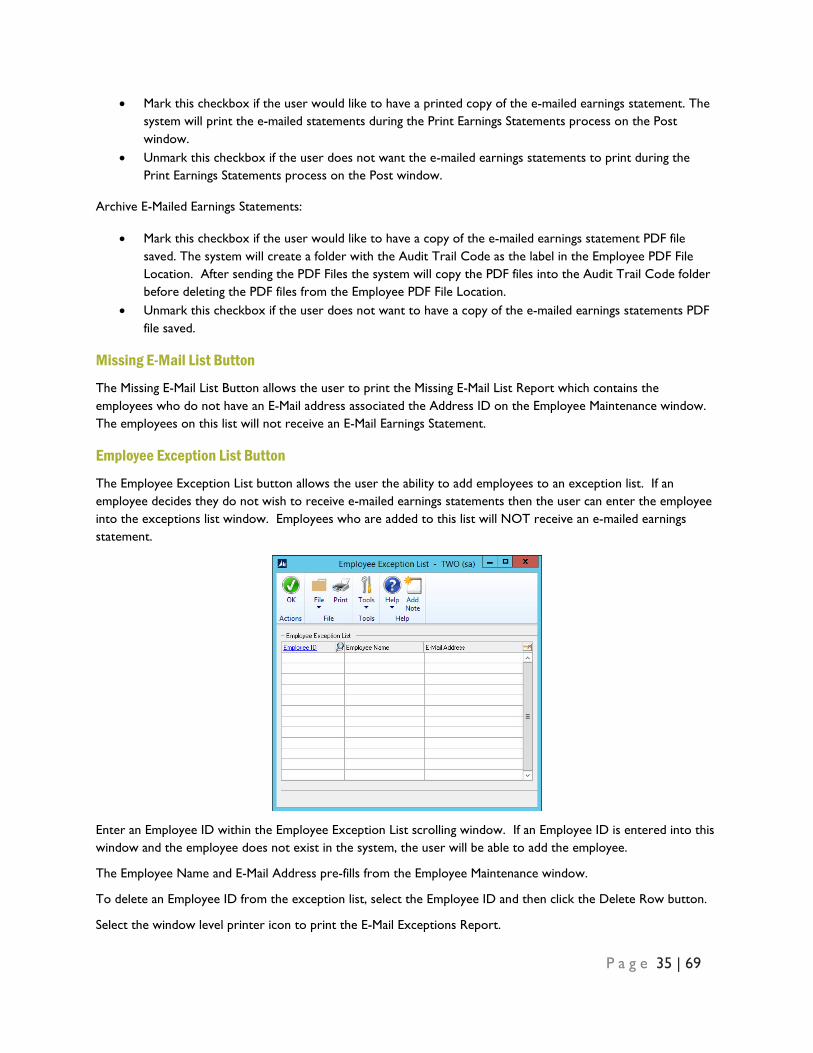
Employee Exception List Button
The Employee Exception List button allows the user the ability to add employees to an exception list. If an employee decides they do not wish to receive e-mailed earnings statements then the user can enter the employee into the exceptions list window. Employees who are added to this list will NOT receive an e-mailed earnings statement.
Enter an Employee ID within the Employee Exception List scrolling window. If an Employee ID is entered into this window and the employee does not exist in the system, the user will be able to add the employee.
The Employee Name and E-Mail Address pre-fills from the Employee Maintenance window.
To delete an Employee ID from the exception list, select the Employee ID and then click the Delete Row button.
Select the window level printer icon to print the E-Mail Exceptions Report.
P a g e 36 | 69
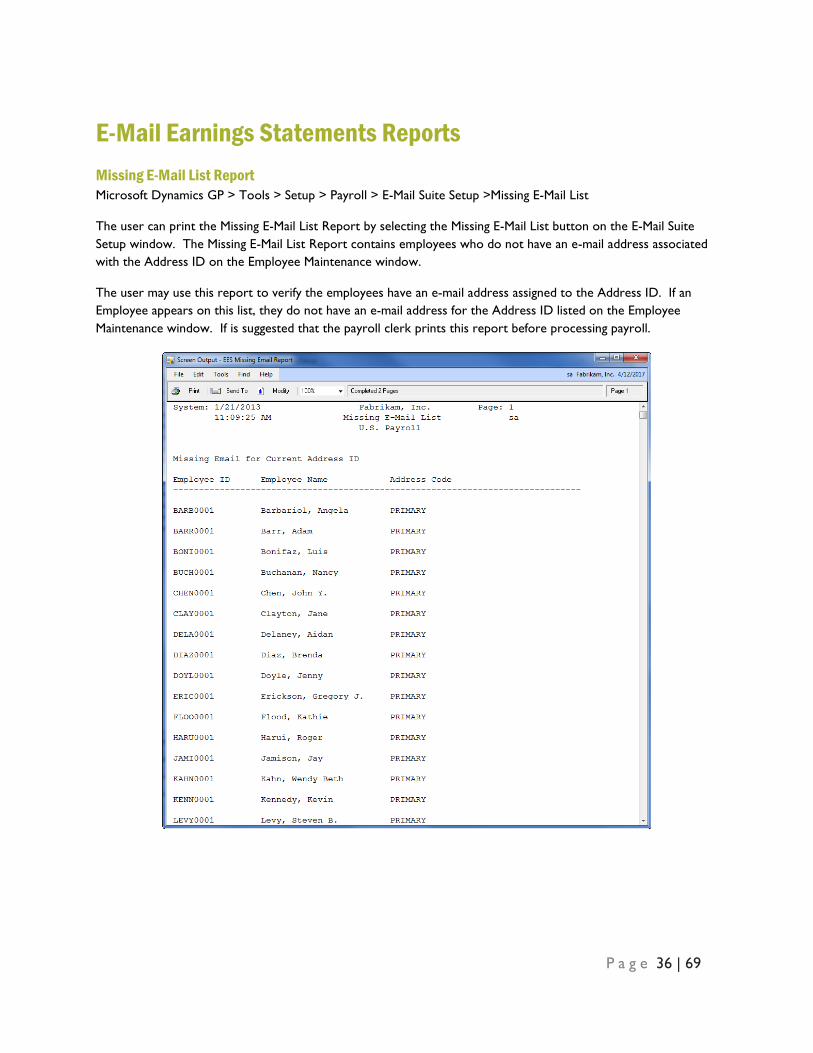
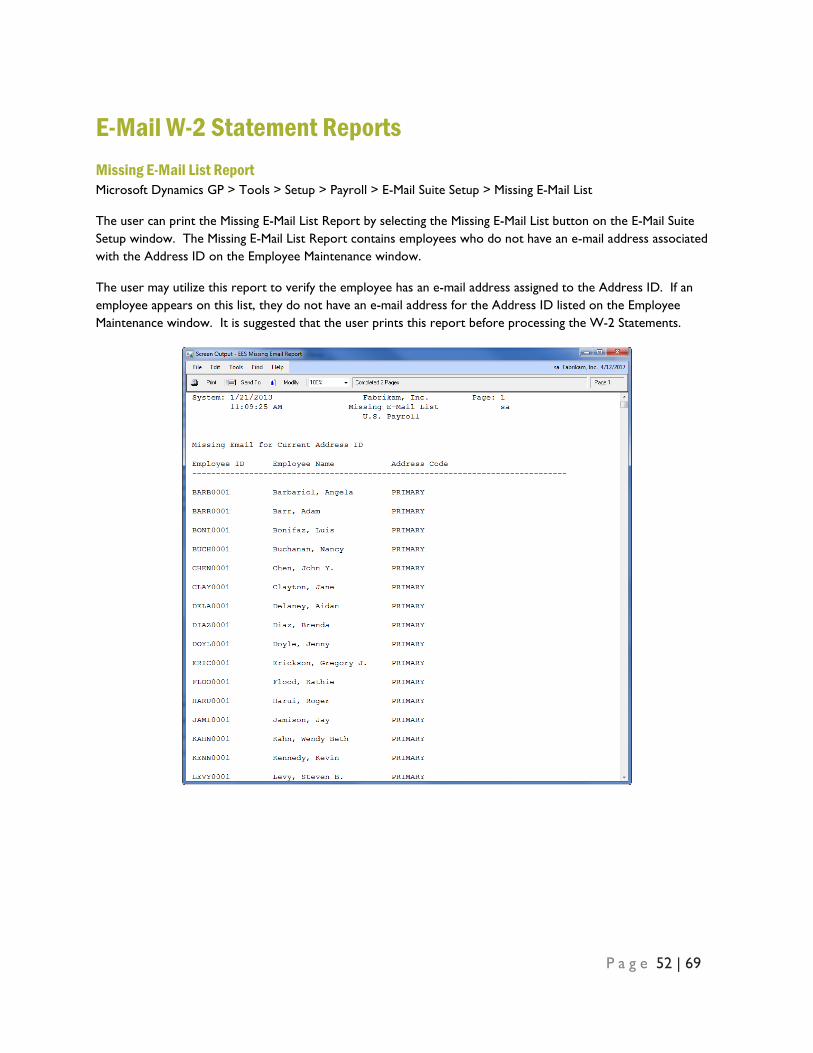
E-Mail Earnings Statements Reports Missing E-Mail List Report Microsoft Dynamics GP > Tools > Setup > Payroll > E-Mail Suite Setup >Missing E-Mail List
The user can print the Missing E-Mail List Report by selecting the Missing E-Mail List button on the E-Mail Suite Setup window. The Missing E-Mail List Report contains employees who do not have an e-mail address associated with the Address ID on the Employee Maintenance window.
The user may use this report to verify the employees have an e-mail address assigned to the Address ID. If an Employee appears on this list, they do not have an e-mail address for the Address ID listed on the Employee Maintenance window. If is suggested that the payroll clerk prints this report before processing payroll.
P a g e 37 | 69
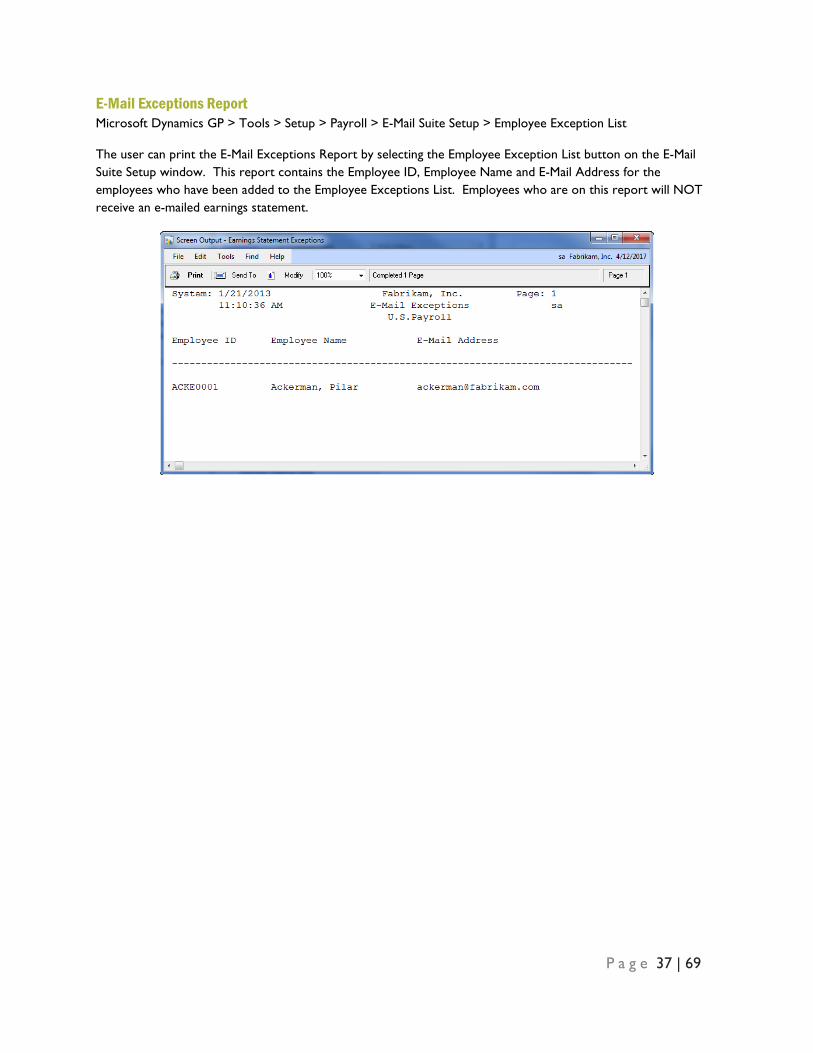
E-Mail Exceptions Report Microsoft Dynamics GP > Tools > Setup > Payroll > E-Mail Suite Setup > Employee Exception List
The user can print the E-Mail Exceptions Report by selecting the Employee Exception List button on the E-Mail Suite Setup window. This report contains the Employee ID, Employee Name and E-Mail Address for the employees who have been added to the Employee Exceptions List. Employees who are on this report will NOT receive an e-mailed earnings statement.
P a g e 38 | 69
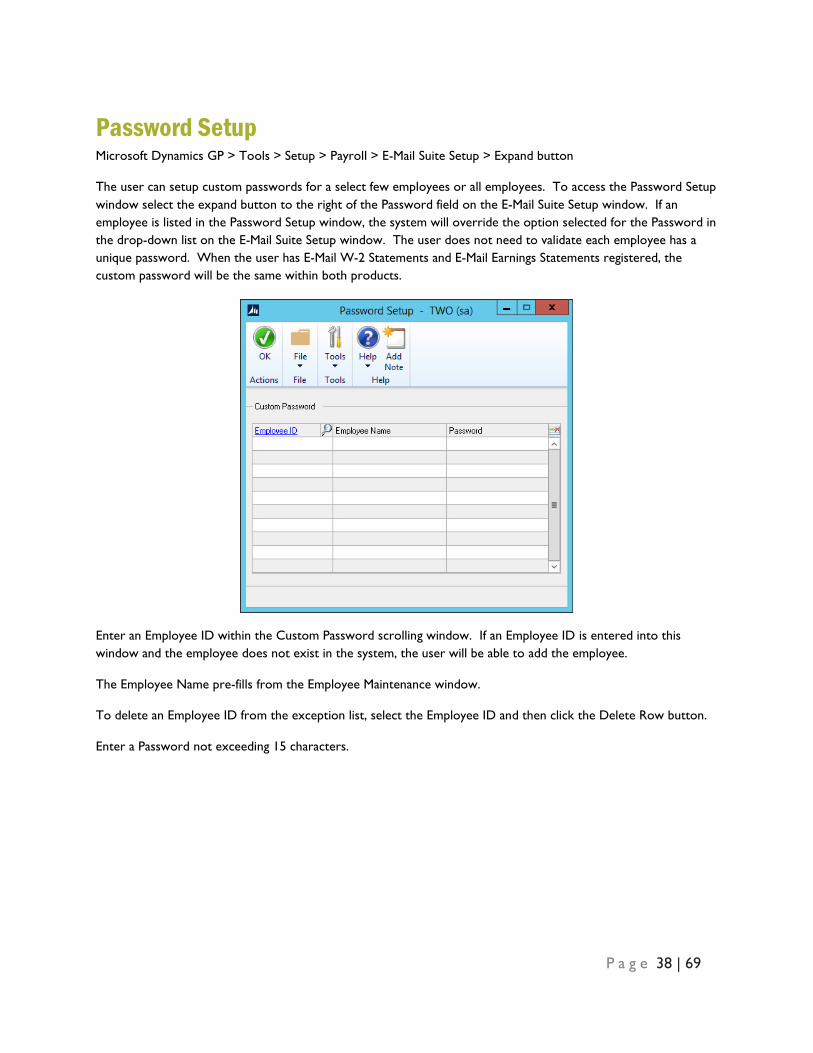
Password Setup Microsoft Dynamics GP > Tools > Setup > Payroll > E-Mail Suite Setup > Expand button
The user can setup custom passwords for a select few employees or all employees. To access the Password Setup window select the expand button to the right of the Password field on the E-Mail Suite Setup window. If an employee is listed in the Password Setup window, the system will override the option selected for the Password in the drop-down list on the E-Mail Suite Setup window. The user does not need to validate each employee has a unique password. When the user has E-Mail W-2 Statements and E-Mail Earnings Statements registered, the custom password will be the same within both products.
Enter an Employee ID within the Custom Password scrolling window. If an Employee ID is entered into this window and the employee does not exist in the system, the user will be able to add the employee.
The Employee Name pre-fills from the Employee Maintenance window.
To delete an Employee ID from the exception list, select the Employee ID and then click the Delete Row button.
Enter a Password not exceeding 15 characters.
P a g e 39 | 69
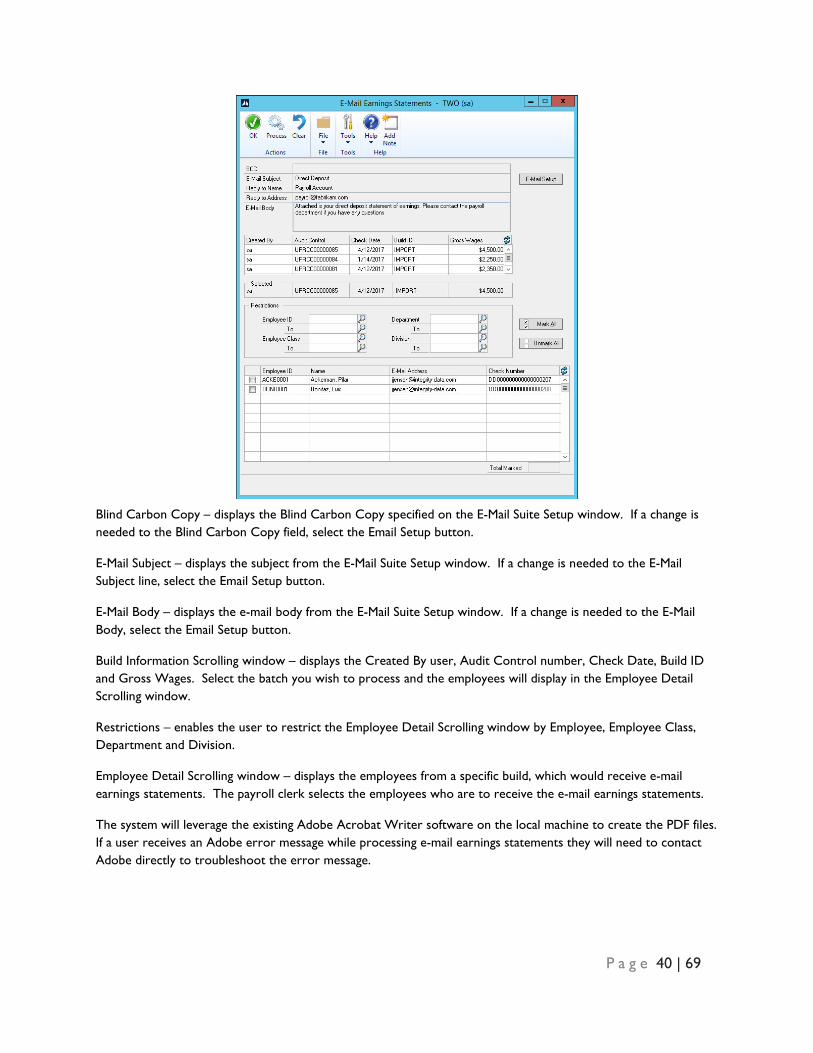
E-Mail Earnings Statements Process Transactions > Payroll > Email Earnings Statements
Once the Post process during payroll has been completed, open the E-Mail Earnings Statements window. The user will select the payroll build and then the system will display the earnings statement details for the build. The user can then mark all or select which employee’s need to be e-mailed.
The system will prevent a user from running a Payroll if E-Mail Earnings Statements are being processed. The system will prevent a user from processing E-Mail Earnings Statements if a Payroll is in process.
If the user has additional company-wide PDF files to send with the employee’s e-mail earnings statements, they can include the file(s) in the EES folder located in the C:\Program Files\Microsoft Dynamics\GP2015\Data folder. These files will be attached to the employee’s e-mail and sent to ALL employees.
Sending Employee Specific attachments
If the user has employee specific files to send, such as a time sheet, with the employee’s e-mail earnings statements, they can include the file(s) in the Employee folder located in the C:\Program Files\Microsoft Dynamics\GP2015\Data\EES folder. The system will only send a file to an employee if the file is named with the employee ID followed by two single quotes. For example, if an Excel document was named ACKE0001’’ Timesheet.xlsx and saved in the \Data\EES\Employee folder when the system sends ACKE0001 their earnings statement the system will send this Excel document.
IMPORTANT: Do not set the Employee PDF File Location on the E-Mail Suite Setup window to this folder. The files included in
this folder (C:\Program Files\Microsoft
Dynamics\GP2013\Data\EES) will be sent to
ALL employees!
P a g e 40 | 69
Blind Carbon Copy – displays the Blind Carbon Copy specified on the E-Mail Suite Setup window. If a change is needed to the Blind Carbon Copy field, select the Email Setup button.
E-Mail Subject – displays the subject from the E-Mail Suite Setup window. If a change is needed to the E-Mail Subject line, select the Email Setup button.
E-Mail Body – displays the e-mail body from the E-Mail Suite Setup window. If a change is needed to the E-Mail Body, select the Email Setup button.
Build Information Scrolling window – displays the Created By user, Audit Control number, Check Date, Build ID and Gross Wages. Select the batch you wish to process and the employees will display in the Employee Detail Scrolling window.
Restrictions – enables the user to restrict the Employee Detail Scrolling window by Employee, Employee Class, Department and Division.
Employee Detail Scrolling window – displays the employees from a specific build, which would receive e-mail earnings statements. The payroll clerk selects the employees who are to receive the e-mail earnings statements.
The system will leverage the existing Adobe Acrobat Writer software on the local machine to create the PDF files. If a user receives an Adobe error message while processing e-mail earnings statements they will need to contact Adobe directly to troubleshoot the error message.
P a g e 41 | 69
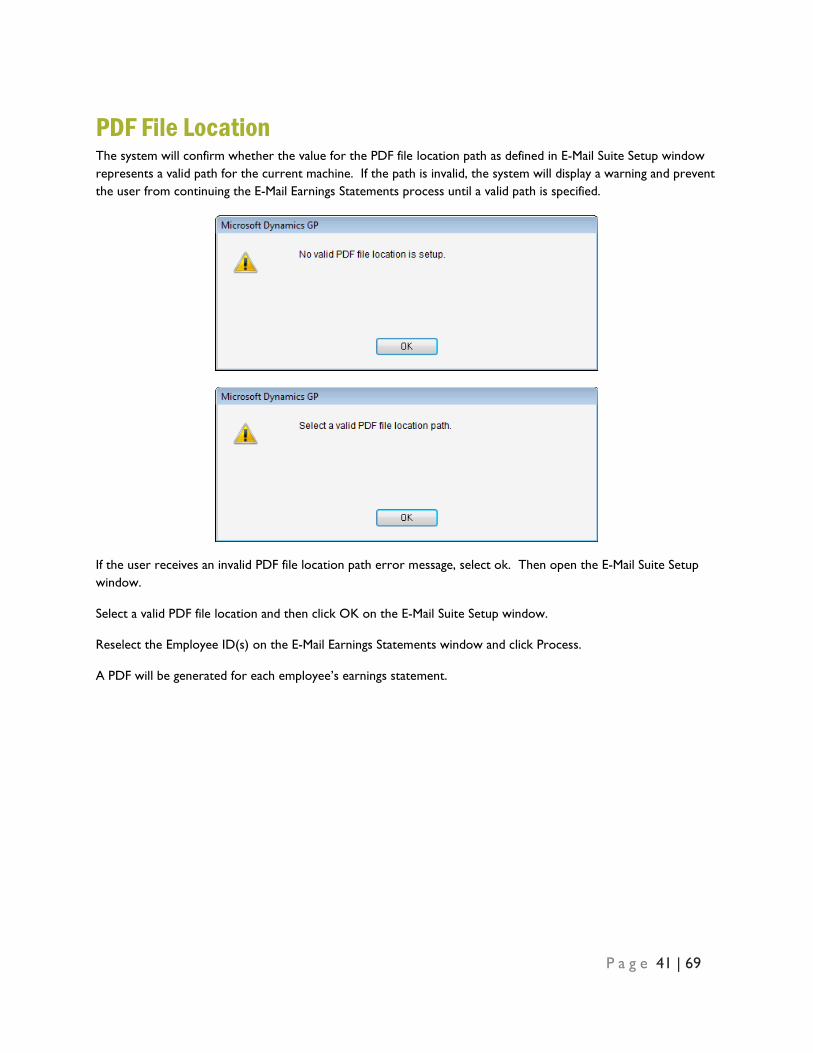
PDF File Location The system will confirm whether the value for the PDF file location path as defined in E-Mail Suite Setup window represents a valid path for the current machine. If the path is invalid, the system will display a warning and prevent the user from continuing the E-Mail Earnings Statements process until a valid path is specified.
If the user receives an invalid PDF file location path error message, select ok. Then open the E-Mail Suite Setup window.
Select a valid PDF file location and then click OK on the E-Mail Suite Setup window.
Reselect the Employee ID(s) on the E-Mail Earnings Statements window and click Process.
A PDF will be generated for each employee’s earnings statement.
P a g e 42 | 69
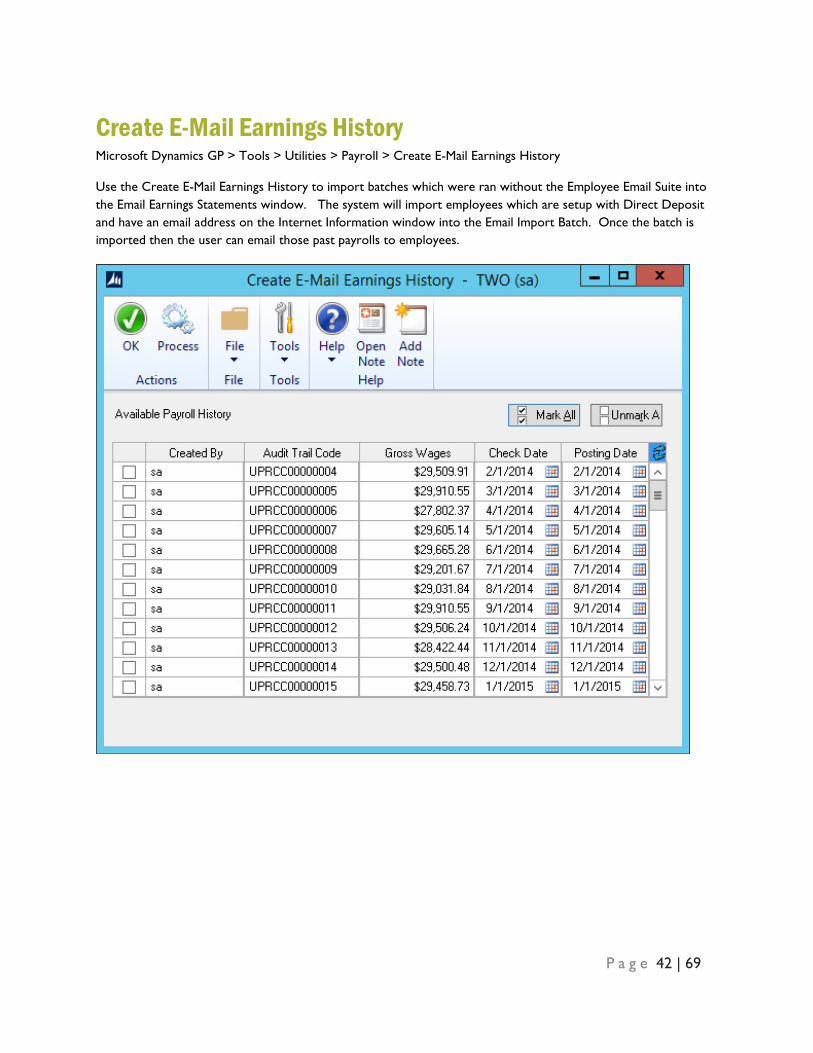
Create E-Mail Earnings History Microsoft Dynamics GP > Tools > Utilities > Payroll > Create E-Mail Earnings History
Use the Create E-Mail Earnings History to import batches which were ran without the Employee Email Suite into the Email Earnings Statements window. The system will import employees which are setup with Direct Deposit and have an email address on the Internet Information window into the Email Import Batch. Once the batch is imported then the user can email those past payrolls to employees.
P a g e 43 | 69
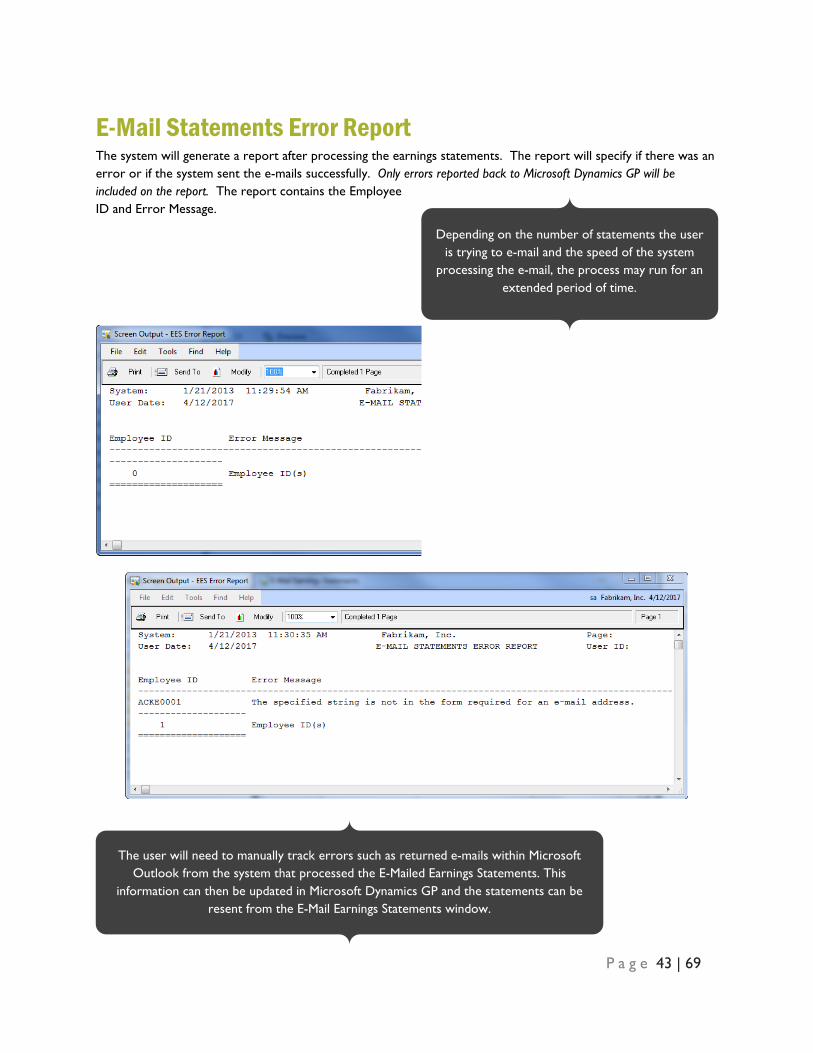
E-Mail Statements Error Report The system will generate a report after processing the earnings statements. The report will specify if there was an error or if the system sent the e-mails successfully. Only errors reported back to Microsoft Dynamics GP will be included on the report. The report contains the Employee ID and Error Message.
Depending on the number of statements the user is trying to e-mail and the speed of the system
processing the e-mail, the process may run for an extended period of time.
The user will need to manually track errors such as returned e-mails within Microsoft Outlook from the system that processed the E-Mailed Earnings Statements. This
information can then be updated in Microsoft Dynamics GP and the statements can be resent from the E-Mail Earnings Statements window.
P a g e 44 | 69
Introduction to E-Mail W-2 Statements Organizations are increasingly moving towards electronic communication. A new benefit a company can implement is the option to receive the Form W-2 electronically.
The E-Mail W-2s product:
• Provides access to W-2 statements earlier than traditional mail;
• Greatly reduces the chance that a W-2 statement will get lost, misdirected or delayed during delivery or misplaced after the employee receives it;
• Ensures employees can receive W-2 statements even while traveling or away from their mailing address;
• Allows employees to retrieve their W-2 statements at any time of day and on weekends;
• Allows employees to print multiple copies of their W-2 statement and
• Helps employees contribute to their employer’s cost savings (forms, printing and postage expenses).
The system will allow the user to:
• Specify setup options for employees to receive e-mail W-2 statements;
• Generate individual W-2 statements for employees;
• E-Mail W-2 statements to employees and
• Archive W-2 statements for employees.
The user will complete the following setup options:
• E-Mail Configuration information
o E-Mail Method
o Subject Line
o Blind Carbon Copy
o E-Mail Body
o Password
o Employee PDF file location
o Employer PDF file location
o Enable archiving for W-2s
• Manage W-2 Recipients
P a g e 45 | 69
o Employee ID
o Employee Name
o Alternate E-Mail Address
o E-Mail W-2
E-Mail W-2 statements will process if the following conditions are met:
• The Employee E-Mail Suite is installed and registered.
• The user has selected the Activate E-Mail W-2 Statements option.
• The employee has an e-mail address assigned on the Internet Information window.
• The employee is marked to receive an e-mail on the Manage W-2 Recipients window.
• The system has at least one Year-End Wage File.
E-Mail W-2 statements will process in the following order:
• Perform a pre-check operation.
• Create a distinct W-2 statement for each employee designated to receive e-mail W-2s.
• Generate the W-2 form as a password protected PDF file.
• E-Mail the W-2’s to employees who are setup to receive them.
Timeline for Electronic W-2 Statement Delivery Please note that employers must furnish electronic Forms W-2 by the same due date as paper Forms W-2.For more information on furnishing Form W-2 to employees electronically, see Regulations section 31.6051-1(j).
Regulations Surrounding Electronic Delivery of W-2 Statements E-Mail W-2 statements for Microsoft Dynamics GP creates Electronic W-2s according to the requirements set forth in IRS Publication 1141 Section 2, titled, Requirements for Substitute Forms Furnished to Employees (copies B, C, and 2).
According to IRS Publication 15a, Employers Supplemental Tax Guide, in order to e-mail W-2 Statements:
• Each employee participating must consent electronically (or receive confirmation of any consent made using a paper document);
• Employers must notify employees of all hardware and software requirements to receive the forms;
• Employers may not send a Form W-2 electronically to any employee who does not consent or who has revoked consent previously provided; and
• Employers must meet the following disclosure requirements and provide a clear and conspicuous statement of each of them to employees:
P a g e 46 | 69
1. The employee must be informed that he or she may receive a paper Form W-2 if consent is not given to receive it electronically.
2. The employee must be informed of the scope and duration of the consent.
3. The employee must be informed of any procedure for obtaining a paper copy of any Form W-2 (and whether or not the request for a paper statement is treated as a withdrawal of his or her consent) after giving consent.
4. The employee must be notified about how to withdraw consent and the effective date and manner by which the employer will confirm the withdrawn consent. The employee must also be notified that the withdrawn consent does not apply to the previously issued Forms W-2.
5. The employee must be informed about any conditions under which electronic Forms W-2 will no longer be furnished (for example, termination of employment).
6. The employee must be informed of any procedures for updating his or her contact information that enables the employer to provide electronic Forms W-2.
7. The employer must notify the employee of any changes to the employer's contact information.
P a g e 47 | 69
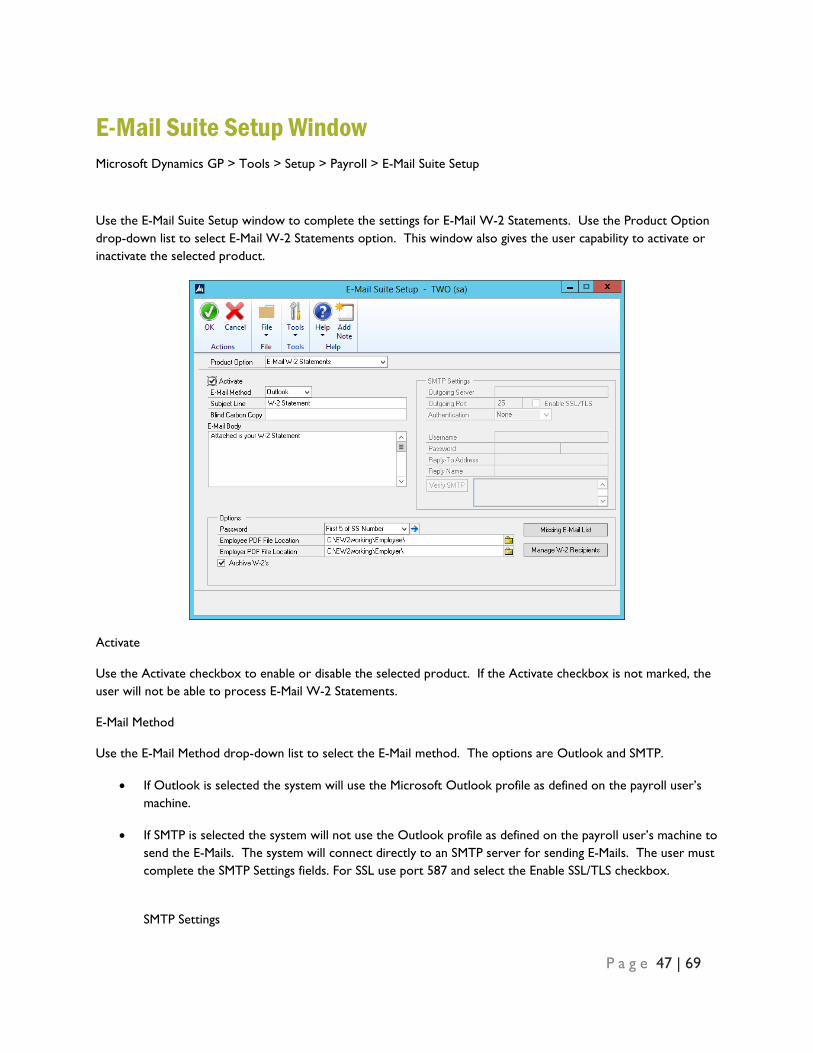
E-Mail Suite Setup Window Microsoft Dynamics GP > Tools > Setup > Payroll > E-Mail Suite Setup
Use the E-Mail Suite Setup window to complete the settings for E-Mail W-2 Statements. Use the Product Option drop-down list to select E-Mail W-2 Statements option. This window also gives the user capability to activate or inactivate the selected product.
Activate
Use the Activate checkbox to enable or disable the selected product. If the Activate checkbox is not marked, the user will not be able to process E-Mail W-2 Statements.
E-Mail Method
Use the E-Mail Method drop-down list to select the E-Mail method. The options are Outlook and SMTP.
• If Outlook is selected the system will use the Microsoft Outlook profile as defined on the payroll user’s machine.
• If SMTP is selected the system will not use the Outlook profile as defined on the payroll user’s machine to send the E-Mails. The system will connect directly to an SMTP server for sending E-Mails. The user must complete the SMTP Settings fields. For SSL use port 587 and select the Enable SSL/TLS checkbox.
SMTP Settings
P a g e 48 | 69
o Outgoing Server – specify the SMTP server the system will use to send the E-Mails, this is a required field.
o Outgoing Port – specify the port the system will use to send the E-Mails, this is a required field.
o Authentication – select the appropriate option from the drop-down list.
None – a user can connect to the SMTP server without credentials.
Current User – the system will use the credentials of the user currently logged into Windows to connect to the SMTP server.
Custom – the system will use the user name and password specified on the E-Mail Suite setup window to connect to the server. If Custom is the option selected for authentication, enter a username and password.
o Reply-To Address – enter an address which can be a general payroll e-mail account which is setup on the server, this is a required field.
o Reply Name – enter a name that can be a general name such as payroll administrator, this is a required field.
o Verify SMTP – Select to send a test email to the reply to address. If the SMTP settings are correct the email address in the Reply To Address will receive the test email and the Verify SMTP message will state successful.
E-Mail Configuration section
The system will generate an e-mail using the default profile settings in Microsoft Outlook or the SMTP Settings on the E-Mail Suite Setup window.
• Subject Line – enter a Subject Line not exceeding 100 characters; this is a required field.
• Blind Carbon Copy – enter a Blind Carbon Copy if desired. This allows the user to keep a copy of the e-mail to resend, if necessary.
• E-Mail Body – enter an e-mail body not exceeding 253 characters.
Options
• Password – the system will assign a password to the W-2 Statement PDF file attached to the e-mail. During the setup, the user needs to select one of the three options or create a custom password:
o None – No password will be assigned to the attached W-2 Statement PDF file. o Last 4 of the Employee Social Security Number – The attached W-2 Statement PDF file will
require the employee to enter in the last 4 digits of his or her Social Security Number to open the W-2 Statement PDF file.
o First 5 of the Employee Social Security Number – The attached W-2 Statement PDF file will require the employee to enter in the first 5 digits of his or her Social Security Number to open the W-2 Statement PDF file.
P a g e 49 | 69
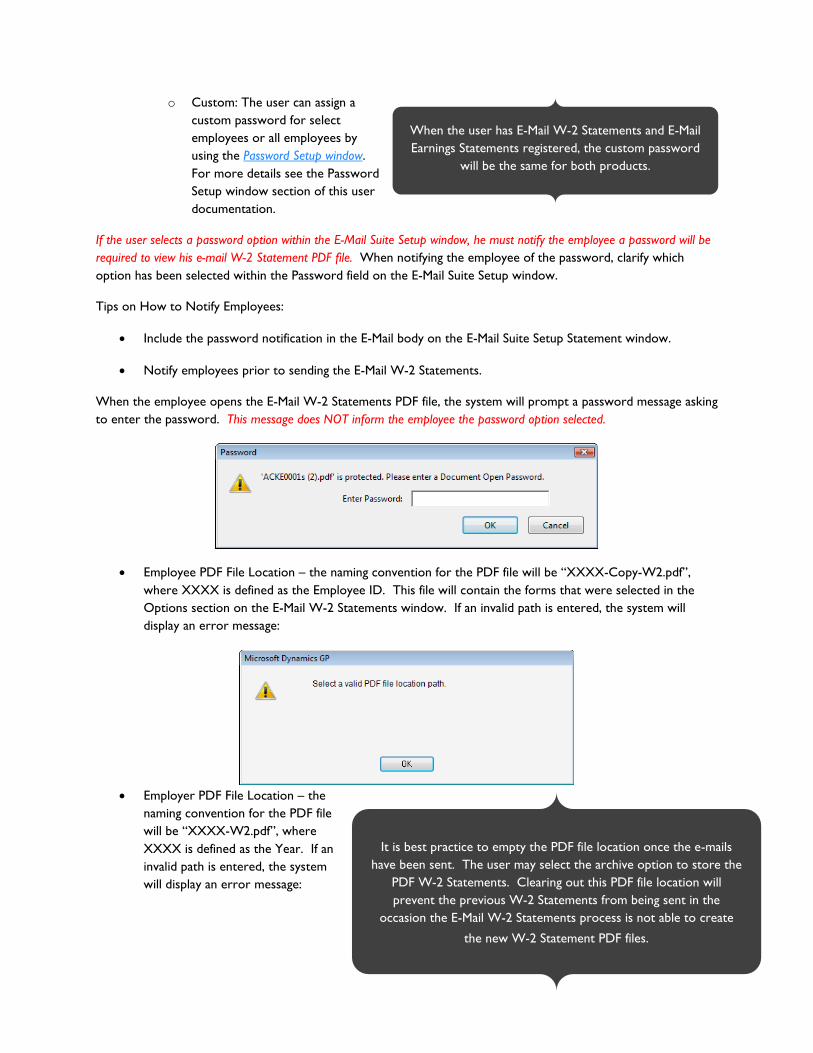
o Custom: The user can assign a custom password for select employees or all employees by using the Password Setup window. For more details see the Password Setup window section of this user documentation.
If the user selects a password option within the E-Mail Suite Setup window, he must notify the employee a password will be required to view his e-mail W-2 Statement PDF file. When notifying the employee of the password, clarify which option has been selected within the Password field on the E-Mail Suite Setup window.
Tips on How to Notify Employees:
• Include the password notification in the E-Mail body on the E-Mail Suite Setup Statement window.
• Notify employees prior to sending the E-Mail W-2 Statements.
When the employee opens the E-Mail W-2 Statements PDF file, the system will prompt a password message asking to enter the password. This message does NOT inform the employee the password option selected.
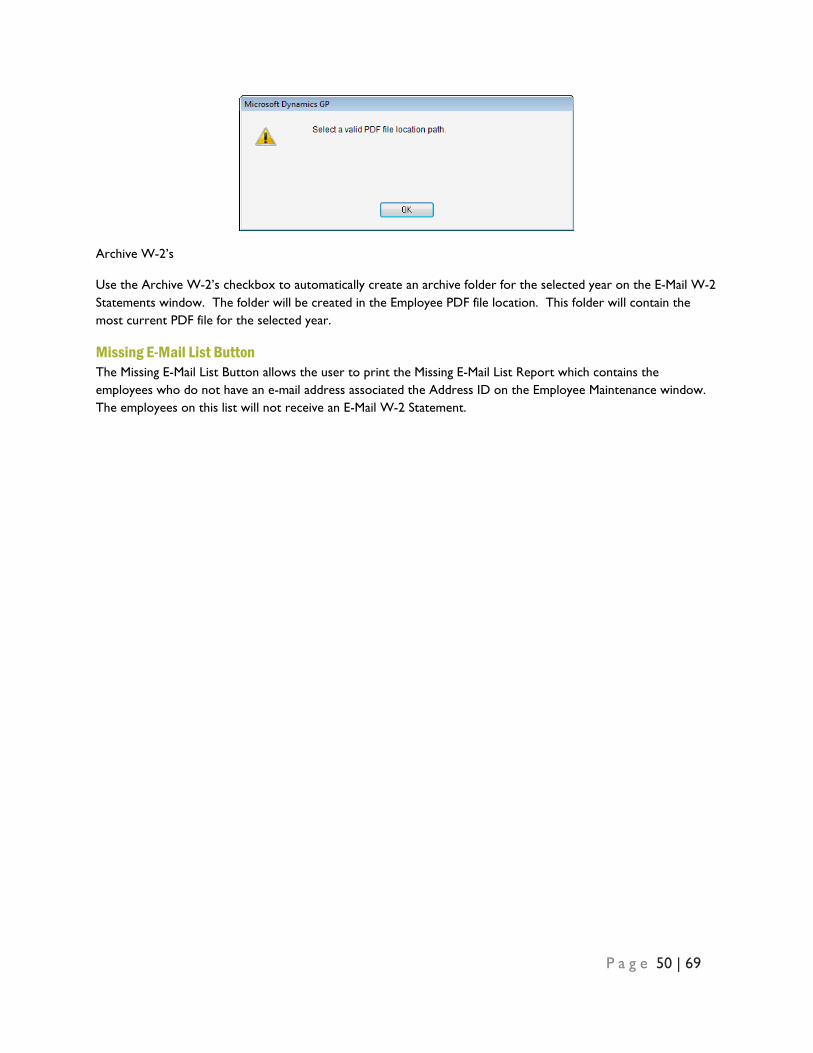
• Employee PDF File Location – the naming convention for the PDF file will be “XXXX-Copy-W2.pdf”, where XXXX is defined as the Employee ID. This file will contain the forms that were selected in the Options section on the E-Mail W-2 Statements window. If an invalid path is entered, the system will display an error message:
• Employer PDF File Location – the
naming convention for the PDF file will be “XXXX-W2.pdf”, where XXXX is defined as the Year. If an invalid path is entered, the system will display an error message:
When the user has E-Mail W-2 Statements and E-Mail Earnings Statements registered, the custom password
will be the same for both products.
It is best practice to empty the PDF file location once the e-mails have been sent. The user may select the archive option to store the
PDF W-2 Statements. Clearing out this PDF file location will prevent the previous W-2 Statements from being sent in the
occasion the E-Mail W-2 Statements process is not able to create
the new W-2 Statement PDF files.
P a g e 50 | 69
Archive W-2’s
Use the Archive W-2’s checkbox to automatically create an archive folder for the selected year on the E-Mail W-2 Statements window. The folder will be created in the Employee PDF file location. This folder will contain the most current PDF file for the selected year.
Missing E-Mail List Button The Missing E-Mail List Button allows the user to print the Missing E-Mail List Report which contains the employees who do not have an e-mail address associated the Address ID on the Employee Maintenance window. The employees on this list will not receive an E-Mail W-2 Statement.
P a g e 51 | 69
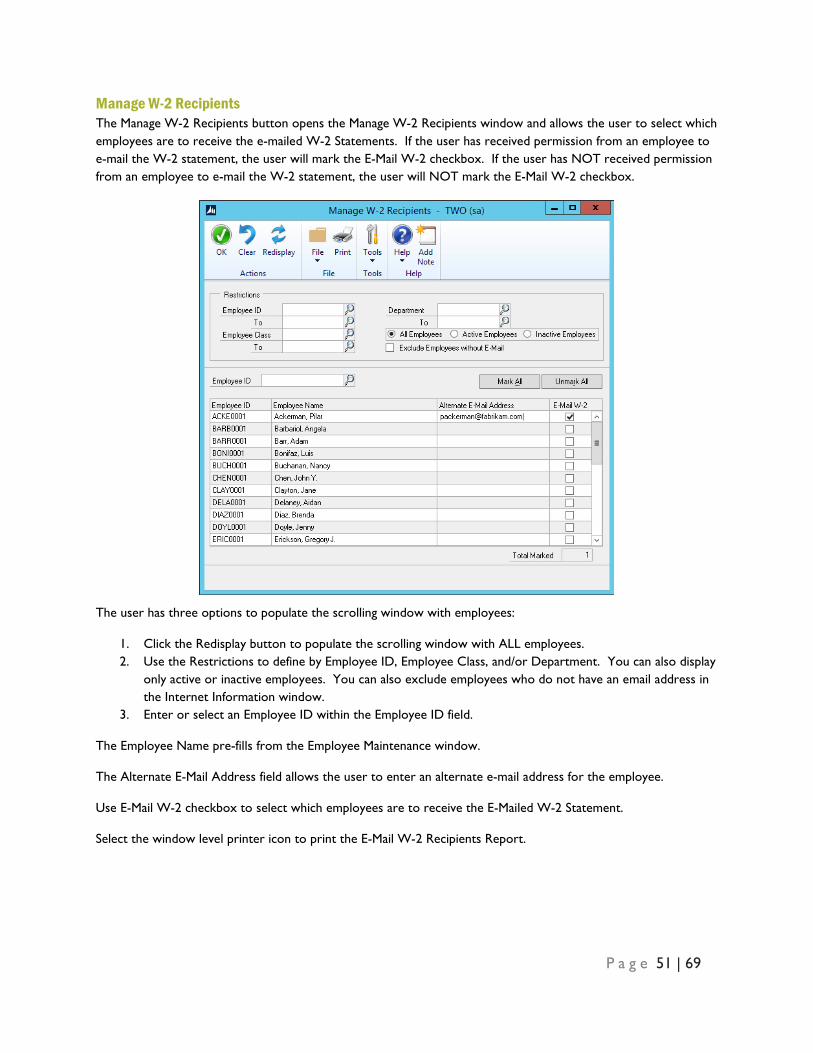
Manage W-2 Recipients The Manage W-2 Recipients button opens the Manage W-2 Recipients window and allows the user to select which employees are to receive the e-mailed W-2 Statements. If the user has received permission from an employee to e-mail the W-2 statement, the user will mark the E-Mail W-2 checkbox. If the user has NOT received permission from an employee to e-mail the W-2 statement, the user will NOT mark the E-Mail W-2 checkbox.
The user has three options to populate the scrolling window with employees:
1. Click the Redisplay button to populate the scrolling window with ALL employees. 2. Use the Restrictions to define by Employee ID, Employee Class, and/or Department. You can also display
only active or inactive employees. You can also exclude employees who do not have an email address in the Internet Information window.
3. Enter or select an Employee ID within the Employee ID field.
The Employee Name pre-fills from the Employee Maintenance window.
The Alternate E-Mail Address field allows the user to enter an alternate e-mail address for the employee.
Use E-Mail W-2 checkbox to select which employees are to receive the E-Mailed W-2 Statement.
Select the window level printer icon to print the E-Mail W-2 Recipients Report.
P a g e 52 | 69
E-Mail W-2 Statement Reports Missing E-Mail List Report Microsoft Dynamics GP > Tools > Setup > Payroll > E-Mail Suite Setup > Missing E-Mail List
The user can print the Missing E-Mail List Report by selecting the Missing E-Mail List button on the E-Mail Suite Setup window. The Missing E-Mail List Report contains employees who do not have an e-mail address associated with the Address ID on the Employee Maintenance window.
The user may utilize this report to verify the employee has an e-mail address assigned to the Address ID. If an employee appears on this list, they do not have an e-mail address for the Address ID listed on the Employee Maintenance window. It is suggested that the user prints this report before processing the W-2 Statements.
P a g e 53 | 69
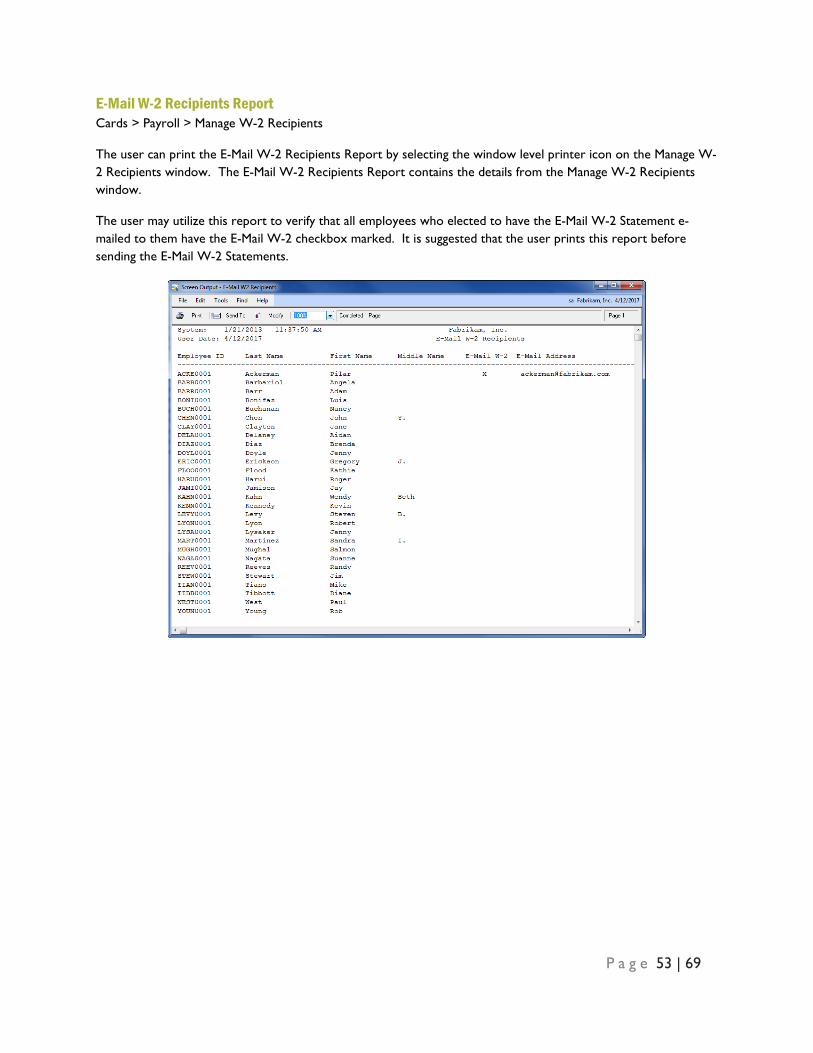
E-Mail W-2 Recipients Report Cards > Payroll > Manage W-2 Recipients
The user can print the E-Mail W-2 Recipients Report by selecting the window level printer icon on the Manage W-2 Recipients window. The E-Mail W-2 Recipients Report contains the details from the Manage W-2 Recipients window.
The user may utilize this report to verify that all employees who elected to have the E-Mail W-2 Statement e-mailed to them have the E-Mail W-2 checkbox marked. It is suggested that the user prints this report before sending the E-Mail W-2 Statements.
P a g e 54 | 69
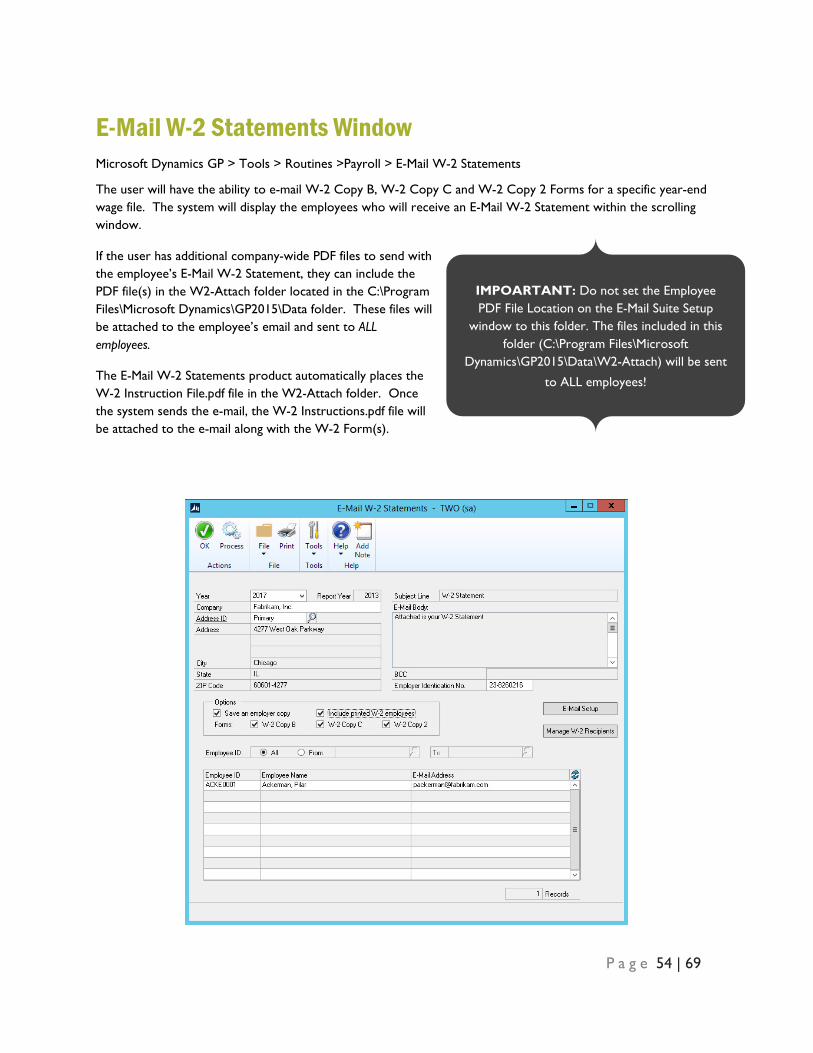
E-Mail W-2 Statements Window Microsoft Dynamics GP > Tools > Routines >Payroll > E-Mail W-2 Statements
The user will have the ability to e-mail W-2 Copy B, W-2 Copy C and W-2 Copy 2 Forms for a specific year-end wage file. The system will display the employees who will receive an E-Mail W-2 Statement within the scrolling window.
If the user has additional company-wide PDF files to send with the employee’s E-Mail W-2 Statement, they can include the PDF file(s) in the W2-Attach folder located in the C:\Program Files\Microsoft Dynamics\GP2015\Data folder. These files will be attached to the employee’s email and sent to ALL employees.
The E-Mail W-2 Statements product automatically places the W-2 Instruction File.pdf file in the W2-Attach folder. Once the system sends the e-mail, the W-2 Instructions.pdf file will be attached to the e-mail along with the W-2 Form(s).
IMPOARTANT: Do not set the Employee PDF File Location on the E-Mail Suite Setup
window to this folder. The files included in this folder (C:\Program Files\Microsoft
Dynamics\GP2015\Data\W2-Attach) will be sent
to ALL employees!
P a g e 55 | 69
Year – select the year for which W-2s will be printed. The drop-down list is populated with the same years that are available to the system from the Print W-2s form process.
Report Year – Displays the current report year format which will be emailed to the employee. The Year and Report year should be the same. The report is updated yearly in November/December and a new version will need to be installed each year as part of the year end process.
Company, Address ID, Address, City, State, ZIP Code – displays from the Company Setup window. The user may change the Address ID if needed.
Subject Line – displays from the E-Mail Suite Setup window. If a change is needed to the Subject Line, select the E-Mail Setup button to open the E-Mail Suite Setup window.
E-Mail Body – displays from the E-Mail Suite Setup window. If a change is needed to the E-Mail Body, select the E-Mail Setup button to open the E-Mail Suite Setup window.
Blind Carbon Copy – displays the Blind Carbon Copy specified on the E-Mail Suite Setup window. If a change is needed to the Blind Carbon Copy field, select the E-Mail Setup button.
Employer Identification Number – displays the company's employer ID for which wages were reported during the year. This number is assigned by the federal government and is the number entered using the Unemployment Tax Setup window. Changes may be made, if necessary.
Options – when the user processes E-Mail W-2 Statements, they have the option to create one PDF file which contains only the e-mailed W-2 Statements or create one PDF file which includes both the e-mailed W-2 Statements and the hardcopy W-2 Statements.
Save an employer copy – mark this checkbox to create one employer copy PDF file for the employees receiving E-Mail W-2 Statements. Marking this checkbox enables the “Include printed W-2 employees” checkbox.
Include printed W-2 employees – mark this checkbox to create one employer copy PDF file including all employees receiving a W-2 Statement via e-mail or hardcopy.
Forms – allows the user to select which W-2 forms will be processed during the E-Mail W-2 Statements process.
• W-2 Copy B
• W-2 Copy C
• W-2 Copy 2
Employee Detail Scrolling window – displays all the employees or the specified employees from the From/To fields. The Employee ID, Employee Name and E-Mail Address displays from the Employee Maintenance window or the Manage W-2 Recipients window.
P a g e 56 | 69
E-Mail W-2 Statements Process When the user selects the Process button, the system will leverage the existing Adobe Acrobat Writer software on the local machine to create the PDF files. If a user receives an Adobe error message while processing E-Mail W-2 Statements they will need to contact Adobe directly to troubleshoot the error message.
P a g e 57 | 69
PDF File Location The system will confirm whether the value for the PDF File Location path as defined in E-Mail Suite Setup window represents a valid path for the current machine. If the path is invalid, the system will display a warning and prevent the user from continuing the E-Mail W-2 Statements process until a valid path is specified.
If the user receives an invalid PDF file location path error message, select ok. Then open the E-Mail Suite Setup window.
1. Select a valid PDF file location and then click OK on the E-Mail Suite Setup window.
2. Reselect the Process button on the E-Mail W-2 Statements window.
A PDF will be generated for each employee’s W-2 statement and placed in the directory specified in E-Mail Suite Setup window. The PDF will remain in this directory until the E-Mail W-2 Statements is processed again.
E-Mail Validation The system will confirm that each employee has a valid e-mail address. If one or more e-mail addresses are missing for an employee, the system will prompt message, “One or more email addresses are missing for employees. If you continue, W-2 statements will not be sent to those employees.” The user may choose Continue, Cancel or Print.
P a g e 58 | 69
Click Continue to proceed with the E-Mail W-2 Statement process. Keeping in mind that the E-Mail W-2 Statements cannot be sent to the employee who does NOT have an e-mail address; however, if a blind carbon copy is setup for this employee, the file will be sent to the e-mail address specified in the blind carbon copy field.
Click Cancel to close the message and the user may update the employee e-mail address.
Click Print to print the Missing E-Mail List Report. The user may utilize this report to update the employee e-mail address.
P a g e 59 | 69
E-Mail Statements Error Report The system will generate an E-Mail Statements Error Report after processing the E-Mail W-2 Statements. The report will specify if there was an error or if the system sent the e-mails successfully. Only errors reported back to Microsoft Dynamics GP will be included on the report. The report contains the Employee ID and Error Message.
Depending on the number of W-2 forms the user is trying to e-mail and the speed of the system
processing the e-mail, the process may run for an extended period of time.
The user will need to manually track errors such as returned e-mails within the system that processed the E-Mailed W-2 Statements. This information can then be updated in Microsoft Dynamics GP and the W-2 forms can be reprocessed from the E-Mail W-2
Statements window.

P a g e 60 | 69
Print W-2 Statements Window Microsoft Dynamics GP > Tools > Routines >Payroll > Print W-2s
The user will be able to print the W-2 statements before or after e-mailing the W-2 statements. The system will allow the user to decide to either print all W-2 statements or print only the employees who elected to not receive an e-mail W-2 statement. Once the user selects the print button on the Print W-2 Forms window the system will prompt message, “Do you wish to exclude employees who receive emailed W-2 statements?” The user may choose Yes or No.
Click No to print all employees including the ones who elected to receive an E-Mail W-2 Statement.
Click Yes to print only employees who elected to receive a printed W-2 Statement.
P a g e 61 | 69
Sample Employee E-Mail and PDF Consent Form Sample E-Mail The following e-mail is an example only and uses the disclosure requirements set forth in IRS Publication 15a and Treasury Regulations Sub Chapter C. Sec 31.6051-1(j).
Email Subject: IMPORTANT TAX RETURN DOCUMENT AVAILABLE
Email Body:
Fabrikam is pleased to offer W-2 statements via e-mail this year instead of the traditional paper copy! Benefits to receiving your W-2 by e-mail are:
(List all benefits – link to list of benefits below).
Please read the attached PDF file for instructions on how to consent to this process and for important information regarding electronic delivery of your W-2. If you are unable to read the attached PDF file, please contact … or download … (with link)
You may decline the electronic W-2 and continue to receive a paper copy of your W-2 by either not replying or by replying and stating:
“I do not want to receive my W-2 electronically.”
P a g e 62 | 69
Sample PDF Consent Form The following text is an example only for a PDF consent form.
If you would like to receive your W-2 by e-mail, you must reply to this message and place the following text in your reply:
“I agree to accept my W-2 statement electronically at this e-mail address.” (Or, you may specify a different e-mail address).
You may decline the electronic W-2 and continue to receive a paper copy of your W-2 by either not replying or by replying and stating:
“I do not want to receive my W-2 electronically.”
Please note you will receive a paper copy of your W-2 unless you specify differently prior to 01/15/2015. Consent is for one year only and consent will be required again next year.
You may revoke your consent for an electronic W-2 delivery prior to January 15, 2015 by contacting the payroll department at [email protected] or at 555-555-5555, ext. 555. Withdrawing consent by January 15, 2015 will be for this year only and does not apply to any W-2 documents you have already received.
Conditions under which W-2s will no longer be furnished electronically may include:
(List all reasons - for example, termination of employment).
E-Mail addresses used for electronic delivery may be changed prior to January 15, 2015 by contacting the payroll department at [email protected] or at 555-555-5555, ext. 555.
When you receive your W-2 electronically, it will be attached to an e-mail as a PDF file – much like the one you are currently reading. You will need PDF reading software (such as Adobe Acrobat Reader) and the hardware necessary to run the PDF reader software. If you are reading this on your own computer after having opened this attached via your e-mail then you meet the hardware and software requirements for receiving your electronic W-2.
P a g e 63 | 69
Hints, Essentials and FAQs How long does it take to process the e-mails? Below is a table of performance measurements from our quality assurance process:
# of Employees Processing time in minutes 1,500 24 4,000 63
This information was based on the following system requirements.
Test Configuration
Computer Model: Dell Optiplex 755 CPU: Core 2 Duo Q9550 2.83 Ghz RAM: Four GB RAM Disk Controller: IntellCH-9 SAT AHCI controller Disks: SATA 250 GB7200 RPM
General System Setup
• Server/Client
• OS Server 03
• Intel 82566 DM-2 GB Ethernet NIC
What are the system requirements Employee E-Mail Suite?
1. Microsoft Dynamics GP Payroll
2. Direct Deposit must be registered, setup and active
3. .NET Framework 3.5
4. Adobe Acrobat version 8, 9 or X installed on the machine processing E-Mail Earnings Statements
5. Microsoft Outlook 2003, 2007 or 2010, or SMTP Server
Will Employee E-Mail Suite work with a Terminal Server?
Yes, E-Mail Earnings Statements will work on a Terminal Server.
Can the e-mail earnings statements and W-2 statements be sent to multiple e-mail addresses? Yes, e-mail earnings statements and W-2 statements can be sent to multiple e-mail address. See the Assign Multiple E-Mail Addresses to an Employee section of this user guide.
Is the PDF statements secure while it is stored on a drive? Yes, once the e-mail process is complete the PDF file is secure.

P a g e 64 | 69
Are any e-mails produced if a payment is voided? No, an e-mail is not produced if a payment is voided. However, you do not have to send the e-mails until the payroll information has been corrected and verified. If a earnings statement is voided before the e-mails are sent the employee will be removed from the e-mail list.
Can the E-Mailed Earnings Statements be resent and will it still be secure? Yes, navigate to the E-Mail Earnings Statements window select the appropriate payroll run and employee.
Will an employee need to have Adobe Reader to open the e-mailed statements? Yes, the employee will need to have Adobe Reader installed on their personal computer in order to open the earnings statement or W-2 statement. In the e-mail body you can manage notifying the employee that they would need Adobe Reader. You can also include a link to a website where the employee can download Adobe Reader.
How do I prevent this error message? "When you create a PostScript file you must rely on system fonts and use document fonts. Please go to the printer properties, "Adobe PDF Settings" page and turn OFF the option "Rely on system fonts only; do not use document fonts". Unmark the "Rely on system fonts only; do not use document fonts" option:
1. Click the Start button
2. Click Control Panel
3. Click Printers and faxes
4. Right click on the Adobe Printer
5. Select Printing Preferences
6. Unmark “Rely on system fonts only; do not use document fonts”
7. Select Apply
8. Close the Adobe PDF Printing Preferences window
P a g e 65 | 69
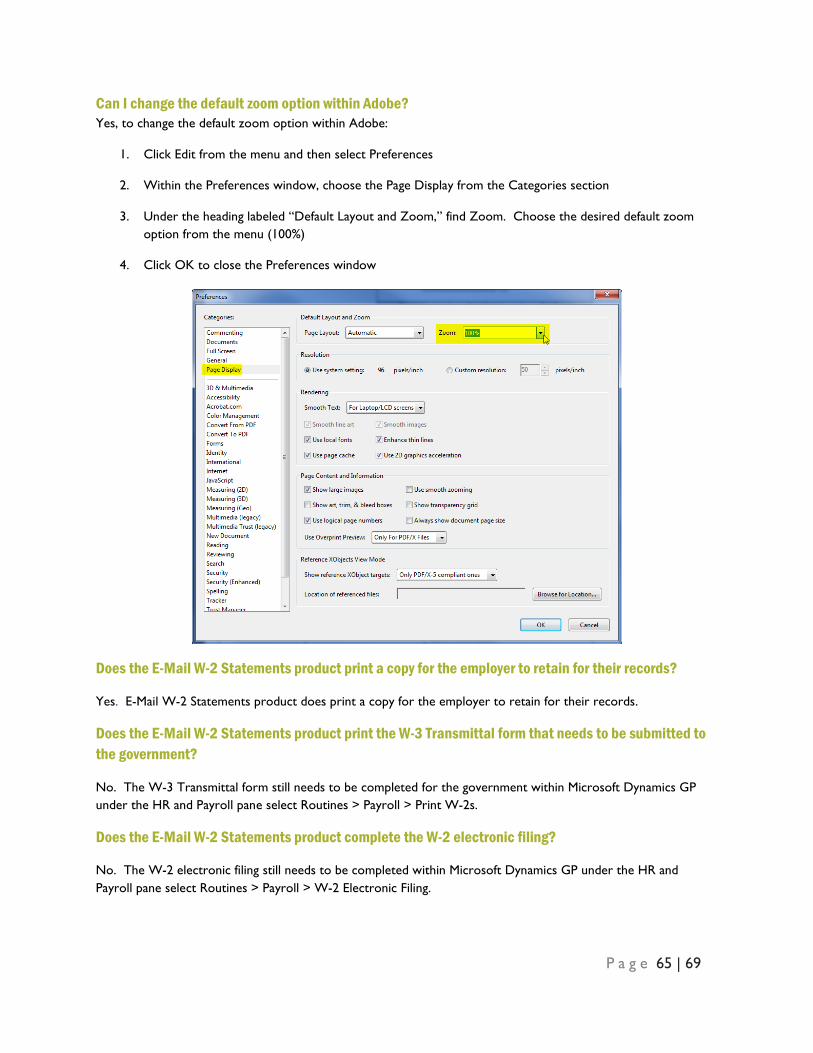
Can I change the default zoom option within Adobe? Yes, to change the default zoom option within Adobe:
1. Click Edit from the menu and then select Preferences
2. Within the Preferences window, choose the Page Display from the Categories section
3. Under the heading labeled “Default Layout and Zoom,” find Zoom. Choose the desired default zoom option from the menu (100%)
4. Click OK to close the Preferences window
Does the E-Mail W-2 Statements product print a copy for the employer to retain for their records?
Yes. E-Mail W-2 Statements product does print a copy for the employer to retain for their records.
Does the E-Mail W-2 Statements product print the W-3 Transmittal form that needs to be submitted to the government?
No. The W-3 Transmittal form still needs to be completed for the government within Microsoft Dynamics GP under the HR and Payroll pane select Routines > Payroll > Print W-2s.
Does the E-Mail W-2 Statements product complete the W-2 electronic filing?
No. The W-2 electronic filing still needs to be completed within Microsoft Dynamics GP under the HR and Payroll pane select Routines > Payroll > W-2 Electronic Filing.
P a g e 66 | 69
Can the user reprint the W-2 statement after filing?
Yes. W-2 statements can be reprinted after filing. Within Microsoft Dynamics GP, open the E-Mail W-2 Statements window under the HR and Payroll pane select Routines > Payroll > E-Mail W-2 Statements, filter to the employee and click Process.
Can the E-Mailed W-2 Statements be resent and will it still be secure?
Yes, you can navigate to the drive/folder where the PDF files are stored and attach the secure PDF file to an e-mail and resend the secure earnings statement.
P a g e 67 | 69
Activation Manager Messages Activation Failed: Trial invalid or trial period expired Situation: The trial period has expired for the product. Solution: Contact [email protected] and request additional trial period or purchase the product.
Activation Failed: Site name does not match this installation Situation: The site name does not match the token which was issued. Solution: Send [email protected] a screenshot of the Activation Manager window with the error message displayed so the account can be updated with the correct site name.
Activation Failed: Product Name does not match this installation Situation: The product name does not match the token which was issued for a product. Solution: Send [email protected] a screenshot of the Activation Manager window with the error message displayed so the account can be updated with the product.
Trial period for Employee Email Suite has expired Situation: The trial period has expired for the product. Solution: Contact [email protected] and request additional trial period or purchase the product.
Employees Allowed has been exceeded Situation: The current employee count has exceeded the employees allowed. Solution: Contact [email protected] to upgrade to the next employee count tier level.
Activation Failed: Unable to contact web service. Activate manually or revert to previous product dictionary Situation: The system could not make a connection to the web service. Solution: Contact [email protected] for assistance.
Activation Failed: Product has been deactivated Situation: The product has been deactivated. Solution: Contact [email protected] for assistance.
Upgrade Failed: Enhancement Plan period expired. Renew Enhancement Plan or revert to previous product version. Situation: User attempted to upgrade a product when their enhancement plan was expired. Solution: Contact [email protected] to renew the enhancement plan.
Employee Email Suite: Activation Failed Situation: Communication breakdown between the user machine and Integrity Data web services. Solution: Contact [email protected] for assistance.
P a g e 68 | 69
Deactivate Product There are three ways to deactivate the Employee E-mail Suite; disable, inactive or uninstall.
Disable To disable Employee E-mail Suite without having to exit Microsoft Dynamics GP, open the Customization Status window. To open this window, select the Microsoft Dynamics GP menu, point to Tools, select Customize and then click Customization Status. Select the product from the list and click Disable. The product can be enabled by closing and reopening Microsoft Dynamics GP.
Inactivate
Option 1: Employee Email Suite and E-Mail W-2 Statements can be inactivated by company, open the Activation Manager window and unmark the company checkbox.
Option 2: Employee Email Suite and E-Mail W-2 Statements can be inactivated by opening the E-Mail Earnings Statement Setup window and unmarking the Activate E-Mail Earnings Statement checkbox. To open this window, select the Microsoft Dynamics GP menu, select Tools, select Setup, select Payroll and then select Employee Email Suite and/or E-Mail W-2 Statements.
Uninstall
If Employee E-mail Suite needs to be uninstalled complete these steps on the server and the client where Employee Email Suite has been installed.
1. Remove the EES.DIC file from the Runtime Directory Default location is C:\Program Files\Microsoft Dynamics\GP2015
2. Make a copy of the Dynamics.set file 3. Open the Dynamics.set file
a. Decrease the top number by one: For example, if the top number is 21 change it to 20
b. Remove the following lines from the Dynamics.set file: 5974 Employee E-mail Suite :C:Program Files/Microsoft Dynamics/GP2015/EES.DIC :C:Program Files/Microsoft Dynamics/GP2015/Data/F5974.DIC :C:Program Files/Microsoft Dynamics/GP2015/Data/R5974.DIC
4. Save the Dynamics.set file 5. Launch Microsoft Dynamics GP and login as the ‘system administrator’
P a g e 69 | 69
Contact Information Get quick answers to your questions
Browse our convenient Knowledge Base for up-to-date answers to the most common questions. For additional questions, please contact your authorized Value Added Reseller (VAR) for support on this product. Or, contact Integrity Data by emailing [email protected] or calling 888.786.6162 x0220 or x0221.
If you have registered your product, Technical Customer Service is available for any customers with a current Enhancement Plan. Please have your Site Name available. Your first line of support should always be your VAR.
Rate us and our products
Are you pleased with your experience with us and our products? Provide a quote and get a gift card! Visit integrity-data.com/testimonials/.
Suggest new features or improvements
User input into improving this product and constructive feedback are appreciated. Please e-mail Tom, our Product Manager, at [email protected]. As always, technical ideas and user input are highly encouraged. At Integrity Data, we want to hear your input, so drop us a line!
Browse our solutions
The Integrity Data website is a great place to get additional information on products and services. The following information is available on our website:
• Integrity Data’s HR & Payroll Add-on pages include Demos, Features and Benefits, and ROI Calculators • Use our catalog to quickly browse our products or forward to a colleague • Purchase products or calculate pricing at our online store • Visit our Services page to learn more about our additional customization services
If you would like to discuss your needs with a Sales Account Executive, please call 888.786.6162 or e-mail [email protected].


![Employee Choice, Convenience and a Robust Suite of …broker.uhc.com/assets/UHCWI655032_000[1] WI 2-50 Multi-Choice... · Employee Choice, Convenience and a Robust Suite of Online](https://img.pdfslide.net/doc/110x75/5aeb001c7f8b9a90318c60c0/employee-choice-convenience-and-a-robust-suite-of-1-wi-2-50-multi-choiceemployee.jpg)


![Buffalo District Office Suite 540 Buffalo [email protected] B ISTRICT](https://img.pdfslide.net/doc/110x75/61fb5e9f2e268c58cd5d5c25/buffalo-district-office-suite-540-buffalo-emailprotected-b-istrict.jpg)